Embed Size (px)
Citation preview

Snappy Accessories
Sew a luxurious boa in an evening
Make theMake theFur Fly
16 sewstylish ◾ SewStylish.com
SIP19_SA6_Fur.indd 16 8/25/11 3:15 PM
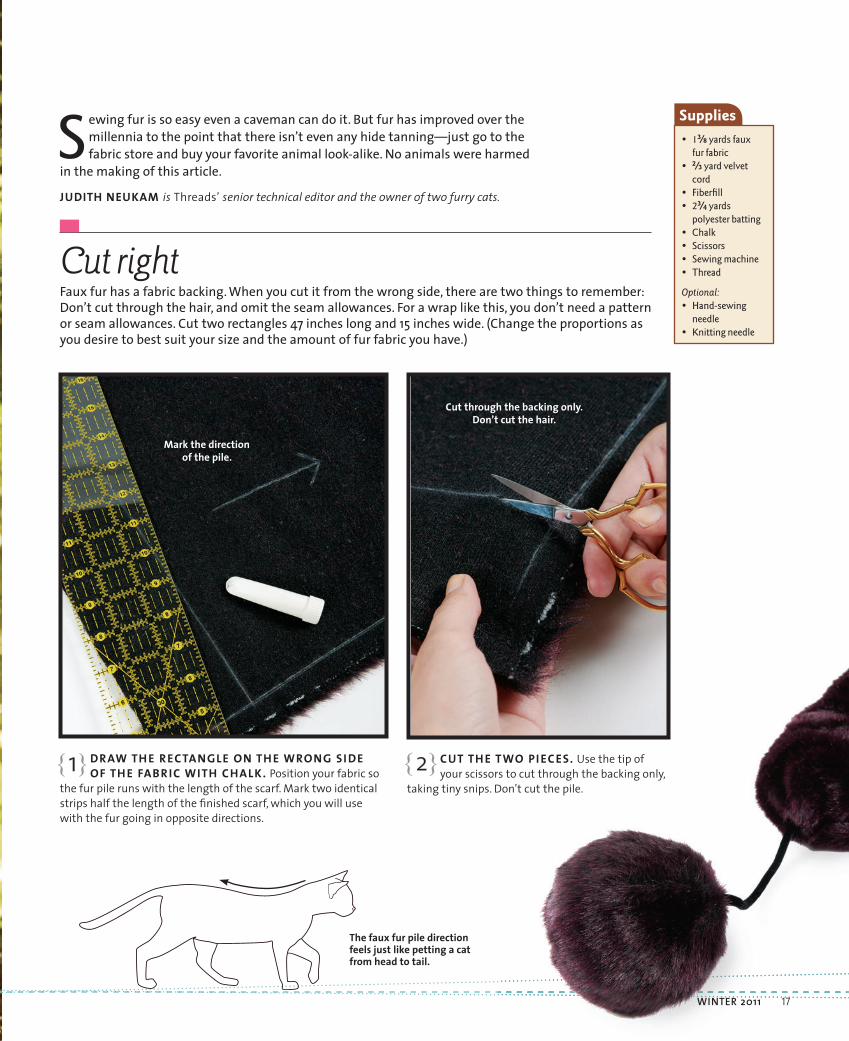
Cut rightFaux fur has a fabric backing. When you cut it from the wrong side, there are two things to remember: Don’t cut through the hair, and omit the seam allowances. For a wrap like this, you don’t need a pattern or seam allowances. Cut two rectangles 47 inches long and 15 inches wide. (Change the proportions as you desire to best suit your size and the amount of fur fabric you have.)
DRAW TH E RECTANGLE ON TH E WRONG SI DE OF TH E FABRIC WITH CHALK. Position your fabric so
the fur pile runs with the length of the scarf. Mark two identical strips half the length of the fi nished scarf, which you will use with the fur going in opposite directions.
{1} CUT TH E TWO PI ECES. Use the tip of your scissors to cut through the backing only,
taking tiny snips. Don’t cut the pile.
{2}
Sewing fur is so easy even a caveman can do it. But fur has improved over the millennia to the point that there isn’t even any hide tanning—just go to the fabric store and buy your favorite animal look-alike. No animals were harmed
in the making of this article.
JUDITH NEUKAM is Threads’ senior technical editor and the owner of two furry cats.
Supplies• 13⁄8 yards faux
fur fabric • 2⁄3 yard velvet
cord• Fiberfi ll• 23⁄4 yards
polyester batting• Chalk• Scissors• Sewing machine• Thread
Optional:• Hand-sewing
needle• Knitting needle
The faux fur pile direction feels just like petting a cat from head to tail.
Cut through the backing only. Don’t cut the hair.
Mark the direction of the pile.
WINTER 2011 17
SIP19_SA6_Fur.indd 17 8/25/11 3:16 PM
PHOT
OS:
SLO
AN H
OW
ARD,
STY
LIST
: JES
SICA
SAA
L, H
AIR
AND
MAK
EUP:
RIC
HAR
D C
OO
LEY/
UTO
PIAN
YC.C
OM
. ILL
UST
RATI
ON
S: M
ELAN
IE M
ENCA
RELL
I. STY
LIN
G C
RED
ITS:
JEAN
S—H
UD
SON
JEAN
S (B
LOO
MIN
GDA
LES.C
OM
), JA
CKET
—AR
MAN
I (M
ACYS
.CO
M),
BOOT
S—W
ORT
HIN
GTO
N (J
CPEN
NEY
.CO
M),
EARR
ING
S—(K
-AM
ATO.
COM
)
Pad rightThe fur used here has a short-hair pile, with fibers that are 1⁄2 inch long. To make it look more luxurious, pad the inside of the scarf. The padding also prevents the boa from collapsing into a flat band.
CUT H IGH-LOFT POLYESTER BATTI NG I N ON E PI ECE TO FIT TH E TWO JOI N ED FU R
PI ECES. Lay the batting on the wrong side of the fur, and baste it to the fur backing. Take giant basting stitches (2 inches to 3 inches long) through the batting in two or three lengthwise rows to anchor it to the fabric.
{1}
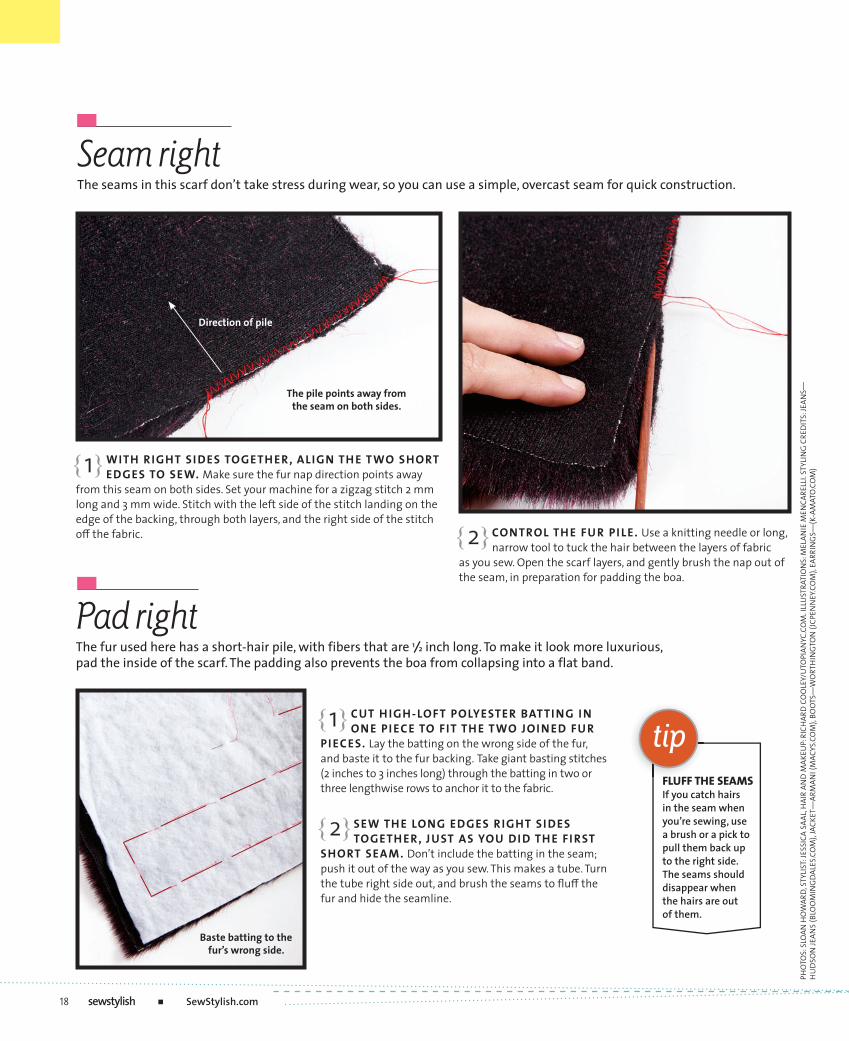
Seam rightThe seams in this scarf don’t take stress during wear, so you can use a simple, overcast seam for quick construction.
WITH RIGHT SI DES TOGETH ER, ALIGN TH E TWO SHORT EDGES TO SEW. Make sure the fur nap direction points away
from this seam on both sides. Set your machine for a zigzag stitch 2 mm long and 3 mm wide. Stitch with the left side of the stitch landing on the edge of the backing, through both layers, and the right side of the stitch o≠ the fabric.
{1}
CONTROL TH E FU R PI LE. Use a knitting needle or long, narrow tool to tuck the hair between the layers of fabric
as you sew. Open the scarf layers, and gently brush the nap out of the seam, in preparation for padding the boa.
{2}
SEW TH E LONG EDGES RIGHT SI DES TOGETH ER, J UST AS YOU DI D TH E FI RST
SHORT SEAM. Don’t include the batting in the seam; push it out of the way as you sew. This makes a tube. Turn the tube right side out, and brush the seams to fl u≠ the fur and hide the seamline.
{2}
FLUFF THE SEAMSIf you catch hairs in the seam when you’re sewing, use a brush or a pick to pull them back up to the right side. The seams should disappear when the hairs are out of them.
The pile points away from the seam on both sides.
Direction of pile
Baste batting to the fur’s wrong side.
18 sewstylish ◾ SewStylish.com
SIP19_SA6_Fur.indd 18 8/25/11 3:16 PM
PHOT
OS:
SLO
AN H
OW
ARD,
STY
LIST
: JES
SICA
SAA
L, H
AIR
AND
MAK
EUP:
RIC
HAR
D C
OO
LEY/
UTO
PIAN
YC.C
OM
. ILL
UST
RATI
ON
S: M
ELAN
IE M
ENCA
RELL
I. STY
LIN
G C
RED
ITS:
JEAN
S—H
UD
SON
JEAN
S (B
LOO
MIN
GDA
LES.C
OM
), JA
CKET
—AR
MAN
I (M
ACYS
.CO
M),
BOOT
S—W
ORT
HIN
GTO
N (J
CPEN
NEY
.CO
M),
EARR
ING
S—(K
-AM
ATO.
COM
)
CUT TWO FI N ISH ED CORDS 11 I NCH ES LONG.
I purchased velvet cording, but any 3⁄8-inch to 1⁄2-inch diameter fi nished cording will work. Sew one end securely to the seam inside the tube on each end.
{1}
Finish with a pom-pomTo finish your boa, add a cord, close each end, and make and attach the pom-poms.
USE A DOU BLE TH READ TO CLOSE TH E BOA EN DS. Pull
the open tube ends together in fourths (1 and 2) and then eighths (3) to close the end, leaving the cord hanging outside. Knot the thread securely.
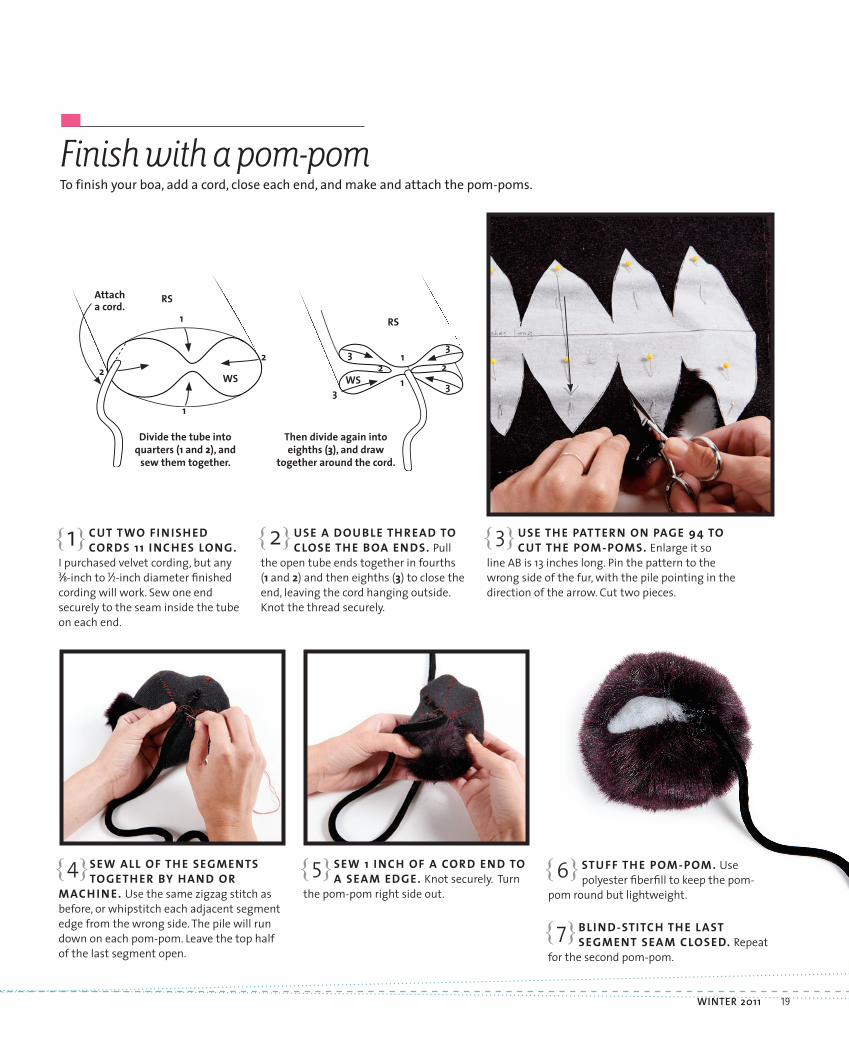
{2} USE TH E PATTERN ON PAGE 94 TO CUT TH E POM-POMS. Enlarge it so
line AB is 13 inches long. Pin the pattern to the wrong side of the fur, with the pile pointing in the direction of the arrow. Cut two pieces.
{3}
1
1
RS
WS22
Divide the tube into quarters (1 and 2), and
sew them together.
1
RS
WS2 2
33
331
Then divide again into eighths (3), and draw
together around the cord.
SEW ALL OF TH E SEGMENTS TOGETH ER BY HAN D OR
MACH I N E. Use the same zigzag stitch as before, or whipstitch each adjacent segment edge from the wrong side. The pile will run down on each pom-pom. Leave the top half of the last segment open.
{4} STU FF TH E POM-POM. Use polyester fi berfi ll to keep the pom-
pom round but lightweight.
{6}SEW 1 I NCH OF A CORD EN D TO A SEAM EDGE. Knot securely. Turn
the pom-pom right side out.
{5}
BLI N D-STITCH TH E LAST SEGMENT SEAM CLOSED. Repeat
for the second pom-pom.
{7}
Attach a cord.
WINTER 2011 19
SIP19_SA6_Fur.indd 19 8/25/11 3:16 PM

This pattern has minimal seam allowances. Enlarge 390 percent to 13 inches long. Make the Fur Fly p. 16
A B13 inches
Pile orientation= 1 inch