Embed Size (px)
Citation preview
Mail Merge in Word
Workbook
December 2007
Edition 3

Mail Merge in Word
Edition 3, December, 2007Document Number: B.2.-WB.3468
iv
PrefaceThe Mail Merge feature enables you to take information from two documents, one, a Main Document and two, a Data Source, and combine them into a single document. Mail Merge automates time-consuming tasks such as creating standard (form) letters, labels, memos, and reports.
This workbook takes you through the steps for creating a mail merge and using the process to create mailing labels. It helps to be confident first with the basics of entering, editing and formatting text in Word.
Copyright © IS 2007
Permission is granted to any individual or institution to use, copy or redistribute this document whole or in part, so long as it is not sold for profit and provided that the above copyright notice and this permission notice appear in all copies.
Where any part of this document is included in another document, due acknowledgement is required.
Mail Merge in Word
Pre
face
v
ContentsIntroduction ......................................................................2
To start the Mail Merge ....................................................3
Using data source files ...................................................8
Sorting records ................................................................9
Merging addresses into mailing labels .......................10
Mail Merge in Word
Contents

Mail Merge in Word
Mail Merge in Word
2
Mai
l Mer
ge in
Wor
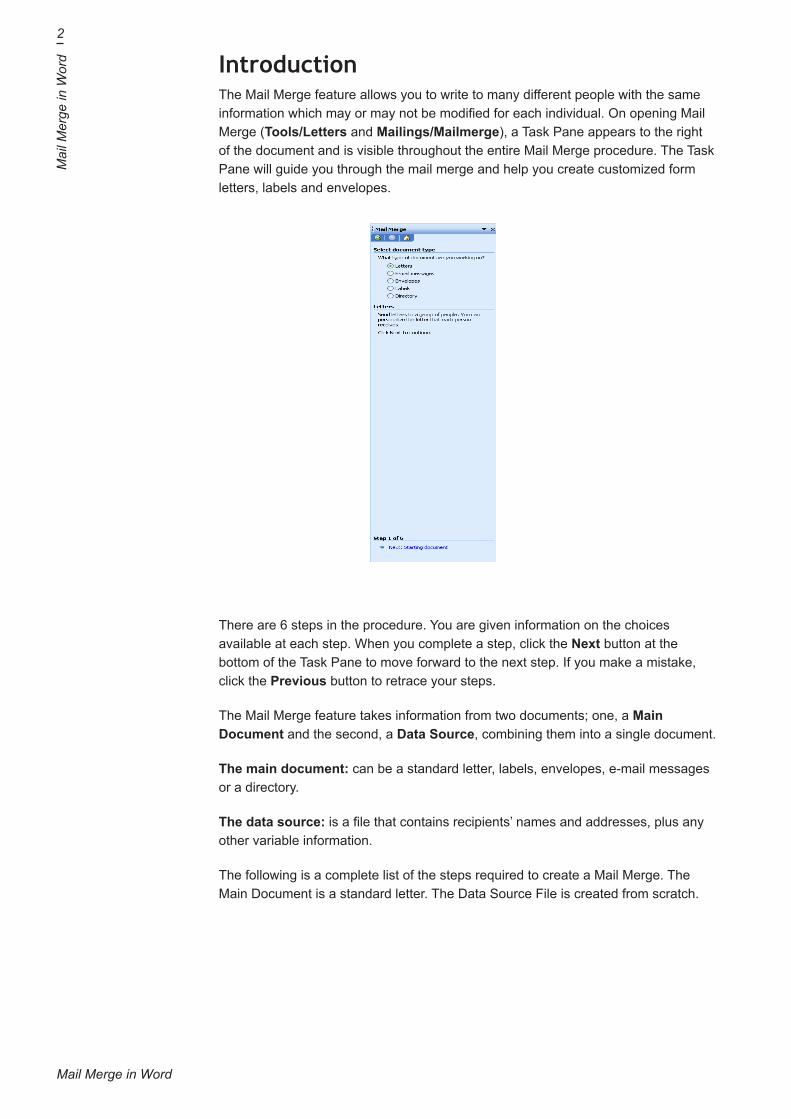
d IntroductionThe Mail Merge feature allows you to write to many different people with the same information which may or may not be modified for each individual. On opening Mail Merge (Tools/Letters and Mailings/Mailmerge), a Task Pane appears to the right of the document and is visible throughout the entire Mail Merge procedure. The Task Pane will guide you through the mail merge and help you create customized form letters, labels and envelopes.
There are 6 steps in the procedure. You are given information on the choices available at each step. When you complete a step, click the Next button at the bottom of the Task Pane to move forward to the next step. If you make a mistake, click the Previous button to retrace your steps.
The Mail Merge feature takes information from two documents; one, a Main Document and the second, a Data Source, combining them into a single document.
The main document: can be a standard letter, labels, envelopes, e-mail messages or a directory.
The data source: is a file that contains recipients’ names and addresses, plus any other variable information.
The following is a complete list of the steps required to create a Mail Merge. The Main Document is a standard letter. The Data Source File is created from scratch.
Mail Merge in Word
3
Mail M
erge in Word
To start the Mail Merge Open a new document. Â
In the  Tools menu, point to Letters and Mailings and then click Mail Merge. A Task Pane appears to the right of the document.
Step 1 of 6: Select Document Type In the  Mail Merge Task Pane, click Letters (if necessary). (When you click an option button, a brief description of that option is displayed in the centre of the Task Pane.)
Step 2 of 6: Select Starting Document Go to the bottom of the Task Pane and click  Next: Starting document
You have a choice of three options when starting the document.
Use the current document:• this is the blank document already on screen. Start from a template:• use this option if you already have a letter template that you prefer to use, or you can base your document on one of Word’s mail merge templates . Start from existing document: Â open an existing document that already contains the pre-typed text.
In this instance, choose, Â Use the current document.
To continue to the next step, click  Next: Select recipients.
Step 3 of 6: Select Recipients The next step is to specify and create the file that contains the recipients’ names and addresses (the Data Source) so that Word can attach it to the letter. There are three options for moving forward in this step:
Use an existing list • Select from Outlook contacts • Type a new list. •
Under  Select recipients, select Type a new list, to create a list of recipients to whom the mail will be sent.
Under  Type a new list, click Create to open the New Address List dialog box.
The New Address List box has data fields, any of which can be used in the mail merge, or you can delete them and add your own. (Note: These data fields are the link between your letter and the data source file.)
To delete or add fields, click the  Customize button.
To remove a field name, select it and click  Delete. Fields must be deleted individually - you cannot select multiple fields. If necessary, use the Move Up and Move Down buttons to arrange the fields in the order you want.
Mail Merge in Word
4
Mai
l Mer
ge in
Wor
d With  Title selected, click Delete - a message box appears asking for confirmation.
Click  Yes to delete the field.
Delete the Field Names: Company Name, Address Line 1, Address Line 2, City, ÂState, ZIP Code, Country, Home Phone, Work Phone, and E-mail Address
Click  Add (to add new field names to the list).
In the box, enter  Department.
Click  OK to add this field name to the list.
Repeat this action to add the following: Â Subject, Year_of_Study, Exam_Date (Note that spaces are not allowed in field names.)
Click  OK to close the Customize Address List dialog box.
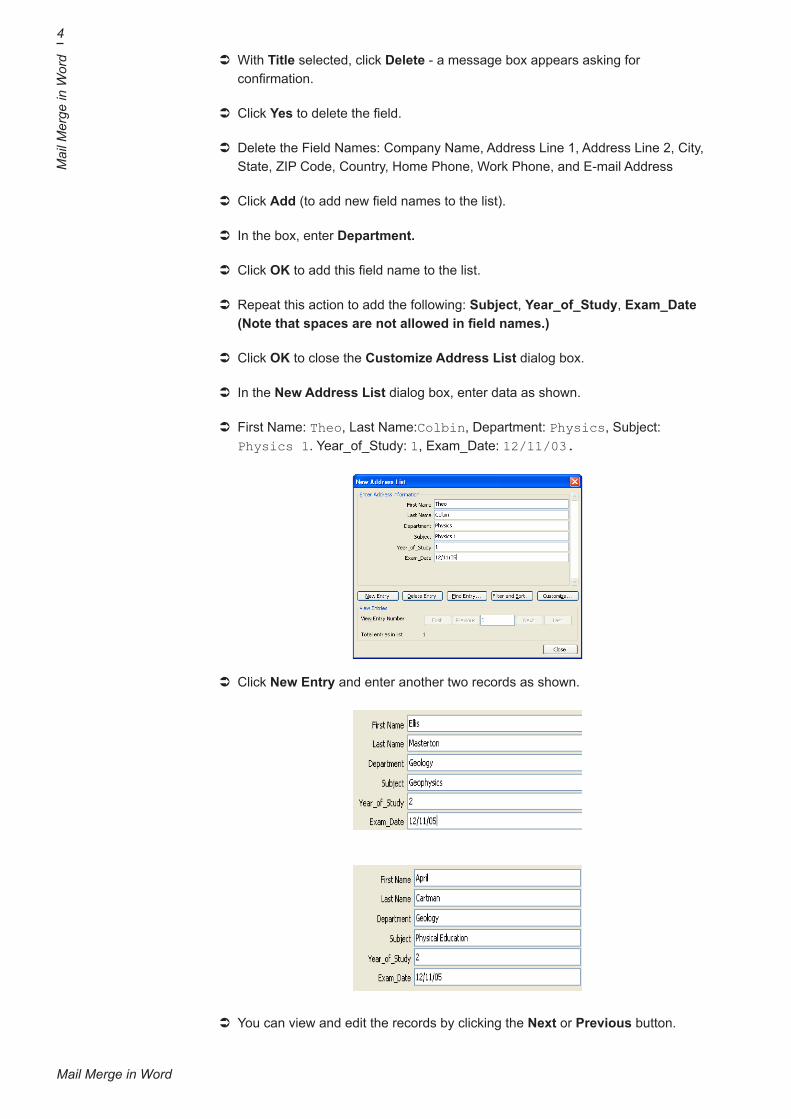
In the  New Address List dialog box, enter data as shown.
First Name: Â Theo, Last Name:Colbin, Department: Physics, Subject: Physics 1. Year_of_Study: 1, Exam_Date: 12/11/03.
Click  New Entry and enter another two records as shown.
You can view and edit the records by clicking the  Next or Previous button.

Mail Merge in Word
5
Mail M
erge in Word
Click  Close, the Save Address List dialog box appears.
Call the file  My_data_source. The data source will be saved as a Microsoft Office Address Lists file type, in the My Data Sources folder.
Note: This database file is stored in a special format allowing it to be managed directly from the Mail Merge function.
Save the file. Â
The Mail Merge Recipients box appears and you have the option to sort or filter the address list.
Click  OK to return to Mail Merge. In the Task Pane, you can now see the name of the data source file in the taskpane which states “Currently, your recipients are selected from:” [Office Address List] My_data_source
Step 4 of 6: Write the standard letter Click in  Next: Write your letter.
Type the standard text of the letter as below, putting a [tab] between ÂDepartment, Subject and Year.
Dear
Department: Subject: Year:
Your examination has been scheduled for . It will take place in the department and you are requested to arrive ten minutes before it starts at 9:30am.
Yours sincerely,
Department Secretary
Mail Merge in Word
6
Mai
l Mer
ge in
Wor
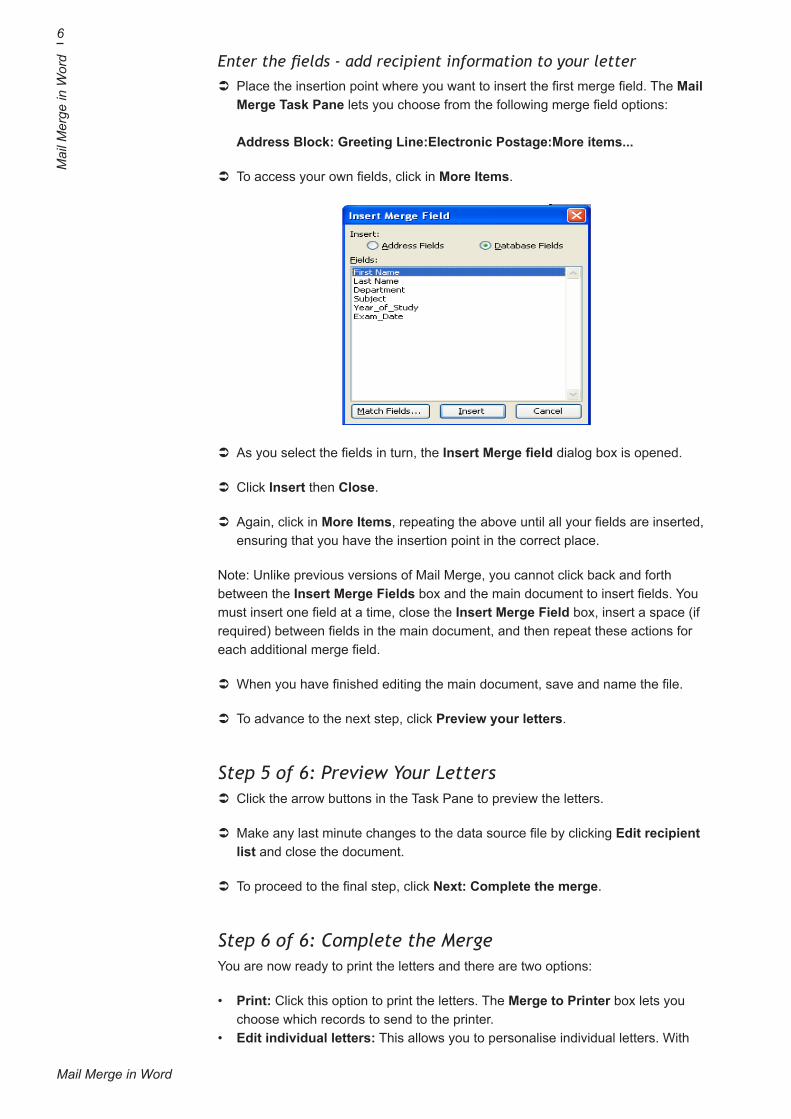
d Enter the fields - add recipient information to your letterPlace the insertion point where you want to insert the first merge field. The  Mail Merge Task Pane lets you choose from the following merge field options: Address Block: Greeting Line:Electronic Postage:More items...
To access your own fields, click in  More Items.
As you select the fields in turn, the  Insert Merge field dialog box is opened.
Click  Insert then Close.
Again, click in  More Items, repeating the above until all your fields are inserted, ensuring that you have the insertion point in the correct place.
Note: Unlike previous versions of Mail Merge, you cannot click back and forth between the Insert Merge Fields box and the main document to insert fields. You must insert one field at a time, close the Insert Merge Field box, insert a space (if required) between fields in the main document, and then repeat these actions for each additional merge field.
When you have finished editing the main document, save and name the file. Â
To advance to the next step, click  Preview your letters.
Step 5 of 6: Preview Your Letters Click the arrow buttons in the Task Pane to preview the letters. Â
Make any last minute changes to the data source file by clicking  Edit recipient list and close the document.
To proceed to the final step, click  Next: Complete the merge.
Step 6 of 6: Complete the Merge You are now ready to print the letters and there are two options:
Print:• Click this option to print the letters. The Merge to Printer box lets you choose which records to send to the printer. Edit individual letters:• This allows you to personalise individual letters. With
Mail Merge in Word
7
Mail M
erge in Word
this option you get the Merge to New Document box. Click OK and the letters are merged to a new document, thereby giving you the opportunity to edit each individual letter. You will see that each letter is separated by a section break (when in Normal View). When you are ready to print the letters, click Print on the File menu.
Note: If you are familiar with mail merge in previous versions of Word then you can choose not to use the Task Pane. Instead, choose View/Toolbars/Mail Merge to display the Mail Merge toolbar and click the Main document setup button to begin.
Mail Merge in Word
8
Mai
l Mer
ge in
Wor
d Using data source filesThe information in a data source is stored as data records in a table. For example, a student data source stores information such as student names, subject and addresses. After creating a data source, you can examine, modify, sort, and filter records in the data source.
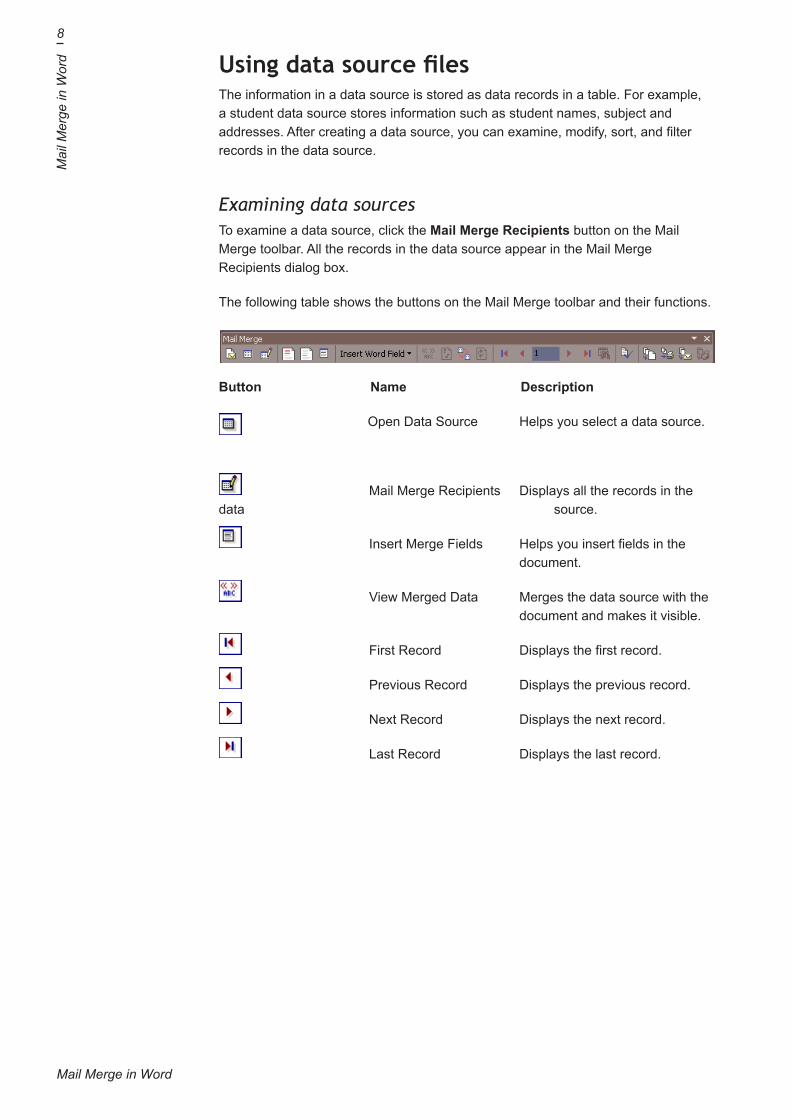
Examining data sourcesTo examine a data source, click the Mail Merge Recipients button on the Mail Merge toolbar. All the records in the data source appear in the Mail Merge Recipients dialog box.
The following table shows the buttons on the Mail Merge toolbar and their functions.
Button Name Description
Open Data Source Helps you select a data source.
Mail Merge Recipients Displays all the records in the data source.
Insert Merge Fields Helps you insert fields in the document.
View Merged Data Merges the data source with the document and makes it visible.
First Record Displays the first record.
Previous Record Displays the previous record.
Next Record Displays the next record.
Last Record Displays the last record.
Mail Merge in Word
9
Mail M
erge in Word
Sorting recordsBefore you print your standard letters, you may want to sort them in a particular way. For example, you might want to print all the letters in alphabetical order by last name. You can do this by sorting the records in the data source by a field in ascending or descending order. By default, the records are sorted in ascending order.
To sort records:
Click the  Mail Merge Recipients button to open the Mail Merge Recipients dialog box.
Click in the arrow as shown to display a menu. Â
Choose  (Advanced…) to open the Filter and Sort dialog box.
Activate the  Sort Records tab.
From the  Sort by list, select Last_Name.
Your list of field names appears. You can sort records according to any of the field names. Next to Sort by, Ascending is selected by default.
Click in  Descending.
Click  OK to close the Filter and Sort dialog box. In the Mail Merge Recipients dialog box, the records are sorted by Last_Name in descending order.
Click  OK.
To view all your records, click in the arrows under  Preview your letter.
Save the document. Â
Mail Merge in Word
10
Mai
l Mer
ge in
Wor
d Merging addresses into mailing labelsYou can also create mailing labels by using the mail merge feature. This is done by merging data from a data source into a mailing label document. The steps to do so are as follows.
Create a document and open • Mail Merge.Under • Select document type, select Labels.In the next step of the wizard, click • Next: Starting document, then Label options to open the Label Options dialog box.Specify the printer and label settings in the Label Options dialog box• Click • OK. A sheet of labels with the specified label information is created.Specify the data source by clicking • Browse. Click Next: Select recipients. This opens the Mail Merge Recipients dialog box.Close the dialog box and move to the next step in the wizard.• Insert the fields in the document.• Click • Update all labels to add the labels to all the divisions in the document.Click the • View Merged Data button.
Preparing mailing labelsOpen a new document. Â
Choose  Tools, Letters and Mailings, Mail Merge and select Labels.
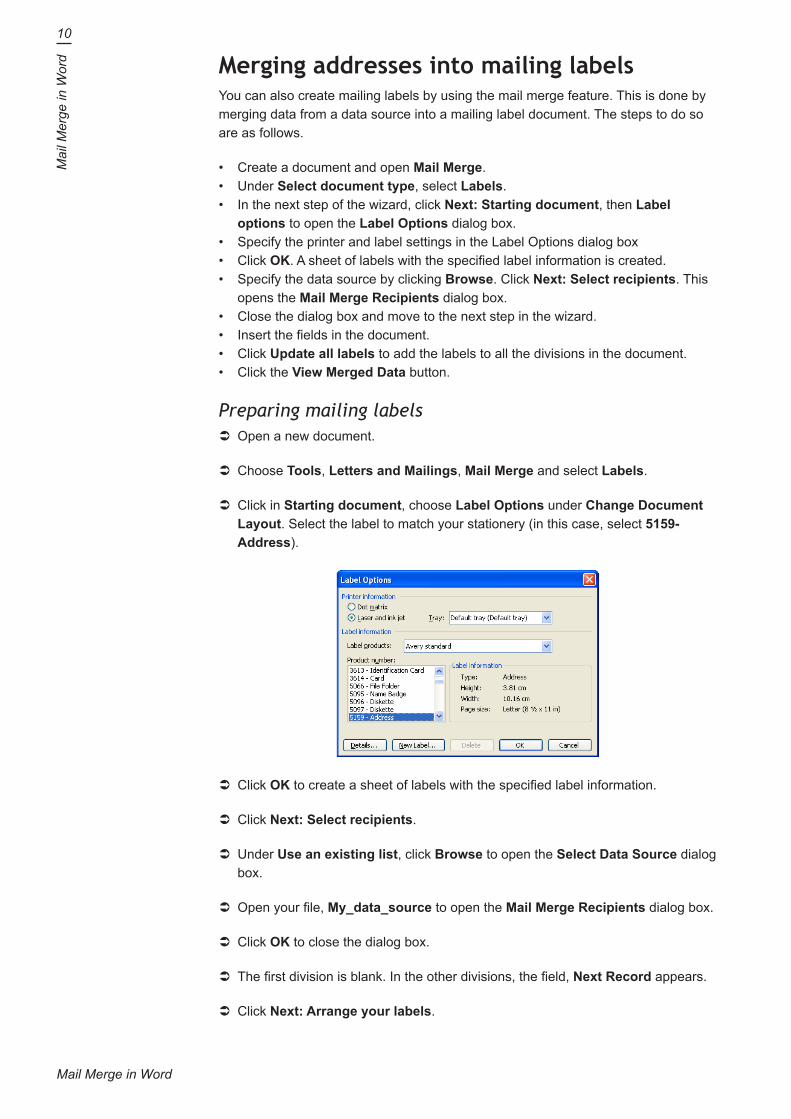
Click in  Starting document, choose Label Options under Change Document Layout. Select the label to match your stationery (in this case, select 5159-Address).
Click  OK to create a sheet of labels with the specified label information.
Click  Next: Select recipients.
Under  Use an existing list, click Browse to open the Select Data Source dialog box.
Open your file, Â My_data_source to open the Mail Merge Recipients dialog box.
Click  OK to close the dialog box.
The first division is blank. In the other divisions, the field, Â Next Record appears.
Click  Next: Arrange your labels.
Mail Merge in Word
11
Mail M
erge in Word
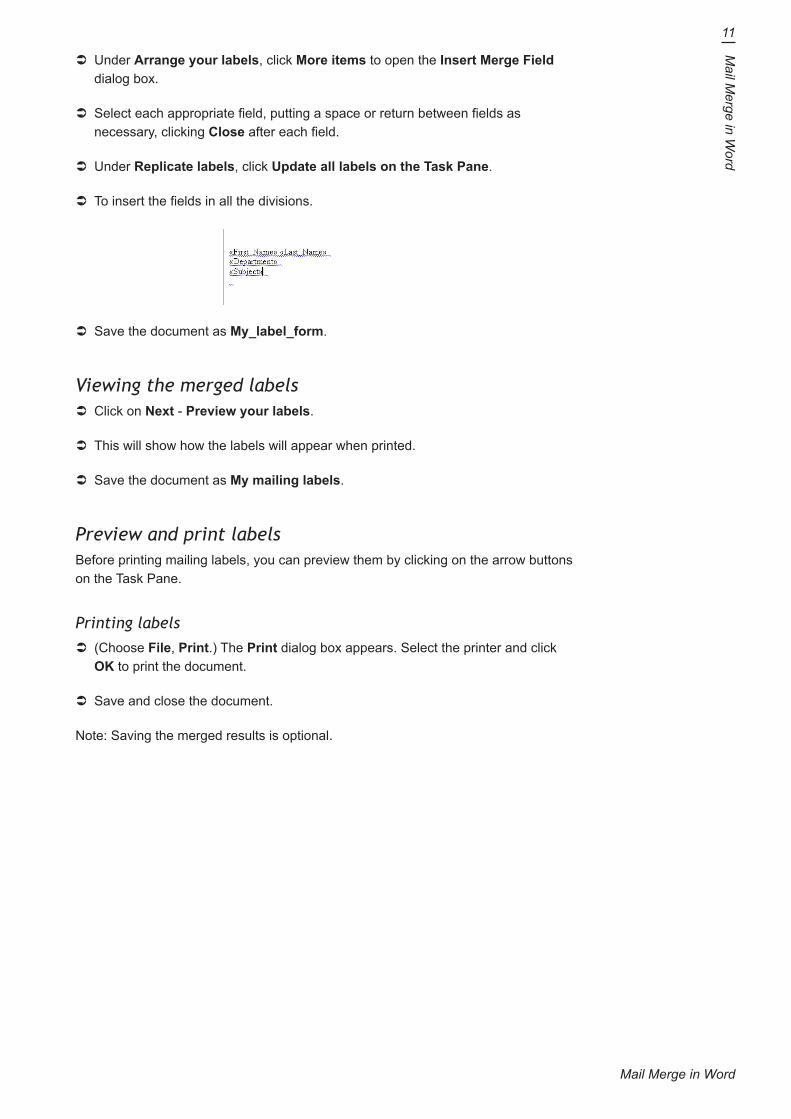
Under  Arrange your labels, click More items to open the Insert Merge Field dialog box.
Select each appropriate field, putting a space or return between fields as Ânecessary, clicking Close after each field.
Under  Replicate labels, click Update all labels on the Task Pane.
To insert the fields in all the divisions. Â
Save the document as  My_label_form.
Viewing the merged labelsClick on  Next - Preview your labels.
This will show how the labels will appear when printed. Â
Save the document as  My mailing labels.
Preview and print labelsBefore printing mailing labels, you can preview them by clicking on the arrow buttons on the Task Pane.
Printing labels(Choose  File, Print.) The Print dialog box appears. Select the printer and click OK to print the document.
Save and close the document. Â
Note: Saving the merged results is optional.