Embed Size (px)
Citation preview
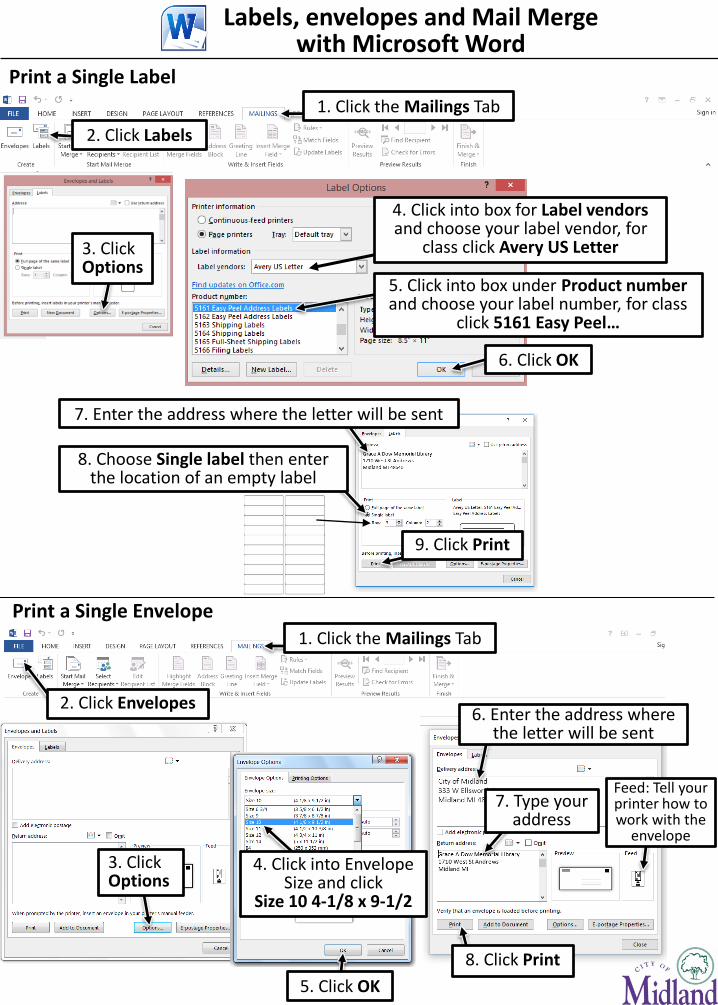
Labels, envelopes and Mail Mergewith Microsoft Word
Print a Single Label
1. Click the Mailings Tab
2. Click Labels
3. Click Options
4. Click into box for Label vendors and choose your label vendor, for
class click Avery US Letter
6. Click OK
9. Click Print
5. Click into box under Product number and choose your label number, for class
click 5161 Easy Peel…
Print a Single Envelope
1. Click the Mailings Tab
2. Click Envelopes
3. Click Options
5. Click OK
8. Click Print
6. Enter the address where the letter will be sent
7. Type your address
7. Enter the address where the letter will be sent
4. Click into Envelope Size and click
Size 10 4-1/8 x 9-1/2
8. Choose Single label then enter the location of an empty label
Feed: Tell your printer how to work with the
envelope
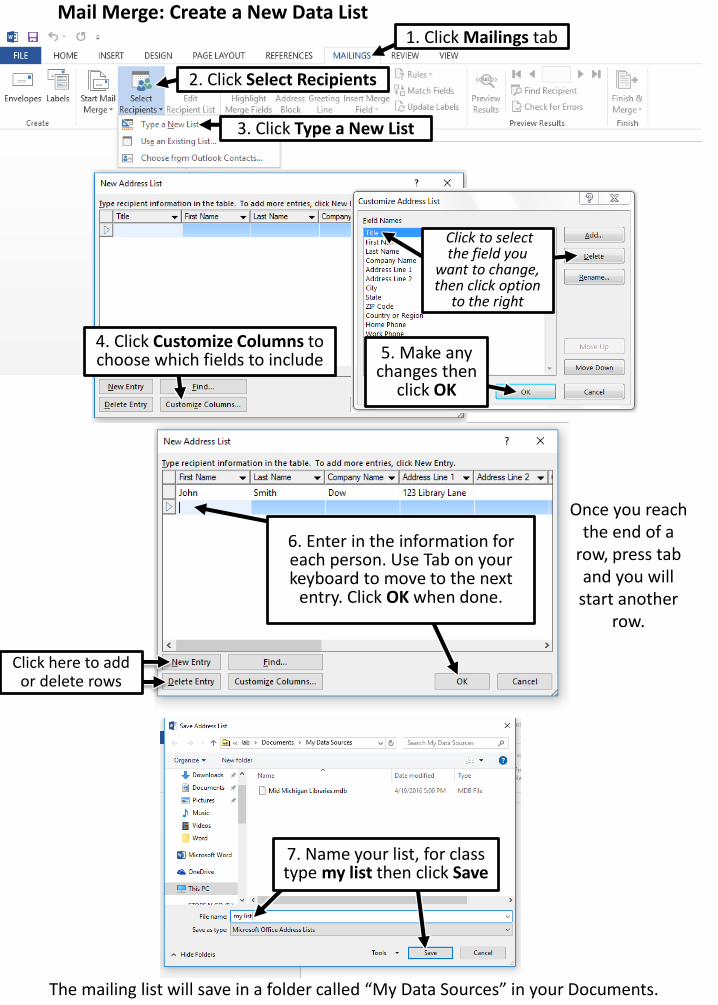
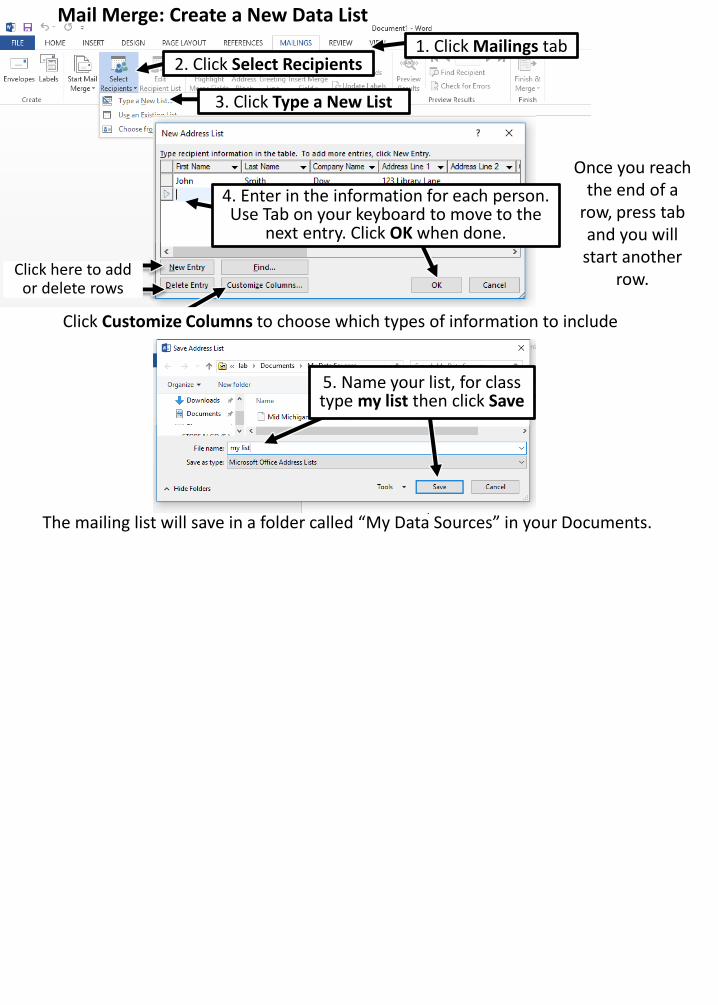
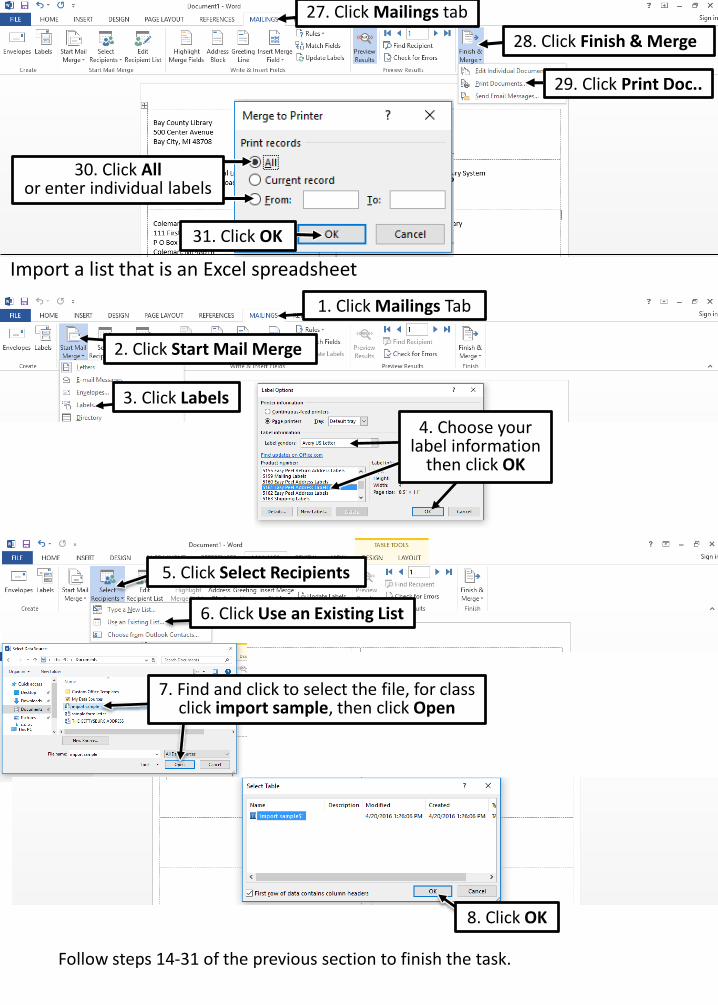
Mail Merge: Create a New Data List
2. Click Select Recipients
3. Click Type a New List
6. Enter in the information for each person. Use Tab on your keyboard to move to the next
entry. Click OK when done.
1. Click Mailings tab
7. Name your list, for class type my list then click Save
Click here to add or delete rows
The mailing list will save in a folder called “My Data Sources” in your Documents.
Once you reach the end of a
row, press tab and you will start another
row.
4. Click Customize Columns to choose which fields to include 5. Make any
changes then click OK
Click to select the field you
want to change, then click option
to the right
Mail Merge: Create a New Data List
2. Click Select Recipients
3. Click Type a New List
1. Click Mailings tab
The mailing list will save in a folder called “My Data Sources” in your Documents.
Once you reach the end of a
row, press tab and you will start another
row.
4. Enter in the information for each person. Use Tab on your keyboard to move to the
next entry. Click OK when done.
Click Customize Columns to choose which types of information to include
5. Name your list, for class type my list then click Save
Click here to add or delete rows
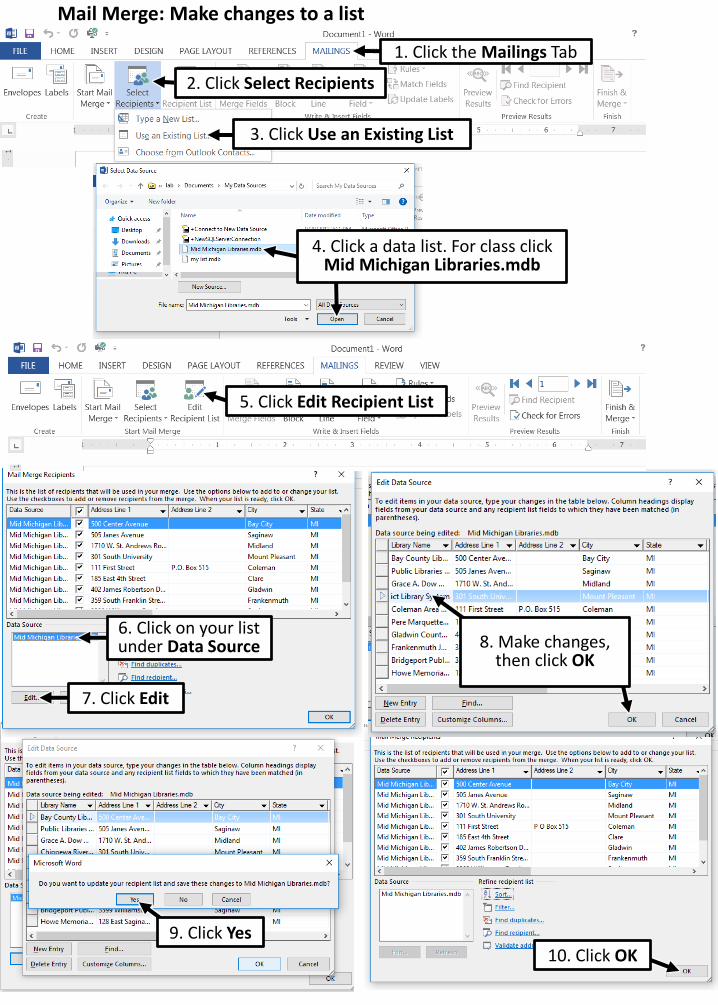
5. Click Edit Recipient List
Mail Merge: Make changes to a list
1. Click the Mailings Tab
2. Click Select Recipients
3. Click Use an Existing List
9. Click Yes
4. Click a data list. For class click Mid Michigan Libraries.mdb
8. Make changes, then click OK
6. Click on your list under Data Source
7. Click Edit
10. Click OK
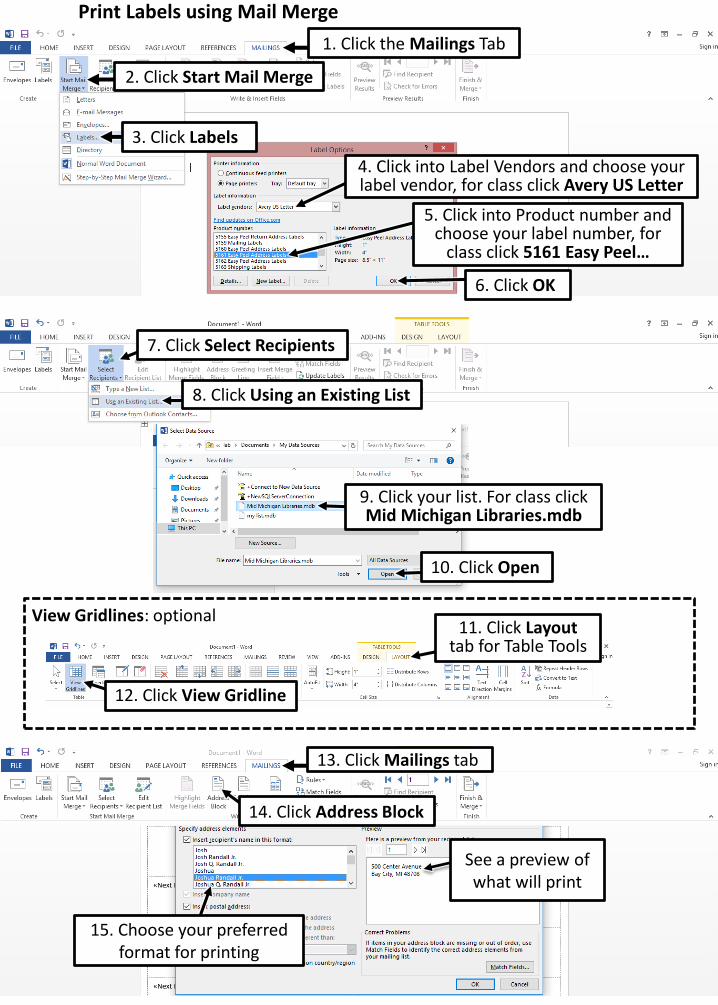
1. Click the Mailings Tab
2. Click Start Mail Merge
3. Click Labels
4. Click into Label Vendors and choose your label vendor, for class click Avery US Letter
5. Click into Product number and choose your label number, for
class click 5161 Easy Peel…
Print Labels using Mail Merge
7. Click Select Recipients
8. Click Using an Existing List
View Gridlines: optional11. Click Layout
tab for Table Tools
12. Click View Gridline
9. Click your list. For class click Mid Michigan Libraries.mdb
10. Click Open
6. Click OK
14. Click Address Block
15. Choose your preferred format for printing
13. Click Mailings tab
See a preview of what will print
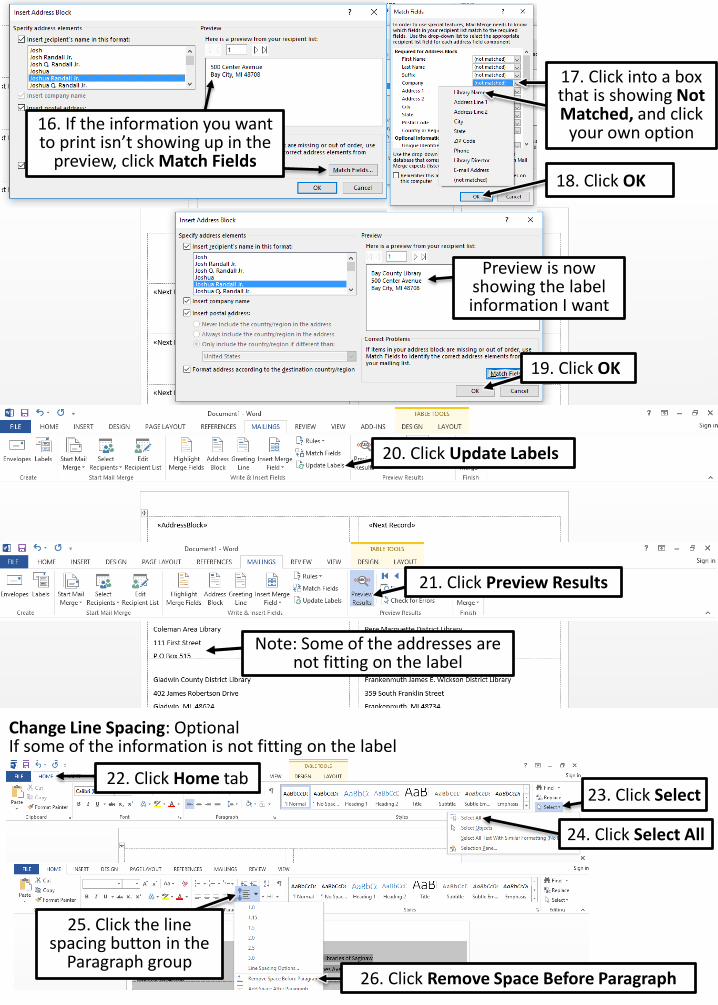
19. Click OK
20. Click Update Labels
18. Click OK
Preview is now showing the label information I want
17. Click into a box that is showing Not Matched, and click
your own option 16. If the information you want to print isn’t showing up in the
preview, click Match Fields
22. Click Home tab23. Click Select
24. Click Select All
26. Click Remove Space Before Paragraph
Change Line Spacing: OptionalIf some of the information is not fitting on the label
21. Click Preview Results
Note: Some of the addresses are not fitting on the label
25. Click the line spacing button in the
Paragraph group
28. Click Finish & Merge
29. Click Print Doc..
31. Click OK
30. Click Allor enter individual labels
27. Click Mailings tab
Import a list that is an Excel spreadsheet
1. Click Mailings Tab
4. Choose your label information
then click OK
2. Click Start Mail Merge
3. Click Labels
5. Click Select Recipients
6. Click Use an Existing List
7. Find and click to select the file, for class click import sample, then click Open
8. Click OK
Follow steps 14-31 of the previous section to finish the task.
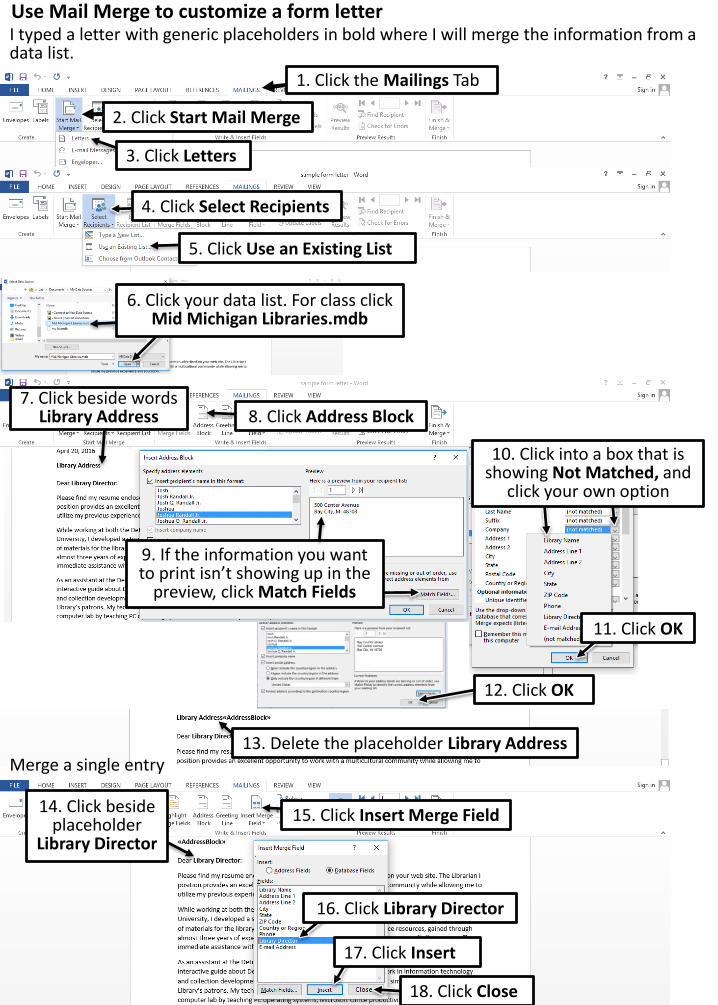
Use Mail Merge to customize a form letter
1. Click the Mailings Tab
2. Click Start Mail Merge
4. Click Select Recipients
5. Click Use an Existing List
6. Click your data list. For class click Mid Michigan Libraries.mdb
7. Click beside words Library Address
I typed a letter with generic placeholders in bold where I will merge the information from a data list.
8. Click Address Block
9. If the information you want to print isn’t showing up in the
preview, click Match Fields
10. Click into a box that is showing Not Matched, and
click your own option
11. Click OK
12. Click OK
13. Delete the placeholder Library Address
14. Click beside placeholder
Library Director
15. Click Insert Merge Field
16. Click Library Director
17. Click Insert
18. Click Close
Merge a single entry
3. Click Letters
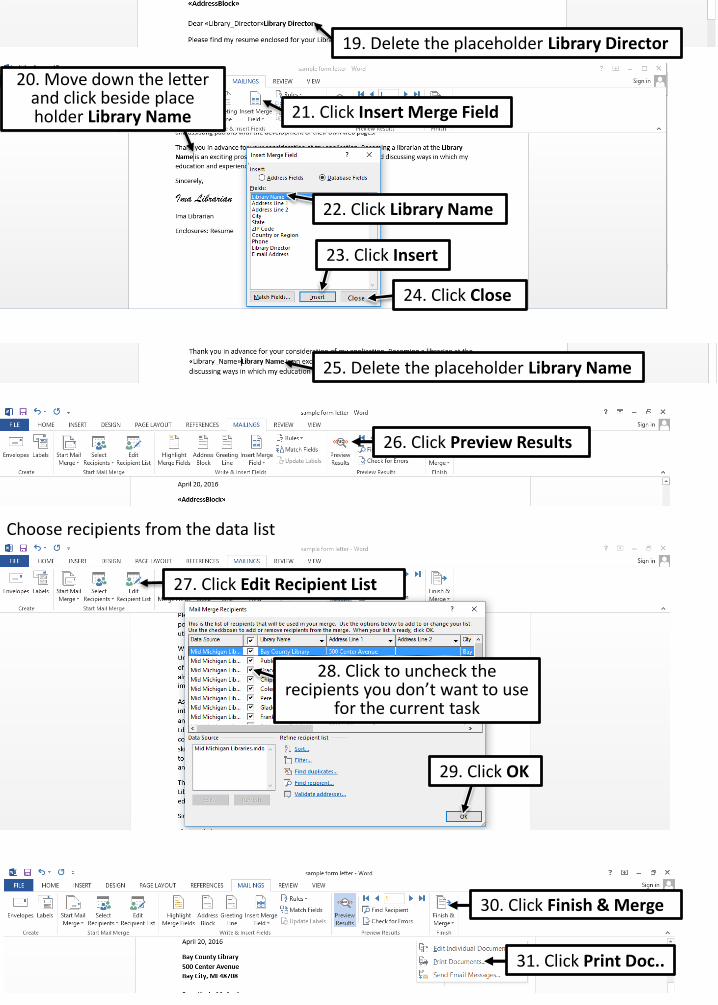
19. Delete the placeholder Library Director
20. Move down the letter and click beside place holder Library Name 21. Click Insert Merge Field
22. Click Library Name
23. Click Insert
25. Delete the placeholder Library Name
26. Click Preview Results
31. Click Print Doc..
30. Click Finish & Merge
27. Click Edit Recipient List
28. Click to uncheck the recipients you don’t want to use
for the current task
29. Click OK
Choose recipients from the data list
24. Click Close
![MAIL MERGE Letters, Envelopes & Labels. WHAT IS IT? Handling sending the same thing to a list [maybe Christmas cards?] of people: – Envelopes – Labels](https://img.pdfslide.us/doc/110x75/5a4d1aed7f8b9ab05997c1e1/mail-merge-letters-envelopes-labels-what-is-it-handling-sending-the.jpg)