Embed Size (px)
Citation preview
PAGE 1
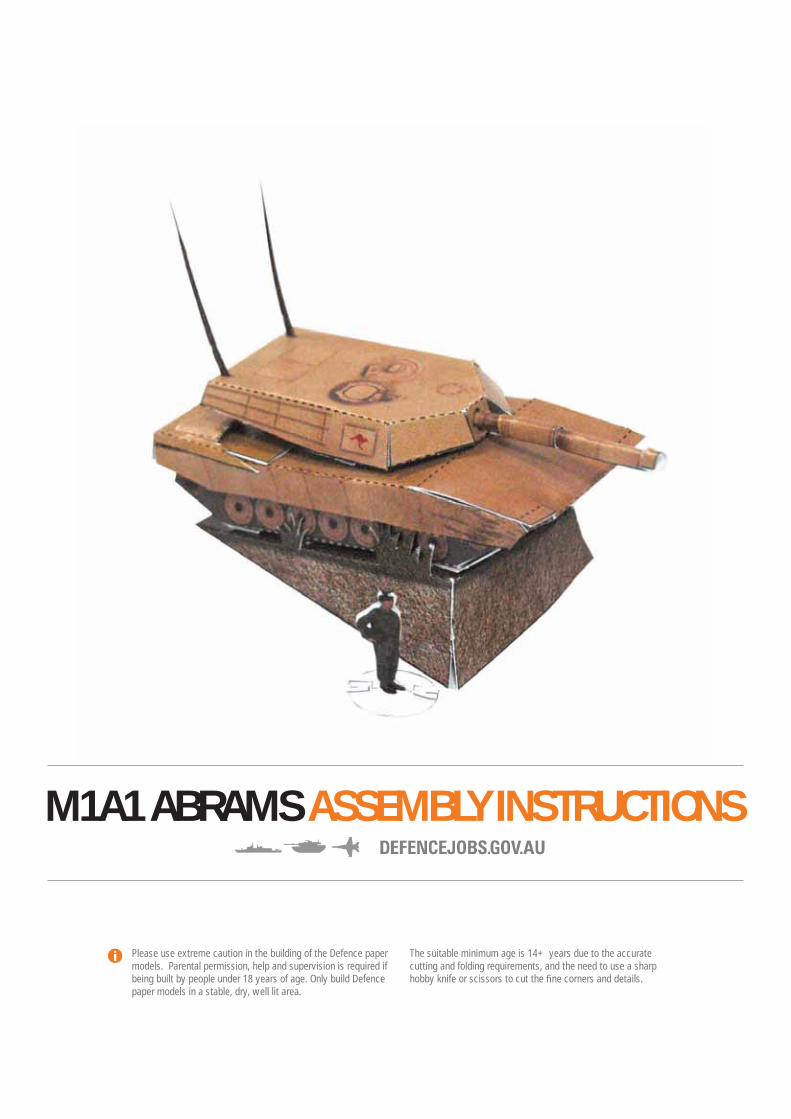
M1A1 ABRAMS ASSEMBLY INSTRUCTIONS
Please use extreme caution in the building of the Defence paper models. Parental permission, help and supervision is required if being built by people under 18 years of age. Only build Defence paper models in a stable, dry, well lit area.
The suitable minimum age is 14+ years due to the accurate cutting and folding requirements, and the need to use a sharp hobby knife or scissors to cut the fi ne corners and details.
M1A1 ABRAMS ASSEMBLY INSTRUCTIONS
PAGE 1
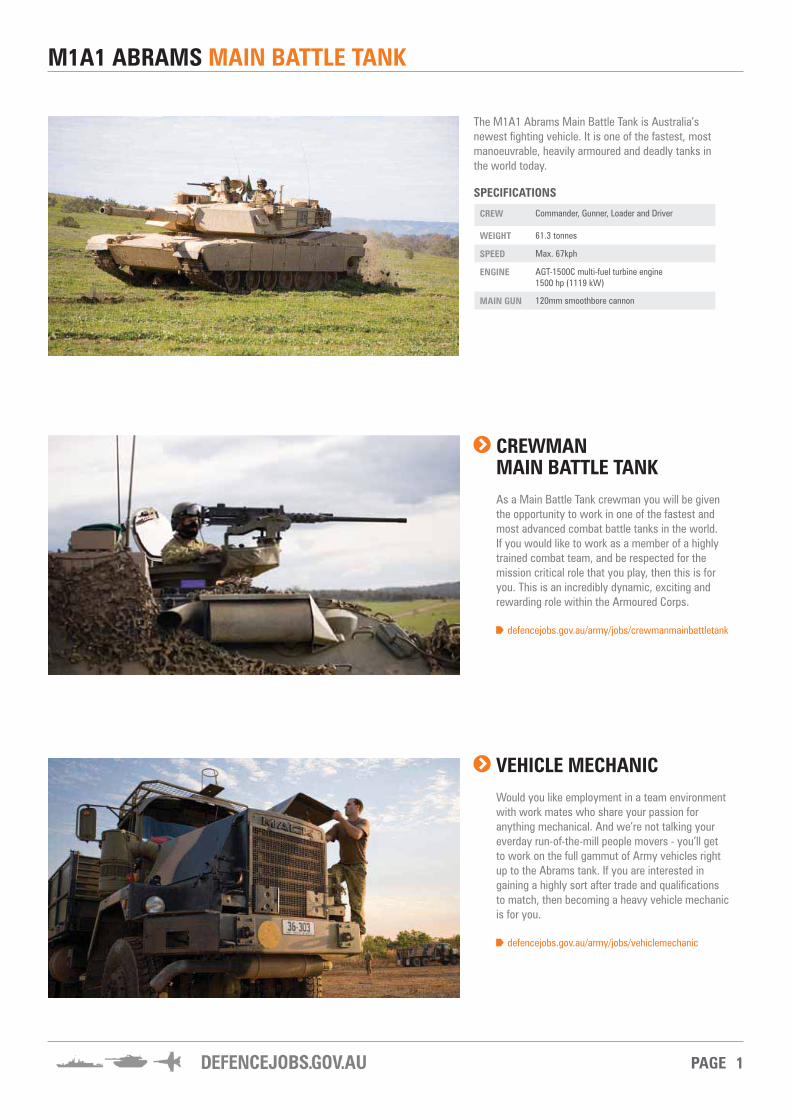
M1A1 ABRAMS MAIN BATTLE TANK
CREWMAN MAIN BATTLE TANK As a Main Battle Tank crewman you will be given the opportunity to work in one of the fastest and most advanced combat battle tanks in the world. If you would like to work as a member of a highly trained combat team, and be respected for the mission critical role that you play, then this is for you. This is an incredibly dynamic, exciting and rewarding role within the Armoured Corps.
defencejobs.gov.au/army/jobs/crewmanmainbattletank
The M1A1 Abrams Main Battle Tank is Australia’s newest fi ghting vehicle. It is one of the fastest, most manoeuvrable, heavily armoured and deadly tanks in the world today.
SPECIFICATIONS
VEHICLE MECHANIC Would you like employment in a team environment with work mates who share your passion for anything mechanical. And we’re not talking your everday run-of-the-mill people movers - you’ll get to work on the full gammut of Army vehicles right up to the Abrams tank. If you are interested in gaining a highly sort after trade and qualifi cations to match, then becoming a heavy vehicle mechanic is for you.
defencejobs.gov.au/army/jobs/vehiclemechanic
CREW Commander, Gunner, Loader and Driver
WEIGHT 61.3 tonnes
SPEED Max. 67kph
ENGINE AGT-1500C multi-fuel turbine engine1500 hp (1119 kW)
MAIN GUN 120mm smoothbore cannon
PAGE 2
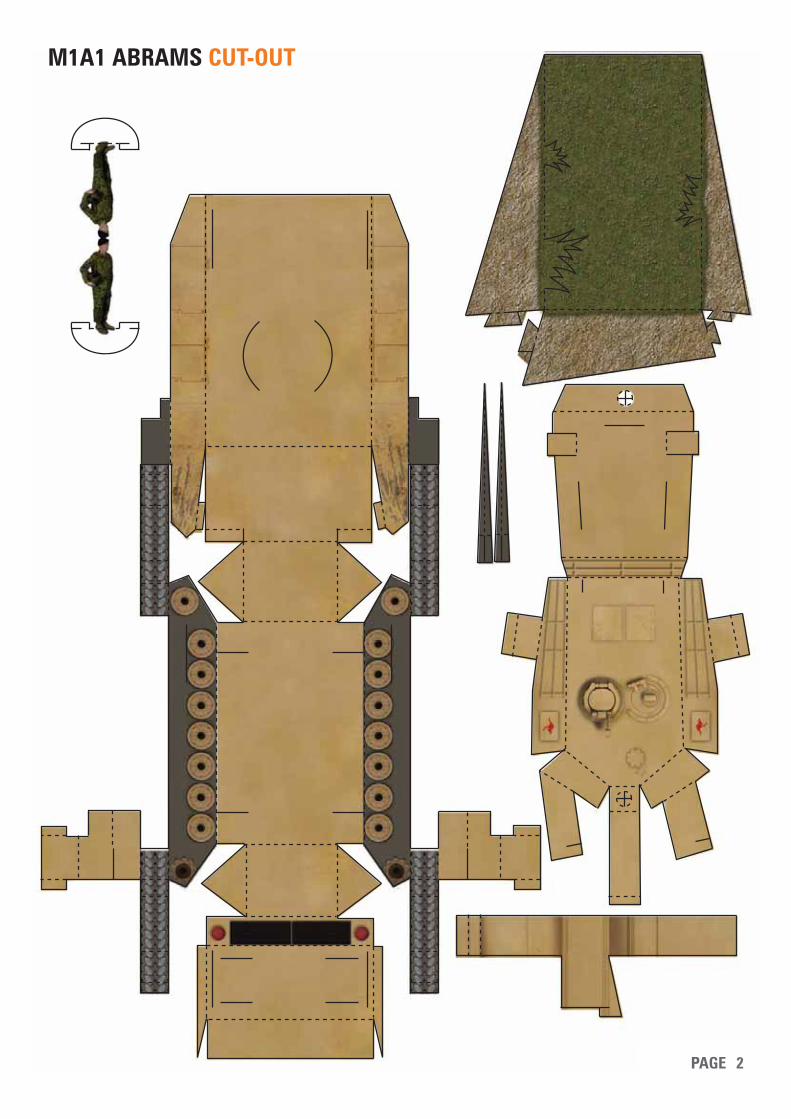
M1A1 ABRAMS CUT-OUT
PAGE 3
M1A1 ABRAMS ASSEMBLY INSTRUCTIONS
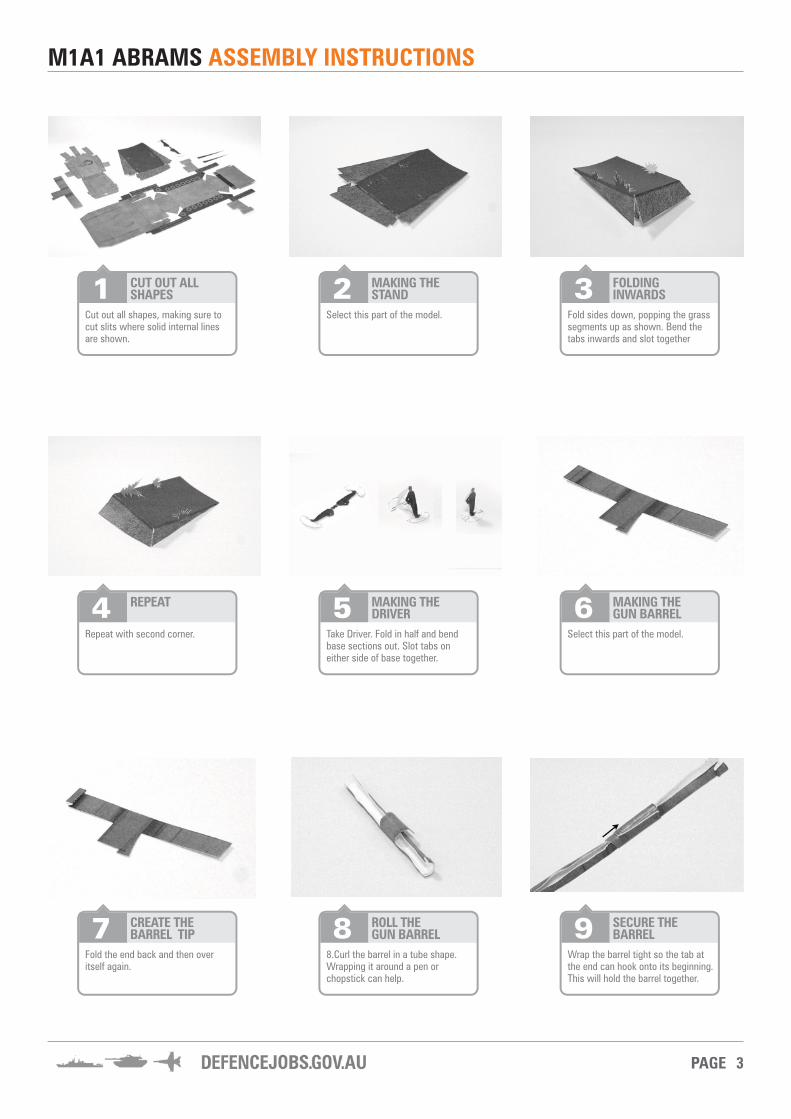
1 CUT OUT ALL SHAPES
Cut out all shapes, making sure to cut slits where solid internal lines are shown.
4 REPEAT
Repeat with second corner.
7 CREATE THE BARREL TIP
Fold the end back and then over itself again.
2 MAKING THE STAND
Select this part of the model.
5 MAKING THE DRIVER
Take Driver. Fold in half and bend base sections out. Slot tabs on either side of base together.
8 ROLL THE GUN BARREL
8.Curl the barrel in a tube shape. Wrapping it around a pen or chopstick can help.
3 FOLDING INWARDS
Fold sides down, popping the grass segments up as shown. Bend the tabs inwards and slot together
6 MAKING THE GUN BARREL
Select this part of the model.
9 SECURE THE BARREL
Wrap the barrel tight so the tab at the end can hook onto its beginning. This will hold the barrel together.

PAGE 4
M1A1 ABRAMS ASSEMBLY INSTRUCTIONS
10 FOLD THE ANTENNAE
Take the antennae. Starting from the widest end, fold in half and work the fold up the dotted line with fi ngers.
13 FOLD TABS OUT
Fold tabs outwards as shown.
16 SECURE TABSAT BASE
Fold base down and push side tabs into their matching slots.
14 CREATE HOLE FRO BARREL
Using a pen or pencil, push the fl aps inside the circle inwards as shown.
11 MAKING THE TURRENT
Select this part of the model.
17 LOCK TOGETHERANGLED FLAPS
Take the 2 opposite fl aps at the front and slot them together a s shown
12 TURN OVER AND FOLD IN
Turn shape over and fold inward at dotted lines as shown above.
15 REPEAT
Repeat step 14 with the second circle as shown above.
18 SECURE FINAL TAB
Fold the last remaining fl ap over and push it into the matching slot.
PAGE 5
M1A1 ABRAMS ASSEMBLY INSTRUCTIONS
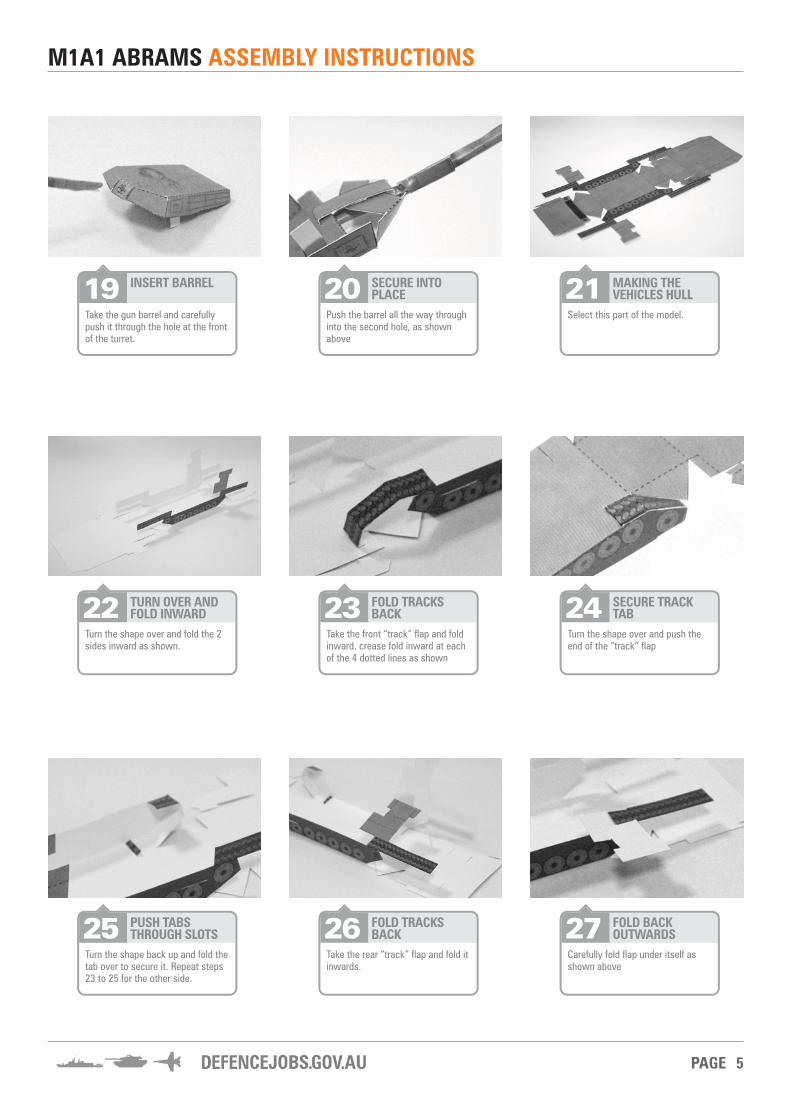
19 INSERT BARREL
Take the gun barrel and carefully push it through the hole at the front of the turret.
22 TURN OVER AND FOLD INWARD
Turn the shape over and fold the 2 sides inward as shown.
25 PUSH TABS THROUGH SLOTS
Turn the shape back up and fold the tab over to secure it. Repeat steps 23 to 25 for the other side.
20 SECURE INTO PLACE
Push the barrel all the way through into the second hole, as shown above
23 FOLD TRACKS BACK
Take the front “track” fl ap and fold inward. crease fold inward at each of the 4 dotted lines as shown
26 FOLD TRACKS BACK
Take the rear “track” fl ap and fold it inwards.
21 MAKING THE VEHICLES HULL
Select this part of the model.
24 SECURE TRACK TAB
Turn the shape over and push the end of the “track” fl ap
27 FOLD BACK OUTWARDS
Carefully fold fl ap under itself as shown above
PAGE 6
M1A1 ABRAMS ASSEMBLY INSTRUCTIONS
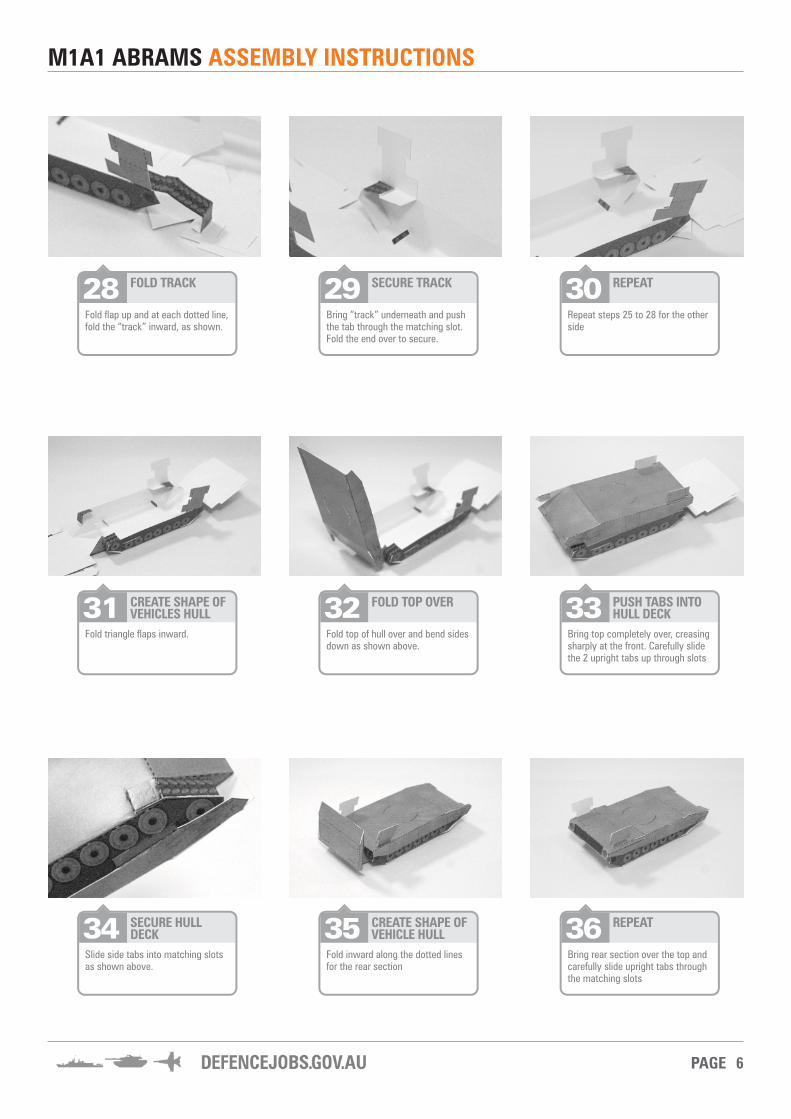
28 FOLD TRACK
Fold fl ap up and at each dotted line, fold the “track” inward, as shown.
31 CREATE SHAPE OF VEHICLES HULL
Fold triangle fl aps inward.
34 SECURE HULL DECK
Slide side tabs into matching slots as shown above.
29 SECURE TRACK
Bring “track” underneath and push the tab through the matching slot. Fold the end over to secure.
32 FOLD TOP OVER
Fold top of hull over and bend sides down as shown above.
35 CREATE SHAPE OF VEHICLE HULL
Fold inward along the dotted lines for the rear section
30 REPEAT
Repeat steps 25 to 28 for the other side
33 PUSH TABS INTO HULL DECK
Bring top completely over, creasing sharply at the front. Carefully slide the 2 upright tabs up through slots
36 REPEAT
Bring rear section over the top and carefully slide upright tabs through the matching slots
PAGE 7
M1A1 ABRAMS ASSEMBLY INSTRUCTIONS
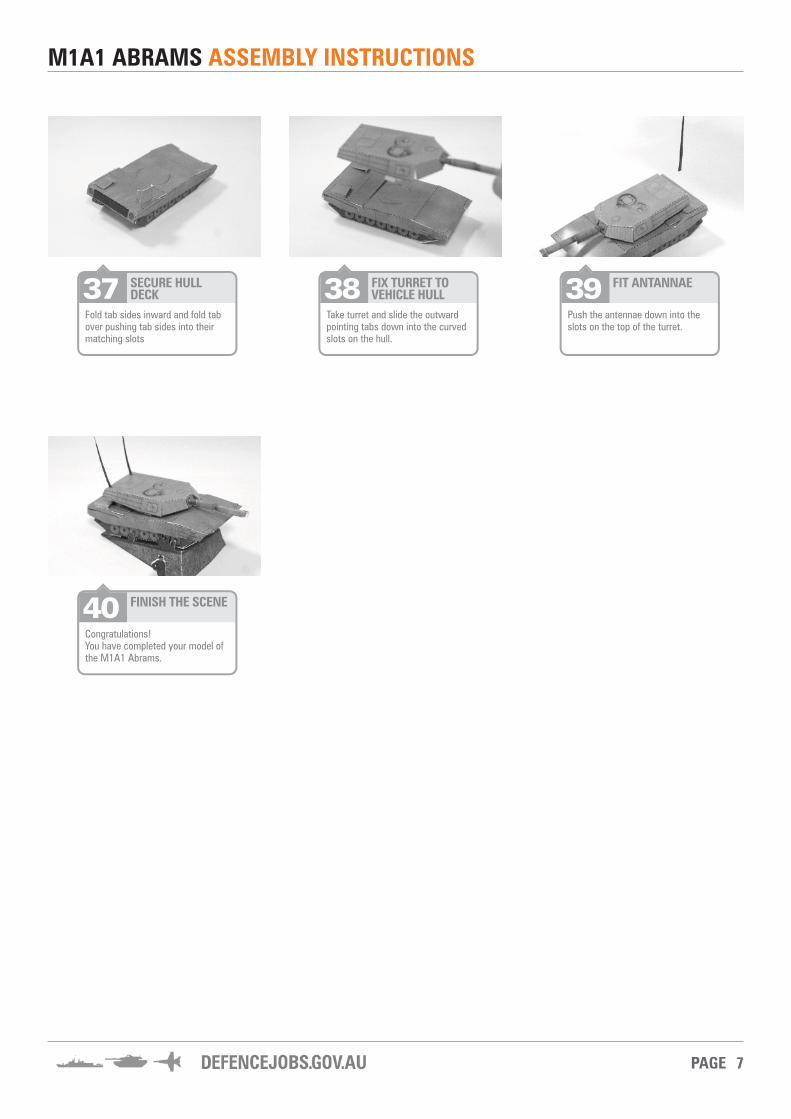
37 SECURE HULL DECK
Fold tab sides inward and fold tab over pushing tab sides into their matching slots
40 FINISH THE SCENE
Congratulations! You have completed your model of the M1A1 Abrams.
38 FIX TURRET TO VEHICLE HULL
Take turret and slide the outward pointing tabs down into the curved slots on the hull.
39 FIT ANTANNAE
Push the antennae down into the slots on the top of the turret.


![1(i) M1A1A1A1 [4] M1A1 M1A1 [4] A1A1 A1 M1 B1 M1 ... packs/MS_MEI_NM.pdf6 -0.00218 sign change so root is correct to 3 dp [M1A1] [TOTAL 8] 3 h M T S 2 3.46410 2 3.65028 2 3.52616 2](https://img.pdfslide.us/doc/110x75/60e84fbad1b031344221d847/1i-m1a1a1a1-4-m1a1-m1a1-4-a1a1-a1-m1-b1-m1-packsmsmeinmpdf-6-000218.jpg)