Embed Size (px)
Citation preview

Luxfer Carbon Composite Cylinders
INSPECTION MANUAL 2009PART 1: A guide to the use, maintenance and periodic inspection of Luxfer fully wrapped carbon composite cylinders with a design life of 15 years in the U.S.A. and Canada

2
Contents Introduction.......................................................................................................................3 Luxfer: Setting the Standard Worldwide ...........................................................................4 1. Cylinder design and specifications ...............................................................................5
1.1 Special Permits ......................................................................................................7 2. Design and performance criteria ..................................................................................8
2.1 Design criteria ........................................................................................................8 3.2 Qualification testing................................................................................................8
3. Manufacture ...............................................................................................................10 3.1 Aluminum-alloy liners...........................................................................................10 3.2 Inspection procedures .........................................................................................10 3.3 Composite overwrapping .....................................................................................11 3.4 Cylinder lot inspection and testing .......................................................................11 3.5 Independent inspection authorities ......................................................................12 3.6 Marking and labeling............................................................................................12 3.7 Protective end caps and boots ............................................................................13
4. Cylinder use ...............................................................................................................14 4.1 General ................................................................................................................14 4.2 Approved gases...................................................................................................15 4.3 Cylinder filling ......................................................................................................16
5. Periodic inspection and requalification .......................................................................17 5.1 General ................................................................................................................17 5.2 Exterior inspection ...............................................................................................17 5.3 Valve removal ......................................................................................................21 5.4 Internal inspection................................................................................................22 5.5 Pressure testing...................................................................................................23
6. Cylinder damage criteria ............................................................................................24 6.1 General ................................................................................................................24 6.2 Abrasion damage.................................................................................................24 6.3 Cuts......................................................................................................................26 6.4 Impact damage ....................................................................................................28 6.5 Delamination........................................................................................................30 6.6 Heat or fire damage .............................................................................................30 6.7 Structural damage ...............................................................................................34 6.8 Chemical attack ...................................................................................................34
7. Repair procedure.......................................................................................................35 8. Final operations.........................................................................................................37
8.1 Drying and cleaning .............................................................................................37 8.2 Repainting............................................................................................................38 8.3 Valve insertion .....................................................................................................38 TABLE 2: Recommended Valve Torque Range .........................................................39 8.4 Destruction of condemned or expired cylinders...................................................40
9. Summary ...................................................................................................................41 Care and maintenance of a Luxfer carbon composite cylinder...................................41
APPENDIX 1: Sample labels.........................................................................................42 APPENDIX 2: Removal and refitting of protective caps, boots .....................................43
3
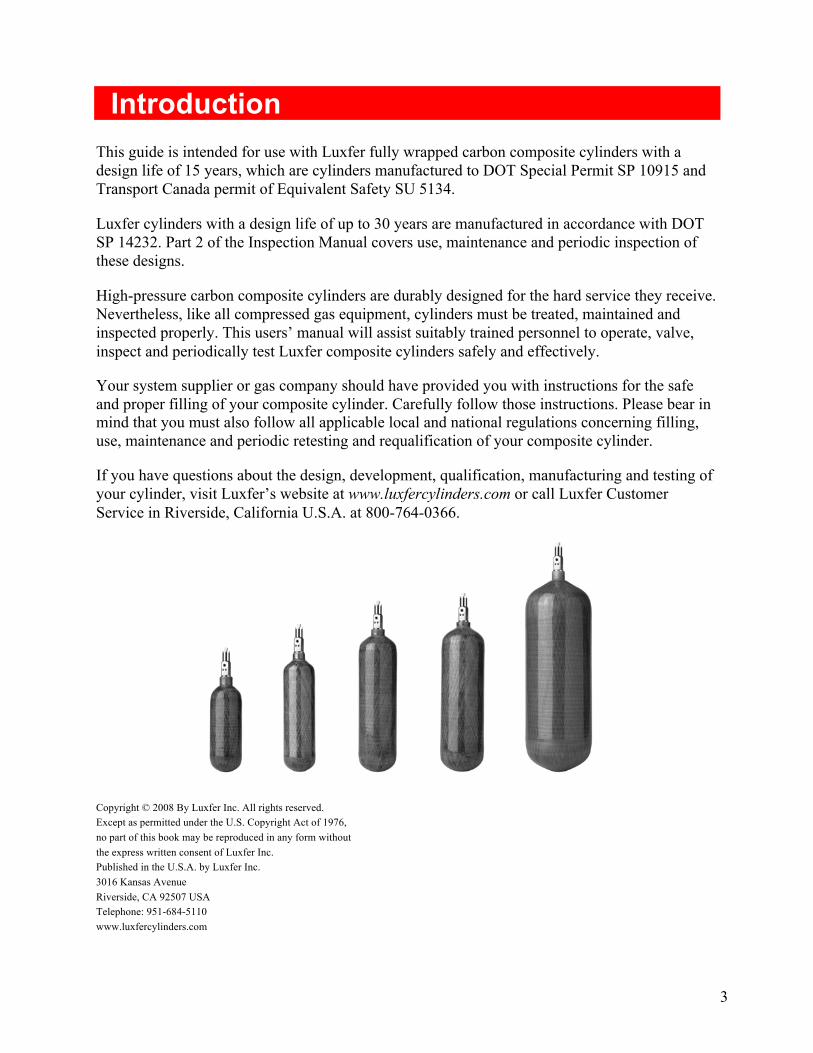
Introduction This guide is intended for use with Luxfer fully wrapped carbon composite cylinders with a design life of 15 years, which are cylinders manufactured to DOT Special Permit SP 10915 and Transport Canada permit of Equivalent Safety SU 5134.
Luxfer cylinders with a design life of up to 30 years are manufactured in accordance with DOT SP 14232. Part 2 of the Inspection Manual covers use, maintenance and periodic inspection of these designs.
High-pressure carbon composite cylinders are durably designed for the hard service they receive. Nevertheless, like all compressed gas equipment, cylinders must be treated, maintained and inspected properly. This users’ manual will assist suitably trained personnel to operate, valve, inspect and periodically test Luxfer composite cylinders safely and effectively.
Your system supplier or gas company should have provided you with instructions for the safe and proper filling of your composite cylinder. Carefully follow those instructions. Please bear in mind that you must also follow all applicable local and national regulations concerning filling, use, maintenance and periodic retesting and requalification of your composite cylinder.
If you have questions about the design, development, qualification, manufacturing and testing of your cylinder, visit Luxfer’s website at www.luxfercylinders.com or call Luxfer Customer Service in Riverside, California U.S.A. at 800-764-0366.
Copyright © 2008 By Luxfer Inc. All rights reserved. Except as permitted under the U.S. Copyright Act of 1976, no part of this book may be reproduced in any form without the express written consent of Luxfer Inc. Published in the U.S.A. by Luxfer Inc. 3016 Kansas Avenue Riverside, CA 92507 USA Telephone: 951-684-5110 www.luxfercylinders.com

4
Luxfer: Setting the Standard Worldwide Founded in 1898, Luxfer is the world’s largest manufacturer of high-pressure aluminum and composite cylinders with manufacturing facilities and sales offices around the world. The industry leader in research and development and innovation, Luxfer holds numerous global patents related to cylinder and metallurgical technology.
As the world’s leading manufacturer of high-pressure composite cylinders, Luxfer strives continually to improve the quality and performance of its products. The following are some of the improvements and innovations that Luxfer has introduced for carbon composite cylinders:
1993 – Smooth gel-coat finish. Fully wrapped composite cylinders were sold with a rough external surface until Luxfer introduced the gel-coat finish for carbon composite cylinders. This smooth, attractive finish, which resists dirt and damage and makes cleaning much easier, set a new standard for composite cylinder aesthetics.
1995 – Luxfer was the first company to be granted approval for sale of its carbon-fiber composite cylinders in the USA and Canada.
2001 – First approval for a five-year requalification period in the USA and Canada.
2003 – First European five-year requalification interval for cylinders with the CE mark for use in the European Union.
2005 – First carbon fiber cylinders manufactured in Luxfer China, Shanghai and Luxfer France, Gerzat.
2007 – Approval of non-metallic protective caps for use in the USA and Canada.
2008 – Introduction of three new composite cylinder ranges to the USA:
LCX–SL® – Super-Lightweight cylinders, the lightest carbon composite cylinders for SCBA and emergency use. LCX–XD® – Carbon cylinders with reinforced domes for extra damage resistance in extreme duty. LCX–EL® – Carbon cylinders designed for service life of up to 30 years.

5
1. Cylinder design and specifications A Luxfer fully wrapped, carbon composite cylinder is composed of these basic components:
• An ultra-lightweight, thin-walled, seamless aluminum liner with no leak paths or joints. Luxfer manufactures its own liners from aluminum alloy 6061 (AA6061). Liners receive a external coating to prevent the possibility of corrosion underneath the composite wrapping.
• Each liner is overwrapped with carbon fiber in an epoxy matrix using computer-controlled winding machines.
• A layer of glass fiber is wound onto the carbon as a sacrificial impact and abrasion layer, and a label is applied under the last layers of glass to protect it from damage.
Ultra thin-walled aluminum liner
Smooth, inert, corrosion-resistant internal finish
Insulating layer between liner and overwrap
High-performance carbon-fiber overwrap in epoxy resin matrix
High-strength fiberglass-reinforced plastic (FRP) protective layer with smooth gel coat
Precision-machined thread

6
In the U.S.A. and Canada, Luxfer offers three different carbon composite cylinder ranges with a 15-year design life.
LCX®
Introduced in 1997, this standard range of carbon composite cylinders offers a balance of high strength and light weight for storage of gases at high pressure.
LCX–SL®
These cylinders have the same fundamental design as the standard LCX range, but are lighter due to reductions in the weight of the aluminum liner and optimization of the carbon composite reinforcement. The SL range has the same thickness of glass overwrap as the standard carbon cylinders, so you can use the same inspection criteria for both.
LCX–XD®
The new range of XD “Extreme Duty” carbon cylinders have the same liners and carbon composite reinforcement as the standard LCX range, but have extra glass reinforcement on the cylinder domes to increase damage resistance.
Visit the Luxfer website at www.luxfercylinders.com for additional information about the complete range of Luxfer cylinders.

7
1.1 Special Permits U.S. Department of Transportation (DOT) Special Permit DOT SP 10915 DOT SP 10915 authorizes the sale and use of non-DOT specification fully wrapped carbon-fiber-reinforced aluminum cylinders with a 15-year design life for use in the U.S.A. This includes the Luxfer LCX, LCX-SL and LCX-XD brands of cylinders. These cylinders are designed and tested in accordance with the “Basic Requirements for Fully Wrapped Carbon-Fiber Reinforced Aluminum Lined Cylinders” (DOT-CFFC). The products are authorized for the transportation of compressed gases named in the permit. Cylinders manufactured under DOT Special Permit may not be used for underwater breathing purposes. A copy of the Luxfer DOT permits can be obtained from Luxfer or from the DOT Hazardous Materials website at http://hazmat.dot.gov/.
The marked service pressure may not exceed 5,000 psi (34,474 kPa) at a reference temperature of 70o F (21.1° C). The test pressure is 5/3 times the design service pressure. The cylinder must have a minimum safety factor (burst/service-pressure ratio) of 3.4. Water volume may not exceed 91 liters (200 lb).
Requalification (retest) period—A five-year requalification (retest) interval is permitted for Luxfer carbon cylinders manufactured and approved to DOT Special Permit SP10915.
Cylinder life—The currently approved life for Luxfer carbon composite cylinders is 15 years from the date of manufacture.
Transport Canada (TC) Special Permit
Cylinder design and testing is conducted in accordance with the standard CAN/CSA B339. Luxfer carbon cylinders for use in Canada are manufactured in accordance with Transport Canada Permit for Equivalent Level of Safety SU 5134, which authorizes the sale and use of fully wrapped carbon-fiber-reinforced aluminum cylinders transportation of compressed gases named in the permit. SU 5134 authorizes cylinders with a 15-year design life, which include the Luxfer LCX, SL and XD ranges of cylinders.
A copy of the Luxfer TC permit can be obtained from Luxfer or from the Transport Canada web site on Transport of Dangerous Goods (http://www.tc.gc.ca/tdg/permits/menu.htm). The marked service pressure may not exceed 5,000 psi (34,474 kPa) at a reference temperature of 70o F (21.1° C). The test pressure is 3/2 times the design service pressure. The cylinder must have a minimum safety factor (burst/service-pressure ratio) of 3.4.
Requalification (retest) period—A five-year requalification (retest) interval is permitted for Luxfer carbon cylinders manufactured and approved to TC SU 5134.

8
2. Design and performance criteria 2.1 Design criteria The design thickness of the fiber overwrapping cannot be reduced to a simple formula because of varying load-bearing layers and varying orientations and thicknesses of composite layers. Moreover, when these components, with their different strength and stiffness characteristics, are pre-strained in the autofrettage process, a complex distribution of stress results. This is analyzed using finite element analysis computer techniques. All cylinders are manufactured by computer-controlled fiber-winding machines to ensure correct lay-up and high integrity of the overwrap. Luxfer uses a variety of computer analysis techniques, including finite element analysis, to produce a reliable model of the cylinder and to calculate the maximum stress at any point in the liner and fibers. Also calculated are load distribution between liner and fibers at zero pressure, service pressure, test pressure and burst pressure. The model used to analyze the cylinder body takes into consideration non-linear material behavior and non-linear geometric changes, accounting both for circumferential and longitudinal pressure stresses. Note: Maximum stresses in the cylinder ends are always designed to be less than the maximum stresses in the cylinder body to pass burst tests. The maximum calculated tensile stress in any fibers (carbon or glass) must not exceed 30 percent of the fiber stress corresponding to the minimum required burst pressure. Cylinder openings: (i) Openings are permitted on heads only. The centerline of the openings must coincide with the centerline of the cylinder. (ii) Threads must be clean-cut, even, without checks, and must be designed in compliance with the requirements of the Federal Standard FED-STDH28. (iii) Tapered threads are not permitted in CFFC cylinders (iv) Straight threads having at least six threads must have a calculated factor of safety in shear of at least 10 at the test pressure for the cylinder. 3.2 Qualification testing It is not possible to use finite-element modeling techniques accurately for all different environments to which a gas cylinder might be exposed. To ensure the safe application of the

9
cylinder design, a testing program is necessary to prove performance in the anticipated service environment.
The following tests are conducted on the cylinder materials and composite overwrap: • Strength of the carbon fibers
• Strength of the glass fibers • Interlaminar shear strength of the composite
• Flexural strength of the composite
The following tests are conducted on finished cylinders: • Extreme temperature fluctuation: -58ºF (-50ºC) to +140ºF (+60ºC)
• Impact resistance • High-velocity impact resistance
• Environmental exposure at high temperatures and high humidity • Exposure to fire
• Cylinder ultimate strength (burst test) • Cyclic fatigue performance

10
3. Manufacture 3.1 Aluminum-alloy liners
Luxfer manufactures liners from 6061-alloy (AA6061) aluminum plate. Each liner is cold-drawn to thickness and hot-spun closed on the open end. The liner is then subjected to a solution heat treatment and artificial aging process to develop strength and toughness required for “T6” mechanical properties. The liner neck is then machined for threads and port seal surfaces.
3.2 Inspection procedures Raw materials are checked and identified on receipt. Liners are checked for wall thickness, straightness, out-of-roundness, eccentricity and surface finish. The effectiveness of the heat treatment is verified by conducting tensile tests on a sample liner from a heat-treatment lot. The thread for every liner is verified. Liners are inspected by lot according to DOT-CFFC and CAN/CSA B-339. Additional visual checks are conducted on liners prior to wrapping to ensure they are clean, free from surface defects and manufactured to the design drawing.

11
3.3 Composite overwrapping Composite overwrapping, pressure testing and finishing operations are carried out at Luxfer Gas Cylinders in Riverside, California U.S.A. Reinforcing carbon fiber in an epoxy matrix contributes most of the strength of full-wrap carbon composite cylinders. Fibers are impregnated with epoxy resin and applied to the liner by computer-controlled filament-winding machines that ensure correct placement of each fiber. The cylinder is then overwrapped with layers of fiberglass, and an identification label is applied under the last layer of glass. The purpose of the outer layer of glass fiber is to protect the cylinder from damage. The net load-sharing capability or this layer is not considered part of the total pressure load in the cylinder at minimum required burst pressure. Composite resin is cured using appropriate controlled-temperature profiles to ensure intimate contact between the fiber filaments and the resin system, as well as complete curing of the resin matrix. After the resin is cured, cylinders undergo autofrettage to redistribute the stresses within the aluminum and composite overwrap. Autofrettage is a pressurization process at a designated pressure in excess of test pressure, and at this stress level the yield point of aluminum is exceeded—that is, the aluminum deforms plastically. When the pressure returns to zero, the aluminum is in compression and the carbon and glass fiber composite is in tension. Therefore, at normal working pressure, the developed stresses in the aluminum liner are reduced compared to those found in a standard aluminum cylinder. Luxfer applies a gel-coat finish on top of the glass-fiber layers, creating an easy-to-clean, smooth surface that is extremely resilient. The gel-coat resists abrasion, impact and UV degradation.
3.4 Cylinder lot inspection and testing The maximum composite cylinder lot (or batch) size is 200 units, plus the number of cylinders required for destructive testing, in accordance with DOT-CFFC and CAN/CSA B339. Each lot of composite cylinders is examined to ensure compliance with design specifications. The following final inspections are carried out in accordance with Luxfer’s Quality Assurance procedures: a) Visual inspection 100 % (all cylinders)
b) Dimensional check 10 % or to customer requirements c) Weight check 100 %
d) Water-capacity check 100 % e) Compliance of marking 100%.
For b), if one unacceptable cylinder is found, then all cylinders in the lot are inspected. The following performance tests are conducted:

12
Hydrostatic test—Each cylinder is hydrostatically pressurized to test pressure after the cylinder has been autofrettaged. Test pressure is maintained for a minimum of 60 seconds and as much longer as necessary to ensure stable volumetric expansion. The elastic and total volumetric expansions are determined. Cylinders that show evidence of leakage or distortion are rejected.
The water-jacket method is used to conduct the hydrostatic test in the U.S.A. and Canada. The pressure reading should be accurate within one percent in the range of 80 percent to 120 percent of the test pressure, and the volumetric expansion measurement should be accurate to within one percent of the total expansion established when in system calibration, or 0.1 cubic centimeter. Records are maintained as evidence of the equipment calibration. Hydraulic burst test—This test is conducted on one cylinder per lot. The cylinder is pressurized at a uniform rate up to 3.4 times the service pressure and held at that pressure for a minimum of 60 seconds. Then the pressure is increased until the cylinder fails, and the pressure is recorded at the onset of failure. Pressure cycling test—This test is conducted on one cylinder per lot. The cylinder is subjected to a minimum of 10,000 cycles to service pressure followed by a further 30 cycles to test pressure.
Each test cylinder must withstand the cycling pressurization test without evidence of visually observable damage, distortion or leakage. After successfully passing the cycling test, each test cylinder is burst-tested and must demonstrate a minimum burst pressure of 3.06 times service pressure. 3.5 Independent inspection authorities The independent inspection authority used by Luxfer in the manufacture of composite cylinders in the U.S.A. is:
Arrowhead Industrial Services, Inc. (AISI) 3537 South NC Hwy 119 P.O. Box 1000 Graham, NC 27253 USA
3.6 Marking and labeling Each finished composite cylinder has a label incorporated into the fiberglass overwrap. The label contains the following information:
• DOT Special Permit (SP) number or DOT Exemption (E) number followed by service pressure expressed in pounds per square inch gauge (psig) and, if applicable, Transport Canada Permit number followed by service pressure expressed in bar.

13
• A serial number and the manufacturer’s name, identification number or symbol (registered at the Associate Administrator for Hazardous Materials safety), located just below or immediately following the DOT marking above.
• The independent inspection agency (IIA) official mark, which must be
placed near the serial number. The marking must contain date (month and year) of the initial hydrostatic test for that cylinder.
• Rejection elastic expansion (REE) marking in cubic centimeters.
Label illegibility may be cause for rejecting a cylinder. If the serial number is no longer legible, the cylinder must be condemned. A Luxfer composite cylinder that still has a legible serial number can be returned to service only after all other product information is made legible. For instance, an illegible part of a composite SCBA cylinder label that still has a legible serial number can be corrected by putting required information back on the cylinder, but only Luxfer can perform this process. Contact Luxfer for further information, if needed. Sample labels are included as Appendix 1.
3.7 Protective end caps and boots Luxfer offers protective end caps and boots for use on cylinders to increase resistance to abrasion, cuts and other damage. Manufactured from a fire-retardant polymer, the caps and boots have been shown to pass all tests to NIOSH and NFPA regulations. Since caps and boots are not integral parts of the cylinder, they must be removed at requalification (retest). Attached to the cylinder with Loctite® E-05CL™ Hysol® Epoxy Adhesive, but can be removed and reinstalled by following the procedure detailed in Appendix 2. Loctite E-05CL is a toughened, ultra-clear, fast-setting, high-peel, low-odor epoxy with a five-minute work-life.

14
Luxfer cylinder fitted with protective cap and boot.
4. Cylinder use
4.1. General Follow these general guidelines to ensure safe, proper use. Maintenance of Carbon Composite Cylinders. No regularly scheduled maintenance is required apart from periodic requalification (retest). Visually inspect each cylinder before filling for signs of damage (see Section 5.2). If desired, clean the cylinder using fresh tap water alone or water and a mild detergent, if necessary. If a detergent is used, rinse the cylinder thoroughly with clean water. Thoroughly dry all components before reassembly. Do not apply heat. Short-term storage (less than six months)—Tightly close the cylinder valve. Leave pressure between 30 and 40 psi (about 2 and 3 bar) in the cylinder. Secure the cylinder and assembly to

15
prevent the cylinder from rolling loose, tipping over or falling. Store at room temperature in a dry place, away from chemicals, artificial heat sources and corrosive environments.
Long-term storage—If it becomes necessary to store a cylinder for a prolonged period, the following procedure is recommended. Empty the cylinder and remove the valve. Wash the cylinder internally and externally with fresh tap water, rinse with distilled or de-ionized water and then thoroughly dry the cylinder inside and out. Visually inspect the internal surfaces. Install the valve and O-ring according to the SCBA manufacturer’s recommendations. The valved cylinder should have between 30 and 40 psi (about 2 to 3 bar) of positive pressure inside the cylinder valve assembly. Protect the valve from possible damage. Store the cylinder either upright or horizontally at room temperature in dry conditions away from chemicals, artificial heat sources and corrosive environments.
Handling—Do not drag, drop or roughly handle cylinders. When transporting cylinders, ensure that the valve is protected from damage and that the cylinder is well secured. Cylinders should not be allowed to roll around loose, tip or fall during transport. Secure cylinders in a protected position, and do not allow other cargo to strike or damage cylinders. Painting—Never use corrosive, caustic or acid paint strippers, burning techniques or solvents to remove paint from composite cylinder surfaces or to prepare those surfaces for painting. Retouch damaged paint areas with air-drying paint. Never heat a cylinder to dry or cure paint. If cylinder composite materials or metal are damaged, do not paint over the damage. Have the cylinder inspected by an authorized technician. It should not be necessary to paint an entire composite cylinder. In the unlikely event that overall painting is required, contact Luxfer for recommendations.
4.2 Approved gases Luxfer carbon composite cylinders are approved for use with the following gases: Gas name Hazard
class/ division
Identification number
Air, compressed (containing up to 39% by volume oxygen content)
2.2 UN1002
Argon, compressed 2.2 UN1006 Carbon Dioxide 2.2 UN1013 Compressed gas, n.o.s. 2.2 UN1956 Compressed gas, oxidizing, n.o.s. 2.2 UN3156 Helium, compressed 2.2 UN1046 Hydrogen, compressed 2.1 UN1049 Liquefied gas, n.o.s. 2.2 UN3163 Methane, compressed or Natural gas, compressed (with high methane content)
2.1 UN1971

16
Nitrogen, compressed 2.2 UN1066 Nitrous Oxide 2.2 UN1070 Oxygen, compressed 2.2 UN1072 4.3 Cylinder filling The pressure of a filled cylinder must not exceed the design filling pressure indicated on the cylinder label. Composite material used in the manufacture of the cylinder is a good insulator, and so heat generated by the filling process takes longer to dissipate than with traditional metal cylinders. Consequently, a cylinder charged to normal filling pressure will reach temperatures in excess of 120oF (49°C) during filling, particularly if filled quickly. (Note: This temperature is well below any temperature that might degrade the aluminum or the composite material.) Then, on returning to ambient temperature, the pressure inside the cylinder will drop slightly, and the cylinder will not have a full charge. Topping up will be necessary to achieve a full charge.
However, it is also possible to optimize filling procedures (e.g., by varying the speed of filling) to achieve a full charge.
Slow filling—Filling a cylinder slowly will significantly reduce the heat generated in the filling process. A maximum charging rate of 435 psi/min (30 bar/min) or less is recommended.
Fast filling—A Luxfer composite cylinder can be fast-filled and reused if the cylinder is properly handled, well maintained and undamaged. However, the filler should take care not to exceed the maximum service pressure. Compressed air—When filling composite cylinders with compressed air, always ensure that the compressor has been properly maintained so that the air quality complies with the appropriate standard. Maximum moisture content should conform to recommendations in Compressed Gas Association (CGA) G-7. In uncontrolled conditions during which moisture may have entered the cylinder, internally inspect the cylinder at least every six months. Do not apply heat. If contaminants are found inside the cylinder, the cylinder interior must be cleaned and dried following procedures found in Section 8.1 of this manual. Oxygen—Use only cylinders, valves and other components specifically cleaned for oxygen or oxygen-enriched applications. (Breathing air that contains more than 23.5 percent oxygen is generally referred to as "oxygen-enriched air.") Use only lubricants approved for oxygen and oxygen-enriched applications. Non-approved lubricants, especially those containing hydrocarbons, could react with oxygen and cause a fire.
The cylinder interior, valve threads, O-ring and any equipment coming into contact with oxygen must be cleaned for oxygen and oxygen-enriched use and be free of any contaminants that might react with oxygen. For additional information about the use of oxygen and oxygen-enriched gas mixtures, contact Luxfer or the oxygen equipment manufacturer.

17
5. Periodic inspection and requalification 5.1 General Luxfer cylinders must be subjected to a thorough periodic inspection and requalification every five years. During periodic requalification, each cylinder must be examined internally and externally for damage and degradation and then subjected to a hydrostatic pressure test to the design test pressure. Only after completing these procedures satisfactorily can the cylinder be returned to service. Only cylinder requalification facilities authorized by the U.S. Department of Transporation (DOT) and Transport Canada (TC) may examine a cylinder externally and internally for damage and hydrostatically test the cylinder. The current Luxfer permit for the cylinder type must be used to determine the latest inspection criteria. Procedures for external and internal inspection are specified in this section, including the appropriate damage identification criteria for the acceptance or rejection of cylinders for further use. This procedure refers to relevant guidance published by the Compressed Gas Association in the U.S.A. (CGA C-6.2, C-6.1 and C-6). Cylinders with only superficial damage—i.e., damage that does not affect safety and integrity—are described as having Level 1 damage. Such cylinders may continue in service. Cylinders with minor damage below the rejection level (see criteria in Sections 6.2 to 6.5), including repairable damage to the reinforcement, can be sent to an authorized cylinder requalification facility for examination and repair. A repaired cylinder must pass a hydrostatic pressure test before being returned to service. Cylinders must be rejected if they do not meet the volumetric expansion criteria or if any damage has grown or worsened following repair and testing. Rejected cylinders must be rendered unable to hold gas under pressure (usually by drilling a hole in the cylinder). 5.2 Exterior inspection Fiber-wrapped cylinders must be periodically inspected for exterior damage to the wrap. Prompt identification of damage and proper repair will keep cylinders in service. The cylinder should be clean, and all attachments that might interfere with visual inspection must be removed. Protective boots, caps or sleeves must be removed prior to inspection (the procedure for removing Luxfer protective boots and caps is shown in Appendix 2). When removing a boot or sleeve, ensure that the surface fibers of the cylinder have not been cut or damaged. Since the exterior surface of a composite cylinder does not look or feel the same as that of an all-metal cylinder, be prepared for differences in appearance and acceptance criteria. Clean the cylinder exterior surface, removing all loose coatings, tar, oil or other foreign matter by a suitable method (e.g., washing and soft brushing). Blasting with grit or shot is not suitable. Do not use chemical cleaning agents, paint strippers or solvents that may harm the composite

18
material (see the picture in 6.8 and the caution box in Section 4.1 of this manual). Paint removal is neither necessary nor recommended prior to inspection. (If paint touch-up or repainting is required, see Section 8.2, Repainting, for guidance.) Chemical exposure—Composite materials can be attacked by chemicals and, in some cases, by treated water. If a cylinder has been exposed to chemicals or aggressive fluids, check the external composite surfaces for any visible signs of damage. If cylinders are known to have been covered, splashed or left standing or soaking in unknown chemical(s), call Luxfer for further instructions; such chemical(s) may have damaged the composite material.
Reject composite cylinders if the composite surface is blotchy or if paint or resin shows any signs of chemical attack (e.g., paint or resin has softened, smeared, bubbled, etc.).
CAUTION: Some chemicals are known to cause damage to composite materials. The types of chemicals listed below are known to damage, attack or harm composite surfaces. Any cylinder composite material coming into prolonged contact (e.g., soaking) with these types of chemicals and materials must be rejected: Solvents: Paint thinners, kerosene, turpentine, paint solvents, paint cleaners, epoxy solvents, resin removers, organic solvents and other aggressive solvents. Vehicle fluids: Materials that contain benzene, battery acids/alkalis, oils containing solvents, flammable materials, gasoline and oil additives and fuels. Strong bases: Materials that contain medium-to-high concentrations of sodium hydroxide, potassium and/or other hydroxides. Acids: Materials that are or contain any concentration of acids, including hydrochloric, sulphuric, nitric and phosphoric acids. Corrosives: Corrosive materials or those containing corrosive components, including chemicals mentioned above, as well as harsh all-purpose cleaners, glass cleaners, metal cleaners, resin cleaners/removers, drain openers/cleaners, glues, rubber cement and other chemical cements; also, atmospheres containing corrosive gases.
High-temperature exposure—In general, a carbon composite cylinder that reaches a temperature of 160°F (71°C) or more should be sent to an authorized cylinder requalification facility for evaluation before being returned to service. Cylinders that show obvious signs of prolonged exposure to fire or high temperatures must be rejected (see Section 6.6, below). It is important not to confuse environmental temperature with the actual cylinder temperature.
It is also important to take into consideration not only temperature, but also exposure time—both of which are critical factors. Brief exposure to elevated temperatures may not damage a cylinder. This is particularly relevant in the case of self-contained breathing apparatus (SCBA) cylinders

19
used by firefighters. Firefighters can wear composite SCBA cylinders with complete confidence even though they are frequently exposed to high temperatures, because a firefighter is never exposed long enough to excessive heat to affect cylinder properties. Even when wearing protective equipment, a firefighter will feel sufficient discomfort from life-threatening heat to pull back before the heat exposure could damage a cylinder. The exceptional safety record of carbon composite cylinders in fire service over more than a decade clearly proves the durability and reliability of these products. The main concern is with SCBA cylinders left in a fire or high-heat environment for a prolonged period; such cylinders must be rejected.
Note: Some SCBA manufacturers specify a maximum temperature that necessitates retesting or rejecting an exposed cylinder. SCBA users should always follow the original equipment manufacturer’s recommendations.
Discoloration of coating — The cosmetic resin coating of carbon composite cylinders can discolor over time. This is a normal occurrence and the discoloration will occur more quickly if the cylinders are subjected to a UV light source, such as sunlight. This has no effect on the cylinder integrity or performance and does not require repair.
The cylinder on the left is an example of UV discolored resin. Cracks in the cosmetic resin coating —Superficial cracks occasionally appear in the cosmetic resin coating of carbon composite cylinders. Such minor resin cracks do not affect cylinder integrity or performance and do not require repair.
Cracks in the vicinity of the neck wrap—Luxfer carbon composite cylinders are often manufactured with glass fiber composite wrapping on the neck to protect exposed aluminum or to provide extra security to the threaded joint. Since this neck wrapping is not joined to the wrapping of the cylinder body, minor resin cracking sometimes occurs at the transition point due to different expansion rates of the fibers, resin and paint (if applicable). The neck-to-shoulder transition point is a low-stress area. A crack in this area is merely cosmetic and does not affect

20
cylinder integrity or performance. No repair is necessary. If desired, such cracking can be filled according to the procedure outlined in Section 8.2. Since this is a cosmetic repair, no hydrostatic pressure test is necessary.
Cracks in the vicinity of the base plug—As part of the manufacturing process, a plug is inserted into the center of the cylinder base, and composite material is wrapped around the plug. Sometimes superficial cracks develop in the cosmetic resin coating in the vicinity of this plug. If the area around the plug is painted, small cracks may appear in the paint, and minor porosity can also develop. These phenomena, which occur due to different expansion rates of the plug, fibers, resin and paint, do not affect cylinder integrity or performance. The base of a composite cylinder is a low-stress area, and the base plug does not contribute to cylinder strength. Superficial cracks and porosity in this area do not affect cylinders performance, and no repair is necessary. If desired, any crack or porosity can be filled and the cylinder painted, according to the repair procedure outlined in section 8.2, Repainting; this is a cosmetic repair that does not necessitate a hydrostatic pressure test.

21
Cracks in the label area—Circumferential hairline cracks may appear in the cosmetic resin coating in the area of the label. Since the label is under the final layer of glass fiber, a slightly raised area results. Occasionally superficial resin cracking occurs at the label edge. This does not affect the integrity of the cylinder, and no repair is needed. Variations in shape of cylinder bases – Luxfer composite cylinders are manufactured by fiber reinforcement of a metal liner. The fiber reinforcement is built up by filament winding and as such the shape of the cylinder base can vary depending on the winding pattern or design characteristics. The picture below shows examples of the typical variation that is possible. The cylinder on the left has not been deformed by pressure but is exhibiting a more pointed shape due to the winding process.
5.3 Valve removal
Before an internal inspection can be performed, the cylinder must be emptied of pressurized gas and the valve must be removed. Slowly release the pressure from the valved cylinder in a safe manner. Do not de-pressurize a cylinder where the contents are not known. Flammable or hazardous gases must be vented using proper equipment.
When the cylinder is empty, remove the valve using proper tools, including a holding fixture that prevents damage to the cylinder fiber windings and valve. Do not use a chain vise. Consult manufacturer’s recommendations before carrying out this procedure; also see CGA V-11.

22
Luxfer recommends a thorough inspection of the valve at this time. Contact the original equipment manufacturer for the proper valve-inspection procedure.
Inspect the threads of the valve and cylinder for damage. Clean the O-ring groove, being careful not to remove metal or damage the groove.
CAUTION: If the valve is hard to remove, STOP! If the valve is damaged or not functioning properly, the inspector/operator may think that the cylinder is empty after opening the valve and not hearing gas released. All valved cylinders thought to be empty should still be handled as if they were under pressure. Luxfer is not responsible for malfunctioning or incorrectly installed valves used with Luxfer cylinders. If the valve is not working properly, contact the original equipment manufacturer for guidance before proceeding. 5.4 Internal inspection Internal inspection is normally required only during the periodic inspection and requalification. Each cylinder must be inspected internally in accordance with requirements in this Inspection Guide and CGA C-6.1 C-6.2. More frequent internal inspection is required in cases where cylinders are charged with breathing air that has not been dried and cleaned to the recommended levels (see section 4.3) or when water may have been drawn into the cylinder during service.
The internal surface of each cylinder should be inspected using sufficient illumination to detect any damage. The cylinder interior should be free of dirt and other foreign material prior to inspection. If internal surfaces are not clean, it will be necessary to clean them so that a proper inspection can occur (see Section 8.1, Drying and cleaning).
Recommended inspection equipment—Use a magnifying dental-type mirror and a high-intensity light that will adequately illuminate the threads and internal diameter below the threads. Optical Plus TM and similar magnification devices with a built-in lights are also helpful inspection tools—however, bear in mind that magnification devices can make harmless cosmetic features appear worse than they really are. If you are uncertain about a feature you see under magnification, contact Luxfer for guidance before rejecting a cylinder.
Reject all cylinders with internal isolated corrosion pit(s) estimated to be more than 0.03 inches (0.76 mm) deep.
Reject all cylinders with sidewall line or broad-spread corrosion when one or more interior pit(s) in the line corrosion is deeper than 0.020 inches (0.51 mm), and/or if the interior broad-spread corrosion is deeper than 0.020 inches (0.51 mm).
Reject all cylinders that have bulges or dents on the inside of the liner. This indicates severe impact or another form of serious damage.
Threads—Inspect clean cylinder threads for cracks, broken threads and other forms of damage with a magnifying dental mirror and high-intensity light or with an Optical Plus TM or similar device. Check for corrosion on cylinder threads and valve thread (if the valve is available). If you cannot determine the thread form, contact Luxfer for advice.

23
Remove the O-ring. Inspect the O-ring gland and cylinder face for cracking. Follow the original equipment manufacturers recommendation about when to replace the O-ring.
Reject all cylinders with corroded or damaged threads. Reject all cylinders that show evidence of cracking in more than one continuous full thread. Contact Luxfer with this information and findings. If you are unsure whether you are detecting a harmless tool-stop mark or a crack, contact Luxfer for guidance before rejecting a cylinder.
Reject all cylinders with O-ring gland cracks, face cracks or other damage that may prevent an effective and safe seal.
Return to service all cylinders with acceptable glands, faces and threads (including those with harmless tool-stop marks; see Recommended inspection equipment, above.).
CAUTION: Do not replace components without following the valve manufacturer’s or OEM’s instructions. Replace components only with parts that are authorized by the OEM and/or valve manufacturer.
5.5 Pressure testing Each cylinder must be subjected to a pressure test in accordance with 49CFR180.205 and DOT SP-10915 or TC SU 5134. When performing a volumetric expansion test, a cylinder should be subjected to a pre-test pressurization not in excess of 85% of the official test pressure. This pressure should be held for a few seconds, then released. Zero the measuring equipment and then conduct the official test. This procedure helps to stabilize the cylinder and test equipment (as a closed system) prior to testing. Thoroughly dry cylinders after pressure testing. Do not use heated air above 160°F (71°C) or place the cylinder in an oven to dry. Inspect each tested cylinder for residual moisture before re-installing the valve.

24
6. Cylinder damage criteria 6.1 General The acceptance/rejection criteria given in this Luxfer manual are the manufacturer’s recommendations and do not replace or supersede any criteria required by DOT SP-10915, TC SU 5134 or CGA C-6.2. First check the marking to ensure that the cylinder is within its working life. Working life is within 15 years from the date of manufacture as indicated on the cylinder label. Luxfer carbon composite cylinders have an outer glass fiber layer that is additional to the structural strength of the carbon wrapping. As a rule, any damage to the glass layer is either acceptable or can be repaired. However, any damage that exposes the structural carbon fiber layers is sufficient to cause rejection of the cylinder. Damage to composite overwrapping can take a number of forms, examples of which are described in the following sections. Luxfer recommends the use of three categories of damage in accordance with CGA C-6.2 (note that in some of the cases specified below, only Levels 1 and 3 are used). Level 1 damage is minor damage considered normal wear-and-tear and that has no adverse affects on the integrity or safety of a cylinder. Cylinders with Level 1 damage can continue in service.
Level 2 damage is greater than Level 1, but less than Level 3. Level 2 damage can be repaired. Level 3 damage is sufficiently severe that the cylinder must be rejected. Level 3 damage cannot be repaired. 6.2 Abrasion damage Abrasion damage is caused by the wearing, grinding or rubbing away of material by friction. Level 1 damage, which consists of small abrasions to the outer gel coating or glass-fiber layer, will not require repair unless the area is large enough to cause unraveling of fibers. Level 2 damage is abrasion that may be repaired. This is where the outer glass fiber layer has been abraded but the underlying carbon fiber has not been abraded. Pressure test a cylinder after the repair and reinspect the cylinder before filling.
Level 3 damage is sufficiently severe that abrasion has passed through the outer glass layer and into the underlying carbon fiber layers.

25
Cylinders with Level 3 damage must be rejected. • Reject cylinders where the carbon fiber has been exposed. • Reject cylinders that show abrasion into the carbon fiber.

26
6.3 Cuts This type of damage consists of cuts caused by contact with sharp objects that penetrate into the composite material, effectively reducing its thickness at the point of contact. This damage is similar in some ways to abrasion damage.
Level 1 damage: Consists of cuts to the outer gel coating or light cuts in the outer glass fiber layer. Level 2 damage: Heavier cuts in the glass fiber layer that have not cut into the underlying carbon fiber layers. Level 2 cuts can cause delamination and/or unraveling of the glass fibers (see Section 6.5). Pressure test cylinders after the repair and re-inspect before filling. Level 3 damage: Reject composite cylinders with cuts through the glass fiber layer and into the underlying carbon fiber layers.

27
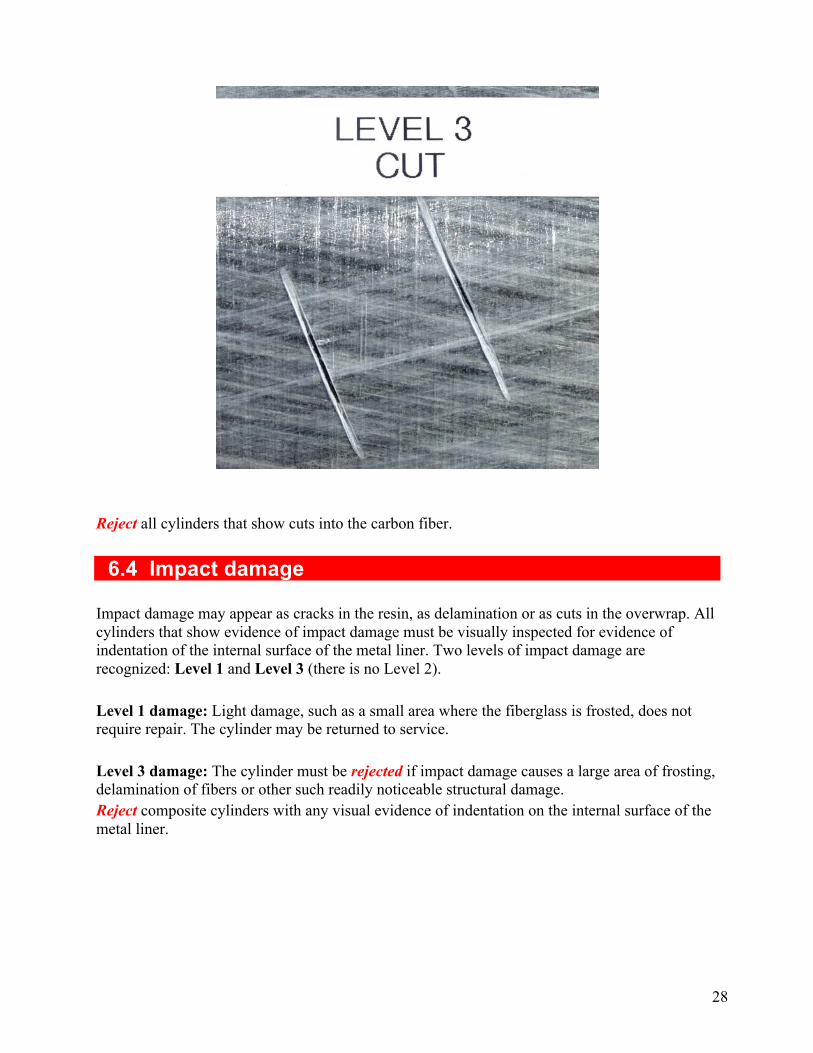
28
S, GOUGES, SCRATCHES, ABRASION
Reject all cylinders that show cuts into the carbon fiber. 6.4 Impact damage Impact damage may appear as cracks in the resin, as delamination or as cuts in the overwrap. All cylinders that show evidence of impact damage must be visually inspected for evidence of indentation of the internal surface of the metal liner. Two levels of impact damage are recognized: Level 1 and Level 3 (there is no Level 2). Level 1 damage: Light damage, such as a small area where the fiberglass is frosted, does not require repair. The cylinder may be returned to service. Level 3 damage: The cylinder must be rejected if impact damage causes a large area of frosting, delamination of fibers or other such readily noticeable structural damage. Reject composite cylinders with any visual evidence of indentation on the internal surface of the metal liner.

29

30
6.5 Delamination Delamination is a separation of composite overwrap layers or strands. It may also appear as a whitish patch, such as a blister or an air space beneath the surface. Delamination is usually a result of an impact, cut or exposure to temperatures of more than 200°F.
Level 1 damage: Light damage, such as a small area where the fiberglass is frosted, does not require repair (see “Level 1 impact,” above). The cylinder may be returned to service.
Level 2 damage: If delamination is restricted to the glass-fiber layer only and any defect does not exceed a width of 2 inches (50 mm), the cylinder may be repaired and returned to service.
Level 3 damage: Delamination damage greater than Level 2 requires the cylinder to be rejected.
6.6 Heat or fire damage Elevated heat exposure—a different condition than obvious heat or fire damage—may or may not result in permanent heat damage to a cylinder. Elevated heat exposure occurs when the cylinder itself, absent any outer protection, has been subjected to a temperature environment in excess of 180°F (80°C).
Level 2 Delamination

31
A composite cylinder is not intended for prolonged use in any environment that would result in composite overwrap temperatures in excess of 180 oF. However, temporary short-term exposure to air temperatures in excess of 180 oF in a firefighting environment is not cause for cylinder condemnation. As extensive field experience has shown, a composite cylinder used within a self-contained breathing apparatus (SCBA) carried by a firefighter can withstand limited exposure to elevated temperatures without damage (also see Section 5.3, above).
CAUTION: Other components used with the cylinder may not be suitable for use at temperatures of 180oF (80oC). Please refer to the OEM’s guidelines for further information.
Developed composite material temperatures in excess of the original cure temperature of the composite will cause discoloration of the resin. This discoloration can range from a very light golden or caramel color to a deep, brownish-black appearance. Light discoloration will occur naturally over time with continued direct exposure to sunlight and may not necessarily be a result of elevated temperature exposure. The discoloration may also be caused from soot or smoke from a firefighting environment. Normally, the degree and depth of discoloration is dependent on either the temperature or duration of exposure. The higher the temperature, or the longer the duration of exposure, the darker the resin system will become. Pay close attention to the condition of any attachments such as valves, decals, stickers, stencils, exposed metal (e.g., aluminum liner ends or necks) and the outer protective paint; these can indicate prolonged exposure to heat or fire. If the valve is available, the condition of the pressure relief device (PRD) should be evaluated to assess the extent of any heat effects. Fire damage to cylinders or equipment is also shown by melted plastics, burned or frayed straps and discolored components. Clean the cylinder and remove smoke residue and dirt from the surface before conducting a thorough inspection. Any cylinder used in equipment that has experienced fire damage should be rejected. Fire damage is shown by charring or burning of the composite, paint, labels, valve materials, melted resin, absence of some or all of the resin and/or by paint damage (e.g., bubbling or melting). Two levels of heat or fire damage are recognized: Level 1 and Level 3 (there is no Level 2). Level 1 damage occurs when the surface of the clear gel coat, paint or composite is soiled from smoke or other contaminants but is intact underneath with no evidence that the resin has been burned. In this case, a cylinder can be returned to service after cleaning.

32
Over time, resin can become tinted due to exposure to heat and smoke. This is not unusual, and the cylinder can be returned to service. Light discoloration of the resin gel-coat or painted surface may be evaluated by cleaning the surface with a fine-grit Scotchbrite® scrubbing pad, fine steel wool or 320-grit sandpaper, as well as liquid dishwashing detergent mixed with warm water. An immediate color change back to an off-white color indicates that the cause of the discoloration has no significant depth. This method may also be used to evaluate the condition of a painted surface that shows no evidence of blistering or charring. After this evaluation, the cylinder must pass a pressure test.
This smoke-darkened cylinder only has Level 1 damage. After cleaning,
it can be returned to service.

33
Level 3 damage (above photograph): Cylinders showing excessive heat damage must be rejected. Cylinders known to have been left unattended in a fire and exhibiting any evidence of heat damage must be rejected. Evidence of heat damage includes charring or melting of the composite or any attachments, valve components, protective layers, stickers or paint. Evidence can also include blistering of a protective layer. The composite would appear dark brown or black in color and would remain unchanged when cleaned and evaluated, as noted above. The original manufacturer’s label may be totally illegible due to the darkness of the resin. If the valve is available, the condition of the pressure relief device (PRD) should be evaluated to assess the extent of any temperature exposure. Cylinders known to have been subjected to the direct action of fire (i.e., prolonged impingement by flame) must be rejected. Evidence of fire damage might include signs of actual burning. Fire damage could occur either in an isolated area of the cylinder surface or over a wider area.
Level 3 damage like this requires
that a cylinder be rejected.

34
6.7 Structural damage A cylinder is rendered unserviceable if there is any evidence of surface bulges or depressions, distorted valve connections or deformation of the aluminum liner revealed by visual examination of the cylinder interior. In some cases, there may be irregularities in the fiberglass overwrap or gel-coat finish; these are normal and are not cause for rejection. Contact Luxfer if you are uncertain about how to distinguish such normal conditions from actual damage.
6.8. Chemical attack
Chemicals can dissolve, corrode, soften, remove or ruin cylinder composite materials. They can also cause bubbling, pitting or extreme dulling of the resin; cause deterioration of the resin or protective paint layer; or create multiple fractures transverse to the direction of the fiber. Sometimes solvents can cause the cylinder to become sticky to the touch. Cylinders with evidence of such damage must be rejected. Carbon fibers are far less susceptible to chemical attack than glass fibers—but if a carbon composite cylinder has been clearly damaged by chemicals, it must be rejected.

35
7. Repair procedure All cylinders that have been repaired must be subjected to a pressure test before being returned to service. After pressure test, the repair sites must be carefully examined for any lifting, peeling or delamination of the composite material.
Any cylinders showing signs of lifting, peeling or delamination must be rejected. Place the cylinder on a table or bench with the damaged area uppermost and easy to reach. Check the damage site carefully in accordance with allowable defect limits.
Ensure the surface is clean and dry. Cut away any loose glass fibers. Slightly roughen the damaged area with either fine sandpaper or a Scotchbrite® scrubbing pad to prepare an acceptable surface for proper resin adhesion.

36
Mix a sufficient amount of two-part epoxy resin according to the resin manufacturer’s instructions. Epoxy resin sets up quickly, so it is important to apply it without delay after it has been mixed. Apply a sufficient amount of the epoxy resin to the damaged area, using the applicator to thoroughly coat and burnish down any loose fibers. Completely fill the damaged area with resin.
Where additional protection is required, apply a slightly oversized piece of fiberglass surface veil over the damaged area. Apply a thin layer of resin over the veil, making sure that the veil and damaged area are completely covered.
Where a superior surface finish is required, use shrink tape. Affix a piece of unidirectional shrink tape, approximately 6 inches (150mm) longer than the damaged area, with outer surface of tape facing downwards, over the damage with ordinary adhesive tape. Apply heat to the tape with a hot air dryer to cause shrinkage. Peel off the tape after the epoxy resin has fully cured.
Allow the epoxy resin to set, typically 5 to 10 minutes. Then move the cylinder to a protected location and leave it undisturbed until the epoxy resin is fully cured in accordance with the resin manufacturer’s guidelines. Apply a desired finish to the repair. Pressure test the cylinder before returning it to service.

37
8. Final operations 8.1 Drying and cleaning The following procedures are recommended for cleaning composite cylinders: EXTERNAL CLEANING PROBLEM
CLEANING METHOD
Moisture and light soil
Wipe with a soft cloth.
Oil and grease Degrease with mild soap and water, wipe or blow dry.
Dirt and Soot Clean with mild soap and water, wipe or blow dry.
INTERNAL CLEANING PROBLEM
CLEANING METHOD
White deposits or staining
Tumble with walnut shells, plastic chips or other non-aggressive media. Then wash with hot water and thoroughly dry. Do not use heated air above 160°F or place in an oven to dry.
Odor Wash with hot water and thoroughly dry. Do not use heated air above 160°F or place in an oven to dry.
For any problems other than the above, please contact Luxfer Gas Cylinders for assistance.

38
8.2 Repainting Luxfer does not recommend the removal of the existing paint from cylinders, since this can only be carried out effectively by using specialized equipment. Never use paint strippers, burning techniques or solvents to remove paints from aluminum or composite surfaces. If the cylinder is dirty, clean the exterior surface with a mild water-based detergent, rinse and dry the cylinder thoroughly. Do not use heat to dry the cylinder. If any damage to the cylinder composite materials is evident, have the cylinder visually inspected by an authorized technician before painting.
If the composite materials are undamaged, lightly rub down the cylinder exterior with 320-grit or finer sandpaper to prepare the surface for good paint adhesion. Retouch damaged paint areas with air-drying paint. Never heat the cylinder to dry or cure paint. The type of air-drying paint is not critical, but flame-retardant epoxy or polyurethane paint is recommended. Do not thin solvent-based paint with toluene, xylene or other aggressive solvents. Water-based polyurethane paint has been found to have good flame-resistant properties.
Spray painting normally gives a better finish. If the entire cylinder is to be painted, contact Luxfer for recommendations.
Do not paint over the cylinder label. If painting near the label, mask off the label to protect it and ensure future legibility (a regulatory requirement).
Take care not to spray paint onto the top face of the cylinder neck since paint in this area can impair proper valve sealing.
Contact Luxfer if you have questions or require additional information.
8.3 Valve insertion Selection of valves and pressure-relief devices (PRD) must conform to the requirements in the current edition of Compressed Gas Association (CGA) Pamphlet S-1.1 and must comply with requirements of 49 CFR 173.34(d) and 173.301(g). Note also that the adequacy of the pressure relief device is determined by a bonfire test as prescribed in CFFC-10. The rated bursting pressure of a rupture disk at ambient temperature must be not less than 83 percent nor more than 100 percent of the cylinder test pressure.
Before inserting the valve into the cylinder, carefully inspect it and, if necessary, repair it in accordance with the recommendations of the valve manufacturer and or SCBA manufacturer. Do not install any valve that has not passed an inspection. Failure to follow these guidelines can lead to unsatisfactory in-service performance.
The valve threads should be free from damage. Use an appropriate gauge to ensure that the valve complies with the correct thread specification. The mating surface on the valve should be smooth and free from damage.

39
Damaged or distorted valve threads can damage cylinder threads. Damage to the mating surface can prevent sealing and damage the top sealing face of the cylinder.
Check to make sure that the O-ring groove and threads in the cylinder are clean and free from damage.
Install a new O-ring on the valve in accordance with the valve manufacturer’s or SCBA manufacturer’s recommendations.
A thin smear of silicone, hydrocarbon-free, oxygen-compatible grease may be applied to the bottom three or four threads to provide lubrication—but take care not to apply grease to the bottom face of the valve stem. Only a small amount of grease is necessary. Too much grease can cause sealing problems.
CAUTION: Hydrocarbon-based lubricants must not be used on cylinders containing oxygen or oxygen-enriched gas!
Insert the valve into the cylinder neck and tighten first by hand to make sure the threads are properly aligned. Then finish tightening the valve in accordance with the OEM or system manufacturer’s recommendations. If no manufacturer’s data are available, the following table may be used for recommended torque levels: TABLE 2: Recommended Valve Torque Range
THREAD TORQUE RANGE 0.625-18 UNF 2B 60-75 ft.lbs (80-100 NM) 0.750-16 UNF 2B 60-75 ft.lbs (80-100 NM) 0.875-14 UNF 2B 90-105 ft.lbs (120-140 NM)
CAUTION: The valve manufacturer should be contacted to ensure that these torque levels are appropriate.

40
8.4 Destruction of condemned or expired cylinders To destroy condemned or expired cylinders, drill a minimum 1/2-inch (13mm) hole all the way through the cylinder wrapping and liner so that the cylinder cannot hold gas. WARNING: Even if completely vented, the cylinder can contain a significant amount of residual gas.

41
9. Summary 11 FILLING THE SCBA CYLINDER Care and maintenance of a Luxfer carbon composite cylinder ALWAYS: • Always be alert for air leaks with each fill. • Always keep the threads and cylinder interior dry and free from oil, dirt and other contaminants. • Always fill cylinders with proper gas recommended by the original equipment manufacturer. • Always follow appropriate inspection recommendations. • Always follow the valve manufacturer’s or SCBA manufacturer’s installation procedures and recommendations. • Always maintain accessory equipment used with your cylinder in strict accordance with the manufacturer’s recommendations. NEVER: • Never fill a cylinder if it leaks. • Never fill a damaged cylinder. • Never fill a cylinder if it is past its required requalification date. • Never fill a composite cylinder past its allowable life. • Never completely discharge a cylinder (except when you are planning to remove the valve) since it can lead to moisture entering into the cylinder. • Never use hydrocarbon-based lubricants with oxygen. • Never use non-oxygen-compatible components with oxygen or oxygen-enriched gases. • Never over-torque a valve. • Never remove, obscure or alter the manufacturer’s labels. • Never use a cylinder that has been exposed to an extremely corrosive atmosphere or environment without having it properly inspected and tested. • Never use a cylinder that has been exposed to extreme heat or fire for a prolonged period without having it properly tested.

42
APPENDIX 1: Sample labels

APPENDIX 2: Removal and refitting of protective caps, boots
Luxfer composite cylinders used in SCBA applications may be fitted with high-impact polymer caps and boots that are are bonded to the cylinder with an adhesive. This procedure describes how to remove these caps and boots so that the entire composite surface may be examined during requalification. Tools required: Thin, flexible metal strip and a Loctite® adhesive kit. Procedure: Carefully slip the metal strip between the cap or boot and cylinder as shown in Photo 1 to a depth of 40-50mm. Continue to insert the metal strip in this manner every 20mm around the circumference of the cylinder.
Photo 1: Note depth of blade under cap. Photo 2: Cylinder surface after cap has been removed. The adhesive bead is 20-30mm from the edge.
Once the metal strip has been passed between the cylinder and cap all the way around, the cap may be removed by lifting the cap by the edge while working around the cylinder. Perform the same procedure to remove the boot from the base-end of the cylinder. Any remaining adhesive on the cylinder or cap/boot may be removed by rubbing the surface with a finger or cloth, if necessary, by using isopropyl alcohol.

46
Photo 3: Applying adhesive. Installation of new caps and boots: Caps and boots are normally reusable. (New caps and boots may be purchased by contacting Luxfer Customer Service.) Luxfer recommends using Loctite adhesive for bonding caps and boots. This adhesive is available for purchase from Luxfer. Contact Luxfer Customer Service for information. Apply a small bead of adhesive to the inside surface of the cap approximately 20 to 30mm from the outside edge (See Photo 3). Immediately after applying the resin, place the cap firmly over the cylinder dome and press in place. Do not use heat to cure the adhesive! Heat may have an adverse effect on the cylinder’s performance.