Embed Size (px)
Citation preview
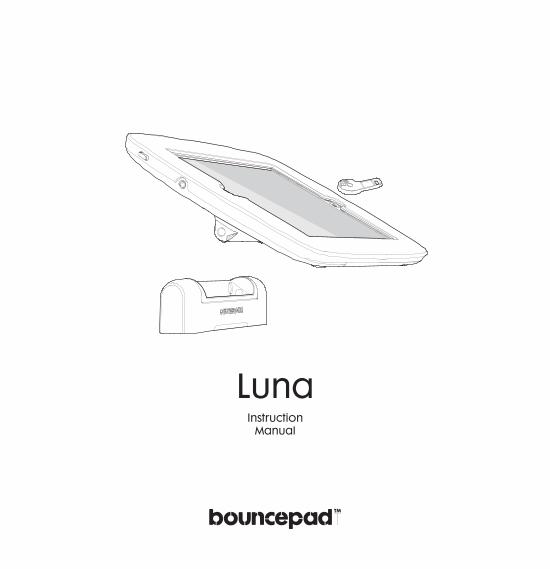
LunaInstruction
Manual
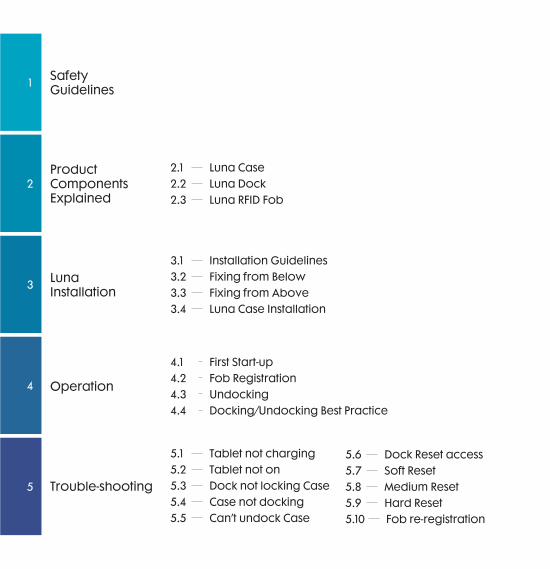
Trouble-shooting
Luna Installation
Operation
Safety Guidelines
Product ComponentsExplained
3
2.1 Luna Case2.2 Luna Dock2.3 Luna RFID Fob
3.1 Installation Guidelines3.2 Fixing from Below3.3 Fixing from Above3.4 Luna Case Installation
4.1 First Start-up
4.3 Undocking4.2 Fob Registration
4.4 Docking/Undocking Best Practice
2
4
5
1
5.1 Tablet not charging5.2 Tablet not on5.3 Dock not locking Case5.4 Case not docking5.5 Can’t undock Case
5.6 Dock Reset access5.7 Soft Reset5.8 Medium Reset5.9 Hard Reset5.10 Fob re-registration

Your Luna device should be installed and treated with care. The information below has been provided in the interest of safety, and to help you create a safe and successful installation.
• Before installing or using the product, first read this instruction manual in full.
• Only install and use the product as described in this instruction manual.
• For users of the installed product, ensure that they have also read the instruction manual, or have otherwise been made aware of the operational instructions of the product.
• DO NOT use a power supply other than the one supplied with the product.
• DO NOT install the product outside, or where it may be exposed to humidity, moisture, liquids, excessive low or high temperatures, mechanical shock or direct sunlight.
• DO NOT install in a low temperature environment as moisture could form inside the device, which may damage the electronics.
• DO NOT install in a high temperature environment as electronics and plastic parts may be damaged.
• DO NOT allow dust, dirt, food or fluids to be spilt on the unit, as this may damage the electronics and mechanics.
• DO NOT use harsh chemical cleaners or solvents or detergents to clean the product. Wipe carefully with a soft dry cloth to clean.
• DO NOT attempt to open the product, except for the opening of the tablet enclosure as part of its operation. There are no user serviceable parts of the product and unauthorised handling may damage the product and will void your warranty.
• DO NOT dock or undock the device without taking care.
• DO NOT use excessive force when handling the product and avoid any heavy impacts caused by dropping the product as this may cause damage to the product.
Safety Guidelines1
3
2
4
6
The Luna Dock locks down your Luna Case, and can be unlocked using the contactless RFID Fob.
The tablet is seamlessly charged whilst the Case is docked.
Product Family Explained2
3
4
5
1

Luna CaseA *Tablet not provided
Tablet Front Camera Access
Case Charging ContactsDocking Pin Recess
3.5mm Audio Port
Tablet Home Button AccessCase Status Light
Tablet Power Push Button
Case Tablet Access Lock
Dock Cable
Charging Contacts
Docking Pins
DC Connector
3.5mm Audio Jack
USB Plug
Luna DockB
Dock Power Light
RFID FobC Presenting a valid RFID Fob releases the Luna Case from the Dock.
2.1 Luna Case
2.2
2.3
Luna Dock
Luna RFID Fob
2
3
4
5
1
2
4
5
1
Luna Installation3
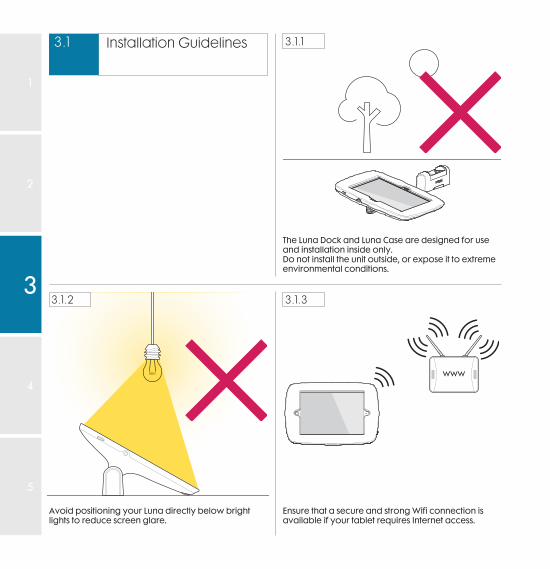
Avoid positioning your Luna directly below bright lights to reduce screen glare.
The Luna Dock and Luna Case are designed for use and installation inside only.Do not install the unit outside, or expose it to extreme environmental conditions.
www
Ensure that a secure and strong Wifi connection is available if your tablet requires Internet access.
Installation Guidelines 3.1.1
3.1.2 3.1.3
3.1
2
4
5
1
3
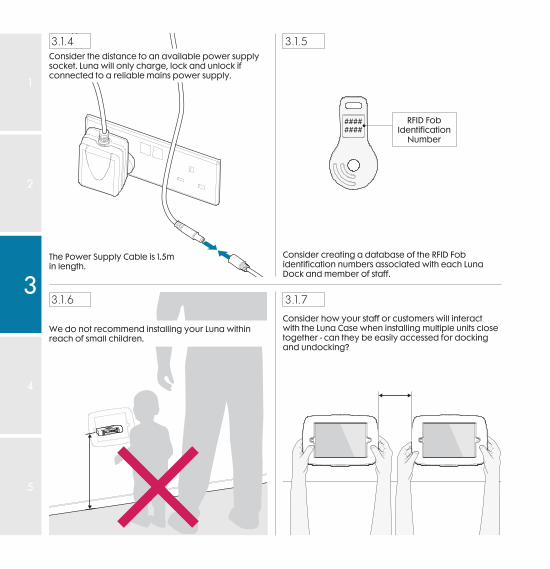
We do not recommend installing your Luna within reach of small children.
Consider the distance to an available power supply socket. Luna will only charge, lock and unlock if connected to a reliable mains power supply.
Consider creating a database of the RFID Fob identification numbers associated with each Luna Dock and member of staff.
Consider how your staff or customers will interact with the Luna Case when installing multiple units close together - can they be easily accessed for docking and undocking?
########
RFID Fob Identification
Number
The Power Supply Cable is 1.5m in length.
3.1.4
3.1.6
3.1.5
3.1.7
2
4
5
1
3
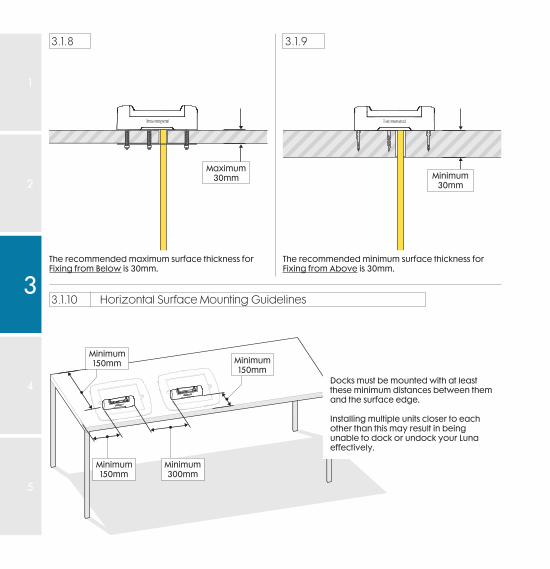
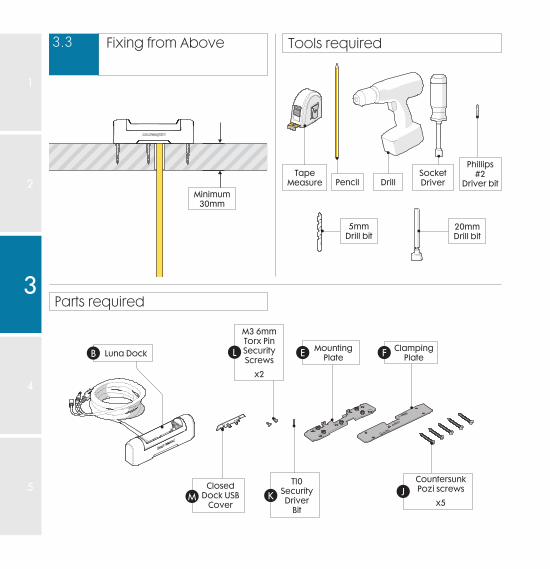
The recommended minimum surface thickness for Fixing from Above is 30mm.
Maximum30mm Minimum
30mm
The recommended maximum surface thickness for Fixing from Below is 30mm.
Minimum150mm
Minimum300mm
Minimum150mm Minimum
150mmDocks must be mounted with at least these minimum distances between them and the surface edge.
Installing multiple units closer to each other than this may result in being unable to dock or undock your Luna effectively.
3.1.10 Horizontal Surface Mounting Guidelines
3.1.8 3.1.9
2
4
5
1
3
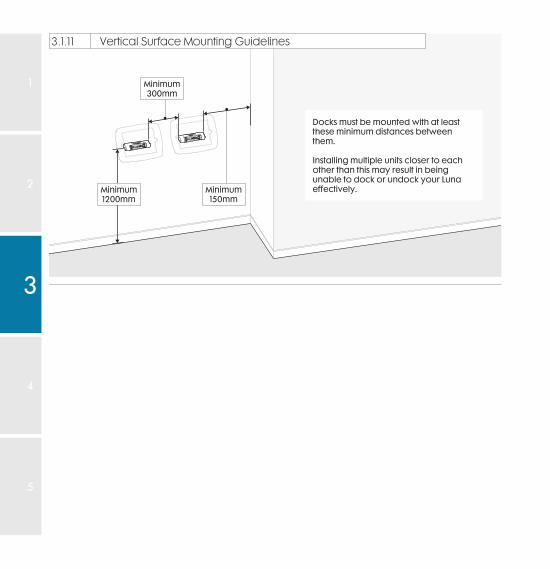
Minimum300mm
Minimum1200mm
Minimum150mm
Docks must be mounted with at least these minimum distances between them.
Installing multiple units closer to each other than this may result in being unable to dock or undock your Luna effectively.
3.1.11 Vertical Surface Mounting Guidelines
2
4
5
1
3

TapeMeasure Pencil Drill
5mm Drill bit
7mmSpanner
Phillips #2Driver bit
SocketDriver
20mm Drill bit
Maximum30mm
Luna DockB
I
M4 40mm Countersunk
Screws
x5
GM4
Nylocs
x5H
M4 Spring
Washers
x5
Mounting PlateE Clamping
PlateF
T10 Security Driver
Bit
KMClosed
Dock USB Cover
L
x2
M3 6mm Torx Pin SecurityScrews
Parts required
Tools requiredFixing from Below3.2
2
4
5
1
3
5mmDrill bitCustomer
Facing
F
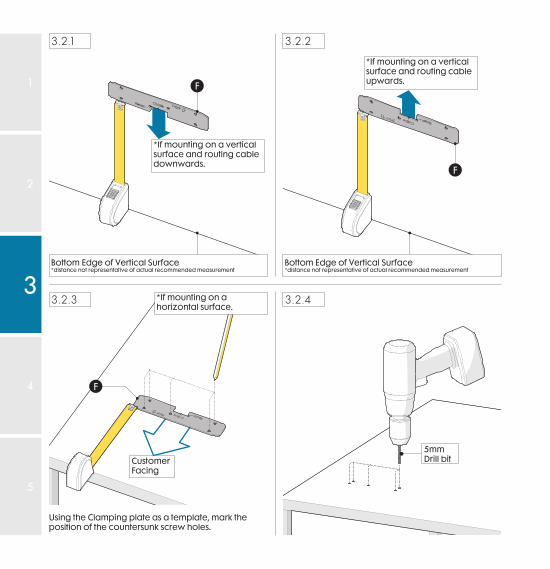
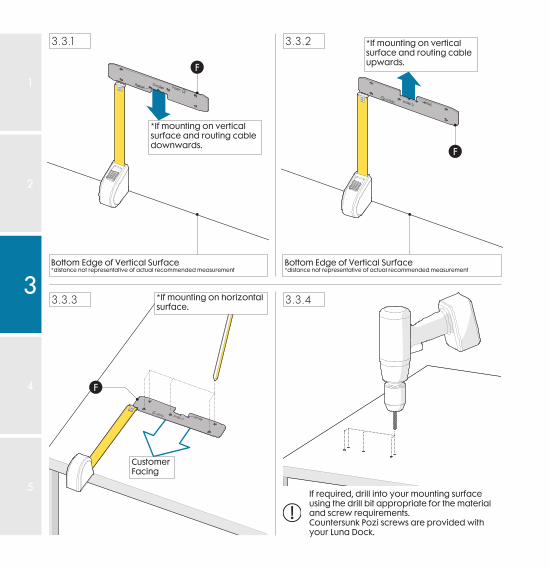
*If mounting on a vertical surface and routing cable downwards.
*If mounting on a horizontal surface.
*If mounting on a vertical surface and routing cable upwards.
Bottom Edge of Vertical Surface*distance not representative of actual recommended measurement
Bottom Edge of Vertical Surface*distance not representative of actual recommended measurement
F
F
Using the Clamping plate as a template, mark the position of the countersunk screw holes.
3.2.1
3.2.3
3.2.2
3.2.4
2
4
5
1
3
20mmDrill bit
F
5mmDrill bit
F
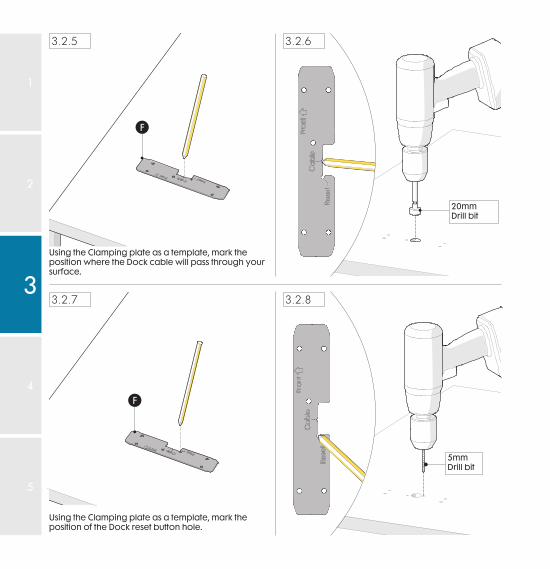
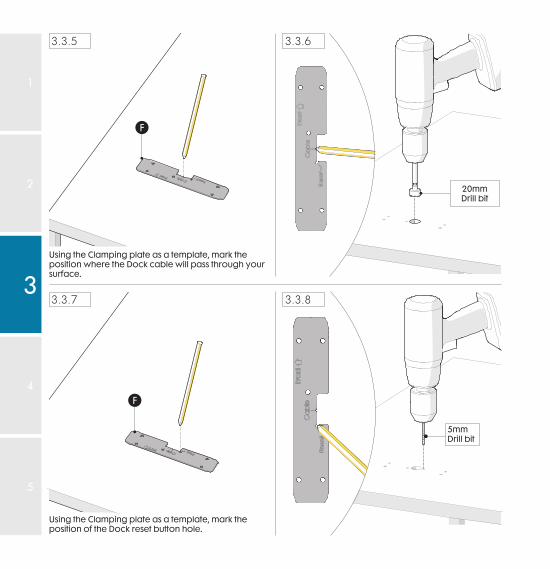
Using the Clamping plate as a template, mark the position where the Dock cable will pass through your surface.
Using the Clamping plate as a template, mark the position of the Dock reset button hole.
3.2.5
3.2.7
3.2.6
3.2.8
2
4
5
1
3
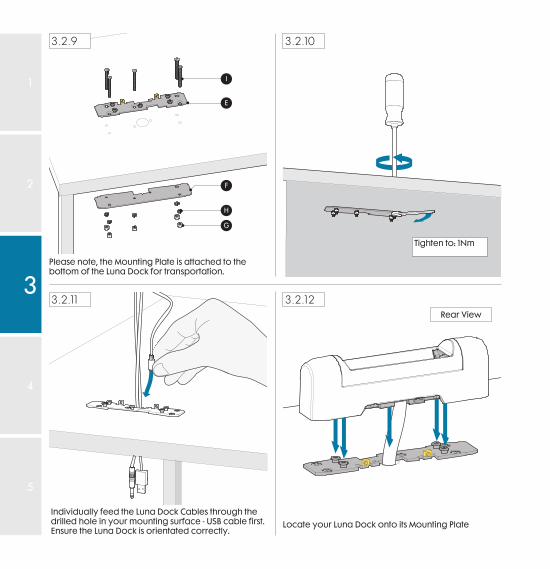
Locate your Luna Dock onto its Mounting Plate
Rear View
I
F
H
G
E
Tighten to: 1Nm
Individually feed the Luna Dock Cables through the drilled hole in your mounting surface - USB cable first.Ensure the Luna Dock is orientated correctly.
Please note, the Mounting Plate is attached to the bottom of the Luna Dock for transportation.
3.2.9
3.2.11
3.2.10
3.2.12
2
4
5
1
3
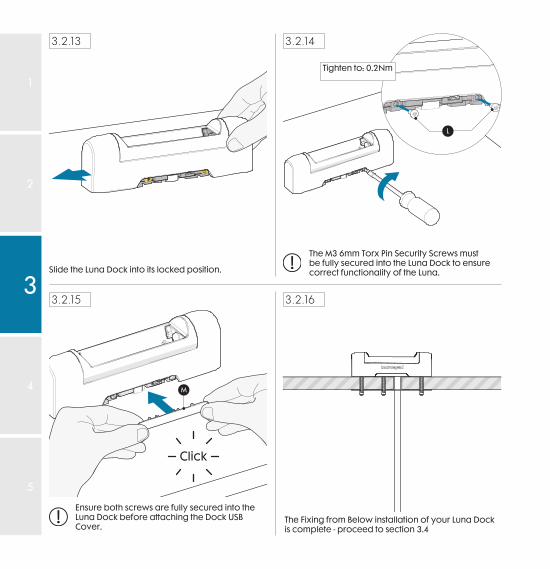
Slide the Luna Dock into its locked position.
Click
The Fixing from Below installation of your Luna Dock is complete - proceed to section 3.4
L
M
Tighten to: 0.2Nm
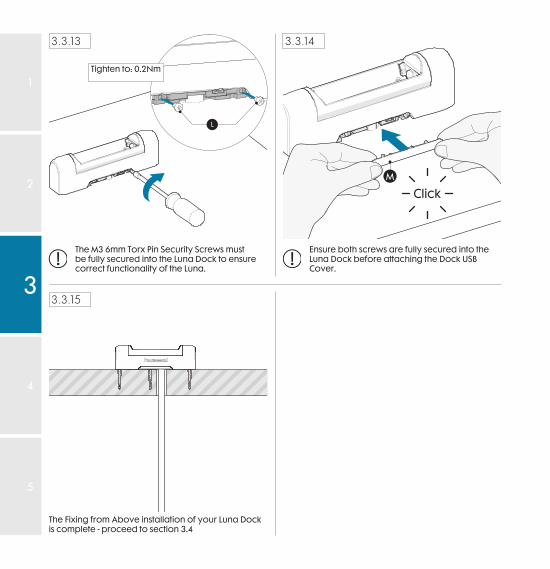
The M3 6mm Torx Pin Security Screws must be fully secured into the Luna Dock to ensure correct functionality of the Luna.
Ensure both screws are fully secured into the Luna Dock before attaching the Dock USB Cover.
3.2.13
3.2.15
3.2.14
3.2.16
2
4
5
1
3
Minimum30mm
TapeMeasure Pencil Drill
Phillips #2
Driver bitSocketDriver
5mm Drill bit
Luna DockB
JCountersunk Pozi screws
x5
Mounting PlateE Clamping
PlateF
T10 Security Driver
Bit
K
L
x2
M3 6mm Torx Pin SecurityScrews
20mm Drill bit
MClosed
Dock USB Cover
Tools required
Parts required
Fixing from Above3.3
2
4
5
1
3
If required, drill into your mounting surface using the drill bit appropriate for the material and screw requirements.Countersunk Pozi screws are provided with your Luna Dock.
*If mounting on vertical surface and routing cable downwards.
*If mounting on vertical surface and routing cable upwards.
Bottom Edge of Vertical Surface*distance not representative of actual recommended measurement
F
F
Customer Facing
F
Bottom Edge of Vertical Surface*distance not representative of actual recommended measurement
*If mounting on horizontal surface.
3.3.1
3.3.3
3.3.2
3.3.4
2
4
5
1
3
20mmDrill bit
F
5mmDrill bit
Using the Clamping plate as a template, mark the position where the Dock cable will pass through your surface.
F
Using the Clamping plate as a template, mark the position of the Dock reset button hole.
3.3.5
3.3.7
3.3.6
3.3.8
2
4
5
1
3
E
J
Rear View
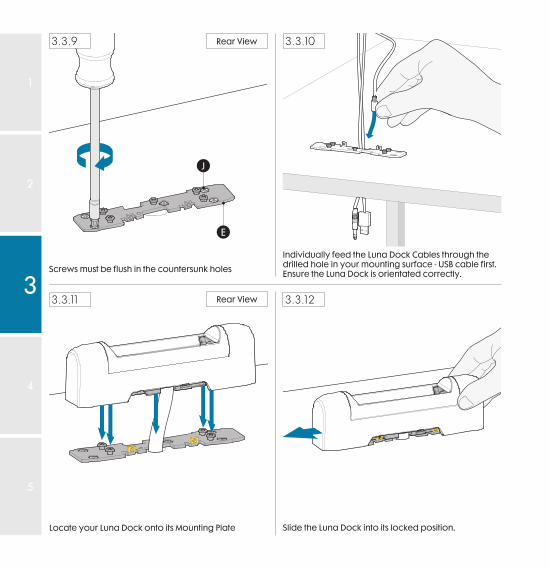
Screws must be flush in the countersunk holes
Locate your Luna Dock onto its Mounting Plate
Rear View
Slide the Luna Dock into its locked position.
Individually feed the Luna Dock Cables through the drilled hole in your mounting surface - USB cable first.Ensure the Luna Dock is orientated correctly.
3.3.9
3.3.11
3.3.10
3.3.12
2
4
5
1
3
Click
The Fixing from Above installation of your Luna Dock is complete - proceed to section 3.4
M
L
Tighten to: 0.2Nm
The M3 6mm Torx Pin Security Screws must be fully secured into the Luna Dock to ensure correct functionality of the Luna.
Ensure both screws are fully secured into the Luna Dock before attaching the Dock USB Cover.
3.3.13 3.3.14
3.3.15
2
4
5
1
3
Luna
Tablet Supports
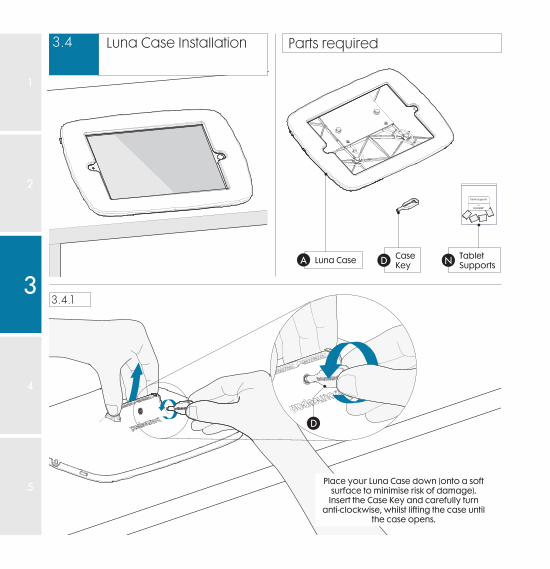
Place your Luna Case down (onto a soft surface to minimise risk of damage).
Insert the Case Key and carefully turn anti-clockwise, whilst lifting the case until
the case opens.
D
Luna CaseA Case Key
Tablet SupportsD N
Parts required
3.4.1
Luna Case Installation3.4
2
4
5
1
3
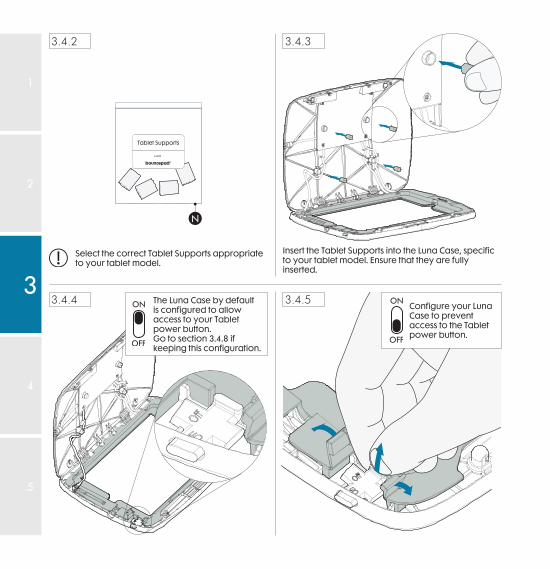
Insert the Tablet Supports into the Luna Case, specific to your tablet model. Ensure that they are fully inserted.
Select the correct Tablet Supports appropriate to your tablet model.
Luna
Tablet Supports
N
The Luna Case by default is configured to allow access to your Tablet power button.Go to section 3.4.8 if keeping this configuration.
Configure your Luna Case to prevent access to the Tablet power button.
3.4.2
3.4.4
3.4.3
3.4.5
2
4
5
1
3
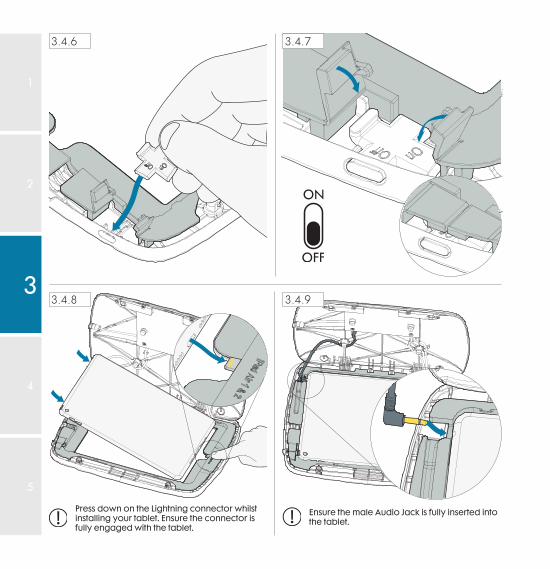
Press down on the Lightning connector whilst installing your tablet. Ensure the connector is fully engaged with the tablet.
Ensure the male Audio Jack is fully inserted into the tablet.
3.4.6
3.4.8
3.4.7
3.4.9
2
4
5
1
3
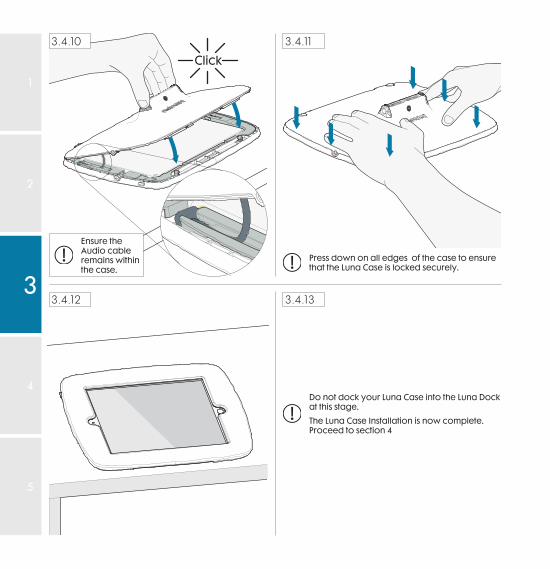
Click
Ensure the Audio cable remains within the case.
The Luna Case Installation is now complete. Proceed to section 4
Press down on all edges of the case to ensure that the Luna Case is locked securely.
Do not dock your Luna Case into the Luna Dock at this stage.
3.4.10 3.4.11
3.4.12 3.4.13
2
4
5
1
3

Operation4
2
3
5
1
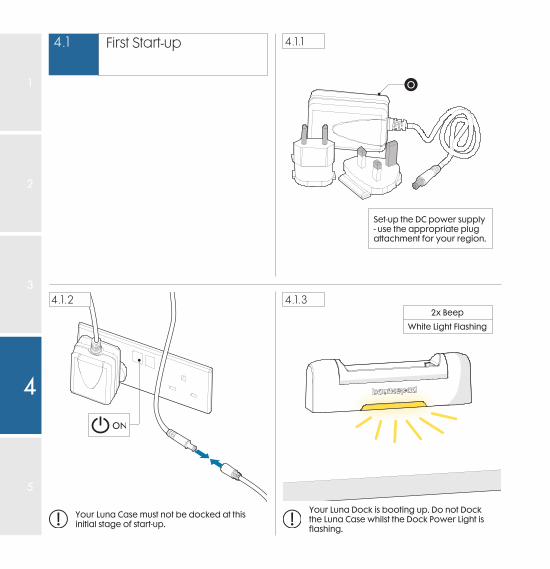
Set-up the DC power supply - use the appropriate plug attachment for your region.
Your Luna Case must not be docked at this initial stage of start-up.
Your Luna Dock is booting up. Do not Dock the Luna Case whilst the Dock Power Light is flashing.
White Light Flashing
2x Beep
O
4.1.1
4.1.2 4.1.3
First Start-up4.1
4
2
3
5
1
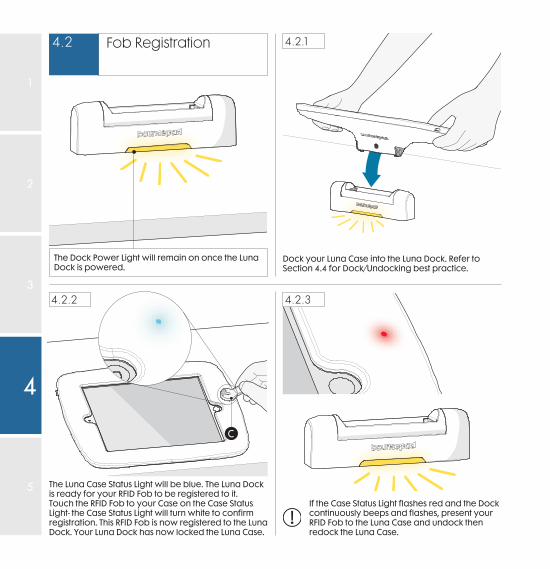
The Luna Case Status Light will be blue. The Luna Dock is ready for your RFID Fob to be registered to it.Touch the RFID Fob to your Case on the Case Status Light- the Case Status Light will turn white to confirm registration. This RFID Fob is now registered to the Luna Dock. Your Luna Dock has now locked the Luna Case.
If the Case Status Light flashes red and the Dock continuously beeps and flashes, present your RFID Fob to the Luna Case and undock then redock the Luna Case.
The Dock Power Light will remain on once the Luna Dock is powered.
Dock your Luna Case into the Luna Dock. Refer to Section 4.4 for Dock/Undocking best practice.
C
Fob Registration4.2 4.2.1
4.2.2 4.2.3
4
2
3
5
1
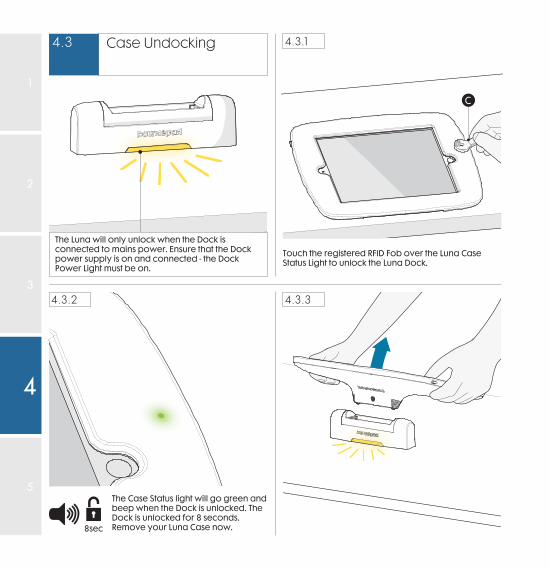
Touch the registered RFID Fob over the Luna Case Status Light to unlock the Luna Dock.
The Case Status light will go green and beep when the Dock is unlocked. The Dock is unlocked for 8 seconds. Remove your Luna Case now.8sec
C
The Luna will only unlock when the Dock is connected to mains power. Ensure that the Dock power supply is on and connected - the Dock Power Light must be on.
Case Undocking4.3 4.3.1
4.3.2 4.3.3
4
2
3
5
1
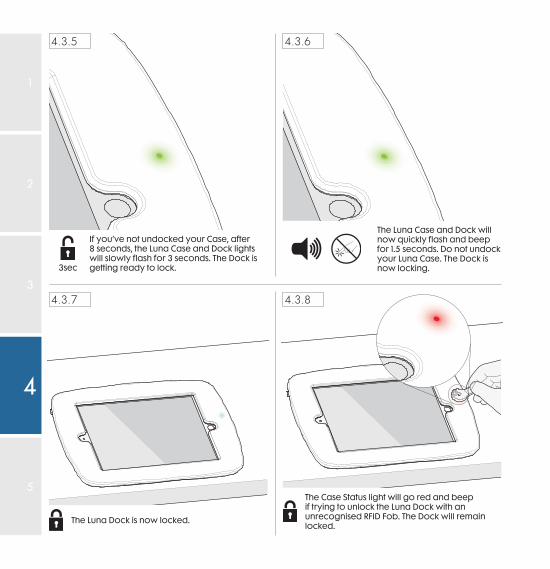
The Case Status light will go red and beep if trying to unlock the Luna Dock with an unrecognised RFID Fob. The Dock will remain locked.
The Luna Dock is now locked.
The Luna Case and Dock will now quickly flash and beep for 1.5 seconds. Do not undock your Luna Case. The Dock is now locking.
If you’ve not undocked your Case, after 8 seconds, the Luna Case and Dock lights will slowly flash for 3 seconds. The Dock is getting ready to lock.3sec
4.3.5 4.3.6
4.3.7 4.3.8
4
2
3
5
1
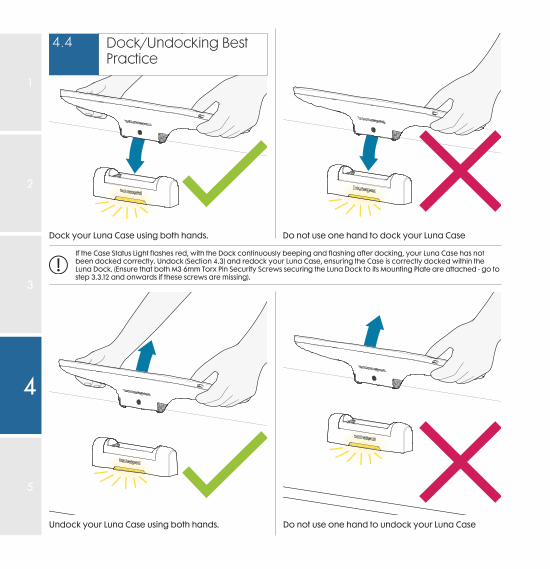
Dock your Luna Case using both hands.
Undock your Luna Case using both hands.
Do not use one hand to dock your Luna Case
Do not use one hand to undock your Luna Case
If the Case Status Light flashes red, with the Dock continuously beeping and flashing after docking, your Luna Case has not been docked correctly. Undock (Section 4.3) and redock your Luna Case, ensuring the Case is correctly docked within the Luna Dock. (Ensure that both M3 6mm Torx Pin Security Screws securing the Luna Dock to its Mounting Plate are attached - go to step 3.3.12 and onwards if these screws are missing).
Dock/Undocking Best Practice
4.4
4
2
3
5
1
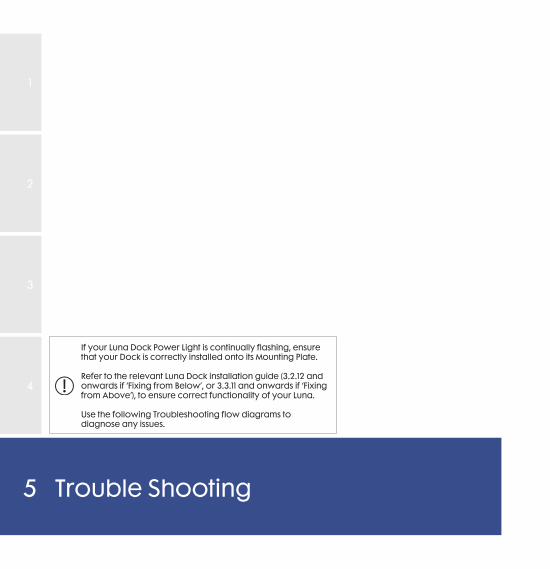
If your Luna Dock Power Light is continually flashing, ensure that your Dock is correctly installed onto its Mounting Plate.
Refer to the relevant Luna Dock installation guide (3.2.12 and onwards if ‘Fixing from Below’, or 3.3.11 and onwards if ‘Fixing from Above’), to ensure correct functionality of your Luna.
Use the following Troubleshooting flow diagrams to diagnose any issues.
Trouble Shooting5
2
3
4
1
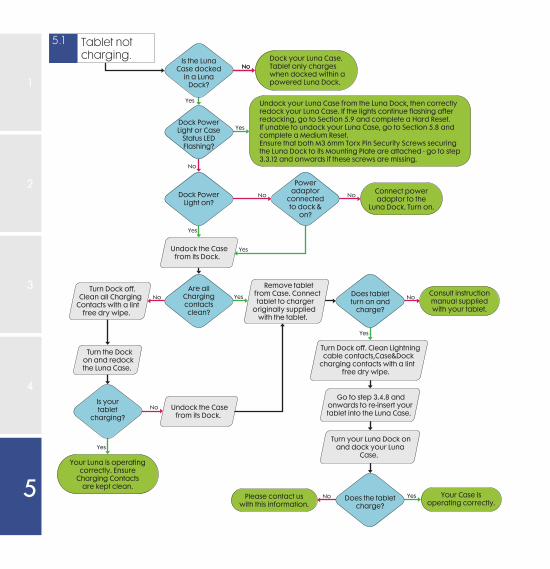
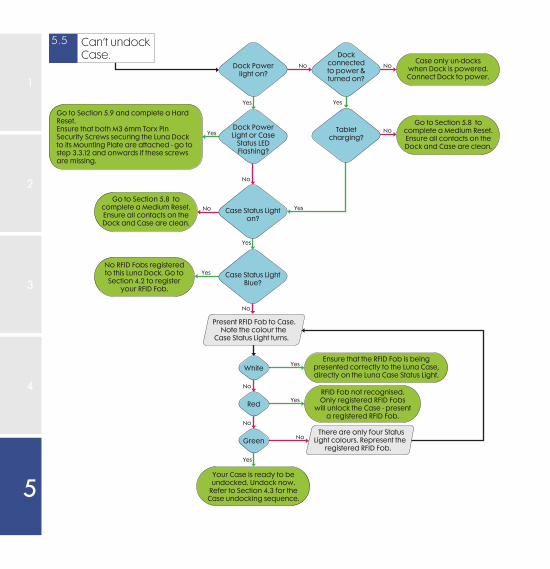
Yes
No
No
Yes
Yes
No
No
Turn Dock off. Clean Lightning cable contacts,Case&Dock
charging contacts with a lint free dry wipe.
Undock the Case from its Dock.
Undock the Case from its Dock.
Go to step 3.4.8 and onwards to re-insert your tablet into the Luna Case.
Turn your Luna Dock on and dock your Luna
Case.
Remove tablet from Case. Connect tablet to charger
originally supplied with the tablet.
Turn Dock off. Clean all Charging
Contacts with a lint free dry wipe.
Turn the Dock on and redock the Luna Case.
Connect power adaptor to the
Luna Dock. Turn on.
Consult instruction manual supplied with your tablet.
Please contact us with this information.
Your Case is operating correctly.
NoNo
No No
No
Yes
Yes
Yes
Yes
Yes
Is the Luna Case docked
in a Luna Dock?
Dock Power Light on?
Does tablet turn on and
charge?
Are all Charging contacts clean?
Is your tablet
charging?
Does the tablet charge?
Power adaptor
connected to dock &
on?
Dock your Luna Case. Tablet only charges when docked within a powered Luna Dock.
Undock your Luna Case from the Luna Dock, then correctly redock your Luna Case. If the lights continue flashing after redocking, go to Section 5.9 and complete a Hard Reset.If unable to undock your Luna Case, go to Section 5.8 and complete a Medium Reset.Ensure that both M3 6mm Torx Pin Security Screws securing the Luna Dock to its Mounting Plate are attached - go to step 3.3.12 and onwards if these screws are missing.
Tablet not charging.
5.1
Your Luna is operating correctly. Ensure
Charging Contacts are kept clean.
Dock Power Light or Case
Status LED Flashing?
5
2
3
4
1
Yes
Yes
Yes
Yes
Yes
Yes
CasePower Button
configured on?
Turn Dock off. With a lint free dry wipe,
clean the Case&Dock Charging contacts.
Undock the Case from the Luna Dock and remove the tablet.
Go to step 3.4.8 and onwards to install your tablet within the
Luna Case.Turn the Dock on and dock your
Luna Case.
Connect tablet to the charger originally
supplied with the device.
Press the tablet power button.
Modify your tablet sleep settings to stop tablet hibernation.
Go to step 3.4.8 onwards to re-install the tablet into Luna.
Press this button once to wake your table from sleep mode.
Dock the Case within a
powered Dock.
Consult instruction manual supplied
with the tablet.
Complete a Soft Reset of your Dock -
Section 5.7
Your Luna is operating correctly. Change Tablet sleep settings if required.
Your Luna is operating correctly.
No
No No
No
No
No
Is the Case docked within
a powered Dock?
Does your tablet
charge & turn on?
Does your tablet
charge & Turn on?
Does the tablet turn
on?
Does your tablet turn on
Yes
NoCan you
access the tablet home
button?
Tablet not on.
5.2
5
2
3
4
1
No
No
Yes
Yes
No
Yes
Yes
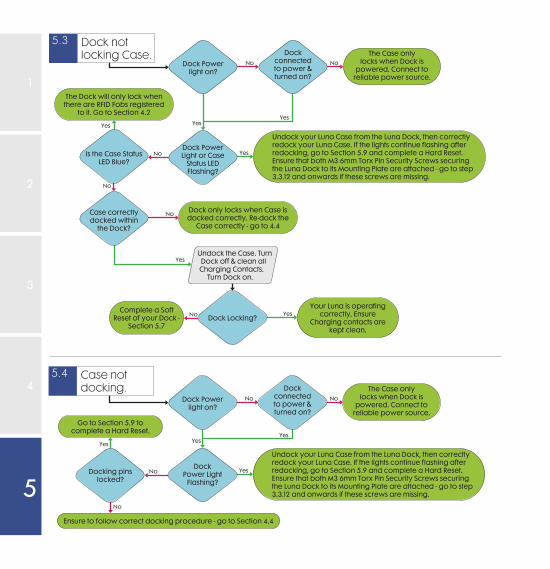
The Dock will only lock when there are RFID Fobs registered
to it. Go to Section 4.2
Dock only locks when Case is docked correctly. Re-dock the
Case correctly - go to 4.4
No No
No
Dock connected to power & turned on?
Yes
Dock Power light on?
Dock Locking?
Is the Case Status LED Blue?
Case correctly docked within
the Dock?
The Case only locks when Dock is
powered. Connect to reliable power source.
Undock the Case. Turn Dock off & clean all Charging Contacts.
Turn Dock on.
Complete a Soft Reset of your Dock -
Section 5.7
Your Luna is operating correctly. Ensure
Charging contacts are kept clean.
Dock not locking Case.
5.3
No
Yes
YesYes
Docking pins locked?
Case not docking.
5.4
No No
No
Dock connected to power & turned on?
Dock Power light on?
The Case only locks when Dock is
powered. Connect to reliable power source.
Ensure to follow correct docking procedure - go to Section 4.4
Go to Section 5.9 to complete a Hard Reset.
Yes
Yes
Undock your Luna Case from the Luna Dock, then correctly redock your Luna Case. If the lights continue flashing after redocking, go to Section 5.9 and complete a Hard Reset. Ensure that both M3 6mm Torx Pin Security Screws securing the Luna Dock to its Mounting Plate are attached - go to step 3.3.12 and onwards if these screws are missing.
Undock your Luna Case from the Luna Dock, then correctly redock your Luna Case. If the lights continue flashing after redocking, go to Section 5.9 and complete a Hard Reset. Ensure that both M3 6mm Torx Pin Security Screws securing the Luna Dock to its Mounting Plate are attached - go to step 3.3.12 and onwards if these screws are missing.
Dock Power Light or Case
Status LED Flashing?
Dock Power Light
Flashing?5
2
3
4
1
Yes
Yes
Yes
Yes
Case only un-docks when Dock is powered. Connect Dock to power.
No RFID Fobs registered to this Luna Dock. Go to Section 4.2 to register
your RFID Fob.
Ensure that the RFID Fob is being presented correctly to the Luna Case, directly on the Luna Case Status Light.
RFID Fob not recognised. Only registered RFID Fobs
will unlock the Case - present a registered RFID Fob.
Go to Section 5.8 to complete a Medium Reset.Ensure all contacts on the Dock and Case are clean.
Go to Section 5.8 to complete a Medium Reset.Ensure all contacts on the Dock and Case are clean.
Present RFID Fob to Case. Note the colour the
Case Status Light turns.
No No
No
No
No
No
No
No
No
Yes
Yes
Yes
Dock Power light on?
Case Status Light Blue?
Case Status Light on?
Green
White
Red
Dock connected to power & turned on?
Tablet charging?
Yes
There are only four Status Light colours. Represent the
registered RFID Fob.
Can’t undock Case.
5.5
Your Case is ready to be undocked. Undock now.
Refer to Section 4.3 for the Case undocking sequence.
Yes
Go to Section 5.9 and complete a Hard Reset. Ensure that both M3 6mm Torx Pin Security Screws securing the Luna Dock to its Mounting Plate are attached - go to step 3.3.12 and onwards if these screws are missing.
Dock Power Light or Case
Status LED Flashing?
5
2
3
4
1
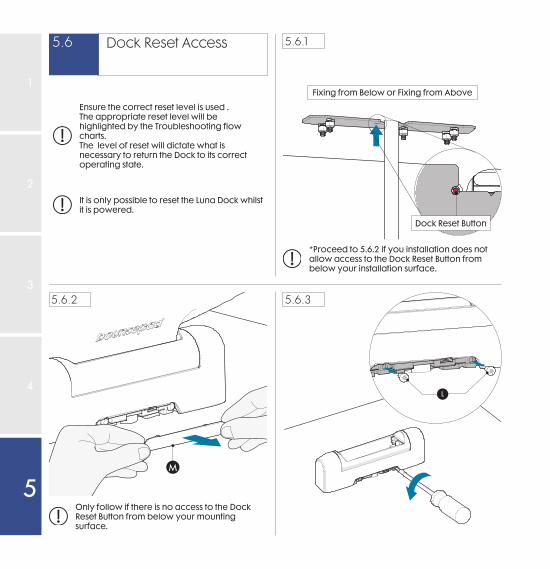
It is only possible to reset the Luna Dock whilst it is powered.
Dock Reset Button
Fixing from Below or Fixing from Above
*Proceed to 5.6.2 if you installation does not allow access to the Dock Reset Button from below your installation surface.
M
Ensure the correct reset level is used .The appropriate reset level will be highlighted by the Troubleshooting flow charts.The level of reset will dictate what is necessary to return the Dock to its correct operating state.
Only follow if there is no access to the Dock Reset Button from below your mounting surface.
L
5.6.1
5.6.2 5.6.3
Dock Reset Access5.6
5
2
3
4
1
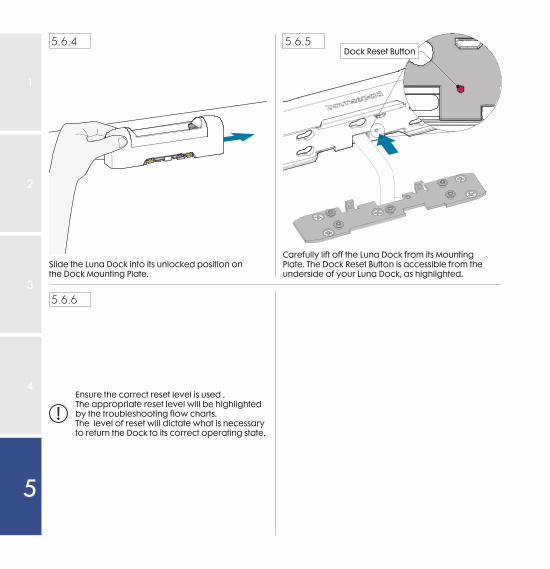
Dock Reset Button
Ensure the correct reset level is used .The appropriate reset level will be highlighted by the troubleshooting flow charts.The level of reset will dictate what is necessary to return the Dock to its correct operating state.
Slide the Luna Dock into its unlocked position on the Dock Mounting Plate.
Carefully lift off the Luna Dock from its Mounting Plate. The Dock Reset Button is accessible from the underside of your Luna Dock, as highlighted.
5.6.4 5.6.5
5.6.6
5
2
3
4
1
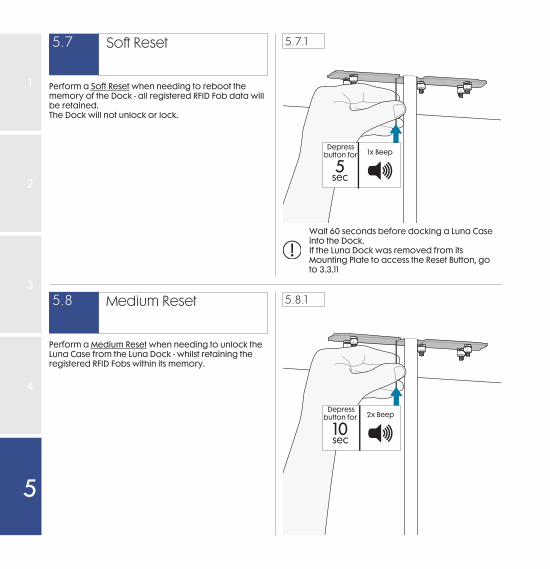
1x Beep
5sec
Depressbutton for
Wait 60 seconds before docking a Luna Case into the Dock.If the Luna Dock was removed from its Mounting Plate to access the Reset Button, go to 3.3.11
Perform a Medium Reset when needing to unlock the Luna Case from the Luna Dock - whilst retaining the registered RFID Fobs within its memory.
Perform a Soft Reset when needing to reboot the memory of the Dock - all registered RFID Fob data will be retained.The Dock will not unlock or lock.
2x Beep
10sec
Depressbutton for
5.7.1Soft Reset5.7
Medium Reset5.8 5.8.1
5
2
3
4
1
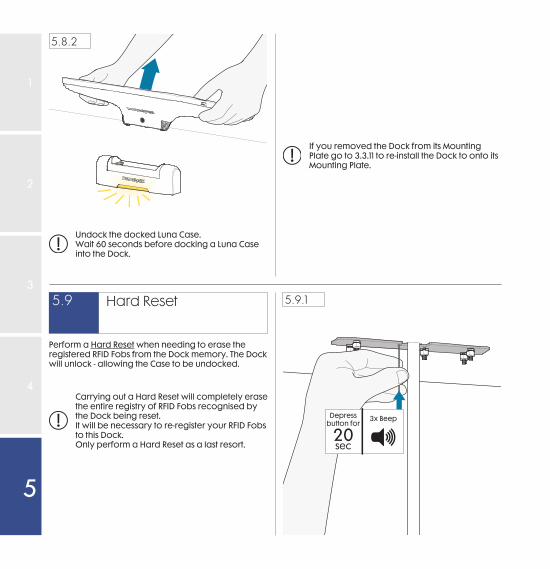
Undock the docked Luna Case.Wait 60 seconds before docking a Luna Case into the Dock.
If you removed the Dock from its Mounting Plate go to 3.3.11 to re-install the Dock to onto its Mounting Plate.
3x Beep
20sec
Depressbutton for
Carrying out a Hard Reset will completely erase the entire registry of RFID Fobs recognised by the Dock being reset.It will be necessary to re-register your RFID Fobs to this Dock.Only perform a Hard Reset as a last resort.
Perform a Hard Reset when needing to erase the registered RFID Fobs from the Dock memory. The Dock will unlock - allowing the Case to be undocked.
5.8.2
5.9.1Hard Reset5.9
5
2
3
4
1
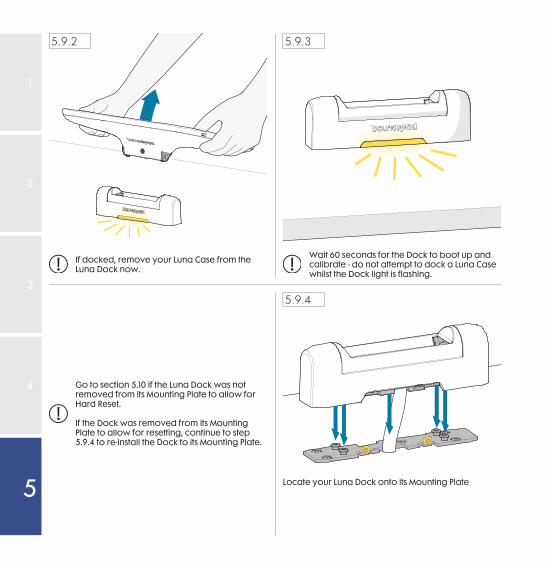
Wait 60 seconds for the Dock to boot up and calibrate - do not attempt to dock a Luna Case whilst the Dock light is flashing.
Go to section 5.10 if the Luna Dock was not removed from its Mounting Plate to allow for Hard Reset.
If the Dock was removed from its Mounting Plate to allow for resetting, continue to step 5.9.4 to re-install the Dock to its Mounting Plate.
If docked, remove your Luna Case from the Luna Dock now.
Locate your Luna Dock onto its Mounting Plate
5.9.2
5.9.4
5.9.3
5
2
3
4
1
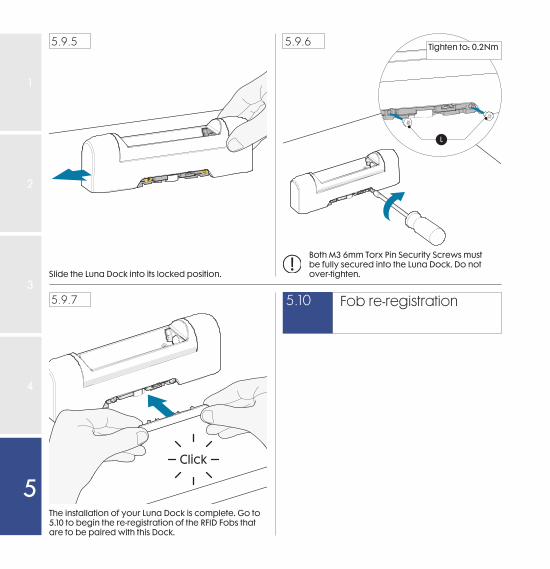
Slide the Luna Dock into its locked position.
Click
L
Tighten to: 0.2Nm
The installation of your Luna Dock is complete. Go to 5.10 to begin the re-registration of the RFID Fobs that are to be paired with this Dock.
Both M3 6mm Torx Pin Security Screws must be fully secured into the Luna Dock. Do not over-tighten.
5.9.5 5.9.6
5.9.7 Fob re-registration5.10
5
2
3
4
1
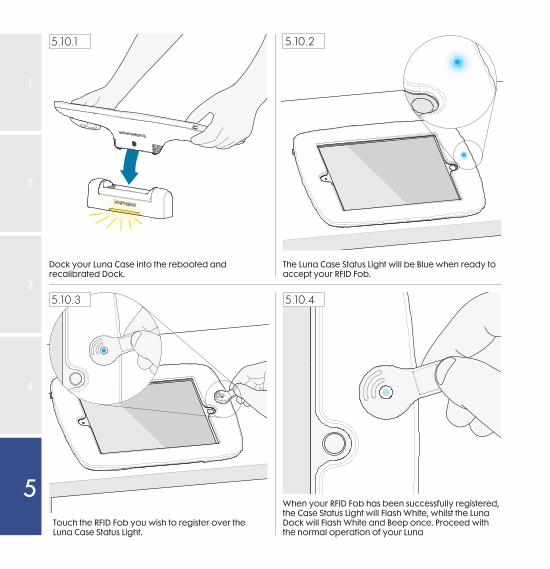
The Luna Case Status Light will be Blue when ready to accept your RFID Fob.
Dock your Luna Case into the rebooted and recalibrated Dock.
When your RFID Fob has been successfully registered, the Case Status Light will Flash White, whilst the Luna Dock will Flash White and Beep once. Proceed with the normal operation of your Luna
Touch the RFID Fob you wish to register over the Luna Case Status Light.
5.10.1 5.10.2
5.10.3 5.10.4
5
2
3
4
1

If you have any queries, please contact our Customer Care Team.
To see our full terms and conditions for the United Kingdom, please visit:www.bouncepad.com/terms-business/
To see our full terms and conditions for the United States and Canada, please visit:www.bouncepad.com/us/terms-business/
To see our full terms and conditions for Germany, please visit:www.bouncepad.com/de/agb/
© 2016 Bouncepad Spotspot Ltd. All rights reserved.
www.bouncepad.com
USA: 1-617-804-0110 [email protected]: +44 (0)20 3693 0000 [email protected]
DE: +49 (0) 30 6098 5170 [email protected]