Embed Size (px)
Citation preview
LOOP KNOTS: LOOP KNOTS: A loop knot, like a hitch, A loop knot, like a hitch,
fastens a rope to another object. A loop knot may be tied in fastens a rope to another object. A loop knot may be tied in the hand and then placed over the object, while a hitch is the hand and then placed over the object, while a hitch is tied directly to the object. However, since a loop knot is tied directly to the object. However, since a loop knot is generally a more secure and permanent type of knot, a generally a more secure and permanent type of knot, a marine technician should be proficient at tying these knots marine technician should be proficient at tying these knots around or to the object when necessary. When a loop knot around or to the object when necessary. When a loop knot is properly tied and drawn tight, it will not slip. Also, since it is properly tied and drawn tight, it will not slip. Also, since it does not lose its shape the same knot may be used many does not lose its shape the same knot may be used many times over. With that being said however, times over. With that being said however, if the loop is if the loop is intended to be permanent a splice is stronger and safer. intended to be permanent a splice is stronger and safer. The only loop knots you are required to learn for this class The only loop knots you are required to learn for this class are bowlines. We will differentiate our loop knots by two are bowlines. We will differentiate our loop knots by two sub-categories: the “sub-categories: the “end-of-the-line bowlinesend-of-the-line bowlines” and the ” and the ““middle-of-the-line-bowlinesmiddle-of-the-line-bowlines”.”.
Bowline: Bowline: The bowline knot is certainly the primary or basic knot The bowline knot is certainly the primary or basic knot
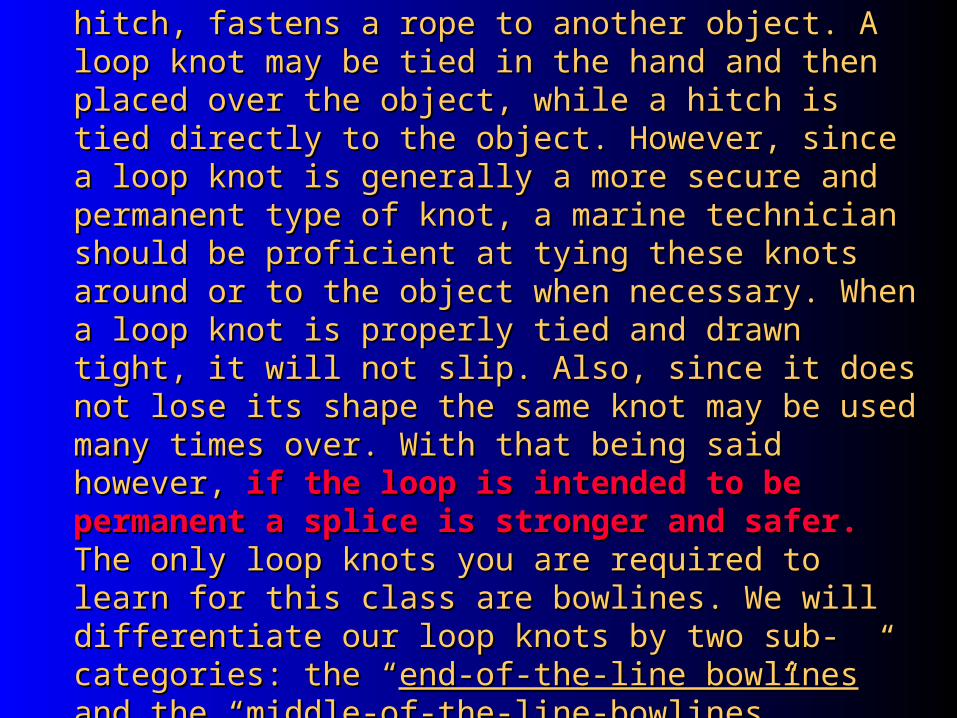
of sailors and/or marine technicians. The bowline is commonly referred to of sailors and/or marine technicians. The bowline is commonly referred to as the “King of Knots” and it is the most useful way to form a loop in the as the “King of Knots” and it is the most useful way to form a loop in the “end-of-a-rope”. Though simple in construction, it never slips or jams and “end-of-a-rope”. Though simple in construction, it never slips or jams and after severe tension has been applied, wet or dry, a simple push of the after severe tension has been applied, wet or dry, a simple push of the finger will loosen it enough to easily untie it. The bowline is tied by forming finger will loosen it enough to easily untie it. The bowline is tied by forming an overhand loop, through which the working end of the line goes up from an overhand loop, through which the working end of the line goes up from the back, around the standing part, and back down through the formed the back, around the standing part, and back down through the formed loop. If you plan to tie the bowline to a ring or other object you should loop. If you plan to tie the bowline to a ring or other object you should pass the working end around or through the object before passing it up pass the working end around or through the object before passing it up through the overhand loop. A sequential tying procedure is shown on the through the overhand loop. A sequential tying procedure is shown on the following slide. Note the difference between the standard bowline and a following slide. Note the difference between the standard bowline and a left-handed bowline – both are acceptable, although the left-handed left-handed bowline – both are acceptable, although the left-handed version has a slightly lower efficiency.version has a slightly lower efficiency.
Standard Bowline
Left-Handed BowlineWorking end finished to left of loop
Working end finished in center of loop

Tying the Bowline:Tying the Bowline:
Left-Handed Bowline Sequence:1 2 3
1 2 3
4
5
6
Completed Bowline
Pass the working endthrough the ring.
Make an overhand loopin the standing part.
Pass the working end up from the back and through the overhand loop.
Continue with the working endaround the standing part (4)andback down through the overhandloop (5-6).
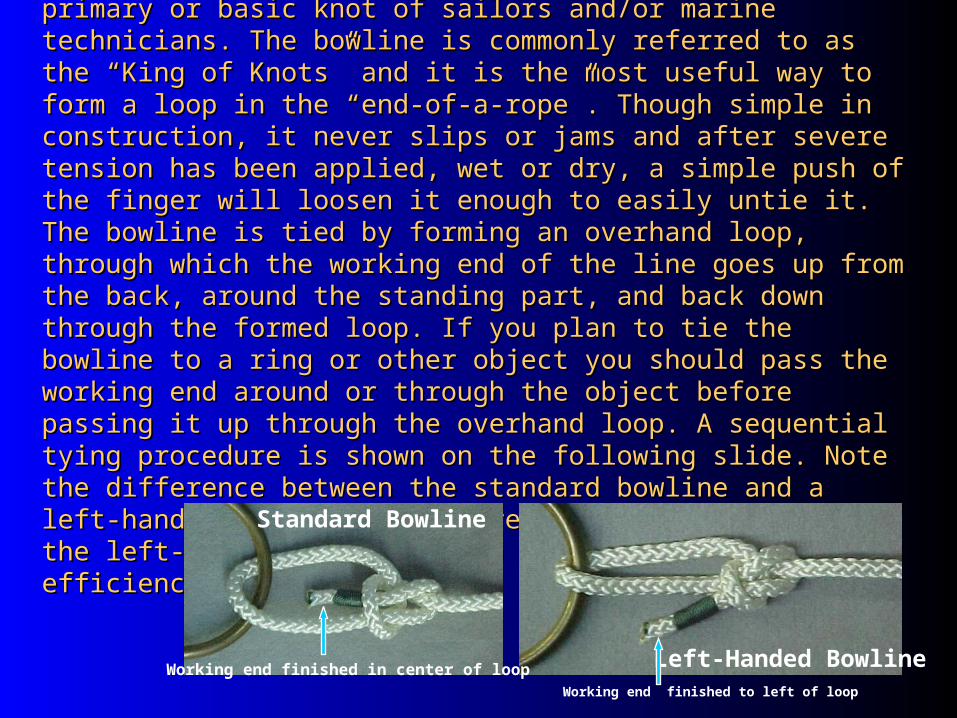
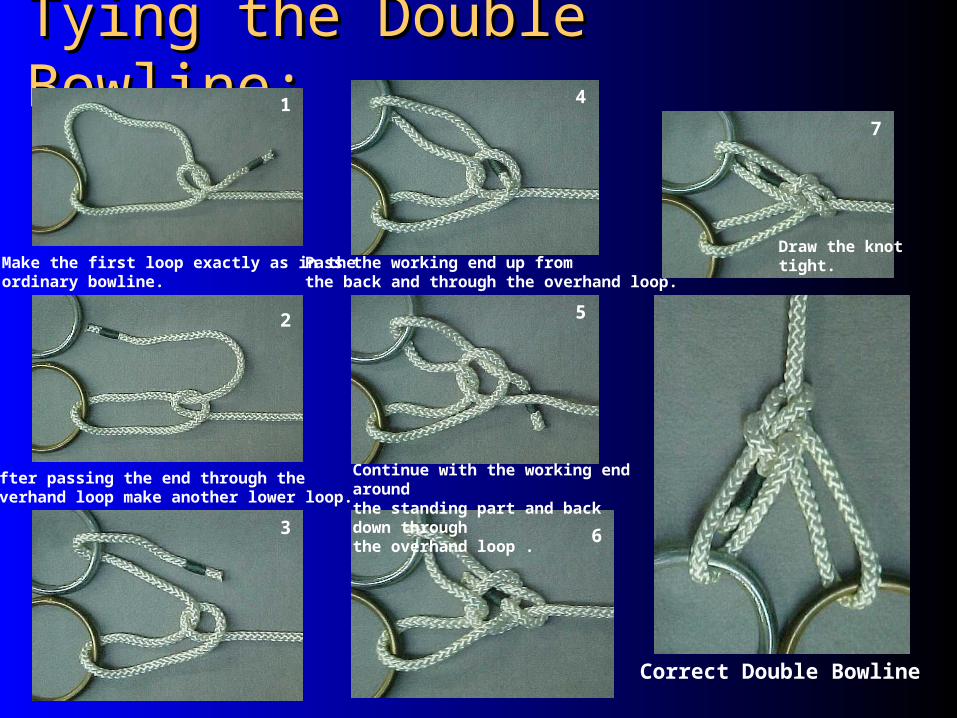
Double Bowline: Double Bowline: The double or The double or French BowlineFrench Bowline is also an is also an
end-of-the-line bowline. It is especially advisable to use this bowline as a end-of-the-line bowline. It is especially advisable to use this bowline as a sling when lowering or hoisting a person as it allows a person to use both sling when lowering or hoisting a person as it allows a person to use both hands and is virtually impossible for a hands and is virtually impossible for a conscious personconscious person to drop out of this to drop out of this type of sling. A person sits in one of the loops, passing the other loop type of sling. A person sits in one of the loops, passing the other loop about their chest and back under the armpits. The person’s weight in one about their chest and back under the armpits. The person’s weight in one loop draws the other loop under the arms taut. When used for making a loop draws the other loop under the arms taut. When used for making a bridle, any number of loops may be formed. To tie, start with an overhand bridle, any number of loops may be formed. To tie, start with an overhand loop exactly as in the ordinary bowline. The difference being that you pass loop exactly as in the ordinary bowline. The difference being that you pass the end through the overhand loop twice – making two lower loops. The the end through the overhand loop twice – making two lower loops. The end is then passed behind the standing part and down through the first end is then passed behind the standing part and down through the first loop again as in the ordinary bowline. A sequential tying procedure is loop again as in the ordinary bowline. A sequential tying procedure is shown on the following slide.shown on the following slide.
Correctly TiedDouble Bowline
End
1st. Lower Loop
2nd. Lower Loop
Overhand Loop
Standing Part
Tying the Double Bowline:Tying the Double Bowline:1
2
3
4
5
6
7
Correct Double Bowline
Make the first loop exactly as in theordinary bowline.
After passing the end through theoverhand loop make another lower loop.
Pass the working end up from the back and through the overhand loop.
Continue with the working end aroundthe standing part and back down throughthe overhand loop .
Draw the knottight.
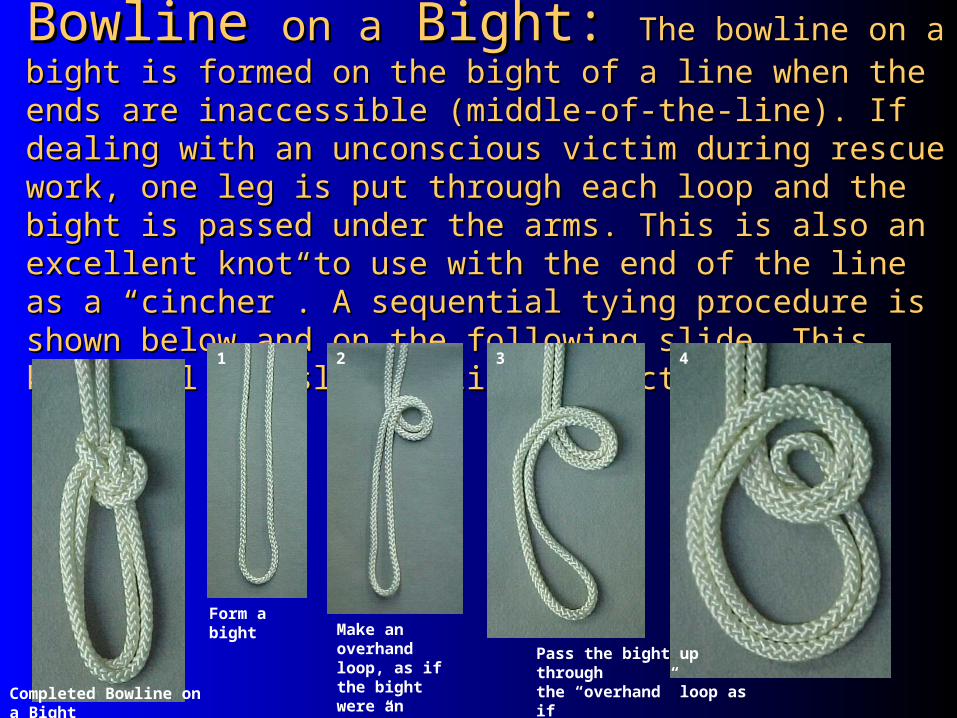
Bowline Bowline on aon a Bight: Bight: The bowline on a bight is formed The bowline on a bight is formed on the bight of a line when the ends are inaccessible (middle-of-on the bight of a line when the ends are inaccessible (middle-of-the-line). If dealing with an unconscious victim during rescue the-line). If dealing with an unconscious victim during rescue work, one leg is put through each loop and the bight is passed work, one leg is put through each loop and the bight is passed under the arms. This is also an excellent knot to use with the end under the arms. This is also an excellent knot to use with the end of the line as a “cincher”. A sequential tying procedure is shown of the line as a “cincher”. A sequential tying procedure is shown below and on the following slide. This knot will not slip if tied below and on the following slide. This knot will not slip if tied correctly.correctly.
Completed Bowline on a Bight
1 2 3 4
Form a bightMake an overhandloop, as if the bightwere an “end”.
Pass the bight up throughthe “overhand” loop as if you were tying a standard bowline.
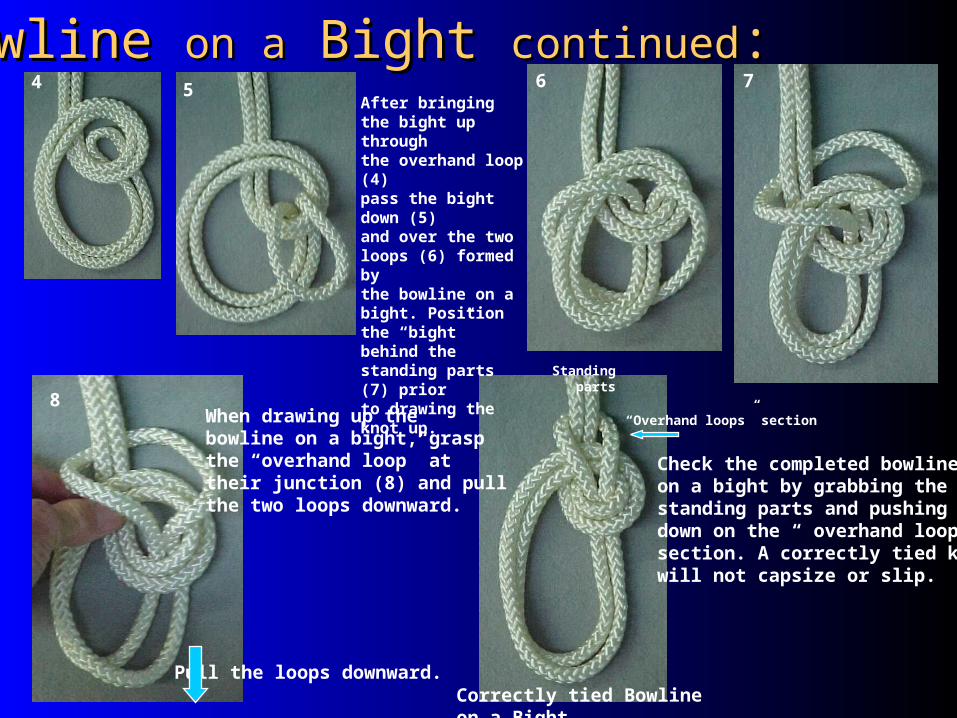
Bowline Bowline on aon a Bight Bight continuedcontinued::5 6 7
8
Check the completed bowlineon a bight by grabbing the standing parts and pushingdown on the “ overhand loops”section. A correctly tied knotwill not capsize or slip.
Correctly tied Bowline on a Bight
Standing parts
“Overhand loops” section
After bringingthe bight up throughthe overhand loop (4) pass the bight down (5)and over the twoloops (6) formed by the bowline on abight. Position the “bight” behind the standing parts (7) priorto drawing the knot up.
4
When drawing up the bowline on a bight, graspthe “overhand loop” at their junction (8) and pull the two loops downward.
Pull the loops downward.
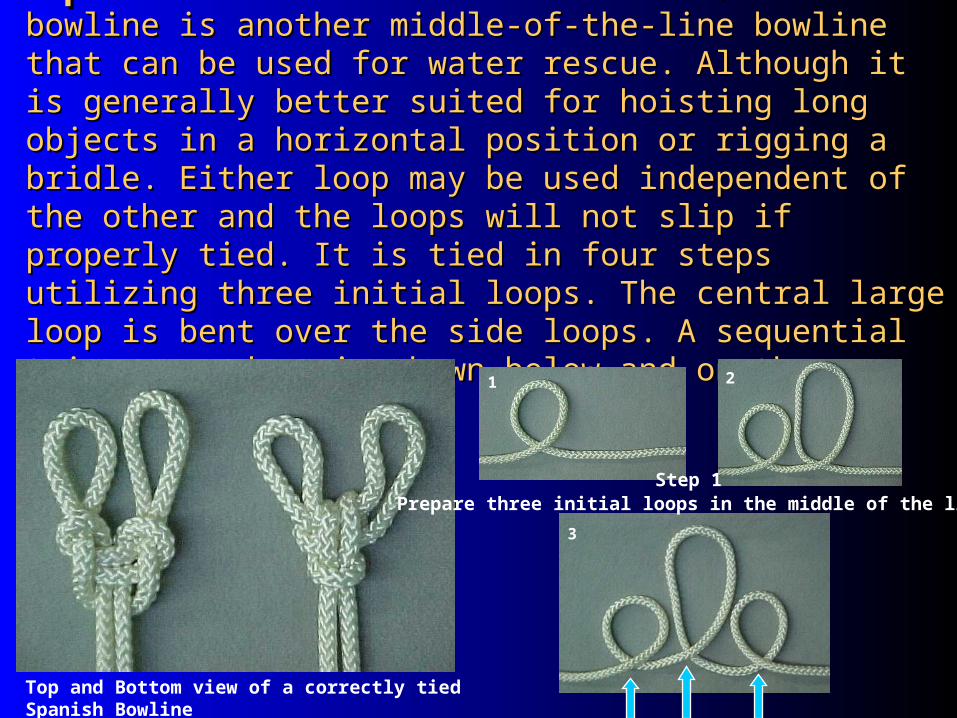
Spanish Bowline: Spanish Bowline: The Spanish bowline is another The Spanish bowline is another
middle-of-the-line bowline that can be used for water rescue. middle-of-the-line bowline that can be used for water rescue. Although it is generally better suited for hoisting long objects in a Although it is generally better suited for hoisting long objects in a horizontal position or rigging a bridle. Either loop may be used horizontal position or rigging a bridle. Either loop may be used independent of the other and the loops will not slip if properly independent of the other and the loops will not slip if properly tied. It is tied in four steps utilizing three initial loops. The central tied. It is tied in four steps utilizing three initial loops. The central large loop is bent over the side loops. A sequential tying large loop is bent over the side loops. A sequential tying procedure is shown below and on the following slide. procedure is shown below and on the following slide.
Top and Bottom view of a correctly tied Spanish Bowline
Prepare three initial loops in the middle of the line.
1 2
3
Step 1
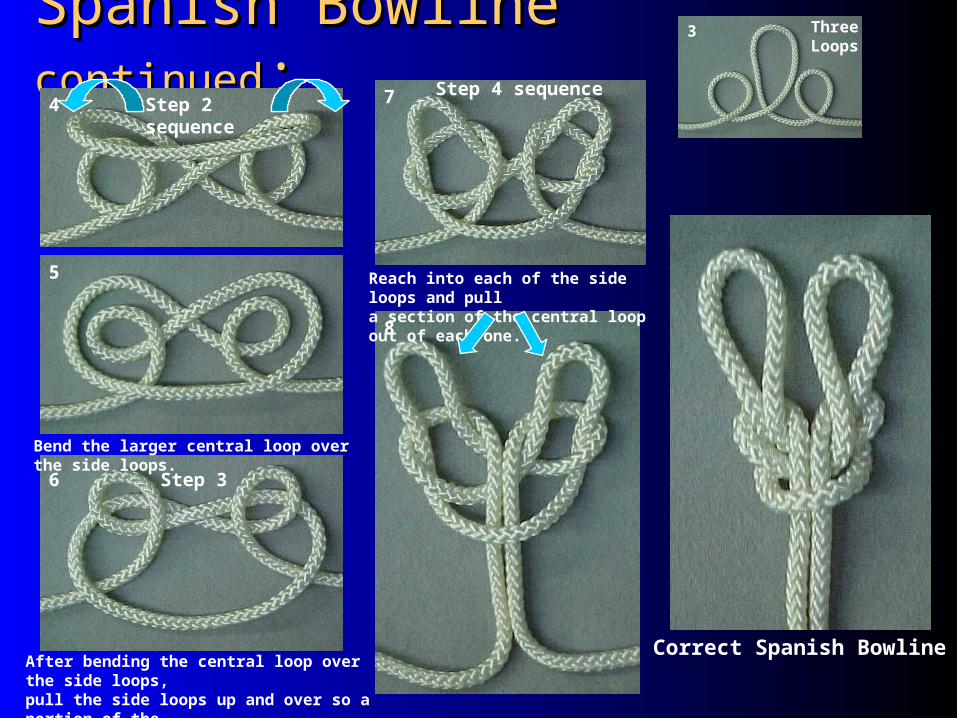
Spanish BowlineSpanish Bowline continued continued:: 3 ThreeLoops
4
5
6
7
8
Correct Spanish Bowline
Step 2 sequence
Step 3
Step 4 sequence
Bend the larger central loop over the side loops.
After bending the central loop over the side loops,pull the side loops up and over so a portion of thecentral loop is centered under each of the side loops.
Reach into each of the side loops and pull a section of the central loop out of each one.
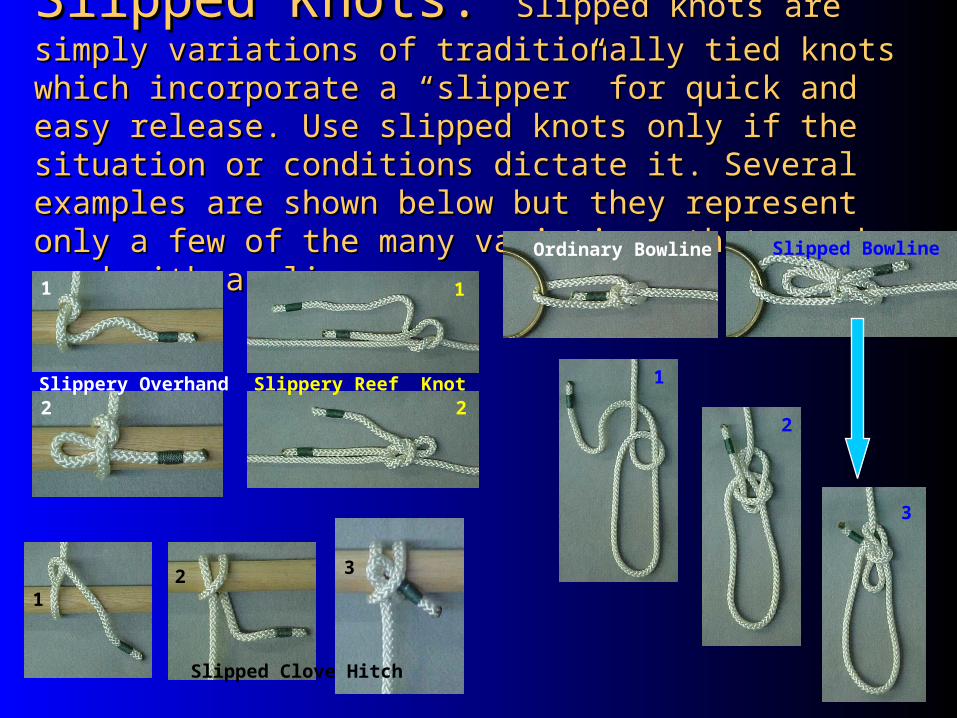
Slipped Knots:Slipped Knots: Slipped knots are simply variations of Slipped knots are simply variations of
traditionally tied knots which incorporate a “slipper” for quick traditionally tied knots which incorporate a “slipper” for quick and easy release. Use slipped knots only if the situation or and easy release. Use slipped knots only if the situation or conditions dictate it. Several examples are shown below but conditions dictate it. Several examples are shown below but they represent only a few of the many variations that can be they represent only a few of the many variations that can be used with a slipper.used with a slipper.1
2
1
2
12 3
1
2
3
Ordinary Bowline Slipped Bowline
Slippery Reef KnotSlippery Overhand
Slipped Clove Hitch
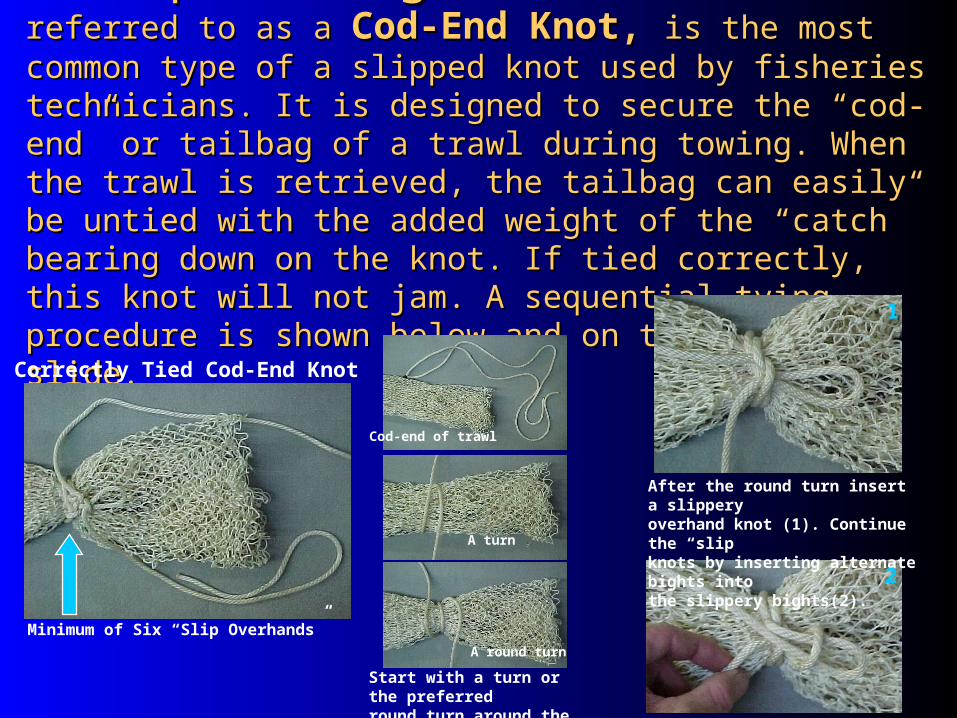
Shrimper’s Bag Knot:Shrimper’s Bag Knot: This knot, also referred to as a This knot, also referred to as a
Cod-End Knot, Cod-End Knot, is the most common type ofis the most common type of aa slipped knot slipped knot used by fisheries technicians. It is designed to secure the “cod-used by fisheries technicians. It is designed to secure the “cod-end” or tailbag of a trawl during towing. When the trawl is end” or tailbag of a trawl during towing. When the trawl is retrieved, the tailbag can easily be untied with the added weight retrieved, the tailbag can easily be untied with the added weight of the “catch” bearing down on the knot. If tied correctly, this knot of the “catch” bearing down on the knot. If tied correctly, this knot will not jam. A sequential tying procedure is shown below and on will not jam. A sequential tying procedure is shown below and on the following slide.the following slide.
Correctly Tied Cod-End Knot
Minimum of Six “Slip Overhands”
Start with a turn or the preferredround turn around the cod-end.
Cod-end of trawl
A turn
A round turn
After the round turn insert a slipperyoverhand knot (1). Continue the “slipknots by inserting alternate bights intothe slippery bights(2).
1
2
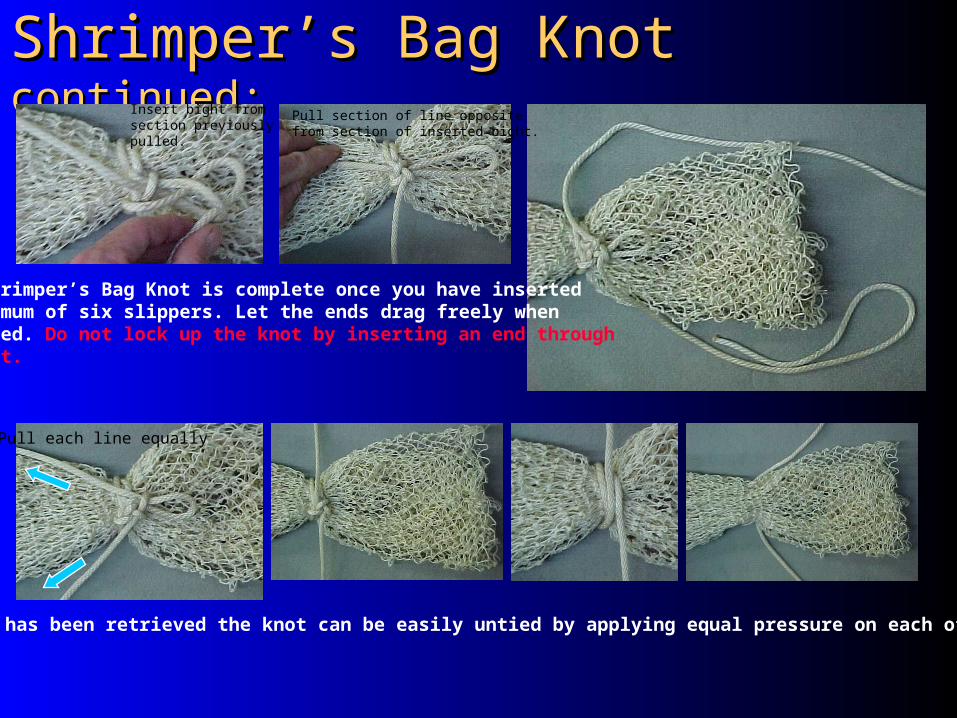
Shrimper’s Bag Knot Shrimper’s Bag Knot continued:continued:
The Shrimper’s Bag Knot is complete once you have inserteda minimum of six slippers. Let the ends drag freely whenfinished. Do not lock up the knot by inserting an end througha bight.
Insert bight fromsection previouslypulled.
Pull section of line oppositefrom section of inserted bight.
Once the trawl has been retrieved the knot can be easily untied by applying equal pressure on each of the lines.
Pull each line equally
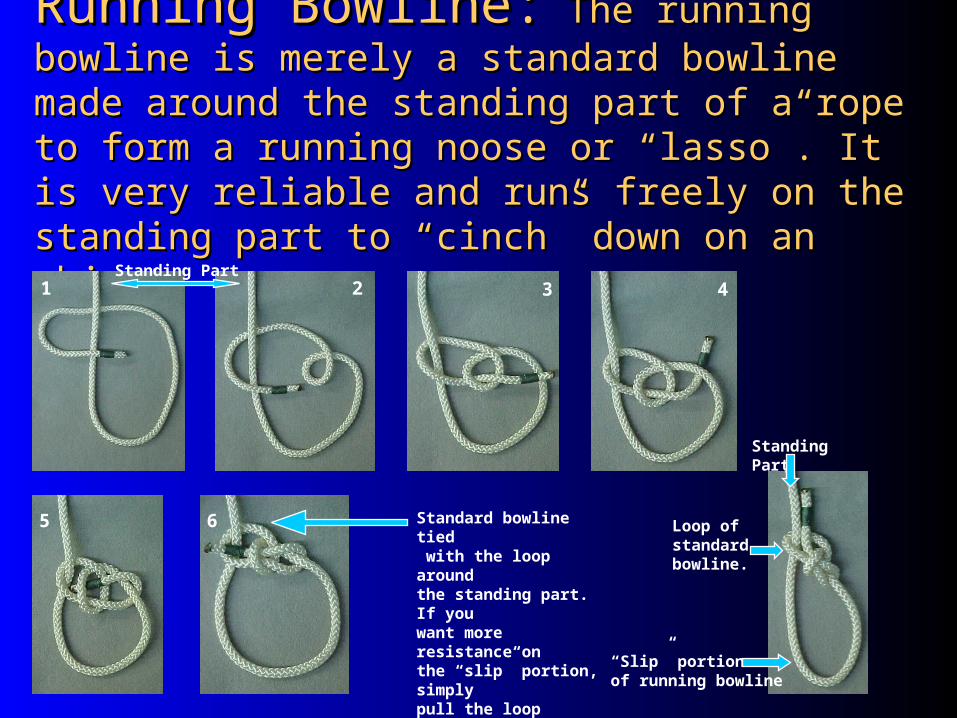
Running Bowline:Running Bowline: The running bowline is The running bowline is merely a standard bowline made around the standing merely a standard bowline made around the standing part of a rope to form a running noose or “lasso”. It is part of a rope to form a running noose or “lasso”. It is very reliable and runs freely on the standing part to very reliable and runs freely on the standing part to “cinch” down on an object. “cinch” down on an object. 1 2 3 4
5 6
Standing Part
Standing Part
Standard bowline tied with the loop around the standing part. If youwant more resistance on the “slip” portion, simplypull the loop tighter againstthe standing part.
Loop of standardbowline.
“Slip” portionof running bowline