Embed Size (px)
Citation preview

157
Ropework

RO
PEW
OR
K
158
Ropework
Stopper KnotsStopper knots are used as a temporarymethod of stopping a rope from fraying oras a method of locking other knots whichmay be prone to loosening.These knots are:
The Overhand KnotThe Figure of Eight Knot
Overhand Knot1.
2.
The Overhand Knot can be used tocreate a loop by doubling the rope andthen tying the knot.
1. 2.
3.
4.
Figure of Eight

159
Joining KnotJoining knots are used for joining ropestogether. The Reef Knot and the Fisherman�’sKnot are used when joining ropes of thesame thickness together, whereas the SheetBend is better suited to ropes of differentthicknesses.The Joining Knots are
The Reef KnotThe Sheet BendThe Fisherman�’s Knot
Reef Knot
1.
2.
3.4.
Sheet bend1.
2.
3.
4.
5.
The Reef Knot is used for tyingbandages, because when tied it liesflat.
When tying with light and heavy linesand braided rope it will be necessaryto secure with a stopper knot orcomplete a number of turns as itStage 4

RO
PEW
OR
K
160
Fisherman�’s Knot
1.
2.
3.
4.
This knot is particularly useful fortying fishing lines together.
Fixing KnotsFixing knots are those knots which arebest suited to fixing a rope to a pole orobject. The Clove Hitch and the RoundTurn and two half hitches are the mainknots used for fixing. The MarlinespikeHitch is used for attaching the rungs to arope ladder. When you need to drag a logor start a diagonal lashing you use theTimber Hitch. The Highwayman�’s Hitchis a fun knot which can be used to fix arope to a branch so as to climb up or
down a tree. The beauty of this knot is that itcan be removed, from the ground, by pullingon the slip loop. The fixing knots are:-
The Clove HitchThe Round Turn and twohalf hitchesThe Highwayman�’s HitchThe Marlinespike HitchThe Timber Hitch
1.
2.
3.Clove Hitch
The Clove Hitch is always used for fixingto a pole when starting a lashing
The Clove Hitch can also be tiedusing two loops which are passedover the top of a pole.

161
Round Turn and two half hitches
1. 2. 3.
4.
This knot is normally used to secure arope to a tree or pole as it will not slipunder strain. It is normally used inboating for tying up a boat to the pier.
Highwayman�’s Hitch
1.2.
3.
4.
LoadSlip loop

RO
PEW
OR
K
162
Marline spike Hitch
1.
2.3.
Timber Hitch
1. 2.
3.
4.
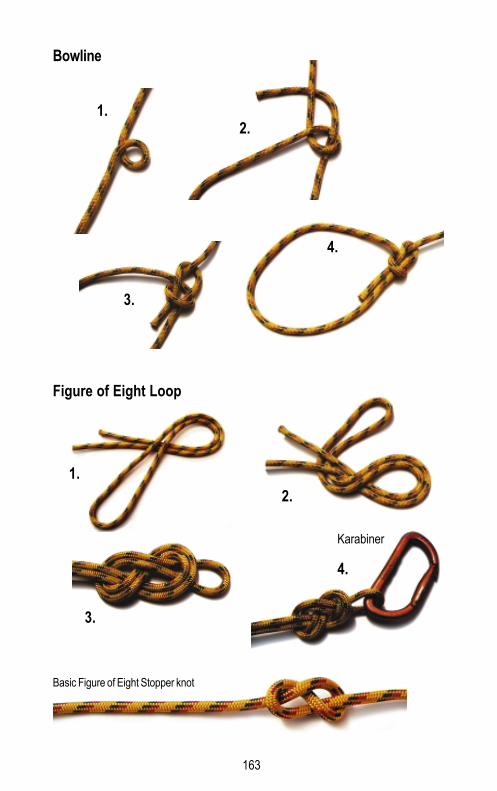
Loop KnotsThe Bowline, Figure of Eight loop and Manharness Knot are essentially climbing knots.Each knot creates a loop that will not slip under strain. The Bowline is normally used to tieyourself onto the end of a rope. The Figure of Eight loop is used to attach a rope to akarabiner, however it can also be used to tie yourself on to the end or middle of a rope. TheManharness Knot can do the same job, but is normally used to tie on the middle of a rope.
Strain on rope keepsknot in place.
163
Bowline
1.2.
3.
4.
Figure of Eight Loop
1.2.
3.
4.
Karabiner
Basic Figure of Eight Stopper knot

RO
PEW
OR
K
164
Two friction knots are illustrated here.They are the Prusik Knot and the ItalianHitch. Both knots are normally used inclimbing and caving. The Prusik Knot hasan unusually feature; it is non-slip whenunder pressure and can be slid along arope when pressure is remove. It is auseful knot for climbing up a rope. TheItalian Hitch is used with a karabiner andallows a person to be lowered down arope, under control, due to the frictioncreated between the karabiner and therope.
Friction Knots
Manharness Hitch
1.
2. 3.
4.
1.
2.
3.
4.
5.
Prusik Knot

165
Karabiner isattached toclimber�’s beltor belay.
This part of therope is held by theclimber.
Load or strain onrope.
Italian Hitch
1.
2. 3.
WhippingIn order to prevent a rope from fraying awhipping is applied to the end of it. Nylonand plastic ropes can be prevented fromfraying, by sealing their ends. This is doneby melting the fibres, using a candle orsoldering iron.
1.
2.
3.
Pull this end of thread to pullloop under the whipping.
Place end of whipping threadthrough loop before pulling loopunder whipping to secure.
4.

RO
PEW
OR
K
166
Splicing Ropes
Back spliceA back splice is used to prevent a ropefrom fraying. It is created by unravellingabout 120 mm of the rope end. The firststep is to make a Crown Knot. Thentaking each strand in turn plait it back intothe rope. This is done by skipping onelay of the rope and passing the strandunder the next. Move to the next strandand repeat this process until all thestrands are plaited back into the rope.Place the splice on the ground and roll itunder your foot to work in the plait. Tidyup the frayed ends of the splice bytrimming closely.
Long spliceA long splice is used to join two ends of arope. The first step is to unravel about120mm of the end of each rope. The strandsare spread apart and placed together equallyas shown. The rope is then plaited as withthe back splice - skip one lay and under thenext. Tidy up ends when finished.
Eye SpliceThe eye splice is slightly more complicatedthat the other splicing methods, however theplaiting method is the same. Normally it isnecessary to have an awl or pointed dowelto enable the lay of the rope to be opened.This is done by twisting the rope andpushing the dowel between the lay to createa hole so that the plaiting strand can bepassed through the lay of the rope.
Crown Knot

167
1. 2. 3.
4. 5. 6.
Unravel the end of the rope by about120mm. Turn the rope to create the loop.Observe the lay of the rope. It will have 3strands and it is necessary to place a strandunder each lay of the rope. Be careful not toget your strands crossed - under the same
lay - otherwise the splice will not plaitcorrectly. When the strands have beenplaced equally under the �‘lays�’- plait the ropeas in the back splice - skip one lay andunder the next. Tidy up the ends whenfinished
Commando ropeThe toggle rope came into prominenceduring the second world war, especiallywith commandos, who often, in the courseof their duties had to scale walls, climbcliffs, cross deep rivers. Most of the tasksrequired large quantities of bulky rope to becarried. Rather than burden a few men
with such an awkward load, eachsoldier was given a piece of rope about2 metres in length, and 20mm - 25mm indiameter, with an eye splice on one endand a toggle on the other, secured bymeans of another eye splice. The openeye splice was large enough to allowthe toggle to fit through with no danger ofthe toggle slipping.This is a versatile piece of equipmentthat every Scout should have. It hasmany and varied uses on hikes, inpioneering, or for emergency measuresand life saving.
100mm
2 metres in length
Eye Splice

RO
PEW
OR
K
168
Lashings
Lashings are knots which usea combination of knots andwrapping to create a bindingwhich holds poles togethersecurely.
Traditional Square Lashing
Traditional square lashingThis lashing is used for joiningpoles that cross at right angles. Thelashing is started using a CloveHitch. The free end of the rope isthen passed around the poles asshown and pulled tightly after eachturn. When five or six turns havebeen made, twist the rope and do anumber of frappings between thetwo poles. The frappings pull thewrappings together and tighten thelashing. Finish with a Clove Hitchon the opposite pole. Diagonal Lashing
The diagonal lashing is used tolash together poles which crosseach other at an angle. Thislashing is started by using atimber hitch. Once secure thewrapping is created as shown.Then do the frapping and finishwith a Clove Hitch

169
Norwegian Lashing
The Norwegian Lashing iseasier to lash and results in atighter lashing due to the factthat you are tightening therope against itself. Thelashing is created by halvingthe lashing rope and startingat the middle, around theupright pole. Make fourwrappings by pulling andchanging over the lashingropes. Then create a numberof frappings in a similarfashion. Finish the lashingwith a Reef Knot
Japanese Lashing
The Japanese Lashing is similar in techniqueto the Norwegian lashing. Start by halvingthe lashing rope and creating a secure looparound the poles. Use the two strands tomake the wrappings as shown. Switch the
direction of the wrappings so as to have twosingle strands working in opposite directions,best done around a pole and frap the lashing.Finish with a Reef Knot

RO
PEW
OR
K
170
Sheer Lashing
The sheer lashing is used to join twopoles together to create sheer legs whenthe butt of the poles are spread apart andto create a long pole and keep themparallel. In the case of joining poles two
lashings are required, one at each end of theoverlapping poles. Start with and finish witha Clove Hitch. Wrap and frap as shown. Inthe case of sheer legs one lashing isrequired.
Tourniquet LashingThe tourniquet lashing is a quick andeasy lashing to create. It is createdusing a closed loop of rope ( heavierthan normal lashing rope) placedaround the poles. A piece of stick isthen placed through the loop andtwisted until tight. The stick is thensecured to one of the poles with apiece of string
Danish Tripod lashing
Traditional Tripod lashing
Tripod or Figure of EightLashing
Sheer legslashing withfrapping Joining poles - no frapping

171
Rope management on rockBelayWhenever you work with ropesat a height it is necessary tobelay yourself to a fixed object(rockface,wall) to prevent a fall.A belay is the method that isused to tie yourself to thisobject. This is done usingcertified equipment such astapes, climbing ropes, chocksand metal pegs. A belay shouldbe fixed to at least two points incase one point fails.Setting up a belay correctlyrequires training and should notbe attempted unless you knowwhat you are doing. Your lifemay depend on it.
AbseilingAbseiling is a means of lowering yourself from aheight, using a rope in a controlled manner. It isnot a sport in itself but rather a technique used inrock climbing, mountaineering and caving.Specialised training is required and abseilingshould not be attempted until you know what youare doing. The technique is an important skill toknow for emergency situations, in the case of aquick escape in bad weather, to assist people ondifficult terrain, or in case of an accident.

RO
PEW
OR
K
172
Climbing techniqueThe lead climber climbs first and as he/she climbsthey place �‘protection devices�’ in small cracks andslots within the rock face. If they fall, the �‘protectiondevice�’ will stop or slow down their fall. The secondclimber protects the lead climber - loosening andtightening the rope as required. When the lead climberhas completed the climb, or a section of the climb,known as a pitch, he/she then belayshimself/herself and brings up the second.The second removes the�‘protection devices�’as they climb.
How to climb up a�‘chimney�’.
1.
2.
3.

173
Safety helmetsSafety helmets are a must forall rock climbing activities.Helmets are made to standardsizes and all have adjustablestrapping. When you place thehelmet on your head adjust it tosuit, and tighten strap under thechin.
Rock climbers use specialist climbingbelts which are designed to preventinjury in the event of a fall. The beltsalso have anchor points and loops toconnect ropes and equipment to the
them.
KarabinersKarabiners are standardclimbing equipment.They are strong metallinks which are used toconnect equipment andropes to the rock and theclimber. �‘Screw gate�’karabiners are preferredfor safety reasons.

RO
PEW
OR
K
174
While walking and climbing mountains youwill often find that you have to scramble oversmall outcrops of rock and steep ground.This is, technically, not rock climbing andoften you may not need a rope. However itis advisable to carry and use one for safety.The climbing of a rock or outcrop is done bytechnique rather than brute force. Your legsprovide the lift and your hands grip andbalance - just like climbing a ladder. You donot pull yourself up by your hands.When climbing, you move one limb at atime, three points of contact should bemaintained at all times. Move slowly andcarefully and never jump for a hold.
Handholds come in all sorts ofshapes and sizes and often youwill have to move and manipulateyour fingers to get a good solidgrip.
Move slowly andcarefully keepingthree points ofcontact.