Embed Size (px)
Citation preview


2 Look at my Hair manual
OVERVIEW Look at my Hair is a plugin that allows growing and styling hair and fur on every object that can be loaded in Studio 4.5. The hair model produced can be exported to Studio as RenderMan curves, or as a textured Alias Wavefront .obj files collection, which makes it possible to use the hair model on every application and render engine. The basic workflow can be resumed in the following steps:
§ Import a model from Studio § Define follicles § Grow and style hair § Optionally define density maps and apply effects § Export
We are going to explore in detail the whole workflow in the next chapters.

3 Look at my Hair manual
REQUIREMENTS AND INSTALLATION Look at my Hair runs on Studio 4.5 for Windows and Mac, on both 32 and 64 bit architecture (64 bit highly recommended for complex hair systems). Minimum system memory required is 2GB.
When you buy Look at my Hair you will need to download the proper installer version (again, Windows or Mac, 32 or 64 bit), and you will receive an Installation Code. Install the plugin, execute it from Studio “New Look at my Hair Object” menu, and you’ll get the activation window as displayed in Figure 1. Copy the Serial Number prompted there, and point your browser at: http://www.gm-‐studio.net/LAMH_activation.aspx Enter the Serial Number and the Installation Code and click “Activate” to get your Activation Code. Back to Look at my Hair, enter the Installation Code, the Activation Code, click ACTIVATE and the process is completed. Look at my Hair is now ready to be used! If you need support please contact me at mailto:[email protected].
Figure 1: the activation window

4 Look at my Hair manual
KEYBOARD AND MOUSE REFERENCE < ALT >< Z >: Undo guide hair (20 undo levels available) < SPACEBAR >: Toggles the heads up display on. Release it to toggle the display off. ALL modes: < LMB > on canvas and drag to rotate the camera. < RMB > and drag to pan the camera. < WHEEL > to zoom in or out. FOLLICLE mode: < LMB > on model: triggers follicle on (or off if < SHIFT > is pressed). Drag the mouse to trigger more follicles on the fly. < ALT >< LMB >: rectangular marquee tool. Drag the mouse to define the area; when released all the follicles in the area will be selected (or deselected if < SHIFT > is pressed). STYLING mode: < LMB> and drag to move selected hair points. < SHIFT >< LMB > to cut selected hair points. < CTRL >< LMB > and drag to scale up or down selected hair points. PAINT mode: < LMB > and drag to paint density on. < SHIFT >< LMB > and drag to paint density off.

5 Look at my Hair manual
IMPORT A MODEL FROM STUDIO Importing a model is straightforward: once you have started Look at my Hair, click on the Import button, select one of the available objects and load it:
Figure 2: open the object browser and choose a model
A few instants later your model will show up in Look at my Hair.

6 Look at my Hair manual
Important to note that models loaded in the plugin are not simply “imported”, but rather bound to Studio; as you’ll see later, each modification done to the model properties in Studio will be inherited in Look at my Hair as well.
Figure 3: Genesis model imported

7 Look at my Hair manual
DEFINING FOLLICLES “Defining follicles” means selecting the model polygons that will be covered with hair later. The process is straightforward: click the left mouse button directly on the model to pick follicles, or use the marquee tool to pick larger areas at once. Be sure to read the “Keyboard and mouse reference” at page 4 to acknowledge all the FOLLICLE mode options.
Figure 4: click to pick single follicles
Figure 5: marquee tool in action
Figure 6: follicles picked with the marquee
Note: using the marquee tool is a very quick way to add or remove follicles, while single clicks are usually helpful to refine the selection. However, there is another way to quickly select follicles that belong to a specific surface through the “select by surface” tool. In the following example I selected all the follicles belonging to the “coat” surface in a single click. And, as you notice, I might quickly add or eventually remove the ones for the other available surfaces. This comes handy especially with animal figures, so that you can just define the follicles for the whole body without having to manually pick them. Also, the second column allows hiding some surfaces that may occlude the underlying geometry, so that you can better see the parts where you are working on.

8 Look at my Hair manual
Figure 7: use the “follicle selection by surface” to speed up the process
9 Look at my Hair manual
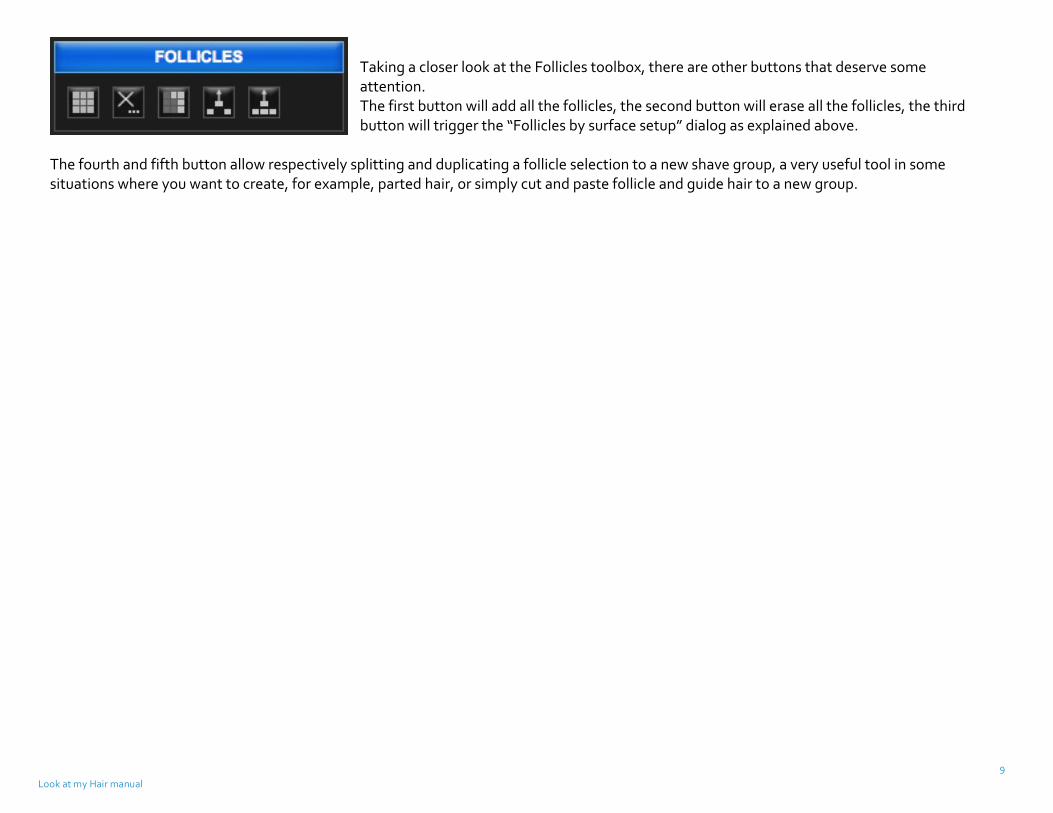
Taking a closer look at the Follicles toolbox, there are other buttons that deserve some attention. The first button will add all the follicles, the second button will erase all the follicles, the third button will trigger the “Follicles by surface setup” dialog as explained above.
The fourth and fifth button allow respectively splitting and duplicating a follicle selection to a new shave group, a very useful tool in some situations where you want to create, for example, parted hair, or simply cut and paste follicle and guide hair to a new group.

10 Look at my Hair manual
STYLING CONTROLS Styling hair is one of the most crucial and important phases of the workflow: the final result is strictly related to the quality of the hair model. I will first start by describing the tools that belong to the styling section, and later I will share some hints about how to efficiently style hair. Growing guide hair Once you have defined the follicles, in order to create the guide hair you just need to enter the desired length, expressed in centimeters, and click the ‘grow guide hair” button. In a few instants you will see the hair grow on the model (see Figure 8). Select by groups
An important feature is the possibility to enable and work only on a specific group of hair. Clicking the “select by groups” button will popup a selection dialog (see figure on the left), which allows restricting hair selection to a specific group or side of the model. You may, for example, enable only the hair on the left side, or the ones that belong to the hair, torso, or else. This way it will be easier to focus styling on a restricted selection of hair and avoid potential and unwanted modifications on other hair groups. To note that it’s also possible to perform a custom selection using the marquee tool: as mentioned in the “Keyboard and mouse reference”, holding the < ALT > key and dragging the mouse will select the hair within the marquee area, or deselect if also the < SHIFT > key is held. Stereo edit mode Enabling stereo mode allows replicating the styling done on one side of the model automatically on the opposite side.
If you style hair on the left side of a figure, if the model is symmetrical, changes will be applied automatically on the right side as well. Toggle occlusion editing This setting is enabled by default and prevents the modification of hair points occluded by the model geometry. It’s a great help to avoid accidental or unknowingly editing on hair that are not visible because of the occlusion. However, in some occasions, it might be convenient to turn it off.

11 Look at my Hair manual
Clump tool This tool allows clumping the guide hair point within the brush area, as displayed in the image below.
Figure 8: effect of the clump tool on a group of guide hair
Figure 9: styling controls

12 Look at my Hair manual
Deformers Before even starting to comb and style hair, it’s advisable to give them an initial shape that conforms approximately to the model. In Figure 10, you see how hair look on Genesis at first: by using the “spherize”, “tilt” and “taper” deformers I can quickly shape the hair giving a proper direction and initial styling (note that some deformers even allow to choose one or more directional axes). This makes things much easier for later styling action.
Figure 10: the deformers currently available
Figure 11: deformers applied on initial Genesis guides allow to give already a good hair style

13 Look at my Hair manual
The next series of controls available in the styling section are not applying to the guides but will affect the final hair instead (i.e. the ones that will be exported). Preview hair This button toggles the hair preview to give an approximate representation of what the exported hair will look. Acting on the density slider you can increase or decrease the preview hair population. Random roots This slider, set at maximum by default, scrambles root placement so that hair will produce a random and diversified cover. Random length This slider allows to reduce each hair length by a unique random coefficient ranging from 0 to 50% of each hair length.
Frizz effects In order to produce a diversified and more natural result, it’s possible to frizz both roots and tips. The process is trivial; enabling the Preview Hair feature you’ll see how tips and/or roots can be bent and frizz using the above controls, and produce a nice variation of hair. Here below a simple example of how frizz affects hair.
Figure 12: on the left, example of frizz applied to roots; on the right, frizz applied to tips
To note that if Preview Hair is on, each time you style the guides, the preview hair will be recalculated as well.

14 Look at my Hair manual
3D PAINTING This feature allows the definition of density maps interactively, by painting directly on the model. Important to understand that each surface will have its own density map, and each map has to be painted separately. So, to make an example, if you load Genesis you can define density maps for the SkinTorso surface, then switch to the SkinArm surface and define the density map for the armpits, and so on.
From the 3D Paint controls panel (see picture above) you can select the map to paint from the combo box, switch it on or off, reset it to zero density (the map will be filled in white) or full density (the map will be filled in red).
By default, density maps are all at 100% (and so completely red), meaning full cover. If you like, you can reset the map to density zero, and start painting using your mouse or tablet. In this example (picture on the left), I painted some areas on the chest where I actually want hair to be. Areas in white (zero density) won’t have any hair cover; shades of red will interpolate and produce the right amount of density to apply. On the right you can see the result: the areas painted in red will receive hair cover; the cover density will be more or less intense according to the intensity of the red pixels. As mentioned in the “Keyboard and mouse reference”, you can paint density directly with the mouse, and decrease or erase density holding the < SHIFT > key while painting.
15 Look at my Hair manual
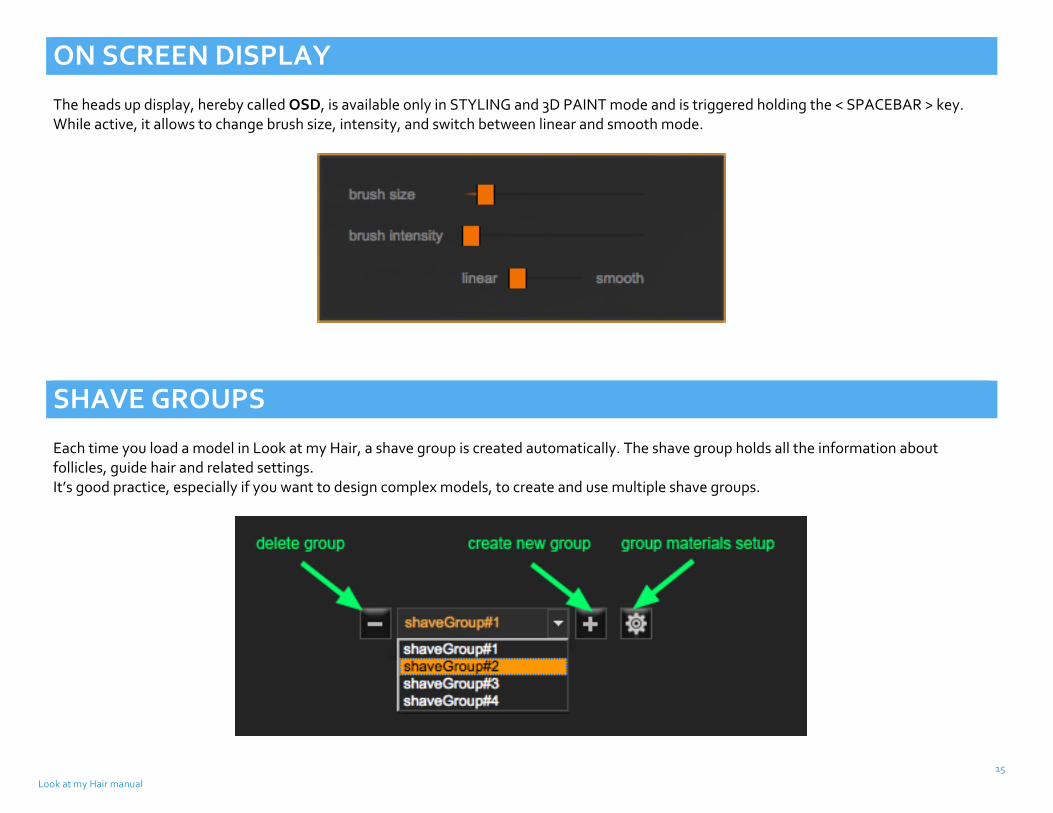
ON SCREEN DISPLAY The heads up display, hereby called OSD, is available only in STYLING and 3D PAINT mode and is triggered holding the < SPACEBAR > key. While active, it allows to change brush size, intensity, and switch between linear and smooth mode.
SHAVE GROUPS Each time you load a model in Look at my Hair, a shave group is created automatically. The shave group holds all the information about follicles, guide hair and related settings. It’s good practice, especially if you want to design complex models, to create and use multiple shave groups.

16 Look at my Hair manual
For example, if you load the Genesis figure, you might use the initial shave group for the hair, create a second shave group for the eyebrows, one for the mustaches, one for the beard and so on. This way you may not only work independently on each shave group, but also set different materials and properties for each one. If you open the “group materials setup window” (figure on the left), you will be able to setup a vast range of options for the current shave group. You may for example set the root and tip thickness (expressed in micrometers, where 1 micrometer=0.001mm.), the thickness random variance, the shader to be applied on the hair for this specific shave group, root, tip and specular colors, and also the texture and density maps to be used (as explained later, setting texture maps will allow to automatically gather hair colors from the underlying model texture). You get the idea: you can set different hair thickness, colors, shader and maps for each single shave group. There is also a convenient Color presets tool that allows picking human standard colors and applying those to the current material.

17 Look at my Hair manual
LOAD AND SAVE PROJECTS
It’s possible to save and load projects created in Look at my Hair using the two buttons at the top interface panel.
Figure 13: load project
Figure 14: save project
The saved projects are stored in your “Documents/DAZ 3D/Studio/lookatmyhairAM/presets” folder and have an .lmh extension. The project file contains all the hair data information and also the pose and shape configuration of the model used, be it a figure or a simple object. This means that when you want to load a project back for Genesis, to make an example, you will just need to load Genesis in Studio, start Look at my Hair and open a project you saved earlier; the plugin will automatically setup Genesis with the pose and shape presets read from the file and apply the hair information too.

18 Look at my Hair manual
PROGRAM OPTIONS You may access the program options window clicking the blue button at the bottom right of the interface panel.
Figure 15: program options
You can change the canvas background image with your preferred one, the number of points per hair (the default 17 are already a good choice, but if you plan to create very curly hair you might want to raise this number of to 4o or even more; on the contrary, very short hair, such has the beard, will probably require no more than 7 point to look good), toggle multi-‐threading support (even if it’s advisable to leave it on), and guide and preview hair colors. Click the save button to apply the options and close the window.

19 Look at my Hair manual
HOW TO STYLE HAIR To better explain how to efficiently style hair, soon there will be also a series of tutorial movies available on my Youtube Channel. In Look at my Hair, each hair is made of a fixed number of points (default is 17). The points are constrained and bound to each other so that moving one hair point will affect at some extent also the others. Next illustration should explain better how that works.
Figure 16: in both examples, pulling selected hair points (the ones within the red cursor area) affects also the other ones
Styling hair and producing a nice model requires patience and practice. The first advice, as mentioned at page 10, is to use deformers to give the hair a basic shape that we can use as a valid starting point.

20 Look at my Hair manual
Figure 17: using deformers such as the spherize is a great way to create an initial shape
Figure 18: combing hair from this camera projection is not efficient
Figure 19: a much better approach; combing from this direction allows to select hair points more precisely and have a better visual
In the example above (Figure 15), I initially created a basic hair model using the spherize and taper deformers. In Figure 16, an example of combing hair from the wrong viewpoint. Hairs are actually pulled down, but it’s difficult to select precisely which points to grab (notice that I’m not selecting only the tips, but also points close to the hair root), and because of that all the hair will result “flattened”. In Figure 17, I’m using a better approach. Combing hair from the front is the right choice: I’m able to easily grab the hair tip points, pull down and give a better conforming shape, with an immediate visual check of the action performed. So remember that in order to comb hair efficiently, the best viewpoint to do it is from the side where hair are displayed in front of the canvas, rather than in front of the underlying model. While this notion may seem a bit abstract, you’ll easily understand it with a very few practice. Scaling hair is straightforward and I don’t think it needs an explanation. I’d like to spend a few words on the scissors tool instead. In order to have the scissors working you don’t have to select the root point. The next figures will explain this concept better.

21 Look at my Hair manual
In the left image, scissors won’t cut because the root point is within the selection. On the right image, scissors will work as expected and cut the two points within the selection.

22 Look at my Hair manual
PARTING HAIR EXAMPLE To create a hair model with parting hair I will cheat using two shave groups, one for the left hair side and one for the right side.
Figure 20: Follicle defined on the right side of the head
Figure 21: the guide hair for these follicles, after some spherize and simple combing

23 Look at my Hair manual
Figure 22: same procedure, this time on the left side
Figure 23: also in this case, some deformers and simple
combing where enough to create a basic shape
I’m now going to toggle hair preview on to have a quick idea of how exported hair will look like.

24 Look at my Hair manual
I might have done this also using a single shave group, but it would have required more time and efforts in order to define the hair selection, part them and achieve the same result.
Figure 24: using two shave groups allowed to
quickly define a parting hair model
Figure 25: some frizz effects to give a random look to hair tips

25 Look at my Hair manual
A NOTE ABOUT DENSITY MAPS Since exported hairs are generated interpolating through the guides, who rely on follicles (i.e. polygonal geometry), the contour of the areas covered with hair can be jagged and very sharp. That’s where density maps come into play. Besides using them to vary hair density, they allow defining smooth contours and discarding unwanted areas, and so we can use them as “cut” maps in this case. In the following Figure you can see how I used the density map to precisely define the areas that I wanted covered with hair.
Figure 26: from the left, object follicles, hair preview, and a density map used as cut map

26 Look at my Hair manual
SYNCING OBJECT WITH STUDIO Objects imported from Studio to Look at my Hair are actually bound to each other. This means that if you style your hair, and then go back to Studio, pose your model, use some morphs and get back to Look at my Hair, it will ask to resynchronize the information just clicking on the canvas. See the following example:
In Step1, I’ve prepared a very basic hair model; in Step2, I switch to Studio and apply a pose to the model.

27 Look at my Hair manual
In Step3, after I switch back to Look at my Hair, I’m notified that data needs to be resynchronized. I click the large resync button on the canvas, and in Step4 you can see how the hair information is properly recalculated to match the new model pose. However, in the Studio viewport you may just pose, shape and transform the figure as you wish, and the viewport data will be automatically computed and made available, so that you can render a new pose at anytime. This is to say that you need to manually resync only when you are going back to Look at my Hair for more styling.

28 Look at my Hair manual
EXPORTING HAIR You may access the export window clicking the following button:
Figure 27: open the export window
The settings available in the export window are straightforward. Geometry type: you can choose whether exporting hair as RenderMan curves, a textured Alias Wavefront .obj file collection or instancing a collection or props by replacing the exported hair with those. RenderMan curves render very fast and are highly optimized; if you plan to render your scene in Studio it’s usually the best choice.
Exporting hair as an .obj collection will create an .obj file for each shave group (plus a companion texture) that you can use in any external application capable of reading the Alias Wavefront .obj file format. If the “Load in Studio” option is disabled, also the model geometry and all the texture maps attached to it will be exported as well. Instancing a prop collection will be explained separately later. Load in Studio: this option relates only to the .obj collection option. If you know you’ll be using the collection in an external application and you do not need to display it in Studio, you may uncheck this option. Note that the exported .obj collection files are in your “Documents/DAZ 3D/Studio/ lookatmyhairAM/presets/” folder. Geometry set name: it’s good practice to assign a name to your hair model so that it will be easily identifiable in Studio. Hair complexity: this slider reduces the number of hair segments upon exporting. To make an example, using the standard number of hair points, 17 (thus 16 segments), and setting this slider to the middle will produce hair with 8 segments. Hair geometry will be simpler and less detailed, but rendering will take less resources and time. Below this option you’ll find a list of the shave groups currently used in
the project, with the possibility to type the desired amount of hair for each group. Note that the value of desired hair won’t account for a density map. As a side note, a human head hair count it’s usually between 90000 and 120000; diameter may range from 17 to 180 micrometers (1 micrometer=0.001 mm.).

29 Look at my Hair manual
INSTANCING GEOMETRY As mentioned in previous chapter, it is possible to export instanced geometry in place of hair. You just need to load some props of your choice in Studio, style some hair and choose “Instanced geometry” from the export dialog: the operation will result in the model being populated with props instances instead of hair. Here below a series of images that will explain better how this works.
In the left figure you can see the objects loaded in Studio: a sphere, which will be used to grow and style hair, and two flower props that will be used to replace hair. In the image on the right, I made some simple styling and opened the export dialog. Here, I’ve chosen to use “instanced geometry”, the number of instances to use, picked the props available in the collection list (you can decide which props you actually want to use: one, some or all of the available ones) and exported. The slider at the bottom, defined as “random Y”, allows to add a random rotation to each prop instance Y axis, in order to get a more diversified look.

30 Look at my Hair manual
The render result is displayed below. You see how instead of hair, we got a sphere completely covered with prop instances, which have been assigned and mixed randomly. Remember that the instanced props will follow hair orientation and scale: so if you style the guides to be longer on some parts of the model, shorter on others, that will be applied to instances as well. The same goes for orientation: the instanced props will follow the hair angle relative to the object surface. Creating a very large number of instances may take its time: using about 3000 instances takes 2-‐3 seconds, creating 100000 instances may take up to 6-‐7 minutes. It’s always better to use a smaller number of complex props (geometry-‐wise), rather than using a very large number of very simple props.
Figure 28: the sphere populated with instanced flower props

31 Look at my Hair manual
RENDERING IN STUDIO Once you have exported hair as RenderMan curves, in the Studio Scene panel you will find a Look at my Hair container node containing an array of items named according to the following syntax: [geometry set label]_Grp_[shave group number]_RMan_[surface] In practice, Look at my Hair will create a RenderMan object for each shave group and related surface. Each RenderMan object has a material that you can edit directly through the Surface panel. The material is inherited from the “material setup” configuration done in Look at my Hair (see page 14). So if you have setup a certain shave group to use the Standard Shader, once that group is exported in Studio you will be able to modify its properties directly form the Surface Panel.
Figure 29: Material setup for current shave group
As you can see I’ve setup the shave group with a red color for the root, blue for the tip and white as specular. No texture maps associated to the group at this time. Also, I’ve chosen to use the Standard Shader. Now, let’s see how this material is available in the Studio Surface panel after exporting the hair.

32 Look at my Hair manual
As you can see in the Figure on the left, the Surface panel inherited Look at my Hair settings for the current shave group. At this point I can easily change the colors and other properties directly from the Surface panel, experiment with different settings and do some test renders. As I mentioned earlier, there are three possible shaders that can be used: the Standard Shader, the Advanced Shader and the Ambient Occlusion Shader. The Standard Shader, despite the limited number of options, provides a very good solution for hair shading. It’s the one that you will most likely use more often. If you aim to produce even more complex shading, try the Advanced Shader. It provides up to 18 different settings that allow customizing hair shading even more. It’s beyond the scope of this manual to explain what each of those settings does, also because the combinations are virtually infinite. The Ambient Occlusion shader is very useful especially on short animal fur, as it allows blending the hair roots with the underlying body mesh almost seamlessly. Finding the right “alchemy” for shaders and lighting is a matter of practice and experimenting. I encourage you to try different options and settings, run some test renders and learn from them, noting how changing parameters affects the result each time.
For preview purposes the default render settings are just fine. However, for a production render, lighting and render settings are critical and they need to be properly set. To achieve high quality I usually use an UberEnvironment Light or three-‐point lighting (a technique that involves using 3 lights equally spaced in order to get an even illumination) and use the render settings as displayed in the following figure.

33 Look at my Hair manual
I also like to add a simple SpotLight or DistantLight set to provide specular illumination only. Shading rate and Pixel Samples are perhaps the most critical settings. Since hairs have a relative small section, a reasonably low shading rate will ensure proper calculation of pixel antialiasing, so that each hair will have a smooth contour. Sometimes, especially if camera is quite far from the hair, you’ll need to use even a 0.001 value for Shading Rate, so that the curves will be accounted with higher precision.
The left figure at page 29 shows a render done with very low settings, no lighting and for preview purposes only; the figure at the right is a render done with medium settings, one specular Pointlight, and one UberEnvironment light.

34 Look at my Hair manual

35 Look at my Hair manual
KNOWN ISSUES AND LIMITATIONS There are still a number of new features, issues and limitations that are currently being taken care of. Here is the current list of issues and limitations:
-‐ The maximum number of shave groups is 16. -‐ When using DAZ figures with multiple LOD levels, only Base Resolution is allowed at this time. This limitation will be relaxed in an
upcoming update. -‐ Current version is capable of adding hair/fur to one object in the scene at a time. This limitation will be relaxed in an upcoming update. -‐ Saving and loading LAMH objects to .duf is not currently possible. -‐ Collision detection between guide hair and the underlying model is currently being developed, and will be added in a future update.