Embed Size (px)
Citation preview

2
CONTENTS
About Look to Learn 3
How to install Look to Learn 4
Licensing your software 4
Getting started 5
Calibration 5
Look to Learn activities 8
Sensory 9
Explore 11
Target 12
Choose 13
Control 15
Analysing activities 17
Changing pictures and videos 18
Keyboard shortcuts 19
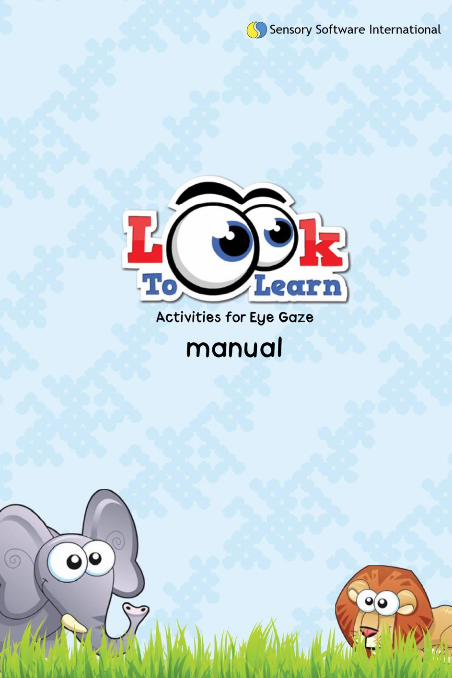
ABOUT LOOK TO LEARN
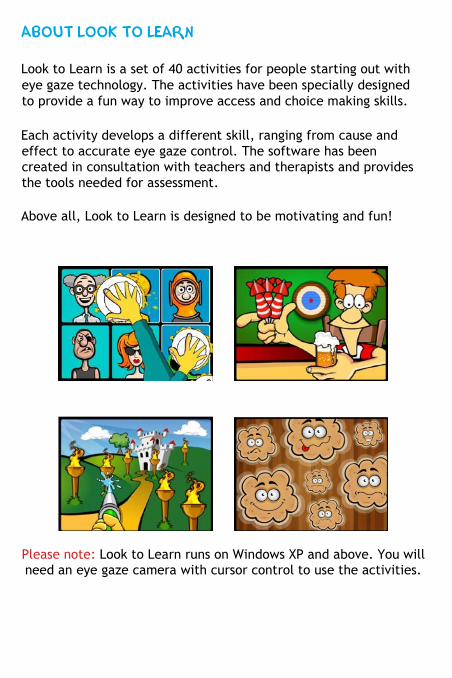
Look to Learn is a set of 40 activities for people starting out with
eye gaze technology. The activities have been specially designed
to provide a fun way to improve access and choice making skills.
Each activity develops a different skill, ranging from cause and
effect to accurate eye gaze control. The software has been
created in consultation with teachers and therapists and provides
the tools needed for assessment.
Above all, Look to Learn is designed to be motivating and fun!
Please note: Look to Learn runs on Windows XP and above. You will
need an eye gaze camera with cursor control to use the activities.
4
HOW TO INSTALL LOOK TO LEARN
1. Start the installation by putting the DVD into your computer’s
DVD drive.
2. Follow the on screen instructions to install the software.
3. Alternatively you can install Look to Learn on any computer by
visiting http://installers.sensorysoftware.com.
LICENSING YOUR SOFTWARE
When you first install Look to Learn you will have access to three
of the activities: Hose, Custard Pies and Dinner Time.
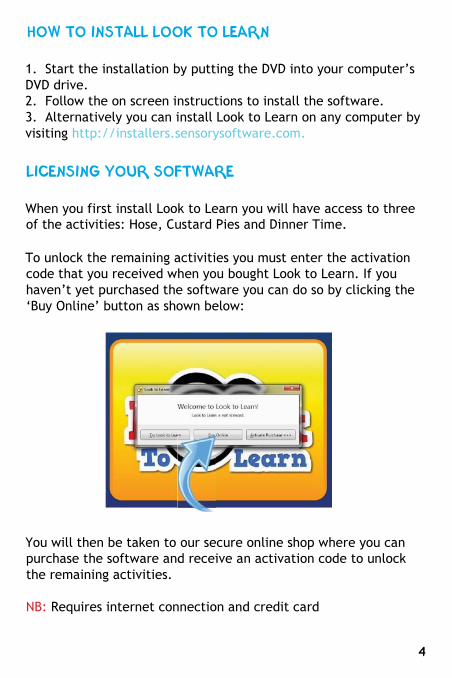
To unlock the remaining activities you must enter the activation
code that you received when you bought Look to Learn. If you
haven’t yet purchased the software you can do so by clicking the
‘Buy Online’ button as shown below:
You will then be taken to our secure online shop where you can
purchase the software and receive an activation code to unlock
the remaining activities.
NB: Requires internet connection and credit card

GETTING STARTED
Setting Up You need an eye gaze camera to use Look to Learn. You must
enable Windows control so that your eyes are moving the mouse
cursor.
Most of the early activities only use the mouse movement and will
result in an instant reaction. Where a selection is needed, the
user will need to look at the object on screen for 1-2 seconds to
confirm the selection.
CALIBRATION
Your eye gaze system needs to measure your eyes to determine
where you are looking on the screen. This process is called
calibration.
Recording a good calibration is important for accurate eye control
of Look to Learn, however it is less important for activities that
use large or no targets such as Magic Mouse and Magic Squares.
When somebody is using eye gaze for the first time, it can be
quite effective to use somebody else’s calibration to get started.
This enables the user to begin enjoying Look to Learn without
having to calibrate.
6
Calibration Tips and Techniques
1. Use a good set up
Each eye gaze camera works in a slightly different way, but for a
standard calibration we recommend starting with the following
settings:
• A dark background colour
• 5 point calibration
• Use a motivating image or a high contrast colour
• Medium speed or step-through calibration
2. Keyboard step-through
Some eye gaze cameras allow you to use a keyboard step-through
calibration. This means that you are in control of when to record
the calibration points. You should press the key only when the
user is looking directly at the calibration target.
To do this effectively you will need to look at the user’s eyes and
analyse when they are looking at the calibration target.
3. Use image for calibration
A good way of encouraging users to calibrate is to use images they
are familiar with. Please check if your eye gaze camera has this
feature.
4. Improve points
Some eye gaze cameras allow you to recapture a reading. It is
worth taking the time to try and improve failed calibration points
for better accuracy.
5. Change colour contrast
A dramatic colour contrast can make it easier for some users to
track the calibration point. The most effective colour contrast for
visually impaired users is blue on a yellow background.
6. Things to watch out for
• Reflective frames on glasses
• Droopy eyelids or long eyelashes (try moving the screen higher
to encourage eyes to open)
• Any bright light shining onto the eye gaze camera
7. Positioning setup tips
• Use the camera’s track indicator to ensure the eyes are at the
correct height and distance from the screen.
• Move the computer into the correct position, not the user!
8. Think about your environment
The environment in which you use eye gaze can make a big
difference to its success. For the best results:
• Remove unnecessary distractions like posters, televisions and
people!
• Use a quiet location
• Avoid too much light – a darker room will make the content
look more attractive
8
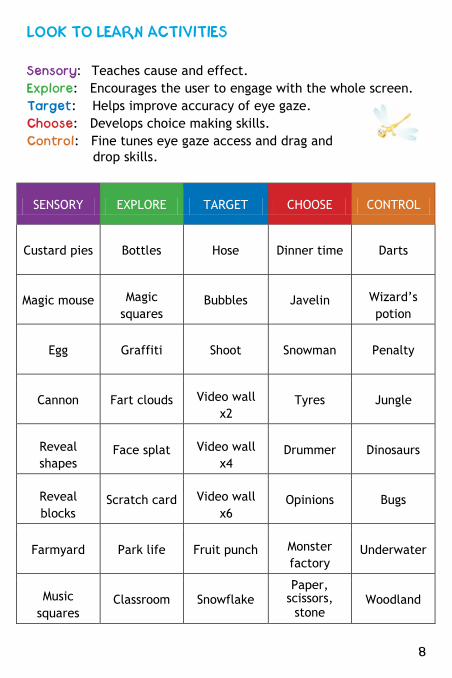
LOOK TO LEARN ACTIVITIES
Sensory: Teaches cause and effect.
Explore: Encourages the user to engage with the whole screen.
Target: Helps improve accuracy of eye gaze.
Choose: Develops choice making skills.
Control: Fine tunes eye gaze access and drag and
drop skills.
SENSORY EXPLORE TARGET CHOOSE CONTROL
Custard pies Bottles Hose Dinner time Darts
Magic mouse Magic
squares Bubbles Javelin Wizard’s
potion
Egg Graffiti Shoot Snowman Penalty
Cannon Fart clouds Video wall
x2 Tyres Jungle
Reveal
shapes Face splat Video wall
x4 Drummer Dinosaurs
Reveal
blocks Scratch card Video wall
x6 Opinions Bugs
Farmyard Park life Fruit punch Monster
factory Underwater
Music
squares Classroom Snowflake
Paper, scissors,
stone Woodland
SENSORY
Custard pies
Look at each photo as it appears on the screen to throw a custard
pie. We have included 6 photos but you can change these to your
own photos (see p.18). This activity is great for analysing
responses to content appearing in different areas of the screen.
Magic mouse
A good activity to start using eye gaze for the first time. Wherever
you look on the screen you will create a special effect along with
a sound effect. When the star appears you can look at this to
move on to the next effect.
Egg
Look at the egg to break the shell and see which animal is inside.
It takes 5 seconds for the animal to emerge. The egg activity
encourages you to focus on a particular area of the screen.
Cannon
Splat paint all over the brick wall by looking at different areas.
The cannon fi res automatically so this is one of the easier
activities.
Reveal shapes
An image is hidden behind the shapes. Look at the shapes and
they will disappear to reveal the image. Changing the image to a
familiar photo may help with motivation (see p.18).
Reveal blocks
Reveal blocks works in the same way as Reveal shapes, but there
is less visual distraction. It leads nicely towards alternative
10
communication software such as The Grid 2 (also from Sensory
Software).
Farmyard
Look at the barn door for 3 seconds for it to open and reveal one
of the animals.
Music squares
Look at each instrument to hear it play. All the instruments are
playing the same tune so see if you can hear the whole band by
looking at each instrument. Look at an instrument again to make
it stop playing.
EXPLORE
Bottles The aim of Bottles is to smash as many bottles as you can. Look at
a bottle to smash it and see if you can get them all.
Magic squares As you look around the screen you will make the musical squares
appear. If you look at the same one more than once it will change
colour and play a different sound.
Graffiti Spray paint over the wall by looking around the screen. Look at
the different colours to change your paint or at the circles to
change the size of the spray. Look at the bottom right-hand
corner to clear the screen.
Fart clouds
For people with a certain sense of humour! Look at the fart clouds
to make them fart.
Face splat
Throw a custard pie at each of the characters by looking at them.
This activity is really rewarding, even for people who are not able
to access small targets.
Scratch card
Look around the screen to scratch away each of the special
textures to reveal an image. You can change the images to
increase motivation.
Park life
Explore this interactive visual scene and make it come to life.
Classroom Look at the objects around this interactive visual scene to make the classroom come to life.

12
TARGET
Hose
Clean the car, put out the fires, water the plants,
squirt the bugs and scare the birds – using the giant hose pipe.
Look at the objects to fi re the hose and complete the level.
Bubbles By looking at the bubbles you will pop them and make them split
into smaller and smaller bubbles.
Shoot As you work through the levels you will need to shoot more
targets. For this activity you are up against the clock. Why not try
and set a high score?
Video wall x2, x4 and x6
The video wall activities allows you to display 2, 4 or 6 videos on
the screen. When you look at a picture it will play a video. As
soon as you look away it will stop.
Please note: you can use your own videos in Look to Learn but
they must be in flash (.flv) format (refer to p.18).
Fruit punch
Flatten the crazy fruit faces with the giant boxing glove. To do
this you need to look at each piece of fruit as it floats across the
screen. Squash 20 pieces of fruit to complete the activity.
Snowflake
By looking at the snowflakes as they fall you will be able to build
a snowman. If you manage to get 25 snowflakes you complete the
activity and the snowman will come to life.
CHOOSE
To make selections in the Choose activities, you need to look at them for 1-2 seconds.
Dinner time
Choose what the man is going to eat for his dinner from the right
hand side of the screen.
Javelin
Choose which object the athlete will throw. Look at the option
you wish to choose on the left-hand side of the screen.
Snowman
Choose how you are going to help the snowman. Look at the
options on the right-hand side of the screen.
Tyres
Choose which tyres to give to Colin the Car. Look at the options
on the left-hand side of the screen.
Drummer Choose which drumsticks Diego the Drummer should use. Look at
the options on the right-hand side of the screen.
Opinions
Have a look at the image in the centre of the screen before
deciding if you LOVE or HATE it! If you love it then look at the
green happy face. If you hate it then look at the red angry face.
14
This is a good activity for transition towards alternative
communication and choice making.
Monster factory
Create your own scary monster at the Look
to Learn Monster Factory! Look at your
choice of mouth, eyes, accessory and body.
Paper, scissors, stone
A classic activity of Paper, scissors, stone.
• Paper beats stone by wrapping it;
• Stone beats scissors by blunting them;
• Scissors beats paper by cutting it.
This activity is best of 3. It helps develop targeting and choice
making skills.
CONTROL
Darts
Look at the pub scene to start the activity. Click as close to the
bull’s eye target as you can. Darts in outer rings earn 10 points,
50 in the blue ring and 100 if you can get the bull’s eye.
Wizard’s potion
The Wizard is making a magic potion using 4 special ingredients.
You have to watch carefully as he adds them to the cauldron
and then copy his recipe exactly. Select each of the coloured
ingredients in the correct order. See how many steps you can
remember.
Penalty
This activity is a penalty shoot-out. You and Molly the Monster
take it in turns to have 5 attempts to score a goal.
Begin the activity by looking at the football. You can now choose
your player and the colour of kit you want to wear.
To take a penalty, choose the area of the goal that you want to
shoot for and look at it. The player will then take a shot and Molly
the Monster will try and save it.
Choose the swap symbol to play as the goalkeeper; look at the
area of the goal you wish to dive into.
Jungle
Create a jungle scene: look at an animal to select it then look at
one of the stars to place it in the scene.
16
Dinosaurs
Create a pre-historic scene: look at a dinosaur to select it then
look at one of the stars to place it in the scene.
Bugs
Create a scene of creepy crawlies: look at a bug to select it then
look at one of the stars to place it in the scene.
Underwater Create a underwater scene: look at an animal to select it then
look wherever you want to place it in the scene.
Woodland
Create a woodland scene: look at an animal to select it then look
wherever you want to place it in the scene.
ANALYSING ACTIVITIES
Look to Learn includes a built-in gaze analysis tool that will tell you
where somebody has looked during an activity. It can also be used
to analyse the range of access to the screen, the relevance of what
the user is looking at and to measure progress.
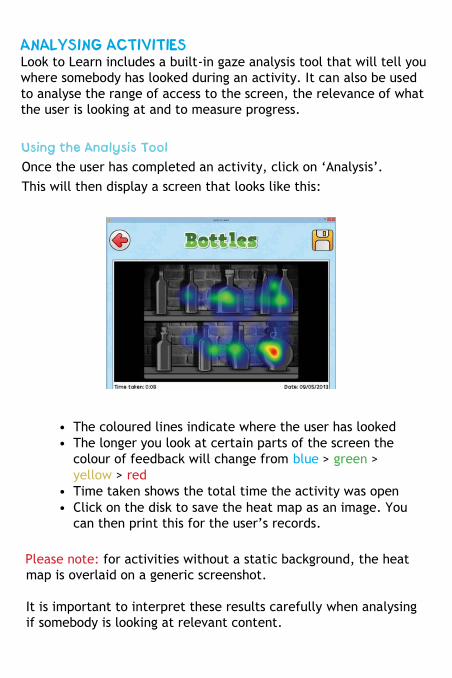
Using the Analysis Tool Once the user has completed an activity, click on ‘Analysis’.
This will then display a screen that looks like this:
• The coloured lines indicate where the user has looked
• The longer you look at certain parts of the screen the
colour of feedback will change from blue > green >
yellow > red
• Time taken shows the total time the activity was open
• Click on the disk to save the heat map as an image. You
can then print this for the user’s records.
Please note: for activities without a static background, the heat
map is overlaid on a generic screenshot.
It is important to interpret these results carefully when analysing
if somebody is looking at relevant content.
18
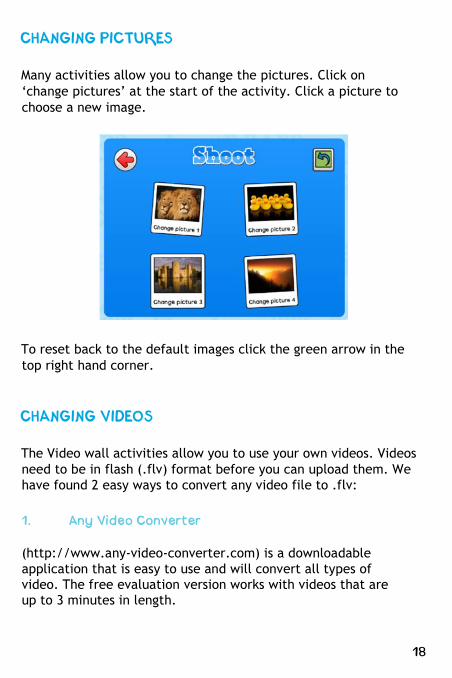
CHANGING PICTURES
Many activities allow you to change the pictures. Click on
‘change pictures’ at the start of the activity. Click a picture to
choose a new image.
To reset back to the default images click the green arrow in the
top right hand corner.
CHANGING VIDEOS
The Video wall activities allow you to use your own videos. Videos
need to be in flash (.flv) format before you can upload them. We
have found 2 easy ways to convert any video file to .flv:
1. Any Video Converter (http://www.any-video-converter.com) is a downloadable
application that is easy to use and will convert all types of
video. The free evaluation version works with videos that are
up to 3 minutes in length.
2. SaveTube (http://www.savetube.com/) enables you to save any video
from YouTube in .flv format:
a. Find the video you wish to use from YouTube
b. Copy the URL
c. Go to the website http://www.savetube.com/
d. Paste in the URL
e. Choose to save the video as .fl v format
f. Windows will automatically save to your downloads
folder - you may wish to move the fi les to My
Videos
KEYBOARD SHORTCUTS
Use these keyboard shortcuts to navigate Look to Learn without a
mouse or touch screen:
A loads analysis tool
D restores default pictures or videos
P or V changes pictures / changes videos
S starts Look to Learn / starts an activity
/ saves heat map
1-9 loads the corresponding activity on the screen /
changes corresponding images or videos
Enter on home screen will start Look to Learn
Backspace takes you to previous screen
Escape takes you to previous screen / exits an activity
20