Embed Size (px)
Citation preview
Programming Manual
Logix 5000 Controllers Security 1756 ControlLogix, 1756 GuardLogix, 1769 CompactLogix, 1769 Compact GuardLogix, 1789 SoftLogix, 5069 CompactLogix, 5069 Compact GuardLogix, Studio 5000 Logix Emulate
Important user information
Read this document and the documents listed in the additional resources section about installation, configuration, and operation of this equipment before you install, configure, operate, or maintain this product. Users are required to familiarize themselves with installation and wiring instructions in addition to requirements of all applicable codes, laws, and standards.
Activities including installation, adjustments, putting into service, use, assembly, disassembly, and maintenance are required to be carried out by suitably trained personnel in accordance with applicable code of practice. If this equipment is used in a manner not specified by the manufacturer, the protection provided by the equipment may be impaired.
In no event will Rockwell Automation, Inc. be responsible or liable for indirect or consequential damages resulting from the use or application of this equipment.
The examples and diagrams in this manual are included solely for illustrative purposes. Because of the many variables and requirements associated with any particular installation, Rockwell Automation, Inc. cannot assume responsibility or liability for actual use based on the examples and diagrams.
No patent liability is assumed by Rockwell Automation, Inc. with respect to use of information, circuits, equipment, or software described in this manual.
Reproduction of the contents of this manual, in whole or in part, without written permission of Rockwell Automation, Inc., is prohibited.
Throughout this manual, when necessary, we use notes to make you aware of safety considerations.
WARNING: Identifies information about practices or circumstances that can cause an explosion in a hazardous environment, which may lead to personal injury or death, property damage, or economic loss.
ATTENTION: Identifies information about practices or circumstances that can lead to personal injury or death, property damage, or economic loss. Attentions help you identify a hazard, avoid a hazard, and recognize the consequence
Important: Identifies information that is critical for successful application and understanding of the product.
Labels may also be on or inside the equipment to provide specific precautions.
SHOCK HAZARD: Labels may be on or inside the equipment, for example, a drive or motor, to alert people that dangerous voltage may be present.
BURN HAZARD: Labels may be on or inside the equipment, for example, a drive or motor, to alert people that surfaces may reach dangerous temperatures.
ARC FLASH HAZARD: Labels may be on or inside the equipment, for example, a motor control center, to alert people to potential Arc Flash. Arc Flash will cause severe injury or death. Wear proper Personal Protective Equipment (PPE). Follow ALL Regulatory requirements for safe work practices and for Personal Protective Equipment (PPE).
Allen-Bradley, Rockwell Software, Rockwell Automation, and TechConnect are trademarks of Rockwell Automation, Inc.
Trademarks not belonging to Rockwell Automation are property of their respective companies.
Rockwell Automation Publication 1756-PM016N-EN-P - November 2018 3
Summary of changes
This manual includes new and updated information. Use these reference tables to locate changed information.
Grammatical and editorial style changes are not included in this summary.
Global changes
None in this release.
New or enhanced features
This table contains a list of topics changed in this version, the reason for the change, and a link to the topic that contains the changed information.
Topic Name Reason
Add an LV instruction to monitor license status on page 35
Added information on the License Validation (LV) instruction.

Rockwell Automation Publication 1756-PM016N-EN-P - November 2018 5
Table of contents
Studio 5000 environment.................................................................................................... 7 Additional resources ............................................................................................................. 7 Legal notices ........................................................................................................................... 8
Chapter 1
Introduction ........................................................................................................................ 11 FactoryTalk Security ......................................................................................................... 11
Permission sets and Logical Names ........................................................................ 11 Source Protection ............................................................................................................... 12
Chapter 2
Introduction ........................................................................................................................ 15 Considerations and limitations for License protection and locked components ................................................................................................................. 16
Enable source protection .................................................................................................. 18 Disable the Configure Source Protection menu option ............................................. 18 Protect components with Source Keys .......................................................................... 19
About source keys ....................................................................................................... 20 Source key names ........................................................................................................ 21 Source key file .............................................................................................................. 21 Apply Source Key protection to a component ..................................................... 22
Specify a Source Key file and location ............................................................ 25 View components without a key ..................................................................... 26 Verify source key protection on a component .............................................. 27 Remove access to a protected routine ............................................................. 28
License Source Protection for components .................................................................. 28 Protect components with Licenses ......................................................................... 28 Add Execution Protection to License-protected components .......................... 30 Apply License Protection to one or more components ...................................... 31 Lock a component ...................................................................................................... 34 Lock all License-Protected content ........................................................................ 35 Add an LV instruction to monitor license status ................................................. 35 Share License privileges with other users on your network ............................... 35
Provide License privileges to other users ........................................................ 36 Provide license privileges for remote desktop users ..................................... 39
Summary of changes
Preface
Security overview
Configuring source protection in the Logix Designer application
Table of contents
6 Rockwell Automation Publication 1756-PM016N-EN-P - November 2018
Appendix A
Accessing a secured controller ......................................................................................... 46 Removing security from a controller with the CPU Security Tool ......................... 48 Removing a password ........................................................................................................ 50
Appendix B
Product policies and securable actions ........................................................................... 54
Securing a ControlLogix controller with the Logix CPU Security Tool
Product policies and securable actions supported by FactoryTalk Security
Index
Rockwell Automation Publication 1756-PM016N-EN-P - November 2018 7
Preface
This manual explains how to configure security for the Logix Designer™ application. It also explains how to set up source protection for your logic and projects. This manual is one of a set of related manuals that show common procedures for programming and operating Logix 5000 controllers.
For a complete list of common procedures manuals, refer to the Logix 5000 Controllers Common Procedures Programming Manual , publication 1756-PM001 .
The term Logix 5000 controller refers to any controller based on the Logix 5000 operating system.
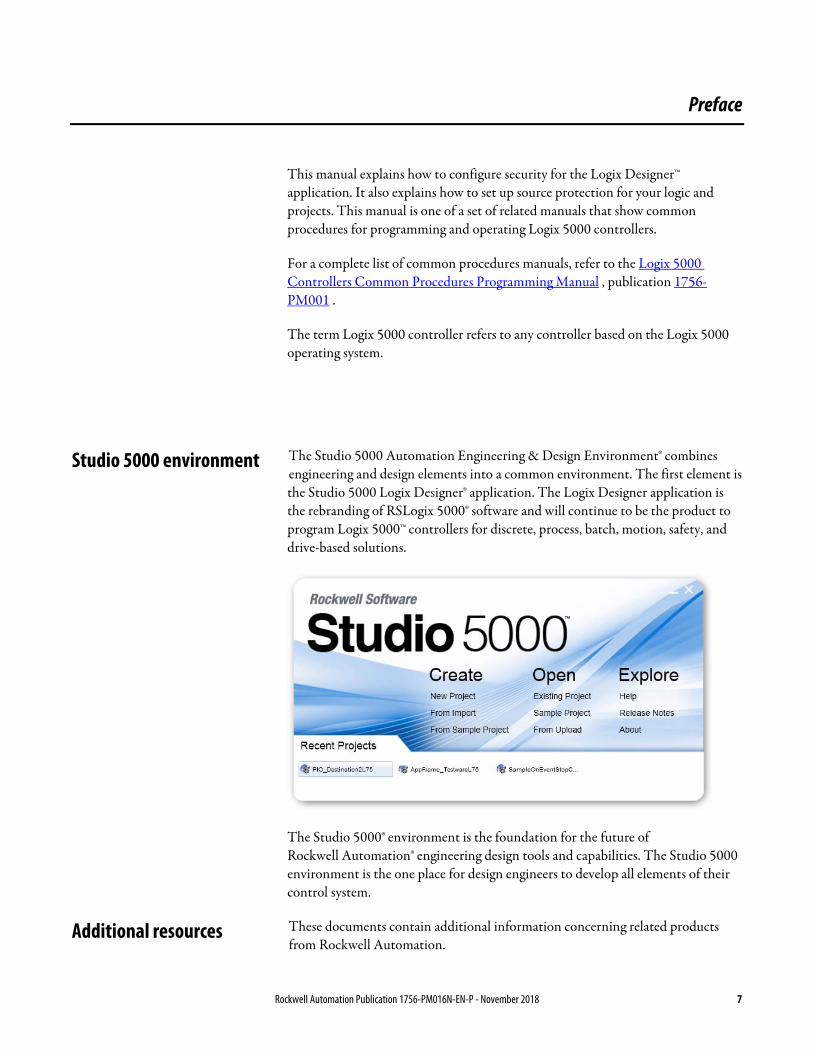
The Studio 5000 Automation Engineering & Design Environment® combines engineering and design elements into a common environment. The first element is the Studio 5000 Logix Designer® application. The Logix Designer application is the rebranding of RSLogix 5000® software and will continue to be the product to program Logix 5000™ controllers for discrete, process, batch, motion, safety, and drive-based solutions.
The Studio 5000® environment is the foundation for the future of Rockwell Automation® engineering design tools and capabilities. The Studio 5000 environment is the one place for design engineers to develop all elements of their control system.
These documents contain additional information concerning related products from Rockwell Automation.
Studio 5000 environment
Additional resources
Preface
8 Rockwell Automation Publication 1756-PM016N-EN-P - November 2018
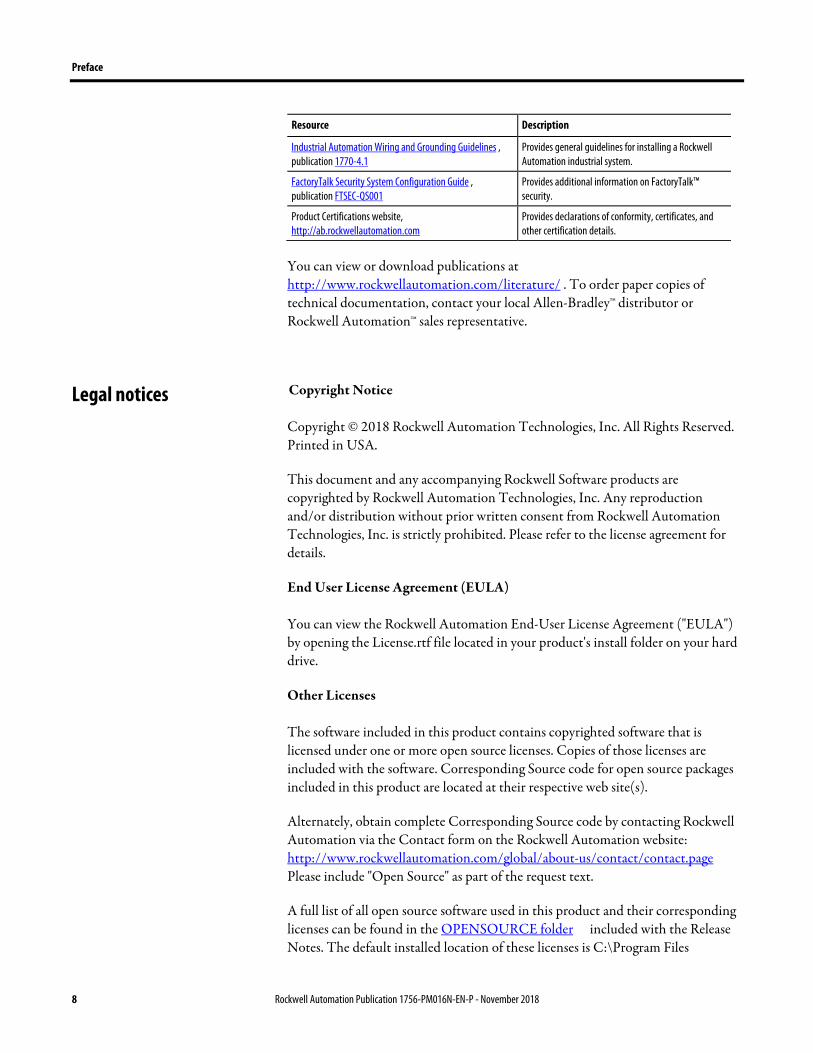
Resource Description
Industrial Automation Wiring and Grounding Guidelines , publication 1770-4.1
Provides general guidelines for installing a Rockwell Automation industrial system.
FactoryTalk Security System Configuration Guide , publication FTSEC-QS001
Provides additional information on FactoryTalk™ security.
Product Certifications website, http://ab.rockwellautomation.com
Provides declarations of conformity, certificates, and other certification details.
You can view or download publications at http://www.rockwellautomation.com/literature/ . To order paper copies of technical documentation, contact your local Allen-Bradley™ distributor or Rockwell Automation™ sales representative.
Copyright Notice
Copyright © 2018 Rockwell Automation Technologies, Inc. All Rights Reserved. Printed in USA.
This document and any accompanying Rockwell Software products are copyrighted by Rockwell Automation Technologies, Inc. Any reproduction and/or distribution without prior written consent from Rockwell Automation Technologies, Inc. is strictly prohibited. Please refer to the license agreement for details.
End User License Agreement (EULA)
You can view the Rockwell Automation End-User License Agreement ("EULA") by opening the License.rtf file located in your product's install folder on your hard drive.
Other Licenses
The software included in this product contains copyrighted software that is licensed under one or more open source licenses. Copies of those licenses are included with the software. Corresponding Source code for open source packages included in this product are located at their respective web site(s).
Alternately, obtain complete Corresponding Source code by contacting Rockwell Automation via the Contact form on the Rockwell Automation website: http://www.rockwellautomation.com/global/about-us/contact/contact.page Please include "Open Source" as part of the request text.
A full list of all open source software used in this product and their corresponding licenses can be found in the OPENSOURCE folder included with the Release Notes. The default installed location of these licenses is C:\Program Files
Legal notices
Preface
Rockwell Automation Publication 1756-PM016N-EN-P - November 2018 9
(x86)\Common Files\Rockwell\Help\<Product>\ReleaseNotes\OPENSOURCE\index.htm.
Trademark Notices
Allen-Bradley, ControlBus, ControlFLASH, Compact GuardLogix, Compact I/O, ControlLogix, CompactLogix, DCM, DH+, Data Highway Plus, DriveLogix, DPI, DriveTools, Explorer, FactoryTalk, FactoryTalk Administration Console, FactoryTalk Alarms and Events, FactoryTalk Batch, FactoryTalk Directory, FactoryTalk Security, FactoryTalk Services Platform, FactoryTalk View, FactoryTalk View SE, FLEX Ex, FlexLogix, FLEX I/O, Guard I/O, High Performance Drive, Integrated Architecture, Kinetix, Logix5000, Logix 5000, Logix5550, MicroLogix, DeviceNet, EtherNet/IP, PLC-2, PLC-3, PLC-5, PanelBuilder, PowerFlex, PhaseManager, POINT I/O, PowerFlex, Rockwell Automation, RSBizWare, Rockwell Software, RSEmulate, Historian, RSFieldbus, RSLinx, RSLogix, RSNetWorx for DeviceNet, RSNetWorx for EtherNet/IP, RSMACC, RSView, RSView32, Rockwell Software Studio 5000 Automation Engineering & Design Environment, Studio 5000 View Designer, SCANport, SLC, SoftLogix, SMC Flex, Studio 5000, Ultra 100, Ultra 200, VersaView, WINtelligent, XM, SequenceManager are trademarks of Rockwell Automation, Inc.
Any Rockwell Automation logo, software or hardware product not mentioned herein is also a trademark, registered or otherwise, of Rockwell Automation, Inc.
Other Trademarks
CmFAS Assistant, CmDongle, CodeMeter, CodeMeter Control Center, and WIBU are trademarks of WIBU-SYSTEMS AG in the United States and/or other countries. Microsoft is a registered trademark of Microsoft Corporation in the United States and/or other countries. ControlNet is a trademark of ControlNet International. DeviceNet is a trademark of the Open DeviceNet Vendors Association (ODVA). Ethernet/IP is a trademark of ControlNet International under license by ODVA.
All other trademarks are the property of their respective holders and are hereby acknowledged.
Warranty
This product is warranted in accordance with the product license. The product’s performance may be affected by system configuration, the application being performed, operator control, maintenance, and other related factors. Rockwell Automation is not responsible for these intervening factors. The instructions in this document do not cover all the details or variations in the equipment, procedure, or process described, nor do they provide directions for meeting every
Preface
10 Rockwell Automation Publication 1756-PM016N-EN-P - November 2018
possible contingency during installation, operation, or maintenance. This product’s implementation may vary among users.
This document is current as of the time of release of the product; however, the accompanying software may have changed since the release. Rockwell Automation, Inc. reserves the right to change any information contained in this document or the software at any time without prior notice. It is your responsibility to obtain the most current information available from Rockwell when installing or using this product.
Environmental Compliance
Rockwell Automation maintains current product environmental information on its website at http://www.rockwellautomation.com/rockwellautomation/about-us/sustainability-ethics/product-environmental-compliance.page
Contact Rockwell
Customer Support Telephone — 1.440.646.3434
Online Support — http://www.rockwellautomation.com/support/
Rockwell Automation Publication 1756-PM016N-EN-P - November 2018 11
Chapter 1
Security overview
This chapter provides an overview of the security features available in the Logix Designer application.
The following features are the main security features that protect controller projects:
• FactoryTalk® Security software, which provides permission-based control.
• Source Protection, which protects the logic in controller projects.
FactoryTalk® Security integrates a common security model across all FactoryTalk enabled products. FactoryTalk® Services Platform (FTSP) includes the FactoryTalk Administration Console that provides the interface for configuring your system. FactoryTalk Services Platform (FTSP) software is installed during the installation of the Logix Designer application.
Use FactoryTalk Security to control access to the logic in your projects with centrally managed, role-based policy enforcement.
For more information about FactoryTalk Security, see the FactoryTalk Security System Configuration Guide , publication FTSEC-QS001 .
Permission sets and Logical Names identify a set of actions that are allowed or denied for one or more user groups or computer groups. You use permission sets and Logical Names to define user permissions in the FactoryTalk Administration Console. Use permission sets to apply the same permissions to multiple controllers or project components. Use a Logical Name to associate permissions with a specific controller. When you use a Logical Name, it must match the name of the controller.
When a user opens a project that has been secured with a permission set or a Logical Name and configured to use only the selected security authority, the Logix Designer application checks the ID of the FactoryTalk Directory to see if it matches the ID stored in the project.
• If the ID matches, the Logix Designer application checks the directory and finds the Logical Name (that matches the controller name), or the
Introduction
FactoryTalk Security
Permission sets and Logical Names
Chapter 1 Security overview
12 Rockwell Automation Publication 1756-PM016N-EN-P - November 2018
permission set associated with the project, and gets the permissions for the current user/computer combination.
• If the ID does not match, the project uses the Guest User permissions defined for that permission set or Logical Name.
When a user opens a project that has been secured but has not been configured to use only the selected security authority, the Logix Designer application checks the connected FactoryTalk Directory, finds the Logical Name or the permission set associated with the project, and gets the permissions for the current user/computer combination. Rockwell recommends configuring the project to use only the selected security authority to maintain control over the directory that secures the project.
Permissions for Guest Users
When you configure permission sets and logical names in the FactoryTalk Administration Console, you can also configure permissions for Guest Users. The permissions for Guest Users determine the level of access for users who are not authenticated on the same FactoryTalk directory that the project was secured with.
Permissions for Guest Users are cached in the project file to which they are associated. However, the permissions are only stored in the project file for permission sets that have been applied to objects by a user of the primary FactoryTalk directory.
Refer to the FactoryTalk online help for more information on permissions for Guest Users.
Source Protection limits users' ability to view and edit routines and Add-On Instructions, including equipment phase state routines, without the associated source key or license. Apply Source Key Protection or License Source Protection to routines and Add-On Instructions. Apply Execution Protection to license-protected components to allow execution only on controllers with a specific execution license.
When protecting a component with License Source Protection, optionally lock the the component. A locked component does not require the source license to open the project or execute the locked component, allowing more secure distribution. A user with the correct license must unlock a component to allow viewing or editing. Rockwell recommends locking unlocked components in projects that are distributed from trusted development environments to unsecured environments to safeguard your intellectual property.
Source Protection
Security overview Chapter 1
Rockwell Automation Publication 1756-PM016N-EN-P - November 2018 13
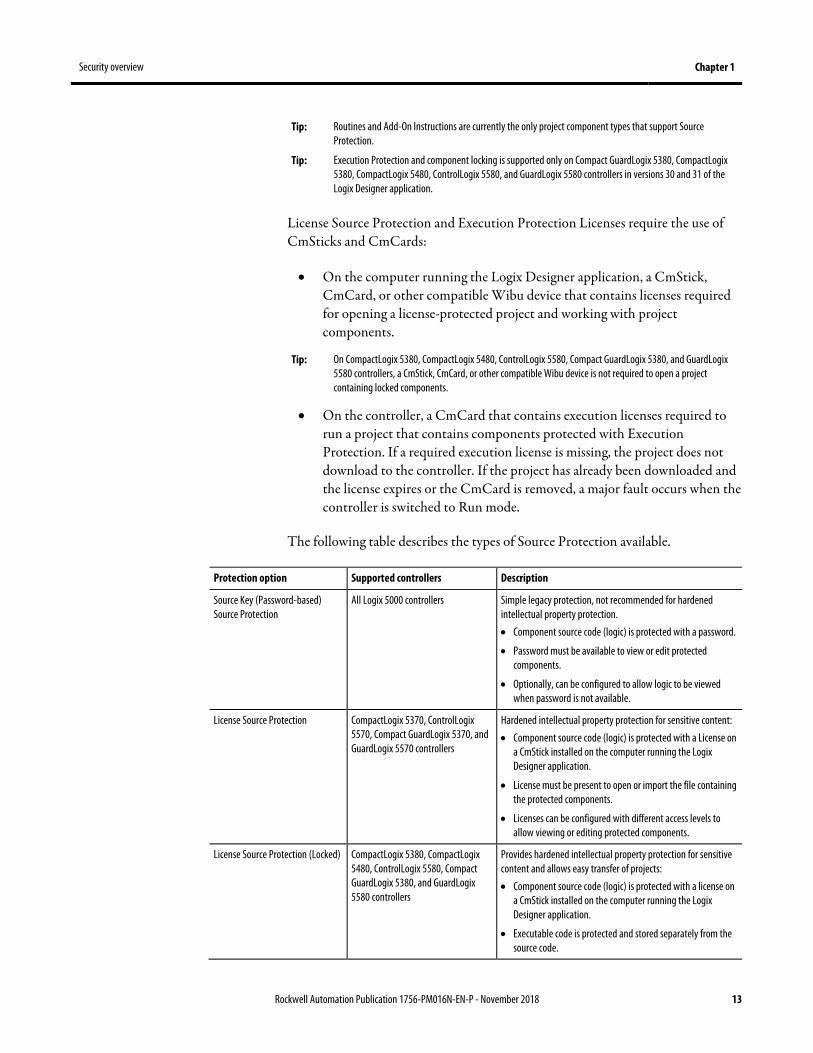
Tip: Routines and Add-On Instructions are currently the only project component types that support Source Protection.
Tip: Execution Protection and component locking is supported only on Compact GuardLogix 5380, CompactLogix 5380, CompactLogix 5480, ControlLogix 5580, and GuardLogix 5580 controllers in versions 30 and 31 of the Logix Designer application.
License Source Protection and Execution Protection Licenses require the use of CmSticks and CmCards:
• On the computer running the Logix Designer application, a CmStick, CmCard, or other compatible Wibu device that contains licenses required for opening a license-protected project and working with project components.
Tip: On CompactLogix 5380, CompactLogix 5480, ControlLogix 5580, Compact GuardLogix 5380, and GuardLogix 5580 controllers, a CmStick, CmCard, or other compatible Wibu device is not required to open a project containing locked components.
• On the controller, a CmCard that contains execution licenses required to run a project that contains components protected with Execution Protection. If a required execution license is missing, the project does not download to the controller. If the project has already been downloaded and the license expires or the CmCard is removed, a major fault occurs when the controller is switched to Run mode.
The following table describes the types of Source Protection available.
Protection option Supported controllers Description
Source Key (Password-based) Source Protection
All Logix 5000 controllers Simple legacy protection, not recommended for hardened intellectual property protection. • Component source code (logic) is protected with a password.
• Password must be available to view or edit protected components.
• Optionally, can be configured to allow logic to be viewed when password is not available.
License Source Protection CompactLogix 5370, ControlLogix 5570, Compact GuardLogix 5370, and GuardLogix 5570 controllers
Hardened intellectual property protection for sensitive content: • Component source code (logic) is protected with a License on
a CmStick installed on the computer running the Logix Designer application.
• License must be present to open or import the file containing the protected components.
• Licenses can be configured with different access levels to allow viewing or editing protected components.
License Source Protection (Locked) CompactLogix 5380, CompactLogix 5480, ControlLogix 5580, Compact GuardLogix 5380, and GuardLogix 5580 controllers
Provides hardened intellectual property protection for sensitive content and allows easy transfer of projects: • Component source code (logic) is protected with a license on
a CmStick installed on the computer running the Logix Designer application.
• Executable code is protected and stored separately from the source code.
Chapter 1 Security overview
14 Rockwell Automation Publication 1756-PM016N-EN-P - November 2018
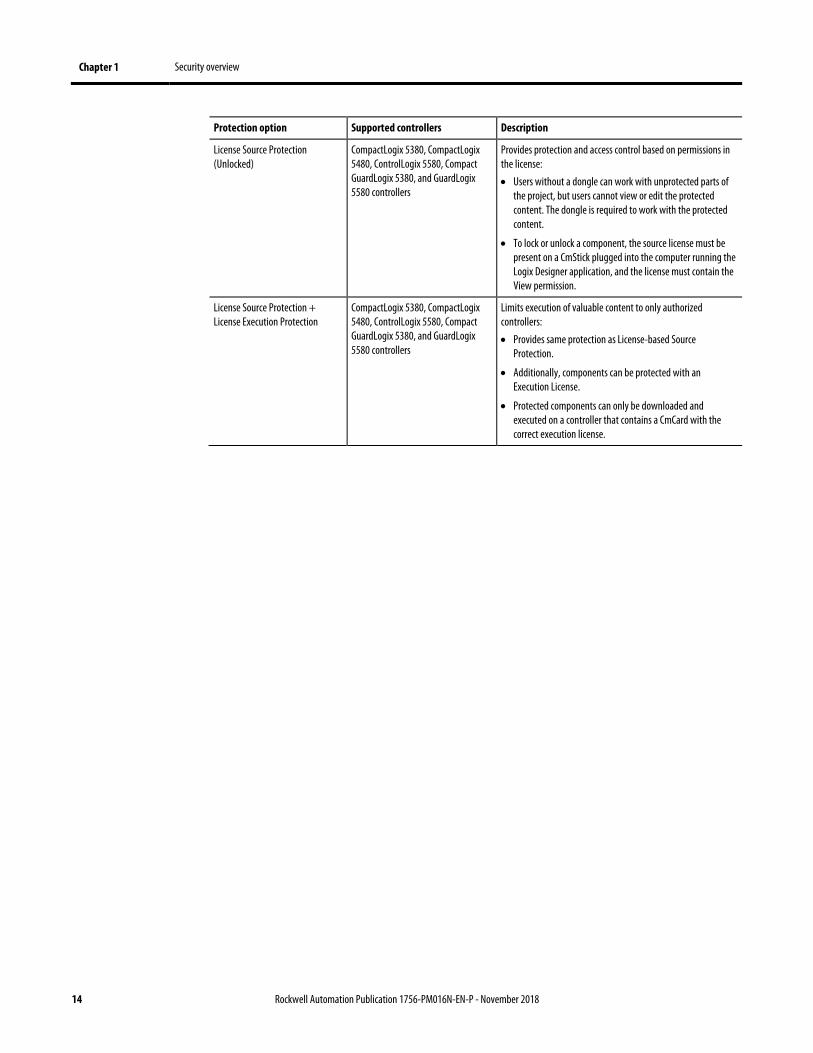
Protection option Supported controllers Description
License Source Protection (Unlocked)
CompactLogix 5380, CompactLogix 5480, ControlLogix 5580, Compact GuardLogix 5380, and GuardLogix 5580 controllers
Provides protection and access control based on permissions in the license: • Users without a dongle can work with unprotected parts of
the project, but users cannot view or edit the protected content. The dongle is required to work with the protected content.
• To lock or unlock a component, the source license must be present on a CmStick plugged into the computer running the Logix Designer application, and the license must contain the View permission.
License Source Protection + License Execution Protection
CompactLogix 5380, CompactLogix 5480, ControlLogix 5580, Compact GuardLogix 5380, and GuardLogix 5580 controllers
Limits execution of valuable content to only authorized controllers: • Provides same protection as License-based Source
Protection.
• Additionally, components can be protected with an Execution License.
• Protected components can only be downloaded and executed on a controller that contains a CmCard with the correct execution license.
Rockwell Automation Publication 1756-PM016N-EN-P - November 2018 15
Chapter 2
Configuring source protection in the Logix Designer application
This chapter describes how to enable and apply source protection for your Logix Designer components, such as routines and Add-On Instructions. You can protect project components using Source Key protection or License protection. You can also apply Execution Protection to source-protected components to allow execution only on controllers with a specific execution license.
Source Key protection:
• Protects components using existing source keys.
Tip: You can optionally allow source-protected components to be available in a read-only format on a system that does not have the source key required for access.
License protection:
• Protects components with specific licenses.
Tip: License Source Protection is not supported on Sequential Function Chart routines in versions 30 and later of the Logix Designer application.
• Execution Protection is an extension of License-Based Source Protection. You can apply Execution Protection to limit the execution of routines and Add-On Instructions, including equipment phase state routines, to controllers that contain a specific execution license.
• When you protect a component with License Source Protection, you can also lock it. When you lock a component, the routine's logic is compiled into executable code and encrypted. It is only decrypted by the controller when it is ready to be executed. As a result, project files containing locked components can be shared with users without licenses to work with the locked components. Those users can work with unprotected parts of the project, upload and download the project file, and even copy and paste locked components into other project files. Rockwell recommends locking unlocked components in projects that are distributed from trusted development environments to unsecured environments in order to safeguard your intellectual property.
Introduction
Chapter 2 Configuring source protection in the Logix Designer application
16 Rockwell Automation Publication 1756-PM016N-EN-P - November 2018
Tip: Execution Protection and component locking is supported only on Compact GuardLogix 5380, CompactLogix 5380, CompactLogix 5480, ControlLogix 5580, and GuardLogix 5580 controllers in version 30 of the Logix Designer application.
Keep the following considerations and limitations in mind when using License Source Protection with routines and Add-On Instructions for CompactLogix 5380, CompactLogix 5480, ControlLogix 5580, Compact GuardLogix 5380, and GuardLogix 5580 controllers.
• Sequential Function Chart routines cannot be protected with License Source Protection and execution protection.
• Function Block Diagram routines cannot be protected with License Source Protection and execution protection.
• You cannot overwrite a locked routine with a locked routine of a different language. If a locked routine needs to be replaced with a locked routine of a different language, first unlock the routine in the target file.
• You cannot overwrite a locked routine with an unlocked routine, and vice versa. To replace a locked routine with an unlocked routine, and vice versa, first delete the routine to be replaced.
• If you overwrite a locked ladder logic routine that contains label (LBL) instructions with a locked ladder logic routine that contains similar labels, other workstations can lose correlation with the project. To recover correlation, upload the project on the affected workstations.
• The controller SD card holds a maximum of 63 active or expired licenses, plus the Rockwell activation license for Execution Protection. If the SD card contains more than 64 licenses, downloads with license-protected content fail to the controller. To remove unwanted licenses, use the removal option on the Wibu administration portal.
• When you lock an Add-On Instruction, the data included in tags is protected but not to the extent that the logic is protected. If your tags contain sensitive data, Rockwell recommends putting that data in literals rather than in tags. Literals are protected at the same level as the logic in locked routines and Add-On Instructions. In programmable logic, a literal is a value that is expressed as itself rather than as a variable's value or the result of an expression.
Limitations for locked components
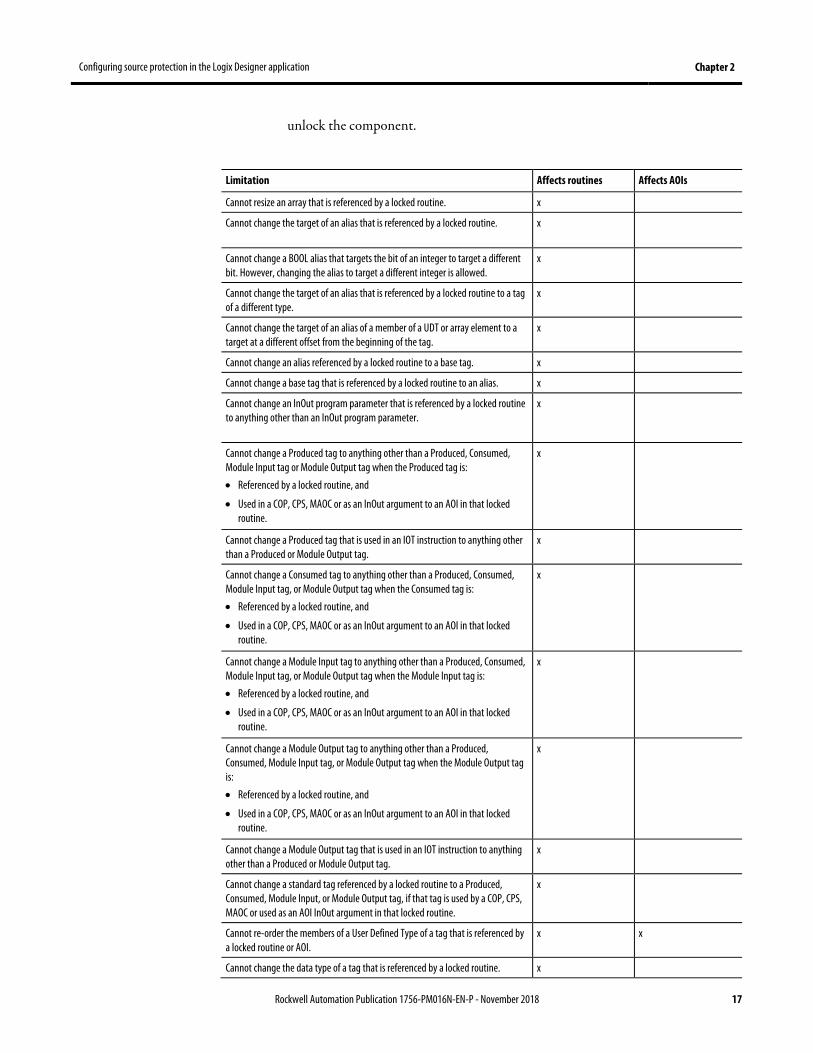
After a routine or an Add-On Instruction (AOI) is locked, strict limits apply to changes made to the routine or to other components the routine references. This table lists limitations that apply to locked components. An authorized user can run a locked component. To view or edit a component an authorized user must
Considerations and limitations for License protection and locked components
Configuring source protection in the Logix Designer application Chapter 2
Rockwell Automation Publication 1756-PM016N-EN-P - November 2018 17
unlock the component.
Limitation Affects routines Affects AOIs
Cannot resize an array that is referenced by a locked routine. x
Cannot change the target of an alias that is referenced by a locked routine. x
Cannot change a BOOL alias that targets the bit of an integer to target a different bit. However, changing the alias to target a different integer is allowed.
x
Cannot change the target of an alias that is referenced by a locked routine to a tag of a different type.
x
Cannot change the target of an alias of a member of a UDT or array element to a target at a different offset from the beginning of the tag.
x
Cannot change an alias referenced by a locked routine to a base tag. x
Cannot change a base tag that is referenced by a locked routine to an alias. x
Cannot change an InOut program parameter that is referenced by a locked routine to anything other than an InOut program parameter.
x
Cannot change a Produced tag to anything other than a Produced, Consumed, Module Input tag or Module Output tag when the Produced tag is: • Referenced by a locked routine, and
• Used in a COP, CPS, MAOC or as an InOut argument to an AOI in that locked routine.
x
Cannot change a Produced tag that is used in an IOT instruction to anything other than a Produced or Module Output tag.
x
Cannot change a Consumed tag to anything other than a Produced, Consumed, Module Input tag, or Module Output tag when the Consumed tag is: • Referenced by a locked routine, and
• Used in a COP, CPS, MAOC or as an InOut argument to an AOI in that locked routine.
x
Cannot change a Module Input tag to anything other than a Produced, Consumed, Module Input tag, or Module Output tag when the Module Input tag is: • Referenced by a locked routine, and
• Used in a COP, CPS, MAOC or as an InOut argument to an AOI in that locked routine.
x
Cannot change a Module Output tag to anything other than a Produced, Consumed, Module Input tag, or Module Output tag when the Module Output tag is: • Referenced by a locked routine, and
• Used in a COP, CPS, MAOC or as an InOut argument to an AOI in that locked routine.
x
Cannot change a Module Output tag that is used in an IOT instruction to anything other than a Produced or Module Output tag.
x
Cannot change a standard tag referenced by a locked routine to a Produced, Consumed, Module Input, or Module Output tag, if that tag is used by a COP, CPS, MAOC or used as an AOI InOut argument in that locked routine.
x
Cannot re-order the members of a User Defined Type of a tag that is referenced by a locked routine or AOI.
x x
Cannot change the data type of a tag that is referenced by a locked routine. x

Chapter 2 Configuring source protection in the Logix Designer application
18 Rockwell Automation Publication 1756-PM016N-EN-P - November 2018
Limitation Affects routines Affects AOIs
Cannot update a profile in a way that changes the data type of a Module Defined Tag that is referenced by a locked routine.
x x
Cannot add, remove, or change the data type of a member of a User Defined Data Type of a tag that is referenced by a locked routine or AOI.
x x
Cannot reorder, add, change the data type of, or remove parameters in an AOI referenced by a locked routine or AOI.
x x
Cannot convert a project containing locked routines or AOIs to a different controller family.
x x
Cannot move locked routines or AOIs to a project of a different controller family. x x
Cannot change the target of an AOI output parameter that aliases a local tag if the AOI is used in a locked AOI.
x
Cannot change the targets of two aliases referenced by a locked routine currently targeting different base tags to the same base tag.
x
Cannot change the targets of two aliases referenced by a locked routine currently targeting the same base tag to target different base tags.
x
Cannot change the type of a base tag targeted by an alias that is referenced by a locked routine.
x
Cannot change an external Output that is referenced by a locked routine to a non-Output.
x
Cannot change an external Output that is referenced by a locked routine to a local Output.
x
Cannot change a local tag that is referenced by a locked routine to an external Output.
x
If Source Protection is unavailable and is not listed in the Tools > Security menu, enable the Source Protection feature by running the RS5KSrcPtc.exe tool on the installation CD. The menu item is also enabled when a CmStick containing a license with protect permissions is inserted into any USB port on the computer.
Follow these steps to enable Logix Designer source protection.
1. Open the ENU\Tools\Source Protection Tool\Vxx.xx folder on the Logix Designer installation CD.
2. Run the RS5KSrcPtc.exe file.
You can disable the ability to configure source protection on a workstation by removing the Configure Source Protection option from the Tools > Security menu.
Important: Write down the source keys or make a copy of the sk.dat file and store in a secure location before deleting the sk.dat file.
1. Open the protected project in the Logix Designer application.
2. Click Tools > Security > Configure Source Protection.
Enable source protection
Disable the Configure Source Protection menu option
Configuring source protection in the Logix Designer application Chapter 2
Rockwell Automation Publication 1756-PM016N-EN-P - November 2018 19
3. In the Source Protection Configuration dialog box, click Source Key Configuration.
4. In the Source Key Configuration dialog box, click Disable Ability To Configure.
5. In the dialog box that prompts you to confirm the action, click Yes.
6. In the dialog box that asks if you want to delete the source key file (sk.dat), click Yes to remove the source key file from the computer, or select No to keep the source key file.
Configure Source Protection is removed from the Tools > Security menu.
Tip: The menu item will not disappear if a CmStick containing a license with the Protect permission is connected to the computer.
When Source Key protection is applied to a component, that component is source-protected. Source keys are user-generated, case-sensitive passwords that lock Logix Designer components from being viewed or modified by third parties.
Important: Source Protection can be applied only on a project file that is offline.
Tip: For Add-on Instructions, Source Protection settings cannot be modified if the Add-On Instruction is sealed. If you wish to source protect and seal an Add-On Instruction, you must apply the source protection settings before sealing.
Tip: Password source protection is designed to work with a relatively small number of source keys in the sk.dat file. When the number of source keys becomes large, there is a corresponding performance impact when opening source protected projects in the Logix Designer application or opening the Source Protection dialog box.
When a component is protected with a Source Key, users without the source key cannot alter the logic of the component. This affects the following features:
• Editing - The Language editor does not open, and the edit menus in the Controller and Logical Organizers are unavailable. The component icon is also unavailable. If the component is protected with the Viewable option, users can open the routine editor in read-only mode.
• Printing - Routines cannot be printed. Add-On instruction can be printed, but the routines and local tags are not included in the print out. Routine logic and Add-On Instruction local tags can be printed if components are protected with the Viewable option.
• Exporting - The protected component is written to the export file in an encoded format.
Protect components with Source Keys
Chapter 2 Configuring source protection in the Logix Designer application
20 Rockwell Automation Publication 1756-PM016N-EN-P - November 2018
• Component Properties - All controls on the dialog boxes of the components are read-only.
• Search and Replace - Find All is the only available search type source. Find Next, Replace All, and Replace Next skip the protected component. When the protected component is skipped, a message appears on the status bar indicating the source is not available. This message is also logged to the Search Results tab when performing a Replace All search. If a component is protected with the Viewable option, search is permitted but replace is still prevented.
Because users cannot view the logic of a protected routine, the Find All search results items do not navigate to the found locations. This affects the following:
• Navigation - Users cannot navigate to a protected component.
• Verification - Users cannot navigate to an error in a protected component.
• Cross Reference - Cross reference information is displayed for items referenced within a protected component, but users are not allowed to navigate to the location within the protected component. Double-clicking to navigate to a protected component beeps and displays a message on the status bar indicating that users are unable to edit the component and that the source is not available.
The Go to Location menu item is unavailable.
• Go To - There is no edit item in the Go To dialog box for a protected component.
• Cut, Copy, Paste - Users can copy, paste, and drag and drop protected components from the Controller and Logical Organizers.
Important: Use caution when copying and pasting components between different versions of the Logix Designer application. The application only supports pasting to the same version or newer version of the application. Pasting to an earlier version of the application is not supported. When pasting to an earlier version, the paste action may succeed, but the results may not be as intended. You cannot paste protected components from later versions of the application into earlier versions of the application. For example, attempting to paste from version 19 into version 18 or from version 20 into version 19 will fail.
In version 18 and earlier of RSLogix 5000 software, only IEC-61131 compliant source keys are recognized. Each source key must begin with a lowercase character a-z or underscore character ( _ ), and contain only characters lowercase a-z, 0-9, and an underscore character ( _ ). You can enter uppercase A-Z characters in RSLogix 5000 software or in the source key file, but the uppercase characters are converted to lowercase. Source keys are limited to 40 characters in length.
About source keys
Configuring source protection in the Logix Designer application Chapter 2
Rockwell Automation Publication 1756-PM016N-EN-P - November 2018 21
In version 19 and later of the application, source keys are case-sensitive and may contain any printable ASCII character, excluding the space character. This includes uppercase A-Z, lowercase a-z, numbers 0-9, and symbols such as "!@#$%. Source keys are limited to 40 characters in length.
Version 19 and later of the Logix Designer application supports associating names with source keys. Source key names are descriptive text that help identify source keys. Where appropriate, the Logix Designer application will display the source key name in place of the source key itself to provide an additional layer of security for the source key.
Use descriptive names to help identify the purpose of the source. For instance, a source key used to secure components that field engineers require access might be named, Field Engineer.
Important: If the same source keys will be used with version 18 and earlier and version 19 and later of the Logix Designer application, begin each source key with a lowercase character a-z, or an underscore character ( _ ), and use only characters lowercase a-z, 0-9 , or an underscore character ( _ ) within the source keys. If you use source key names in version 19 and later of the application, and your source keys are IEC61131-3 compliant, your source keys will still work in version 18 and earlier.
Source keys that are available to the application through an sk.dat file are unencrypted. We recommend that you write down your source keys or back up and store the sk.dat file in a secure location. If necessary, the individual keys can be distributed or provided to the necessary parties.
Important: Source key files are created in an ANSI format in Logix Designer versions 18 and earlier. In versions 19 and later, the Logix Designer application creates UTF-8 formatted sk.dat files, and modified ANSI sk.dat files are converted to UTF-8 sk.dat files. Source keys must not appear on the first line of a UTF-8 formatted sk.dat file. The first line of UTF-8 formatted sk.dat files is ignored in Logix Designer versions 18 and earlier. Versions 19 and later insert a header on the first line of the sk.dat file if one is not already present.
Follow these steps to assign a name to an existing source key.
1. Click Tools > Security > Configure Source Protection.
2. In the Source Protection Configuration dialog box, click Source Key Configuration.
Source key names
Source key file
Chapter 2 Configuring source protection in the Logix Designer application
22 Rockwell Automation Publication 1756-PM016N-EN-P - November 2018
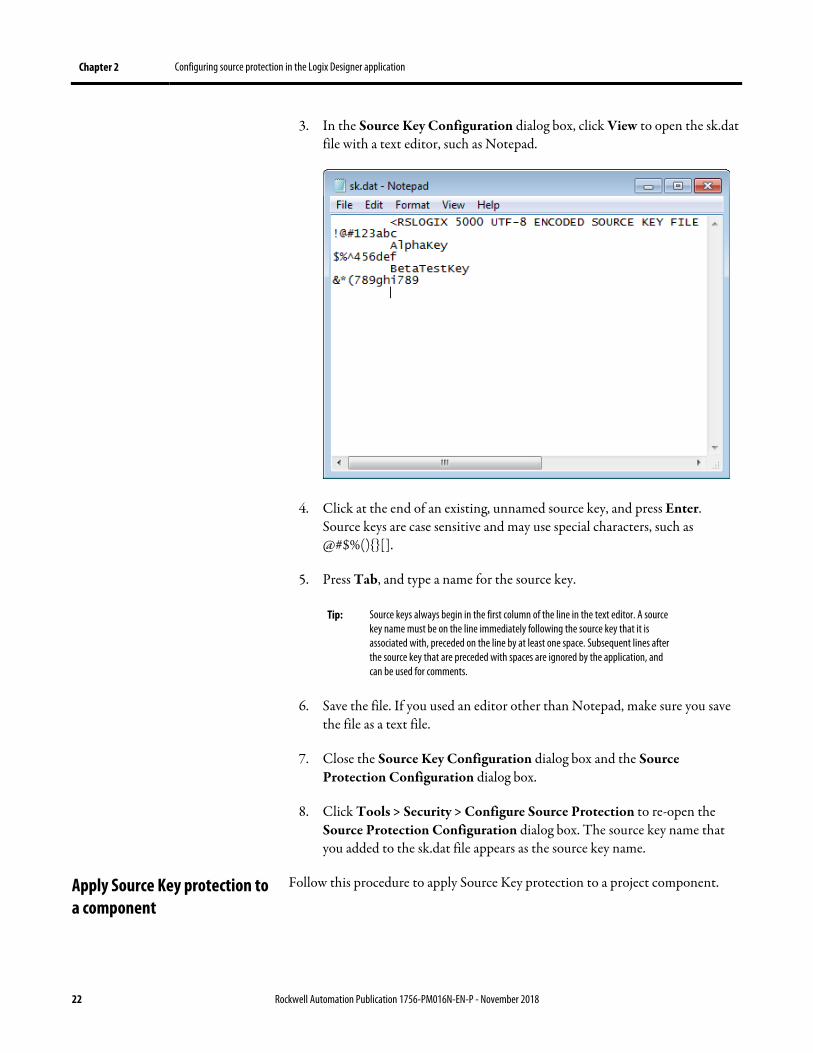
3. In the Source Key Configuration dialog box, click View to open the sk.dat file with a text editor, such as Notepad.
4. Click at the end of an existing, unnamed source key, and press Enter. Source keys are case sensitive and may use special characters, such as @#$%(){}[].
5. Press Tab, and type a name for the source key.
Tip: Source keys always begin in the first column of the line in the text editor. A source key name must be on the line immediately following the source key that it is associated with, preceded on the line by at least one space. Subsequent lines after the source key that are preceded with spaces are ignored by the application, and can be used for comments.
6. Save the file. If you used an editor other than Notepad, make sure you save the file as a text file.
7. Close the Source Key Configuration dialog box and the Source Protection Configuration dialog box.
8. Click Tools > Security > Configure Source Protection to re-open the Source Protection Configuration dialog box. The source key name that you added to the sk.dat file appears as the source key name.
Follow this procedure to apply Source Key protection to a project component. Apply Source Key protection to a component
Configuring source protection in the Logix Designer application Chapter 2
Rockwell Automation Publication 1756-PM016N-EN-P - November 2018 23
Important: Source Protection can be applied only on a project file that is offline.
Tip: For Add-on Instructions, Source Protection settings cannot be modified if the Add-On Instruction is sealed. If you wish to source protect and seal an Add-On Instruction, you must apply the source protection settings before sealing.
Follow these steps to apply a source key to one or more components.
1. Open an offline project file in the Logix Designer application.
2. On the menu bar, click Tools > Security > Configure Source Protection.
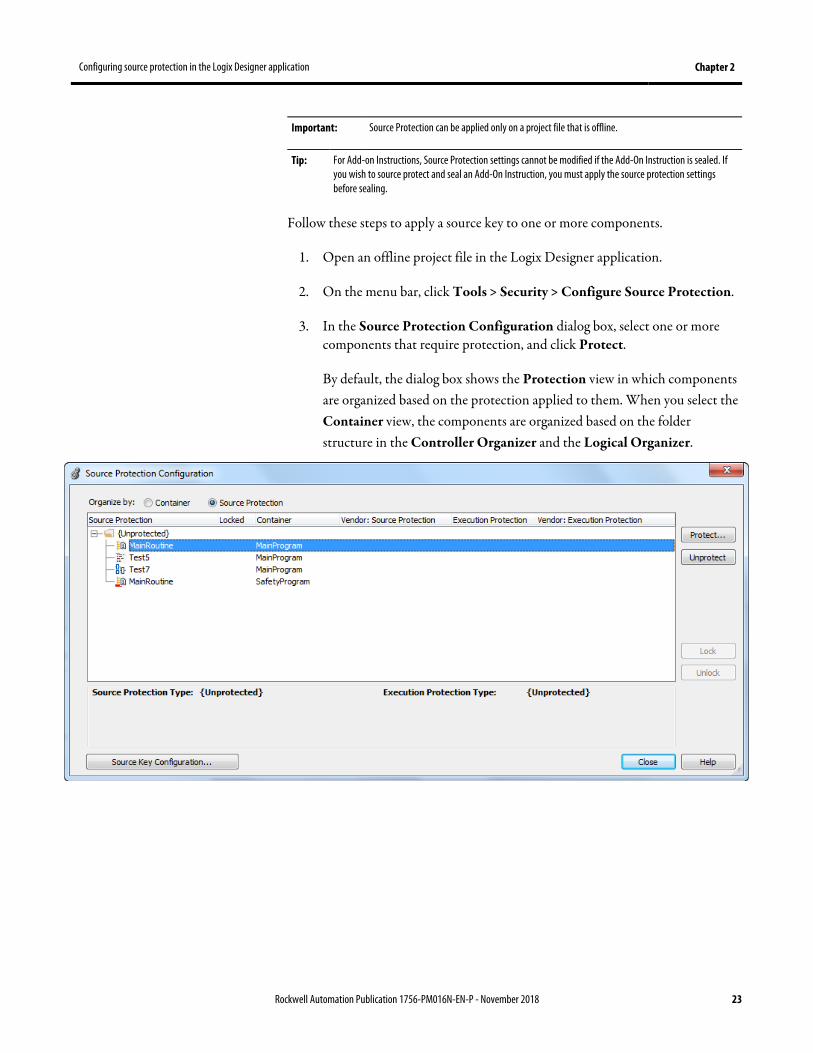
3. In the Source Protection Configuration dialog box, select one or more components that require protection, and click Protect.
By default, the dialog box shows the Protection view in which components are organized based on the protection applied to them. When you select the Container view, the components are organized based on the folder structure in the Controller Organizer and the Logical Organizer.
Chapter 2 Configuring source protection in the Logix Designer application
24 Rockwell Automation Publication 1756-PM016N-EN-P - November 2018
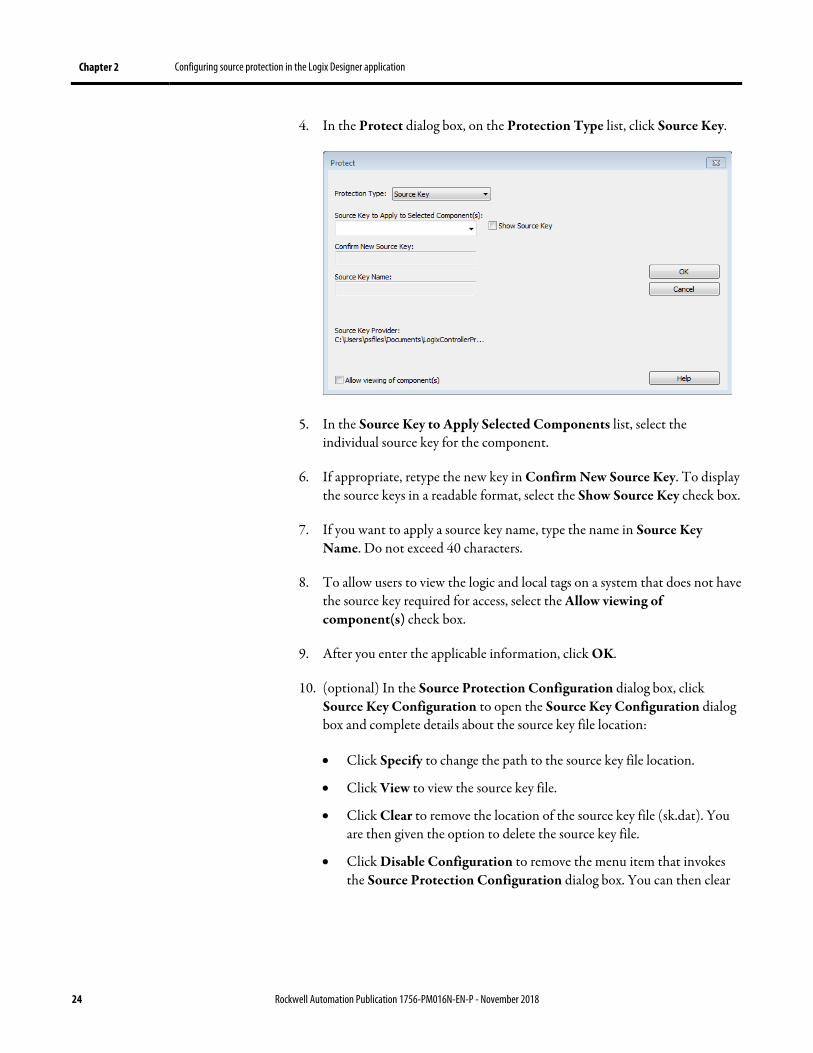
4. In the Protect dialog box, on the Protection Type list, click Source Key.
5. In the Source Key to Apply Selected Components list, select the individual source key for the component.
6. If appropriate, retype the new key in Confirm New Source Key. To display the source keys in a readable format, select the Show Source Key check box.
7. If you want to apply a source key name, type the name in Source Key Name. Do not exceed 40 characters.
8. To allow users to view the logic and local tags on a system that does not have the source key required for access, select the Allow viewing of component(s) check box.
9. After you enter the applicable information, click OK.
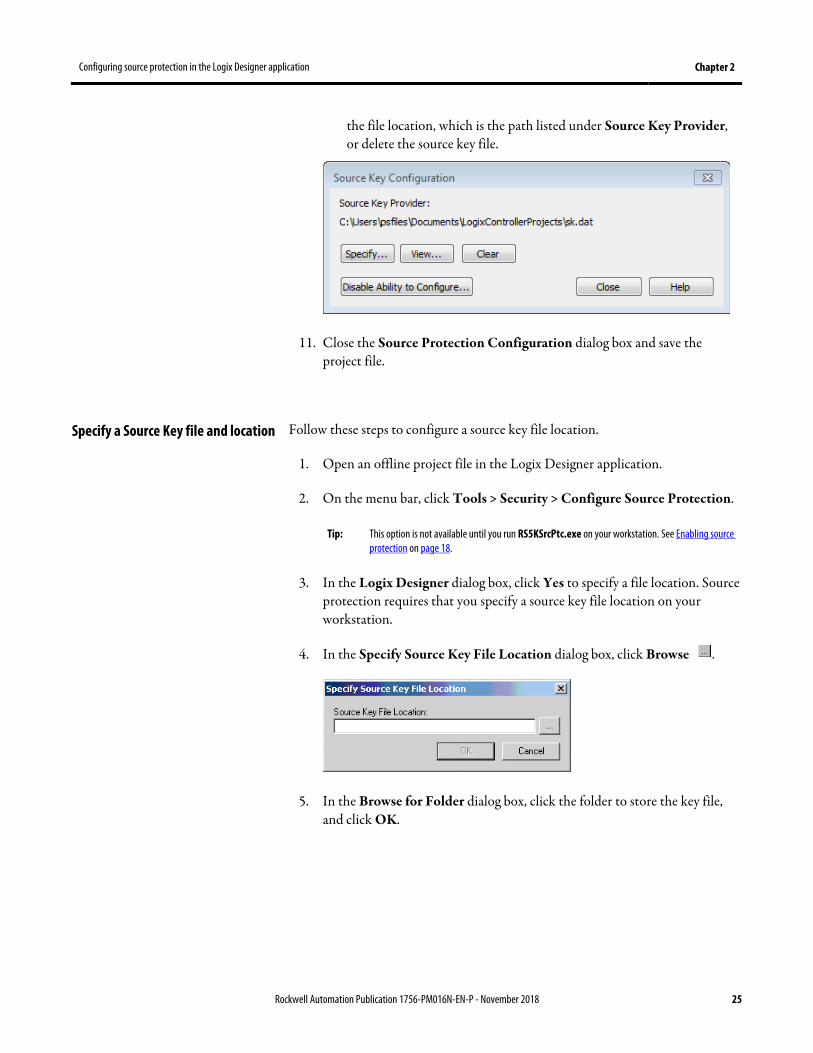
10. (optional) In the Source Protection Configuration dialog box, click Source Key Configuration to open the Source Key Configuration dialog box and complete details about the source key file location:
• Click Specify to change the path to the source key file location.
• Click View to view the source key file.
• Click Clear to remove the location of the source key file (sk.dat). You are then given the option to delete the source key file.
• Click Disable Configuration to remove the menu item that invokes the Source Protection Configuration dialog box. You can then clear
Configuring source protection in the Logix Designer application Chapter 2
Rockwell Automation Publication 1756-PM016N-EN-P - November 2018 25
the file location, which is the path listed under Source Key Provider, or delete the source key file.
11. Close the Source Protection Configuration dialog box and save the project file.
Follow these steps to configure a source key file location.
1. Open an offline project file in the Logix Designer application.
2. On the menu bar, click Tools > Security > Configure Source Protection.
Tip: This option is not available until you run RS5KSrcPtc.exe on your workstation. See Enabling source protection on page 18.
3. In the Logix Designer dialog box, click Yes to specify a file location. Source protection requires that you specify a source key file location on your workstation.
4. In the Specify Source Key File Location dialog box, click Browse .
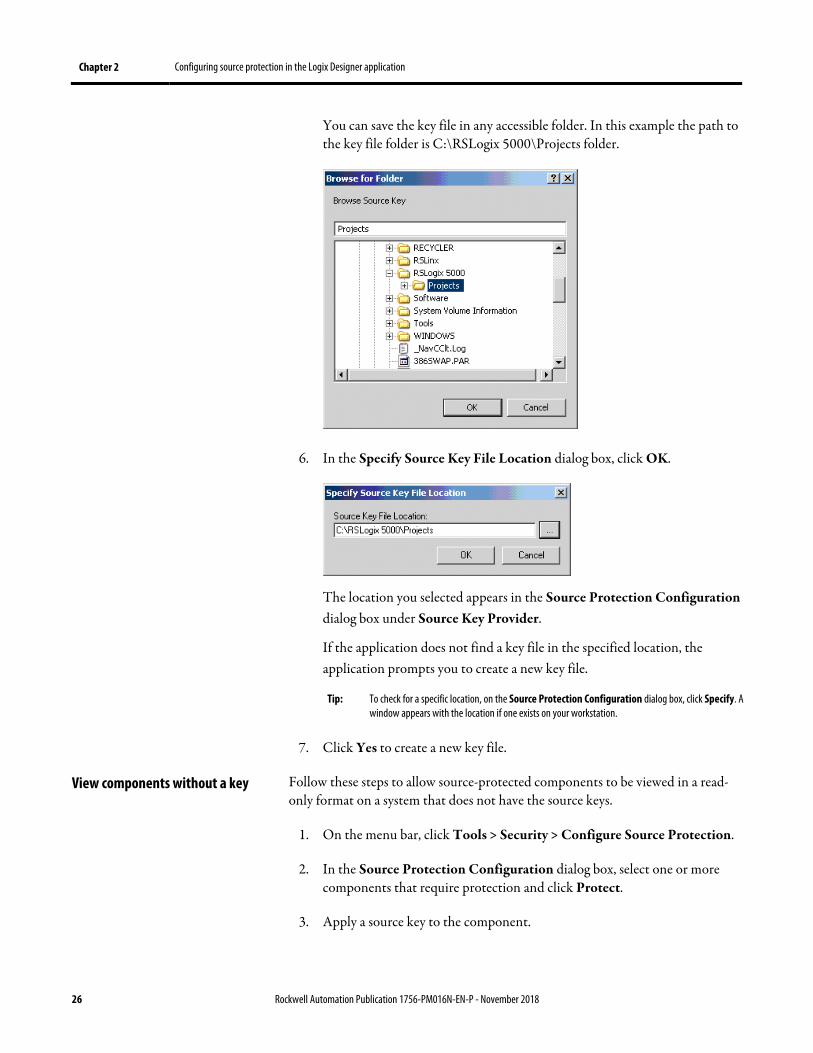
5. In the Browse for Folder dialog box, click the folder to store the key file, and click OK.
Specify a Source Key file and location
Chapter 2 Configuring source protection in the Logix Designer application
26 Rockwell Automation Publication 1756-PM016N-EN-P - November 2018
You can save the key file in any accessible folder. In this example the path to the key file folder is C:\RSLogix 5000\Projects folder.
6. In the Specify Source Key File Location dialog box, click OK.
The location you selected appears in the Source Protection Configuration dialog box under Source Key Provider.
If the application does not find a key file in the specified location, the application prompts you to create a new key file.
Tip: To check for a specific location, on the Source Protection Configuration dialog box, click Specify. A window appears with the location if one exists on your workstation.
7. Click Yes to create a new key file.
Follow these steps to allow source-protected components to be viewed in a read-only format on a system that does not have the source keys.
1. On the menu bar, click Tools > Security > Configure Source Protection.
2. In the Source Protection Configuration dialog box, select one or more components that require protection and click Protect.
3. Apply a source key to the component.
View components without a key
Configuring source protection in the Logix Designer application Chapter 2
Rockwell Automation Publication 1756-PM016N-EN-P - November 2018 27
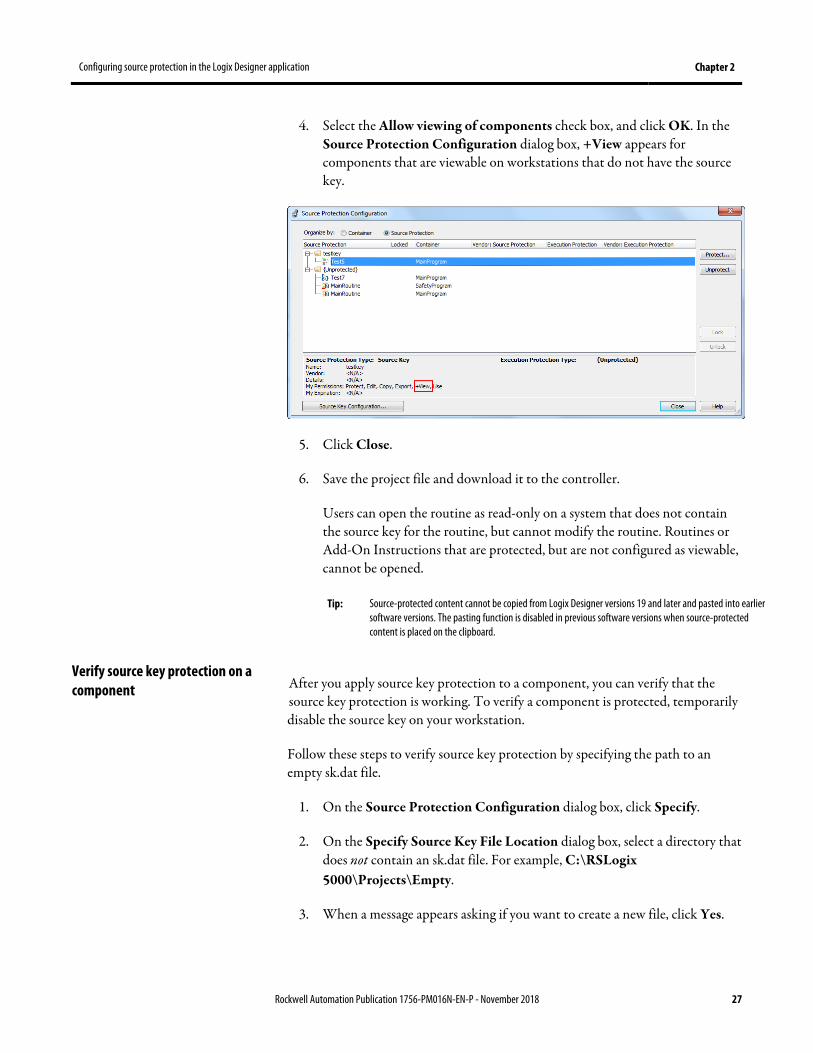
4. Select the Allow viewing of components check box, and click OK. In the Source Protection Configuration dialog box, +View appears for components that are viewable on workstations that do not have the source key.
5. Click Close.
6. Save the project file and download it to the controller.
Users can open the routine as read-only on a system that does not contain the source key for the routine, but cannot modify the routine. Routines or Add-On Instructions that are protected, but are not configured as viewable, cannot be opened.
Tip: Source-protected content cannot be copied from Logix Designer versions 19 and later and pasted into earlier software versions. The pasting function is disabled in previous software versions when source-protected content is placed on the clipboard.
After you apply source key protection to a component, you can verify that the source key protection is working. To verify a component is protected, temporarily disable the source key on your workstation.
Follow these steps to verify source key protection by specifying the path to an empty sk.dat file.
1. On the Source Protection Configuration dialog box, click Specify.
2. On the Specify Source Key File Location dialog box, select a directory that does not contain an sk.dat file. For example, C:\RSLogix 5000\Projects\Empty.
3. When a message appears asking if you want to create a new file, click Yes.
Verify source key protection on a component
Chapter 2 Configuring source protection in the Logix Designer application
28 Rockwell Automation Publication 1756-PM016N-EN-P - November 2018
4. When the message appears asking if you want to create a new directory, click Yes. The software points to an empty sk.dat file, which mimics a user who does not have a source key.
5. Verify that you cannot access the protected component.
6. On the Specify Source Key File Location dialog box, switch back to the directory that contains your original sk.dat file.
You can delete a source key file (sk.dat) from a workstation.
Important: Write down the source keys or make a copy of the sk.dat file and store it in a secure location before deleting the sk.dat file.
1. Open the protected project.
2. Click Tools > Security > Configure Source Protection to open the Source Protection Configuration dialog box.
3. Click Source Key Configuration.
4. On the Source Key Configuration dialog box, click Clear.
5. When a dialog box asks for confirmation that you want to delete the source key file, select Yes to remove the source key file from the workstation.
License Source Protection limits access to projects to only users with the required license. Users without the required license cannot open the project or import components protected by the license. A CmStick containing the corresponding license must be plugged into a USB port on the computer to open the project containing the component.
License protection uses licenses that you create and administer through a license portal. Refer to your license portal help for details on using the portal.
Tip: License Source Protection is not supported on the following routine types on Compact GuardLogix 5380, CompactLogix 5380, CompactLogix 5480, ControlLogix 5580, and GuardLogix 5580 controllers: • Sequential Function Chart routines.
• Function Block Diagrams, unless the Function Block Diagram is included in an Add-On Instruction.
When using License Protection on CompactLogix 5380, CompactLogix 5480, and ControlLogix 5580 controllers, you can also apply Execution Protection for the component, which allows execution of the component only on a specific controller family, or only on controllers in a specific controller family that contain the execution license.
The permissions provided by licenses are:
Remove access to a protected routine
License Source Protection for components
Protect components with Licenses

Configuring source protection in the Logix Designer application Chapter 2
Rockwell Automation Publication 1756-PM016N-EN-P - November 2018 29
Permission Description
Use The minimum permission available for a license. Allows a user to open, import, upload, or download the project. Important: On CompactLogix 5370, ControlLogix 5570, Compact GuardLogix 5370, and GuardLogix 5570 controllers, insert a CmStick containing a license with Use permission in any USB port on the computer. A network license server cannot provide Use permission. Either the local CmStick or a license server on the network can contain all other license privileges. Tip: On Compact GuardLogix 5380, CompactLogix 5380, CompactLogix 5480, ControlLogix 5580, and GuardLogix 5580 controllers, a Use license is not required to open, import, upload, or download a project containing a License-Protected component when that component is locked.
View View routine logic for the component or local tags for an Add-On Instruction. Enables printing, searching, and cross referencing. Limits the components editors and properties dialog boxes to read-only, and prevents changes. Tip: To unlock, view, and re-lock a License-Protected component requires a View license.
Edit Edit the routine or Add-On Instruction. Tip: To unlock, view, and re-lock a License-Protected component requires a View license.
Copy Copy the logic in the routine or Add-On Instruction.
Export Export the routine or Add-On Instruction in a non-encrypted format.
Protect Enable or remove license protection from a component. Important: Add or remove protection from a component only when the Protect permission exists on the license currently protecting that component.
License Source Protection on a component affects:
• Editing - If the license does not contain the View permission, the Language editor does not open, the edit menus are unavailable in the Controller Organizer and the Logical Organizer, and the component icon is dimmed. With View permission, the editor opens in read-only mode. Allows editing if the license contains Edit permission.
• Printing -The license must contain View permission to print routines. Can print Add-On instructions, but the routines and local tags do not print without View permission.
• Exporting - Writes the protected component to the export file in an encoded format unless the license contains Export permission. To export in non-encrypted text, the license must contain the Export permission, and when saving the export file, deselect the Encode Source Protected Content option. Locked components are always exported encoded.
Tip: To export protected components in non-encrypted text, uncheck the Always Encode Protected Content on Export check box on the General tab of the Workstation Options dialog box.
• Component Properties - All controls on the components dialog boxes are read-only unless the license contains Edit permission.

Chapter 2 Configuring source protection in the Logix Designer application
30 Rockwell Automation Publication 1756-PM016N-EN-P - November 2018
• Search and Replace - Find All is the only available search type. Find Next, Replace All, and Replace Next skip the protected component. When skipping the protected component, a message appears on the status bar indicating the source is not available. This message is logged to the search results tab for a Replace All search. Edit and View permissions control users' ability to search and replace.
When the license does not contain the View permission, users cannot view the logic of a protected routine, and the Find All search result items do not navigate to the found locations. This affects the following features:
• Navigation -Cannot navigate to a protected component.
• Verification - Cannot navigate to an error in a protected component.
• Cross Reference - Cross reference information displays for items referenced within a protected component, but users cannot navigate to the location within the protected component. Double-clicking to navigate to a protected component displays a message on the status bar indicating that users are unable to edit the component and that the source is not available.
Tip: Find does not search locked components even when a View license is present.
The Go to Location menu item is unavailable.
• Go To -No edit item in the Go To dialog box for a protected component.
• Cut, Copy, Paste - Can copy, paste, and drag and drop source protected components from the Controller Organizer or Logical Organizer. Cannot copy, paste, or drag and drop logic contained within the source protected component unless the license contains Copy permission.
Important: Use caution when copying and pasting components between different versions of the Logix Designer application. The application only supports pasting to the same version or newer version of the application. Does not support pasting to an earlier version of the application. When pasting to an earlier version, the paste action may succeed, but unintended results may occur. Cannot paste protected components from later versions of the application into earlier versions of the application. For example, attempting to paste from version 19 into version 18 or from version 20 into version 19 fails.
Execution Protection is an extension of License-Based Source Protection. You can apply Execution Protection to limit the execution of routines and Add-On Instructions, including equipment phase state routines, to controllers that contain a specific execution license.
When you apply Execution Protection to a component, you first apply License-Based Source Protection. Therefore, a user applying Execution Protection must have the same credentials that are required to apply License-Based Source Protection:
Add Execution Protection to License-protected components
Configuring source protection in the Logix Designer application Chapter 2
Rockwell Automation Publication 1756-PM016N-EN-P - November 2018 31
• A CmStick containing a license with Use permission must be present locally on any USB port on the computer. Use permission cannot be obtained from a network license server. All other license privileges can be contained on the local CmStick, or provided by a license server on the network.
• A license containing the Protect permission, either on a local CmStick or provided by a license server on the network. When components are locked, unauthorized users cannot view or edit the component, but authorized users can run the project without a CmStick.
The following credentials are required to run a component that is protected by Execution Protection:
• After a component is locked, the controller running the component must be of the same controller family as the controller on which you locked the component. For example, when you apply License-Based Source Protection and Execution Protection to a component on a 5580 controller and lock the component, you can only execute that component on another 5580 controller. A component that was protected on a 5580 controller cannot be executed on a 5380 controller. To execute the component on a controller from a different family, you must unlock the component and re-lock it on the different family controller.
• The controller running the component must contain the following licenses on a CmCard:
• The required Execution license (if any)
• A valid FactoryTalk Activation license for Execution Protection
Follow these steps to apply License Protection to one or more components. Apply License Protection to one or more components
Chapter 2 Configuring source protection in the Logix Designer application
32 Rockwell Automation Publication 1756-PM016N-EN-P - November 2018
Tip: Version 32 of the Logix Designer application, License Source Protection does not support these routine types: • Safety routines.
• Sequential Function Chart routines.
• Function Block Diagrams on Compact GuardLogix 5380, CompactLogix 5380, CompactLogix 5480, ControlLogix 5580, and GuardLogix 5580 controllers, unless the Function Block Diagram is included in an Add-On Instruction. However, License-protected Function Block Diagrams are supported are supported in both routines and Add-On Instructions on CompactLogix 5370, ControlLogix 5570, Compact GuardLogix 5370, and GuardLogix 5570 controllers.
Tip: Cannot modify the Source Protection settings if the Add-On Instruction is sealed. To source protect and seal an Add-On Instruction, apply the source protection settings before sealing.
Important: On CompactLogix 5380, CompactLogix 5480, ControlLogix 5580, Compact GuardLogix 5380, and GuardLogix 5580 controllers, to open a project when a component is license-protected but not locked, insert a CmStick containing the corresponding license into a USB port on the computer. A locked component does not require a corresponding license to open the project or use the component.
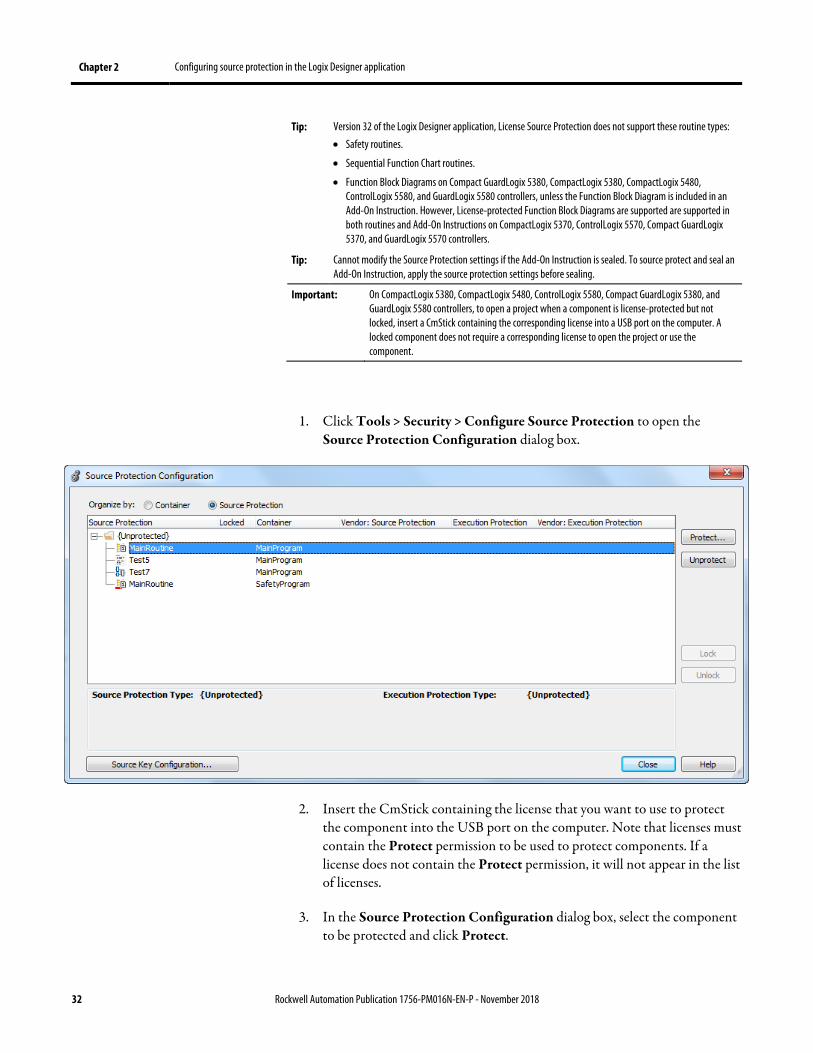
1. Click Tools > Security > Configure Source Protection to open the Source Protection Configuration dialog box.
2. Insert the CmStick containing the license that you want to use to protect the component into the USB port on the computer. Note that licenses must contain the Protect permission to be used to protect components. If a license does not contain the Protect permission, it will not appear in the list of licenses.
3. In the Source Protection Configuration dialog box, select the component to be protected and click Protect.
Configuring source protection in the Logix Designer application Chapter 2
Rockwell Automation Publication 1756-PM016N-EN-P - November 2018 33
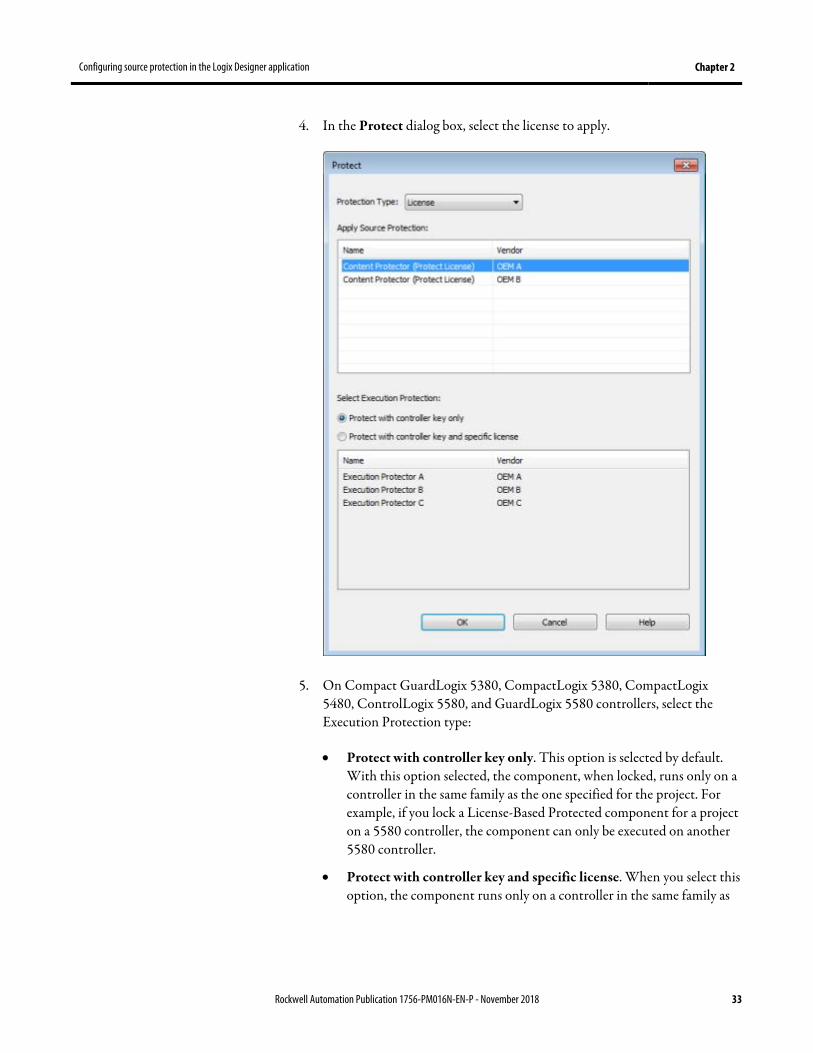
4. In the Protect dialog box, select the license to apply.
5. On Compact GuardLogix 5380, CompactLogix 5380, CompactLogix 5480, ControlLogix 5580, and GuardLogix 5580 controllers, select the Execution Protection type:
• Protect with controller key only. This option is selected by default. With this option selected, the component, when locked, runs only on a controller in the same family as the one specified for the project. For example, if you lock a License-Based Protected component for a project on a 5580 controller, the component can only be executed on another 5580 controller.
• Protect with controller key and specific license. When you select this option, the component runs only on a controller in the same family as
Chapter 2 Configuring source protection in the Logix Designer application
34 Rockwell Automation Publication 1756-PM016N-EN-P - November 2018
the one specified for the project and that contains a CmCard with the execution license that you select.
If you select Protect with controller key and specific license, select the execution license from the list of available licenses. On CompactLogix 5380, CompactLogix 5480, ControlLogix 5580, Compact GuardLogix 5380, and GuardLogix 5580 controllers, after components are protected, they can also be locked. Locking a component prevents users from viewing or editing the component but allows authorized users to run it.
6. Click OK to return to the Source Protection Configuration dialog box.
Tip: To save changes to a component that is protected with License-Based Source Protection, a CmStick containing the required license must be plugged into the computer running the Logix Designer application. Make sure you save your edits to the project or lock the protected components before removing the CmStick containing the required license. If the license is not present, you could lose your edits to the project.
7. Close the Source Protection Configuration dialog box and save the project file.
After you apply License Source Protection to a routine or an Add-On Instruction, you can lock it on Compact GuardLogix 5380, CompactLogix 5380, CompactLogix 5480, ControlLogix 5580, and GuardLogix 5580 controllers.
When locking a component, the routine's logic is compiled into executable code and encrypted. The code is decrypted by the controller when it is ready for execution. As a result, sharing project files containing locked components with users without licenses to use the locked components is possible. Those users can use unprotected parts of the project, upload and download the project file, and copy and paste locked components into other project files. However, if a component is protected using the Protect with controller key and specific license option, executing the project requires an SD card with the correct execution license.
Tip: To lock or unlock a component, the source license must be present on a CmStick plugged into the computer running the Logix Designer application, and the license must contain the View permission.
Important: When locking a routine or an Add-On Instruction, the data included in tags is protected, but not to the extent that the logic is protected. If your tags contain sensitive data, Rockwell recommends putting that data in character string literals rather than in tags. Literals are protected at the same level as the logic in locked routines and Add-On Instructions.
Follow these steps to lock or encrypt a component.
1. Apply License Source Protection to the component.
2. In the Source Protection Configuration dialog box, select the protected component.
Lock a component
Configuring source protection in the Logix Designer application Chapter 2
Rockwell Automation Publication 1756-PM016N-EN-P - November 2018 35
3. Click Lock.
4. To unlock the component, select it and click Unlock.
Tip: When a component is License-Protected, lock and unlock it by selecting it in the Controller Organizer, right-clicking, and selecting Lock or Unlock. Use the Security toolbar to lock and unlock a component or to lock all License-Protected components at once.
Lock a routine or Add-On Instruction that is protected by License Source Protection and is shared outside a trust boundary, such as sent using email or to an end customer. Do not distribute projects that contain unlocked components because they are in a less secure state.
To lock all license-protected components in a project at once, use the Lock All button on the Security toolbar.
To lock all components in a project:
1. Apply License Source Protection to the components to protect.
2. On the Security toolbar, click the Lock All button. This button is disabled when there are no components to lock.
Or on the main menu, select Tools > Security > Lock all unlocked content.
Tip: If an error prevents a component from locking, an error message appears. The Logix Designer application locks other eligible components without error.
To monitor license status and verify the license is not expired or removed, insert a License Validation (LV) instruction in a Ladder diagram. The LV instruction checks that a non-expired license associated with a routine or an Add-On Instruction is present in the controller. Insert additional logic in the routine to act on the license status.
Adjust network settings to provide additional privileges to users on the network or to use License Source Protection when using a remote desktop connection.
When sharing license privileges with users on the network consider:
• Configure the network to allow communication between the devices that need to share license privileges. Set TCP and UDP ports 22350 to open on the computer that provides privileges.
Lock all License-Protected content
Add an LV instruction to monitor license status
Share License privileges with other users on your network
Chapter 2 Configuring source protection in the Logix Designer application
36 Rockwell Automation Publication 1756-PM016N-EN-P - November 2018
• Enable the license to share for network use. Use the License Portal to configure licenses and optionally enable them for network use.
• The computers that receive permissions from the remote workstation must install a CmStick that contains the same license with Use permission. Plug the CmStick into a USB port locally on the computers.
You can share license privileges with other users and provide license privileges to users of remote desktop.
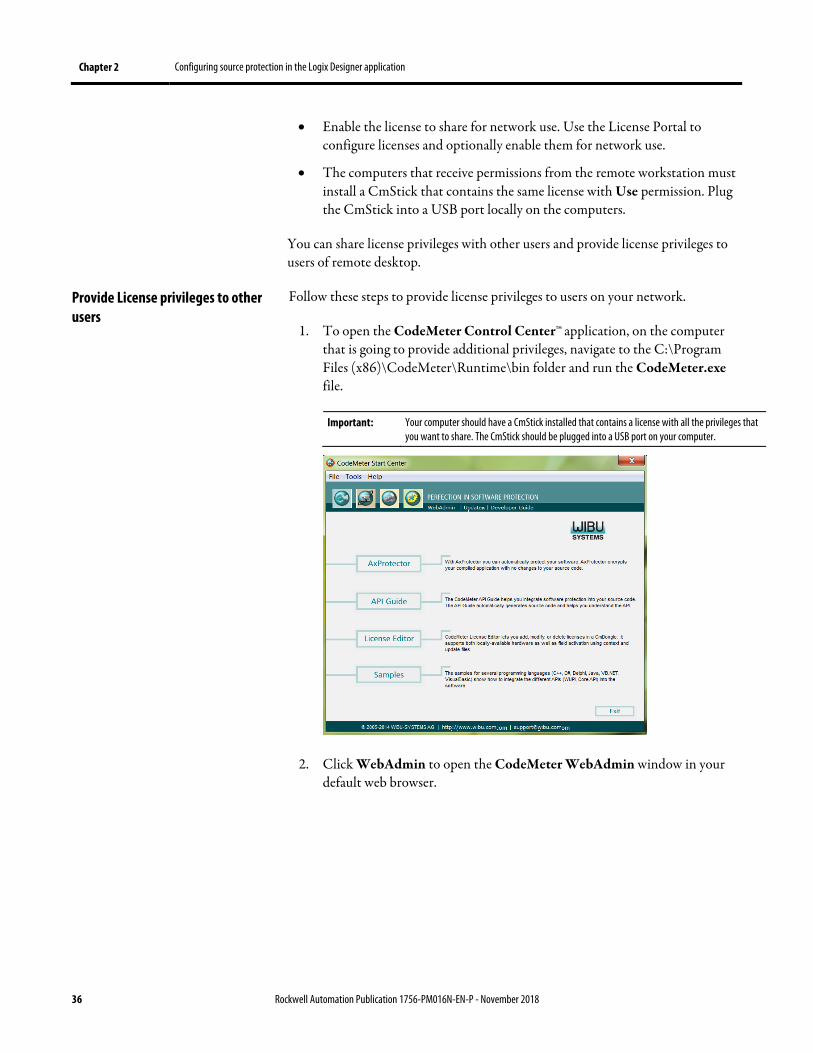
Follow these steps to provide license privileges to users on your network.
1. To open the CodeMeter Control Center™ application, on the computer that is going to provide additional privileges, navigate to the C:\Program Files (x86)\CodeMeter\Runtime\bin folder and run the CodeMeter.exe file.
Important: Your computer should have a CmStick installed that contains a license with all the privileges that you want to share. The CmStick should be plugged into a USB port on your computer.
2. Click WebAdmin to open the CodeMeter WebAdmin window in your default web browser.
Provide License privileges to other users
Configuring source protection in the Logix Designer application Chapter 2
Rockwell Automation Publication 1756-PM016N-EN-P - November 2018 37
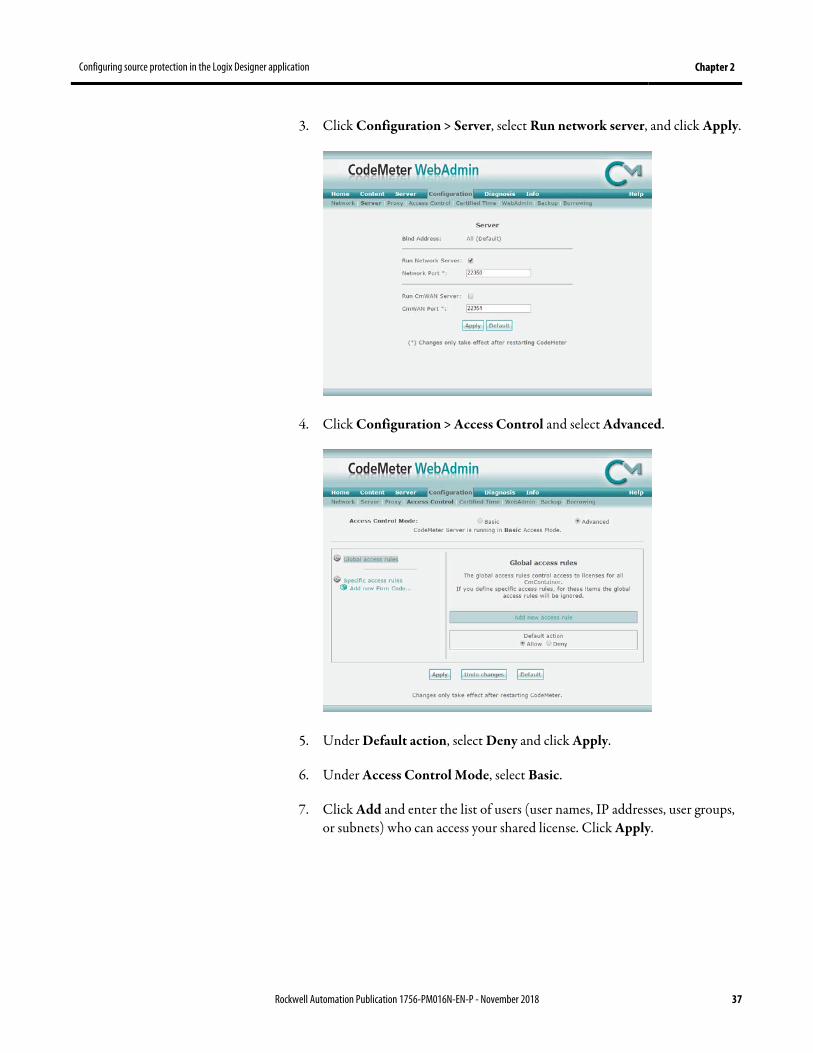
3. Click Configuration > Server, select Run network server, and click Apply.
4. Click Configuration > Access Control and select Advanced.
5. Under Default action, select Deny and click Apply.
6. Under Access Control Mode, select Basic.
7. Click Add and enter the list of users (user names, IP addresses, user groups, or subnets) who can access your shared license. Click Apply.
Chapter 2 Configuring source protection in the Logix Designer application
38 Rockwell Automation Publication 1756-PM016N-EN-P - November 2018
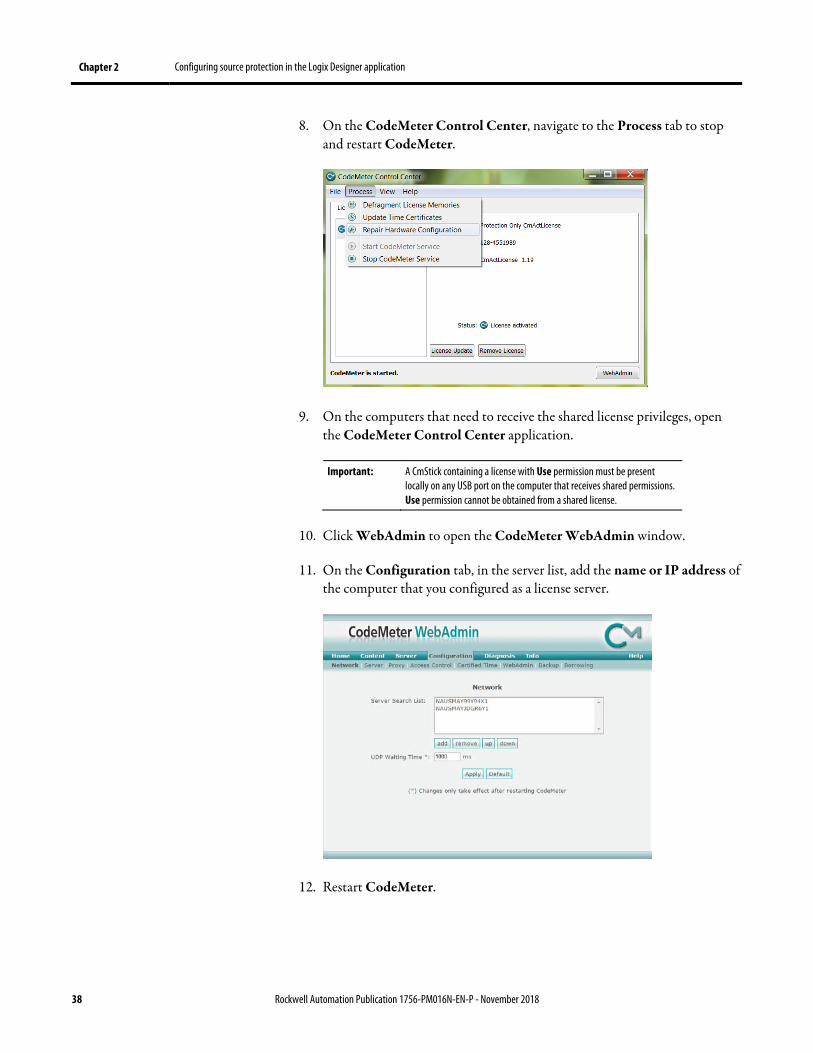
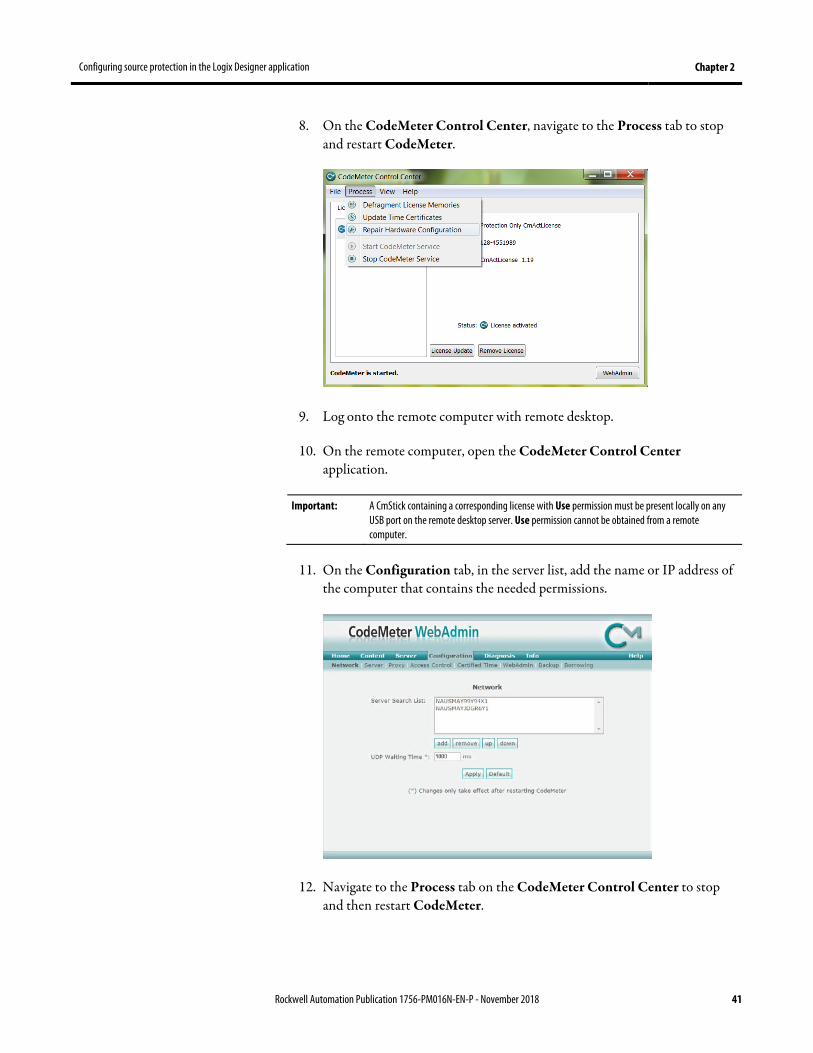
8. On the CodeMeter Control Center, navigate to the Process tab to stop and restart CodeMeter.
9. On the computers that need to receive the shared license privileges, open the CodeMeter Control Center application.
Important: A CmStick containing a license with Use permission must be present locally on any USB port on the computer that receives shared permissions. Use permission cannot be obtained from a shared license.
10. Click WebAdmin to open the CodeMeter WebAdmin window.
11. On the Configuration tab, in the server list, add the name or IP address of the computer that you configured as a license server.
12. Restart CodeMeter.
Configuring source protection in the Logix Designer application Chapter 2
Rockwell Automation Publication 1756-PM016N-EN-P - November 2018 39
Tip: When the Server Search List is blank in the CodeMeter WebAdmin tool, CodeMeter searches all servers that it finds on your subnet. When a user has a license that is also on a license server, the user's permissions might be upgraded to match the license on the server. To prevent accidental granting of privileges and to prevent CodeMeter from searching unnecessarily, add 127.0.0.1 (the localhost IP address) to the Server Search List.
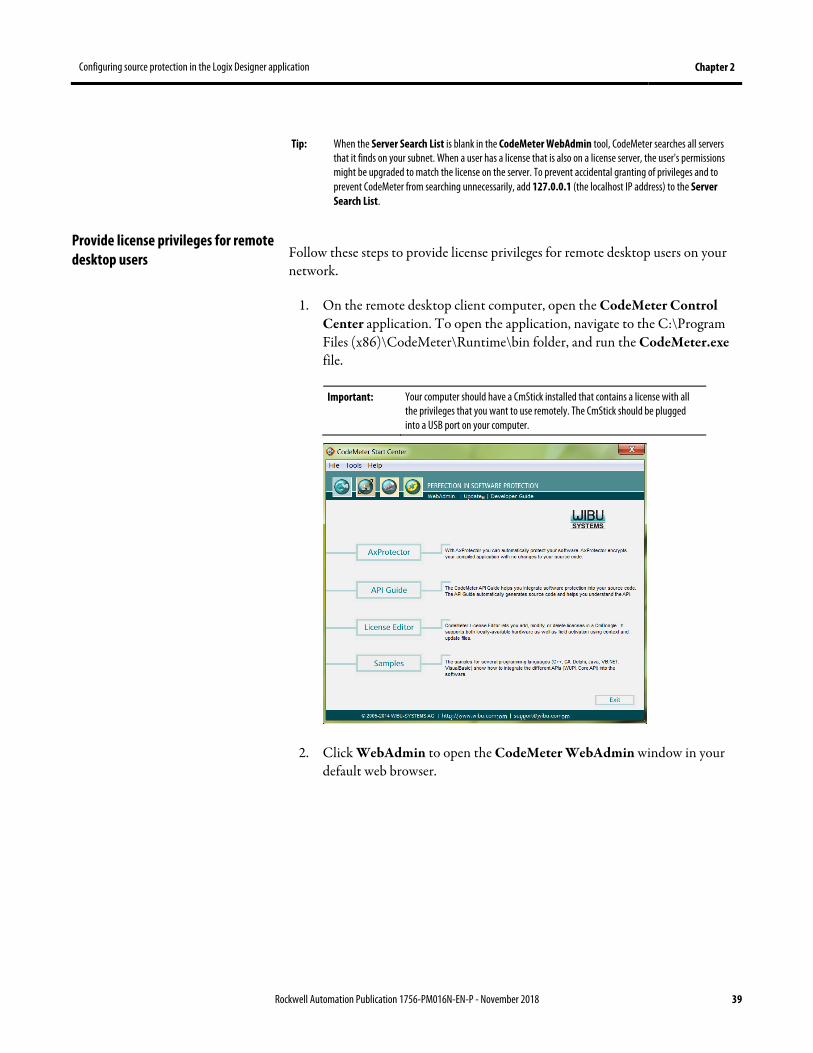
Follow these steps to provide license privileges for remote desktop users on your network.
1. On the remote desktop client computer, open the CodeMeter Control Center application. To open the application, navigate to the C:\Program Files (x86)\CodeMeter\Runtime\bin folder, and run the CodeMeter.exe file.
Important: Your computer should have a CmStick installed that contains a license with all the privileges that you want to use remotely. The CmStick should be plugged into a USB port on your computer.
2. Click WebAdmin to open the CodeMeter WebAdmin window in your default web browser.
Provide license privileges for remote desktop users

Chapter 2 Configuring source protection in the Logix Designer application
40 Rockwell Automation Publication 1756-PM016N-EN-P - November 2018
3. Click Configuration > Server, select Run network server, and click Apply.
4. Click Configuration > Access Control and select Advanced.
5. Under Default action, select Deny and click Apply.
6. Under Access Control Mode, select Basic.
7. Click Add and enter the list of users (user names, IP addresses, user groups, or subnets) who can access your shared license. Click Apply.
Configuring source protection in the Logix Designer application Chapter 2
Rockwell Automation Publication 1756-PM016N-EN-P - November 2018 41
8. On the CodeMeter Control Center, navigate to the Process tab to stop and restart CodeMeter.
9. Log onto the remote computer with remote desktop.
10. On the remote computer, open the CodeMeter Control Center application.
Important: A CmStick containing a corresponding license with Use permission must be present locally on any USB port on the remote desktop server. Use permission cannot be obtained from a remote computer.
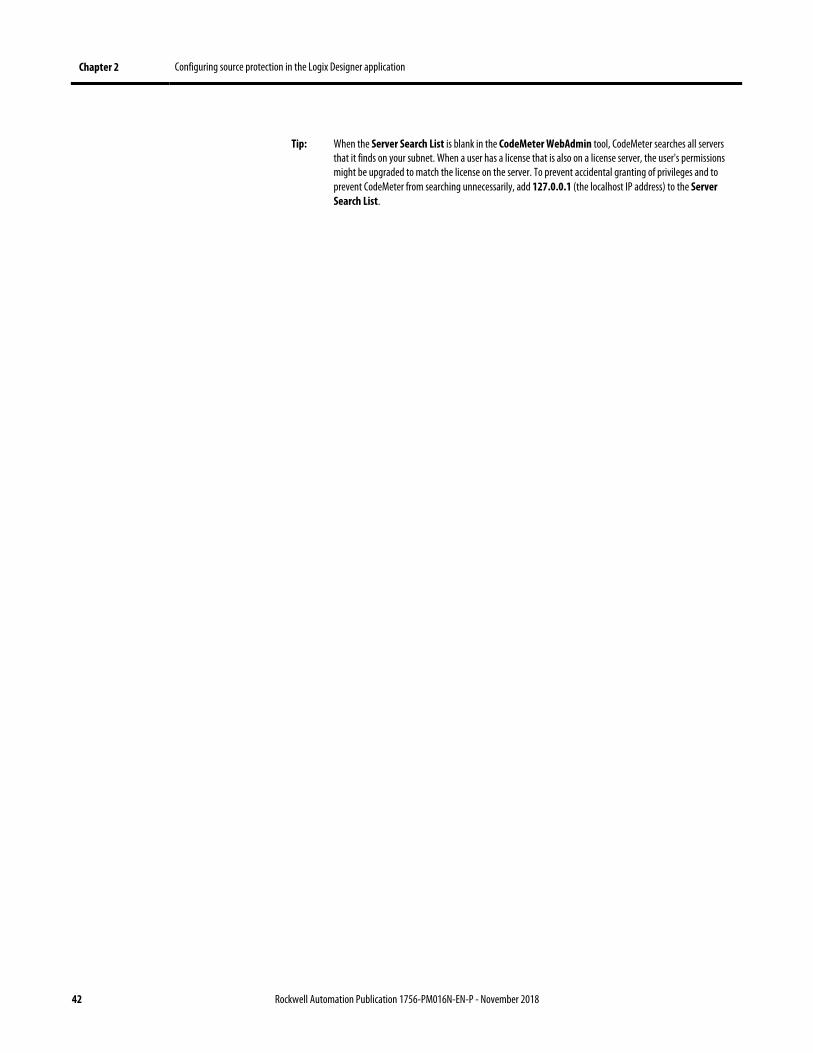
11. On the Configuration tab, in the server list, add the name or IP address of the computer that contains the needed permissions.
12. Navigate to the Process tab on the CodeMeter Control Center to stop and then restart CodeMeter.
Chapter 2 Configuring source protection in the Logix Designer application
42 Rockwell Automation Publication 1756-PM016N-EN-P - November 2018
Tip: When the Server Search List is blank in the CodeMeter WebAdmin tool, CodeMeter searches all servers that it finds on your subnet. When a user has a license that is also on a license server, the user's permissions might be upgraded to match the license on the server. To prevent accidental granting of privileges and to prevent CodeMeter from searching unnecessarily, add 127.0.0.1 (the localhost IP address) to the Server Search List.
Rockwell Automation Publication 1756-PM016N-EN-P - November 2018 43
Appendix A
Securing a ControlLogix controller with the Logix CPU Security Tool
You can secure a controller with the Logix CPU Security Tool. The Logix CPU Security Tool is automatically installed when you install Logix Designer version 17, 18, or 19. The tool is installed under the Logix Designer menu bar on the Tools menu.
Important: The Logix CPU Security Tool is supported only in Logix Designer application versions 17, 18, and 19. It is not supported in versions 20 and later.
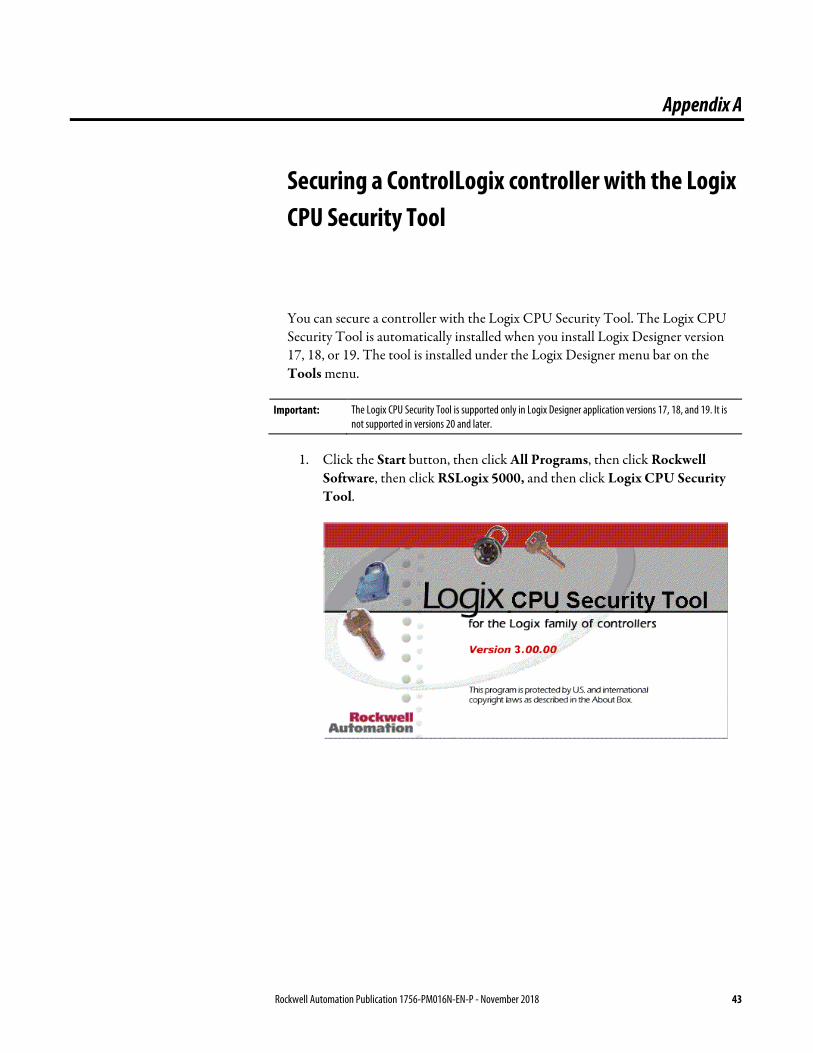
1. Click the Start button, then click All Programs, then click Rockwell Software, then click RSLogix 5000, and then click Logix CPU Security Tool.
Appendix A Securing a ControlLogix controller with the Logix CPU Security Tool
44 Rockwell Automation Publication 1756-PM016N-EN-P - November 2018
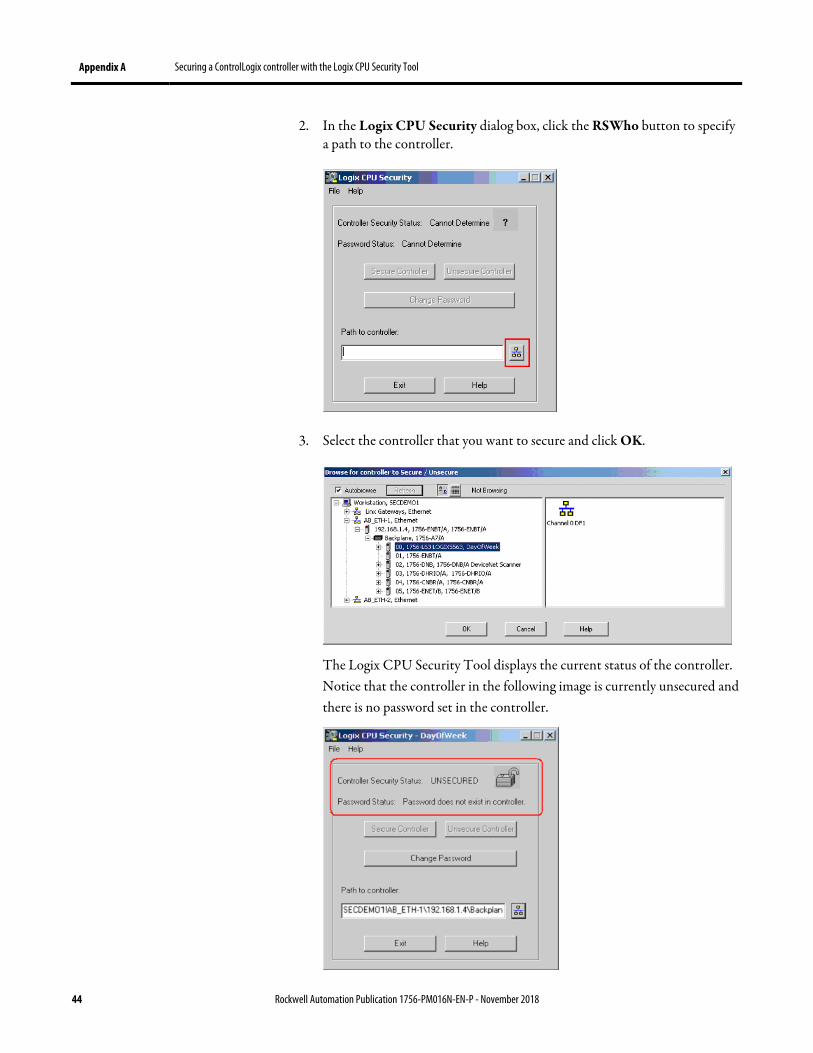
2. In the Logix CPU Security dialog box, click the RSWho button to specify a path to the controller.
3. Select the controller that you want to secure and click OK.
The Logix CPU Security Tool displays the current status of the controller. Notice that the controller in the following image is currently unsecured and there is no password set in the controller.
Securing a ControlLogix controller with the Logix CPU Security Tool Appendix A
Rockwell Automation Publication 1756-PM016N-EN-P - November 2018 45
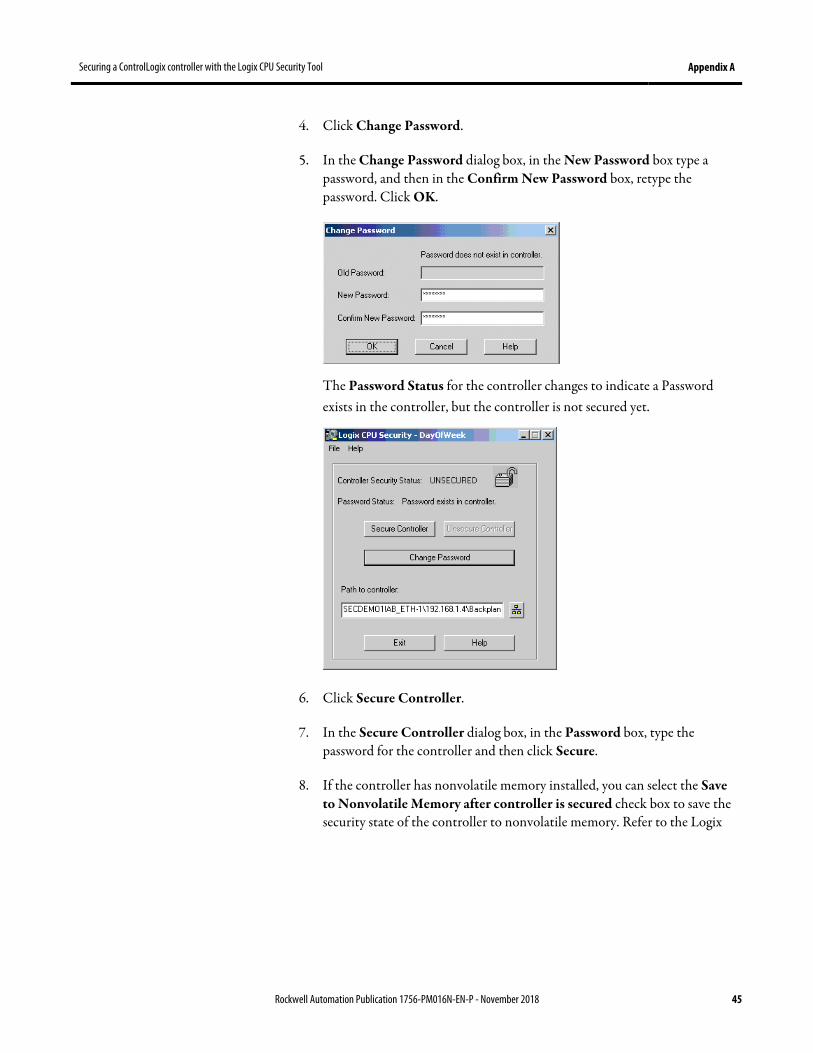
4. Click Change Password.
5. In the Change Password dialog box, in the New Password box type a password, and then in the Confirm New Password box, retype the password. Click OK.
The Password Status for the controller changes to indicate a Password exists in the controller, but the controller is not secured yet.
6. Click Secure Controller.
7. In the Secure Controller dialog box, in the Password box, type the password for the controller and then click Secure.
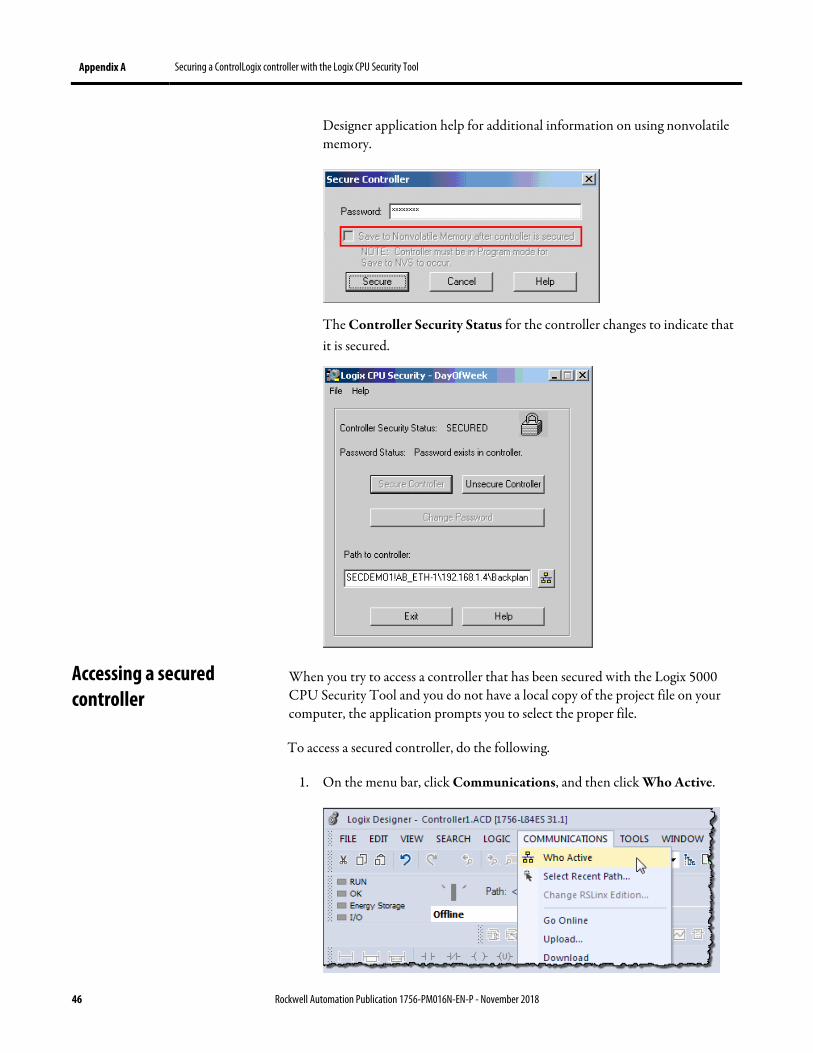
8. If the controller has nonvolatile memory installed, you can select the Save to Nonvolatile Memory after controller is secured check box to save the security state of the controller to nonvolatile memory. Refer to the Logix
Appendix A Securing a ControlLogix controller with the Logix CPU Security Tool
46 Rockwell Automation Publication 1756-PM016N-EN-P - November 2018
Designer application help for additional information on using nonvolatile memory.
The Controller Security Status for the controller changes to indicate that it is secured.
When you try to access a controller that has been secured with the Logix 5000 CPU Security Tool and you do not have a local copy of the project file on your computer, the application prompts you to select the proper file.
To access a secured controller, do the following.
1. On the menu bar, click Communications, and then click Who Active.
Accessing a secured controller
Securing a ControlLogix controller with the Logix CPU Security Tool Appendix A
Rockwell Automation Publication 1756-PM016N-EN-P - November 2018 47
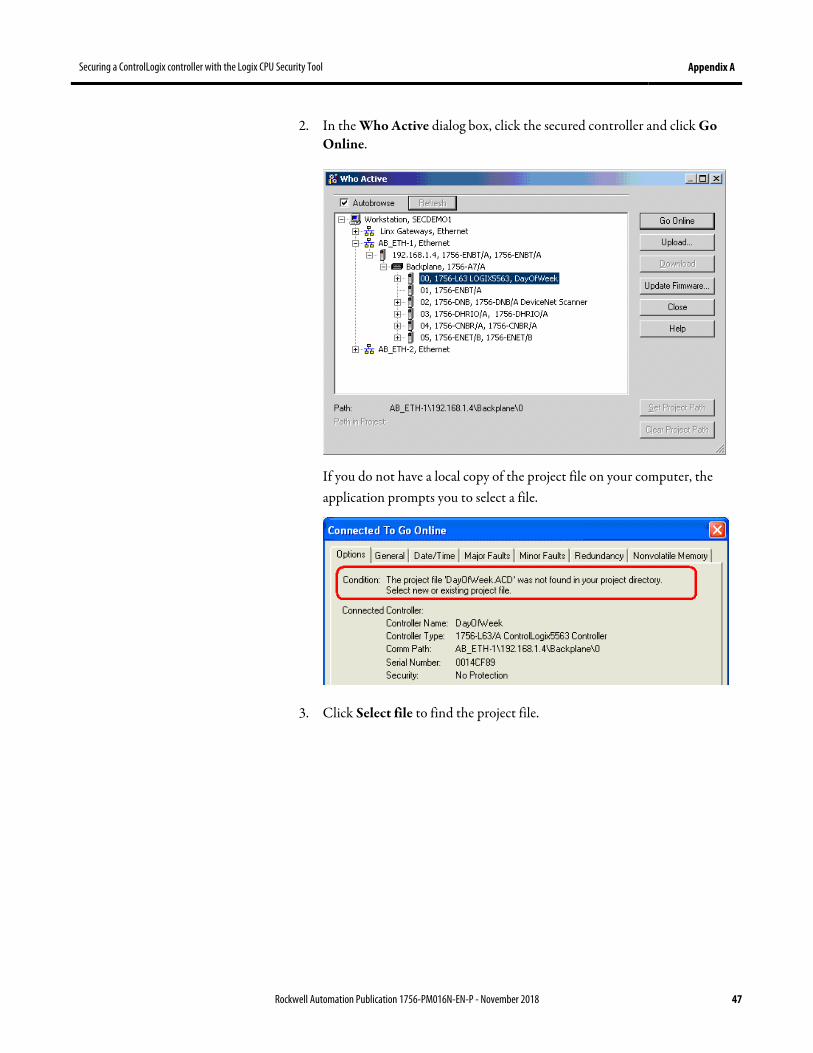
2. In the Who Active dialog box, click the secured controller and click Go Online.
If you do not have a local copy of the project file on your computer, the application prompts you to select a file.
3. Click Select file to find the project file.
Appendix A Securing a ControlLogix controller with the Logix CPU Security Tool
48 Rockwell Automation Publication 1756-PM016N-EN-P - November 2018
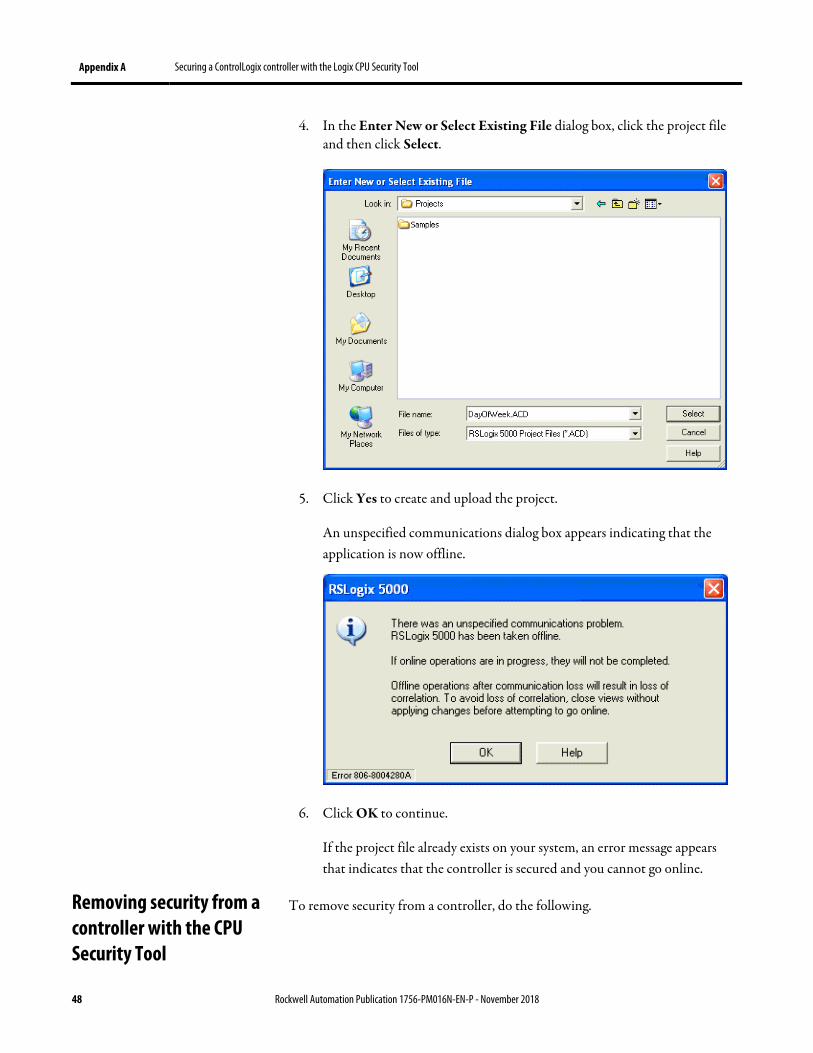
4. In the Enter New or Select Existing File dialog box, click the project file and then click Select.
5. Click Yes to create and upload the project.
An unspecified communications dialog box appears indicating that the application is now offline.
6. Click OK to continue.
If the project file already exists on your system, an error message appears that indicates that the controller is secured and you cannot go online.
To remove security from a controller, do the following. Removing security from a controller with the CPU Security Tool
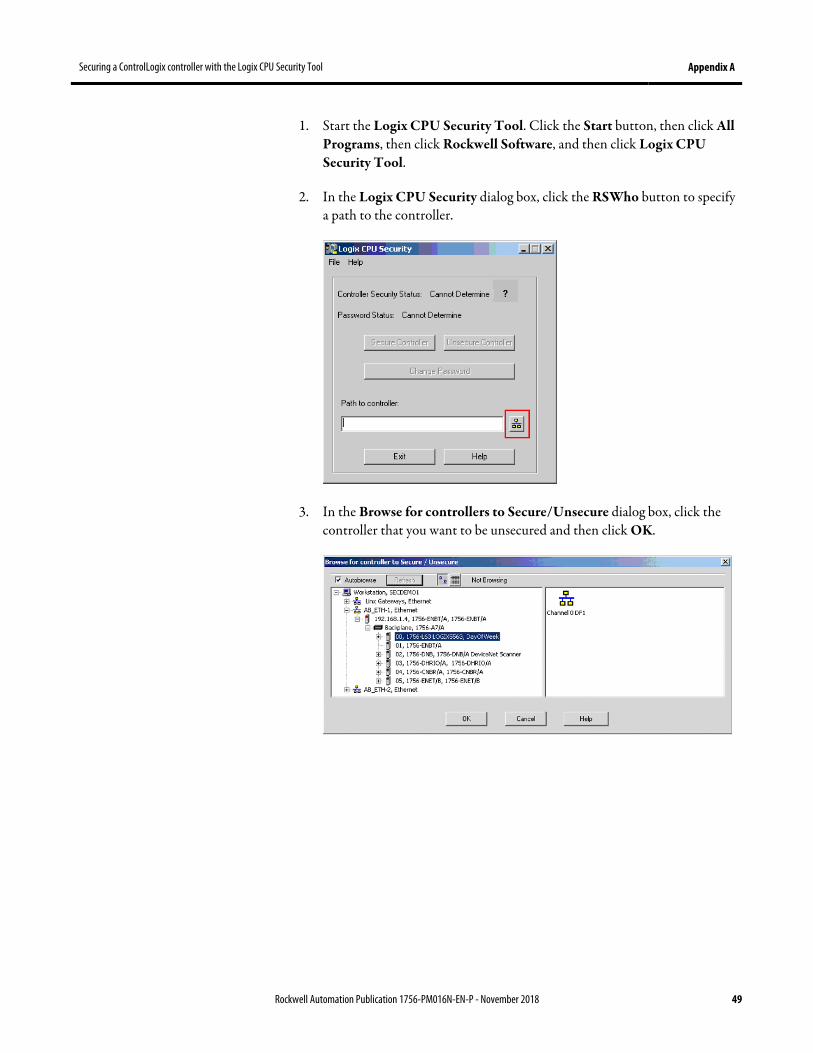
Securing a ControlLogix controller with the Logix CPU Security Tool Appendix A
Rockwell Automation Publication 1756-PM016N-EN-P - November 2018 49
1. Start the Logix CPU Security Tool. Click the Start button, then click All Programs, then click Rockwell Software, and then click Logix CPU Security Tool.
2. In the Logix CPU Security dialog box, click the RSWho button to specify a path to the controller.
3. In the Browse for controllers to Secure/Unsecure dialog box, click the controller that you want to be unsecured and then click OK.
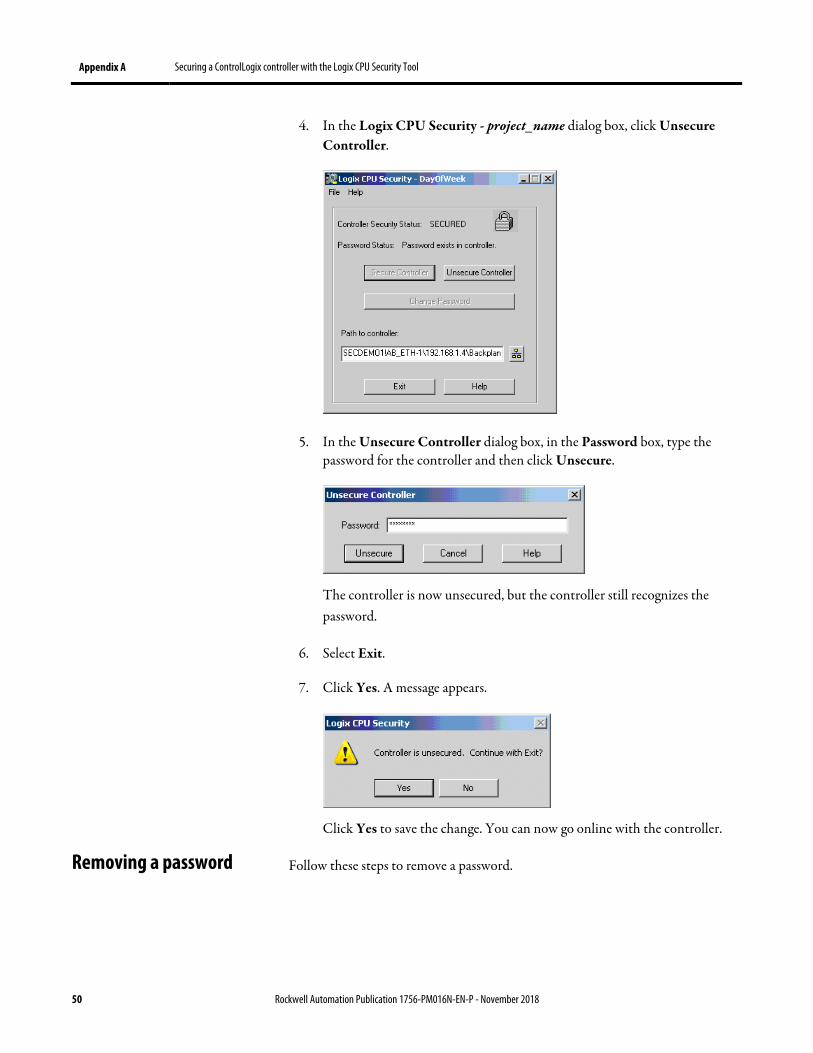
Appendix A Securing a ControlLogix controller with the Logix CPU Security Tool
50 Rockwell Automation Publication 1756-PM016N-EN-P - November 2018
4. In the Logix CPU Security - project_name dialog box, click Unsecure Controller.
5. In the Unsecure Controller dialog box, in the Password box, type the password for the controller and then click Unsecure.
The controller is now unsecured, but the controller still recognizes the password.
6. Select Exit.
7. Click Yes. A message appears.
Click Yes to save the change. You can now go online with the controller.
Follow these steps to remove a password. Removing a password
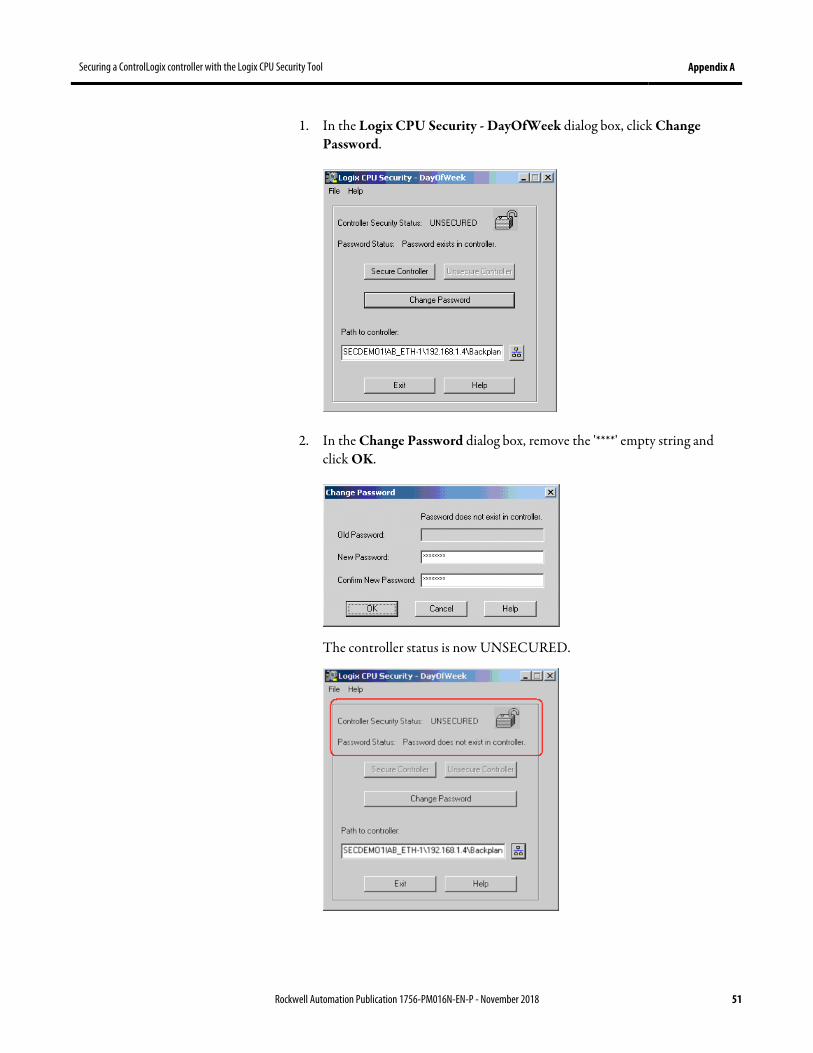
Securing a ControlLogix controller with the Logix CPU Security Tool Appendix A
Rockwell Automation Publication 1756-PM016N-EN-P - November 2018 51
1. In the Logix CPU Security - DayOfWeek dialog box, click Change Password.
2. In the Change Password dialog box, remove the '****' empty string and click OK.
The controller status is now UNSECURED.
Appendix A Securing a ControlLogix controller with the Logix CPU Security Tool
52 Rockwell Automation Publication 1756-PM016N-EN-P - November 2018
Rockwell Automation Publication 1756-PM016N-EN-P - November 2018 53
Appendix B
Product policies and securable actions supported by FactoryTalk Security
When used with the Logix Designer application, FactoryTalk Security supports Product Policies and Securable Actions. You configure these FactoryTalk Security settings in the FactoryTalk Administration Console.
Product Policies are not tied to a specific project, and may include the following.
• Securing the controller
• Creating a new project (either through the New Controller dialog box, or through the Translator Tool utility)
• Updating your firmware
Securable Actions let you perform specific tasks on a specific project or group of projects, and may include the following.
• Viewing a project
• Going online
• Creating tags
• Creating modules
In a safety controller project, you can specify additional protection to safety components. For example, to create a safety program, you need to have access granted for both of the following securable actions.
• Safety: Modify Component
• Program: Create
Keep the following considerations in mind when configuring security settings for the Logix Designer application.
• Security settings are obtained from the FactoryTalk Network Directory.
• RSSecurity Emulator is not used by the Logix Designer application, but may be required by other software.
• FactoryTalk Local directory is not supported.
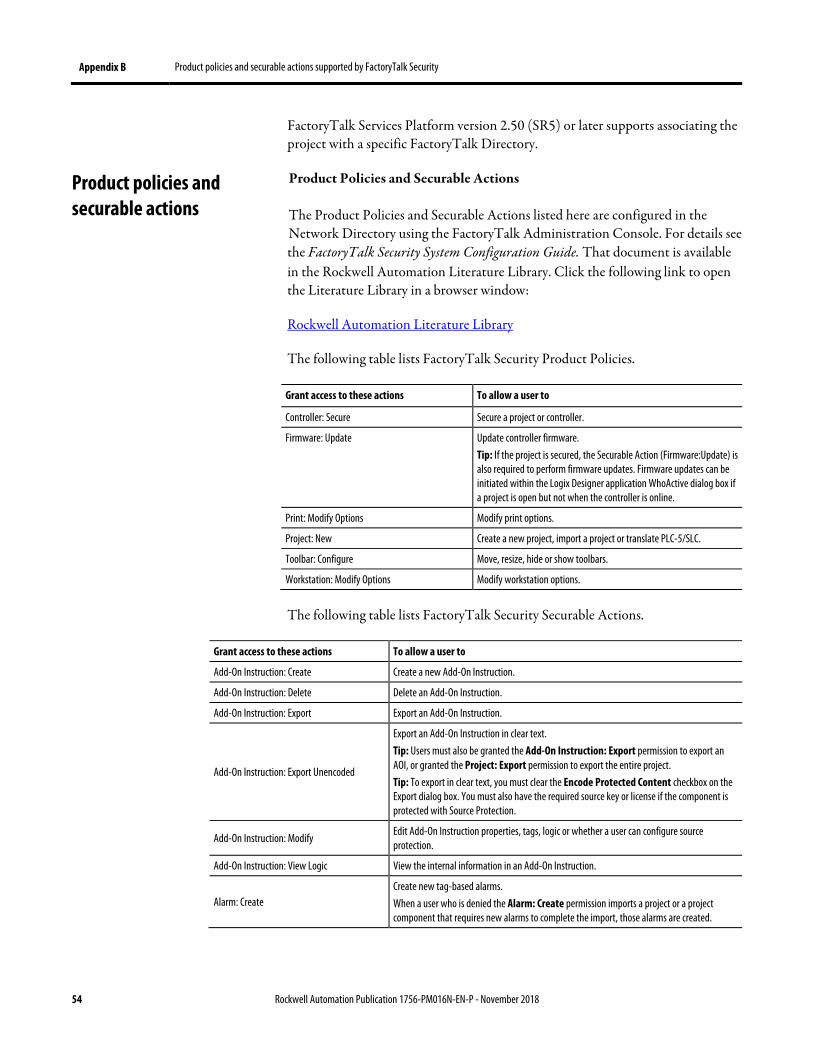
Appendix B Product policies and securable actions supported by FactoryTalk Security
54 Rockwell Automation Publication 1756-PM016N-EN-P - November 2018
FactoryTalk Services Platform version 2.50 (SR5) or later supports associating the project with a specific FactoryTalk Directory.
Product Policies and Securable Actions
The Product Policies and Securable Actions listed here are configured in the Network Directory using the FactoryTalk Administration Console. For details see the FactoryTalk Security System Configuration Guide. That document is available in the Rockwell Automation Literature Library. Click the following link to open the Literature Library in a browser window:
Rockwell Automation Literature Library
The following table lists FactoryTalk Security Product Policies.
Grant access to these actions To allow a user to
Controller: Secure Secure a project or controller.
Firmware: Update Update controller firmware. Tip: If the project is secured, the Securable Action (Firmware:Update) is also required to perform firmware updates. Firmware updates can be initiated within the Logix Designer application WhoActive dialog box if a project is open but not when the controller is online.
Print: Modify Options Modify print options.
Project: New Create a new project, import a project or translate PLC-5/SLC.
Toolbar: Configure Move, resize, hide or show toolbars.
Workstation: Modify Options Modify workstation options.
The following table lists FactoryTalk Security Securable Actions.
Grant access to these actions To allow a user to
Add-On Instruction: Create Create a new Add-On Instruction.
Add-On Instruction: Delete Delete an Add-On Instruction.
Add-On lnstruction: Export Export an Add-On Instruction.
Add-On lnstruction: Export Unencoded
Export an Add-On Instruction in clear text. Tip: Users must also be granted the Add-On Instruction: Export permission to export an AOI, or granted the Project: Export permission to export the entire project. Tip: To export in clear text, you must clear the Encode Protected Content checkbox on the Export dialog box. You must also have the required source key or license if the component is protected with Source Protection.
Add-On Instruction: Modify Edit Add-On Instruction properties, tags, logic or whether a user can configure source protection.
Add-On Instruction: View Logic View the internal information in an Add-On Instruction.
Alarm: Create Create new tag-based alarms. When a user who is denied the Alarm: Create permission imports a project or a project component that requires new alarms to complete the import, those alarms are created.
Product policies and securable actions
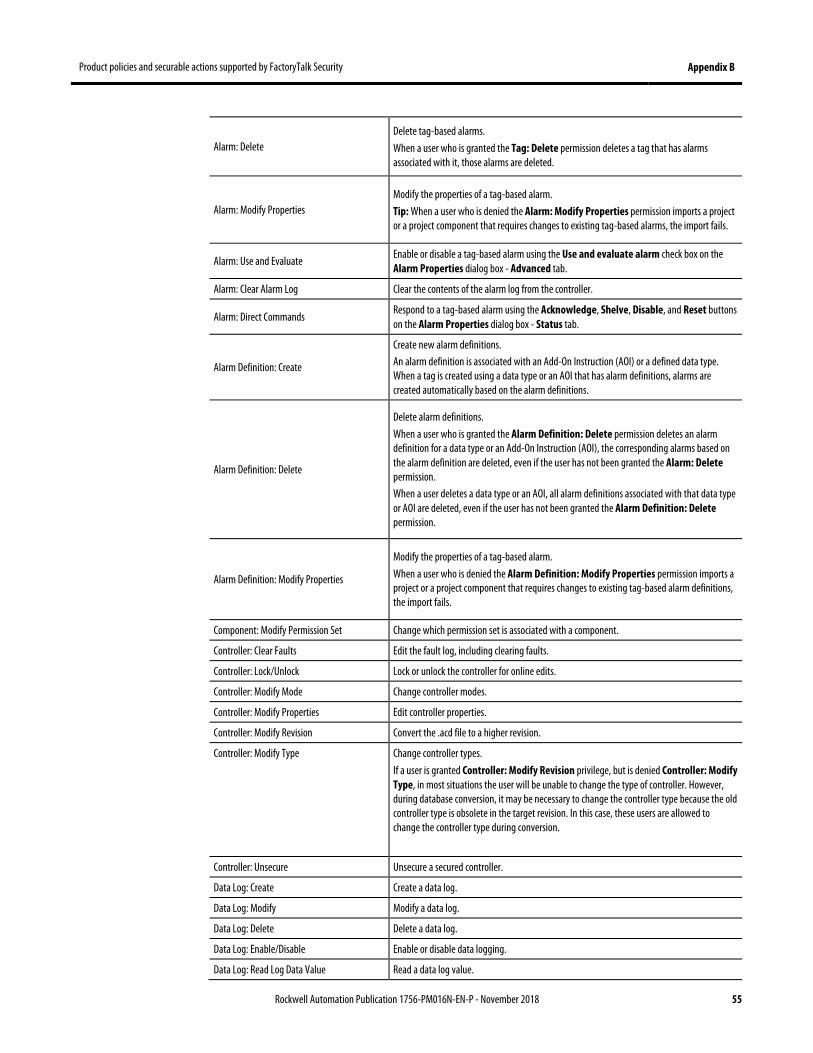
Product policies and securable actions supported by FactoryTalk Security Appendix B
Rockwell Automation Publication 1756-PM016N-EN-P - November 2018 55
Alarm: Delete Delete tag-based alarms. When a user who is granted the Tag: Delete permission deletes a tag that has alarms associated with it, those alarms are deleted.
Alarm: Modify Properties Modify the properties of a tag-based alarm. Tip: When a user who is denied the Alarm: Modify Properties permission imports a project or a project component that requires changes to existing tag-based alarms, the import fails.
Alarm: Use and Evaluate Enable or disable a tag-based alarm using the Use and evaluate alarm check box on the Alarm Properties dialog box - Advanced tab.
Alarm: Clear Alarm Log Clear the contents of the alarm log from the controller.
Alarm: Direct Commands Respond to a tag-based alarm using the Acknowledge, Shelve, Disable, and Reset buttons on the Alarm Properties dialog box - Status tab.
Alarm Definition: Create
Create new alarm definitions. An alarm definition is associated with an Add-On Instruction (AOI) or a defined data type. When a tag is created using a data type or an AOI that has alarm definitions, alarms are created automatically based on the alarm definitions.
Alarm Definition: Delete
Delete alarm definitions. When a user who is granted the Alarm Definition: Delete permission deletes an alarm definition for a data type or an Add-On Instruction (AOI), the corresponding alarms based on the alarm definition are deleted, even if the user has not been granted the Alarm: Delete permission. When a user deletes a data type or an AOI, all alarm definitions associated with that data type or AOI are deleted, even if the user has not been granted the Alarm Definition: Delete permission.
Alarm Definition: Modify Properties
Modify the properties of a tag-based alarm. When a user who is denied the Alarm Definition: Modify Properties permission imports a project or a project component that requires changes to existing tag-based alarm definitions, the import fails.
Component: Modify Permission Set Change which permission set is associated with a component.
Controller: Clear Faults Edit the fault log, including clearing faults.
Controller: Lock/Unlock Lock or unlock the controller for online edits.
Controller: Modify Mode Change controller modes.
Controller: Modify Properties Edit controller properties.
Controller: Modify Revision Convert the .acd file to a higher revision.
Controller: Modify Type Change controller types. If a user is granted Controller: Modify Revision privilege, but is denied Controller: Modify Type, in most situations the user will be unable to change the type of controller. However, during database conversion, it may be necessary to change the controller type because the old controller type is obsolete in the target revision. In this case, these users are allowed to change the controller type during conversion.
Controller: Unsecure Unsecure a secured controller.
Data Log: Create Create a data log.
Data Log: Modify Modify a data log.
Data Log: Delete Delete a data log.
Data Log: Enable/Disable Enable or disable data logging.
Data Log: Read Log Data Value Read a data log value.
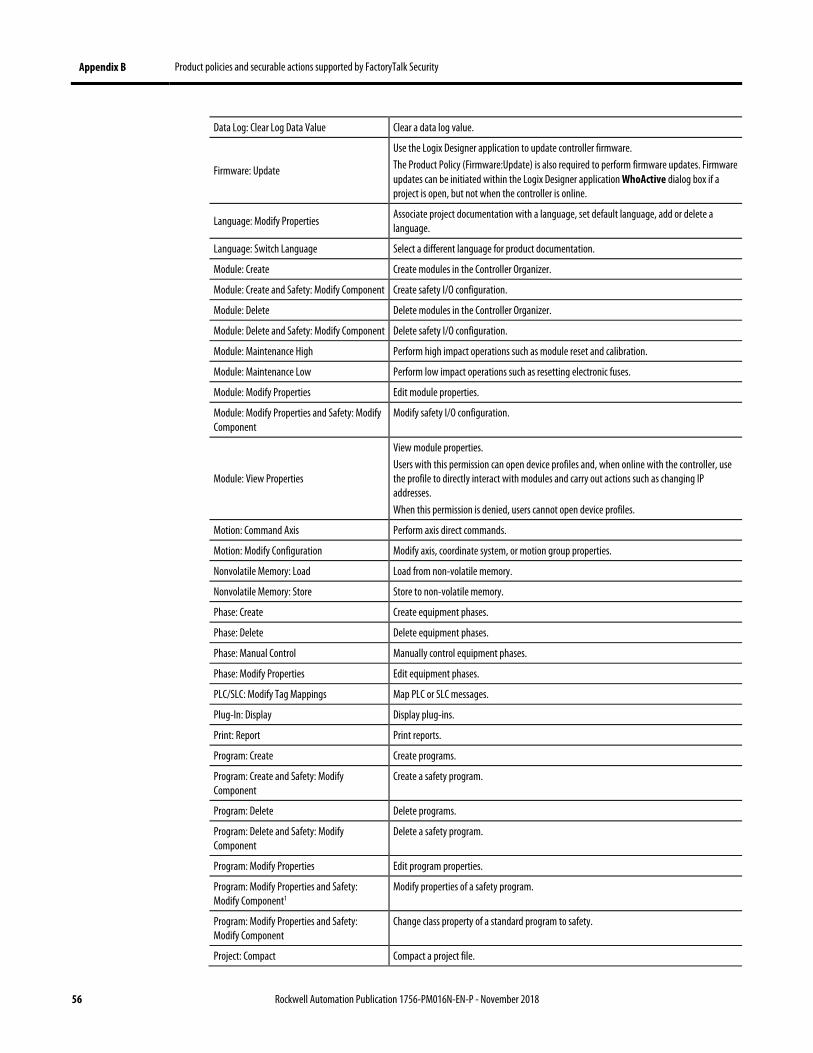
Appendix B Product policies and securable actions supported by FactoryTalk Security
56 Rockwell Automation Publication 1756-PM016N-EN-P - November 2018
Data Log: Clear Log Data Value Clear a data log value.
Firmware: Update
Use the Logix Designer application to update controller firmware. The Product Policy (Firmware:Update) is also required to perform firmware updates. Firmware updates can be initiated within the Logix Designer application WhoActive dialog box if a project is open, but not when the controller is online.
Language: Modify Properties Associate project documentation with a language, set default language, add or delete a language.
Language: Switch Language Select a different language for product documentation.
Module: Create Create modules in the Controller Organizer.
Module: Create and Safety: Modify Component Create safety I/O configuration.
Module: Delete Delete modules in the Controller Organizer.
Module: Delete and Safety: Modify Component Delete safety I/O configuration.
Module: Maintenance High Perform high impact operations such as module reset and calibration.
Module: Maintenance Low Perform low impact operations such as resetting electronic fuses.
Module: Modify Properties Edit module properties.
Module: Modify Properties and Safety: Modify Component
Modify safety I/O configuration.
Module: View Properties
View module properties. Users with this permission can open device profiles and, when online with the controller, use the profile to directly interact with modules and carry out actions such as changing IP addresses. When this permission is denied, users cannot open device profiles.
Motion: Command Axis Perform axis direct commands.
Motion: Modify Configuration Modify axis, coordinate system, or motion group properties.
Nonvolatile Memory: Load Load from non-volatile memory.
Nonvolatile Memory: Store Store to non-volatile memory.
Phase: Create Create equipment phases.
Phase: Delete Delete equipment phases.
Phase: Manual Control Manually control equipment phases.
Phase: Modify Properties Edit equipment phases.
PLC/SLC: Modify Tag Mappings Map PLC or SLC messages.
Plug-In: Display Display plug-ins.
Print: Report Print reports.
Program: Create Create programs.
Program: Create and Safety: Modify Component
Create a safety program.
Program: Delete Delete programs.
Program: Delete and Safety: Modify Component
Delete a safety program.
Program: Modify Properties Edit program properties.
Program: Modify Properties and Safety: Modify Component1
Modify properties of a safety program.
Program: Modify Properties and Safety: Modify Component
Change class property of a standard program to safety.
Project: Compact Compact a project file.
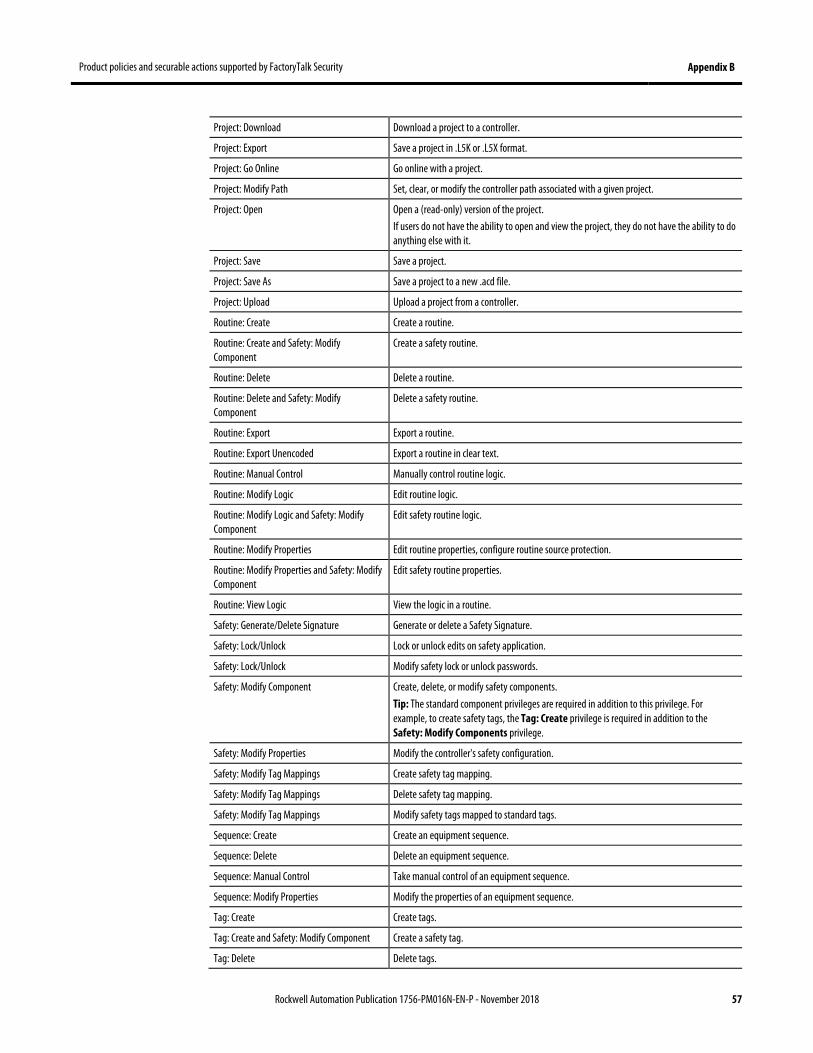
Product policies and securable actions supported by FactoryTalk Security Appendix B
Rockwell Automation Publication 1756-PM016N-EN-P - November 2018 57
Project: Download Download a project to a controller.
Project: Export Save a project in .L5K or .L5X format.
Project: Go Online Go online with a project.
Project: Modify Path Set, clear, or modify the controller path associated with a given project.
Project: Open Open a (read-only) version of the project. If users do not have the ability to open and view the project, they do not have the ability to do anything else with it.
Project: Save Save a project.
Project: Save As Save a project to a new .acd file.
Project: Upload Upload a project from a controller.
Routine: Create Create a routine.
Routine: Create and Safety: Modify Component
Create a safety routine.
Routine: Delete Delete a routine.
Routine: Delete and Safety: Modify Component
Delete a safety routine.
Routine: Export Export a routine.
Routine: Export Unencoded Export a routine in clear text.
Routine: Manual Control Manually control routine logic.
Routine: Modify Logic Edit routine logic.
Routine: Modify Logic and Safety: Modify Component
Edit safety routine logic.
Routine: Modify Properties Edit routine properties, configure routine source protection.
Routine: Modify Properties and Safety: Modify Component
Edit safety routine properties.
Routine: View Logic View the logic in a routine.
Safety: Generate/Delete Signature Generate or delete a Safety Signature.
Safety: Lock/Unlock Lock or unlock edits on safety application.
Safety: Lock/Unlock Modify safety lock or unlock passwords.
Safety: Modify Component Create, delete, or modify safety components. Tip: The standard component privileges are required in addition to this privilege. For example, to create safety tags, the Tag: Create privilege is required in addition to the Safety: Modify Components privilege.
Safety: Modify Properties Modify the controller's safety configuration.
Safety: Modify Tag Mappings Create safety tag mapping.
Safety: Modify Tag Mappings Delete safety tag mapping.
Safety: Modify Tag Mappings Modify safety tags mapped to standard tags.
Sequence: Create Create an equipment sequence.
Sequence: Delete Delete an equipment sequence.
Sequence: Manual Control Take manual control of an equipment sequence.
Sequence: Modify Properties Modify the properties of an equipment sequence.
Tag: Create Create tags.
Tag: Create and Safety: Modify Component Create a safety tag.
Tag: Delete Delete tags.
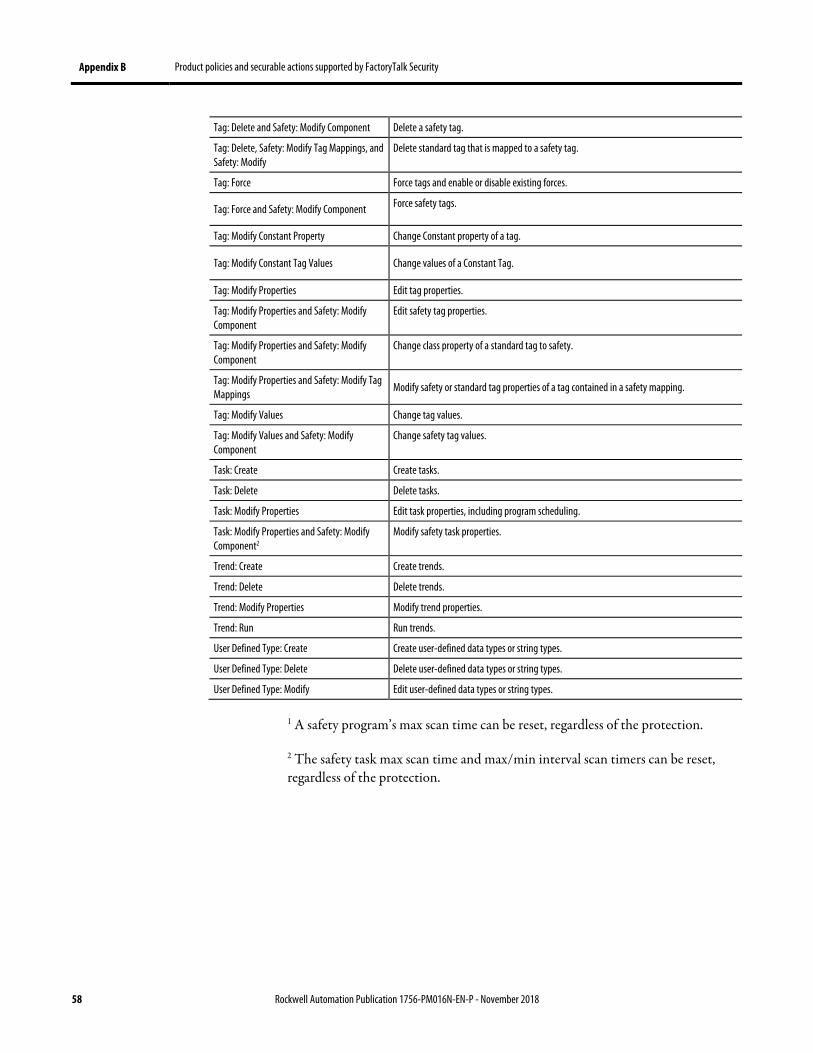
Appendix B Product policies and securable actions supported by FactoryTalk Security
58 Rockwell Automation Publication 1756-PM016N-EN-P - November 2018
Tag: Delete and Safety: Modify Component Delete a safety tag.
Tag: Delete, Safety: Modify Tag Mappings, and Safety: Modify
Delete standard tag that is mapped to a safety tag.
Tag: Force Force tags and enable or disable existing forces.
Tag: Force and Safety: Modify Component Force safety tags.
Tag: Modify Constant Property Change Constant property of a tag.
Tag: Modify Constant Tag Values Change values of a Constant Tag.
Tag: Modify Properties Edit tag properties.
Tag: Modify Properties and Safety: Modify Component
Edit safety tag properties.
Tag: Modify Properties and Safety: Modify Component
Change class property of a standard tag to safety.
Tag: Modify Properties and Safety: Modify Tag Mappings
Modify safety or standard tag properties of a tag contained in a safety mapping.
Tag: Modify Values Change tag values.
Tag: Modify Values and Safety: Modify Component
Change safety tag values.
Task: Create Create tasks.
Task: Delete Delete tasks.
Task: Modify Properties Edit task properties, including program scheduling.
Task: Modify Properties and Safety: Modify Component2
Modify safety task properties.
Trend: Create Create trends.
Trend: Delete Delete trends.
Trend: Modify Properties Modify trend properties.
Trend: Run Run trends.
User Defined Type: Create Create user-defined data types or string types.
User Defined Type: Delete Delete user-defined data types or string types.
User Defined Type: Modify Edit user-defined data types or string types.
1 A safety program’s max scan time can be reset, regardless of the protection.
2 The safety task max scan time and max/min interval scan timers can be reset, regardless of the protection.
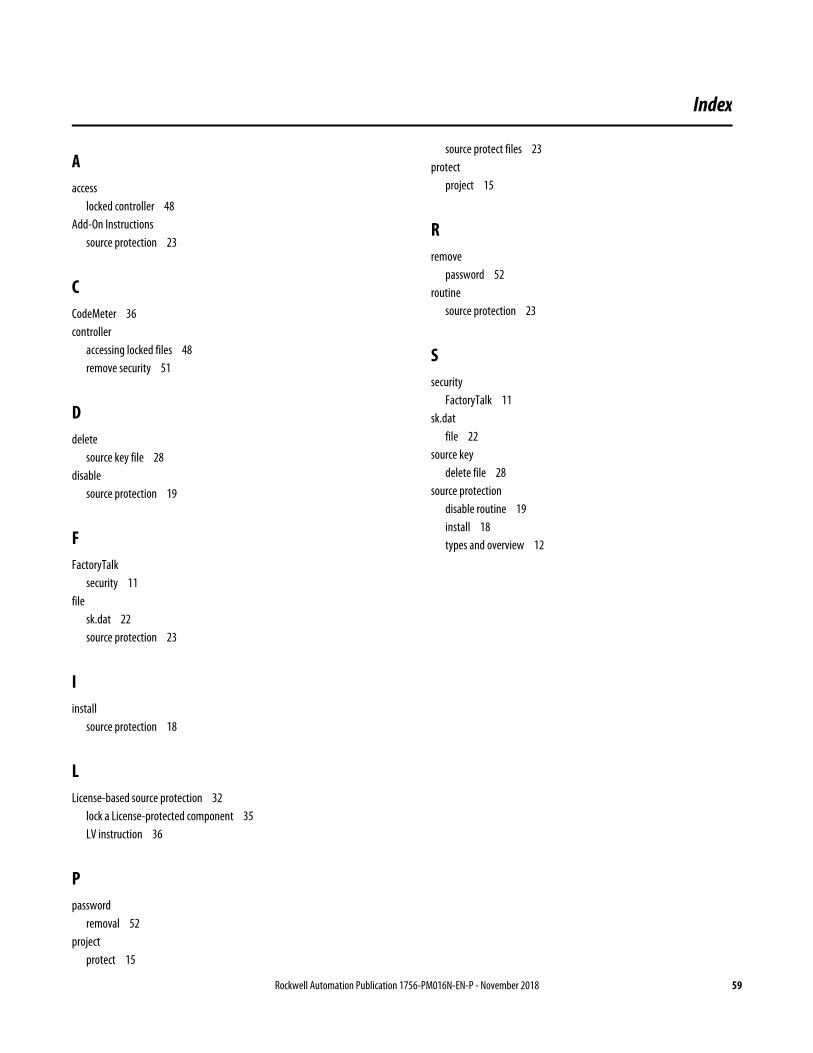
Rockwell Automation Publication 1756-PM016N-EN-P - November 2018 59
A access
locked controller 48 Add-On Instructions
source protection 23
C CodeMeter 36 controller
accessing locked files 48 remove security 51
D delete
source key file 28 disable
source protection 19
F FactoryTalk
security 11 file
sk.dat 22 source protection 23
I install
source protection 18
L License-based source protection 32
lock a License-protected component 35 LV instruction 36
P password
removal 52 project
protect 15
source protect files 23 protect
project 15
R remove
password 52 routine
source protection 23
S security
FactoryTalk 11 sk.dat
file 22 source key
delete file 28 source protection
disable routine 19 install 18 types and overview 12
Index

Rockwell Automation Publication 1756-PM016N-EN-P - November 2018
Supersedes Publication 1756-PM016M-EN-P - February 2018 Copyright © 2018 Rockwell Automation Technologies, Inc. All Rights Reserved. Printed in the U.S.A.
Rockwell Automation support
Rockwell Automation provides technical information on the web to assist you in using its products. At http://www.rockwellautomation.com/support you can find technical and application notes, sample code, and links to software service packs. You can also visit our Support Center at https://rockwellautomation.custhelp.com for software updates, support chats and forums, technical information, FAQs, and to sign up for product notification updates.
In addition, we offer multiple support programs for installation, configuration, and troubleshooting. For more information, contact your local distributor or Rockwell Automation representative, or visit http://www.rockwellautomation.com/services/online-phone .
Installation assistance
If you experience a problem within the first 24 hours of installation, review the information that is contained in this manual. You can contact Customer Support for initial help in getting your product up and running.
United States or Canada 1.440.646.3434
Outside United States or Canada Use the Worldwide Locator available at http://www.rockwellautomation.com/locations , or contact your local Rockwell Automation representative.
New product satisfaction return
Rockwell Automation tests all of its products to ensure that they are fully operational when shipped from the manufacturing facility. However, if your product is not functioning and needs to be returned, follow these procedures.
United States Contact your distributor. You must provide a Customer Support case number (call the phone number above to obtain one) to your distributor to complete the return process.
Outside United States Please contact your local Rockwell Automation representative for the return procedure.
Documentation feedback
Your comments will help us serve your documentation needs better. If you have any suggestions on how to improve this document, complete the feedback form, publication RA-DU002 http://literature.rockwellautomation.com/idc/groups/literature/documents/du/ra-du002_-en-e.pdf.