Embed Size (px)
Citation preview

Linux® Host Utilities 6.1 Installation and Setup Guide
NetApp, Inc.495 East Java DriveSunnyvale, CA 94089 U.S.A.Telephone: +1 (408) 822-6000Fax: +1 (408) 822-4501Support telephone: +1 (888) 4-NETAPPDocumentation comments: [email protected] Web: http://www.netapp.com
Part number 215-07065_B0February 2013


Contents
Changes to this document: February 2013 ................................................ 7The Linux Host Utilities ............................................................................... 9
Overview of the supported Linux environments ....................................................... 10
How to find instructions for your Linux environment .............................................. 12
Quick start checklist for planning the Host Utilities installation ........... 14Setup procedures for QLogic and Emulex HBAs .................................... 17
(FC) What you need to know about Fibre Channel HBAs and drivers ..................... 17
(iSCSI) Configuring Broadcom 10 Gb iSCSI offload .............................................. 18
Installing the Linux Host Utilities software ............................................. 21(Red Hat) Configuring space reclamation on hosts running Red Hat Linux 6.2 ...... 22
(Oracle VM) Configuring the O2CB_HEARTBEAT_THRESHOLD ..................... 23
(iSCSI) How to configure iSCSI for Linux .............................................. 24(iSCSI) Getting the initiator node name .................................................................... 24
(iSCSI) Setting the timeout values to enable multipathing ....................................... 26
(iSCSI) Setting up CHAP for Red Hat Linux 5, 6 and SUSE Linux 10, 11 ............. 26
(iSCSI) Setting up CHAP for Red Hat Enterprise Linux 4 series ............................. 27
(iSCSI) Starting the iSCSI service ............................................................................ 29
(iSCSI) Methods for setting up target discovery with software initiators ................. 29
(iSCSI) Discovering the iSCSI target by using the iscsiadm utility on
Red Hat 5, 6, SUSE 10, 11 ...................................................................... 29
(iSCSI) Setting up target discovery on Red Hat Enterprise Linux 4 series
.................................................................................................................. 30
(iSCSI) Discovering targets by using YaST2 on SUSE 10, 11 ..................... 31
(iSCSI) Configuring the iSCSI service to start automatically ................................... 32
(iSCSI) Configuring manual or automatic node login .............................................. 32
Configuring the storage system ................................................................. 34DM-Multipath configuration ..................................................................... 36
Verifying the required multipathing packages .......................................................... 36
Editing the DM-Multipath configuration file ............................................................ 37
Starting DM-Multipath .............................................................................................. 39
Configuring DM-Multipath to start automatically while booting ................. 40
Verifying the DM-Multipath configuration .............................................................. 40
Table of Contents | 3
Stopping DM-Multipath ............................................................................................ 43
Veritas Dynamic Multipath configuration ............................................... 44(Veritas) VxDMP restore daemon and LUN retries tunable configuration .............. 44
(Veritas) Setting the restore daemon and LUN retry tunable values ............ 45
(Veritas, Red Hat) Configuring Red Hat 6, 5 to support Veritas Storage
Foundation ........................................................................................................... 46
(Veritas, SUSE) Configuring SUSE Linux 11 to support Veritas Storage
Foundation ........................................................................................................... 47
(Veritas) The Array Support Library and Array Policy Module ............................... 48
(Veritas) What the ASL is ............................................................................. 48
(Veritas) What the APM is ............................................................................ 49
(Veritas) Installing the ASL and APM software ........................................... 49
(Veritas) Removing the ASL and APM ........................................................ 50
(Veritas) Information about ASL error messages ......................................... 51
Methods for working with LUNs in native Linux environments ........... 52(FC, Hardware iSCSI) Discovering new LUNs ........................................................ 52
(Software iSCSI, multipathing) Discovering new LUNs on Red Hat 5, 6, SUSE
10, 11 ................................................................................................................... 53
(Software iSCSI, multipathing) Discovering new LUNs on Red Hat 4 .................... 54
Viewing a list of LUNs ............................................................................................. 54
Examples of sanlun, iscsiadm, iscsi output when used to view LUNs ......... 55
(Native multipathing) Using sanlun to display DM-Multipath information ............. 62
(Native multipathing) Examples of sanlun output containing DM-
Multipath information ............................................................................. 62
Enabling device persistence for newly discovered LUNs ......................................... 66
Removing an unmapped LUN ................................................................................... 67
(Veritas) LUN access when using VxDMP ............................................... 68(Veritas, FC) Discovering new LUNs ....................................................................... 68
(Veritas, Software iSCSI) Discovering new LUNs for Red Hat 5, 6, or SUSE
10, 11 ................................................................................................................... 69
(Veritas) Viewing LUNs mapped to the host ............................................................ 70
(Veritas) Examples of sanlun, iscsiadm, iscsi output when used to view
LUNs ....................................................................................................... 70
(Veritas) Displaying multipathing information for VxDMP ..................................... 75
(Veritas) Examples of sanlun output for VxDMP ......................................... 75
(Veritas) Removing a LUN ....................................................................................... 76
4 | Linux Host Utilities 6.1 Installation and Setup Guide
(Veritas) Displaying available paths using VxVM ................................................... 77
(FC) Setting up a SAN boot LUN on Red Hat Enterprise Linux ........... 79(FC) Setting up a SAN boot LUN on SUSE Linux Enterprise Server ... 80
(FC) Configuring the root partition with DM-Multipath on SUSE Linux
Enterprise Server ................................................................................................. 80
(iSCSI) SAN boot configuration for iSCSI hardware, softwareinitiators .................................................................................................. 82
(Hardware iSCSI) Configuring SAN boot on Red Hat Enterprise Linux ................. 82
(Software iSCSI) Configuring SAN boot on Red Hat Enterprise Linux .................. 83
(Software iSCSI) Configuring SAN boot on SUSE Linux Enterprise Server .......... 84
(Software iSCSI) Configuring multipathing for a SAN boot LUN using SUSE
Linux Enterprise Server ....................................................................................... 86
(Veritas) Configuring SAN boot in a Veritas environment .................... 88Support for host virtualization .................................................................. 90
Hypervisor VHD requires alignment for best performance ...................................... 90
Supported Linux and Data ONTAP features .......................................... 92Protocols and configurations supported by Host Utilities ......................................... 92
The FC protocol ............................................................................................ 92
The FCoE protocol ........................................................................................ 93
The iSCSI protocol ........................................................................................ 93
SAN booting .................................................................................................. 94
Support for Linux Device Mapper Multipathing .......................................... 94
Volume management and multipathing with Veritas Storage Foundation . . . 94
Linux configurations that support ALUA ..................................................... 95
Troubleshooting .......................................................................................... 96LUNs not recognized by DM-Multipath ................................................................... 96
(FC) LUNs not visible on the Linux host .................................................................. 96
FC troubleshooting .................................................................................................... 97
(FC) Warnings displayed during Host Utilities installation .......................... 97
(FC) Linux hosts with QLogic initiators fail to detect LUNs ....................... 98
(FC) The SAN booted root on a DM-Multipath host freezes during FC
path faults ................................................................................................ 99
(FC) Poor performance due to misalignment of partitioned LUNs .............. 99
(FC) sanlun command displays error when HBA libHBAAPI.so is
missing ..................................................................................................... 99
(FC) LUNs are unavailable after a storage system failover or giveback .... 100
Table of Contents | 5
(FC) SCSI rescan issues on SUSE Linux Enterprise Server hosts .............. 100
Warning messages displayed when using LVM with multipathing
software ................................................................................................. 100
iSCSI troubleshooting ............................................................................................. 101
(iSCSI) LVM devices are not automatically mounted during system boot
on SUSE Linux Enterprise Server 11 .................................................... 101
(iSCSI) LVM devices are not automatically mounted during system boot
on SUSE Linux Enterprise Server 10 .................................................... 101
Multipathd occasionally fails to update the path status of DM-Multipath
devices ................................................................................................... 101
(iSCSI) Poor performance due to misalignment of partitioned LUNs ........ 102
iSCSI: LUNs not visible on the Linux host ................................................. 102
Veritas Storage Foundation troubleshooting ........................................................... 103
(Veritas) Error while stopping the fencing driver ....................................... 103
(Veritas) Secondary paths identified incorrectly ......................................... 104
(Veritas) Enclosure-based naming not reflected on NetApp storage .......... 104
(Veritas) Setting up a LUN for SAN booting fails ...................................... 104
(Veritas) Encapsulation of the root disk fails .............................................. 104
Installing the nSANity data collection program ...................................................... 104
Sample configuration files for Red Hat Enterprise Linux 6 ................ 106Sample configuration file for Red Hat Enterprise Linux 5 .................. 113Sample configuration file for Red Hat Enterprise Linux 4 .................. 118Sample configuration file for Red Hat Enterprise Virtualization
Hypervisor ............................................................................................ 120Sample configuration file for Oracle VM 3.0.1, 3.1.1 ............................ 123Sample configuration files for SUSE Linux Enterprise Server 11
series ...................................................................................................... 128Sample configuration file for SUSE Linux Enterprise Server 10 ........ 132Where to find more information ............................................................. 135Copyright information ............................................................................. 138Trademark information ........................................................................... 139How to send your comments .................................................................... 140Index ........................................................................................................... 141
6 | Linux Host Utilities 6.1 Installation and Setup Guide

Changes to this document: February 2013
This section contains information on the changes made to this guide since it was orginally released.
The 6.1 version of the Linux Host Utilities adds support for more configurations and features. Thisdocument contains information about those features. In addition, this document is updated wheninformation about new configurations and features becomes available.
Any time this document is updated, a note is added to the Release Notes. It is a good practice tocheck the online Release Notes regularly to determine whether there is new information about usingthe Linux Host Utilities or changes to this guide. The most current versions of the Release Notes andthis guide are posted on the NetApp Support Site at support.netapp.com.
Note: For the most current information on what the Linux Host Utilities support, see theInteroperability Matrix, which is online at support.netapp.com/NOW/products/interoperability.
February 2013 update
This document was updated in February 2013 with new information on requirements:
• The recommended value for the Oracle VM heartbeat has changed.For information on the recommended value and the steps required to enable this feature, see (Oracle VM) Configuring the O2CB_HEARTBEAT_THRESHOLD on page 23.
• The sample multipath.conf file for Oracle VM 3.0.1 has been updated to includeno_path_retry "queue".In addition, a sample multipath.conf file has been added for Oracle VM 3.1.1.For information on the recommended value and the steps required to enable this feature, see Sample configuration file for Oracle Linux on page 123.
• If you are using Oracle VM with iSCSI, you must setnode.session.timeo.replacement_timeout = 5.For information, see (iSCSI) Setting the timeout values to enable multipathing on page 26.
• A sample multipath.conf for Red Hat Enterprise Linux 6.3 has been added.For information, see Sample configuration file for Red Hat Enterprise Linux Series 6 on page106.
July 2012 update
In July 2012, this document was updated to support the Linux Host Utilities 6.1. The followinginformation was added to this document:
• The QConvergeConsole CLI replaces the SANsurfer CLI when you are working with HBAs.QLogic is deprecating the SANsurfer CLI.If you are using Emulex FC HBAs, you should now use /usr/sbin/ocmanager insteadof /usr/sbin/hbanyware/.
7
• The 6.1 version of the Linux Host Utilities provides both a 32-bit and a 64-bit installationpackage.For information on these packages, see Installing the Linux Host Utilities software on page 21.
• When you are running Red Hat Enterprise Linux 6 update 2, you can use the space reclamationfeatures.For information on the steps required to enable this feature, see Configuring space reclamation onpage 22.
• If you are using Oracle VM, you must set the O2CB_HEARTBEAT_THRESHOLD timeout value to61 in addition to creating a DM-Multipath file.For more information, see (Oracle VM) Configuring the O2CB_HEARTBEAT_THRESHOLDon page 23 and Sample configuration file for Oracle VM on page 123.
• With Red Hat Enterprise Linux 5.7 and later, the recommended value for the path_checkerparameter is tur and for the features parameter is "3 queue_if_no_pathpg_init_retries 50".For examples of the DM-Multipath configuration files that use these values, see Sampleconfiguration file for Red Hat Enterprise Linux Series 6 on page 106 and Sample configurationfile for Red Hat Enterprise Linux Series 5 on page 113.
• An example of a SUSE Linux Enterprise Server 11 SP2 DM-Multipath file has been added.See Sample configuration file for SUSE Linux Enterprise Server 11 series on page 128.
• To enable the Linux Host Utilities 6.1 to work with Red Hat Enterprise Virtualization Hypervisor6.2, you must create a DM-Multipath configuration file with values that support this environment.For an example of the Red Hat Enterprise Virtualization Hypervisor 6.2 DM-Multipath file, see (FC) Sample configuration file for Red Hat Enterprise Virtualization Hypervisor on page 120.
• For Veritas Storage Foundation 6.0 and later, you must set the IOFENCE timeout parameter to30000.
For information on doing this, see (Veritas, Red Hat) Configuring Red Hat 6, 5 to support VeritasStorage Foundation on page 46.
8 | Linux Host Utilities 6.1 Installation and Setup Guide

The Linux Host Utilities
The Host Utilities provide software programs and documentation that you can use to connect yourLinux host to NetApp storage systems running Data ONTAP. The software is available as either a32-bit or a 64-bit .rpm file that you can download from the NetApp Support Site.
The Host Utilities include the following components:
• The SAN ToolkitThe toolkit is installed automatically when you install the Host Utilities. This kit provides thefollowing key tools:
Note: This toolkit is common across all configurations and protocols of the Host Utilities. As aresult, some of its contents apply to one configuration, but not another. Having unusedcomponents does not affect your system performance.
• The sanlun utility, which helps you to manage LUNs and HBAs.• The san_version command, which displays the versions of the Host Utilities.
Note: Previous versions of the Host Utilities also included diagnostics programs. Theseprograms have been replaced by the nSANity Diagnostic and Configuration Data Collector,and are no longer installed with the Host Utilities. The nSANity program is not part of the HostUtilities. You should download, install, and execute it only when requested to do so bytechnical support.
See the man pages for these commands for details on using them.• Documentation
The documentation provides information about installing, setting up, using, and troubleshootingthe Host Utilities. The documentation consists of the following:
• This installation and setup guide• Quick Command Reference• Host Settings Affected by Linux Host Utilities• Quick Start Guide• Release Notes
Note: The Release Notes are updated whenever new information about the Host Utilities isavailable. You should check the Release Notes before installing the Host Utilities to see ifthere is new information about installing and working with the Host Utilities.
You can download the documentation from the NetApp Support Site when you download theHost Utilities software.
9
Overview of the supported Linux environmentsThe Host Utilities support several Linux environments. These environments consist of differentversions of the Linux operating system using protocols such as Fibre Channel (FC), FCoE, or iSCSI.Some environments also use Veritas Storage Foundation.
For details about the environments, including the supported operating system versions and VeritasStorage Foundation versions, see the Interoperability Matrix. The Linux Host Utilities documentationis available on the NetApp Support Site.
The following table summarizes key aspects of the main environments:
10 | Linux Host Utilities 6.1 Installation and Setup Guide

Linux Environment Notes
Red Hat Enterprise Linux,Oracle Linux, SUSE LinuxEnterprise Server
• This environment works with features provided by the Linuxoperating system.
• Multipathing: DM-Multipath• Volume management: Native Linux volume managers• Protocols: FC, FCoE, and iSCSI• ALUA (Asymmetric Logical Unit Access): For systems using
Data ONTAP operating in Cluster-Mode, ALUA is supportedwith FC, FCoE, and iSCSI. For systems using Data ONTAPoperating in 7-Mode, ALUA is supported with FC and FCoEonly.
• Setup issues:
• If you are using HBAs, set them up before you install theHost Utilities.
• If you are using multipathing, set up DM-Multipath.• (Red Hat Enterprise Linux 6 update 2 or later) If you
want to use space reclamation, you must use this version ofthe operating sytem,
• Configuration issues:
• If you are using a Hypervisor virtual hard disk (HVD),make sure the LUNs are properly aligned for bestperformance.
This guide provides instructions and examples using Red HatEnterprise Linux and SUSE Linux Enterprise Server. In mostcases, Red Hat Enterprise Linux and Oracle Linux use the samesetup procedures. To simplify this guide, it uses "Red Hat" to referto both systems using Red Hat Enterprise Linux and systems usingOracle Linux. If Oracle Linux requires a different procedure, thatprocedure is included.
Note: The examples in this documentation apply to currentLinux distributions. If you have an earlier version of Linux, youmust check the documentation for previous versions of theLinux Host Utilities. For example, if you use SUSE LinuxEnterprise Server 9, see the Linux Host Utilities 5.2 Installationand Setup Guide for those instructions and examples.
The Linux Host Utilities | 11
Linux Environment Notes
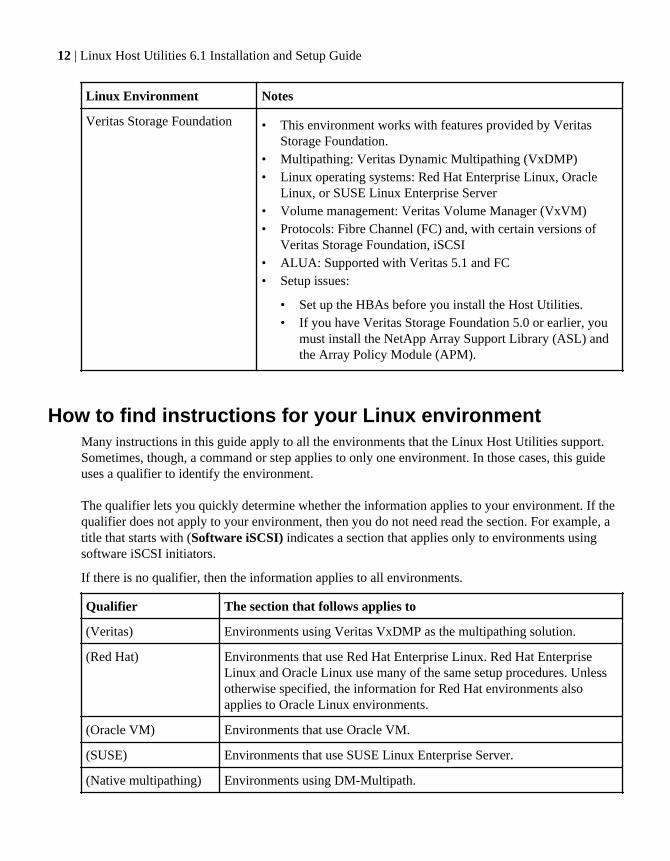
Veritas Storage Foundation • This environment works with features provided by VeritasStorage Foundation.
• Multipathing: Veritas Dynamic Multipathing (VxDMP)• Linux operating systems: Red Hat Enterprise Linux, Oracle
Linux, or SUSE Linux Enterprise Server• Volume management: Veritas Volume Manager (VxVM)• Protocols: Fibre Channel (FC) and, with certain versions of
Veritas Storage Foundation, iSCSI• ALUA: Supported with Veritas 5.1 and FC• Setup issues:
• Set up the HBAs before you install the Host Utilities.• If you have Veritas Storage Foundation 5.0 or earlier, you
must install the NetApp Array Support Library (ASL) andthe Array Policy Module (APM).
How to find instructions for your Linux environmentMany instructions in this guide apply to all the environments that the Linux Host Utilities support.Sometimes, though, a command or step applies to only one environment. In those cases, this guideuses a qualifier to identify the environment.
The qualifier lets you quickly determine whether the information applies to your environment. If thequalifier does not apply to your environment, then you do not need read the section. For example, atitle that starts with (Software iSCSI) indicates a section that applies only to environments usingsoftware iSCSI initiators.
If there is no qualifier, then the information applies to all environments.
Qualifier The section that follows applies to
(Veritas) Environments using Veritas VxDMP as the multipathing solution.
(Red Hat) Environments that use Red Hat Enterprise Linux. Red Hat EnterpriseLinux and Oracle Linux use many of the same setup procedures. Unlessotherwise specified, the information for Red Hat environments alsoapplies to Oracle Linux environments.
(Oracle VM) Environments that use Oracle VM.
(SUSE) Environments that use SUSE Linux Enterprise Server.
(Native multipathing) Environments using DM-Multipath.
12 | Linux Host Utilities 6.1 Installation and Setup Guide
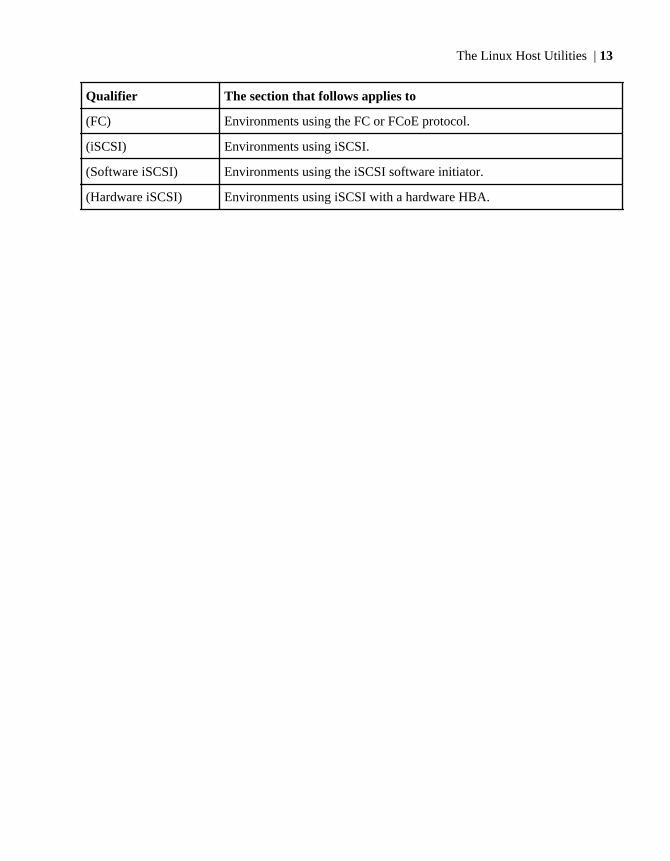
Qualifier The section that follows applies to
(FC) Environments using the FC or FCoE protocol.
(iSCSI) Environments using iSCSI.
(Software iSCSI) Environments using the iSCSI software initiator.
(Hardware iSCSI) Environments using iSCSI with a hardware HBA.
The Linux Host Utilities | 13

Quick start checklist for planning the HostUtilities installation
Installing the Host Utilities and setting up your system involves numerous tasks that are performedon both the storage system and the host. The following checklist provides a high-level overview ofthese tasks.
If you are an experienced Linux user, this checklist can serve as a quick start guide to installing andsetting up the Host Utilities.
Regardless of your experience level, planning how you will install and configure the Host Utilities isa good practice.
The detailed steps for each the tasks presented in the checklist are provided later in this guide.
Note: Occasionally there are known problems that can affect your system setup. Review the HostUtilities Release Notes before you install the Host Utilities. The Release Notes are updatedwhenever an issue is found, and may contain information about the Host Utilities that wasdiscovered after this guide was produced.
Task 1: Make sure the prerequisites for installing and setting up the Host Utilities have beenmet
1. Verify that your system setup is correct. Check the Interoperability Matrix for the most currentinformation about system requirements. This includes:
• Host operating system version and patches• HBAs and drivers, or software initiators, model and version
Note: This guide contains information on QLogic and Emulex HBAs. Other HBAs are alsosupported. Check the Interoperability Matrix at support.netapp.com/NOW/products/interoperability for complete information on supported HBAs.
• (Veritas) Veritas Storage FoundationSet up the Veritas Volume Manager (VxVM), and then set up the Array Support Library(ASL) and Array Policy Module (APM), if this software was not installed with your versionof Veritas Storage Foundation.
• Volume management and multipathing.• Optional setup based on your operating system:.
• (Red Hat Enterprise Linux 6 or later) This version of the Red Hat Enterprise Linuxoperating system supports space reclamation, but you must perform some setup steps touse space reclamation successfully.
• (Oracle VM)If you are using Oracle VM, you need to set theO2CB_HEARTBEAT_THRESHOLD to 65.
2. Verify that your storage system is:
14 | Linux Host Utilities 6.1 Installation and Setup Guide
• Running a supported version of Data ONTAP.
Note: If you are using Red Hat Enterprise Linux 6.0 or later, you should run Data ONTAP8.0.1 or higher on the storage systems. That way you can use the Block Limits VPD page(0xb0) information. Using the Block Limits VPD page helps maintain block alignment,which results in enhanced I/O performance on the NetApp LUN.
• Running the correct, licensed protocol for your environment.• Set up to work with the host and the initiator HBAs or software initiators, as needed by your
protocol.• Set up to work with ALUA, if it is supported with your version of Data ONTAP and your
protocol.For Data ONTAP operating in Cluster-Mode, ALUA works with the FC, FCoE and iSCSIprotocols and must be enabled. For Data ONTAP operating in 7-Mode, ALUA works withthe FC and FCoE protocols.
• Set up with working volumes.
3. (FC) If you are using a switch, verify that it is:
• Set up correctly.• Zoned.• Cabled correctly.
Note: For information about supported topologies and cablilng, see the for your version ofData ONTAP.
4. Confirm that the host and the storage system can communicate.
Task 2: Install the Host Utilities
1. If you are upgrading the Host Utilities from an earlier version, remove the currently installedversion of the Host Utilities.If you are uninstalling the current version of the Host Utilities or Linux Host Utilities 5.3, you canuse the rpm -e command. Prior to the Linux Host Utilities 5.3, the software for the Host Utilitieswas not provided in .rpm format. If you have one of those versions of the Host Utilities installed,you must use the /uninstall command.
2. Download a copy of the .rpm file containing the Host Utilities software for your host architecturefrom the NetApp Support Site.
Note: The Linux Host Utilities provide both a 32-bit software installation package and a 64-bitsoftware installaiton package.
3. Install the Host Utilities software using the rpm -ivh package_name command.
Note: Starting with Linux Host Utilities 5.3, if you are upgrading the Host utilities from LinuxHost Utilities, you can use the rpm -Uvh package_name command.
(iSCSI) Task 3: Configure the iSCSI protocol
1. Record the host’s iSCSI node name.
Quick start checklist for planning the Host Utilities installation | 15
2. Start the iSCSI service.
3. Set up target discovery.
4. (Optional) Set up CHAP.
5. Configure the iSCSI service to start automatically.
6. Configure automatic node login.
Task 4: Set up multipathing
1. Supply the correct parameters based on your multipathing system.If you are using the native DM-Multipath, you must configure the multipath.conf file.If you are using Veritas Dynamic Multipathing (VxDMP) you must set the appropriateparameters.
2. Verify the configuration.
3. (Native multipathing only) Configure DM-Multipath to start automatically during system boots.
Task 5: Set up access between the host and the LUNs on the storage system
1. Discover new LUNs.
2. View the LUNs.
3. Display multipathing information about the LUNs.
4. Enable device persistence for the LUNs.
5. Remove LUNs.
16 | Linux Host Utilities 6.1 Installation and Setup Guide

Setup procedures for QLogic and Emulex HBAs
Linux Host Utilities environments using FC or hardware iSCSI require that you set up your HBAsbefore you install the Host Utilities. The setup involves making sure that the HBAs and their driversuse the correct parameter values. If you use QLogic or Emulex HBAs, you will need to change someof these values from the default settings. The following sections provide information on the tools youneed and how to change the settings.
(FC) What you need to know about Fibre Channel HBAs anddrivers
If your Linux Host Utilities environment uses HBAs, you must install the HBAs before you installthe Host Utilities software. There are certain things you need to know about working with the HBAs.
• Make sure you are using a supported HBA and driver.If your driver firmware is not supported, uninstall it and get a supported version of the firmware.If the HBA is not supported, remove it and get a supported HBA.Check the Interoperability Matrix for the most current information about supported HBAs anddrivers.For information on installing and uninstalling the HBAs and drivers, see the instructions providedby the vendor.
• If you have multiple HBAs, make sure they are all the same brand.You should not use HBAs from different vendors on the same Linux host to access LUNs.
Note: For hardware iSCSI, enabling or initializing an additional network driver or anadditional iSCSI driver for a second port while accessing storage using iSCSI might result ininconsistent behavior by the host.
• Make sure you are using the correct values for the HBA and driver parameters.
Note: The HBA and driver parameter values recommended in this guide apply only toenvironments using the FC protocol or a hardware iSCSI HBA, not to environments using theFCoE protocol. In some cases, the values you supply for the parameters differ based onwhether the driver was bundled with the Linux operating system distribution or downloadedseparately from an OEM.
For QLogic and Emulex HBAs you can use the default values for the HBA and driver parameters.• You must install the HBA management packages provided by the vendors on their web sites.
The management software enables the sanlun command to gather information about the FCHBAs, such as their WWPNs.Make sure you download the correct package for your host architecture.QLogic HBA
• QConvergeConsole CLI
17

Emulex HBA
• OneCommand Manager core application (CLI) package for your host• If you did not record the WWPN of the HBAs, you can use the sanlun fcp show adapter
command to list the HBAs.
(iSCSI) Configuring Broadcom 10 Gb iSCSI offloadYou can use a Broadcom 10 Gb adapter in iSCSI environments that use iSCSI offload.
Before you begin
Get the Broadcom 10 Gb adapter. For detailed instructions, see the Broadcom documentation.
About this task
iSCSI Offload uses the TCP Offload Engine (TOE) technology in network interface cards (NICs) tooffload the processing of the TCP/IP stack to a network controller. Normally, this TOE is used withhigh-speed network interfaces such as gigabit Ethernet and 10 Gb Ethernet, where the overhead ofprocessing a network stack can become significant.
Steps
1. Install the Linux operating system.
If you are installing the operating system on your machine, follow the standard installationprocedure. If you are using a SAN boot LUN, see the instructions in this guide for setting up aSAN boot LUN.
For more information, check the Broadcom NetXtreme II™ Network Adapter User Guide.
Note: Do not install the iscsi-util package that comes with the operating system distribution.This package is part of the Broadcom driver package and is installed when you install thedrivers.
2. Install the Broadcom iSCSI package.
3. Install the appropriate Broadcom drivers. For instructions, see the Broadcom README file thatcomes with the drivers.
4. Configure the initiator and connect it to the target using the offload path by performing thefollowing steps:
a) Add a new target or node by entering the following command:
iscsiadm -m node -p <target ipaddr:[port],TPGT> -T <iqn.targetname> -onew
Example
The following command line provides an example of adding a new target:
18 | Linux Host Utilities 6.1 Installation and Setup Guide
iscsiadm -m node -p 192.168.1.250:3260,1 -T iqn.2005-03.broadcom:jho-
target -o new
b) Get the Broadcom NX2 transport name by entering the following command:
dmes | grep “bnx2i: netif”
Example
This command line returns the following type of output on a system that has two NetXtremeII devices. The transport names are shown in bold:
bnx2i: netif=eth0, iscsi=bcm570x-030000bnx2i: netif=eth1, iscsi=bcm570x-030001
c) Bind the iSCSI target to the Broadcom NX2 transport using the following command:
iscsiadm -m node -p <target ipaddr:[port]> -T <iqn.targetname > --o=update --name=iface.transport_name --value=$XPORT_NAME
Example
The following command line binds the iSCSI target to the Broadcom NX2 transport:
iscsiadm -m node -p 192.168.1.250:3260 -T iqn.2005-03.broadcom:jho-
target --op=update --name=iface.transport_name --value=bcm570x-030000
d) Log in to the target using the command:
iscsiadm -m node -p <target ipaddr:[port]> -T <iqn.targetname > --login
Example
The following command line provides an example of logging in to the target:
iscsiadm -m node -p 192.168.1.250:3260 -T iqn.2005-03.broadcom:jho-
target --login
Verifying your configuration
Before you offload the iSCSI sessions, the information has the following format:
tcp: [1] 192.168.200.6:3260,1005 iqn.1992-08.com.netapp:sn.118045890tcp: [2] 192.168.200.5:3260,1004 iqn.1992-08.com.netapp:sn.118045890
After you offload the iSCSI sessions, the information has the following format:
bcm570x-1a0000: [6] 192.168.200.6:3260,1005 iqn.1992-08.com.netapp:sn.118045890
Setup procedures for QLogic and Emulex HBAs | 19

bcm570x-1a0000: [5] 192.168.200.5:3260,1004 iqn.1992-08.com.netapp:sn.118045890
After you finish
You must get the host to discover the LUNs.
20 | Linux Host Utilities 6.1 Installation and Setup Guide

Installing the Linux Host Utilities software
The Linux Host Utilities software is packaged in both a 32-bit and a 64-bit .rpm file. You mustdownload the appropriate .rpm file from the NetApp Support Site. After you have the correct .rpmfile for your system, you can use the rpm -ivh command to install the software.
Before you begin
It is a good practice to confirm that you have the correct version of the Linux Host Utilities for yourversion of the Linux host. For the most current information about the correct version, see theInteroperability Matrix at support.netapp.com/NOW/products/interoperability.
(Red Hat Enterprise Linux 6) If you are using Red Hat Enterprise Linux 6.0 or later, NetApprecommends that you run Data ONTAP 8.0.1 or higher on the storage systems connected to the host.That way you can use the Block Limits VPD page (0xb0) information. Using this page helpsmaintain block alignment, which leads to enhanced I/O performance on the NetApp LUN.
Steps
1. If you have a version of the Linux Host Utilities currently installed, you must remove it.
If you are uninstalling the Linux Host Utilities 5.3 or higher, you can use the rpm -e command.
If you have an earlier version of the Host Utilities installed, go to the directory where the HostUtilties software is installed (the default is /opt/netapp/santools) enter the /uninstallcommand.
Note: Prior to the Linux Host Utilities 5.3, the software for the Host Utilities was not providedin .rpm format.
2. Download the appropriate .rpm file for your operating system from the NetApp Support Site toyour Linux host.
The Linux Host Utilities provide two versions of the software package:
• A 32-bit version: netapp_linux_host_utilities-6-1.i386.rpm• A 64-bit verson: netapp_linux_host_utilities-6-1.x86_64.rpm
3. Go to the directory to which you downloaded the latest Host Utilities file.
4. Install the Host Utilities software by entering the following command:
rpm -ivh netapp_linux_host_utilities-6-1.<processor>.rpm
Note: If you are upgrading the Host Utilities from Linux Host Utilities 5.3, you can use therpm -Uvh package_name command.
21

(Red Hat) Configuring space reclamation on hosts runningRed Hat Linux 6.2
If you are running Red Hat Enterprise Linux 6 update 2 on your host and Data ONTAP 8.1 or lateron the storage systems, you can set up your system to use space reclamation.
Before you begin
The storage systems must be running Data ONTAP 8.1 or later.
About this task
The following steps take you through the process of configuring space reclamation. For more details,see the Red Hat Enterprise Linux 6 Storage Administration Guide information on tuningconsiderations for Solid-State Disk Deployment. At the time this guide was created, this informationwas located at http://docs.redhat.com/docs/en-US/Red_Hat_Enterprise_Linux/6/html/Storage_Administration_Guide/newmds-ssdtuning.html.
Steps
1. On the storage controller, enable the LUN to report provisioning threshhold events by entering onthe LUN the command:
-e space_alloc
2. If you have not already done so, map the LUN to the host running Red Hat Enterprise Linux 6update 2.
3. Configure DM-Multipath on the LUN so that it shows up as a DM-Multipath device.
4. Mount the DM-Multipath device using the discard option of the ext4 command.
Example
The following is an example of mounting the DM-Multipath device:
mount -t ext4 -o discard /dev/mapper/360a98000572d4461524a64793868696d /mnt
22 | Linux Host Utilities 6.1 Installation and Setup Guide
(Oracle VM) Configuring theO2CB_HEARTBEAT_THRESHOLD
When you run Oracle VM with multipathing in a clustered host environment, you need to configurethe O2CB_HEARTBEAT_THRESHOLD to 65.
About this task
This timeout value works with the I/O layer and sets the maximum amount of time in seconds that anode waits for an I/O operation. In the heartbeat system file, the node writes to the block every twoseconds. The block offset is equal to its global node number. This means that node 0 writes to thefirst block, node 1 to the second block, and so on. All the nodes also read the heartbeat sysfile everytwo seconds. As long as the timestamp keeps changing, that node is considered "alive."
Steps
1. On each hypervisor, run the command:
service o2cb configure
2. Set O2CB_HEARTBEAT_THRESHOLD to 65 by entering:
O2CB_HEARTBEAT_THRESHOLD = 65
Heartbeat settings and multipath settings should be exactly same on all the hypervisors in a serverpool.
3. Either restart the O2CB service or reboot your system.
Installing the Linux Host Utilities software | 23
(iSCSI) How to configure iSCSI for Linux
The iSCSI initiator software comes with the operating system distribution. Its components include akernel module, which is already compiled into the Linux kernel, and user space packages. For it towork properly, you must perform configuration tasks.
These tasks include the following:
• Record the host’s initiator node name.You must supply the node name when you set up igroups on the storage system. Once the igroupis created, you map LUNs to it so that all the hosts associated with that igroup can discover theLUNs.It is a good practice to change the initiator node name from the default name to one that includesthe host name. That way the name is easier to use.
• If you want to use multipathing, you must edit the iSCSI configuration file to set it up.• If you want to use CHAP, you must edit the iSCSI configuration file to set it up.• You must set up target discovery so that the host can access LUNs on the storage system.• Configure the initiator with the IP address for each storage system using either static, ISNS, or
dynamic discovery.
The following sections explain how to perform these tasks.
(iSCSI) Getting the initiator node nameYou must supply the iSCSI initiator node name when you set up igroups. To make this process gosmoothly, it is a good practice to write down the node name now. Before you record the node name,you might want to change it. By default, a node name ends with a string of random numbers.Changing this part of the name to something such as the host name can make the node name easier touse.
About this task
Each node name must be unique. Do not change multiple node names to the same name.
If you decide to change the node name, you can only change the RandomNumber portion of the namethat appears at the end. The first part of a node name starts with iqn and uses a standard format thatyou cannot change. For example, if your node name is iqn.2005-03.com.RedHat:012345, youcould change the last six numbers to a word or phrase so that the name becomes iqn.2005-03.com.RedHat:Toaster.
Steps
1. Use a text editor to open the file containing the node names.
24 | Linux Host Utilities 6.1 Installation and Setup Guide

If you are using... Open the following file...
Red Hat Enterprise Linux 6 series and 5 series, SUSE LinuxEnterprise Server 10 series, or SUSE Linux EnterpriseServer 11
/etc/iscsi/initiatorname.iscsi
Red Hat Enterprise Linux 4 series /etc/initiatorname.iscsi
2. (Optional) If you want to change the default name, edit the line in the file containing the nodename.
You can only replace the RandomNumber portion of the name. When you replace this, make sureyou follow the node name rules:
• A node name can be up to 223 characters.• Uppercase characters are always mapped to lowercase characters.• A node name can contain alphabetic characters (a to z), numbers (0 to 9), and the following
three special characters:
• Period ( . )• Hyphen ( - )
Note: The underscore character ( _ ) is not supported.
• Colon ( : )
Note: If the node name does not exist, you can create one by adding a line to the file containingnode names. Use the same format shown below for modifying a node name.
If you are using... Then...
Red Hat EnterpriseLinux 6 series and 5series
Locate the node name (InitiatorName=iqn.2005-03.com.RedHat:RandomNumber) you want to modify and change theRandomNumber part of the name to a unique value.
The following line shows an example of a modified node name:
InitiatorName=iqn.2005-03.com.RedHat:linux-host1
Red Hat EnterpriseLinux 4 series
Locate the node name (InitiatorName=iqn.1987-05.com.cisco:RandomNumber) you want to modify and change theRandomNumber part of the name to a unique value.
The following line shows an example of a modified node name:
InitiatorName=iqn.1987-05.com.cisco:linux-host1
SUSE LinuxEnterprise Server10 series or Server11
Locate the node name (InitiatorName=iqn.1996-04.de.suse:RandomNumber) you want to modify and change theRandomNumber part of the name to a unique value.
The following line shows an example of a modified node name:
InitiatorName=iqn.1996-04.de.suse:linux-host1
(iSCSI) How to configure iSCSI for Linux | 25
3. Write down the node name so that you can easily enter it when you configure the storage system.
4. If you modified the file, make sure you save it before you close it.
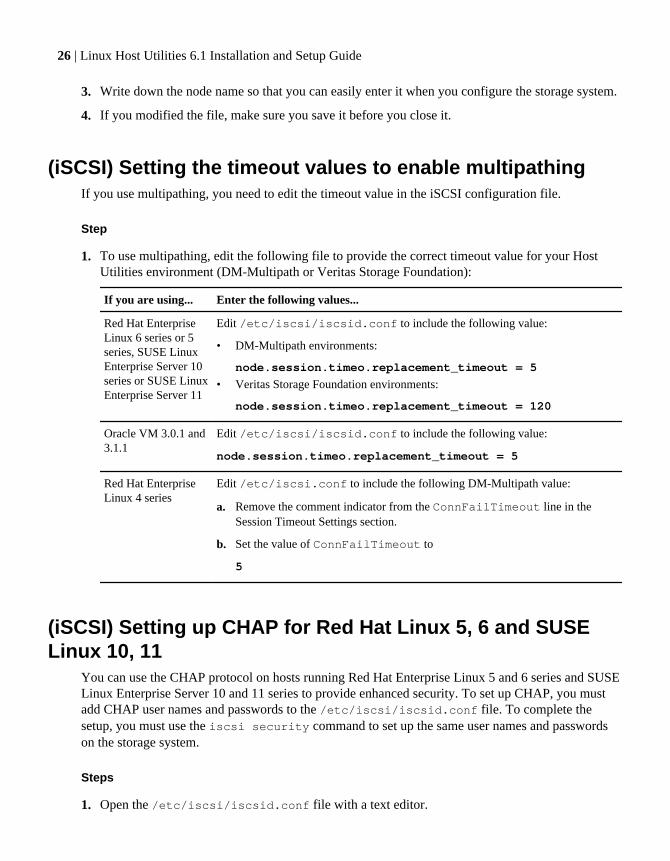
(iSCSI) Setting the timeout values to enable multipathingIf you use multipathing, you need to edit the timeout value in the iSCSI configuration file.
Step
1. To use multipathing, edit the following file to provide the correct timeout value for your HostUtilities environment (DM-Multipath or Veritas Storage Foundation):
If you are using... Enter the following values...
Red Hat EnterpriseLinux 6 series or 5series, SUSE LinuxEnterprise Server 10series or SUSE LinuxEnterprise Server 11
Edit /etc/iscsi/iscsid.conf to include the following value:
• DM-Multipath environments:
node.session.timeo.replacement_timeout = 5
• Veritas Storage Foundation environments:
node.session.timeo.replacement_timeout = 120
Oracle VM 3.0.1 and3.1.1
Edit /etc/iscsi/iscsid.conf to include the following value:
node.session.timeo.replacement_timeout = 5
Red Hat EnterpriseLinux 4 series
Edit /etc/iscsi.conf to include the following DM-Multipath value:
a. Remove the comment indicator from the ConnFailTimeout line in theSession Timeout Settings section.
b. Set the value of ConnFailTimeout to
5
(iSCSI) Setting up CHAP for Red Hat Linux 5, 6 and SUSELinux 10, 11
You can use the CHAP protocol on hosts running Red Hat Enterprise Linux 5 and 6 series and SUSELinux Enterprise Server 10 and 11 series to provide enhanced security. To set up CHAP, you mustadd CHAP user names and passwords to the /etc/iscsi/iscsid.conf file. To complete thesetup, you must use the iscsi security command to set up the same user names and passwordson the storage system.
Steps
1. Open the /etc/iscsi/iscsid.conf file with a text editor.
26 | Linux Host Utilities 6.1 Installation and Setup Guide

2. Enable CHAP authentication by setting node.session.auth.authmethod to CHAP
The default is None.
node.session.auth.authmethod = CHAP
3. Provide a CHAP user name and password for the target to use when authenticating the initiator.You must remove the comment indicators and supply values for the options username andpassword in the following configuration entries:
node.session.auth.username = username
node.session.auth.password = password
4. Provide a CHAP user name and password for the initiator to use when authenticating the target.You must remove the comment indicators and supply values for the options username_in andpassword_in in the following configuration entries:
node.session.auth.username_in = username_in
node.session.auth.password_in = password_in
5. For a successful session discovery, enable discovery CHAP authentication by supplying thepasswords in the discovery.sendtargets.auth. options.
Note: The user name and password must match for both session and discovery on the host.Ensure that you use the same user names and passwords that you used when you set up CHAPon the storage system with the iscsi security command.
discovery.sendtargets.auth.authmethod = CHAP
discovery.sendtargets.auth.username = username
discovery.sendtargets.auth.password = password
discovery.sendtargets.auth.username_in = username_in
discovery.sendtargets.auth.password_in = password_in
(iSCSI) Setting up CHAP for Red Hat Enterprise Linux 4series
You can use the CHAP protocol on hosts running Red Hat Enterprise Linux 4 series to provideenhanced security. To set up CHAP, you need edit the /etc/iscsi.conf file to add CHAP usernames and passwords. To complete the setup, you must use the iscsi security command to setup the same user names and passwords on the storage system.
Steps
1. Open the /etc/iscsi.conf file with a text editor.
(iSCSI) How to configure iSCSI for Linux | 27
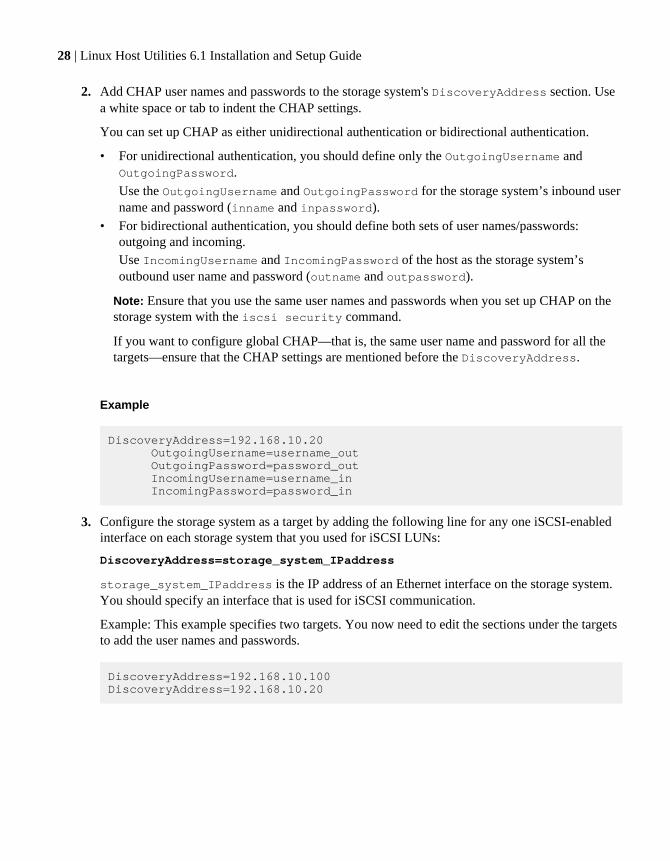
2. Add CHAP user names and passwords to the storage system's DiscoveryAddress section. Usea white space or tab to indent the CHAP settings.
You can set up CHAP as either unidirectional authentication or bidirectional authentication.
• For unidirectional authentication, you should define only the OutgoingUsername andOutgoingPassword.Use the OutgoingUsername and OutgoingPassword for the storage system’s inbound username and password (inname and inpassword).
• For bidirectional authentication, you should define both sets of user names/passwords:outgoing and incoming.Use IncomingUsername and IncomingPassword of the host as the storage system’soutbound user name and password (outname and outpassword).
Note: Ensure that you use the same user names and passwords when you set up CHAP on thestorage system with the iscsi security command.
If you want to configure global CHAP—that is, the same user name and password for all thetargets—ensure that the CHAP settings are mentioned before the DiscoveryAddress.
Example
DiscoveryAddress=192.168.10.20 OutgoingUsername=username_out OutgoingPassword=password_out IncomingUsername=username_in IncomingPassword=password_in
3. Configure the storage system as a target by adding the following line for any one iSCSI-enabledinterface on each storage system that you used for iSCSI LUNs:
DiscoveryAddress=storage_system_IPaddress
storage_system_IPaddress is the IP address of an Ethernet interface on the storage system.You should specify an interface that is used for iSCSI communication.
Example: This example specifies two targets. You now need to edit the sections under the targetsto add the user names and passwords.
DiscoveryAddress=192.168.10.100 DiscoveryAddress=192.168.10.20
28 | Linux Host Utilities 6.1 Installation and Setup Guide

(iSCSI) Starting the iSCSI serviceAfter you edit the iSCSI configuration file, you must start the iSCSI service so that the host candiscover the targets and access LUNs. If the iSCSI service is running, you must restart it.
Step
1. To start the iSCSI service, enter the following command at the Linux host command prompt:
If you are using... Enter...
Red Hat Enterprise Linux 6 series
Note: You must execute this command the first time you start the iSCSIservice on a host running Red Hat Enterprise Linux 6 series. If youexecute /etc/init.d/iscsi start without previously executingservice iscsid force-start, you will get an error message.
service iscsidforce-start
Red Hat Enterprise Linux 5 or 4 series /etc/init.d/iscsistart
SUSE Linux Enterprise Server 10 or 11 series /etc/init.d/open-iscsi start
(iSCSI) Methods for setting up target discovery withsoftware initiators
You need to configure the iSCSI initiator to discover the target so that the host can access LUNs onthe target. The method you use to do this depends on your version of the operating system.
• Red Hat Enterprise Linux 5 and 6 series: use the iscsiadm utility.• Red Hat Enterprise Linux 4 series: modify the /etc/iscsi.conf file.• SUSE Linux Enterprise Server 10 and 11 series: use either the iscsiadm utility or YaST2.
The following sections provide instructions for setting up targets on Red Hat Enterprise Linux 5 and6 series, Red Hat Enterprise Linux 4 series, and SUSE Linux Enterprise Server 10 and 11 series.
Note: If you are using SUSE Linux Enterprise Server 9 series, see the Linux Host Utilities 5.2Installation and Setup Guide, which is available on the NetApp Support Site.
(iSCSI) Discovering the iSCSI target by using the iscsiadm utility on RedHat 5, 6, SUSE 10, 11
You can use the iscsiadm utility to manage (update, delete, insert, and query) the persistentdatabase on Red Hat Enterprise 5 or 6 series, SUSE Linux Enterprise Server 10 or 11 series. The
(iSCSI) How to configure iSCSI for Linux | 29
utility enables you to perform a set of operations on iSCSI nodes, sessions, connections, anddiscovery records.
Steps
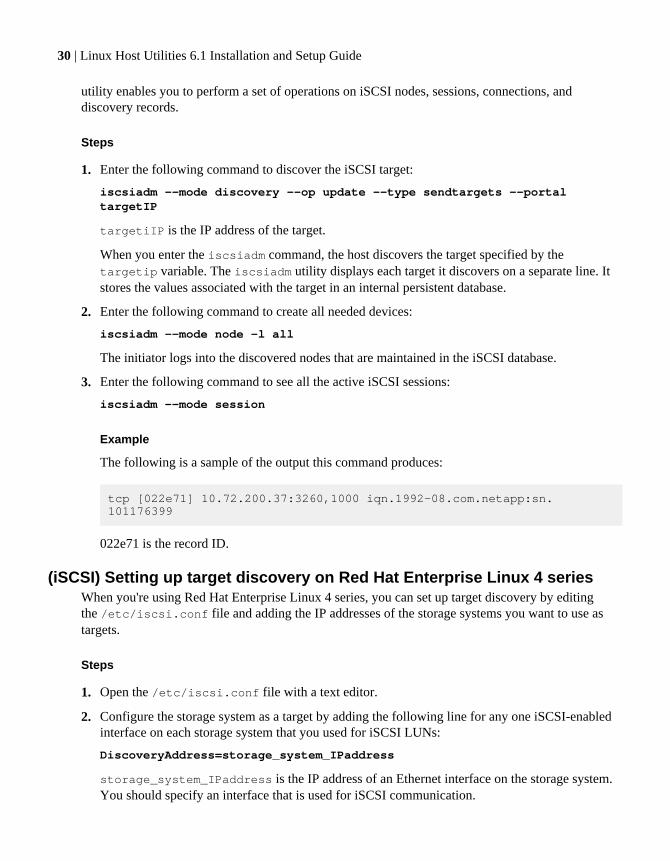
1. Enter the following command to discover the iSCSI target:
iscsiadm --mode discovery --op update --type sendtargets --portaltargetIP
targetiIP is the IP address of the target.
When you enter the iscsiadm command, the host discovers the target specified by thetargetip variable. The iscsiadm utility displays each target it discovers on a separate line. Itstores the values associated with the target in an internal persistent database.
2. Enter the following command to create all needed devices:
iscsiadm --mode node -l all
The initiator logs into the discovered nodes that are maintained in the iSCSI database.
3. Enter the following command to see all the active iSCSI sessions:
iscsiadm --mode session
Example
The following is a sample of the output this command produces:
tcp [022e71] 10.72.200.37:3260,1000 iqn.1992-08.com.netapp:sn.101176399
022e71 is the record ID.
(iSCSI) Setting up target discovery on Red Hat Enterprise Linux 4 seriesWhen you're using Red Hat Enterprise Linux 4 series, you can set up target discovery by editingthe /etc/iscsi.conf file and adding the IP addresses of the storage systems you want to use astargets.
Steps
1. Open the /etc/iscsi.conf file with a text editor.
2. Configure the storage system as a target by adding the following line for any one iSCSI-enabledinterface on each storage system that you used for iSCSI LUNs:
DiscoveryAddress=storage_system_IPaddress
storage_system_IPaddress is the IP address of an Ethernet interface on the storage system.You should specify an interface that is used for iSCSI communication.
30 | Linux Host Utilities 6.1 Installation and Setup Guide

Example
The following lines set up the storage systems with the IP addresses 192.168.10.100 and192.168.10.20 as targets:
DiscoveryAddress=192.168.10.100 DiscoveryAddress=192.168.10.20
(iSCSI) Discovering targets by using YaST2 on SUSE 10, 11If you are running SUSE Linux Enterprise Server 10 series or SUSE Linux Enterprise Server 11, youcan use YaST2 to discover and configure iSCSI connections. By using YaST2, you can enable theiSCSI initiator at boot time, add new targets to the system, and discover iSCSI targets in the network.You can also view the iSCSI targets that are currently connected.
Steps
1. Enter the following command:
yast2
2. Click Network Services > iSCSI Initiator > Discovered Targets > Discovery in the YaST2window.
3. Ensure the port number is 3260. If that is not the port number, then change the port number to3260.
4. Enter the IP address of the iSCSI target.
5. If you have an authentication mechanism in place, enter the credentials.
6. Click Next to start the discovery.
7. After discovering the targets, use Login to activate the target.
8. Enter the authentication credentials required for using the selected iSCSI target.
9. Click Next to finish the configuration.
The target now appears in Connected Targets.
10. Click Connected Targets.
11. Change the start-up option to Manual or Automatic, depending on your requirement, by using theToggle Start-Up button for all the discovered targets.
For more information about using YaST2, see the SUSE Linux Enterprise Server 10 seriesdocumentation available at the Novell website.
Related information
Novell website - http://www.novell.com
(iSCSI) How to configure iSCSI for Linux | 31
(iSCSI) Configuring the iSCSI service to start automaticallyYou can use the chkconfig command to configure the iSCSI service to start automatically atsystem boot.
Step
1. Enter the following command at the Linux host command prompt:
If you are using... Enter the following command...
Red Hat Enterprise Linux chkconfig iscsi on
SUSE Linux Enterprise Server 10 or 11 series chkconfig open-iscsi on
(iSCSI) Configuring manual or automatic node loginWhen you are running Red Hat Enterprise Linux 6 or 5 series or SUSE Linux Enterprise Server 11 or10 series, you can specify whether the system automatically logs in to an iSCSI node at startup orwhether you must manually log it in to the node.
Before you begin
Make sure the iSCSI service is running when the logins are supposed to occur.
About this task
If you set your login mode to manual, you will need to log in to the nodes manually the next time thesystem starts up. If you set your login mode to automatic, the system will log in to the nodesautomatically when it starts up.
Note: (Red Hat Enterprise Linux 4 series) When you are running Red Hat Enterprise Linux 4series, all sessions are logged in automatically when you start the iSCSI service.
Setting the login mode affects only nodes that are discovered after the value is set.
Step
1. To set the login mode for a specific portal on a target or for all the portals on a target, use theiscsiadm command.
To set a login mode for all targets and their ports, edit the /etc/iscsi/iscsid.conf file.
The iscsiadm command has more than one format. Use the format that applies to your system.You must supply information such as the target name as well as whether the login will be manualor automatic.
32 | Linux Host Utilities 6.1 Installation and Setup Guide

Note: For more information on the iscsiadm options, see the man page.
To set the loginmode for...
Do the following ...
A specific port ona target
Enter the appropriate command for your system:
iscsiadm --mode node -T targetname -p ip:port -o update -nnode.startup -v manual|automatic
iscsiadm --mode node -T targetname -p ip:port -o update -nnode.conn[0].startup -v manual|automatic
All the ports on atarget
Enter the appropriate command for your system:
iscsiadm --mode node -T targetname -o update -nnode.startup -v manual|automatic
iscsiadm --mode node -T targetname -o update -nnode.conn[0].startup -v manual|automatic
All the targets a. Modify the /etc/iscsi/iscsid.conf file to add the following line. Youmust specify either manual or automatic:
node.startup = manual|automatic
b. Rediscover the iSCSI target.
c. Restart the iSCSI service.
(iSCSI) How to configure iSCSI for Linux | 33

Configuring the storage system
You need to configure the storage system so that the protocol you are using can access it. Forexample, if your environment uses FC, you must supply the host's WWPN and make sure the storagesystem is using a supported cfmode. For environments using the iSCSI protocol, you must supply thenames of the initiator nodes and, if you are using CHAP, set up the user names and passwords on thestorage system.
Before you begin
Make sure you have the host's WWPNs that you recorded when you installed the FC HBAs or theiSCSI imitator nodes that you recorded.
Note: If you are using Red Hat Enterprise Linux 6.0 or later, NetApp recommends that you runData ONTAP 8.0.1 or higher on the storage systems connected to the host. That way you can usethe Block Limits VPD page (0xb0) information. Using the Block Limits VPD page helps maintainblock alignment, which leads to enhanced I/O performance on the NetApp LUN.
About this task
This checklist steps you through the requirements for making sure your storage system is correctlyset up.
Steps
1. Ensure that the protocol you are using (FC or iSCSI) is licensed and the service is running.
2. (iSCSI) If you want to use CHAP authentication, use the iscsi security command or theFilerView interface to configure the CHAP user name and password on the storage system. Makesure you use the same user names and passwords that you supplied when you set up CHAP on thehost.
3. Create an igroup that includes the Linux host.
Note: You can use the sanlun fcp show adapter -c command to get the informationnecessary to create an igroup on the controller. The information supplied by this command canonly be used to create an igroup if the controller is running Data ONTAP operating in 7-Mode.
4. Create and map the LUNs to the igroup.
Make sure that you specify the LUN operating system type and igroup type as linux.
5. Optionally, enable ALUA.
For Data ONTAP operating in Cluster-Mode, ALUA works with the FC, FCoE and iSCSIprotocols. For Data ONTAP operating in 7-Mode, ALUA works with the FC and FCoE protocols.For information on which versions of Linux support ALUA, see the section Linux configurationsthat support ALUA.
34 | Linux Host Utilities 6.1 Installation and Setup Guide

Note: ALUA must be enabled if you are using Data ONTAP operating in Cluster-Mode.
6. If you are using clustered Linux hosts, ensure that the igroup contains either the WWPNs or theinitiator names of all the hosts in the cluster that need access to the mapped LUN.
Configuring the storage system | 35
DM-Multipath configuration
You can configure DM-Multipath for use in multipathing in environments that use native Linuxsolutions. With DM-Multipath, you can configure multiple I/O paths between a host and storagecontrollers into a single device. If one path fails, DM-Multipath reroutes I/Os to the remaining paths.
Note: If you are running Veritas Storage Foundation, you need to use VxDMP as yourmultipathing solution.
When you have multiple paths to a LUN, Linux creates a SCSI device for each path. This means thata single LUN might appear as/dev/sdd and /dev/sdf if there are two paths to it. To make it easyto keep track of the LUNs, DM-Multipath creates a single device in /dev/mapper/ for each LUNthat includes all the paths. For example, /dev/mapper/360a9800043346852563444717a513571is the multipath device that is created on top of /dev/sdd and /dev/sdf.
When you are using DM-Multipath, you should create a file system for each LUN and then mountthe LUN using the device in /dev/mapper/.
Note: To create a file system on a LUN, use /dev/mapper/device on a Linux host console.
device is the multipath device name of the LUN in the /dev/mpath/ directory.
You also use the DM-Multipath's configuration file to specify whether ALUA is being used and ifthe hardware handler should be enabled for ALUA.
When DM-Multipath is running, it automatically checks the paths. As a result, if you look at theoutput of a command such as lun stats -o, you see a small amount of FC partner path trafficlisted under the operations per second. On average, this is usually about 4 kb of operations per pathper LUN every 20 seconds, which is the default time period. This is expected behavior for DM-Multipath.
Verifying the required multipathing packagesIt is a good practice to verify that you have the multipathing packages that enable you to use DM-Multipath. These packages are part of your Linux distribution.
Steps
1. Use the rpm -q command to display information about the name and version of the DM-Multipath package that you have installed.
36 | Linux Host Utilities 6.1 Installation and Setup Guide
If you are using... Enter the following command...
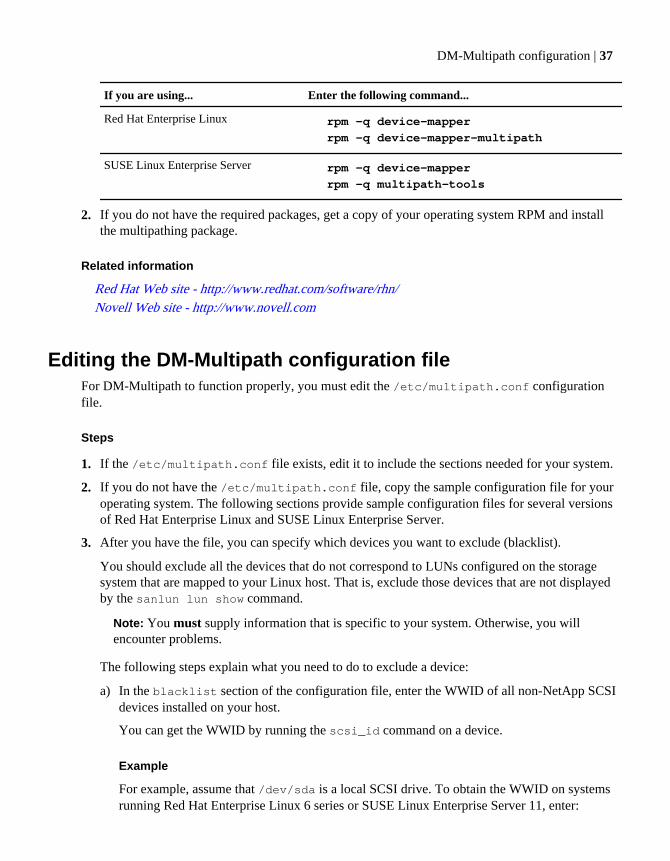
Red Hat Enterprise Linux rpm -q device-mapper
rpm -q device-mapper-multipath
SUSE Linux Enterprise Server rpm -q device-mapper
rpm -q multipath-tools
2. If you do not have the required packages, get a copy of your operating system RPM and installthe multipathing package.
Related information
Red Hat Web site - http://www.redhat.com/software/rhn/Novell Web site - http://www.novell.com
Editing the DM-Multipath configuration fileFor DM-Multipath to function properly, you must edit the /etc/multipath.conf configurationfile.
Steps
1. If the /etc/multipath.conf file exists, edit it to include the sections needed for your system.
2. If you do not have the /etc/multipath.conf file, copy the sample configuration file for youroperating system. The following sections provide sample configuration files for several versionsof Red Hat Enterprise Linux and SUSE Linux Enterprise Server.
3. After you have the file, you can specify which devices you want to exclude (blacklist).
You should exclude all the devices that do not correspond to LUNs configured on the storagesystem that are mapped to your Linux host. That is, exclude those devices that are not displayedby the sanlun lun show command.
Note: You must supply information that is specific to your system. Otherwise, you willencounter problems.
The following steps explain what you need to do to exclude a device:
a) In the blacklist section of the configuration file, enter the WWID of all non-NetApp SCSIdevices installed on your host.
You can get the WWID by running the scsi_id command on a device.
Example
For example, assume that /dev/sda is a local SCSI drive. To obtain the WWID on systemsrunning Red Hat Enterprise Linux 6 series or SUSE Linux Enterprise Server 11, enter:
DM-Multipath configuration | 37
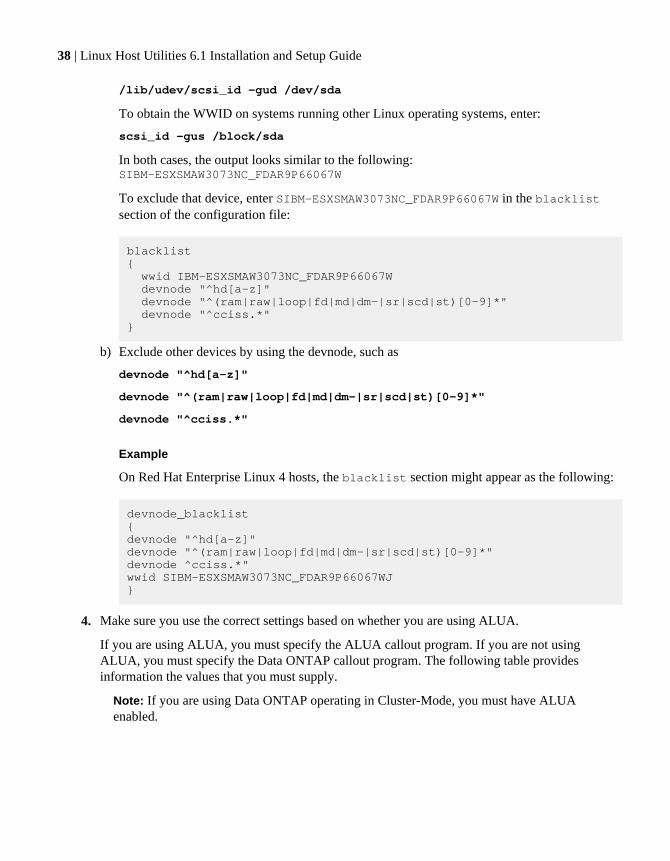
/lib/udev/scsi_id -gud /dev/sda
To obtain the WWID on systems running other Linux operating systems, enter:
scsi_id -gus /block/sda
In both cases, the output looks similar to the following:SIBM-ESXSMAW3073NC_FDAR9P66067W
To exclude that device, enter SIBM-ESXSMAW3073NC_FDAR9P66067W in the blacklistsection of the configuration file:
blacklist{ wwid IBM-ESXSMAW3073NC_FDAR9P66067W devnode "^hd[a-z]" devnode "^(ram|raw|loop|fd|md|dm-|sr|scd|st)[0-9]*" devnode "^cciss.*"}
b) Exclude other devices by using the devnode, such as
devnode "^hd[a-z]"
devnode "^(ram|raw|loop|fd|md|dm-|sr|scd|st)[0-9]*"
devnode "^cciss.*"
Example
On Red Hat Enterprise Linux 4 hosts, the blacklist section might appear as the following:
devnode_blacklist {devnode "^hd[a-z]"devnode "^(ram|raw|loop|fd|md|dm-|sr|scd|st)[0-9]*" devnode ^cciss.*"wwid SIBM-ESXSMAW3073NC_FDAR9P66067WJ}
4. Make sure you use the correct settings based on whether you are using ALUA.
If you are using ALUA, you must specify the ALUA callout program. If you are not usingALUA, you must specify the Data ONTAP callout program. The following table providesinformation the values that you must supply.
Note: If you are using Data ONTAP operating in Cluster-Mode, you must have ALUAenabled.
38 | Linux Host Utilities 6.1 Installation and Setup Guide
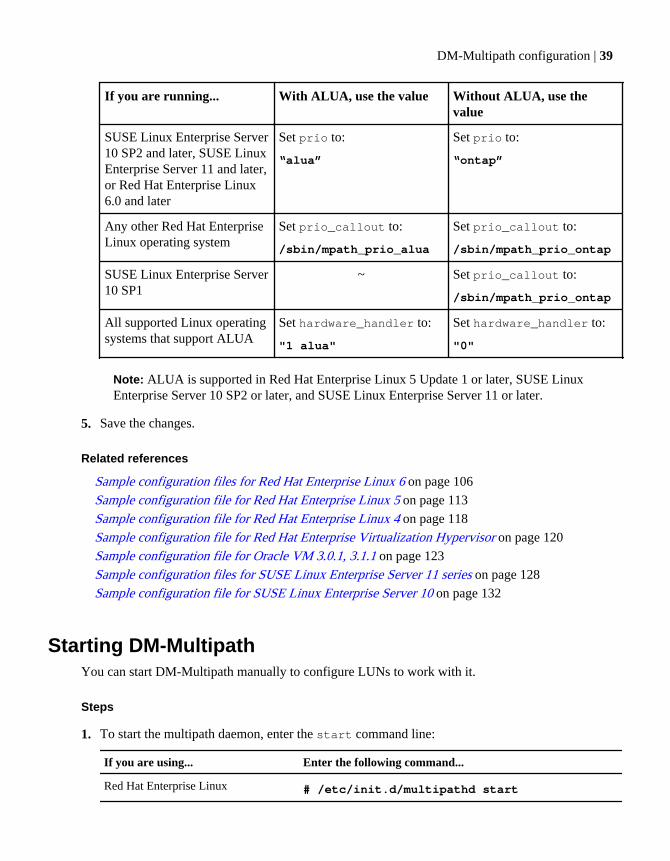
If you are running... With ALUA, use the value Without ALUA, use thevalue
SUSE Linux Enterprise Server10 SP2 and later, SUSE LinuxEnterprise Server 11 and later,or Red Hat Enterprise Linux6.0 and later
Set prio to:
“alua”
Set prio to:
“ontap”
Any other Red Hat EnterpriseLinux operating system
Set prio_callout to:
/sbin/mpath_prio_alua
Set prio_callout to:
/sbin/mpath_prio_ontap
SUSE Linux Enterprise Server10 SP1
~ Set prio_callout to:
/sbin/mpath_prio_ontap
All supported Linux operatingsystems that support ALUA
Set hardware_handler to:
"1 alua"
Set hardware_handler to:
"0"
Note: ALUA is supported in Red Hat Enterprise Linux 5 Update 1 or later, SUSE LinuxEnterprise Server 10 SP2 or later, and SUSE Linux Enterprise Server 11 or later.
5. Save the changes.
Related references
Sample configuration files for Red Hat Enterprise Linux 6 on page 106
Sample configuration file for Red Hat Enterprise Linux 5 on page 113
Sample configuration file for Red Hat Enterprise Linux 4 on page 118
Sample configuration file for Red Hat Enterprise Virtualization Hypervisor on page 120
Sample configuration file for Oracle VM 3.0.1, 3.1.1 on page 123
Sample configuration files for SUSE Linux Enterprise Server 11 series on page 128
Sample configuration file for SUSE Linux Enterprise Server 10 on page 132
Starting DM-MultipathYou can start DM-Multipath manually to configure LUNs to work with it.
Steps
1. To start the multipath daemon, enter the start command line:
If you are using... Enter the following command...
Red Hat Enterprise Linux # /etc/init.d/multipathd start
DM-Multipath configuration | 39
If you are using... Enter the following command...
SUSE Linux Enterprise Server # /etc/init.d/boot.multipath start
# /etc/init.d/multipathd start
2. To configure the DM-Multipath devices, run the following command:
# multipath
Configuring DM-Multipath to start automatically while bootingYou can configure DM-Multipath to start automatically while booting.
Step
1. To add the multipath service to the boot sequence, perform the following action on the Linux hostconsole:
If you are using... Enter the following command...
Red Hat Enterprise Linux chkconfig --add multipathd
chkconfig multipathd on
Note: You should reboot the host if you are configuring a SAN boot LUNon the host.
SUSE Linux EnterpriseServer
chkconfig --add boot.multipath
chkconfig --add multipathd
chkconfig boot.multipath on
chkconfig multipathd on
Verifying the DM-Multipath configurationYou can use the multipath command on the Linux host to view the DM-Multipath configuration.You can change the amount of configuration detail that is displayed by using the -v parameter.
Steps
1. Enter the following command on the Linux host:
multipath -v3 -d -ll
Note: The -d (dry run) parameter prevents the command from updating the multipath maps.
2. Verify that the multipathd is running by entering the following command:
/etc/init.d/multipathd status
40 | Linux Host Utilities 6.1 Installation and Setup Guide

Note: To determine if multipathd is working correctly on your system, enter the multipathdshow config command. This command displays the values currently being used for themultipath.conf file. You can then confirm that multipathd is using the values you specified.
3. To view a list of the multipath devices, including which /dev/sdx devices are used, enter thefollowing command:multipath -ll
Example
(FC) The output looks similar to the following for FC:
# multipath -ll3360a98000486e5372635a44646a505643NETAPP,LUN[size=10G][features=1 queue_if_no_path][hwhandler=0]\_ round-robin 0 [prio=8][active] \_ 6:0:0:0 sda 8:0 [active][ready] \_ 7:0:1:0 sdg 8:96 [active][ready]\_ round-robin 0 [prio=2][enabled]\_ 6:0:1:0 sdc 8:32 [active][ready] \_ 7:0:0:0 sde 8:64 [active][ready]
Example
(FC and Data ONTAP Cluster-Mode) If the storage system is running Data ONTAP in Cluster-Mode and using iSCSI, the output looks similar to the following:
# multipath -ll360a98000486e2f66426f2f7a32745338 dm-0 NETAPP,LUN C-Modesize=1.0G features='1 queue_if_no_path' hwhandler='1 alua' wp=rw|-+- policy='round-robin 0' prio=50 status=active| |- 3:0:1:1 sdd 8:48 active ready running| |- 3:0:4:1 sdh 8:112 active ready running| |- 2:0:0:1 sdj 8:144 active ready running| `- 2:0:2:1 sdn 8:208 active ready running`-+- policy='round-robin 0' prio=10 status=enabled|- 3:0:0:1 sdb 8:16 active ready running|- 3:0:2:1 sdf 8:80 active ready running|- 2:0:1:1 sdl 8:176 active ready running`- 2:0:3:1 sdp 8:240 active ready running
Example
(FC on Red Hat Enterprise Linux 6, SUSE Linux Enterprise Server 11 SP1 or later) Theoutput looks similar to the following when you have ALUA enabled and are using either Red HatEnterprise Linux 6 or SUSE Linux Enterprise Server 11 with SP1 or later:
# multipath -ll360a98000486e2f66426f2f7a32745338 dm-0 NETAPP,LUN
DM-Multipath configuration | 41
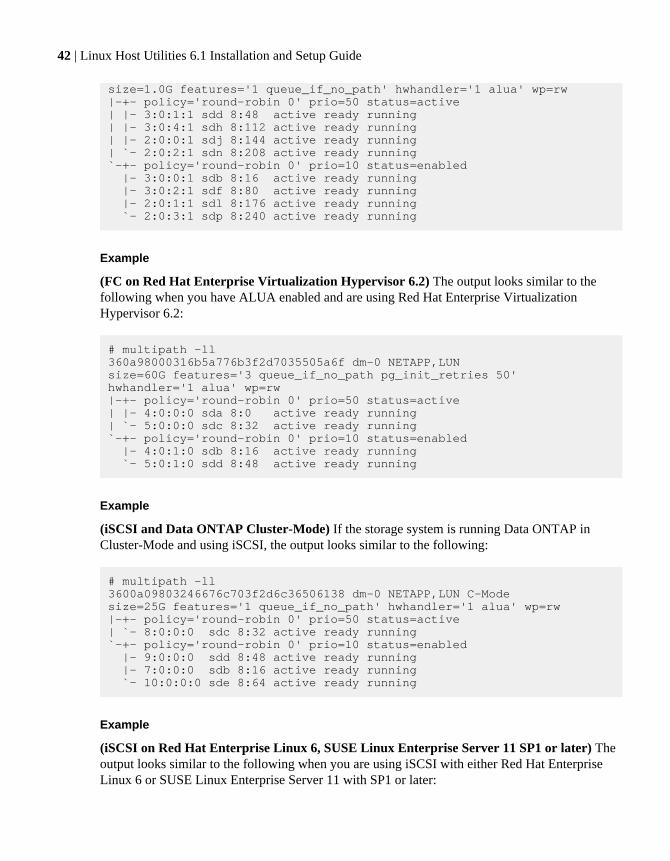
size=1.0G features='1 queue_if_no_path' hwhandler='1 alua' wp=rw|-+- policy='round-robin 0' prio=50 status=active| |- 3:0:1:1 sdd 8:48 active ready running| |- 3:0:4:1 sdh 8:112 active ready running| |- 2:0:0:1 sdj 8:144 active ready running| `- 2:0:2:1 sdn 8:208 active ready running`-+- policy='round-robin 0' prio=10 status=enabled |- 3:0:0:1 sdb 8:16 active ready running |- 3:0:2:1 sdf 8:80 active ready running |- 2:0:1:1 sdl 8:176 active ready running `- 2:0:3:1 sdp 8:240 active ready running
Example
(FC on Red Hat Enterprise Virtualization Hypervisor 6.2) The output looks similar to thefollowing when you have ALUA enabled and are using Red Hat Enterprise VirtualizationHypervisor 6.2:
# multipath -ll360a98000316b5a776b3f2d7035505a6f dm-0 NETAPP,LUNsize=60G features='3 queue_if_no_path pg_init_retries 50' hwhandler='1 alua' wp=rw|-+- policy='round-robin 0' prio=50 status=active| |- 4:0:0:0 sda 8:0 active ready running| `- 5:0:0:0 sdc 8:32 active ready running`-+- policy='round-robin 0' prio=10 status=enabled |- 4:0:1:0 sdb 8:16 active ready running `- 5:0:1:0 sdd 8:48 active ready running
Example
(iSCSI and Data ONTAP Cluster-Mode) If the storage system is running Data ONTAP inCluster-Mode and using iSCSI, the output looks similar to the following:
# multipath -ll3600a09803246676c703f2d6c36506138 dm-0 NETAPP,LUN C-Modesize=25G features='1 queue_if_no_path' hwhandler='1 alua' wp=rw|-+- policy='round-robin 0' prio=50 status=active| `- 8:0:0:0 sdc 8:32 active ready running`-+- policy='round-robin 0' prio=10 status=enabled |- 9:0:0:0 sdd 8:48 active ready running |- 7:0:0:0 sdb 8:16 active ready running `- 10:0:0:0 sde 8:64 active ready running
Example
(iSCSI on Red Hat Enterprise Linux 6, SUSE Linux Enterprise Server 11 SP1 or later) Theoutput looks similar to the following when you are using iSCSI with either Red Hat EnterpriseLinux 6 or SUSE Linux Enterprise Server 11 with SP1 or later:
42 | Linux Host Utilities 6.1 Installation and Setup Guide

# multipath -ll360a9800050334b50694a625563326f37 dm-3 NETAPP,LUNsize=9.0G features='1 queue_if_no_path' hwhandler='0' wp=rw`-+- policy='round-robin 0' prio=2 status=active |- 4:0:0:1 sdc 8:32 active ready running `- 3:0:0:1 sdb 8:16 active ready running
4. To view the /dev/mapper devices, enter the following command:
ls -l /dev/mapper/
Example
The following example shows the sample output of the ls -l dev/mapper command:
total 0brw------- 1 root root 253, 1 Sep 20 17:09 360a98000486e5363693444646a2f656cbrw------- 1 root root 253, 0 Sep 20 17:09 360a98000486e5372635a44646a505643lrwxrwxrwx 1 root root 16 Sep 12 10:16 control -> ../device-mapper
Stopping DM-MultipathWhen you want to stop DM-Multipath on the Linux host, you should stop the affected services.
Steps
1. Unmount all the file systems on the LUNs.
2. Flush the DM-Multipath devices by running the following command:
multipath -F
3. To stop the multipath daemon, perform the appropriate action:
If you are using... Enter the following command...
Red Hat Enterprise Linux /etc/init.d/multipathd stop
SUSE Linux Enterprise Server /etc/init.d/multipathd stop
/etc/init.d/boot.multipath stop
DM-Multipath configuration | 43

Veritas Dynamic Multipath configuration
When you are using Veritas Dynamic Multipathing (VxDMP), you need to perform someconfiguration tasks to enable multipathing.
There are several tunable parameters that you might need to be set, depending on your version ofLinux. These parameters might include:
• vxdmpadm start restore interval=60
• vxdmpadm settune dmp_lun_retry_timeout=300
• vxdmpadm settune dmp_path_age=120
In addition, if you are running either Red Hat Enterprise Linux 6 series or SUSE Linux EnterpriseServer 11 series, you must modify the /etc/udev/rules.d/40-rport.rules file.
You must also have the Array Support Library (ASL) and the Array Policy Module (APM) thatSymantec provides for NetApp storage systems installed. The amount of work you need to do to setup the ASL and APM depends on your version of Veritas Storage Foundation.
The following sections describe the configuration work necessary to set up VxDMP.
(Veritas) VxDMP restore daemon and LUN retries tunableconfiguration
It is a good practice to set the Veritas restore daemon values for the restore policy and the pollinginterval and the VxDMP tunable dmp_lun_retry_timeout to the Host Utilities recommendedvalues.
The restore policy and the polling interval settings determine how frequently the Veritas daemonchecks paths between the host and the storage system. At the time this document was produced, theHost Utilities recommended the following restore daemon settings:
• A restore policy of "disabled"• A polling interval of "60"
Check the Release Notes to see if these recommendations have changed.
The tunable dmp_lun_retry_timeout tells the VxDMP to continue retrying I/O requests to a LUNwhere all the paths to the disk have failed. Setting this value provides for more robust handling oftemporary path failures that are quickly restored. The recommended value for this tunable is 300,which means that the VxDMP continues to retry paths to the LUN until either the I/O succeeds or300 seconds have elapsed.
44 | Linux Host Utilities 6.1 Installation and Setup Guide
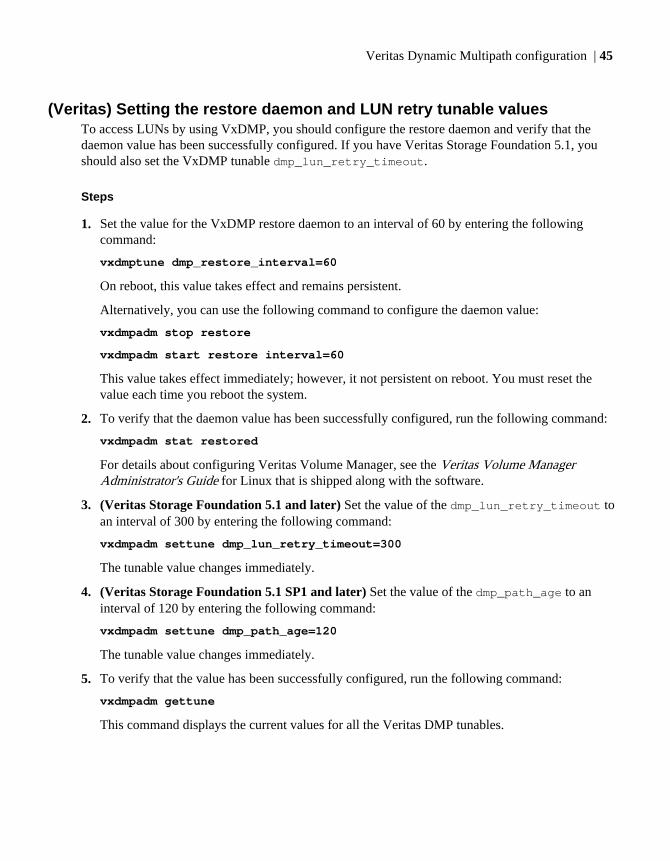
(Veritas) Setting the restore daemon and LUN retry tunable valuesTo access LUNs by using VxDMP, you should configure the restore daemon and verify that thedaemon value has been successfully configured. If you have Veritas Storage Foundation 5.1, youshould also set the VxDMP tunable dmp_lun_retry_timeout.
Steps
1. Set the value for the VxDMP restore daemon to an interval of 60 by entering the followingcommand:
vxdmptune dmp_restore_interval=60
On reboot, this value takes effect and remains persistent.
Alternatively, you can use the following command to configure the daemon value:
vxdmpadm stop restore
vxdmpadm start restore interval=60
This value takes effect immediately; however, it not persistent on reboot. You must reset thevalue each time you reboot the system.
2. To verify that the daemon value has been successfully configured, run the following command:
vxdmpadm stat restored
For details about configuring Veritas Volume Manager, see the Veritas Volume ManagerAdministrator's Guide for Linux that is shipped along with the software.
3. (Veritas Storage Foundation 5.1 and later) Set the value of the dmp_lun_retry_timeout toan interval of 300 by entering the following command:
vxdmpadm settune dmp_lun_retry_timeout=300
The tunable value changes immediately.
4. (Veritas Storage Foundation 5.1 SP1 and later) Set the value of the dmp_path_age to aninterval of 120 by entering the following command:
vxdmpadm settune dmp_path_age=120
The tunable value changes immediately.
5. To verify that the value has been successfully configured, run the following command:
vxdmpadm gettune
This command displays the current values for all the Veritas DMP tunables.
Veritas Dynamic Multipath configuration | 45

(Veritas, Red Hat) Configuring Red Hat 6, 5 to supportVeritas Storage Foundation
If you are using Red Hat Enterprise Linux 6 or later or 5 or later, you must configure it to supportVeritas Storage Foundation.
About this task
Note: If you are running Red Hat Enterprise Linux 6 or 5 series, you must perform someadditional steps and make sure the value of the IOFENCE timeout parameter is correct.
Steps
1. Log in to the host as the root user.
2. Create the file /etc/udev/rules.d/40-rport.rules with the following content line:
KERNEL=="rport-*", SUBSYSTEM=="fc_remote_ports", ACTION=="add", RUN+="/bin/sh -c 'echo 20 > /sys/class/fc_remote_ports/%k/fast_io_fail_tmo'"
3. (Red Hat Enterprise Linux 6 or later only) Check the value of the IOFENCE timeoutparameter is make sure it is set to 30000.
The IOFENCE timeout parameter specifies the amount of time in milliseconds that it takes clientsto respond to an IOFENCE message before the system halts. When clients receive an IOFENCEmessage, they must unregister from the GAB driver within the number of milliseconds specifiedby the IOFENCE timeout parameter. If they do not unregister within that time, the system halts.The default value for this parameter is 15000 milliseconds or 15 seconds.
Example
To check the value of this parameter, enter the command gabconfig -l on the host. Thefollowing is an example of the type of output this command produces.
# gabconfig -lGAB Driver ConfigurationDriver state : ConfiguredPartition arbitration: DisabledControl port seed : EnabledHalt on process death: DisabledMissed heartbeat halt: DisabledHalt on rejoin : DisabledKeep on killing : DisabledQuorum flag : DisabledRestart : EnabledNode count : 2 Send queue limit : 128
46 | Linux Host Utilities 6.1 Installation and Setup Guide
Recv queue limit : 128IOFENCE timeout (ms) : 15000Stable timeout (ms) : 5000
4. If the value of the IOFENCE timeout parameter is not 30000, change it by entering thecommand:
gabconfig -f 30000
This value is not persistent across reboots, so you must check it each time you boot the host andreset it if necessary.
(Veritas, SUSE) Configuring SUSE Linux 11 to supportVeritas Storage Foundation
If you are using SUSE Linux Enterprise Server 11 or later, you must configure it to support VeritasStorage Foundation.
Before you begin
Check Symantec TechNote 124725 for the latest update on using SUSE Linux Enterprise Server 11with Veritas Storage Foundation.
Steps
1. Log in to the host as the root user.
2. Install SUSE Linux Enterprise Server 11 with kernel version 2.6.27.45-0.1.1 or later from Novell.
3. Create the file /etc/udev/rules.d/40-rport.rules with the following content line:
KERNEL=="rport-*", SUBSYSTEM=="fc_remote_ports", ACTION=="add",RUN+="/bin/sh -c 'echo 20 > /sys/class/fc_remote_ports/%k/fast_io_fail_tmo;echo 864000 >/sys/class/fc_remote_ports/%k/dev_loss_tmo'"
4. Reboot the host.
Related information
Novell Web site - http://www.novell.comSymantec TechNote for setting up SUSE Linux Enterprise Server 11 - http://www.symantec.com/business/support/index?page=content&id=TECH124725
Veritas Dynamic Multipath configuration | 47

(Veritas) The Array Support Library and Array Policy ModuleSymantec provides both the Array Support Library (ASL) and the Array Policy Module (APM) forNetApp storage systems.
Note: These are Symantec products; therefore, Symantec provides customer support if youencounter a problem using them.
To determine which version of the ASL and APM you need for this version of the Host Utilities,check the NetApp Interoperability Matrix. Once you know which version you need, go to theSymantec Web site and download the ASL and APM.
Note: Starting with Veritas Storage Foundation 5.1, ALUA is supported on FC.
(Veritas) What the ASL isThe ASL is a Data ONTAP-qualified library that provides information about storage array attributesand multipathing configurations to the Device Discovery Layer (DDL) and Veritas DynamicMultipathing (VxDMP) components of Veritas Volume Manager (VxVM).
The ASL provides enclosure-based naming, where the name of the disk is based on the logical nameof its enclosure, or disk array. The ASL provides specific vendor and model information to VxDMPand VxVM, instead of referring to them as JBOD or raw devices.
Note: You cannot use storage systems simultaneously as JBOD and vendor arrays. If you installthe ASL, storage systems cannot be configured in VxVM as JBOD. They are reported as storagearrays, unless you explicitly exclude them by using the vxddladm exclude array command.
(Veritas) ASL array type
The ASL reports information about the multipathing configuration to the DDL as an Active/Active(A/A), ALUA , or an Active/Passive Concurrent (A/P-C) disk array type.
• Active/Active (A/A)There are multiple active paths to a storage system, and simultaneous I/O is supported on eachpath. If a path fails, I/O is distributed across the remaining paths.
• Active/Passive Concurrent (A/P-C)An A/P-C array is a variant of the A/P array type that supports concurrent I/O and load balancingby having multiple primary paths to LUNs. Failover to the secondary (passive) path occurs only ifall the active primary paths fail.
• ALUAA LUN in an ALUA-enabled array can be accessed through both controllers, using optimized andnon-optimized paths. The array informs the host of path options, their current state, and statechanges. Using this information, the host can determine which paths are optimized. Failover tothe non-optimized path occurs only if all the optimized paths fail.
48 | Linux Host Utilities 6.1 Installation and Setup Guide
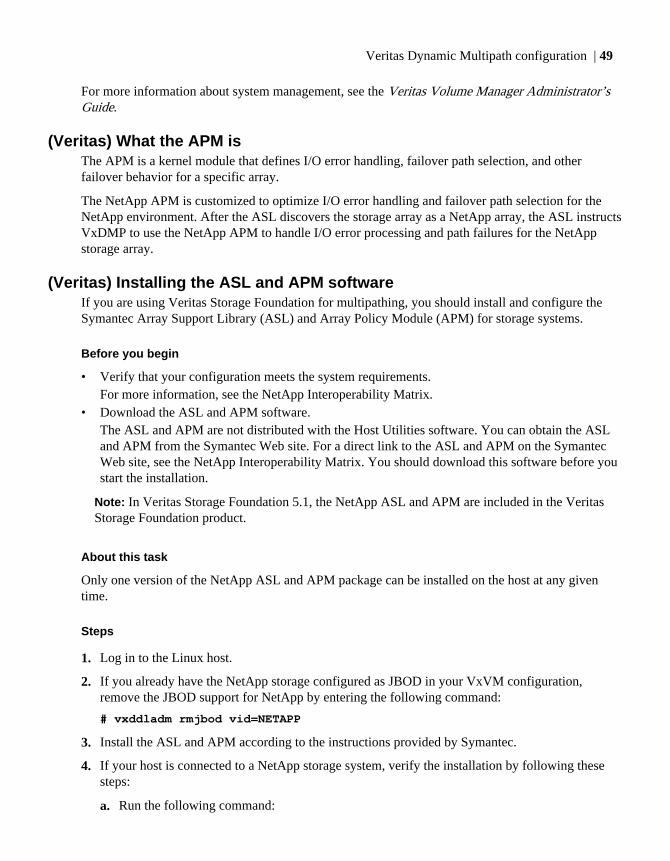
For more information about system management, see the Veritas Volume Manager Administrator’sGuide.
(Veritas) What the APM isThe APM is a kernel module that defines I/O error handling, failover path selection, and otherfailover behavior for a specific array.
The NetApp APM is customized to optimize I/O error handling and failover path selection for theNetApp environment. After the ASL discovers the storage array as a NetApp array, the ASL instructsVxDMP to use the NetApp APM to handle I/O error processing and path failures for the NetAppstorage array.
(Veritas) Installing the ASL and APM softwareIf you are using Veritas Storage Foundation for multipathing, you should install and configure theSymantec Array Support Library (ASL) and Array Policy Module (APM) for storage systems.
Before you begin
• Verify that your configuration meets the system requirements.For more information, see the NetApp Interoperability Matrix.
• Download the ASL and APM software.The ASL and APM are not distributed with the Host Utilities software. You can obtain the ASLand APM from the Symantec Web site. For a direct link to the ASL and APM on the SymantecWeb site, see the NetApp Interoperability Matrix. You should download this software before youstart the installation.
Note: In Veritas Storage Foundation 5.1, the NetApp ASL and APM are included in the VeritasStorage Foundation product.
About this task
Only one version of the NetApp ASL and APM package can be installed on the host at any giventime.
Steps
1. Log in to the Linux host.
2. If you already have the NetApp storage configured as JBOD in your VxVM configuration,remove the JBOD support for NetApp by entering the following command:
# vxddladm rmjbod vid=NETAPP
3. Install the ASL and APM according to the instructions provided by Symantec.
4. If your host is connected to a NetApp storage system, verify the installation by following thesesteps:
a. Run the following command:
Veritas Dynamic Multipath configuration | 49
# vxdmpadm listenclosure all
The output shows the model name of the storage device if you are using enclosure- basednaming with VxVM.
Example
The vxdmpadm listenclosure all command shows the Enclosure Type as FAS3170 in thisexample.
# vxdmpadm listenclosure allENCLR_NAME ENCLR_TYPE ENCLR_SNO STATUS ARRAY_TYPE LUN_COUNT================================================================disk Disk DISKS CONNECTED Disk 1fas31700 FAS3170 80010081 CONNECTED A/A-NETAPP 15fas31701 FAS3170 80010082 CONNECTED A/A-NETAPP 15
(Veritas) Removing the ASL and APMIf you do not require the ASL and APM, you can remove them from the host.
About this task
You do not need to stop any volumes created on unaffected disk arrays, such as disk arrays fromother vendors, before removing ASL and APM support. This is also true for arrays or disks in theOTHER_DISKS category. The OTHER_DISKS category includes local non-FC attached disks.Volumes created on these arrays remain accessible because they do not have multipath support.
Steps
1. Log in to the host as the root user.
2. Stop all I/O to LUNs configured on storage controllers.
Note: In a Storage Foundation RAC cluster, you should also stop clustering on a node beforeyou remove the ASL and APM.
3. Use the rpm command to remove the ASL package. This command has the format: rpm -evasl_rpm_name
Example
The following command line removes a previous version of the ASL:
If you are using... Enter the following command...
Red Hat Enterprise Linux rpm -ev VRTSNTAPasl-5.0-3.0_RHEL5
SUSE Linux Enterprise Server rpm -ev VRTSNTAPasl-5.0-3.0_SLES10
4. Use the rpm command to remove the APM package. This command has the format: rpm -evapm_rpm_name.
50 | Linux Host Utilities 6.1 Installation and Setup Guide

Example
The following command line removes a previous version of the APM:
If you are using... Enter the following command...
Red Hat Enterprise Linux rpm -ev VRTSNTAPapm-5.0-1.0_RHEL5
SUSE Linux Enterprise Server rpm -ev VRTSNTAPapm-5.0-1.0_SLES10
(Veritas) Information about ASL error messagesThe ASL works silently and seamlessly with the VxVM DDL. If an error, misconfiguration, ormalfunction occurs, messages from the library are logged to the console by using the host’s loggingfacility.
The following table lists the importance and severity of these messages:
Messageseverity
Definition Action required
Error Indicates that an ERROR status is being returned from the ASL tothe VxVM DDL that prevents the device (LUN) from being used.The device might still appear in the vxdisk list, but it is not usable.
Call Symantectechnical supportfor help.
Warning Indicates that an UNCLAIMED status is being returned. Unlessclaimed by a subsequent ASL, dynamic multipathing is disabled.No error is being returned, but the device (LUN) might notfunction as expected.
Call Symantectechnical supportfor help.
Info Indicates that a CLAIMED status is being returned. The devicefunctions fully, with VxDMP enabled, but the results seen by theuser might be other than what is expected. For example, theenclosure name might change.
Call Symantectechnical supportfor help.
Veritas Dynamic Multipath configuration | 51
Methods for working with LUNs in native Linuxenvironments
The method you use when working with LUNs often varies depending on your environment--whether you are using multipathing, which protocol you are using, whether you have an HBA,hardware iSCSI initiator, or a software iSCSI initiator, and whether you are using Veritas StorageFoundation. In some cases, the method also varies depending on your version of the Linux operatingsystem.
Note: If you are using Veritas Storage Foundation, see the section on accessing LUNs withVxDMP. The sections here focus on working with LUNs in a native Linux environment.
The sections that follow provide information about the tools you need to use to work LUNs as wellas what actions you should take when working with LUNs in your environment. For example, if youdo not have multipathing enabled, it is a good practice to provide persistent identification for theLUNs. Or, if you are using the iSCSI software initiator, you can use either the sanlun or iscsiadmcommand to view LUNs.
As you work with LUNs, remember that the host cannot distinguish multiple LUNs from multiplepaths to the same LUN without multipathing software. As a result:
• If you have more than one path from the host to a LUN, you should use DM-Multipath.• If you are not using multipathing software, you should limit each LUN to a single path.
For information about the supported configurations for DM-Multipath, see the NetAppInteroperability Matrix.
(FC, Hardware iSCSI) Discovering new LUNsWhen you're using an FC or hardware iSCSI environment, you can use the rescan script to discoverthe LUNs you've created and mapped to the Linux host.
Before you begin
If you do not have a copy of the rescan script, get one. The rescan script is available with thesg3_utils package. In addition, the rescan script is available with Red Hat Enterprise Linux 5Update 4 or later, Red Hat Enterprise Linux 6 or later, SUSE Linux Enterprise Server 10 SP2 or later,and SUSE Linux Enterprise Server 11 or later. For earlier versions, use the vendor-specific rescanscripts, which are available on their web sites. See HBA vendor-specific documentation.
Step
1. To discover a new LUN, enter the following command:
/usr/bin/rescan-scsi-bus.sh
52 | Linux Host Utilities 6.1 Installation and Setup Guide

(Software iSCSI, multipathing) Discovering new LUNs onRed Hat 5, 6, SUSE 10, 11
When you are running Red Hat Enterprise Linux 5 or 6 series or SUSE Linux Enterprise Server 10 or11 series with DM-Multipath and the software iSCSI initiator, you can discover new LUNs byrescanning the iSCSI service on the host. Rescanning the service displays all the newly created LUNsthat have been mapped to the host.
Before you begin
If you do not have a copy of the rescan script, get one. The rescan script is available with thesg3_utils package. In addition, the rescan script is available with Red Hat Enterprise Linux 5Update 4, Red Hat Enterprise Linux 6 or later, SUSE Linux Enterprise Server 10 SP2 or later, andSUSE Linux Enterprise Server 11 or later.
About this task
You cannot view new LUNs until after the operating system discovers them. Once the LUNs havebeen discovered, they are automatically added to the DM-Multipath configuration.
Note: You can use the rescan script to discover new LUNs in both those environments that areusing multipathing and those that are not using multipathing.
Steps
1. To discover a new LUN on a system running DM-Multipath, enter one of the followingcommands:
If you want to... Enter the following command...
Obtain the list of all the current sessions iscsiadm -m session
Rescan a specific session iscsiadm -m session --sid=N --rescan
N is the specific session ID.
Rescan all the sessions iscsiadm -m session --rescan
Rescan using the SCSI rescan script /usr/bin/rescan-scsi-bus.sh
2. To verify that the new LUNs have been discovered, use the sanlun command or the iscsiadmcommand.
Methods for working with LUNs in native Linux environments | 53

(Software iSCSI, multipathing) Discovering new LUNs onRed Hat 4
When you are running Red Hat Enterprise Linux 4 series with DM-Multipath and the software iSCSIinitiator, you can discover new LUNs by reloading the iSCSI service on the host. Reloading theservice displays all the newly created LUNs that have been mapped to the host.
About this task
You cannot view new LUNs until after the operating system discovers them. Once the LUNs havebeen discovered, they are automatically added to the DM-Multipath configuration.
Steps
1. Enter the following command on the Linux host to reload the iSCSI service:
/etc/init.d/iscsi reload
2. Use the sanlun or iscsi-ls command to verify that the new LUNs have been discovered.
Viewing a list of LUNsWhether your environment uses multipathing or not, you have several options for viewing LUNs thatare mapped to the host. The sanlun lun show all command works for all environments andprotocols. If you are using an iSCSI software initiator, you also have a choice between using theiscsiadm command or the iscsi command, depending on your version of Linux.
Step
1. To view the list of LUNs mapped to your host, run the appropriate command for your systemenvironment.
The following table summarizes the commands and the environments that support them. For moreinformation on the commands and their options, see the man pages.
Note: You can use the sanlun command to display LUN information and the iscsiadmcommand to view iSCSI information.
If you are using... Enter one of the following commands...
All environments sanlun lun show all
(iSCSI software initiator) Red Hat EnterpriseLinux 5 or 6 series
iscsiadm --mode session --sid=N -P 3
54 | Linux Host Utilities 6.1 Installation and Setup Guide

If you are using... Enter one of the following commands...
(iSCSI software initiator) Red Hat EnterpriseLinux 4 series
iscsi-ls -l
(iSCSI software initiator) SUSE LinuxEnterprise Server 10 or 11 series
• (SUSE Linux Enterprise Server 10 SP2):
iscsiadm --mode session --sid=N -P 3
• (SUSE Linux Enterprise Server 10 SP1):
iscsiadm --mode session --sid=N -i
The sections that follow contain examples of the type of output these commands produce withdifferent protocols and operating systems.
Examples of sanlun, iscsiadm, iscsi output when used to view LUNsYou can use either the sanlun command, the iscsiadm command, or the iscsi command to viewthe LUNs configured on your Linux host. The examples in this section show the type of output youwould see if you ran one of these commands on your Linux operating system in an environment withDM-Multipath enabled or one with it disabled.
The tool you use depends on your version of Linux and what you want to view as well as whetheryou have DM-Multipath enabled or not. The sanlun command displays the host device names andthe LUNs to which they are mapped. The iscsiadm command lists the available storage systemsand LUNs. The iscsi-ls -l command lists storage system node names, IP addresses, andavailable LUNs.
The following sections provide examples of the type of output you would see if you ran one of thesecommands in a specific environment; for example with iSCSI and DM-Multipath on Red HatEnterprise Linux 5 series.
• FC with DM-Multipath running sanlun• iSCSI with multipathing running sanlun• (Red Hat Linux) Software iSCSI with DM-Multipath running iscsiadm• (Red Hat 5, 6) Software iSCSI without multipathing running iscsiadm• (SUSE Linux 10, 11) Software iSCSI with DM-Multipath running iscsiadm• (SUSE Linux 10, 11) Software iSCSI without multipathing running iscsiadm• (Red Hat 4) Software iSCSI without multipathing running iscsi-ls
FC with DM-Multipath example of using sanlun to view LUNs
This example shows sample output from the sanlun lun show all command when it is issued ina Host Utilities environment that is running the FC protocol with DM-Multipath and the storagesystem running Data ONTAP operating in Cluster-Mode.
# sanlun lun show allcontroller(7mode)/ device host lunvserver(Cmode) lun-pathname filename adapter protocol size mode---------------------------------------------------------------------------------
Methods for working with LUNs in native Linux environments | 55

vs_data28_2 /vol/vol1/lun1 /dev/sdgf host1 FCP 3g Cvs_data28_2 /vol/vol2/lun2 /dev/sdge host1 FCP 3g Cvs_data28_2 /vol/vol3/lun3 /dev/sdgd host1 FCP 3g C
This example shows sample output from the sanlun lun show all command when it is issued ina Host Utilities environment that is running the FC protocol with DM-Multipath and the storagesystem running Data ONTAP operating in 7-Mode.
# sanlun lun show allcontroller(7mode)/ device host lunvserver(Cmode) lun-pathname filename adapter protocol size mode--------------------------------------------------------------------------------fas3040-201-25 /vol/vol1/lun1 /dev/sdu host1 FCP 5g 7fas3040-201-25 /vol/vol2/lun2 /dev/sdt host1 FCP 5g 7fas3040-201-25 /vol/vol3/lun3 /dev/sds host1 FCP 5g 7
iSCSI with DM-Multipath example of using sanlun to view LUNs
This example shows sample output from the sanlun lun show all command when it is issued ina Host Utilities environment that is running the iSCSI protocol with DM-Multipath and the storagesystem running Data ONTAP operating in Cluster-Mode.
# sanlun lun show allcontroller(7mode)/ device host lunvserver(Cmode) lun-pathname filename adapter protocol size mode-------------------------------------------------------------------------------vs_data78_1 /vol/vol1/lun1 /dev/sdcx host29 iSCSI 3g Cvs_data78_0 /vol/vol2/lun2 /dev/sdcw host20 iSCSI 3g Cvs_data79_1 /vol/vol3/lun3 /dev/sdck host14 iSCSI 3g C
This example shows sample output from the sanlun lun show all command when it is issued ina Host Utilities environment that is running the iSCSI protocol with DM-Multipath and the storagesystem running Data ONTAP operating in 7-Mode.
# sanlun lun show allcontroller(7mode)/ device host lunvserver(Cmode) lun-pathname filename adapter protocol size mode-------------------------------------------------------------------------------fas3040-201-24 /vol/vol1/lun1 /dev/sdb host6 iSCSI 10m 7fas3040-201-24 /vol/vol2/lun2 /dev/sdb host6 iSCSI 10m 7fas3040-201-24 /vol/vol3/lun3 /dev/sdb host6 iSCSI 10m 7
(Red Hat Enterprise Linux 5, 6) Software iSCSI with DM-Multipath example of usingiscsiadm to view LUNs
This example shows sample output from the iscsiadm command when it is issued in a HostUtilities environment that is running the iSCSI protocol and DM-Multipath on a Red Hat EnterpriseLinux 5 or 6 series system.
Note: This example lists the available storage systems and LUNs for a session with a specificsession ID. To view the details of all the sessions, use the iscsiadm -m session -P 3command.
56 | Linux Host Utilities 6.1 Installation and Setup Guide
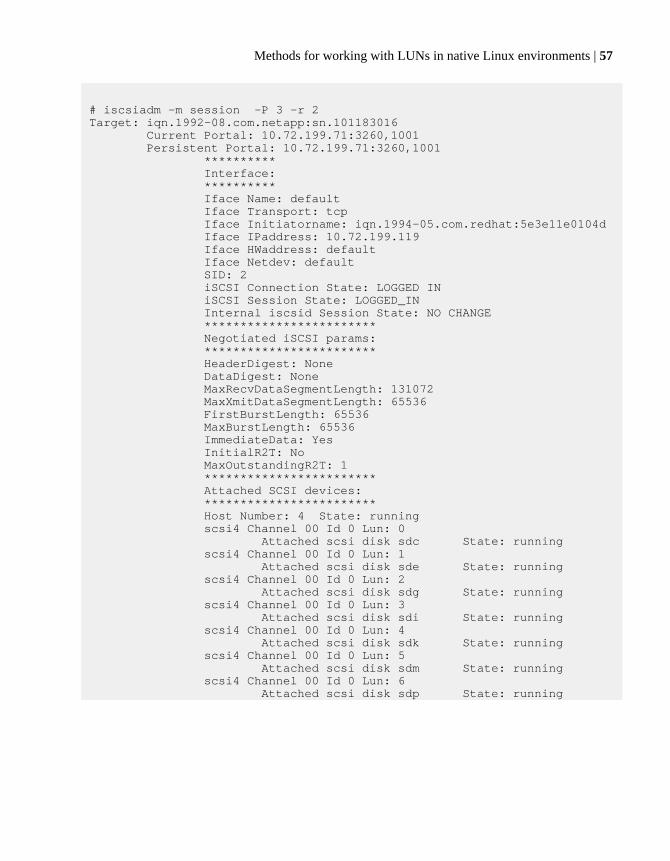
# iscsiadm -m session -P 3 -r 2Target: iqn.1992-08.com.netapp:sn.101183016 Current Portal: 10.72.199.71:3260,1001 Persistent Portal: 10.72.199.71:3260,1001 ********** Interface: ********** Iface Name: default Iface Transport: tcp Iface Initiatorname: iqn.1994-05.com.redhat:5e3e11e0104d Iface IPaddress: 10.72.199.119 Iface HWaddress: default Iface Netdev: default SID: 2 iSCSI Connection State: LOGGED IN iSCSI Session State: LOGGED_IN Internal iscsid Session State: NO CHANGE ************************ Negotiated iSCSI params: ************************ HeaderDigest: None DataDigest: None MaxRecvDataSegmentLength: 131072 MaxXmitDataSegmentLength: 65536 FirstBurstLength: 65536 MaxBurstLength: 65536 ImmediateData: Yes InitialR2T: No MaxOutstandingR2T: 1 ************************ Attached SCSI devices: ************************ Host Number: 4 State: running scsi4 Channel 00 Id 0 Lun: 0 Attached scsi disk sdc State: running scsi4 Channel 00 Id 0 Lun: 1 Attached scsi disk sde State: running scsi4 Channel 00 Id 0 Lun: 2 Attached scsi disk sdg State: running scsi4 Channel 00 Id 0 Lun: 3 Attached scsi disk sdi State: running scsi4 Channel 00 Id 0 Lun: 4 Attached scsi disk sdk State: running scsi4 Channel 00 Id 0 Lun: 5 Attached scsi disk sdm State: running scsi4 Channel 00 Id 0 Lun: 6 Attached scsi disk sdp State: running
Methods for working with LUNs in native Linux environments | 57
scsi4 Channel 00 Id 0 Lun: 7 Attached scsi disk sdq State: running
(Red Hat Enterprise Linux 5, 6) Software iSCSI without multipathing example of usingiscsiadm to view LUNs
This example shows sample output from the iscsiadm command when it is issued in a HostUtilities environment that is running the iSCSI protocol without multipathing on a Red HatEnterprise Linux 5 or 6 series system. This example uses a specific session ID.
Note: This example lists the available storage systems and LUNs for a session with a specificsession ID. To view the details of all the sessions, use the iscsiadm -m session -P 3command.
# iscsiadm -m session -P 3 -r 2Target: iqn.1992-08.com.netapp:sn.101183016 Current Portal: 10.72.199.71:3260,1001 Persistent Portal: 10.72.199.71:3260,1001 ********** Interface: ********** Iface Name: default Iface Transport: tcp Iface Initiatorname: iqn.1994-05.com.redhat:5e3e11e0104d Iface IPaddress: 10.72.199.119 Iface HWaddress: default Iface Netdev: default SID: 2 iSCSI Connection State: LOGGED IN iSCSI Session State: LOGGED_IN Internal iscsid Session State: NO CHANGE ************************ Negotiated iSCSI params: ************************ HeaderDigest: None DataDigest: None MaxRecvDataSegmentLength: 131072 MaxXmitDataSegmentLength: 65536 FirstBurstLength: 65536 MaxBurstLength: 65536 ImmediateData: Yes InitialR2T: No MaxOutstandingR2T: 1 ************************ Attached SCSI devices: ************************ Host Number: 4 State: running scsi4 Channel 00 Id 0 Lun: 0 Attached scsi disk sdc State: running scsi4 Channel 00 Id 0 Lun: 1 Attached scsi disk sde State: running scsi4 Channel 00 Id 0 Lun: 2 Attached scsi disk sdg State: running
58 | Linux Host Utilities 6.1 Installation and Setup Guide

scsi4 Channel 00 Id 0 Lun: 3 Attached scsi disk sdi State: running scsi4 Channel 00 Id 0 Lun: 4 Attached scsi disk sdk State: running scsi4 Channel 00 Id 0 Lun: 5 Attached scsi disk sdm State: running scsi4 Channel 00 Id 0 Lun: 6 Attached scsi disk sdp State: running scsi4 Channel 00 Id 0 Lun: 7 Attached scsi disk sdq State: running
(SUSE Linux 10, 11) Software iSCSI with DM-Multipath example of using iscsiadmcommand
This example shows sample output from the iscsiadm command when it is issued in a HostUtilities environment that is running the iSCSI protocol and DM-Multipath on a SUSE LinuxEnterprise Server 10 or 11 series.
Note: This example lists the available storage systems and LUNs for a specific session. To viewthe details of all the sessions, use the iscsiadm -m session -P 3 command.
# iscsiadm -m session --sid=0 -P 3 iSCSI Transport Class version 2.0-724iscsiadm version 2.0-868Target: iqn.1992-08.com.netapp:sn.101180456 Current Portal: 10.72.199.144:3260,1001 Persistent Portal: 10.72.199.144:3260,1001 ********** Interface: ********** Iface Name: default Iface Transport: tcp Iface Initiatorname: iqn.1996-04.de.suse:lnx.200.109 Iface IPaddress: 10.72.200.109 Iface HWaddress: default Iface Netdev: default SID: 1 iSCSI Connection State: LOGGED IN iSCSI Session State: LOGGED_INInternal iscsid Session State: NO CHANGE ************************ Negotiated iSCSI params: ************************ HeaderDigest: CRC32C DataDigest: None MaxRecvDataSegmentLength: 131072 MaxXmitDataSegmentLength: 65536 FirstBurstLength: 65536 MaxBurstLength: 65536 ImmediateData: Yes InitialR2T: No MaxOutstandingR2T: 1 ************************ Attached SCSI devices:
Methods for working with LUNs in native Linux environments | 59

************************ Host Number: 47 State: running scsi47 Channel 00 Id 0 Lun: 2 Attached scsi disk sdj State: running scsi47 Channel 00 Id 0 Lun: 1 Attached scsi disk sdf State: running scsi47 Channel 00 Id 0 Lun: 0 Attached scsi disk sdb State: running
(SUSE Linux 10, 11) Software iSCSI without multipathing example of using iscsiadmcommand
This example shows sample output from the iscsiadm command when it is issued in a HostUtilities environment that is running the iSCSI protocol without multipathing on a SUSE LinuxEnterprise Server 10 or 11 series.
Note: This example lists the available storage systems and LUNs for a specific session. To viewthe details of all the sessions, use the iscsiadm -m session -P 3 command.
# iscsiadm -m session --sid=N -P 3 iSCSI Transport Class version 2.0-724iscsiadm version 2.0-868Target: iqn.1992-08.com.netapp:sn.101180456 Current Portal: 10.72.199.144:3260,1001 Persistent Portal: 10.72.199.144:3260,1001 ********** Interface: ********** Iface Name: default Iface Transport: tcp Iface Initiatorname:iqn.1996-04.de.suse:lnx.200.109 Iface IPaddress: 10.72.200.109 Iface HWaddress: default Iface Netdev: default SID: 1 iSCSI Connection State: LOGGED IN iSCSI Session State: LOGGED_IN Internal iscsid Session State: NO CHANGE ************************ Negotiated iSCSI params: ************************ HeaderDigest: CRC32C DataDigest: None MaxRecvDataSegmentLength: 131072 MaxXmitDataSegmentLength: 65536 FirstBurstLength: 65536 MaxBurstLength: 65536 ImmediateData: Yes InitialR2T: No MaxOutstandingR2T: 1 ************************ Attached SCSI devices: ************************ Host Number: 47 State: running
60 | Linux Host Utilities 6.1 Installation and Setup Guide
scsi47 Channel 00 Id 0 Lun: 2 Attached scsi disk sdj State: running scsi47 Channel 00 Id 0 Lun: 1 Attached scsi disk sdf State: running scsi47 Channel 00 Id 0 Lun: 0 Attached scsi disk sdb State: running
(Red Hat 4) Software iSCSI without multipathing example of using iscsi-ls command
This example shows sample output from the iscsi-ls -l command when it is issued in a HostUtilities environment that is running the iSCSI protocol without multipathing on a Red HatEnterprise Linux 4 series system.
# /sbin/iscsi-ls -l******************************************************************************* SFNet iSCSI Driver Version ... 3.6.2 (27-Sep-2004 )*******************************************************************************TARGET NAME : iqn.1992-08.com.netapp:sn.33604646TARGET ALIAS :HOST NO : 0BUS NO : 0TARGET ID : 0TARGET ADDRESS : 10.60.128.100:3260SESSION STATUS : ESTABLISHED AT Mon Jan 3 10:05:14 2005NO. OF PORTALS : 1PORTAL ADDRESS 1 : 10.60.128.100:3260,1SESSION ID : ISID 00023d000001 TSID 103
DEVICE DETAILS :--------------LUN ID : 0 Vendor: NETAPP Model: LUN Rev: 0.2 Type: Direct-Access ANSI SCSI revision: 04 page83 type3: 60a980004f6443745359763759367733 page83 type1:4e45544150502020204c554e204f644374535976375936773300000000000000 page80: 4f6443745359763759367733 Device: /dev/sdbLUN ID : 1 Vendor: NETAPP Model: LUN Rev: 0.2 Type: Direct-Access ANSI SCSI revision: 04 page83 type3: 60a980004f644374535976426253674b page83 type1:4e45544150502020204c554e204f644374535976426253674b00000000000000 page80: 4f644374535976426253674b
Methods for working with LUNs in native Linux environments | 61
Device: /dev/sdc*******************************************************************************
(Native multipathing) Using sanlun to display DM-Multipathinformation
When you are using DM-Multipath, you can use the sanlun command to confirm that DM-Multipath is set up.
Step
1. Enter the following command on the Linux host console:
sanlun lun show -p
You can also use the sanlun lun show all command to display more information about yourLUN setup, such as whether you are using LUNs mapped with Data ONTAP operating inCluster-Mode or Data ONTAP operating in 7-Mode.
Note: Check the Interoperability Matrix to determine if Data ONTAP operating in Cluster-Mode is supported with your Host Utilities environment.
(Native multipathing) Examples of sanlun output containing DM-Multipathinformation
When you use the sanlun command to confirm that DM-Multipath is set up, the command outputvaries depending on the protocol you are using and whether you are using Data ONTAP operating inCluster-Mode or Data ONTAP operating in 7-Mode.
The following sections provide examples of the type of output produced when you run the sanluncommand in the following environments:
• Data ONTAP operating in Cluster-Mode with FC• Data ONTAP operating in 7-Mode with FC• Data ONTAP operating in Cluster-Mode with ISCSI• Data ONTAP operating in 7-Mode ISCSI
Data ONTAP operating in Cluster-Mode with FC: Example of using sanlun to displayDM-Multipath information
The following examples show the output from the sanlun lun show -p command and thesanlun lun show all command in a Host Utilities environment that is running Data ONTAPoperating in Cluster-Mode with FC and DM-Multipath.
The first example uses the sanlun lun show -p command. The output from the command showsthat DM-Multipath (Multipath Provider: Native) is configured.
62 | Linux Host Utilities 6.1 Installation and Setup Guide

# sanlun lun show -p ONTAP Path: vs_data28_2:/vol/vol1/lun1 LUN: 2 LUN Size: 3g Mode: C Host Device: 3600a09803246664c422b2d51674f7470 Multipath Policy: round-robin 0 Multipath Provider: Native--------- ---------- ------- ------------ -----------------------------------host vserverpath path /dev/ host vserverstate type node adapter LIF--------- ---------- ------- ------------ -----------------------------------up primary sdfo host0 lif1up primary sdfk host0 lif2up primary sdga host1 lif3up primary sdge host1 lif4up secondary sdgm host1 lif5up secondary sdgj host0 lif6up secondary sdfw host0 lif7up secondary sdgq host1 lif8
This example uses the sanlun lun show all command. The output shows that the LUNs aremapped to Data ONTAP operating in Cluster-Mode in an environment using FC.
# sanlun lun show allcontroller(7mode)/ device host lunvserver(Cmode) lun-pathname filename adapter protocol size mode---------------------------------------------------------------------------------vs_data28_2 /vol/vol1/lun1 /dev/sdgf host1 FCP 3g Cvs_data28_2 /vol/vol2/lun2 /dev/sdge host1 FCP 3g Cvs_data28_2 /vol/vol3/lun3 /dev/sdgd host1 FCP 3g C
Data ONTAP operating in 7-Mode with FC: Example of using sanlun to display DM-Multipath information
The following examples show the output from the sanlun lun show -p command and thesanlun lun show all in a Host Utilities environment that is running Data ONTAP operating in7-Mode with FC and DM-Multipath.
Note: With the Linux Host Utilities 6.0 release, the output format of the sanlun utility haschanged. The format no longer maintains backward compatibility when using LUNs mapped forData ONTAP operating in 7-Mode.
The first example uses the sanlun lun show -p command. The output from the command showsthat DM-Multipath (Multipath Provider: Native) is configured.
# sanlun lun show -p ONTAP Path: fas3040-201-25:/vol/vol1/lun1 LUN: 27 LUN Size: 5g Controller CF State: Cluster Enabled Controller Partner: fas3040-201-24 Mode: 7 Host Device: 360a98000486e2f65686f647876573362 Multipath Policy: round-robin 0
Methods for working with LUNs in native Linux environments | 63
Multipath Provider: Native--------- ---------- ------- ------------ -----------------------------------host controller controllerpath path /dev/ host targetstate type node adapter port--------- ---------- ------- ------------ -----------------------------------up primary sdbq host0 2aup primary sdeu host0 1aup primary sdgj host1 2aup primary sdjn host1 1aup secondary sdab host0 2aup secondary sddf host0 1aup secondary sdhy host1 2aup secondary sdlc host1 1a
This example uses the sanlun lun show all command. The output shows that the LUNs aremapped to Data ONTAP operating in 7-Mode in an environment using FC.
# sanlun lun show allcontroller(7mode)/ device host lunvserver(Cmode) lun-pathname filename adapter protocol size mode--------------------------------------------------------------------------------fas3040-201-25 /vol/vol1/lun1 /dev/sdu host1 FCP 5g 7fas3040-201-25 /vol/vol2/lun2 /dev/sdt host1 FCP 5g 7fas3040-201-25 /vol/vol3/lun3 /dev/sds host1 FCP 5g 7
Data ONTAP operating in Cluster-Mode with ISCSI: Example of using sanlun todisplay DM-Multipath information
The following examples show the output from the sanlun lun show -p command and thesanlun lun show all in a Host Utilities environment that is running Data ONTAP operating inCluster-Mode with iSCSI and DM-Multipath. The output is the same regardless of whether you areusing a software iSCSI initiator or hardware iSCSI initiator.
The first example uses the sanlun lun show -p command. The output from the command showsthat DM-Multipath (Multipath Provider: Native) is configured.
# sanlun lun show -p ONTAP Path: vs_data28_2:/vol/vol1/lun1 LUN: 2 LUN Size: 3g Mode: C Host Device: 3600a09803246664c422b2d51674f7470 Multipath Policy: round-robin 0 Multipath Provider: Native--------- ---------- ------- ------------ -------------------------------------host vserverpath path /dev/ host vserverstate type node adapter LIF--------- ---------- ------- ------------ -------------------------------------up primary sdfo host0 lif1up primary sdfk host0 lif2up primary sdga host1 lif3up primary sdge host1 lif4up secondary sdgm host1 lif5up secondary sdgj host0 lif6
64 | Linux Host Utilities 6.1 Installation and Setup Guide
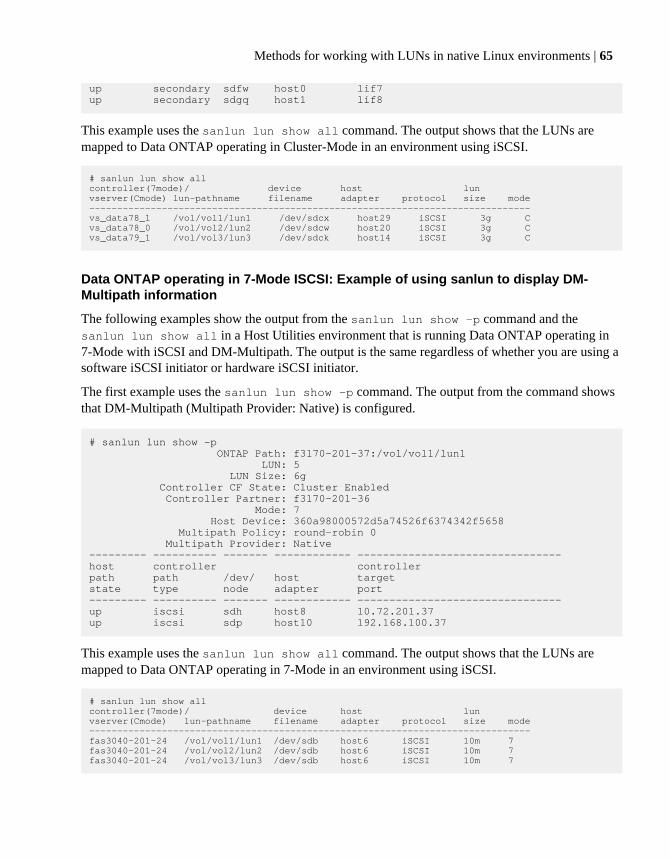
up secondary sdfw host0 lif7up secondary sdgq host1 lif8
This example uses the sanlun lun show all command. The output shows that the LUNs aremapped to Data ONTAP operating in Cluster-Mode in an environment using iSCSI.
# sanlun lun show allcontroller(7mode)/ device host lunvserver(Cmode) lun-pathname filename adapter protocol size mode-------------------------------------------------------------------------------vs_data78_1 /vol/vol1/lun1 /dev/sdcx host29 iSCSI 3g Cvs_data78_0 /vol/vol2/lun2 /dev/sdcw host20 iSCSI 3g Cvs_data79_1 /vol/vol3/lun3 /dev/sdck host14 iSCSI 3g C
Data ONTAP operating in 7-Mode ISCSI: Example of using sanlun to display DM-Multipath information
The following examples show the output from the sanlun lun show -p command and thesanlun lun show all in a Host Utilities environment that is running Data ONTAP operating in7-Mode with iSCSI and DM-Multipath. The output is the same regardless of whether you are using asoftware iSCSI initiator or hardware iSCSI initiator.
The first example uses the sanlun lun show -p command. The output from the command showsthat DM-Multipath (Multipath Provider: Native) is configured.
# sanlun lun show -p ONTAP Path: f3170-201-37:/vol/vol1/lun1 LUN: 5 LUN Size: 6g Controller CF State: Cluster Enabled Controller Partner: f3170-201-36 Mode: 7 Host Device: 360a98000572d5a74526f6374342f5658 Multipath Policy: round-robin 0 Multipath Provider: Native--------- ---------- ------- ------------ --------------------------------host controller controllerpath path /dev/ host targetstate type node adapter port--------- ---------- ------- ------------ --------------------------------up iscsi sdh host8 10.72.201.37up iscsi sdp host10 192.168.100.37
This example uses the sanlun lun show all command. The output shows that the LUNs aremapped to Data ONTAP operating in 7-Mode in an environment using iSCSI.
# sanlun lun show allcontroller(7mode)/ device host lunvserver(Cmode) lun-pathname filename adapter protocol size mode-------------------------------------------------------------------------------fas3040-201-24 /vol/vol1/lun1 /dev/sdb host6 iSCSI 10m 7fas3040-201-24 /vol/vol2/lun2 /dev/sdb host6 iSCSI 10m 7fas3040-201-24 /vol/vol3/lun3 /dev/sdb host6 iSCSI 10m 7
Methods for working with LUNs in native Linux environments | 65
Enabling device persistence for newly discovered LUNsThe Linux Host sees LUNs on the storage system as SCSI devices. When you have multiple LUNs,you must be able to persistently identify each LUN across system reboots. This means you shouldmake sure each LUN has a unique file system label and then mount the file system using that label.
Before you begin
Discover the LUNs.
About this task
The issue of persistent identification occurs because the Linux operating system assigns a uniquedevice name, such as /dev/sda, to each LUN as it discovers the LUN. If you reboot or restart theiSCSI service, these names might change because the order in which the operating system discoversLUNs cannot be predicted.
When you use multipathing, DM-Multipath automatically creates persistent devices for each LUN inthe /dev/mapper/ directory on the Linux host.
Step
1. Mount the new file system by adding an entry to /etc/fstab.
If you are running ... Enter the following line ...
DM-Multipath with Red Hat EnterpriseLinux
device mount_point type_netdev,defaults 0 0
DM-Multipath with SUSE LinuxEnterprise Server
device mount_point type _netdev,defaultsnofail,rw 0 0
device is the name of the device in the /dev/mapper/ directory. You can create a file systemdirectly on a multipath device in /dev/mapper/. You do not have to create a partition or labelon the multipath device.
mount_point is the mount point you created for the file system.
type is the file system type, such as ext2 or ext3.
_netdev is used for any network-dependent devices such as iSCSI. It is only used in iSCSIenvironments and lets you add iSCSI mount point devices to /etc/fstab.
66 | Linux Host Utilities 6.1 Installation and Setup Guide

Removing an unmapped LUNYou can use the SCSI rescan script to remove an unmapped LUN from the host.
Before you begin
Make sure that the LUN is not in use and that it has been unmapped.
If you do not have a copy of the rescan script, get one. The rescan script is available with thesg3_utils package. In addition, the rescan script is available with Red Hat Enterprise Linux 5Update 4 or later and Red Hat Enterprise Linux 6 or later, SUSE Linux Enterprise Server 10 SP2 orlater, and SUSE Linux Enterprise Server 11 or later. For earlier versions, use the vendor-specificrescan scripts, which are available on their web sites. See the documentation for your HBA.
Step
1. Enter the following command to remove the LUN:
/usr/bin/rescan-scsi-bus.sh –r
Methods for working with LUNs in native Linux environments | 67

(Veritas) LUN access when using VxDMP
If you configured your system correctly for Veritas Storage Foundation, you can use VxDMP formultipathing and VxVM to manage the LUNs. You can still use commands such as sanlun todisplay information about the LUN paths.
There are some things you should check before you start working with LUNs in a Veritas StorageFoundation environment:
• If you are using iSCSI, make sure you are using a version of Veritas Storage Foundation thatsupports that protocol.See the Interoperability Matrix, which is available at support.netapp.com/NOW/products/interoperability.
• Make sure you have set the HBA driver parameters correctly for your system setup.Having the correct values for these parameters ensures that the multipathing and storage systemfailover work correctly.
• If you configured VxDMP, multipath devices are created for all the LUNs that are discovered bythe HBA driver.Each time an HBA driver is started, it scans the storage system and discovers all mapped LUNs.
• Make sure you set the VxDMP restore daemon to the correct values.These values ensure that Veritas Storage Foundation works efficiently and correctly.
• When you use Veritas Storage Foundation, the VxVM manages the LUNs.This means that, in addition to using tools such as sanlun and iscsadm to display informationabout the LUNs, you can also use the VxVM interface to display information about the VxVMdevices.
(Veritas, FC) Discovering new LUNsAfter you create a new LUN and map it to the Linux host, you can discover the LUN by using theSCSI rescan script.
Before you begin
If you do not have a copy of the rescan script, get one. The rescan script is available with thesg3_utils package. In addition, the rescan script is available with Red Hat Enterprise Linux 5Update 4 or later, Red Hat Enterprise Linux 6 or later, SUSE Linux Enterprise Server 10 SP2 or later,and SUSE Linux Enterprise Server 11 or later. For earlier versions, use the vendor-specific rescanscripts, which are available on their web sites. See HBA vendor-specific documentation.
Steps
1. Enter the following command to rescan the operating system:/usr/bin/rescan-scsi-bus.sh
68 | Linux Host Utilities 6.1 Installation and Setup Guide

2. Initiate a rescan of the operating system device tree from the Veritas Volume Manager byentering the following command:
vxdisk scandisks
(Veritas, Software iSCSI) Discovering new LUNs for Red Hat5, 6, or SUSE 10, 11
When you are running Red Hat Enterprise Linux 5 or 6 series or SUSE Linux Enterprise Server 10 or11 series and the software iSCSI initiator, you can discover new LUNs by rescanning the iSCSIservice on the host. Rescanning the service displays all the newly created LUNs that have beenmapped to the host.
Before you begin
If you do not have a copy of the rescan script, get one. The rescan script is available with thesg3_utils package. In addition, the rescan script is available with Red Hat Enterprise Linux 5Update 4, Red Hat Linux 6 or later, SUSE Linux Enterprise Server 10 SP2 or later, and SUSE LinuxEnterprise Server 11 or later. For earlier versions, use the vendor-specific rescan scripts, which areavailable on their web sites. See HBA vendor-specific documentation.
About this task
You cannot view new LUNs until after the operating system discovers them. Once the LUNs havebeen discovered, they are automatically added to the VxDMP configuration.
Steps
1. To discover a new LUN, enter the following command:
If you want to... Enter the following command...
Obtain the list of all the current sessions iscsiadm -m session
Rescan a specific session iscsiadm -m session --sid=N --rescan
N is the specific session ID.
Rescan all the sessions iscsiadm -m session --rescan
Rescan using the SCSI rescan script /usr/bin/rescan-scsi-bus.sh
Rescan Veritas devices vxdisk scandisks
2. To verify that the new LUNs have been discovered, use the sanlun command or the iscsiadmcommand.
(Veritas) LUN access when using VxDMP | 69
(Veritas) Viewing LUNs mapped to the hostRegardless of the protocol your environment uses, you have several options for viewing LUNs thatare mapped to the host. The sanlun command works for all protocols. If you are using an iSCSIsoftware initiator, you also have a choice between using the iscsiadm command or the iscsicommand , depending on your version of Linux. You can also use vxdisk list to see the LUNs onVxVM disks.
Steps
1. To view a list of LUNs mapped to your host, run the appropriate command for your systemenvironment.
The following table summarizes the commands and the environments that support them. For moreinformation on the commands and their options, see the man pages.
If you are using... Enter one of the following commands...
(FC, iSCSI hardware initiator) All versionsof Linux
sanlun lun show all
(iSCSI software initiator) Red Hat EnterpriseLinux 5 or 6 series
• sanlun lun show all
• iscsiadm --mode session --sid=N -P 3
(iSCSI software initiator) SUSE LinuxEnterprise Server 10 or 11 series
• sanlun lun show all
• (SUSE Linux Enterprise Server 10 SP2):
iscsiadm --mode session --sid=N -P 3
• (SUSE Linux Enterprise Server 10 SP1):
iscsiadm --mode session --sid=N -i
The sections that follow contain examples of the type of output these commands produce withdifferent protocols and operating systems.
2. To view the LUNs on the VxVM disks, enter the vxdisk list command.
(Veritas) Examples of sanlun, iscsiadm, iscsi output when used to viewLUNs
You can use either the sanlun command, the iscsiadm command, or the iscsi command to viewthe LUNs configured on your Linux host. The examples in this section show the type of output youwould see if you ran one of these commands on your Linux operating system in an environmentrunning VxDMP .
The tool you use depends on your version of Linux and what you would like to view. The sanluncommand displays the host device names and the LUNs to which they are mapped. The iscsiadmcommand lists the available storage systems and LUNs.
70 | Linux Host Utilities 6.1 Installation and Setup Guide
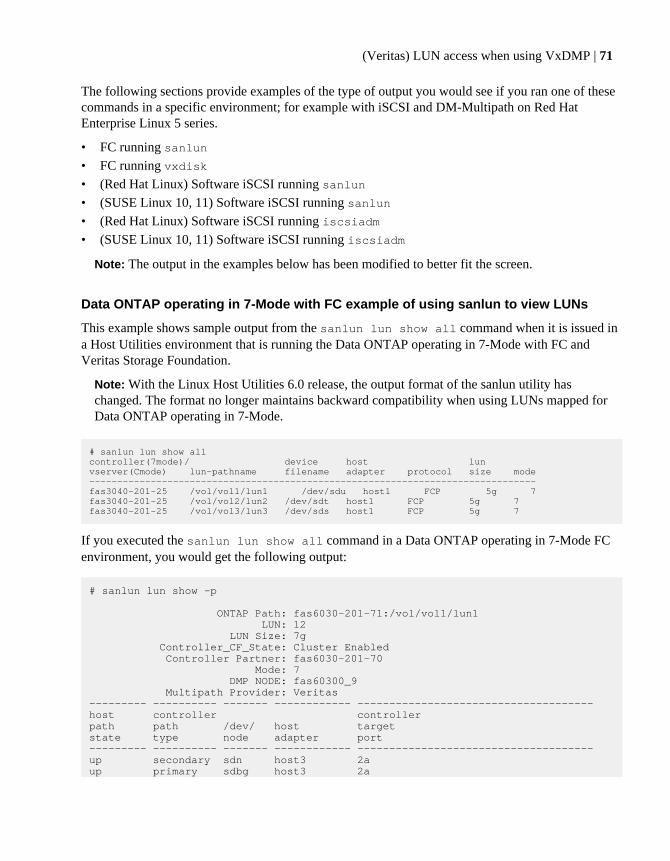
The following sections provide examples of the type of output you would see if you ran one of thesecommands in a specific environment; for example with iSCSI and DM-Multipath on Red HatEnterprise Linux 5 series.
• FC running sanlun• FC running vxdisk• (Red Hat Linux) Software iSCSI running sanlun• (SUSE Linux 10, 11) Software iSCSI running sanlun• (Red Hat Linux) Software iSCSI running iscsiadm• (SUSE Linux 10, 11) Software iSCSI running iscsiadm
Note: The output in the examples below has been modified to better fit the screen.
Data ONTAP operating in 7-Mode with FC example of using sanlun to view LUNs
This example shows sample output from the sanlun lun show all command when it is issued ina Host Utilities environment that is running the Data ONTAP operating in 7-Mode with FC andVeritas Storage Foundation.
Note: With the Linux Host Utilities 6.0 release, the output format of the sanlun utility haschanged. The format no longer maintains backward compatibility when using LUNs mapped forData ONTAP operating in 7-Mode.
# sanlun lun show allcontroller(7mode)/ device host lunvserver(Cmode) lun-pathname filename adapter protocol size mode--------------------------------------------------------------------------------fas3040-201-25 /vol/vol1/lun1 /dev/sdu host1 FCP 5g 7fas3040-201-25 /vol/vol2/lun2 /dev/sdt host1 FCP 5g 7fas3040-201-25 /vol/vol3/lun3 /dev/sds host1 FCP 5g 7
If you executed the sanlun lun show all command in a Data ONTAP operating in 7-Mode FCenvironment, you would get the following output:
# sanlun lun show -p
ONTAP Path: fas6030-201-71:/vol/vol1/lun1 LUN: 12 LUN Size: 7g Controller_CF_State: Cluster Enabled Controller Partner: fas6030-201-70 Mode: 7 DMP NODE: fas60300_9 Multipath Provider: Veritas--------- ---------- ------- ------------ -------------------------------------host controller controllerpath path /dev/ host targetstate type node adapter port--------- ---------- ------- ------------ -------------------------------------up secondary sdn host3 2aup primary sdbg host3 2a
(Veritas) LUN access when using VxDMP | 71

up primary sdes host4 2bup secondary sdcz host4 2b
FC example of using vxdisk to view LUNs
This example shows sample output from the vxdisk list command when it is issued in a HostUtilities environment that is running the FC protocol. The vxdisk list displays the LUNs on theVxVM disks:
# vxdisk listDEVICE TYPE DISK GROUP STATUSfas20200_0 auto:cdsdisk data_dg01 data_dg online thinrclm sharedfas20200_1 auto:cdsdisk data_dg02 data_dg online thinrclm sharedfas20200_2 auto:cdsdisk data_dg113 data_dg online thinrclm sharedfas20200_3 auto:cdsdisk data_dg180 data_dg online thinrclm shared
Data ONTAP operating in 7-Mode with iSCSI example of using sanlun to view LUNs
This example shows sample output from the sanlun lun show all command when it is issued ina Host Utilities environment that is running the Data ONTAP operating in 7-Mode with iSCSI andVeritas Storage Foundation.
Note: With the Linux Host Utilities 6.0 release, the output format of the sanlun utility haschanged. The format no longer maintains backward compatibility when using LUNs mapped forData ONTAP operating in 7-Mode.
# sanlun lun show allcontroller(7mode)/ device host lunvserver(Cmode) lun-pathname filename adapter protocol size mode-------------------------------------------------------------------------------fas3040-201-24 /vol/vol1/lun1 /dev/sdb host6 iSCSI 10m 7fas3040-201-24 /vol/vol2/lun2 /dev/sdb host6 iSCSI 10m 7fas3040-201-24 /vol/vol3/lun3 /dev/sdb host6 iSCSI 10m 7
If you executed the sanlun lun show all command in a Data ONTAP operating in 7-ModeiSCSI environment, you would get the following output:
# ./sanlun lun show -p
ONTAP Path: fas6030-201-70:/vol/vol1/lun1 LUN: 21 LUN Size: 7g Controller_CF_State: Cluster Enabled Controller Partner: fas6030-201-71 Mode: 7 DMP NODE: fas60300_44 Multipath Provider: Veritas--------- ---------- ------- ------------ --------------------------------host controller controllerpath path /dev/ host targetstate type node adapter port--------- ---------- ------- ------------ --------------------------------
72 | Linux Host Utilities 6.1 Installation and Setup Guide

up iscsi sdaq host6 10.72.201.24up iscsi sdbp host7 10.72.201.25
(Red Hat Enterprise Linux 5) Software iSCSI example of using iscsiadm to view LUNs
This example shows sample output from the iscsiadm command when it is issued in a HostUtilities environment that is running the iSCSI protocol and Veritas Storage Foundation on a Red HatEnterprise Linux 5 series system.
Note: This example lists the available storage systems and LUNs for a session with a specificsession ID. To view the details of all the sessions, use the iscsiadm -m session -P 3command.
# iscsiadm -m session -P 3 -r 2Target: iqn.1992-08.com.netapp:sn.101183016 Current Portal: 10.72.199.71:3260,1001 Persistent Portal: 10.72.199.71:3260,1001 ********** Interface: ********** Iface Name: default Iface Transport: tcp Iface Initiatorname: iqn.1994-05.com.redhat:5e3e11e0104d Iface IPaddress: 10.72.199.119 Iface HWaddress: default Iface Netdev: default SID: 2 iSCSI Connection State: LOGGED IN iSCSI Session State: Unknown Internal iscsid Session State: NO CHANGE ************************ Negotiated iSCSI params: ************************ HeaderDigest: None DataDigest: None MaxRecvDataSegmentLength: 131072 MaxXmitDataSegmentLength: 65536 FirstBurstLength: 65536 MaxBurstLength: 65536 ImmediateData: Yes InitialR2T: No MaxOutstandingR2T: 1 ************************ Attached SCSI devices: ************************ Host Number: 4 State: running scsi4 Channel 00 Id 0 Lun: 0 Attached scsi disk sdc State: running scsi4 Channel 00 Id 0 Lun: 1 Attached scsi disk sde State: running scsi4 Channel 00 Id 0 Lun: 2 Attached scsi disk sdg State: running scsi4 Channel 00 Id 0 Lun: 3 Attached scsi disk sdi State: running scsi4 Channel 00 Id 0 Lun: 4 Attached scsi disk sdk State: running scsi4 Channel 00 Id 0 Lun: 5 Attached scsi disk sdm State: running scsi4 Channel 00 Id 0 Lun: 6
(Veritas) LUN access when using VxDMP | 73
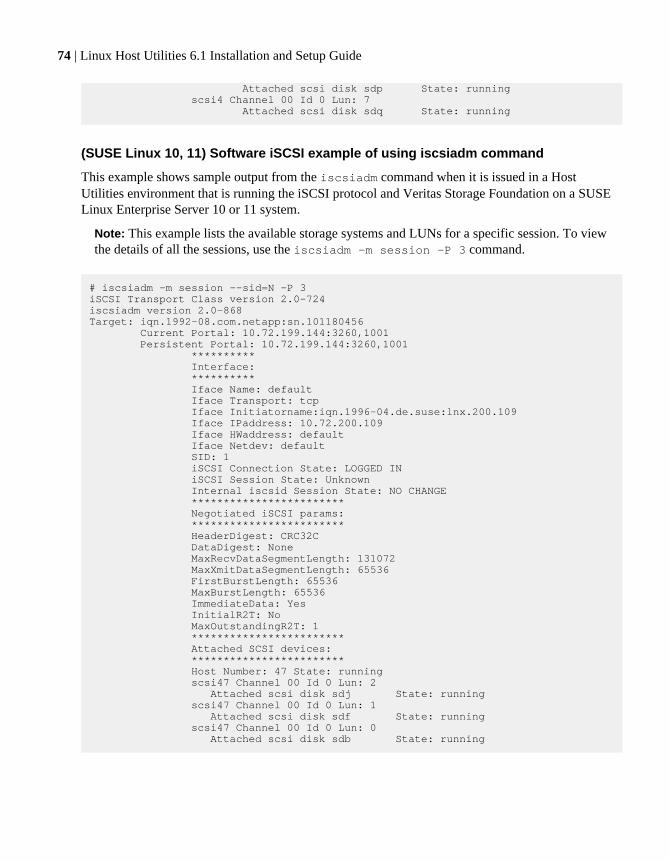
Attached scsi disk sdp State: running scsi4 Channel 00 Id 0 Lun: 7 Attached scsi disk sdq State: running
(SUSE Linux 10, 11) Software iSCSI example of using iscsiadm command
This example shows sample output from the iscsiadm command when it is issued in a HostUtilities environment that is running the iSCSI protocol and Veritas Storage Foundation on a SUSELinux Enterprise Server 10 or 11 system.
Note: This example lists the available storage systems and LUNs for a specific session. To viewthe details of all the sessions, use the iscsiadm -m session -P 3 command.
# iscsiadm -m session --sid=N -P 3 iSCSI Transport Class version 2.0-724iscsiadm version 2.0-868Target: iqn.1992-08.com.netapp:sn.101180456 Current Portal: 10.72.199.144:3260,1001 Persistent Portal: 10.72.199.144:3260,1001 ********** Interface: ********** Iface Name: default Iface Transport: tcp Iface Initiatorname:iqn.1996-04.de.suse:lnx.200.109 Iface IPaddress: 10.72.200.109 Iface HWaddress: default Iface Netdev: default SID: 1 iSCSI Connection State: LOGGED IN iSCSI Session State: Unknown Internal iscsid Session State: NO CHANGE ************************ Negotiated iSCSI params: ************************ HeaderDigest: CRC32C DataDigest: None MaxRecvDataSegmentLength: 131072 MaxXmitDataSegmentLength: 65536 FirstBurstLength: 65536 MaxBurstLength: 65536 ImmediateData: Yes InitialR2T: No MaxOutstandingR2T: 1 ************************ Attached SCSI devices: ************************ Host Number: 47 State: running scsi47 Channel 00 Id 0 Lun: 2 Attached scsi disk sdj State: running scsi47 Channel 00 Id 0 Lun: 1 Attached scsi disk sdf State: running scsi47 Channel 00 Id 0 Lun: 0 Attached scsi disk sdb State: running
74 | Linux Host Utilities 6.1 Installation and Setup Guide
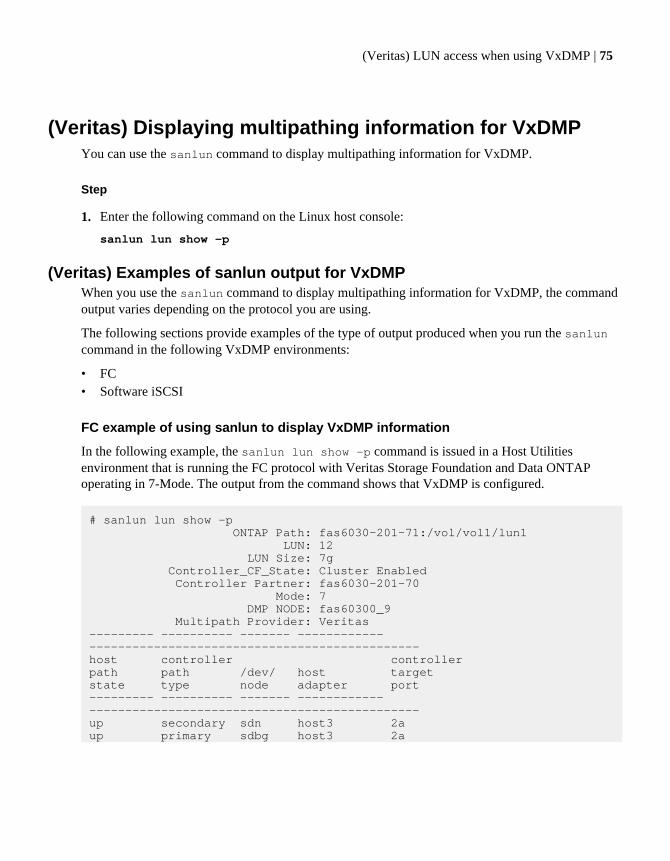
(Veritas) Displaying multipathing information for VxDMPYou can use the sanlun command to display multipathing information for VxDMP.
Step
1. Enter the following command on the Linux host console:
sanlun lun show -p
(Veritas) Examples of sanlun output for VxDMPWhen you use the sanlun command to display multipathing information for VxDMP, the commandoutput varies depending on the protocol you are using.
The following sections provide examples of the type of output produced when you run the sanluncommand in the following VxDMP environments:
• FC• Software iSCSI
FC example of using sanlun to display VxDMP information
In the following example, the sanlun lun show -p command is issued in a Host Utilitiesenvironment that is running the FC protocol with Veritas Storage Foundation and Data ONTAPoperating in 7-Mode. The output from the command shows that VxDMP is configured.
# sanlun lun show -p ONTAP Path: fas6030-201-71:/vol/vol1/lun1 LUN: 12 LUN Size: 7g Controller_CF_State: Cluster Enabled Controller Partner: fas6030-201-70 Mode: 7 DMP NODE: fas60300_9 Multipath Provider: Veritas--------- ---------- ------- ------------ ----------------------------------------------host controller controllerpath path /dev/ host targetstate type node adapter port--------- ---------- ------- ------------ ----------------------------------------------up secondary sdn host3 2aup primary sdbg host3 2a
(Veritas) LUN access when using VxDMP | 75
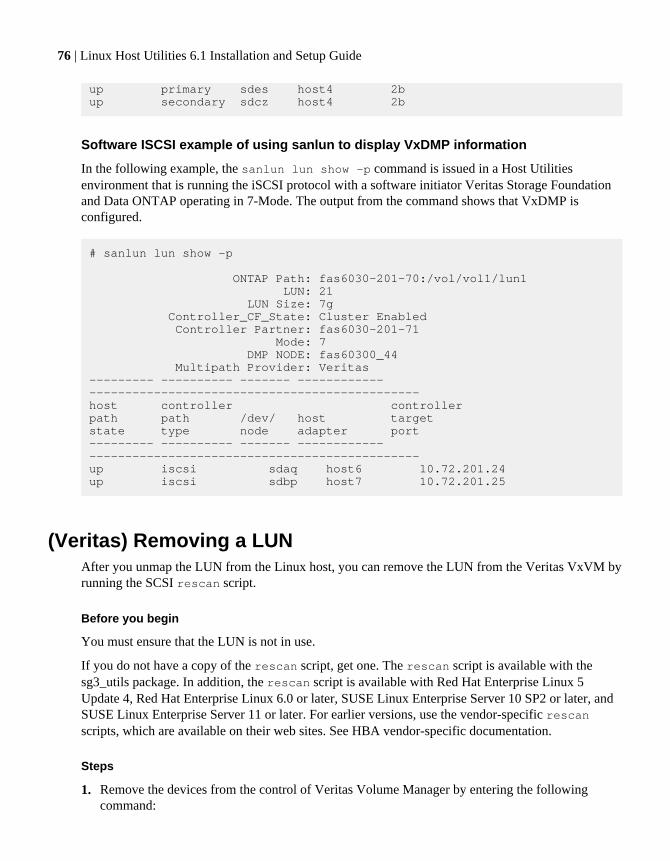
up primary sdes host4 2bup secondary sdcz host4 2b
Software ISCSI example of using sanlun to display VxDMP information
In the following example, the sanlun lun show -p command is issued in a Host Utilitiesenvironment that is running the iSCSI protocol with a software initiator Veritas Storage Foundationand Data ONTAP operating in 7-Mode. The output from the command shows that VxDMP isconfigured.
# sanlun lun show -p
ONTAP Path: fas6030-201-70:/vol/vol1/lun1 LUN: 21 LUN Size: 7g Controller_CF_State: Cluster Enabled Controller Partner: fas6030-201-71 Mode: 7 DMP NODE: fas60300_44 Multipath Provider: Veritas--------- ---------- ------- ------------ ----------------------------------------------host controller controllerpath path /dev/ host targetstate type node adapter port--------- ---------- ------- ------------ ----------------------------------------------up iscsi sdaq host6 10.72.201.24up iscsi sdbp host7 10.72.201.25
(Veritas) Removing a LUNAfter you unmap the LUN from the Linux host, you can remove the LUN from the Veritas VxVM byrunning the SCSI rescan script.
Before you begin
You must ensure that the LUN is not in use.
If you do not have a copy of the rescan script, get one. The rescan script is available with thesg3_utils package. In addition, the rescan script is available with Red Hat Enterprise Linux 5Update 4, Red Hat Enterprise Linux 6.0 or later, SUSE Linux Enterprise Server 10 SP2 or later, andSUSE Linux Enterprise Server 11 or later. For earlier versions, use the vendor-specific rescanscripts, which are available on their web sites. See HBA vendor-specific documentation.
Steps
1. Remove the devices from the control of Veritas Volume Manager by entering the followingcommand:
76 | Linux Host Utilities 6.1 Installation and Setup Guide
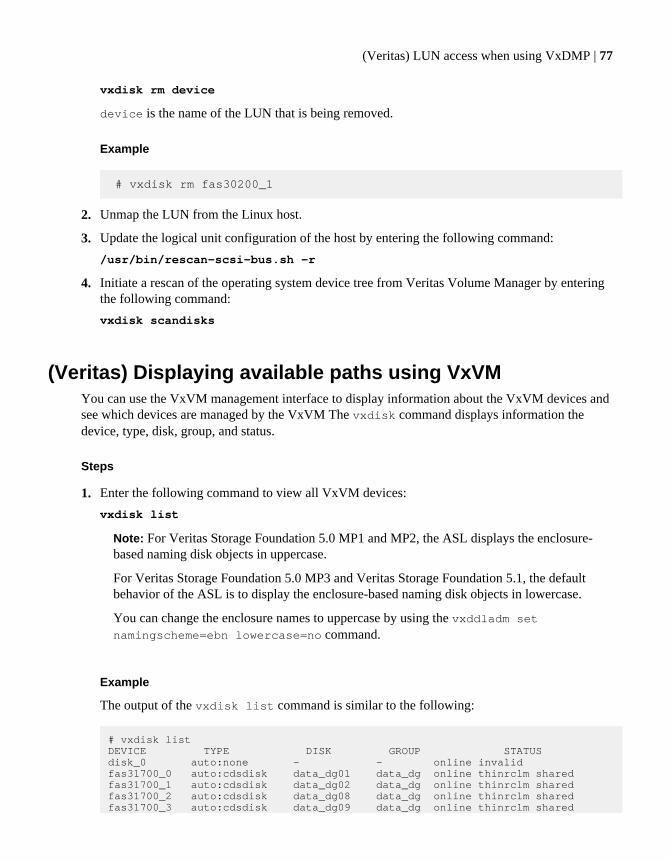
vxdisk rm device
device is the name of the LUN that is being removed.
Example
# vxdisk rm fas30200_1
2. Unmap the LUN from the Linux host.
3. Update the logical unit configuration of the host by entering the following command:
/usr/bin/rescan-scsi-bus.sh -r
4. Initiate a rescan of the operating system device tree from Veritas Volume Manager by enteringthe following command:
vxdisk scandisks
(Veritas) Displaying available paths using VxVMYou can use the VxVM management interface to display information about the VxVM devices andsee which devices are managed by the VxVM The vxdisk command displays information thedevice, type, disk, group, and status.
Steps
1. Enter the following command to view all VxVM devices:
vxdisk list
Note: For Veritas Storage Foundation 5.0 MP1 and MP2, the ASL displays the enclosure-based naming disk objects in uppercase.
For Veritas Storage Foundation 5.0 MP3 and Veritas Storage Foundation 5.1, the defaultbehavior of the ASL is to display the enclosure-based naming disk objects in lowercase.
You can change the enclosure names to uppercase by using the vxddladm setnamingscheme=ebn lowercase=no command.
Example
The output of the vxdisk list command is similar to the following:
# vxdisk listDEVICE TYPE DISK GROUP STATUSdisk_0 auto:none - - online invalidfas31700_0 auto:cdsdisk data_dg01 data_dg online thinrclm sharedfas31700_1 auto:cdsdisk data_dg02 data_dg online thinrclm sharedfas31700_2 auto:cdsdisk data_dg08 data_dg online thinrclm sharedfas31700_3 auto:cdsdisk data_dg09 data_dg online thinrclm shared
(Veritas) LUN access when using VxDMP | 77

fas31700_4 auto:cdsdisk data_dg10 data_dg online thinrclm sharedfas31700_5 auto:cdsdisk data_dg11 data_dg online thinrclm sharedfas31700_6 auto:cdsdisk data_dg12 data_dg online thinrclm sharedfas31700_7 auto:cdsdisk data_dg13 data_dg online thinrclm shared
2. On the host console, enter the following command to display path information for the device youwant:
vxdmpadm getsubpaths dmpnodename=device
device is the name listed under the output of the vxdisk list command.
Example
The output of the vxdmpadm getsubpaths dmpnodename=device command is similar to thefollowing:
vxdmpadm getsubpaths dmpnodename=fas31700_1NAME STATE[A] PATH-TYPE[M] CTLR-NAME ENCLR-TYPE ENCLR-NAME ATTRS======================================================================sdb ENABLED(A) - c7 FAS3170 fas31700 -sdq ENABLED(A) - c8 FAS3170 fas31700 -
3. To obtain path information for a host HBA, enter the following command:
vxdmpadm getsubpaths ctlr=controller_name
controller_name is the controller displayed under “CTRL-NAME” in the output of thevxdmpadm getsubpaths dmpnodename command.
The output displays information about the paths to the storage system (whether the path is aprimary or secondary path). The output also lists the storage system that the device is mapped to.
Example
The output of the vxdmpadm getsubpaths ctlr= controller_name command is similar tothe following:
#vxdmpadm getsubpaths ctlr=c7
NAME STATE[A] PATH-TYPE[M] DMPNODENAME ENCLR-TYPE ENCLR-NAME ATTRS========================================================================sdj ENABLED(A) - fas31700_0 FAS3170 fas31700 -sdb ENABLED(A) - fas31700_1 FAS3170 fas31700 -sdl ENABLED(A) - fas31700_10 FAS3170 fas31700 -sdm ENABLED(A) - fas31700_11 FAS3170 fas31700 -sdn ENABLED(A) - fas31700_12 FAS3170 fas31700 -
78 | Linux Host Utilities 6.1 Installation and Setup Guide
(FC) Setting up a SAN boot LUN on Red HatEnterprise Linux
You can set up a SAN boot LUN to work in a Red Hat Enterprise Linux environment that is usingthe FC protocol.
Before you begin
Verify that your system setup supports SAN boot LUNs. See the NetApp Interoperability Matrix.
Steps
1. Create a LUN on the storage system and map it to the host. This LUN will be the SAN boot LUN.
You should ensure the following:
• The SAN boot LUN is mapped to the host.• Multiple paths to the LUN are available.• The LUN is visible to the host during the boot process.
2. Enable the BIOS of the HBA port to which the SAN boot LUN is mapped.
For information about how to enable the HBA BIOS, see your HBA vendor-specificdocumentation.
3. Configure the paths to the HBA boot BIOS as primary, secondary, tertiary, and so on, on the bootdevice.
For more information, see your vendor-specific documentation.
4. Save and exit.
5. Reboot the host.
6. Install the operating system on the SAN boot LUN.
Note: You must specify Boot Option as linux mpath during the operating systeminstallation. When you specify linux mpath, you can see the multipath devices (/dev/mapper/mpathx) as installation devices.
7. Install the Host Utilities.
8. Configure DM-Multipath.
79
(FC) Setting up a SAN boot LUN on SUSE LinuxEnterprise Server
You can set up a SAN boot LUN to work in a SUSE Linux Enterprise Server environment that isusing the FC protocol.
Before you begin
Verify that your system setup supports SAN boot LUNs. See the NetApp Interoperability Matrix.
Steps
1. Create a LUN on the storage system and map it to the host. This LUN will be the SAN boot LUN.
You should ensure the following:
• The SAN boot LUN is mapped to the host.
Note: If you are running a SAN boot installation using a version of SUSE Linux EnterpriseServer prior to 11 SP2, then only one primary path to the LUN is available. SUSE LinuxEnterprise Server 11 SP2 supports multiple paths to the LUN.
• The LUN is visible to the host during the boot process.
2. Enable the BIOS of the HBA port to which the SAN boot LUN is mapped.
For information about how to enable the HBA BIOS, see your HBA documentation.
3. Install the operating system on the SAN boot LUN.
4. Install the Host Utilities.
5. Configure DM-Multipath.
(FC) Configuring the root partition with DM-Multipath onSUSE Linux Enterprise Server
You can configure the root partition with DM-Multipath on your SUSE Linux Enterprise Server host.
Steps
1. Configure DM-Multipath support.
2. Install the Linux Host Utilities.
3. Enable all paths to the LUN on the storage controller.
4. Re-create the initrd by running the following command:
80 | Linux Host Utilities 6.1 Installation and Setup Guide

If you are using... Enter the following command...
SUSE Linux Enterprise Server 11 mkinitrd -f multipath
SUSE Linux Enterprise Server 10 SP2 mkinitrd -f mpath
Note: You must keep a backup of the initrd image.
5. Reboot the host.
Note: Because all paths to the SAN boot LUN are now available on the host, you shouldconfigure all paths in the HBA boot BIOS as primary boot device, secondary boot device, andso on.
(FC) Setting up a SAN boot LUN on SUSE Linux Enterprise Server | 81
(iSCSI) SAN boot configuration for iSCSIhardware, software initiators
When you set up a SAN boot device, you use a SAN-attached disk, such as a LUN, as a root devicefor a host. A SAN boot LUN can be implemented either by an iSCSI HBA or a network interfacecard (NIC) and software iSCSI stack.
• Software iSCSIFor a software initiator to implement a SAN boot device, you can have the root device on aniSCSI LUN, and you can use any of the following options to load the kernel:
• A host’s locally attached disk (for storing kernel and initrd images)• A Preboot Execution Environment (PXE) Server
• Hardware iSCSIIf the SAN boot LUN uses an iSCSI HBA, then, because the protocol stack runs on the HBA, it isready to communicate with the storage system and discover a LUN when it starts up.You can have both the boot device and root device on an iSCSI LUN.
Note: Not all operating systems supported by the Host Utilities work with iSCSI SAN boot LUNs.For example, Oracle VM does not support creating a SAN boot LUN that uses software iSCSI.
(Hardware iSCSI) Configuring SAN boot on Red HatEnterprise Linux
When you are running Red Hat Enterprise Linux, you can configure SAN boot LUN to use an iSCSIhardware initiator.
Steps
1. Create a LUN on the storage system and map it to the host. This will be the SAN boot LUN.
You should ensure that the SAN boot LUN is mapped, and multiple paths to the SAN boot LUNare available on the host. You should also ensure that the SAN boot LUN is visible to the hostduring the boot process.
2. Set the Initiator IP Settings and Initiator iSCSI Name in Host Adapter Settings.
3. Set the Primary and Alternate Target IP and iSCSI Name and Adapter Boot Mode to Manual iniSCSI Boot Settings.
For information, see your HBA vendor-specific documentation.
4. After making changes to the HBA BIOS, save and exit.
5. Reboot the host.
82 | Linux Host Utilities 6.1 Installation and Setup Guide
6. Install the operating system on the boot LUN and follow the installation prompts to complete theinstallation.
Note: You should specify Boot Option as linux mpath during the operating systeminstallation. When you specify linux mpath, you can see the multipath devices (/dev/mapper/mpathx) as installation devices.
(Software iSCSI) Configuring SAN boot on Red HatEnterprise Linux
You can configure SAN boot on a Red Hat Enterprise Linux host using software iSCSI.
Before you begin
Check the NetApp Interoperability Matrix.
Steps
1. When you initiate the installation, specify the Boot Option as linux mpath and press Enter.
2. Continue with the installation until you reach the storage configuration page. Click Advancedstorage configuration.
3. Select Add iSCSI target and click Add drive.
4. Enter the Target IP address and the iSCSI initiator name.
Note: You should ensure that you associate this IQN with the correct privileges on the storagecontroller.
5. On the storage controller, create an igroup with the initiator name that you provided in Step 4.
6. Create a LUN on the storage system on which you intend to create root partition, and map it tothe igroup.
7. Return to the host screen.
8. Click Add Target in the Configure iSCSI Parameters window.
When you add the target, the target portal is discovered.
Note: You should ensure that multiple target portals are discovered, because the Red Hatinstaller does not identify the iSCSI device as a multipathed device unless it has more than onepath.
9. To discover more target portals, repeat Step 2 through Step 8.
You should now see a multipathed iSCSI device listed in the drives section.
Note: If the iSCSI multipathed device is not listed, you should check the configuration.
10. Select a partitioning layout as Create custom layout and Click Next.
(iSCSI) SAN boot configuration for iSCSI hardware, software initiators | 83
You can now proceed with the installation process and enter choices until you reach theInstallation Summary page.
11. At the storage devices selection screen , select the iSCSI multipathed device from the list ofallowable drives where you want to install the root file system.
12. Create the root file system on the selected device and select the mount point as /.
13. Create a SWAP partition.
Note: You can create a SWAP partition on the same LUN that contains the root partition or ona different LUN.
If you are using the software suspend functionality, you should ensure that the SWAP partitionis on a local disk.
14. Create the /boot partition.
You can create a /boot partition on a locally attached disk or use a PXE server to load the kernelboot image.
15. Click Next and follow the installation prompts to complete the installation.
(Software iSCSI) Configuring SAN boot on SUSE LinuxEnterprise Server
You can configure a SAN boot LUN on SUSE Linux Enterprise Server. Doing this requires multiplesteps and close attention to the requirements in each step.
Before you begin
Verify that your system setup supports SAN boot LUNs. See the NetApp Interoperability Matrix.
Steps
1. Log in to the storage system console or the Web interface of the storage system.
2. When you initiate the installation, specify Boot Option as follows: linux withiscsi=1netsetup=1
3. In the iSCSI Initiator Overview page, select the Service tab and enter the Target IP address andthe iSCSI initiator name.
Note: You should ensure that you associate this IQN with the appropriate privileges on thestorage controller.
4. On the storage controller, create an igroup with the initiator name that you provided in theprevious step.
5. Create a LUN on the storage system on which you can create the root partition, and map it to theigroup.
84 | Linux Host Utilities 6.1 Installation and Setup Guide
6. Return to the host screen. Select the Connected Targets tab and click Add.
7. On the iSCSI Initiator Discovery page, perform the following steps:
a) Specify the IP address of the storage system.b) Specify the port. The default is 3260.c) Specify the credentials if you are using an authentication mechanism.d) Click Next.
8. In the list of storage systems that are discovered, click Connect for each one. You might alsohave to do this for the authentication credentials also.
Note: During the installation, you should enable only one path to the root LUN.
Click Next.
9. Verify that the value for Connected is true for all the targets and click Next.
The Connected Targets pane lists all the targets.
10. Set the Start-up mode to onboot by using the Toggle Start-up button, and click Finish.
11. In the Installation Settings page, select the Expert tab.
12. Click Partitioning.
13. Select the Create Custom Partition Setup option.
Note: You can view the list of local disks and LUNs.
14. Select the Custom Partitioning (for experts) option.
15. In the Expert Partitioner page, select the LUN where you want to install the root file system.
16. Create the root file system on the selected LUN and select the mount point as /.
17. Click the Fstab Options button.
18. Select the Mount by Device ID option.
19. Ensure that you have the _netdev, nofail keyword in the Arbitrary Option Value text box, andclick OK.
20. In the Create a Primary Partition page, click OK.
21. Create a SWAP partition.
Note: You can create a SWAP partition on the same LUN that contains the root partition or ona different LUN.
If you are using the software suspend functionality, you should ensure that the SWAP partitionis on a local disk.
22. Create the /boot partition.
(iSCSI) SAN boot configuration for iSCSI hardware, software initiators | 85
You can create a /boot partition on a locally attached disk or use a PXE server to load the kernelboot image.
23. After you return to the Expert Partitioner page, review the configuration. Click Finish.
24. In the Installation Settings page, click the Booting tab.
25. Select Default Label.
26. Click Edit.
27. For the Optional Kernel Command Line Parameter, ensure that all references to installerarguments are removed.
The parameter should look similar to the following:resume=/dev/sda1 splash=silent showopts
28. Click OK.
29. Click the Boot Loader Installation tab.
30. In the Boot Loader Location pane, select the Boot from Master Boot Record option.
Click Finish. Doing this returns you to the Installation Settings page.
31. Review the configuration settings and click Accept. The Confirm Installation page is displayed.
32. Click Install and follow the prompts to complete the installation.
(Software iSCSI) Configuring multipathing for a SAN bootLUN using SUSE Linux Enterprise Server
When you set up a SAN boot LUN for SUSE Linux Enterprise Server, you install the operatingsystem on a SCSI device. After you do that, you should set up multipathing. Multipathing must beconfigured on the root partition of the SAN boot LUN.
Before you begin
Verify that your system setup supports SAN boot LUNs. See the NetApp Interoperability Matrix.
Steps
1. Enable additional paths to the NetApp LUN (root LUN).
2. Use YaST2 to change the start-up mode for all the iSCSI sessions.
If you are using... Set the start-up mode to ...
SUSE Linux Enterprise Server 11 Onboot
SUSE Linux Enterprise Server 10 SP2 automatic
86 | Linux Host Utilities 6.1 Installation and Setup Guide
3. Modify the /etc/sysconfig/network/ifcfg x file so that the value of STARTMODE nowreads nfsroot .
4. Change the value of the session re-establishment timeout for iSCSI sessions fetching the SANboot LUN by entering the following command:
iscsiadm -m node -T targetname -p ip:port -o update -nnode.session.timeo.replacement_timeout -v 5
5. Create a new initrd image with the root partition on multipath enabled.
If you are using... Enter the command ...
SUSE Linux Enterprise Server 11 mkinitrd -f "iscsi multipath"
SUSE Linux Enterprise Server 10 series mkinitrd -f "iscsi mpath"
6. Change the start-up mode of the iSCSI sessions fetching the SAN boot LUN by entering thefollowing command:
iscsiadm -m node -T targetname -p ip:port -o update -n node.startup -vonboot
iscsiadm -m node -T targetname -p ip:port -o update -nnode.conn[0].startup -v onboot
7. Reboot the host.
The system boots with multipathing enabled on the root device. You can verify this by runningthe mount command and ensuring that the root partition is on a DM-Multipath device.
(iSCSI) SAN boot configuration for iSCSI hardware, software initiators | 87

(Veritas) Configuring SAN boot in a Veritasenvironment
You can set up a SAN boot LUN to work in a Veritas Storage Foundation environment.
Before you begin
Verify that SAN boot LUNs are supported with your version of Veritas Storage Foundation and yourLinux operating system. See the NetApp Interoperability Matrix.
About this task
When you are working in a Veritas Storage Foundation environment, the steps you need to performto set up a SAN boot LUN are essentially the same for both Red Hat Enterprise Linux and SUSELinux Enterprise Server.
Steps
1. Create a LUN on the storage system. This LUN will be the SAN boot LUN.
2. Map the LUN to the host.
3. Ensure that only one primary path is available to the LUN.
4. Ensure that only one SAN boot LUN is available to the host.
5. Enable the boot BIOS of the HBA port to which the SAN boot LUN is mapped.
Note: It is best to enable the spinup delay option for the HBA port.
For information about how to enable the boot BIOS, see the HBA vendor-specific documentation.
6. After performing the appropriate changes to the HBA BIOS and ensuring that the SAN boot LUNis visible, install the operating system on the SAN boot LUN.
Before installing the operating system, see the section on rootability in the Veritas VolumeManager Administrator’s Guide for Linux that is shipped along with the software for partitioninginformation.
Note: (Red Hat) The Red Hat Enterprise Linux 4 Update 4 distribution does not include HBAdrivers for 4-Gb and 8-Gb QLogic cards; therefore, you should use the device driver kitprovided by QLogic. For more information about the supported drivers, see the NetAppInteroperability Matrix.
Note: (SUSE) When you install the SUSE Linux Enterprise Server operating system, youshould ensure that GRUB is installed in the Master Boot Record. You can do this from theExpert tab in the software package selection screen during installation.
7. After installing the operating system, reboot the host.
88 | Linux Host Utilities 6.1 Installation and Setup Guide
The host boots from the SAN boot LUN on the storage system through a primary path.
8. Install the Linux Host Utilities.
9. If you are using HBA drivers acquired from an OEM, install the supported versions of the drivers.
10. Verify the HBA settings.
11. Install Veritas Storage Foundation and any appropriate patches or fixes for it.
12. Configure the vxdmp restore daemon by setting it to an interval of 60:
vxdmptune dmp_restore_interval 60
On reboot, this value takes effect and remains persistent across system reboots.
13. (Veritas Storage Foundation 5.1 and later) Set the Veritas DMP LUN retries tunable to a valueof 300:
vxdmpadm settune dmp_lun_retry_timeout=300
The new value takes effect immediately.
14. (Veritas Storage Foundation 5.1 SP1 and later) Set the value of the dmp_path_age to aninterval of 120 by entering the following command:
vxdmpadm settune dmp_path_age=120
The new value takes effect immediately.
15. Enable persistence by entering the following command:
vxddladm set namingscheme=osn persistence=yes
You must enable persistence before you can encapsulate the root disk.
16. Encapsulate the root disk for use in VxVM by entering the following command:
vxdiskadm
For the detailed steps, see the section on encapsulating the disk in the Veritas Volume ManagerAdministrator’s Guide for Linux that is shipped along with the software.
17. Reboot the host after encapsulation.
18. Verify the encapsulation by entering the following command:
vxprint
This command displays the rootvol and swapvol volumes under the corresponding disk group.
19. Configure the paths to the HBA boot BIOS as primary, secondary, tertiary, and so on, on the bootdevice.
For more information, see the respective HBA vendor-specific documentation.
(Veritas) Configuring SAN boot in a Veritas environment | 89
Support for host virtualization
The Host Utilities support virtualization, including such features as a Kernel-based Virtual Machine(KVM) and Oracle VM.
Server virtualization is a method of dividing computer resources into multiple, isolatedenvironments. In a virtual ecosystem, a host operating system runs one or more guest virtualmachines in a simulated environment. Each guest virtual machine (VM) has access to all of the host'shardware. You can configure guest VMs in full and paravirtualized modes.
KVM is a full virtualization solution for Linux on x86 hardware that contains virtualizationextensions (Intel VT or AMD-V). It consists of a loadable kernel module (kvm.ko) that provides thecore virtualization infrastructure and a processor-specific module (kvm-intel.ko or kvm-amd.ko).KVM is supported with Red Hat Enterprise Linux 5 Update 4 or later and Red Hat Enterprise Linux6.0 or later.
Note: KVM leverages the Linux kernel's infrastructure and extends it to serve as a full-fledgedhypervisor. Thus, any limitations that apply to the Linux kernel also apply to the KVM hypervisor.
Oracle VM is a server virtualization solution that consists of Oracle VM Server (OVS). This is a self-contained virtualization environment designed to provide a lightweight, secure, server-basedplatform for running virtual machines. OVS is based on an updated version of the underlying Xenhypervisor technology. Oracle VM Manager provides the user interface to manage OVS and guests.
Note: If you are using Oracle VM hypervisor, see the sections for configuring FC, iSCSI, andmultipathing. In this guide, sections that refer to Red Hat Enterprise Linux also apply to OracleLinux. Both operating systems use the same instructions for the tasks featured in this guide.
Paravirtualization support involves providing a paravirtualized network driver, a paravirtualizedblock I/O device (disk) driver, and a balloon driver to effect the operation of the guest virtualmemory manager and provide CPU optimization for Linux guests. Both KVM and Oracle VMprovide limited paravirtualization support for guest VMs.
Hypervisor VHD requires alignment for best performanceA virtual hard disk (VHD) is partitioned with a master boot record that is used by a Linux virtualmachine. It must be aligned with the underlying LUN for best performance.
If the data block boundaries of a disk partition do not align with the block boundaries of theunderlying LUN, the storage system often has to complete two block reads or writes for everyoperating system block read or write. The additional block reads and writes caused by themisalignment can lead to serious performance problems.
90 | Linux Host Utilities 6.1 Installation and Setup Guide
The misalignment is caused by the location of the starting sector for each partition defined by themaster boot record. Partitions created by Linux usually are not aligned with underlying NetAppLUNs.
A workaround for misaligned Linux guests is available at the NetApp Linux Community Programsite at http://linux.netapp.com/tools/fix-alignment.
Note: See technical report TR-3747 for best practices on configuring the aligned LUNs.
Related information
Technical report TR-3747
Support for host virtualization | 91
Supported Linux and Data ONTAP features
The Host Utilities support a number of features and configurations for Linux hosts and storagesystems running Data ONTAP.
Some of the supported features include
• SAN booting• The Linux Device Mapper Multipathing• Volume management and multipathing with Veritas Storage Foundation• Host and storage virtualization• ALUA
Note: Your specific environment can affect what the Host Utilities support.
Protocols and configurations supported by Host UtilitiesThe Host Utilities provide support for Fibre Channel, Fibre Channel over Ethernet (FCoE), andiSCSI connections to the storage system using direct-attached, fabric-attached, and Ethernet networkconfigurations.
These protocols enable the host to access data on storage systems. The storage systems are targetsthat have storage target devices called LUNs.
Protocols enable hosts to access LUNs to store and retrieve data.
For more information about using the protocols with your storage system, see the for your version ofData ONTAP.
For more details on supported topologies, including diagrams, see the SAN Configuration Guide(called Fibre Channel and iSCSI Configuration Guide in Data ONTAP 8.1 and earlier) for yourversion of Data ONTAP.
The sections that follow provide high-level information about these protocols.
The FC protocolThe FC protocol requires one or more supported host bus adapters (HBAs) in the host. Each HBAport is an initiator that uses FC to access the LUNs on the storage system. The HBA port is identifiedby a worldwide port name (WWPN).
You need to make a note of the WWPN so that you can supply it when you create an initiator group(igroup). To enable the host to access the LUNs on the storage system using the FC protocol, youmust create an igroup on the storage system and provide the WWPN as an identifier. Then, when youcreate the LUN, you map it to that igroup. This mapping enables the host to access that specificLUN.
92 | Linux Host Utilities 6.1 Installation and Setup Guide

The Linux Host Utilities support the FC protocol with fabric-attached SAN and direct-attachedconfigurations:
• Fabric-attached SANThe Host Utilities support two variations of fabric-attached SANs:
• A single-port FC connection from the HBA to the storage system through a single switchA host is cabled to a single FC switch that is connected by cable to redundant FC ports on ahigh-availability storage system. A fabric-attached single-path host has one HBA.
• A dual-port FC connection from the HBA to the storage system through dual switchesThe redundant configuration avoids the single point of failure of a single-switchconfiguration.
• Direct-attachedA single host with a direct FC connection from the host HBA to stand-alone or high-availabilitystorage system configurations.
Note: You should use redundant configurations with two FC switches for high availability inproduction environments. However, direct FC connections and switched configurations using asingle-zoned switch might be appropriate for less critical business applications.
The FCoE protocolFibre Channel over Ethernet (FCoE) is a new model for connecting hosts to storage systems. Like thetraditional FC protocol, FCoE maintains existing FC management and controls, but it uses a 10-gigabit Ethernet network as the hardware transport.
Setting up an FCoE connection requires one or more supported converged network adapters (CNAs)in the host, connected to a supported data center bridging (DCB) Ethernet switch. The CNA is aconsolidation point and effectively serves as both an HBA and an Ethernet adapter.
In general, you can configure and use FCoE connections the same way you use traditional FCconnections.
The iSCSI protocolThe iSCSI protocol is implemented on both the host and the storage system.
On the host, the iSCSI protocol is implemented over either the host’s standard Ethernet interfaces oran HBA.
On the storage system, the iSCSI protocol can be implemented over the storage system’s standardEthernet interface using one of the following:
• A software driver that is integrated into Data ONTAP.• (Data ONTAP 7.1 and later) An iSCSI target HBA or an iSCSI TCP/IP offload engine (TOE)
adapter.
The connection between the initiator and target uses a standard TCP/IP network. The storage systemlistens for iSCSI connections on TCP port 3260.
Supported Linux and Data ONTAP features | 93
You need to make a note of the iSCSI node name so that you can supply it when you create anigroup.
SAN bootingSAN booting is the general term for booting a Linux host from a storage system LUN instead of aninternal hard disk. SAN booting uses a SAN-attached disk, such as a LUN configured on a storagecontroller, as a boot device for a host.
Note: SAN booting is not supported with Oracle VM.
A SAN boot LUN provides the following advantages:
• No maintenance and servicing costs for hard drivesYou can remove the hard drives from your servers and use the SAN for booting needs.
• Consolidated and centralized storage, because the host uses the SAN• Lower cost
The hardware and operating costs are lowered.• Greater reliability
Systems without the disks are less prone to failure.• Quick server swaps
If a server fails, systems without the disks can be swapped.• Better disaster recovery
Site duplication is simplified.
For information about the configurations that are supported for SAN boot LUNs, see theInteroperability Matrix.
Support for Linux Device Mapper MultipathingYou can use Linux Device Mapper Multipathing (DM-Multipath) to provide I/O failover and pathload sharing for multipathed block devices.
The software module for DM-Multipath is included in the standard Red Hat Enterprise Linux andSUSE Linux Enterprise Server distributions. You should install additional user space packages aspart of the setup process.
For information on setting up DM-Multipath, see section DM-Multipath configuration.
Volume management and multipathing with Veritas Storage FoundationIf your environment uses Veritas Storage Foundation, you can use the tools it supplies to work withLUNs and provide multipathing. These tools include Veritas Volume Manager (VxVM) andDynamic Multipathing (VxDMP).
With VxVM, you can manage the LUNs that you create on the storage systems. You can useVxDMP to provide the multipathing solution for your system.
For more information about Veritas Volume Manager, see the Veritas Volume ManagerAdministrator’s Guide for Linux that is shipped along with the software.
94 | Linux Host Utilities 6.1 Installation and Setup Guide
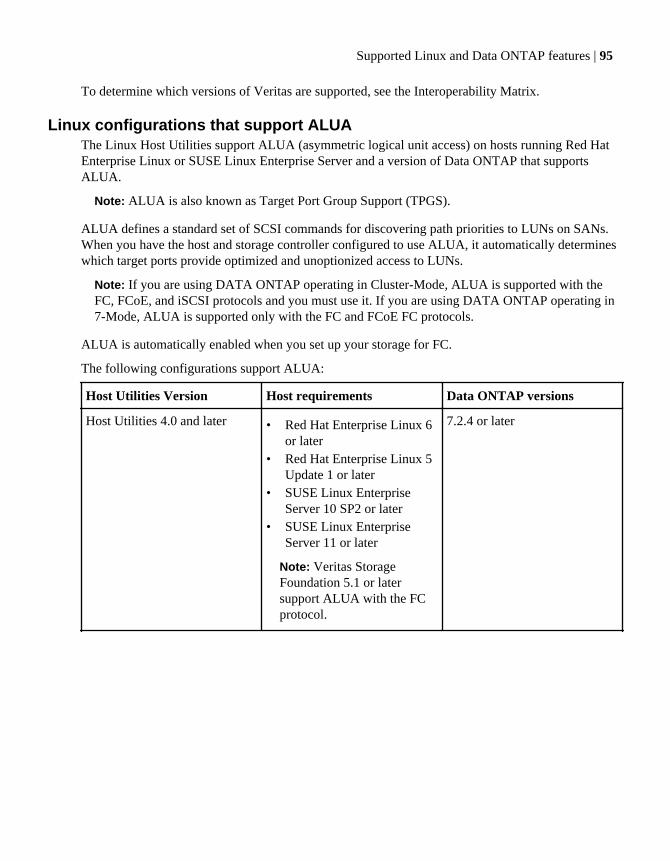
To determine which versions of Veritas are supported, see the Interoperability Matrix.
Linux configurations that support ALUAThe Linux Host Utilities support ALUA (asymmetric logical unit access) on hosts running Red HatEnterprise Linux or SUSE Linux Enterprise Server and a version of Data ONTAP that supportsALUA.
Note: ALUA is also known as Target Port Group Support (TPGS).
ALUA defines a standard set of SCSI commands for discovering path priorities to LUNs on SANs.When you have the host and storage controller configured to use ALUA, it automatically determineswhich target ports provide optimized and unoptionized access to LUNs.
Note: If you are using DATA ONTAP operating in Cluster-Mode, ALUA is supported with theFC, FCoE, and iSCSI protocols and you must use it. If you are using DATA ONTAP operating in7-Mode, ALUA is supported only with the FC and FCoE FC protocols.
ALUA is automatically enabled when you set up your storage for FC.
The following configurations support ALUA:
Host Utilities Version Host requirements Data ONTAP versions
Host Utilities 4.0 and later • Red Hat Enterprise Linux 6or later
• Red Hat Enterprise Linux 5Update 1 or later
• SUSE Linux EnterpriseServer 10 SP2 or later
• SUSE Linux EnterpriseServer 11 or later
Note: Veritas StorageFoundation 5.1 or latersupport ALUA with the FCprotocol.
7.2.4 or later
Supported Linux and Data ONTAP features | 95

Troubleshooting
If you encounter problems while running the Host Utilities on FC, iSCSI, or Veritas StorageFoundation, you can check the sections that follow for troubleshooting tips.
LUNs not recognized by DM-MultipathLUNs are mapped to the Linux host and are correctly reported by the sanlun lun show allcommand. However, the LUNs are not reported by the multipath -ll command. Check to makesure the LUNs are not blacklisted (excluded) from the DM-Multipath support configuration inthe /etc/multipath.conf file.
Enter the following command on the Linux host to display the devices that are blacklisted:
multipath -v3 -d | grep blacklist
If any devices show up as being blacklisted, check the devnode_blacklist or blacklist section ofthe /etc/multipath.conf file. Ensure that all the entries are correctly specified.
If the devices are not blacklisted, but are still not recognized by the multipath command,regenerate the multipath maps by entering the following command:
multipath -v3
For more information, see bug number 228744 on Bugs Online, which is available on the NetAppSupport Site.
(FC) LUNs not visible on the Linux hostFC LUNs appear as local disks to the host. If the storage system LUNs are not available as disks onthe hosts, try rescanning the HBAs by reloading the drivers. If the LUNs still do not appear, verifythe configuration settings.
Configuration settings What you should do
Driver version Verify that the version of the external HBA driver you arerunning is supported. You can check the up-to-date systemrequirements in the NetApp Interoperability Matrix.
Cabling Verify that the cables between the host and the storage systemare properly connected.
Zoning Verify that the zoning is correct.
HBA Setting Verify the recommended HBA settings.
96 | Linux Host Utilities 6.1 Installation and Setup Guide
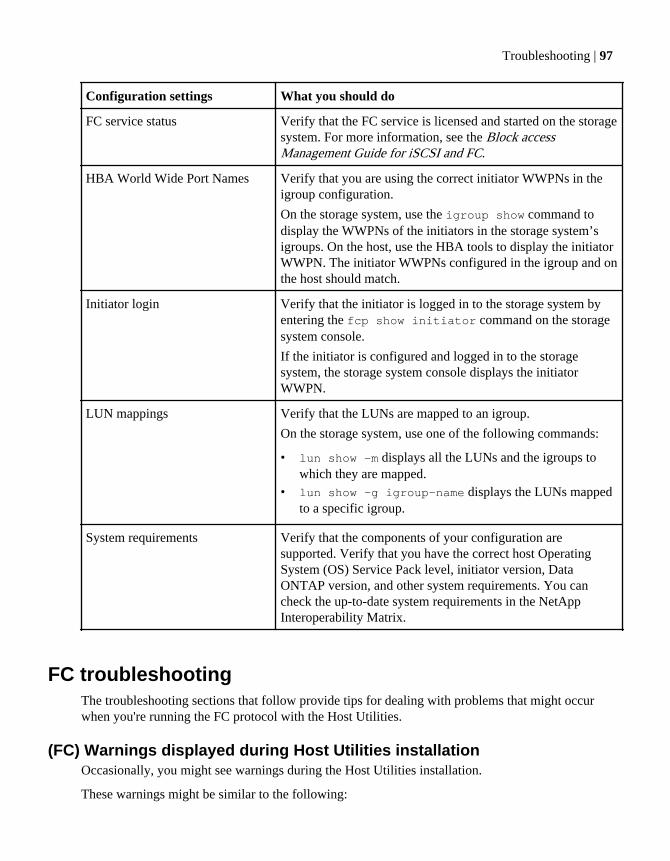
Configuration settings What you should do
FC service status Verify that the FC service is licensed and started on the storagesystem. For more information, see the Block accessManagement Guide for iSCSI and FC.
HBA World Wide Port Names Verify that you are using the correct initiator WWPNs in theigroup configuration.
On the storage system, use the igroup show command todisplay the WWPNs of the initiators in the storage system’sigroups. On the host, use the HBA tools to display the initiatorWWPN. The initiator WWPNs configured in the igroup and onthe host should match.
Initiator login Verify that the initiator is logged in to the storage system byentering the fcp show initiator command on the storagesystem console.
If the initiator is configured and logged in to the storagesystem, the storage system console displays the initiatorWWPN.
LUN mappings Verify that the LUNs are mapped to an igroup.
On the storage system, use one of the following commands:
• lun show -m displays all the LUNs and the igroups towhich they are mapped.
• lun show -g igroup-name displays the LUNs mappedto a specific igroup.
System requirements Verify that the components of your configuration aresupported. Verify that you have the correct host OperatingSystem (OS) Service Pack level, initiator version, DataONTAP version, and other system requirements. You cancheck the up-to-date system requirements in the NetAppInteroperability Matrix.
FC troubleshootingThe troubleshooting sections that follow provide tips for dealing with problems that might occurwhen you're running the FC protocol with the Host Utilities.
(FC) Warnings displayed during Host Utilities installationOccasionally, you might see warnings during the Host Utilities installation.
These warnings might be similar to the following:
Troubleshooting | 97
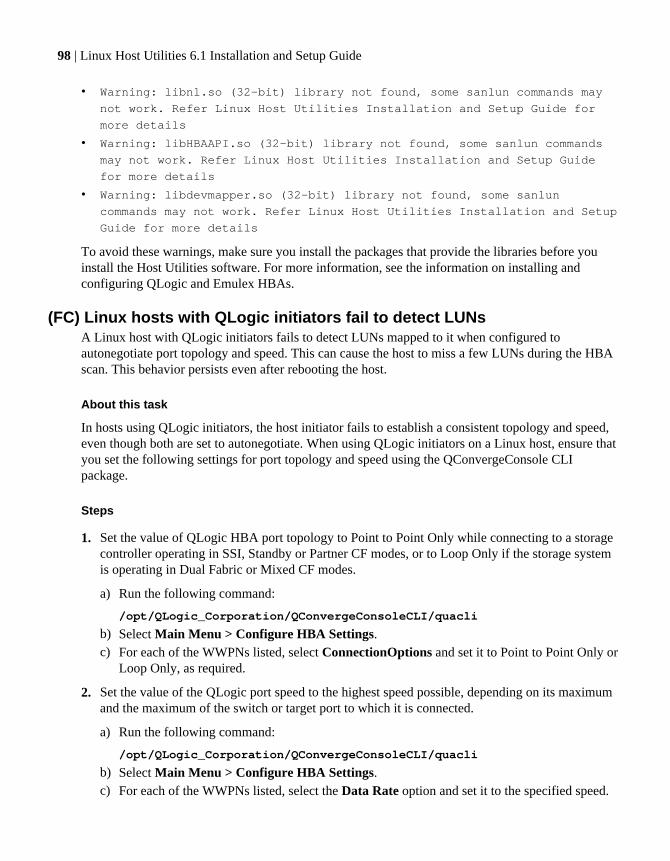
• Warning: libnl.so (32-bit) library not found, some sanlun commands may
not work. Refer Linux Host Utilities Installation and Setup Guide for
more details
• Warning: libHBAAPI.so (32-bit) library not found, some sanlun commands
may not work. Refer Linux Host Utilities Installation and Setup Guide
for more details
• Warning: libdevmapper.so (32-bit) library not found, some sanlun
commands may not work. Refer Linux Host Utilities Installation and Setup
Guide for more details
To avoid these warnings, make sure you install the packages that provide the libraries before youinstall the Host Utilities software. For more information, see the information on installing andconfiguring QLogic and Emulex HBAs.
(FC) Linux hosts with QLogic initiators fail to detect LUNsA Linux host with QLogic initiators fails to detect LUNs mapped to it when configured toautonegotiate port topology and speed. This can cause the host to miss a few LUNs during the HBAscan. This behavior persists even after rebooting the host.
About this task
In hosts using QLogic initiators, the host initiator fails to establish a consistent topology and speed,even though both are set to autonegotiate. When using QLogic initiators on a Linux host, ensure thatyou set the following settings for port topology and speed using the QConvergeConsole CLIpackage.
Steps
1. Set the value of QLogic HBA port topology to Point to Point Only while connecting to a storagecontroller operating in SSI, Standby or Partner CF modes, or to Loop Only if the storage systemis operating in Dual Fabric or Mixed CF modes.
a) Run the following command:
/opt/QLogic_Corporation/QConvergeConsoleCLI/quacli
b) Select Main Menu > Configure HBA Settings.c) For each of the WWPNs listed, select ConnectionOptions and set it to Point to Point Only or
Loop Only, as required.
2. Set the value of the QLogic port speed to the highest speed possible, depending on its maximumand the maximum of the switch or target port to which it is connected.
a) Run the following command:
/opt/QLogic_Corporation/QConvergeConsoleCLI/quacli
b) Select Main Menu > Configure HBA Settings.c) For each of the WWPNs listed, select the Data Rate option and set it to the specified speed.
98 | Linux Host Utilities 6.1 Installation and Setup Guide
(FC) The SAN booted root on a DM-Multipath host freezes during FC pathfaults
The SAN booted root on a DM-Multipath host triggers a freeze during FC path faults on Red HatEnterprise Linux 5 Update 1.
For SAN boot support on Red Hat Enterprise Linux 5 Update 1, you have to download theappropriate errata multipathing package from the Red Hat Network Web site. For more information,see NetApp Interoperability Matrix.
(FC) Poor performance due to misalignment of partitioned LUNsIf you experience poor performance on some or all FC LUNs that have partitions, it might be due toan alignment mismatch between the LUN block boundaries and the underlying WAFL boundaries.
This problem occurs only with partitions and only with certain combinations of disk geometryparameters.
You can resolve the issue by using the fdisk command to manually enter the disk geometryparameters when creating partitions. For specific steps, see bug number 156121 on Bugs Online,which is available on the NetApp Support Site..
(FC) sanlun command displays error when HBA libHBAAPI.so is missingThe sanlun command uses the HBAAPI software provided by both the host operating system andthe HBA vendor's API plugins to gather information about the HBAs, including their WWPNs. Ifthis software is not available, the sanlun command returns an error message.
Error messages similar to the following indicate that the operating system's libHBAAPI library is notinstalled:
• Unable to locate /usr/lib/libHBAAPI.so library
• Unable to locate /usr/lib64/libHBAAPI.so library
Error messages similar to the following indicate that the HBA vendor API plug-in is not installed:
• No supported adapters are present
• Unable to load HBA control library
To avoid this problem, make sure you have the correct management software package for your HBAand host architecture installed:
• For QLogic HBAS, install the QLogic QConvergeConsole CLI package.• For Emulex HBAs, install the Emulex OneCommand Manager core application (CLI) package.
Note: If you are using a different HBA that is supported by the Host Utilities, you must install themanagement software for that HBA.
These packages are available from the HBA vendor.
Troubleshooting | 99
(FC) LUNs are unavailable after a storage system failover or givebackThe host requires specific driver, HBA, and FC switch zoning settings to maintain LUN accessacross a storage system takeover, giveback, and reboot. You should confirm that you have set therequired driver and HBA settings. Also, verify that you have correctly zoned your FC switches.
For multipath LUNs, you can restore access to the LUNs by restarting the multipathing daemon andupdating the multipathing maps by running the following commands:
• /etc/init.d/multipathd restart
• multipath -v3
(FC) SCSI rescan issues on SUSE Linux Enterprise Server hostsOn a SUSE Linux Enterprise Server host connected to a storage controller, the presence of dummyLUNs causes issues during a SCSI rescan. This issue is not yet resolved in SUSE Linux EnterpriseServer 9 and SUSE Linux Enterprise Server 10.
Dummy LUNs are those that show up as "UNKNOWN" in /proc/scsi/scsi/ even when noLUNs are mapped to the host. These LUNs have a generic device node (/dev/sg* entry), but nocorresponding disk node (/dev/sd* entry). Due to these dummy LUNs, subsequent SCSI rescans onthe host fail to recognize newly added LUNs, unless preceded by a write to the sysfs delete attributeof the dummy LUN.
Warning messages displayed when using LVM with multipathing softwareWhen you LVM in a multipathing environment, it displays a warning message.
In a default configuration, LVM scans all attached disks and identifies the disks that contain physicalvolumes. In environments that use multipathing software, each path to a particular LUN is registeredas a different SCSI device. LVM detects this and chooses one of the devices. LVM then displays awarning message.
To avoid this problem, you should modify the paths to the preferred_names parameter inthe/etc/lvm/lvm.conf file.
The following is an example of a how the preferred_names parameter line should look:
preferred_names = [ "^/dev/mapper/*" ]
After you make the change, perform a rescan (pvscan and vgscan) to ensure all devices areproperly displayed.
100 | Linux Host Utilities 6.1 Installation and Setup Guide
iSCSI troubleshootingSometimes you might encounter a problem while running iSCSI. The sections that follow providetips for resolving any issues that might occur.
(iSCSI) LVM devices are not automatically mounted during system boot onSUSE Linux Enterprise Server 11
Currently, the volume groups created on iSCSI devices are not automatically scanned when iSCSILUNs are discovered. Therefore, during the system boot, the volume groups that were created on theiSCSI devices are unavailable.
To overcome this problem, manually mount the logical volumes by using the following command:
/sbin/mount -a
(iSCSI) LVM devices are not automatically mounted during system boot onSUSE Linux Enterprise Server 10
Currently, the volume groups created on iSCSI devices are not automatically scanned when iSCSILUNs are discovered. Therefore, during the system boot, the volume groups that were created on theiSCSI devices are unavailable. To overcome this problem, a helper script is provided in /usr/share/doc/packages/lvm2/ lvm-vg-to-udev-rules.sh.
You can use this script to generate udev rules for iSCSI Logical Volume Manager (LVM) devices,which can be automatically mounted during system boot.
Example:
• Run the script /bin/bash /usr/share/doc/packages/lvm2/lvm-vg-to-udev-rules.sh/dev/vgname/lvname. lvname is the name of the logical volume that is created ontop of volume group vgname.
• Add the generated rules to the /etc/udev/rules.d/85-mount-fstab-lvm.rules file.
After completing the preceding steps for each logical volumes, the logical volumes can beautomatically mounted by adding entries in /etc/fstab.
Multipathd occasionally fails to update the path status of DM-Multipathdevices
Occasionally, multipathd does not update the path status of DM-Multipath devices after running I/Ofaults.
Set both HOTPLUG_USE_HWSCAN and HOTPLUG_USE_SUBFS to no in the /etc/sysconfig/hotplug file.
Multipathd fails occasionally because it fails to start "event checker" for some of the DM-Multipathdevices. Because of this failure, multipathd is unable to keep track of the path up or down status forthose devices.
Troubleshooting | 101

(iSCSI) Poor performance due to misalignment of partitioned LUNsIf you experience poor performance on some or all LUNs that have partitions, the alignment betweenthe LUN block boundaries and the underlying WAFL boundaries might not match. Manually enterthe disk geometry parameters when creating partitions with the fdisk command.
This problem occurs only with partitions and certain combinations of disk geometry parameters. Formore details, see bug number 156121 on Bugs Online, which is available on the NetApp SupportSite.
Modify the filter in the /etc/lvm/lvm.conf file to scan only the multipath device and not theSCSI device underneath: filter = [ "r|/dev/sd*|", "r|/dev/disk/.*|", "r|/dev/block/.*|", "a/.*/" ]
iSCSI: LUNs not visible on the Linux hostiSCSI LUNs appear as local disks to the host. If the storage system LUNs are not available as diskson the hosts, verify the configuration settings.
Configuration setting What you should do
Cabling Verify that the cables between the host and the storage systemare properly connected.
Network connectivity Verify that there is TCP/IP connectivity between the host andthe storage system. From the storage system command line:
• Ping the host interfaces that are used for iSCSI.• Ping the storage system interfaces that are used for iSCSI.
iSCSI service status Verify that the iSCSI service is licensed and started on thestorage system. For more information, see the Block AccessManagement Guide for iSCSI and FC.
Initiator login Verify that the initiator is logged in to the storage system byentering the iscsi show initiator command on thestorage system console.
If the initiator is configured and logged in to the storage system,the storage system console displays the initiator node name andthe target portal group to which it is connected.
If the command output shows that no initiators are logged in,check the initiator configuration on the host. Verify that thestorage system is configured as a target of the initiator.
102 | Linux Host Utilities 6.1 Installation and Setup Guide
Configuration setting What you should do
iSCSI node names Verify that you are using the correct initiator node names in theigroup configuration.
On the storage system, use the igroup show command todisplay the node name of the initiators in the storage system’sigroups. On the host, use the initiator tools and commands todisplay the initiator node name. The initiator node namesconfigured in the igroup and on the host should match.
LUN mappings Verify that the LUNs are mapped to an igroup.
On the storage system, use one of the following commands:
• lun show -m displays all the LUNs and the igroups towhich they are mapped.
• lun show -g igroup-name displays the LUNs mappedto a specific igroup.
System requirements Verify that the components of your configuration are supported.Verify that you have the correct host Operating System (OS)Service Pack level, initiator version, Data ONTAP version, andother system requirements. You can check the up-to-datesystem requirements in the NetApp Interoperability Matrix.
Jumbo frames If you are using jumbo frames in your configuration, ensure thatthe jumbo frames are enabled on all the devices in the networkpath: the host Ethernet NIC, the storage system, and anyswitches.
Firewall settings Verify that the iSCSI port (3260) is open in the firewall rule.
Veritas Storage Foundation troubleshootingSometimes you might encounter a problem while running Veritas Storage Foundation with the HostUtilities. The sections that follow provide tips for resolving any issues that might occur.
(Veritas) Error while stopping the fencing driverYou might get an error when you stop the fencing driver.
Steps
1. Stop the Veritas cluster service by using hastop on all the nodes.
2. Try stopping the fencing driver again.
3. If the fencing driver does not stop, remove the name of the coordinator diskgroup from /etc/vxfendg.
Troubleshooting | 103

4. In the /etc/vxfenmode file, make the following change:
vxfen_mode=disabled
5. Stop the fencing driver by using the following command:
/etc/init.d/vxfen stop
Note: It is best to halt all the nodes except the last one in the cluster.
(Veritas) Secondary paths identified incorrectlySecondary paths are identified incorrectly as primary paths while configuring VxDMP. In such ascenario, you should verify that the ASL for the storage system was installed correctly and that noerror messages occurred during installation.
(Veritas) Enclosure-based naming not reflected on NetApp storageThe VxVM enclosure-based naming feature is enabled, but the VxDMP devices do not contain astorage model string. In such a scenario, verify that the ASL for the storage system was installedcorrectly and that no error messages occurred during installation.
(Veritas) Setting up a LUN for SAN booting failsThe process to set up a LUN for SAN booting fails if you have multiple paths configured to the bootLUN before installing the operating system. You should verify that the host can see only one path tothe LUN.
(Veritas) Encapsulation of the root disk failsEncapsulation of the root disk fails after SAN boot installation. Ensure that you follow therecommended partitioning scheme.
For more information on partitioning scheme, see the Veritas Volume Manager Administrator’sGuide.
Installing the nSANity data collection programDownload and install the nSANity Diagnostic and Configuration Data Collectorprogram when instructed to do so by your technical support representative.
Before you begin
The nSANity program replaces the diagnostic programs included in previous versions of the HostUtilities. The nSANity program runs on a Windows or Linux system with network connectivity tothe component from which you want to collect data.
Steps
1. Log in to the NetApp Support Site and search for "nSANity".
104 | Linux Host Utilities 6.1 Installation and Setup Guide

2. Follow the instructions to download the Windows zip or Linux tgz version of the nSANityprogram, depending on the workstation or server you want to run it on.
3. Change to the directory to which you downloaded the zip or tgz file.
4. Extract all of the files and follow the instructions in the README.txt file. Also be sure to reviewthe RELEASE_NOTES.txt file for any warnings and notices.
After you finish
Run the specific nSANity commands specified by your technical support representative.
Troubleshooting | 105
Sample configuration files for Red Hat EnterpriseLinux 6
All versions of Red Hat Enterprise Linux 6 series use a DM-Multipath configuration file, but theremight be slight variations in the file based on which Red Hat update you have installed.
You can use the sample Red Hat Enterprise Linux 6 series configuration files shown here to createyour own multipath.conf file. When you create your file, keep the following in mind:
Red Hat Enterprise Linux 6 series notes Explanation
Blacklist section You must provide information on your systemin the blacklist section.
Any names shown in the sample files areexamples and will not work with your system.
Blacklisting the local device If you want to blacklist the local disk, you mustput the WWID of the local disk in the blacklistsection.
You do not need to add other devnode linesbecause DM-Multipath adds them by default.
SAN boot LUNs and theuser_friendly_names parameter
NetApp recommends that you set theuser_friendly_names parameter to no.There have been reports of problems when thisparameter is set to yes.
Red Hat Enterprise Linux 6 series, SAN boot LUNs, and user_friendly_namesparameter
When you create a SAN boot LUN, the installer sets the user_friendly_names parameter to yesby default. NetApp recommends that you set the user_friendly_names parameter to no. Therehave been reports of problems when this parameter is set to yes.
If you create a SAN boot LUN and the installer sets the user_friendly_names parameter to yes,you must perform the following steps.
1. Change the user_friendly_names parameter to no.
2. Make a backup of initrd-image.
3. Re-create the initrd-image using the command mkinitrd.Red Hat Enterprise Linux 6 series and later use either the command
mkinitrd -f /boot/ initramfs-"`uname -r`".img `uname -r`
or the command
106 | Linux Host Utilities 6.1 Installation and Setup Guide

dracut -f
4. Change the root dm-multipath device name to the WWID-based device name in all the locationsthat refer to the device, such as /etc/fstab and /boot/grub/device.map.
5. Reboot the host.
For example, suppose the name of the root device is /dev/mapper/mpatha and the WWID of thedevice is 360a98000486e2f66426f583133796572. You must recreate the initrd-image.Then you mustchange the device name to /dev/mapper/360a98000486e2f66426f583133796572 in /etc/fstab and /boot/grub/device.map and any other place that that refers to device /dev/mapper/mpatha. After that, reboot the host.
Red Hat Enterprise Linux 6 with ALUA enabled sample configuration file
The following file provides an example of the values you need to supply when your host is runningRed Hat Enterprise Linux 6 with ALUA enabled.
Remember: If you use the blacklist section, you must replace the sample information withinformation for your system.
defaults { user_friendly_names no max_fds max flush_on_last_del yes queue_without_daemon no}# All data under blacklist must be specific to your system.blacklist {devnode "^hd[a-z]"devnode "^(ram|raw|loop|fd|md|dm-|sr|scd|st)[0-9]*"devnode "^cciss.*"}devices { device { vendor "NETAPP" product "LUN" path_grouping_policy group_by_prio features "3 queue_if_no_path pg_init_retries 50" prio "alua" path_checker tur failback immediate path_selector "round-robin 0" hardware_handler "1 alua" rr_weight uniform rr_min_io 128 getuid_callout "/lib/udev/scsi_id -g -u -d /dev/%n"
Sample configuration files for Red Hat Enterprise Linux 6 | 107
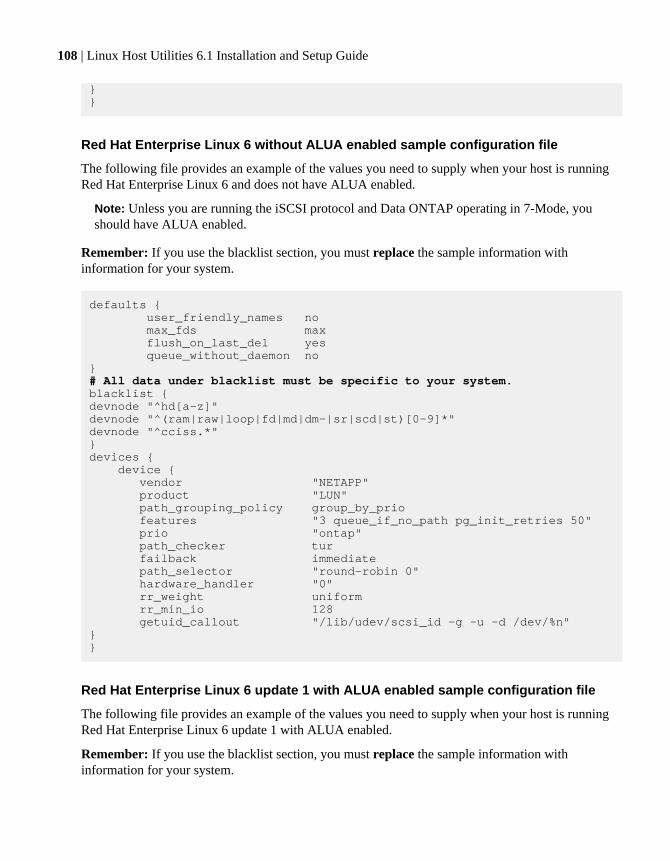
}}
Red Hat Enterprise Linux 6 without ALUA enabled sample configuration file
The following file provides an example of the values you need to supply when your host is runningRed Hat Enterprise Linux 6 and does not have ALUA enabled.
Note: Unless you are running the iSCSI protocol and Data ONTAP operating in 7-Mode, youshould have ALUA enabled.
Remember: If you use the blacklist section, you must replace the sample information withinformation for your system.
defaults { user_friendly_names no max_fds max flush_on_last_del yes queue_without_daemon no}# All data under blacklist must be specific to your system.blacklist {devnode "^hd[a-z]"devnode "^(ram|raw|loop|fd|md|dm-|sr|scd|st)[0-9]*"devnode "^cciss.*"}devices { device { vendor "NETAPP" product "LUN" path_grouping_policy group_by_prio features "3 queue_if_no_path pg_init_retries 50" prio "ontap" path_checker tur failback immediate path_selector "round-robin 0" hardware_handler "0" rr_weight uniform rr_min_io 128 getuid_callout "/lib/udev/scsi_id -g -u -d /dev/%n"}}
Red Hat Enterprise Linux 6 update 1 with ALUA enabled sample configuration file
The following file provides an example of the values you need to supply when your host is runningRed Hat Enterprise Linux 6 update 1 with ALUA enabled.
Remember: If you use the blacklist section, you must replace the sample information withinformation for your system.
108 | Linux Host Utilities 6.1 Installation and Setup Guide
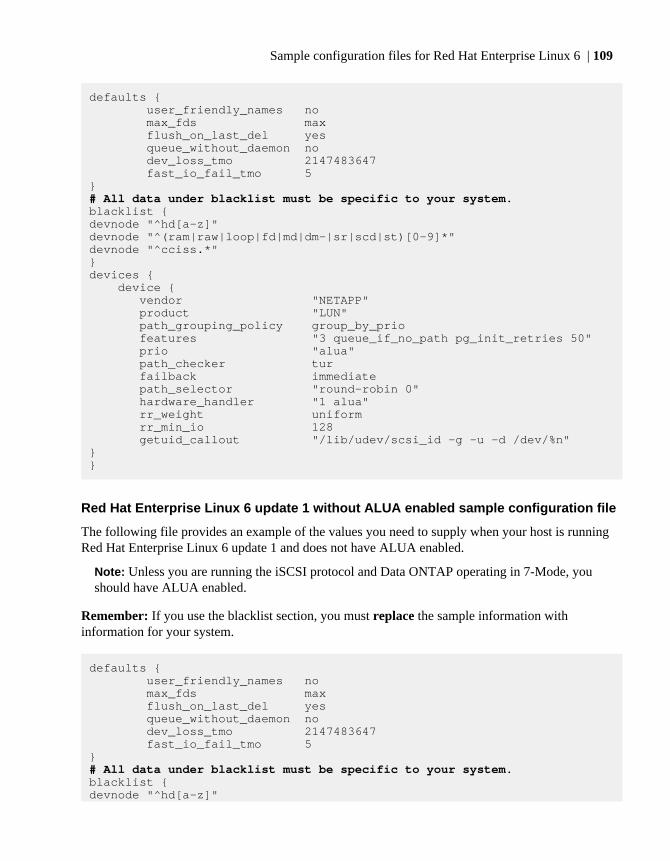
defaults { user_friendly_names no max_fds max flush_on_last_del yes queue_without_daemon no dev_loss_tmo 2147483647 fast_io_fail_tmo 5}# All data under blacklist must be specific to your system.blacklist {devnode "^hd[a-z]"devnode "^(ram|raw|loop|fd|md|dm-|sr|scd|st)[0-9]*"devnode "^cciss.*"}devices { device { vendor "NETAPP" product "LUN" path_grouping_policy group_by_prio features "3 queue_if_no_path pg_init_retries 50" prio "alua" path_checker tur failback immediate path_selector "round-robin 0" hardware_handler "1 alua" rr_weight uniform rr_min_io 128 getuid_callout "/lib/udev/scsi_id -g -u -d /dev/%n"}}
Red Hat Enterprise Linux 6 update 1 without ALUA enabled sample configuration file
The following file provides an example of the values you need to supply when your host is runningRed Hat Enterprise Linux 6 update 1 and does not have ALUA enabled.
Note: Unless you are running the iSCSI protocol and Data ONTAP operating in 7-Mode, youshould have ALUA enabled.
Remember: If you use the blacklist section, you must replace the sample information withinformation for your system.
defaults { user_friendly_names no max_fds max flush_on_last_del yes queue_without_daemon no dev_loss_tmo 2147483647 fast_io_fail_tmo 5}# All data under blacklist must be specific to your system.blacklist {devnode "^hd[a-z]"
Sample configuration files for Red Hat Enterprise Linux 6 | 109
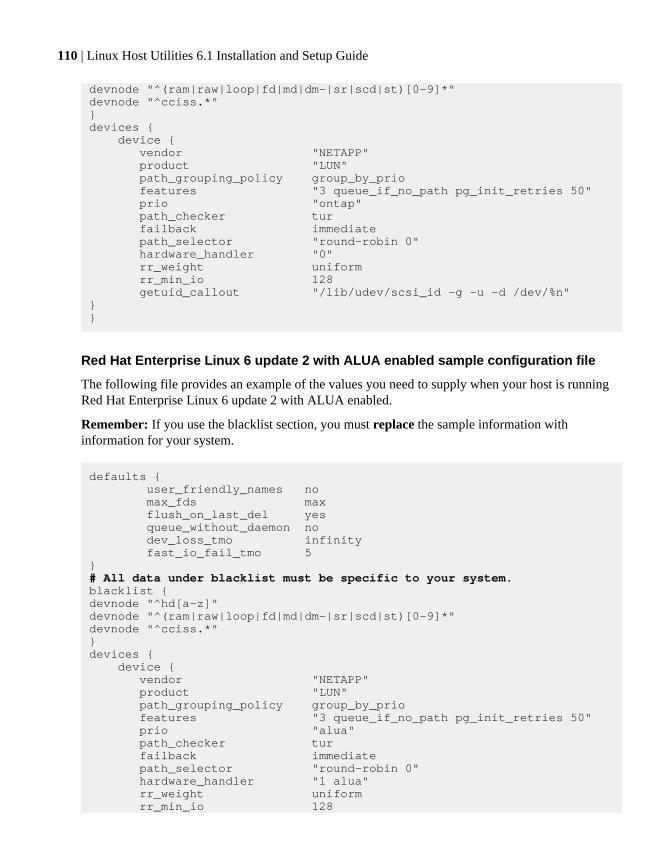
devnode "^(ram|raw|loop|fd|md|dm-|sr|scd|st)[0-9]*"devnode "^cciss.*"}devices { device { vendor "NETAPP" product "LUN" path_grouping_policy group_by_prio features "3 queue_if_no_path pg_init_retries 50" prio "ontap" path_checker tur failback immediate path_selector "round-robin 0" hardware_handler "0" rr_weight uniform rr_min_io 128 getuid_callout "/lib/udev/scsi_id -g -u -d /dev/%n"}}
Red Hat Enterprise Linux 6 update 2 with ALUA enabled sample configuration file
The following file provides an example of the values you need to supply when your host is runningRed Hat Enterprise Linux 6 update 2 with ALUA enabled.
Remember: If you use the blacklist section, you must replace the sample information withinformation for your system.
defaults { user_friendly_names no max_fds max flush_on_last_del yes queue_without_daemon no dev_loss_tmo infinity fast_io_fail_tmo 5}# All data under blacklist must be specific to your system. blacklist {devnode "^hd[a-z]"devnode "^(ram|raw|loop|fd|md|dm-|sr|scd|st)[0-9]*"devnode "^cciss.*"}devices { device { vendor "NETAPP" product "LUN" path_grouping_policy group_by_prio features "3 queue_if_no_path pg_init_retries 50" prio "alua" path_checker tur failback immediate path_selector "round-robin 0" hardware_handler "1 alua" rr_weight uniform rr_min_io 128
110 | Linux Host Utilities 6.1 Installation and Setup Guide
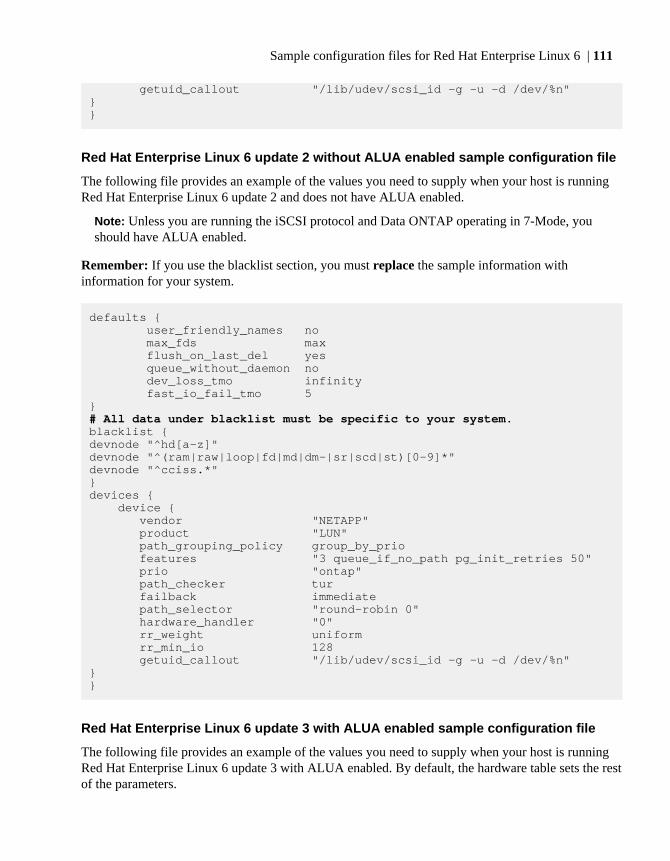
getuid_callout "/lib/udev/scsi_id -g -u -d /dev/%n"}}
Red Hat Enterprise Linux 6 update 2 without ALUA enabled sample configuration file
The following file provides an example of the values you need to supply when your host is runningRed Hat Enterprise Linux 6 update 2 and does not have ALUA enabled.
Note: Unless you are running the iSCSI protocol and Data ONTAP operating in 7-Mode, youshould have ALUA enabled.
Remember: If you use the blacklist section, you must replace the sample information withinformation for your system.
defaults { user_friendly_names no max_fds max flush_on_last_del yes queue_without_daemon no dev_loss_tmo infinity fast_io_fail_tmo 5}# All data under blacklist must be specific to your system.blacklist {devnode "^hd[a-z]"devnode "^(ram|raw|loop|fd|md|dm-|sr|scd|st)[0-9]*"devnode "^cciss.*"}devices { device { vendor "NETAPP" product "LUN" path_grouping_policy group_by_prio features "3 queue_if_no_path pg_init_retries 50" prio "ontap" path_checker tur failback immediate path_selector "round-robin 0" hardware_handler "0" rr_weight uniform rr_min_io 128 getuid_callout "/lib/udev/scsi_id -g -u -d /dev/%n"}}
Red Hat Enterprise Linux 6 update 3 with ALUA enabled sample configuration file
The following file provides an example of the values you need to supply when your host is runningRed Hat Enterprise Linux 6 update 3 with ALUA enabled. By default, the hardware table sets the restof the parameters.
Sample configuration files for Red Hat Enterprise Linux 6 | 111
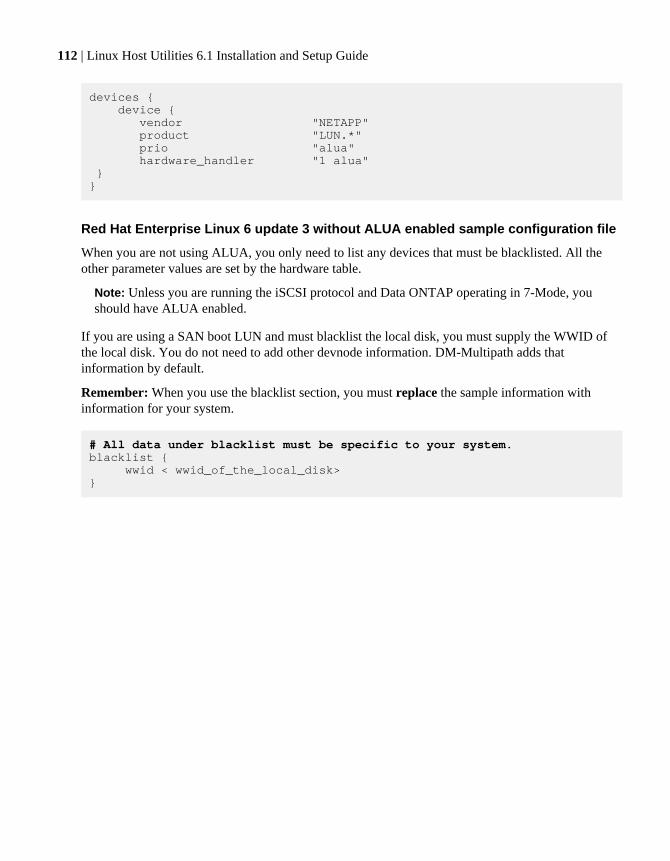
devices { device { vendor "NETAPP" product "LUN.*" prio "alua" hardware_handler "1 alua" }}
Red Hat Enterprise Linux 6 update 3 without ALUA enabled sample configuration file
When you are not using ALUA, you only need to list any devices that must be blacklisted. All theother parameter values are set by the hardware table.
Note: Unless you are running the iSCSI protocol and Data ONTAP operating in 7-Mode, youshould have ALUA enabled.
If you are using a SAN boot LUN and must blacklist the local disk, you must supply the WWID ofthe local disk. You do not need to add other devnode information. DM-Multipath adds thatinformation by default.
Remember: When you use the blacklist section, you must replace the sample information withinformation for your system.
# All data under blacklist must be specific to your system.blacklist { wwid < wwid_of_the_local_disk>}
112 | Linux Host Utilities 6.1 Installation and Setup Guide

Sample configuration file for Red Hat EnterpriseLinux 5
All versions of Red Hat Enterprise Linux 5 series use a DM-Multipath configuration file, but theremight be slight variations in the file based on which Red Hat update you have installed. You canreplace your current file with this sample file and change the values to ones that are appropriate foryour system.
You can use the sample Red Hat Enterprise Linux 5 series configuration files shown here to createyour own multipath.conf file. When you create your file, keep the following in mind:
Red Hat Enterprise Linux 5 series notes Explanation
Blacklist section You must provide information on your systemin the blacklist section.
Any names shown in the sample files areexamples and will not work with your system.
SAN boot LUNs and theuser_friendly_names parameter
NetApp recommends that you set theuser_friendly_names parameter to no.There have been reports of problems when thisparameter is set to yes.
Red Hat Enterprise Linux 5 prior to Update 6 If you are using a version of Red Hat EnterpriseLinux 5 series prior to update 6, check theRecommended Host Settings for Linux HostUtilities to see if there are any parameter valuesspecific to that version.
Red Hat Enterprise Linux 5 series, SAN boot LUNs, and user_friendly_namesparameter
When you create a SAN boot LUN, the installer sets the user_friendly_names parameter to yesby default. NetApp recommends that you set the user_friendly_names parameter to no. Therehave been reports of problems when this parameter is set to yes.
If you create a SAN boot LUN and the installer sets the user_friendly_names parameter to yes,you must perform the following steps.
1. Change the user_friendly_names parameter to no.
2. Make a backup of initrd-image.
3. Re-create the initrd-image using the command mkinitrd.You could use the following command line:
mkinitrd -f /boot/initrd-"`uname -r`".img `uname -r`
113
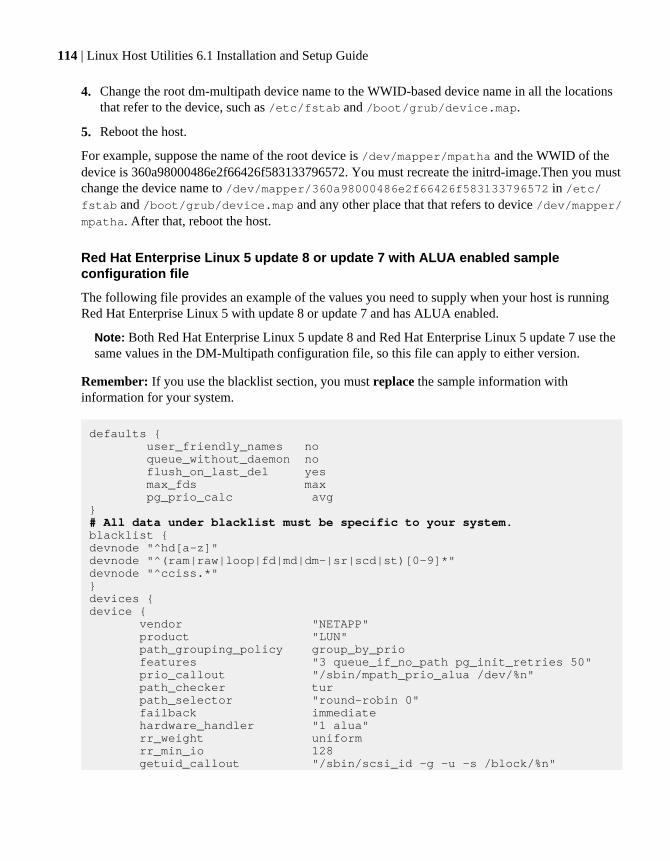
4. Change the root dm-multipath device name to the WWID-based device name in all the locationsthat refer to the device, such as /etc/fstab and /boot/grub/device.map.
5. Reboot the host.
For example, suppose the name of the root device is /dev/mapper/mpatha and the WWID of thedevice is 360a98000486e2f66426f583133796572. You must recreate the initrd-image.Then you mustchange the device name to /dev/mapper/360a98000486e2f66426f583133796572 in /etc/fstab and /boot/grub/device.map and any other place that that refers to device /dev/mapper/mpatha. After that, reboot the host.
Red Hat Enterprise Linux 5 update 8 or update 7 with ALUA enabled sampleconfiguration file
The following file provides an example of the values you need to supply when your host is runningRed Hat Enterprise Linux 5 with update 8 or update 7 and has ALUA enabled.
Note: Both Red Hat Enterprise Linux 5 update 8 and Red Hat Enterprise Linux 5 update 7 use thesame values in the DM-Multipath configuration file, so this file can apply to either version.
Remember: If you use the blacklist section, you must replace the sample information withinformation for your system.
defaults { user_friendly_names no queue_without_daemon no flush_on_last_del yes max_fds max pg_prio_calc avg}# All data under blacklist must be specific to your system.blacklist {devnode "^hd[a-z]"devnode "^(ram|raw|loop|fd|md|dm-|sr|scd|st)[0-9]*"devnode "^cciss.*"} devices {device { vendor "NETAPP" product "LUN" path_grouping_policy group_by_prio features "3 queue_if_no_path pg_init_retries 50" prio_callout "/sbin/mpath_prio_alua /dev/%n" path_checker tur path_selector "round-robin 0" failback immediate hardware_handler "1 alua" rr_weight uniform rr_min_io 128 getuid_callout "/sbin/scsi_id -g -u -s /block/%n"
114 | Linux Host Utilities 6.1 Installation and Setup Guide
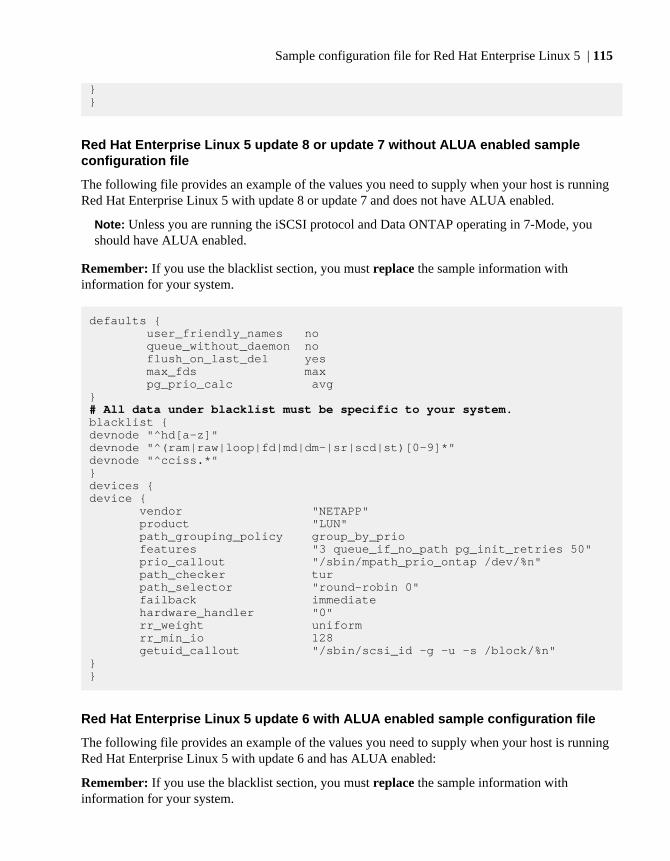
}}
Red Hat Enterprise Linux 5 update 8 or update 7 without ALUA enabled sampleconfiguration file
The following file provides an example of the values you need to supply when your host is runningRed Hat Enterprise Linux 5 with update 8 or update 7 and does not have ALUA enabled.
Note: Unless you are running the iSCSI protocol and Data ONTAP operating in 7-Mode, youshould have ALUA enabled.
Remember: If you use the blacklist section, you must replace the sample information withinformation for your system.
defaults { user_friendly_names no queue_without_daemon no flush_on_last_del yes max_fds max pg_prio_calc avg}# All data under blacklist must be specific to your system.blacklist {devnode "^hd[a-z]"devnode "^(ram|raw|loop|fd|md|dm-|sr|scd|st)[0-9]*"devnode "^cciss.*"}devices {device { vendor "NETAPP" product "LUN" path_grouping_policy group_by_prio features "3 queue_if_no_path pg_init_retries 50" prio_callout "/sbin/mpath_prio_ontap /dev/%n" path_checker tur path_selector "round-robin 0" failback immediate hardware_handler "0" rr_weight uniform rr_min_io 128 getuid_callout "/sbin/scsi_id -g -u -s /block/%n"}}
Red Hat Enterprise Linux 5 update 6 with ALUA enabled sample configuration file
The following file provides an example of the values you need to supply when your host is runningRed Hat Enterprise Linux 5 with update 6 and has ALUA enabled:
Remember: If you use the blacklist section, you must replace the sample information withinformation for your system.
Sample configuration file for Red Hat Enterprise Linux 5 | 115
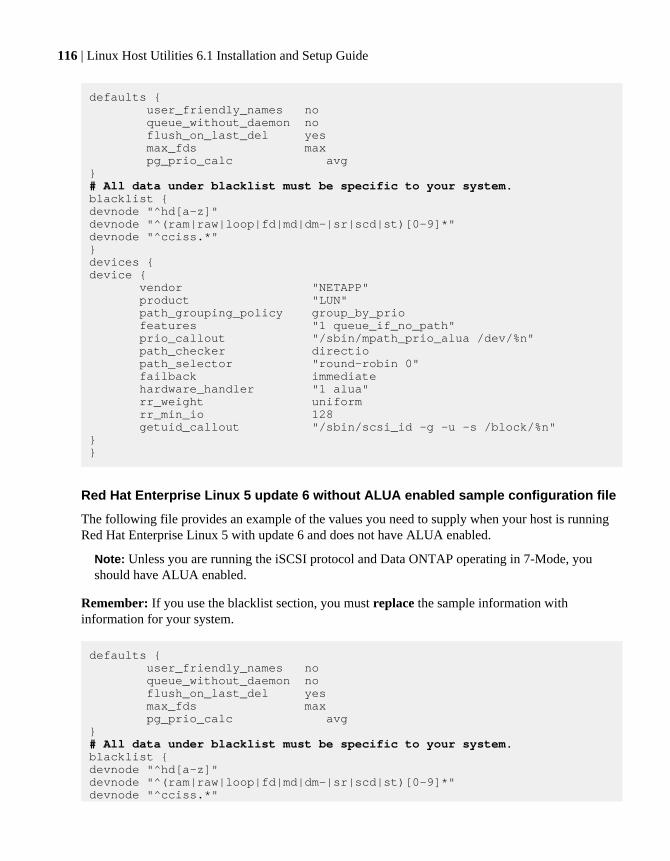
defaults { user_friendly_names no queue_without_daemon no flush_on_last_del yes max_fds max pg_prio_calc avg}# All data under blacklist must be specific to your system.blacklist {devnode "^hd[a-z]"devnode "^(ram|raw|loop|fd|md|dm-|sr|scd|st)[0-9]*"devnode "^cciss.*"} devices {device { vendor "NETAPP" product "LUN" path_grouping_policy group_by_prio features "1 queue_if_no_path" prio_callout "/sbin/mpath_prio_alua /dev/%n" path_checker directio path_selector "round-robin 0" failback immediate hardware_handler "1 alua" rr_weight uniform rr_min_io 128 getuid_callout "/sbin/scsi_id -g -u -s /block/%n"}}
Red Hat Enterprise Linux 5 update 6 without ALUA enabled sample configuration file
The following file provides an example of the values you need to supply when your host is runningRed Hat Enterprise Linux 5 with update 6 and does not have ALUA enabled.
Note: Unless you are running the iSCSI protocol and Data ONTAP operating in 7-Mode, youshould have ALUA enabled.
Remember: If you use the blacklist section, you must replace the sample information withinformation for your system.
defaults { user_friendly_names no queue_without_daemon no flush_on_last_del yes max_fds max pg_prio_calc avg}# All data under blacklist must be specific to your system.blacklist {devnode "^hd[a-z]"devnode "^(ram|raw|loop|fd|md|dm-|sr|scd|st)[0-9]*"devnode "^cciss.*"
116 | Linux Host Utilities 6.1 Installation and Setup Guide

}devices {device { vendor "NETAPP" product "LUN" path_grouping_policy group_by_prio features "1 queue_if_no_path" prio_callout "/sbin/mpath_prio_ontap /dev/%n" path_checker directio path_selector "round-robin 0" failback immediate hardware_handler "0" rr_weight uniform rr_min_io 128 getuid_callout "/sbin/scsi_id -g -u -s /block/%n"}}
Sample configuration file for Red Hat Enterprise Linux 5 | 117
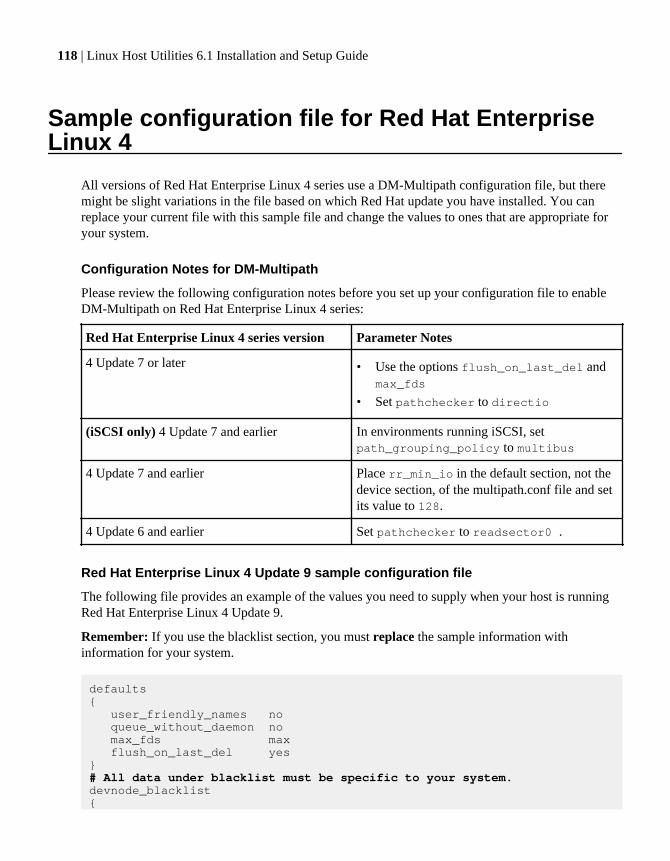
Sample configuration file for Red Hat EnterpriseLinux 4
All versions of Red Hat Enterprise Linux 4 series use a DM-Multipath configuration file, but theremight be slight variations in the file based on which Red Hat update you have installed. You canreplace your current file with this sample file and change the values to ones that are appropriate foryour system.
Configuration Notes for DM-Multipath
Please review the following configuration notes before you set up your configuration file to enableDM-Multipath on Red Hat Enterprise Linux 4 series:
Red Hat Enterprise Linux 4 series version Parameter Notes
4 Update 7 or later • Use the options flush_on_last_del andmax_fds
• Set pathchecker to directio
(iSCSI only) 4 Update 7 and earlier In environments running iSCSI, setpath_grouping_policy to multibus
4 Update 7 and earlier Place rr_min_io in the default section, not thedevice section, of the multipath.conf file and setits value to 128.
4 Update 6 and earlier Set pathchecker to readsector0 .
Red Hat Enterprise Linux 4 Update 9 sample configuration file
The following file provides an example of the values you need to supply when your host is runningRed Hat Enterprise Linux 4 Update 9.
Remember: If you use the blacklist section, you must replace the sample information withinformation for your system.
defaults{ user_friendly_names no queue_without_daemon no max_fds max flush_on_last_del yes}# All data under blacklist must be specific to your system.devnode_blacklist{
118 | Linux Host Utilities 6.1 Installation and Setup Guide
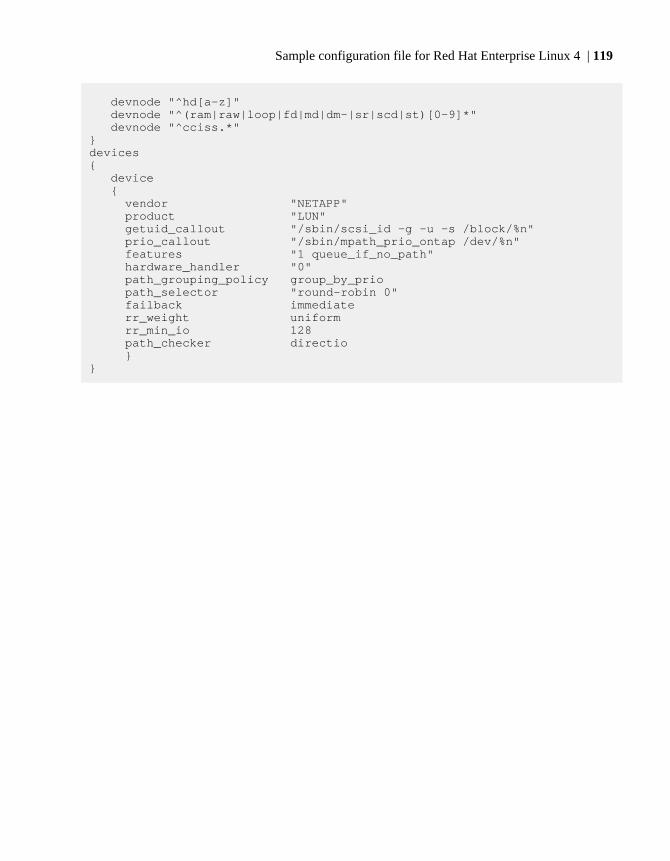
devnode "^hd[a-z]" devnode "^(ram|raw|loop|fd|md|dm-|sr|scd|st)[0-9]*" devnode "^cciss.*"}devices { device { vendor "NETAPP" product "LUN" getuid_callout "/sbin/scsi_id -g -u -s /block/%n" prio_callout "/sbin/mpath_prio_ontap /dev/%n" features "1 queue_if_no_path" hardware_handler "0" path_grouping_policy group_by_prio path_selector "round-robin 0" failback immediate rr_weight uniform rr_min_io 128 path_checker directio }}
Sample configuration file for Red Hat Enterprise Linux 4 | 119

Sample configuration file for Red Hat EnterpriseVirtualization Hypervisor
All versions of Red Hat Enterprise Virtualization Hypervisor 6.2 (RHEV) use a DM-Multipathconfiguration file, but there might be slight variations in the file. You can replace your current filewith this sample file and change the values to ones that are appropriate for your system.
You can use the sample Red Hat Enterprise Virtualization Hypervisor 6.2 configuration files shownhere to create your own multipath.conf file. When you create your file, keep the following in mind:
Red Hat Enterprise VirtualizationHypervisor
Explanation
Blacklist section You must provide information on your systemin the blacklist section.
Any names shown in the sample files areexamples and will not work with your system.
Revision and private tags The first and second lines of the file should bethe revision and private tags:
# RHEV REVISION 0.7# RHEV PRIVATE
These tags tell the VDSM not to overwrite theconfiguration file. If there is no tag thenconfiguration file will be overwritten with thedefaults after server reboot/update.
multipath.conf and persistence You must set the multipath.conf file to persistacross reboots.
DM-Multipath configuration file requires command to persist across reboots
By default, the DM-Multipath configuration file for Red Hat Enterprise Virtualization Hypervisor 6.2does not persist across reboots.
You must enter the following command to ensure that it persists:persist /etc/multipath.conf
Red Hat Enterprise Virtualization Hypervisor 6.2 with ALUA enabled sampleconfiguration file
The following file provides an example of the values you need to supply when your host is runningRed Hat Enterprise Virtualization Hypervisor 6.2 with ALUA enabled.
120 | Linux Host Utilities 6.1 Installation and Setup Guide

Remember: If you use the blacklist section, you must replace the sample information withinformation for your system.
# RHEV REVISION 0.7# RHEV PRIVATEdefaults { user_friendly_names no max_fds max flush_on_last_del yes queue_without_daemon no dev_loss_tmo infinity fast_io_fail_tmo 5}# All data under blacklist must be specific to your system.blacklist {devnode "^hd[a-z]"devnode "^(ram|raw|loop|fd|md|dm-|sr|scd|st)[0-9]*"devnode "^cciss.*"}devices { device { vendor "NETAPP" product "LUN" path_grouping_policy group_by_prio features "3 queue_if_no_path pg_init_retries 50" prio "alua" path_checker tur failback immediate path_selector "round-robin 0" hardware_handler "1 alua" rr_weight uniform rr_min_io 128 getuid_callout "/lib/udev/scsi_id -g -u -d /dev/%n" }}
Red Hat Enterprise Virtualization Hypervisor 6.2 without ALUA enabled sampleconfiguration file
The following file provides an example of the values you need to supply when your host is runningRed Hat Enterprise Virtualization Hypervisor 6.2 and does not have ALUA enabled.
Note: Unless you are running the iSCSI protocol and Data ONTAP operating in 7-Mode, youshould have ALUA enabled.
Remember: If you use the blacklist section, you must replace the sample information withinformation for your system.
# RHEV REVISION 0.7# RHEV PRIVATEdefaults { user_friendly_names no
Sample configuration file for Red Hat Enterprise Virtualization Hypervisor | 121

max_fds max flush_on_last_del yes queue_without_daemon no dev_loss_tmo infinity fast_io_fail_tmo 5}# All data under blacklist must be specific to your system.blacklist {devnode "^hd[a-z]"devnode "^(ram|raw|loop|fd|md|dm-|sr|scd|st)[0-9]*"devnode "^cciss.*"}devices { device { vendor "NETAPP" product "LUN" path_grouping_policy group_by_prio features "3 queue_if_no_path pg_init_retries 50" prio "ontap" path_checker tur failback immediate path_selector "round-robin 0" hardware_handler "0" rr_weight uniform rr_min_io 128 getuid_callout "/lib/udev/scsi_id -g -u -d /dev/%n" }}
122 | Linux Host Utilities 6.1 Installation and Setup Guide
Sample configuration file for Oracle VM 3.0.1,3.1.1
All versions of Oracle VM use a DM-Multipath configuration file, but there might be slightvariations in the file based on which Oracle update you have installed. You can replace your currentfile with this sample file and change the values to ones that are appropriate for your system.
You can use the sample Oracle VM configuration files shown here to create your own multipath.conffile.
Note: Internal testing has shown that the using these values when you are running Oracle VMhelps avoid problems that might occur if a cluster fault happens.
When you create your file, keep the following in mind:
Oracle VM 3.0.1, 3.1.1 Parameter notes
Blacklist section You must provide information on your systemin the blacklist section.
Any names shown in the sample files areexamples and will not work with your system.
wwid <Dev ID> Use the actual device ID. Run the scsi_id -gus /block/<sd_device> command on theSCSI drive to be blacklisted.
Multipath settings and heartbeat settings Multipath settings and heartbeat settings must bethe same on all hypervisors in a server pool.
SAN boot support SAN booting is supported only with Oracle VM3.1.1 and the FC protocol.
SAN boot LUNs and theuser_friendly_names parameter
NetApp recommends that you set theuser_friendly_names parameter to no.There have been reports of problems when thisparameter is set to yes.
Oracle VM, SAN boot LUNs, and user_friendly_names parameter
The recommended value for the user_friendly_names parameter is no. There have been reportsof problems when this parameter is set to yes.
If you create a SAN boot LUN and the installer sets the user_friendly_names parameter to yes,you must perform the following steps.
1. Change the user_friendly_names parameter to no.
2. Make a backup of initrd-image.
123

3. Re-create the initrd-image using the command mkinitrd.You could use the following command line:
mkinitrd -f /boot/ initrd-"`uname -r`".img `uname -r`".img `uname -r`
4. Change the root dm-multipath device name to the WWID-based device name in all the locationsthat refer to the device, such as /etc/fstab and /boot/grub/device.map.
5. Reboot the host.
Oracle VM 3.0.1 with ALUA enabled sample configuration file
The following file provides an example of the values you need to supply when your host is runningOracle VM 3.0.1 with ALUA enabled.
Note: In addition to providing a DM-Multipath configuration file, you must also set theO2CB_HEARTBEAT_THRESHOLD timeout.
Remember: If you use the blacklist section, you must replace the sample information withinformation for your system.
defaults { user_friendly_names no max_fds max flush_on_last_del no queue_without_daemon no}# All data under blacklist must be specific to your system.blacklist {devnode "^hd[a-z]"devnode "^(ram|raw|loop|fd|md|dm-|sr|scd|st)[0-9]*"devnode "^cciss.*"}devices { device { vendor "NETAPP" product "LUN" path_grouping_policy group_by_prio features "1 queue_if_no_path" prio "alua" path_checker directio no_path_retry "queue" failback immediate hardware_handler "1 alua" rr_weight uniform rr_min_io 128 getuid_callout "/lib/udev/scsi_id -gus/block/%n" }}
Oracle VM 3.0.1 without ALUA enabled sample configuration file
The following file provides an example of the values you need to supply when your host is runningOracle VM 3.0.1 and ALUA is not enabled.
124 | Linux Host Utilities 6.1 Installation and Setup Guide

Note: In addition to providing a DM-Multipath configuration file, you must also set theO2CB_HEARTBEAT_THRESHOLD timeout. Also, unless you are running the iSCSI protocol andData ONTAP operating in 7-Mode, you should have ALUA enabled.
Remember: If you use the blacklist section, you must replace the sample information withinformation for your system.
defaults { user_friendly_names no max_fds max flush_on_last_del no queue_without_daemon no}# All data under blacklist must be specific to your system.blacklist {devnode "^hd[a-z]"devnode "^(ram|raw|loop|fd|md|dm-|sr|scd|st)[0-9]*"devnode "^cciss.*"}devices { device { vendor "NETAPP" product "LUN" path_grouping_policy group_by_prio features "1 queue_if_no_path" prio "ontap" path_checker directio no_path_retry "queue" failback immediate hardware_handler "0" rr_weight uniform rr_min_io 128 getuid_callout "/lib/udev/scsi_id -gus/block/%n" }}
Oracle VM 3.1.1 with ALUA enabled sample configuration file
The following file provides an example of the values you need to supply when your host is runningOracle VM 3.1.1 with ALUA enabled.
Note: In addition to providing a DM-Multipath configuration file, you must also set theO2CB_HEARTBEAT_THRESHOLD timeout.
defaults { user_friendly_names no max_fds max flush_on_last_del no queue_without_daemon yes}# All data under blacklist must be specific to your system.
Sample configuration file for Oracle VM 3.0.1, 3.1.1 | 125

blacklist {devnode "^hd[a-z]"devnode "^(ram|raw|loop|fd|md|dm-|sr|scd|st)[0-9]*"devnode "^cciss.*"}devices { device { vendor "NETAPP" product "LUN.*" path_grouping_policy group_by_prio features "3 queue_if_no_path pg_init_retries 50" prio "alua" path_checker tur no_path_retry "queue" failback immediate hardware_handler "1 alua" rr_weight uniform rr_min_io 128 getuid_callout "/lib/udev/scsi_id -gus/block/%n" }}
Oracle VM 3.1.1 without ALUA enabled sample configuration file
The following file provides an example of the values you need to supply when your host is runningOracle VM and ALUA is not enabled.
Note: In addition to providing a DM-Multipath configuration file, you must also set theO2CB_HEARTBEAT_THRESHOLD timeout. Also, unless you are running the iSCSI protocol andData ONTAP operating in 7-Mode, you should have ALUA enabled.
defaults { user_friendly_names no max_fds max flush_on_last_del no queue_without_daemon yes}# All data under blacklist must be specific to your system.blacklist {devnode "^hd[a-z]"devnode "^(ram|raw|loop|fd|md|dm-|sr|scd|st)[0-9]*"devnode "^cciss.*"}devices { device { vendor "NETAPP" product "LUN.*" path_grouping_policy group_by_prio features "3 queue_if_no_path pg_init_retries 50" prio "ontap" path_checker tur no_path_retry "queue" failback immediate hardware_handler "0"
126 | Linux Host Utilities 6.1 Installation and Setup Guide

rr_weight uniform rr_min_io 128 getuid_callout "/lib/udev/scsi_id -gus/block/%n" }}
Sample configuration file for Oracle VM 3.0.1, 3.1.1 | 127

Sample configuration files for SUSE LinuxEnterprise Server 11 series
All versions of SUSE Linux Enterprise Server use a DM-Multipath configuration file, but theremight be slight variations in the file based on which version and update of SUSE Linux Enterpriseserver you have. If you are running SUSE Linux Enterprise Server 11, 11 SP1, or 11 SP2, you canreplace your current file with one of the sample configuration files and then change the values toones that are appropriate for your system.
You can use the sample SUSE Linux Enterprise Server 11 series configuration files shown here tocreate your own multipath.conf file. When you create your file, keep the following in mind:
SUSE Linux Enterprise Server 11 series notes Explanation
Blacklist section You must provide information on your systemin the blacklist section.
Any names shown in the sample files areexamples and will not work with your system.
SUSE Linux Enterprise Server 11, 11 SP1 with ALUA enabled sample configurationfile
The following file provides an example of the values you need to supply when your host is runningeither SUSE Linux Enterprise Server 11 or 11 SP1 with ALUA.
Remember: If you use the blacklist section, you must replace the sample information withinformation for your system.
defaults{ user_friendly_names no max_fds max flush_on_last_del yes}# All data under blacklist must be specific to your system.blacklist{ devnode "^hd[a-z]" devnode "^(ram|raw|loop|fd|md|dm-|sr|scd|st)[0-9]*" devnode "^cciss.*"}devices{ device { vendor "NETAPP"
128 | Linux Host Utilities 6.1 Installation and Setup Guide
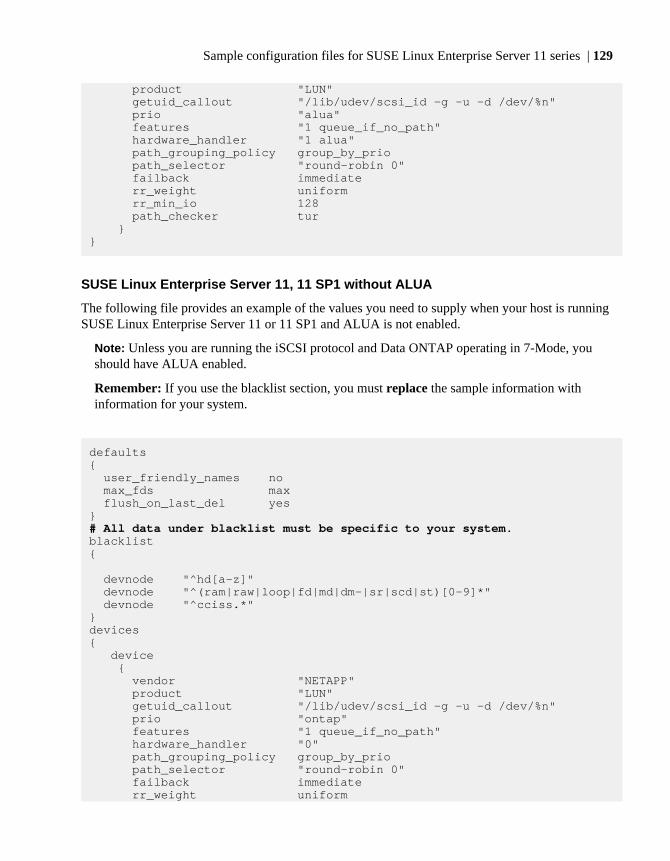
product "LUN" getuid_callout "/lib/udev/scsi_id -g -u -d /dev/%n" prio "alua" features "1 queue_if_no_path" hardware_handler "1 alua" path_grouping_policy group_by_prio path_selector "round-robin 0" failback immediate rr_weight uniform rr_min_io 128 path_checker tur }}
SUSE Linux Enterprise Server 11, 11 SP1 without ALUA
The following file provides an example of the values you need to supply when your host is runningSUSE Linux Enterprise Server 11 or 11 SP1 and ALUA is not enabled.
Note: Unless you are running the iSCSI protocol and Data ONTAP operating in 7-Mode, youshould have ALUA enabled.
Remember: If you use the blacklist section, you must replace the sample information withinformation for your system.
defaults{ user_friendly_names no max_fds max flush_on_last_del yes}# All data under blacklist must be specific to your system.blacklist{ devnode "^hd[a-z]" devnode "^(ram|raw|loop|fd|md|dm-|sr|scd|st)[0-9]*" devnode "^cciss.*"}devices{ device { vendor "NETAPP" product "LUN" getuid_callout "/lib/udev/scsi_id -g -u -d /dev/%n" prio "ontap" features "1 queue_if_no_path" hardware_handler "0" path_grouping_policy group_by_prio path_selector "round-robin 0" failback immediate rr_weight uniform
Sample configuration files for SUSE Linux Enterprise Server 11 series | 129
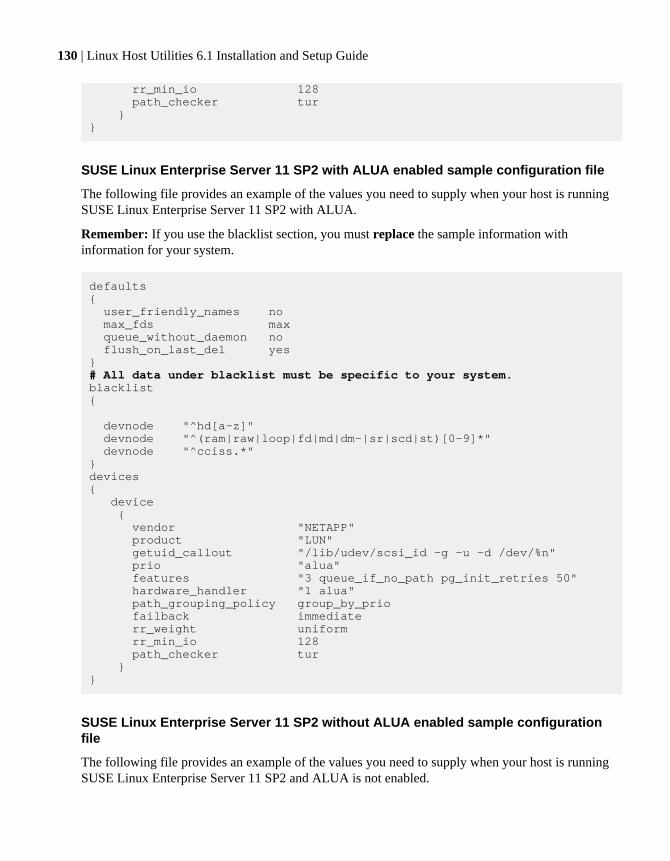
rr_min_io 128 path_checker tur }}
SUSE Linux Enterprise Server 11 SP2 with ALUA enabled sample configuration file
The following file provides an example of the values you need to supply when your host is runningSUSE Linux Enterprise Server 11 SP2 with ALUA.
Remember: If you use the blacklist section, you must replace the sample information withinformation for your system.
defaults{ user_friendly_names no max_fds max queue_without_daemon no flush_on_last_del yes}# All data under blacklist must be specific to your system.blacklist{ devnode "^hd[a-z]" devnode "^(ram|raw|loop|fd|md|dm-|sr|scd|st)[0-9]*" devnode "^cciss.*"}devices{ device { vendor "NETAPP" product "LUN" getuid_callout "/lib/udev/scsi_id -g -u -d /dev/%n" prio "alua" features "3 queue_if_no_path pg_init_retries 50" hardware_handler "1 alua" path_grouping_policy group_by_prio failback immediate rr_weight uniform rr_min_io 128 path_checker tur }}
SUSE Linux Enterprise Server 11 SP2 without ALUA enabled sample configurationfile
The following file provides an example of the values you need to supply when your host is runningSUSE Linux Enterprise Server 11 SP2 and ALUA is not enabled.
130 | Linux Host Utilities 6.1 Installation and Setup Guide
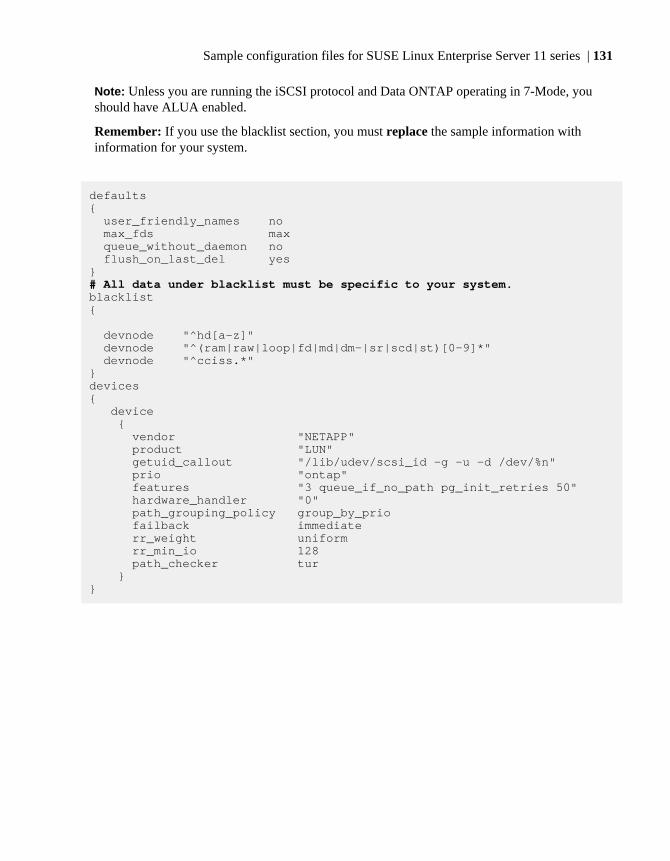
Note: Unless you are running the iSCSI protocol and Data ONTAP operating in 7-Mode, youshould have ALUA enabled.
Remember: If you use the blacklist section, you must replace the sample information withinformation for your system.
defaults{ user_friendly_names no max_fds max queue_without_daemon no flush_on_last_del yes}# All data under blacklist must be specific to your system.blacklist{ devnode "^hd[a-z]" devnode "^(ram|raw|loop|fd|md|dm-|sr|scd|st)[0-9]*" devnode "^cciss.*"}devices{ device { vendor "NETAPP" product "LUN" getuid_callout "/lib/udev/scsi_id -g -u -d /dev/%n" prio "ontap" features "3 queue_if_no_path pg_init_retries 50" hardware_handler "0" path_grouping_policy group_by_prio failback immediate rr_weight uniform rr_min_io 128 path_checker tur }}
Sample configuration files for SUSE Linux Enterprise Server 11 series | 131
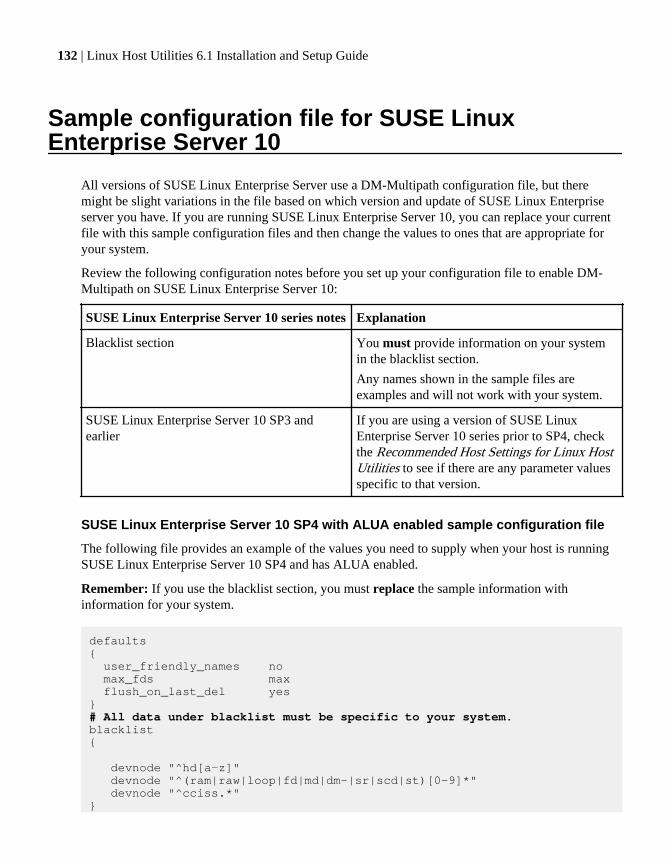
Sample configuration file for SUSE LinuxEnterprise Server 10
All versions of SUSE Linux Enterprise Server use a DM-Multipath configuration file, but theremight be slight variations in the file based on which version and update of SUSE Linux Enterpriseserver you have. If you are running SUSE Linux Enterprise Server 10, you can replace your currentfile with this sample configuration files and then change the values to ones that are appropriate foryour system.
Review the following configuration notes before you set up your configuration file to enable DM-Multipath on SUSE Linux Enterprise Server 10:
SUSE Linux Enterprise Server 10 series notes Explanation
Blacklist section You must provide information on your systemin the blacklist section.
Any names shown in the sample files areexamples and will not work with your system.
SUSE Linux Enterprise Server 10 SP3 andearlier
If you are using a version of SUSE LinuxEnterprise Server 10 series prior to SP4, checkthe Recommended Host Settings for Linux HostUtilities to see if there are any parameter valuesspecific to that version.
SUSE Linux Enterprise Server 10 SP4 with ALUA enabled sample configuration file
The following file provides an example of the values you need to supply when your host is runningSUSE Linux Enterprise Server 10 SP4 and has ALUA enabled.
Remember: If you use the blacklist section, you must replace the sample information withinformation for your system.
defaults { user_friendly_names no max_fds max flush_on_last_del yes}# All data under blacklist must be specific to your system.blacklist { devnode "^hd[a-z]" devnode "^(ram|raw|loop|fd|md|dm-|sr|scd|st)[0-9]*" devnode "^cciss.*" }
132 | Linux Host Utilities 6.1 Installation and Setup Guide
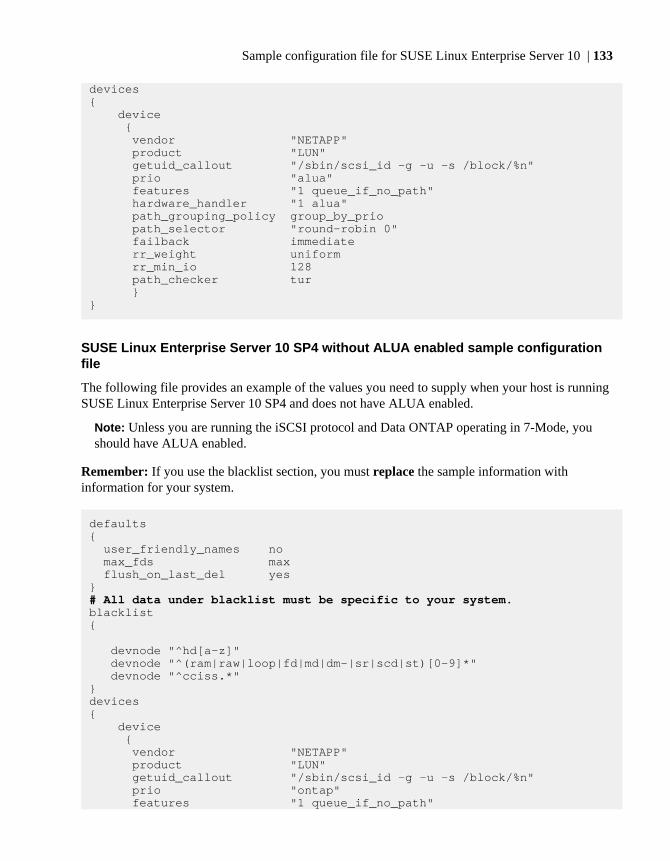
devices{ device { vendor "NETAPP" product "LUN" getuid_callout "/sbin/scsi_id -g -u -s /block/%n" prio "alua" features "1 queue_if_no_path" hardware_handler "1 alua" path_grouping_policy group_by_prio path_selector "round-robin 0" failback immediate rr_weight uniform rr_min_io 128 path_checker tur }}
SUSE Linux Enterprise Server 10 SP4 without ALUA enabled sample configurationfile
The following file provides an example of the values you need to supply when your host is runningSUSE Linux Enterprise Server 10 SP4 and does not have ALUA enabled.
Note: Unless you are running the iSCSI protocol and Data ONTAP operating in 7-Mode, youshould have ALUA enabled.
Remember: If you use the blacklist section, you must replace the sample information withinformation for your system.
defaults { user_friendly_names no max_fds max flush_on_last_del yes}# All data under blacklist must be specific to your system.blacklist { devnode "^hd[a-z]" devnode "^(ram|raw|loop|fd|md|dm-|sr|scd|st)[0-9]*" devnode "^cciss.*" }devices{ device { vendor "NETAPP" product "LUN" getuid_callout "/sbin/scsi_id -g -u -s /block/%n" prio "ontap" features "1 queue_if_no_path"
Sample configuration file for SUSE Linux Enterprise Server 10 | 133

hardware_handler "0" path_grouping_policy group_by_prio path_selector "round-robin 0" failback immediate rr_weight uniform rr_min_io 128 path_checker tur }}
134 | Linux Host Utilities 6.1 Installation and Setup Guide
Where to find more information
This table contains pointers to documents and web sites that provide more information about host andstorage system requirements, supported configurations, best practices, your operating system, andtroubleshooting.
If you need more informationabout...
See this source...
Known issues, systemrequirements, and last minuteupdates
The latest Host Utilities Release Notes
Note: Generally, the Release Notes are updated morefrequently than other documentation. It is a good practice tocheck the release notes before installing the Host Utilities tosee if there have been any changes to the installation or setupprocess since this document was prepared. After that, youshould check the Release Notes periodically to see if there isnew information on using the Host Utilities. A summary ofwhat has been updated and when is on the Release Notesindex page.
The latest supportedconfigurations and requirements
• The Interoperability Matrix• System Configuration Guide
Configuring the storage systemand managing SAN storage on it
• Data ONTAP documentation Index• Best Practices for Reliability: New System Installation• Data ONTAP Software Setup Guide•• Data ONTAP Release Notes• Command Reference
Supported SAN topologies The SAN Configuration Guide (called Fibre Channel and iSCSIConfiguration Guide in Data ONTAP 8.1 and earlier)for yourversion of Data ONTAP software
Verifying compatibility of astorage system withenvironmental requirements
Site Requirements
Upgrading Data ONTAP Data ONTAP® Upgrade Guide
Best practices/configurationissues
NetApp Knowledge Base
135

If you need more informationabout...
See this source...
Installing and configuring theHBA on the host
HBA vendor documentation
Enabling ALUA Note: In particular, see the section “Enabling ALUA for aFibre Channel igroup”.
Host Utilities examples usingSUSE Linux Enterprise Server 9
Linux Host Utilities 5.2 Installation and Setup Guide
Note: There were no changes to the information about usingSUSE Linux Enterprise Server 9 between the Host Utilities5.2 release and 5.3 release.
Working with QLogic Refer to the QLogic documentation
Working with Emulex Refer to the Emulex documentation
Additional supported HBAs Check the NetApp Interoperability Matrix to see which HBAsare supported and if there are Netapp-specific Release Notesassociated with them.
Broadcom 10GB iSCSI Check vendor documentation, including the README and theBroadcom NetXtreme II™ Network Adapter User Guide
Infomation about Oracle VM • Oracle® VM Release Notes• Oracle® VM Installation and Upgrade Guide• Oracle® VM User's Guide Release 3.0 for x86
Information about OracleCluster File System
Oracle Cluster File System (OCFS2) User’s Guide and OCFS2 -Frequently Asked Questions
Information about Oracle RealApplication Cluster (RAC)
Oracle RAC installation information from the Oracle Web site
Information about managing theiSCSI initiator
OS vendor documentation
Information about installing andconfiguring SnapDrive forUNIX
The SnapDrive for UNIX Installation and Administration Guidefor your version of SnapDrive
Veritas Storage Foundation andits features
Refer to the Veritas documentation
Information about Oracle VM Refer to the Oracle documentation
Information about KVM Refer to the Linux documentation
136 | Linux Host Utilities 6.1 Installation and Setup Guide
If you need more informationabout...
See this source...
Information about configuringmultipath support on Red HatEnterprise Linux
The Multipath-usage.txt file included with the device-mapper-multipath RPM for Red Hat Enterprise Linux 4 Update 3and later in /usr/share/doc/device-mapper-multipath-version.
version is the latest version number shipped with the Red HatEnterprise Linux release.
Information about Red HatCluster and GFS
The Red Hat Web site
Related information
Oracle Web site - http://oss.oracle.comRed Hat Web site - http://www.redhat.comNovell Web site - http://www.novell.com
Where to find more information | 137

Copyright information
Copyright © 1994–2013 NetApp, Inc. All rights reserved. Printed in the U.S.
No part of this document covered by copyright may be reproduced in any form or by any means—graphic, electronic, or mechanical, including photocopying, recording, taping, or storage in anelectronic retrieval system—without prior written permission of the copyright owner.
Software derived from copyrighted NetApp material is subject to the following license anddisclaimer:
THIS SOFTWARE IS PROVIDED BY NETAPP "AS IS" AND WITHOUT ANY EXPRESS ORIMPLIED WARRANTIES, INCLUDING, BUT NOT LIMITED TO, THE IMPLIEDWARRANTIES OF MERCHANTABILITY AND FITNESS FOR A PARTICULAR PURPOSE,WHICH ARE HEREBY DISCLAIMED. IN NO EVENT SHALL NETAPP BE LIABLE FOR ANYDIRECT, INDIRECT, INCIDENTAL, SPECIAL, EXEMPLARY, OR CONSEQUENTIALDAMAGES (INCLUDING, BUT NOT LIMITED TO, PROCUREMENT OF SUBSTITUTEGOODS OR SERVICES; LOSS OF USE, DATA, OR PROFITS; OR BUSINESSINTERRUPTION) HOWEVER CAUSED AND ON ANY THEORY OF LIABILITY, WHETHERIN CONTRACT, STRICT LIABILITY, OR TORT (INCLUDING NEGLIGENCE OROTHERWISE) ARISING IN ANY WAY OUT OF THE USE OF THIS SOFTWARE, EVEN IFADVISED OF THE POSSIBILITY OF SUCH DAMAGE.
NetApp reserves the right to change any products described herein at any time, and without notice.NetApp assumes no responsibility or liability arising from the use of products described herein,except as expressly agreed to in writing by NetApp. The use or purchase of this product does notconvey a license under any patent rights, trademark rights, or any other intellectual property rights ofNetApp.
The product described in this manual may be protected by one or more U.S. patents, foreign patents,or pending applications.
RESTRICTED RIGHTS LEGEND: Use, duplication, or disclosure by the government is subject torestrictions as set forth in subparagraph (c)(1)(ii) of the Rights in Technical Data and ComputerSoftware clause at DFARS 252.277-7103 (October 1988) and FAR 52-227-19 (June 1987).
138 | Linux Host Utilities 6.1 Installation and Setup Guide
Trademark information
NetApp, the NetApp logo, Network Appliance, the Network Appliance logo, Akorri,ApplianceWatch, ASUP, AutoSupport, BalancePoint, BalancePoint Predictor, Bycast, CampaignExpress, ComplianceClock, Cryptainer, CryptoShred, Data ONTAP, DataFabric, DataFort, Decru,Decru DataFort, DenseStak, Engenio, Engenio logo, E-Stack, FAServer, FastStak, FilerView,FlexCache, FlexClone, FlexPod, FlexScale, FlexShare, FlexSuite, FlexVol, FPolicy, GetSuccessful,gFiler, Go further, faster, Imagine Virtually Anything, Lifetime Key Management, LockVault,Manage ONTAP, MetroCluster, MultiStore, NearStore, NetCache, NOW (NetApp on the Web),Onaro, OnCommand, ONTAPI, OpenKey, PerformanceStak, RAID-DP, ReplicatorX, SANscreen,SANshare, SANtricity, SecureAdmin, SecureShare, Select, Service Builder, Shadow Tape,Simplicity, Simulate ONTAP, SnapCopy, SnapDirector, SnapDrive, SnapFilter, SnapIntegrator,SnapLock, SnapManager, SnapMigrator, SnapMirror, SnapMover, SnapProtect, SnapRestore,Snapshot, SnapSuite, SnapValidator, SnapVault, StorageGRID, StoreVault, the StoreVault logo,SyncMirror, Tech OnTap, The evolution of storage, Topio, vFiler, VFM, Virtual File Manager,VPolicy, WAFL, Web Filer, and XBB are trademarks or registered trademarks of NetApp, Inc. in theUnited States, other countries, or both.
IBM, the IBM logo, and ibm.com are trademarks or registered trademarks of International BusinessMachines Corporation in the United States, other countries, or both. A complete and current list ofother IBM trademarks is available on the web at www.ibm.com/legal/copytrade.shtml.
Apple is a registered trademark and QuickTime is a trademark of Apple, Inc. in the United Statesand/or other countries. Microsoft is a registered trademark and Windows Media is a trademark ofMicrosoft Corporation in the United States and/or other countries. RealAudio, RealNetworks,RealPlayer, RealSystem, RealText, and RealVideo are registered trademarks and RealMedia,RealProxy, and SureStream are trademarks of RealNetworks, Inc. in the United States and/or othercountries.
All other brands or products are trademarks or registered trademarks of their respective holders andshould be treated as such.
NetApp, Inc. is a licensee of the CompactFlash and CF Logo trademarks.
NetApp, Inc. NetCache is certified RealSystem compatible.
139

How to send your comments
You can help us to improve the quality of our documentation by sending us your feedback.
Your feedback is important in helping us to provide the most accurate and high-quality information.If you have suggestions for improving this document, send us your comments by email to [email protected]. To help us direct your comments to the correct division, include in thesubject line the product name, version, and operating system.
You can also contact us in the following ways:
• NetApp, Inc., 495 East Java Drive, Sunnyvale, CA 94089 U.S.• Telephone: +1 (408) 822-6000• Fax: +1 (408) 822-4501• Support telephone: +1 (888) 463-8277
140 | Linux Host Utilities 6.1 Installation and Setup Guide
Index
A
alignmentVHD partition 90
ALUAconfiguring in /etc/multipath.conf 37supported environments 95
APMfailover path 49I/O error handling 49I/O error processing 49path failures 49
Array Policy Moduleinstalling 49
Array Support Libraryinstalling 49
B
block alignmentVHD partition 90
Broadcomconfiguring 10 Gb iSCSI offload 18
C
command, iSCSI servicechkconfig 32
configure DM-Multipath, commandchkconfig 40
D
Device Mapper MultipathingDM-Multipath 94Red Hat Enterprise Linux 94SUSE Linux Enterprise Server 94
discovering LUNsrescan script 52SCSI rescan 52sg3_utils 52
discovering LUNs, verificationiscsi-ls 54sanlun 54
DM-Multipath
/etc/multipath.conf 37configuring ALUA 37displaying information using sanlun lun show -p 62editing configuration file 37I/O failover 94Oracle VM s sample multipath-conf file 123path load sharing 94Red Hat Enterprise Linux 4 sample multipath-conffile 118Red Hat Enterprise Linux 5 sample multipath-conffile 113Red Hat Enterprise Linux 6 sample multipath-conffile 106Red Hat Enterprise Virtualization Hypervisor samplemultipath-conf file 120SCSI device 94SUSE Linux Enterprise Server 10 sample multipath-conf file 132SUSE Linux Enterprise Server 11 sample multipath-conf files 128user_friendly_names parameter and SAN boot LUNs113verifying 36viewing with multipath -ll command 40
DM-Multipath, configuration, command# multipath 39
E
environmentfinding instructions 12
environmentsspecifying 12
Examplessanlun FC, iSCSI output 62
F
FC protocoldiscovering LUNS 52host bus adapters
HBA port 92sanlun output 62
FCoEconverged network adapters 93data center bridging 93
Index | 141

Ethernet switch 93traditional FC 93
H
HBAgeneral notes 17getting WWPN 17
HBA driverbundled with Linux distribution 17downloaded from OEM 17
Host Utilitiescontents 9defined 9drivers 17HBA 17host configuration 17installing 21Linux environments 10planning installation 14
Hypervisoralign partitions for best performance 90
I
initiator groupigroup 92
initiator node nameSee node name
installationoverview 14planning 14
installingHost Utilities software 21
iSCSIsetting multipathing timeout values 26
iSCSI protocolautomatic node login 32changing initiator node name 24configuring a SAN boot LUN 82configuring Broadcom 18configuring Red Hat SAN boot LUN 82configuring software iSCSI SAN boot LUN 83, 84discovering LUNs in hardware iSCSI environments52HBA 93initiator node name 24iSCSI target HBA 93manual node login 32
methods of target discovery with software initiators29preboot execution environment (PXE) 82sanlun output 62setting multipathing timeout values 26standard Ethernet interfaces 93starting automatically 32starting the iSCSI service 29
iSCSI protocol, configure SAN bootnetwork interface card (NIC) 82software iSCSI
locally attached disk 82preboot execution environment (PXE) 82
K
Kernel-based Virtual Machine (KVM)supported in Linux Host Utilities 90
L
LinuxHost Utilities 9
Linux configurationsALUA support
automatically enabled 95asymmetric logical unit access
Target Port Group Support 95Linux Host Utilities
direct-attached configurationshigh-availability 92single-zoned 92stand-alone 92
fabric-attached SANdual-port 92single-port 92
Linux versionsOracle Linux 10Red Hat Enterprise Linux 10SUSE Linux Enterprise Server 10Veritas Storage Foundation 10
LUN retry tunable valuesconfiguring for Veritas Storage Foundation 45
LUNsdiscovering in FC environments 52discovering in hardware iSCSI environments 52discovering in iSCSI environments 53discovering in Veritas, iSCSI environments 69iSCSI protocol
discovering LUNs 53
142 | Linux Host Utilities 6.1 Installation and Setup Guide
native Linux environments. 52removing 67removing in Vertias environments 76viewing 54
M
man pagesinstalled by Host Utilities 9
misalignmentVHD partition 90
mounting, new filedevice mount_point type _netdev 0 0 54
multipath -ll command 40multipath.conf
Oracle VM sample file 123Red Hat Enterprise Linux 4 sample file 118Red Hat Enterprise Linux 5 sample file 113Red Hat Enterprise Linux 6 sample file 106Red Hat Enterprise Virtualization Hypervisor samplefile 120SUSE Linux Enterprise Server 10 sample file 132SUSE Linux Enterprise Server 11 sample files 128user_friendly_names parameter and SAN boot LUNs113
multipathingdisplaying with sanlun lun show -p 75setting iSCSI timeout values 26
multipathing packagesDM-Multipath 36verifying 36
N
node namechanging 24recording 24
nSANitydiagnostic utility 9installing 104
O
O2CB_HEARTBEAT_THRESHOLDset to 65 23
Oracle LinuxHost Utilities environment 10
Oracle VMsample multipath-conf file 123SAN booting not supported 123
setting O2CB_HEARTBEAT_THRESHOLD to 6523setting up 23supported in Linux Host Utilities 90
P
performancealign VHD partitions 90
protocolsFibre Channel (FC) 92Fibre Channel over Ethernet (FCoE) 92iSCSI 92
Q
qualifiersspecifying environments 12
R
Red Hat Enterprise Linuxconfiguring Red Hat Linux 6, 5 to work with VeritasStorage Foundation 46Host Utilities environment 10setting iSCSI timeout values 26setting the IOFENCE timeout value 46setting up space reclamation 22
Red Hat Enterprise Linux 4sample multipath-conf file 118
Red Hat Enterprise Linux 5sample multipath-conf file 113
Red Hat Enterprise Linux 6sample multipath-conf file 106
Red Hat Enterprise Virtualization Hypervisorsample multipath-conf file 120
reloading iSCSI, command/etc/init.d/iscsi reload 54
requirementsconfigurations
more information 135more information 135
rescan scriptdiscovering LUNs 68, 69LUNs
discovering in Veritas environments 68removing LUNs 67
Index | 143
S
SAN bootcentralized storage 94disaster recovery 94maintenance 94not supported on Oracle VM 123reliability 94server swaps 94user_friendly_names parameter and SAN boot LUNs113
SAN boot LUNconfiguring iSCSI hardware initiator 82configuring software iSCSI on Red Hat 83configuring software iSCSI on SUSE Linux 84configuring with iSCSI 82
SAN boot, FCBIOS 79configuring root partition, SUSE Linux EnterpriseServer 80DM-Multipath 80HBA BIOS 80initird 80installing, Red Hat Enterprise Linux 79installing, SUSE Linux Enterprise Server 80linux mpath 79SAN boot LUN 79, 80spinup delay 80
SAN boot, hardware iSCSIBoot Option 82linux mpath 82Red Hat Enterprise Linux, SAN boot 82SAN boot LUN 82spinup delay 82
SAN boot, root partitioniSCSI sessions 86mount 86Start-Up mode 86SUSE Linux Enterprise Server, SAN boot 86
SAN boot, software iSCSI/boot 84Boot Option 83initiator name 84IQN 84iSCSI initiator name 83linux mpath 83Red Hat Enterprise Linux, SAN boot 83root file system 83SUSE Linux Enterprise Server, SAN boot 84SWAP partition 83, 84
target IP address 83san_version
installed by Host Utilities 9sanlun
displaying Veritas DMP multipathing information 75examples of FC, iSCSI output 62iscsi
viewing LUNs 54iscsiadm
viewing LUNs 54sanlun lun show -p output 62sanlun lun show all output 62viewing LUNs 54
sanlun utilityinstalled by Host Utilities 9
server virtualizationKVM 90Oracle VM 90supported in Linux Host Utilities 90
space reclamationsetting up 22
starting DM-Multipath, command/etc/init.d/boot.multipath start 39/etc/init.d/multipathd start 39
stopping DM-Multipath, command/etc/init.d/boot.multipath stop 43/etc/init.d/multipathd stop 43
storage systemdirect-attached 92Ethernet network 92fabric-attached 92
SUSE Linux Enterprise Serverconfiguring SUSE Linux 11 to work with VeritasStorage Foundation 47Host Utilities environment 10setting iSCSI timeout values 26
SUSE Linux Enterprise Server 10sample multipath-conf files 132
SUSE Linux Enterprise Server 11sample multipath-conffile 128
T
timeout valuesiSCSI multipathing timeout values 26
V
VeritasDynamic Multipathing
144 | Linux Host Utilities 6.1 Installation and Setup Guide
VxDMP 94using VxDMP 68using VxVM 68Veritas Volume Manager
VxVM 94Veritas DMP
sanlun lun show -p 75Veritas Dynamic Multipathing
VxDMP 94Veritas restore daemon
configuring 45Veritas Storage Foundation
Array Policy Module, 49Array Support Library 49boot BIOS 88configure Red Hat 6, 5 46configure SAN boot, Red Hat Enterprise Linux 88configuring LUN retry tunable values 45
configuring the restore daemon 45HBA BIOS 88HBA port 88Host Utilities environment 10SUSE Linux 11 must be configured 47
viewing a DM-Multipath configuration 40viewing LUNs, command
sanlun lun show all 70virtual hard disk (VHD)
align partitions for best performance 90VxDMP
prerequisites 68VxVM
managing LUNs 68VxVM, command
vxdisk list 77vxdmpadm getsubpaths ctlr 77vxdmpadm getsubpaths dmpnodename 77
Index | 145

![CERES CALIPSO Earth Radiation Budget Temperature ~ 254 K ...€¦ · MMTS)] =[(Ttrue −Ttrue)+(εsys LiG −ε sys MMTS) =εsys LiG −ε sys MMTS+ ε sys MMTS = ε sys LiG Figure](https://img.pdfslide.us/doc/110x75/5f2fcc11e6b3f96a310e1035/ceres-calipso-earth-radiation-budget-temperature-254-k-mmts-ttrue-attruesys.jpg)