Embed Size (px)
Citation preview
Linking Orion To A Portfolio Accounting System
- 1 -
Linking Telemet Orion to a Portfolio Accounting System
Telemet Orion v8 can import portfolio data from any portfolio management, order management, or trust accounting system that can export to standard text based files. Please note that, assuming that your exported portfolio files will be consistently saved with the same formatting, this setup process will only need to be followed once. Once the Data Storage Descriptor is successfully created and the exported Portfolio Account files are identified, the Portfolio Accounts can be selected within Orion as needed. The basic steps in this setup process are:
• Export a sample of your portfolio data
• Create a Telemet Data Storage Descriptor file that describes how your portfolio data is formatted
• Show Orion where the exported portfolio data files are going to be stored If you have good control over the formatting of the exports from your portfolio management system, please see Appendix A for Telemet’s recommended export format.
Advent Axys® 3 users should skip directly to Part 4 and PortfolioCenter™ users should skip directly to Part 5.
Table of Contents
Part 1 - Export a sample of your portfolio data......................................................2
Part 2: Create a Data Storage Descriptor .............................................................3
Part 3: Identifying Portfolio Accounts ..................................................................10
Part 4: Working with Advent Axys® 3 files .........................................................12
Part 5: Integrating PortfolioCenter™ with Telemet Orion ...................................14
Glossary..............................................................................................................18
Appendix A – Telemet’s recommended export format ........................................19
Linking Orion To A Portfolio Accounting System
- 2 -
Part 1 - Export a sample of your portfolio data
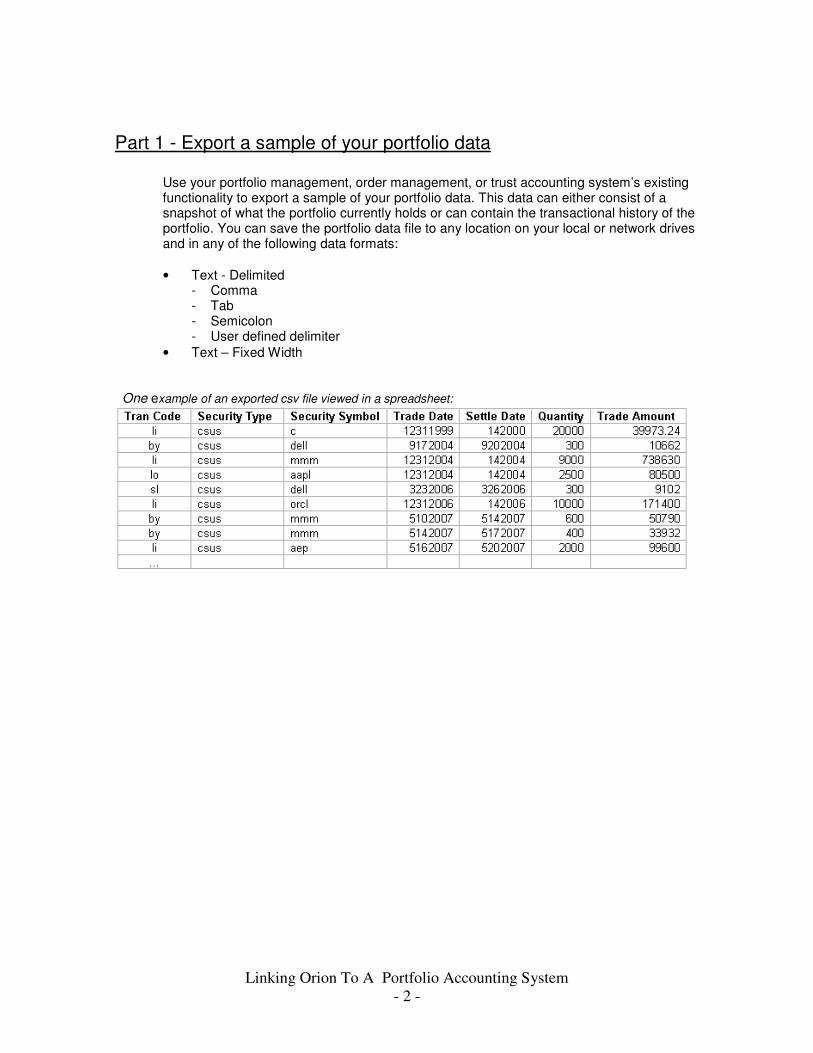
Use your portfolio management, order management, or trust accounting system’s existing functionality to export a sample of your portfolio data. This data can either consist of a snapshot of what the portfolio currently holds or can contain the transactional history of the portfolio. You can save the portfolio data file to any location on your local or network drives and in any of the following data formats:
• Text - Delimited - Comma - Tab - Semicolon - User defined delimiter
• Text – Fixed Width One example of an exported csv file viewed in a spreadsheet:
Linking Orion To A Portfolio Accounting System
- 3 -
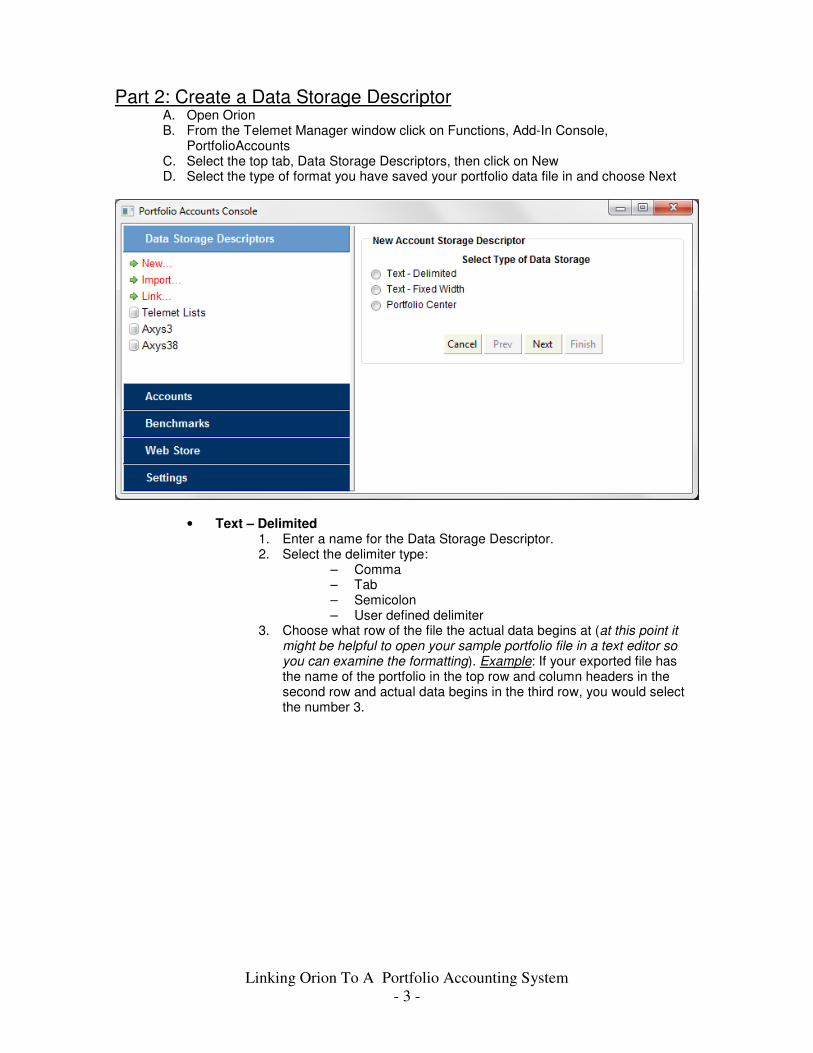
Part 2: Create a Data Storage Descriptor A. Open Orion B. From the Telemet Manager window click on Functions, Add-In Console,
PortfolioAccounts C. Select the top tab, Data Storage Descriptors, then click on New D. Select the type of format you have saved your portfolio data file in and choose Next
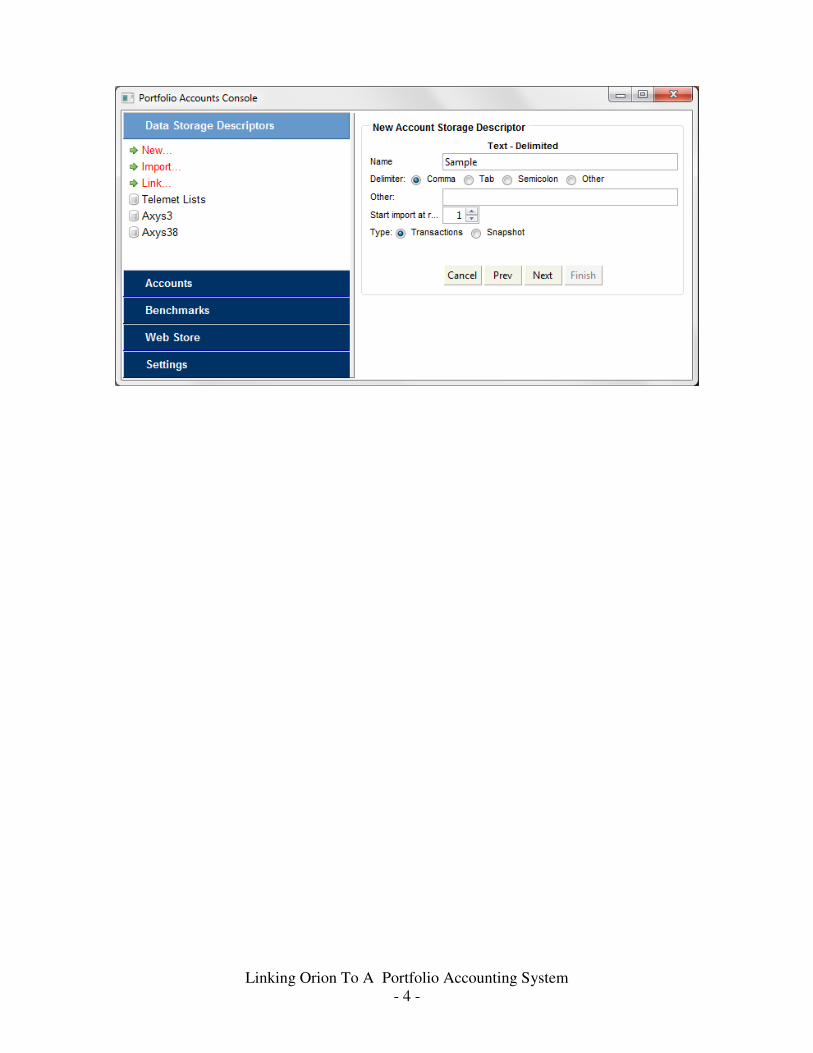
• Text – Delimited 1. Enter a name for the Data Storage Descriptor. 2. Select the delimiter type:
– Comma – Tab – Semicolon – User defined delimiter
3. Choose what row of the file the actual data begins at (at this point it might be helpful to open your sample portfolio file in a text editor so you can examine the formatting). Example: If your exported file has the name of the portfolio in the top row and column headers in the second row and actual data begins in the third row, you would select the number 3.
Linking Orion To A Portfolio Accounting System
- 4 -
Linking Orion To A Portfolio Accounting System
- 5 -
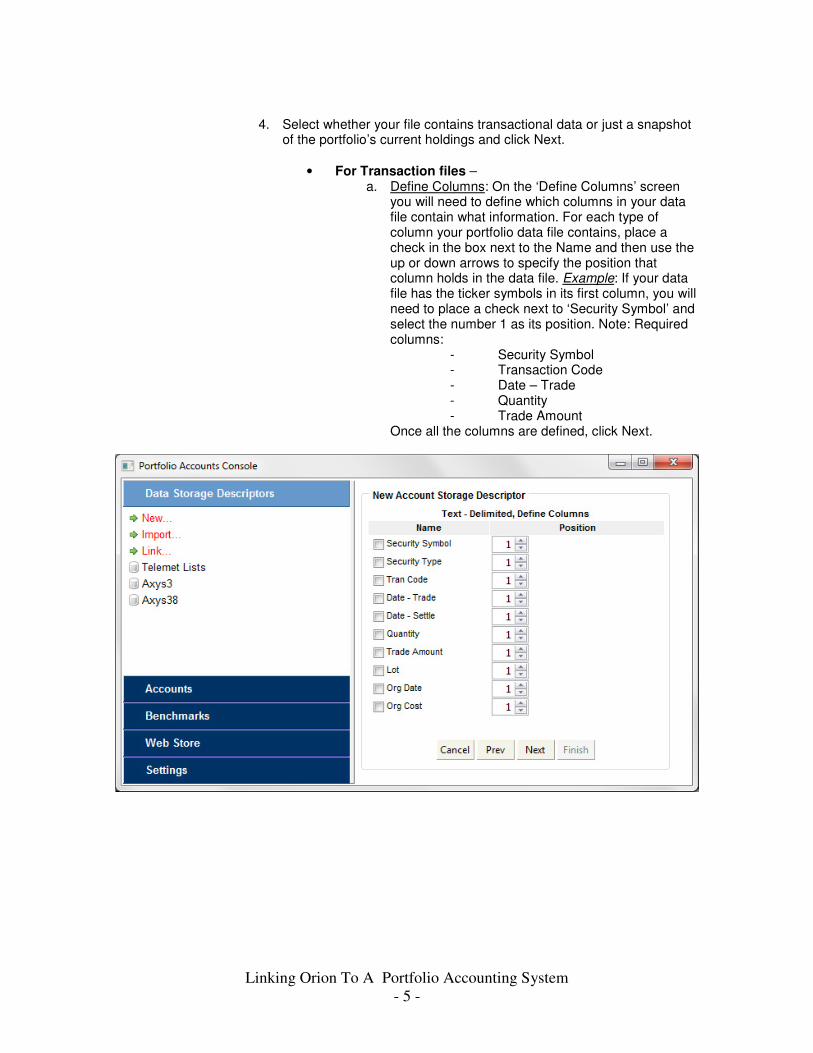
4. Select whether your file contains transactional data or just a snapshot of the portfolio’s current holdings and click Next.
• For Transaction files – a. Define Columns: On the ‘Define Columns’ screen
you will need to define which columns in your data file contain what information. For each type of column your portfolio data file contains, place a check in the box next to the Name and then use the up or down arrows to specify the position that column holds in the data file. Example: If your data file has the ticker symbols in its first column, you will need to place a check next to ‘Security Symbol’ and select the number 1 as its position. Note: Required columns:
- Security Symbol - Transaction Code - Date – Trade - Quantity - Trade Amount
Once all the columns are defined, click Next.
Linking Orion To A Portfolio Accounting System
- 6 -
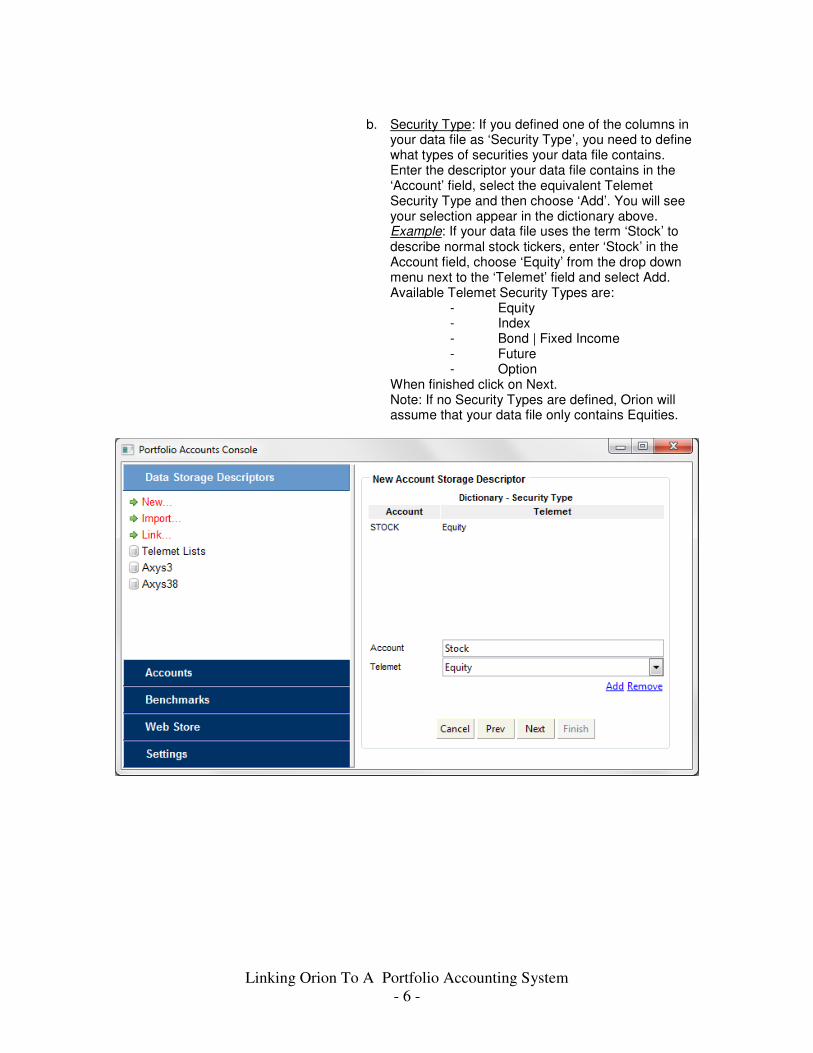
b. Security Type: If you defined one of the columns in your data file as ‘Security Type’, you need to define what types of securities your data file contains. Enter the descriptor your data file contains in the ‘Account’ field, select the equivalent Telemet Security Type and then choose ‘Add’. You will see your selection appear in the dictionary above. Example: If your data file uses the term ‘Stock’ to describe normal stock tickers, enter ‘Stock’ in the Account field, choose ‘Equity’ from the drop down menu next to the ‘Telemet’ field and select Add. Available Telemet Security Types are:
- Equity - Index - Bond | Fixed Income - Future - Option
When finished click on Next. Note: If no Security Types are defined, Orion will assume that your data file only contains Equities.

Linking Orion To A Portfolio Accounting System
- 7 -
c. Transactions: The ‘Transactions’ screen allows you
to match up the transaction types from your data file to their Orion equivalents. Enter the transaction type name from your data file in the ‘Account’ field, select the Telemet equivalent from the drop down arrow next to the ‘Telemet’ field then select Add. You will see your selection appear in the dictionary above. When finished click on Next. Available Telemet Transaction types are shown below.
d. Preview: If you wish to preview your data, click on the word ‘Select’ on the ‘Account URL’ line, browse to your exported data file, select it and choose
Linking Orion To A Portfolio Accounting System
- 8 -
Open. You will see your exported data file previewed in the screen below. Previewing data is optional. Important: To preview or use your exported data file make sure you do not have the file open in any other application. When ready, click on Finish. You will see the name of your Data Storage Descriptor appear on the left side of the window underneath the heading ‘Text Files’.
• For Snapshot files – a. Define Columns: On this screen you will need to
define which columns in your data file contain what information. For each type of column your file contains, place a check in the box next to the Name and then use the up or down arrows to specify the position that column holds in the data file. Example: If your data file has the ticker symbols in its first column, you will need to place a check next to ‘Security Symbol’ and select the number 1 as its position. Once all the columns are defined, click Next. Note: Required columns:
- Security Symbol - Shares
b. Security Type: If you defined one of the columns in your data file as ‘Security Type’, you need to define what types of securities your data file contains. Enter the descriptor your data file contains in the ‘Account’ field, select the equivalent Telemet Security Type and then choose ‘Add’. You will see your selection appear in the dictionary above. Example: If your data file uses the term ‘Stock’ to describe normal stock tickers, enter ‘Stock’ in the Account field, choose ‘Equity’ from the drop down menu next to the ‘Telemet’ field and select Add. When finished click on Next. Available Telemet Security Types are:
- Equity - Index - Bond | Fixed Income - Future - Option
Note: If no Security Types are defined, Orion will assume that your data file only contains Equities.
c. Preview: If you wish to preview your data, click on the word ‘Select’ on the ‘Account URL’ line, browse to your exported data file, select it and choose Open. You will see your exported data file previewed in the screen below. Important: To preview or use your exported data file make sure you do not have the file open in any other application.
d. When ready, click on Finish. You will see the name of your Data Storage Descriptor appear on the left side of the window underneath the heading ‘Text Files’.
Linking Orion To A Portfolio Accounting System
- 9 -
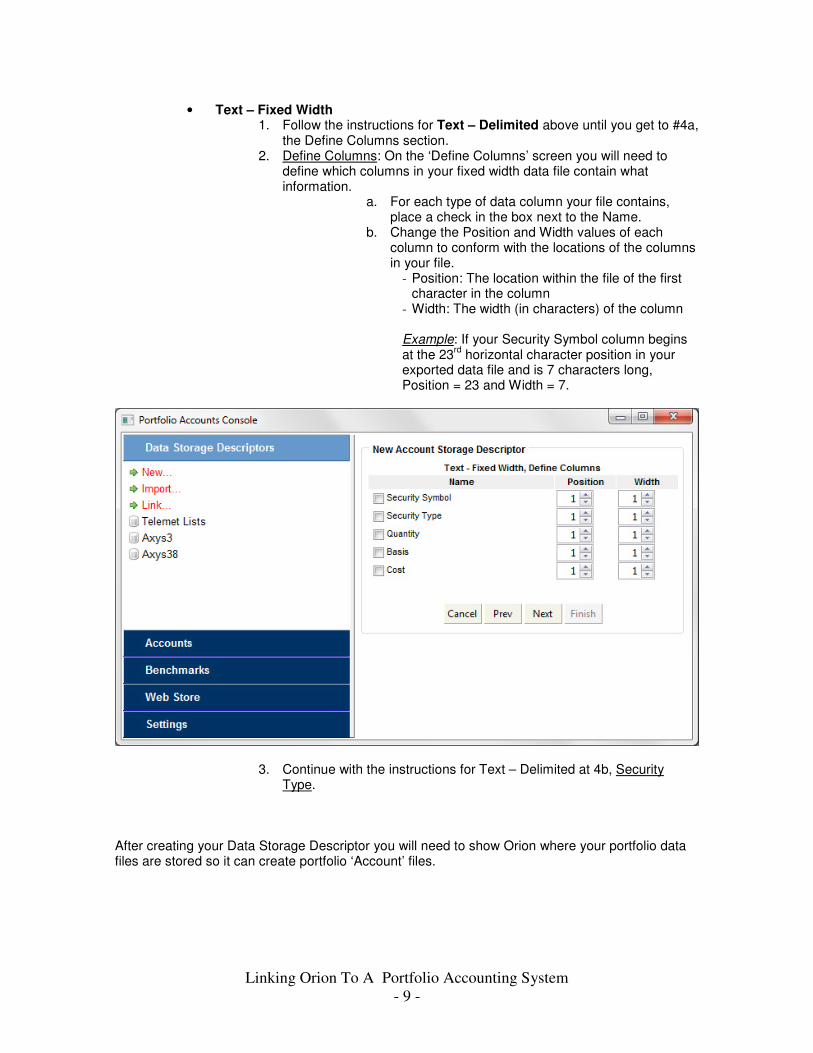
• Text – Fixed Width 1. Follow the instructions for Text – Delimited above until you get to #4a,
the Define Columns section. 2. Define Columns: On the ‘Define Columns’ screen you will need to
define which columns in your fixed width data file contain what information.
a. For each type of data column your file contains, place a check in the box next to the Name.
b. Change the Position and Width values of each column to conform with the locations of the columns in your file.
- Position: The location within the file of the first character in the column
- Width: The width (in characters) of the column Example: If your Security Symbol column begins at the 23
rd horizontal character position in your
exported data file and is 7 characters long, Position = 23 and Width = 7.
3. Continue with the instructions for Text – Delimited at 4b, Security Type.
After creating your Data Storage Descriptor you will need to show Orion where your portfolio data files are stored so it can create portfolio ‘Account’ files.
Linking Orion To A Portfolio Accounting System
- 10 -
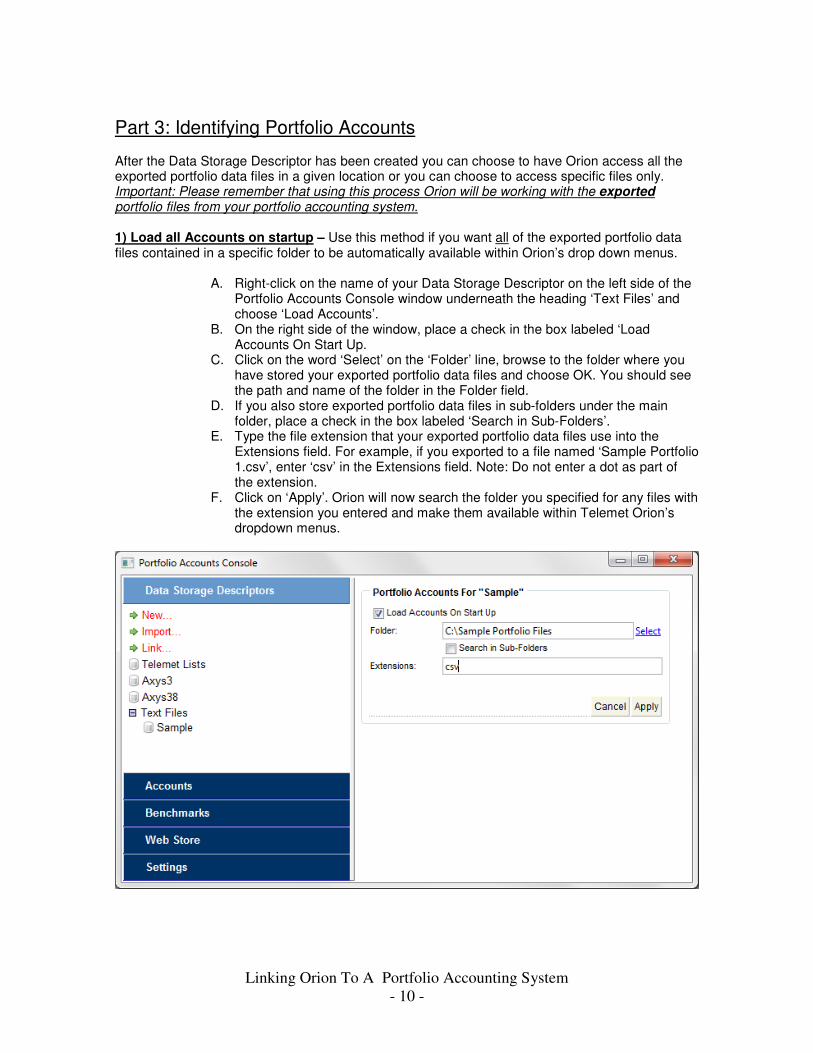
Part 3: Identifying Portfolio Accounts After the Data Storage Descriptor has been created you can choose to have Orion access all the exported portfolio data files in a given location or you can choose to access specific files only. Important: Please remember that using this process Orion will be working with the exported portfolio files from your portfolio accounting system. 1) Load all Accounts on startup – Use this method if you want all of the exported portfolio data files contained in a specific folder to be automatically available within Orion’s drop down menus.
A. Right-click on the name of your Data Storage Descriptor on the left side of the Portfolio Accounts Console window underneath the heading ‘Text Files’ and choose ‘Load Accounts’.
B. On the right side of the window, place a check in the box labeled ‘Load Accounts On Start Up.
C. Click on the word ‘Select’ on the ‘Folder’ line, browse to the folder where you have stored your exported portfolio data files and choose OK. You should see the path and name of the folder in the Folder field.
D. If you also store exported portfolio data files in sub-folders under the main folder, place a check in the box labeled ‘Search in Sub-Folders’.
E. Type the file extension that your exported portfolio data files use into the Extensions field. For example, if you exported to a file named ‘Sample Portfolio 1.csv’, enter ‘csv’ in the Extensions field. Note: Do not enter a dot as part of the extension.
F. Click on ‘Apply’. Orion will now search the folder you specified for any files with the extension you entered and make them available within Telemet Orion’s dropdown menus.
Linking Orion To A Portfolio Accounting System
- 11 -
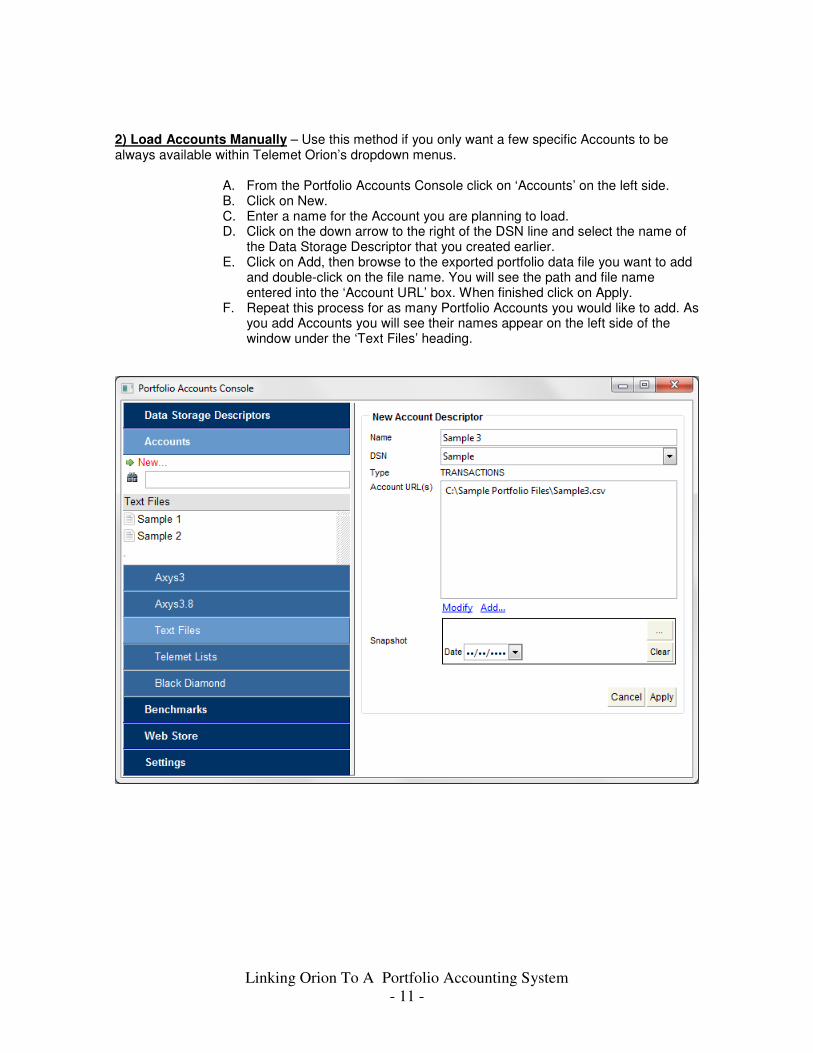
2) Load Accounts Manually – Use this method if you only want a few specific Accounts to be always available within Telemet Orion’s dropdown menus.
A. From the Portfolio Accounts Console click on ‘Accounts’ on the left side. B. Click on New. C. Enter a name for the Account you are planning to load. D. Click on the down arrow to the right of the DSN line and select the name of
the Data Storage Descriptor that you created earlier. E. Click on Add, then browse to the exported portfolio data file you want to add
and double-click on the file name. You will see the path and file name entered into the ‘Account URL’ box. When finished click on Apply.
F. Repeat this process for as many Portfolio Accounts you would like to add. As you add Accounts you will see their names appear on the left side of the window under the ‘Text Files’ heading.
Linking Orion To A Portfolio Accounting System
- 12 -
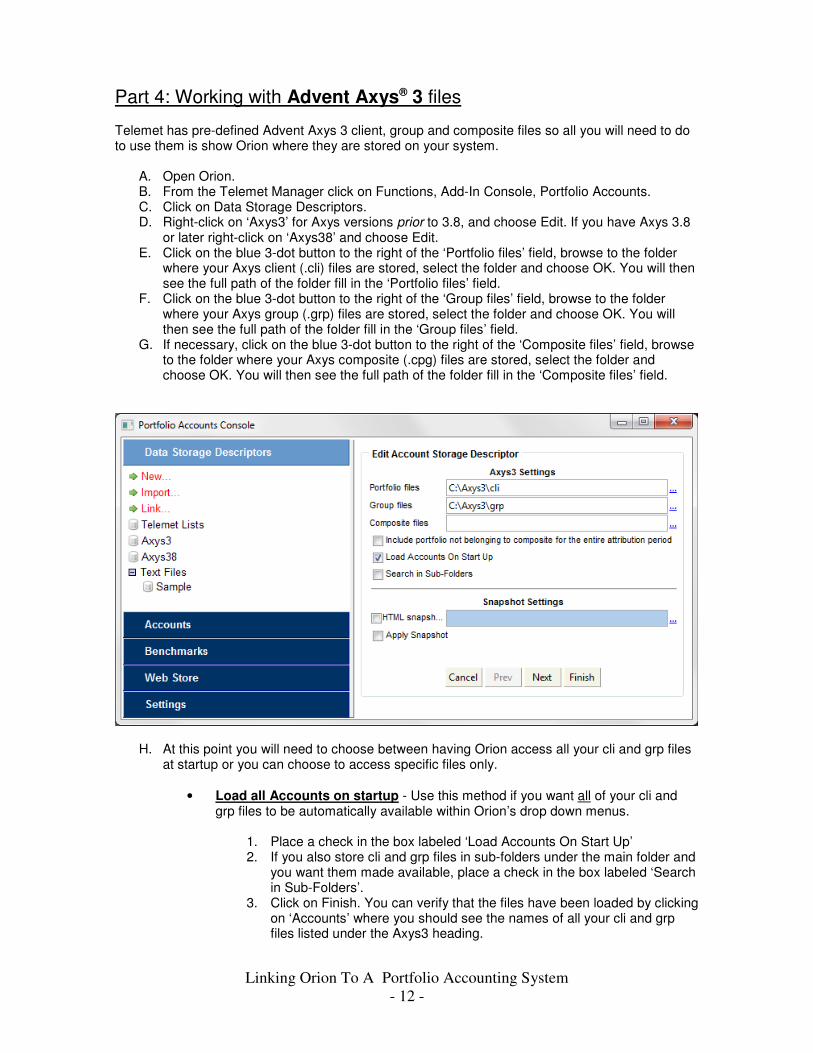
Part 4: Working with Advent Axys® 3 files
Telemet has pre-defined Advent Axys 3 client, group and composite files so all you will need to do to use them is show Orion where they are stored on your system.
A. Open Orion. B. From the Telemet Manager click on Functions, Add-In Console, Portfolio Accounts. C. Click on Data Storage Descriptors. D. Right-click on ‘Axys3’ for Axys versions prior to 3.8, and choose Edit. If you have Axys 3.8
or later right-click on ‘Axys38’ and choose Edit. E. Click on the blue 3-dot button to the right of the ‘Portfolio files’ field, browse to the folder
where your Axys client (.cli) files are stored, select the folder and choose OK. You will then see the full path of the folder fill in the ‘Portfolio files’ field.
F. Click on the blue 3-dot button to the right of the ‘Group files’ field, browse to the folder where your Axys group (.grp) files are stored, select the folder and choose OK. You will then see the full path of the folder fill in the ‘Group files’ field.
G. If necessary, click on the blue 3-dot button to the right of the ‘Composite files’ field, browse to the folder where your Axys composite (.cpg) files are stored, select the folder and choose OK. You will then see the full path of the folder fill in the ‘Composite files’ field.
H. At this point you will need to choose between having Orion access all your cli and grp files at startup or you can choose to access specific files only.
• Load all Accounts on startup - Use this method if you want all of your cli and grp files to be automatically available within Orion’s drop down menus.
1. Place a check in the box labeled ‘Load Accounts On Start Up’ 2. If you also store cli and grp files in sub-folders under the main folder and
you want them made available, place a check in the box labeled ‘Search in Sub-Folders’.
3. Click on Finish. You can verify that the files have been loaded by clicking on ‘Accounts’ where you should see the names of all your cli and grp files listed under the Axys3 heading.
Linking Orion To A Portfolio Accounting System
- 13 -
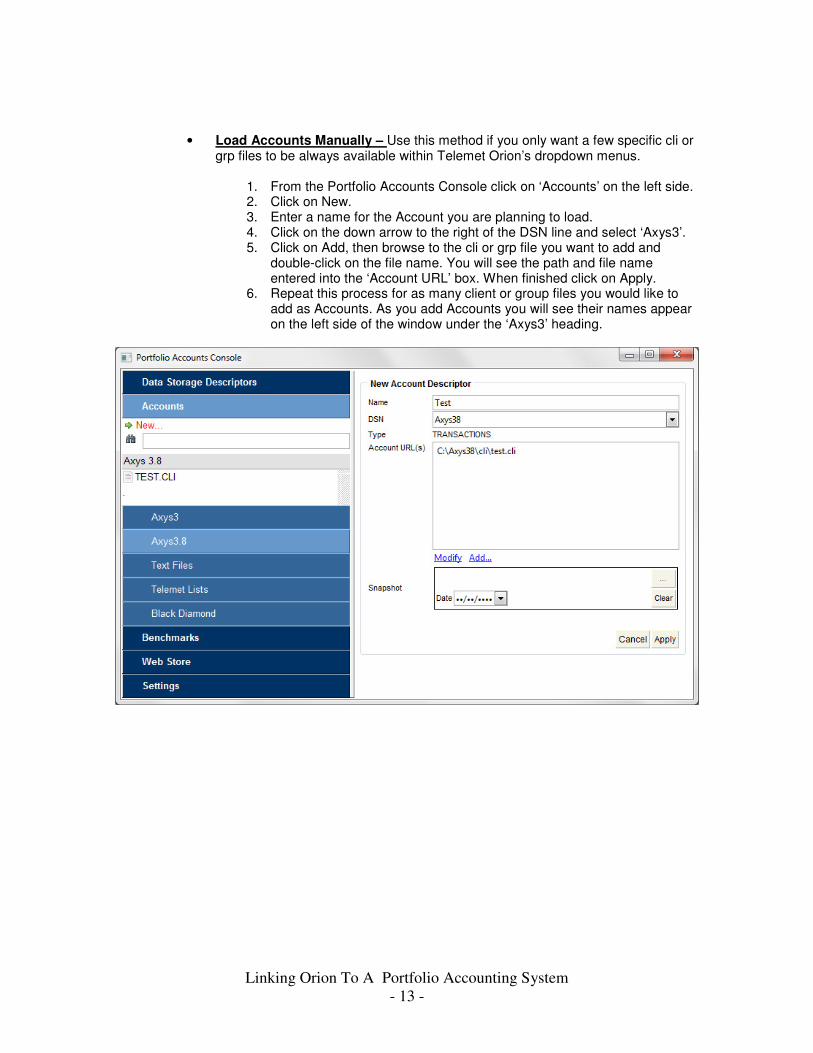
• Load Accounts Manually – Use this method if you only want a few specific cli or grp files to be always available within Telemet Orion’s dropdown menus.
1. From the Portfolio Accounts Console click on ‘Accounts’ on the left side. 2. Click on New. 3. Enter a name for the Account you are planning to load. 4. Click on the down arrow to the right of the DSN line and select ‘Axys3’. 5. Click on Add, then browse to the cli or grp file you want to add and
double-click on the file name. You will see the path and file name entered into the ‘Account URL’ box. When finished click on Apply.
6. Repeat this process for as many client or group files you would like to add as Accounts. As you add Accounts you will see their names appear on the left side of the window under the ‘Axys3’ heading.
Linking Orion To A Portfolio Accounting System
- 14 -
Part 5: Integrating PortfolioCenter™ With Telemet Orion
Portfolio Center’s Accounts and Groups can be viewed within Telemet Orion Attribution
and other Portfolio Analytics reports very easily after some initial setup steps are taken.
There are two main processes that need to be completed:
• Creation of a Telemet report profile in Portfolio Center
• Modification of the pre-existing Portfolio Center Data Storage Descriptor (DSD) in
Telemet Orion.
Both of these processes need to be done one time only and thereafter will provide quick
access to Portfolio Center’s Accounts and Groups within Telemet Orion.
1) Creation of a Telemet report profile in Portfolio Center – A Telemet report profile
needs to be created within Portfolio Center to allow Telemet Orion to extract the proper
data from the Portfolio Center database in order to provide you with Portfolio Analytic
reports in Orion. The following steps will guide you through this process:
A. From the main Portfolio Center screen, click on Settings, Report Profile, New
B. Enter ‘Telemet’ for the profile name and ‘Link profile for Telemet Orion’ for the
description then choose ‘OK’.
C. Highlight a representative portfolio that you will want to run Orion’s Portfolio
Analytics reports on, then right-click on it and choose ‘Reports’.
D. On the left side of the window choose "Transaction Detail Reports" and then as the
specific report, choose "Transaction Ledger".
E. Click on the ‘Change Profile’ button on the right, select the profile named
‘Telemet’, and then choose ‘OK’.
F. Click on the ‘Settings’ button, then click on the browse button on the far right of
the ‘Activity Types’ line.
G. Verify that ALL of the available Activity Type fields have been selected. If they
are not, select any remaining fields in the left side box and move them to the right
side box by clicking on the arrow button that points to the right. Choose ‘Ok’.
H. Click on the browse button on the far right of the ‘Columns’ line. The columns
listed below MUST be selected. If they are not, select each one in the left side box
and move it to the right side box by clicking on the arrow button that points to the
right. When finished click on ‘OK’.
• Symbol
• Security Type
• Activity
• Trade Date
• Settlement Date
• Ex Date
• Quantity
• Net Amount
• Principal
• Flow Amount
• Cost of Shares Sold
• Original Trade Date
Linking Orion To A Portfolio Accounting System
- 15 -
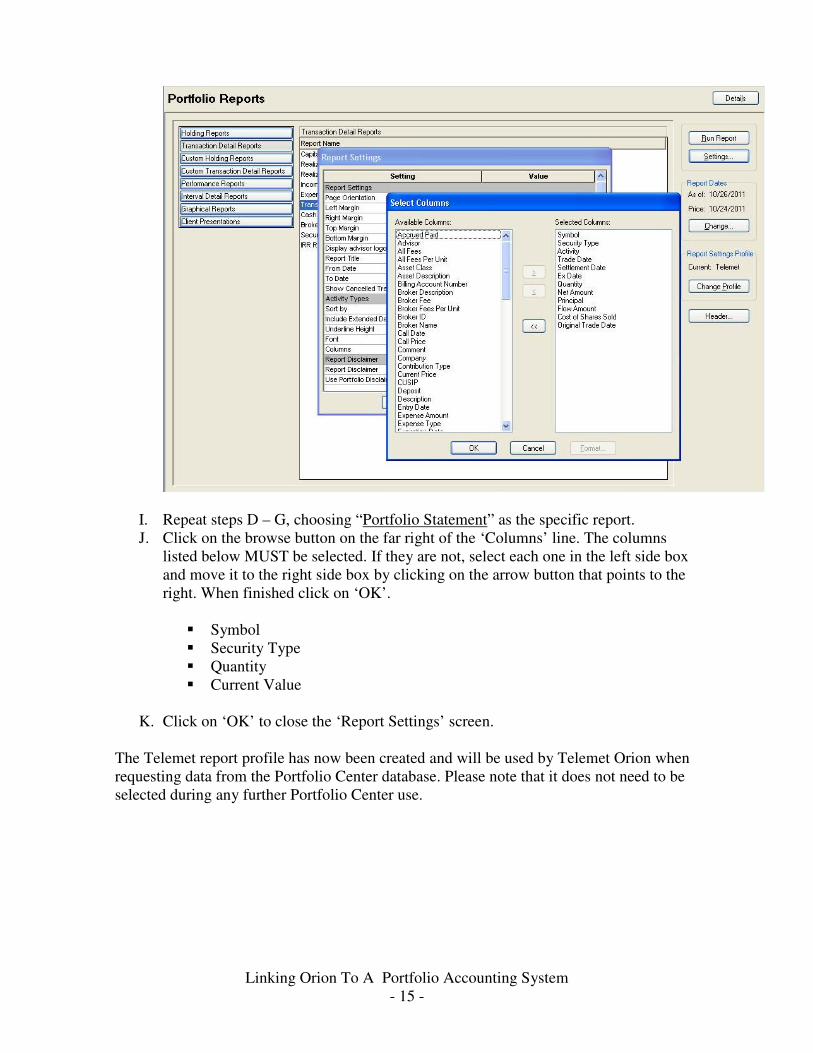
I. Repeat steps D – G, choosing “Portfolio Statement” as the specific report.
J. Click on the browse button on the far right of the ‘Columns’ line. The columns
listed below MUST be selected. If they are not, select each one in the left side box
and move it to the right side box by clicking on the arrow button that points to the
right. When finished click on ‘OK’.
� Symbol
� Security Type
� Quantity
� Current Value
K. Click on ‘OK’ to close the ‘Report Settings’ screen.
The Telemet report profile has now been created and will be used by Telemet Orion when
requesting data from the Portfolio Center database. Please note that it does not need to be
selected during any further Portfolio Center use.
Linking Orion To A Portfolio Accounting System
- 16 -
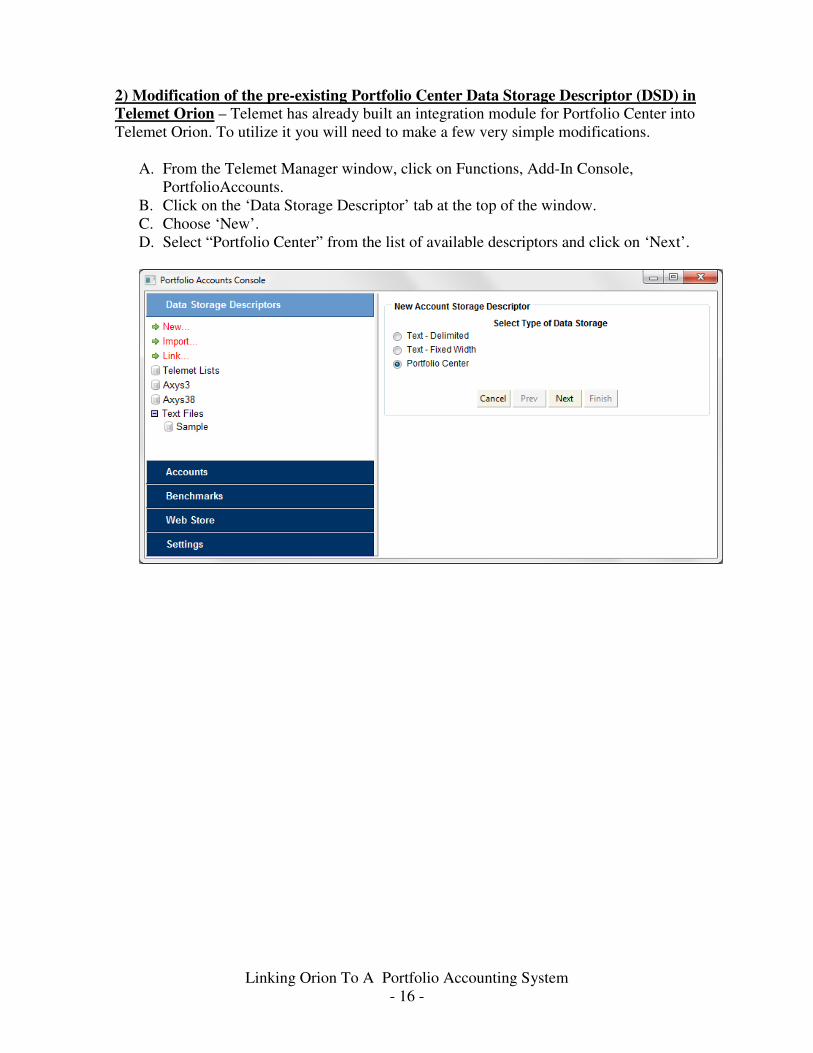
2) Modification of the pre-existing Portfolio Center Data Storage Descriptor (DSD) in
Telemet Orion – Telemet has already built an integration module for Portfolio Center into
Telemet Orion. To utilize it you will need to make a few very simple modifications.
A. From the Telemet Manager window, click on Functions, Add-In Console,
PortfolioAccounts.
B. Click on the ‘Data Storage Descriptor’ tab at the top of the window.
C. Choose ‘New’.
D. Select “Portfolio Center” from the list of available descriptors and click on ‘Next’.
Linking Orion To A Portfolio Accounting System
- 17 -
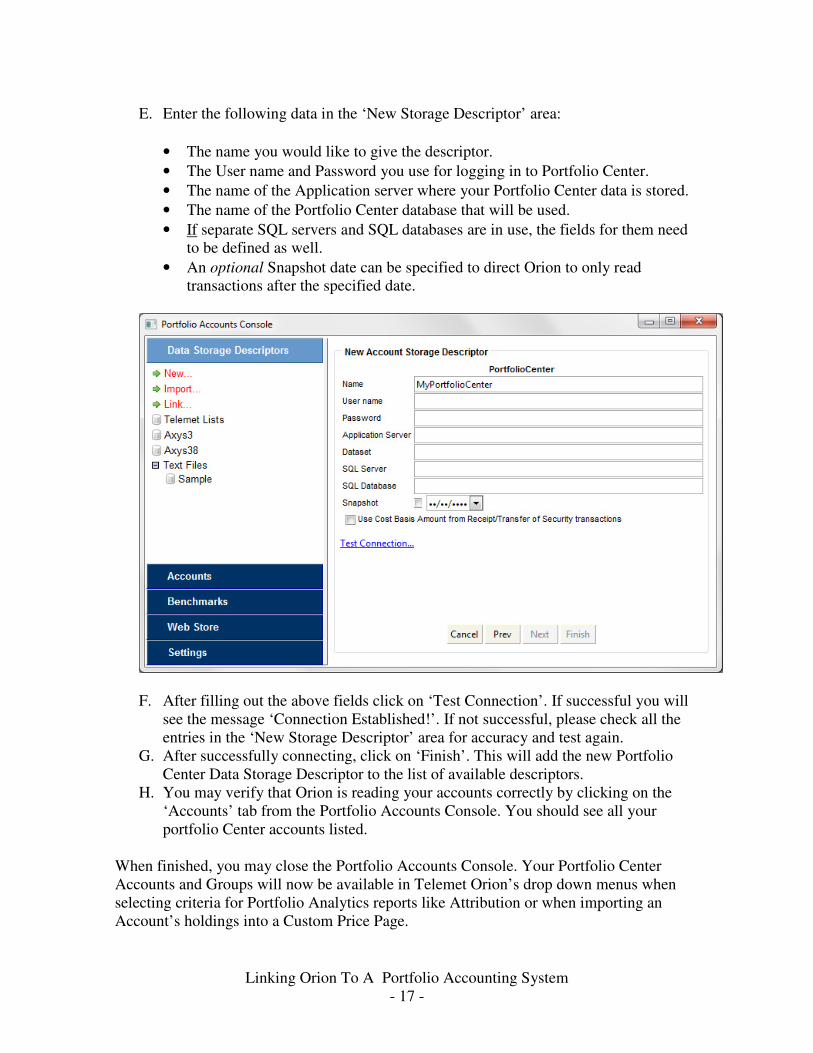
E. Enter the following data in the ‘New Storage Descriptor’ area:
• The name you would like to give the descriptor.
• The User name and Password you use for logging in to Portfolio Center.
• The name of the Application server where your Portfolio Center data is stored.
• The name of the Portfolio Center database that will be used.
• If separate SQL servers and SQL databases are in use, the fields for them need
to be defined as well.
• An optional Snapshot date can be specified to direct Orion to only read
transactions after the specified date.
F. After filling out the above fields click on ‘Test Connection’. If successful you will
see the message ‘Connection Established!’. If not successful, please check all the
entries in the ‘New Storage Descriptor’ area for accuracy and test again.
G. After successfully connecting, click on ‘Finish’. This will add the new Portfolio
Center Data Storage Descriptor to the list of available descriptors.
H. You may verify that Orion is reading your accounts correctly by clicking on the
‘Accounts’ tab from the Portfolio Accounts Console. You should see all your
portfolio Center accounts listed.
When finished, you may close the Portfolio Accounts Console. Your Portfolio Center
Accounts and Groups will now be available in Telemet Orion’s drop down menus when
selecting criteria for Portfolio Analytics reports like Attribution or when importing an
Account’s holdings into a Custom Price Page.

Linking Orion To A Portfolio Accounting System
- 18 -
Glossary
Telemet Transaction Types: Accrued Interest Purchased, Sold –
Enter accrued interest for purchased fixed income securities or sold fixed income securities.
Adjust Cost Long, Short – Reduce the cost basis of a security without changing the number of units held, as in
spinoffs. Buy -
Establish a long position. Cover Short –
Close some or all shares of a short position. Long In – Deliver a position or cash into a portfolio. Long Out – Deliver a position or cash out of a portfolio. Deposit –
Move cash between cash accounts of the same currency within a portfolio. Record portfolio and management fees.
Dividend – Record dividend income for stock or dividend expenses for short stock. Dividend Reclaim – Reclaim the foreign withholding tax on a dividend from an issuer country. Dividend Reclaim Writeoff –
Write off the foreign withholding tax reclaim amounts on a dividend from an issuer country. Interest – Record interest income for cash, an interest expense, and bond interest
payments. Enter negative interest, such as for a margin account. Sell -
Close some or all shares of a long position. Sell Short -
Open a short position. Transfer In Long, Short -
Transfer in a position or cash into a portfolio from another portfolio. Transfer Out Long, Short -
Transfer a position or cash out of a portfolio into another portfolio. Withdrawal -
Move cash between accounts within a portfolio. Establish a margin account balance.
Linking Orion To A Portfolio Accounting System
- 19 -
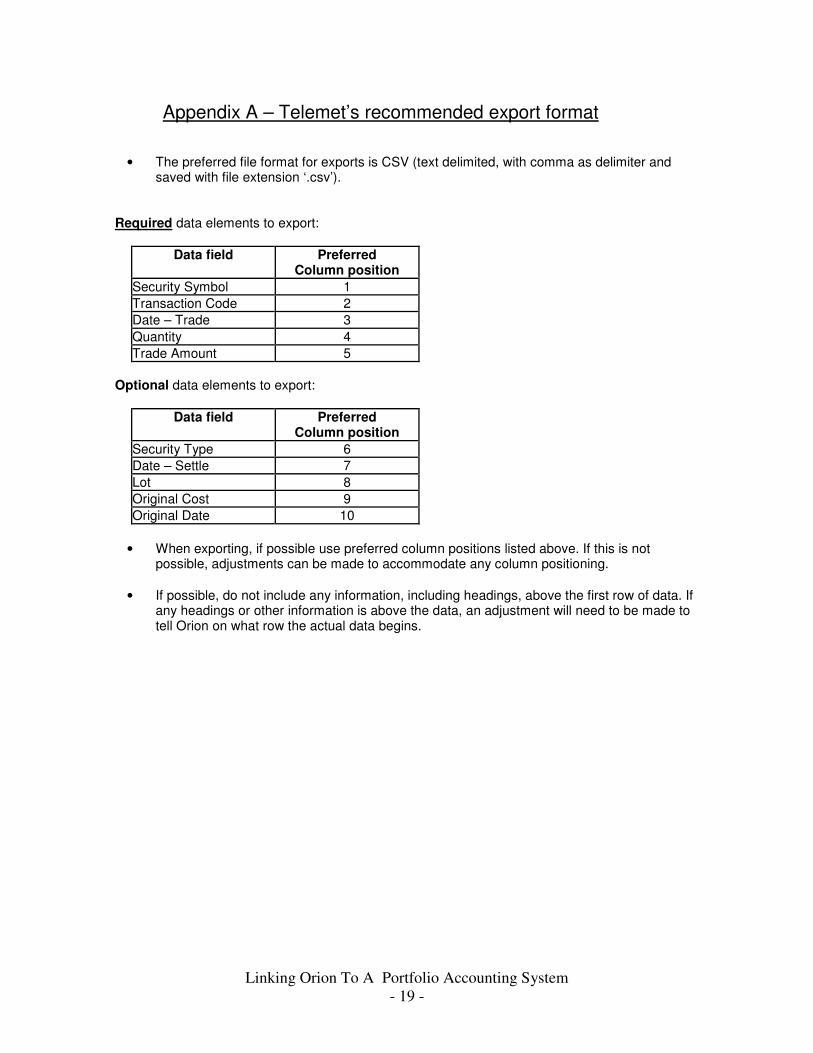
Appendix A – Telemet’s recommended export format
• The preferred file format for exports is CSV (text delimited, with comma as delimiter and saved with file extension ‘.csv’).
Required data elements to export:
Data field Preferred Column position
Security Symbol 1
Transaction Code 2
Date – Trade 3
Quantity 4
Trade Amount 5
Optional data elements to export:
Data field Preferred Column position
Security Type 6
Date – Settle 7
Lot 8
Original Cost 9
Original Date 10
• When exporting, if possible use preferred column positions listed above. If this is not possible, adjustments can be made to accommodate any column positioning.
• If possible, do not include any information, including headings, above the first row of data. If any headings or other information is above the data, an adjustment will need to be made to tell Orion on what row the actual data begins.