Embed Size (px)
Citation preview
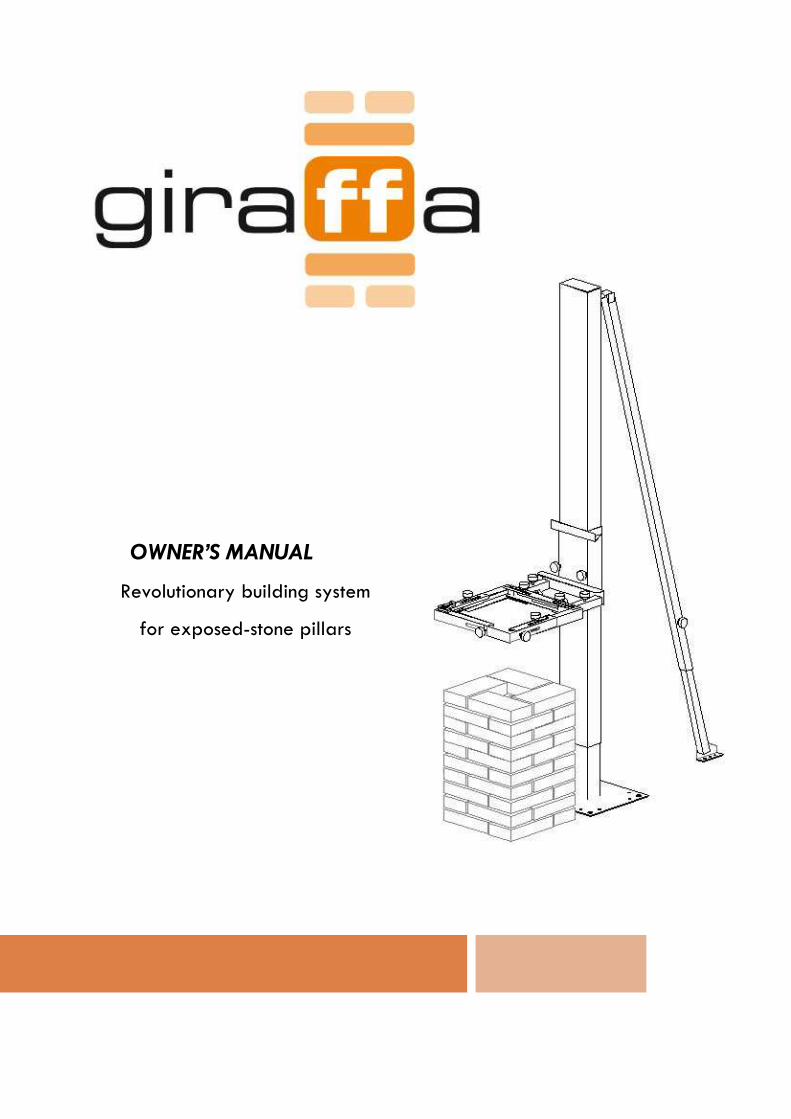
OWNER’S MANUAL
Revolutionary building system
for exposed-stone pillars
GIRAFFA
Page1
INDEX
1) INTRODUCTION 1.1) Description of the product
1.2) Safetystandards
2) GIRAFFA KIT
2.1) Package contents
3) GIRAFFA SYSTEM INSTALLATION
3.1) Assemblingtools
3.2) Assembly instructions
3.3) Installation and positioning
4) USE of GIRAFFA SYSTEM
4.1) Basic and repetitiveoperations
4.2) Adjustablesquare and rectangulartemplate
4.3) Template for helicalpillars
5) MAINTENANCE
6) WARRANTY
GIRAFFA
Page2
1) INTRODUCTION
IMPORTANT: read carefully the warnings contained in the following booklet as they
provide important information regarding safety during the installation, use and
maintenance, following these suggestions may avoid unpleasant accidents with the
Giraffa tool which may compromise the operator’s safety.
Before using the Giraffa System,check the separate components and the quantity
needed for each one as reported in these instructions.
This booklet illustrates the assembly and functionality of the Giraffa product.
1.1) Description of the product
The galvanized steel telescopic structure allows the construction of the exposed-stone
pillars up to a maximum height of 3.5 m; Giraffa System reduces greatly the time of
construction of the pillar, guaranteeing excellent results and particularly the uniformity
of the execution.
GIRAFFA is a purely mechanical and manual tool.
GIRAFFA
Page3
1.2) SafetyStandards
The Giraffa system is to be assembled with at least two operators in
order to support in an easy and secure way the structure, preventing
operators from hurting themselves (I.e. Accidental falls).
Wear a helmet and safety shoes to protect yourself against
accidental falls of parts of the Giraffa structure.
Wear working gloves to make sure to hold correctly the various
components of the Giraffa is designed to avoid sharp edges,
nevertheless, the use of gloves prevents possible injuries in any
situation in which the operator may find oneself.
Demarcate the work area with the appropriate tape, indicating the
rods in a visiblemanner.
Avoid the use of the Giraffa system and its tampering by
unauthorized personnel.
The Giraffa has to be used within the security plan.
Use Giraffa system only at ground level and when there is a safe and
flat bottom; do not install the structure in improper places, as it may
harm the operators and third parties (failing to observe the previous
instructions absolves the company from any responsibility).
UseGiraffa systemfar from any sources of heat and electricity as the
metallic structure is highly conductive, and it could transmit harmful
electric shocks to the operator.
GIRAFFA
Page4
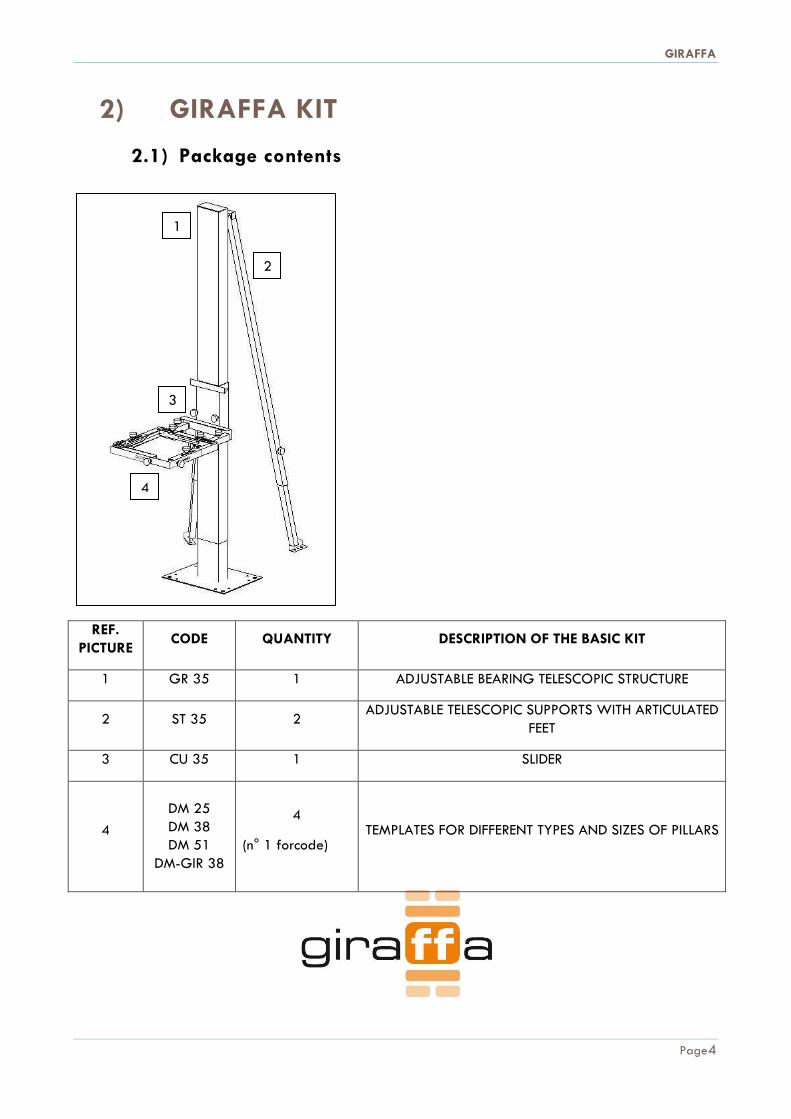
2) GIRAFFA KIT
2.1) Package contents
REF.
PICTURE CODE QUANTITY DESCRIPTION OF THE BASIC KIT
1 GR 35 1 ADJUSTABLE BEARING TELESCOPIC STRUCTURE
2 ST 35 2 ADJUSTABLE TELESCOPIC SUPPORTS WITH ARTICULATED
FEET
3 CU 35 1 SLIDER
4
DM 25
DM 38
DM 51
DM-GIR 38
4
(n° 1 forcode) TEMPLATES FOR DIFFERENT TYPES AND SIZES OF PILLARS
1
2
3
4
GIRAFFA
Page5
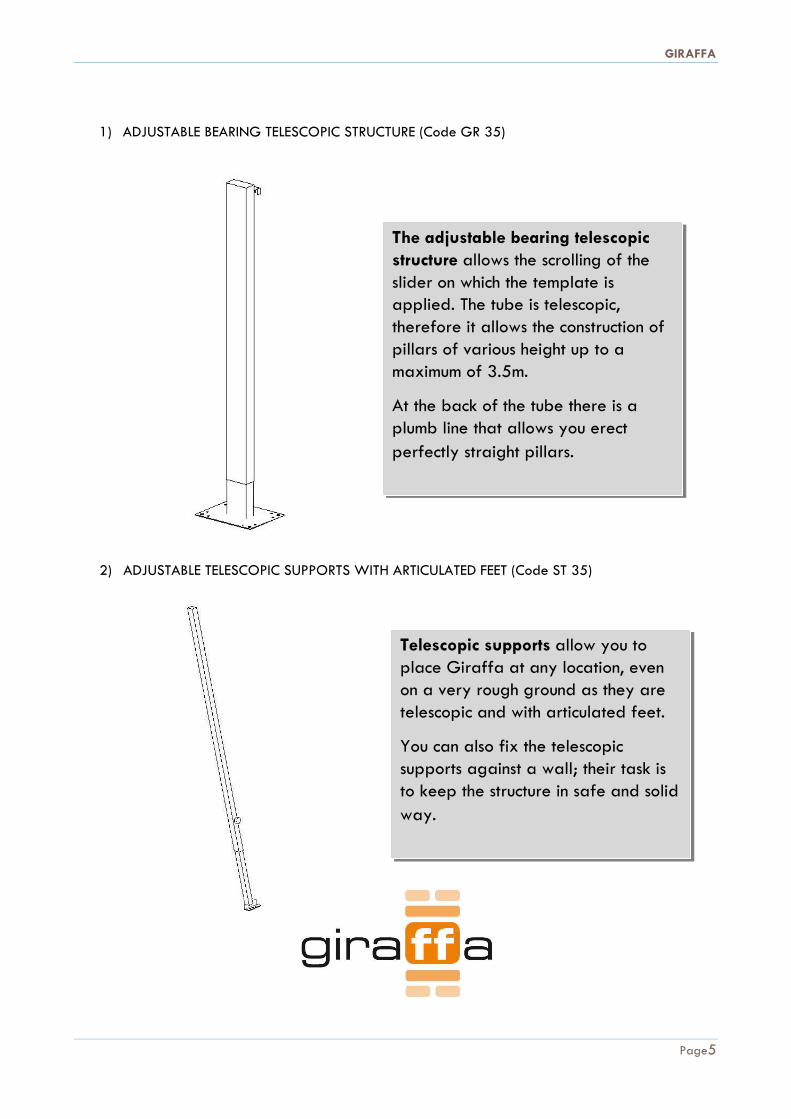
1) ADJUSTABLE BEARING TELESCOPIC STRUCTURE (Code GR 35)
2) ADJUSTABLE TELESCOPIC SUPPORTS WITH ARTICULATED FEET (Code ST 35)
The adjustable bearing telescopic
structure allows the scrolling of the
slider on which the template is
applied. The tube is telescopic,
therefore it allows the construction of
pillars of various height up to a
maximum of 3.5m.
At the back of the tube there is a
plumb line that allows you erect
perfectly straight pillars.
Telescopic supports allow you to
place Giraffa at any location, even
on a very rough ground as they are
telescopic and with articulated feet.
You can also fix the telescopic
supports against a wall; their task is
to keep the structure in safe and solid
way.
GIRAFFA
Page6
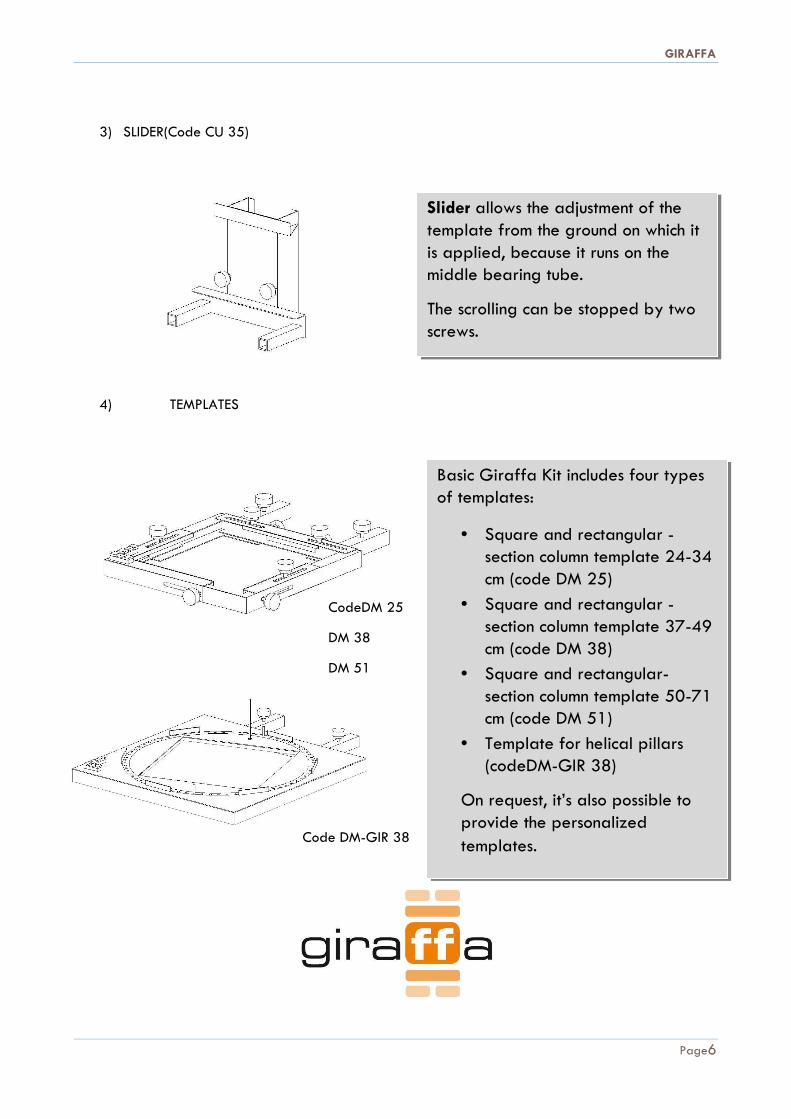
3) SLIDER(Code CU 35)
4) TEMPLATES
Slider allows the adjustment of the
template from the ground on which it
is applied, because it runs on the
middle bearing tube.
The scrolling can be stopped by two
screws.
Basic Giraffa Kit includes four types
of templates:
• Square and rectangular -
section column template 24-34
cm (code DM 25)
• Square and rectangular -
section column template 37-49
cm (code DM 38)
• Square and rectangular-
section column template 50-71
cm (code DM 51)
• Template for helical pillars
(codeDM-GIR 38)
On request, it’s also possible to
provide the personalized
templates.
CodeDM 25
DM 38
DM 51
Code DM-GIR 38
GIRAFFA
Page7
3) GIRAFFA SYSTEM INSTALLATION
3.1) Assemblingtools
For the installation of Giraffa system there is no need of special equipment; the
locking screws can be tightened manually, while is recommended the use of a proper
key for bolts.
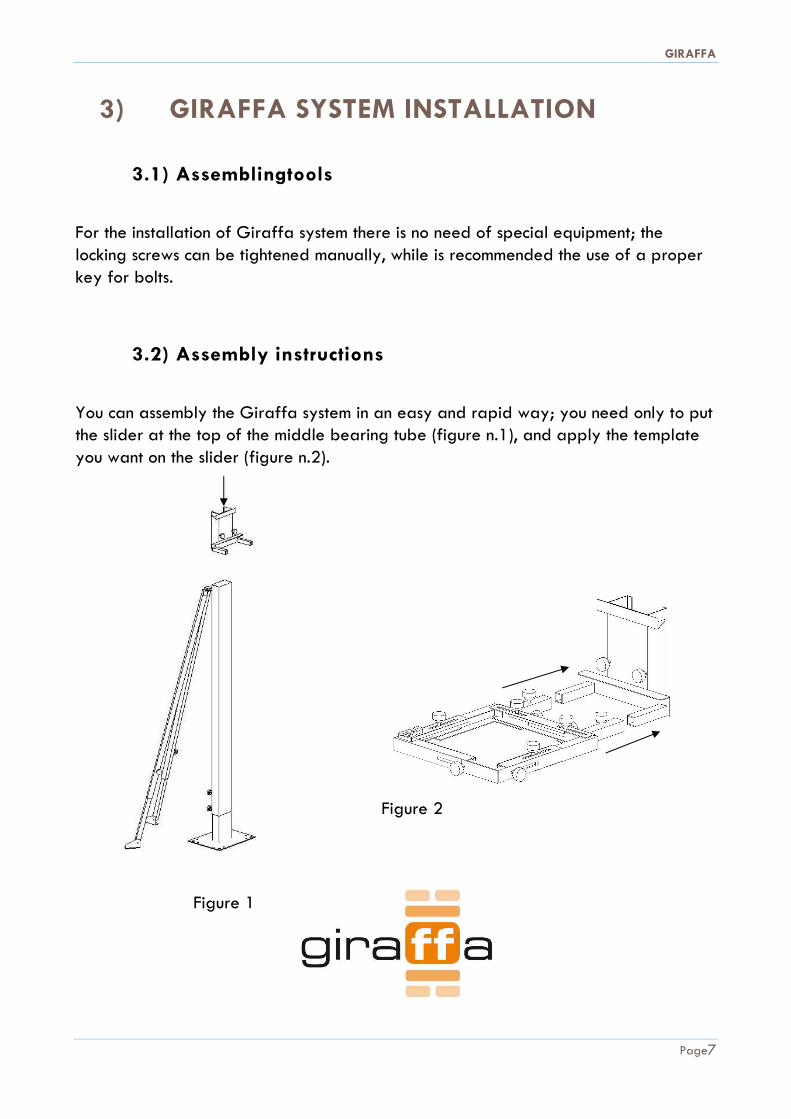
3.2) Assembly instructions
You can assembly the Giraffa system in an easy and rapid way; you need only to put
the slider at the top of the middle bearing tube (figure n.1), and apply the template
you want on the slider (figure n.2).
Figure 1
Figure 2
GIRAFFA
Page8
3.3) Installation and positioning
The various ways in which the Giraffa can be positioned depend on different
requirements and different building yards, also because the Giraffa system was
created in order to be adapted to different conditions..
In this instruction book i twill be illustrated how to position the Giraffa and i twill be
showed its use in the most ordinary phases in a building yard:
• Place the Giraffa tool where you want to build the pillar, then place the base
of the middle bearing tube fixing it to the flat ground by its adjustable
telescopic supports using nails, screws or dowels;
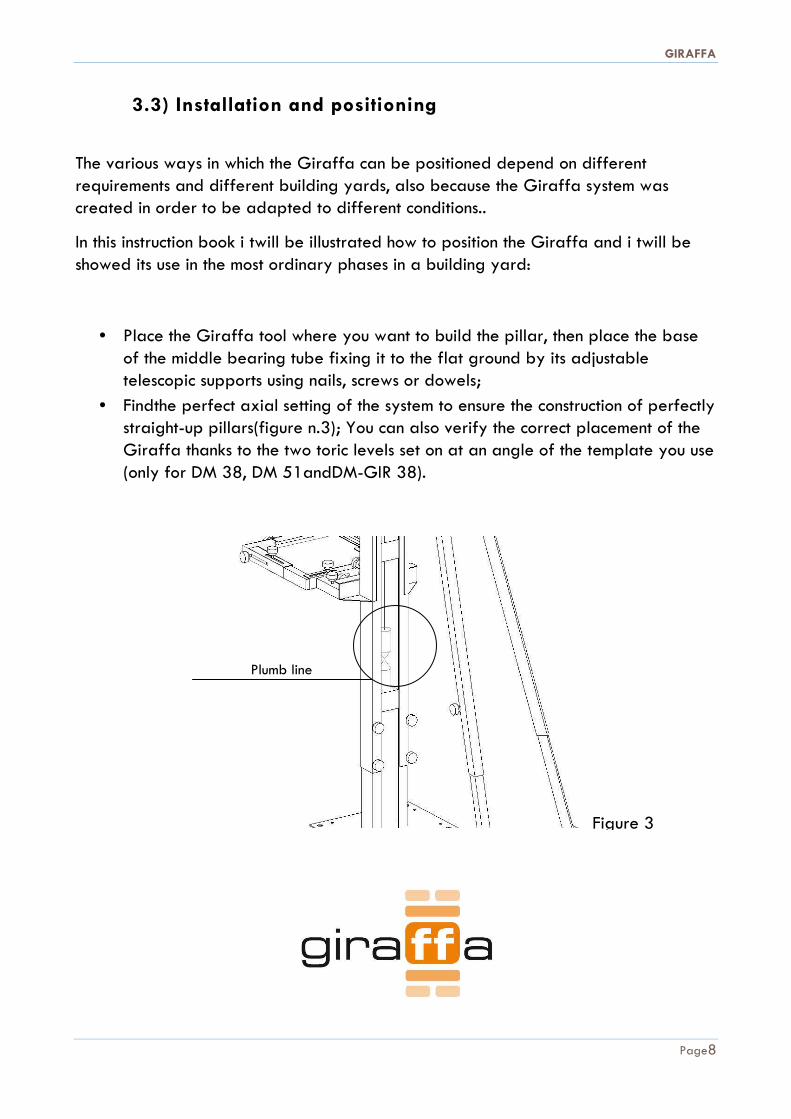
• Findthe perfect axial setting of the system to ensure the construction of perfectly
straight-up pillars(figure n.3); You can also verify the correct placement of the
Giraffa thanks to the two toric levels set on at an angle of the template you use
(only for DM 38, DM 51andDM-GIR 38).
Figure 3
Plumb line
GIRAFFA
Page9
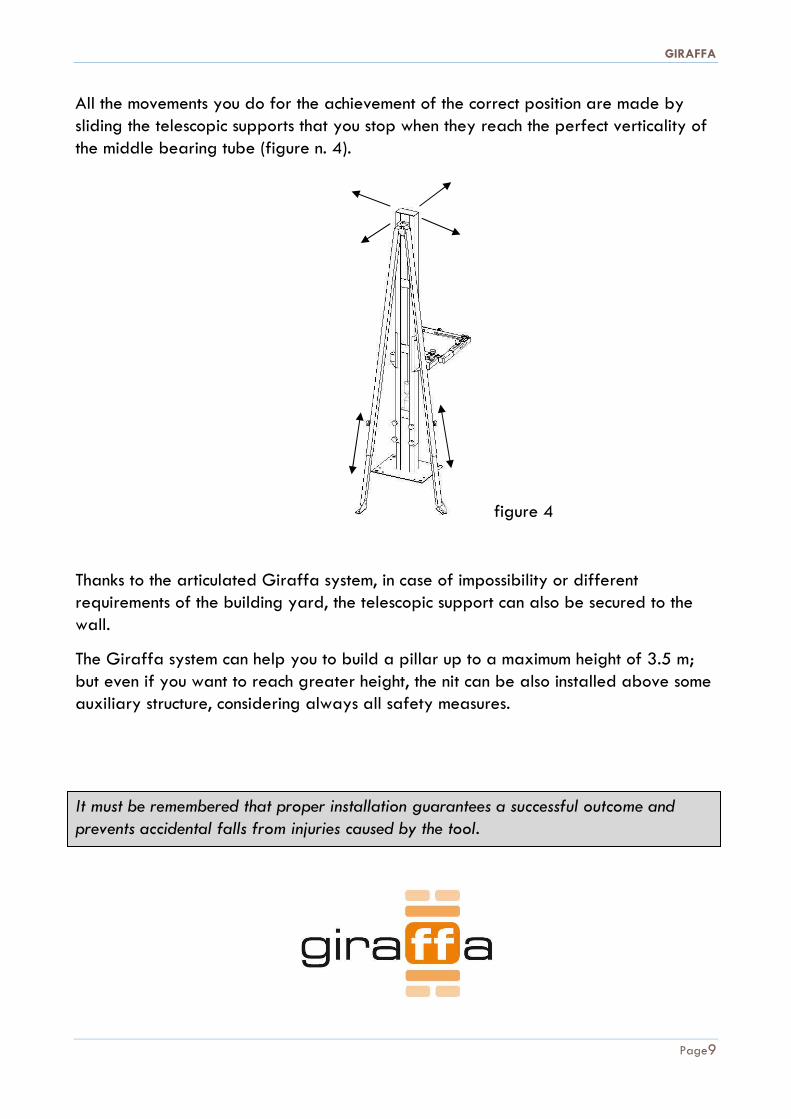
All the movements you do for the achievement of the correct position are made by
sliding the telescopic supports that you stop when they reach the perfect verticality of
the middle bearing tube (figure n. 4).
figure 4
Thanks to the articulated Giraffa system, in case of impossibility or different
requirements of the building yard, the telescopic support can also be secured to the
wall.
The Giraffa system can help you to build a pillar up to a maximum height of 3.5 m;
but even if you want to reach greater height, the nit can be also installed above some
auxiliary structure, considering always all safety measures.
It must be remembered that proper installation guarantees a successful outcome and
prevents accidental falls from injuries caused by the tool.

GIRAFFA
Page10
4) THE USE OF GIRAFFA SYSTEM
4.1) Basic and repetitiveoperations
Once the Giraffa structure has been installed, the operator may begin with the
construction of the columns according to the following, fast and simple operations:
• After having completely lowered the template to the ground, you can start the
building the first level of the bricks (figure n. 5);
Figure 5
• To facilitate the work is recommended the marking on the middle bearing tube
with the indicative lines, after having accounted the rise in height of the
template of each level of bricks.
• The operator must repeatedly raise the slider at the desired height while he is
building new levels of bricks, you must always make sure that you have
tightened the screws accurately with locking of the slider because of your
greater safety and for better precision of the product.
GIRAFFA
Page11
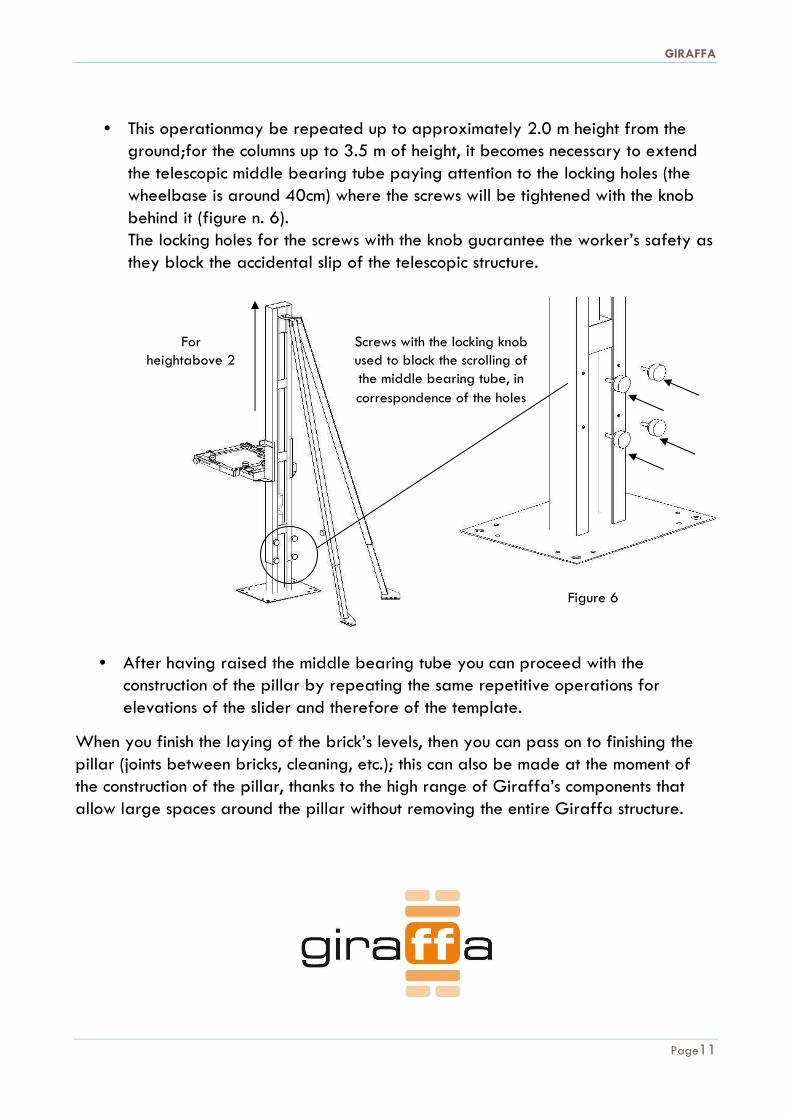
• This operationmay be repeated up to approximately 2.0 m height from the
ground;for the columns up to 3.5 m of height, it becomes necessary to extend
the telescopic middle bearing tube paying attention to the locking holes (the
wheelbase is around 40cm) where the screws will be tightened with the knob
behind it (figure n. 6).
The locking holes for the screws with the knob guarantee the worker’s safety as
they block the accidental slip of the telescopic structure.
Figure 6
• After having raised the middle bearing tube you can proceed with the
construction of the pillar by repeating the same repetitive operations for
elevations of the slider and therefore of the template.
When you finish the laying of the brick’s levels, then you can pass on to finishing the
pillar (joints between bricks, cleaning, etc.); this can also be made at the moment of
the construction of the pillar, thanks to the high range of Giraffa’s components that
allow large spaces around the pillar without removing the entire Giraffa structure.
For
heightabove 2
m
Screws with the locking knob
used to block the scrolling of
the middle bearing tube, in
correspondence of the holes
GIRAFFA
Page12
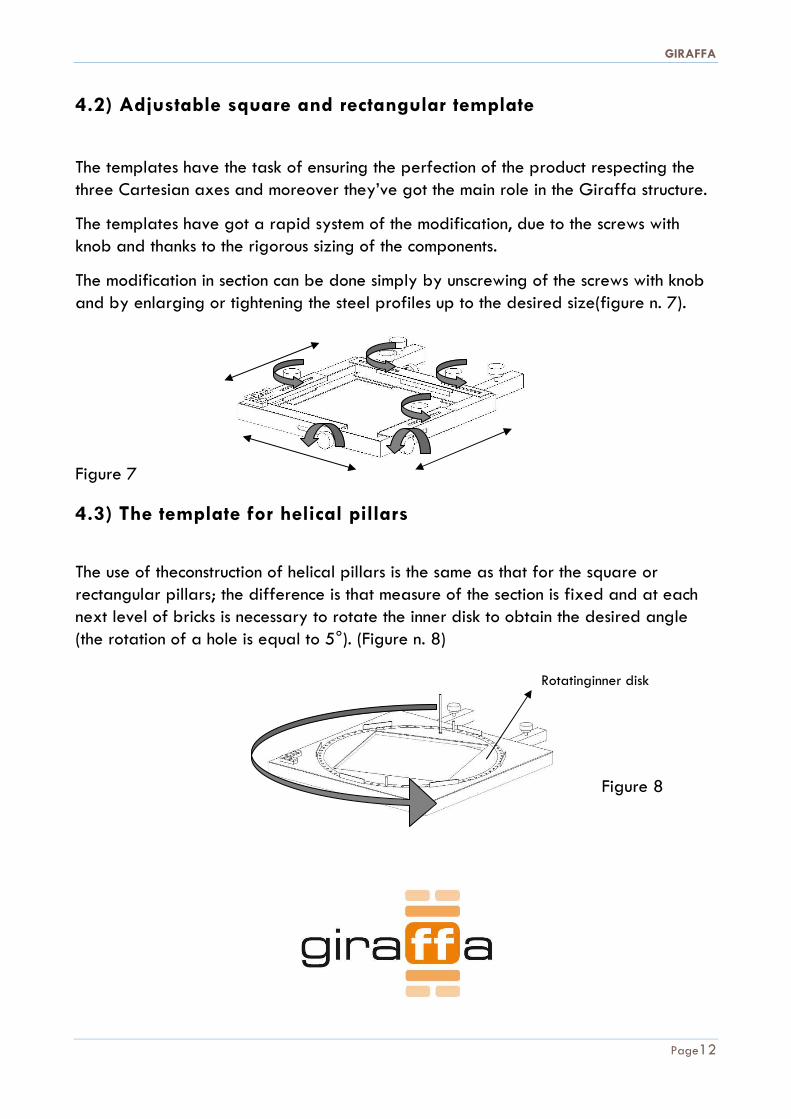
4.2) Adjustable square and rectangular template
The templates have the task of ensuring the perfection of the product respecting the
three Cartesian axes and moreover they’ve got the main role in the Giraffa structure.
The templates have got a rapid system of the modification, due to the screws with
knob and thanks to the rigorous sizing of the components.
The modification in section can be done simply by unscrewing of the screws with knob
and by enlarging or tightening the steel profiles up to the desired size(figure n. 7).
Figure 7
4.3) The template for helical pillars
The use of theconstruction of helical pillars is the same as that for the square or
rectangular pillars; the difference is that measure of the section is fixed and at each
next level of bricks is necessary to rotate the inner disk to obtain the desired angle
(the rotation of a hole is equal to 5°). (Figure n. 8)
Rotatinginner disk
Figure 8
GIRAFFA
Page13
5) MAINTENANCE
As Giraffa system is a fully manual and mechanical tool, there is no need of any
special maintenance; nevertheless you have to keep clean the entire structure,
eliminating residues of glue, cement and crushed stone from sliding points.
It is recommended to store and use the Giraffa structure only in dry locations.
Do not bend or deform any component.
6) WARRANTY
The two-year warranty covers only possible manufacturing defects, which can’t
attributable to an improper use of the equipment. Any eventual breaking due to the
improper use of the Giraffa tool will not be accepted under warranty.
Visible deformation of the sliding elements due to their incorrect use or assembly will
not be accepted under warranty.
Changes of the tool, made by third parties, will void your warranty and will release
the producer from any responsibility.
Contact the manufacturer in case of doubt arisen during the assembly or maintenance
of the Giraffa.
All rights of the production of these instructions for use, in whole or in part, are reserved.
Giraffa is a registered patent.
Any imitation will be prosecuted by law.
GIRAFFA
Page14
NOTE:
GIRAFFA
Page15
EDIL GIRAFFA di KramarMarjana
Strada Saccole Pignole, 6
tel / fax 0376 919151
46041 Asola (MN) - Italy
P.Iva 02340130208
[email protected] www.edilgiraffa.com
GIRAFFA
Page16
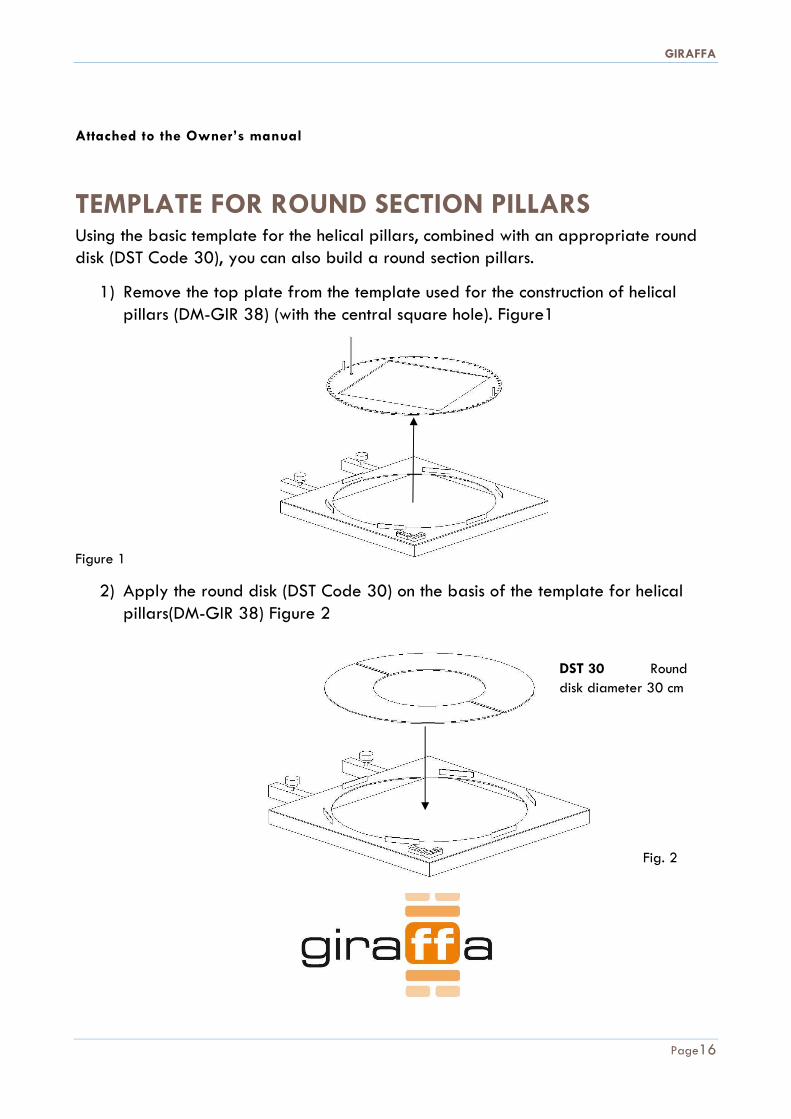
Attached to the Owner’s manual
TEMPLATE FOR ROUND SECTION PILLARS Using the basic template for the helical pillars, combined with an appropriate round
disk (DST Code 30), you can also build a round section pillars.
1) Remove the top plate from the template used for the construction of helical
pillars (DM-GIR 38) (with the central square hole). Figure1
Figure 1
2) Apply the round disk (DST Code 30) on the basis of the template for helical
pillars(DM-GIR 38) Figure 2
Fig. 2
DST 30 Round
disk diameter 30 cm
GIRAFFA
Page17
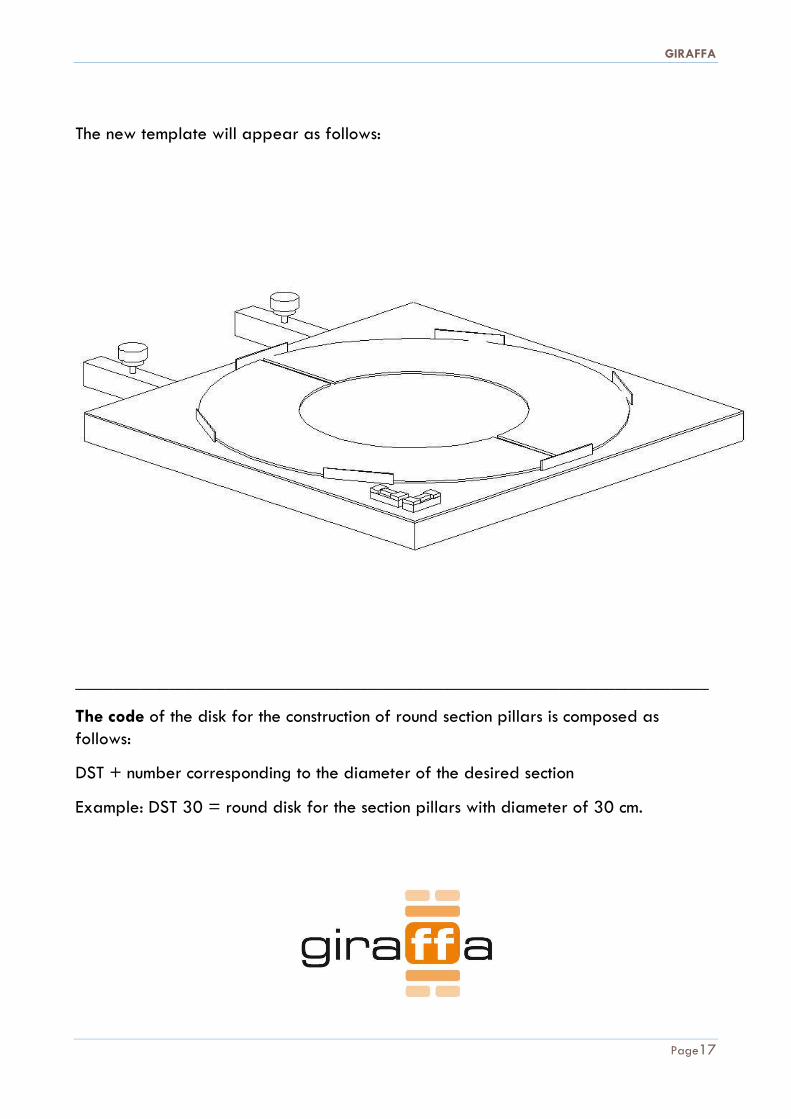
The new template will appear as follows:
____________________________________________________________________
The code of the disk for the construction of round section pillars is composed as
follows:
DST + number corresponding to the diameter of the desired section
Example: DST 30 = round disk for the section pillars with diameter of 30 cm.
GIRAFFA
Page18
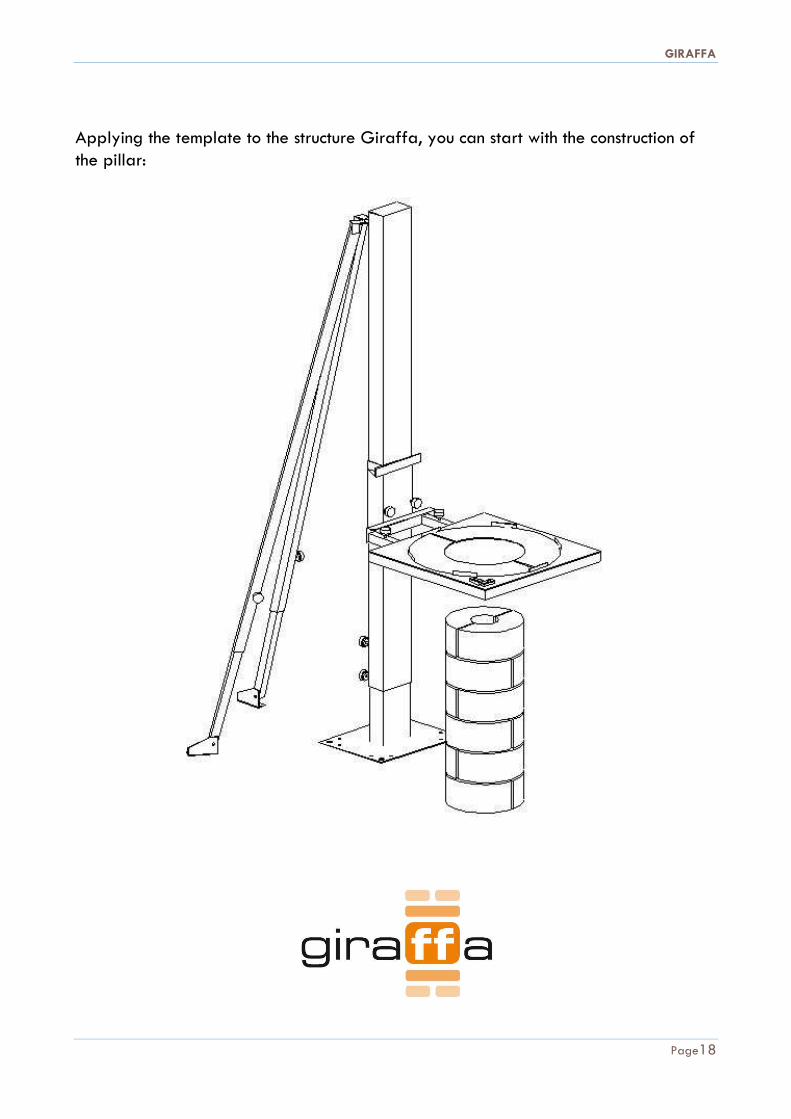
Applying the template to the structure Giraffa, you can start with the construction of
the pillar:


![Allegato Rev 01 [file .pdf]](https://img.pdfslide.us/doc/110x75/5872003d1a28abec698bc8d0/allegato-rev-01-file-pdf.jpg)