Embed Size (px)
Citation preview
Special Points of interest
Telescopic stainless steel mast and legs 240 grit polished
16mm Steel wire reinforced braided nylon rope
One piece hydraulically pressed aluminium joints
Legs 15mm Fahr Industries CNC Cut Plastic Insert
Foundation Stainless Steel Feet
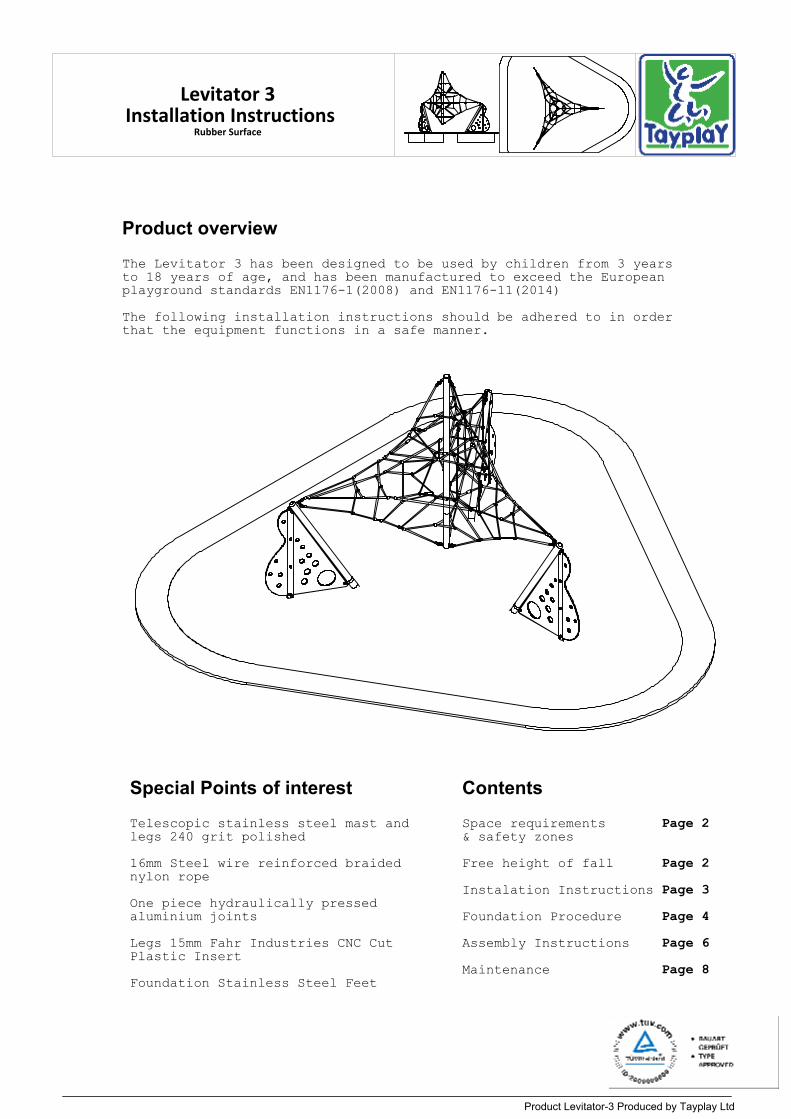
Product overview
The Levitator 3 has been designed to be used by children from 3 years to 18 years of age, and has been manufactured to exceed the European playground standards EN1176-1(2008) and EN1176-11(2014)
The following installation instructions should be adhered to in order that the equipment functions in a safe manner.
Contents
Space requirements Page 2& safety zones
Free height of fall Page 2
Instalation Instructions Page 3
Foundation Procedure Page 4 Assembly Instructions Page 6
Maintenance Page 8
Product Levitator-3 Produced by Tayplay Ltd
Levitator 3 Installation Instructions
Rubber Surface
CFH
: 159
5 Safety Surface R1565
Free Space R2000
4466
Product Levitator-3 Produced by Tayplay Ltd
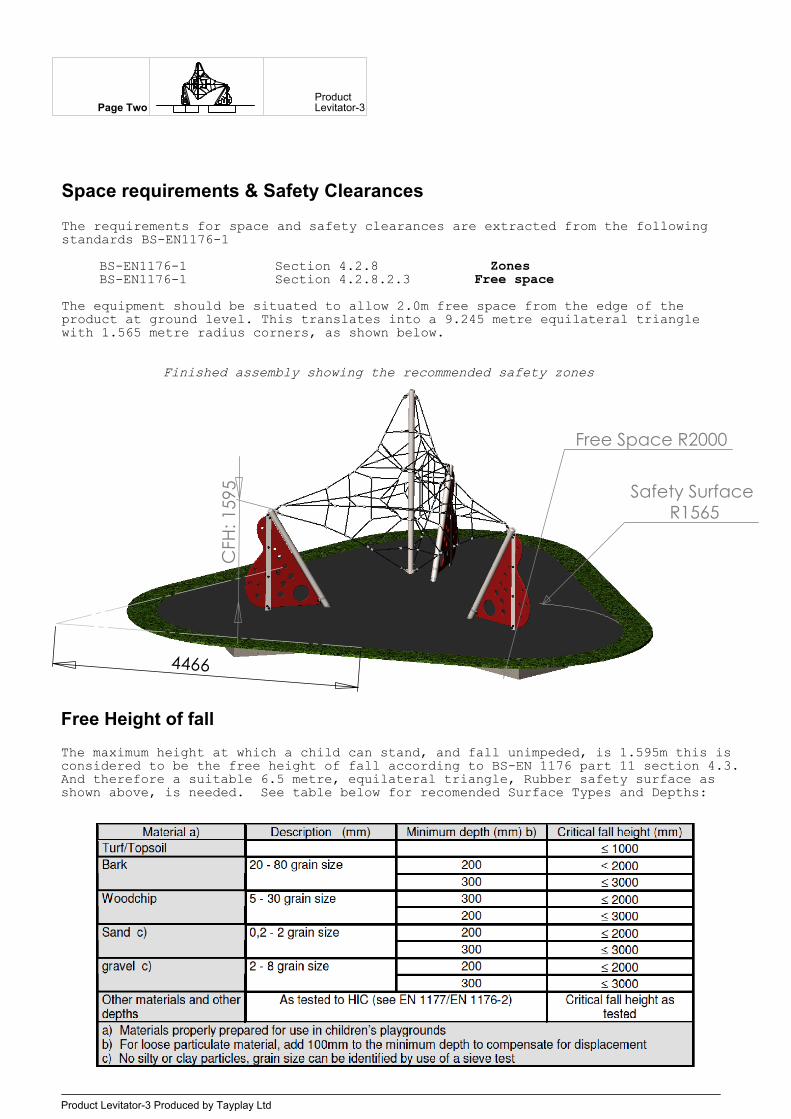
Space requirements & Safety Clearances
The requirements for space and safety clearances are extracted from the following standards BS-EN1176-1
BS-EN1176-1 Section 4.2.8 ZonesBS-EN1176-1 Section 4.2.8.2.3 Free space
The equipment should be situated to allow 2.0m free space from the edge of the product at ground level. This translates into a 9.245 metre equilateral triangle with 1.565 metre radius corners, as shown below.
Finished assembly showing the recommended safety zones
Free Height of fallThe maximum height at which a child can stand, and fall unimpeded, is 1.595m this is considered to be the free height of fall according to BS-EN 1176 part 11 section 4.3. And therefore a suitable 6.5 metre, equilateral triangle, Rubber safety surface as shown above, is needed. See table below for recomended Surface Types and Depths:
Page TwoProduct Levitator-3
Product Levitator-3 Produced by Tayplay Ltd
Leg
Foot
x3 Leg
Brac
ket
x3 Levi
tato
r Leg
x3 Levi
tato
r Tie
x6
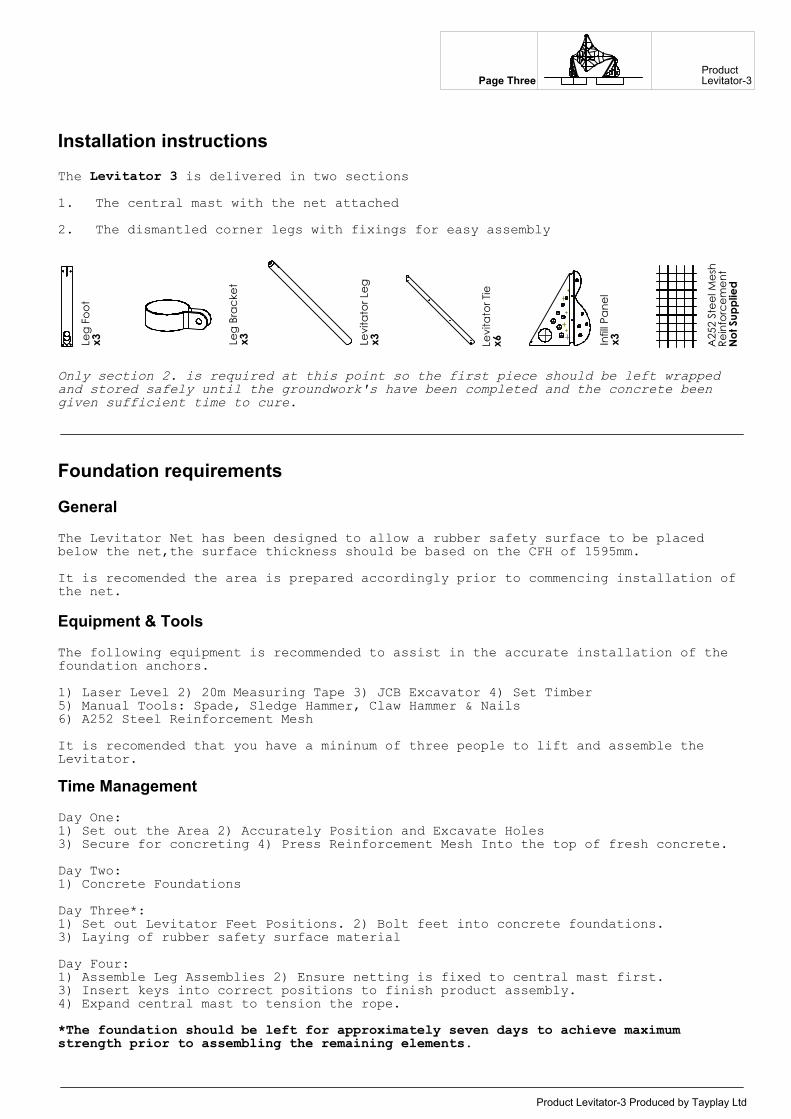
Installation instructions
The Levitator 3 is delivered in two sections
The central mast with the net attached1.
The dismantled corner legs with fixings for easy assembly 2.
Only section 2. is required at this point so the first piece should be left wrapped and stored safely until the groundwork's have been completed and the concrete been given sufficient time to cure.
Foundation requirements
General
The Levitator Net has been designed to allow a rubber safety surface to be placed below the net,the surface thickness should be based on the CFH of 1595mm.
It is recomended the area is prepared accordingly prior to commencing installation of the net.
Equipment & Tools
The following equipment is recommended to assist in the accurate installation of thefoundation anchors.
1) Laser Level 2) 20m Measuring Tape 3) JCB Excavator 4) Set Timber5) Manual Tools: Spade, Sledge Hammer, Claw Hammer & Nails6) A252 Steel Reinforcement Mesh
It is recomended that you have a mininum of three people to lift and assemble the Levitator.
Time Management
Day One:1) Set out the Area 2) Accurately Position and Excavate Holes3) Secure for concreting 4) Press Reinforcement Mesh Into the top of fresh concrete.
Day Two:1) Concrete Foundations
Day Three*:1) Set out Levitator Feet Positions. 2) Bolt feet into concrete foundations.3) Laying of rubber safety surface material
Day Four:1) Assemble Leg Assemblies 2) Ensure netting is fixed to central mast first.3) Insert keys into correct positions to finish product assembly.4) Expand central mast to tension the rope.
*The foundation should be left for approximately seven days to achieve maximumstrength prior to assembling the remaining elements.
Infil
l Pan
elx3 A
252
Stee
l Mes
hRe
info
rcem
ent
Not
Sup
plie
d
ProductLevitator-3Page Three

500
1000 2000
*Steel Mesh
120
°
3243
1353
4817 7
81
Product Levitator-3 Produced by Tayplay Ltd
Foundation Procedure
Setting Out
There are a total of Three holes that need to be excavated. The excavated holes will fix the three Levitator legs positioned evenly around the floating central mast. All foundation concrete blocks must be at the same level.
Once the correct position of the holes has been marked prior to excavation, The use of a datum peg is highly recommended in order to easily relocate the exact foundation position.
Excavation & Foundation Positioning
Procedure
In loose ground, it may be necessary to use timber framework (or shuttering) to prevent soil falling into the hole. It will also prevent an unnecessary excess volume of concrete being used. Concrete to be in 30/N mm2 mix. Total volume required: three cubic metre. It is important to ensure that the concrete blocks are level.
*A sheet of A252 mesh reinforcement should be pressed into the top of the fresh concrete, to cover the entire surface ensuring at least 50mm cover.
Foundation Positioning
When setting out the concrete blocks and feet positions, mark down the first two blocks positions using the measurements given. Repeat this process around the 360 degrees.
ProductLevitator-3Page Four
2009
2849
116
0
3613
J
L
M
DETAIL L SCALE 1 : 5
130
1
0
10
10
163
1
575
Product Levitator-3 Produced by Tayplay Ltd
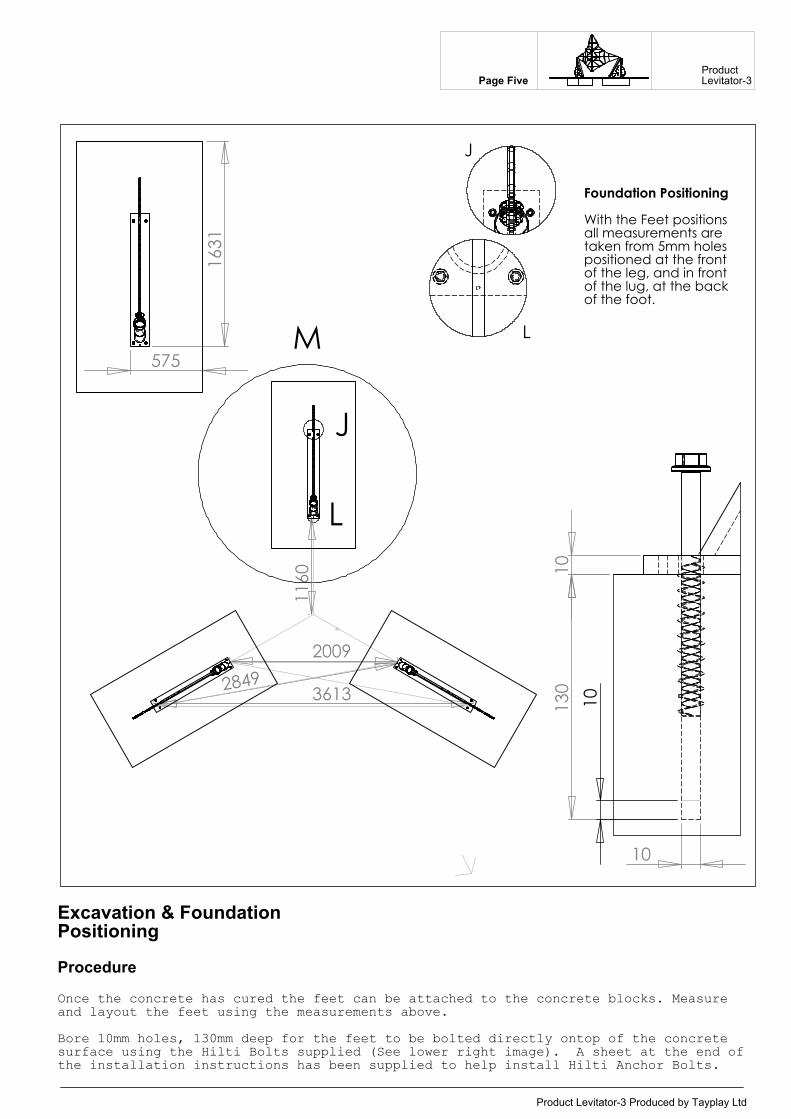
Excavation & Foundation Positioning
Procedure
Once the concrete has cured the feet can be attached to the concrete blocks. Measure and layout the feet using the measurements above.
Bore 10mm holes, 130mm deep for the feet to be bolted directly ontop of the concrete surface using the Hilti Bolts supplied (See lower right image). A sheet at the end of the installation instructions has been supplied to help install Hilti Anchor Bolts.
J
L
Foundation Positioning
With the Feet positions all measurements are taken from 5mm holes positioned at the front of the leg, and in front of the lug, at the back of the foot.
ProductLevitator-3Page Five
2
1
3
6
5
4
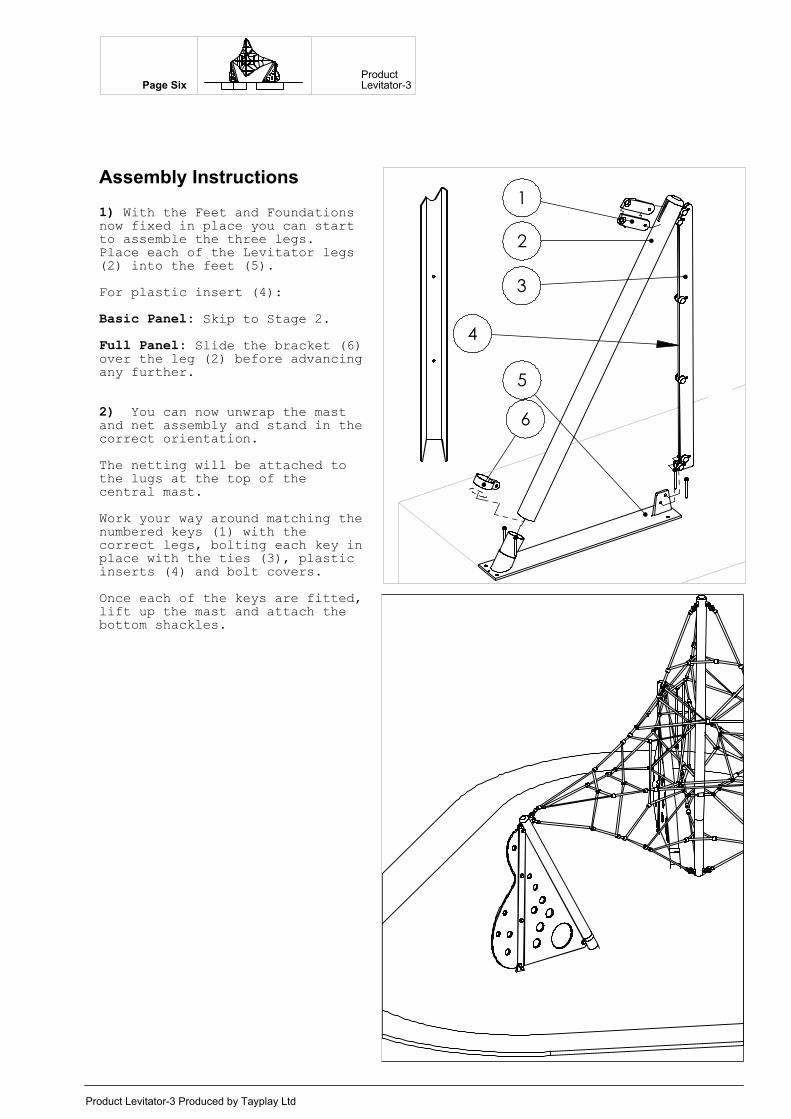
Assembly Instructions
1) With the Feet and Foundations now fixed in place you can start to assemble the three legs. Place each of the Levitator legs (2) into the feet (5).
For plastic insert (4):
Basic Panel: Skip to Stage 2.
Full Panel: Slide the bracket (6) over the leg (2) before advancing any further.
2) You can now unwrap the mast and net assembly and stand in the correct orientation.
The netting will be attached to the lugs at the top of the central mast.
Work your way around matching the numbered keys (1) with the correct legs, bolting each key in place with the ties (3), plastic inserts (4) and bolt covers.
Once each of the keys are fitted, lift up the mast and attach the bottom shackles.
Product Levitator-3 Produced by Tayplay Ltd
Product Levitator-3Page Six

475
325
0
7
Tighten the Net
4) Before using the product, Tension the net by using a wrench in the bottom of the central mast (7), torquing the central pole, this torque should be limited to 20Nm in keeping with safety testing.
Product Levitator-3 Produced by Tayplay Ltd
Product Levitator-3Page Seven
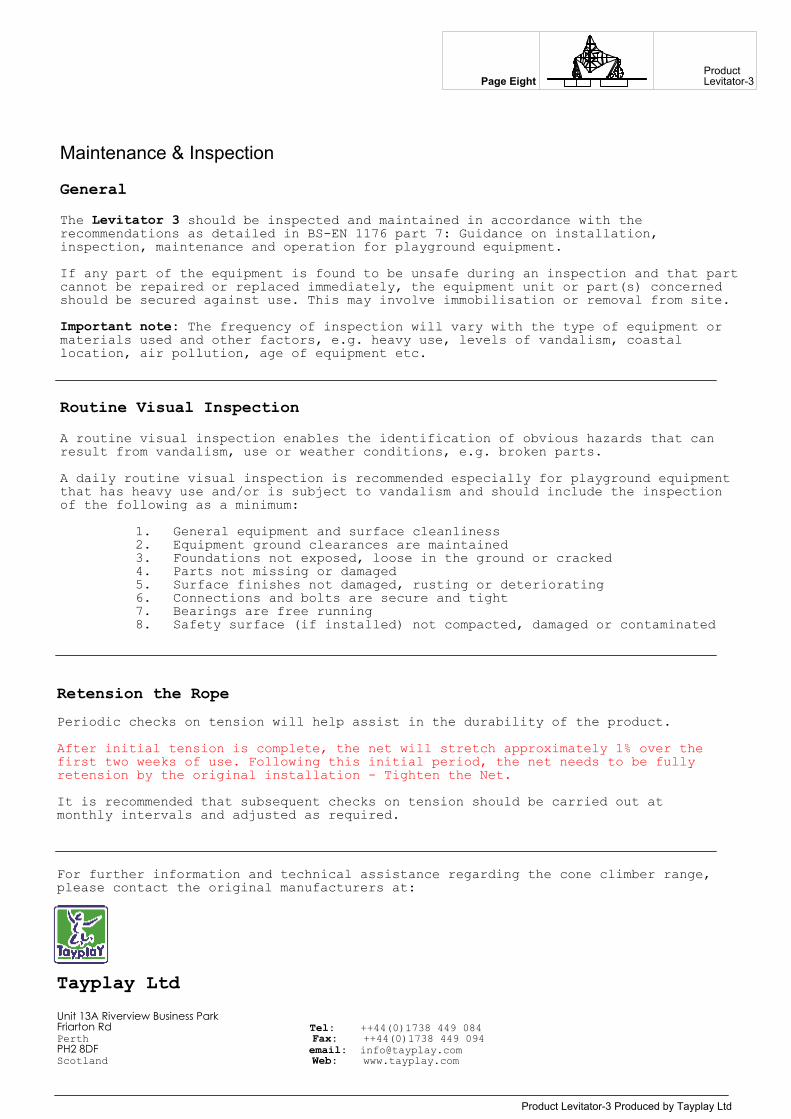
Maintenance & Inspection
General
The Levitator 3 should be inspected and maintained in accordance with the recommendations as detailed in BS-EN 1176 part 7: Guidance on installation, inspection, maintenance and operation for playground equipment.
If any part of the equipment is found to be unsafe during an inspection and that part cannot be repaired or replaced immediately, the equipment unit or part(s) concerned should be secured against use. This may involve immobilisation or removal from site.
Important note: The frequency of inspection will vary with the type of equipment or materials used and other factors, e.g. heavy use, levels of vandalism, coastal location, air pollution, age of equipment etc.
Routine Visual Inspection
A routine visual inspection enables the identification of obvious hazards that can result from vandalism, use or weather conditions, e.g. broken parts.
A daily routine visual inspection is recommended especially for playground equipment that has heavy use and/or is subject to vandalism and should include the inspection of the following as a minimum:
General equipment and surface cleanliness1.Equipment ground clearances are maintained2.Foundations not exposed, loose in the ground or cracked3.Parts not missing or damaged4.Surface finishes not damaged, rusting or deteriorating5.Connections and bolts are secure and tight6.Bearings are free running7.Safety surface (if installed) not compacted, damaged or contaminated8.
Product Levitator-3 Produced by Tayplay Ltd
For further information and technical assistance regarding the cone climber range, please contact the original manufacturers at:
Tayplay Ltd
Unit 13A Riverview Business ParkFriarton Rd Tel: ++44(0)1738 449 084Perth Fax: ++44(0)1738 449 094PH2 8DF email: [email protected] Web: www.tayplay.com
Retension the Rope
Periodic checks on tension will help assist in the durability of the product.
After initial tension is complete, the net will stretch approximately 1% over the first two weeks of use. Following this initial period, the net needs to be fully retension by the original installation - Tighten the Net.
It is recommended that subsequent checks on tension should be carried out atmonthly intervals and adjusted as required.
Product Levitator-3Page Eight


![138 1176-1-sp[1]](https://img.pdfslide.us/doc/110x75/5444b08eafaf9f550d8b4a10/138-1176-1-sp1.jpg)