Embed Size (px)
Citation preview
16-1
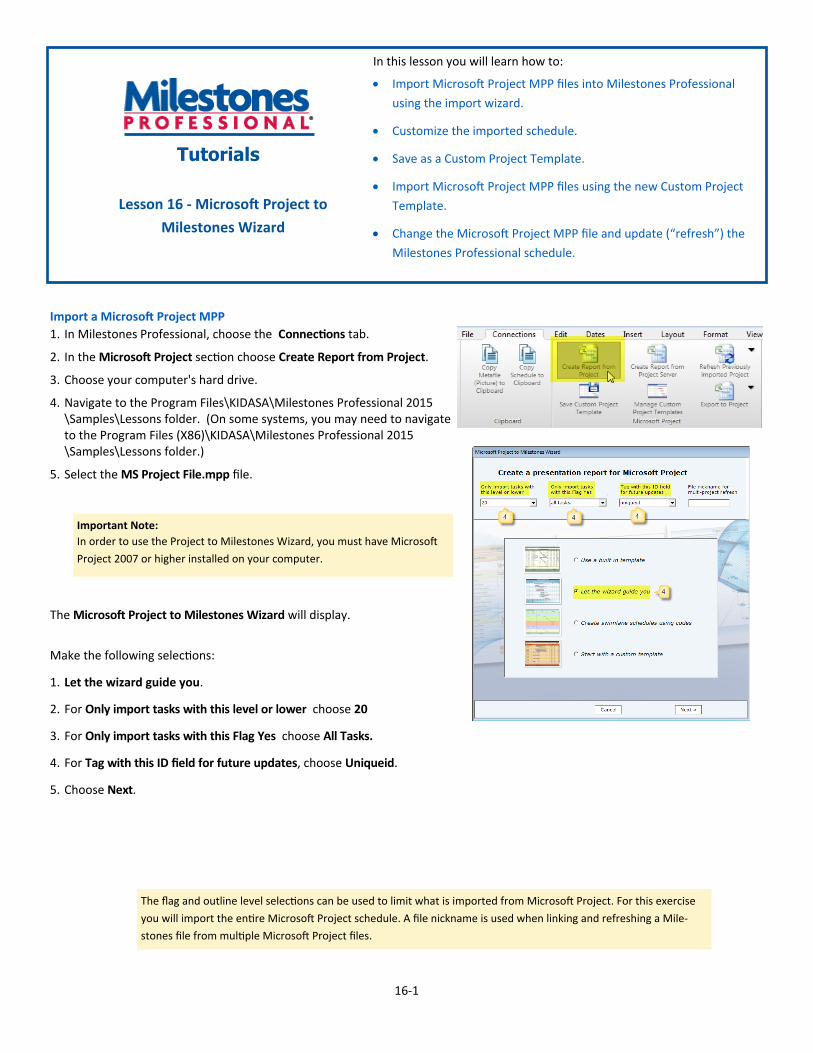
Import a Microsoft Project MPP
1. In Milestones Professional, choose the Connections tab.
2. In the Microsoft Project section choose Create Report from Project.
3. Choose your computer's hard drive.
4. Navigate to the Program Files\KIDASA\Milestones Professional 2015\Samples\Lessons folder. (On some systems, you may need to navigate to the Program Files (X86)\KIDASA\Milestones Professional 2015\Samples\Lessons folder.)
5. Select the MS Project File.mpp file.
The Microsoft Project to Milestones Wizard will display.
Make the following selections:
1. Let the wizard guide you.
2. For Only import tasks with this level or lower choose 20
3. For Only import tasks with this Flag Yes choose All Tasks.
4. For Tag with this ID field for future updates, choose Uniqueid.
5. Choose Next.
The flag and outline level selections can be used to limit what is imported from Microsoft Project. For this exercise
you will import the entire Microsoft Project schedule. A file nickname is used when linking and refreshing a Mile-
stones file from multiple Microsoft Project files.
In this lesson you will learn how to:
Import Microsoft Project MPP files into Milestones Professional
using the import wizard.
Customize the imported schedule.
Save as a Custom Project Template.
Import Microsoft Project MPP files using the new Custom Project
Template.
Change the Microsoft Project MPP file and update (“refresh”) the
Milestones Professional schedule.
Lesson 16 - Microsoft Project to
Milestones Wizard
Tutorials
Important Note:
In order to use the Project to Milestones Wizard, you must have Microsoft
Project 2007 or higher installed on your computer.
16-2
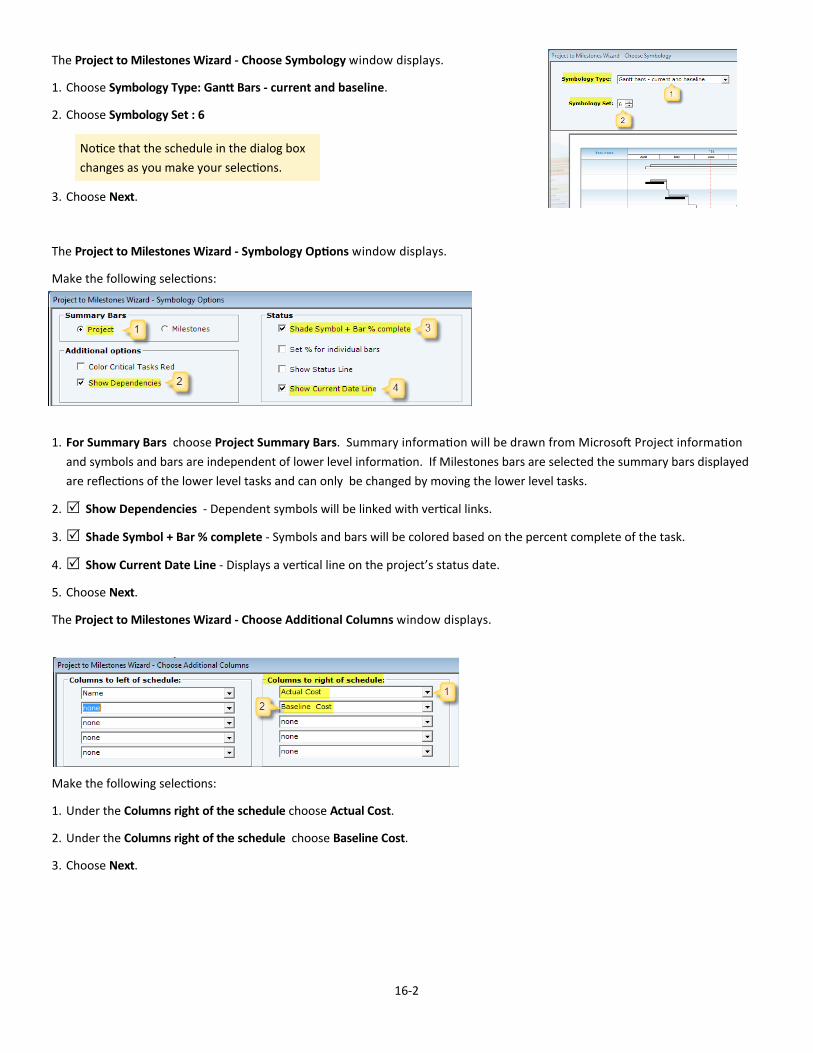
The Project to Milestones Wizard - Choose Symbology window displays.
1. Choose Symbology Type: Gantt Bars - current and baseline.
2. Choose Symbology Set : 6
3. Choose Next.
The Project to Milestones Wizard - Symbology Options window displays.
Make the following selections:
1. For Summary Bars choose Project Summary Bars. Summary information will be drawn from Microsoft Project information
and symbols and bars are independent of lower level information. If Milestones bars are selected the summary bars displayed
are reflections of the lower level tasks and can only be changed by moving the lower level tasks.
2. Show Dependencies - Dependent symbols will be linked with vertical links.
3. Shade Symbol + Bar % complete - Symbols and bars will be colored based on the percent complete of the task.
4. Show Current Date Line - Displays a vertical line on the project’s status date.
5. Choose Next.
The Project to Milestones Wizard - Choose Additional Columns window displays.
Make the following selections:
1. Under the Columns right of the schedule choose Actual Cost.
2. Under the Columns right of the schedule choose Baseline Cost.
3. Choose Next.
Notice that the schedule in the dialog box
changes as you make your selections.
16-3
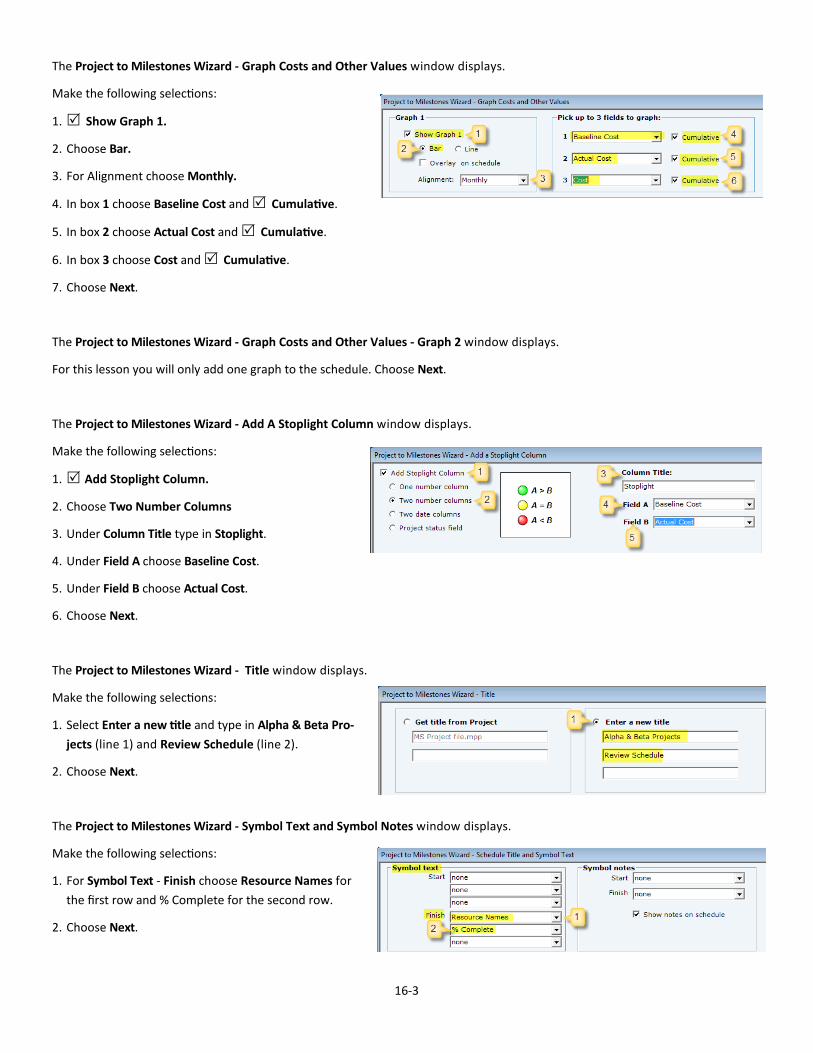
The Project to Milestones Wizard - Graph Costs and Other Values window displays.
Make the following selections:
1. Show Graph 1.
2. Choose Bar.
3. For Alignment choose Monthly.
4. In box 1 choose Baseline Cost and Cumulative.
5. In box 2 choose Actual Cost and Cumulative.
6. In box 3 choose Cost and Cumulative.
7. Choose Next.
The Project to Milestones Wizard - Graph Costs and Other Values - Graph 2 window displays.
For this lesson you will only add one graph to the schedule. Choose Next.
The Project to Milestones Wizard - Add A Stoplight Column window displays.
Make the following selections:
1. Add Stoplight Column.
2. Choose Two Number Columns
3. Under Column Title type in Stoplight.
4. Under Field A choose Baseline Cost.
5. Under Field B choose Actual Cost.
6. Choose Next.
The Project to Milestones Wizard - Title window displays.
Make the following selections:
1. Select Enter a new title and type in Alpha & Beta Pro-
jects (line 1) and Review Schedule (line 2).
2. Choose Next.
The Project to Milestones Wizard - Symbol Text and Symbol Notes window displays.
Make the following selections:
1. For Symbol Text - Finish choose Resource Names for
the first row and % Complete for the second row.
2. Choose Next.
16-4
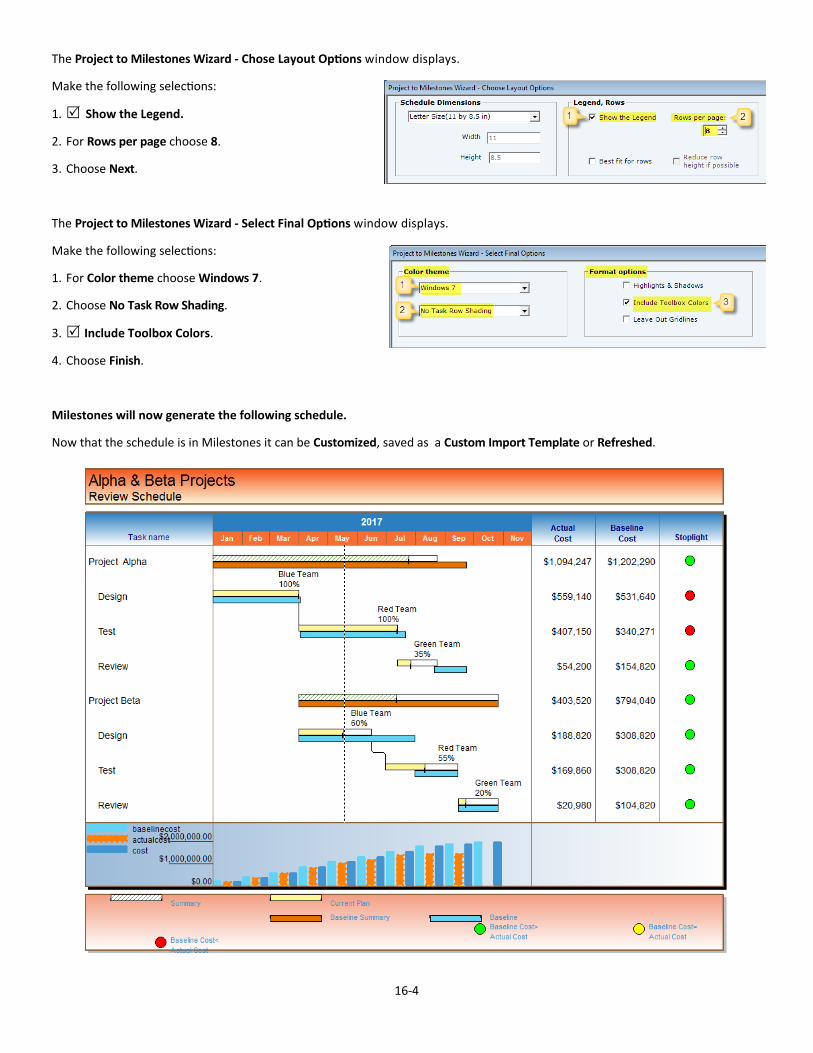
The Project to Milestones Wizard - Chose Layout Options window displays.
Make the following selections:
1. Show the Legend.
2. For Rows per page choose 8.
3. Choose Next.
The Project to Milestones Wizard - Select Final Options window displays.
Make the following selections:
1. For Color theme choose Windows 7.
2. Choose No Task Row Shading.
3. Include Toolbox Colors.
4. Choose Finish.
Milestones will now generate the following schedule.
Now that the schedule is in Milestones it can be Customized, saved as a Custom Import Template or Refreshed.
16-5
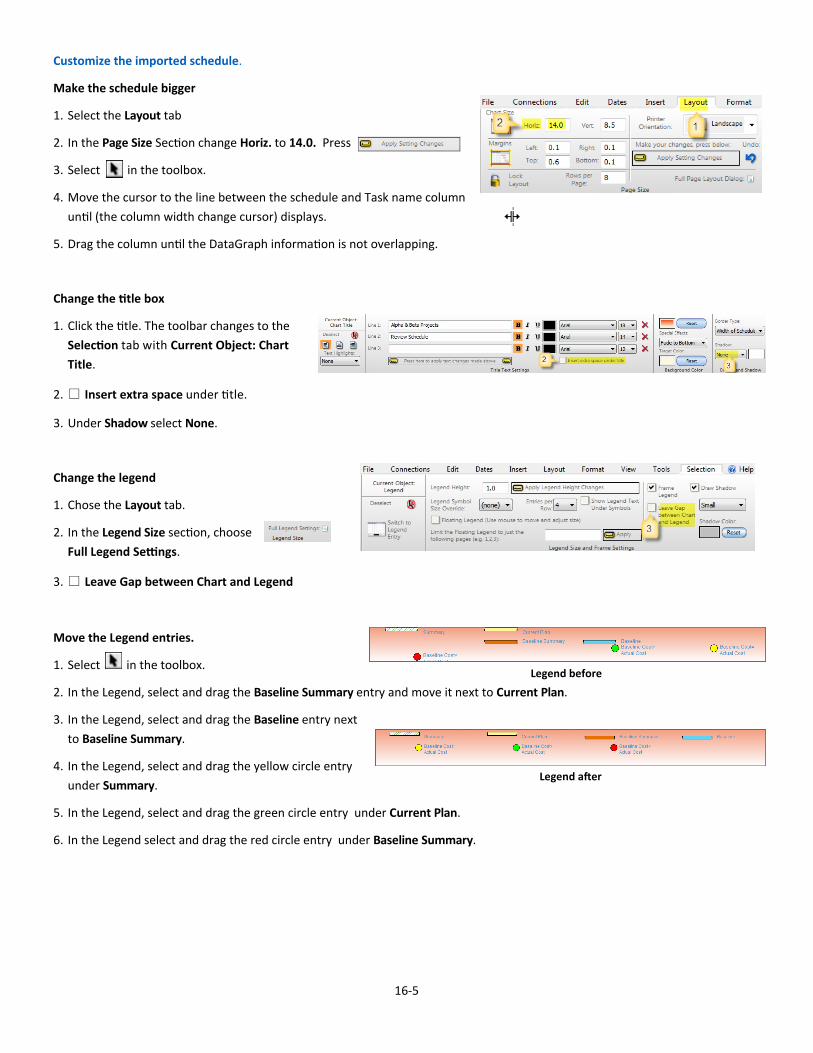
Customize the imported schedule.
Make the schedule bigger
1. Select the Layout tab
2. In the Page Size Section change Horiz. to 14.0. Press
3. Select in the toolbox.
4. Move the cursor to the line between the schedule and Task name column
until (the column width change cursor) displays.
5. Drag the column until the DataGraph information is not overlapping.
Change the title box
1. Click the title. The toolbar changes to the
Selection tab with Current Object: Chart
Title.
2. Insert extra space under title.
3. Under Shadow select None.
Change the legend
1. Chose the Layout tab.
2. In the Legend Size section, choose
Full Legend Settings.
3. Leave Gap between Chart and Legend
Move the Legend entries.
1. Select in the toolbox.
2. In the Legend, select and drag the Baseline Summary entry and move it next to Current Plan.
3. In the Legend, select and drag the Baseline entry next
to Baseline Summary.
4. In the Legend, select and drag the yellow circle entry
under Summary.
5. In the Legend, select and drag the green circle entry under Current Plan.
6. In the Legend select and drag the red circle entry under Baseline Summary.
Legend before
Legend after

16-6
Change the status symbol
1. Double click the right symbol on the last symbol, bar, symbol row in the toolbox.
2. In the Symbol Options dialog box select (the down arrow) for Standard Shape
scroll up and select shape 13 (down pointing arrow).
3. Choose OK.
Change the summary bar pattern
1. Double click the bar in the first row of the toolbox.
2. In the Bar Options dialog box select (the down arrow) for Fill Pattern.
scroll up and choose the solid fill.
3. Choose OK.
Save the customized schedule
1. Save the customized schedule to your Desk Top naming it Alpha & Beta Projects. You will use this schedule later in this tutorial
for Refresh.
2. Leave the schedule open for the next part of the tutorial, Save as Custom Project Template.
16-7
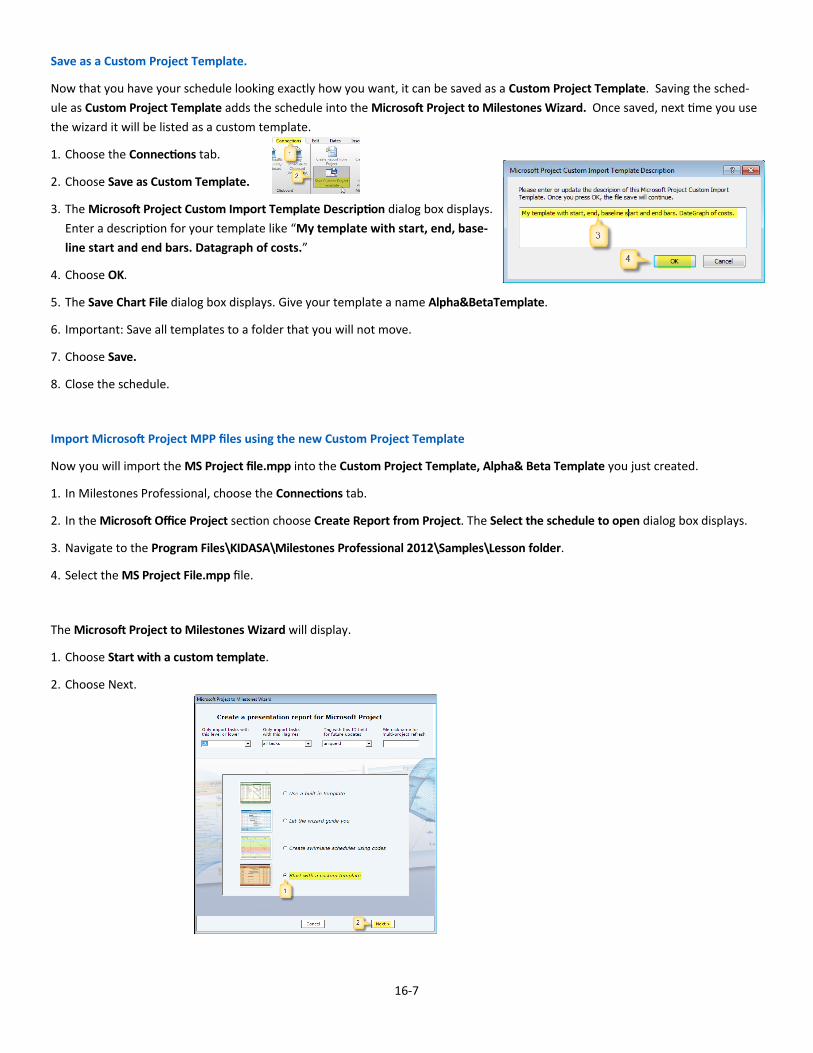
Save as a Custom Project Template.
Now that you have your schedule looking exactly how you want, it can be saved as a Custom Project Template. Saving the sched-
ule as Custom Project Template adds the schedule into the Microsoft Project to Milestones Wizard. Once saved, next time you use
the wizard it will be listed as a custom template.
1. Choose the Connections tab.
2. Choose Save as Custom Template.
3. The Microsoft Project Custom Import Template Description dialog box displays.
Enter a description for your template like “My template with start, end, base-
line start and end bars. Datagraph of costs.”
4. Choose OK.
5. The Save Chart File dialog box displays. Give your template a name Alpha&BetaTemplate.
6. Important: Save all templates to a folder that you will not move.
7. Choose Save.
8. Close the schedule.
Import Microsoft Project MPP files using the new Custom Project Template
Now you will import the MS Project file.mpp into the Custom Project Template, Alpha& Beta Template you just created.
1. In Milestones Professional, choose the Connections tab.
2. In the Microsoft Office Project section choose Create Report from Project. The Select the schedule to open dialog box displays.
3. Navigate to the Program Files\KIDASA\Milestones Professional 2012\Samples\Lesson folder.
4. Select the MS Project File.mpp file.
The Microsoft Project to Milestones Wizard will display.
1. Choose Start with a custom template.
2. Choose Next.

16-8
The Set options for custom template dialog box displays.
1. Click (the down arrow) and select Alpha&BetaTemplate.mlf.
2. Under Start: Text Line 1: select Duration.
3. Under Finish: Text Line 1: select Resource Names.
4. Under Finish: Text Line 2: select % Complete.
5. Choose Project summary bars.
6. Color Critical Tasks Red.
7. Choose Next.
The Custom Template Title dialog box displays.
1. Select Use title in custom template.
2. Choose Finish.
Here is the imported schedule.
16-9
Refresh an imported Milestones Professional file when the Microsoft Project file has been changed
Now you are going to change the Microsoft Project file. Then you will refresh the Milestones Professional file to reflect the chang-
es in the Microsoft Project file.
Open the Microsoft Project file.
1. Choose your computer's hard drive.
2. Navigate to the Program Files\KIDASA\Milestones Professional 2015\Samples\Lessons folder.
3. Select the MS Project File.mpp file.
Once the Microsoft Project file is open perform the following steps.
1. Change Unique ID 4 Review Finish date to 9/23/2017.
2. Change Unique ID 4 Review % Complete to 100.
3. Choose the File tab.
4. Choose Save As and save the Microsoft Project file to your Desk Top naming it MS Project File Changed.
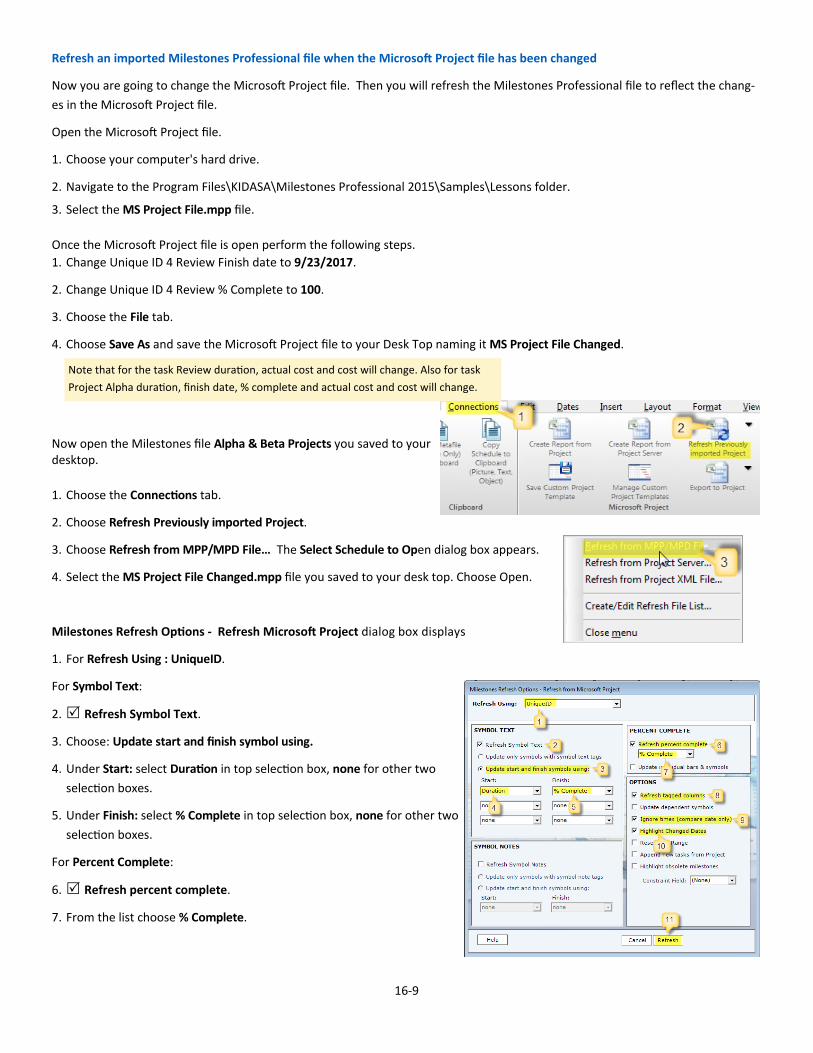
Now open the Milestones file Alpha & Beta Projects you saved to your desktop.
1. Choose the Connections tab.
2. Choose Refresh Previously imported Project.
3. Choose Refresh from MPP/MPD File… The Select Schedule to Open dialog box appears.
4. Select the MS Project File Changed.mpp file you saved to your desk top. Choose Open.
Milestones Refresh Options - Refresh Microsoft Project dialog box displays
1. For Refresh Using : UniqueID.
For Symbol Text:
2. Refresh Symbol Text.
3. Choose: Update start and finish symbol using.
4. Under Start: select Duration in top selection box, none for other two
selection boxes.
5. Under Finish: select % Complete in top selection box, none for other two
selection boxes.
For Percent Complete:
6. Refresh percent complete.
7. From the list choose % Complete.
Note that for the task Review duration, actual cost and cost will change. Also for task
Project Alpha duration, finish date, % complete and actual cost and cost will change.
16-10
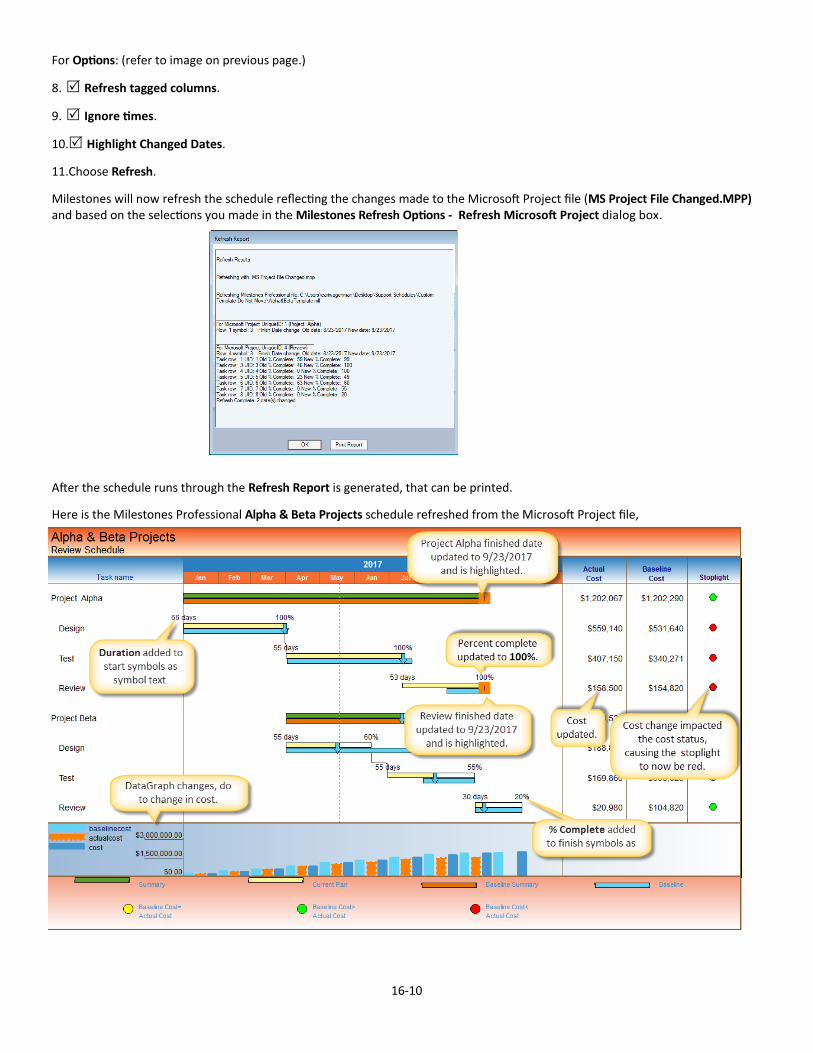
For Options: (refer to image on previous page.)
8. Refresh tagged columns.
9. Ignore times.
10. Highlight Changed Dates.
11.Choose Refresh.
Milestones will now refresh the schedule reflecting the changes made to the Microsoft Project file (MS Project File Changed.MPP) and based on the selections you made in the Milestones Refresh Options - Refresh Microsoft Project dialog box.
After the schedule runs through the Refresh Report is generated, that can be printed.
Here is the Milestones Professional Alpha & Beta Projects schedule refreshed from the Microsoft Project file,