Embed Size (px)
Citation preview
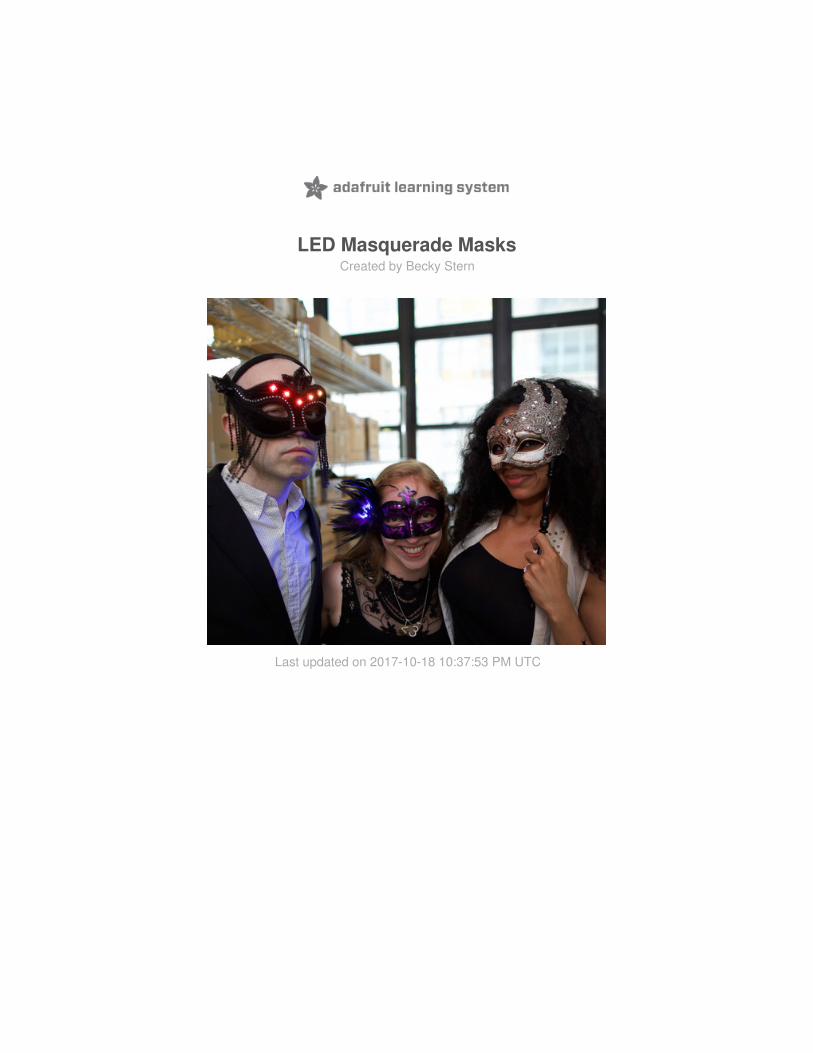
LED Masquerade MasksCreated by Becky Stern
Last updated on 2017-10-18 10:37:53 PM UTC
2346
11131419262729
Guide Contents
Guide ContentsOverviewFor the NeoPixel and Audio-Reactive Masks…Super Simple Sequin MaskNeoPixel GEMMA MaskArduino CodeCircuitPython CodeAudio-Reactive MaskArduino CodeCircuitPython CodeWear 'em!
© Adafruit Industries https://learn.adafruit.com/led-masquerade-masks Page 2 of 29

OverviewGot a costume ball coming up? Learn to adorn masquerade masks with LEDs, three ways! This guide will show youhow to make three masks at different difficulty levels:
Super Simple Sequin Mask: A few LED sequins and battery pack, no programming or microcontroller required! Just alittle soldering and glueing will get you illuminated accents in under an hour.
NeoPixel GEMMA Mask: If it's color-changing animations you crave, wire up some individual NeoPixels and a GEMMAmicrocontroller. Use our sample code or write your own animations! 1-4 hours, depending on your solderingexperience
Audio-Reactive Mask: A microphone monitors audio levels and uses loudness to control the brightness of some LEDsequins. Use our sample code or mod it up to do something different. 1-4 hours, depending on your solderingexperience
© Adafruit Industries https://learn.adafruit.com/led-masquerade-masks Page 3 of 29

Although each mask is made from different electronics components, there are a few tools and supplies that you'll needregardless of design:
masquerade masks, we got ours at Halloween Adventure30 gauge silicone coated stranded wire, in a color to match your maskE6000 and Quick Hold adhesives, we grabbed a multipacksewing pins for layout/designwire strippersflush snipssoldering iron and toolsscissorsDremel or other rotary tool (optional)multimeter
For the NeoPixel and Audio-Reactive Masks…
This guide was written for the 'original' Gemma board, but can be done with either the original or M0Gemma. We recommend the Gemma M0 as it is easier to use and is more compatible with moderncomputers! (The “Super Simple” mask requires no Gemma at all!)
© Adafruit Industries https://learn.adafruit.com/led-masquerade-masks Page 4 of 29

GEMMA M0 boards can run CircuitPython — a different approach to programming compared to Arduino sketches. In
fact, CircuitPython comes factory pre-loaded on GEMMA M0. If you’ve overwritten it with an Arduino sketch, or just
want to learn the basics of setting up and using CircuitPython, this is explained in the Adafruit GEMMA M0 guide.
We’ll provide sample code for either CircuitPython or Arduino…use whichever you’re more comfortable with!
© Adafruit Industries https://learn.adafruit.com/led-masquerade-masks Page 5 of 29

Super Simple Sequin Mask
Ok, let's start with some simple accent lighting! In addition to the supplies listed on the first page, you will need:
LED sequins in your favorite colorCR2032 battery pack with switchCR2032 batteries
This mask has a feather accent that's just begging for LEDs. Decide where your sequins will go, then solder themtogether with wires in parallel, as shown in the circuit diagram:
© Adafruit Industries https://learn.adafruit.com/led-masquerade-masks Page 6 of 29

Sequins come in sheets of five. If they'll be close together in your design, consider leaving them attached to the sheetas you solder them, since they'll stay put more readily-- you can detach and discard the connecting piece before theygo into your mask.
Strip and tin pieces of wire before soldering them them, two at a time in some cases, to your LED sequins. When youget to the end of the chain, repeat with the battery wires, with the red wire connected to the + side of the sequins and
© Adafruit Industries https://learn.adafruit.com/led-masquerade-masks Page 7 of 29

the black wire connected to the - (as shown in the circuit diagram).
Heat up your glue gun or find your Quick Hold and glue your sequins into the feather accent.
© Adafruit Industries https://learn.adafruit.com/led-masquerade-masks Page 8 of 29

You can glue the circuit to the outside, or tuck the wires behind the first layer of lace. Power up your battery pack todouble check that nothing is blocking the LEDs.
© Adafruit Industries https://learn.adafruit.com/led-masquerade-masks Page 9 of 29

Finally, find a spot for your battery holder. This may be glued inside the forehead of the mask, or in this case, wesandwiched it in between the feather accent and the mask itself using E6000 adhesive (hot glue won't hold here forlong). Set it up to dry where it won't slide apart (we balanced our mask on a paper cup), and let it dry for 24 hours.
© Adafruit Industries https://learn.adafruit.com/led-masquerade-masks Page 10 of 29

NeoPixel GEMMA Mask
In addition to the supplies listed on the first page, you will need:
Individual Flora NeoPixels or Mini NeoPixels to comprise your designGEMMA M0 or GEMMA V2 microcontroller150mAh lipoly battery and charger
You should also check out the following prerequisite guides:
Introducing GEMMA M0 or Introducing GEMMAAdafruit NeoPixel Überguide
and optionally take a look at these projects with nearly identical circuits:
3D Printed Unicorn HornSpace Face LED Galaxy MakeupNeoPixel Coat ButtonsNeoPixel TiaraCyberpunk Spikes
© Adafruit Industries https://learn.adafruit.com/led-masquerade-masks Page 11 of 29

Use sewing pins to arrange and mock up your design on your mask. Use the circuit diagram below, adding orsubtracting NeoPixels to suit your own design.
Wire connections are as follows:
GEMMA Vout connects to the (+) side of your NeoPixelsGEMMA D1 connects to the data input of the first pixeldata output of each pixel connects to data input of next pixelGEMMA GND connects to the (-) side of all NeoPixels150mAh (or larger if you prefer) battery plugs in to GEMMA JST port
© Adafruit Industries https://learn.adafruit.com/led-masquerade-masks Page 12 of 29

To ensure you have enough wire slack between pixels for your design, it can be helpful to first solder the dataconnections, then add the power and ground connections with the circuit in its rough orientation. Don't forget that thepower and ground connections need two wires connected at a time, which is easier to do at once instead ofseparately!
Arduino Code
(CircuitPython code appears further down this page)
Once soldered, plug in your GEMMA to your computer over USB and program it up with the following sample code orany NeoPixel designs you like! Remember that GEMMA's power switch must be in the ON position!
© Adafruit Industries https://learn.adafruit.com/led-masquerade-masks Page 13 of 29

CircuitPython Code
Below is CircuitPython code that works similarly to the Arduino sketch shown above. To use this, plug the GEMMA M0
into USB…it should show up on your computer as a small flash drive…then edit the file “main.py” with your text editor
of choice. Select and copy the code below and paste it into that file, entirely replacing its contents (don’t mix it in with
lingering bits of old code). When you save the file, the code should start running almost immediately (if not, see notesat the bottom of this page).
If GEMMA M0 doesn’t show up as a drive, follow the Introducing GEMMA M0 guide link above to prepare the boardfor CircuitPython.
#include <Adafruit_NeoPixel.h>
#define NUM_LEDS 5 // Number of NeoPixels#define PIN 1 // DIGITAL pin # where NeoPixels are connected
// IMPORTANT: Avoid connecting on a live circuit...// if you must, connect GND first.
Adafruit_NeoPixel strip = Adafruit_NeoPixel(NUM_LEDS, PIN);
void setup() { strip.begin(); strip.setBrightness(100); // 100/255 brightness (about 40%) strip.show(); // Initialize all pixels to 'off'}
void loop() { for(int j=0; j<256; j++) { for(int i=0; i<NUM_LEDS; i++) { strip.setPixelColor(i, Wheel((i * 8 + j) & 255)); } strip.show(); delay(20); }}
// Input a value 0 to 255 to get a color value.// The colours are a transition r - g - b - back to r.uint32_t Wheel(byte WheelPos) { if(WheelPos < 85) { return strip.Color(WheelPos * 3, 255 - WheelPos * 3, 0); } else if(WheelPos < 170) { WheelPos -= 85; return strip.Color(255 - WheelPos * 3, 0, WheelPos * 3); } else { WheelPos -= 170; return strip.Color(0, WheelPos * 3, 255 - WheelPos * 3); }}
© Adafruit Industries https://learn.adafruit.com/led-masquerade-masks Page 14 of 29

Once you've verified your circuit works, glue it up to your mask and route the GEMMA wires around to the back.
import boardimport neopixelimport time
numpix = 5 # Number of NeoPixelspixpin = board.D1 # Pin where NeoPixels are connectedhue = 0 # Starting colorstrip = neopixel.NeoPixel(pixpin, numpix, brightness=0.4)
def wheel(pos): # Input a value 0 to 255 to get a color value. # The colours are a transition r - g - b - back to r. if (pos < 0) or (pos > 255): return [0, 0, 0] elif (pos < 85): return [int(pos * 3), int(255 - (pos * 3)), 0] elif (pos < 170): pos -= 85 return [int(255 - pos * 3), 0, int(pos * 3)] else: pos -= 170 return [0, int(pos * 3), int(255 - pos * 3)]
while True: # Loop forever... for i in range(numpix): strip[i] = wheel((hue + i * 8) & 255) strip.write() time.sleep(0.02) # 20 ms = ~50 fps hue = (hue + 1) & 255 # Increment hue and 'wrap around' at 255
© Adafruit Industries https://learn.adafruit.com/led-masquerade-masks Page 15 of 29

Use more glue or foam/velcro tape to put GEMMA in place.
Velcro tape is best for securing the battery, so that you can remove it for charging (GEMMA does not have onboardlipoly charging for your safety).
© Adafruit Industries https://learn.adafruit.com/led-masquerade-masks Page 16 of 29

Use clear or color-coordinging thread to tack the wires to the mask for a clean finish.
You can optionally use 3D printed diffusers to deck out your NeoPixels even further! Browse our Thingiverse page formultiple available designs.
© Adafruit Industries https://learn.adafruit.com/led-masquerade-masks Page 17 of 29

Learn more in our NinjaFlex guide.
© Adafruit Industries https://learn.adafruit.com/led-masquerade-masks Page 18 of 29

Audio-Reactive Mask
This mask reacts to sound! Five LED sequins are wired up to a GEMMA and microphone. In addition to the supplieslisted on the first page, you will need:
LED sequins in your favorite colorGEMMA M0 or GEMMA v2 microcontrollerMAX 9814 or MAX4466 electret microphone amplifier
You should also check out the following prerequisite guides:
Introducing Gemma M0 or Introducing GEMMAAdafruit LED SequinsAdafruit Microphone Amplifier BreakoutAdafruit AGC Electret Microphone Amplifier - MAX9814
and optionally take a look at these similar projects for inspiration:
Ursula Seashell NecklaceVU Meter Baseball Hat3D Printed LED Microphone FlagSound Reactive Drums
© Adafruit Industries https://learn.adafruit.com/led-masquerade-masks Page 19 of 29

By measuring audio levels in the room, we can use that measurement to control the brightness of the LEDs, giving apulse-with-the-music effect! Use sewing pins to mock up your sequin design on the mask:
© Adafruit Industries https://learn.adafruit.com/led-masquerade-masks Page 20 of 29

Check out the circuit diagram to get an idea of how the sequins can be arranged-- the positive sides (+) should all facethe same way:
© Adafruit Industries https://learn.adafruit.com/led-masquerade-masks Page 21 of 29

Wire connections are as follows:
GEMMA GND to sequins (-)GEMMA D0 to sequins (+)Microphone GND to GEMMA GNDMicrophone Vdd to GEMMA 3VMicrophone output to GEMMA A1150mAh (or larger if desired) battery plugs in to GEMMA's JST port
You can run the wires over the front of the mask, like on the previous page, or you can run the wires on the back ofthe mask by punching or drilling holes for the wires to pass through. Remove the pinned sequins and drill two holesthat match up with the hole spacing on the sequins.
© Adafruit Industries https://learn.adafruit.com/led-masquerade-masks Page 22 of 29

Prep your microphone by tinning and soldering wires to the Vdd, GND, and outout pins.
pass wires through the holes of the mask, then strip and tin them before soldering to the sequins:
© Adafruit Industries https://learn.adafruit.com/led-masquerade-masks Page 23 of 29

Once both positive and negative sides are soldered, pull the wires from the back so the sequin sits flush, then clip theleads with flush snips.
Find a place to put the microphone, which will be different on every mask. We found ajn opening in the fabric lacenear the forehead that worked perfectly, but you could put it on the inside facing the wearer's mouth, or anywhere youlike.
© Adafruit Industries https://learn.adafruit.com/led-masquerade-masks Page 24 of 29

Solder the sequins and microphone up to GEMMA according to the circuit diagram.
Install a battery using velcro tape. Plug in GEMMA to your computer with a USB cable and make sure GEMMA's powerswitch is set to the ON position.
© Adafruit Industries https://learn.adafruit.com/led-masquerade-masks Page 25 of 29

Arduino Code
(CircuitPython code appears further down this page)
Load up this sample code using the Arduino software to get you started:
// Sound level sketch for Adafruit microphone amplifier.// For the GEMMA sequin masquerade mask.
#define SAMPLE_WINDOW 33 // Sample window width in mS (33 mS = ~30 Hz)#define LED_PIN 0 // DIGITAL pin # where LEDs are connected#define MIC_PIN A1 // ANALOG pin # where microphone "OUT" is connected
void setup() { pinMode(LED_PIN, OUTPUT);}
void loop() { // Listen to mic for short interval, recording min & max signal unsigned int signalMin = 1023, signalMax = 0; unsigned long startTime = millis(); while((millis() - startTime) < SAMPLE_WINDOW) { int sample = analogRead(MIC_PIN); if(sample < signalMin) signalMin = sample; if(sample > signalMax) signalMax = sample; } int peakToPeak = signalMax - signalMin; // Max - min = peak-peak amplitude int n = (peakToPeak - 10) / 4; // Remove low-level noise, lower gain if(n > 255) n = 255; // Limit to valid PWM range else if(n < 0) n = 0; analogWrite(LED_PIN, n); // And send to LEDs as PWM level}
© Adafruit Industries https://learn.adafruit.com/led-masquerade-masks Page 26 of 29

CircuitPython Code
Below is CircuitPython code that works similarly to the Arduino sketch shown above. To use this, plug the GEMMA M0
into USB…it should show up on your computer as a small flash drive…then edit the file “main.py” with your text editor
of choice. Select and copy the code below and paste it into that file, entirely replacing its contents (don’t mix it in with
lingering bits of old code). When you save the file, the code should start running almost immediately (if not, see notesat the bottom of this page).
If GEMMA M0 doesn’t show up as a drive, follow the Introducing GEMMA M0 guide link above to prepare the boardfor CircuitPython.
Now talk or play music for your mask, and see the LEDs change brightness with the volume!
This code requires version 2.1 or later of CircuitPython. Earlier versions didn’t yet support PWM output. The“Introducing Gemma M0” guide explains how to load or update CircuitPython if needed.
import boardimport pulseioimport analogioimport time
sampleWindow = 0.033 # Sample window width (0.033 sec = 33 mS = ~30 Hz)ledPin = board.D0 # Pin where LEDs are connected (PWM not avail on D1)micPin = board.A1 # Microphone 'OUT' is connected here
mic = analogio.AnalogIn(micPin)pwm = pulseio.PWMOut(ledPin, frequency=1000, duty_cycle=0)
while True: # Listen to mic for short interval, recording min & max signal signalMin = 65535 signalMax = 0 startTime = time.monotonic() while((time.monotonic() - startTime) < sampleWindow): signal = mic.value if signal < signalMin: signalMin = signal if signal > signalMax: signalMax = signal
peakToPeak = signalMax - signalMin # Audio amplitude n = (peakToPeak - 250) * 4 # Remove low-level noise, boost if n > 65535: n = 65535 # Limit to valid PWM range elif n < 0: n = 0 pwm.duty_cycle = n # And send to LED as PWM level
© Adafruit Industries https://learn.adafruit.com/led-masquerade-masks Page 27 of 29

© Adafruit Industries https://learn.adafruit.com/led-masquerade-masks Page 28 of 29

Wear 'em!
Enjoy your costume masks! These are fun to make in groups and are sure to be a hit at Mardi Gras or Halloween. Treatyour mask with care and don't wear it in the rain!
© Adafruit Industries Last Updated: 2017-10-18 10:37:52 PM UTC Page 29 of 29