Embed Size (px)
Citation preview
1
ITEC321 - Administering Web-based Content Management System
Lecture 2:
Introduction to Web Design
2
Create your first website
Select Your Theme
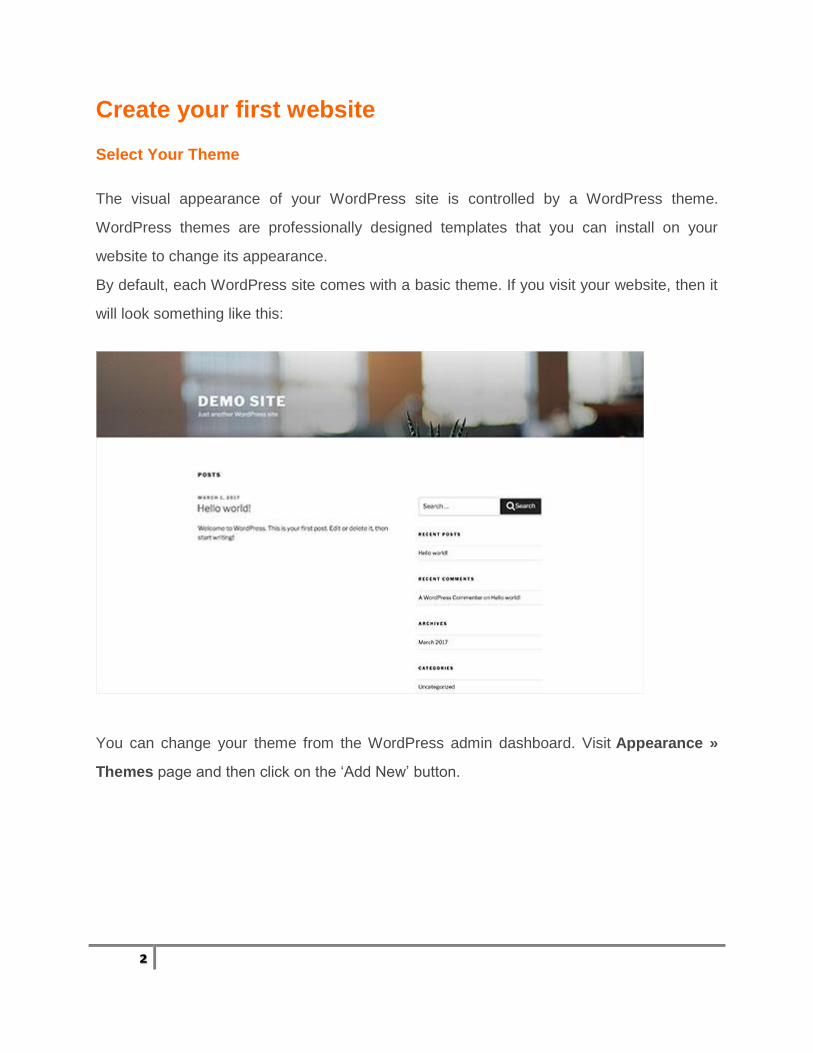
The visual appearance of your WordPress site is controlled by a WordPress theme.
WordPress themes are professionally designed templates that you can install on your
website to change its appearance.
By default, each WordPress site comes with a basic theme. If you visit your website, then it
will look something like this:
You can change your theme from the WordPress admin dashboard. Visit Appearance »
Themes page and then click on the ‘Add New’ button.
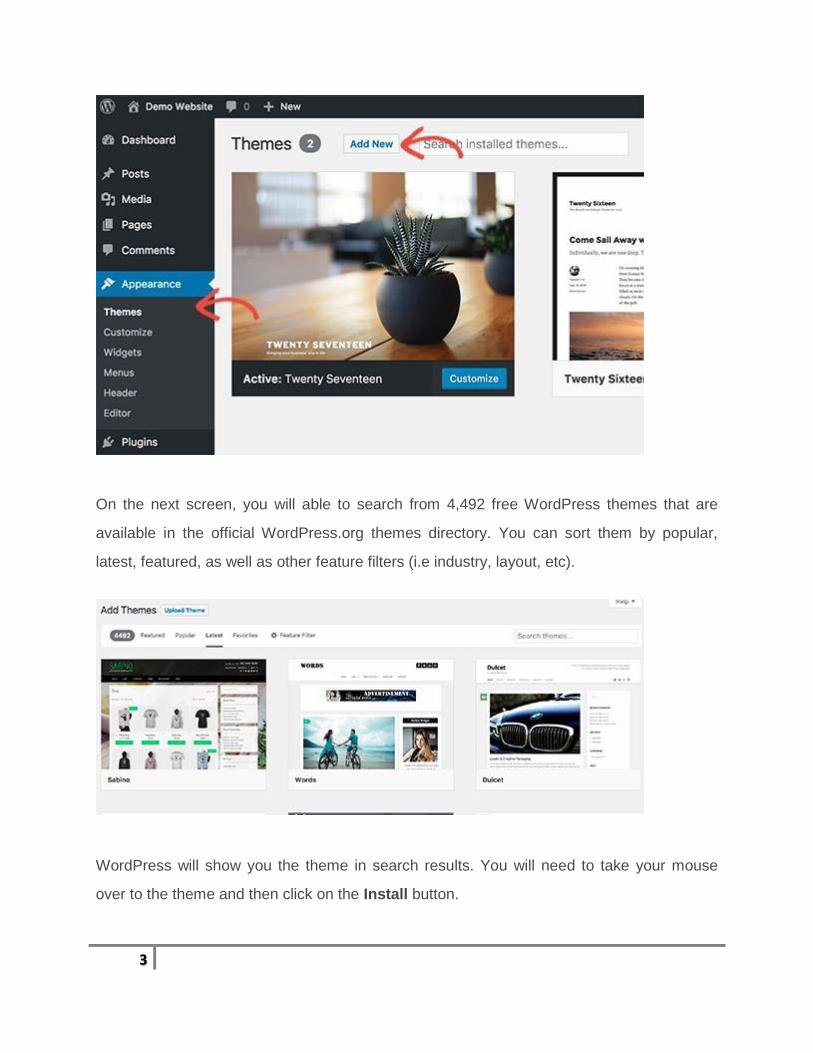
3
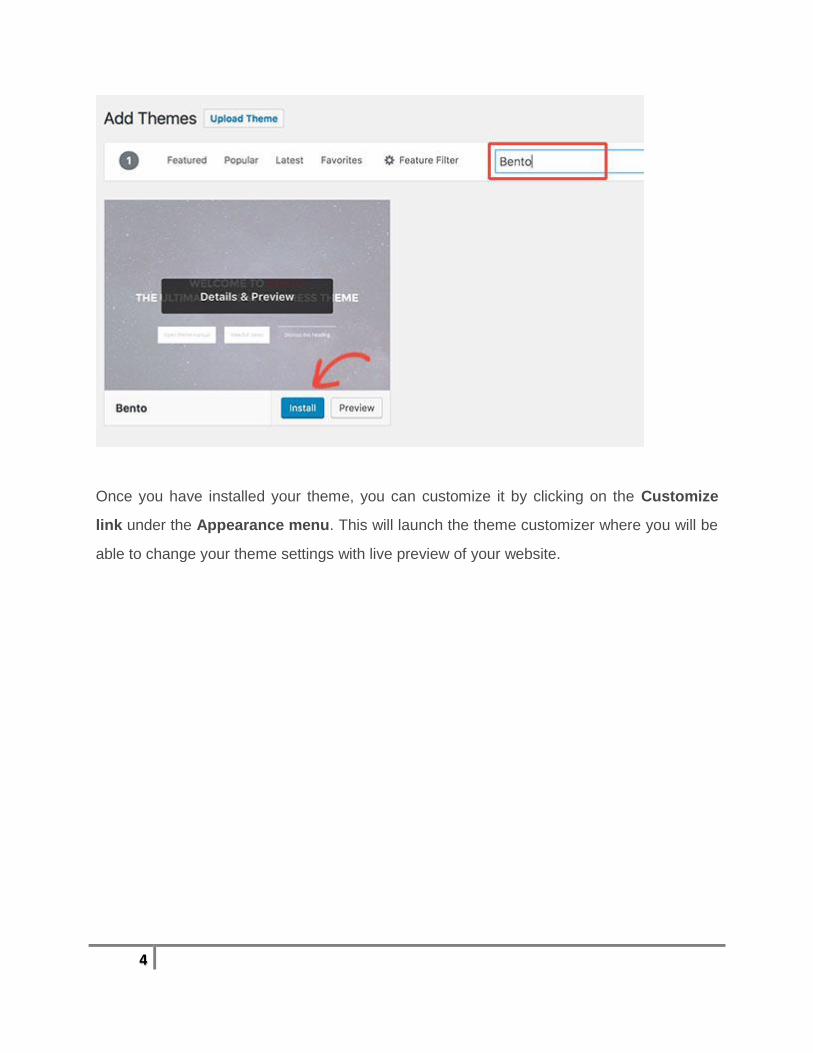
On the next screen, you will able to search from 4,492 free WordPress themes that are
available in the official WordPress.org themes directory. You can sort them by popular,
latest, featured, as well as other feature filters (i.e industry, layout, etc).
WordPress will show you the theme in search results. You will need to take your mouse
over to the theme and then click on the Install button.
4
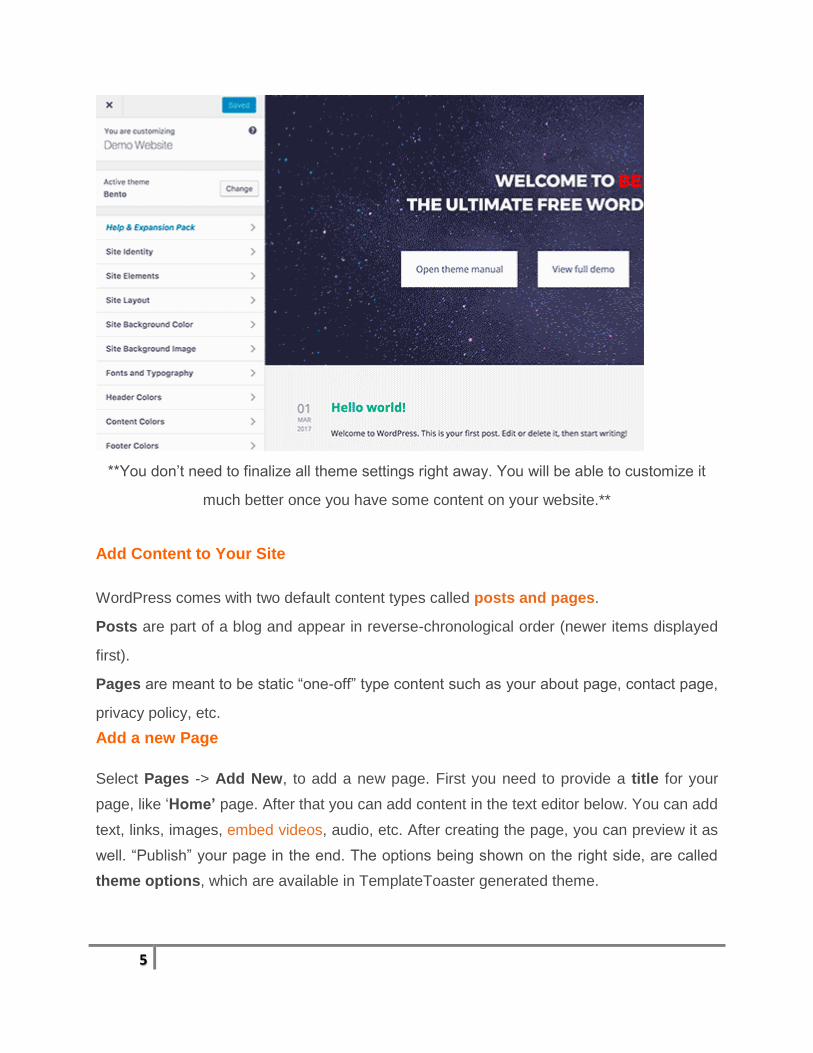
Once you have installed your theme, you can customize it by clicking on the Customize
link under the Appearance menu. This will launch the theme customizer where you will be
able to change your theme settings with live preview of your website.
5
**You don’t need to finalize all theme settings right away. You will be able to customize it
much better once you have some content on your website.**
Add Content to Your Site
WordPress comes with two default content types called posts and pages.
Posts are part of a blog and appear in reverse-chronological order (newer items displayed
first).
Pages are meant to be static “one-off” type content such as your about page, contact page,
privacy policy, etc.
Add a new Page
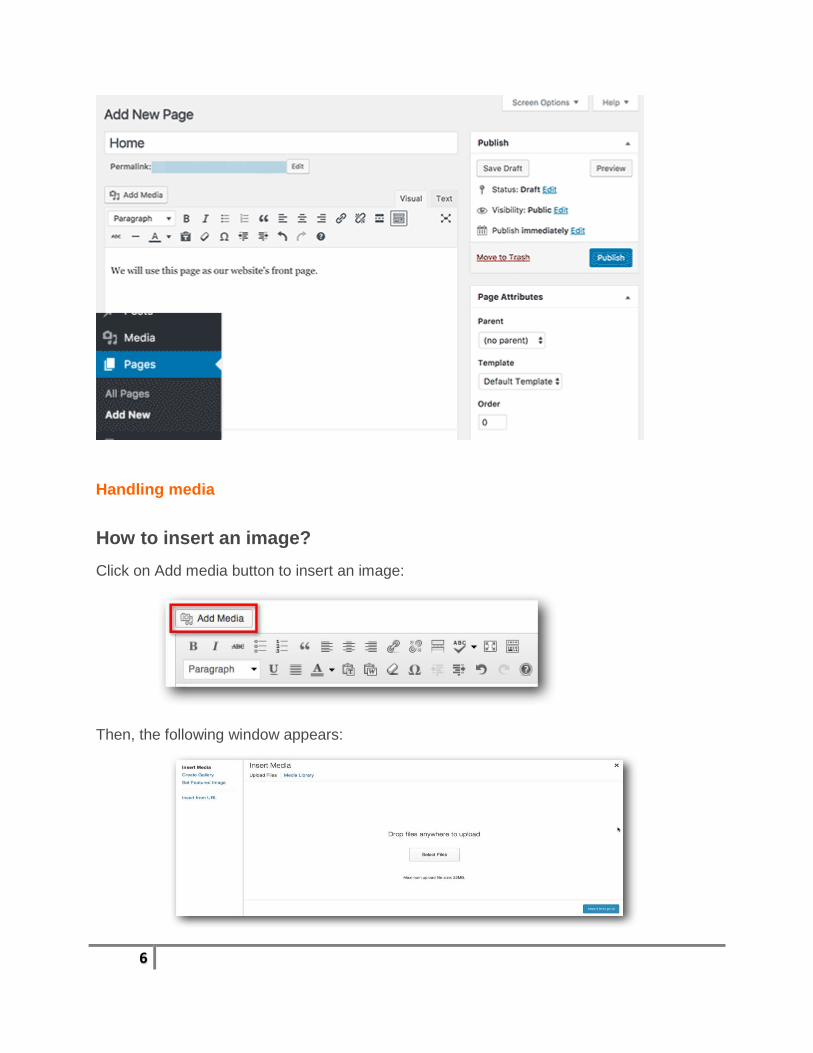
Select Pages -> Add New, to add a new page. First you need to provide a title for your
page, like ‘Home’ page. After that you can add content in the text editor below. You can add
text, links, images, embed videos, audio, etc. After creating the page, you can preview it as
well. “Publish” your page in the end. The options being shown on the right side, are called
theme options, which are available in TemplateToaster generated theme.
6
Handling media
How to insert an image?
Click on Add media button to insert an image:
Then, the following window appears:
7
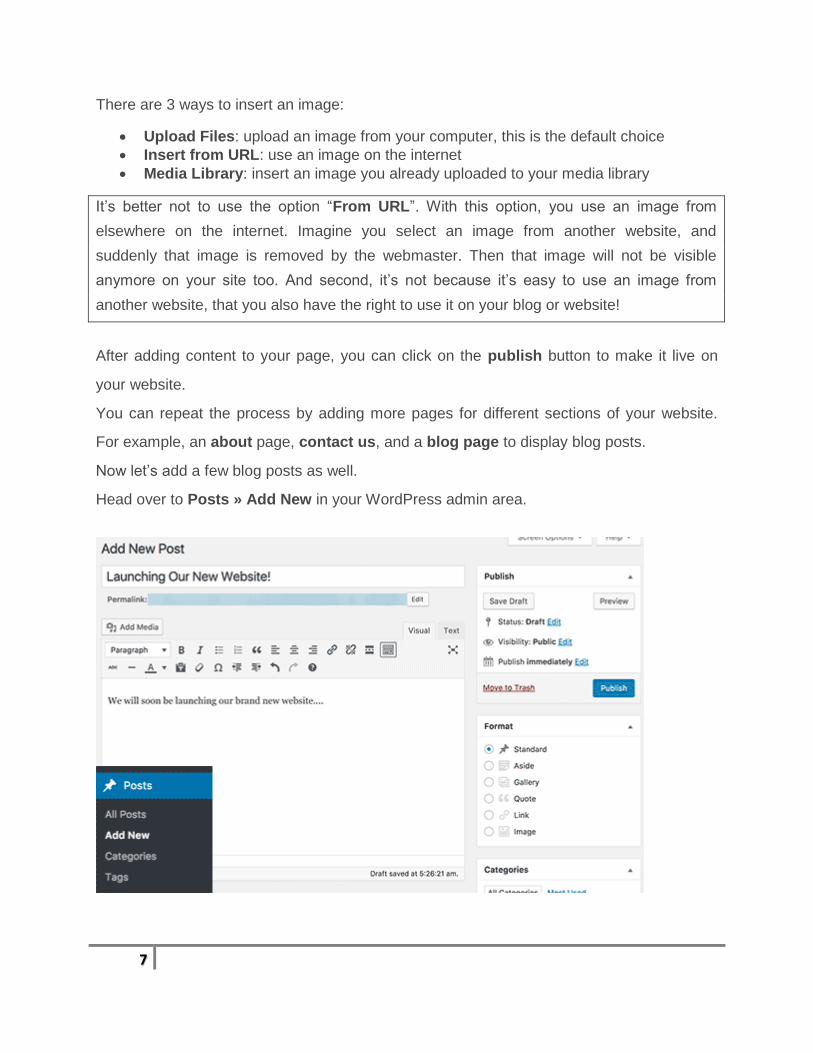
There are 3 ways to insert an image:
Upload Files: upload an image from your computer, this is the default choice
Insert from URL: use an image on the internet
Media Library: insert an image you already uploaded to your media library
It’s better not to use the option “From URL”. With this option, you use an image from
elsewhere on the internet. Imagine you select an image from another website, and
suddenly that image is removed by the webmaster. Then that image will not be visible
anymore on your site too. And second, it’s not because it’s easy to use an image from
another website, that you also have the right to use it on your blog or website!
After adding content to your page, you can click on the publish button to make it live on
your website.
You can repeat the process by adding more pages for different sections of your website.
For example, an about page, contact us, and a blog page to display blog posts.
Now let’s add a few blog posts as well.
Head over to Posts » Add New in your WordPress admin area.
8
You will see a screen much like you saw earlier when adding pages.
You can add a post title and then add content in the visual post editor.
You can click on the save button to store your post as a draft or click on the publish button
to make it visible on your site.
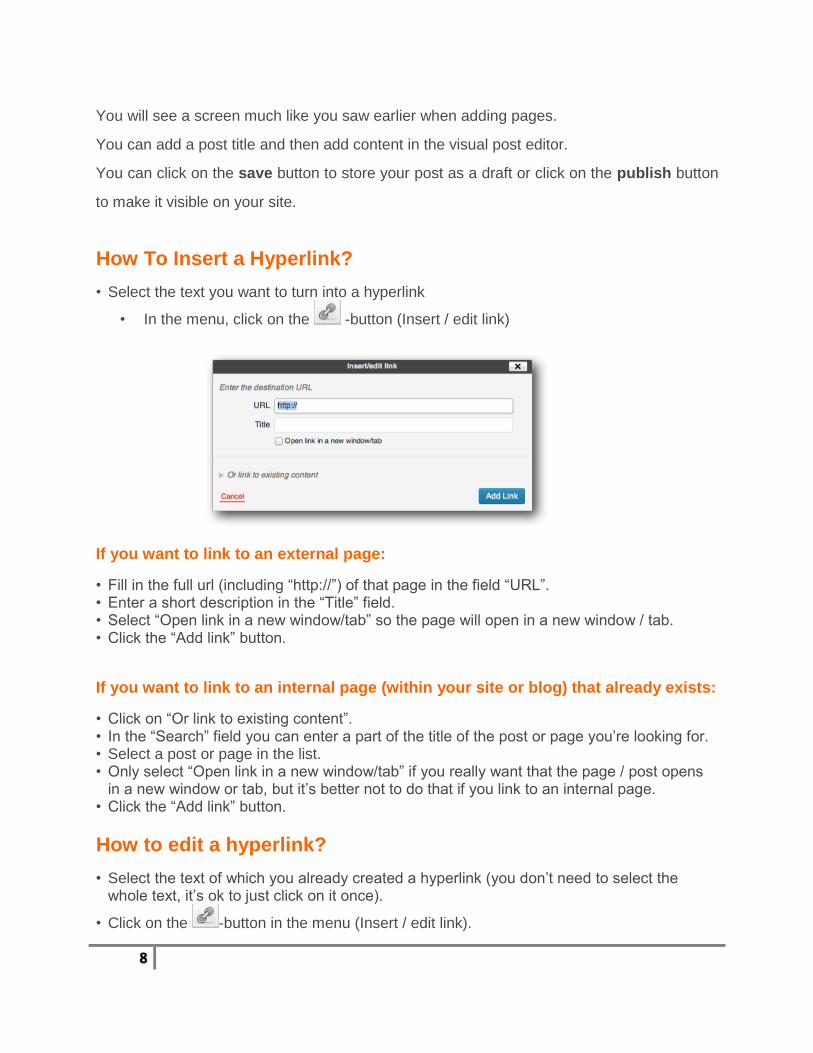
How To Insert a Hyperlink?
• Select the text you want to turn into a hyperlink
• In the menu, click on the -button (Insert / edit link)
If you want to link to an external page:
• Fill in the full url (including “http://”) of that page in the field “URL”. • Enter a short description in the “Title” field. • Select “Open link in a new window/tab” so the page will open in a new window / tab. • Click the “Add link” button.
If you want to link to an internal page (within your site or blog) that already exists:
• Click on “Or link to existing content”. • In the “Search” field you can enter a part of the title of the post or page you’re looking for. • Select a post or page in the list. • Only select “Open link in a new window/tab” if you really want that the page / post opens
in a new window or tab, but it’s better not to do that if you link to an internal page. • Click the “Add link” button.
How to edit a hyperlink?
• Select the text of which you already created a hyperlink (you don’t need to select the whole text, it’s ok to just click on it once).
• Click on the -button in the menu (Insert / edit link).
9
• Do the changes you need. • Click on the “Update” button.
How to remove a hyperlink?
• Select the text of which you already created a hyperlink (you don’t need to select the
whole text, it’s ok to just click on it once).
• Click the -button (Unlink).
Customizing and Tweaking Your Website
Now that you have created some content on your website, you will be able to customize and
put it all in a nice presentable shape on your website.
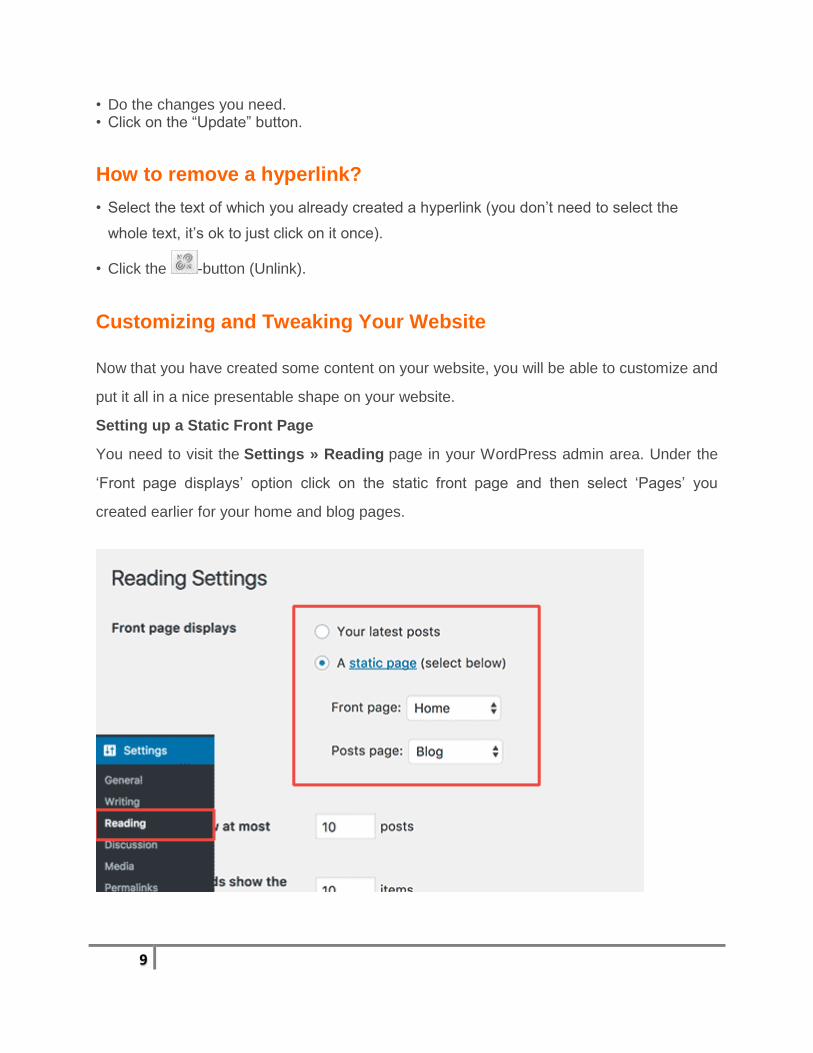
Setting up a Static Front Page
You need to visit the Settings » Reading page in your WordPress admin area. Under the
‘Front page displays’ option click on the static front page and then select ‘Pages’ you
created earlier for your home and blog pages.
10
Don’t forget to click on the ‘Save Changes’ button at the bottom of the page to store your
changes.
WordPress will now use the page titled ‘Home’ as your site’s front page and ‘Blog’ page to
display your blog posts.
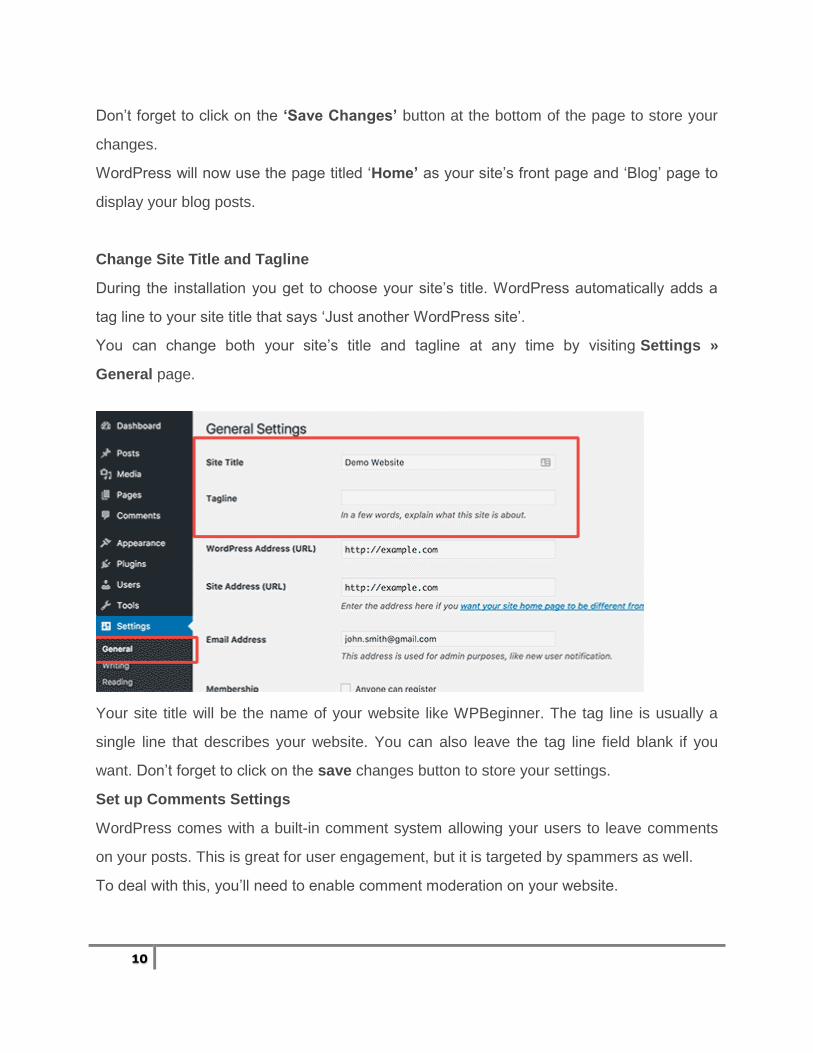
Change Site Title and Tagline
During the installation you get to choose your site’s title. WordPress automatically adds a
tag line to your site title that says ‘Just another WordPress site’.
You can change both your site’s title and tagline at any time by visiting Settings »
General page.
Your site title will be the name of your website like WPBeginner. The tag line is usually a
single line that describes your website. You can also leave the tag line field blank if you
want. Don’t forget to click on the save changes button to store your settings.
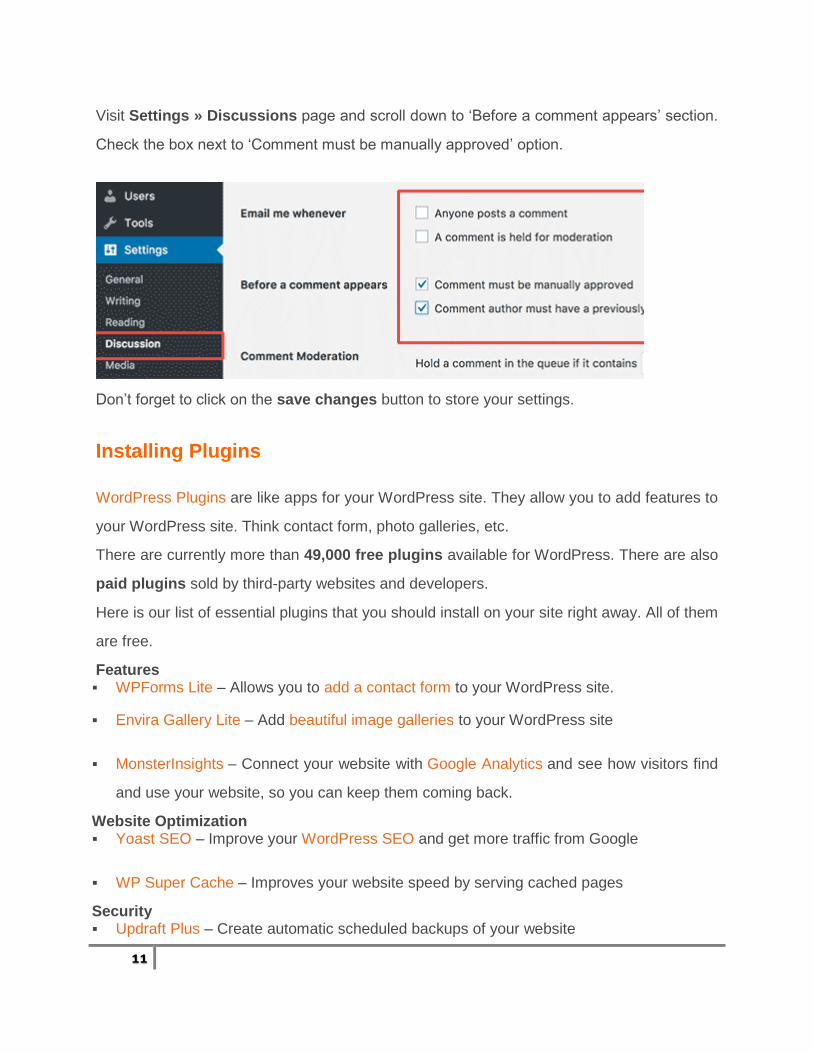
Set up Comments Settings
WordPress comes with a built-in comment system allowing your users to leave comments
on your posts. This is great for user engagement, but it is targeted by spammers as well.
To deal with this, you’ll need to enable comment moderation on your website.
11
Visit Settings » Discussions page and scroll down to ‘Before a comment appears’ section.
Check the box next to ‘Comment must be manually approved’ option.
Don’t forget to click on the save changes button to store your settings.
Installing Plugins
WordPress Plugins are like apps for your WordPress site. They allow you to add features to
your WordPress site. Think contact form, photo galleries, etc.
There are currently more than 49,000 free plugins available for WordPress. There are also
paid plugins sold by third-party websites and developers.
Here is our list of essential plugins that you should install on your site right away. All of them
are free.
Features WPForms Lite – Allows you to add a contact form to your WordPress site.
Envira Gallery Lite – Add beautiful image galleries to your WordPress site
MonsterInsights – Connect your website with Google Analytics and see how visitors find
and use your website, so you can keep them coming back.
Website Optimization Yoast SEO – Improve your WordPress SEO and get more traffic from Google
WP Super Cache – Improves your website speed by serving cached pages
Security Updraft Plus – Create automatic scheduled backups of your website
12
Sucuri – Website security audit and malware scanner
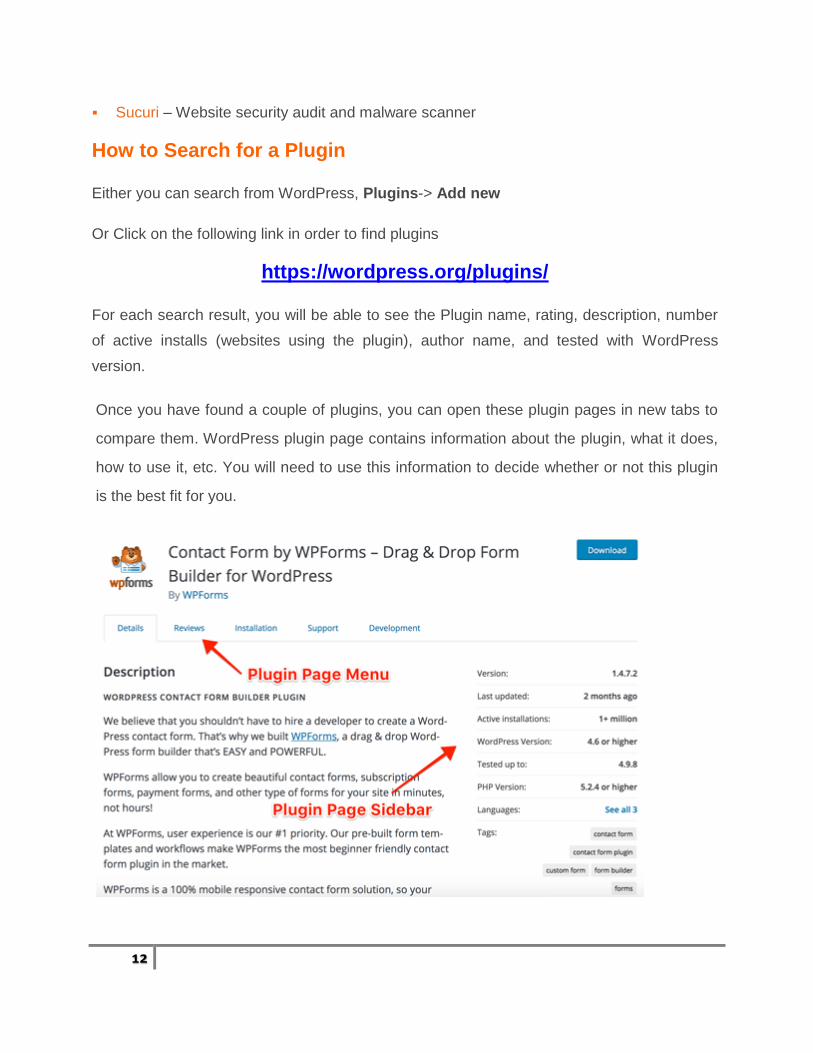
How to Search for a Plugin
Either you can search from WordPress, Plugins-> Add new
Or Click on the following link in order to find plugins
https://wordpress.org/plugins/
For each search result, you will be able to see the Plugin name, rating, description, number
of active installs (websites using the plugin), author name, and tested with WordPress
version.
Once you have found a couple of plugins, you can open these plugin pages in new tabs to
compare them. WordPress plugin page contains information about the plugin, what it does,
how to use it, etc. You will need to use this information to decide whether or not this plugin
is the best fit for you.
13
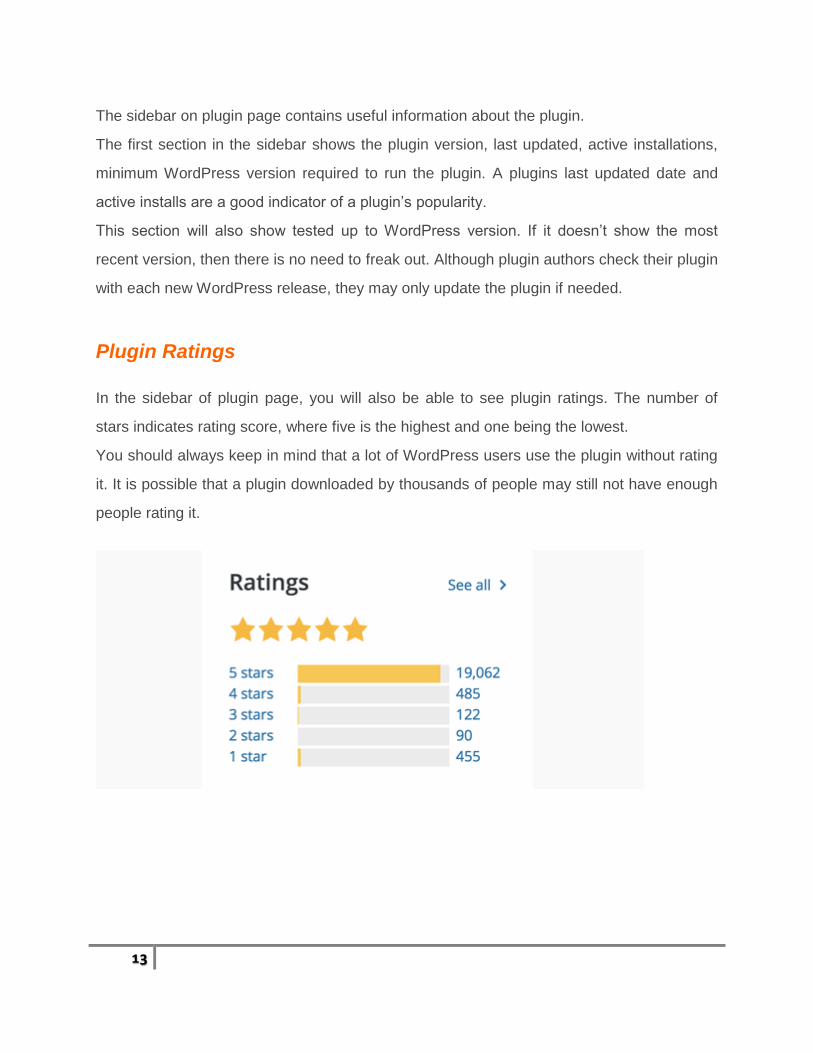
The sidebar on plugin page contains useful information about the plugin.
The first section in the sidebar shows the plugin version, last updated, active installations,
minimum WordPress version required to run the plugin. A plugins last updated date and
active installs are a good indicator of a plugin’s popularity.
This section will also show tested up to WordPress version. If it doesn’t show the most
recent version, then there is no need to freak out. Although plugin authors check their plugin
with each new WordPress release, they may only update the plugin if needed.
Plugin Ratings
In the sidebar of plugin page, you will also be able to see plugin ratings. The number of
stars indicates rating score, where five is the highest and one being the lowest.
You should always keep in mind that a lot of WordPress users use the plugin without rating
it. It is possible that a plugin downloaded by thousands of people may still not have enough
people rating it.
14
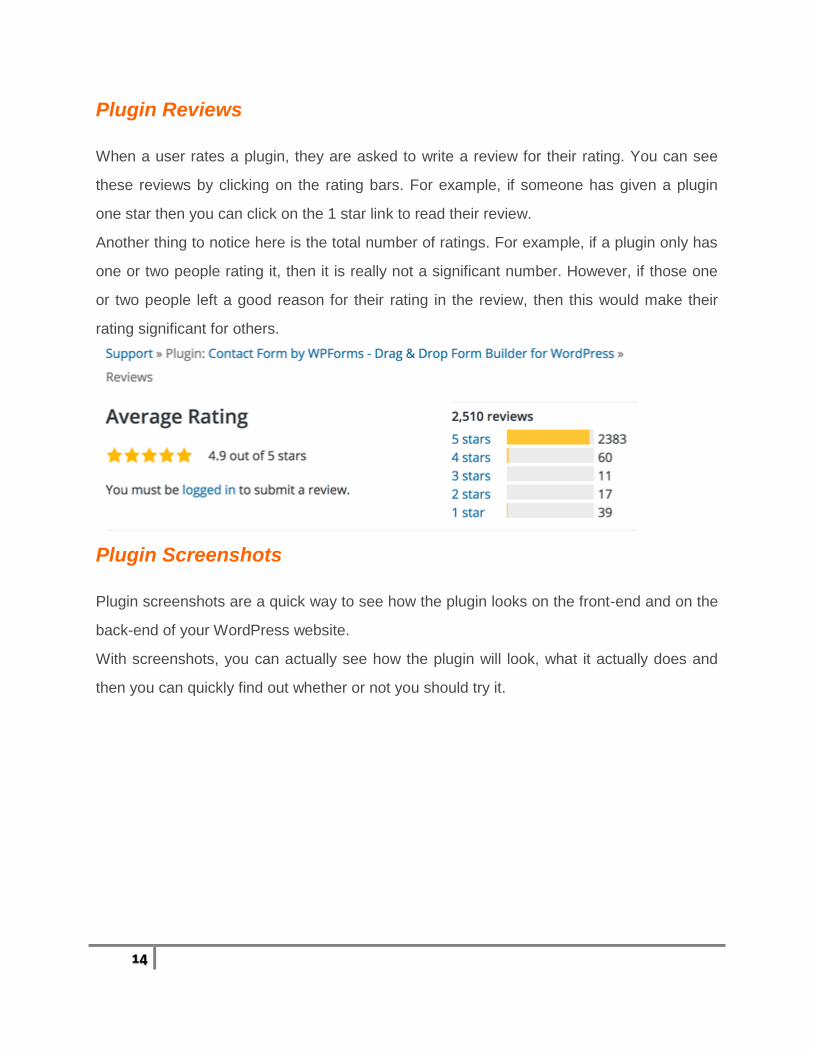
Plugin Reviews
When a user rates a plugin, they are asked to write a review for their rating. You can see
these reviews by clicking on the rating bars. For example, if someone has given a plugin
one star then you can click on the 1 star link to read their review.
Another thing to notice here is the total number of ratings. For example, if a plugin only has
one or two people rating it, then it is really not a significant number. However, if those one
or two people left a good reason for their rating in the review, then this would make their
rating significant for others.
Plugin Screenshots
Plugin screenshots are a quick way to see how the plugin looks on the front-end and on the
back-end of your WordPress website.
With screenshots, you can actually see how the plugin will look, what it actually does and
then you can quickly find out whether or not you should try it.


![TCL Q3 & YTD Dec 18 Signed Results · 2019-01-30 · ! Êê ® Ê 15 ÊÔ Í Ê 6 Ê % Ê Ê Ê ¡ 9 Ê F1 Gë \ + Ê : °7 Ê ÊC º = Ê z a ± Ê Ê Ê ] ¢ Ê ¯ . y ÊI r Hì](https://img.pdfslide.us/doc/110x75/5f561fa3e994306673769de0/tcl-q3-ytd-dec-18-signed-results-2019-01-30-15-6.jpg)


![Fiac Catalogo PISTONI E21550 FIAC S.p.A. 6 >Ê6 ââ> ]ÊÓÎÊ Ê{ääÎÇÊ* ÌiVV Ê >ÀV Ê } >®Ê Ì> ÞÊ Ê/i °\ʳΠÊäx£ÊÈÇ°nÈ°n££ÊUÊ >Ý\ʳΠÊäx£Ên{°xÓ°È£Ê](https://img.pdfslide.us/doc/110x75/602ded37739614151a1f8fd9/fiac-catalogo-pistoni-50-fiac-spa-6-6-.jpg)
![À }Ê/ i Ê iÀiÊ ÊÃV Ê À }Ê/ i Ê iÀiÊ ÊÃV Ê > `ÊÜ À « >ViÊÌ ... › 2017 › 04 › tshirt-action.pdfJ À }/ i iÀi VÌ ÃÊ Ê/i>V iÀÃ]Ê ÕÀÃiÃ]Ê `Ü ÛiÃ]Ê](https://img.pdfslide.us/doc/110x75/60bf2e37c1c1697ab666bd47/-i-ii-fv-i-ii-fv-oe-vioe.jpg)

![* Ê ,/] * Ê ] · i Ì> Ê i> Ì Ê-iÀÛ viÃÊ vÌÊ Ê vÌ !lmansor#ourt 3 !lmansor3t !lhambra #alifornia 7ednesday /ctober !-n 0-](https://img.pdfslide.us/doc/110x75/60c66d7c3c847420d37b70d1/-i-oe-i-oe-i-vif-voe-voe-lmansorourt.jpg)
![>ÀÌÊEÊ Àii Ê Õ ` }Ê Ê Ê ÊÊÊÊ ià } ]Ê ÃÌÀÕVÌ ÊEÊ > >}i i Ì · PDF file- >ÀÌÊEÊ Àii Ê Õ ` }Ê Ê Ê ÊÊÊÊ ià } ]Ê ÃÌÀÕVÌ ÊEÊ > >}i i Ì Registration](https://img.pdfslide.us/doc/110x75/5aba34ed7f8b9aa6018ec7de/-e-ii-i-v-e-i-i-e-ii-i-v-e-i-i-registration-form-the-hkie-.jpg)