Embed Size (px)
Citation preview

3CHAPTER
In this chapter by Laura Acklen
Learning Essential FormattingTechniques
In this chapter
Choosing the Right Font 62
Emphasizing Important Text 64
Changing Margins by Using Guidelines 67
Justifying Text 69
Using QuickBullets 70
Inserting Special Characters 72
Getting a Word Count 74
Troubleshooting 75

62 Chapter 3 Learning Essential Formatting Techniques
Choosing the Right FontWhat can you do to transform a plain vanilla document into something that a reader wouldforward to reviewing? Choose attractive fonts to generate interest in your subject. Make thetitles and headings larger than the body text so that they really stand out. It only takes a fewminutes, and the results are well worth your effort.
There are 900 fonts included with WordPerfect Office X3. Of these, 24 are the character setfonts, which contain the symbols and foreign language alphabets. During a typical installa-tion, a default set of fonts is installed. The rest can be installed separately, using either theInstall Wizard or the Windows Fonts folder. To use the Fonts folder, choose Start, ControlPanel, Fonts. In the Fonts dialog box, choose File, Install New Font and follow the prompts.
3
C A U T I O NAs you format your document, remember to always, always, always position the inser-tion point first. As a general rule, your changes take effect at the insertion point, whichmay or may not be where you want them. If you forget and get some unexpectedresults, you’ve got a safety net: You can click the Undo button to reverse the last action(or continue clicking to reverse the last several actions).
Selecting FontsThe quickest way to choose a different font is to click the Font Face drop-down arrow onthe property bar. A drop-down list of fonts appears, and a large preview window pops up atthe top of the document (see Figure 3.1). As you point to a font in the list, the sample textin the preview window morphs into that font. Thanks to Real Time Preview, the text in thedocument does the same thing. You don’t have to play guessing games, trying to figure outhow a font will look from a tiny piece of sample text—you can see how a whole page of textwill look. When you find the font that you want, click it.
C A U T I O NWhen you’re changing the font (or font size) for existing text, such as a title or heading,select it first. Otherwise, the new font (or size) takes effect at the insertion point andstays in effect for the rest of the document (unless, of course, you change the font or sizeagain later).
Selecting Font SizesChoosing a different font size works essentially the same way as choosing a different font.Click the Font Size drop-down arrow on the property bar to open a drop-down list of sizes.If you click the scroll arrows, you’ll see that the list has sizes ranging from 6 points to 72points. A point is a unit of measurement used to describe the size of a font. A 72-point char-acter is 1" tall; a 36-point character is 1/2" tall, and so forth.

63Choosing the Right Font
A preview window with sample text opens next to the list. As you move the mouse downthrough the list, the sample text and the document text expand and contract to show thenew size.
3
Font Size
Font Face drop-down list
Preview window
Figure 3.1As you hover overfonts in the drop-down list, the sampletext in the previewwindow and the textin the documentmorph into that font.
T I P F R O MIf you want to use a font size that isn’t in the list, click the Font Size box (to select thecurrent size), then type the size you want, then press Enter.
When you’ve decided which font you want to use for the body text, set that as the defaultfont for the document. Likewise, if you select a font that you want to use for most, if not all,your documents, set that as the default for all new documents. Choose Format, Font to openthe Font Properties dialog box. Make your selections, and then choose Settings. Choose SetFace and Point Size As Default for This Document or Set Face and Point Size As Defaultfor All Documents.
T I P F R O MHave you ever been stuck making last-minute changes to a document on a machine thatdidn’t have the same fonts installed? What was once a logistical nightmare is now com-pletely painless, thanks to font-embedding technology. You can save fonts with a docu-ment so they go where the document goes. When you save a file, choose Embed Fontsusing TrueDoc™ in the Save As dialog box. WordPerfect compresses the fonts and savesthem with the file.

64 Chapter 3 Learning Essential Formatting Techniques
➔ To find a list of all the macros that ship with WordPerfect, along with the stepsto create your own macros, see “Running the Shipping Macros,” p. 570.
Selecting Recently Used Fonts by Using QuickFontsSay you’re formatting a lengthy report. You’re finished experimenting, so you know whichfonts you want to use for your headings and key terms. Even with the Font Face and FontSize drop-down lists, reselecting the same fonts and sizes over and over is tedious.
QuickFonts to the rescue! The last 10 fonts (with sizes and effects) you selected are kept inthe QuickFonts list for fast access. Click the QuickFonts button on the property bar (seeFigure 3.2), and then click the font you want to reuse. Sorry—no Real Time Preview here.
3
T I P F R O MEver wish you had a “font catalog” that you could flip through? WordPerfect includes anifty macro that prints out a sample of the fonts on your system. Choose Tools, Macro,Play, and then double-click the Allfonts icon. Bear in mind that if you have hundreds offonts on your system (and who doesn’t) it will take a while to build the document. It willalso take a while to print and may overload your printer, depending on how muchprinter memory you have. If you are unable to print the entire font document, try break-ing it up into several pieces.
QuickFontsClick to open the FontProperties dialog box
Figure 3.2Click the QuickFontsbutton to select fromthe 10 most recentlyused fonts.
Emphasizing Important TextWhen you speak, you use inflection for emphasis. To get an important point across, youmight raise your voice and enunciate each word slowly and clearly. This gets the audience’sattention and it gives a point of reference.
You can do the same thing with your printed document. Judicious use of bold, italic, under-line, and other effects can guide a reader through the text and draw attention to key points.You have to be careful not to use these elements too much or you risk distracting the reader.

65Emphasizing Important Text
Using Bold, Italic, and UnderlineBefore there were gazillions of fonts to play with, the only way you could vary the look ofthe text was with bold, italic, and underline. These old standbys still have their place. Thedesigners for the Special Edition Using books decided to use italic to point out importantterms and to emphasize words. Titles and headings are bold so they really stand out.Screenshots illustrate WordPerfect’s use of underlines for hotkeys. All of these things makeit easier for you to understand the information being presented.
To apply bold, italic, or underline, select the text, and then click the Bold, Italic, orUnderline button (or any combination of the three).
If you can’t figure out why your bold, italic, and underline disappear after you change the font, see“Disappearing Act” in the Troubleshooting section at the end of this chapter.
Adding ColorI can’t remember the last time I printed a document for someone to read. Like many others,I use e-mail most of the time. I just attach the file to an e-mail message. The recipient opensit in his word processing program and reads it onscreen.
This method of reviewing documents gave me the excuse I needed to start adding color tomy documents. I began using it to draw attention to titles and headings, and progressed tousing it for key terms, statistics, quotes, references, headers and footers, and so on.
To add color to your text, follow these steps:
1. If you’ve already typed some text to which you want to add color, select the text youwant to add color to. Otherwise, position the insertion point where you want to starttyping the colored text.
3
N O T EDon’t get carried away with all the different fonts and font effects that you can choosefrom! A light touch is all you need. Too many fonts, too many effects, or too much coloronly frustrates the reader.
Try to keep things simple: Don’t use more than three or four fonts on a page, don’t applybold and italic and underline (all at once), don’t apply color to long passages of text,don’t use a bunch of different font sizes, and choose a font that suits the subject matter.
C A U T I O NWhen you finish typing the colored text, you’ll have to switch the color back to black. Forthis reason, it’s easier to type the text, select it, and then choose the color.
2. Click the Font Color button on the property bar (see Figure 3.3).
3. Click one of the color boxes to choose one of the standard colors.

66 Chapter 3 Learning Essential Formatting Techniques
➔ To learn how to use the Highlight feature (instead of font color) to accentuatesections of text, see “Using the Highlight Tool,” p. 379.
Using Other Font EffectsBold, italic, underline, and color all have buttons on the property bar, so they are the easiestfont effects to add. The other effects, also called attributes, are found in the Font Propertiesdialog box. First, position the insertion point where you want the effects to start (or selectsome existing text). Choose Format, Font or press F9 to open the Font Properties dialog box(see Figure 3.4).
The font attributes are listed in the Appearance section. As you select attributes, the sampletext in the lower-left corner shows you how the attributes will look when applied to the text.The Real Time Preview feature pops up again here—WordPerfect pulls in a short section oftext from your document and uses it as the sample text. (If you’re working in a blank docu-ment, the sample text is the name of the currently selected font.) Click OK when you’redone choosing effects.
3
Font Color
Most recently chosen colors
Create your own custom colors
Figure 3.3Clicking the FontColor button on theproperty bar is thefastest way to openthe color palette. Thispalette is also avail-able in the FontProperties dialog box.
T I P F R O MSo, 42 colors aren’t enough for you? When you’ve got to have just the right shade ofblue/green (and you have a few minutes to play), choose More from the color palette toopen the Select Color dialog box. Click anywhere on the color wheel to move the littleselection box and display the color you’ve created in the New Color section. Now, clickand drag the selection box on the vertical luminosity bar to the desired color intensity.You can then make minor adjustments by tweaking the numbers in the Color Valuessection.
T I P F R O MIf you use the same colors over and over, you’ll love this! WordPerfect places the lastseven colors you’ve selected on the top row of the palette. I really appreciate this withthe custom colors because I don’t have to reselect them each time.

67Changing Margins by Using Guidelines
If you received an error message during setup saying that you had too many fonts selected, see“Too Many Fonts” in the Troubleshooting section at the end of this chapter.
If you’re selecting options in the Appearance section of the Font Properties dialog box and thesample text isn’t changing to reflect your changes, see “Disappearing Act” in the Troubleshootingsection at the end of this chapter.
Changing Margins by Using GuidelinesBelieve it or not, you can make your document easier to read by adjusting the margins. Awider margin creates more whitespace around the text and limits the number of words on aline. The shorter the line, the less likely the reader is to lose her place.
On the other hand, if you’re trying to keep the number of pages down, you might want tomake the margins smaller so you can fit more on a page. For example, if you plan to use
3
Choose color
Choose font size
Choose font
Sample text from document
Chooseattributes
Figure 3.4You can use the FontProperties dialog boxif you need to setmultiple font optionsor if you want to pre-view your changesfirst.
T I P F R O MIf you use font attributes a lot, consider adding buttons for them to the toolbar. Or, cre-ate a new toolbar and add all your favorite buttons to it. Choose Tools, Settings,Customize. You can add to an existing toolbar, or you can create a new toolbar. To add abutton to an existing toolbar, select the toolbar, and then choose Edit. Open the FeatureCategories drop-down list and choose Format. Select the feature in the list, and thenchoose Add Button. When you are finished adding buttons, click OK to save yourchanges. To create a new toolbar, choose Create, type a name for the toolbar, and thenclick OK. Add buttons as previously described.
68 Chapter 3 Learning Essential Formatting Techniques
headers and footers, you might want to cut the top and bottom margins down to 1/2 inch.By default, the margins are set to 1 inch on all sides (see Table 3.1 later in this chapter).
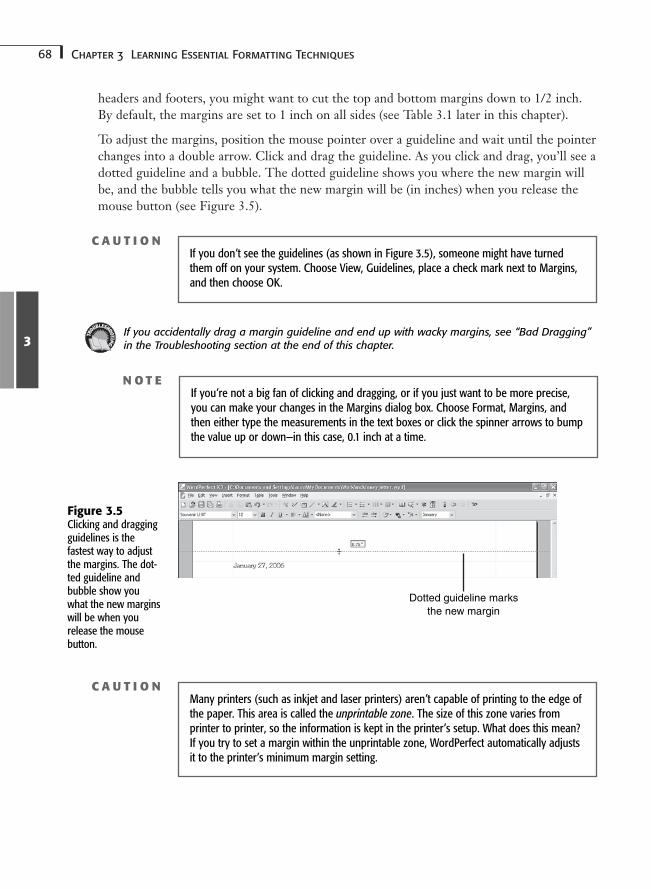
To adjust the margins, position the mouse pointer over a guideline and wait until the pointerchanges into a double arrow. Click and drag the guideline. As you click and drag, you’ll see adotted guideline and a bubble. The dotted guideline shows you where the new margin willbe, and the bubble tells you what the new margin will be (in inches) when you release themouse button (see Figure 3.5).
3
C A U T I O NIf you don’t see the guidelines (as shown in Figure 3.5), someone might have turnedthem off on your system. Choose View, Guidelines, place a check mark next to Margins,and then choose OK.
If you accidentally drag a margin guideline and end up with wacky margins, see “Bad Dragging”in the Troubleshooting section at the end of this chapter.
N O T EIf you’re not a big fan of clicking and dragging, or if you just want to be more precise,you can make your changes in the Margins dialog box. Choose Format, Margins, andthen either type the measurements in the text boxes or click the spinner arrows to bumpthe value up or down—in this case, 0.1 inch at a time.
Dotted guideline marksthe new margin
Figure 3.5Clicking and draggingguidelines is thefastest way to adjustthe margins. The dot-ted guideline andbubble show youwhat the new marginswill be when yourelease the mousebutton.
C A U T I O NMany printers (such as inkjet and laser printers) aren’t capable of printing to the edge ofthe paper. This area is called the unprintable zone. The size of this zone varies fromprinter to printer, so the information is kept in the printer’s setup. What does this mean?If you try to set a margin within the unprintable zone, WordPerfect automatically adjustsit to the printer’s minimum margin setting.

69Justifying Text
Justifying TextJustification controls how text flows between the left and right margins. The most obviousexample of this is centering text on a line. WordPerfect does the math, and you get the sameamount of space on the left and right sides. No matter what you do to the left and rightmargins, that text stays centered.
The default setting in WordPerfect is left justification, which creates a smooth left marginand a ragged right margin. The result is an open, informal appearance that is accessible andeasy to read. For that reason, this book has been formatted with left justification.
There are four other justification options that you might be interested in, especially if youwork with columns, newsletters, and formal documents (see Figure 3.6).
3
Justification
Last line isn’t justified
Figure 3.6This sample docu-ment illustrates thedifferent justificationsettings.
Before you choose which type of justification you want to use in your document, decidewhere you want the justification to take effect, and then move the insertion point there.This may be at the top of the document, the top of a column, or the beginning of a para-graph. If you want to apply justification to a section of text, such as a multiline title, selectthe text first.
Instead of using the menus, you can click the Justification button on the property bar, andthen choose the justification setting from the pop-up list. This method offers an advantageover the others in that you get a Real Time Preview of each justification setting when youhover over it.

70 Chapter 3 Learning Essential Formatting Techniques
WordPerfect offers the following justification options:
■ Left—Text is aligned against the left margin so the left margin is smooth and the rightis ragged. It’s suitable for almost every type of document, especially those with long pas-sages of text. To apply left justification, choose Format, Justification, Left, or pressCtrl+L.
■ Right—Text is aligned against the right margin so the right side is smooth and the leftis ragged. The unique placement draws attention, but because it’s hard to read, youmight not want to use it on more than three or four lines. To apply right justification,choose Format, Justification, Right, or press Ctrl+R.
■ Center—Text is centered between the left and right margins. It’s common practice tocenter titles and headings to differentiate them from the rest of the text. To apply centerjustification, choose Format, Justification, Center, or press Ctrl+E.
■ Full—Text is aligned against the left and right margins, so both edges are smooth.How? WordPerfect makes slight adjustments to the spacing between words so that eachline extends from the left to the right margin. Full justification gives documents a moreformal and organized appearance. To apply full justification, choose Format,Justification, Full, or press Ctrl+J.
■ All—This type of justification stretches lines of text between the left and right margins,regardless of their length. Whereas full justification adjusts the spacing between words,all justification adjusts the spacing between letters as well. This setting is used for letter-head, informal titles and headings, and special effects. To apply all justification, chooseFormat, Justification, All.
3
C A U T I O NWith justification set to full, the last line in a paragraph won’t be justified if it doesn’textend to the right margin (or pretty close to it). Refer to Figure 3.6 for an example ofhow this looks.
T I P F R O MHave you noticed that articles in the newspaper are formatted into columns with smoothleft and right margins? When the column edges are well defined, side-by-side columnsdon’t look cluttered or disorganized. You can achieve the same result by setting justifica-tion to full. This can be done before or after you type the text into columns.
➔ To learn how to define columns, see “Setting Up Columns,” p. 212.
Using QuickBulletsI use lists in all sorts of documents. They’re easier to follow than long, drawn-out explana-tions, so readers really appreciate them. WordPerfect’s QuickBullets feature makes it easyfor you to create a bulleted list on-the-fly. Simply type a symbol, and then press Tab—WordPerfect converts the symbol to a bullet. Table 3.1 lists the QuickBullets symbols.

71Using QuickBullets
Inserting QuickBullets is easy when you use the following steps:
1. Choose the Tools menu and select QuickCorrect, Format-As-You-Go. If necessary,place a check mark next to the QuickBullets option.
2. Type one of the QuickBullets symbols, and then press Tab. As soon as you press Tab,WordPerfect converts the symbol to a bullet.
3
N O T EIf you type more than one line of text next to the bullet, you’ll notice that the text auto-matically wraps under the text, not under the bullet. WordPerfect actually converts thetab to an indent so the list has the proper format.
3. Type the text, and then press Enter. Notice that you automatically get another bulletwhen you press Enter (see Figure 3.7).
4. When you are finished with the list, press Enter and then backspace to delete thebullet.
New bullet is inserted when you press Enter
Figure 3.7You can use theQuickBullets featureto create bulleted listswith just one or twokeystrokes.
Table 3.1 lists the six bullet symbols you can create with symbols on the keyboard. You canalso refer to the help topic on this for a quick reminder.
T I P F R O MIf for some reason you don’t like the QuickBullets feature, you can easily turn it off.Choose the Tools menu and select QuickCorrect, Format-As-You-Go. Deselect (that is,remove the check mark from) the QuickBullets option.

72 Chapter 3 Learning Essential Formatting Techniques
Table 3.1 QuickBullet Symbols
Press This To Get This
+ then Tab ✰
^ then Tab ◊
o or * then Tab •
O then Tab ●
> then Tab →
— then Tab —
➔ To learn how to indent text, see “Indenting Text,” p. 176.
➔ To learn how to insert bullets with the Bullets and Numbers dialog box, see “Working with Bulleted andNumbered Lists,” p. 284.
Inserting Special CharactersSpecial characters, or symbols, are one of the many areas where WordPerfect distinguishesitself from the competition. WordPerfect has more than 1,500 special characters, includingentire foreign language alphabets, that you can insert anywhere in your document.
3
N O T ENot all special characters are available in every font. Depending on the font you haveselected, you may see empty boxes instead of special characters, which means that thosecharacters aren’t available. On the other hand, certain fonts, such as Wingdings, arecomposed entirely of special characters.
To insert special characters, follow these steps:
1. Click in the document where you want the special character to appear.
2. Press Ctrl+W or choose Insert, Symbols to open the Symbols dialog box (see Figure3.8). You might need to scroll down to see the symbol you want.
3. If you don’t see the character you need, open the Set drop-down list and then select adifferent character set from the list.
4. Select the symbol, and then choose Insert, or double-click a symbol in the list to insertit. The dialog box stays open to make it easier for you to insert other symbols. (If youwant to move it, click and drag the title bar.) Choose Close when you are finished. Ifyou only need to insert one symbol, choose Insert and Close instead.
If you see empty or black boxes instead of the special characters in the Symbols dialog box, see“Symbols Display As Empty or Black Boxes” in the Troubleshooting section at the end of thischapter.

73Inserting Special Characters
The QuickCorrect feature is designed to automatically correct common spelling errors andtypos while you type. There are five common symbols that you can insert withQuickCorrect (see Table 3.2).
Table 3.2 Creating Symbols with QuickCorrect
To Get This Type This
Copyright symbol (c or (c)
Registered trademark symbol (r or (r)1⁄2 1/2
en dash (–) -- or n-
em dash (—) --- or m-
If you don’t want QuickCorrect making these automatic replacements, you can take thesesymbols out of the list. Choose Tools, QuickCorrect. Select the entry you want to remove,and then choose Delete Entry.
3
Switch to another set of special characters
Scroll down through thesymbols available in this set
Figure 3.8Through the Symbolsdialog box, you caninsert more than1,500 symbols andcharacters from for-eign languagealphabets.
T I P F R O MIf you insert the same symbols over and over, you’ll appreciate this shortcut. The nexttime you select a symbol, look for the two numbers in the Number text box. Then, whenyou need to insert that character again, press Ctrl+W, type the two numbers (separatedby a space or a comma), and then press Enter. For example, to insert the heart symbolshown in Figure 3.8, press Ctrl+W, type 5,0; then, press Enter.
74 Chapter 3 Learning Essential Formatting Techniques
Getting a Word CountOne of the most valuable tools that a writer can have is a word count feature. Author guide-lines will clearly state a minimum or maximum word count as part of the instructions.Whether you are submitting a magazine article, a short story, a nonfiction work, or a schoolassignment, you’ll need to pay close attention to the number of words in your document.
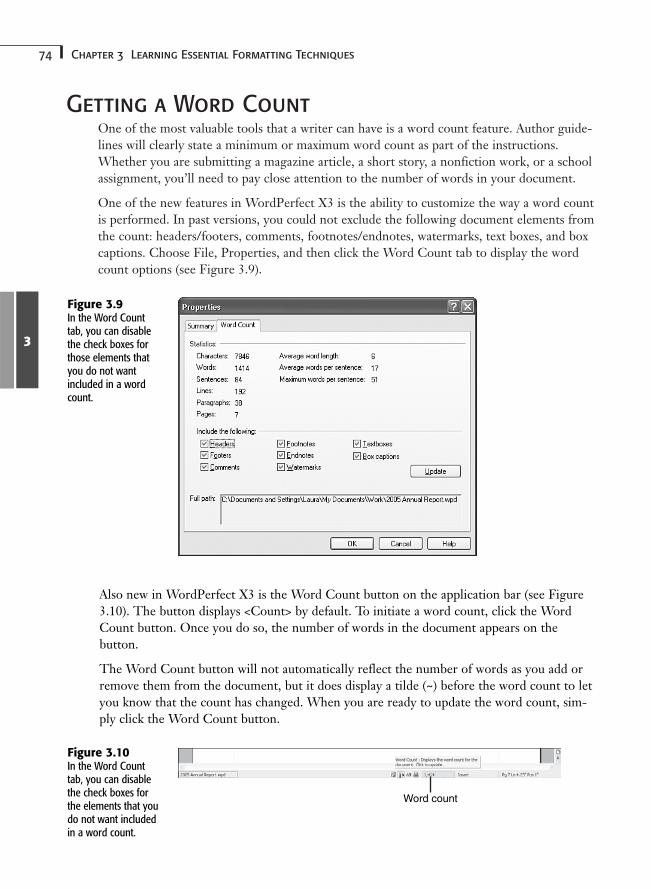
One of the new features in WordPerfect X3 is the ability to customize the way a word countis performed. In past versions, you could not exclude the following document elements fromthe count: headers/footers, comments, footnotes/endnotes, watermarks, text boxes, and boxcaptions. Choose File, Properties, and then click the Word Count tab to display the wordcount options (see Figure 3.9).
3
Figure 3.9In the Word Counttab, you can disablethe check boxes forthose elements thatyou do not wantincluded in a wordcount.
Also new in WordPerfect X3 is the Word Count button on the application bar (see Figure3.10). The button displays <Count> by default. To initiate a word count, click the WordCount button. Once you do so, the number of words in the document appears on thebutton.
The Word Count button will not automatically reflect the number of words as you add orremove them from the document, but it does display a tilde (~) before the word count to letyou know that the count has changed. When you are ready to update the word count, sim-ply click the Word Count button.
Word count
Figure 3.10In the Word Counttab, you can disablethe check boxes forthe elements that youdo not want includedin a word count.

75Troubleshooting
TroubleshootingToo Many Fonts
During a custom installation, I got the error message “Too Many Fonts Selected” after I marked thefonts I wanted to install. The installation continued, but now I’m not sure which fonts were installed.
All the fonts you marked were copied to your hard drive, but not all of them were regis-tered. There is a limit to the number of fonts that can be registered in the WindowsRegistry. When you exceed this limit, all sorts of problems can crop up—from fonts not dis-playing correctly to buttons showing symbols instead of text. I’ve seen conflicting reports onwhat the actual limitation is, but most technicians recommend that you keep a maximum of300 fonts registered at one time. This number includes any fonts that you already had onyour system (such as Windows fonts and fonts installed with other applications). I wouldsuggest that you run a typical installation so that the character set fonts and default fonts aresafely installed before you attempt to install additional fonts.
To see the fonts that are currently registered on your system, open the Fonts folder bychoosing Start, Control Panel, Fonts. To make room for the WordPerfect fonts, select anddelete the fonts that you don’t use. Then choose File, Install New Font to add fonts thatwere copied to the hard drive but not registered during setup.
Bad Dragging
I accidentally grabbed a margin guideline with the mouse and before I knew what was happening,half my page had new margins. How do I fix this?
It’s really faster to undo the change than to try to drag the guideline back to its originalposition. Either click the Undo button; choose Edit, Undo; or press Ctrl+Z.
If you save the document before trying Undo, you won’t be able to undo the margin changebecause by default, the Undo information isn’t saved. You can still reverse the marginchange, though. Simply position the insertion point where the margin change begins, turnon Reveal Codes and delete the margin code. To delete the code, click and drag it out of theReveal Codes window.
Disappearing Act
After spending 15 minutes selecting text and applying italics, I decided to change the font. Now allthe text I italicized is back to normal. How do I restore the italics I originally had?
Sometimes changing the font causes your bold, italic, underline, or other font effects to dis-appear. Why? Because the new font doesn’t support those effects. This doesn’t happen veryoften—it occurs mostly with the more decorative fonts—but when it does, it’s disconcerting.You can either switch to another font and see whether it supports them, or you can just for-get about the effects.

76 Chapter 3 Learning Essential Formatting Techniques
Symbols Display As Empty or Black Boxes
When I open the Symbols dialog box, I don’t see the special characters that are shown in Figure 3.8. Isee black boxes instead. How can I get the special characters back?
Sometimes the registry entries for the WP character font files get corrupted and you have tore-create them. To force Windows to rewrite the entries, you’ll need to delete the files (sendthem to the Recycle Bin), and then restore them. Click Start, Control Panel, Fonts. In theFonts folder, select all the fonts that begin with WP (everything between WP Arabic Sihafaand WP TypographicSymbols). Delete the files. Restart the computer. Double-click theRecycle Bin icon, and then select all the WP fonts. Choose File, Restore.
If the characters are still displayed as black boxes, you might need to delete and reinstall thefonts. Follow the steps given in the previous paragraph to delete the fonts. Run theWordPerfect Office setup program to install the fonts again. You’ll have to restart the com-puter after you update the install. The characters should then display correctly inWordPerfect.