Embed Size (px)
DESCRIPTION
Further Word 97 Formatting Techniques. Word 97 - Intermediate. Adding Bullets to a List. Use the Bullets icon Or use the Bullets and Numbering command under the Format drop down menu and then select the Bulleted tab. Customizing Your Bullet Formatting. You can customize: The bullet symbol - PowerPoint PPT Presentation
Citation preview
© Cheltenham Computer Training 1995-2002 Word 97 Intermediate - Further Formatting Techniques - Slide No. 1
Further Word 97 Formatting Techniques
Word 97 - Intermediate
© Cheltenham Computer Training 1995-2002 Word 97 Intermediate - Further Formatting Techniques - Slide No. 2
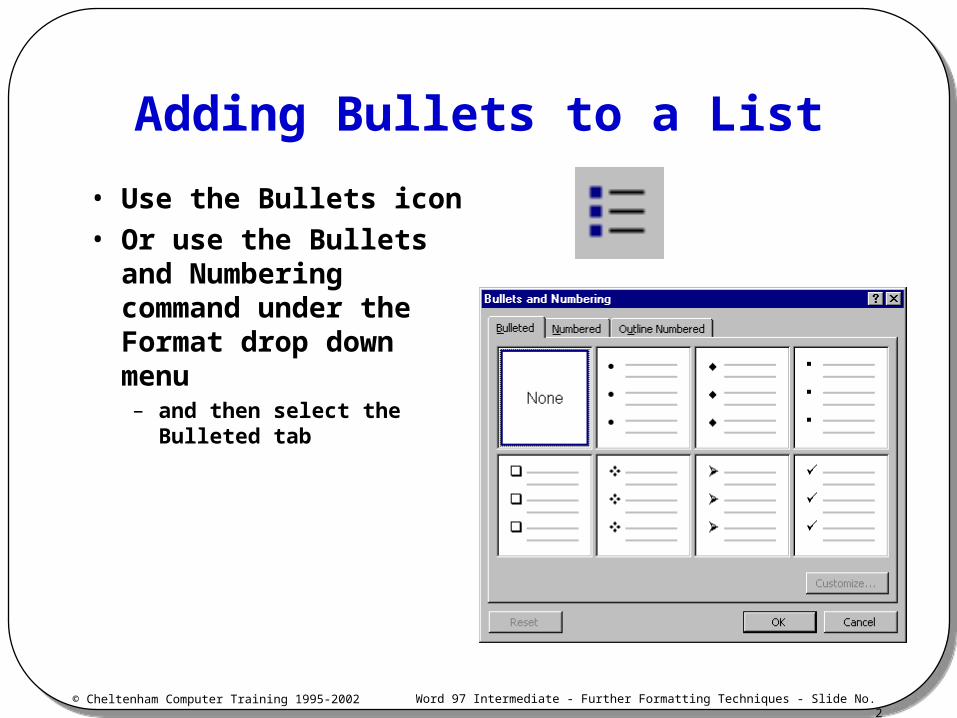
Adding Bullets to a List
• Use the Bullets icon• Or use the Bullets and
Numbering command under the Format drop down menu– and then select the
Bulleted tab
© Cheltenham Computer Training 1995-2002 Word 97 Intermediate - Further Formatting Techniques - Slide No. 3
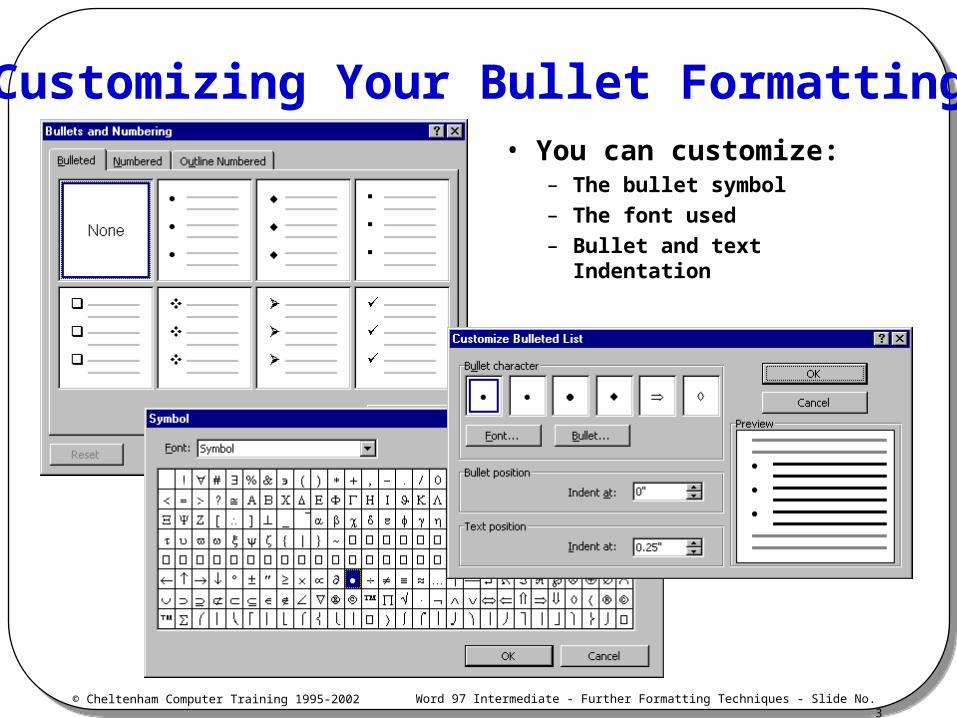
Customizing Your Bullet Formatting• You can customize:
– The bullet symbol
– The font used
– Bullet and text Indentation
© Cheltenham Computer Training 1995-2002 Word 97 Intermediate - Further Formatting Techniques - Slide No. 4
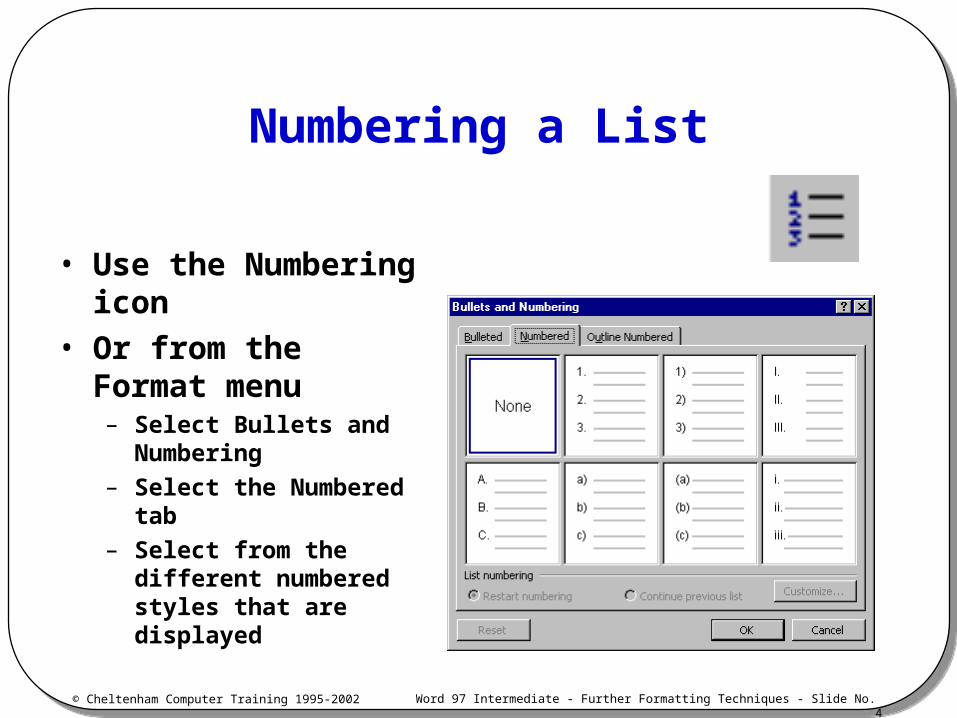
Numbering a List
• Use the Numbering icon
• Or from the Format menu– Select Bullets and
Numbering
– Select the Numbered tab
– Select from the different numbered styles that are displayed
© Cheltenham Computer Training 1995-2002 Word 97 Intermediate - Further Formatting Techniques - Slide No. 5
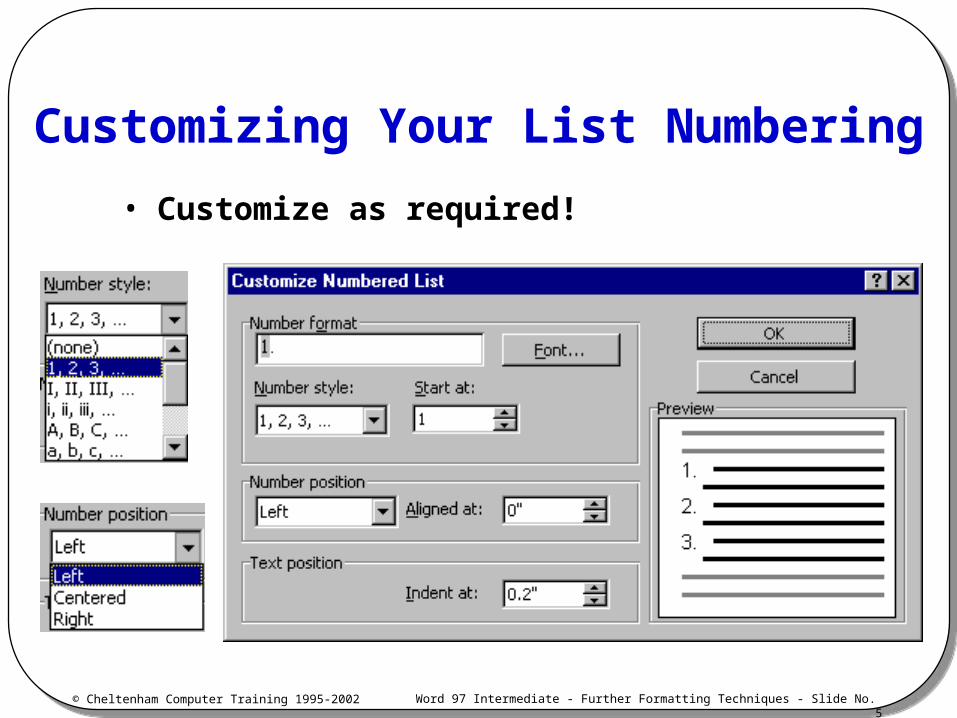
Customizing Your List Numbering
• Customize as required!
© Cheltenham Computer Training 1995-2002 Word 97 Intermediate - Further Formatting Techniques - Slide No. 6
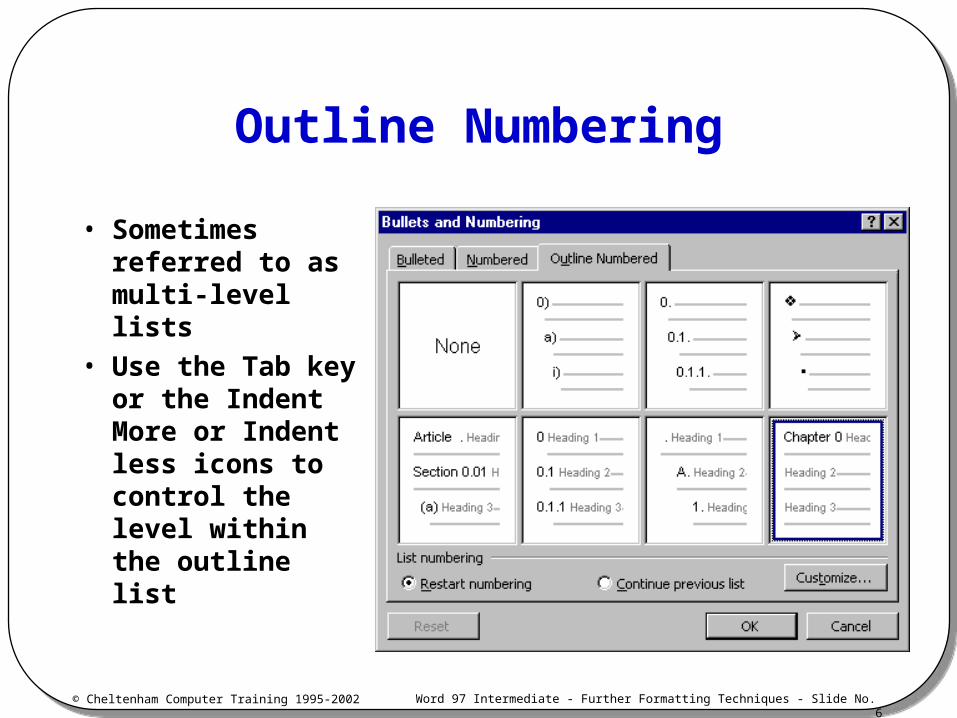
Outline Numbering
• Sometimes referred to as multi-level lists
• Use the Tab key or the Indent More or Indent less icons to control the level within the outline list
© Cheltenham Computer Training 1995-2002 Word 97 Intermediate - Further Formatting Techniques - Slide No. 7
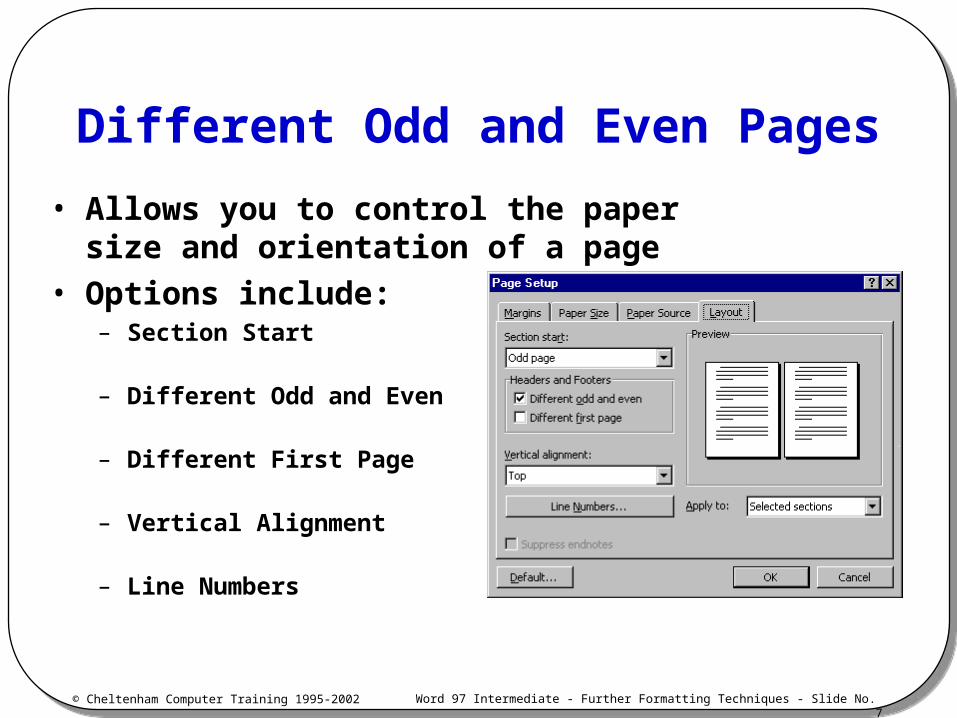
Different Odd and Even Pages
• Allows you to control the paper size and orientation of a page
• Options include:– Section Start
– Different Odd and Even
– Different First Page
– Vertical Alignment
– Line Numbers
© Cheltenham Computer Training 1995-2002 Word 97 Intermediate - Further Formatting Techniques - Slide No. 8
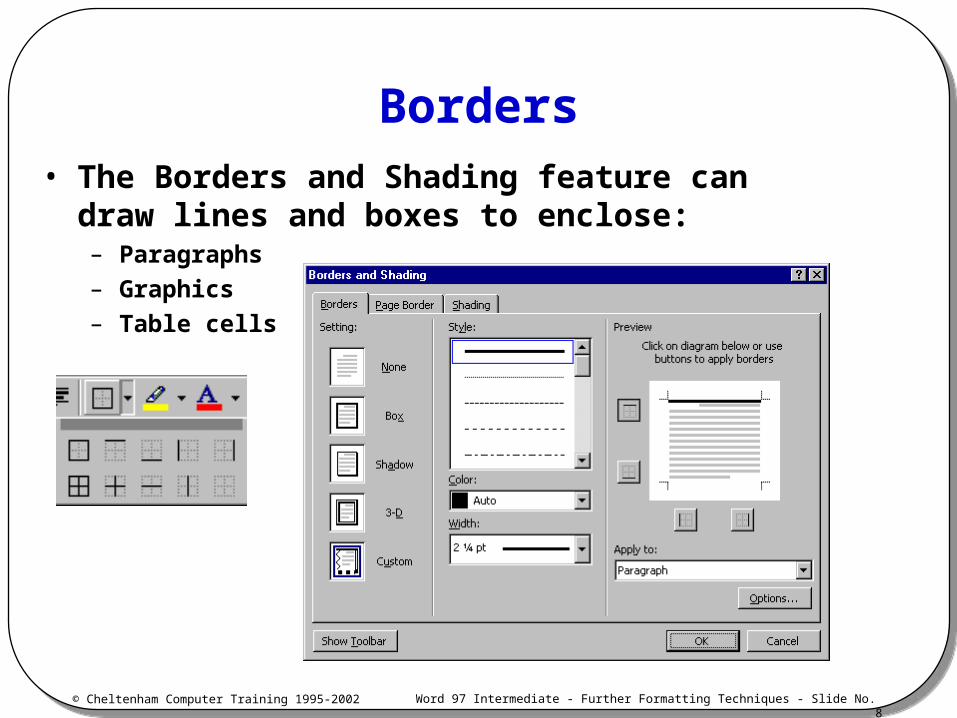
Borders• The Borders and Shading feature can draw lines
and boxes to enclose:– Paragraphs
– Graphics
– Table cells

© Cheltenham Computer Training 1995-2002 Word 97 Intermediate - Further Formatting Techniques - Slide No. 9
Shading
• Borders can also be shaded using color or pattern shading
© Cheltenham Computer Training 1995-2002 Word 97 Intermediate - Further Formatting Techniques - Slide No. 10
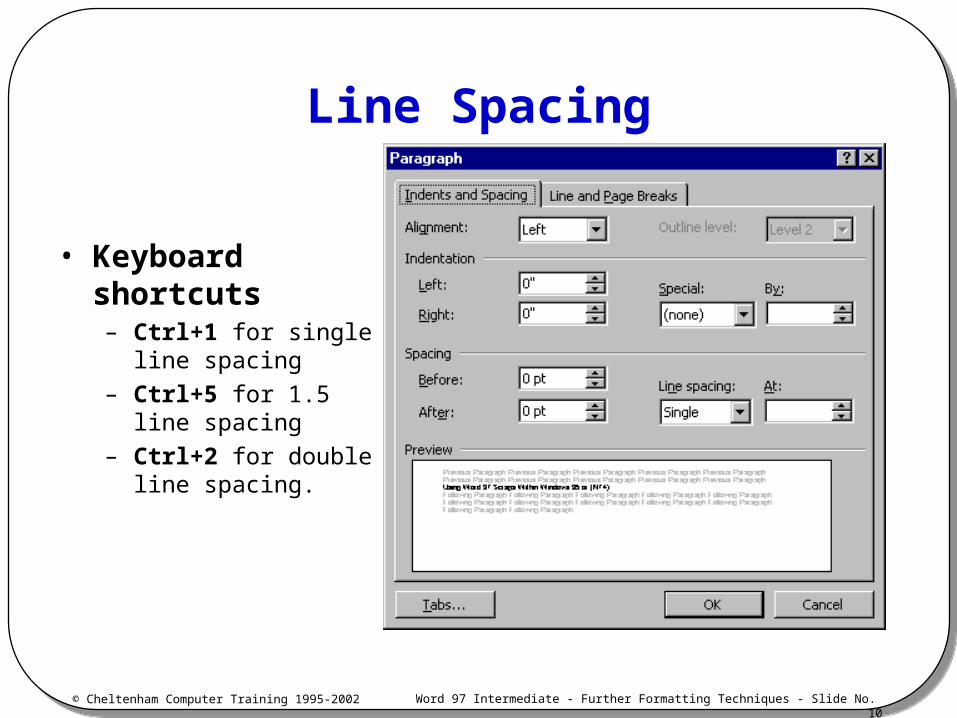
Line Spacing
• Keyboard shortcuts– Ctrl+1 for single line
spacing
– Ctrl+5 for 1.5 line spacing
– Ctrl+2 for double line spacing.
© Cheltenham Computer Training 1995-2002 Word 97 Intermediate - Further Formatting Techniques - Slide No. 11
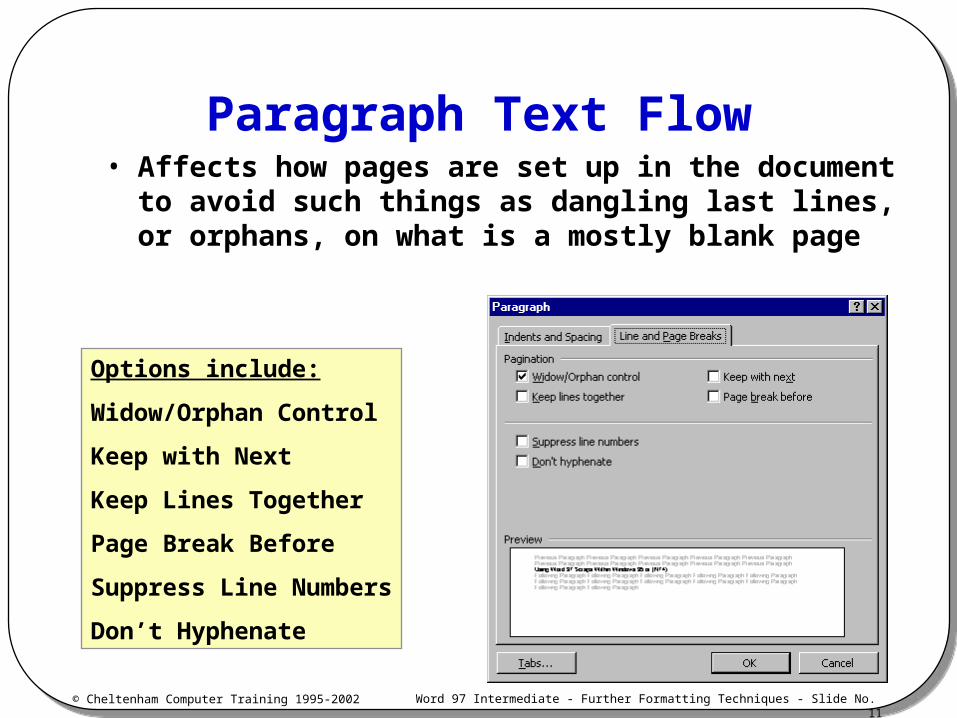
Paragraph Text Flow• Affects how pages are set up in the document to
avoid such things as dangling last lines, or orphans, on what is a mostly blank page
Options include:
Widow/Orphan Control
Keep with Next
Keep Lines Together
Page Break Before
Suppress Line Numbers
Don’t Hyphenate
© Cheltenham Computer Training 1995-2002 Word 97 Intermediate - Further Formatting Techniques - Slide No. 12
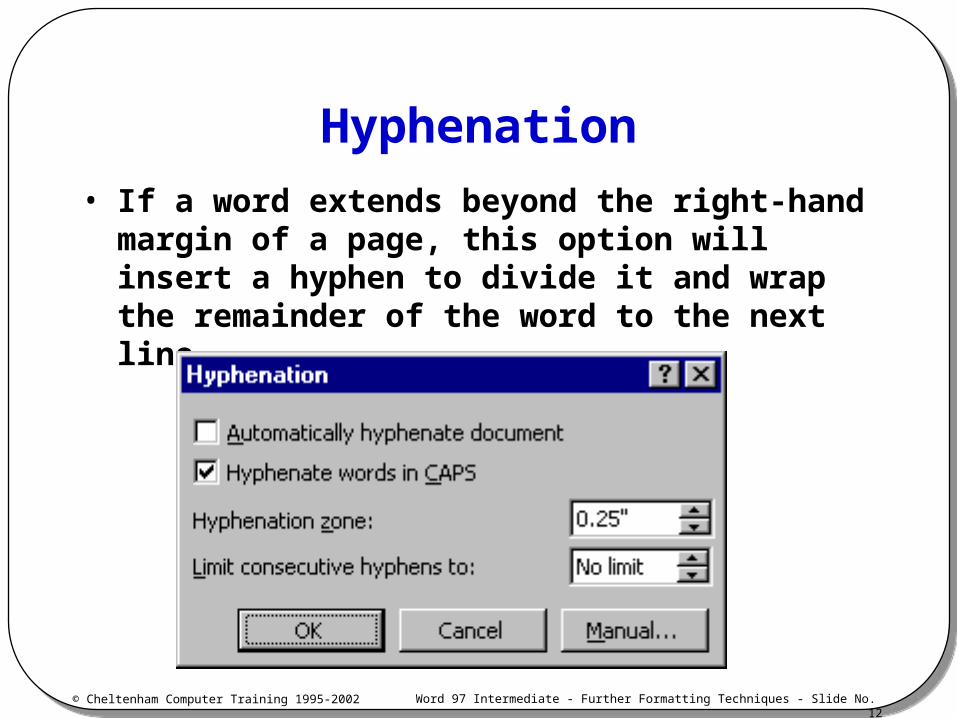
Hyphenation
• If a word extends beyond the right-hand margin of a page, this option will insert a hyphen to divide it and wrap the remainder of the word to the next line
© Cheltenham Computer Training 1995-2002 Word 97 Intermediate - Further Formatting Techniques - Slide No. 13
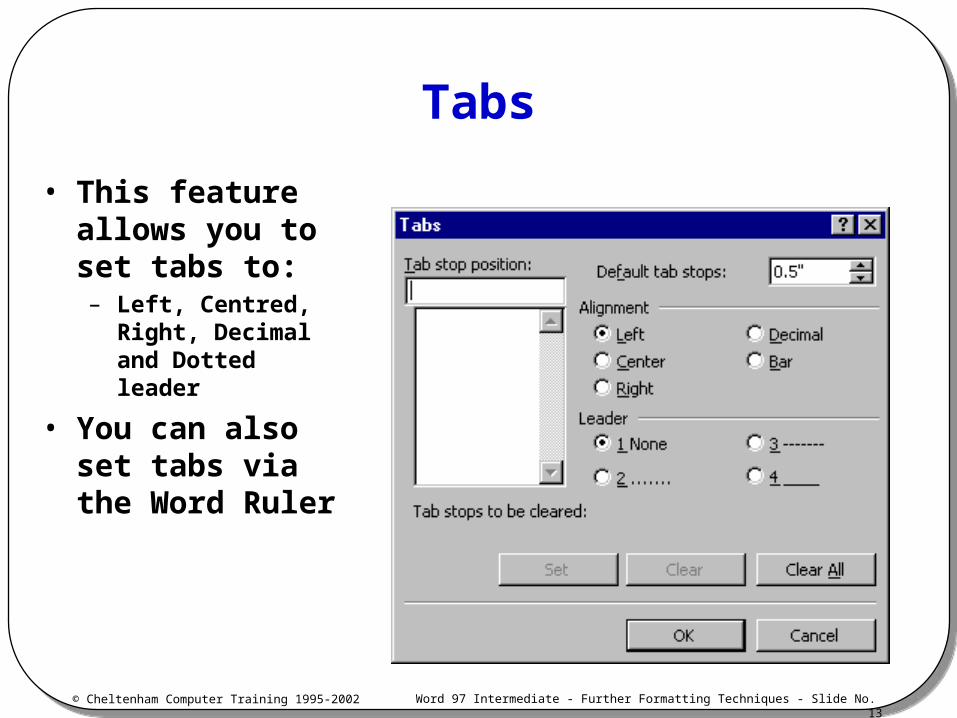
Tabs
• This feature allows you to set tabs to:– Left, Centred, Right,
Decimal and Dotted leader
• You can also set tabs via the Word Ruler
© Cheltenham Computer Training 1995-2002 Word 97 Intermediate - Further Formatting Techniques - Slide No. 14
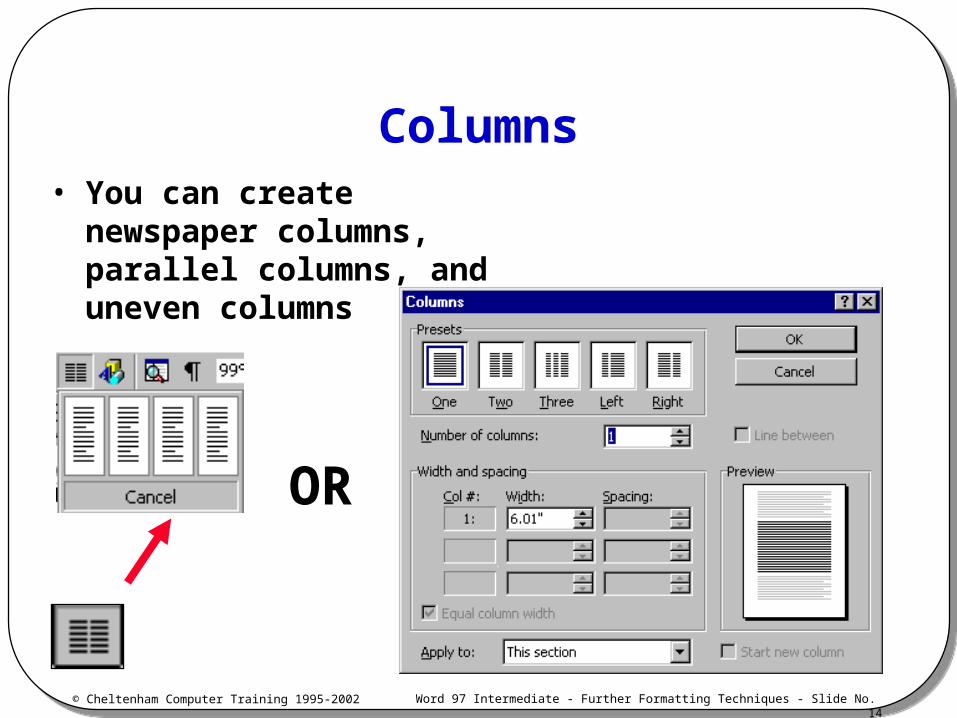
Columns• You can create newspaper
columns, parallel columns, and uneven columns
OR
© Cheltenham Computer Training 1995-2002 Word 97 Intermediate - Further Formatting Techniques - Slide No. 15
Review Questions
© Cheltenham Computer Training 1995-2002 Word 97 Intermediate - Further Formatting Techniques - Slide No. 16
Tables
Microsoft Word 97
- Intermediate -
© Cheltenham Computer Training 1995-2002 Word 97 Intermediate - Further Formatting Techniques - Slide No. 17
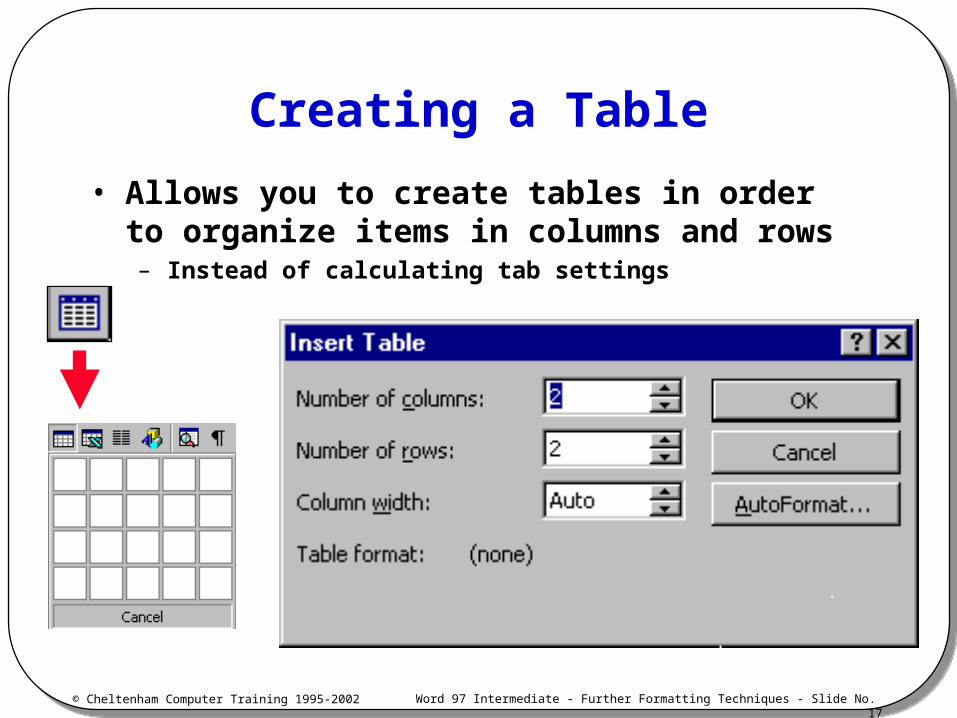
Creating a Table
• Allows you to create tables in order to organize items in columns and rows– Instead of calculating tab settings
© Cheltenham Computer Training 1995-2002 Word 97 Intermediate - Further Formatting Techniques - Slide No. 18
Table Manipulation
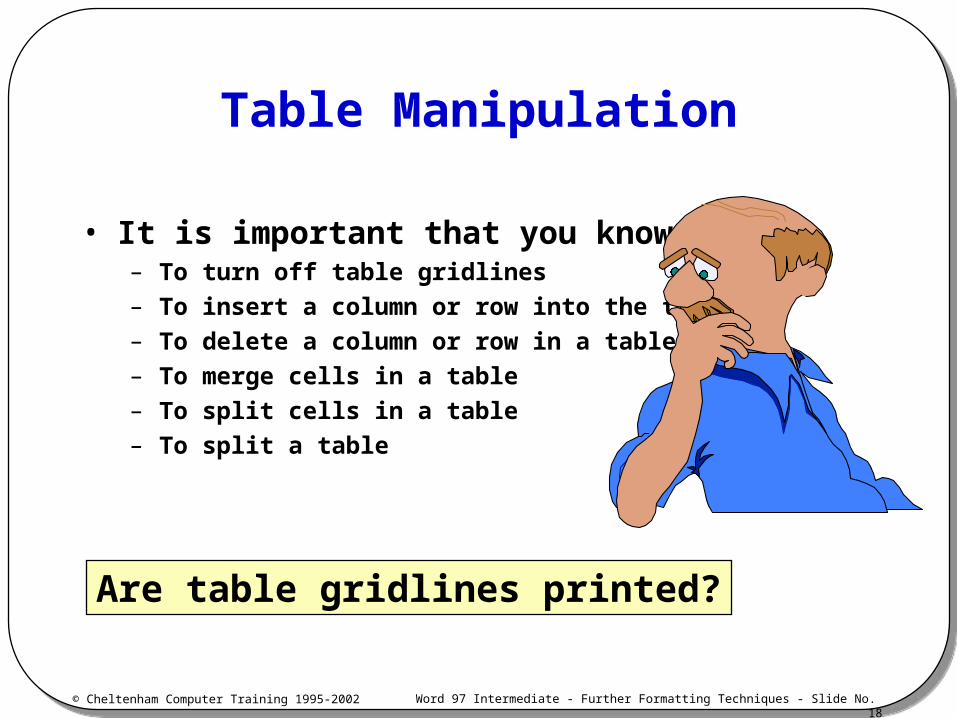
• It is important that you know how:– To turn off table gridlines
– To insert a column or row into the table
– To delete a column or row in a table
– To merge cells in a table
– To split cells in a table
– To split a table
Are table gridlines printed?
© Cheltenham Computer Training 1995-2002 Word 97 Intermediate - Further Formatting Techniques - Slide No. 19
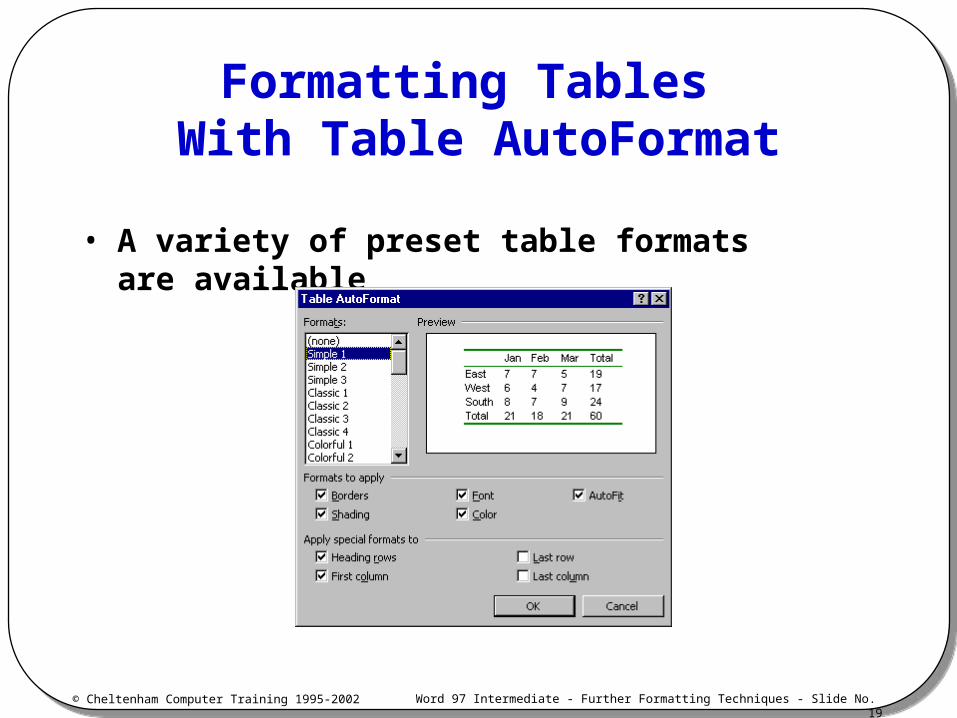
Formatting Tables With Table AutoFormat
• A variety of preset table formats are available
© Cheltenham Computer Training 1995-2002 Word 97 Intermediate - Further Formatting Techniques - Slide No. 20
Review Questions
© Cheltenham Computer Training 1995-2002 Word 97 Intermediate - Further Formatting Techniques - Slide No. 21
File Management Within Word 97
Microsoft Word 97
- Intermediate -
© Cheltenham Computer Training 1995-2002 Word 97 Intermediate - Further Formatting Techniques - Slide No. 22
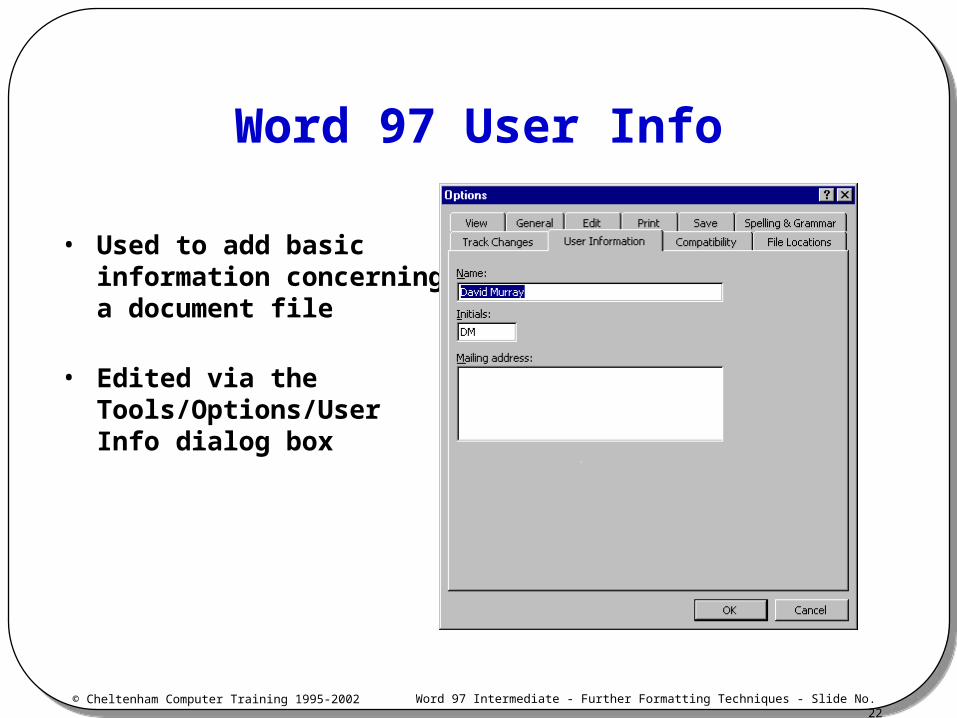
Word 97 User Info
• Used to add basic information concerning a document file
• Edited via the Tools/Options/User Info dialog box
© Cheltenham Computer Training 1995-2002 Word 97 Intermediate - Further Formatting Techniques - Slide No. 23
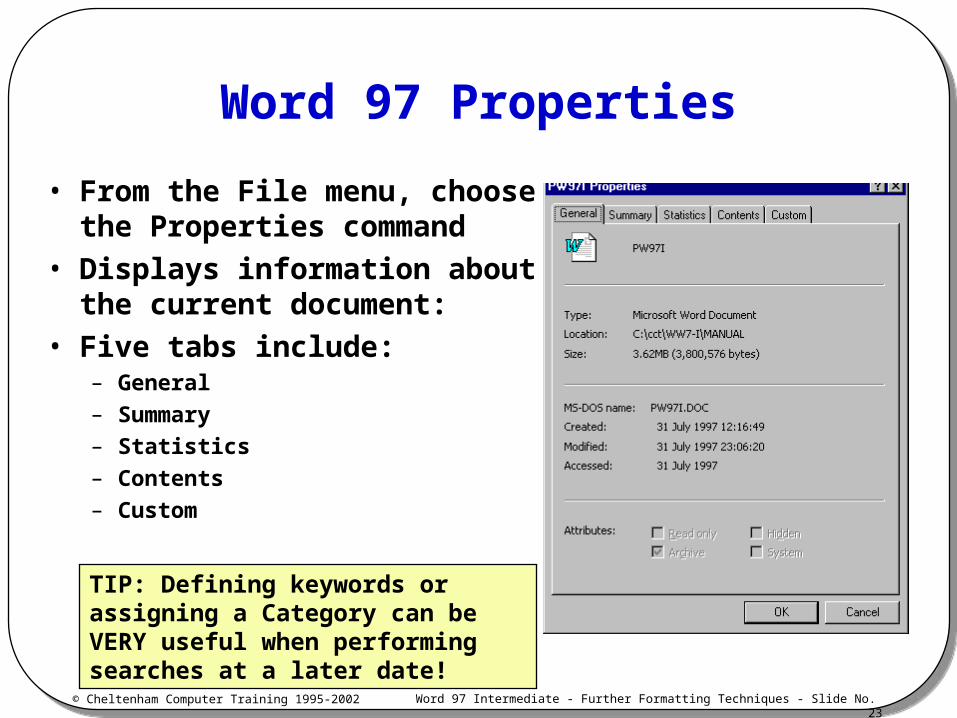
Word 97 Properties
• From the File menu, choose the Properties command
• Displays information about the current document:
• Five tabs include:– General
– Summary
– Statistics
– Contents
– Custom
TIP: Defining keywords or assigning a Category can be VERY useful when performing searches at a later date!
© Cheltenham Computer Training 1995-2002 Word 97 Intermediate - Further Formatting Techniques - Slide No. 24
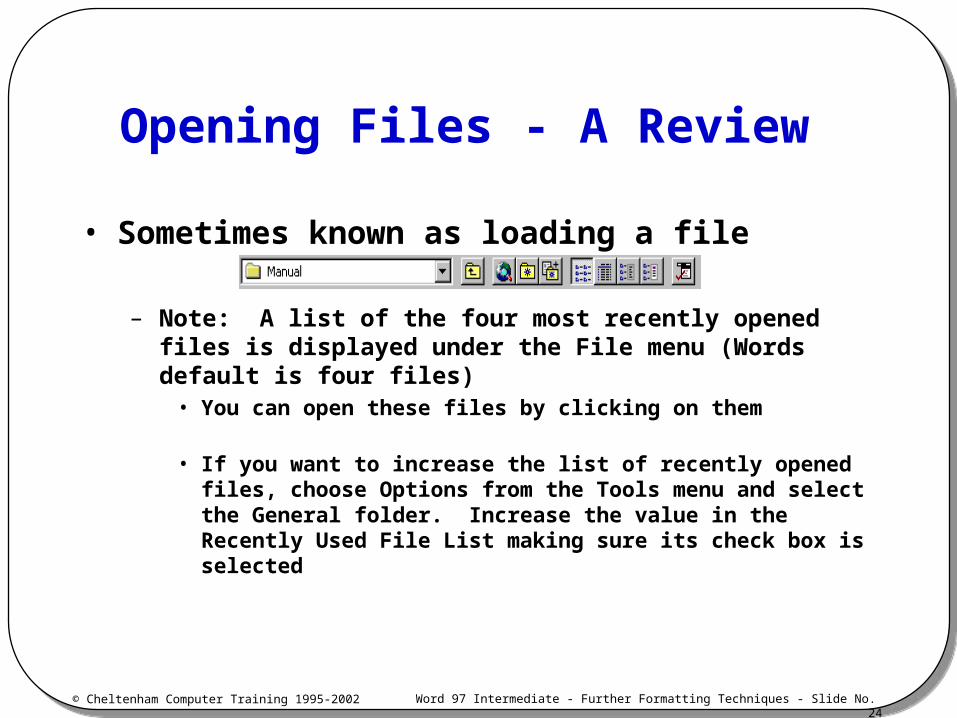
Opening Files - A Review
• Sometimes known as loading a file
– Note: A list of the four most recently opened files is displayed under the File menu (Words default is four files)
• You can open these files by clicking on them
• If you want to increase the list of recently opened files, choose Options from the Tools menu and select the General folder. Increase the value in the Recently Used File List making sure its check box is selected
© Cheltenham Computer Training 1995-2002 Word 97 Intermediate - Further Formatting Techniques - Slide No. 25
Selecting Files
• To mark sequential files– Click on the first file
– Depress the Shift key
– Click on the last file of the range you wish to select
– Release the Shift key
• To mark non-sequential files– Click on a file
– Depress the Ctrl key (and keep it depressed)
– Click on other files you wish to select
– Release the Ctrl key
© Cheltenham Computer Training 1995-2002 Word 97 Intermediate - Further Formatting Techniques - Slide No. 26
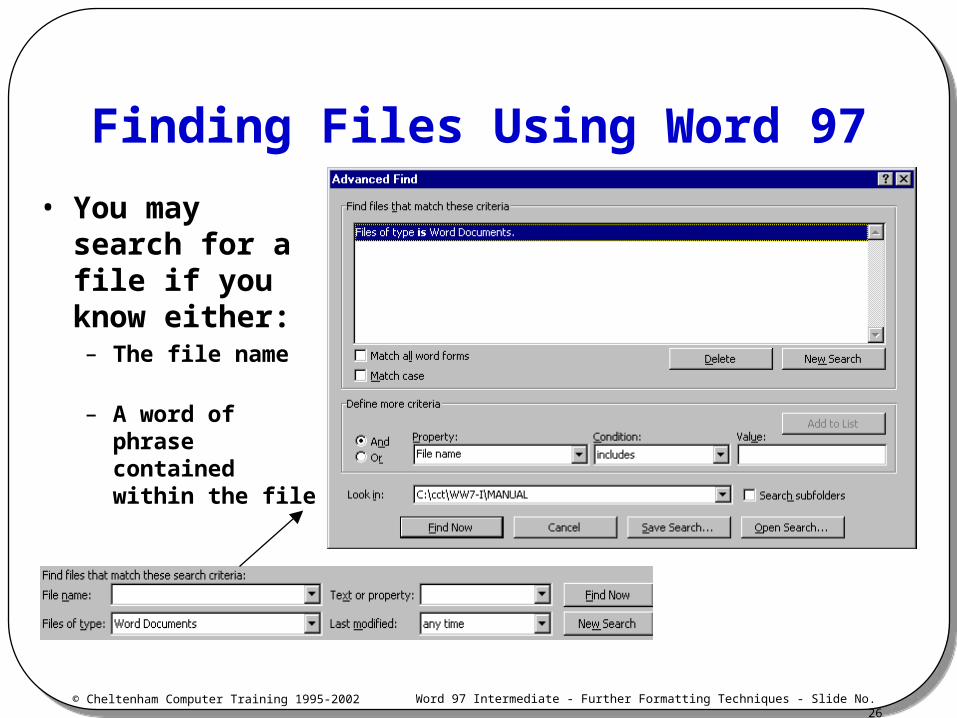
Finding Files Using Word 97
• You may search for a file if you know either:– The file name
– A word of phrase contained within the file
© Cheltenham Computer Training 1995-2002 Word 97 Intermediate - Further Formatting Techniques - Slide No. 27
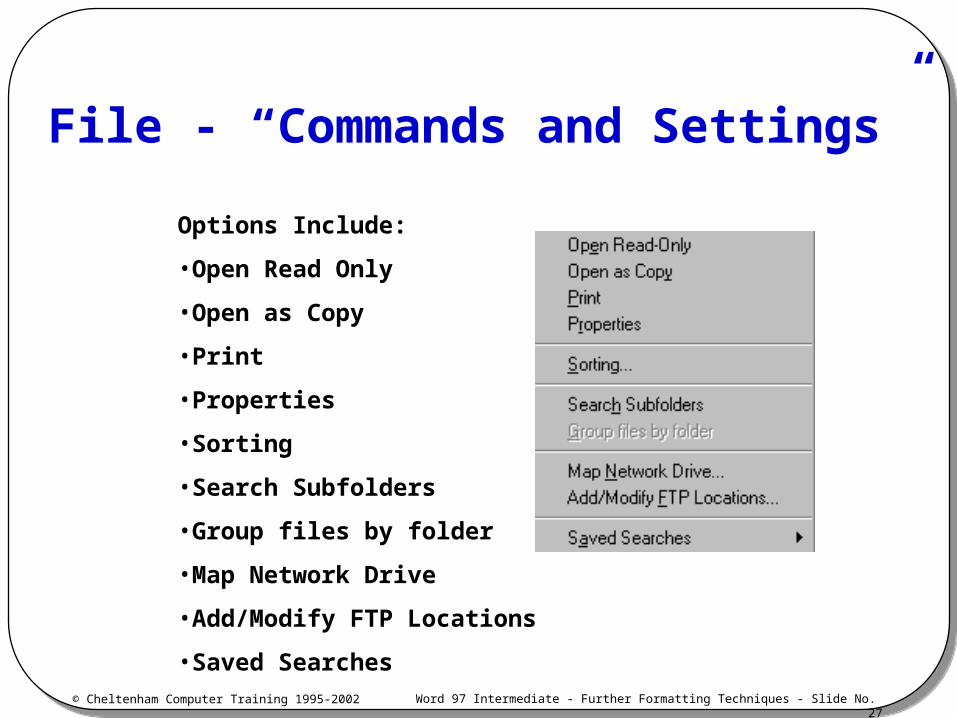
File - “Commands and Settings”
Options Include:
•Open Read Only
•Open as Copy
•Properties
•Sorting
•Search Subfolders
•Group files by folder
•Map Network Drive
•Add/Modify FTP Locations
•Saved Searches
© Cheltenham Computer Training 1995-2002 Word 97 Intermediate - Further Formatting Techniques - Slide No. 28
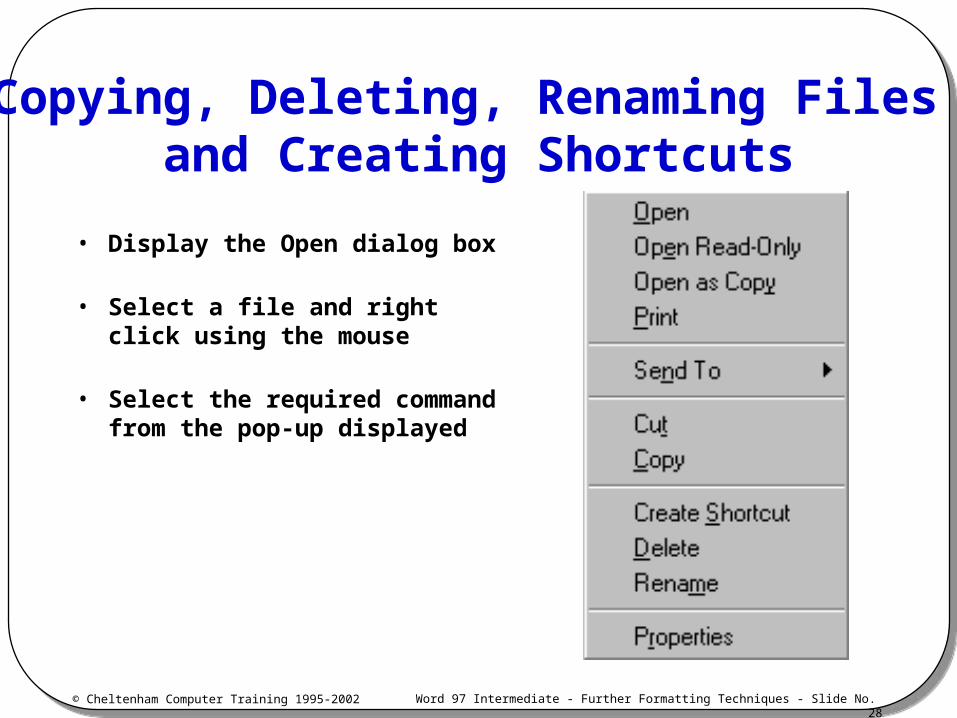
Copying, Deleting, Renaming Files and Creating Shortcuts
• Display the Open dialog box
• Select a file and right click using the mouse
• Select the required command from the pop-up displayed
© Cheltenham Computer Training 1995-2002 Word 97 Intermediate - Further Formatting Techniques - Slide No. 29
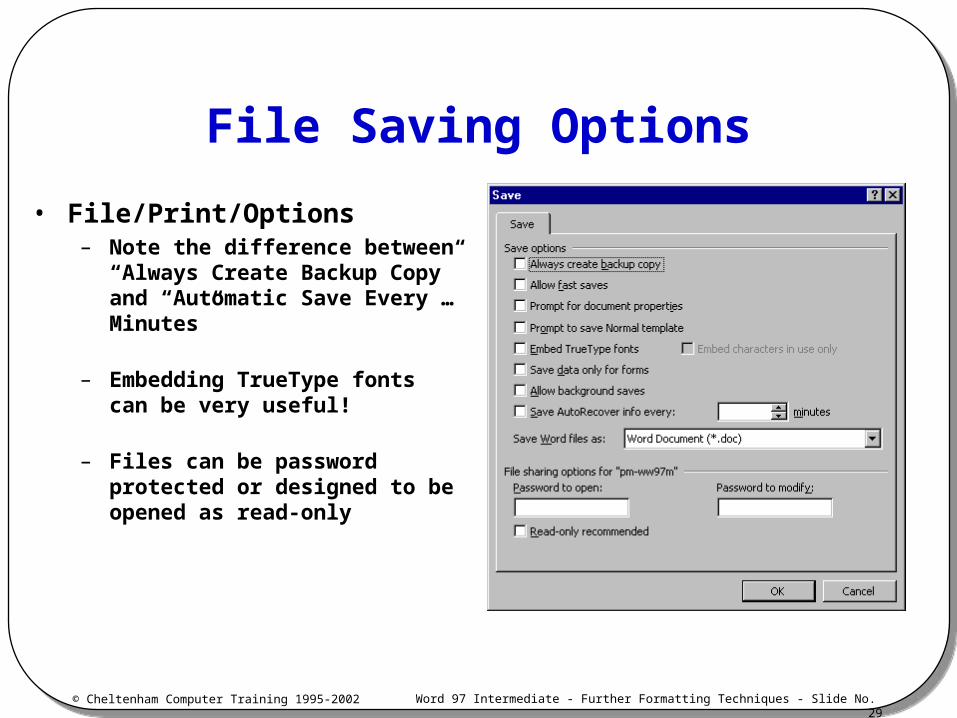
File Saving Options
• File/Print/Options– Note the difference between
“Always Create Backup Copy” and “Automatic Save Every … Minutes”
– Embedding TrueType fonts can be very useful!
– Files can be password protected or designed to be opened as read-only
© Cheltenham Computer Training 1995-2002 Word 97 Intermediate - Further Formatting Techniques - Slide No. 30
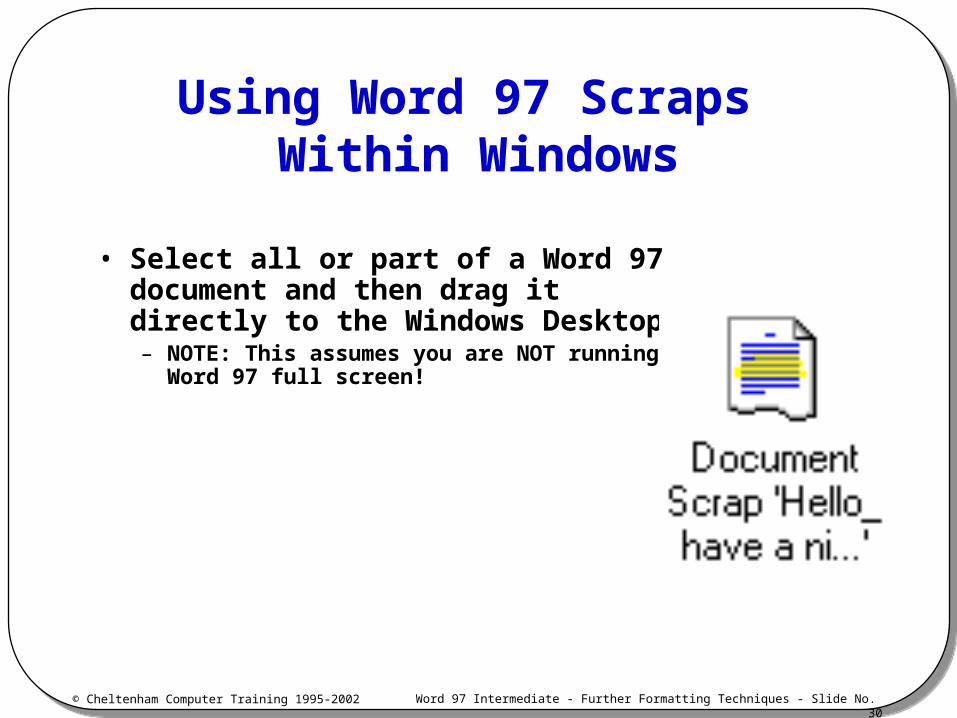
Using Word 97 Scraps Within Windows
• Select all or part of a Word 97 document and then drag it directly to the Windows Desktop– NOTE: This assumes you are NOT running
Word 97 full screen!
© Cheltenham Computer Training 1995-2002 Word 97 Intermediate - Further Formatting Techniques - Slide No. 31
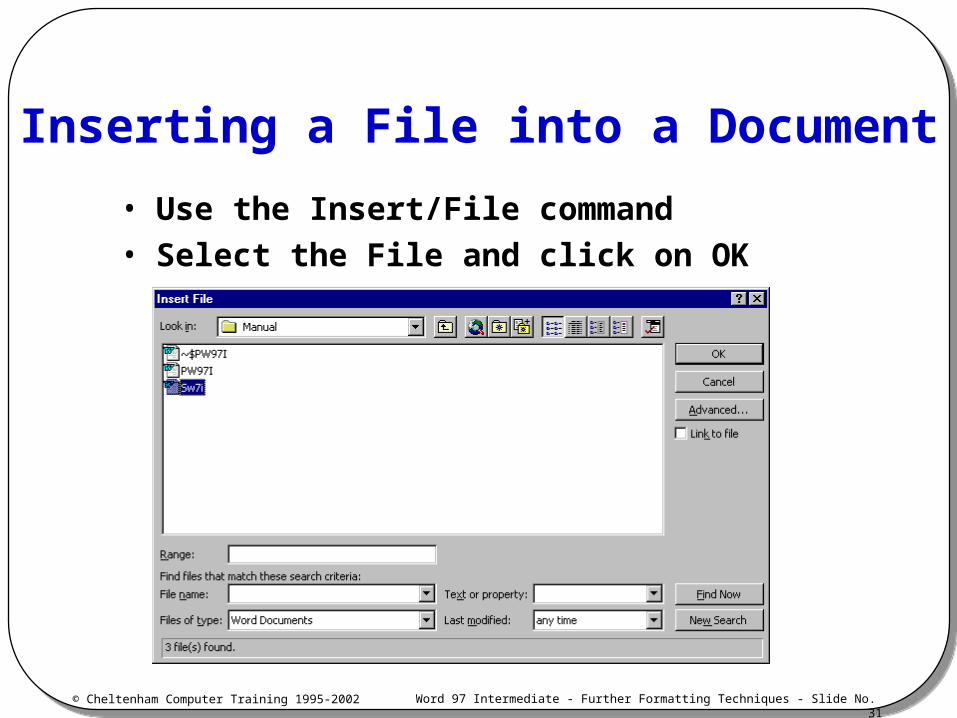
Inserting a File into a Document
• Use the Insert/File command• Select the File and click on OK

© Cheltenham Computer Training 1995-2002 Word 97 Intermediate - Further Formatting Techniques - Slide No. 32
Review Questions
© Cheltenham Computer Training 1995-2002 Word 97 Intermediate - Further Formatting Techniques - Slide No. 33
Using Find and Replace
Microsoft Word 97
- Intermediate -
© Cheltenham Computer Training 1995-2002 Word 97 Intermediate - Further Formatting Techniques - Slide No. 34
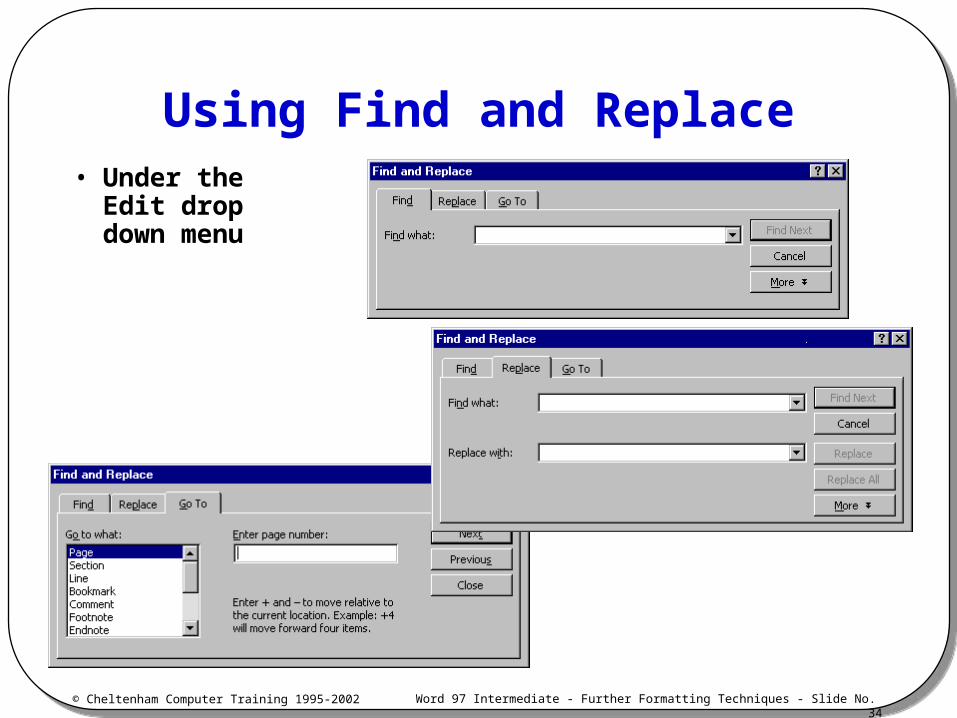
Using Find and Replace• Under the
Edit drop down menu
© Cheltenham Computer Training 1995-2002 Word 97 Intermediate - Further Formatting Techniques - Slide No. 35
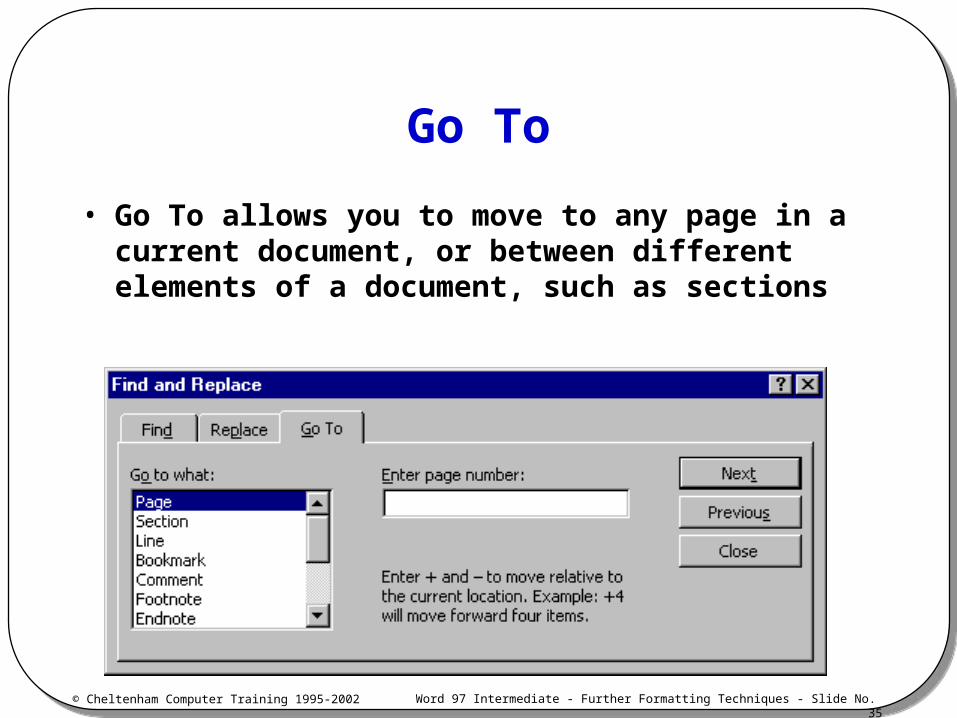
Go To
• Go To allows you to move to any page in a current document, or between different elements of a document, such as sections
© Cheltenham Computer Training 1995-2002 Word 97 Intermediate - Further Formatting Techniques - Slide No. 36
Review Questions
© Cheltenham Computer Training 1995-2002 Word 97 Intermediate - Further Formatting Techniques - Slide No. 37
AutoCorrect
Microsoft Word 97
- Intermediate -
© Cheltenham Computer Training 1995-2002 Word 97 Intermediate - Further Formatting Techniques - Slide No. 38
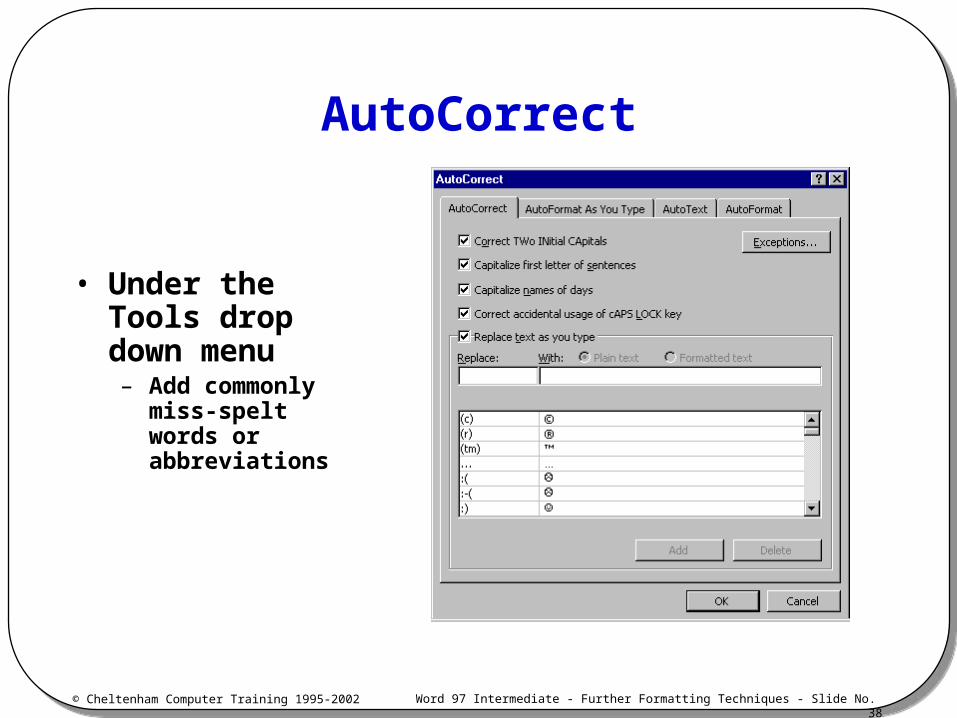
AutoCorrect
• Under the Tools drop down menu– Add commonly
miss-spelt words or abbreviations

© Cheltenham Computer Training 1995-2002 Word 97 Intermediate - Further Formatting Techniques - Slide No. 39
Review Questions

© Cheltenham Computer Training 1995-2002 Word 97 Intermediate - Further Formatting Techniques - Slide No. 40
AutoText
Microsoft Word 97
- Intermediate -
© Cheltenham Computer Training 1995-2002 Word 97 Intermediate - Further Formatting Techniques - Slide No. 41
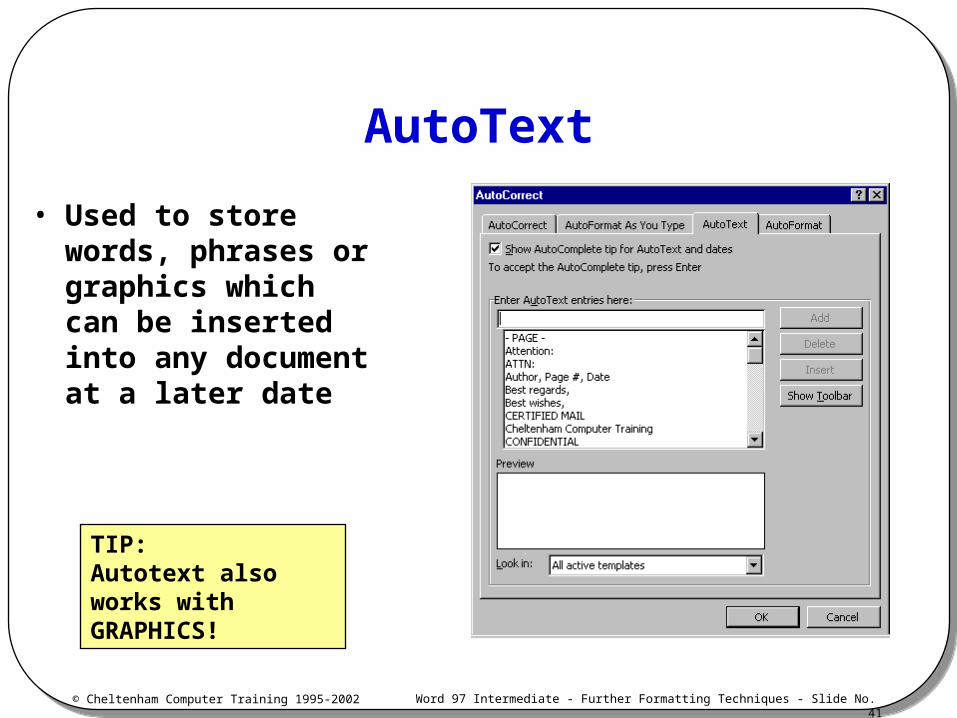
AutoText
• Used to store words, phrases or graphics which can be inserted into any document at a later date
TIP:Autotext also works with GRAPHICS!

© Cheltenham Computer Training 1995-2002 Word 97 Intermediate - Further Formatting Techniques - Slide No. 42
Review Questions
© Cheltenham Computer Training 1995-2002 Word 97 Intermediate - Further Formatting Techniques - Slide No. 43
Mail Merge, Envelopes and Labels
Microsoft Word 97
- Intermediate -
© Cheltenham Computer Training 1995-2002 Word 97 Intermediate - Further Formatting Techniques - Slide No. 44
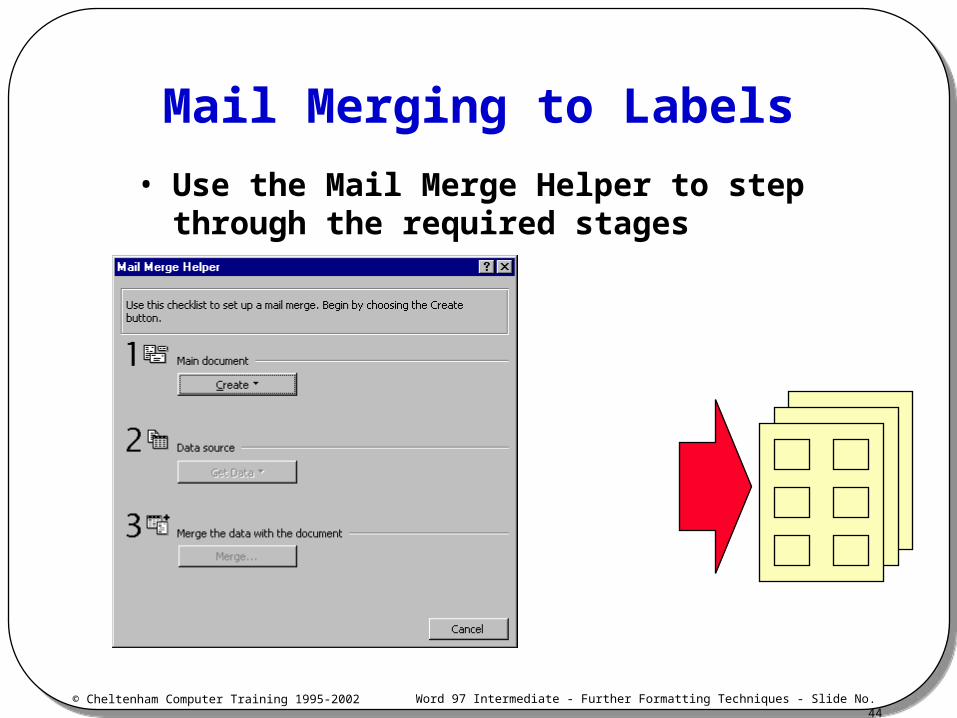
Mail Merging to Labels
• Use the Mail Merge Helper to step through the required stages
© Cheltenham Computer Training 1995-2002 Word 97 Intermediate - Further Formatting Techniques - Slide No. 45
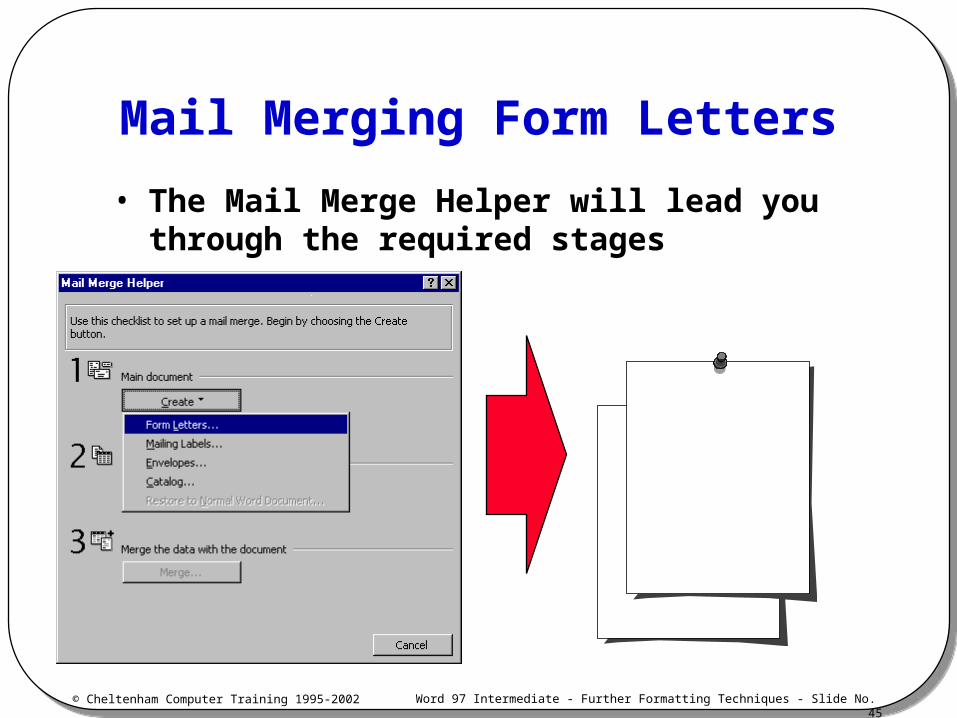
Mail Merging Form Letters
• The Mail Merge Helper will lead you through the required stages
© Cheltenham Computer Training 1995-2002 Word 97 Intermediate - Further Formatting Techniques - Slide No. 46
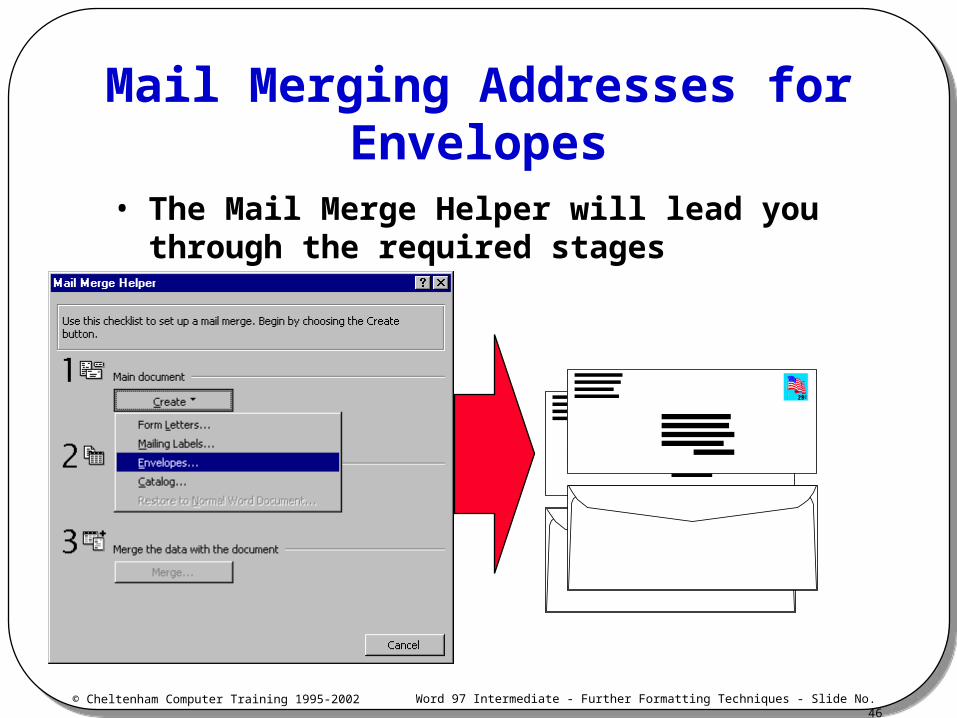
Mail Merging Addresses for Envelopes
• The Mail Merge Helper will lead you through the required stages
© Cheltenham Computer Training 1995-2002 Word 97 Intermediate - Further Formatting Techniques - Slide No. 47
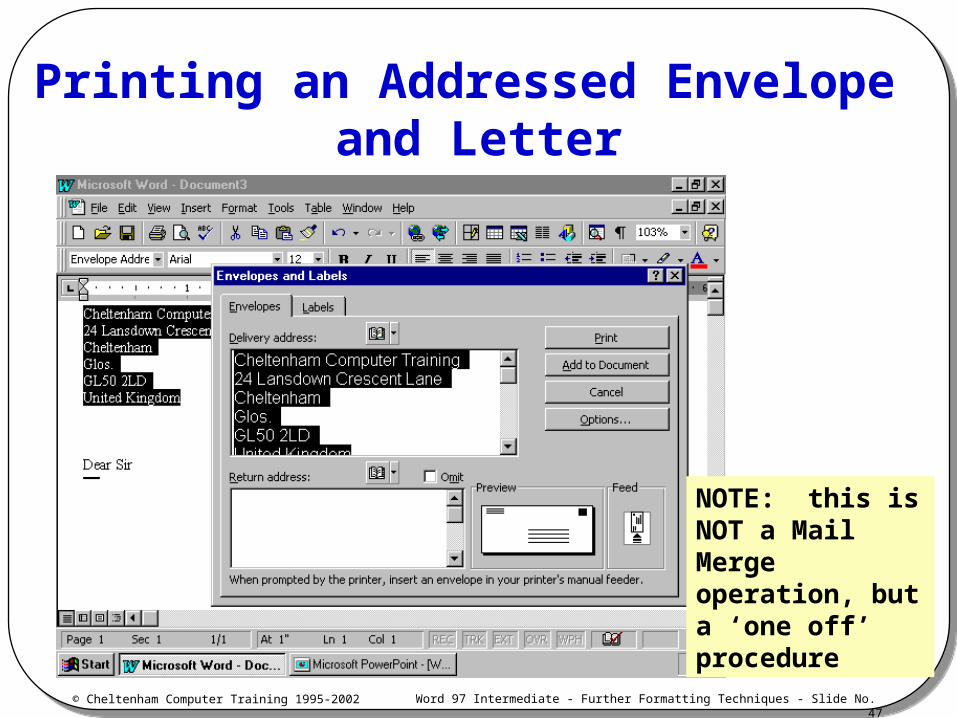
Printing an Addressed Envelope and Letter
NOTE: this is NOT a Mail Merge operation, but a ‘one off’ procedure

© Cheltenham Computer Training 1995-2002 Word 97 Intermediate - Further Formatting Techniques - Slide No. 48
Review Questions

© Cheltenham Computer Training 1995-2002 Word 97 Intermediate - Further Formatting Techniques - Slide No. 49
Text Boxes, Graphics and WordArt
Microsoft Word 97
- Intermediate -
© Cheltenham Computer Training 1995-2002 Word 97 Intermediate - Further Formatting Techniques - Slide No. 50
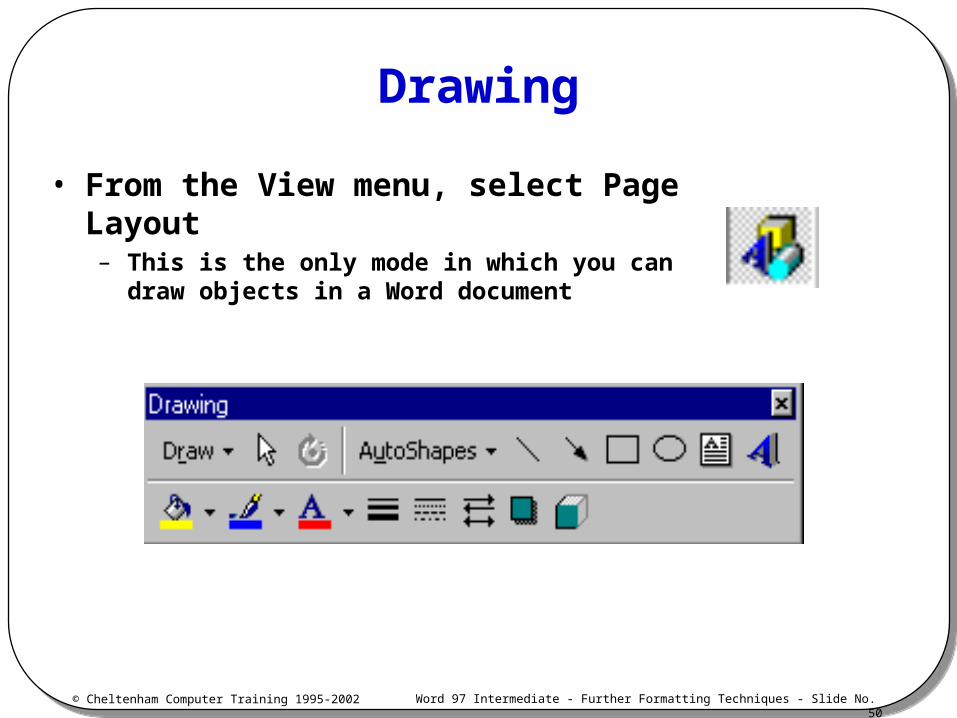
Drawing
• From the View menu, select Page Layout– This is the only mode in which you can draw
objects in a Word document
© Cheltenham Computer Training 1995-2002 Word 97 Intermediate - Further Formatting Techniques - Slide No. 51
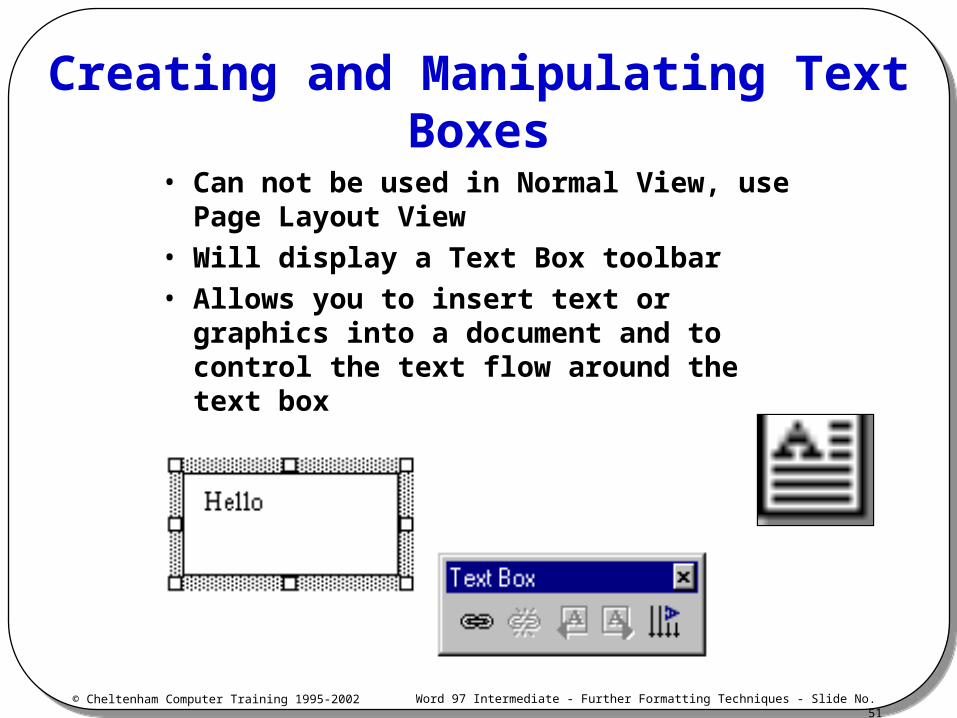
Creating and Manipulating Text Boxes
• Can not be used in Normal View, use Page Layout View
• Will display a Text Box toolbar• Allows you to insert text or graphics
into a document and to control the text flow around the text box
© Cheltenham Computer Training 1995-2002 Word 97 Intermediate - Further Formatting Techniques - Slide No. 52
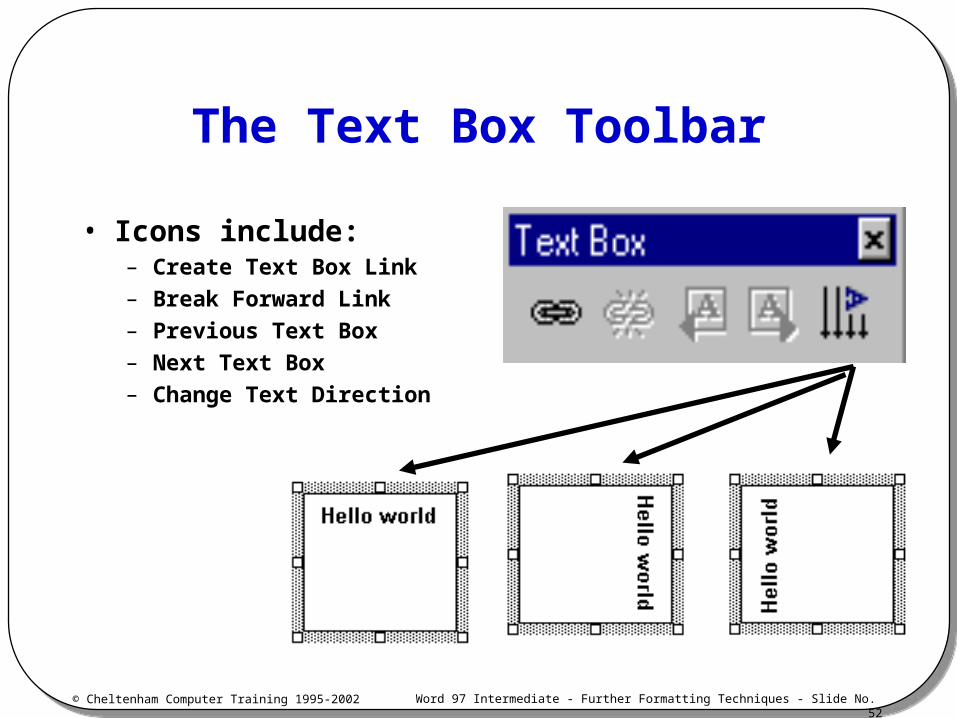
The Text Box Toolbar
• Icons include:– Create Text Box Link
– Break Forward Link
– Previous Text Box
– Next Text Box
– Change Text Direction
© Cheltenham Computer Training 1995-2002 Word 97 Intermediate - Further Formatting Techniques - Slide No. 53
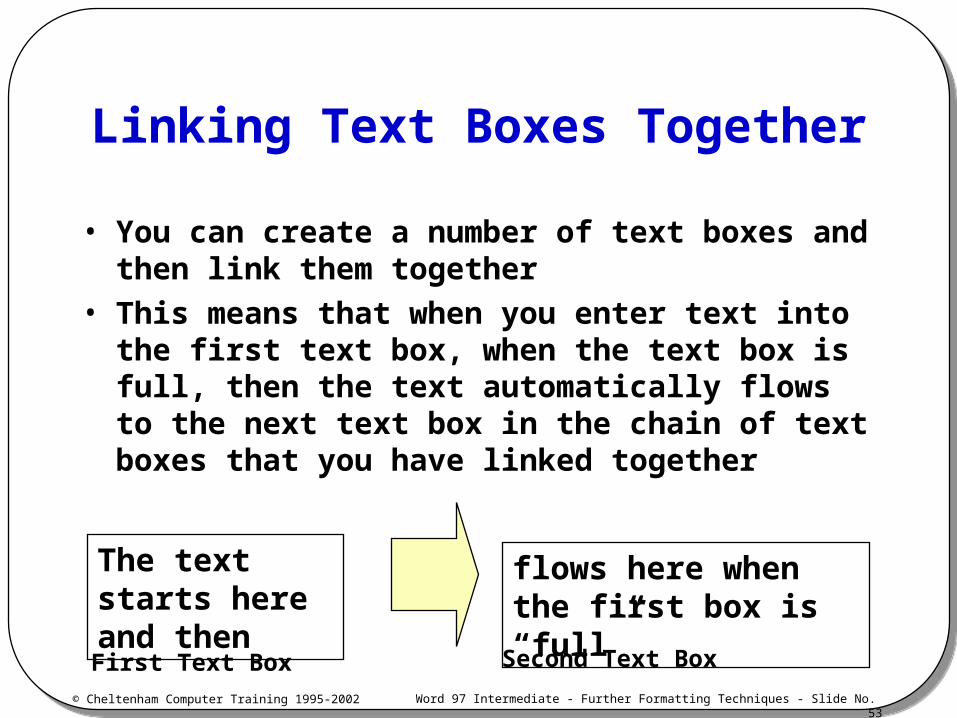
Linking Text Boxes Together
• You can create a number of text boxes and then link them together
• This means that when you enter text into the first text box, when the text box is full, then the text automatically flows to the next text box in the chain of text boxes that you have linked together
The text starts here and then
flows here when the first box is “full”
First Text Box Second Text Box
© Cheltenham Computer Training 1995-2002 Word 97 Intermediate - Further Formatting Techniques - Slide No. 54
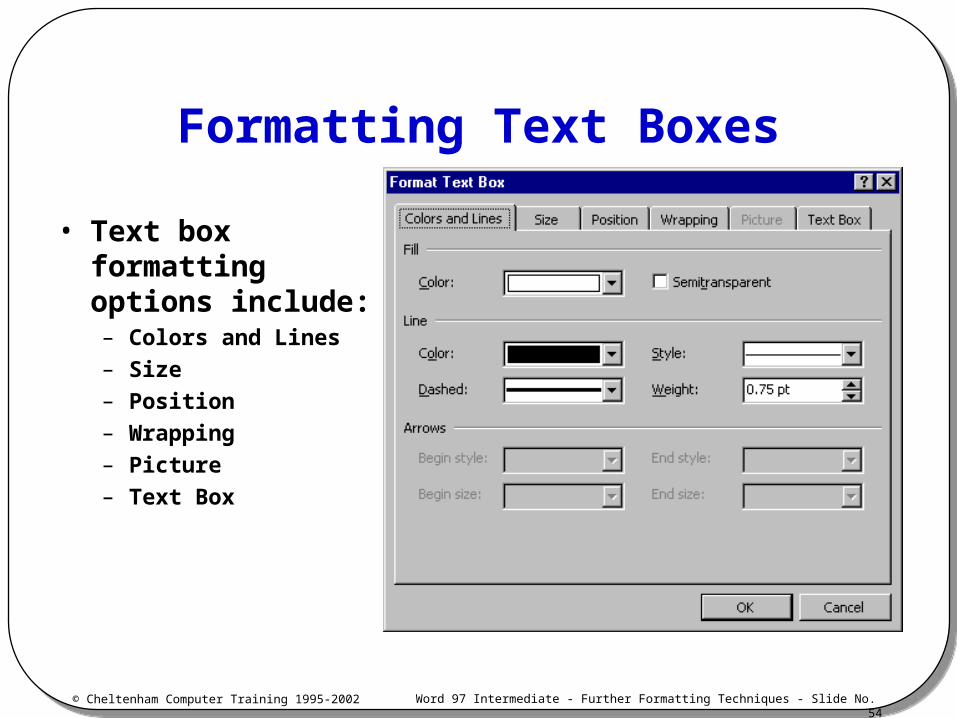
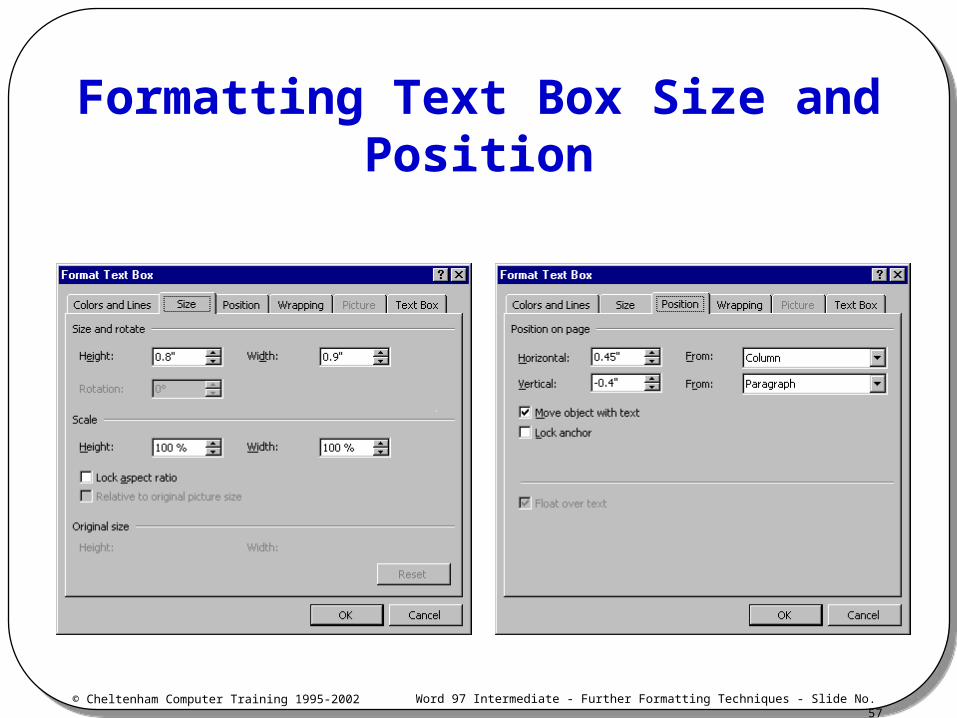
Formatting Text Boxes
• Text box formatting options include:– Colors and Lines
– Size
– Position
– Wrapping
– Picture
– Text Box
© Cheltenham Computer Training 1995-2002 Word 97 Intermediate - Further Formatting Techniques - Slide No. 55
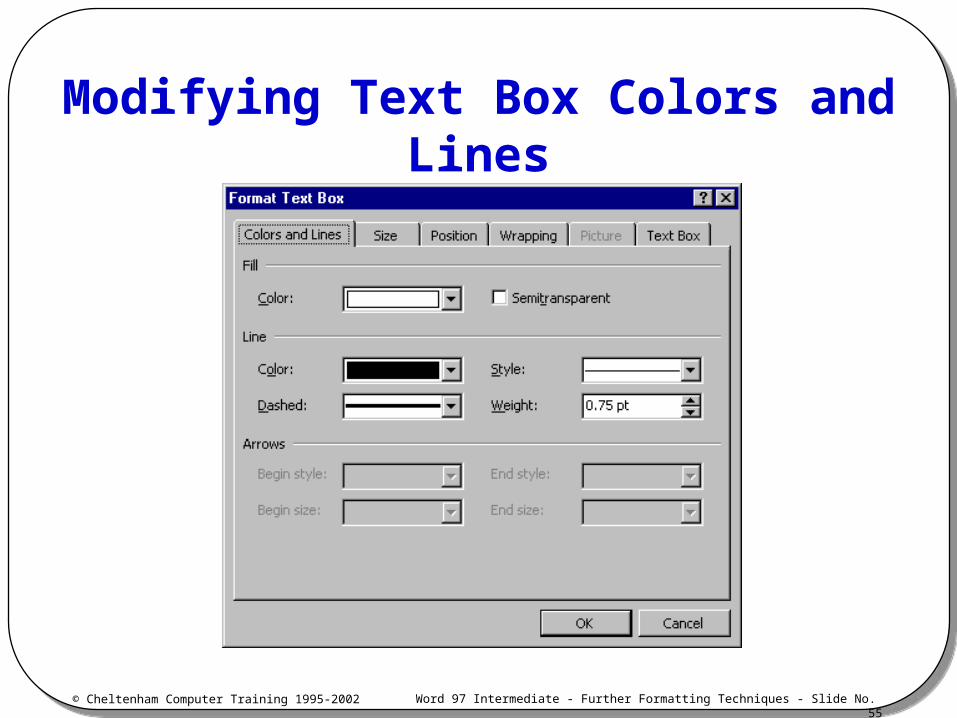
Modifying Text Box Colors and Lines
© Cheltenham Computer Training 1995-2002 Word 97 Intermediate - Further Formatting Techniques - Slide No. 56
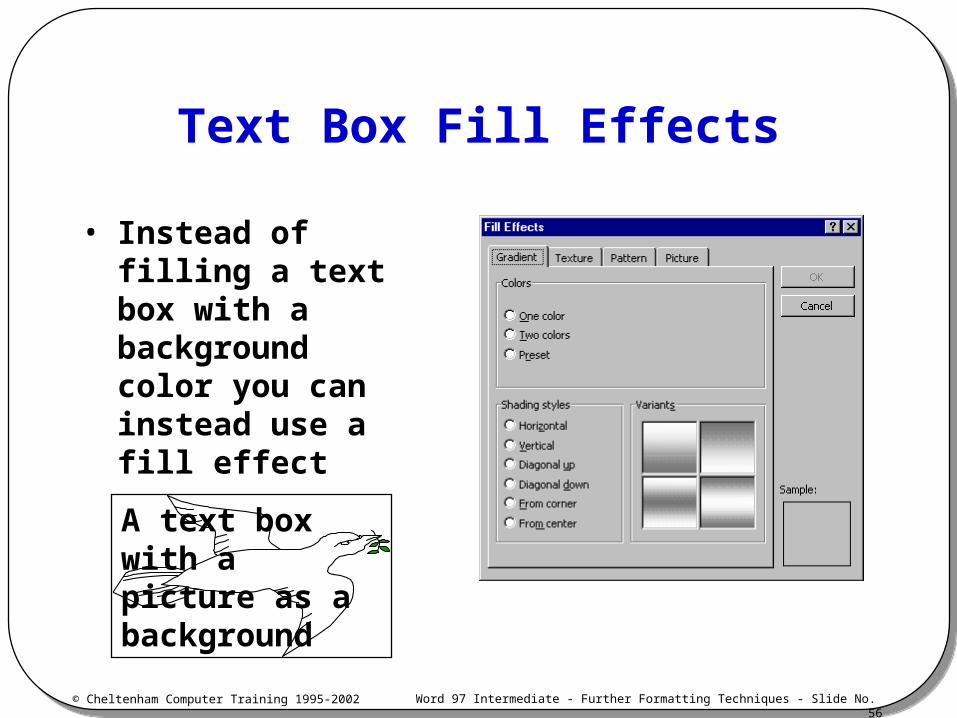
Text Box Fill Effects
• Instead of filling a text box with a background color you can instead use a fill effect
A text box with a picture as a background
© Cheltenham Computer Training 1995-2002 Word 97 Intermediate - Further Formatting Techniques - Slide No. 57
Formatting Text Box Size and Position
© Cheltenham Computer Training 1995-2002 Word 97 Intermediate - Further Formatting Techniques - Slide No. 58
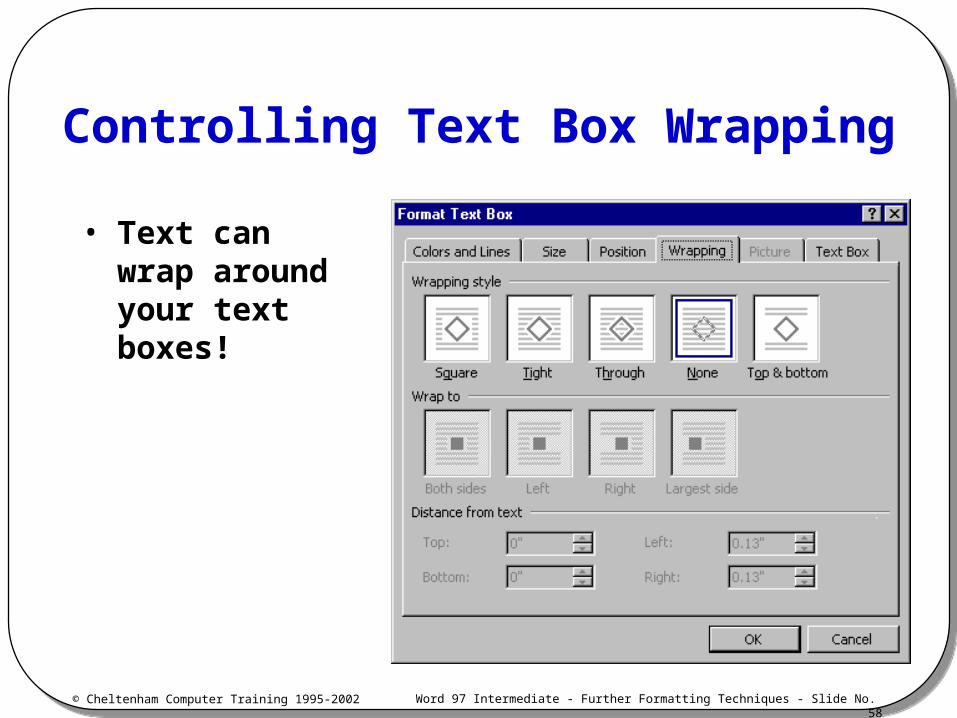
Controlling Text Box Wrapping
• Text can wrap around your text boxes!
© Cheltenham Computer Training 1995-2002 Word 97 Intermediate - Further Formatting Techniques - Slide No. 59
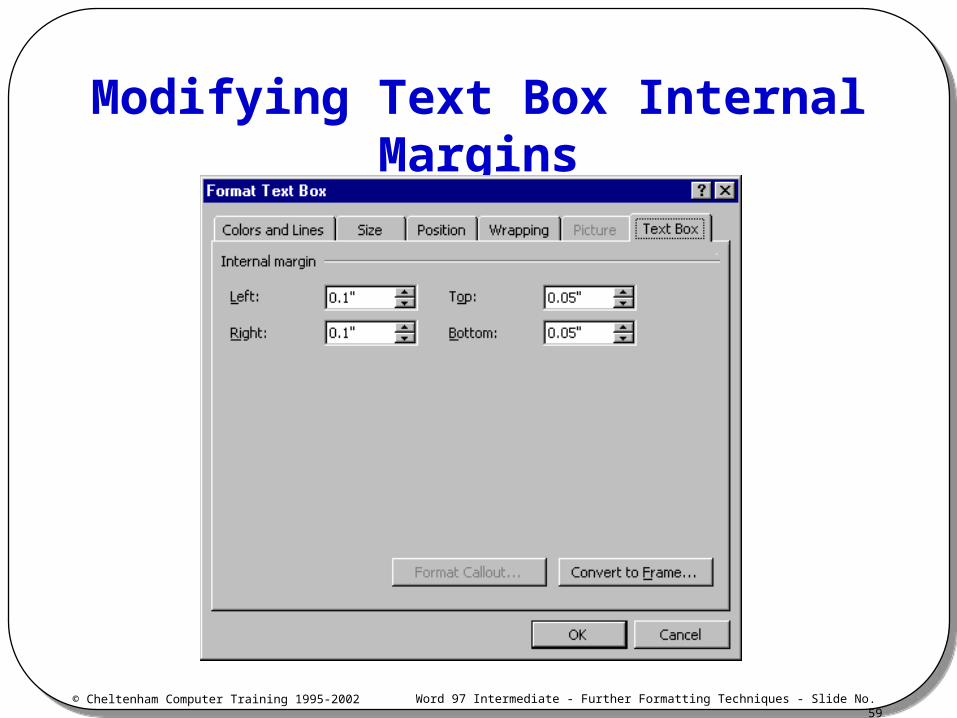
Modifying Text Box Internal Margins
© Cheltenham Computer Training 1995-2002 Word 97 Intermediate - Further Formatting Techniques - Slide No. 60
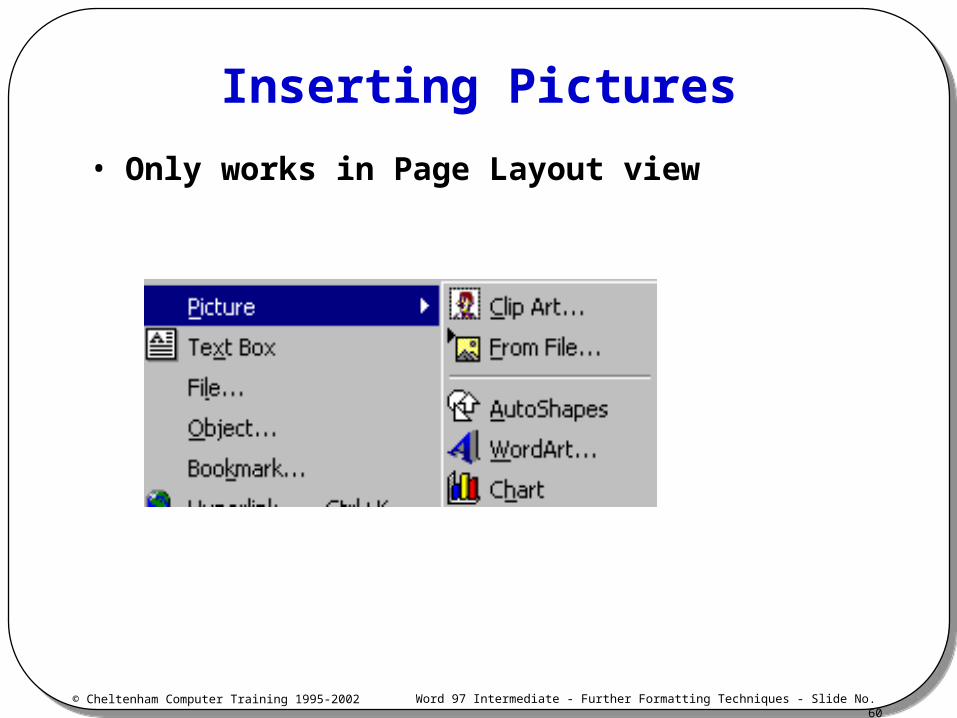
Inserting Pictures
• Only works in Page Layout view

© Cheltenham Computer Training 1995-2002 Word 97 Intermediate - Further Formatting Techniques - Slide No. 61
WordArt• Allows you to produce
special effects with text
© Cheltenham Computer Training 1995-2002 Word 97 Intermediate - Further Formatting Techniques - Slide No. 62
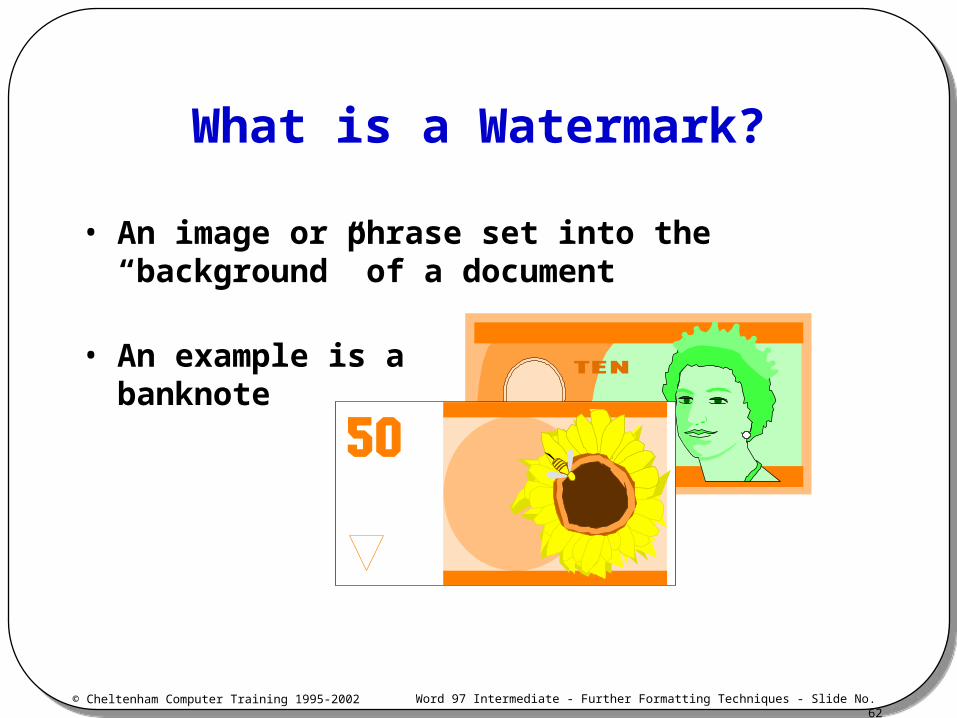
What is a Watermark?
• An image or phrase set into the “background” of a document
• An example is a banknote
© Cheltenham Computer Training 1995-2002 Word 97 Intermediate - Further Formatting Techniques - Slide No. 63
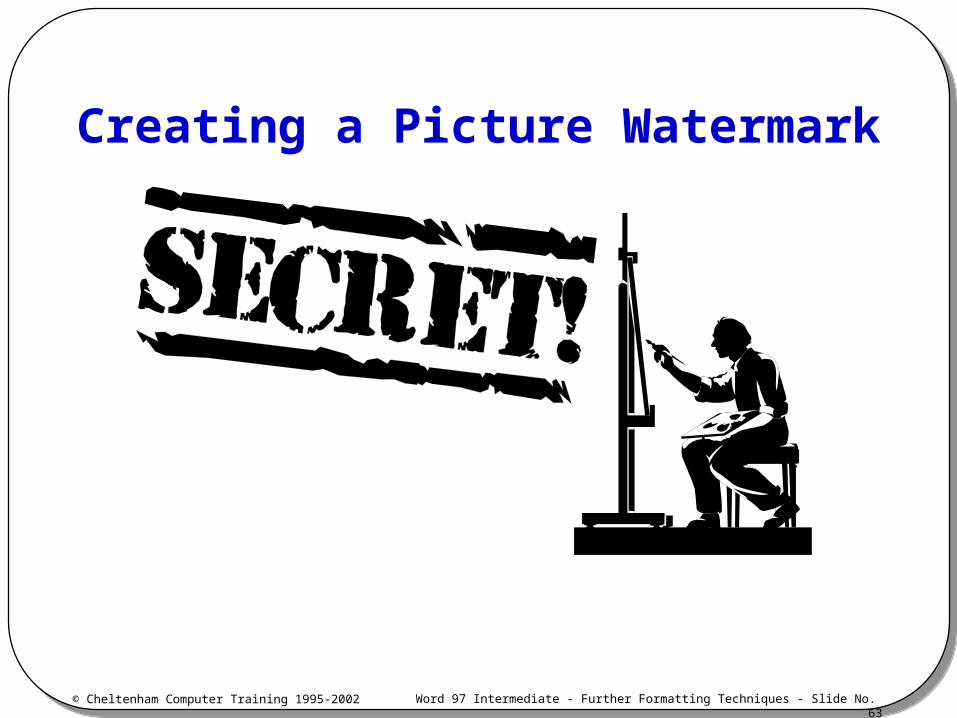
Creating a Picture Watermark
© Cheltenham Computer Training 1995-2002 Word 97 Intermediate - Further Formatting Techniques - Slide No. 64
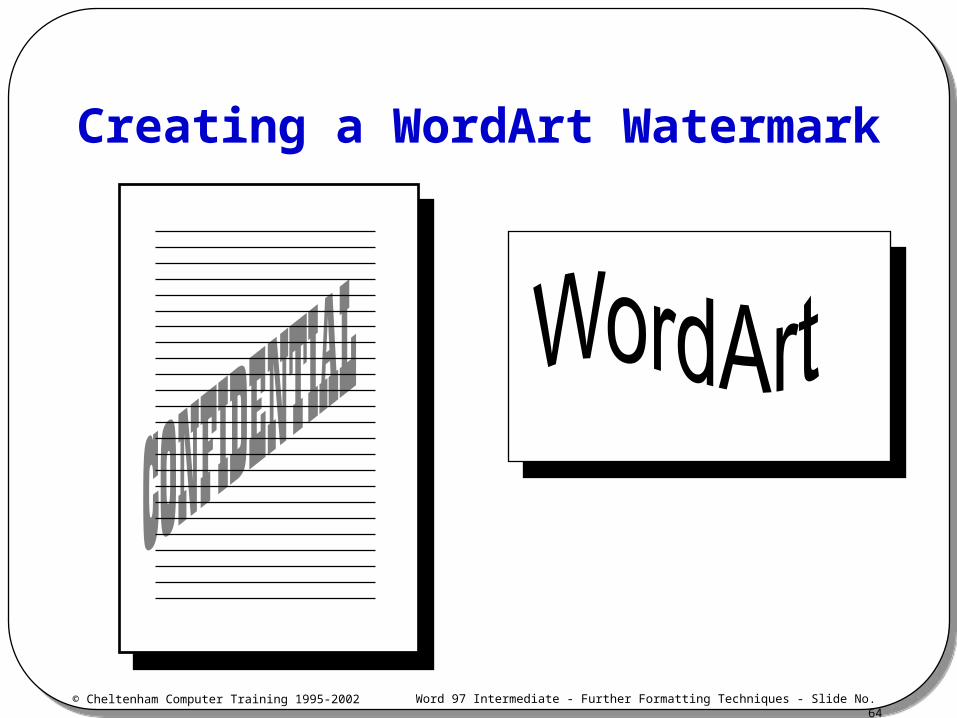
Creating a WordArt Watermark
© Cheltenham Computer Training 1995-2002 Word 97 Intermediate - Further Formatting Techniques - Slide No. 65
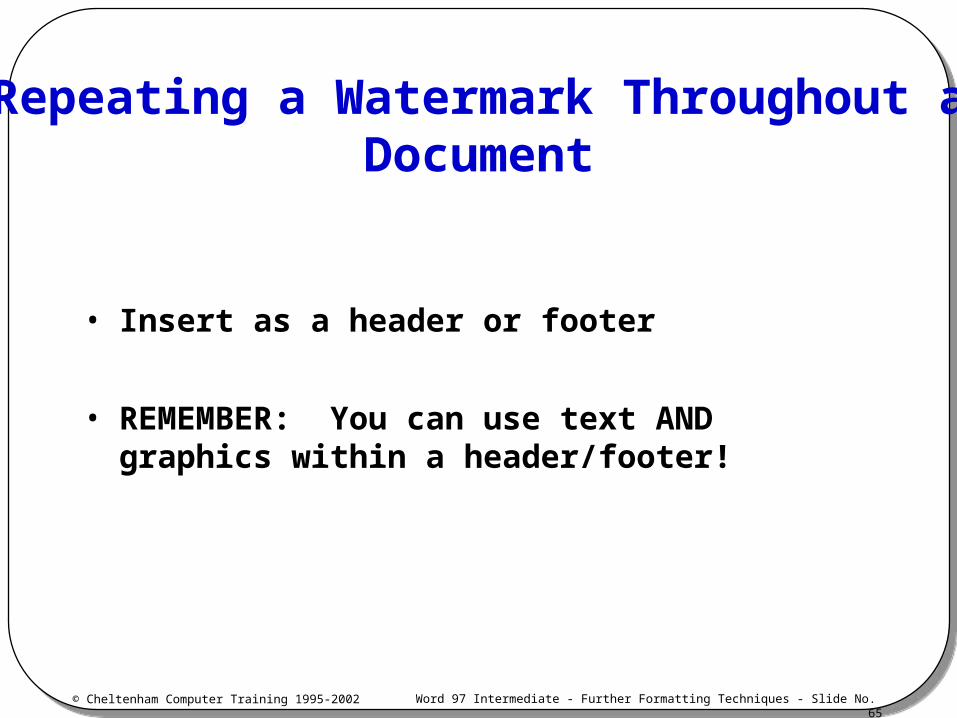
• Insert as a header or footer
• REMEMBER: You can use text AND graphics within a header/footer!
Repeating a Watermark Throughout a Document
© Cheltenham Computer Training 1995-2002 Word 97 Intermediate - Further Formatting Techniques - Slide No. 66
Review Questions
© Cheltenham Computer Training 1995-2002 Word 97 Intermediate - Further Formatting Techniques - Slide No. 67
OLE (Object Linking and Embedding)
Microsoft Word 97
- Intermediate -
© Cheltenham Computer Training 1995-2002 Word 97 Intermediate - Further Formatting Techniques - Slide No. 68
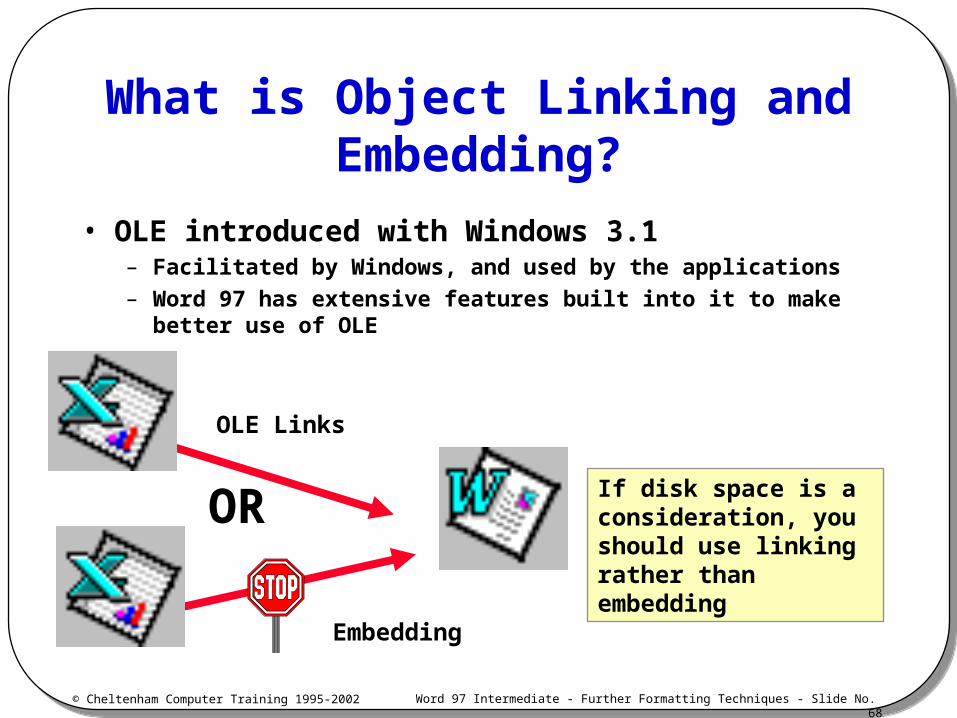
What is Object Linking and Embedding?
• OLE introduced with Windows 3.1– Facilitated by Windows, and used by the applications
– Word 97 has extensive features built into it to make better use of OLE
OLE Links
Embedding
OR If disk space is a consideration, you should use linking rather than embedding
© Cheltenham Computer Training 1995-2002 Word 97 Intermediate - Further Formatting Techniques - Slide No. 69
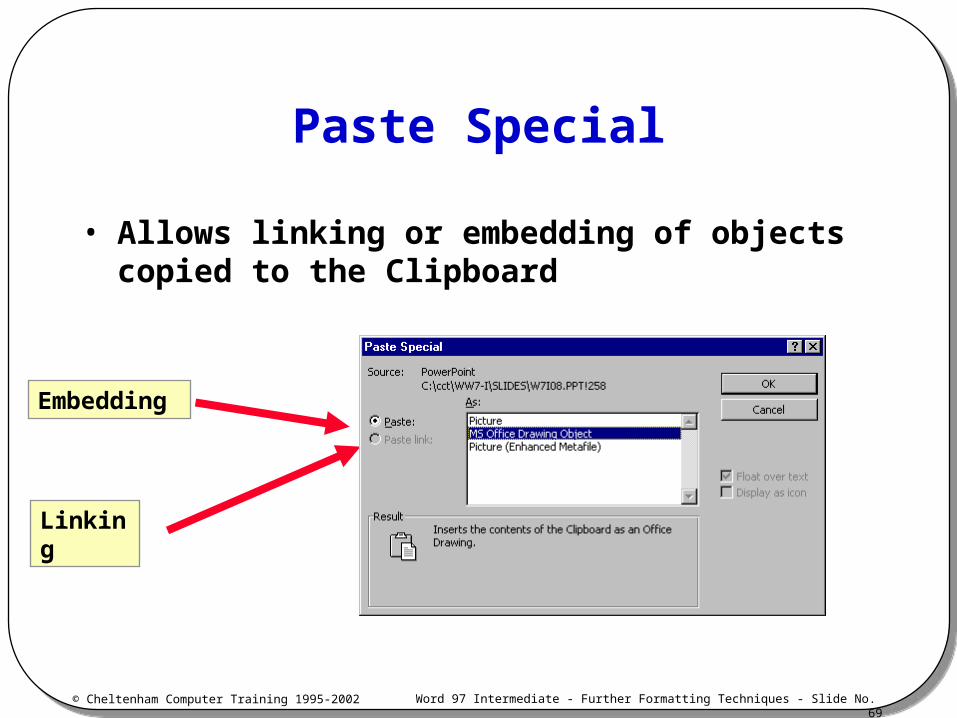
Paste Special
• Allows linking or embedding of objects copied to the Clipboard
Embedding
Linking
© Cheltenham Computer Training 1995-2002 Word 97 Intermediate - Further Formatting Techniques - Slide No. 70
Embedding an Object
• Objects are types of data such as Clipart, pictures, sounds, and video clips which can be inserted into a document
© Cheltenham Computer Training 1995-2002 Word 97 Intermediate - Further Formatting Techniques - Slide No. 71
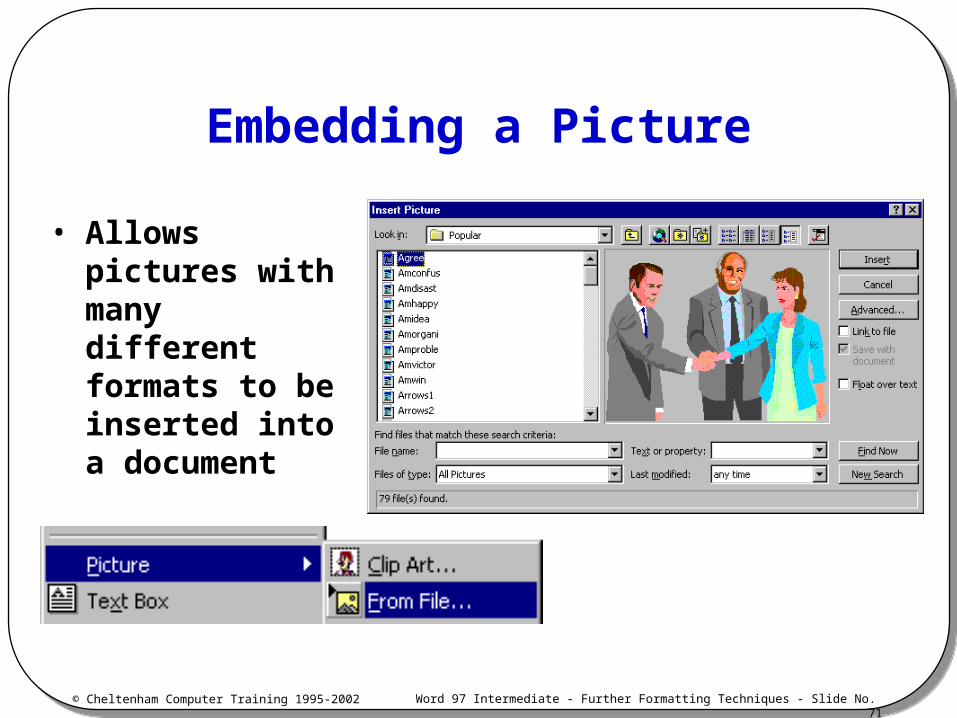
Embedding a Picture
• Allows pictures with many different formats to be inserted into a document

© Cheltenham Computer Training 1995-2002 Word 97 Intermediate - Further Formatting Techniques - Slide No. 72
Review Questions