Embed Size (px)
Citation preview
Nikon A1R Confocal User Protocol (01_17)
Page 1
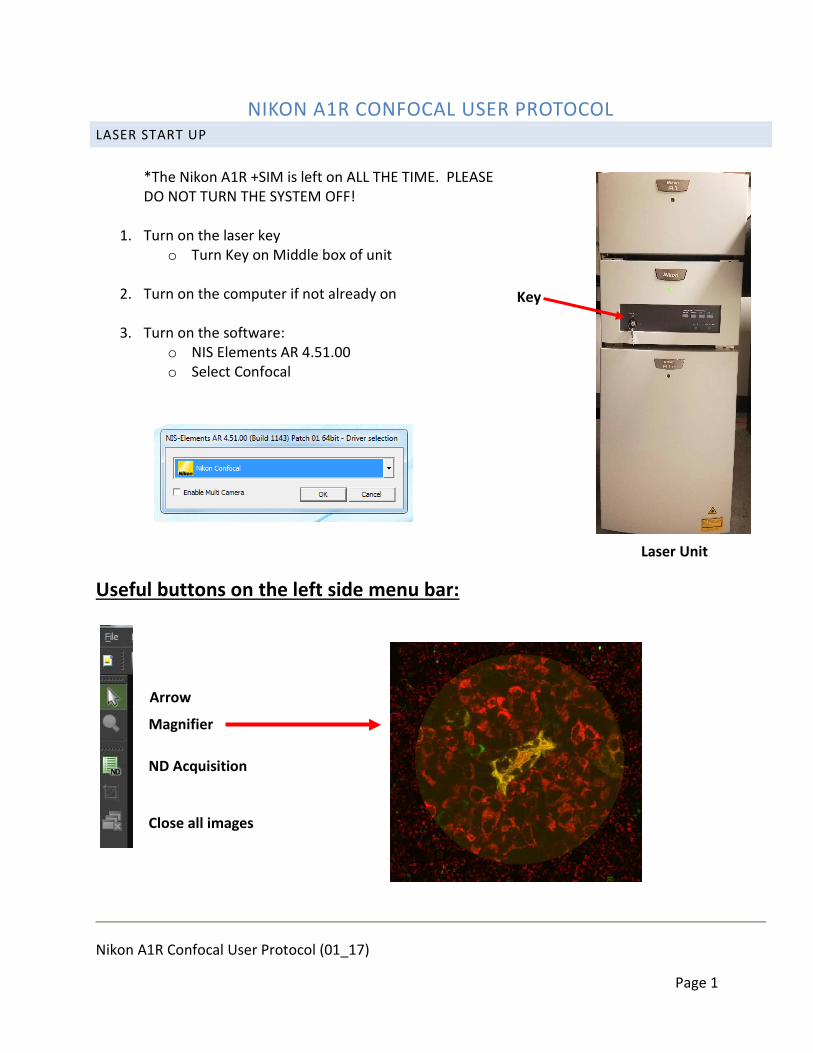
NIKON A1R CONFOCAL USER PROTOCOL LASER START UP
*The Nikon A1R +SIM is left on ALL THE TIME. PLEASE DO NOT TURN THE SYSTEM OFF!
1. Turn on the laser key o Turn Key on Middle box of unit
2. Turn on the computer if not already on
3. Turn on the software:
o NIS Elements AR 4.51.00 o Select Confocal
Useful buttons on the left side menu bar:
Laser Unit
Key
Arrow
ND Acquisition
Close all images
Magnifier
Nikon A1R Confocal User Protocol (01_17)
Page 2
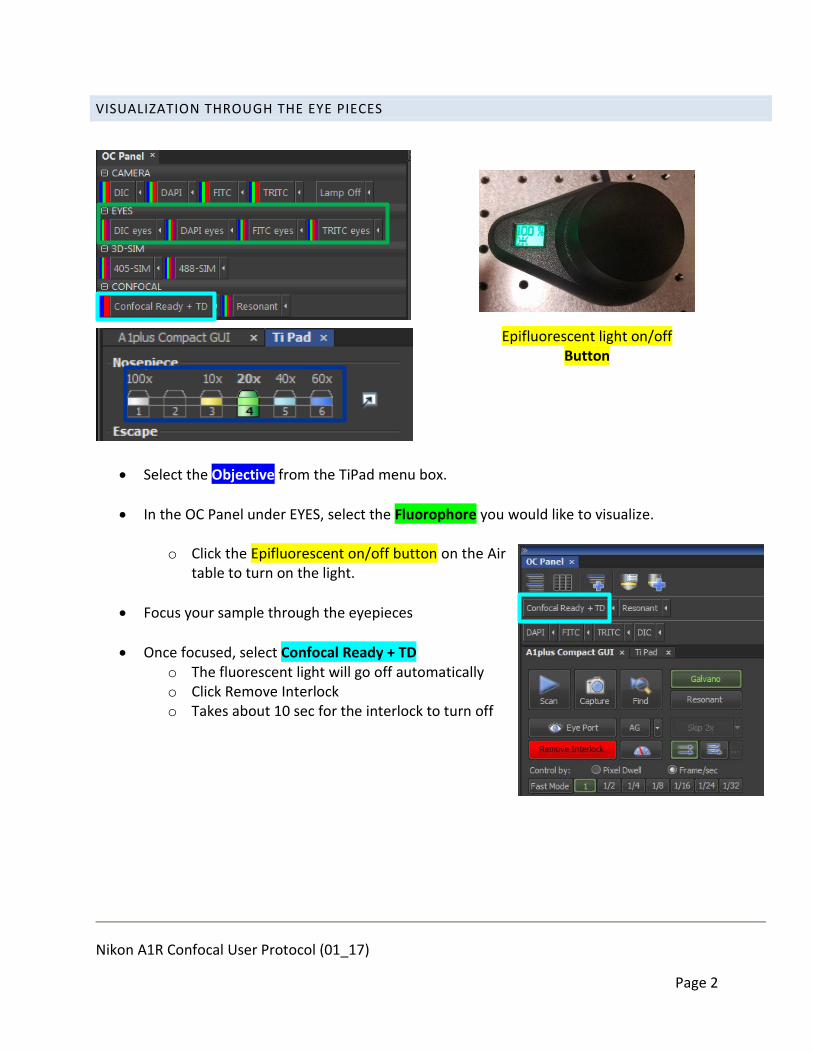
VISUALIZATION THROUGH THE EYE PIECES
• Select the Objective from the TiPad menu box.
• In the OC Panel under EYES, select the Fluorophore you would like to visualize.
o Click the Epifluorescent on/off button on the Air
table to turn on the light.
• Focus your sample through the eyepieces
• Once focused, select Confocal Ready + TD o The fluorescent light will go off automatically o Click Remove Interlock o Takes about 10 sec for the interlock to turn off
Epifluorescent light on/off Button
Nikon A1R Confocal User Protocol (01_17)
Page 3
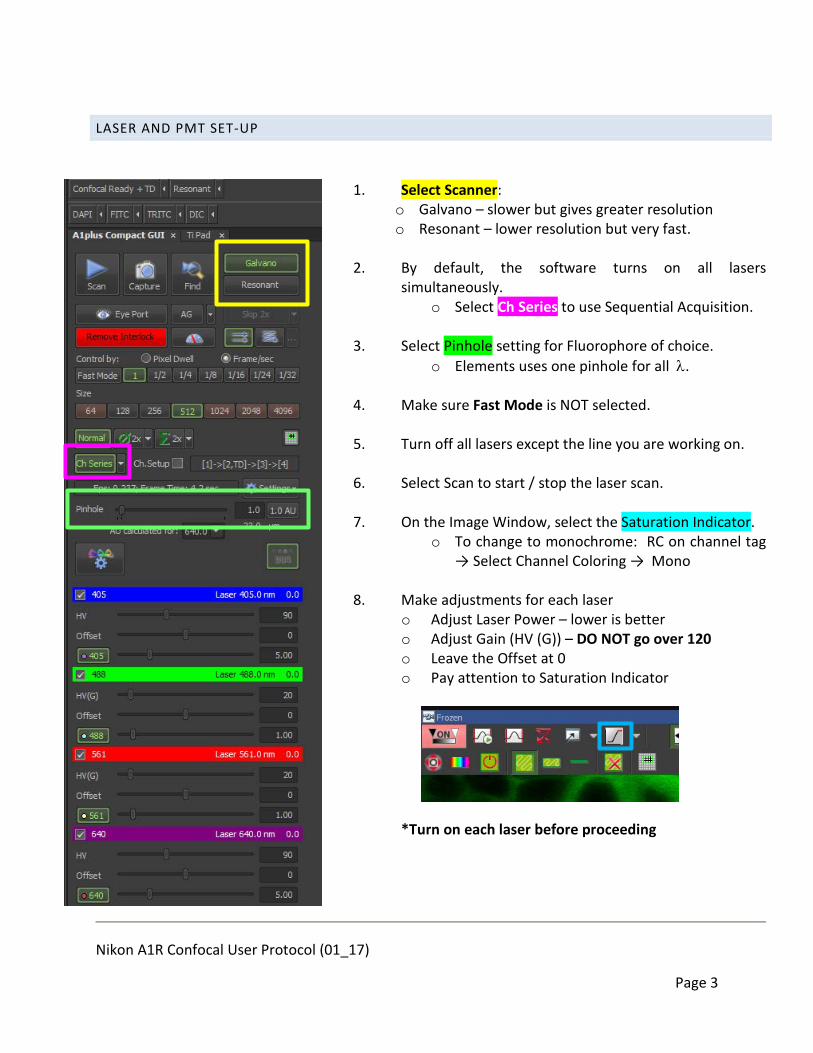
LASER AND PMT SET-UP
1. Select Scanner: o Galvano – slower but gives greater resolution o Resonant – lower resolution but very fast.
2. By default, the software turns on all lasers
simultaneously. o Select Ch Series to use Sequential Acquisition.
3. Select Pinhole setting for Fluorophore of choice.
o Elements uses one pinhole for all λ.
4. Make sure Fast Mode is NOT selected.
5. Turn off all lasers except the line you are working on.
6. Select Scan to start / stop the laser scan.
7. On the Image Window, select the Saturation Indicator. o To change to monochrome: RC on channel tag
→ Select Channel Coloring → Mono
8. Make adjustments for each laser o Adjust Laser Power – lower is better o Adjust Gain (HV (G)) – DO NOT go over 120 o Leave the Offset at 0 o Pay attention to Saturation Indicator
• *Turn on each laser before proceeding
Nikon A1R Confocal User Protocol (01_17)
Page 4
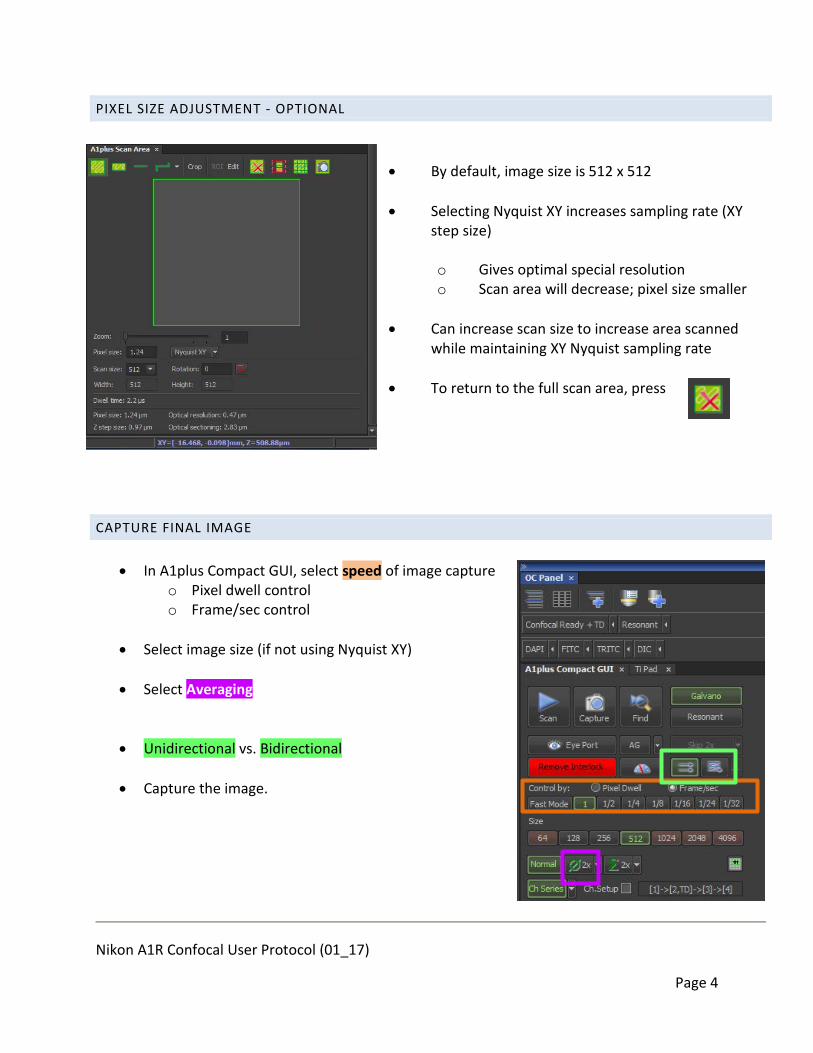
PIXEL SIZE ADJUSTMENT - OPTIONAL
• By default, image size is 512 x 512 • Selecting Nyquist XY increases sampling rate (XY
step size)
o Gives optimal special resolution o Scan area will decrease; pixel size smaller
• Can increase scan size to increase area scanned
while maintaining XY Nyquist sampling rate
• To return to the full scan area, press
CAPTURE FINAL IMAGE
• In A1plus Compact GUI, select speed of image capture o Pixel dwell control o Frame/sec control
• Select image size (if not using Nyquist XY)
• Select Averaging
• Unidirectional vs. Bidirectional
• Capture the image.
Nikon A1R Confocal User Protocol (01_17)
Page 5
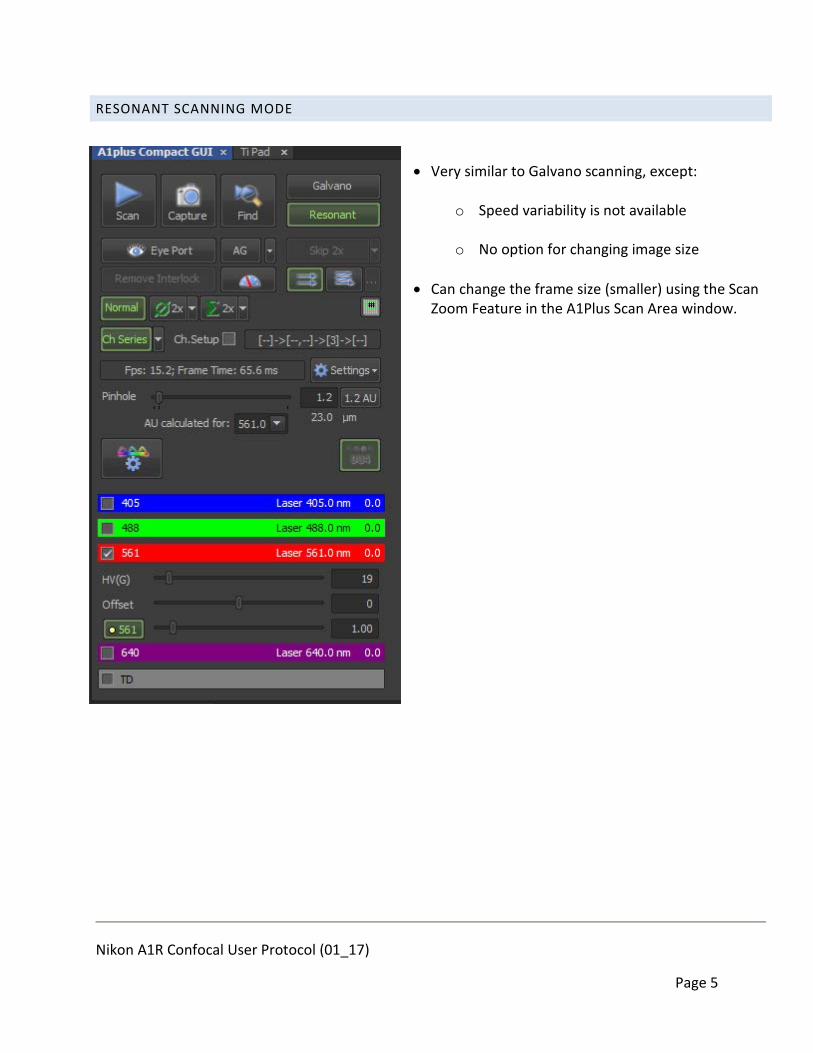
RESONANT SCANNING MODE
• Very similar to Galvano scanning, except:
o Speed variability is not available
o No option for changing image size
• Can change the frame size (smaller) using the Scan Zoom Feature in the A1Plus Scan Area window.
Nikon A1R Confocal User Protocol (01_17)
Page 6
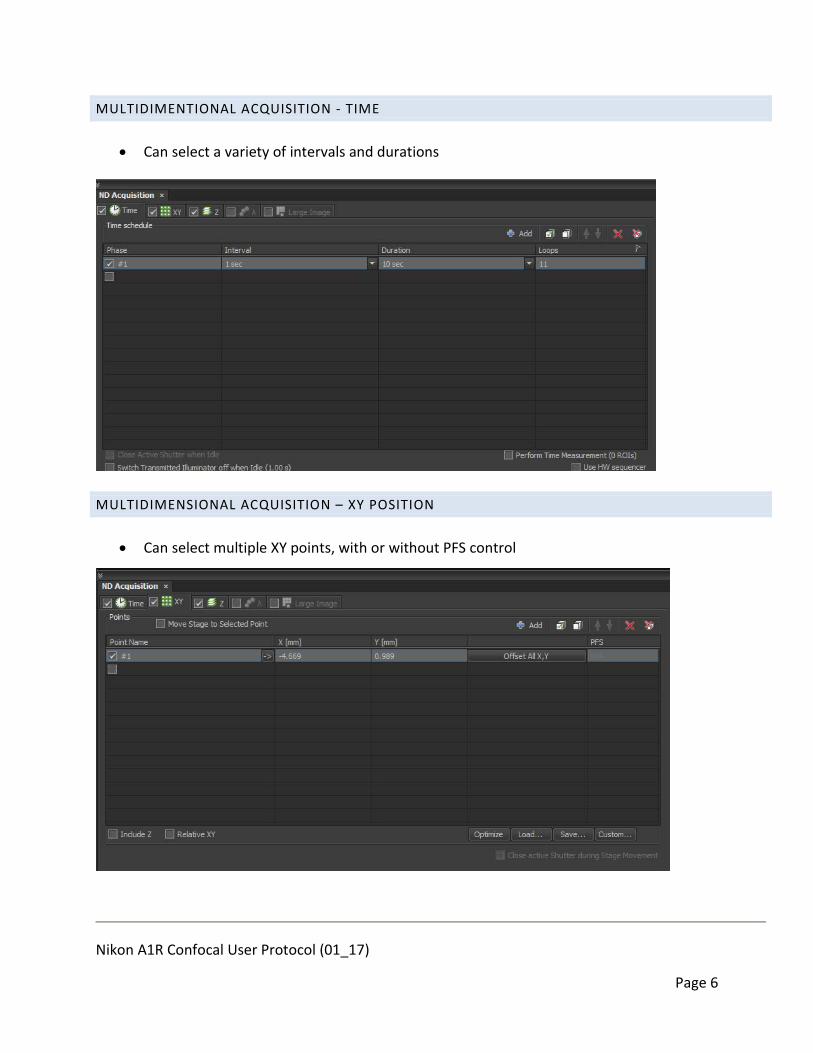
MULTIDIMENTIONAL ACQUISITION - TIME
• Can select a variety of intervals and durations
MULTIDIMENSIONAL ACQUISITION – XY POSITION
• Can select multiple XY points, with or without PFS control
Nikon A1R Confocal User Protocol (01_17)
Page 7
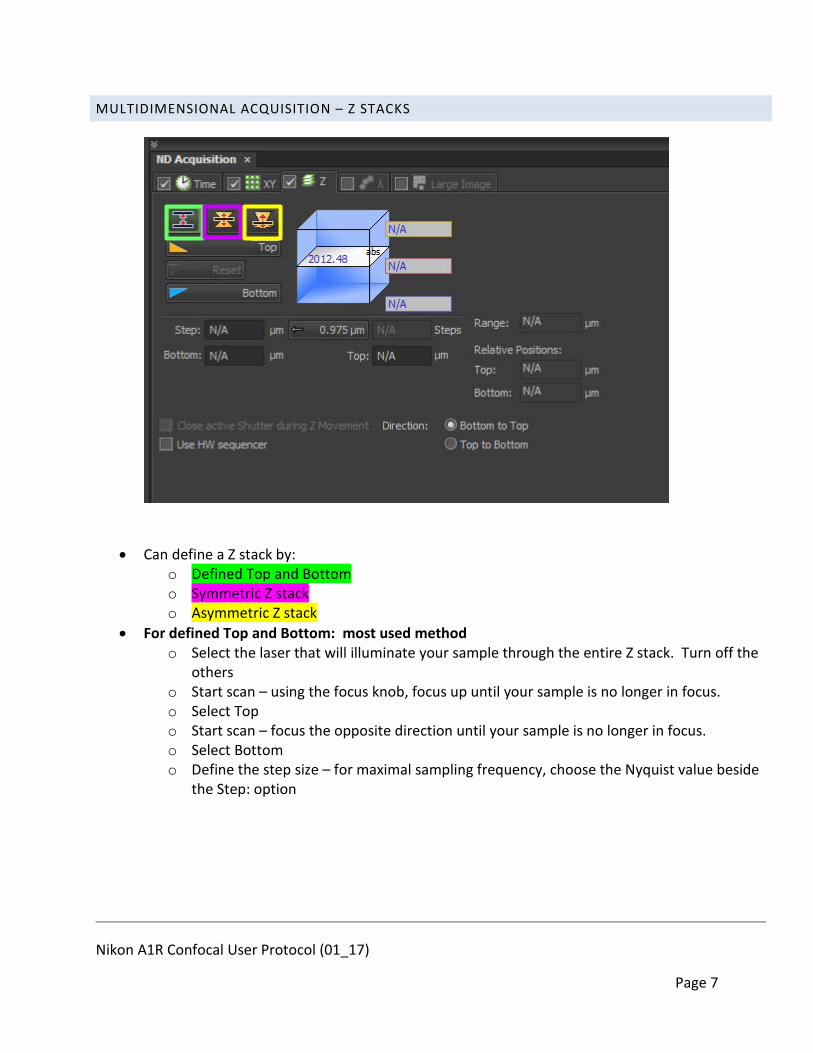
MULTIDIMENSIONAL ACQUISITION – Z STACKS
• Can define a Z stack by: o Defined Top and Bottom o Symmetric Z stack o Asymmetric Z stack
• For defined Top and Bottom: most used method o Select the laser that will illuminate your sample through the entire Z stack. Turn off the
others o Start scan – using the focus knob, focus up until your sample is no longer in focus. o Select Top o Start scan – focus the opposite direction until your sample is no longer in focus. o Select Bottom o Define the step size – for maximal sampling frequency, choose the Nyquist value beside
the Step: option
Nikon A1R Confocal User Protocol (01_17)
Page 8
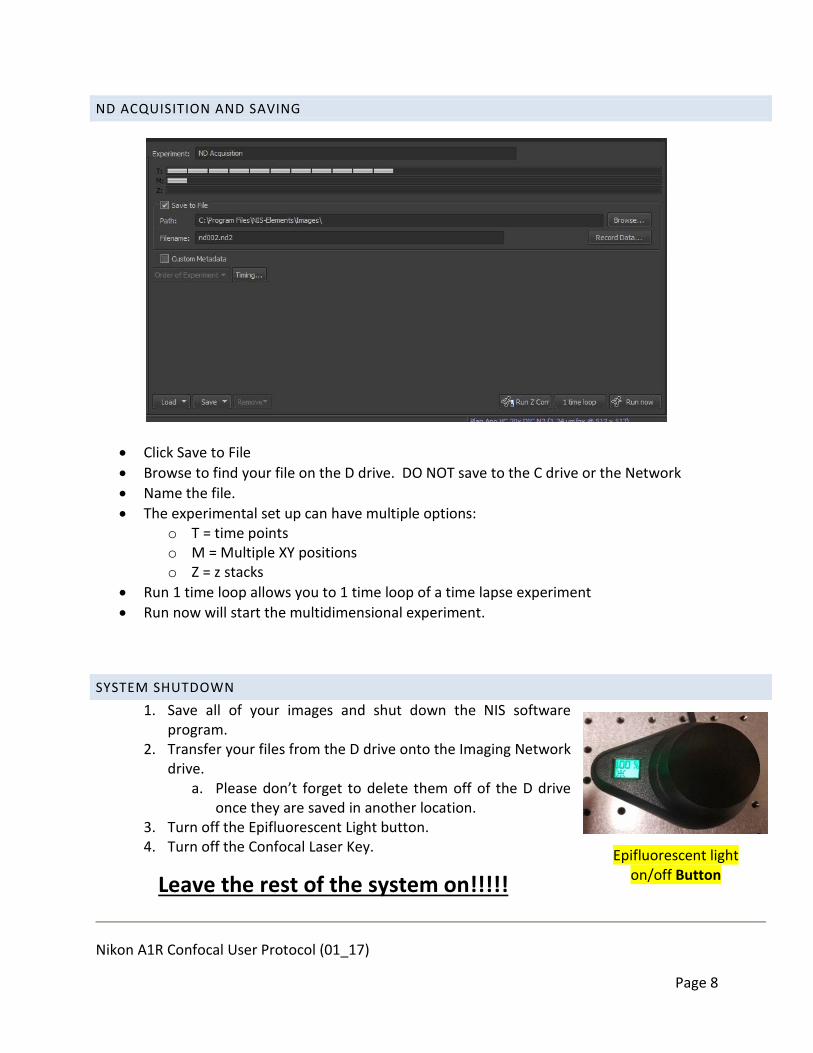
ND ACQUISITION AND SAVING
• Click Save to File • Browse to find your file on the D drive. DO NOT save to the C drive or the Network • Name the file. • The experimental set up can have multiple options:
o T = time points o M = Multiple XY positions o Z = z stacks
• Run 1 time loop allows you to 1 time loop of a time lapse experiment • Run now will start the multidimensional experiment.
SYSTEM SHUTDOWN 1. Save all of your images and shut down the NIS software
program. 2. Transfer your files from the D drive onto the Imaging Network
drive. a. Please don’t forget to delete them off of the D drive
once they are saved in another location. 3. Turn off the Epifluorescent Light button. 4. Turn off the Confocal Laser Key.
Leave the rest of the system on!!!!! Epifluorescent light
on/off Button
Nikon A1R Confocal User Protocol (01_17)
Page 9
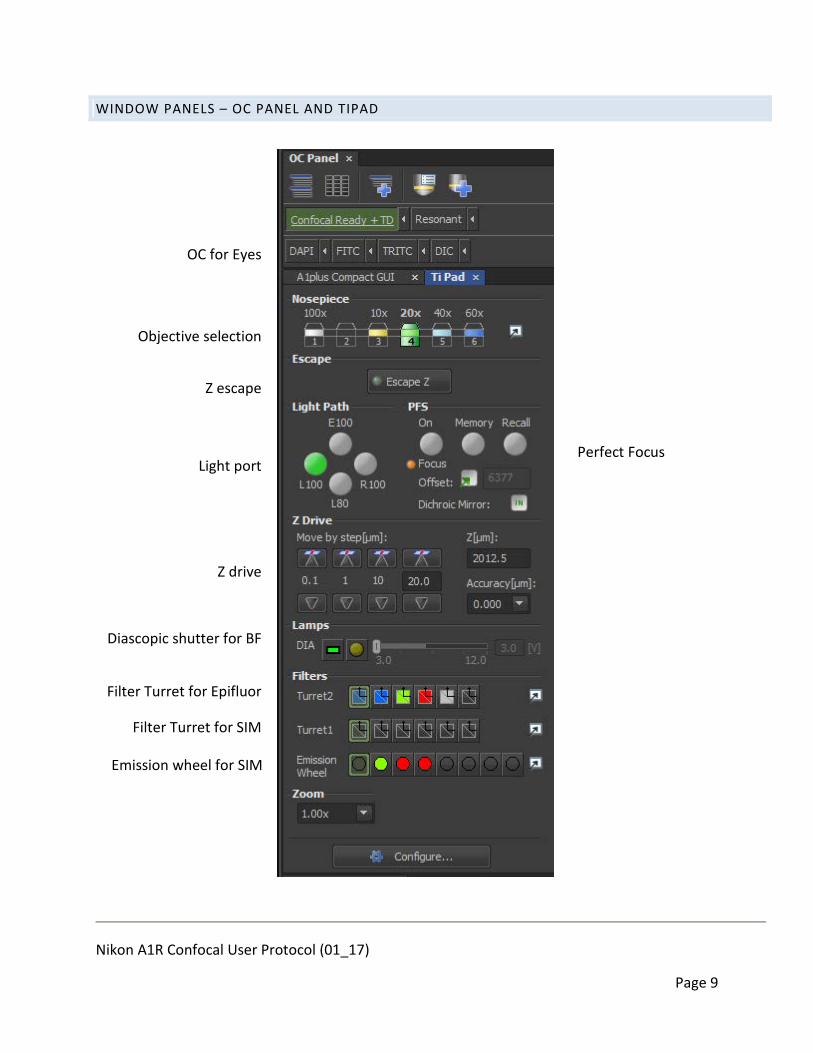
WINDOW PANELS – OC PANEL AND TIPAD
OC for Eyes
Objective selection
Z escape
Perfect Focus
Z drive
Diascopic shutter for BF
Light port
Filter Turret for SIM
Filter Turret for Epifluor
Emission wheel for SIM

Nikon A1R Confocal User Protocol (01_17)
Page 10
WINDOW PANELS – A1PLUS COMPACT GUI
Image scan and capture Scanner selection
Scan speed
Image Size (ppi)
Sequential scanning
Averaging and Summation
Pinhole Diameter
Laser controls
Laser Path
Scanning direction
Nikon A1R Confocal User Protocol (01_17)
Page 11
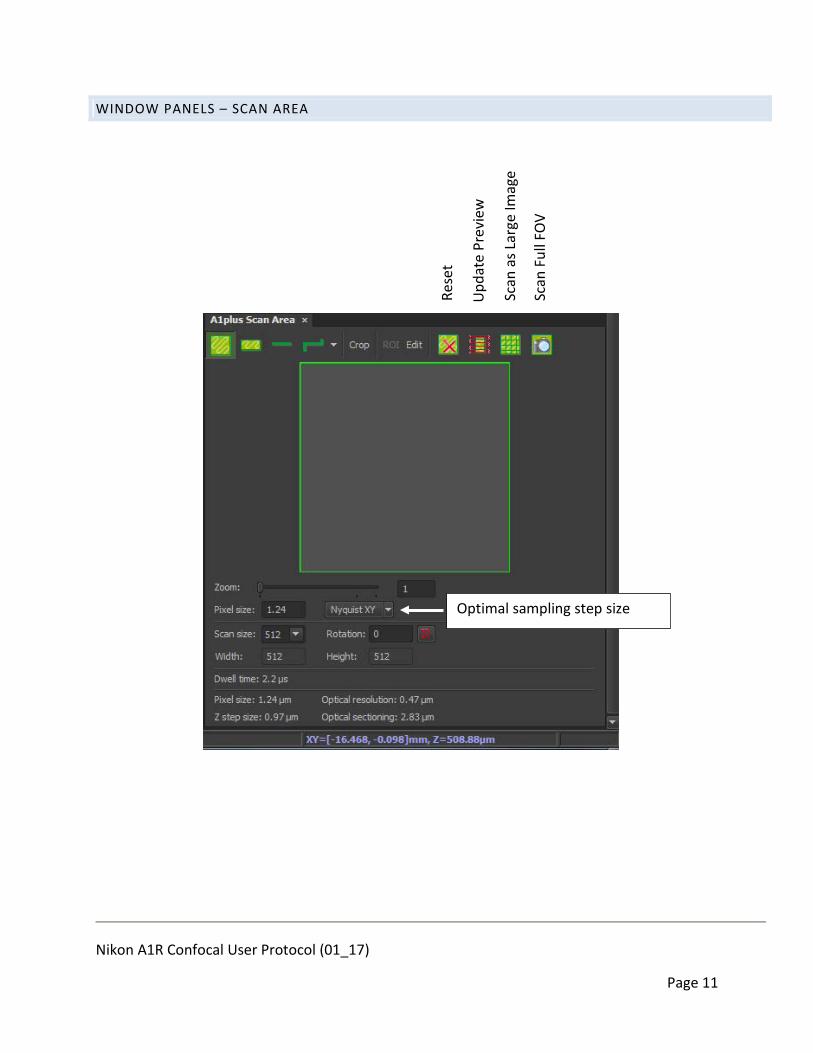
WINDOW PANELS – SCAN AREA
Optimal sampling step size
Rese
t
Scan
Ful
l FO
V
Scan
as L
arge
Imag
e
Upd
ate
Prev
iew
Nikon A1R Confocal User Protocol (01_17)
Page 12
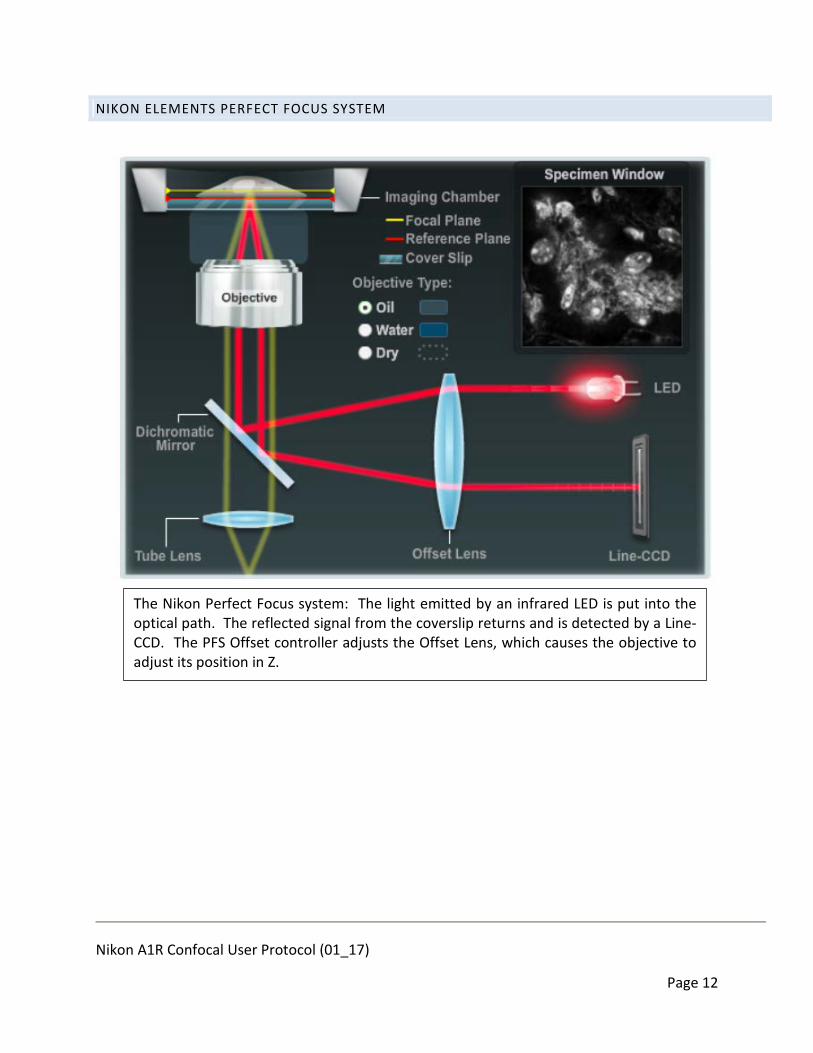
NIKON ELEMENTS PERFECT FOCUS SYSTEM
The Nikon Perfect Focus system: The light emitted by an infrared LED is put into the optical path. The reflected signal from the coverslip returns and is detected by a Line-CCD. The PFS Offset controller adjusts the Offset Lens, which causes the objective to adjust its position in Z.