Embed Size (px)
Citation preview
LABORATORY EXERCISES
For
GEOLOGY 414/514
INTRODUCTORY GEOCHEMISTRY
Joseph H. Rule
2 GEOL 414/514 GEOCHEMISTRY
EXERCISE ONE
Instrumentation in Geochemical Analyses
Purpose
This exercise is designed to introduce basic principles, capabilities, and limitations of common laboratory instruments.
Discussion
Geochemistry is a field of chemical analyses rather than physical observation. In many fields of geology, the worker makes visual observations and physical measurements in the field and/or laboratory and the work is mostly completed. This is not to say that interpretations of these observations are easy, they are often not. But as the name implies, the geochemist must employ many techniques of chemical analyses, some rout ine, others very specialized and extremely difficult. This exercise is designed to acquaint the student with the general applications of the analytical (determinative) tools or techniques most often used in geochemistry. Some of these, which we will use, will be discussed in greater detail than others. This handout is only an outline, please refer to the references given for a more complete explanation.
Instrumentation EMISSION INSTRUMENTS
1. D.C. Arc Spectrograph - Volatilize a powdered sample in a high current (5-30 A), low-voltage (10-25 V) electrical discharge between two carbon electrodes; record the emission spectra on fixed wavelength detectors and photomultiplier tubes which convert the emission lines to electrical signals. This method is an excellent one for multielement qualitative and semi-quantative analyses. This method utilizes powdered soil, rock, sediment, and plant ash samples.
2. Electron Microprobe - bombard target (sample), which is in a vacuum, with electrons which
excite electrons in target atoms, and measure the emitted radiation. Elemental analyses is by detection of wavelengths characteristic of given elements. Can measure very small and specific areas in a target.
3. Flame Emission (flame photometry) - aspirate liquid sample into a flame. Atoms of element of
interest are excited; emitted radiation is measured by detector set for wavelength of interest. Must have liquid sample; water or soil extract. As in all emission techniques, radiation not of interest is also emitted and may cause spectral interferences. Generally less than 1.5% of all atoms present will emit radiation from flame excitation. Flame emission best for easily ionized elements such as alkali (Group I) and alkali-earth (Group II) elements. Commonly used for determination of Na and K, less frequently for Ca and Mg. Can be used for many other elements.
4. Inductively Coupled Argon Plasma (ICP or ICAP) Emission Spectrograph - A liquid sample
is introduced, with argon gas, into a high-frequency magnetic field. The radio frequency induction of the argon gas forms a high temperature plasma (partially ionized gas) causing the
3 breakdown of chemical compounds into their constituent elements. These elements are ionized by the plasma and emit characteristic radiation which allows their identification and quantification. The many emission lines are separated by a diffraction grating or monochrometer and detected by photomultiplier detectors. This is a rapid multielement technique which uses sequential or simultaneous detection. The latest development is the combination of ICP and mass spectrometry (ICP-Mass Spec).
5. Fluorescence
A. Atomic fluorescence - emission of radiation as an excited atom (usually by flame) returns to ground state (atom excited by absorption of light from same element) - also called resonance radiation. Can measure by using a detector set at right angle to the flame on atomic absorption spectomphotometer.
B. Molecular fluorescence - the element of interest is complexed with an aromatic organic molecule - aromatic (odors and unsaturated bonds) hydrocarbons. A fluorimeter (low UV wavelength) is used for measurements.
C. X-ray excited (initiated) fluorescence - X-ray excitation of elements cause elements to emit secondary or characteristic X-rays. Elements less than atomic No. 16 are difficult to determine. Used for qualitative and quantative analyses; good for multielement analyses. Utilizes primarily solid samples, sometimes liquid samples.
ABSORPTION INSTRUMENTS
1. UV/Visible Spectrophotometer (colorimeter) - determine elements that quantatively form colors with complexing agents. The intensity of the color is a function of the concentration of the element in question. A beam of light is passed through the colored solution. The greater the intensity the color (sample concentration) in the solution, the greater the absorption of light from the spectrophotometer source. Used for P, Si, NO3
-, NH4+, B, Al+3, others. Can use to determine
several metals and can use in field with portable spectophotometer. Must have liquid sample or extract.
2. Atomic Absorption Spectomphotometry (AAS) - the sample is heated (flame or graphite
furnace) and atoms are dissociated from chemical bonds into an "unexcited", unionized, "ground" state. These ground state atoms will then absorb radiation from a separate source of the same element. Example: if a light beam from a Fe source (lamp with a Fe cathode) is directed through a heated sample containing many different ground state atoms, only the Fe atoms would absorb this radiation.
The wavelength range in which the available detectors can work is from 1937Å (193.7nm) to 8651Å (865.1nm). This is, of course, in the ultraviolet and visible range.
Source of Radiation for Atoms to Absorb - Hollow cathod lamp (HCL) - a glass chamber filled with Ne or Ar and having as the cathode, the element of interest. Sometimes, the cathode consists of more than one element. With a detector, unwanted radiation may be screened out.
Flame Method - A liquid sample is aspirated into a flame which causes dissociation of the atoms.
The HCL beam is passed through the flame to measure the atomic absorption. The most commonly used flame mixture is air-acetylene. A mixture giving a hotter flame is nitrous oxide-acetylene. Flame sensitivities are in the range of ppm's.
4 Graphite furnace - Hollow Graphite Atomization - The beam from the HCL lamp passes
through a hollow graphite tube instead of a flame. The tube is heated, the sample is vaporized and for a short period of time will absorb radiation from the HCL. A very high sensitivity (ppb) is obtained because of the much longer residence time of atoms in the beam when using the graphite tube. Other types of graphite atomizers (cups and rods) are also used.
Advantages of Absorption Methods - 1. Spectral interferences rarely, if ever, occur if "proper" conditions are used. 2. Relatively free from chemical interferences. 3. Many elements are dissociated completely at temperatures well below temperatures
at which they would be "excited" enough to emit radiation. In many instances nearly 100% of the atoms of interest are dissociated while rarely is over 1.5% of atoms excited under "optimum" conditions for emission techniques. For each excited atom there are at least 1000 dissociated and accessable for absorption. Flame absorption is not 1000 times as sensitive as flame emission, however. Changes in the flame character (geometry, fuel or air flow, etc.) could cause a 100% change
in the number of atoms available for emission but only a 0.1% change in those available for absorption.
Interferences in Atomic Absorption -
1. "Chemical" - incomplete dissociation (gives low values) because of compounds and other radicals present. A higher temperature flame (nitrous oxide-acetylene) will genrally correct these interferences.
2. "Ionization" - if atoms are ionized, they will absorb energy at wavelength(s) other than the one of interest. To correct: add an excess of a more easily ionizable element (Sr, La).
3. "Bulk" or "Matrix-Changes" or differences caused by viscosity or "nature" of the sample solution, especially if sample matrix is different than the standard matrix. Always be sure that the matrix of the standard is as similar as possible to that of the sample.
A. Enhancement of sensitivity by organic solvents: two to four times increase in sensitivity over aqueous solvent (commonly used organics are xylene and methyl isobutyl keytone, MIBK).
B. Different concentrations of dissolved solids in sample solutions will affect the flow rate to the burner. Different flow rates will change sensitivity.
Sensitivity - a measure of the absorption produced by a given sample concentration; generally concentration per one percent absorption, i.e., µg/ml/1% abs.
Detection Limit - the minimum sample concentration which is possible to distinguish from zero. this is generally a signal that is twice the strength of the background signal.
Atomic absorption methods are generally used for analysis for most common metals not determined by flame emission. Example: Ca, Cd, Cr, Cu, Fe, Mg, Mn, Pb, Zn and many others. RADIOACTIVITY DETECTION
1. Methods of Detection
5 A. Gas ionization - ionized gas in a chamber having an electrical potential across the
chambers. A particle (alpha, ß-, or x-ray) causes ionization of the gas and current flow. Used primarily for ß-, some alpha and gamma.
B. Scintillation
1. Solid Fluor (solid crystals) - used for x-ray detection.
a. NaI (T1) - sodium iodide crystal, "activated" by the presence of thallium. Most sensitive of the solid fluors; detection levels of 0.01 to 0.1 micro curie (µCi); 1 µCi = 22 X 105 dpm.
b. Ge (Li) - Lithium "drifted" germanium crystal. Has the best resolving capability of the solid fluors; detection levels of 10 µCi.
2. Liquid Fluor - place sample in one or more fluorescing liquids. Very "efficient" and sensitive for ß- particles and also for weak x-rays.
C. Autoradiography - photographic emulsions are exposed by radiation. Crude for quantative measurements, used for qualitative measurements.
2. Neutron Activation Analyses (NAA) - produce radioactivity in a sample by bombardment with
high energy neutrons. Determine the radioactivity produced by one of the above methods. This is one of the most sensitive determinative tools available. But one needs a nuclear reactor for the source of neutrons! Can be used for multielement analyses.
OTHER
1. Mass Spectrograph - Separation of ionized particles in an electromagnetic field. Used for stable isotope analysis and separations.
2. Chromatography - used for analyses of organic compounds and, in a few limited instances, for
metals.
A. Ion Exchange - Utilize an organic, synthetic resin material having a high cation or anion exchange capactiy. Used to separate and concentrate iorganic, generally ionic, species for subsequent analyses by various methods (atomic absorption, x-ray fluorescence, etc.)
B. Paper - separation of groups of compounds by movement of organic solvents along paper. Separation is based on diffusion rate as it is controlled by solubility and molecular size.
C. Liquid - high pressure forces liquid through a column packed with an absorbing material. D. Thin Layer (TLC) - a more highly developed form from paper chromatography. A very thin
layer of material (ex. silica gel) is placed on a glass plate and "developed" as with paper. E. Gas-Liquid (GLC) - most versatile method. Sample can be placed on absorber and different
groups of compounds removed by sequential addition of different solvents and use of variable temperature with detection of individual species in each group.
3. Expanded Range pH meter or specific ion meter - use to determine a variety of ions for which
specific ion probes exist. Examples: H+, Ca++, K+, NH4+, NO3
-, Cl-, F-, Cd++, and many more. Some units are portable and may be used in the field. Also, either may be used to determine the Eh (redox potential). Use water sample, soil or sediment extract.

6
7
PROCEDURES
1. Use of Atomic Absorption Spectrophotometer (AAS).
Separate instructions for use of the AAS will be provided and its operation will be demonstrated. Take appropriate notes when instructed.
2. Use of pH meters.
Using the buffer solutions provided, standardize each pH meter and determine the pH of the unknown solutions.
3. Use of the UV/Visible Spectrophotometer.
Using the instructions provided with the Spectrophotometer, determine the %T of each phosphate standard and unknown (instructions below). Construct a standard curve and determine the concentrations of the unknowns.
RESULTS
1. Report pH of unknown (s).
2. Report concentration of unknown (s) from Spectrophotometer measurements.
Preparation of a Standard Calibration Graph Using Phosphate Standards A standard solution of 50mg/1 PO4-P is provided. Using a pipet, add 0, 1, 5, 10, 15, 20, and 25 ml to 50 ml graduate cylinders. Fill all cylinders to 50 ml with D.I.H2O, cover with parafilm and thoroughly mix. To each cylinder add 10 ml of the Vanadate-molybdate reagent, recover each with the parafilm and mix thoroughly. After 10 minutes pour some of each standard into a clean colorimeter tube and determine the %T of each at 470 nm using the 0 standard (instead of D.I.H2O) to set 100%T. Plot the curve of mg/1 of standard versus %T. Determine the linear working range of this method. Determination of PO4-P in Unknown Sample Take 50 ml of the unknown sample(s), add the Vanadate-molybdate reagent, and read the %T as with the standards above. From the calibration graph determine the concentration of PO4-P in the unknown(s). Conduct the determination of the unknown(s) at the same time as preparation of the calibration graph.
8 EXERCISE TWO
Acids, Bases, and Buffers
PURPOSE
Standard solutions of an acid and a base will be prepared and subsequently used to obtain buffer curves of selected solutions.
DISCUSSION A buffer is a substance which resists changes in pH. It must have the ability to "absorb" or react with added H+ or OH- ions so that the resulting pH is little changed. The amount or degree of buffering capacity is greatly variable with differing substances. A buffer is usually a mixture of a weak acid and its conjugate base or conversely a weak base and its conjugate acid. A buffer system at any given pH can be constructed by using the ratios of the equilibrium constant expressions for the two substances. The most efficeitn buffer action usually occurs where the acid and base are presnet in equal concentrations. The most efficient buffer pH for any system can be computed from the acid constant from the acid since pH = pKa. All of the systems used in the following exercise are solutions. If solids were present, as they are in many natural systems, some of the solids may enter into the buffering ability of the system. One excellent example is that of sea water. The sea water sample (which is artificial, i.e., synthetic ocean water) in the lab exhibits a measurable degree of buffering because of the soluble constituents. However, the buffering capacity of the waters of the oceans are greatly aided by the CaCO3 present in the sediments. Various solutions will be titrated with first a standard acid and then a standard base and the buffer curve for each solution will be plotted. The acid and base solution will be standardized before beginning the buffer curve titrations.
MATERIALS Approximately 0.1 M HCl, approximately 0.1 M NaOH, KHP (potassium acid phthalate), burets and stand, 250 ml Erlenmeyer flasks, phenophthalein indicator solution, deionized H2O, tap H2O, artificial sea water (30 ppt.), M sodium acetate solution, pH 4.3, pH meter, pH buffer.
PROCEDURE
A. Standardization of NaOH with KHP 1. Into 250 ml Erlenmeyer flasks weigh precisely duplicate .5000 - .7000 g portions
(i.e., record weight to nearest 0.1 mg) of reagent-grade KHP (potassium acid phthalate). The KHP has been dried at 100oC for 2 hours and kept in a desiccator.
2. Add about 50 ml of freshly collected DI H2O (provided in a special bottle), and 2 drops of phenolphthalein, and titrate with the NaOH to the faintest tinge of pink that persists for 15 seconds after swirling.
9 3. Calculate the normality of the NaOH. a. meq wt of KHP = .2042 g b. meq = ml X N c. convert N to molarity 4. Pipet exactly 25 ml of the ~.1 M HCl into a clean Erlenmeyer flask, add 25 ml of
DI H2O (same H2O as used with KHP) and 2 drops of phenolphthalein. Titrate to the same end point as with the KHP.
5. Calculate the normality of the HCl. a. ml X N = ml X N b. convert N to M B. Buffer Curves - Samples Used: 1. Deionized H2O 3. Artificial sea H2O - 30 ppt. 2. Tap H2O 4. Na OAc + OHAc, 0.01 M, pH _ 4.3 C. Procedure 1. Place 100 ml of sample in a 250 ml beaker, measure and record the pH. (Don't
forget to standardize the pH meter). 2. Titrate to the nearest 0.5 pH unit with 0.1 M HCl (if sample is pH 5.8, titrate to
pH 5.5) and record the amount of HCl used. NOTE: When titrating the deionized and tap water samples, add the HCl (and later the
NaOH) dropwise and slowly. Stir the samples constantly while adding titrant.
3. Titrate the sample to pH 2.0, recording the ml of HCl required for each 0.5 unit change in the sample pH.
4. Discard the sample, thoroughly rinse the beaker with deionized H2O and take 100 ml of the same sample as just titrated with the HCl.
5. Titrate the sample to pH 12.0 with 0.1 M NaOH in the same manner as for the HCl. Note: If excessive NaOH or HCl is required, stop the titration before reaching pH 2 or 12.
RESULTS
1. Report M of the HCl and NaOH. Show all calculations. 2. Include table of results from buffer curve titrations. 3. Construct a graph of buffer curves of the four samples. Plot the pH on the y-axis and the
ml of HCl or NaOH used on the x-axis. Construct only four buffer curves. Include both the NaOH and HCl portions for each solution on the same curve. Use the same axes scale for all graphs!
10 QUESTIONS
1. What could account for any buffering capacity of tap water? 2. Write a reaction(s) to account for the buffering capacity of the seawater. 3. Discuss the relationship of pH to buffering capacity and whether or not you would
estimate buffering capacity from pH. 4. Why is understanding the concept of buffering capacity important in geochemical
systems?
11 EXERCISE THREE
Hydrogen ion activity and pH
PURPOSE
The calculated hydrogen ion concentration from standard solutions of HCl will be compared to the
measured values (from pH measurement).
DISCUSSION
Much is discussed concerning the hydrogen ion concentration and activity and pH. If ideal conditions exist, pH measurements should allow calculation of the H ion concentration or knowing the H ion concentration, pH calculation should be possible. Where ideal conditions are met, the hydrogen ion activity equals the hydrogen ion concentration. This exercise is designed to investigate the validity and limits of the above statements.
Standard solutions of HCl will be prepared from the ~0.1 M HCl which was standardized in Laboratory 2. Their pH values will be determined, the hydrogen ion concentration computed, and compared with the calculated value.
MATERIALS
pH meter with probe, pH 4.0 buffer, standard HCl, 10 ml pipets, volumetric flasks, 50 ml, 150 ml, or 250 ml beakers.
PROCEDURE
1. Soak the pH probe in a small amount of 0.1 M HCl for about 1-2 minutes and rinse the probe thoroughly with D.I. H2O. NOTE: Be sure to rinse the probe thoroughly during this exercise!
2. Standardize the pH meter with the 4.0 buffer. 3. Measure the pH of a second portion of the 0.1 M HCl and record. Do not leave the pH probe in
this solution any longer than necessary. 4. Prepare solutions of 10-2, 10-3, 10-4, and 10-5 M HCl by diluting the 0.1 M HCl with D.I. H2O. Do
not prepare any more than necessary but use at least a 10 ml pipet for the dilutions. (10 ml HCl: 100 ml is a convenient dilution).
5. Measure and record the pH of each of the solutions prepared in No. 4. 6. Record the results as indicated below in the Data Record.
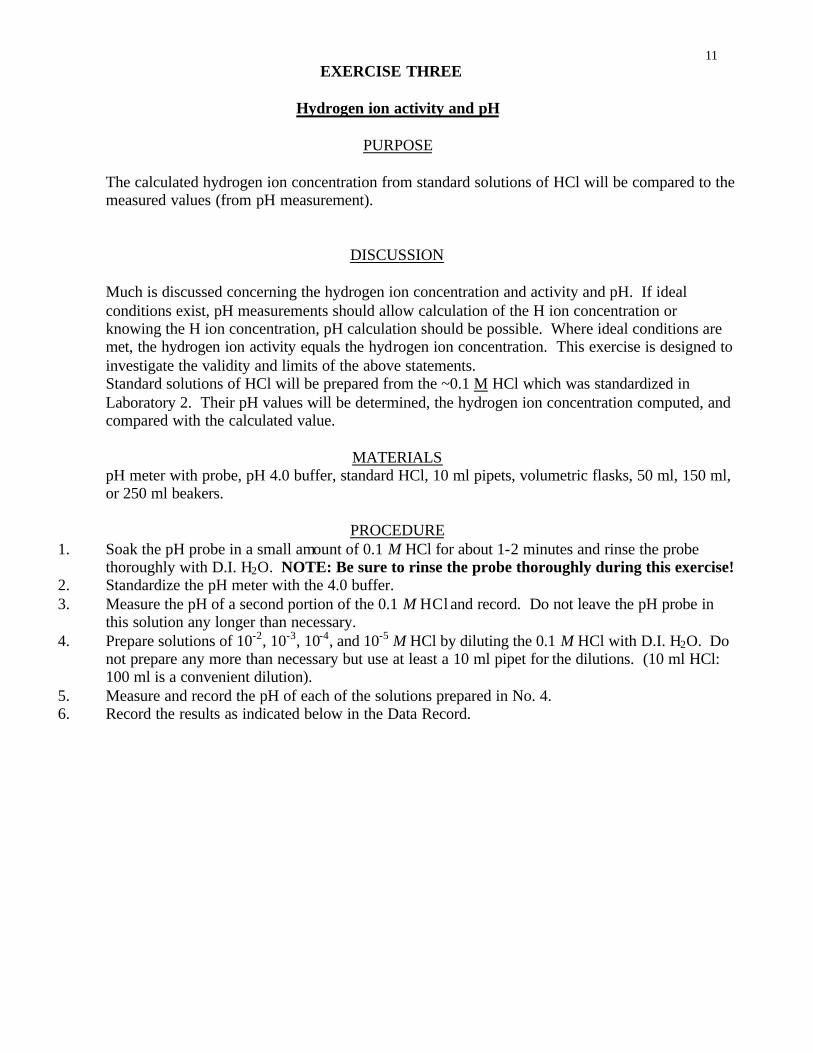
12 Results
1. Data Record
M of HCl as
prepared
Measured
pH
M of HCl calculated from pH
Differences between prepared and calculated and comments
2. Construct a graph of "prepared M of HCl" versus "measured M of HCl".
13 QUESTIONS
1. How did the "prepared M" values (actually determined via wet chemistry standardization)
compare with the "measured M"? 2. Comment on the relationship, pattern, or lack thereof from the graph prepared above.
14 EXERCISE FOUR
Hydrolysis
PURPOSE
The calculated pH of solutions of various salts will be compared with the measured pH of the solutions.
DISCUSSION
Salts which consist of cations from strong bases and anions from strong acids are called neutral salts. When these salts are dissolved in water, neutral solutions result. Salts consisting of cations and anions of weak bases/strong acids or strong base/weak acids will give either acidic or basic solutions. This resultant acidic or basic solution is caused by the process of hydrolysis. Hydrolysis occurs when a dissocia ted cation or anion reacts with the water molecule to form a new ion and either H+ or OH-. This exercise allow comparison of the pH of various salt solutions to the calculated or theoretical pH. A neutral salt and salts which hydrolyze to give acidic and basic solutions will be used.
MATERIALS
NaCl, Na2CO3, CuSO4, pH meter and probe, pH 4.0, 7.0 and 10.0 buffers, pipets, volumetric flasks, balance, beakers, CO2-free deionized H2O.
PROCEDURE
1. Prepare at least 100 ml of 10-2 M solutions of NaCl, Na2CO3 and CuSO4 using the CO2-free DI H2O.
2. Standardize the pH meter carefully using the buffer appropriate for each sample. 3. Measure and record the pH of the D.I. H2O used to prepare the solutions. 4. Measure and record the pH of the three salt solutions.
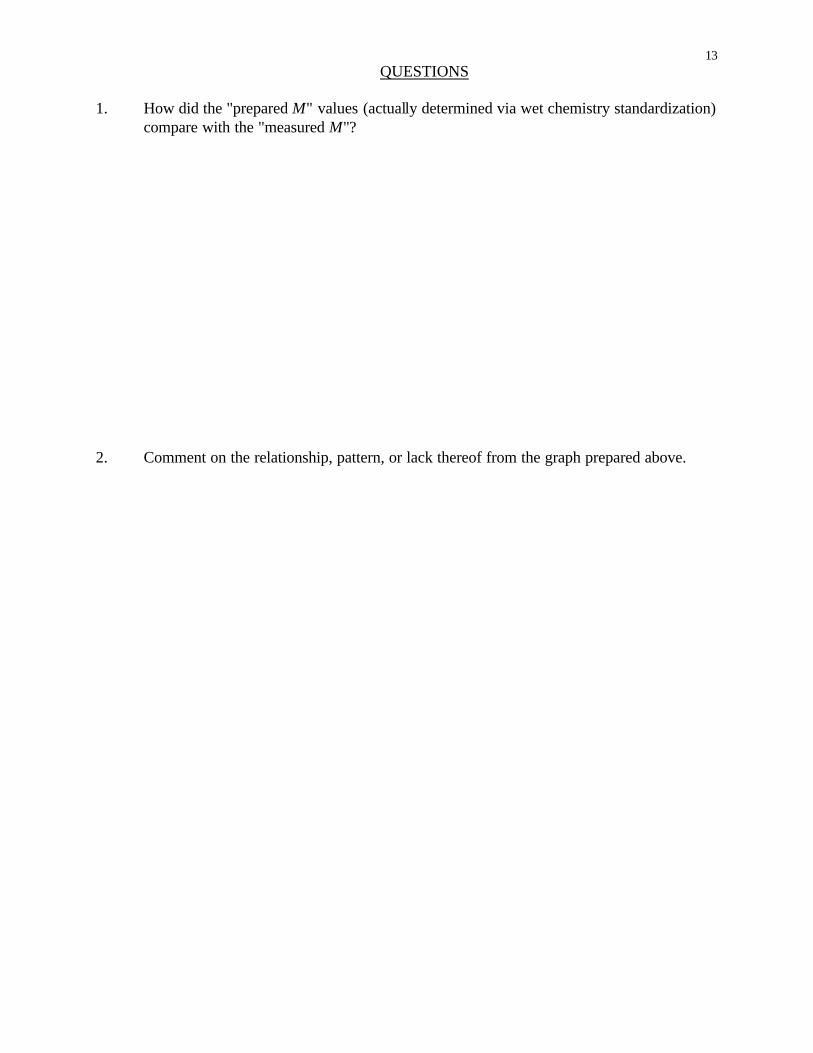
RESULTS
Solution Measured pH
Calculated pH
Differences in pH values, if any
15
QUESTIONS
1. Were the measured versus calculated pH values the same for all salt solutions? Explain, if necessary.
2. Was the pH of the D.I. water of significance? Explain. 3. Comment on any other observations, discrepancies or problems.
16
EXERCISE FIVE
Factors Affecting the Solubility of CaCO3
PURPOSE
The effect of grain size on the solubility of calcite and of other salts on the solubility of pure CaCO3 will be investigated.
DISCUSSION
Much information abounds concerning the effect of grain size on solubility. "Common sense"
tells one that the smaller the particle size the greater the rate of solubility should be. Obviously there may be many factors which influence solubilities in natural systems and some of these may complicate the effect of grain size. In order to minimize the number of influencing (and complicating) factors, solubility studies are conducted in the laboratory under controlled conditions. In doing this, not only the complicating factors are eliminated but other conditions are changed from the natural environment. In particular, the system in the laboratory will utilize a fixed volume of water and will (hopefully) exclude the effect of CO2. The textbook presents a thorough discussion concerning the effect of grain size and other factors on the solubility of CaCO3. This laboratory is designed to test some of these factors. Strict adherence to the instructions is mandatory if proper results are to be obtained.
MATERIALS
Calcite; mortar and pestle; 160 ml bottles (or flask) with closure; Reagent Grade CaCO3, CaCl2 ·2H2O, CaSO4, and FeSO4 ·7H2O; 1, 10 and 25 ml pipets; storage bottles or vials; balance; CO2-free deionized water; phi sieves.
17 PROCEDURE
A. Effect of Grain Size on the Solubility of Calcite. 1. Crush the calcite pieces in the mortar and pestle. Crush in small batches and mix
these before sieving. 2. Sieve the mixture through a set of sieves containing -2, -1.5, -0.5, 0.5, 1.5, 2.5,
and 3.5 phi sieves. 3. Take samples from the following sieves to obtain the size ranges indicated. Sample from Sample size sieve (phi) range ------------ ------------ pan <3.5 phi 2.5 1.5 to 2.5 0.5 -0.5 to 0.5 -1.5 -2.0 to -1.5 4. Add 0.5 g of each size range to a clean 125 ml bottle and fill with CO2-free
deionized water. Shake the bottle (by hand) and store in the appropriate area. 5. Each morning for the next week (including next lab period and excluding
Saturday and Sunday, if you wish) take a 10 ml sample from each bottle, place in a storage bottle and add 1 ml of 1 N HCl. Then shake the bottle and contents. Minimize the time that the sample container is open! Do not add any more water to the samples.
B. Effect of Other Compounds on the Solubility of Pure CaCO3. 1. All substances used in this portion of this laboratory will be Reagent Grade
chemicals. Be sure not to contaminate the stock supply of these chemicals. 2. Place 1.00 g of CaCO3 in each of four 125 ml bottles. 3. Add no other chemicals to Bottle 1. 4. To Bottle 2, add also 0.50 g of CaCl2 ·2H2O. Calculate the molarity of the
solution with respect to the Ca++ from the CaCl2. 5. Add 0.50 g CaSO4 to Bottle 3. 6. To Bottle 4, add 1.00 g of FeSO4 ·7H2O. Calculate the molity of the resulting
solution with respect to Fe++. 7. To Bottle 5 add 5.00 g CaCO3. 8. Fill all five bottles to a level just above the shoulder with CO2-free D.I.H2O. 9. Cap each bottle and shake thoroughly (the bottle). Shake each bottle three or four
times during this laboratory period and at least once a day for the next week. Keep the bottles tightly capped. DO NOT SHAKE on the morning of the next laboratory period.
10. Withdraw 25 ml of clear supernatent, place in a storage bottle and acidify with 1 ml of 2 N HCl.
C. Analyses of Samples for Ca++ by Atomic Absorption Spectrophotometry (AAS) Samples from both the A and B portions of this Exercise will be analyzed for their Ca++
content by AAS on the date announced by the instructor.

18 RESULTS
A. Effect of Grain Size on the Solubility of Calcite.
Sample Size
Range
Ca++ in Solution
mg/l
Solubility of CaCO3
B. Effect of Other Compounds on the Solubility of Pure CaCO3
Sample Solubility of CaCO3
19 QUESTIONS
1. What was the brown precipitate that formed in the bottle to which FeSO4 was added? 2. What reactions were involved in the formation of the precipitate? 3. Calculate the concentration (µg/ml) of Ca++ added to Bottle 2 from the CaCl2. Subtract
this amount from the total Ca++ concentration. Compare the remaining concentration of Ca++ with that in Bottle 1, CaCO3 only. What was the effect of CaCl2 on the solubility of CaCO3?

20 EXERCISE SIX
Dissolution of Geochemical Samples Using Concentrated
Inorganic Acids PURPOSE The effect of different types of acids on samples and extraction precision will be evaluated.
DISCUSSION
This experiment is designed to show differences in the effectiveness of different combinations of mineral acids and hydrogen peroxide on various sedimentary materials. Different acid/peroxide combinations are included in this exercise. The acids and peroxide (Conc. HNO3, Conc. HCl, 30% H2O2) will affect partial dissolutions on samples. We wish to note both the efficiency of extraction as well as replicate precision. Hydrochloric acid is generally used for dissolution of carbonates or carbonate portions of samples. Hydrochloric acid is a reducing agent, that is, it becomes oxidized during reactions. Nitric acid is a relatively strong oxidizing agent. It is often used for oxidation of organic matter in samples before other acids are used. Of HCl or HNO3 being used alone, HNO3 is probably most frequently used. In a specific combination, HCL and HNO3 form a very powerful reagent, aqua regia, which is strong enough to dissolve the noble metal Au. The procedure using HCl-plus-HNO3 (not aqua regia) is one of several variations used for dissolution of a great number of geochemical samples (rock, ore, soil, stream sediment, etc., in ore analyses and geochemical prospecting). A 30% solution of hydrogen peroxide is a strong oxidizing agent that will rapidly and vigorously decompose with the application of heat. It is usually used in conjunction with a mineral acid. The sediment "dissolution" procedure currently used in the Geochemistry Research Laboratory utilizes concentrated HNO3 plus 30% H2O2 and involves a six-hour digestion period. SAMPLES: 1. 2. 3. 4. MATERIALS ACIDS: Specific acids or acid mixtures will be randomly assigned to all groups. OTHER: 250 ml beakers, watch glasses, Whatman No 2 or No 40 filter paper, funnels and stand, 100 ml volumetric flasks.
21 Procedure 1
DISSOLUTION OF GEOCHEMICAL SAMPLES USING CONCENTRATED NITRIC ACID
AND HYDROGEN PEROXIDE
1. Weigh 4.00 g sample into a 250 ml beaker, add enough D I H2O just to wet the sample and cautiously add 15 ml conc. HNO3.
2. Cover the beaker with a watch glass and place on a hotplate where the temperature is maintained at _100o C.
3. Prepare a digestion blank by adding the same amount of D I H2O and conc. HNO3 to a beaker (without sample) and carrying it through the entire procedure.
4. Heat the samples (at _100o C) for one hour, remove from the hid, cool slightly and carefully add 5 ml of 30% H2O2.
5. Replace the watch glass and set the beaker on the hotplate. Carefully monitor the vigorous reaction that will occur. If extreme spattering occurs, remove the sample from the hotplate, allow the reaction to subside and proceed with the digestion. 6. After the vigorous boiling has subsided, remove the watch glass and over the period of 1 hr allow the liquid level to evaporate until about 10 ml remains. Replace the watch glass if necessary. NOTE: The sample must not be allowed to dry. If this happens, you must start at the beginning with a new sample. The total digestion time should be two hours.
7. At the end of two hours, remove the sample from the hotplate, add 25 ml D I H2O, replace the watch glass and allow the sample to cool in the hood.
8. While the sample is cooling, place a folded No 2 or No 40 Whatman filter paper in a funnel and rinse the paper with 10% HNO3.
9. Filter the sample into a 100 ml volumetric flask. Initially, minimize the amount of sediment that is poured into the filter. Rinse the residue in the beaker with D I H2O (minimum of three washings) and pour through the filter. After this liquid has passed through the filter, rinse the filter and residue with additional D I H2O.
11. Fill the volumetric flask to the 100 ml mark with deionized water, mix well by inverting the flask, and transfer to a clean, dry storage bottle. CAUTION: Do not exceed 100 ml.
NOTE: Label the bottle with your name, sample name, and type of acid used. Store the extract as instructed.
22 Procedure 2
DISSOLUTION OF GEOCHEMICAL SAMPLES USING CONCENTRATED
NITRIC AND HYDROCHLORIC ACIDS
1. Weigh 4.00 g sample into a 250 ml beaker, add enough D I H2O just to wet the sample and cautiously add 15 ml conc. HNO3.
2. Cover the beaker with a watch glass and place on a hotplate where the temperature is maintained at _100o C.
3. Prepare a digestion blank by adding the same amount of D I H2O and conc. HNO3 to a beaker (without sample) and carrying it through the entire procedure.
4. Heat the samples (at _100o C) for one hour, remove from the hotplate, cool slightly and carefully add 2 ml of conc. HCl.
5. Replace the watch glass and set the beaker on the hotplate. Carefully monitor the reaction that will occur. If extreme spattering occurs, remove the sample from the hotplate, allow the reaction to subside and proceed with the digestion.
6. After the vigorous reaction and evolution of nitrogen oxide fumes have subsided, remove the watch glass and over the period of 1 hour allow the liquid level to evaporate until about 10 ml remains. Replace the watch glass if necessary.
NOTE: The sample must not be allowed to dry. If this happens, you must start at the beginning with a new sample. The total digestion time should be two hours.
7. At the end of two hours, remove the sample from the hotplate, add 25 ml D I H2O, replace the watch glass and allow the sample to cool in the hood.
8. While the sample is cooling, place a folded No 2 or No 40 Whatman filter paper in a funnel and rinse the paper with 10% HNO3.
9. Filter the sample into a 100 ml volumetric flask. Initially, minimize the amount of sediment that is poured into the filter. Rinse the residue in the beaker with D I H2O (minimum of three washings) and pour through the filter. After this liquid has passed through the filter, rinse the filter and residue with additional D I H2O.
11. Fill the volumetric flask to the 100 ml mark with deionized water, mix well by inverting the flask, and transfer to a clean, dry storage bottle. CAUTION: Do not exceed 100 ml volume.
NOTE: Label the bottle with your name, sample name, and type of acid used. Store the extract as instructed.
23 Procedure 3
DISSOLUTION OF GEOCHEMICAL SAMPLES USING CONCENTRATED
NITRIC AND HYDROCHLORIC ACIDS AND HYDROGEN PEROXIDE
1. Weigh 4.00 g sample into a 250 ml beaker, add enough D I H2O just to wet the sample and cautiously add 15 ml conc. HNO3.
2. Cover the beaker with a watch glass and place on a hotplate where the temperature is maintained at _100o C.
3. Prepare a digestion blank by adding the same amount of D I H2O and conc. HNO3 to a beaker (without sample) and carrying it through the entire procedure.
4. Heat the samples (at _100o C) for 30 minutes, remove from the hotplate, cool slightly and carefully add 5 ml of 30% H2O2.
5. Replace the watch glass and set the beaker on the hotplate. Carefully monitor the reaction that will occur. If extreme spattering occurs, remove the sample from the hotplate, allow the reaction to subside and then digest for 30 more minutes. 6. Cool the sample slightly, add 2 ml of conc. HCl and return it to the hotplate for 1 hour. Remove the watch glass so as to allow about 10 ml of liquid to remain at the end of two hours. Replace the watch glass if necessary. NOTE: The sample must not be allowed to dry. If this happens, you must start at the beginning with a new sample. The total digestion time should be two hours.
7. At the end of two hours, remove the sample from the hotplate, add 25 ml D I H2O, replace the watch glass and allow the sample to cool in the hood.
8. While the sample is cooling, place a folded No 2 or No 40 Whatman filter paper in a funnel and rinse the paper with 10% HNO3.
9. Filter the sample into a 100 ml volumetric flask. Initially, minimize the amount of sediment that is poured into the filter. Rinse the residue in the beaker with D I H2O (minimum of three washings) and pour through the filter. After this liquid has passed through the filter, rinse the filter and residue with additional D I H2O.
11. Fill the volumetric flask to the 100 ml mark with deionized water, mix well by inverting the flask, and transfer to a clean, dry storage bottle.CAUTION: Do not exceed 100 ml.
NOTE: Label the bottle with your name, sample name, and type of acid used. Store the extract as instructed.

24 Procedure 4
DISSOLUTION OF GEOCHEMICAL SAMPLES
USING CONCENTRATED NITRIC AND HYDROCHLORIC ACIDS
1. Weigh 4.00 g sample into a 250 ml beaker, add enough D I H2O just to wet the sample and cautiously add 15 ml conc. HNO3 plus 2 ml of conc. HCl.
2. Cover the beaker with a watch glass and place on a hotplate where the temperature is maintained at _100o C.
3. Prepare a digestion blank by adding the same amount of D I H2O, conc. HNO3 and HCl to a beaker (without sample) and carrying it through the entire procedure.
4. Heat the samples (at _100o C) for two hours. Removing the watch glass during the last hour so as to allow the liquid level to evaporate until about 10 ml remains. Replace the watch glass if necessary.
NOTE: The sample must not be allowed to dry. If this happens, you must start at the beginning with a new sample. The total digestion time should be two hours.
5. At the end of two hours, remove the sample from the hotplate, add 25 ml D I H2O, replace the watch glass and allow the sample to cool in the hood.
6. While the sample is cooling, place a folded No 2 or No 40 Whatman filter paper in a funnel and rinse the paper with 10% HNO3.
7. Filter the sample into a 100 ml volumetric flask. Initially, minimize the amount of sediment that is poured into the filter. Rinse the residue in the beaker with D I H2O (minimum of three washings) and pour through the filter. After this liquid has passed through the filter, rinse the filter and residue with additional D I H2O.
8. CAUTION: Do not exceed 100 ml volume. 9. Fill the volumetric flask to the 100 ml mark with deionized water, mix well by inverting the
flask, and transfer to a clean, dry storage bottle. NOTE: Label the bottle with your name, sample name, and type of acid used. Store the extract as
instructed.
25 Procedure 5
DISSOLUTION OF GEOCHEMICAL SAMPLES USING CONCENTRATED HCl ACID
1. Weigh 4.00g sample into a 250 ml beaker, add 10 ml of concentrated HCl, cover with a
watch glass and place on a "medium" hot plate. 2. Prepare a reagent blank by adding the same amount of acid to a beaker without a sample
and carrying it through the digestion procedure. 3. Heat gently for about 15 minutes and then digest (boiling or near) for 20 minutes (do not
allow to boil too vigorously!) CAUTION: DO NOT allow sample to go to dryness. 4. Add 5 ml of concentrated HCl and 10 ml of deionized water. Remove the watch glass and
boil (or near) for about 30 minutes. Do not allow sample volume to become less than 10 ml. Cover with watch glass if necessary.
5. NOTE: While sample is digesting, prepare a preweighted filter paper, as follows: obtain a No. 2 Whatman filter paper, fold and place into a funnel. Thoroughly wet and then rinse the paper with at least 50 ml of deionized water. Place the paper on a clean watch glass and dry in the oven at 60oC for about 30 minutes. Remove the paper (on the watch glass), cool in a desiccator for 20 minutes, weigh and record weight. Handle the paper with clean, dry forceps.
6. Cool the sample and filter into a 100 ml graduated cylinder or volumetric flask using preweighed No. 2 whatman filter paper. Rinse the residue in the beaker well (minimum of three washings) and pour through the filter. Rinse the filter paper after addition of the sample and beaker washings. Use deionized water for rinsings. DO NOT DISCARD RESIDUE - CAUTION: do not exceed 100 ml volume. After the liquid is collected in the flask, remove flask and rinse all residue from the beaker into the filter paper. Rinse the filter paper and residue THOROUGHLY until all acid is removed!!
7. Fill the flask (or cylinder) to 100 ml with deionized water, mix well (use stopper or plastic film for cap, of course), and transfer to a storage bottle. Do not forget to properly label the bottle with your name, sample name, and type of acid used. Store the sample extract as instructed.
8. Dry the residue in the filter paper (place on a watch glass) at 60oC. Cool in the desiccator and weigh as described above. Record the weight and calculate the amount of the sample dissolved by the acid.
9. DATA TO REPORT: 1. Weight of sample used 2. Weight of sample dissolved 3. Concentration of metals in sample
26 Procedure 6
DISSOLUTION OF GEOCHEMICAL SAMPLES USING CONCENTRATED
HCl AND HNO3 ACIDS
1. Weigh 4.00g sample into a 250 ml beaker, add 10 ml of concentrated HCl, cover with a watch glass and place on a "medium" hot plate.
2. Prepare a reagent blank by adding the same amount of acid to a beaker without a sample and carrying it through the digestion procedure.
3. After about 15 minutes, remove beaker from the hot plate, allow to cool slightly, and cautiously add 5 ml of concentrated HNO3. Replace watch glass and digest for 20 minutes (do not allow to boil too vigorously!) CAUTION: DO NOT allow sample to go to dryness after adding HNO3. Reduction and precipitation of Au and other metals may occur.
4. Add 5 ml of concentrated HCl and 10 ml of deionized water. Remove the watch glass and heat (about 30 minutes) to expel HNO3 digestion gases. Do not allow liquid volume to become less than 10 ml. Replace cover glass, if necessary.
5. NOTE: While sample is digesting, prepare a preweighted filter paper, as follows: obtain a No. 2 Whatman filter paper, fold and place into a funnel. Thoroughly wet and then rinse the paper with at least 50 ml of deionized water. Place the paper on a clean watch glass and dry in the oven at 60oC for about 30 minutes. Remove the paper (on the watch glass), cool in a desiccator for 20 minutes, weigh and record weight. Handle the paper with clean, dry forceps.
6. Cool the sample and filter into a 100 ml graduated cylinder or volumetric flask using preweighed No. 2 Whatman filter paper. Rinse the residue in the beaker well (minimum of three washings) and pour through the filter. Rinse the filter paper after addition of the sample and beaker washings. Use deionized water for rinsings. DO NOT DISCARD RESIDUE - CAUTION: do not exceed 100 ml volume. After the liquid is collected in the flask, remove flask and rinse all residue from the beaker into the filter paper. Rinse the filter paper and residue THOROUGHLY until all acid is removed!!
7. Fill the flask (or cylinder) to 100 ml with deionized water, mix well (use stopper or plastic film for cap, of course), and transfer to a storage bottle. Do not forget to properly label the bottle. Store the sample extract as instructed.
8. Dry the residue in the filter paper (place on a watch glass) at 60oC. Cool in the desiccator and weigh as described above. Record the weight and calculate the amount of the sample dissolved by the acid.
9. DATA TO REPORT: 1. Weight of sample used 2. Weight of sample dissolved 3. Concentration of metals in sample
27 Procedure 7 DISSOLUTION OF GEOCHEMICAL SOLUTIONS USING CONCENTRATED
HNO3 ACID 1. Weigh 4.00g sample into a 250 ml beaker, add 10 ml of concentrated HNO3, cover with a
watch glass and place on a "medium" hot plate. 2. Prepare a reagent blank by adding the same amount of acid to a beaker without a sample
and carrying it through the digestion procedure. 3. Heat gently for about 20 minutes and then digest (boiling or near) for 20 minutes (do not
allow to boil too vigorously!) CAUTION: DO NOT allow sample to go to dryness. 4. Add 5 ml of HNO3 and 10 ml of deionized water. Remove the watch glass and boil (or
near) for about 30 minutes. Do not allow sample volume to become less than 10 ml. Replace cover glass, if necessary.
5. NOTE: While sample is digesting, prepare a preweighted filter paper, as follows: obtain a No. 2 Whatman filter paper, fold and place into a funnel. Thoroughly wet and then rinse the paper with at least 50 ml of deionized water. Place the paper on a clean watch glass and dry in the oven at 60oC for about 30 minutes. Remove the paper (on the watch glass), cool in a desiccator for 20 minutes, weigh and record weight. Handle the paper with clean, dry forceps.
6. Cool the sample and filter into a 100 ml graduated cylinder or volumetric flask using preweighed No. 2 Whatman filter paper. Rinse the residue in the beaker well (minimum of three washings) and pour through the filter. Rinse the filter paper after addition of the sample and beaker washings. Use deionized water for rinsings. DO NOT DISCARD RESIDUE - CAUTION: do not exceed 100 ml volume. After the liquid is collected in the flask, remove flask and rinse all residue from the beaker into the filter paper. Rinse the filter paper and residue THOROUGHLY until all acid is removed!!
7. Fill the flask (or cylinder) to 100 ml with deionized water, mix well (use stopper or plastic film for cap, of course), and transfer to a storage bottle. Do not forget to properly label the bottle. Store the sample extract as instructed.
8. Dry the residue in the filter paper (place on a watch glass) at 60oC. Cool in the desiccator and weigh as described above. Record the weight and calculate the amount of the sample dissolved by the acid.
9. DATA TO REPORT: 1. Weight of sample used 2. Weight of sample dissolved 3. Concentration of metals in sample

28
EXERCISE 6. Dissolution of Geochemical Samples Using Concentrated Acids
DATA SUMMARY FOR ______________________________
GROUP 1 2 3 AVG 4 5 6 AVG 7 8 9 AVG
Acid
Sample 1
Sample 2
Sample 3
Sample 4
29
EXERCISE 6. Dissolution of Geochemical Samples Using Concentrated Acids
DATA SUMMARY FOR ______________________________
GROUP 1 2 3 AVG 4 5 6 AVG 7 8 9 AVG
Acid
Sample 1
Sample 2
Sample 3
Sample 4
30 EXERCISE SEVEN
Variations in Natural Systems
PURPOSE
The variability of replicate samples and extraction procedures will be measured.
DISCUSSION Statistical considerations are often necessary to measure the validity or degree of validity of the measurement of one or more parameters. With many measurements, very low differences among replications are obtainable and often necessary for an observation to be statistically valid. Statistical methods are generally based on a "normal distribution" of a large population. In natural (geologic, biologic, agronomic and others) systems, one is often far from the "normal distribution" conditions. Limits in sample numbers and size are sometimes reasons for large variations. One factor which must be understood is a natural variation within whatever unit that one is examining. Variations over a geologic area may be tremendous, as well as within a single geologic formation. Even within what one considers a rather homogeneous sample, natural variations are sometimes present. This exercise attempts to point out a method of determining sample variability. Several replications from a single sample will be extracted for a metal cation using a weak solution of a mineral acid (10 % HNO3). Alternately, an aqueous chelate solution may be used. The chelate most commonly used is the sodium salt of ethylene diamine tetraacetic acid (NaEDTA). These methods of analyses are sometimes used in geochemical prospecting and soil testing. The same method (several replications of the same sample) can be used for extraction, digestion, etc. procedures. Be careful to treat each replication in the same manner. The different soil:solution ratios will demonstrate the need of keeping such a ratio constant when making extractions where results are to be compared.
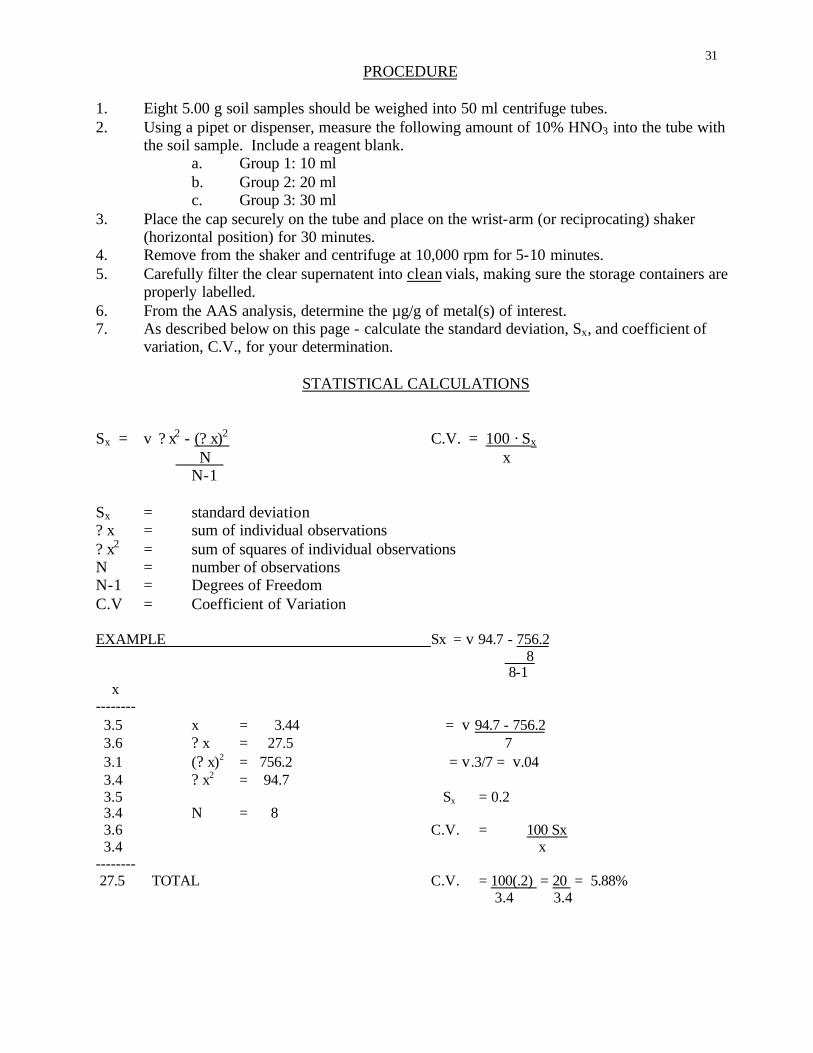
31 PROCEDURE
1. Eight 5.00 g soil samples should be weighed into 50 ml centrifuge tubes. 2. Using a pipet or dispenser, measure the following amount of 10% HNO3 into the tube with
the soil sample. Include a reagent blank. a. Group 1: 10 ml b. Group 2: 20 ml c. Group 3: 30 ml
3. Place the cap securely on the tube and place on the wrist-arm (or reciprocating) shaker (horizontal position) for 30 minutes.
4. Remove from the shaker and centrifuge at 10,000 rpm for 5-10 minutes. 5. Carefully filter the clear supernatent into clean vials, making sure the storage containers are
properly labelled. 6. From the AAS analysis, determine the µg/g of metal(s) of interest. 7. As described below on this page - calculate the standard deviation, Sx, and coefficient of
variation, C.V., for your determination.
STATISTICAL CALCULATIONS
Sx = v ? x2 - (? x)2 C.V. = 100 · Sx N x N-1 Sx = standard deviation ? x = sum of individual observations ? x2 = sum of squares of individual observations N = number of observations N-1 = Degrees of Freedom C.V = Coefficient of Variation EXAMPLE Sx = v 94.7 - 756.2 8 8-1 x -------- 3.5 x = 3.44 = v 94.7 - 756.2 3.6 ? x = 27.5 7 3.1 (? x)2 = 756.2 = v.3/7 = v.04 3.4 ? x2 = 94.7 3.5 Sx = 0.2 3.4 N = 8 3.6 C.V. = 100 Sx 3.4 x -------- 27.5 TOTAL C.V. = 100(.2) = 20 = 5.88% 3.4 3.4
32 1. Draw for Group 1, 2 or 3 (Soil:Solution Ratio). Also complete the following during today's laboratory period: 2. Clean dilution tubes, shake dry: prepare 1:10 and 1:100 dilutions of the solutions from Lab.
No. 5 (Calcite Solubility). Use the solution of 1.1% Sr in 0.4% HNO3 for these dilutions. Include dilution blanks.
3. Clean dilution tubes, shake dry: prepare 1:10, 1:100 and 1:1000 dilutions of sample extracts
from Exercise 6. Use 10% HNO3 for these dilutions. Prepare the 1:1000 dilution by making a 1:100 dilution of the 1:10 dilution. Include dilution blanks.
33
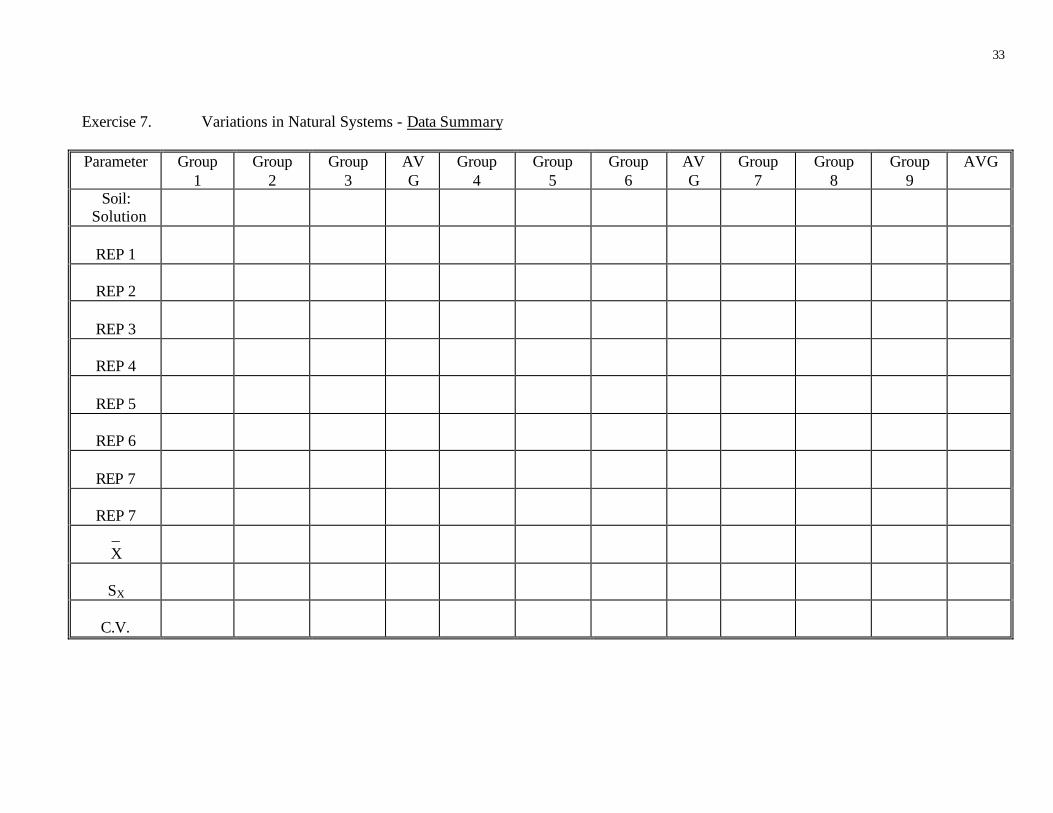
Exercise 7. Variations in Natural Systems - Data Summary
Parameter Group 1
Group 2
Group 3
AVG
Group 4
Group 5
Group 6
AVG
Group 7
Group 8
Group 9
AVG
Soil: Solution
REP 1
REP 2
REP 3
REP 4
REP 5
REP 6
REP 7
REP 7
_ X
SX
C.V.
34
QUESTIONS
1. What was the effect of soil to solution ratio on the total amount of element extracted? 2. Discuss all potential sources of variability in conducting this type of extraction and
analyses.
35 EXERCISE EIGHT
Atomic Absorption Spectrophotometry Analysis of Extracts
from Laboratory No. 5 and 6
It is important that all samples be ready for analyses before the lab period, i.e., all dilutions prepared. Analyses will be conducted on the samples for 1 or more elements, with one or more groups in the AAS room at one time. Data sheets and instructions for calculation of sample concentrations will be provided at this time. Include these in your Laboratory Notebook.
Be on time for the lab and be in the AAS room when your group is there. When not in the AAS room, use your time wisely - clean labware from past experiments, prepare for the next lab, or finish past labs.
NOTE: For sample calculations
Sample Concentration, µg/g = µg/ml (from std. curve) X (sample volume) X (dilution factor, if any) ÷ sample weight
36
EXERCISE NINE
Oxidation-Reduction in Natural and Artificial Systems
PURPOSE
The reduction and oxidation of different geologic materials by natural and artificial agents will be studied.
DISCUSSION
Oxidation-Reduction (Redox) reactions are sometimes very important in the chemical weathering and subsequent transport and fate of many elements. The two elements most susceptible and noticeable are iron and manganese. Similar conditions generally effect both elements similarly (both are oxidized or both are reduced) but often one may be oxidized while the other is reduced.
The redox behavior of these elements took on added significance when it was discovered that many other heavy metals may be absorbed to or "trapped" in compounds of these elements. Iron and manganese are constantly undergoing redox reactions in response to their changing environment. Thus many metals may be solubilized, transported, or precipitated as these two metals respond to their changing environment. Oxidation of these elements causes precipitation and "ionic" immobilization while reduction causes solubilization of compounds. Precipitated compounds can, of course, be physically transported but in order to remain solubilized after reduction, the elements must be "stabilized" by some method.
One method of stabilization would be to remain in a reducing environment. Another method would be for the elements to become complexed by a chelating compound. A chelate is a chemical compound in which a metal ion is held by at least two charge sources to form a ring compound. This type molecule is very stable under a wide range of conditions. Natural chelates (such as citric acid) pay important roles in the mobilization and transport of metal ions in natural systems.
Experiment I. REDOX SYSTEMS These systems will be created to demonstrate different aspects of oxidation-reduction. They will
be started during this laboratory period and observed for the next several weeks. It is imperative that these samples NOT be stirred or shaken after the initial mixing. You should record observations and comments during each discussion session with your instructor and any other times as necessary.
Sample Descriptions
1. Sandy soil, well-drained with oxidized iron compounds. 2. Sediment, moderately reduced, from the Elizabeth River. 3. Soil Sample. This is a soil derived from limestone and is relatively rich in iron oxides.
37 Summary of Treatments One portion of each sample will be subjected to each of the following treatments: A. Deionized Water B. D.I. H2O and sugar C. D.I. H2O and sugar + chelating agent (sodium citrate) + buffer D. D.I. H2O + reducing agent (sodium dithionite) E. D.I. H2O + reducing agent + chelating agent (sodium citrate) + buffer (NaHCO3)
PROCEDURE
Each of the three samples will be subjected to all five treatments. We will make two sets of all sample treatments. Each group wil be assigned a portion of the overall experiment to prepare. Place the neatly lettered labels near the top of each vial. Treatment A
Place 10 g of each sample into a clean vial. Add 30 ml of D.I. H2O to each and stir thoroughly. Do Not Restir.
Treatment B
Place 10 g of each sample into a clean vial. Add 30 ml of D.I. H2O and 5 g of sugar to each and stir thoroughly. Make sure that the sugar has dissolved. Do Not Restir.
Treatment C
Place 10 g of each sample into a clean vial. Add 5 ml of Na citrate-NaHCO3, 25 ml D.I. H2O, and 5 g sugar to each and stir thoroughly. Make sure that the sugar dissolves and Do Not Restir. The Na citrate mixture is 0.3 M Na citrate and 0.11 M NaHCO3 at about pH 7.3.
Treatment D
Place 10 g of each sample into a clean vial. Add 30 ml of D.I. H2O and 3 g of Na2S2O4 (sodium dithionite) to each and stir thoroughly. Na2S2O4 is a salt of very high reducing power. Do Not Restir.
Treatment E
Place 10 g of each sample into a clean vial. Add 30 ml of the Na citrate-NaHCO3 and 3 g of Na2S2O4 to each and stir thoroughly.
Although the above preparations are a group project, each person should be watching when each treatment is added to at least one of the samples. Your observations will start the moment the treatments are added to the samples! Please cooperate with the directions given by your instructor.

38 Record your observations during the laboratory period, daily for the next week and weekly until instructed otherwise. Record all observations. Remember, no apparent reaction may be a very important fact! Include a concluding summary paragraph.
39 Experiment II. Extraction and Analyses of Fe 1. Place 3.00 g of the soil sample provided into each of four 50 ml centrifuge tubes. 2. To one of four tubes add the following: a. 30 ml of D.I. H2O b. 30 ml of D.I. H2O plus 3 g sodium dithionite c. 30 ml of (Na citrate + NaHCO3) d. 30 ml of (Na citrate + NaHCO3) + 3 g sodium dithionite
The sodium dithionite will be added as a solid by a calibrated spoon after adding the liquids. Don't forget a blank for each.
3. Tightly cap, shake the tubes vigorously and place on the shaker overnight. NOTE: Start in Late Afternoon and remove from shaker the Next Morning!
4. Remove the tubes from the shaker, let them sit for a few minutes and then centrifuge at
1500 rpm for 10 minutes. 5. If the supernatent is not clear, filter into a plastic bottle. If clear, carefully decant into
bottle from centrifuge tube. 6. Store the extracts in the refrigerator until next laboratory.
These extracts will be analyzed for Fe and other elements to determine the effectiveness of the above solution for solubilizing and extracting iron compounds.
40 GEOL 414/514 - GEOCHEMISTRY LABORATORY 9 DATE _____________
SED 1 SED COLOR
LIQUID COLOR
BOUND-ARIES
MISC.
A
B
C
D
E
SED 2
A
B
C
D
E
SED 3
A
B
C
D
E

41 GEOL 414/514 - GEOCHEMISTRY LABORATORY 9 DATE _____________ SED
1 SED
COLOR LIQUID COLOR
BOUNDARIES
MISC.
A
B
C
D
E
SED 2
A
B
C
D
E
SED 3
A
B
C
D
E

42 GEOL 414/514 - GEOCHEMISTRY LABORATORY 9 DATE _____________ SED
1 SED
COLOR LIQUID COLOR
BOUNDARIES
MISC.
A
B
C
D
E
SED 2
A
B
C
D
E
SED 3
A
B
C
D
E
43 GEOL 414/514 - GEOCHEMISTRY LABORATORY 9 DATE _____________ SED
1 SED
COLOR LIQUID COLOR
BOUNDARIES
MISC.
A
B
C
D
E
SED 2
A
B
C
D
E
SED 3
A
B
C
D
E

44 GEOL 414/514 - GEOCHEMISTRY LABORATORY 9 DATE _____________ SED
1 SED
COLOR LIQUID COLOR
BOUNDARIES
MISC.
A
B
C
D
E
SED 2
A
B
C
D
E
SED 3
A
B
C
D
E
45
EXERCISE TEN
Atomic Absorption Spectrophotometry Analysis of Extracts from Laboratory No. 7 and 9
Sample dilutions of the extracts from Laboratory No. 9 will have to be prepared. Each group should have several dilution tubes cleaned and dried. Similar instructions to Lab 8 are issued for this period. Continue observation of Exercise No. 9. AAS instrumentation precision will be measured by repeated analyses of a single extract. Please record these readings.
46
EXERCISE ELEVEN
Colloids (Part 1)
PURPOSE
Colloidal suspensions will be prepared and some of their important properties observed.
DISCUSSION
The definition of "colloid" has been historically unclear or imprecise or both. The term originated when a distinction was attempted between crystalline materials (crystalloids) and non-crystalline (colloid) materials. It was later found that many substances could be prepared in both a crystalloidal and a colloidal form. Currently colloid generally refers to very fine-grained materials which approach molecular size. Many workers prefer using the term colloidal and defining it to be a substance of very small particles dispersed in another substance. The absolute size range of colloidal particles is not universally agreed upon, but the particle diameter range of 10-3 to 10-6 mm (1µ m to 1 nm) is commonly used. Remembering that the size of clay particles is 2µ (µm) and smaller, one notices that not all of clay-sized materials are colloidal but all colloidal particles are clay-sized. Some of the properties of clays will vary as a function of particle size. Some colloidal chemists use the point where significant changes occur in the properties of clay colloidal particles to define the start of the colloidal size range. This exercise is concerned primarily with the preparation of selected colloid systems and determination or observation of some of the properties of colloids. Solutions will also be prepared and their properties compared with those of the colloid systems.
MATERIALS Dialysis tubing, glass tubing, FeCl3 solution, 600 ml, 250 ml and 50 ml beakers, rubberbands, ring stands, clamps, AgNO3 solution, 5 ml and 10 ml pipets, 50 ml graduate cylinders, phosphate solution, ammonium solution, Nessler reagent, Vanadate-molybdate reagent.
47 PROCEDURE
I. Preparation of colloidal systems A. Preparation of ferric hydroxide by hydrolysis. 1. Heat 800 ml of deionized water to boiling. 2. Add two (2) ml of a 50% FeCl3 solution. The concentration of OH- increases
because of the increase in the temperature of the water. Upon addition of FeCl3 the following reaction occurs:
FeCl3 + 3H2O = Fe(OH)3 + 3HCl Component reactions: FeCl3 = Fe+3 + 3Cl- Fe+3 + 3H2O = Fe(OH)3 + 3H+ 3H+ + 3Cl- =3HCl (or vice versa) 3. The HCl must be removed in order to stabilize the colloidal Fe(OH)3. This
removal may be completed by either boiling the suspension or by dialyzing the suspension. The latter procedure will be used.
NOTE: The Fe(OH)3 suspension will be freshly prepared prior to the
laboratory period. All persons should start the dialysis of the Fe(OH)3 during this laboratory period!
4. Dialysis of the Fe(OH)3 a. Remove a piece of the dialysis tubing from the supply beaker. The tubing
has been soaking in deionized water in order to soften the material. b. Tie one end of the tubing securely together with a small rubberband. c. Pour the Fe(OH)3 suspension into the dialysis bag until it is 3/4 full. d. Place a section of glass tubing inside the neck of the dialysis bag and
fasten securely with a clamp. e. Suspend the dialysis bag by the glass tubing into a beaker of deionized
water. NOTE: The liquid level inside the bag may rise during dialysis.
f. Continue dialysis and periodically renew the deionized water in the beaker. Each time the water is changed, test for Cl- using AgNO3. DO NOT add the AgNO3 to the beaker containing the dialysis bag.
g. Continue dialysis and renewal of the deionized water until a very faint test for Cl- is obtained. NOTE: If the dialysis is allowed to proceed for too long of a time, too much Cl- will be removed and the stability of the Fe(OH)3 will be reduced.
h. After dialysis is complete, store the suspension in a clean storage bottle .
48 B. Preparation of Ammonia-Nessler complex The Nessler reagent consists of mercuric iodide, potassium iodide, and sodium
hydroxide. When this reagent reacts with ammonia, a colloidal particle is produced. In dilute concentrations this suspension appears to be just a colored solution and obeys Beer's Law as does a true solution. Many substances can interfere in this reaction. The most common problem is the formation of larger particles which precipitate instead of remaining in suspension. This precipitation is frequently caused by calcium, magnesium, and iron ions.
1. Dilute 5 ml of 100 mg/1 NH3 to 50 ml with deionized water. 2. Add 2 ml of the Nessler reagent and mix. 3. Pass the beam from a small flashlight through the mixture. Record and explain
your observations. 4. Pour this solution into a dialysis bag. Use the procedure described in the
preparation of the Fe(OH)3 and use a 250 ml beaker for the rinse water. 5. Dialyze for several hours and record your observations. The water in the beaker
need not be changed. 6. Dilute 5 ml of 100 mg/1 NH3 to 50 ml with tap water and add 2 ml of the Nessler
reagent. Record your observations. DO NOT dialyze this preparation. Compare this with the mixture in D.I.H2O.
II. Preparation of a Vanadomolybdophosphoric complex
The phophate ion forms a colored complex with a mixture of ammonium molybdate and ammonium metavanadate (Vanadate-molybdate Reagent).
1. Pipet 5 ml of 100 mg/1 P into a 50 ml graduate cylinder and fill to the 50 ml mark with deionized water.
2. Add 10 ml of the Vanadate-molybdate reagent and mix. 3. Pass the beam from a small flashlight through the mixture. Record and explain
your observations.
4. Dialyze the preparations as previously described. Record your observations.
49 EXERCISE ELEVEN
Colloids - Part 2
Flocculation and Dispersion of Clays and Silts1
PURPOSE
The effectiveness of various types and concentrations of cations in flocculation of clay- and silt-sized sediment particles will be determined. The influence of hydrous Fe oxides on flocculation will also be investigated.
DISCUSSION
The composition of silt-sized particles is usually significantly different than that of clay-sized particles. Numerous primary minerals, including quartz, occur in silt-sized materials. These materials have very low, if any, capacity for ion exchange and react little with one another or with ionic substances in their surroundings. Properties seemingly exhibited by silt particles are often caused by adhering colloids of silicate clay minerals or Fe or Mn oxides.
Clay-sized particles are predominantly comprised of silicate clay minerals and hydrous Fe oxides, in humid environments other than tropical. In the tropical areas, other types of colloids, such as allophane, sometimes predominate. Properties of the silicate clays may be influenced by an adherence of hydrous Fe oxides. These oxides may impart their characteristics on (or over) those of the silicate clays. This possibility will be examined during this laboratory. Most soil and sediment colloids are negatively charged. In water suspension, these colloids tend to repel one another because of their like charges. Each colloid particle has a "sheath" of water molecules absorbed strongly enough that they will move with the particle in an electrical field. These tightly-held water molecules help to physically prevent colloid particles from coming together. Adsorbed cations tend to neutralize the charge on soil colloids to varying degrees.
Water molecules are attracted to ions in aqueous solutions in a manner similar to their attraction to the colloid particles. The cation (or anion) is then said to be hydrated. These water molecules are rather strongly attached to the ion and effectively increase the ionic radius.
Highly hydrated, relatively large sodium ions do not neutralize the negative charge on clays as effectively as the more highly charged divalent or trivalent cations. The charge on the cation nucleus must be physically close to the clay surface in order to neutralize the clay charge. If sufficient Na+ is adsorbed, the soil colloid actually retains a net negative charge due to the distance between the positive cation and the negative charge on the clay. The negative clay particles then repel other negative colloids with enough force to disintegrate soil aggregates and disperse the soil. Divalent and trivalent cations have higher charge densities than monovalent cations and are more effective in flocculating soil colloids. The higher charge densities aid these higher valenced cations to overcome the effect of the sheath of adsorbed water molecules. If ions such as Ca++ replace Na+ on the exchange sites the charge on the clay is neutralized more effectively and flocculation occurs. The adsorbed cation that most effectively neutralizes the charge on the clay will cause the most rapid flocculation and greatest degree of floccule stability.
1Adapted, in part, from Soil Laboratory Exercise Source Book, 1971. Eds. Jacobs, J.W., R.M. Reed, S.J. Thien, and L.V. Withee. American Society of Agronomy, INc., pp. 99-101, by permission.
50 Neutralization effectiveness is related to ionic size and charge, and solution concentration. Flocculation is the first step in aggregation which is so important to soil permeability, aeration, stability, and tilth and to the stability of sediment floccules.
MATERIALS
Silt- and clay-sized river sediment suspensions; test tubes and rack; graduated transfer pipet; 0.5 N AlCl3, CaCl2, KCl, NaCl; deionized H2O; CaCl2 (1 N, 0.1 N, 0.01 N and 0.001 N).
PROCEDURE
A. Effect of Cation on Flocculation 1. Suspensions of silt- and clay-sized material from the Elizabeth River were
prepared, dispersed, and washed free of excess salts. 2. Add 10 ml each of the silt and clay suspensions to five test tubes. 3. Add 1 ml of an 0.5 N solution of the following reagents to one tube each of the
two sets of suspensions: AlCl3, CaCl2, KCl, NaCl and 1 ml of deionized H2O to the last tube.
4. Mix the tube and observe them for formation of floccules. Record the time to the
first observable flocculation and note the depth to which the floccules have settled after 30 minutes. Record the observations about the size and nature of the floccules formed.
B. Effect of Cation Concentration of Flocculation 1. Add 10 ml of the clay suspension to each of five test tubes. 2. Add 1 ml of the following concentrations of CaCl2 to each of the tubes: 1 N, 0.1
N, 0.01 N, 0.001 N and 1 ml of D.I.H2O to the last tube. The resultant concentrations of CaCl2 in the suspensions will be 0.1 N, 0.01 N, 0.001 N, 0.0001 N and no CaCl2.
3. Record the time for flocculation and note any pertinent observations. C. Effect of Hydrous Fe Oxides on Flocculation 1. Suspensions of silt- and clay-sized sediments were treated with sodium dithionite
to remove any Fe oxide coatings. The suspensions were then washed free of excess salts.
2. Conduct the test of cation effectiveness as instructed in Part A above with the
oxide-free sediments and record the results. Discuss any differences in the two sets of suspensions in the Question section.
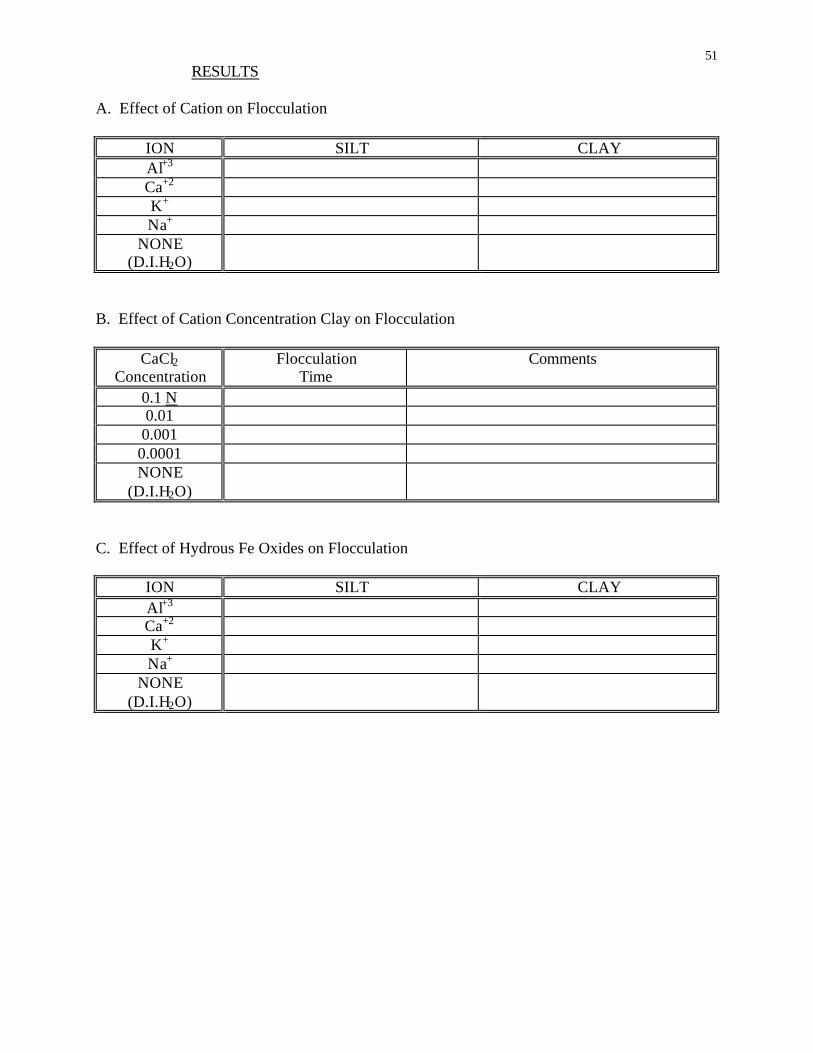
51 RESULTS
A. Effect of Cation on Flocculation
ION SILT CLAY Al+3 Ca+2 K+ Na+
NONE (D.I.H2O)
B. Effect of Cation Concentration Clay on Flocculation
CaCl2 Concentration
Flocculation Time
Comments
0.1 N 0.01 0.001 0.0001 NONE
(D.I.H2O)
C. Effect of Hydrous Fe Oxides on Flocculation
ION SILT CLAY Al+3 Ca+2 K+ Na+
NONE (D.I.H2O)
52
QUESTIONS
1. Rank the flocculation effectiveness of the ions for the silt and clay, Part A. 2. Rank the flocculation effectiveness of the ions for the silt and clay, Part C. 3. Discuss any differences between flocculation in Part A and Part C.
53 4. Discuss the effect of (Ca++) concentration on flocculation of clay. 5. Compare the effect of K+ and Na+ on flocculation and explain any difference in their
actions.
54
EXERCISE TWELVE
Data Comparison and Summary
PURPOSE
Data from all Laboratories, especially Numbers 6 and 7 will be discussed.
DISCUSSION
It is necessary that all laboratory exercises and data tabulations be completed before this laboratory period.
![04 414 514 Ch1 web - Old Dominion Universityww2.odu.edu/~jrule/geo514/review.pdf · or activity of a pure solid = 1 • So: Keq = [Ca +2][SO 4-] • Example of formation of hematite](https://img.pdfslide.us/doc/110x75/5ec400b3a42cb70cfd7af310/04-414-514-ch1-web-old-dominion-jrulegeo514reviewpdf-or-activity-of-a-pure.jpg)