Embed Size (px)
Citation preview

Komodo User Guide
Table of ContentsWelcome to the Komodo User Guide................................................................................................................1
What's new in Komodo IDE....................................................................................................................1Support and Community..........................................................................................................................2Sample Project.........................................................................................................................................2Feature Showcase.....................................................................................................................................2Tutorials...................................................................................................................................................2
Komodo IDE/Edit 6.1 Release Notes.................................................................................................................3What's New in Komodo IDE/Edit...........................................................................................................3
6.1......................................................................................................................................................3Detailed Changes and Bug Fixes in Komodo IDE/Edit...........................................................................3
6.1.2 Bug Fixes..................................................................................................................................36.1.1 Bug Fixes..................................................................................................................................46.1.0 Bug Fixes..................................................................................................................................4
Known Issues...........................................................................................................................................5Installation & Upgrade......................................................................................................................5Startup...............................................................................................................................................5Editing...............................................................................................................................................5Debugging.........................................................................................................................................6Interactive Shell.................................................................................................................................8Source Code Control.........................................................................................................................8Mac OS X..........................................................................................................................................9Linux.................................................................................................................................................9Other................................................................................................................................................10
Starting Komodo...............................................................................................................................................12Windows................................................................................................................................................12Mac OS X..............................................................................................................................................12Linux......................................................................................................................................................13
Komodo Installation Guide..............................................................................................................................14Windows................................................................................................................................................14
Prerequisites....................................................................................................................................14Hardware Requirements...........................................................................................................14Operating System Requirements..............................................................................................14Software Prerequisites on Windows.........................................................................................15
Installing the Komodo License on Windows..................................................................................15Upgrading from Previous Komodo Versions..................................................................................15Installing Komodo on Windows......................................................................................................15Command Line Installation Options...............................................................................................15
Installing the MSI in Silent Mode.............................................................................................16Turning on Logging..................................................................................................................16Controlling the Install Directory...............................................................................................16Controlling Which Features Get Installed................................................................................16
Starting Komodo on Windows........................................................................................................16Uninstalling Komodo on Windows.................................................................................................17
Mac OS X..............................................................................................................................................17Prerequisites....................................................................................................................................17
Komodo User Guide
i
Table of ContentsKomodo Installation Guide
Hardware Requirements...........................................................................................................17Operating System Requirements..............................................................................................17
Installing the Komodo License on OS X.........................................................................................17Upgrading from Previous Komodo Versions..................................................................................17Installing Komodo on Mac OS X....................................................................................................17Starting Komodo on OS X..............................................................................................................18Uninstalling Komodo on OS X.......................................................................................................18
Linux......................................................................................................................................................18Prerequisites....................................................................................................................................18
Hardware Requirements...........................................................................................................18Operating System Requirements..............................................................................................18Software Prerequisites on Linux...............................................................................................18Adding Perl or Python to the PATH Environment Variable....................................................19
Installing the Komodo License on Linux........................................................................................19Upgrading from Previous Komodo Versions..................................................................................19Installing Komodo on Linux...........................................................................................................20Starting Komodo on Linux..............................................................................................................20Uninstalling Komodo on Linux.......................................................................................................21
Language and Debugging Prerequisites.................................................................................................21Source Code Control Integration Prerequisites......................................................................................21
The Komodo Workspace..................................................................................................................................23The Start Page........................................................................................................................................23Menus.....................................................................................................................................................24Context Menus.......................................................................................................................................24Toolbars.................................................................................................................................................24Left Pane................................................................................................................................................26
Places...............................................................................................................................................26Code Sidebar Komodo IDE only.....................................................................................................26DOM Viewer Sidebar Komodo IDE only.......................................................................................27Database Explorer Sidebar Komodo IDE only...............................................................................28
Right Pane..............................................................................................................................................28Toolbox Sidebar..............................................................................................................................28Shared Toolbox Sidebar Komodo IDE only...................................................................................28
Editor Pane.............................................................................................................................................29Bottom Pane...........................................................................................................................................29Status Bar...............................................................................................................................................30Managing Tabs, Sidebars and Panes......................................................................................................30
Showing and Hiding Tabs and Sidebars..........................................................................................30Showing and Hiding Panes..............................................................................................................30Resizing Panes.................................................................................................................................31
Enabling Full Screen Mode Windows and Linux only..........................................................................31
Getting Started with the Sample Project........................................................................................................32Opening the Sample Project and Files...................................................................................................32Editing a Sample Program.....................................................................................................................32Debugging a Sample Program...............................................................................................................32
Komodo User Guide
ii
Table of ContentsSupport and Feedback......................................................................................................................................33
Documentation.......................................................................................................................................33ActiveState Community Site.................................................................................................................33Mailing Lists..........................................................................................................................................33Reporting Bugs......................................................................................................................................33Feature Requests....................................................................................................................................34ActiveState Technical Support..............................................................................................................34Comments and Feedback.......................................................................................................................34
Projects...............................................................................................................................................................35Projects Pane..........................................................................................................................................35
Open vs. Active Projects.................................................................................................................35File and Folder Links......................................................................................................................35Project Groups.................................................................................................................................36Project Menus..................................................................................................................................36
Project Properties and Settings..............................................................................................................36
Toolboxes...........................................................................................................................................................38Adding, Removing and Managing Tools...............................................................................................38Special Folders - Abbreviations and Vi Commands..............................................................................39Behind the Scenes - How Tools are Stored...........................................................................................39Importing and Exporting Tools..............................................................................................................39
Working with Files............................................................................................................................................40Creating Files.........................................................................................................................................40
Creating Files from Templates........................................................................................................40Opening Files.........................................................................................................................................40
Go to File (Fast Open).....................................................................................................................41Opening Files with the Open/Find Toolbar.....................................................................................41Opening Remote Files.....................................................................................................................42
Connecting to a remote server..................................................................................................42Using Public Key Authentication.............................................................................................42Navigating the Remote File System.........................................................................................43
Opening Mapped URIs....................................................................................................................43Switching Between Files.......................................................................................................................43Comparing Files.....................................................................................................................................43Refreshing File Status............................................................................................................................44Source Code Control..............................................................................................................................45File Properties and Settings...................................................................................................................45
File Properties..................................................................................................................................45File Source Control Settings............................................................................................................46File Editor Settings..........................................................................................................................46Indentation Tab................................................................................................................................46Browser Preview.............................................................................................................................46
Printing Files..........................................................................................................................................46Page Setup.......................................................................................................................................47Print to HTML File..........................................................................................................................47
Saving Files............................................................................................................................................47
Komodo User Guide
iii
Table of ContentsWorking with Files
Saving Files Remotely.....................................................................................................................48Show Unsaved Changes..................................................................................................................48
Reverting Files.......................................................................................................................................48Closing Files..........................................................................................................................................48
Find & Replace..................................................................................................................................................49Match Highlighting................................................................................................................................49Incremental Search.................................................................................................................................49Find Dialog............................................................................................................................................49
Regex Searches................................................................................................................................50Case Sensitivity...............................................................................................................................50Match Whole Words.......................................................................................................................50Multiline..........................................................................................................................................50Scope...............................................................................................................................................50Actions.............................................................................................................................................51Find Dialog Keyboard Shortcuts.....................................................................................................51
Replace in Files......................................................................................................................................52Confirming Changes........................................................................................................................52
Confirm Replacements.............................................................................................................52Make Changes...........................................................................................................................53
Review and Undo............................................................................................................................53Find Results Tabs............................................................................................................................53
Open/Find Toolbar.................................................................................................................................53Finding Functions: Function Search Komodo Edit only.......................................................................54
Editing................................................................................................................................................................55Language Support..................................................................................................................................55
Syntax Coloring and Indentation.....................................................................................................55Background Syntax Checking.........................................................................................................56AutoComplete and CallTips............................................................................................................57
Perl AutoComplete and CallTips..............................................................................................57Python AutoComplete and CallTips.........................................................................................58Ruby AutoComplete and CallTips............................................................................................59PHP AutoComplete and CallTips.............................................................................................59Tcl AutoComplete and CallTips...............................................................................................60XSLT AutoComplete................................................................................................................61XML AutoComplete and CallTips...........................................................................................61
Soft Characters................................................................................................................................62Viewing the Current File as Another Language..............................................................................62Commenting Blocks of Code..........................................................................................................62
Manipulating Code................................................................................................................................63Cutting and Copying Lines..............................................................................................................63Selecting and Dragging Lines.........................................................................................................63Automatically Repeating Keystrokes..............................................................................................63Indenting and Un-indenting Lines of Code.....................................................................................63Reflowing Paragraphs.....................................................................................................................64Formatting Code Komodo IDE only...............................................................................................64
Komodo User Guide
iv
Table of ContentsEditing
Joining Lines...................................................................................................................................64Converting between Uppercase and Lowercase..............................................................................64Transposing Characters...................................................................................................................64Literal Characters............................................................................................................................65Commenting and Un-commenting Lines or Blocks of Code..........................................................65Cleaning Line Endings....................................................................................................................65Tabifying and Untabifying Regions................................................................................................65Column / Rectangular Selection......................................................................................................66Column Editing...............................................................................................................................67Completing Words..........................................................................................................................67Selecting Blocks of Code................................................................................................................67
Editor Display Characteristics...............................................................................................................68Toggling Whitespace On and Off...................................................................................................68Toggling Indentation Guides On and Off........................................................................................68Toggling Line Numbers On and Off...............................................................................................68Toggling EOL (end of line) Markers On and Off...........................................................................68Increasing and Decreasing the Code Font Size...............................................................................68Toggling Fixed and Non-Fixed Width Fonts..................................................................................69Folding and Unfolding Code...........................................................................................................69
Navigating Within Files.........................................................................................................................70Moving to a Specific Line...............................................................................................................70Go to Definition...............................................................................................................................70Setting and Moving to Bookmarks and Marks................................................................................70Matching Braces..............................................................................................................................71
Detecting Changed Files........................................................................................................................71Preview in Browser................................................................................................................................71Editor Tab Display.................................................................................................................................72
Abbreviations....................................................................................................................................................73Inserting Snippets..................................................................................................................................73Abbreviation Search Order....................................................................................................................74Adding New Abbreviations...................................................................................................................74
History................................................................................................................................................................75Locations................................................................................................................................................75History Navigation.................................................................................................................................75
Snippets..............................................................................................................................................................76Creating Snippets...................................................................................................................................76Configuring Snippets.............................................................................................................................76Using Snippets.......................................................................................................................................77
Abbreviations..................................................................................................................................77Snippet Options......................................................................................................................................77
Snippet Properties............................................................................................................................77Assigning Custom Icons to Snippets........................................................................................77Snippet Key Bindings...............................................................................................................78
Komodo User Guide
v
Table of ContentsTabstops.............................................................................................................................................................79
Creating Tabstops..................................................................................................................................79Using Tabstops......................................................................................................................................79Examples................................................................................................................................................79
Macros................................................................................................................................................................81Creating Macros.....................................................................................................................................81
Recording Macros...........................................................................................................................81Writing Macros................................................................................................................................81
Running Macros.....................................................................................................................................82Managing Macros..................................................................................................................................82Macro Properties....................................................................................................................................82
Assigning Key Bindings to Macros.................................................................................................82Assigning Custom Icons to Macros.................................................................................................83Running Macros in the Background................................................................................................83Specifying Macro Triggers..............................................................................................................83
Trigger Macro subject Variable................................................................................................84Macro Return Values................................................................................................................84
Vi Command Mode Macros...................................................................................................................84
Macro API.........................................................................................................................................................85The Komodo Macro API.......................................................................................................................85
Warning...........................................................................................................................................85Feedback..........................................................................................................................................85
JavaScript Macros..................................................................................................................................85ko.views.manager.currentView.scimoz...........................................................................................86
scimoz Attributes......................................................................................................................86scimoz Methods........................................................................................................................87scimoz Notes.............................................................................................................................90
ko.views.manager.currentView.koDoc...........................................................................................91koDoc Attributes.......................................................................................................................91
ko.views.manager.currentView.koDoc.file.....................................................................................91document.file attributes............................................................................................................91
ko.commands.doCommand()..........................................................................................................92ko.open.URI()..................................................................................................................................92ko.projects.findPart().......................................................................................................................92ko.interpolate.interpolateString()....................................................................................................93ko.interpolate.getWordUnderCursor()............................................................................................93ko.run.runEncodedCommand().......................................................................................................93
Python Macros.......................................................................................................................................94Creating a view object.....................................................................................................................94Accessing the editor........................................................................................................................95Opening a URI.................................................................................................................................95Interpolate a string...........................................................................................................................95Get word under cursor.....................................................................................................................95Running a Komodo command.........................................................................................................95Find a part........................................................................................................................................96
Komodo User Guide
vi
Table of ContentsKomodo Command Id List..............................................................................................................................97
Breakpoint Manager...............................................................................................................................97Code Browser.........................................................................................................................................97Code.......................................................................................................................................................97Debugger................................................................................................................................................98Document Outline..................................................................................................................................99Editor.....................................................................................................................................................99Fast Open.............................................................................................................................................105Find......................................................................................................................................................105General.................................................................................................................................................106Help......................................................................................................................................................107Macro...................................................................................................................................................108Move up one directory.........................................................................................................................108Open the Komodo Error Log for viewin..............................................................................................108PDK.....................................................................................................................................................109Places...................................................................................................................................................109Projects/Toolbox..................................................................................................................................109Publishing............................................................................................................................................110Source Code Control............................................................................................................................110Source Code.........................................................................................................................................110Spell Check..........................................................................................................................................110TDK Bug Databas................................................................................................................................110TDK Communit...................................................................................................................................110TDK Email List...................................................................................................................................111TDK.....................................................................................................................................................111Toolbox................................................................................................................................................111Tools....................................................................................................................................................111User Interface.......................................................................................................................................111Replace in Place...................................................................................................................................112
Templates.........................................................................................................................................................113Creating New Files from Templates....................................................................................................113Creating Custom Templates.................................................................................................................113
Using Interpolation Shortcuts in Custom Templates....................................................................114Project Templates.................................................................................................................................114Storing Templates in a Toolbox...........................................................................................................114
Template Options..........................................................................................................................114Assigning Custom Icons to Templates..........................................................................................115Template Key Bindings.................................................................................................................115
URL Shortcuts.................................................................................................................................................116URL Shortcut Options.........................................................................................................................116
URL Shortcut Properties...............................................................................................................116Assigning Custom Icons to URL Shortcuts............................................................................116URL Shortcut Key Bindings...................................................................................................117
Komodo User Guide
vii
Table of ContentsRun Commands...............................................................................................................................................118
Creating Run Commands.....................................................................................................................118Simple Run Commands.................................................................................................................118Advanced Run Commands............................................................................................................119Command Output Tab...................................................................................................................119
Storing Run Commands in a Toolbox.................................................................................................120Run Command Properties.............................................................................................................120
Assigning Custom Icons to Run Commands..........................................................................120Run Command Key Bindings.................................................................................................121
Custom Toolbars and Menus.........................................................................................................................122Creating Custom Toolbars and Menus................................................................................................122Custom Menu and Toolbar Properties.................................................................................................122
Debugging Programs Komodo IDE only......................................................................................................123Starting the Debugger..........................................................................................................................123
Multi-Session Debugging..............................................................................................................124Debugging Options..............................................................................................................................124
Global Options..............................................................................................................................125General Tab...................................................................................................................................125Environment Tab...........................................................................................................................126CGI Environment Tab...................................................................................................................126CGI Input Tab...............................................................................................................................126Storing Debug Configurations.......................................................................................................127
Breakpoints and Tcl Spawnpoints.......................................................................................................127Breakpoint and Spawnpoint Management....................................................................................127
Toggling Breakpoints.............................................................................................................128Toggling Spawnpoints............................................................................................................128Go to the Source Code............................................................................................................129Breakpoint Properties.............................................................................................................129Forcing a Break.......................................................................................................................130
Remote Debugging..............................................................................................................................130When to use Remote Debugging...................................................................................................131Listen for Debugger Connections..................................................................................................131Check Listener Status....................................................................................................................132Multi-User Debugging..................................................................................................................132Mapped URIs for Remote Debugging...........................................................................................132Debugger Proxy.............................................................................................................................132
Sending Input to the Program..............................................................................................................134Using Debugger Commands................................................................................................................134
Debugger Command Description..................................................................................................134Debugger Stepping Behavior........................................................................................................136
Viewing the Debugging Session..........................................................................................................136Viewing Variables.........................................................................................................................137
Python Variables and Objects.................................................................................................137PHP and Tcl Variables............................................................................................................137Perl Variables..........................................................................................................................137XSLT Variables......................................................................................................................137
Komodo User Guide
viii
Table of ContentsDebugging Programs Komodo IDE only
Setting Watched Variables............................................................................................................138Output Tab.....................................................................................................................................138HTML Preview Tab......................................................................................................................139Viewing the Call Stack..................................................................................................................139
Watching Files.....................................................................................................................................139Detaching the Debugger......................................................................................................................139Stopping the Debugger........................................................................................................................140
Debugging Perl Komodo IDE only................................................................................................................141Configuring the Perl Debugger............................................................................................................141
Startng a Komodo debugging session with perl -d........................................................................141Enabling "Break Now"..................................................................................................................141
Debugging Perl Remotely....................................................................................................................141Disabling and Enabling the Perl Dev Kit (PDK) Debugger................................................................143
Disabling the PDK Debugger on the Remote Machine................................................................143Configuring Perl for CGI Debugging..................................................................................................144
Configuring a Microsoft IIS Web Server......................................................................................144Configuring an Apache Web Server.............................................................................................145Starting a CGI Debugging Session................................................................................................146
Debugging mod_perl...........................................................................................................................146
Debugging Python Komodo IDE only...........................................................................................................148Configuring the Python Debugger.......................................................................................................148Using the Python Remote Debugger....................................................................................................148
Installing the Python Remote Debugger on the Remote Machine................................................148Invoking the Python Remote Debugger........................................................................................150
Running pydbgp.py from the Command Line........................................................................150Calling dbgp.client.brk() in your Python Programs................................................................151Python Just-in-Time Debugging.............................................................................................151
CGI Debugging.............................................................................................................................151
Debugging PHP Komodo IDE only...............................................................................................................152Installing PHP......................................................................................................................................152
Windows........................................................................................................................................152Linux.............................................................................................................................................152Mac OS X......................................................................................................................................153
Local PHP Debugging.........................................................................................................................153Configuring Local PHP Debugging..............................................................................................153Starting and Stopping a PHP Local Debugging Session...............................................................153
Remote PHP Debugging......................................................................................................................154Configuring Remote PHP Debugging...........................................................................................154
Step 1 - Copy the Debugging Extension to the Web Server...................................................154Step 2 - Edit the Web Server's PHP Configuration................................................................155Step 3 - Verify the Web Server's PHP Configuration.............................................................156
Starting and Stopping a PHP Remote Debugging Session............................................................156To initiate remote debugging from a web browser:................................................................157To initiate remote debugging from the command line:..........................................................157
Komodo User Guide
ix
Table of ContentsDebugging PHP Komodo IDE only
To initiate remote debugging using the DBGP Proxy:...........................................................158To stop the debugger:.............................................................................................................158
Using xdebug_break()...................................................................................................................158Xdebug Logging............................................................................................................................159PHP Just-in-Time Debugging / Break on Exception.....................................................................159
Common PHP Debugging Problems...................................................................................................159Debugging PHP on OS X..............................................................................................................159Debugging PHP on 64-bit Linux...................................................................................................160Zend Optimizer and Zend Studio Debugger.................................................................................160
Debugging Ruby Komodo IDE only..............................................................................................................161Configuring the Ruby Debugger..........................................................................................................161Debugging Ruby Remotely.................................................................................................................161
Setting a Break in your Ruby Code...............................................................................................162Rubygems and RUBYOPT...........................................................................................................163
Debugging Rails Applications.............................................................................................................163Local Rails Debugging..................................................................................................................163Remote Rails Debugging...............................................................................................................163
Debugging Tcl Komodo IDE only.................................................................................................................165Configuring Local Tcl Debugging.......................................................................................................165Remote Tcl Debugging........................................................................................................................165
Installing the Tcl Debugger Application on a Remote Machine...................................................165Invoking the Tcl Debugger Application........................................................................................166
Debugging XSLT Komodo IDE only.............................................................................................................168Using the XSLT Debugger..................................................................................................................168
Using a Remote XML Input File...................................................................................................168XSLT Stepping Behavior..............................................................................................................168
Unit Testing.....................................................................................................................................................170Creating and Editing Test Plans...........................................................................................................170
Supported Test Frameworks by Language....................................................................................170Adding Libraries Required for Unit Testing.................................................................................170
Running a Test Plan.............................................................................................................................170Importing Global Test Plans................................................................................................................171
HTTP Inspector Komodo IDE only..............................................................................................................172Starting the HTTP Inspector................................................................................................................172Connecting the Browser.......................................................................................................................172Inspecting the HTTP Data...................................................................................................................172Break on Request/Response.................................................................................................................173
Editing a Request/Response..........................................................................................................173Rules....................................................................................................................................................173
Komodo User Guide
x
Table of ContentsInteractive Shell Komodo IDE only..............................................................................................................175
Stand-Alone Interactive Shell..............................................................................................................175Debugging with an Interactive Shell....................................................................................................175Using the Interactive Shell...................................................................................................................175
Setting Shell Preferences...............................................................................................................176Starting the Interactive Shell.........................................................................................................176Using Multiple Shells....................................................................................................................176Using AutoComplete and CallTips...............................................................................................176Customizing Colors and Fonts......................................................................................................177Viewing Shell History...................................................................................................................177Stopping a Shell Session...............................................................................................................177Clearing the Shell Buffer...............................................................................................................177
Using the Python Interactive Shell......................................................................................................177Debugging with the Python Shell..................................................................................................178
Using the Tcl Interactive Shell............................................................................................................178Debugging with the Tcl Shell........................................................................................................178
Using the Perl Interactive Shell...........................................................................................................178Debugging with the Perl Shell.......................................................................................................180
Using the Ruby Interactive Shell.........................................................................................................180Debugging with the Ruby Shell....................................................................................................181
Code Intelligence.............................................................................................................................................182Code Browser Komodo IDE only........................................................................................................182
Context Menu................................................................................................................................183Sorting...........................................................................................................................................183Locating Current Scope.................................................................................................................183Filtering Symbols..........................................................................................................................183
Object Browser Komodo IDE only......................................................................................................184
DOM Viewer Komodo IDE only...................................................................................................................185Navigating the DOM Tree...................................................................................................................185Filtering the DOM Tree.......................................................................................................................185DOM Resources...................................................................................................................................185
Source Code Control Komodo IDE only......................................................................................................186Using Source Code Control.................................................................................................................187
SCC Toolbar, Menus and Output Tab...........................................................................................187Source Code Control Toolbar.................................................................................................187Source Code Control Menus...................................................................................................187Source Code Control Output Tab and Status Messages.........................................................187
Source Code Control Commands..................................................................................................187File Status Icons............................................................................................................................188Refresh Status................................................................................................................................188
SCC Checkout Wizard.........................................................................................................................188Step One: Set the SCC handler and the checkout data..................................................................189Step Two: Customize the checkout parameters............................................................................189Step Three: Command line summary............................................................................................190
Commit (Check-in to Source Control) Dialog.....................................................................................190
Komodo User Guide
xi
Table of ContentsSource Code Control Komodo IDE only
Configuring Source Code Control Integration.....................................................................................191Configuring CVS...........................................................................................................................191
Basic CVS Configuration.......................................................................................................191CVS Over SSH.......................................................................................................................191
Configuring Subversion (SVN).....................................................................................................191Basic SVN Configuration.......................................................................................................191SVN Over SSH.......................................................................................................................191
Configuring Perforce (P4).............................................................................................................191Basic Perforce Configuration..................................................................................................192
Configuring Preferences................................................................................................................192Configuring SSH Support for CVS and Subversion............................................................................192
Installing and Configuring Putty on Windows..............................................................................192Using CVS with Putty on Windows.......................................................................................194Using Subversion with Putty on Windows.............................................................................195Configuring CVS with Windows/Cygwin-SSH or Linux/SSH..............................................196Configuring Subversion with SSH on Linux or Mac OS X...................................................196
Using the Rx Toolkit Komodo IDE only.......................................................................................................198Selecting a Language...........................................................................................................................198Creating Regular Expressions..............................................................................................................199
Adding Metacharacters to a Regular Expression..........................................................................199Setting the Match Type.................................................................................................................199Adding Modifiers to a Regular Expression...................................................................................200
Evaluating Regular Expressions..........................................................................................................200Match Results................................................................................................................................201
Modifier Examples...............................................................................................................................201Using Ignore Case.........................................................................................................................201Using Multi-Line Mode.................................................................................................................202Using Single-Line Mode...............................................................................................................202Using Multi-line Mode and Single-line Mode..............................................................................203Using Verbose...............................................................................................................................204
Using Regular Expressions..................................................................................................................204Perl.................................................................................................................................................205Python............................................................................................................................................205Tcl..................................................................................................................................................205PHP................................................................................................................................................205Ruby..............................................................................................................................................206
Regular Expressions Primer..........................................................................................................................208About this Primer.................................................................................................................................208What are regular expressions?.............................................................................................................208Matching: Searching for a String.........................................................................................................208
Literal Match.................................................................................................................................209Wildcards.......................................................................................................................................209Escaping Metacharacters...............................................................................................................209Quantifiers.....................................................................................................................................210
Question mark.........................................................................................................................210
Komodo User Guide
xii
Table of ContentsRegular Expressions Primer
Asterisk...................................................................................................................................210Plus..........................................................................................................................................211Number: '{N}'.........................................................................................................................211Ranges: '{min, max}'..............................................................................................................211Quantifier Summary...............................................................................................................212
Alternation.....................................................................................................................................212Grouping with Parentheses............................................................................................................212Character Classes..........................................................................................................................213Negated Character Classes............................................................................................................214Anchors: Matching at Specific Locations.....................................................................................215
Substitution: Searching and Replacing................................................................................................215Modifiers..............................................................................................................................................216
Modifier Summary........................................................................................................................217Python Regex Syntax...........................................................................................................................217More Regex Resources........................................................................................................................217
Komodo and the Perl Dev Kit Komodo IDE only........................................................................................219Perl Dev Kit 6 and 7.............................................................................................................................219Perl Dev Kit 3.1 to 5.3.........................................................................................................................219
Configuring the General Tab.........................................................................................................220Configuring the Modules Tab.......................................................................................................220
Specifying Extra Modules For Your Script............................................................................220Specifying Modules to Trim from the Package......................................................................221
Configuring the Files Tab..............................................................................................................221Adding Files............................................................................................................................221Editing Files............................................................................................................................221Deleting Files..........................................................................................................................221
Configuring the Version Tab.........................................................................................................221Configuring the Library Paths Tab................................................................................................221
Specifying "lib" and "blib" Directories to Include.................................................................221Configuring the Extra Tab.............................................................................................................222
Specifying Icon files...............................................................................................................222Specifying Additional Command Line Parameters................................................................222
Interpolation Shortcuts..................................................................................................................................223Interpolation Code List........................................................................................................................223Basic Interpolation Shortcut Syntax....................................................................................................224
Non-Bracketed Syntax..................................................................................................................224Bracketed Syntax...........................................................................................................................224
Basic Interpolation Options.................................................................................................................225%(date).................................................................................................................................................226
%(date) Syntax..............................................................................................................................226%(date) Format Options................................................................................................................226
%(ask) and %(askpass)........................................................................................................................227%(ask) and %(askpass) Syntax......................................................................................................227%(ask) and %(askpass) Options....................................................................................................228
%(path).................................................................................................................................................228
Komodo User Guide
xiii
Table of ContentsInterpolation Shortcuts
%(path) Syntax..............................................................................................................................228%(path) Options............................................................................................................................228
%(debugger).........................................................................................................................................229%(debugger) Syntax......................................................................................................................229%(debugger) Options....................................................................................................................229
%(pref).................................................................................................................................................229%(pref) Syntax..............................................................................................................................229
Back-References..................................................................................................................................230Back-Reference Syntax.................................................................................................................230
Preferences.......................................................................................................................................................231Appearance Preferences.......................................................................................................................231Code Intelligence Preferences..............................................................................................................231Debugger Preferences Komodo IDE only...........................................................................................232
Debugger Connection Preferences................................................................................................233Advanced Debugger Preferences..................................................................................................233
Editor Preferences................................................................................................................................233Configuring Key Bindings............................................................................................................234Configuring Indentation................................................................................................................236Smart Editing.................................................................................................................................237
Configuring Word Completion...............................................................................................237Configuring Word or Character Wrap....................................................................................237Configuring Edge Lines..........................................................................................................237Soft Characters........................................................................................................................238Line Cut/Copy.........................................................................................................................238Hyperlinks...............................................................................................................................238Background Syntax Checking................................................................................................238Configuring Folding...............................................................................................................238
Save Options..................................................................................................................................238Environment.........................................................................................................................................239Find......................................................................................................................................................239File Associations..................................................................................................................................240Fonts and Colors Preferences...............................................................................................................240
Fonts..............................................................................................................................................241Colors............................................................................................................................................241Common Syntax Coloring.............................................................................................................242Language-Specific Coloring..........................................................................................................243
Code Formatters Komodo IDE only....................................................................................................243HTTP Inspector Preferences Komodo IDE only.................................................................................243Interactive Shell Preferences Komodo IDE only.................................................................................244Internationalization Preferences...........................................................................................................244Language Help Settings.......................................................................................................................245
Configuring Reference Locations.................................................................................................245Using Language Help....................................................................................................................245
Language Configuration......................................................................................................................245Configuring JavaScript..................................................................................................................245Configuring Perl............................................................................................................................246
Komodo User Guide
xiv

Table of ContentsPreferences
Configuring PHP...........................................................................................................................246Configuring Python.......................................................................................................................247Configuring Ruby..........................................................................................................................247Configuring Tcl.............................................................................................................................247
Tcl Syntax Checking...............................................................................................................248Tcl Debugging........................................................................................................................248
Configuring HTML.......................................................................................................................249Configuring XML Catalogs...........................................................................................................249
Mapped URIs.......................................................................................................................................249New Files Preferences..........................................................................................................................250Printing Preferences.............................................................................................................................250Projects and Workspace Preferences...................................................................................................251Servers Preferences..............................................................................................................................252Shared Support Preferences.................................................................................................................252
Sharing .tip, .pcx and .pdx Files....................................................................................................253Sharing Preferences.......................................................................................................................253
Source Code Control Preferences Komodo IDE only.........................................................................254CVS Integration.............................................................................................................................254Perforce Integration.......................................................................................................................254Subversion Integration..................................................................................................................255
Web and Browser Preferences.............................................................................................................255Windows Integration Preferences........................................................................................................255
Komodo Tutorial Overview Komodo IDE only...........................................................................................257Feature Showcase.................................................................................................................................257Ruby on Rails Tutorial.........................................................................................................................257PHP Tutorial........................................................................................................................................257Perl Tutorial.........................................................................................................................................257Python Tutorial....................................................................................................................................257Ruby Tutorial.......................................................................................................................................258XSLT Tutorial......................................................................................................................................258Run Command Tutorial.......................................................................................................................258
Feature Showcase............................................................................................................................................259Project and Workspace........................................................................................................................259Editing..................................................................................................................................................259Debugging............................................................................................................................................259Search...................................................................................................................................................259Tools....................................................................................................................................................259
Perl Tutorial Komodo IDE only....................................................................................................................260Perl Tutorial Overview........................................................................................................................260
Before You Start............................................................................................................................260Perl Tutorial Scenario....................................................................................................................260
Installing Perl Modules Using PPM....................................................................................................260Running the Perl Package Manager..............................................................................................260About PPM....................................................................................................................................261
Komodo User Guide
xv
Table of ContentsPerl Tutorial Komodo IDE only
Opening Files.......................................................................................................................................261Open the Perl Tutorial Project.......................................................................................................261Open the Perl Tutorial Files..........................................................................................................261Overview of the Tutorial Files......................................................................................................261
Analyzing the Program........................................................................................................................261Introduction...................................................................................................................................261Setting Up the Program.................................................................................................................262
Line 1 - Shebang Line.............................................................................................................262Lines 2 to 4 - External Modules..............................................................................................262
Writing the Output Header............................................................................................................262Lines 6 to 7 - Open Files.........................................................................................................262Lines 9 to 13 - Print the Header to the Output File.................................................................262
Setting Up Input Variables............................................................................................................262Lines 15 to 16 - Assign Method Call to Scalar Variable........................................................262Lines 18 to 19 - Method "getline"..........................................................................................262
Starting the Processing Loop.........................................................................................................263Line 21 - "while" Loop...........................................................................................................263Lines 22 to 25 - Extracting a Line of Input Data....................................................................263
Converting Characters with a Regular Expression........................................................................263Lines 27 to 31 - "foreach".......................................................................................................263
Combining Field Reference and Field Data..................................................................................263Lines 33 to 35 - hash slice......................................................................................................263
Writing Data to the Output File.....................................................................................................263Lines 37 to 50 - Writing Data to the Output File....................................................................263
Closing the Program......................................................................................................................264Line 51 - Closing the Processing Loop...................................................................................264Lines 52 to 54 - Ending the Program......................................................................................264
Run the Program to Generate Output...................................................................................................264Debugging the Program.......................................................................................................................264More Perl Resources............................................................................................................................265
Documentation..............................................................................................................................265Tutorials and Reference Sites........................................................................................................266
PHP Tutorial Komodo IDE only...................................................................................................................267Overview..............................................................................................................................................267
Before You Start............................................................................................................................267PHP Tutorial Scenario...................................................................................................................267
Opening the Tutorial Project................................................................................................................267Overview of the Tutorial Files......................................................................................................267Open the PHP Tutorial File...........................................................................................................267
Analyzing the PHP Tutorial File.........................................................................................................268Analyzing guestbook.php....................................................................................................................268
Introduction...................................................................................................................................268HTML Header...............................................................................................................................268
Lines 1 to 8 - HTML Header..................................................................................................268PHP Declaration and Datafile.......................................................................................................268
Line 9 - PHP Declaration........................................................................................................268
Komodo User Guide
xvi
Table of ContentsPHP Tutorial Komodo IDE only
Lines 10 to 18 - Comments.....................................................................................................268Line 22 - Datafile....................................................................................................................268
GuestBook Class...........................................................................................................................268Lines 25 to 28 - Class Declaration..........................................................................................268
GuestBook Function......................................................................................................................269Lines 34 to 37 - GuestBook Function.....................................................................................269Lines 40 to 44 - Check for Valid Form Entry.........................................................................269Lines 45 to 46 - Check for Variable Value.............................................................................269
_getData Function.........................................................................................................................269Lines 53 to 58 - _getData Function........................................................................................269
outputData Function......................................................................................................................270Lines 64 to 66 - outputData Function.....................................................................................270
_createEntryHTML Function........................................................................................................270Lines 72 to 77 - Retrieve Form Data......................................................................................270Lines 80 to 83 - Validate Form Data......................................................................................270Line 86 - Current Date and Time............................................................................................270Lines 89 to 94 - Interpolate Form Data with HTML..............................................................270
_writeDataFile Function................................................................................................................271Lines 100 to 106 - Open the Data File....................................................................................271Lines 108 to 110 - Write to the Data Files..............................................................................271Lines 111 to 113 - Close the Data File...................................................................................271
addGuestBookEntry Function.......................................................................................................271Lines 120 to 125 - Call Functions for Writing Data...............................................................271
outputForm Function.....................................................................................................................271Lines 127 to 142 - The Function for HTML Form.................................................................271
Closing Tags..................................................................................................................................271Lines 148 to 151 - Closing Tags.............................................................................................271
Running the Program...........................................................................................................................272Debugging the Program.......................................................................................................................272More PHP Resources...........................................................................................................................274
Tutorials and Reference Sites........................................................................................................274
Python Tutorial Komodo IDE only...............................................................................................................275Overview..............................................................................................................................................275
Before You Start............................................................................................................................275Python Tutorial Scenario...............................................................................................................275
Opening the Tutorial Project................................................................................................................275Overview of the Tutorial Files......................................................................................................275Open the Python Tutorial File.......................................................................................................276
Analyzing the Python Files..................................................................................................................276Analyzing preprocess.py...............................................................................................................276Setting Up the preprocess.py Program..........................................................................................276
Lines 3 to 57 - Defining a Module Docstring.........................................................................276Lines 59 to 65 - Importing Standard Python Modules............................................................277Line 67 - Importing the contenttype Module..........................................................................277
Defining an Exception Class.........................................................................................................277Lines 72 to 88 - Declaring an Exception................................................................................277
Komodo User Guide
xvii

Table of ContentsPython Tutorial Komodo IDE only
Initializing Global Objects............................................................................................................277Line 93 - Initializing log.........................................................................................................277Lines 98 to 111 - Mapping Language Comments...................................................................277
Defining a Private Method............................................................................................................278Lines 116 to 123 - Expression Evaluation..............................................................................278
Preprocessing a File.......................................................................................................................278Lines 129 to 140 - The preprocess Method Interface.............................................................278Lines 145 to 156 - Identifying the File Type..........................................................................278Lines 158 to 166 - Defining Patterns for Recognized Directives...........................................278Lines 178 to 303 - Scanning the File to Generate Output......................................................278Lines 311 to 349 - Interpreting Command Line Arguments..................................................279Lines 351 to 352 - Running the Main Method........................................................................279
Analyzing contenttype.py..............................................................................................................279Open contenttype.py......................................................................................................................279Setting Up the contenttype.py Module..........................................................................................279
Lines 16 to 19 - Importing External Modules.........................................................................279Getting Data from content.types...................................................................................................279
Lines 29 to 31 - Finding the Helper File (content.types)........................................................279Lines 33 to 80 - Loading the Content Types from content.types...........................................280Lines 85 to 118 - Determining a File's Content Type.............................................................280
Running the Program...........................................................................................................................280Using a Run Command.................................................................................................................281Using the Debugger.......................................................................................................................281
Debugging the Program.......................................................................................................................282Explore Python with the Interactive Shell...........................................................................................284More Python Resources.......................................................................................................................284
Tutorials and Reference Sites........................................................................................................285Preprocessor Reference.................................................................................................................285
Ruby Tutorial Komodo IDE only..................................................................................................................286Overview..............................................................................................................................................286
Before You Start............................................................................................................................286Ruby Tutorial Scenario.................................................................................................................286
Opening the Tutorial Project................................................................................................................286Overview of the Tutorial Files......................................................................................................286Open the Ruby Tutorial File..........................................................................................................286
Analyzing the Ruby program...............................................................................................................287Introduction...................................................................................................................................287
Line 6 - Importing the YAML class.......................................................................................287Line 8 to 13 - Define and Initialize the Entry class................................................................287Line 15 - Expose instance variables.......................................................................................287Line 18 to 26 - Data Storage Methods....................................................................................287Line 28 to 35 - Data Behavior Methods.................................................................................287Line 39 to 46 - Command Help..............................................................................................288Line 48 to 55 - Define and Initialize the Menagerie class......................................................288Line 57 to 69 - Adding Entries...............................................................................................288Line 74 to 88 - Searching for Entries......................................................................................288
Komodo User Guide
xviii
Table of ContentsRuby Tutorial Komodo IDE only
Line 90 to 98 - Deleting Entries..............................................................................................288Line 100 to 102 - Listing Entries............................................................................................288Line 104 to 133 - Saving to a File..........................................................................................289Line 135 to 143 - Loading from a File....................................................................................289Line 145 to 149 - Showing Help.............................................................................................289Line 151 - Starting the Program.............................................................................................289Line 153 to 180 - Handling Commands from the User..........................................................289
Running the Program...........................................................................................................................290Debugging the Program.......................................................................................................................290More Ruby Resources..........................................................................................................................291
Tutorials and Reference Sites........................................................................................................291
Ruby on Rails Tutorial Komodo IDE only...................................................................................................292Overview..............................................................................................................................................292
Before You Start............................................................................................................................292Tutorial Scenario...........................................................................................................................292
Creating a Rails Project.......................................................................................................................292Creating the Database..........................................................................................................................293
Editing the database.yml file.........................................................................................................293Running the Create Databases Macro...........................................................................................294
Creating a Scaffold..............................................................................................................................294Migration.......................................................................................................................................294
Testing Rails Scaffolds........................................................................................................................294 Running Model Tests in Komodo IDE.........................................................................................295 Running Tests in Komodo Edit....................................................................................................295Running Controller Tests..............................................................................................................296
Starting the Rails Application Server..................................................................................................297Dealing with Mongrel...................................................................................................................297Testing the Application.................................................................................................................298
Installing Plugins.................................................................................................................................299Adding Pagination.........................................................................................................................299Testing Pagination.........................................................................................................................300Testing Pagination in the Application...........................................................................................301Adding In-Place Editing................................................................................................................301
Adding Borrower Data.........................................................................................................................302Handling Checkouts.............................................................................................................................303Rails Resources....................................................................................................................................305
Tutorials and Reference Sites........................................................................................................305
XSLT Tutorial.................................................................................................................................................306XSLT Tutorial Overview.....................................................................................................................306
Before You Start............................................................................................................................306XSLT Tutorial Scenario................................................................................................................306
Opening the Tutorial Project................................................................................................................306Opening the XSLT Tutorial Files..................................................................................................306Overview of the Tutorial Files......................................................................................................306
Analyzing the Program........................................................................................................................306
Komodo User Guide
xix

Table of ContentsXSLT Tutorial
XSLT Header................................................................................................................................307Lines 1 to 3 - XML and XSLT Declarations..........................................................................307
HTML Header...............................................................................................................................307Line 6 - XSLT "template".......................................................................................................307Lines 7 to 11 - HTML Tags....................................................................................................307Line 12 - XSLT apply-templates............................................................................................307Lines 13 to 15 - HTML Tags..................................................................................................308
Format Email Header....................................................................................................................308Lines 18 to 21 - Select HEADER content..............................................................................308Lines 22 to 29 - call-template.................................................................................................308
Process Email................................................................................................................................308Lines 33 to 34 - Process First Message...................................................................................308Lines 36 to 39 - Process Email Body......................................................................................308
Format Email Addresses...............................................................................................................309Lines 45 to 52 - Format Email Addresses...............................................................................309
Running the Program...........................................................................................................................309Debugging the Program.......................................................................................................................309More XSLT Resources........................................................................................................................310
Documentation..............................................................................................................................310Tutorials and Reference Sites..............................................................................................................310
Run Command Tutorial.................................................................................................................................312Run Command Tutorial Overview.......................................................................................................312
Run Command Tutorial Scenario..................................................................................................312Opening the Tutorial Project.........................................................................................................312
Running Simple Commands................................................................................................................312Hello, World!.................................................................................................................................312Command Output Tab...................................................................................................................313Inserting Command Output...........................................................................................................313Filtering Parts of a Document.......................................................................................................313
Using Advanced Options.....................................................................................................................314Specifying a Command's Working Directory...............................................................................315Specifying Environment Variables...............................................................................................315Running GUI Apps or Running Commands in a Console............................................................316
Saving and Rerunning Commands......................................................................................................316Rerunning Recent Commands.......................................................................................................316Saving Commands in the Toolbox................................................................................................316Editing Saved Command Properties..............................................................................................317
Using Interpolation Shortcuts..............................................................................................................318Shortcuts for the Current File........................................................................................................319Shortcuts for the Current Selection...............................................................................................320Using Shortcuts for a Command's Directory.................................................................................320
Prompting for Input.............................................................................................................................321Introduction...................................................................................................................................321Always Prompting with %(ask) or %(askpass).............................................................................321Prompting When Necessary with %(...:orask)..............................................................................322
Parsing Command Output....................................................................................................................322
Komodo User Guide
xx
Table of ContentsRun Command Tutorial
Introduction...................................................................................................................................322Parsing Output with a Regular Expression....................................................................................322Using "Find in Files".....................................................................................................................324
Komodo FAQ..................................................................................................................................................326Where is Komodo installed?................................................................................................................326Where does Komodo keep settings data?............................................................................................327Where does Komodo log output and errors?.......................................................................................327Komodo doesn't start. Why?................................................................................................................327"Acces Denied" during installation on Windows XP SP3...................................................................327Why can't I see my Left or Right Pane................................................................................................328I can't see my Bottom Pane..................................................................................................................328I want to maximize the Editor Pane.....................................................................................................328How do I know if I'm debugging?.......................................................................................................328How do I know if I'm editing?.............................................................................................................328How can I add command-line arguments to my program for debugging?..........................................328Komodo crashes. What can I do?........................................................................................................329Why is Komodo so big?.......................................................................................................................330I already have Mozilla. Why do I need to have two versions?............................................................330I'm having trouble debugging PHP. What do I do?.............................................................................330How do I emulate sessions in PHP debugging?...................................................................................331Why don't breakpoints work when I use the Psyco extension in Python?...........................................331How do I configure Virtual Hosting on an Apache Web server?........................................................332I moved my Komodo installation on Linux, and am now getting Perl debugging errors....................333How do I prevent the dialog from displaying every time I start the debugger?..................................333Why do I get a CGI security alert when debugging PHP?..................................................................333When I click Check Configuration on the Start Page, Komodo reports that a language that is installed on my system is not available. Why?...................................................................................333My screen goes black for a second or two whenever I open files for which Komodo performs background syntax checking. Why?...................................................................................................333How can I run additional CVS commands from within Komodo?......................................................334Why doesn't Ruby debugging work on my Linux x64 system?..........................................................334
Key Binding Schemes.....................................................................................................................................335Sharing Key Binding Schemes............................................................................................................335
Windows/Linux Key Bindings (Default).......................................................................................................336Windows/Linux Scheme......................................................................................................................336
Code Browser................................................................................................................................336Code Intelligence...........................................................................................................................336Debugger.......................................................................................................................................336Editor.............................................................................................................................................337Find................................................................................................................................................339General..........................................................................................................................................339Help...............................................................................................................................................339Macro.............................................................................................................................................339Source Code..................................................................................................................................340
Komodo User Guide
xxi
Table of ContentsWindows/Linux Key Bindings (Default)
Source Control...............................................................................................................................340Tools..............................................................................................................................................340User Interface................................................................................................................................340Snippets.........................................................................................................................................341
OS X Key Bindings (Default).........................................................................................................................343OS X Scheme.......................................................................................................................................343
Code Browser................................................................................................................................343Code Intelligence...........................................................................................................................343Debugger.......................................................................................................................................343Editor.............................................................................................................................................343Find................................................................................................................................................346General..........................................................................................................................................346Help...............................................................................................................................................347Macro.............................................................................................................................................347Source Code..................................................................................................................................347Source Control...............................................................................................................................347Tools..............................................................................................................................................348User Interface................................................................................................................................348Snippets.........................................................................................................................................348
Emacs Key Bindings (Default).......................................................................................................................350Emacs Scheme.....................................................................................................................................350
Code Browser................................................................................................................................350Debugger.......................................................................................................................................350Delete Blank Line..........................................................................................................................350Editor.............................................................................................................................................350Find................................................................................................................................................353General..........................................................................................................................................354Help...............................................................................................................................................354Macro.............................................................................................................................................354Source Code..................................................................................................................................355Source Control...............................................................................................................................355Tools..............................................................................................................................................355User Interface................................................................................................................................355
Vi Key Bindings...............................................................................................................................................357Vi Emulation........................................................................................................................................357
Custom Vi Commands..................................................................................................................358Vi Scheme............................................................................................................................................358
Vi-specific key bindings................................................................................................................359Code Browser................................................................................................................................360Debugger.......................................................................................................................................360Editor.............................................................................................................................................360
Komodo User Guide
xxii
Table of ContentsXML Catalogs.................................................................................................................................................363
Using an Existing XML Catalog.........................................................................................................363Creating an XML Catalog....................................................................................................................363XML Catalog Resources......................................................................................................................364
User-Defined Language Support...................................................................................................................365Introduction..........................................................................................................................................365Luddite Language Overview................................................................................................................365
A Sample.......................................................................................................................................365Luddite in a Nutshell............................................................................................................................366Families................................................................................................................................................367Styles....................................................................................................................................................367Keywords.............................................................................................................................................367Pattern Variables..................................................................................................................................368States and Transitions..........................................................................................................................369
The Initial State.............................................................................................................................369Specifying State Transitions..........................................................................................................369Include, Upto, and EOF Conditions..............................................................................................369Redo and Lookahead.....................................................................................................................370Preventing Keyword Promotion....................................................................................................371Pattern Syntax................................................................................................................................371Pushing States................................................................................................................................371Handling Newlines........................................................................................................................372Supporting Arbitrary Delimiters...................................................................................................372
Supporting Here Documents...................................................................................................374Disambiguation....................................................................................................................................375Specifying Folding...............................................................................................................................376Recognizing XML Vocabularies.........................................................................................................376Compiling and Installing.....................................................................................................................377Samples................................................................................................................................................377Luddite Reference................................................................................................................................377Keywords.............................................................................................................................................377Style Names.........................................................................................................................................382Terms...................................................................................................................................................383Concepts...............................................................................................................................................384
Komodo Release Notes...................................................................................................................................385
License and Copyrights..................................................................................................................................387Komodo License..................................................................................................................................387
Komodo User Guide
xxiii
Welcome to the Komodo User Guide
What's new in Komodo IDE
Better Support for Django:better syntax highlighting and smarter indentation for templates♦ syntax checking for templates♦ automatic code completions for Django template tags and filters♦ hyperlinks to easily jump to template file locations♦ easier to open files with fast open supporting directory name matching♦
•
Projects: By popular demand, file and directory references have been reintroduced. These can beorganized in Groups to keep things logical and tidy.
•
Database Explorer: Lets you easily explore local and remote database installations, includingviewing and managing data. SQLite is supported in this release, with more databases coming soon.Support for each database is implemented as a Komodo extension, so integration with other databasescan be easily added.
•
Places: A new file manager has been added to Komodo's left pane. It provides a customized view ofyour file system (local or remote) and easy file management operations such as file editing, drag/dropcopying, creation of new files and folders, and search.
•
Publishing: Copy remote files to your local system to work on them, then push them back to theremote system when you're done. Komodo keeps track of the synchronization details to avoid copyingfiles that haven't changed, as well as using advanced conflict detection to avoid overwriting changesmade by others.
•
New Toolbox: The Komodo toolbox and project system are being rewritten. Individual toolbox items(commands, macros, snippets, etc.) are saved in separate JSON files rather than as nodes in atoolbox.kpf file. There is a new "Invoke Tool" command which allows you to easily search and thenexecute specific tools. In future versions project-specific tools will appear in the Toolbox sidebarinstead of the Projects sidebar, which will eventually be removed.
•
Faster: A number of Komodo components have been made to run faster, such as startup, shutdown,tab-switching and finding text. The underlying Mozilla source code has been updated to version 1.9.1,the same code base as Firefox 3.5, which means improved performance gains for Komodo.
•
Workspace Save and Restore: Komodo will now be regularly saving your workspace. In the case ofan unexpected shutdown, you can choose to restore your last used workspace the next time it startsup.
•
Hyperlink Additions: Hyperlinks have been extended and can now...show image preview while hovering on an image link,♦ show Code Intelligence definitions while hovering on a symbol,♦ jump to an HTML anchor tag to it's definition,♦ jump to HREF and SRC locations,♦ open files from a path reference,♦ jump to PHP file includes♦
•
Rx Toolkit Improvements: Choose between Python, Perl, PHP, Ruby, and JavaScript syntax fortesting your Regular Expressions. They are now evaluated "out of process", so a long-running regularexpression won't tie up the IDE.
•
HTML 5 and CSS3 Support: Autocomplete for HTML 5 and CSS3.• More Languages: Syntax highlighting for Markdown, MySQL, and others.•
(Read the full Release Notes.)
Welcome to the Komodo User Guide 1

Support and Community
The ActiveState Community site has resources to help you use Komodo effectively:
Komodo FAQs• Komodo Forums•
Sample Project
Get started fast with Komodo's Sample Project.
Feature Showcase
Quick Demos showing advanced search functionality, editing, debugging, and more.
Tutorials
Helpful introductions to Ruby on Rails, Ruby, PHP, Perl, Python, XSLT and Run Commands.
Komodo User Guide
Support and Community 2
Komodo IDE/Edit 6.1 Release NotesThese Release Notes cover what's new, detailed changes and bug fixes and known issues for Komodo IDEand Komodo Edit.
What's New in Komodo IDE/Edit
6.1
Better Support for Django:better syntax highlighting and smarter indentation for templates,♦ syntax checking for templates,♦ automatic code completion for Django template tags and filters,♦ hyperlinks to easily jump to template file locations and♦ directory name matching in "Go to File" for quickly opening project files♦
•
Projects: By popular demand, file and directory references have been reintroduced. These can beorganized in Groups to keep things logical and tidy.
•
Detailed Changes and Bug Fixes in Komodo IDE/Edit
Changes related to debugging, interactive shells, source code control, the HTTP Inspector, the Rx Toolkit, theCode Browser, and the Sections List apply to Komodo IDE only.
6.1.2 Bug Fixes
Code Intelligence:PHP: provide completions for classes defined in namespaces. (Bug 88964)♦ PHP: provide completions for variables defined in namespaces. (Bug 88964)♦ PHP: show calltips for inherited class constructors. (Bug 90156)♦ PHP: ensure parent class lookup resolves namespaces correctly. (Bug 89755)♦ Python: detect class instance variable assigned via tuples. (Bug 89416)♦ jQuery: updated API catalog to version 1.6.1. (Bug 89475)♦ CSS: removed empty string completion items for 'text-align', 'content' and 'quote'. (Bug90055)
♦
•
Places:Right-clicking project properties now brings up the selected project properties. (Bug 89797)♦ Re-use remote file connections. (Bug 90181)♦ Stop reopening the places sidebar when switching tabs when sync'ing places sidebar and tabsis on. (Bug 89553)
♦
•
SCC:Git: when performing an update - don't try to pull from ".". (Bug 88308)♦ Mercurial: file status detection now supports renamed file status. (Bug 89547)♦
•
Code Formatters:JavaScript: make JS Beautify respect indentation settings. (Bug 89789)♦ Python: quote the path to re-indent script. (Bug 89782)♦
•
Remote Files:Allow selection of the root "/" directory. (Bug 89654)♦ Correctly handle french directory listings. (Bug 88866)♦
•
Komodo IDE/Edit 6.1 Release Notes 3
Database Explorer: when editing a row, show scroll bars if there are too many columns to fit on thescreen. (Bug 90087)
•
Debugging: Ruby: correctly encode attribute values that contain special characters. (Bug 90564)• Project Templates: improve compatibility with v5 extensions and macros. (Bug 89750)• Django: trigger syntax checking when the Python interpreter changes. (Bug 89573)•
6.1.1 Bug Fixes
Projects: Fix "Browse" and "Browse Remote" buttons in project properties. (Bug 89296)• Places: Fix performance issue caused by files changes. (Bug 89377)• Debugging: Komodo could hang when starting/stopping debugging sessions. (Bug 88439)• Startup: Remove Komodo-specific environment variables. (Bug 89345)• Fast Open: Sort directory listings.• CSS: Improve CSS3 syntax checking for unknown at-rules. (Bug 85396)• CSS: Improve CSS3 syntax checking for unknown properties. (Bug 87425)• Tcl: Lexer must escape '['. (Bug 89290)• Allow opening directories from the command line. (Bug 89364)• Editor: Ensure 'Close Others' on tabs offers to save unsaved files. (Bug 89304)• Sections List: Use "Ctrl+L" keybinding instead of "Ctrl+F8". (Bug 89399)• Keybindings: Allow "Ctrl+Space" keybinding on Mac OS X. (Bug 89069)• Vi Emulation: Ensure a repeat of the ">>" command works properly. (Bug 89370)•
6.1.0 Bug Fixes
Editor:Smarty highlights "==" incorrectly. (Bug 88693)♦ Comment Region command in Javascript now works more effectively. (Bug 82144)♦ Improved auto-indent for Django and RHTML after lines that contain <% kwd ... %> and {%kwd ... %}
♦
•
Places:Add "open Places here" command to the editor tab context menu. (Bug 84646)♦ Fix "set_currentPlace: URI (file path) doesn't exist" on startup. (Bug 89031)♦ Double-right-clicks in the places pane interpreted as double-left-clicks. (Bug 89066)♦
•
Debugger:Show better variable hover tooltips for arrays and objects. (Bug 69765)♦ Remember the debugging options "Directory" field between runs. (Bug 80940)♦
•
Go to File:Include the places base directory in the search path. (Bug 87909)♦ Allow matching to a directory name within a project. (Bug 86555)♦ Allow filtering on the directory name. (Bug 82770)♦
•
JavaScript:Fixed backslash syntax highlighting. (Bug 89046)♦ Update jsdoc calltips to version 2. (Bug 89027)♦ Correct the calltips for @param and @argument. (Bug 89026)♦
•
PythonCorrectly resolve relative directory imports. (Bug 45822)♦ Auto dedent else/except blocks. (Bug 85011)♦ Add completions for magic python symbols. (Bug 88252)♦ Properly syntax check Django HTML templates. (Bug 77251)♦
•
Perl: Fix completions for installed site lib modules. (Bug 89106)•
Komodo User Guide
6.1.2 Bug Fixes 4
CSS: Show completions for HTML5 tag names. (Bug 89143)• Rx Toolkit: Allow choice of delimiter (delimiters) for Perl and PHP. (Bug 88637, 88637)• Rx Toolkit: Allow customization of the Regex fonts. (Bug 88035)• Preferences: Ensure Unicode entries are saved correctly. (Bug 84566)• Preferences: allow user to save prefs, leaving erroneous entries unchanged (Bug 84919)• Don't show the current file name when creating an unnamed new file. (Bug 89062)• Ensure pasting of code keeps the right tab settings. (Bug 89115)• Stop the editor from scrolling when resizing in Linux. (Bug 88968)• Database explorer reverses value of "Nullable?" when viewing Sqlite3 table schema. (Bug 89074)• Add command-line "-n" option to open a new Komodo window. (Bug 89071)• Add a command to switch between Komodo windows. (Bug 88970)• Hyperlinks: for relative paths, resolve through the current file path. (Bug 89057)• Formatting: Keep place in file after applying a format operation. (Bug 83418)• SCC: Git: Use "git difftool" when external diff is selected. (Bug 88778)• Stop hyperlinks from interfering with rectangular column selections. (Bug 89114)• Vi Emulation: Stop doubling of delete commands after using a visual replace command. (Bug 89041)• When switching tabs, ensure the focus stays on the editor. (Bug 89163)•
Known Issues
To view the status of outstanding Komodo issues, including those that have been fixed in this release, or toadd comments or additional issues, please visit the Komodo Bug Database.
Installation & Upgrade
Windows Vista will prompt you to either 'Allow' or 'Deny' the installation. Click on 'Allow' andKomodo will install normally.
•
The Komodo installer requires up to 230 MB in your TMP directory (as indicated by the value of your'TMP' environment variable) during installation, even if you plan to install Komodo to another drive.If you do not have the required space on this drive, manually set the 'TMP' environment variable toanother directory with sufficient space. Ensure that you have enough space, temporarily, forinstallation. (Bug 7057)
•
If you try to install Komodo on Windows and the MSI install fails with error 2355, your MSI file iscorrupt. Please download Komodo again and re-run the MSI install. (Bug 7405)
•
Startup
The first time Komodo is run after installation, it must register a number of components with theoperating system. This causes the first launch to be considerably slower than subsequent launches.
•
Editing
Tabstop syntax has changed in Komodo 5.0. Abbreviation from the Toolbox|Samples directory ofpre-5.0 versions of Komodo will not work as expected with the current implementation. Delete theolder versions to use the ones featured in the "Samples (5.0.0)" directory. Alternatively, if you havemade modifications to these snippets or have implemented your own using tabstops linked by name,consult the documentation and revise them using numbered linking.
•
By design, Komodo does not attempt Replace in Files operations on unknown file types. However,file association preferences can be used to associate a user-defined extension with a language category
•
Komodo User Guide
6.1.0 Bug Fixes 5

(e.g. "Text") which then enables replacements for that file type.Linux users may need to install the SCIM platform packages for non-ASCII text entry. See "LinuxSoftware Prerequisites" in the Installation Guide for details. (Bug 70812)
•
While autocomplete on many of the modules in the Python PyWin32 packages works, Komodo'sPyWin32 API catalog currently does not have information for: pythoncom and the binarysub-modules of win32com.
•
The macro recorder will record events that it cannot handle, such as the opening of dialogs. The onlydialog that can be opened via a macro is the Find dialog; other dialogs will cause the macro to stop.
•
Languages that are read right to left and Asian languages are not supported. All Latin and Cyrilliclanguages are fully supported. (Bug 29702)
•
On slow networks, users may notice performance degradation when editing files on networkmachines. Performance can be improved by disabling the Komodo function that checks if files on diskhave changed. Use the Editor Preferences to disable this feature. (Bug 18297)
•
Interpolation shortcuts in snippets are not executed when the snippet is inserted in the Editor Pane viadragging and dropping.
•
On Linux, GTK2 hard codes 'Ctrl'+'Shift' to use international input. Therefore, all key bindingsinvolving 'Ctrl'+'Shift'+ (any valid hexadecimal character) do not work in Komodo. A workaround isto start Komodo with the command: export GTK_IM_MODULE=xim; ./komodo'. Otherwise,key bindings of this kind must be changed. (Bug 38205)
•
When copying text that does not have Windows line endings into another application, which expectsWindows line endings, the text may not retain the desired formatting. The text is often pasted as asingle line. (Bug 36791)
•
Code snippets that are 8-bit-encoded and contain high-bit characters may have the wrong encoding (orno encoding) when inserted from the Toolbox into a UTF-8 encoded file in the Editor Pane. (Bug36769)
•
When editing a code comment in Komodo you may use <Shift+Enter> to start a new line within thecomment -- the comment prefix is added automatically. Komodo may fail to properly add thecomment prefix if many new lines are added quickly with repeated <Shift+Enter> presses. (Bug38658)
•
Debugging
PHP: The xdebug.remote_autostart option will interfere with local debugging configurationin Komodo if it is enabled. If you need this option enabled for remote debugging, set the Path toalternate PHP configuration file under Preferences|Languages|PHP to point to a copy of php.iniwithout this option.
•
PHP: A non-empty doc_root setting in php.ini causes a 'No input file specified' error when startinga local debugging session with CGI emulation. The Web Developer Suite 2.0 package and others usethis setting, and it is copied into the debugging version of php.ini during PHP auto-config. Commentthis setting out in the file specified in 'Preferences|Languages|PHP|Path to alternate PHP configurationfile' to avoid this problem.
•
Python: Breakpoints will not work with the Psyco extension enabled. The Komodo FAQ has awork-around solution.
•
Tcl 8.5: Tcl Beta releases contain only version-specific executables (e.g. tclsh85.exe andwish85.exe). Komodo does not automatically find these in the path. To use them, specify theexecutables manually in Edit|Preferences...|Languages|Tcl|Interpreters, or create non-versionedsymlinks/shortcuts to the versioned executables.
•
The Perl debugger uses alarm() internally. This can conflict with some Perl frameworks andmodules (such as POE) which use alarm() as well. To work around this problem, add alarm=0 tothe PERLDB_OPTS environment variable (in the Environment tab of the Debugger Options) which
•
Komodo User Guide
Editing 6
stops the debugger from using alarm(). With this work-around in place, the Break Now button andmenu item will not work in debugging sessions.Using the JavaScript debugger on files with mapped URIs can yield confusing results. Komodo willopen the mapped source file rather than querying Firefox for the runtime JavaScript.
•
Python debugging with IronPython does not currently work as there is no support for Pythondebugging hooks in IronPython.
•
In PerlApp executables, it is now possible to step into loaded modules, but not to set breakpoints inthem.
•
The Komodo JavaScript Debugger is incompatible with the FireBug Firefox extension. FireBug mustbe manually disabled (Tools|Firebug|Disable Firebug) for the JavaScript debugger to work. (Bug47208)
•
PHP 5.0.0, 5.0.1 and 5.0.2 do not work with the debugger extension. Use PHP versions 4.3.10 orgreater, or 5.0.3 or greater, including 5.1.
•
If the debug listener (Debug|Listen for Debugger Connections) is off, multithreaded applicationsmay not run or debug as expected. Only the main thread operates through the debugger. To debugmultithreaded applications, turn on debug listening prior to debugging. (Debug listening is turned onby default.) (Bug 32776)
•
PHP configurations that use Zend Extensions (such as PHP Accelerator) are not compatible with theKomodo PHP debugger. (Bug 21890)
•
Due to the way the core Perl interpreter works, it is not possible to step over "require" statements.(Bug 18776)
•
You cannot debug 'freestanding' executables created with the PDK in Komodo. Instead, build a'dependant' executable, which requires a local install of ActivePerl.
•
The variable watcher does not work when debugging\\machine\d$\path\to\perl_script.pl. It does work when opening the same file via aUNC path that does not include a '$' character. (Bug 19558)
•
When debugging remote applications, Komodo fails if the remote process does not have valid stdoutand stderr handles. GUI applications, such as those started with "wperl.exe" or "pythonw.exe", orthose using the Pythonwin or wxPython frameworks, or those with certain embedded applications,can have invalid stdout and stderr handles. Until we resolve this issue, try to run and debug yourremote program under perl.exe or python.exe.
•
Python, XSLT and PHP debugging require TCP/IP to be installed and properly configured, even ifyou are debugging scripts locally. While TCP/IP is configured by default on most systems, earlyversions of Windows may require manual TCP/IP configuration.
•
When debugging a GUI script in Komodo, adding a "watched variable" when not stopped at abreakpoint can cause Komodo to hang. You must manually terminate the script being debugged tostop Komodo from hanging. The problem occurs because the GUI script, while in its message loop,does not respond to Komodo's request for the variable value. (Bug 23516)
•
If the Komodo debugger is configured to use a specific port, when Komodo is shut down, the port issometimes not immediately released. If Komodo is restarted before the port is released by theoperating system, a message is displayed advising that the system is unable to bind that port. As aworkaround, we suggest configuring port 0 as the Komodo debugging port and using the debuggerproxy for remote debugging. (Bug 32821)
•
Breaking into a running Perl script can only occur while crossing sub boundaries in the Perl code, asthat's currently the only chance the Perl debugger has to check to see if the IDE has sent the breakcommand. (Bug 35611)
•
When debugging Perl, if you set a breakpoint on the while statement, the debugger stops on thebreakpoint only once, namely before the first pass through the loop. This is a limitation in the Perlinterpreter. (Bug 34866)
•
Komodo debugger uses TCP/IP networking for communications. On systems with firewalls installed,the debugger may fail if the firewall is not configured to allow Komodo to listen for connections. On
•
Komodo User Guide
Debugging 7
Windows, you may see a "Windows Security Alert" dialog asking if you want to allow Komodo tolisten for connections, you will need to unblock Komodo. (Bug 21684)The Perl debugger cannot trap fatal runtime errors. Users can accomplish this in their code bywrapping problematic code in an eval block, and then testing for an exception. (Bug 33855)
•
Komodo does not provide proper source debugging in Python exec and eval statements. This is alimitation of Python's interpreter. (Bug 40336)
•
When debugging PHP on a remote Linux machine from a local Windows machine, the debuggingoption "Try to find files on the local system when remote debugging" has no effect. This is due todifferences in Unix and Win32 file paths. (Bug 39137)
•
When debugging Python, Komodo does not permit you to set local variables in the interactive shell.However, you can edit those values from the program's variable viewers, such as the Watch andLocals panes on the Debug tab. (Bug 36794)
•
When debugging PHP scripts on Komodo with CGI emulation, you may need to change the settingfor cgi.force_redirect in the php.ini file. You may also need to set an environment variable inthe Debugger Options dialog box: "REDIRECT_STATUS=200 OK". These settings vary dependingon your system and the configuration of PHP. (Bug 35021)
•
When Debugging PHP, the HTML pane of the Output tab does not refresh automatically. To refreshthe contents of this pane, click the "Reload HTML view" button on the Output tab. (Bug 36999)
•
Komodo supports full Unicode debugging with Perl 5.8. Although Perl 5.6 can be used for debuggingprograms with single-byte encodings (e.g. cp1251), it is recommended that programmers withmulti-byte character sets upgrade to Perl 5.8.5 or better. (Bug 36760)
•
When debugging Python, if you launch the debugger from a directory containing a module with thesame name as one of the modules used by the debugger, the wrong file is used. For example, if youhave a file named logging.py in the directory where the debugger is launched, the debugger will fail.(Bug 36783)
•
When stepping through Perl files, the Komodo debugger displays the wrong print results in the Localswindow of the Debug tab. This is because Perl provides only one iterator for each collection variable.The Komodo debugger must iterate through a hash or an array in order to display the values inKomodo. A workaround is to display the Watch pane instead of the Locals pane, and type the namesof the expressions that you want to view. (Bug 33668)
•
As of Komodo 5.0, the Perl debugger emits numeric hash keys with embedded underscores. Forexample, a hash key of '123456789' now appears in the variables tabs as '123_456_789'.
•
Breakpoints don't work in files with symlinks in their path. The debugger engine calculates whether tobreak based on the actual file path. To work around this limitation, load the file in Komodo using thereal path, or create a hard link (e.g. on Linux, use 'ln' without the '-s' option). (Bug 79147)
•
Interactive Shell
The interactive shell does not initialize properly when invoked while the Command Output tab hasfocus. To avoid this, switch focus to another tab or sidebar before starting the interactive shell.
•
Perl: Only pattern variables $1 .. $9 are preserved across each query. (Bug 34528)• Python: The getpass package requires the use of a tty on UNIX systems. Komodo does not provide atty in its interactive shell so getpass will fail with an exception. (Bug 34259)
•
Source Code Control
The SCC Checkout wizard does not correctly handle password authentication. SCC checkoutsrequiring password authentication should be done at the command line.
•
A bug in CVS will cause WinCVS and TortoiseCVS to detect file changes when a Komodo projecthas merely been opened. The problem is likely a bug in the cvshome.org executable or in the
•
Komodo User Guide
Interactive Shell 8
cvsnt.org executable, which are used by both WinCVS and TortoiseCVS. (Bug 21085)Komodo's integration with the Perforce commit/submit command cannot commit files that are not inthe default changelist. These files must be submitted via an external interface (e.g. p4, P4Win). Notethat any files checked out inside Komodo are in the default changelist, so this limitation should onlyapply to users who already use an external interface to their Perforce repository. (Bug 27070)
•
If the Perforce connection cannot be established, checking the status of files in a Perforce repositorywill hang Komodo. (Bug 35058)
•
If you are using CVS Source Code Control, note that the very first time you log in to a repository,cvs.exe fails to create the .cvspass file correctly and will return an error. Repeat the command to logina second time and correctly generate the file. This is a CVS bug. (Bug 20353)
•
Mac OS X
If you have two drives with the same name, and you use the file open dialog in a Mozilla application,the directory menu (top middle of dialog) may crash when clicked. To avoid this, rename one of thehard drives.
•
New Custom Menus created in a Project or in the Toolbox will not appear until Komodo has beenrestarted.
•
Throughout the Komodo documentation there are references to key bindings that use the 'Cmd' key.This key may be better known to OS X users as the 'Command' key. (Bug 41959)
•
Komodo will shut down and restart itself the first time it is run after installation. (Bug 40143)• Display of text during editing ("painting") may sometimes be slow or pause momentarily.• Certain UI elements stop working after changing key bindings. Restarting Komodo fixes this. (Bug38683)
•
When saving a file, Komodo does not set file information (type and creator) for the OS X Finder toknow that Komodo created the file. (Bug 38745)
•
Breakpoints cannot be removed when debugging XSLT scripts. (Bug 40072)• PHP debugging will not work with the PHP build distributed with OS X because it does not loadexternal modules. To use PHP debugging on OS X, build PHP from source or download a binaryfrom http://www.entropy.ch/software/macosx/php(Bug 39901)
•
Komodo is sometimes recognized as a web browser by some applications on OS X (e.g. Safari's"Default Web Browser" setting). Using Komodo as the default web browser is not recommended.
•
Application menu items that have multi-key key bindings will not show their key bindings in a pop-uptool tip on OS X. This is a limitation in OS X.
•
Context menus may not display unless you hold down the mouse button for a period of time. This isbecause the Komodo editor is implemented in Mozilla as a plugin, and it does not access theappropriate context menu event to handle this behavior properly without interfering with other mouseevents (for example, drag and drop). (Bug 41216)
•
Due to a limitation in the Mozilla code base, key bindings for the Next File and Previous File optionson the Window menu are not displayed next to the menu items. The key bindings are'Cmd'+'PageDown' to view the next file and 'Cmd'+'PageUp' to view the previous file. (Bug 40716)
•
Linux
The Fonts and Colors pane in the Preferences dialog box displays the same list of fonts in both theFixed and Proportional lists. There is no programmatic way to identify whether a font is proportionalor not on GTK; therefore, users must know the properties of the individual fonts when modifyingthese values. (Bug 27206)
•
Komodo User Guide
Source Code Control 9
Install Komodo into a directory path that only includes alphanumeric characters. Komodo is known tohave trouble with paths that include spaces and some non-alphanumeric characters.
•
Key bindings defined in the window manager (such as KDE) take precedence over Komodo keybindings. In the case of conflicts, you must either change the Komodo key bindings or the windowmanager key bindings. (Bug 30926)
•
You cannot move an existing Komodo installation to a new directory. You must uninstall Komodofrom the existing location and reinstall it in the new location. (Bug 19478)
•
Red Hat Linux 9.0 is known to have threading library bugs in its glibc that may cause Komodo tohang in certain situations. The recommended solution is to upgrade to the latest glibc for Red HatLinux 9.0. (Bug 24340)
•
Using colon-separated include paths in the Perl shebang line causes a parse failure on some versionsof Perl. Instead of using "/usr/bin/perl -cwT -I/path1:/path2 yourscript.pl", try using multiple includearguments such as "/usr/bin/perl -cwT -I/path1 -I/path2 yourscript.pl"(Bug 33524)
•
Komodo may not start up correctly on some Linux systems if C++ compatibility libraries have notbeen installed. On Fedora and Red Hat systems, install the "compat-libstdc++" package. On SuSE,install the "compat" package. On Gentoo, as root, run emerge lib-compat. This is not thought tobe a problem on Debian systems. (Bug 36244)
•
Other
A limitation in the parser used by the DOM Viewer causes HTML elements embedded in JavaScriptstrings to appear as element nodes of the current document. Placing the JavaScript in a CDATAsection or a comment avoids this problem.
•
Komodo inherits a Mozilla bug whereby certain video drivers on Windows cause Komodo to crash. Ifyou experience this behavior, upgrade your video driver to the latest version. If the problem persists,reduce the color definition assigned to the driver (Control Panel|Display|Settings). (Bug 32746)
•
Komodo inherits a Mozilla bug regarding display on dual-monitor systems where the secondarymonitor is to the left of the primary monitor (causing negative coordinate results). The Komododisplay occasionally fails to refresh; Komodo must be stopped and restarted to fix the display (Bug26852)
•
When using Komodo's Preview in Browser feature, users running Mozilla on Windows XP Pro,Windows 2000 Pro and Windows 98 may find that they cannot exit Komodo if Mozilla is still open. Ifthis should occur, close all open browser windows before exiting Komodo. (Bug 26431)
•
The Palm Desktop for Windows software makes exclusive use of the 'Ctrl'+'Shift'+'T' keycombination, thus making this combination unavailable in Komodo. (Bug 27851)
•
When using the PDK Build Standalone Application feature in Komodo with Perl 5.8.0 on a Linuxinstallation where the environment is set to use UTF-8, you must add a module 'utf8' on the modulestab. This is the equivalent of 'perlapp --add utf8'. This does not affect Perl 5.6.x or future versions ofPerl 5.8.1 or higher. (Bug 26898)
•
On Windows NT, some interactive commands may not work properly when run from the CommandOutput tab of the Output Pane. You must run these commands in a separate shell. (Bug 23176)
•
Perforce client version 2001.1 and previous for Windows is known to hang when used for Komodo'sPerforce integration. Upgrading to the most recent version of Perforce is known to fix the problem.(Bug 19959)
•
The Output tab cuts off lines at 250 characters. (Bug 20711)• Macros will not record certain commands, including (but possibly not limited to)'Ctrl'+'Shift'+'B'|'R'|'E'|'D' (toggle toolbars or button text), 'Ctrl'+'Shift'+'N' (new default file), andView as Language menu items.
•
If you are using the Pop-Up Stopper ad-blocking program (Pop-Up Zapper on OS X), it will close the•
Komodo User Guide
Linux 10
Rx Toolkit window immediately after it is opened. (Bug 21768)When you schedule a new file to be added using CVS, CVS will not permit you to remove the filefrom the repository using the "revert changes" command. (Bug 27192)
•
Users of the Japanese version of Windows XP may experience difficulties in starting Komodo.• The Open field in the Open/Find Toolbar does not automatically display a drop-down list ofdirectories when an UNC path is typed. Currently, the list is only displayed when a the path includes asubdirectory. (Bug 29011)
•
When creating a "diff" in Komodo (Tools|Compare Files), the line endings of the files arenormalized to Unix style line endings. Lines in files that have different line endings are not displayeddifferently in the diff (unless other differences are present), but a warning is provided to the user inthe 'diff' window, or the 'no difference' dialog. (Bug 32932)
•
In Komodo's Rx Toolkit, the match offsets for Unicode or high-bit data are incorrect. When matching,the program does not account for UTF-8 multi-byte characters. (Bug 33287)
•
When adding new key bindings via the Preferences dialog box, Komodo displays a messageindicating that the key bindings will not take effect until Komodo is restarted. However, somechanges do take effect immediately.(Bug 36710)
•
If you rename a folder that was added to a custom menu, the name is changed in Komodo's Toolboxbut not on the menu itself. A workaround is to move the renamed folder out and then back into theassociated custom menu icon in the Toolbox. (Bug 36679)
•
A newly created custom menu is added to the Toolbox but is not immediately displayed alongsideexisting toolbars. Restarting Komodo causes the new toolbar to display. (Bug 40078)
•
Komodo User Guide
Other 11
Starting Komodo
Windows
From within the Windows environment, use one of the following methods to launch Komodo:
double-click the Komodo desktop icon• launch Komodo from the Windows program menu (Start|Programs|ActiveState Komodo<version>|Komodo)
•
right click a file name in Windows Explorer (and other dialogs that support the standard Windowsright-click context menu) and select Edit with Komodo
•
To start Komodo from a command prompt, enter:
komodo [options] [filenames]
Multiple filenames may be specified; all specified filenames will be loaded in the Komodo editor pane.
The following command-line options are available:
Help: -h or --help• Show Komodo version: -V or --version• Open at a specified line number: -l line or --line=line• Open with a specified range selected: -s range or --selection=range(e.g. komodo -s 1,5-2,15 example.py would open example.py and select from line 1and column 5 to line 2 column 15)
•
Mac OS X
From within the OS X environment, use one of the following methods to launch Komodo:
In the Dock, click the Komodo icon.• In the Dock, click the "Finder" icon. In the left pane of the Finder dialog box, select Applications. Inthe right pane of the Finder, double-click the Komodo file.
•
On the Finder's Go menu, click Applications. In the right pane, double-click the Komodo file.•
To start Komodo from the Terminal:
If you want to start to Komodo from the command line, it is best to first create an alias for 'komodo':
alias komodo='open -a "Komodo IDE"'
If you're using Komodo Edit, modify the command accordingly:
alias komodo='open -a "Komodo Edit"'
This line can be added to your ~/.bash_profile.
Once the alias is set, the following syntax applies:
Starting Komodo 12
komodo [options] [filenames]
All command line options described in the Windows section are available.
Linux
To start Komodo from a shell prompt, enter:
komodo [options] [filenames]
All command line options described in the Windows section are available.
Desktop icons and taskbar applets are not added automatically during installation on Linux. Check yourwindow manager documentation for information on creating these manually. A choice of Komodo icons isavailable. By default, the icon files (.xpm) are stored in the Komodo installation directory.
Komodo User Guide
Mac OS X 13
Komodo Installation GuideWindows
Prerequisites♦ Installing the Komodo License♦ Upgrading from a Previous Komodo Version♦ Installing Komodo on Windows♦ Command Line Installation Options♦ Starting Komodo on Windows♦ Uninstalling Komodo on Windows♦
•
Mac OS XPrerequisites♦ Installing the Komodo License♦ Upgrading from a Previous Komodo Version♦ Installing Komodo on OS X♦ Starting Komodo on OS X♦ Uninstalling Komodo on OS X♦
•
LinuxPrerequisites♦ Installing the Komodo License♦ Upgrading from a Previous Komodo Version♦ Installing Komodo on Linux♦ Starting Komodo on Linux♦ Uninstalling Komodo on Linux♦
•
Language and Debugging Prerequisites• Source Code Control Integration Prerequisites•
Windows
Prerequisites
Hardware Requirements
1GHz (or faster) x86 or x86_64 processor• 1 GB RAM• 200 MB hard disk space• 340 MB of temporary hard disk space during installation•
Operating System Requirements
The following platforms are officially supported. Current Critical Updates, Windows Updates, and ServicePacks must be installed (see http://windowsupdate.microsoft.com).
Windows 7• Windows Vista• Windows XP• Windows Server 2003•
To install on Windows XP, you may need to upgrade your version of Windows Installer.
Komodo Installation Guide 14
Software Prerequisites on Windows
Miscellaneous Prerequisites:
Perl Dev Kit: In order to build executable programs, ActiveX controls and Windows services in Perl,you must have ActiveState's Perl Dev Kit version 3.1 or greater installed on your system.
•
Installing the Komodo License on Windows
Komodo IDE comes with a 21-day trial license. To install a permanent license:
Download the license installer from the My Account page.• Double-click the downloaded installer.•
Upgrading from Previous Komodo Versions
Newer versions of Komodo should not be installed in the same directory as older versions. For major releaseupgrades (e.g. 3.5 to 4.0) the installer will automatically put Komodo in a new directory.
For minor releases (e.g. 4.1 to 4.2) and patch-level releases (4.1.1 to 4.1.2), use the auto-update system(Help|Check for Updates). The changes will be applied safely in the current install directory. If you need toupdate using an installer, completely uninstall the older version before installing the new one, or manuallyspecify a different install directory during the installation process. Your Komodo preferences will bepreserved as they are installed in a different directory.
Installing Komodo on Windows
Before you start:
If you intend to run the installation from a shared network drive, your system must have SYSTEMrights (or greater) to the directory from which the installation is run. Alternatively, run the installationfrom a local drive.
•
To install Komodo on Windows:
Ensure you have the prerequisite hardware and software.1. Download the Komodo installer file.2. Double-click the installer file and follow the instructions.3.
When installation is complete, you will see an ActiveState Komodo icon on your desktop.
Command Line Installation Options
Komodo can also be installed from the command line. For example:
c:\> msiexec.exe /i Komodo-<version>.msi
Komodo's installer uses Windows Installer technology, which allows you to partially control the install fromthe command line. For example:
Komodo User Guide
Software Prerequisites on Windows 15
Installing the MSI in Silent Mode
You can have the Komodo installer run with a reduced user interface. For example, the following will installsilently and only open a dialog when the installation is complete.
c:\> msiexec.exe /i Komodo-<version>.msi /qn+
The following will install with no dialog at all.
c:\> msiexec.exe /i Komodo-<version>.msi /q
Turning on Logging
You can generate a log of the Komodo installation with the following command:
c:\> msiexec.exe /i Komodo-<version>.msi /L*v install.log
Controlling the Install Directory
Command line options can be used to configure Komodo installation properties. The following will installKomodo to "E:\myapps\Komodo", instead of the default location:
c:\> msiexec.exe /i Komodo-<version>.msi INSTALLDIR=D:\myapps\Komodo
Controlling Which Features Get Installed
Komodo is divided into a number of distinct features. In the "Customize Setup" dialog you can select whichfeatures to install. You can also do this on the command line with the ADDLOCAL property. For example,the following command will install just the core Komodo functionality (i.e. not the PyWin32 extensions or thedocumentation.
c:\> msiexec.exe /i Komodo-<version>.msi ADDLOCAL=core
The current set of Komodo features are:
core Komodo coreenv Windows environment settings desktop Desktop shortcut quicklaunch Quick launch shortcut register Register this as the default Komododocs Documentation
The hierarchy denotes dependencies (i.e. to install quicklaunch you must install the env.
The register option puts the Komodo location in the registry so 'start komodo' works, and adds bindings for.kpz and .kpf Komodo project files.
Starting Komodo on Windows
To start Komodo on Windows, use one of the following methods:
Double-click the desktop icon.•
Komodo User Guide
Installing the MSI in Silent Mode 16
Select Start|Programs|ActiveState Komodo|Komodo.• Add the Komodo install directory to your PATH environment variable, then from the command lineprompt, enter komodo.
•
Uninstalling Komodo on Windows
To uninstall Komodo, select Start|Programs|ActiveState Komodo|Modify or Uninstall Komodo.
Alternatively, use the Add/Remove Programs menu (accessible from the Windows Control Panel).
Mac OS X
Prerequisites
Hardware Requirements
Intel processor• 1 GB RAM• 200 MB hard disk space• 340 MB of temporary hard disk space during installation•
Operating System Requirements
Mac OS X 10.4 (Tiger) or later•
Installing the Komodo License on OS X
Komodo IDE comes with a 21-day trial license. To install a permanent license:
Download the license installer from the My Account page.• Double-click the downloaded zip file to unpack it (this is done automatically if you are using Safari),and double-click the enclosed license installer.
•
Upgrading from Previous Komodo Versions
Newer versions of Komodo should not be installed in the same directory as older versions.
For minor releases (e.g. 4.1 to 4.2) and patch-level releases (4.1.1 to 4.1.2), use the auto-update system(Help|Check for Updates). The changes will be applied safely in the current install directory. If you need toupdate using an installer, completely uninstall the older version or rename the .app before installing the newone. Your Komodo preferences will be preserved as they are installed in a different directory.
Installing Komodo on Mac OS X
To install Komodo:
Download the Komodo disk image (Komodo-<version>-macosx-<x86>.dmg).• If the browser does not automatically mount the disk image and open the mounted folder in Finder,double-click the .dmg file to do so.
•
Komodo User Guide
Starting Komodo on Windows 17
Open a new Finder window. Drag the Komodo icon from the mounted folder to the Applicationsfolder.
•
If desired, drag the Komodo icon into the Dock.•
Starting Komodo on OS X
Click the Komodo icon in the Dock or the Applications folder.
Uninstalling Komodo on OS X
Drag the Komodo icon into the Trash.
Linux
Prerequisites
Hardware Requirements
1GHz (or faster) x86 or x86_64 processor• 1 GB RAM• 200 MB hard disk space• 340 MB of temporary hard disk space during installation•
Operating System Requirements
Supported operating systems:
The following platforms are officially supported.
Red Hat Enterprise Linux 5 or later• CentOS 5.0 or later• Fedora Core 8 or later• OpenSUSE 10.2 or later• Ubuntu 7.04 or later•
Other operating systems:
Komodo can also be run on the following platforms. This version of Komodo has not necessarily been testedon these platforms; platform-specific bugs may or may not be fixed.
Debian GNU/Linux 4.0 ("etch")• Mandriva• FreeBSD (with Linux binary compatibility)• Gentoo•
Software Prerequisites on Linux
Installation Prerequisites:
Komodo User Guide
Installing Komodo on Mac OS X 18
glibc 2.4 (or higher) and libjpeg.so.62 (or higher): These libraries are included in standard Linuxdistributions.
•
libstdc++6 (or higher)• GTK+ 2.10 (or higher)•
Non-ASCII Input Requirements (IME):
SuSE: scim, scim-bridge-gtk and scim-bridge-qt packages.• Ubuntu: scim, scim-gtk2-immodule, scim-qtimm, and scim-tables-additional packages (if not alreadyinstalled).
•
Fedora Core / RHEL / CentOS: scim, scim-gtk and scim-qtimm packages.•
Adding Perl or Python to the PATH Environment Variable
To add Perl or Python to the PATH environment variable, do one of the following:
Modify your PATH environment variable. For example, if you use the Bash shell, add the followingline to your ~/.bashrc file:
export PATH=<installdir>/bin:$PATH
...where <installdir> points to the directory where you installed ActivePerl or ActivePython.
•
Create a symbolic link to the Perl or Python executable. For example, for ActivePerl, enter:
ln -s <installdir>/bin/perl /usr/local/bin/perl
For ActivePython, enter:
ln -s <installdir>/bin/python /usr/local/bin/python
...where <installdir> points to the directory where you installed ActivePerl or ActivePython.
•
Installing the Komodo License on Linux
Komodo IDE comes with a 21-day trial license. To install a permanent license:
Download the license installer from the My Account page.• Change the permissions on the downloaded file to allow execution (e.g. `chmod +xKomodo_<version>_<license#>.bin`)
•
Run the installer (e.g. `./Komodo_<version>_<license#>.bin`).•
Upgrading from Previous Komodo Versions
Newer versions of Komodo should not be installed in the same directory as older versions. For major releaseupgrades (e.g. 3.5 to 4.0) the installer will automatically put Komodo in a new directory.
For minor releases (e.g. 4.1 to 4.2) and patch-level releases (4.1.1 to 4.1.2), use the auto-update system(Help|Check for Updates). The changes will be applied safely in the current install directory. If you need toupdate using an installer, completely uninstall the older version before installing the new one, or manuallyspecify a different install directory during the installation process. Your Komodo preferences will bepreserved as they are installed in a different directory.
Komodo User Guide
Software Prerequisites on Linux 19
Installing Komodo on Linux
This version of Komodo allows non-root installation on Linux. Note, however, that the user who executes thelicense file will be the user who is licensed to use the software.
To install Komodo on Linux:
Download the Komodo installer (.tar.gz file) into a convenient directory.1. Unpack the tarball:
tar -xvzf Komodo-<version>-<platform>.tar.gz
2.
Change to the new directory:
cd Komodo-<version>-<platform>
3.
Run the install script ("install.sh"):
./install.sh
4.
Answer the installer prompts:5. Specify where you want Komodo installed, or press 'Enter' to accept the default location(/home/<username>/Komodo-<IDE|Edit>-x.y).The -I option can be used tospecify the install directory. For example:
./install.sh -I ~/opt/Komodo-IDE-4.2
If multiple users are sharing the system and will be using the same installation, installKomodo in a location every user can access (e.g. /opt/Komodo-x.x/ or/usr/local/Komodo-x.x/).
Note:
Each Komodo user requires their own license key.◊ Do not install Komodo in a path that contains spaces or non-alphanumeric characters.◊ Be sure to install Komodo into its own directory (i.e. not directly in an existingdirectory containing shared files and directories such as /usr/local).
◊
♦ 6.
Once the installer has finished, add Komodo to your PATH with one of the following:Add Komodo/bin to your PATH directly:
export PATH=<installdir>/bin:$PATH
♦
Add a symlink to Komodo/bin/komodo from another directory in your PATH:
ln -s <installdir>/bin/komodo /usr/local/bin/komodo
Note: Creating symlinks in system directories such as /usr/bin requires root access.
♦
7.
After completing the installation, you can delete the temporary directory where the Komodo tarball wasunpacked.
Starting Komodo on Linux
Komodo User Guide
Installing Komodo on Linux 20
To start Komodo on Linux enter `komodo` at the command line or create a shortcut on your desktop or inyour toolbar using the full path to the komodo executable.
Uninstalling Komodo on Linux
To uninstall Komodo on Linux:
Delete the directory that Komodo created during installation.1. If you wish to delete your Komodo preferences, delete the ~/.komodo directory. If you do notdelete this directory, subsequent installations of Komodo will use the same preferences.
2.
Note: You cannot relocate an existing Komodo installation to a new directory by simply moving it. You mustuninstall Komodo from the existing location and reinstall it in the new location.
Language and Debugging Prerequisites
Debugging: If firewall software is installed on the system, it must be configured to allow Komodo toaccess the network during remote debugging.
•
Debugger Proxy: The optional Debugger Proxy (pydbgpproxy) requires Python 2.2 or greater onMac OS X and Linux systems. An appropriate version of Python is installed by default on Mac OS Xsystems.
•
Perl: Perl 5.6 or greater is required to debug Perl programs. Download the latest version ofActivePerl from the ActiveState website. Ensure that the directory location of the Perl interpreter (bydefault, C:\perl) is included in your system's PATH environment variable. On Windows, somefeatures such as background syntax checking and remote debugging may require ActivePerl -- thereare known incompatibilities with Cygwin and msys perl.
•
Python: Python 2.2 or greater is required to debug Python programs. You can download the latestversion of ActivePython from the ActiveState website. Ensure that the directory location of thePython interpreter (by default C:\Pythonxx (where "xx" is the Python version)) is included in yoursystem's PATH environment variable.
•
PHP: PHP 4.4 or greater is required to debug PHP programs. Download PHP fromhttp://www.php.net/downloads.php. For complete instructions for configuring Komodo and PHP, seeConfiguring the PHP Debugger.
•
Tcl: Tcl 7.6 or greater is required to debug Tcl programs. Download the latest version of ActiveTclfrom the ActiveState website.
•
Ruby: Ruby 1.8.4 or greater is required to debug Ruby programs. Download the latest version ofRuby from http://rubyinstaller.rubyforge.org/wiki/wiki.pl. Cygwin-based versions of Ruby arecurrently unsupported. Ruby 1.9.1 (and later) users will need to also install ruby-debug-base (e.g. geminstall ruby-debug-base19) as a compatible version is not shipped with Komodo.
•
The debugging libraries for all languages are bundled with Komodo IDE, but they are also available fordownload from the Komodo Bits page.
Source Code Control Integration Prerequisites
CVS Source Control Integration: Requires CVS, which is available fromhttp://www.nongnu.org/cvs/, or the latest stable version of CVSNT, which is available fromhttp://www.cvsnt.org/wiki/.
•
CVS Source Control Integration using Putty (Windows): Requires Putty version 0.52 or greater.•
Komodo User Guide
Starting Komodo on Linux 21

Perforce Source Control Integration: Requires a connection to a Perforce server with version 99.1or later.
•
Subversion Source Code Control Integration: Requires the svn command line client, availablefrom http://subversion.tigris.org/. Komodo cannot use the TortoiseSVN client as its SVN executable.
•
Komodo User Guide
Source Code Control Integration Prerequisites 22
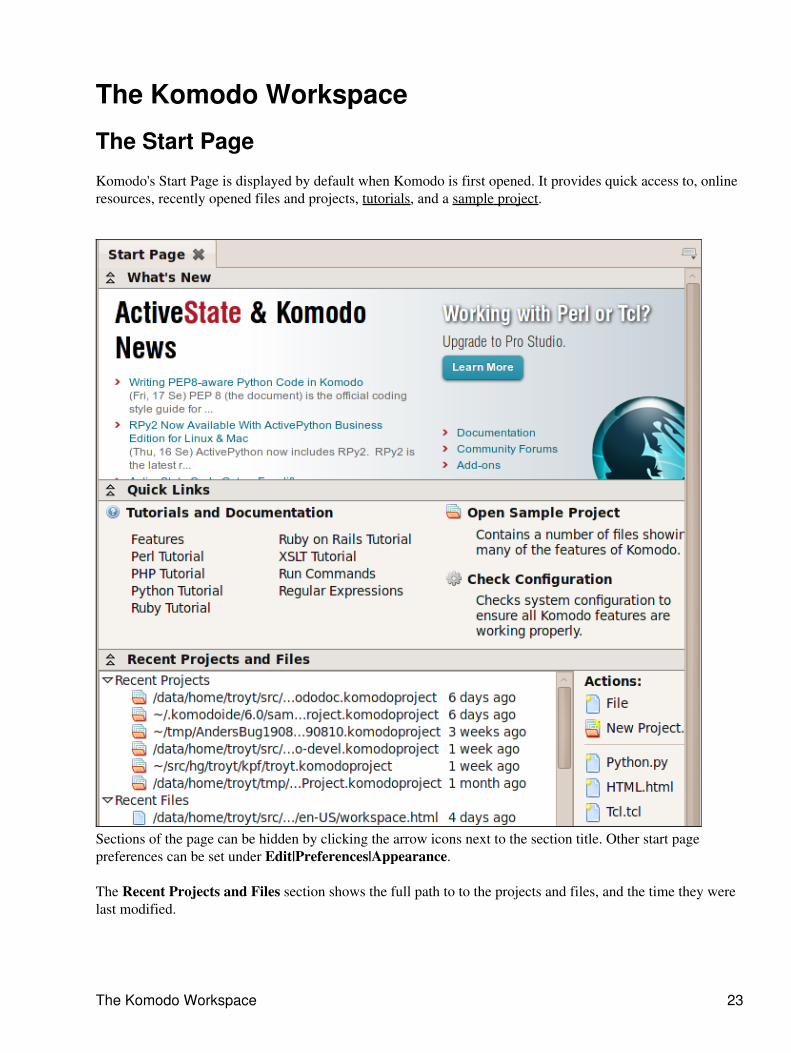
The Komodo Workspace
The Start Page
Komodo's Start Page is displayed by default when Komodo is first opened. It provides quick access to, onlineresources, recently opened files and projects, tutorials, and a sample project.
Sections of the page can be hidden by clicking the arrow icons next to the section title. Other start pagepreferences can be set under Edit|Preferences|Appearance.
The Recent Projects and Files section shows the full path to to the projects and files, and the time they werelast modified.
The Komodo Workspace 23
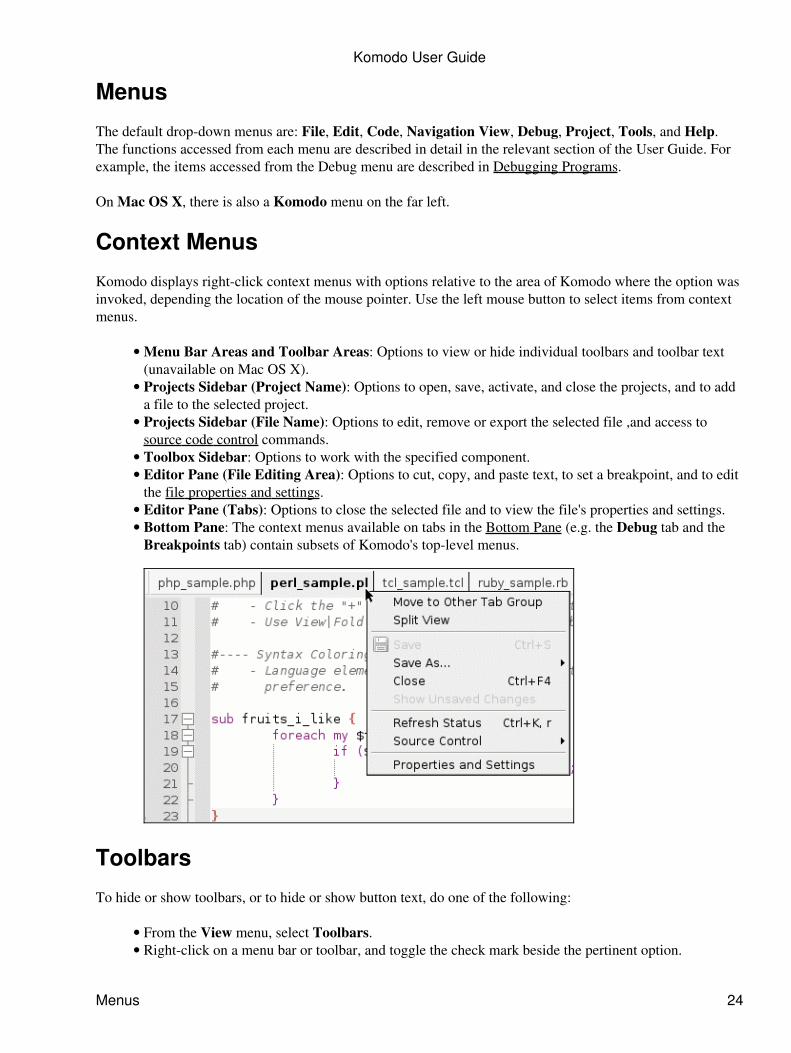
Menus
The default drop-down menus are: File, Edit, Code, Navigation View, Debug, Project, Tools, and Help.The functions accessed from each menu are described in detail in the relevant section of the User Guide. Forexample, the items accessed from the Debug menu are described in Debugging Programs.
On Mac OS X, there is also a Komodo menu on the far left.
Context Menus
Komodo displays right-click context menus with options relative to the area of Komodo where the option wasinvoked, depending the location of the mouse pointer. Use the left mouse button to select items from contextmenus.
Menu Bar Areas and Toolbar Areas: Options to view or hide individual toolbars and toolbar text(unavailable on Mac OS X).
•
Projects Sidebar (Project Name): Options to open, save, activate, and close the projects, and to adda file to the selected project.
•
Projects Sidebar (File Name): Options to edit, remove or export the selected file ,and access tosource code control commands.
•
Toolbox Sidebar: Options to work with the specified component.• Editor Pane (File Editing Area): Options to cut, copy, and paste text, to set a breakpoint, and to editthe file properties and settings.
•
Editor Pane (Tabs): Options to close the selected file and to view the file's properties and settings.• Bottom Pane: The context menus available on tabs in the Bottom Pane (e.g. the Debug tab and theBreakpoints tab) contain subsets of Komodo's top-level menus.
•
Toolbars
To hide or show toolbars, or to hide or show button text, do one of the following:
From the View menu, select Toolbars.• Right-click on a menu bar or toolbar, and toggle the check mark beside the pertinent option.•
Komodo User Guide
Menus 24
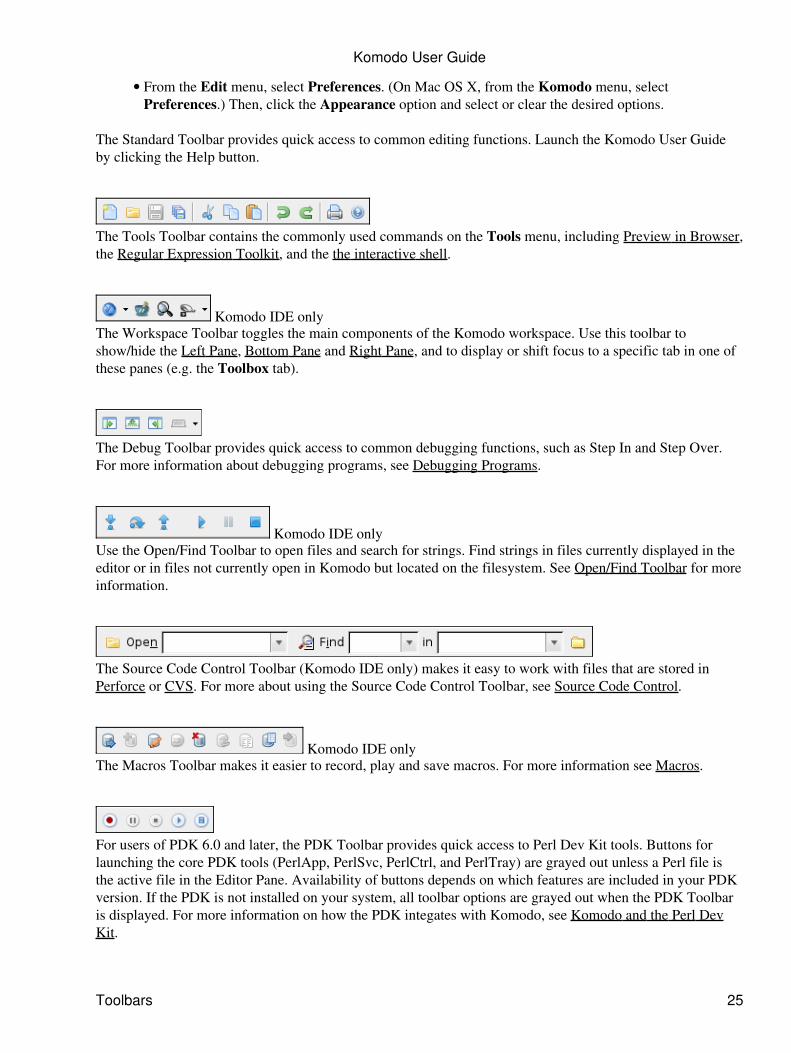
From the Edit menu, select Preferences. (On Mac OS X, from the Komodo menu, selectPreferences.) Then, click the Appearance option and select or clear the desired options.
•
The Standard Toolbar provides quick access to common editing functions. Launch the Komodo User Guideby clicking the Help button.
The Tools Toolbar contains the commonly used commands on the Tools menu, including Preview in Browser,the Regular Expression Toolkit, and the the interactive shell.
Komodo IDE onlyThe Workspace Toolbar toggles the main components of the Komodo workspace. Use this toolbar toshow/hide the Left Pane, Bottom Pane and Right Pane, and to display or shift focus to a specific tab in one ofthese panes (e.g. the Toolbox tab).
The Debug Toolbar provides quick access to common debugging functions, such as Step In and Step Over.For more information about debugging programs, see Debugging Programs.
Komodo IDE onlyUse the Open/Find Toolbar to open files and search for strings. Find strings in files currently displayed in theeditor or in files not currently open in Komodo but located on the filesystem. See Open/Find Toolbar for moreinformation.
The Source Code Control Toolbar (Komodo IDE only) makes it easy to work with files that are stored inPerforce or CVS. For more about using the Source Code Control Toolbar, see Source Code Control.
Komodo IDE onlyThe Macros Toolbar makes it easier to record, play and save macros. For more information see Macros.
For users of PDK 6.0 and later, the PDK Toolbar provides quick access to Perl Dev Kit tools. Buttons forlaunching the core PDK tools (PerlApp, PerlSvc, PerlCtrl, and PerlTray) are grayed out unless a Perl file isthe active file in the Editor Pane. Availability of buttons depends on which features are included in your PDKversion. If the PDK is not installed on your system, all toolbar options are grayed out when the PDK Toolbaris displayed. For more information on how the PDK integates with Komodo, see Komodo and the Perl DevKit.
Komodo User Guide
Toolbars 25
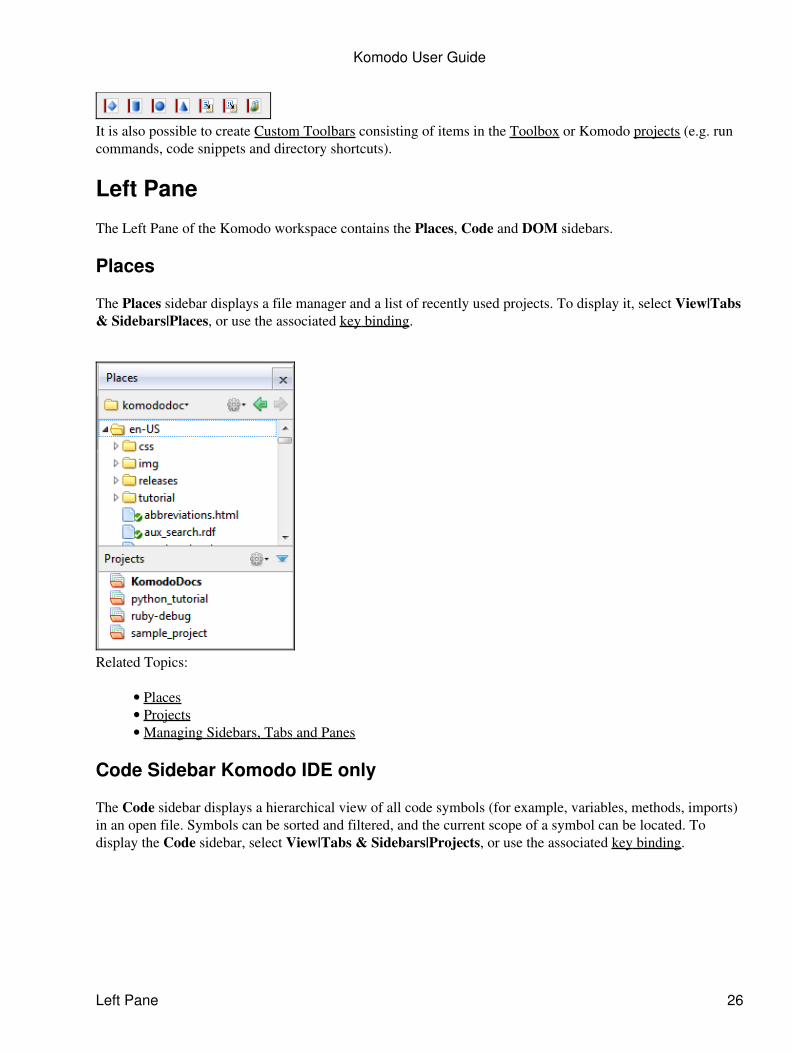
It is also possible to create Custom Toolbars consisting of items in the Toolbox or Komodo projects (e.g. runcommands, code snippets and directory shortcuts).
Left Pane
The Left Pane of the Komodo workspace contains the Places, Code and DOM sidebars.
Places
The Places sidebar displays a file manager and a list of recently used projects. To display it, select View|Tabs& Sidebars|Places, or use the associated key binding.
Related Topics:
Places• Projects• Managing Sidebars, Tabs and Panes•
Code Sidebar Komodo IDE only
The Code sidebar displays a hierarchical view of all code symbols (for example, variables, methods, imports)in an open file. Symbols can be sorted and filtered, and the current scope of a symbol can be located. Todisplay the Code sidebar, select View|Tabs & Sidebars|Projects, or use the associated key binding.
Komodo User Guide
Left Pane 26
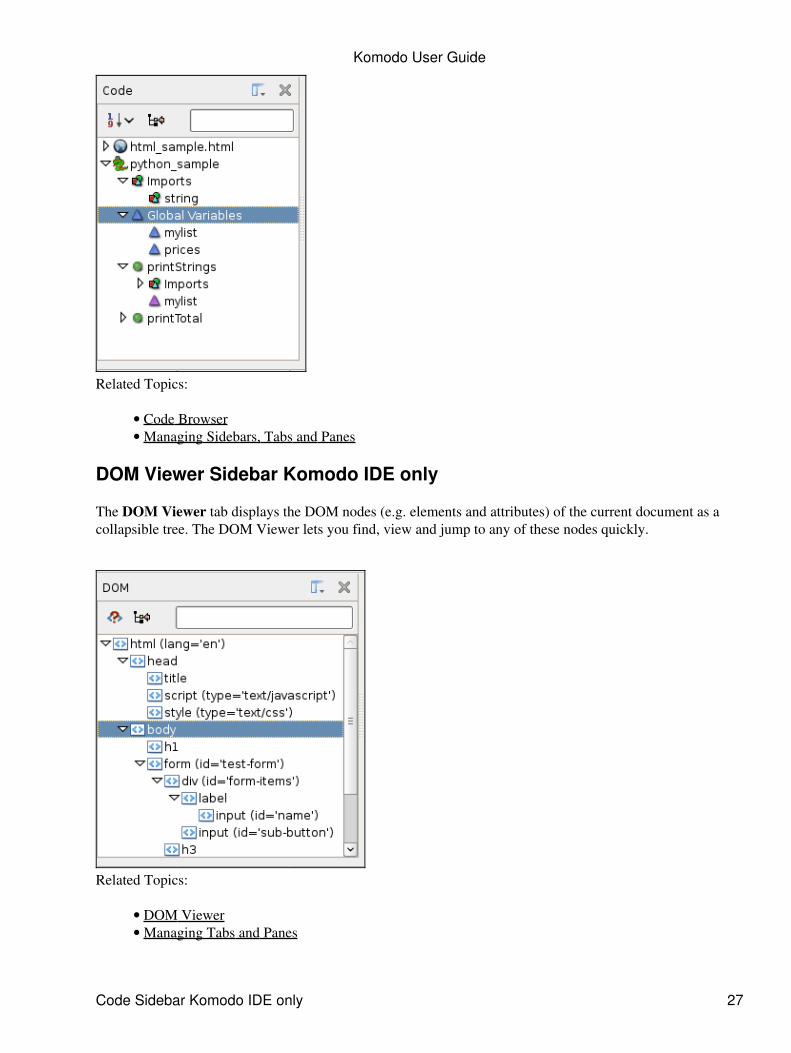
Related Topics:
Code Browser• Managing Sidebars, Tabs and Panes•
DOM Viewer Sidebar Komodo IDE only
The DOM Viewer tab displays the DOM nodes (e.g. elements and attributes) of the current document as acollapsible tree. The DOM Viewer lets you find, view and jump to any of these nodes quickly.
Related Topics:
DOM Viewer• Managing Tabs and Panes•
Komodo User Guide
Code Sidebar Komodo IDE only 27
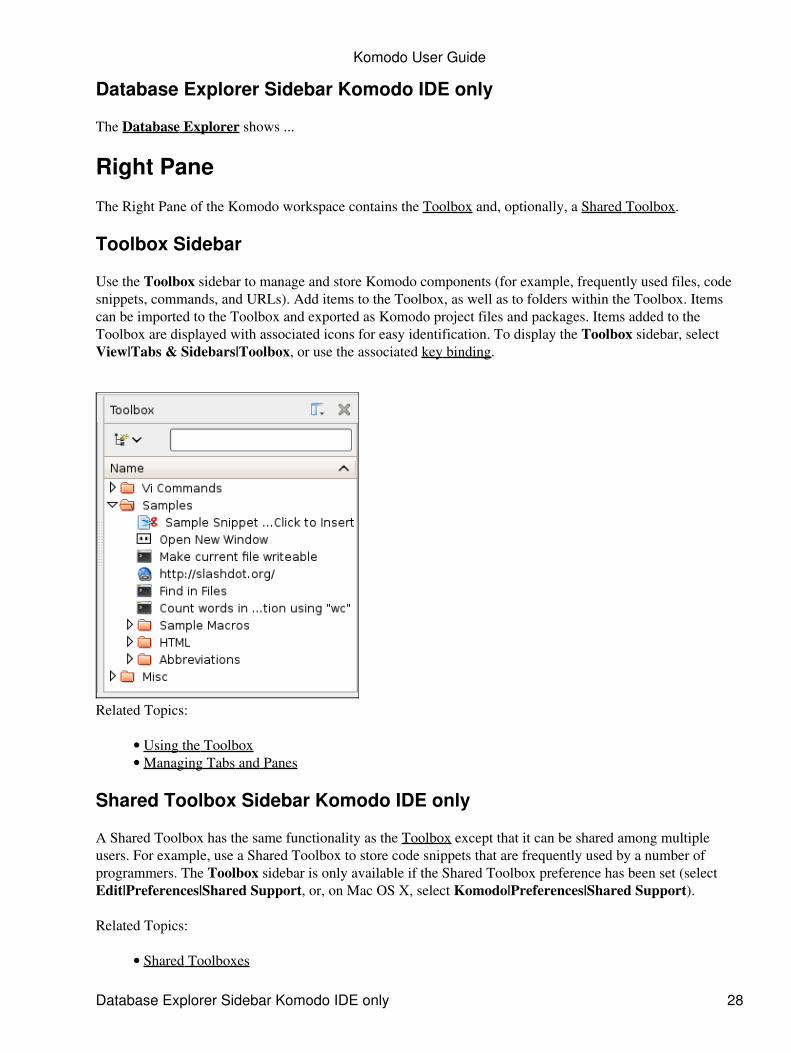
Database Explorer Sidebar Komodo IDE only
The Database Explorer shows ...
Right Pane
The Right Pane of the Komodo workspace contains the Toolbox and, optionally, a Shared Toolbox.
Toolbox Sidebar
Use the Toolbox sidebar to manage and store Komodo components (for example, frequently used files, codesnippets, commands, and URLs). Add items to the Toolbox, as well as to folders within the Toolbox. Itemscan be imported to the Toolbox and exported as Komodo project files and packages. Items added to theToolbox are displayed with associated icons for easy identification. To display the Toolbox sidebar, selectView|Tabs & Sidebars|Toolbox, or use the associated key binding.
Related Topics:
Using the Toolbox• Managing Tabs and Panes•
Shared Toolbox Sidebar Komodo IDE only
A Shared Toolbox has the same functionality as the Toolbox except that it can be shared among multipleusers. For example, use a Shared Toolbox to store code snippets that are frequently used by a number ofprogrammers. The Toolbox sidebar is only available if the Shared Toolbox preference has been set (selectEdit|Preferences|Shared Support, or, on Mac OS X, select Komodo|Preferences|Shared Support).
Related Topics:
Shared Toolboxes•
Komodo User Guide
Database Explorer Sidebar Komodo IDE only 28
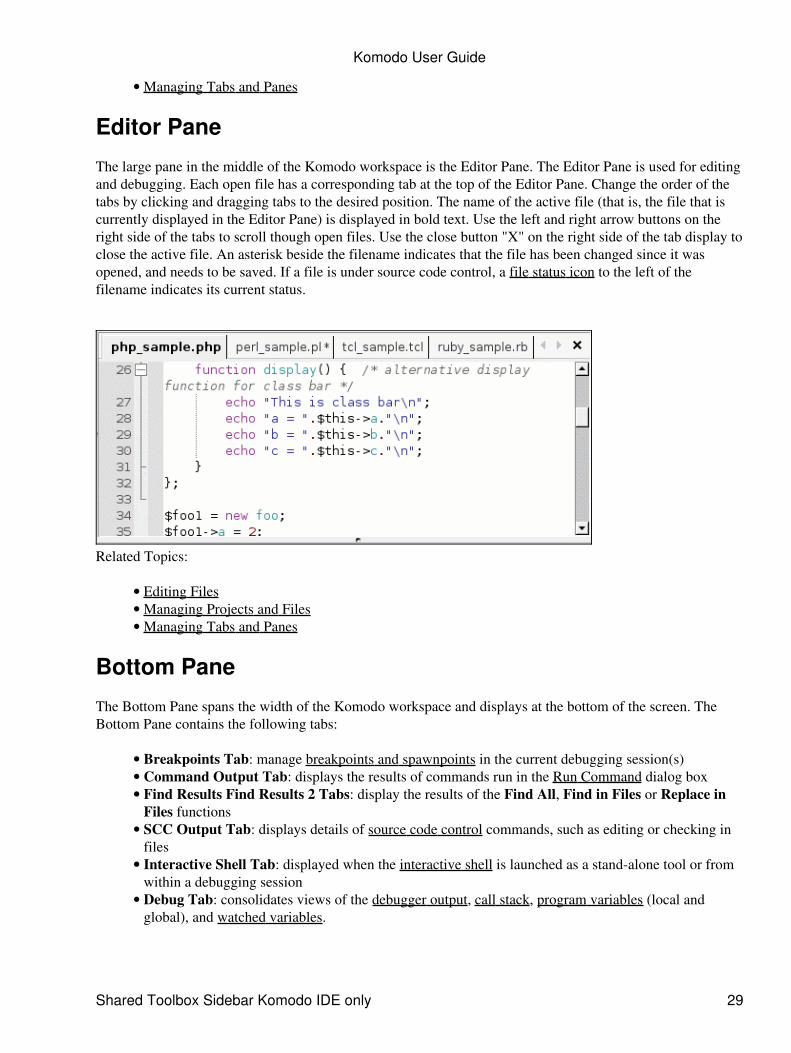
Managing Tabs and Panes•
Editor Pane
The large pane in the middle of the Komodo workspace is the Editor Pane. The Editor Pane is used for editingand debugging. Each open file has a corresponding tab at the top of the Editor Pane. Change the order of thetabs by clicking and dragging tabs to the desired position. The name of the active file (that is, the file that iscurrently displayed in the Editor Pane) is displayed in bold text. Use the left and right arrow buttons on theright side of the tabs to scroll though open files. Use the close button "X" on the right side of the tab display toclose the active file. An asterisk beside the filename indicates that the file has been changed since it wasopened, and needs to be saved. If a file is under source code control, a file status icon to the left of thefilename indicates its current status.
Related Topics:
Editing Files• Managing Projects and Files• Managing Tabs and Panes•
Bottom Pane
The Bottom Pane spans the width of the Komodo workspace and displays at the bottom of the screen. TheBottom Pane contains the following tabs:
Breakpoints Tab: manage breakpoints and spawnpoints in the current debugging session(s)• Command Output Tab: displays the results of commands run in the Run Command dialog box• Find Results Find Results 2 Tabs: display the results of the Find All, Find in Files or Replace inFiles functions
•
SCC Output Tab: displays details of source code control commands, such as editing or checking infiles
•
Interactive Shell Tab: displayed when the interactive shell is launched as a stand-alone tool or fromwithin a debugging session
•
Debug Tab: consolidates views of the debugger output, call stack, program variables (local andglobal), and watched variables.
•
Komodo User Guide
Shared Toolbox Sidebar Komodo IDE only 29
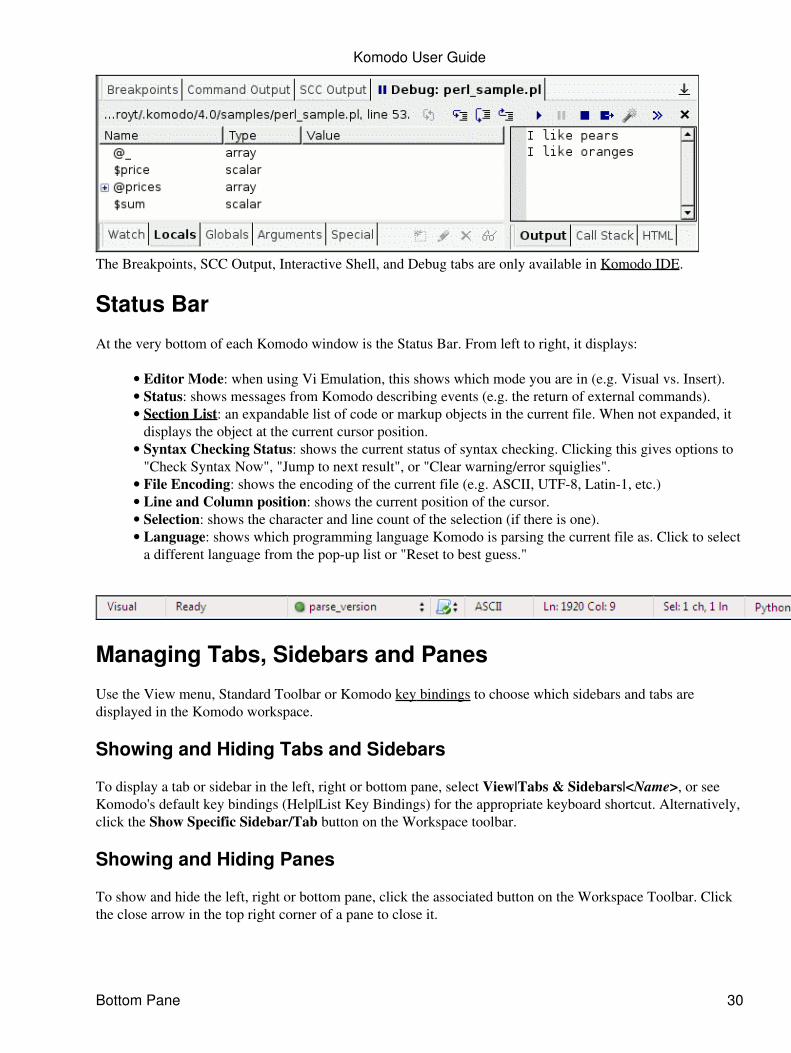
The Breakpoints, SCC Output, Interactive Shell, and Debug tabs are only available in Komodo IDE.
Status Bar
At the very bottom of each Komodo window is the Status Bar. From left to right, it displays:
Editor Mode: when using Vi Emulation, this shows which mode you are in (e.g. Visual vs. Insert).• Status: shows messages from Komodo describing events (e.g. the return of external commands).• Section List: an expandable list of code or markup objects in the current file. When not expanded, itdisplays the object at the current cursor position.
•
Syntax Checking Status: shows the current status of syntax checking. Clicking this gives options to"Check Syntax Now", "Jump to next result", or "Clear warning/error squiglies".
•
File Encoding: shows the encoding of the current file (e.g. ASCII, UTF-8, Latin-1, etc.)• Line and Column position: shows the current position of the cursor.• Selection: shows the character and line count of the selection (if there is one).• Language: shows which programming language Komodo is parsing the current file as. Click to selecta different language from the pop-up list or "Reset to best guess."
•
Managing Tabs, Sidebars and Panes
Use the View menu, Standard Toolbar or Komodo key bindings to choose which sidebars and tabs aredisplayed in the Komodo workspace.
Showing and Hiding Tabs and Sidebars
To display a tab or sidebar in the left, right or bottom pane, select View|Tabs & Sidebars|<Name>, or seeKomodo's default key bindings (Help|List Key Bindings) for the appropriate keyboard shortcut. Alternatively,click the Show Specific Sidebar/Tab button on the Workspace toolbar.
Showing and Hiding Panes
To show and hide the left, right or bottom pane, click the associated button on the Workspace Toolbar. Clickthe close arrow in the top right corner of a pane to close it.
Komodo User Guide
Bottom Pane 30
Resizing Panes
When you are focusing on coding alone, you may want to maximize the Editor Pane. To increase the size ofthe Editor Pane, hide the Left Pane and the Right Pane. The Left, Right and Bottom Panes can be resized byclicking and dragging.
Enabling Full Screen Mode Windows and Linux only
To take advantage of as much of the Komodo workspace as possible, select View|Full Screen. When FullScreen mode is enabled, the workspace is maximized, and the toolbars and status bar are hidden. To restorethe previous view, select View|Full Screen again.
Komodo User Guide
Resizing Panes 31
Getting Started with the Sample ProjectKomodo's sample project includes a number of programs in different languages. Use these sample programsto familiarize yourself with Komodo's functionality.
Opening the Sample Project and Files
On Komodo's Start Page, click Open Sample Project. The Sample Project and its associated files will displayon the Places sidebar.
To open a sample program, double-click the file name on the Places sidebar. The contents of the file willdisplay in the Editor Pane.
Editing a Sample Program
Komodo includes sample programs written in Perl, Python, JavaScript, PHP, Tcl, and XSLT. Each program isannotated with comments and exercises that describe Komodo's language-specific features. Open the sampleprograms for languages that interest you, and read the comments to explore Komodo's editing features.
Debugging a Sample Program
Komodo provides debugging support for Perl, Python, PHP, Ruby, Tcl and XSLT. Komodo works with thecore language distribution for Perl, Python, PHP and Ruby to provide interpreter support. XSLT, on the otherhand, is entirely self-contained. To debug the sample files for Perl, Python, PHP, Ruby and Tcl, you mustconfigure the location of the language interpreter. See Configuring the Perl Debugger, Configuring the PythonDebugger, Debugging PHP Configuring the Ruby Debugger, or Configuring the Tcl Debugger, forinstructions. Then open the sample file for the desired language, and view the comments in the "Debugging"section. General debugging functionality is discussed below.
Breakpoints: In the sample program, click on the gray margin to the immediate left of the EditorPane. A green circle will appear, indicating that a breakpoint has been set. When you run thedebugger, program processing will stop at lines where breakpoints have been set.
1.
Start / Step Over / Step In: To start debugging, click the "Go" button on the Debug Toolbar. Whendebugging begins, the Bottom Pane will be displayed beneath the Editor Pane in the Komodoworkspace. The program will run until a breakpoint is encountered; when program execution pausesat a breakpoint, click "Step In" to move through the program in single line increments, or "Step Over"to execute the entire function (as applicable), or "Step Out" to execute the remainder of a function (asapplicable).
2.
Debug Tab: The tab labeled Debug: <filename> is displayed when debugging begins. In addition tothe debug output, the Debug tab displays the call stack, variables, and variable values.
3.
Getting Started with the Sample Project 32
Support and FeedbackThere are a number of ways to get help if you run into problems using Komodo.
Documentation
Have a look through this user guide to see if there is any relevant documentation. Use the Search field in thetop right corner of the Komodo Help window to search the table of contents.
ActiveState Community Site
Komodo developers monitor the Komodo Support forum for issues. You can search the site to see if otherusers have encountered a similar problem.
The site also hosts FAQs, Screencasts, and a discussion forum.
http://community.activestate.com/products/Komodo
RSS feeds are available for all forums and articles.
Mailing Lists
The Komodo mailing lists are another good resource for peer support. You can join the mailing lists, or searchthe archives.
http://code.activestate.com/lists/komodo-discuss/
http://code.activestate.com/lists/komodo-beta/
Reporting Bugs
If you have found a bug, we'd like to know about it. First, query our on-line bug database to see if your bughas already been reported:
http://bugs.activestate.com/query.cgi
Try a few searches using different keywords related to the problem; someone else may have reported the sameproblem, but described it slightly differently. If you can't find an existing bug, submit a new one. A set ofguidelines for writing up a bug can be found here:
http://bugs.activestate.com/page.cgi?id=bug-writing.html
New bugs can be submitted here:
Support and Feedback 33
http://bugs.activestate.com/enter_bug.cgi
Your bug will be assigned a bug ID (and related URL) that you can use to monitor the progress of the bug.The system can also email you when your bug is resolved.
Feature Requests
If you tried Komodo and you would like to see a specific feature or enhancement, provide a detaileddescription in a bug report with Severity set to "7-enhancement".
ActiveState Technical Support
If the problem you are having is not referenced in any of the resources above, or if the posted solutions do notwork for you, Komodo IDE users can get technical support by sending an email to [email protected] as much information as possible about the problem you are having and the software you are running,including:
the version of Komodo (copy the Build Information listed in "Help|About Komodo").• your operating system version• relevant details of any associated software you are running (e.g. PHP version, SCC type, filesystemtype)
•
Comments and Feedback
We're interested to hear what you think of Komodo, and welcome your feedback. If you would like to tell ushow Komodo met or didn't meet your coding needs, send us an email at: [email protected]
Komodo User Guide
Reporting Bugs 34
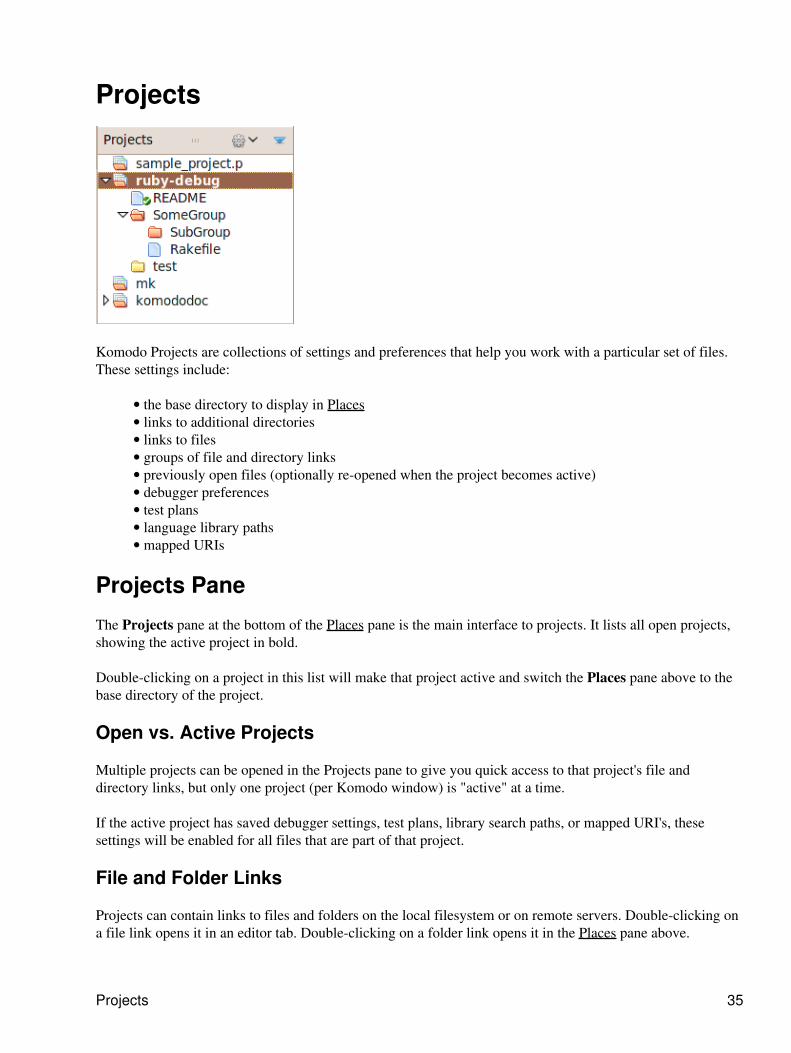
Projects
Komodo Projects are collections of settings and preferences that help you work with a particular set of files.These settings include:
the base directory to display in Places• links to additional directories• links to files• groups of file and directory links• previously open files (optionally re-opened when the project becomes active)• debugger preferences• test plans• language library paths• mapped URIs•
Projects Pane
The Projects pane at the bottom of the Places pane is the main interface to projects. It lists all open projects,showing the active project in bold.
Double-clicking on a project in this list will make that project active and switch the Places pane above to thebase directory of the project.
Open vs. Active Projects
Multiple projects can be opened in the Projects pane to give you quick access to that project's file anddirectory links, but only one project (per Komodo window) is "active" at a time.
If the active project has saved debugger settings, test plans, library search paths, or mapped URI's, thesesettings will be enabled for all files that are part of that project.
File and Folder Links
Projects can contain links to files and folders on the local filesystem or on remote servers. Double-clicking ona file link opens it in an editor tab. Double-clicking on a folder link opens it in the Places pane above.
Projects 35
Project Groups
Groups are named virtual containers for files and folders. You can use them to organize items for quick accesswhich might be in disparate locations. Groups are not actual direcories, they just contain links to files andfolders (or sub-groups).
Project Menus
Projects menus are available in the main toolbar, the Projects pane toolbar and as a right-click context menu.The toolbar menus operate on the active project and the context menu operates on the selected project.
Each menu offers a different list of options, but there is some overlap. The following options are available:
Show in Places: Changes the Places pane to the base directory of the project without making it theactive project.
•
Open Project: Opens a diolog for choosing a .komodoproject file to open. The project is opened inthe pane and becomes the active project by default.
•
New Project: Creates a new project, then opens it and makes it active.• Close Project: Removes the selected project from the Projects pane.• Close All Projects: Removes all projects from the Projects pane.• Save Project: Saves the current project properties to the ".komodoproject" file.• Save Project As...: Saves a copy of the current project with a different name (or in a differentlocation), then makes the new project active.
•
Rename Project...: Renames the current project.• Open Project in New Window: Each Komodo window can have only one active project at a time.This feature opens a new Komodo window with the selected project active, allowing you to work withmultiple projects silmultaneously.
•
New Project: Opens the filesystem browser to select the location and name of a new project. Theproject preferences and settings are stored in a ".komodoproject" file. The directory selected becomesthe base directory for display in Places.
•
Refresh Status: Updates the filesystem and source code control status of all files and directories inthe project.
•
Add: Add files folders and groups.New File: Add a new file to the project or folder (depending on context or selection).♦ New Group: Add a new named group of folders or files.♦ Existing File: Select a file to include in the project, folder or group.♦ Existing Folder: Select a filesystem folder to include in a project or group.♦ Existing Remote File / Folder: As above, but using the remote filesystem browser.♦
•
Source Code Control: A sub-menu of SCC actions. (Komodo IDE only)• Publishing: A sub-menu of Publishing actions. (Komodo IDE only)• Show in File Manager: Open the selection in the system's default file manager.• Remove: Remove the selection from the project.• Properties: Opens the Properties and Settings dialog for the current or selected project.•
Project Properties and Settings
Komodo has preferences at the file, project and global level. File preferences take precedence over projectpreferencs which take precedence over global preferences. When a project is active, it's settings overrideglobal preferences wherever there is overlap.
Komodo User Guide
Project Groups 36

Project settings include the following sub-set of the global preferences:
Debugging• Test Plan Configuration• Languages• Mapped URIs•
Komodo User Guide
Project Properties and Settings 37
ToolboxesFeature Showcases
create a custom toolbar• assign a custom keybinding to a component•
The Toolbox sidebar is for storing "tools" - bits of code that you can quickly add to Komodo to automatetasks, integrate extrnal tools, or just store snippets of text or links.
The following types of tools can be added anywhere in the Toolbox sidebar:
macros• commands• snippets• templates• URLs•
To show and hide the Toolbox sidebar click the Show/Hide Right Pane button in the Workspace toolbar,click View|Tabs & Sidebars|Toolbox, or use the key binding for your platform (e.g. "Ctrl" + "Shift" + "L").
The top level of the Toolbox sidebar is considered the global toolbox. This is an area for tools that aregenerally applicable for any file you might be working on. Tools can be grouped into folders to keep themorganized.
There are also two optional toolboxes indicated by special toolbox icons in the sidebar:
Shared Toolbox: A toolbox for tools shared with a group of people or otherwise accessed by otherinstallations of Komodo. It is configured and toggled on or off in the Shared Support preferences.
•
Project Toolbox: Tools specific to a particular project, only visible when that project is active.•
Adding, Removing and Managing Tools
To add an item to the toolbox: click the Tools menu button and select the type of tool you want (e.g. "NewMacro..."). A relevant dialog box will open with options for the tool. Clicking "OK" adds it the new tool atthe top level of the Toolbox.
To add an item in a specific place: right-click on the desired folder or toolbox, and select Add|New... fromthe context menu.
To remove an item: select it and hit the Delete key or right-click on it and choose "Delete" from the contextmenu.
To move tools: drag tools or directories between folders and toolboxes or cut/copy paste anywhere in theToolbox sidebar.
Toolboxes 38
Special Folders - Abbreviations and Vi Commands
There are two folder names that have special behavior in Komodo:
Abbreviations: Any folder named "Abbreviations" for snippets it can use with the Abbreviationsfunction. See the "Samples" toolbox directory for an example.
•
Vi Commands: Macros stored in a folder named "Vi Commands" can be run in command-line modeif Vi emulation is enabled.
•
Behind the Scenes - How Tools are Stored
Tooboxes are stored as special directories containing a file for each tool.
global toolbox: stored in a "tools" sub-directory of the user data directory.• shared toolbox: stored in a "tools" sub-directory of the path set in the Shared Support preferences.This will generally be on a mapped network drive or mounted network directory, but synchronizing alocal copy of the directory (e.g. using source code control, rsync, or Publishing) is also an option.
•
project-specific toolboxes: stored in a hidden ".komodotools" directory adjacent to the project file.Note: projects stored in the same directory will have a common toolbox, whether or not the basedirectories set in the project settings are different.
•
The individual tools are stored in JSON files with a ".komodotool" extension.
Importing and Exporting Tools
The toolbox menu and context menu have options to help with saving, importing and exporting tools anddirectories. Files with the ".komodotool" extension or directories containing those files can be imported, ascan legacy (5.2 and previous) Komodo toolbox files in ".kpf" format.
Toolboxes can also be exported as standard zip archives using "Export as Zip File..."
Komodo User Guide
Special Folders - Abbreviations and Vi Commands 39
Working with FilesKomodo provides a variety of methods for accessing and editing files. While files can be opened and editedindividually, they can also be stored in projects or the Toolbox as components.
If Komodo is configured to integrate with a source code control system (SCC), status icons beside thefilenames indicate the file's current SCC status, and SCC options are available from the File menu and theright-click context menus. This integration is described in detail in the Source Code Control section of theKomodo documentation.
Files are manipulated in various ways: via the File menu, via context menus in the editor, via context menuson the file tab (above the editor), and as components within projects and the Toolbox.
This document describes file functionality, such as opening, printing, and saving files. See the Editing pagefor information about editing files.
Creating Files
To create a new file, click the "New File" button on the standard toolbar. (To display the standard toolbar,click View|Toolbars|Standard.) A new file with the default file extension for the file type is created andopened in the Komodo editor. Use the New Files page in Komodo's Preferences to specify the default fileextension for new files.
Creating Files from Templates
New files can be created based on pre-defined templates that contain default content for specific file types.See the Templates documentation for information about configuring custom templates.
To create a new file from a template, select File|New|File. The New File dialog box contains numerouspre-defined templates organized into categories. Select the desired category, then select the desired templatewithin that category.
Click Open to create a file with the contents of the template file. The file is loaded in the editor.
The File|New|File menu displays a list of the most recently accessed templates. To alter the number oftemplate files displayed, refer to the New Files page in Komodo's Preferences.
To add a template to the Toolbox for quick access, select the desired template and click Add to Toolbox.
Opening Files
There are numerous methods for opening files in Komodo. These include:
File|Open|File: Open a file using the system file browser.• File|Open|Go to File: Open a file using the Go to File dialog.• Projects or Toolbox sidebars: Double-click, drag and drop, or use the file's right-click context menuto open a file contained in a project or the Toolbox.
•
Open/Find Toolbar: Use the Open/Find Toolbar. To display the Open/Find Toolbar, selectView|Toolbars|Open/Find.
•
Working with Files 40
Most Recently Used List: The most recently opened files are displayed on Komodo's Start Page.This list is also accessible from the File|Recent Files menu. The number of files in the most recentlyused list is determined by the Appearance preference.
•
Drag and Drop: Drag and drop one or more files from another drag-and-drop application (such asWindows Explorer) onto the Komodo editor.
•
Command-Line Argument: When Komodo is invoked from the command line, files can be specifiedas open arguments. See Starting on Windows, Starting on OSX, or Starting on Linux for moreinformation.
•
Go to File (Fast Open)
The Go to File dialog is an alternative to the system native "Open File" dialog. It typically makes it faster tofind and open files. File names are gathered from a number of sources. A filter box allows you to quickly filterthis list down to the file you are looking for. You can then open an item by pressing 'Enter' or double-clickingon the filename. File names sources are (configurable in the "Fast Open" preferences panel):
currently open files• files in the current project (if any)• files in the current directories of open files (excluding remote directories)• the last 50 files in History•
File name filtering works as follows:
Words in the filter box are used to match substrings in file basename.• Matching uses "Smart Case": case-insensitive if the filter words are all lowercase, case-sensitive ifuppercase letters are used.
•
You can also specify full and relative paths in the filter box. E.g. "~/myproject/Makefile","../relative/to/current/file.py".
•
Opening Files with the Open/Find Toolbar
The Open/Find Toolbar provides quick access for opening files and finding strings. The toolbar is displayed inKomodo by default. To hide or show the toolbar, select View|Toolbars|Open/Find.
Use the Open field on the Open/Find Toolbar to open one or more files in the filesystem. The Open fieldgenerates a drop-down list of files and directories as you navigate the hierarchy. To open a file, enter the filepath and name, and then press 'Enter'.
For example, to open a file named "debug.txt" in the directory C:\temp\log on a machine running Windows,enter C:\tmp\log\debug.txt in the Open field and then press 'Enter'. As you enter each backslash, a drop-downlist displays the files and directories beneath the current directory.
Enter "./" or ".\" in the Open field to display a list of files and directories in the "current" directory. Thecurrent directory is determined as follows:
Current File: If a file is open in the editor, the directory where the file is stored is the currentdirectory. If multiple files are open, the file that is currently displayed is the current file.
1.
HOME Variable: If no files are open, Komodo checks if the system has a defined HOMEenvironment variable. If so, the directory specified in that variable's value is the current directory.
2.
Komodo User Guide
Opening Files 41

Filesystem Root: If neither of the above conditions is met, the system's root directory is used ("C:\" isthe default on Windows, and "/" is the default on Linux and Mac OS X).
3.
To narrow the results in the list box, enter one or more characters in the name of the file or directory you wishto open or view. (The search is case-sensitive.) Alternatively, use the arrow keys to navigate the drop-downlist. The contents of the Open field are updated as you move up and down the list with the arrow keys.
Note that you can use standard directory navigation syntax to change directories. For example, if the currentdirectory is /home/fred/tmp/foo, change to the /home/fred/tmp/bar directory by entering ../bar.
To open a file, press 'Enter' when the file name is displayed in the Open field. To continue navigating thedirectory structure, append a frontslash or backslash to the directory name displayed in the Open field; thedrop-down list is updated with the list of files and directories that exist under the current location.
To open multiple files, specify a wildcard ("*" for a file name segment, "?" for a specific character). Forexample, to open all the files with the extension ".tcl" in the directory /home/fred/tmp, enter/home/fred/tmp/*.tcl.
At any time, press the 'Escape' key to return focus to the Komodo editor.
Opening Remote Files
Komodo can open files located on remote machines, providing that the remote machine is configured for FTP,FTPS, SFTP, or SCP access. To quickly access frequently used servers, create an entry in the ServerPreferences (Edit|Preferences|Servers).
To open a file located on a remote server, select File|Open|Remote File.
Connecting to a remote server
Pre-Configured Server Connection: If remote servers have been configured in Komodo'sPreferences, select the name of the configuration from the Server drop-down list. Access the ServerConfiguration dialog box by clicking the Accounts button to the right of the Server field.
•
Manual Server Connection: Enter the server's fully qualified hostname in the Server field. Press'Enter'. You are prompted to enter a name and password for the server. If the server is configured foranonymous access, select Anonymous login. To store the login name and password for the server,click Remember these values.
•
Using Public Key Authentication
Komodo supports public key authentication through external key agents like ssh-agent (inlcuded with theOpenSSH distribution) and Pageant (a companion utility for Putty). This allows you to access remote filesover SFTP or SCP without entering passwords.
ssh-agent configuration: See Jeremy Mates's "OpenSSH Public Key Authentication" guide or thessh-agent manual page.
•
Pageant configuration: See Using Pageant for authentication".•
Information on configuring public key authentication with source code control (CVS and SVN) can be foundin Configuring SSH Support for CVS and Subversion.
Komodo User Guide
Opening Files with the Open/Find Toolbar 42
Navigating the Remote File System
After establishing a connection to the remote server, a list of files and directories is displayed. These files anddirectories exist under the directory specified in the Look in field. Double-click a directory (indicated by a filefolder icon) to navigate the directory structure. Use the navigation buttons in the top right corner of the dialogbox to navigate the remote filesystem.
To open a single file, double-click the filename. To open multiple files, hold down the 'Ctrl' key whileclicking multiple files, then click Open.
The buttons in the top right corner of the dialog box perform various file and directory manipulationfunctions. Hover your mouse pointer over the buttons for a description of their functions. To delete or renamea file on the remote server, right-click the filename and, with the left mouse button, select the desiredcommand on the context menu.
Opening Mapped URIs
Mapped URIs can be opened by dragging a mapped link from a browser into Komodo. For example, if youmapped the URL http://www.example.org/ to the local directory /var/www/, you could drag a link likehttp://www.example.org/projects/test.html from a browser into Komodo, which would open the local file/var/www/projects/test.html
This feature also works with URIs mapped to remote filesystems (via FTP, SFTP or SCP), which in turn canbe configured for automatic authentication under Edit|Preferences|Servers.
Switching Between Files
To switch between open files in the editor:
Key Binding: Use the associated key binding.• Editor Tabs: Click the tab with the desired filename.• Window Menu: On the Window menu, select Next File or Previous File to move from left to right(or right to left) across the file tabs. Alternatively, select the desired file from the list of files currentlyopen in the editor.
•
Project or Toolbox: Double-click the filename.•
If more files are opened than can be displayed by file tabs, click the right and left arrow buttons located in thetop right corner of the editor to view the tabs of all open files.
To re-order the position of the file tabs, drag and drop the tabs into the desired positions.
For more information about working with the editor tabs, see Editor Tab Display in the editor documentation.
Comparing Files
Komodo includes a "diff" mechanism used to compare files. To compare two files using Komodo's "diff"window:
Select Tools|Compare Files.1.
Komodo User Guide
Navigating the Remote File System 43
By default, the path and file name of the file currently displayed in the editor is the first file forcomparison. As desired, alter this selection by entering an alternate path and file, or browse for thedesired file using Browse button. Use the same mechanism to specify the second file.
2.
Click Compare Files. The contents of both files are displayed in the "diff" window.3.
If the file is stored in a project or the Toolbox, this function can also be invoked by right-clicking the file andselecting Compare File With.
The unique characteristics of each file are displayed in different colors (red and blue by default); commoncharacteristics are displayed in a third color (black by default). To configure custom colors for the "diff"window, alter the Language-Specific Coloring setting for the Other|Diff language in the Fonts and Colorspreference.
The following buttons (and default keybindings) are available in the "diff" window:
Next ('F8'): Jump to the next change.• Previous ('F7'): Jump to the previous change.• Reveal ('F9'): Jump to corresponding line. Opens and/or shifts focus to the original file in the EditorPane. If viewing a diff in an editor tab, right-click and select Jump to Corresponding Line (or selectNavigation|Jump to Corresponding Line) to shift focus to the editor tab containing the source code.Selecting this option opens the source code tab in the Editor Pane if it is not already open and/or shiftsfocus to the original file in the Editor Pane. (If viewing a diff in an editor tab, right-click and selectJump to Corresponding Line.)
•
A right-click context menu is also available with the following additional options:
Copy• Select All• View Whitespace• View Indentation Guides• View Line Numbers• View EOL Markers• Word Wrap•
Pressing 'Esc' closes the window.
Refreshing File Status
The Refresh Status option checks the read/write disk status for the component. If the file is of a language forwhich "code intelligence" is supported and enabled (as configured in the Code Intelligence Preferences),Refresh Status also updates the code intelligence database with the contents of the file.
If the component is stored in a source code control system, Refresh Status also checks the repository status ofthe file. Komodo determines whether a file is contained in an SCC repository by the following methods:
Perforce: analysis of the client configuration• CVS: analysis of the CVS control directories•
To refresh the file status of the current file, right-click the file tab or right-click within the editor and selectRefresh Status. The same option is available on the right-click context menu of files in projects or within the
Komodo User Guide
Comparing Files 44
Toolbox.
Source Code Control
Komodo provides source code control support for files stored in CVS or Perforce repositories. Source codecontrol support (including SCC configuration, status icons and specific commands) is described in detail inthe Source Code Control section of the documentation. To access source code control commands:
Editor Context Menu: Right-click a file in the editor and select Source Control.• File Tab Context Menu: Right-click a file tab above the editor and select Source Control.• Toolbox or Project Context Menu: Right-click a file in the Toolbox or Projects sidebar and selectSource Control.
•
Toolbox or Project Menu: If a file is currently selected in the Toolbox or Projects sidebar, use themenu to access source code control commands for the selected file.
•
File Properties and Settings
In addition to the Komodo's global Preferences, some preferences can also be configured on a per-file basis.These settings override the global and project level preferences. To access the Properties and Settings dialogbox for a file:
Edit Menu: On the Edit menu, click Current File Settings.• Editor Context Menu: Right-click in the editor and select Properties and Settings from the contextmenu.
•
File Tab Context Menu: Right-click the tab above the editor that displays the filename, and selectProperties and Settings.
•
File Properties
The Properties category in the Properties and Settings dialog box displays general information about the file,such as the directory where it is stored, the size and creation and modification dates. The following filecharacteristics can be modified on this tab:
Attributes: Toggle the file's status between writable and read-only.• Language: This field displays the current language association (which affects language-specificoptions like syntax coloring and AutoComplete) for the current file. To change the languageassociation, select another language from the drop-down list. To set the language association to theKomodo default (as configured in the File Association Preference, click Reset.
•
Encoding: Use this field to set the International Encoding for the current file. Select Use signature(BOM) to use the byte order mark (a Unicode character at the top of the file which indicates theencoding) if present.
•
Line Endings: Use this field to set the desired line endings for the current file. By default, Komodopreserves the line endings contained in a file when the file is opened. (Default line endings for newfiles are configured in the New Files preference.) If you select Preserve existing line endings, newlines are assigned the end-of-line character selected in the drop-down list, but existing lines are not bealtered.
•
For HTML and XML documents, two additional settings are available:
Komodo User Guide
Refreshing File Status 45

Default DOCTYPE• Default Namespace•
Komodo tries to determine these values from the document's XML declaration. If the document does not haveone, the DOCTYPE and namespace can be manually set here, enabling appropriate XML autocompletion.XHTML 1.1 is the default if no declaration or settings are present.
File Source Control Settings
If Komodo is configured to work in conjunction with a Source Code Control system, the Source CodeControl category displays the current SCC status and settings.
File Editor Settings
The options on this tab are a subset of the General Editor and Smart Editing preferences. Refer to thosesections of the Preferences documentation for information about individual options.
Indentation Tab
The options on this tab are a subset of the Indentation Preferences. Refer to that section of the Preferencesdocumentation for information about individual options.
Browser Preview
This option configures the behavior of the Preview in Browser function. When the Preview in Browserfunction is invoked, you are prompted to specify the file or URL used to preview the current file. (Forexample, when previewing a CSS file, specify an HTML file to use for the preview.) The Preview in Browserdialog box has an option for remembering the specification. If that option is enabled, the file or URL specifiedis displayed in the Preview field. Click Change to alter the preview file.
Printing Files
To print the file that is currently displayed in the editor, use one of the following methods. These methodsinvoke the standard system dialog box for printer selection and configuration. Advanced print functions aredescribed below.
File|Print|Print: Invoke the print function from the File menu.• Standard Toolbar: On the Standard Toolbar, click the Print button.• Editor Context Menu: Right-click the file and select Print.•
Printing style is configured on the Printing page in Komodo's Preferences. Alternatively, selectFile|Print|Print Settings to display the Printing preferences page.
To display a preview of the printed output, select File|Print|Print Preview.
Select File|Print|Print Preview contains features for setting the scale and orientation of a print job. Use thearrow buttons to move forward or backward in a multi-page print job, or enter a specific page number in thefield provided. Click the Page Setup button to access the complete set of print features in the Page Setupdialog box.
Komodo User Guide
File Properties 46
To print a selection of text rather than the entire file, select the desired text in the editor, then selectFile|Print|Print Selected Text.
Page Setup
Manage the format of print jobs using the options available in the Page Setup dialog box. Select File|PageSetup to access these options.
Format and Options
Orientation: Select whether the printed output should have a portrait or landscape orientation.• Scale: If the Shrink To Fit Page Width check box is not selected, use this field to manually enter apercentage.
•
Shrink To Fit Page Width: Select this check box to make the print job fit the paper size selected forthe default printer.
•
Print Background (colors & images): Select this check box to include background colors andgraphics (e.g., on a web page) in a print job.
•
Margins and Header/Footer
Margins: Use the fields provided to enter the size of the margins in inches.• Headers and Footers: Use the drop-down lists to select the type of information that appears in theheaders and/or footers, and to determine their position on the page. The top row of lists contains theheader options, and the bottom row contains the footer options. Choose from options such as "Title","URL" and "Page #". Select the "Custom" option from any of the drop-down lists to enter customheader information. To print without headers and footers, select the "blank" option in each of thedrop-down lists.
•
Print to HTML File
To generate an HTML file from the file currently active in the editor:
On the File menu, click Print to HTML File. You are prompted to name the output file.1. Enter the file location in the field provided. Click OK. The HTML file opens in the editor.2.
To print a selection of text to an HTML file (rather than the entire file), select the desired text in the editor,then select File|Print|Print to HTML File.
Saving Files
Komodo is "intelligent" about saving files. For example, Komodo prompts to save unsaved files on close.Attempting to save changes to a file that is set to read-only displays a dialog box where you are given theoption to change the status or to "force" the save (which makes the file writable, saves the changes, then setsthe file back to read-only). In addition, Komodo can be configured to automatically save a backup copy offiles open in the editor. To configure Komodo's save functionality, use the Save Options preference page.
To save a file with its current name, do one of the following:
Key Binding: Use the associated key binding.•
Komodo User Guide
Printing Files 47
File|Save: Use the File|Save menu option to save the file that is currently displayed in the editor. Tosave the file to a different name, select File|Save As. To save all open files, select File|Save All
•
Standard Toolbar: Click the Save button on the Standard toolbar. To save all open files, click theSave All button.
•
File Tab Context Menu: Right-click the file tab and select Save. To save the file to a different name,select File|Save As.
•
Saving Files Remotely
To save a copy of the current file to a remote server, select File|Save Remotely As. The Remote File dialogbox is displayed. When editing files located on a remote server (including remote files stored in a project orthe Toolbox), saving the file automatically saves it to the remote location.
Show Unsaved Changes
Before saving a file, view the changes in the file since it was last saved by using the Show Unsaved Changesoption. To invoke this option, right-click within the editor (or on the file tab above the editor) and select ShowUnsaved Changes. An external window displays the differences between the current version of the file andthe disk version (e.g., the version that was last saved).
The unique characteristics of each file are displayed in different colors (red and blue by default); commoncharacteristics are displayed in a third color (black by default). To configure custom colors for the "diff"window, alter the Language-Specific Coloring setting for the Other|Diff language in the Fonts and Colorspreference.
Reverting Files
To abandon changes made to a file since it was last saved, but leave the file open in the editor, selectFile|Revert.
Closing Files
To close one or more files, use one of the following methods:
Editor Tabs: Click the "x" in the top right corner of the tab, or middle-click on the tab.• File Menu: Select File|Close then one of Current Tab, Other Tabs or All Tabs.• Key Binding: Use the associated key binding (e.g. "Ctrl"+"F4" on Windows).• Editor Tab Context Menu: Right-click the file tab and select Close.•
Komodo User Guide
Saving Files 48
Find & ReplaceThere are a number of ways to search for text in Komodo:
Incremental Search quickly finds text in the current buffer• The Find dialog box offers several find and replace options.• The Open/Find Toolbar can search the current buffer or files in a project or directory•
To replace text, use the Find dialog with the Replace option enabled.
Additional features are available for:
Replace in Files, with Confirm and Undo options.• Function Search for Perl, Python, PHP, Ruby and Tcl.• Vi Mode command line for searches and substitutions.•
Match Highlighting
When performing a search on the current buffer, all matching text strings will be highlighted. Press 'Esc' toclear the highlighting.
To guard against performance problems caused by slow searches, Komodo will stop highlighting matchesafter the timeout configured in the Find preferences.
Incremental Search
Use incremental search to quickly find a word or string in the file you are currently editing.
Start an incremental search: Use the associated key binding (by default: 'Ctrl'+'I' on Windows andLinux, 'Cmd'+'I' on Mac OS X). The status bar displays "Incremental Search:" followed by thecharacters in your search. Begin typing the characters you want to find. As you type, the cursor movesto the first match after the current cursor position.
•
Jump to the next/previous occurrence: Press 'Ctrl'+'I' 'Ctrl'+'I' to cycle through all subsequentoccurrences; press 'Ctrl'+'Shift'+'I' to cycle through previous ones.
•
Use a selection as your search string: Select the text you want to use with the mouse or keyboard,then press 'Ctrl'+'I'.
•
Change the search string while searching: Use 'Shift'+'Right Arrow' to add the character to the rightof the current selection, and 'Shift'+'Left Arrow' will remove a character.
•
Cancel the search: Press 'Esc'.•
Find Dialog
The Find dialog box is a multi-purpose interface for finding and replacing text. It has the following options:
Regex: Use regular expressions instead of plain text.• Smart case / Match case: Toggles between "Match case" (selected - case sensitive), "Match case"(deselected - case insensitive), and "Smart Case".
•
Word: Match whole words only.•
Find & Replace 49
Multiline: Changes the "Find what:" field to a multi-line field, allowing you to insert blocks of text.• Replace: Adds the "Replace with:" field for making substitutions.•
The interface changes as different options are selected, so that you only see fields and buttons that are relevantto your task.
Regex Searches
Selecting Regex will interpret the search string as a Python regular expression, and perform the searchaccordingly.
To the right of the "Find what:" field are two buttons which can help you compose your regular expression:
Regular Expression Shortcuts: A drop list of commonly used regular expression special charactersand sequences with a short description of what each one does.
•
Open in Rx Toolkit: Opens the regular expression from the "Find what:" field in the Rx Toolkit,allowing you to test it before running your search. Komodo IDE only
•
When used in conjunction with Replace, regular expression replacement sequences can be used in the"Replace with:" field (e.g. "\1", "\g<name>", etc.).
Case Sensitivity
The Smart case / Match case option is a three-way toggle:
Match case (selected): Performs a case sensitive search; only exact matches are found (e.g."myString" matches "myString" but not "mystring").
•
Match case (deselected): Performs a case insensitive search; strings will match even if the case isdifferent (e.g. "mystring" will match "myString").
•
Smart case (selected): Search strings containing capital letters are automatically case sensitive.•
Match Whole Words
With Word selected, search strings will only match if a whitespace occurs on either side of the string. Forexample, if the search string is "edit" and "Word" is selected, only occurrences of the word "edit" will befound. If it is not selected, "editing", "editor", "editorial" and "edited" could also be found.
Multiline
Selecting Multiline changes the "Find what:" field (and the "Replace with:" field if Replace is selected) withlarger, multiline text boxes.
This makes it easier to paste in multiline blocks of text in these fields. The search text will only match if theline breaks are the same. Line breaks in the "Replace with:" field are likewise respected.
Scope
The "Search in:" drop list defines where the find or replace will happen. It contains the following options:
Komodo User Guide
Find Dialog 50
Current document• Selected text• Open files• Project (current project)• Files•
Selecting Files from this list opens additional fields allowing you to set the scope of your search in directorieson your filesystem:
Directories: Defines the path to the directory to start your search in. Multiple paths can be added byseparating them with a semi-colon (";"). Relative paths can be specified using the path of the file inthe current editor tab as the starting point (e.g. "../adjacent-dir/").
•
Search in sub-directories: If selected, makes the search recursive. The search starts in the directoryor directories specified above and descends into all sub-directories.
•
Include: Defines the file names to include in the search or replace. Can be used to specify a partialfilename or file extension with glob syntax (e.g. "*.html, *.txt").
•
Exclude: As above, but defining the files and directories to exclude.•
See also the Replace in Files section for a description of the Confirm and Undo options.
Actions
Once all the options for the Find or Replace are set, choose the action you wish to perform. The action buttonsavailable will depend on which options have been selected:
Find Next: Finds consecutive occurrences of the search string in your file or selection. As matchesare found, the text will be highlighted. The Find dialog box remains in focus. To keep the focus inyour file, close the Find dialog box, then use the associated key binding.
•
Find All: Locates all occurrences of the search string in your file or selection. The matches will bedisplayed in the Find Results tab in the Bottom Pane.
•
Replace: Highlights the next occurrence of the search string; if you click Replace again, thehighlighted text will be replaced with the replacement string and the next occurrence of the searchstring will be highlighted.
•
Replace All: Replaces all occurrences of the search string in the document or selection withoutprompting for confirmation. All replacements will be displayed on the Find Results tab of the BottomPane.
•
Mark All: Inserts a bookmark on each line that contains the search string. To move the editing cursorto a bookmarked line, press 'F2'.
•
Find Dialog Keyboard Shortcuts
On Windows and Linux, keyboard shortcuts for the Find dialog are indicated by an underlined letter in theoption, field and button labels. Hold down 'Alt' and press the underlined letter to toggle the option, jump to thefield, or start the operation.
On Mac OS X, these keyboard shortcuts are accessed by holding down the 'Ctrl' key, but are not indicated inthe interface. They are:
Find what: 'N'• Replace with: 'L'•
Komodo User Guide
Scope 51
Regex: 'X'• Match/Smart case: 'C'• Word: 'W'• Multiline: 'T'• Search in: 'I'• Directories: 'D'• Browse button: '.'• Search in sub-directories: 'B'• Include: 'U'• Exclude: 'E'• Find Next: 'F'• Replace: 'R'• Replace All: 'A'• Show results: 'O'• Confirm: 'M'•
Replace in Files
Globally replacing strings in multiple files can be daunting. Using a search string that matches more than whatwas intended, specifying an incorrect replacement string, or selecting the wrong starting directory for arecursive replacement can cause havoc.
Komodo's Replace in Files feature has a Confirm option which lets you check the substitutions before youapply them, and an Undo feature to revert the replacement if you make a mistake.
Confirming Changes
When "Search in: Files" is selected, the only action button available is Replace All. Beneath this button is aConfirm check box. This option adds an additional step to the replacement process which allows you to viewchanges before applying them, and "un-mark" specific changes you don't want to apply.
Confirm Replacements
The Confirm Replacements dialog box shows a list of all pending replacements from the Replace in Filesoperation. Each line shows:
A check mark (by default all are marked) indicating that the replacements in that file are marked forinclusion. Click on the check marks to toggle them on or off.
•
The path and filename• The number of replacements to be made in the file•
Show Selected Changes previews all selected changes in the list. Use 'Shift'+'Click' or 'Ctrl'+'Click' to selectmultiple items.
Show Marked Changes previews all marked changes.
The preview window has the same format and options as Compare Files. The preview is in unified diffformat, so it can be copied and saved as a patch.
Komodo User Guide
Find Dialog Keyboard Shortcuts 52
Make Changes
Once you have confirmed that all pending replacements are correct, or un-marked the changes you do notwant to include, click Make Changes.
Review and Undo
As Komodo makes the replacements, it outputs a log of the changes in a Find Results tab in the bottom pane.You can click on any of the changes to open the file in an editor tab at the appropriate line.
If you've made a mistake and would like to roll back all of the changes from the last Replace in Filesoperation, click the Undo Replacements button in the Find Results tab toolbar.
Find Results Tabs
Find Results tabs are opened in the Bottom Pane to display matches from Find All, Find in Files or Replacein Files operations.
Komodo can open two tabs, Find Results 1 and Find Results 2, which can be locked using the Lock buttonin their respective toolbars. New find or replace operations will not overwrite contents in a locked tab.
Komodo uses the first available tab for output. If both tabs are locked during subsequent find or replaceoperations, Komodo prompts you to unlock one of the tabs or cancel the action.
The Find Results tabs display columns for:
File: the path and filename in which the match or replacement occurred• Line: the line number on which the match or replacement occurred• Content: the text that was matched or replaced•
Double-click on any output line to jump to the relevant file and line in an editor tab.
The Find Results toolbar has buttons to:
Jump to Previous/Next Result• Stop Search• Undo Replacements (with Replace in Files output)• Lock or Unlock the tab•
Open/Find Toolbar
The Open/Find toolbar provides a quick way to open files and find strings. The toolbar is not displayed bydefault; to open it select View|Toolbars|Open/Find.
This toolbar has three fields:
Open: The file to open. Use the full path of the file, the relative path from the directory of the currentfile, or just the filename if it's in the same directory as the current file.
•
Find: The string to search for. Pressing 'Enter' after typing the search term searches the current file.•
Komodo User Guide
Make Changes 53

in: The directory or file to search in. Pressing 'Enter' in this field causes the search term in the Findfield to be applied to the specified directory or file instead of the current file. You can use the Browsebutton to the right of the field to populate this field. Accepts the glob wildcards '*' and '?'.
•
The Find and in fields both keep a list of the most recently entered strings and file specifications.
If a file or directory is specified in the in field, matches will be displayed in a Find Results tab.
Press 'Esc' to return focus to the Komodo editor. All fields can be accessed via their associated key bindings.
Finding Functions: Function Search Komodo Edit only
The Function Search looks through the current document for the following constructs:
Perl programs: sub and package statements.• Python programs: class and def statements.• PHP programs: class and function statements.• Ruby programs: module, class and def statements.• Tcl programs: proc statements.•
Use Navigation|Find Next Function or Navigation|Find Previous Function (or the associated keybindings) to cycle through the functions.
Use Navigation|Find All Functions to display a list of all functions in a Find Results tab. Double-click onany entry to jump to the relevant line.
Komodo IDE has a more powerful feature with the same default keybinding ('Ctrl'+'F8') called the SectionsList.
Komodo User Guide
Open/Find Toolbar 54
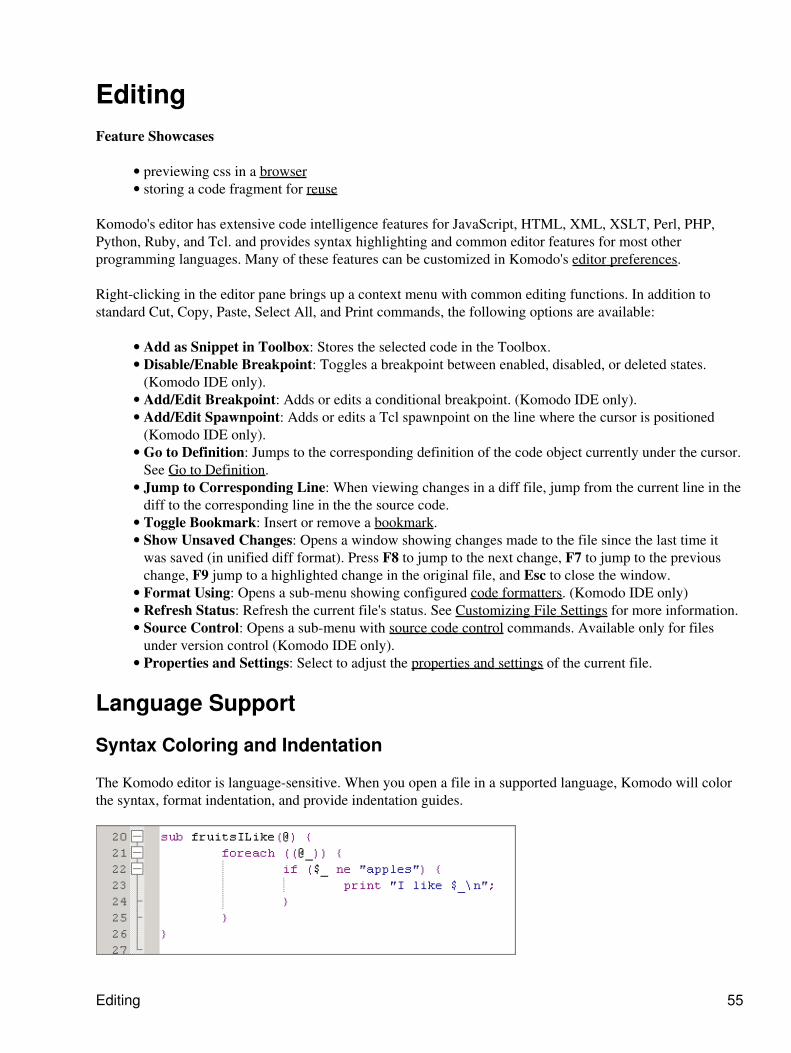
EditingFeature Showcases
previewing css in a browser• storing a code fragment for reuse•
Komodo's editor has extensive code intelligence features for JavaScript, HTML, XML, XSLT, Perl, PHP,Python, Ruby, and Tcl. and provides syntax highlighting and common editor features for most otherprogramming languages. Many of these features can be customized in Komodo's editor preferences.
Right-clicking in the editor pane brings up a context menu with common editing functions. In addition tostandard Cut, Copy, Paste, Select All, and Print commands, the following options are available:
Add as Snippet in Toolbox: Stores the selected code in the Toolbox.• Disable/Enable Breakpoint: Toggles a breakpoint between enabled, disabled, or deleted states.(Komodo IDE only).
•
Add/Edit Breakpoint: Adds or edits a conditional breakpoint. (Komodo IDE only).• Add/Edit Spawnpoint: Adds or edits a Tcl spawnpoint on the line where the cursor is positioned(Komodo IDE only).
•
Go to Definition: Jumps to the corresponding definition of the code object currently under the cursor.See Go to Definition.
•
Jump to Corresponding Line: When viewing changes in a diff file, jump from the current line in thediff to the corresponding line in the the source code.
•
Toggle Bookmark: Insert or remove a bookmark.• Show Unsaved Changes: Opens a window showing changes made to the file since the last time itwas saved (in unified diff format). Press F8 to jump to the next change, F7 to jump to the previouschange, F9 jump to a highlighted change in the original file, and Esc to close the window.
•
Format Using: Opens a sub-menu showing configured code formatters. (Komodo IDE only)• Refresh Status: Refresh the current file's status. See Customizing File Settings for more information.• Source Control: Opens a sub-menu with source code control commands. Available only for filesunder version control (Komodo IDE only).
•
Properties and Settings: Select to adjust the properties and settings of the current file.•
Language Support
Syntax Coloring and Indentation
The Komodo editor is language-sensitive. When you open a file in a supported language, Komodo will colorthe syntax, format indentation, and provide indentation guides.
Editing 55
More Information:
Customizing Fonts and Colors• File Associations• Viewing the Current File as Another Language• Customizing Indentation•
Background Syntax Checking
As you write code in the editor, Komodo periodically checks for syntax errors. Syntax errors are underlinedwith a red wavy line; syntax warnings are underlined with a green wavy line. Komodo uses the languageinterpreter's own error-checking functions, so there may be slight differences in the way that syntax errors aredetected and displayed depending on the version of the interpreter.
The syntax checking icon in the status bar displays the syntax status of the current file displayed in the EditorPane:
A green check mark over the icon indicates that the language interpreter does not detect any warningsor errors in the program.
•
A red exclamation mark over the icon indicates one or more errors. To see the number of errors andwarnings contained in the program, hover your mouse pointer over the syntax checking icon. Apop-up tool tip will display the total number of errors and warnings.
•
An hourglass over the icon indicates that syntax analysis is in progress.•
You can view the error message from the interpreter in the status bar if the editing cursor is on the same lineas the error. If it is not, hover the mouse pointer over the error and the interpreter error will be displayed in apop-up tool tip.
To move the editing cursor to the line containing the error or warning, double-click the syntax checking icon.If there are multiple errors or warnings, each time you double-click the icon, the editing cursor will move tothe next error.
If background syntax checking is disabled in Preferences, shift-click on the syntax checking icon to check thesyntax of the file.
Right-clicking on the syntax checking icon brings up the context menu.
Check syntax now (same as shift-click)• Jump to next result (same as double-click)• Clear warning/error squigglies•
Komodo supports background syntax checking for the following languages:
HTML• JavaScript• Perl *• PHP **•
Python•
Tcl• XML• XSLT•
* requires ActivePerl build 623or higher
** requires PHP version 4.05 orgreater
More Information:
Komodo User Guide
Syntax Coloring and Indentation 56
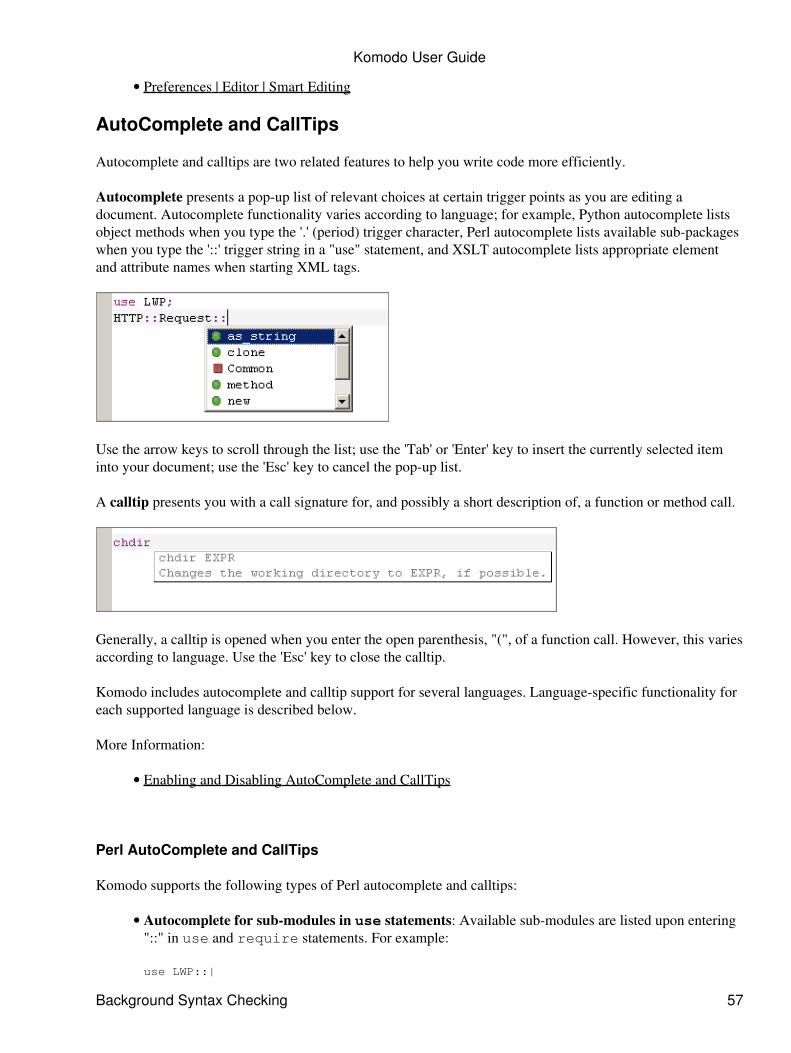
Preferences | Editor | Smart Editing•
AutoComplete and CallTips
Autocomplete and calltips are two related features to help you write code more efficiently.
Autocomplete presents a pop-up list of relevant choices at certain trigger points as you are editing adocument. Autocomplete functionality varies according to language; for example, Python autocomplete listsobject methods when you type the '.' (period) trigger character, Perl autocomplete lists available sub-packageswhen you type the '::' trigger string in a "use" statement, and XSLT autocomplete lists appropriate elementand attribute names when starting XML tags.
Use the arrow keys to scroll through the list; use the 'Tab' or 'Enter' key to insert the currently selected iteminto your document; use the 'Esc' key to cancel the pop-up list.
A calltip presents you with a call signature for, and possibly a short description of, a function or method call.
Generally, a calltip is opened when you enter the open parenthesis, "(", of a function call. However, this variesaccording to language. Use the 'Esc' key to close the calltip.
Komodo includes autocomplete and calltip support for several languages. Language-specific functionality foreach supported language is described below.
More Information:
Enabling and Disabling AutoComplete and CallTips•
Perl AutoComplete and CallTips
Komodo supports the following types of Perl autocomplete and calltips:
Autocomplete for sub-modules in use statements: Available sub-modules are listed upon entering"::" in use and require statements. For example:
use LWP::|
•
Komodo User Guide
Background Syntax Checking 57
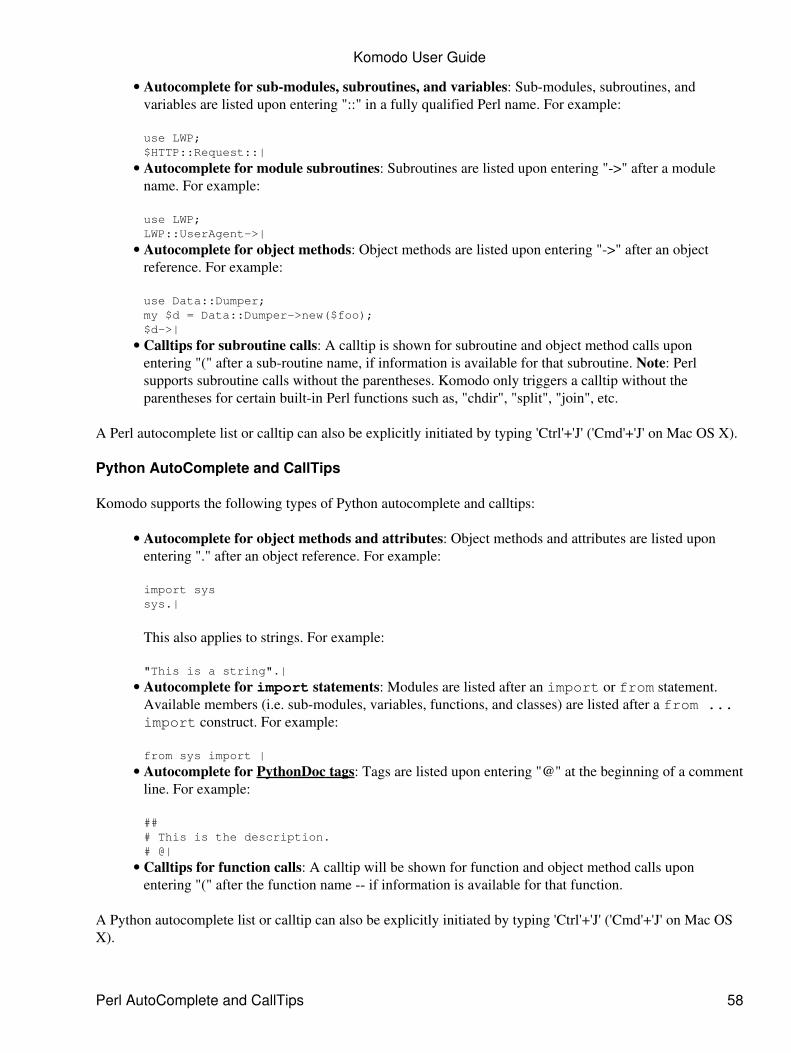
Autocomplete for sub-modules, subroutines, and variables: Sub-modules, subroutines, andvariables are listed upon entering "::" in a fully qualified Perl name. For example:
use LWP;$HTTP::Request::|
•
Autocomplete for module subroutines: Subroutines are listed upon entering "->" after a modulename. For example:
use LWP;LWP::UserAgent->|
•
Autocomplete for object methods: Object methods are listed upon entering "->" after an objectreference. For example:
use Data::Dumper;my $d = Data::Dumper->new($foo);$d->|
•
Calltips for subroutine calls: A calltip is shown for subroutine and object method calls uponentering "(" after a sub-routine name, if information is available for that subroutine. Note: Perlsupports subroutine calls without the parentheses. Komodo only triggers a calltip without theparentheses for certain built-in Perl functions such as, "chdir", "split", "join", etc.
•
A Perl autocomplete list or calltip can also be explicitly initiated by typing 'Ctrl'+'J' ('Cmd'+'J' on Mac OS X).
Python AutoComplete and CallTips
Komodo supports the following types of Python autocomplete and calltips:
Autocomplete for object methods and attributes: Object methods and attributes are listed uponentering "." after an object reference. For example:
import syssys.|
This also applies to strings. For example:
"This is a string".|
•
Autocomplete for import statements: Modules are listed after an import or from statement.Available members (i.e. sub-modules, variables, functions, and classes) are listed after a from ...import construct. For example:
from sys import |
•
Autocomplete for PythonDoc tags: Tags are listed upon entering "@" at the beginning of a commentline. For example:
### This is the description.# @|
•
Calltips for function calls: A calltip will be shown for function and object method calls uponentering "(" after the function name -- if information is available for that function.
•
A Python autocomplete list or calltip can also be explicitly initiated by typing 'Ctrl'+'J' ('Cmd'+'J' on Mac OSX).
Komodo User Guide
Perl AutoComplete and CallTips 58
Ruby AutoComplete and CallTips
Komodo supports the following types of Ruby autocomplete and calltips:
Autocomplete for require statements: Available Ruby libraries are listed upon entering theopening quote and for slashes in the quotes. For example:
require '| require 'net/|
•
Autocomplete for available attributes on a class or module namespace: Available methods,constants and sub-modules are listed upon entering "::" in a fully qualified Ruby name. For example:
class Animal def initialize(species) @@species = species end
def grunt "ugh" end
def run endend
Animal::|
•
Autocomplete for methods on an class instance: Available methods on an instance are listed uponentering ".". For example:
a = Animal.new("dog")a.|
•
Calltips for method calls: The method signature (and possibly some method documentation) isshown in a calltip upon entering the "(" for a method call.
a = Animal.new(|"dog")
•
A Ruby autocomplete list or calltip can also be explicitly initiated by typing 'Ctrl'+'J' ('Cmd'+'J' on Mac OSX).
PHP AutoComplete and CallTips
Komodo supports the following types of PHP autocomplete and calltips:
Classes and Methods: Classes in the current file, and classes in any included files, are displayedupon entry of the keyword "new". Methods for a class instance are displayed after you enter "->" onthe instance variable or alternatively if the scope is inside the class you will get completions after"this->", "self::", "parent::" operators. Static and constants are displayed after you enter "::" after aclass name.
class Student { const UNIVERSITY = "Pluto"; var $id = ""; var $name = ""; function Print() { echo "Id: " . $this->id . " Name: " . $this->name . "\n"; } }
•
Komodo User Guide
Ruby AutoComplete and CallTips 59
$student1 = new |Student(); $student1->|name = "Student 1"; $uni = Student::|UNIVERSITY;
Functions: Standard PHP functions and functions defined within the script (and within any includedfiles) are displayed after you have typed three characters that match one or more function names.Function calltips are displayed after the opening parentheses "(" on a function call.
php|info(); phpversion(|);
•
Constants: PHP constants are included with the functions list triggering after three characters havebeen typed.
echo "Filename is: " . __F|ILE__ . "\n";
•
Variables: Variables declared in the current file, or in any included files, are displayed when youenter the symbol "$" followed by one letter.
$student1 = new Student(); $s|tudent1->name = "Student 1";
•
Tcl AutoComplete and CallTips
Komodo supports the following types of Tcl autocomplete and calltips:
Autocomplete for command names: A list of matching Tcl commands is displayed after you havetyped three characters in a command. For example,
str|
•
Calltips for command arguments: A calltip is displayed for a Tcl command upon entering ' ' (space)after the command name. For example,
string is alpha |
•
Customizing Tcl AutoComplete
Tcl autocomplete and calltips use the built-in function definitions contained in Tcl .tip files, which are in thelib/support/tcl subdirectory of the Komodo installation directory.
Windows
<komodo-install-directory>\lib\support\tcl
Linux
<komodo-install-directory>/lib/support/tcl
Mac OS X
<komodo-install-directory>/Contents/SharedSupport/tcl
Komodo User Guide
PHP AutoComplete and CallTips 60
Edit the .tip files to customize or extend Tcl autocomplete and calltips in Komodo. Review the existing .tipfiles for examples before editing.
XSLT AutoComplete
Komodo supports the following types of XSLT autocomplete:
Autocomplete for XSLT elements: A list of appropriate elements in the XSL-namespace for thecurrent context is supplied upon entering "<" to start a tag.
•
Autocomplete for XSLT attributes: A list of appropriate attributes in the XSL-namespace for thecurrent element is supplied upon entering ' ' (space) in a tag.
•
Autocomplete for end-tags: A one item list containing the appropriate closing tag for the currentposition is supplied upon entering '</'.
•
Autocomplete for output: A list of elements and attributes for HTML or XML output (as defined inthe method attribute of the xsl:output element) is supplied upon entering "<" withinxsl:template blocks. If the output method is a specific dialect of XML, specifying thepublicId or systemId of that dialect in the doctype-public or doctype-system(respectively) enables autocompletion appropriate to that dialect.
•
XML AutoComplete and CallTips
Komodo supports XML autocomplete and calltips for basic XML as well as a a number of XML dialects,including:
HTML• XHTML• SGML• RELAX• RELAX NG• RDF• MXML•
XML Schema• Atom• Dublin Core• DocBook• WAP• XSLT•
VXML• SVG• MathML• XBL• XUL• XML Catalog•
Support for additional XML dialects can be configured by adding an XML Catalog for the dialect in theSGML/XML Catalogs section of the Code Intelligence Preferences.
Komodo supports the following types of XML autocomplete:
Autocomplete for elements: A list of elements available in the current namespace is supplied uponentering "<". If the current document's XML dialect is not recognized (i.e. it is not in the above list orin a configured catalog), the completion list is drawn from elements used in the document.
•
Autocomplete for attributes: A list of attributes available within in the current element is suppliedupon entering a space after the element name.
•
Autocomplete for end-tags: A list (of length one) to close the current tag is supplied upon entering'</'.
•
If the document does not have an XML declaration, autocomplete will default to XHTML 1.1. TheDOCTYPE and namespace can be manually set under File Properties.
Komodo User Guide
Tcl AutoComplete and CallTips 61
Soft Characters
With Enable soft characters selected in Komodo's editor preferences, typing one of "[" "{" "(" will put thematching, highlighted closing character to the right of the cursor. The highlighting indicates that it's a "soft"character. If you move over the soft character with navigation keys or move to a new cursor position outsideof the delimiters with the mouse, the soft characters become fixed (i.e. are inserted as normal text). You canalso "type over" soft characters. For example:
object.method(value|)
Hitting the right arrow key or typing a ")" results in:
object.method(value)|
In most programming languages, typing a string-start character in a "default" context (i.e. not in a string orcomment), will generate the appropriate soft quote to the right of the cursor. Komodo is aware that in somelanguages characters like single-quote are used to start a comment, so no soft character is generated.
Cursor movement (e.g. moving over the soft character with the right-arrow) "hardens" soft characters.
Viewing the Current File as Another Language
Komodo's syntax coloring, background syntax checking, and indentation are language-specific. However,Komodo provides the option to view a file as another language. This is useful when you open, for example, aPerl file that has no extension. You can select the Perl language option, then edit the file as a regular Perl file.Komodo's File Associations do not allow you to set a language association with a file that doesn't have anextension.
To view the current file as another language:
On the View menu, select View as Language.1. From the list, select the desired language.2.
If you have opened a file that does not have a file association specified in the Preferences dialog box, Komododisplays the file as text. You can select to view the file as another language, but Komodo does not rememberagain. If you will be working with a new type of file, it is recommended that you specify a file association.
For example, if you open a DocBook (*.docb) file in Komodo, it does not have XML syntax coloring. Specifya file association to tell Komodo to open *.docb files as XML files. For more information on specifying fileassociations, see Customizing File Associations.
If you choose to view a file in a different language and then save the file, the original language will not berestored when you re-open the file. If you are unsure of the original language, you can select View|View AsLanguage|Reset to best guess. Komodo will ignore the user preference, and analyze the file in an attempt todetermine its language.
Commenting Blocks of Code
The commenting function is used to convert a single line or a group of lines into a comment, with the syntaxappropriate for the file's language. Komodo supports commenting for the following languages:
Komodo User Guide
Soft Characters 62
More Information:
Commenting and Un-commenting Lines or Blocks of Code•
Manipulating Code
Cutting and Copying Lines
When no text is selected, the Cut and Copy commands operate on the entire line. For example, pressing'Ctrl'+'X' while editing a line will cut the entire line even though there is no selection. Note: This behavioralso applies to blank lines.
Copying or cutting lines repeatedly from the same cursor position adds each line to the clipboard rather thanoverwriting the previous clipboard contents.
Selecting and Dragging Lines
If the line number column is displayed, lines can be selected by and clicking on the line number. The selectionwill only be highlighted while the mouse button is depressed. To select multiple lines click on the starting linenumber, press 'Shift', then click the ending line number.
To drag a single line, click the line number and (keeping the left mouse button depressed) drag it to thedesired location. The same operation can be done with multi-line selections.
Automatically Repeating Keystrokes
Komodo can repeat a single keystroke for a given number of characters. To have Komodo repeat a keysequence a specified number of times:
Select Code|Repeat Next Keystroke N Times. The status bar at the bottom of the Komodoworkspace prompts you for the number of times the keystroke will be repeated.
1.
Type a number using only numeric characters.2. Enter the keystroke. The results of the sequence are displayed in the Editor Pane the specified numberof times.
3.
Indenting and Un-indenting Lines of Code
To indent a single line or a selected block of code:
Single Line: Position the cursor at the start of the text on the desired line. Press Tab, or selectCode|Indent.
•
Multiple Lines: Select the desired lines by clicking and dragging in the Editor Pane. Press Tab, orselect Code|Indent.
•
To un-indent a single line or a selected block of code:
Single Line: Position the cursor at the start of the text on the desired line. Select Code|Dedent or usethe associated key binding.
•
Komodo User Guide
Commenting Blocks of Code 63
Multiple Lines: Select the desired lines by clicking and dragging in the Editor Pane. SelectCode|Dedent, or use the associated key binding.
•
Specify the number of spaces per tab in the Indentation Editor Preferences(Edit|Preferences|Editor|Indentation).
Reflowing Paragraphs
To reformat a section of code so that it is left-aligned and displays within the Edge line column, select thesection of code to be reflowed, and then select Code|Reflow Paragraph. Alternatively, use the associated keybinding.
Formatting Code Komodo IDE only
Komodo offers integrations with external code formatters. Selected text, or an entire document can be passedto the formatter, processed, returned via stdin and reinserted in the buffer. You can add or edit code formattersin the Code Formatters preferences.
To use a formatter on the current buffer:
Select the formatter from the list under Code|Format Using. The first sub-menu shows the formattersavailable based on Komodo's language detection. Additional formatters are available under the OtherFormatters sub-menu.
•
Use the Editor: Format Code or Text command ('cmd_format'). Komodo will run the formatter onthe selection if there is one. If there is no selection, the entire document will be formatted. By default,this command does not have a key binding; you can assign one in the Key Bindings preferences.
•
Note: Komodo uses HTML Tidy as the default formatter for HTML documents. Since this parser cannotdifferentiate between isolated sections of HTML and complete documents, use Tidy Fragment whenformatting selection and Tidy Document when formatting the entire file.
Joining Lines
To cause two lines of code to display on the same line, position the cursor in the first of the two lines, andselect Code|Join Lines. The second line is joined with the first line.
Converting between Uppercase and Lowercase
To convert a selection of text from uppercase to lowercase (or vice-versa), from the Code menu, select MakeUppercase or Make Lowercase, or use the associated key binding.
Transposing Characters
To reverse the position of the two characters to the left of the editing cursor, use the associated key binding.
Komodo User Guide
Indenting and Un-indenting Lines of Code 64
Literal Characters
To insert literal characters into the editor, select Code|Enter Next Character as Raw Literal, and then enterthe key or key combination representing the literal character. (Alternatively, use the associated key binding.)For example, to insert a form feed, enter 'Ctrl'+'L'. The following characters are common:
Ctrl+L: Form Feed (shown as "FF")• Esc: Escape character (shown as "ESC")• Return or Ctrl+M: Carriage Return (shown as "CR")• Ctrl+J: Line Feed (shown as "LF")• Tab or Ctrl+I: Tab (shown as "---->")•
Commenting and Un-commenting Lines or Blocks of Code
To comment a single line of code, place the cursor on the desired line, then, from the Code menu, selectComment Region. Alternatively, use the associated key binding.
To un-comment a line of code, place the cursor is on the desired line, then, from the Code menu, selectUncomment Region. Alternatively, use the associated key binding.
To comment a block of code, select the lines you wish to comment by clicking and dragging the mouse in theEditor Pane. Then, from the Code menu, select Comment Region. Alternatively, use the associated keybinding.
To un-comment a line of code, place your cursor is on the desired line, then, from the Code menu, selectUncomment Region, or use the associated key binding.
Cleaning Line Endings
If a file contains line endings for more than one platform, you can replace the unwanted line endings with theline endings specified in file's Properties and Settings dialog box.
On the View menu, click View EOL Markers to show line endings.1. Select the line(s) for which you want to replace the endings.2. On the Code menu, click Clean Line Endings. The line endings are replaced with the line endingsspecified in the file's settings.
3.
Tabifying and Untabifying Regions
"Tabifying" a region converts leading spaces to tabs. If you select a line of code that has some leading spacesand you choose to tabify the region, you convert all the leading spaces into Tab characters. The Tabify regiondialog box sets the ratio of space characters to Tab characters. If you select 8, then each 8 space characterswill be represented as 1 Tab character.
To tabify a region:
From the Code menu, select Tabify Region.1. In the dialog box, set the number of spaces, from 1 to 16, to apply to a tab.Click OK or press Enter.
2.
Komodo User Guide
Literal Characters 65
To untabify a region:
From the Code menu, select Untabify Region.1. In the dialog box, set the number of spaces, from 1 to 16, to apply to a tab.2. Click OK or press Enter.3.
To illustrate tabifying, follow this procedure:
Open the sample_project.kpf.1. Open perl_sample.pl.2. Turn on the Line Numbers.3. Turn on the Whitespace characters.4. Find the following line: $sum += $prices[$i]; There are four leading spaces on this line. Youcan tabify this line and convert each space character into one Tab character.
5.
Tabify this line. Set the number of spaces to 1. This means each space character will be converted toone Tab character.
6.
Now this line has four Tab characters, represented as right arrows, preceding print $sum +=$prices[$i];. This causes the line to be indented too far.
7.
Untabify this line. Set the number of spaces to 1. This returns the line to the original state.8.
Now look at another line with 8 leading spaces.
Open python_sample.py1. Find the following line: print "element %s is a string" % element. There are 8leading spaces on this line.
2.
Tabify this line. Set the number of spaces to 8. This means the 8 spaces will be converted to one Tabcharacter.
3.
Now this line has one Tab character, represented as a right arrow, preceding print "element %sis a string" % element;. This does not change the line's indentation.
4.
Untabify this line. Set the number of spaces to 8. This returns the line to the original state.5.
You can set the width of Tab characters in the Preferences dialog box. The default value is 8.
Column / Rectangular Selection
Rectangular selection is useful in selecting columns and other space or tab delimited text.
Platform Via Mouse Via Keyboard
Windows 'Alt'+'left-click' + drag 'Alt'+'Shift' + direction key
Mac OS X 'Cmd'+'left-click' + drag 'Ctrl'+'Shift' + direction key
Linux 'Ctrl'+'left-click' + drag 'Alt'+'Shift' + direction keyCut, Copy, Paste and Delete commands will operate on the highlighted block.
Note: On Linux, the default key bindings may conflict with ones used by the window manager. To avoid this,re-map the "Editor: Select Rectangular..." commands in the Key Binding Preferences to unused keycombinations.
Komodo User Guide
Tabifying and Untabifying Regions 66
Column Editing
Once a rectangular selection has been made, text insertion will operate on each line of the selection; thecharacters will be duplicated on all selected lines.
For example to change "directory-name" in the file list below, select the column containing that name asdescribed above.
Once the column is selected, begin typing. The cursor will appear only at the top line of the selection, but thenew text will appear on all subsequent lines within the colum selection.
Press 'Esc' or any direction key to exit column editing mode.
Note: Column selections in areas beyond line endings will not appear correctly. The areas beyond the end ofline will not be highlighted, but column editing will still work. Text will be inserted immediately after thelongest line in the selection.
With Vi emulation enabled, mouse selection and Vi visual blockwise selection ('Ctrl'+'V') will not triggercolumn editing. While in Input mode, use 'Alt'+'Shift' with the direction keys to make the column selection,and 'Esc' to exit column editing mode.
Completing Words
The Komodo editor maintains an index of words in the current file. Rather than re-entering words that alreadyexist in the current file, use the Complete Word feature to finish words.
Enter one or more characters, then select Code|Complete Word, or use the associated key binding. Words arecompleted based on the most recent occurrence in the current file. For example, if you type "pr", Komodosearches backward from the insertion point to find the first instance of a word that begins with "pr". Continuepressing the spacebar while holding down the 'Ctrl' ('Cmd' on Mac OS X) key to cycle through all possiblecompletions for the word. The Complete Word feature is case sensitive.
Selecting Blocks of Code
Quickly select blocks of code using Komodo's Select Block function (Edit|Select|Select Block, or use theassociated key binding). This function uses the Code Folding logic.
Komodo User Guide
Column Editing 67
When the Select Block function is invoked, Komodo analyzes the cursor position relevant to the blocks ofcode in the document. If the cursor is within a block, the entire block will be selected. (If the cursor is within anested block, only the current sub-block will be selected, not the block that contains the entire nestedstructure.) If the cursor is not inside a block, the entire document will be selected.
Editor Display Characteristics
Toggling Whitespace On and Off
Whitespace is any space in a file not taken up by text. Line breaks, spaces, and tabs are consideredwhitespace.
To toggle whitespace on and off, select View|View Whitespace, or use the associated key binding.
To set a default for whitespace display, see Customizing Editor Features for more information.
Toggling Indentation Guides On and Off
Indentation guides display vertical lines in the Editor Pane that indicate the number of whitespace indents.The width of indentation guides is determined by the value in the Indentation Width preference. SeeCustomizing Indentation for more information.
To toggle indentation guides on and off, select View|View Indentation Guides, or use the associated keybinding.
Toggling Line Numbers On and Off
Line numbers can help orient you when working in a long file.
To toggle line numbers on and off, select View|View Line Numbers, or use the associated key binding.
To set this option globally, see Customizing General Editor Features for more information.
Toggling EOL (end of line) Markers On and Off
End-of-line markers indicate where and how a line ends, such as by a hard return or another key. If you useEnter to end a line, the EOL marker could be CR or CR+LF.
To toggle EOL markers on and off, select View|View EOL markers, or use the associated key binding.
To set this option globally, see Customizing General Editor Features for more information.
Increasing and Decreasing the Code Font Size
To increase the font size in the Editor Pane, select View|Font, and then Increase or Decrease. Alternatively,use the associated key binding. Repeat until the font size is appropriate. The size specification applies to allfiles open in the Editor Pane.
When you save a file, the new font size is saved.
Komodo User Guide
Selecting Blocks of Code 68
Toggling Fixed and Non-Fixed Width Fonts
In Komodo, you can use fixed width or non-fixed width fonts for editing. You can also toggle between thesesettings. The default font is non-fixed width. Note that this setting does not persist. If you toggle to a differentsetting, the next time you open the file it will restore the width specified on the Fonts tab of the Fonts andColors page in Komodo Preferences.
To toggle between fixed and non-fixed width font:
On the View menu, select Font, then Toggle Fixed/Proportional Fonts. This changes the font tofixed width.
1.
Repeat to reverse.2.
Folding and Unfolding Code
Code folding symbols appear in the left margin of the Editor Pane immediately left of the line of code that isor can be folded. Minus signs indicate the beginning of a block of code that can be collapsed or folded. Plussigns indicate the beginning of a block of code that can be expanded or unfolded. This line of code is alsounderlined.
Either specific code blocks or all code blocks can be folded.
To collapse or fold a single block of code:
Click the minus sign immediately to the left of a block of codeor
•
On the View menu, select Fold, then Collapseor
•
Use the associated key binding.•
To collapse or fold all foldable blocks of code:
On the View menu, select Fold, then Collapse All
All foldable blocks of code collapse and the minus signs all become plus signs.
•
To expand or unfold a single block of code:
Click the plus sign immediately to the left of a block of codeor
•
On the View menu, select Fold, then Expandor
•
Use the associated key binding.•
To expand or unfold all foldable blocks of code:
On the View menu, select Fold, then Expand All
All foldable blocks of code expand and the plus signs all become minus signs.
•
Komodo User Guide
Toggling Fixed and Non-Fixed Width Fonts 69
Navigating Within Files
Moving to a Specific Line
While editing, you can move to a specific line number as follows:
On the View menu, select Goto Line.1. In the dialog box, enter the line number, or, to move backward or forward from the current line enter"+" or "-" in front of the number. For example, enter "+5" to move five lines ahead.
2.
Click Goto Line or press Enter.3.
Go to Definition
You can jump to the definition of a code object under your cursor (e.g. a variable, a subroutine, a module,etc.) in any of the following ways:
Select Navigation|Go to Definition• Right-click to bring up the context menu and select Go to Definition• Typing 'Ctrl'+'K','Ctrl'+'G'•
Alternatively, double-click the symbol node for the object in the Code Browser tree.
Objects defined within the file, in user-defined modules, and in the site library are accessible in this way;objects defined in a language's standard library are not.
In Rails applications, you can also jump to symbol definitions in models from controller files.
Setting and Moving to Bookmarks and Marks
Bookmarks are points of interest in a file. Komodo displays blue triangles on the left margin besidebookmarked lines. Marks, which are derived from the Emacs editor, are similar to bookmarks. The keydifference is that marks have no graphical representation in Komodo. Marks make it possible to create aninvisible reminder of previously visited locations in a file.
Bookmarks
To set or unset a bookmark: Position the editing cursor on the line of interest. SelectNavigation|Toggle Bookmark or use the associated key binding to bookmark the line. If the line isalready bookmarked, the bookmark will be removed.
•
To move to the next bookmark: Select Navigation|Next Bookmark or use the associated keybinding.
•
To move to the previous bookmark: Select Navigation|Previous Bookmark or use the associatedkey binding.
•
To clear all bookmarks: Select Navigation|Remove All Bookmarks or use the associated keybinding.
•
Marks
Komodo has three commands for Emacs-style transient marks, which have following defaults using the
Komodo User Guide
Navigating Within Files 70
Emacs key binding scheme:
Editor: Set Mark - Ctrl+Space• Editor: Exchange Current Point and Mark - Ctrl+X, Ctrl+X• Editor: Move to previous mark in mark ring - Ctrl+U, Ctrl+Space•
These commands can be bound to custom key sequences in the Key Bindings preferences with any keybinding scheme.
Matching Braces
Use the Matching Brace functions to quickly jump between opening and closing braces and parentheses.Notice that when the editing cursor is adjacent to a brace or parenthesis, the brace is displayed in bold red.The associated closing or opening brace is also displayed in bold red.
To jump to the matching brace, select Navigation|Jump to Matching Brace, or use the associated keybinding. To select the braces and the contents they contain, select Edit|Select|Select to Matching Brace.
Detecting Changed Files
Komodo can be configured to monitor the status of files that are opened in the editor. If the file is changed ondisk, you will be prompted to reload the latest version under the following circumstances:
when you change between tabs in the editor• when you switch back to Komodo from another application• when you save a file•
Use Komodo's Preferences to enable or disable this function.
Preview in Browser
You can configure Komodo to preview a variety of file types in your default browser, or in the Editor Pane.The Preview in Browser feature is particularly useful when working with HTML or XML files.
The browser preview will be displayed in a separate window, in the Editor Pane, or in a split view of theEditor Pane, depending on which preference has been set.
The context menu in the Editor Pane is only available when the "source" tab is in focus. If Komodo does notsupport previewing of a specific file type, the Preview in Browser option will not be available from either thetoolbar or the View menu.
To preview a file with the Preview in Browser feature:
Open the file in the Komodo Editor Pane. Or, if the file is already open, make sure it is the selectedtab in the Editor Pane.
1.
Select View|Preview in Browser. A dialog box will appear, prompting you to choose which file topreview.
2.
If you want to preview the current file, select Preview with this file, or, if you want to preview usinganother file that includes the current file (e.g., use an HTML file to preview a CSS file), select
3.
Komodo User Guide
Setting and Moving to Bookmarks and Marks 71
Preview with another file or URL, then click Browse to navigate to the desired file location. If youdo not want to be prompted each time you preview a specific file, select Remember this selection forthis file. If you later decide that you want to specify a different preview selection, change the BrowserPreview file or URL in the current file's Properties and Settings.Click Preview. The file will be displayed in the Editor Pane or in a separate window, depending onwhich preference has been set.
4.
Editor Tab Display
Use the following commands on the Window menu to manage the way previews and tab groups are displayedin the Editor Pane:
Move to Other Tab Group: Splits the Editor Pane (if not already split) and moves the active file tothe other tab group.
•
Split View: Splits the Editor Pane (if not already split) and displays the active file in both tab groups.• Rotate Tab Groups: If two tab groups are displayed, this option switches between a horizontal andvertical split.
•
If displayed in the Editor Pane, previews include a toolbar with basic Web browser functionality, including(from left to right) "Back", "Forward" "Reload", and "Stop" buttons.
Komodo User Guide
Preview in Browser 72
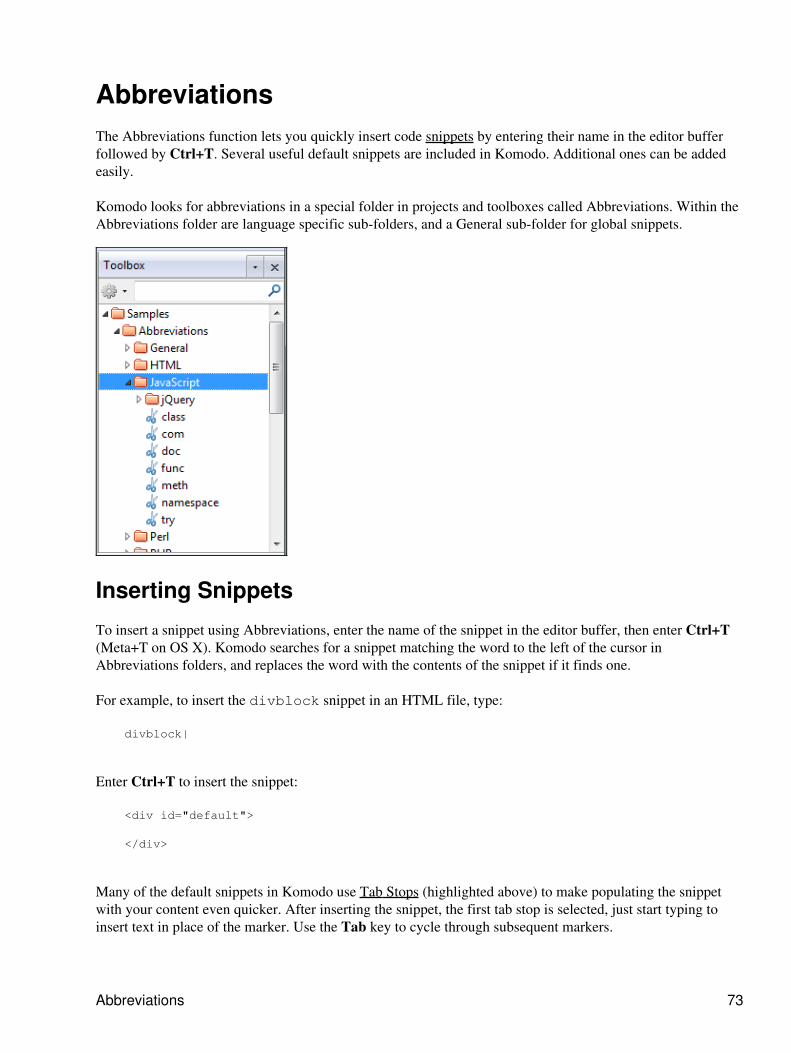
AbbreviationsThe Abbreviations function lets you quickly insert code snippets by entering their name in the editor bufferfollowed by Ctrl+T. Several useful default snippets are included in Komodo. Additional ones can be addedeasily.
Komodo looks for abbreviations in a special folder in projects and toolboxes called Abbreviations. Within theAbbreviations folder are language specific sub-folders, and a General sub-folder for global snippets.
Inserting Snippets
To insert a snippet using Abbreviations, enter the name of the snippet in the editor buffer, then enter Ctrl+T(Meta+T on OS X). Komodo searches for a snippet matching the word to the left of the cursor inAbbreviations folders, and replaces the word with the contents of the snippet if it finds one.
For example, to insert the divblock snippet in an HTML file, type:
divblock|
Enter Ctrl+T to insert the snippet:
<div id="default">
</div>
Many of the default snippets in Komodo use Tab Stops (highlighted above) to make populating the snippetwith your content even quicker. After inserting the snippet, the first tab stop is selected, just start typing toinsert text in place of the marker. Use the Tab key to cycle through subsequent markers.
Abbreviations 73
Abbreviation Search Order
When Ctrl+T is entered, Komodo searches for relevant snippets in the toolbox. It first checks thelanguage-specific subdirectory of the Abbreviations folder, then the General snippets. The first match getsinserted.
Exact case matches take precedence over mismatched case. For example, "Class" would trigger a snippetnamed "class" if there isn't one named "Class".
This allows you to have snippets with the same names for multiple languages. For example an abbreviationcalled 'class' abbreviation would insert a different snippet in a Perl file than in a PHP file.
Adding New Abbreviations
To add a new abbreviation to the Toolbox, right-click on the appropriate sub-folder underSamples/Abbreviations and select Add|New Snippet....
To add a new abbreviation to a project, use the steps above after adding the necessary folders (i.e. at leastAbbreviations/General) to the project.
As with all project and toolbox items, snippets can be copied, cut and pasted between toolboxes and projects.
Komodo User Guide
Abbreviation Search Order 74
HistoryThe History feature lets you navigate backwards and forwards through your editing sessions. Similar to thehistory feature provided by a web browser, Komodo provides Back and Forward buttons, and a drop downlist of recent editing positions.
Locations
The editing history is saved as a list of locations. Each location is made up of a filename and a cursor position.There is one history session per Komodo window.
Positions are saved to the history when:
opening a new file• changing to another open file and making an edit• jumping to a line from the Find Results tab• using Go To Definition• any other command or interaction in Komodo that jumps to a new editing position•
History Navigation
You can navigate the history using the Back and Forward buttons, or by selecting the desired position fromthe drop down list.
Back and Forward are also available in the Code menu, and will display the keybindings assigned to theseactions ("Editor: Go Forward" and "Editor: Go Back" in the Key Binding preferences). The defaultkeybindings are the same as those used in most browsers: 'Alt'+'Left/Right arrows' on Windows and Linux,'Cmd' + '[' or ']' on Mac OS X.
History 75
SnippetsFeature Showcases
Abbreviations: inserting snippets by name• a snippet that prompts for input• a snippet containing a code fragment•
Snippets are frequently used strings that can be quickly inserted into the current document. For example,repetitive sections of code or standard comments can be stored within a snippet. Snippets have advancedproperties; they support the use of Tabstops and Interpolation Shortcuts, can be assigned to Key Bindings, andallow for the specification of indentation context and cursor position.
Snippets are stored in the Projects sidebar or the Toolbox.
Creating Snippets
To create a code snippet, select the desired block of text in the Editor Pane. Then drag and drop the selectedsection onto the Toolbox tab or into a project on the Projects tab.
Alternatively, select the desired text, then right-click and select Add as Snippet in the Toolbox.
Alternatively, right-click a folder in the Toolbox or on a project or folder name in the Projects sidebar, andselect New Snippet. If you use this method, you must manually enter the contents of the snippet; text selectedin the Editor Pane is not automatically added to the Snippet dialog box.
Configuring Snippets
To configure snippet properties, right-click the snippet on either the Toolbox tab or the Projects tab, and selectProperties. The following configuration properties are available:
Snippet Name: Enter the text that should display in the Projects or Toolbox sidebars for this codesnippet. If the snippet was created by dragging a text selection from the Editor Pane, the snippet isnamed after the text in the snippet.
•
Snippet Contents: If the snippet was created by dragging a text selection from the Editor Pane, thecontents of the selected text are displayed in the Snippet Contents field. Otherwise, enter the contentsof the snippet manually. Add or edit snippet content as desired.
•
Snippet Shortcuts: Add Interpolation Shortcuts or Tabstops to a snippet by clicking the arrow buttonto the right of the Snippets Contents field, and selecting a shortcut from the drop-down menu.Interpolation shortcuts in snippets are not executed when the snippet is inserted in the Editor Pane viadragging and dropping.
•
Maintain selected text or cursor position after insertion: Within the snippet contents field, eitherselect a portion of the snippet (by dragging the mouse pointer over the desired selection) or positionthe editing cursor within the string. If this check box is selected, when the snippet is inserted into theEditor Pane, the selected text or the cursor position is displayed in the same manner.
•
Maintain indentation context after insertion: If the snippet is inserted into the Editor Pane whenthe editing cursor is in an indented position, select this check box to use the indentation point as anindentation "prefix". The indentation structure of the snippet is preserved at the position of insertion.
•
Snippets 76

Using Snippets
To insert the contents of a snippet at the current cursor position in the Editor Pane, double-click it, orright-click the snippet and select Insert Snippet.
Although you can also drag and drop snippets onto the Editor Pane, the cursor position and indentation checkbox options explained above in Configuring Snippets will only take effect if the snippet is added using thedouble-click or Insert Snippet method.
Abbreviations
Snippets saved in a toolbox or project folder called "Abbreviations" (or a language-specific sub-directory) canbe inserted by typing the snippet name in the buffer. See Abbreviations.
Snippet Options
To access options for the selected snippet, right-click a snippet in the Toolbox and select the desired option.
The following options are available:
Insert Snippet: Use this option to insert the snippet at the current cursor position in the editor, asdescribed above in Using Snippets.
•
Cut/Copy/Paste: Used to duplicate or move a snippet when dragging is not convenient (e.g. to aproject which is currently closed).
•
Show in File Manager: Shows the JSON file for the snippet in the system's default file manager.• Export as Zip File...: Exports the snippet in a standard ".zip" archive.• Rename: Changes the snippet name.• Delete: Permanently removes the selected snippet from the toolbox.•
Snippet Properties
Snippet properties are used to alter or rename snippets (as described in Configuring Snippets, above). TheProperties dialog box is also used to assign a custom icon to a snippet or to assign a custom key binding. Toaccess the Properties dialog box, right-click the snippet and select Properties.
Assigning Custom Icons to Snippets
The default snippet icons can be replaced with custom icons. Komodo includes more than 600 icons;alternatively, select a custom image stored on a local or network drive (use 16x16-pixel images for bestresults).
To assign a custom icon to a snippet:
In the Projects or Toolbox sidebar, right-click the desired snippet and select Properties. Alternatively,click the icon in the Projects or Toolbox sidebar, then select Projects|snippet_name|Properties orToolboxsnippet_name|Properties.
1.
In the Properties dialog box, click Change Icon.2. In the Pick an Icon dialog box, select a new icon and click OK. Alternatively, click Choose Other,and browse to the desired image file.
3.
Komodo User Guide
Using Snippets 77
In the Properties dialog box for the snippet, click OK. The custom icon is displayed next to thesnippet.
4.
To revert to the default icon for a selected snippet:
In the Projects or Toolbox sidebar, right-click the desired snippet and select Properties.1. Click Reset, then click OK. The default icon is displayed next to the snippet.2.
Snippet Key Bindings
To assign a key binding to a snippet, right-click the snippet on either the Toolbox, and select Properties.Select the Key Bindings tab, and configure the desired binding. See Key Bindings for Custom Componentsfor more information.
See Abbreviations for details on inserting snippets by name.
Komodo User Guide
Assigning Custom Icons to Snippets 78
TabstopsTabstops are highlighted placeholders for inserting content in snippets and templates. Tabstops with the samenumber are linked, and will mirror the content inserted in the first one. When tabstops are present in thebuffer, the tab key moves the cursor through the tabstops instead of inserting a whitespace tab.
Creating Tabstops
Tabstops are set in snippets and templates using a similar syntax to bracketed interpolation shortcuts. Thesimplest type just provides a placeholder for inserting text:
[[%tabstop]]
Adding a colon followed by any string provides a default value (or just a helpful name):
[[%tabstop:myValue]]
Numbered tabstops are linked together in the buffer. Text replacements in one numbered tabstop will bereplicated in tabstops with the same number. Linked tabstops should use the same default string or omit thedefault string once it's been defined in the first linked tabstop:
print <<"[[%tabstop1:EOT]]"; [[%tabstop:TextHere]][[%tabstop1]]
Tabstops can be nested within other tabstops:
def [[%tabstop1:method]](self[[%tabstop2:, ARGS]]):[[%tabstop: [[%tabstop1]].__init__(self[[%tabstop2]])]] [[%tabstop:pass]]
Using Tabstops
When the snippet or template is inserted or loaded in the buffer, the tabstops will show the default text (i.e.specified after the colon) highlighted in the buffer. Hitting the Tab key cycles the cursor through the tabstopsin the order they appear in the snippet or template (not in numbered order).
With the cursor on a tabstop, typing overwrites the default value (if defined). Hitting Tab again inserts thedefault value and moves to the next tabstop.
Examples
This "blank" PHP function snippet uses numbered tabstops. This is what it looks like when defined in thesnippet:
/* * function [[%tabstop1:name]] * @param [[%tabstop2:arg]]*/
function [[tabstop1:name]]($[[%tabstop2:arg]]) {
Tabstops 79
[[%tabstop]];}
When inserted in the buffer, it will look like this:
/* * function name * @param $arg;*/
function name($arg) {
}
The "name" tabstop is the first place Tab will stop. It gets replaced with the function name which ispropagated through the rest of the snippet when Tab is hit again. The "arg" tabstop is the next place Tabstops, and is treated the same way. The unnamed tabstop is invisible in the buffer, but hitting Tab again willmove the cursor to its position.
Here's another example of a short snippet for HTML:
<[[%tabstop1:div]]>[[%s]]</[[%tabstop1:div]]>
The current selection is wrapped in an element (a "div" by default).
<div>[[%s]]</div>
Hitting Tab after insertion will select the first "div" for replacement. If it is replaced, the closing tag will bechanged as you type. If it is not replaced, "div" will be used as the element type.
Komodo User Guide
Examples 80

MacrosMacros are scripts which automate Komodo. They are stored toolboxes and can be launched bydouble-clicking the macro icon, pressing an associated custom key binding, or by binding them to eventtriggers.
The Macros toolbar provides quick access for recording, running, and saving macros. To show or hide thetoolbar, select View|Toolbars|Macros. You can also use the Tools|Macros menu items.
Creating Macros
Macros can be created by recording keystroke and command sequences, or written from scratch in JavaScriptor Python using the Macro API.
Recording Macros
Recording is a simple method for creating a macro. Only keystrokes (not mouse movements) are recorded.
To record a macro:
Select Tools|Macros|Start Recording (or use the Record Macro button in the Macro toolbar). TheKomodo status bar displays "Recording Macro".
1.
In the Editor Pane, enter the keystrokes to store in the macro. While entering keystrokes, pauserecording by selecting Tools|Macros|Pause Recording. Select Start Recording when ready toresume macro creation.
2.
To end macro recording, select Tools|Macros|Stop Recording. The status bar displays "MacroRecorded".
3.
Note: Though keystrokes in the Editor pane can be captured and recorded in this manner, several Komodocommands cannot. If your resulting macro does not replay certain operations, you may be able to add themmanually by editing the recorded macro. Consult the Writing Macros section in conjunction with theCommand ID List and the Macro API for further information.
To save the most recent macro:
Select Tools|Macros|Save to Toolbox, or click Macro: Save to Toolbox on the Macro Toolbar.1. Give the new macro a unique name in the Enter name for new macro field. A reference to the macrois automatically added to the Toolbox.
2.
Writing Macros
Use the "New Macro" Properties dialog box to write macros in either Python or JavaScript. This dialog boxhas tabs for specifying key bindings and Komodo event triggers that invoke the macro automatically.
To add a macro:
Select Add New Macro... from the Toolbox drop-down menu or a folder's right-click context menu.1. Language: Specify the language (Python or JavaScript) in which to program the macro.2. Set any desired macro properties.3.
Macros 81
Write the macro in the editor field or save what you have so far by clicking OK. You can open it in aneditor tab by right-clicking on the macro icon and selecting Edit Macro. This is useful as it providesautocompletion and other Komodo editing features.
4.
Refer to the Macro API for information about writing JavaScript and Python macros in Komodo.
Running Macros
To run the most recently recorded macro, select Tools|Macros|Execute Last Macro. If the Macro Toolbar isopen (View|Toolbars|Macro), click Macro: Run Last Macro.
To run a macro that has been saved to a project or toolbox, double-click the macro or use the key binding youhave assigned to it. Alternatively, right-click the macro and select Execute Macro.
Managing Macros
Macros can be dragged into any toolbox or toolbox folder. Right-clicking on a macro brings up a contextmenu with the following additional options:
Execute Macro: Runs the selected macro.• Edit Macro: Opens the macro in an editor tab.• Cut/Copy/Paste: Used to duplicate or move a macro when dragging is not convenient (e.g. to aproject which is currently closed).
•
Show in File Manager: Shows the JSON file for the macro in the system's default file manager.• Export as Zip File...: Exports the macro in a standard ".zip" archive.• Rename: Changes the macro name.• Delete: Permanently removes the selected macro from the toolbox.•
Macro Properties
Right-click on a macro and select Properties to view or edit the macro or configure the following properties.
Assigning Key Bindings to Macros
Use the Key Binding tab to specify a key combination or sequence for invoking the macro. To add a newkeybinding:
Select the New Key Sequence field1. Press the desired key combinations. The Key Sequence Currently Used By field will alert you ifthere are any conflicts.
2.
Click Add (multiple keybindings are allowed).3. Click OK on the Properties dialog box to close it.4.
If the macro is in a toolbox, the assigned keybinding will always trigger the macro. If it's in a project, thekeybinding will work only when that project is open.
Komodo User Guide
Writing Macros 82
Assigning Custom Icons to Macros
The default macro icon can be replaced with custom icons. Komodo includes more than 600 icons, but youcan use any 16x16-pixel image you wish.
To assign a custom icon to a macro:
In the macro's Properties dialog box, click Change Icon.1. In the Pick an Icon dialog box, select an icon set from the drop list, choose a new icon, and click OK.To choose an icon from your filesystem, click Choose Other, and browse to the desired image file.
2.
Click OK on the Properties dialog box to close it. The custom icon is displayed next to the macro.3.
To revert to the default icon for a selected macro, use the Reset button.
Running Macros in the Background
Macros that invoke and do not affect the current file should be run in the background to minimize interferencewith Komodo responsiveness. Macros that run in the background are run in threads (Python), or in a timeout(JavaScript). To set this option:
Right-click the macro in the Toolbox and select Properties.1. Select the Run in Background option.2. Click Apply.3.
If a macro is not associated with a Komodo event, it can run either in the foreground or in the background.
Macros that perform "editor" functions or modify open files should always run in the foreground to "block"and prevent user interference. This prevents the user from moving the cursor and disrupting the macrocurrently in progress.
Specifying Macro Triggers
Macros can be configured to execute on certain Komodo events. When an event occurs (for example, a file isopened in Komodo), the macro is triggered.
Check to make sure macro triggers are enabled in the Projects and Workspace preferences. In the TriggeringMacros area, select Enable triggering of macros on Komodo events, and then click OK.
To add a trigger to a macro:
Select the Triggers tab on the Macro Properties dialog1. Select the Macro should trigger on a Komodo event check box.2. Choose one of the following triggers:
On startup (occurs at the end of the Komodo startup process)♦ After file open♦ Before file save (see Macro Return Values below)♦ After file save♦ Before file close (see Macro Return Values below)♦ After file close♦ On shutdown (see Macro Return Values below)♦
3.
Komodo User Guide
Assigning Custom Icons to Macros 83
On a system notification♦ Set the Rank (optional): Enter a numerical rank for the macro. For example, if three macros allinvoke "After a file is opened", a macro executes first (100), second (101), or third (102). The defaultis 100 to provide room for macros to run before the default (1-99). Note that if two macros trigger onthe same event with the same rank, both execute in indeterminate order.
4.
Click Apply.5.
Trigger Macro subject Variable
Trigger macros run with an argument called "subject", available as a global variable within the macro. Thisvariable references the ko.views.manager.currentView object for post-open, pre/post-save, and pre-closetrigger macros. For post-close macros, it references the URI since the view object is empty at that point. Forexample, in a macro with an "After file open" trigger you could use:
alert("Just opened file " + subject.document.displayPath);
Macro Return Values
Komodo macros that use the event triggers "Before file save", "Before file close", or "On shutdown", canmake use of return values. Macros that return that return a true value (e.g. True in Python, true inJavaScript) can interrupt the process under execution. For example, the following JavaScript macro triggering"Before file save" prevents you from saving files on Sunday:
var currentTime = new Date();if (currentTime.getDay() == 7) { alert("Never on a Sunday!") return true;}else { return null;}
Vi Command Mode Macros
Komodo's Vi emulation offers a command-line mode. Entering ':' opens a text box for entering commands. Toaccess a macros from this mode, create a toolbox folder named Vi Commands and move or copy the macrointo it. Type the macro name in the Vi command text box to run it.
Komodo User Guide
Specifying Macro Triggers 84
Macro API
The Komodo Macro API
Macros in Komodo can be written in JavaScript or Python. The Macro API for JavaScript is a subset of theKomodo JavaScript API. Python macros have access to the XPCOM interface. The komodo. namespace formacro functions is deprecated, but currently still available for supporting older macros and providingfunctions in Python for which there are not direct equivalents in XPCOM.
The interfaces for the two macro languages are described separately:
JavaScript Macros• Python Macros•
Warning
The macro system is a powerful mechanism by which Komodo users can execute arbitrary code inside theKomodo process. It is easy for novices to write macros that can significantly disrupt Komodo's behavior,leading to instability and data loss. Avoid experimenting with macros while working with important files.
Of particular note:
Macros that never terminate (for example, due to infinite loops) can hang Komodo.• Macros that modify the buffer should never be run in the background, as multiple threads accessingthe editor object could cause crashes.
•
Macros that modify the scimoz object should be written with care, to avoid data loss.•
Feedback
The Komodo JavaScript API is under active development. If you have questions or feedback about the API,please post to the Komodo Macros and Extensions forum.
The API described below may change in future releases (we will of course try to minimizebackwards-incompatible changes).
JavaScript Macros
For macros, the most important parts of the Komodo JavaScript API are:
The ko.views.manager.currentView object which contains:The scimoz object for manipulation of code buffers.♦ The koDoc object for manipulation of documents in memory.♦ The koDoc.file object, corresponding to files on disk.♦
•
The ko.commands.doCommand(...) function to execute Komodo commands.• The ko.open.URI(...) function to open a local or remote file using a URI.• The ko.projects.findPart(...) function to find other components (snippets, runcommands, other macros, etc).
•
The ko.interpolate object which contains:•
Macro API 85
The interpolateString(...) function for evaluation of interpolation codes♦ The getWordUnderCursor() function to retrieve the word under the editing cursor.♦
The ko.run.runEncodedCommand(...) function to open a local or remote file using a URI.•
ko.views.manager.currentView.scimoz
The ko.views.manager.currentView.scimoz object corresponds to the main text editing widgetthat contains and manipulates files in the Editor Pane. It is a thin wrapper around the Scintilla widget, anopen-source component written by Neil Hodgson (www.scintilla.org).
The Scintilla API is large, complex and subject to change. This document only contains the calls mostrelevant to Komodo, and notes some common patterns of use relevant to changing the editor widget.
scimoz Attributes
int currentPosThe location (in character units) of the caret.
int anchorThe location (in character units) of the selection anchor.
string textThe contents of the buffer.
string selTextThe contents of the selection (readonly).
long scrollWidthThe width of the scroll area (in pixels).
long xOffsetThe horizontal scroll position (in pixels) of the start of the text view.
boolean viewEOLWhether to show end-of-line markers or not.
long viewWSWhether to show whitespace characters (0: no, 1: yes).
long eOLModeThe characters that are inserted when the user presses 'Enter': either 'CRLF' (0 - the default onWindows), 'CR' (1) or 'LF' (2 - the default on Linux).
long tabWidthThe size of a tab as a multiple of the size of a space character.
long indentThe size of indentation in terms of the width of a space.
boolean useTabsWhether indentation should be created out of a mixture of tabs and spaces (1) or be based purely onspaces (0).
boolean indentationGuidesWhether to show indentation guides or not.
readonly long firstVisibleLineThe line number of the first visible line in the text view.
long lineCountThe number of lines in the text view.
long textLengthThe length of the current buffer in characters.
long targetStart
Komodo User Guide
JavaScript Macros 86
The start of the target region; see replaceTarget.long targetEnd
The end of the target region; see replaceTarget.long linesOnScreen
The number of complete lines visible on the screen.
scimoz Methods
void emptyUndoBuffer()Empty the undo buffer.
void undo()Undo the last action.
void cut()Cut current selection (ko.commands.doCommand('cmdCut') is the preferred method).
void copy()Copy current current selection.
void paste()Replace current selection with the clipboard contents.
void clear()Clear current selection.
long replaceTarget(in long length, in string text)Replace the target text with the argument text. Text is counted so it can contain NULs. Returns thelength of the replacement text..
string getTextRange(in long min, in long max)Return a range of characters from the current buffer.
void insertText(in long pos, in string text)Insert text at a specified position.
void colourise(in long start, in long end)Force the re-coloring of the specified range.
wchar getWCharAt(in long pos)Get the (Unicode) character at the specified position.
void addText(in long length, in string text)Add text to the end of the current buffer.
void selectAll()Select the entire buffer.
void gotoLine(in long line)Jump to the specified line.
void gotoPos(in long pos)Jump to the specified position in the buffer.
void deleteBack()Delete the character to the left of the cursor.
void newLine()Add a newline (note: this is a less 'smart' newline than can be obtained usingko.commands.doCommand('cmd_newlineExtra').
void redo()Redo the last action.
boolean canRedo()There is an action that can be redone.
void beginUndoAction()Begin an undo block (see note).
void endUndoAction()
Komodo User Guide
scimoz Attributes 87
End an undo block (see note).long getColumn(in long pos)
Get the column (0-based) of the specified position.long getLineEndPosition(in long line)
Get the position corresponding to the last character on the specified line (not including EOLcharacters).
void setSel(in long start, in long end)Make selection start at start and end at end.
long lineFromPosition(in long pos)Get the line number (0-indexed) from character position pos.
long positionFromLine(in long line)Get character position which begins the specified line.
void lineScroll(in long columns, in long lines)This will attempt to scroll the display by the number of columns and lines that you specify. Positiveline values increase the line number at the top of the screen (i.e. they move the text upwards as far asthe user is concerned). Negative line values do the reverse.
void scrollCaret()If the current position (this is the caret if there is no selection) is not visible, the view is scrolled tomake it visible.
long lineLength(in long line)Return the length of the current line.
void replaceSel(string)Replace current selection with the text in the string.
void lineDown()Move cursor down one line.
void lineDownExtend()Extend selection down one line.
void lineUp()Move cursor up one line.
void lineUpExtend()Extend selection up one line.
void charLeft()Move cursor one character to the left.
void charLeftExtend()Extend selection one character to the left.
void charRight()Move cursor one character to the right.
void charRightExtend()Extend selection one character to the right.
void wordLeft()Move cursor one word to the left.
void wordLeftExtend()Extend selection one word to the left.
void wordRight()Move cursor one word to the right.
void wordRightExtend()Extend selection one word to the right.
void home()Move cursor to the Home position.
void homeExtend()Extend selection to the Home position.
Komodo User Guide
scimoz Methods 88
void lineEnd()Move cursor to the end of the line.
void lineEndExtend()Extend selection to the end of the line.
void documentStart()Move cursor to the start of the document.
void documentStartExtend()Extend selection to the start of the document.
void documentEnd()Move cursor to the end of the document.
void documentEndExtend()Extend selection to the end of the document.
void pageUp()Page up.
void pageUpExtend()Extend selection one page up.
void pageDown()Page down.
void pageDownExtend()Extend selection one page down.
void editToggleOvertype()Toggle overtype mode.
void vCHome()Move cursor to the first non-whitespace character on a line or, if none, the beginning of a line.
void vCHomeExtend()Extend the selection to the first non-whitespace character on a line or, if none, the beginning of a line.
void zoomIn()Increase font size.
void zoomOut()Decrease font size.
void delWordLeft()Delete word to the left of the cursor.
void delWordRight()Delete word to the right of the cursor.
void lineCopy()Copy line at the cursor.
void lineCut()Cut line at the cursor.
void lineDelete()Delete line at the cursor.
void lineTranspose()Transpose current line and previous line.
void lineDuplicate()Duplicate current line.
void lowerCase()Convert selection to lower case.
void upperCase()Convert selection to upper case.
void lineScrollDown()Scroll display down one line.
void lineScrollUp()
Komodo User Guide
scimoz Methods 89
Scroll display up one line.void deleteBackNotLine()
Delete last character except if at beginning of line.void homeDisplay()
Move cursor to Home position for the current display line (as opposed to the buffer line when wordwrap is enabled).
void homeDisplayExtend()Extend selection to the Home position for the current display line (as opposed to the buffer line whenword wrap is enabled).
void lineEndDisplay()Move cursor to end of the current display line (as opposed to the buffer line when word wrap isenabled).
void lineEndDisplayExtend()Extend selection to the end of the current display line (as opposed to the buffer line when word wrapis enabled).
void wordPartLeft()Move cursor a word segment to the left. Word segments are marked by capitalization(aCamelCaseIdentifier) or underscores (an_under_bar_ident).
void wordPartLeftExtend()Extend selection a word segment (as described in void wordPartLeft()) to the left.
void wordPartRight()Move cursor a word segment (as described in void wordPartLeft()) to the right.
void wordPartRightExtend()Extend selection a word segment (as described in void wordPartLeft()) to the right.
void delLineLeft()Delete to beginning of line.
void delLineRight()Delete to end of line.
void paraDown()Move cursor one paragraph down.
void paraDownExtend()Extend selection one paragraph down.
void paraUp()Move cursor one paragraph up.
void paraUpExtend()Extend selection one paragraph up.
scimoz Notes
Invalid Parameters: The Scintilla API assumes that users of the API do their own error-checking. Passingarguments that are out of bounds or otherwise erroneous can result in Komodo crashing.
The Undo Stack: Scintilla manages the "undo" stack. To treat a sequence of operations as a single operationfor the sake of Undo/Redo, wrap these operations in a beginUndoAction / endUndoAction pair. TheendUndoAction must be called even in the case of an exception in the code. Otherwise, the undo stack willbe corrupted and might lose data.
For example, for JavaScript:
ko.views.manager.currentView.scimoz.beginUndoAction()try {
Komodo User Guide
scimoz Notes 90
... // do your sequence here} finally { ko.views.manager.currentView.scimoz.endUndoAction()}
ko.views.manager.currentView.koDoc
The ko.views.manager.currentView.koDoc object refers to the current document; the contents ofthe file being edited. These contents will be different than those of the file on disk if the file is unsaved or"dirty".
koDoc replaces the document object present in Komodo 5 and previous versions. If you need to writemacros compatible with earlier versions, use capability-detection style code such as:
JavaScript
var koDoc = (komodo.koDoc === undefined ? komodo.document : komodo.koDoc);
Python
koDoc = (komodo.koDoc if hasattr(komodo, "koDoc") else komodo.document)
koDoc Attributes
string baseNameThe basename of the document (e.g. "myfile.txt").
string displayPathThe display path of the document (e.g. "C:\Code\myfile.txt").
fileThe koDoc.file object corresponding to the document (null if the document is unsaved).
string bufferThe contents of the document (Unicode string).
boolean isDirtyWhether there are unsaved changes to the document.
boolean isUntitledWhether the document has never been saved.
string languageThe language that this document is viewed as ("Python", "Perl", etc.
ko.views.manager.currentView.koDoc.file
The file object is an attribute of koDoc objects, and corresponds to a wrapper object around the file object.
document.file attributes
string URIThe URI to the file (e.g. "file:///C:/Code/myfile.txt").
string displayPathThe display path of the file (e.g. "C:\Code\myfile.txt"), or the URI if the URI is not of thefile:// scheme.
string baseName
Komodo User Guide
ko.views.manager.currentView.koDoc 91

The base name of the file (e.g. "myfile.txt").string dirName
The directory of the file (e.g. "C:\Code").
ko.commands.doCommand()
Signature:
ko.commands.doCommand(commandId)
Execute the internal Komodo command specified by commandId.
Command IDs and their corresponding functions are available in the Command ID reference.
Most editor-related commands require that the Editor Pane be in focus. To ensure focus before invokingdoCommand, set the focus explicitly as follows:
ko.views.currentView.setFocus()
ko.open.URI()
Signature:
ko.open.URI(uri_string#line_number)
Open the file specified by the URI string and move the cursor to the line number specified after '#' (if any).
All file access protocols used by Komodo are valid. For example:
ko.open.URI("file:///home/user/example.txt#33");ko.open.URI("ftp://example.org/pub/example.xml");ko.open.URI("scp:///host.example.org/home/user/file.txt#11");
ko.projects.findPart()
Signature:
ko.projects.findPart(type, name, where) -> part
Find a "part" (the internal name for a component such as a snippet, another macro, a run command, etc) in theToolbox or a project.
type: The type of component to search for. It can be one of:• "snippet"♦ "command"♦ "macro"♦ "file"♦ "folder"♦ "dialog"♦ "URL"♦ "template"♦
•
Komodo User Guide
document.file attributes 92
"DirectoryShortcut"♦ name: The component's name.• where: A string corresponding to the component container that should be searched. Supported valuesare:"toolbox"
search in the Toolbox"shared toolbox"
search in the Shared Toolbox (if enabled)"toolboxes"
search in both the Toolbox and the Shared Toolbox"container"
search the project or Toolbox that contains the current macro"*"
search all of the above
•
ko.interpolate.interpolateString()
Signature:
ko.interpolate.interpolateString(s[, bracketed], queryTitle]]) -> string
Evaluate interpolation shortcuts in the given string.
s: The string to interpolate.• bracketed: An optional boolean value indicating whether plain (e.g. %F) or bracketed (e.g.[[%F]]) syntax is being used. If not specified, plain interpolation is used (i.e.bracketed=false)</.
•
ko.interpolate.getWordUnderCursor()
Signature:
ko.interpolate.getWordUnderCursor() -> string
This function returns the word under the cursor in the current buffer.
ko.run.runEncodedCommand()
Signature:
ko.run.runEncodedCommand(window, command[, callback]) -> string
Runs a shell command and optional callback function.
window: Required (literal) argument indicating Komodo's top-level window object. This allows themethod to be called from dialog boxes or other sub-windows.
•
command: The shell command to run. Can include arguments in Python dict format.• callback: An optional callback function.•
For example:
Komodo User Guide
ko.projects.findPart() 93
function did_it() { alert("Done.");}ko.run.runEncodedCommand(window, 'sleep 5', did_it);
Command options and environment variables can be added in curly braces "{...}" after the command inPython dict format. For example:
ko.run.runEncodedCommand(window, 'svn up "%F" {"cwd": "%D", "env": "SVN_SSH=plink.exe"}')
The following JavaScript macro uses Komodo's cmd_refreshStatus function as the callback inko.run.runEncodedCommand(). This updates the SCC status information after running 'svn up' onthe file in the current editor tab:
if (komodo.view) { komodo.view.setFocus();
ko.run.runEncodedCommand(window, 'svn up "%F"', (function (view) { return function () { view.setFocus(); komodo.doCommand('cmd_refreshStatus'); } })(komodo.view) );};
Python Macros
Macros written in Python can use the XPCOM interface. Though it is deprecated, komodo. namespace isstill available for those functions (interpolate() and getWordUnderCursor()) which cannot bedone easily with XPCOM.
To use the XPCOM components described below, add the following to your macro:
from xpcom import components
Creating a view object
There is no global object in Python macros to get the current "view" (i.e. the main active Komodo tab)because this can change during macro execution. Instead, a view object can be created in the macro at thepoint where it will be used. For example:
from xpcom import componentsviewSvc = components.classes["@activestate.com/koViewService;1"]\ .getService(components.interfaces.koIViewService)view = viewSvc.currentView.queryInterface(components.interfaces.koIScintillaView)
The view object will have the same properties as ko.views.manager.currentView, exposing:
The scimoz object for manipulation of code buffers.• The koDoc object for manipulation of documents in memory.•
Komodo User Guide
ko.run.runEncodedCommand() 94
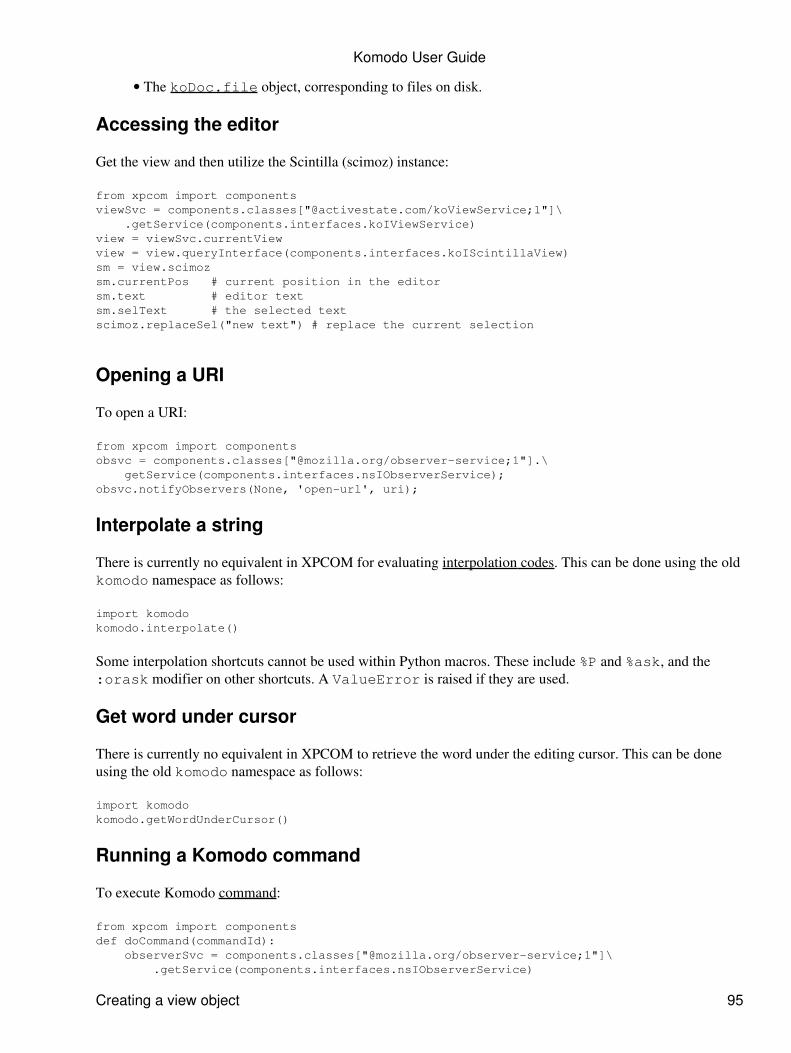
The koDoc.file object, corresponding to files on disk.•
Accessing the editor
Get the view and then utilize the Scintilla (scimoz) instance:
from xpcom import componentsviewSvc = components.classes["@activestate.com/koViewService;1"]\ .getService(components.interfaces.koIViewService)view = viewSvc.currentViewview = view.queryInterface(components.interfaces.koIScintillaView)sm = view.scimozsm.currentPos # current position in the editorsm.text # editor textsm.selText # the selected textscimoz.replaceSel("new text") # replace the current selection
Opening a URI
To open a URI:
from xpcom import componentsobsvc = components.classes["@mozilla.org/observer-service;1"].\ getService(components.interfaces.nsIObserverService);obsvc.notifyObservers(None, 'open-url', uri);
Interpolate a string
There is currently no equivalent in XPCOM for evaluating interpolation codes. This can be done using the oldkomodo namespace as follows:
import komodokomodo.interpolate()
Some interpolation shortcuts cannot be used within Python macros. These include %P and %ask, and the:orask modifier on other shortcuts. A ValueError is raised if they are used.
Get word under cursor
There is currently no equivalent in XPCOM to retrieve the word under the editing cursor. This can be doneusing the old komodo namespace as follows:
import komodokomodo.getWordUnderCursor()
Running a Komodo command
To execute Komodo command:
from xpcom import componentsdef doCommand(commandId): observerSvc = components.classes["@mozilla.org/observer-service;1"]\ .getService(components.interfaces.nsIObserverService)
Komodo User Guide
Creating a view object 95
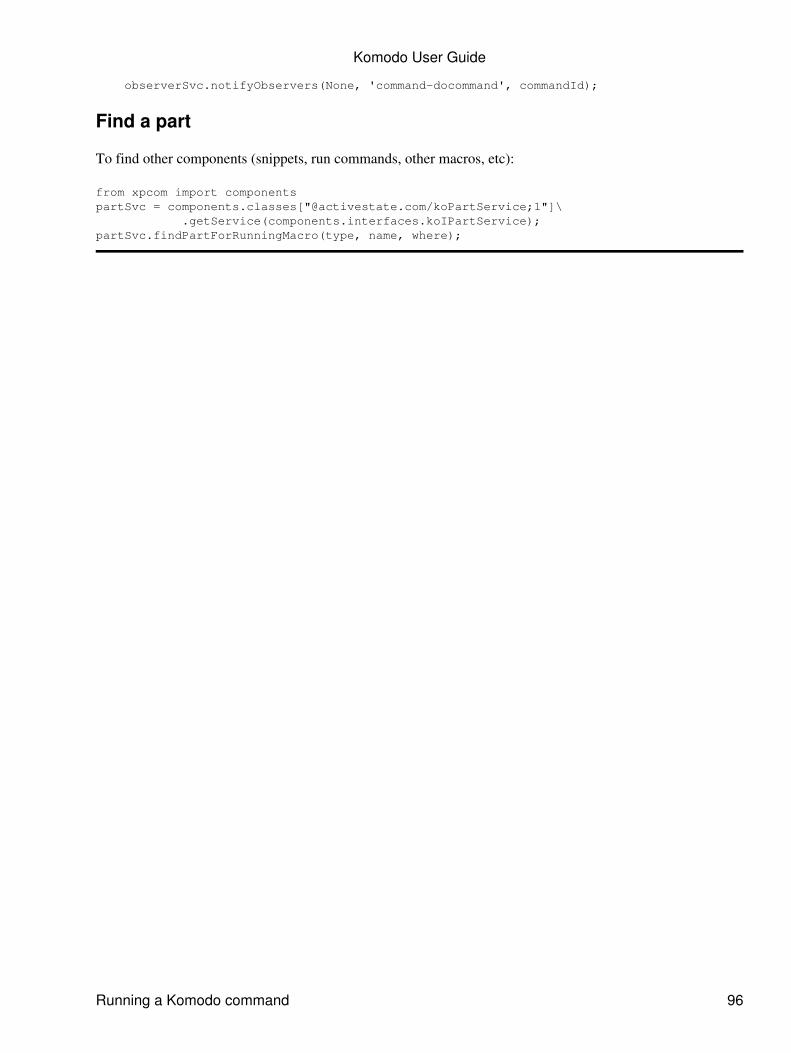
observerSvc.notifyObservers(None, 'command-docommand', commandId);
Find a part
To find other components (snippets, run commands, other macros, etc):
from xpcom import componentspartSvc = components.classes["@activestate.com/koPartService;1"]\ .getService(components.interfaces.koIPartService);partSvc.findPartForRunningMacro(type, name, where);
Komodo User Guide
Running a Komodo command 96
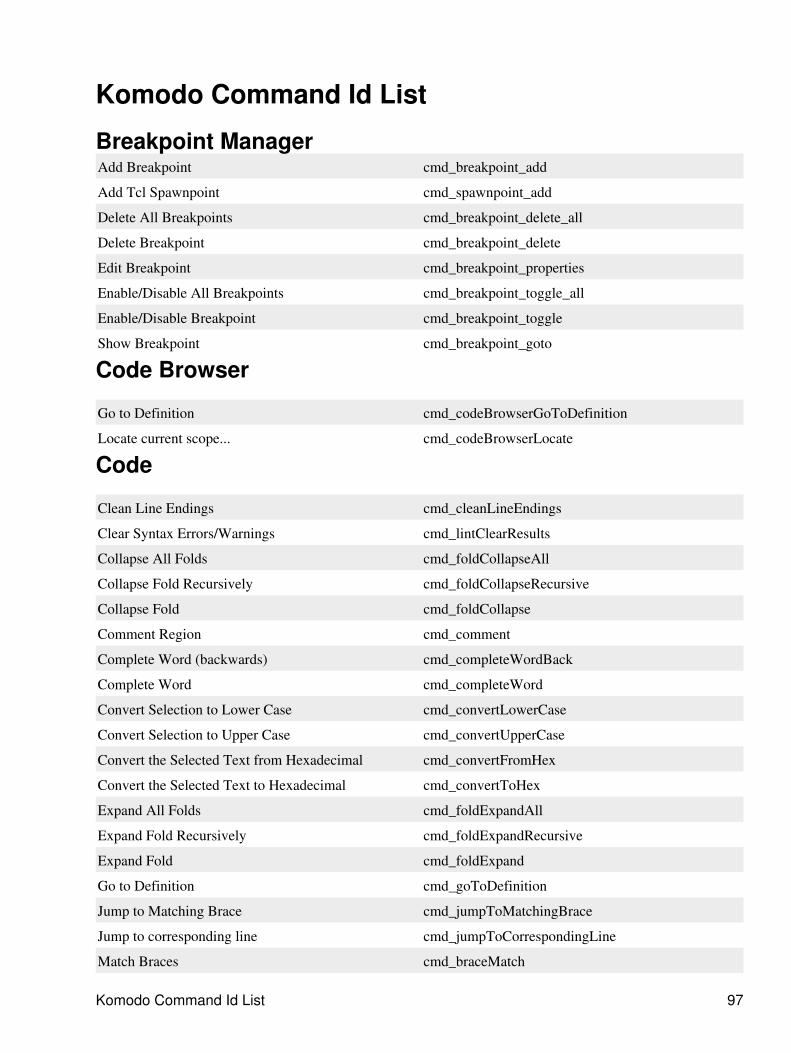
Komodo Command Id List
Breakpoint ManagerAdd Breakpoint cmd_breakpoint_add
Add Tcl Spawnpoint cmd_spawnpoint_add
Delete All Breakpoints cmd_breakpoint_delete_all
Delete Breakpoint cmd_breakpoint_delete
Edit Breakpoint cmd_breakpoint_properties
Enable/Disable All Breakpoints cmd_breakpoint_toggle_all
Enable/Disable Breakpoint cmd_breakpoint_toggle
Show Breakpoint cmd_breakpoint_goto
Code Browser
Go to Definition cmd_codeBrowserGoToDefinition
Locate current scope... cmd_codeBrowserLocate
Code
Clean Line Endings cmd_cleanLineEndings
Clear Syntax Errors/Warnings cmd_lintClearResults
Collapse All Folds cmd_foldCollapseAll
Collapse Fold Recursively cmd_foldCollapseRecursive
Collapse Fold cmd_foldCollapse
Comment Region cmd_comment
Complete Word (backwards) cmd_completeWordBack
Complete Word cmd_completeWord
Convert Selection to Lower Case cmd_convertLowerCase
Convert Selection to Upper Case cmd_convertUpperCase
Convert the Selected Text from Hexadecimal cmd_convertFromHex
Convert the Selected Text to Hexadecimal cmd_convertToHex
Expand All Folds cmd_foldExpandAll
Expand Fold Recursively cmd_foldExpandRecursive
Expand Fold cmd_foldExpand
Go to Definition cmd_goToDefinition
Jump to Matching Brace cmd_jumpToMatchingBrace
Jump to corresponding line cmd_jumpToCorrespondingLine
Match Braces cmd_braceMatch
Komodo Command Id List 97

Next Syntax Error/Warning cmd_nextLintResult
Run Syntax Check cmd_lintNow
Select Block cmd_blockSelect
Select to Matching Brace cmd_selectToMatchingBrace
Tabify Region... cmd_tabify
Toggle Fold cmd_foldToggle
Un-comment Region cmd_uncomment
Un-tabify Region... cmd_untabify
Debugger
Add Watch Variable cmd_dbgAddVariable
Add/Edit Breakpoint... cmd_dbgBreakpointAddOrEdit
Add/Edit Spawnpoint... cmd_dbgSpawnpointAddOrEdit
Break Now cmd_dbgBreakNow
Clear All Breakpoints cmd_dbgBreakpointClearAllInURI
Delete Selected Variable cmd_dbgDeleteVariable
Detach cmd_dbgDetach
Disable/Enable Breakpoint cmd_dbgBreakpointToggle
Edit Selected Variable Name cmd_dbgWatchedVariable
Edit Selected Variable Value cmd_dbgEditVariable
Go/Continue cmd_dbgGo
Inspect (probe) the Application in a Debugger Shell cmd_dbgInspect
Interactive Debugger Shell Clear Buffer cmd_dbgInteractiveClearBuffer
Listen for Remote Debugger cmd_debuggerListener
Load HTML Preview cmd_dbgViewAsHTML
Make Selection a Watched Variable cmd_dbgMakeWatchedVariable
New Session cmd_dbgNewSession
Pretty Print cmd_dbgPrettyPrint
Run Script cmd_dbgRun
Run to Cursor cmd_dbgStepCursor
Show Current Statement cmd_dbgShowCurrentStatement
Show Hidden Variables cmd_dbgShowHiddenVars
Start Default Interactive Shell cmd_startInteractiveShell
Start Perl Interactive Shell cmd_startPerlInteractiveShell
Start Python Interactive Shell cmd_startPythonInteractiveShell
Start Ruby Interactive Shell
Komodo User Guide
Code 98
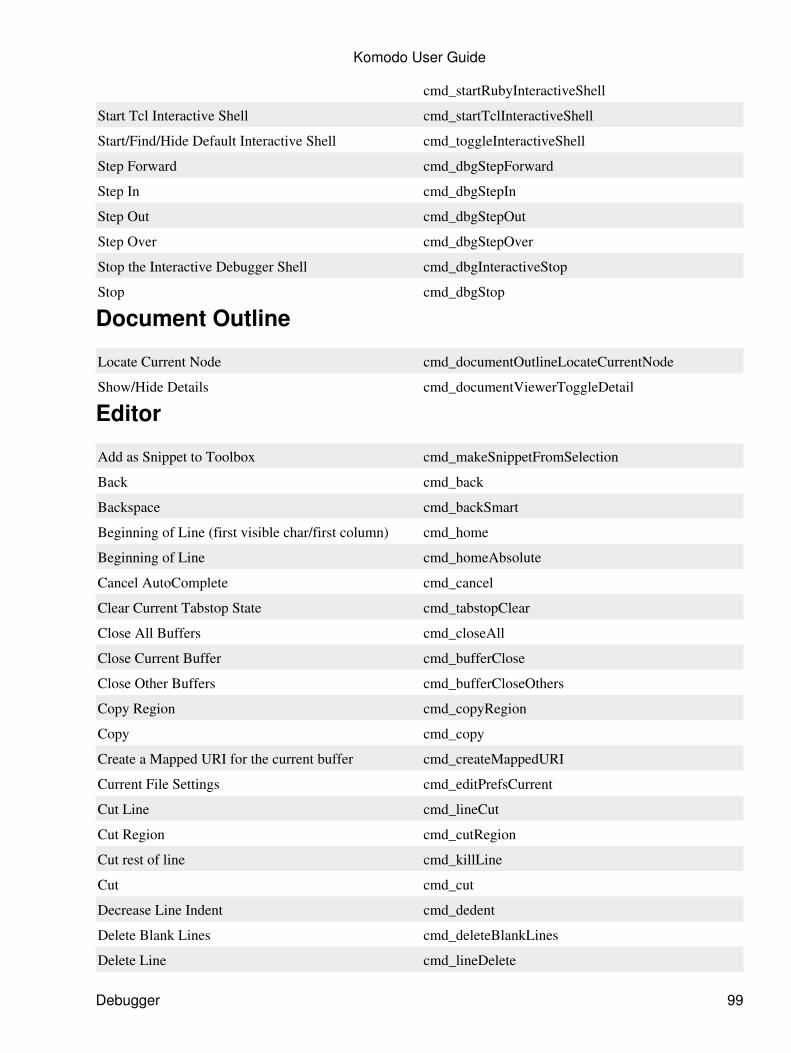
cmd_startRubyInteractiveShell
Start Tcl Interactive Shell cmd_startTclInteractiveShell
Start/Find/Hide Default Interactive Shell cmd_toggleInteractiveShell
Step Forward cmd_dbgStepForward
Step In cmd_dbgStepIn
Step Out cmd_dbgStepOut
Step Over cmd_dbgStepOver
Stop the Interactive Debugger Shell cmd_dbgInteractiveStop
Stop cmd_dbgStop
Document Outline
Locate Current Node cmd_documentOutlineLocateCurrentNode
Show/Hide Details cmd_documentViewerToggleDetail
Editor
Add as Snippet to Toolbox cmd_makeSnippetFromSelection
Back cmd_back
Backspace cmd_backSmart
Beginning of Line (first visible char/first column) cmd_home
Beginning of Line cmd_homeAbsolute
Cancel AutoComplete cmd_cancel
Clear Current Tabstop State cmd_tabstopClear
Close All Buffers cmd_closeAll
Close Current Buffer cmd_bufferClose
Close Other Buffers cmd_bufferCloseOthers
Copy Region cmd_copyRegion
Copy cmd_copy
Create a Mapped URI for the current buffer cmd_createMappedURI
Current File Settings cmd_editPrefsCurrent
Cut Line cmd_lineCut
Cut Region cmd_cutRegion
Cut rest of line cmd_killLine
Cut cmd_cut
Decrease Line Indent cmd_dedent
Delete Blank Lines cmd_deleteBlankLines
Delete Line cmd_lineDelete
Komodo User Guide
Debugger 99

Delete Word Left cmd_deleteWordLeft
Delete Word Right cmd_deleteWordRight
Delete cmd_delete
Duplicate Line or Selection cmd_lineOrSelectionDuplicate
Duplicate Line cmd_lineDuplicate
End of Line cmd_end
Exchange Current Point and Mark cmd_transientMarkExchangeWithPoint
Format Code or Text cmd_format
Format the Current Sub-Languange Block cmd_formatSubLanguageBlock
Go Back cmd_historyBack
Go Forward cmd_historyForward
Go to Beginning of word cmd_beginningOfWord
Go to End of Document cmd_documentEnd
Go to End of word cmd_endOfWord
Go to Line... cmd_gotoLine
Go to Next Bookmark cmd_bookmarkGotoNext
Go to Next Line cmd_lineNext
Go to Previous Bookmark cmd_bookmarkGotoPrevious
Go to Previous Line cmd_linePrevious
Go to Top of Document cmd_documentHome
Increase Line Indent cmd_indent
Insert Abbreviation Snippet by Name cmd_expandAbbrev
Insert Newline (align with current line) cmd_newlineSame
Insert Newline (continue comments) cmd_newlineExtra
Insert Newline (no favors) cmd_newlineBare
Insert Newline (starting on the previous line) cmd_newlinePrevious
Insert Newline cmd_newline
Insert Next Key as Literal Character cmd_rawKey
Invoke Hyperlink cmd_invokeHyperlink
Join current and next lines cmd_join
Jump to Next Section cmd_jumpToNextSection
Jump to Previous Section cmd_jumpToPreviousSection
Move Back Part of Word cmd_wordPartLeft
Move Forward Part of Word cmd_wordPartRight
Move Left One Character cmd_left
Komodo User Guide
Editor 100

Move One Character Right cmd_right
Move One Word Left cmd_wordLeft
Move One Word Right cmd_wordRight
Move To End Of Word To Left cmd_wordLeftEnd
Move to previous mark in mark ring cmd_transientMarkMoveBack
Open Line cmd_openLine
Page Down cmd_pageDown
Page Up cmd_pageUp
Paragraph Down cmd_paraDown
Paragraph Up cmd_paraUp
Paste and Select cmd_pasteAndSelect
Paste cmd_paste
Redo cmd_redo
Reflow paragraph(s) cmd_editReflow
Remove All Bookmarks cmd_bookmarkRemoveAll
Repeat next keystroke N times cmd_repeatNextCommandBy
Reset language to best guess cmd_viewAsGuessedLanguage
Scroll One Line Down cmd_lineScrollDown
Scroll One Line Up cmd_lineScrollUp
Scroll current line to center of screen cmd_editCenterVertically
Scroll current line to top of screen cmd_editMoveCurrentLineToTop
Select All (Deprecated Binding) cmd_editSelectAll
Select All cmd_selectAll
Select Next Character cmd_selectCharNext
Select Next Part of Word cmd_wordPartRightExtend
Select Next Word cmd_selectWordRight
Select Page Down cmd_selectPageDown
Select Page Up cmd_selectPageUp
Select Previous Character cmd_selectCharPrevious
Select Previous Part of Word cmd_wordPartLeftExtend
Select Previous Word cmd_selectWordLeft
Select Rectangular Next Character cmd_selectRectCharNext
Select Rectangular Page Down cmd_selectRectPageDown
Select Rectangular Page Up cmd_selectRectPageUp
Select Rectangular Previous Character cmd_selectRectCharPrevious
Komodo User Guide
Editor 101
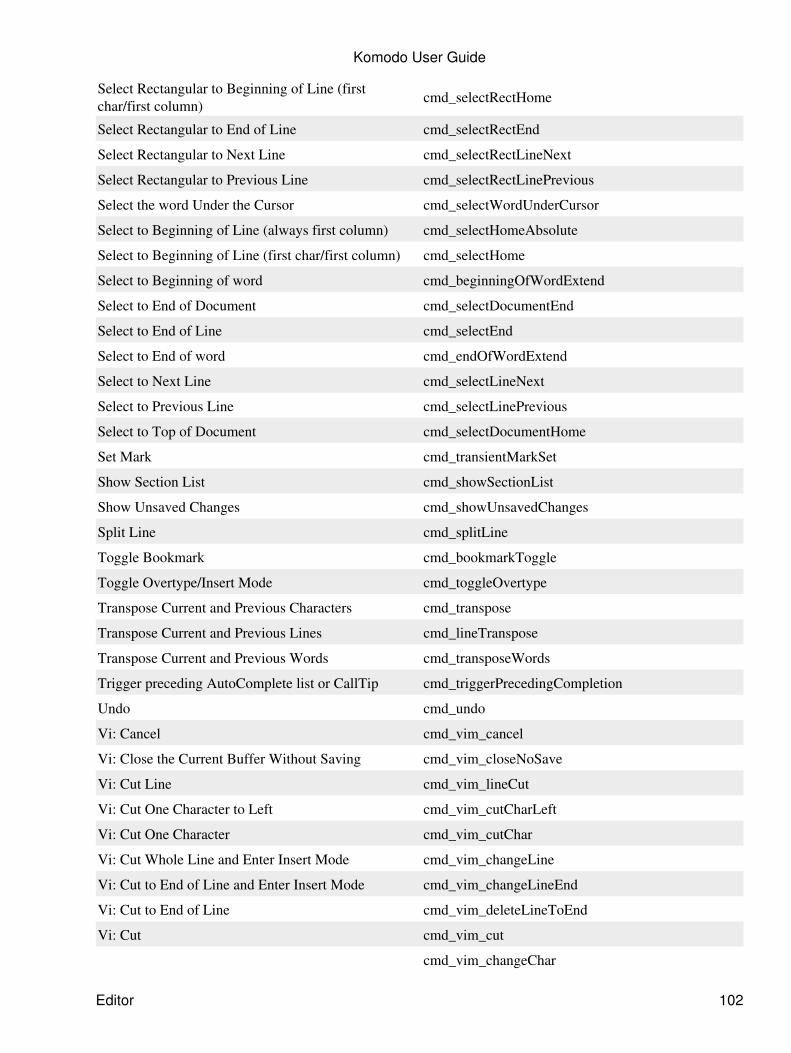
Select Rectangular to Beginning of Line (firstchar/first column) cmd_selectRectHome
Select Rectangular to End of Line cmd_selectRectEnd
Select Rectangular to Next Line cmd_selectRectLineNext
Select Rectangular to Previous Line cmd_selectRectLinePrevious
Select the word Under the Cursor cmd_selectWordUnderCursor
Select to Beginning of Line (always first column) cmd_selectHomeAbsolute
Select to Beginning of Line (first char/first column) cmd_selectHome
Select to Beginning of word cmd_beginningOfWordExtend
Select to End of Document cmd_selectDocumentEnd
Select to End of Line cmd_selectEnd
Select to End of word cmd_endOfWordExtend
Select to Next Line cmd_selectLineNext
Select to Previous Line cmd_selectLinePrevious
Select to Top of Document cmd_selectDocumentHome
Set Mark cmd_transientMarkSet
Show Section List cmd_showSectionList
Show Unsaved Changes cmd_showUnsavedChanges
Split Line cmd_splitLine
Toggle Bookmark cmd_bookmarkToggle
Toggle Overtype/Insert Mode cmd_toggleOvertype
Transpose Current and Previous Characters cmd_transpose
Transpose Current and Previous Lines cmd_lineTranspose
Transpose Current and Previous Words cmd_transposeWords
Trigger preceding AutoComplete list or CallTip cmd_triggerPrecedingCompletion
Undo cmd_undo
Vi: Cancel cmd_vim_cancel
Vi: Close the Current Buffer Without Saving cmd_vim_closeNoSave
Vi: Cut Line cmd_vim_lineCut
Vi: Cut One Character to Left cmd_vim_cutCharLeft
Vi: Cut One Character cmd_vim_cutChar
Vi: Cut Whole Line and Enter Insert Mode cmd_vim_changeLine
Vi: Cut to End of Line and Enter Insert Mode cmd_vim_changeLineEnd
Vi: Cut to End of Line cmd_vim_deleteLineToEnd
Vi: Cut cmd_vim_cut
cmd_vim_changeChar
Komodo User Guide
Editor 102
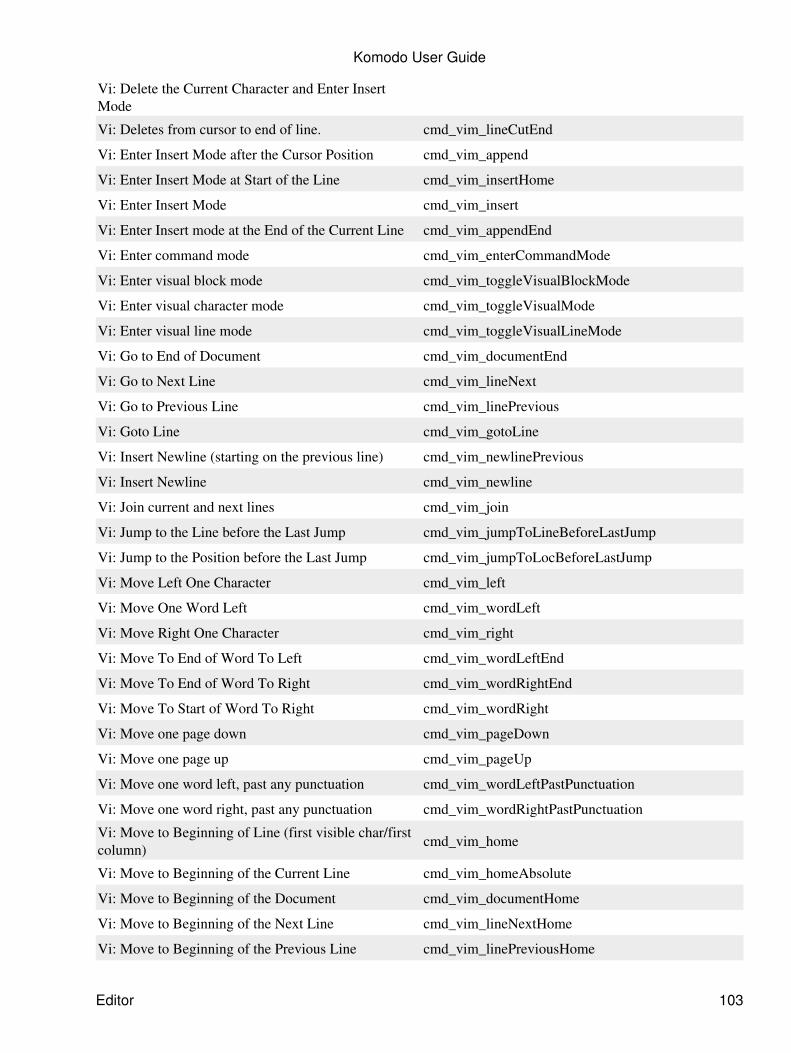
Vi: Delete the Current Character and Enter InsertMode
Vi: Deletes from cursor to end of line. cmd_vim_lineCutEnd
Vi: Enter Insert Mode after the Cursor Position cmd_vim_append
Vi: Enter Insert Mode at Start of the Line cmd_vim_insertHome
Vi: Enter Insert Mode cmd_vim_insert
Vi: Enter Insert mode at the End of the Current Line cmd_vim_appendEnd
Vi: Enter command mode cmd_vim_enterCommandMode
Vi: Enter visual block mode cmd_vim_toggleVisualBlockMode
Vi: Enter visual character mode cmd_vim_toggleVisualMode
Vi: Enter visual line mode cmd_vim_toggleVisualLineMode
Vi: Go to End of Document cmd_vim_documentEnd
Vi: Go to Next Line cmd_vim_lineNext
Vi: Go to Previous Line cmd_vim_linePrevious
Vi: Goto Line cmd_vim_gotoLine
Vi: Insert Newline (starting on the previous line) cmd_vim_newlinePrevious
Vi: Insert Newline cmd_vim_newline
Vi: Join current and next lines cmd_vim_join
Vi: Jump to the Line before the Last Jump cmd_vim_jumpToLineBeforeLastJump
Vi: Jump to the Position before the Last Jump cmd_vim_jumpToLocBeforeLastJump
Vi: Move Left One Character cmd_vim_left
Vi: Move One Word Left cmd_vim_wordLeft
Vi: Move Right One Character cmd_vim_right
Vi: Move To End of Word To Left cmd_vim_wordLeftEnd
Vi: Move To End of Word To Right cmd_vim_wordRightEnd
Vi: Move To Start of Word To Right cmd_vim_wordRight
Vi: Move one page down cmd_vim_pageDown
Vi: Move one page up cmd_vim_pageUp
Vi: Move one word left, past any punctuation cmd_vim_wordLeftPastPunctuation
Vi: Move one word right, past any punctuation cmd_vim_wordRightPastPunctuation
Vi: Move to Beginning of Line (first visible char/firstcolumn) cmd_vim_home
Vi: Move to Beginning of the Current Line cmd_vim_homeAbsolute
Vi: Move to Beginning of the Document cmd_vim_documentHome
Vi: Move to Beginning of the Next Line cmd_vim_lineNextHome
Vi: Move to Beginning of the Previous Line cmd_vim_linePreviousHome
Komodo User Guide
Editor 103
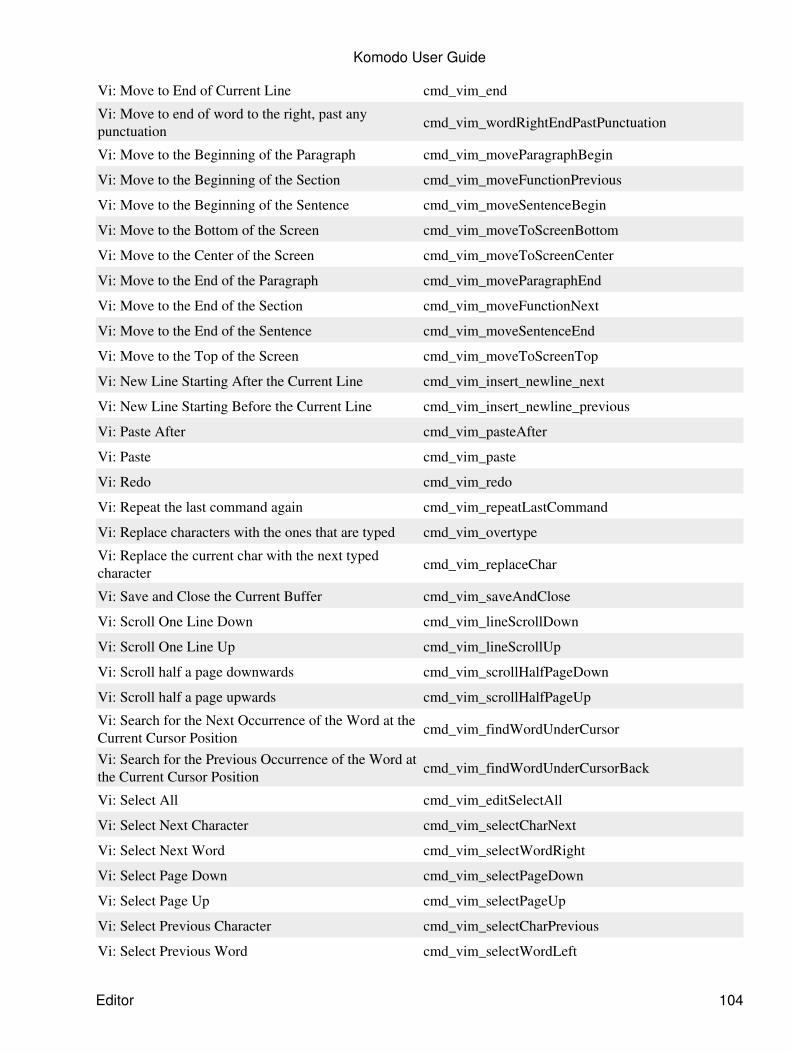
Vi: Move to End of Current Line cmd_vim_end
Vi: Move to end of word to the right, past anypunctuation cmd_vim_wordRightEndPastPunctuation
Vi: Move to the Beginning of the Paragraph cmd_vim_moveParagraphBegin
Vi: Move to the Beginning of the Section cmd_vim_moveFunctionPrevious
Vi: Move to the Beginning of the Sentence cmd_vim_moveSentenceBegin
Vi: Move to the Bottom of the Screen cmd_vim_moveToScreenBottom
Vi: Move to the Center of the Screen cmd_vim_moveToScreenCenter
Vi: Move to the End of the Paragraph cmd_vim_moveParagraphEnd
Vi: Move to the End of the Section cmd_vim_moveFunctionNext
Vi: Move to the End of the Sentence cmd_vim_moveSentenceEnd
Vi: Move to the Top of the Screen cmd_vim_moveToScreenTop
Vi: New Line Starting After the Current Line cmd_vim_insert_newline_next
Vi: New Line Starting Before the Current Line cmd_vim_insert_newline_previous
Vi: Paste After cmd_vim_pasteAfter
Vi: Paste cmd_vim_paste
Vi: Redo cmd_vim_redo
Vi: Repeat the last command again cmd_vim_repeatLastCommand
Vi: Replace characters with the ones that are typed cmd_vim_overtype
Vi: Replace the current char with the next typedcharacter cmd_vim_replaceChar
Vi: Save and Close the Current Buffer cmd_vim_saveAndClose
Vi: Scroll One Line Down cmd_vim_lineScrollDown
Vi: Scroll One Line Up cmd_vim_lineScrollUp
Vi: Scroll half a page downwards cmd_vim_scrollHalfPageDown
Vi: Scroll half a page upwards cmd_vim_scrollHalfPageUp
Vi: Search for the Next Occurrence of the Word at theCurrent Cursor Position cmd_vim_findWordUnderCursor
Vi: Search for the Previous Occurrence of the Word atthe Current Cursor Position cmd_vim_findWordUnderCursorBack
Vi: Select All cmd_vim_editSelectAll
Vi: Select Next Character cmd_vim_selectCharNext
Vi: Select Next Word cmd_vim_selectWordRight
Vi: Select Page Down cmd_vim_selectPageDown
Vi: Select Page Up cmd_vim_selectPageUp
Vi: Select Previous Character cmd_vim_selectCharPrevious
Vi: Select Previous Word cmd_vim_selectWordLeft
Komodo User Guide
Editor 104
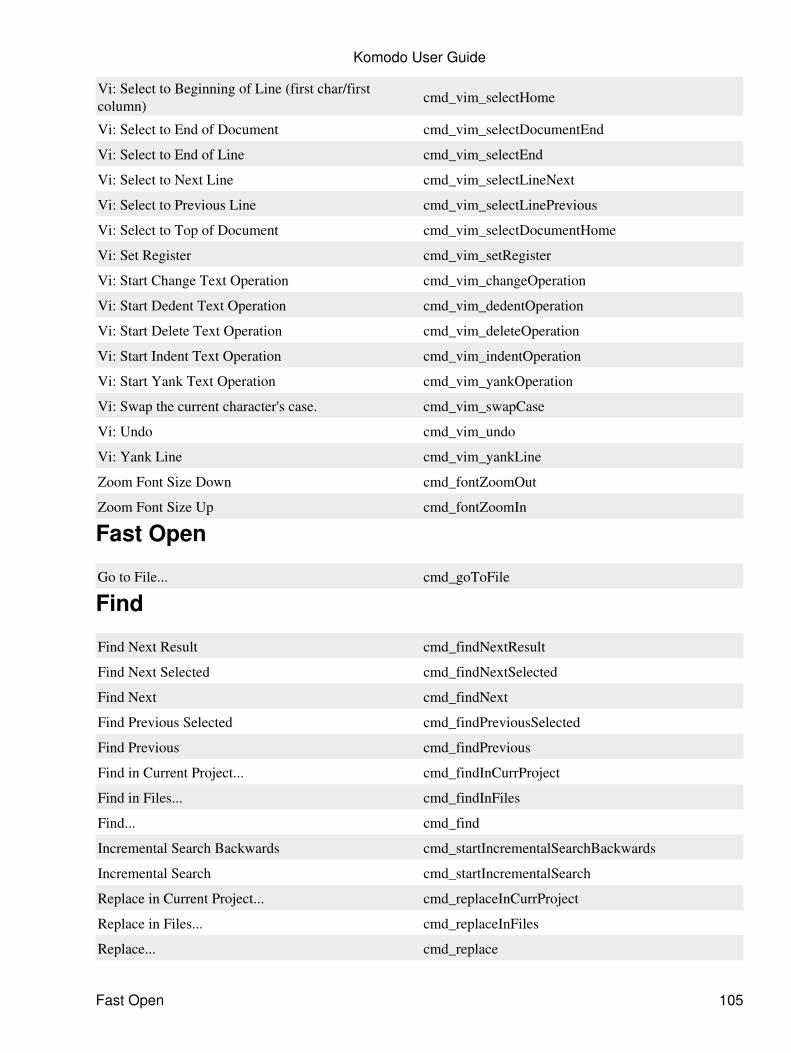
Vi: Select to Beginning of Line (first char/firstcolumn) cmd_vim_selectHome
Vi: Select to End of Document cmd_vim_selectDocumentEnd
Vi: Select to End of Line cmd_vim_selectEnd
Vi: Select to Next Line cmd_vim_selectLineNext
Vi: Select to Previous Line cmd_vim_selectLinePrevious
Vi: Select to Top of Document cmd_vim_selectDocumentHome
Vi: Set Register cmd_vim_setRegister
Vi: Start Change Text Operation cmd_vim_changeOperation
Vi: Start Dedent Text Operation cmd_vim_dedentOperation
Vi: Start Delete Text Operation cmd_vim_deleteOperation
Vi: Start Indent Text Operation cmd_vim_indentOperation
Vi: Start Yank Text Operation cmd_vim_yankOperation
Vi: Swap the current character's case. cmd_vim_swapCase
Vi: Undo cmd_vim_undo
Vi: Yank Line cmd_vim_yankLine
Zoom Font Size Down cmd_fontZoomOut
Zoom Font Size Up cmd_fontZoomIn
Fast Open
Go to File... cmd_goToFile
Find
Find Next Result cmd_findNextResult
Find Next Selected cmd_findNextSelected
Find Next cmd_findNext
Find Previous Selected cmd_findPreviousSelected
Find Previous cmd_findPrevious
Find in Current Project... cmd_findInCurrProject
Find in Files... cmd_findInFiles
Find... cmd_find
Incremental Search Backwards cmd_startIncrementalSearchBackwards
Incremental Search cmd_startIncrementalSearch
Replace in Current Project... cmd_replaceInCurrProject
Replace in Files... cmd_replaceInFiles
Replace... cmd_replace
Komodo User Guide
Fast Open 105

Vi: Enter Search Backwards cmd_vim_enterSearchBackward
Vi: Enter Search Forward cmd_vim_enterSearchForward
Vi: Find Next Pattern cmd_vim_findNext
Vi: Find Next Result cmd_vim_findNextResult
Vi: Find Previous Pattern cmd_vim_findPrevious
Vi: Find the Character Typed, After Cursor in CurrentLine, Moves to Position Before the Char cmd_vim_findCharInLinePosBefore
Vi: Find the Character Typed, After Cursor in CurrentLine cmd_vim_findCharInLine
Vi: Find the Character Typed, Before Cursor inCurrent Line, Moves to Position After the Char cmd_vim_findPreviousCharInLinePosAfter
Vi: Find the Character Typed, Before Cursor inCurrent Line cmd_vim_findPreviousCharInLine
Vi: Repeat the last Find Character In Line command,but reverse the direction cmd_vim_repeatLastFindCharInLineReversed
Vi: Repeat the last Find Character In Line command cmd_vim_repeatLastFindCharInLine
General
Close Project cmd_closeProject
Create Template From Project... cmd_saveProjectAsTemplate
Edit Properties cmd_editProperties
Export Selection as HTML... cmd_exportHTMLSelection
Export as HTML... cmd_exportHTML
Import From File System into Current Project cmd_importFromFS_Project
Least Recently Viewed File cmd_bufferNextLeastRecent
Most Recently Viewed File cmd_bufferNextMostRecent
New File (default type) cmd_new
New File... cmd_newTemplate
New Project From Template... cmd_newProjectFromTemplate
New Project... cmd_newProject
New Window cmd_newWindow
Next File cmd_bufferNext
Open File dialog... cmd_open
Open Project... cmd_openProject
Open Remote File dialog... cmd_open_remote
Open Template... cmd_openTemplate
Perform the import from file system again (refreshes) cmd_reimportFromFS_Project
Preferences... cmd_editPrefs
Komodo User Guide
Find 106
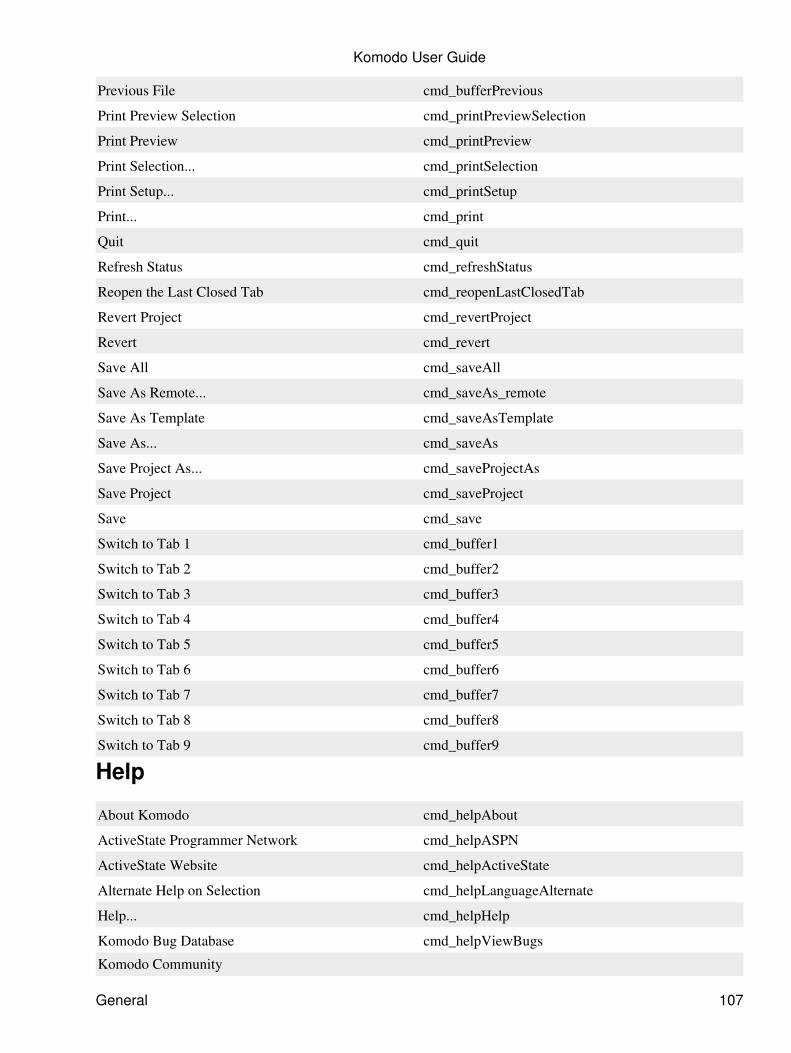
Previous File cmd_bufferPrevious
Print Preview Selection cmd_printPreviewSelection
Print Preview cmd_printPreview
Print Selection... cmd_printSelection
Print Setup... cmd_printSetup
Print... cmd_print
Quit cmd_quit
Refresh Status cmd_refreshStatus
Reopen the Last Closed Tab cmd_reopenLastClosedTab
Revert Project cmd_revertProject
Revert cmd_revert
Save All cmd_saveAll
Save As Remote... cmd_saveAs_remote
Save As Template cmd_saveAsTemplate
Save As... cmd_saveAs
Save Project As... cmd_saveProjectAs
Save Project cmd_saveProject
Save cmd_save
Switch to Tab 1 cmd_buffer1
Switch to Tab 2 cmd_buffer2
Switch to Tab 3 cmd_buffer3
Switch to Tab 4 cmd_buffer4
Switch to Tab 5 cmd_buffer5
Switch to Tab 6 cmd_buffer6
Switch to Tab 7 cmd_buffer7
Switch to Tab 8 cmd_buffer8
Switch to Tab 9 cmd_buffer9
Help
About Komodo cmd_helpAbout
ActiveState Programmer Network cmd_helpASPN
ActiveState Website cmd_helpActiveState
Alternate Help on Selection cmd_helpLanguageAlternate
Help... cmd_helpHelp
Komodo Bug Database cmd_helpViewBugs
Komodo Community
Komodo User Guide
General 107
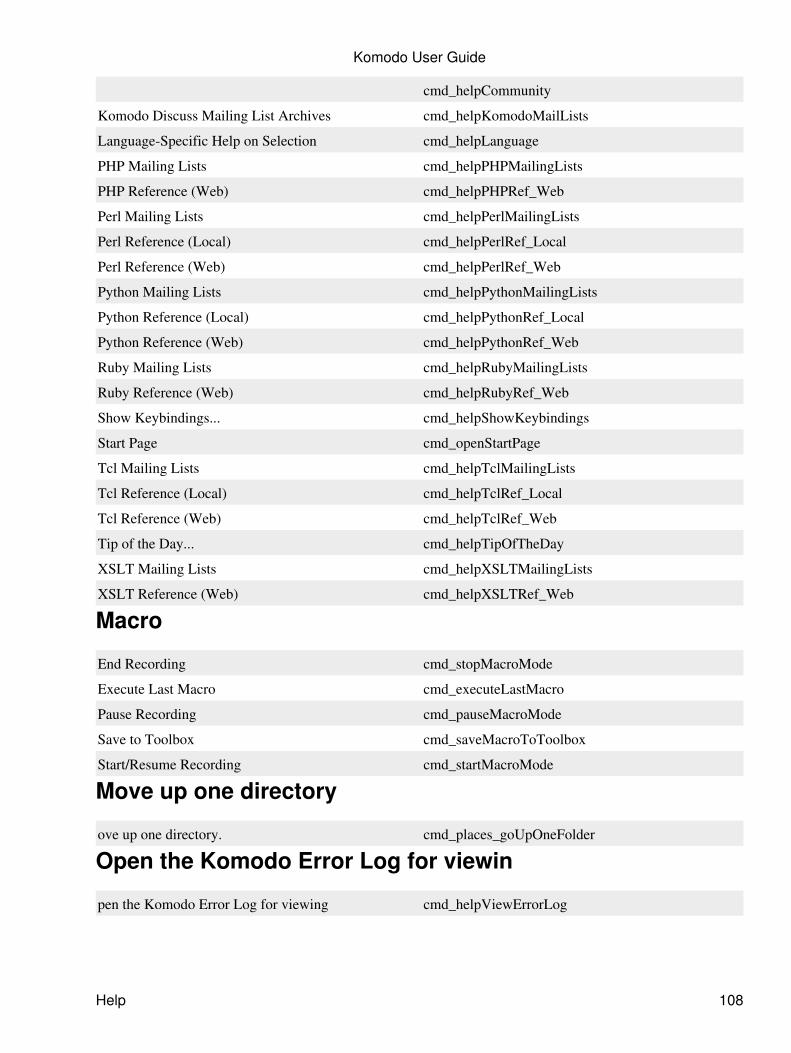
cmd_helpCommunity
Komodo Discuss Mailing List Archives cmd_helpKomodoMailLists
Language-Specific Help on Selection cmd_helpLanguage
PHP Mailing Lists cmd_helpPHPMailingLists
PHP Reference (Web) cmd_helpPHPRef_Web
Perl Mailing Lists cmd_helpPerlMailingLists
Perl Reference (Local) cmd_helpPerlRef_Local
Perl Reference (Web) cmd_helpPerlRef_Web
Python Mailing Lists cmd_helpPythonMailingLists
Python Reference (Local) cmd_helpPythonRef_Local
Python Reference (Web) cmd_helpPythonRef_Web
Ruby Mailing Lists cmd_helpRubyMailingLists
Ruby Reference (Web) cmd_helpRubyRef_Web
Show Keybindings... cmd_helpShowKeybindings
Start Page cmd_openStartPage
Tcl Mailing Lists cmd_helpTclMailingLists
Tcl Reference (Local) cmd_helpTclRef_Local
Tcl Reference (Web) cmd_helpTclRef_Web
Tip of the Day... cmd_helpTipOfTheDay
XSLT Mailing Lists cmd_helpXSLTMailingLists
XSLT Reference (Web) cmd_helpXSLTRef_Web
Macro
End Recording cmd_stopMacroMode
Execute Last Macro cmd_executeLastMacro
Pause Recording cmd_pauseMacroMode
Save to Toolbox cmd_saveMacroToToolbox
Start/Resume Recording cmd_startMacroMode
Move up one directory
ove up one directory. cmd_places_goUpOneFolder
Open the Komodo Error Log for viewin
pen the Komodo Error Log for viewing cmd_helpViewErrorLog
Komodo User Guide
Help 108
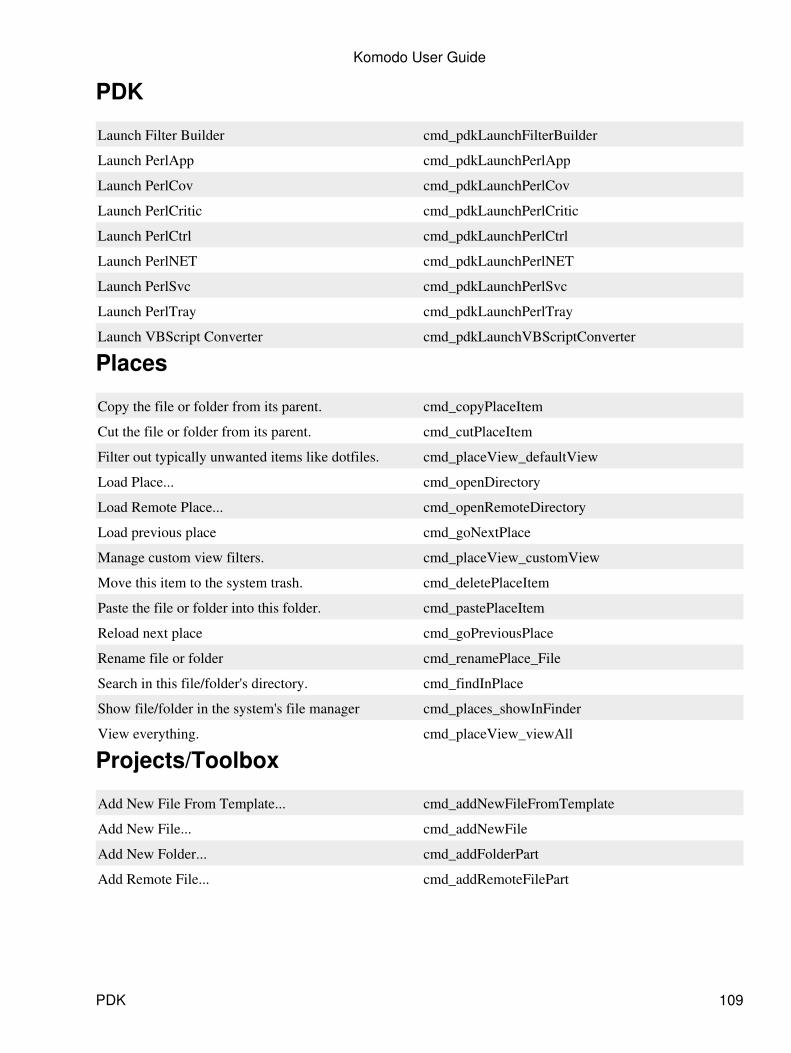
PDK
Launch Filter Builder cmd_pdkLaunchFilterBuilder
Launch PerlApp cmd_pdkLaunchPerlApp
Launch PerlCov cmd_pdkLaunchPerlCov
Launch PerlCritic cmd_pdkLaunchPerlCritic
Launch PerlCtrl cmd_pdkLaunchPerlCtrl
Launch PerlNET cmd_pdkLaunchPerlNET
Launch PerlSvc cmd_pdkLaunchPerlSvc
Launch PerlTray cmd_pdkLaunchPerlTray
Launch VBScript Converter cmd_pdkLaunchVBScriptConverter
Places
Copy the file or folder from its parent. cmd_copyPlaceItem
Cut the file or folder from its parent. cmd_cutPlaceItem
Filter out typically unwanted items like dotfiles. cmd_placeView_defaultView
Load Place... cmd_openDirectory
Load Remote Place... cmd_openRemoteDirectory
Load previous place cmd_goNextPlace
Manage custom view filters. cmd_placeView_customView
Move this item to the system trash. cmd_deletePlaceItem
Paste the file or folder into this folder. cmd_pastePlaceItem
Reload next place cmd_goPreviousPlace
Rename file or folder cmd_renamePlace_File
Search in this file/folder's directory. cmd_findInPlace
Show file/folder in the system's file manager cmd_places_showInFinder
View everything. cmd_placeView_viewAll
Projects/Toolbox
Add New File From Template... cmd_addNewFileFromTemplate
Add New File... cmd_addNewFile
Add New Folder... cmd_addFolderPart
Add Remote File... cmd_addRemoteFilePart
Komodo User Guide
PDK 109
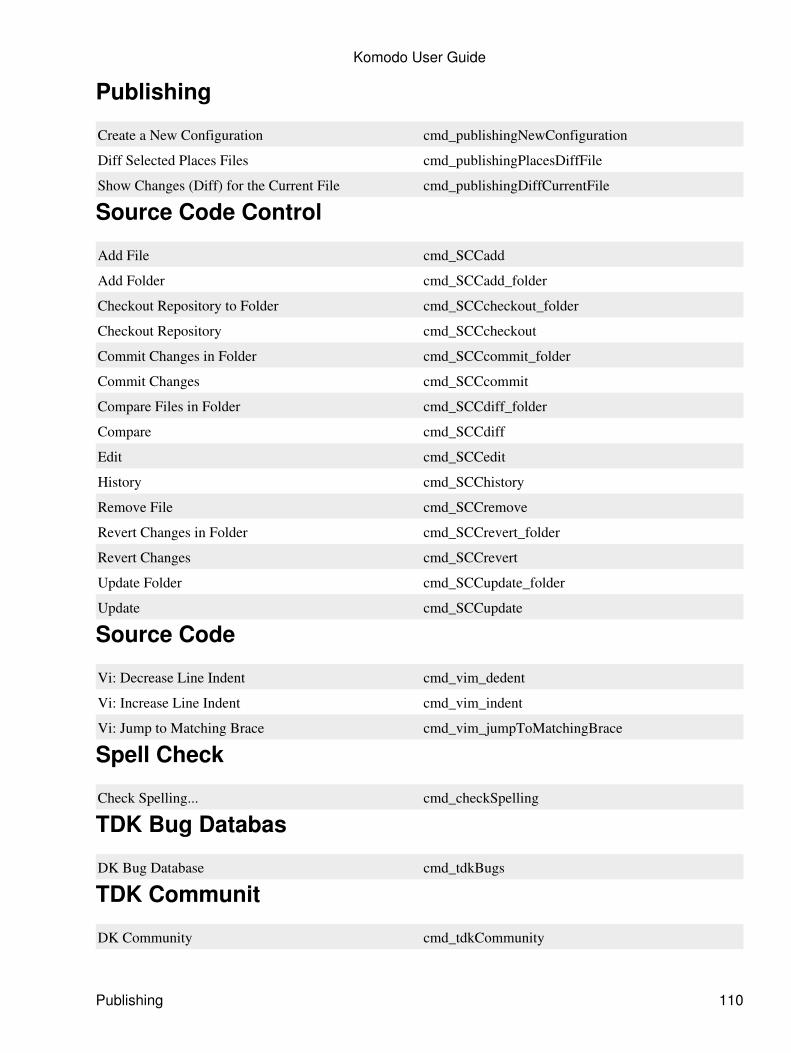
Publishing
Create a New Configuration cmd_publishingNewConfiguration
Diff Selected Places Files cmd_publishingPlacesDiffFile
Show Changes (Diff) for the Current File cmd_publishingDiffCurrentFile
Source Code Control
Add File cmd_SCCadd
Add Folder cmd_SCCadd_folder
Checkout Repository to Folder cmd_SCCcheckout_folder
Checkout Repository cmd_SCCcheckout
Commit Changes in Folder cmd_SCCcommit_folder
Commit Changes cmd_SCCcommit
Compare Files in Folder cmd_SCCdiff_folder
Compare cmd_SCCdiff
Edit cmd_SCCedit
History cmd_SCChistory
Remove File cmd_SCCremove
Revert Changes in Folder cmd_SCCrevert_folder
Revert Changes cmd_SCCrevert
Update Folder cmd_SCCupdate_folder
Update cmd_SCCupdate
Source Code
Vi: Decrease Line Indent cmd_vim_dedent
Vi: Increase Line Indent cmd_vim_indent
Vi: Jump to Matching Brace cmd_vim_jumpToMatchingBrace
Spell Check
Check Spelling... cmd_checkSpelling
TDK Bug Databas
DK Bug Database cmd_tdkBugs
TDK Communit
DK Community cmd_tdkCommunity
Komodo User Guide
Publishing 110
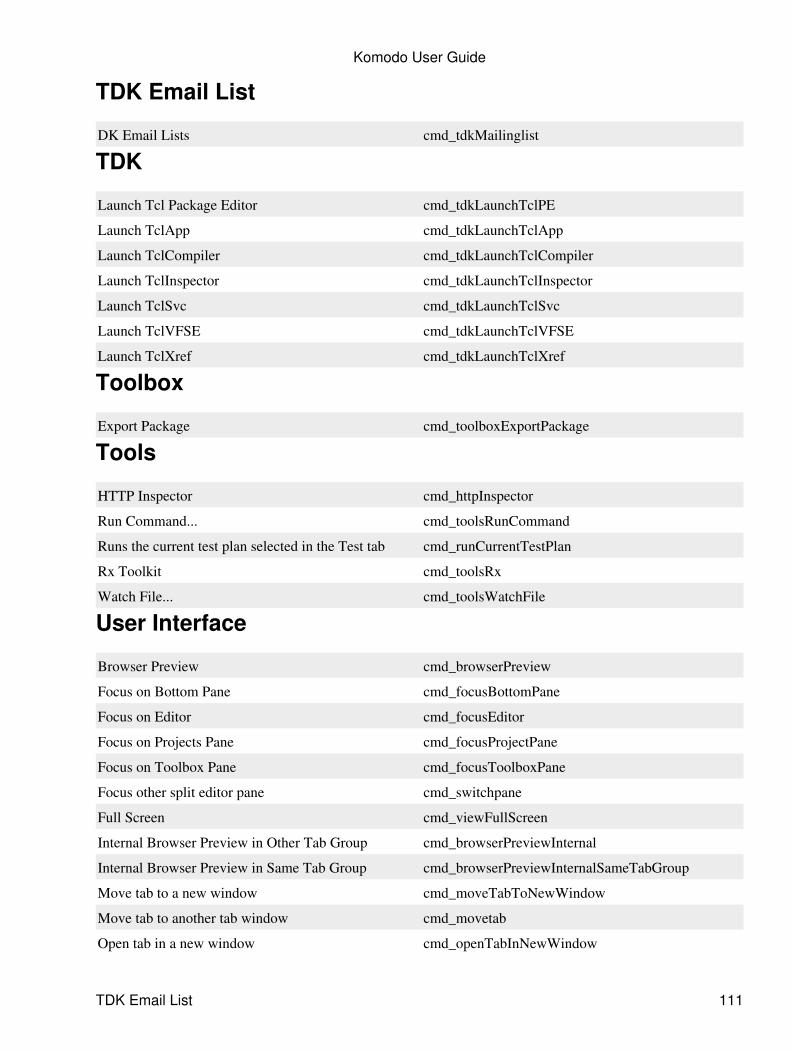
TDK Email List
DK Email Lists cmd_tdkMailinglist
TDK
Launch Tcl Package Editor cmd_tdkLaunchTclPE
Launch TclApp cmd_tdkLaunchTclApp
Launch TclCompiler cmd_tdkLaunchTclCompiler
Launch TclInspector cmd_tdkLaunchTclInspector
Launch TclSvc cmd_tdkLaunchTclSvc
Launch TclVFSE cmd_tdkLaunchTclVFSE
Launch TclXref cmd_tdkLaunchTclXref
Toolbox
Export Package cmd_toolboxExportPackage
Tools
HTTP Inspector cmd_httpInspector
Run Command... cmd_toolsRunCommand
Runs the current test plan selected in the Test tab cmd_runCurrentTestPlan
Rx Toolkit cmd_toolsRx
Watch File... cmd_toolsWatchFile
User Interface
Browser Preview cmd_browserPreview
Focus on Bottom Pane cmd_focusBottomPane
Focus on Editor cmd_focusEditor
Focus on Projects Pane cmd_focusProjectPane
Focus on Toolbox Pane cmd_focusToolboxPane
Focus other split editor pane cmd_switchpane
Full Screen cmd_viewFullScreen
Internal Browser Preview in Other Tab Group cmd_browserPreviewInternal
Internal Browser Preview in Same Tab Group cmd_browserPreviewInternalSameTabGroup
Move tab to a new window cmd_moveTabToNewWindow
Move tab to another tab window cmd_movetab
Open tab in a new window cmd_openTabInNewWindow
Komodo User Guide
TDK Email List 111
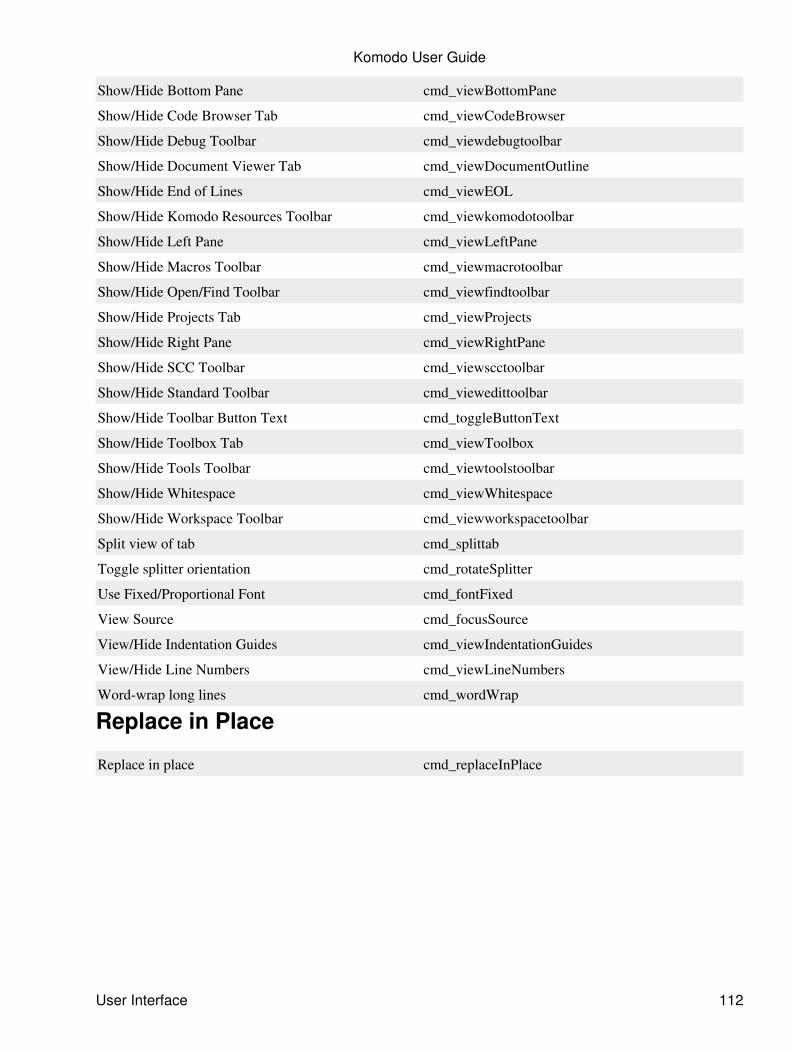
Show/Hide Bottom Pane cmd_viewBottomPane
Show/Hide Code Browser Tab cmd_viewCodeBrowser
Show/Hide Debug Toolbar cmd_viewdebugtoolbar
Show/Hide Document Viewer Tab cmd_viewDocumentOutline
Show/Hide End of Lines cmd_viewEOL
Show/Hide Komodo Resources Toolbar cmd_viewkomodotoolbar
Show/Hide Left Pane cmd_viewLeftPane
Show/Hide Macros Toolbar cmd_viewmacrotoolbar
Show/Hide Open/Find Toolbar cmd_viewfindtoolbar
Show/Hide Projects Tab cmd_viewProjects
Show/Hide Right Pane cmd_viewRightPane
Show/Hide SCC Toolbar cmd_viewscctoolbar
Show/Hide Standard Toolbar cmd_viewedittoolbar
Show/Hide Toolbar Button Text cmd_toggleButtonText
Show/Hide Toolbox Tab cmd_viewToolbox
Show/Hide Tools Toolbar cmd_viewtoolstoolbar
Show/Hide Whitespace cmd_viewWhitespace
Show/Hide Workspace Toolbar cmd_viewworkspacetoolbar
Split view of tab cmd_splittab
Toggle splitter orientation cmd_rotateSplitter
Use Fixed/Proportional Font cmd_fontFixed
View Source cmd_focusSource
View/Hide Indentation Guides cmd_viewIndentationGuides
View/Hide Line Numbers cmd_viewLineNumbers
Word-wrap long lines cmd_wordWrap
Replace in Place
Replace in place cmd_replaceInPlace
Komodo User Guide
User Interface 112
TemplatesTemplates are files that contain the basic structure for new files or projects. For example, a Perl templatemight contain the standard "#!" line, appropriate copyright statements, and use statements calling a standardset of modules.
Komodo includes templates for a number of languages languages, and lets you create and use your own.Templates can contain Interpolation Shortcuts or Tabstops. They can be stored in a project or in the Toolboxfor quick access, and shared via the Common Data Directory.
Creating New Files from Templates
The New File menu option, invoked via File|New|New File, or via the associated key binding, providesaccess to numerous templates for creating new files. These templates consist of standard code that is generallyincluded in programs of the selected type. For example, the Perl template creates a file with a ".pl"extension that contains the line "use strict;"; the XSLT stylesheet template creates a file with an".xsl" extension and an xml version and xsl stylesheet declaration.
To create a new file from a template file, in the New File dialog box, select the category in the Left Pane, thendouble-click the template name in the Right Pane. A new file is created in the Komodo editor using the codestored in the template.
When using the New File button on the Standard Toolbar, the template (if any) associated with the languagein the new files preferences is used to create the new file.
Alternatively, templates can be stored in a project or the Toolbox, and can be associated with a key binding.
Creating Custom Templates
Custom templates are created in the Komodo editor; on saving the file, it is identified as a template.
Create Template File: In Komodo, create a file with the desired contents for the template.1. Save as Template: Select File|Save As Template.2.
Custom templates are stored in the "My Templates" folder (as displayed in the Save File dialog box). Due to aKomodo bug (41829), OS X users must navigate manually to:
<User-home-directory>/Library/Application Support/Komodo/3.x/templates/My Templates
Optionally, create shortcuts (on Windows), aliases (Mac OS X) or symlinks (on Linux or Mac OS X) in the"My Templates" directory structure that point to files located elsewhere on the system. Files should have anextension that allows Komodo to correctly detect the language (according to the settings configured inKomodo's File Associations preference).
If you create a directory alongside My Templates with the same name as a template group that alreadyexists in Komodo (such as Common or Web), the contents of the two directories are merged. If files of thesame name exist in both directories, the file in the directory at the same level as My Templates is used.
For example:
Templates 113
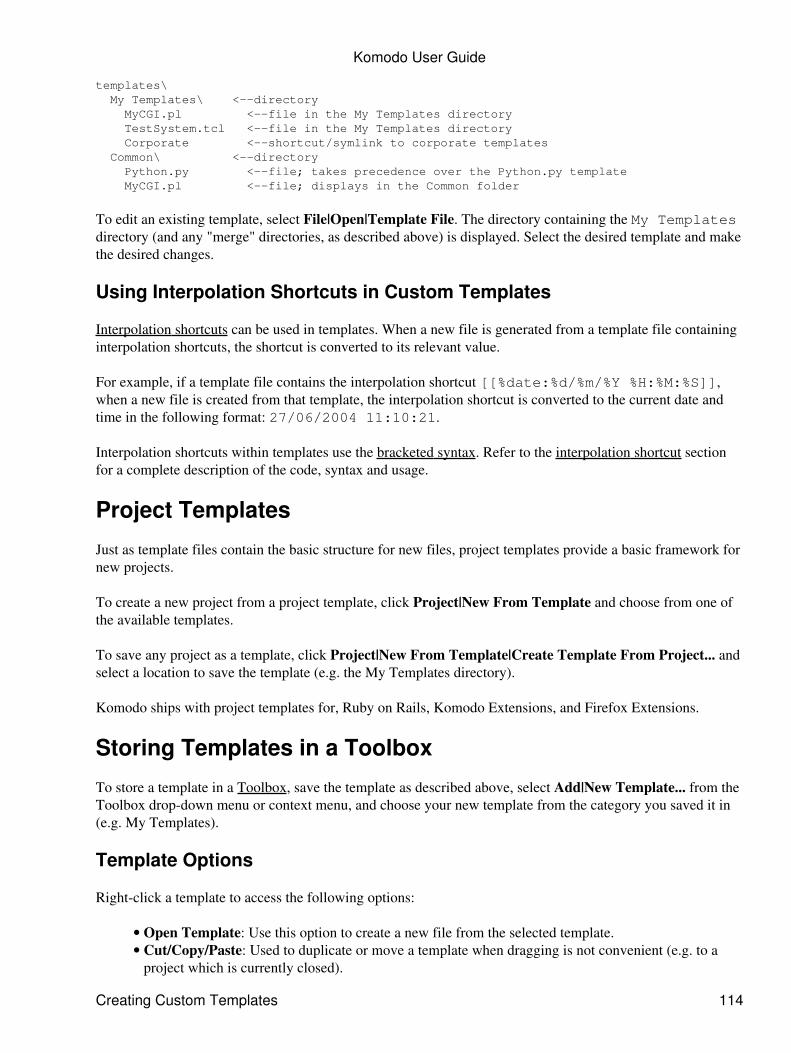
templates\ My Templates\ <--directory MyCGI.pl <--file in the My Templates directory TestSystem.tcl <--file in the My Templates directory Corporate <--shortcut/symlink to corporate templates Common\ <--directory Python.py <--file; takes precedence over the Python.py template MyCGI.pl <--file; displays in the Common folder
To edit an existing template, select File|Open|Template File. The directory containing the My Templatesdirectory (and any "merge" directories, as described above) is displayed. Select the desired template and makethe desired changes.
Using Interpolation Shortcuts in Custom Templates
Interpolation shortcuts can be used in templates. When a new file is generated from a template file containinginterpolation shortcuts, the shortcut is converted to its relevant value.
For example, if a template file contains the interpolation shortcut [[%date:%d/%m/%Y %H:%M:%S]],when a new file is created from that template, the interpolation shortcut is converted to the current date andtime in the following format: 27/06/2004 11:10:21.
Interpolation shortcuts within templates use the bracketed syntax. Refer to the interpolation shortcut sectionfor a complete description of the code, syntax and usage.
Project Templates
Just as template files contain the basic structure for new files, project templates provide a basic framework fornew projects.
To create a new project from a project template, click Project|New From Template and choose from one ofthe available templates.
To save any project as a template, click Project|New From Template|Create Template From Project... andselect a location to save the template (e.g. the My Templates directory).
Komodo ships with project templates for, Ruby on Rails, Komodo Extensions, and Firefox Extensions.
Storing Templates in a Toolbox
To store a template in a Toolbox, save the template as described above, select Add|New Template... from theToolbox drop-down menu or context menu, and choose your new template from the category you saved it in(e.g. My Templates).
Template Options
Right-click a template to access the following options:
Open Template: Use this option to create a new file from the selected template.• Cut/Copy/Paste: Used to duplicate or move a template when dragging is not convenient (e.g. to aproject which is currently closed).
•
Komodo User Guide
Creating Custom Templates 114
Show in File Manager: Shows the JSON file for the template in the system's default file manager.• Export as Zip File...: Exports the template in a standard ".zip" archive.• Rename: Changes the template name.• Delete: Permanently removes the selected template from the toolbox.•
Assigning Custom Icons to Templates
The default template icon can be replaced with custom icons. Komodo includes more than 600 icons;alternatively, select a custom image stored on a local or network drive (use 16x16-pixel images for bestresults).
To assign a custom icon to a template:
Right-click the desired template in the Toolbox and select Properties.1. In the Properties dialog box, click Change Icon.2. In the Pick an Icon dialog box, select a new icon and click OK. Alternatively, click Choose Other,and browse to the desired image file.
3.
In the Properties dialog box for the template, click OK. The custom icon is displayed next to thetemplate.
4.
To revert to the default icon for a selected template:
On the Projects or Toolbox tab, right-click the desired template and select Properties.1. Click Reset, then click OK. The default icon is displayed next to the template.2.
Template Key Bindings
Custom key bindings can be assigned to templates stored in the Toolbox. Use the Key Binding tab in thetemplate's Properties to specify the keystrokes that invoke the template. See Key Bindings for CustomComponents for more information.
Komodo User Guide
Template Options 115
URL ShortcutsURL shortcuts are components within a project or the Toolbox that are used to store frequently used URLaddresses. These URL shortcuts can be opened in an external browser (as specified in the Web and Browserpreference) or displayed in a new tab within Komodo.
Refer to Adding, Removing and Managing Tools for instructions on adding components a Toolbox. Inaddition, URL shortcuts can be created by dragging a URL from a browser address bar or from a Komodo tabonto a project or Toolbox. URLs must be preceded by "http://".
To open a URL, double-click the URL name (which opens the URL in an external browser), use the assignedkey binding, or right-click the URL and select Open URL in browser or Open URL in tab.
URL Shortcut Options
To access options for the URL shortcut, right-click on it's icon in the Toolbox to bring up the context menu.The following options are available:
Open URL in browser: Use this option to launch the default web browser (as specified in the Weband Browser preference) and display the stored URL.
•
Open URL in tab: Use this option to display the stored URL in a tab in the Komodo Editor Pane.• Cut/Copy/Paste: Used to duplicate or move a URL shortcut when dragging is not convenient (e.g. toa project which is currently closed).
•
Show in File Manager: Shows the JSON file for the URL shortcut in the system's default filemanager.
•
Export as Zip File...: Exports the URL shortcut in a standard ".zip" archive.• Rename: Changes the URL shortcut name.• Delete: Permanently removes the selected URL shortcut from the toolbox.•
URL Shortcut Properties
URL shortcut properties are used to alter the address of the URL or to change the URL shortcut's name. TheProperties dialog box is also used to assign a custom icon to a URL shortcut or to assign a custom keybinding. To access the Properties dialog box, right-click the URL shortcut and select Properties.
Assigning Custom Icons to URL Shortcuts
The default URL shortcut icon can be replaced with custom icons. Komodo includes more than 600 icons;alternatively, select a custom image stored on a local or network drive (use 16x16-pixel images for bestresults).
To assign a custom icon to a URL shortcut:
Right-click the URL shortcut in the Toolbox and select Properties.1. In the Properties dialog box, click Change Icon.2. In the Pick an Icon dialog box, select a new icon and click OK. Alternatively, click Choose Other,and browse to the desired image file.
3.
In the Properties dialog box for the URL shortcut, click OK. The custom icon is displayed next to theURL shortcut.
4.
URL Shortcuts 116
To revert to the default icon for a selected URL shortcut:
In the Projects or Toolbox sidebar, right-click the desired URL shortcut and select Properties.1. Click Reset, then click OK. The default icon is displayed next to the URL shortcut.2.
URL Shortcut Key Bindings
Custom key bindings can be assigned to URL shortcuts stored in the Toolbox. Use the Key Binding tab in theURL shortcut's Properties to specify the keystrokes that invoke the URL shortcut. See Key Bindings forCustom Components for more information.
Komodo User Guide
Assigning Custom Icons to URL Shortcuts 117
Run CommandsTutorial
Run Commands•
Feature Showcase
Google Run Command•
Run commands are operating system commands run from within Komodo. Use the Run Command dialog boxto interact with the system command line or shell while editing or debugging files in Komodo. Besidesmaking it easy to run simple and complex custom commands from within Komodo, the Run Command dialogbox can insert the results of shell commands into a document in the Editor Pane, or pass the contents of adocument to the system command line or shell.
To view examples of run commands, see the "Samples" folder in the Toolbox.
Run commands can be stored for re-use in a project or the Toolbox, where they can be assigned key bindings.
Access the last ten commands executed in the Run Command dialog box by selecting Tools|RecentCommands. The prefixes [i], [l] and [il] indicate that Insert output, Pass selection as input or both wereselected with the original command.
Creating Run Commands
To create a run command, select Tools|Run Command. The Run Command dialog box is displayed.Alternatively, invoke the Run Command dialog box from the Projects sidebar or the Toolbox by selectingAdd|New Command from the Project or Toolbox menu.
The Run Command dialog box can be toggled between its "simple" or "advanced" form by clicking theMore/Less button.
Simple Run Commands
This section describes the components of the Run Command dialog box that are displayed when the advancedcommands are hidden (via the More/Less button. See Advanced Run Commands for information about theadvanced fields.
Run: Enter the command to run.• Interpolation Shortcut: Click the arrow button to the right of the Run field to access a drop-downlist of interpolation shortcuts. When an interpolation shortcut is selected, it is inserted at the currentcursor position in the Run field. Windows users should enclose shortcuts for files and directories indouble quotes (e.g. "%F") to ensure that spaces in the file name or file path are interpreted correctly.
•
Pass selection as input: If this check box is selected, the text currently highlighted in the editor ispassed to the command in the Run field. For example, if the Run field contains grep myvar, eachline containing "myvar" in the text selected in the editor is returned.
•
Insert output: If this check box is selected, the results of the command are inserted at the cursorposition in the current document.
•
Run Commands 118
Add to Toolbox: If this check box is selected, the command is saved in the Toolbox.•
Advanced Run Commands
Click the More button in the Run Command dialog box to display advanced options. The following optionsare available:
Start in: Enter the directory where the command should be run, or click the Browse button tonavigate the filesystem. Click the arrow button to the right of the Start in field to select interpolationshortcuts pertinent to the Start in setting. Interpolation shortcuts are inserted at the current cursorposition in the Run field.
•
Run in: Specify the environment in which the command should be run. The options are:Command Output Tab: The command is run in Komodo's Bottom Pane.♦ New Console: The command is run in a new shell or command window.♦ No Console (GUI Application): The command launches the specified application withoutdisplaying output in a shell or on the Command Output tab.
♦
•
Do not open output pane: If this check box is selected, the Bottom Pane containing the CommandOutput tab does not automatically open when the command is run. To manually view the BottomPane, select View|Command Output. (This option is only accessible if the Run in field is set toCommand Output tab.)
•
Parse output with: If this check box is selected, the field to the right is used to enter a regularexpression that parses the output. See Parsing Command Output in the Run Command Tutorial for anexample. (This option is only accessible if the Run in field is set to Command Output tab.)
•
Show parsed output as list: If output parsing is configured, select Show parsed output as list todisplay the output in list format on the Command Output tab. (This option is only accessible if theRun in field is set to Command Output tab.)
•
Environment Variables: Use the Environment Variables section of the dialog box to configurenew environment variables or change the value of existing environment variables for the duration ofthe run. To add or alter an environment variable, click New and configure the following values:
Variable Name: Enter a name for the variable.♦ Variable Value: Enter a value for the variable.♦ Interpolation Shortcut: Click the arrow button to the right of the Variable Value field toinsert an interpolation shortcut pertinent to the Variable Value setting. The interpolationshortcut is inserted at the current cursor position in the Variable Value field.
♦
Add Path: Click this button to insert a directory as the variable value.♦
•
Save advanced options as defaults: If this check box is selected, the current settings are stored as thedefaults for the Run Command dialog box.
•
Command Output Tab
By default, the commands run in the Command Output tab on Komodo's Bottom Pane. (Use the Run infield to run the command in a new shell window, or to run a graphical application without a console.)
If the command prompts for input, enter it directly on the Command Output tab. Output written to "stderr"(standard error output) is displayed in red at the top of the tab. Click the Close button at the top right of theCommand Output tab to terminate a running command. Click the Toggle Raw/Parsed Output View buttonto jump from parsed results to raw output and vice versa. (Parsing is enabled and configured via the Parseoutput with field.)
Komodo User Guide
Simple Run Commands 119
Note: For more information on parsing command output, see the Parsing Command Output section of the RunCommand Tutorial.
Storing Run Commands in a Toolbox
To add a run command to Toolbox, select Add to Toolbox in the Run Command dialog box. Run commandscan also be added to a toolbox directly via Add|New Command... in the drop-down or context menus.
To run a command stored in a Toolbox, double-click the run command's name, use the assigned key binding,or right-click the run command and select Run.
To access run command options for the selected run command, right-click the run command's name. Theoptions are as follows:
Run Command: Execute the stored run command.• Cut/Copy/Paste: Used to duplicate or move a command when dragging is not convenient (e.g. to aproject which is currently closed).
•
Show in File Manager: Shows the JSON file for the command in the system's default file manager.• Export as Zip File...: Exports the command in a standard ".zip" archive.• Rename: Changes the command name.• Delete: Permanently removes the selected command from the toolbox.•
Run Command Properties
To access the properties of a run command stored in a project or the Toolbox, right-click the run commandand select Properties. The Properties dialog box contains all the elements of the Run Command dialog box,and is therefore used for editing stored run commands. In addition, the Properties dialog box is used to assigna custom icon to the run command, and to assign a custom key binding.
Assigning Custom Icons to Run Commands
The default run command icon can be replaced with custom icons. Komodo includes more than 600 icons;alternatively, select a custom image stored on a local or network drive (use 16x16-pixel images for bestresults).
To assign a custom icon to a run command:
In the Projects sidebar or Toolbox, right-click the desired run command and select Properties.Alternatively, single click the run command to highlight it in the sidebar then selectProjects|runcommand_name|Properties or Toolboxruncommand_name|Properties.
1.
In the Properties dialog box, click Change Icon.2. In the Pick an Icon dialog box, select a new icon and click OK. Alternatively, click Choose Other,and browse to the desired image file.
3.
In the properties dialog box for the run command, click OK. The custom icon is displayed next to therun command.
4.
To revert to the default icon for a selected run command:
In the Projects or Toolbox sidebar, right-click the desired run command and select Properties.1. Click Reset, then click OK. The default icon is displayed next to the run command.2.
Komodo User Guide
Command Output Tab 120
Run Command Key Bindings
Custom key bindings can be assigned to run commands stored in the Toolbox or in a Project. Use the KeyBinding tab in the run command's Properties to specify the keystrokes that invoke the run command. See KeyBindings for Custom Components for more information.
Komodo User Guide
Run Command Key Bindings 121
Custom Toolbars and MenusFeature Showcase
create a custom toolbar•
Any component that can be stored in a Toolbox can be stored in a custom toolbar or menu. They are useful forexposing, snippets, commands, macros or links which are used often.
Custom toolbars and menus are created within a toolbox. Those in project-specific toolboxes are onlydisplayed when that project is active; those contained in the global toolbox (i.e. at the top level) are alwaysdisplayed.
Creating Custom Toolbars and Menus
On the Toolbox drop-down menu, select New Custom Toolbar or New Custom Menu. Enter aname for the new item.
1.
Copy and paste or drag and drop the item(s) to be included onto the icon created in the previous step.Alternatively, right-click the custom menu or toolbar name and select Add. New toolbars aredisplayed alongside the default Komodo toolbars and can be accessed via the View|Toolbars menu.New menus are displayed to the right of the default Komodo menus.
2.
Custom Menu and Toolbar Properties
Custom menu or toolbar properties are used to alter the name of the custom menu or toolbar, or change thecustom menu or toolbar's display order. To access the Properties dialog box, right-click the custom menu ortoolbar and select Properties.
Custom menus are displayed between the default Tools and Help menus. If multiple custom menus are ineffect, the display order depends on the menu's Priority setting. New menus have a default priority of 100;alter the priority of custom menus to control the left-to-right order of display.
Custom toolbars are displayed to the right of default Komodo toolbars. If necessary, a new row is created fortheir display. If multiple custom toolbars are in effect, the display order depends on the toolbar's Prioritysetting. New toolbars have a default priority of 100; alter the priority of custom toolbars to control theleft-to-right order of display.
To assign a letter to be used in combination with the 'Alt' key for menu access, enter a shortcut letter in theMenu Access Key field. If the letter is already assigned to a Komodo core function, you are prompted to entera different letter.
Custom Toolbars and Menus 122
Debugging Programs Komodo IDE onlyTutorials
Perl tutorial• Python tutorial• PHP tutorial• Ruby tutorial• XSLT tutorial•
Feature Showcases
conditional breakpoints• XSLT debug view•
The Komodo debugger is a tool for analyzing programs on a line-by-line basis, monitoring and alteringvariables, and watching output as it is generated. Debugging features include:
breakpoint and spawnpoint control• remote debugging• stepping• watching variables• viewing the call stack• sending input• adding command-line arguments• interactive shell•
The sections that follow contain general information about the debugger that is applicable to each language.Komodo provides debugging support for Perl, Python, PHP, Ruby, XSLT and Tcl. For information aboutconfiguring languages and language-specific debugger functions, see:
Debugging Perl• Debugging Python• Debugging PHP• Debugging Ruby• Debugging Tcl• Debugging XSLT•
Notes
Be sure you meet the software prerequisites for debugging, as described in the Installation Guide.•
Starting the Debugger
To start the debugger, do one of the following:
Debug Toolbar: Select Go/Continue or Step In.• Keyboard: Use the associated key binding.• Debug Menu: Click Go/Continue or Step In.•
Debugging Programs Komodo IDE only 123
By default, the Debugging Options dialog box is displayed (unless the debugger preference has beenconfigured to start without displaying the dialog box). To override the debugger preference on Windows andLinux systems, hold down the 'Ctrl' key while invoking the key binding for starting the debug session. (SelectHelp|List Key Bindings to view the current key bindings; use the key bindings preference to configurecustom key bindings.) Alternatively, the 'Ctrl' key can be used to suppress the display of the DebuggingOptions dialog box.
If multiple files are open in the Editor Pane, the program that is currently displayed is debugged. If nobreakpoints are set, Go/Continue causes the debugger to run to the end without stopping. Step In movesthrough the program one line at a time.
If the Bottom Pane is hidden, Komodo automatically shows it.
To run a program without debugging, do one of the following:
Debug Menu: Select Run without debugging.• Keyboard: Use the associated key binding.•
To run a program to the current cursor position, do one of the following:
Debug Menu: Select Run to Cursor.• Keyboard: Use the associated key binding.•
By default, the debugger will break on the first line of executable code when it starts. This is useful for addingbreakpoints if none have been set yet. To change this behavior, set Initial break behavior to Run to firstbreakpoint in the debugger preferences (Edit|Preferences|Debugger).
Multi-Session Debugging
Komodo supports the concurrent debugging of multiple applications, or multi-session debugging. Withmulti-session debugging, Komodo debugs more than one project at a time, regardless of the supportedlanguages used in the programs being debugged.
When debugging multiple sessions, each session has a unique Debug tab (located in the Bottom Pane) forcontrolling the debug actions specific to that process. A Debug tab is created each time a new debuggersession is started. To close a Debug tab, click the X button at the top right corner.
To start multiple debugging sessions, do one of the following:
Debug Menu: Click Start New Session.• Keyboard: Use the associated key binding.•
Debugging Options
When the debugger is invoked, the Debugging Options dialog box is displayed. Use this to configure thesystem environment, command-line arguments, CGI environment, and other debugging options.
Not all of the debugging options described below apply to all languages. The available tabs and fields dependon the interpreter used to debug the file. The interpreter is determined by the File Associations configured forthe active file in the Editor Pane.
Komodo User Guide
Starting the Debugger 124
To suppress the display of the Debugging Options dialog box on Windows and Linux systems, hold down the'Ctrl' key while clicking the desired debugging button on the Debug Toolbar, or use the desired keyboardshortcut. Change the default display by selecting Skip debug options dialog fromEdit|Preferences|Debugger.
Global Options
These options are displayed regardless of which configuration tabs are available.
Language: The language of the file being debugged.• Simulate CGI Environment: Select this check box to display two additional CGI option tabs - CGIEnvironment and CGI Input.
•
Debug in separate console: Select this check box to display the debug process in a separate consolewindow rather than the Output tab. As applicable, the console window displays program output andprompts for program input.
•
General Tab
Interpreter Arguments: As required, enter command line options and arguments for the interpreterin this field. Use the Shortcut button to the right of the input field to select commonlanguage-specific options.
•
Script: Enter the name of the script to be debugged. By default, this field contains the full path andname of the program displayed in the Editor pane. When manually specifying a script, UNC or SMBpaths (which identify remote machines on a local area network via the "\\" prefix) are not supported.Instead, map the network share to a drive letter (Windows) or mount the share on the filesystem (OSX and Linux). When set as a Project setting, this is the script that Komodo opens for debugging whena session is started from any file in the project. This is useful when working in modules which arecalled by a 'main' program.
•
Script Arguments: As required, enter arguments for the script in this field as they would appear onthe command line. Multiple Arguments must be separated with spaces. If the Simulate CGIEnvironment box is selected, and CGI Input variables of the type GET are set, the contents of thisfield are ignored.
•
Directory: Specify the directory to start the program in. If unset, the program starts in the directorywhere it resides.
•
Select the input XML file: (XSLT only) Specify the name and location of the input XML file.• Select the interpreter to use for debugging: (PHP and Tcl only) For Tcl programs, select tclsh orthe wish interpreter, depending on whether you are debugging a console or a GUI application. ForPHP programs, select the CLI (Command Line Interface) or CGI (Common Gateway Interface)interpreter. These selections reference the interpreters configured under Edit|Preferences... in theLanguage Configuration section.
•
Select the directory that contains the php.ini file: (PHP only) If more than one version of PHPexists on the system, specify the directory that contains the php.ini file you wish to use.
•
Disable Output Buffering (PHP only): Output from the PHP interpreter is not buffered (it isdisplayed as it occurs) if this option is enabled. This option has no effect when Simulate CGIEnvironment is selected. To disable output buffering in CGI emulation mode, comment out theoutput_buffering setting in php.ini with a ";" character, or set it to "off".
•
Enable Implicit Flush (PHP only): The PHP output layer flushes itself automatically after everyoutput block. If this option is not enabled, output is buffered by the operating system and is flushedperiodically by the operating system, or when the application is finished. This option has no effectwhen Simulate CGI Environment is selected.
•
Komodo User Guide
Debugging Options 125
Environment Tab
The Environment tab displays all environment variables set on the system. Use this tab to add new variablesor change the values of existing variables for the duration of the debug session. The Default EnvironmentVariables pane displays environment variables that have been declared on your system. The UserEnvironment Variables pane displays environment variables set in the saved configuration which overridethe Default Environment Variables.
Change variables by adding a new variable with the same name and a new value. These changes have noeffect outside of the Komodo debugger and are stored in each saved configuration.
To Add New Variables: Click New and enter the Variable Name and Variable Value in theEnvironment Variable dialog box. To add one or more directories to the Variable Value field, clickAdd Path and navigate to the desired directory.
•
To Edit Existing Variables: Select the variable, click Edit, then change as desired. This creates anew variable with the same name and the desired value. (User Environment Variables takeprecedence over Default Environment Variables.)
•
To Delete a Variable: Select the variable from the User Environment Variables pane and clickDelete. Default Environment Variables cannot be deleted, but can be set to an empty value.
•
CGI Environment Tab
The CGI Environment tab is only displayed if the Simulate CGI Environment check box is selected on theGeneral tab. It displays CGI Environment Variables commonly configured on a web server. Use this tab toalter existing variables and add new variables. Variable changes have no effect outside of the Komododebugger and are stored in each saved configuration.
To Add New Variables: Click New, and enter the Variable Name and Variable Value in theEnvironment Variable dialog box. To add one or more directories to the Variable Value field, clickAdd Path and navigate to the desired directory.
•
To Edit Existing Variables: Select the variable, click Edit, then change as desired. This creates anew variable with the same name and the desired value. (User CGI Environment Variables takeprecedence over Default CGI Environment Variables.)
•
To Delete a Variable: Select the variable from the User CGI Environment Variables pane andclick Delete.
•
CGI Input Tab
The CGI Input tab is only displayed if the Simulate CGI Environment check box is selected on the GlobalOptions tab. It is used to configure the CGI form type and variables for the purpose of simulating CGI input.Note that Komodo's CGI emulation does not generate HTTP Request Headers; rather, it executes the CGIdirectly by emulating a web server environment.
Request Method: Select the request method that has been assigned to the form in the CGI program.• Post Type: Select the format in which data is sent from the browser to the server.•
Use the Request Variable section of the dialog box to create variables that are processed by your CGIprogram. These variables are displayed in the Browser Arguments section of the dialog box.
Type: Specify the type of input associated with the variable (GET, POST, cookie or file).•
Komodo User Guide
Environment Tab 126
Name: Enter the variable name as specified in the CGI program.• Value: Enter the value for the variable specified in the Name field. To provide a directory path andfile, click the Browse Files button, select the desired file and click Add. (To accommodate fileuploads, select Multipart as the form's POST method.)
•
To alter variables: Click on the desired variable in the Browser Arguments section of the dialog box, makechanges in the Type, Name and Value fields, then click Update.
To delete variables: click on the desired variable in the Browser Arguments section of the dialog box, andclick Delete.
Storing Debug Configurations
Debugging options can be saved as "named configurations" in the Debug Configuration panel. To save thecurrent configuration:
Click New...1. Enter a unique Configuration Name.2. Click OK.3.
Existing saved configurations can be selected from the drop-down list. If you wish to delete a savedconfiguration, select it from the list and click Delete.
If the file being debugged is part of a project that is currently open, these preferences are saved in that project.If not, this configuration is automatically saved as part of the file's Properties and Settings (although theycannot be altered via the file's Properties dialog box).
Breakpoints and Tcl Spawnpoints
Breakpoints are set at lines in the program where you want program execution to pause. Enabled breakpointsappear as solid red circles in the left margin of the Editor pane and are also listed on the Breakpoints tabduring debugging. Disabled breakpoints appear as white circles with a red outline. Double-clicking on anenabled or disabled breakpoint from the Breakpoints tab opens the associated file in the Editor Pane andshifts focus to the line number for that break location.
Spawnpoints are set at points in a Tcl script where you want an external application to execute (spawn). Whena spawnpoint is encountered during the debugging process, Komodo configures the spawned application tostart as a new debugger session. Both the initial and spawned debugger sessions run concurrently. Enabledspawnpoints appear as solid green arrows in the left margin of the Editor pane and are also listed on theBreakpoints tab during debugging. Disabled spawnpoints appear as white arrows with a green outline.Double-clicking an enabled or disabled spawnpoint from the Breakpoints tab opens the associated file in theEditor pane and shifts focus to the line number coinciding with that spawnpoint location.
Breakpoint and Spawnpoint Management
Breakpoints and spawnpoints can be monitored and managed on the Breakpoints tab in the Bottom pane(displayed during debugging or invoked by selecting View|Tabs & Sidebars|Command Output). This tablists all breakpoints and spawnpoints set in the program. Use the Breakpoints tab to:
toggle breakpoints•
Komodo User Guide
CGI Input Tab 127
toggle spawnpoints• go to source code• set breakpoint properties•
Toggling Breakpoints
Breakpoints and Spawnpoints can be toggled between enabled, disabled and deleted. To toggle a breakpoint,do one of the following:
Breakpoint Margin: Click on the line you wish to break at once to enable a breakpoint, a secondtime to disable it, and a third time to delete it.
•
Debug Menu: Click Enable/Disable Breakpoint once to enable a breakpoint on the current line, asecond time to disable it, and a third time to delete it.
•
Keyboard: Press 'F9' ('Cmd'+'\' on Mac OS X) once to enable a breakpoint on the current line, asecond time to disable it, and a third time to delete it.
•
To create a new breakpoint in the Breakpoints tab:
Click the New button and then select New Breakpoint or right-click in the Breakpoints pane andselect Add|New Breakpoint on the context menu.
1.
The following Breakpoint Properties are required:2. Language: By default, the language of the program being debugged.♦ File: The location of the file where the breakpoint is being set.♦ Line: The line number in the file where the spawnpoint is to be set.♦ Enable: Select the check box to enable the breakpoint.♦
3.
Click OK.4.
To delete a breakpoint in the Breakpoints tab, do one of the following:
Select the breakpoint and click the Delete Breakpoint button• Right-click on the breakpoint and select Delete.•
To clear or remove multiple breakpoints, do one of the following:
Debug Menu: Click Clear All Breakpoints.• Breakpoint Tab: Click the Delete All Breakpoints button.• Keyboard: Use the associated key binding.•
To disable or enable all breakpoints:
On the Breakpoints tab, click the Disable/Enable All Breakpoints button. All breakpoints aredisabled if previously enabled, or enabled if previously disabled.
•
Toggling Spawnpoints
To add a Tcl spawnpoint, use the Breakpoints tab:
Click the New button and then select New Tcl Spawnpoint or right-click in the Breakpoints list andselect Add|New Tcl Spawnpoint on the context menu.
1.
The following properties are configurable in the Spawnpoint Properties dialog box:2. Language: Tcl♦ 3.
Komodo User Guide
Breakpoint and Spawnpoint Management 128
File: The location of the file where the spawnpoint is to be set (for example,C:\samples\tcl_sample.tcl).
♦
Line: The line number in the file where the spawnpoint is to be set.♦ Enable: Select the check box to enable the spawnpoint. Deselect the check box to disable thespawnpoint.
♦
Click OK.4.
To delete a spawnpoint in the Breakpoints tab, do one of the following:
Select the spawnpoint and click the Delete Breakpoint button• Right-click on the spawnpoint and select Delete.•
To clear or remove multiple spawnpoints, do one of the following:
Debug Menu: Click Clear All Breakpoints.• Breakpoint Tab: Click the Delete All Breakpoints button.• Keyboard: Use the associated key binding.•
To disable or enable all spawnpoints:
On the Breakpoints tab, click the Disable/Enable All Breakpoints button. All spawnpoints aredisabled if previously enabled, or enabled if previously disabled.
•
Note: Breakpoints and spawnpoints added or modified while a program is running are not necessarily updatedin the breakpoint manager. To add breakpoints while debugging, interrupt the debugging session using theBreak button to ensure that the new breakpoint is properly updated.
Go to the Source Code
To open the source code in the Editor Pane at the line number where the breakpoint or spawnpoint is set, doone of the following:
Breakpoints Tab: Double-click the breakpoint to view the associated source code.• Breakpoints Tab: Select the desired breakpoint and click the Go to the Source Code button.•
Breakpoint Properties
When adding or editing a breakpoint in the Breakpoint tab, a Breakpoint Properties dialog box appears.This dialog box contains a tab for each available breakpoint type. Change the breakpoint type by switching toa different tab.
Each tab is split into two parts, separated by a horizontal line. The top section contains configuration itemsthat are required; the bottom section contains configuration options that are optional. The last item on this tabis the Enable checkbox.
Language: The language of the file where the breakpoint is to be set.• File: The line number on which to break.• Condition: Evaluate some code and break if it evaluates to true. For example, 0==0, as the conditionwould always evaluate to true and cause the debugger to break. The condition should be specified inthe syntax of the language selected in the Language drop-down list.
•
Watch: Break when the value of the specified variable (or expression) is set or changed.•
Komodo User Guide
Toggling Spawnpoints 129

Function Call: Break after the specified function is called.• Function Return: Break after the specified function has finished executing.• Exception: Break when the specified exception is caught.• Line: Break on the specified line.• Hit Counts: Break when the condition specified in any of the above has been met a certain number oftimes. Each time the debugger engine reaches a breakpoint, it adds one to the count. It then looks atthe hit count setting to see if the evaluation allows for a break at that moment. There are twoconfiguration items related to hit counts, the condition and the count. There are three types ofconditions:
Break when hit count is greater than or equal to♦ Break when hit count is equal to♦ Break when hit count is a multiple of♦
For example:
Set a breakpoint on line 2 of a script.
for 1 in range(256):print 'hello'
1.
Define a hit condition 'Break when hit count is a multiple of'.2. Enter the value 5. The debugger breaks every 5th time it passes the line with the printstatement.
3.
•
Not all breakpoint types are supported for all languages. The following table shows breakpoint support bylanguage:
Type Tcl Perl PHP XSLT Python
Line Number Yes Yes Yes Yes Yes
Function Call No Yes Yes Yes Yes
Function Return No Yes Yes Yes Yes
Exception No No Yes No Yes
Conditional Yes Yes Yes Yes Yes
Watch Yes Yes No No Yes
Forcing a Break
Use the Break Now function to stop debugging an application at the current execution point, and thencontinue debugging from that point. For example, use this control when debugging applications running longprocesses. To force a break while debugging an application, do one of the following:
Debug Menu: Select Break Now.• Debug Toolbar: Click the Break Now button.•
Remote Debugging
Komodo User Guide
Breakpoint Properties 130
Remote debugging usually involves executing code on a remote machine while observing and controlling thedebugging process from within Komodo. Remote debugging sessions are initiated from the command line orfrom code in the program itself. This approach is useful for debugging applications in the environments wherethey are ultimately run (e.g. CGI programs on a live web server), and for client/server applications.
Komodo can be set to Listen for Debugger Connections continuously. Additionally, you can set remotedebugger preferences and check listener status of the current listener configuration. For instructions onconfiguring specific languages for remote debugging, see:
Debugging Perl• Debugging Python• Debugging PHP• Debugging XSLT• Debugging Tcl•
When to use Remote Debugging
Remote debugging is most commonly used to debug programs on a remote server, but there are otherinstances where it is useful or necessary:
Running programs on an unsupported platform/OS: Some interpreters running in an embeddedenvironment or on an operating system that Komodo itself does not run on can use the debugginglibraries provided by Komodo:
PHP: Xdebug can be compiled or cross-compiled for the target platform.♦ Perl: The "pure-Perl" remote debugging libraries should work on most platforms.♦ Python: The remote debugging libraries have "pure-Python" fallbacks if the binaries cannotbe run.
♦
Ruby: The remote debugging libraries use ruby-debug. This platform and version-specificcomponent can be compiled separately or installed as a gem.
♦
•
Post-mortem debugging: Error trapping code in a program can be used to initiate a remote debuggingsession before exiting (also called "just-in-time" debugging).
•
Running programs in Cygwin: The language interpreters in Cygwin are not stand-alone Win32applications; they need to be run from within the Cygwin shell. Komodo cannot use these interpretersdirectly for local debugging, but can accept remote debugging connections from them.
•
Consult the language-specific debugging documentation listed above for configuration instructions.
Listen for Debugger Connections
To toggle continuous listening for remote debugging, do one of the following:
Debug Menu: select Listen for Debugger Connections.• Keyboard: Use the associated key binding.•
Note: A check mark appears when Listen for Debugger Connections is enabled. Otherwise, this feature isdisabled.
Komodo User Guide
Remote Debugging 131
Check Listener Status
To check the status and current configuration of the Komodo debugger:
On the Debug menu, select Listener Status. The Debugger Listener status screen appears.1. Click OK after reviewing listener status, or use the associated key binding.2.
Multi-User Debugging
When multiple users are running Komodo session, configure Komodo's Debugger Connection Options tolisten for debug connections on port "0" (see Set Debugger Preferences). The system provides Komodo with aunique port each time Komodo is started, allowing multiple users on the system to debug applicationssimultaneously. In remote debugging, this requires the remote debugger application to be manually set toconnect on the system-allocated port unless the Debugger Proxy is used.
Mapped URIs for Remote Debugging
By default, Komodo recieves a read-only copy of the program from the debugger. You can set breakpoints inthis copy to control how it executes, but you cannot make changes to it or have the breakpoints persist acrossdebugging sessions. For Komodo to open an editable copy of the file (i.e. the original program file), a URImapping must be created to link the file on the remote filesystem with the URI Komodo receives from theremote debugger.
The incoming URI for a remote debugging session is in the form:
file://server name or ip address/path/to/file
For example, the file '/www/htdocs/php/info.php' on a server named 'myserver', would send thefollowing URI to Komodo:
file://myserver/www/htdocs/php/info.php
If 'myserver' was accessible via SFTP, you could add the following mapping in Komodo's Preferences:
URI: file://myserver/wwwPath: sftp://user@myserver/apache/www
This mapping would apply to all files in www and its subdirectories.
The Path can include remote files accessed via FTP, SFTP or SCP as well as files on the local filesystem.
Mapped URIs can also be specified by right-clicking on the editor tab and selecting Create Mapped URIfrom the context menu. By default, the Path field will show the full path of the file in that editor tab. Thispath can be shortened to include more files and directories in the mapping (as above).
Debugger Proxy
Remote debugger processes can communicate with Komodo through the DBGP proxy (debugger protocolproxy). The proxy allows Komodo to use a system-allocated listener port for debugging without the userhaving to manually configure the same port number on the remote debugger. This is useful for running
Komodo User Guide
Check Listener Status 132
multiple remote debugging sessions and on networks where a remote debugging process can not connect toKomodo directly. The proxy can run on the local machine, the remote machine, or a separate machine.
A typical DBGP Proxy connection is established as follows:
Komodo contacts the DBGP proxy and identifies itself with:1. Hostname or IP: The hostname or IP address of the machine Komodo is running on. This isset to localhost or 127.0.0.1 if the debugger is running locally.
♦
Port Number: The port configured in Preferences|Debugger or the system-assigned port.♦ Proxy Key: The Proxy Key configured in Preferences|Debugger. If unset, Komodo will usethe USER or USERNAME environment variable value.
♦
2.
The DBGP Proxy stores this information.3. The remote debugging process contacts the DBGP Proxy, providing an IDE Key which correspondsto the Proxy Key specified in Komodo. By default, this connection happens on port 9000 but can beconfigured to use another port (see language-specific debugging instructions and "-d" option below).
4.
DBGP Proxy uses the IDE Key value to match the connection to the appropriate instance of Komodo.5. The remote debugger connects to Komodo on the system-assigned or user-specified port.6.
To start the proxy on Windows:
set PYTHONPATH="<Komodo install directory>\lib\support\dbgp\pythonlib;%PYTHONPATH%"cd <Komodo install directory>\lib\support\dbgp\binpydbgpproxy
To start the proxy on Linux (requires Python 2.2 or later):
export PYTHONPATH=<Komodo install directory>/lib/support/dbgp/pythonlib;$PYTHONPATHcd <Komodo install directory>/lib/support/dbgp/binpython pydbgpproxy
To start the proxy on OS X:
export PYTHONPATH=<Komodo install directory>/Contents/SharedSupport/dbgp/pythonlib;$PYTHONPATHcd <Komodo install directory>/Contents/SharedSupport/dbgp/binpython pydbgpproxy
The following options are available:
-d <hostname:port>: Listener port for debugger processes.• -i <hostname:port>: Listener port for Komodo instances.• -l <log_level>: Logging level. Logging is dumped to stout and can be set to CRITICAL, ERROR,WARN, INFO or DEBUG.
•
Example
If you are debugging scripts on a remote web server that cannot connect to Komodo directly because of afirewall, you can run dbgpProxy on an intermediary server (e.g. a gateway) which can connect to Komodo andthe web server on specified ports. The three servers in this example are:
workstation: The machine running Komodo. The following preferences are set:Listen for Debugger Connections is enabled.♦ Enable Debugger Proxy is selected.♦
1.
Komodo User Guide
Debugger Proxy 133

Listen for debug connections on port is set to '0' (use system-assigned port)♦ Proxy Listener Address is set to gateway:9001♦ Proxy Key is set to "jdoe"♦
Debug|Listener Status displays a system-assigned Host Port of 37016.2.
gateway: A gateway server with access to the internal and external networks. The proxy is runningwith the following options:
dbgpProxy -i gateway:9001 -d gateway:9000
3.
webserver: The machine running a Python CGI script called test.py.4.
The debugging process on 'webserver' is launched with the following command:
python dbgpClient.py -d gateway:9000 -k "jdoe" test.py
The remote debugger running on 'webserver' (dbgpClient.py in this case) connects to the proxy(dbgpProxy.py) running on 'gateway'. The proxy uses the IDE Key "jdoe" to connect the debugger process tothe Komodo instance listening with a Proxy Key of "jdoe". The proxy continues to communicate with theremote debugger on port 9000, but routes the debugging session to Komodo on port 37016.
Sending Input to the Program
When a program prompts for input, enter the desired input in the console window or Output tab (dependingon the Debugging Options configuration), and press Enter to continue.
Using Debugger Commands
Debugger Command Description
This table lists common tasks and their Komodo commands.
To do this Press this
Run a program
The debugger runs until the program ends.Debug Menu: Select Run WithoutDebugging
•
Windows/Linux Keyboard: Press 'F7'• Mac OS X Keyboard: Press'Cmd'+'Ctrl'+'R'
•
Start the debugger
The debugger runs until it encounters abreakpoint, or until the program ends.
Debug Menu: Select Go/Continue• Windows/Linux Keyboard: Press 'F5'• Mac OS X Keyboard: Press 'Cmd'+'>'• Debug Toolbar: Click the Go/Continuebutton
•
Step In
The debugger executes the next unit of code, andDebug Menu: Select Step In• Windows/Linux Keyboard: Press 'F11'•
Komodo User Guide
Sending Input to the Program 134

then stops at the subsequent line. Mac OS X Keyboard: Press'Cmd'+'Shift'+'I'
•
Debug Toolbar: Click the Step Inbutton
•
Step Over
Like Step In, Step Over executes the next unit ofcode. However, if the next unit contains afunction call, Step Over executes the entirefunction then stops at the first unit outside of thefunction.
Debug Menu: Select Step Over• Windows/Linux Keyboard: Press 'F12'• Mac OS X Keyboard: Press'Cmd'+'Ctrl'+'O'
•
Debug Toolbar: Click the Step Overbutton
•
Step Out
The debugger executes the remainder of thecurrent function and then stops at the first unitoutside of the function.
Debug Menu: Select Step Out• Windows/Linux Keyboard: Press'Shift'+'F11'
•
Mac OS X Keyboard: Press'Cmd'+'Ctrl'+'T'
•
Debug Toolbar: Click the Step Outbutton
•
Run to Cursor
The debugger runs until it reaches the line wherethe cursor is currently located.
Debug Menu: Select Run to Cursor.• Windows/Linux Keyboard: Press'Shift'+'F10'
•
Mac OS X Keyboard: Press'Cmd'+'Shift'+'Ctrl'+'I'
•
Break Now
Pause debugging an application at the currentexecution point. Go/Continue continuesdebugging from that point.
Debug Menu: Select Break Now• Debug Toolbar: Click the Break Nowbutton
•
Stop
Stop the debugging session. Go/Continuerestarts debugging from the beginning of theprogram.
Debug Menu: Select Stop• Windows/Linux Keyboard: Press'Shift'+'F5'
•
OS X Keyboard: Press 'Cmd'+'Ctrl'+'P'• Debug Toolbar: Click the Stop button•
Toggle breakpoint
Enables, disables, or deletes a breakpoint on thecurrent line.
Debug Menu: Select Disable/EnableBreakpoint
•
Windows/Linux Keyboard: Press 'F9'• Mac OS X Keyboard: Press 'Cmd'+'\'•
Show Current Statement
Moves the editing cursor from any position in thefile to the statement at which the debugger isstopped.
Debug Menu: Select Show CurrentStatement
•
Windows/Linux Keyboard: 'Alt'+'*'• Mac OS X Keyboard: 'Cmd'+'Shift'+'C'•
Komodo User Guide
Debugger Command Description 135
Detach
Stop the debugging process but continueapplication process execution.
Debug Menu: Select Detach• Debug Toolbar: Click the Detach button•
Debugger Stepping Behavior
Instead of running to the end of a program or to the next breakpoint, the debugger can also step through codeone statement at a time. The following Debug menu items and toolbar buttons control stepping behavior:
Step In: Executes the current statement and pauses at the following statement.• Step Over: Executes the current statement. If the line of code calls a function or method, the functionor method is executed in the background and the debugger pauses at the statement that follows theoriginal one.
•
Step Out: When the debugger is within a function or method, Step Out will execute the code withoutstepping through the code line by line. The debugger will stop on the line of code following thefunction or method call in the calling program.
•
When stepping through a program which calls a function or method from an external program (e.g. a moduleor package) the debugger steps into the external program at the point where the function or method is called,opening it in a new tab. Stepping continues in the external program until the function call is completed.
Note: Perl operators sort, map, and grep behave like other looping constructs with respect to steppingbehavior in the debugger. When Komodo has stopped at one of these operators, Step Over stops at the firststatement or expression used within the first argument of these operators.
For example, if the debugger steps over a statement containing a foreach, while, map, grep, or sortlooping construct that evaluates its body five times, the debugger remains inside that loop for five iterations.When it steps over on the sixth iteration, the debugger exits the loop and stops at the next statement.
To skip execution of such looping constructs, set a breakpoint on the statement following the construct, andcontinue until Komodo reaches that breakpoint.
Viewing the Debugging Session
When the Komodo debugger is started, the Debug tab opens in the Bottom Pane. This tab consolidates viewsof the debugger output, call stack, program variables (local and global), and watch variables. The Debug tabalso contains a Debug Toolbar for stepping in, out, over, and running functions while debugging.
When debugging more than one session at a time (multi-session debugging), a Debug tab for each session isaccessible in the Bottom Pane. The Debug tab selected is the session currently being debugged. To change toanother debug session, select the Debug tab for that session (identified by the filename of the program). Whena new session is started, a new Debug tab is created and Komodo automatically switches to that new session.
The Debug tab is divided into two sub-panes, which have tabs of their own. The right sub-pane contains theOutput, Call Stack, and HTML Preview tabs. The left sub-pane contains variable tabs.
Komodo User Guide
Debugger Stepping Behavior 136
Viewing Variables
The variables section of the Debug tab is divided into tabs that vary according to the language of the programbeing debugged. (Language variations are described below.) Variables with multiple values (such as arrays)are indicated by plus and minus symbols to the left of the variable name.
To Expand or Collapse Variables: Plus symbols indicate variables with multiple values that can beexpanded; minus symbols indicate variables that can be collapsed. Click on the plus or minus symbol toexpand or collapse the variable list.
To Change Variable Values: Double-click in the variable's Value field and enter the desired value. (Thevalue of nodes in XML documents cannot be changed.)
Python Variables and Objects
While debugging Python programs, variables and objects are displayed on the Locals, Globals, and CodeObjects tabs:
Locals: Displays variables referenced within the current function. If the program is currently outsideof a function, all variables are displayed.
•
Globals: Displays all used program variables.• Code Objects: Displays an expandable tree view of all classes, functions, and their attributes.•
During Python debugging sessions, click the Show Hidden Variables button to display special Pythonvariables prefixed with double underscores, such as __doc__, __dict__, etc.
PHP and Tcl Variables
While debugging PHP and Tcl programs, variables are displayed on the Locals and Globals tabs:
Locals: Displays variables referenced within the current function. If the program is currently outsideof a function, all variables are displayed.
•
Globals: Displays all used program variables. Note: PHP "Super Globals" ($_POST, $_GET, etc.) arehidden by default. The Show Hidden Variables button will toggle them on and off.
•
Perl Variables
While debugging Perl programs, Argument and Special tabs are displayed in addition to the Locals andGlobals tabs listed above.
Argument: Displays parameters for the current subroutine (i.e. @_).• Special: Displays current Perl special variables (i.e. @ARGV, %ENV, @INC, $0, etc.)•
XSLT Variables
While debugging XSLT programs, data nodes and variables are displayed on the Locals and Globals tabs:
Locals: Displays data nodes from the input XML document. Only nodes contained in the context ofthe template specified in the Call Stack are displayed.
•
Komodo User Guide
Viewing Variables 137

Globals: Displays xsl:param and xsl:variable elements declared at the top level of theprogram.
•
Setting Watched Variables
The Watch variable tab monitors selected variables and expressions. Use the Watch variable tab to watchvariables, or expressions based on variables, by typing expressions, dragging and dropping expressions froman editor, or selecting variables from one of the other variable tabs. Also, use the Watch tab to change thevalue of a variable or remove a variable from the Watch tab.
Watched variables can be added, manipulated and removed regardless of whether the debugger is currentlyrunning.
To watch one or more variables during program execution:
Click the Add button on the Watch variables tab and type a variable name in the dialog box• Select the variable in the editor (or any other drag-and-drop aware application), then drag and dropthe variable into the Watch tab
•
Right-click a variable in one of the other variable tabs and select Add to Watch from the contextmenu.
•
The Watch variable tab supports viewing the results of expressions made with watched variables. Forexample, in a Perl program with scalar variables $base and $height the following expression could beentered:
($base / 2) * $height
To enter arbitrary expressions on the Watch variable tab:
Click the Add button above the Watch variable tab.1. Enter an arbitrary expression in the dialog box.2. Click OK.3.
To change the values of variables:
Double-click the variable on the Watch variable tab and specify a value. Currently, only the values ofsimple variables can be changed. For example, values of variables such as 'a.b[3]' (in Python) or'$a{b}->[3]' (in Perl) cannot be changed.
•
Note: This function is not available for arbitrary expressions.• Double-click the variable on the Locals or Globals pane and specify a value in the dialog box.•
To remove a variable from the Watch variable tab, select the variable and click Delete on the bottom righttoolbar. Alternatively, right-click the desired variable and select Remove Watch on the context menu.
Output Tab
The Output tab is used to view program output and to send input to the program being debugged. Thefollowing standard data streams are handled in the Output tab:
stdout: program output•
Komodo User Guide
XSLT Variables 138
stderr: errors• stdin: program input (not supported for Perl or PHP during remote debugging)•
When debugging Tcl and Python, if stdin is requested by the program, a red percent character is shown inthe margin of the Output tab.
HTML Preview Tab
If the program produces HTML output, select the HTML tab to preview the rendered output. Unlike theOutput tab, the HTML preview is not constantly updated. Use the Reload HTML View button in thebottom-pane toolbar to update the preview.
Viewing the Call Stack
The call stack is a data area or buffer used for storing requests that need to be handled by the program.Komodo's stack stores temporary data such as variables and parameters and operates as a push-down list. Newdata moves to the top of the stack and pushes the older data down in a "last-in, first-out" arrangement.
To view the call stack in a current debugging session, select the Call Stack tab in the right pane of the Debugtab.
There is one line in this tab per stack frame at any point in the execution of a program. The calling framecontains the information about a function call, including the filename, the line number, and any parameters orlocal variables.
Watching Files
When debugging a program that writes output to another file, or when watching programs execute, you canwatch the output or the log file using Komodo's File Watcher.
The Watch File tool shows a file as the file is being updated on disk. It has no relationship with variableviewing, except that, while debugging, it is often useful to watch variables change state and files changecontent.
To use the File Watcher:
On the Tools menu, select Watch File.1. Browse to the desired file and click OK.2. Run the program.3.
Detaching the Debugger
Use the Detach control to stop the debugging process but continue running the application. When applicationexecution is detached from the debugging process, output continues to print on the Debug tab until theapplication finishes running.
To detach application execution from the debugging process, do one of the following:
Debug Menu: Select Detach.•
Komodo User Guide
Output Tab 139
Debug Toolbar: Click the Detach button.•
Stopping the Debugger
To stop the Komodo debugger, do one of the following:
Debug Menu: Select Stop.• Keyboard: Use the associated key binding.• Debug Toolbar: Click the Stop button.•
The debug session ends.
Komodo User Guide
Detaching the Debugger 140
Debugging Perl Komodo IDE onlyTutorial
Perl Tutorial•
Komodo can debug Perl programs locally or remotely, including debugging in CGI and mod_perlenvironments. The instructions below describe how to configure Komodo and Perl for debugging. For generalinformation about using the Komodo debugger, see Komodo Debugger Functions.
Debugger commands can be accessed from the Debug menu, by shortcut keys, or from the Debug Toolbar.For a summary of debugger commands, see the Debugger Command List.
Configuring the Perl Debugger
To specify which Perl interpreter Komodo uses to debug and run Perl programs:
On the Edit menu, click Preferences.1. In the Preferences dialog box under Languages, click Perl. Komodo searches for Perl interpreters onyour system and displays them in the drop-down list.
2.
If the preferred interpreter is in this list, click to select it. If not, click Browse to locate it.3. Click OK.4.
To start a local Perl debugging session:
On the Debug menu or Debug Toolbar, click Go/Continue or Step In to invoke the debugging session. SeeKomodo Debugger Functions for full instructions on using Komodo's debugging functionality.
Startng a Komodo debugging session with perl -d
You may wish to use the Komodo debugger when working at the command line instead of using perl's built-indebugger. To do this, configure the environment variables described in Debugging Perl Remotely on yourlocal machine using localhost as the hostname. Running the comand 'perl -d' will start a debuggingsession in Komodo.
Enabling "Break Now"
By default, the Break Now function is disabled for Perl debugging because some programs and modules (e.g.LWP and WWW::Mechanize) are not compatible with asynchronous breaking.
To enable Break Now, include the setting 'async=1' in the PERLDB_OPTS environment variable. This canbe done in Komodo's Environment preferences (Edit|Preferences...|Environment).
Debugging Perl Remotely
When debugging a Perl program remotely, the program is executed on the remote system and the debugoutput is sent to Komodo. Komodo controls the debugging session (e.g. stepping and breakpoints) once thesession starts on the remote system.
Debugging Perl Komodo IDE only 141
Perl remote debugging works on any system that can run the version of perl5db.pl distributed with Komodo.ActivePerl and most other distributions of Perl (version 5.6 or greater) will work.
Note: If you have the ActiveState Perl Development Kit (PDK) installed, follow the instructions for PDKusers to disable the PDK debugger before continuing.
To debug Perl programs remotely:
Step One: Configure the Remote Machine
Copy Komodo's perl debugger and its associated libraries to the remote machine by copying the entiredbgp/perllib sub-directory of the Komodo installation to the new machine, or download a packagefrom the Komodo Remote Debugging page.
Note: Do not copy perl5db.pl to the standard "lib" directory of the Perl installation on the remotemachine, as this will overwrite the standard perl5db.pl file.
1.
On the remote machine, set the PERL5LIB environment variable to the location of the newperl5db.pl and its libraries. For example, if the remote machine is running Windows and perllibdirectory was copied to C:\misc\perllib, set the variable as follows:
set PERL5LIB=C:/misc/perllib
For CGI debugging with IIS, you would also need to set the PERL5DB environment variable asfollows:
set PERL5DB=BEGIN { require q(C:/misc/perllib/perl5db.pl) }
Note the forward slashes "/" in place of the regular Windows backslash path separators. This isoptional for PERL5LIB, but necessary for PERL5DB.
Another example: If the remote machine is running Linux or Mac OS X and perllib was copied to the/home/me/perl/komodo_perl_debugging directory, set the variable as follows:
export PERL5LIB=/home/me/perl/komodo_perl_debugging/perllib
2.
On the remote machine, set the PERLDB_OPTS and DBGP_IDEKEY variables. This tells the Perlinterpreter on the remote machine where to connect to Komodo or the DBGP Proxy and how toidentify itself.
PERLDB_OPTS=RemotePort=<hostname>:<port>DBGP_IDEKEY=<ide_key>
The port number must match the port number specified in Edit|Preferences|Debugger. ClickDebug|Listener Status to check the current port.
♦
Replace <hostname> with the name or IP address of the machine running Komodo.♦ If DBGP_IDEKEY is unset, the USER or USERNAME environment variable is used as theIDE Key.
♦
The variable definitions must be on one line.♦ For example:
Windows 2000, NT, XP
3.
Komodo User Guide
Debugging Perl Remotely 142
set PERLDB_OPTS=RemotePort=127.0.0.1:9000set DBGP_IDEKEY=jdoe
Windows Me
Use the MSCONFIG utility (Start|Run|MSCONFIG). Select the Environment tab, and create a newvariable with the Variable Name of PERLDB_OPTS, and the Variable Value ofRemotePort=127.0.0.1:9000.
Linux and Mac OS X Systems
export PERLDB_OPTS="RemotePort=127.0.0.1:9000"export DBGP_IDEKEY="jdoe"
Note: As with local debugging, the Break Now function is disabled by default. To enable this buttonand functionality, add the option 'async=1' to the PERLDB_OPTS environment variable. Forexample, on Windows:
set PERLDB_OPTS=RemotePort=127.0.0.1:9000 async=1
Step Two: Listen for Debugger Connections
In Komodo, on the Debug menu, click Listen for Debugger Connections.
Step Three: Start the Perl Program on the Remote Machine
Start the debugging process using the "-d" flag:
perl -d program_name.pl
A Perl Debug tab is displayed in Komodo.
Note: For Komodo to open an editable copy of the file, a MappedURI must be created to link the file on the remote filesystem withthe URI Komodo receives from the remote debugger.
Step Four: Debug the Perl Program using Komodo
Click Step In, or Go/Continue to run to the first breakpoint. See Komodo Debugger Functions for fullinstructions on using Komodo's debugging functionality.
Disabling and Enabling the Perl Dev Kit (PDK) Debugger
If you have installed the ActiveState Perl Development Kit (PDK) on the remote machine, the system may beconfigured to use the PDK debugger when a Perl debug session (perl -d) is launched. To use Komodo'sdebugger, disable the PDK debugger on the remote machine first. If necessary, you can re-enable the PDKdebugger on the remote machine later.
Disabling the PDK Debugger on the Remote Machine
To disable the PDK debugger on the remote machine, perform one of the following procedures:
Komodo User Guide
Disabling and Enabling the Perl Dev Kit (PDK) Debugger 143
Option 1:
At the command shell, enter the following command:
Windows
set PERL5DB=BEGIN { require 'perl5db.pl'; }set PERLDB_OPTS=
Linux
export PERLDB_OPTS=
To re-enable the PDK debugger, set the PERL5DB variable to an empty string.
Option 2: (Windows)
Open System Properties:1. On Windows 9x/NT/2000, right-click the My Computer icon and select Properties.♦ On Windows XP, click Start | Control Panel | System♦
Click the Advanced tab.◊ Click Environment Variables.◊ In the System variables section, click New.◊ Set the Variable Name field to PERL5DB.◊ Set the Variable Value field to BEGIN { require 'perl5db.pl'}.◊ Select the PERLDB_OPTS variable, click Edit.◊ Delete the contents of the Variable Value field.◊ Click OK three times to exit.◊
♦
2.
These changes take effect in new Command Prompt windows. To re-enable the PDK debugger, delete thePERL5DB variable, and change the PERLDB_OPTS variable back to its original value.
Configuring Perl for CGI Debugging
Debugging CGI programs on live production servers can seriously impair performance. We recommend usinga test server for CGI debugging. Instructions for configuring Microsoft IIS and Apache servers are shownbelow; for other web servers, use these examples and the web server software documentation as a guide formodifying the server environment.
The settings and paths listed are examples only. Substitute these with the specific paths, hostnames and portnumbers of your server as necessary
Configuring a Microsoft IIS Web Server
Modify the Server's Environment Variables: Right-click the My Computer icon on the desktop,and select Properties. On the Advanced tab, click the Environment Variables button. Add thefollowing items to the System Variables pane:
PERL5LIB=C:\Program Files\ActiveState Komodo x.x\lib\support\dbgp\perllibPERL5DB=BEGIN { require q(C:/Program Files/ActiveState Komodo x.x/lib/support/dbgp/perllib/perl5db.pl) }PERLDB_OPTS=RemotePort=<hostname>:<port>
•
Komodo User Guide
Disabling the PDK Debugger on the Remote Machine 144
DBGP_IDEKEY="<ide_key>"
Note: The path for the PERL5LIB directory shown above is the correct path in a default installation.That path must be changed if you have installed Komodo in a different location. Forward slashes, "/",are used in place of the normal Windows path separator, "\", in the PERL5DB environment variable.Modify the Internet Information Services Configuration: A "-d" option must be added to theExecutable Path for the Perl CGI script mapping.
•
IIS 4 and 5:Open the Internet Information Services manager.1. Select one web site or the entire Web Sites node as desired.2. Click Action|Properties3. On the Home Directory tab, click the Configuration button.4. Add (or modify) an entry for Perl with the following characteristics:
Extension = .plExecutable Path = c:\perl\bin\perl.exe -d "%s" %s
5.
♦
IIS 6:Open the Internet Information Services manager.1. Select the Web Service Extensions node.2. Add (or modify) the Web Service Extension for Perl CGI as above.3.
♦
IIS 7:Open the Internet Information Services manager.1. Select the level at which you want the debugger configuration applied (e.g. at the hostlevel for a specific website).
2.
In the center pane in the IIS section, double-click Handler Mappings3. Add (or modify) an entry for Perl CGI (ActivePerl adds one called "Perl CGI for.pl"). For example:
Request path: *.pl⋅ Executable: C:\Perl\bin\perl.exe -d "%s" %s⋅
4.
♦
•
Reboot: The system must be rebooted for the changes to take effect. Environment variables are notupdated by restarting the IIS service.
•
Configuring an Apache Web Server
Ensure that Perl CGI scripts are operating correctly on the Apache server before proceeding with CGIdebugger configuration. If you are running Apache under Windows, disable theScriptInterpreterSource registry in the httpd.conf file. Use a stand-alone Perl interpreter for remotedebugging.
Modify the httpd.conf file: The following values can be configured for a specific virtual host or allhosts. Add the following values in the appropriate sections:
SetEnv PERL5LIB "C:\Program Files\ActiveState Komodo x.x\lib\support\dbgp\perllib"SetEnv PERLDB_OPTS "RemotePort=<hostname>:<port>"SetEnv DBGP_IDEKEY "<ide_key>"
Note: You must enable the mod_env Apache module (seehttpd.apache.org/docs/mod/mod_env.html) for the SetEnv directive to function.
•
Modify the Perl Script: Add the "-d" flag to the "shebang" line:
#!/perl/bin/perl -d
•
Komodo User Guide
Configuring a Microsoft IIS Web Server 145
Starting a CGI Debugging Session
After the configuration is complete, debug programs as follows:
In Komodo, on the Debug menu, click Listen for Debugger Connections.• Using a web browser, access your CGI script.• A Perl Debug tab is displayed in Komodo. See Komodo Debugger Functions for full instructions onusing Komodo's debugging functionality.
•
Debugging mod_perl
Debugging mod_perl handlers is similar to debugging any Perl program remotely (see Debugging PerlRemotely to familiarize yourself with the terminology). Debugging mod_perl is different in that you'lltypically invoke the code indirectly with a web browser, and that the Perl code is running inside an Apacheweb server.
To configure Komodo debugging in mod_perl:
Copy the entire dbgp/perllib sub-directory of the Komodo installation to a convenient directory on theserver, or download and unpack the Perl Remote Debugging package from the Komodo RemoteDebugging page. If you are running Apache on your local workstation, you can use Komodo's copydirectly (e.g. <Komodo-install-dir>/lib/support/dbgp/perllib ) for the following steps. Note: Do notcopy perl5db.pl to the standard "lib" directory of the Perl installation on the remote machine, as thiswill overwrite the standard perl5db.pl file.
1.
2. In the directory containing perl5db.pl, create a new directory called Apache. For example:
$ cd Komodo/lib/support/dbgp/perllib$ mkdir Apache
3.
Create a symlink or shortcut to perl5db.pl within the new Apache directory. For example:
$ cd Apache$ ln -s ../perl5db.pl .
4.
Install the Apache::DB perl module on the server:
$ cpan Apache::DB
5.
Add the following snippet to your httpd.conf file (replace "/path/to/dbgp/perllib" with the full path tothe directory containing perl5db.pl):
<Perl> use ModPerl::Registry; use lib qw(/path/to/dbgp/perllib); $ENV{PERLDB_OPTS} = "RemotePort=localhost:9000 LogFile=stderr"; use Apache::DB (); Apache::DB->init;</Perl>
Make sure that RemotePort is set to the hostname and port Komodo using to listen for debuggerconnections (see the PERLDB_OPTS setting in the "Configure the Remote Machine" section ofDebugging Perl Remotely).
6.
You will probably already have a <Location> section in httpd.conf (or apache.conf) for your perlscripts. Add the following line to that section:
7.
Komodo User Guide
Starting a CGI Debugging Session 146
PerlFixupHandler Apache::DB
For example:
<Location /perl-bin> SetHandler perl-script PerlHandler ModPerl::Registry Options +ExecCGI PerlOptions +ParseHeaders PerlFixupHandler Apache::DB</Location>
Restart Apache in debug mode (e.g. apache -X), and open the page you wish to debug in abrowser.
8.
Komodo User Guide
Debugging mod_perl 147

Debugging Python Komodo IDE onlyTutorial
Python Tutorial•
Komodo can be used to debug Python programs locally or remotely, including debugging in CGIenvironments. The instructions below describe how to configure Komodo and Python for debugging. Forgeneral information about using the Komodo debugger, see Komodo Debugger Functions.
Debugger commands can be accessed from the Debug menu, by shortcut keys, or from the Debug Toolbar.For a summary of debugger commands, see the Debugger Command List.
Note: Breakspoints will not work with the Psyco Python extension enabled. The Komodo FAQ has awork-around solution.
Configuring the Python Debugger
To specify which Python interpreter Komodo should use to debug and run Python programs locally:
On the Edit menu, click Preferences.1. In the Preferences dialog box under Languages, click Python. Komodo searches for Pythoninterpreters on your system and displays them in the drop-down list.
2.
If the preferred interpreter is in this list, click to select the interpreter. If not, click Browse to locate it.3. Click OK.4.
On the Debug menu or Debug Toolbar, click Go/Continue or Step In to invoke the debugging session. SeeKomodo Debugger Functions for full instructions on using Komodo's debugging functionality.
Using the Python Remote Debugger
When debugging a Python program remotely, the program is executed on the remote machine, and the debugoutput is sent to Komodo. Komodo controls the debugging session once the session starts on the remotemachine.
Installing the Python Remote Debugger on the Remote Machine
To debug a Python program remotely, the Python debugger client package must be installed on the remotemachine. Packages are available for download from the Komodo Remote Debugging page. Alternatively, ifyour remote machine uses the same platform as the machine on which you installed Komodo, you can get thePython debugger client files from the pythonlib and bin subdirectories of the Komodo installation directoryfor your platform. The locations are as follows:
Windows
<komodo-install-directory>\lib\support\dbgp\pythonlib\<komodo-install-directory>\lib\support\dbgp\bin
Linux
Debugging Python Komodo IDE only 148

<komodo-install-directory>/lib/support/dbgp/pythonlib/<komodo-install-directory>/lib/support/dbgp/bin
Mac OS X
<komodo-install-directory>/Contents/SharedSupport/dbgp/pythonlib/<komodo-install-directory>/Contents/SharedSupport/dbgp/bin
To install the Python Remote Debugger:
The Python remote debugging package requires the logging package, which is included in Python2.3 and later. However, if you have Python 2.2 (the earliest supported version), you must downloadand install the logging package. To verify that the logging package is installed correctly, run thefollowing command:
python -c "import logging; print 'ok'"
If this command prints the word "ok", you can move to the next step. If this command results in anImportError, you need to resolve the error before continuing.
1.
Download and unzip the Komodo-PythonRemoteDebugging package for your platform and Komodoversion from the Komodo Remote Debugging page.
2.
Set up your Python installation so the dbgp Python package is on your PythonPath. You can do thisby copying the dbgp directory to the site-packages directory of your Python installation.Alternatively, you can copy the dbgp directory to a convenient location, and then add that directory toyour PYTHONPATH environment variable. For example, on Windows, if you copied the files to adirectory called C:\debugger, enter the following at the command line:
set PYTHONPATH=%PYTHONPATH%;C:\debugger
To verify that the setup is correct, run the following command:
python -c "import dbgp.client; print 'ok'"
If this command prints the word "ok", you can move to the next step. If this command results in anImportError then you need to resolve the error before continuing.
3.
Put the bin\pydbgp.py script (bin/pydbgp on Linux and Mac OS X) somewhere convenient. This is themain script that you run to start a remote debugging session.
4.
Tip: Placing the pydbgp.py script in a directory that is on your PATH environment variable, makes the scripteasier to run. On Windows, also make sure that your PATHEXT environment variable includes .py. On Linuxand Mac OS X, ensure that the pydbgp script is executable by running this command:
chmod u+x path/to/pydbgp
Now try running this command:
pydbgp --help
If the setup is correct, the internal help documentation for running pydbgp is displayed.
Note: The debugging client relies on certain core python library files (e.g. sys, os, getopt, socket,types). If you have added custom modules to your python site-packages, PYTHONPATH or sys.path with
Komodo User Guide
Installing the Python Remote Debugger on the Remote Machine 149
the same name as those imported by pydbgp, the debugger may not work properly.
Invoking the Python Remote Debugger
Python remote debugging sessions are started in one of three ways:
Running the pydbgp.py driver script.• Calling dbgp.client.brk() directly from within your Python program code.• An exception reaches the top-level in a Python script that is set up for just-in-time debugging.•
All methods require that the Python remote debugger client package is installed on the remote machine (seeInstalling the Python Remote Debugger).
Note: For Komodo to open an editable copy of the file, a MappedURI must be created to link the file on the remote filesystem withthe URI Komodo receives from the remote debugger.
Running pydbgp.py from the Command Line
To start a Python remote debugging session from the command line:
On the Debug menu, ensure that Listen for Debugger Connections is checked.1. Log in to the remote machine. (Note: the "remote" machine can be the same machine on whichKomodo is running.)
2.
On the remote machine, run the pydbgp.py driver program with the appropriate options:
python -S path/to/pydbgp.py -d host:port your-script.py
where host:port identifies the port on which Komodo is listening. By default, Komodo listens forremote debugger connections on port 9000. For example, if the "remote" machine is the samemachine on which Komodo is running, start a debugging session with this command:
python -S path/to/pydbgp.py -d localhost:9000 your-script.py
Other options for using the pydbgp.py driver are available by running:
python -S path/to/pydbgp.py --help
If you are connecting to a DBGP Proxy, you must specify an ide_key value with the -k option topydbgp.py. Listener port and DBGP Proxy settings are configurable via Edit|Preferences|Debugger.Select Debug|Listener Status to view the current settings.
3.
Note: If your application requires that sitecustomize.py is loaded,you must run Python with the -S argument. The debugger willload site.py at the appropriate time. Komodo is unable to debugsitecustomize.py due to how Python handles loading of that file.Note: If you followed the tip described in Installing the PythonRemote Debugger the basic command is:
pydbgp -d host:port your-script.py
Komodo User Guide
Invoking the Python Remote Debugger 150
Calling dbgp.client.brk() in your Python Programs
To break into a remote debugging session directly from within your Python code:
On the Debug menu, ensure that Listen for Debugger Connections is checked1. Import and use the brk() function in the dbgp.client module to set a hard breakpoint. Forexample, the following simple Python script will break into a debugging session when executionreaches the brk() call:
from dbgp.client import brkdef foo(): print "Hello, World!" brk(host="mybox", port=9000) print "Goodbye."
2.
Run your Python program.3.
The brk() function supports the following arguments:
host: machine running Komodo or the DBGP Proxy (uses localhost if unspecified)• port: port to connect on (uses 9000 if unspecified)• idekey: key used to identify the debugging session to Komodo or the DBGP Proxy (uses the value ofthe USER or USERNAME environment variable if unspecified)
•
Python Just-in-Time Debugging
"Just-in-time debugging" allows the remote debugger to connect to Komodo if an uncaught exception occursduring execution (i.e. if a Python exception reaches the top level of your Python program). By adding thefollowing lines of code to the beginning of your script, you can trap and explore the execution state of yourPython program when an exception reaches the top level:
from dbgp.client import brkOnExceptbrkOnExcept(host='mybox', port=9000)
If and when an exception reaches the top level of your Python program, a post-mortem debugging session isstarted in Komodo at the line at which the exception is raised. The debug session is automatically placed ininteractive mode so that you can inspect the current program environment, exactly like a Python interactiveshell.
The brkOnExcept() function takes the same arguments as brk(). As with brk(), brkOnExcept()attempts to connect to localhost on port 9000 with an idekey of USER or USERNAME if no argumentsare specified.
CGI Debugging
To debug CGI applications written in Python:
Configure Python to be used as the CGI (or embedded extension) for your Web server. Forinformation on configuring Python, refer to the Python documentation.
•
Follow the steps outlined in Using dbgp.client Functions in Python Programs to call the Pythonremote debugger from within the application. Start the remote application through a web browserinstead of running it from the command line.
•
Komodo User Guide
Calling dbgp.client.brk() in your Python Programs 151
Debugging PHP Komodo IDE onlyTutorial
PHP Tutorial•
Komodo can be used to debug PHP programs locally or remotely. Remote PHP debugging encompasses alltypes of PHP debugging not initiated from within Komodo, including debugging PHP scripts running under alocal web server.
The instructions below describe how to configure Komodo and PHP for debugging. For general informationabout using the Komodo debugger, see Komodo Debugger Functions.
Debugger commands can be accessed from the Debug menu, by shortcut keys, or from the Debug Toolbar.For a summary of debugger commands, see the Debugger Command List.
Komodo uses a PHP debugger extension called Xdebug that must be installed for Komodo to debug PHPscripts. Komodo automatically configures itself to use Xdebug for local PHP debugging, but the configurationmust be done manually for remote PHP debugging. Pre-built binaries named "php_xdebug.dll" (for Windows)or "xdebug.so" (for Linux and Mac OS X) are provided with Komodo and are also available for downloadfrom the Komodo Remote Debugging page.
See www.xdebug.org/install.php for instructions on compiling Xdebug from source on other platforms.
Installing PHP
PHP debugging in Komodo will work with PHP 4.4 or later, with the exception of versions 5.0.0 through5.0.2. If you are using PHP 5.0, you will need at least 5.0.3 or greater. Download PHP fromhttp://www.php.net/downloads.php.
Refer to the PHP website for detailed information on installing PHP.
To debug PHP scripts in a web environment, be sure PHP is operating correctly with your web server beforeconfiguring the debugger extension. Consult the PHP documentation for details on configuring PHP withvarious web servers.
Windows
If you are unfamiliar with the installation of PHP, we recommend using the Windows InstallShield package.To install the PHP executable or SAPI module manually, see the PHP website. Be sure that the PHP directoryis included in your system's PATH.
Linux
Your Linux system may already have PHP installed. Login and type 'php -v' to determine the version of yourcurrent PHP interpreter. If it is earlier than version 4.3.11 (or 5.0.0 through 5.0.2) you must upgrade. PHPmust also support loading dynamic extensions (the default for PHP under Linux). If it does not, reinstall PHPas per the instructions on the PHP website.
Debugging PHP Komodo IDE only 152

RPMs are available for Red Hat from www.redhat.com/apps/support/updates.html• RPMs for for other distributions are available from http://rpmfind.net/.•
When installing PHP to a non-default directory, you must add the following argument to the ./configurecommand:
--with-config-file-path=/path/to/php.ini
where /path/to/php.ini is the full path to the directory where the php.ini file is located.
Mac OS X
Although both the Jaguar and Tiger releases of OS X include a version of PHP, it is recommended that youobtain a more recent version. Either build from source code, or download a PHP module for OS X's Apacheweb server from www.entropy.ch/software/macosx/php/.
Local PHP Debugging
In local debugging mode, Komodo executes PHP directly. While this is convenient for quickly debugging aPHP script, if your script depends on the availability of a web server, use Remote PHP Debugging even if thescript is running on the same machine as Komodo. This makes it possible to test the script in its trueenvironment.
When debugging locally, certain environment variables are not available, such as those provided by the CGIenvironment. However, it is possible to simulate a CGI environment by specifying CGI environment variablesand CGI input in the Debugging Options dialog box. It is is not necessary to install a web server to useKomodo's local debugging features. Once you have configured PHP to use the debugger extension asdescribed below, you can debug your scripts by opening a PHP file and using Komodo Debugger Functions.
If you receive an error message when attempting to debug a PHP script, check the PHP troubleshootingsection of the Komodo FAQ.
Configuring Local PHP Debugging
Komodo configures itself automatically for local PHP debugging by launching the default PHP interpreter(i.e. the first in your PATH) and attempting to load the Xdebug extension (php_xdebug.dll orxdebug.so). If this is successful, a new copy of php.ini is created automatically with debugging enabledwhich Komodo will use when debugging PHP scripts locally.
Note: If Xdebug is already installed and configured, make surexdebug.remote_autostart is not enabled. This settingwill interfere with local debugging in Komodo. If you need thisoption enabled for remote debugging, set the Path to alternatePHP configuration file under Preferences|Languages|PHP topoint to a copy of php.ini without this option.
Starting and Stopping a PHP Local Debugging Session
To step through the script, from Debug menu, select Step In.
Komodo User Guide
Linux 153
To run the script to the first breakpoint, from the Debug menu, select Go/Continue.
To stop the debugger, from the Debug menu, select Stop.
See Komodo Debugger Functions for full instructions on using Komodo's debugging functionality.
Remote PHP Debugging
Remote PHP debugging encompasses all types of PHP debugging not initiated from within Komodo,including debugging PHP scripts running under a local web server.
When a PHP script is run through a web browser, the web server uses the PHP interpreter to execute thescript. If PHP is configured for remote debugging, the server contacts Komodo to start a debugging session.Komodo controls the debugging (e.g. stepping and breakpoints) once the session starts. CGI variables areavailable, as are all other variables that are available when running PHP under a web server.
Though remote PHP debugging allows PHP scripts to be run in their true environment, it may be slower thanlocal PHP debugging.
Configuring Remote PHP Debugging
Remote debugging of PHP in Komodo is set up differently depending on how many people will be debuggingscripts on the same web server:
Single User Remote PHP Debugging: In single user remote debugging, PHP is configured to always look fora specific instance of Komodo on a specific machine. This configuration requires no changes to the PHPscript. Your web server and your instance of Komodo can be on one machine or two machines
Multi-User Remote PHP Debugging: When multiple users need to debug PHP scripts on a single webserver, use the DBGP Proxy with the remote PHP debugging instructions below. While it is possible toconfigure Apache with Virtual Hosting, it is easier to configure multi-user remote PHP debugging with theproxy.
Remote PHP debugging must be configured manually. The following procedure assumes that you havealready installed PHP.
Step 1 - Copy the Debugging Extension to the Web Server
Before debugging PHP scripts in Komodo, PHP must be configured to use the Xdebug extension(php_xdebug.dll or xdebug.so).
Find the appropriate extension for the version of PHP you are running and manually copy it into a directoryon the server that the PHP interpreter and web server can access. The Xdebug files can be found in the phpsub-directory of the Komodo installation. For example:
Windows
File: php_xdebug.dll• Location:<komodo-install-directory>\lib\support\php\debugging\<PHP-version> or
•
Komodo User Guide
Starting and Stopping a PHP Local Debugging Session 154
the Komodo Remote Debugging page.
Linux
File: xdebug.so• Location:<komodo-install-directory>/lib/support/php/debugging/<PHP-version>/or the Komodo Remote Debugging page.
•
Mac OS X
File: xdebug.so• Location:<komodo-install-directory>/Contents/SharedSupport/lib/support/php/debugging/<PHP-version>/or the Komodo Remote Debugging page.
•
In the downloadable packages, the extensions are found in version-specific subdirectories of the unpackedarchive.
The Xdebug extension does not have to be installed in the PHP extension_dir because its location isspecified explicitly in php.ini (see below).
Step 2 - Edit the Web Server's PHP Configuration
Open the php.ini configuration file on the server. There may be multiple copies of this file, so check the valueof "Loaded Configuration File" in the phpinfo() output to see which one is being used by the web server(e.g. create a phpinfo.php file containing the line '<?php phpinfo(); ?>' in a web server directory, thenopen the corresponding URL in a browser).
Note: Xdebug is incompatible with the Zend Optimizer andZend Studio Debugger extensions. These extensions should becommented out in php.ini when configuring PHP for remotedebugging with Komodo.
In the "Dynamic Extension" section, add the lines specified below. Edit the values to reflect yourparticular environment (see Xdebug settings explained below).
Windows
The php.ini configuration file is generally in your operating system directory (e.g. C:\WINDOWS orC:\WINNT) or in the same directory as php.exe (e.g. C:\PHP). Check phpinfo() as describedabove if you cannot find the file or have multiple copies.
; xdebug config for Windows; - zend_extension_ts is for PHP <= 5.2; - zend_extension is for PHP >= 5.3; or you can specify both if your not sure.zend_extension_ts=c:\path\to\php_xdebug.dllzend_extension=c:\path\to\php_xdebug.dllxdebug.remote_enable=1xdebug.remote_handler=dbgpxdebug.remote_mode=reqxdebug.remote_host=127.0.0.1xdebug.remote_port=9000
•
Komodo User Guide
Step 1 - Copy the Debugging Extension to the Web Server 155
xdebug.idekey=<idekey>
Linux and Mac OS X
; xdebug config for Linux and Mac OS Xzend_extension=/path/to/xdebug.soxdebug.remote_enable=1xdebug.remote_handler=dbgpxdebug.remote_mode=reqxdebug.remote_host=127.0.0.1xdebug.remote_port=9000xdebug.idekey=<idekey>
•
Xdebug settings explained:
zend_extension_ts or zend_extensionShould be set to the full path to the xdebug library on your system. Use zend_extension_ts("thread safe") on Windows PHP <= 5.2, else zend_extension for Windows PHP >= 5.3 and forall other platforms (i.e. Mac, Linux).
xdebug.remote_enableEnables remote debugging.
xdebug.remote_handlerShould be set to dbgp for use with Komodo.
xdebug.remote_modeSet to req to have the script connect to Komodo when it starts. Set to jit to connect only on anerror condition (see PHP Just-in-Time Debugging / Break on Exception).
xdebug.remote_hostSet to the hostname or IP address of the computer running Komodo or the DBGP Proxy. Use'localhost' or '127.0.0.1' if Komodo and the web server are running on the same system.
xdebug.remote_portSet to the same value as the debugging listener port configured in the Debugger Connectionpreferences (or the system assigned Host Port displayed under Debug|Listener Status)
xdebug.idekey (optional)If you are using the DBGP Proxy, set this to the Proxy Key configured in the Debugger Connectionpreferences.
Restart the web server to load the new configuration.
Step 3 - Verify the Web Server's PHP Configuration
Once the php.ini file is updated, verify that Xdebug is configured by checking the output of phpinfo()(described in Step 2). There should be an Xdebug section in the alpabetical list of modules which shows all ofthe relevant settings.
Note: Recent versions of PHP are set to buffer program output by default. While debugging, it is useful todisable output buffering so that results of print and echo statements can be seen immediately whenstepping through code. To disable output buffering, comment out the output_buffering setting inphp.ini with a ";" character, or set it to "off".
Starting and Stopping a PHP Remote Debugging Session
Once remote PHP debugging is configured, the PHP interpreter can contact Komodo and initiate a remotedebugging session when a PHP script is executed on the web server.
Komodo User Guide
Step 2 - Edit the Web Server's PHP Configuration 156
Note: For Komodo to open an editable copy of the file, a MappedURI must be created to link the file on the remote filesystem withthe URI Komodo receives from the remote debugger.
To initiate remote debugging from a web browser:
Ensure PHP is installed and configured properly for your web server.1. Ensure Komodo and PHP are configured for remote debugging (as described in "Configuring RemotePHP Debugging").
2.
Click Debug | Listen for Debugger Connections.3. In your browser, enter the URL of the script you want to debug. Append?XDEBUG_SESSION_START=1 to the end of the URL (an HTTP GET with a true boolean value).For example:
http://example.org/sample.php?XDEBUG_SESSION_START=1
If you are using the DBGP Proxy, the value for the GET method should match the Proxy Key valueshown in Debug|Listener Status. For example:
http://example.org/sample.php?XDEBUG_SESSION_START=jdoe
It is also possible to call XDEBUG_SESSION_START by adding it in an input element of anHTML form. For example:
<input type="hidden" name="XDEBUG_SESSION_START" value="jdoe" />
Note: This is only required for the first request. After that, Xdebug tracks the debugging session witha cookie. For more information on how this works, seewww.xdebug.org/docs-debugger.php#browser_session
4.
A PHP debugging session starts in Komodo. On the Debug menu, click Step In or Go/Continue torun to the first breakpoint.
5.
To initiate remote debugging from the command line:
On the Debug menu, click Listen for Debugger Connections.1. Set the XDEBUG_CONFIG environment variable. Use the port specified inEdit|Preferences|Debugger or listed in Debug|Listener Status.
On Windows:
set XDEBUG_CONFIG=remote_port=9000 remote_enable=1
On Linux/Mac OS X:
export XDEBUG_CONFIG="remote_port=9000 remote_enable=1"
2.
3. Run the script using the PHP interpreter:
php -f sample.php
4.
A PHP debugging session will start in Komodo. Click Step In to start stepping through the script orGo/Continue to run to the first breakpoint.
5.
Komodo User Guide
Starting and Stopping a PHP Remote Debugging Session 157
To initiate remote debugging using the DBGP Proxy:
From the Debug menu, select Listen for Debugger Connections.1. Set the XDEBUG_CONFIG environment variable as above. Use the port specified inEdit|Preferences|Debugger or listed in Debug|Listener Status. Add an IDE Key value to theXDEBUG_CONFIG environment variable that matches the Proxy Key value shown inDebug|Listener Status.
On Windows:
$set XDEBUG_CONFIG=remote_port=9000 remote_enable=1 idekey=<USERNAME>
On Linux/Mac OS X:
export XDEBUG_CONFIG="remote_port=9000 remote_enable=1 idekey=<USER>"
2.
Run the script using the PHP interpreter:
php -f sample.php
3.
A PHP debugging session will start in Komodo. On the Debug menu, Click Step In to start steppingthrough the script or Go/Continue to run to the first breakpoint.
4.
Output from the debug session appears in the Bottom Pane of the Komodo Workspace. Komodo does notsupport a console for remote debugging. The browser will not show the script output until debugging iscomplete.
To stop the debugger:
On the Debug menu, select Stop or pass the XDEBUG_SESSION_STOP=1 variable by appending it to theURL or adding it to a form (as with XDEBUG_SESSION_START=1 above).
See Komodo Debugger Functions for full instructions on using Komodo's debugging functionality.
If you receive an error message while debugging a PHP script that is not caused by the errors in the scriptitself, check the PHP troubleshooting section of the Komodo FAQ.
Using xdebug_break()
The xdebug_break() function is used to hard-code a break in a PHP program. It can be used instead of aKomodo breakpoint. For example:
<?phpecho "<p>Breaks after this line.</p>";xdebug_break();echo "<p>Breaks before this line.<p>";?>
This function breaks the code during a debugging session but will not initiate a new session. Usexdebug_break() in conjunction with the methods described above for starting debugging sessions.
Komodo User Guide
To initiate remote debugging using the DBGP Proxy: 158

Xdebug Logging
To log xdebug sessions on the server, add the following line to the xdebug config section of the php.iniconfiguration file:
xdebug.remote_log=/tmp/xdebug.log
...or add remote_log to the XDEBUG_CONFIG environment variable. For example:
export XDEBUG_CONFIG="remote_port=9000 remote_enable=1 remote_log=/tmp/xdebug.org"
You can replace "/tmp/xdebug.org" with any writable directory and the filename of your choice.
PHP Just-in-Time Debugging / Break on Exception
PHP remote debugging can be configured to break when an exception is thrown. Sometimes calledjust-in-time debugging, this method allows you to test your application and stop to examine code when thereis a problem.
To turn this on, change the xdebug.remote_mode setting in php.ini from 'req' to 'jit' or override thesetting in your code:
<?php ini_set('xdebug.remote_mode', 'jit');...?>
Whenever an exception is thrown, a debugging session is initiated with a break at the line that caused theproblem.
This may generate a lot of breaks if PHP is configured with verbose error handling (e.g.error_reporting = E_ALL). In PHP 5, you can define your own Exception class which enables JITdebugging only for specific exceptions:
<?phpclass KoException extends Exception{ function __construct($message, $code = 0) { ini_set('xdebug.remote_mode', 'jit'); parent::__construct($message, $code); }}
throw new KoException('this is my exception!', 42);?>
Common PHP Debugging Problems
Debugging PHP on OS X
The version of PHP supplied with Mac OS X is not complied with loadable extension support, so it is notcompatible with Komodo's debugger (Xdebug). For PHP debugging on OS X, either build PHP from source
Komodo User Guide
Xdebug Logging 159
with loadable extension support or use binaries from http://www.entropy.ch/software/macosx/php/. The 4.3.11or 5.0.4 for Apache 1 packages have been found to work well with Komodo PHP debugging.
Debugging PHP on 64-bit Linux
The version of xdebug.so for Linux provided by Komodo is not compatible with 64-bit versions of PHP.To configure PHP debugging on 64-bit Linux systems, compile Xdebug from source, replaceKomodo-<version>/lib/support/php/debugging/<PHP version>/xdebug.so with the new 64-bit version, andre-check the PHP Configuration Debugger status in Komodo's PHP preferences..
Zend Optimizer and Zend Studio Debugger
Xdebug is incompatible with the Zend Optimizer and Zend Studio Debugger extensions. If these extensionsare enabled in php.ini, they will not be imported into the copy created by Komodo for debugging. Whenconfiguring Remote PHP Debugging, these extensions should be manually commented out in php.ini.
Komodo User Guide
Debugging PHP on OS X 160
Debugging Ruby Komodo IDE onlyTutorial
Ruby Tutorial•
Komodo can debug Ruby programs locally or remotely. The instructions below describe how to configureKomodo and Ruby for debugging. For general information about using the Komodo debugger, see KomodoDebugger Functions.
Debugger commands can be accessed from the Debug menu, by shortcut keys, or from the Debug Toolbar.For a summary of debugger commands, see the Debugger Command List.
Configuring the Ruby Debugger
To specify which Ruby interpreter Komodo uses for debuging:
Select Edit|Preferences (OS X: Komodo|Preferences).1. In the Preferences dialog box under Languages, click Ruby. Komodo searches for Ruby interpreterson your system and displays them in the drop-down list.
2.
If the preferred interpreter is in this list, click to select it. If not, click Browse to locate it.3. Click OK.4.
To start a local Ruby debugging session:
On the Debug menu or Debug Toolbar, click Go/Continue or Step In to invoke the debugging session. SeeKomodo Debugger Functions for full instructions on using Komodo's debugging functionality.
Note: Mac OS X users may have to install a more recent version of Ruby (1.8.4 or greater). Linux users onx86_64 systems will need to install a 64 bit version of the ruby-debug library (see the Komodo FAQ entryfor more information).
Debugging Ruby Remotely
When debugging a Ruby program remotely, the program is executed on the remote system and the debugoutput is sent to Komodo. Komodo controls the debugging session (e.g. stepping and breakpoints) once thesession starts on the remote system.
Install the Ruby debugger application and associated files on the remote machine. All of these filesare included in /lib/support/dbgp/rubylib beneath the Komodo installation directory(/Contents/SharedSupport/dbgp/rubylib on ac OS X). Copy rdbgp.rb and the contents of the DBdirectory to a convenient location on the remote machine. Note:Some of these files are shared libraryfiles (.so), which are platform specific. If your Komodo installation is on a different platform,download the Komodo-PythonRemoteDebugging package for the appropriate platform and Komodoversion from the Komodo Remote Debugging page.
1.
Start Komodo on the local machine.2. On the remote machine, set the dbgdir variable to specify the location of the remote mahcinedirectory where you copied rdbgp.rb and its associated files.
3.
Debugging Ruby Komodo IDE only 161
Windows
set dbgdir=<Path_To_rbdbgp.rb>
Linux/Mac OS X
dbgdir=<Path_To_rbdbgp.rb>
On the remote machine, set the RUBYDB_OPTS variable his supplies the Ruby interpreter with theinformation that is necessary to connect to the Komodo application running on the local machine.
Windows
set RUBYDB_OPTS=remoteport=<ServerName>:<Port>set RUBYOPT=
Linux/Mac OS X
export RUBYDB_OPTS=remoteport=<Server_Name>:<Port>unset RUBYOPT
4.
Start the debugger and open the program that you want to debug.5. Windows
ruby -I%dbgdir% -r %dbgdir%\rdbgp.rb <Program_To_Debug.rb>
Linux/Mac OS X
ruby -I"$dbgdir" -r "$dbgdir"/rdbgp.rb <Program_To_Debug.rb>
The remote file will open in Komodo with the debugger stopped at the first line of executable code. Ayellow arrow indicates the current position. You can now set breakpoints in this file, step through, anduse other Komodo debugging features as if it were a local file. However, you cannot modify the file.
6.
Note: For Komodo to open an editable copy of the file, a MappedURI must be created to link the file on the remote filesystem withthe URI Komodo receives from the remote debugger.
Setting a Break in your Ruby Code
To break into a remote debugging session directly from within your Ruby code, insert the following:
ENV['RUBYDB_OPTS'] = 'remoteport=<Server_Name>:<Port>'$:.push('<Path_To_rdbgp.rb>')require 'rdbgp'
The first two lines set up the environment for remote debugging (similar to steps three and four above). Thethird line loads the debugger which breaks immediately by default.
Once the debugger has been loaded, subsequent breaks can be specified in the program with theDebugger.current_context.stop_next function. It's a good idea to wrap this function in a begin... end block in case the module wasn't loaded:
begin; Debugger.current_context.stop_next = 1;rescue Exception;
Komodo User Guide
Debugging Ruby Remotely 162
end
These in-code breakpoints can be easily toggled by changing the boolean value (i.e. 1 = enabled, 0 =disabled).
Rubygems and RUBYOPT
Rubygems is the most commonly used framework for managing third-party Ruby modules.
Rubygems is included with the One-Click Installer (available at http://rubyforge.org/projects/rubyinstaller/).This installer adds the environment variable RUBYOPT=rubygems to the list of system variables. This isusually correct behavior, as it automatically enables all your Ruby scripts to use rubygems to find modules.However, it will cause the Ruby debugger to always step into a file called ubygems.rb (a simple wrapperaround rubygems.rb) when debugging.
There are three ways to avoid this:
Set a breakpoint on the first line of the main file, and start the debugger with Go instead of the StepInto.
•
In Komodo's Environment preferences, set the RUBYOPT environment variable an empty string.• When you start the debugger, choose the Environment tab in the Debugging Options dialog box, adda new entry for RUBYOPT in the User Environment Variables box, and leave its value empty.
•
Debugging Rails Applications
Ruby on Rails applications can be debugged locally or remotely just like any other ruby application. However,since much of the Rails framework has to run within the debugger, the process is normally slower than with astandalone ruby program.
Local Rails Debugging
Load the pertinent app or controllers files in Komodo.1. Set breakpoints in the methods where you want to stop.2. Load the script/server file that you would normally run from the command-line.3. In the Debugging Configuration dialog, set the Directory field to the top-level directory containingthe apps folder.
4.
With the script/server file active, start the debugger.5.
Remote Rails Debugging
Follow the steps described above in Debugging Ruby Remotely to install the ruby debugger and setthe environment variables dbgdir and RUBYDB_OPTS.
1.
Start the Rails script/server with the ruby debugger from the top-level directory containing the appsfolder:
Windows
ruby -I%dbgdir% -r %dbgdir%\rdbgp.rb script/server
Linux/Mac OS X
2.
Komodo User Guide
Setting a Break in your Ruby Code 163
ruby -I"$dbgdir" -r "$dbgdir"/rdbgp.rb script/server
The remote files will open in Komodo with the debugger stopped at the first line of executable code. A yellowarrow indicates the current position. You can now set breakpoints in this file, step through, and use otherKomodo debugging features as if it were a local file. However, you cannot modify the file.
Komodo User Guide
Remote Rails Debugging 164
Debugging Tcl Komodo IDE onlyKomodo can be used to debug Tcl programs locally or remotely. The following instructions describe how toconfigure Tcl debugging. For general information about using the Komodo debugger, see Komodo DebuggerFunctions.
Debugger commands can be accessed from the Debug menu, by shortcut keys, or from the Debug Toolbar.For a summary of debugger commands, see the Debugger Command List.
Configuring Local Tcl Debugging
Specify the Tcl interpreter Komodo uses to debug and run Tcl programs:
On the Edit menu, select Preferences.1. In the Preferences dialog box under Languages, click Tcl. Komodo searches for Tcl interpreters inthe system PATH and lists all tclsh and wish interpreters available in separate drop-down lists. Ifno Tcl interpreters are displayed in the list, check that the location of the interpreters is specified inyour PATH environment variable.
2.
If the preferred interpreters are in these lists, click to select them. If they are not, click Browse tolocate them.
3.
Click OK.4.
Note: Tcl Beta releases contain only version-specific executables (e.g. tclsh85.exe and wish85.exe).Komodo does not automatically find these in the path. To use them, specify them manually in the Interpreterssection of the Tcl language preferences rather than selecting Find on Path.
To start a local Tcl debugging session, click Go/Continue or Step In on the Debugger menu or toolbar. SeeKomodo Debugger Functions for full instructions on using Komodo's debugging functionality.
Remote Tcl Debugging
When debugging a Tcl program remotely, the program is executed on the remote machine and the debugoutput is sent to Komodo. Komodo controls the debugging session (e.g. stepping, breakpoints, andspawnpoints) once the session has been started on the remote machine.
Installing the Tcl Debugger Application on a Remote Machine
To debug a Tcl program remotely, the Tcl debugger application, dbgp_tcldebug.exe (Windows) ordbgp_tcldebug (Linux and OS X), must be installed on the remote machine. This file is installed in the tclsubdirectory of the Komodo installation directory for your platform.
Windows
<komodo-install-directory>\lib\support\tcl
Linux
<komodo-install-directory>/lib/support/tcl
Debugging Tcl Komodo IDE only 165

Mac OS X
<komodo-install-directory>/Contents/SharedSupport/tcl
This application is also available for download from the Komodo Remote Debugging page.
To install the Tcl debugger application on the remote machine:
If necessary, install a Komodo license.• Copy the dbgp_tcldebug executable to any convenient directory.•
Invoking the Tcl Debugger Application
To debug a Tcl script on a remote machine:
In Komodo, select Listen for Debugger Connections from the Debug menu.1. Log in to the remote machine.2. On the remote machine, run the dbgp_tcldebug executable from the command line. To specifycommand line arguments for the script that you are debugging, simply add those arguments to the endof the command, after the dbgp_tcldebug arguments.
dbgp_tcldebug -dbgp <komodo_host:port> -app-file <tcl_program> -app-shell </path/to/tclsh_or_wish>
The following options are available:
-dbgp: Sets the hostname (or IP address) and port where Komodo or the DBGP Proxy isrunning. In Komodo, select Debug|Listener Status to check the current port setting.
♦
-app-file: Specifies the Tcl program to debug. Program arguments should follow a "--"delimiter after the Tcl program name (e.g. ... -app-file test.tcl -- arg_0arg_1).
♦
-app-shell: Sets the path to the Tcl interpreter (tclsh or wish).♦ -help: Displays a complete list of options.♦
3.
A Tcl Debug tab opens in Komodo. Click Step In, or Go/Continue) to run to the first breakpoint (seeKomodo Debugger Functions for full instructions).
4.
Note: For Komodo to open an editable copy of the file, a MappedURI must be created to link the file on the remote filesystem withthe URI Komodo receives from the remote debugger.
Example
Remote Machine (Windows):
The file dbgp_tcldebug.exe has been copied into the C:\remote_debug directory.• The Tcl file to be debugged is called test.tcl and is located in the current working directory.• The Tcl interpreter is C:\Tcl\bin\wish.exe.•
Local Machine:
The hostname is "mybox".•
Komodo User Guide
Installing the Tcl Debugger Application on a Remote Machine 166
The Komodo remote debugging listener port is set to 9000.•
In this scenario, the following command is entered on the remote machine:
C:\remote_debug\dbgp_tcldebug.exe -dbgp mybox:9000 -app-file test.tcl -app-shell C:\Tcl\bin\wish.exe
Komodo User Guide
Invoking the Tcl Debugger Application 167

Debugging XSLT Komodo IDE onlyTutorial
XSLT Tutorial•
Komodo does not need to be manually configured for local XSLT debugging. It uses the libxslt and libxmllibraries directly to transform XML documents into HTML, text, or other XML document types. Seewww.libxml.org for more information on this XML C parser and toolkit.
For general information about debugging with Komodo, see General Debugger Functions. Debuggercommands can be accessed from the Debug menu, by shortcut keys, or from the Debug Toolbar. For asummary of debugger commands, see the Debugger Command List.
Using the XSLT Debugger
To debug an XSLT file:
Open the XSLT file and set breakpoints.1. Start the debugger by clicking Go/Continue or Step In on the Debug Toolbar.2. In the Debugging Options dialog, Select the input XML file3. Click OK to start the debugger.4.
The XSLT program, the input XML file, and the results of the transformation appear simultaneously. Bydefault, Komodo splits the Editor pane horizontally.
The XSLT program continues to appear in the top tab group.• The XML input file appears in a new tab below the XSLT program.• The results of the transformation are displayed in the Output tab.•
A yellow arrow on the breakpoint margin shows the current line of execution in both the XSLT and XML file.Breakpoints can be set in the both files before starting the debugging session, or while stepping through thecode.
Using a Remote XML Input File
To debug using an XML file on a remote server, enter the full URL to the file in the Select the input XMLfile field (for example, http://www.example.org/input_file.xml).
XSLT Stepping Behavior
Stepping behavior in the XSLT file is similar to the standard stepping behavior described in DebuggerStepping Behavior, but the terminology for describing XSLT is slightly different than that used for scriptinglanguages.
Step In: Executes the current XSL element or template line and pauses at the following line.• Step Over: Not applicable. Behaves the same as Step In.• Step Out: When the debugger is within an XSL element, Step Out will execute the entire blockwithout stepping through the code line by line. The debugger will stop on the line following the
•
Debugging XSLT Komodo IDE only 168

closing tag of the element.
Though the current line is highlighted in both the XSLT and XML files, the stepping behavior is onlyapplicable to the XSLT file.
Komodo User Guide
XSLT Stepping Behavior 169
Unit TestingKomodo has a unit testing interface for Perl, PHP, Ruby and Python. Unit tests can be defined within projector file preferences. Test output is displayed in the Test Results tab in the bottom pane. Click on an error tojump to the relevant file and line number.
Creating and Editing Test Plans
To create a test plan for a specific file, click Tools|Test Plans|Create New Test Plan.... File-based test planscan be edited and managed in the file's preferences (Edit|Current File Settings).
To create a project-specific test plan, right-click on a project and select Create New Test Plan....Project-specific test plans can be edited and managed in the project preferences.
In the "Define a new Test Plan" dialog box:
Give the test plan a unique name1. Select the language2. Set the directory to run the test command in (usually the base directory of a project).3. Specify any additional command line options (see below).4. Click 'OK' to save the test plan5.
To edit an existing test plan, select the test plan from the drop list in the Test Results tab and click the EditCurrent Test Plan button.
Supported Test Frameworks by Language
Perl: Uses 'make test'. If no Makefile is present, it first runs 'perl Makefile.PL' to generateone before running 'make test'. Note: On Windows, if you're testing an XS library, and nmakewants to rebuild part of it, you need to have the Visual C++ environment loaded when Komodo islaunched.
•
Python: Uses the unittest framework. You need to specify a list of files and/or directories to test.• PHP: Uses the PHPUnit framework. Set the test plan to point to the base directory of the project.The test harness will look for a subdirectory called tests.
•
Ruby: Runs 'rake'. If the default action of the Rakefile is to run tests, no command-line options areneeded. If not, enter the appropriate target for rake (e.g. 'rake test').
•
Adding Libraries Required for Unit Testing
If the test framework you are running requires additional libraries that are not in the language interpreter'sdefault search path (e.g. PERL5LIB or PYTHONPATH), you can add them to the language settings in theproject properties or global preferences.
Running a Test Plan
To run a test plan, select it from the drop list in the Tests Results tab in the bottom pane and click the RunTest Plan button. The drop list shows all test plans available for the current file and in the active project.
Unit Testing 170
These plans can also be started from the Tools|Test menu.
Project-specific test plans can be run by right-clicking on the project to bring up the context menu, thenselecting the test plan from the Test sub-menu.
Importing Global Test Plans
Version 4.3 of Komodo allowed the creation of global test plans. Since these are almost always associatedwith specific files, version 4.4 has replaced global test plans with file-specific ones.
To copy or move a global test plan into the current document's preferences, select Tools|Test|Move GlobalTest Plans to Document. This opens the "Import Global Test Plans" dialog. Select the desired test plans andclick Move (deletes the global test plans), or Copy (leaves them available for other documents).
Komodo User Guide
Running a Test Plan 171
HTTP Inspector Komodo IDE onlyThe HTTP Inspector is used to examine HTTP requests and responses as they happen. It runs a local proxyservice to intercepts HTTP traffic and display each transaction.
Transactions highlighted in the Transaction table are displayed in detail in the Request and Response panesbelow.
Starting the HTTP Inspector
The HTTP Inspector runs a local proxy for intercepting HTTP traffic. Start the proxy by opening the HTTPInspector (Tools|HTTP Inspector) and selecting the Start button on the Inspector toolbar.
Alternatively, set Komodo to start the HTTP Inspector proxy automatically at startup. UnderPreferences|HTTP Inspector, select Run HTTP Inspector in the background when Komodo starts up. Ifyou want to run the Inspector on a port other than 8080 (the default) specify it in the Listen on port field.
If you are working behind a web proxy (i.e. at your network gateway) you can specify the hostname and portof the proxy for the HTTP Inspector to forward connections through. Select Enable proxy forwarding andenter the hostname and port (e.g. host.example.org:18080) of the proxy. If no port is specifiedKomodo will attempt to use port 8080.
Connecting the Browser
Once the HTTP Inspector is running, your browser must be configured to connect to it. Set the browser'sinternet connection settings to point to the HTTP proxy on localhost:8080 (default). If you've set theInspector to use a different port, use the port specified above in Preferences|HTTP Inspector. If you arerunning the browser on a different machine, specify the hostname of the system running Komodo.
Debugging HTTP connections may require you to switch back and forth from using the Inspector to making adirect connection to the internet. If this is the case you may find it useful to configure a separate browser fordebugging HTTP, or use a browser plugin (e.g. SwitchProxy Tool for Firefox) that allows you to change yourproxy configuration quickly.
Note: The HTTP Inspector does not unencrypt HTTPS (encrypted) sessions.
Inspecting the HTTP Data
Once Komodo and your browser have been configured to debug HTTP sessions, load the page you are tryingto analyze:
If it is not already running, start the HTTP Inspector1. Load the page in the browser2. Watch the HTTP transactions (request/response pairs).3. Select a transaction to view details in the Request and Response panes. A data dump of thetransactions can be seen in the data buffer panes below.
4.
By default, the Transaction table shows the following columns:
HTTP Inspector Komodo IDE only 172
State: This appears blank for an uninterrupted transaction. If a Break on Request/Response has beenselected, an icon will appear in this column indicating the break state of the current transaction(Request or Response).
•
Time: Time of the transaction.• Duration: How long the transaction took.• Method: HTTP method used (GET, POST, etc.)• Status: Status returned by the server.• Size: Amount of data transferred in bytes (content-length.• Content: MIME content-type.• URL: Full URL of the target.•
Break on Request/Response
Selecting Break on every Request or Break on every Response in the toolbar will stop on theappropriate part of the next transaction. The request or response can then be edited before being submitted.The current break state of the transaction will appear in the State column in the main Inspector window.
Editing a Request/Response
All fields, headers and data buffers in the Request and Response panes are editable in the relevant breakstate.
If the response is returned in a compressed format (i.e. the response headers contain a "gzip"content-encoding) the unzipped data will be displayed in the data buffer. If any modifications are made, thedata will be re-compressed before being passed back to the browser.
When modifying request or response data, the content-length header will be automatically modified to matchthe length of data in the corresponding data buffer.
Rules
Rules perform specified actions when a certain HTTP request or response is detected. They can be created(New...), edited (Edit...), removed (Delete) and ordered (Move Up and Move Down). The order of the rulescan be important as all matching rules are processed sequentially.
The following parameters can be set for each rule:
Rule Name: Arbitrary name for the rule.• Rule Type: Match on a request, a response, or either one.• Tests: The match criteria for triggering a rule.
Match on all|any of the following: One or more match criteria can be set. This option selectswhether the match should apply to all or any of the match criteria.
♦
Request/Response part to match: The rule can match against the URL, Method, Status,Version, Header or Data fields of an HTTP Request or Response.
♦
Match type: Use contains for a substring match or regex for a regular expresion pattern(Python syntax)
♦
Match string: The string or pattern which triggers the rule.♦
•
Actions: Specifies one or more actions to be taken once a rule is triggered. The following actions areavailable:
•
Komodo User Guide
Inspecting the HTTP Data 173

Break: Breaks at the point the rule is triggered. The HTTP Inspector window must be openfor the break to occur.
♦
Delay: Delays the request or response by a specified number of seconds. Use up to threedecimal places to specify milliseconds (e.g. 0.001 = 1 ms). Use literal to specify the exactvalue, or random to set a range.
♦
Timeout: Wait for the HTTP timeout.♦ Modify Field: Change the value of a Method, URL, Client IP, Status or Data.♦ Set Header: Add a new header or change the value of an existing one.♦ Remove Header: Remove a named header.♦
Komodo User Guide
Rules 174
Interactive Shell Komodo IDE onlyTutorial
Python Tutorial•
Feature Showcase
interactive shell•
Komodo's interactive shell implements individual language shells within Komodo. Shells are used to directlycommunicate with the specified language interpreter.
Statements, expressions, and code fragments can be entered independent of program files. The shell can beused as a stand-alone interactive tool or as a shell that interacts from within a debugging session.
Stand-Alone Interactive Shell
When the interactive shell is started as a stand-alone tool, use the shell to help test modules and experimentwith new languages or programs. Other uses for a stand-alone interactive shell include:
prototyping code• identifying bugs• experimenting with a library• programming interactively• learning new syntax•
The interactive shell supports history recall, AutoComplete and CallTips (Tcl only), and custom colors andfonts.
Debugging with an Interactive Shell
When the interactive shell is started from within a debug session, use the shell to access all functions and codebeing debugged. When the shell is closed from within a debug session, continue the debug process where youleft off. Depending on the language used, changes made in the shell remain in effect for the duration of thedebug session. Other uses for an interactive shell within a debug session include:
exploring and debugging a program• adding new code to the program being debugged (language-dependent)• modifying existing variables using complex expressions• adding new variables with code•
The interactive shell supports history recall, AutoComplete and CallTips (Tcl only), and custom colors andfonts.
Using the Interactive Shell
Interactive Shell Komodo IDE only 175
Each Komodo interactive shell is associated with a corresponding interpreter and is thus language-specific.Each time a command or multi-line string is entered into the Shell tab, that code is sent to the correspondinginterpreter for evaluation. The interpreter evaluates the command, and then returns output and error text.
Setting Shell Preferences
Use the Preferences dialog box to specify the default language to use within an interactive shell. Other shellscan still be accessed via Tools|Interactive Shell.
To set the default shell preference:
On the Tools menu, select Interactive Shell|Configure1. On the Preferred Interactive Shell drop-down list, select the desired language (Python, Perl, Tcl).2. Click OK.3.
Starting the Interactive Shell
The interactive shell can be opened as a stand-alone tool or as a shell inside of a debugging session.
To start the shell as a stand-alone tool:
Select Tools|Interactive Shell, and then select the desired language (Python, Tcl, Perl, or Ruby).Alternatively, click the down arrow for the Shell button on the Workspace toolbar and select thedesired language.
•
The interactive shell opens in a Shell tab in the Bottom Pane beside the Command Output and Breakpointtabs.
To start the shell from within a debug session:
On the active Debug tab, click the Inspect (>>) button on the Debug toolbar, or selectDebug|Inspect. The Debug tab toggles to a Shell tab. Enter code as desired. To toggle back to theDebug tab, click the Inspect button on the Debug Toolbar.
•
View debugging and code inspection functions by clicking the "Collapse/Expand Pane" button at the left sideof the Bottom Pane. This splits the shell into a left and right pane. The left pane performs debugging functionswhile the right pane contains the interactive shell.
Using Multiple Shells
Open multiple interactive shells to interact with various code snippets from a single language or use manyshells to simultaneously explore a different language in each shell.
Using AutoComplete and CallTips
The Tcl interactive shell displays AutoComplete and CallTips when recognized code and commands areentered into the shell. Use autocomplete and calltips to limit the amount of typing in each session. To select asuggested item, press Enter. Use the up and down arrow keys to scroll through the various options on thescreen. To cancel or ignore the suggested autocomplete or calltip, press Esc.
Komodo User Guide
Using the Interactive Shell 176
Komodo can also detect when further data is required at the command prompt. When insufficientprogramming data is entered at the prompt, Komodo displays a language-dependent "more" prompt. Thisprompt indicates that the language interpreter requires more information before the code can run. Onceenough data is entered, Komodo executes the code and the standard language-dependent input prompt returns.
Customizing Colors and Fonts
The Shell tab displays commands, variables, error messages, and all language syntax in the same scheme asspecified in Edit|Preferences|Fonts and Colors. See Customizing Fonts and Colors for more information.
Viewing Shell History
The code history consists of the ordered, numbered sets of commands entered in the lifetime of the shell,including interleaved output and error messages. Use the up and down arrow keys to cycle through the historyof all entered commands. When viewing a multi-line command or function, use the 'Enter' key to select thedesired function and then use the arrow keys to cycle through the multiple lines within that function.
Stopping a Shell Session
To stop an interactive shell session and close the Shell tab, click the X button located in the upper-right cornerof the Shell tab. To stop the interactive shell and keep the Shell tab open, click the square button, or use theassociated key binding.
Clearing the Shell Buffer
To clear the shell buffer, click the Clear Buffer button. There is no limit to buffer size; unless it is manuallycleared, the buffer will continue to increment until the interactive shell session is closed. Manually clearingthe buffer only removes the command history and command results, and has no effect on the buffer state (suchas changes to the working directory, etc).
Using the Python Interactive Shell
The Python shell prompt is a group of three angle brackets >>>. A ... prompt is displayed if Komododetermines that more information is required before the code can execute. A '%' prompt is displayed wheninput from stdin is required (for example, in a Python shell, enter help()). No prompt is displayed whenprogram output is sent to the screen. Code errors are displayed in italics. When a Python interactive shellsession begins, a welcome message is printed stating a version number and copyright notice. The first promptis printed as follows:
Python 2.2.2 (#37, Nov 25 2002, 13:15:27) [MSC 32 bit (Intel)] on win32Type "copyright", "credits" or "license" for more information.>>>
The following example shows a series of Python statements with resulting output:
>>> # Comment: my hello world test>>> print "Hello World"Hello World>>> x=12**2>>> x/272
Komodo User Guide
Using AutoComplete and CallTips 177
>>>
Debugging with the Python Shell
To start a Python shell from within a debug session, click the Inspect button, located in the upper-right cornerof the Debug tab. Starting a shell within a debug session enables Inspect Mode. In Inspect Mode, viewdebugging and code inspection functions by clicking the "Collapse/Expand Pane" button at the left side of theBottom Pane. This splits the shell into a left and right pane. The left pane performs debugging functions whilethe right pane contains the interactive shell. In Inspect Mode, debugging functionality (for example, Run, StepIn, Step Out) is not available. To return to the debugger, click the Inspect button again to exit Inspect Mode.
Using the Tcl Interactive Shell
The Tcl interactive shell supports the tclsh interpreter. The Tcl shell prompt is a percent character %. A >prompt is displayed if Komodo determines that more information is required before the code executes. A %prompt is displayed when input from stdin is required. No prompt is displayed when program output is sentto the screen. Code errors are displayed in italics. The following examples show how input, output, and errorsare displayed in the Tcl shell:
%puts "Hello World"Hello World%
With an error:
%put "hello world"invalid command name "put"%puts "hello world"hello world%
Debugging with the Tcl Shell
To start a Tcl shell from within a debug session, click the Inspect (>>)button, located in the upper-rightcorner of the Debug tab. Starting a shell within a debug session enables Inspect Mode. In Inspect Mode, viewdebugging and code inspection functions by clicking the "Collapse/Expand Pane" button at the left side of theBottom Pane. This splits the shell into a left and right pane. The left pane performs debugging functions whilethe right pane contains the interactive shell. In Inspect Mode, debugging functionality (for example, Run, StepIn, Step Out) is not available. To return to the debugger, click the Inspect button again to exit Inspect Mode.
Using the Perl Interactive Shell
The Perl interactive shell prompt is a percent character %. A > prompt is displayed if Komodo determinesthat more information is required before the code executes. No prompt is displayed when program output issent to the screen. Code errors are displayed in italics. The following examples show how input, output, anderrors are displayed in the Perl shell:
%print "Hello World! \n";Hello World!%
Komodo User Guide
Using the Python Interactive Shell 178
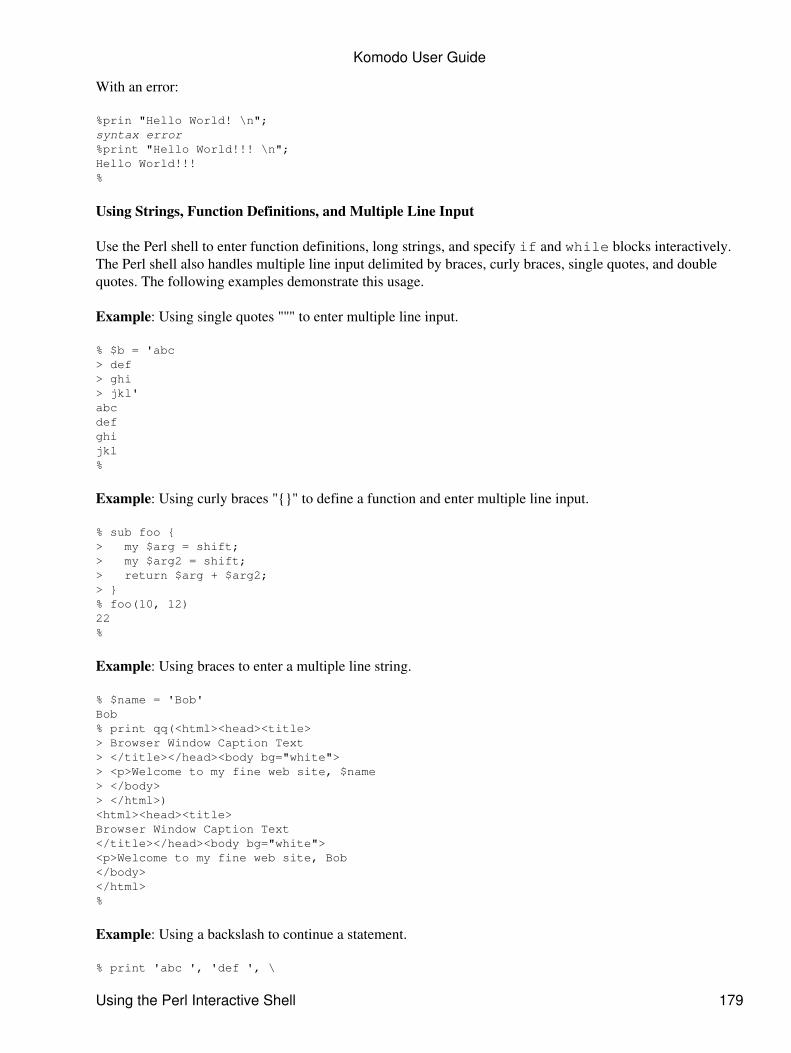
With an error:
%prin "Hello World! \n";syntax error %print "Hello World!!! \n";Hello World!!!%
Using Strings, Function Definitions, and Multiple Line Input
Use the Perl shell to enter function definitions, long strings, and specify if and while blocks interactively.The Perl shell also handles multiple line input delimited by braces, curly braces, single quotes, and doublequotes. The following examples demonstrate this usage.
Example: Using single quotes "''" to enter multiple line input.
% $b = 'abc> def> ghi> jkl'abcdefghijkl%
Example: Using curly braces "{}" to define a function and enter multiple line input.
% sub foo {> my $arg = shift;> my $arg2 = shift;> return $arg + $arg2;> }% foo(10, 12)22%
Example: Using braces to enter a multiple line string.
% $name = 'Bob'Bob % print qq(<html><head><title> > Browser Window Caption Text > </title></head><body bg="white"> > <p>Welcome to my fine web site, $name > </body> > </html>) <html><head><title> Browser Window Caption Text </title></head><body bg="white"> <p>Welcome to my fine web site, Bob </body> </html> %
Example: Using a backslash to continue a statement.
% print 'abc ', 'def ', \
Komodo User Guide
Using the Perl Interactive Shell 179
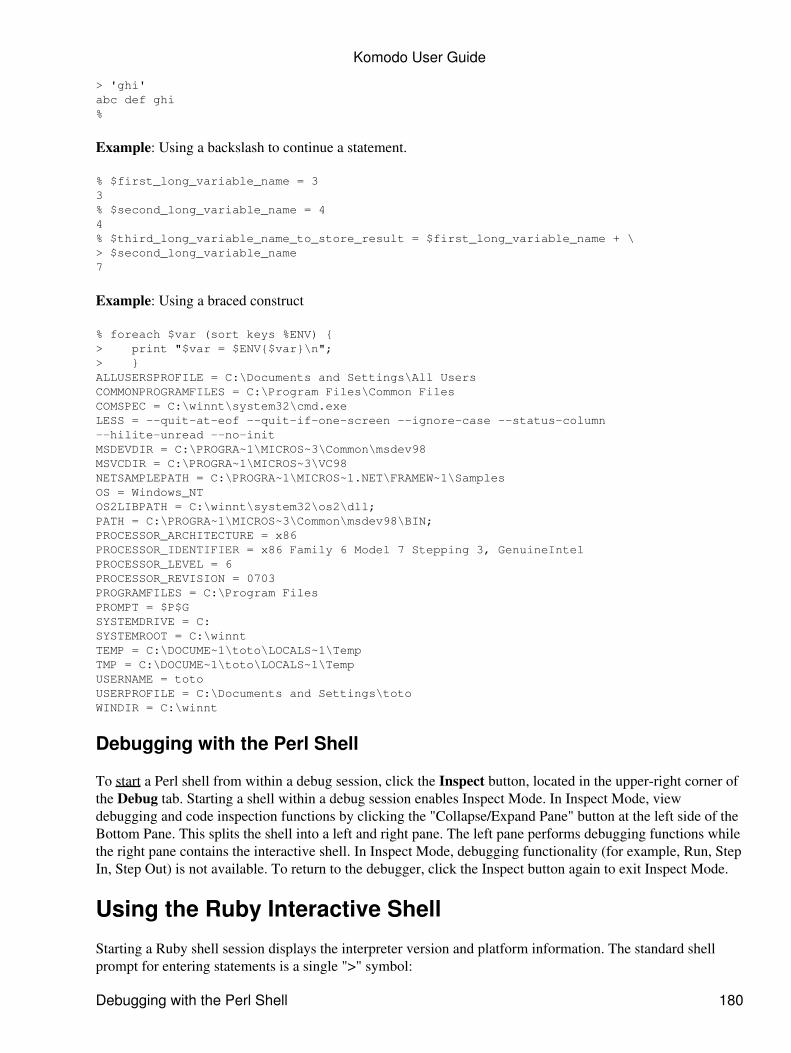
> 'ghi'abc def ghi %
Example: Using a backslash to continue a statement.
% $first_long_variable_name = 33% $second_long_variable_name = 44% $third_long_variable_name_to_store_result = $first_long_variable_name + \> $second_long_variable_name7
Example: Using a braced construct
% foreach $var (sort keys %ENV) {> print "$var = $ENV{$var}\n";> }ALLUSERSPROFILE = C:\Documents and Settings\All UsersCOMMONPROGRAMFILES = C:\Program Files\Common FilesCOMSPEC = C:\winnt\system32\cmd.exeLESS = --quit-at-eof --quit-if-one-screen --ignore-case --status-column--hilite-unread --no-initMSDEVDIR = C:\PROGRA~1\MICROS~3\Common\msdev98MSVCDIR = C:\PROGRA~1\MICROS~3\VC98NETSAMPLEPATH = C:\PROGRA~1\MICROS~1.NET\FRAMEW~1\SamplesOS = Windows_NTOS2LIBPATH = C:\winnt\system32\os2\dll;PATH = C:\PROGRA~1\MICROS~3\Common\msdev98\BIN;PROCESSOR_ARCHITECTURE = x86PROCESSOR_IDENTIFIER = x86 Family 6 Model 7 Stepping 3, GenuineIntelPROCESSOR_LEVEL = 6PROCESSOR_REVISION = 0703PROGRAMFILES = C:\Program FilesPROMPT = $P$GSYSTEMDRIVE = C:SYSTEMROOT = C:\winntTEMP = C:\DOCUME~1\toto\LOCALS~1\TempTMP = C:\DOCUME~1\toto\LOCALS~1\TempUSERNAME = totoUSERPROFILE = C:\Documents and Settings\totoWINDIR = C:\winnt
Debugging with the Perl Shell
To start a Perl shell from within a debug session, click the Inspect button, located in the upper-right corner ofthe Debug tab. Starting a shell within a debug session enables Inspect Mode. In Inspect Mode, viewdebugging and code inspection functions by clicking the "Collapse/Expand Pane" button at the left side of theBottom Pane. This splits the shell into a left and right pane. The left pane performs debugging functions whilethe right pane contains the interactive shell. In Inspect Mode, debugging functionality (for example, Run, StepIn, Step Out) is not available. To return to the debugger, click the Inspect button again to exit Inspect Mode.
Using the Ruby Interactive Shell
Starting a Ruby shell session displays the interpreter version and platform information. The standard shellprompt for entering statements is a single ">" symbol:
Komodo User Guide
Debugging with the Perl Shell 180
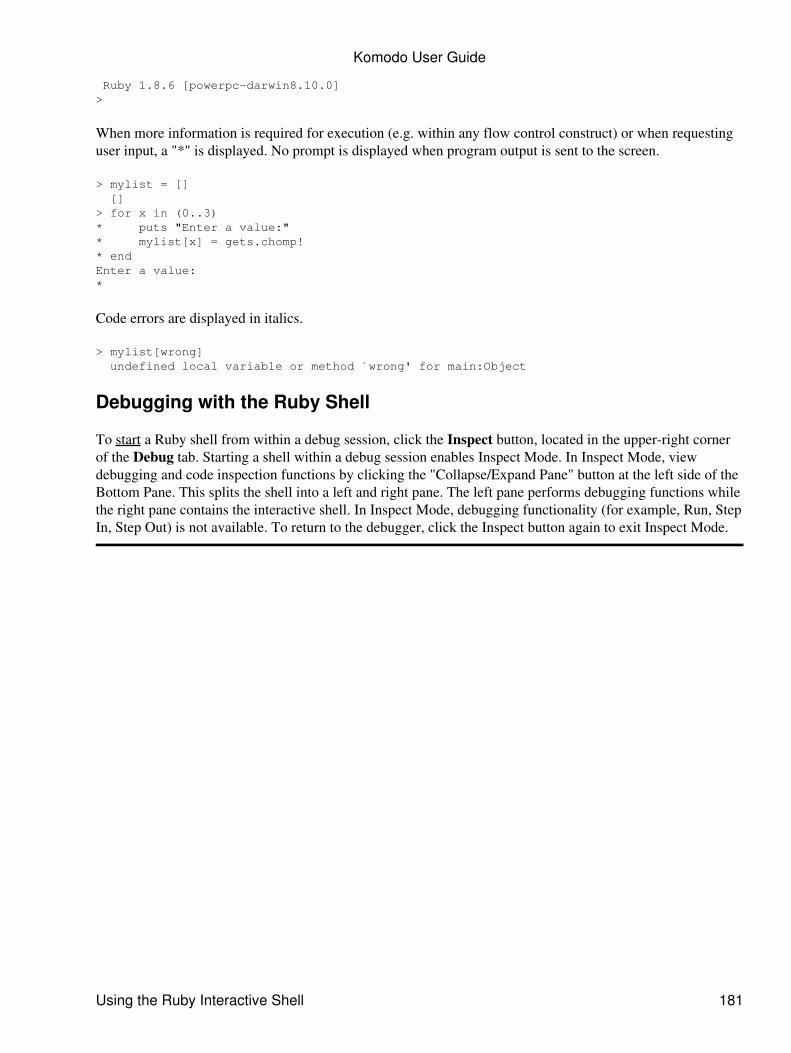
Ruby 1.8.6 [powerpc-darwin8.10.0]>
When more information is required for execution (e.g. within any flow control construct) or when requestinguser input, a "*" is displayed. No prompt is displayed when program output is sent to the screen.
> mylist = [] []> for x in (0..3)* puts "Enter a value:"* mylist[x] = gets.chomp!* endEnter a value:*
Code errors are displayed in italics.
> mylist[wrong]undefined local variable or method `wrong' for main:Object
Debugging with the Ruby Shell
To start a Ruby shell from within a debug session, click the Inspect button, located in the upper-right cornerof the Debug tab. Starting a shell within a debug session enables Inspect Mode. In Inspect Mode, viewdebugging and code inspection functions by clicking the "Collapse/Expand Pane" button at the left side of theBottom Pane. This splits the shell into a left and right pane. The left pane performs debugging functions whilethe right pane contains the interactive shell. In Inspect Mode, debugging functionality (for example, Run, StepIn, Step Out) is not available. To return to the debugger, click the Inspect button again to exit Inspect Mode.
Komodo User Guide
Using the Ruby Interactive Shell 181
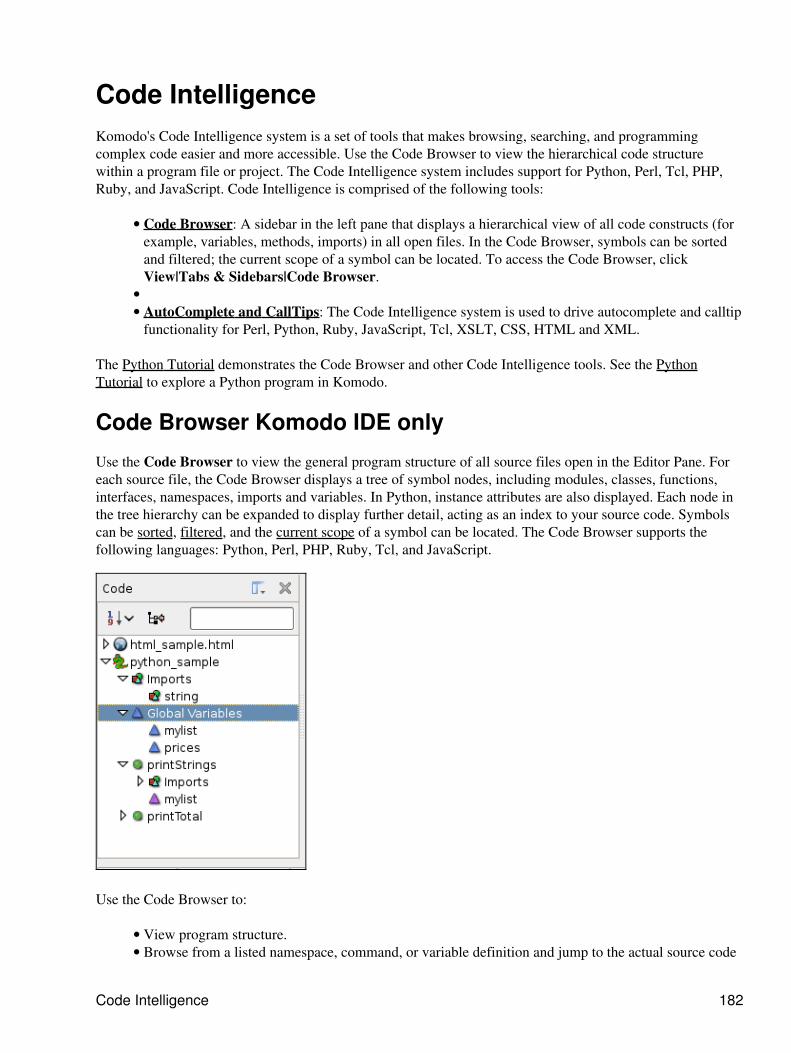
Code IntelligenceKomodo's Code Intelligence system is a set of tools that makes browsing, searching, and programmingcomplex code easier and more accessible. Use the Code Browser to view the hierarchical code structurewithin a program file or project. The Code Intelligence system includes support for Python, Perl, Tcl, PHP,Ruby, and JavaScript. Code Intelligence is comprised of the following tools:
Code Browser: A sidebar in the left pane that displays a hierarchical view of all code constructs (forexample, variables, methods, imports) in all open files. In the Code Browser, symbols can be sortedand filtered; the current scope of a symbol can be located. To access the Code Browser, clickView|Tabs & Sidebars|Code Browser.
•
• AutoComplete and CallTips: The Code Intelligence system is used to drive autocomplete and calltipfunctionality for Perl, Python, Ruby, JavaScript, Tcl, XSLT, CSS, HTML and XML.
•
The Python Tutorial demonstrates the Code Browser and other Code Intelligence tools. See the PythonTutorial to explore a Python program in Komodo.
Code Browser Komodo IDE only
Use the Code Browser to view the general program structure of all source files open in the Editor Pane. Foreach source file, the Code Browser displays a tree of symbol nodes, including modules, classes, functions,interfaces, namespaces, imports and variables. In Python, instance attributes are also displayed. Each node inthe tree hierarchy can be expanded to display further detail, acting as an index to your source code. Symbolscan be sorted, filtered, and the current scope of a symbol can be located. The Code Browser supports thefollowing languages: Python, Perl, PHP, Ruby, Tcl, and JavaScript.
Use the Code Browser to:
View program structure.• Browse from a listed namespace, command, or variable definition and jump to the actual source code•
Code Intelligence 182
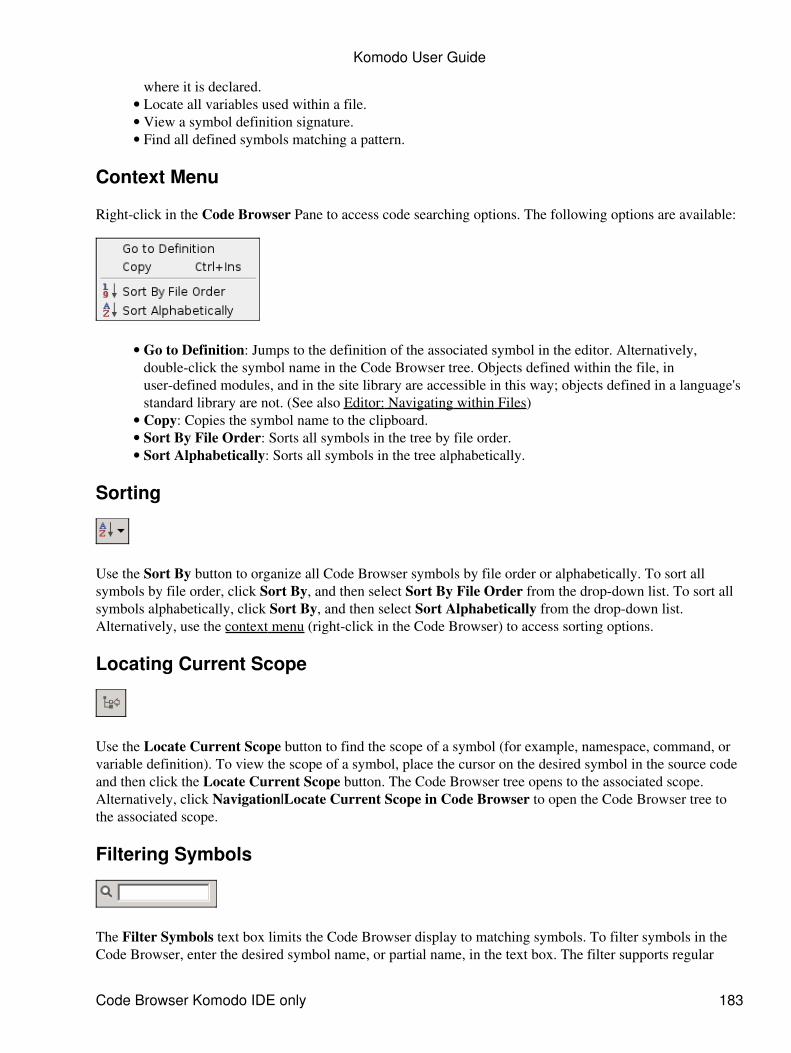
where it is declared.Locate all variables used within a file.• View a symbol definition signature.• Find all defined symbols matching a pattern.•
Context Menu
Right-click in the Code Browser Pane to access code searching options. The following options are available:
Go to Definition: Jumps to the definition of the associated symbol in the editor. Alternatively,double-click the symbol name in the Code Browser tree. Objects defined within the file, inuser-defined modules, and in the site library are accessible in this way; objects defined in a language'sstandard library are not. (See also Editor: Navigating within Files)
•
Copy: Copies the symbol name to the clipboard.• Sort By File Order: Sorts all symbols in the tree by file order.• Sort Alphabetically: Sorts all symbols in the tree alphabetically.•
Sorting
Use the Sort By button to organize all Code Browser symbols by file order or alphabetically. To sort allsymbols by file order, click Sort By, and then select Sort By File Order from the drop-down list. To sort allsymbols alphabetically, click Sort By, and then select Sort Alphabetically from the drop-down list.Alternatively, use the context menu (right-click in the Code Browser) to access sorting options.
Locating Current Scope
Use the Locate Current Scope button to find the scope of a symbol (for example, namespace, command, orvariable definition). To view the scope of a symbol, place the cursor on the desired symbol in the source codeand then click the Locate Current Scope button. The Code Browser tree opens to the associated scope.Alternatively, click Navigation|Locate Current Scope in Code Browser to open the Code Browser tree tothe associated scope.
Filtering Symbols
The Filter Symbols text box limits the Code Browser display to matching symbols. To filter symbols in theCode Browser, enter the desired symbol name, or partial name, in the text box. The filter supports regular
Komodo User Guide
Code Browser Komodo IDE only 183

expressions (Python syntax). If there is an error in the pattern, the text is highlighted and a tooltip describesthe error.
Press 'Tab' to switch focus between the Filter text box and the Code Browser tree. Press 'Esc' to clear thecurrent filter pattern.
Object Browser Komodo IDE only
The Object Browser is currently being re-implemented with Komodo's new Code Intelligence backend and isnot available in this release.
Komodo User Guide
Filtering Symbols 184
DOM Viewer Komodo IDE onlyThe Document Object Model (DOM) is an interface for dynamically accessing the content, structure andstyle of XML and HTML documents. Komodo's DOM Viewer tab displays the DOM nodes (e.g. elementsand attributes) of the current document as a collapsible tree. The DOM Viewer lets you find, view and jump toany of these nodes quickly.
Navigating the DOM Tree
Double-clicking on a node in the DOM Viewer moves the cursor to the corresponding node in the document.
The Locate current node button does two things:
If the window focus is on the DOM Viewer, it moves the cursor in the editor tab to the node selectedin the DOM Viewer.
•
If the window focus is on the editor tab, it finds the node in the tree corresponding to the currentcursor position in the document.
•
The Show/hide attributes button toggles the visibility of element attributes. Attributes are hidden by default.
Filtering the DOM Tree
Entering text in the Filter box performs an XPath search on the nodes in the tree, limiting the tree view tomatching nodes and their parents.
For example, when viewing an HTML document, entering table in the Filter box might limit the tree viewto the <table ...> element and the parent <body> and <html> elements. If a node matching the searchstring is found in a collapsed branch, the branch is automatically expanded.
For documents that use namespace prefixes, like XSLT, use the format prefix:element-name in the search (e.g.xsl:template).
The Filter box uses the XPath syntax supported in Python's ElementTree.
DOM Resources
More information on various aspects of the Document Object Model can be found here:
W3C DOM Recommendations: The canonical source for DOM Technical Reports (specifications).• What does each DOM Level bring?: Abstracts of the three DOM Level specs by Fabian Guisset.• W3 Schools XML DOM Tutorial: A straightforward tutorial with links to an XML DOM objectreference and examples. See also their HTML DOM Tutorial.
•
DOM Viewer Komodo IDE only 185

Source Code Control Komodo IDE onlySource code control (also called "revision control", "version control" or "code management") is the practice ofmanaging changes to a set of files in a common repository. Files can be checked out from the repository,edited, reverted, merged, checked in or compared with other versions.
Komodo supports common operations for the following SCC systems:
CVS• Subversion (SVN)• Perforce (P4)• Git• Mercurial (Hg)• Bazaar (bzr)•
From within Komodo, you can perform the following SCC actions:
add files to the repository• remove files from the repository• compare files in the editor against their repository versions (a "diff")• show a revision history for a file• submit files back to the repository• revert files to their previous state•
Depots, repositories, branches, and projects cannot be created or configured from within Komodo. This mustbe done using the SCC software directly. Komodo's SCC features become available when files are checkedout from the source code repository.
Komodo can work in conjunction with external graphial SCC clients such as TortoiseCVS and TortoiseSVN,and P4Win. However, the command line executables (i.e. cvs, svn and p4) must be present on the localsystem.
SCC functions are available in the following locations:
Toolbox Context Menu: Right-click a file in the Toolbox to access the Source Control menuoptions. Source code control functions can also be performed on Folders in the Toolbox; right-click afolder and select Source Control on Contents to access the menu.
•
Projects sidebar context menu: Right-click a file in the Project Manager to access the SourceControl menu options. SCC functions can also be performed on Folders in the Toolbox; right-click afolder and select Source Control on Contents to access the menu. Two source code control optionsare available from the Projects sidebar and Toolbox context menus:
Source Control applies source code functions to the selected file only.♦ Source Control on Contents applies source code functions to the contents of the selectedproject or folder.
♦
•
Editor Pane: Right-click a file in the Editor Pane to access the Source Control menu options.• Filename Tab: Right-click the filename tab above the Editor Pane to access the Source Controlmenu options.
•
File Menu: Select the Source Control option from the File menu.•
The Source Control submenu options are the same regardless of which method is used to access the menu.
Source Code Control Komodo IDE only 186
Using Source Code Control
SCC Toolbar, Menus and Output Tab
Source Code Control Toolbar
Access common source code control commands from the SCC Toolbar at the top of the Komodo workspace.Refer to the command descriptions below for more information. The toolbar commands only apply to the filecurrently active in the Editor Pane.
Source Code Control Menus
To access source code control functions, select File|Source Control.
Invoke source code control context menus by right-clicking files or folders in the following areas:
Projects sidebar• Toolbox• Editor Pane•
Source Code Control Output Tab and Status Messages
The SCC Output tab is located in the Bottom Pane of the Komodo workspace. As you execute source codecontrol commands, such as editing or checking in files, details of the commands are displayed on the SCCOutput tab.
Error messages and warnings are also displayed on the SCC Output tab. Additionally, error messages andwarnings are displayed on the status bar in the bottom left corner of the Komodo workspace.
Source Code Control Commands
As described above, source code control commands are invoked from the toolbar, the File menu and theSource Control context menu. The following commands are available, depending on the context:
Checkout: Launches the SCC Checkout wizard for fetching a local copy from a repository.• Add: Add a file from a designated source code directory on your local drive to the source coderepository.
•
Edit: Unlock a file for editing.• Revert Changes: Check the file back into the repository, abandoning any changes made since it waschecked out.
•
Remove: Delete the file from both the source code repository and the corresponding local directory.• Update: When the local version no longer matches the repository version of a file, select thiscommand to update the local version of the file.
•
Diff (Compare Files): Compare the version of a file open in the Editor Pane with the version in thesource code repository. Depending on the setting in Preferences, the diff display is shown on anotherKomodo editor tab or in a separate window. If the display style for diffs (Edit|Preferences|SourceCode Control) is set to Create new window, press 'F9' or select Jump to Corresponding Line toopen and/or shift focus to the original file in the Editor Pane. If viewing a diff in an editor tab,right-click and select Jump to Corresponding Line to shift focus to the editor tab containing thesource code. Selecting this option opens the source code tab in the Editor Pane if it is not already
•
Komodo User Guide
Using Source Code Control 187
open.History: Show the change history for the current file.• Commit Changes: Submit the file back to the source code repository.•
File Status Icons
If Perforce, CVS or Subversion is enabled in Komodo's Preferences, the status of files in the source coderepository is indicated by icons that appear on file tabs in the Editor Pane and next to files and projects on theProjects sidebar.
The icons can appear in a variety of combinations, depending on the status of the file and where they aredisplayed in the Komodo workspace. For example, a pencil icon next to a padlock icon on a tab in the EditorPane indicates that the file has been locally modified and that the version of the file in your local directory isin sync with the version in the source code repository.
The file is being added to the source code repository.
The file is being deleted from the source code repository.
The file has been locally modified.
The version of the file in your local directory is in sync with the version in the source code repository (i.e.there are no pending updates from the SCC server).
The file is read-only.
The version of the file in your local directory is out of sync with the version in the source code repository.
There is a conflict between the version of the file in your local directory and the source file that cannot beresolved by simply syncing your directory with the source code repository. The discrepancy must bemanually resolved.
Refresh Status
To refresh the SCC status of the current file do one of the following:
Right-click the on file tab or within the editor pane and select Refresh Status• Right-click on the file in the Projects sidebar and select Refresh Status• Click Refresh Status on the File menu• Press 'Ctrl' + 'K', 'R'•
To refresh the SCC status of an entire folder, do one of the following:
Right-click the on the folder and select Refresh Status• Select the folder in the Projects sidebar and click Refresh Status on the File menu• Select the folder in the Projects sidebar and press 'Ctrl' + 'K', 'R'•
SCC Checkout Wizard
Komodo's Checkout command launches a wizard which steps through downloading a local copy of a set ofversion controlled files (e.g. a branch).
Komodo User Guide
Source Code Control Commands 188
Step One: Set the SCC handler and the checkout data
Set the following options:
SCC Handler: Choose the SCC system to use (e.g. svn, git, bzr, etc.)• Checkout URL: Specify the specific URL of the branch being checked out (e.g."http://svn.openkomodo.com/repos/komododoc/trunk/"). Specify the protocol to use (e.g. "http://","rsync://", "git://" etc.).
•
Save to: Specify the local directory to download to. Some SCC clients, such as CVS, will require thatthe specified directory already exists. Others, such as SVN, will create the directory if it does not existalready.
•
Step Two: Customize the checkout parameters
Each SCC handler will have different additional paramenters which can be set:
bzr:Revision: The revision to check out. User the revision number or other revision identifier.♦ Hard-link working tree files where possible: Uses the "--hardlink" command line option.♦
•
cvs:Module: A path within the repository or a CVS module name (required field).♦ Branch or Tag: The branch or "sticky tag" of the branch to be checked out.♦ Specific date: Checkout version from a specific date. Accepts a variety of date formats (e.g."YYYY-MM-DD HH:MM").
♦
Checkout Type: Normal (for working on the modules) or Export (for making a softwarerelease).
♦
•
git:Local repository: Used if the repository to clone is locally available. Uses the "--local"command line option.
♦
Do not perform a HEAD checkout after cloning: Uses the "--no-checkout" option.♦ Make a bare GIT repository: Uses the "--bare" option.♦
•
hg:Revision: The revision number to check out. Current if unspecified.♦ Do not update the new working directory: Uses the "--noupdate" option.♦ Use pull protocol to copy metadata: Uses the "--pull" option.♦ Use uncompressed transfer (fast over LAN): Uses the "--uncompressed" option.♦
•
svn:Revision: The revision number to check out (HEAD by default).♦ Only check out the top folder: Users the "--non-recursive" option.♦ Omit externals: Uses the "--ignore-externals" option.♦
•
Options mentioned above are explained with more detail in the documentation for each SCC handler:
Bazaar User Guide• CVS Documentation• Git Documentation• Distributed revision control with Mercurial• Version Control with Subversion:•
Komodo User Guide
Step One: Set the SCC handler and the checkout data 189
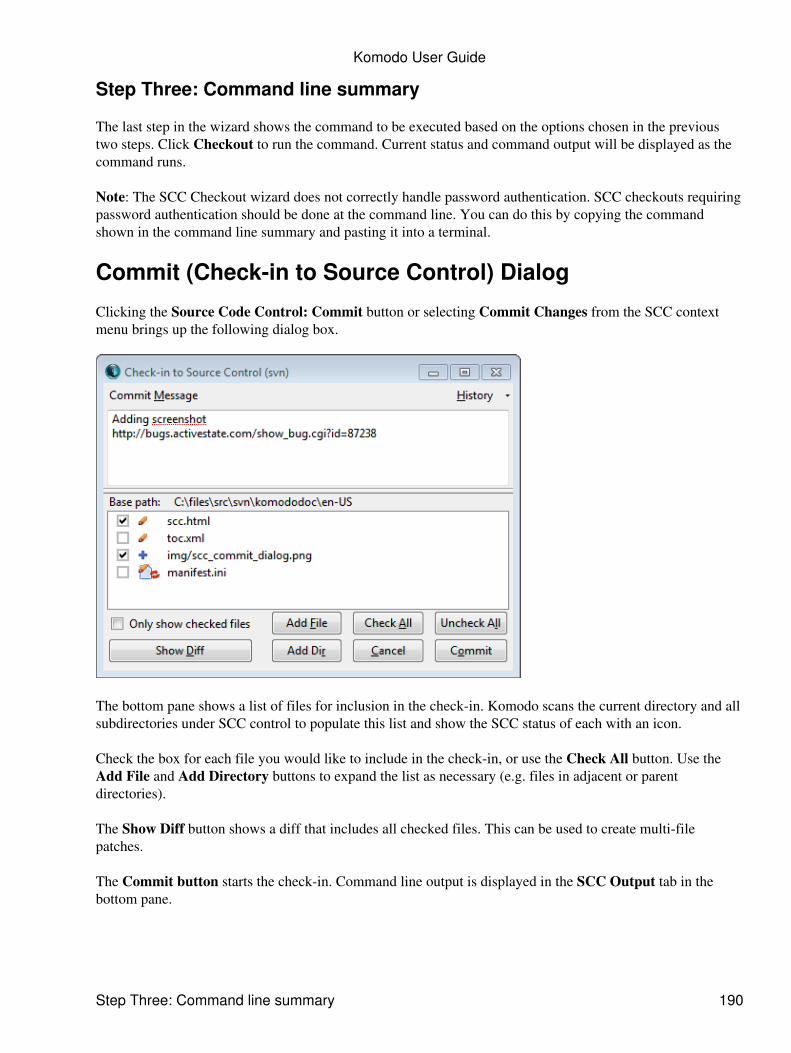
Step Three: Command line summary
The last step in the wizard shows the command to be executed based on the options chosen in the previoustwo steps. Click Checkout to run the command. Current status and command output will be displayed as thecommand runs.
Note: The SCC Checkout wizard does not correctly handle password authentication. SCC checkouts requiringpassword authentication should be done at the command line. You can do this by copying the commandshown in the command line summary and pasting it into a terminal.
Commit (Check-in to Source Control) Dialog
Clicking the Source Code Control: Commit button or selecting Commit Changes from the SCC contextmenu brings up the following dialog box.
The bottom pane shows a list of files for inclusion in the check-in. Komodo scans the current directory and allsubdirectories under SCC control to populate this list and show the SCC status of each with an icon.
Check the box for each file you would like to include in the check-in, or use the Check All button. Use theAdd File and Add Directory buttons to expand the list as necessary (e.g. files in adjacent or parentdirectories).
The Show Diff button shows a diff that includes all checked files. This can be used to create multi-filepatches.
The Commit button starts the check-in. Command line output is displayed in the SCC Output tab in thebottom pane.
Komodo User Guide
Step Three: Command line summary 190
Configuring Source Code Control Integration
Configuring CVS
Basic CVS Configuration
If you have not already done so, install the cvs command-line utility on your system.1. Check out files: Komodo does not have integrated SCC checkout functions. As necessary, run cvsfrom the command line (e.g. 'cvs checkout repository ...').
2.
Enable CVS support in Komodo: Under Preferences|Source Code Control|CVS and ensure that the"CVS Integration" option is checked and that the cvs executable is available in your PATH or isspecified with a full pathname.
3.
Open any file under CVS control in Komodo.4.
Komodo should now recognize that the file is under CVS source code control and the SCC menus and statusicons should be enabled. If not, click Refresh Status on the File menu (or Ctrl-K, R) to force it to reset.
CVS Over SSH
Some CVS repositories (e.g. SourceForge) will only support CVS access over SSH (secure shell). Whenaccessing these repositories, an SSH client is required. See Configuring SSH Support for CVS andSubversion below for details on configuring SSH support.
Configuring Subversion (SVN)
Basic SVN Configuration
If you have not already done so, install the svn command-line client on your system.1. Enable Subversion support in Komodo: Under Preferences|Source Code Control|Subversion andensure that the "SVN Integration" option is checked and that the svn executable is available in yourPATH or is specified with a full pathname.
2.
Check out files: If you haven't checked out a local working copy of the files yet, use the SCCcheckout wizard or run svn checkout ... from the command line.
3.
Open any file under Subversion control in Komodo.4.
Komodo will recognize the files is under Subversion source code control and the SCC menus and status iconsshould be enabled. If not, click Refresh Status on the File menu (or Ctrl-K, R) to force it to reset.
SVN Over SSH
Some Subversion repositories only support Subversion access over SSH (secure shell). When accessing theserepositories, an SSH client is required. See Configuring SSH Support for CVS and Subversion below fordetails on configuring SSH support.
Configuring Perforce (P4)
Komodo User Guide
Configuring Source Code Control Integration 191
Basic Perforce Configuration
If you have not already done so, install Perforce on your system.1. Check out files: Komodo does not have integrated SCC checkout functions. As necessary, run p4from the command line (e.g. 'p4 sync path').
2.
Enable Perforce support in Komodo: Under Preferences|Source Code Control|Perforce and ensure thatthe "Perforce Integration" option is checked and that the p4 executable is available in your PATH or isspecified with a full pathname.
3.
Set P4 environment variables: Unless Komodo is always started from a shell with all necessary P4environment variables set (e.g. P4CLIENT, P4PORT, P4USER), you will need to specify them inKomodo's Environment preferences.
4.
Open any file under Perforce control in Komodo.5.
Komodo should now recognize that the file is under Perforce source code control and the SCC menus andstatus icons should be enabled. If not, click Refresh Status on the File menu (or Ctrl-K, R) to force it to reset.
Users of Perforce's P4CONFIG feature may find that Komodo's source code control doesn't work unlessKomodo is started from within the client view of the Perforce repository.
Configuring Preferences
Use the Source Code Control page in Komodo's Preferences to configure Source Code Control integration.To open the Komodo Preferences dialog box, select Edit|Preferences.
Configuring SSH Support for CVS and Subversion
Tunneling your CVS or Subversion connections over SSH can provide an added level of security for yourrepository access. CVS and Subversion use very similar methods for tunneling over an SSH connection. OnWindows, download and install Putty or Cygwin to provide SSH support. Linux and OS X distributionstypically include SSH support.
This is a basic guideline for configuring CVS and Subversion to use SSH, however, because serverconfigurations can vary, you should consult the documentation for the control system you are using, or requesthelp from you system administrator.
The use of Pageant (on Windows) or ssh-agent (OS X and Linux) with Komodo is strongly recommended.
Installing and Configuring Putty on Windows
Putty is a free SSH, Telnet and Rlogin client for Windows.
1. Install Putty
Download Putty (version 0.52 or greater) and associated programs from:
http://www.chiark.greenend.org.uk/~sgtatham/putty/
To connect to a server via SSH, the following programs are required:
putty.exe•
Komodo User Guide
Basic Perforce Configuration 192
puttygen.exe• pageant.exe• pscp.exe• plink.exe•
Ensure that the directory where Putty is installed is specified in your system's PATH environment variable.
2. Generate the Putty Key
Run the puttygen utility. Configure as follows:
Set Parameters: Select either "SSH2 RSA" or "SSH2 DSA".1. Generate Key Pair: Click the Generate button to generate the key pair. While the key is beinggenerated, move the mouse pointer around the blank space to provide key randomness.
2.
Enter Key Passphrase: Enter and confirm a passphrase for the key. Remember the passphrase - it isrequired later.
3.
Save Public Key: Click the "Save public key" button and store the key in a file called public1.key.4. Save Private Key: Click the Save private key button and store the key in a file called private1.key,in the same directory as the public key.Note: The extension .ppk will be appended to the name specified (i.e. private1.key.ppk).
5.
Copy Key Contents: Copy the contents of the public key field (at the top of the dialog box) to a filenamed public1-openssh.key. This key is required later.
6.
Close puttygen7.
3. Load and Configure the Putty Authentication Agent
Run the pageant program. This loads the Putty Authentication Agent into the Windows System Tray.
Right-click the Pageant icon in the Windows System Tray. Select Add Key. Navigate to the directory whereyou saved the public and private keys in the previous step, and select the file private1.key.ppk.
4. Configure Putty To Use Pageant
Run the putty program. Configure as follows:
Specify Server: On the Session page of the Configuration form, enter the host name or IP address ofthe server.
1.
Specify Protocol: On the Session page, in the Protocol field, select the "SSH" protocol.2. Create Saved Session: In the Saved Sessions field, enter the host name again. Click the Save button.3. Configure Connection: on the Connection page of the Configuration form, enter your username forthe server in the Auto-login username field.
4.
Configure SSH Protocol: On the SSH page of the Configuration form, specify "2" for the PreferredSSH protocol version.
5.
Enable Agent Forwarding: On the Auth page of the Configuration form, check Allow agentforwarding. In the Private key file for authentication field, specify the path and filename of theprivate key created above (private1.key).
6.
Save Session Information: On the Session page of the Configuration form, click the Save button.7.
5. Store the Public Key on the Server
You must store the public key file generated in step 2 (public1-openssh.key) on the CVS or Subversion server.
Komodo User Guide
Installing and Configuring Putty on Windows 193
Open Command Prompt Window: Type cmd in the Windows Run dialog box.1. Copy Public Key to Server: At the command prompt, enter:
pscp c:\path\to\public1-openssh.key [email protected]:public1-openssh.key
...where c:\path\to\public1-openssh.key specifies the location of the key file created in step two, [email protected] specifies your username and URL on the remote server. You are prompted toconfirm the legitimacy of the host, and may be prompted to enter your password for the server.
2.
Connect Using Putty: If necessary, run the putty program. In the Saved Sessions field,double-click the configuration created in Step 4. This establishes a connection to the server.
3.
Configure the Key on the Server: After logging on to the server, enter the following commands toconfigure the SSH key:
mkdir ~/.sshchmod 700 .sshcat ~/public1-openssh.key >> ~/.ssh/authorized_keysrm ~/public1-openssh.keychmod 600 ~/.ssh/*
4.
Log Off and Exit Putty: Enter exit to close the session of the server.5.
6. Test the Configuration
Restart Putty. In the Saved Sessions field, double-click the configuration created in Step 4. You should not beprompted to log in. If you are, the configuration failed. Review the steps above and ensure that they werecompleted correctly.
Using CVS with Putty on Windows
Use the following additional steps if you are using CVS with Komodo.
7. Check Out a CVS Module
Create Local CVS Directory: Create a directory to store a copy of the CVS repository.1. Copy Files to Local Directory: At a command prompt, enter:
set CVS_RSH=plinkset PLINK_PROTOCOL=sshcvs -d :ext:[email protected]:/repository_name co cvs_module
...where [email protected] specifies your username on the CVS server and the URL of theCVS server, repository_name specifies the name of the repository on the server, and cvs_modulespecifies the name of the module in the chosen working repository.
Login is handled by SSH. The files are copied to the local system. These environment variables donot interfere with non-SSH repositories.
2.
Ensure that these variables are permanently configured in your system environment (for example, by addingthem to the autoexec.bat file or configuring them in the system properties).
8. Using Komodo and CVS
Before starting Komodo, perform the following steps:
Komodo User Guide
Using CVS with Putty on Windows 194

Set PLINK_PROTOCOL=ssh: In the user environment, set the environment variablePLINK_PROTOCOL to "ssh".
•
Set CVS_RSH=plink: In the user environment, set the environment variable CVS_RSH to "plink".• Ensure Pageant Is Running: Run the pageant program to enable the authentication agent. Ensurethat the private1.key is loaded.
You can also execute Pageant and load the key via a batch file. For example:
C:\PuTTY\pageant.exe c:\path\to\private.key c:\path\to\private2.key
•
Using Subversion with Putty on Windows
Use the following additional steps if you are using Subversion with Komodo.
7. Check Out a Subversion Repository
Create Local Subversion Directory: Create a directory to store a copy of the Subversion repository.1. Copy Files to Local Directory: At a command prompt, enter:
svn checkout svn+ssh://svn.server.com/repository_path/module/ local_path
...where svn.server.com specifies the server domain name of the Subversion server,repository_path/module specifies the path of the repository on the server, and local_path specifies thepreferred location on your local system for your copy of the repository. The local_path can beommited, in which case the local path is the last part of the repository_path.
Login is handled by SSH. The files are copied to the local system.
2.
Ensure that these variables are permanently configured in your system environment (for example, by addingthem to the autoexec.bat file or configuring them in the system properties).
8. Using Komodo and Subversion
Set the following environment variables in Environment Preferences:
PLINK_PROTOCOL=ssh• SVN_SSH=c:/path/to/plink.exe -batch•
Specify the full path to plink.exe using forward slashes "/" or escaped back slashes "\\". The -batchargument is used to prevent plink from prompting for user input. You can specify a specific private key byadding "-i C:/path/to/private_keyfile". For example:
SVN_SSH="c:/path/to/plink.exe" -i "c:/path/to/private_keyfile"
You can use the Subversion configuration file instead of setting the SVN_SSH environment variable:
[tunnels]ssh = $SVN_SSH plink.exe
This permits configuration of different connection types. The config file is located in the Subversion directory,typically inside the Application Data area of the user's profile directory (eg. C:\Documents andSettings\USERNAME\Application Data\Subversion). See the Subversion documentation for more
Komodo User Guide
Using Subversion with Putty on Windows 195
information.
If you use "plink = $SVN_SSH plink.exe" in the tunnels section of the config file, use "svn+plink" for yourcheckout url rather than "svn+ssh".
Run pageant to enable the authentication agent. Ensure that the private1.key is loaded. You can startPageant and load the key using a batch file. For example:
C:\PuTTY\pageant.exe c:\path\to\private.key c:\path\to\private2.key
Configuring CVS with Windows/Cygwin-SSH or Linux/SSH
To configure CVS to use SSH, refer to http://forrest.apache.org/docs_0_70/howto/cvs-ssh/howto-cvs-ssh.html.
On all platforms, create an environment variable as follows:
CVS_RSH=ssh
CVS determines when to use SSH, depending on how you check out the modules. If you use the "cvs login"method with the "pserver" protocol, CVS does not use SSH, even if CVS_RSH=ssh is set in the environment.
On Windows, also configure the cygwin SSH Agent as follows:
Open a cygwin shell.1. Enter exec ssh-agent bash.2. Enter ssh-add /path/to/public/key (e.g. 'ssh-add /.ssh/id_rsa.pub')3. To check out a CVS module, enter:
cvs -d :ext:[email protected]:/repository_name co cvs_module
...where [email protected] specifies your username on the CVS server and the URL of theCVS server, repository_name specifies the name of the repository on the server, and cvs_modulespecifies the name of the module in the chosen working repository.
4.
Start Komodo within the cygwin shell as follows:
/path/to/komodo/bin/komodo
5.
After completing the configuration steps above, follow these steps to open Komodo with CVS-SSH enabled:
Open a cygwin shell.1. Enter exec ssh-agent bash.2. Enter ssh-add /path/to/public/key (e.g. 'ssh-add ~/.ssh/id_rsa.pub')3. Start Komodo within the cygwin shell as follows:
/path/to/komodo/komodo.exe
4.
Configuring Subversion with SSH on Linux or Mac OS X
Subversion determines when to use SSH depending on how you check out the modules. If you use http:// orfile:/// URIs, Subversion will not use SSH.
Komodo User Guide
Configuring CVS with Windows/Cygwin-SSH or Linux/SSH 196
To use subversion with SSH, do the following before starting Komodo:
Open a shell.1. Enter exec ssh-agent bash.2. Enter ssh-add /path/to/public/key (e.g. 'ssh-add ~/.ssh/id_rsa.pub')3. To check out a Subversion module, enter:
svn checkout svn+ssh://svn.server.com/repository_path/module/ local_path
...where svn.server.com specifies the server domain name of the Subversion server,repository_path/module specifies the path of the repository on the server, and local_path specifies thepreffered location on your local system for your copy of the repository. The local_path can beommited, in which case the local path is the last part of the repository_path.
4.
Start Komodo from within the shell. Komodo inherits the environment set in the shell by ssh-agent5.
Refer to http://svnbook.red-bean.com/en/1.0/ch06s03.html#svn-ch-6-sect-3.3 for more detailed instructions,including information on configuring svn+ssh to be non-interactive (i.e. no password prompt).
Komodo User Guide
Configuring Subversion with SSH on Linux or Mac OS X 197

Using the Rx Toolkit Komodo IDE onlyTutorial
Regular Expression Primer•
Feature Showcase
test a regular expression•
Komodo's Rx Toolkit is a tool for building, editing and debugging regular expressions. Build a regularexpression in the Regular Expression pane, and enter the sample search string in the Search Text pane.Adjust the regular expression as necessary to produce the desired matches in the Match Results pane.
If you are new to Regular Expressions, see the Regular Expressions Primer. In addition, online references forPython, Perl, PHP, Ruby, and Tcl regular expressions are available via the Rx Toolkit's Help menu.
To open the Rx Toolkit, click in the toolbar, or select Tools|Rx Toolkit.
Rx Toolkit Quick Reference
Select a language Rx engine• Create and edit regular expressions in the Regular Expression pane.• Apply one or more metacharacters to a regular expression by selecting them from the Shortcuts menuor entering them in the Regular Expression pane.
•
Select a match type using the buttons at the top of the Rx Toolkit window.• Apply modifiers to a regular expression by selecting one or more Modifiers check boxes.• Test a regular expression against a string by entering text in the Search Text pane, or by clicking theSearch Text pane's Open button and navigating to a file.
•
Right-click a pane in the Rx Toolkit to access a context menu used to Show/Hide IndentationGuides, Show/Hide Line Numbers, Show/Hide EOL Markers, Show/Hide Whitespace and turnWord Wrap on and off. This context menu is not available in the Match Results pane.
•
Select Help|Load Sample Regex and Search Text to reload the default regular expression andsearch text if it has been replaced or deleted.
•
Double-click a result in the Match Results pane to highlight the corresponding text in the SearchText pane.
•
Selecting a Language
Regular expression syntax is similar in most programming languages, but there are some importantdifferences. The Rx Toolkit can evaluate regular expressions using:
JavaScript• Perl• PHP• Python• Ruby (requires the JSON module)•
Select the regular expression engine you want to use from the drop-down list in the Regular Expression panel.
Using the Rx Toolkit Komodo IDE only 198
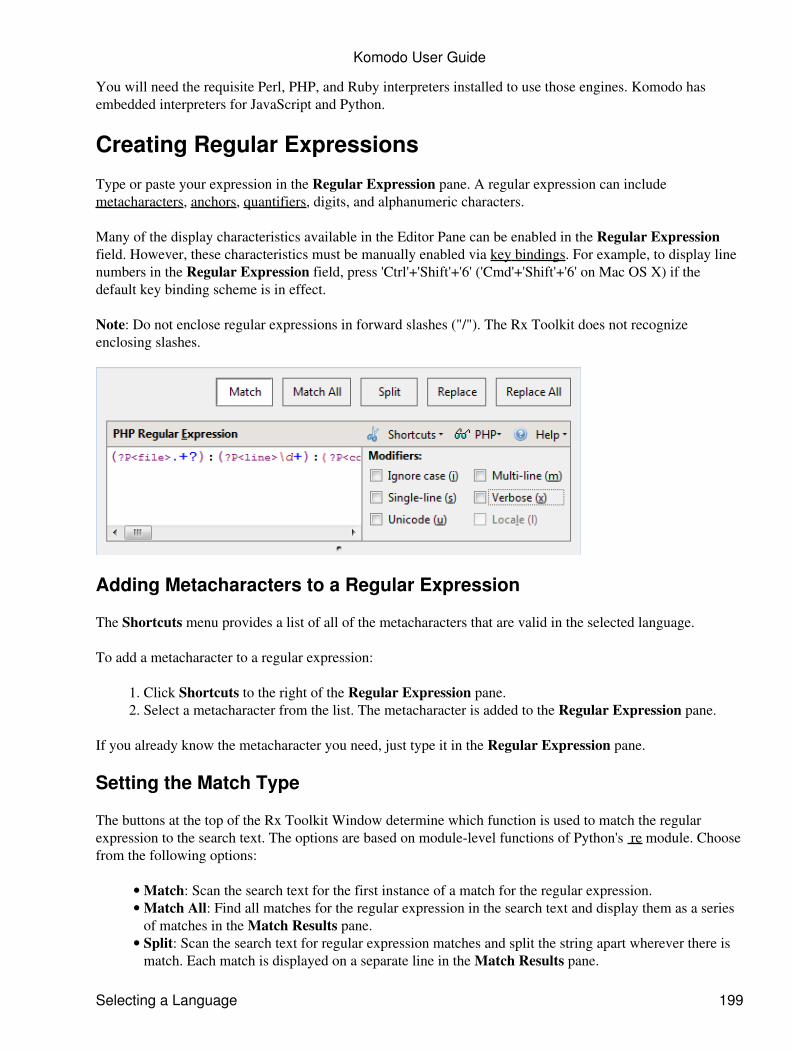
You will need the requisite Perl, PHP, and Ruby interpreters installed to use those engines. Komodo hasembedded interpreters for JavaScript and Python.
Creating Regular Expressions
Type or paste your expression in the Regular Expression pane. A regular expression can includemetacharacters, anchors, quantifiers, digits, and alphanumeric characters.
Many of the display characteristics available in the Editor Pane can be enabled in the Regular Expressionfield. However, these characteristics must be manually enabled via key bindings. For example, to display linenumbers in the Regular Expression field, press 'Ctrl'+'Shift'+'6' ('Cmd'+'Shift'+'6' on Mac OS X) if thedefault key binding scheme is in effect.
Note: Do not enclose regular expressions in forward slashes ("/"). The Rx Toolkit does not recognizeenclosing slashes.
Adding Metacharacters to a Regular Expression
The Shortcuts menu provides a list of all of the metacharacters that are valid in the selected language.
To add a metacharacter to a regular expression:
Click Shortcuts to the right of the Regular Expression pane.1. Select a metacharacter from the list. The metacharacter is added to the Regular Expression pane.2.
If you already know the metacharacter you need, just type it in the Regular Expression pane.
Setting the Match Type
The buttons at the top of the Rx Toolkit Window determine which function is used to match the regularexpression to the search text. The options are based on module-level functions of Python's re module. Choosefrom the following options:
Match: Scan the search text for the first instance of a match for the regular expression.• Match All: Find all matches for the regular expression in the search text and display them as a seriesof matches in the Match Results pane.
•
Split: Scan the search text for regular expression matches and split the string apart wherever there ismatch. Each match is displayed on a separate line in the Match Results pane.
•
Komodo User Guide
Selecting a Language 199

Replace: Scan the text for the first occurrence of the regular expression and replace it with textspecified in the Replacement pane. The Replacement pane is only displayed when either theReplace or Replace All is selected.
•
Replace All: Scan the text for all occurrences of the regular expression and replace them with the textspecified in the Replacement pane. The Replacement pane is only displayed when either theReplace or Replace All is selected.
•
Adding Modifiers to a Regular Expression
Add modifiers to regular expression by selecting one or more of the check boxes to the right of the RegularExpression pane:
Note: You must use the Modifiers check boxes to add modifiers to a regular expression. The Rx Toolkit doesnot recognize modifiers entered in the Regular Expression pane.
Ignore Case: Ignore alphabetic case distinctions while matching. Use this to avoid specifying thecase in the pattern you are trying to match.
•
Multi-line Mode: Let caret "^" and dollar "$" match next to newline characters. Use this when apattern is more than one line long and has at least one newline character.
•
Single-line Mode: Let dot "." match newline characters. Use this when a pattern is more than one linelong and has at least one newline character.
•
Verbose: Permit the use of whitespace and comments in regular expressions. Use this to pretty printand/or add comments to regular expressions.
•
Unicode (Python Only): Make the special characters "\w", "\W", "\b" and "\B" dependent onUnicode character properties.
•
Locale (Python Only): Make the special characters "\w", "\W", "\b" and "\B" dependent on thecurrent locale.
•
Evaluating Regular Expressions
A debugged regular expression correctly matches the intended patterns and provides information about whichvariable contains which pattern.
If there is a match...
Matches are displayed in the Match Results pane.• Komodo highlights the search text string in yellow.•
If there is no match...
If a regular expression does not match the test string, an error message is displayed in the MatchResults pane.
•
If a regular expression is invalid, the title bar of the Match Results pane becomes red and details ofthe error are displayed in that pane.
•
Komodo User Guide
Setting the Match Type 200
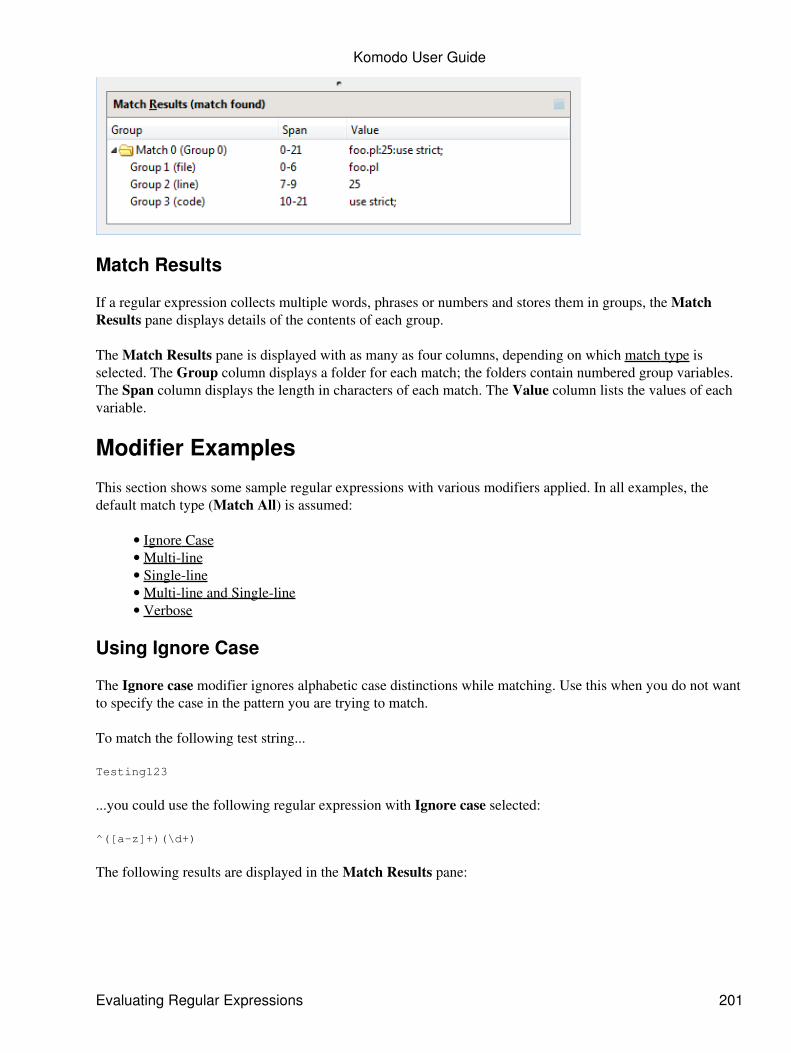
Match Results
If a regular expression collects multiple words, phrases or numbers and stores them in groups, the MatchResults pane displays details of the contents of each group.
The Match Results pane is displayed with as many as four columns, depending on which match type isselected. The Group column displays a folder for each match; the folders contain numbered group variables.The Span column displays the length in characters of each match. The Value column lists the values of eachvariable.
Modifier Examples
This section shows some sample regular expressions with various modifiers applied. In all examples, thedefault match type (Match All) is assumed:
Ignore Case• Multi-line• Single-line• Multi-line and Single-line• Verbose•
Using Ignore Case
The Ignore case modifier ignores alphabetic case distinctions while matching. Use this when you do not wantto specify the case in the pattern you are trying to match.
To match the following test string...
Testing123
...you could use the following regular expression with Ignore case selected:
^([a-z]+)(\d+)
The following results are displayed in the Match Results pane:
Komodo User Guide
Evaluating Regular Expressions 201
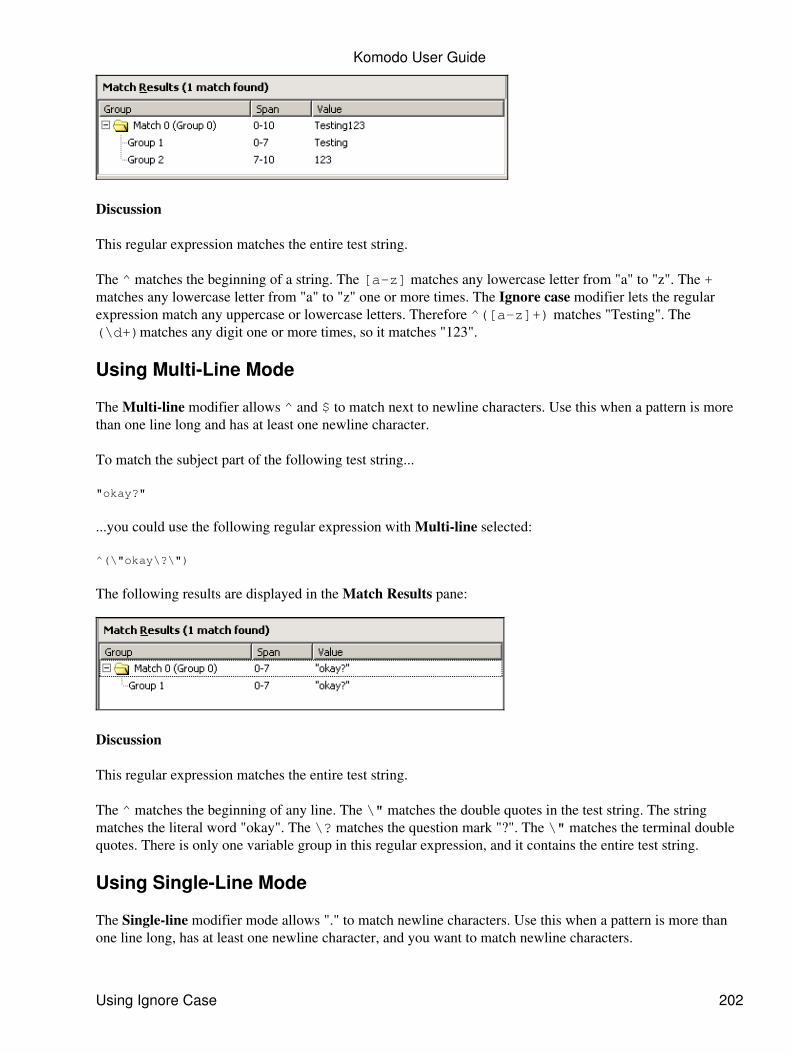
Discussion
This regular expression matches the entire test string.
The ^ matches the beginning of a string. The [a-z] matches any lowercase letter from "a" to "z". The +matches any lowercase letter from "a" to "z" one or more times. The Ignore case modifier lets the regularexpression match any uppercase or lowercase letters. Therefore ^([a-z]+) matches "Testing". The(\d+)matches any digit one or more times, so it matches "123".
Using Multi-Line Mode
The Multi-line modifier allows ^ and $ to match next to newline characters. Use this when a pattern is morethan one line long and has at least one newline character.
To match the subject part of the following test string...
"okay?"
...you could use the following regular expression with Multi-line selected:
^(\"okay\?\")
The following results are displayed in the Match Results pane:
Discussion
This regular expression matches the entire test string.
The ^ matches the beginning of any line. The \" matches the double quotes in the test string. The stringmatches the literal word "okay". The \? matches the question mark "?". The \" matches the terminal doublequotes. There is only one variable group in this regular expression, and it contains the entire test string.
Using Single-Line Mode
The Single-line modifier mode allows "." to match newline characters. Use this when a pattern is more thanone line long, has at least one newline character, and you want to match newline characters.
Komodo User Guide
Using Ignore Case 202
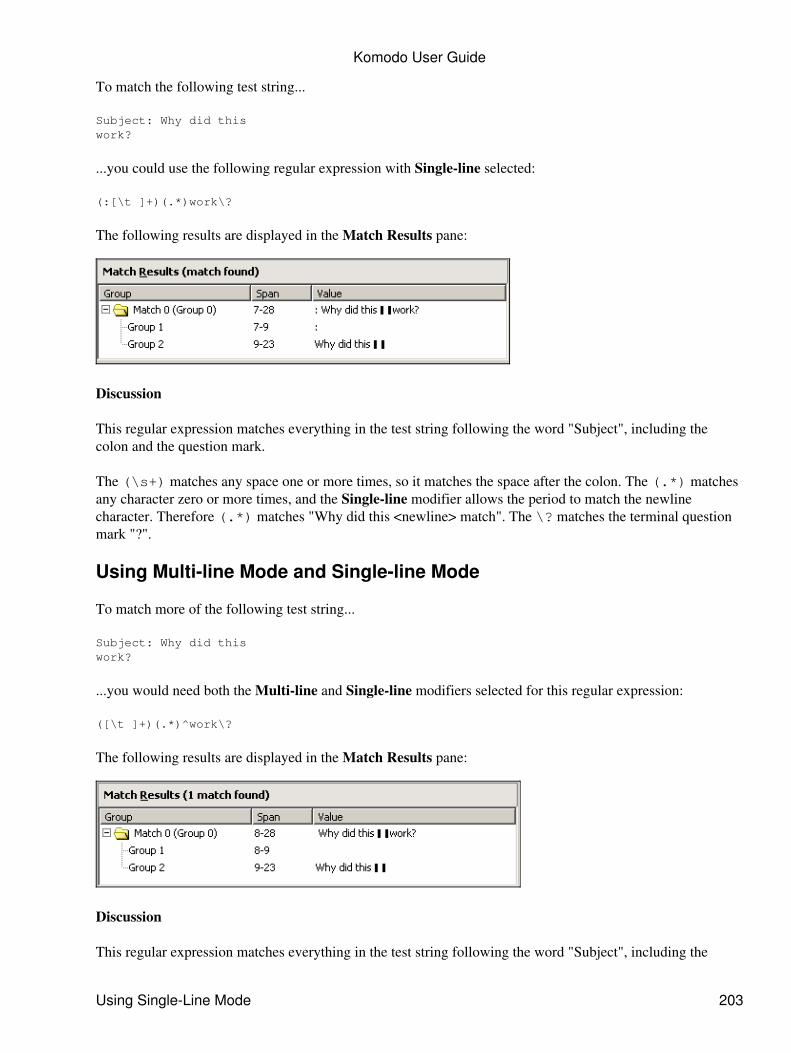
To match the following test string...
Subject: Why did thiswork?
...you could use the following regular expression with Single-line selected:
(:[\t ]+)(.*)work\?
The following results are displayed in the Match Results pane:
Discussion
This regular expression matches everything in the test string following the word "Subject", including thecolon and the question mark.
The (\s+) matches any space one or more times, so it matches the space after the colon. The (.*) matchesany character zero or more times, and the Single-line modifier allows the period to match the newlinecharacter. Therefore (.*) matches "Why did this <newline> match". The \? matches the terminal questionmark "?".
Using Multi-line Mode and Single-line Mode
To match more of the following test string...
Subject: Why did thiswork?
...you would need both the Multi-line and Single-line modifiers selected for this regular expression:
([\t ]+)(.*)^work\?
The following results are displayed in the Match Results pane:
Discussion
This regular expression matches everything in the test string following the word "Subject", including the
Komodo User Guide
Using Single-Line Mode 203
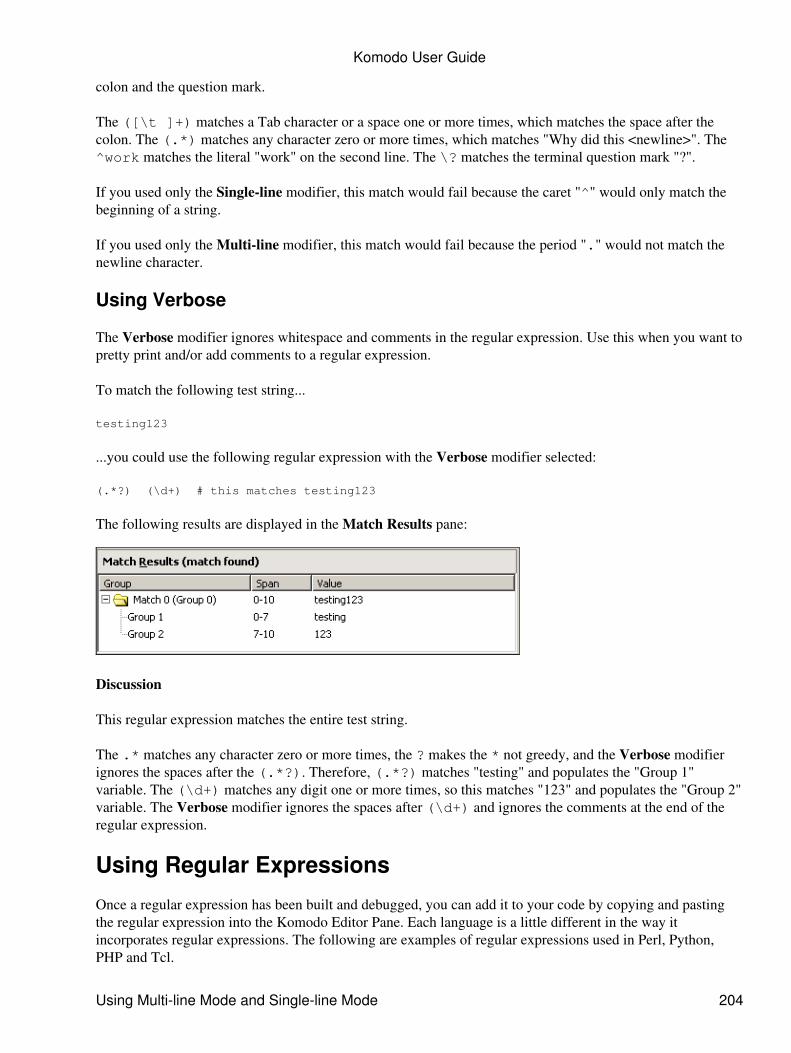
colon and the question mark.
The ([\t ]+) matches a Tab character or a space one or more times, which matches the space after thecolon. The (.*) matches any character zero or more times, which matches "Why did this <newline>". The^work matches the literal "work" on the second line. The \? matches the terminal question mark "?".
If you used only the Single-line modifier, this match would fail because the caret "^" would only match thebeginning of a string.
If you used only the Multi-line modifier, this match would fail because the period "." would not match thenewline character.
Using Verbose
The Verbose modifier ignores whitespace and comments in the regular expression. Use this when you want topretty print and/or add comments to a regular expression.
To match the following test string...
testing123
...you could use the following regular expression with the Verbose modifier selected:
(.*?) (\d+) # this matches testing123
The following results are displayed in the Match Results pane:
Discussion
This regular expression matches the entire test string.
The .* matches any character zero or more times, the ? makes the * not greedy, and the Verbose modifierignores the spaces after the (.*?). Therefore, (.*?) matches "testing" and populates the "Group 1"variable. The (\d+) matches any digit one or more times, so this matches "123" and populates the "Group 2"variable. The Verbose modifier ignores the spaces after (\d+) and ignores the comments at the end of theregular expression.
Using Regular Expressions
Once a regular expression has been built and debugged, you can add it to your code by copying and pastingthe regular expression into the Komodo Editor Pane. Each language is a little different in the way itincorporates regular expressions. The following are examples of regular expressions used in Perl, Python,PHP and Tcl.
Komodo User Guide
Using Multi-line Mode and Single-line Mode 204

Perl
This Perl code uses a regular expression to match two different spellings of the same word. In this case theprogram prints all instances of "color" and "colour".
while($word = <STDIN>){ print "$word" if ($word =~ /colou?r/i );}
The metacharacter "?" specifies that the preceding character, "u", occurs zero or one times. The modifier "i"(ignore case) that follows /colou?r/ means that the regular expression will match $word, regardless ofwhether the specified characters are uppercase or lowercase (for example, Color, COLOR and CoLour will allmatch).
Python
This Python code uses a regular expression to match a pattern in a string. In Python, regular expressions areavailable via the re module.
import rem = re.search("Java[Ss]cript", "in the JavaScript tutorial")if m: print "matches:", m.group()else: print "Doesn't match."
The re.search() function returns a match object if the regular expression matches; otherwise, it returnsnone. The character class "[Ss]" is used to find the word "JavaScript", regardless of whether the "s" iscapitalized. If there is a match, the script uses the group() method to return the matching strings. Otherwisethe program prints "Doesn't Match".
Tcl
This Tcl code uses a regular expression to match all lines in a document that contain a URL.
while {[gets $doc line]!=-1} { if {regexp -nocase {www\..*\.com} $line} { puts $line
This while loop searches every line in a file for any instance of a URL and displays the results. Tclimplements regular expressions using the regexp and regsub commands. In the example shown above, theregexp is followed by the -nocase option, which specifies that the following regular expression shouldmatch, regardless of case. The regular expression attempts to match all web addresses. Notice the use ofbackslashes to include the literal dots (.) that follow "www" and precede "com".
PHP
This PHP code uses a Perl Compatible Regular Expressions(PCRE) to search for valid phone numbers in theUnited States and Canada; that is, numbers with a three-digit area code, followed by an additional sevendigits.
$numbers = array("777-555-4444",
Komodo User Guide
Perl 205
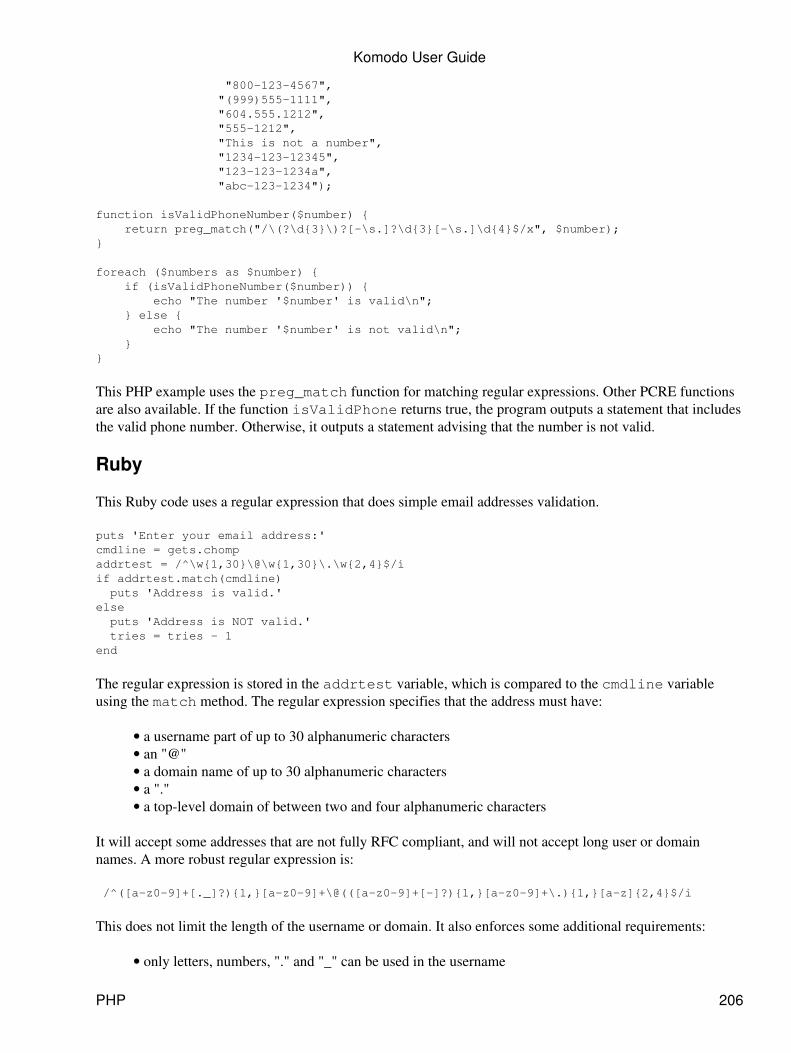
"800-123-4567", "(999)555-1111", "604.555.1212", "555-1212", "This is not a number", "1234-123-12345", "123-123-1234a", "abc-123-1234");
function isValidPhoneNumber($number) { return preg_match("/\(?\d{3}\)?[-\s.]?\d{3}[-\s.]\d{4}$/x", $number);}
foreach ($numbers as $number) { if (isValidPhoneNumber($number)) { echo "The number '$number' is valid\n"; } else { echo "The number '$number' is not valid\n"; }}
This PHP example uses the preg_match function for matching regular expressions. Other PCRE functionsare also available. If the function isValidPhone returns true, the program outputs a statement that includesthe valid phone number. Otherwise, it outputs a statement advising that the number is not valid.
Ruby
This Ruby code uses a regular expression that does simple email addresses validation.
puts 'Enter your email address:'cmdline = gets.chompaddrtest = /^\w{1,30}\@\w{1,30}\.\w{2,4}$/iif addrtest.match(cmdline) puts 'Address is valid.'else puts 'Address is NOT valid.' tries = tries - 1end
The regular expression is stored in the addrtest variable, which is compared to the cmdline variableusing the match method. The regular expression specifies that the address must have:
a username part of up to 30 alphanumeric characters• an "@"• a domain name of up to 30 alphanumeric characters• a "."• a top-level domain of between two and four alphanumeric characters•
It will accept some addresses that are not fully RFC compliant, and will not accept long user or domainnames. A more robust regular expression is:
/^([a-z0-9]+[._]?){1,}[a-z0-9]+\@(([a-z0-9]+[-]?){1,}[a-z0-9]+\.){1,}[a-z]{2,4}$/i
This does not limit the length of the username or domain. It also enforces some additional requirements:
only letters, numbers, "." and "_" can be used in the username•
Komodo User Guide
PHP 206

only letters, numbers, and "-" can be used in the username• "_" and "." cannot be used at the beginning or end of the username• "-" cannot be used at the beginning or end of the domain name• the top-level domain can only contain letters•
Writing a regular expression that is fully compliant with RFC 822 is quite a bit more complicated.
Komodo User Guide
Ruby 207
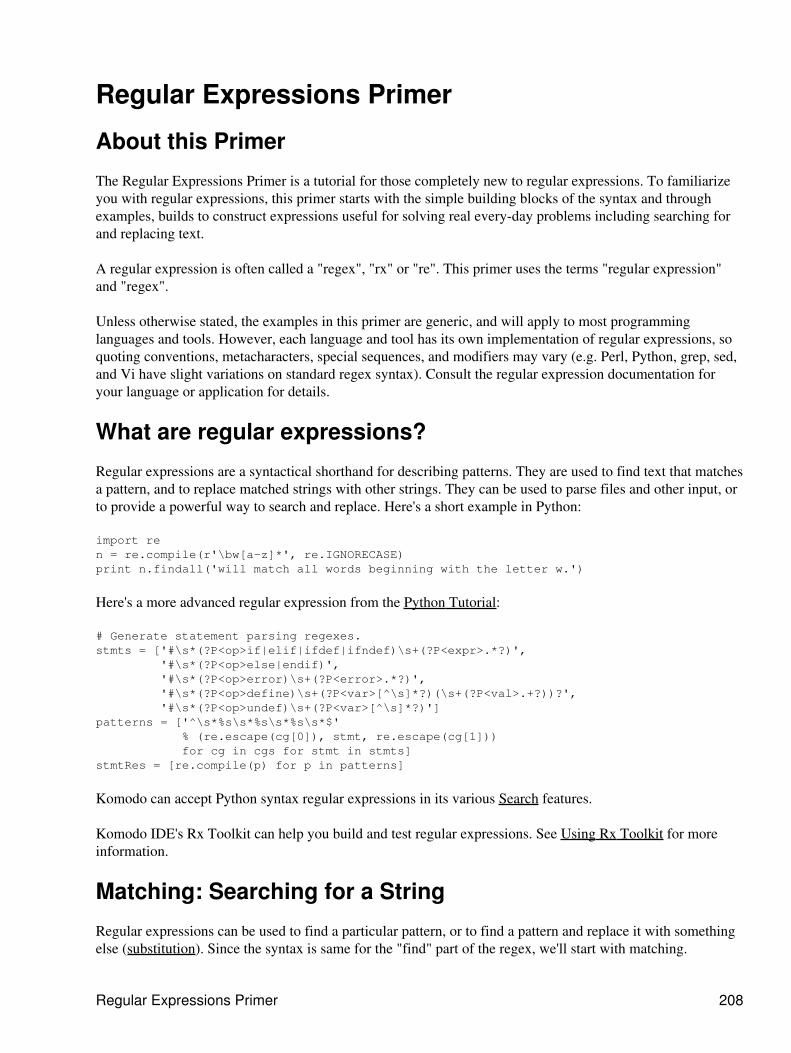
Regular Expressions Primer
About this Primer
The Regular Expressions Primer is a tutorial for those completely new to regular expressions. To familiarizeyou with regular expressions, this primer starts with the simple building blocks of the syntax and throughexamples, builds to construct expressions useful for solving real every-day problems including searching forand replacing text.
A regular expression is often called a "regex", "rx" or "re". This primer uses the terms "regular expression"and "regex".
Unless otherwise stated, the examples in this primer are generic, and will apply to most programminglanguages and tools. However, each language and tool has its own implementation of regular expressions, soquoting conventions, metacharacters, special sequences, and modifiers may vary (e.g. Perl, Python, grep, sed,and Vi have slight variations on standard regex syntax). Consult the regular expression documentation foryour language or application for details.
What are regular expressions?
Regular expressions are a syntactical shorthand for describing patterns. They are used to find text that matchesa pattern, and to replace matched strings with other strings. They can be used to parse files and other input, orto provide a powerful way to search and replace. Here's a short example in Python:
import ren = re.compile(r'\bw[a-z]*', re.IGNORECASE)print n.findall('will match all words beginning with the letter w.')
Here's a more advanced regular expression from the Python Tutorial:
# Generate statement parsing regexes.stmts = ['#\s*(?P<op>if|elif|ifdef|ifndef)\s+(?P<expr>.*?)', '#\s*(?P<op>else|endif)', '#\s*(?P<op>error)\s+(?P<error>.*?)', '#\s*(?P<op>define)\s+(?P<var>[^\s]*?)(\s+(?P<val>.+?))?', '#\s*(?P<op>undef)\s+(?P<var>[^\s]*?)']patterns = ['^\s*%s\s*%s\s*%s\s*$' % (re.escape(cg[0]), stmt, re.escape(cg[1])) for cg in cgs for stmt in stmts]stmtRes = [re.compile(p) for p in patterns]
Komodo can accept Python syntax regular expressions in its various Search features.
Komodo IDE's Rx Toolkit can help you build and test regular expressions. See Using Rx Toolkit for moreinformation.
Matching: Searching for a String
Regular expressions can be used to find a particular pattern, or to find a pattern and replace it with somethingelse (substitution). Since the syntax is same for the "find" part of the regex, we'll start with matching.
Regular Expressions Primer 208
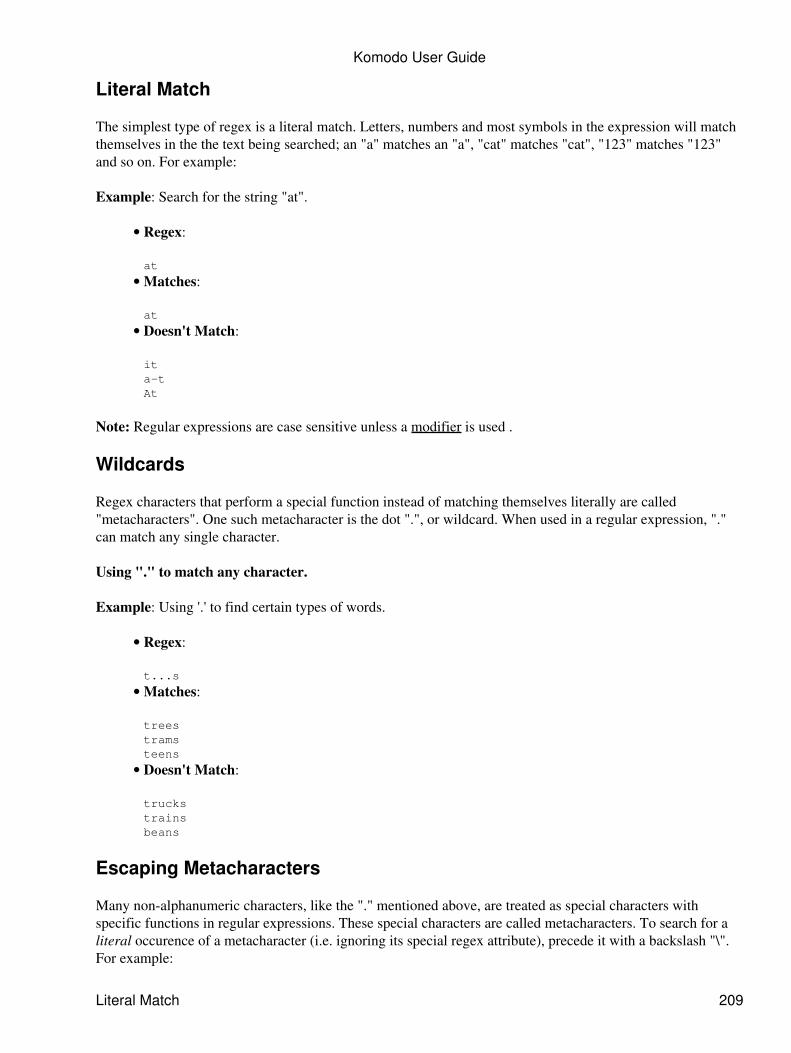
Literal Match
The simplest type of regex is a literal match. Letters, numbers and most symbols in the expression will matchthemselves in the the text being searched; an "a" matches an "a", "cat" matches "cat", "123" matches "123"and so on. For example:
Example: Search for the string "at".
Regex:
at
•
Matches:
at
•
Doesn't Match:
ita-tAt
•
Note: Regular expressions are case sensitive unless a modifier is used .
Wildcards
Regex characters that perform a special function instead of matching themselves literally are called"metacharacters". One such metacharacter is the dot ".", or wildcard. When used in a regular expression, "."can match any single character.
Using "." to match any character.
Example: Using '.' to find certain types of words.
Regex:
t...s
•
Matches:
treestramsteens
•
Doesn't Match:
truckstrainsbeans
•
Escaping Metacharacters
Many non-alphanumeric characters, like the "." mentioned above, are treated as special characters withspecific functions in regular expressions. These special characters are called metacharacters. To search for aliteral occurence of a metacharacter (i.e. ignoring its special regex attribute), precede it with a backslash "\".For example:
Komodo User Guide
Literal Match 209
Regex:
c:\\readme\.txt
•
Matches:
c:\readme.txt
•
Doesn't Match:
c:\\readme.txtc:\readme_txt
•
Precede the following metacharacters with a backslash "\" to search for them as literal characters:
^ $ + * ? . | ( ) { } [ ] \
These metacharacters take on a special function (covered below) unless they are escaped. Conversely, somecharacters take on special functions (i.e. become metacharacters) when they are preceeded by a backslash(e.g. "\d" for "any digit" or "\n" for "newline"). These special sequences vary from language to language;consult your language documentation for a comprehensive list.
Quantifiers
Quantifiers specify how many instances of the preceeding element (which can be a character or a group) mustappear in order to match.
Question mark
The "?" matches 0 or 1 instances of the previous element. In other words, it makes the element optional; it canbe present, but it doesn't have to be. For example:
Regex:
colou?r
•
Matches:
colourcolor
•
Doesn't Match:
colouurcolur
•
Asterisk
The "*" matches 0 or more instances of the previous element. For example:
Regex:
www\.my.*\.com
•
Matches:
www.my.comwww.mypage.com
•
Komodo User Guide
Escaping Metacharacters 210
www.mysite.com then text with spaces ftp.example.com
Doesn't Match:
www.oursite.commypage.com
•
As the third match illustrates, using ".*" can be dangerous. It will match any number of any character(including spaces and non alphanumeric characters). The quantifier is "greedy" and will match as much text aspossible. To make a quantifier "non-greedy" (matching as few characters as possible), add a "?" after the "*".Applied to the example above, the expression "www\.my.*?\.com" would match just"www.mysite.com", not the longer string.
Plus
The "+" matches 1 or more instances of the previous element. Like "*", it is greedy and will match as much aspossible unless it is followed by a "?".
Regex:
bob5+@foo\.com
•
Matches:
[email protected]@foo.com
•
Doesn't Match:
[email protected]@foo.com
•
Number: '{N}'
To match a character a specific number of times, add that number enclosed in curly braces after the element.For example:
Regex:
w{3}\.mydomain\.com
•
Matches:
www.mydomain.com
•
Doesn't Match:
web.mydomain.comw3.mydomain.com
•
Ranges: '{min, max}'
To specify the minimum number of matches to find and the maximum number of matches to allow, use anumber range inside curly braces. For example:
Regex:
60{3,5} years
•
Komodo User Guide
Asterisk 211

Matches:
6000 years60000 years600000 years
•
Doesn't Match:
60 years6000000 years
•
Quantifier Summary
Quantifier Description
? Matches any preceding element 0 or 1times.
* Matches the preceding element 0 ormore times.
+ Matches the preceding element 1 ormore times.
{num} Matches the preceding element numtimes.
{min,max}
Matches the preceding element at leastmin times, but not more than maxtimes.
Alternation
The vertical bar "|" is used to represent an "OR" condition. Use it to separate alternate patterns or charactersfor matching. For example:
Regex:
perl|python
•
Matches:
perlpython
•
Doesn't Match:
ruby
•
Grouping with Parentheses
Parentheses "()" are used to group characters and expressions within larger, more complex regularexpressions. Quantifiers that immediately follow the group apply to the whole group. For example:
Regex:
(abc){2,3}
•
Komodo User Guide
Ranges: '{min, max}' 212
Matches:
abcabcabcabcabc
•
Doesn't Match:
abcabccc
•
Groups can be used in conjunction with alternation. For example:
Regex:
gr(a|e)y
•
Matches:
graygrey
•
Doesn't Match:
graey
•
Strings that match these groups are stored, or "delimited", for use in substitutions or subsequent statements.The first group is stored in the metacharacter "\1", the second in "\2" and so on. For example:
Regex:
(.{2,5}) (.{2,8}) <\1_\2@example\.com>
•
Matches:
Joe Smith <[email protected]>jane doe <[email protected]>459 33154 <[email protected]>
•
Doesn't Match:
john doe <[email protected]>Jane Doe <[email protected]>
•
Character Classes
Character classes indicate a set of characters to match. Enclosing a set of characters in square brackets "[...]"means "match any one of these characters". For example:
Regex:
[cbe]at
•
Matches:
catbateat
•
Doesn't Match:
sat
•
Komodo User Guide
Grouping with Parentheses 213
beat
Since a character class on its own only applies to one character in the match, combine it with a quantifier tosearch for multiple instances of the class. For example:
Regex:
[0123456789]{3}
•
Matches:
123999376
•
Doesn't Match:
W3C2_4
•
If we were to try the same thing with letters, we would have to enter all 26 letters in upper and lower case.Fortunately, we can specify a range instead using a hyphen. For example:
Regex:
[a-zA-Z]{4}
•
Matches:
PerlrubySETL
•
Doesn't Match:
1234AT&T
•
Most languages have special patterns for representing the most commonly used character classes. Forexample, Python uses "\d" to represent any digit (same as "[0-9]") and "\w" to represent any alphanumeric, or"word" character (same as "[a-zA-Z_]"). See your language documentation for the special sequencesapplicable to the language you use.
Negated Character Classes
To define a group of characters you do not want to match, use a negated character class. Adding a caret "^" tothe beginning of the character class (i.e. [^...]) means "match any character except these". For example:
Regex:
[^a-zA-Z]{4}
•
Matches:
1234$.25#77;
•
Doesn't Match:•
Komodo User Guide
Character Classes 214
PerlAT&T
Anchors: Matching at Specific Locations
Anchors are used to specify where in a string or line to look for a match. The "^" metacharacter (when notused at the beginning of a negated character class) specifies the beginning of the string or line:
Regex:
^From: root@server.*
•
Matches:
From: [email protected]
•
Doesn't Match:
I got this From: [email protected] yesterday>> From: [email protected]
•
The "$" metacharacter specifies the end of a string or line:
Regex:
.*\/index.php$
•
Matches:
www.example.org/index.phpthe file is /tmp/index.php
•
Doesn't Match:
www.example.org/index.php?id=245www.example.org/index.php4
•
Sometimes it's useful to anchor both the beginning and end of a regular expression. This not only makes theexpression more specific, it often improves the performance of the search.
Regex:
^To: .*example.org$
•
Matches:
To: [email protected]: [email protected], [email protected]
•
Doesn't Match:
To: [email protected], [email protected] a Message To: example.org
•
Substitution: Searching and Replacing
Regular expressions can be used as a "search and replace" tool. This aspect of regex use is known assubstitution.
Komodo User Guide
Negated Character Classes 215
There are many variations in substitution syntax depending on the language used. This primer uses the"/search/replacement/modifier" convention used in Perl. In simple substitutions, the "search" text will be aregex like the ones we've examined above, and the "replace" value will be a string:
For example, to earch for an old domain name and replace it with the new domain name:
Regex Substitution:
s/http:\/\/www\.old-domain\.com/http://www.new-domain.com/
•
Search for:
http://www.old-domain.com
•
Replace with:
http://www.new-domain.com
•
Notice that the "/" and "." characters are not escaped in the replacement string. In replacement strings, they donot need to be. In fact, if you were to preceed them with backslashes, they would appear in the substitutionliterally (i.e. "http:\/\/www\.new-domain\.com").
The one way you can use the backslash "\" is to put saved matches in the substitution using "\num". Forexample:
Substitution Regex:
s/(ftp|http):\/\/old-domain\.(com|net|org)/\1://new-domain.\2/
•
Target Text:
http://old-domain.com
•
Result:
http://new-domain.com
•
This regex will actually match a number of URLs other than "http://old-domain.com". If we had a list ofURLs with various permutations, we could replace all of them with related versions of the new domain name(e.g. "ftp://old-domain.net" would become "ftp://new-domain.net"). To do this we need to use a modifier.
Modifiers
Modifiers alter the behavior of the regular expression. The previous substitution example replaces only thefirst occurence of the search string; once it finds a match, it performs the substitution and stops. To modifythis regex in order to replace all matches in the string, we need to add the "g" modifier.
Substitution Regex:
/(ftp|http):\/\/old-domain\.(com|net|org)/\1://new-domain.\2/g
•
Target Text:
http://old-domain.com and ftp://old-domain.net
•
Result:
http://new-domain.com and ftp://new-domain.net
•
Komodo User Guide
Substitution: Searching and Replacing 216
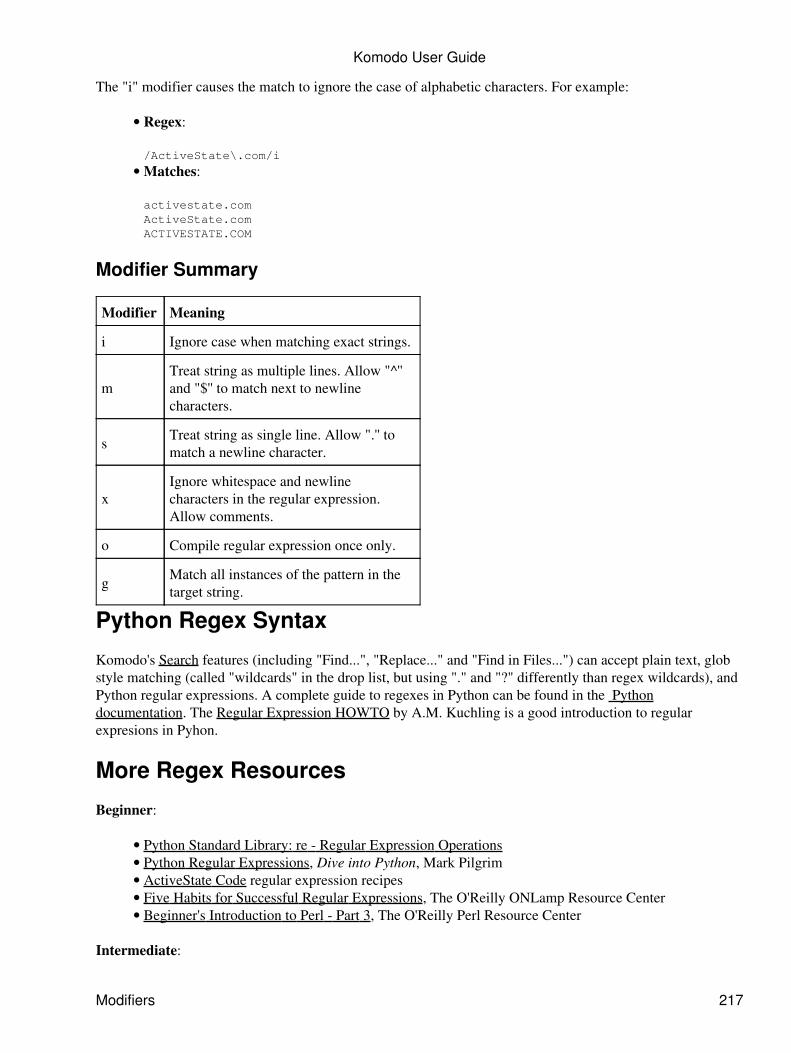
The "i" modifier causes the match to ignore the case of alphabetic characters. For example:
Regex:
/ActiveState\.com/i
•
Matches:
activestate.comActiveState.comACTIVESTATE.COM
•
Modifier Summary
Modifier Meaning
i Ignore case when matching exact strings.
mTreat string as multiple lines. Allow "^''and "$'' to match next to newlinecharacters.
s Treat string as single line. Allow ".'' tomatch a newline character.
xIgnore whitespace and newlinecharacters in the regular expression.Allow comments.
o Compile regular expression once only.
g Match all instances of the pattern in thetarget string.
Python Regex Syntax
Komodo's Search features (including "Find...", "Replace..." and "Find in Files...") can accept plain text, globstyle matching (called "wildcards" in the drop list, but using "." and "?" differently than regex wildcards), andPython regular expressions. A complete guide to regexes in Python can be found in the Pythondocumentation. The Regular Expression HOWTO by A.M. Kuchling is a good introduction to regularexpresions in Pyhon.
More Regex Resources
Beginner:
Python Standard Library: re - Regular Expression Operations• Python Regular Expressions, Dive into Python, Mark Pilgrim• ActiveState Code regular expression recipes• Five Habits for Successful Regular Expressions, The O'Reilly ONLamp Resource Center• Beginner's Introduction to Perl - Part 3, The O'Reilly Perl Resource Center•
Intermediate:
Komodo User Guide
Modifiers 217
Regexp Power, The O'Reilly Perl Resource Center•
Advanced:
Power Regexps, Part II, The O'Reilly Perl Resource Center•
Language-Specific:
Perl: http://perldoc.perl.org/perlre.html• PHP: http://www.php.net/manual/en/ref.pcre.php• Python: http://docs.python.org/lib/module-re.html• Ruby: http://www.rubycentral.com/book/ref_c_regexp.html• Tcl: http://www.tcl.tk/man/tcl8.4/TclCmd/re_syntax.htm• Javascript: http://developer.mozilla.org/en/docs/Core_JavaScript_1.5_Guide:Regular_Expressions•
Komodo User Guide
More Regex Resources 218
Komodo and the Perl Dev Kit Komodo IDE onlyKomodo integrates with ActiveState's Perl Dev Kit (PDK), a suite of tools for creating and deployingapplications in Perl.
Perl Dev Kit 6 and 7
Users of the Perl Dev Kit 6.x and 7.x can access PDK tools via the Tools menu (Tools|Perl Dev Kit) or thePerl Dev Kit Toolbar. The VBScript Converter, Filter Builder and Visual Package Manager options aredisplayed by default. The other options (described below) are only available if a Perl file is open in the EditorPane. Select the feature from the menu, or click the toolbar, to launch a graphical user interface for the chosenPDK tool.
PerlApp - Build an executable file from Perl scripts.• PerlCtrl - Build Active X controls from Perl scripts.• PerlNET - Create Perl components and applications that are compliant with Microsoft's .NETFramework.
•
PerlSvc - Convert Perl programs to Windows services.• PerlTray - Write system tray applications in Perl.• PerlTray - Analyse code coverage and hotspot information for your perl programs. (PDK 7)• Filter Builder - Easily construct perl regular expressions and package them as filters.• VBScript Converter - Convert VBScript code to its functional equivalent in Perl.•
Instructions for using these tools can be found in the Perl Dev Kit documentation.
Perl Dev Kit 3.1 to 5.3
Integration with earlier versions of the PDK is available through an optional package installer which adds theBuild Standalone Perl Application option to the Tools menu. To install this extension:
Click File|Open|File...1. Navigate to the /lib/support/modules/ subdirectory of your Komodo installation.2. Select the perlapp.xpi package and click Open.3. The Software Installation dialog will appear. Click Install to add the extension.4.
To use this extension, select Tools|Build Standalone Perl Application with a Perl script open in Komodo'sEditor Pane.
After configuring options using the tabs in the Build Standalone Perl Application dialog box, use the buttonsat the bottom of the dialog box to:
Add to Toolbox - Once you have created a new script, click this button to add it to the Toolbox as arun command.
•
Build - Create a new build or overwrite an existing build.• Debug - If the Komodo debugging option is selected on the General tab, click this button to start thedebugger.
•
Note: When using the Build Standalone Application feature with Perl 5.8.0 on a Linux installation wherethe environment is set to use UTF-8, you must add the module 'utf8' on the Modules tab. This is the
Komodo and the Perl Dev Kit Komodo IDE only 219

equivalent of perlapp --add utf8. The module is not required for Perl 5.8.1 or higher.
Configuring the General Tab
The build options for the Perl Dev Kit correspond with the tools described in the documentation included withyour version of Perl Dev Kit.
Enter the name of the script to build using the PDK - Specify the path and filename of the sourcePerl script. This option is equivalent to the -script command-line argument.
•
Build the script using - Select the type of output to generate.• Enter the name of the target executable or control - Specify the path and name of the output file.This option is equivalent to the -exe command-line argument.
•
DependenciesNone - Include all necessary files in the output file, so that it can be run on systems that donot have Perl56.dll or ActivePerl. This option is equivalent to the -freestandingcommand-line argument.
♦
Perl Dll required on target - Reduce the size of the generated executable by excludingPerl56.dll from the output file. Target systems must have the Perl56.dll installed. This settingcorresponds with the -xclude command-line argument.
♦
ActivePerl required on target - Create an output file to run on systems where ActivePerland any modules included via use and require statements are installed. This option isequivalent to the -dependent command-line argument.
♦
•
Verbose build information - Generate detailed output messages while the output file is being built.This option corresponds to the -verbose command-line argument.
•
Hide console (for GUI applications) - Similar to running wperl.exe, this option is useful for buildingapplications that run in the background. This setting corresponds with the PerlApp -guicommand-line argument and is only available for the PerlApp tool.
•
Overwrite existing build - Replace the existing build with a new build. If you attempt to overwrite abuild without selecting this option, a pop-up dialog box warns that the .exe file already exists. Youcan then choose to overwrite the file, overwrite the file and enable the check box, or cancel thecommand. This option is equivalent to the -force command-line argument.
•
Delete temp files after each run - Freestanding Perl applications, services and controls sometimescontain embedded DLLs that are extracted and cached in the host system's temporary directory. Selectthis check box to delete these files after each run. This setting corresponds with the -cleancommand-line argument.
•
Debugging - To debug the Perl executable, control or service as it is being built, select the desireddebugger from the drop-down list. If you are not using either the Komodo or PDK debugger, specify aHostname and Port for another debugger in the fields provided.
•
Configuring the Modules Tab
Use the Modules tab to add external modules to the build, and trim unwanted modules.
Specifying Extra Modules For Your Script
To add a module to the output program, enter the name of the module in the Module name field, and clickAdd. The module to be added is displayed in the list box above. Remove modules from the list box using theDelete and Delete All buttons.
This option corresponds with the -add command-line argument.
Komodo User Guide
Perl Dev Kit 3.1 to 5.3 220
Specifying Modules to Trim from the Package
To remove an unwanted module from the build, enter the name of the module in the Modules field, and clickAdd. The module to be trimmed is displayed in the list box above. Remove modules from the list box usingthe Delete and Delete All buttons.
This option corresponds with the -trim command-line argument.
Configuring the Files Tab
Use the Files tab to add additional files (typically data files used by the embedded program) to the output filethat is extracted when the program runs.
This option corresponds with the -bind command-line argument.
Adding Files
To add a file to the output program, click Add. In the pop-up dialog box, enter the source location of the fileon your system, and the location where the file should be extracted when the output file runs.
Editing Files
To edit a file that has been added to the output program, click Edit. In the dialog box, as required, alter thesource location of the file on your system, and the location where the file should be extracted when the outputfile runs.
Deleting Files
To remove a file that was to be added to the output program, click the file, then click Delete.
Configuring the Version Tab
Use the Version tab to embed version information in the output program. It corresponds to the -infocommand-line argument.
To alter any of the version options, select the desired option in the Version field column, and enter the desiredvalue in the field below. This information is assembled as a version information (VERINFO) resource anddisplayed to users if they view the properties for the script in Windows Explorer.
Configuring the Library Paths Tab
Use the Library Paths tab to add directories to your build. The options on this tab correspond with thecommand-line arguments -lib and -blib.
Specifying "lib" and "blib" Directories to Include
To add a lib or blib directory to include in an output file, click Add. In the Browse for Folder dialog box,select the directory path to include, and click OK. The path can contain multiple directories that are separatedin the same way as in the PATH environment variable.
Komodo User Guide
Specifying Modules to Trim from the Package 221

Use Delete and Delete All to remove directories that you do not want to add from the "lib" and "blib" listboxes.
Configuring the Extra Tab
The Extra tab is for adding icon files as well as manually specifying any additional command-line arguments.
Specifying Icon files
To include .ico files in a build, click Add. From the Add Icon dialog box, select the icon(s) you want to add,and click Open. The complete path for the icon file is displayed in the Icon File list box.
This option is equivalent to the -icon command-line argument.
Specifying Additional Command Line Parameters
If you want to specify any command-line parameters in addition to those selected using the options in theBuild Standalone Perl Application dialog box, enter them in the field provided.
Komodo User Guide
Specifying "lib" and "blib" Directories to Include 222

Interpolation ShortcutsInterpolation shortcuts are codes embedded in run commands, snippets or templates that, at "execution" time,get replaced with values. For example, the path and name of the current file can be inserted via aninterpolation shortcut when a run command is executed.
Interpolation shortcuts can be inserted in Run Commands using the drop-down list to the right of Commandfield in the "Add Command..." and "Properties" dialog boxes, or entered manually. When using interpolationshortcuts in snippets or templates, insert the interpolation code using bracketed syntax. Run commands andsnippets can be stored in a project or the Toolbox for frequent use.
Interpolation Code List
The following table shows the interpolation shortcuts available in Komodo. Windows users should encloseshortcuts for files and directories in double quotes (e.g. "%F") to ensure that spaces in the file name or filepath are interpreted correctly.
Code Description
%% a literal percent sign (%) (e.g. %%PATH%% instead of %PATH% on Windows)
%f the basename of the current file
%b the basename of the current file without its extension
%F the full path and name of the current file
%L the line where the editing cursor is located within the current file
%d the base directory of the current file
%D the entire directory path of the current file
%P the full path of the active project
%p the directory path of the active project
%w the word under the cursor in the editor
%W URL-escaped word under cursor; replaces characters that are not valid in a query string,such as spaces and ampersands
%s the current selection; interpolates the text that is currently selected in the editor
%S URL-escaped selection; replaces characters that are not valid in a query string, such asspaces and ampersands
%(perl) the perl interpreter specified in Komodo's Perl preference
%(php) the php interpreter specified in Komodo's PHP preference
%(python) the python interpreter specified in Komodo's Python preference
%(pythonw) the pythonw interpreter for python scripts that display a GUI (Windows and OS X only -requires ActivePython)
Interpolation Shortcuts 223

%(ruby) the ruby interpreter specified in Komodo's Ruby preference
%(tclsh) the tclsh interpreter specified in Komodo's Tcl preference
%(wish) the wish interpreter specified in Komodo's Tcl preference
%(browser) the browser specified in Komodo's Web Browser preference
%(guid) a new GUID (Global Unique Identifier)
%(date) the current date (see %(date) Format Options)
%(ask) ask the user for a value when invoked (see %(ask) Syntax)
%(askpass) ask the user for a password when invoked (see %(askpass) Syntax)
%(path) special Komodo directories (see %(path) Syntax)
%(pref) values from Komodo preferences (see %(pref) Syntax)
%(debugger) runtime properties of the debugger system (see %(debugger)
Basic Interpolation Shortcut Syntax
Interpolation shortcut blocks come in two forms: bracketed and non-bracketed. Run commands use thenon-bracketed format. snippets and templates use the bracketed format.
Non-Bracketed Syntax
The syntax for a non-bracketed interpolation code is:
%<code>
For shortcuts with options:
%(<code><backref>:<options>...)
For example:
%(perl)%w%guid2%(ask:Your Name:Trent Mick)
The parentheses are optional if the block does not contain spaces. For example, the following two commandsare equivalent:
%ask:Name:Trent%(ask:Name:Trent)
Bracketed Syntax
The syntax for a bracketed interpolation code is:
[[%(<code><backref>:<options>...)]]
Komodo User Guide
Interpolation Code List 224

<code> is one of the codes shown in the table above, <backref> is a number and <options>... depend on thespecific code. Back-references and options are discussed in other sections. The following are examples ofbracketed syntax:
[[%perl]][[%w]][[%guid2]][[%ask:Your Name:Trent Mick]]
With bracketed interpolation codes, the parentheses are always optional. The double brackets enclose spaces,making parentheses unnecessary. For example, both of the following commands are valid:
[[%ask:Your Name:Trent Mick]][[%(ask:Your Name:Trent Mick)]]
Bracketed interpolation code blocks permit some excess space immediately adjacent to the double brackets.For example the following are equivalent:
[[%ask:Your Name:Trent Mick]][[ %ask:Your Name:Trent Mick]][[%(ask:Your Name:Trent Mick) ]][[ %(ask:Your Name:Trent Mick) ]]
Basic Interpolation Options
The following table shows the standard options available for most interpolation shortcuts, though the %(ask),%(askpass), %(path), %(pref) and %(debugger) shortcuts have their own additional options and syntax.
Option Syntax Description
orask %(<code>:orask:<question>)
If a value for the shortcut cannot be determined automatically,the user is prompted when the command is invoked. The<question> is text that will be displayed when the user is askedto enter a value.
else %(<code>:else:<default>) If a value for the shortcut cannot be determined automatically,then <default> is used.
lowercase %(<code>:lowercase) The interpolation result will all be lower cased.
uppercase %(<code>:uppercase) The interpolation result will all be upper cased.
capitalize %(<code>:capitalize) The first character of the interpolation result will be uppercased.
dirname %(<code>:dirname) The parent directory of the resulting shortcut code.
basename %(<code>:basename) The base name (leaf name) of the resulting shortcut code.
Use the %(...:orask) modifier with other interpolation shortcuts to prompt for input if no value can bedetermined. For example:
%(s:orask:Element Name)
If there is no selected text, a pop-up dialog box appears with a text field called "Element Name".
Komodo User Guide
Bracketed Syntax 225
See Using Command Query Shortcuts in the Run Command Tutorial for examples of %(ask) and%(...:orask) shortcuts.
%(date)
A %(date) shortcut is replaced with the current date, formatted according to a given optional format or thedefault format.
%(date) Syntax
The syntax of the %(date) shortcut is as follows:
%(date<backref>:<optional-format>)[[%(date:<optional-format>)]]
As noted in the Basic Interpolation Code Syntax section, the parentheses are optional. The <backref> optionalparameter is discussed in the Back-references section. The following examples are valid:
%date[[%date]]%(date)%date:%H:%M:%S[[%date:%d/%m/%Y %H:%M:%S]]
%(date) Format Options
If no <optional-format> is specified in a date shortcut, the default date format is used. Configure the defaultdate format using Komodo's Internationalization preferences.
If this format is not appropriate, you can specify a different one using the following date formatting codes(from Python's time.strftime() method):
Directive Meaning
%a Locale's abbreviated weekday name.
%A Locale's full weekday name.
%b Locale's abbreviated month name.
%B Locale's full month name.
%c Locale's appropriate date and time representation.
%d Day of the month as a decimal number [01,31].
%H Hour (24-hour clock) as a decimal number [00,23].
%I Hour (12-hour clock) as a decimal number [01,12].
%j Day of the year as a decimal number [001,366].
%m Month as a decimal number [01,12].
Komodo User Guide
Basic Interpolation Options 226
%M Minute as a decimal number [00,59].
%p Locale's equivalent of either AM or PM.
%S Second as a decimal number [00,61].
%U Week number of the year (Sunday as the first day of the week) as a decimal number [00,53]. Alldays in a new year preceding the first Sunday are considered to be in week 0.
%w Weekday as a decimal number [0(Sunday),6].
%W Week number of the year (Monday as the first day of the week) as a decimal number [00,53].All days in a new year preceding the first Sunday are considered to be in week 0.
%x Locale's appropriate date representation.
%X Locale's appropriate time representation.
%y Year without century as a decimal number [00,99].
%Y Year with century as a decimal number.
%Z Time zone name (or by no characters if no time zone exists).
%% A literal "%" character.
For more information about Python's time access and conversions, seehttp://www.python.org/doc/2.2/lib/module-time.html
%(ask) and %(askpass)
The %(ask) and %(askpass) shortcuts will prompt the user with a pop-up dialog box for a replacementvalue. The %(askpass) shortcut is appropriate for prompting for passwords as the text is obscured in thedialog box and the password is not stored in a most-recently-used list. If a snippet or run command includesmore than one "ask" shortcut, the dialog box shows a field for each one.
%(ask) and %(askpass) Syntax
The %(ask) and %(askpass) shortcuts can be used without options, or with optional "name" and"default" values. The syntax is:
%(ask[:NAME:[DEFAULT]])%(askpass[:NAME:[DEFAULT]])
"NAME" appears next to the corresponding field in pop-up dialog box, and "DEFAULT" is an optionaldefault value. A "DEFAULT" cannot be specified without a "NAME".
Typical usage of the %(askpass) shortcut would use "Password" for the "NAME" and not set a"DEFAULT". For example:
%(askpass:Password)
As noted in Basic Interpolation Code Syntax, usage of parentheses depends on the context. The followingexamples are valid:
Komodo User Guide
%(date) Format Options 227
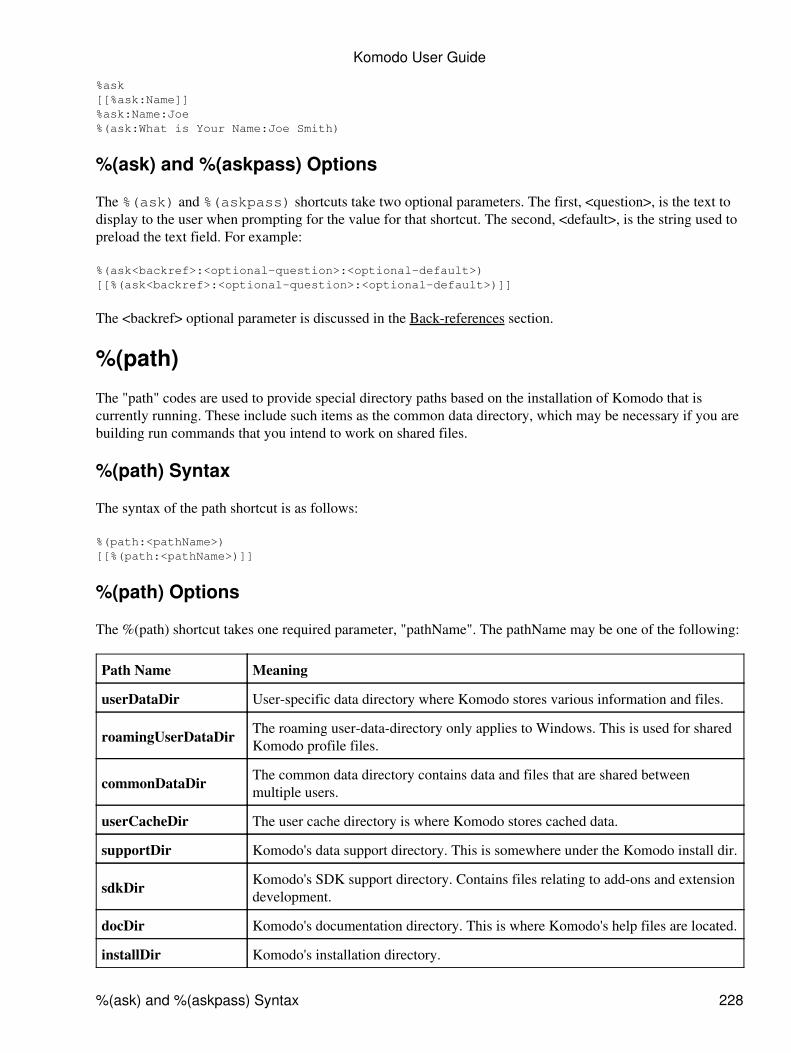
%ask[[%ask:Name]]%ask:Name:Joe%(ask:What is Your Name:Joe Smith)
%(ask) and %(askpass) Options
The %(ask) and %(askpass) shortcuts take two optional parameters. The first, <question>, is the text todisplay to the user when prompting for the value for that shortcut. The second, <default>, is the string used topreload the text field. For example:
%(ask<backref>:<optional-question>:<optional-default>)[[%(ask<backref>:<optional-question>:<optional-default>)]]
The <backref> optional parameter is discussed in the Back-references section.
%(path)
The "path" codes are used to provide special directory paths based on the installation of Komodo that iscurrently running. These include such items as the common data directory, which may be necessary if you arebuilding run commands that you intend to work on shared files.
%(path) Syntax
The syntax of the path shortcut is as follows:
%(path:<pathName>)[[%(path:<pathName>)]]
%(path) Options
The %(path) shortcut takes one required parameter, "pathName". The pathName may be one of the following:
Path Name Meaning
userDataDir User-specific data directory where Komodo stores various information and files.
roamingUserDataDir The roaming user-data-directory only applies to Windows. This is used for sharedKomodo profile files.
commonDataDir The common data directory contains data and files that are shared betweenmultiple users.
userCacheDir The user cache directory is where Komodo stores cached data.
supportDir Komodo's data support directory. This is somewhere under the Komodo install dir.
sdkDir Komodo's SDK support directory. Contains files relating to add-ons and extensiondevelopment.
docDir Komodo's documentation directory. This is where Komodo's help files are located.
installDir Komodo's installation directory.
Komodo User Guide
%(ask) and %(askpass) Syntax 228
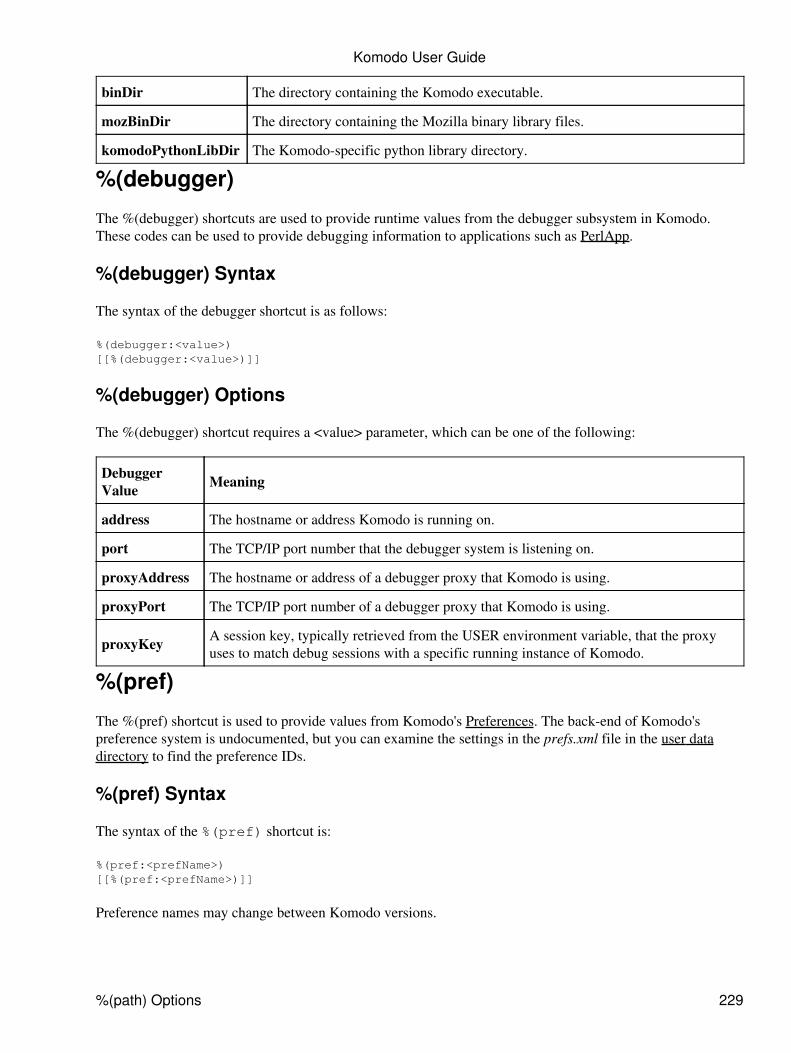
binDir The directory containing the Komodo executable.
mozBinDir The directory containing the Mozilla binary library files.
komodoPythonLibDir The Komodo-specific python library directory.
%(debugger)
The %(debugger) shortcuts are used to provide runtime values from the debugger subsystem in Komodo.These codes can be used to provide debugging information to applications such as PerlApp.
%(debugger) Syntax
The syntax of the debugger shortcut is as follows:
%(debugger:<value>)[[%(debugger:<value>)]]
%(debugger) Options
The %(debugger) shortcut requires a <value> parameter, which can be one of the following:
DebuggerValue Meaning
address The hostname or address Komodo is running on.
port The TCP/IP port number that the debugger system is listening on.
proxyAddress The hostname or address of a debugger proxy that Komodo is using.
proxyPort The TCP/IP port number of a debugger proxy that Komodo is using.
proxyKey A session key, typically retrieved from the USER environment variable, that the proxyuses to match debug sessions with a specific running instance of Komodo.
%(pref)
The %(pref) shortcut is used to provide values from Komodo's Preferences. The back-end of Komodo'spreference system is undocumented, but you can examine the settings in the prefs.xml file in the user datadirectory to find the preference IDs.
%(pref) Syntax
The syntax of the %(pref) shortcut is:
%(pref:<prefName>)[[%(pref:<prefName>)]]
Preference names may change between Komodo versions.
Komodo User Guide
%(path) Options 229
Back-References
Back-references are particularly useful for code snippets. You can use back-references to interpolate the samevalue any number of times in the snippet. Back-references make it possible to prompt the user for an inputvalue only once, and then insert that value multiple times. For example, you could create a snippet thatprompts for a value, which would then be entered at various places in the snippet text.
Back-Reference Syntax
You create a back-referenced set of shortcuts by suffixing the interpolation code with a number. The syntaxfor back-reference is as follows:
%(<code><backref>:<options>...)[[%(<code><backref>:<options>...)]]
For example:
%(ask1:Name:Trent)%w1:else:Foo[[%guid1]]
All interpolation blocks with the same shortcut/number pairs are part of the same back-reference set. Allmembers of the same back-reference set will be replaced with the first code block in that set. For example:
echo Hi there %(ask1:Name:Trent). That name again is %ask1
This opens a pop-up dialog box prompting for one entry, "Name", with a default of "Trent". Whatever valuethe user entered for "Name" would then be inserted in two places in the command, resulting in the followingcommand:
echo Hi there Bill. That name again is Bill
Another useful application of back-references is the "guid" code. A guid code is replaced with a new GUID(Globally Unique Identifier). Sometimes it is desirable to have the same GUID inserted in more than oneplace in a file. In snippets, this can be done by using a code "%guid1" instead of just "%guid" wherever youwant the GUID inserted.
Komodo User Guide
Back-References 230
PreferencesKomodo's preferences are used to set the default behavior of Komodo. Preferences can be set for variousaspects of Komodo functionality, such as editor behavior, preferred language interpreters, the Komodoworkspace layout, etc.
Some preferences can also be configured on a per-file basis. For example, the configuration of line endings,indentation style and word wrap can be configured for individual files. File-specific settings override thedefault preferences described in this section. To configure file-specific defaults, see File Properties andSettings in the File section of the Komodo documentation.
To display the Preferences dialog box:
Windows and Linux: Edit|Preferences...• OS X: Komodo|Preferences...•
Appearance Preferences
Use the Appearance preferences to customize the default layout of the Komodo workspace. The functionsdescribed below can also be changed using keyboard shortcuts; see Key Bindings for more information. Tocustomize the Komodo workspace, select Edit|Preferences|Appearance. Configure the following options:
Toolbar Configuration
Show button text: Descriptive text displayed beneath toolbar icons.• Show standard toolbar: Toolbar with commonly used functions, for example, Open and Save.• Show debug toolbar: Toolbar with debugging functions, for example, Step Over and Step Through.• Show source code control toolbar: Toolbar with source code control functions, for example, Updateand Revert.
•
Show macro toolbar: Toolbar containing commands for recording macros.•
Initial Page Configuration
Show Komodo Start Page on startup: Select to display the Start Page in the Editor Pane whenKomodo launches.
•
Hide Tutorials Pane: Select to hide the Tutorials section of the Komodo Start Page.• Hide Quick Links Pane: Select to hide the Quick Links section of the Komodo Start Page.•
Most Recently Used
Number of Projects: The number of projects displayed on Komodo's Start Page, and on the RecentProjects menu.
•
Number of Files: The number of files displayed on Komodo's Start Page, and on the Recent Filesmenu.
•
Code Intelligence Preferences
Code Intelligence refers to the system that provides autocomplete, calltips, and the Code Browser.
Preferences 231
Enable automatic autocomplete and calltip triggering while you type: Toggles automaticautocomplete triggering and calltips (Enabled by default). Click OK to save changes.
•
Enable autocomplete fill-up characters: Toggles"fill-up" characters. Typing certain characters, like'(' or '.', during an autocomplete session will trigger insertion of the current completion before thecharacter itself is inserted.
•
Maximum number of lines shown in calltip: Used to control how much calltip information can bedisplayed.
•
API Catalogs
Komodo uses API catalogs to provide autocomplete and calltips for 3rd-party libraries. In the API Catalogspanel, select the libraries that you use in your code to enable them. Selecting multiple API catalogs for aparticular language can yield confusing results if there are overlapping namespaces, classes or function names.
Debugger Preferences Komodo IDE only
To customize general debugging functions, select Edit|Preferences|Debugger. For language-specific settings(such as interpreter selection), see the Language preference.
Debugging Session Startup
When starting a new debug session: Specify whether Komodo should Ask me what files to save(which displays a list of changed files); Save all modified files (whereby all modified files areautomatically saved); or Save no files (whereby the debugging session starts without saving anyfiles).
•
When receiving a remote debugging connection: Specify whether Komodo should Ask me toallow connection (Komodo prompts to allow the connection request); Allow the connection(Komodo accepts the connection without prompting); or Refuse the connection (Komodo refuses theconnection without prompting).
•
Initial break behavior: Specify whether Komodo should Break on first executable line or Run tofirst breakpoint. Breaking on the first line of code is useful for adding breakpoints if none have beenset yet (e.g. in a non-local JavaScript file).
•
Skip debugging options dialog: To block the display of the debugger dialog box when the debuggeris invoked, check this box. Using the 'Ctrl' key in conjunction with a debugger command key togglesthe value specified here. However, commands invoked from the Debugger drop-down menu alwaysuse the convention specified here.
•
Debugging Session Shutdown
Confirm when closing debugger session tab: If the debugger is running when you attempt to closethe Debug tab, this check box determines whether you are prompted to halt the debug session andclose the tab, or whether this happens without prompting.
•
Debugger Editor Options
Show expression values in hover tooltip: If this is enabled, while you are debugging, you can hoverthe mouse pointer over a variable or expression in Komodo to see a tooltip with the value of thatvariable.
•
Try to find files on the local system when remote debugging: By default, when Komodo performsremote debugging, it retrieves a read-only copy of the file to be debugged from the debug engine.
•
Komodo User Guide
Code Intelligence Preferences 232
When this check box is selected, however, Komodo first searches for the debugger file on the localsystem. While it is probably safe to leave this check box selected for all of your remote debugging,there is a slight possibility that Komodo retrieves the wrong file if remote debugging is performed onanother machine. If, by chance, there is a file on your local system with the same name and locationas the file on the remote system, Komodo uses the local file. This would only happen if the names andlocations were identical (e.g., if both machines contained a file called "C:\foo\bar\baz.pl").
Debugger Connection Preferences
Debugger Connection Options
Komodo should listen for debugging connections on:a system provided free port: Komodo assigns a port automatically. This is useful onmulti-user systems where multiple instances of Komodo are running.
♦
a specific port: Set the port manually. The default is 9000.♦
•
I am running a debugger proxy and Komodo should use it: Select this to use a debugger proxy.The proxy must be started separately at the command line.
•
Proxy Listener Address: The interface IP address and port Komodo uses to listen for connectionsfrom the proxy. By default, the debugger proxy uses port 9000 to listen for remote debuggers and port9001 to listen for connections from Komodo.
•
Proxy Key: This identifies which instance of Komodo requires the connection. If blank, the USER orUSERNAME environment variable is used.
•
Advanced Debugger Preferences
The Performance Tuning settings are for fine-tuning data displayed in the Variables tabs in the debugoutput pane. The default values should generally be kept.
Children per page: The number of child nodes displayed for an object in a variable view. Clicking"...Next Page..." at the end of the list will fetch another "page" of nodes.
•
Variable Data retrieved: The maximum number of bytes stored for a value in a variable view.• Recursive Depth retrieved: Recursion depth for nested objects (e.g. arrays of arrays etc.).•
Editor Preferences
To configure editing preferences, select Edit|Preferences|Editor.
General Preferences
Show whitespace characters: Display or hide whitespace characters in the editor. Spaces aredisplayed as dots; tab characters appear as right arrows.
•
Show end-of-line characters: This option sets the default for displaying end of line markers. Displaycan also be toggled using the View|View EOL Markers menu option.
•
Show line numbers: This option sets the default for displaying line numbers. If enabled, linenumbers are displayed on the left side of the Editor Pane. Line numbers can also be toggled using theView|View Line Numbers menu option.
•
Options set through the Preferences dialog box are the default for all files opened in Komodo. Some displaycharacteristics can be assigned to individual files.
Komodo User Guide
Debugger Preferences Komodo IDE only 233
Cursor options
There are three cursor style options:
Line cursor - adjustable using "Width of line cursor"• Block Cursor• Invisible•
Confirmation Dialogs
When files that are opened in the Komodo editor are changed by another application, Komodo can beconfigured to respond in various ways:
Detect when files are changed outside the environment: When this option is enabled, Komodopays attention to changes made to files outside the Komodo environment.
•
If files have been changed: When files are changed outside Komodo, select whether Komodo shouldAsk me what files to reload (prompt for reload confirmation); Reload all files (reload withoutprompting); or Reload no files (do nothing).
•
If files have been deleted: When files are deleted outside Komodo, select whether Komodo shouldAsk me what files to close (prompt for close confirmation); Close all files (close without prompting);or Close no files (do nothing).
•
If Ask me what files to reload Ask me what files to close are selected, the prompt is displayed when:
changing between tabs in the editor• switching back to Komodo from another application• saving a file• deleting a file•
Scrolling
The Scrolling setting determines the number of lines that are be displayed above or below the editing cursor.As the editing cursor moves, the number of lines specified here are displayed between the cursor and the topor bottom of the Editor Pane. You can also set the horizontal scroll bar width by entering the desired size inpixels.
Configuring Key Bindings
Most Komodo functions can be invoked via key bindings. These key bindings can be customized. To view anHTML list of the key bindings currently in effect, select Help|List Key Bindings.
On Linux systems, key bindings defined in the window manager (including default key bindings) takeprecedence over Komodo key bindings. If certain keys or key combinations do not work as expected inKomodo, check the window manager's key binding scheme. In the case of conflicts, change either theKomodo key bindings or the window manager key bindings.
To configure key binding defaults, select Edit|Preferences|Editor|Key Bindings. By default, menu keybindings are accessed using 'Alt' key combinations on Windows and Linux. For example, the File menu isopened via 'Alt'+'F'. Select Remove Alt-<letter> shortcuts from menus to disable menu access via these keybindings. The 'Alt' key still activates the File menu.
Komodo User Guide
Editor Preferences 234
Key Binding Schemes
Key binding "schemes" are sets of pre-configured key bindings. Click the links below to view a list of keybindings for each of the schemes.
Windows/Linux: Consistent with standard key bindings on Windows and Linux.• Mac OS X: Consistent with standard key bindings on Mac OS X.• Emacs: Contains many of the most commonly used Emacs key bindings.• Vi: Contains many of the most commonly used Vi key bindings. Requires Vi emulation.•
Pre-configured schemes cannot be modified. When you attempt to modify a key binding, you are prompted tomake a copy of the scheme with a new name before making changes.
Remove Alt-<letter> shortcuts from menus
Some Emacs key bindings use 'Alt'+'letter' combinations that are also used to access Komodo menus. Toavoid this conflict, select Remove Alt-<letter> shortcuts from menus.
Vi Emulation
Vi emulation mimics the modal behavior of the Vi editor. Selecting Enable Vi emulation when a schemeother than Vi is selected prompts you to create a new scheme. This scheme is based on the current schemewith the Vi emulation behavior added.
Schemes created with Vi emulation enabled (including the default Vi scheme) will always require Viemulation. The Enable Vi emulation checkbox cannot be toggled.
Modifying Key Bindings
To alter or view a specific key binding, scroll the Commands list or enter characters in the filter field. Ifmultiple key bindings are assigned to a single command, the Current Key Sequence field displays as adrop-down list. Click the Clear button to delete the key binding displayed for the selected command; clickClear All to delete all key bindings for the selected command.
To add a new key binding for the selected command, enter the desired key binding in the New Key Sequencefield. If the key sequence is already assigned to another command, the current assignment is displayed in theKey Sequence Already Used By field. Click Change to update the key binding displayed in the CurrentKey Sequence field; click Add to make the new key binding an additional key binding. If the key binding isalready assigned, the original assignment is cleared.
Key Bindings for Tools
Custom key bindings can be assigned to the following types of tools:
URLs• Run Commands• Macros• Snippets• Templates•
Komodo User Guide
Configuring Key Bindings 235
When the key binding associated with a toolis invoked, it has the same action as double-clicking the tool inthe Toolbox sidebar.
Key bindings assigned to tools in a project toolbox are only available for the active project. Key bindings fortools in the global toolbox are always available.
To assign a key binding to a tool, or to alter or delete an existing key binding, right-click the tool and selectProperties, then click the Key Binding tab. Configure as described above.
Sharing Keybindings
Keybindings can be shared between Komodo installations by copying the keybinding (*.kkf) scheme files.
Configuring Indentation
From the Edit menu, select Preferences, then click Editor|Indentation.
Auto-Indent Style: Choose from one of three indentation styles:Use Smart Indent: Komodo automatically anticipates logical indentation points, based onlanguage cues (such as open braces).
♦
Indent to first non-empty column: Komodo maintains the current level of indentation.♦ Don't auto-indent: Select to prevent all forms of automatic indentation.♦
•
Auto-adjust closing braces: Komodo automatically aligns closing braces with correspondingopening braces.
•
Show indentation guides: Select to display indentation markers (grey vertical lines). An indentationmarker is displayed every time the number of spaces on the left margin equals the value specified inthe Number of spaces per indent field.
•
Allow file contents to override Tab settings: If selected when files are open, Komodo uses theindentation settings saved in the file, possibly overriding the other preferences. If de-selected,Komodo uses the preference configuration regardless of the indentation values in the file.
•
Prefer Tab characters over spaces: Komodo displays Tab characters wherever possible, accordingto the values specified in the Number of spaces per indent and the Width of each Tab characterfields. When the 'Tab' key is pressed, Komodo inserts indentation up to the next indent width. If thenew indentation is a multiple of the Tab width, Komodo inserts a Tab character. Example: With a Tabwidth of 8 and an indent width of 4, the first indent is 4 spaces, the second indent is a Tab character,and the third indent is a Tab character plus 4 spaces.
•
Tab and indent widths are specified as follows:
Number of spaces per indent: Number of spaces Komodo inserts on the left margin when indentinga line of code.
•
Width of each Tab character: Number of spaces that are equal to a Tab character.• Fold mark style: Use the drop-down list to select the style of node used in code folding.• Use horizontal line on folds: Displays collapsed code with fold marks; a thin line also spans thewidth of the Editor Pane.
•
'Backspace' decreases indentation in leading whitespace: If this option is enabled, pressing'Backspace' clears an entire indentation, rather than a single space, if there is nothing between theediting cursor and the left margin. For example, if the number of spaces per indent is set to four, andthere are five spaces between the left margin and the editing cursor, pressing 'Backspace' once clearsone space; pressing 'Backspace' a second time clears four spaces.
•
Komodo User Guide
Configuring Indentation 236
Restore fold state on document load (slows down file opening): If this option is enabled, thecurrent state of code folding is remembered when a file is closed, and reinstated when the file is nextopened.
•
Options set through the Preferences dialog box are the default for all files opened in Komodo. Someindentation characteristics can be assigned to individual files.
Smart Editing
Options set through the Preferences dialog box are the default for all files opened in Komodo. Some SmartEditing features can be assigned to individual files.
Configuring Word Completion
The Komodo editor maintains an index of words in the current file. Instead of re-entering words that alreadyexist in the current file, you can use the Complete Word function to finish words. If you are using the defaultkey binding scheme, word completion is invoked from the keyboard by pressing 'Ctrl'+'Space' ('F5' or'Alt'+'Esc' on Mac OS X). If you also want to be able to complete words by pressing the 'Tab' key, select thecheck box labeled Use tab character to complete words like Ctrl+Space. Note that the 'Tab' key can still beused for other purposes when this check box is selected. Word completion only occurs when the cursor ispositioned to the right of characters in a word that has been stored in the editor's index.
Configuring Word or Character Wrap
Select an option from the Word wrap long lines drop-down list to have lines automatically "wrapped"; thatis, when a line exceeds the width of the Editor Pane, it wraps to the next line. This is merely a displaycharacteristic - no end-of-line marker is inserted. You can choose Word, Character, or leave it as the defaultvalue of None. The Character option wraps the line at the immediate position where the line exceeds thewidth of the Editor Pane; the Word option wraps the line from the beginning of the word that extends beyondthe width of the Editor Pane.
Note: For lines that have been wrapped automatically, the behavior of the 'Home' and 'End' keys is slightlydifferent. Pressing 'Home' or 'End' moves the cursor to the beginning or end of the current line. Pressing thesame key a second time moves the cursor to the previous or next end-of-line marker.
Select an option from the Word wrap markers drop-down list to display markers in the Editor Pane. You canchoose to view End of line markers, Start of line markers, Both or None. The default is None.
Configuring Edge Lines
The edge line is a vertical line that indicates a column marker.
Show edge line / Highlight characters beyond edge line: Select to show where the line wraps, andto highlight characters beyond the wrap column. With fixed-width fonts, a line is drawn at the columnspecified. With proportional-width fonts, those characters beyond the specified column are drawn ona colored background. The line or background color is configured on the Fonts and Colors preferencepage.
•
Edge line column: Specify the column position of the vertical marker.•
Komodo User Guide
Smart Editing 237

Soft Characters
Enable soft characters turns on language-specific autocompletion for brackets, braces and other delimiters.The highlighted closing character is inserted after the cursor and can be "typed over". See Soft Characters inthe Editor section for more information.
Line Cut/Copy
Cut/Copy with no selection... changes the behavior of Cut and Copy operations when there is no selection inthe current buffer. By default, the current line is cut or copied if there is no selection.
Hyperlinks
Enable or disable 'Ctrl'+'mouse-hover' hyperlinks ('Cmd'+'mouse-hover' on Mac OS X) in the buffer.
Background Syntax Checking
Background syntax checking validates code against the language interpreter as you type. (If Code Intelligenceis enabled for Python, the code intelligence database is used to validate Python code.) Syntax errors andwarnings are underlined in the Editor Pane. See Background Syntax Checking for more information.
By default, Komodo performs a background syntax check one second (1000 msecs) after you stop typing. Invery large files, this background process can slow down editing. If you notice slowness in the editor pane, tryextending the delay or disabling background syntax checking. Syntax checking can be run manually byclicking the syntax checking icon ( or ) in the status bar.
The level of background syntax checking for Perl is determined by the setting on the Perl Languagepreference page.
Enable checking of mixed end-of-line (EOL) characters" checks for inconsistent end-of-line characterscaused by editing a file on multiple platforms (e.g. CR-LF on Windows vs. LF on Linux).
Configuring Folding
Komodo can fold (i.e. hide and un-hide) logical segments of code in many languages and data file types. Thefollowing options define how code folding looks and works:
Fold mark style: Controls how the folding will look.Don't show fold marks (disables code folding)♦ Square Trees (default)♦ Curvy Trees♦ +/- signs♦ Arrows♦
•
Use horizontal line on folds: Draws a horizontal line at the point of the code fold.• Restore fold state on document load: Preserves all folding from the previous editing session of afile. Enabling this option may increase the loading time for larger files with numerous folds.
•
Save Options
To automatically fix whitespace errors when saving files:
Komodo User Guide
Soft Characters 238
Clean trailing whitespace and EOL markers: Eliminates unnecessary empty space between textand EOL markers, and fixes inappropriate EOL markers.
•
Ensure file ends with EOL marker: Adds an EOL marker to the last line in a file if one does notalready exist.
•
Based on the specified Minutes between auto-save, Komodo saves backup copies of all files open in theeditor. When Komodo is shut down normally, the backup copies are deleted. If Komodo is shut downabnormally (such as through a system crash), Komodo prompts to restore the backup copy when the file isnext opened. If you respond "Yes", the backup copy of the file, rather than the (older) disk copy, is opened inthe editor.
When files without extensions are saved, Komodo can be configured to prompt for an action. Configure the Iffilename has no extension drop-down list:
Ask me what to do: Komodo prompts you with a dialog box to decide what to do when a particularfile is saved without an extension.
•
Add appropriate extension: Komodo automatically adds an extension based on file content.• Leave filename alone: Komodo does nothing when a file is saved without an extension.•
Environment
At startup, Komodo loads all environment variables it can access. If it is launched from a desktop icon ratherthan a shell, environment variables set in the default shell will not be loaded automatically.
To ensure that Komodo runs with the correct environment variables, (e.g. SCC settings, library locations, SSHoptions, etc.) set them in the User Environment Variables (override defaults) list box. Three buttons areavailable for manipulating this list:
New...: opens a dialog box prompting for a Name and Value.• Edit...: opens a dialog box with the currently selected user environment variable. Name and Valuecan be edited.
•
Delete...: Deletes the currently selected user environment variable.•
Additionally, double-clicking a variable in Startup Environment Variables copies it into UserEnvironment Variables (override defaults) where it can be edited. This new variable will override the onein Startup Environment Variables
Find
Highlighting
Enable highlighting of find and replace results: Toggles the highlighting of matching strings in thecurrent buffer. To guard against performance problems caused by slow searches, Komodo will stophighlighting matches after the timeout configured here.
•
Incremental Search
These options set the defaults for the Incremental Search feature.
Match Case: Choose the default case sensitivity for searches.•
Komodo User Guide
Save Options 239
Uses: Specify the search syntax type. Plain Text exactly matches the search string; RegularExpressions interprets the search text as a regular expression; Wildcard interprets asterisk andquestion mark characters as wildcards.
•
File Associations
Komodo's file associations determine the functionality of editing features such as autocomplete and codecoloring. Use the File Associations preference to associate file extensions and characteristics with particularlanguages.
Editing the Language Associated with a File Pattern
To edit the language associated with a file pattern:
Select the desired extension from the Patterns list.1. From the Language drop-down list, select the language to associate with the selected file pattern.2.
To remove an association, select the desired pattern and click Remove.
Adding a New File Association
To add a new file pattern/language association:
Enter the desired pattern in the Pattern field. The pattern consists of the wildcards and the namingconvention. Typically, file associations are made by the filename extension; for example, a Perl scripthas the extension ".pl". The pattern for a Perl script is therefore "*.pl".
1.
Select the language to associate with the pattern from the Language drop-down list.2.
Use File Content to Determine Language
Komodo can be configured to identify the language of a file based on its contents rather than its extension.The following characteristics can be used to override the file associations settings for syntax checking anddebugging configuration.
XML Declarations: The Use XML Declarations option checks for XML declarations that specifythe language of a file (e.g. <!DOCTYPE html PUBLIC "-//W3C//DTD XHTML 1.0 Strict//EN""http://www.w3.org/TR/xhtml1/DTD/xhtml1-strict.dtd"> for XHTML 1.0).
•
Shebang (#!...) Line: The Use shebang line option checks for a "#!/..." line at the top of a file thatspecifies the interpreter (e.g. #!/usr/bin/perl).
•
Emacs-Style Mode Variable: When this check box is selected, as Komodo opens files, it checks foran embedded Emacs "mode" specification used to set the syntax checking and debuggingconfiguration.
•
Fonts and Colors Preferences
Komodo's Fonts and Colors Preference is used to customize the display of text in the Editor Pane. To modifythe font and color preferences, from the Edit menu, select Preferences, then click Fonts and Colors.
The Sample Text window at the top of the Fonts and Colors page offers a preview of the current scheme. Ifmultiple schemes are configured, select the desired scheme from the Scheme drop-down list.
Komodo User Guide
Find 240
To create a new scheme:
Select the scheme that you want to base your new scheme upon.1. Click the New button and enter a name for the new scheme.2. Make any necessary changes using the controls on the Fonts, Colors, Common Syntax Coloring, andLanguage-Specific Coloring tabs.
3.
Click OK to save the new scheme.4.
Schemes are added to the Scheme drop-down list. Remove the selected scheme by clicking the Delete button.System schemes appear in bold and cannot be deleted.
Fonts
The Fonts tab is used to configure the display characteristics for fixed-width and/or proportional fonts. Notethat the default font characteristics configured on this tab are not overridden by any language-specific fontconfigurations.
To create a scheme that affects characters in specific encodings, select the type of encoding from theEncoding drop-down list. If you do not specify the encoding, Komodo uses the system's default encoding.
The Fonts tab contains two identical sets of font controls, one for fixed-width fonts on the left, and the otherfor proportional fonts on the right. Select the Prefer Fixed or Prefer Prop. option button to set the desiredfont type and then use the drop-down list immediately beneath the selected option to choose a specific font.
Font: Select specific fixed-width or proportional fonts from the drop-down lists. (On Linux, the samelist of fonts is displayed in both drop-down lists. On GTK, there is no programmatic way to identifywhether a font is proportional or not; therefore, you must know the properties of the individual fontswhen modifying these values.)
•
Font Size: Select the size of the font from the drop-down list.• Bold: If you want the default font to be displayed in bold, click the "B".• Italic: If you want the default font to be displayed in italics, click the "I".• Font Color: Set the font color by clicking on the "Fore" color box. Select the desired color from thecolor picker dialog box. Click the small arrow button to set the font color using the system colorpalette (Windows and Mac OS X only).
•
Background Color: Set the background color for the Editor Pane by clicking on the "Back" colorbox. Select the desired color from the color picker dialog box. Click the small arrow button to set thebackground color using the system color palette.
•
Reset: Click this button to return the font and color preferences to Komodo's original, default settings.•
Colors
Use the Color Choice drop-down list on the Colors tab to configure general color properties for the EditorPane. After selecting an interface component from the list, click the box to the right of the drop-down list tochoose a color from the color palette, or click the small arrow button to select a color from the system colorpalette.
The following interface elements can be configured:
Current Line Background Color: The color configured here does not take effect unless theHighlight Current Line check box is selected. This sets the highlighting color of the line in which
•
Komodo User Guide
Fonts and Colors Preferences 241
the editing cursor is positioned.Cursor Color: Sets the color of the editing cursor.• Selection Background Color: The background of text that has been selected in the Editor Pane (bydouble-clicking, or clicking and dragging), is colored according to this setting.
•
Selection Text Color: This option is only available if the Override Text Color in Selection checkbox is selected. Regardless of other color configurations, all text that has been selected in the EditorPane (by double-clicking, or clicking and dragging), is displayed in the color specified in this setting.
•
Active Breakpoints Color: Sets the color of the breakpoint at which the debugger is currentlystopped.
•
Pending Breakpoints Color: Sets the color of breakpoints at which the debugger has yet to stop.• Bookmark Color: Sets the color of the bookmarks that are inserted in the margin to the left of theEditor Pane.
•
Debugger Current Line Background Color: Sets the background color of the line highlighted bythe debugger.
•
Debugger Calling Line Background Color: Sets the color of lines that call subroutines. Caller linecoloring is applied only when you have changed the stack position to view the line that calls thecurrent line. View caller lines in the Call Stack drop-down list box on the Variables tab on theDebug tab.
•
Edge Line/Background Color of Text Too Far: If Word Wrap is enabled, use this option to set thecolor of the word wrap column marker, as well as the highlighted characters beyond the wrap column.If using fixed-width fonts, a line is drawn at the specified column. If using a proportional-width font,characters beyond the specified column are drawn on a colored background.
•
The Override Text Color in Selection check box activates the "Selection Text Color" setting describedabove. The Highlight Current Line check box activates the coloring specified in the "Current LineBackground Color" setting described above.
Common Syntax Coloring
Some language elements are common to a number of programming languages. The element colors specifiedon the Common Syntax Coloring tab applies to all languages that use these elements. Select an element fromthe Element Type drop-down list and use controls described below to set the font characteristics. Note thatthe font characteristics configured on this tab are overridden by any language-specific font configurations.
Face: Select the typeface of the font from the drop-down list. You can choose either "Fixed-width" or"Proportional".
•
Size: Select the size of the font from the drop-down list.• Bold: If you want the default font to be displayed in bold, click the "B".• Italic: If you want the default font to be displayed in italics, click the "I".• Font Color: Set the font color by clicking on the foreground color box. Select the desired color fromthe color picker dialog box, or click the small arrow button to select a color from the system colorpalette.
•
Background Color: Set the background color for the Editor Pane by clicking on the backgroundcolor box. Select the desired color from the color picker dialog box, or click the small arrow button toselect a color from the system color palette.
•
Reset: Click this button to return the font and color preferences to Komodo's original, default settings.•
Komodo User Guide
Colors 242
Language-Specific Coloring
The colors configured on the Language-Specific Coloring tab apply to elements that appear in a specificlanguage. Select a language from the Language drop-down list and an element from the Element Typedrop-down list, then use the controls described below to set the font characteristics.
Face: Select the typeface of the font from the drop-down list. You can choose either "Fixed-width" or"Proportional".
•
Size: Select the size of the font from the drop-down list.• Bold: If you want the default font to be displayed in bold, click the "B".• Italic: If you want the default font to be displayed in italics, click the "I".• Font Color: Set the font color by clicking on the foreground color box. Select the desired color fromthe color picker dialog box, or click the small arrow button to select a color from the system colorpalette.
•
Background Color: Set the background color for the Editor Pane by clicking on the backgroundcolor box. Select the desired color from the color picker dialog box, or click the small arrow button toselect a color from the system color palette.
•
Reset: Click this button to return the font and color preferences to Komodo's original, default settings.•
Code Formatters Komodo IDE only
Komodo offers integrations with external code formatters. Selected text, or an entire document can be passedto the formatter, processed, returned via stdin and reinserted in the buffer.
You can configure one or more formatters for any language. Each language will have one formatter marked asDefault, which is the one used by the Format Code or Text ('cmd_format') function. By default, thiscommand does not have a key binding. You can assign one in the Key Bindings preferences.
HTTP Inspector Preferences Komodo IDE only
The HTTP Inspector runs a local proxy for examining HTTP traffic between browser and server. This proxyhas the following configuration options:
HTTP Inspector Options:
Run HTTP Inspector at startup: If selected, this starts the proxy when Komodo is launched. If not,the proxy can be started from the HTTP Inspector interface.
•
Listen on port: Specify the port the proxy runs on. Most proxies use port 8080.• Only accept connections from the local machine: Enabled by default.•
Proxy forwarding:
Enable proxy forwarding: Enable this option if you use an HTTP proxy to connect to the internet(i.e. at your network gateway).
•
Forward proxy connections on to this host: If you have enabled proxy forwarding, enter the proxyinformation in the format <hostname>:<port>. If no port is specified, Komodo will attempt touse port 8080.
•
Komodo User Guide
Language-Specific Coloring 243
Interactive Shell Preferences Komodo IDE only
The Interactive Shell is an implementation of the language interpreter's shell within the Komodo environment.These preferences set the default behavior for interactive shell functionality.
Preferred Language: Specify which language interpreter's shell is launched when the interactiveshell is invoked.
•
Session Control:Close tab when interactive shell session ends: If this option is selected, the Shell tab closeswhen the Stop button is clicked. Otherwise, the tab remains visible (although you mustinvoke another interactive shell session to use the shell).
♦
Confirm when closing interactive shell: When you attempt to close the Shell tab beforestopping the session (by clicking the Stop button), this option determines whether you areprompted for confirmation. The confirmation dialog box has an option to disable the warning;to re-enable the warning, set this field to Ask me each time.
♦
•
Working Directory: This option sets the "current" directory for the interactive shell session. Specifythe desired directory.
•
Internationalization Preferences
Language encodings provide support for files containing characters in non-ASCII character sets.
Encodings are determined in the following order:
File Preference: If a specific encoding has been assigned to a file via the file's Properties and Settingscontext menu, the assigned encoding is always used when that file is opened.
1.
Auto-Detect: If the Auto-Detect File Encoding when Opened box is checked, Komodo analyzes theexisting encoding of the file by first looking for a Byte Order Marker (BOM), then by checking for anXML declaration, and then by performing heuristic analysis on the file's contents. If an encoding canbe determined, it is applied.
2.
Language-specific Default Encoding: Specific encodings can be assigned to programminglanguages. (Komodo determines the programming language of a file based on the File Associationpreferences.) If an encoding is associated with a programming language, that encoding is used. CheckSignature (BOM) to embed a Byte Order Marker (BOM) at the beginning of the file. If the specifiedencoding is set to the default encoding, the System Encoding or Custom Encoding is used.
3.
System Encoding or Custom Encoding: If the Use Encoding Defined in Environment box ischecked, Komodo uses the encoding specified in the operating system. The following systemvariables are checked:
Windows: The Control Panel's "Regional Settings" (Windows 98, ME, and NT); "RegionalOptions" (Windows 2000); "Regional and Language Options" (Windows XP).
♦
Mac OS X: The "International" settings accessed via the the OS X System Preferences.♦ Linux: LC_CTYPE, LANG and LANGUAGE.♦
To use a different encoding, uncheck this box and select the desired encoding from the CustomEncoding drop-down list.
4.
When you create a new file, only the third and fourth methods described above are used to set the file'sencoding.
The following settings override all other encoding settings except the File Preference setting.
Komodo User Guide
Interactive Shell Preferences Komodo IDE only 244
Allow XML Declaration to Override Auto-Detection: Komodo always uses the XML encodingdeclaration contained in the XML file when opening XML files (if applicable).
•
Allow HTML META tag to Override Auto-Detection: Komodo uses the charset setting definedin META tags in HTML documents.
•
Allow 'coding:' tag to Override Auto-Detection: If the file contains a"coding: <encoding_name>" directive within the first two lines, that encoding is used.
•
The Date & Time format determines the display format of the date and time for items listed on the Start Page,and for the Current File settings display.
Language Help Settings
Use the Language Help page in Komodo Preferences (Edit|Preferences|Language Help) to configurecontext-sensitive language look-up.
Configuring Reference Locations
The Language Lookup Commands section of the Language Help page displays the default URL forlanguage-specific help. (The %(browser) string is an interpolation shortcut.) If you are using the defaultkey binding scheme, 'Shift'+'F1' ('Cmd'+'/' on Mac OS X) opens a browser window and looks up the addressof the sites specified here. The site is selected according to the type of file currently active in the Editor Pane.(To configure file association, see File Associations.)
The General Help field is used to specify a help location that does not specifically apply to a language (orapplies to a language not available in the above list).
To reset any of the help settings to their original value, click Reset beside the pertinent field.
Using Language Help
In the Editor Pane, double-click to select the keyword that you want to look up. Then, if you are using thedefault key binding scheme, press 'Shift'+'F1' ('Cmd'+'/' on Mac OS X) to invoke a browser window and lookup the keyword on the site configured in the Preferences. Press 'Ctrl'+'F1' ('Cmd'+'Ctrl'+'/' on Mac OS X) toperform the lookup using the site configured in the General Help field on the Language Help page.
Language Configuration
To configure the languages supported by Komodo, select Edit|Preferences|Languages, then select thedesired language.
Configuring JavaScript
Syntax Checking: Use the checkboxes to enable or disable basic and strict warnings from the JavaScriptinterpreter.
JavaScript Directories: Specify any directories that you want Komodo to use for autocompletion andcalltips. Komodo scans these directories recursively (up to 5 directories deep) for information.
Komodo User Guide
Internationalization Preferences 245
Code intelligence for several common JavaScript libraries can be enabled in the API Catalogs section of theCode Intelligence preferences.
Configuring Perl
Use this interpreter: Select Find on Path to use the first Perl interpreter that occurs in the system'sPATH variable. The paths to interpreters found in the PATH variable are available from the drop-downlist; select a specific interpreter as desired. Alternatively, click Browse and navigate the filesystem toselect the desired interpreter.
•
Background Syntax Checking: Perl syntax checking is configurable; the degree of syntax checkingis determined by switches sent to the interpreter. Specify the desired level of syntax checking byselecting the corresponding interpreter switch combination from the drop-down list. If a setting thatuses "taint" mode is selected, the PERL5LIB environment variable is ignored; syntax checking is notperformed on modules located in directories specified via PERL5LIB.
•
Perl Critic options: Sets the strictness level for Perl::Critc checking. The 'Perl::Critic' and 'criticism'modules must be installed in order to enable this.
•
Debugger Logging: If this option is enabled, the Komodo debugger logs the debugging session to afile in the directory specified in the Debugger Log Path field (or the directory specified in thesystem's TEMP variable, if no directory is specified). This is primarily for debugging the debugger, asopposed to gaining additional insight on the debug session itself. The debugger log file is namedperl-dbgp.log. The contents of the log file are overwritten each time the debugger is invoked.
•
Additional Perl Import Directories: Directories specified in this field are inserted at the beginningof Perl's @INC array (in the same manner as Perl's "I" command-line argument). Modules in thespecified directories are used for debugging, syntax checking and during interactive shell sessions.
•
PDK Installation Locations
To access the Perl Dev Kit preference page, select Edit|Preferences|Languages|Perl|PDK.
Use this installation: Use the drop-down list or the Browse button to specify the path to the PDKexecutable file.
•
Configuring PHP
Komodo will try to automatically configure itself for local PHP debugging. If this fails then you'll need tomanually configure PHP debugging, refer to Debugging PHP for instructions.
Use this interpreter: Select Find on Path to use the first PHP interpreter that occurs in the system'sPATH variable. The paths to interpreters found in the PATH variable are available from the drop-downlist; select a specific interpreter as desired. Alternatively, click Browse and navigate the filesystem toselect the desired interpreter.
•
Path to alternate PHP configuration file: The php.ini file to be used by Komodo PHP functions,enter the path in this field, or use the Browse button.
•
PHP Directories: Specify any directories that you want Komodo to use for autocompletion andcalltips. Komodo scans these directories recursively (up to 5 directories deep) for information.
•
Comment Style: PHP can use "//" or "#" for comments. Choose one of these styles for use by theComment Region and Un-comment Region features.
•
Note: Be sure your php.ini configuration file is located in your operating system directory. If you used thePHP Windows installer, this file should be in the correct location. To verify, on Windows 2000/NT the
Komodo User Guide
Configuring JavaScript 246
php.ini file should be in \winnt; on Windows 98/Me the php.ini file should be in \windows. OnWindows XP, the system directory is either \winnt or \windows, depending on whether XP was a nativeinstallation or was an upgrade from a previous Windows version.
Sharing PHP Preferences and Files
Use Komodo's shared support functionality to share PHP preferences, run commands, code snippets,templates, .tip files, or other items that have special usefulness within your PHP programming group. SeeConfiguring Shared Support for more information.
Configuring Python
Python 2.x and 3.x are different enough that they need to be evaluated with different interpreters. The Pythonpreference group should be set up with Python 2.x interpreters and libraries, and the Python3 group should beset up with Python 3.x interpreters and libraries.
Komodo performs basic syntax analysis to determine which version of Python to use when a Python file isopened in the editor. This version information can be seen (and changed) in the File Type section at the rightside of the status bar.
Use this interpreter: Select Find on Path to use the first Python interpreter that occurs in thesystem's PATH variable. The paths to interpreters found in the PATH variable are available from thedrop-down list; select a specific interpreter as desired. Alternatively, click Browse and navigate thefilesystem to select the desired interpreter.
•
Additional Python Import Directories: Directories specified in this field are inserted at thebeginning of Python's PYTHONPATH environment variable. Modules in the specified directories areused for debugging, syntax checking and during interactive shell sessions.
•
Configuring Ruby
Use this interpreter: Select Find on Path to use the first Ruby interpreter that occurs in the system'sPATH variable. The paths to interpreters found in the PATH variable are available from the drop-downlist; select a specific interpreter as desired. Alternatively, click Browse and navigate the filesystem toselect the desired interpreter.
•
Background Syntax Checking: Ruby syntax checking is configurable; the degree of syntax checkingis determined by switches sent to the interpreter. Specify the desired level of syntax checking byselecting the corresponding interpreter switch combination from the drop-down list.
•
Debugger Logging: If this option is enabled, the Komodo debugger logs the debugging session to afile in the directory specified in the Debugger Log Path field (or the directory specified in thesystem's TEMP variable, if no directory is specified). This is primarily for debugging the debugger, asopposed to gaining additional insight on the debug session itself. The debugger log file is namedruby-dbgp.log. The contents of the log file are overwritten each time the debugger is invoked.
•
Additional Ruby Import Directories: Directories specified in this field are inserted at the beginningof Ruby's PATH_LOAD environment variable. Modules in the specified directories are used fordebugging and syntax checking.
•
Configuring Tcl
Komodo can use the standard tclsh interpreter, the Tk-enabled wish interpreter, or any other Tcl corecompatible extended shell.
Komodo User Guide
Configuring PHP 247
Use this Wish interpreter: Select Find on Path to use the first Wish interpreter that occurs in thesystem's PATH variable. The paths to interpreters found in the PATH variable are available from thedrop-down list; select a specific interpreter as desired. Alternatively, click Browse and navigate thefilesystem to select the desired interpreter.
•
Use this Tclsh Interpreter: As described above, specify the desired Tclsh interpreter.• Enable Debugger Log: If this option is enabled, the debugger logs sessions to a file calledtcl-dbgp.log in the directory specified in Debugger Log Path (or the the system's TEMP directory ifno path is specified). The contents of the log file are overwritten each time the debugger is invoked.This file is primarily useful in troubleshooting debugger sessions.
•
Additional Tcl Include Directories: Directories specified in this field are inserted at the beginning ofTcl's TCLLIBPATH environment variable. Modules in the specified directories are used fordebugging, syntax checking and during interactive shell sessions.
•
Note: Tcl Beta releases contain only version-specific executables (e.g. tclsh85.exe and wish85.exe).Komodo does not automatically find these in the path. To use them, specify them manually in the Interpreterssection rather than selecting Find on Path.
Tcl Syntax Checking
Syntax checking support in Komodo Edit requires the TCL Syntax Checker extension.
To specify Tcl syntax checking:
Warning messages to suppress: The warning messages listed in this dialog box can be disabled. Thisprevents Komodo's syntax checking functionality from reporting these warnings.
•
Error messages to suppress: The error messages listed in this dialog box can be disabled. Thisprevents Komodo's syntax checking functionality from reporting these errors.
•
Additional options: Configure the level of error and warning checking by using the switches -W1(display parsing and syntax errors), -W2 (display parsing and syntax errors, and usage warnings),-W3 (display parsing and syntax errors, portability warnings, upgrade warnings, performancewarnings, and usage warnings), and -Wall (displays all messages and errors (the default)).Additionally, specific warning and error messages can be suppressed using the -suppress errorswitch.
•
Force checking for specific Tcl/Tk Version: To use a version of Tcl other than the default (8.4) forwarning and error checking, select the desired version from the drop-down list.
•
Tcl Debugging
Komodo's Tcl debugger has additional preferences for instrumenting files and logging debug sessions.
Tcl Instrumented Files: By default, all files are instrumented. However, once modules are added tothis list box, you can choose to not instrument specific modules by clearing the appropriate checkboxes next to the module names. To instrument modules in the list box, select the check box besidethe module name. To add a module to the list (e.g. "incrtcl, "TclX"), click the "Add Entry" button,specify the Module Name, and click OK. To remove a module, select one or more module names inthe list box, and click "Delete Entries".
•
Debugger Logging: If this option is enabled, the Komodo debugger logs the debugging session to afile in the directory specified in the Debugger Log Path field (or the directory specified in thesystem's TEMP variable, if no directory is specified). This is primarily for debugging the debugger, asopposed to gaining additional insight on the debug session itself. The debugger log file is namedtcl.log. The contents of the log file are overwritten each time the debugger is invoked.
•
Komodo User Guide
Configuring Tcl 248
Sharing Tcl Preferences and Files
Use Komodo's shared support functionality to share Tcl preferences, run commands, code snippets, templates,.tip files, or other items that have special usefulness within your Tcl programming group. See ConfiguringShared Support for more information.
Configuring HTML
Komodo works in conjunction with HTML Tidy to provide configurable syntax checking for HTML files.The following options can be configured:
Error Level: Errors Only displays all HTML errors with a red underline; Errors and Warningsdisplays both errors and warnings with a red underline.
•
WAI Accessibility Conformance level: The Web Accessibility Initiative (WAI) provides HTMLdevelopers with guidelines for making web content accessible to those with disabilities. Theseguidelines include methods for making content understandable and navigable (for example, adding"alt" text to an "img" tag for those who cannot view images). WAI accessibility levels are:
Off: WAI accessibility is off. No WAI-related syntax errors are reported.♦ Priority 3: The lowest WAI conformance level. One or more groups will have difficultyaccessing the information in this document.
♦
Priority 2: Satisfying this level removes significant barriers to accessing content in thisdocument.
♦
Priority 1: The highest WAI conformance level. A web content developer must satisfy thislevel for the greatest content accessibility.
♦
•
Configuration File: Tidy functionality can be customized via a custom configuration file. Seeteaching Tidy about new tags on the W3C site for information on building a custom configurationfile. To specify a custom Tidy configuration file, click Browse beside the Configuration File textbox to locate the configuration file on your filesystem.
•
Configuring XML Catalogs
Komodo has built-in support for a wide range of XML dialects. Support for additional XML dialects can beconfigured by adding XML Catalog files. These files map XML namespaces to local DTD and RelaxNGSchema files.
Click the Add... button to add your own catalogs.
Click the Delete... button to delete the currently selected catalog from the list.
Use the arrow buttons to rearrange the order of the catalogs. Catalogs at the top of the list take precedenceover those below. All catalogs specified here (and the DTDs and RelaxNG Schemas referenced by them) takeprecedence over the ones that ship with Komodo.
Mapped URIs
Mapped URIs are associations that allow Komodo to open files specified at one location using a differentpath.
For example, opening a file with the URL:
Komodo User Guide
Tcl Debugging 249
http://www.example.org/index.html
... might open the file from:
/var/www/index.html
... which would be an editable copy of the file.
These URI mappings are particularly useful for:
remote debugging• dragging URLs into the Editor pane• previewing HTML files•
To map a URI (the address of an internet or network resource, such as a web URL) to a local directory:
Click the Add... button.1. Enter the URI in the URI field.2. Enter the path in the Path field or click the Local... or Remote... buttons to browse to and select thedesired directory.
3.
The Path can refer to remote paths that are accessed via FTP, SFTP, or SCP (e.g.scp://[email protected]:/home/user/) in addition to paths on the local filesystem. If the remote server isconfigured under Servers Preferences, Komodo will open the file without prompting for authentication.
Double-click an existing mapping in the list to edit the URI or Local Path. URI mappings are substringmatches. For example, /home/user/public_html/project would match any directories starting with that string(i.e. subdirectories project_1, project_2, etc.).
New Files Preferences
When the New button is used to create a new file, Komodo, by default, opens a text file in the Editor Pane. Toalter the default, select the desired file type from the drop-down list. To specify the end-of-line marker fornew files, select the desired marker from the drop-down list.
The Komodo templates used to create new files (File|New|New File) support the same Interpolation Shortcutcodes as snippets and run commands. Prior to Komodo Version 2.5, only a limited set of variables could beused (for example, to embed the current date and time in files created from custom templates). The newInterpolation Shortcuts are more powerful but are backward-incompatible.
Enter a number in the Number of recent templates to remember field to specify how many recent templatenames appear on the File|New drop-down menu.
The encoding for new files is determined by the configuration of the Internationalization preference.
Printing Preferences
Print Line Numbers: Check this box to print the line numbers.• Print in Color: To print in the colors displayed in the Editor Pane, check this box.•
Komodo User Guide
Mapped URIs 250
Wrap long lines at n characters: Set the column at which lines will wrap. Specify "0" characters forno line wrapping.
•
Scale font sizes from screen to print by n: Specify the number of times larger or smaller the printedfont size will be in relation to its size on screen. The default is "1.5". Specify "1" to print the currentfont size.
•
Projects and Workspace Preferences
Workspace
Use the When starting Komodo field to specify the display when Komodo is opened.
Ask me whether to restore workspace: Komodo prompts to open recent files and projects.• Restore last workspace: Komodo displays the workspace exactly as it was when you last quitKomodo (including expanded tabs and open files).
•
Do not restore last workspace: Komodo displays the default workspace (the Start Page and noexpanded tabs).
•
Opening and Closing Projects
These options specify the relationship between projects and files that are open in the Editor Pane.
When opening a project, set Komodo to:
Ask me what to do: Komodo prompts whether the files that were open when the project was lastclosed should be re-opened.
•
Open recent files: Komodo automatically opens the files that were open when the project was lastclosed.
•
Open no files: Komodo opens the project without opening any files.•
When closing a project, set Komodo to:
Ask me what to do: Komodo prompts whether open files associated with the project should beclosed.
•
Close all open files in project: Komodo automatically closes open files associated with the project.• Close no files: Komodo closes no files.•
File Status Updates in Places sidebar
The Update file status automatically option enables a periodic check of the read/write status and the sourcecode control status of files in the Places sidebar.
Status refresh can also be performed manually with the Refresh context menu item for any tool, file or folder.
Triggering Macros
Macros can be configured to execute when specific Komodo events occur (such as before a file is saved orafter a file is closed). To disable this feature, uncheck Enable triggering of macros on Komodo events.
Komodo User Guide
Printing Preferences 251

Servers Preferences
Use the Servers page to configure server account settings for remote file access. To access the Servers page,select Edit|Preferences|Servers. You can also manually specify a connection (server name, username andpassword) when opening or saving remote files.
See Opening Remote Files for information about working with remote files.
If no servers have been previously configured, enter access information as described below and click the Addbutton. If there are prior server configurations, click the New Server button to clear the fields. To alter anexisting configuration, select the configuration from the drop-down list, make the desired changes, then clickthe Update button. To delete a configuration, select the desired configuration and click the Delete button.
Remote Accounts: Previous server configurations can be accessed via this field.• Server Type: Select the type of connection to the server (FTP, SFTP or SCP).• Name: Enter a name for the account. The value in this field is displayed in the "Remote Accounts"drop-down list box, and is used as the Server name in the Remote File dialog box.
•
Hostname: Enter the name of the remote server. The name may be fully qualified (e.g."server.example.org", or just the hostname of a machine within a local domain.
•
Port: Enter the port to use to connect to the server. SFTP and SCP generally use port 22. FTPgenerally uses port 21.
•
User Name: If you require an account to use the remote server, enter the user name in this field. If theserver accepts anonymous access, enter "anonymous" or click the Anonymous Login check box.
•
Password: If you require an account to use the remote server, enter the account password in this field.If access to the server is anonymous, the password is usually an email address (such as"[email protected]").
•
Default Path: To specify the directory that displays when you connect to the server, enter the path inthis field.
•
Anonymous Login: If the server allows anonymous login, check this box.•
Note: Passwords are stored (encrypted) using Mozilla's password manager.
Shared Support Preferences
Komodo's shared support functionality is used to configure components on one machine and distribute themfor use on other machines. Shared support is implemented via a "Common Data Directory", which stores theshared components. The following components can be shared:
templates• Shared Toolbox• Tcl .tip files (syntax definition files)• .pcx files (checker extension files that define exact syntax information)• .pdx files (debugger extension files)• preferences•
To configure shared support, select Edit|Preferences|Shared Support.
To access shared components, Komodo users must have "read" access rights to shared files in both theCommon Data Directory and the Shared Toolbox (if the directory is not the same as the Common DataDirectory). To alter shared components, users must also have "write" rights.
Komodo User Guide
Servers Preferences 252
By default, the The Common Data Directory is the same as the user data directory.
To specify a custom location for the Common Data Directory:
On the Edit menu, select Preferences|Shared Support.1. Click Use custom Common Data Directory location.2. Click Choose to select a new location.3. Click OK.4.
Sharing .tip, .pcx and .pdx Files
Through Shared Support, .tip files (which provide syntax checking for PHP and Tcl) can be made availablesite-wide. All .tip files should be stored along with the default .tip information in the tcl subdirectory of theCommon Data Directory.
The other file types that can be shared are .pcx files, which can be used to extend the command informationsupported by the TDK Checker and Komodo Tcl linter, and .pdx files, which are debugger extension files thatdefine debugging functions, such as spawnpoints. Like .tip files, .pcx and .pdx files are stored in the tclsubdirectory of the Common Data Directory.
Sharing Preferences
Shared preferences are used to set a default preference configuration that is shared between multiple Komodousers. An organization or user group can specify defaults like the language type for new files, default tabwidths, and other Komodo settings.
There are three levels of preference recognition in Komodo:
user preferences1. shared preferences (common)2. default preferences (factory)3.
In a shared configuration, user preferences always override the shared preferences. Shared preferences alwaysoverride the default preferences.
To configure shared preferences, set the desired preferences in one instance of Komodo. (This sets userpreferences for that Komodo installation.) Then, edit the prefs.xml file that stores the preferences.
The default locations are as follows:
Windows: C:\Program Files\ActiveState Komodo 6.x• Mac OS X: <komodo-install-directory>/Contents/SharedSupport/• Linux: /etc/komodo/•
Make a backup copy of prefs.xml before editing it. In prefs.xml, make the following changes:
Change the value of commonDataDirMethod to custom.• Change the value of customCommonDataDir to the path to the Common Data Directory.•
Komodo User Guide
Shared Support Preferences 253

Copy prefs.xml to the Common Data Directory. When other Komodo sessions (configured to use the sameCommon Data Directory) are started, the preferences in the Common Data Directory are used.
Because user preferences override both default and shared preferences, ensure that user preferences are notconfigured for items defined in the shared preferences. For example, if the shared preference contains a tabsize definition, and a user's personal preference contains a tab size definition, the user's preference is used, notthe shared preference.
Source Code Control Preferences Komodo IDE only
Komodo IDE features source code control (SCC) integration, which you can use to perform the most commonSCC repository tasks from within Komodo, including checking files out, comparing them to the repositoryversion, and checking files back in. See Source Code Control for information about using SCC functionswithin Komodo.
Show SCC Output Tab on Commands: Select the desired action from the drop-down list to specifywhether the SCC tab is displayed when SCC commands produce output.
•
Method used to display 'diff' output: Specify whether the output from the SCC diff commandshould be displayed in a separate window, or within a new tab in the Komodo Editor Pane.
•
CVS Integration
Configure these options to use CVS source code control integration.
CVS Integration: Select this check box if you are using a CVS source code repository.• CVS executable used: Choose the path to the desired CVS executable file from the drop-down list, orclick Browse to navigate to the file location.
•
Check for status changes from outside of Komodo: If this check box is selected, Komodo checks tosee if the status of files that are open in the editor has changed from the status they had at the lastcheck. Specify the interval at which Komodo should check the file status in the field below.
•
Do recursive status checks: When checking the CVS status of files in a project, select this check boxto recurse the directories. If this check box is not selected, only the status of files in the currentdirectory are checked.
•
Diff options: When you use the option Diff (Compare Files), the comparison is performed accordingto the style specified here. Any CVS diff options may be specified. For a complete list of options,refer to the CVS Manual.
•
Do not warn about CVS external protocols (CVS_RSH) at startup: If you are using an externalprotocol (such as RSH) to connect to the CVS repository, select this check box if you do not want awarning displayed when you start Komodo.
•
Perforce Integration
Configure these options to use Perforce source code control integration.
Perforce Integration: Select this check box if using a Perforce source code repository.• Perforce executable used: Use the drop-down list or the Browse button to specify the path to thePerforce executable file.
•
Check for status changes from outside of Komodo: If this check box is selected, Komodo checks tosee if the status of files that are open in the editor has changed from the status it had at the last check.Specify the interval at which Komodo should check the file status in the field below.
•
Komodo User Guide
Sharing Preferences 254
Do recursive status checks: When checking the status of files in a project, select this check box torecurse the directories. If this box is not checked, only the status of files in the current directory ischecked.
•
Show diff in Komodo: When you use the option Diff (Compare Files), the comparison is performedaccording to the style specified here. Refer to the Perforce Manual for a complete description of theoptions. (Alternatively, on the command line, enter p4 help diff.)
•
Use external diff tool: If you want to use a diff tool other than Perforce, it must be specified in thisfield. The location of the diff tool must also be included in your system's PATH environment variable.
•
Automatically open files for edit before save: Select an option from the drop-down list to determinewhat Komodo does if you attempt to save a file that has not been checked out of Perforce.
•
Subversion Integration
Configure these options to use Subversion source code control integration.
SVN Integration: Select this check box if you are using a Subversion source code repository.• SVN executable used: Use the drop-down list or the Browse button to specify the path to theSubversion executable file. Requires the svn command line client, available fromhttp://subversion.tigris.org/. Komodo cannot use the TortoiseSVN client as its SVN executable.
•
Check for status changes from outside of Komodo: If this box is selected, Komodo checks to see ifthe status of files that are open in the editor has changed from the status they had at the last check.Specify the interval at which Komodo should check the file status in the field below.
•
Do recursive status checks: When checking the Subversion status of files in a project, check this boxto recurse the directories. If this box is not checked, only the status of files in the current directory arechecked.
•
Diff options: When you use the option Diff (Compare Files), the comparison is performed accordingto the style specified here. Any Subversion diff options may be specified. For more about diff options,refer to the Subversion Documentation.
•
Do not warn about Subversion external protocols (SVN_SSH) at startup: If you are using anexternal protocol (such as SSH) to connect to the Subversion repository, check this box if you do notwant a warning displayed when you start Komodo.
•
Web and Browser Preferences
Web Browser: Specify the browser that Komodo should launch when a web-based language query orthe web browser preview is invoked. Select the desired browser from the list, or use the Browsebutton to navigate to the desired browser. If you do not specify a browser, Komodo uses the system'sdefault browser.
•
Preview in Browser: Choose the method Komodo uses to preview code in the selected web browser:Preview in Komodo tab, other tab group: This option splits the Editor Pane to display thebrowser preview in a separate pane.
♦
Preview in Komodo tab, same tab group: This option displays the browser preview in theEditor Pane.
♦
Preview in external browser: This option opens the default browser (specified in the Weband Browser Preferences drop-down list) in a separate window.
♦
•
Windows Integration Preferences
Windows Integration preferences set system-wide file associations on the Windows platform. By configuring
Komodo User Guide
Perforce Integration 255
file associations, Komodo becomes the default editor for specific file types. When one of these files isinvoked (for example, by double-clicking the filename in Windows Explorer), Komodo is automaticallylaunched (if not already running), and the file is loaded in the Editor Pane.
When a file extension is added to the "Edit with Komodo" association, the context menu displayed when thefilename is right-clicked in Window Explorer contains an "Edit with Komodo" option.
To configure file associations:
Select Edit|Preferences|Windows Integration.1. Click Configure common associations. The Setup Common Komodo File Associations dialog boxopens.
2.
Select the file extensions for which Komodo should be the default editor, and the files extensions thatshould have the "Edit with Komodo" context menu option.
3.
Individual file extensions may be added and deleted via the lists.
If another application overrides the associations configured by Komodo, click Re-apply settings to system toreset the Komodo associations.
Komodo User Guide
Windows Integration Preferences 256
Komodo Tutorial Overview Komodo IDE onlyThe following tutorials provide hands-on introductions to Komodo's capabilities.
Feature Showcase
This tutorial provides an introduction to Komodo's general features in the areas of:
Editing• Code Analysis• Debugging• Search• Tools• Project and Workspace•
Ruby on Rails Tutorial
This tutorial provides an introduction to Komodo's Ruby on Rails features, including:
Creating a Rails scaffold using the Ruby on Rails Komodo project template• Using project macros to create a MySQL database and a core application• Writing a Rails application iteratively• Debugging the application•
PHP Tutorial
This tutorial provides an introduction to Komodo's PHP features, including:
Analyzing the PHP tutorial file• Running the program• Debugging the program•
Perl Tutorial
This tutorial provides an introduction to Komodo's Perl features, including:
Installing Perl modules• Opening files• Analyzing the program• Running the program to generate output• Debugging the program•
Python Tutorial
This tutorial provides an introduction to Komodo's Python features, including:
Analyzing the Python files•
Komodo Tutorial Overview Komodo IDE only 257
Running the program• Exploring Python with the interactive shell•
Ruby Tutorial
This tutorial provides an introduction to Komodo's Ruby features, including:
Analyzing the Ruby and YAML files• Running the program• Debugging the program•
XSLT Tutorial
This tutorial provides an introduction to Komodo's XSLT features, including:
Analyzing the program• Running the program• Debugging the program•
Run Command Tutorial
This tutorial provides an introduction to Komodo's Run Command feature, including:
Running simple commands• Using advanced options• Saving and re-running commands• Using command shortcuts• Using command query shortcuts• Parsing command output•
Komodo User Guide
Python Tutorial 258
Feature ShowcaseThese quick demos highlight a variety of Komodo features that help you write code quickly and accurately.
Project and Workspace
Remote Files• Custom Toolbars• Export/Import a Project Package• Custom Keybindings• Custom Template in a Project•
Editing
Preview Cascading Style Sheets• Simple Snippets• Create a Prompting Snippet• Code Completion Snippet•
Debugging
Break on a Variable Value• Debug an XSLT Program•
Search
Fast String Finder• Incremental Search• Open/Find Toolbar•
Tools
Installing Extensions• Using SCC• Google Run Command• Interactive Shell• Test a Regular Expression•
Feature Showcase 259
Perl Tutorial Komodo IDE only
Perl Tutorial Overview
Before You Start
This tutorial assumes...
...that ActivePerl build 623 or greater is installed on your system. ActivePerl is a free distribution ofthe core Perl language. See Komodo's Installation Guide for configuration instructions.
•
...that you have a connection to the Internet.•
...that you are interested in Perl. You don't need to have previous knowledge of Perl; the tutorial willwalk you through a simple program and suggest some resources for further information.
•
Perl Tutorial Scenario
You have exported a number of email messages to a text file. You want to extract the name of the sender andthe contents of the email, and convert it to XML format. You intend to eventually transform it to HTML usingXSLT. To create an XML file from a text source file, you will use a Perl program that parses the data andplaces it within XML tags. In this tutorial you will:
Install a Perl module for parsing text files containing comma-separated values.1. Open the Perl Tutorial Project and associated files.2. Analyze parse.pl the Perl program included in the Tutorial Project.3. Generate output by running the program.4. Debug the program using the Komodo debugger.5.
Installing Perl Modules Using PPM
One of the great strengths of Perl is the wealth of free modules available for extending the core Perldistribution. ActivePerl includes the Perl Package Manger (PPM) that makes it easy to browse, download andupdate Perl modules from module repositories on the internet. These modules are added to the core ActivePerlinstallation.
Running the Perl Package Manager
The Text::CSV_XS Perl module is necessary for this tutorial. To install it using PPM:
Open the Run Command dialog box. Select Tools|Run Command.1. In the Run field, enter the command:
ppm install Text::CSV_XS
2.
Click the Run button to run the command. PPM connects to the default repository, downloads thenecessary files and installs them.
3.
Perl Tutorial Komodo IDE only 260

About PPM
PPM can be run directly from the command line with the ppm command. Enter ppm help for moreinformation on command-line options.
•
By default, PPM accesses the Perl Package repository at http://ppm.activestate.com. The ActiveStaterepository contains binary versions of most packages available from CPAN, the Comprehensive PerlArchive Network.
•
More information about PPM is available on ASPN. PPM documentation is also included with yourActivePerl distribution.
•
On Linux systems where ActivePerl has been installed by the super-user (i.e. root), most users willnot have permissions to install packages with PPM. Run ppm as root at the command line to installpackages.
•
Perl Pointer It is also possible to install Perl modules without PPM using the CPAN shell. See the CPANFAQ for more information.
Opening Files
Open the Perl Tutorial Project
On the Start Page under Tutorials and Documentation, click Perl Tutorial, or open the perl_tutorial.kpffile from the samples/perl_tutorials subdirectory of Komodo's user data directory
The tutorial project will open in the Places sidebar.
Open the Perl Tutorial Files
On the Projects sidebar, double-click the files parse.pl, mailexport.xml and mailexport.txt.These files will open in the Editor Pane; a tab at the top of the pane displays their names.
Overview of the Tutorial Files
mailexport.txt This file was generated by exporting the contents of an email folder (using the emailprogram's own Export function) to a comma-separated text file. Notice that the key to the file contentsare listed on the first line. The Perl program will use this line as a reference when parsing the emailmessages.
•
parse.pl This is the Perl program that will parse mailexport.txt and generate mailexport.xml.• mailexport.xml This file was generated by parse.pl, using mailexport.txt as input. When you runparse.pl (in Generating Output), this file will be regenerated.
•
Analyzing the Program
Introduction
In this step, you will examine the Perl program on a line-by-line basis. Ensure that Line Numbers are enabledin Komodo (View|View Line Numbers). Ensure that the file "parse.pl" is displayed in the Komodo EditorPane.
Komodo User Guide
About PPM 261
Setting Up the Program
Line 1 - Shebang Line
Komodo analyzes this line for hints about what language the file contains• warning messages are enabled with the "-w" switch•
Komodo Tip notice that syntax elements are displayed in different colors. You can adjust the display optionsfor language elements in the Preferences dialog box.Lines 2 to 4 - External Modules
these lines load external Perl modules used by the program• Perl module files have a ".pm" extension; "use strict" uses the "strict.pm" module, part of the core Perldistribution
•
"use Text::CSV_XS" refers to the module installed in Step One•
Writing the Output Header
Lines 6 to 7 - Open Files
input and output files are opened; if the output file does not exist, it is created• scalar variables, indicated by the "$" symbol, store the files• "strict" mode (enabled by loading "strict.pm" in line 2) requires that variables be declared using theformat "my $variable"
•
Perl Pointer scalar variables store "single" items; their symbol ("$") is shaped like an "s", for "scalar".Lines 9 to 13 - Print the Header to the Output File
"<<" is a "here document" indicator that defines the string to be printed• the text "EOT" is arbitrary and user-defined, and defines the beginning and end of the string♦ the second EOT on line 13 indicates the end of output♦
•
lines 10 and 11 are data that will be printed to the output file•
Setting Up Input Variables
Lines 15 to 16 - Assign Method Call to Scalar Variable
the result of the method call "new" is assigned to the scalar variable $csv• the method "new" is contained in the module Text::CSV_XS• ({binary => 1}) tells the method to treat the data as binary•
Perl Pointer good Perl code is liberally annotated with comments (indicated by the "#" symbol).Lines 18 to 19 - Method "getline"
the method "getline" is contained in the module Text::CSV_XS, referenced in the $csv scalar variable• "getline" reads the first line of mailexport.txt (referenced in the $in variable), parses the line intofields, and returns a reference to the resulting array to the $fields variable
•
Komodo User Guide
Setting Up the Program 262

Starting the Processing Loop
Line 21 - "while" Loop
the "while" statement is conditional• the condition is "1', so the program endlessly repeats the loop because the condition is alwaysmet
♦
the logic for breaking out of the loop is on line 25♦ the loop is enclosed in braces; the opening brace is on line 21, the closing brace on line 51♦
•
Komodo Tip Click on the minus symbol to the left of line 21. The entire section of nested code will becollapsed. This is Code Folding.Komodo Tip click the mouse pointer on line 21. Notice that the opening brace changes to a bold red font.The closing brace on line 51 is displayed the same way.Lines 22 to 25 - Extracting a Line of Input Data
the "getline" function extracts one line of data from the input file and places it in the $record scalarvariable
•
if "getline" returns an empty array, the input file has been fully processed and the program exits theloop and proceeds to line 52
•
Perl Pointer variable arrays store lists of items indexed by number; their symbol ("@") is shaped like an "a",for "array".
Converting Characters with a Regular Expression
Lines 27 to 31 - "foreach"
"foreach" cycles through the elements stored in the @$record array• the regular expressions on lines 29 and 30 find the characters "<" and "&", and replace them withtheir character entity values ("<" and "&" are reserved characters in XML)
•
Komodo Tip Komodo's Rx Toolkit is a powerful tool for creating and debugging regular expressions. SeeRegular Expressions Primer for more information.
Combining Field Reference and Field Data
Lines 33 to 35 - hash slice
line 35 combines the @$record array with the field reference generated in line 19•
Perl Pointer variable hashes are indicated by the symbol "%", and store lists of items indexed by string.
Writing Data to the Output File
Lines 37 to 50 - Writing Data to the Output File
one line at a time, lines from the input file are processed and written to the output file• portions of the data line (stored in the $record scalar variable) are extracted based on thecorresponding text in the field reference (the first line in the input file, stored in the $fields variable)
•
Komodo User Guide
Starting the Processing Loop 263

Closing the Program
Line 51 - Closing the Processing Loop
at line 51, processing will loop back to the opening brace on line 21• the logic to exit the loop is on line 25•
Lines 52 to 54 - Ending the Program
line 52 prints the closing tag to the XML file• line 53 closes the output file or, if it cannot, fails with the error "Can't write mailexport.xml"• line 54 closes the input file (it is not necessary to check the status when closing the input file becausethis only fails if the program contains a logic error.)
•
Run the Program to Generate Output
To start, you will simply generate the output by running the program through the debugger without setting anybreakpoints.
Clear the contents of mailexport.xml Click on the "mailexport.xml" tab in the Editor Pane. Deletethe contents of the file - you will regenerate it in the next step. Save the file.
1.
Run the Debugger Click on the "parse.pl" tab in the editor. From the menu, selectDebug|Go/Continue. In the Debugging Options dialog box,click OK to accept the defaults.
2.
View the contents of mailexport.xml Click on the "mailexport.xml" tab in the editor. Komodoinforms you that the file has changed. Click OK to reload the file.
3.
Debugging the Program
In this step you'll add breakpoints to the program and "debug" it. Adding breakpoints lets you to run theprogram in chunks, making it possible to watch variables and view output as it is generated. Before you begin,ensure that line numbering is enabled in Komodo (View|View Line Numbers).
Set a breakpoint: On the "parse.pl" tab, click in the grey margin immediately to the left of the codeon line 9 of the program. This will set a breakpoint, indicated by a red circle.
1.
Run the Debugger: Select Debug|Go/Continue. In the Debugging Options dialog box, click OK toaccept the defaults. The debugger will process the program until it encounters the first breakpoint.
2.
Komodo Tip Debugger commands can be accessed from the Debug menu, by shortcut keys, or from theDebug Toolbar. For a summary of debugger commands, see Debugger Command List.
Watch the debug process: A yellow arrow on the breakpoint indicates the position at which thedebugger has halted. Click on the "mailexport.xml" tab. Komodo informs you that the file haschanged. Click OK to reload the file.
3.
View variables: In the Bottom Pane, see the Debug tab. The variables "$in" and "$out" appear in theLocals tab.
4.
Line 9 - Step In: Select Debug|Step In. "Step In" is a debugger command that causes the debugger toexecute the current line and then stop at the next processing line (notice that the lines between 9 and13 are raw output indicated by "here" document markers).
5.
Komodo User Guide
Closing the Program 264

Line 16 - Step In: On line 16, the processing transfers to the module Text::CSV_XS. Komodo opensthe file CSV_XS.pm and stops the debugger at the active line in the module.
6.
Line 61 - Step Out: Select Debug|Step Out. The Step Out command will make the debugger executethe function in Text::CSV_XS and pause at the next line of processing, which is back in parse.pl online 19.
7.
Line 19 - Step Over: Select Debug|Step Over. The debugger will process the function in line 19without opening the module containing the "getline" function.
8.
Komodo Tip What do the debugger commands do?
Step In executes the current line of code and pauses at the following line.• Step Over executes the current line of code. If the line of code calls a function or method, thefunction or method is executed in the background and the debugger pauses at the line that follows theoriginal line.
•
Step Out when the debugger is within a function or method, Step Out will execute the code withoutstepping through the code line by line. The debugger will stop on the line of code following thefunction or method call in the calling program.
•
Line 22 - Set Another Breakpoint: After the debugger stops at line 21, click in the grey marginimmediately to the left of the code on line 22 to set another breakpoint.
9.
Perl Pointer The perl debugger will not break on certain parts of control structures, such as lines containingonly braces ( { }).With Perl 5.6 and earlier, the debugger will also not break at the start of while, until, for, or foreachstatements.
Line 22 - Step Out: It appears that nothing happened. However, the debugger actually completed oneiteration of the "while loop" (from lines 21 to 51). To see how this works, set another breakpoint atline 37, and Step Out again. The debugger will stop at line 37. On the Debug Session tab, look at thedata assigned to the $record variable. Then Step Out, and notice that $record is no longer displayed,and the debugger is back on line 21. Step Out again, and look at the $record variable - it now containsdata from the next record in the input file.
10.
Line 37 - Stop the Debugger: Select Debug|Stop to stop the Komodo debugger.11. 12.
Perl Pointer Did you notice that output wasn't written to mailexport.xml after every iteration of the whileloop?This is because Perl maintains an internal buffer for writing to files. You can set the buffer to "autoflush"using the special Perl variable "$|".
More Perl Resources
Documentation
There is a wealth of documentation available for Perl. The first source for language documentation is the Perldistribution installed on your system. To access the documentation contained in the Perl distribution, use thefollowing commands:
Open the Run Command dialog box (Tools|Run Command), and then type perldoc perldoc.A description of the "perldoc" command will be displayed on your screen. Perldoc is used to navigate
•
Komodo User Guide
Debugging the Program 265
the documentation contained in your Perl distribution.
Documentation for the latest version of ActivePerl is available online at:http://docs.activestate.com/activeperl/
Tutorials and Reference Sites
There are many Perl tutorials and beginner Perl sites on the Internet, such as:
Introduction to Perl, a course developed by the University of Missouri• learn.perl.org, which provides book reviews, tips, and access to Perl news lists and books•
Komodo User Guide
Documentation 266

PHP Tutorial Komodo IDE only
Overview
Before You Start
This tutorial assumes:
PHP 4.3.11 or greater is installed on your system. See the Debugging PHP documentation forinstallation and configuration instructions.
•
You are interested in PHP. You don't need previous knowledge of PHP; the tutorial will walk youthrough a simple program and suggest some resources for further information.
•
PHP Tutorial Scenario
This tutorial examines a PHP program that implements a form on a website - in this case, a guest book wheresite visitors can log comments. In addition to providing an overview and working example of PHP, the tutorialintroduces Komodo's CGI Debugging functionality. In this tutorial you will:
Open the PHP Tutorial Project and associated files.1. Analyze guestbook.php, the PHP program included in the PHP Tutorial Project.2. Run the program and generate HTML output by running the program.3. Debug the program using the Komodo debugger.4.
See Debugging Programs for more information on this Komodo functionality.
Opening the Tutorial Project
On the Start Page under Tutorials and Documentation, click PHP Tutorial, or open the php_tutorial.kpffile from the samples/php_tutorials subdirectory of Komodo's user data directory
The tutorial project will open in the Places sidebar.
Overview of the Tutorial Files
The following components are included in the php_tutorial.kpf project file:
guestbook.php: This PHP program writes data from an HTML form to a data file, then extracts thecontents of the data file and formats it as HTML.
•
Open the PHP Tutorial File
In the Places sidebar, double-click the file guestbook.php. The file opens in the Editor Pane; a tab at the top ofthe pane displays the filename.
PHP Tutorial Komodo IDE only 267
Analyzing the PHP Tutorial File
This section reviews the code in guestbook.php.
Analyzing guestbook.php
Introduction
In this step, you will analyze the PHP program on a line-by-line basis. Ensure that line numbers are enabled inKomodo (View|View Line Numbers) and that the file guestbook.php is displayed in the Komodo editor.
HTML Header
Lines 1 to 8 - HTML Header
a standard HTML header is written to the program output•
Komodo Tip: Notice that syntax elements are displayed in different colors. Adjust the display options forlanguage elements in the Preferencesdialog box.
PHP Declaration and Datafile
Line 9 - PHP Declaration
PHP programs are embedded in HTML• the characters <?php indicate the start of the PHP program•
Lines 10 to 18 - Comments
the // characters indicate a single-line comment in PHP programs; the # symbol can also be used.Multi-line comments are nested in /* and */ characters, as shown on lines 27 to 30
•
Line 22 - Datafile
the file guestbook.dat is created if it does not exist• the tmp directory must exist beneath the root of the drive where the program resides (unless adifferent location is specified in the Debugging Options).
•
PHP statements are terminated with semicolons•
Komodo Tip: On line 23, type $da. Komodo displays a list of the variables declared above the cursorposition that begin with the letters da. This is AutoComplete.
GuestBook Class
Lines 25 to 28 - Class Declaration
a class is a collection of variables and functions• class GuestBook contains the functions GuestBook, _getData", outputData, etc•
Komodo User Guide
Analyzing the PHP Tutorial File 268
the var statement declares variables as class members, thus making them portable across functionscontained in the class
•
Komodo Tip: Click the mouse pointer at the end of line 25. Notice that the brace changes to a bold red font.The closing brace on line 144 is displayed the same way. In this case, the braces mark the beginning and endof a class. See Editing Files in the Komodo User Guide for more about matching braces.
GuestBook Function
Lines 34 to 37 - GuestBook Function
a function is a discrete block of code• the $datafile argument is passed to the function GuestBook; multiple arguments are separatedby commas
•
the contents of a function are enclosed in braces• $_SERVER is a pre-defined PHP variable; it is passed to the script from the web server•
in PHP, global variables must be declared to be global inside a function if they are going to beused in that function
♦ •
a local variable is defined for the current function by use of the term $this; notice that the samesyntax is used to call another function
•
gb_dat variable is declared on line 27♦ gb_dat variable is assigned the value of $datafile♦ $this->data variable is cleared of any prior value♦ $this->_getData variable calls the _getData function that begins on line 53; when the_getData function is complete, processing returns to line 40
♦
•
Komodo Tip: On line 38, type function GuestBook(. When you type the left parenthesis, Komododisplays a pop-up hint that describes parameters for the function GuestBook. This is a CallTip.Lines 40 to 44 - Check for Valid Form Entry
if the REQUEST_METHOD contained in $_SERVER is equal to POST, processing passes to theaddGuestBookEntry function on line 120
•
if the REQUEST_METHOD is not equal to POST, a redirect message is displayed to the user• the echo command generates output♦ the characters \" are not included inside the double quotation marks that follow, so that themessage can be displayed as output
♦
the PHP variable PHP_SELF is the filename of the current script♦ $_SERVER["PHP_SELF"] extracts the PHP_SELF variable from the $_SERVER variable♦
•
Lines 45 to 46 - Check for Variable Value
the if ($this->data) statement tests if the variable $this->data has a value• the program executes the outputData function and then the outputForm function♦ •
_getData Function
Lines 53 to 58 - _getData Function
the "file" statement parses the contents of the file stored in the gb_dat variable into the $linesarray
•
Komodo User Guide
Lines 25 to 28 - Class Declaration 269
the @ symbol suppresses warnings; in this case, if the data file is empty, the programgenerates a non-fatal error
♦ •
the if ($lines) statement checks to see if the $lines variable has data• the "join" statement converts the $lines array to a string and places it in the variable$this->data
•
PHP Pointer: Use the "@" operator with care; you could disable error messages for critical errors thatterminate the execution of the script.
outputData Function
Lines 64 to 66 - outputData Function
the contents of the $this->data variable are written to the standard output using the echostatement
•
_createEntryHTML Function
Lines 72 to 77 - Retrieve Form Data
the PHP variable $_POST is used to provide data to the script via HTTP POST• lines 74 to 77 extract the form data and place the items in variables•
Lines 80 to 83 - Validate Form Data
On line 80, the validity of the name and message variables is tested:• in !$name and !$message, "!" is a "not" operator; it is true if either variable is not true♦ The || symbol is an "or" operator♦
•
PHP Pointer: PHP has two "or" operators: the word "or", and the symbol ||. The || operator hasprecedence over the word "or", providing flexibility in logic tests.Line 86 - Current Date and Time
the variable $today contains the result of the PHP function date:• the date function returns a string♦ the "switches" are interpreted as follows:♦
F: text month◊ j: numeric day within month◊ y: four digit year◊ g: hour (12 hour format)◊ a: AM / PM◊
♦
•
Lines 89 to 94 - Interpolate Form Data with HTML
text and HTML tags are parsed with the $today variable and the form data• the return statement supplies the result (true or false) of a function or the value of a variable to theroutine from which it was called
•
Komodo User Guide
Lines 53 to 58 - _getData Function 270

_writeDataFile Function
Lines 100 to 106 - Open the Data File
the fopen function opens the file stored in the $this->gb_dat variable• the w switch opens the file if it exists♦ If the file does not exist, fopen will attempt to create it♦ the file is opened for writing only, and the file pointer is positioned at the top of the file♦
•
the if !$f statement checks to see if the $f variable contains a value•
Lines 108 to 110 - Write to the Data Files
the fwrite function writes the contents of $this->data to the file contained in the $f variable•
Lines 111 to 113 - Close the Data File
the fclose function closes the file stored in the $f variable• the value of the return statement is tested on line 112•
Komodo Tip: Click on the minus symbol to the left of line 100. The entire_writeDataFile functioncollapses. This is Code Folding.
addGuestBookEntry Function
Lines 120 to 125 - Call Functions for Writing Data
the $entry variable is local to the addGuestBookEntry function• the $entry contains the contents of the $data variable, returned in the _createEntryHTMLfunction
•
on line 123, the contents of $entry are concatenated with the contents of $this->data, andstored in $this->data
•
outputForm Function
Lines 127 to 142 - The Function for HTML Form
these lines generate a standard HTML form• notice the PHP snippet on line 133 that provides the program name to the HTML output•
Closing Tags
Lines 148 to 151 - Closing Tags
the $gb variable creates a new instance of the GuestBook class using the file specified in the$datafile variable
•
when the functions in the GuestBook class are complete, the PHP program is closed using thesyntax ?>
•
closing HTML tags are written as output•
Komodo User Guide
_writeDataFile Function 271
Running the Program
This section reviews how to run the guestbook.php program using the Komodo debugger.
Run the debugger: Select Debug|Go/Continue.1. Configure debugging options: In the Debugging Options dialog box, configure the followingoptions:
2.
General tab: Select the Simulate CGI Environment check box.♦ CGI Input tab:
Set the Request Method option button to Post.◊ On the Post Type drop-down list, select URL encoded.◊ On the Type drop-down list, select the variable type Post.◊ Enter the following names in the Name text box, adding a meaningful value for eachin the Value text box. For example, the value for "name" could be your own name.Click the Add button after each entry to add it to the Browser Arguments.
◊
"name"⋅ "email"⋅ "company"⋅ "message"⋅
◊
♦ 3.
Run the debugger: Click OK to run the debugger with the selected options.4. View the Command Output tab: Notice the messages in the bottom left corner of the Komodoscreen; these inform you of the status of the debugger.
5.
View the rendered HTML: Click the HTML tab on the right side of the Debug tab. The HTML isdisplayed in the Bottom Pane; previous guestbook entries are displayed at the top of the output, andthe HTML form is displayed at the bottom. Click the Output tab to return to the HTML code.
6.
Create New File: To create a new HTML file that contains the HTML code on the Output tab, selectFile|New|New File. In the New File dialog box, select the Common Category, and the HTMLtemplate. Click Open.
7.
Save the Output: Delete the contents of the new HTML file tab in the Editor Pane, then select theHTML code on the Output tab. Copy the contents to the new HTML file tab in the Editor Pane usingthe key binding associated with your selected scheme. Select File|Save As to save the file with aunique name.
8.
Debugging the Program
In this step you will add breakpoints to the program and debug it. Adding breakpoints lets you run theprogram in chunks, making it possible to watch variables and view output as it is generated. Before beginning,ensure that line numbering is enabled in Komodo (View|View Line Numbers).
Set breakpoints: On the guestbook.php tab in the editor, click on the gray margin immediately to theleft of the code in line 9 of the program. This sets a breakpoint, indicated by a red circle. Set a secondbreakpoint on line 148.
1.
Run the debugger: Select Go|Continue. In the Debugging Options dialog box, click OK to acceptthe defaults (assuming that you created the CGI variables in the previous step, Running the Program).
2.
Komodo Tip: Notice that the Debugger Options have been saved from the last time a PHP program was runor debugged.
Komodo User Guide
Running the Program 272
Komodo Tip: Debugger commands can be accessed from the Debug menu, by shortcut keys, or from theDebug Toolbar. For a summary of debugger commands, see Debugger Command List.
Watch the debug process: A yellow arrow on the breakpoint indicates the position at which thedebugger has halted.
3.
Line 9: Step In: Select Debug|Step In. "Step In" is a debugger command that causes the debugger toexecute the current line and then stop at the next processing line (line 19). The lines between line 9and line 19 are comments, not processing statements, and are therefore ignored by the debugger.
4.
View Variables: Expand the Bottom Pane (if necessary) by clicking and dragging the bottom marginof the Komodo workspace. Variables defined in the program are displayed on the Locals tab.
5.
Line 19: Select Go|Continue. The debugger moves to line 148. The GuestBook class is called fromline 148.
6.
Line 148: Step In: The debugger is now processing the GuestBook function.7. View Variables: The Locals tab displays all variables.8.
Line 35: Step In: Expand the $this variable on the Locals tab in the Bottom Pane. Notice that itnow has a sub-variable gb_dat, which stores the value of the data file.
9.
Line 36: Step In: Continue to step in until the debugger stops at the _getData function. Continueto select Step In to process each statement in the function. After line 57 has been processed and thedebugger is stopped at line 58, the $lines variable can be expanded on the Locals tab.
10.
Line 58: Step Out: On line 58, select Step Out to process the rest of the _getData function. Thedebugger will proceed to line 40, which follows the line where _getData was called.
11.
Komodo Tip: What do the debugger commands do?
Step In: Executes the current line of code and pauses at the following line.• Step Over: Executes the current line of code. If the line of code calls a function or method, thefunction or method is executed in the background and the debugger pauses at the line that follows theoriginal line.
•
Step Out: Executes the code without stepping through the code line by line (when the debugger iswithin a function or method). The debugger stops on the line of code following the function ormethod call in the calling program.
•
Line 40: Step In: Continue to select Step In until the debugger is on line 121, in theaddGuestBookEntry function. On line 121, the addGuestBookEntry function calls the_createEntryHTML function.
14.
Line 121: Step In: In the _createEntryHTML function, the program assigns variables to the CGIinput data configured in the Debugging Options.
15.
Line 74: Step Out: The _createEntryHTML function completes, and processing returns to line122.
16.
Line 122: Step In: Use Step In to process each line of the addGuestBookEntry function, untilprocessing moves to the _writeDataFile function on line 102.
17.
Line 102: Step In: Process line 102.18. Open Watch Window: On line 102, the program opened the datafile (by default,\tmp\guestbook.dat). To watch the activity in the datafile, select Tools|Watch File, then specify thedatafile.
19.
Line 103: Step In: Continue to select Step In until line 108 has been processed. After line 108 isprocessed, the contents of the $this->data variable are written to the datafile, as displayed in the
20.
Komodo User Guide
Debugging the Program 273

Watch tab.Line 111: Step In: Step In until processing returns to line 45 of the GuestBook function.21. Line 45: Step Over: The Step Over debugger command executes the current line, including anyfunctions called by the current line. When the debugger returns to line 46, notice that the contents ofthe $this->data variable have been written to the Bottom Pane.
22.
Line 46: Step Over: The debugger executes the outputForm function, which writes the HTMLform to the Bottom Pane.
23.
Continue: Select Debug|Continue to run the debugger to the end of the program.24.
More PHP Resources
Tutorials and Reference Sites
There are many PHP tutorials and beginner PHP sites on the Internet, including:
The PHP Resource Index, a collection of resources dealing with PHP.• www.PHP.net, the home of all that is PHP-related.•
Komodo User Guide
More PHP Resources 274
Python Tutorial Komodo IDE only
Overview
Before You Start
This tutorial assumes:
Python 2.3 or greater is installed on your system. ActivePython is a free distribution of the Pythonlanguage. See the Debugging Python documentation for configuration instructions.
•
You are interested in learning about Komodo functionality, including the debugger and the interactiveshell.
•
You are interested in Python and have some programming experience either in Python or anotherlanguage.
•
Python Tutorial Scenario
The Python Tutorial demonstrates how to use the Komodo debugger and interactive shell to explore a Pythonprogram. In particular, this tutorial examines a Python script that preprocesses files (similar to the Cpreprocessor). In this tutorial you will:
Open the Python Tutorial Project.1. Analyze preprocess.py the Python program included in the Tutorial Project.2. Analyze contenttype.py the Python module included in the Tutorial Project.3. Run the program and generate program output.4. Debug the program using the Komodo debugger.5. Explore Python using the Komodo interactive shell.6.
See Interactive Shell and Debugging Programs for more information on this Komodo functionality.
Opening the Tutorial Project
On the Start Page under Tutorials and Documentation, click Python Tutorial, or open thepython_tutorial.kpf file from the samples/python_tutorials subdirectory of Komodo's user data directory
The tutorial project will open in the Places sidebar.
Overview of the Tutorial Files
The following components are included in the python_tutorial.kpf project file:
preprocess.py: The main program. This Python program parses input source files and producesoutput filtered on a set of rules and statements embedded in the original input source.
•
preprocess current file: A run command for executing preprocess.py on the file currently open inKomodo.
•
contenttype.py: A Python module used by the main program (preprocess.py) to identify the languageof a given file.
•
content.types: A support file used by the Python module contenttype.py.•
Python Tutorial Komodo IDE only 275
helloworld.html and helloworld.py: Sample files to process using preprocess.py.•
Open the Python Tutorial File
In the Places sidebar, double-click the preprocess.py file. This file opens in the Editor Pane; a tab at the top ofthe pane displays the filename.
Analyzing the Python Files
This section reviews the code in preprocess.py and contenttype.py.
Analyzing preprocess.py
In this step, you will analyze the Python program preprocess.py in sections. This program is an advancedPython script that is best addressed by focusing on certain areas within the code. Be sure that line numbers areenabled in Komodo (View|View Line Numbers) and that preprocess.py is displayed in the Komodo Editor.
About Preprocessors: A preprocessor is a program that examines a file for specific statements called"directive statements". These directive statements are interpreted, and the resulting program output isconditional based on those statements. In languages like C/C++, preprocessing is a common step applied tosource files before compilation. The Python preprocess.py program mimics a C/C++ preprocessor usingsimilar directive statements.
About Directive Statements: Preprocessor directive statements are dependent on the preprocessor programthey are used within. In the preprocess.py program, a directive is preceded with a pound sign (#), and islocated alone on a line of code. Placing a directive on a unique line ensures the statement is included in a filewithout breaking file syntax rules. Valid preprocess.py directives include:
#define <var>[=<value>] #undef <var> #if <expr> #elif <expr> #else #endif #error <error string>
Setting Up the preprocess.py Program
Komodo Tip: Notice that syntax elements are displayed in different colors. You can adjust the displayoptions for language elements in the Preferences dialog box.Lines 3 to 57 - Defining a Module Docstring
help is defined in a module docstring• docstrings are contained in triple-quoted strings (""")•
Komodo Tip: See Explore Python with the Interactive Shell to examine these docstrings, and other Pythonelements, using the Komodo interactive shell.Komodo Tip: Click on the minus symbol to the left of line 3. The entire section of nested help code iscollapsed. This is called Code Folding.
Komodo User Guide
Overview of the Tutorial Files 276
Lines 59 to 65 - Importing Standard Python Modules
Imports the following six modules:• os: operating system dependant helper routines♦ sys: functions for interacting with the Python interpreter♦ getopt: parses command line options♦ types: defines names for all type symbols in the standard Python interpreter♦ re: evaluates regular expressions♦ pprint: supports pretty-print output♦ logging: writes errors to a log file♦
•
Line 67 - Importing the contenttype Module
The custom contenttype module is used by the preprocess.py program and is not included in a standardPython installation.
loads the contenttype module and imports the getContentType method•
Komodo Tip: To interact directly with the contenttype.py module, see Explore Python with theInteractive Shell for more information.
Defining an Exception Class
Lines 72 to 88 - Declaring an Exception
PreprocessError class inherits from the Python Exception class• an instance of the PreprocessError class is thrown by the preprocess module when an erroroccurs
•
Komodo Tip: Click the mouse pointer on the closing parenthesis ")" on line 72. Notice that its color changesto a bold red. The opening brace is displayed the same way. This is called "Brace Matching". Related featuresin Komodo are Jump to Matching Brace and Select to Matching Brace, available via the Code menu.
Initializing Global Objects
Line 93 - Initializing log
log is a global object used to log debug messages and error messages•
Komodo Tip: On line 95, enter: log = logging.When you type the period, Komodo displays a list of the members in the log package. This is calledAutoComplete. If the default key bindingscheme is in effect Pressing 'Ctrl'+'J' (Windows/Linux) or 'Cmd'+'J'(Mac OS X) also displays the AutoComplete list. Delete the contents of line 95.Lines 98 to 111 - Mapping Language Comments
_commentGroups is a mapping of file type (as returned by content.types) to opening andclosing comments delimiters
•
mapping is private to the preprocess.py module (_commentGroups is prefixed with anunderscore to indicate that it is private to the preprocess.py module). This is a commontechnique used in variable, function, and class naming in Python coding).
•
Komodo User Guide
Lines 59 to 65 - Importing Standard Python Modules 277
Note that preprocessor directives recognized by the preprocess.py module are hidden in programminglanguage-specific comments.
Komodo Tip: Use the Code sidebar, available in the Left Pane, to browse the general program structure ofall currently open files. For each file, the code browser shows a tree of classes, functions, methods andimported modules. Python instance attributes are also displayed.
Defining a Private Method
Lines 116 to 123 - Expression Evaluation
_evaluate method is private to the preprocess module• evaluates the given expression string with the given context•
Preprocessing a File
The preprocess method examines the directives in the sample source file and outputs the modifiedprocessed text.
Lines 129 to 140 - The preprocess Method Interface
The preprocess method takes three parameters as input:
first parameter is the filename, infile• second parameter specifies the output file (defaults to stdout); outfile=sys.stdout• third parameter is an optional list of definitions for the preprocessor; defines={}•
Lines 145 to 156 - Identifying the File Type
Examines how programming comments are delimited (started and ended) based on the type of file (forexample, HTML, C++, Python).
getContentType is called (imported earlier from the contenttype.py module) to determinethe language type of the file
•
file type is used to look up all comment delimiters (opening and closing language commentcharacters) in _commentGroups
•
Lines 158 to 166 - Defining Patterns for Recognized Directives
This section defines advanced regular expressions for finding preprocessor directives in the input file.
Komodo Tip: Use the Komodo Rx Toolkit to build, edit, or test regular expressions. New to regularexpressions? The Regular Expressions Primer is a tutorial for those wanting to learn more about regexsyntax.Lines 178 to 303 - Scanning the File to Generate Output
This block of code implements a basic state machine. The input file is scanned line by line looking forpreprocessor directives with the patterns defined above (stmtRes). This code determines whether each lineshould be skipped or written to the output file.
source file is processed•
Komodo User Guide
Lines 98 to 111 - Mapping Language Comments 278
output is generated by a state machine implemented in Python•
Lines 311 to 349 - Interpreting Command Line Arguments
The main method takes the text entered at the command line and uses the getopt module to parse the datainto arguments. These arguments are then passed into the "preprocess" method.
runs when preprocess.py is executed as a program rather than loaded as a module• parses the filename and any defines (-D) set as command line arguments• passes all data to the preprocess method•
Lines 351 to 352 - Running the Main Method
runs the main method when preprocess.py is executed as a program•
Analyzing contenttype.py
In this step, you will analyze the Python program contenttype.py in sections. This Python script is bestaddressed by focusing on certain areas within the code. Be sure that line numbers are enabled in Komodo(View|View Line Numbers) and that contenttype.py is displayed in the Komodo Editor Pane.
Open contenttype.py
In the Places sidebar, double-click the contenttype.py file. This file opens in the Editor Pane; a tab at the top ofthe pane displays the filename.
Setting Up the contenttype.py Module
The contenttype.py module is used by the main program, preprocess.py, to identify what programminglanguage a particular file is written in based on the file extension and several other tests.
Lines 16 to 19 - Importing External Modules
imports external modules used in this file (re, os, sys, logging)• logging is not a standard module; it is new in Python 2.3•
Getting Data from content.types
Lines 29 to 31 - Finding the Helper File (content.types)
This section outlines the usage of the private _getContentTypesFile method located in thecontenttype module.
returns the complete path to the content.types file• assumes the file is in the same directory as contenttype.py• _getContentTypesFile is a private method that cannot be accessed from outside of thecontenttype module
•
Komodo User Guide
Lines 178 to 303 - Scanning the File to Generate Output 279
Lines 33 to 80 - Loading the Content Types from content.types
This section outlines the usage of the private _getContentTypesRegistry method located in thecontenttype module.
locates the content.types file and scans it to calculate three mappings to return, as follows:•
file suffix -> content type (i.e. ".cpp", a C++ implementation file)regex -> content type (i.e. ".*\.html?", an HTML file)filename -> content type (i.e. "Makefile", a Makefile)
_getContentTypesRegistry is a private method that cannot be accessed from outside of thecontenttype module.
•
Lines 44 to 45: gets the content.types file; if none is specified in the parameter for themethod, _getContentTypesFile is called to find the system default
♦
Lines 47 to 49: lists the three mappings to return (empty mappings are created here)♦ Lines 51 to 79: opens and processes the content.types file on a line-by-line basis♦
scanning of the file stops when the last line is found, line 57◊ Lines 58 to 78: each line is parsed to determine which of the three mappingsit contains
⋅
an entry is made in the matching one⋅ commented lines (starts with #) are ignored⋅
◊ ♦
Lines 79 to 80: closes the content.types file and returns the mappings♦
•
Lines 85 to 118 - Determining a File's Content Type
This section outlines the usage of the public getContentType method located in the contenttypemodule.
takes one parameter (the name of the file to determine the content)• returns a string specifying the content type (for example,getContentType("my_web_page.htm") returns "HTML" )
•
getContentType is the only publicly accessible method in the module• Line 92: _getContentTypesRegistry is called to load the content.types file andto load the mappings
♦
Lines 96 to 99: filenameMap is first checked to determine if the whole filename can beused to find a match
♦
Lines 101 to 109: if the filename has a suffix (contains a '.'), the suffix map is then used tofind a match
♦
Lines 111 to 117: each regex in the regex map is then used to determine if it matches thefilename
♦
Line 118: returns the content type for the file (returns an empty string if no match was foundby the above three mappings)
♦
•
Running the Program
This section reviews how to run the preprocess.py program using both a run command and the Komododebugger.
Komodo User Guide
Lines 33 to 80 - Loading the Content Types from content.types 280
Using a Run Command
To start, generate simple output by running the program with the preprocess current file run command,included in the python_tutorial project toolbox.
Open the Source File: In the Projects sidebar, double-click the helloworld.html file. The file opensin the Editor Pane.
1.
Run Command: In the Toolbox sidebar under the python_tutorial toolbox, double-click thepreprocess current file command. A Preprocess Current File dialog box appears.
2.
Preprocess Current File: In the Preprocessor Options text area, enter:-D SAY_BYEClick OK to run the program.
3.
View Output: The helloworld.html file output is displayed on the Command Output tab as follows:['path_to_file\\python_tutorials\\helloworld.html']<html><head> <title>Hello World</title> </head><body><p>Hello, World!</p></body></html>
4.
Python Tutorial Tip: For more information about the -D SAY_BYE command, see Using the Debugger.Komodo Tip: For more infomation on using run commands in Komodo, see the Run Command Tutorial.
Using the Debugger
Generate output by running the program through the debugger without setting any breakpoints.
Run the debugger: Select the preprocess.py tab in the editor. From the menu, selectDebug|Go/Continue. In the Debugging Options dialog box, click OK to accept the defaults.
1.
View the Debug Output Tab: Notice the messages in the bottom left corner of the Komodo screen;these inform you of the status of the debugger. When the program has finished, program output isdisplayed in the Bottom Pane, on the right side. If necessary, click the Debug Output tab to displayit.
2.
Troubleshooting: "Why is this error message displayed?"
preprocess: error: incorrect number of arguments:argv=['C:\\path_to_tutorial\\preprocess.py']
This error message is the expected output by the preprocess.py program when no source file or arguments arespecified before it is run. The following instructions explain how to specify a file at the command line.
Specify a File to Process: In the Projects sidebar, double-click the file helloworld.html. Note thepreprocessor directives inside the comments (#) in this file. Select the preprocess.py tab in the editor.From the menu select Debug|Go/Continue. In the Script Arguments text box on the DebuggingOptions dialog box, enter helloworld.html. Click OK.
3.
Troubleshooting: "Why is this error message displayed?"
<html>
Komodo User Guide
Using a Run Command 281
<head> <title>Hello World</title> </head><body>preprocess: error: helloworld.html:5: #error: "SAY_BYE is notdefined, use '-D' option"
This error message is the expected output by the preprocess.py program when no command-line argumentsare specified with the source file helloworld.html. The following instructions explain how to specify acommand-line argument with the source file to be processed.
Specify an Argument with the Source File: Select Debug|Go/Continue. In the Script Argumentstext box in the Debugging Options dialog box, enter the following source file and argument: -DSAY_BYE helloworld.html. Click OK.
4.
Troubleshooting: Specifying -D SAY_BYE helloword.html outputs the following:
<html><head> <title>Hello World</title> </head><body><p>Hello, World!</p></body></html>
In the helloworld.html file, if SAY_BYE is not defined, preprocessing generates an error. If SAY_BYE isdefined, the preprocessor includes the line <p>Hello, World!</p> in the body of the output of theHTML. This demonstrates how a Python preprocessor can be used to conditionally include blocks of a sourcefile being processed.
View the Debug Output Tab: Notice the HTML output and compare the result to the actual filehelloworld.html.
5.
View Rendered HTML: On the right side of the Bottom Pane, click the HTML tab. The renderedHTML for the helloworld.html file is displayed in the Bottom Pane. Click the Output tab to return tothe HTML code.
6.
Create New File: To create a new HTML file that will later contain the HTML code in the BottomPane, select File|New|File from Template. In the New File dialog box, select the HTML Template.Click Open.
7.
Save the Output: Delete the contents of the new HTML file tab in the Editor Pane, and then selectthe contents of the Output tab on the Bottom Pane. Copy the contents to the new HTML file tab inthe Editor Pane. Select File|Save As to save the file with a unique name.
8.
Specify Another Source File: Go through steps 3 to 5 using the file helloworld.py in place ofhelloworld.html. Notice how the output displayed is now in Python, (for example, print "Hello,World!"). This demonstrates how the preprocess.py program can be used to process files written indifferent language types.
9.
Debugging the Program
In this step you will add breakpoints to the program and "debug" it. Adding breakpoints lets you run theprogram in sections, making it easier to watch variables and view the output as it is generated.
Set a breakpoint: On the preprocess.py tab, click on the gray margin immediately to the left of thecode on line 347 of the program. This sets a breakpoint, indicated by a red circle.
1.
Run the debugger: Select Debug|Go/Continue. In the Script Arguments text box on the DebuggingOptions dialog box, enter the following source file and argument (if not there from a recent run): -D
2.
Komodo User Guide
Using the Debugger 282
"SAY_BYE" helloworld.html. Click OK.
Komodo Tip: Debugger commands can be accessed from the Debug menu, by shortcut keys, or from theDebug Toolbar. For a summary of debugger commands, see the Debugger Command List.
Watch the debug process: Notice that the line where the breakpoint is set (line 347) turns pink. Also,a yellow arrow appears on the breakpoint. This arrow indicates the position at which the debugger hashalted.
3.
View variables: On the Debug tab, click the Locals tab. If necessary, resize the pane by clicking anddragging the upper margin. On the Locals tab, notice the declared variables are assigned values.Examine the infile variable. This variable contains the name of the file specified above(helloworld.html).
4.
Komodo Tip: What do the debugger commands do?
Step In: Executes the current line of code and pauses at the following line.• Step Over: Executes the current line of code. If the line of code calls a function or method, thefunction or method is executed in the background and the debugger pauses at the line that follows theoriginal line.
•
Step Out: When the debugger is within a function or method, Step Out executes the code withoutstepping through the code line-by-line. The debugger stops on the line of code following the functionor method call in the calling program.
•
Step In: Select Debug|Step In until the debugger stops at line 129, the preprocess method. "StepIn" is a debugger command that causes the debugger to enter a function called from the current line.
5.
Set another breakpoint: Click on the gray margin immediately to the left of the code in line 145 toset another breakpoint. Line 145 is where getContentType is called.
6.
Run the debugger: Select Debug|Go/Continue.7. Step Over: When line 145 is processed, the variable contentType is assigned the source file's(helloworld.html) type (HTML). "Step Over" is a debugger command that executes the current line ofcode. If the line of code calls a function or method, the function or method is executed in thebackground and the debugger pauses at the line that follows the original line.
8.
View variables: On the Debug tab, click the Locals tab. Examine the contentType variable. Thisvariable contains the type of the source file; the type is "HTML" for helloworld.html.
9.
Set another breakpoint: Click on the gray margin immediately to the left of the code in line 197 toset another breakpoint. Line 197 is inside of the loop where the source file helloworld.html is beingprocessed.
10.
Run the debugger: Select Debug|Go/Continue.11. Add Watches for Variables: On the Debug tab, click the Watch tab. Click the New button in thelower-right corner of the Debug tab. An Add Variable dialog box appears. In the Add Variabledialog box, enter lineNum in the text box. Click OK. Notice that the lineNum variable and itsvalue are displayed in the Watch tab. The lineNum variable is the line number of the line currentlybeing processed in the source file helloworld.html. Follow the above steps again to enter a watch forthe variable line. The line variable contains the actual text of the line currently being processed.
12.
Run the debugger: Select Debug|Go/Continue. Notice how the variables in the Watch tab changeevery time the debugger stops at the breakpoint set at line 197. Also, notice the output in the right sideof the Debug tab. This output changes as new lines are displayed.
13.
Disable and Delete a breakpoint: Click on the red breakpoint at line 197. The red beakpoint is nowwhite with a red outline. This breakpoint is now disabled. Click on the disabled white breakpoint.This removes the breakpoint, but does not stop the debugger.
14.
Komodo User Guide
Debugging the Program 283
Stop the Debugger: On the Debug menu, click Stop.15.
Explore Python with the Interactive Shell
In this step you will use the interactive shell to explore the contenttype module. The Komodo interactiveshell helps you test, debug, and examine your program. See Interactive Shell for more information.
If starting this section of the tutorial with currently open Python shells, please follow the steps below to ensurethe Python shell's current directory is the Python Tutorial directory.
Close any Current Python Shells: Click the "X" button, located in the upper-right corner of theShell tab, for each open Python shell.
1.
Make sure python_tutorial is open (bold): If you haven't opened it before, click on the PythonTutorial link on the Start Page. If it's in your list of recent projects in the Projects pane,double-click it.
2.
Start using the interactive shell with the Python Tutorial project files:
Start the Interactive Shell: On the Tools menu, select Interactive Shell|Start New Python Shell. APython Shell tab is displayed in the Bottom Pane.
1.
Import a Module: At the ">>>" Python prompt in the interactive shell, enter: importcontenttypeNotice that another ">>>" Python prompt appears after the import statment. This indicates that thecontenttype module imported successfully.
2.
Get Help for a Module: At the prompt, enter: help (contenttype)The help instructions embedded in the contenttype.py file are printed to the interactive shell screen.This is useful for easily accessing Python documentation without installing external help files.
3.
Get Help for a Method in a Module: At the prompt, press the up arrow to redisplay previouslyentered commands. When help (contenttype) is redisplayed, enter .getContentType atthe end of the command. The entire command is as follows:help (contenttype.getContentType)Press Enter. The help instructions for the getContentType method are printed to the shell screen.The ability to instantly access help on specific Python functions is a powerful use for the interactiveshell.
4.
Run a Method: At the prompt, enter:contenttype.getContentType("helloworld.html")Notice the output identifies the file type as HTML.
5.
Run Another Method: At the prompt, enter:contenttype.getContentType("helloworld.py")Notice the output identifies the file type as Python.
6.
Run a Final Method: At the prompt, enter: contenttype.getContentType("test.txt")Notice the output identifies the file type as Text. The contenttype module uses several tests todetermine the data type used within a file. The test that determined that test.txt is a text file simplyanalyzed the file extension.
7.
More Python Resources
Komodo User Guide
Explore Python with the Interactive Shell 284

Tutorials and Reference Sites
There are many Python tutorials and beginner Python sites on the Internet, including:
The Python Home Page, the home of all that is Python.• Python DevCenter, run by O'Reilly Networks, which provides access to tips, articles and other Pythonrelated items.
•
ActivePython Documentation•
Preprocessor Reference
The preprocess.py program in this tutorial is a simplified version of another Python preprocess.py scriptavailable via http://starship.python.net/crew/tmick/#preprocess. The version available on starship.python.netis an advanced portable multi-language file preprocessor.
Komodo User Guide
Tutorials and Reference Sites 285
Ruby Tutorial Komodo IDE only
Overview
Before You Start
This tutorial assumes:
Ruby 1.8.0 or greater is installed on your system. See the Debugging Ruby documentation forconfiguration instructions.
•
You are interested in learning about Komodo functionality, including the debugger.• You are interested in Ruby and have some programming experience either in Ruby or anotherlanguage.
•
Ruby Tutorial Scenario
The Ruby Tutorial demonstrates how to use Komodo to write and debug a simple Ruby program which savesits data in a YAML file. In this tutorial you will:
Open the Ruby Tutorial Project.1. Analyze menagerie.rb the Ruby program included in the Tutorial Project.2. Run the program in Komodo.3. Debug the program using the Komodo debugger.4.
See Debugging Programs for more information on debugging in Komodo.
Opening the Tutorial Project
On the Start Page under Tutorials and Documentation, click Ruby Tutorial, or open the ruby_tutorial.kpffile from the samples/ruby_tutorials subdirectory of Komodo's user data directory
The tutorial project will open in the Places sidebar.
Overview of the Tutorial Files
The ruby_tutorial project contains:
menagerie.rb: A program which stores and retrieves information on animals.• animals.yaml: A YAML data file containing a base list of animals.• check_fname: A code snippet that can be added to the program.•
Open the Ruby Tutorial File
In the Places sidebar, double-click the menagerie.rb file. This file opens in the Editor Pane; a tab at the top ofthe pane displays the filename.
Ruby Tutorial Komodo IDE only 286
Analyzing the Ruby program
The menagerie.rb program is a simple interactive program that can add, list, and search for information aboutanimals. It can also store this information in a YAML file (e.g. animals.yaml). It is essentially an extremelysimple database with predefined fields.
Introduction
In this step, you will analyze the program in sections. Ensure that line numbers are enabled in Komodo(View|View Line Numbers) and that the file menagerie.rb is displayed in the Komodo editor.
Line 6 - Importing the YAML class
This line loads Ruby's core YAML class.•
Komodo Tip: Notice that syntax elements are displayed in different colors. You can adjust the displayoptions for language elements in the Preferences dialog box.Line 8 to 13 - Define and Initialize the Entry class
The Entry class contains variables which hold data for individual entries in our simple database, and thebehavior of that data. Information about each animal in our menagerie will be contained in an Entry classobject.
class Entry declares the class• the initialize method sets the instance variables @sci_name, @desc, and @time_mod.•
These variables need to be private (instance variables) rather than global because there will be an instance ofthe Entry class for each animal in the menagerie.
Line 15 - Expose instance variables
attr_reader is a Ruby shortcut for exposing @sci_name, @desc, and @time_mod as read-onlyattributes of the Entry class.
•
Line 18 to 26 - Data Storage Methods
the sci_name= method ensures that @time_mod is updated with the current time whenever@sci_name is updated.
•
the desc= method does the same thing for @desc.•
Komodo Tip: Click on the minus symbol to the left of line 18. The section of code for the sci_name methodis collapsed. Doing this at line 8 collapses the entire Entry class. This is called Code Folding.Line 28 to 35 - Data Behavior Methods
the contains? method lets the cmd_search method determine if a particular entry contains the stringthe user entered (see line 82).
•
the to_sci method returns the scientific name and description of an entry (see lines 77 and 83).•
Komodo User Guide
Analyzing the Ruby program 287
Line 39 to 46 - Command Help
the $help global variable contains a string with information on command usage, providing an easyway for methods to display help information when needed.
•
Line 48 to 55 - Define and Initialize the Menagerie class
The Menagerie class contains the @menagerie hash: the container which holds the multiple instances of theEntry class. It also contains all the methods available to the user of the application (via the commandinterface starting at line 154.
class Menagerie declares the class• initialize sets the instance variables @menagerie and @fname.•
The name of the animal is stored as a key in the @menagerie hash. It references the Entry object whichcontains the rest of the information, namely the scientific name (sci_name) and description (descr). Allthe information we store on each animal is kept in two separate areas -- the @menagerie key and the Entryit points to.
Line 57 to 69 - Adding Entries
the split method (from Ruby's String class) allows us to enter an entire record in one line, specifyingthe separator character we intend to use
•
line 60 checks for an existing entry of the same name• if none is found, a new entry (i.e. Entry.new) is added• if there is an existing key of the same name, the entry is only updated if there is a change tosci_name or descr (or both)
•
Exercise: After completing the tutorial, come back to this section and try writing a more "user friendly"version of this cmd_add method which asks for the name, scientific name and description separately (i.e. oneat a time).Line 74 to 88 - Searching for Entries
line 75 checks to make sure an argument has been provided• line 76 searches @menagerie's key for a match• if there is a matching key, line 77 returns the result using the to_sci method from the Entry class•
Line 90 to 98 - Deleting Entries
line 91 checks to make sure an argument (name) has been given• line 92 checks if the name given matches a key in @menagerie• if the name matches the delete method removes the entry•
Line 100 to 102 - Listing Entries
line 100 specifies that the argument for cmd_list is called "not_used" - a placeholder argument namewhich tells us that the method will not actually use the argument
•
line 101 calls the dump method of the YAML class (see line 6) to show the entire Menagerie objectin YAML format
•
Komodo User Guide
Line 39 to 46 - Command Help 288

Line 104 to 133 - Saving to a File
line 105 to 112: checks if the first character of the fname argument is "!"; this sets the overwritevariable which determines whether cmd_save can overwrite an existing file
•
line 115 to 117: if overwrite is false and the specified file exists, warn the user with a helpfulmessage.
•
line 118 to 122: if the fname argument exists, set the @fname instance variable, if not, prompt theuser with a useful error message.
•
line 123 to 126 uses ruby's File class to open the file for writing• a file descriptor (fd) is created on line 124 which is written to in the next line (a YAML dump of ourmenagerie)
•
line 127 to 131 provides error handling for problems during the save•
Line 135 to 143 - Loading from a File
line 136 assigns the method's argument to an instance variable• line 138 loads the data using the YAML class's load_data method• line 139 to 141 provides error handling for problems during loading•
Line 145 to 149 - Showing Help
prints the $help variable (see line 39)•
Line 151 - Starting the Program
creates a new instance of the Menagerie class called obj•
Line 153 to 180 - Handling Commands from the User
The program needs a way to handle input from the user. This section deals with parsing input and splitting itinto commands which call methods in the Menagerie class, and arguments for those methods.
line 153 compiles a regular expression into the cmd_re variable• line 154 prints the list of available commands (see line 39)• line 156 prompts the user for a command• line 159 captures user input and saves it to the cmdline variable• the if block beginning at line 160 matches the user input against cmd_re• this regular expression captures the first word "(\w+)" and the word that follows it "(.*)"• the input is split into two parts:•
the first word has the string "cmd_" prepended to it, and is then assigned to the cmd variable♦ the second word, or words, are assumed to be arguments and assigned to the args variable♦
•
line 163 checks if cmd is a valid method in the Menagerie class.• if it is, cmd and args are passed to the current Menagerie object using the send method(inherited from Ruby's Object class)
♦
if the command is "quit" the program is ended with a break♦ if neither, an error message is passed to the user♦
•
if the cmd_re regular expression cannot parse the command, line 177 prints an error message referingthe user to the 'help' command
•
Komodo User Guide
Line 104 to 133 - Saving to a File 289
Running the Program
In this step you will run the program and interact with it.
To run menagerie.rb without debugging: Select Debug|Go/Continue. The program interfacedisplays in the Command Output tab. Try various commands to test the program.
1.
In the Command Output tab, enter various commands to test the program.2. Enter the following commands:3.
load animals.yaml♦ list♦ delete Komodo dragon♦
4.
The output of the last command (including "Error: undefined method...") indicates that something is notworking correctly. Debugging can help trace this problem. Type quit in the Output window before startingthe debugger.
Debugging the Program
In this step you will add breakpoints to the program and "debug" it. Adding breakpoints lets you run theprogram in sections, making it easier to watch variables and view the output as it is generated.
Breakpoints are used to identify exactly where a program may be having problems. A bug has beenintentionally left in the cmd_delete method which can illustrate this.
Set a breakpoint: On the menagerie.rb tab, click on the gray margin immediately to the left of thecode on line 93 of the program. This sets a breakpoint, indicated by a red circle.
1.
Run the debugger: Select Debug|Go/Continue (or enter 'F5', or use the Debug Toolbar). TheDebugging Options dialog box will then pop up; press the Return key or OK button to dismiss it.You can pass program options to the program with the Script Arguments text box, but this particularprogram doesn't take any.
2.
Enter commands: In the Command Output tab, re-enter the commands from the Running theProgram section ('load animals.yaml', 'list', and 'delete Komodo dragon').
3.
Komodo Tip: Debugger commands can be accessed from the Debug menu, by shortcut keys, or from theDebug Toolbar. For a summary of debugger commands, see the Debugger Command List.
Watch the debug process: After the last command, notice that a yellow arrow appears wherebreakpoint is set (line 93). This arrow indicates the position at which the debugger has halted. Thistells us that our command did match a key in @menagerie.
4.
Check the relevant variables: Click on the Self tab to see the current object's instance and classvariables. Notice the @menagerie hash. Expand the view of the hash by clicking the plus symbolnext to it. It should only contain the "Leopard gecko" entry after the "Komodo dragon" entry has beendeleted.
5.
Set a Watch variable: Select the Watch tab of the debugger window, highlight'@menagerie.has_key?(name))' on line 92 and drag it into the Watch tab. You can place mostvalid Ruby expressions in this area, including assignments, whether they're in the program or not. Forexample, placing the expression 'x = 2 + 2' in the Watch tab will show that a local variable called'x' is set to 4.
6.
Komodo User Guide
Running the Program 290
Komodo Tip: What do the debugger commands do?
Step In: Executes the current line of code and pauses at the following line.• Step Over: Executes the current line of code. If the line of code calls a function or method, thefunction or method is executed in the background and the debugger pauses at the line that follows theoriginal line.
•
Step Out: When the debugger is within a function or method, Step Out executes the code withoutstepping through the code line-by-line. The debugger stops on the line of code following the functionor method call in the calling program.
•
Step In: Select Debug|Step In until the debugger stops at line 166 (print status_message). "Step In"is a debugger command that causes the debugger to enter a function called from the current line.
6.
View local variable: On the Debug tab, click the Locals tab. Examine the status_messagevariable. This variable contains the message that will be returned to the user.
7.
Run the debugger: Select Debug|Go/Continue (or enter 'F5', or use the Debug Toolbar). Thecommand returns "#<Entry:0x83096f8>Error: undefined method `[]' for#<Entry:0x83096f8>" which is not a very user-friendly message. The cmd_delete method ismissing an explicit return value to provide if the deletion was successful.
8.
Fix the problem: On the Debug menu, click Stop (or use the Stop button on the Debug Toolbar).Uncomment line 94 by removing the "#".
9.
Disable and Delete a breakpoint: Click on the red breakpoint at line 93. The red breakpoint is nowwhite with a red outline. This breakpoint is now disabled. Click on the disabled white breakpoint.This removes the breakpoint.
10.
Run the debugger: Select Debug|Go/Continue and re-run the commands used previously ('loadanimals.yaml', 'list', and 'delete Komodo dragon'). The 'delete' command now returns the message"Deleted".
11.
More Ruby Resources
Tutorials and Reference Sites
There are many Ruby tutorials and beginner Ruby sites on the Internet, including:
ruby-lang.org: The main page for the ruby language, including release notes and downloads.• ruby-doc.org: Extensive online documentation including tutorials and links, with well organized coreand standard library API documentation.
•
Programming Ruby: Tutorial and reference.• why's (poignant) guide to ruby: An entertaining introduction to Ruby.• Learn to Program: Excellent Ruby tutorials for beginners by Chris Pine.• Ruby on Rails - Documentation: Documentation and tutorials for the Ruby on Rails webdevelopment framework.
•
Komodo User Guide
Debugging the Program 291
Ruby on Rails Tutorial Komodo IDE only
Overview
Before You Start
For this tutorial you will need:
A recent local installation of Ruby (1.8.6 or later). See the Debugging Ruby documentation fordebugger configuration instructions.
•
A local installation of Ruby on Rails (version 2.x or later).• The Komodo Ruby on Rails extension.• Access to a MySQL or SQLite database. If using MySQL, you'll need to install a Ruby library:
gem install mysql # for Rails version 2 gem install mysql2 # for Rails version 3
•
Several online "how to" guides are available for installing and configuring Ruby on Rails. See RailsResources for links to setup tutorials and installation bundles
Tutorial Scenario
This tutorial walks you through the creation of a very simple Rails application. The Movie Lending Libraryapplication is a web application that allows you to add, remove, borrow and return movies from a sharedlibrary.
Komodo has a very powerful Ruby on Rails project extension with macros and commands for furtherautomating the creation of Rails applications. The entire application can be created within Komodo usingthese tools and Komodo itself, without having to work at the command-line.
In this tutorial you will:
Create a new Rails scaffold using the Ruby on Rails Komodo project extension.1. Create a MySQL database.2. Create the core of the application using just the project macros.3. Write some code to iteratively develop the Movie Library application.4. Test and debug the application.5.
Creating a Rails Project
Komodo ships with a powerful extension for creating Rails projects, containing several macros for:
Creating and deleting databases• Generating controllers, migrations, models and scaffolds• Migrating databases• Running a built-in web server(Mongrel, Webrick, or LightHTTPD)• Debugging the application•
Ruby on Rails Tutorial Komodo IDE only 292
When creating a new Rails project, you can tell Komodo where the Rails executable lives, and which databaseyou prefer to use, at Preferences | Languages | Ruby | Rails. Komodo will make sure that the version ofRails matches the current version of Ruby.
To create the tutorial project file:
In Komodo, select Project | Create Ruby on Rails Project. Create a new directory/folder in aconvenient location (e.g. C:\rails\movielib on Windows, or /home/username/rails/movielib on OS Xor Linux). You can create a new Rails project in an existing directory, but it's advisable to not havemore than one Rails project in a directory.
1.
Give the file a useful name. Since this tutorial creates a movie lending library, let's call itmovielib.komodoproject.
2.
If Rails has been installed correctly, you should see output in the bottom pane saying "The movielib project isbuilt". The movielib project should open in the Places sidebar on the left, and should show the directoriescreated by the rails command (app, components, config, db, etc.).
When you installed the Ruby on Rails extension, it added a "Ruby on Rails" toolbox in the Toolbox sidebar.You'll find the tools that carry out the most common functions for creating and managing Rails applicationsthere. If you prefer not to keep the Toolbox sidebar open, you can access these tools by name via the Tools |Invoke Tool menu item.
Rails tools have a lot of third-party dependencies, and sometimes a new release of one of them can break thetools in the Rails project template. If a macro or command isn't working as expected, check the the onlineFAQs for possible solutions.
Creating the Database
Editing the database.yml file
If you chose SQLite2 or SQLite3 as your database tool, you can skip this step. If you chose PostgreSQL orOracle, you'll need to manage the database manually. This section applies only to MySQL users.
If MySQL is installed locally and can accept connections by 'root' without a password (it often does bydefault), click the Create Databases macro in the Rails Tools project folder to create the database.
If you have set a MySQL root password, created another MySQL account that you would like to use, or arerunning the server on a different host, you will need to configure the database.yml file:
Open the config project folder and double-click database.yml to open it in an editor tab.1. As necessary, modify the username and password values to match the configuration of yourMySQL server. If you're not sure what values to use, leave the default values ('username: root'and 'password: '). In this tutorial, we will only be working with the development database andtest databases, but you should modify the production section as well to avoid seeing errorswhen running the Create Databases macro below.
2.
If you are running MySQL on a remote server, add the setting hostname: host to thedevelopment: configuration block, or modify the value if that setting is already present (set tolocalhost by default.
3.
Komodo User Guide
Creating a Rails Project 293
If you would like to use a database server other than MySQL, consult the Rails documentation on configuringthis file, making sure you have the necessary database drivers installed, and creating the database manually.The database macros in the project will only work with MySQL.
Running the Create Databases Macro
In the Rails Tools project folder is a macro called Create Databases. Double-click the macro to run it.
If the database.yml file (and the database server) are configured correctly, a database called movielib (asspecified in the database.yml file - derived from the project name) will be created and an alert will appearindicating that the database creation is done.
Creating a Scaffold
Generating a scaffold is a quick way to get a skeletal, working Rails application that can be modifiediteratively. Since most database driven web applications are very similar in their basic design, Rails builds ageneric application based on the information in your models which you can then modify to meet your specificrequirements.
In the Generators folder, double-click the scaffold macro. In the dialog box enter movie as the model name,and title:string as the only attribute in the movie model. Click OK.
A list of the files that were created and/or modified should then appear in the Command Output tab.
Several files are created and opened in editor tabs. You can unclutter your workspace by closing most ofthem. For now close all the files but movie.rb, movie_tests.rb, movie_controller.rb, andmovie_controller_tests.rb. We'll return to most of the other generated files later.
Migration
Now that we've defined the model in Rails, we need to apply them to our database. In Rails this is done withthe 'rake db:migrate' command. Again, there's a macro to do this for us.
Double-click the db:migrate macro in Rails Tools|Migrate. The Command Output tab should show that thetable 'movies' has been created.
Testing Rails Scaffolds
At this point we have a working application. While it's tempting to start the server, switch to the browser, andtry it out, we should take advantage of the testing framework built into Rails to verify that our application isworking as we expect.
Let's add a couple of sanity checks to the model: we want to verify that all movie entries have a title, and thatthere are no duplicates. Bring up movie.rb and add this code at lines 2 and 3, immediately after classMovie < ActiveRecord::Base:
validates_presence_of :title validates_uniqueness_of :title
Komodo User Guide
Editing the database.yml file 294
You should see code-completion after you type val each time.
In the second line, after you type :t you can press the tab key to have it finish :title. If this does nothingverify that the "Use tab character to complete words like Ctrl+Space" setting is on underEdit|Preferences|Editor|Smart Editing.
Bring up movie_test.rb, delete the test_truth method that the scaffolder generated for you (this will lookslightly different with Rails 3), and add these two tests:
def test_present m = Movie.new assert !m.valid? m.title = "Rocky" assert m.valid? end
def test_unique m1 = Movie.create(:title => "Alien") assert m1.valid? m2 = Movie.create(:title => "Alien") # First film should still be valid assert m1.valid? assert !m2.valid? m2.title += "s" assert m2.valid? end
Running Model Tests in Komodo IDE
Note: the functions described in this section currently don't work with Rails 3. If you're using Rails 3, and findrunning the tests generate errors, please skip to the next section.
Komodo IDE introduced unit-test integration with version 4.3. To run the unit tests click on the Test Resultstab in the bottom window. In the test plan dropdown menu on the right side. Select "test:units", and press theRun button immediately to the right.
This command might fail if the Ruby and Rake executables in the system path are different from the onesyou've indicated in the Preferences settings. In this case, you'll need to change the path environment Komodoruns in.
You should see the tests run for a few seconds, and then a list of results will appear. If you get a messagealong the lines of the following: "Run `rake db:migrate` to update your database then try again." you probablyskipped that step above. Run the Rails Tools/Migrate/db:migrate macro, and retry the tests.
The result tab should show that 2 tests passed, 0 failed, and there were 0 errors. There's also an "Information"line, where Komodo displays lines of output from the underlying test pass that might be of interest, but don'tfit in any particular test.
Running Tests in Komodo Edit
This tutorial assumes you're using Komodo IDE, but it's easy to follow along with Komodo Edit. You can rununit tests inside Komodo Edit with the Rails Tools/Test/Unit Tests macro. This will show the results in the
Komodo User Guide
Testing Rails Scaffolds 295
Command Output window. You should see a final result of:
2 tests, 6 assertions, 0 failures, 0 errors
Other commands (e.g. rake test:functionals below) can be run in a Run Command.
Running Controller Tests
While the generated model test file has one trivial test, the Rails scaffolder generates a full complement ofcontroller tests. Bring up movie_controller_test.rb to have a look at them.
Click on the Test Results tab, select the test:functionals test from the dropdown list, and press the Runbutton.
This time you should see that two of the tests failed: test_should_create_movie andtest_should_update_movie. If you click on the red "failures" button above the results, it will cyclethrough the failed tests.
The Details window shows the results for each test. Make sure the test_should_create_movie test ishighlighted in the first window.
Double-click the first line of code that refers to test/functional/movies_controller_test.rb.movies_controller_test.rb should become the current file, with the cursor at the line that was reported in thetraceback; in this case, line 16. We see that this code is failing:
assert_difference('Movie.count') do post :create, :movie => { } end
The problem is that the controller_test's call to 'post' hits the controller's create command, which does gothrough the validation check. The failure to pass the check prevents a new movie from being created, and westill have two entries in the database after the block runs. Let's make a change that should satisfy the model'srules:
def test_should_create_movie assert_difference('Movie.count') do post :create, :movie => { :title => "movie 3" } end
If we rerun the test, we're now down to one failure. Click on the red failure button to move to the failed test,then double-click on the line starting withtest/functional/movies_controller_test.rb:35:in`test_should_update_movie' in the Details window to see the failed code.
def test_should_update_movie put :update, :id => movies(:one).id, :movie => { } assert_redirected_to movie_path(assigns(:movie)) end
Komodo User Guide
Running Tests in Komodo Edit 296
It's not obvious why this test is failing. Rails tests are just Ruby code, so let's use the debugger (Komodo IDEonly) to have a closer look, with the following steps:
Set a breakpoint at line 62 of movies_controller.rb, in the update routine.• Bring up movies_controller_test.rb• Start the debugger, with the Debug|Go/Continue menu item• In the Debugging Options box, make sure the Directory field consists of the top-level directory ofyour project (the directory containing the movielib.kpf file, not the test file).
•
Press OK.• The debugger should stop at line 62. Now set breakpoints at lines 64 and 68, to capture the successand failure branches, and continue.
•
The debugger should stop at line 68, since this test failed. Examine the cause of failure by clicking onthe Self tab in the Debug: movies_controller.rb tab, finding @movie, and then expanding the.@errors field under it. This field has another .@errors field, so expand that, and you'll see thatthe title field is set to "has already been taken". Why?
•
What are those duplicate values? While the debugger is still running, enter the interactive shell with theDebug|Inspect menu command, and type the line:
Movie.find(:all).map(&:title)
Ruby should reply with ["MyString", "MyString"]. Those values come from the filetest/fixtures/movies.yml. The problem is that when Rails reads the fixtures file to populate the database, itdoesn't run the values through ActiveRecord's validation checks. Once you start using controller methods, likethe update method here, the values are run through validation checks.
Let's fix that. Stop the debugger and change one of those "MyString" movie titles to something moreinteresting, like "Who Is Harry Kellerman and Why Is He Saying Those Terrible Things About Me?", or "MyOther String", if you're not up for all that typing.
The unit and functional tests should now pass.
Starting the Rails Application Server
At this point we have a working application. It's not yet useful as a lending library, but we can have a look atwhat we've got so far.
In the Run folder, double-click the run server macro. This will start one of the Mongrel, lighttpd, orWebrick servers, depending on your Ruby installation, and run it in a separate console window.
Dealing with Mongrel
Rails now uses Mongrel as its default web server. The dependencies between different versions of Mongrel,Mongrel_Service and Rails haven't been worked out on Windows yet. If your console window exits with aMissingSourceFile message (along with a long traceback), you can have Rails use Webrick by editingthe Rails Tools|Run|run server macro (right-click -> Properties) and making the following change:
Replace the lines:
2: 'script/server webrick',
Komodo User Guide
Running Controller Tests 297
3: 'script/rails server webrick'
with:
2: 'script/server webrick', 3: 'script/rails server webrick'
Testing the Application
Open the URL http://localhost:3000/movies in your favorite web browser. You should see a Listing moviespage with no data and a New movie link. This is now usable, but not terribly interesting. However we canleave the web server running and see our changes as we make them.
While the application the Rails scaffolder generates is certainly serviceable, there are some tweaks that willimmediately make it friendlier:
If we're going to enter a number of movies, let's speed things up by stealing the New Movie link fromindex.html.erb, and placing it in show.html.erb:
Copy the line
<%= link_to 'New movie', new_movie_path %>
from index.html.erb, and paste it at the end of show.html.erb. Put a "|" character at the end of the previous lineto maintain consistency. Save show.html.erb. No need to restart the server -- switch to the app, enter a newtitle at the New Movie screen, press the "Create" button, and you should have a "New movie" link.
Similarly, it would be nice if the cursor was in the Title field when we load the New movie page, similar tohow the Search field has the focus on Google's home page. Since we're going to be using the Prototypelibrary, I added the javascript_include_tag directive to the head section ofapp/views/layouts/movies.html.erb (Rails 3 does this already):
<title>Movies: <%= controller.action_name %></title> <%= stylesheet_link_tag 'scaffold' %> <%= javascript_include_tag :defaults %>
Then add this code to the end of new.html.erb:
<script type="text/javascript"> Event.observe(window, "load", function() { $('movie_title').focus(); }); </script>
If you type this code in, you should see code-completion after 'Event.' and a call-tip after '(' if you'veenabled the prototype.js code intelligence API catalog in Preferences.
Again, there's no need to restart the server. As soon as you load the new controller and view code, yourchanges will come into effect.
Komodo User Guide
Dealing with Mongrel 298
Installing Plugins
Too many software packages gain bloat as they reach higher revisions. Rails is different -- the Rails teamactually dropped much of its code going from 1.2 to 2.0. Most of the dropped functionality is still available asplugins, but now people who want it need to explicitly install it. The idea is that people who don't need aparticular widget shouldn't subsidize the few who want it.
We're going to install two plugins, to handle in-place editing and pagination.
Fortunately Komodo ships with macros that install these plugins, and add necessary patches. Open the RailsTools|Plugins folder in your Rails project, and run the in-place editing and paginationmacros. If you try to install a plugin that's already installed, you'll get a warning.
It's easy to create new plugin macros. Every installable plugin is treated as a resource, usually in a publicsubversion repository, and identifiable with a URI. On the command-line you would invoke rubyscript/install plugin <URI> for Rails v2. In Komodo you would just need to copy one of themacros, edit it, and replace the old URI with the new one.
Plugins need to be installed in new Rails projects that use them (i.e. the plugin is added to the specific Railsapplication, not to Rails itself). You have to restart the server after doing this, so this would be a good time tostop the current Rails server. Find the window it's running in, and press Ctrl-C (Ctrl-Break onWindows). We'll restart it again later.
Adding Pagination
First we'll add pagination by making these changes to the movie model and controller.
In app/controllers/movies_controller.rb, change line 5 from:
@movies = Movie.find(:all)
to
For Rails 2:
@movies = Movie.paginate(:page => params[:page])
•
For Rails 3:
@movies = Movie.find(:all).paginate(:page => params[:page], :per_page=>Movie.per_page)
•
Add this code at the class level to app/models/movie.rb (lines 4-5):
cattr_reader :per_page @@per_page = 10
Finally, add pagination to the view. The last three lines of app/views/movies/index.html.erb should containthis code:
Komodo User Guide
Installing Plugins 299
<%= will_paginate(@movies) %> <br /> <%= link_to 'New movie', new_movie_path %>
Testing Pagination
Now we could start up the server, enter a few dozen different titles, and verify that the pagination is working.Or we can write another test, in movies_controller_test.rb:
def test_pagination Movie.delete_all 35.times {|i| Movie.create(:title => "title #{i}")} get :index assert_tag(:tag => 'div', :attributes => { :class => 'pagination'}) assert_tag(:tag => 'span', :content => '« Previous', :attributes => { :class => 'disabled'}) assert_tag(:tag => 'span', :content => '1', :attributes => { :class => 'current'}) assert_tag(:tag => 'div', :attributes => { :class => 'pagination'}, :child => { :tag => 'a', :attributes => { :href => "/movies?page=4" }, :content => "4" }) end
Those assert_tag tests might look like they were pulled out of thin air, but the debugger was very usefulin writing them. Originally the test read like this:
def test_pagination Movie.delete_all 35.times {|i| Movie.create(:title => "title #{i}")} get :index assert_response :success end
We used the debugger to stop at the final line, captured the contents of @request.body by double-clickingon it in the Self tab of the Debug tab, and pasted it into an empty HTML buffer in Komodo, and found thepaginator was generating this code:
<div class="pagination"> <span class="disabled">« Previous</span> <span class="current">1</span> <a href="/movies?page=2">2</a> <a href="/movies?page=3">3</a> <a href="/movies?page=4">4</a> <a href="/movies?page=2">Next »</a> </div>
We then entered an interactive context with the Debug|Inspect menu item, found some documentation onthe assert_tag, and interactively tried out the expressions, starting with simple expressions and makingthem more complex. A final set that covered the situations was then copied into the test.
Komodo User Guide
Adding Pagination 300
Testing Pagination in the Application
The functional test results should have you convinced that these additions didn't break anything. But nowwould be a good time to restart the server, try the application, and make sure it still works as before. If youadd eleven movies you should see the paginator at work.
Adding In-Place Editing
Rails 2 only! We haven't found a straightforward solution to supporting in-place-editing in Rails 3 yet.
Having to bring up an editing screen to change the spelling of a movie is cumbersome. This is easy to fix.
Add this code to movies/index.html.erb, replacing the movie.title accessor:
<td class="dvdlib_item"> <% @movie = movie %> <%= in_place_editor_field :movie, :title %> </td>
Replace line 3 of show.html.erb with just this line:
<%= in_place_editor_field :movie, :title %>
It should replace the line that displays the movie's title in a readonly field (<%= h(movie.title) %>)with a user-editable field. You can also remove the link to the edit page (in the show.html.erb file as well), andremove views/movies/edit.html.erb by right-clicking its icon in the project view, selecting Delete, andchoosing "Move to Trash".
Finally you need to tell your controller you're doing in-place editing:
On line 2 of movies_controller.rb add:
in_place_edit_for :movie, :title protect_from_forgery :except => [:set_movie_title]
Also in the controller, change the edit method so it doesn't go looking for the now-deleted edit.html.erb file.A quick way to find this method is with the Sections panel in the statusbar -- it's the text field immediately tothe right of a green circle.:
# GET /movies/1/edit def edit @movie = Movie.find(params[:id]) respond_to do |format| format.html { render :action => "show" } format.xml { render :xml => @movie } end end
Once again, run the unit and functional tests to verify these changes didn't break anything. They should befine, and this would be a good time to verify their actions in the browser, especially because in-place editing is
Komodo User Guide
Testing Pagination in the Application 301
hard to verify in a functional test. Click on a movie title in the list view, and you should see the field becomewritable, and an OK button appear. Make a change and press the OK button. If you see a "Saving..." messagein the field, and nothing else is happening, check the end of your log/development.log file. If you're curiousabout the calls to protect_from_forgery, they're related to a security issue that was addressed in Rails2.0, but not by the plugin.
Adding Borrower Data
Now that we have a working library of DVDs, let's add the pieces needed to track DVDs that leave the library,who took them, and when they need to bring them back.
Run Rails Tools|Generators|Migration, with a migration name of AddBorrowerInformation.
Set the contents of add_borrower_information.rb to this:
class AddBorrowerInformation < ActiveRecord::Migration def self.up add_column :movies, :borrower, :string, :limit => 60 add_column :movies, :borrowed_on, :date add_column :movies, :due_on, :date end
def self.down remove_column :movies, :borrower remove_column :movies, :borrowed_on remove_column :movies, :due_on end end
Run the Rails Tools|Migrate|db:migrate tool.
Let's add another validation routine. This one's more complex: we want to verify that if any of theborrower, borrowed_on, and due_on fields are specified, they all are, and we'll do a sanity check onthe value of due_on. This is to guard the case where someone hits the controller without going through oneof our own views.
Add this method to movie.rb:
def validate if borrowed_on.blank? && borrower.blank? && due_on.blank? # ok elsif !borrowed_on.blank? && !borrower.blank? && !due_on.blank? if due_on <borrowed_on errors.add(:due_on, "is before date-borrowed") end elsif borrowed_on.blank? errors.add(:borrowed_on ,"is not specified") elsif borrower.blank? errors.add(:borrower ,"is not specified") else errors.add(:due_on ,"is not specified") end end
Komodo User Guide
Adding In-Place Editing 302
Add this test to movie_test.rb:
def test_borrower m = Movie.create(:title => "House") m.borrowed_on = Date.today assert !m.valid? m.borrower = "Dave" assert !m.valid? m.due_on = Date.yesterday # Date.today - 1 if using Rails 3.0 assert !m.valid? m.due_on = m.borrowed_on + 3 assert m.valid?
# Now clear the borrower m.borrower = "" assert !m.valid? end
The unit and functional tests should all pass.
Handling Checkouts
We're almost done. Let's outline the remaining pieces, since we're now moving away from the code Railsgenerated for us:
Add a checkout method and checkout screen1. Add a return method2. Show the details in the list view3.
Here's the RHTML for the checkout screen. Create the file app/views/movies/checkout.html.erb with thiscode. One way to create this file is to right-click the app/views/movies folder and select "Add New File..."
<h1>Checkout a movie</h1> <p>Title: <%= h @movie.title %></p> <% form_tag :action => 'checkout', :id => @movie do %> <p>Your name: <%= text_field(:movie, :borrower) %> <%= submit_tag 'Check out' %> <% end %> <%= link_to 'Back to the library', movies_path %>
You might have noticed that we accept any name to be typed in the form. We can get away with this becausewe're building a lending library that our friends will use. In a public application you would need to build aseparate table to track members, and another one to handle login status, and then you'd have to deal withissues like password hashing and email address verification. All good information, and interesting, but beyondthe scope of this tutorial. See the references section for more info.
Here are the two new methods we need to add to the movies_controller.rb:
# Non-Rest methods def checkout @movie = Movie.find(params[:id]) if request.post? # It's an update @movie.borrower = params[:movie][borrower]
Komodo User Guide
Adding Borrower Data 303
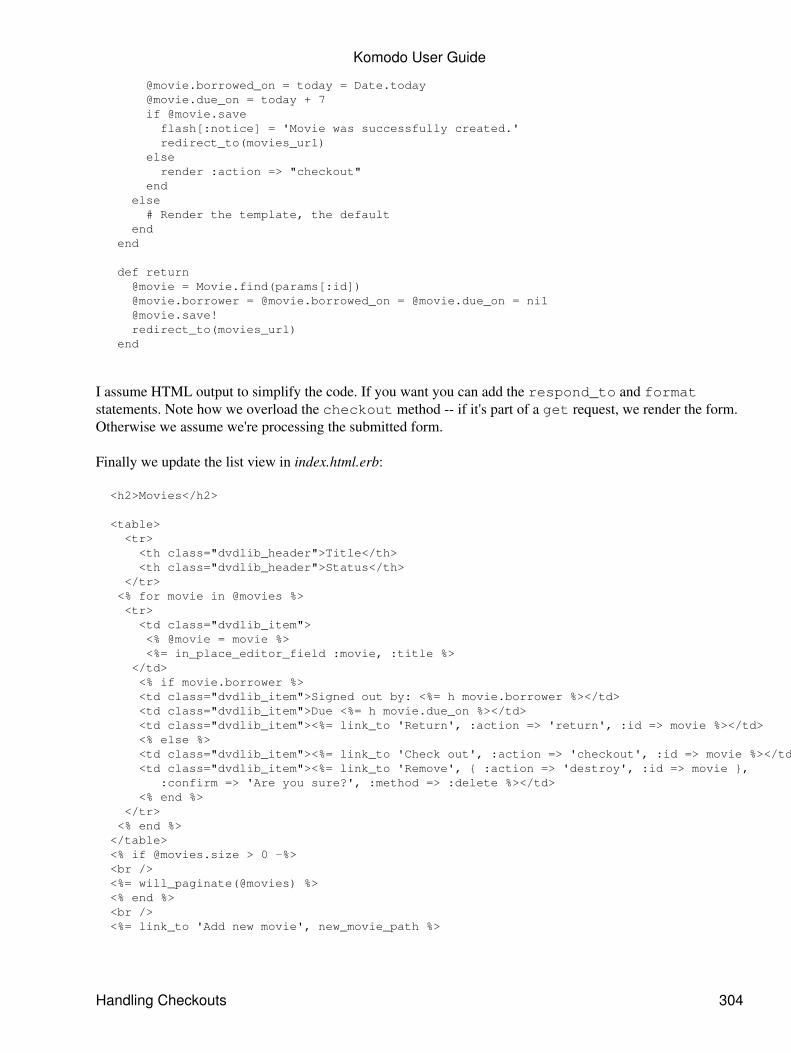
@movie.borrowed_on = today = Date.today @movie.due_on = today + 7 if @movie.save flash[:notice] = 'Movie was successfully created.' redirect_to(movies_url) else render :action => "checkout" end else # Render the template, the default end end
def return @movie = Movie.find(params[:id]) @movie.borrower = @movie.borrowed_on = @movie.due_on = nil @movie.save! redirect_to(movies_url) end
I assume HTML output to simplify the code. If you want you can add the respond_to and formatstatements. Note how we overload the checkout method -- if it's part of a get request, we render the form.Otherwise we assume we're processing the submitted form.
Finally we update the list view in index.html.erb:
<h2>Movies</h2>
<table> <tr> <th class="dvdlib_header">Title</th> <th class="dvdlib_header">Status</th> </tr> <% for movie in @movies %> <tr> <td class="dvdlib_item"> <% @movie = movie %> <%= in_place_editor_field :movie, :title %> </td> <% if movie.borrower %> <td class="dvdlib_item">Signed out by: <%= h movie.borrower %></td> <td class="dvdlib_item">Due <%= h movie.due_on %></td> <td class="dvdlib_item"><%= link_to 'Return', :action => 'return', :id => movie %></td> <% else %> <td class="dvdlib_item"><%= link_to 'Check out', :action => 'checkout', :id => movie %></td> <td class="dvdlib_item"><%= link_to 'Remove', { :action => 'destroy', :id => movie }, :confirm => 'Are you sure?', :method => :delete %></td> <% end %> </tr> <% end %> </table> <% if @movies.size > 0 -%> <br /> <%= will_paginate(@movies) %> <% end %> <br /> <%= link_to 'Add new movie', new_movie_path %>
Komodo User Guide
Handling Checkouts 304
Add two tests to movies_controller_test.rb to verify that everything is working correctly:
def test_checkout_get get :checkout, :id => movies(:one).id assert_response :success end
def test_checkout_put post :checkout, :id => movies(:one).id, :movie => {:borrower => "Fred"} assert_redirected_to movies_path end
We were expecting no errors, but this time we get an undefined local variable or methoderror for borrower at around line 97-99 of movie_controller.rb. Sure enough, we forgot to put a ":"before the param name "borrower". Change it to :borrower, rerun the tests, and they should pass.
People familiar with the first version of this tutorial will recall using the debugger to correct a problem likethis. Writing tests is more efficient. You can debug Rails apps if you need to, though. Press the RailsTools|Run|debug rails app tool, set breakpoints at the points in the controllers and views you'reinterested in, and then hit them with your application.
Finally, start the server one more time, and verify that your application now works as you expect. You'reready to take this one live.
Rails Resources
Tutorials and Reference Sites
Ruby on Rails: The home page of the Ruby on Rails project. Links to downloads, documentation andother resources.
•
Rolling with Ruby on Rails (Revisited): A Windows-based tutorial by Bill Walton and Curt Hibbs.• Instant Rails: An all-in-one bundle for windows containing Ruby, Rails, Apache, and MySQL.• 74 Quality Ruby on Rails Resources and Tutorials: An excellent compendium of Rails resources.• Simplify Views with Rails 2.0: A screencast covering the resource-based approach to building a webapplication with Rails 2.0.
•
Komodo User Guide
Rails Resources 305
XSLT Tutorial
XSLT Tutorial Overview
Before You Start
This tutorial assumes:
You are interested in XSLT. Previous knowledge of XSLT is not required for this tutorial. The XSLTTutorial walks you through a simple program and later suggests various resources for furtherinformation.
•
XSLT Tutorial Scenario
In the Perl Tutorial, a Perl program converts a text file containing exported email messages to an XML file. Inthis tutorial, XSLT converts the XML file to HTML. Note that you do not need to complete the Perl Tutorialbefore doing the XSLT Tutorial. Each tutorial can be completed independently. In this tutorial you will:
Open the XSLT Tutorial Project and associated files.1. Analyze mailexport.xml the XSLT program included in the XSLT Tutorial Project.2. Run the Program and generate HTML output through the transformation.3. Debug the program using the Komodo debugger.4.
Opening the Tutorial Project
On the Start Page under Tutorials and Documentation, click XSLT Tutorial, or open the xslt_tutorial.kpffile from the samples/xslt_tutorials subdirectory of Komodo's user data directory
The tutorial project will open in the Places sidebar.
Opening the XSLT Tutorial Files
In the Placessidebar, double-click the files mailexport.html, mailexport.xml, and mailexport2html.xsl. Thesefiles open in the Editor Pane; a tab at the top of the pane displays each of their names.
Overview of the Tutorial Files
mailexport.xml: An input file that contains email messages converted to XML format. (See how thiswas done in the Perl Tutorial.)
•
mailexport2html.xsl: An XSLT program that generates an HTML file from the mailexport.xml inputfile.
•
mailexport.html: A file that stores the HTML output from the XSLT transformation.•
Analyzing the Program
In this step, you will analyze the XSLT program on a line-by-line basis. Open the XSLT Tutorial Project andassociated files as described in the previous step. Be sure Line Numbers are enabled in Komodo (View|View
XSLT Tutorial 306
Line Numbers). Be sure the mailexport2html.xsl file is displayed in the Komodo Editor Pane.
XSLT Header
Lines 1 to 3 - XML and XSLT Declarations
an XSLT program is an XML document - thus, the XML version and character set are declared on thefirst line
•
the namespace declaration on the second line tells the "parser" (the XSLT interpreter) that XSLTelements are prefixed with xsl: to prevent confusion with user-defined element names andnon-XSLT elements
•
xsl:output controls the appearance of the generated output; for example, the presence of this linegenerates a META declaration in the head of the HTML output
•
Komodo Tip: Notice that different types of language elements are displayed in different colors. Adjust thedisplay options for language elements in the Preferences dialog box.
XSLT Pointer: Processing routines in XSLT programs are enclosed in opening and closing tags similar tothose in XML.
HTML Header
Line 6 - XSLT "template"
template is the main processing element in an XSLT program• the match="/" attribute specifies that the template is selected when the document element isprocessed
•
XSLT Pointer: XSLT commands have (up to) four components: namespace ("xsl"), element ("template"),attribute(s) ("match="), and attribute value(s) ("/").
XSLT Pointer: XSLT uses XPath expressions to select data from XML documents. On line 6, match="/"selects a "node" in the XML document's hierarchy, rather than a specific item of data.Lines 7 to 11 - HTML Tags
writes standard HTML tags to the output document•
Line 12 - XSLT apply-templates
processes each node of the XML document (that is, each sub-section contained beneath the currentposition in the XML document)
•
for each node, the XSLT "engine" (the internal processor) checks the XSLT program for a matchingtemplate
•
the first XML tag with a corresponding template is <EMAIL>•
Komodo User Guide
Analyzing the Program 307
Lines 13 to 15 - HTML Tags
after processing all the nodes in the XML document, processing returns to line 13, where the closingtags for the HTML page are written to the output
•
line 15 closes the XSLT processing routine, completing the program•
Format Email Header
Lines 18 to 21 - Select HEADER content
when line 18 is processed, content in <HEADER> tags in the XML document are processed• lines 19 and 21 write standard HTML formatting around the content generated in line 20• on line 20, the value-of statement selects content contained in the <SUBJECT> tag and writes it tothe output document
•
Komodo Tip: Click the minus symbol to the left of line 19. The entire section of nested code is collapsed.This is called Code Folding.Lines 22 to 29 - call-template
after the From: text, the call-template routine causes the XSLT program to proceed to thetemplate formatEmail on line 51; after completing the formatEmail routine, processing returnsto line 23
•
with-param indicates that the parameter address should be applied to the contents of the<ORIGADDRESS> XML tag
•
the same selection and formatting routine is applied to the contents of the <DESTADDRESS> XMLtag on lines 26 to 28
•
XSLT Pointer: Notice the <BR/> HTML tag on line 25. XML and XSLT treat all tags as container tags thathave both opening and closing elements. However, some HTML tags (like <BR> and <IMG>) stand alone,and do not require a closing tag. They are represented with a closing slash. XSLT tags also use a closing slashif they are not a tag pair (as shown on line 23).
Process Email
Lines 33 to 34 - Process First Message
when the apply-templates tag in line 12 is encountered, processing jumps to line 33• on line 34, the HEADER node is selected and processing jumps to line 18•
XSLT Pointer: Comments in XSLT programs are enclosed in the tags <!-- and -->, the same as inHTML.Lines 36 to 39 - Process Email Body
after processing the email header, the XSLT program proceeds to line 36• the contents of the BODY tag are placed in the HTML tags•
Komodo Tip: XSLT programs and XML input documents must be "well-formed" in order to performtransformations. Komodo's Background Syntax Checking makes it easy to identify and fix coding errors.
Komodo User Guide
Lines 13 to 15 - HTML Tags 308

Format Email Addresses
Lines 45 to 52 - Format Email Addresses
the routine that starts on line 47 is called from lines 22 and 26• address parameter contents are determined on lines 23 and 27• on line 49, the contents of the address parameter are converted to a variable and concatenated withthe text that constitutes a valid email address reference in HTML
•
Running the Program
To start, generate program output by running the program through the debugger without setting anybreakpoints.
Assign XML input file: On the Debug menu, click Go/Continue. In the Debugging Options dialogbox, specify mailexport.xml as the XML input file. Use the Browse button to navigate to the directorycontaining the XSLT tutorial project files.
1.
Run the debugger: Click OK to run the debugger.2. Stop the debugger: From the Debug menu, select Stop to end the debugging process.3. View Debug Output: Notice the messages displayed on the status bar in the bottom left corner of thescreen; these indicate the debugger status. The results of the transformation are displayed on theDebug tab.
4.
View the Output as HTML: On the right side of the Bottom Pane, click the HTML tab. Therendered HTML is displayed in the Bottom Pane. Click the Output tab to return to the HTML code.
5.
Create New File: To create a new HTML file that will later contain the HTML code in the BottomPane, select File|New|New File. In the New File dialog box, select the HTML Category. Click Open.
6.
Save the Output: Delete the contents of the new HTML file tab in the Editor Pane, and then selectthe contents of the Output tab on the Bottom Pane. Copy the contents to the new HTML file tab inthe Editor Pane. Select File|Save As to save the file with a unique name.
7.
Debugging the Program
This section reviews how to add breakpoints to the program and "debug" it. Adding breakpoints lets you torun the program in parts, making it possible to watch variables and view output as they are generated. Beforebeginning, be sure that line numbering is enabled in Komodo (View|View Line Numbers).
Step In/Assign the XML input file: If necessary, click on the mailexport2html.xsl tab in the editor.From the menu, select Debug|Step In. In the Debugging Options dialog box, specify mailexport.xmlas the XML input file. This should already be set if the input file was assigned in the previous step.Assigning the XML input file to the XSLT program file selects the XML file as the default input filewhen running the transformation.
1.
Start Debugging: In the Debugging Options dialog box, click OK to start debugging.2.
Komodo Tip: Debugger commands can be accessed from the Debug menu, by shortcut keys, or from theDebug Toolbar. For a summary of debugger commands, see the Debugger Command List.
Komodo User Guide
Format Email Addresses 309

Watch the debug process: A yellow arrow on line 7 indicates the position in the XSLT file where thedebugger has halted.
3.
View Debug tab: In the Bottom Pane, click the Debug tab. On the right side of the Debug tab, clickthe Call Stack tab. On the Call Stack tab, notice that the current call stack is the template in line 6 ofthe XSLT program.
4.
Set a breakpoint: On the mailexport2html.xsl tab in the Editor Pane, click the gray marginimmediately to the left of the code on line 12. This sets a breakpoint, indicated by a red circle.
5.
Komodo Tip: Breakpoints can be set at any time. An enabled breakpoint is a solid red circle. A disabledbreakpoint is a white circle with a red outline. Click once in the gray margin to enable a breakpoint. Click anenabled breakpoint once to disable it.
Line 7: Continue: Select Debug|Go/Continue. The debugger runs until it encounters the breakpointon line 12. If no breakpoint had been set, the debugger would have run to the end of the program.
6.
Line 12: Step In: Click Debug|Step In. Notice the debugger jumps to line 33 of the XSLT program,and shows a pointer in the XML file on line 3. When the debugger processed line 12(xsl:apply-templates), it looked for a template that matched the top node in the XMLdocument (<EMAILCOMMENTS>). When no matching template was found, it proceeded to the nextnode in the XML document (<EMAIL>) and found a matching template on line 33.
7.
View the Debug tab: Notice that the Call Stack tab displays the current template match. Previoustemplate matches can be selected from the list; double-clicking them jumps to the corresponding linesin both files.
8.
Line 33: Step In: Use the Step In command until the current-line pointer in the XSLT file is on line20.
9.
Line 20: Step In: Watch the Bottom Pane as you Step In line 21. The xsl:value-of statementselects the contents of the <SUBJECT> field on line 7 of the XML file and places it within the HTMLtags on lines 19 and 21.
10.
Line 21: Step In: Line 22 calls the template formatEmail on line 45. Continue to step in until line49 is processed. The formatEmail template is processed with the address parameter on line 46.This routine processes the contents of the <ORIGADDRESS> node in the XML document. In order togenerate the hyperlink in the output HTML document, lines 48 and 49 concatenate the stringmailto: with the contents of the <ORIGADDRESS> node.
11.
Line 49 to end: Go/Continue: On Debug menu, click Go/Continue to run the rest of the XSLTprogram. The program's output is displayed in the Bottom Pane: raw output in the Output tab andrendered output in the HTML tab.
12.
More XSLT Resources
Documentation
The W3C (World Wide Web Consortium) specifications are available online:
XSLT• XPath• XML•
Tutorials and Reference Sites
There are many XSLT tutorials and beginner XSLT sites on the Internet, including:
Komodo User Guide
Debugging the Program 310

xml.com's What is XSLT?• free tutorials at W3Schools.com•
Komodo User Guide
Tutorials and Reference Sites 311
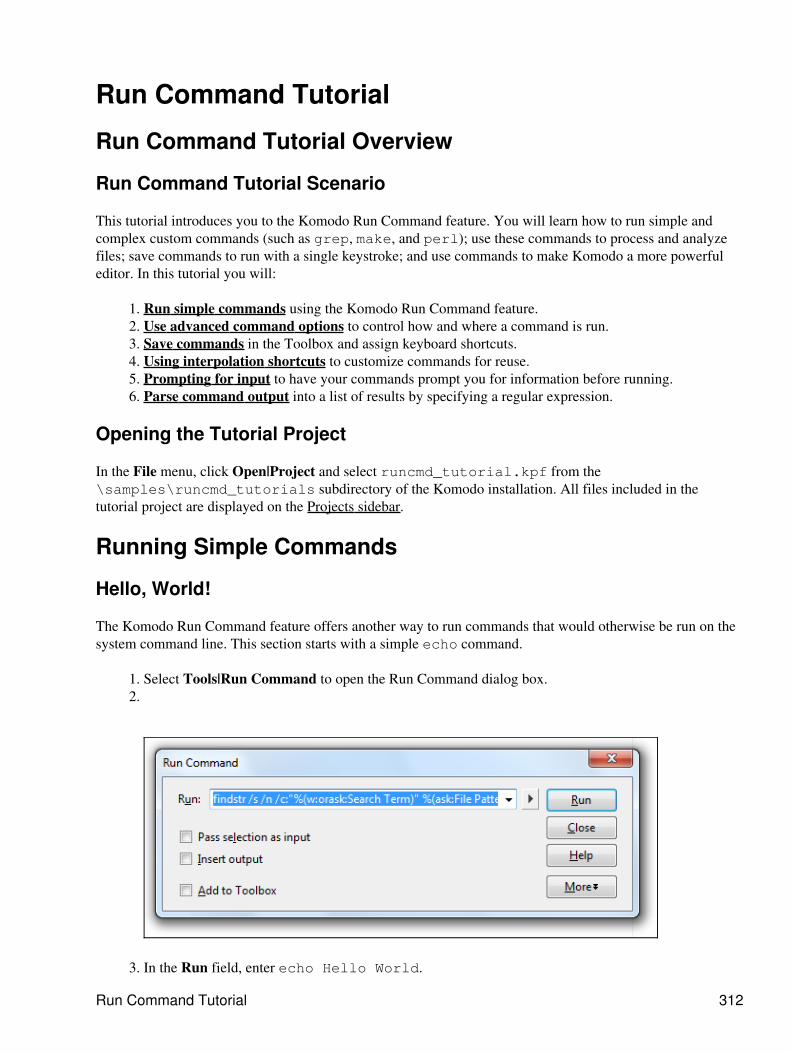
Run Command Tutorial
Run Command Tutorial Overview
Run Command Tutorial Scenario
This tutorial introduces you to the Komodo Run Command feature. You will learn how to run simple andcomplex custom commands (such as grep, make, and perl); use these commands to process and analyzefiles; save commands to run with a single keystroke; and use commands to make Komodo a more powerfuleditor. In this tutorial you will:
Run simple commands using the Komodo Run Command feature.1. Use advanced command options to control how and where a command is run.2. Save commands in the Toolbox and assign keyboard shortcuts.3. Using interpolation shortcuts to customize commands for reuse.4. Prompting for input to have your commands prompt you for information before running.5. Parse command output into a list of results by specifying a regular expression.6.
Opening the Tutorial Project
In the File menu, click Open|Project and select runcmd_tutorial.kpf from the\samples\runcmd_tutorials subdirectory of the Komodo installation. All files included in thetutorial project are displayed on the Projects sidebar.
Running Simple Commands
Hello, World!
The Komodo Run Command feature offers another way to run commands that would otherwise be run on thesystem command line. This section starts with a simple echo command.
Select Tools|Run Command to open the Run Command dialog box.1. 2.
In the Run field, enter echo Hello World.3.
Run Command Tutorial 312
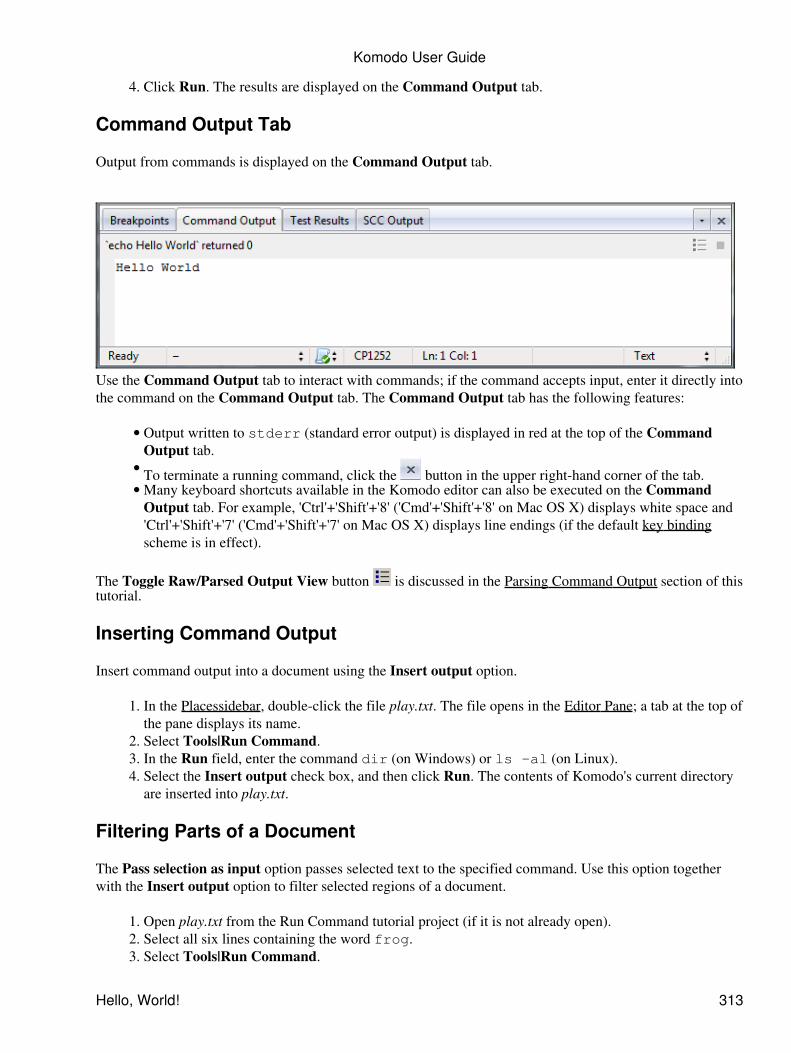
Click Run. The results are displayed on the Command Output tab.4.
Command Output Tab
Output from commands is displayed on the Command Output tab.
Use the Command Output tab to interact with commands; if the command accepts input, enter it directly intothe command on the Command Output tab. The Command Output tab has the following features:
Output written to stderr (standard error output) is displayed in red at the top of the CommandOutput tab.
•
To terminate a running command, click the button in the upper right-hand corner of the tab.• Many keyboard shortcuts available in the Komodo editor can also be executed on the CommandOutput tab. For example, 'Ctrl'+'Shift'+'8' ('Cmd'+'Shift'+'8' on Mac OS X) displays white space and'Ctrl'+'Shift'+'7' ('Cmd'+'Shift'+'7' on Mac OS X) displays line endings (if the default key bindingscheme is in effect).
•
The Toggle Raw/Parsed Output View button is discussed in the Parsing Command Output section of thistutorial.
Inserting Command Output
Insert command output into a document using the Insert output option.
In the Placessidebar, double-click the file play.txt. The file opens in the Editor Pane; a tab at the top ofthe pane displays its name.
1.
Select Tools|Run Command.2. In the Run field, enter the command dir (on Windows) or ls -al (on Linux).3. Select the Insert output check box, and then click Run. The contents of Komodo's current directoryare inserted into play.txt.
4.
Filtering Parts of a Document
The Pass selection as input option passes selected text to the specified command. Use this option togetherwith the Insert output option to filter selected regions of a document.
Open play.txt from the Run Command tutorial project (if it is not already open).1. Select all six lines containing the word frog.2. Select Tools|Run Command.3.
Komodo User Guide
Hello, World! 313
In the Run field, enter the command sort (on Windows) or sort -n (on Linux).4. Note that the Pass selection as input and Insert output options are selected automatically. If one ormore lines are selected in a document, the Run Command expects to filter the selected lines.
5.
Click Run to sort the list of frogs.6.
Use the grep command line utility to filter lines of text. Use grep to filter out all but the red frogs from thelist.
This tutorial assumes the grep utility is installed on your system and is in your system's PATH. Grep is aLinux utility that searches for text and characters in files. Windows operating system users may not have agrep installation. There are a number of free versions available on the Web. Search using the keywordsgrep for Windows.
Open play.txt from the Run Command tutorial project (if it is not already open).1. Select the "5 red frogs" and "6 green frogs" lines.2. Select Tools|Run Command.3. In the Run field, enter the command grep red.4. Click Run to remove all but the red frogs.5.
Using Advanced Options
Clicking the More button in the Run Command dialog box reveals a number of advanced options.
Komodo User Guide
Filtering Parts of a Document 314
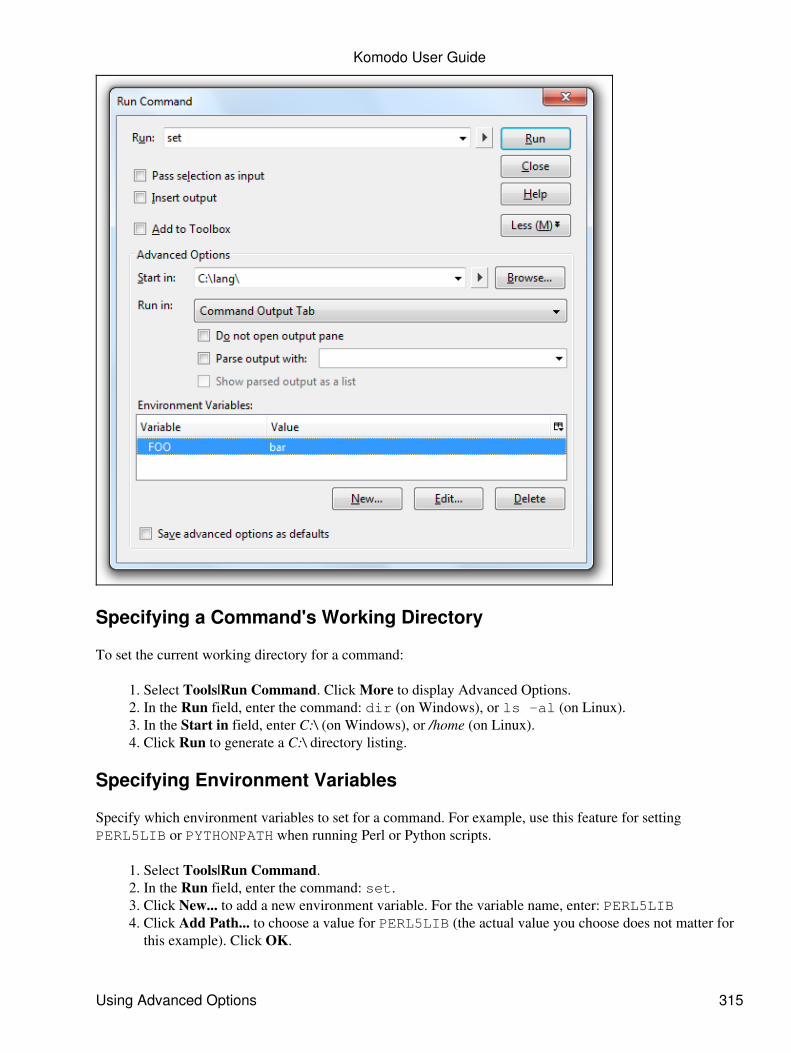
Specifying a Command's Working Directory
To set the current working directory for a command:
Select Tools|Run Command. Click More to display Advanced Options.1. In the Run field, enter the command: dir (on Windows), or ls -al (on Linux).2. In the Start in field, enter C:\ (on Windows), or /home (on Linux).3. Click Run to generate a C:\ directory listing.4.
Specifying Environment Variables
Specify which environment variables to set for a command. For example, use this feature for settingPERL5LIB or PYTHONPATH when running Perl or Python scripts.
Select Tools|Run Command.1. In the Run field, enter the command: set.2. Click New... to add a new environment variable. For the variable name, enter: PERL5LIB3. Click Add Path... to choose a value for PERL5LIB (the actual value you choose does not matter forthis example). Click OK.
4.
Komodo User Guide
Using Advanced Options 315
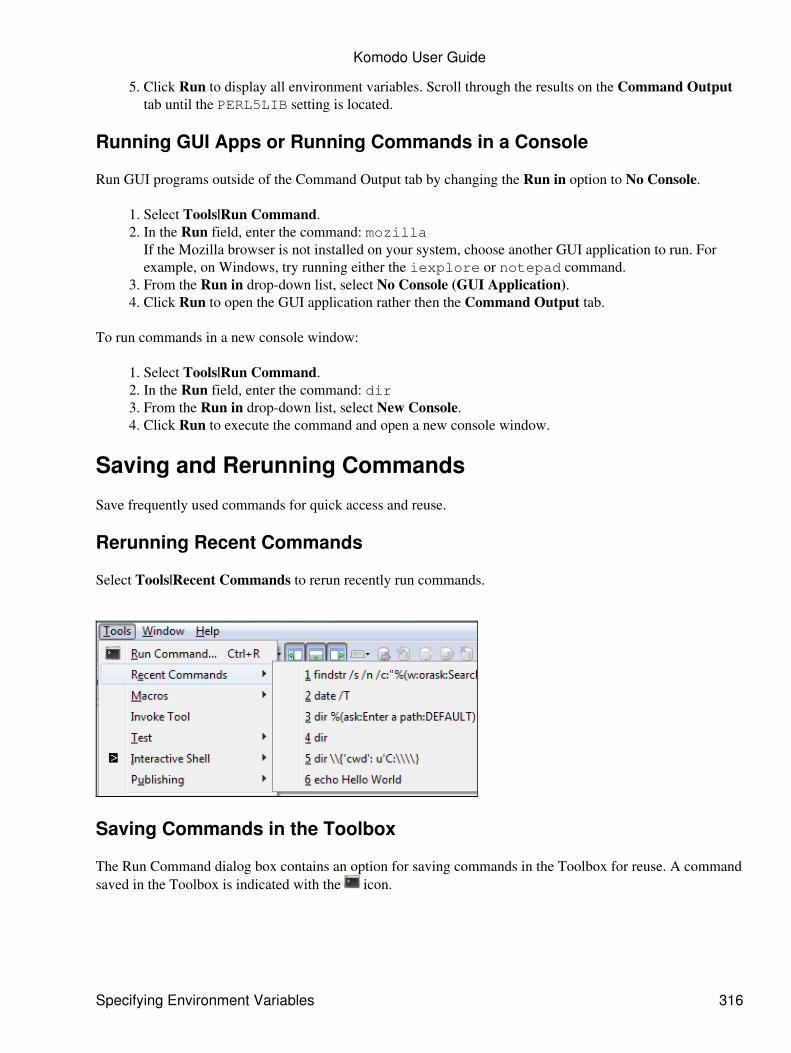
Click Run to display all environment variables. Scroll through the results on the Command Outputtab until the PERL5LIB setting is located.
5.
Running GUI Apps or Running Commands in a Console
Run GUI programs outside of the Command Output tab by changing the Run in option to No Console.
Select Tools|Run Command.1. In the Run field, enter the command: mozillaIf the Mozilla browser is not installed on your system, choose another GUI application to run. Forexample, on Windows, try running either the iexplore or notepad command.
2.
From the Run in drop-down list, select No Console (GUI Application).3. Click Run to open the GUI application rather then the Command Output tab.4.
To run commands in a new console window:
Select Tools|Run Command.1. In the Run field, enter the command: dir2. From the Run in drop-down list, select New Console.3. Click Run to execute the command and open a new console window.4.
Saving and Rerunning Commands
Save frequently used commands for quick access and reuse.
Rerunning Recent Commands
Select Tools|Recent Commands to rerun recently run commands.
Saving Commands in the Toolbox
The Run Command dialog box contains an option for saving commands in the Toolbox for reuse. A commandsaved in the Toolbox is indicated with the icon.
Komodo User Guide
Specifying Environment Variables 316
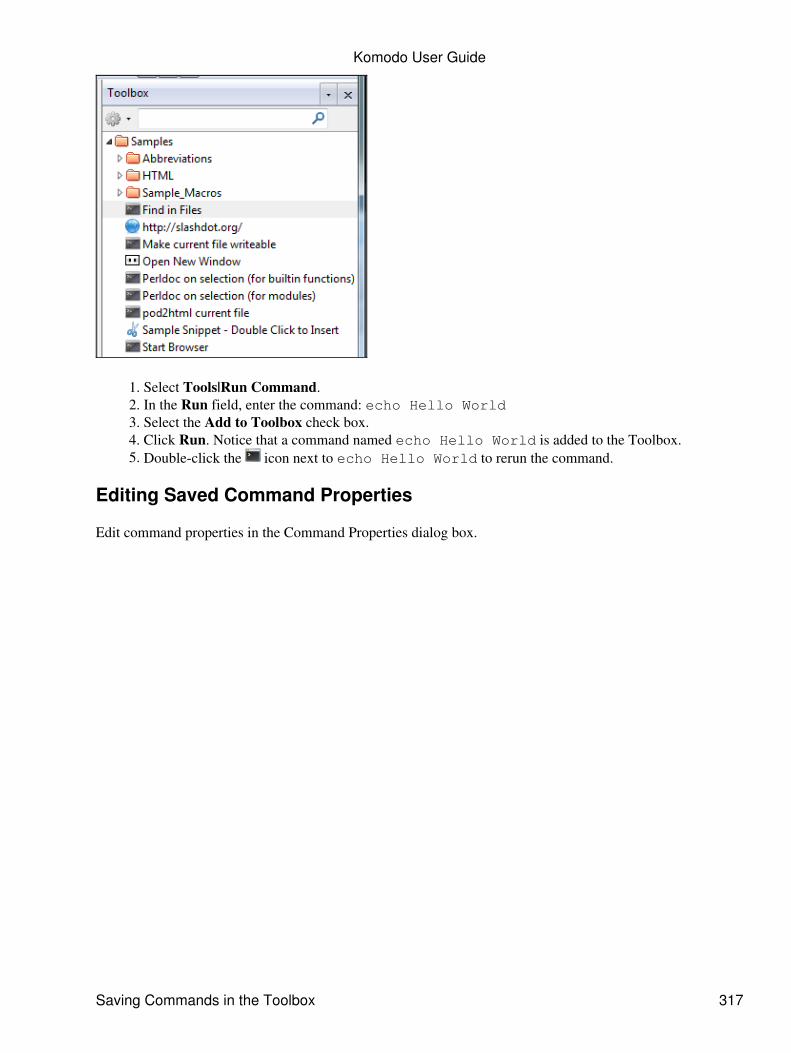
Select Tools|Run Command.1. In the Run field, enter the command: echo Hello World2. Select the Add to Toolbox check box.3. Click Run. Notice that a command named echo Hello World is added to the Toolbox.4. Double-click the icon next to echo Hello World to rerun the command.5.
Editing Saved Command Properties
Edit command properties in the Command Properties dialog box.
Komodo User Guide
Saving Commands in the Toolbox 317
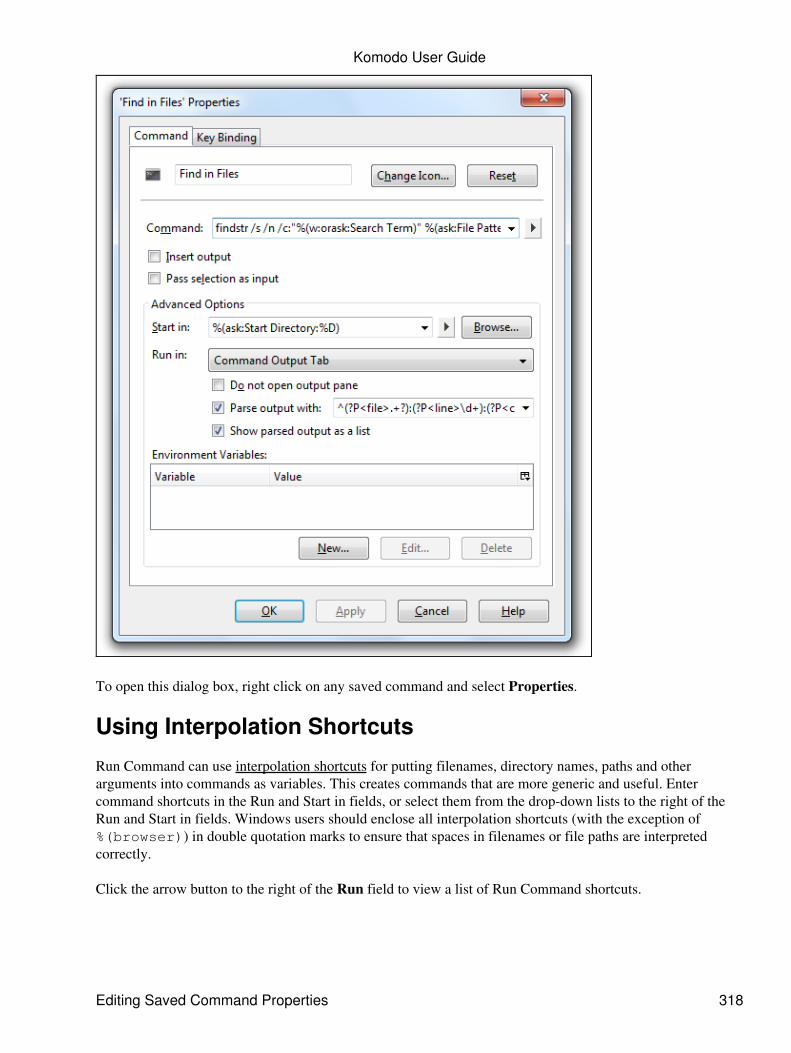
To open this dialog box, right click on any saved command and select Properties.
Using Interpolation Shortcuts
Run Command can use interpolation shortcuts for putting filenames, directory names, paths and otherarguments into commands as variables. This creates commands that are more generic and useful. Entercommand shortcuts in the Run and Start in fields, or select them from the drop-down lists to the right of theRun and Start in fields. Windows users should enclose all interpolation shortcuts (with the exception of%(browser)) in double quotation marks to ensure that spaces in filenames or file paths are interpretedcorrectly.
Click the arrow button to the right of the Run field to view a list of Run Command shortcuts.
Komodo User Guide
Editing Saved Command Properties 318
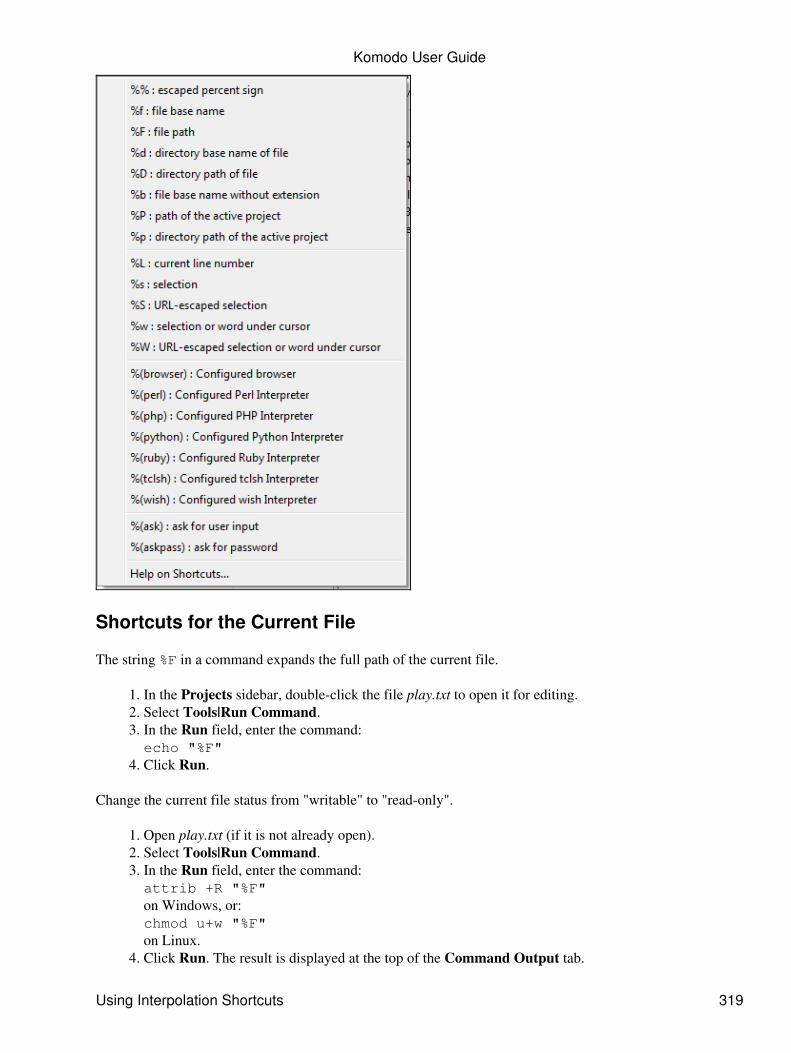
Shortcuts for the Current File
The string %F in a command expands the full path of the current file.
In the Projects sidebar, double-click the file play.txt to open it for editing.1. Select Tools|Run Command.2. In the Run field, enter the command:echo "%F"
3.
Click Run.4.
Change the current file status from "writable" to "read-only".
Open play.txt (if it is not already open).1. Select Tools|Run Command.2. In the Run field, enter the command:attrib +R "%F"on Windows, or:chmod u+w "%F"on Linux.
3.
Click Run. The result is displayed at the top of the Command Output tab.4.
Komodo User Guide
Using Interpolation Shortcuts 319
To open a current HTML file in a Web browser, combine %F with the %(browser) shortcut.
In the Projects sidebar, double-click the file index.html.1. Select Tools|Run Command.2. Click the arrow to the right the Run field to display the shortcuts drop-down list. Select %browser,press the space bar, and then select %F. Enclose the %F in double quotation marks. On Mac OS X,you wil have to add 'open' at the beginning of the command if Safari is your default browser.
3.
From the Run in drop-down menu, select No Console (GUI Application).4. Click Run.5.
Shortcuts for the Current Selection
The %s, %S, %w and %W codes insert current selections, or the current word under the cursor, intocommands. This shortcut helps when running utilities like grep, or for searching the Web.
In the Projects sidebar, double-click the file index.html.1. Position the cursor over the word "PHP" in index.html.2. Select Tools|Run Command.3. In the Run field, enter the command:%(browser) http://www.google.com/search?q="%W".
4.
Select the Add to Toolbox check box to save this command.5. Click Run to search for "PHP" with Google.6.
Now that you have searched for a word or selection in Google, try the following shortcut to search for PHPmethods.
Open index.html.1. Select the text mysql_info methods in the file.2. Select Tools|Run Command.3. In the Run field, enter the command "%(browser)http://www.php.net/manual-lookup.php?pattern=%S".
4.
Select the Add to Toolbox check box to save this command.5. Click Run to search mysql_info methods in PHP's online manual.6.
These two commands are built into Komodo. If the default key binding scheme is in effect, 'Ctrl'+'F1'('Cmd'+'Ctrl'+'/' on Mac OS X) starts a Google search for the current selection. 'Shift'+'F1' ('Cmd'+'/' on OS X)in a Perl, Python or PHP file starts a help search appropriate for that language. Customize searches in thePreferences dialog box (Edit|Preferences|Language Help).
Using Shortcuts for a Command's Directory
Run commands from the directory where the current file is stored, rather then the current directory. Forexample, use the command %(perl) "%F" to run the current file with a configured Perl interpreter.
In the Projects sidebar, double-click the file hello.pl.1. Select Tools|Run Command.2. In the Run field, enter the command:%(perl) "%F"
3.
In the Start in field, enter: "%D"4. Click Run.5.
Komodo User Guide
Shortcuts for the Current File 320
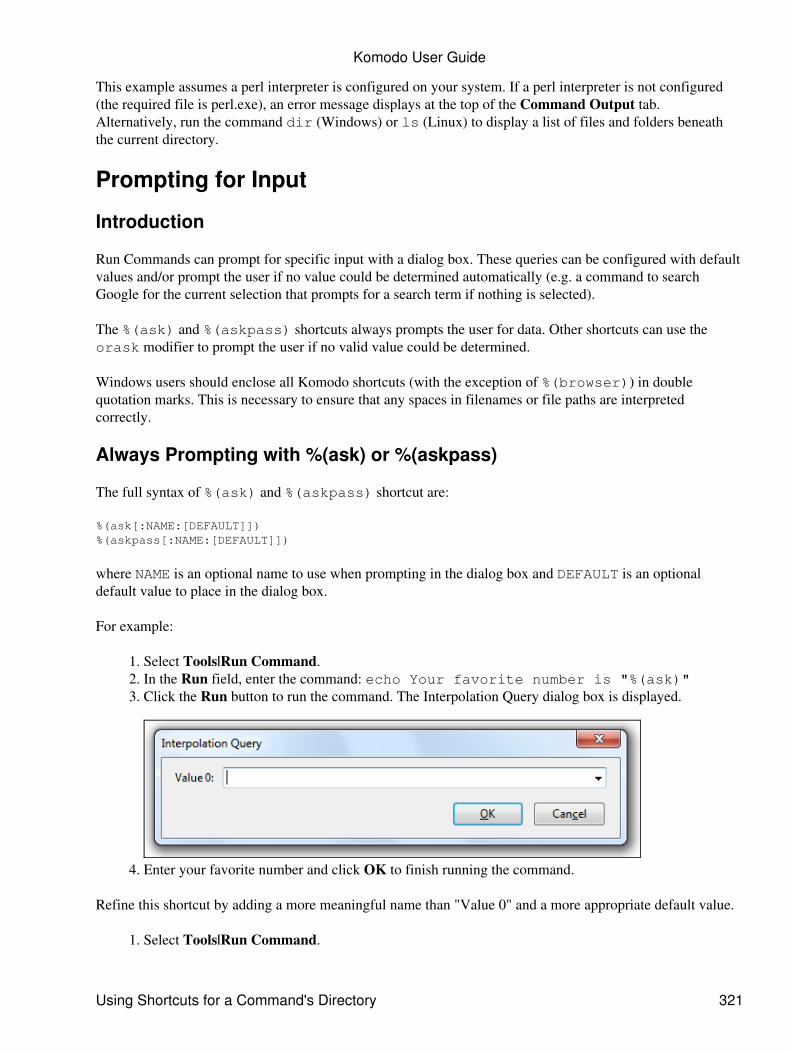
This example assumes a perl interpreter is configured on your system. If a perl interpreter is not configured(the required file is perl.exe), an error message displays at the top of the Command Output tab.Alternatively, run the command dir (Windows) or ls (Linux) to display a list of files and folders beneaththe current directory.
Prompting for Input
Introduction
Run Commands can prompt for specific input with a dialog box. These queries can be configured with defaultvalues and/or prompt the user if no value could be determined automatically (e.g. a command to searchGoogle for the current selection that prompts for a search term if nothing is selected).
The %(ask) and %(askpass) shortcuts always prompts the user for data. Other shortcuts can use theorask modifier to prompt the user if no valid value could be determined.
Windows users should enclose all Komodo shortcuts (with the exception of %(browser)) in doublequotation marks. This is necessary to ensure that any spaces in filenames or file paths are interpretedcorrectly.
Always Prompting with %(ask) or %(askpass)
The full syntax of %(ask) and %(askpass) shortcut are:
%(ask[:NAME:[DEFAULT]])%(askpass[:NAME:[DEFAULT]])
where NAME is an optional name to use when prompting in the dialog box and DEFAULT is an optionaldefault value to place in the dialog box.
For example:
Select Tools|Run Command.1. In the Run field, enter the command: echo Your favorite number is "%(ask)"2. Click the Run button to run the command. The Interpolation Query dialog box is displayed.3.
Enter your favorite number and click OK to finish running the command.4.
Refine this shortcut by adding a more meaningful name than "Value 0" and a more appropriate default value.
Select Tools|Run Command.1.
Komodo User Guide
Using Shortcuts for a Command's Directory 321

In the Run field, enter the command: echo Your favorite number is "%(ask:FavNumber:42)"
2.
Click the Run button to run the command. The Interpolation Query dialog box will now look likethis:
3.
If your favorite number does not happen to be 42, enter a different number and click OK to finishrunning the command.
4.
Prompting When Necessary with %(...:orask)
Any Run Command shortcut can be modified to prompt the user for a value if one cannot be determinedautomatically. The full syntax of the modified shortcut is:
%(SHORTCUT:orask[:NAME])
where NAME is an optional name to use when prompting in the dialog box.
In the previous step we created a shortcut to search for the selected word on Google with the command:
%(browser) http://www.google.com/search?q="%W"
However, if nothing has been selected and there is no word under the cursor, the command fails. In this case,it would be better if the command prompted you for a search term.
Be sure your cursor is not positioned over a word.1. Select Tools|Run Command.2. In the Run field, enter the command:%(browser) http://www.google.com/search?q="%(W:orask:Search for)"
3.
Click Run. The Interpolation Query dialog box prompts for a search term.4.
Parsing Command Output
Introduction
Use Run Commands to specify a regular expression to parse filename and line number information from linesof output. The parsed results are displayed in a table to quickly identify the desired file. Explore this usage bycreating a "Find in Files" command later in this section.
Parsing Output with a Regular Expression
Output from a run command can be parsed with a Python regular expression and displayed in the CommandOutput tab as a list.
Komodo User Guide
Always Prompting with %(ask) or %(askpass) 322
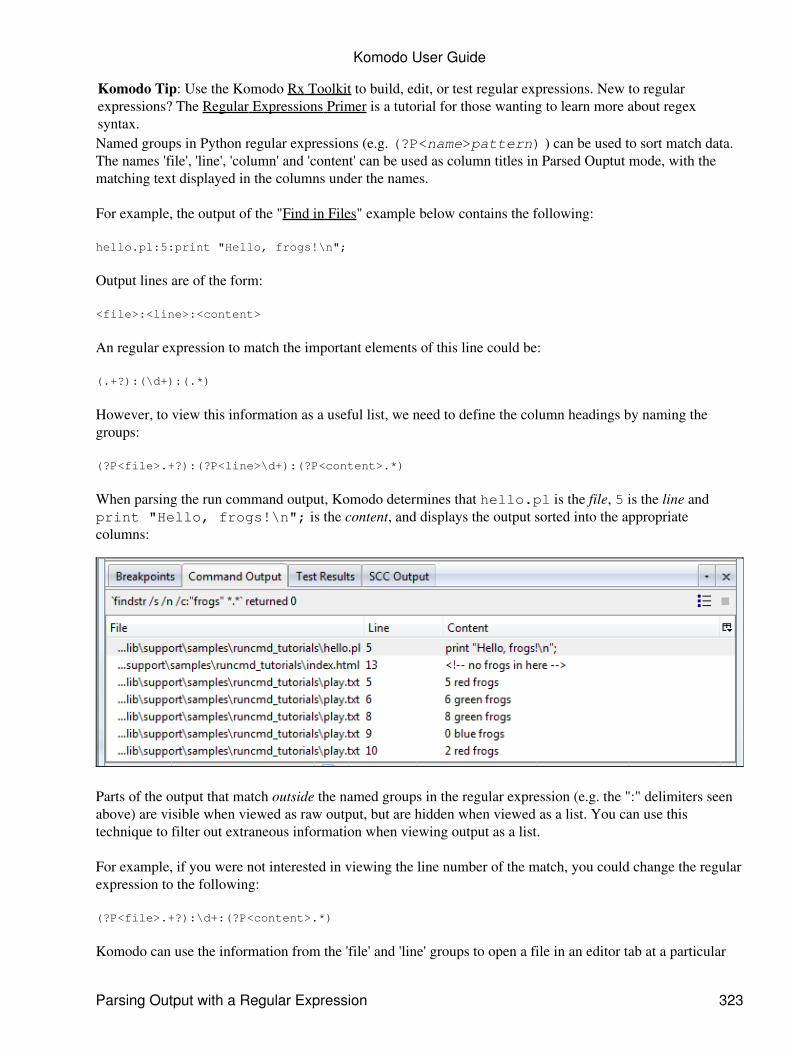
Komodo Tip: Use the Komodo Rx Toolkit to build, edit, or test regular expressions. New to regularexpressions? The Regular Expressions Primer is a tutorial for those wanting to learn more about regexsyntax.Named groups in Python regular expressions (e.g. (?P<name>pattern) ) can be used to sort match data.The names 'file', 'line', 'column' and 'content' can be used as column titles in Parsed Ouptut mode, with thematching text displayed in the columns under the names.
For example, the output of the "Find in Files" example below contains the following:
hello.pl:5:print "Hello, frogs!\n";
Output lines are of the form:
<file>:<line>:<content>
An regular expression to match the important elements of this line could be:
(.+?):(\d+):(.*)
However, to view this information as a useful list, we need to define the column headings by naming thegroups:
(?P<file>.+?):(?P<line>\d+):(?P<content>.*)
When parsing the run command output, Komodo determines that hello.pl is the file, 5 is the line andprint "Hello, frogs!\n"; is the content, and displays the output sorted into the appropriatecolumns:
Parts of the output that match outside the named groups in the regular expression (e.g. the ":" delimiters seenabove) are visible when viewed as raw output, but are hidden when viewed as a list. You can use thistechnique to filter out extraneous information when viewing output as a list.
For example, if you were not interested in viewing the line number of the match, you could change the regularexpression to the following:
(?P<file>.+?):\d+:(?P<content>.*)
Komodo can use the information from the 'file' and 'line' groups to open a file in an editor tab at a particular
Komodo User Guide
Parsing Output with a Regular Expression 323

line (see below).
Using "Find in Files"
Create a "Find in Files" command using all information presented in this tutorial.
In the Projects sidebar, double-click the file hello.pl.1. Position the cursor over the word frogs.2. Select Tools|Run Command.3. On Windows, enter the command:findstr /s /n /c:"%(w:orask:Search Term)" "%(ask:File Pattern:*.*)"Or on Linux enter the command:find . -name "%(ask:File Pattern:*)" | xargs -l grep -nH"%(w:orask:Search Term)"
Note that findstr is a Windows command line utility that searches for strings in files.
4.
Select the Add to Toolbox check box to save this command.5. In the Start in field, enter:%(ask:Start Directory:%D)(When the command is run, Komodo should prompt for the "Start Directory" using the directory ofthe current file, or %D as the default value).
6.
Select the Parse output with check box and enter:^(?P<file>.+?):(?P<line>\d+):(?P<content>.*)$as the regular expression with which to parse.
7.
Select the Show parsed output as a list check box.8. Click Run. The Interpolation Query dialog box is displayed.9.
Click OK to run findstr. A list of all occurrences of "frogs" in the files of the Run Command tutorialproject is displayed on the Command Output tab.
10.
Komodo User Guide
Using "Find in Files" 324
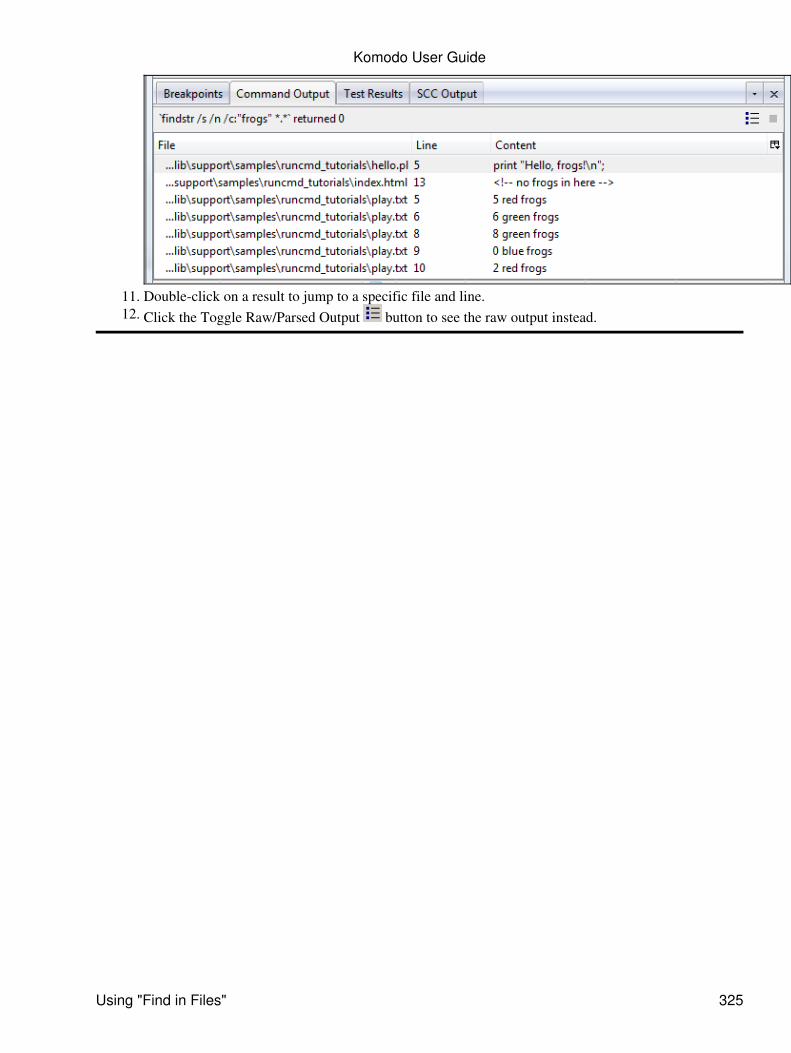
Double-click on a result to jump to a specific file and line.11. Click the Toggle Raw/Parsed Output button to see the raw output instead.12.
Komodo User Guide
Using "Find in Files" 325

Komodo FAQWhere is Komodo installed?• Where does Komodo keep settings data?• Where does Komodo save log files?• Komodo doesn't start• "Acces Denied" during installation on Windows XP SP3.• I can't see my Left or Right Pane• I can't see my Bottom Pane• I want to maximize my Editor Pane• How do I know if I'm debugging?• How do I know if I'm editing?• How can I add command-line arguments to my program for debugging?• Komodo crashes. What can I do?• Why is Komodo so big?• I already have Mozilla. Why do I need to have two versions?• I'm having trouble debugging PHP. What do I do?• How do I emulate sessions in PHP debugging?• Why don't breakpoints work when I use the Psyco extension in Python?• How do I configure Virtual Hosting on an Apache Web server?• I moved my Komodo installation on Linux, and am now getting Perl debugging errors.• How do I prevent the dialog from displaying every time I start the debugger?• Why do I get a CGI security alert when debugging PHP?• The Check Configuration window reports that a language installed on my system is not available.Why?
•
My screen goes black for a second or two whenever I open files for which Komodo performsbackground syntax checking. Why?
•
How can I run additional CVS commands from within Komodo?• Why doesn't Ruby debugging work on my Linux x64 system?•
Where is Komodo installed?
The Komodo installer will prompt for an installation directory; you can choose any directory you havepermissions to install to. The default location varies by platform, and the name of the directory corresponds tothe version of Komodo you are running ("IDE" or "Edit" on Windows, "IDE" or "Edit" plus the versionnumber on OS X and Linux):
Windows
C:\Program Files\ActiveState Komodo [IDE|Edit]\
Note: Older versions of Komodo on Windows installed in a directory which included the version number (e.g."ActiveState Komodo IDE 4.2"), which allowed for side-by-side installations of different versions ofKomodo. If you wish to do this, manually specify an install directory with a version number.
Linux
/opt/Komodo-[IDE|Edit]-<version>/
OS X
Komodo FAQ 326

/Applications/Komodo-[IDE|Edit]-<version>.app
Where does Komodo keep settings data?
Komodo stores preferences, macros, templates, keybinding schemes and other settings in a user-specificdirectory called the user data directory. The name and location of this directory varies depending on theoperating system and Komodo version:
Windows 2000 and XP
C:\Documents and Settings\<user>\Application Data\ActiveState\Komodo[IDE|Edit]\<version>
Windows Vista
C:\Users\<user>\AppData\Roaming\ActiveState\Komodo[IDE|Edit]\<version>
Linux
/home/<user>/.komodo[ide|edit]/<version>
Mac OS X
/Users/<user>/Library/Application Support/Komodo[IDE|Edit]/<version>
The location of this directory can be overridden using the KOMODO_USERDATADIR environment variable.
Where does Komodo log output and errors?
The user data directory contains pystderr.log and pystdout.log, which can be useful fortroubleshooting problems with Komodo.
Komodo doesn't start. Why?
If Komodo doesn't start, there could be one of several issues.
Do you have Norton Anti-Virus (NAV) installed, or more specifically, the File System RealtimeProtection feature enabled?
The problematic relationship between Komodo and Norton Anti-Virus' File System RealtimeProtection feature is a known issue, which we are working to remedy. In the meantime, you candisable NAV Corp 7.5 FSRP before running Komodo, and then re-enable it after Komodo starts.
•
If none of these seem to apply to you, please follow the instructions in this FAQ entry to log a bug inKomodo's bug database.
"Acces Denied" during installation on Windows XP SP3.
You may need to upgrade your version of Windows Installer. Make sure that the Windows Installer Service isstopped before upgrading (requires a restart upon completion).
Komodo User Guide
Where is Komodo installed? 327
Why can't I see my Left or Right Pane
One or more panes may be hidden.
To view the Left Pane, click the Show/Hide Left Pane button on the toolbar, use the options on the Viewmenu, or use the associated key binding.
I can't see my Bottom Pane
The Bottom Pane appears below the Editor Pane during debugging. If you can't see your Bottom Pane, it maybe hidden.
To view the Bottom Pane, click the Show/Hide Bottom Pane button on the toolbar, use the options on theView menu, or use the associated key binding.
For more information, see Debugging Programs
I want to maximize the Editor Pane
I like to see the Left and Right Panes and the Bottom Pane, but right now I want to maximize my Editor Paneto get some coding done. How can I maximize my Editor Pane?
To maximize your Editor Pane, hide the other panes in the Komodo workspace:
Click the close arrow button that appears in the top right corner of each of these panes.1.
How do I know if I'm debugging?
When Komodo is debugging, the title of the Komodo workspace includes an indication of the state of thedebugger. If the debugger is running, the title looks similar to [pathname\filename] - ActiveState Komodo -Debugger is running. If the debugger has hit a breakpoint, the title looks similar to [pathname\filename] -ActiveState Komodo - Debugger is in Break Mode.
How do I know if I'm editing?
You are editing any time you're not formally debugging. When Komodo is editing, the title of the Komodoworkspace is [pathname\filename] - ActiveState Komodo.
How can I add command-line arguments to my program fordebugging?
If you want to send add command-line arguments to your program for debugging, you can add these using theDebugger Launch Options dialog:
On the Debug menu, click Start.1. In the Debugger Launch Options dialog, select the directory you want to begin debugging yourprogram in. Click Browse and navigate to the appropriate directory.
2.
Komodo User Guide
Why can't I see my Left or Right Pane 328
In the same Debugger Launch Options dialog, enter your command-line arguments. These are sent tothe script and not to the interpreter. Separate the arguments with spaces.
3.
Click OK.4.
Komodo crashes. What can I do?
As Komodo is running it updates a few log files with debugging and error information. If Komodo crashes,you can help us best determine the issue by sending us those log files, along with information on how youcame across the crash. On some operating systems the system creates a crash log as well, which you shouldalso send to us. The log files may include:
startup.log (in your Komodo user data dir)• pystderr.log (in your Komodo user data dir)• pystdout.log (in your Komodo user data dir)• console.log (in your Komodo user data dir)• komodo-bin.crash.log (Mac OS X only, in ~/Library/Logs/CrashReporter)•
Please use the following steps to send us your crash information:
Step 1: Ensure the logs are for the time Komodo crashed
Komodo's log files are only for the last time Komodo was run. If you have restarted Komodo since the time itcrashed on you, you must reproduce the crash so that the log files are relevant.
Note: If Komodo is hung (i.e. won't shutdown), you may need to manually stop the komodo-bin process:
WindowsPress 'Ctrl'+'Shift'+'Esc' to open "Windows Task Manager". Select the "Processes" tab.Right-click on the "komodo.exe" entry and select "End Process".
Mac OS XRight-click (or 'Option'+click) on the Komodo head icon in the Dock and select the "Force Quit"option.
LinuxAt the terminal run ps ux | grep komodo-bin to determine the Komodo process id (or "pid").Then run kill -9 PID where "PID" is the process id from the previous command.
Step 2: Locating the error log files
Komodo stores its log files in the host data subdirectory of the user data directory.
On Mac OS X, an additional komodo-bin.crash.log is created by the system in~/Library/Logs/CrashReporter/.
Step 3: Verifying and sending the files to ActiveState
To send the error log files to ActiveState:
Locate the files.1. Verify that the files are not blank by viewing them with a text editor.2.
Komodo User Guide
How can I add command-line arguments to my program fordebugging? 329
Create a bug describing what happened just before the crash in the Komodo or OpenKomodo bugdatabase. (If you do not already have an ASPN or ActiveState bug database account, you can openone by selecting "New Account".)
3.
Once the bug has been created, add the error log files by selecting Create in the Attachments andDependencies section of the bug report.
4.
Why is Komodo so big?
Because Komodo is built on the Mozilla framework, it is necessary for us to include the Mozilla build thatexactly matches the development version of Komodo. For that reason, even if you have Mozilla on yoursystem, Komodo installs the Mozilla version that it requires.
Another sizable component of Komodo is language support. Komodo is so tightly integrated with Perl,Python, Ruby and PHP that it is necessary to include components of those languages, at specific versionlevels, for debugger and editor support.
I already have Mozilla. Why do I need to have two versions?
When ActiveState develops a Komodo release, the work is based upon a specific version of Mozilla. Duringthe development process, we upgrade the level of Mozilla used by Komodo, but this process requiresconsiderable testing to ensure that no functionality is lost. Additionally, we add some custom components tothe Mozilla tree that are used by Komodo. For these reasons, we recommend that you do not replace theMozilla version included with Komodo with a later Mozilla version.
I'm having trouble debugging PHP. What do I do?
If you receive an error message when attempting to debug a PHP program or if the debugging process doesnot proceed as expected, verify that you have installed PHP and the Xdebug extension as per the instructionsin the Debugging PHP documentation, then check the following:
Confirm PHP Configuration
xdebug: in the command or shell window, enter php -m. "xdebug" should be listed under ZendModules (and not under PHP Modules). If this is not the case, your configuration is incorrect. See"Common PHP Configuration Problems" below.
1.
Syntax Checking: in Komodo, select Edit|Preferences. Click on Smart Editing, and ensure that"Enable background syntax checking" is checked. Open a PHP file and enter something that issyntactically incorrect, such as:
<?asdfecho test;?>
Komodo should display a red squiggly line under echo test;. If it does not, it indicates thatKomodo is not able to communicate with the PHP interpreter.
2.
Debug: if steps one and two were successful, ensure that the debugger is functioning by opening aPHP program and debugging it. Ensure that the correct Preferences are configured for PHP.
3.
If any of the steps above were unsuccessful, proceed to the next section.
Komodo User Guide
Komodo crashes. What can I do? 330
Common PHP Configuration Problems
Multiple PHP executables on one machine: in Komodo's Preferences, explicitly specify the PHPinterpreter configured in your php.ini file. The location of the php.ini file can also be explicitly set.
•
Verify the PHP version: PHP 4.0.5 or greater is required for PHP syntax checking. PHP 4.3.11 orgreater is required to debug PHP programs.
•
Verify Xdebug library specification: The location of xdebug.dll (Windows) or xdebug.so (Linux)must be defined the php.ini file, for example:
Windows: zend_extension_ts=C:\php-4.3.7\extensions\php_xdebug.dll♦ Linux: zend_extension=/php-4.3.7/extensions/php_xdebug.dll♦
•
Ensure that the Xdebug extension is configured correctly in the php.ini file as per the Remote PHPDebugging instructions.
•
Windows-Specific Configuration Issues
Windows 2000 upgrade: if you upgraded to Windows 2000 from an earlier version of Windows,check the value of the "COMSPEC" variable in the "System variables" (as described above). It shouldpoint to C:\WINNT\system32\cmd.exe, and not command.com. If you must change thevariable, reboot your system.
•
There are known issues regarding the installation of PHP on Windows Millennium systems; pleaserefer to the PHP site for installation information.
•
Version Error Messages
If you receive a dialog with the following text:
Warningxdebug: Unable to initialize moduleModule compiled with debug=0, thread-safety=1 module API=20001222PHP compiled with debug=0, thread-safety=1 module API=20001222These options need to match
... download an updated version of xdebug.dll (Windows) or xdebug.so (Linux) from theXdebug.org site.
How do I emulate sessions in PHP debugging?
Though it is possible to emulate sessions in local debugging mode, this requires pre-knowledge of sessionkeys, and how those session keys are communicated to PHP.
It is easier to debug sessions using remote debugging. Run the script under a web server and start thedebugging session from a web browser. Komodo intercepts the session and debugs it. All session data isavailable and modifiable through the Variable tabs.
Why don't breakpoints work when I use the Psycoextension in Python?
Komodo User Guide
I'm having trouble debugging PHP. What do I do? 331
When debugging Python programs that use Psyco, the breakpoints will be ignored. This is due to theoptimizations/changes made by the psyco compiler.
You can work around this problem with the following code which disables Psyco while debugging:
import loggingif not logging.Logger.manager.loggerDict.has_key('dbgp'): import psyco psyco.full()
How do I configure Virtual Hosting on an Apache Webserver?
Virtual Hosting is an Apache feature for maintaining multiple servers on the same machine, differentiatingthem by their apparent hostname. For example, a single machine could contain two servers,"www.yourdomain.com" and "debug.yourdomain.com".
If you have configured your Apache installation to use Virtual Hosting (seehttpd.apache.org/docs/1.3/vhosts/), you can add directives to your VirtualHost sections to specify howKomodo's PHP debugger extension operates for those hosts. Use the "php_admin_value" to set specificdebugger settings for that virtual host. Here is an example:
NameVirtualHost *<VirtualHost *>php_admin_value xdebug.enabled 0DocumentRoot "/Apache/htdocs/"ErrorLog logs/www.error.logServername www.yourdomain.com</VirtualHost>
<VirtualHost *>php_admin_value xdebug.enabled 1DocumentRoot "/Apache/htdocs/"ErrorLog logs/debug.error.logServername debug.yourdomain.com</VirtualHost>
This will enable debugging under debug.yourdomain.com, but not under www.yourdomain.com. You canadditionally configure the Virtual Host to use a specific machine for remote debugging:
<VirtualHost *>php_admin_value xdebug.enabled 1php_admin_value xdebug.remote_host komodo.yourdomain.comDocumentRoot "/Apache/htdocs/"ErrorLog logs/debug.error.logServername debug.yourdomain.com</VirtualHost>
For more information on configuring Virtual Hosting under Apache, see the Apache documentation athttpd.apache.org/docs/.
Komodo User Guide
Why don't breakpoints work when I use the Psycoextension in Python? 332
I moved my Komodo installation on Linux, and am nowgetting Perl debugging errors.
On Linux, you cannot relocate an existing Komodo installation to a new directory. You must uninstallKomodo from the existing location and reinstall it in the new location. See Uninstalling Komodo on Linux forinstructions.
How do I prevent the dialog from displaying every time Istart the debugger?
To prevent the debugger dialog from appearing each time you start the debugger, hold down the 'Ctrl' keywhen you start the debugger. For example, on Windows and Linux, press 'Ctrl'+'F5' rather than 'F5' to startdebugging. Click Help|List Key Bindings to find the equivalent key binding for the Emacs and OS X defaultkey binding schemes.
Why do I get a CGI security alert when debugging PHP?
The CGI security alert only occurs when you compile PHP with --enable-cgi-force-redirect. That compilationdirective forces PHP to check if it is being run as a CGI by looking at environment variables commonlyavailable only under a CGI environment. If they exist, it looks for another environment variable that isreliably available ONLY under Apache, REDIRECT_STATUS (or HTTP_REDIRECT_STATUS underNetscape/iPlanet). If that environment variable does not exist, the security alert is generated.
To run your compilation of PHP under Komodo with CGI emulation, you have to add a CGI environmentvariable called REDIRECT_STATUS with any value.
When I click Check Configuration on the Start Page,Komodo reports that a language that is installed on mysystem is not available. Why?
In order for Komodo to detect the presence of a language installed on your system, the location of thelanguage interpreter must be specified in your system's PATH environment variable. If the Komodo Start Pagestates that a language is "Not Functional", or if the Komodo Preferences say that the language interpreter isnot found on your system, check that the interpreter is specified in your PATH.
My screen goes black for a second or two whenever I openfiles for which Komodo performs background syntaxchecking. Why?
Komodo launches a process as part of the background syntax checking that can cause a full screen commandprompt to momentarily appear on some Windows systems. You can make the process invisible by editing theproperties for the command prompt window. On the Windows Start menu, right-click the Command Promptitem, and select Properties. Select the Options tab, and change the Display options to Window.
Komodo User Guide
I moved my Komodo installation on Linux, and am now getting Perl debugging errors. 333

How can I run additional CVS commands from withinKomodo?
Komodo can be used to check out, add, remove, compare, submit and revert files in a CVS repository. CVSoffers additional commands such as import, checkout, history, annotate, rdiff and watch which can be put intoRun Commands and saved to a project or the Toolbox. For example, the following cvs import commandprompts for the User, Host, Module, Project and Version to import:
cvs -d :ext:%(ask:User)@%(ask:Host):%(ask:Path) import %(ask:Module:)%(ask:Project:) %(ask:Version:)
Alternatively, the %(ask:...) interpolation shortcut could be populated with defaults or replaced withstatic values:
cvs -d :ext:%(ask:User:jdoe)@myhost:/var/cvsroot import %(ask:Module:)%(ask:Project:MyProject)
CVS requires a real terminal for adding change descriptions. Be sure to set Run in: New Console in thecommand's properties.
Why doesn't Ruby debugging work on my Linux x64system?
Linux users trying to debug a Ruby application on AMD 64bit systems may see the following error:
The Komodo ruby debugger couldn't load the ruby-debug-base component.This library ships with Komodo, but also can be installed by running `gem installruby-debug-base'
Komodo ships with a 32-bit version of ruby-debug-base, which will not work with 64-bit versions of Ruby.To fix this:
Delete the installed ruby-debug libraries by removing the/lib/support/dbgp/rubylib/1.8/ directory.
1.
Download the latest ruby-debug-base gem from http://rubyforge.org/frs/?group_id=19002. Install the downloaded file using gem:
sudo gem install ruby-debug-base-0.10.x.gem
3.
Komodo will automatically find and use the new version of the debugging library.
Komodo User Guide
How can I run additional CVS commands from within Komodo? 334
Key Binding SchemesThe following pages list the key bindings for Komodo's default keybinding schemes:
Windows/Linux default key bindings• Mac OS X default key bindings• Emacs default key bindings• Vi default key bindings•
To view the current list of key bindings for your Komodo installation, including any custom key bindings,select Help|List Key Bindings. The default key binding scheme is set according to your platform. To select adifferent key binding scheme, select Edit|Preferences|Editor|Keybindings.
Sharing Key Binding Schemes
Keybinding schemes are stored in files with a '.kkf' extension in the schemes subdirectory of the user datadirectory. The filenames correspond to the scheme names displayed in Edit|Preferences|Editor|Keybindings.
To duplicate your current keybindings on a new system, copy the desired .kkf to the corresponding schemesdirectory on the target system, then start (or restart) Komodo on that system. The copied scheme will beavailable for selection in the key binding preferences.
Key Binding Schemes 335
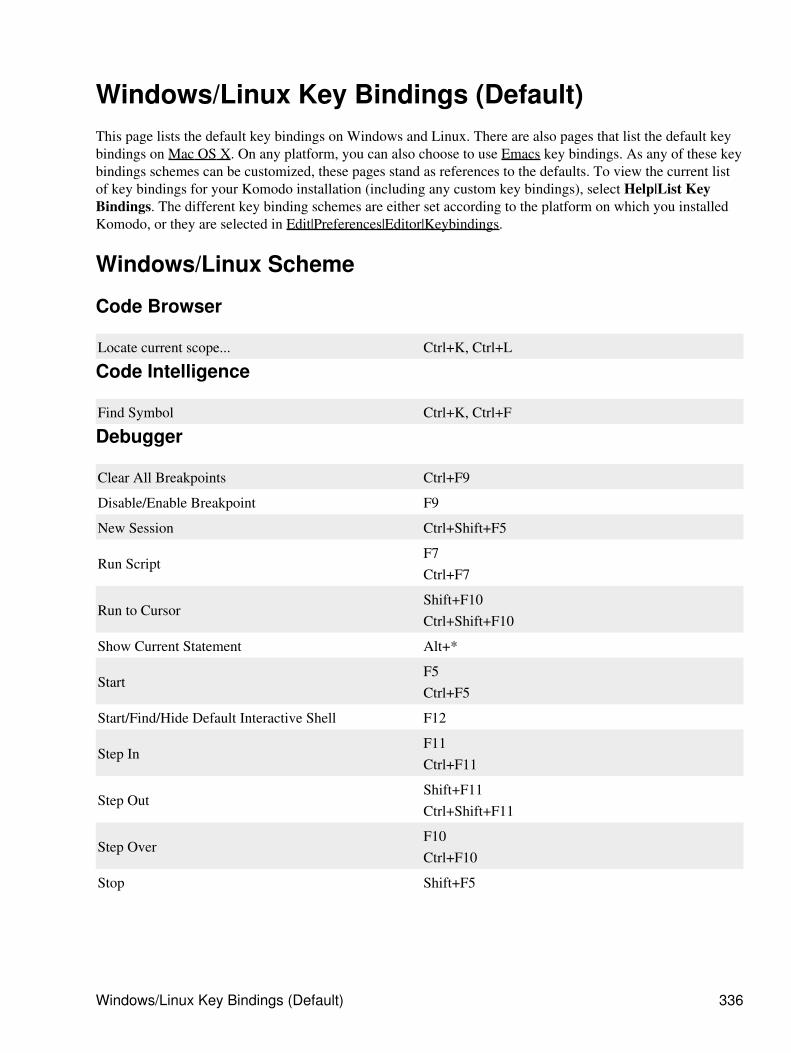
Windows/Linux Key Bindings (Default)This page lists the default key bindings on Windows and Linux. There are also pages that list the default keybindings on Mac OS X. On any platform, you can also choose to use Emacs key bindings. As any of these keybindings schemes can be customized, these pages stand as references to the defaults. To view the current listof key bindings for your Komodo installation (including any custom key bindings), select Help|List KeyBindings. The different key binding schemes are either set according to the platform on which you installedKomodo, or they are selected in Edit|Preferences|Editor|Keybindings.
Windows/Linux Scheme
Code Browser
Locate current scope... Ctrl+K, Ctrl+L
Code Intelligence
Find Symbol Ctrl+K, Ctrl+F
Debugger
Clear All Breakpoints Ctrl+F9
Disable/Enable Breakpoint F9
New Session Ctrl+Shift+F5
Run ScriptF7Ctrl+F7
Run to CursorShift+F10Ctrl+Shift+F10
Show Current Statement Alt+*
StartF5Ctrl+F5
Start/Find/Hide Default Interactive Shell F12
Step InF11Ctrl+F11
Step OutShift+F11Ctrl+Shift+F11
Step OverF10Ctrl+F10
Stop Shift+F5
Windows/Linux Key Bindings (Default) 336

Editor
Back Shift+Backspace
Backspace Backspace
Beginning of Line (first char/first column) Home
Cancel AutoComplete Escape
CopyCtrl+CCtrl+Insert
CutCtrl+XShift+DeleteCtrl+Shift+X
Delete Delete
Delete Word Left Ctrl+Backspace
Delete Word Right Ctrl+Delete
End of Line End
Go to End of Document Ctrl+End
Go to End of word Ctrl+E
Go to Line... Ctrl+G
Go to Next Bookmark F2
Go to Next Line Down
Go to Previous Bookmark Shift+F2
Go to Previous Line Up
Go to Top of Document Ctrl+Home
Insert Newline Return
Insert Newline (align with current line) Ctrl+Shift+Return
Insert Newline (continue comments) Shift+Return
Insert Newline (no favors) Ctrl+Return
Insert Next Key as Literal Character Ctrl+M
Join current and next lines Ctrl+K, Ctrl+J
Move Back Part of Word Alt+Right
Move Forward Part of Word Alt+Left
Move Left One Character Left
Move One Character Right Right
Move One Word Left Ctrl+Left
Move One Word Right Ctrl+Right
Page Down Page_Down
Komodo User Guide
Editor 337
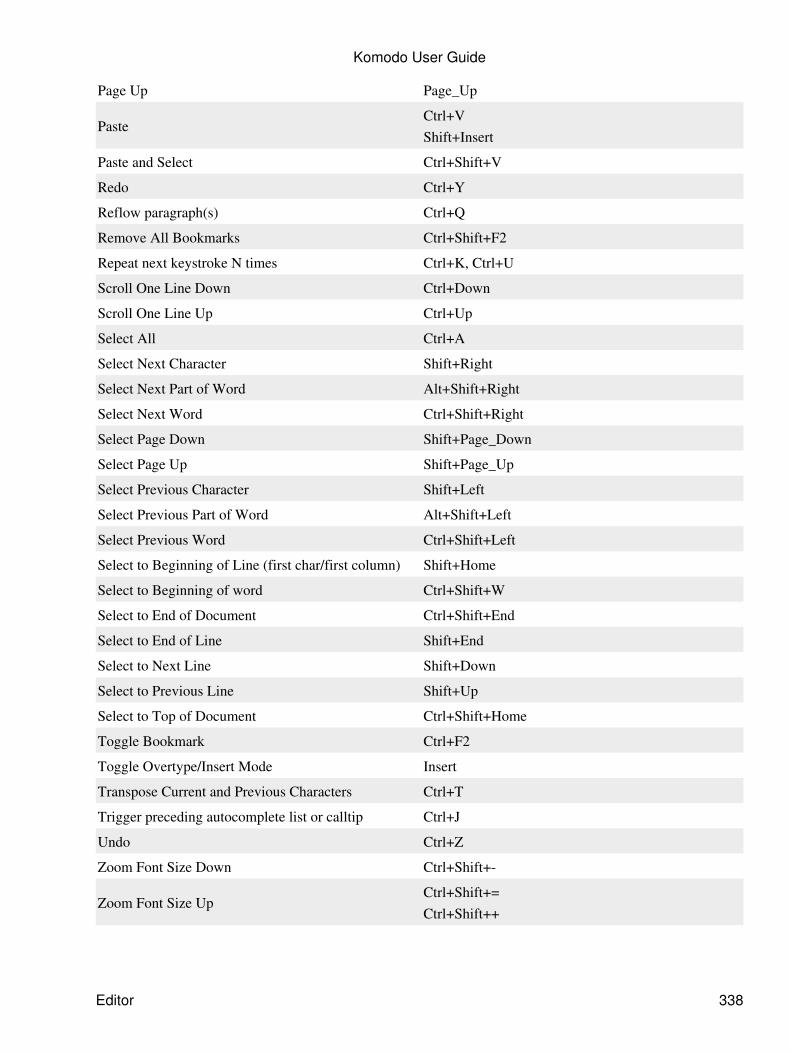
Page Up Page_Up
PasteCtrl+VShift+Insert
Paste and Select Ctrl+Shift+V
Redo Ctrl+Y
Reflow paragraph(s) Ctrl+Q
Remove All Bookmarks Ctrl+Shift+F2
Repeat next keystroke N times Ctrl+K, Ctrl+U
Scroll One Line Down Ctrl+Down
Scroll One Line Up Ctrl+Up
Select All Ctrl+A
Select Next Character Shift+Right
Select Next Part of Word Alt+Shift+Right
Select Next Word Ctrl+Shift+Right
Select Page Down Shift+Page_Down
Select Page Up Shift+Page_Up
Select Previous Character Shift+Left
Select Previous Part of Word Alt+Shift+Left
Select Previous Word Ctrl+Shift+Left
Select to Beginning of Line (first char/first column) Shift+Home
Select to Beginning of word Ctrl+Shift+W
Select to End of Document Ctrl+Shift+End
Select to End of Line Shift+End
Select to Next Line Shift+Down
Select to Previous Line Shift+Up
Select to Top of Document Ctrl+Shift+Home
Toggle Bookmark Ctrl+F2
Toggle Overtype/Insert Mode Insert
Transpose Current and Previous Characters Ctrl+T
Trigger preceding autocomplete list or calltip Ctrl+J
Undo Ctrl+Z
Zoom Font Size Down Ctrl+Shift+-
Zoom Font Size UpCtrl+Shift+=Ctrl+Shift++
Komodo User Guide
Editor 338
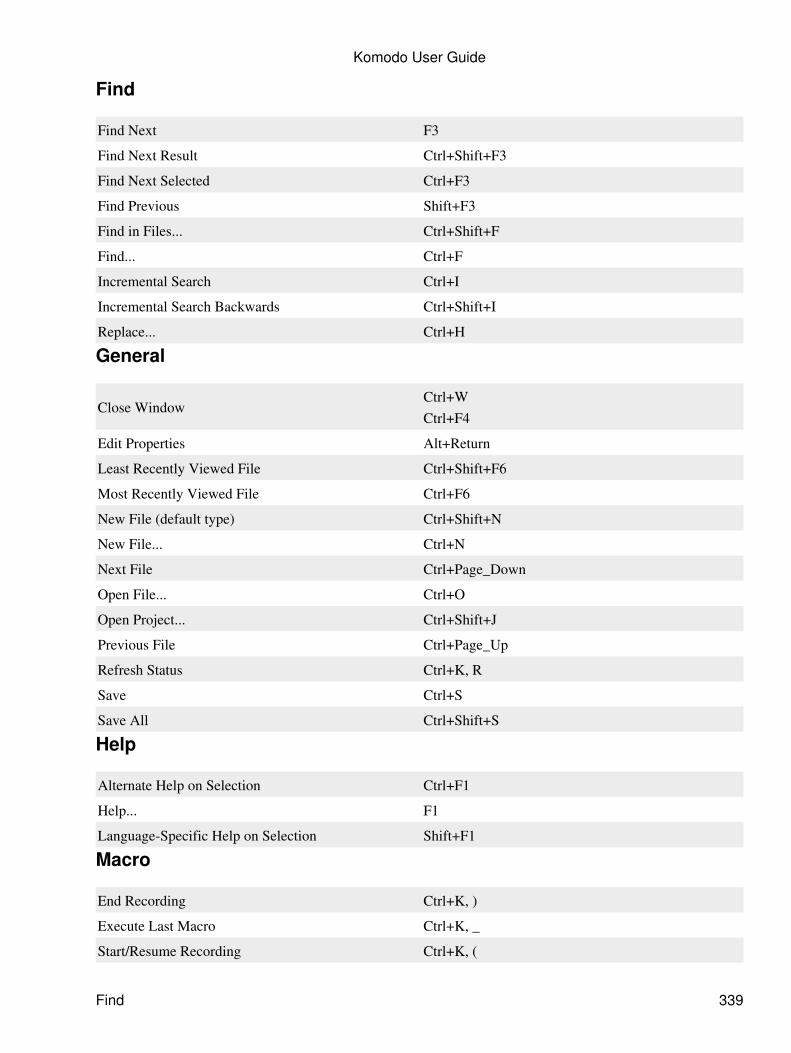
Find
Find Next F3
Find Next Result Ctrl+Shift+F3
Find Next Selected Ctrl+F3
Find Previous Shift+F3
Find in Files... Ctrl+Shift+F
Find... Ctrl+F
Incremental Search Ctrl+I
Incremental Search Backwards Ctrl+Shift+I
Replace... Ctrl+H
General
Close WindowCtrl+WCtrl+F4
Edit Properties Alt+Return
Least Recently Viewed File Ctrl+Shift+F6
Most Recently Viewed File Ctrl+F6
New File (default type) Ctrl+Shift+N
New File... Ctrl+N
Next File Ctrl+Page_Down
Open File... Ctrl+O
Open Project... Ctrl+Shift+J
Previous File Ctrl+Page_Up
Refresh Status Ctrl+K, R
Save Ctrl+S
Save All Ctrl+Shift+S
Help
Alternate Help on Selection Ctrl+F1
Help... F1
Language-Specific Help on Selection Shift+F1
Macro
End Recording Ctrl+K, )
Execute Last Macro Ctrl+K, _
Start/Resume Recording Ctrl+K, (
Komodo User Guide
Find 339
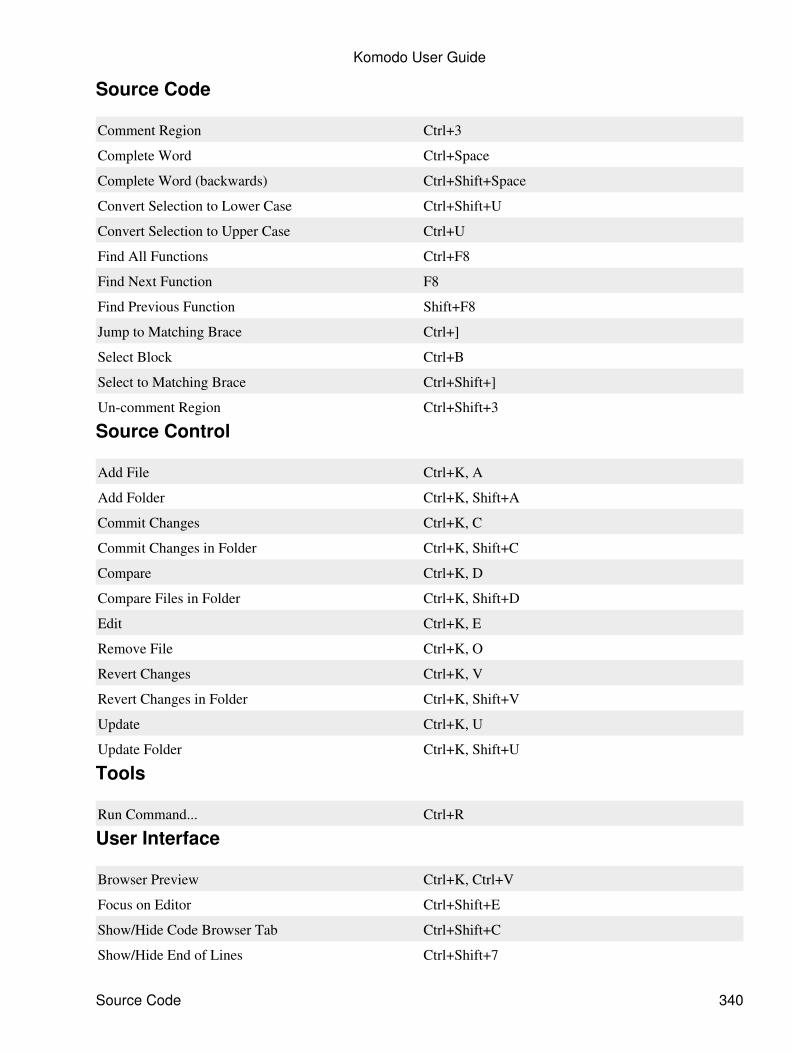
Source Code
Comment Region Ctrl+3
Complete Word Ctrl+Space
Complete Word (backwards) Ctrl+Shift+Space
Convert Selection to Lower Case Ctrl+Shift+U
Convert Selection to Upper Case Ctrl+U
Find All Functions Ctrl+F8
Find Next Function F8
Find Previous Function Shift+F8
Jump to Matching Brace Ctrl+]
Select Block Ctrl+B
Select to Matching Brace Ctrl+Shift+]
Un-comment Region Ctrl+Shift+3
Source Control
Add File Ctrl+K, A
Add Folder Ctrl+K, Shift+A
Commit Changes Ctrl+K, C
Commit Changes in Folder Ctrl+K, Shift+C
Compare Ctrl+K, D
Compare Files in Folder Ctrl+K, Shift+D
Edit Ctrl+K, E
Remove File Ctrl+K, O
Revert Changes Ctrl+K, V
Revert Changes in Folder Ctrl+K, Shift+V
Update Ctrl+K, U
Update Folder Ctrl+K, Shift+U
Tools
Run Command... Ctrl+R
User Interface
Browser Preview Ctrl+K, Ctrl+V
Focus on Editor Ctrl+Shift+E
Show/Hide Code Browser Tab Ctrl+Shift+C
Show/Hide End of Lines Ctrl+Shift+7
Komodo User Guide
Source Code 340
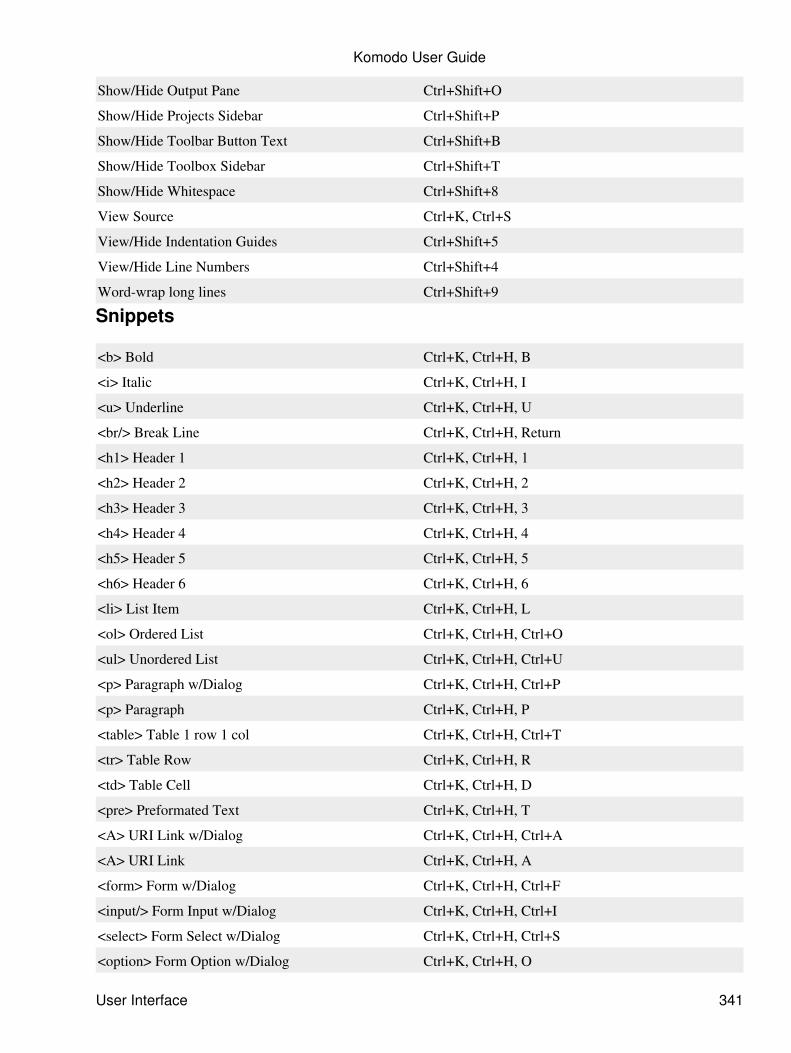
Show/Hide Output Pane Ctrl+Shift+O
Show/Hide Projects Sidebar Ctrl+Shift+P
Show/Hide Toolbar Button Text Ctrl+Shift+B
Show/Hide Toolbox Sidebar Ctrl+Shift+T
Show/Hide Whitespace Ctrl+Shift+8
View Source Ctrl+K, Ctrl+S
View/Hide Indentation Guides Ctrl+Shift+5
View/Hide Line Numbers Ctrl+Shift+4
Word-wrap long lines Ctrl+Shift+9
Snippets
<b> Bold Ctrl+K, Ctrl+H, B
<i> Italic Ctrl+K, Ctrl+H, I
<u> Underline Ctrl+K, Ctrl+H, U
<br/> Break Line Ctrl+K, Ctrl+H, Return
<h1> Header 1 Ctrl+K, Ctrl+H, 1
<h2> Header 2 Ctrl+K, Ctrl+H, 2
<h3> Header 3 Ctrl+K, Ctrl+H, 3
<h4> Header 4 Ctrl+K, Ctrl+H, 4
<h5> Header 5 Ctrl+K, Ctrl+H, 5
<h6> Header 6 Ctrl+K, Ctrl+H, 6
<li> List Item Ctrl+K, Ctrl+H, L
<ol> Ordered List Ctrl+K, Ctrl+H, Ctrl+O
<ul> Unordered List Ctrl+K, Ctrl+H, Ctrl+U
<p> Paragraph w/Dialog Ctrl+K, Ctrl+H, Ctrl+P
<p> Paragraph Ctrl+K, Ctrl+H, P
<table> Table 1 row 1 col Ctrl+K, Ctrl+H, Ctrl+T
<tr> Table Row Ctrl+K, Ctrl+H, R
<td> Table Cell Ctrl+K, Ctrl+H, D
<pre> Preformated Text Ctrl+K, Ctrl+H, T
<A> URI Link w/Dialog Ctrl+K, Ctrl+H, Ctrl+A
<A> URI Link Ctrl+K, Ctrl+H, A
<form> Form w/Dialog Ctrl+K, Ctrl+H, Ctrl+F
<input/> Form Input w/Dialog Ctrl+K, Ctrl+H, Ctrl+I
<select> Form Select w/Dialog Ctrl+K, Ctrl+H, Ctrl+S
<option> Form Option w/Dialog Ctrl+K, Ctrl+H, O
Komodo User Guide
User Interface 341

<textarea> Form Text Area w/Dialog Ctrl+K, Ctrl+H, Ctrl+Q
Komodo User Guide
Snippets 342
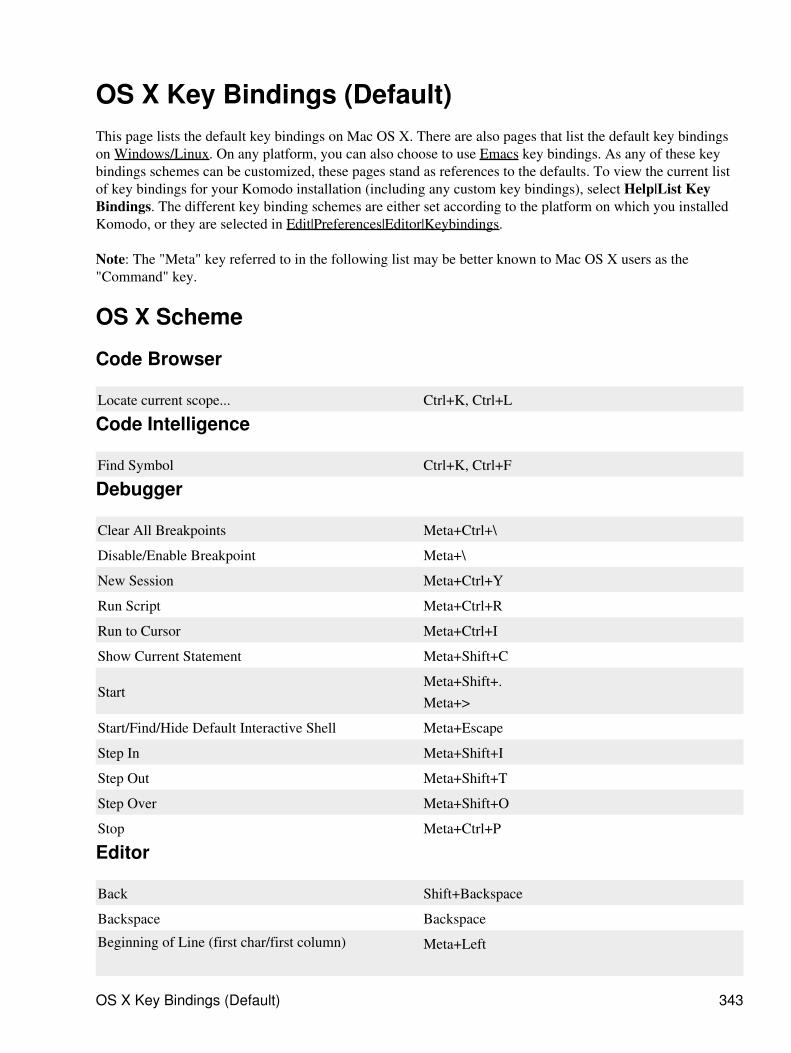
OS X Key Bindings (Default)This page lists the default key bindings on Mac OS X. There are also pages that list the default key bindingson Windows/Linux. On any platform, you can also choose to use Emacs key bindings. As any of these keybindings schemes can be customized, these pages stand as references to the defaults. To view the current listof key bindings for your Komodo installation (including any custom key bindings), select Help|List KeyBindings. The different key binding schemes are either set according to the platform on which you installedKomodo, or they are selected in Edit|Preferences|Editor|Keybindings.
Note: The "Meta" key referred to in the following list may be better known to Mac OS X users as the"Command" key.
OS X Scheme
Code Browser
Locate current scope... Ctrl+K, Ctrl+L
Code Intelligence
Find Symbol Ctrl+K, Ctrl+F
Debugger
Clear All Breakpoints Meta+Ctrl+\
Disable/Enable Breakpoint Meta+\
New Session Meta+Ctrl+Y
Run Script Meta+Ctrl+R
Run to Cursor Meta+Ctrl+I
Show Current Statement Meta+Shift+C
StartMeta+Shift+.Meta+>
Start/Find/Hide Default Interactive Shell Meta+Escape
Step In Meta+Shift+I
Step Out Meta+Shift+T
Step Over Meta+Shift+O
Stop Meta+Ctrl+P
Editor
Back Shift+Backspace
Backspace Backspace
Beginning of Line (first char/first column) Meta+Left
OS X Key Bindings (Default) 343

Home
Cancel autocomplete Escape
Copy Meta+C
Cut Meta+X
Cut rest of lineCtrl+BackspaceCtrl+Delete
Delete Delete
Delete Word Left Meta+Backspace
Delete Word Right Meta+Delete
End of LineMeta+RightEnd
Go to End of DocumentMeta+DownMeta+End
Go to End of word Meta+E
Go to Line... Meta+L
Go to Next Bookmark F2
Go to Next Line Down
Go to Previous Bookmark Shift+F2
Go to Previous Line Up
Go to Top of DocumentMeta+UpMeta+Home
Insert Newline Return
Insert Newline (align with current line) Meta+Shift+Return
Insert Newline (continue comments) Shift+Return
Insert Newline (no favors) Meta+Return
Insert Next Key as Literal Character Meta+M
Join current and next lines Ctrl+K, Ctrl+J
Move Back Part of Word Meta+Alt+Right
Move Forward Part of Word Meta+Alt+Left
Move Left One Character Left
Move One Character Right Right
Move One Word Left Alt+Left
Move One Word Right Alt+Right
Page Down Page_Down
Page Up Page_Up
Paste Meta+V
Komodo User Guide
Editor 344
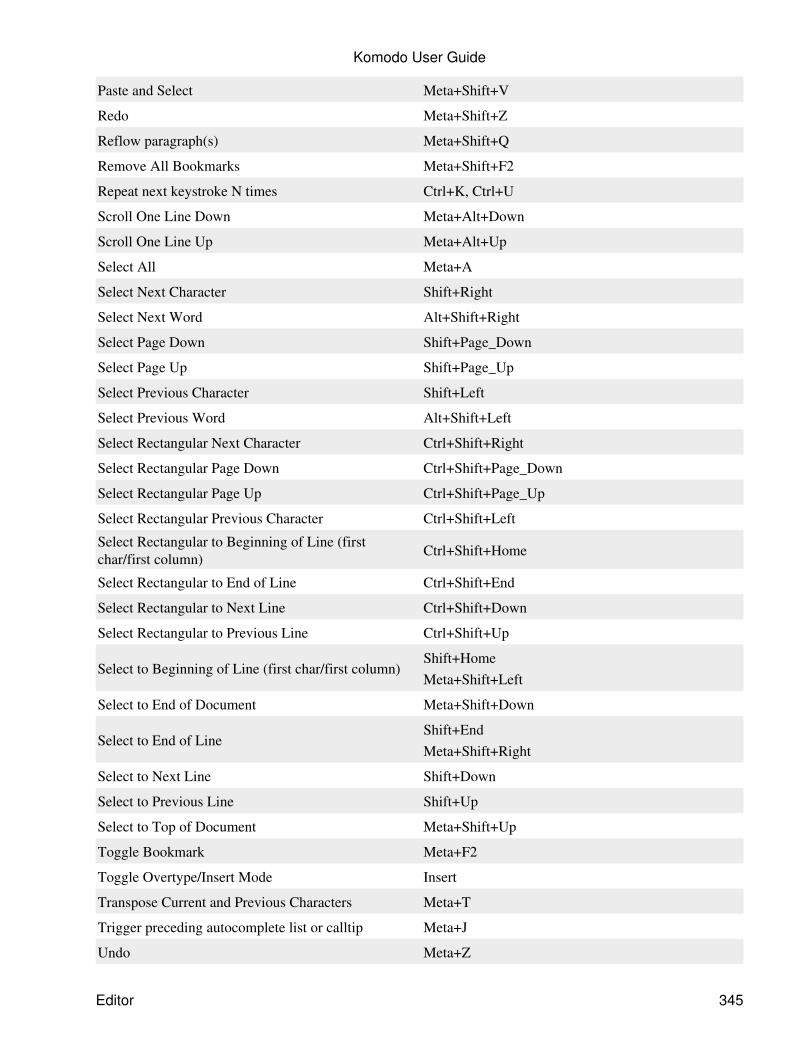
Paste and Select Meta+Shift+V
Redo Meta+Shift+Z
Reflow paragraph(s) Meta+Shift+Q
Remove All Bookmarks Meta+Shift+F2
Repeat next keystroke N times Ctrl+K, Ctrl+U
Scroll One Line Down Meta+Alt+Down
Scroll One Line Up Meta+Alt+Up
Select All Meta+A
Select Next Character Shift+Right
Select Next Word Alt+Shift+Right
Select Page Down Shift+Page_Down
Select Page Up Shift+Page_Up
Select Previous Character Shift+Left
Select Previous Word Alt+Shift+Left
Select Rectangular Next Character Ctrl+Shift+Right
Select Rectangular Page Down Ctrl+Shift+Page_Down
Select Rectangular Page Up Ctrl+Shift+Page_Up
Select Rectangular Previous Character Ctrl+Shift+Left
Select Rectangular to Beginning of Line (firstchar/first column) Ctrl+Shift+Home
Select Rectangular to End of Line Ctrl+Shift+End
Select Rectangular to Next Line Ctrl+Shift+Down
Select Rectangular to Previous Line Ctrl+Shift+Up
Select to Beginning of Line (first char/first column)Shift+HomeMeta+Shift+Left
Select to End of Document Meta+Shift+Down
Select to End of LineShift+EndMeta+Shift+Right
Select to Next Line Shift+Down
Select to Previous Line Shift+Up
Select to Top of Document Meta+Shift+Up
Toggle Bookmark Meta+F2
Toggle Overtype/Insert Mode Insert
Transpose Current and Previous Characters Meta+T
Trigger preceding autocomplete list or calltip Meta+J
Undo Meta+Z
Komodo User Guide
Editor 345
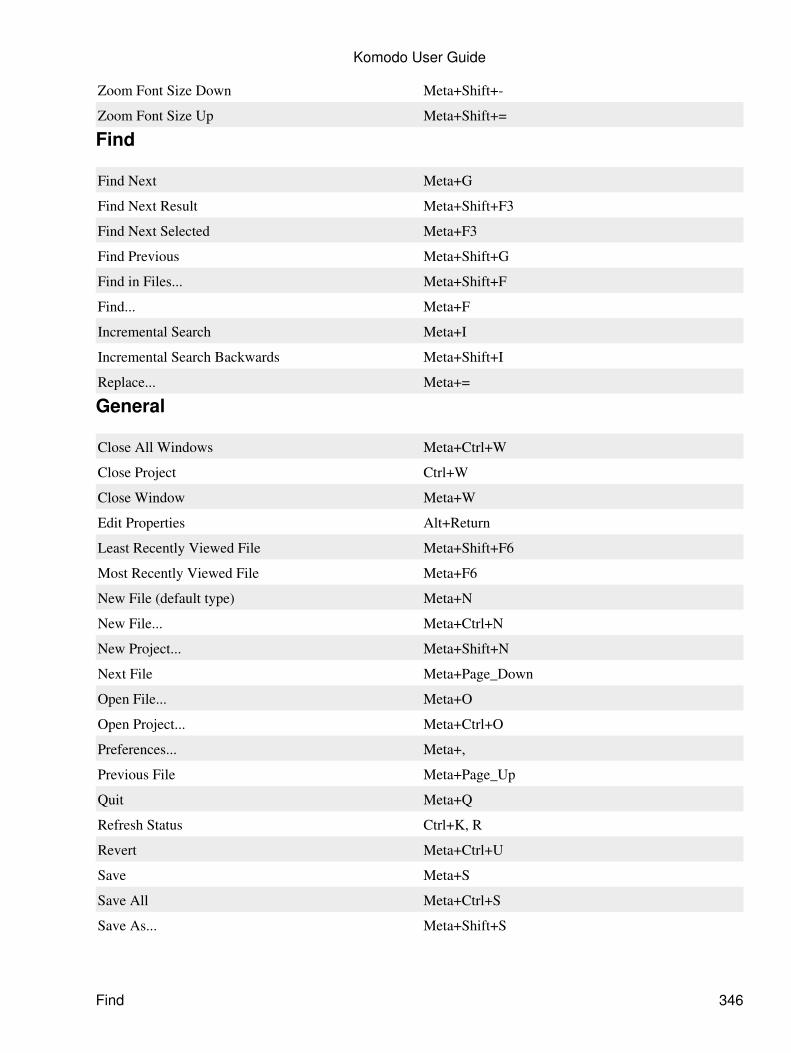
Zoom Font Size Down Meta+Shift+-
Zoom Font Size Up Meta+Shift+=
Find
Find Next Meta+G
Find Next Result Meta+Shift+F3
Find Next Selected Meta+F3
Find Previous Meta+Shift+G
Find in Files... Meta+Shift+F
Find... Meta+F
Incremental Search Meta+I
Incremental Search Backwards Meta+Shift+I
Replace... Meta+=
General
Close All Windows Meta+Ctrl+W
Close Project Ctrl+W
Close Window Meta+W
Edit Properties Alt+Return
Least Recently Viewed File Meta+Shift+F6
Most Recently Viewed File Meta+F6
New File (default type) Meta+N
New File... Meta+Ctrl+N
New Project... Meta+Shift+N
Next File Meta+Page_Down
Open File... Meta+O
Open Project... Meta+Ctrl+O
Preferences... Meta+,
Previous File Meta+Page_Up
Quit Meta+Q
Refresh Status Ctrl+K, R
Revert Meta+Ctrl+U
Save Meta+S
Save All Meta+Ctrl+S
Save As... Meta+Shift+S
Komodo User Guide
Find 346
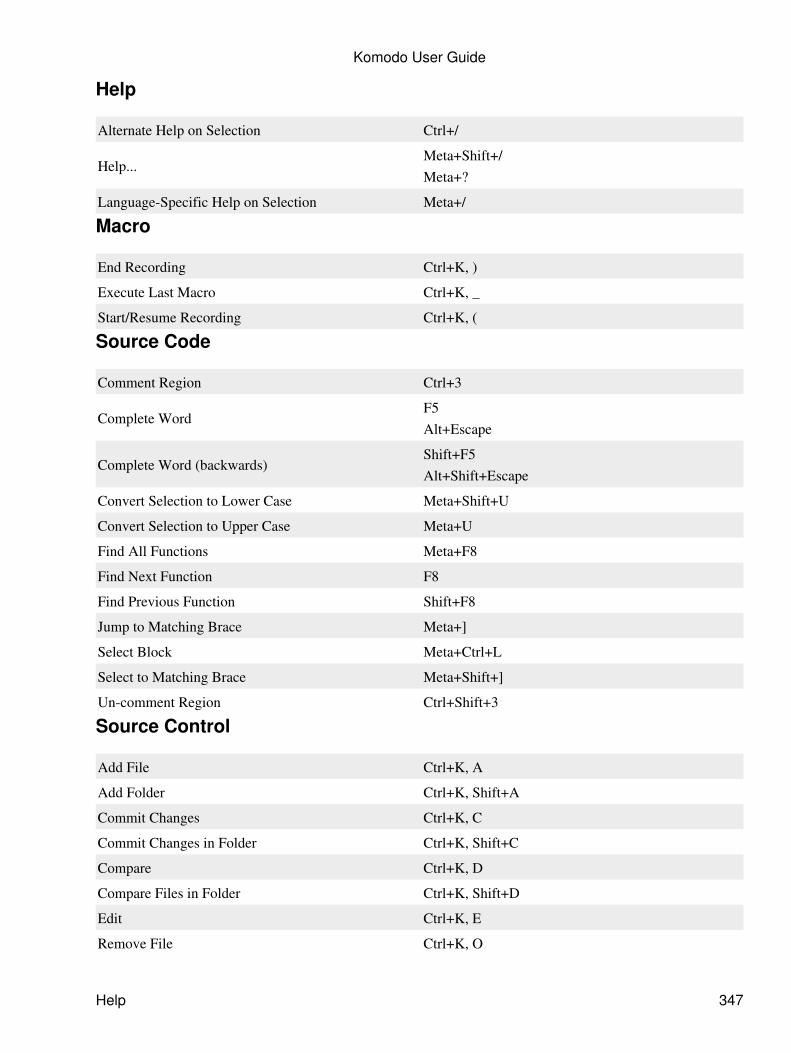
Help
Alternate Help on Selection Ctrl+/
Help...Meta+Shift+/Meta+?
Language-Specific Help on Selection Meta+/
Macro
End Recording Ctrl+K, )
Execute Last Macro Ctrl+K, _
Start/Resume Recording Ctrl+K, (
Source Code
Comment Region Ctrl+3
Complete WordF5Alt+Escape
Complete Word (backwards)Shift+F5Alt+Shift+Escape
Convert Selection to Lower Case Meta+Shift+U
Convert Selection to Upper Case Meta+U
Find All Functions Meta+F8
Find Next Function F8
Find Previous Function Shift+F8
Jump to Matching Brace Meta+]
Select Block Meta+Ctrl+L
Select to Matching Brace Meta+Shift+]
Un-comment Region Ctrl+Shift+3
Source Control
Add File Ctrl+K, A
Add Folder Ctrl+K, Shift+A
Commit Changes Ctrl+K, C
Commit Changes in Folder Ctrl+K, Shift+C
Compare Ctrl+K, D
Compare Files in Folder Ctrl+K, Shift+D
Edit Ctrl+K, E
Remove File Ctrl+K, O
Komodo User Guide
Help 347
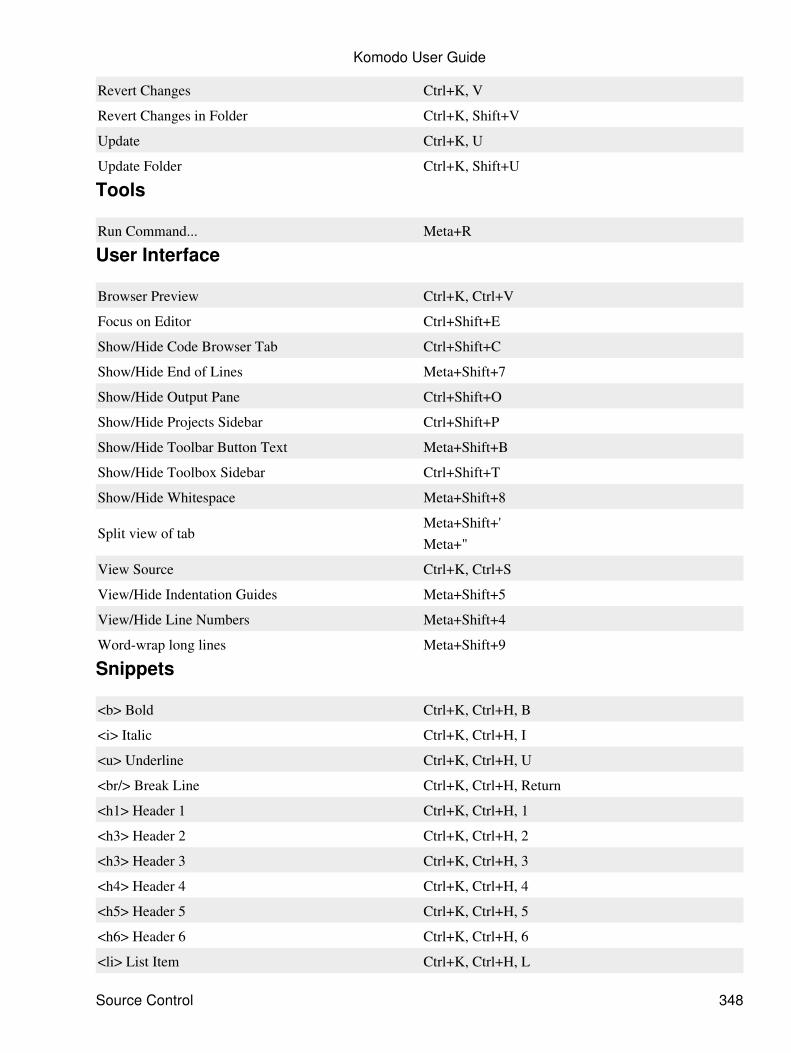
Revert Changes Ctrl+K, V
Revert Changes in Folder Ctrl+K, Shift+V
Update Ctrl+K, U
Update Folder Ctrl+K, Shift+U
Tools
Run Command... Meta+R
User Interface
Browser Preview Ctrl+K, Ctrl+V
Focus on Editor Ctrl+Shift+E
Show/Hide Code Browser Tab Ctrl+Shift+C
Show/Hide End of Lines Meta+Shift+7
Show/Hide Output Pane Ctrl+Shift+O
Show/Hide Projects Sidebar Ctrl+Shift+P
Show/Hide Toolbar Button Text Meta+Shift+B
Show/Hide Toolbox Sidebar Ctrl+Shift+T
Show/Hide Whitespace Meta+Shift+8
Split view of tabMeta+Shift+'Meta+"
View Source Ctrl+K, Ctrl+S
View/Hide Indentation Guides Meta+Shift+5
View/Hide Line Numbers Meta+Shift+4
Word-wrap long lines Meta+Shift+9
Snippets
<b> Bold Ctrl+K, Ctrl+H, B
<i> Italic Ctrl+K, Ctrl+H, I
<u> Underline Ctrl+K, Ctrl+H, U
<br/> Break Line Ctrl+K, Ctrl+H, Return
<h1> Header 1 Ctrl+K, Ctrl+H, 1
<h3> Header 2 Ctrl+K, Ctrl+H, 2
<h3> Header 3 Ctrl+K, Ctrl+H, 3
<h4> Header 4 Ctrl+K, Ctrl+H, 4
<h5> Header 5 Ctrl+K, Ctrl+H, 5
<h6> Header 6 Ctrl+K, Ctrl+H, 6
<li> List Item Ctrl+K, Ctrl+H, L
Komodo User Guide
Source Control 348
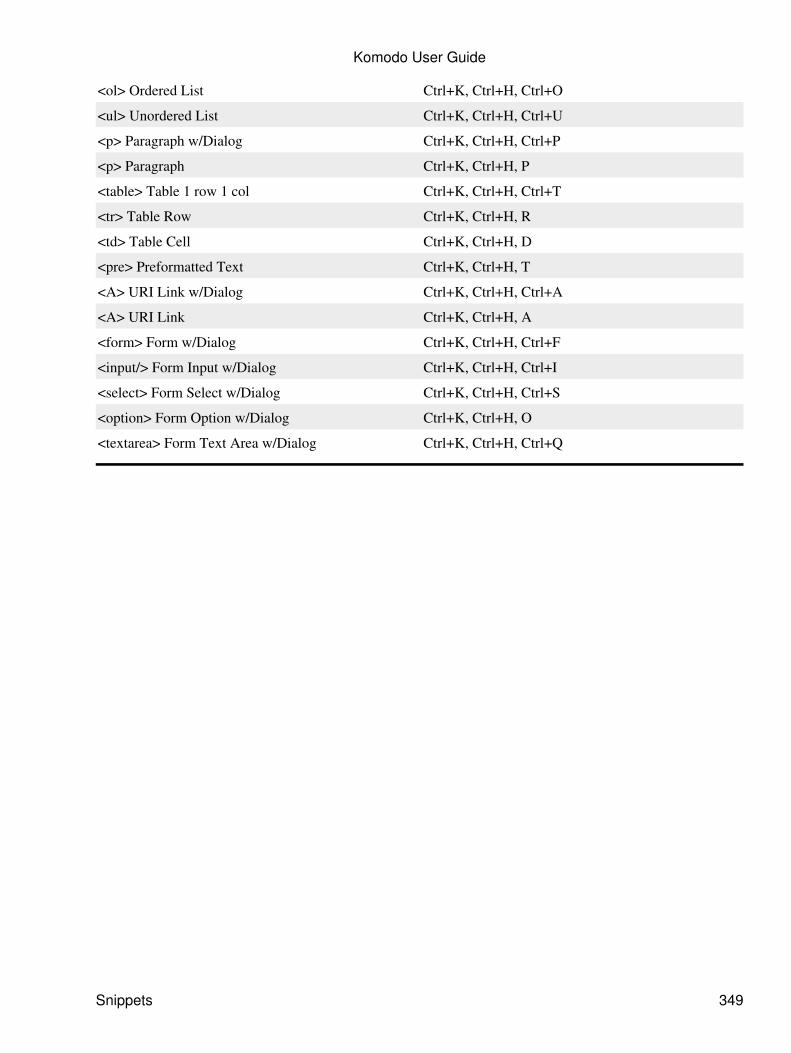
<ol> Ordered List Ctrl+K, Ctrl+H, Ctrl+O
<ul> Unordered List Ctrl+K, Ctrl+H, Ctrl+U
<p> Paragraph w/Dialog Ctrl+K, Ctrl+H, Ctrl+P
<p> Paragraph Ctrl+K, Ctrl+H, P
<table> Table 1 row 1 col Ctrl+K, Ctrl+H, Ctrl+T
<tr> Table Row Ctrl+K, Ctrl+H, R
<td> Table Cell Ctrl+K, Ctrl+H, D
<pre> Preformatted Text Ctrl+K, Ctrl+H, T
<A> URI Link w/Dialog Ctrl+K, Ctrl+H, Ctrl+A
<A> URI Link Ctrl+K, Ctrl+H, A
<form> Form w/Dialog Ctrl+K, Ctrl+H, Ctrl+F
<input/> Form Input w/Dialog Ctrl+K, Ctrl+H, Ctrl+I
<select> Form Select w/Dialog Ctrl+K, Ctrl+H, Ctrl+S
<option> Form Option w/Dialog Ctrl+K, Ctrl+H, O
<textarea> Form Text Area w/Dialog Ctrl+K, Ctrl+H, Ctrl+Q
Komodo User Guide
Snippets 349
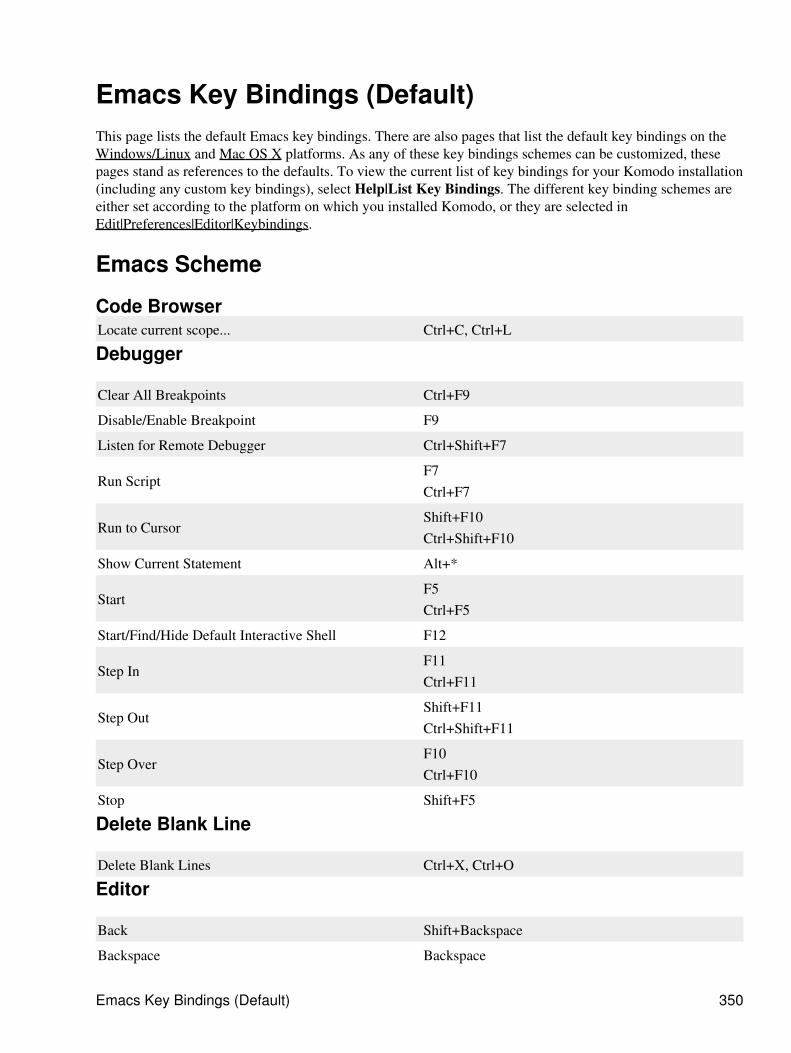
Emacs Key Bindings (Default)This page lists the default Emacs key bindings. There are also pages that list the default key bindings on theWindows/Linux and Mac OS X platforms. As any of these key bindings schemes can be customized, thesepages stand as references to the defaults. To view the current list of key bindings for your Komodo installation(including any custom key bindings), select Help|List Key Bindings. The different key binding schemes areeither set according to the platform on which you installed Komodo, or they are selected inEdit|Preferences|Editor|Keybindings.
Emacs Scheme
Code BrowserLocate current scope... Ctrl+C, Ctrl+L
Debugger
Clear All Breakpoints Ctrl+F9
Disable/Enable Breakpoint F9
Listen for Remote Debugger Ctrl+Shift+F7
Run ScriptF7Ctrl+F7
Run to CursorShift+F10Ctrl+Shift+F10
Show Current Statement Alt+*
StartF5Ctrl+F5
Start/Find/Hide Default Interactive Shell F12
Step InF11Ctrl+F11
Step OutShift+F11Ctrl+Shift+F11
Step OverF10Ctrl+F10
Stop Shift+F5
Delete Blank Line
Delete Blank Lines Ctrl+X, Ctrl+O
Editor
Back Shift+Backspace
Backspace Backspace
Emacs Key Bindings (Default) 350
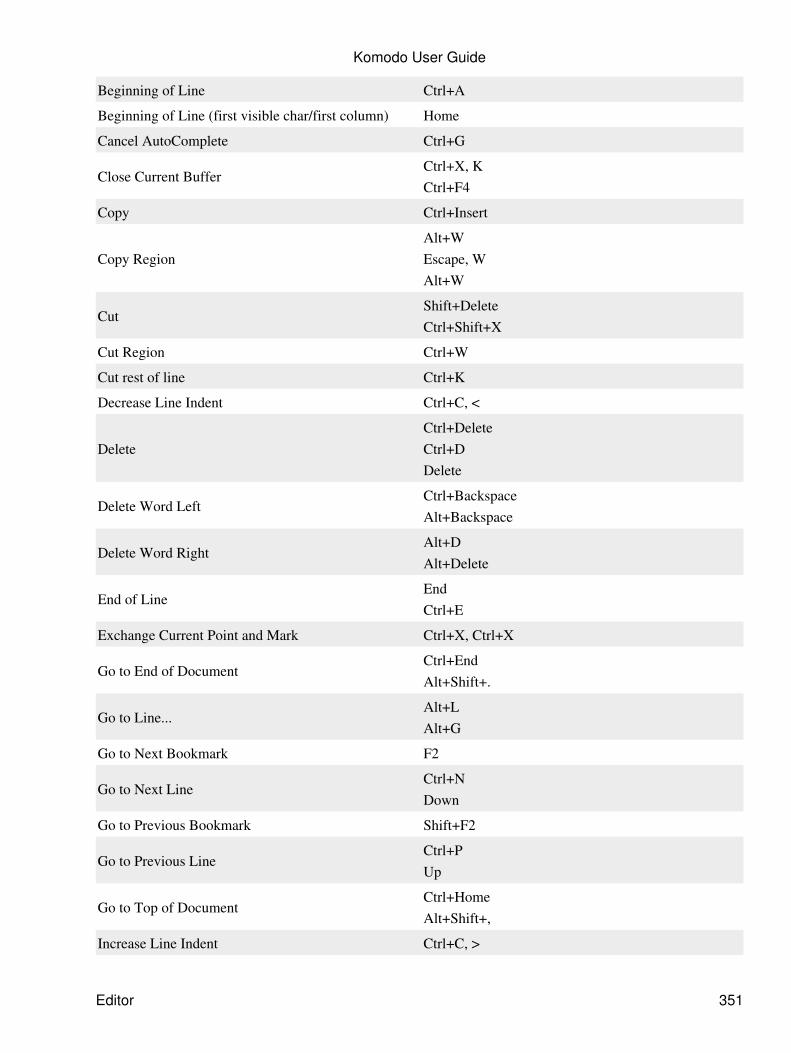
Beginning of Line Ctrl+A
Beginning of Line (first visible char/first column) Home
Cancel AutoComplete Ctrl+G
Close Current BufferCtrl+X, KCtrl+F4
Copy Ctrl+Insert
Copy RegionAlt+WEscape, WAlt+W
CutShift+DeleteCtrl+Shift+X
Cut Region Ctrl+W
Cut rest of line Ctrl+K
Decrease Line Indent Ctrl+C, <
DeleteCtrl+DeleteCtrl+DDelete
Delete Word LeftCtrl+BackspaceAlt+Backspace
Delete Word RightAlt+DAlt+Delete
End of LineEndCtrl+E
Exchange Current Point and Mark Ctrl+X, Ctrl+X
Go to End of DocumentCtrl+EndAlt+Shift+.
Go to Line...Alt+LAlt+G
Go to Next Bookmark F2
Go to Next LineCtrl+NDown
Go to Previous Bookmark Shift+F2
Go to Previous LineCtrl+PUp
Go to Top of DocumentCtrl+HomeAlt+Shift+,
Increase Line Indent Ctrl+C, >
Komodo User Guide
Editor 351
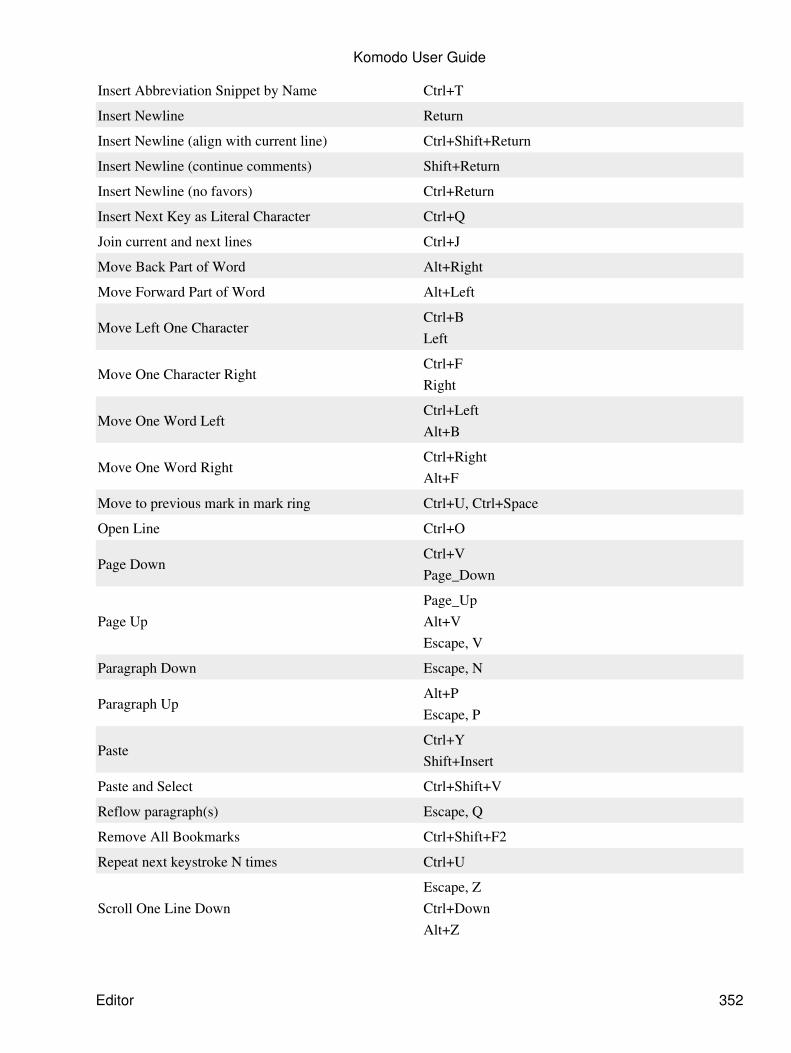
Insert Abbreviation Snippet by Name Ctrl+T
Insert Newline Return
Insert Newline (align with current line) Ctrl+Shift+Return
Insert Newline (continue comments) Shift+Return
Insert Newline (no favors) Ctrl+Return
Insert Next Key as Literal Character Ctrl+Q
Join current and next lines Ctrl+J
Move Back Part of Word Alt+Right
Move Forward Part of Word Alt+Left
Move Left One CharacterCtrl+BLeft
Move One Character RightCtrl+FRight
Move One Word LeftCtrl+LeftAlt+B
Move One Word RightCtrl+RightAlt+F
Move to previous mark in mark ring Ctrl+U, Ctrl+Space
Open Line Ctrl+O
Page DownCtrl+VPage_Down
Page UpPage_UpAlt+VEscape, V
Paragraph Down Escape, N
Paragraph UpAlt+PEscape, P
PasteCtrl+YShift+Insert
Paste and Select Ctrl+Shift+V
Reflow paragraph(s) Escape, Q
Remove All Bookmarks Ctrl+Shift+F2
Repeat next keystroke N times Ctrl+U
Scroll One Line DownEscape, ZCtrl+DownAlt+Z
Komodo User Guide
Editor 352
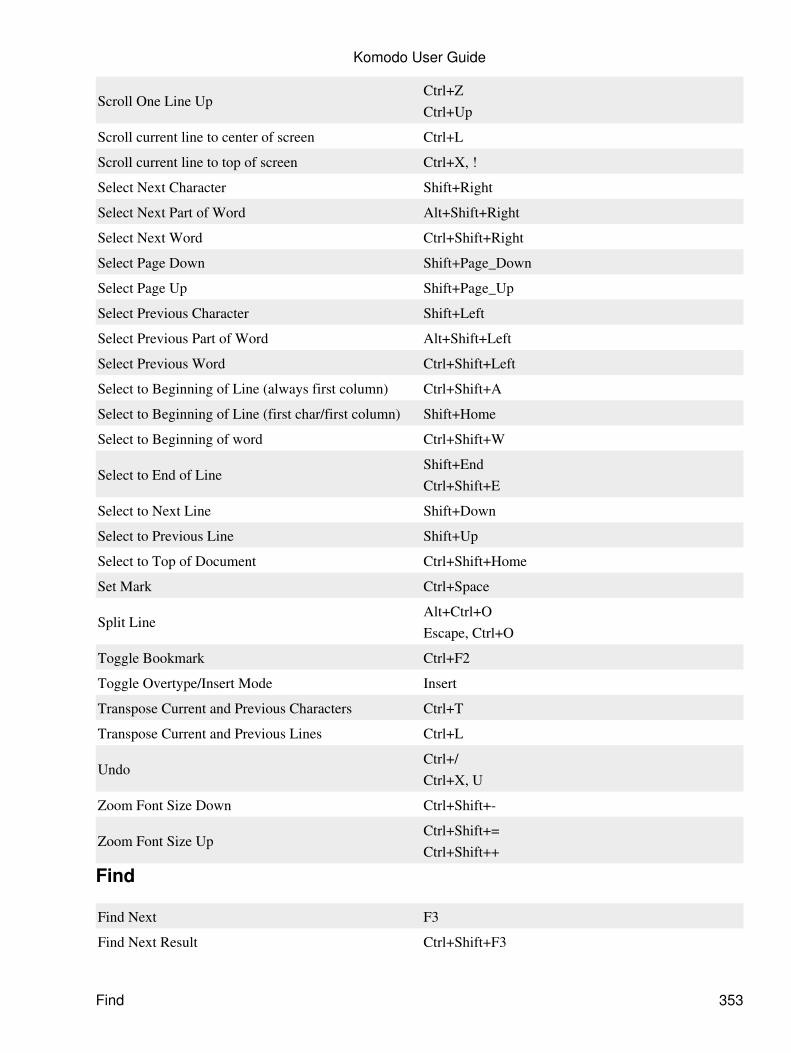
Scroll One Line UpCtrl+ZCtrl+Up
Scroll current line to center of screen Ctrl+L
Scroll current line to top of screen Ctrl+X, !
Select Next Character Shift+Right
Select Next Part of Word Alt+Shift+Right
Select Next Word Ctrl+Shift+Right
Select Page Down Shift+Page_Down
Select Page Up Shift+Page_Up
Select Previous Character Shift+Left
Select Previous Part of Word Alt+Shift+Left
Select Previous Word Ctrl+Shift+Left
Select to Beginning of Line (always first column) Ctrl+Shift+A
Select to Beginning of Line (first char/first column) Shift+Home
Select to Beginning of word Ctrl+Shift+W
Select to End of LineShift+EndCtrl+Shift+E
Select to Next Line Shift+Down
Select to Previous Line Shift+Up
Select to Top of Document Ctrl+Shift+Home
Set Mark Ctrl+Space
Split LineAlt+Ctrl+OEscape, Ctrl+O
Toggle Bookmark Ctrl+F2
Toggle Overtype/Insert Mode Insert
Transpose Current and Previous Characters Ctrl+T
Transpose Current and Previous Lines Ctrl+L
UndoCtrl+/Ctrl+X, U
Zoom Font Size Down Ctrl+Shift+-
Zoom Font Size UpCtrl+Shift+=Ctrl+Shift++
Find
Find Next F3
Find Next Result Ctrl+Shift+F3
Komodo User Guide
Find 353

Find Next Selected Ctrl+F3
Find Previous Shift+F3
Find in Files... Ctrl+Shift+F
Incremental Search Ctrl+S
Incremental Search Backwards Ctrl+R
Replace... Alt+Shift+5
General
Edit Properties Alt+Return
Least Recently Viewed FileCtrl+Shift+TabCtrl+Shift+F6
Most Recently Viewed FileCtrl+TabCtrl+F6
New File (default type) Ctrl+Shift+N
Next File Ctrl+Page_Down
Open File dialog... Ctrl+X, Ctrl+F
Open Project... Ctrl+Shift+J
Previous File Ctrl+Page_Up
Quit Ctrl+X, Ctrl+C
Refresh Status Ctrl+C, R
Save Ctrl+X, Ctrl+S
Save All Ctrl+Shift+S
Help
Alternate Help on Selection Ctrl+F1
Help... F1
Language-Specific Help on Selection Shift+F1
Macro
End RecordingCtrl+X, )Ctrl+X, )
Execute Last MacroCtrl+X, MCtrl+X, e
Start/Resume RecordingCtrl+X, (Ctrl+X, (
Komodo User Guide
General 354
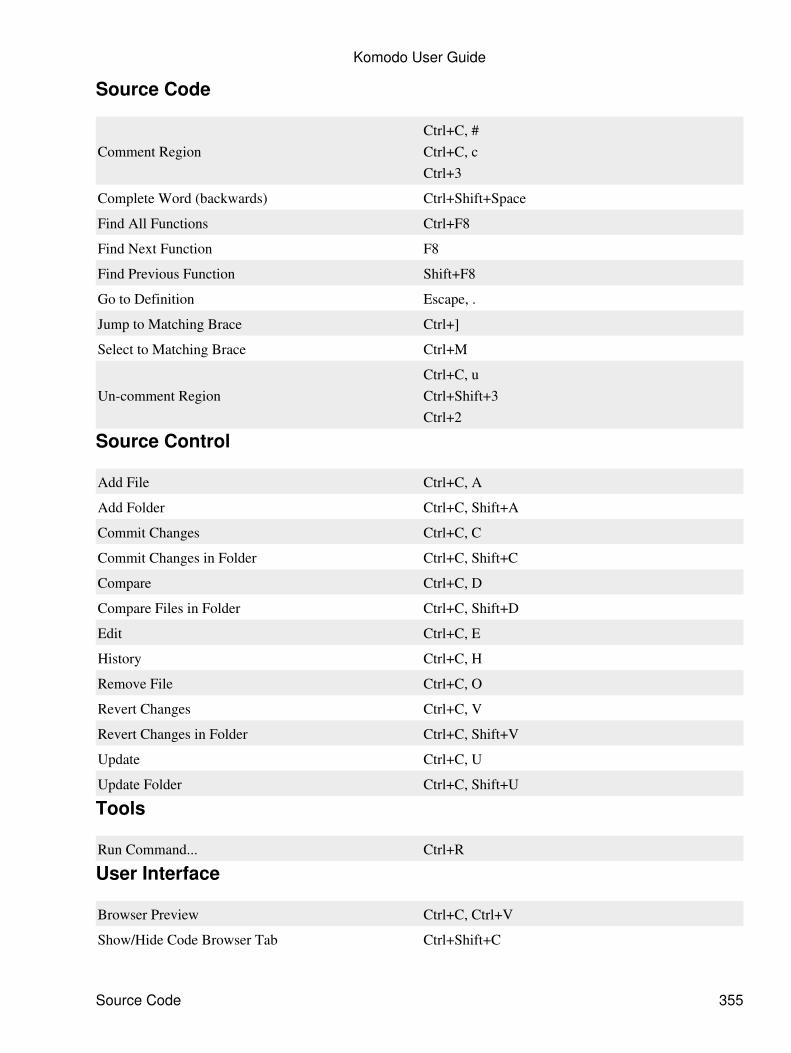
Source Code
Comment RegionCtrl+C, #Ctrl+C, cCtrl+3
Complete Word (backwards) Ctrl+Shift+Space
Find All Functions Ctrl+F8
Find Next Function F8
Find Previous Function Shift+F8
Go to Definition Escape, .
Jump to Matching Brace Ctrl+]
Select to Matching Brace Ctrl+M
Un-comment RegionCtrl+C, uCtrl+Shift+3Ctrl+2
Source Control
Add File Ctrl+C, A
Add Folder Ctrl+C, Shift+A
Commit Changes Ctrl+C, C
Commit Changes in Folder Ctrl+C, Shift+C
Compare Ctrl+C, D
Compare Files in Folder Ctrl+C, Shift+D
Edit Ctrl+C, E
History Ctrl+C, H
Remove File Ctrl+C, O
Revert Changes Ctrl+C, V
Revert Changes in Folder Ctrl+C, Shift+V
Update Ctrl+C, U
Update Folder Ctrl+C, Shift+U
Tools
Run Command... Ctrl+R
User Interface
Browser Preview Ctrl+C, Ctrl+V
Show/Hide Code Browser Tab Ctrl+Shift+C
Komodo User Guide
Source Code 355
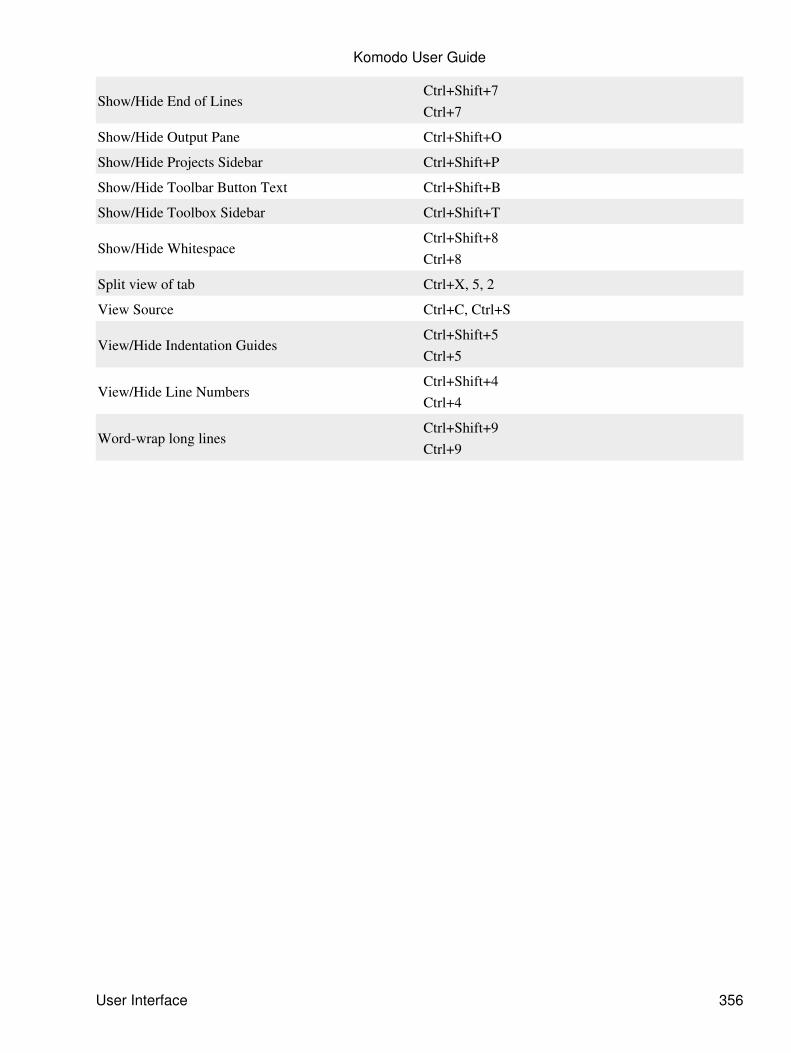
Show/Hide End of LinesCtrl+Shift+7Ctrl+7
Show/Hide Output Pane Ctrl+Shift+O
Show/Hide Projects Sidebar Ctrl+Shift+P
Show/Hide Toolbar Button Text Ctrl+Shift+B
Show/Hide Toolbox Sidebar Ctrl+Shift+T
Show/Hide WhitespaceCtrl+Shift+8Ctrl+8
Split view of tab Ctrl+X, 5, 2
View Source Ctrl+C, Ctrl+S
View/Hide Indentation GuidesCtrl+Shift+5Ctrl+5
View/Hide Line NumbersCtrl+Shift+4Ctrl+4
Word-wrap long linesCtrl+Shift+9Ctrl+9
Komodo User Guide
User Interface 356
Vi Key BindingsVi emulation mimics the modal behavior of the Vi editor. The Vi scheme (and custom schemes created withVi emulation) require this emulation in order to assign keystrokes to appropriate actions in the various modes.
Keybinding schemes and Vi emulation are configured in Edit|Preferences|Editor|Keybindings.
Vi Emulation
Komodo emulates the following Vi modes:
Normal: navigation and editing.
When you open a file in Komodo with the Vi scheme enabled, you start off in command mode.Keystrokes in this mode control movement, deletion, cutting, pasting and other standard editingcommands that are generally mapped to Ctrl and Alt key combinations in other schemes.
•
Input: entering text.
Hitting an "input" command key in Normal mode (i.e. 'i' to insert, 'a' to append, or 'o' to open a newline and insert) puts the editor into Input mode. Keystrokes in this mode enter text. Use the 'Esc' keyto exit into Normal mode.
•
Visual: visual selection of text with navigation keystrokes.
Similar to Vim's visual modes. Entering 'v' enables selection by character, 'V' enables linewiseselection, and 'Ctrl'+'v' enables blockwise selection. Navigation keystrokes within these modesexpand and contract the selection area. Use the 'Esc' key to exit into Normal mode.
•
Command-line: running vi/ex commands.
In Normal mode, entering ':' opens a text box in the status bar at the bottom of the Komodo windowfor entering Vi commands. The following Vi and Vim commands have been implemented in thedefault Vi scheme:
edit♦ exit♦ help♦ next♦ previous♦ quit♦ set♦ splitview♦ undo♦ write♦ wq♦ xit♦ number <line number>♦ <range>s/<search string>/<substitution>/[g|i|I]♦
•
Vi Key Bindings 357
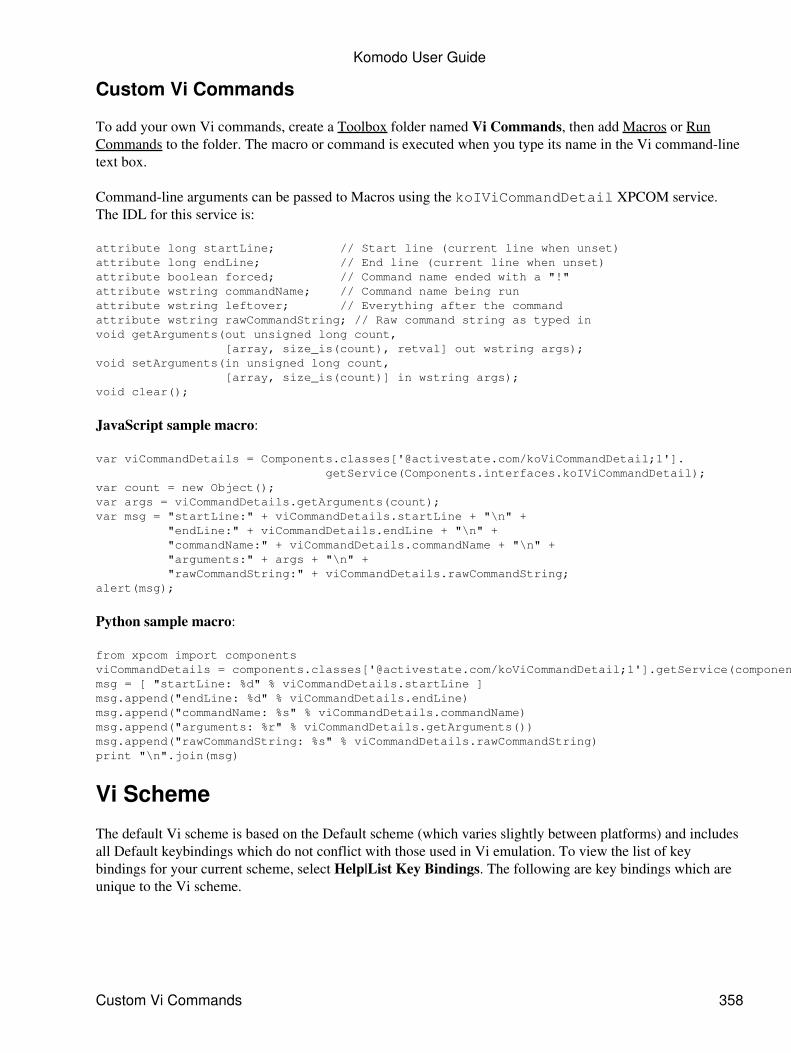
Custom Vi Commands
To add your own Vi commands, create a Toolbox folder named Vi Commands, then add Macros or RunCommands to the folder. The macro or command is executed when you type its name in the Vi command-linetext box.
Command-line arguments can be passed to Macros using the koIViCommandDetail XPCOM service.The IDL for this service is:
attribute long startLine; // Start line (current line when unset)attribute long endLine; // End line (current line when unset)attribute boolean forced; // Command name ended with a "!"attribute wstring commandName; // Command name being runattribute wstring leftover; // Everything after the commandattribute wstring rawCommandString; // Raw command string as typed invoid getArguments(out unsigned long count, [array, size_is(count), retval] out wstring args);void setArguments(in unsigned long count, [array, size_is(count)] in wstring args);void clear();
JavaScript sample macro:
var viCommandDetails = Components.classes['@activestate.com/koViCommandDetail;1']. getService(Components.interfaces.koIViCommandDetail);var count = new Object();var args = viCommandDetails.getArguments(count);var msg = "startLine:" + viCommandDetails.startLine + "\n" + "endLine:" + viCommandDetails.endLine + "\n" + "commandName:" + viCommandDetails.commandName + "\n" + "arguments:" + args + "\n" + "rawCommandString:" + viCommandDetails.rawCommandString;alert(msg);
Python sample macro:
from xpcom import componentsviCommandDetails = components.classes['@activestate.com/koViCommandDetail;1'].getService(components.interfaces.koIViCommandDetail)msg = [ "startLine: %d" % viCommandDetails.startLine ]msg.append("endLine: %d" % viCommandDetails.endLine)msg.append("commandName: %s" % viCommandDetails.commandName)msg.append("arguments: %r" % viCommandDetails.getArguments())msg.append("rawCommandString: %s" % viCommandDetails.rawCommandString)print "\n".join(msg)
Vi Scheme
The default Vi scheme is based on the Default scheme (which varies slightly between platforms) and includesall Default keybindings which do not conflict with those used in Vi emulation. To view the list of keybindings for your current scheme, select Help|List Key Bindings. The following are key bindings which areunique to the Vi scheme.
Komodo User Guide
Custom Vi Commands 358

Vi-specific key bindings
Vi: Cancel Ctrl+[
Vi: Close the Current Buffer Without Saving Z, Q
Vi: Cut One Character x
Vi: Cut One Character to Left X
Vi: Cut Whole Line and Enter Insert Mode S
Vi: Cut to End of Line and Enter Insert Mode C
Vi: Delete the Current Character and Enter InsertMode s
Vi: Deletes from cursor to end of line. D
Vi: Enter Insert Mode i
Vi: Enter Insert Mode after the Cursor Position a
Vi: Enter Insert Mode at Start of the Line I
Vi: Enter Insert mode at the End of the Current Line A
Vi: Enter command mode :
Vi: Enter visual block mode Ctrl+V
Vi: Enter visual character mode v
Vi: Enter visual line mode V
Vi: Go to Next Line j
Vi: Go to Previous LineCtrl+Pk
Vi: Goto Line G
Vi: Join current and next lines J
Vi: Move Left One Character h
Vi: Move One Word Left b
Vi: Move Right One CharacterSpacel
Vi: Move To End of Word To Right e
Vi: Move To Start of Word To Right w
Vi: Move one page down Ctrl+F
Vi: Move one page up Ctrl+B
Vi: Move one word left, past any punctuation B
Vi: Move one word right, past any punctuation W
Vi: Move to Beginning of Line (first visible char/firstcolumn) ^
Komodo User Guide
Vi-specific key bindings 359

Vi: Move to Beginning of the Current Line|0
Vi: Move to Beginning of the Previous Line -
Code Browser
Locate current scope... Ctrl+K, Ctrl+L
Debugger
Clear All Breakpoints Ctrl+F9
Disable/Enable Breakpoint F9
New Session Ctrl+Shift+F5
Run ScriptF7Ctrl+F7
Run to CursorShift+F10Ctrl+Shift+F10
Show Current Statement Alt+*
StartF5Ctrl+F5
Start/Find/Hide Default Interactive Shell F12
Step InF11Ctrl+F11
Step OutShift+F11Ctrl+Shift+F11
Step OverF10Ctrl+F10
Stop Shift+F5
Editor
Back Shift+Backspace
Backspace Backspace
Beginning of Line (first visible char/first column) Home
Cancel AutoComplete Escape
Close Current BufferCtrl+WCtrl+F4
CopyCtrl+CCtrl+Insert
Komodo User Guide
Code Browser 360
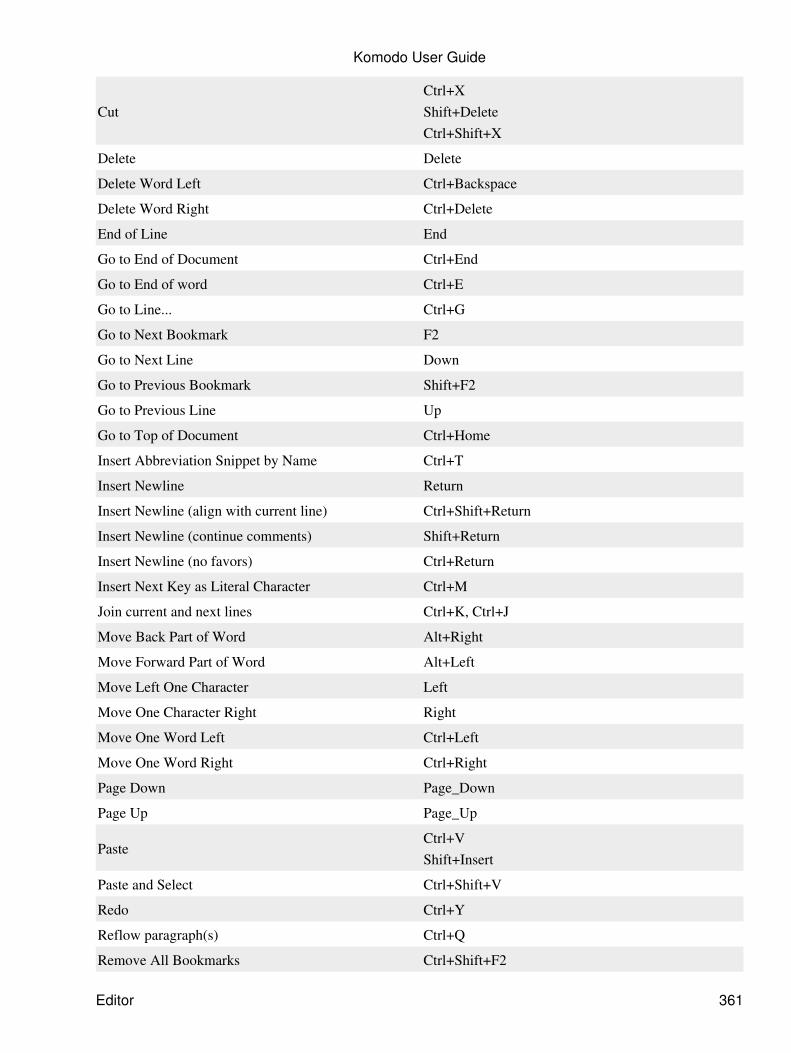
CutCtrl+XShift+DeleteCtrl+Shift+X
Delete Delete
Delete Word Left Ctrl+Backspace
Delete Word Right Ctrl+Delete
End of Line End
Go to End of Document Ctrl+End
Go to End of word Ctrl+E
Go to Line... Ctrl+G
Go to Next Bookmark F2
Go to Next Line Down
Go to Previous Bookmark Shift+F2
Go to Previous Line Up
Go to Top of Document Ctrl+Home
Insert Abbreviation Snippet by Name Ctrl+T
Insert Newline Return
Insert Newline (align with current line) Ctrl+Shift+Return
Insert Newline (continue comments) Shift+Return
Insert Newline (no favors) Ctrl+Return
Insert Next Key as Literal Character Ctrl+M
Join current and next lines Ctrl+K, Ctrl+J
Move Back Part of Word Alt+Right
Move Forward Part of Word Alt+Left
Move Left One Character Left
Move One Character Right Right
Move One Word Left Ctrl+Left
Move One Word Right Ctrl+Right
Page Down Page_Down
Page Up Page_Up
PasteCtrl+VShift+Insert
Paste and Select Ctrl+Shift+V
Redo Ctrl+Y
Reflow paragraph(s) Ctrl+Q
Remove All Bookmarks Ctrl+Shift+F2
Komodo User Guide
Editor 361
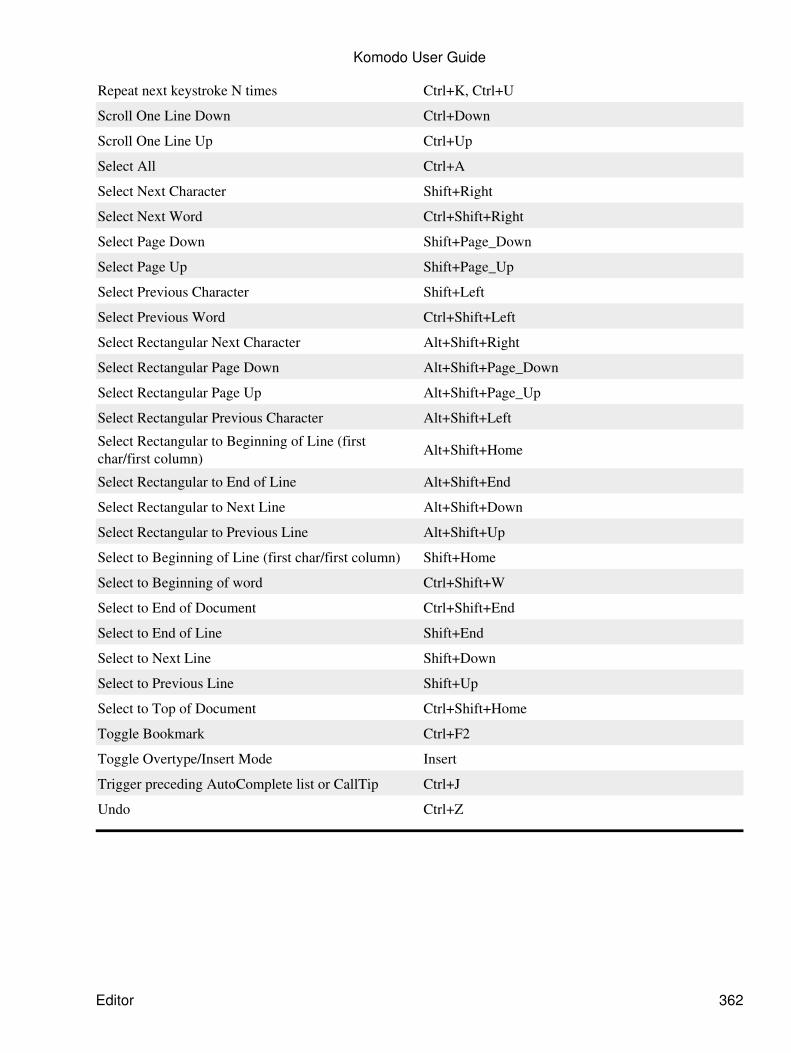
Repeat next keystroke N times Ctrl+K, Ctrl+U
Scroll One Line Down Ctrl+Down
Scroll One Line Up Ctrl+Up
Select All Ctrl+A
Select Next Character Shift+Right
Select Next Word Ctrl+Shift+Right
Select Page Down Shift+Page_Down
Select Page Up Shift+Page_Up
Select Previous Character Shift+Left
Select Previous Word Ctrl+Shift+Left
Select Rectangular Next Character Alt+Shift+Right
Select Rectangular Page Down Alt+Shift+Page_Down
Select Rectangular Page Up Alt+Shift+Page_Up
Select Rectangular Previous Character Alt+Shift+Left
Select Rectangular to Beginning of Line (firstchar/first column) Alt+Shift+Home
Select Rectangular to End of Line Alt+Shift+End
Select Rectangular to Next Line Alt+Shift+Down
Select Rectangular to Previous Line Alt+Shift+Up
Select to Beginning of Line (first char/first column) Shift+Home
Select to Beginning of word Ctrl+Shift+W
Select to End of Document Ctrl+Shift+End
Select to End of Line Shift+End
Select to Next Line Shift+Down
Select to Previous Line Shift+Up
Select to Top of Document Ctrl+Shift+Home
Toggle Bookmark Ctrl+F2
Toggle Overtype/Insert Mode Insert
Trigger preceding AutoComplete list or CallTip Ctrl+J
Undo Ctrl+Z
Komodo User Guide
Editor 362
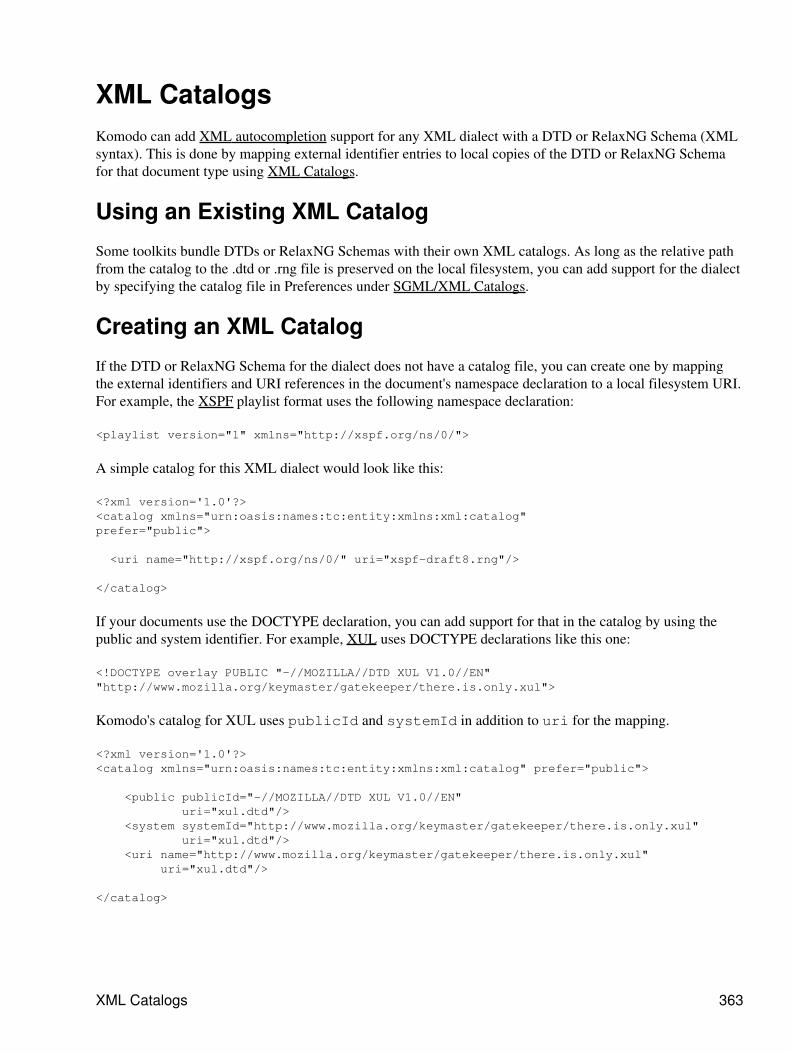
XML CatalogsKomodo can add XML autocompletion support for any XML dialect with a DTD or RelaxNG Schema (XMLsyntax). This is done by mapping external identifier entries to local copies of the DTD or RelaxNG Schemafor that document type using XML Catalogs.
Using an Existing XML Catalog
Some toolkits bundle DTDs or RelaxNG Schemas with their own XML catalogs. As long as the relative pathfrom the catalog to the .dtd or .rng file is preserved on the local filesystem, you can add support for the dialectby specifying the catalog file in Preferences under SGML/XML Catalogs.
Creating an XML Catalog
If the DTD or RelaxNG Schema for the dialect does not have a catalog file, you can create one by mappingthe external identifiers and URI references in the document's namespace declaration to a local filesystem URI.For example, the XSPF playlist format uses the following namespace declaration:
<playlist version="1" xmlns="http://xspf.org/ns/0/">
A simple catalog for this XML dialect would look like this:
<?xml version='1.0'?><catalog xmlns="urn:oasis:names:tc:entity:xmlns:xml:catalog"prefer="public">
<uri name="http://xspf.org/ns/0/" uri="xspf-draft8.rng"/>
</catalog>
If your documents use the DOCTYPE declaration, you can add support for that in the catalog by using thepublic and system identifier. For example, XUL uses DOCTYPE declarations like this one:
<!DOCTYPE overlay PUBLIC "-//MOZILLA//DTD XUL V1.0//EN""http://www.mozilla.org/keymaster/gatekeeper/there.is.only.xul">
Komodo's catalog for XUL uses publicId and systemId in addition to uri for the mapping.
<?xml version='1.0'?><catalog xmlns="urn:oasis:names:tc:entity:xmlns:xml:catalog" prefer="public">
<public publicId="-//MOZILLA//DTD XUL V1.0//EN" uri="xul.dtd"/> <system systemId="http://www.mozilla.org/keymaster/gatekeeper/there.is.only.xul" uri="xul.dtd"/> <uri name="http://www.mozilla.org/keymaster/gatekeeper/there.is.only.xul" uri="xul.dtd"/>
</catalog>
XML Catalogs 363

XML Catalog Resources
The XML Catalog specification can be found at:
http://www.oasis-open.org/committees/entity/spec.html•
Examples of XML catalog files can be found in the Komodo installation under:
<komodo-install-directory>\lib\support\catalogs (Windows)• /Applications/Komodo.app/Contents/SharedSupport/catalogs/ (OS X)• <komodo-install-directory>/lib/support/catalogs (Linux)•
Komodo User Guide
XML Catalog Resources 364
User-Defined Language SupportLuddite Reference
Keywords• Style Names• Terms• Concepts•
Komodo's system for defining multi-language syntax lexing and user-defined syntax highlighting is calledUDL (User Defined Languages). UDL files are written in a language called Luddite, then compiled intoScintilla lexers and packaged for use in Komodo.
Introduction
Komodo includes a general-purpose lexer engine that loads a description resource, and walks it while lexingthe buffer. It currently allows for up to five sub-languages, each of which is expected to be a member of apre-defined family ("markup", "style", "client-side scripting language", "server-side scripting language", and"template language"). The format of these resource files is low-level and intended to be fast to parse, so wehave provided a programming language that is intended to allow users to build lexers for their ownprogramming languages.
Currently these lexers allow for six-bit colorizing, meaning that both errors and warnings can be highlightedin the buffer. The lexer description language allows for:
specifying a set of keywords and folding conditions for each family• disambiguation rules for each family (e.g. in JavaScript, when does '/' indicate division, and whendoes it start a regex?)
•
constant strings and patterns to look for, and what to do with them•
Luddite Language Overview
Luddite programs typically consist of a set of files, called modules. A well-designed Luddite program willcontain one main file, that provides a name for the target language, and then a list of include statementsthat load the other modules.
Luddite consists of a set of declarations, most of which can appear in any order, except for the initial "family"declaration. This is because some declarations are family-specific, and bind to the prevailing familydeclaration.
A Sample
The php-mainlex.udl file defines the PHP lexer. It is a useful example as it uses one of each of the languagefamilies: markup (HTML), css (CSS), client-side (JavaScript), and server-side (PHP). It includes transitionsfrom HTML to JavaScript, CSS, and PHP, followed by transitions back to HTML from each of theselanguages, and finally the main language modules.
language PHP
User-Defined Language Support 365

include "html2js.udl"
include "html2css.udl"
include "html2php.udl"
include "css2html.udl"
include "js2html.udl"
include "php2html.udl"
include "html.udl"include "csslex.udl"include "jslex.udl"include "phplex.udl"
Working from the bottom of the list towards the top, we have four core files that contain code to describe howto lex each language on its own. Above those are files that explain how to transition from one language toanother (e.g. "php2html.udl"). As rules are attempted in the order they're first presented, we normally need totest transition rules before we attempt internal rules, which is why the core modules appear at the bottom.
Luddite in a Nutshell
Luddite programs consist of declarative statements separated either by newlines or semi-colons. Commentsstart with "#" and continue to the end of line. Because it's a declarative language, the order of differentstatements doesn't matter, but the order of rules in the same group does.
The Luddite compiler allows lists to be entered with minimal punctuation (i.e without quotes around strings,or commas between entries). However, the following words should always be quoted when declared as stringsas they are reserved words in Luddite:
accept• all• at_eol• clear_delimiter• delimiter• family• fold• include• initial• keep_delimiter• keywords•
keyword_style• language• namespace• no_keyword• paint• pattern• public_id• redo• reject• set_delimiter• set_opposite_delimiter•
skip• state• sublanguage• sub_language• system_id• token_check• start_style• end_style• upto• spush_check• spop_check•
Luddite is intended to work only with Scintilla. It is helpful to refer to the Scintilla documentation whenwriting lexers in Luddite. To reduce redundancy, you can refer to the names of colors by using either the fullname, such as "SCE_UDL_M_ATTRNAME", or you can drop the common prefix, and refer to"M_ATTRNAME". A partial prefix won't work, nor will hard-wired numeric values.
Komodo User Guide
A Sample 366
Families
Most lexer components need to declare which language family they belong to: markup, css, csl (client-sidelanguage), ssl (server-side language - usually JavaScript ), or tpl (template language). This last language isusually used by the server-side processor that has to determine which code is markup to be output "as is", andwhich is server-side code to be executed (e.g. PHP's Smarty and Perl's Template Toolkit).
The default family is "markup". You can write a lexer for any language that lives in one family, and it won'tlook like markup. This is an arbitrary starting point that makes sense for most template languages.
All directives in a file belong to the most recent family directive. When a new file is included, it starts off inthe family at the point of inclusion. If a new family is specified, when the include-file is processed, Ludditepops to using the family that was current when the include began.
There are currently three domains that are family-specific: keywords, named patterns, and look-back tests,which are used to disambiguate.
Example:
family csl
Styles
For each family, we currently need to specify the style from scintilla.iface that the family will use.
Example:
start_style CSL_DEFAULTend_style CSL_REGEX
This isn't surprising, as the code in scintilla.iface reads like so:
# Template: client-side language # Start at 30val SCE_UDL_CSL_DEFAULT=30val SCE_UDL_CSL_COMMENT=31val SCE_UDL_CSL_COMMENTBLOCK=32val SCE_UDL_CSL_NUMBER=33val SCE_UDL_CSL_STRING=34val SCE_UDL_CSL_WORD=35val SCE_UDL_CSL_IDENTIFIER=36val SCE_UDL_CSL_OPERATOR=37val SCE_UDL_CSL_REGEX=38
A complete list of Scintilla Styles can be found in the Luddite Reference.
Keywords
Most sub-languages have a set of keywords that we want to color differently from identifiers. You specifythem using keywords, supplying a list of names and strings, which may be comma-separated, as in this codefor JavaScript:
keywords [as break case catch class const # ...
Komodo User Guide
Families 367

get, "include", set abstract debugger enum goto implements # ...]
The string "include" is quoted because it is a Luddite keyword. Commas are optional, and comments can beadded at the end of a line inside a list.
You must generally specify a different list of keywords for each family, however it is possible to define somelanguages without keywords (e.g. HTML).
Tell Luddite when to color a range of text as a keyword with the keyword_style directive. For example:
keyword_style CSL_IDENTIFIER => CSL_WORD
A complete list of Luddite Keywords can be found in the Luddite Reference.
To prevent the color for an identifer from being converted into a keyword, use the no_keyword command.
Pattern Variables
To specify how Luddite should process text, provide a string for it to match verbatim, or provide a pattern.The pattern syntax is nearly identical to Perl's regex language.
Patterns for a particular language tend to be repetitive. To make it easier to use them, Luddite supportsfamily-based pattern variables, which are interpolated into pattern expressions. These are the four patternvariables used in the JavaScript lexer:
pattern NMSTART = '\w\x80-\xff' # inside csetpattern CS = '\w\d_\x80-\xff' # inside csetpattern WS = '\s\t\r\n' # inside csetpattern OP = '!\#%&\(\)\*\+,-\.\/:;<=>\?@\[\]\^\{\}~|'
These patterns are interpolated into a character set. For example:
/[^$WS]+/ # Match one or more non-white-space characters
The CSS UDL includes a more complex set of statements:
family css
pattern CS = '-\w\d._\x80-\xff' # inside csetpattern WS = '\s\t\r\n' # inside csetpattern NONASCII = '[^\x00-\x7f]'pattern UNICODE = '\\[0-9a-f]{1,6}'pattern ESCAPE = '$UNICODE|\\[ -~\x80-\xff]'pattern NMCHAR = '[a-zA-Z0-9-]|$NONASCII|$ESCAPE'pattern NMSTART = '[a-zA-Z]|$NONASCII|$ESCAPE'
Pattern variables can nest within one another. You need to keep track of which variables define a characterset, and which ones are intended to be used inside a character set.
Komodo User Guide
Keywords 368
States and Transitions
The heart of every Luddite program is a set of state-transitions. The key concept is that states in Luddite,unlike most Scintilla lexers that are hand-coded in C, are not directly related to the colors that each characterwill be given. In Luddite you create your own names for each state, describe for each state which pieces oftext or patterns to look for, and specify what to do with them.
The Initial State
The HTML lexer starts with this code:
initial IN_M_DEFAULT
The first statement means that we should start lexing at the state we call "IN_M_DEFAULT". Subsequentinitial statements are ignored, without warning messages.
Specifying State Transitions
To specify a state transition, provide a state block. For example, with HTML:
state IN_M_DEFAULT:'<?' : paint(upto, M_DEFAULT), => IN_M_PI_1'<[CDATA[' : paint(upto, M_DEFAULT), => IN_M_CDATA'<!--' : paint(upto, M_DEFAULT), => IN_M_COMMENT
# These are more complicated, because if they aren't followed# by a character we want to leave them as text.
'</' : paint(upto, M_DEFAULT), => IN_M_ETAG_1'&#' : paint(upto, M_DEFAULT), => IN_M_ENT_CREF_1'&' : paint(upto, M_DEFAULT), => IN_M_ENT_REF_1'<' : paint(upto, M_DEFAULT), => IN_M_STAG_EXP_TNAME
When we're in the state we call "IN_M_DEFAULT" (Luddite turns this into an arbitrary number to be used byScintilla), if we match any of the above strings, we first will have Scintilla color (or "paint") everything up tothe current starting position the SCE_UDL_M_DEFAULT color (remember, the prefix is implicit), and thenchange to the state named to the right of the "=>". The comma before "=>" is optional, but advisable in morecomplex rules.
The match strings may use double-quotes instead of single-quoted. Simple C-like backslash-escaping is used,such as ' and ", but not hex or octal escapes.
Include, Upto, and EOF Conditions
state IN_M_PI_1:'?>' : paint(include, M_PI) => IN_M_DEFAULT/\z/ : paint(upto, M_PI)
The "include" directive for the paint command paints from the last paint-point, to the position we end at.Recall that paint(upto,[color]) stops at the position we were at when we attempted to match thestring.
Komodo User Guide
States and Transitions 369
One of the advantages of this approach over a standard regular expression based set of rules, specifying thestart and end delimiters, is that Luddite is geared to building editor lexers. When people are using lexers theyoften are typing at the end of the file. For example, if I was typing this code:
---- top ----...<?somepi<EOF>---- bottom ----
I would like the last line to be colored like a processing instruction, even though I haven't completed it.Luddite lets you do things to confound your users, such as choosing a different color for an incompletedirective at the end of file. However, most of the time, you won't want to do this. If all of the first colors in astate block map to the same color, Luddite will automatically supply that color for an end-of-file condition atthat state. In other words, the '/z/'-condition is rarely necessary.
Redo and Lookahead
There are two main ways to to delay state transitions and colorizing in Luddite:
Perl-like (?=...) lookahead test in a regular expression, which will match but won't advance thecursor into that text.
1.
The redo command. In the following example, we modify our rules for recognizing processinginstructions in HTML. If the "<?" is followed immediately by "php", and then by a non-namecharacter, we want to transition to the server-side family, which presumably implements a PHP lexer.
2.
In the HTML lexer, we rewrite the state blocks for PIs as follows:
state IN_M_PI_1:/./ : redo, => IN_M_PI_2
state IN_M_PI_2:'?>' : paint(include, M_PI) => IN_M_DEFAULT
Wait a minute, you say. That does just the same thing, and less efficiently than when there was just the onestate. In fact, all state IN_M_PI_1 does is a so-called epsilon transition to state IN_M_PI_2 ("epsilon"transitions don't consume input).
Go back to that sample at the beginning of this document. Notice that the "html2php.udl" file is includedbefore "html.udl". This file is short, and is reproduced here without comments:
family markup
state IN_M_PI_1:/php\b/ : paint(upto, M_OPERATOR), paint(include, M_TAGNAME), \ => IN_SSL_DEFAULT
Because "html2php.udl" is processed before "html.udl", its pattern will be attempted earlier. If the lexer finds"php" followed by a word boundary, it will then paint the leading "<?" as a markup operator, paint the "php"as a markup tagname, and then switch to the default state in the server-side language family.
If you write a Luddite program that ends up where two states do epsilon transitions to one another, the lexerengine will detect this. More precisely, if it notices that it has carried out 1000 consecutive epsilon transitions,it will move on to the next character. This shows up in Komodo as the rest of the buffer highlighted in a single
Komodo User Guide
Include, Upto, and EOF Conditions 370
color (remember the implicit end-of-buffer coloring).
Preventing Keyword Promotion
The no_keyword command is used to prevent identifier to keyword promotion when an identifier isrecognized. This is useful for programming languages that allow any token, even keywords, to be used incertain contexts, such as after the "." in Python, Ruby, and VBScript, or after "::" or "->" in Perl. See sampleLuddite code.
Pattern Syntax
The Luddite syntax for patterns is very similar to Perl's. Only forward slashes may be used as regexdelimiters, all the usual escaping rules apply. For example, JavaScript uses this pattern to handle single-linecomments:
state IN_CSL_DEFAULT:# ...# Swallow to end-of-line/\/\/.*/ : paint(upto, CSL_DEFAULT), paint(include, CSL_COMMENT)
If no target state is specified, the lexer will stay in the current state.
Pushing States
In many languages you need to push one state, transition to another, and at some point return to the previousstate. There are many examples where this comes up in template-based languages.
In most Smarty files, you transition from HTML to Smarty on "{", and transition back on "}". But if you findan open-brace while processing Smarty code, you should allow for a matching "}".
In RHTML, the delimiters "<%=" and "%>" are used to transition from HTML into a Ruby expression, andback. These delimiters can occur in many different parts of HTML files, including attribute strings andcontent. The lexer needs to be told which state to return to when it finishes processing the Ruby expression.
In Ruby proper, you can interpolate arbitrary amounts of Ruby code inside double-quoted strings between"#{" and "}". By pushing a state when you find "#{" in a Ruby string, you can allow for multiple nested pairsof braces in the expression, and return to the string when the matching "}" is reached.
The Luddite code for expressing this is simple. Let's look at how it's expressed for double-quoted strings inRuby:
state IN_SSL_DEFAULT:#...'"' : paint(upto, SSL_DEFAULT), => IN_SSL_DSTRING#... Note the redo here for things that could be operators/[$OP]/ : paint(upto, SSL_DEFAULT), redo, => IN_SSL_OP1#...
state IN_SSL_DSTRING:'#{' : paint(include, SSL_STRING), spush_check(IN_SSL_DSTRING), \ => IN_SSL_DEFAULT...
Komodo User Guide
Redo and Lookahead 371
state IN_SSL_OP1:'{' : paint(include, SSL_OPERATOR), spush_check(IN_SSL_DEFAULT) \ => IN_SSL_DEFAULT'}' : paint(upto, SSL_DEFAULT), paint(include, SSL_OPERATOR), \ spop_check, => IN_SSL_DEFAULT# ...
When we find "#{" while processing a double-quoted string, we push the state we want to return to(IN_SSL_DSTRING), and transition to the default Ruby state (IN_SSL_DEFAULT), where we lex anexpression.
If we find an open-brace while looking for operators, we again push the default state on the stack.
To handle a close-brace, we carry out a "spop_check" test. If there's something on the stack, we pop it andtransition to the state it specified. Otherwise, we transition to the specified state. If users never made mistakes,you would never need to specify a target state in a directive containing an "spop" command. But becausepeople are capable of typing things like:
cmd { yield }
...we need to tell Luddite what to do on the extra close-brace.
Handling Newlines
Some template languages use line-oriented embedded languages. For example, in Mason you can insert a lineof Perl code by putting a '%' character at the start of the line.
The simplest way to express this in Luddite is to put an at_eol command in the transition into that state.When the lexer reaches the end of that line, it will automatically transition into the specified state. Forexample, the Luddite code to express this for the above Mason example is here:
state IN_M_DEFAULT:/^%/ : paint(upto, M_DEFAULT), paint(include, TPL_OPERATOR), \ at_eol(IN_M_DEFAULT), => IN_SSL_DEFAULT
Supporting Arbitrary Delimiters
Some languages support arbitrary delimiters for objects like strings and regular expressions. For example, inPerl you can provide a list of words with the 'qw' construct (e.g. qw/abc def 1234/), and in Ruby youcan use the '%' character to delimit a string (e.g. %Q(abc(nested parens)def)). You can express thesein Luddite using the delimiter keyword.
There are actually four parts to supporting delimiters:
Targeting an "opposite" delimiter, so that one of the four characters "[", "{", "(" or "<" is matched byits closing character "]", "}", ")", or ">" respectively. These pairs are hard-wired into UDL.
1.
Targeting any character as the closing delimiter. Alphabetic characters can be targeted. The onlycharacter that cannot be targeted is the "\".
2.
Matching a delimiter.3. Continuing use of a delimiter. For example, to support a construct like Perl's "s,\\,/,g" idiom, set4.
Komodo User Guide
Pushing States 372
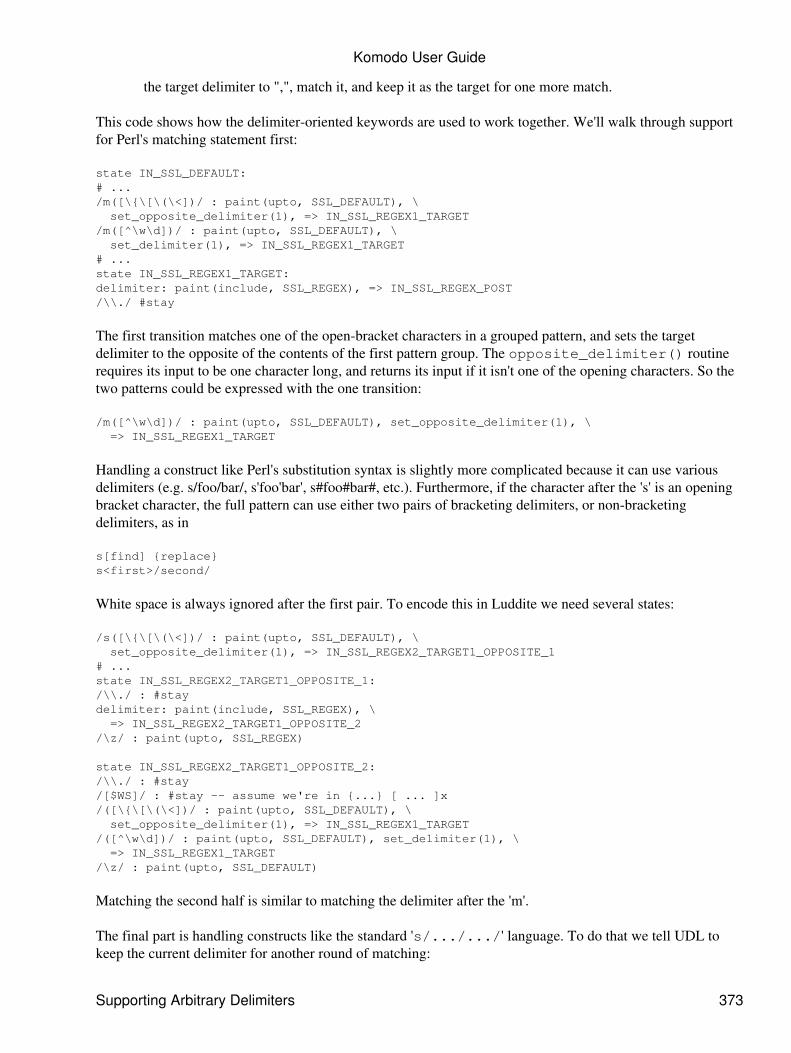
the target delimiter to ",", match it, and keep it as the target for one more match.
This code shows how the delimiter-oriented keywords are used to work together. We'll walk through supportfor Perl's matching statement first:
state IN_SSL_DEFAULT:# .../m([\{\[\(\<])/ : paint(upto, SSL_DEFAULT), \ set_opposite_delimiter(1), => IN_SSL_REGEX1_TARGET/m([^\w\d])/ : paint(upto, SSL_DEFAULT), \ set_delimiter(1), => IN_SSL_REGEX1_TARGET# ...state IN_SSL_REGEX1_TARGET:delimiter: paint(include, SSL_REGEX), => IN_SSL_REGEX_POST/\\./ #stay
The first transition matches one of the open-bracket characters in a grouped pattern, and sets the targetdelimiter to the opposite of the contents of the first pattern group. The opposite_delimiter() routinerequires its input to be one character long, and returns its input if it isn't one of the opening characters. So thetwo patterns could be expressed with the one transition:
/m([^\w\d])/ : paint(upto, SSL_DEFAULT), set_opposite_delimiter(1), \ => IN_SSL_REGEX1_TARGET
Handling a construct like Perl's substitution syntax is slightly more complicated because it can use variousdelimiters (e.g. s/foo/bar/, s'foo'bar', s#foo#bar#, etc.). Furthermore, if the character after the 's' is an openingbracket character, the full pattern can use either two pairs of bracketing delimiters, or non-bracketingdelimiters, as in
s[find] {replace}s<first>/second/
White space is always ignored after the first pair. To encode this in Luddite we need several states:
/s([\{\[\(\<])/ : paint(upto, SSL_DEFAULT), \ set_opposite_delimiter(1), => IN_SSL_REGEX2_TARGET1_OPPOSITE_1# ...state IN_SSL_REGEX2_TARGET1_OPPOSITE_1:/\\./ : #staydelimiter: paint(include, SSL_REGEX), \ => IN_SSL_REGEX2_TARGET1_OPPOSITE_2/\z/ : paint(upto, SSL_REGEX)
state IN_SSL_REGEX2_TARGET1_OPPOSITE_2:/\\./ : #stay/[$WS]/ : #stay -- assume we're in {...} [ ... ]x/([\{\[\(\<])/ : paint(upto, SSL_DEFAULT), \ set_opposite_delimiter(1), => IN_SSL_REGEX1_TARGET/([^\w\d])/ : paint(upto, SSL_DEFAULT), set_delimiter(1), \ => IN_SSL_REGEX1_TARGET/\z/ : paint(upto, SSL_DEFAULT)
Matching the second half is similar to matching the delimiter after the 'm'.
The final part is handling constructs like the standard 's/.../.../' language. To do that we tell UDL tokeep the current delimiter for another round of matching:
Komodo User Guide
Supporting Arbitrary Delimiters 373
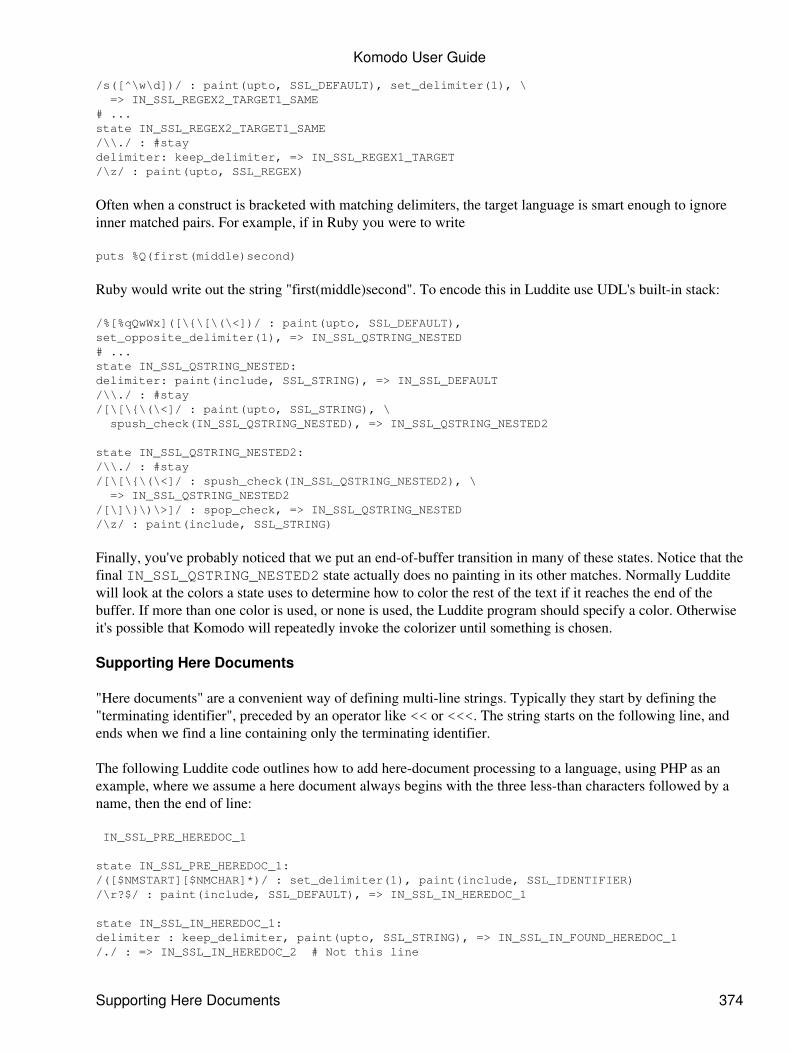
/s([^\w\d])/ : paint(upto, SSL_DEFAULT), set_delimiter(1), \ => IN_SSL_REGEX2_TARGET1_SAME# ...state IN_SSL_REGEX2_TARGET1_SAME/\\./ : #staydelimiter: keep_delimiter, => IN_SSL_REGEX1_TARGET/\z/ : paint(upto, SSL_REGEX)
Often when a construct is bracketed with matching delimiters, the target language is smart enough to ignoreinner matched pairs. For example, if in Ruby you were to write
puts %Q(first(middle)second)
Ruby would write out the string "first(middle)second". To encode this in Luddite use UDL's built-in stack:
/%[%qQwWx]([\{\[\(\<])/ : paint(upto, SSL_DEFAULT),set_opposite_delimiter(1), => IN_SSL_QSTRING_NESTED# ...state IN_SSL_QSTRING_NESTED:delimiter: paint(include, SSL_STRING), => IN_SSL_DEFAULT/\\./ : #stay/[\[\{\(\<]/ : paint(upto, SSL_STRING), \ spush_check(IN_SSL_QSTRING_NESTED), => IN_SSL_QSTRING_NESTED2
state IN_SSL_QSTRING_NESTED2:/\\./ : #stay/[\[\{\(\<]/ : spush_check(IN_SSL_QSTRING_NESTED2), \ => IN_SSL_QSTRING_NESTED2/[\]\}\)\>]/ : spop_check, => IN_SSL_QSTRING_NESTED/\z/ : paint(include, SSL_STRING)
Finally, you've probably noticed that we put an end-of-buffer transition in many of these states. Notice that thefinal IN_SSL_QSTRING_NESTED2 state actually does no painting in its other matches. Normally Ludditewill look at the colors a state uses to determine how to color the rest of the text if it reaches the end of thebuffer. If more than one color is used, or none is used, the Luddite program should specify a color. Otherwiseit's possible that Komodo will repeatedly invoke the colorizer until something is chosen.
Supporting Here Documents
"Here documents" are a convenient way of defining multi-line strings. Typically they start by defining the"terminating identifier", preceded by an operator like << or <<<. The string starts on the following line, andends when we find a line containing only the terminating identifier.
The following Luddite code outlines how to add here-document processing to a language, using PHP as anexample, where we assume a here document always begins with the three less-than characters followed by aname, then the end of line:
IN_SSL_PRE_HEREDOC_1
state IN_SSL_PRE_HEREDOC_1:/([$NMSTART][$NMCHAR]*)/ : set_delimiter(1), paint(include, SSL_IDENTIFIER)/\r?$/ : paint(include, SSL_DEFAULT), => IN_SSL_IN_HEREDOC_1
state IN_SSL_IN_HEREDOC_1:delimiter : keep_delimiter, paint(upto, SSL_STRING), => IN_SSL_IN_FOUND_HEREDOC_1/./ : => IN_SSL_IN_HEREDOC_2 # Not this line
Komodo User Guide
Supporting Here Documents 374
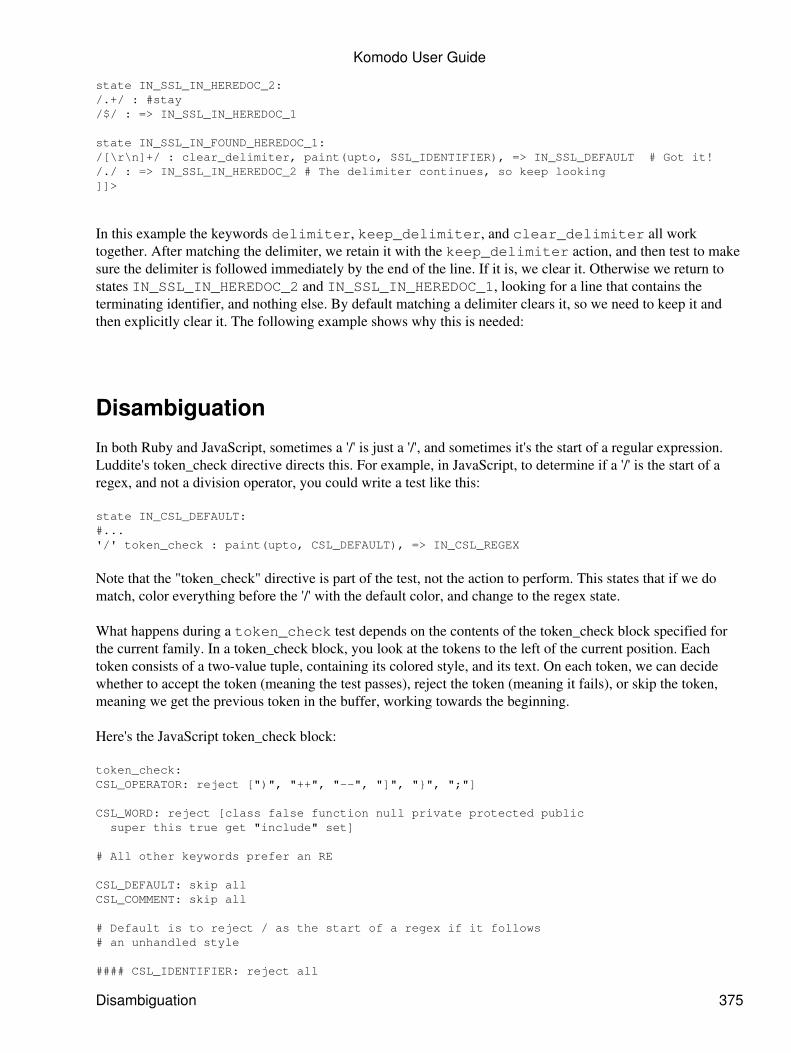
state IN_SSL_IN_HEREDOC_2:/.+/ : #stay/$/ : => IN_SSL_IN_HEREDOC_1
state IN_SSL_IN_FOUND_HEREDOC_1:/[\r\n]+/ : clear_delimiter, paint(upto, SSL_IDENTIFIER), => IN_SSL_DEFAULT # Got it!/./ : => IN_SSL_IN_HEREDOC_2 # The delimiter continues, so keep looking]]>
In this example the keywords delimiter, keep_delimiter, and clear_delimiter all worktogether. After matching the delimiter, we retain it with the keep_delimiter action, and then test to makesure the delimiter is followed immediately by the end of the line. If it is, we clear it. Otherwise we return tostates IN_SSL_IN_HEREDOC_2 and IN_SSL_IN_HEREDOC_1, looking for a line that contains theterminating identifier, and nothing else. By default matching a delimiter clears it, so we need to keep it andthen explicitly clear it. The following example shows why this is needed:
Disambiguation
In both Ruby and JavaScript, sometimes a '/' is just a '/', and sometimes it's the start of a regular expression.Luddite's token_check directive directs this. For example, in JavaScript, to determine if a '/' is the start of aregex, and not a division operator, you could write a test like this:
state IN_CSL_DEFAULT:#...'/' token_check : paint(upto, CSL_DEFAULT), => IN_CSL_REGEX
Note that the "token_check" directive is part of the test, not the action to perform. This states that if we domatch, color everything before the '/' with the default color, and change to the regex state.
What happens during a token_check test depends on the contents of the token_check block specified forthe current family. In a token_check block, you look at the tokens to the left of the current position. Eachtoken consists of a two-value tuple, containing its colored style, and its text. On each token, we can decidewhether to accept the token (meaning the test passes), reject the token (meaning it fails), or skip the token,meaning we get the previous token in the buffer, working towards the beginning.
Here's the JavaScript token_check block:
token_check:CSL_OPERATOR: reject [")", "++", "--", "]", "}", ";"]
CSL_WORD: reject [class false function null private protected public super this true get "include" set]
# All other keywords prefer an RE
CSL_DEFAULT: skip allCSL_COMMENT: skip all
# Default is to reject / as the start of a regex if it follows# an unhandled style
#### CSL_IDENTIFIER: reject all
Komodo User Guide
Disambiguation 375
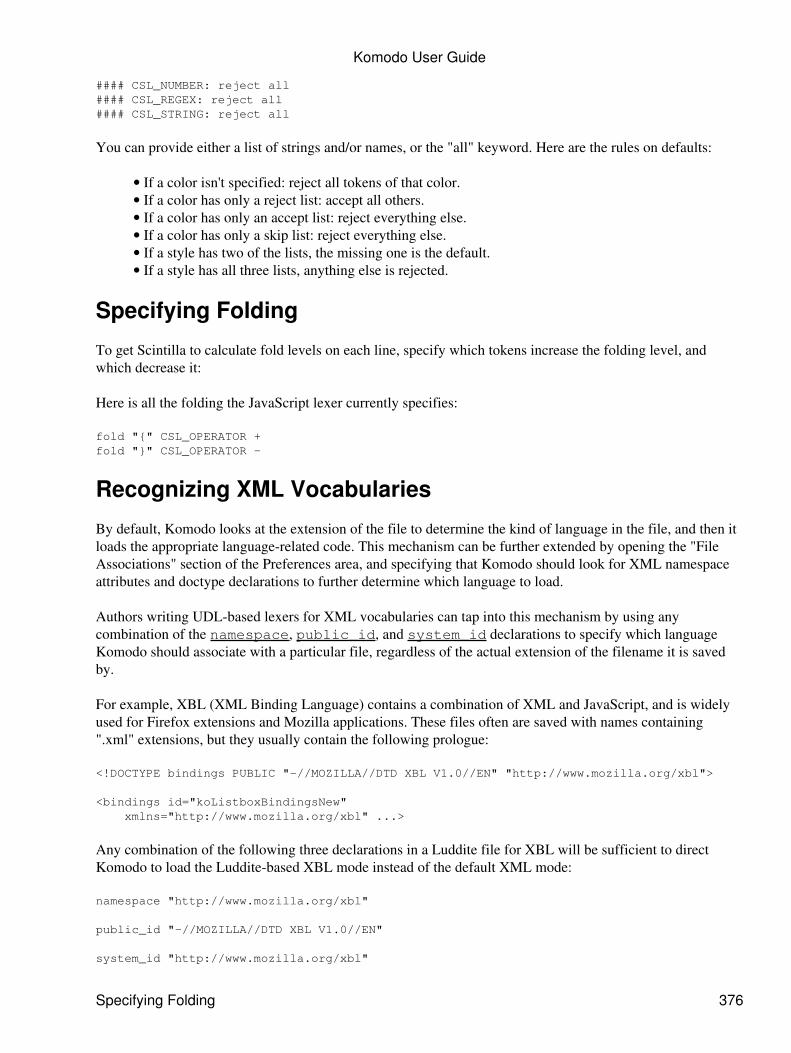
#### CSL_NUMBER: reject all#### CSL_REGEX: reject all#### CSL_STRING: reject all
You can provide either a list of strings and/or names, or the "all" keyword. Here are the rules on defaults:
If a color isn't specified: reject all tokens of that color.• If a color has only a reject list: accept all others.• If a color has only an accept list: reject everything else.• If a color has only a skip list: reject everything else.• If a style has two of the lists, the missing one is the default.• If a style has all three lists, anything else is rejected.•
Specifying Folding
To get Scintilla to calculate fold levels on each line, specify which tokens increase the folding level, andwhich decrease it:
Here is all the folding the JavaScript lexer currently specifies:
fold "{" CSL_OPERATOR +fold "}" CSL_OPERATOR -
Recognizing XML Vocabularies
By default, Komodo looks at the extension of the file to determine the kind of language in the file, and then itloads the appropriate language-related code. This mechanism can be further extended by opening the "FileAssociations" section of the Preferences area, and specifying that Komodo should look for XML namespaceattributes and doctype declarations to further determine which language to load.
Authors writing UDL-based lexers for XML vocabularies can tap into this mechanism by using anycombination of the namespace, public_id, and system_id declarations to specify which languageKomodo should associate with a particular file, regardless of the actual extension of the filename it is savedby.
For example, XBL (XML Binding Language) contains a combination of XML and JavaScript, and is widelyused for Firefox extensions and Mozilla applications. These files often are saved with names containing".xml" extensions, but they usually contain the following prologue:
<!DOCTYPE bindings PUBLIC "-//MOZILLA//DTD XBL V1.0//EN" "http://www.mozilla.org/xbl">
<bindings id="koListboxBindingsNew" xmlns="http://www.mozilla.org/xbl" ...>
Any combination of the following three declarations in a Luddite file for XBL will be sufficient to directKomodo to load the Luddite-based XBL mode instead of the default XML mode:
namespace "http://www.mozilla.org/xbl"
public_id "-//MOZILLA//DTD XBL V1.0//EN"
system_id "http://www.mozilla.org/xbl"
Komodo User Guide
Specifying Folding 376
Compiling and Installing
The Luddite compiler and sample .udl files can be found in the "Komodo SDK" directory within theKomodo installation tree:
Windows: INSTALLDIR\lib\sdk\• Mac OS X: INSTALLDIR/Contents/SharedSupport/sdk/• Linux: INSTALLDIR/lib/sdk/•
Simply place the SDK bin directory on your PATH and you should be able to run luddite:
# On WindowsC:\> set PATH=INSTALLDIR\lib\sdk\bin;%PATH%C:\> set PATHEXT=%PATHEXT%;.pyC:\> luddite help
# On Mac OS X$ export PATH=INSTALLDIR/Contents/SharedSupport/sdk/bin:$PATH$ luddite help
# On Linux$ export PATH=INSTALLDIR/lib/sdk/bin:$PATH$ luddite help
Typically you would:
author one or more .udl files,1. generate the Komodo resource files (the main such file is the .lexres compiled version of your.udl file) with the "luddite compile ..." command, and
2.
build a Komodo extension (a .xpi file) with the "luddite package ..." command.3.
To install that extension, open the built .xpi file in Komodo.
Samples
Sample UDL files can be found in the udl subdirectory of the Komodo SDK directory.
Luddite Reference
Luddite is the language Komodo uses for user-defined syntax highlighting and multi-language lexing. Anintroduction to the Luddite language can be found in the User-Defined Language Support documentation.
Keywords
The following is a list of Luddite keywords - not to be confused with the keywords described by the UDL fileitself for the target language definition. The Luddite keyword is always given followed by its argument list,where applicable; optional arguments are given in square brackets ([ ... ]).
accept name-or-string-list | allUsed in token_check definitions to disambiguate characters. If all is specified, then atoken_check test will always succeed. If the previous token falls in the name-or-string list, the
Komodo User Guide
Compiling and Installing 377
token_check test succeeds. Otherwise Luddite will look at the results of any skip and rejectstatements in the current family to decide which action to take.
allUsed in accept, reject, and skip statements in token_check definitions. This means that thetoken_check test will follow whatever directive is associated with this occurrence of all.
at_eol(state-name)Used to specify the Luddite state to transition to when the end of the current line is reached. This isuseful for processing languages like the Perl-based template language, Mason, in which one canembed Perl code on a single line by putting a '%' character at the start of the line, as in this example: Good % if ($time > 12) { afternoon % } else { morning % }
This is easily handled with this Luddite code: state IN_M_DEFAULT: /^%/ : paint(upto, M_DEFAULT), paint(include, TPL_OPERATOR), \ at_eol(IN_M_DEFAULT), => IN_SSL_DEFAULT
If there's a percent character at the start of a line in markup mode, cause it to be lexed as a templateoperator, and switch to Perl lexing (IN_SSL_DEFAULT), and switch back to markup-based lexingwhen it reaches the end of the line.
clear_delimiterUsed in conjunction with keep_delimiter, this action explicitly clears the current delimiter (useful inrecognizing terminating identifiers in here documents).
delimiterUsed in place of a pattern or match-string in transitions, this will succeed if there's a current delimiterdefined, and it can be matched at the current point in the buffer. When it's matched, the currentdelimiter will be unset, unless the keep_delimiter action is given in the transition.
family csl | markup | ssl | style | tplThe sub-type of this sub-language. The meaning of each family name is:
cslclient-side language (e.g. usually JavaScript)
markupmarkup language (e.g. HTML, XHTML, other XML dialects)
sslserver-side language (e.g. Perl, Python, Ruby)
stylestylesheet language (usually CSS)
tpla "template-oriented" language, usually geared to either adding template-side processing tothe server-side language, or making it easier to inject the server-side language into other partsof the full multi-language document, as in CSS or JS. Examples include Smarty for PHPprocessing.
fold "name-or-string" style +|-
Komodo User Guide
Keywords 378
Used to describe which tokens start and end a code-folding block. For example:
fold "{" CSL_OPERATOR + fold "if" SSL_WORD + fold "end" SSL_WORD -
keep_delimiterUsed when the delimiter directive was used in place of a pattern or string, this tells the UDL lexerto retain that directive for subsequent matching. This is useful for matching a construct like Perl'ss,/,\\, construct, where we would be using ',' as the regex delimiter, instead of the normal '/'.
keywords name-or-string-listList the words that should be colored as keywords (as opposed to identifiers) in the defined language.Keywords for the target language that are the same as reserved words in Luddite must be quoted.
keywords ["en-US/luddite.html", "188", BEGIN, class ensure nil ]
keyword_style style-name => style-nameThis directive works with keywords to tell UDL which identifier-type style needs to be promoted toa keyword style. So all tokens listed in keywords that are colored as the first style normally will bepromoted to the second style.
keyword_style SSL_IDENTIFIER => SSL_WORD
include [path/]fileInclude a UDL file. The include path starts with the current directory; if you include a file in adifferent directory, that file's directory is appended to the include path.
include "html2ruby.udl"
includeWhen used as an argument to the paint keyword, include a style.
initial state-nameThe state processing for the current family should start at.
initial IN_SSL_DEFAULT
language nameThe name of the language being defined. The language directive must be given. It may be given morethan once, but only with the same value is given each time. This value shows up in the Komodo UI inplaces like Language Preferences and the "New File" command.
language RHTML
namespace XML Namespace identifierThe namespace declaration tells Komodo to load the language service described by the currentLuddite program when it sees an XML file that uses the specified namespace as a default attributevalue. namespace "http://www.w3.org/2001/XMLSchema" namespace "http://www.w3.org/1999/XMLSchema" # Be prepared if a new version is released in a few centuries. namespace "http://www.w3.org/2525/XMLSchema"
Komodo User Guide
Keywords 379
no_keywordThe no_keyword command is used to prevent identifier => keyword promotion when an identifier isrecognized. This is useful for programming languages that allow any token, even keywords, to beused in certain contexts, such as after the "." in Python, Ruby, and VBScript, or after "::" or "->" inPerl. state IN_SSL_DEFAULT: /\.(?=[a-z])/ : paint(upto, SSL_DEFAULT), \ paint(include, SSL_OPERATOR), => IN_SSL_NON_KEYWORD_IDENTIFIER_1
state IN_SSL_NON_KEYWORD_IDENTIFIER_1: /[^a-zA-Z0-9_]/ : paint(upto, SSL_IDENTIFIER), redo, no_keyword, \ => IN_SSL_DEFAULT
paint(include|upto, style-name)These directives are used in state transitions, and are key to the way UDL generates lexers. Theyappear in a context like this: state IN_SSL_COMMENT_1 : /$/ : paint(include, SSL_COMMENT) => IN_SSL_DEFAULT
This means that when we're in a state with name "IN_SSL_COMMENT_1" (remember that statenames are completely arbitrary in your Luddite programs), and we find the end of the line, we shouldpaint everything from the last "paint point" to the end of the line with the style"SCE_UDL_SSL_COMMENT". This will also move the paint-point to the point after the lastcharacter this command styles.A transition can have a paint(include...) command, a paint(upto...) command, both of them, or neither.
pattern name = stringThese are used as macro substitution inside patterns used in state tables. The names should containonly letters, and are referenced in patterns and the right-hand side of Luddite patterns by putting a "$"before them. pattern NMSTART = '_\w\x80-\xff' # used inside character sets only pattern NMCHAR = '$NMSTART\d' # used inside character sets only ... state IN_SSL_SYMBOL_1: /[$NMCHAR]+/ : paint(include, SSL_STRING), => IN_SSL_DEFAULT
public_id DOCTYPE public identifierThe public_id declaration tells Komodo to load the language service described by the current Ludditeprogram when it sees an XML or SGML file that uses the specified public declaration in its Doctypedeclaration. public_id "-//MOZILLA//DTD XBL V1.0//EN" publicid "-//MOZILLA//DTD XBL V1.1//EN" # Be prepared # "publicid" is a synonym for "public_id"
redoThe redo command indicates that the lexer should not advance past the current characters beingmatched, but should stay there in the new state. state IN_SSL_NUMBER_3: ... /[^\d]/ : paint(upto, SSL_NUMBER), redo, => IN_SSL_DEFAULT
This specifies that when we're processing numbers (assuming the arbitrary name"IN_SSL_NUMBER_3" reflects the idea that we're trying to recognize numeric terms in the input),and find a non-digit, we should paint everything up to but not including the start of the matched textwith the SCE_UDL_SSL_NUMBER style, change to the default state for this family, and retry lexing
Komodo User Guide
Keywords 380
the same character.
Since having both a redo action and a paint(include...) action in the same transition wouldbe contradictory, the Luddite compiler gives an error message when it detects this condition and stopsprocessing.
reject name-or-string-list | allUsed in token_check definitions to disambiguate characters. If all is specified, then a token_checktest will always fail. If the previous token falls in the name-or-string list, the token_check test fails.Otherwise Luddite will look at the results of any reject and skip statements in the current family todecide which action to take.
set_delimiter (number)This transition action takes a single argument, which must be a reference to a grouped sub-pattern inthe transition's pattern. It sets the current delimiter to that contents of the subpattern. /m([^\w\d])/ : paint(upto, SSL_DEFAULT), set_delimiter(1), \ => IN_SSL_REGEX1_TARGET
set_opposite_delimiter (number)This transition action takes a single argument, which must be a reference to a grouped sub-pattern inthe transition's pattern. It sets the current delimiter to that contents of the subpattern. /m([\{\[\(\<])/ : paint(upto, SSL_DEFAULT), \ set_opposite_delimiter(1), => IN_SSL_REGEX1_TARGET
skip name-or-string-list | allUsed in token_check definitions to disambiguate characters. If all is specified, then a token_checktest will retry with the token preceding this one. If the previous token falls in the name-or-string list,the token_check test keeps going. Otherwise Luddite will look at the results of any accept and rejectstatements in the current family to decide which action to take.
state state-name: transition-listThe core of Luddite programs. Each state block is in effect upto the next Luddite keyword.
sublanguage nameThe common name of the language this family targets. sublanguage ruby
sub_languageSynonym for sublanguage
system_id DOCTYPE system identifierThe system_id declaration tells Komodo to load the language service described by the current Ludditeprogram when it sees an XML or SGML file that uses the specified system declaration in its Doctypedeclaration.
system_id "http://www.w3.org/2001/XMLSchema" systemid "http://www.w3.org/1999/XMLSchema" # "systemid" is a synonym for "system_id"
token_check: token-recognition-listA set of directives that define the token checking set for this family.
Komodo User Guide
Keywords 381
Used in state transitions immediately after a pattern or string (match target) is given. This is used fortoken disambiguation. For example in Ruby, Perl, and JavaScript, a '/' can either be a divisionoperator or the start of a regular expression. By looking at how the previous token was styled, we candetermine how to interpret this character.
If the token_check test fails, the pattern is deemed to fail, and UDL tries subsequent transitions in thestate block.
start_style style-nameThe lowest style in the list of styles Luddite will use for this family (in terms of the values given inScintilla.iface). This is used for token_check processing while lexing, so it's not required otherwise.
end_styleThe highest style in the list of styles Luddite will use for this family (in terms of the values given inScintilla.iface). This is used for token_check processing while lexing, so it's not required otherwise.
uptoSee paint
spop_checkSee spush_check
spush_check(state-name)Used to specify the Luddite state to transition to at a later point. state IN_SSL_DSTRING: '#{' : paint(include, SSL_STRING), spush_check(IN_SSL_DSTRING), \ => IN_SSL_DEFAULT ... state IN_SSL_OP1: '{' : paint(include, SSL_OPERATOR), spush_check(IN_SSL_DEFAULT) \ => IN_SSL_DEFAULT ... state IN_SSL_DEFAULT: '}' : paint(upto, SSL_DEFAULT), paint(include, SSL_OPERATOR), \ spop_check, => IN_SSL_DEFAULT
This code is used to account for the way the Ruby lexer is intended to color expressions inside #{...}brackets in strings as if they weren't in strings. When the "}" is reached, the lexer needs to knowwhether it should go back to lexing a string, or to the default state. We use the spush_check andspop_check directives to specify this.
Style Names
The style names are all listed in Scintilla.iface, in the section for UDL. The ones for client-side,server-side, style, and template languages are generic, and shouldn't need much explanation here. This sectionwill focus on the markup section in specifics.
First, we are limited to about 56 styles, as UDL partitions the style byte associated with each character by 6bits for styles, 1 bit for error squigging, and 1 bit for warnings. Additionally, scintilla reserves styles 32through 39 for its own use, leaving us with 56.
This reduces the number of available styles for each family down to the basics. This includes the default style(which should only be used for white-space in most cases), comments, numbers, strings, keywords, identifiers,
Komodo User Guide
Style Names 382
operators, and regular expressions. We add a style for variable names for the server-side, and leavecomment-blocks in as well, although their usefulness is in question.
Some of the styles in the markup block reflect terms used in ISO 8859, the SGML standard. These are:
SCE_UDL_M_STAGOStart-tag-open character, as in "<"
SCE_UDL_M_TAGNAMEThe name immediately after a tag-open character.
SCE_UDL_M_TAGSPACEWhite-space in start-tags, end-tags, and empty tags.
SCE_UDL_M_ATTRNAMEAttribute names in start-tags.
SCE_UDL_M_OPERATOROperator characters, which is essentially just the '=' in attribute assignments in start-tags.
SCE_UDL_M_STAGCStart-tag-close character (">")
SCE_UDL_M_EMP_TAGCTag-close sequence for an empty start-tag ("/>")
SCE_UDL_M_STRINGString attribute values in start-tags
SCE_UDL_M_ETAGOEnd-tag-open character ("</")
SCE_UDL_M_ETAGCEnd-tag-close character (">"). Distinguished from an "STAGC" only by context.
SCE_UDL_M_ENTITYA complete entity reference, from the leading "&" through the closing ";".
SCE_UDL_M_PIProcessing instructions, including the leading XML declaration, from the leading "<?" through theclosing "?>".
SCE_UDL_M_CDATACDATA marked sections.
SCE_UDL_M_COMMENTSGML comments.
Terms
name-or-stringEither a quoted string, delimited by single- or double-quote characters, with -escape sequences, or asequence of characters starting with a letter, followed by zero or more alphanumeric characters,hyphens, or underscores.
name-or-string-listList of strings or non-keyword-names surrounded by square brackets. Commas are optional.
state-nameA symbolic name for a UDL state. These names are are completely arbitrary, but we recommend theconvention that they start with "IN_", then contain a sequence that reflects the family they belong to("SSL", "CSL", "CSS", "TPL", or "M" for "Markup"), and finally a descriptive part.
Example:
Komodo User Guide
Terms 383
IN_TPL_BLOCK_COMMENT_1
style-nameA symbolic name that reflects the style names used in .h files derived from the Scintilla.iface file.These names all start with the prefix "SCE_UDL_", which may always be omitted.
Example:SSL_STRING
token-recognition-listA line-oriented list of directives containing a style-name, a colon, and then an accept, reject, or skipdirective.
transition-listZero or more transition, separated by newlines
transitionConsists of a string or pattern to be matched, an optional token_check, ":" (optional), an optional listof actions (comma-separated), and optionally, an "=>" followed by a style-name. Actions includepaint, redo, spush_check, and spop_check.
Concepts
Order of token_check statements1. The statements in a token_check directive are followed in order, and are family-specific. The defaultaction, if no term is chosen, depend on what kinds of statements are specified:
Only reject list: accept all others♦ Only accept list: reject everything else♦ Only skip list: reject everything else, but♦ having only a set of skip items is redundant, as everything will be♦ rejected anyway.♦ If a style has two of the lists, the missing one is the default♦ If a style has all three lists, the default action is 'reject'.♦
2.
Order of state transitions2. UDL walks the list of transitions for the current state. As soon as it finds one, it does whateverpainting is called for, switches to the specified state, and then restarts at the next state.
The target state is optional. A transition that contains both a "paint(include...)" and a "redo" directivewould loop indefinitely, so UDL contains a limit of 1000 before it bypasses the current character andcontinue with the next one.
3.
Komodo User Guide
Concepts 384

Komodo Release NotesSelect a Komodo version from the list below to see its release notes.
Komodo IDE/Edit 6.0.3 (December 2010)• Komodo IDE/Edit 6.0.2 (November 2010)• Komodo IDE/Edit 6.0.1 (October 2010)• Komodo IDE/Edit 6.0.0 (October 2010)• Komodo IDE/Edit 6.0.0rc1 (September 2010)• Komodo IDE/Edit 6.0.0b3 (August 2010)• Komodo IDE/Edit 6.0.0b2 (July 2010)• Komodo IDE/Edit 6.0.0b1 (June 2010)• Komodo IDE/Edit 6.0.0a2(April 2010)• Komodo IDE/Edit 6.0.0a1(March 2010)• Komodo IDE/Edit 5.2.4 (December 2009)• Komodo IDE/Edit 5.2.3 (November 2009)• Komodo IDE/Edit 5.2.1 (September 2009)• Komodo IDE/Edit 5.2.0 (August 2009)• Komodo IDE/Edit 5.1.4 (June 2009)• Komodo IDE/Edit 5.1.3 (April 2009)• Komodo IDE/Edit 5.1.1 (April 2009)• Komodo IDE/Edit 5.1.0 (March 2009)• Komodo IDE/Edit 5.0.3 (December 2008)• Komodo IDE/Edit 5.0.2 (December 16, 2008)• Komodo IDE/Edit 5.0.1 (November 6, 2008)• Komodo IDE/Edit 5.0.0 (November 4, 2008)• Komodo IDE/Edit 4.4.1 (June 24, 2008)• Komodo IDE/Edit 4.4 (June 24, 2008)• Komodo IDE/Edit 4.3.2 (April 15, 2008)• Komodo IDE/Edit 4.3.1 (March 26, 2008)• Komodo IDE/Edit 4.3.0 (March 6, 2008)• Komodo IDE/Edit 4.2.1 (November 15, 2007)• Komodo IDE/Edit 4.2 (September 17, 2007)• Komodo IDE/Edit 4.1.1 (June 7, 2007)• Komodo IDE/Edit 4.1 (May 15, 2007)• Komodo IDE/Edit 4.1 Beta 3 (May 9, 2007)• Komodo IDE/Edit 4.1 Beta 2 (April 27, 2007)• Komodo IDE/Edit 4.0.3 (April 17, 2007)• Komodo IDE/Edit 4.1 Beta 1 (March 6, 2007)• Komodo IDE/Edit 4.0.2 (February 13, 2007)• Komodo IDE 4.0.1 (January 29, 2007)• Komodo IDE 4.0, Edit 4.0 Beta 5 (January 22, 2007)• Komodo 4.0 Beta 4 (January 11, 2007)• Komodo 4.0 Beta 3 (December 14, 2006)• Komodo 4.0 Beta 2 (November 27, 2006)• Komodo 4.0 Beta 1 (October 31, 2006)• Komodo 4.0 Alpha 7 (October 24, 2006)• Komodo 4.0 Alpha 6 (September 19, 2006)• Komodo 4.0 Alpha 5 (September 1, 2006)• Komodo 4.0 Alpha 4 (August 24, 2006)•
Komodo Release Notes 385

Komodo 4.0 Alpha 3 (July 25, 2006)• Komodo 4.0 Alpha 2 (July 11, 2006)• Komodo 4.0 Alpha 1 (June 26, 2006)• Komodo 3.5.3 (May 4, 2006)• Komodo 3.5.3 Beta 1 (March, 2006)• Komodo 3.5.2 (December 6, 2005)• Komodo 3.5.1 (November 29, 2005)• Komodo 3.5.1 Beta 1 (November 22, 2005)• Komodo 3.5 for Mac OS X, 3.5 Beta 1 for Windows and Linux (November 2, 2005)• Komodo 3.5 Beta 3 for Mac OS X, 3.5 Alpha 2 for Windows and Linux (October 28, 2005)• Komodo 3.5 Beta 2 for Mac OS X, 3.5 Alpha 1 for Windows and Linux (October 11, 2005)• Komodo 3.5 Beta 1 for Mac OS X (October 4, 2005)• Komodo 3.5 Alpha 1 for Mac OS X (August 2, 2005)• Komodo 3.1 (February, 2005)• Komodo 3.1 Beta 2 (January, 2005)• Komodo 3.1 Beta 1 (January, 2005)• Komodo 3.1 Alpha 4 (December, 2004)• Komodo 3.1 Alpha 3 (November, 2004)• Komodo 3.1 Alpha 2 (October, 2004)• Komodo 3.1 Alpha 1 (October, 2004)• Komodo 3.0.1 (August, 2004)• Komodo 3.0 (July, 2004)• Komodo 2.5.2 (January, 2004)• Komodo 2.5.1 (October, 2003)• Komodo 2.5 (September, 2003)• Komodo 2.3 (February, 2003)• Komodo 2.0.1 for Linux (November, 2002)• Komodo 2.0 for Windows (September, 2002)• Komodo 1.2.9 (July, 2002)• Komodo 1.2 for Windows and Linux (December, 2001)• Komodo 1.1 (June, 2001)•
Komodo User Guide
Komodo Release Notes 386

License and CopyrightsCopyright © 2010 ActiveState Software Inc. All Rights Reserved.
ActiveState is a registered trademark of ActiveState Software Inc. Komodo, the Perl Dev Kit, the Tcl DevKit, ActivePerl, ActivePython, ActiveTcl and ASPN are trademarks of ActiveState Software Inc.
All other products mentioned are trademarks or registered trademarks of their respective companies.
Some of the icons in Komodo are used under Creative Commons license from Mark James, and some are thework of Bright Creative. We are grateful to Mark James and Dave Shea for their great creative work.
Some SCC icons are derived from those in the TortoiseSVN project and used under the TortoiseSVN IconLicense.
The Debugger icons are from the Fugue Icon set, which is licensed under the Creative Commons Attribution3.0 license. Thanks to Yusuke Kamiyamane for creating such a great set of icons.
The Komodo documentation is licensed under a Creative CommonsAttribution-Noncommercial-Share Alike 2.5 Canada License. Users are encouraged to make translations oradd content and share them with other users on the Komodo community site. Suggested corrections should besubmitted to the OpenKomodo Bug Database.
Komodo LicenseACTIVESTATE KOMODO IDE LICENSE AGREEMENT
Please read carefully: THIS IS A LICENSE AND NOT AN AGREEMENT FOR SALE. By using and installing ActiveState's Software or, where applicable, choosing the "I ACCEPT..." option at the end of the License you indicate that you have read, understood, and accepted the terms and conditions of the License. IF YOU DO NOT AGREE WITH THE TERMS AND CONDITIONS, YOU SHOULD NOT ATTEMPT TO INSTALL THE SOFTWARE. If the Software is already downloaded or installed, you should promptly cease using the Software in any manner and destroy all copies of the Software in your possession. You, the user, assume all responsibility for the selection of the Software to achieve your intended results and for the installation, use and results obtained from the Software. If you have any questions concerning this, you may contact ActiveState via email at [email protected].
This ActiveState License ("License") is made between ActiveState Software Inc. ("ActiveState") as licensor, and you, as licensee, as of the date of your use of the Software (the Software is in use on a computer when it is loaded into the RAM or installed into the permanent memory (e.g., hard disk or other storage device) of that computer.).
This License reflects ActiveState's intent to retain full ownership of and control of the use and distribution of ActiveState Komodo IDE, the License Key (as hereinafter defined) and other applicable software (collectively the "Software").
1. License Grant. Subject to the terms and conditions of this License, ActiveState grants to you a personal, non-exclusive, non-transferable, and limited license to use the Software solely to create, compile, test
License and Copyrights 387
and deploy, in source or object code form, your own application programs ("Works"). You may create redistributable applications based on your unique development work using the Software and you may sublicense to end users of such Works ("End Users") the personal, non-exclusive, non-transferable right to install and execute the files, and/or libraries that are necessary to use the Works created using the Software. Use of such files and/or libraries by such End Users is limited to runtime purposes only. You may not provide any End User with access to the development or interactive capabilities of the Software libraries or technology, nor may you expose the base programming language(s) as a scripting language within the Works to any such End User. When you pay the license fee established by ActiveState, you will receive a license key (the "License Key") from ActiveState that authorizes you to use the Software only in the following specific contexts:
(i) Commercial Use. If your License Key authorizes Commercial Use, you may use the software on more than one computer or on a network so long as you are the sole user of the Software. (A "network" is any combination of two or more computers that are electronically linked and capable of sharing the use of a single software program.) You will obtain a separate license for each additional user of the Software (whether or not such users are connected on a network). You are not permitted to sell, lease, distribute, transfer, sublicense, or otherwise dispose of the Software, in whole or in part, for any form of actual or potential commercial gain or consideration.
(ii) Evaluation (Trial) Use. If your License Key authorizes Evaluation (Trial) Use you may use the software only for evaluation purposes without payment of the License Fee for a period of no more than twenty-one (21) days from the date of download.
(iii) Non-commercial Use. If your License Key authorizes Non-commercial Use, you may use the software in a teaching or learning environment only. You are not permitted to sell, lease, distribute, transfer, sublicense, or otherwise dispose of the Software, in whole or in part, for any form of actual or potential commercial gain or consideration.
(iv) Other Use. Any use of the software other than the uses specified above requires a separate license from ActiveState and the payment of additional license fees as determined by ActiveState. Such additional redistribution options are available, at ActiveState's sole discretion, on a case-by-case basis. Contact Sales@ActiveState to discuss any redistribution options not covered by this license agreement. ActiveState reserves all rights not expressly granted to you herein.
2. Termination. This License Agreement is effective until terminated.ActiveState may terminate this License immediately and without priornotice if you breach any term of this License or for any othercommercially reasonable ground. In the event of any termination orexpiration, you agree to: immediately destroy and/or erase the originaland all copies of the Software and License Keys, to discontinue theiruse, and not retain or store the Software or any copies thereof in anyform or medium.
3. Proprietary Rights. The Software is licensed, not sold, to you. ActiveState reserves all rights not expressly granted to you. Ownership of the Software and its associated proprietary rights, including but not limited to patent and patent applications, are retained by ActiveState. The Software is protected by the copyright laws of Canada and the United States and by international treaties. Therefore, you must comply with such laws and treaties in your use of the Software.
Komodo User Guide
Komodo License 388
You agree not to remove any of ActiveState's copyright, trademarks and other proprietary notices from the Software.
4. Distribution. Except as may be expressly allowed in Section 1, or as otherwise agreed to in a written agreement signed by both you and ActiveState, you will not distribute the Software, either in whole or in part, in any form or medium.
5. Transfer and Use Restrictions. You may not sell, license, sub-license, lend, lease, rent, share, assign, transmit, telecommunicate, export, distribute or otherwise transfer the Software to others, except as expressly permitted in this License Agreement or in another agreement with ActiveState. In order to use the Software you will be required to obtain a License Key and agree to this License Agreement for the use of the Software. You will not disclose or provide access to your License Key to any other person or entity. You must comply with all applicable Canadian and other export control laws in your use of the Software. Except as may be expressly permitted above, you may not modify, reverse engineer, decompile, decrypt, extract or otherwise disassemble the Software.
6. NO WARRANTY. ACTIVESTATE MAKES NO WARRANTIES WHATSOEVER REGARDING THE SOFTWARE AND IN PARTICULAR, DOES NOT WARRANT THAT THE SOFTWARE WILL FUNCTION IN ACCORDANCE WITH THE ACCOMPANYING DOCUMENTATION IN EVERY COMBINATION OF HARDWARE PLATFORM OR SOFTWARE ENVIRONMENT OR CONFIGURATION, OR BE COMPATIBLE WITH EVERY COMPUTER SYSTEM. IF THE SOFTWARE IS DEFECTIVE FOR ANY REASON, YOU WILL ASSUME THE ENTIRE COST OF ALL NECESSARY REPAIRS OR REPLACEMENTS.
7. DISCLAIMER. ACTIVESTATE DOES NOT WARRANT THAT THE SOFTWARE IS FREE FROM BUGS, DEFECTS, ERRORS OR OMISSIONS. THE SOFTWARE IS PROVIDED ON AN "AS IS" BASIS AND ACTIVESTATE MAKES NO OTHER WARRANTIES OR CONDITIONS, EXPRESS OR IMPLIED, WITH RESPECT TO THE SOFTWARE OR ANY ACCOMPANYING ITEMS INCLUDING WITHOUT LIMITATION THE IMPLIED WARRANTIES OR CONDITIONS OF MERCHANTABILITY OR FITNESS FOR A PARTICULAR PURPOSE. SOME JURISDICTIONS DO NOT ALLOW THE EXCLUSION OF IMPLIED WARRANTIES, IN WHICH CASE THE ABOVE EXCLUSIONS MAY NOT APPLY TO YOU.
8. LIMITATION OF LIABILITY. ACTIVESTATE WILL HAVE NO LIABILITY OR OBLIGATION FOR ANY DAMAGES OR REMEDIES, INCLUDING, WITHOUT LIMITATION, THE COST OF SUBSTITUTE GOODS, LOST DATA, LOST PROFITS, LOST REVENUES OR ANY OTHER DIRECT, INDIRECT, INCIDENTAL, SPECIAL, GENERAL, PUNITIVE OR CONSEQUENTIAL DAMAGES, ARISING OUT OF THIS LICENSE OR THE USE OR INABILITY TO USE THE SOFTWARE. IN NO EVENT WILL ACTIVESTATE'S TOTAL AGGREGATE LIABILITY (WHETHER IN CONTRACT (INCLUDING FUNDAMENTAL BREACH), WARRANTY, TORT (INCLUDING NEGLIGENCE), PRODUCT LIABILITY, INTELLECTUAL PROPERTY INFRINGEMENT OR OTHER LEGAL THEORY) WITH REGARD TO THE SOFTWARE AND/OR THIS LICENSE EXCEED THE LICENSE FEE PAID BY YOU TO ACTIVESTATE. FURTHER, ACTIVESTATE WILL NOT BE LIABLE FOR ANY DELAY OR FAILURE TO PERFORM ITS OBLIGATIONS UNDER THIS LICENSE AS A RESULT OF ANY CAUSES OR CONDITIONS BEYOND ACTIVESTATE'S REASONABLE CONTROL.
9. U.S. Government Restricted Rights Legend. If the Software is acquired by any agency or other part of the U.S. government in a transaction subject to the Federal Acquisition Regulations or the Defense Federal Acquisition Regulations, the Software is furnished with Restricted Rights. Use, duplication, or disclosure of the Software by the U.S. government is subject to all applicable restrictions set forth in such Regulations, as amended from time to time, including subparagraphs (c)(1) and (2) of the Commercial Computer Software - Restricted Rights clause at Section 48 C.F.R. 52.227-19.
Komodo User Guide
Komodo License 389
10. Entire Agreement. This License and the Usage License Agreementconstitutes the entire agreement between you and ActiveState regardingthe Software. If any provision is found to be invalid by a court ofcompetent jurisdiction, the balance of the provisions will remain infull force and effect. This License will be governed by and construed inaccordance with the laws of the Province of British Columbia, Canada,excluding its conflict of laws rules. The parties hereby attorn to thejurisdiction of the courts of the Province of British Columbia in theevent of any dispute hereunder. The provisions of the U.N. Convention onContracts For The International Sale of Goods (1980) and any successorConvention, will not apply to this License.
11. Inurement. The rights, restrictions, limitations, disclaimers and remedies granted to, retained by, or for the benefit of ActiveState will inure to the benefit of and will be enforceable by ActiveState and its licensors, successors and assigns. You may not assign your rights, obligations and interest in and to this License without the prior written consent of ActiveState. The obligations, covenants and rights which apply to you will inure to your benefit and will be binding on you and your permitted successors and assigns.
BY INSTALLING THE SOFTWARE, OR, WHERE APPLICABLE, CHOOSING THE "I ACCEPT..." OPTION, YOU INDICATE THAT YOU HAVE READ, UNDERSTOOD AND ACCEPT THE TERMS AND CONDITIONS OF THE LICENSE. IF YOU DO NOT AGREE WITH THE TERMS AND CONDITIONS, YOU SHOULD NOT ATTEMPT TO INSTALL THE SOFTWARE.
Komodo User Guide
Komodo License 390