Embed Size (px)
Citation preview
' ' Outdoor Exposure Guide
for the Vest Pock-et Kodak, Model B
Sus.rnctSrop
OppNrNcSrruttpn
S p p p p
Ordinary landscapes show-ing sky, with a principalobiect in the foreground.
Snow. marine and beachscenes.
'btremely dis-tant landscapes. Moun:tains.
No. 1
No. 2
No. 3
No. 3\one
second
No. 1
gl .tb" hours f-torn 2/2tro"is uft.it sunrise until 2rfi-\ours before sun-;;t
"; auvt whe., the sun is shining. If-pictures
;;;;tA; earlier or later in- the dav.than thisilii.a, rt iii-t it a slishttu cloudv .oi hazv dav,irse the next larger stop opemng than t'he onespecified--tG-largest
stop- opening is No' 1' Thents-h; the iumber the smaller the opening'
Picture taking with the
*+. t 'Vest Pocket
EASTMAN KODAK COMPANYRocnnsrER, N.Y., U. S. A'
www.orphancameras.com
66Kodak"TRADE MARK
1888
EASTMAN KODAK COMPANY
Rocnnsrnn, N. Y.
Manufacttners o!
K o n e r B R o w N r E A N DH e w r - E v n C . I M E R A SCrwf-Kooars KooascopnsKoner Frr,u Vnr,ox Sor,roEesrueN Bnorvrrop Pappns
K o ' p e r F r ' r , l r T . r N r sEasruan TpsrEb Cnnnrc.r.r.sKoo.g DnrM ouNrrNcTrgsunTnrpoog eNp. Org,pn Pnoro-
GRAPHTc M.rrsnr.rr,s-
Trade Marlcs Reg. U. S. Pat. Of .
..KODAKERY''
j:ll l
rf\HIS most interestins and profuselvI illustrated monthly magazine sho#s
how to make better pictures, and de-scribes many novel and unusual meth-ods of making photographs. Anyonewho buys an Eastman camera is en-titled to "Kodakery," free of charge.
Return the post card included withthis manual, properly filled out, andyour name will be put on the mailinglist, to receive "Kodakery."
"Kodakery" will be sent for sixmonths on this offer. A post card will beenclosed with the fifth copv: if this nostcard is filled out and retuir'ea to ui, itwill entitle you to an additional'sixmonths, free of charge. After that thesubscription price will be sixty centsfor one year, or one dollar for twoyears, but you are under no obligationto renew.
Send us the card promptly, and startenjoying "Kodakery" at. once. Thereis no charge; no obligation.
EASTMAN KODAK CON{PANY,Rocupsrnn, Npw Yom.
www.orphancameras.com
Picture taking with tlte
Vest PocketKodak
Model BSrNcr,o LpNs
Published bu
EASTMAN KODAK COMPANYRocnosrnn, N. Y., U. S. A.
www.orphancameras.com
Order Film by Number
All Kodak Films are distinguishedbv the numbers on the ends of theci,rtons. The number is also on thecartridge, and on the Kodak.
L 127 is the number of film for theVest Pocket Kodak, Model B.
Autographic Film can be used in theearlier moiiels of cameras, and "N.C."film can be used in AutographicKodaks.
Autographic results can only be ob-tained by'using Autographic- Film inan Autographic Kodak.
IMPORTANT
When autograPhing film, beardown $tith the stylus as heauilYas the paper will stand withouttearing.
Before Loading
Before taking any pictures with yourKodak, read the following instructionscarefully. Make yourself familiar withthe camera, taking especial care to learnhow to operate the shutter (see page11). Work it for both instantaneousand time exposures several times beforeIoading the Kodak with fiIm.
The first thing to remember is thatthe light, which impresses the photo-graphic image upon the sensitive filmin a fraction of a second. when it comesthrough the lens, can destroy the fiImas quickly as it makes the picture.While loading and unloading, be verycareful to keep the red paper woundtightly around the film to prevent thelight striking it.
www.orphancameras.com
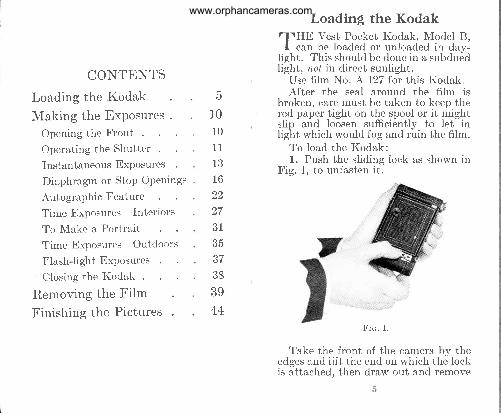
CONTENTS
Loading the Kodak
Making the Exposures
Opening the tr'rontOperating the Shutter
Instantaneous ExPosures
Diaphragm or StoP OPenings
Autographic I'eature
Time Exposures-Interiors
To Make a Portrait . .
Time Exposures-Outdoors
Flash-light ExPosures
Closing the Kodak
Removing the F ilm
Finishing the Pictures .
Loading the Kodakrf\HE Vest Pocket Kodak, Model B,I can be loaded or unloaded in day-
light. This should be done in a subduedlight, not in direct sunlight.
IJse film No. A L27 for this Kodak.After the seal around the film is
broken, care must be taken to keep thered paper tight on the spool or it mightslip and loosen sufficiently to let inlight which would fog and ruin the film.
To load the Kodak:l. Push the sliding lock as shown in
Fig. I, to unfasten it .
Frc. I .
Take the front of the camera by theedges and lift the end on whieh the lockis attaehed. then draw out and remove
c1010
1 1
13
16
22
27
31
35
37
38
3944
www.orphancameras.com
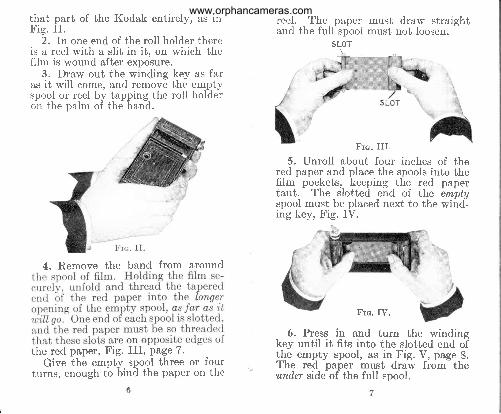
that part of the Kodak entirely, as inFig. I I .
2. In one end of the roll holder thereis a reel with a slit in it, on which thefilm is wound after exposure.
3. Draw out the winding key as faras it will come, and remove the emptyspool or reel by tapping the roll holderon the palm of the hand.
4. Remove the band from around
the red paper, Fig. III, Page 7.Give the empty spool three or four
turns, enough tb bind the paper on the
reel. The paper mustand the full spool must
SLOT
draw straightnot loosen.
5. Unroll about four inches of thered paper and place the spools into thefilm pockets, keeping the red papertaut. The slotted end of the emptyspool must be placed next to the wind-ing key, Fig. IV.
Fro. IV.
6. Press in and turn the windingkey until it fits into the slotted end ofthe empty spool, as in Fig. V, page 8.The red paper must draw from theunder side of the full spool.
Fra. I I I .
www.orphancameras.com
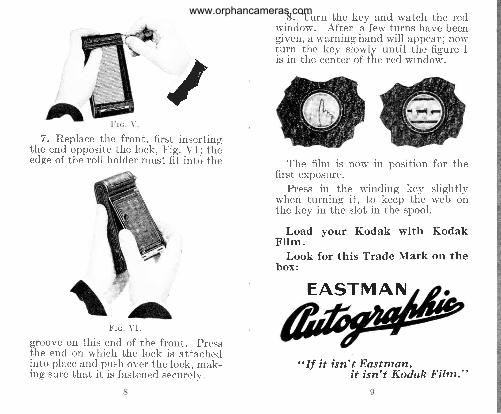
f- 7 . Replace the front, first inserting
the end opposite the lock, FiS. VI; theedge of the roll holder must fit into the
8. Turn the key and watch the redwindow. After a few turns have beengiven, a warning hand will appear; nowturn the key slowly until the figure 1is in the center of the red window.
for theThe film is now in positionfirst exposure.
Press in the winding keywhen turning it, to keep thethe key in the slot in the spool.
slightlSrweb on
Load your Kodak with KodakFilrn.
Look for this Trade Mark on thebox:
Frc YI .
groove on this end of the front. Pressthe end on which the lock is attachedinto place and push over the lock, mak-ing sure that i t is fastened seeurely.
" If it isn't Eastmart,it isn't Kodak Film."
EASTMAN
www.orphancameras.com
Making the ExposuresD EFORE making an exposure withI -D t he Ves t Pocke t Kodak , t h reethings must be done:
First-The shutter must be adjustedfor an instantaneous or time exposure.
Second-The diaphragm dial turnedto the correct stop opening.
Third-An unexposed section of thefilm turned into position.
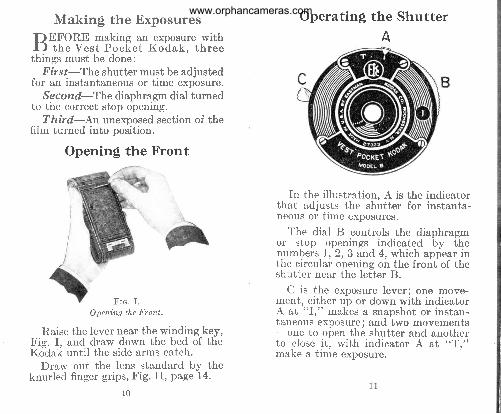
Openin$ the Front
Frc . I .Opening the Front.
Raise the lever near the winding key,trig. I, and draw down the bed of theKo?ak until the side arms catch.
Draw out the lens standard by theknurled finger grips, Fig. II, page 14.
Operating the Shutter
A
In the illustration, A is the indicatorthat adjusts the shutter for instanta-neous or time exposures.
The dial B eontrols the diaphragmor stop openings indicated by thenumbers l, 2,3 and 4, which appear inthe eircular opening on the front of theshutter near the letter B.
C is the exposure lever; one move-ment, either up or down with indicatorA at "I," makes a snapshot or instan-taneous exposure; and two movements-one to open the shutter and anotherto close it, with indicator A at "T,"make a time exposure.
10
www.orphancameras.com
Instantaqeous Exposures"Snapshots"
Fdrsf-Move the indicator A to "I."This adjusts the shutter for Instantan-eous or Snapshot Exposures.
S econd-Revolve the diaphragm dialB'by the milled edge, until number Iis cdntered in the ciicular opening, seeillustration of shutter on page 11. Thisbrings the largest diaphragm or stopopen"inq before the lens. No. I is thecorreciopening for ordinary outdoorpictures, such as street scenes, nearbyviews, etc., when the subject is in thebright sunlight.
Third-To ma!<e the exposure, movethe lever C once either up or down.Push the Iever until it clicks. Unlessit is pushed as far as it will go, no clickwill be heard and no exposure will bemade. Move the lever slowlg so as notto jar the Kodak.
Time ExposuresFirst-Move the indicator A to "T"
(time). This adjusts the shutter forTime Exposures.
Second-Revolve the dial B unti^No. 1, 2, 3 or 4 shows in the circularopening.' See instructions for using thediaohrasm or stop openings given onpases l6'and 17; aiso t-he table for mak-ing Interior Time Exposures on pages
31 and 32, and the table for Time Ex-posures Outdoors on page 35.
Third-Press the exposure lever Cuntil it clicks. This opens the shutter,which norv stays open. Time the ex-posure by a watch. Press the exposureIever in the opposite direction.- Thiscloses the shutter
Important-Neaer oil the shutter.In case of accident. return the Kodak
to your dealer or to us for repairs.
Instantaneous Exposures. t tsnapshotstt
When making instantaneous expo-sures or snapshots, the subject shouli.be in the broad, open sunlight, but thecamera must not. The sun should bebehind your back or over the shoulder.If it shines directly into the lens it willblur and fog the picture.
To make portraits outdoors, whenthe sun is shining brightly, the subjectshould be in the shade of a buildinsor a large tree, but with clear and unlobstructed sky overhead-use stop No.3 or No. 4, place the Kodak on somefirm, steady support (do not hold it inthe hands) and make a short time ex-posure. The exposure lever C shouldbe moved twice. up and down or downand up rvithout a pause, and care must
t2 13
www.orphancameras.com
be taken not to jat the camera. Byfollowing this rule, unpleasant and dis-torting shadows on the face will beavoided.
Special instructions for making por-traits indoors, are given on page 31.
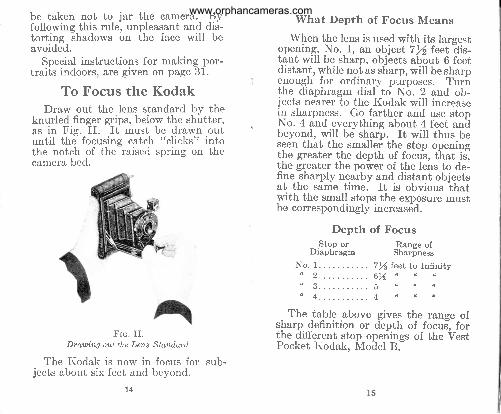
To Focus the KodakDraw out the lens standard by the
knurled finger grips, below the shutter,as in Fig. II. It must be drawn outuntil the focusing catch "clicks" intothe notch of the raised spring on thecamera bed.
Frc . I I .Dratting out the Lens Standard.
The Kodak is now in focus forjects about six feet and beyond.
What Depth of Focus Means
When the lens is used with its larsestopening, No. 1, an object 7rh feet
-dis-
tant will be sharp, objects about O feetdistant, ryhile not as sharp, will be sharpenough for ordinary purposes. Turirthe diaphragm dial to No. 2 and ob-jects nearer to the Kodak will increasein sharpness. Go farther and use stopNo. 4 and everything about 4 feet andbeyond, will be sharp. It will thus beseen that the smaller the stop openingthe greater the depth of focus, that is',the greater the power of the lens to de-fine -sharply nearby and distant objectsat the same time. It is obvious ihatwith the small stops the exposure mustbe correspondingly increased.
Depth of Focus
_ -Stop or Range ofDiaphragm Sharpness
No. I . 7% feet to Infinity, , 2 . 6 % u 4 'a a e F g u t !
u . . . . . )
" 4 . . . . . . 4 , t u i
The table -above gives the range ofsfarp. definition or depth of focus-, forthe different stop openings of the VestPocket Kodak, Nlollel B.
T4
sub-
www.orphancameras.com
N0. I
N0. ?
NO.3
N 0 . 4CoPYRTcHT 1922 By
EASTMAN KoDAK CoMpANy
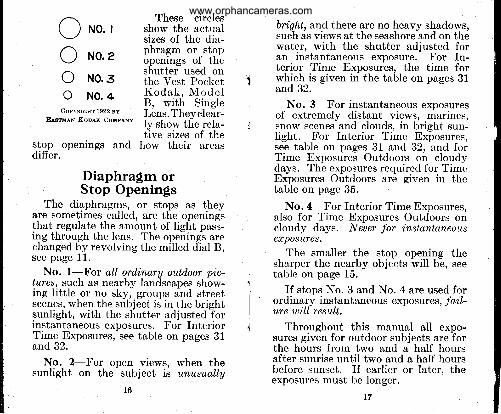
stop openings anddiffer.
These eirclesshow the actualsizes of the dia-phragm or stopopenings of theshutter used onthe Vest PocketK o d a k , M o d e lB, with SingleLens.Theyclear-ly shor,v the rela-tive sizes of the
how their areas
ooo
Diaphragm orStop Openings
The diaphragms, or stops as theyare sometimes called, are the openingsthat regulate the amount of light pass-ilg through the lens. The openings arechanged by revolving the milled dial B,see page 11.
No. l-For all ordi.nary outdoor pic-fzres, such as nearby landscapes show-ing little or no sky, groups and streetscenes, when the subject is in the brightsunlight, with the shutter adjusted forinstantaneous exposures. For InteriorTime Exposures, see table on pages 31and 32.
No. 2-For open views, when thesunlight on the subject is unusually
bright, and there are no heavy shadows,such as views at the seashore and on thewater, with the shutter adjusted foran instantaneous exposure. For In-terior Time Exposures, the time forwhich is given in the table on pages 31and 32.
No. 3-For instantaneous exposuresof extremely distant views, marines,snow scenes and clouds, in bright sun-Iight. For Interior Time Exposures,see table on pages 31 and 32, and forTime Exposures Outdoors on cloudvdays. The exposures required for TimeExposures Outdoors are given in thetable on page 35.
No. 4-For Interior Time Exposures.also for Time Exposures Outdoors oricloudy days. Neuer for i,nstantaneousefr'posuTes,
The smaller the stop opening thesharper the nearby objects will be, seetable on page 15.
If stops No. 3 and No. 4 are used forordinary instantaneous exposurcs, fail-ure will result.
Throughout this manual all expo-sures given for outdoor subjects are forthe hours from two and a half hoursafter sunrise until two and a half hoursbefore sunset. If earlier or later, theexposures must be longer.
1
I
.1
www.orphancameras.com
For subjects in the shadow, underporches or under- trees, no accuratedirections can be given; experience onlycan teach the correct exposure to give.When making pictures under theseconditions the Kodak must be placedon a tripod or some other steadY, firmsupport.
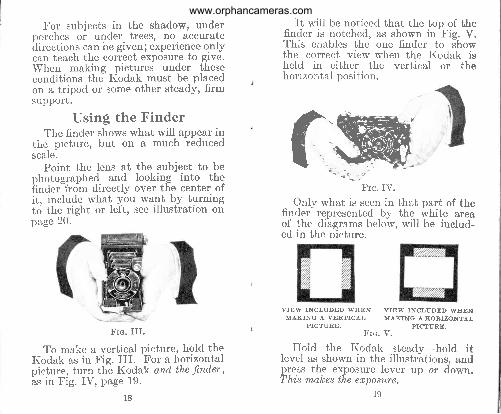
Using the FinderThe finder shows what will aPPear in
the picture, but on a much reducedscale.
Point the lens at the subject to bephotosraphed and looking into thehnderJrom directly over the center ofit, include what you want bY turningto the right or left, see illustration onpage 20.
Frc. II I .
To make a vertical picture, hold theKodak as in Fig. III. For a horizonta'lpicture, turn thb Kodak and the f'nder ,as in Fig. IV, page 19.
It will be noticed that the top of thefinder is notched, as shown in Fig. V.This enables the one finder to showthe correct view when the Kodak isheld in either the vertical or thehorizontal posit ion.
.*.q 1"Frc. IV.
Only what is seen in that part of thefinder represented by the white areaof the diagrams below, will be includ-ed in the nieture.
VIEW INCI,UDED WIIEN VIEW INCIJUDED WEEINMAKING A YERTICAL MAKING A EORIZONTAIJ
PrcruRE'
Frc . v .
Prc ruRE'
Hold the Kodak steadv-hold itlevel as shown in the illustrbtions, andpress the exposure lever up or down.This makes the enposure.
1918
www.orphancameras.com
Hold the Kodak LevelThe I(odak must be held level. If
all of the subjeet cannot be includedin the finder without tilting the lensupwards, move backwards until it isall inelucled uith the camera held leuel.
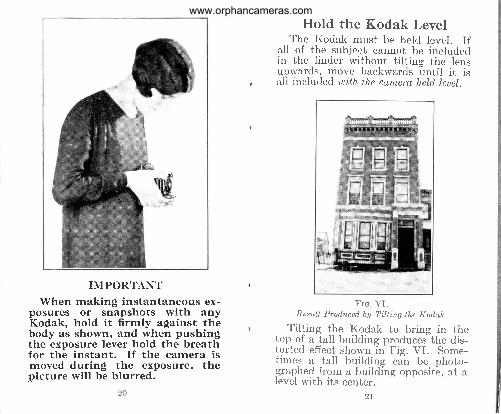
IMPORTANT
When making instantaneous ex-posures or snapshots with anyKodak, hold it firmly against thebody as shown, and when pushingthe exposure lever hold the breathfor the instant. I f the camera ismoved during the exposure, thepicture wil l be blurred.
R e sutt p, o aur rlJf, Itnrors the K odarc.
Tilting the Kodak to bring in thetop of a tall building produceJthe dis-torted effeet shown in Fig. VI. Some-times a tall building can be photo-graphed from a building opposit-e, at alevel r,vith its center.
2T
www.orphancameras.com
If the subject is below the normalheight, like a small child or a dog, theKodak should be held down level withthe center of the subject.
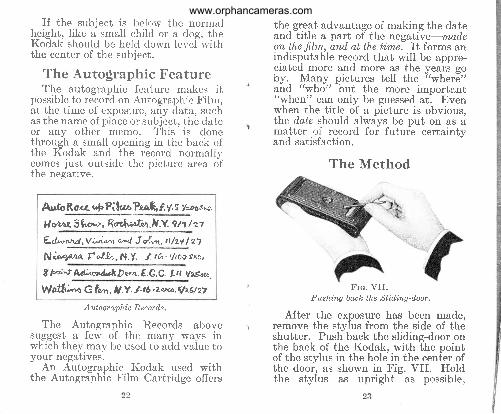
The Autographic FeatureThe autographic feature makes it
possible to record on Autographic Film,at the time of exposure, any data, suchas the name of place or subject, the dateor any other memo. This is donethrough a small opening in the back ofthe Kodak and the record normallvcomes just outside the picture area dfthe negative.
Aufo Rant {-P Piht& ?2& f"rf ,g !/aoo$gac.
t{ertA*. $ftr^^t' Rrt4-&0f{r},if,Y, 9/t I z"r
La^*aU rV;t;vn w*4 S q{rr17t, ,t/"* | 2V
N;Ad A f&Ij'",f\r,y" g,6-,lt$0 src'
8 pv;^f466"4*Dwa.f,G.C. $u tlr&,w
Wa#;t G fe^, tl.Y..f. $, z*es&. Va#rz
Autographic Records.
The Autographic Reeords abovesuggest a few of the many ways inwhich they may be used to add value toyour negatives.
An Autographic Kodak used withthe Autographic Film Cartridge offers
the great advantage of making the dateand title a part of the negativ *madeon the fiIm, and at the t'ime. It forms anindisputable record that will be appre-ciated more and more as the years goby. Many pictures tell the "where"and t'who" but the more important"when" can only be guessed at. Evenwhen the title of a picture is obvious,the date should always be put on as amatter of record for future certaintvand satisfaction.
P u shin s ulif ,lr"tti d in s - d, o o, .
After the exposure has been made,remove the stylus from the side of theshutter. Push back the sliding-door onthe back of the Kodak, with the pointof the stvlus in the hole in the eenter ofthe dooi, as shown in Fig. VII. Holdthe stylus as upright as possible,
The Method
www.orphancameras.com
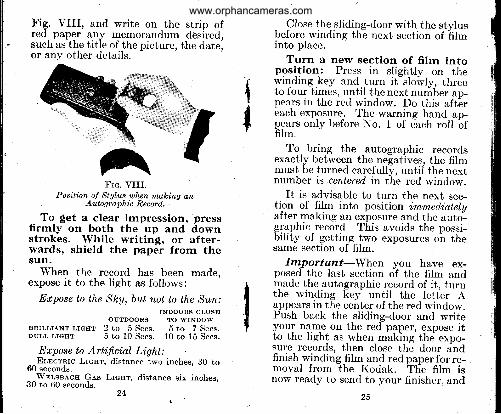
Fig. VIII, and write on the strip ofred paper any memorandum desired,sueh as the title of the picture, the date,or anv other details.
- Close the sliding-door with the stylusbefore winding the next section of hhinto place.
Turn a new section of film intoposition: Press in slightly on thewinding key and turn it-slowly, threeto four times, until the next number ap-pears in the red window. Do this aft-ereach exposure. The warning hand an-pears only before No. 1 of each roll bffilm.
To bring the autographic recordsexactly between the negatives, the filmmust be turned carefully, untii the nextnumber is centered in the red window.
It is advisable to turn the next sec-tilrn of film into position ,immediatelllafter making an exposure and the auto-graphic^reeord This avoids the possi-bility of getting two exposures on thesame section of filnr.
Importanf-When you have ex-posed the last section of the film andmade the autographic record of it, turnthe winding [ey until the letter Aappears in the center of the red window.Push back the slidins-door and writeyour nam_e on the red-paper, expose itto the light as when mbking'the expo-sure records, then close the door Cndfinish winding film and red paper for re-moval from the Kodak. The film isnow ready to send to your finisher, and
{
{
Frc. VIILPosition oI Stulus when making on
Autographic Becord. .
To get a clear impression, pressfirmly on both the up and downstrokes. While writing, or after-wards, shield the paper from thesun.
When the record has been made.expose it to the light as follows:
Erpose to the Sky, but not to the Sun:
ourDooRs t"i3ll""3'.?,,1"
BRTLLTANT LrcHT 2 to 5 Secs. 5 to 7 Secg-DULrr LrcHT 5 to 10 Secs. 10 to 15 Secs.
Erpose to Artifi.cial Light:__Er,ocrnrc Lrcnr, distance two inches, 30 to60 seconds.
W'nr,gs.lcrr Ges Lrcur, distance six inches,30 to 60 seeonds.
24
www.orphancameras.com
when developed will -be easily identi-
n.a UV the i,utographic c.opy of your
nu-. iotti.tt you wrote on the red paper'
Kodak SkY Filter: This accessory
is -for
obtaining more . detail in the
aona. when photograp\ing landscap.es'
The upper htlf of the filter is stained' a
;;ilt*-iolor which reduces. the bright-
it... "f
the sky and- equalizes the ex-
;;;t", the col6rless lower h^ulf permits
;;;"ial exposure for -the- foregrotttt+'
The same exPosure should be made
;iih tn" roaat Skv Filter in. position
ar would be required without it'
Use Kod,ak SkA Filter l{o' 8 with the
Vesf Po.t .t Kodak, Model B, when it
is fitted with the Single Lens'
Kodak Color Filter: This attach-
-."i i. "tp"cially
valuable in outdoorpn-otogtaPhy, a+a for all subjectt tg,t-
taininE cblors that act slqwly on lnesensitive film. It is helpful in cleartng
iui" when photograPliing extremely
distant landscapes; also. tor recordlng
the eorrect coloi ualues itt u black and
*^nit" -print,
of flowers, fruit and other
;;i;;;douieicts. When'using the Kodak
Coiot Filt'er make an exposu-re .aboutseven times longer than would' be re-
quired without it.
Use Kod'akColorFilter l[o' 8 with the
Ve.f Pocket Kodak, Mo-del B, when it
is fitted with the Single Lens'
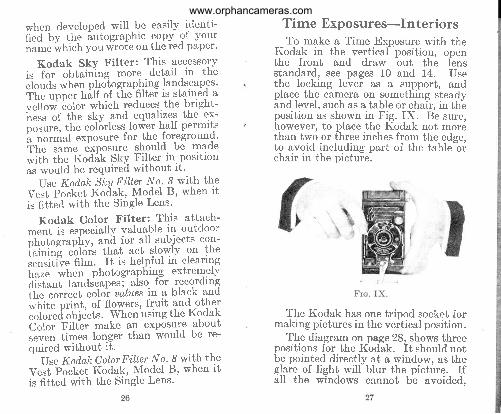
Time Exposures-InteriorsTo make a Time Exposure with the
Kodak in the vertical position, openthe front and draw out the lensstandard, see pages 10 and 14. Usethe locking lever as a support, andplace the camera on something steadyand level, such as a table or chair, in theposition as shown in Fig. IX. Be sure,however, to place the Kodak not morethan two or three inches from the edse.to avoid including part of the table-oichair in the picture.
The Kodak has one tripod socket formaking pictures in the vertical position.
The diagram on page 28, shows threepositions for the Kodak. It should notb_e pointed directly at a window, as theglare of light will blur the picture. Ifall the windows cannot be avoidedn
www.orphancameras.com
draw the shades of those n'ithin rangeof the lens.
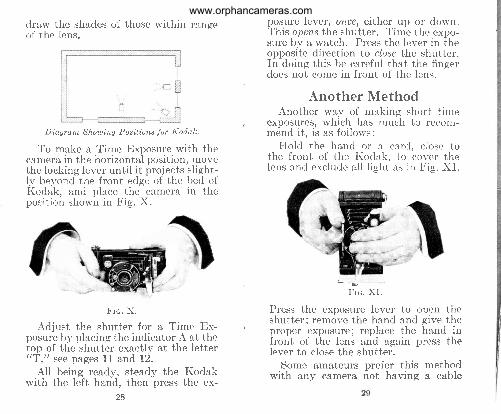
Diagram Showing Positions for Kodak
To make a Time Exposure with thecamera in the horizontal position, movethe locking lever until it projects slight-ly bevond the front edge of the bed ofKodak, and place the camera in thepo:it ion shown in Fig. X.
Frc. X.
Adjust the shutter for a Time Ex-posure by placing the indicator A at thetop of the shutter exaetly at the letter"Tl ' see pages 11 and 12.
All being ready, steady the Kodakwith the left hand, then press the ex-
28
posure lever, once, either up or down.This opens the shutter. Time the expo-sure by a watch. Press the lever in theopposite direetion to close the shutter.In doing this be careful that the fingerdoes not come in front of the lens.
Another MethodAnother way of making short tirne
exposures, which has much to recom-mend it, is as fol lows:
Hold the hand or a card, elose tothe front of the Kodak, to cover thelens and exclude all l ight as in Fig. XI.
-Tt" xt.-
Press the exposure lever to open theshutter: remove the hand and give theproper exposure; replace the hand infront of the lens and again press thelever to close the shutter.
Some amateurs prefer this methodwith any camera not having a cable
www.orphancameras.com
release, as it practically does away withany danger of jarring the camera duringexposure, and thus blurring the picture.
Turn the Winding Key: Aftermaking the autographic record, turnthe winding key until the next numberappears in the center of the window.
Tnn Kooar rs Now READY FoR THENEXT INrpnron ExposuRE.
Follow these directions for each ex-posure.
When the last Interior Exposure hasbeen made, always move the indieatorA at the top of the shutter, from ( (T"
to "I," to be ready for Instantaneousor Snapshot Exposures.
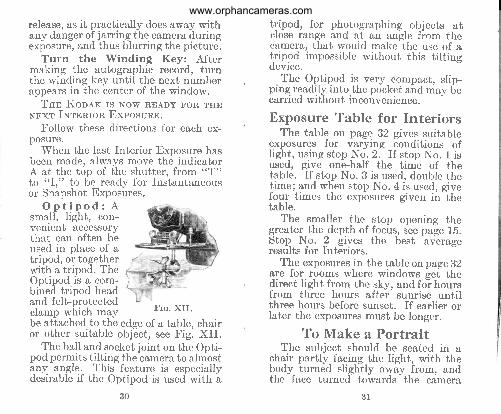
O p t i p o d : Asmall, Iight, con-venient accessorythat can often beused in place of atripod, or togetherwith a tripod. TheOptipod is a com-bined tripod headand felt-protected;i;;p *[i;ti -;t Frc' XII'
tripod, for photographing objects atclose range and at an angle fiom thecamera, that would make the use of atlip.od irnpossible without this tiltingdeviee.
. The O_p-tipod is_ very compact, slip-ping readily into-the pocket and may 6ecarried without inconvenience.
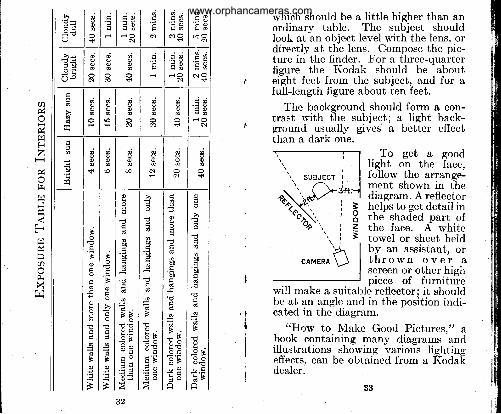
Bxposure Table for InteriorsThe table on page 32 gives suitable
exposures for varying conditions oflight, using stop No. 2. If stop No. 1 isused, give one-half the time of thetable. If stop No. 3 is used, double thetime; ?nd when stop No. 4 is used, givefour times the exposures given in thetable.
The smaller the stop opening thegreater_the depth of focus, see page 15.Stop No. ? gives the best
-average
results for Interiors.The exposures in the table on page 32
&re for rooms where windows get thedirect light from the sky, and foi hoursfrom three hours after sunrise untilthree hours before sunset. If earlier orlater the exposures must be longer.
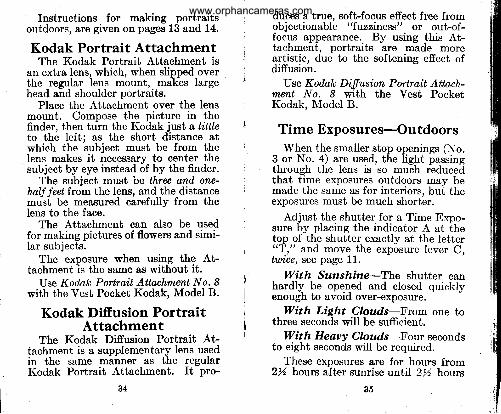
To Make a PortraitThe subject should be seated in a
chair partly facing the light, with thebody turned slightly away from, andthe face turned towards the camera
be attached to the edge of a table, chairor other suitable objEct, see Fig. Xff.
The ball and socket joint on the Opti-pod permits tilting the camera to almostqny a_n_gle. This feature is especiallydesirable if the Optipod is used with
-a
3 1
www.orphancameras.com
a
EI3z
/?t
Fl
f-t
f-l
a
X
i a. i x
a , ae r Q
d
a
€b0I
a
@
et
g i I c g i
, l * t
<1 | c\I
a
a
6l
which should be a little higher than anordinary table. The subject shouldlook at an object level with the lens, ordirectly at the lens. Compose the pic-ture in the finder. For a three-quarterfigure the Kodak should be
- about
eight feet from the subject, and for afull-length figure about ten feet.
The background should form a con-trast rvith the subject; a light back-ground usually gives a better effectthan a dark one.
To get a goodlight on the face,follow the arranse-ment shown in the
ao"rao fl
diagram. A reflectorhelps to get detail inthe shaded part ofthe face. A whitetowel or sheet heldby an assistant, ort h r o w n o v e r ascreen or other hisl,piece of f urniture
will make a suitable reflector; it shouldbe at an angle and in the position indi-cated in the diagram.
"How to Make Good Pictures," abook containing manv diagrams andillustrations showing various lishtinseffects, can be obtained from a Kodaiidealer.
c lq d l
I
o lL I
I I6 lt D lb0 I
b0 l
I
6 la l
c B l' . 1
> l
E' t I. g z I
A I
a
ht)
o
cnB
0)h
(n@bc
a
F F
. 9 B
o €
a
F
-Fq)
a
F0)
F
F
F
0)L
d.
a
Fo
F
III
, tI
I
o lo l
I
" lY I
d lI
a lb0 l
b ! lc t6 l
I
* la l
x l4 lo l
-Ealo d l
T'E Ia \ l
3ooz=
I6 F
E B
3 6
www.orphancameras.com
Instructions for making portraitsoutdoors, are given on pages 13 and 14.
Kodak Portrait AttachmentThe Kodak Portrait Attachment is
an extra lens, which, when slipped overthe regular lens mount, makes largehead and shoulder portraits.
Place the Attachment over the lensmount. Compose the picture in thefinder, then turn the Kodak just a lttttleto the left: as the short distance atwhich the
'subject must be from the
Iens makes it necessary to center thesubject by eye instead of by the finder.
The subject must be three and one-haU jeet from the lens, and the distancemusi be measured c6,refully from thelens to the face.
The Attachment can also be usedfor making pictures of flowers and simi-lar subjects.
The exposure when using the At-tachment is the same as without it.
IJse Kodak Portrait Attachment No. 8with the Vest Pocket Kodak, Model B.
Kodak Diffusion PortraitAttachment
The Kodak Difrusion Portrait At-tachment is a supplementary lens usedin the same manner as the regularKodak Portrait Attachment. It pro-
duces a truen soft-focus effect free fromobjectionable "fuzziness" or out-of-focus appearance. By using this At-tachment, portraits are made moreartistic, due to the softening effect ofdiffusion.
Use Koilnk Difrusion Portrait Attach-tnent No. 8 with the Vest PocketKodak, N4odel B.
Time Exposures-OutdoorsWhen the smaller stop openings (No.
3 or No. 4) are used, the light passinsthrough the lens is'so muEh reducefithat time exposures outdoors may bemade the same as for interiors, bui theexposures must be much shorter.
Adjust the shutter for a Time Expo-sure by placing the indicator A at thetop of the shutter exactly at the letterttT," and move the exposure lever C,twice, see page 11.
With Sunshine-The shutter eanhardly be opealed and closed quicklyenough to avoid over-exposure.
With Light Clouds-From one tothree seconds will be sufficient.
With Heauy Clouds-Four secondsto eight seconds will be required.
These exposures are for hours from2% hours after sunrise until 2% hovs
34 36
www.orphancameras.com
before sunset and for subjects in theopen. For other hours, or for subjectsin the shadow, under porches or undertrees, the lighting conditions vary soercal lv that no definite instructions can5e given; experience only can teachthe correct exposure to give.
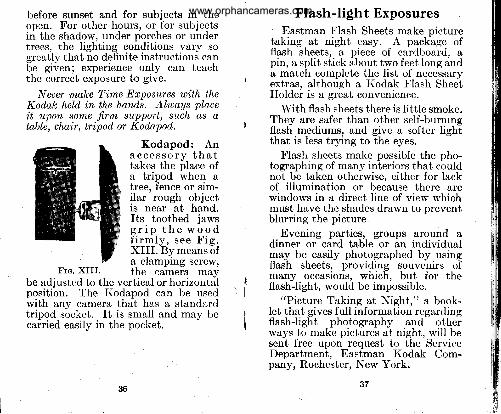
Neuer make T'ime Erposures with theKod,ak held'in the hands. Always placeit upon some fi,rm support, such as atable, cha'ir, tri,pod or Kodapod.
Kodapod: Ana e c e s s o r y t h a ttahes the place ofa tripod when atree. fence or sim-i lar 'rough objectis near at hand.Its toothed jawsg r i p t h e w o o df i rm ly , see F ig .XI[. By means ofa clamping screw,
Flash-light ExposuresEastman Flash Sheets make picture
taking at night easy. A package offlash sheets, a piece of cardboard, apin, a split stick about two feet long anda match complete the list of necessaryextras, although a Kodak Flash SheetHolder is a great convenience.
With flash sheets there is little smoke.They are safer than other self-burningflash mediums, and give a softer lightthat is less trying to the eyes.
Flash sheets make possible the pho-tographing of many interiors that couldnot be taken otherwise. either for lackof illumination or because there arewindows in a direct line of view rvhichmust have the shades drawn to preventblurring the picture.
Evening parties, groups around adinner or card table or an individualmay be easily photographed by usingflash sheets, providing souvenirs -ofmany occasions, which, but for theflash-Iight, would be impossible.
"Picture Taking at Night," a book-let that gives full information regardingflash-light photography and otherways to make pictures at night, will besent free upon request to the ServiceDepartment, Eastman Kodak Com-panyr Rochester, New York.
Fro. XIII. the camera maybe adjusted to the vertical or horizontalposition. The Kodapod can be usedwith any camera that has a standardtripod socket. It is small and mav becairied easily in the pocket.
www.orphancameras.com
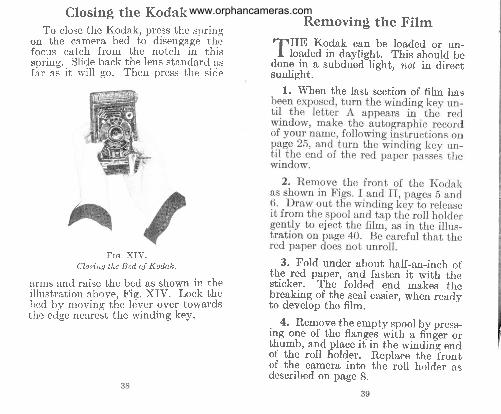
Closing the KodakTo close the Kodak, press the spring
on the camera bed to disengage thefocus catch from the notch in thisspring. Slide back the lens standard asfar as it will go. Then press the side
Frc. XIV.Closins the Bed of Kodak.
arms and raise the bed as shown in theillustration above, Fig. XIV. Lock thebed by moving the lever over towardsthe edge nearest the winding key.
Removing the Filmrf'IHE Kodak can be loaded or un-I loaded in daylight. This should be
done in a subdued-light, not in directsunlight.
1. When the last section of film has
3. Fold under about half-an-inch ofthe red paper, and fasten it with thesticker. The folded end makes thebreaking of the seal easier, when readyto develop the film.
4. Remove the empty srlool by press-ilg oo" of the flangds with a finger ortlu.gab, and-place if in the windi"? endof the roll holder. Replaee the Trontof the camera into the roll holder asdescribed on page 8.
www.orphancameras.com
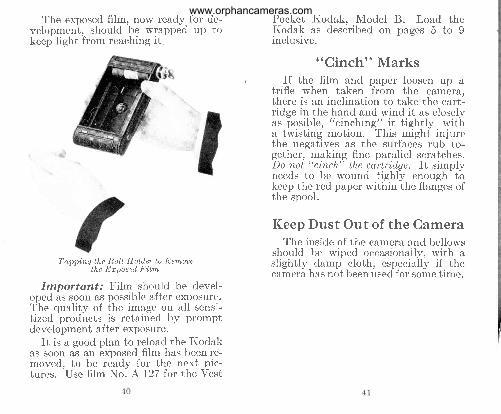
The exposed film, now ready for de-velopment, should be wrapped up tokeep light from reaching it
Tapping the Rol l Holder to Remcaethe Erposerl Fi Im.
Important: F ilm should be devel-oped as soon as possible after exDosure.The quality of the image on all sensi-tized products is retained by promptdevelopment after exposure.
It is a good plan to reload the I(odakas soon as an exposed film has been re-moved, to be ready for the next pic-tures. IJse film No. A I27 for the Vest
Pocket Kodak, Model B. Load theKodak as described on pages 5 to Iinelusive.
t tCinch" MarksIf the film and paper loosen up a
trifle when taken from the eamera,there is an inclination to take the cart-ridge in the hand and wind it as closelyas posible, "cinching" it tightly witha twisting motion. This might injurethe negatives as the surfaces rub to-gether, making fine parallel scratches.Do not "cinch" the cartridge. It simplyneeds to be wound tighly enough
^ to
keep the red paper within the flanges ofthe spool.
Keep Dust Out of the CameraThe inside of the camera and bellows
should be wiped occasionallv, with aslightly damp cloth, especially if thecamera has not been used for some time.
www.orphancameras.com
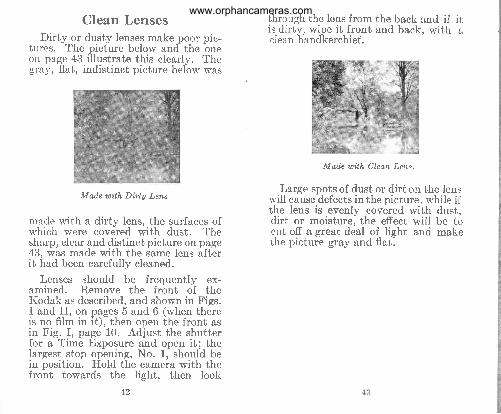
Clean LensesDirty or dusty lenses make poor
tures. The picture below and theon page 43 illustrate this clearlv.gray,
-flat, indistinct picture beiow
through the lens from the back and if itis dirty, wipe it front and back, with aelean handkerchief.
Made with Clean Lens.
Large spots of dust or dirt on the lenswill eause defects in the picture, while ifthe lens is evenly eovered with dust,dirt or moisture, the effeet will be tocut off a great deal of light and makethe pictuie gray and flatl,
plc-oneThewas
Made with Dirty Lens.
made with a dirty lens, the surfaces ofwhich were covered with dust, Thesharp, elear and distinct picture on page43, was made with the same lens afterit had been earefully cleaned.
Lenses should be frequently ex-amined. Remove the front of theKodak as described, and shown in Figs.I and II, on pages 5 and 6 (when thereis no film in it), then open the front asin Fig. I, page 10. Adjust the shutterfor a Time Exposure and open it; thelargest stop opening, No. 1, should bein position. Ilold the eamera with thefront towards the light, then look
42
www.orphancameras.com
Finishing, the Pictures
I-THERE are two distinct steps in theI making of photographs-the pic-
ture taking and the picture fi.nishingTo free our instruction books from un-necessary details, which might be con-fusing, we give with the camera thedirections for picture taking only.
The instructions in this booklet areample for the handling of the cameraunder practically all conditions. Thosewho wish to do their own developingand printing will find full directionswith the Kodak Film Tanks (for de-veloping in daylight), or with the Out-fits for tray or dark-room use.
To develop film (No. A I27) used inthe Vest Pocket Kodak, Model B,obtain a Vest Pocket Kodak FilmTank. This film may be developed inthe larger tanks-but not so eco-nomically.
If the dark-room method of develop-ment is preferred, obtain an Eastman3A Developing and Printing Outfit.
In keeping with our plan and purposeto provide the users of our cameras withevery help in the production of goodpictures, we will be glad to furnish suchdeveloping and printing instructions,at anv time. whether a tank or outfit ispurcliased or not
Virith the Kodak Film Tank andVelox paper many amateurs find asmuch pleasure in the finishing of thepictures as in the taking of them, andare able to produce excellent picturesby the simple methods we have workedout.
We never lose interest in the pur-chaser of a Kodak. lVe are not onlywilling, but are anxious at all times tbhelp solve any problems that mayariie, either by sending the tteces.uiyprinted instru"ctions or" by individudlcorrespondence, through our ServiceDepartment. Making use of the knowl-edge of our experts places you under noobligation. Kodak Service is free-ald_ goes with the purchase of everyKodak.
EASTMAN KODAK COMPANY,RocnrsrBn, N. Y.
www.orphancameras.com
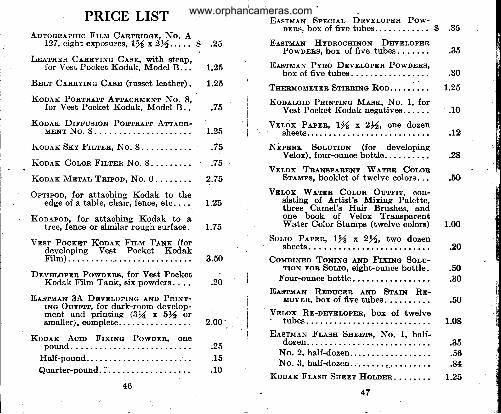
PRICE LISTAurocnepsrc Frr,rr Canrnroop, No. A
127, eight exposures, L,A x 2%.. . . . $
Lnernnn ClnnyrNc C,lso, with strap,for Vest Pocket Kodak, Model B. . .
Bnr,r C.tnnyrr.re Casp (russet leather).
Koo.r.r Ponrnerr Arrecslrcwr No. 8,for Vest Pocket Kodak, Model B..
Koper DrrrueroN Ponrnerr Arr.rcs-u n r r N o . 8 . . . . .
Kooer Sry Frr,rrn, No. 8.
Koo.rr Cor,on Frr,rpn No. 8.
Koo.l Mor,rr, Tnrroo, No. 0,
Ortrroo, for attaching Kodak to theedge of a table, chair, fence, eto... .
Kooeroo, for attaching Kodak to atree, fence or similar rough surface.
Vssr Pocrur Kooe.r Frr,u Tlwr (fordeveloping Vest Pocket KodakF i lm) . .
Drvnlopsn Powosns, for Veet PocketKodak Film Tank, six powders. . . .
ElsrN{eN 3A Dpvnr,oprNc AND Pnrrrrr-rNG OurFrr, for dark-room develop-ment and printing (3% x 5)6 orsmaller), complete.
Kooer Acro Frxrwe Powonn, onepound.
Half-pound.
Quarter-pound. ;. . .
Eesrruerv Sppcrll Drvpr,orpn Pow-onns. box o f f i ve tubes . . . . . $ .35
E,rsruln Ilvonocsrxorv Dpvpr,opsnPowonng, box of frve tubes .35
Eesruen Pvno Dnvsr,oron Powouns,b o x o f f i v e t u b e s . . . . : : . . . 9 0
Tsnnuouornn Srrnnrxs Roo... L.25
Koo,rr,oro PnrNrruo M,rsr, No. 1, forYest Pocket Kodak negatives. . . . .. .10
Vpr,ox Prpnn, Lsl x 2ll, one dozen- sheetg. .12
Nnpnnir Sor,urron (for developingYelor), four-ounoe bottle.
Vnr,ox Tnrlvgpr,nnwr'Wermn Cor.onSreurs, booklet of twelve colors... .5O
Vsr,ox Weron Cor,on Ourrrr, con-sisting of Artist's Mixing Palette,three Camel's Ilair Brushes, andone book of Velox Transparent'Water
Color Stamps (twelve colors) 1.00
Sor,ro Plppn, L6/6 x 2l$, two d.ozensheets. .2O
CoMsrNno TonrNs exo Frxruo Sor,u-TroN FoR Sor,ro, eight-ounce bottle. .50
Four-ounce bottle. .30
E,rsrM,{r\r Rnoucpn .eup Srerrrr Rp-Movnn, bor of five tubes. . .50
Vnr,ox Rp-onvnr,opon, bor of twelve' tubes.
Eegrlrer.r Fr,rrgg Suoors, No. 1, half-dozen.
No. 2, half-dozen.,. .56No. 3, half-dozela, .,. . . . . r,t .84
Koolr Fr,,rss Ssnpr llor,onn. 1.25
.25
L.25
t .25
. l o
L.25
. t o
. l o
?.75
L Z 5
t.75
3.50
.20
2.00'
.25
.15.10
www.orphancameras.com
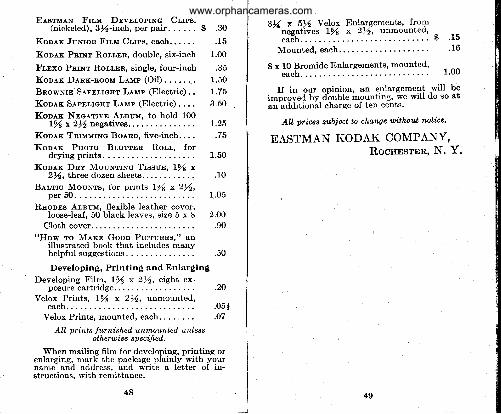
E.rsrM.{N Frr,u Dpvur,opruo Cr,rps.(nickeled), 8%-inch, per pair. . . . . . $ .30
Koo.r.x JuNron Frr,M Cl,rpe, each.. . . . . .15
Koo.x Pnrrr Ror,r,pn, double, six-inch 1.00
Fr,pxo Pnrr.rr Ror,r-nn, single, four-inch .35
Kopex Denr-noou Leup (Oil) 1.50
Bnowxrp Srrsr,rcnr L.rnap (E]ectric). . 1.75
Koo.* Slrnr,rcur L.tlrr (Electric). . . . 3.50
Koo.r,r Nrcerrvn Alauu, to hold 100l3A x2% negatives. 1.25
I(ooex Tnrururre Bo.rno, five-inch.. . . .75
I(ooer Psoro Br,orrpn Ror,l, fordrying prints. 1.50
I(oolr Dny Mour.rrrNc Trssuo, 1td x21, three dozen sheets. .10
Ber,rrc MouNrs, for prints l5A x 2rZ,per 50. 1..05
Rsoons Ar,suu, flexible leather cover,loose-leaf, 50 black leaves, size 5 x 8 2.00
Cloth cover. .90
"How ro M.txn Gooo Ptctunps," anillustrated book that includes manyhelpful suggestions .50
Developing, Printing and Enlarging
Developing F.llrr,, I5l x 2%, eight ex-posure cartridge. .20
Yelox Prints, L'/s x 2ll, tnmownted,each. . . .051
Velox Prints, mounted, each. . . . . . ., .Oz
All prints lurnished unmounted unlessotheruise specified,
TV'hen mailing film for developing, printing orenlarging, mark the package plainly with yourname and address. and write a letter of in-etructions, with remittance.
3% x 5/z Velox Enlargements, from'-negatives l5l x 2rl, unmountect'
"aEtt. . .
Mounted, each... '16
8 x 10 Bromide Enlargements, mounted,- - " " c t . . . . . . . . , . . . . . . 1 . 0 0
If in our opinion, an enlargement will be
improved by double mounting, we wrll do so at
an-additional charge of ten cents.
AII prices subiect to change without noticc'
trASTMAN KODAK COMPANY'RocnpsrnR, N. Y.
www.orphancameras.com
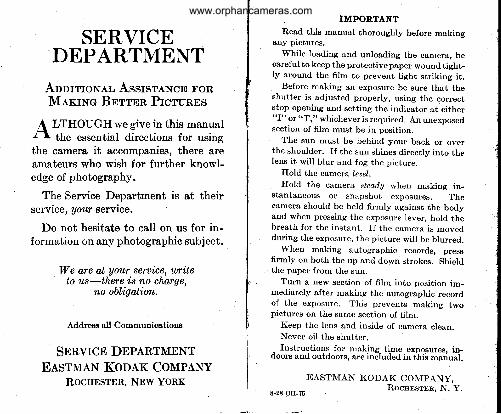
SERVICEDEPARTMENT
AonrrroNer, AssrsrANcE FoRMerrxc Bnrrpn Prcrunps
A LTHOUGH we give in this manualfa. ths essential directions for usingthe camera it accompanies, there areamateurs who wish for further knowl-edge of photography.
The Service Department is at theirservice, yotn sewice,
Do not hesitate to call on rxl for in-formation on any photographic subject.
We are at your seraice, writeto us-there'is no charge,
no obligoli,on,.
Address all Communieations
SNNVTCN DEPARTMENT
EASTMAN KODAK COMPANYROCIIESTER, NEW YORK
l)
IMPORTANT
Read this manual thoroughly before makingany pictures.
While loading and unloading the camera, becareful to keep the protective paper wound tight-ly around the film to prevent light striking it.
Before making an exposure be sure that theshutter is adjusted properly, using the correctstop opening and setting the indicator at either"I" or " Tr, " whichever is required. An unexposed.section of film must be in position.
The sun must be behind your back or overthe shoulder. If the sun shines directly into thelens it will blur and fog the picture.
Hold the camera leuel.Hold the camera steadg when making in-
Stantaneous or snapshot exposures. Thecamer& should be held firmly against the bodyand when pressing the exposure lever, hold thebreath for the instant. If the camera is movedduring the exposure, the picture will be blurred.
When making autographic records, pressfirmly on both the up and down strokes. Shieldthe paper from the sun,
Turn a new section of film into position im-mediately after making the autographic recordof the exposure. This prevents making twopictures on the same section of film.
Keep the lens and inside of camera clean.Never oil the shutter.
- Instructions for nraking time exposures. in-doors and outdoors, are included in this m;ilual.
EASTMAN KODAK COMPANY,
E-28-crr-?6 Rocunston, N' Y'
www.orphancameras.com