Embed Size (px)
Citation preview
© 2013 Toshiba Global Commerce Solutions, Inc.
Oracle iSupport
OverviewKelvin KY Lim & Todd
2 October 2014
© 2013 Toshiba Global Commerce Solutions, Inc.
Order of Contents
1. Logging In
2. Opening iSupport
3. Home – 5 slides
4. Create Service Request – 5 slides
5. Viewing Existing SRs – 4 slides
6. Creating New SR Views – 5 slides
7. Recommended Views
8. Changing SR Views – 2 slides
9. Modifying SR Lists Views – 3 slides
10.Business Partners – 3 slides
© 2013 Toshiba Global Commerce Solutions, Inc.
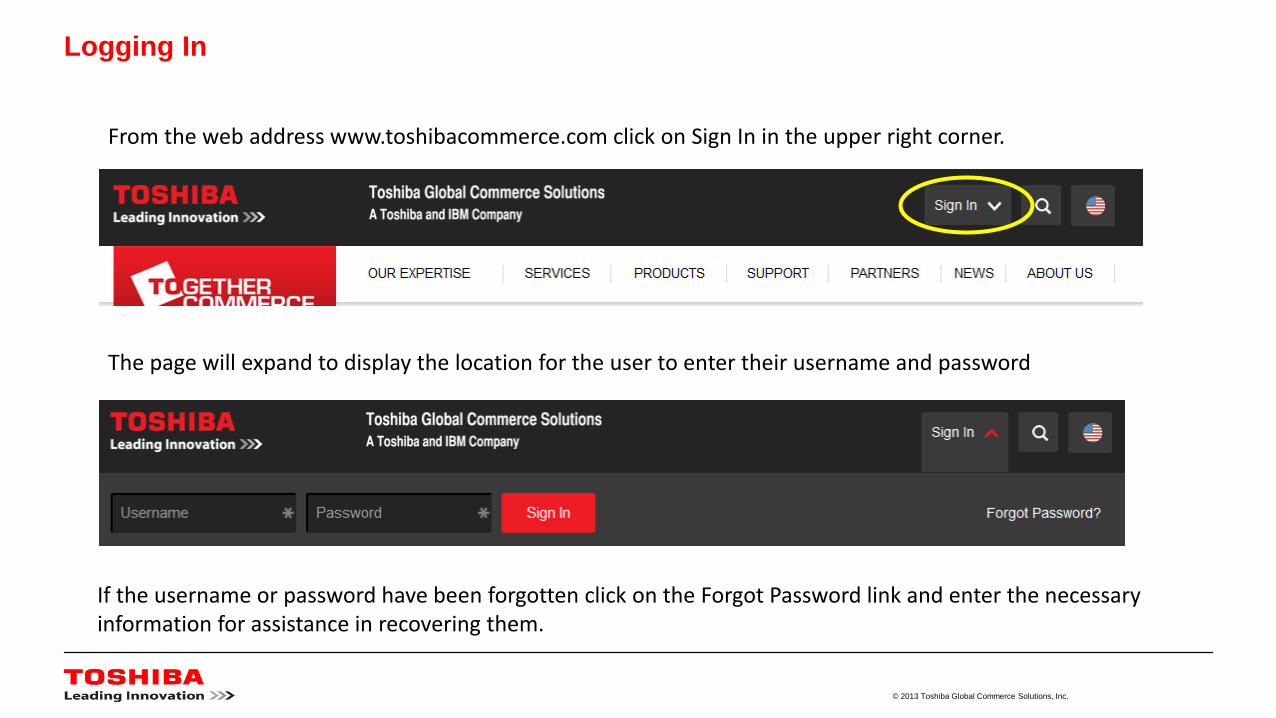
Logging In
If the username or password have been forgotten click on the Forgot Password link and enter the necessary information for assistance in recovering them.
From the web address www.toshibacommerce.com click on Sign In in the upper right corner.
The page will expand to display the location for the user to enter their username and password
© 2013 Toshiba Global Commerce Solutions, Inc.
Locating the links
Scroll to the bottom of the page under Useful Links to find:1) Submit a service request or EBS
Next, we will walk through “Submit a service request” and in the middle of that task, discuss sharing files.

© 2013 Toshiba Global Commerce Solutions, Inc.
Submit a Service Request will open a new window that looks like this:
This is an overall view of the Home page. More detailed information will be provided in the next few slides.

© 2013 Toshiba Global Commerce Solutions, Inc.
Home
When logged into the main site this menu will be displayed in the upper left corner of the screen.
•Home – Opens the Home page
•Account – Opens a page with details about the specific account
•Support – Opens a page displaying a list of SRs
© 2013 Toshiba Global Commerce Solutions, Inc.
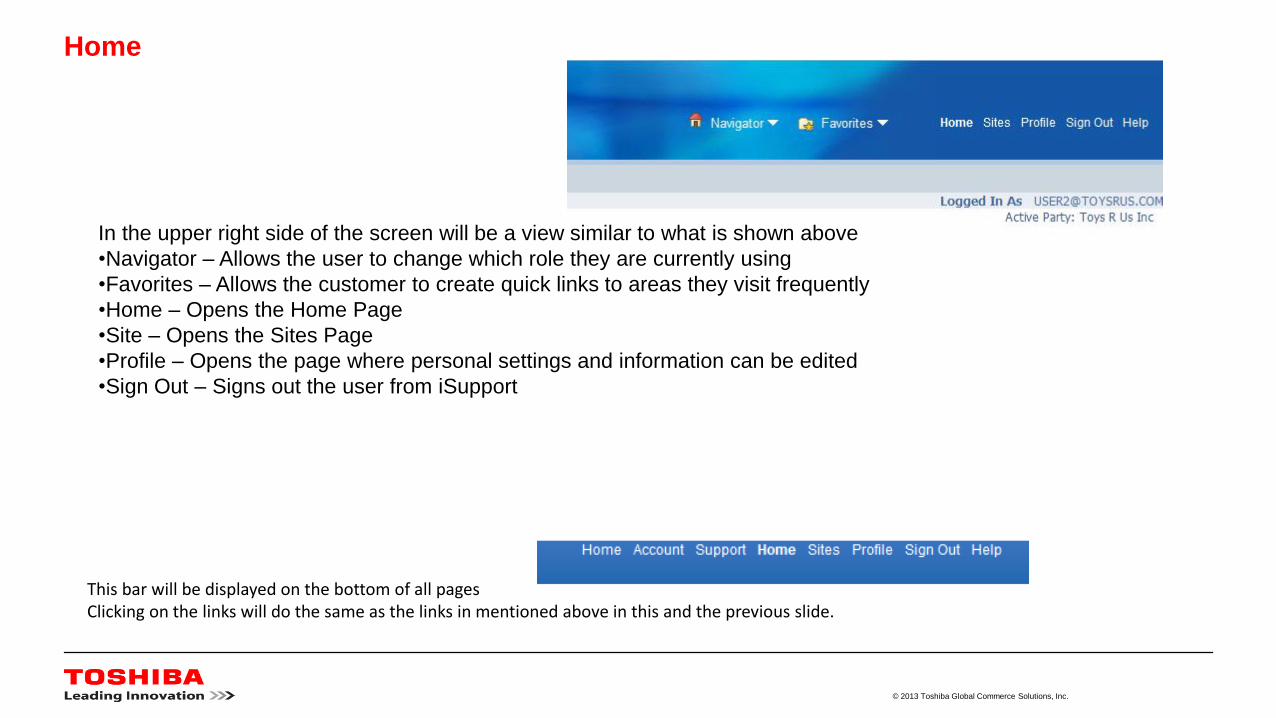
Home
In the upper right side of the screen will be a view similar to what is shown above
•Navigator – Allows the user to change which role they are currently using
•Favorites – Allows the customer to create quick links to areas they visit frequently
•Home – Opens the Home Page
•Site – Opens the Sites Page
•Profile – Opens the page where personal settings and information can be edited
•Sign Out – Signs out the user from iSupport
This bar will be displayed on the bottom of all pagesClicking on the links will do the same as the links in mentioned above in this and the previous slide.
© 2013 Toshiba Global Commerce Solutions, Inc.
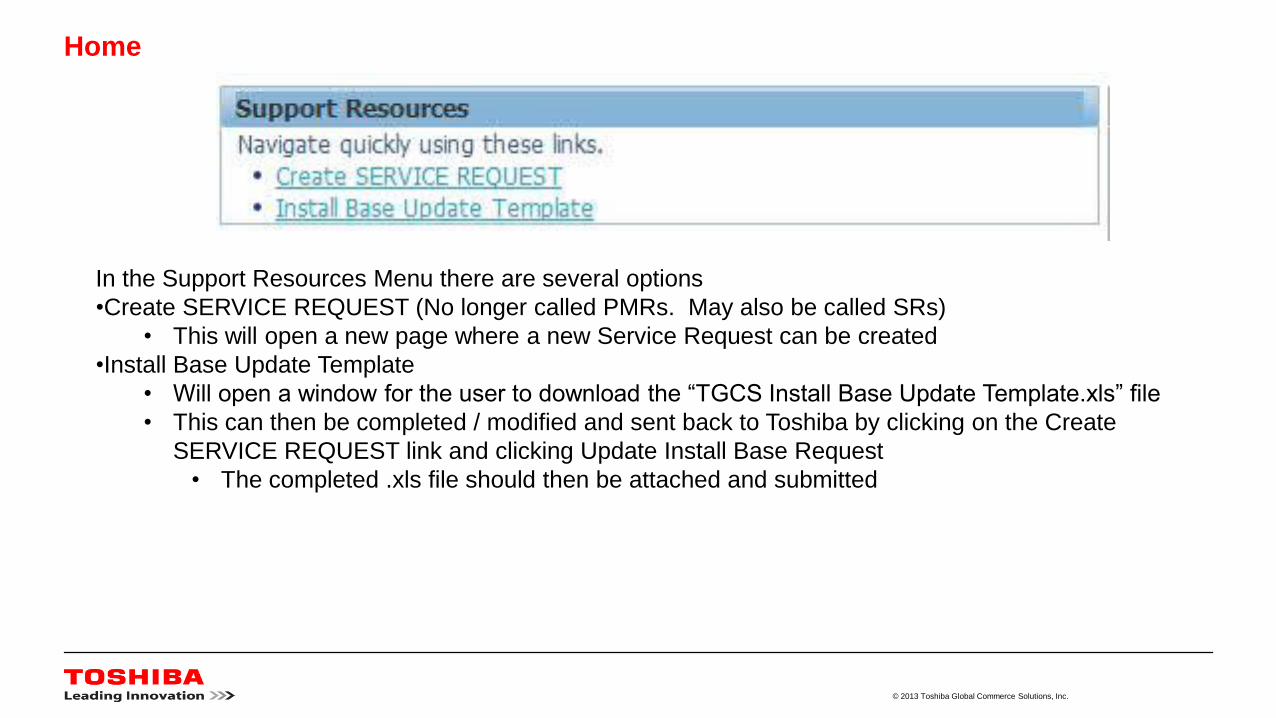
In the Support Resources Menu there are several options
•Create SERVICE REQUEST (No longer called PMRs. May also be called SRs)
• This will open a new page where a new Service Request can be created
•Install Base Update Template
• Will open a window for the user to download the “TGCS Install Base Update Template.xls” file
• This can then be completed / modified and sent back to Toshiba by clicking on the Create
SERVICE REQUEST link and clicking Update Install Base Request
• The completed .xls file should then be attached and submitted
Home
© 2013 Toshiba Global Commerce Solutions, Inc.
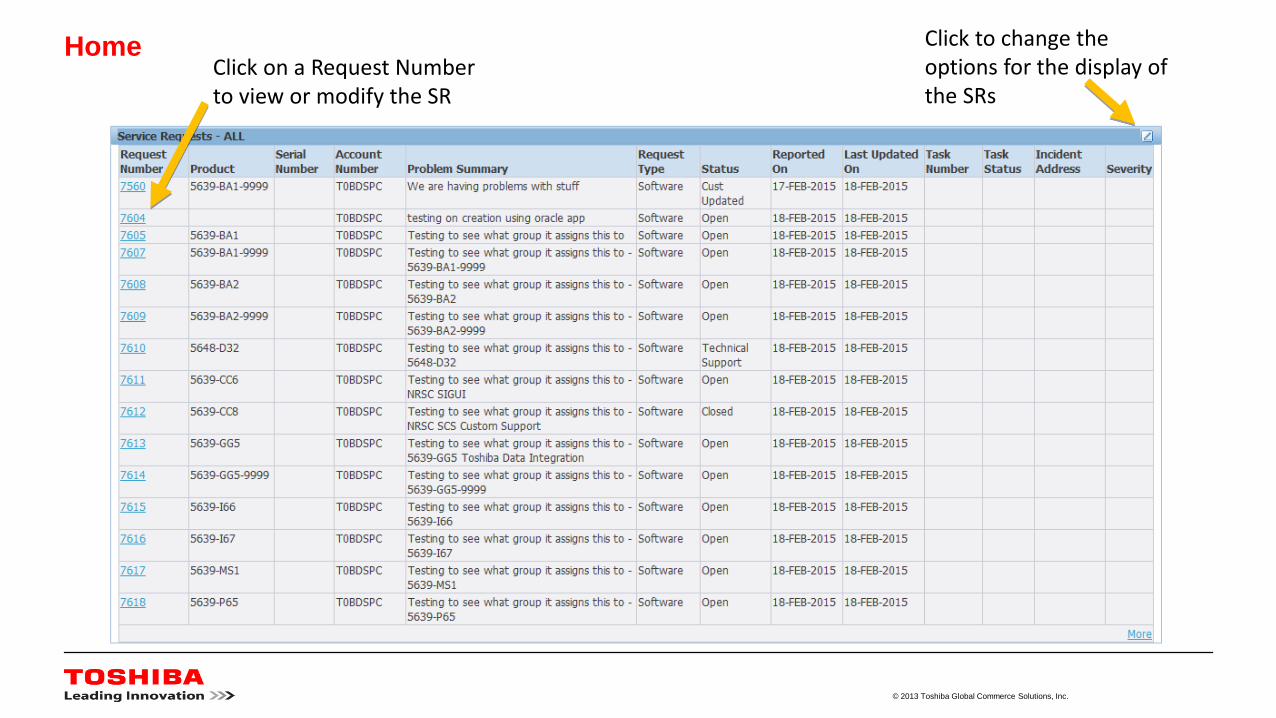
Home Click to change the options for the display of the SRs
Click on a Request Number to view or modify the SR
© 2013 Toshiba Global Commerce Solutions, Inc.
Create Service Request
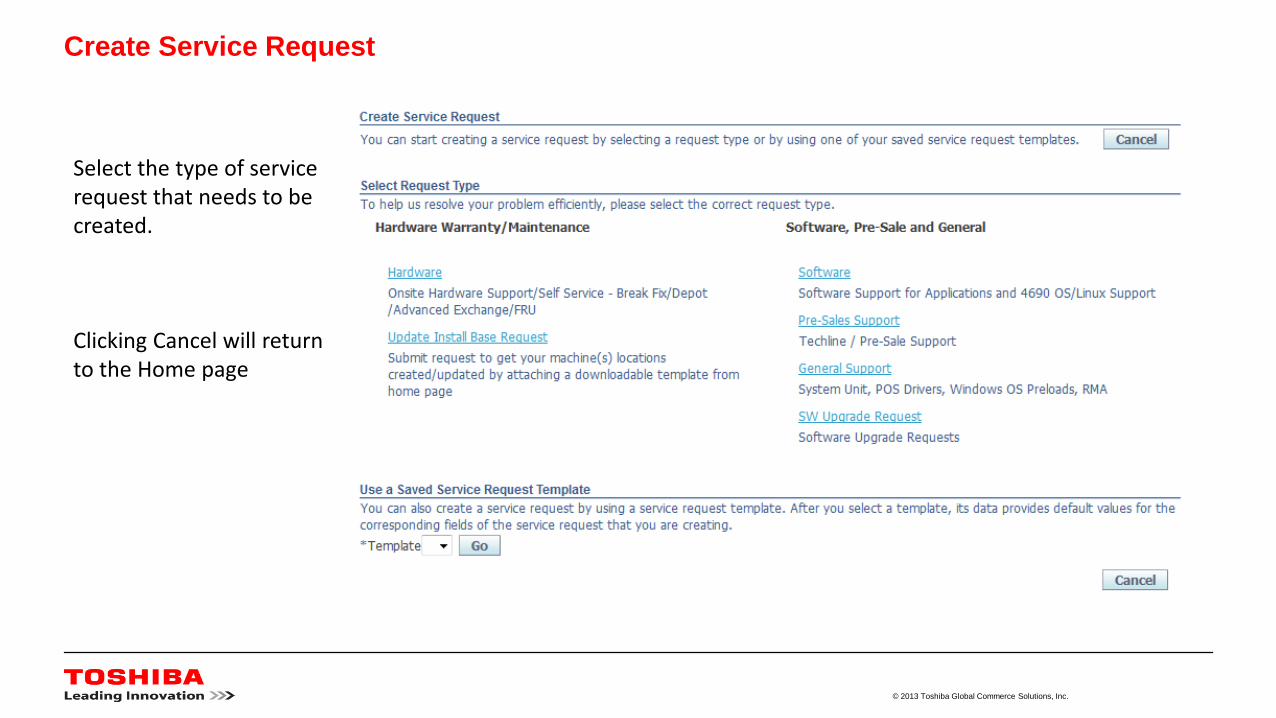
Select the type of service request that needs to be created.
Clicking Cancel will return to the Home page

© 2013 Toshiba Global Commerce Solutions, Inc.
Create Service Request
For Software Problems, here is the current list of products that you can enter directly on the next screen:5639-BA1 SurePOS Ace V7 5639-TK2 NRSC Toshiba TCx Gravity
5799-RQL GUI for 4690 Astra 5639-TK3 Terminal Event Monitor
5669-212 Chain Drug Sales Application 5639-TR8 NRSC CHEC
5639-Z01 IBM CHEC Enterprise BOSS V6 R6 5639-TR9 NRSC DIF
5697-N94 IBM CHEC V6 - Backoffice 5648-D32 NRSC ACE
5697-P01 IBM CHEC V6 - Client 5799-GEW NRSC Custom Code
5639-GG5 Data Integration Facility V2 5696-536 Supermarket Application
5639-P86 Toshiba TCx Gravity V2 5697-G45 Electronic Journal for 4690 V2
5696-546 General Sales Application 5799-PNH Electronic Marketing
5639-CC6 NRSC SIGUI 5639-P71 Store Integrator V3
5639-CC8 NRSC SCS 5799-EPS UK EPS V7
5639-I66 NRSC StorePay 5799-SSW SureSwitch V5R2
5639-I67 NRSC Electronic Marketing Ext 5799-HRL Support for SLEPOS 11
5639-P65 NRSC EM Enhancements 5799-VS5 VisualStore Suite V5
5639-TK0 Program Loyalty and Mgmt Sys 5799-SP4 UK Storepay V4
5639-MS1 TCxAmplify 5799-TGP Genius POS Express
5639-TK1 NRSC Mobile Shopper 5799-TGE Genius POS
5639-P70 4690 Operating System V6 5648-A86 RCO Retail Connectivity Option
© 2013 Toshiba Global Commerce Solutions, Inc.
Create Service Request
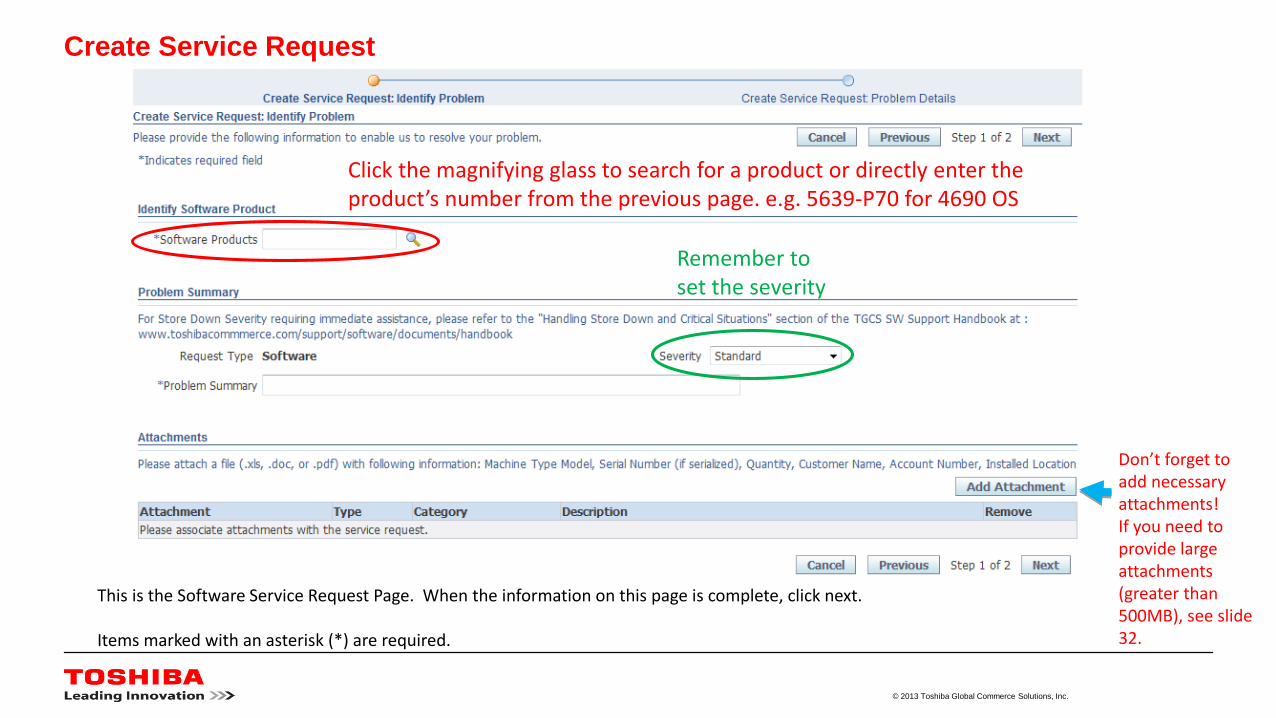
This is the Software Service Request Page. When the information on this page is complete, click next.
Items marked with an asterisk (*) are required.
Don’t forget to add necessary attachments!If you need to provide large attachments (greater than 500MB), see slide 32.
Remember to set the severity
Click the magnifying glass to search for a product or directly enter the product’s number from the previous page. e.g. 5639-P70 for 4690 OS
© 2013 Toshiba Global Commerce Solutions, Inc.
Create Service Request
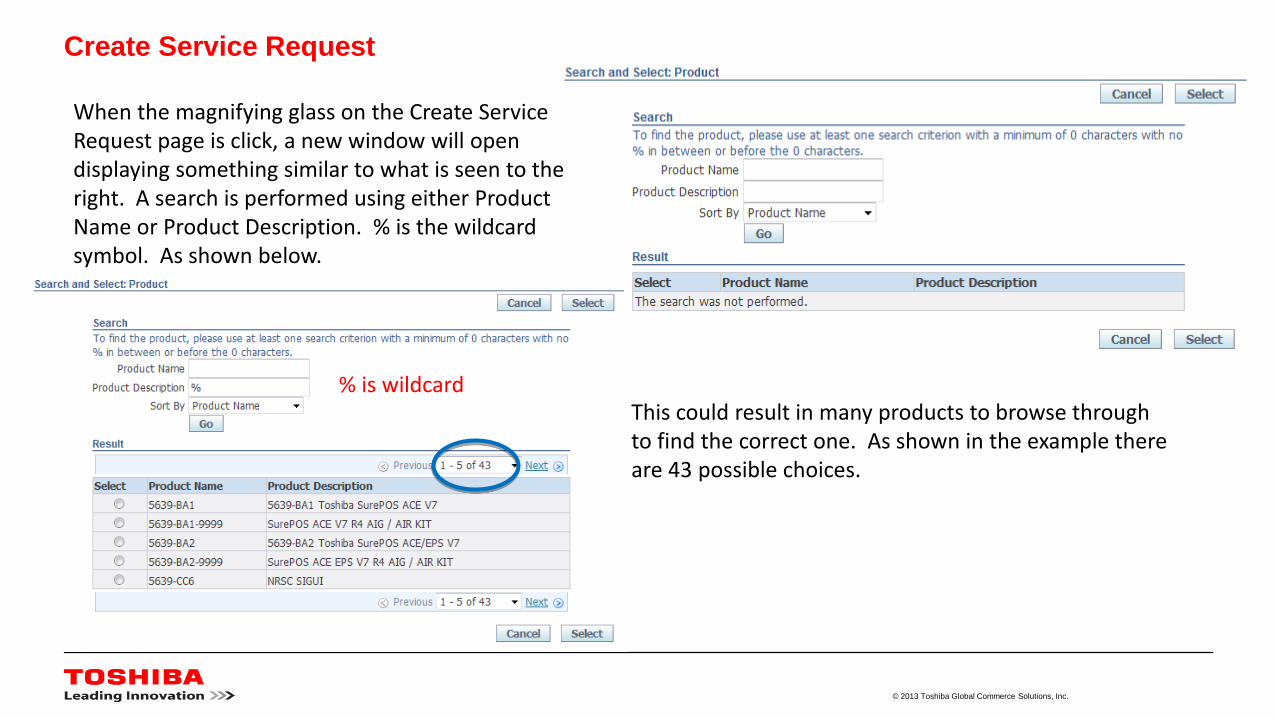
When the magnifying glass on the Create Service Request page is click, a new window will open displaying something similar to what is seen to the right. A search is performed using either Product Name or Product Description. % is the wildcard symbol. As shown below.
% is wildcardThis could result in many products to browse through to find the correct one. As shown in the example there are 43 possible choices.
© 2013 Toshiba Global Commerce Solutions, Inc.
Create Service Request
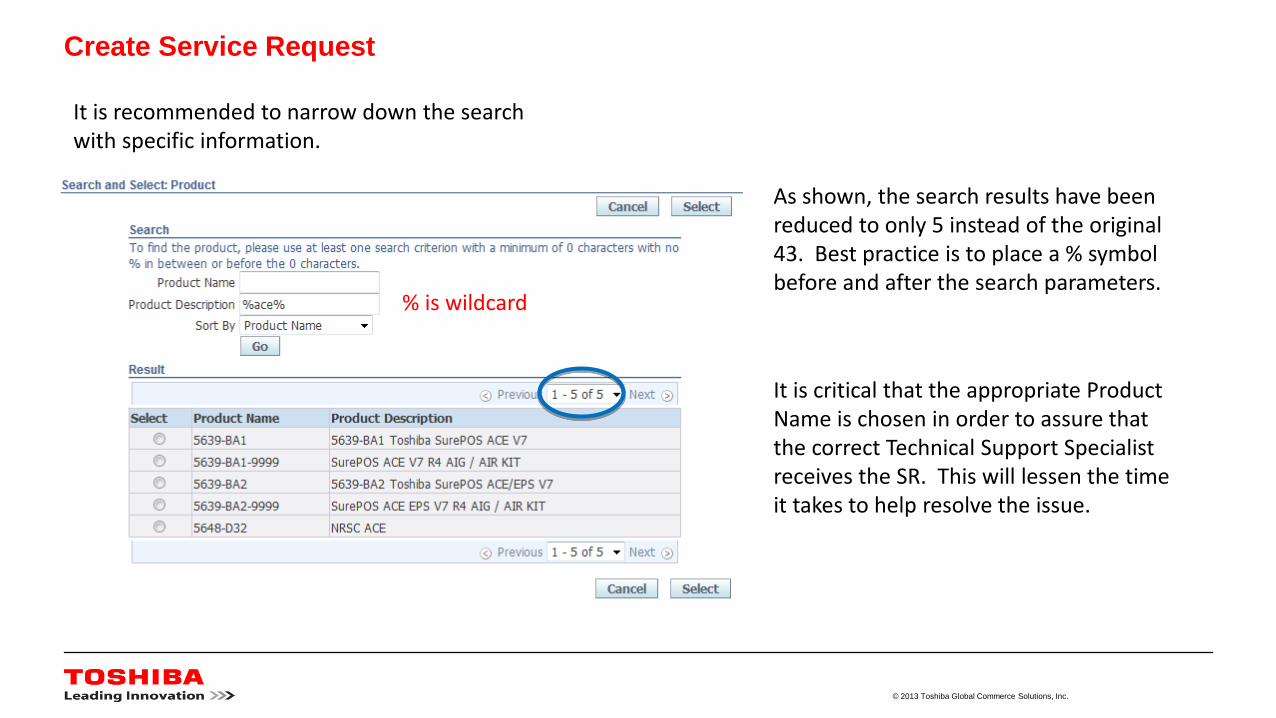
It is recommended to narrow down the search with specific information.
% is wildcard
As shown, the search results have been reduced to only 5 instead of the original 43. Best practice is to place a % symbol before and after the search parameters.
It is critical that the appropriate Product Name is chosen in order to assure that the correct Technical Support Specialist receives the SR. This will lessen the time it takes to help resolve the issue.
© 2013 Toshiba Global Commerce Solutions, Inc.
Create Service Request
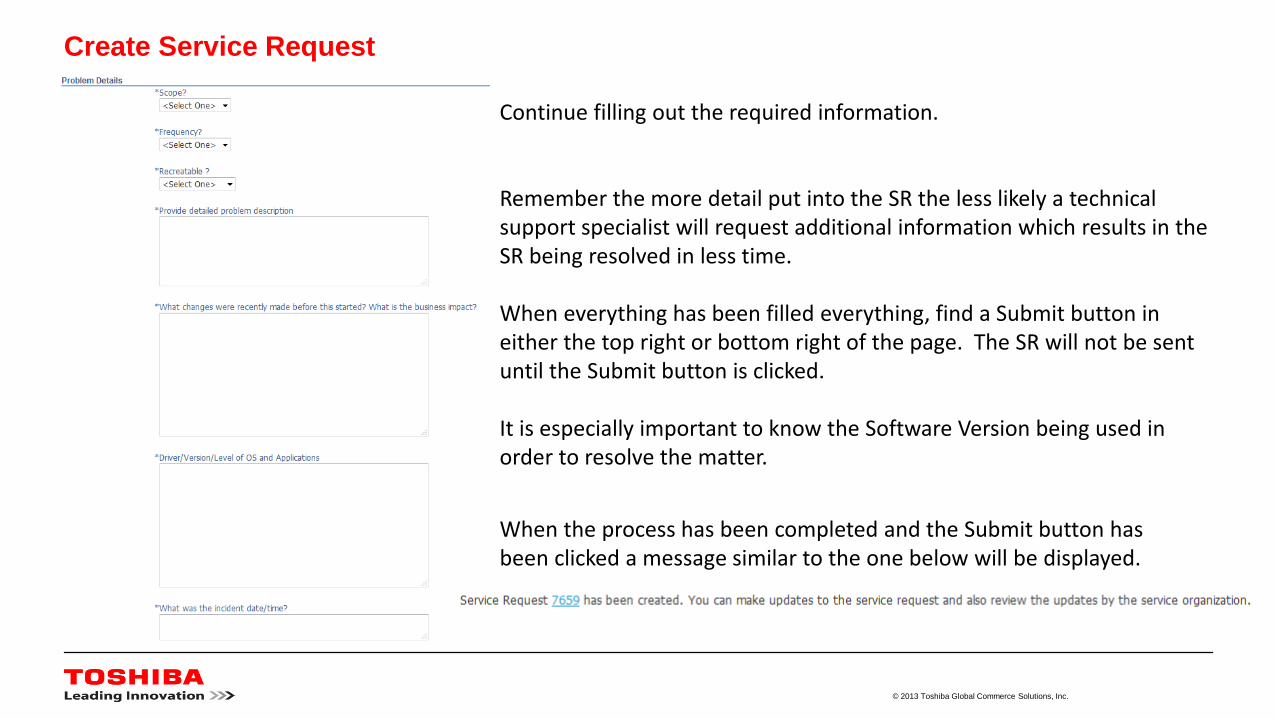
Continue filling out the required information.
Remember the more detail put into the SR the less likely a technical support specialist will request additional information which results in the SR being resolved in less time.
When everything has been filled everything, find a Submit button in either the top right or bottom right of the page. The SR will not be sent until the Submit button is clicked.
It is especially important to know the Software Version being used in order to resolve the matter.
When the process has been completed and the Submit button has been clicked a message similar to the one below will be displayed.
© 2013 Toshiba Global Commerce Solutions, Inc.
Viewing Existing SRs
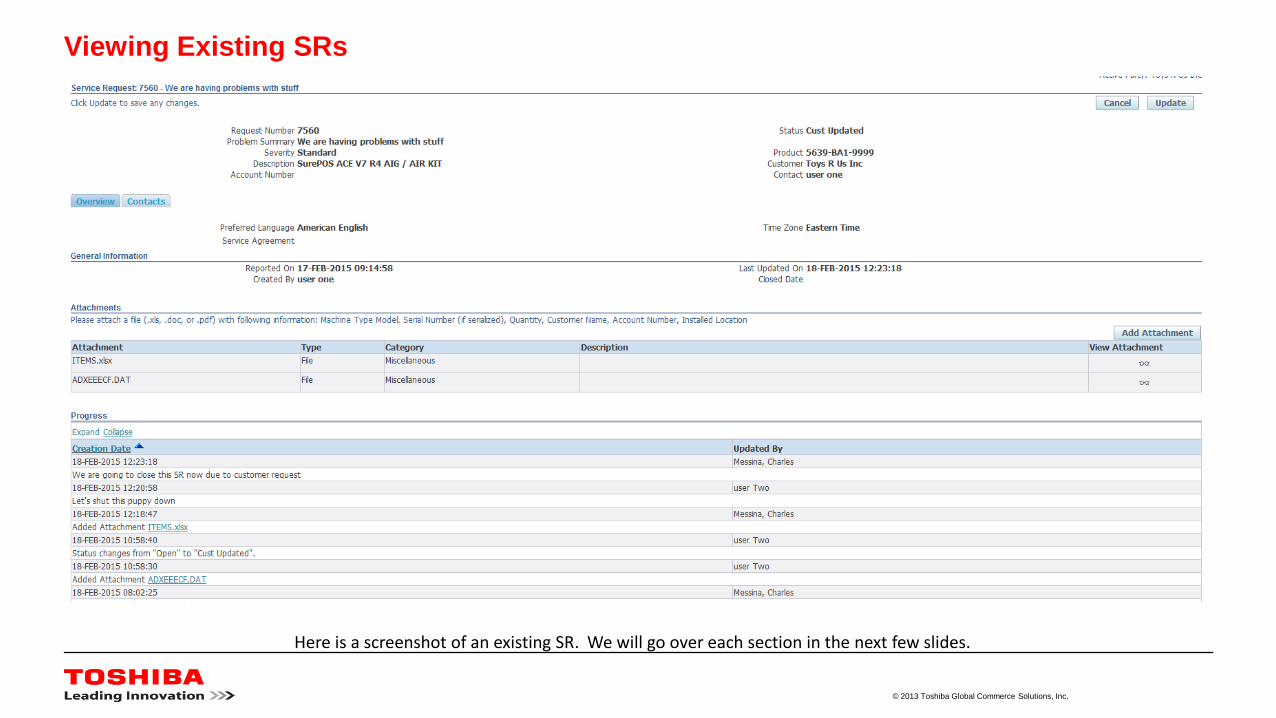
Here is a screenshot of an existing SR. We will go over each section in the next few slides.
© 2013 Toshiba Global Commerce Solutions, Inc.
Viewing Existing SRs
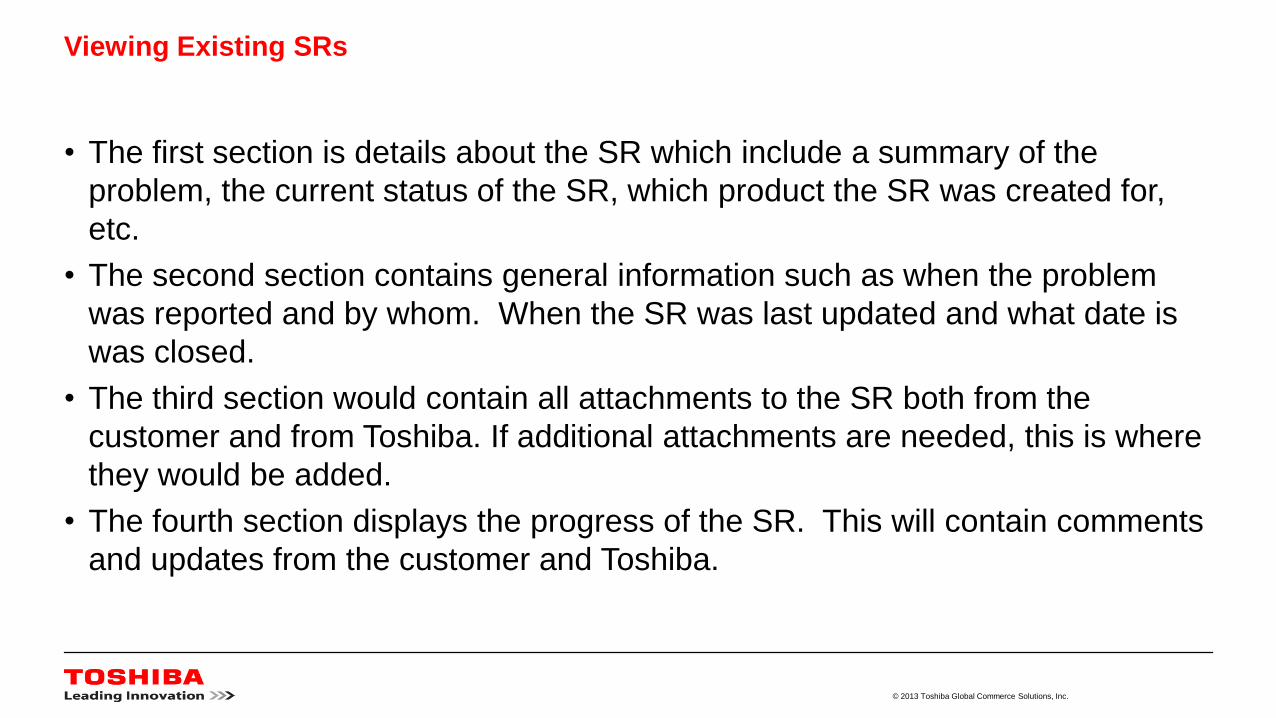
• The first section is details about the SR which include a summary of the
problem, the current status of the SR, which product the SR was created for,
etc.
• The second section contains general information such as when the problem
was reported and by whom. When the SR was last updated and what date is
was closed.
• The third section would contain all attachments to the SR both from the
customer and from Toshiba. If additional attachments are needed, this is where
they would be added.
• The fourth section displays the progress of the SR. This will contain comments
and updates from the customer and Toshiba.
© 2013 Toshiba Global Commerce Solutions, Inc.
Viewing Existing SRs
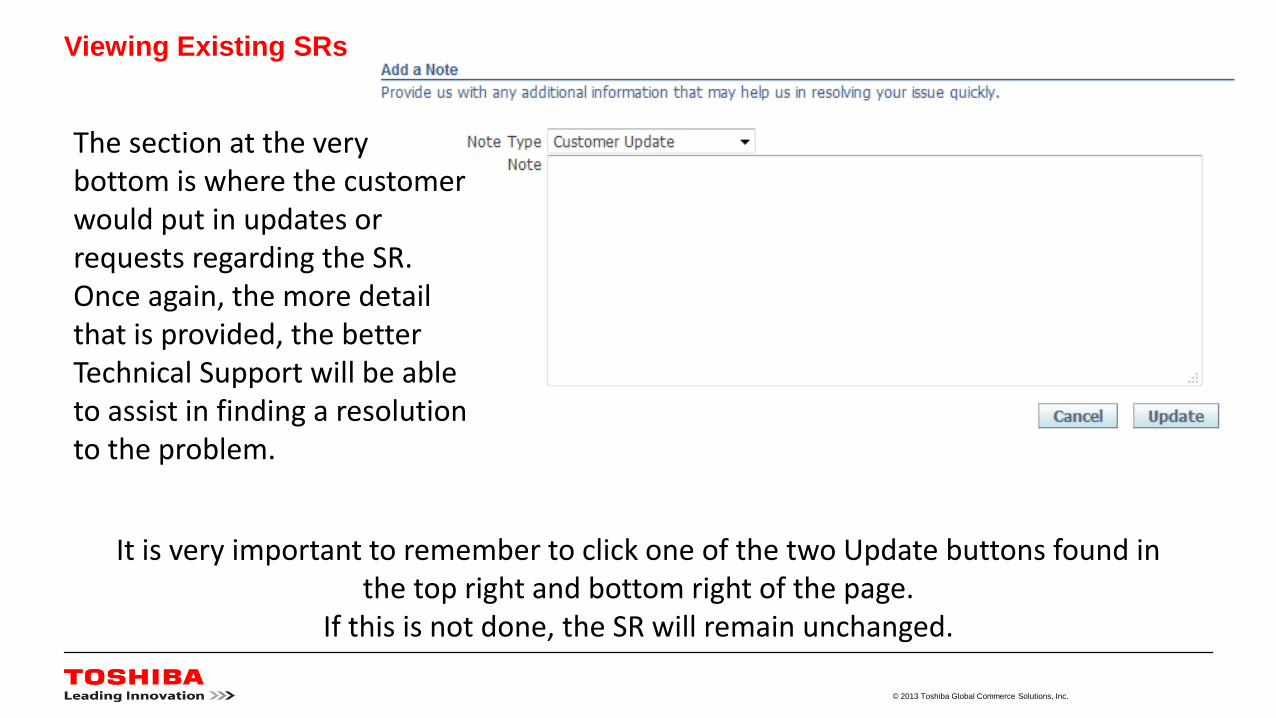
The section at the very bottom is where the customer would put in updates or requests regarding the SR. Once again, the more detail that is provided, the better Technical Support will be able to assist in finding a resolution to the problem.
It is very important to remember to click one of the two Update buttons found in the top right and bottom right of the page.
If this is not done, the SR will remain unchanged.
© 2013 Toshiba Global Commerce Solutions, Inc.
Viewing Existing SRs
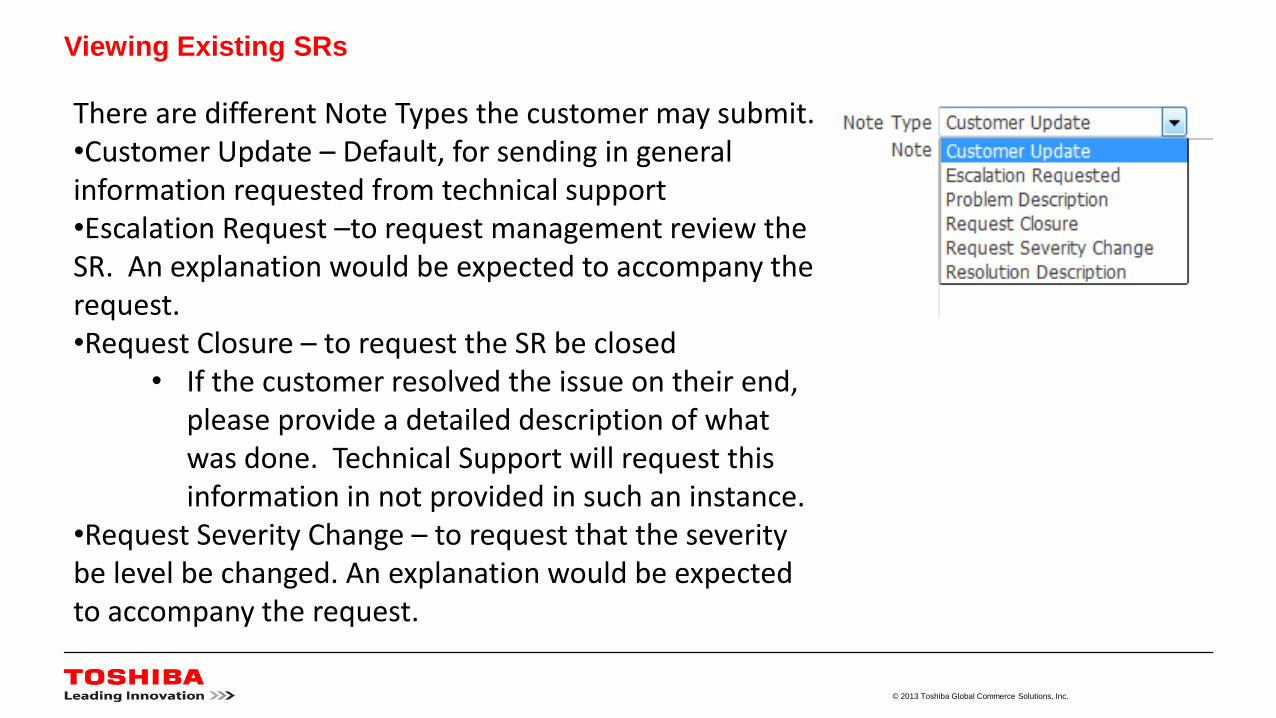
There are different Note Types the customer may submit. •Customer Update – Default, for sending in general information requested from technical support•Escalation Request –to request management review the SR. An explanation would be expected to accompany the request.•Request Closure – to request the SR be closed
• If the customer resolved the issue on their end, please provide a detailed description of what was done. Technical Support will request this information in not provided in such an instance.
•Request Severity Change – to request that the severity be level be changed. An explanation would be expected to accompany the request.
© 2013 Toshiba Global Commerce Solutions, Inc.
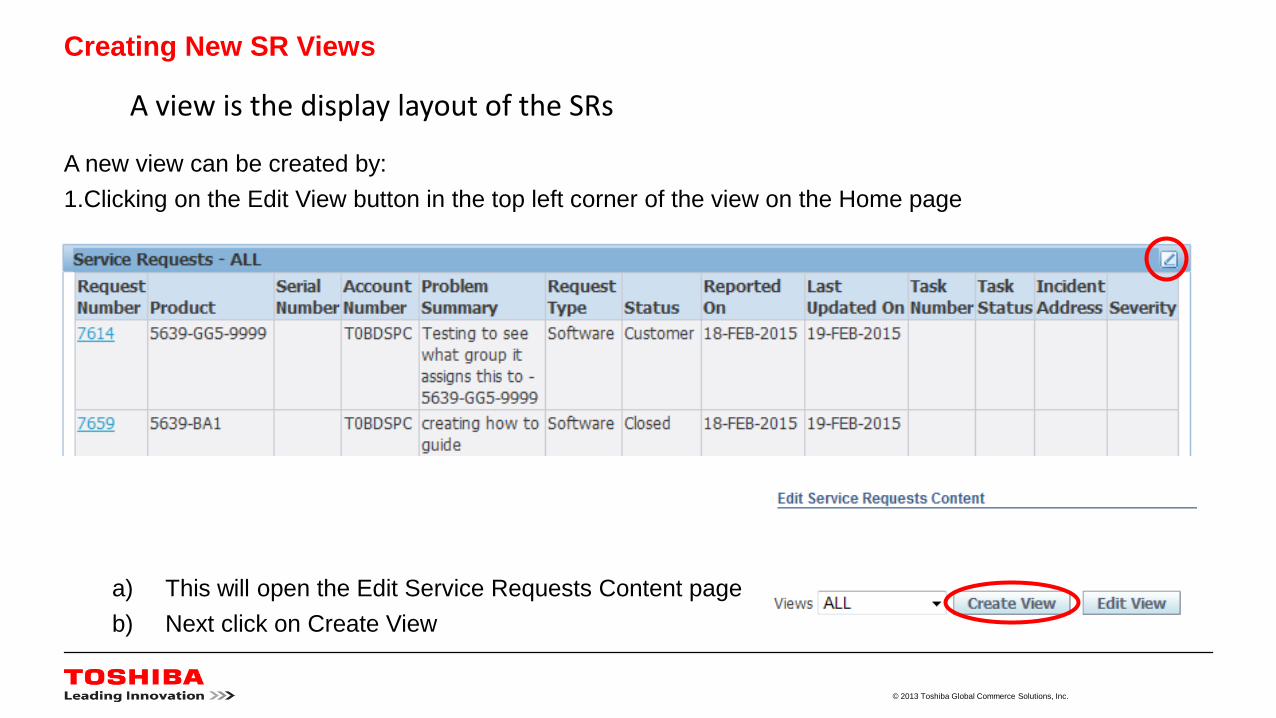
A new view can be created by:
1.Clicking on the Edit View button in the top left corner of the view on the Home page
a) This will open the Edit Service Requests Content page
b) Next click on Create View
Creating New SR Views
A view is the display layout of the SRs
© 2013 Toshiba Global Commerce Solutions, Inc.
Creating New SR Views
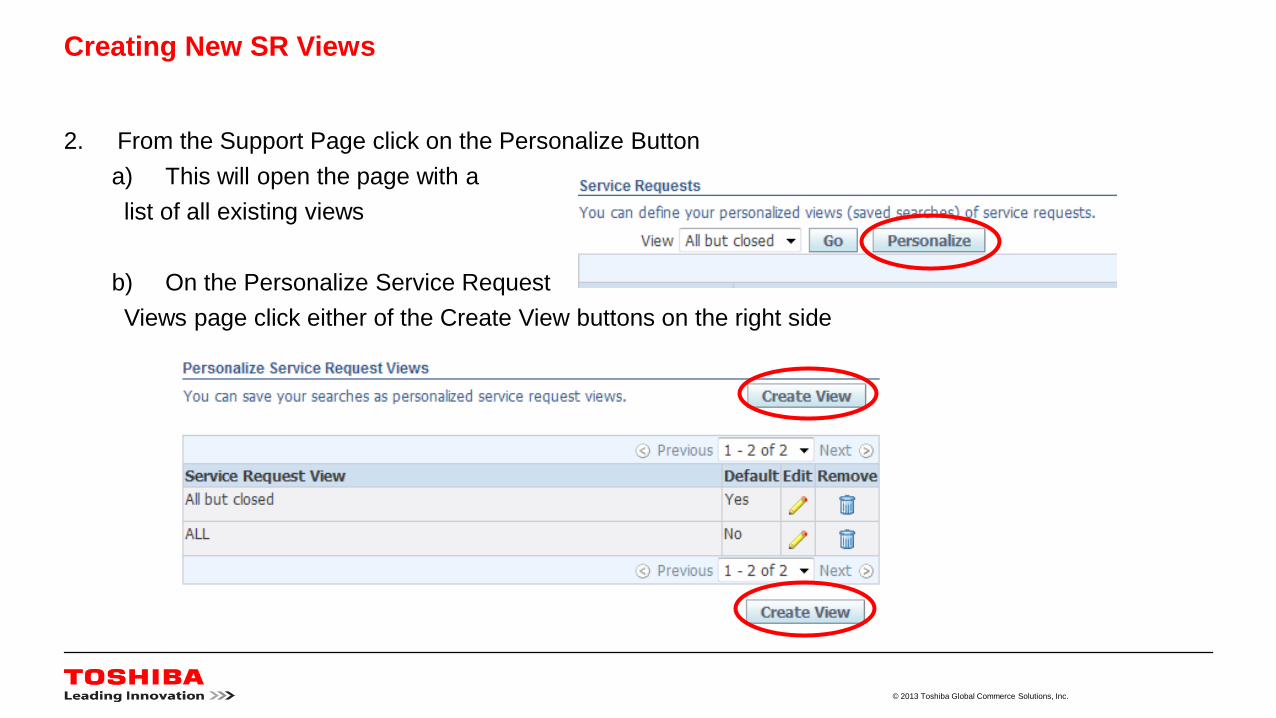
2. From the Support Page click on the Personalize Button
a) This will open the page with a
list of all existing views
b) On the Personalize Service Request
Views page click either of the Create View buttons on the right side
© 2013 Toshiba Global Commerce Solutions, Inc.
Creating New SR Views
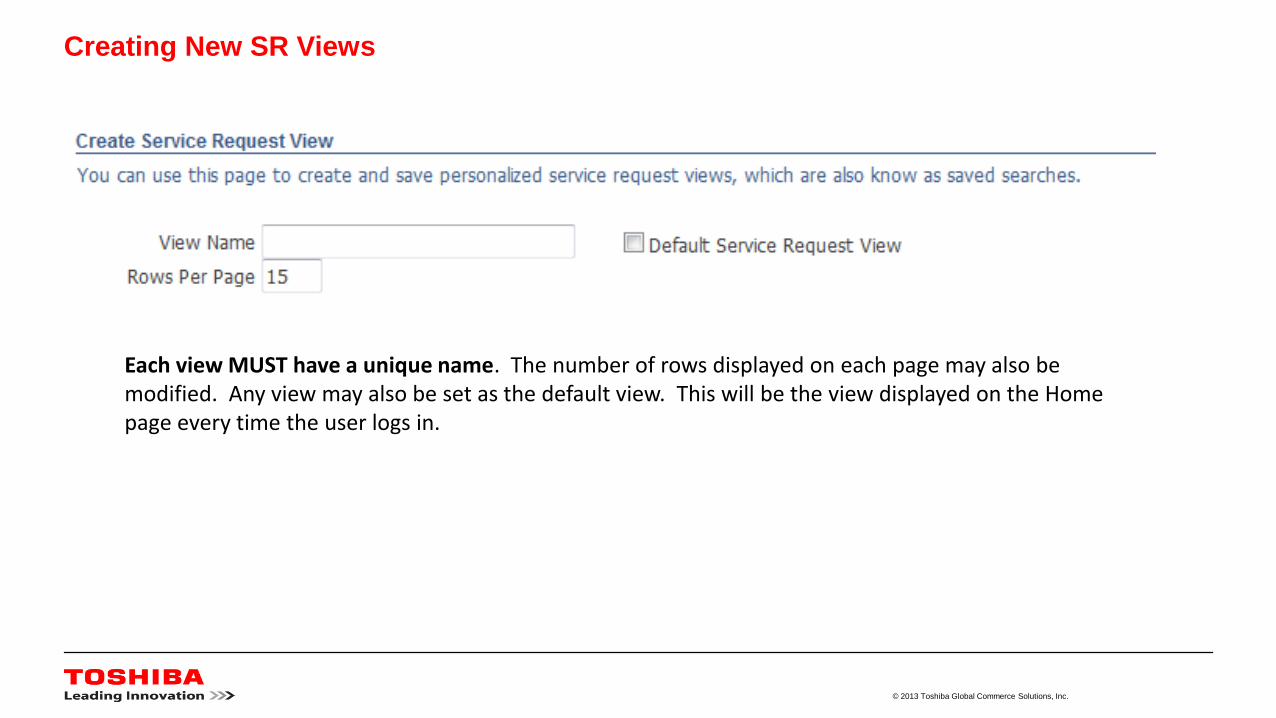
Each view MUST have a unique name. The number of rows displayed on each page may also be modified. Any view may also be set as the default view. This will be the view displayed on the Home page every time the user logs in.
© 2013 Toshiba Global Commerce Solutions, Inc.
Creating New SR Views
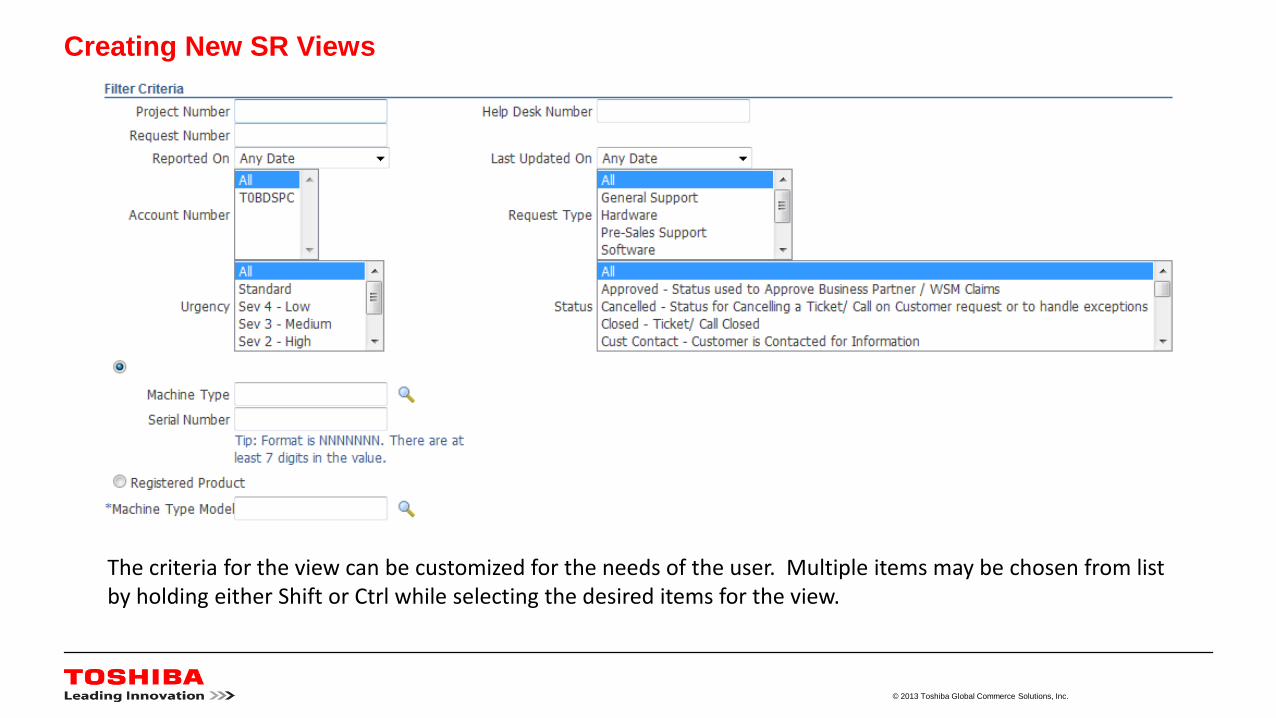
The criteria for the view can be customized for the needs of the user. Multiple items may be chosen from list by holding either Shift or Ctrl while selecting the desired items for the view.

© 2013 Toshiba Global Commerce Solutions, Inc.
Creating New SR Views
In addition to what is displayed in a given view, how the view is displayed may be modified for the
needs of the user. The user may add or remove columns from the view as well as have the view
sorted by up to three specified columns.
© 2013 Toshiba Global Commerce Solutions, Inc.
Recommended SR Views
There are 4 views recommended for creation and how to create them
1.ALL – This will display all the SRs in the system for the customer
a) In the Status Section – Only Select “All”
2.All Closed – This will display all the closed SRs
1. In the Status section – Only Select “Closed”
3.All Customer – This will display only the SRs that are waiting for action from the customer
a) In the Status Section – Only Select “Customer”
4.All Not Closed – This will display all the SRs that are in any state except closed
a) In the Status section - Select the first option below “All”
b) Scroll to the bottom of the list – While holding Shift select the very last item
c) Scroll back up and locate “Closed”
d) Hold Ctrl and select “Closed – This will remove “Closed” from the status criteria
© 2013 Toshiba Global Commerce Solutions, Inc.
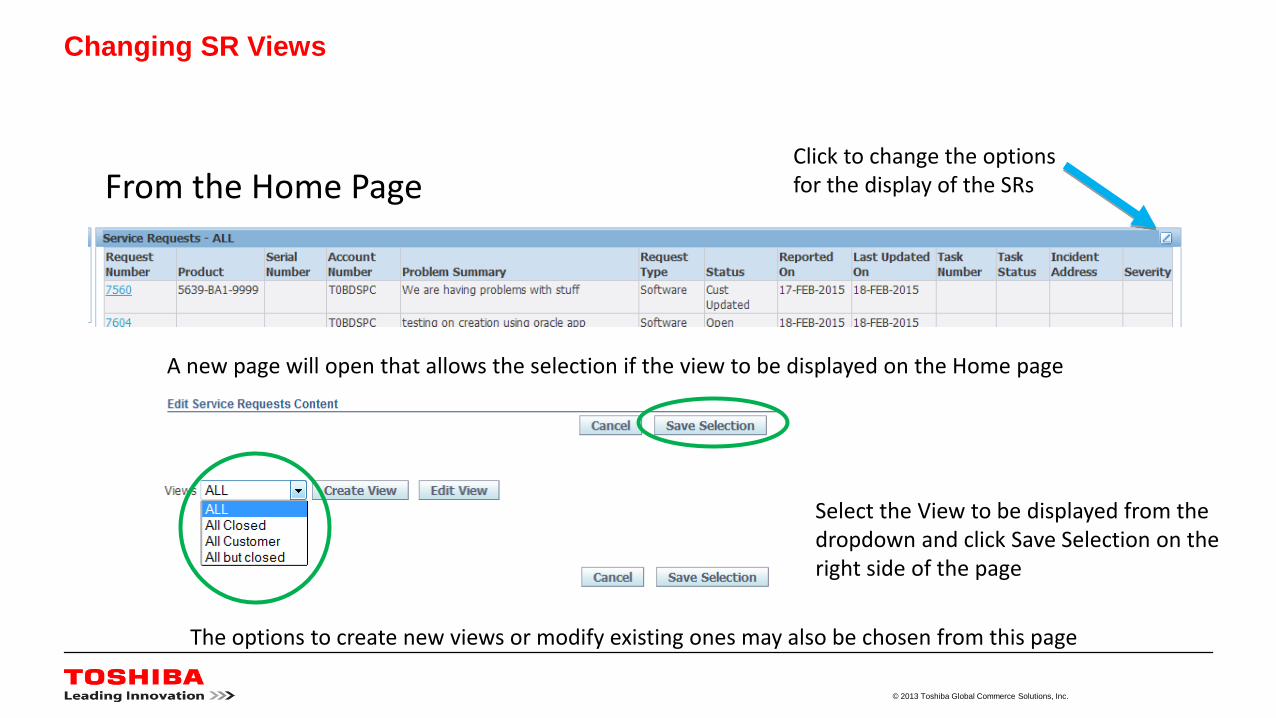
Changing SR Views
From the Home PageClick to change the options for the display of the SRs
A new page will open that allows the selection if the view to be displayed on the Home page
Select the View to be displayed from the dropdown and click Save Selection on the right side of the page
The options to create new views or modify existing ones may also be chosen from this page
© 2013 Toshiba Global Commerce Solutions, Inc.
Changing SR Views
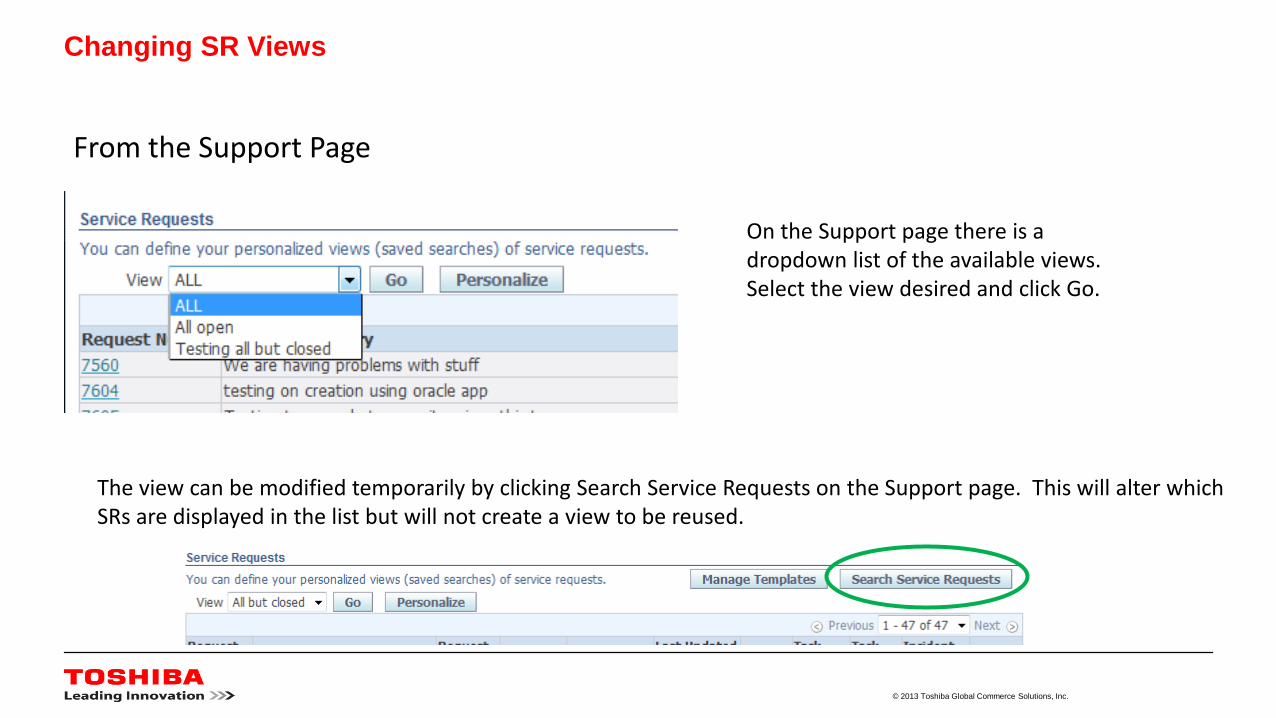
From the Support Page
On the Support page there is a dropdown list of the available views. Select the view desired and click Go.
The view can be modified temporarily by clicking Search Service Requests on the Support page. This will alter which SRs are displayed in the list but will not create a view to be reused.
© 2013 Toshiba Global Commerce Solutions, Inc.
Modifying SR Views
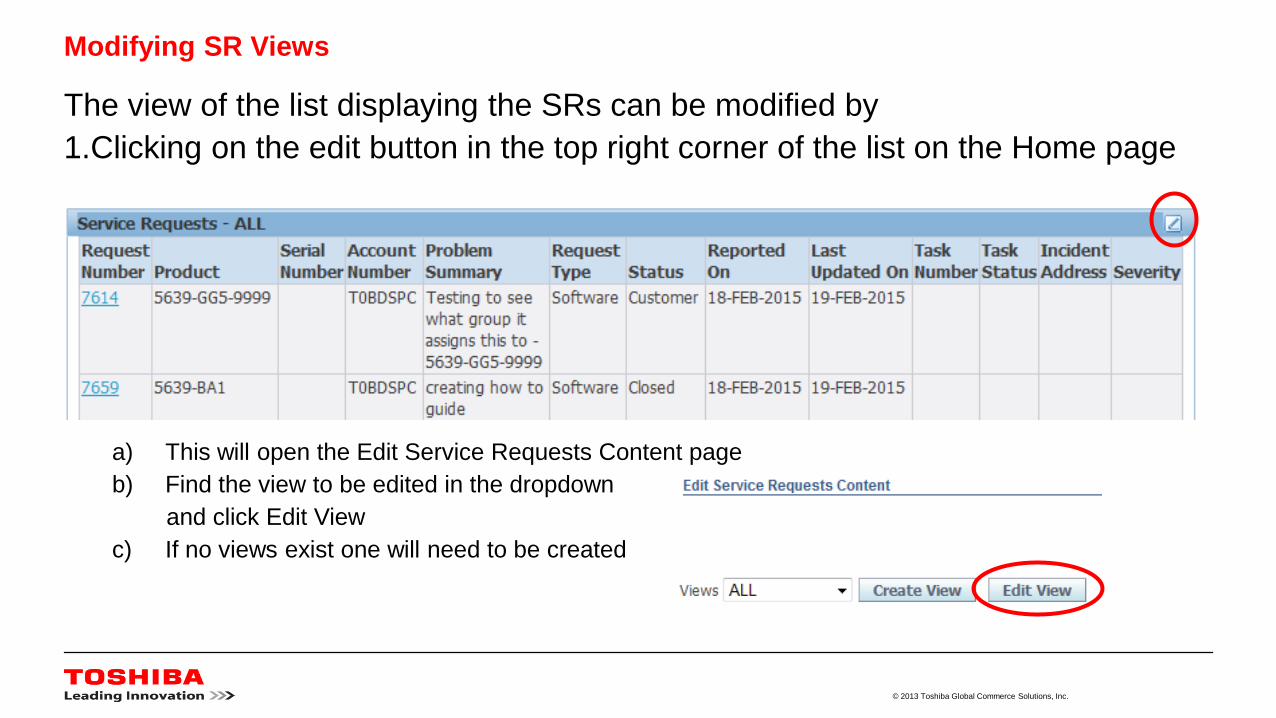
The view of the list displaying the SRs can be modified by
1.Clicking on the edit button in the top right corner of the list on the Home page
a) This will open the Edit Service Requests Content page
b) Find the view to be edited in the dropdown
and click Edit View
c) If no views exist one will need to be created
© 2013 Toshiba Global Commerce Solutions, Inc.
Modifying SR Views
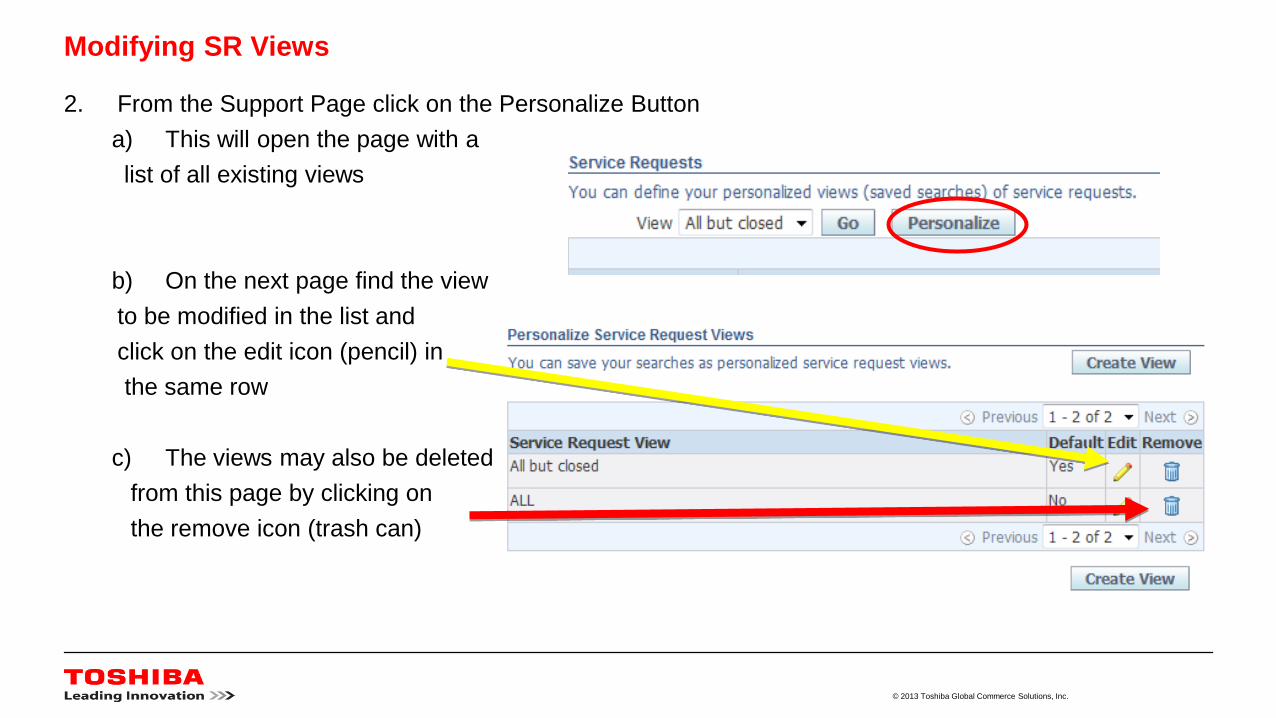
2. From the Support Page click on the Personalize Button
a) This will open the page with a
list of all existing views
b) On the next page find the view
to be modified in the list and
click on the edit icon (pencil) in
the same row
c) The views may also be deleted
from this page by clicking on
the remove icon (trash can)
© 2013 Toshiba Global Commerce Solutions, Inc.
Modifying SR Views
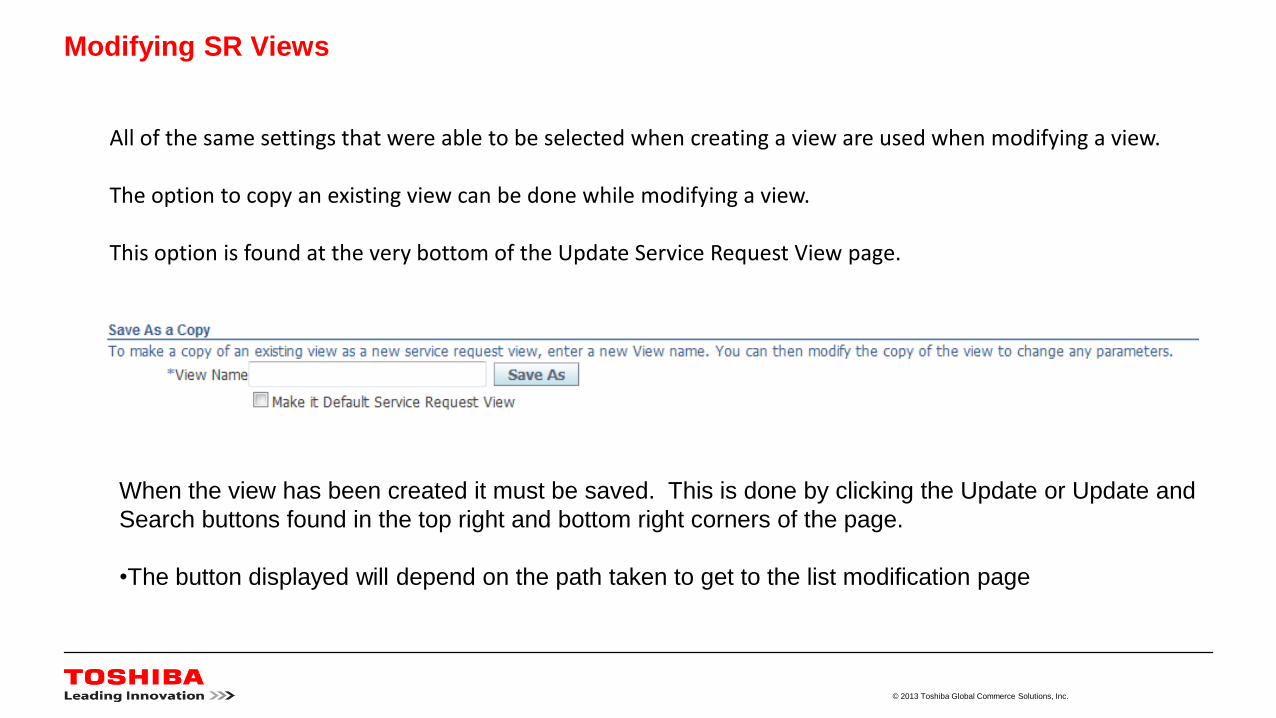
When the view has been created it must be saved. This is done by clicking the Update or Update and
Search buttons found in the top right and bottom right corners of the page.
•The button displayed will depend on the path taken to get to the list modification page
All of the same settings that were able to be selected when creating a view are used when modifying a view.
The option to copy an existing view can be done while modifying a view.
This option is found at the very bottom of the Update Service Request View page.
© 2013 Toshiba Global Commerce Solutions, Inc.
Business Partners
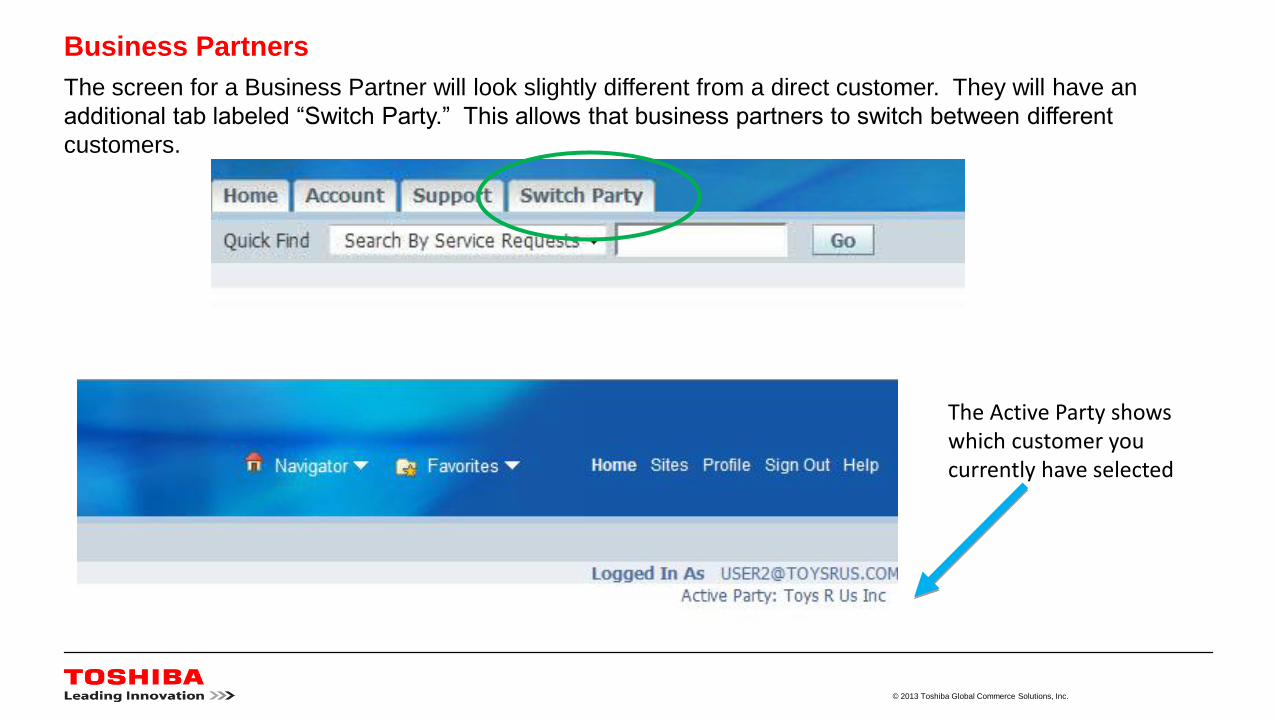
The screen for a Business Partner will look slightly different from a direct customer. They will have an
additional tab labeled “Switch Party.” This allows that business partners to switch between different
customers.
The Active Party shows which customer you currently have selected
© 2013 Toshiba Global Commerce Solutions, Inc.
Business Partners
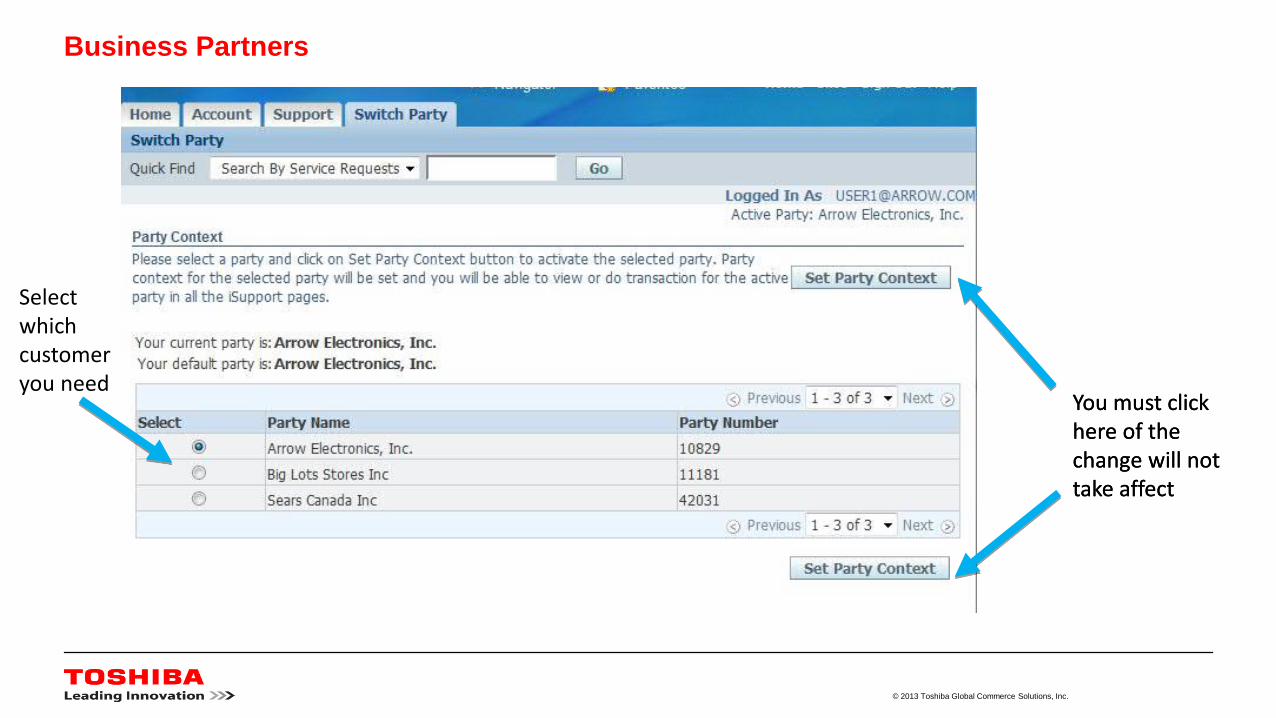
You must click here of the change will not take affect
You must click here of the change will not take affect
Select which customer you need
© 2013 Toshiba Global Commerce Solutions, Inc.
Attachments
iSupport does offer the ability to Add Attachments.
The size limitation may be a challenge for some tickets. Our recommendation is to Add Attachments with in
iSupport up to 500 MB.
For attachments greater than 500MB, we have set up an alternative for you to using Content Central
(Enterprise Content Management).
The next few slides provide guidance on getting to the tool for attachments and making us aware that you
did put attachments in Content Central (ECM).
NOTE: This requires that you Submitted your Service Request so you have a number.
© 2013 Toshiba Global Commerce Solutions, Inc.
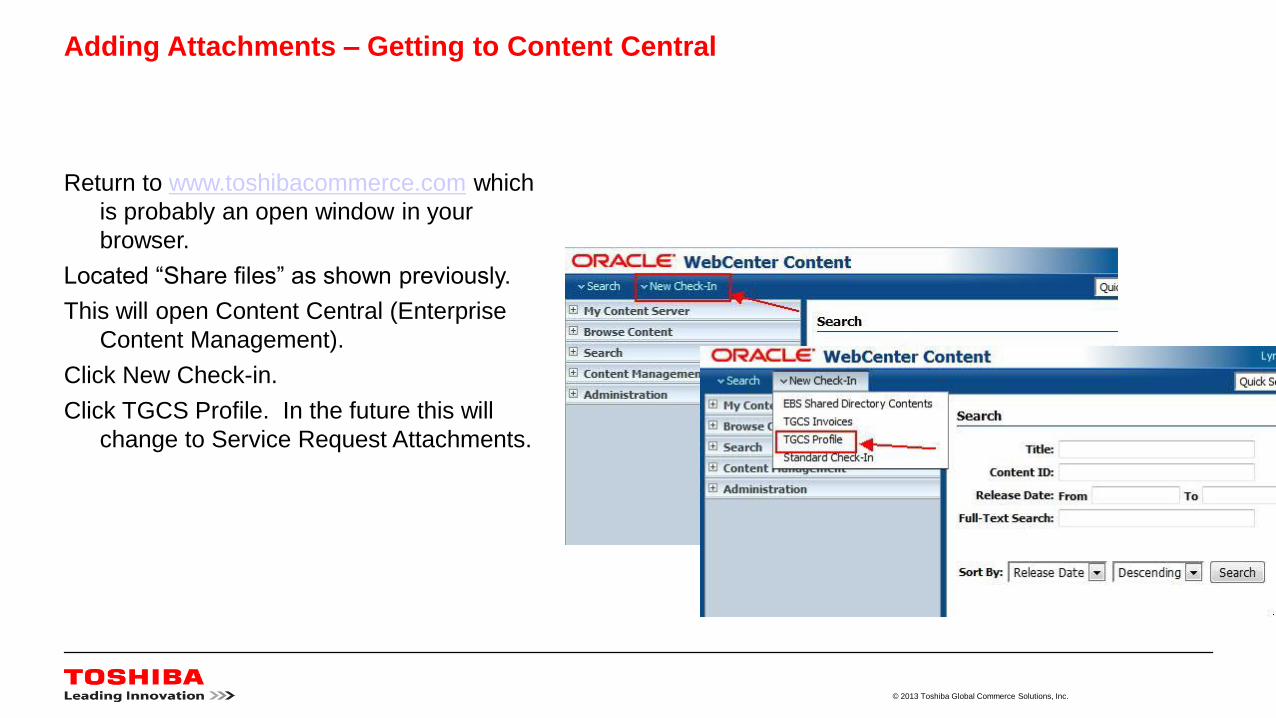
Adding Attachments – Getting to Content Central
Return to www.toshibacommerce.com which
is probably an open window in your
browser.
Located “Share files” as shown previously.
This will open Content Central (Enterprise
Content Management).
Click New Check-in.
Click TGCS Profile. In the future this will
change to Service Request Attachments.
© 2013 Toshiba Global Commerce Solutions, Inc.
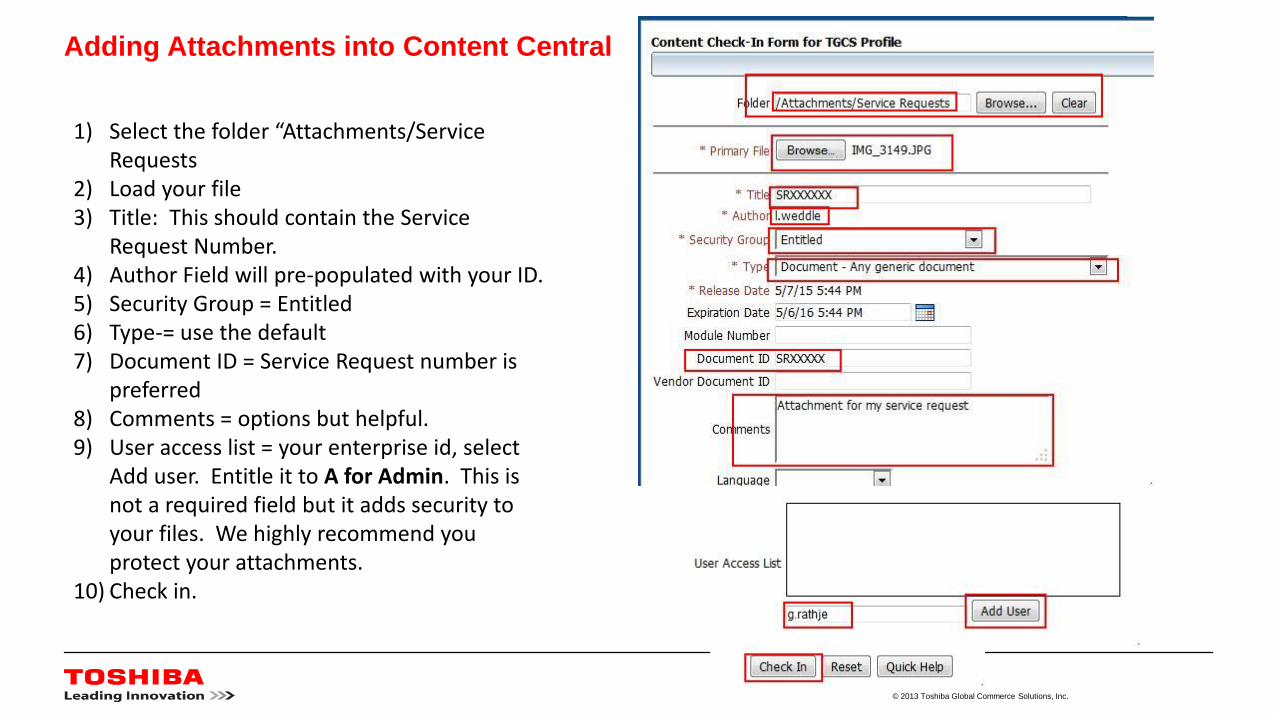
Adding Attachments into Content Central
1) Select the folder “Attachments/Service Requests
2) Load your file3) Title: This should contain the Service
Request Number.4) Author Field will pre-populated with your ID.5) Security Group = Entitled6) Type-= use the default7) Document ID = Service Request number is
preferred8) Comments = options but helpful.9) User access list = your enterprise id, select
Add user. Entitle it to A for Admin. This is not a required field but it adds security to your files. We highly recommend you protect your attachments.
10) Check in.
© 2013 Toshiba Global Commerce Solutions, Inc.
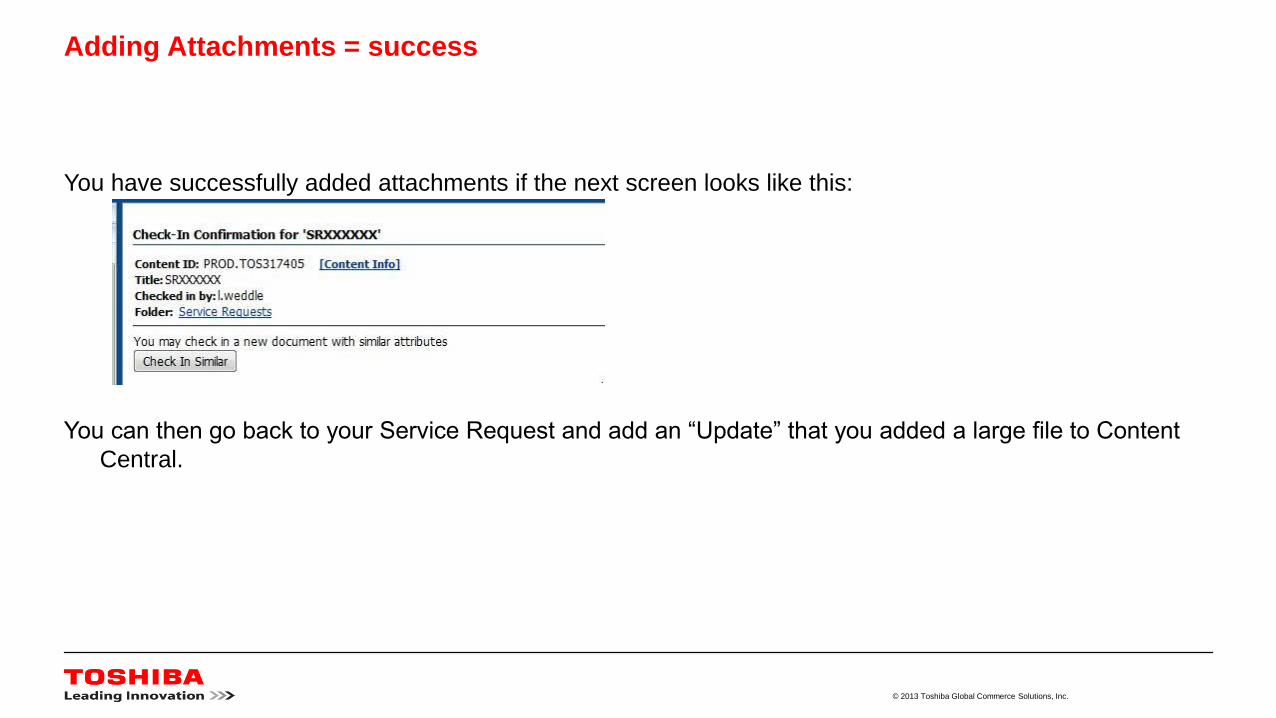
Adding Attachments = success
You have successfully added attachments if the next screen looks like this:
You can then go back to your Service Request and add an “Update” that you added a large file to Content
Central.