Embed Size (px)
Citation preview
B64-5057-10/01 (EW)© 2012 JVC KENWOOD Corporation
KDC-201KDC-101CD-RECEIVERINSTRUCTION MANUALCD-RECEIVERBEDIENUNGSANLEITUNGCD-PECИBEPИHCTPУKЦИЯ ПO ЭKCПЛУATAЦИИCD-РЕСІВЕРІНСТРУКЦІЯ З ЕКСПЛУАТАЦІЇ
Изделие изготовлено в Mалайзии
B64-5057-10_01_KDC201_E_En.indd 1 12/12/19 9:01
i
Declaration of Conformity with regard to the EMC Directive 2004/108/ECManufacturer:JVC KENWOOD Corporation3-12,Moriya-cho,Kanagawa-ku,Yokohama-shi,Kanagawa,221-0022,Japan
EU Representative’s:KenwoodElectronicsEuropeBVAmsterdamseweg37,1422ACUITHOORN,TheNetherlands
Konformitätserklärung in Bezug auf die EMC-Vorschrift 2004/108/ECHersteller:JVC KENWOOD Corporation3-12,Moriya-cho,Kanagawa-ku,Yokohama-shi,Kanagawa,221-0022,Japan
EU-Vertreter:KenwoodElectronicsEuropeBVAmsterdamseweg37,1422ACUITHOORN,Niederlande
Information on Disposal of Old Electrical and Electronic Equipment and Batteries (applicable for EU countries that have adopted separate waste collection systems)Productsandbatterieswiththesymbol(crossed-outwheeledbin)cannotbedisposedashouseholdwaste.Oldelectricalandelectronicequipmentandbatteriesshouldberecycledatafacilitycapableofhandlingtheseitemsandtheirwastebyproducts.Contactyourlocalauthorityfordetailsinlocatingarecyclefacilitynearesttoyou.Properrecyclingandwastedisposalwillhelpconserveresourceswhilstpreventingdetrimentaleffectsonourhealthandtheenvironment.Notice: Thesign“Pb”belowthesymbolforbatteriesindicatesthatthisbattery
containslead.
Entsorgung von gebrauchten elektrischen und elektronischen Geräten und Batterien (anzuwenden in den Ländern der Europäischen Union und anderen europäischen Ländern mit einem separaten Sammelsystem für solche Geräte)DasSymbol(durchgestricheneMülltonne)aufdemProduktoderseinerVerpackungweistdaraufhin,dassdiesesProduktnichtalsnormalerHaushaltsabfallbehandeltwerdendarf,sondernaneinerAnnahmestellefürdasRecyclingvonelektrischenundelektronischenGerätenundbatterienabgegebenwerdenmuss.DurchIhrenBeitragzurkorrektenEntsorgungdiesesProduktesschützenSiedieUmweltunddieGesundheitIhrerMitmenschen.UnsachgemässeoderfalscheEntsorgunggefährdenUmweltundGesundheit.WeitereInformationenüberdasRecyclingdiesesProdukteserhaltenSievonIhrerGemeindeoderdenkommunalenEntsorgungsbetrieben.Achtung:DasZeichen„Pb“unterdemSymbolfurBatterienzeigtan,dassdiese
BatterieBleienthalt.
EN_KDC-201_E.indd 1 12/11/09 11:55
ii
The marking of products using lasersThelabelisattachedtothechassis/caseandsaysthatthecomponentuseslaserbeamsthathavebeenclassifiedasClass1.Itmeansthattheunitisutilizinglaserbeamsthatareofaweakerclass.Thereisnodangerofhazardousradiationoutsidetheunit.
Kennzeichnung von Geräten mit Laser-AbtasternDasEtikettistamChassis/Gehäuseangebrachtundbesagt,dasssichdieKomponenteLaserstrahlenbedient,diealsLaserstrahlenderKlasse1klassifiziertwurden.Diesweistdaraufhin,dasssichdasGerätLaserstrahlenbedient,dieeinerschwächerenKlasseangehören.Dasbedeutet,dassdurchdensehrschwachenLaserstrahlkeineGefahrdurchgefährlicheStrahlungenaußerhalbdesGerätsbesteht.
Маркировка изделий, использующих лазеры Ккорпусуустройстваприкрепленатабличка,указывающая,чтоустройствоиспользуетлазерныелучикласса1.Этоозначает,чтовустройствеиспользуютсялазерныелучислабойинтенсивности.Онинепредставляютопасностиинераспространяютопаснуюрадиациювнеустройства.
Маркування виробів, обладнаних лазеромНакаркас/корпуспоміщаєтьсянаклейка,вякійзазначається,щоданийвирібвипромінюєєлазерніпроменіКласу1.Цеозначає,щоданийапаратвикористовуєлазерніпроменіслабшогокласу.Замежамиданогоапаратунеіснуєнебезпекилазерноговипромінювання.
ПриПравильномсоблюдениивсехусловийэксплуатацииитехническкихтребований,указанныхвданнойинструкций,срокслужбыкупленногоBaмизделиясоставляет7лет.Гарантийныйсрокэксплуатацииизделиясоответевуетсpоку,указанномувгaрантийномталоне.ВпериодсрокаслужбыэксплуатацияихранениеизделиянеможетпредставлятьoпасностьдляВашейжизни,здоровья,причинятьвредВашемуимуществуилиокружающейсрeде.
Декларація про Відповідність Вимогам Технічного Регламенту Обмеження Використання деяких Небезпечних Речовин в електричному та електронному обладнанні (затвердженого Постановою №1057 Кабінету Міністрів України)
ВирібвідповідаєвимогамТехнічногоРегламентуОбмеженняВикористаннядеякихНебезпечнихРечовинвелектричномутаелектронномуобладнанні(ТРОВНР).
Вмістнебезпечнихречовинувипадках,необумовленихвДодатку№2ТРОВНР:1. свинець(Pb)–неперевищує0.1%вагиречовиниабовконцентраціїдо
1000 частин на мільйон;2. кадмій(Cd)–неперевищує0.01%вагиречовиниабовконцентраціїдо
100 частин на мільйон;3. ртуть(Hg)–неперевищує0.1%вагиречовиниабовконцентраціїдо
1000 частин на мільйон;4. шестивалентнийхром(Cr6+)–неперевищує0.1%вагиречовиниабов
концентраціїдо1000частиннамільйон;5. полібромбіфеноли(PBB)–неперевищує0.1%вагиречовиниабов
концентраціїдо1000частиннамільйон;6. полібромдефеніловіефіри(PBDE)–неперевищує0.1%вагиречовиниабов
концентраціїдо1000частиннамільйон.
For TurkeyBuürün28300sayılıResmiGazete’deyayımlananAtikElektrikliveElektronikEşyalarinKontrolüYönetmeliğeuygunolaraküretilmiştir.
Eski Elektrik ve Elektronik Ekipmanların İmha Edilmesi Hakkında Bilgi (ayrı atık toplama sistemlerini kullanan ülkeleri için uygulanabilir)
Sembollü(üzerindeçarpıişaretiolançöpkutusu)ürünlerevatıklarıolarakatılamaz.Eskielektrikveelektronikekipmanlar,buürünleriveürünatıklarınıgeridönüştürebilecekbirtesistedeğerlendirilmelidir.Yaşadığınızbölgeyeenyakıngeridönüşümtesisininyeriniöğrenmekiçinyerelmakamlaramüracaatedin.Uygungeridönüşümveatıkimhayöntemisağlığımızveçevremizüzerindekizararlıetkileriönlerkenkaynaklarınkorunmasınadayardımcıolacaktır.
ENGLISH |
EN_KDC-201_E.indd 2 12/11/09 11:55
2
CONTENTS BEFORE USE
Warning Do not operate any function that takes your attention away from safe driving.
Caution Volume setting:• Adjustthevolumesothatyoucanhearsoundsoutsidethecartopreventaccident.• Lowerthevolumebeforeplayingdigitalsourcestoavoiddamagingthespeakersbythesuddenincreaseoftheoutputlevel.
General:• AvoidusingtheUSBdeviceoriPod/iPhoneifitmighthinderdrivingsafety.• Makesureallimportantdatahasbeenbackedup.Weshallbearnoresponsibilityforanylossofrecordeddata.• Neverputorleaveanymetallicobjects(suchascoinsormetaltools)insidetheunit,topreventashortcircuit.• Ifadiscerroroccursduetocondensationonthelaserlens,ejectthediscandwaitforthemoisturetoevaporate.• USBratingisindicatedonthemainunitunderthedetachablefaceplate.
BEFORE USE 2
BASICS 3
GETTING STARTED 4
RADIO 5
CD / USB / iPod 6
AUX 7
AUDIO SETTINGS 8
DISPLAY SETTINGS 9
MORE INFORMATION 9
TROUBLESHOOTING 10
SPECIFICATIONS 11
INSTALLATION / CONNECTION 12
How to read this manual• Operationsexplainedmainlyusingbuttonsonthefaceplate.
• [XX]indicatestheselecteditems.• (➜ XX)indicatesreferencesareavailableonthestatedpagenumber.
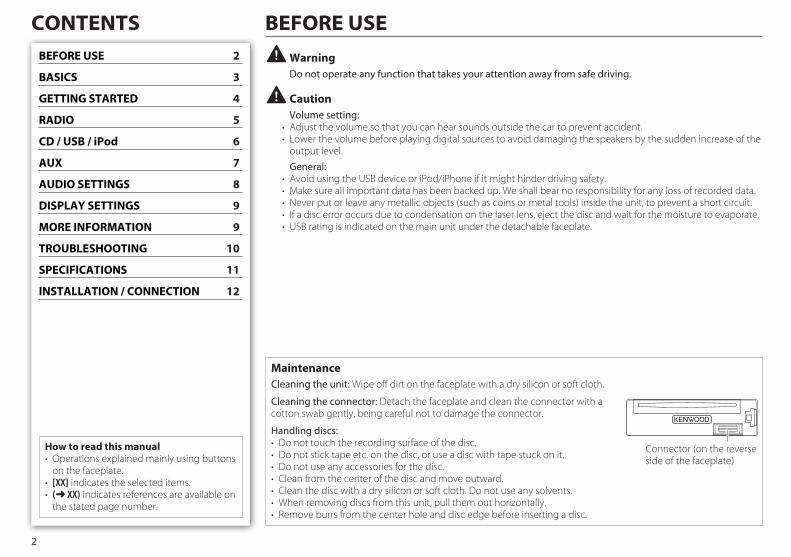
MaintenanceCleaning the unit:Wipeoffdirtonthefaceplatewithadrysiliconorsoftcloth.
Cleaning the connector:Detachthefaceplateandcleantheconnectorwithacottonswabgently,beingcarefulnottodamagetheconnector.
Handling discs:• Donottouchtherecordingsurfaceofthedisc.• Donotsticktapeetc.onthedisc,oruseadiscwithtapestuckonit.• Donotuseanyaccessoriesforthedisc.• Cleanfromthecenterofthediscandmoveoutward.• Cleanthediscwithadrysiliconorsoftcloth.Donotuseanysolvents.• Whenremovingdiscsfromthisunit,pullthemouthorizontally.• Removeburrsfromthecenterholeanddiscedgebeforeinsertingadisc.
Connector(onthereversesideofthefaceplate)
B64-5057-10_01_KDC201_E_En.indd 2 12/12/19 9:01
3
KDC-201
KDC-101
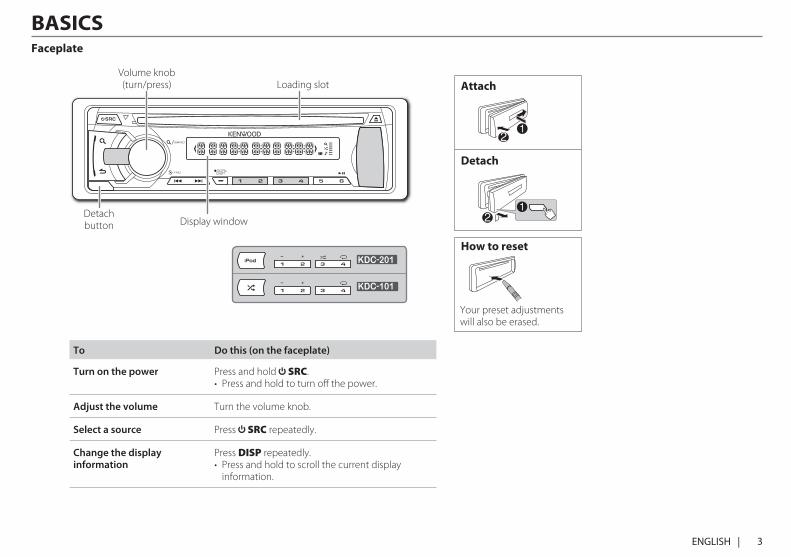
BASICS
To Do this (on the faceplate)
Turn on the power Pressandhold SRC.• Pressandholdtoturnoffthepower.
Adjust the volume Turnthevolumeknob.
Select a source Press SRCrepeatedly.
Change the display information
PressDISPrepeatedly.• Pressandholdtoscrollthecurrentdisplayinformation.
Faceplate
Volumeknob(turn/press) Loadingslot
DisplaywindowDetachbutton
ENGLISH |
How to reset
Attach
Detach
Yourpresetadjustmentswillalsobeerased.
B64-5057-10_01_KDC201_E_En.indd 3 12/12/19 9:01
4
GETTING STARTED
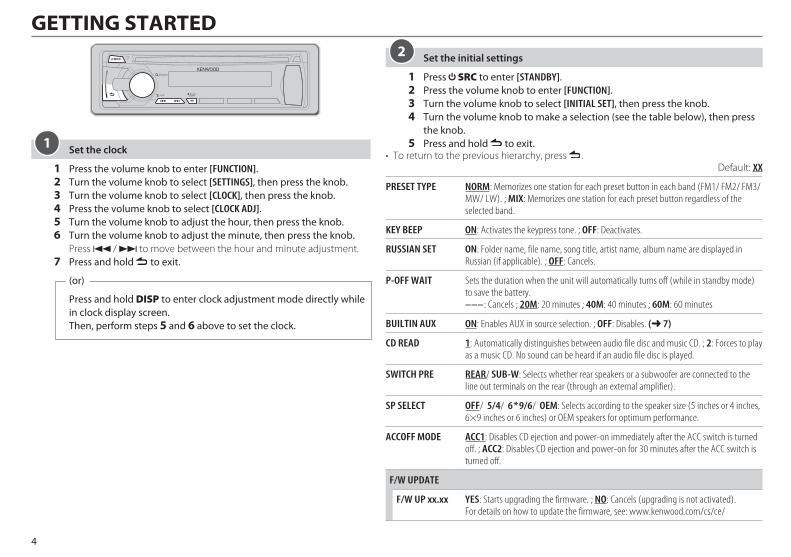
Set the clock
1 Press the volume knob to enter [FUNCTION].2 Turn the volume knob to select [SETTINGS], then press the knob.3 Turn the volume knob to select [CLOCK], then press the knob.4 Press the volume knob to select [CLOCK ADJ].5 Turn the volume knob to adjust the hour, then press the knob.6 Turn the volume knob to adjust the minute, then press the knob. Press4 / ¢tomovebetweenthehourandminuteadjustment.7 Press and hold to exit.
(or)
Press and hold DISP to enter clock adjustment mode directly while in clock display screen.
Then, perform steps 5 and 6 above to set the clock.
1
Set the initial settings
1 Press SRC to enter [STANDBY].2 Press the volume knob to enter [FUNCTION].3 Turn the volume knob to select [INITIAL SET], then press the knob.4 Turn the volume knob to make a selection (see the table below), then press
the knob.5 Press and hold to exit.
• Toreturntotheprevioushierarchy,press .Default:XX
PRESET TYPE NORM: Memorizes one station for each preset button in each band (FM1/ FM2/ FM3/ MW/ LW). ; MIX: Memorizes one station for each preset button regardless of the selected band.
KEY BEEP ON: Activates the keypress tone. ; OFF: Deactivates.
RUSSIAN SET ON: Folder name, file name, song title, artist name, album name are displayed in Russian (if applicable). ; OFF: Cancels.
P-OFF WAIT Sets the duration when the unit will automatically turns off (while in standby mode) to save the battery.––– : Cancels ; 20M: 20 minutes ; 40M: 40 minutes ; 60M: 60 minutes
BUILTIN AUX ON: Enables AUX in source selection. ; OFF: Disables. (➜ 7)
CD READ 1: Automatically distinguishes between audio file disc and music CD. ; 2: Forces to play as a music CD. No sound can be heard if an audio file disc is played.
SWITCH PRE REAR/ SUB-W: Selects whether rear speakers or a subwoofer are connected to the line out terminals on the rear (through an external amplifier).
SP SELECT OFF/ 5/4/ 6 * 9/6/ OEM: Selects according to the speaker size (5 inches or 4 inches, 6×9 inches or 6 inches) or OEM speakers for optimum performance.
ACCOFF MODE ACC1: Disables CD ejection and power-on immediately after the ACC switch is turned off. ; ACC2: Disables CD ejection and power-on for 30 minutes after the ACC switch is turned off.
F/W UPDATE
F/W UP xx.xx YES: Starts upgrading the firmware. ; NO: Cancels (upgrading is not activated).For details on how to update the firmware, see: www.kenwood.com/cs/ce/
2
B64-5057-10_01_KDC201_E_En.indd 4 12/12/19 9:01
5ENGLISH |
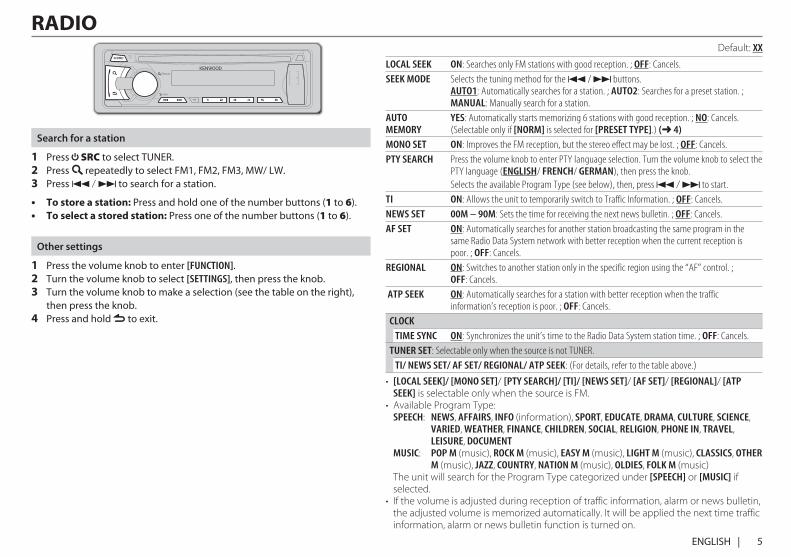
RADIO
Search for a station
1 Press SRC to select TUNER.2 Press repeatedly to select FM1, FM2, FM3, MW/ LW.3 Press 4 / ¢ to search for a station.
• To store a station: Press and hold one of the number buttons (1 to 6).• To select a stored station: Press one of the number buttons (1 to 6).
Other settings
1 Press the volume knob to enter [FUNCTION].2 Turn the volume knob to select [SETTINGS], then press the knob.3 Turn the volume knob to make a selection (see the table on the right),
then press the knob.4 Press and hold to exit.
Default:XX
LOCAL SEEK ON: Searches only FM stations with good reception. ; OFF: Cancels.SEEK MODE Selects the tuning method for the 4 / ¢ buttons.
AUTO1: Automatically searches for a station. ; AUTO2: Searches for a preset station. ; MANUAL: Manually search for a station.
AUTO MEMORY
YES: Automatically starts memorizing 6 stations with good reception. ; NO: Cancels. (Selectable only if [NORM] is selected for [PRESET TYPE].) (➜ 4)
MONO SET ON: Improves the FM reception, but the stereo effect may be lost. ; OFF: Cancels.PTY SEARCH Press the volume knob to enter PTY language selection. Turn the volume knob to select the
PTY language (ENGLISH/ FRENCH/ GERMAN), then press the knob.Selects the available Program Type (see below), then, press 4 / ¢ to start.
TI ON: Allows the unit to temporarily switch to Traffic Information. ; OFF: Cancels.NEWS SET 00M – 90M: Sets the time for receiving the next news bulletin. ; OFF: Cancels.AF SET ON: Automatically searches for another station broadcasting the same program in the
same Radio Data System network with better reception when the current reception is poor. ; OFF: Cancels.
REGIONAL ON: Switches to another station only in the specific region using the “AF” control. ; OFF: Cancels.
ATP SEEK ON: Automatically searches for a station with better reception when the traffic information’s reception is poor. ; OFF: Cancels.
CLOCKTIME SYNC ON: Synchronizes the unit’s time to the Radio Data System station time. ; OFF: Cancels.
TUNER SET: Selectable only when the source is not TUNER.TI/ NEWS SET/ AF SET/ REGIONAL/ ATP SEEK: (For details, refer to the table above.)
• [LOCAL SEEK]/ [MONO SET]/ [PTY SEARCH]/ [TI]/ [NEWS SET]/ [AF SET]/ [REGIONAL]/ [ATP SEEK]isselectableonlywhenthesourceisFM.
• AvailableProgramType: SPEECH: NEWS, AFFAIRS, INFO (information), SPORT, EDUCATE, DRAMA, CULTURE, SCIENCE,
VARIED, WEATHER, FINANCE, CHILDREN, SOCIAL, RELIGION, PHONE IN, TRAVEL, LEISURE, DOCUMENT
MUSIC: POP M (music), ROCK M (music), EASY M (music), LIGHT M (music), CLASSICS, OTHER M (music), JAZZ, COUNTRY, NATION M (music), OLDIES, FOLK M (music)
TheunitwillsearchfortheProgramTypecategorizedunder[SPEECH] or [MUSIC]ifselected.
• Ifthevolumeisadjustedduringreceptionoftrafficinformation,alarmornewsbulletin,theadjustedvolumeismemorizedautomatically.Itwillbeappliedthenexttimetrafficinformation,alarmornewsbulletinfunctionisturnedon.
B64-5057-10_01_KDC201_E_En.indd 5 12/12/19 9:01

6
CD / USB / iPodStart playback
CD
ThesourcechangestoCDandplaybackstarts.
USB
ThesourcechangestoUSBandplaybackstarts.
iPod/iPhone ( KDC-201 only)
ThesourcechangestoiPodandplaybackstarts.
Press and hold iPod to select the control mode while in iPod source.MODE ON:FromtheiPod*1.MODE OFF:Fromtheunit.*1Youcanstillcontrolplay/pause,file
selection,fast-forwardorreversefilesfromtheunit.
Label side 0: Eject disc
USB input terminal
USB input terminal
CA-U1EX (max.: 500 mA) (optional accessory)
KCA-iP102 (optional accessory)
: Applicable— : Notapplicable
KDC-201
To Do this CD USB iPod
Pause or resume playback
Press 6 38.
Select a track/file Press 4 / ¢.
Select a folder Press 1 – / 2 +. *2 —
Reverse/Fast-forward Press and hold 4 / ¢.
Select a track/file from a list
1 Press .2 Turn the volume knob to make a selection, then press the knob.• Audiofile:Selectthedesiredfolder,thenafile.• iPodorKENWOODMusicEditorLight(KMELight)/KENWOODMusicControl(KMC)file*4:Selectthedesiredfilefromthelist(PLAYLISTS,ARTISTS,ALBUMS,SONGS,PODCASTS*5,GENRES,COMPOSERS*5).
• Toreturntotherootfolder(orfirstfile),pressnumberbutton5.• Toreturntotheprevioushierarchy,press .• Tocancel,pressandhold .
*3
• Toskipsongsataspecificratio,press 4 / ¢. (➜ 7) — *4 *3
Repeat play Press 4 repeatedly.• AudioCD:TRACREPEAT,REPEATOFF• Audiofile:FILEREPEAT,FOLDREPEAT,REPEATOFF• iPodorKMELight/KMCfile:FILEREPEAT,REPEATOFF
*3
Random play Press 3 repeatedly.• AudioCD:DISCRANDOM,RANDOMOFF• Audiofile/iPodorKMELight/KMCfile:FOLDRANDOM,RANDOMOFF
*3
Press and hold 3 to select “ALL RANDOM.” *2 *3
*2OnlyforAudiofile.*3Applicableonlywhen[MODE OFF]isselected.
*4Onlyforfilesregisteredinthedatabasecreated withKMELight/KMC.(➜ 9)
*5OnlyforiPod.
B64-5057-10_01_KDC201_E_En.indd 6 12/12/19 9:01
7ENGLISH |
Select a song by name( KDC-201 only)
WhilelisteningtoiPod...1 Press .2 Turn the volume knob to select a category, then
press the knob.3 Press again.4 Turn the volume knob to select the character to
be searched for.5 Press 4 / ¢ to move to the entry position. Youcanenteruptothreecharacters.6 Press the volume knob to start searching.7 Turn the volume knob to make a selection, then
press the knob. Repeatstep7untilthedesireditemisselected.
• TosearchforacharacterotherthanAtoZand0to9,enteronly“*”.
• Toreturntotheprevioushierarchy,press .• Toreturntothetopmenu,pressnumberbutton5.• Tocancel,pressandhold .• TurningthevolumeknobfastintheMusicsearchmodeallowsyoutoenterthealphabetsearchmode.
Set the skip ratio
WhilelisteningtoiPod( KDC-201 only)or KME Light/KMCfile...
1 Press the volume knob to enter [FUNCTION].2 Turn the volume knob to select [SETTINGS], then
press the knob.3 Turn the volume knob to select [SKIP SEARCH],
then press the knob.4 Turn the volume knob to make a selection, then
press the knob. 0.5%(default)/1%/ 5%/ 10%:Setstheskipratio
whensearchingforasong. (Pressing4 / ¢continuously,forlongerthan3
secondswillskipsongsata10%ratioregardlessofpreviouslyconfiguredsettings.)
5 Press and hold to exit.
Muting upon the reception of a phone callConnecttheMUTEwiretoyourtelephoneusingacommercialtelephoneaccessory.(➜ 13)
When a call comes in, “CALL” appears.• Theaudiosystempauses.• Tocontinuelisteningtotheaudiosystemduringacall,press SRC.“CALL”disappearsandtheaudiosystemresumes.
When the call ends, “CALL” disappears.• Theaudiosystemresumes.
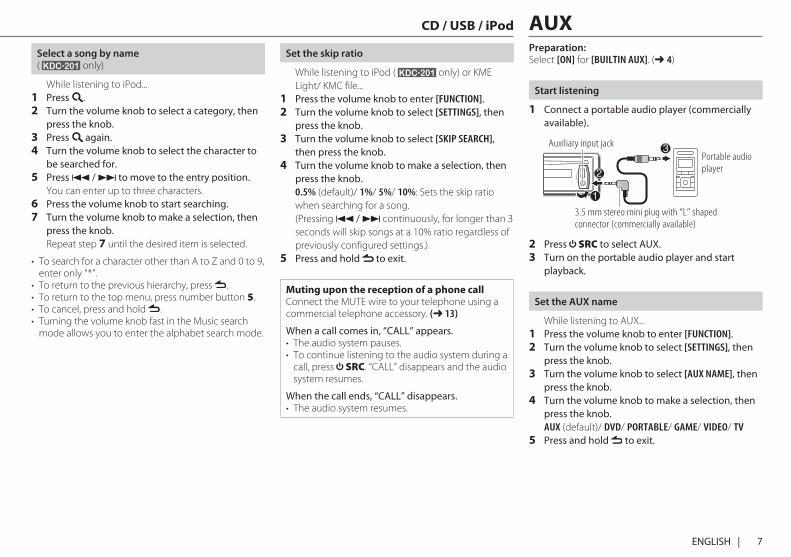
AUXPreparation:Select[ON]for[BUILTIN AUX].(➜ 4)
Start listening
1 Connect a portable audio player (commercially available).
2 Press SRC to select AUX.3 Turn on the portable audio player and start
playback.
Set the AUX name
WhilelisteningtoAUX...1 Press the volume knob to enter [FUNCTION].2 Turn the volume knob to select [SETTINGS], then
press the knob.3 Turn the volume knob to select [AUX NAME], then
press the knob.4 Turn the volume knob to make a selection, then
press the knob. AUX(default)/DVD/ PORTABLE/ GAME/ VIDEO/ TV5 Press and hold to exit.
Auxiliary input jackPortable audio player
3.5 mm stereo mini plug with “L” shaped connector (commercially available)
CD / USB / iPod CD / USB / iPod
B64-5057-10_01_KDC201_E_En.indd 7 12/12/19 9:01
8
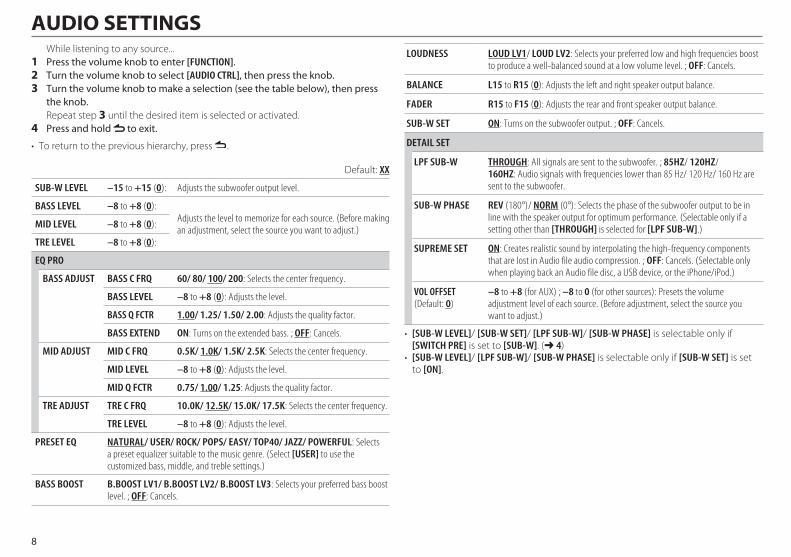
AUDIO SETTINGS Whilelisteningtoanysource...1 Press the volume knob to enter [FUNCTION].2 Turn the volume knob to select [AUDIO CTRL], then press the knob.3 Turn the volume knob to make a selection (see the table below), then press
the knob. Repeatstep3untilthedesireditemisselectedoractivated.4 Press and hold to exit.
• Toreturntotheprevioushierarchy,press .
Default:XX
SUB-W LEVEL –15 to +15 (0): Adjusts the subwoofer output level.
BASS LEVEL –8 to +8 (0):Adjusts the level to memorize for each source. (Before making an adjustment, select the source you want to adjust.)
MID LEVEL –8 to +8 (0):
TRE LEVEL –8 to +8 (0):
EQ PRO
BASS ADJUST BASS C FRQ 60/ 80/ 100/ 200: Selects the center frequency.
BASS LEVEL –8 to +8 (0): Adjusts the level.
BASS Q FCTR 1.00/ 1.25/ 1.50/ 2.00: Adjusts the quality factor.
BASS EXTEND ON: Turns on the extended bass. ; OFF: Cancels.
MID ADJUST MID C FRQ 0.5K/ 1.0K/ 1.5K/ 2.5K: Selects the center frequency.
MID LEVEL –8 to +8 (0): Adjusts the level.
MID Q FCTR 0.75/ 1.00/ 1.25: Adjusts the quality factor.
TRE ADJUST TRE C FRQ 10.0K/ 12.5K/ 15.0K/ 17.5K: Selects the center frequency.
TRE LEVEL –8 to +8 (0): Adjusts the level.
PRESET EQ NATURAL/ USER/ ROCK/ POPS/ EASY/ TOP40/ JAZZ/ POWERFUL: Selects a preset equalizer suitable to the music genre. (Select [USER] to use the customized bass, middle, and treble settings.)
BASS BOOST B.BOOST LV1/ B.BOOST LV2/ B.BOOST LV3: Selects your preferred bass boost level. ; OFF: Cancels.
LOUDNESS LOUD LV1/ LOUD LV2: Selects your preferred low and high frequencies boost to produce a well-balanced sound at a low volume level. ; OFF: Cancels.
BALANCE L15 to R15 (0): Adjusts the left and right speaker output balance.
FADER R15 to F15 (0): Adjusts the rear and front speaker output balance.
SUB-W SET ON: Turns on the subwoofer output. ; OFF: Cancels.
DETAIL SET
LPF SUB-W THROUGH: All signals are sent to the subwoofer. ; 85HZ/ 120HZ/ 160HZ: Audio signals with frequencies lower than 85 Hz/ 120 Hz/ 160 Hz are sent to the subwoofer.
SUB-W PHASE REV (180°)/ NORM (0°): Selects the phase of the subwoofer output to be in line with the speaker output for optimum performance. (Selectable only if a setting other than [THROUGH] is selected for [LPF SUB-W].)
SUPREME SET ON: Creates realistic sound by interpolating the high-frequency components that are lost in Audio file audio compression. ; OFF: Cancels. (Selectable only when playing back an Audio file disc, a USB device, or the iPhone/iPod.)
VOL OFFSET(Default: 0)
–8 to +8 (for AUX) ; –8 to 0 (for other sources): Presets the volume adjustment level of each source. (Before adjustment, select the source you want to adjust.)
• [SUB-W LEVEL]/ [SUB-W SET]/ [LPF SUB-W]/ [SUB-W PHASE]isselectableonlyif[SWITCH PRE]issetto[SUB-W].(➜ 4)
• [SUB-W LEVEL]/ [LPF SUB-W]/ [SUB-W PHASE]isselectableonlyif[SUB-W SET]issetto [ON].
B64-5057-10_01_KDC201_E_En.indd 8 12/12/19 9:01
9ENGLISH |
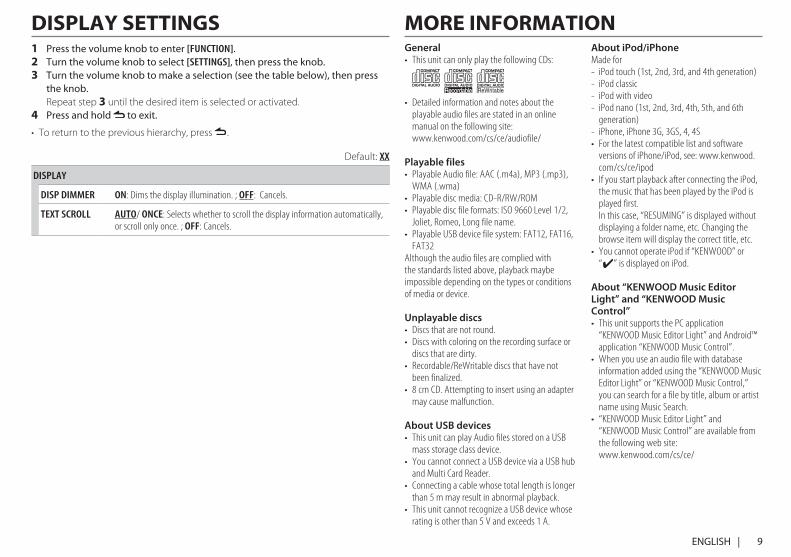
DISPLAY SETTINGS1 Press the volume knob to enter [FUNCTION].2 Turn the volume knob to select [SETTINGS], then press the knob.3 Turn the volume knob to make a selection (see the table below), then press
the knob. Repeatstep3untilthedesireditemisselectedoractivated.4 Press and hold to exit.
• Toreturntotheprevioushierarchy,press .
Default:XX
DISPLAY
DISP DIMMER ON: Dims the display illumination. ; OFF: Cancels.
TEXT SCROLL AUTO/ ONCE: Selects whether to scroll the display information automatically, or scroll only once. ; OFF: Cancels.
MORE INFORMATIONGeneral• ThisunitcanonlyplaythefollowingCDs:
• Detailedinformationandnotesabouttheplayable audio files are stated in an online manual on the following site: www.kenwood.com/cs/ce/audiofile/
Playable files• PlayableAudiofile:AAC(.m4a),MP3(.mp3),
WMA (.wma)• Playablediscmedia:CD-R/RW/ROM• Playablediscfileformats:ISO9660Level1/2,
Joliet, Romeo, Long file name.• PlayableUSBdevicefilesystem:FAT12,FAT16,
FAT32Although the audio files are complied with the standards listed above, playback maybe impossible depending on the types or conditions of media or device.
Unplayable discs• Discsthatarenotround.• Discswithcoloringontherecordingsurfaceor
discs that are dirty.• Recordable/ReWritablediscsthathavenot
been finalized.• 8cmCD.Attemptingtoinsertusinganadapter
may cause malfunction.
About USB devices• ThisunitcanplayAudiofilesstoredonaUSB
mass storage class device.• YoucannotconnectaUSBdeviceviaaUSBhub
and Multi Card Reader.• Connectingacablewhosetotallengthislonger
than 5 m may result in abnormal playback.• ThisunitcannotrecognizeaUSBdevicewhose
rating is other than 5 V and exceeds 1 A.
About iPod/iPhoneMade for- iPod touch (1st, 2nd, 3rd, and 4th generation)- iPod classic- iPod with video- iPod nano (1st, 2nd, 3rd, 4th, 5th, and 6th
generation)- iPhone, iPhone 3G, 3GS, 4, 4S• Forthelatestcompatiblelistandsoftware
versions of iPhone/iPod, see: www.kenwood.com/cs/ce/ipod
• IfyoustartplaybackafterconnectingtheiPod,the music that has been played by the iPod is played first.
In this case, “RESUMING” is displayed without displaying a folder name, etc. Changing the browse item will display the correct title, etc.
• YoucannotoperateiPodif“KENWOOD”or “ ” is displayed on iPod.
About “KENWOOD Music Editor Light” and “KENWOOD Music Control”• ThisunitsupportsthePCapplication
“KENWOOD Music Editor Light” and Android™ application “KENWOOD Music Control”.
• Whenyouuseanaudiofilewithdatabaseinformation added using the “KENWOOD Music Editor Light” or “KENWOOD Music Control,” you can search for a file by title, album or artist name using Music Search.
• “KENWOODMusicEditorLight”and“KENWOOD Music Control” are available from the following web site: www.kenwood.com/cs/ce/
B64-5057-10_01_KDC201_E_En.indd 9 12/12/19 9:01
10
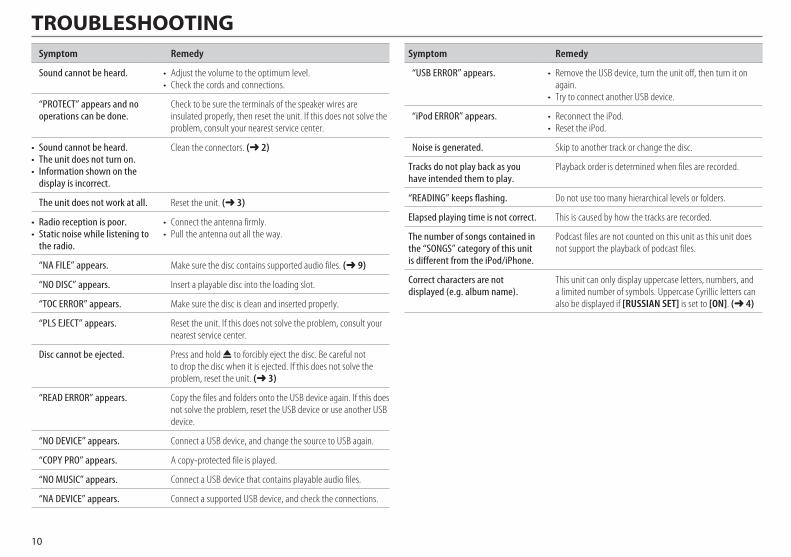
TROUBLESHOOTING Symptom Remedy
Sound cannot be heard. • Adjustthevolumetotheoptimumlevel.• Checkthecordsandconnections.
“PROTECT” appears and no operations can be done.
Check to be sure the terminals of the speaker wires are insulated properly, then reset the unit. If this does not solve the problem, consult your nearest service center.
• Soundcannotbeheard.• Theunitdoesnotturnon.• Informationshownonthe
display is incorrect.
Clean the connectors. (➜ 2)
Theunitdoesnotworkatall. Reset the unit. (➜ 3)
• Radioreceptionispoor.• Staticnoisewhilelisteningto
the radio.
• Connecttheantennafirmly.• Pulltheantennaoutalltheway.
“NAFILE”appears. Make sure the disc contains supported audio files. (➜ 9)
“NODISC”appears. Insert a playable disc into the loading slot.
“TOC ERROR” appears. Make sure the disc is clean and inserted properly.
“PLSEJECT”appears. Reset the unit. If this does not solve the problem, consult your nearest service center.
Disc cannot be ejected. Press and hold 0 to forcibly eject the disc. Be careful not to drop the disc when it is ejected. If this does not solve the problem, reset the unit. (➜ 3)
“READ ERROR” appears. Copy the files and folders onto the USB device again. If this does not solve the problem, reset the USB device or use another USB device.
“NODEVICE”appears. Connect a USB device, and change the source to USB again.
“COPY PRO” appears. A copy-protected file is played.
“NOMUSIC”appears. Connect a USB device that contains playable audio files.
“NADEVICE”appears. Connect a supported USB device, and check the connections.
Symptom Remedy
“USB ERROR” appears. • RemovetheUSBdevice,turntheunitoff,thenturnitonagain.
• TrytoconnectanotherUSBdevice.
“iPod ERROR” appears. • ReconnecttheiPod.• ResettheiPod.
Noiseisgenerated. Skip to another track or change the disc.
Tracksdonotplaybackasyouhaveintendedthemtoplay.
Playback order is determined when files are recorded.
“READING”keepsflashing. Do not use too many hierarchical levels or folders.
Elapsedplayingtimeisnotcorrect. This is caused by how the tracks are recorded.
Thenumberofsongscontainedinthe“SONGS”categoryofthisunitisdifferentfromtheiPod/iPhone.
Podcast files are not counted on this unit as this unit does not support the playback of podcast files.
Correct characters are not displayed(e.g.albumname).
This unit can only display uppercase letters, numbers, and a limited number of symbols. Uppercase Cyrillic letters can also be displayed if [RUSSIAN SET] is set to [ON]. (➜ 4)
B64-5057-10_01_KDC201_E_En.indd 10 12/12/19 9:01
11ENGLISH |
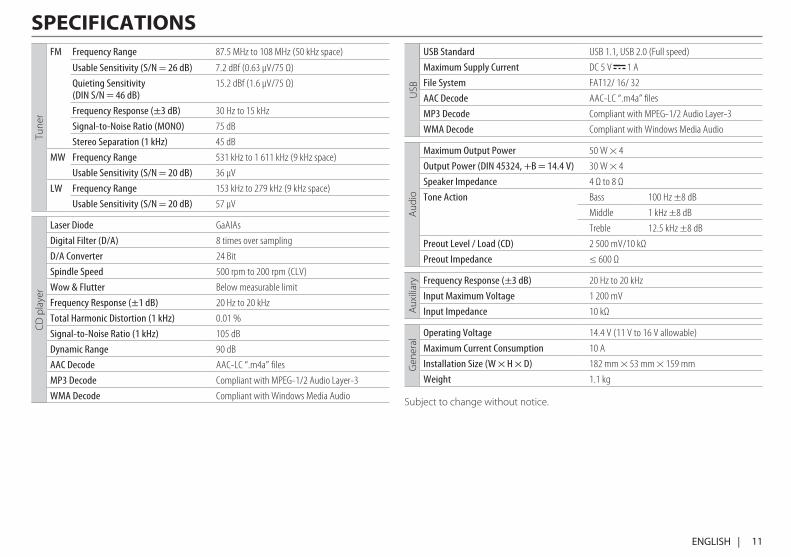
SPECIFICATIONSTune
r
FM FrequencyRange 87.5 MHz to 108 MHz (50 kHz space)
UsableSensitivity(S/N=26dB) 7.2 dBf (0.63 μV/75 Ω)
QuietingSensitivity (DINS/N=46dB)
15.2 dBf (1.6 μV/75 Ω)
FrequencyResponse(±3dB) 30 Hz to 15 kHz
Signal‑to‑NoiseRatio(MONO) 75 dB
StereoSeparation(1kHz) 45 dB
MW FrequencyRange 531 kHz to 1 611 kHz (9 kHz space)
UsableSensitivity(S/N=20dB) 36 μV
LW FrequencyRange 153 kHz to 279 kHz (9 kHz space)
UsableSensitivity(S/N=20dB) 57 μV
CDplayer
LaserDiode GaAIAs
DigitalFilter(D/A) 8 times over sampling
D/AConverter 24 Bit
Spindle Speed 500 rpm to 200 rpm (CLV)
Wow&Flutter Below measurable limit
FrequencyResponse(±1dB) 20 Hz to 20 kHz
TotalHarmonicDistortion(1kHz) 0.01 %
Signal‑to‑NoiseRatio(1kHz) 105 dB
DynamicRange 90 dB
AAC Decode AAC-LC “.m4a” files
MP3 Decode Compliant with MPEG-1/2 Audio Layer-3
WMA Decode Compliant with Windows Media AudioUSB
USB Standard USB 1.1, USB 2.0 (Full speed)
MaximumSupplyCurrent DC 5 V 1 A
FileSystem FAT12/ 16/ 32
AAC Decode AAC-LC “.m4a” files
MP3 Decode Compliant with MPEG-1/2 Audio Layer-3
WMA Decode Compliant with Windows Media Audio
Aud
io
MaximumOutputPower 50 W × 4
OutputPower(DIN45324,+B=14.4V) 30 W × 4
SpeakerImpedance 4 Ω to 8 Ω
Tone Action Bass 100 Hz ±8 dB
Middle 1 kHz ±8 dB
Treble 12.5 kHz ±8 dB
PreoutLevel/Load(CD) 2 500 mV/10 kΩ
PreoutImpedance ≤ 600 Ω
Auxiliary FrequencyResponse(±3dB) 20 Hz to 20 kHz
InputMaximumVoltage 1 200 mV
InputImpedance 10 kΩ
Gen
eral
OperatingVoltage 14.4 V (11 V to 16 V allowable)
MaximumCurrentConsumption 10 A
InstallationSize(W×H×D) 182 mm × 53 mm × 159 mm
Weight 1.1 kg
Subjecttochangewithoutnotice.
B64-5057-10_01_KDC201_E_En.indd 11 12/12/19 9:01
12
INST
ALL
AT
ION
/ C
ON
NEC
TIO
N
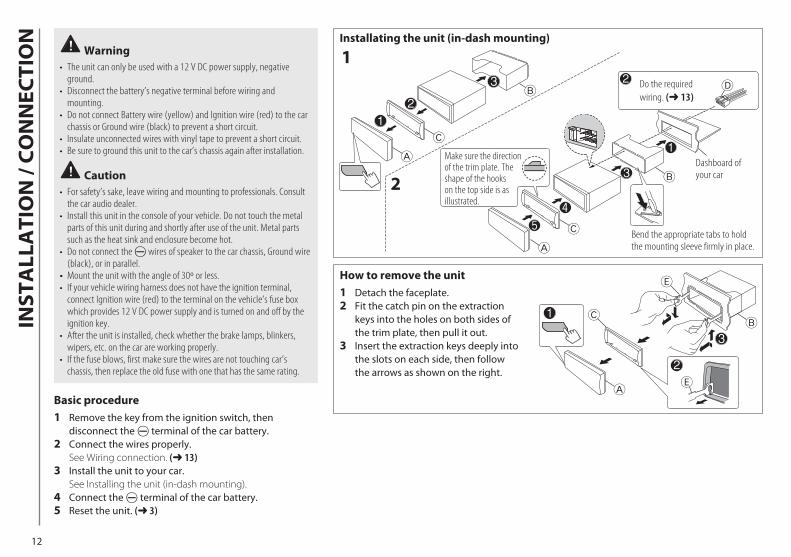
Do the required wiring. (➜ 13)
Dashboard of your car
Bend the appropriate tabs to hold the mounting sleeve firmly in place.
How to remove the unit1 Detach the faceplate.2 Fit the catch pin on the extraction
keys into the holes on both sides of the trim plate, then pull it out.
3 Insert the extraction keys deeply into the slots on each side, then follow the arrows as shown on the right.
Installating the unit (in-dash mounting) Warning
• Theunitcanonlybeusedwitha12VDCpowersupply,negativeground.
• Disconnectthebattery’snegativeterminalbeforewiringandmounting.
• DonotconnectBatterywire(yellow)andIgnitionwire(red)tothecarchassis or Ground wire (black) to prevent a short circuit.
• Insulateunconnectedwireswithvinyltapetopreventashortcircuit.• Besuretogroundthisunittothecar’schassisagainafterinstallation.
Caution• Forsafety’ssake,leavewiringandmountingtoprofessionals.Consult
the car audio dealer.• Installthisunitintheconsoleofyourvehicle.Donottouchthemetal
parts of this unit during and shortly after use of the unit. Metal parts such as the heat sink and enclosure become hot.
• Donotconnectthe· wires of speaker to the car chassis, Ground wire (black), or in parallel.
• Mount the unit with the angle of 30º or less.• Ifyourvehiclewiringharnessdoesnothavetheignitionterminal,
connect Ignition wire (red) to the terminal on the vehicle’s fuse box which provides 12 V DC power supply and is turned on and off by the ignition key.
• Aftertheunitisinstalled,checkwhetherthebrakelamps,blinkers,wipers, etc. on the car are working properly.
• Ifthefuseblows,firstmakesurethewiresarenottouchingcar’schassis, then replace the old fuse with one that has the same rating.
Basic procedure1 Remove the key from the ignition switch, then
disconnect the · terminal of the car battery.2 Connect the wires properly. SeeWiringconnection.(➜ 13)3 Install the unit to your car. SeeInstallingtheunit(in-dashmounting).4 Connect the · terminal of the car battery.5 Reset the unit. (➜ 3)
Make sure the direction of the trim plate. The shape of the hooks on the top side is as illustrated.
B64-5057-10_01_KDC201_E_En.indd 12 12/12/19 9:01
13ENGLISH |
REMOTE CONT
STEERING WHEELREMOTE INPUT
MUTE
P. CONT
ANT CONT
R L
REA
R/SW
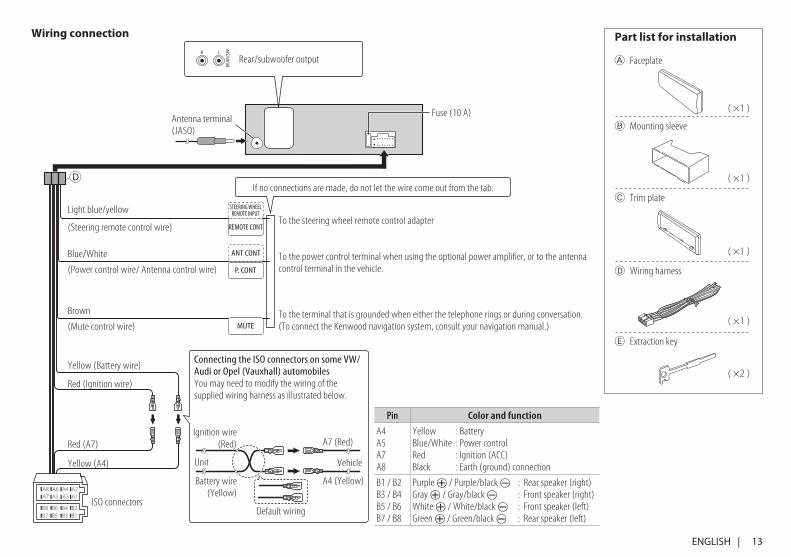
Wiring connection Part list for installation
Fuse (10 A)Antenna terminal (JASO)
( ×4 )
( ×4 )
( ×2 )
( ×1 )
( ×1 )
( ×1 )
( ×1 )
A Faceplate
B Mounting sleeve
C Trim plate
D Wiring harness
E Extraction key
Light blue/yellow
(Steering remote control wire)To the steering wheel remote control adapter
Blue/White
(Power control wire/ Antenna control wire)
Brown
(Mute control wire)
To the power control terminal when using the optional power amplifier, or to the antenna control terminal in the vehicle.
To the terminal that is grounded when either the telephone rings or during conversation. (To connect the Kenwood navigation system, consult your navigation manual.)
Yellow (A4)
Red (Ignition wire)
Red (A7)
Yellow (Battery wire)
Pin Color and function
A4A5A7A8
Yellow : BatteryBlue/White : Power controlRed : Ignition (ACC)Black : Earth (ground) connection
B1 / B2B3 / B4B5 / B6B7 / B8
Purple ª / Purple/black · : Rear speaker (right)Gray ª / Gray/black · : Front speaker (right)White ª / White/black · : Front speaker (left)Green ª / Green/black · : Rear speaker (left)
ISO connectors
ConnectingtheISOconnectorsonsomeVW/AudiorOpel(Vauxhall)automobilesYou may need to modify the wiring of the supplied wiring harness as illustrated below.
Unit Vehicle
A7 (Red)Ignition wire
(Red)
A4 (Yellow)
Default wiring
Battery wire (Yellow)
If no connections are made, do not let the wire come out from the tab.
Rear/subwoofer output
B64-5057-10_01_KDC201_E_En.indd 13 12/12/19 9:01