Embed Size (px)
Citation preview
Page 1
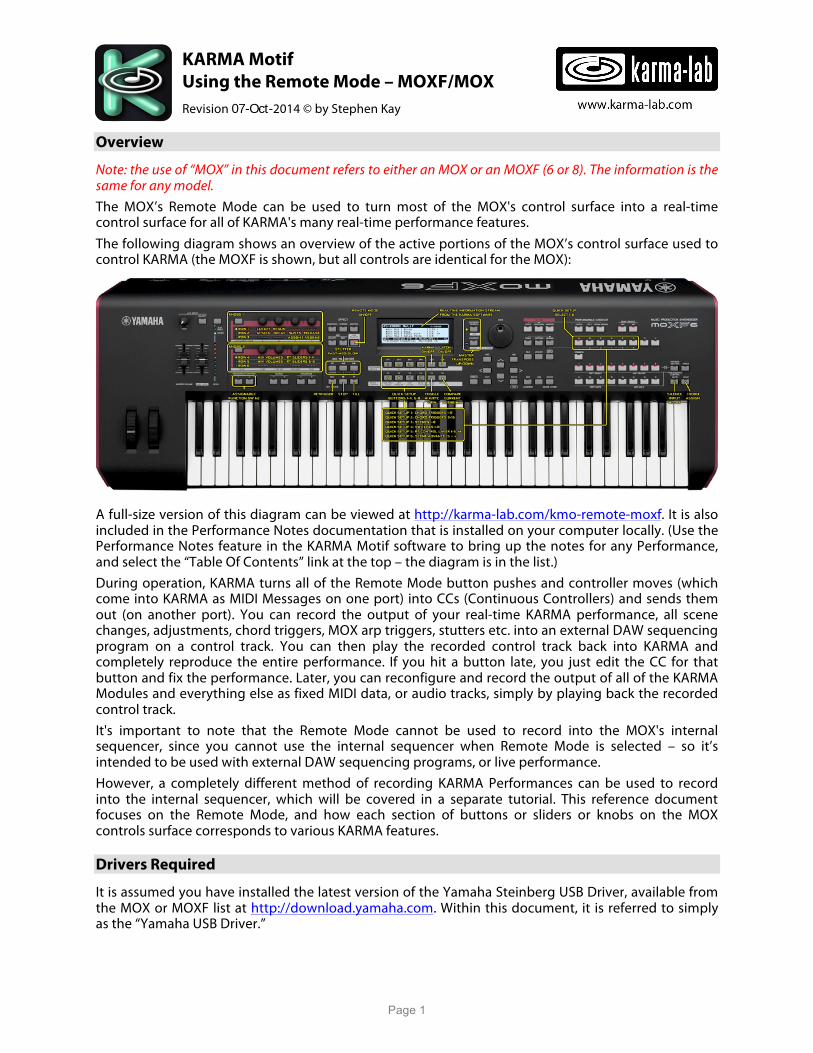
KARMA Motif Using the Remote Mode – MOXF/MOX Revision 07-Oct-2014 © by Stephen Kay
Overview
Note: the use of “MOX” in this document refers to either an MOX or an MOXF (6 or 8). The information is the same for any model. The MOX’s Remote Mode can be used to turn most of the MOX's control surface into a real-time control surface for all of KARMA's many real-time performance features. The following diagram shows an overview of the active portions of the MOX’s control surface used to control KARMA (the MOXF is shown, but all controls are identical for the MOX):
A full-size version of this diagram can be viewed at http://karma-lab.com/kmo-remote-moxf. It is also included in the Performance Notes documentation that is installed on your computer locally. (Use the Performance Notes feature in the KARMA Motif software to bring up the notes for any Performance, and select the “Table Of Contents” link at the top – the diagram is in the list.) During operation, KARMA turns all of the Remote Mode button pushes and controller moves (which come into KARMA as MIDI Messages on one port) into CCs (Continuous Controllers) and sends them out (on another port). You can record the output of your real-time KARMA performance, all scene changes, adjustments, chord triggers, MOX arp triggers, stutters etc. into an external DAW sequencing program on a control track. You can then play the recorded control track back into KARMA and completely reproduce the entire performance. If you hit a button late, you just edit the CC for that button and fix the performance. Later, you can reconfigure and record the output of all of the KARMA Modules and everything else as fixed MIDI data, or audio tracks, simply by playing back the recorded control track. It's important to note that the Remote Mode cannot be used to record into the MOX's internal sequencer, since you cannot use the internal sequencer when Remote Mode is selected – so it’s intended to be used with external DAW sequencing programs, or live performance. However, a completely different method of recording KARMA Performances can be used to record into the internal sequencer, which will be covered in a separate tutorial. This reference document focuses on the Remote Mode, and how each section of buttons or sliders or knobs on the MOX controls surface corresponds to various KARMA features.
Drivers Required
It is assumed you have installed the latest version of the Yamaha Steinberg USB Driver, available from the MOX or MOXF list at http://download.yamaha.com. Within this document, it is referred to simply as the “Yamaha USB Driver.”
www.karma-lab.com

Page 2
Remote Mode settings in the KARMA software
KARMA Motif should be auto-configured to respond to the Remote Mode during the first launch. However, if you find this is not working correctly, the place where this is controlled in the software is in the MIDI Setup (Global) > Devices Page, where you should have the following settings: 1. Remote Active checkbox = On 2. Remote In Port 1 = On; set to
“Port2 – Yamaha MOX” of the Yamaha USB Driver
3. Remote In Port 1 Control Map = MOX/MOXF - Cubase
4. Remote Out Port = On; set to “Port2 – Yamaha MOX” of the Yamaha USB Driver
Mac port names shown; Windows port names are slightly different.
Remote Mode settings in the MOX
The only setting you to need to make for Remote Mode in the MOX itself is to set the DAW Select to “Cubase.” Assuming you loaded the included MOX Data file with Global Settings, this should already be set up correctly. If not, you can locate this setting at Utility > General > Remote > DAW Select: Cubase.
Activating Remote Mode
With a KARMA Performance selected in the KARMA Motif software, simply press the DAW Remote button on the MOX. Then (assuming you have loaded our Yamaha Data File for the MOX/MOXF and turned the unit off and back on as explained in the “Installation and First Launch” Tutorial), use the Bank Select Inc/Dec buttons to select our Custom Control Template “45: KARMA Motif.” You can stay in Remote Mode and select different KARMA
Performances (from the software) without leaving the Remote Mode if desired. Note: if you leave the KARMA software set to the Real-Time Control Editor, you can watch as the Remote Mode controls various buttons and features as you work through the following sections.
About the Custom Control Template
When using the Remote Mode, you should select our Custom Control Template “45: KARMA Motif.” It has the upper three rows of Knobs set to the correct CCs to operate the “Tone Knob” settings we have programmed into each Performance (as detailed in each Performance Notes document). Also, the software sends various pieces of information to the screen as explained later in this document. One example is shown above – don’t worry if yours doesn’t look the same right now.
Page 3
We have chosen location 45 because it is empty in both the MOX and MOXF Factory Control Templates. If you have some of your own custom templates already, then you should know how to use the Remote Editor, and you can import “45: KARMA Motif” to any location you prefer using the Library feature of the Remote Editor to insert it into your own bank of templates.
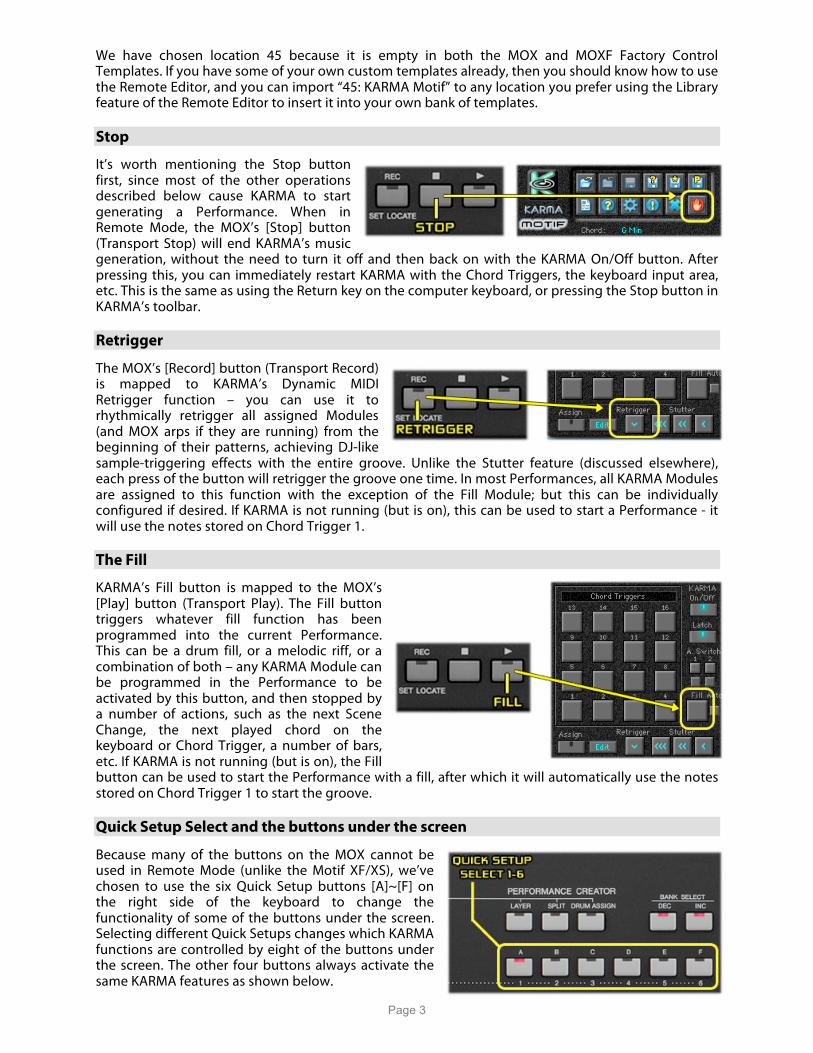
Stop
It’s worth mentioning the Stop button first, since most of the other operations described below cause KARMA to start generating a Performance. When in Remote Mode, the MOX’s [Stop] button (Transport Stop) will end KARMA’s music generation, without the need to turn it off and then back on with the KARMA On/Off button. After pressing this, you can immediately restart KARMA with the Chord Triggers, the keyboard input area, etc. This is the same as using the Return key on the computer keyboard, or pressing the Stop button in KARMA’s toolbar.
Retrigger
The MOX’s [Record] button (Transport Record) is mapped to KARMA’s Dynamic MIDI Retrigger function – you can use it to rhythmically retrigger all assigned Modules (and MOX arps if they are running) from the beginning of their patterns, achieving DJ-like sample-triggering effects with the entire groove. Unlike the Stutter feature (discussed elsewhere), each press of the button will retrigger the groove one time. In most Performances, all KARMA Modules are assigned to this function with the exception of the Fill Module; but this can be individually configured if desired. If KARMA is not running (but is on), this can be used to start a Performance - it will use the notes stored on Chord Trigger 1.
The Fill
KARMA’s Fill button is mapped to the MOX’s [Play] button (Transport Play). The Fill button triggers whatever fill function has been programmed into the current Performance. This can be a drum fill, or a melodic riff, or a combination of both – any KARMA Module can be programmed in the Performance to be activated by this button, and then stopped by a number of actions, such as the next Scene Change, the next played chord on the keyboard or Chord Trigger, a number of bars, etc. If KARMA is not running (but is on), the Fill button can be used to start the Performance with a fill, after which it will automatically use the notes stored on Chord Trigger 1 to start the groove.
Quick Setup Select and the buttons under the screen
Because many of the buttons on the MOX cannot be used in Remote Mode (unlike the Motif XF/XS), we’ve chosen to use the six Quick Setup buttons [A]~[F] on the right side of the keyboard to change the functionality of some of the buttons under the screen. Selecting different Quick Setups changes which KARMA functions are controlled by eight of the buttons under the screen. The other four buttons always activate the same KARMA features as shown below.
Page 4
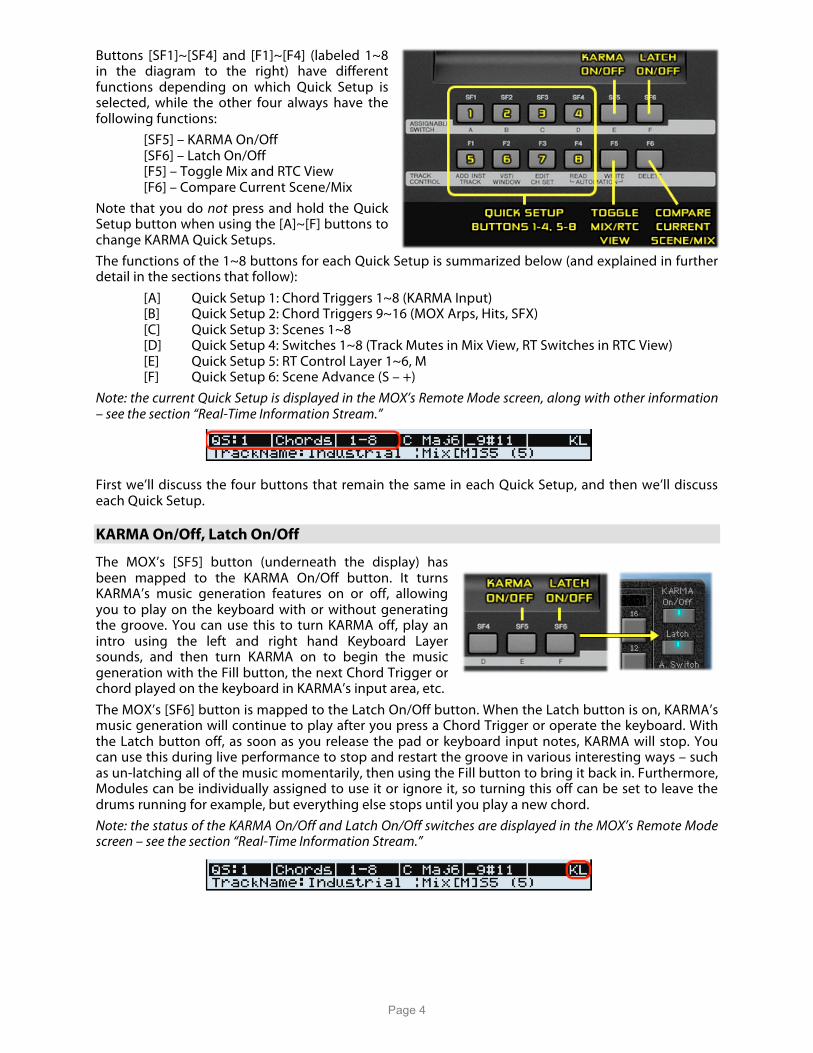
Buttons [SF1]~[SF4] and [F1]~[F4] (labeled 1~8 in the diagram to the right) have different functions depending on which Quick Setup is selected, while the other four always have the following functions:
[SF5] – KARMA On/Off [SF6] – Latch On/Off [F5] – Toggle Mix and RTC View [F6] – Compare Current Scene/Mix
Note that you do not press and hold the Quick Setup button when using the [A]~[F] buttons to change KARMA Quick Setups. The functions of the 1~8 buttons for each Quick Setup is summarized below (and explained in further detail in the sections that follow):
[A] Quick Setup 1: Chord Triggers 1~8 (KARMA Input) [B] Quick Setup 2: Chord Triggers 9~16 (MOX Arps, Hits, SFX) [C] Quick Setup 3: Scenes 1~8 [D] Quick Setup 4: Switches 1~8 (Track Mutes in Mix View, RT Switches in RTC View) [E] Quick Setup 5: RT Control Layer 1~6, M [F] Quick Setup 6: Scene Advance (S – +)
Note: the current Quick Setup is displayed in the MOX’s Remote Mode screen, along with other information – see the section “Real-Time Information Stream.”
First we’ll discuss the four buttons that remain the same in each Quick Setup, and then we’ll discuss each Quick Setup.
KARMA On/Off, Latch On/Off
The MOX’s [SF5] button (underneath the display) has been mapped to the KARMA On/Off button. It turns KARMA’s music generation features on or off, allowing you to play on the keyboard with or without generating the groove. You can use this to turn KARMA off, play an intro using the left and right hand Keyboard Layer sounds, and then turn KARMA on to begin the music generation with the Fill button, the next Chord Trigger or chord played on the keyboard in KARMA’s input area, etc. The MOX’s [SF6] button is mapped to the Latch On/Off button. When the Latch button is on, KARMA’s music generation will continue to play after you press a Chord Trigger or operate the keyboard. With the Latch button off, as soon as you release the pad or keyboard input notes, KARMA will stop. You can use this during live performance to stop and restart the groove in various interesting ways – such as un-latching all of the music momentarily, then using the Fill button to bring it back in. Furthermore, Modules can be individually assigned to use it or ignore it, so turning this off can be set to leave the drums running for example, but everything else stops until you play a new chord. Note: the status of the KARMA On/Off and Latch On/Off switches are displayed in the MOX’s Remote Mode screen – see the section “Real-Time Information Stream.”
Page 5
Toggle Mix/RTC View
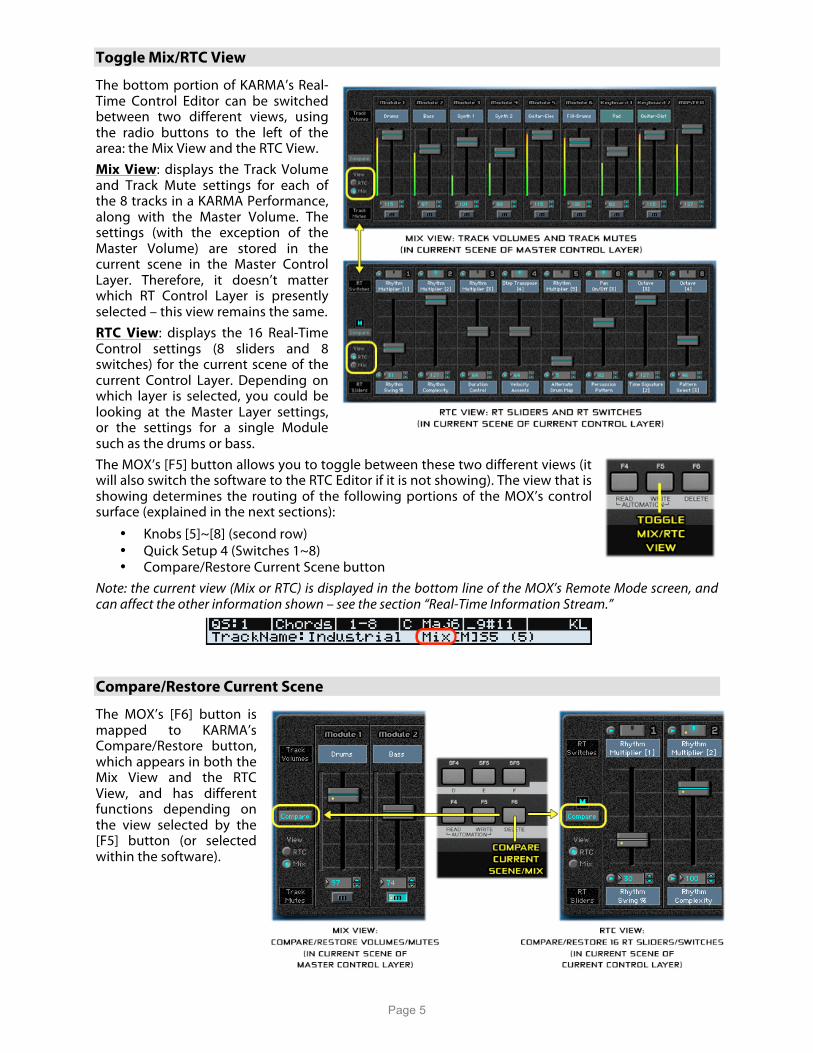
The bottom portion of KARMA’s Real-Time Control Editor can be switched between two different views, using the radio buttons to the left of the area: the Mix View and the RTC View. Mix View: displays the Track Volume and Track Mute settings for each of the 8 tracks in a KARMA Performance, along with the Master Volume. The settings (with the exception of the Master Volume) are stored in the current scene in the Master Control Layer. Therefore, it doesn’t matter which RT Control Layer is presently selected – this view remains the same. RTC View: displays the 16 Real-Time Control settings (8 sliders and 8 switches) for the current scene of the current Control Layer. Depending on which layer is selected, you could be looking at the Master Layer settings, or the settings for a single Module such as the drums or bass. The MOX’s [F5] button allows you to toggle between these two different views (it will also switch the software to the RTC Editor if it is not showing). The view that is showing determines the routing of the following portions of the MOX’s control surface (explained in the next sections):
• Knobs [5]~[8] (second row) • Quick Setup 4 (Switches 1~8) • Compare/Restore Current Scene button
Note: the current view (Mix or RTC) is displayed in the bottom line of the MOX’s Remote Mode screen, and can affect the other information shown – see the section “Real-Time Information Stream.”
Compare/Restore Current Scene
The MOX’s [F6] button is mapped to KARMA’s Compare/Restore button, which appears in both the Mix View and the RTC View, and has different functions depending on the view selected by the [F5] button (or selected within the software).
Page 6
When the Mix View is displayed, you can compare the current Master Layer Scene’s Mix (Track Volumes and Mutes) with the stored version. When the RTC View is displayed, you can compare the current Control Layer’s current RT Slider/Switch settings with the stored version. Once compared, the button text changes to “Restore.” Pressing the button a second time in either view restores the settings back to the previously edited state. Note that these operations are quantized by the Scene Change Quantize Window and happen in the same way that scene changes do (delayed until downbeat) – so you can use this as a performance feature, by modifying a scene in real-time to something completely different, then comparing it back to the original as if it was a scene change. Furthermore, each scene in each layer, in each view maintains its own compare buffer, so you can switch between scenes and layers, editing, comparing and restoring at any time and in any layer or scene. Note: Edited parameters are tagged with a yellow dot in either view. The Compare button will be grayed out if nothing has been edited in the applicable scene. Furthermore, the current view (Mix or RTC) is displayed in the MOX’s Remote Mode screen, along with the RT Control Layer, so you always know which buffer you are comparing. The names and values of the sliders, knobs and switches are displayed as well, along with an indication of whether they have been edited or not, so you can see the compare and restore in action – see the section “Real-Time Information Stream.”
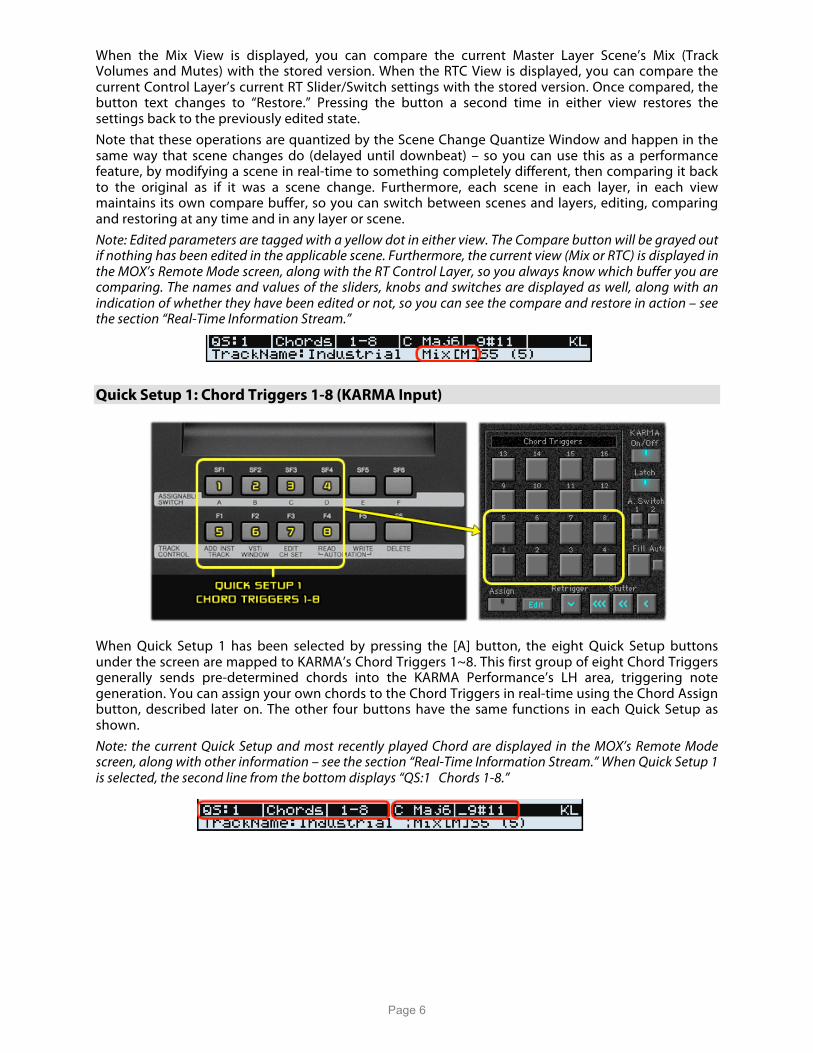
Quick Setup 1: Chord Triggers 1-8 (KARMA Input)
When Quick Setup 1 has been selected by pressing the [A] button, the eight Quick Setup buttons under the screen are mapped to KARMA’s Chord Triggers 1~8. This first group of eight Chord Triggers generally sends pre-determined chords into the KARMA Performance’s LH area, triggering note generation. You can assign your own chords to the Chord Triggers in real-time using the Chord Assign button, described later on. The other four buttons have the same functions in each Quick Setup as shown. Note: the current Quick Setup and most recently played Chord are displayed in the MOX’s Remote Mode screen, along with other information – see the section “Real-Time Information Stream.” When Quick Setup 1 is selected, the second line from the bottom displays “QS:1 Chords 1-8.”
Page 7
Quick Setup 2: Chord Triggers 9-16 (MOX Arps, Hits, SFX)
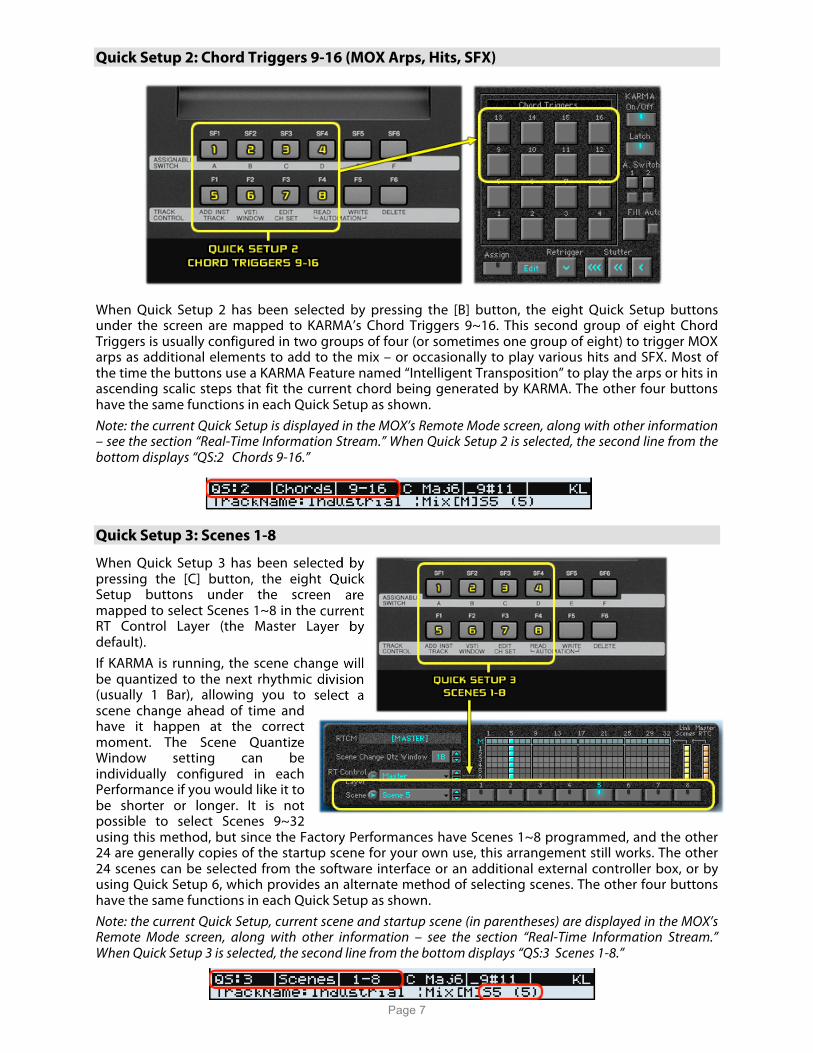
When Quick Setup 2 has been selected by pressing the [B] button, the eight Quick Setup buttons under the screen are mapped to KARMA’s Chord Triggers 9~16. This second group of eight Chord Triggers is usually configured in two groups of four (or sometimes one group of eight) to trigger MOX arps as additional elements to add to the mix – or occasionally to play various hits and SFX. Most of the time the buttons use a KARMA Feature named “Intelligent Transposition” to play the arps or hits in ascending scalic steps that fit the current chord being generated by KARMA. The other four buttons have the same functions in each Quick Setup as shown. Note: the current Quick Setup is displayed in the MOX’s Remote Mode screen, along with other information – see the section “Real-Time Information Stream.” When Quick Setup 2 is selected, the second line from the bottom displays “QS:2 Chords 9-16.”
Quick Setup 3: Scenes 1-8
When Quick Setup 3 has been selected by pressing the [C] button, the eight Quick Setup buttons under the screen are mapped to select Scenes 1~8 in the current RT Control Layer (the Master Layer by default). If KARMA is running, the scene change will be quantized to the next rhythmic division (usually 1 Bar), allowing you to select a scene change ahead of time and have it happen at the correct moment. The Scene Quantize Window setting can be individually configured in each Performance if you would like it to be shorter or longer. It is not possible to select Scenes 9~32 using this method, but since the Factory Performances have Scenes 1~8 programmed, and the other 24 are generally copies of the startup scene for your own use, this arrangement still works. The other 24 scenes can be selected from the software interface or an additional external controller box, or by using Quick Setup 6, which provides an alternate method of selecting scenes. The other four buttons have the same functions in each Quick Setup as shown. Note: the current Quick Setup, current scene and startup scene (in parentheses) are displayed in the MOX’s Remote Mode screen, along with other information – see the section “Real-Time Information Stream.” When Quick Setup 3 is selected, the second line from the bottom displays “QS:3 Scenes 1-8.”
Page 8
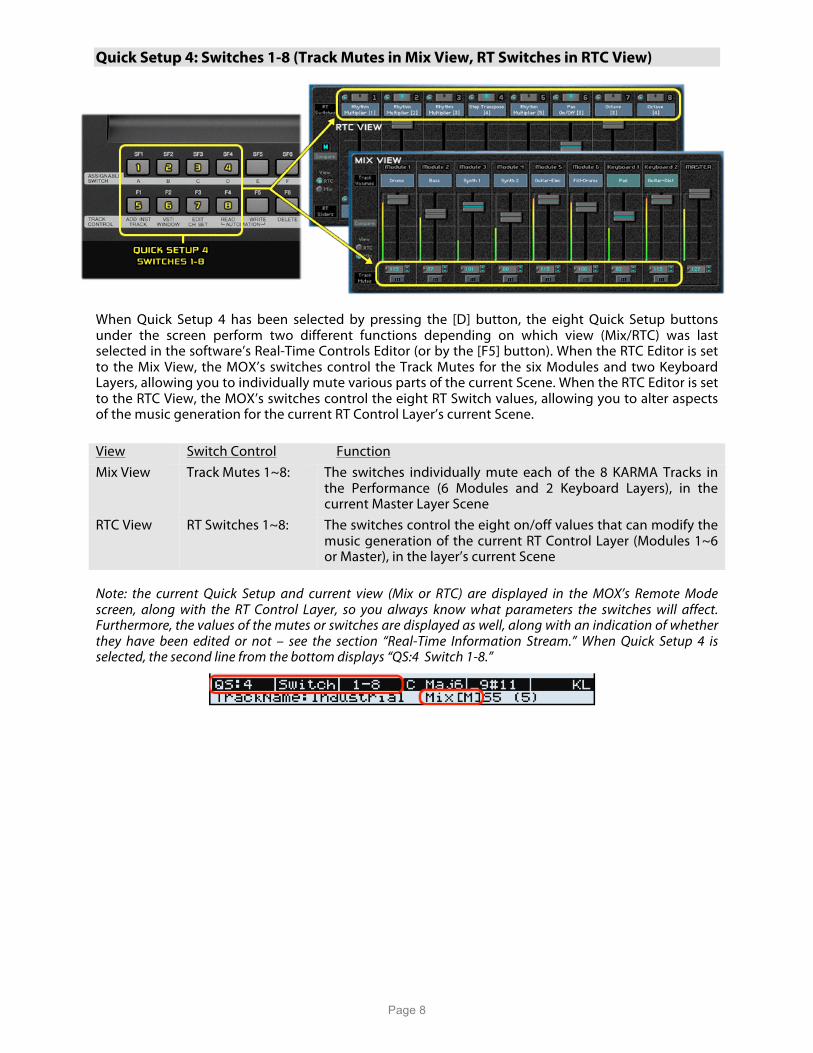
Quick Setup 4: Switches 1-8 (Track Mutes in Mix View, RT Switches in RTC View)
When Quick Setup 4 has been selected by pressing the [D] button, the eight Quick Setup buttons under the screen perform two different functions depending on which view (Mix/RTC) was last selected in the software’s Real-Time Controls Editor (or by the [F5] button). When the RTC Editor is set to the Mix View, the MOX’s switches control the Track Mutes for the six Modules and two Keyboard Layers, allowing you to individually mute various parts of the current Scene. When the RTC Editor is set to the RTC View, the MOX’s switches control the eight RT Switch values, allowing you to alter aspects of the music generation for the current RT Control Layer’s current Scene. View Switch Control Function Mix View Track Mutes 1~8: The switches individually mute each of the 8 KARMA Tracks in
the Performance (6 Modules and 2 Keyboard Layers), in the current Master Layer Scene
RTC View RT Switches 1~8: The switches control the eight on/off values that can modify the music generation of the current RT Control Layer (Modules 1~6 or Master), in the layer’s current Scene
Note: the current Quick Setup and current view (Mix or RTC) are displayed in the MOX’s Remote Mode screen, along with the RT Control Layer, so you always know what parameters the switches will affect. Furthermore, the values of the mutes or switches are displayed as well, along with an indication of whether they have been edited or not – see the section “Real-Time Information Stream.” When Quick Setup 4 is selected, the second line from the bottom displays “QS:4 Switch 1-8.”
Page 9
Quick Setup 5: RT Control Layer 1-6, M
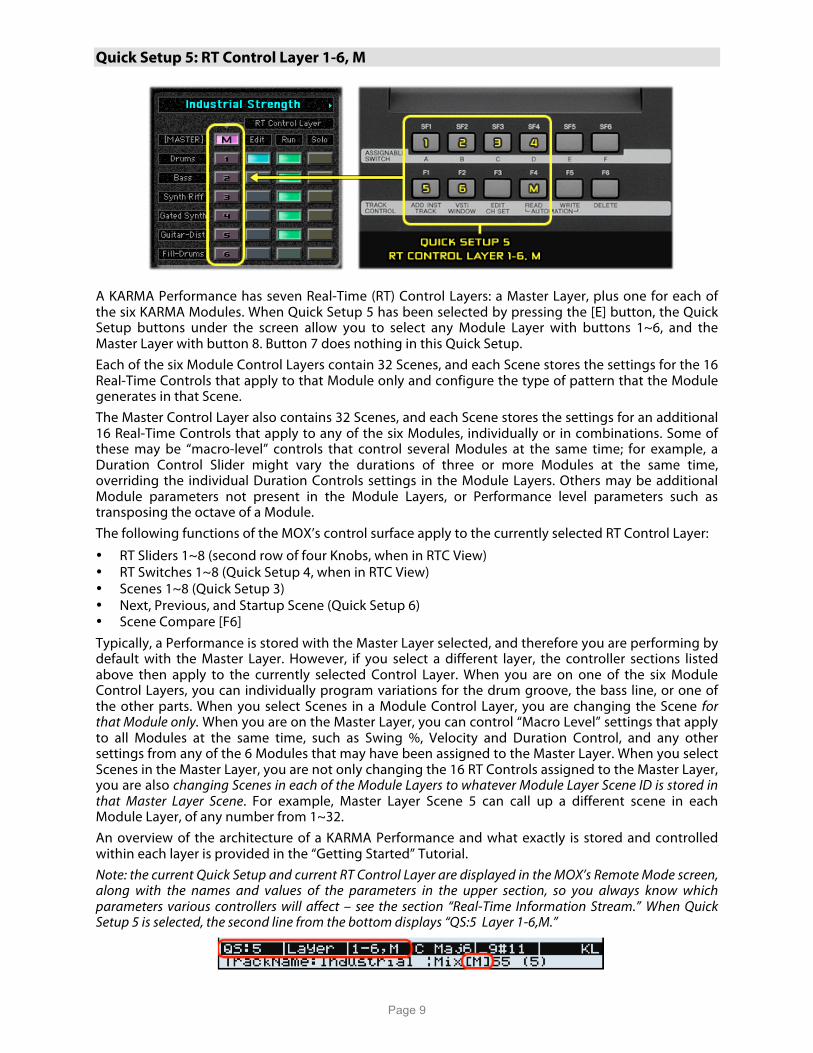
A KARMA Performance has seven Real-Time (RT) Control Layers: a Master Layer, plus one for each of the six KARMA Modules. When Quick Setup 5 has been selected by pressing the [E] button, the Quick Setup buttons under the screen allow you to select any Module Layer with buttons 1~6, and the Master Layer with button 8. Button 7 does nothing in this Quick Setup. Each of the six Module Control Layers contain 32 Scenes, and each Scene stores the settings for the 16 Real-Time Controls that apply to that Module only and configure the type of pattern that the Module generates in that Scene. The Master Control Layer also contains 32 Scenes, and each Scene stores the settings for an additional 16 Real-Time Controls that apply to any of the six Modules, individually or in combinations. Some of these may be “macro-level” controls that control several Modules at the same time; for example, a Duration Control Slider might vary the durations of three or more Modules at the same time, overriding the individual Duration Controls settings in the Module Layers. Others may be additional Module parameters not present in the Module Layers, or Performance level parameters such as transposing the octave of a Module. The following functions of the MOX’s control surface apply to the currently selected RT Control Layer:
• RT Sliders 1~8 (second row of four Knobs, when in RTC View) • RT Switches 1~8 (Quick Setup 4, when in RTC View) • Scenes 1~8 (Quick Setup 3) • Next, Previous, and Startup Scene (Quick Setup 6) • Scene Compare [F6] Typically, a Performance is stored with the Master Layer selected, and therefore you are performing by default with the Master Layer. However, if you select a different layer, the controller sections listed above then apply to the currently selected Control Layer. When you are on one of the six Module Control Layers, you can individually program variations for the drum groove, the bass line, or one of the other parts. When you select Scenes in a Module Control Layer, you are changing the Scene for that Module only. When you are on the Master Layer, you can control “Macro Level” settings that apply to all Modules at the same time, such as Swing %, Velocity and Duration Control, and any other settings from any of the 6 Modules that may have been assigned to the Master Layer. When you select Scenes in the Master Layer, you are not only changing the 16 RT Controls assigned to the Master Layer, you are also changing Scenes in each of the Module Layers to whatever Module Layer Scene ID is stored in that Master Layer Scene. For example, Master Layer Scene 5 can call up a different scene in each Module Layer, of any number from 1~32. An overview of the architecture of a KARMA Performance and what exactly is stored and controlled within each layer is provided in the “Getting Started” Tutorial. Note: the current Quick Setup and current RT Control Layer are displayed in the MOX’s Remote Mode screen, along with the names and values of the parameters in the upper section, so you always know which parameters various controllers will affect – see the section “Real-Time Information Stream.” When Quick Setup 5 is selected, the second line from the bottom displays “QS:5 Layer 1-6,M.”

Page 10
Quick Setup 6: Scene Advance (S – +)
When Quick Setup 6 has been selected by pressing the [F] button, the first three Quick Setup buttons provide an alternate method of changing scenes in the current RT Control Layer (the Master Layer by default):
Button 1 (S): Return to the Startup Scene Button 2 (–): Previous Scene (decrement) Button 3 (+): Next Scene (increment)
The other five Quick Setup buttons do nothing in this Quick Setup. If you repeatedly press the Next (+) or Previous (–) button before the scene change occurs, you can advance forwards or backwards by several scenes. This method therefore makes it possible to move beyond Scene 8 and select scenes from locations 9~32. Using Startup button automatically returns you to the stored Startup Scene, from wherever you might be at the moment. Note: the current Quick Setup, current scene and startup scene (in parentheses) for the current RT Control Layer is displayed in the MOX’s Remote Mode screen – see the section “Real-Time Information Stream.” When Quick Setup 6 is selected, the second line from the bottom displays “QS:6 Scenes S – +.”
Using the MOX Knobs
The MOX’s two groups of four knobs can be used to control several different KARMA Functions. As shown in the diagram, we shall refer to them as Knobs 1 and Knobs 2. Furthermore, we shall refer to the three rows of parameters in each group as rows 1, 2 and 3 (under Knobs 1) and rows 4, 5 and 6 (under Knobs 2). The functions of these two groups of Knobs are not affected by changing the current Quick Setup, and are explained in more detail in the following sections. Note: selecting different rows of parameters with the buttons in each section changes the information displayed in the MOX’s Remote Mode screen – see the section “Real-Time Information Stream.”
Knobs 1 - Controlling the Tone Settings
The Knobs 1 group controls eight different “Tone” CCs that have been programmed in each KARMA Performance. These eight CCs correspond to the eight Tone 1 Knobs of the Motif XF and XS implementation – and since all of KARMA Motif’s supported Yamaha models share the same KARMA Performances, the four additional knobs of the MOX (labeled ----- in the diagram) purposely have no functionality. These eight CCs are listed in the accompanying Performance Notes for each KARMA Performance under the “Tone 1 Knobs” section. Unlike the way these are normally used in the MOX to affect the currently selected track when in Song Mode, KARMA has the ability to route these to any of the six Modules and two Keyboard Tracks, separately or in combinations – when used from the Remote Mode.
Page 11
Changing the row with the button to the left of the knobs displays the following three screens when using our Custom Control Template “45: KARMA Motif”: Note that a value of +0 represents “as stored” and other values will be positive or negative offsets. An example “Tone 1 Knobs” section from one of the Performance Notes documents is shown below. The eight knobs in the table correspond to the same eight available parameters spread across the three rows here in the MOX.
See also the “Tone 1 Knob Reference” tutorial for more information.
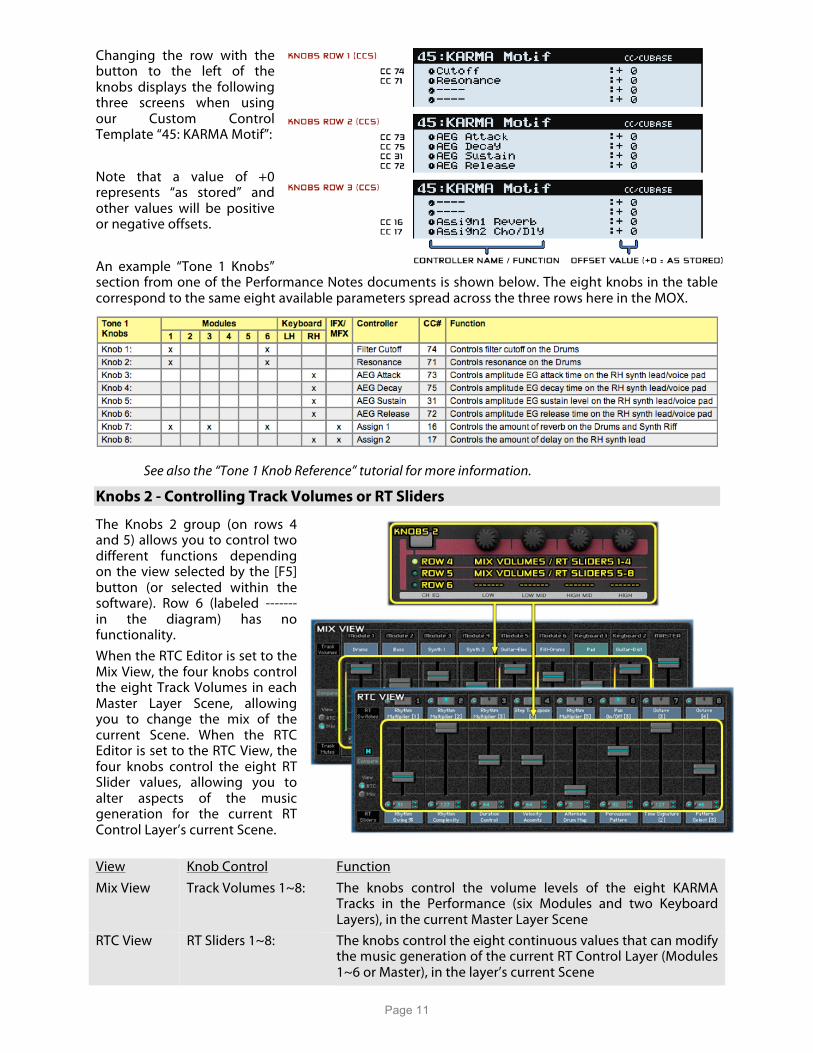
Knobs 2 - Controlling Track Volumes or RT Sliders
The Knobs 2 group (on rows 4 and 5) allows you to control two different functions depending on the view selected by the [F5] button (or selected within the software). Row 6 (labeled ------- in the diagram) has no functionality. When the RTC Editor is set to the Mix View, the four knobs control the eight Track Volumes in each Master Layer Scene, allowing you to change the mix of the current Scene. When the RTC Editor is set to the RTC View, the four knobs control the eight RT Slider values, allowing you to alter aspects of the music generation for the current RT Control Layer’s current Scene. View Knob Control Function Mix View Track Volumes 1~8: The knobs control the volume levels of the eight KARMA
Tracks in the Performance (six Modules and two Keyboard Layers), in the current Master Layer Scene
RTC View RT Sliders 1~8: The knobs control the eight continuous values that can modify the music generation of the current RT Control Layer (Modules 1~6 or Master), in the layer’s current Scene
Page 12
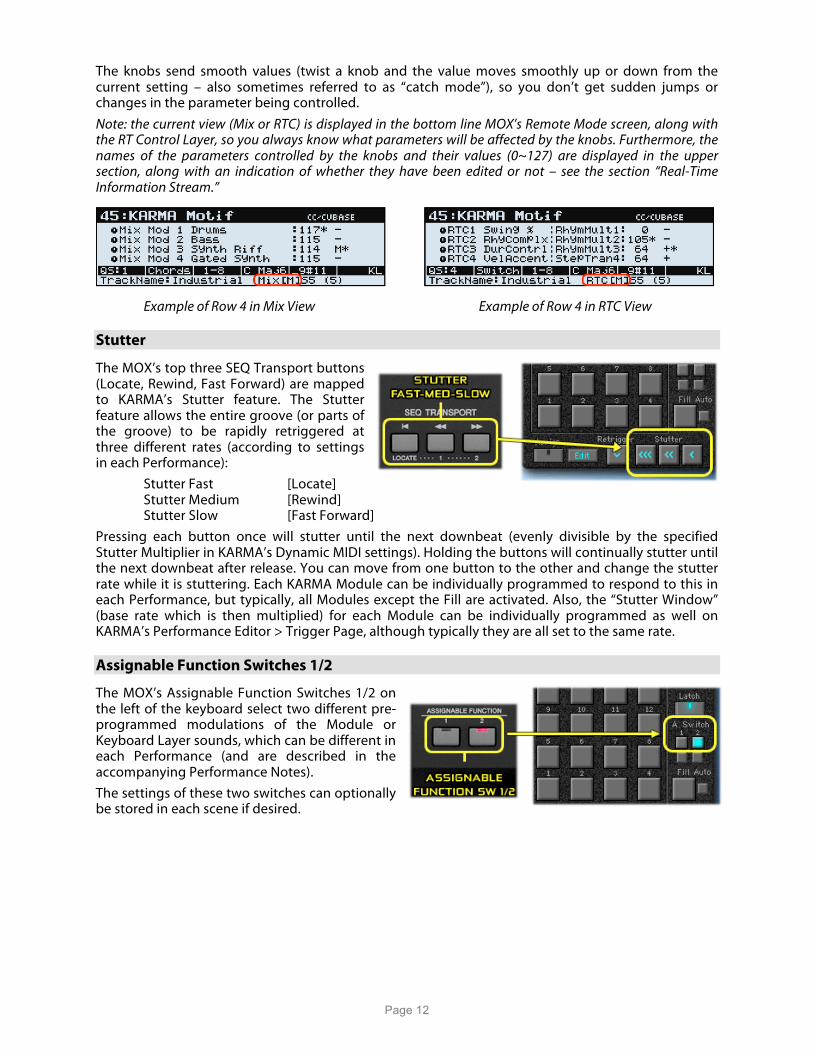
The knobs send smooth values (twist a knob and the value moves smoothly up or down from the current setting – also sometimes referred to as “catch mode”), so you don’t get sudden jumps or changes in the parameter being controlled. Note: the current view (Mix or RTC) is displayed in the bottom line MOX’s Remote Mode screen, along with the RT Control Layer, so you always know what parameters will be affected by the knobs. Furthermore, the names of the parameters controlled by the knobs and their values (0~127) are displayed in the upper section, along with an indication of whether they have been edited or not – see the section “Real-Time Information Stream.”
Example of Row 4 in Mix View Example of Row 4 in RTC View
Stutter
The MOX’s top three SEQ Transport buttons (Locate, Rewind, Fast Forward) are mapped to KARMA’s Stutter feature. The Stutter feature allows the entire groove (or parts of the groove) to be rapidly retriggered at three different rates (according to settings in each Performance):
Stutter Fast [Locate] Stutter Medium [Rewind] Stutter Slow [Fast Forward]
Pressing each button once will stutter until the next downbeat (evenly divisible by the specified Stutter Multiplier in KARMA’s Dynamic MIDI settings). Holding the buttons will continually stutter until the next downbeat after release. You can move from one button to the other and change the stutter rate while it is stuttering. Each KARMA Module can be individually programmed to respond to this in each Performance, but typically, all Modules except the Fill are activated. Also, the “Stutter Window” (base rate which is then multiplied) for each Module can be individually programmed as well on KARMA’s Performance Editor > Trigger Page, although typically they are all set to the same rate.
Assignable Function Switches 1/2
The MOX’s Assignable Function Switches 1/2 on the left of the keyboard select two different pre-programmed modulations of the Module or Keyboard Layer sounds, which can be different in each Performance (and are described in the accompanying Performance Notes). The settings of these two switches can optionally be stored in each scene if desired.

Page 13
Master Transpose Up/Down/Reset
The MOX’s [Category Search] and [Favorite] buttons (to the left of the Data Wheel) have been mapped to KARMA’s Master Transpose feature.
The Master Transpose setting allows the changing of the overall “key” in which KARMA is generating the Performance – and can be stored in each Performance. Each time you press the Transpose Up or Transpose Down buttons, you transpose the key by one semitone up or down from the current setting – and it works in real-time (try it while you are jamming away). You can play in the key that you are comfortable in while KARMA generates music and transposes your keyboard parts into a different key (i.e. play in the key of C, with the Master Transpose at +4, and everything comes out in the key of E). You can also use the feature as a creative tool, giving the illusion that you are soloing in ever-changing keys during live performance. To reset to the stored Master Transpose setting, press both buttons at the same time. KARMA’s interface displays the current Master Transpose offset in the upper left corner next to the name of the currently played chord (under the toolbar icons). Note: the current Chord and Master Transpose setting are displayed in the MOX’s Remote Mode screen – see the section “Real-Time Information Stream.”
Chord Assign
You can assign your own chords to KARMA’s Chord Triggers using the Chord Assign button, which has been mapped to the MOX’s [Solo] button on the far right. KARMA always remembers the last chord (or note) that you have played on the keyboard. When you wish to assign that chord or note to one of the 16 Chord Triggers, simply press the Chord Assign button and then press the Chord Trigger button to which you want to assign it. The chord or note is then instantly assigned to that button, and will be stored in the Performance (if you save the settings, of course). In other words, one method of assigning a chord is: play a chord or note on the keyboard, press the Chord Assign button (LED goes on in the software), then press any of the 16 Chord Trigger buttons. The LED goes off and the chord or note is assigned to that Chord Trigger. There is also a second method for assigning chords when they have a wider voicing than you can comfortably play. Press the Chord Assign button first (LED goes on), then press the lowest note of the chord and hold it down while using the other hand to press up to seven more notes in succession, anywhere on the keyboard. When finished, release the keys, and press the Chord Trigger button to which you want to assign the chord. The LED goes off and the chord is assigned to that Chord Trigger.
Page 14
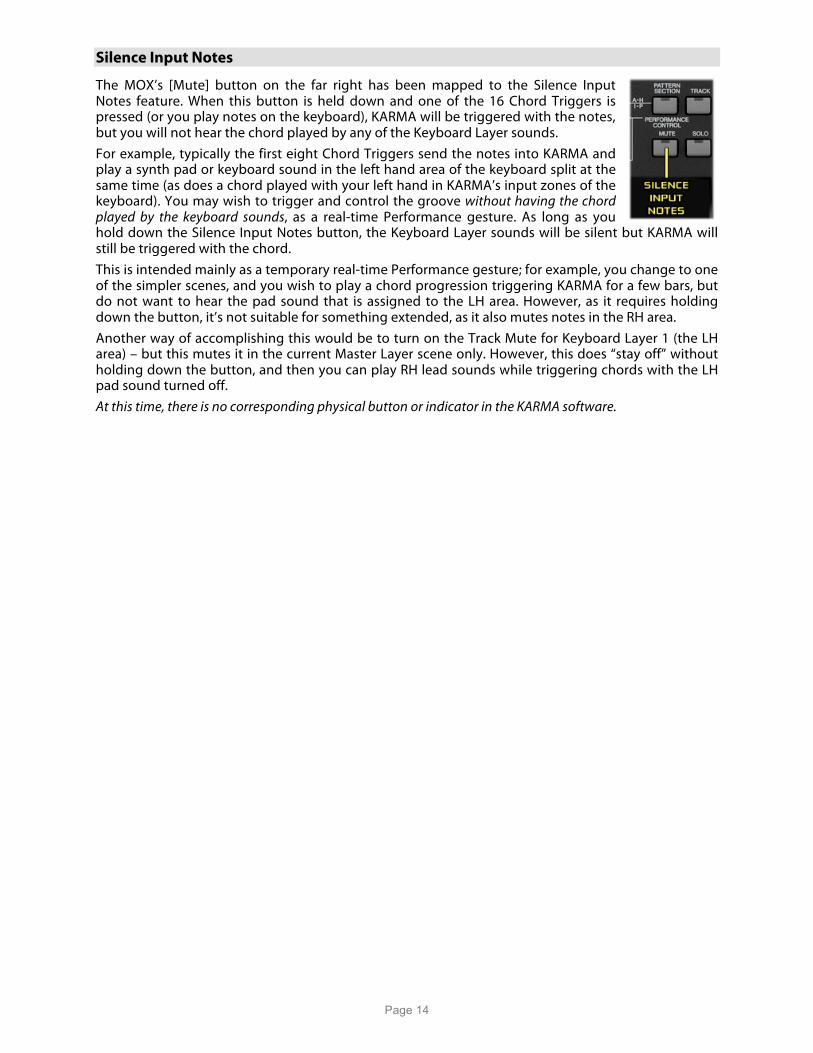
Silence Input Notes
The MOX’s [Mute] button on the far right has been mapped to the Silence Input Notes feature. When this button is held down and one of the 16 Chord Triggers is pressed (or you play notes on the keyboard), KARMA will be triggered with the notes, but you will not hear the chord played by any of the Keyboard Layer sounds. For example, typically the first eight Chord Triggers send the notes into KARMA and play a synth pad or keyboard sound in the left hand area of the keyboard split at the same time (as does a chord played with your left hand in KARMA’s input zones of the keyboard). You may wish to trigger and control the groove without having the chord played by the keyboard sounds, as a real-time Performance gesture. As long as you hold down the Silence Input Notes button, the Keyboard Layer sounds will be silent but KARMA will still be triggered with the chord. This is intended mainly as a temporary real-time Performance gesture; for example, you change to one of the simpler scenes, and you wish to play a chord progression triggering KARMA for a few bars, but do not want to hear the pad sound that is assigned to the LH area. However, as it requires holding down the button, it’s not suitable for something extended, as it also mutes notes in the RH area. Another way of accomplishing this would be to turn on the Track Mute for Keyboard Layer 1 (the LH area) – but this mutes it in the current Master Layer scene only. However, this does “stay off” without holding down the button, and then you can play RH lead sounds while triggering chords with the LH pad sound turned off. At this time, there is no corresponding physical button or indicator in the KARMA software.
Page 15
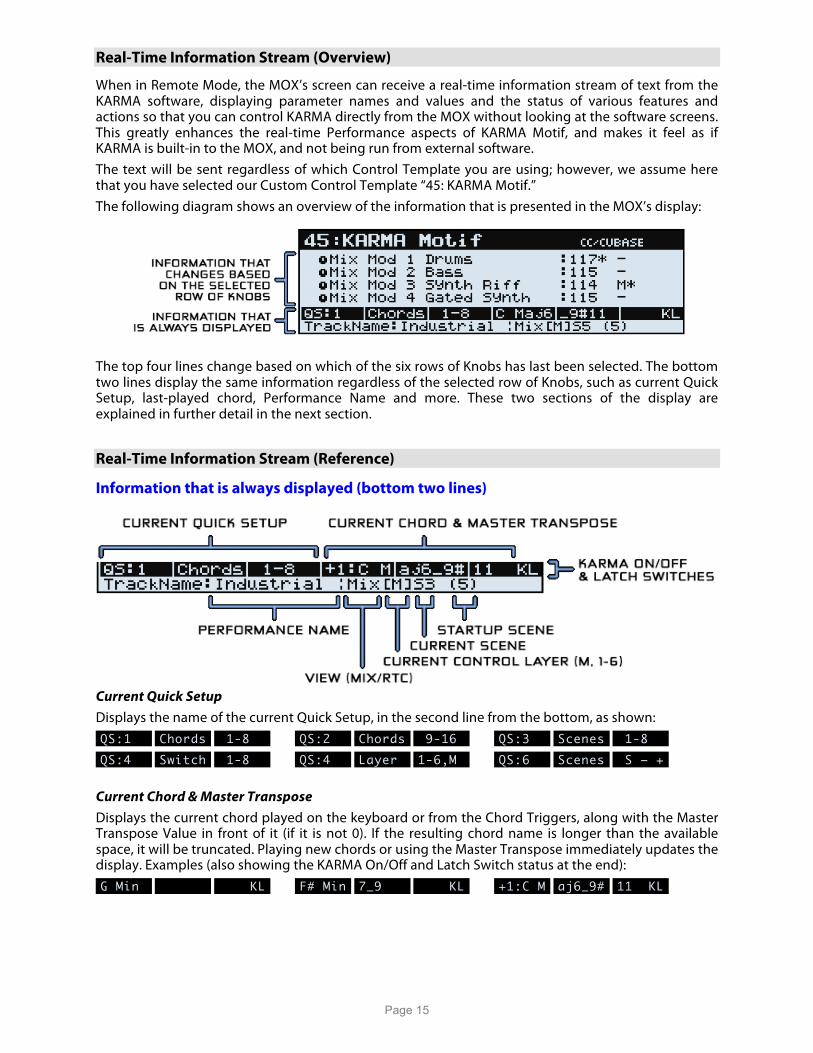
Real-Time Information Stream (Overview)
When in Remote Mode, the MOX’s screen can receive a real-time information stream of text from the KARMA software, displaying parameter names and values and the status of various features and actions so that you can control KARMA directly from the MOX without looking at the software screens. This greatly enhances the real-time Performance aspects of KARMA Motif, and makes it feel as if KARMA is built-in to the MOX, and not being run from external software. The text will be sent regardless of which Control Template you are using; however, we assume here that you have selected our Custom Control Template “45: KARMA Motif.” The following diagram shows an overview of the information that is presented in the MOX’s display:
The top four lines change based on which of the six rows of Knobs has last been selected. The bottom two lines display the same information regardless of the selected row of Knobs, such as current Quick Setup, last-played chord, Performance Name and more. These two sections of the display are explained in further detail in the next section.
Real-Time Information Stream (Reference)
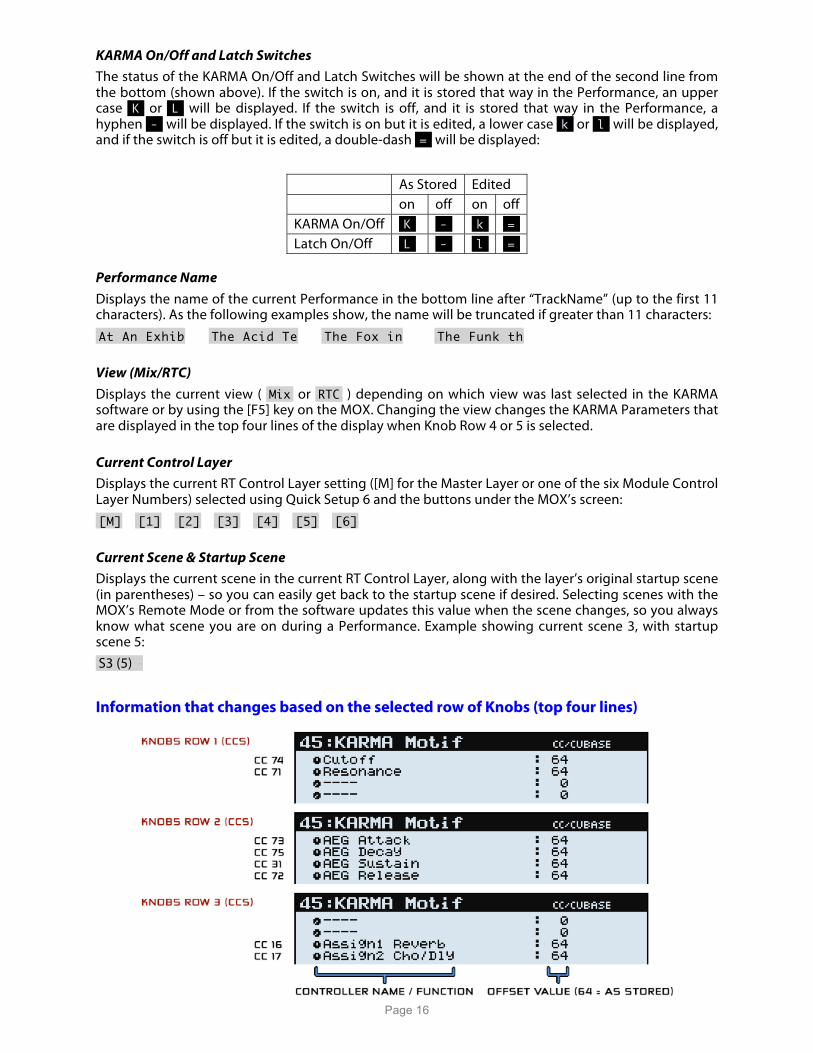
Information that is always displayed (bottom two lines)
Current Quick Setup Displays the name of the current Quick Setup, in the second line from the bottom, as shown: -QS:1 - -Chords- - 1-8 - -QS:2 - -Chords- - 9-16 - -QS:3 - -Scenes- - 1-8 - -QS:4 - -Switch- - 1-8 - -QS:4 - -Layer - -1-6,M - -QS:6 - -Scenes- - S – +- Current Chord & Master Transpose Displays the current chord played on the keyboard or from the Chord Triggers, along with the Master Transpose Value in front of it (if it is not 0). If the resulting chord name is longer than the available space, it will be truncated. Playing new chords or using the Master Transpose immediately updates the display. Examples (also showing the KARMA On/Off and Latch Switch status at the end): -G Min - - - - KL- -F# Min- -7_9 - - KL- -+1:C M- -aj6_9#- -11 KL-
Page 16
KARMA On/Off and Latch Switches The status of the KARMA On/Off and Latch Switches will be shown at the end of the second line from the bottom (shown above). If the switch is on, and it is stored that way in the Performance, an upper case -K- or -L- will be displayed. If the switch is off, and it is stored that way in the Performance, a hyphen --- will be displayed. If the switch is on but it is edited, a lower case -k- or -l- will be displayed, and if the switch is off but it is edited, a double-dash -=- will be displayed:
As Stored Edited on off on off KARMA On/Off -K- --- -k- -=- Latch On/Off -L- --- -l- -=-
Performance Name Displays the name of the current Performance in the bottom line after “TrackName” (up to the first 11 characters). As the following examples show, the name will be truncated if greater than 11 characters:
.At An Exhib .The Acid Te .The Fox in .The Funk th View (Mix/RTC) Displays the current view ( .Mix. or .RTC. ) depending on which view was last selected in the KARMA software or by using the [F5] key on the MOX. Changing the view changes the KARMA Parameters that are displayed in the top four lines of the display when Knob Row 4 or 5 is selected. Current Control Layer Displays the current RT Control Layer setting ([M] for the Master Layer or one of the six Module Control Layer Numbers) selected using Quick Setup 6 and the buttons under the MOX’s screen:
.[M] .[1] .[2] .[3] .[4] .[5] .[6] Current Scene & Startup Scene Displays the current scene in the current RT Control Layer, along with the layer’s original startup scene (in parentheses) – so you can easily get back to the startup scene if desired. Selecting scenes with the MOX’s Remote Mode or from the software updates this value when the scene changes, so you always know what scene you are on during a Performance. Example showing current scene 3, with startup scene 5: .S3 (5) -
Information that changes based on the selected row of Knobs (top four lines)
Page 17
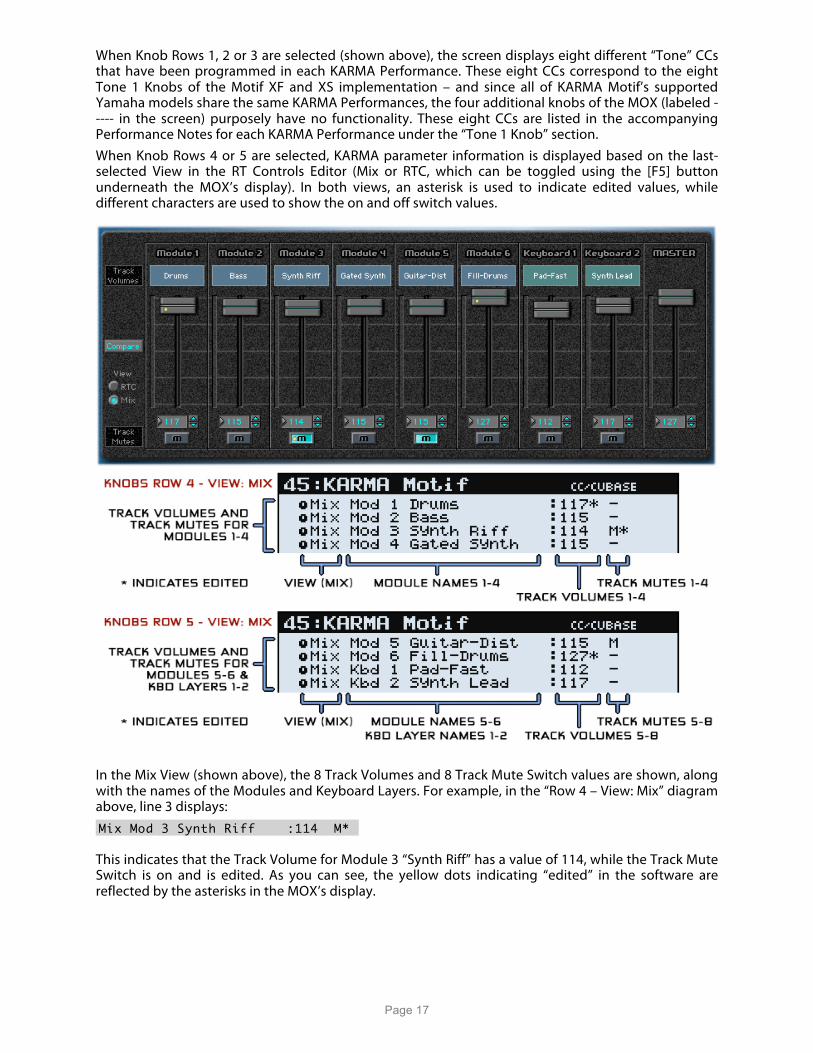
When Knob Rows 1, 2 or 3 are selected (shown above), the screen displays eight different “Tone” CCs that have been programmed in each KARMA Performance. These eight CCs correspond to the eight Tone 1 Knobs of the Motif XF and XS implementation – and since all of KARMA Motif’s supported Yamaha models share the same KARMA Performances, the four additional knobs of the MOX (labeled ----- in the screen) purposely have no functionality. These eight CCs are listed in the accompanying Performance Notes for each KARMA Performance under the “Tone 1 Knob” section. When Knob Rows 4 or 5 are selected, KARMA parameter information is displayed based on the last-selected View in the RT Controls Editor (Mix or RTC, which can be toggled using the [F5] button underneath the MOX’s display). In both views, an asterisk is used to indicate edited values, while different characters are used to show the on and off switch values.
In the Mix View (shown above), the 8 Track Volumes and 8 Track Mute Switch values are shown, along with the names of the Modules and Keyboard Layers. For example, in the “Row 4 – View: Mix” diagram above, line 3 displays:
.Mix Mod 3 Synth Riff :114 M* . . . This indicates that the Track Volume for Module 3 “Synth Riff” has a value of 114, while the Track Mute Switch is on and is edited. As you can see, the yellow dots indicating “edited” in the software are reflected by the asterisks in the MOX’s display.
Page 18
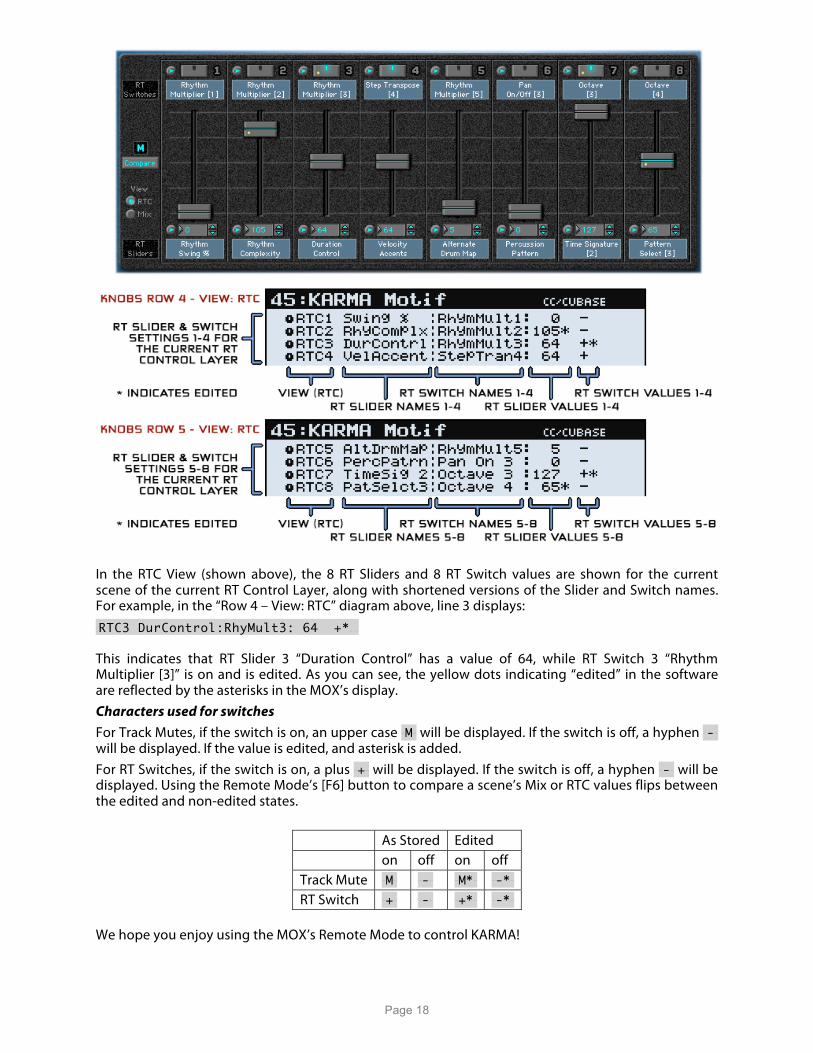
In the RTC View (shown above), the 8 RT Sliders and 8 RT Switch values are shown for the current scene of the current RT Control Layer, along with shortened versions of the Slider and Switch names. For example, in the “Row 4 – View: RTC” diagram above, line 3 displays:
.RTC3 DurControl:RhyMult3: 64 +* . . . This indicates that RT Slider 3 “Duration Control” has a value of 64, while RT Switch 3 “Rhythm Multiplier [3]” is on and is edited. As you can see, the yellow dots indicating “edited” in the software are reflected by the asterisks in the MOX’s display. Characters used for switches For Track Mutes, if the switch is on, an upper case -M- will be displayed. If the switch is off, a hyphen --- will be displayed. If the value is edited, and asterisk is added. For RT Switches, if the switch is on, a plus -+- will be displayed. If the switch is off, a hyphen --- will be displayed. Using the Remote Mode’s [F6] button to compare a scene’s Mix or RTC values flips between the edited and non-edited states.
As Stored Edited on off on off Track Mute -M- --- -M*- --*- RT Switch -+- --- -+*- --*-
We hope you enjoy using the MOX’s Remote Mode to control KARMA!