Embed Size (px)
Citation preview
Joomla! E-Commerce with VirtueMart
Suhreed Sarkar
Chapter No. 5 "Managing Customers and Orders"
For More Information: www.packtpub.com/joomla-e-commerce-with-virtuemart-1-1-x/book
In this package, you will find: A Biography of the author of the book
A preview chapter from the book, Chapter NO 5 "Managing Customers and Orders"
A synopsis of the book’s content
Information on where to buy this book
About the Author Suhreed Sarkar is an IT consultant, trainer, and technical writer. He studied Marine engineering, served on board for two years, and then started his journey into the IT world with MCSE in Windows NT 4.0 track. Later, he studied business administration and earned an MBA from the University of Dhaka. He has many BrainBench certifications on various topics including PHP4, Project Management, RDBMS Concepts, E-commerce, Web Server Administration, Internet Security, Training Development, Training Delivery and Evaluation, and Technical Writing.
He has taught courses on System Administration, Web Development, E-commerce, and MIS. He has consulted for several national and international organizations including United Nations, and helped clients build and adopt their web portals, large scale databases, and management information systems. At present, he is working on building a framework for the education sector in MIS, and promoting use of ICTs in education.

For More Information: www.packtpub.com/joomla-e-commerce-with-virtuemart-1-1-x/book
Suhreed is a renowned technical author in Bengali—having a dozen book published on subjects covering web development, LAMP, networking, and system administration. He authored Zen Cart: E-commerce Application Development, published by Packt Publishing.
When not busy with hacking some apps, blogging on his blog (http://www.suhreedsarkar.com), reading the philosophy of Bertrand Russell or the management thoughts of Peter F Drucker—he likes to spend some special moments with his family.
For More Information: www.packtpub.com/joomla-e-commerce-with-virtuemart-1-1-x/book
Book Joomla! E-Commerce with VirtueMart Joomla! is an award-winning content management system, which can be used to build multiple types of websites including, but not limited to, e-commerce sites. Joomla!'s power comes from its extensibility through different types of extensions, namely components, modules, plug-ins, and templates. There is a vast repository of over 4,500 Joomla! extensions, most of which are available free of cost and comes with open source licensing. VirtueMart is one such extension which helps to build an online shop in conjunction with Joomla!. Being an extension of Joomla!, VirtueMart provides seamless integration with a Joomla! site, using the same security, look and feel, and convenient framework for extending the e-commerce application. Web developers can easily build a Joomla! and VirtueMart-based e-commerce website without the need for custom coding. Even ordinary people, with little knowledge in HTML, CSS, and PHP, can build a functional online store using Joomla! and VirtueMart. This book teaches how to build a Joomla! and VirtueMart online shop without delving into extensive coding.
What This Book Covers Chapter 1, Introduction to Joomla! and E-Commerce, introduces Joomla! and VirtueMart along with some other components similar to VirtueMart. This chapter describes Joomla!, its main features, and the e-commerce options in Joomla!. It also elaborates on VirtueMart and its features, and lists alternatives to VirtueMart and the other shopping carts that can be used with Joomla!
Chapter 2, Installation and Basic Configuration of Joomla! and VirtueMart, explains the installation of Joomla! and Virtuemart. First, it shows the basic requirements for installing Joomla! and VirtueMart. It then proceeds to show the installation procedures for Joomla! and VirtueMart. This chapter also describes installing and uninstalling Joomla! components, plug-ins, modules, and templates. It also explains setting up the basic configurations for a Joomla! site, installing the VirtueMart component and modules, and configuring the basic options for a VirtueMart shop. At the end of this chapter, you will get a Joomla! site with the VirtueMart shopping cart installed.
For More Information: www.packtpub.com/joomla-e-commerce-with-virtuemart-1-1-x/book
Chapter 3, Configuring the VirtueMart Store, explains how to configure a VirtueMart shop. First, this chapter explains configuring the shop, creating and using appropriate zones, currencies, and locales, installing and uninstalling appropriate modules, and configuring those followed by configuring the payment methods, shipping methods, and taxes for the shop. The configuration options discussed in this chapter are specific to VirtueMart which gives basis for further configuring and customizing the shop.
Chapter 4, Managing the Product Catalogue, explains details about building a product catalogue and managing the catalogue for a VirtueMart store. This chapter teaches managing manufacturers and vendors, managing the product categories and products, creating and using product attributes, and creating and using product types. In this chapter, you are going to add and edit a lot of information about manufacturers, vendors, product categories, and products. In this chapter, the VirtueMart shop will take shape with the products you want to sell.
Chapter 5, Managing Customers and Orders, discusses managing customers and orders. Specifically, it teaches configuring the user registration settings for VirtueMart, managing users for the VirtueMart shop, creating and managing fields for the customer registration form, creating and managing user groups, and creating and using order status types. This is followed by viewing order statistics, viewing details of an order, updating an order, and managing inventory. The skills taught in this chapter are invaluable for any shop administrator.
Chapter 6, Customizing the Look and Feel, discusses customizing the look and feel of the shop. This chapter teaches installing and applying a new Joomla! template to the site. It then shows how to customize the look and feel of the VirtueMart store. It also explains VirtueMart theming and layouts. Later, this chapter shows how to customize the look and feel of the VirtueMart store as a whole, and how to use search engine friendly (SEF) URLs for your shop.
Chapter 7, Promotion and Public Relations, describes the promotion and public relations tools available in VirtueMart. This chapter teaches you to use Joomla!'s and VirtueMart's promotional tools like banner ads, specials, and featured products, and also how to use coupons to attract more customers. Later, this chapter explains how to use newsletters and product notifications to keep continuous communication with your customers. You will also learn how to use VirtueMart's product review feature to express customer experiences.

For More Information: www.packtpub.com/joomla-e-commerce-with-virtuemart-1-1-x/book
Managing Customers and Orders
So far, we have seen how to configure a store and build a product catalog. When our product catalog is ready, it is time to test the user registration and order management functionalities. In this chapter, we are going to discuss how to manage customers and orders. On completion of this chapter, you will be able to:
Configure the user registration settings for VirtueMartManage users for a VirtueMart shopCreate and manage fields for a customer registration formCreate and manage user groupsCreate and use order status typesView order statisticsView details of an orderUpdate an orderManage inventory
Note that all VirtueMart customers must be registered with Joomla!. However, not all Joomla! users need to be the VirtueMart customers. Within the first few sections of this chapter, you will have a clear concept about user management in Joomla! and VirtueMart.
•
•
•
•
•
•
•
•
•
For More Information: www.packtpub.com/joomla-e-commerce-with-virtuemart-1-1-x/book
Managing Customers and Orders
[ 168 ]
Customer managementCustomer management in VirtueMart includes registering customers to the VirtueMart shop, assigning them to user groups for appropriate permission levels, managing fields in the registration form, viewing and editing customer information, and managing the user groups. Let's dive in to these activities in the following sections.
Registration/Authentication of customersJoomla! has a very strong user registration and authentication system. One core component in Joomla! is com_users, which manages user registration and authentication in Joomla!. However, VirtueMart needs some extra information for customers. VirtueMart collects this information through its own customer registration process, and stores the information in separate tables in the database. The extra information required by VirtueMart is stored in a table named jos_vm_user_info, which is related to the jos_users table by the user id field. Usually, when a user registers to the Joomla! site, they also register with VirtueMart. This depends on some global settings. In the following sections, we are going to learn how to enable the user registration and authentication for VirtueMart.
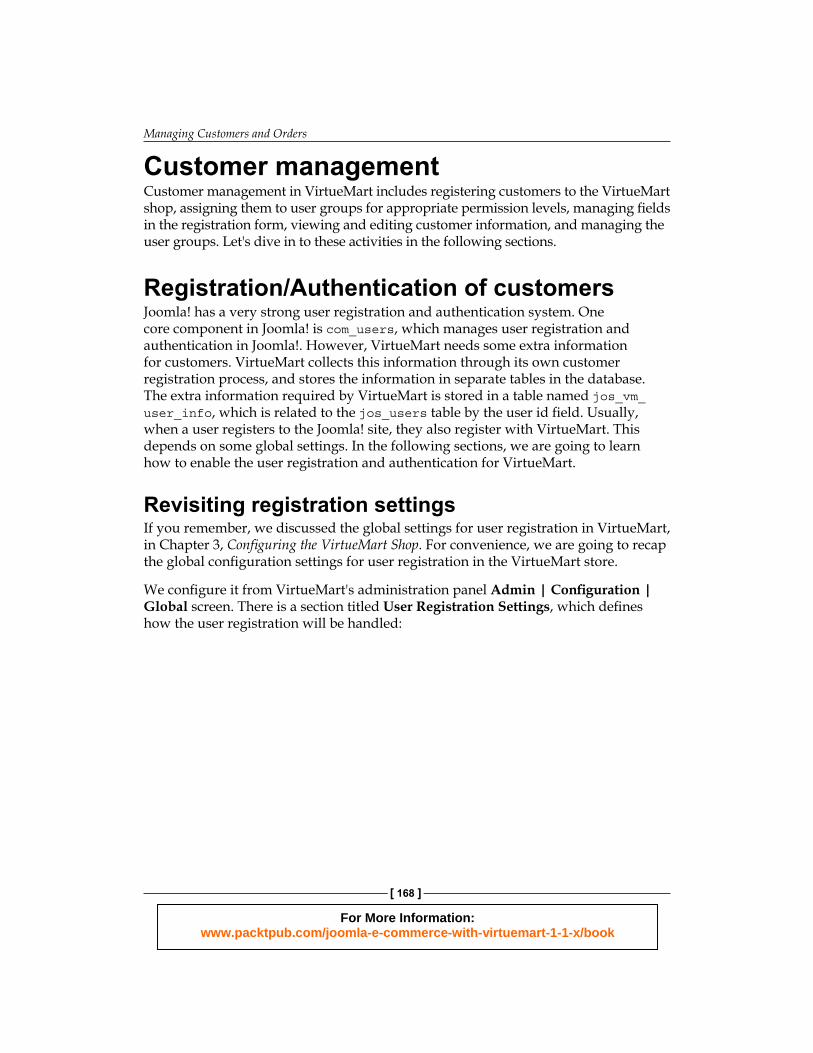
Revisiting registration settingsIf you remember, we discussed the global settings for user registration in VirtueMart, in Chapter 3, Configuring the VirtueMart Shop. For convenience, we are going to recap the global configuration settings for user registration in the VirtueMart store.
We configure it from VirtueMart's administration panel Admin | Configuration | Global screen. There is a section titled User Registration Settings, which defines how the user registration will be handled:
For More Information: www.packtpub.com/joomla-e-commerce-with-virtuemart-1-1-x/book
Chapter 5
[ 169 ]
Ensure that your VirtueMart shop has been configured as shown in the screenshot above. The first field to configure is the User Registration Type. Selecting Normal Account Creation in this field creates both a Joomla! and VirtueMart account during user registration. For our example shop, we will be using this setting.
In Chapter 3, we also warned that Joomla!'s new user activation should be disabled when we are using VirtueMart. That means the Joomla! New account activation necessary? field should read No.
For More Information: www.packtpub.com/joomla-e-commerce-with-virtuemart-1-1-x/book
Managing Customers and Orders
[ 170 ]
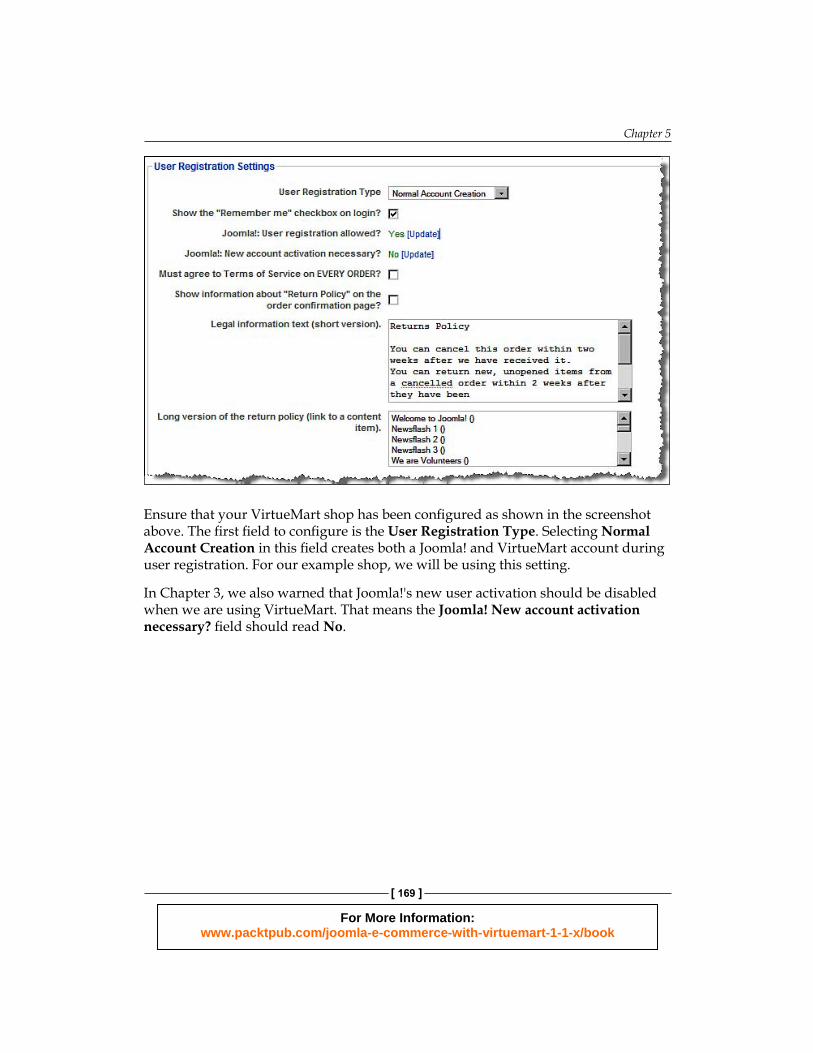
Enabling VirtueMart login moduleThere is a default module in Joomla! which is used for user registrations and login. When we are using this default Login Form (mod_login module), it does not collect information required by VirtueMart, and does not create customers in VirtueMart. By default, when published, the mod_login module looks like the following screenshot.
As you see, registered users can log in to Joomla! through this form, recover their forgotten password by clicking on the Forgot your password? link, and create a new user account by clicking on the Create an account link. When a user clicks on the Create an account link, they get the form as shown in the following screenshot:
For More Information: www.packtpub.com/joomla-e-commerce-with-virtuemart-1-1-x/book
Chapter 5
[ 171 ]
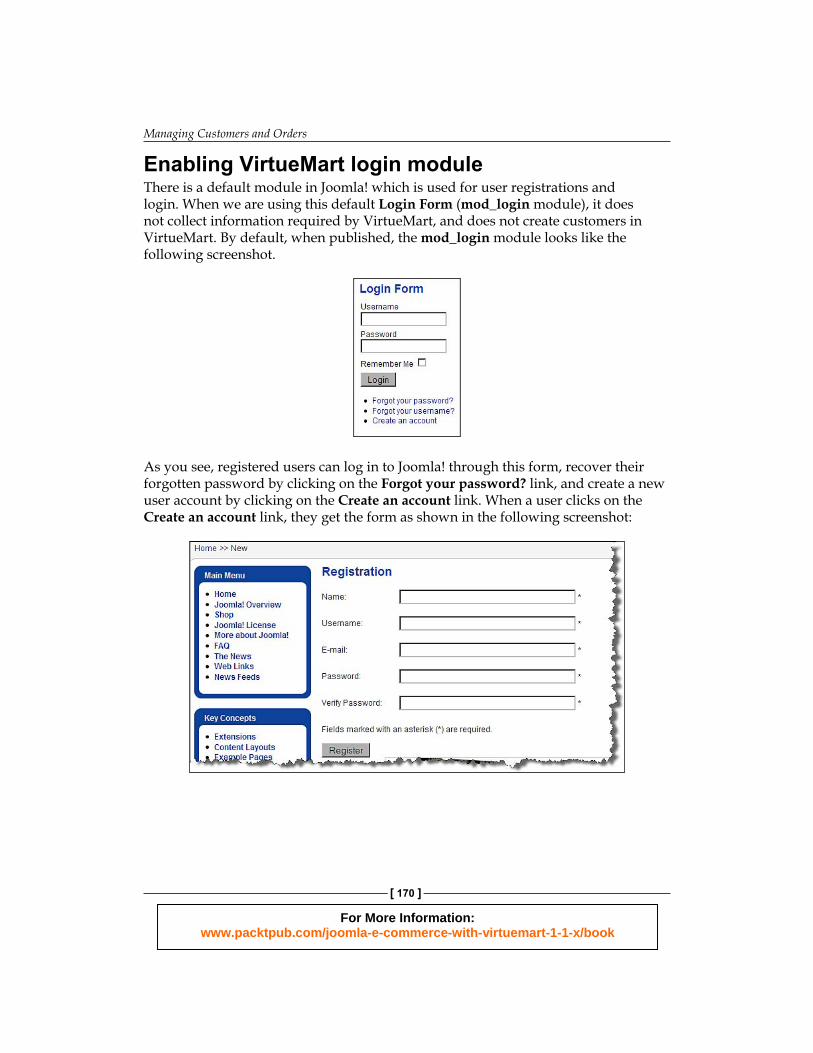
We see that normal registration in Joomla! only requires four pieces of information: Name, Username, Email, and Password. It does not collect information needed in VirtueMart, such as billing and shipping address, to be a customer. Therefore, we need to disable the mod_login module and enable the mod_virtuemart_login module. We have already learned how to enable and disable a module in Joomla!. We have also learned how to install modules. If you followed the instructions from Chapter 2 and installed all of the VirtueMart modules, you will find it from Joomla! control panel by clicking on Extensions | Module Manager:
By default, the mod_virtuemart_login module's title is VirtueMart Login. You may prefer to show this title as Login only. In that case, click on the VirtueMart Login link in the Module Name column. This brings the Module: [Edit] screen:
For More Information: www.packtpub.com/joomla-e-commerce-with-virtuemart-1-1-x/book
Managing Customers and Orders
[ 172 ]
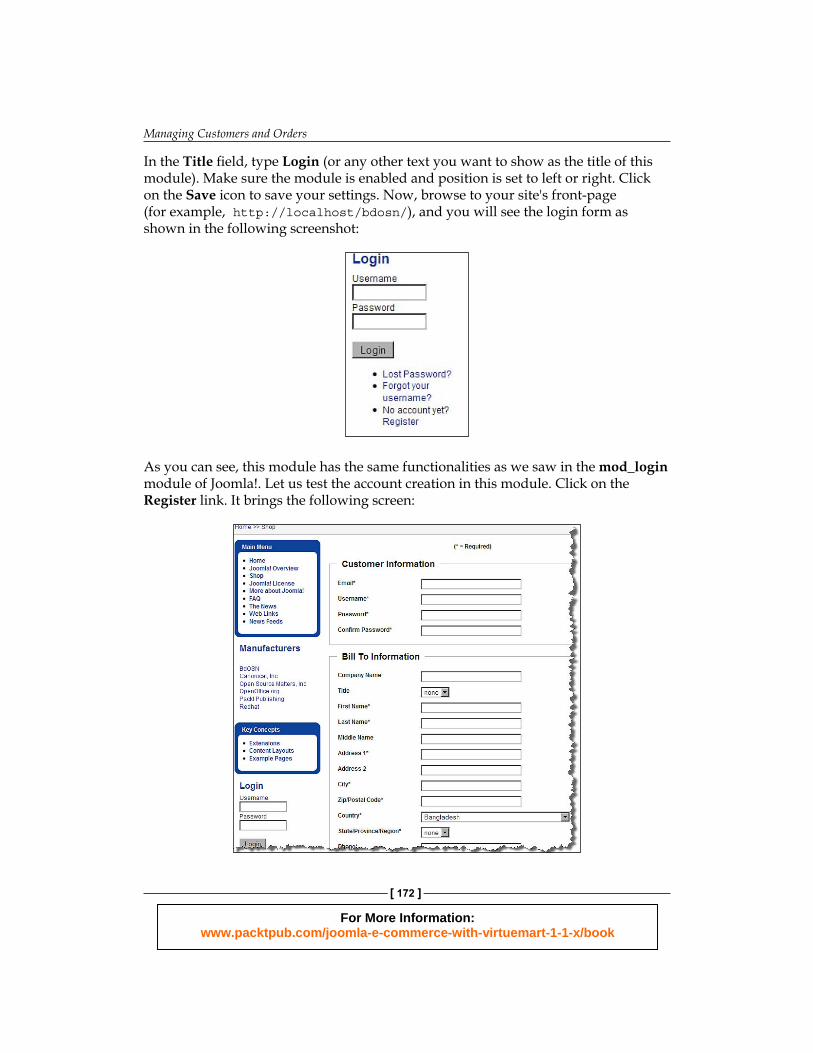
In the Title field, type Login (or any other text you want to show as the title of this module). Make sure the module is enabled and position is set to left or right. Click on the Save icon to save your settings. Now, browse to your site's front-page (for example, http://localhost/bdosn/), and you will see the login form as shown in the following screenshot:
As you can see, this module has the same functionalities as we saw in the mod_login module of Joomla!. Let us test the account creation in this module. Click on the Register link. It brings the following screen:

For More Information: www.packtpub.com/joomla-e-commerce-with-virtuemart-1-1-x/book
Chapter 5
[ 173 ]
The registration form has three main sections: Customer Information, Bill To Information, and Send Registration. At the end, there is the Send Registration button for submitting the form data. In the Customer Information section, type your email address, the desired username, and password. Confirm the password by typing it again in the Confirm password field. In the Bill To Information section, type the address details where bills are to be sent. In the entire form, required fields are marked with an asterisk (*). You must provide information for these required fields.
In the Send Registration section, you need to agree to the Terms of Service. Click on the Terms of Service link to read it. Then, check the I agree to the Terms of Service checkbox and click on the Send Registration button to submit the form data:
If you have provided all of the required information and submitted a unique email address, the registration will be successful. On successful completion of registration, you get the following screen notification, and will be logged in to the shop automatically:
If you scroll down to the Login module, you will see that you are logged in and greeted by the store. You also see the User Menu in this screen:
For More Information: www.packtpub.com/joomla-e-commerce-with-virtuemart-1-1-x/book
Managing Customers and Orders
[ 174 ]
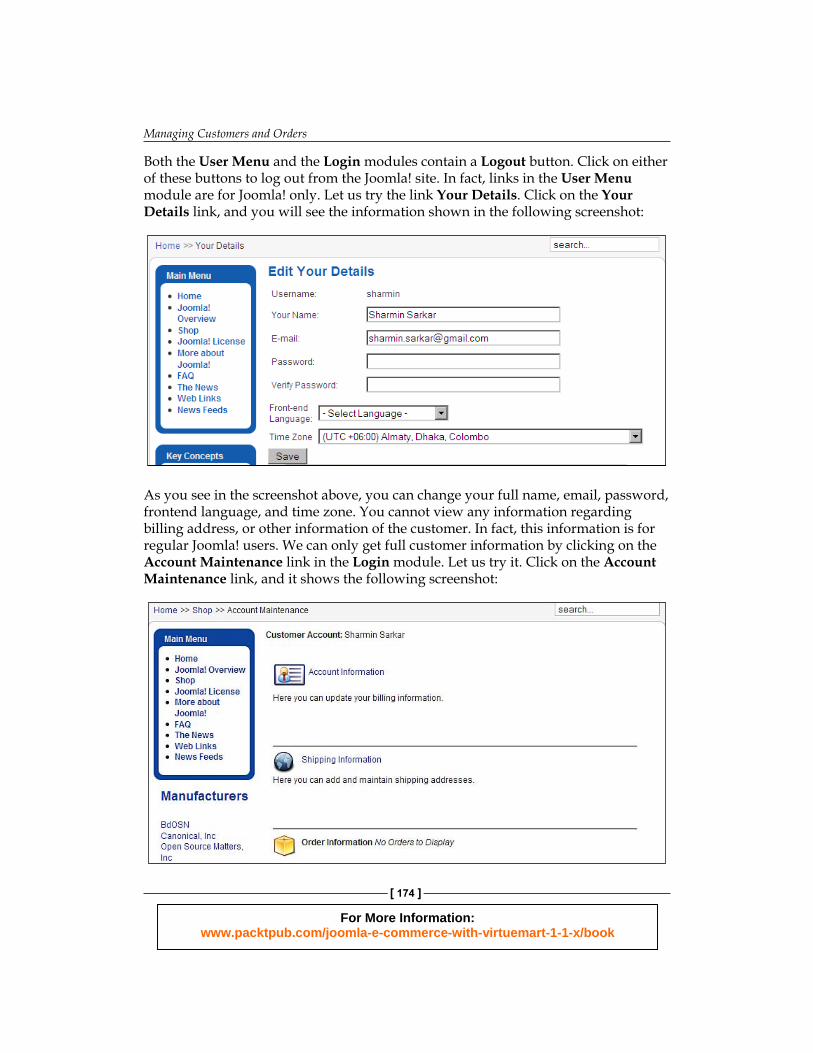
Both the User Menu and the Login modules contain a Logout button. Click on either of these buttons to log out from the Joomla! site. In fact, links in the User Menu module are for Joomla! only. Let us try the link Your Details. Click on the Your Details link, and you will see the information shown in the following screenshot:
As you see in the screenshot above, you can change your full name, email, password, frontend language, and time zone. You cannot view any information regarding billing address, or other information of the customer. In fact, this information is for regular Joomla! users. We can only get full customer information by clicking on the Account Maintenance link in the Login module. Let us try it. Click on the Account Maintenance link, and it shows the following screenshot:
For More Information: www.packtpub.com/joomla-e-commerce-with-virtuemart-1-1-x/book
Chapter 5
[ 175 ]
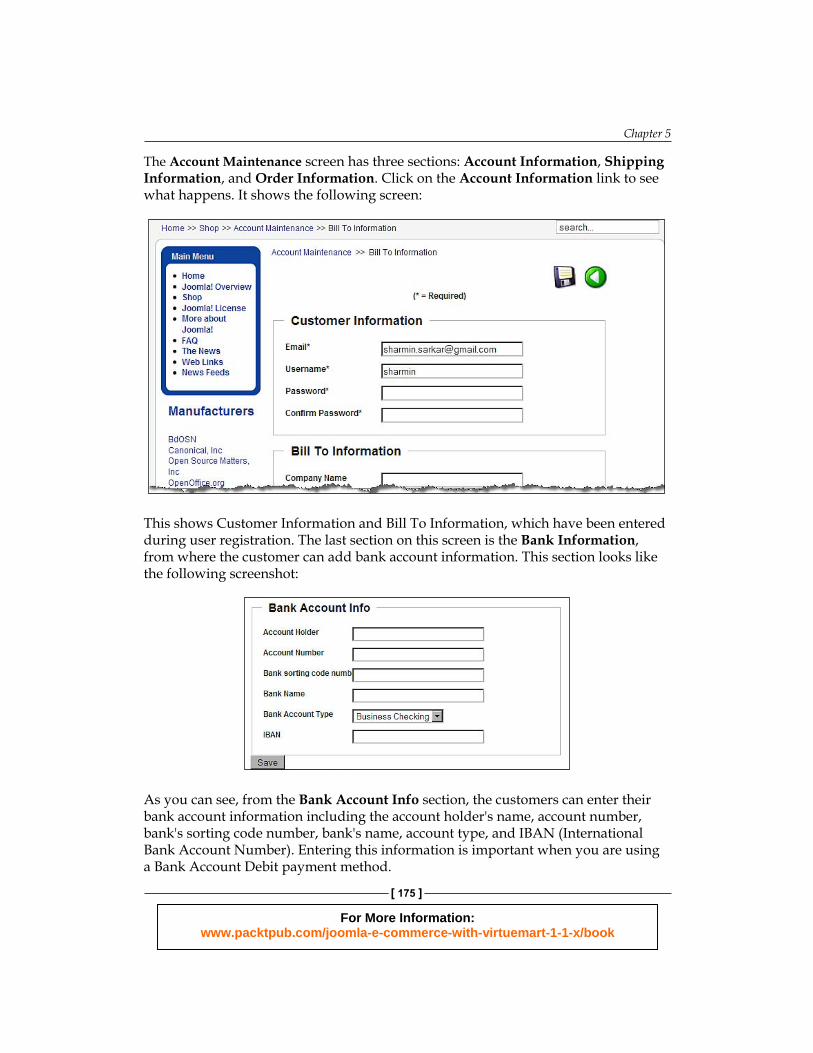
The Account Maintenance screen has three sections: Account Information, Shipping Information, and Order Information. Click on the Account Information link to see what happens. It shows the following screen:
This shows Customer Information and Bill To Information, which have been entered during user registration. The last section on this screen is the Bank Information, from where the customer can add bank account information. This section looks like the following screenshot:
As you can see, from the Bank Account Info section, the customers can enter their bank account information including the account holder's name, account number, bank's sorting code number, bank's name, account type, and IBAN (International Bank Account Number). Entering this information is important when you are using a Bank Account Debit payment method.
For More Information: www.packtpub.com/joomla-e-commerce-with-virtuemart-1-1-x/book
Managing Customers and Orders
[ 176 ]
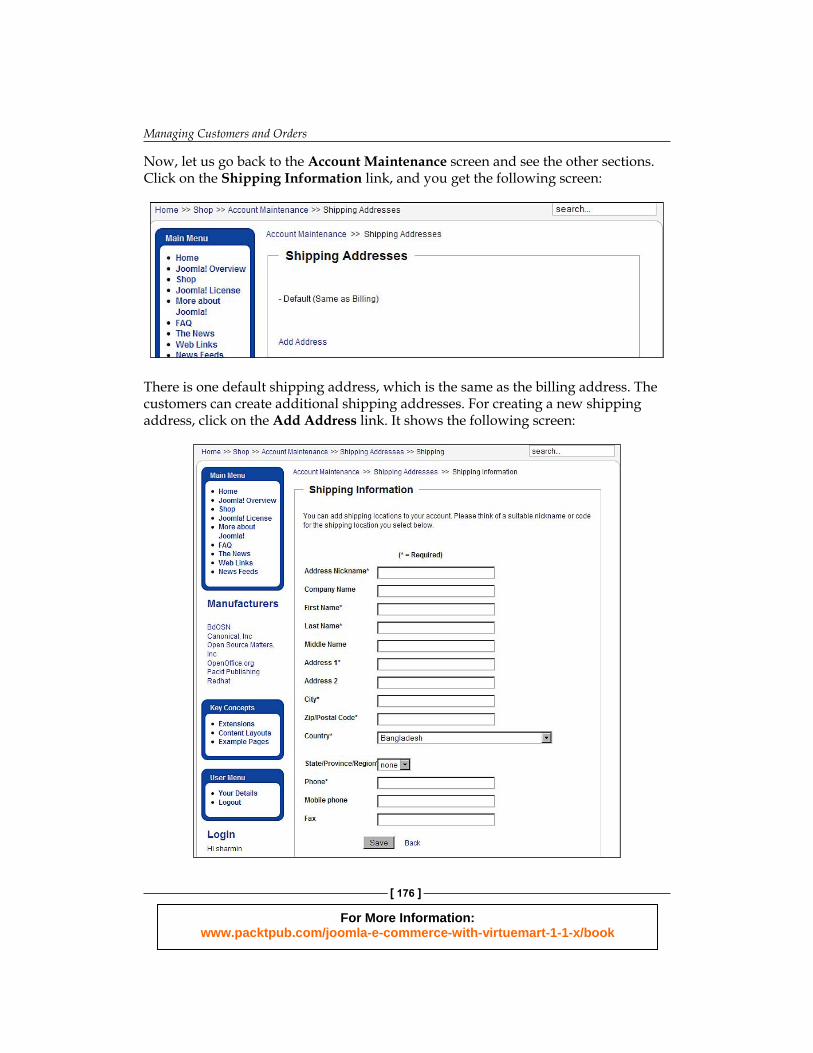
Now, let us go back to the Account Maintenance screen and see the other sections. Click on the Shipping Information link, and you get the following screen:
There is one default shipping address, which is the same as the billing address. The customers can create additional shipping addresses. For creating a new shipping address, click on the Add Address link. It shows the following screen:
For More Information: www.packtpub.com/joomla-e-commerce-with-virtuemart-1-1-x/book
Chapter 5
[ 177 ]
As you see in the above screenshot, customers can add shipping address information. Mandatory fields are marked with an asterisk (*), and must be filled in. The customer also needs to provide a nickname for the address, which will be displayed for selecting the shipping address during checkout. After filling in the form, save it by clicking on the Save button.
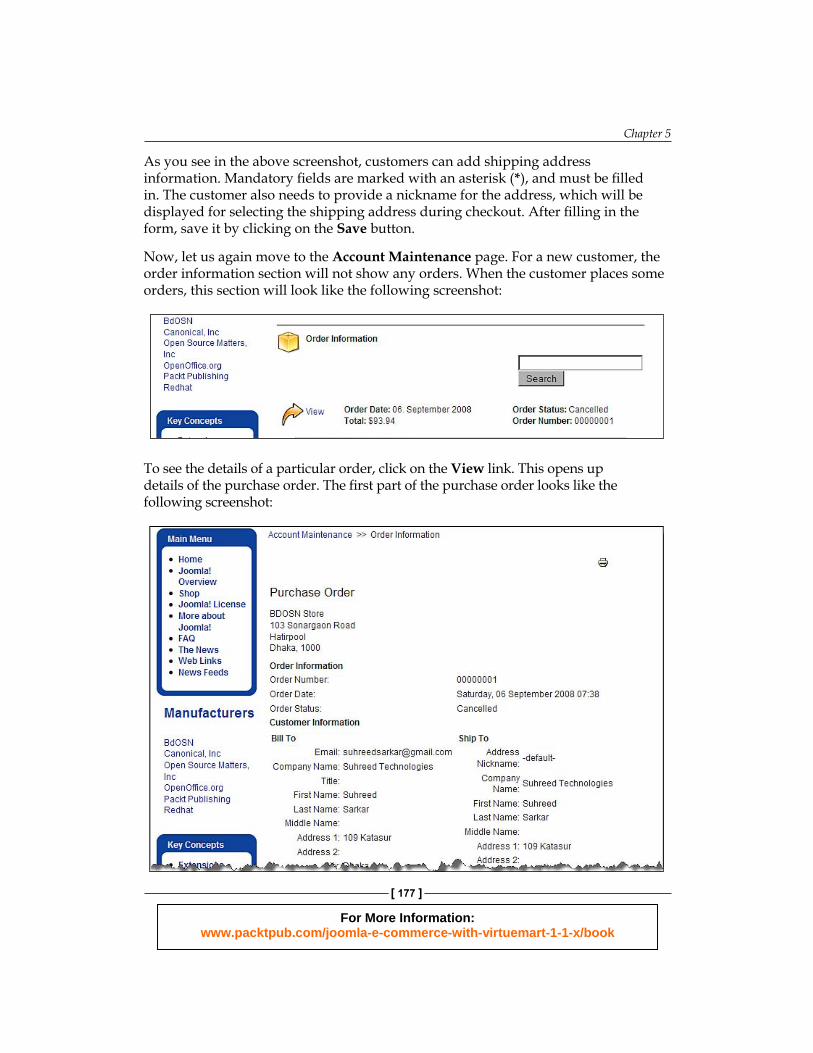
Now, let us again move to the Account Maintenance page. For a new customer, the order information section will not show any orders. When the customer places some orders, this section will look like the following screenshot:
To see the details of a particular order, click on the View link. This opens up details of the purchase order. The first part of the purchase order looks like the following screenshot:
For More Information: www.packtpub.com/joomla-e-commerce-with-virtuemart-1-1-x/book
Managing Customers and Orders
[ 178 ]
The first part of the Purchase Order contains the store's address, order information like order number, order date, and its status. It also contains the customer's information including the Bill To and Ship To addresses.
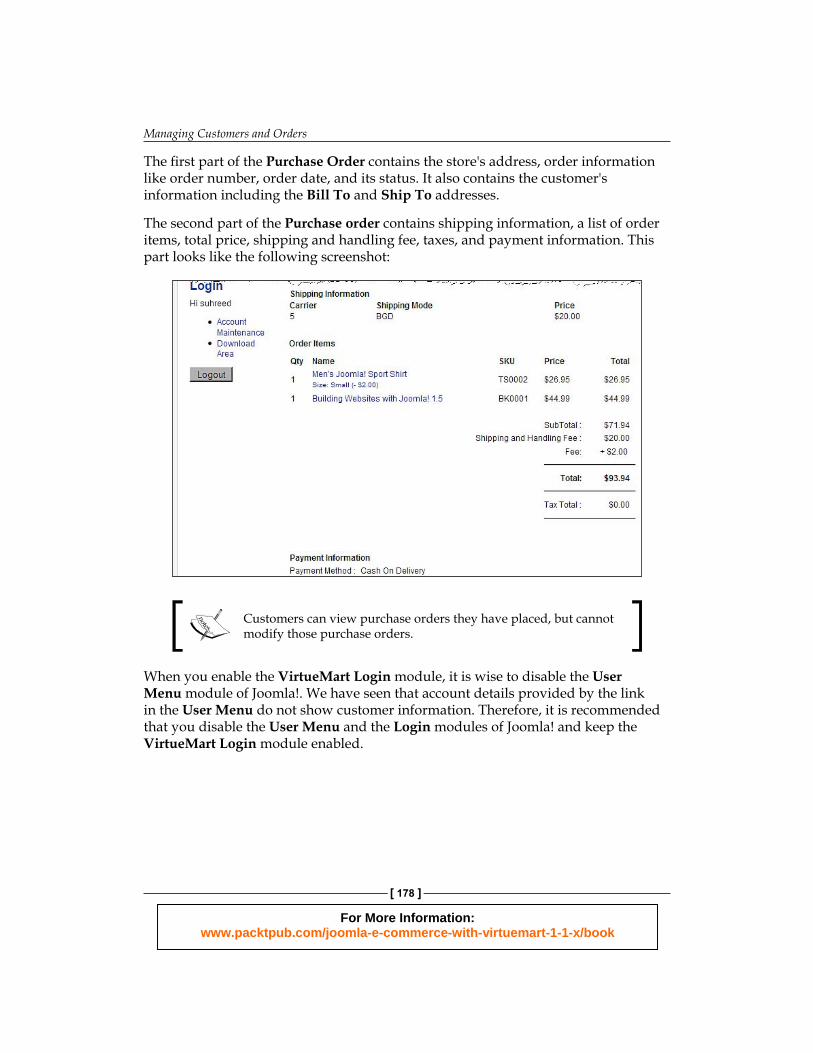
The second part of the Purchase order contains shipping information, a list of order items, total price, shipping and handling fee, taxes, and payment information. This part looks like the following screenshot:
Customers can view purchase orders they have placed, but cannot modify those purchase orders.
When you enable the VirtueMart Login module, it is wise to disable the User Menu module of Joomla!. We have seen that account details provided by the link in the User Menu do not show customer information. Therefore, it is recommended that you disable the User Menu and the Login modules of Joomla! and keep the VirtueMart Login module enabled.
For More Information: www.packtpub.com/joomla-e-commerce-with-virtuemart-1-1-x/book
Chapter 5
[ 179 ]
Managing fields for user registration formIn the previous section, we saw how customers can register to a VirtueMart shop. To enable registration and login of customers, we have disabled Joomla!'s Login Form module, and enabled the VirtueMart Login module. When registering through the Register link provided by the VirtueMart Login module, customers get some extra fields which are used for the shop's purpose such as billing and shipping to addresses. VirtueMart gives us the flexibility to define additional fields for the form, and also decide which fields will be shown in which page—registration, account information, and so on.
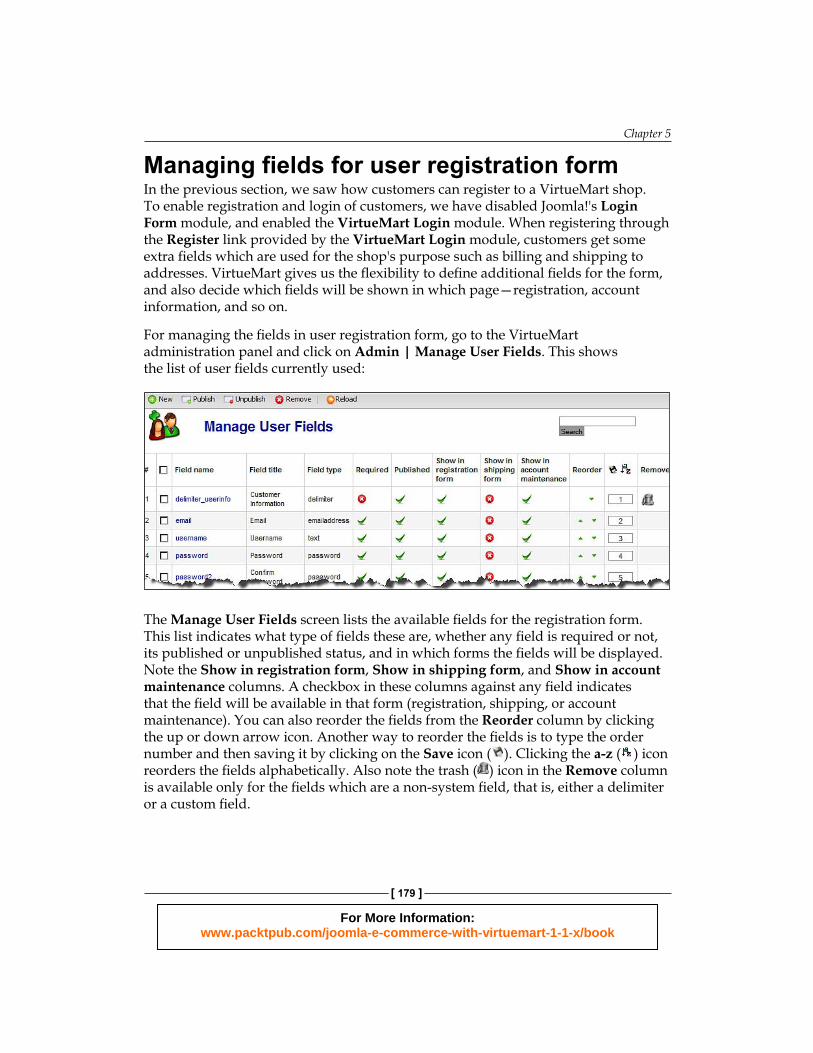
For managing the fields in user registration form, go to the VirtueMart administration panel and click on Admin | Manage User Fields. This shows the list of user fields currently used:
The Manage User Fields screen lists the available fields for the registration form. This list indicates what type of fields these are, whether any field is required or not, its published or unpublished status, and in which forms the fields will be displayed. Note the Show in registration form, Show in shipping form, and Show in account maintenance columns. A checkbox in these columns against any field indicates that the field will be available in that form (registration, shipping, or account maintenance). You can also reorder the fields from the Reorder column by clicking the up or down arrow icon. Another way to reorder the fields is to type the order number and then saving it by clicking on the Save icon ( ). Clicking the a-z ( ) icon reorders the fields alphabetically. Also note the trash ( ) icon in the Remove column is available only for the fields which are a non-system field, that is, either a delimiter or a custom field.
For More Information: www.packtpub.com/joomla-e-commerce-with-virtuemart-1-1-x/book
Managing Customers and Orders
[ 180 ]
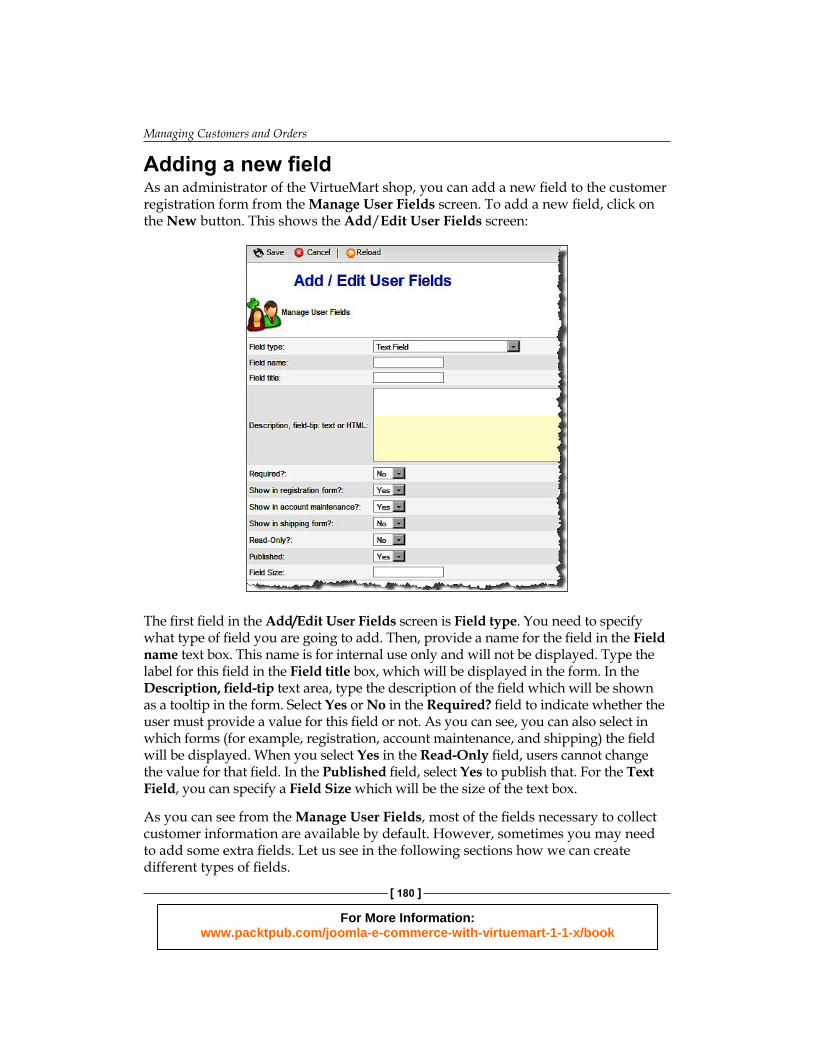
Adding a new fieldAs an administrator of the VirtueMart shop, you can add a new field to the customer registration form from the Manage User Fields screen. To add a new field, click on the New button. This shows the Add/Edit User Fields screen:
The first field in the Add/Edit User Fields screen is Field type. You need to specify what type of field you are going to add. Then, provide a name for the field in the Field name text box. This name is for internal use only and will not be displayed. Type the label for this field in the Field title box, which will be displayed in the form. In the Description, field-tip text area, type the description of the field which will be shown as a tooltip in the form. Select Yes or No in the Required? field to indicate whether the user must provide a value for this field or not. As you can see, you can also select in which forms (for example, registration, account maintenance, and shipping) the field will be displayed. When you select Yes in the Read-Only field, users cannot change the value for that field. In the Published field, select Yes to publish that. For the Text Field, you can specify a Field Size which will be the size of the text box.
As you can see from the Manage User Fields, most of the fields necessary to collect customer information are available by default. However, sometimes you may need to add some extra fields. Let us see in the following sections how we can create different types of fields.
For More Information: www.packtpub.com/joomla-e-commerce-with-virtuemart-1-1-x/book
Chapter 5
[ 181 ]
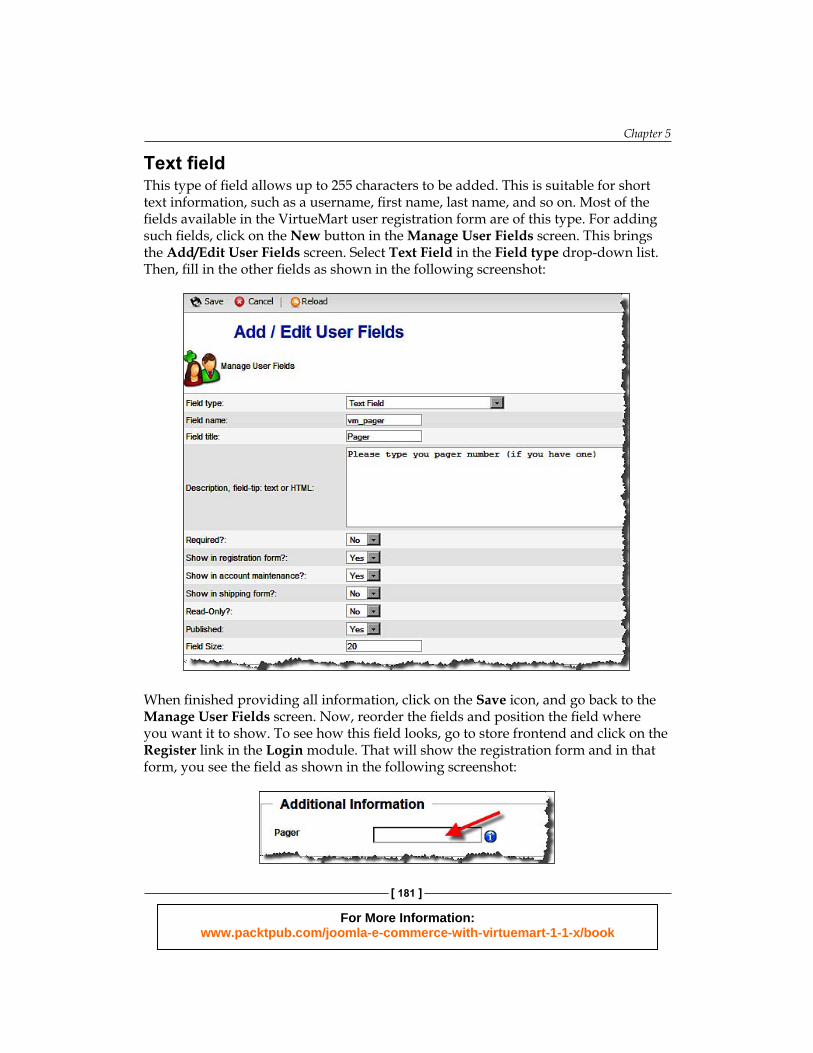
Text fieldThis type of field allows up to 255 characters to be added. This is suitable for short text information, such as a username, first name, last name, and so on. Most of the fields available in the VirtueMart user registration form are of this type. For adding such fields, click on the New button in the Manage User Fields screen. This brings the Add/Edit User Fields screen. Select Text Field in the Field type drop-down list. Then, fill in the other fields as shown in the following screenshot:
When finished providing all information, click on the Save icon, and go back to the Manage User Fields screen. Now, reorder the fields and position the field where you want it to show. To see how this field looks, go to store frontend and click on the Register link in the Login module. That will show the registration form and in that form, you see the field as shown in the following screenshot:
For More Information: www.packtpub.com/joomla-e-commerce-with-virtuemart-1-1-x/book
Managing Customers and Orders
[ 182 ]
As you can see, the Pager field is added to the form. Hover your mouse pointer over the info icon ( ) besides the field. It shows the text you typed in the Description, field-tip field during the creation of this field.
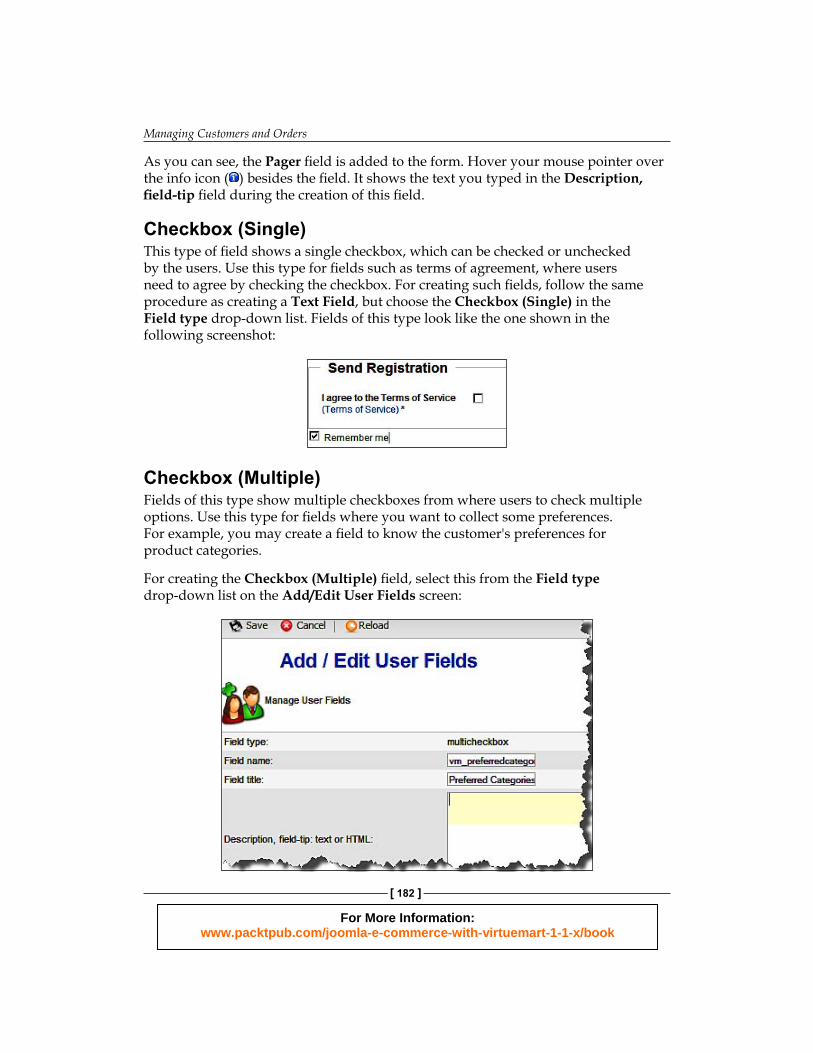
Checkbox (Single)This type of field shows a single checkbox, which can be checked or unchecked by the users. Use this type for fields such as terms of agreement, where users need to agree by checking the checkbox. For creating such fields, follow the same procedure as creating a Text Field, but choose the Checkbox (Single) in the Field type drop-down list. Fields of this type look like the one shown in the following screenshot:
Checkbox (Multiple)Fields of this type show multiple checkboxes from where users to check multiple options. Use this type for fields where you want to collect some preferences. For example, you may create a field to know the customer's preferences for product categories.
For creating the Checkbox (Multiple) field, select this from the Field type drop-down list on the Add/Edit User Fields screen:
For More Information: www.packtpub.com/joomla-e-commerce-with-virtuemart-1-1-x/book
Chapter 5
[ 183 ]
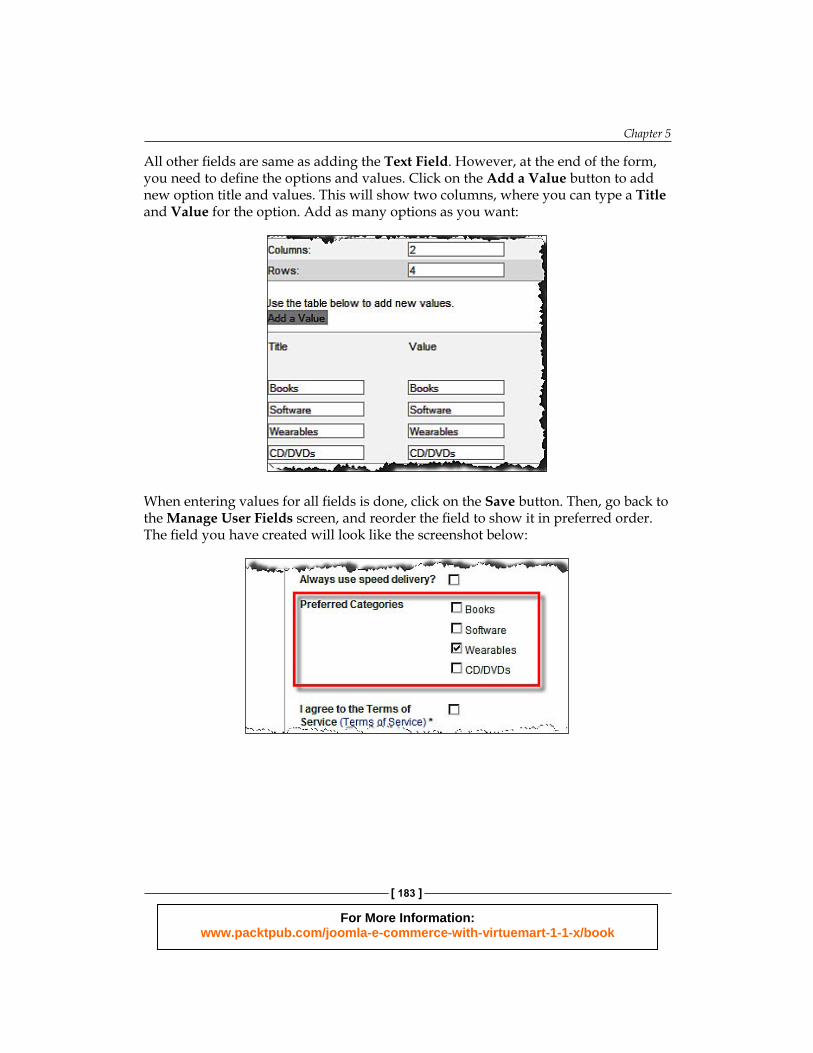
All other fields are same as adding the Text Field. However, at the end of the form, you need to define the options and values. Click on the Add a Value button to add new option title and values. This will show two columns, where you can type a Title and Value for the option. Add as many options as you want:
When entering values for all fields is done, click on the Save button. Then, go back to the Manage User Fields screen, and reorder the field to show it in preferred order. The field you have created will look like the screenshot below:
For More Information: www.packtpub.com/joomla-e-commerce-with-virtuemart-1-1-x/book
Managing Customers and Orders
[ 184 ]
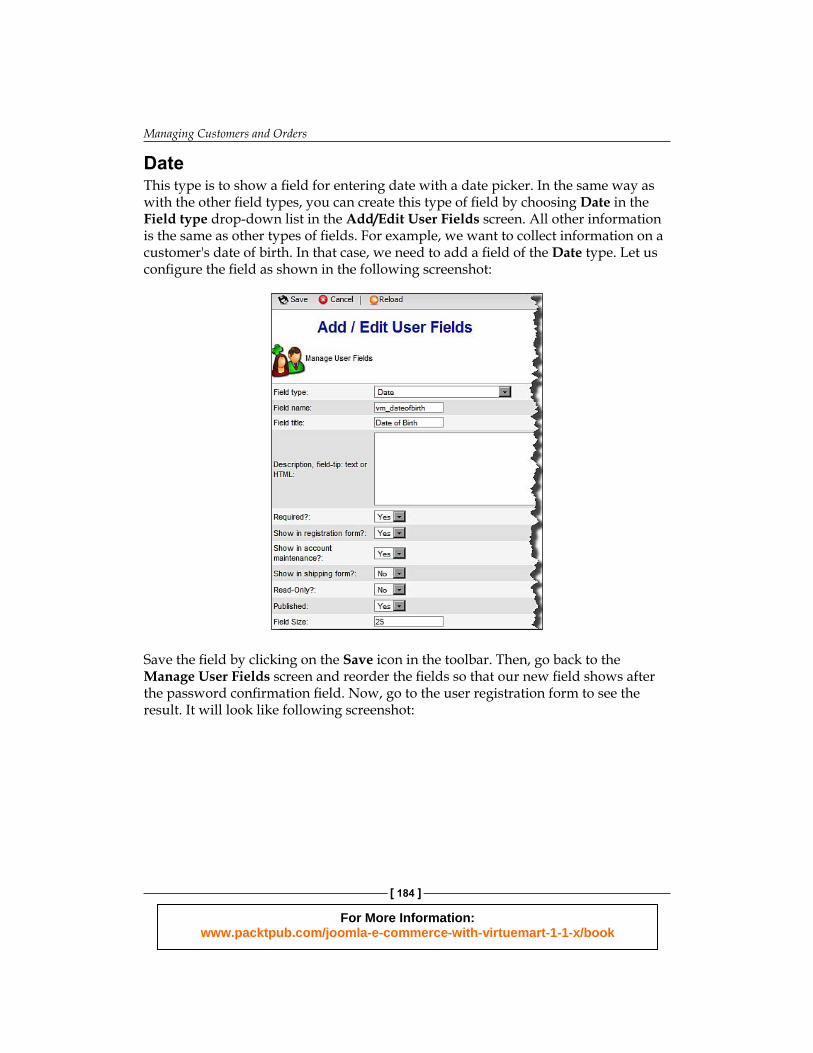
DateThis type is to show a field for entering date with a date picker. In the same way as with the other field types, you can create this type of field by choosing Date in the Field type drop-down list in the Add/Edit User Fields screen. All other information is the same as other types of fields. For example, we want to collect information on a customer's date of birth. In that case, we need to add a field of the Date type. Let us configure the field as shown in the following screenshot:
Save the field by clicking on the Save icon in the toolbar. Then, go back to the Manage User Fields screen and reorder the fields so that our new field shows after the password confirmation field. Now, go to the user registration form to see the result. It will look like following screenshot:

For More Information: www.packtpub.com/joomla-e-commerce-with-virtuemart-1-1-x/book
Chapter 5
[ 185 ]
The Date of Birth field is marked with an asterisk (*) to indicate that users must enter a value for this field. This happened as we selected Yes in the Required drop-down list while creating the field.
Age verification (date select fields)Fields of this type provide a drop-down list for selecting a month, day, and year to indicate a date of birth. While creating a field of this type, the administrator can set a minimum age for registration. Selecting the date from a field of this type, and submitting the form, will automatically calculate the user's age and notify whether he or she is eligible for registration or not. For some sites, registration is restricted to adults only (for example, 18+ years old). Adding a field of this type can help ensure implementing the restriction policy. To enforce such a policy, let us create a field of this type with the configurations shown in the following screenshot:
For More Information: www.packtpub.com/joomla-e-commerce-with-virtuemart-1-1-x/book
Managing Customers and Orders
[ 186 ]
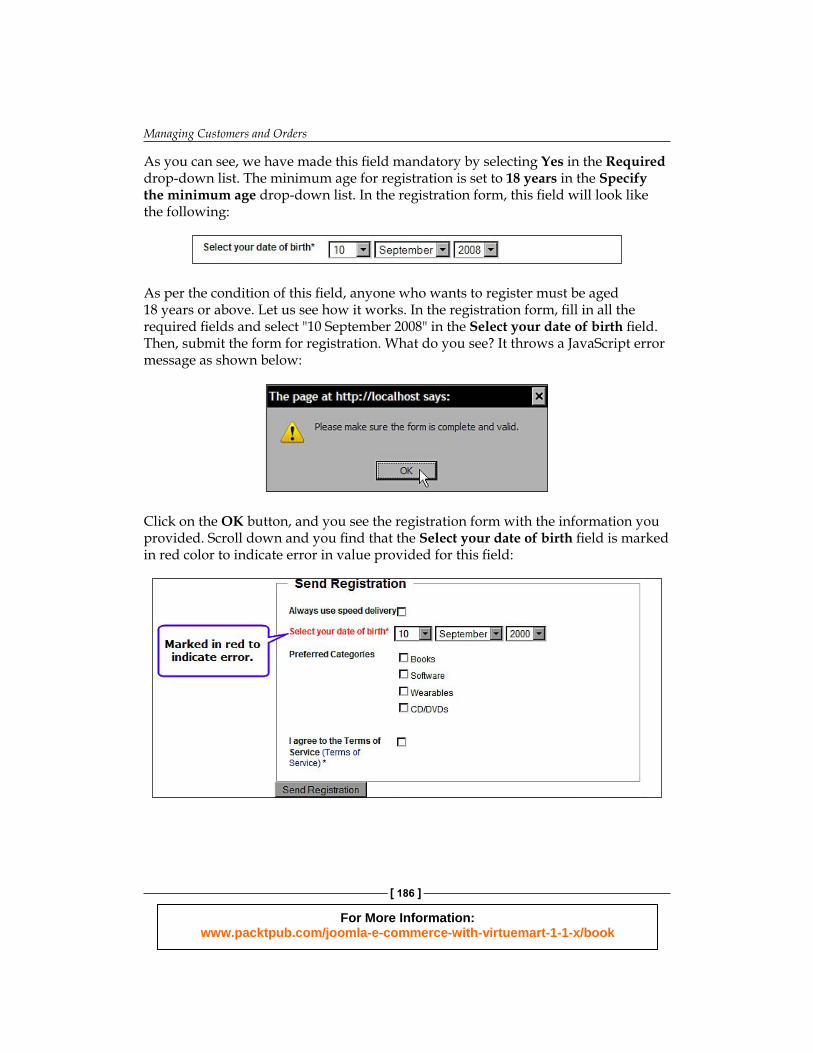
As you can see, we have made this field mandatory by selecting Yes in the Required drop-down list. The minimum age for registration is set to 18 years in the Specify the minimum age drop-down list. In the registration form, this field will look like the following:
As per the condition of this field, anyone who wants to register must be aged 18 years or above. Let us see how it works. In the registration form, fill in all the required fields and select "10 September 2008" in the Select your date of birth field. Then, submit the form for registration. What do you see? It throws a JavaScript error message as shown below:
Click on the OK button, and you see the registration form with the information you provided. Scroll down and you find that the Select your date of birth field is marked in red color to indicate error in value provided for this field:
For More Information: www.packtpub.com/joomla-e-commerce-with-virtuemart-1-1-x/book
Chapter 5
[ 187 ]
Now, select the birth date as "10 September 1985", and click on the Send Registration button. Voila! It works! You are now registered, because the date of birth indicates that your age is more than 18 years.
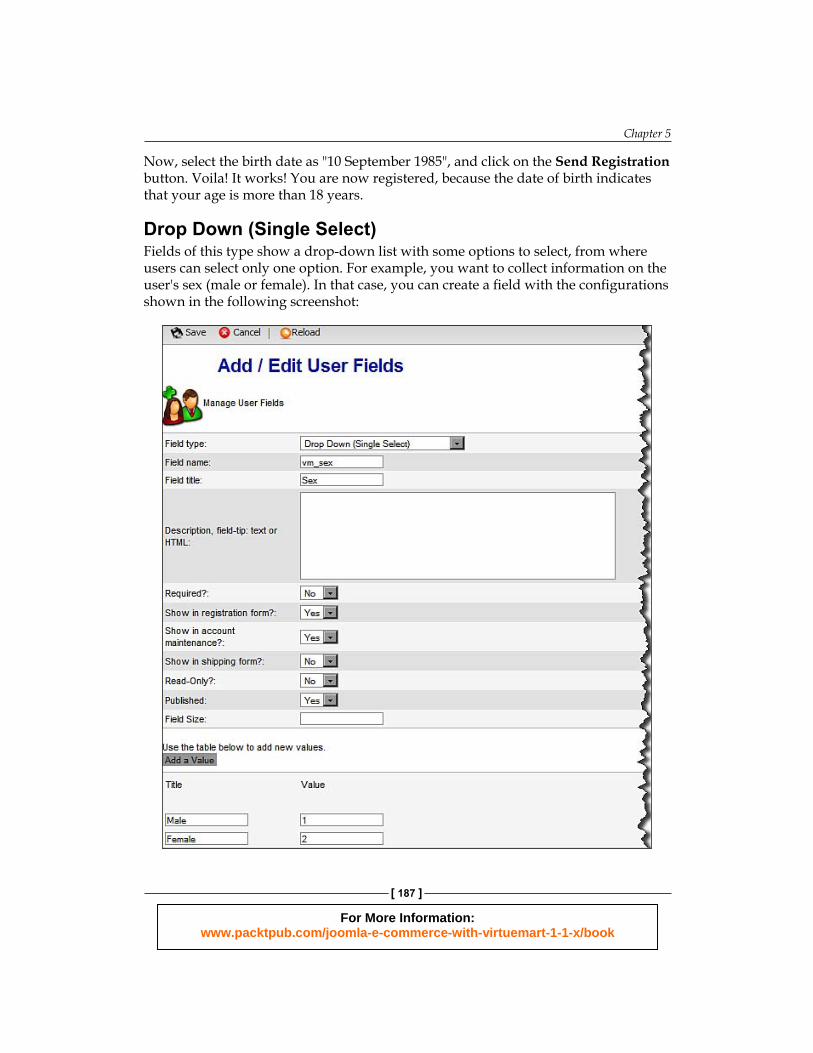
Drop Down (Single Select)Fields of this type show a drop-down list with some options to select, from where users can select only one option. For example, you want to collect information on the user's sex (male or female). In that case, you can create a field with the configurations shown in the following screenshot:
For More Information: www.packtpub.com/joomla-e-commerce-with-virtuemart-1-1-x/book
Managing Customers and Orders
[ 188 ]
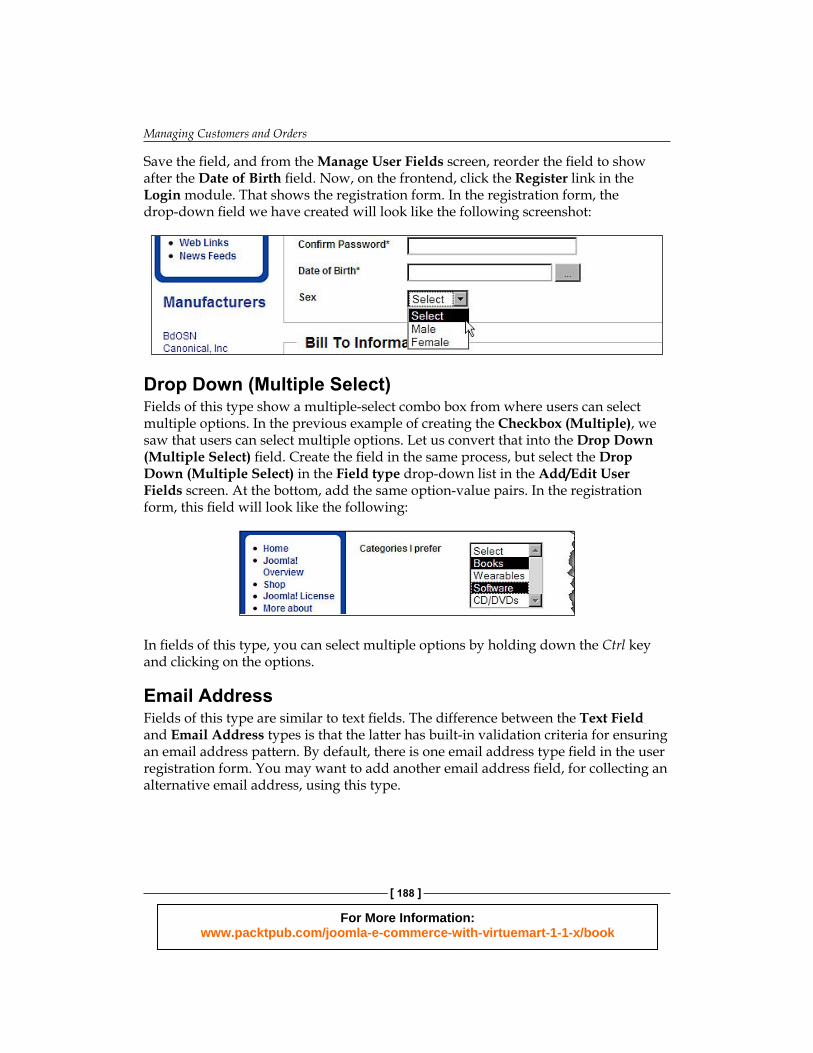
Save the field, and from the Manage User Fields screen, reorder the field to show after the Date of Birth field. Now, on the frontend, click the Register link in the Login module. That shows the registration form. In the registration form, the drop-down field we have created will look like the following screenshot:
Drop Down (Multiple Select)Fields of this type show a multiple-select combo box from where users can select multiple options. In the previous example of creating the Checkbox (Multiple), we saw that users can select multiple options. Let us convert that into the Drop Down (Multiple Select) field. Create the field in the same process, but select the Drop Down (Multiple Select) in the Field type drop-down list in the Add/Edit User Fields screen. At the bottom, add the same option-value pairs. In the registration form, this field will look like the following:
In fields of this type, you can select multiple options by holding down the Ctrl key and clicking on the options.
Email AddressFields of this type are similar to text fields. The difference between the Text Field and Email Address types is that the latter has built-in validation criteria for ensuring an email address pattern. By default, there is one email address type field in the user registration form. You may want to add another email address field, for collecting an alternative email address, using this type.
For More Information: www.packtpub.com/joomla-e-commerce-with-virtuemart-1-1-x/book
Chapter 5
[ 189 ]
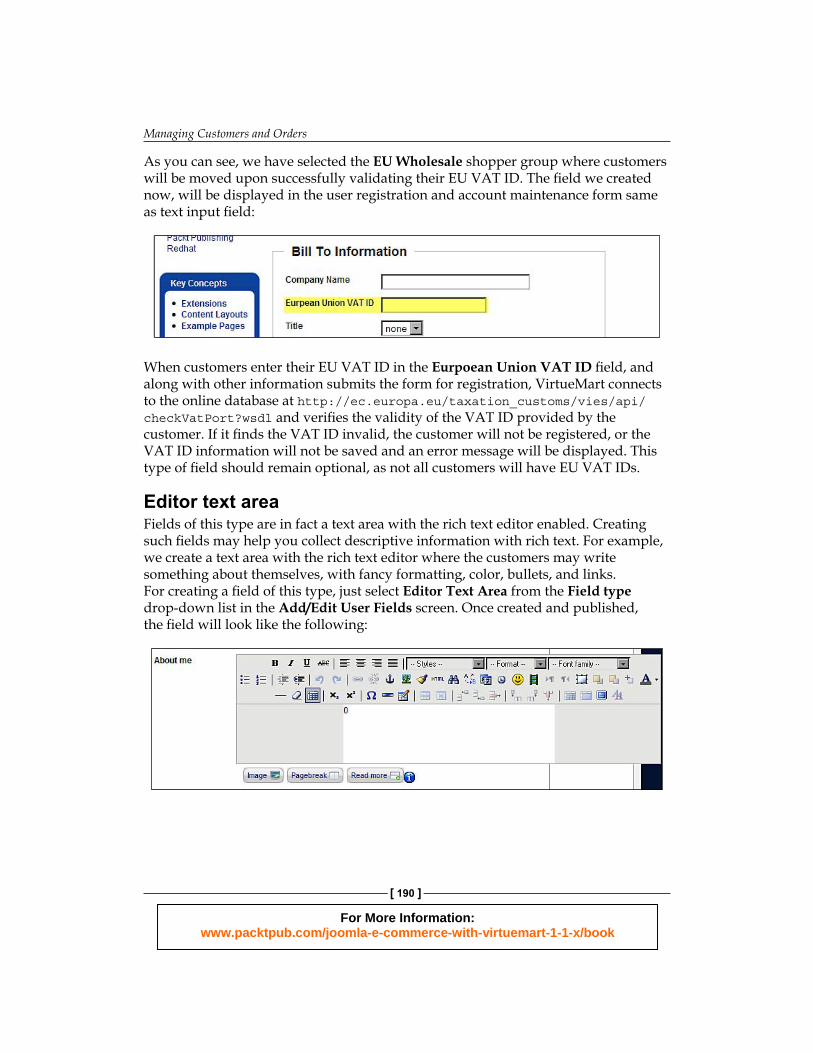
EU VAT IDWhile doing business with European Union (EU) countries, you need a valid Value Added Tax (VAT) ID. Customers who are from EU countries may use their EU VAT ID, if you add a field of this type and collect that information. When you define a field of this type, you can also configure which shopper group the customer will be moved to after successfully validating of his or her VAT ID. For example, we may create a shopper group named EU Wholesale, and add all the customers to this shopper group upon successful validation of their EU VAT ID.
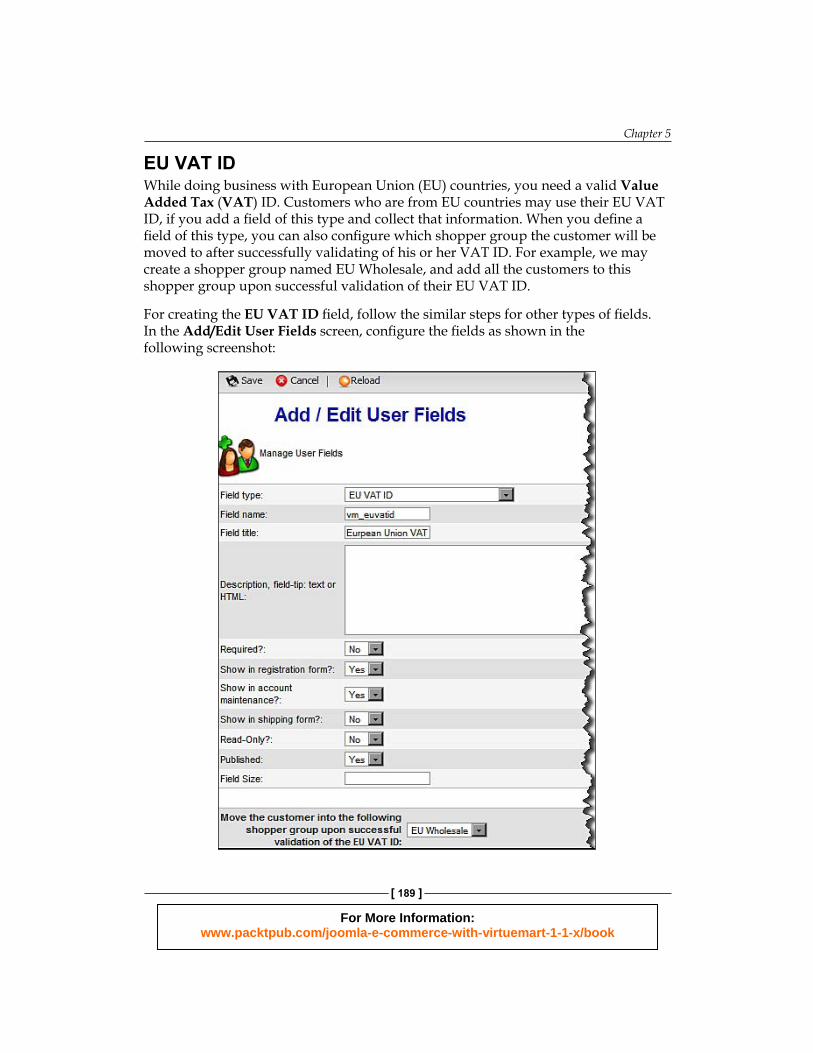
For creating the EU VAT ID field, follow the similar steps for other types of fields. In the Add/Edit User Fields screen, configure the fields as shown in the following screenshot:
For More Information: www.packtpub.com/joomla-e-commerce-with-virtuemart-1-1-x/book
Managing Customers and Orders
[ 190 ]
As you can see, we have selected the EU Wholesale shopper group where customers will be moved upon successfully validating their EU VAT ID. The field we created now, will be displayed in the user registration and account maintenance form same as text input field:
When customers enter their EU VAT ID in the Eurpoean Union VAT ID field, and along with other information submits the form for registration, VirtueMart connects to the online database at http://ec.europa.eu/taxation_customs/vies/api/checkVatPort?wsdl and verifies the validity of the VAT ID provided by the customer. If it finds the VAT ID invalid, the customer will not be registered, or the VAT ID information will not be saved and an error message will be displayed. This type of field should remain optional, as not all customers will have EU VAT IDs.
Editor text areaFields of this type are in fact a text area with the rich text editor enabled. Creating such fields may help you collect descriptive information with rich text. For example, we create a text area with the rich text editor where the customers may write something about themselves, with fancy formatting, color, bullets, and links. For creating a field of this type, just select Editor Text Area from the Field type drop-down list in the Add/Edit User Fields screen. Once created and published, the field will look like the following:
For More Information: www.packtpub.com/joomla-e-commerce-with-virtuemart-1-1-x/book
Chapter 5
[ 191 ]
Text areaFields of this type are a simple text area where customers can enter ample descriptive information. This does not show the rich text editor in the text area. For creating such field, select Text Area as the field type and specify other information. At the end of the Add/Edit User Fields screen, specify the Columns and Rows (for example, 40 and 10, respectively). Once saved and published, the field will look like the following screenshot:
You can make this text area smaller or larger by changing the values in the Columns and Widths fields in the Add/Edit User Fields screen.
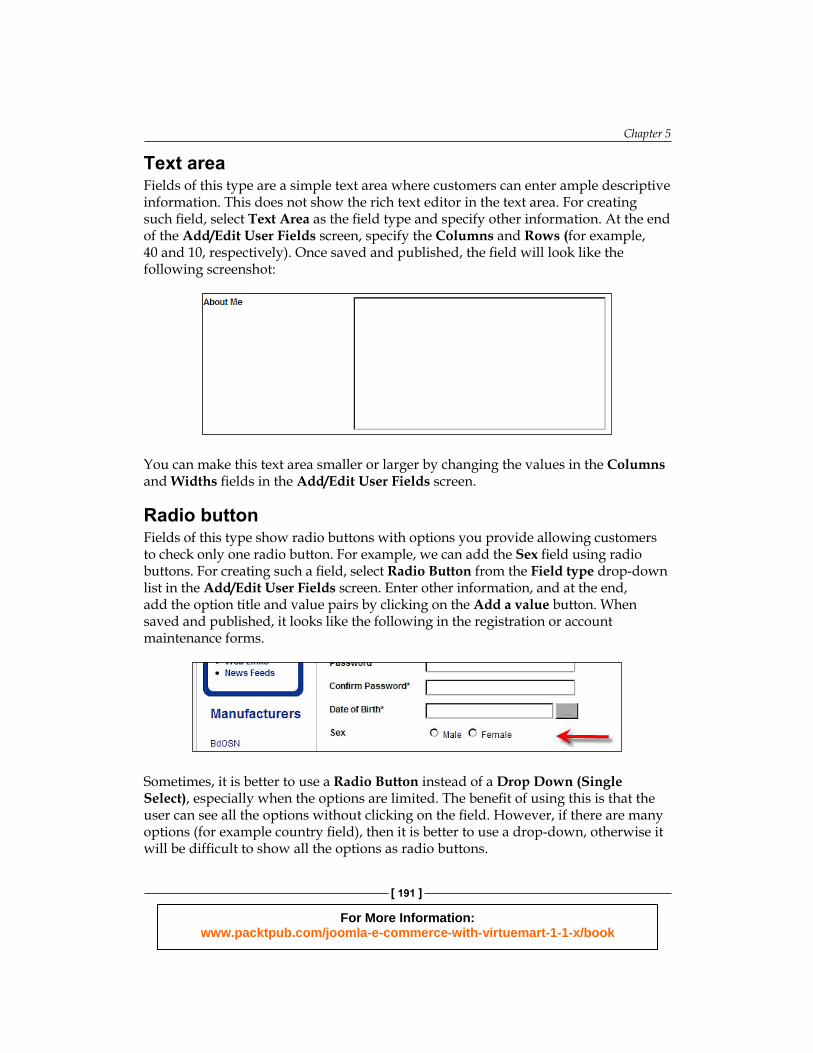
Radio buttonFields of this type show radio buttons with options you provide allowing customers to check only one radio button. For example, we can add the Sex field using radio buttons. For creating such a field, select Radio Button from the Field type drop-down list in the Add/Edit User Fields screen. Enter other information, and at the end, add the option title and value pairs by clicking on the Add a value button. When saved and published, it looks like the following in the registration or account maintenance forms.
Sometimes, it is better to use a Radio Button instead of a Drop Down (Single Select), especially when the options are limited. The benefit of using this is that the user can see all the options without clicking on the field. However, if there are many options (for example country field), then it is better to use a drop-down, otherwise it will be difficult to show all the options as radio buttons.
For More Information: www.packtpub.com/joomla-e-commerce-with-virtuemart-1-1-x/book
Managing Customers and Orders
[ 192 ]
Web addressFields of this type allow web addresses to be entered, and validates the input to ensure that these fields are in the URL format. In the Add/Edit User Fields screen, select Web Address as the field type and at the bottom, select the URL Only or the Hypertext and URL from the Field type drop-down list.
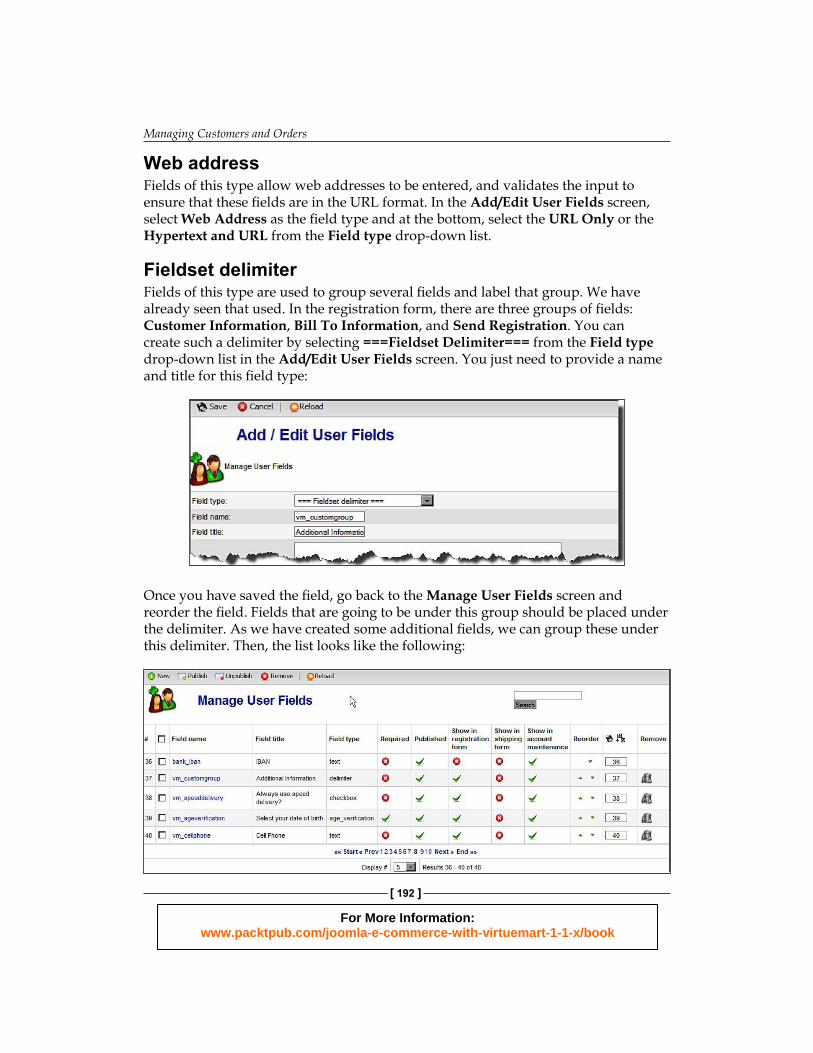
Fieldset delimiter Fields of this type are used to group several fields and label that group. We have already seen that used. In the registration form, there are three groups of fields:Customer Information, Bill To Information, and Send Registration. You can create such a delimiter by selecting ===Fieldset Delimiter=== from the Field type drop-down list in the Add/Edit User Fields screen. You just need to provide a name and title for this field type:
Once you have saved the field, go back to the Manage User Fields screen and reorder the field. Fields that are going to be under this group should be placed under the delimiter. As we have created some additional fields, we can group these under this delimiter. Then, the list looks like the following:
For More Information: www.packtpub.com/joomla-e-commerce-with-virtuemart-1-1-x/book
Chapter 5
[ 193 ]
From here, you can see that under our new delimiter vm_customgroup, there are three fields. Now, go to the user registration page in the frontend, and you will see the group as shown:
So far, we have discussed all the available field types. If you have installed components like Letterman, YANC, ANJEL, or CCNewletter, another field type for subscribing to newsletters will be available. We will discuss more on implementing newsletters in Chapter 7, Promotion and Public Relations.
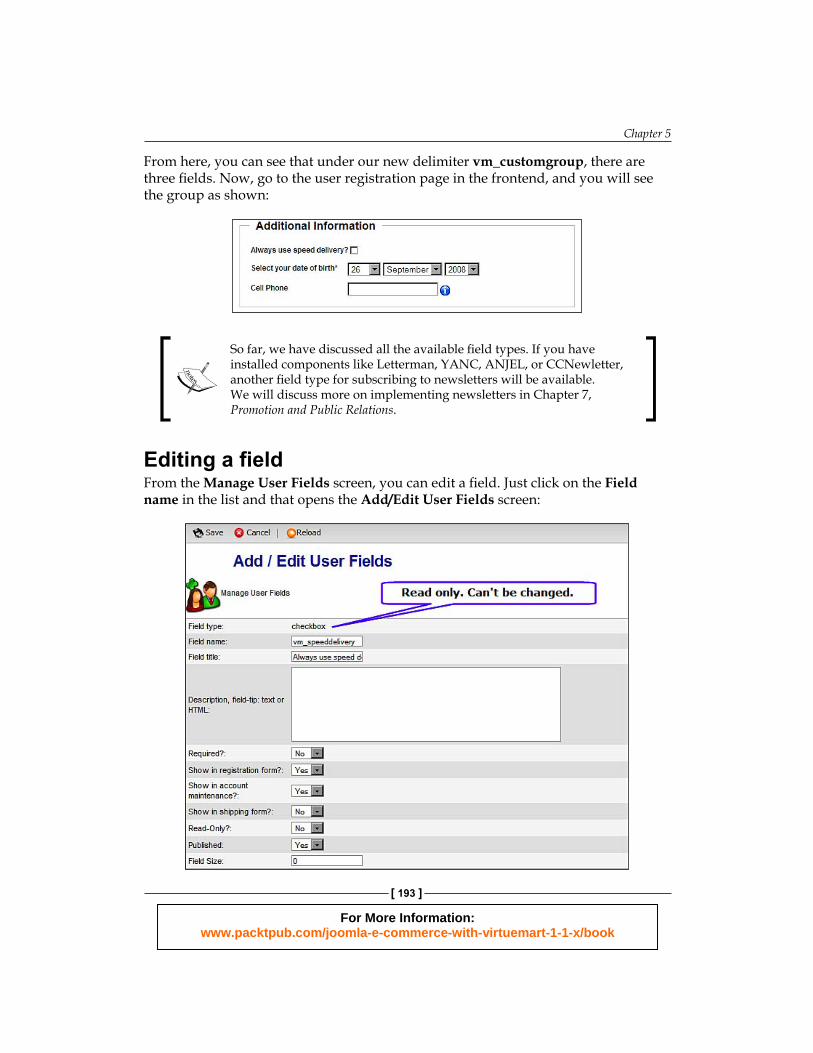
Editing a fieldFrom the Manage User Fields screen, you can edit a field. Just click on the Field name in the list and that opens the Add/Edit User Fields screen:
For More Information: www.packtpub.com/joomla-e-commerce-with-virtuemart-1-1-x/book
Managing Customers and Orders
[ 194 ]
Although you can edit all of the information provided in the screen, you cannot change the field type. For example, a field created as a checkbox cannot be changed into a drop-down list or a text box. However, you may delete the field and create another field of your desired type. In that case, any data collected through the fields will be deleted.
In creating additional fields, we have typed plain English in the Field title text box, which is displayed in the frontend as a label for that particular field. If you look into the built-in or system fields, you see the values in the Field title field are something like PHPSHOP_***. These language constants are defined in the language files for VirtueMart. These constants are required for localization of VirtueMart. Since we have not yet discussed language files or localization, we just typed English words. We are going to see details of VirtueMart localization and language files in Chapter 8, Localization of VirtueMart.
User managerIn Joomla!, there is one User Manager component from where you can manage the users of that site. However, for the VirtueMart component, there is another user manager which should be used for the VirtueMart shop. To be clear about the differences of these two user managers, let us look into both.
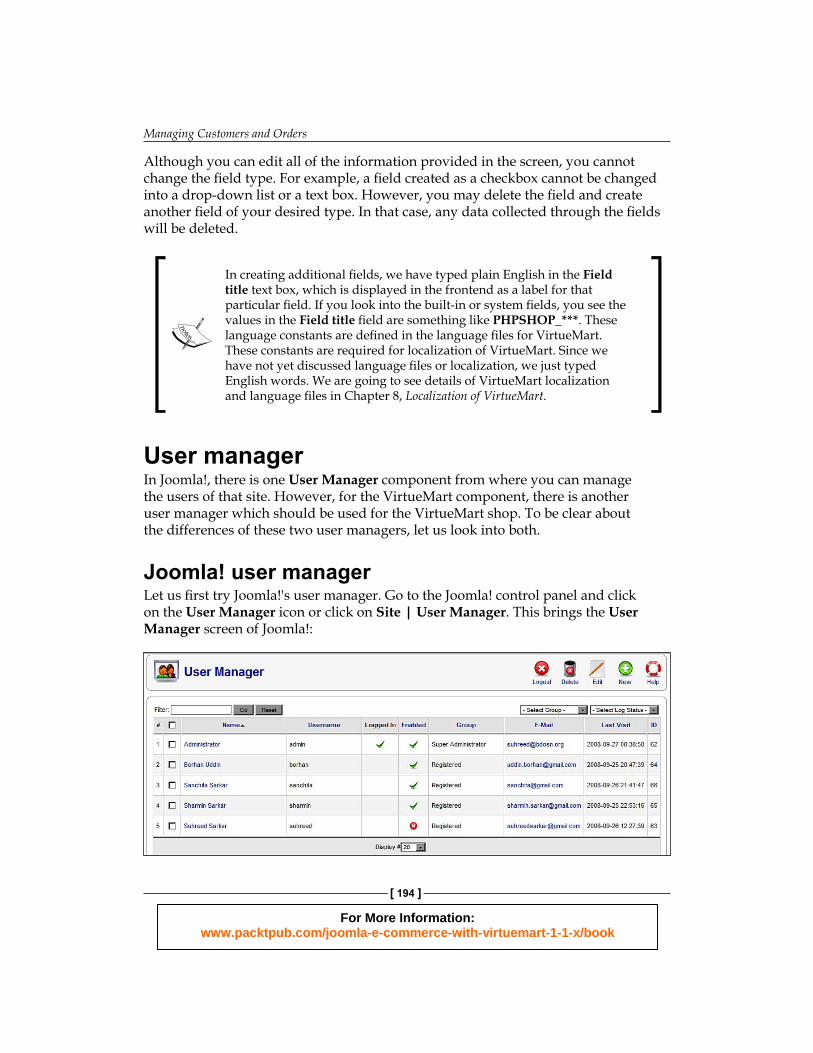
Joomla! user managerLet us first try Joomla!'s user manager. Go to the Joomla! control panel and click on the User Manager icon or click on Site | User Manager. This brings the User Manager screen of Joomla!:
For More Information: www.packtpub.com/joomla-e-commerce-with-virtuemart-1-1-x/book
Chapter 5
[ 195 ]
We see that the users registered to the Joomla! site are listed in this screen. This screen shows the username, full name, enabled status, group that the user is assigned to, email of the user, date and time when they last visited, and user ID. From this screen, you may guess that any user can be enabled or disabled by clicking on the icon in the Enabled column. Enabled user accounts show a green tick mark in the Enabled column.
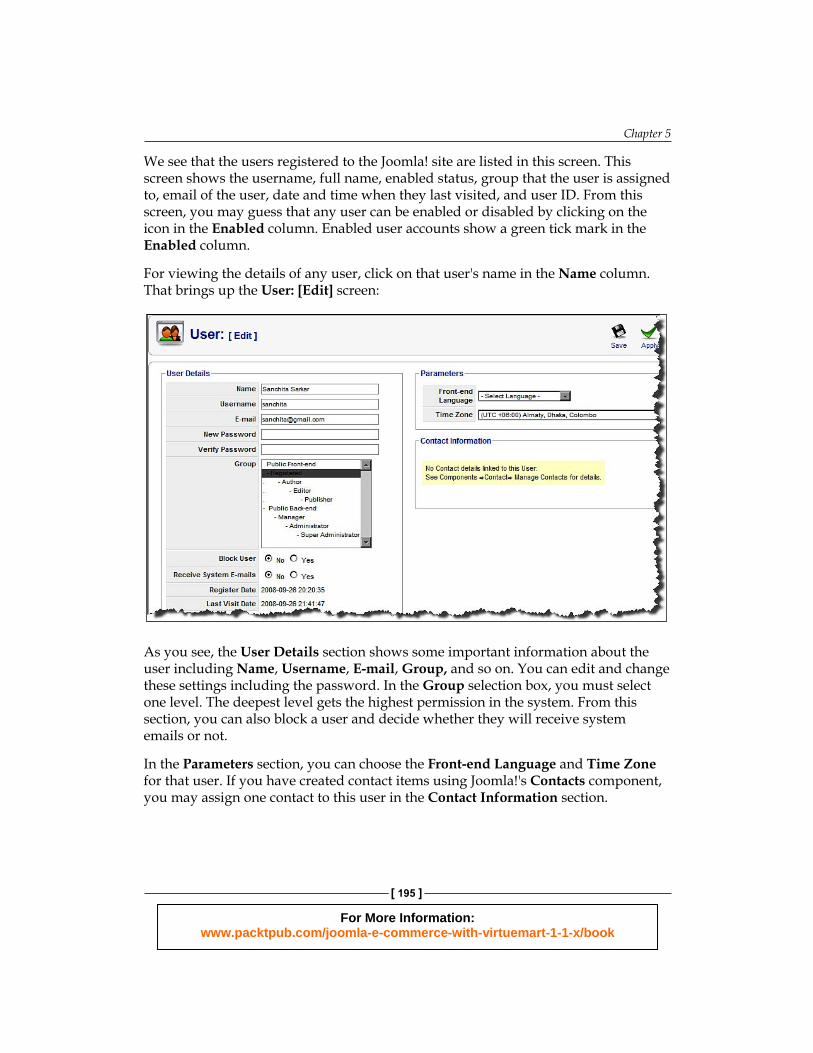
For viewing the details of any user, click on that user's name in the Name column. That brings up the User: [Edit] screen:
As you see, the User Details section shows some important information about the user including Name, Username, E-mail, Group, and so on. You can edit and change these settings including the password. In the Group selection box, you must select one level. The deepest level gets the highest permission in the system. From this section, you can also block a user and decide whether they will receive system emails or not.
In the Parameters section, you can choose the Front-end Language and Time Zone for that user. If you have created contact items using Joomla!'s Contacts component, you may assign one contact to this user in the Contact Information section.
For More Information: www.packtpub.com/joomla-e-commerce-with-virtuemart-1-1-x/book
Managing Customers and Orders
[ 196 ]
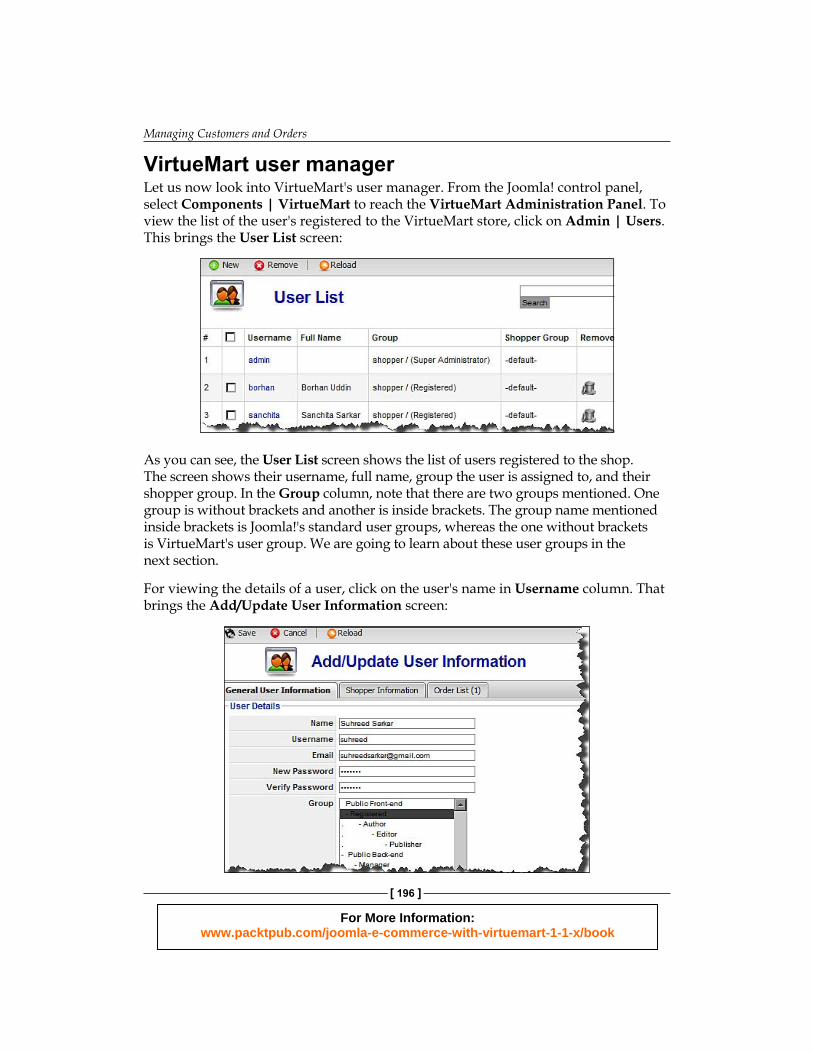
VirtueMart user managerLet us now look into VirtueMart's user manager. From the Joomla! control panel, select Components | VirtueMart to reach the VirtueMart Administration Panel. To view the list of the user's registered to the VirtueMart store, click on Admin | Users. This brings the User List screen:
As you can see, the User List screen shows the list of users registered to the shop. The screen shows their username, full name, group the user is assigned to, and their shopper group. In the Group column, note that there are two groups mentioned. One group is without brackets and another is inside brackets. The group name mentioned inside brackets is Joomla!'s standard user groups, whereas the one without brackets is VirtueMart's user group. We are going to learn about these user groups in the next section.
For viewing the details of a user, click on the user's name in Username column. That brings the Add/Update User Information screen:
For More Information: www.packtpub.com/joomla-e-commerce-with-virtuemart-1-1-x/book
Chapter 5
[ 197 ]
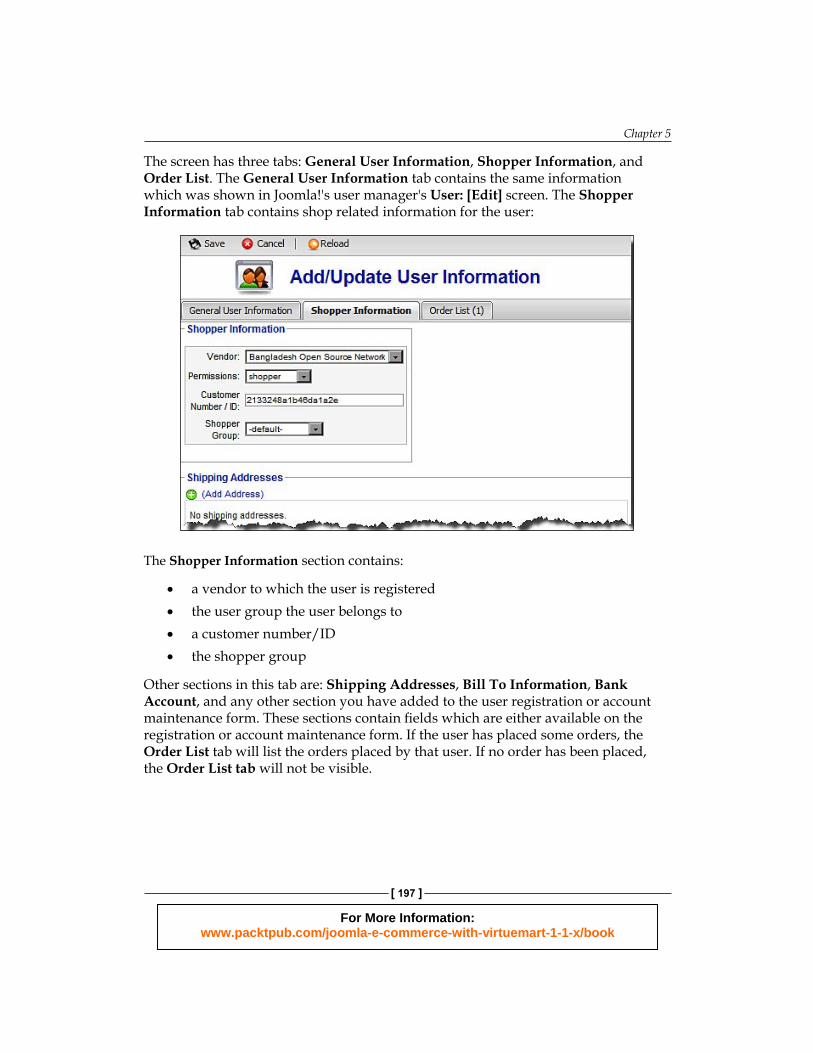
The screen has three tabs: General User Information, Shopper Information, and Order List. The General User Information tab contains the same information which was shown in Joomla!'s user manager's User: [Edit] screen. The Shopper Information tab contains shop related information for the user:
The Shopper Information section contains:
a vendor to which the user is registeredthe user group the user belongs toa customer number/IDthe shopper group
Other sections in this tab are: Shipping Addresses, Bill To Information, Bank Account, and any other section you have added to the user registration or account maintenance form. These sections contain fields which are either available on the registration or account maintenance form. If the user has placed some orders, the Order List tab will list the orders placed by that user. If no order has been placed, the Order List tab will not be visible.
•
•
•
•
For More Information: www.packtpub.com/joomla-e-commerce-with-virtuemart-1-1-x/book
Managing Customers and Orders
[ 198 ]
Which user manager should we use?As we can see, there is a difference between Joomla!'s user manager and VirtueMart's user manager. VirtueMart's user manager shows some additional information fields, which are necessary for the operation of the shop. Therefore, whenever you are managing users for your shop, use the user manager in the VirtueMart component, not Joomla!'s user manager. Otherwise, all customer information will not be added or updated. This may create some problems in operating the VirtueMart store.
User groupsDo you want to decide who can do what in your shop? There is a very good way for doing that in Joomla! and VirtueMart. Both Joomla! and VirtueMart have some predefined user groups. In both cases, you can create additional groups and assign permission levels to these groups. When users register to your site, you assign them to one of the user groups.
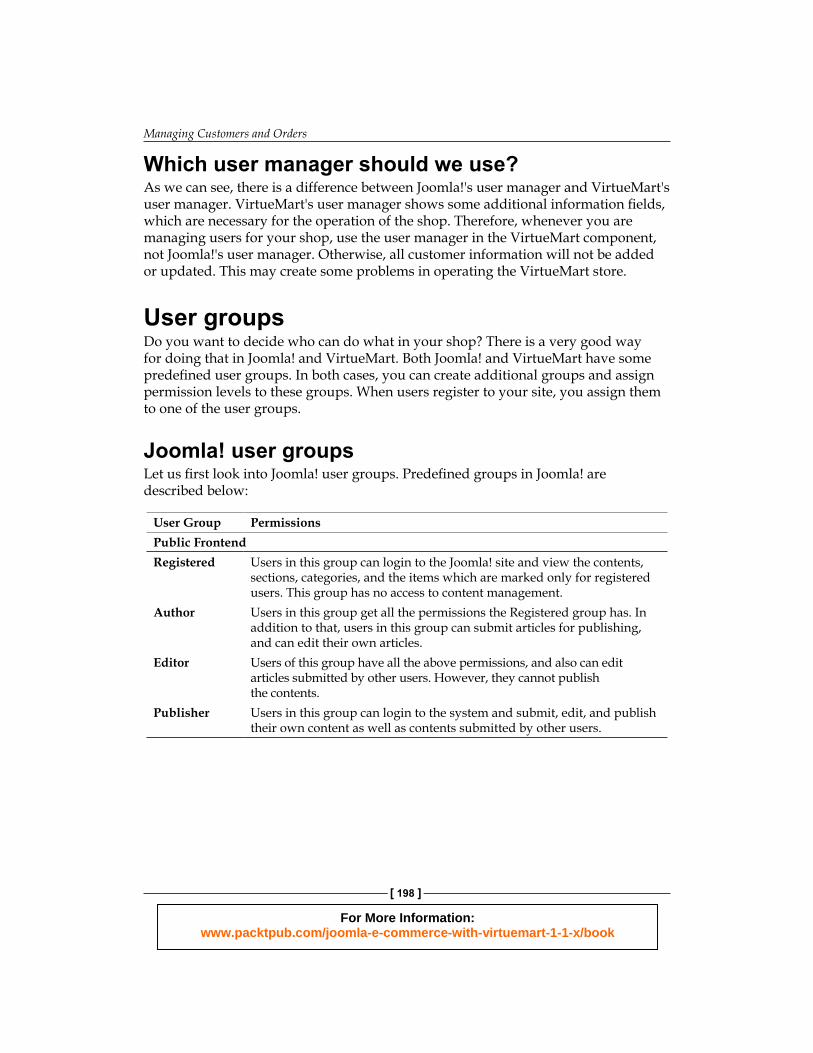
Joomla! user groupsLet us first look into Joomla! user groups. Predefined groups in Joomla! are described below:
User Group PermissionsPublic FrontendRegistered Users in this group can login to the Joomla! site and view the contents,
sections, categories, and the items which are marked only for registered users. This group has no access to content management.
Author Users in this group get all the permissions the Registered group has. In addition to that, users in this group can submit articles for publishing, and can edit their own articles.
Editor Users of this group have all the above permissions, and also can edit articles submitted by other users. However, they cannot publish the contents.
Publisher Users in this group can login to the system and submit, edit, and publish their own content as well as contents submitted by other users.
For More Information: www.packtpub.com/joomla-e-commerce-with-virtuemart-1-1-x/book
Chapter 5
[ 199 ]
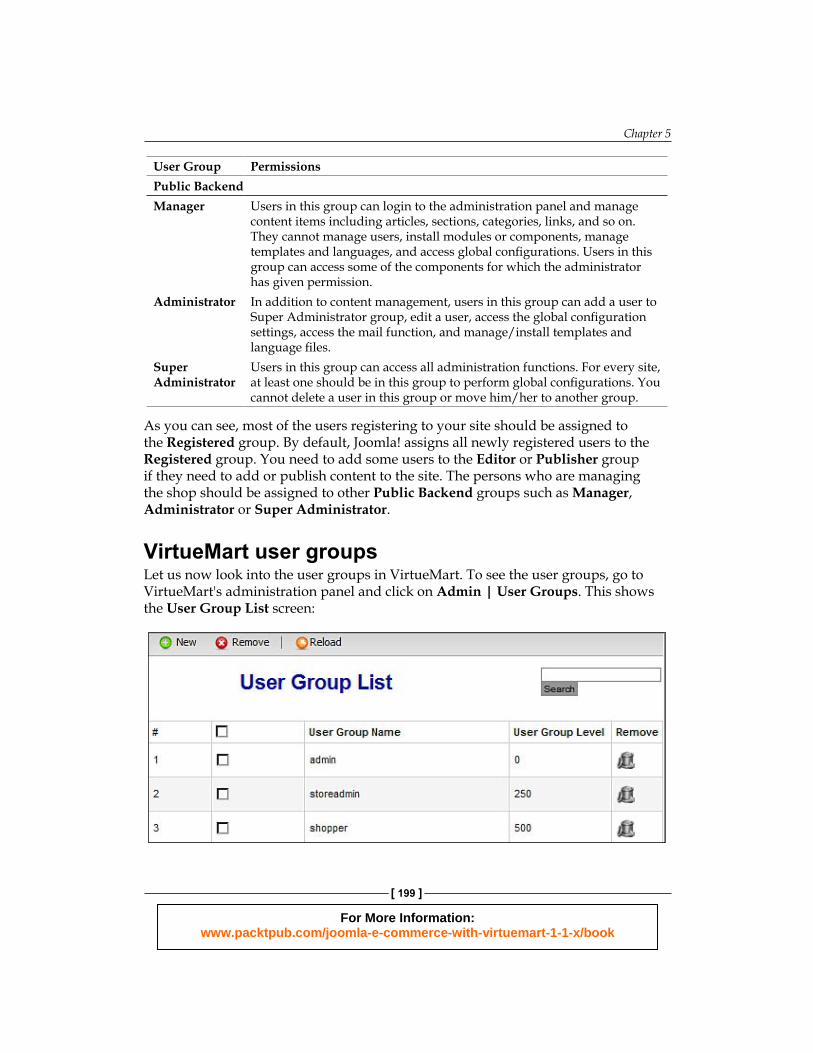
User Group PermissionsPublic BackendManager Users in this group can login to the administration panel and manage
content items including articles, sections, categories, links, and so on. They cannot manage users, install modules or components, manage templates and languages, and access global configurations. Users in this group can access some of the components for which the administrator has given permission.
Administrator In addition to content management, users in this group can add a user to Super Administrator group, edit a user, access the global configuration settings, access the mail function, and manage/install templates and language files.
Super Administrator
Users in this group can access all administration functions. For every site, at least one should be in this group to perform global configurations. You cannot delete a user in this group or move him/her to another group.
As you can see, most of the users registering to your site should be assigned to the Registered group. By default, Joomla! assigns all newly registered users to the Registered group. You need to add some users to the Editor or Publisher group if they need to add or publish content to the site. The persons who are managing the shop should be assigned to other Public Backend groups such as Manager, Administrator or Super Administrator.
VirtueMart user groupsLet us now look into the user groups in VirtueMart. To see the user groups, go to VirtueMart's administration panel and click on Admin | User Groups. This shows the User Group List screen:
For More Information: www.packtpub.com/joomla-e-commerce-with-virtuemart-1-1-x/book
Managing Customers and Orders
[ 200 ]
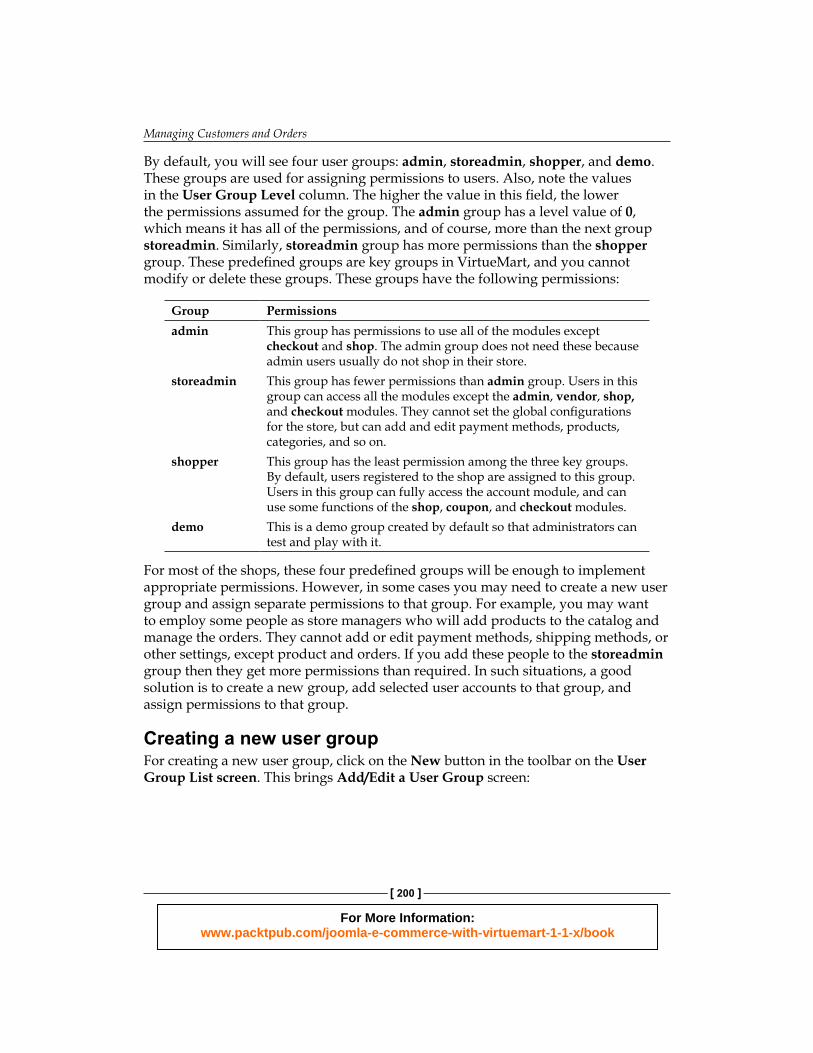
By default, you will see four user groups: admin, storeadmin, shopper, and demo. These groups are used for assigning permissions to users. Also, note the values in the User Group Level column. The higher the value in this field, the lower the permissions assumed for the group. The admin group has a level value of 0, which means it has all of the permissions, and of course, more than the next group storeadmin. Similarly, storeadmin group has more permissions than the shopper group. These predefined groups are key groups in VirtueMart, and you cannot modify or delete these groups. These groups have the following permissions:
Group Permissionsadmin This group has permissions to use all of the modules except
checkout and shop. The admin group does not need these because admin users usually do not shop in their store.
storeadmin This group has fewer permissions than admin group. Users in this group can access all the modules except the admin, vendor, shop, and checkout modules. They cannot set the global configurations for the store, but can add and edit payment methods, products, categories, and so on.
shopper This group has the least permission among the three key groups. By default, users registered to the shop are assigned to this group. Users in this group can fully access the account module, and can use some functions of the shop, coupon, and checkout modules.
demo This is a demo group created by default so that administrators can test and play with it.
For most of the shops, these four predefined groups will be enough to implement appropriate permissions. However, in some cases you may need to create a new user group and assign separate permissions to that group. For example, you may want to employ some people as store managers who will add products to the catalog and manage the orders. They cannot add or edit payment methods, shipping methods, or other settings, except product and orders. If you add these people to the storeadmin group then they get more permissions than required. In such situations, a good solution is to create a new group, add selected user accounts to that group, and assign permissions to that group.
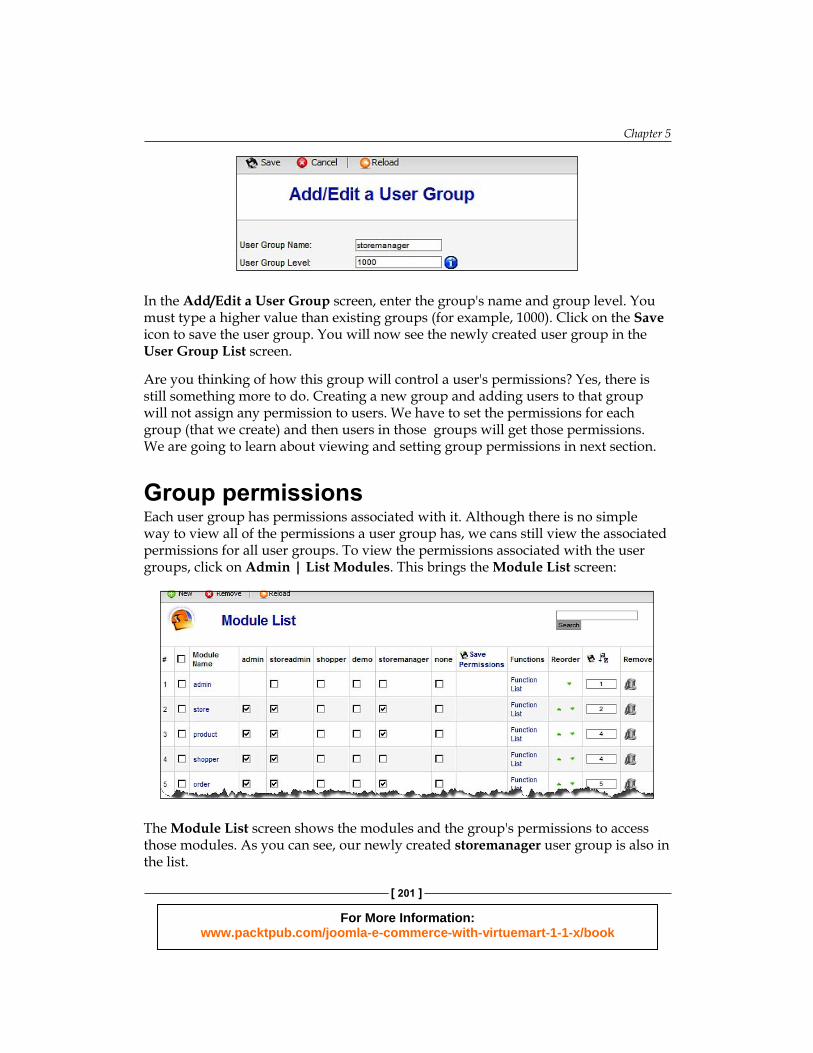
Creating a new user groupFor creating a new user group, click on the New button in the toolbar on the User Group List screen. This brings Add/Edit a User Group screen:
For More Information: www.packtpub.com/joomla-e-commerce-with-virtuemart-1-1-x/book
Chapter 5
[ 201 ]
In the Add/Edit a User Group screen, enter the group's name and group level. You must type a higher value than existing groups (for example, 1000). Click on the Save icon to save the user group. You will now see the newly created user group in the User Group List screen.
Are you thinking of how this group will control a user's permissions? Yes, there is still something more to do. Creating a new group and adding users to that group will not assign any permission to users. We have to set the permissions for each group (that we create) and then users in those groups will get those permissions. We are going to learn about viewing and setting group permissions in next section.
Group permissionsEach user group has permissions associated with it. Although there is no simple way to view all of the permissions a user group has, we cans still view the associated permissions for all user groups. To view the permissions associated with the user groups, click on Admin | List Modules. This brings the Module List screen:
The Module List screen shows the modules and the group's permissions to access those modules. As you can see, our newly created storemanager user group is also in the list.
For More Information: www.packtpub.com/joomla-e-commerce-with-virtuemart-1-1-x/book
Managing Customers and Orders
[ 202 ]
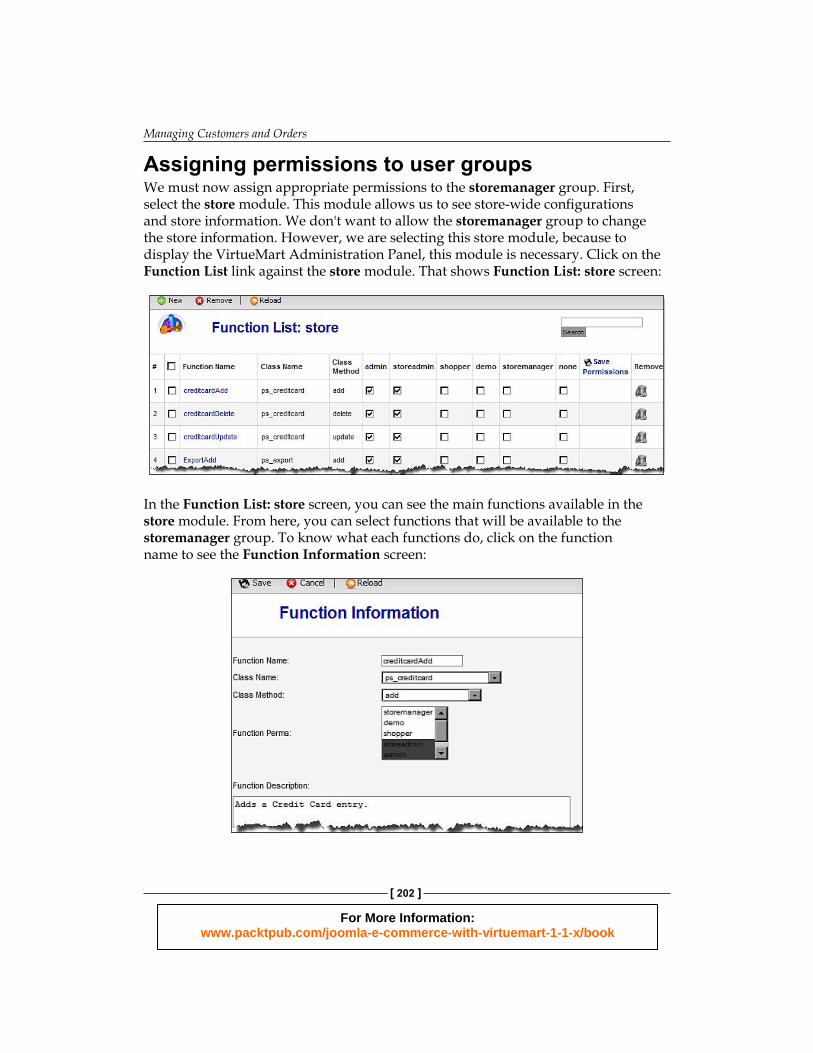
Assigning permissions to user groupsWe must now assign appropriate permissions to the storemanager group. First, select the store module. This module allows us to see store-wide configurations and store information. We don't want to allow the storemanager group to change the store information. However, we are selecting this store module, because to display the VirtueMart Administration Panel, this module is necessary. Click on the Function List link against the store module. That shows Function List: store screen:
In the Function List: store screen, you can see the main functions available in the store module. From here, you can select functions that will be available to the storemanager group. To know what each functions do, click on the function name to see the Function Information screen:
For More Information: www.packtpub.com/joomla-e-commerce-with-virtuemart-1-1-x/book
Chapter 5
[ 203 ]
The Function Information screen shows the function name, class name, class method, groups which have permission to use that function, and a description of the function. This will help you understand where the function comes from and for what purpose it serves.
Are you pondering the fields in this screen? We are going to explain the fields available in this screen later in this chapter, under the Adding New Function section.
As our store managers will not change any settings regarding credit cards, payment and shipping methods, and export modules, in the Function List: store screen, we need to uncheck all modules for the storemanager group.
For the storemanager group, select the store, product, order, reportbasic, account, and help modules. Then, click on the Save Permissions link.
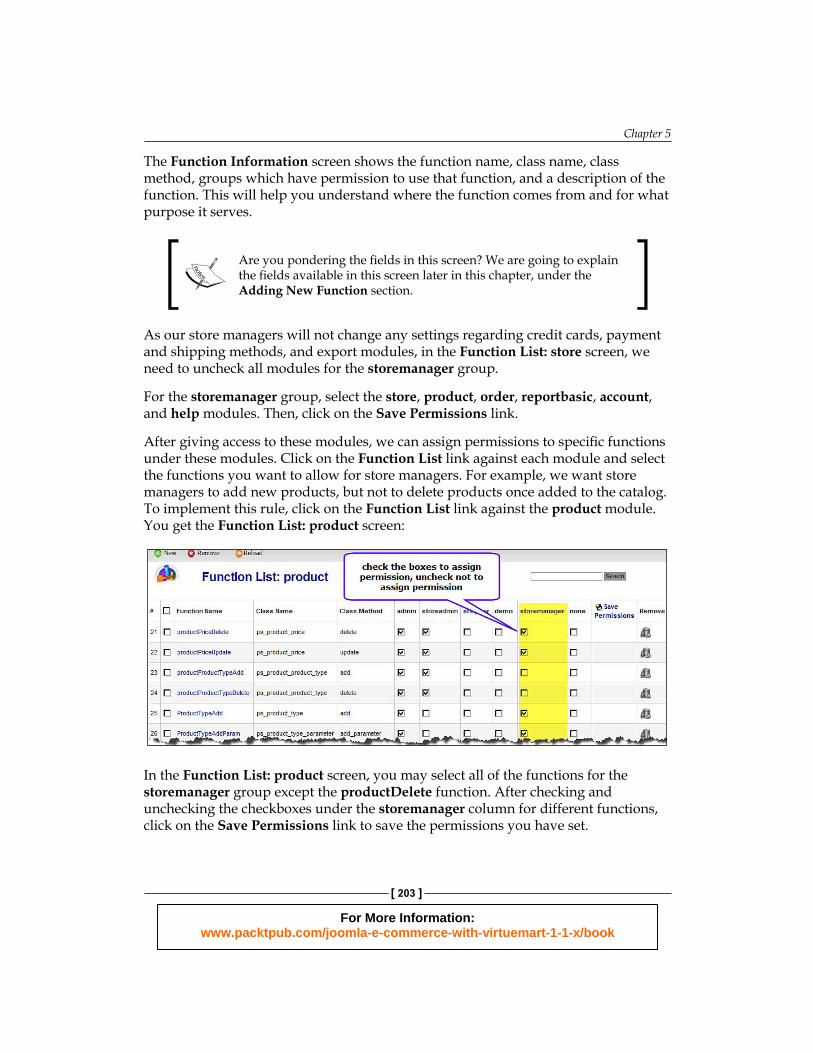
After giving access to these modules, we can assign permissions to specific functions under these modules. Click on the Function List link against each module and select the functions you want to allow for store managers. For example, we want store managers to add new products, but not to delete products once added to the catalog. To implement this rule, click on the Function List link against the product module. You get the Function List: product screen:
In the Function List: product screen, you may select all of the functions for the storemanager group except the productDelete function. After checking and unchecking the checkboxes under the storemanager column for different functions, click on the Save Permissions link to save the permissions you have set.
For More Information: www.packtpub.com/joomla-e-commerce-with-virtuemart-1-1-x/book
Managing Customers and Orders
[ 204 ]
When you see the none column checked, that means no restriction is applied for that function or module. Also note that, in both the Module List and Function List screen, there is a New button in the toolbar. You can add a new module or function by clicking on this New button.
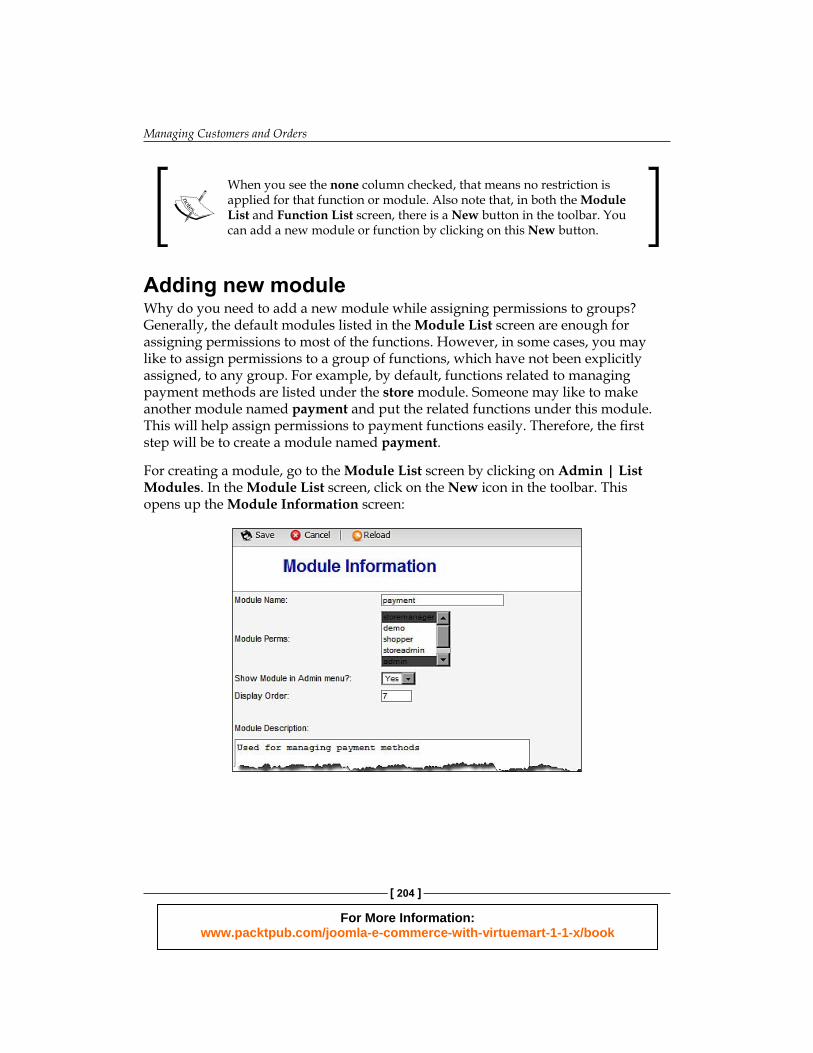
Adding new moduleWhy do you need to add a new module while assigning permissions to groups? Generally, the default modules listed in the Module List screen are enough for assigning permissions to most of the functions. However, in some cases, you may like to assign permissions to a group of functions, which have not been explicitly assigned, to any group. For example, by default, functions related to managing payment methods are listed under the store module. Someone may like to make another module named payment and put the related functions under this module. This will help assign permissions to payment functions easily. Therefore, the first step will be to create a module named payment.
For creating a module, go to the Module List screen by clicking on Admin | List Modules. In the Module List screen, click on the New icon in the toolbar. This opens up the Module Information screen:
For More Information: www.packtpub.com/joomla-e-commerce-with-virtuemart-1-1-x/book
Chapter 5
[ 205 ]
In the Module Information screen, we need to provide the name of the module, and some additional information. In the Module Name field, type payment (or any other name which is not used as a module name already). In the Module Perms list, select the groups to which you want to give permissions to access this module. Select Yes in the Show Module in Admin menu? drop-down list. This will show a section named Payment in the admin menu. Assign the display order, say 7, in the Display Order field. Finally, give a description what the module does. Click on the Save icon to save the module. You can now see this module in the Module List screen.
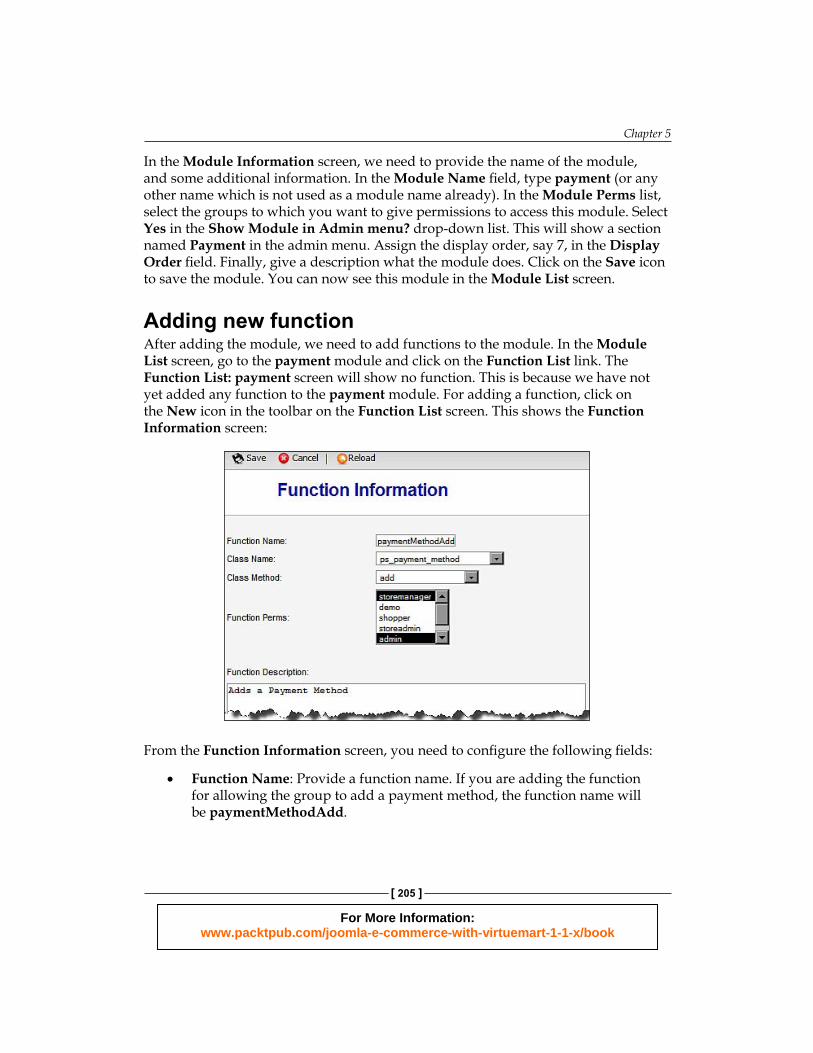
Adding new functionAfter adding the module, we need to add functions to the module. In the Module List screen, go to the payment module and click on the Function List link. The Function List: payment screen will show no function. This is because we have not yet added any function to the payment module. For adding a function, click on the New icon in the toolbar on the Function List screen. This shows the Function Information screen:
From the Function Information screen, you need to configure the following fields:
Function Name: Provide a function name. If you are adding the function for allowing the group to add a payment method, the function name will be paymentMethodAdd.
•
For More Information: www.packtpub.com/joomla-e-commerce-with-virtuemart-1-1-x/book
Managing Customers and Orders
[ 206 ]
Class Name: From this drop-down list, select an appropriate class file. As we are adding functions for payment methods, select the ps_payment_method class file here.Class Method: When you select a class file in the Class Name field, you will see the available functions from that class in this drop-down list.. You will notice that, in the ps_payment_method class, there are add, update, delete, list_method, and some other functions. The functions named here are usable by user groups. Other functions, such as validate_add, validate_delete, validate_update, and so on, are automatically executed upon use of the add, delete or update functions. For the time being, select the add function from the drop-down list.Function Perms: Select the user groups who will be able to use this function. You can select multiple groups from the list.Function Description: Provide a description of the function to help administrators understand what this function is for. As the paymentMethodAdd function will add a payment method, type Adds a payment method in this text area.
When you have entered all this information, click on the Save icon in the toolbar. That adds the function to the payment module. Similarly, add three more functions named paymentMethodUpdate, paymentMethodDelete, and paymentMethodList. All of these will use the same ps_payment_method class and use the update, delete, and list_method class methods respectively.
Warning:You may get an error message while adding new functions. It happens if another function exists with the same name. As the paymentMethodAdd, and other functions we have added now, are part of store module, you will first need to delete those functions in store module.
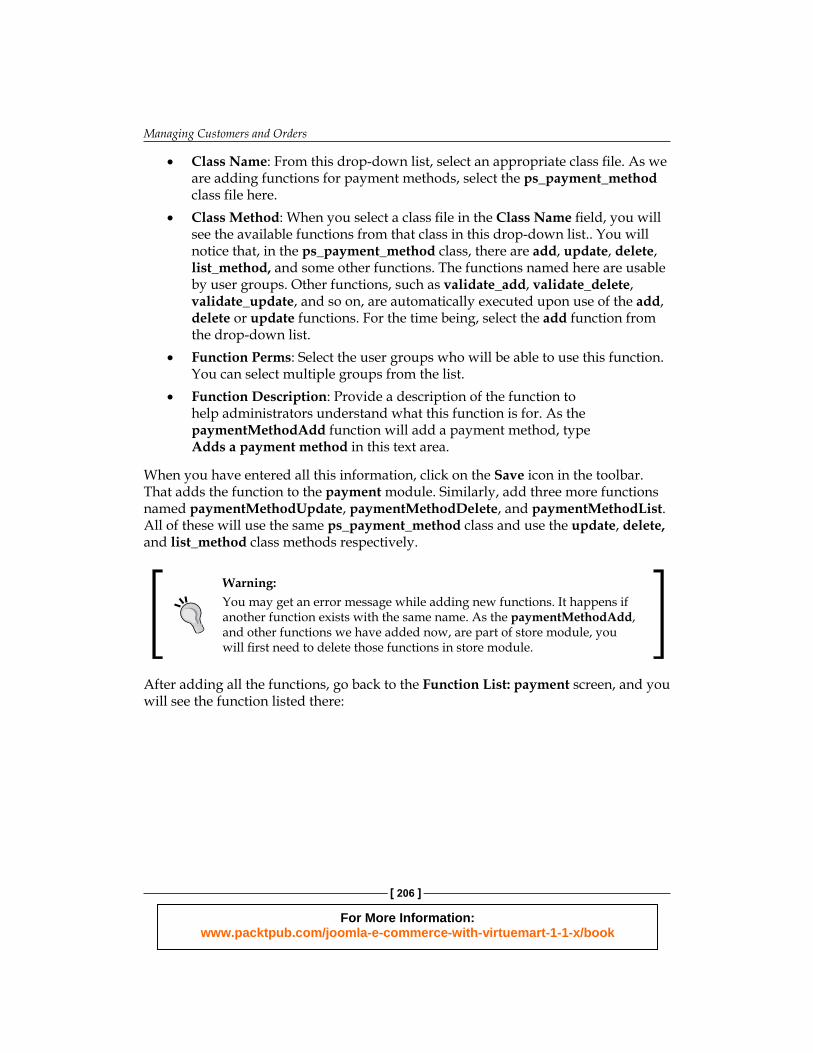
After adding all the functions, go back to the Function List: payment screen, and you will see the function listed there:
•
•
•
•
For More Information: www.packtpub.com/joomla-e-commerce-with-virtuemart-1-1-x/book
Chapter 5
[ 207 ]
From the Function List: payment screen, you can see the permissions assigned to the different user groups. If you want to change some of these permissions, do so, and click on the Save Permissions link to save the settings.
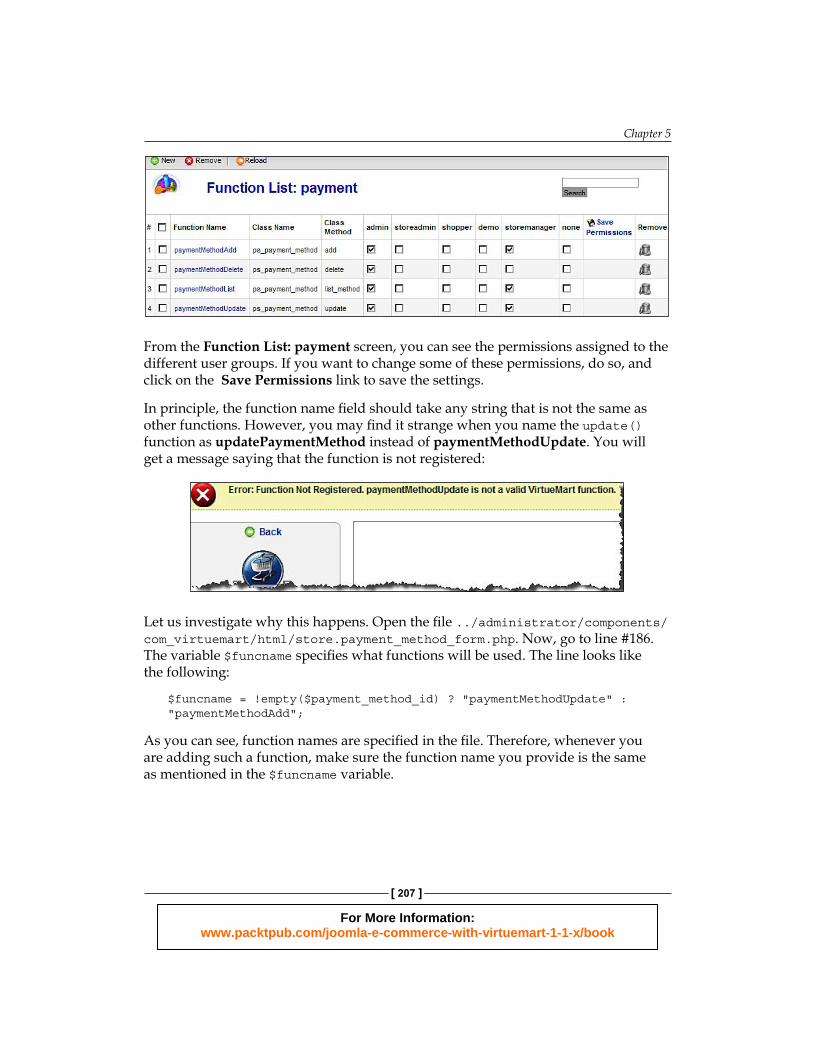
In principle, the function name field should take any string that is not the same as other functions. However, you may find it strange when you name the update() function as updatePaymentMethod instead of paymentMethodUpdate. You will get a message saying that the function is not registered:
Let us investigate why this happens. Open the file ../administrator/components/com_virtuemart/html/store.payment_method_form.php. Now, go to line #186. The variable $funcname specifies what functions will be used. The line looks like the following:
$funcname = !empty($payment_method_id) ? "paymentMethodUpdate" : "paymentMethodAdd";
As you can see, function names are specified in the file. Therefore, whenever you are adding such a function, make sure the function name you provide is the same as mentioned in the $funcname variable.
For More Information: www.packtpub.com/joomla-e-commerce-with-virtuemart-1-1-x/book
Managing Customers and Orders
[ 208 ]
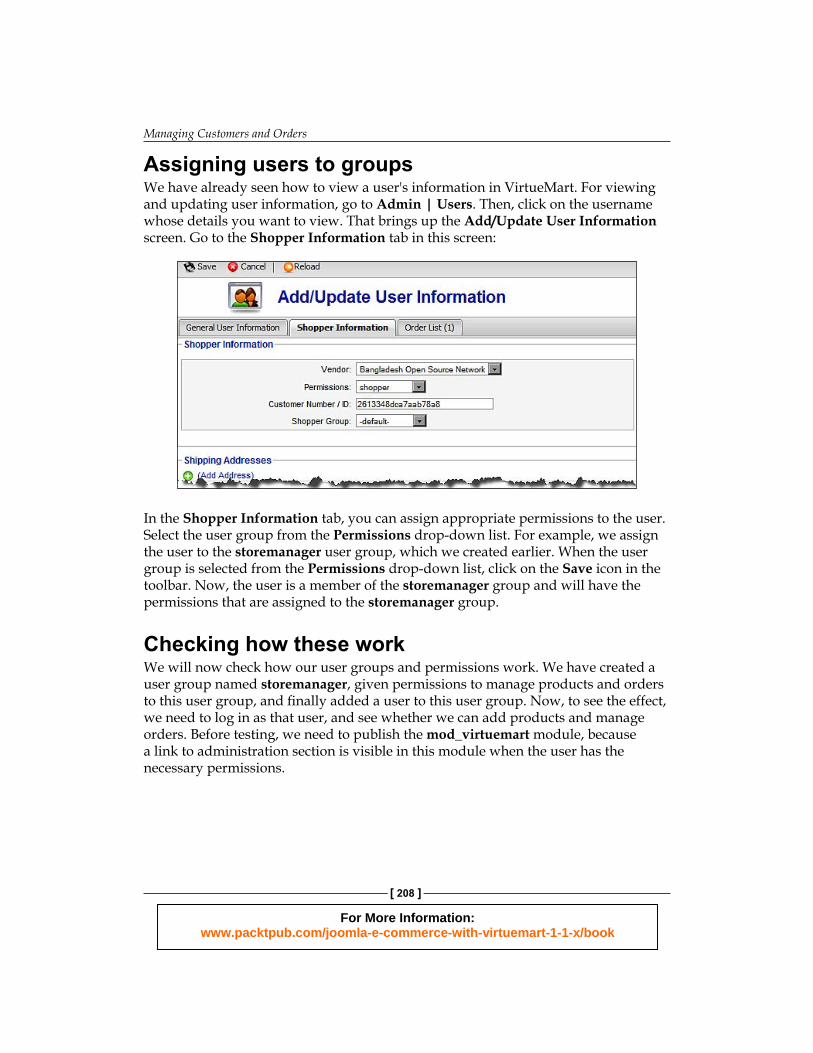
Assigning users to groupsWe have already seen how to view a user's information in VirtueMart. For viewing and updating user information, go to Admin | Users. Then, click on the username whose details you want to view. That brings up the Add/Update User Information screen. Go to the Shopper Information tab in this screen:
In the Shopper Information tab, you can assign appropriate permissions to the user. Select the user group from the Permissions drop-down list. For example, we assign the user to the storemanager user group, which we created earlier. When the user group is selected from the Permissions drop-down list, click on the Save icon in the toolbar. Now, the user is a member of the storemanager group and will have the permissions that are assigned to the storemanager group.
Checking how these workWe will now check how our user groups and permissions work. We have created a user group named storemanager, given permissions to manage products and orders to this user group, and finally added a user to this user group. Now, to see the effect, we need to log in as that user, and see whether we can add products and manage orders. Before testing, we need to publish the mod_virtuemart module, because a link to administration section is visible in this module when the user has the necessary permissions.
For More Information: www.packtpub.com/joomla-e-commerce-with-virtuemart-1-1-x/book
Chapter 5
[ 209 ]
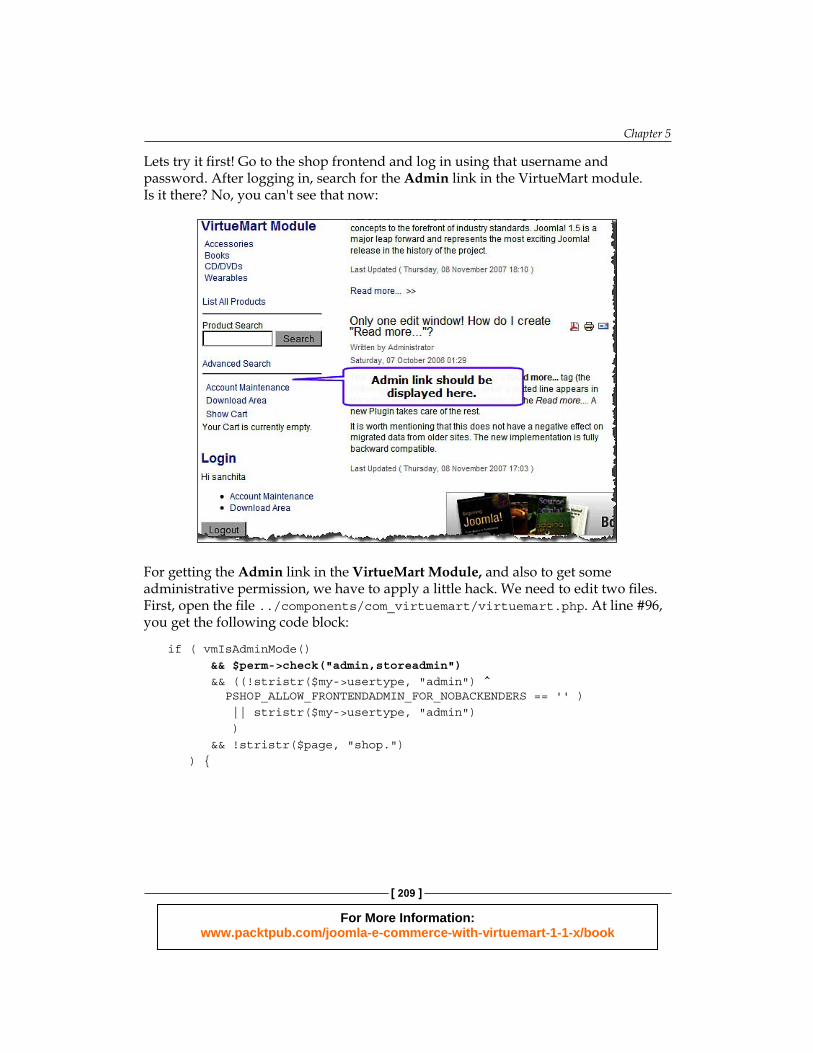
Lets try it first! Go to the shop frontend and log in using that username and password. After logging in, search for the Admin link in the VirtueMart module. Is it there? No, you can't see that now:
For getting the Admin link in the VirtueMart Module, and also to get some administrative permission, we have to apply a little hack. We need to edit two files. First, open the file ../components/com_virtuemart/virtuemart.php. At line #96, you get the following code block:
if ( vmIsAdminMode() && $perm->check("admin,storeadmin") && ((!stristr($my->usertype, "admin") ^ PSHOP_ALLOW_FRONTENDADMIN_FOR_NOBACKENDERS == '' ) || stristr($my->usertype, "admin") ) && !stristr($page, "shop.") ) {
For More Information: www.packtpub.com/joomla-e-commerce-with-virtuemart-1-1-x/book
Managing Customers and Orders
[ 210 ]
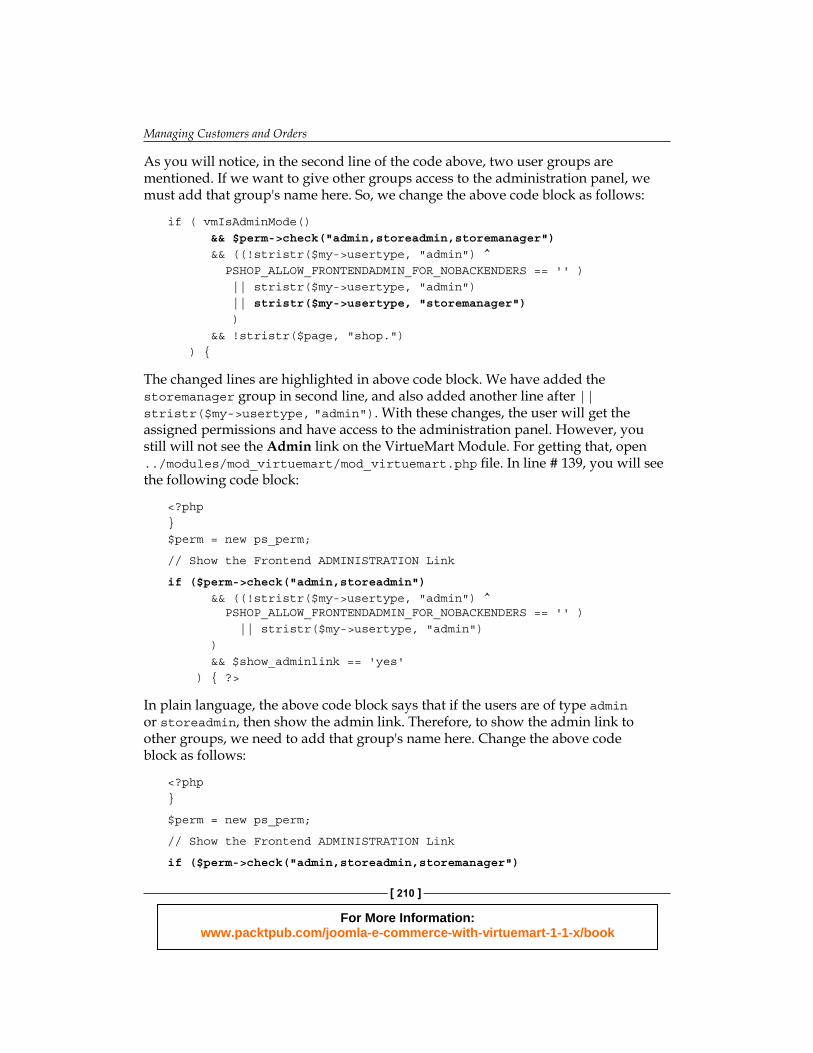
As you will notice, in the second line of the code above, two user groups are mentioned. If we want to give other groups access to the administration panel, we must add that group's name here. So, we change the above code block as follows:
if ( vmIsAdminMode() && $perm->check("admin,storeadmin,storemanager") && ((!stristr($my->usertype, "admin") ^ PSHOP_ALLOW_FRONTENDADMIN_FOR_NOBACKENDERS == '' ) || stristr($my->usertype, "admin") || stristr($my->usertype, "storemanager") ) && !stristr($page, "shop.") ) {
The changed lines are highlighted in above code block. We have added the storemanager group in second line, and also added another line after || stristr($my->usertype, "admin"). With these changes, the user will get the assigned permissions and have access to the administration panel. However, you still will not see the Admin link on the VirtueMart Module. For getting that, open ../modules/mod_virtuemart/mod_virtuemart.php file. In line # 139, you will see the following code block:
<?php}$perm = new ps_perm;
// Show the Frontend ADMINISTRATION Link
if ($perm->check("admin,storeadmin") && ((!stristr($my->usertype, "admin") ^ PSHOP_ALLOW_FRONTENDADMIN_FOR_NOBACKENDERS == '' ) || stristr($my->usertype, "admin") ) && $show_adminlink == 'yes' ) { ?>
In plain language, the above code block says that if the users are of type admin or storeadmin, then show the admin link. Therefore, to show the admin link to other groups, we need to add that group's name here. Change the above code block as follows:
<?php}
$perm = new ps_perm;
// Show the Frontend ADMINISTRATION Link
if ($perm->check("admin,storeadmin,storemanager")
For More Information: www.packtpub.com/joomla-e-commerce-with-virtuemart-1-1-x/book
Chapter 5
[ 211 ]
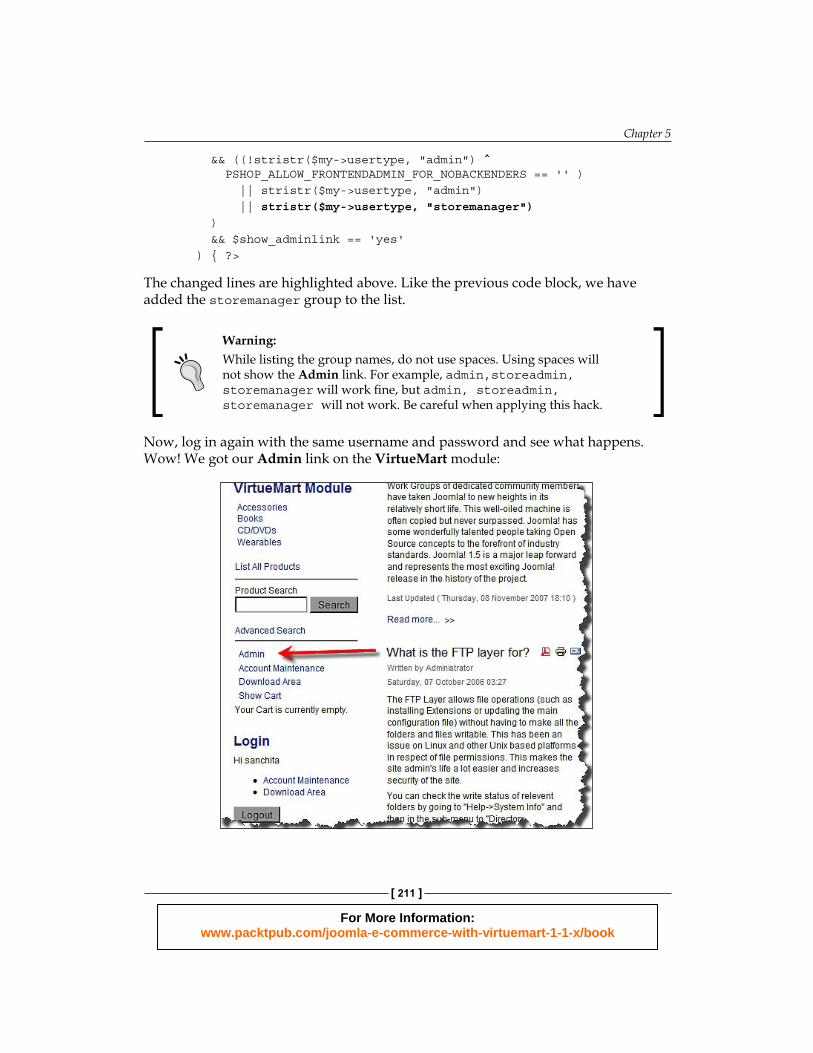
&& ((!stristr($my->usertype, "admin") ^ PSHOP_ALLOW_FRONTENDADMIN_FOR_NOBACKENDERS == '' ) || stristr($my->usertype, "admin") || stristr($my->usertype, "storemanager") ) && $show_adminlink == 'yes' ) { ?>
The changed lines are highlighted above. Like the previous code block, we have added the storemanager group to the list.
Warning:While listing the group names, do not use spaces. Using spaces will not show the Admin link. For example, admin,storeadmin, storemanager will work fine, but admin, storeadmin, storemanager will not work. Be careful when applying this hack.
Now, log in again with the same username and password and see what happens. Wow! We got our Admin link on the VirtueMart module:
For More Information: www.packtpub.com/joomla-e-commerce-with-virtuemart-1-1-x/book
Managing Customers and Orders
[ 212 ]
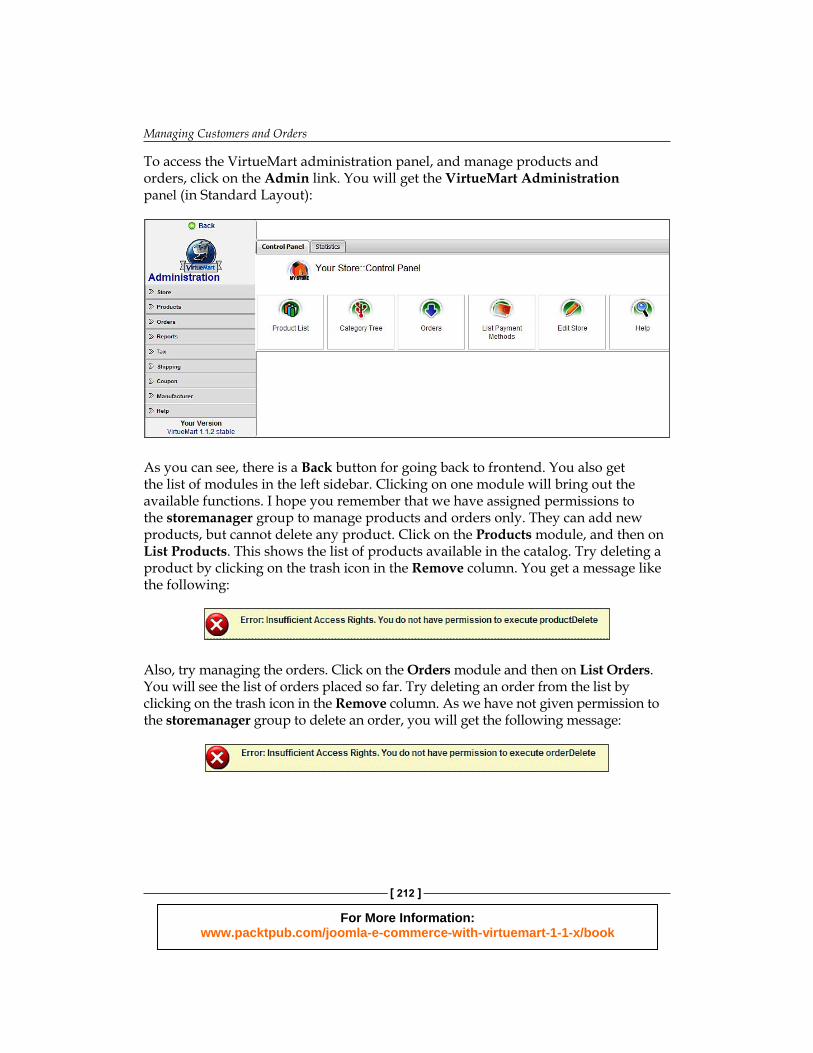
To access the VirtueMart administration panel, and manage products and orders, click on the Admin link. You will get the VirtueMart Administration panel (in Standard Layout):
As you can see, there is a Back button for going back to frontend. You also get the list of modules in the left sidebar. Clicking on one module will bring out the available functions. I hope you remember that we have assigned permissions to the storemanager group to manage products and orders only. They can add new products, but cannot delete any product. Click on the Products module, and then on List Products. This shows the list of products available in the catalog. Try deleting a product by clicking on the trash icon in the Remove column. You get a message like the following:
Also, try managing the orders. Click on the Orders module and then on List Orders. You will see the list of orders placed so far. Try deleting an order from the list by clicking on the trash icon in the Remove column. As we have not given permission to the storemanager group to delete an order, you will get the following message:
For More Information: www.packtpub.com/joomla-e-commerce-with-virtuemart-1-1-x/book
Chapter 5
[ 213 ]
Try to do something else for which the group has no permission, and you will get messages like these. From this, we understand that the permissions we have given to users are in effect. This is one wonderful way for giving access to a frontend user to manage the shop's specific tasks.
What other changes were made? Yes, we created a module named payment and added four functions to that module: paymentMethodAdd, payMentMethodUpdate, paymentMethodDelete, and paymentMethodList. The storemanager group can use all of the methods except the paymentMethodDelete. Lets try that.
But where is the payment module in left sidebar? All other modules are there, only our newly created payment module is missing. Then how do you try to add, update, and list the payment methods. During creation of the payment module, we indicated that this module should be displayed in the administration panel. However, it is not showing there. To showthe module, and other links to that module, we need to edit a file. We will be looking at this issue later, in Chapter 9, Extending VirtueMart's Functionalities.
If you click on the Store module, you get two payment method related links: List Payment Methods, and Add Payment Method. As the group storemanager has permission to do both, you may try and see what happens. Surely, you will be able to add a payment method, edit a payment method, and to see the list of payment methods. However, you will not be able to delete a payment method, as you have no permission to do so.
Managing ordersOur shop is now ready for customers. They can register to the shop and get some permissions to browse products and place orders. After building the catalog, one of the big tasks of the shop administrator is to manage the orders. Managing an order includes viewing the order, ensuring that payment is made, shipping the product to customers ship to address, and setting the appropriate status of the order. Whenever the status of the order changes, the shop administrator can also notify the customer about its status. When the product is delivered, the status should also be changed. Sometimes, you need to change the status when the customer refunds it for some reason.
For More Information: www.packtpub.com/joomla-e-commerce-with-virtuemart-1-1-x/book
Managing Customers and Orders
[ 214 ]
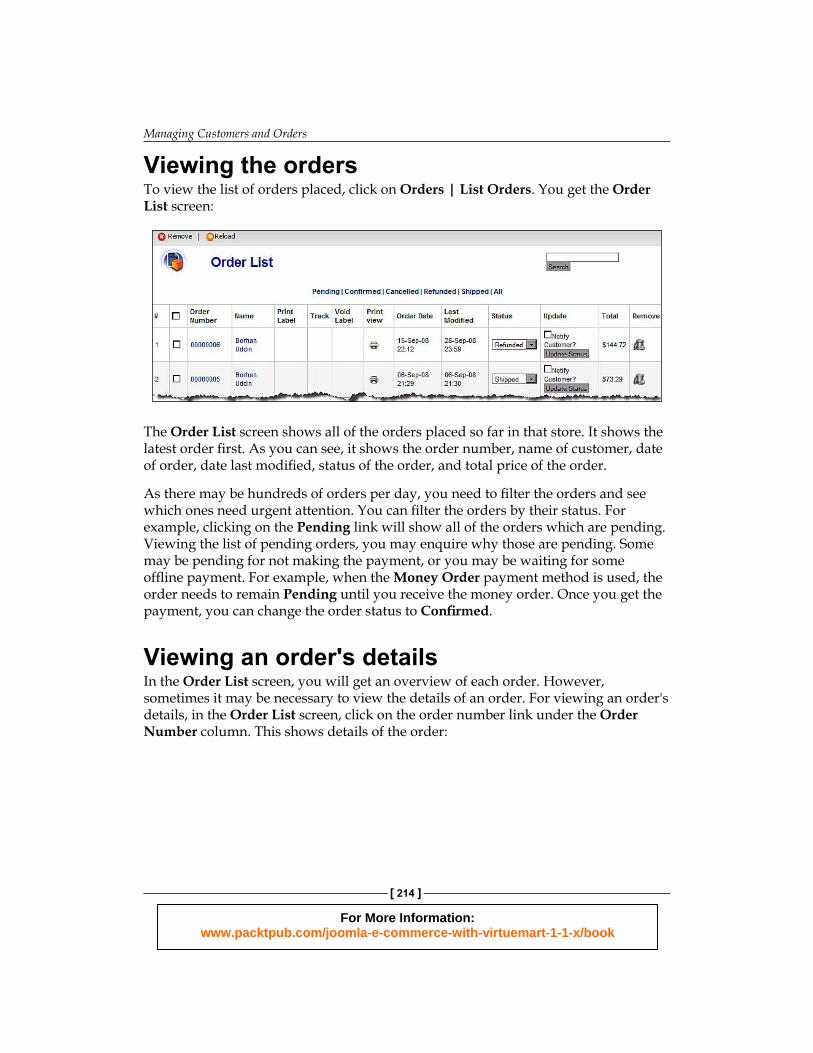
Viewing the ordersTo view the list of orders placed, click on Orders | List Orders. You get the Order List screen:
The Order List screen shows all of the orders placed so far in that store. It shows the latest order first. As you can see, it shows the order number, name of customer, date of order, date last modified, status of the order, and total price of the order.
As there may be hundreds of orders per day, you need to filter the orders and see which ones need urgent attention. You can filter the orders by their status. For example, clicking on the Pending link will show all of the orders which are pending. Viewing the list of pending orders, you may enquire why those are pending. Some may be pending for not making the payment, or you may be waiting for some offline payment. For example, when the Money Order payment method is used, the order needs to remain Pending until you receive the money order. Once you get the payment, you can change the order status to Confirmed.
Viewing an order's detailsIn the Order List screen, you will get an overview of each order. However, sometimes it may be necessary to view the details of an order. For viewing an order's details, in the Order List screen, click on the order number link under the Order Number column. This shows details of the order:
For More Information: www.packtpub.com/joomla-e-commerce-with-virtuemart-1-1-x/book
Chapter 5
[ 215 ]
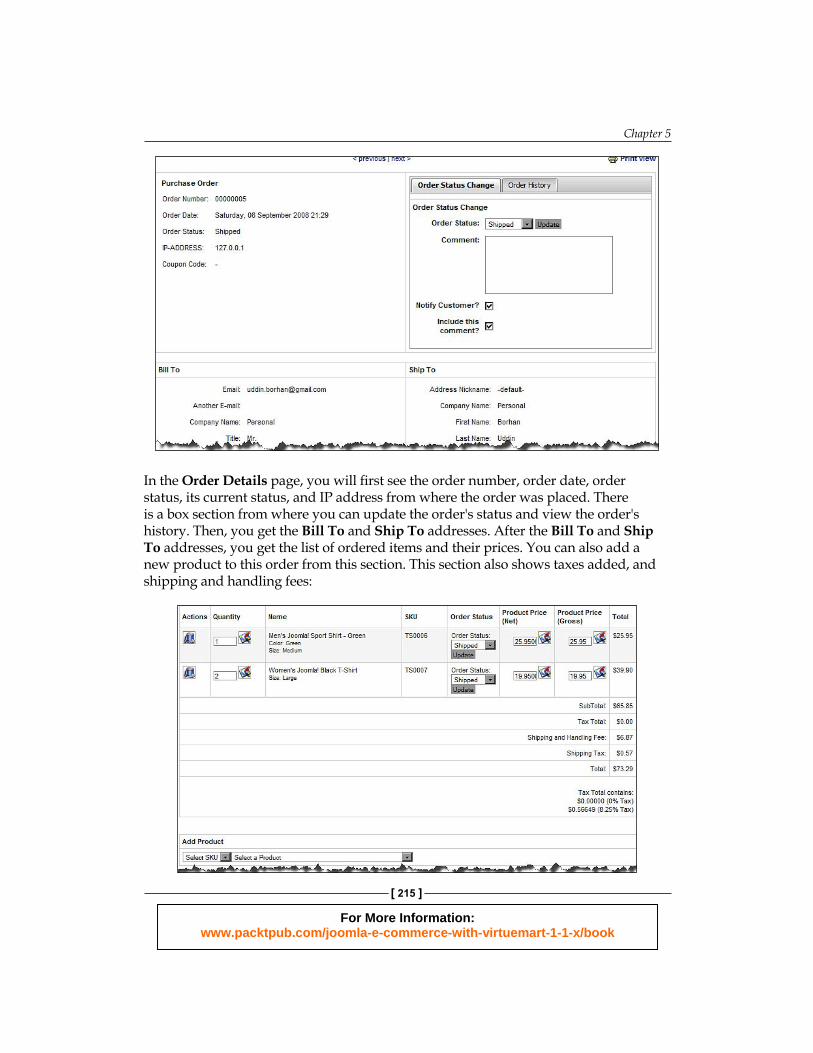
In the Order Details page, you will first see the order number, order date, order status, its current status, and IP address from where the order was placed. There is a box section from where you can update the order's status and view the order's history. Then, you get the Bill To and Ship To addresses. After the Bill To and Ship To addresses, you get the list of ordered items and their prices. You can also add a new product to this order from this section. This section also shows taxes added, and shipping and handling fees:
For More Information: www.packtpub.com/joomla-e-commerce-with-virtuemart-1-1-x/book
Managing Customers and Orders
[ 216 ]
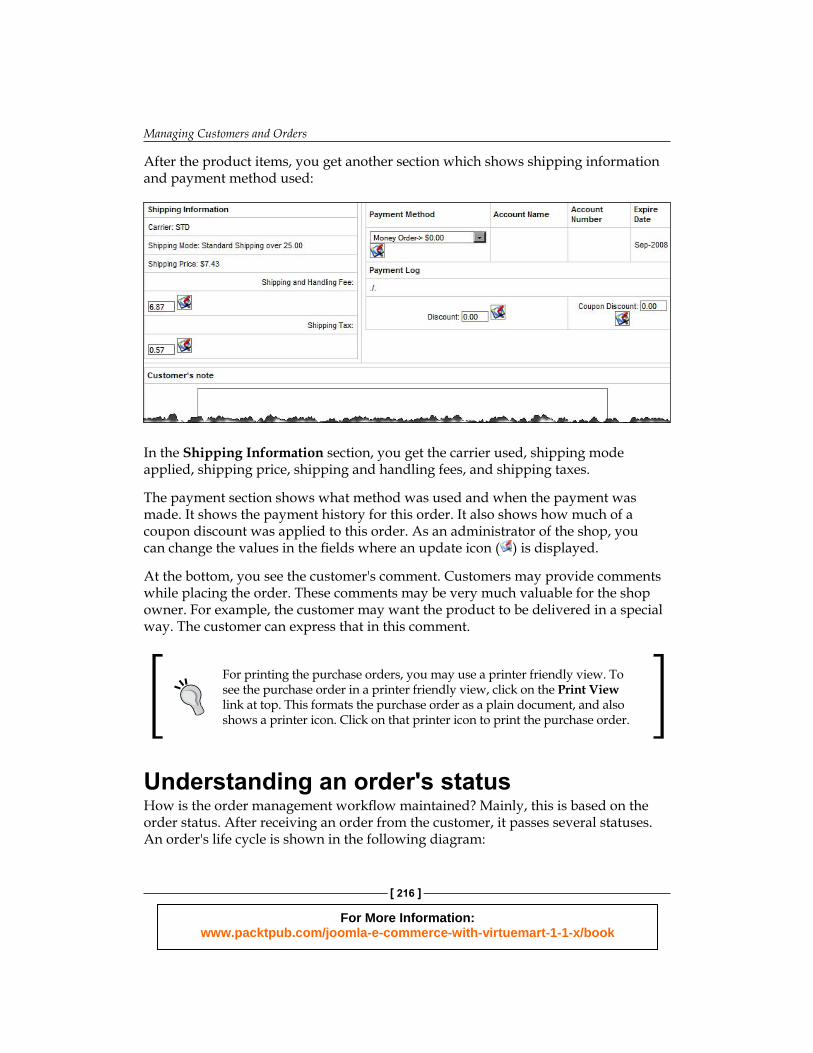
After the product items, you get another section which shows shipping information and payment method used:
In the Shipping Information section, you get the carrier used, shipping mode applied, shipping price, shipping and handling fees, and shipping taxes.
The payment section shows what method was used and when the payment was made. It shows the payment history for this order. It also shows how much of a coupon discount was applied to this order. As an administrator of the shop, you can change the values in the fields where an update icon ( ) is displayed.
At the bottom, you see the customer's comment. Customers may provide comments while placing the order. These comments may be very much valuable for the shop owner. For example, the customer may want the product to be delivered in a special way. The customer can express that in this comment.
For printing the purchase orders, you may use a printer friendly view. To see the purchase order in a printer friendly view, click on the Print View link at top. This formats the purchase order as a plain document, and also shows a printer icon. Click on that printer icon to print the purchase order.
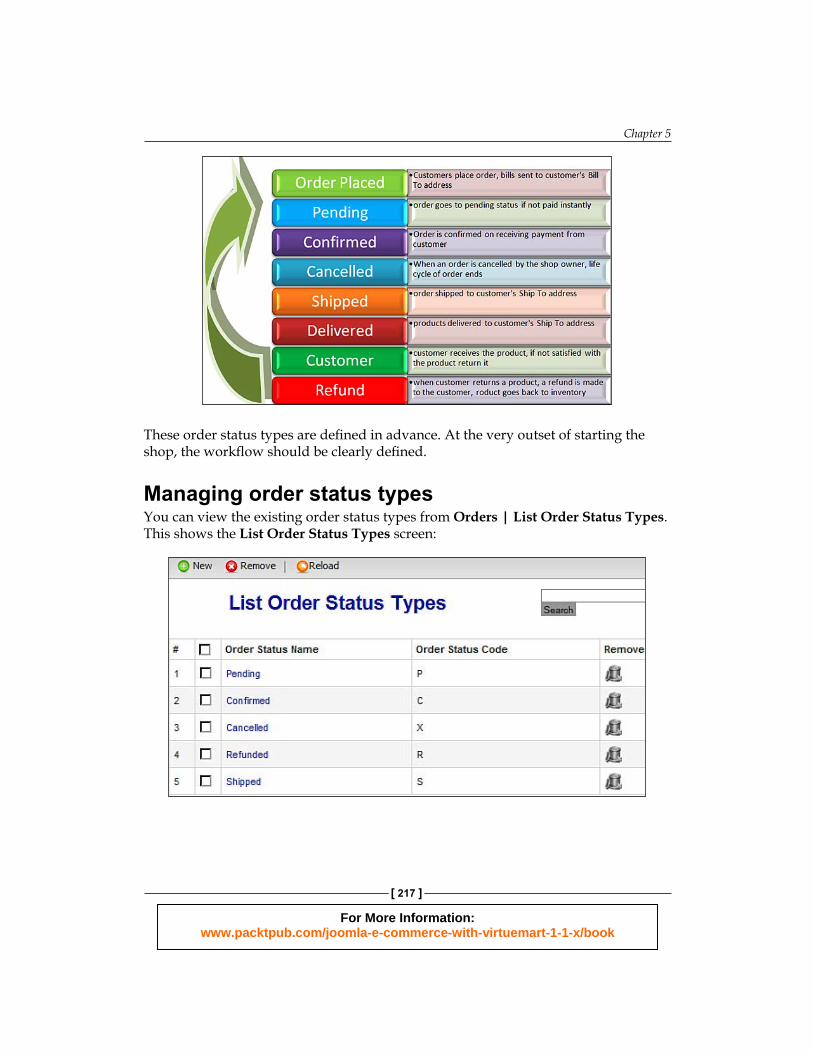
Understanding an order's statusHow is the order management workflow maintained? Mainly, this is based on the order status. After receiving an order from the customer, it passes several statuses. An order's life cycle is shown in the following diagram:
For More Information: www.packtpub.com/joomla-e-commerce-with-virtuemart-1-1-x/book
Chapter 5
[ 217 ]
These order status types are defined in advance. At the very outset of starting the shop, the workflow should be clearly defined.
Managing order status typesYou can view the existing order status types from Orders | List Order Status Types. This shows the List Order Status Types screen:
For More Information: www.packtpub.com/joomla-e-commerce-with-virtuemart-1-1-x/book
Managing Customers and Orders
[ 218 ]
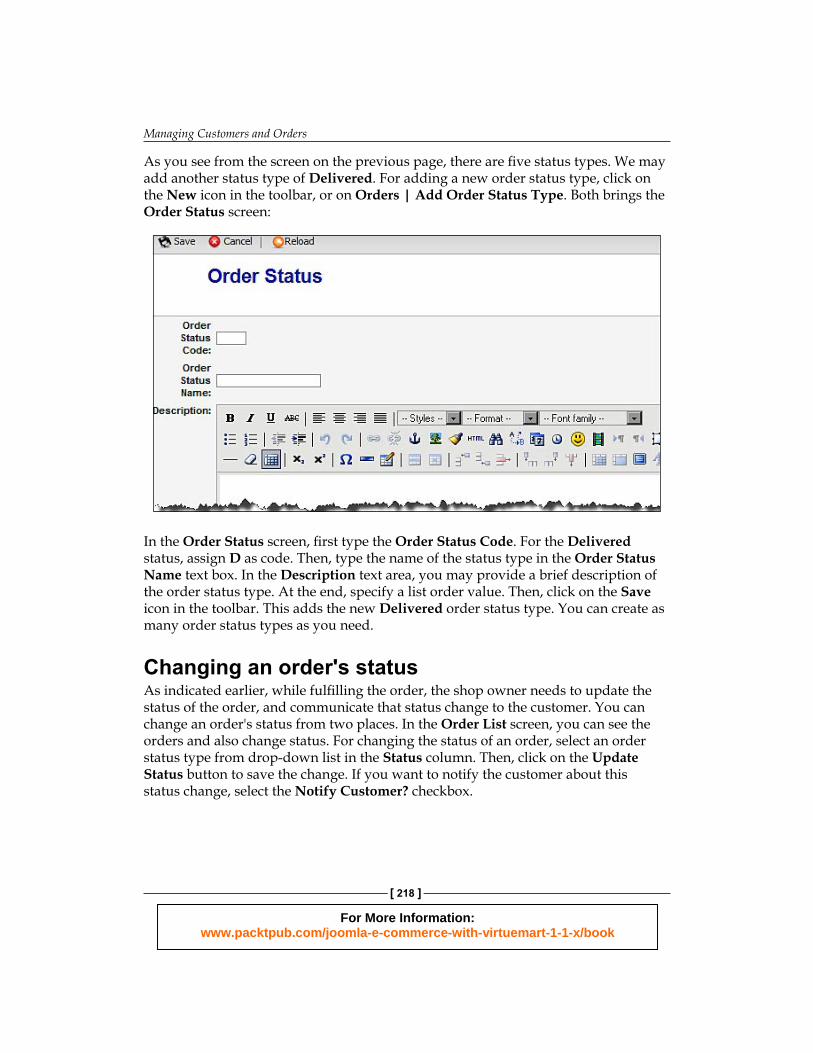
As you see from the screen on the previous page, there are five status types. We may add another status type of Delivered. For adding a new order status type, click on the New icon in the toolbar, or on Orders | Add Order Status Type. Both brings the Order Status screen:
In the Order Status screen, first type the Order Status Code. For the Delivered status, assign D as code. Then, type the name of the status type in the Order Status Name text box. In the Description text area, you may provide a brief description of the order status type. At the end, specify a list order value. Then, click on the Save icon in the toolbar. This adds the new Delivered order status type. You can create as many order status types as you need.
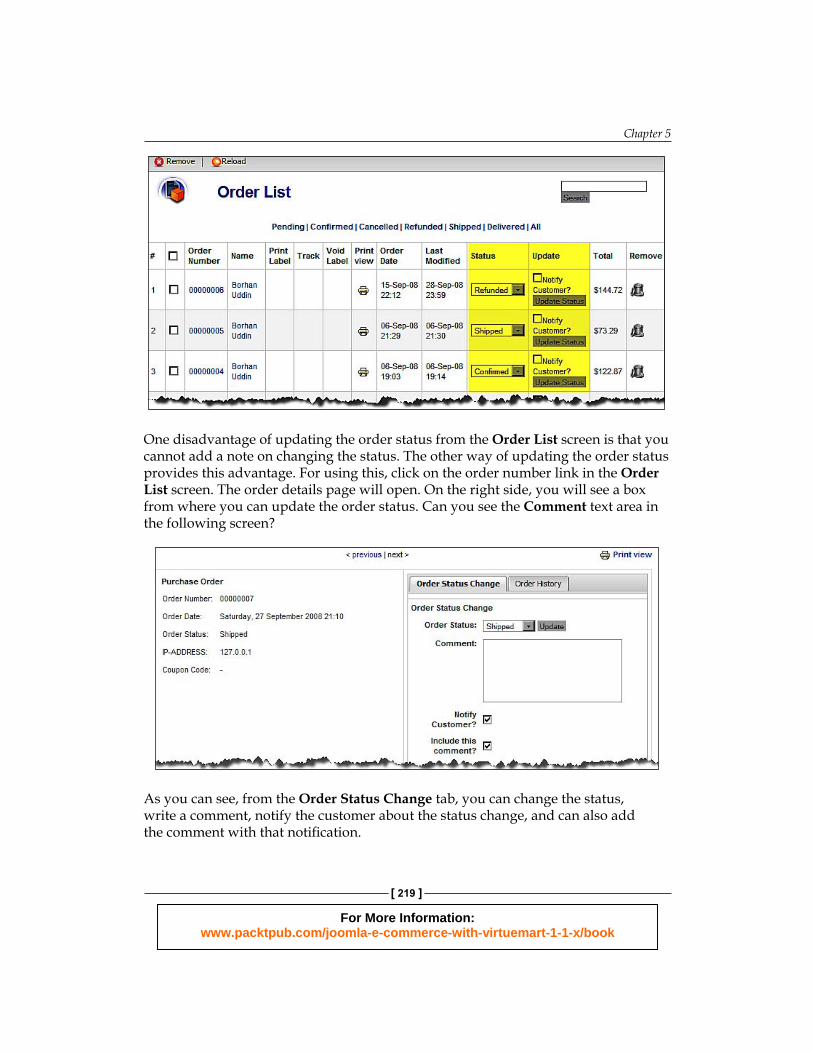
Changing an order's status As indicated earlier, while fulfilling the order, the shop owner needs to update the status of the order, and communicate that status change to the customer. You can change an order's status from two places. In the Order List screen, you can see the orders and also change status. For changing the status of an order, select an order status type from drop-down list in the Status column. Then, click on the Update Status button to save the change. If you want to notify the customer about this status change, select the Notify Customer? checkbox.
For More Information: www.packtpub.com/joomla-e-commerce-with-virtuemart-1-1-x/book
Chapter 5
[ 219 ]
One disadvantage of updating the order status from the Order List screen is that you cannot add a note on changing the status. The other way of updating the order status provides this advantage. For using this, click on the order number link in the Order List screen. The order details page will open. On the right side, you will see a box from where you can update the order status. Can you see the Comment text area in the following screen?
As you can see, from the Order Status Change tab, you can change the status, write a comment, notify the customer about the status change, and can also add the comment with that notification.
For More Information: www.packtpub.com/joomla-e-commerce-with-virtuemart-1-1-x/book
Managing Customers and Orders
[ 220 ]
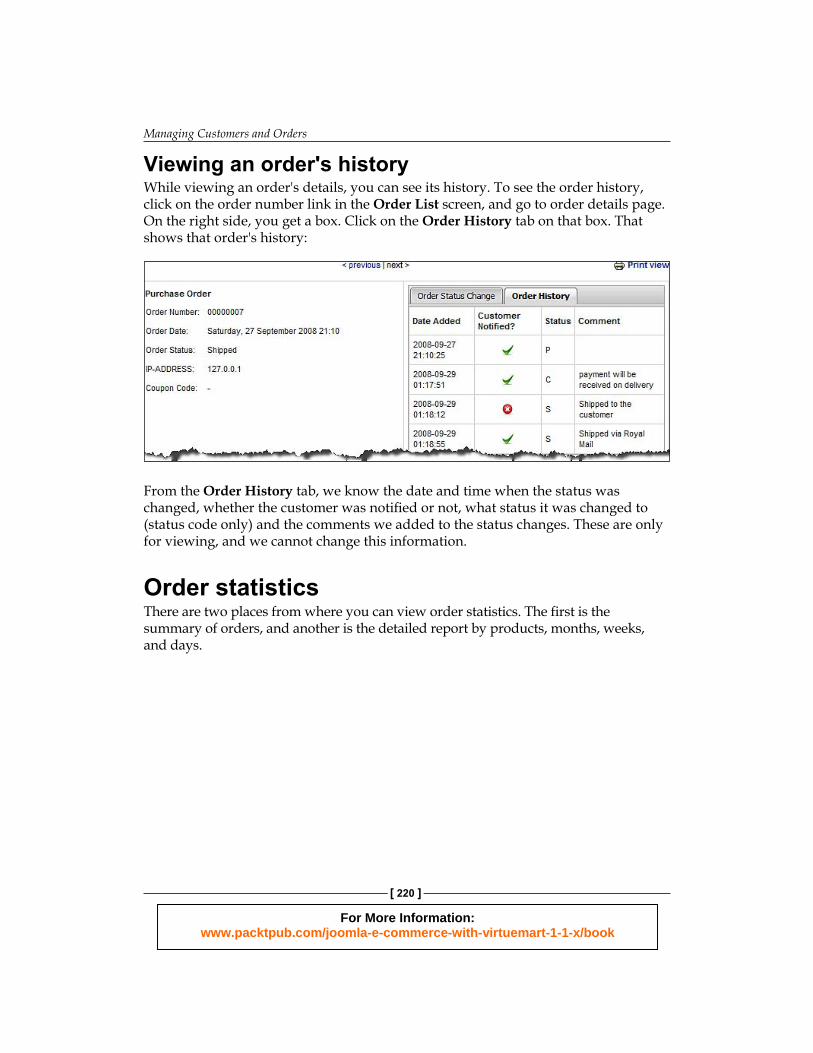
Viewing an order's historyWhile viewing an order's details, you can see its history. To see the order history, click on the order number link in the Order List screen, and go to order details page. On the right side, you get a box. Click on the Order History tab on that box. That shows that order's history:
From the Order History tab, we know the date and time when the status was changed, whether the customer was notified or not, what status it was changed to (status code only) and the comments we added to the status changes. These are only for viewing, and we cannot change this information.
Order statisticsThere are two places from where you can view order statistics. The first is the summary of orders, and another is the detailed report by products, months, weeks, and days.

For More Information: www.packtpub.com/joomla-e-commerce-with-virtuemart-1-1-x/book
Chapter 5
[ 221 ]
Let us see the summary of orders statistics first. When you log in to the VirtueMart administration panel, you get a summary of your store's orders in the Statistics tab:

For More Information: www.packtpub.com/joomla-e-commerce-with-virtuemart-1-1-x/book
Managing Customers and Orders
[ 222 ]
This Statistics tab shows the number of customers, the number of active products, inactive products, and featured products. In the Orders section, it shows the number of orders by order status type. In the New Orders section, we get a listing of new orders and their prices. Similarly, you can see new customers in the New Customers section.
Of course, you will not be satisfied with the summary of orders shown in the Statistics tab. You want to see more details and analyze which products are selling and on which occasions. For this purpose, you can use the Report module in theVirtueMart administration panel. Click on Reports | Reports. This shows the Reports screen:
As you can see, from the Reports screen, we can view monthly, weekly, or even daily order statistics. We can also select a date range and view the orders placed during that period.
Let us first see how the monthly report looks. For generating such a report, in the Set Interval field, select the Monthly radio button. Then, click on the This Month button to see orders placed in the current month. That displays the sales for that month at the bottom of the screen with a heading like 'Report for Sep 1, 2008 --> Sep 30, 2008' (as shown in the screenshot above). The report shows the period, number of orders, total items sold, and total revenue from these orders.
For More Information: www.packtpub.com/joomla-e-commerce-with-virtuemart-1-1-x/book
Chapter 5
[ 223 ]
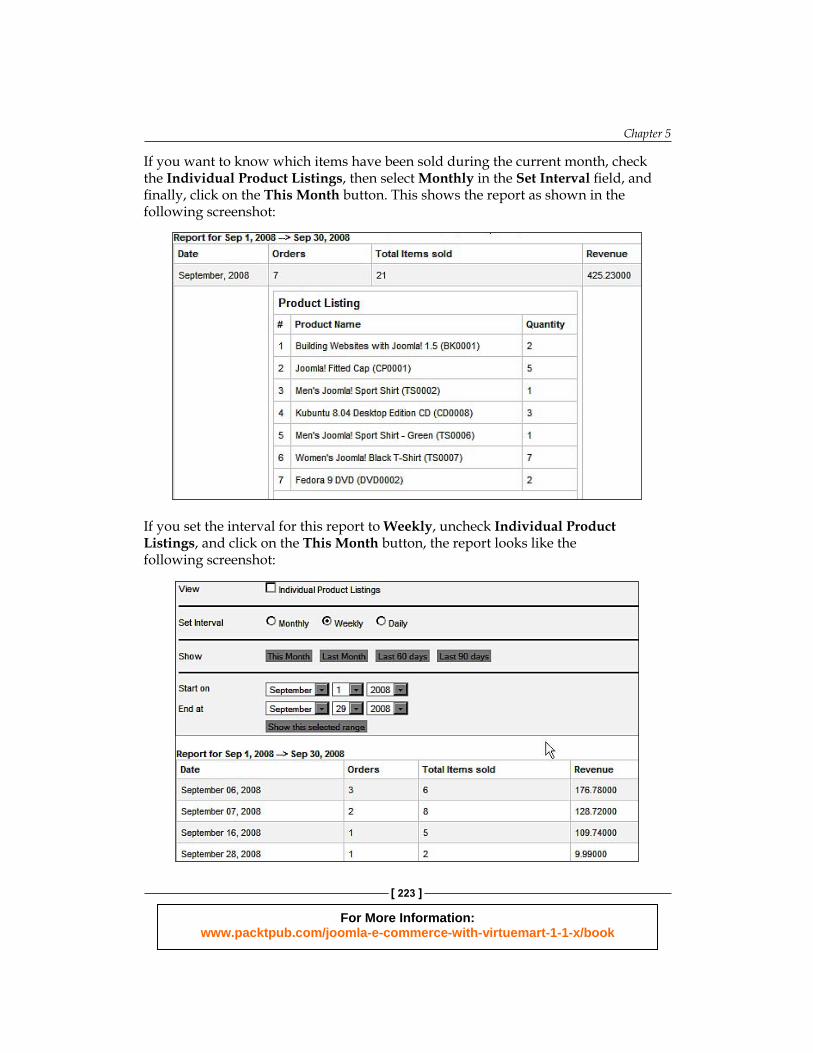
If you want to know which items have been sold during the current month, check the Individual Product Listings, then select Monthly in the Set Interval field, and finally, click on the This Month button. This shows the report as shown in the following screenshot:
If you set the interval for this report to Weekly, uncheck Individual Product Listings, and click on the This Month button, the report looks like the following screenshot:
For More Information: www.packtpub.com/joomla-e-commerce-with-virtuemart-1-1-x/book
Managing Customers and Orders
[ 224 ]
Similarly, you can see the report for the last month, last sixty days, last ninety days, and selecting the date range, and also by daily interval. These statistics will help you manage your orders and will be of great help for promotion and public relations, which we will discuss in detail in Chapter 7, Promotion and Public Relations.
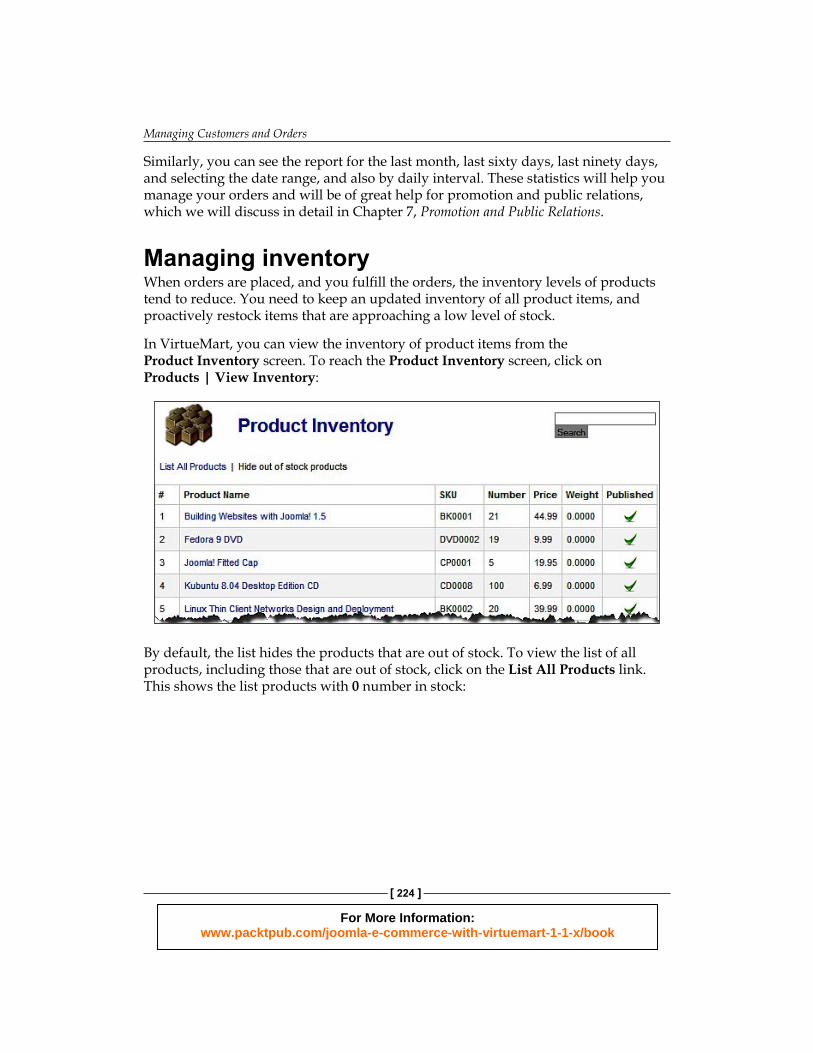
Managing inventoryWhen orders are placed, and you fulfill the orders, the inventory levels of products tend to reduce. You need to keep an updated inventory of all product items, and proactively restock items that are approaching a low level of stock.
In VirtueMart, you can view the inventory of product items from the Product Inventory screen. To reach the Product Inventory screen, click on Products | View Inventory:
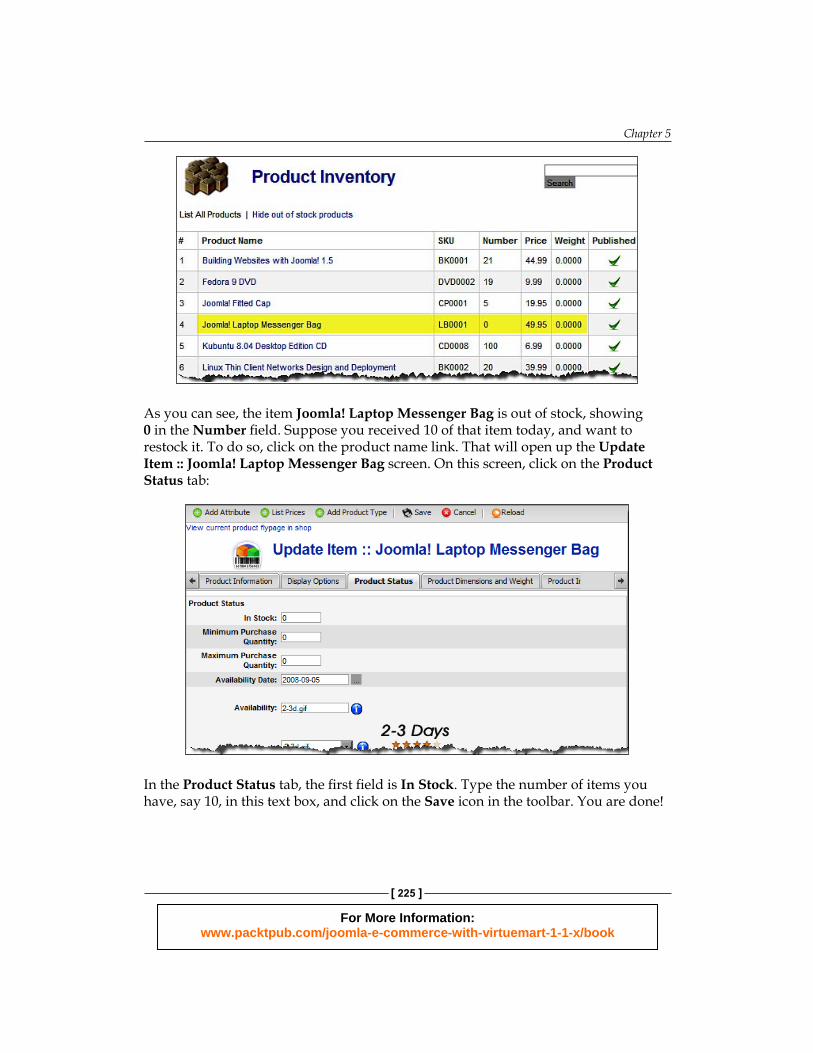
By default, the list hides the products that are out of stock. To view the list of all products, including those that are out of stock, click on the List All Products link. This shows the list products with 0 number in stock:
For More Information: www.packtpub.com/joomla-e-commerce-with-virtuemart-1-1-x/book
Chapter 5
[ 225 ]
As you can see, the item Joomla! Laptop Messenger Bag is out of stock, showing 0 in the Number field. Suppose you received 10 of that item today, and want to restock it. To do so, click on the product name link. That will open up the Update Item :: Joomla! Laptop Messenger Bag screen. On this screen, click on the Product Status tab:
In the Product Status tab, the first field is In Stock. Type the number of items you have, say 10, in this text box, and click on the Save icon in the toolbar. You are done!

For More Information: www.packtpub.com/joomla-e-commerce-with-virtuemart-1-1-x/book
Managing Customers and Orders
[ 226 ]
Now, go back to Product Inventory screen again. You will see that the Joomla! Laptop Messenger Bag has 10 in stock:
Using the same process, you can update the stock level of any product item by entering a new value in the In Stock field on the Update Item screen.
The limitation of inventory management in VirtueMart is that, like other shopping carts, it does not warn you when a product's stock level reduces to a certain low level. It also does not show the out of stock products at a glance.
SummaryThis has been a long chapter indeed, and I am sure you have learned a lot from this chapter. In this chapter, you have seen how to allow customer registrations to your VirtueMart shop, how to manage the registered users, how to define extra fields for customer registration and account maintenance forms, how to create and manage user groups and assign permissions to user groups. You have also seen how to create permission modules and functions that are used for implementing a permission system for special groups. Finally, you have learned about managing orders, viewing an order's details, updating an order's status, creating and managing order status types, and also managing and updating product inventory.
All the things you have learned in this chapter are very much essential for running a VirtueMart shop, as you must deal with customers, orders, and manage the inventory. So far, we have built the catalog, allowed customers to register, set the order status types, and learned how to manage orders and inventory. Before allowing our shop to go online online, still there is at least one more thing to do. We have to change the look and feel of the store. As you have seen, we are still using Joomla!'s default theme. We must give it a look that we want. Yes, in the next chapter, we are going to learn about customizing the look and feel of our VirtueMart store.

For More Information: www.packtpub.com/joomla-e-commerce-with-virtuemart-1-1-x/book
Where to buy this book You can buy Joomla! E-Commerce with VirtueMart from the Packt Publishing website: http://www.packtpub.com/joomla-e-commerce-with-virtuemart-1-1-x/book.
Free shipping to the US, UK, Europe and selected Asian countries. For more information, please read our shipping policy.
Alternatively, you can buy the book from Amazon, BN.com, Computer Manuals and most internet book retailers.
www.PacktPub.com