Embed Size (px)
Citation preview
http://www.flexiblewebdesign.com -‐ Copyright 2009 -‐ 2014 ©
1
// Flexible – Joomla + Virtuemart 2 Template – StyleMart // author Flexible Web Design Team // Copyright 2009 – 20014 © flexiblewebdesign.com // License GNU/GPLv3 http://www.gnu.org/licenses/gpl-‐3.0.html
FLEXIBLE WEB DESIGN TEAM Joomla + Virtuemart 2 Template – StyleMart
TUTORIAL
1. Installing StyleMart Template: ......................................................................................................................... 2 1.1. Explaining the files and folders. ......................................................................................................................... 2 1.2. First Method: Installing through QuickStart Package ........................................................................................ 2 1.3. Second Method: Installing everything One-‐By One. ........................................................................................... 3
2. The fun Part: CONFIGURATION: ....................................................................................................................... 5 2.1. What to do when you update Virtuemart. ......................................................................................................... 5 2.1.1. Tutorial 1: To show manufacturer LOGOs ....................................................................................................... 5 2.1.2. Tutorial 2: Multiple Thumbnails in Category Page .......................................................................................... 5 2.1.3. Tutorial 3: Modification for VM Custom, Stockable ........................................................................................ 5 2.2. Translate some texts that come with StyleMart: ............................................................................................... 6 2.3. Changing parameters for Virtuemart pages by Using plg_flexibleTemplate Plugin: ......................................... 6 2.4. Important Virtuemart Settings: .......................................................................................................................... 7 2.5. THIS IS VERY IMPORTANT. READ THIS, OTHERWISE THE PRICE MIGHT NOT GET CROSSED (LINE-‐THROUGH) .. 8 2.6. Changing Price Labels ........................................................................................................................................ 8 2.7. Virtuemart Backend >> Configuration >> Template ........................................................................................ 10 2.8. Virtuemart Backend >> Configuration >> Checkout ......................................................................................... 12 2.9. Product & Category Layout override issue ....................................................................................................... 12 2.10. Availability (shipping time) icons ................................................................................................................... 14 2.11. Creating SPECIFICATION TAB in product details page ................................................................................... 15 2.12. That’s all folks ;) ............................................................................................................................................. 17
http://www.flexiblewebdesign.com -‐ Copyright 2009 -‐ 2014 ©
2
1. Installing StyleMart Template:
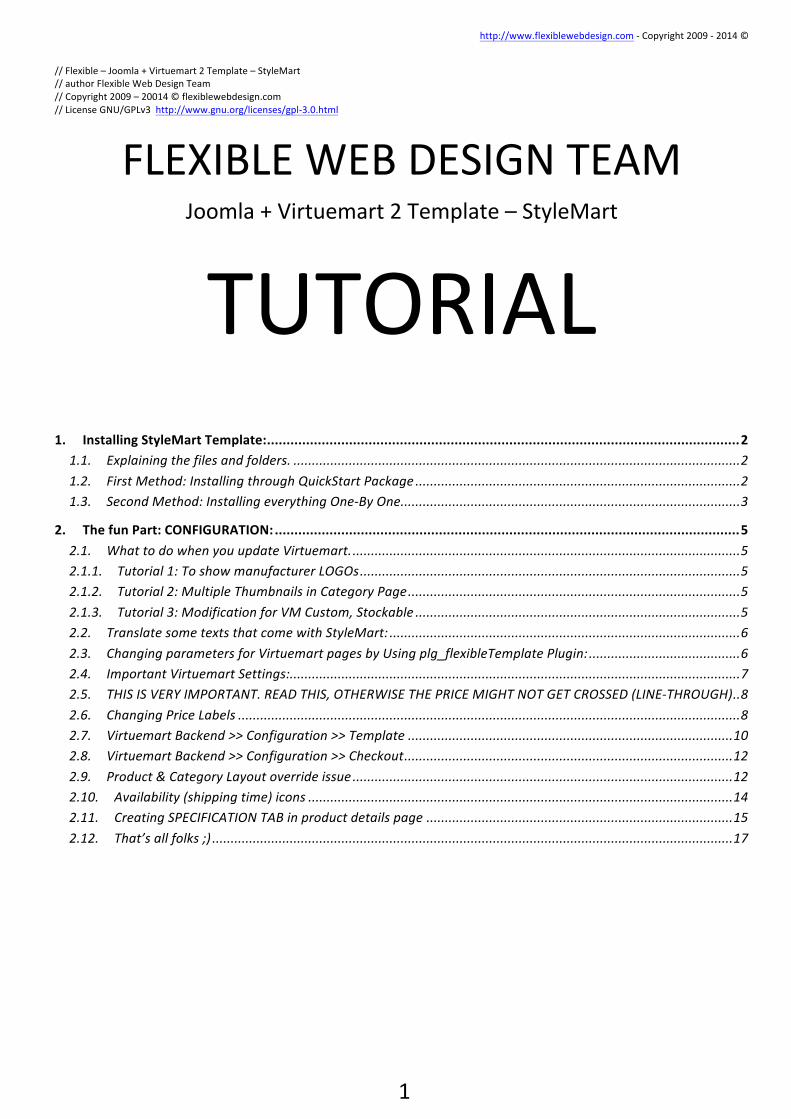
1.1. Explaining the files and folders. Once you UNZIP the Installation file that you download from our server, you will get 2 folders and 2 files.
Release Notes.txt = Includes the Release History. TUTORIAL.pdf = You are now reading it :) QuickStart Folder = The Magic folder. It is the Quick Start package to install everything at once. One-‐By One Folder = Lets you install the StyleMart without the Sample DATA and modules.
1.2. First Method: Installing through QuickStart Package This is the magic folder, once you performed this installation you will get exactly the same layout and contents as you see in our DEMO. If you are starting a new project with using StyleMart, installing through QuickStart package is HIGHLY recommended (unless you are an advanced joomla developer). Basically take the 2 files from the QuickStart Folder and upload them to your server through FTP Client. For instance, if your domain is www.domain.com, then 2 files should be located here:
-‐ http://www.domain.com/kickstart.php -‐ http://www.domain.com/QuickStart-‐AkeebaBackup.zip
Then browse the kickstart.php in your server and follow the instructions. You can watch this tutorial video below if you are unfamiliar with Akeeba Backup installation procedure: https://www.youtube.com/watch?v=hlU1HSWMs7c
http://www.flexiblewebdesign.com -‐ Copyright 2009 -‐ 2014 ©
3
After you perform this QuickStart method, you will get:
! Joomla! 2.5.19 ! Virtuemart Component 2.6 ! Virtuemart AIO Component 2.6 ! StyleMart Template [template core and necessary plugins to run the framework] ! Shopping Cart [Module + Plugin] ! 3D Slider Module ! Sample data [articles + modules + virtuemart products that you see in the live DEMO]
All in all, everything!!! I would strongly suggest you to go through QuickStart installation. Then go to Virtuemart Component, delete the created products/categories and instead add yours. You will be pretty much good to go. Q: Today’s Virtuemart/Joomla 2.5 version is newer than what comes with this QuickStart package. A: First go through the QuickStart, and then simply update the joomla / Virtuemart by clicking the update buttons.
1.3. Second Method: Installing everything One-‐By One. If you already have joomla and already have Virtuemart installed and you don’t want lose your DATA’s both from joomla! and from Virtuemart – OR – If you already have a StyleMart Template and you just want to update it; then this method is for you. Once you perform this installation method, you won’t lose your contents (menu items, modules, virtuemart products, etc..) Before going through One-‐By One installation, make sure you already have; -‐ Joomla 2.5.xx [requirement] -‐ Virtuemart 2.6 [requirement] -‐ Virtuemart AIO 2.6 Then proceed to installation. There is only one ZIP file that you need to install through Joomla Extensions Manager, which is this: One-‐One by One >> pkg_stylemart.zip
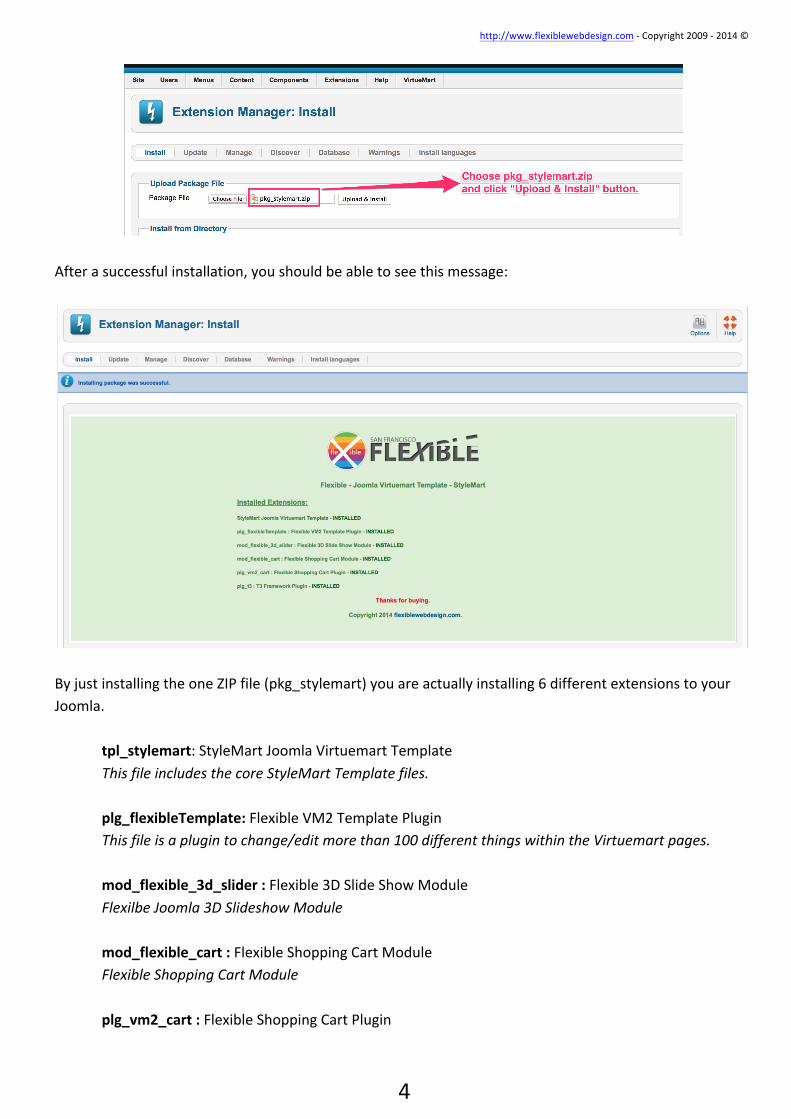
http://www.flexiblewebdesign.com -‐ Copyright 2009 -‐ 2014 ©
4
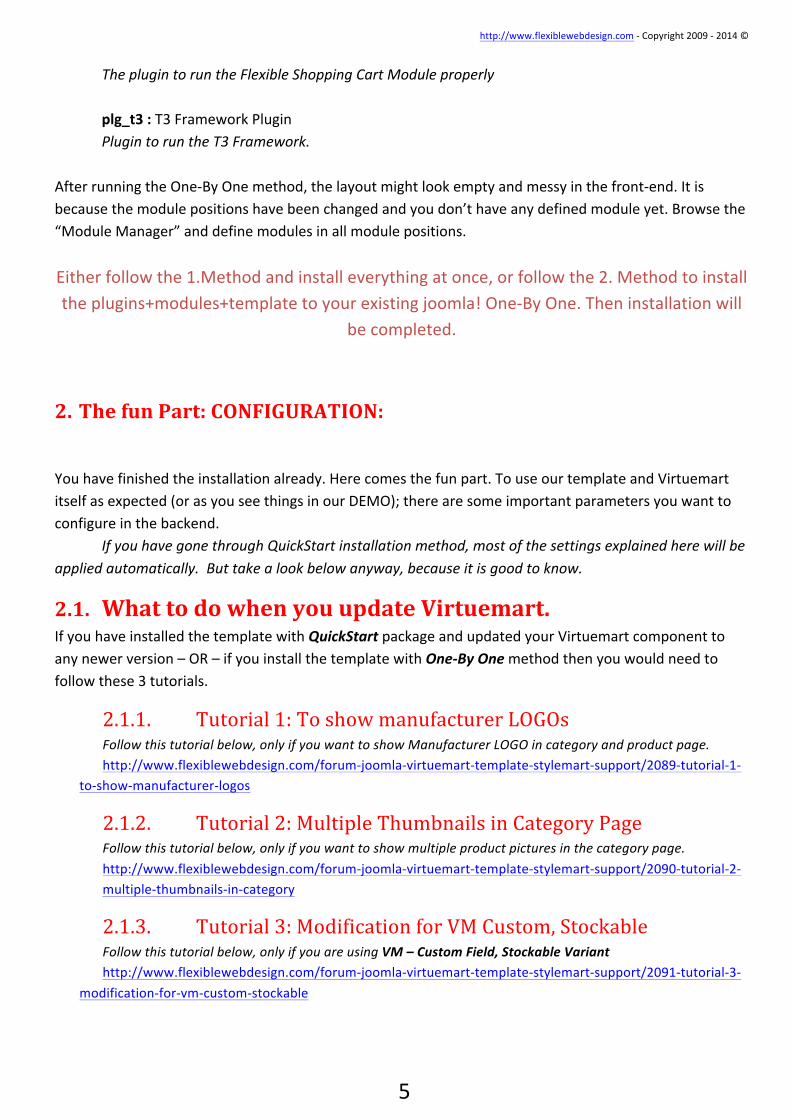
After a successful installation, you should be able to see this message:
By just installing the one ZIP file (pkg_stylemart) you are actually installing 6 different extensions to your Joomla.
tpl_stylemart: StyleMart Joomla Virtuemart Template This file includes the core StyleMart Template files. plg_flexibleTemplate: Flexible VM2 Template Plugin This file is a plugin to change/edit more than 100 different things within the Virtuemart pages. mod_flexible_3d_slider : Flexible 3D Slide Show Module Flexilbe Joomla 3D Slideshow Module mod_flexible_cart : Flexible Shopping Cart Module Flexible Shopping Cart Module plg_vm2_cart : Flexible Shopping Cart Plugin
http://www.flexiblewebdesign.com -‐ Copyright 2009 -‐ 2014 ©
5
The plugin to run the Flexible Shopping Cart Module properly plg_t3 : T3 Framework Plugin Plugin to run the T3 Framework.
After running the One-‐By One method, the layout might look empty and messy in the front-‐end. It is because the module positions have been changed and you don’t have any defined module yet. Browse the “Module Manager” and define modules in all module positions. Either follow the 1.Method and install everything at once, or follow the 2. Method to install the plugins+modules+template to your existing joomla! One-‐By One. Then installation will
be completed.
2. The fun Part: CONFIGURATION: You have finished the installation already. Here comes the fun part. To use our template and Virtuemart itself as expected (or as you see things in our DEMO); there are some important parameters you want to configure in the backend. If you have gone through QuickStart installation method, most of the settings explained here will be applied automatically. But take a look below anyway, because it is good to know.
2.1. What to do when you update Virtuemart. If you have installed the template with QuickStart package and updated your Virtuemart component to any newer version – OR – if you install the template with One-‐By One method then you would need to follow these 3 tutorials.
2.1.1. Tutorial 1: To show manufacturer LOGOs Follow this tutorial below, only if you want to show Manufacturer LOGO in category and product page. http://www.flexiblewebdesign.com/forum-‐joomla-‐virtuemart-‐template-‐stylemart-‐support/2089-‐tutorial-‐1-‐
to-‐show-‐manufacturer-‐logos
2.1.2. Tutorial 2: Multiple Thumbnails in Category Page Follow this tutorial below, only if you want to show multiple product pictures in the category page. http://www.flexiblewebdesign.com/forum-‐joomla-‐virtuemart-‐template-‐stylemart-‐support/2090-‐tutorial-‐2-‐multiple-‐thumbnails-‐in-‐category
2.1.3. Tutorial 3: Modification for VM Custom, Stockable Follow this tutorial below, only if you are using VM – Custom Field, Stockable Variant http://www.flexiblewebdesign.com/forum-‐joomla-‐virtuemart-‐template-‐stylemart-‐support/2091-‐tutorial-‐3-‐
modification-‐for-‐vm-‐custom-‐stockable
http://www.flexiblewebdesign.com -‐ Copyright 2009 -‐ 2014 ©
6
2.2. Translate some texts that come with StyleMart: Our template’s language file is located in here: ROOT/language/en-‐GB1/en-‐GB1.tpl_flexible_stylemart.ini 1 en-‐GB is the initials for English; your language file is stored in different folder depends on the initials.
There are not too many lines in that file; you can do the translation by yourself in couple minutes. They are extremely basic texts.
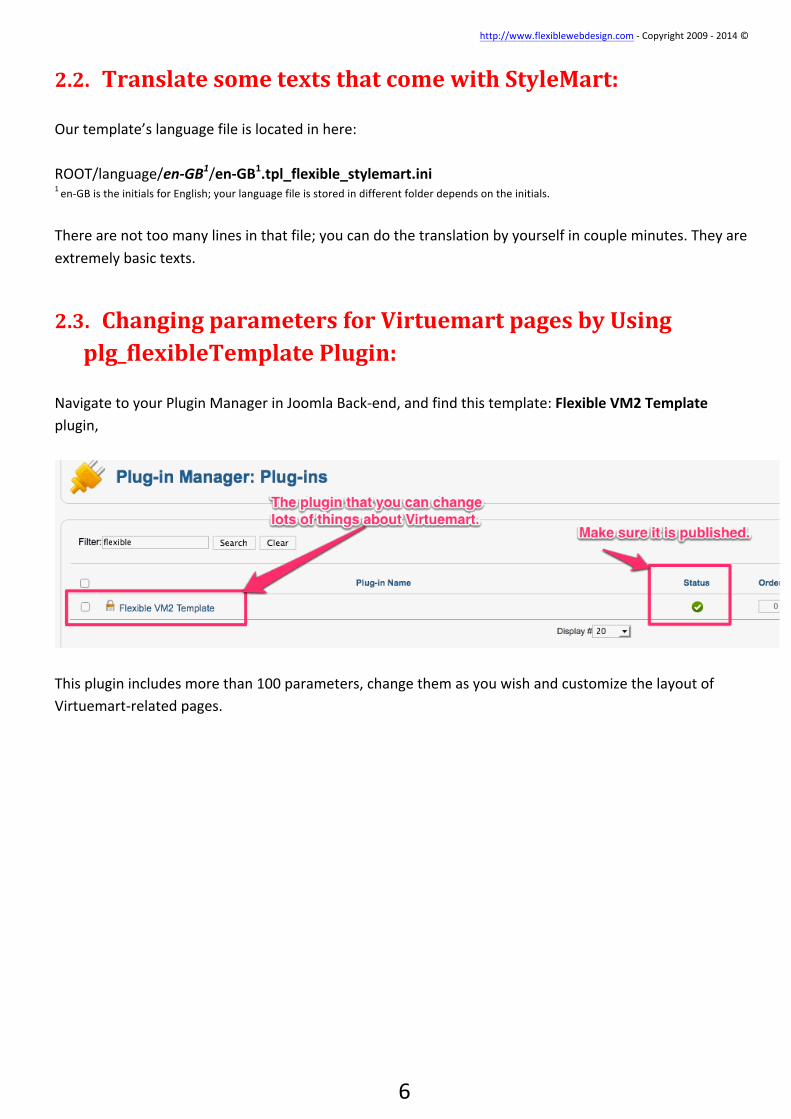
2.3. Changing parameters for Virtuemart pages by Using plg_flexibleTemplate Plugin:
Navigate to your Plugin Manager in Joomla Back-‐end, and find this template: Flexible VM2 Template plugin,
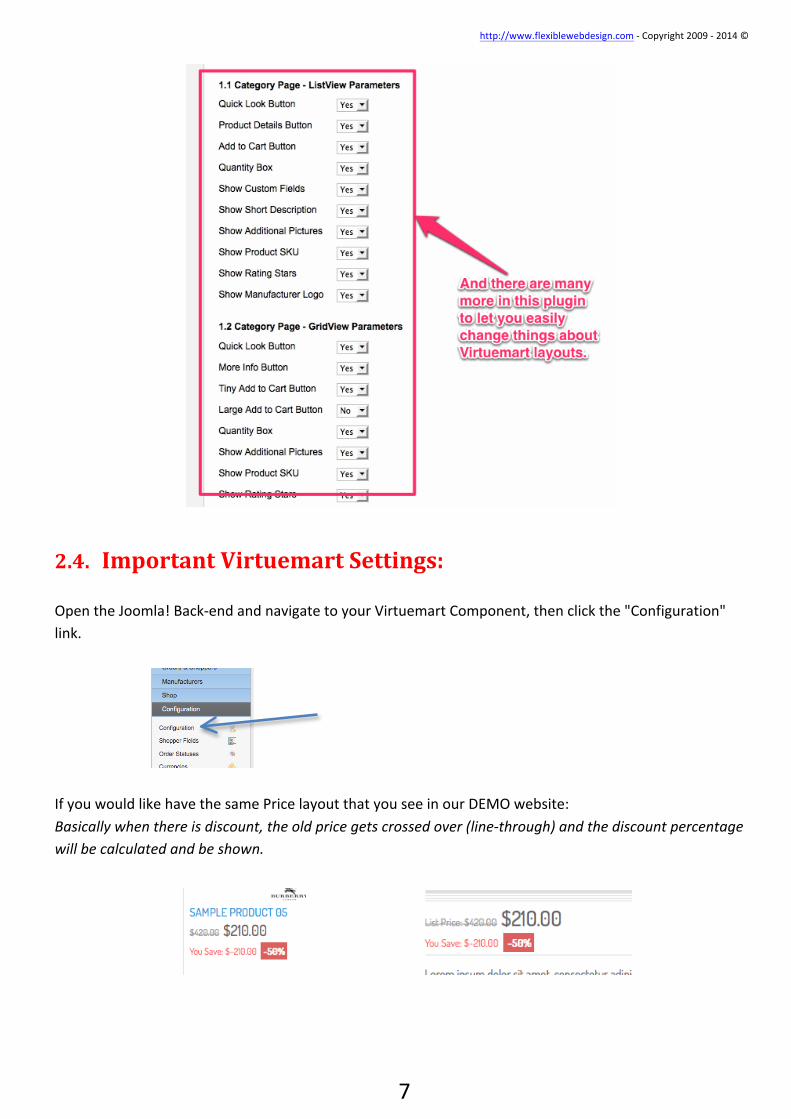
This plugin includes more than 100 parameters, change them as you wish and customize the layout of Virtuemart-‐related pages.
http://www.flexiblewebdesign.com -‐ Copyright 2009 -‐ 2014 ©
7
2.4. Important Virtuemart Settings: Open the Joomla! Back-‐end and navigate to your Virtuemart Component, then click the "Configuration" link.
If you would like have the same Price layout that you see in our DEMO website: Basically when there is discount, the old price gets crossed over (line-‐through) and the discount percentage will be calculated and be shown.
http://www.flexiblewebdesign.com -‐ Copyright 2009 -‐ 2014 ©
8
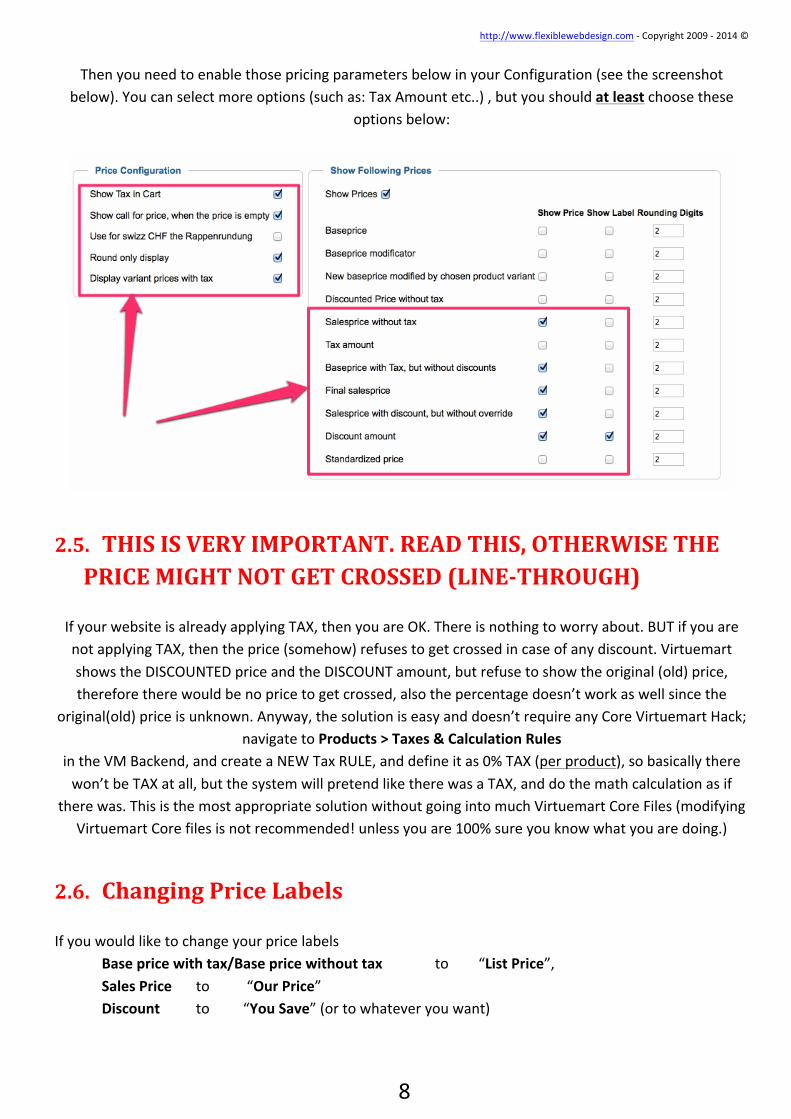
Then you need to enable those pricing parameters below in your Configuration (see the screenshot below). You can select more options (such as: Tax Amount etc..) , but you should at least choose these
options below:
2.5. THIS IS VERY IMPORTANT. READ THIS, OTHERWISE THE PRICE MIGHT NOT GET CROSSED (LINE-‐THROUGH)
If your website is already applying TAX, then you are OK. There is nothing to worry about. BUT if you are not applying TAX, then the price (somehow) refuses to get crossed in case of any discount. Virtuemart shows the DISCOUNTED price and the DISCOUNT amount, but refuse to show the original (old) price, therefore there would be no price to get crossed, also the percentage doesn’t work as well since the
original(old) price is unknown. Anyway, the solution is easy and doesn’t require any Core Virtuemart Hack; navigate to Products > Taxes & Calculation Rules
in the VM Backend, and create a NEW Tax RULE, and define it as 0% TAX (per product), so basically there won’t be TAX at all, but the system will pretend like there was a TAX, and do the math calculation as if
there was. This is the most appropriate solution without going into much Virtuemart Core Files (modifying Virtuemart Core files is not recommended! unless you are 100% sure you know what you are doing.)
2.6. Changing Price Labels If you would like to change your price labels Base price with tax/Base price without tax to “List Price”, Sales Price to “Our Price” Discount to “You Save” (or to whatever you want)
http://www.flexiblewebdesign.com -‐ Copyright 2009 -‐ 2014 ©
9
The file you need to modify is this: yourdomain.com/language/en-‐GB3/en-‐GB.com_virtuemart.ini en-‐G3 is for English Virtuemarts .It will be what ever language you currently have for your Virtuemart. For example; for French, it is fr-‐FR
In this file; look for the text you want to change, and change the text to anything. This file actually is the translation file for your Virtuemart Component. For example, you can remove the “No Additional Charge” text from this language INI file that appears in the Custom Field attributes. If you want to remove any thing from the language file, then don’t completely remove the line, but make it blank. For instance; replace this line: COM_VIRTUEMART_CART_PRICE_FREE="No additional charge" With this: COM_VIRTUEMART_CART_PRICE_FREE=" "
http://www.flexiblewebdesign.com -‐ Copyright 2009 -‐ 2014 ©
10
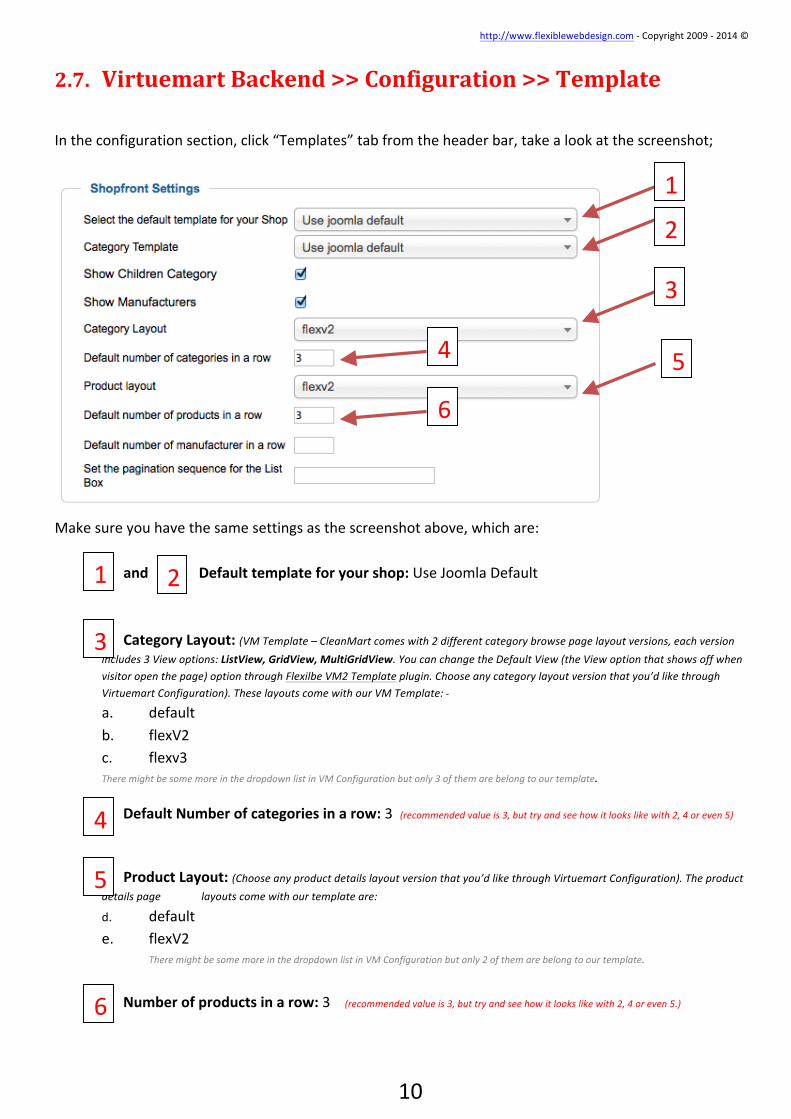
2.7. Virtuemart Backend >> Configuration >> Template In the configuration section, click “Templates” tab from the header bar, take a look at the screenshot;
Make sure you have the same settings as the screenshot above, which are:
and Default template for your shop: Use Joomla Default Category Layout: (VM Template – CleanMart comes with 2 different category browse page layout versions, each version includes 3 View options: ListView, GridView, MultiGridView. You can change the Default View (the View option that shows off when visitor open the page) option through Flexilbe VM2 Template plugin. Choose any category layout version that you’d like through Virtuemart Configuration). These layouts come with our VM Template: -‐ a. default b. flexV2 c. flexv3 There might be some more in the dropdown list in VM Configuration but only 3 of them are belong to our template.
Default Number of categories in a row: 3 (recommended value is 3, but try and see how it looks like with 2, 4 or even 5)
Product Layout: (Choose any product details layout version that you’d like through Virtuemart Configuration). The product details page layouts come with our template are: d. default e. flexV2 There might be some more in the dropdown list in VM Configuration but only 2 of them are belong to our template.
Number of products in a row: 3 (recommended value is 3, but try and see how it looks like with 2, 4 or even 5.)
3
4 5
6
3
4
5
6
2
1
1 2

http://www.flexiblewebdesign.com -‐ Copyright 2009 -‐ 2014 ©
11
We are still on “Templates” tab, scroll down the page little bit and look at the screenshot below
Enable “Use Fancybox” option. It is a “MUST” option. Disable “User external Google jQuery Library” option. Is because it is not necessary. StyleMart is already loading jQuery1.8 and no need to load multiple jQuery. If enable/disabling that option still
doesn’t solve the conflict problem; then you can install this plugin: jQuery Easy plugin and choose jQuery1.8 from the dropdown (or jQuery1.7) For more info about that plugin visit here: http://www.flexiblewebdesign.com/forum-‐virtuemart-‐2-‐template-‐puremart-‐support/523-‐the-‐easiest-‐way-‐to-‐solve-‐jquery-‐conflict-‐issues Basically, that plugin will block all the jQuery library from the website, and will load what ever you choose (from Google Api)
Enable the “Dynamic Thumbnail Resizing” option. (We need this in the 4th step) For the best use of our template, you should set your thumbnail size bigger than 250px by 250px (350x350 is recommended). Making them too large or too small values might create some weird
visual bugs. If you already have uploaded pictures, you have an ongoing website and your thumbnails are larger or smaller than these values, CleanMart might not look cool. When you change those values, you won’t see the affects in the front-‐end right away, because your thumbnails were already generated based on old dimensions. You need to re-‐generate the thumbnails. To re-‐generate the thumbnail based on the
1
2
3
4
http://www.flexiblewebdesign.com -‐ Copyright 2009 -‐ 2014 ©
12
new pixel values, remove this folder: yourdomain.com/images/stories/virtuemart/product/resized/ When you re-‐visit your website, you will see that folder is re-‐created and the thumbnail are re-‐generated with the new dimensions you have entered.
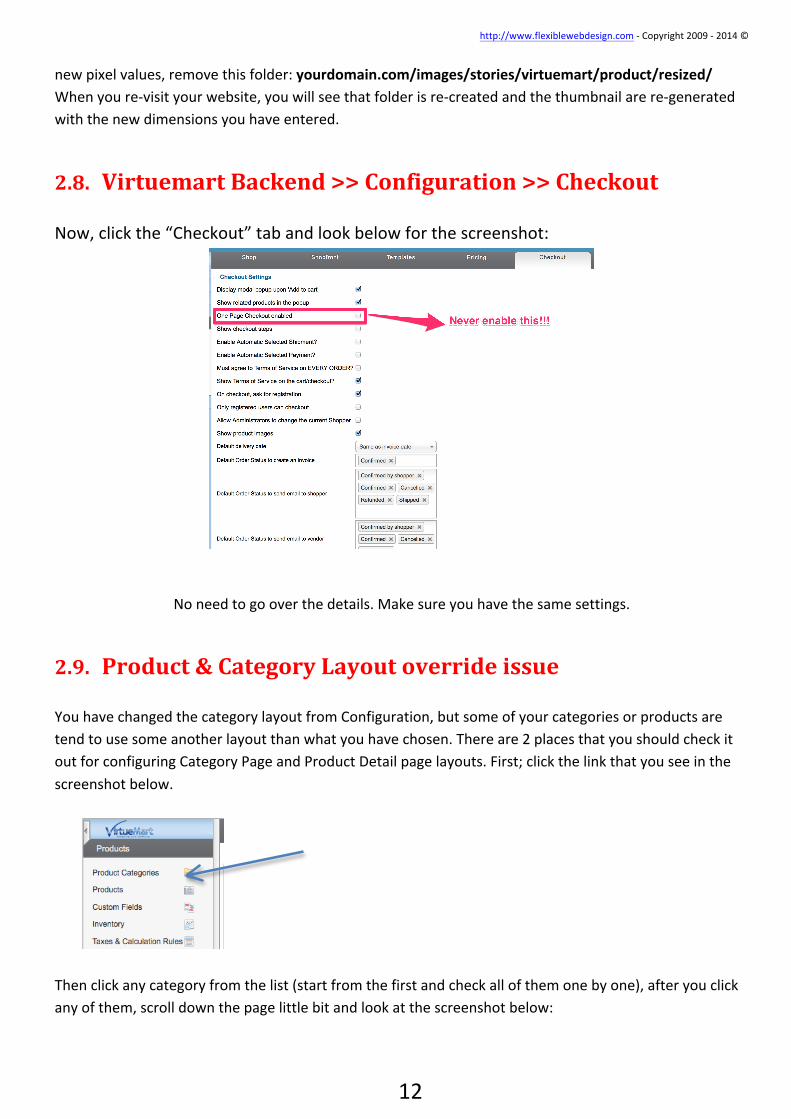
2.8. Virtuemart Backend >> Configuration >> Checkout Now, click the “Checkout” tab and look below for the screenshot:
No need to go over the details. Make sure you have the same settings.
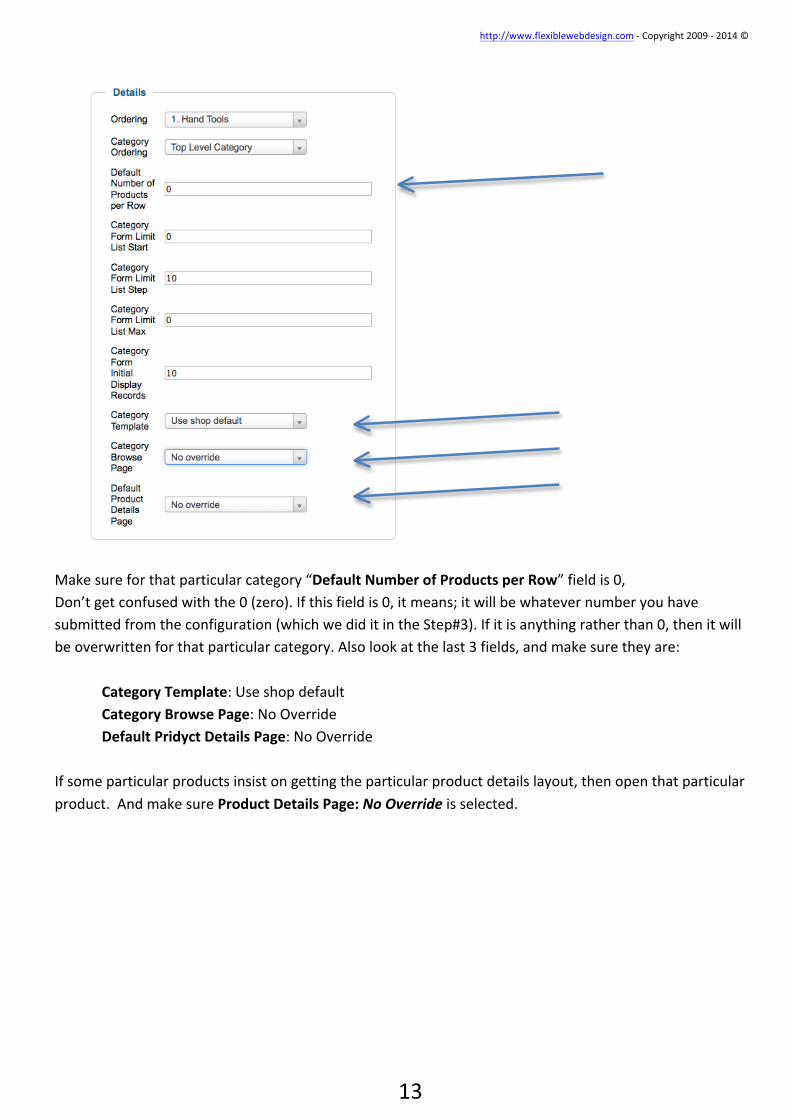
2.9. Product & Category Layout override issue You have changed the category layout from Configuration, but some of your categories or products are tend to use some another layout than what you have chosen. There are 2 places that you should check it out for configuring Category Page and Product Detail page layouts. First; click the link that you see in the screenshot below.
Then click any category from the list (start from the first and check all of them one by one), after you click any of them, scroll down the page little bit and look at the screenshot below:
http://www.flexiblewebdesign.com -‐ Copyright 2009 -‐ 2014 ©
13
Make sure for that particular category “Default Number of Products per Row” field is 0, Don’t get confused with the 0 (zero). If this field is 0, it means; it will be whatever number you have submitted from the configuration (which we did it in the Step#3). If it is anything rather than 0, then it will be overwritten for that particular category. Also look at the last 3 fields, and make sure they are: Category Template: Use shop default Category Browse Page: No Override Default Pridyct Details Page: No Override If some particular products insist on getting the particular product details layout, then open that particular product. And make sure Product Details Page: No Override is selected.

http://www.flexiblewebdesign.com -‐ Copyright 2009 -‐ 2014 ©
14
2.10. Availability (shipping time) icons People have asked this so many times, I should mention about it; The shipment icon that you see in our DEMO, that says: 1-‐2 days, 24 hours, 3-‐5days shipping.. etc. they appear only if you select any of them. While you are in the product edit page. (the screenshot below was taken from “product edit page”). Click the “Product Status” tab.
And these icons are ENGLISH. You might want to translate them to your native language. This is also easy, because those PNG images come with PSD (Photoshop Document) Source files. Basically, open the PSD file with any Adobe Photoshop version, edit the text and save as PNG (overwrite with the existing one). PSD and PNG files are stored in the same folder with the same file name. For instance, the availability icon that says 1-‐2 Months is PNG and stored in here:
ROOT/templates/flexible_stylemart/html/com_virtuemart/assets/images/availability/1-‐2m.png
And the PSD of that icon is located here:
And select a Shipment Icon from this dropdown box. Than the icon will start appearing in the product detail page. (For this specific product)
http://www.flexiblewebdesign.com -‐ Copyright 2009 -‐ 2014 ©
15
ROOT/templates/flexible_stylemart/html/com_virtuemart/assets/images/availability/1-‐2m.psd You are free to restyle them and make them look as you wish. Using the local shipment company logo in the icon is recommend! You can use www.iconfinder.com to get free icons to use inside those availability images.
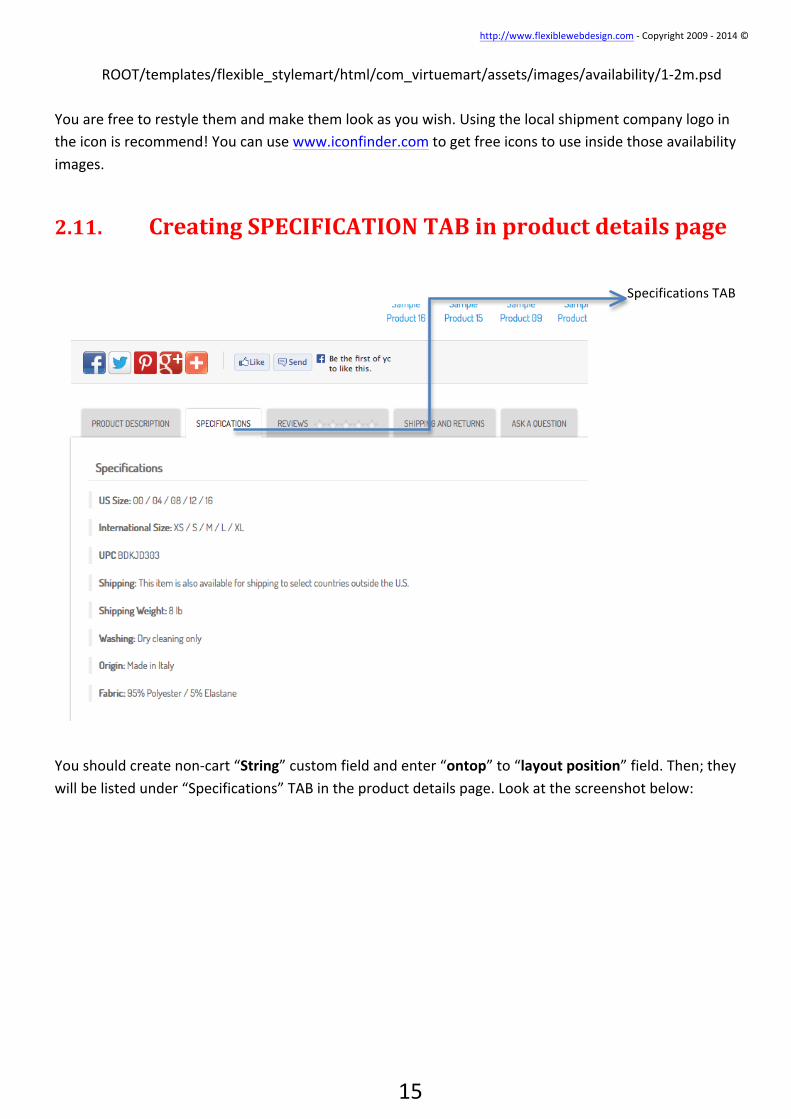
2.11. Creating SPECIFICATION TAB in product details page
You should create non-‐cart “String” custom field and enter “ontop” to “layout position” field. Then; they will be listed under “Specifications” TAB in the product details page. Look at the screenshot below:
Specifications TAB
http://www.flexiblewebdesign.com -‐ Copyright 2009 -‐ 2014 ©
16
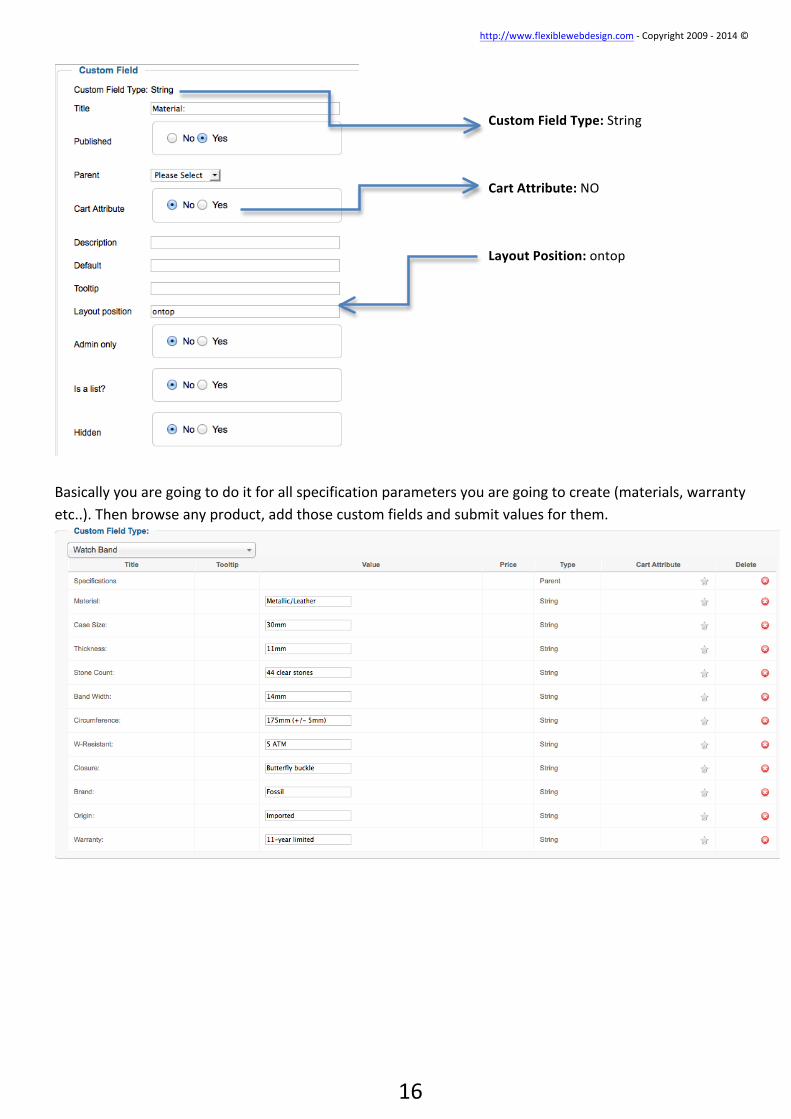
Basically you are going to do it for all specification parameters you are going to create (materials, warranty etc..). Then browse any product, add those custom fields and submit values for them.
Custom Field Type: String
Cart Attribute: NO
Layout Position: ontop
http://www.flexiblewebdesign.com -‐ Copyright 2009 -‐ 2014 ©
17
2.12. That’s all folks ;)
Thanks for reading the tutorial. Hope you’ll find it useful.
Thanks for buying this template, hope you’ll like it. Flexible Web Design Team http://www.flexiblewebdesign.com/support