Embed Size (px)
Citation preview

IVA
CHECKLIST
Issue 2.0 – January 2015


IVA CHECKLIST INTRODUCTION
In order to have the best possible chance of a successful (first time) IVA pass, we recommend that
you follow the advice in this checklist.
Whilst every effort was made to ensure that the Assembly Guide is correct and accurate;
improvements to the product and changes to the requirements for IVA mean this is not always the
case.
If presenting the car for the test yourself, it should be noted that you are not permitted to carry out
work on the car (correct an item that the tester identifies), however simple. However, it is advisable
to take a basic tool kit, some spare cable ties and any spare rubber trim / caps you may have, in case
the tester offers you the opportunity.
Alternatively, you may choose to have Caterham or your Caterham dealer present the car on your
behalf. It should be noted that the car will be driven to and from the test, which allows time for the
brake pads to bed in before the test.
In either case, completion of forms (including proof of address and identity), payment of the test fee
and booking of the test itself, is your responsibility and cannot be carried out by Caterham on your
behalf.
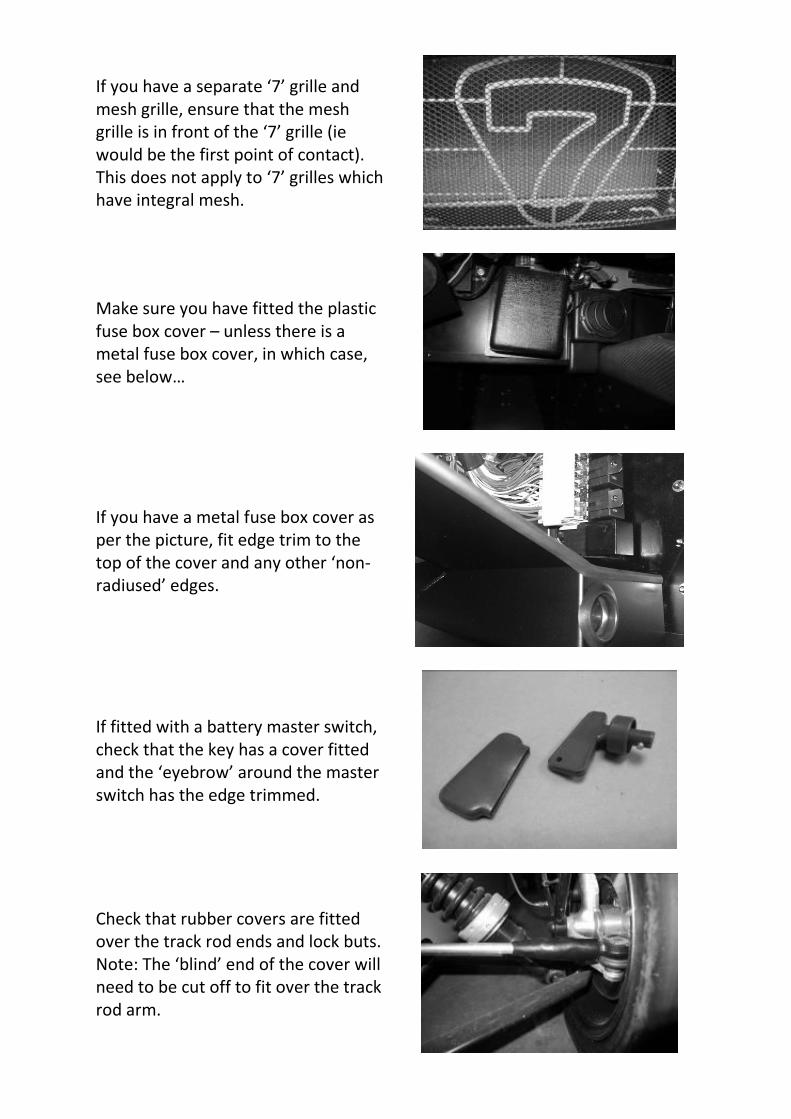
If you have a separate ‘7’ grille and mesh grille, ensure that the mesh grille is in front of the ‘7’ grille (ie would be the first point of contact). This does not apply to ‘7’ grilles which have integral mesh.
Make sure you have fitted the plastic fuse box cover – unless there is a metal fuse box cover, in which case, see below…
If you have a metal fuse box cover as per the picture, fit edge trim to the top of the cover and any other ‘non-radiused’ edges.
If fitted with a battery master switch, check that the key has a cover fitted and the ‘eyebrow’ around the master switch has the edge trimmed.
Check that rubber covers are fitted over the track rod ends and lock buts. Note: The ‘blind’ end of the cover will need to be cut off to fit over the track rod arm.

Check all plastic covers are fitted to the front suspension bolt. Also fit to the exhaust mounting bolt heads and (if fitted) rollcage mounting bolt heads.
Mirrors must be mounted on the central windscreen stanchion screw (or the upper screw for Academy cars)
Ensure that the indicator pod is trimmed, ALL the way around (continuously and permanently attached)
Check that the fog and reverse light spacing wedges are fitted.
If fitted with four/six point harnesses, ensure that the upper mounting bolts protrude through the chassis rail.

Ensure that the cycle wing is trimmed, ALL the way around (continuously and permanently attached)
The indicator wiring must be sheathed in the engine bay and a grommet fitted on the exit and entry points of the headlight brackets
The exposed wiring under the headlight must also be sheathed
Ensure the that the ‘heat shrink’ sheathing has shrunk around the side repeater wire and that there is a grommet in the wingstay.
Ensure the side repeater wiring is neatly and securely clipped to the wishbone…

…and that there is some washer pipe where the wire passes into the body work (to protect against chaffing). The pipe can be split with a knife to allow it to be added to the wire.
Ensure that the apertures in the body for the suspension are trimmed (along the front and top).
Check that the fuel filler cap is tethered to the car.
Ensure that the fuel filler neck cover is fitted in the boot area.
Check that the seat mounting bolts protrude through the nyloc nuts.

Ensure that the edge of the scuttle is trimmed with the heavy duty trim provided.
Check that the leading edge of the front wing cover the wheel (excluding the tyre)
Fit a bonnet catch cover over the rear catch
Fit a rubber bonnet cover over the hook of the bonnet spring catch.
Bend the exhaust spring mounting hooks down and put some washer pipe over the end.

Fit a nut cover to the connection nut on the starter motor…
…and the alternator
Ensure that the bonnet spring bolts are rounded around the base and not a sharp edge.
Check that the fuel tank earth wire is fitted and visible…
…it is located on a wing fixing on the inside of the right-hand rear wing.

Check that the brake fluid information label is fitted on the brake master cylinder reservoir.
Fit the trim used for the scuttle edge in the cockpit to the leading edge of the exhaust/catalyst cover if your car has one.
Ensure that the handbrake cable is not fouling or running on anything. Secure with cable ties if necessary…
…like so…by cable tying it to the A-frame.
Ensure that the wiring to the rear light cluster is fully insulated.

Ensure that the nose cone does not foul against the anti-roll bar.
Ensure the steering column does not foul the belt tensioner.
Ensure the fuel hose does not foul on anything.
Fit trim to the corner of the dash board on the passenger.
If fitted with a carbon dash, fit edge trim along the underside edge of the dash.

Fit edge trim to the redundant steering column mount on the underside of the dash of the passenger side.
Glue a grommet to the flat edge of the sidescreen hinges.
Ensure large grommets are fitted to the knee trim panels under the dash on either side.
Fit rubber trim to the top edge of passenger side knee trim panel.
If you have a metal fuse box cover as per the picture, fit edge trim to the top of the cover and any other ‘non-radiused’ edges.

Seven 160 only: Ensure a W clip secures the rear braided brake hose to the brake pipe
Fit caps onto exposed fittings (nuts) in the footwells.
Ensure that the engine bay wiring is secured at least every 300mm or installed in a secure hollow component, eg conduit, and then check that there are no pinch points, sharp edges, etc that wires could rub against, paying particular
attention to areas where there is relative movement between components, eg engine to chassis. This applies equally around the car and is not just confined
to the engine bay. However, it is essential the engine bay wiring is ‘tidy’.