Embed Size (px)
Citation preview
2007 GMI, Inc.
SURVEY DISTRIBUTION
Version 5.0 September 2007
Notice
The information contained in this document is confidential and proprietary and is intended only for the persons to whom it is transmitted by Global Market Insite, Inc. Any reproduction of this document, in whole or in part, or the divulgence of any of its contents, without prior written consent of Global Market Insite, Inc., is prohibited. Receipt or possession of this document does not convey any right to disclose its contents, in whole or in part, to any third party, or to develop, manufacture, use or sell anything described herein.
Survey Distribution
2007 GMI, Inc. v 5.0, September 2007 2
Table of Contents Distribution Overview ............................................................................................ 4
Distribution Methods..............................................................................................4 E-mail Targeted Distribution ..............................................................................5 Single URL Distribution .....................................................................................5 Multiple Distributions ........................................................................................6
Stages of Distribution and E-mail List Maintenance....................................................6 E-mail List Maintenance ....................................................................................6
E-mail Targeted Distribution .................................................................................. 8 Preparing for Distribution .......................................................................................8 Distributing the Survey ..........................................................................................9 Add Distribution Title and Name............................................................................11 Date Information.................................................................................................12 Add Respondents ................................................................................................13
Enter E-mail Addresses ...................................................................................14 Preloading and Mail-Merge ..............................................................................16 Preparing Data to be Preloaded........................................................................17 Mail-Merge ....................................................................................................17 Reporting Issues ............................................................................................18 Preload Addresses and Data ............................................................................18 Select Contacts ..............................................................................................21 Use Respondents from a Previous Distribution ...................................................24 Use Previous Upload .......................................................................................26
Include/Exclude Partial Completes.........................................................................26 Embed Survey in E-Mail .......................................................................................27 Anonymous Survey .............................................................................................28 InstantResults ....................................................................................................29 Prevent Use of Back Button ..................................................................................31 Security Settings.................................................................................................31 Invitation: E-mail Targeted...................................................................................32 Reminder Settings...............................................................................................35 Permissions ........................................................................................................36 Final Survey Preview ...........................................................................................37
Note on E-mail Targeted Distribution Processing ................................................39 Single URL Distribution ........................................................................................ 40
Distributing the Survey ........................................................................................40 Add Distribution Title and Name............................................................................42 Number of Respondents .......................................................................................44 Date Information.................................................................................................44 Prevent Multiple Submissions................................................................................45 Include/Exclude Partial Completes.........................................................................46 InstantResults ....................................................................................................47 Prevent Use of Back Button ..................................................................................49 Security Settings.................................................................................................49 Permissions ........................................................................................................50 Final Survey Preview ...........................................................................................51
Note on Single URL Distribution Processing........................................................53 Deploying your Survey URL ..................................................................................53
Distribution Templates......................................................................................... 55
Survey Distribution
2007 GMI, Inc. v 5.0, September 2007 3
Create a Distribution Template..............................................................................55 Edit a Distribution Template .................................................................................59
Distribution Templates Dates ...........................................................................60 Distribution Templates Options ........................................................................61 Distribution Templates Respondents .................................................................62 Distribution Templates Invitation......................................................................63 Distribution Templates Reminders ....................................................................65
Use a Distribution Template..................................................................................66 Share a Distribution Template...............................................................................68 Delete a Distribution Template..............................................................................70
Survey Management............................................................................................. 71 Distributed Surveys .............................................................................................71 My Active Distributions ........................................................................................73
Status...........................................................................................................75 Answering Timeline ........................................................................................76 Dates............................................................................................................76 Options.........................................................................................................76 Respondents..................................................................................................77 Invitation ......................................................................................................80 Reminders.....................................................................................................81 Events ..........................................................................................................82 Deployment...................................................................................................83
Audience Management/Manage My Contacts ....................................................... 84 Importing Contacts..............................................................................................85
Provide E-mail Addresses Separated by Returns.................................................86 Provide E-mail Addresses from File...................................................................88 Choose Respondents from a Previous Distribution ..............................................89
Managing Contacts ..............................................................................................90 Create a Contact List ......................................................................................92 Delete Contacts and Lists ................................................................................93 Filtering ........................................................................................................93 Editing a Contact............................................................................................94 Distribute Surveys to Contacts.........................................................................95 Viewing Survey History ...................................................................................96
Unsubscribe ......................................................................................................... 98 Declining a Distribution ........................................................................................98 Blocking All Future Distributions............................................................................99 Adding Addresses to Your Block List .................................................................... 100
Index ................................................................................................................. 102
Survey Distribution
2007 GMI, Inc. v 5.0, September 2007 4
Distribution Overview Distributing your survey to your audience is where the rubber meets the road. InstantSurvey provides powerful tools for delivering your surveys and tracking participation.
Two InstantSurvey Distribution tools allow you to distribute quickly and easily your completed survey to respondents using either its built-in targeted e-mail engine or via a single URL displayed on your Web site or in a pop-up window.
This section includes:
Distribution methods
Stages of distribution and email list maintenance.
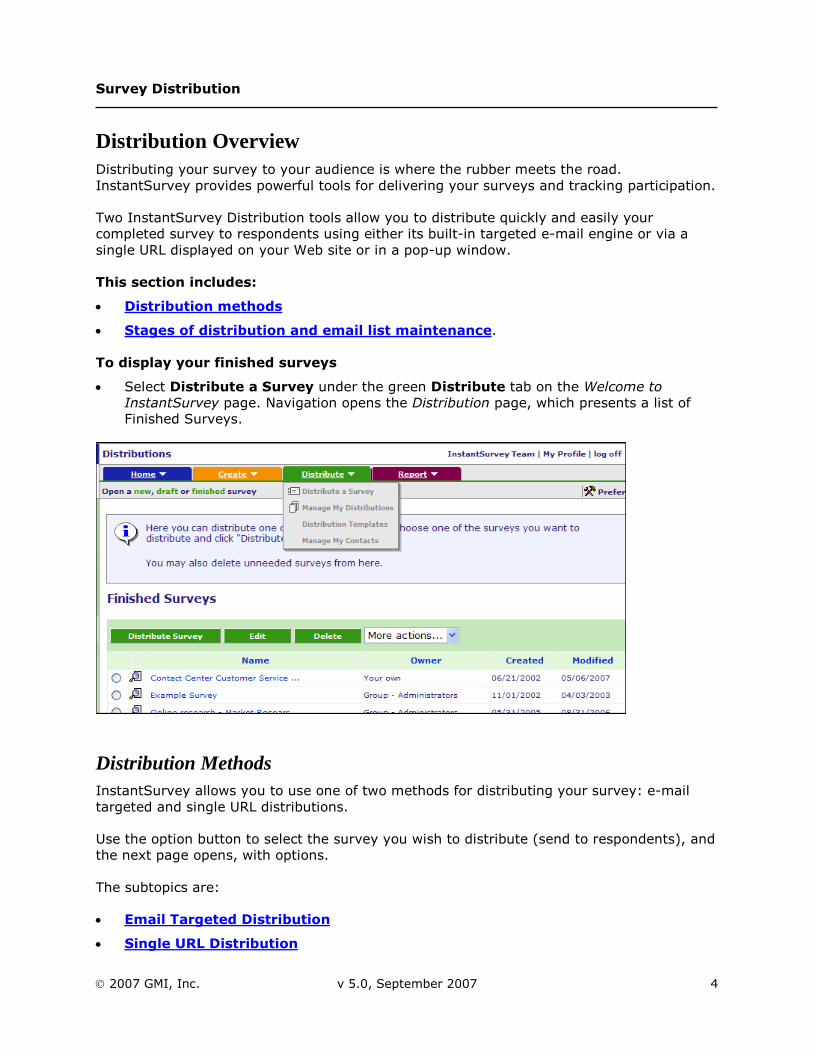
To display your finished surveys
Select Distribute a Survey under the green Distribute tab on the Welcome to InstantSurvey page. Navigation opens the Distribution page, which presents a list of Finished Surveys.
Distribution Methods InstantSurvey allows you to use one of two methods for distributing your survey: e-mail targeted and single URL distributions.
Use the option button to select the survey you wish to distribute (send to respondents), and the next page opens, with options.
The subtopics are:
Email Targeted Distribution
Single URL Distribution
Survey Distribution
2007 GMI, Inc. v 5.0, September 2007 5
Multiple Distributions.
E-mail Targeted Distribution E-mail targeted distribution allows you to send the survey to a list of individual survey recipients.
If you have a fixed list of survey recipients and you know their e-mail addresses, InstantSurvey can send individually targeted e-mail invitations using its built-in mail server. This is also known as a “private distribution”.
The invitation can be personalized with the recipient’s name or other profile information. You can include a unique link to the survey, or you can embed the first page of the survey into the e-mail.
Advantages to E-mail Targeted Distribution
The application sends all participants an e-mail containing their own unique URL to access the survey. The URL expires after the respondent completes the survey. This ensures that respondents cannot take the survey more than once and prevents “ballot stuffing.”
You can easily schedule and send reminder e-mail messages to only those participants who have not yet responded to the survey.
You can see who has or has not responded to your survey when viewing the status of the survey.
You can preload data into the survey—for example, to ask the user to verify information you have on file for them, or to associate internal data (such as employee number or sales region) with respondent’s survey answers.
InstantSurvey’s Audience Management system can track the survey histories of individuals who are sent e-mail targeted distributions.
Single URL Distribution If you do not have a predetermined list of respondents—for example, you are surveying visitors to your Web site—InstantSurvey can provide you with a single survey URL that respondents use to take the survey. You can use several methods to present this URL to respondents:
Post a link to the survey on your Web site.
Display the survey in a pop-up window on your Web site.
Send the URL to respondents using your own e-mail system.
Incorporate the first page of the survey form directly into your Web site. (Subsequent pages are hosted on GMI’s servers.)
Embed the first page of the survey in an HTML e-mail message.
Survey Distribution
2007 GMI, Inc. v 5.0, September 2007 6
Note: If you choose to distribute the survey yourself as a public survey, you will not be able to track who has completed your survey, nor will you be able to send reminders to participants who have not responded. If you need to send reminders or track individual responses, be sure to use the E-mail Targeted Distribution method to distribute your survey.
Multiple Distributions InstantSurvey allows you to create multiple distributions of the same survey. This is useful if you want to compare survey responses over time.
Note: If you want to reuse a survey without making any changes to it, you should create a new distribution of it rather than copying it. This allows you to create reports that aggregate or compare results of the different distributions of the survey.
See also:
Distribution Templates.
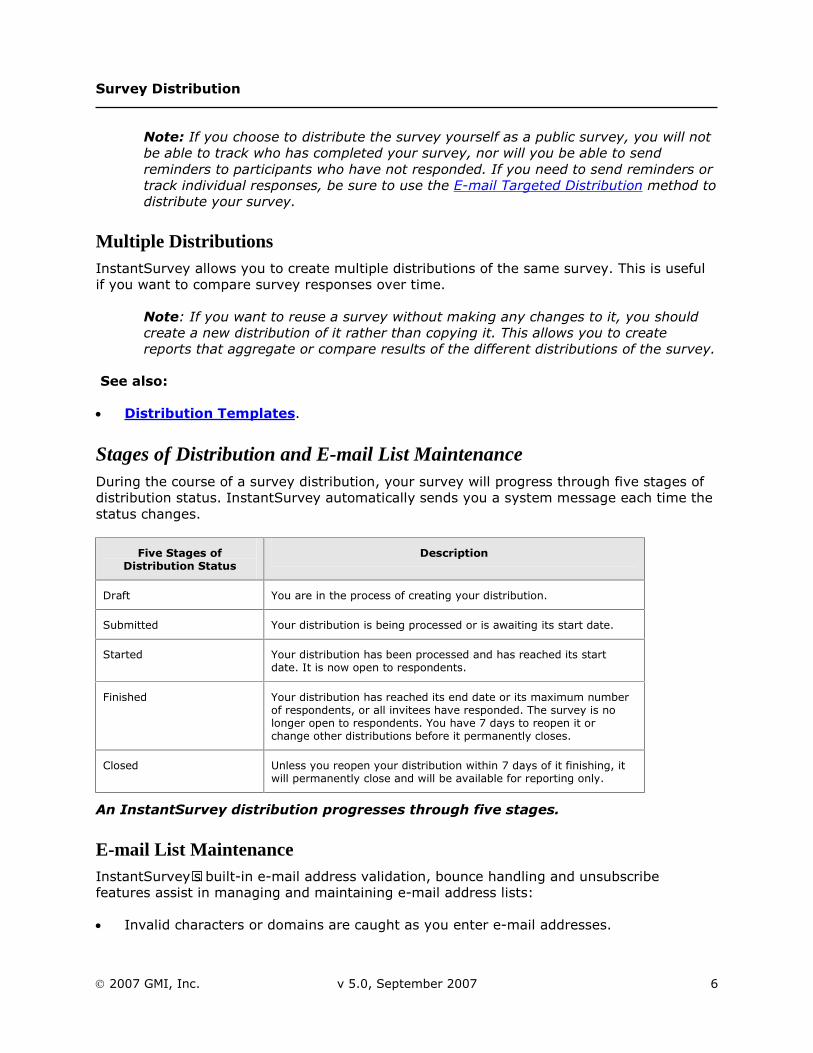
Stages of Distribution and E-mail List Maintenance During the course of a survey distribution, your survey will progress through five stages of distribution status. InstantSurvey automatically sends you a system message each time the status changes.
Five Stages of Distribution Status
Description
Draft You are in the process of creating your distribution.
Submitted Your distribution is being processed or is awaiting its start date.
Started Your distribution has been processed and has reached its start date. It is now open to respondents.
Finished Your distribution has reached its end date or its maximum number of respondents, or all invitees have responded. The survey is no longer open to respondents. You have 7 days to reopen it or change other distributions before it permanently closes.
Closed Unless you reopen your distribution within 7 days of it finishing, it will permanently close and will be available for reporting only.
An InstantSurvey distribution progresses through five stages.
E-mail List Maintenance InstantSurvey’s built-in e-mail address validation, bounce handling and unsubscribe features assist in managing and maintaining e-mail address lists:
Invalid characters or domains are caught as you enter e-mail addresses.
Survey Distribution
2007 GMI, Inc. v 5.0, September 2007 7
Any messages that are returned as undeliverable are intercepted by InstantSurvey rather than flooding your Inbox.
Bounced messages are flagged in Survey Management. They can be deleted or corrected and resent.
Unsubscribe requests are tracked and automatically filtered out of future distributions.
See also:
View Messages in the “Overview” document.
Survey Distribution
2007 GMI, Inc. v 5.0, September 2007 8
E-mail Targeted Distribution InstantSurvey’s powerful e-mail targeted distribution engine allows you to send personalized survey invitations and actively track responses over time.
This section includes:
Preparing for distribution
Distributing the survey
Add distribution title and name
Date information
Add respondents
Include/ exclude partial completes
Embed the survey in email
Anonymous survey
InstantResults
Prevent use of Back button
Security settings
Invitation: E-mail targeted
Reminder settings
Permissions
Final survey preview.
Preparing for Distribution Before you begin your distribution, we recommend having several items ready:
Respondents’ list: This can take one of several forms:
o The list of e-mail address (one per line) uploaded as a plain text file or ready to be cut and pasted.
o A set of Contacts in InstantSurvey’s Audience Management system
o The list of respondents from a previous distribution.
E-mail invitation text: InstantSurvey provides suggested invitation text, although you can prepare your own invitation text. You can also reuse the invitation text from a previous distribution.
Preload data (optional): If you plan to preload any data into your survey, you should prepare the data before you begin your distribution.
If you use the step-by-step distribution wizard, you will need all of these items ready before you begin. If you do not choose the distribution wizard, the Distribution Settings page will automatically open and you can set up your distribution.
Survey Distribution
2007 GMI, Inc. v 5.0, September 2007 9
Your survey must also be marked as “Finished” before it can be distributed. This creates the database structures needed to store answer data.
See also:
Preloading and Mail-Merge
Finishing and Saving Your Survey in the “Survey Design” document.
Distributing the Survey Distributing your survey can be accomplished by one of three different methods: e-mail targeted, using a singlet URL, or using reusing previous distribution information.
The option to select the wizard appears after you have chosen the survey to distribute. It appears on the Distribution Method page.
Note: It is important that you do not refresh the browser window or use the browser Back and Forward buttons at any point when using the Survey Distribution Wizard. Instead, use the back button included in the application, click on the title of a previous step in the left margin, or click cancel to quit.
Below are descriptions of all the available distribution options. They will appear in different order and locations depending on whether you choose the step-by-step wizard or not.
To distribute an email targeted survey
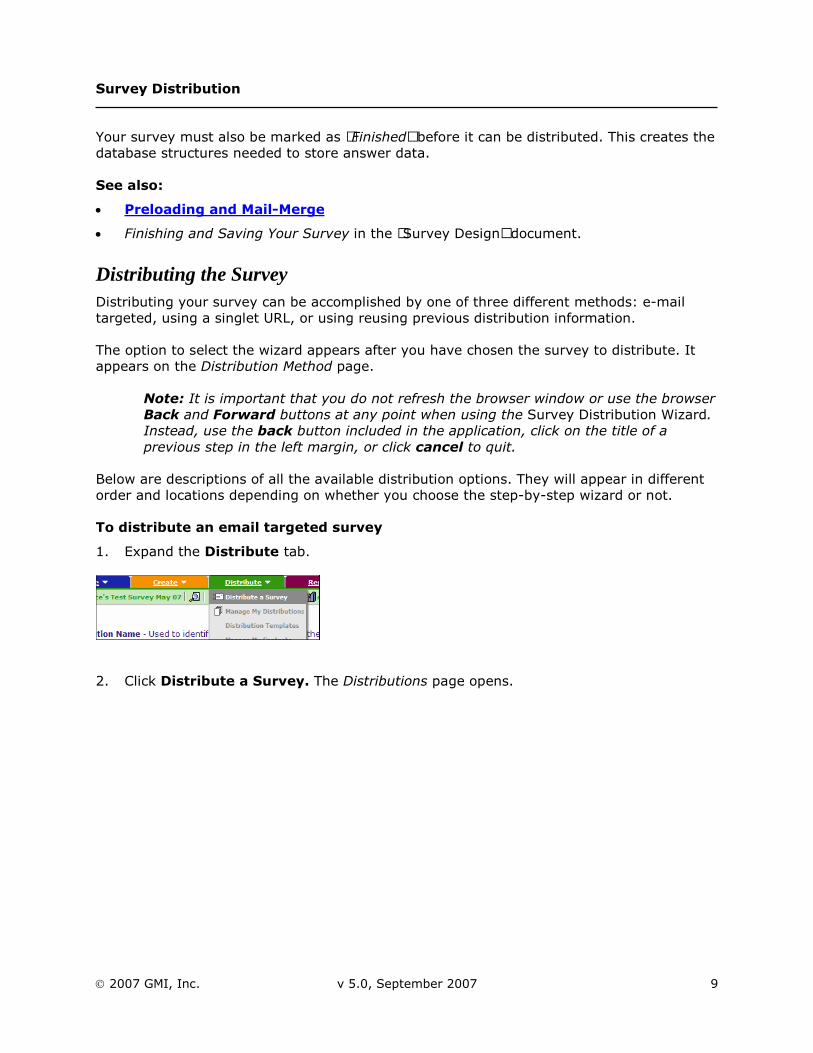
1. Expand the Distribute tab.
2. Click Distribute a Survey. The Distributions page opens.
Survey Distribution
2007 GMI, Inc. v 5.0, September 2007 10
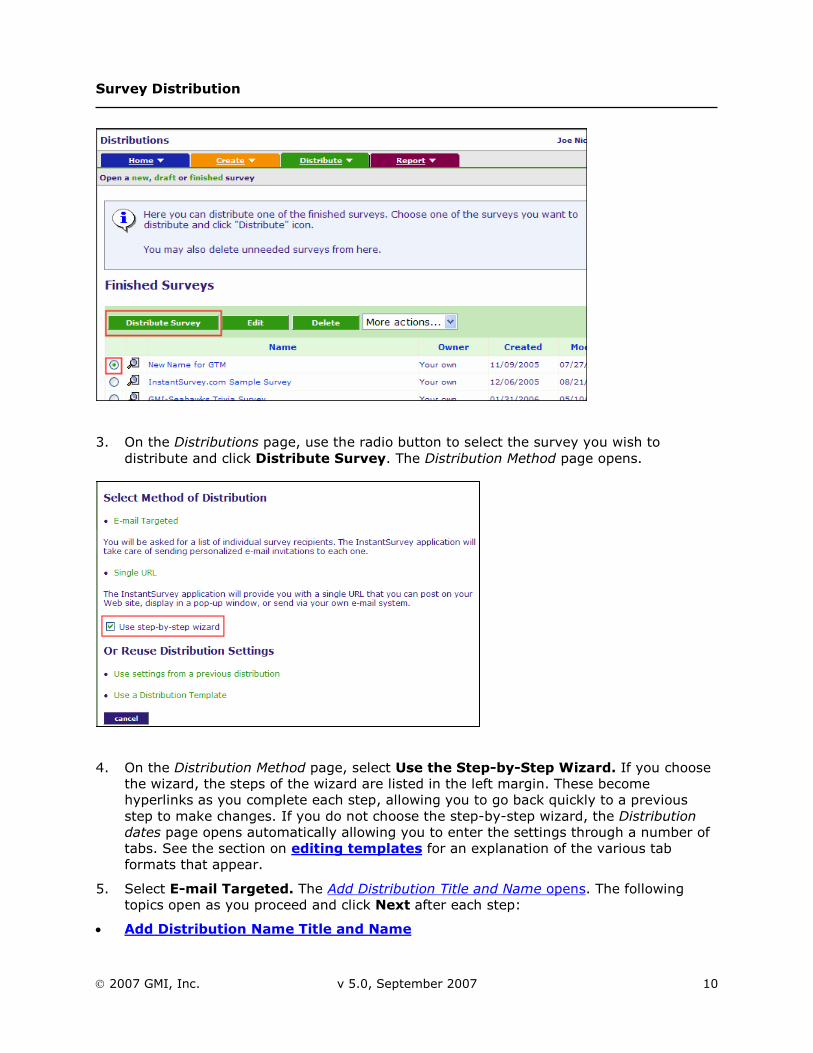
3. On the Distributions page, use the radio button to select the survey you wish to distribute and click Distribute Survey. The Distribution Method page opens.
4. On the Distribution Method page, select Use the Step-by-Step Wizard. If you choose the wizard, the steps of the wizard are listed in the left margin. These become hyperlinks as you complete each step, allowing you to go back quickly to a previous step to make changes. If you do not choose the step-by-step wizard, the Distribution dates page opens automatically allowing you to enter the settings through a number of tabs. See the section on editing templates for an explanation of the various tab formats that appear.
5. Select E-mail Targeted. The Add Distribution Title and Name opens. The following topics open as you proceed and click Next after each step:
Add Distribution Name Title and Name
Survey Distribution
2007 GMI, Inc. v 5.0, September 2007 11
Date Information
Add Respondents
Include / Exclude Partial Completes
Embed Survey in E-Mail
Anonymous Survey
InstantResults
Prevent Use of Back Button
Security Settings
Invitation
Reminder Settings
Permissions
Final Survey Review.
Add Distribution Title and Name
To add distribution title and name
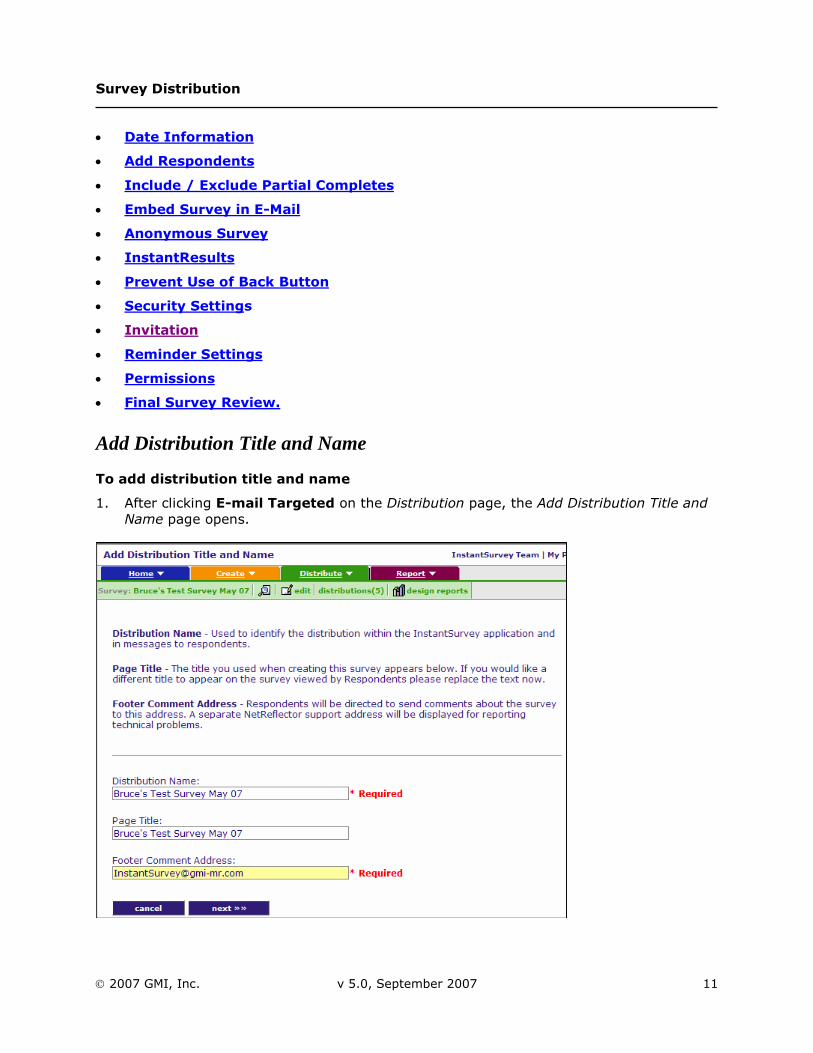
1. After clicking E-mail Targeted on the Distribution page, the Add Distribution Title and Name page opens.
Survey Distribution
2007 GMI, Inc. v 5.0, September 2007 12
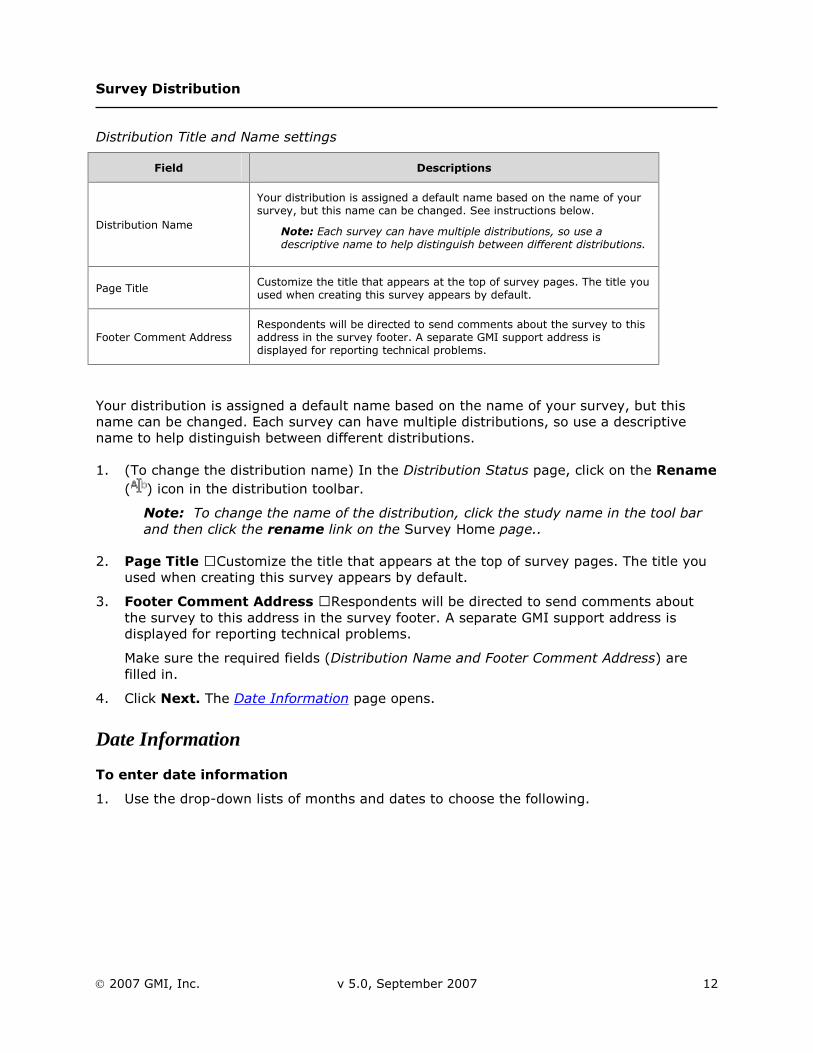
Distribution Title and Name settings
Field Descriptions
Distribution Name
Your distribution is assigned a default name based on the name of your survey, but this name can be changed. See instructions below.
Note: Each survey can have multiple distributions, so use a descriptive name to help distinguish between different distributions.
Page Title Customize the title that appears at the top of survey pages. The title you used when creating this survey appears by default.
Footer Comment Address Respondents will be directed to send comments about the survey to this address in the survey footer. A separate GMI support address is displayed for reporting technical problems.
Your distribution is assigned a default name based on the name of your survey, but this name can be changed. Each survey can have multiple distributions, so use a descriptive name to help distinguish between different distributions.
1. (To change the distribution name) In the Distribution Status page, click on the Rename ( ) icon in the distribution toolbar.
Note: To change the name of the distribution, click the study name in the tool bar and then click the rename link on the Survey Home page..
2. Page Title – Customize the title that appears at the top of survey pages. The title you used when creating this survey appears by default.
3. Footer Comment Address – Respondents will be directed to send comments about the survey to this address in the survey footer. A separate GMI support address is displayed for reporting technical problems.
Make sure the required fields (Distribution Name and Footer Comment Address) are filled in.
4. Click Next. The Date Information page opens.
Date Information
To enter date information
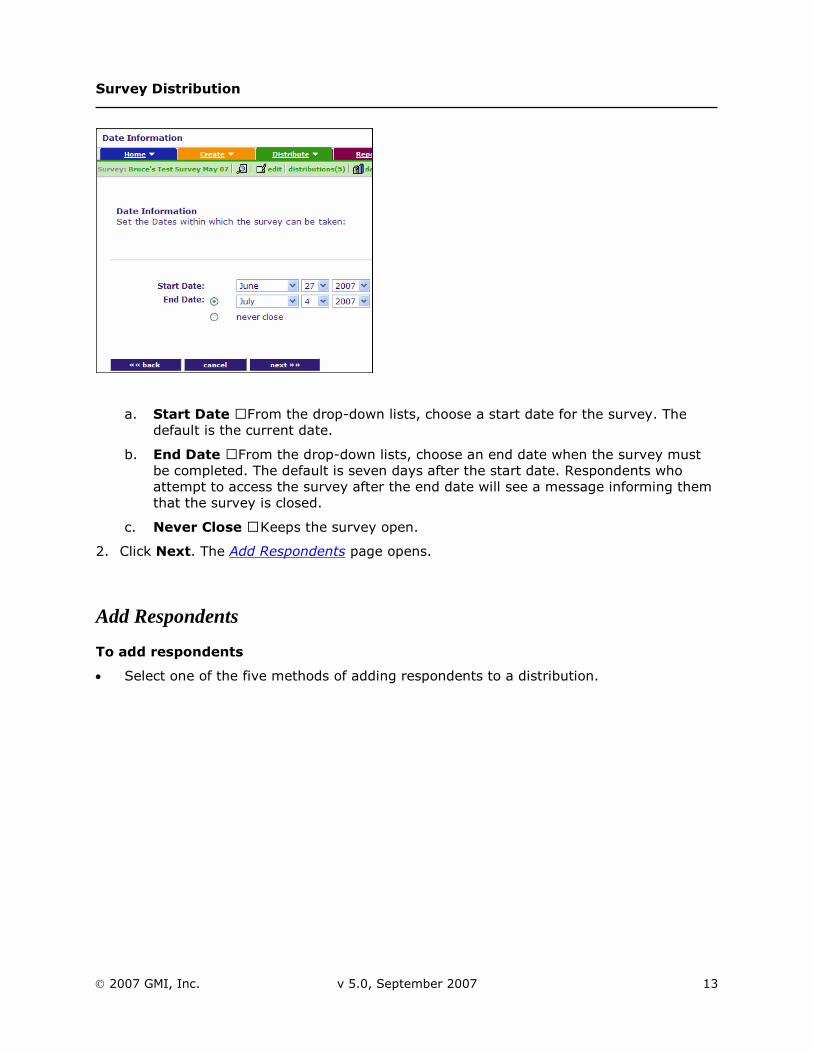
1. Use the drop-down lists of months and dates to choose the following.
Survey Distribution
2007 GMI, Inc. v 5.0, September 2007 13
a. Start Date – From the drop-down lists, choose a start date for the survey. The default is the current date.
b. End Date – From the drop-down lists, choose an end date when the survey must be completed. The default is seven days after the start date. Respondents who attempt to access the survey after the end date will see a message informing them that the survey is closed.
c. Never Close – Keeps the survey open.
2. Click Next. The Add Respondents page opens.
Add Respondents
To add respondents
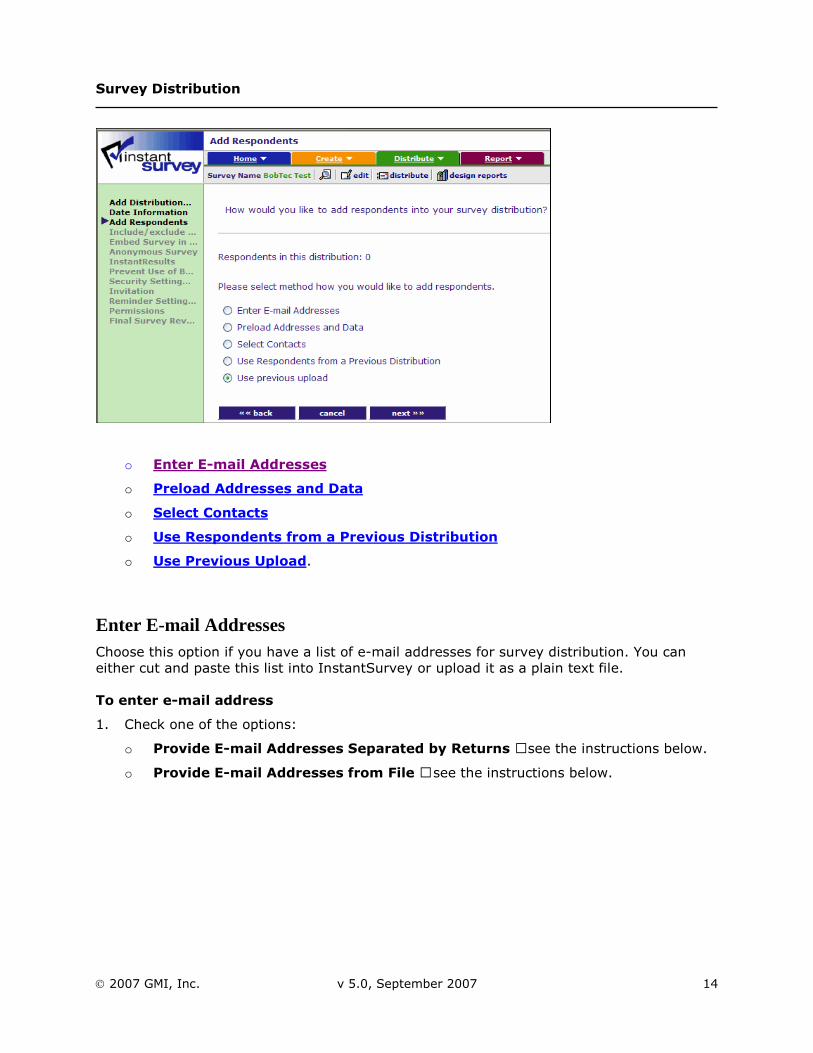
Select one of the five methods of adding respondents to a distribution.
Survey Distribution
2007 GMI, Inc. v 5.0, September 2007 14
o Enter E-mail Addresses
o Preload Addresses and Data
o Select Contacts
o Use Respondents from a Previous Distribution
o Use Previous Upload.
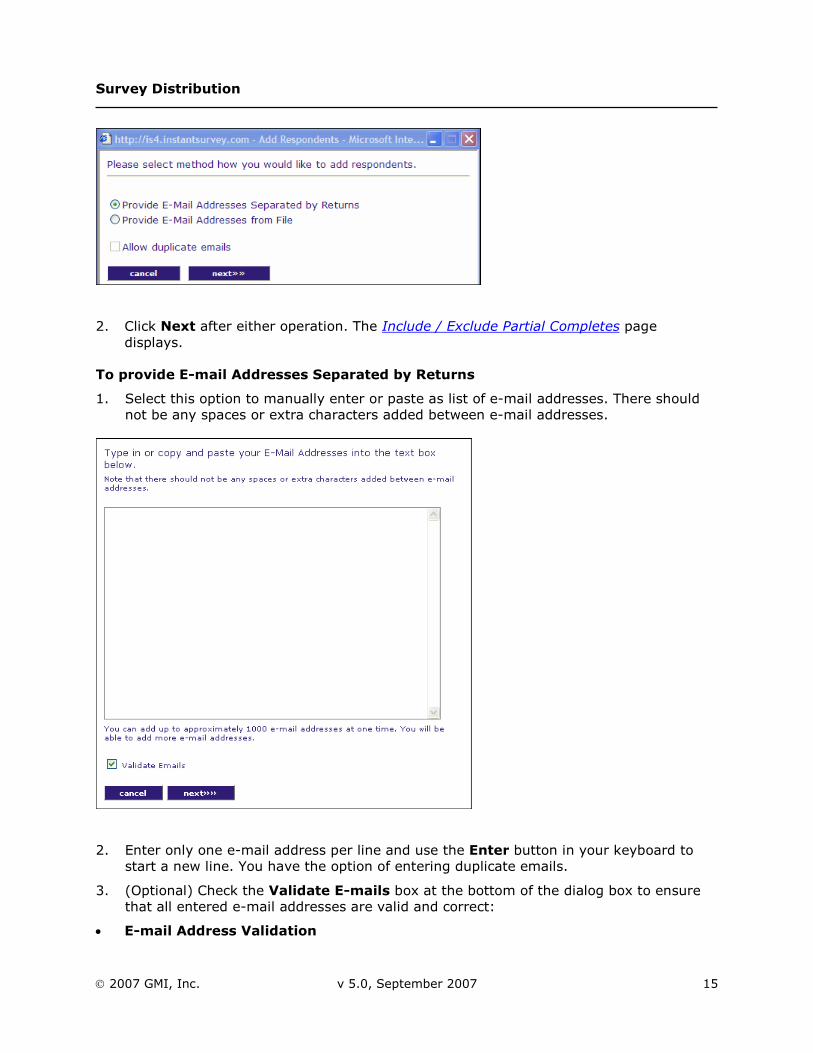
Enter E-mail Addresses Choose this option if you have a list of e-mail addresses for survey distribution. You can either cut and paste this list into InstantSurvey or upload it as a plain text file.
To enter e-mail address
1. Check one of the options:
o Provide E-mail Addresses Separated by Returns – see the instructions below.
o Provide E-mail Addresses from File – see the instructions below.
Survey Distribution
2007 GMI, Inc. v 5.0, September 2007 15
2. Click Next after either operation. The Include / Exclude Partial Completes page displays.
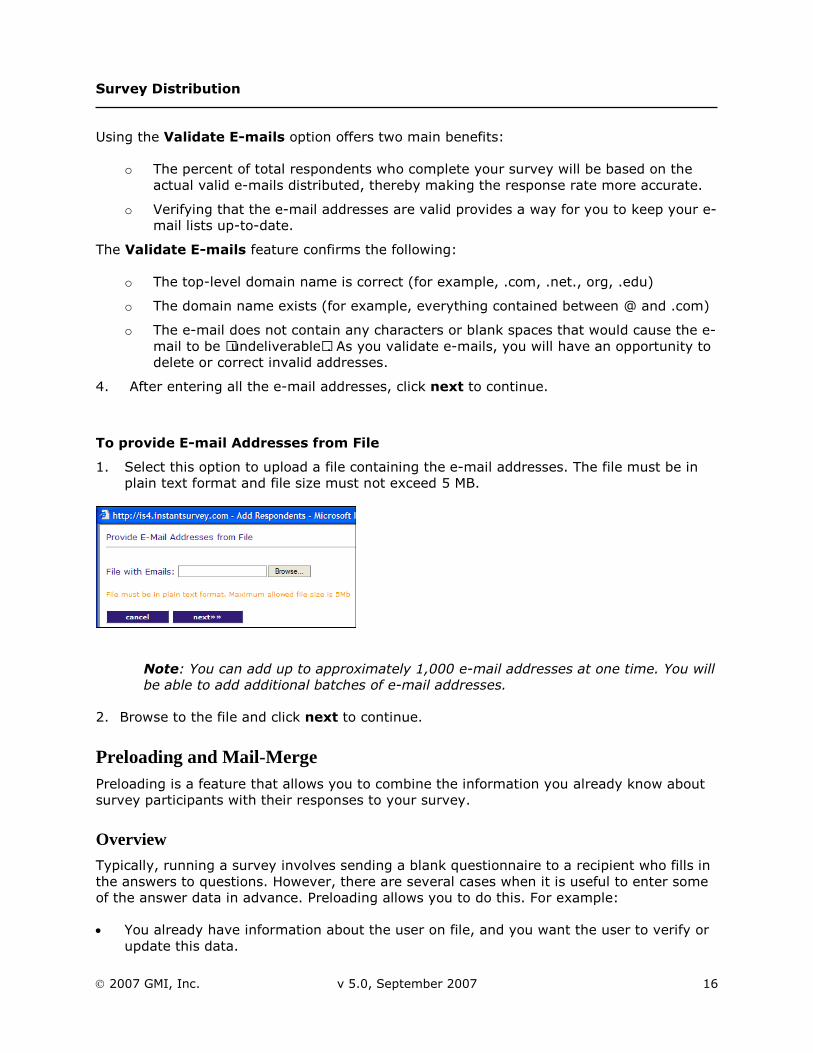
To provide E-mail Addresses Separated by Returns
1. Select this option to manually enter or paste as list of e-mail addresses. There should not be any spaces or extra characters added between e-mail addresses.
2. Enter only one e-mail address per line and use the Enter button in your keyboard to start a new line. You have the option of entering duplicate emails.
3. (Optional) Check the Validate E-mails box at the bottom of the dialog box to ensure that all entered e-mail addresses are valid and correct:
E-mail Address Validation
Survey Distribution
2007 GMI, Inc. v 5.0, September 2007 16
Using the Validate E-mails option offers two main benefits:
o The percent of total respondents who complete your survey will be based on the actual valid e-mails distributed, thereby making the response rate more accurate.
o Verifying that the e-mail addresses are valid provides a way for you to keep your e-mail lists up-to-date.
The Validate E-mails feature confirms the following:
o The top-level domain name is correct (for example, .com, .net., org, .edu)
o The domain name exists (for example, everything contained between @ and .com)
o The e-mail does not contain any characters or blank spaces that would cause the e-mail to be “undeliverable”. As you validate e-mails, you will have an opportunity to delete or correct invalid addresses.
4. After entering all the e-mail addresses, click next to continue.
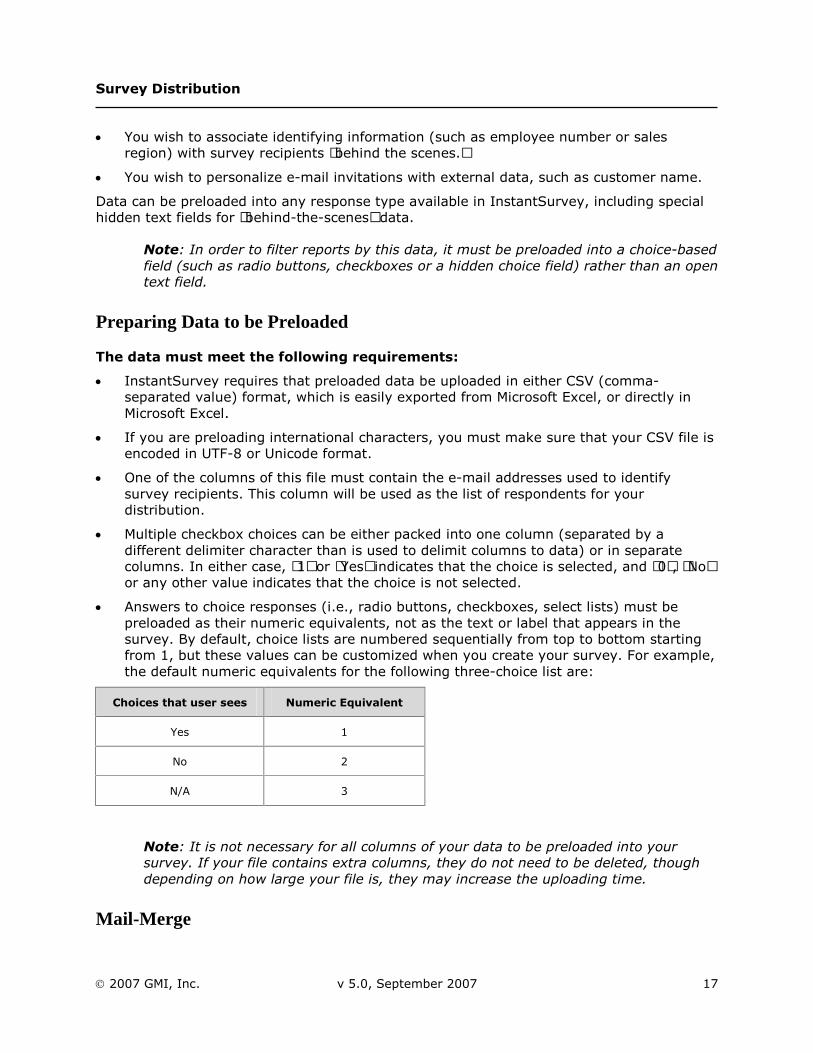
To provide E-mail Addresses from File
1. Select this option to upload a file containing the e-mail addresses. The file must be in plain text format and file size must not exceed 5 MB.
Note: You can add up to approximately 1,000 e-mail addresses at one time. You will be able to add additional batches of e-mail addresses.
2. Browse to the file and click next to continue.
Preloading and Mail-Merge Preloading is a feature that allows you to combine the information you already know about survey participants with their responses to your survey.
Overview
Typically, running a survey involves sending a blank questionnaire to a recipient who fills in the answers to questions. However, there are several cases when it is useful to enter some of the answer data in advance. Preloading allows you to do this. For example:
You already have information about the user on file, and you want the user to verify or update this data.
Survey Distribution
2007 GMI, Inc. v 5.0, September 2007 17
You wish to associate identifying information (such as employee number or sales region) with survey recipients “behind the scenes.”
You wish to personalize e-mail invitations with external data, such as customer name.
Data can be preloaded into any response type available in InstantSurvey, including special hidden text fields for “behind-the-scenes” data.
Note: In order to filter reports by this data, it must be preloaded into a choice-based field (such as radio buttons, checkboxes or a hidden choice field) rather than an open text field.
Preparing Data to be Preloaded
The data must meet the following requirements:
InstantSurvey requires that preloaded data be uploaded in either CSV (comma-separated value) format, which is easily exported from Microsoft Excel, or directly in Microsoft Excel.
If you are preloading international characters, you must make sure that your CSV file is encoded in UTF-8 or Unicode format.
One of the columns of this file must contain the e-mail addresses used to identify survey recipients. This column will be used as the list of respondents for your distribution.
Multiple checkbox choices can be either packed into one column (separated by a different delimiter character than is used to delimit columns to data) or in separate columns. In either case, “1” or “Yes” indicates that the choice is selected, and “0”, “No” or any other value indicates that the choice is not selected.
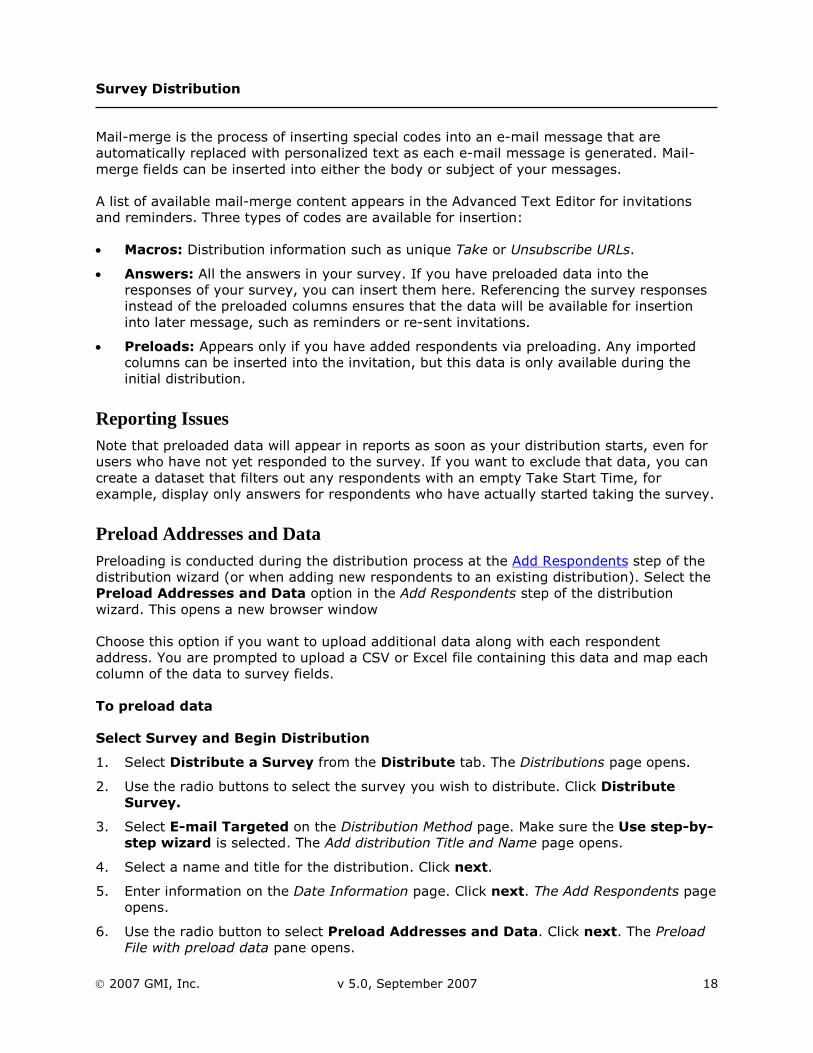
Answers to choice responses (i.e., radio buttons, checkboxes, select lists) must be preloaded as their numeric equivalents, not as the text or label that appears in the survey. By default, choice lists are numbered sequentially from top to bottom starting from 1, but these values can be customized when you create your survey. For example, the default numeric equivalents for the following three-choice list are:
Choices that user sees Numeric Equivalent
Yes 1
No 2
N/A 3
Note: It is not necessary for all columns of your data to be preloaded into your survey. If your file contains extra columns, they do not need to be deleted, though depending on how large your file is, they may increase the uploading time.
Mail-Merge
Survey Distribution
2007 GMI, Inc. v 5.0, September 2007 18
Mail-merge is the process of inserting special codes into an e-mail message that are automatically replaced with personalized text as each e-mail message is generated. Mail-merge fields can be inserted into either the body or subject of your messages.
A list of available mail-merge content appears in the Advanced Text Editor for invitations and reminders. Three types of codes are available for insertion:
Macros: Distribution information such as unique Take or Unsubscribe URLs.
Answers: All the answers in your survey. If you have preloaded data into the responses of your survey, you can insert them here. Referencing the survey responses instead of the preloaded columns ensures that the data will be available for insertion into later message, such as reminders or re-sent invitations.
Preloads: Appears only if you have added respondents via preloading. Any imported columns can be inserted into the invitation, but this data is only available during the initial distribution.
Reporting Issues Note that preloaded data will appear in reports as soon as your distribution starts, even for users who have not yet responded to the survey. If you want to exclude that data, you can create a dataset that filters out any respondents with an empty Take Start Time, for example, display only answers for respondents who have actually started taking the survey.
Preload Addresses and Data Preloading is conducted during the distribution process at the Add Respondents step of the distribution wizard (or when adding new respondents to an existing distribution). Select the Preload Addresses and Data option in the Add Respondents step of the distribution wizard. This opens a new browser window
Choose this option if you want to upload additional data along with each respondent address. You are prompted to upload a CSV or Excel file containing this data and map each column of the data to survey fields.
To preload data
Select Survey and Begin Distribution
1. Select Distribute a Survey from the Distribute tab. The Distributions page opens.
2. Use the radio buttons to select the survey you wish to distribute. Click Distribute Survey.
3. Select E-mail Targeted on the Distribution Method page. Make sure the Use step-by-step wizard is selected. The Add distribution Title and Name page opens.
4. Select a name and title for the distribution. Click next.
5. Enter information on the Date Information page. Click next. The Add Respondents page opens.
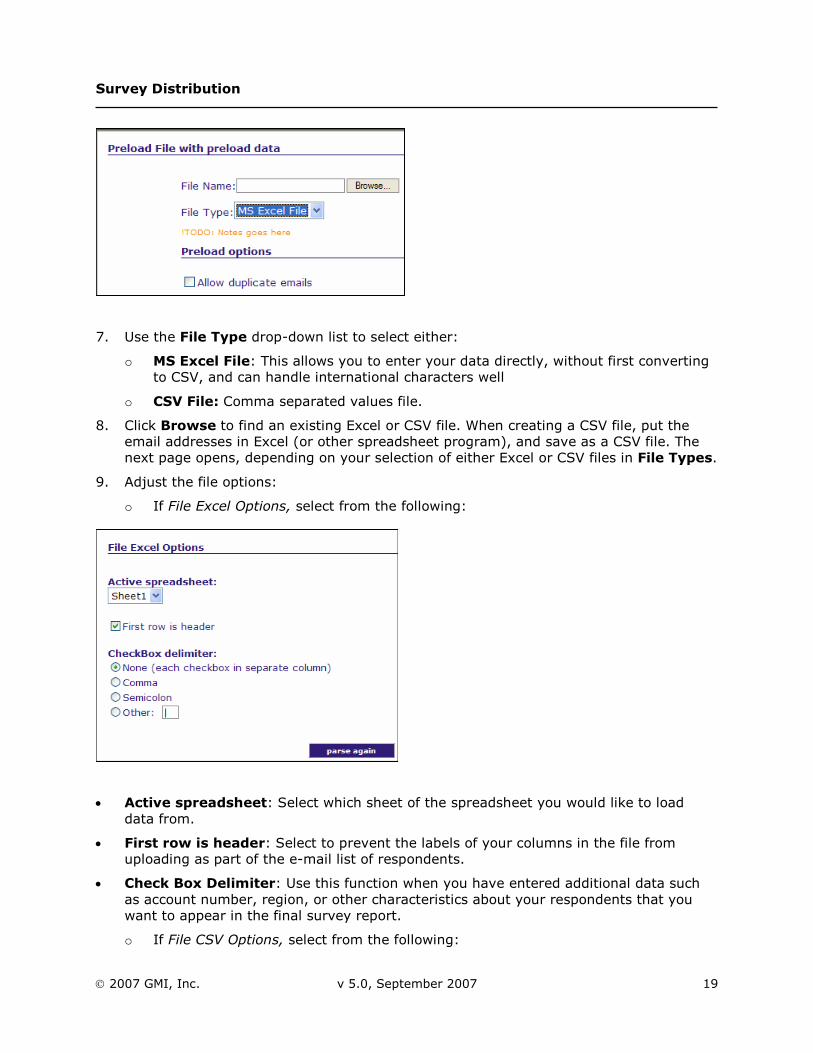
6. Use the radio button to select Preload Addresses and Data. Click next. The Preload File with preload data pane opens.
Survey Distribution
2007 GMI, Inc. v 5.0, September 2007 19
7. Use the File Type drop-down list to select either:
o MS Excel File: This allows you to enter your data directly, without first converting to CSV, and can handle international characters well
o CSV File: Comma separated values file.
8. Click Browse to find an existing Excel or CSV file. When creating a CSV file, put the email addresses in Excel (or other spreadsheet program), and save as a CSV file. The next page opens, depending on your selection of either Excel or CSV files in File Types.
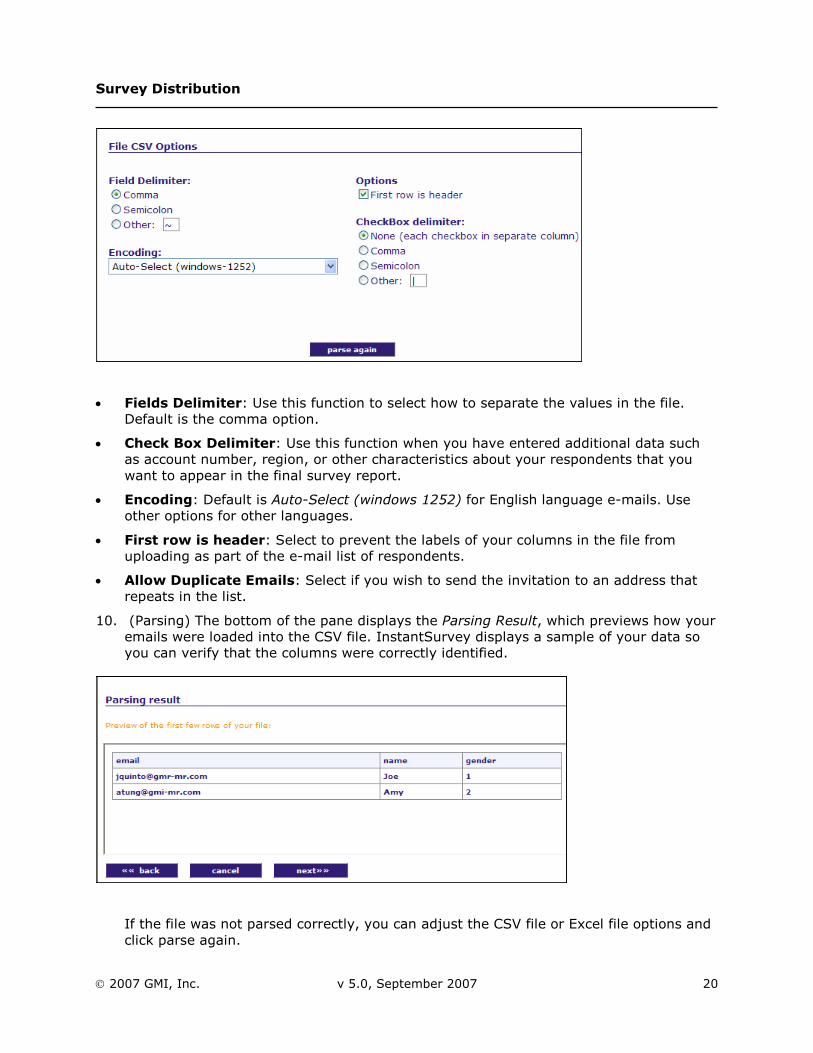
9. Adjust the file options:
o If File Excel Options, select from the following:
Active spreadsheet: Select which sheet of the spreadsheet you would like to load data from.
First row is header: Select to prevent the labels of your columns in the file from uploading as part of the e-mail list of respondents.
Check Box Delimiter: Use this function when you have entered additional data such as account number, region, or other characteristics about your respondents that you want to appear in the final survey report.
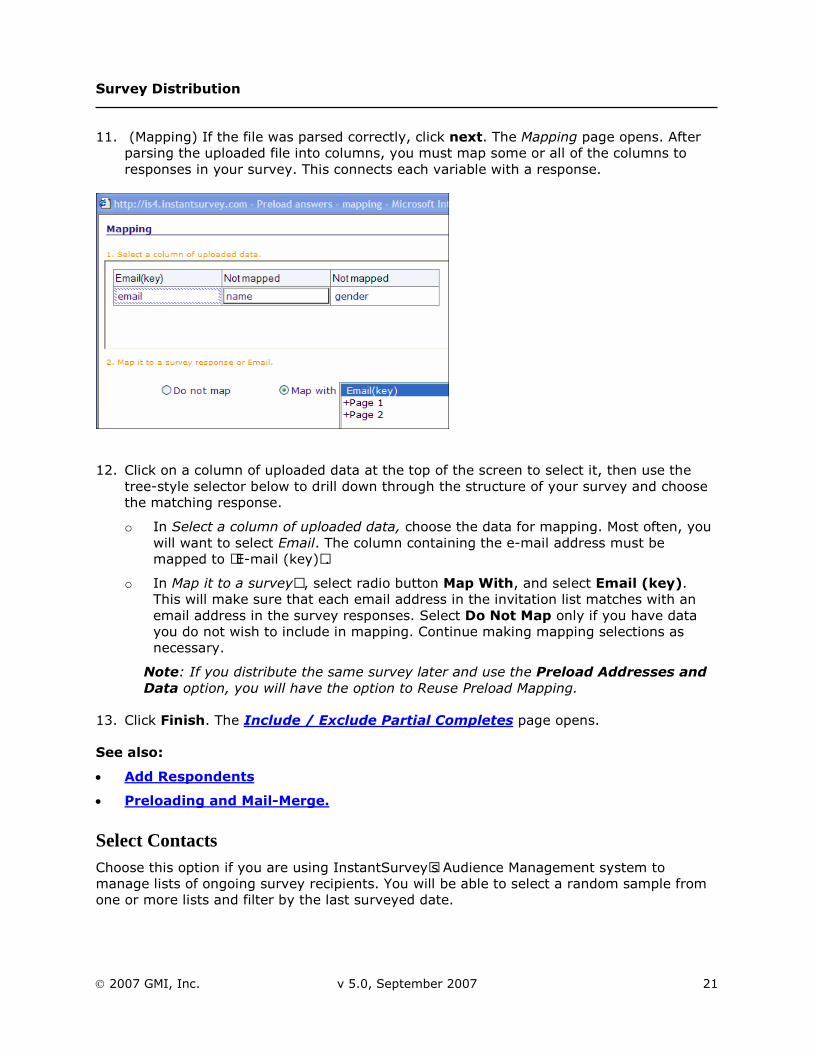
o If File CSV Options, select from the following:
Survey Distribution
2007 GMI, Inc. v 5.0, September 2007 20
Fields Delimiter: Use this function to select how to separate the values in the file. Default is the comma option.
Check Box Delimiter: Use this function when you have entered additional data such as account number, region, or other characteristics about your respondents that you want to appear in the final survey report.
Encoding: Default is Auto-Select (windows 1252) for English language e-mails. Use other options for other languages.
First row is header: Select to prevent the labels of your columns in the file from uploading as part of the e-mail list of respondents.
Allow Duplicate Emails: Select if you wish to send the invitation to an address that repeats in the list.
10. (Parsing) The bottom of the pane displays the Parsing Result, which previews how your emails were loaded into the CSV file. InstantSurvey displays a sample of your data so you can verify that the columns were correctly identified.
If the file was not parsed correctly, you can adjust the CSV file or Excel file options and click parse again.
Survey Distribution
2007 GMI, Inc. v 5.0, September 2007 21
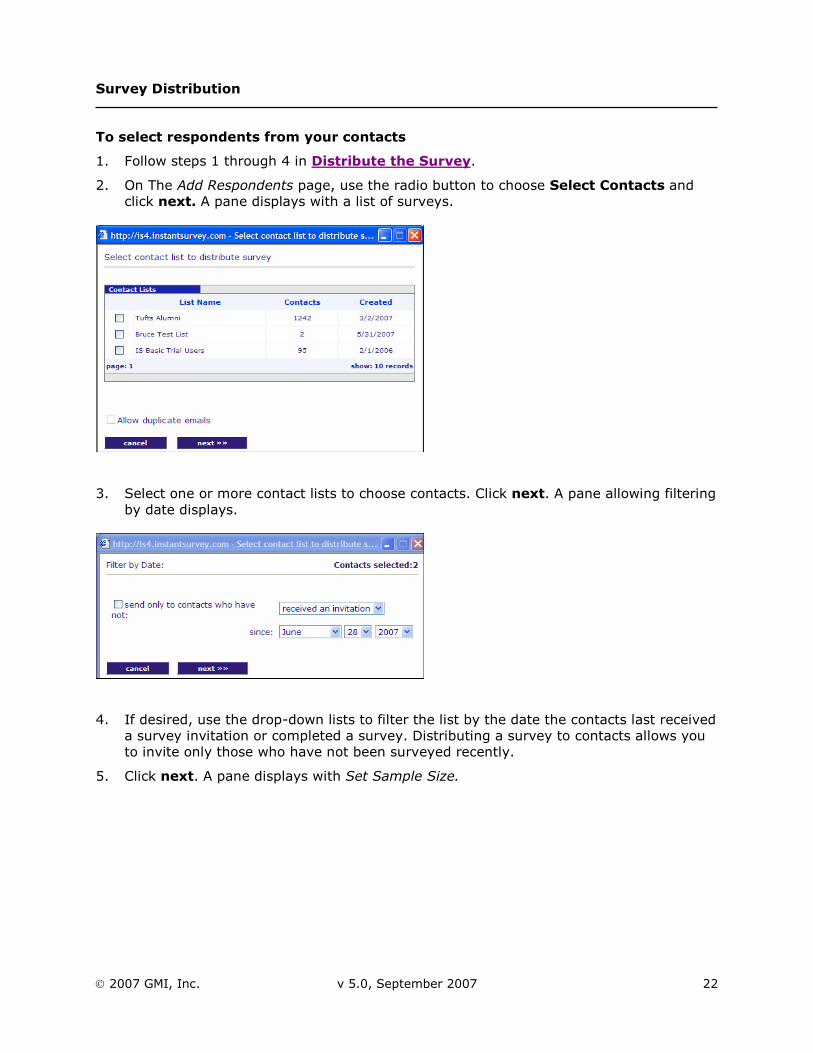
11. (Mapping) If the file was parsed correctly, click next. The Mapping page opens. After parsing the uploaded file into columns, you must map some or all of the columns to responses in your survey. This connects each variable with a response.
12. Click on a column of uploaded data at the top of the screen to select it, then use the tree-style selector below to drill down through the structure of your survey and choose the matching response.
o In Select a column of uploaded data, choose the data for mapping. Most often, you will want to select Email. The column containing the e-mail address must be mapped to “E-mail (key)”.
o In Map it to a survey…, select radio button Map With, and select Email (key). This will make sure that each email address in the invitation list matches with an email address in the survey responses. Select Do Not Map only if you have data you do not wish to include in mapping. Continue making mapping selections as necessary.
Note: If you distribute the same survey later and use the Preload Addresses and Data option, you will have the option to Reuse Preload Mapping.
13. Click Finish. The Include / Exclude Partial Completes page opens.
See also:
Add Respondents
Preloading and Mail-Merge.
Select Contacts Choose this option if you are using InstantSurvey’s Audience Management system to manage lists of ongoing survey recipients. You will be able to select a random sample from one or more lists and filter by the last surveyed date.
Survey Distribution
2007 GMI, Inc. v 5.0, September 2007 22
To select respondents from your contacts
1. Follow steps 1 through 4 in Distribute the Survey.
2. On The Add Respondents page, use the radio button to choose Select Contacts and click next. A pane displays with a list of surveys.
3. Select one or more contact lists to choose contacts. Click next. A pane allowing filtering by date displays.
4. If desired, use the drop-down lists to filter the list by the date the contacts last received a survey invitation or completed a survey. Distributing a survey to contacts allows you to invite only those who have not been surveyed recently.
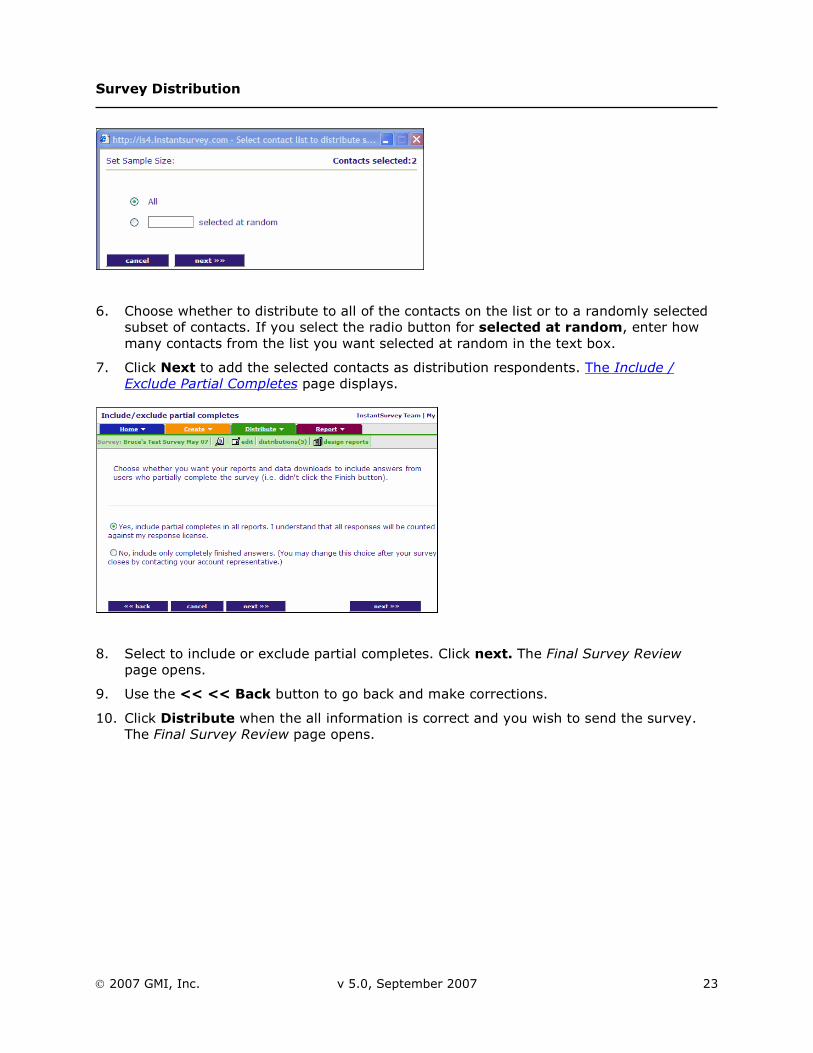
5. Click next. A pane displays with Set Sample Size.
Survey Distribution
2007 GMI, Inc. v 5.0, September 2007 23
6. Choose whether to distribute to all of the contacts on the list or to a randomly selected subset of contacts. If you select the radio button for selected at random, enter how many contacts from the list you want selected at random in the text box.
7. Click Next to add the selected contacts as distribution respondents. The Include / Exclude Partial Completes page displays.
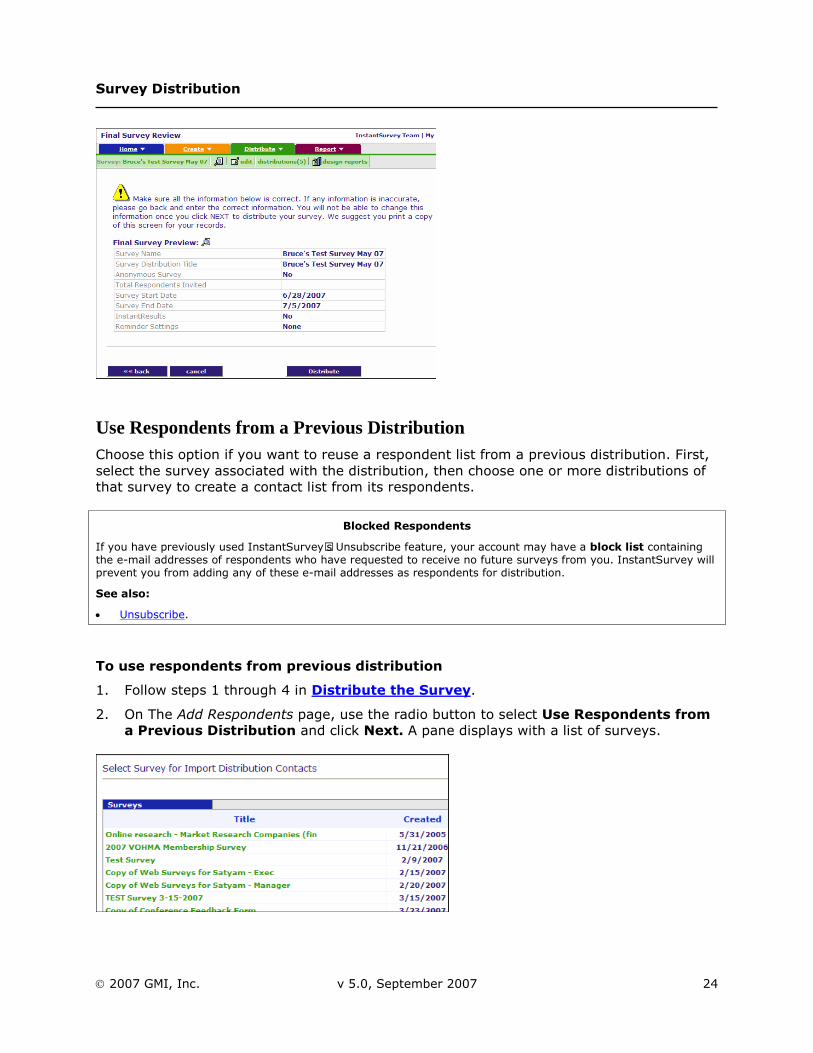
8. Select to include or exclude partial completes. Click next. The Final Survey Review page opens.
9. Use the << << Back button to go back and make corrections.
10. Click Distribute when the all information is correct and you wish to send the survey. The Final Survey Review page opens.
Survey Distribution
2007 GMI, Inc. v 5.0, September 2007 24
Use Respondents from a Previous Distribution Choose this option if you want to reuse a respondent list from a previous distribution. First, select the survey associated with the distribution, then choose one or more distributions of that survey to create a contact list from its respondents.
Blocked Respondents
If you have previously used InstantSurvey’s Unsubscribe feature, your account may have a block list containing the e-mail addresses of respondents who have requested to receive no future surveys from you. InstantSurvey will prevent you from adding any of these e-mail addresses as respondents for distribution.
See also:
Unsubscribe.
To use respondents from previous distribution
1. Follow steps 1 through 4 in Distribute the Survey.
2. On The Add Respondents page, use the radio button to select Use Respondents from a Previous Distribution and click Next. A pane displays with a list of surveys.
Survey Distribution
2007 GMI, Inc. v 5.0, September 2007 25
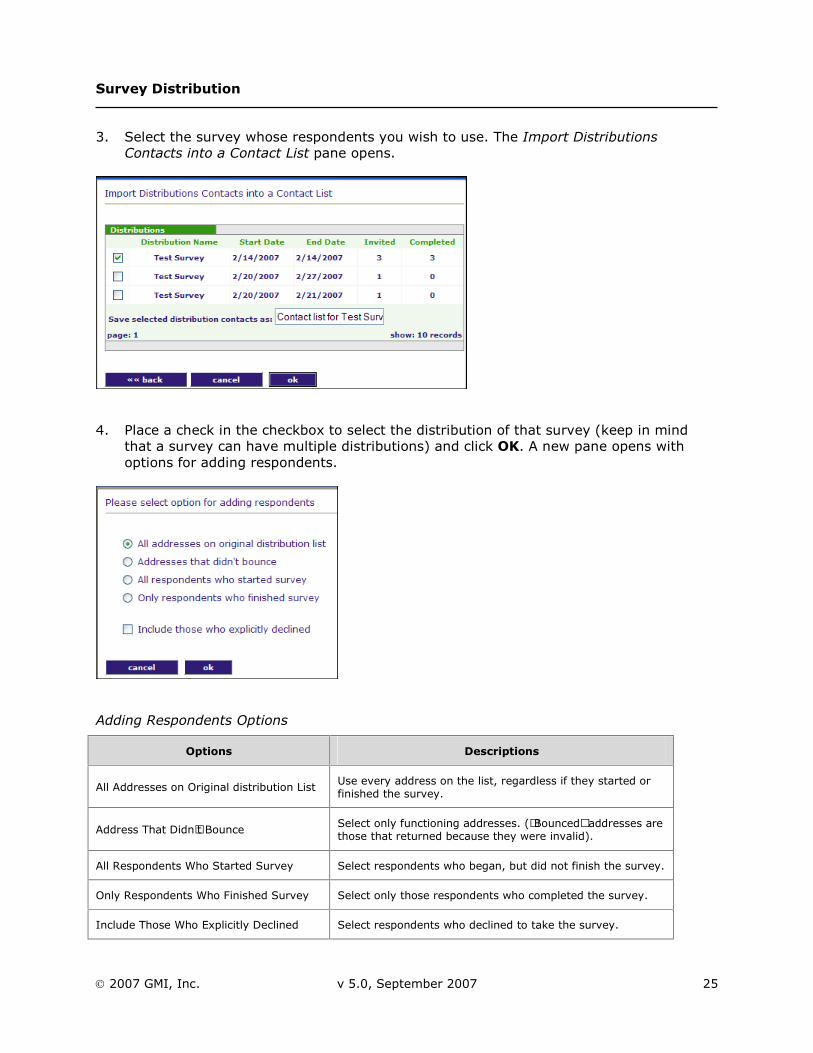
3. Select the survey whose respondents you wish to use. The Import Distributions Contacts into a Contact List pane opens.
4. Place a check in the checkbox to select the distribution of that survey (keep in mind that a survey can have multiple distributions) and click OK. A new pane opens with options for adding respondents.
Adding Respondents Options
Options Descriptions
All Addresses on Original distribution List Use every address on the list, regardless if they started or finished the survey.
Address That Didn’t Bounce Select only functioning addresses. (“Bounced” addresses are those that returned because they were invalid).
All Respondents Who Started Survey Select respondents who began, but did not finish the survey.
Only Respondents Who Finished Survey Select only those respondents who completed the survey.
Include Those Who Explicitly Declined Select respondents who declined to take the survey.
Survey Distribution
2007 GMI, Inc. v 5.0, September 2007 26
Note: After the Add Respondents step, you can click Finish at any time to skip the remaining steps and start your distribution. The default choices will be used for each skipped step.
5. After making a selection, click OK. The Include/Exclude Partial Completes page opens.
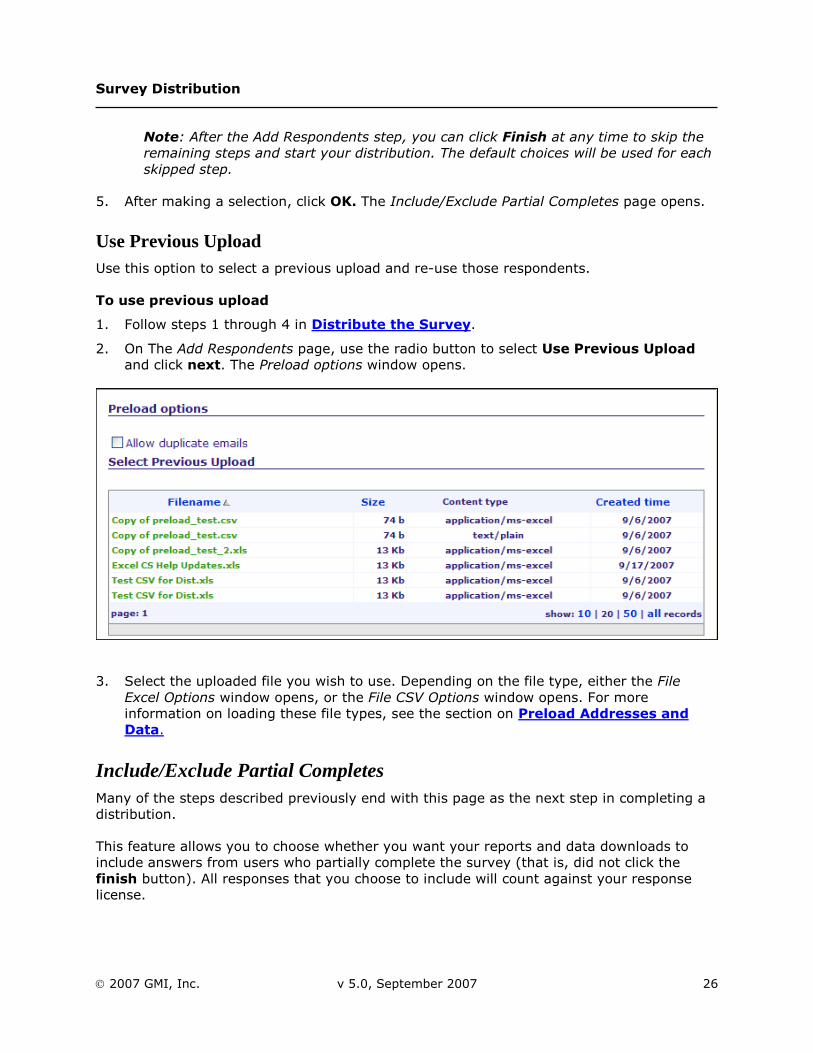
Use Previous Upload Use this option to select a previous upload and re-use those respondents.
To use previous upload
1. Follow steps 1 through 4 in Distribute the Survey.
2. On The Add Respondents page, use the radio button to select Use Previous Upload and click next. The Preload options window opens.
3. Select the uploaded file you wish to use. Depending on the file type, either the File Excel Options window opens, or the File CSV Options window opens. For more information on loading these file types, see the section on Preload Addresses and Data.
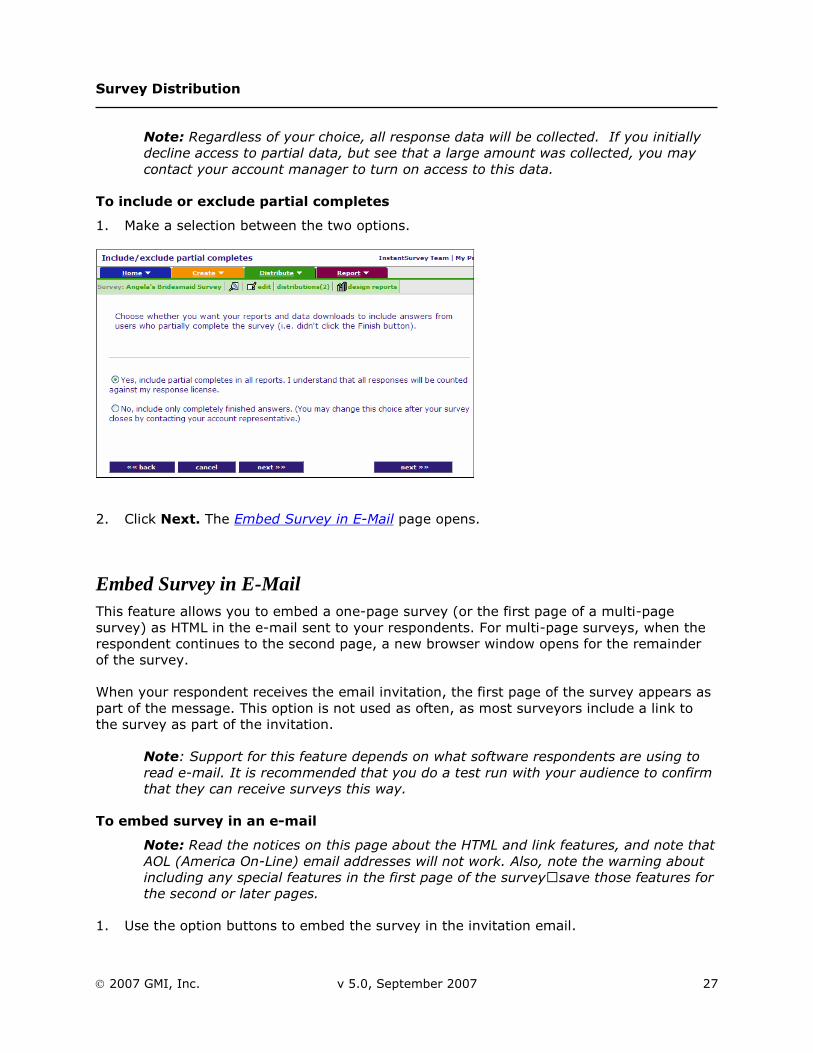
Include/Exclude Partial Completes Many of the steps described previously end with this page as the next step in completing a distribution.
This feature allows you to choose whether you want your reports and data downloads to include answers from users who partially complete the survey (that is, did not click the finish button). All responses that you choose to include will count against your response license.
Survey Distribution
2007 GMI, Inc. v 5.0, September 2007 27
Note: Regardless of your choice, all response data will be collected. If you initially decline access to partial data, but see that a large amount was collected, you may contact your account manager to turn on access to this data.
To include or exclude partial completes
1. Make a selection between the two options.
2. Click Next. The Embed Survey in E-Mail page opens.
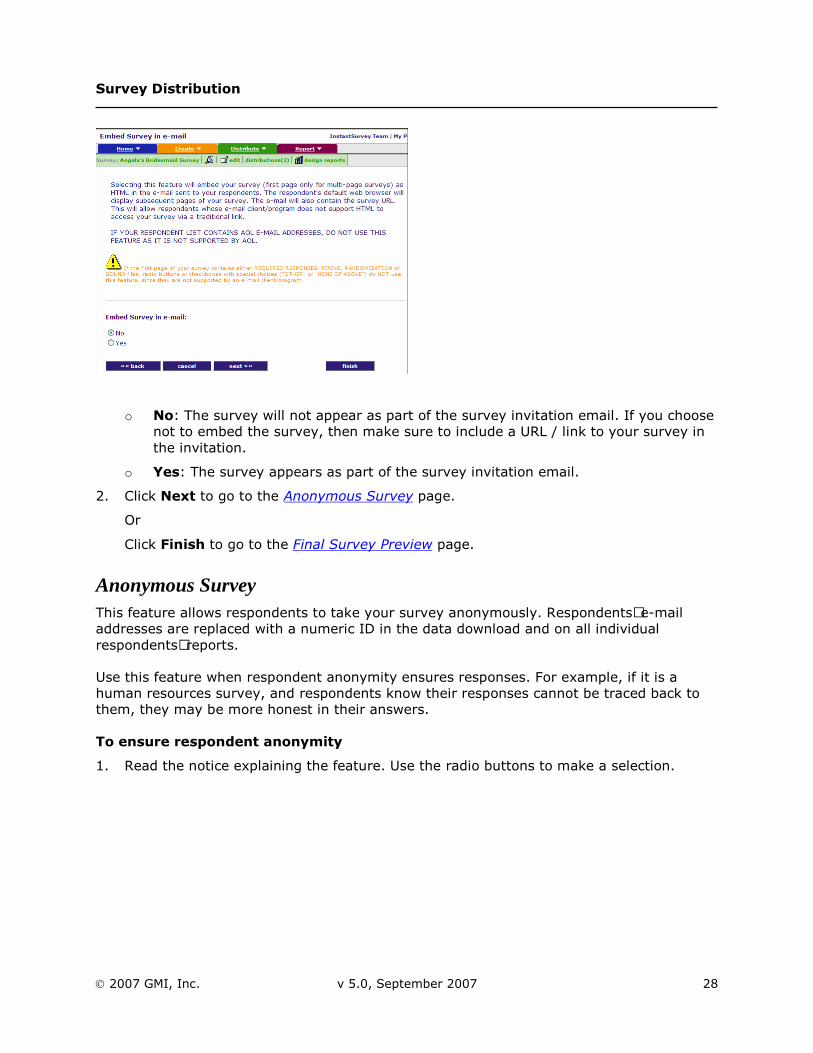
Embed Survey in E-Mail This feature allows you to embed a one-page survey (or the first page of a multi-page survey) as HTML in the e-mail sent to your respondents. For multi-page surveys, when the respondent continues to the second page, a new browser window opens for the remainder of the survey.
When your respondent receives the email invitation, the first page of the survey appears as part of the message. This option is not used as often, as most surveyors include a link to the survey as part of the invitation.
Note: Support for this feature depends on what software respondents are using to read e-mail. It is recommended that you do a test run with your audience to confirm that they can receive surveys this way.
To embed survey in an e-mail
Note: Read the notices on this page about the HTML and link features, and note that AOL (America On-Line) email addresses will not work. Also, note the warning about including any special features in the first page of the survey—save those features for the second or later pages.
1. Use the option buttons to embed the survey in the invitation email.
Survey Distribution
2007 GMI, Inc. v 5.0, September 2007 28
o No: The survey will not appear as part of the survey invitation email. If you choose
not to embed the survey, then make sure to include a URL / link to your survey in the invitation.
o Yes: The survey appears as part of the survey invitation email.
2. Click Next to go to the Anonymous Survey page.
Or
Click Finish to go to the Final Survey Preview page.
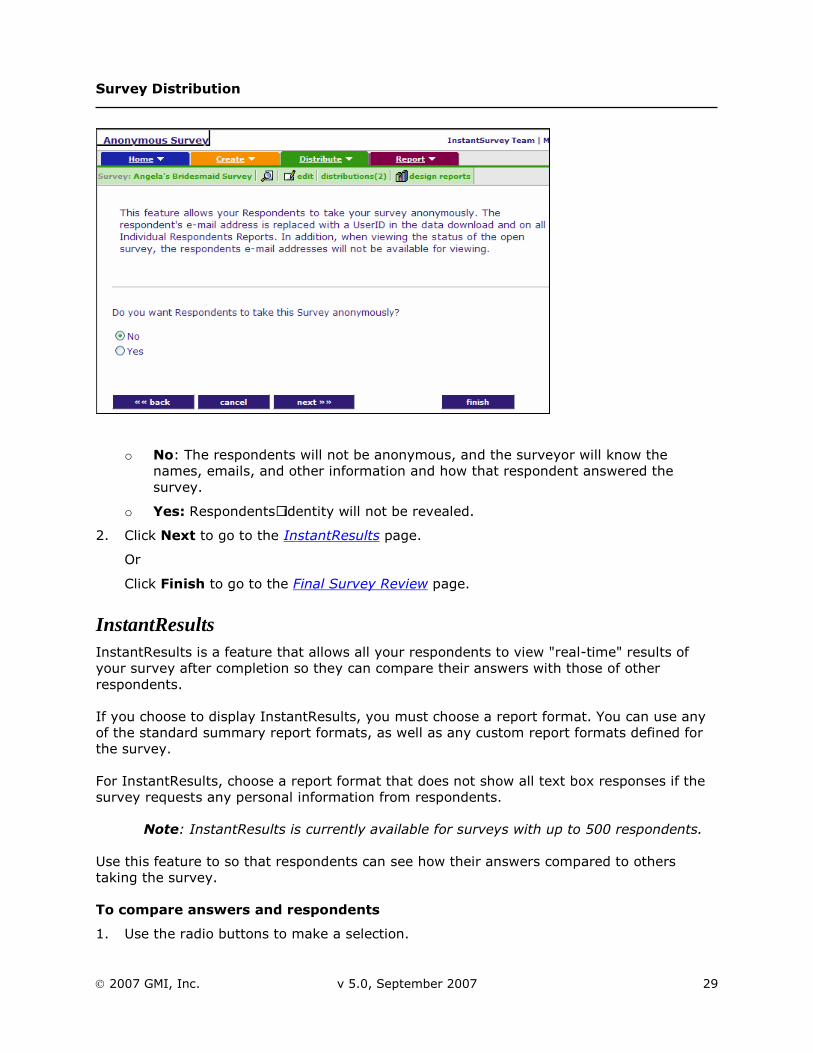
Anonymous Survey This feature allows respondents to take your survey anonymously. Respondents’ e-mail addresses are replaced with a numeric ID in the data download and on all individual respondents’ reports.
Use this feature when respondent anonymity ensures responses. For example, if it is a human resources survey, and respondents know their responses cannot be traced back to them, they may be more honest in their answers.
To ensure respondent anonymity
1. Read the notice explaining the feature. Use the radio buttons to make a selection.
Survey Distribution
2007 GMI, Inc. v 5.0, September 2007 29
o No: The respondents will not be anonymous, and the surveyor will know the names, emails, and other information and how that respondent answered the survey.
o Yes: Respondents’ identity will not be revealed.
2. Click Next to go to the InstantResults page.
Or
Click Finish to go to the Final Survey Review page.
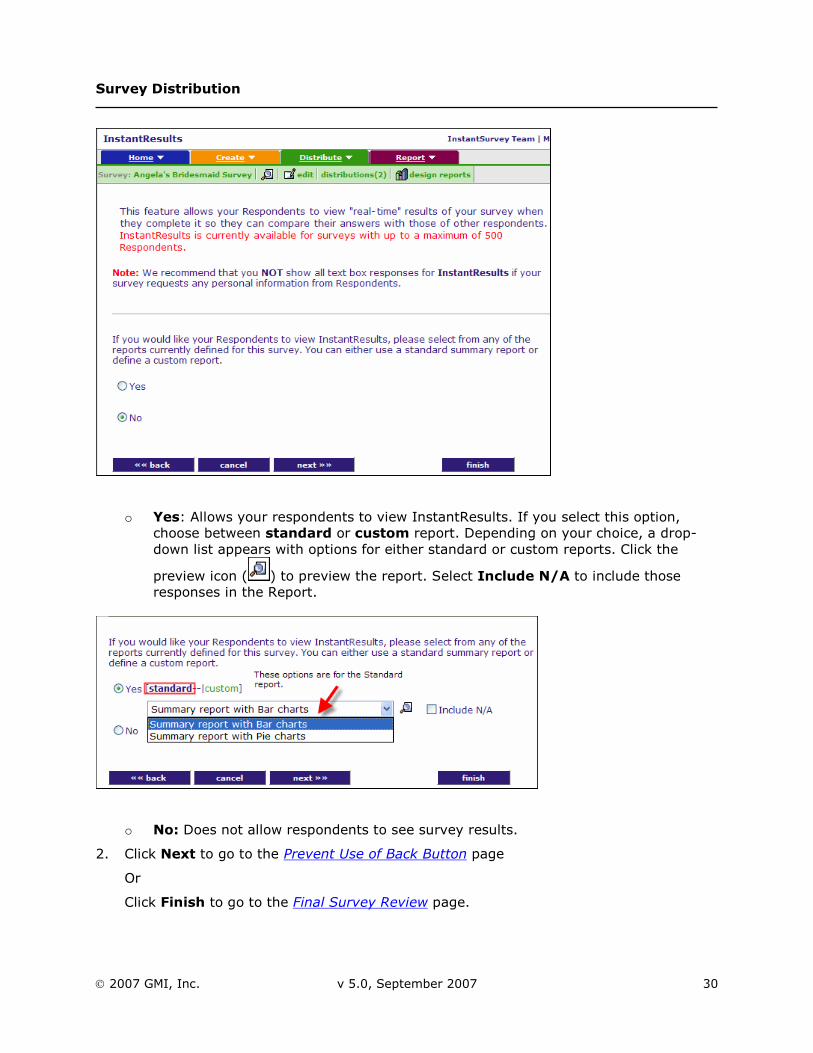
InstantResults InstantResults is a feature that allows all your respondents to view "real-time" results of your survey after completion so they can compare their answers with those of other respondents.
If you choose to display InstantResults, you must choose a report format. You can use any of the standard summary report formats, as well as any custom report formats defined for the survey.
For InstantResults, choose a report format that does not show all text box responses if the survey requests any personal information from respondents.
Note: InstantResults is currently available for surveys with up to 500 respondents.
Use this feature to so that respondents can see how their answers compared to others taking the survey.
To compare answers and respondents
1. Use the radio buttons to make a selection.
Survey Distribution
2007 GMI, Inc. v 5.0, September 2007 30
o Yes: Allows your respondents to view InstantResults. If you select this option,
choose between standard or custom report. Depending on your choice, a drop-down list appears with options for either standard or custom reports. Click the
preview icon ( ) to preview the report. Select Include N/A to include those responses in the Report.
o No: Does not allow respondents to see survey results.
2. Click Next to go to the Prevent Use of Back Button page
Or
Click Finish to go to the Final Survey Review page.

Survey Distribution
2007 GMI, Inc. v 5.0, September 2007 31
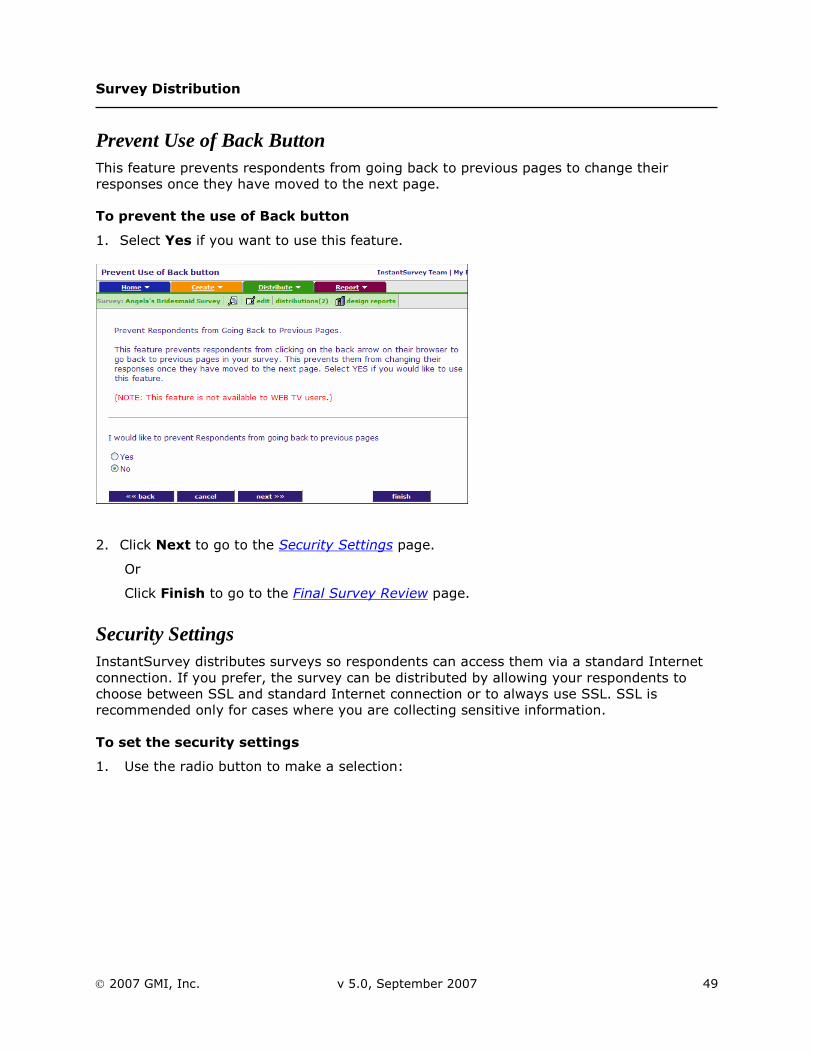
Prevent Use of Back Button This feature prevents respondents from going back to previous pages to change their responses once they have moved to the next page.
To prevent the use of Back button
1. Select Yes if you want to use this feature.
2. Click Next to go to the Security Setting page.
Or
Click Finish to go to the Final Survey Review page.
Security Settings InstantSurvey distributes surveys so respondents can access them via a standard Internet connection. If you prefer, the survey can be distributed by allowing your respondents to choose between SSL and standard Internet connection or to always use SSL. SSL is recommended only for cases where you are collecting sensitive information.
To set the security settings
1. Use the radio buttons to make a selection.

Survey Distribution
2007 GMI, Inc. v 5.0, September 2007 32
Don’t Use SSL: Responses will not be encrypted.
Allow Respondents to choose between SSL and Standard Internet Connection: Respondents have the option of encrypting their information.
Always Use SSL: Reponses to this survey (distribution) will always be encrypted.
2. Click Next to go to the Invitation page.
Or
Click Finish to go to Final Survey Review page.
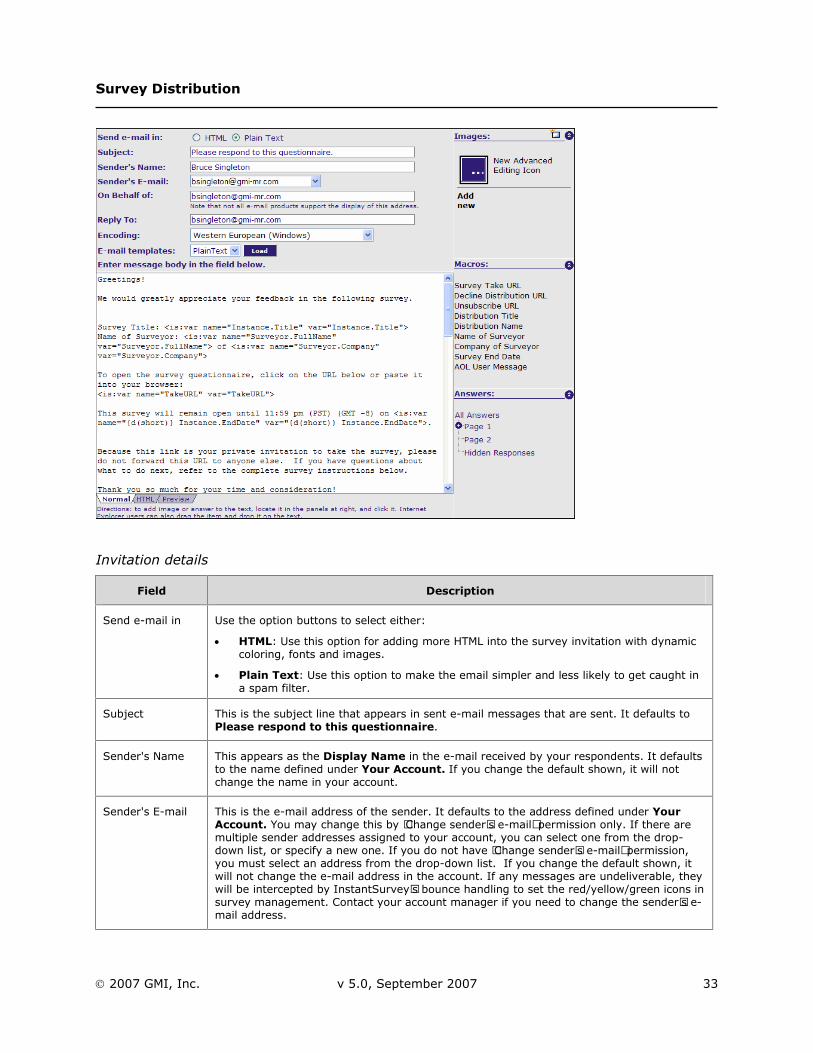
Invitation: E-mail Targeted E-mail targeted distributions require an invitation to respondents. When the Invitation page opens, the Advanced Text Editor opens allowing you to use the default invitation text or to customize your invitation as required. You can also customize the e-mail received by your respondents. Default header information is assigned based on your user profile information.
To customize invitation details
1. Change the invite information by clicking in the fields provided.
Survey Distribution
2007 GMI, Inc. v 5.0, September 2007 33
Invitation details
Field Description
Send e-mail in Use the option buttons to select either:
HTML: Use this option for adding more HTML into the survey invitation with dynamic coloring, fonts and images.
Plain Text: Use this option to make the email simpler and less likely to get caught in a spam filter.
Subject This is the subject line that appears in sent e-mail messages that are sent. It defaults to Please respond to this questionnaire.
Sender's Name This appears as the Display Name in the e-mail received by your respondents. It defaults to the name defined under Your Account. If you change the default shown, it will not change the name in your account.
Sender's E-mail This is the e-mail address of the sender. It defaults to the address defined under Your Account. You may change this by ‘Change sender’s e-mail’ permission only. If there are multiple sender addresses assigned to your account, you can select one from the drop-down list, or specify a new one. If you do not have ‘Change sender’s e-mail’ permission, you must select an address from the drop-down list. If you change the default shown, it will not change the e-mail address in the account. If any messages are undeliverable, they will be intercepted by InstantSurvey’s bounce handling to set the red/yellow/green icons in survey management. Contact your account manager if you need to change the sender’s e-mail address.

Survey Distribution
2007 GMI, Inc. v 5.0, September 2007 34
Field Description
Warning: It is illegal to send mass e-mail from an anonymous e-mail address.
On Behalf of This field can be specified if it is supported by the recipient’s e-mail client. This defaults to the address defined under Your Account.
Reply To This is the address that will be used if the recipient replies to the invitation. It defaults to the reply address defined under Your Account.
Encoding Select the encoding to be used for the invitation. The file encoding option should be the same as your browser encoding option. If you work with languages other than English, select Unicode (UTF 8). Otherwise, select the default option.
E-mail templates Select the e-mail template to use: Plain Text or HTML. Click Load to apply this.
Message Body You can customize the message text received by respondents. You can:
Use the default invitation text provided.
Edit the default text or replace it with your own text.
Reuse the invitation text from a previous distribution.
Create rich-text HTML messages using the Advanced Text Editor, a WYSIWYG HTML editor that is only available in Internet Explorer.
If you choose to customize your invitation text, it is highly recommended that you include the following information, which is already included in the default text:
Survey Take URL (required)
Distribution Title
Survey End Date
InstantSurvey can automatically mail-merge these values and other data into your invitation.
Images Select an image to insert into your email invitation. Use the Add Image icon ( ) to find and add images for inserting in your email.
Macros These insert the necessary unique URLs to identify respondents and allow them to perform certain functions. Hover your cursor over the area in the body of the email where you would like them to appear, and then click on the appropriate macro:
Survey Take URL: Includes the URL that the respondent clicks to take the survey.
Decline Distribution URL: Includes the URL that the respondent clicks to opt out of taking this survey.
Unsubscribe URL: Includes the URL that the respondent clicks to be removed from taking any further surveys.
Distribution Title: Includes the distribution title (appears at the top of each page in the survey) in the email message.
Distribution Name: Includes the distribution name in the email message.
Name of Surveyor: Includes the same of the person or entity sending the email invitation in the email message.
Company of Surveyor: Includes the name of the company of the person sending the email message.
Survey End Date: Includes the date that the survey ends.
Survey Distribution
2007 GMI, Inc. v 5.0, September 2007 35
Field Description
AOL Sender Message: Includes a message to AOL users that they can use other links to take the survey, based on the version of AOL.
Answers Allows you to include pre-loaded responses or information.
2. Click Next to go to the Reminder Setting page.
Or
Click Finish to go to the Final Survey Preview page.
See also:
Preloading and Mail-Merge.
About Unsubscribe Links
The default invitation text includes two optional links that allow automatic processing of respondents who wish to be removed from your mailing list. This makes it easier for you to comply with growing efforts to regulate spam e-mail and protect privacy on the Internet. The two optional links are:
Decline Distribution URL – Allows the respondent to decline the invitation and receive no further messages regarding it.
Unsubscribe URL – Allows the respondent to block all future survey invitations from your account.
See also:
Unsubscribe.
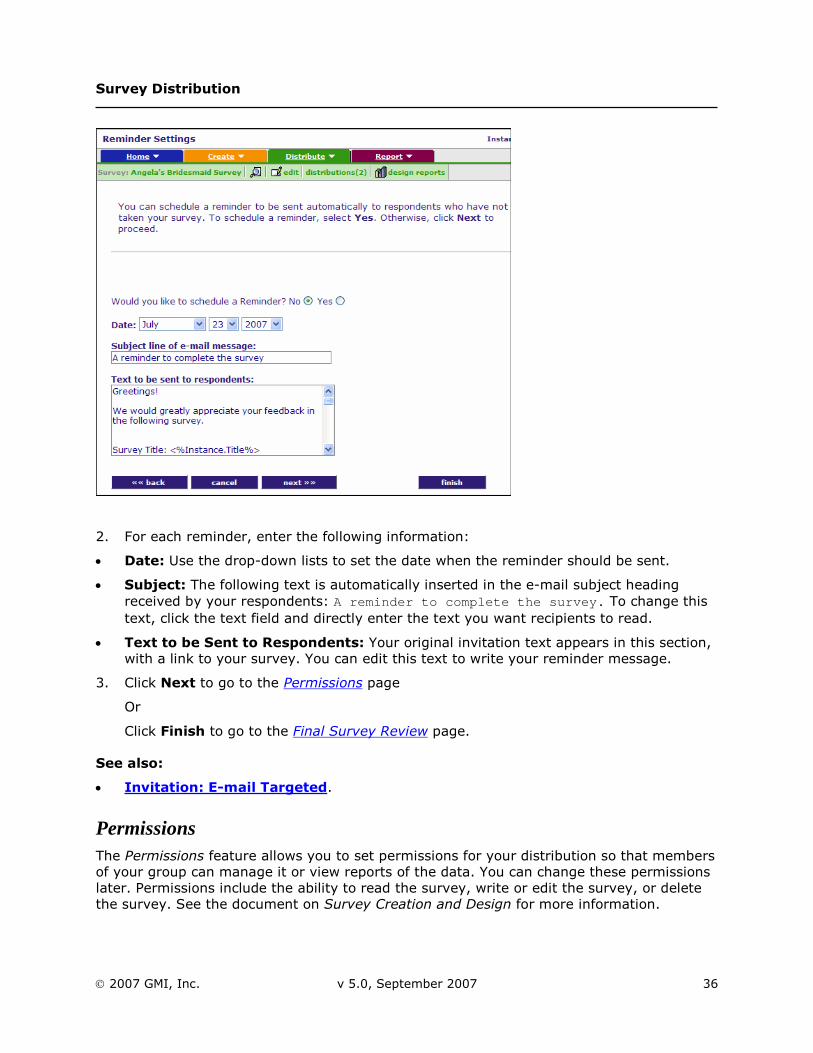
Reminder Settings E-mail targeted distributions allow you to schedule a reminder e-mail to be sent automatically to respondents. Only those respondents who have not completed your survey by the date the reminder is sent will receive the e-mail.
If you choose not to use the reminder e-mail option at this time, you can still send a reminder after your survey is distributed.
To use reminder settings
1. Use the radio buttons to choose whether wish to send your respondents a reminder email.
Survey Distribution
2007 GMI, Inc. v 5.0, September 2007 36
2. For each reminder, enter the following information:
Date: Use the drop-down lists to set the date when the reminder should be sent.
Subject: The following text is automatically inserted in the e-mail subject heading received by your respondents: A reminder to complete the survey. To change this text, click the text field and directly enter the text you want recipients to read.
Text to be Sent to Respondents: Your original invitation text appears in this section, with a link to your survey. You can edit this text to write your reminder message.
3. Click Next to go to the Permissions page
Or
Click Finish to go to the Final Survey Review page.
See also:
Invitation: E-mail Targeted.
Permissions The Permissions feature allows you to set permissions for your distribution so that members of your group can manage it or view reports of the data. You can change these permissions later. Permissions include the ability to read the survey, write or edit the survey, or delete the survey. See the document on Survey Creation and Design for more information.
Survey Distribution
2007 GMI, Inc. v 5.0, September 2007 37
The Permissions feature is available in the distribution wizard only. You cannot set Permissions on the Distribution Status page. You must set permissions earlier on the Manage My Distribution page in the More Actions drop down list before selecting the method of distribution.
The permissions will default to be the same as the survey you are distributing.
Note: Group members must have “read” permission to both the survey and the distribution to be able to view a report.
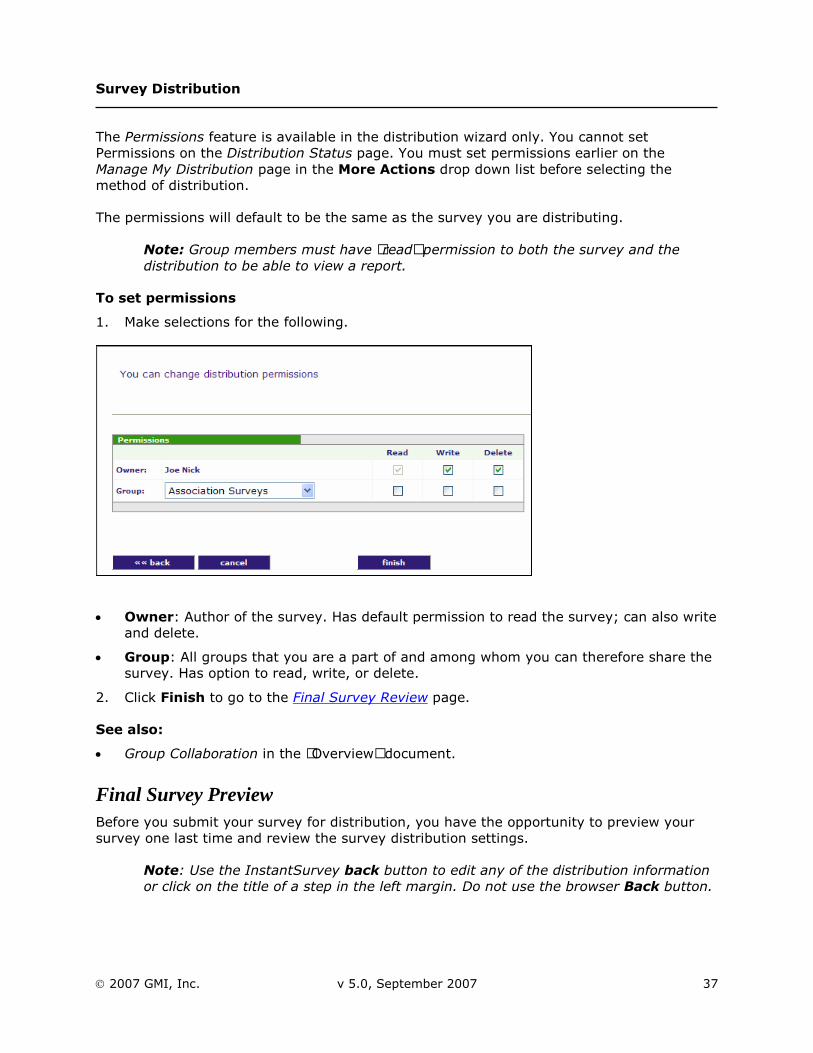
To set permissions
1. Make selections for the following.
Owner: Author of the survey. Has default permission to read the survey; can also write
and delete.
Group: All groups that you are a part of and among whom you can therefore share the survey. Has option to read, write, or delete.
2. Click Finish to go to the Final Survey Review page.
See also:
Group Collaboration in the “Overview” document.
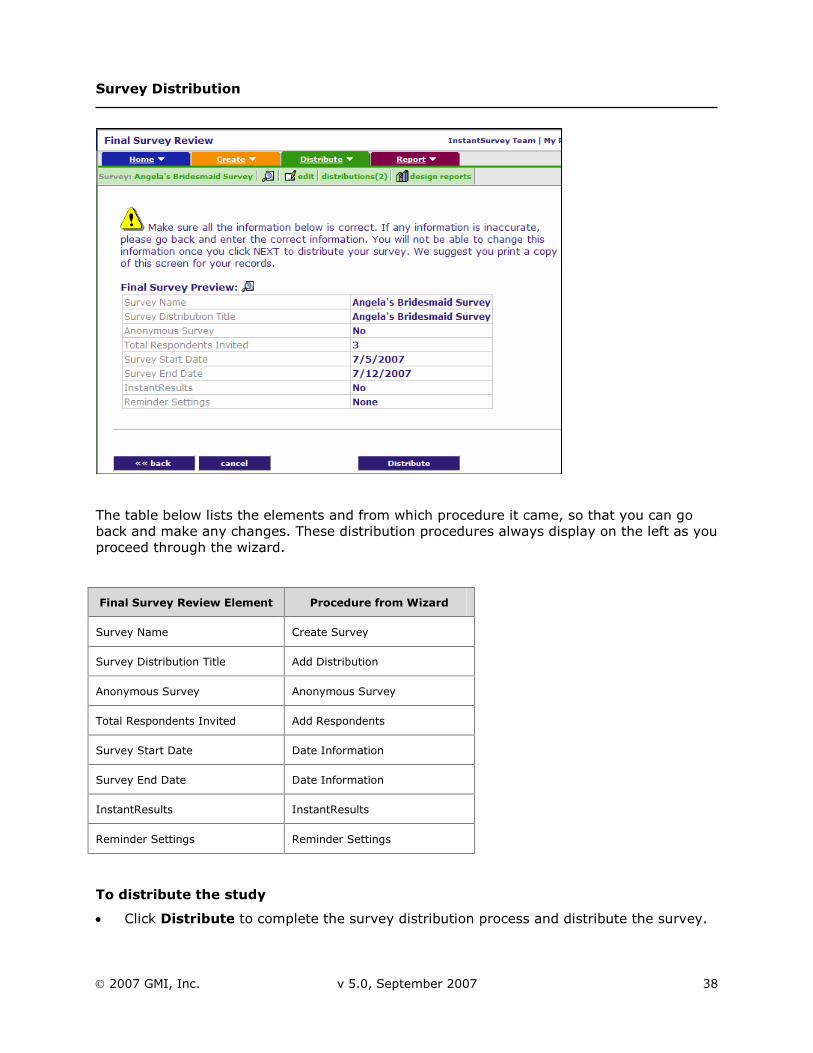
Final Survey Preview Before you submit your survey for distribution, you have the opportunity to preview your survey one last time and review the survey distribution settings.
Note: Use the InstantSurvey back button to edit any of the distribution information or click on the title of a step in the left margin. Do not use the browser Back button.
Survey Distribution
2007 GMI, Inc. v 5.0, September 2007 38
The table below lists the elements and from which procedure it came, so that you can go back and make any changes. These distribution procedures always display on the left as you proceed through the wizard.
Final Survey Review Element Procedure from Wizard
Survey Name Create Survey
Survey Distribution Title Add Distribution
Anonymous Survey Anonymous Survey
Total Respondents Invited Add Respondents
Survey Start Date Date Information
Survey End Date Date Information
InstantResults InstantResults
Reminder Settings Reminder Settings
To distribute the study
Click Distribute to complete the survey distribution process and distribute the survey.
Survey Distribution
2007 GMI, Inc. v 5.0, September 2007 39
Note on E-mail Targeted Distribution Processing E-mail targeted distributions can take anywhere from a few seconds to an hour to be processed by the InstantSurvey mail server, depending on the number of recipients. The Survey Management page for your distribution will display its status. Once processing of your distribution is complete, you will receive a status message indicating how many invitations were successfully sent, and which (if any) failed for some reason.
See also:
Survey Management.
Survey Distribution
2007 GMI, Inc. v 5.0, September 2007 40
Single URL Distribution Distributing to a single URL provides a powerful tool for conducting Web site feedback studies and other open-response surveys.
Note: Your survey must be marked as “Finished” before it can be distributed. This creates the database structures needed to store answer data.
This section includes:
Distributing the survey
Add survey title
Number of respondents
Date information
Prevent multiple submissions
Include/exclude partial completes
InstantResults
Prevent use of Back button
Security settings
Permissions
Final survey preview
Distribution done
Deploying your survey URL.
Distributing the Survey If you choose the wizard, the steps of the wizard are listed in the left margin. These become hyperlinks as you complete each step, allowing you to quickly go back to a previous step to make changes.
Note: It is important that you do not refresh the browser window or use the browser Back and Forward buttons at any point when using the Survey Distribution Wizard. Instead, use the back button included in the application, click on the title of a previous step in the left margin, or click cancel to quit.
Below are descriptions of all the available distribution options. They will appear in different order and locations depending on whether you choose the step-by-step wizard or not. If you do not choose the step-by-step wizard, the Distribution options page opens with three tabs for entering the settings there.
Survey Distribution
2007 GMI, Inc. v 5.0, September 2007 41
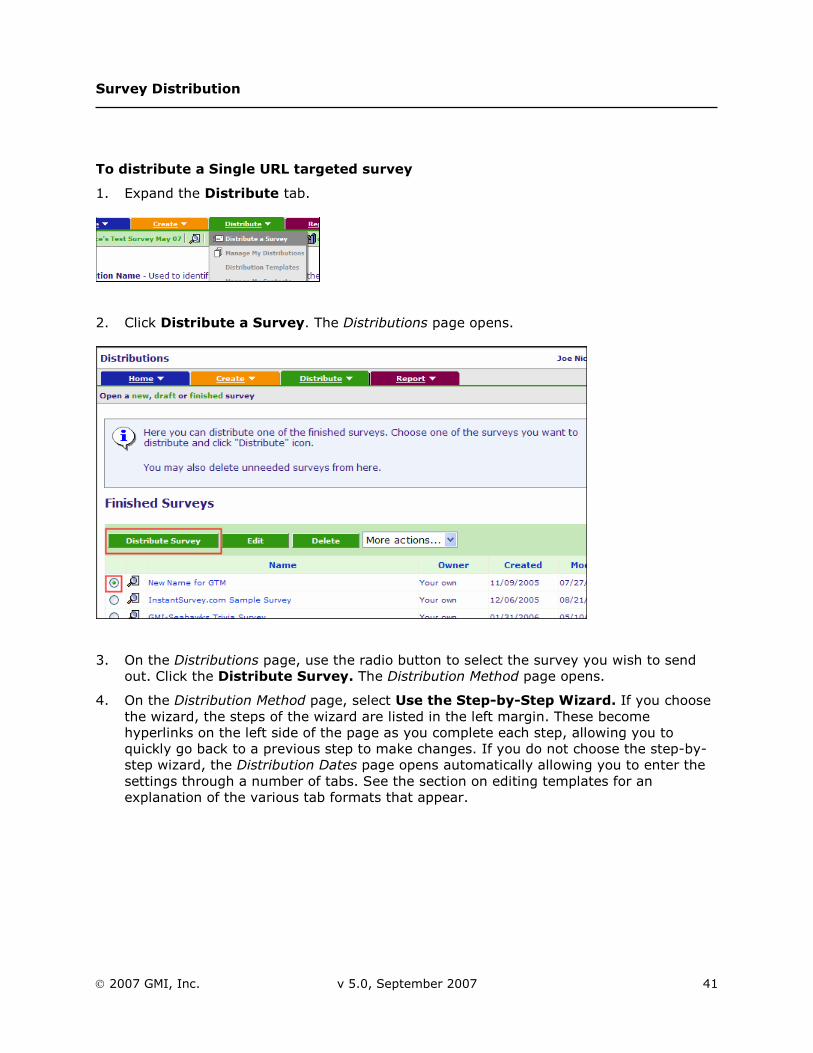
To distribute a Single URL targeted survey
1. Expand the Distribute tab.
2. Click Distribute a Survey. The Distributions page opens.
3. On the Distributions page, use the radio button to select the survey you wish to send out. Click the Distribute Survey. The Distribution Method page opens.
4. On the Distribution Method page, select Use the Step-by-Step Wizard. If you choose the wizard, the steps of the wizard are listed in the left margin. These become hyperlinks on the left side of the page as you complete each step, allowing you to quickly go back to a previous step to make changes. If you do not choose the step-by-step wizard, the Distribution Dates page opens automatically allowing you to enter the settings through a number of tabs. See the section on editing templates for an explanation of the various tab formats that appear.

Survey Distribution
2007 GMI, Inc. v 5.0, September 2007 42
5. Select Single URL. The following topics open as you proceed and click Next after each step:
Add Survey Title
Number of Responses
Date Information
Prevent Multiple Submissions
Include / Exclude Partial Completes
InstantResults
Prevent Use of Back Button
Security Settings
Permissions
Final Survey Preview
Distribution Done.
See also:
Distribution Settings.
Add Distribution Title and Name Your distribution is assigned a default name based on the name of your survey, but this name can be changed. Each survey can have multiple distributions, so use a descriptive name to help distinguish between different distributions.
Your distribution is assigned a default name based on the name of your survey, but this name can be changed. Each survey can have multiple distributions, so use a descriptive name to help distinguish between different distributions.
Survey Distribution
2007 GMI, Inc. v 5.0, September 2007 43
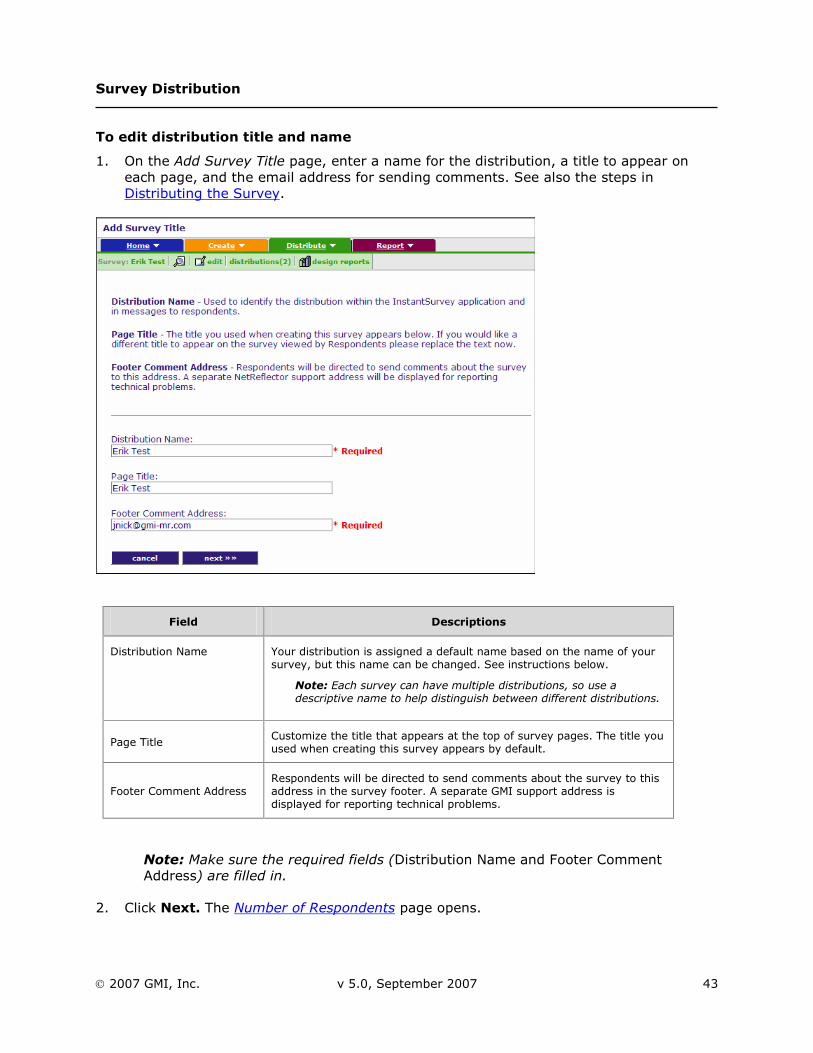
To edit distribution title and name
1. On the Add Survey Title page, enter a name for the distribution, a title to appear on each page, and the email address for sending comments. See also the steps in Distributing the Survey.
Field Descriptions
Distribution Name Your distribution is assigned a default name based on the name of your survey, but this name can be changed. See instructions below.
Note: Each survey can have multiple distributions, so use a descriptive name to help distinguish between different distributions.
Page Title Customize the title that appears at the top of survey pages. The title you used when creating this survey appears by default.
Footer Comment Address Respondents will be directed to send comments about the survey to this address in the survey footer. A separate GMI support address is displayed for reporting technical problems.
Note: Make sure the required fields (Distribution Name and Footer Comment Address) are filled in.
2. Click Next. The Number of Respondents page opens.
Survey Distribution
2007 GMI, Inc. v 5.0, September 2007 44
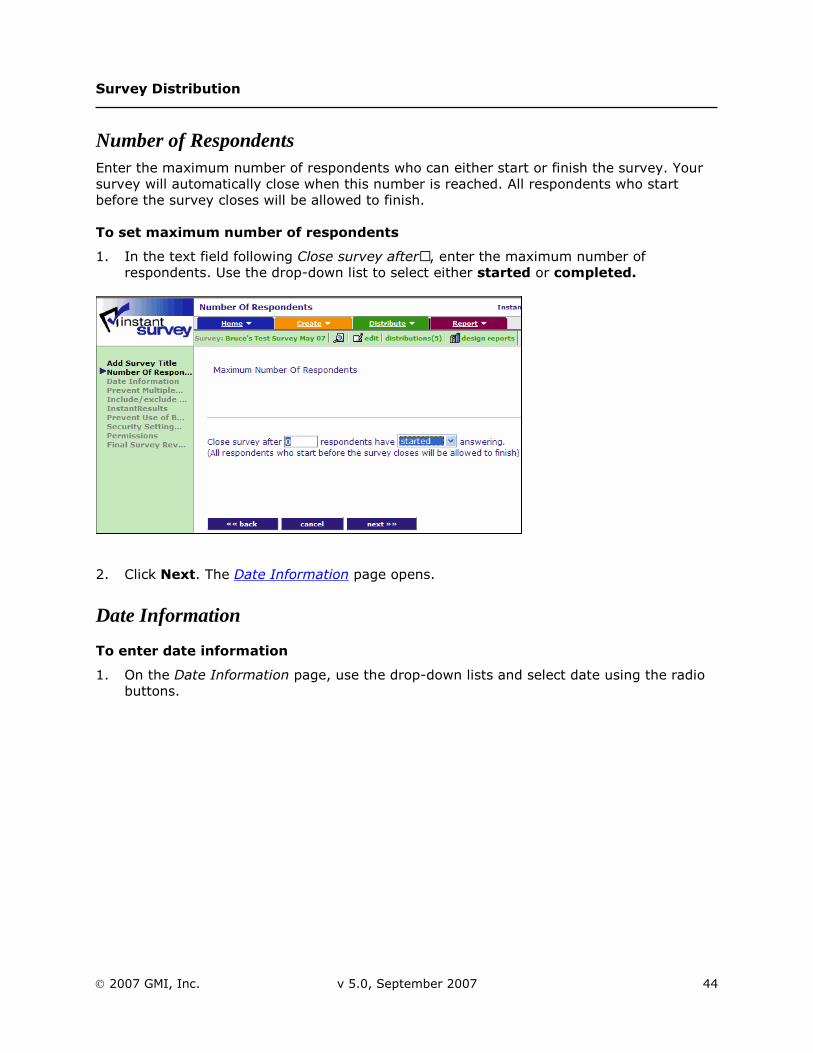
Number of Respondents Enter the maximum number of respondents who can either start or finish the survey. Your survey will automatically close when this number is reached. All respondents who start before the survey closes will be allowed to finish.
To set maximum number of respondents
1. In the text field following Close survey after…, enter the maximum number of respondents. Use the drop-down list to select either started or completed.
2. Click Next. The Date Information page opens.
Date Information
To enter date information
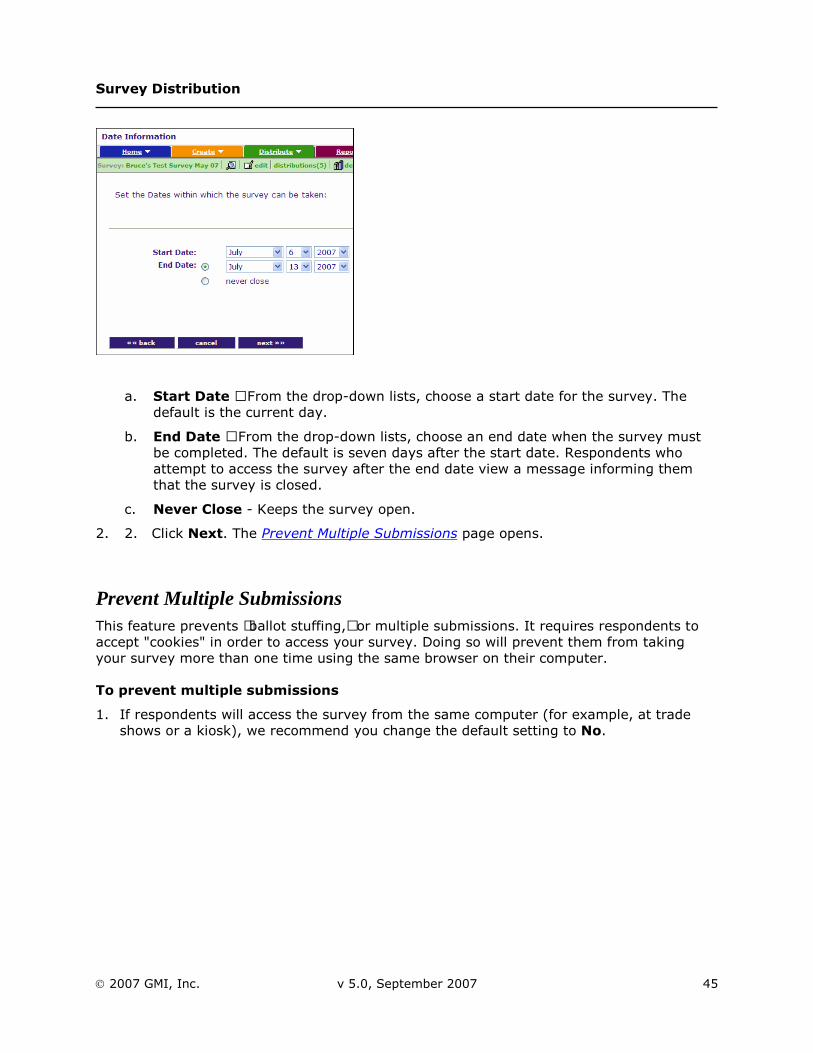
1. On the Date Information page, use the drop-down lists and select date using the radio buttons.
Survey Distribution
2007 GMI, Inc. v 5.0, September 2007 45
a. Start Date – From the drop-down lists, choose a start date for the survey. The default is the current day.
b. End Date – From the drop-down lists, choose an end date when the survey must be completed. The default is seven days after the start date. Respondents who attempt to access the survey after the end date view a message informing them that the survey is closed.
c. Never Close - Keeps the survey open.
2. 2. Click Next. The Prevent Multiple Submissions page opens.
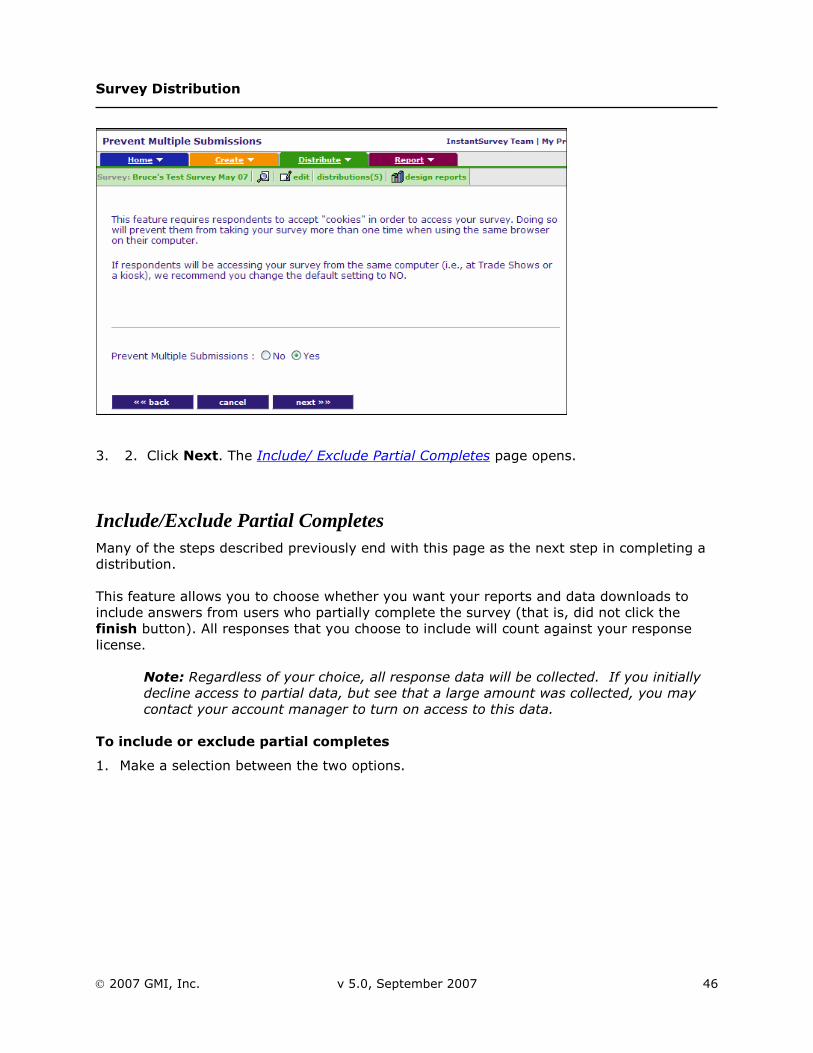
Prevent Multiple Submissions This feature prevents “ballot stuffing,” or multiple submissions. It requires respondents to accept "cookies" in order to access your survey. Doing so will prevent them from taking your survey more than one time using the same browser on their computer.
To prevent multiple submissions
1. If respondents will access the survey from the same computer (for example, at trade shows or a kiosk), we recommend you change the default setting to No.
Survey Distribution
2007 GMI, Inc. v 5.0, September 2007 46
3. 2. Click Next. The Include/ Exclude Partial Completes page opens.
Include/Exclude Partial Completes Many of the steps described previously end with this page as the next step in completing a distribution.
This feature allows you to choose whether you want your reports and data downloads to include answers from users who partially complete the survey (that is, did not click the finish button). All responses that you choose to include will count against your response license.
Note: Regardless of your choice, all response data will be collected. If you initially decline access to partial data, but see that a large amount was collected, you may contact your account manager to turn on access to this data.
To include or exclude partial completes
1. Make a selection between the two options.

Survey Distribution
2007 GMI, Inc. v 5.0, September 2007 47
4. 2. Click Next. The InstantResults page opens.
InstantResults InstantResults is a feature that allows all your respondents to view "real-time" results of your survey after completion so they can compare their answers with those of other respondents.
If you choose to display InstantResults, you must choose a report format. You can use any of the standard summary report formats, as well as any custom report formats defined for the survey.
For InstantResults, choose a report format that does not show all text box responses if the survey requests any personal information from respondents.
Note: InstantResults is currently available for surveys with up to 500 respondents.
Use this feature to so that respondents can see how their answers compared to others taking the survey.
To show answers comparison to respondents
1. Use the radio buttons to make a selection.

Survey Distribution
2007 GMI, Inc. v 5.0, September 2007 48
o Yes: Allows your respondents to view InstantResults. If you select this option, choose between standard or custom report. Depending on your choice, a drop-down list appears with options for either standard or custom reports. Click the
preview icon ( ) to preview the report. Select Include N/A to include these responses in the report.
o No: Does not allow respondents to see survey results.
2. Click Next to go to the Prevent Use of Back Button page.
Or
Click Finish to go to the Final Survey Review page.
Survey Distribution
2007 GMI, Inc. v 5.0, September 2007 49
Prevent Use of Back Button This feature prevents respondents from going back to previous pages to change their responses once they have moved to the next page.
To prevent the use of Back button
1. Select Yes if you want to use this feature.
2. Click Next to go to the Security Settings page.
Or
Click Finish to go to the Final Survey Review page.
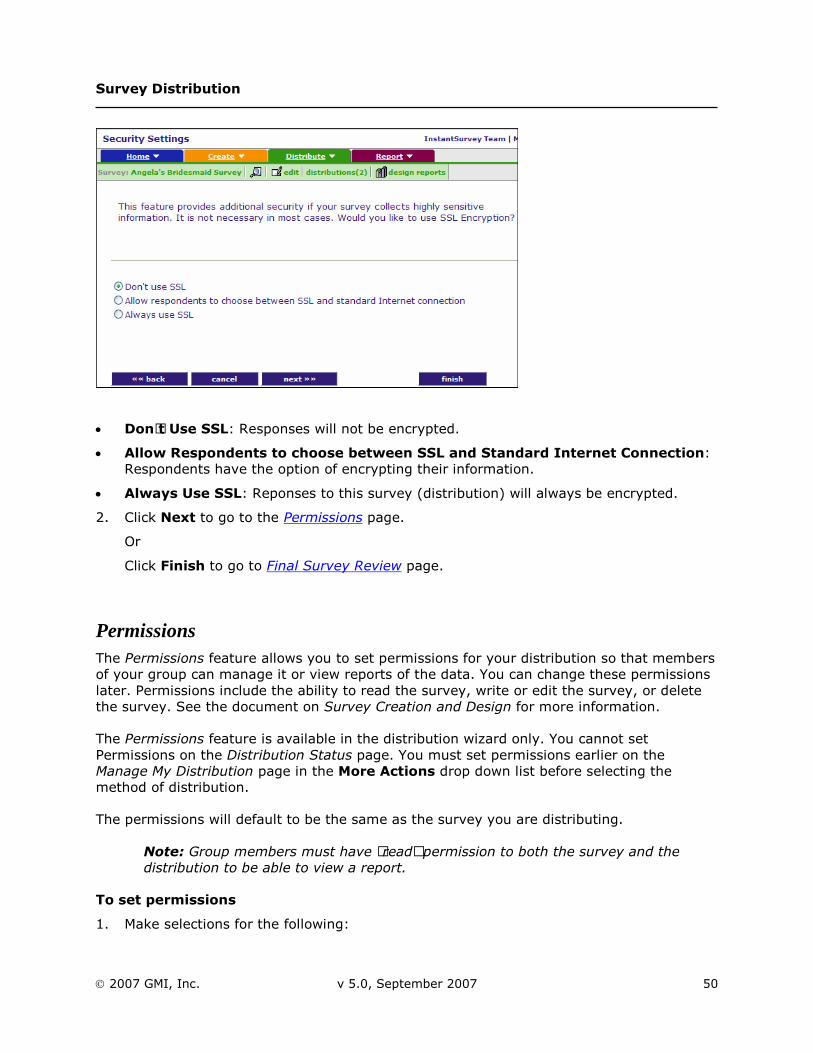
Security Settings InstantSurvey distributes surveys so respondents can access them via a standard Internet connection. If you prefer, the survey can be distributed by allowing your respondents to choose between SSL and standard Internet connection or to always use SSL. SSL is recommended only for cases where you are collecting sensitive information.
To set the security settings
1. Use the radio button to make a selection:
Survey Distribution
2007 GMI, Inc. v 5.0, September 2007 50
Don’t Use SSL: Responses will not be encrypted.
Allow Respondents to choose between SSL and Standard Internet Connection: Respondents have the option of encrypting their information.
Always Use SSL: Reponses to this survey (distribution) will always be encrypted.
2. Click Next to go to the Permissions page.
Or
Click Finish to go to Final Survey Review page.
Permissions The Permissions feature allows you to set permissions for your distribution so that members of your group can manage it or view reports of the data. You can change these permissions later. Permissions include the ability to read the survey, write or edit the survey, or delete the survey. See the document on Survey Creation and Design for more information.
The Permissions feature is available in the distribution wizard only. You cannot set Permissions on the Distribution Status page. You must set permissions earlier on the Manage My Distribution page in the More Actions drop down list before selecting the method of distribution.
The permissions will default to be the same as the survey you are distributing.
Note: Group members must have “read” permission to both the survey and the distribution to be able to view a report.
To set permissions
1. Make selections for the following:

Survey Distribution
2007 GMI, Inc. v 5.0, September 2007 51
Owner: Author of the survey. Has default permission to read the survey; can also write and delete.
Group: All groups that you are a part of and among whom you can therefore share the survey. Has option to read, write, or delete.
2. Click Finish. The Final Survey Preview page opens.
See also:
Group Collaboration in the “Overview” document.
Final Survey Preview Before you submit your survey for distribution, you have the opportunity to preview your survey one last time and review the survey distribution settings.
Note: Use the InstantSurvey back button to edit any of the distribution information or click on the title of a step in the left margin. Do not use the browser Back button.
Survey Distribution
2007 GMI, Inc. v 5.0, September 2007 52
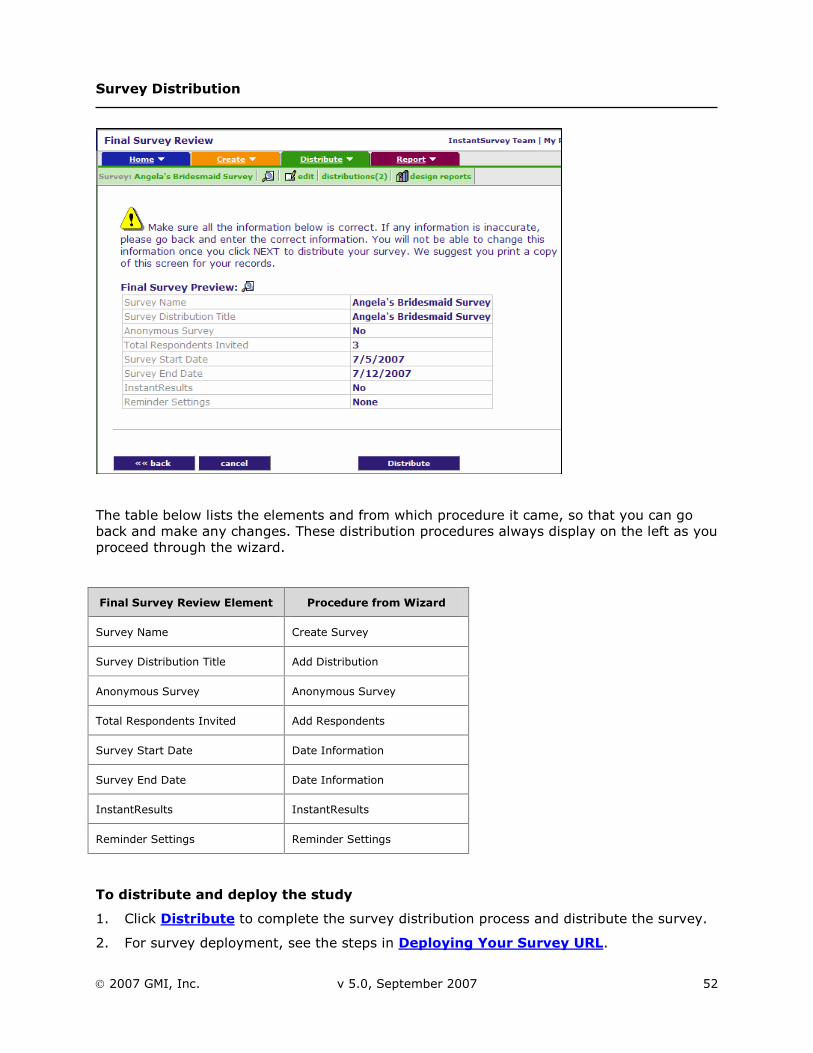
The table below lists the elements and from which procedure it came, so that you can go back and make any changes. These distribution procedures always display on the left as you proceed through the wizard.
Final Survey Review Element Procedure from Wizard
Survey Name Create Survey
Survey Distribution Title Add Distribution
Anonymous Survey Anonymous Survey
Total Respondents Invited Add Respondents
Survey Start Date Date Information
Survey End Date Date Information
InstantResults InstantResults
Reminder Settings Reminder Settings
To distribute and deploy the study
1. Click Distribute to complete the survey distribution process and distribute the survey.
2. For survey deployment, see the steps in Deploying Your Survey URL.
Survey Distribution
2007 GMI, Inc. v 5.0, September 2007 53
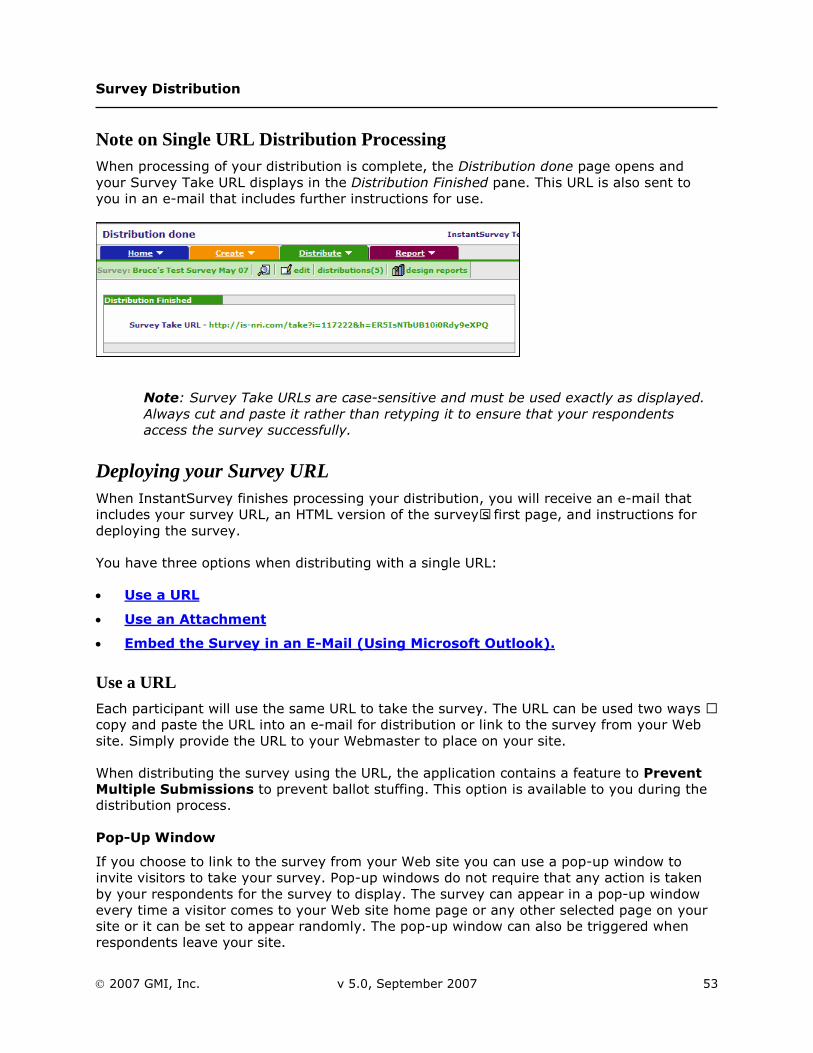
Note on Single URL Distribution Processing When processing of your distribution is complete, the Distribution done page opens and your Survey Take URL displays in the Distribution Finished pane. This URL is also sent to you in an e-mail that includes further instructions for use.
Note: Survey Take URLs are case-sensitive and must be used exactly as displayed. Always cut and paste it rather than retyping it to ensure that your respondents access the survey successfully.
Deploying your Survey URL When InstantSurvey finishes processing your distribution, you will receive an e-mail that includes your survey URL, an HTML version of the survey’s first page, and instructions for deploying the survey.
You have three options when distributing with a single URL:
Use a URL
Use an Attachment
Embed the Survey in an E-Mail (Using Microsoft Outlook).
Use a URL
Each participant will use the same URL to take the survey. The URL can be used two ways – copy and paste the URL into an e-mail for distribution or link to the survey from your Web site. Simply provide the URL to your Webmaster to place on your site.
When distributing the survey using the URL, the application contains a feature to Prevent Multiple Submissions to prevent ballot stuffing. This option is available to you during the distribution process.
Pop-Up Window
If you choose to link to the survey from your Web site you can use a pop-up window to invite visitors to take your survey. Pop-up windows do not require that any action is taken by your respondents for the survey to display. The survey can appear in a pop-up window every time a visitor comes to your Web site home page or any other selected page on your site or it can be set to appear randomly. The pop-up window can also be triggered when respondents leave your site.

Survey Distribution
2007 GMI, Inc. v 5.0, September 2007 54
GMI’s professional services group can provide you with a code that your Webmaster can place on your Web site to display your survey in a pop-up window. Your Webmaster can then place the code on the Web site pages you want to trigger the survey.
Note: If the first page of your survey contains any required responses or any randomization, you will not be able to use this feature.

Survey Distribution
2007 GMI, Inc. v 5.0, September 2007 55
Distribution Templates InstantSurvey supports reusing existing distribution settings, thus saving time and effort. The Distribution Methods page allows you to reuse existing distribution settings by presenting the following options:
Use Existing Settings from a Previous Distribution
InstantSurvey allows you to reuse distribution settings from an existing list of distributions.
Use a Distribution Template
InstantSurvey allows you to choose a template from a list of surveys that you have completed and to copy this to your templates.
Distribution templates save time by allowing you to easily reuse settings from previous distribution. Templates enable you to save and share frequently-used distribution settings, including respondent lists and invitations.
This section includes:
Create a Distribution Template
Edit a Distribution Template
Use a Distribution Template
Share a Distribution Template
Delete a Distribution Template.
Create a Distribution Template Distribution templates can be created by opening and editing an existing distribution and clicking copy to templates. This creates a new template with the same name as the original distribution. You can then edit, rename and share this template.
To create a distribution template
1. Expand the Distribute tab.
2. Select Manage My Distributions. The Manage My Distributions page opens. Lists of distributed and active surveys display.
Survey Distribution
2007 GMI, Inc. v 5.0, September 2007 56
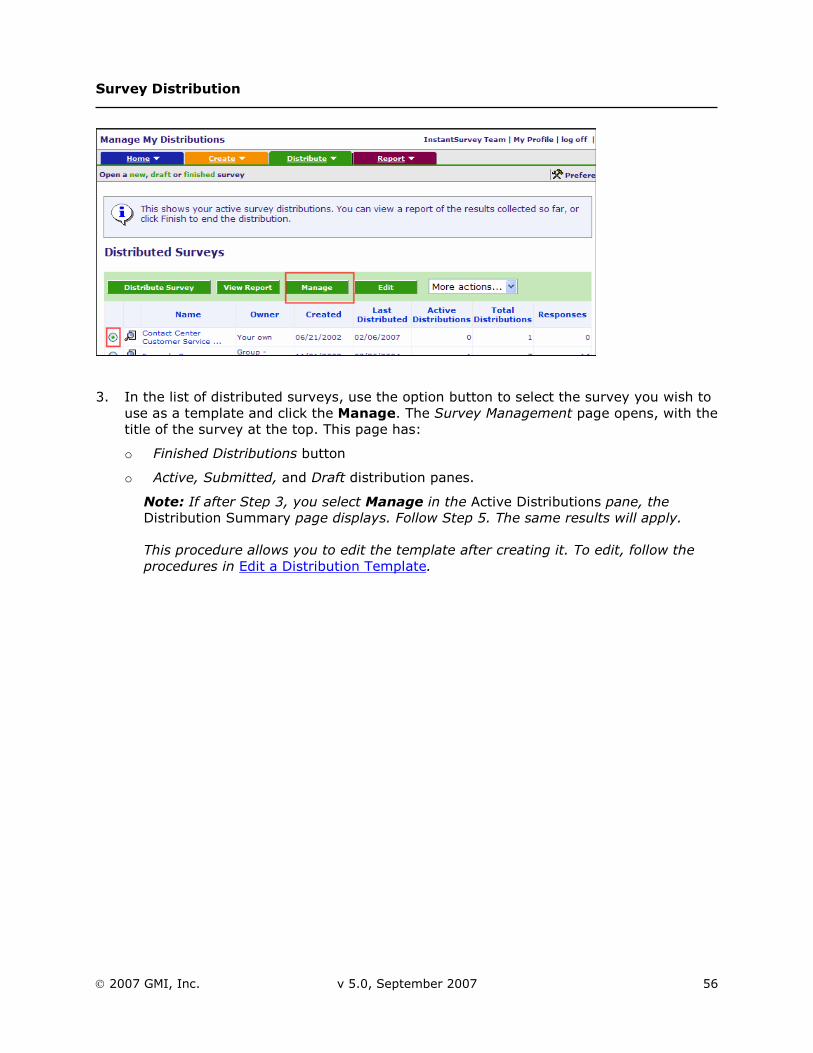
3. In the list of distributed surveys, use the option button to select the survey you wish to use as a template and click the Manage. The Survey Management page opens, with the title of the survey at the top. This page has:
o Finished Distributions button
o Active, Submitted, and Draft distribution panes.
Note: If after Step 3, you select Manage in the Active Distributions pane, the Distribution Summary page displays. Follow Step 5. The same results will apply.
This procedure allows you to edit the template after creating it. To edit, follow the procedures in Edit a Distribution Template.
Survey Distribution
2007 GMI, Inc. v 5.0, September 2007 57
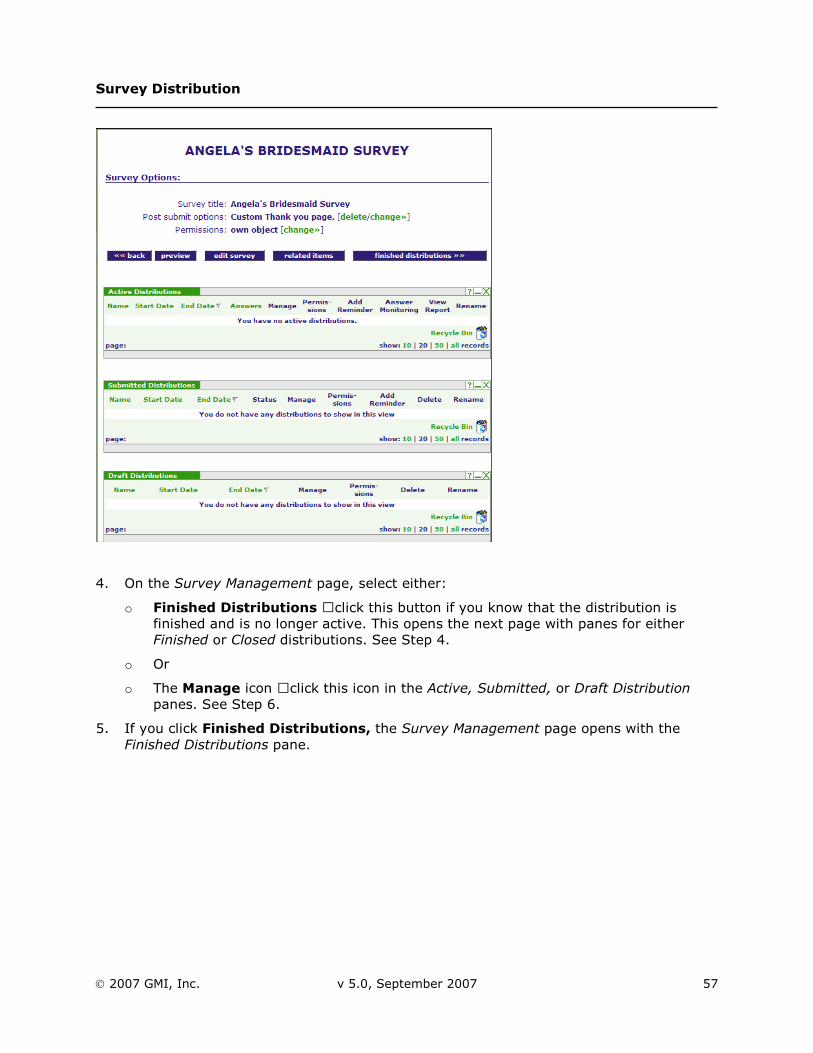
4. On the Survey Management page, select either:
o Finished Distributions – click this button if you know that the distribution is finished and is no longer active. This opens the next page with panes for either Finished or Closed distributions. See Step 4.
o Or
o The Manage icon – click this icon in the Active, Submitted, or Draft Distribution panes. See Step 6.
5. If you click Finished Distributions, the Survey Management page opens with the Finished Distributions pane.
Survey Distribution
2007 GMI, Inc. v 5.0, September 2007 58
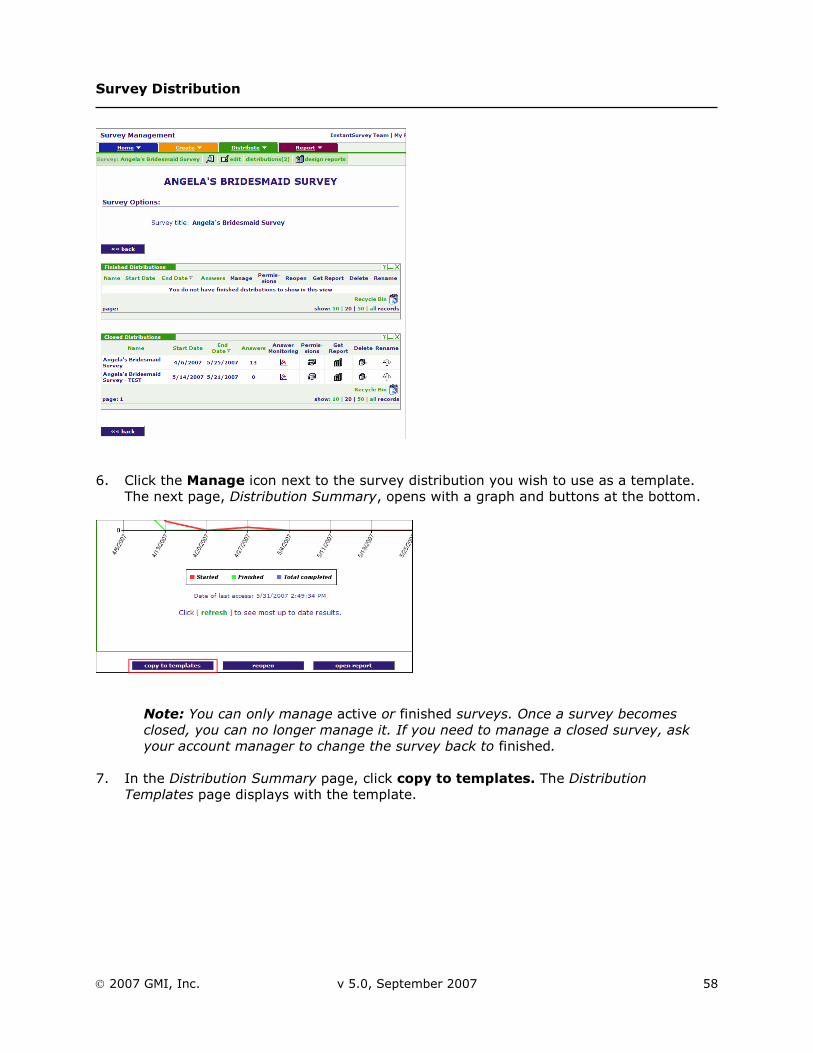
6. Click the Manage icon next to the survey distribution you wish to use as a template. The next page, Distribution Summary, opens with a graph and buttons at the bottom.
Note: You can only manage active or finished surveys. Once a survey becomes closed, you can no longer manage it. If you need to manage a closed survey, ask your account manager to change the survey back to finished.
7. In the Distribution Summary page, click copy to templates. The Distribution Templates page displays with the template.
Survey Distribution
2007 GMI, Inc. v 5.0, September 2007 59
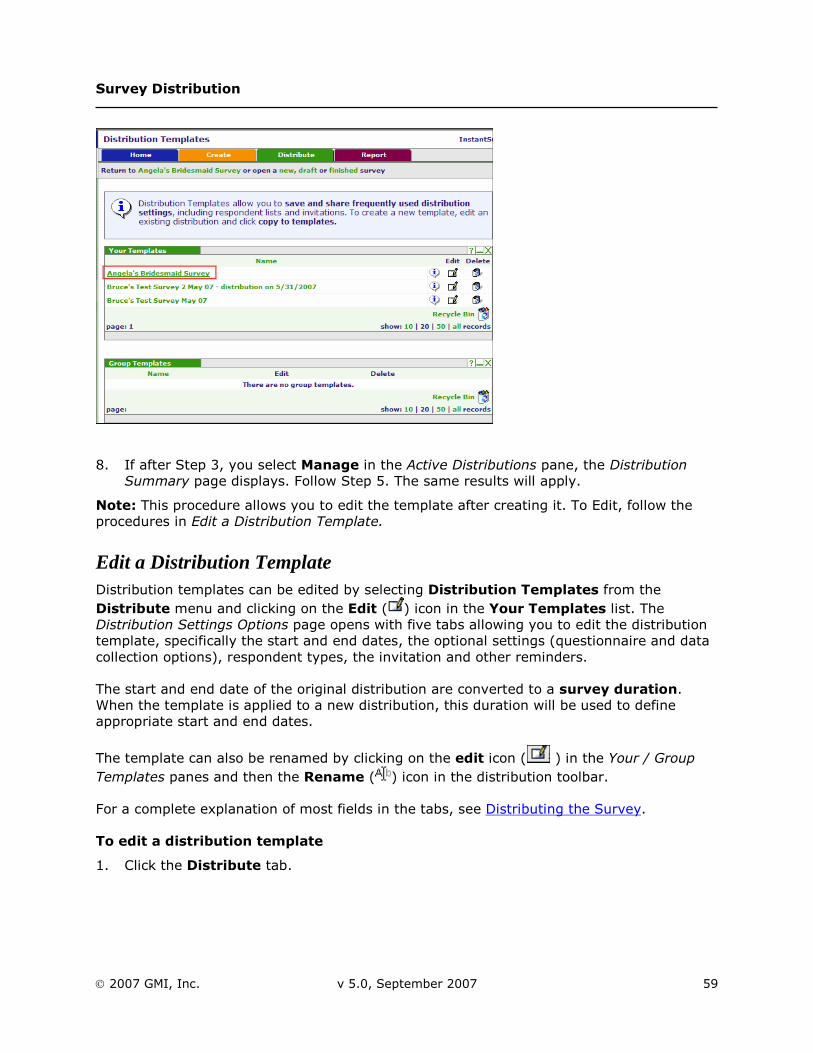
8. If after Step 3, you select Manage in the Active Distributions pane, the Distribution Summary page displays. Follow Step 5. The same results will apply.
Note: This procedure allows you to edit the template after creating it. To Edit, follow the procedures in Edit a Distribution Template.
Edit a Distribution Template Distribution templates can be edited by selecting Distribution Templates from the Distribute menu and clicking on the Edit ( ) icon in the Your Templates list. The Distribution Settings Options page opens with five tabs allowing you to edit the distribution template, specifically the start and end dates, the optional settings (questionnaire and data collection options), respondent types, the invitation and other reminders.
The start and end date of the original distribution are converted to a survey duration. When the template is applied to a new distribution, this duration will be used to define appropriate start and end dates.
The template can also be renamed by clicking on the edit icon ( ) in the Your / Group Templates panes and then the Rename ( ) icon in the distribution toolbar.
For a complete explanation of most fields in the tabs, see Distributing the Survey.
To edit a distribution template
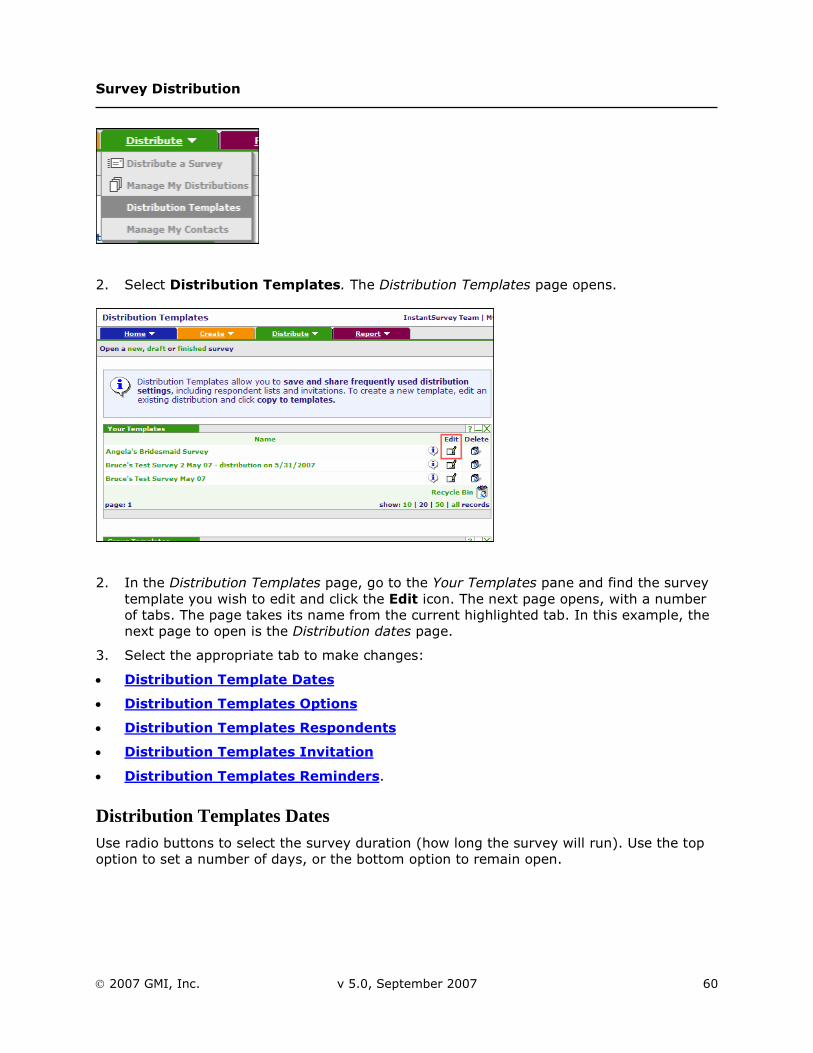
1. Click the Distribute tab.
Survey Distribution
2007 GMI, Inc. v 5.0, September 2007 60
2. Select Distribution Templates. The Distribution Templates page opens.
2. In the Distribution Templates page, go to the Your Templates pane and find the survey template you wish to edit and click the Edit icon. The next page opens, with a number of tabs. The page takes its name from the current highlighted tab. In this example, the next page to open is the Distribution dates page.
3. Select the appropriate tab to make changes:
Distribution Template Dates
Distribution Templates Options
Distribution Templates Respondents
Distribution Templates Invitation
Distribution Templates Reminders.
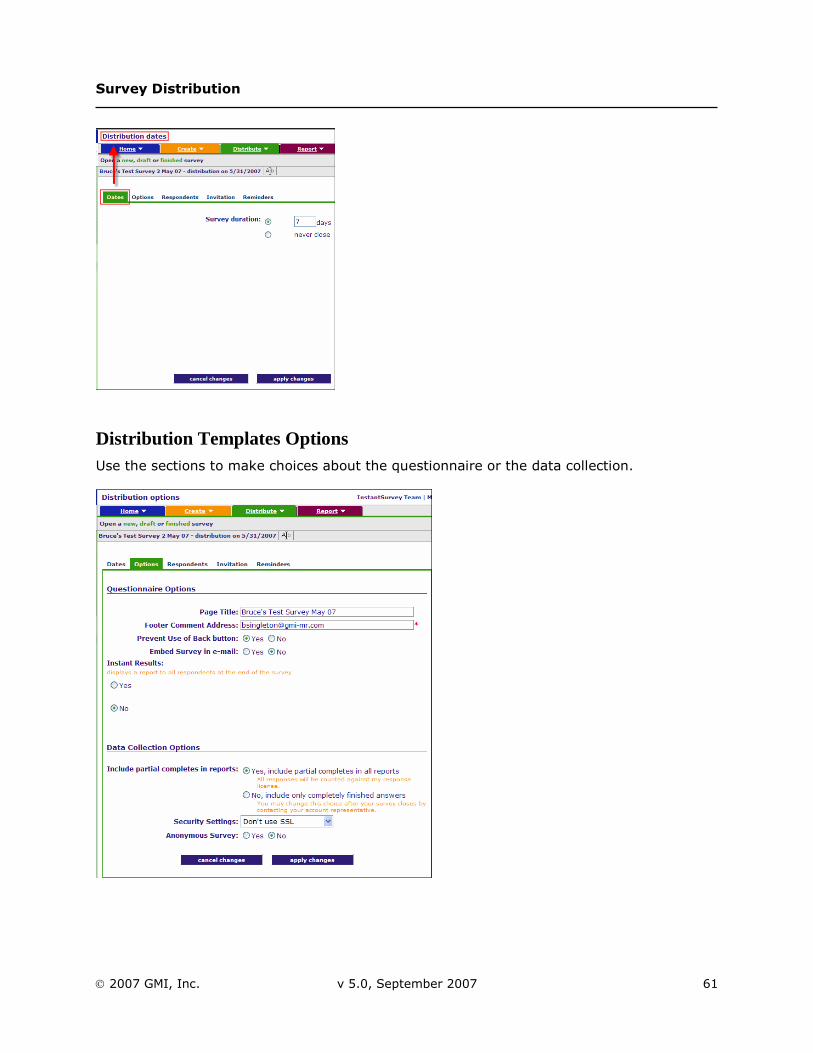
Distribution Templates Dates Use radio buttons to select the survey duration (how long the survey will run). Use the top option to set a number of days, or the bottom option to remain open.
Survey Distribution
2007 GMI, Inc. v 5.0, September 2007 61
Distribution Templates Options Use the sections to make choices about the questionnaire or the data collection.
Survey Distribution
2007 GMI, Inc. v 5.0, September 2007 62
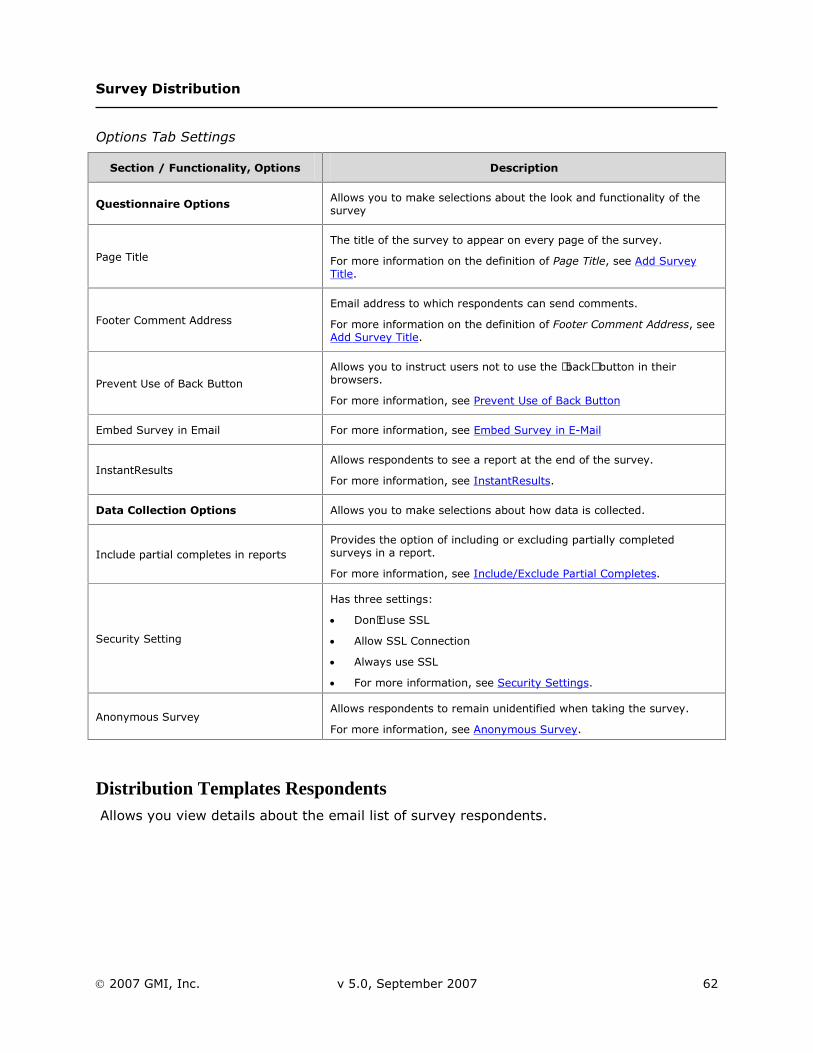
Options Tab Settings
Section / Functionality, Options Description
Questionnaire Options Allows you to make selections about the look and functionality of the survey
Page Title
The title of the survey to appear on every page of the survey.
For more information on the definition of Page Title, see Add Survey Title.
Footer Comment Address
Email address to which respondents can send comments.
For more information on the definition of Footer Comment Address, see Add Survey Title.
Prevent Use of Back Button
Allows you to instruct users not to use the “back” button in their browsers.
For more information, see Prevent Use of Back Button
Embed Survey in Email For more information, see Embed Survey in E-Mail
InstantResults Allows respondents to see a report at the end of the survey.
For more information, see InstantResults.
Data Collection Options Allows you to make selections about how data is collected.
Include partial completes in reports Provides the option of including or excluding partially completed surveys in a report.
For more information, see Include/Exclude Partial Completes.
Security Setting
Has three settings:
Don’t use SSL
Allow SSL Connection
Always use SSL
For more information, see Security Settings.
Anonymous Survey Allows respondents to remain unidentified when taking the survey.
For more information, see Anonymous Survey.
Distribution Templates Respondents Allows you view details about the email list of survey respondents.
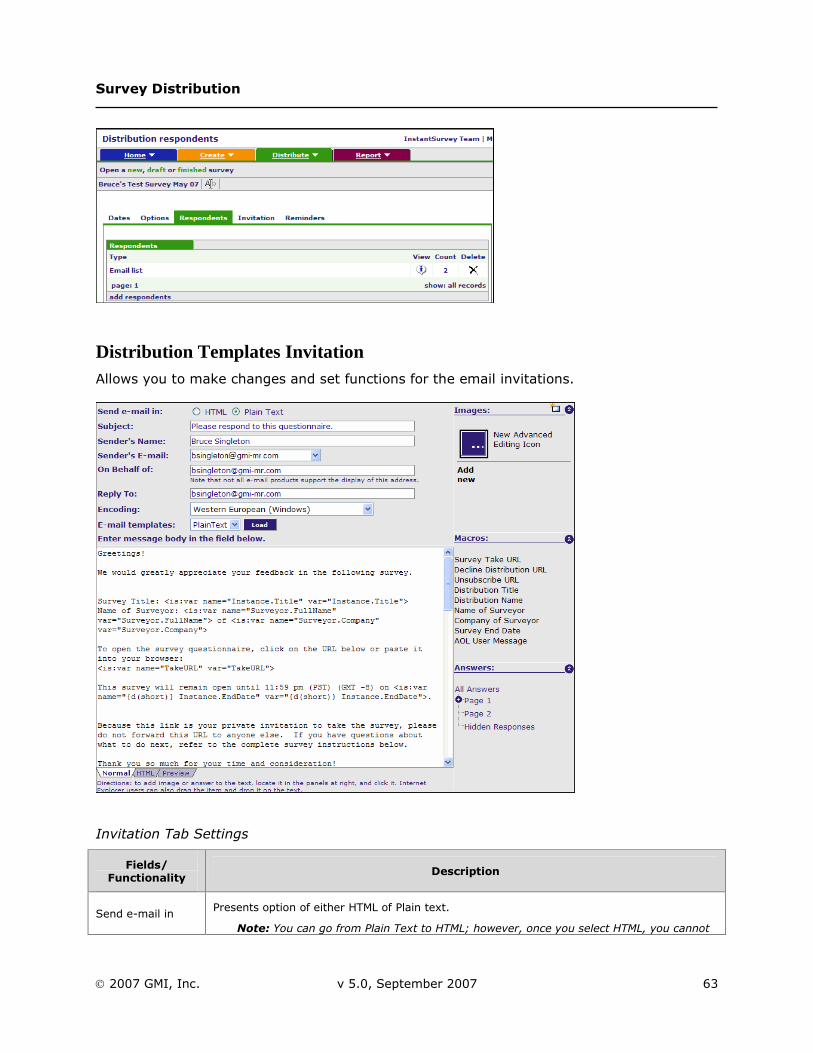
Survey Distribution
2007 GMI, Inc. v 5.0, September 2007 63
Distribution Templates Invitation Allows you to make changes and set functions for the email invitations.
Invitation Tab Settings
Fields/ Functionality
Description
Send e-mail in Presents option of either HTML of Plain text.
Note: You can go from Plain Text to HTML; however, once you select HTML, you cannot
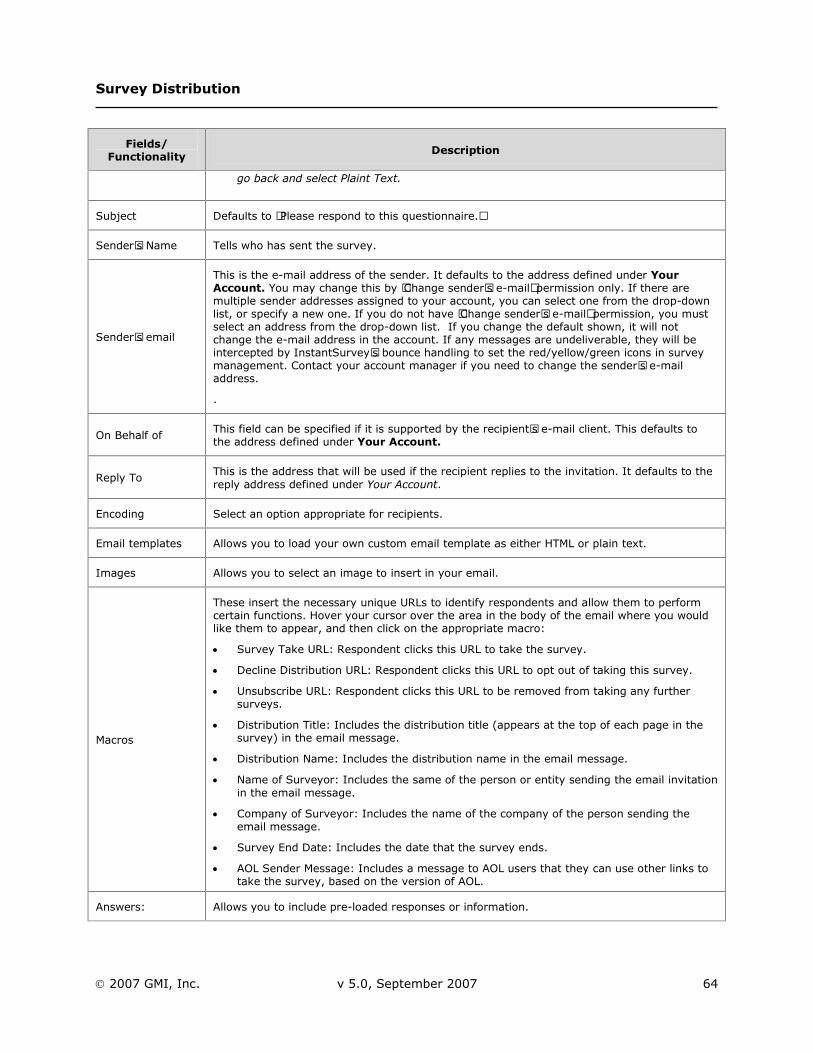
Survey Distribution
2007 GMI, Inc. v 5.0, September 2007 64
Fields/ Functionality
Description
go back and select Plaint Text.
Subject Defaults to “Please respond to this questionnaire.”
Sender’s Name Tells who has sent the survey.
Sender’s email
This is the e-mail address of the sender. It defaults to the address defined under Your Account. You may change this by ‘Change sender’s e-mail’ permission only. If there are multiple sender addresses assigned to your account, you can select one from the drop-down list, or specify a new one. If you do not have ‘Change sender’s e-mail’ permission, you must select an address from the drop-down list. If you change the default shown, it will not change the e-mail address in the account. If any messages are undeliverable, they will be intercepted by InstantSurvey’s bounce handling to set the red/yellow/green icons in survey management. Contact your account manager if you need to change the sender’s e-mail address.
.
On Behalf of This field can be specified if it is supported by the recipient’s e-mail client. This defaults to the address defined under Your Account.
Reply To This is the address that will be used if the recipient replies to the invitation. It defaults to the reply address defined under Your Account.
Encoding Select an option appropriate for recipients.
Email templates Allows you to load your own custom email template as either HTML or plain text.
Images Allows you to select an image to insert in your email.
Macros
These insert the necessary unique URLs to identify respondents and allow them to perform certain functions. Hover your cursor over the area in the body of the email where you would like them to appear, and then click on the appropriate macro:
Survey Take URL: Respondent clicks this URL to take the survey.
Decline Distribution URL: Respondent clicks this URL to opt out of taking this survey.
Unsubscribe URL: Respondent clicks this URL to be removed from taking any further surveys.
Distribution Title: Includes the distribution title (appears at the top of each page in the survey) in the email message.
Distribution Name: Includes the distribution name in the email message.
Name of Surveyor: Includes the same of the person or entity sending the email invitation in the email message.
Company of Surveyor: Includes the name of the company of the person sending the email message.
Survey End Date: Includes the date that the survey ends.
AOL Sender Message: Includes a message to AOL users that they can use other links to take the survey, based on the version of AOL.
Answers: Allows you to include pre-loaded responses or information.
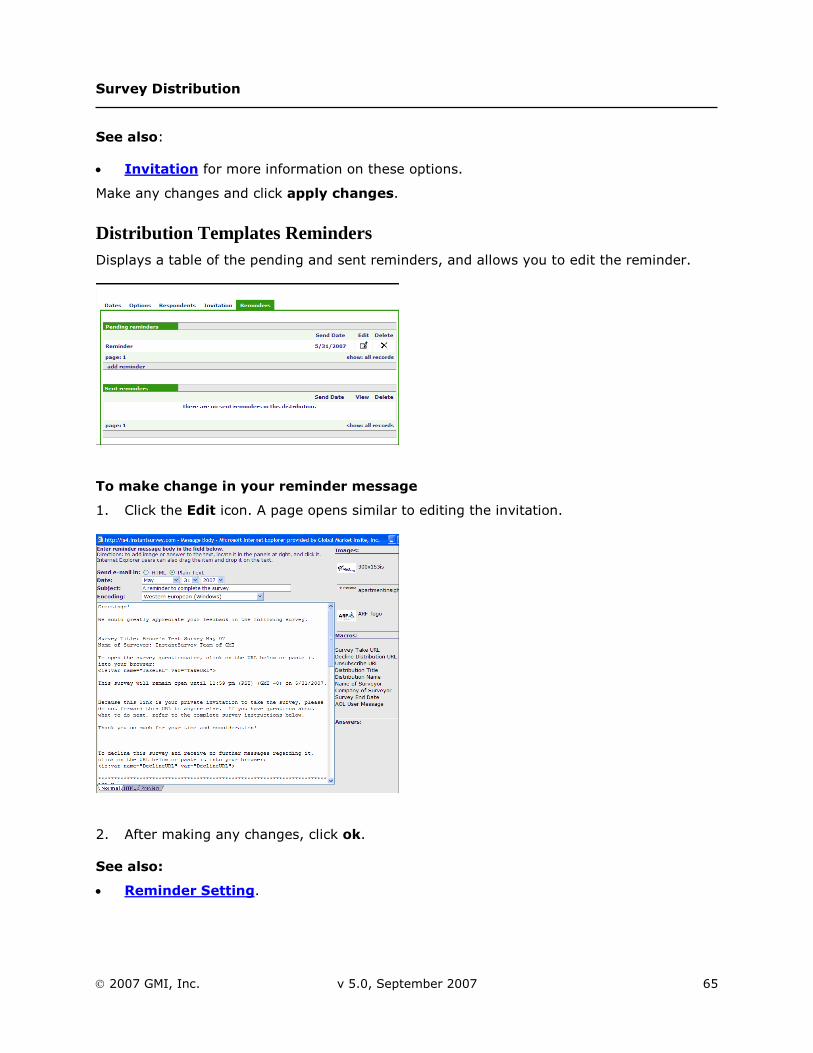
Survey Distribution
2007 GMI, Inc. v 5.0, September 2007 65
See also:
Invitation for more information on these options.
Make any changes and click apply changes.
Distribution Templates Reminders Displays a table of the pending and sent reminders, and allows you to edit the reminder.
To make change in your reminder message
1. Click the Edit icon. A page opens similar to editing the invitation.
2. After making any changes, click ok.
See also:
Reminder Setting.
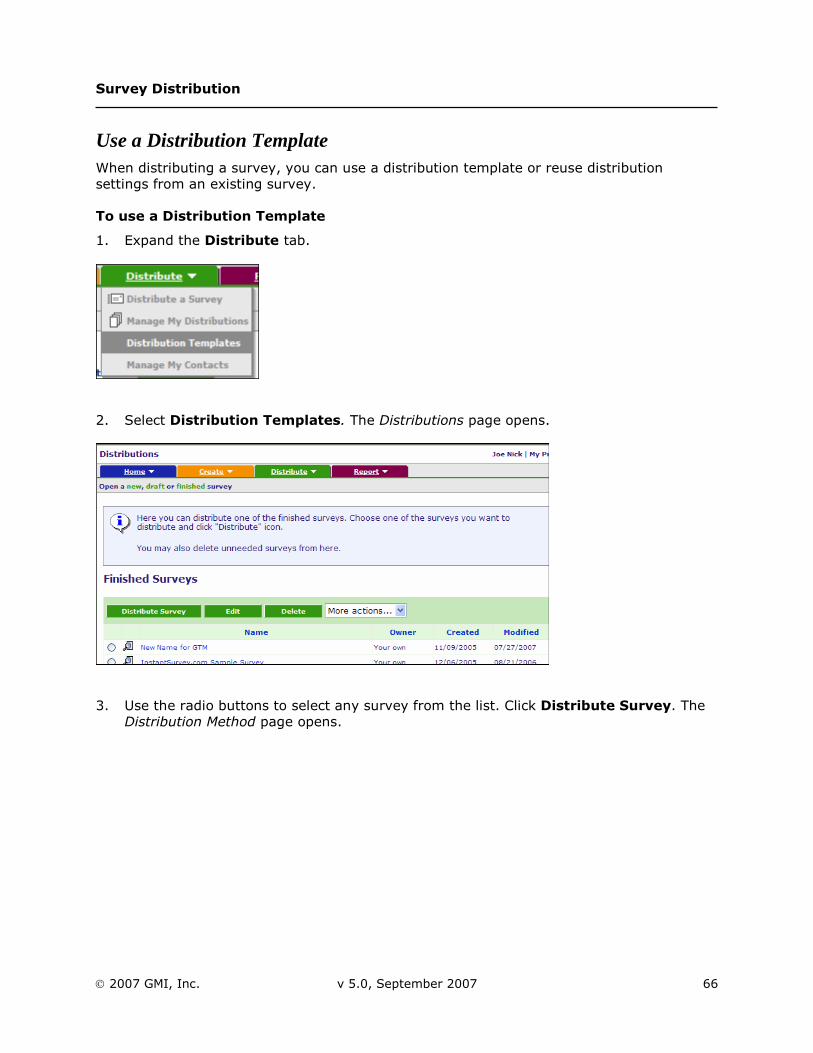
Survey Distribution
2007 GMI, Inc. v 5.0, September 2007 66
Use a Distribution Template When distributing a survey, you can use a distribution template or reuse distribution settings from an existing survey.
To use a Distribution Template
1. Expand the Distribute tab.
2. Select Distribution Templates. The Distributions page opens.
3. Use the radio buttons to select any survey from the list. Click Distribute Survey. The Distribution Method page opens.
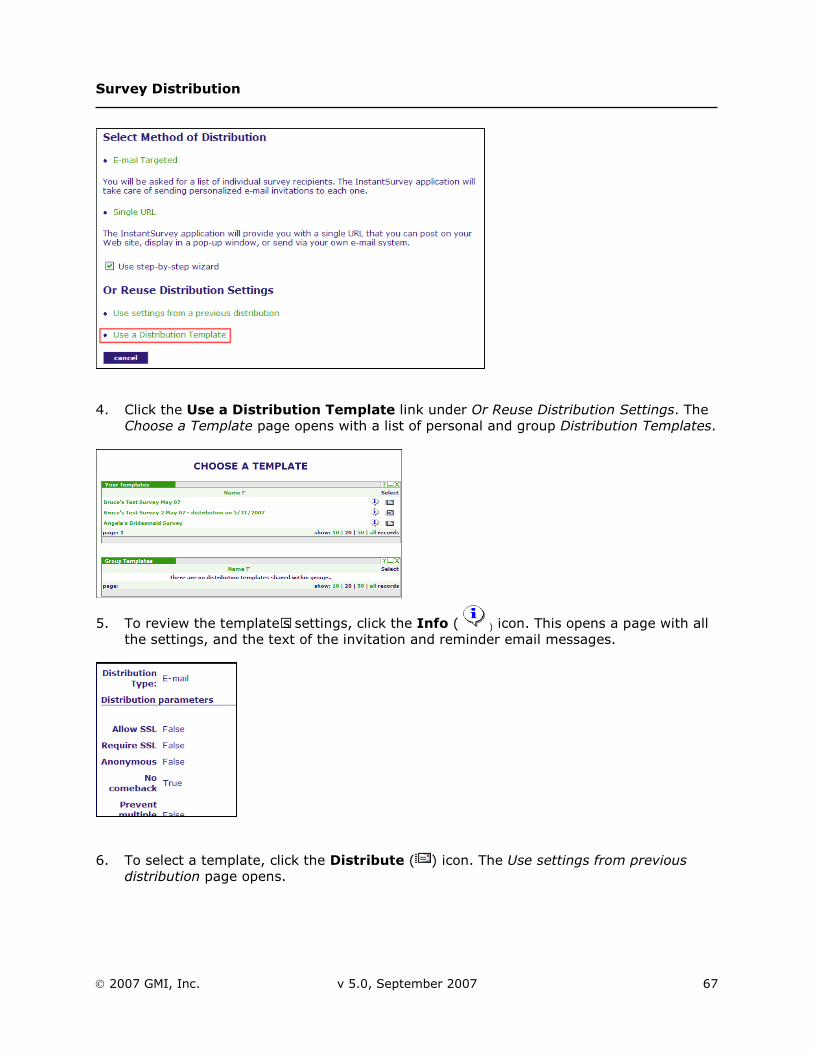
Survey Distribution
2007 GMI, Inc. v 5.0, September 2007 67
4. Click the Use a Distribution Template link under Or Reuse Distribution Settings. The Choose a Template page opens with a list of personal and group Distribution Templates.
5. To review the template’s settings, click the Info ( ) icon. This opens a page with all the settings, and the text of the invitation and reminder email messages.
6. To select a template, click the Distribute ( ) icon. The Use settings from previous distribution page opens.

Survey Distribution
2007 GMI, Inc. v 5.0, September 2007 68
7. Click the checkboxes to select which settings to use from the template and then click next. The Distribution Settings page opens with five tabs enabling the template’s settings to be loaded into a new distribution.
See also:
Distributing the Survey
Edit a Distribution Template.
Share a Distribution Template Distribution templates can be shared with others by editing the template, selecting Manage Permissions, and setting the appropriate permissions. By sharing a survey, you share all distribution templates associated with the survey.
To share a Distribution Template
1. Click the Distribute tab.
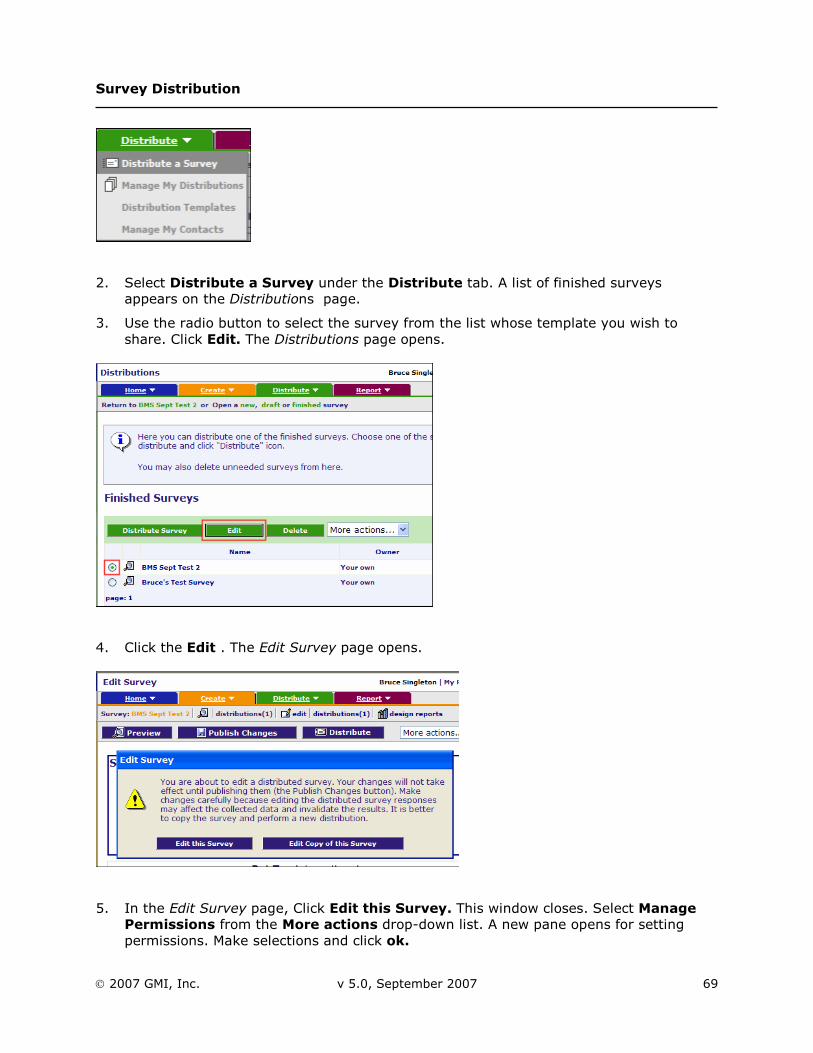
Survey Distribution
2007 GMI, Inc. v 5.0, September 2007 69
2. Select Distribute a Survey under the Distribute tab. A list of finished surveys appears on the Distributions page.
3. Use the radio button to select the survey from the list whose template you wish to share. Click Edit. The Distributions page opens.
4. Click the Edit . The Edit Survey page opens.
5. In the Edit Survey page, Click Edit this Survey. This window closes. Select Manage Permissions from the More actions drop-down list. A new pane opens for setting permissions. Make selections and click ok.

Survey Distribution
2007 GMI, Inc. v 5.0, September 2007 70
You return to the Edit survey page. Click Edit this Survey again.
6. Click the Publish Changes subtab. A pop up window opens asking if you want to refresh the survey cache.
7. Click OK. The Update survey cache opens. Click Close.
See also:
Permissions.
My Groups in the “Overview” document.
Delete a Distribution Template Distribution templates can be moved to the distribution recycle bin by clicking the Move to
Recycle Bin ( ) icon. In the Recycle Bin, the templates can be either permanently destroyed or restored.
To delete a Distribution Template
1. Expand the Distribute tab.,
2. Select Distribution Templates. A list of templates appears.
3. Click the Delete icon next to the survey you need to delete.
Survey Distribution
2007 GMI, Inc. v 5.0, September 2007 71
Survey Management Once your survey is distributed, InstantSurvey provides powerful tools for tracking responses and sending targeted reminders.
InstantSurvey allows you to distribute multiple versions of the same survey. Each version of a survey is called a distribution. Whenever a new distribution of a survey is created, InstantSurvey sends an e-mail to the survey owner notifying them of the change.
To manage a distribution in
Select Manage My Distributions from the Distribute menu. The Manage My Distribution page opens with two sections:
o Distributed Surveys
o My Active Distributions.
Use the option button to select the survey you wish to manage.
This section includes:
Distributed surveys
My active distributions/ Manage distributions
Status
Answering Timeline
Dates
Options
Respondents
Invitation
Reminders
Events
Deployment.
Distributed Surveys
To manage distributed surveys
1. Expand the Distribute tab.
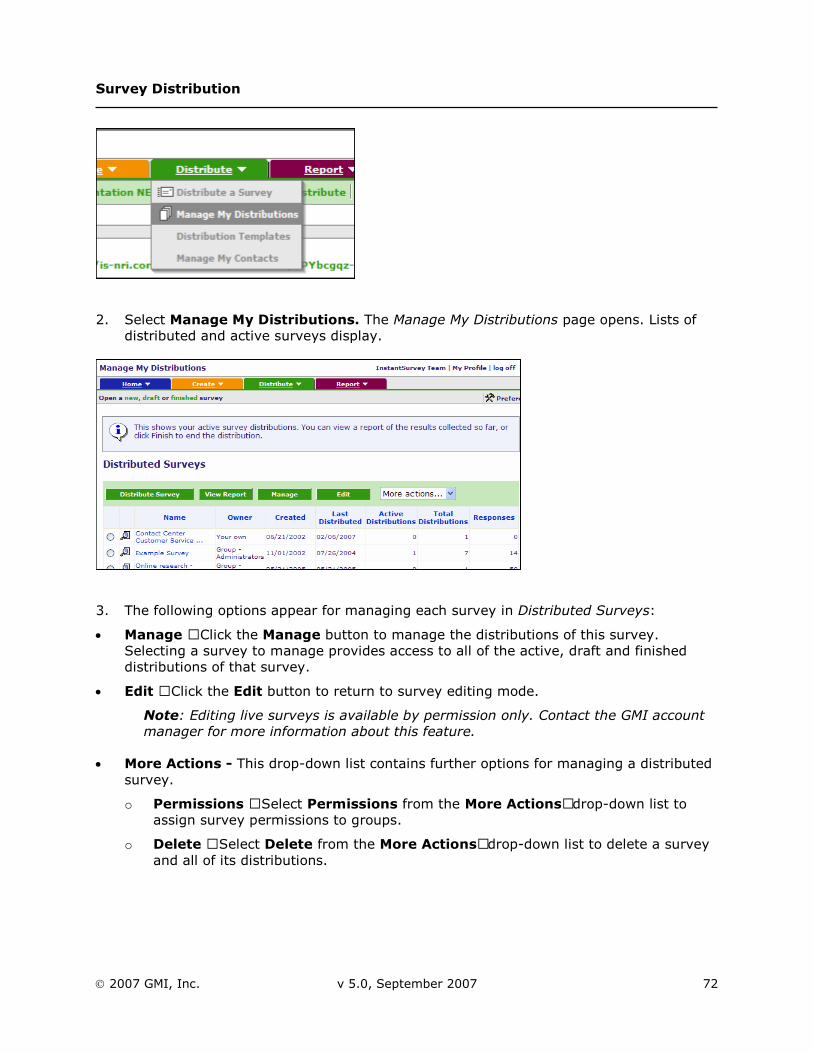
Survey Distribution
2007 GMI, Inc. v 5.0, September 2007 72
2. Select Manage My Distributions. The Manage My Distributions page opens. Lists of distributed and active surveys display.
3. The following options appear for managing each survey in Distributed Surveys:
Manage – Click the Manage button to manage the distributions of this survey. Selecting a survey to manage provides access to all of the active, draft and finished distributions of that survey.
Edit – Click the Edit button to return to survey editing mode.
Note: Editing live surveys is available by permission only. Contact the GMI account manager for more information about this feature.
More Actions - This drop-down list contains further options for managing a distributed survey.
o Permissions – Select Permissions from the More Actions…drop-down list to assign survey permissions to groups.
o Delete – Select Delete from the More Actions…drop-down list to delete a survey and all of its distributions.
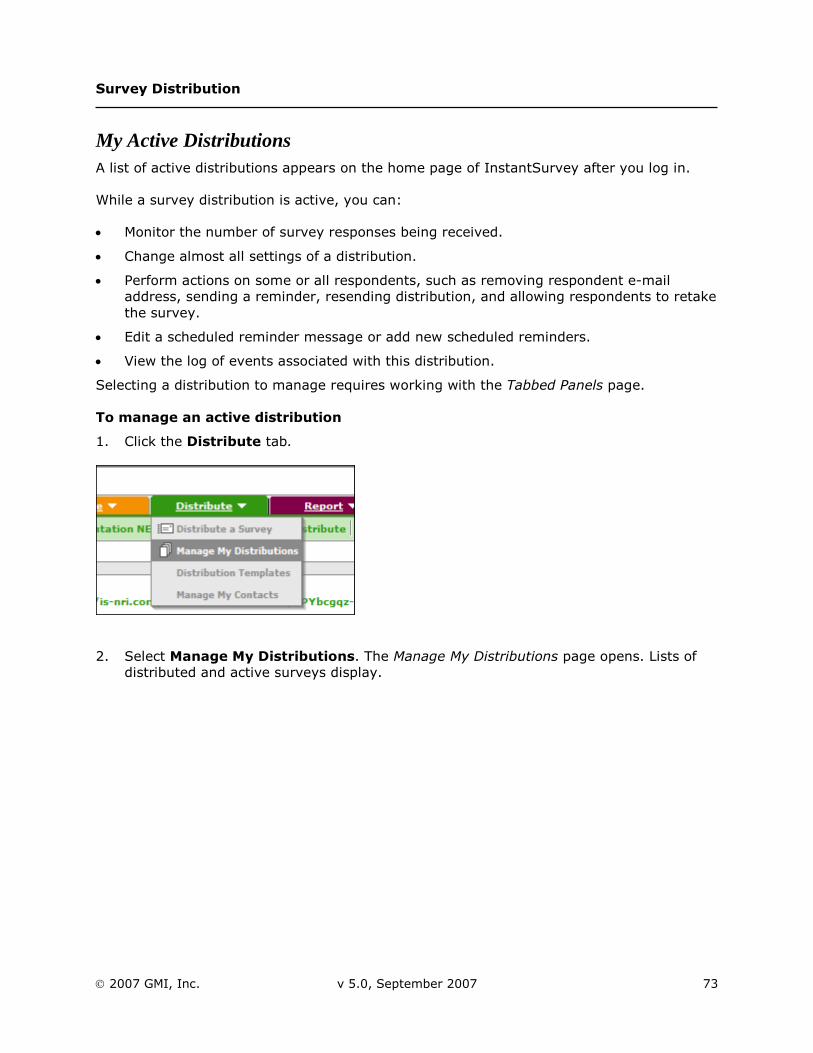
Survey Distribution
2007 GMI, Inc. v 5.0, September 2007 73
My Active Distributions A list of active distributions appears on the home page of InstantSurvey after you log in.
While a survey distribution is active, you can:
Monitor the number of survey responses being received.
Change almost all settings of a distribution.
Perform actions on some or all respondents, such as removing respondent e-mail address, sending a reminder, resending distribution, and allowing respondents to retake the survey.
Edit a scheduled reminder message or add new scheduled reminders.
View the log of events associated with this distribution.
Selecting a distribution to manage requires working with the Tabbed Panels page.
To manage an active distribution
1. Click the Distribute tab.
2. Select Manage My Distributions. The Manage My Distributions page opens. Lists of distributed and active surveys display.
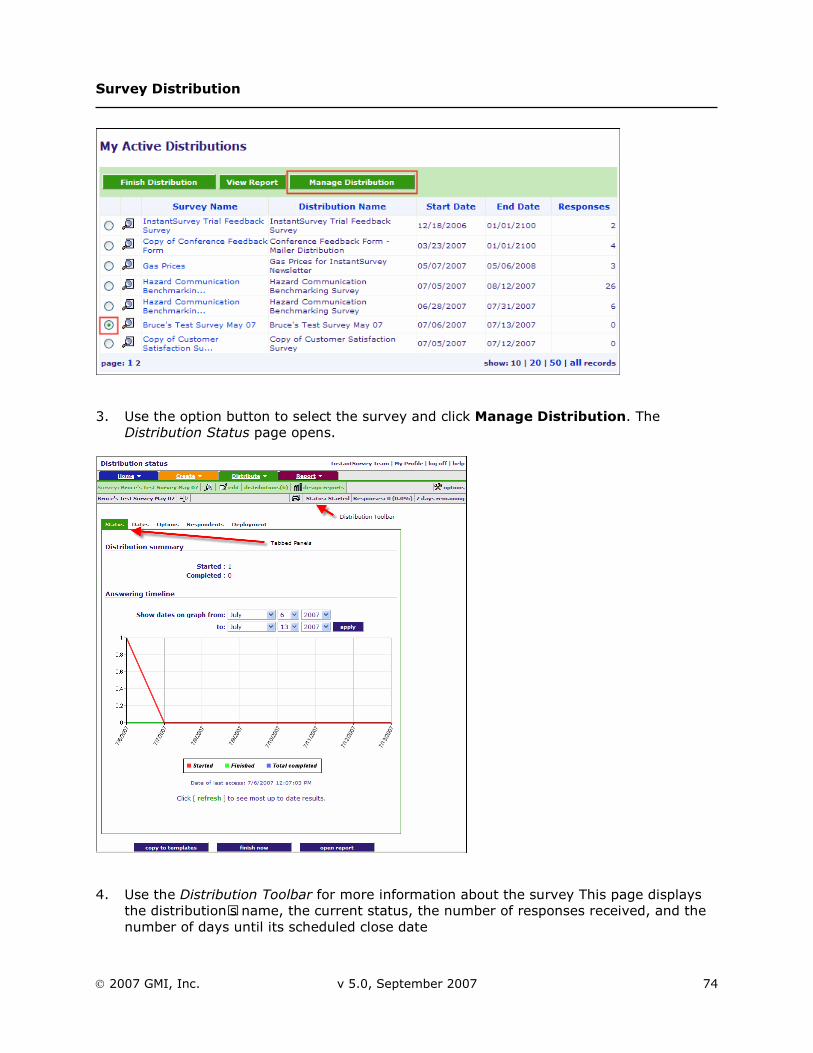
Survey Distribution
2007 GMI, Inc. v 5.0, September 2007 74
3. Use the option button to select the survey and click Manage Distribution. The Distribution Status page opens.
4. Use the Distribution Toolbar for more information about the survey This page displays the distribution’s name, the current status, the number of responses received, and the number of days until its scheduled close date
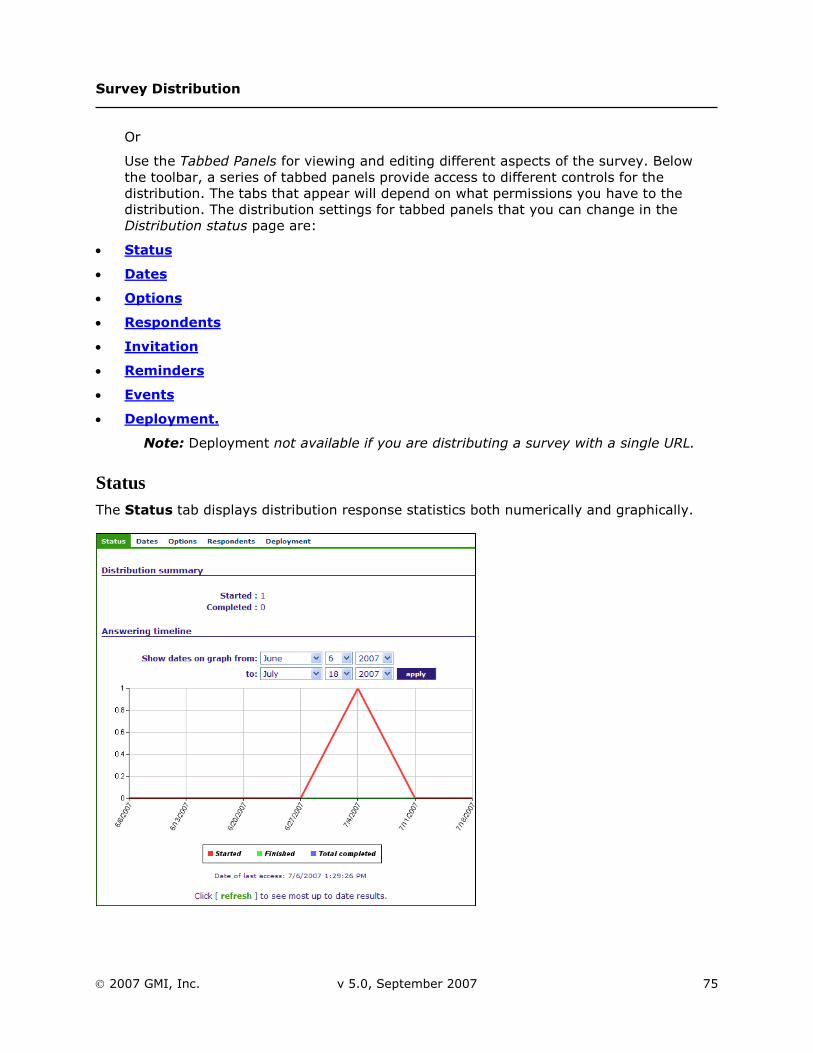
Survey Distribution
2007 GMI, Inc. v 5.0, September 2007 75
Or
Use the Tabbed Panels for viewing and editing different aspects of the survey. Below the toolbar, a series of tabbed panels provide access to different controls for the distribution. The tabs that appear will depend on what permissions you have to the distribution. The distribution settings for tabbed panels that you can change in the Distribution status page are:
Status
Dates
Options
Respondents
Invitation
Reminders
Events
Deployment.
Note: Deployment not available if you are distributing a survey with a single URL.
Status The Status tab displays distribution response statistics both numerically and graphically.
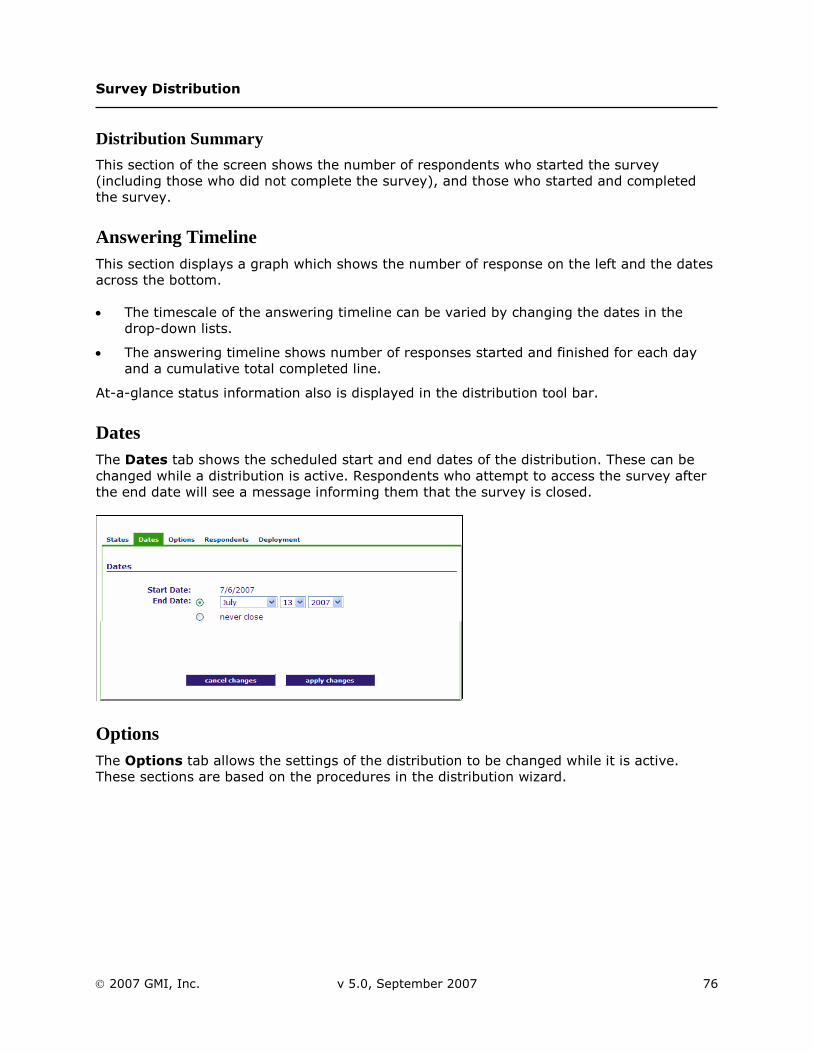
Survey Distribution
2007 GMI, Inc. v 5.0, September 2007 76
Distribution Summary
This section of the screen shows the number of respondents who started the survey (including those who did not complete the survey), and those who started and completed the survey.
Answering Timeline This section displays a graph which shows the number of response on the left and the dates across the bottom.
The timescale of the answering timeline can be varied by changing the dates in the drop-down lists.
The answering timeline shows number of responses started and finished for each day and a cumulative total completed line.
At-a-glance status information also is displayed in the distribution tool bar.
Dates The Dates tab shows the scheduled start and end dates of the distribution. These can be changed while a distribution is active. Respondents who attempt to access the survey after the end date will see a message informing them that the survey is closed.
Options The Options tab allows the settings of the distribution to be changed while it is active. These sections are based on the procedures in the distribution wizard.
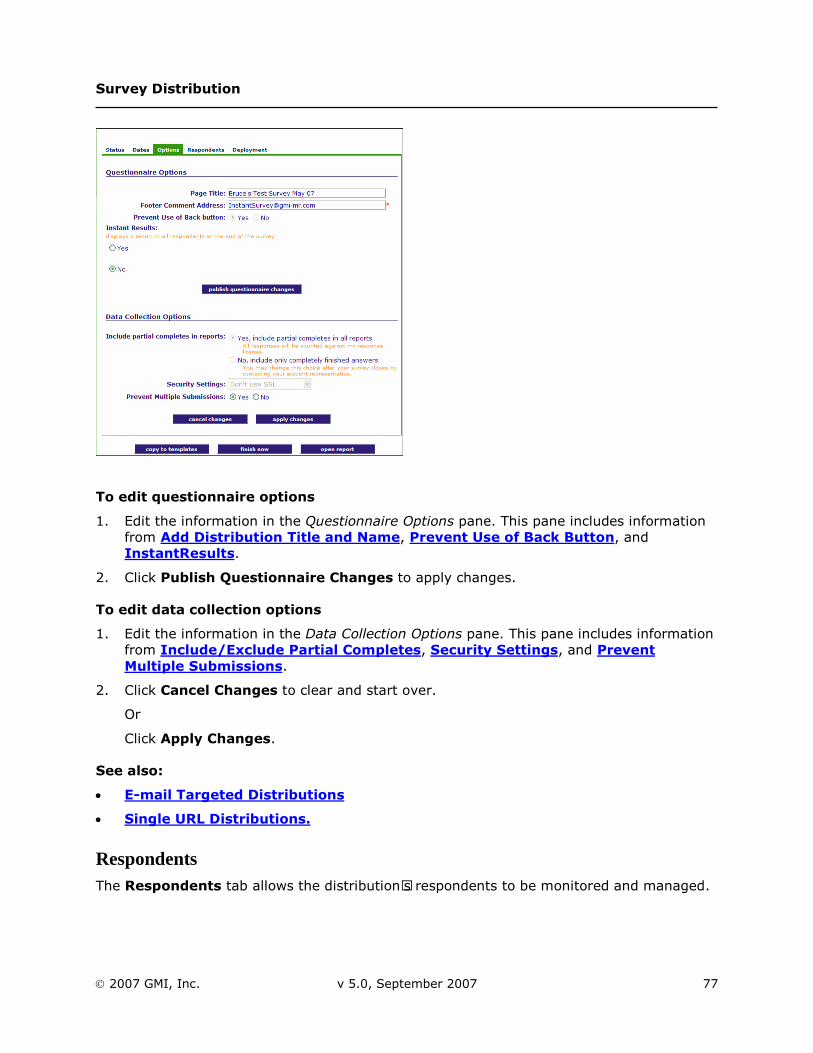
Survey Distribution
2007 GMI, Inc. v 5.0, September 2007 77
To edit questionnaire options
1. Edit the information in the Questionnaire Options pane. This pane includes information from Add Distribution Title and Name, Prevent Use of Back Button, and InstantResults.
2. Click Publish Questionnaire Changes to apply changes.
To edit data collection options
1. Edit the information in the Data Collection Options pane. This pane includes information from Include/Exclude Partial Completes, Security Settings, and Prevent Multiple Submissions.
2. Click Cancel Changes to clear and start over.
Or
Click Apply Changes.
See also:
E-mail Targeted Distributions
Single URL Distributions.
Respondents The Respondents tab allows the distribution’s respondents to be monitored and managed.
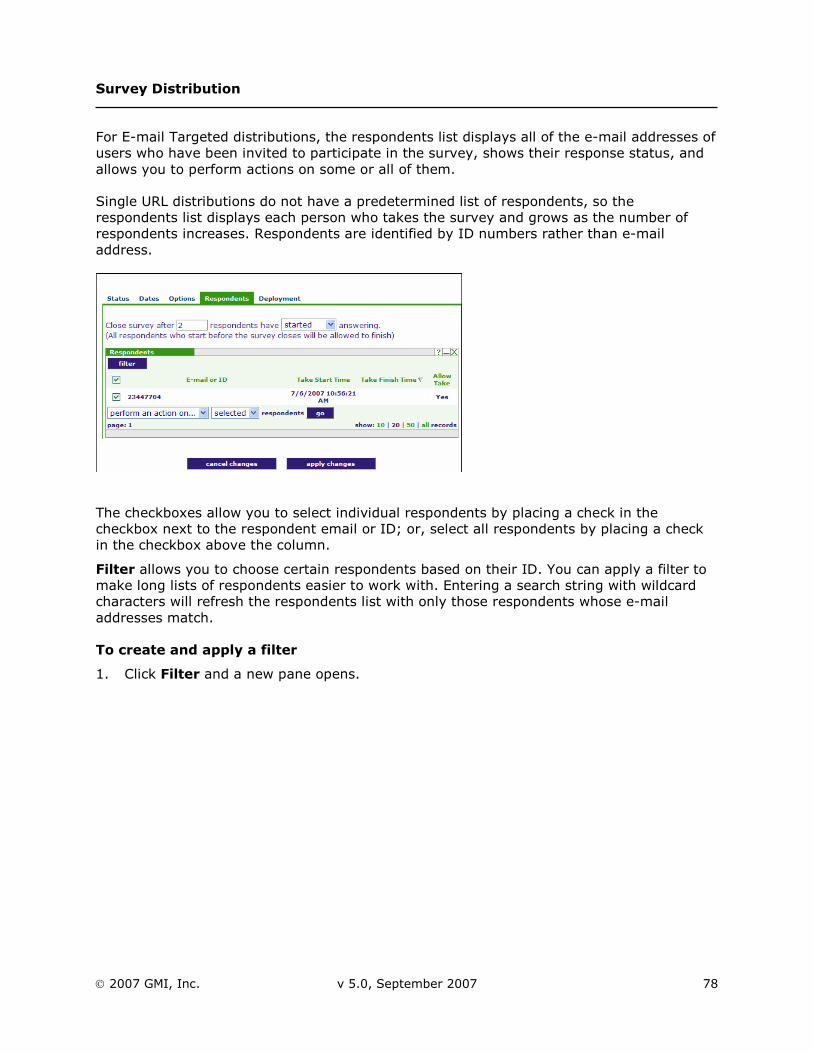
Survey Distribution
2007 GMI, Inc. v 5.0, September 2007 78
For E-mail Targeted distributions, the respondents list displays all of the e-mail addresses of users who have been invited to participate in the survey, shows their response status, and allows you to perform actions on some or all of them.
Single URL distributions do not have a predetermined list of respondents, so the respondents list displays each person who takes the survey and grows as the number of respondents increases. Respondents are identified by ID numbers rather than e-mail address.
The checkboxes allow you to select individual respondents by placing a check in the checkbox next to the respondent email or ID; or, select all respondents by placing a check in the checkbox above the column.
Filter allows you to choose certain respondents based on their ID. You can apply a filter to make long lists of respondents easier to work with. Entering a search string with wildcard characters will refresh the respondents list with only those respondents whose e-mail addresses match.
To create and apply a filter
1. Click Filter and a new pane opens.
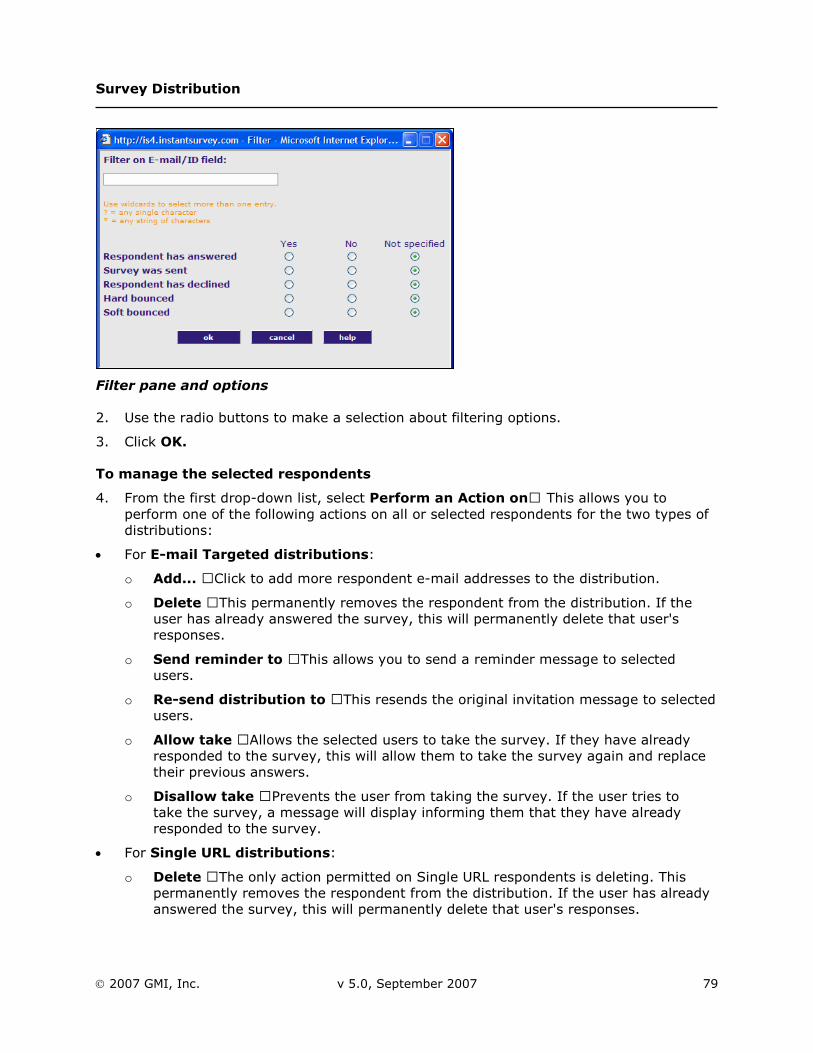
Survey Distribution
2007 GMI, Inc. v 5.0, September 2007 79
Filter pane and options
2. Use the radio buttons to make a selection about filtering options.
3. Click OK.
To manage the selected respondents
4. From the first drop-down list, select Perform an Action on… This allows you to perform one of the following actions on all or selected respondents for the two types of distributions:
For E-mail Targeted distributions:
o Add... – Click to add more respondent e-mail addresses to the distribution.
o Delete – This permanently removes the respondent from the distribution. If the user has already answered the survey, this will permanently delete that user's responses.
o Send reminder to – This allows you to send a reminder message to selected users.
o Re-send distribution to – This resends the original invitation message to selected users.
o Allow take – Allows the selected users to take the survey. If they have already responded to the survey, this will allow them to take the survey again and replace their previous answers.
o Disallow take – Prevents the user from taking the survey. If the user tries to take the survey, a message will display informing them that they have already responded to the survey.
For Single URL distributions:
o Delete – The only action permitted on Single URL respondents is deleting. This permanently removes the respondent from the distribution. If the user has already answered the survey, this will permanently delete that user's responses.
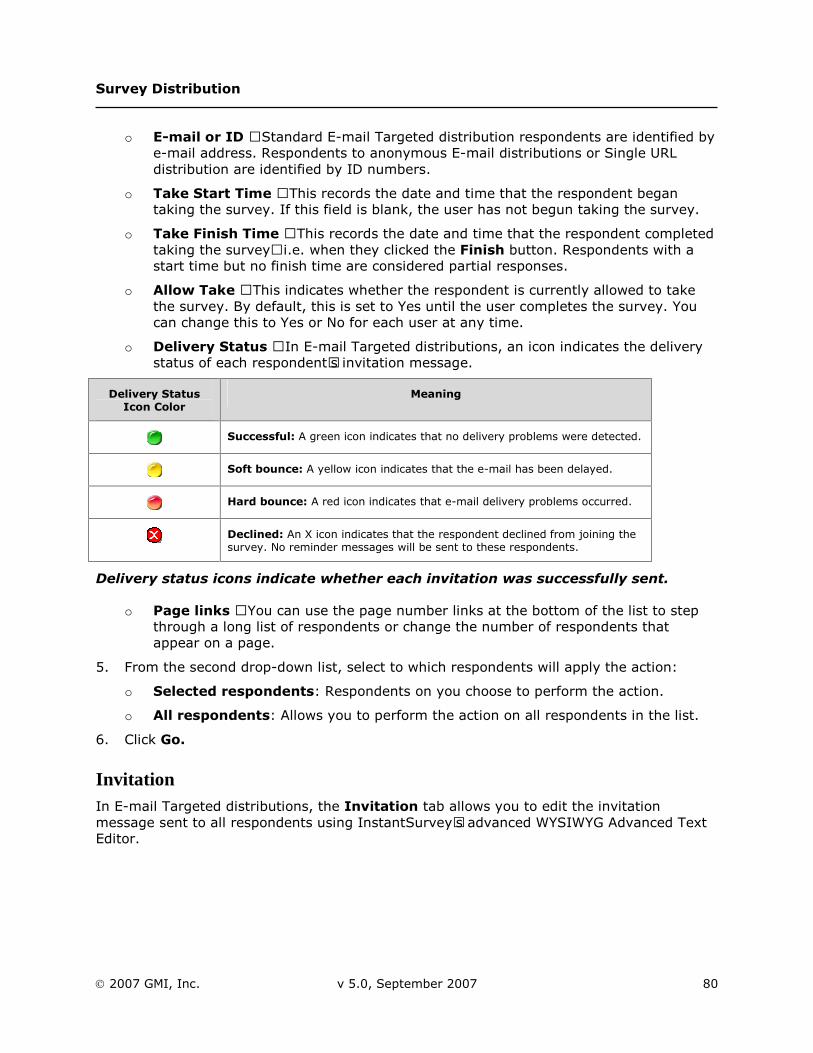
Survey Distribution
2007 GMI, Inc. v 5.0, September 2007 80
o E-mail or ID – Standard E-mail Targeted distribution respondents are identified by e-mail address. Respondents to anonymous E-mail distributions or Single URL distribution are identified by ID numbers.
o Take Start Time – This records the date and time that the respondent began taking the survey. If this field is blank, the user has not begun taking the survey.
o Take Finish Time – This records the date and time that the respondent completed taking the survey—i.e. when they clicked the Finish button. Respondents with a start time but no finish time are considered partial responses.
o Allow Take – This indicates whether the respondent is currently allowed to take the survey. By default, this is set to Yes until the user completes the survey. You can change this to Yes or No for each user at any time.
o Delivery Status – In E-mail Targeted distributions, an icon indicates the delivery status of each respondent’s invitation message.
Delivery Status Icon Color
Meaning
Successful: A green icon indicates that no delivery problems were detected.
Soft bounce: A yellow icon indicates that the e-mail has been delayed.
Hard bounce: A red icon indicates that e-mail delivery problems occurred.
Declined: An X icon indicates that the respondent declined from joining the survey. No reminder messages will be sent to these respondents.
Delivery status icons indicate whether each invitation was successfully sent.
o Page links – You can use the page number links at the bottom of the list to step through a long list of respondents or change the number of respondents that appear on a page.
5. From the second drop-down list, select to which respondents will apply the action:
o Selected respondents: Respondents on you choose to perform the action.
o All respondents: Allows you to perform the action on all respondents in the list.
6. Click Go.
Invitation In E-mail Targeted distributions, the Invitation tab allows you to edit the invitation message sent to all respondents using InstantSurvey’s advanced WYSIWYG Advanced Text Editor.
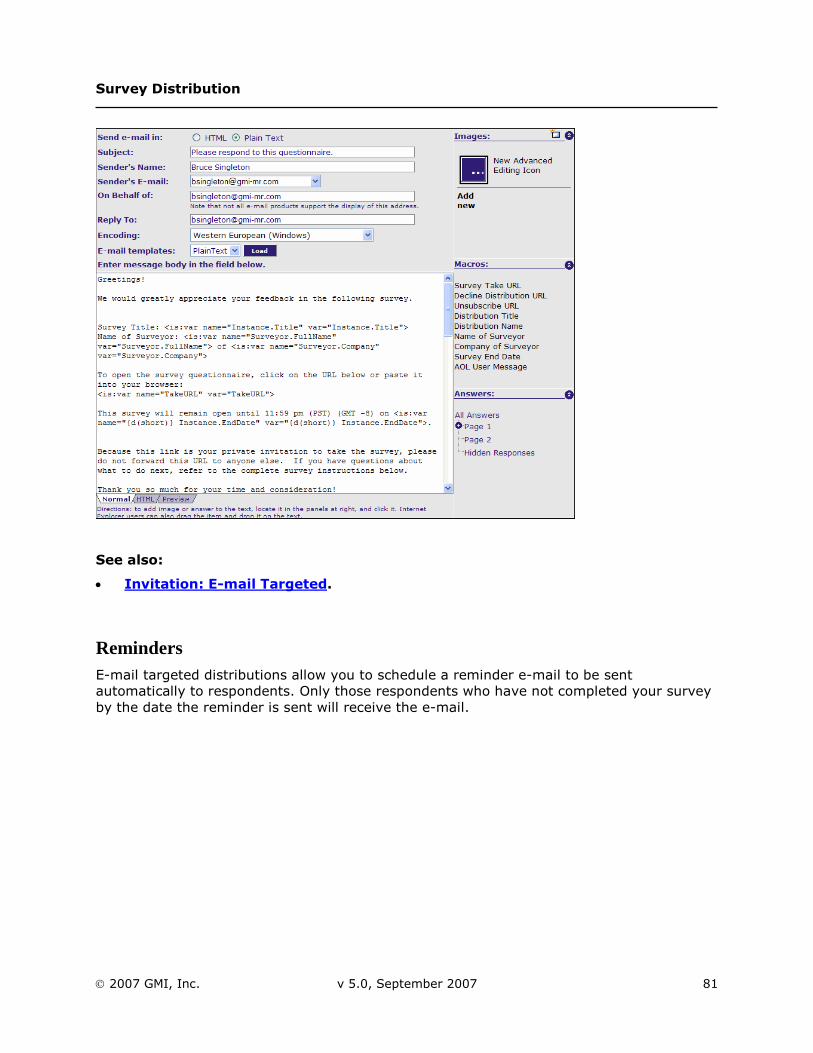
Survey Distribution
2007 GMI, Inc. v 5.0, September 2007 81
See also:
Invitation: E-mail Targeted.
Reminders E-mail targeted distributions allow you to schedule a reminder e-mail to be sent automatically to respondents. Only those respondents who have not completed your survey by the date the reminder is sent will receive the e-mail.
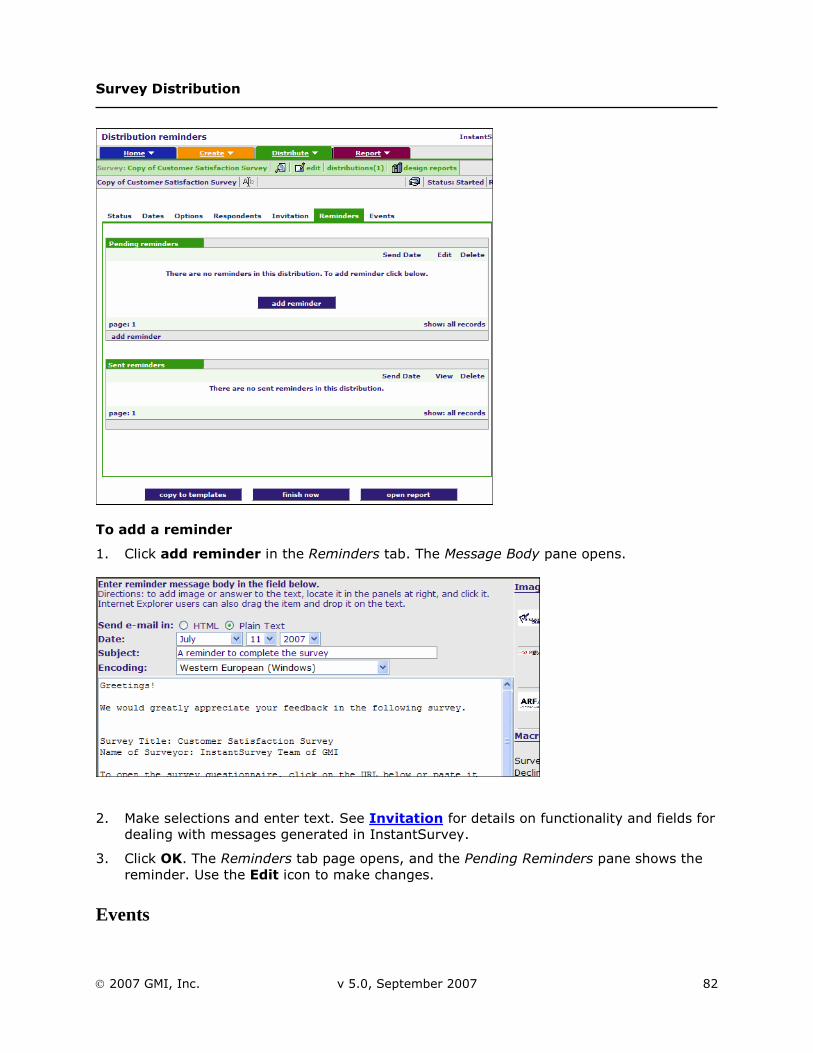
Survey Distribution
2007 GMI, Inc. v 5.0, September 2007 82
To add a reminder
1. Click add reminder in the Reminders tab. The Message Body pane opens.
2. Make selections and enter text. See Invitation for details on functionality and fields for dealing with messages generated in InstantSurvey.
3. Click OK. The Reminders tab page opens, and the Pending Reminders pane shows the reminder. Use the Edit icon to make changes.
Events
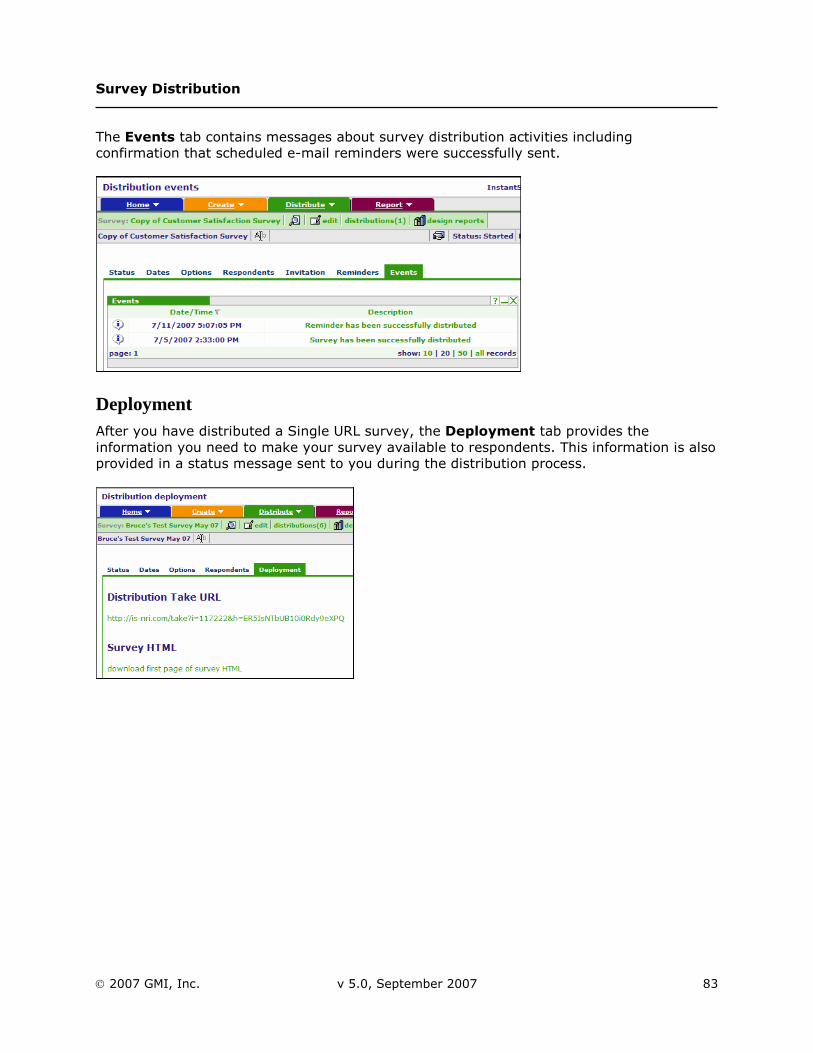
Survey Distribution
2007 GMI, Inc. v 5.0, September 2007 83
The Events tab contains messages about survey distribution activities including confirmation that scheduled e-mail reminders were successfully sent.
Deployment After you have distributed a Single URL survey, the Deployment tab provides the information you need to make your survey available to respondents. This information is also provided in a status message sent to you during the distribution process.
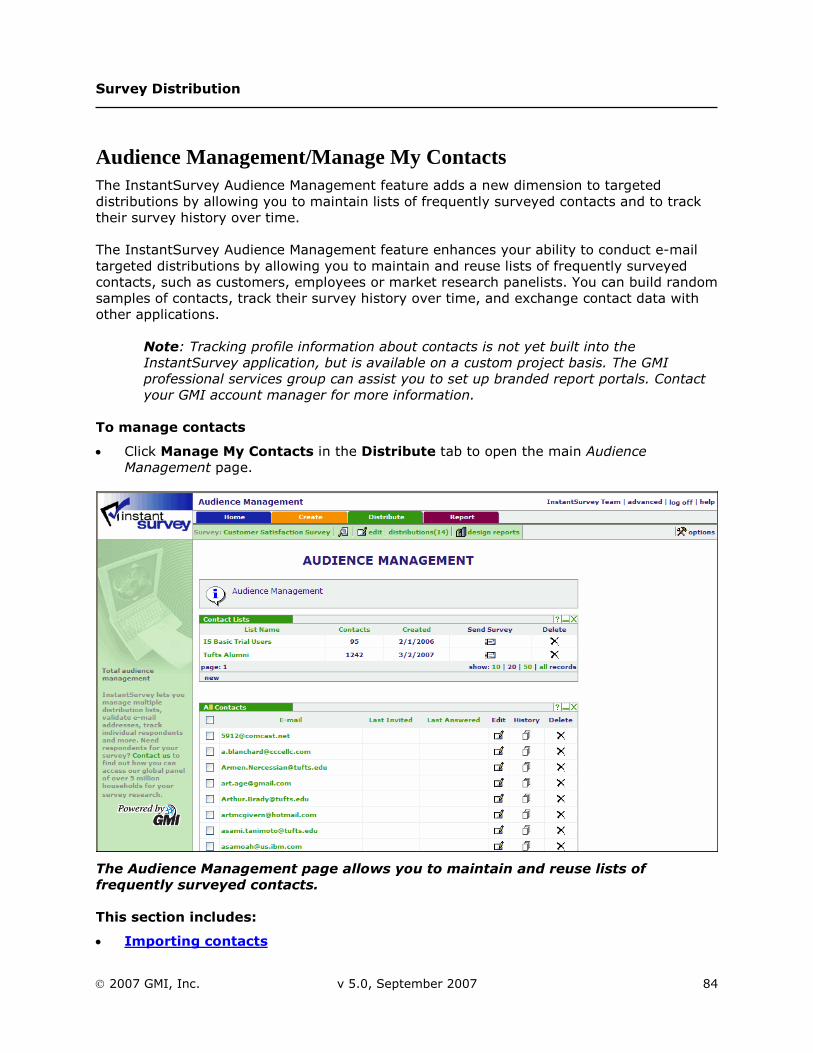
Survey Distribution
2007 GMI, Inc. v 5.0, September 2007 84
Audience Management/Manage My Contacts The InstantSurvey Audience Management feature adds a new dimension to targeted distributions by allowing you to maintain lists of frequently surveyed contacts and to track their survey history over time.
The InstantSurvey Audience Management feature enhances your ability to conduct e-mail targeted distributions by allowing you to maintain and reuse lists of frequently surveyed contacts, such as customers, employees or market research panelists. You can build random samples of contacts, track their survey history over time, and exchange contact data with other applications.
Note: Tracking profile information about contacts is not yet built into the InstantSurvey application, but is available on a custom project basis. The GMI professional services group can assist you to set up branded report portals. Contact your GMI account manager for more information.
To manage contacts
Click Manage My Contacts in the Distribute tab to open the main Audience Management page.
The Audience Management page allows you to maintain and reuse lists of frequently surveyed contacts.
This section includes:
Importing contacts
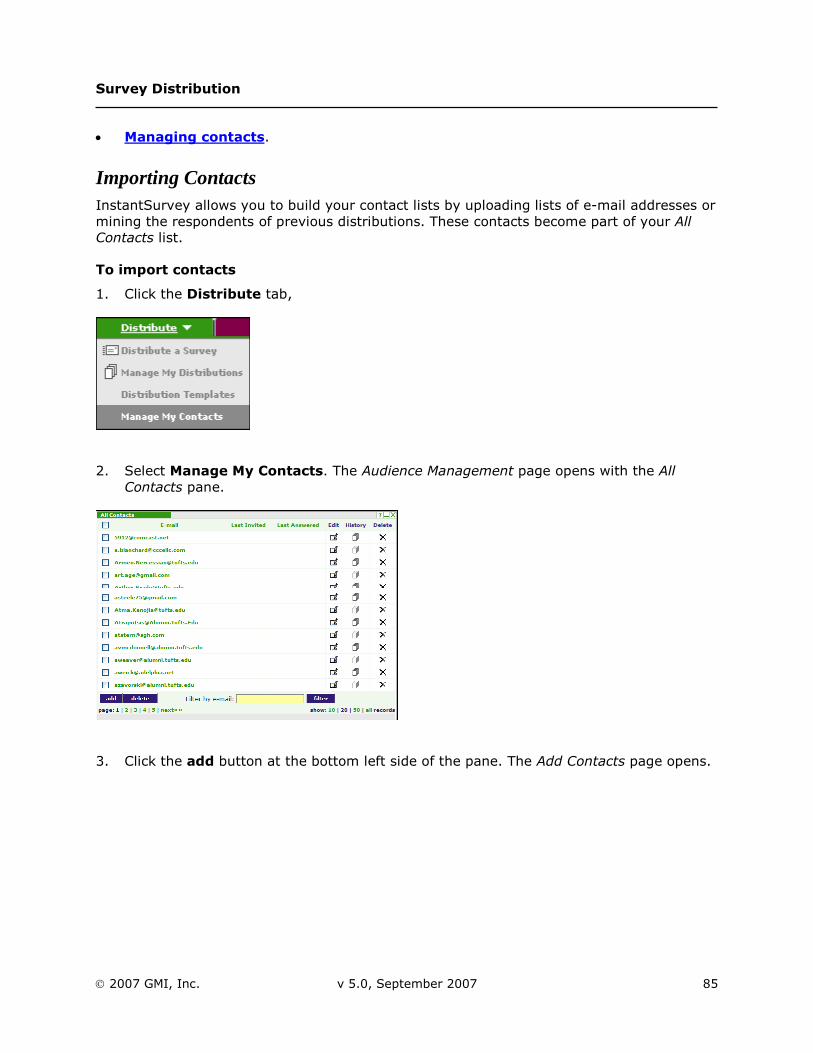
Survey Distribution
2007 GMI, Inc. v 5.0, September 2007 85
Managing contacts.
Importing Contacts InstantSurvey allows you to build your contact lists by uploading lists of e-mail addresses or mining the respondents of previous distributions. These contacts become part of your All Contacts list.
To import contacts
1. Click the Distribute tab,
2. Select Manage My Contacts. The Audience Management page opens with the All Contacts pane.
3. Click the add button at the bottom left side of the pane. The Add Contacts page opens.

Survey Distribution
2007 GMI, Inc. v 5.0, September 2007 86
4. Select the method of adding contacts:
o Provide E-mail Addresses Separated by Returns
o Provide E-mail Addresses from File
o Choose Respondents from a Previous Distribution.
Provide E-mail Addresses Separated by Returns
To provide E-mail Addresses Separated by Returns
1. Select this option to enter manually e-mail addresses. A dialog box opens a text box for entering email addresses.
2. Enter only one e-mail address per line and use the return button to start a new line.
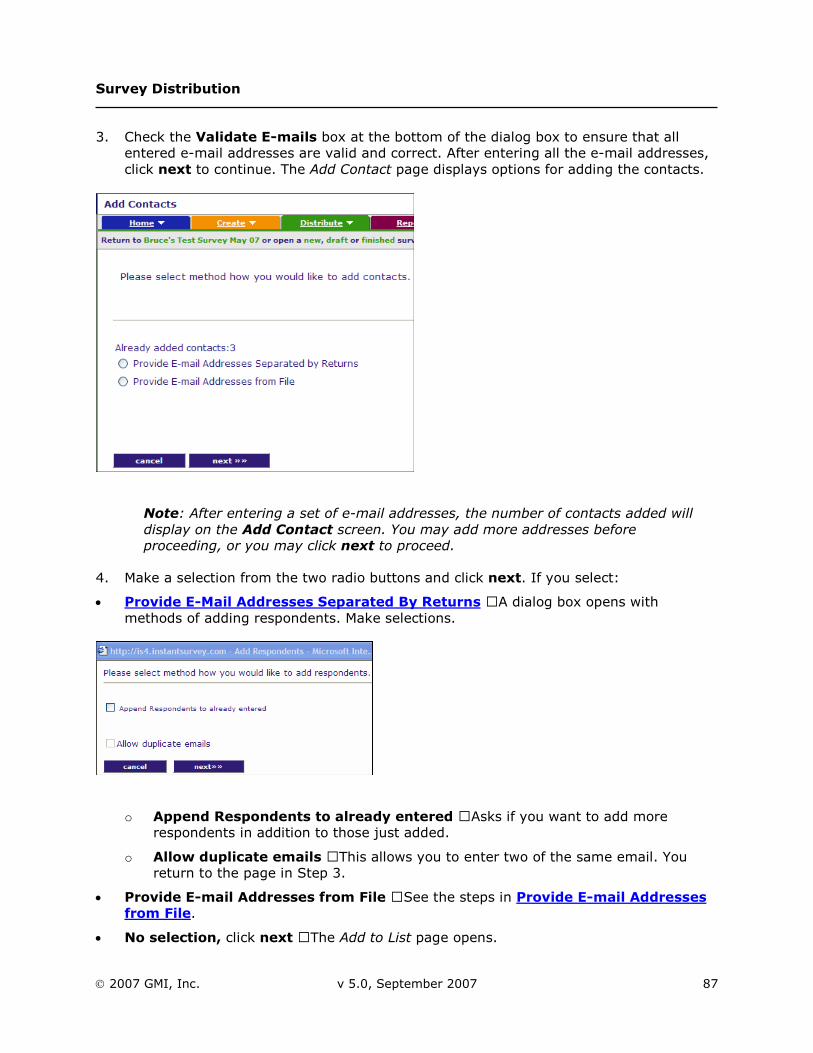
Survey Distribution
2007 GMI, Inc. v 5.0, September 2007 87
3. Check the Validate E-mails box at the bottom of the dialog box to ensure that all entered e-mail addresses are valid and correct. After entering all the e-mail addresses, click next to continue. The Add Contact page displays options for adding the contacts.
Note: After entering a set of e-mail addresses, the number of contacts added will display on the Add Contact screen. You may add more addresses before proceeding, or you may click next to proceed.
4. Make a selection from the two radio buttons and click next. If you select:
Provide E-Mail Addresses Separated By Returns – A dialog box opens with methods of adding respondents. Make selections.
o Append Respondents to already entered – Asks if you want to add more respondents in addition to those just added.
o Allow duplicate emails – This allows you to enter two of the same email. You return to the page in Step 3.
Provide E-mail Addresses from File – See the steps in Provide E-mail Addresses from File.
No selection, click next – The Add to List page opens.
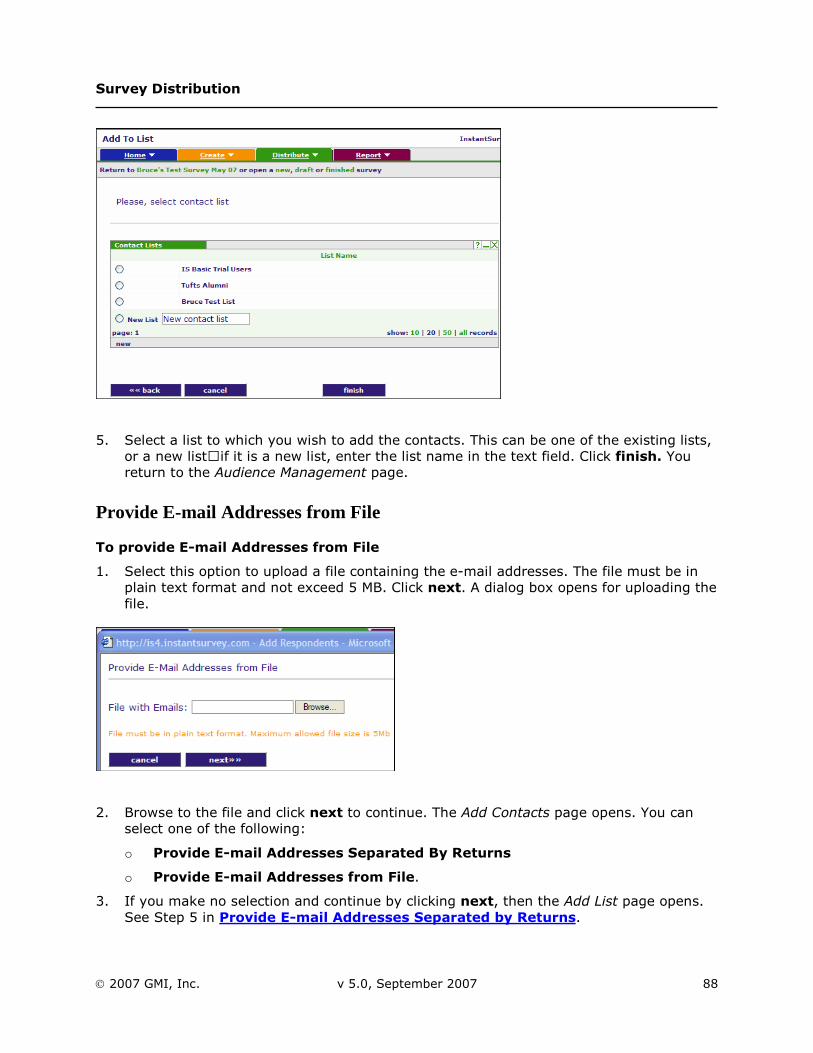
Survey Distribution
2007 GMI, Inc. v 5.0, September 2007 88
5. Select a list to which you wish to add the contacts. This can be one of the existing lists, or a new list—if it is a new list, enter the list name in the text field. Click finish. You return to the Audience Management page.
Provide E-mail Addresses from File
To provide E-mail Addresses from File
1. Select this option to upload a file containing the e-mail addresses. The file must be in plain text format and not exceed 5 MB. Click next. A dialog box opens for uploading the file.
2. Browse to the file and click next to continue. The Add Contacts page opens. You can select one of the following:
o Provide E-mail Addresses Separated By Returns
o Provide E-mail Addresses from File.
3. If you make no selection and continue by clicking next, then the Add List page opens. See Step 5 in Provide E-mail Addresses Separated by Returns.
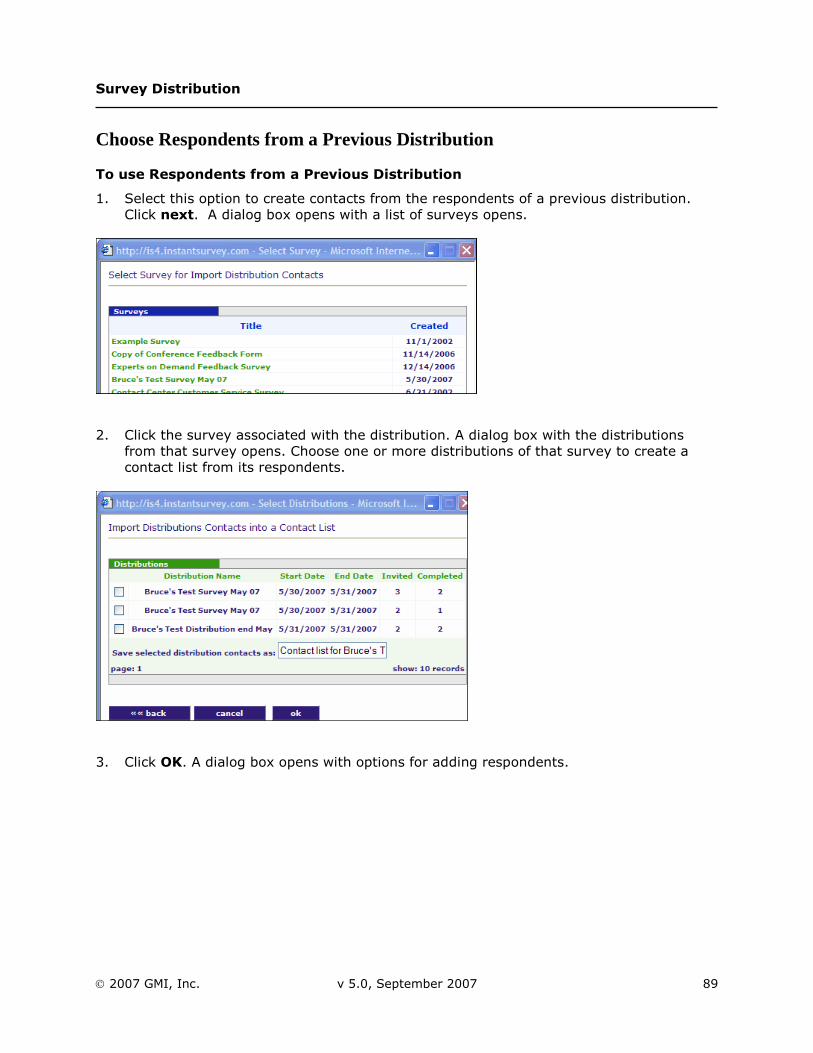
Survey Distribution
2007 GMI, Inc. v 5.0, September 2007 89
Choose Respondents from a Previous Distribution
To use Respondents from a Previous Distribution
1. Select this option to create contacts from the respondents of a previous distribution. Click next. A dialog box opens with a list of surveys opens.
2. Click the survey associated with the distribution. A dialog box with the distributions from that survey opens. Choose one or more distributions of that survey to create a contact list from its respondents.
3. Click OK. A dialog box opens with options for adding respondents.

Survey Distribution
2007 GMI, Inc. v 5.0, September 2007 90
Adding Respondents Options
Option Description
All addresses on original distribution list Includes all addresses on the original list of the previous distribution selected.
Addresses that didn’t bounce Valid addresses that were not returned as undeliverable.
All respondents who started survey Addresses of all those who started, but did not complete the survey.
Only respondents who finished survey Addresses of those who finished the survey.
Include those who explicitly declined Addresses of those who declined to take that survey.
4. Select an option. Click OK. The Add Contacts page opens, showing that the contacts have been added. Click finish.
Note: Regarding Blocked Respondents: If you have previously used InstantSurvey’s Unsubscribe feature, your account may have a block list containing the e-mail addresses of respondents who have requested to receive no future surveys from you. InstantSurvey will prevent you from adding any of these e-mail addresses as new contacts.
5. After entering a set of e-mail addresses, the number of contacts added will display on the Add Contact screen. You may add more addresses before proceeding, or you may click next to proceed.
6. If you would like to group these contacts into a Contact List, select an existing list or enter the name of a new list.
7. Click finish to add the contacts and return to the Audience Management page.
Managing Contacts Contacts can be grouped into lists. Each contact can be a member of more than one list.
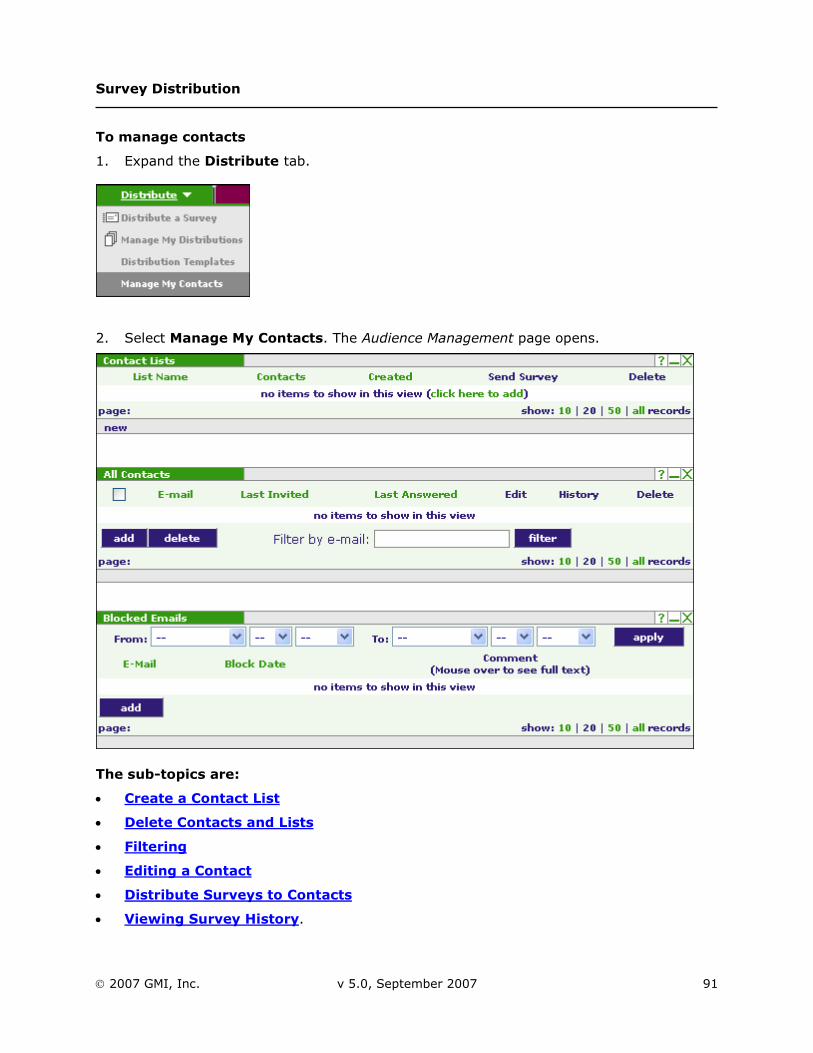
Survey Distribution
2007 GMI, Inc. v 5.0, September 2007 91
To manage contacts
1. Expand the Distribute tab.
2. Select Manage My Contacts. The Audience Management page opens.
The sub-topics are:
Create a Contact List
Delete Contacts and Lists
Filtering
Editing a Contact
Distribute Surveys to Contacts
Viewing Survey History.
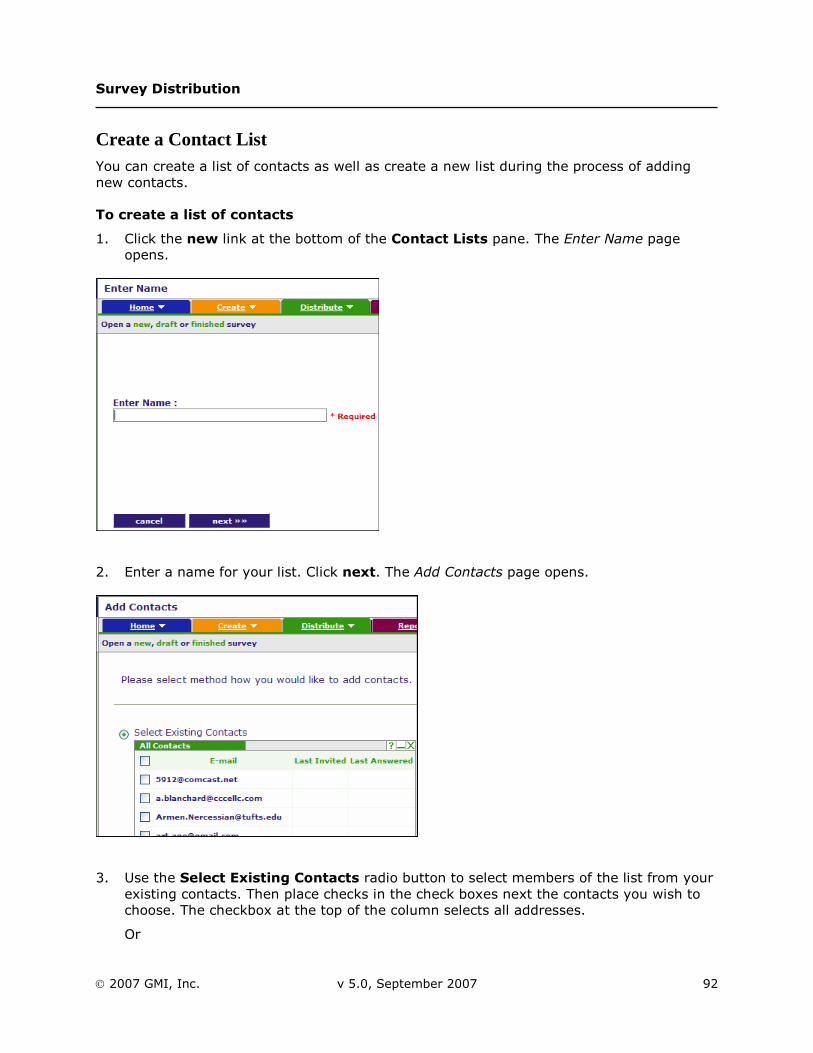
Survey Distribution
2007 GMI, Inc. v 5.0, September 2007 92
Create a Contact List You can create a list of contacts as well as create a new list during the process of adding new contacts.
To create a list of contacts
1. Click the new link at the bottom of the Contact Lists pane. The Enter Name page opens.
2. Enter a name for your list. Click next. The Add Contacts page opens.
3. Use the Select Existing Contacts radio button to select members of the list from your existing contacts. Then place checks in the check boxes next the contacts you wish to choose. The checkbox at the top of the column selects all addresses.
Or
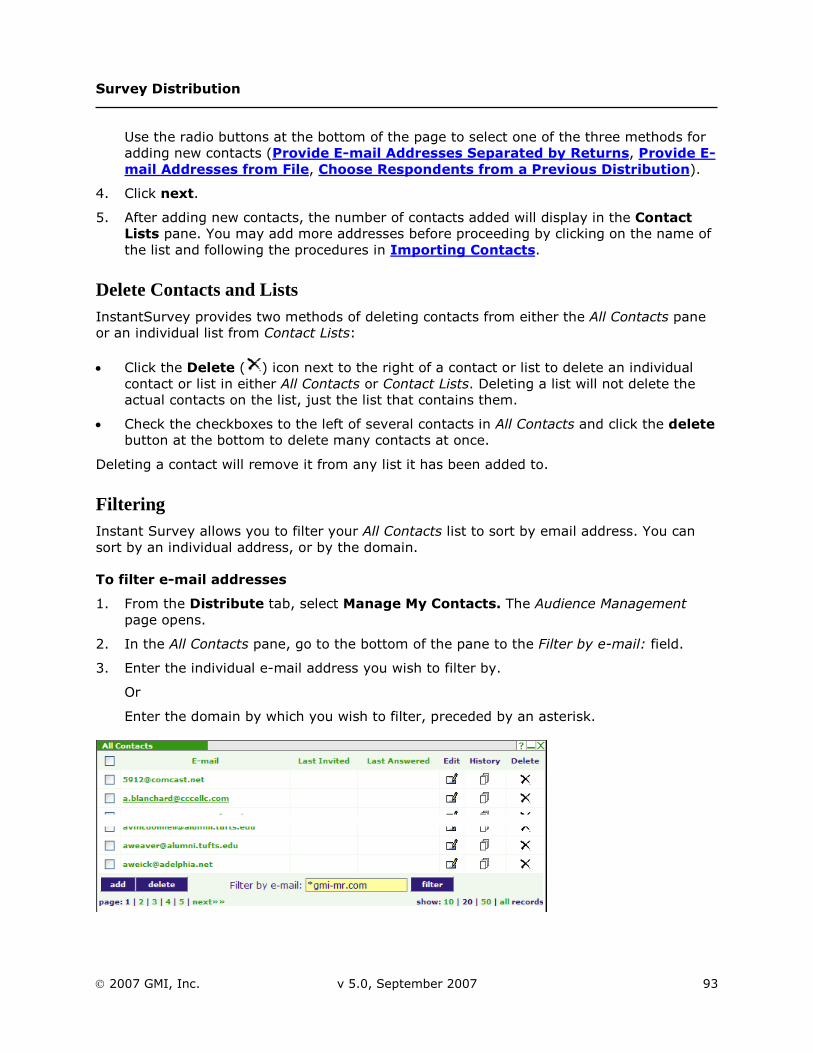
Survey Distribution
2007 GMI, Inc. v 5.0, September 2007 93
Use the radio buttons at the bottom of the page to select one of the three methods for adding new contacts (Provide E-mail Addresses Separated by Returns, Provide E-mail Addresses from File, Choose Respondents from a Previous Distribution).
4. Click next.
5. After adding new contacts, the number of contacts added will display in the Contact Lists pane. You may add more addresses before proceeding by clicking on the name of the list and following the procedures in Importing Contacts.
Delete Contacts and Lists InstantSurvey provides two methods of deleting contacts from either the All Contacts pane or an individual list from Contact Lists:
Click the Delete ( ) icon next to the right of a contact or list to delete an individual contact or list in either All Contacts or Contact Lists. Deleting a list will not delete the actual contacts on the list, just the list that contains them.
Check the checkboxes to the left of several contacts in All Contacts and click the delete button at the bottom to delete many contacts at once.
Deleting a contact will remove it from any list it has been added to.
Filtering Instant Survey allows you to filter your All Contacts list to sort by email address. You can sort by an individual address, or by the domain.
To filter e-mail addresses
1. From the Distribute tab, select Manage My Contacts. The Audience Management page opens.
2. In the All Contacts pane, go to the bottom of the pane to the Filter by e-mail: field.
3. Enter the individual e-mail address you wish to filter by.
Or
Enter the domain by which you wish to filter, preceded by an asterisk.
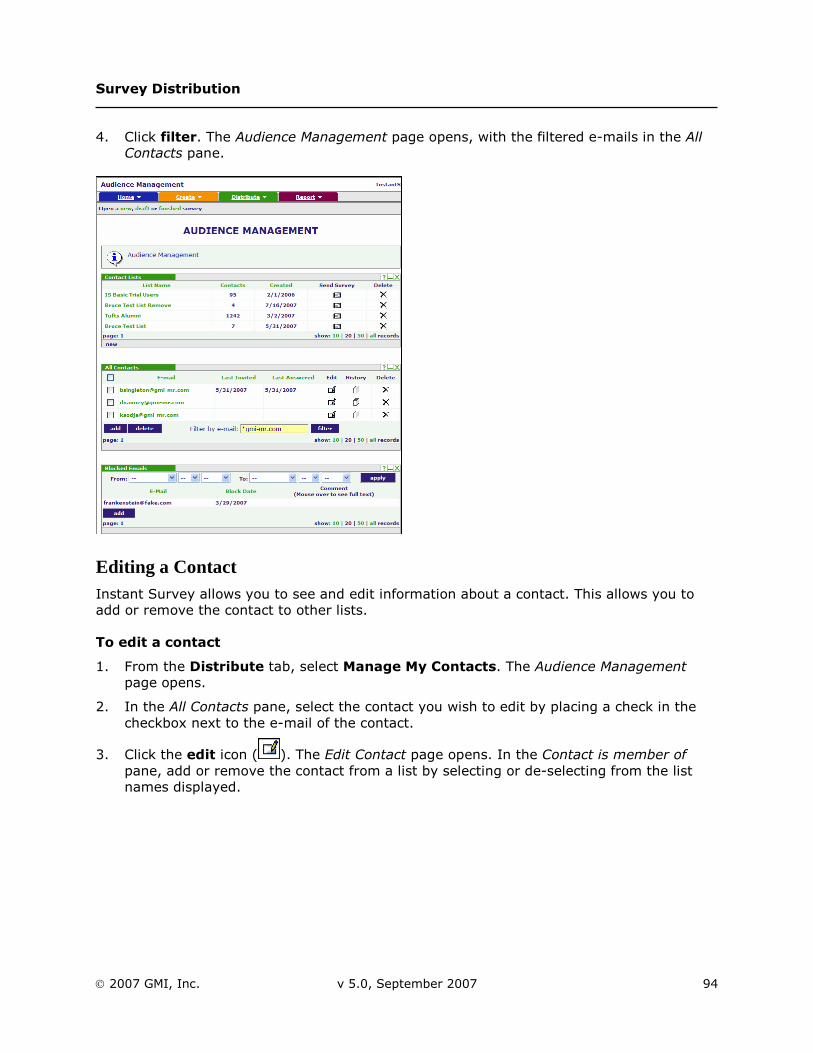
Survey Distribution
2007 GMI, Inc. v 5.0, September 2007 94
4. Click filter. The Audience Management page opens, with the filtered e-mails in the All Contacts pane.
Editing a Contact Instant Survey allows you to see and edit information about a contact. This allows you to add or remove the contact to other lists.
To edit a contact
1. From the Distribute tab, select Manage My Contacts. The Audience Management page opens.
2. In the All Contacts pane, select the contact you wish to edit by placing a check in the checkbox next to the e-mail of the contact.
3. Click the edit icon ( ). The Edit Contact page opens. In the Contact is member of pane, add or remove the contact from a list by selecting or de-selecting from the list names displayed.
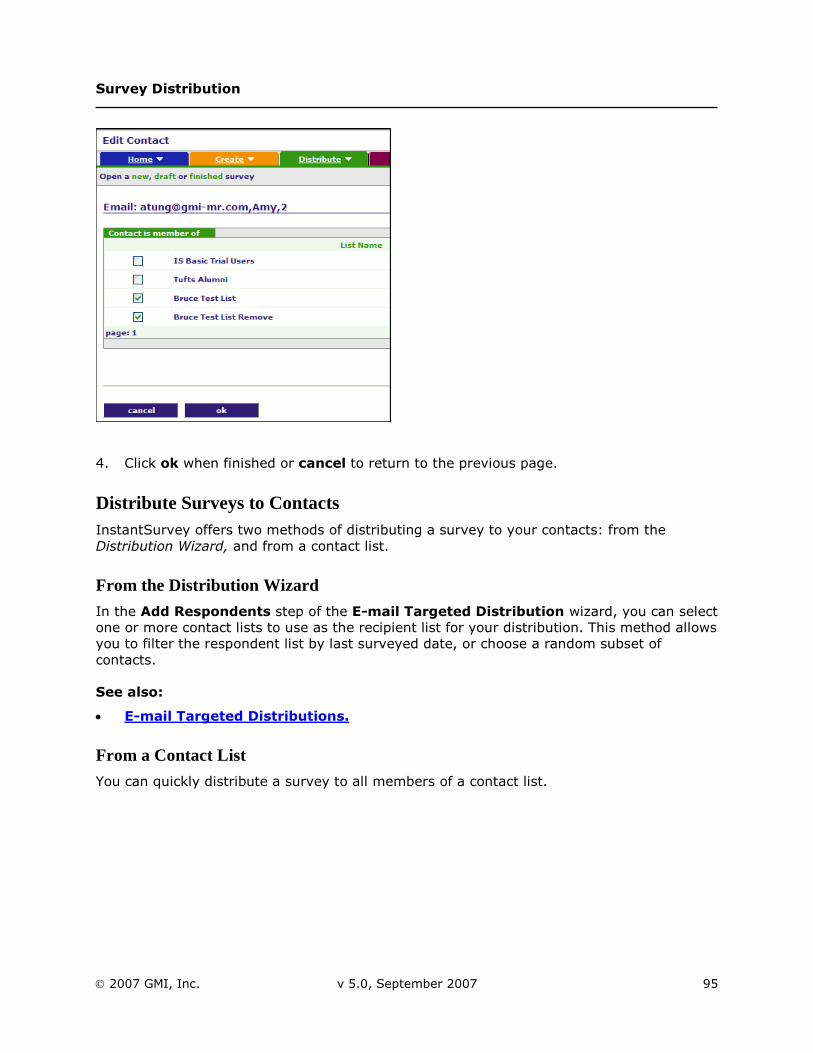
Survey Distribution
2007 GMI, Inc. v 5.0, September 2007 95
4. Click ok when finished or cancel to return to the previous page.
Distribute Surveys to Contacts InstantSurvey offers two methods of distributing a survey to your contacts: from the Distribution Wizard, and from a contact list.
From the Distribution Wizard
In the Add Respondents step of the E-mail Targeted Distribution wizard, you can select one or more contact lists to use as the recipient list for your distribution. This method allows you to filter the respondent list by last surveyed date, or choose a random subset of contacts.
See also:
E-mail Targeted Distributions.
From a Contact List
You can quickly distribute a survey to all members of a contact list.
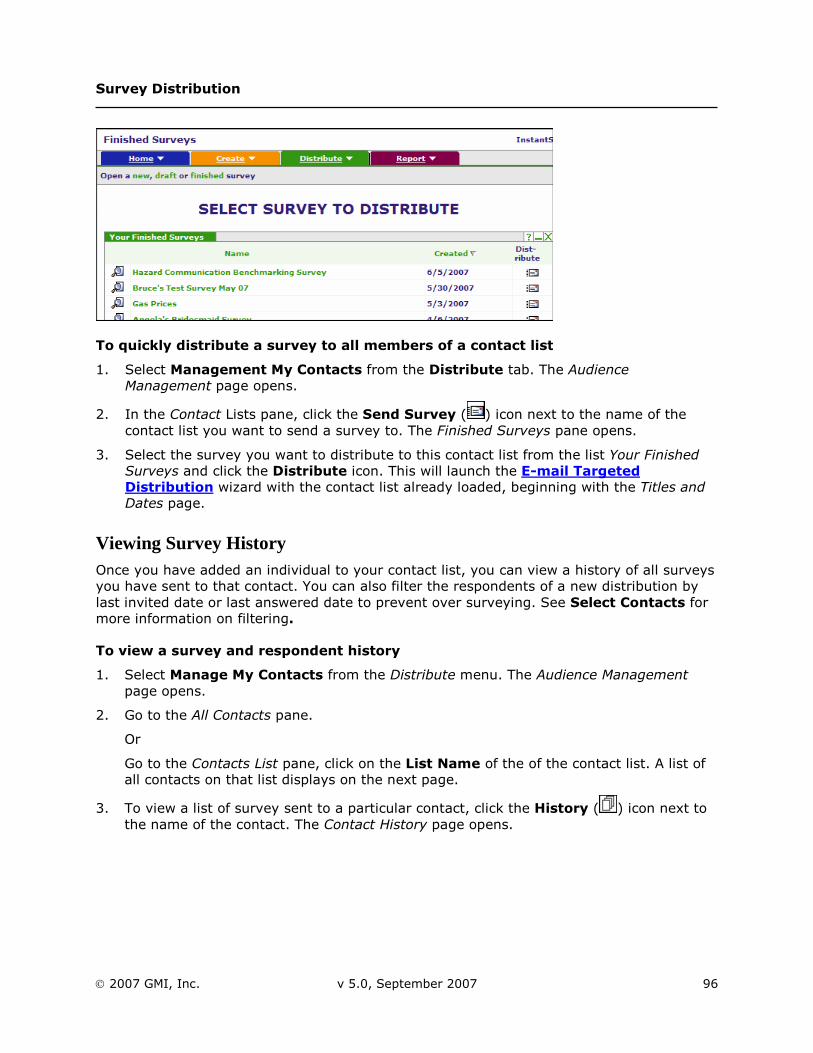
Survey Distribution
2007 GMI, Inc. v 5.0, September 2007 96
To quickly distribute a survey to all members of a contact list
1. Select Management My Contacts from the Distribute tab. The Audience Management page opens.
2. In the Contact Lists pane, click the Send Survey ( ) icon next to the name of the contact list you want to send a survey to. The Finished Surveys pane opens.
3. Select the survey you want to distribute to this contact list from the list Your Finished Surveys and click the Distribute icon. This will launch the E-mail Targeted Distribution wizard with the contact list already loaded, beginning with the Titles and Dates page.
Viewing Survey History Once you have added an individual to your contact list, you can view a history of all surveys you have sent to that contact. You can also filter the respondents of a new distribution by last invited date or last answered date to prevent over surveying. See Select Contacts for more information on filtering.
To view a survey and respondent history
1. Select Manage My Contacts from the Distribute menu. The Audience Management page opens.
2. Go to the All Contacts pane.
Or
Go to the Contacts List pane, click on the List Name of the of the contact list. A list of all contacts on that list displays on the next page.
3. To view a list of survey sent to a particular contact, click the History ( ) icon next to the name of the contact. The Contact History page opens.
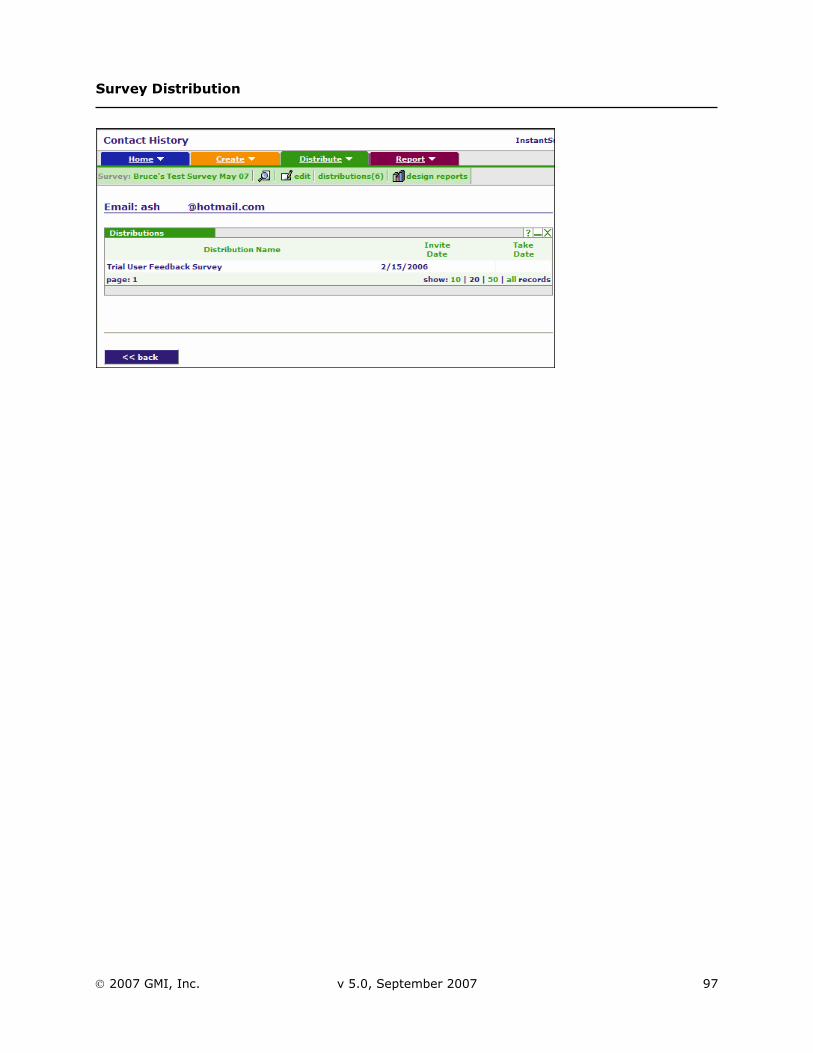
Survey Distribution
2007 GMI, Inc. v 5.0, September 2007 97
Survey Distribution
2007 GMI, Inc. v 5.0, September 2007 98
Unsubscribe The InstantSurvey Unsubscribe feature helps you comply with anti-spam laws by managing respondents who request to be removed from your distribution list.
The InstantSurvey Unsubscribe feature provides an automated mechanism for dealing with respondents who request to be removed from your distribution list. This makes it easier for you to comply with growing efforts to regulate spam e-mail and protect privacy on the Internet.
Unsubscribe is an optional feature that applies only to e-mail targeted distributions. Unsubscribe is made available to survey respondents via the invitation e-mail that they receive from you. The InstantSurvey default e-mail invitation text includes unsubscribe links. You can remove them if you do not want to offer unsubscribe, or you can add these links to your own invitation text if you are not using the default text.
Two types of unsubscribe options are available through InstantSurvey:
Declining a single survey distribution
Blocking all future distributions from a InstantSurvey account
You can also add e-mail addresses to your own block list.
The section includes:
Declining a Distribution
Blocking All Future Distributions
Adding Addresses to Your Block List.
Declining a Distribution Offering this option to your respondents gives them the ability to indicate that they do not wish to participate in your survey. They will be automatically excluded from any reminder messages for the current distribution, but will not prevent them from receiving future survey distributions. This will also help you distinguish respondents who have not yet responded from those who don’t intend to respond at all.
InstantSurvey’s default e-mail invitation text includes the following instruction text and link for declining the distribution:
To decline this survey and receive no further messages regarding it, click on the URL below or paste it into your browser: <%DeclineURL%>
To add the decline URL to a custom invitation message
Select Decline Distribution URL from the macro list, then click in your invitation text to insert the URL.
Survey Distribution
2007 GMI, Inc. v 5.0, September 2007 99
If you include the Decline URL in your invitation text, respondents who click on it will be taken to an online Web page where they can confirm their request. Note that the e-mail address, first and last name, and company name in your account profile will display on this page.
Respondents who decline an invitation will be marked as declined in the Distribution Management page for this distribution.
See also:
Invitation.
Blocking All Future Distributions Offering this option to your respondents gives them the ability to block all future survey distributions from you. Their address is added to a “block” list associated with your account, and the InstantSurvey application will prevent them from being added to future distributions or your contact list.
When respondents request to block all future surveys from your account, they will receive a confirmation message containing instructions on how to remove this blocking.
Note: Only the respondent who requested blocking can unblock the account to resume receiving survey invitations. The confirmation message they receive after blocking an account contains instructions for removing the blocking. Respondents who have lost this message can enter their e-mail address at http://Is4.instantsurvey.com/unblock to receive another copy.
InstantSurvey’s default e-mail invitation text includes the following instruction text and link for blocking future distributions:
If you wish to block all future survey invitations from this user, click on the URL link below or paste it into your browser: <%UnsubscribeURL%>
To add the unsubscribe URL to a custom invitation message
Select Unsubscribe URL from the macro list, then click in your invitation text to insert the URL.
If you include the Unsubscribe URL in your invitation text, respondents who click on it will be taken to an online Web page where they can confirm the blocking request and enter a comment. Note that the e-mail address, first and last name, and company name in your account profile will display on this page.
See also:
Invitation.

Survey Distribution
2007 GMI, Inc. v 5.0, September 2007 100
Respondents requesting to block all future surveys from your account will be asked to confirm the account they wish to block and to enter a comment.
Adding Addresses to Your Block List Only the recipient who requested blocking may remove the block. If you believe a recipient has requested blocking by mistake, the recipient may request removal from this list by going to http://is4.instantsurvey.com/unblock ,entering an e-mail address, and following the instructions that are sent via e-mail.
To view the list of survey recipients who have blocked surveys from you
1. Expand the Distribute tab.
2. Select Manage My Contacts. The Audience Management page opens with a list in the Blocked Emails pane at the bottom of the page.
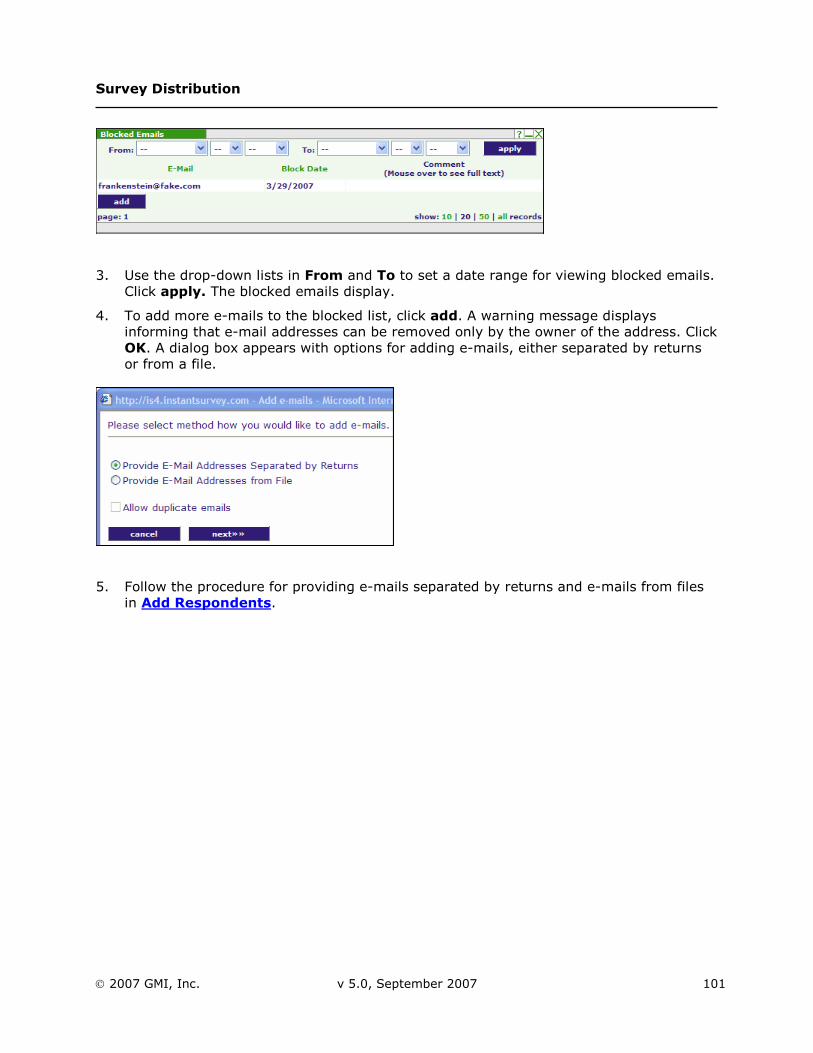
Survey Distribution
2007 GMI, Inc. v 5.0, September 2007 101
3. Use the drop-down lists in From and To to set a date range for viewing blocked emails. Click apply. The blocked emails display.
4. To add more e-mails to the blocked list, click add. A warning message displays informing that e-mail addresses can be removed only by the owner of the address. Click OK. A dialog box appears with options for adding e-mails, either separated by returns or from a file.
5. Follow the procedure for providing e-mails separated by returns and e-mails from files in Add Respondents.
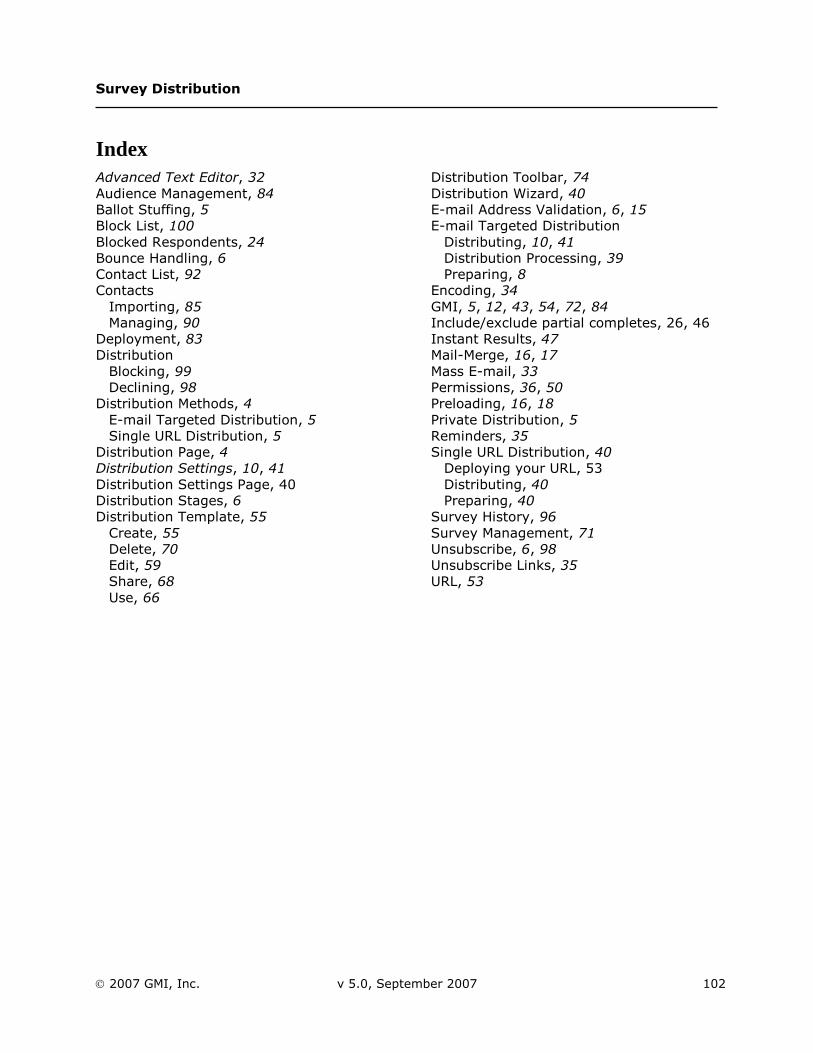
Survey Distribution
2007 GMI, Inc. v 5.0, September 2007 102
Index Advanced Text Editor, 32 Audience Management, 84 Ballot Stuffing, 5 Block List, 100 Blocked Respondents, 24 Bounce Handling, 6 Contact List, 92 Contacts
Importing, 85 Managing, 90
Deployment, 83 Distribution
Blocking, 99 Declining, 98
Distribution Methods, 4 E-mail Targeted Distribution, 5 Single URL Distribution, 5
Distribution Page, 4 Distribution Settings, 10, 41 Distribution Settings Page, 40 Distribution Stages, 6 Distribution Template, 55
Create, 55 Delete, 70 Edit, 59 Share, 68 Use, 66
Distribution Toolbar, 74 Distribution Wizard, 40 E-mail Address Validation, 6, 15 E-mail Targeted Distribution
Distributing, 10, 41 Distribution Processing, 39 Preparing, 8
Encoding, 34 GMI, 5, 12, 43, 54, 72, 84 Include/exclude partial completes, 26, 46 Instant Results, 47 Mail-Merge, 16, 17 Mass E-mail, 33 Permissions, 36, 50 Preloading, 16, 18 Private Distribution, 5 Reminders, 35 Single URL Distribution, 40
Deploying your URL, 53 Distributing, 40 Preparing, 40
Survey History, 96 Survey Management, 71 Unsubscribe, 6, 98 Unsubscribe Links, 35 URL, 53