Embed Size (px)
Citation preview

15-601130 Issue 11e - (15 May 2010)
Intuity Mailbox Mode User Guide
IP Office
Intuity Mailbox Mode User Guide Page 215-601130 Issue 11e (15 May 2010)IP Office
© 2010 AVAYA All Rights Reserved.
NoticesWhile reasonable efforts have been made to ensure that the information inthis document is complete and accurate at the time of printing, Avayaassumes no liability for any errors. Avaya reserves the right to make changesand corrections to the information in this document without the obligation tonotify any person or organization of such changes.
Documentation disclaimerAvaya shall not be responsible for any modifications, additions, or deletionsto the original published version of this documentation unless suchmodifications, additions, or deletions were performed by Avaya.
End User agree to indemnify and hold harmless Avaya, Avaya's agents,servants and employees against all claims, lawsuits, demands and judgmentsarising out of, or in connection with, subsequent modifications, additions ordeletions to this documentation, to the extent made by End User.
Link disclaimerAvaya is not responsible for the contents or reliability of any linked Web sitesreferenced within this site or documentation(s) provided by Avaya. Avaya isnot responsible for the accuracy of any information, statement or contentprovided on these sites and does not necessarily endorse the products,services, or information described or offered within them. Avaya does notguarantee that these links will work all the time and has no control over theavailability of the linked pages.
WarrantyAvaya provides a limited warranty on this product. Refer to your salesagreement to establish the terms of the limited warranty. In addition, Avaya’sstandard warranty language, as well as information regarding support for thisproduct, while under warranty, is available to Avaya customers and otherparties through the Avaya Support Web site: http://www.avaya.com/support.Please note that if you acquired the product from an authorized Avaya reselleroutside of the United States and Canada, the warranty is provided to you bysaid Avaya reseller and not by Avaya.
LicensesTHE SOFTWARE LICENSE TERMS AVAILABLE ON THE AVAYA WEBSITE,HTTP://SUPPORT.AVAYA.COM/LICENSEINFO/ ARE APPLICABLE TO ANYONEWHO DOWNLOADS, USES AND/OR INSTALLS AVAYA SOFTWARE,PURCHASED FROM AVAYA INC., ANY AVAYA AFFILIATE, OR AN AUTHORIZEDAVAYA RESELLER (AS APPLICABLE) UNDER A COMMERCIAL AGREEMENTWITH AVAYA OR AN AUTHORIZED AVAYA RESELLER. UNLESS OTHERWISEAGREED TO BY AVAYA IN WRITING, AVAYA DOES NOT EXTEND THISLICENSE IF THE SOFTWARE WAS OBTAINED FROM ANYONE OTHER THANAVAYA, AN AVAYA AFFILIATE OR AN AVAYA AUTHORIZED RESELLER, ANDAVAYA RESERVES THE RIGHT TO TAKE LEGAL ACTION AGAINST YOU ANDANYONE ELSE USING OR SELLING THE SOFTWARE WITHOUT A LICENSE. BYINSTALLING, DOWNLOADING OR USING THE SOFTWARE, OR AUTHORIZINGOTHERS TO DO SO, YOU, ON BEHALF OF YOURSELF AND THE ENTITY FORWHOM YOU ARE INSTALLING, DOWNLOADING OR USING THE SOFTWARE(HEREINAFTER REFERRED TO INTERCHANGEABLY AS “YOU” AND “ENDUSER”), AGREE TO THESE TERMS AND CONDITIONS AND CREATE ABINDING CONTRACT BETWEEN YOU AND AVAYA INC. OR THE APPLICABLEAVAYA AFFILIATE (“AVAYA”).
Avaya grants End User a license within the scope of the license typesdescribed below. The applicable number of licenses and units of capacity forwhich the license is granted will be one (1), unless a different number oflicenses or units of capacity is specified in the Documentation or othermaterials available to End User. "Designated Processor" means a singlestand-alone computing device. "Server" means a Designated Processor thathosts a software application to be accessed by multiple users. "Software"means the computer programs in object code, originally licensed by Avayaand ultimately utilized by End User, whether as stand-alone products orpre-installed on Hardware. "Hardware" means the standard hardwareoriginally sold by Avaya and ultimately utilized by End User.
License typesDesignated System(s) License (DS). End User may install and use each copyof the Software on only one Designated Processor, unless a different numberof Designated Processors is indicated in the Documentation or other materialsavailable to End User. Avaya may require the Designated Processor(s) to beidentified by type, serial number, feature key, location or other specificdesignation, or to be provided by End User to Avaya through electronic meansestablished by Avaya specifically for this purpose.
CopyrightExcept where expressly stated otherwise, no use should be made of materialson this site, the Documentation(s) and Product(s) provided by Avaya. Allcontent on this site, the documentation(s) and the product(s) provided byAvaya including the selection, arrangement and design of the content isowned either by Avaya or its licensors and is protected by copyright and otherintellectual property laws including the sui generis rights relating to theprotection of databases. You may not modify, copy, reproduce, republish,upload, post, transmit or distribute in any way any content, in whole or inpart, including any code and software. Unauthorized reproduction,transmission, dissemination, storage, and or use without the express writtenconsent of Avaya can be a criminal, as well as a civil, offense under theapplicable law.
Third Party Components Certain software programs or portions thereof included in the Product maycontain software distributed under third party agreements ("Third PartyComponents"), which may contain terms that expand or limit rights to usecertain portions of the Product ("Third Party Terms"). Information regardingdistributed Linux OS source code (for those Products that have distributed theLinux OS source code), and identifying the copyright holders of the ThirdParty Components and the Third Party Terms that apply to them is availableon the Avaya Support Web site: http://support.avaya.com/Copyright.
Preventing toll fraud"Toll fraud" is the unauthorized use of your telecommunications system by anunauthorized party (for example, a person who is not a corporate employee,agent, subcontractor, or is not working on your company's behalf). Be awarethat there can be a risk of toll fraud associated with your system and that, iftoll fraud occurs, it can result in substantial additional charges for yourtelecommunications services.
Avaya fraud interventionIf you suspect that you are being victimized by toll fraud and you needtechnical assistance or support, call Technical Service Center Toll FraudIntervention Hotline at +1-800-643-2353 for the United States and Canada.For additional support telephone numbers, see the Avaya Support Web site:http://support.avaya.comSuspected security vulnerabilities with Avaya products should be reported toAvaya by sending mail to: [email protected].
TrademarksAvaya and Aura are trademarks of Avaya, Inc.The trademarks, logos and service marks (“Marks”) displayed in this site, thedocumentation(s) and product(s) provided by Avaya are the registered orunregistered Marks of Avaya, its affiliates, or other third parties. Users arenot permitted to use such Marks without prior written consent from Avaya orsuch third party which may own the Mark. Nothing contained in this site, thedocumentation(s) and product(s) should be construed as granting, byimplication, estoppel, or otherwise, any license or right in and to the Markswithout the express written permission of Avaya or the applicable third party.Avaya is a registered trademark of Avaya Inc. All non-Avaya trademarks arethe property of their respective owners.
Downloading documentsFor the most current versions of documentation, see the Avaya Support Website: http://www.avaya.com/support
Contact Avaya SupportAvaya provides a telephone number for you to use to report problems or toask questions about your product. The support telephone number is1-800-242-2121 in the United States. For additional support telephonenumbers, see the Avaya Web site: http://www.avaya.com/support
Intuity Mailbox Mode User Guide Page 315-601130 Issue 11e (15 May 2010)IP Office
Contents
ContentsIntroduction1.
..................................................................... 71.1 Summary of Mailbox Options
..................................................................... 81.2 Options for Mailbox Callers
Logging in to Your Mailbox2...................................................................... 102.1 Logging in for the First Time
..................................................................... 112.2 Logging in After the First Time
..................................................................... 112.3 Logging in Remotely
..................................................................... 122.4 Other Ways to Log in
Listening to Messages3...................................................................... 173.1 Listening to Your Messages
..................................................................... 183.2 Calling the Message Sender
..................................................................... 183.3 Replying to a Message
..................................................................... 193.4 Forwarding a Message
..................................................................... 203.5 Sending a New Message
..................................................................... 213.6 Recording a Message
..................................................................... 223.7 Scanning Your Messages
Mailing Lists4...................................................................... 254.1 Creating a Mailing List
..................................................................... 264.2 Using a Mailing List
..................................................................... 274.3 Forwarding to a List
..................................................................... 284.4 Reviewing a List
..................................................................... 284.5 Changing a Lists Status
..................................................................... 294.6 Adding Members to a List
..................................................................... 294.7 Removing Members from a List
..................................................................... 304.8 Deleting a List
Personal Greetings5...................................................................... 325.1 Temporary Greetings
..................................................................... 335.2 Hunt Group Greetings
..................................................................... 345.3 Personal Greetings
..................................................................... 355.4 Recording a Greeting
..................................................................... 365.5 Administer Greetings
..................................................................... 375.6 Activating a Greeting
..................................................................... 375.7 Deactivate a Greeting
..................................................................... 385.8 Scanning Greetings
..................................................................... 385.9 Listening to a Greeting
..................................................................... 395.10 Changing a Greeting
..................................................................... 395.11 Deleting a Greeting
..................................................................... 405.12 Creating a Temporary Greeting
..................................................................... 415.13 Giving Callers a Transfer Option
Voicemail Notification6...................................................................... 446.1 Turning Ringback On or Off
..................................................................... 456.2 Outcalling
............................................................................ 466.2.1 Configuring Outcalling Destinations
............................................................................ 476.2.2 Turning Outcalling On or Off
............................................................................ 486.2.3 Changing Telephone Numbers
............................................................................ 496.2.4 Changing the Time Out Settings
............................................................................ 506.2.5 Creating an Escalation List
............................................................................ 516.2.6 Selecting When to Receive Outcalling
............................................................................ 526.2.7 Specifying your Time Profile
............................................................................ 546.2.8 Answering Outcalling Calls
Mailbox Administration7...................................................................... 567.1 Changing Your Password
..................................................................... 567.2 Recording Your Name
..................................................................... 577.3 Addressing a Message Before You Record
..................................................................... 577.4 Preventing Further Calls and Messages
..................................................................... 587.5 Setting the Order in which Messages are Played
Fax Messages8...................................................................... 608.1 Forwarding a Fax Message
..................................................................... 618.2 Changing a Personal Fax Number
..................................................................... 618.3 Deleting a Personal Fax Number
Visual Voice9................................................................................65Index


Intuity Mailbox Mode User Guide Page 515-601130 Issue 11e (15 May 2010)IP Office
Introduction
Chapter 1.

Intuity Mailbox Mode User Guide Page 715-601130 Issue 11e (15 May 2010)IP Office
Introduction:
1. IntroductionThis document covers the operation of an IP Office voicemail server running in Intuity emulation mode. Currently thatmode of operation is supported by Voicemail Pro. It is not supported by Embedded Voicemail and Voicemail Lite.
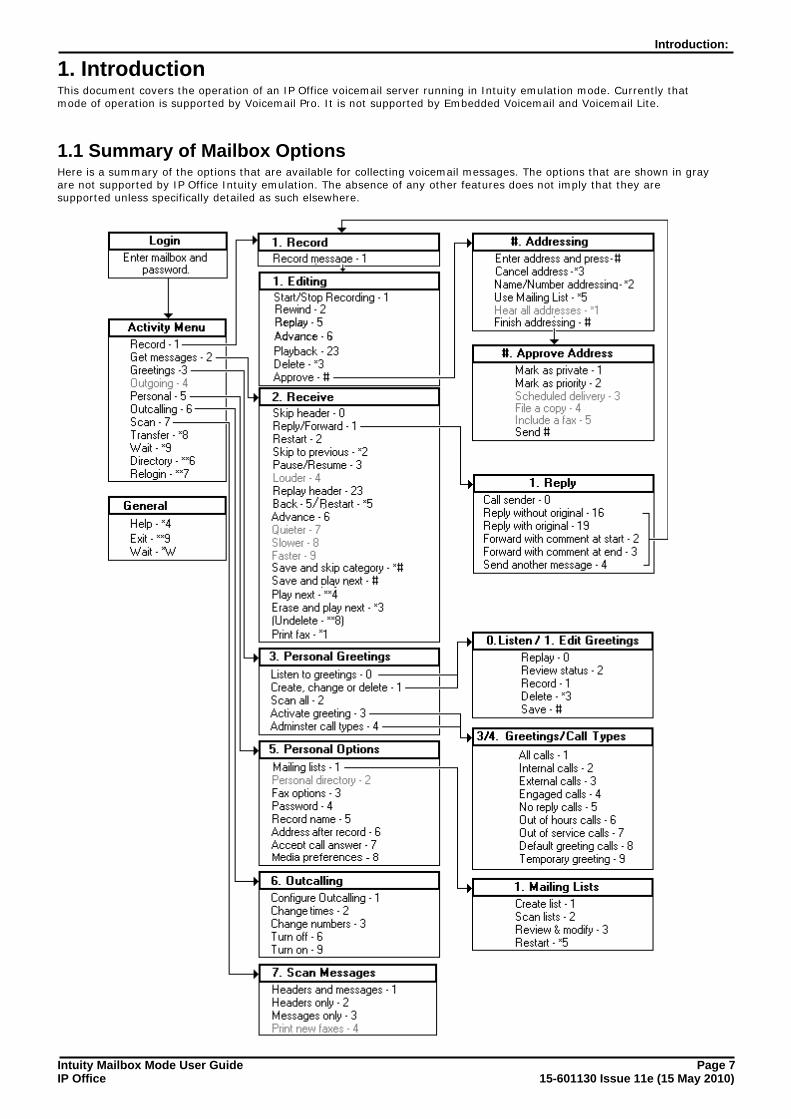
1.1 Summary of Mailbox OptionsHere is a summary of the options that are available for collecting voicemail messages. The options that are shown in grayare not supported by IP Office Intuity emulation. The absence of any other features does not imply that they aresupported unless specifically detailed as such elsewhere.
Intuity Mailbox Mode User Guide Page 815-601130 Issue 11e (15 May 2010)IP Office
· If the system administrator has set up at least 1 voicemail transfer number, you can press *0 while you arecollecting messages and you will be transferred to a reception number.
· Usually you do not need to wait for a prompt to finish before you choose an option. However, you cannot dialthrough error messages or prompts that the system wants you to hear.
· For details of options that are available to callers who want to leave a message see the Options for Mailbox CallersOverview.
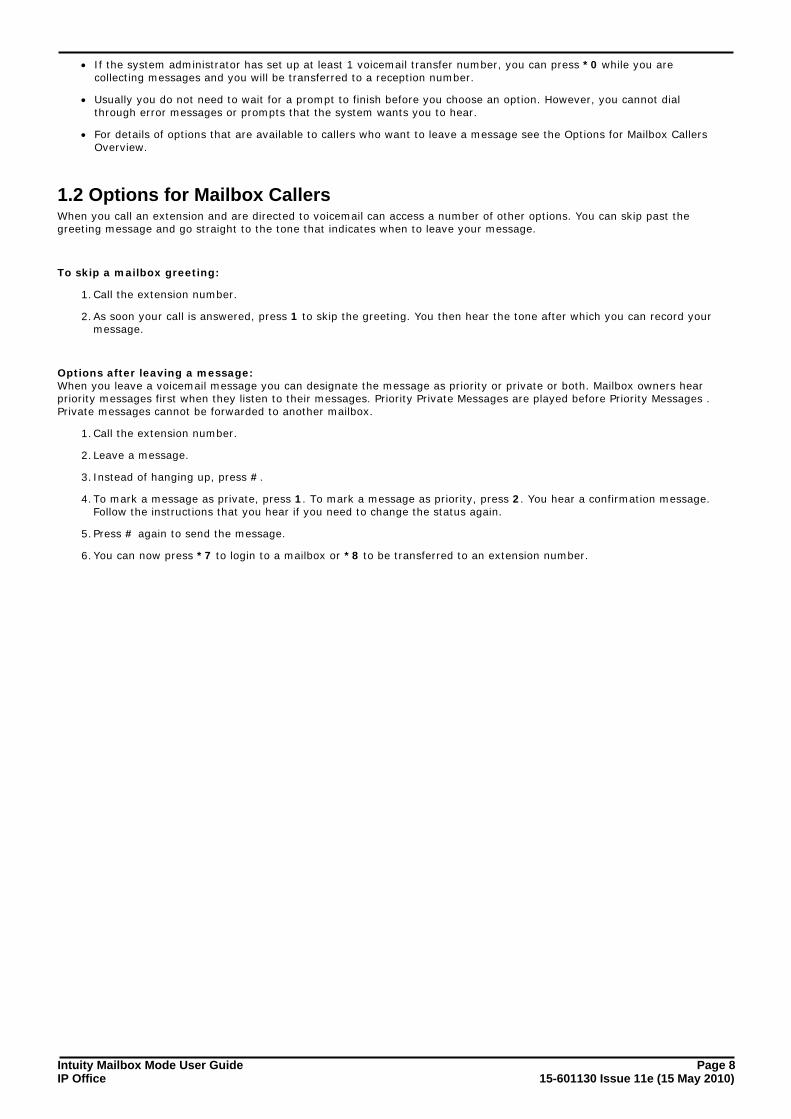
1.2 Options for Mailbox CallersWhen you call an extension and are directed to voicemail can access a number of other options. You can skip past thegreeting message and go straight to the tone that indicates when to leave your message.
To skip a mailbox greeting:
1.Call the extension number.
2.As soon your call is answered, press 1 to skip the greeting. You then hear the tone after which you can record yourmessage.
Options after leaving a message: When you leave a voicemail message you can designate the message as priority or private or both. Mailbox owners hearpriority messages first when they listen to their messages. Priority Private Messages are played before Priority Messages .Private messages cannot be forwarded to another mailbox.
1.Call the extension number.
2.Leave a message.
3.Instead of hanging up, press #.
4.To mark a message as private, press 1. To mark a message as priority, press 2. You hear a confirmation message.Follow the instructions that you hear if you need to change the status again.
5.Press # again to send the message.
6.You can now press *7 to login to a mailbox or *8 to be transferred to an extension number.

Intuity Mailbox Mode User Guide Page 915-601130 Issue 11e (15 May 2010)IP Office
Logging in to Your Mailbox
Chapter 2.
Intuity Mailbox Mode User Guide Page 1015-601130 Issue 11e (15 May 2010)IP Office
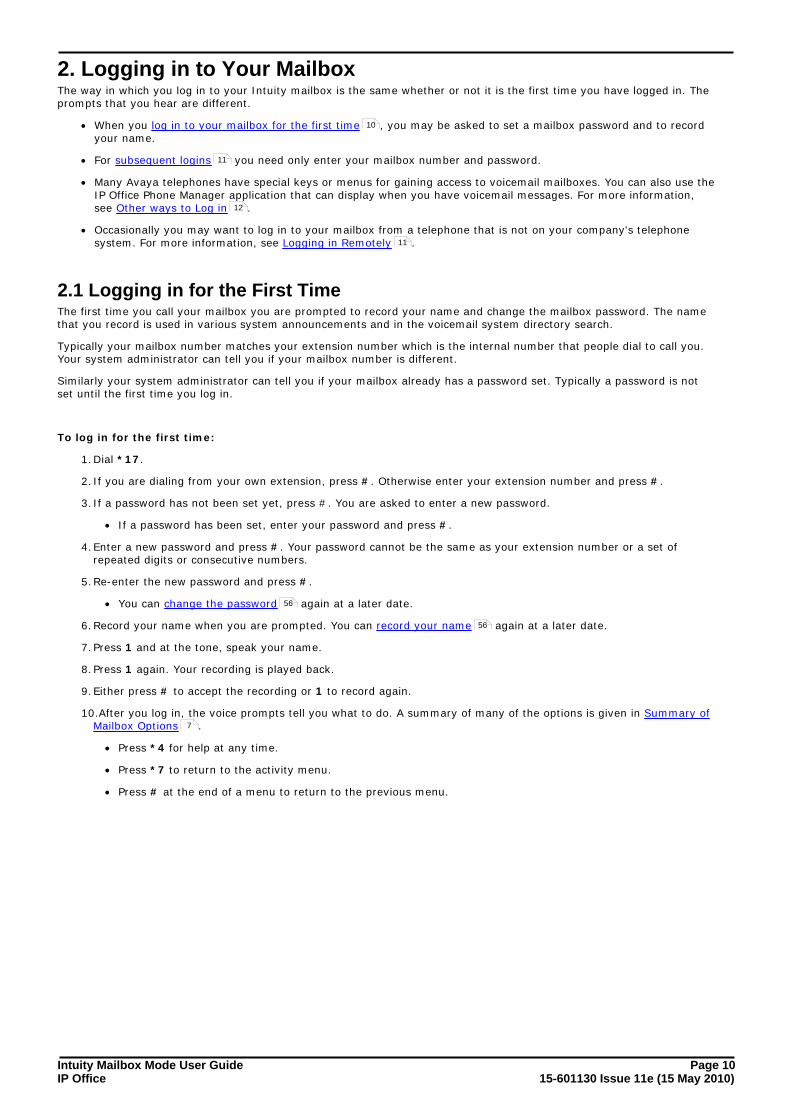
2. Logging in to Your MailboxThe way in which you log in to your Intuity mailbox is the same whether or not it is the first time you have logged in. Theprompts that you hear are different.
· When you log in to your mailbox for the first time , you may be asked to set a mailbox password and to recordyour name.
· For subsequent logins you need only enter your mailbox number and password.
· Many Avaya telephones have special keys or menus for gaining access to voicemail mailboxes. You can also use theIP Office Phone Manager application that can display when you have voicemail messages. For more information,see Other ways to Log in .
· Occasionally you may want to log in to your mailbox from a telephone that is not on your company's telephonesystem. For more information, see Logging in Remotely .
2.1 Logging in for the First TimeThe first time you call your mailbox you are prompted to record your name and change the mailbox password. The namethat you record is used in various system announcements and in the voicemail system directory search.
Typically your mailbox number matches your extension number which is the internal number that people dial to call you.Your system administrator can tell you if your mailbox number is different.
Similarly your system administrator can tell you if your mailbox already has a password set. Typically a password is notset until the first time you log in.
To log in for the first time:
1.Dial *17.
2.If you are dialing from your own extension, press #. Otherwise enter your extension number and press #.
3.If a password has not been set yet, press #. You are asked to enter a new password.
· If a password has been set, enter your password and press #.
4.Enter a new password and press #. Your password cannot be the same as your extension number or a set ofrepeated digits or consecutive numbers.
5.Re-enter the new password and press #.
· You can change the password again at a later date.
6.Record your name when you are prompted. You can record your name again at a later date.
7.Press 1 and at the tone, speak your name.
8.Press 1 again. Your recording is played back.
9.Either press # to accept the recording or 1 to record again.
10.After you log in, the voice prompts tell you what to do. A summary of many of the options is given in Summary ofMailbox Options .
· Press *4 for help at any time.
· Press *7 to return to the activity menu.
· Press # at the end of a menu to return to the previous menu.
10
11
12
11
56
56
7
Intuity Mailbox Mode User Guide Page 1115-601130 Issue 11e (15 May 2010)IP Office
Logging in to Your Mailbox: Logging in for the First Time
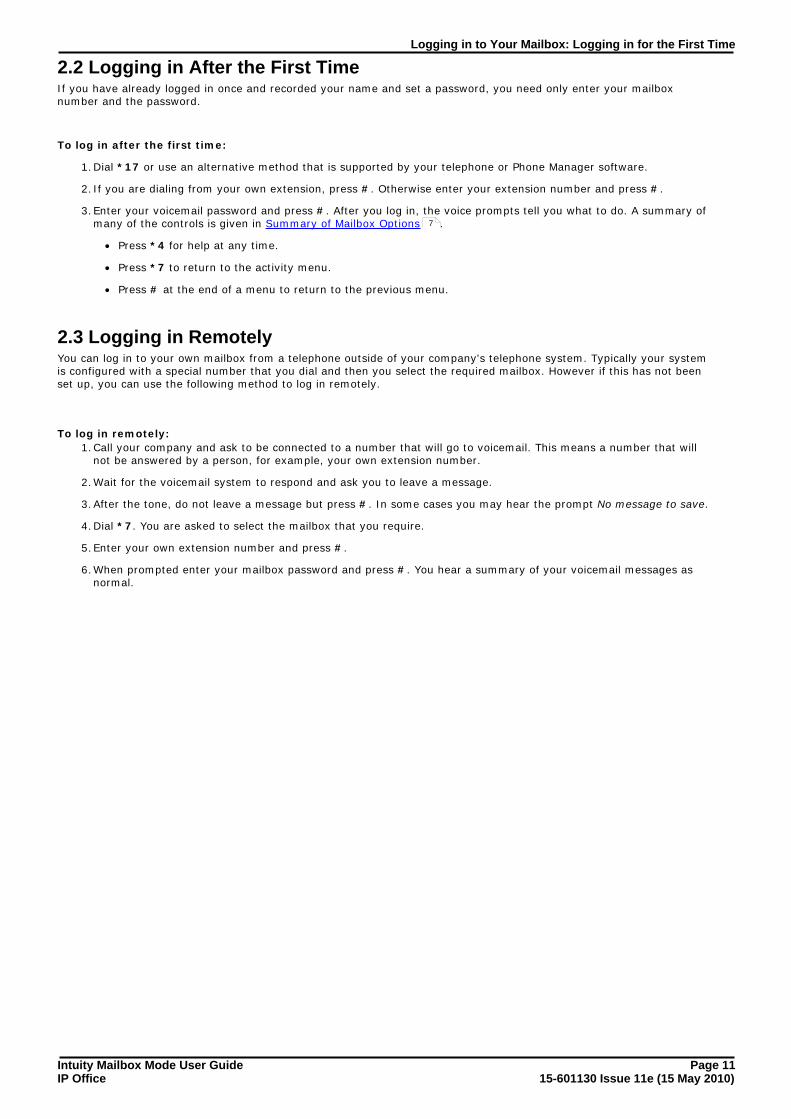
2.2 Logging in After the First TimeIf you have already logged in once and recorded your name and set a password, you need only enter your mailboxnumber and the password.
To log in after the first time:
1.Dial *17 or use an alternative method that is supported by your telephone or Phone Manager software.
2.If you are dialing from your own extension, press #. Otherwise enter your extension number and press #.
3.Enter your voicemail password and press #. After you log in, the voice prompts tell you what to do. A summary ofmany of the controls is given in Summary of Mailbox Options .
· Press *4 for help at any time.
· Press *7 to return to the activity menu.
· Press # at the end of a menu to return to the previous menu.
2.3 Logging in RemotelyYou can log in to your own mailbox from a telephone outside of your company's telephone system. Typically your systemis configured with a special number that you dial and then you select the required mailbox. However if this has not beenset up, you can use the following method to log in remotely.
To log in remotely:
1.Call your company and ask to be connected to a number that will go to voicemail. This means a number that willnot be answered by a person, for example, your own extension number.
2.Wait for the voicemail system to respond and ask you to leave a message.
3.After the tone, do not leave a message but press #. In some cases you may hear the prompt No message to save.
4.Dial *7. You are asked to select the mailbox that you require.
5.Enter your own extension number and press #.
6.When prompted enter your mailbox password and press #. You hear a summary of your voicemail messages asnormal.
7

Intuity Mailbox Mode User Guide Page 1215-601130 Issue 11e (15 May 2010)IP Office
2.4 Other Ways to Log inThere are other ways to log in to your mailbox, apart from using the default short code *17. The options available dependon the type of telephone you are using and the settings that have been applied. For more information, see your systemadministrator.
The options available are by using a:
· Voicemail collect button .
· Menu key .
· Visual Voice button .
· Phone Manager .
· Text Phone .
Using a Voicemail Collect ButtonYou can collect your voice messages from your own extension using a button programmed for voicemail collect. If yourextension is a trusted extension you will not need to enter your voicemail code.
To log in using a Voicemail Collect button:
1.Press the button labelled VMCol.
2.The activity menu is played.
Using a Menu Key
On some Avaya telephones there is a Menu key that can be used to log in to your mailbox. Being tested by Brian.
To log in using a Menu key:
1.Press Menu twice.
2.Press the key below Msgs.
3.Press the key below Voice. The names of the mailboxes for which you receive message waiting indication areshown plus the number of new messages in each mailbox.
4.Press the key below the mailbox required. Continue to log in as you usually do. For more information, see Loggingin After the First Time .
Using a Visual Voice ButtonA Visual Voice button provides a display menu for access to your mailbox. The menu provides you with options to listen tomessages, send messages, change your greetings and password.
To log in using a Visual Voice button:
1.Press the button labeled Voice.
2.Select from the displayed action. The options that may be available are:
· Listen - play your new or old messages.
· Message - send a voice message.
· Greeting - Change your personal greetings.
· Email - Change the alert status of your email notification.
· Password - Change your voicemail password.
· Group - play voice messages of the group that you have voicemail access.
For more information about using Visual Voice, see the relevant telephone user guide.
12
12
12
13
13
11
Intuity Mailbox Mode User Guide Page 1315-601130 Issue 11e (15 May 2010)IP Office
Logging in to Your Mailbox: Other Ways to Log in
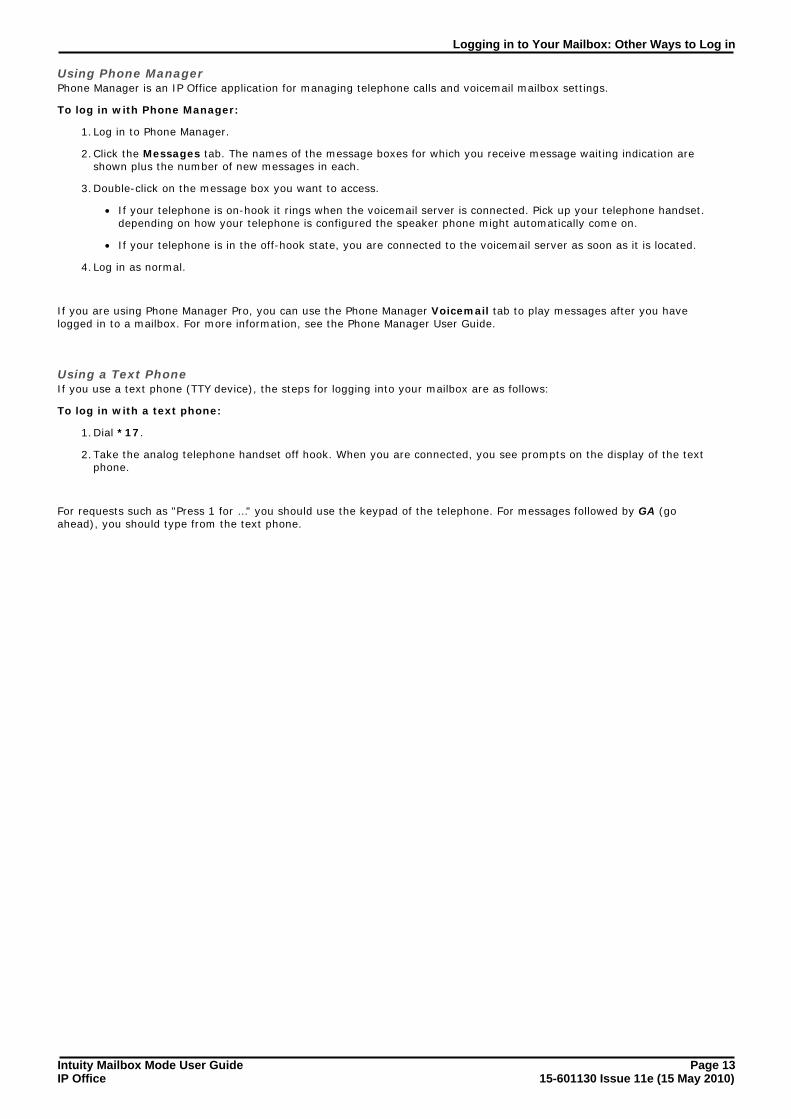
Using Phone ManagerPhone Manager is an IP Office application for managing telephone calls and voicemail mailbox settings.
To log in with Phone Manager:
1.Log in to Phone Manager.
2.Click the Messages tab. The names of the message boxes for which you receive message waiting indication areshown plus the number of new messages in each.
3.Double-click on the message box you want to access.
· If your telephone is on-hook it rings when the voicemail server is connected. Pick up your telephone handset.depending on how your telephone is configured the speaker phone might automatically come on.
· If your telephone is in the off-hook state, you are connected to the voicemail server as soon as it is located.
4.Log in as normal.
If you are using Phone Manager Pro, you can use the Phone Manager Voicemail tab to play messages after you havelogged in to a mailbox. For more information, see the Phone Manager User Guide.
Using a Text PhoneIf you use a text phone (TTY device), the steps for logging into your mailbox are as follows:
To log in with a text phone:
1.Dial *17.
2.Take the analog telephone handset off hook. When you are connected, you see prompts on the display of the textphone.
For requests such as "Press 1 for …" you should use the keypad of the telephone. For messages followed by GA (goahead), you should type from the text phone.


Intuity Mailbox Mode User Guide Page 1515-601130 Issue 11e (15 May 2010)IP Office
Listening to Messages
Chapter 3.
Intuity Mailbox Mode User Guide Page 1615-601130 Issue 11e (15 May 2010)IP Office
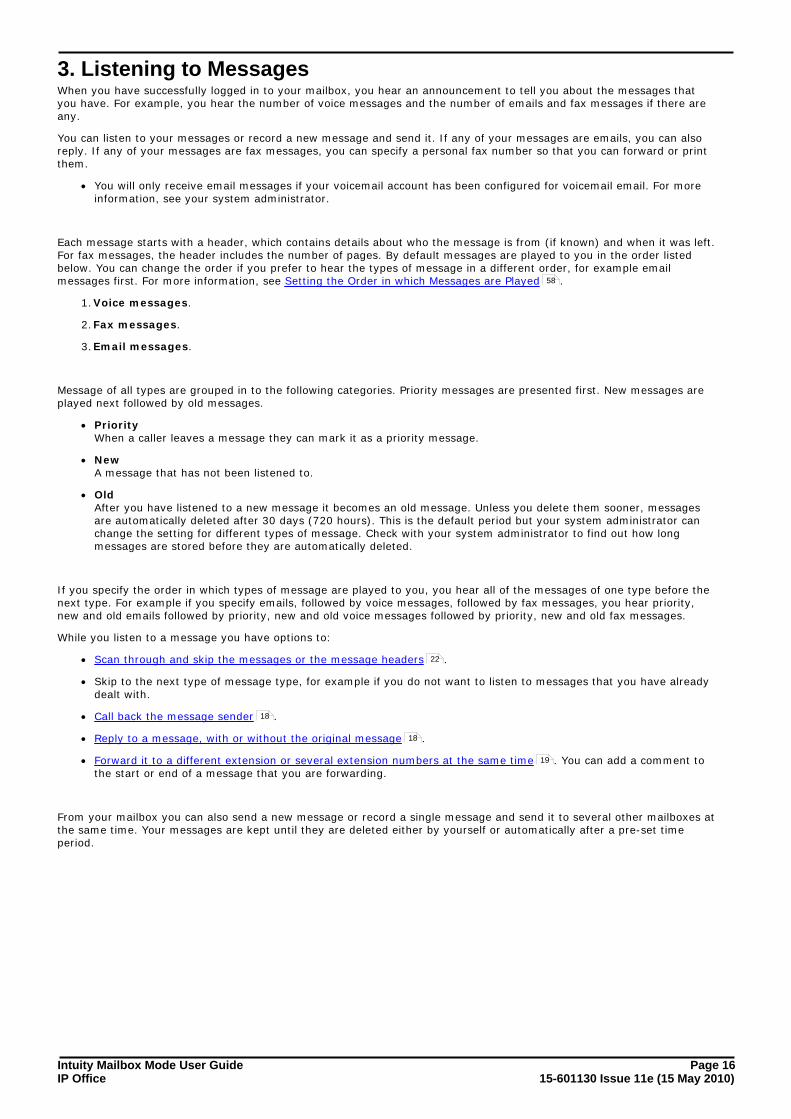
3. Listening to MessagesWhen you have successfully logged in to your mailbox, you hear an announcement to tell you about the messages thatyou have. For example, you hear the number of voice messages and the number of emails and fax messages if there areany.
You can listen to your messages or record a new message and send it. If any of your messages are emails, you can alsoreply. If any of your messages are fax messages, you can specify a personal fax number so that you can forward or printthem.
· You will only receive email messages if your voicemail account has been configured for voicemail email. For moreinformation, see your system administrator.
Each message starts with a header, which contains details about who the message is from (if known) and when it was left.For fax messages, the header includes the number of pages. By default messages are played to you in the order listedbelow. You can change the order if you prefer to hear the types of message in a different order, for example emailmessages first. For more information, see Setting the Order in which Messages are Played .
1.Voice messages.
2.Fax messages.
3.Email messages.
Message of all types are grouped in to the following categories. Priority messages are presented first. New messages areplayed next followed by old messages.
· PriorityWhen a caller leaves a message they can mark it as a priority message.
· NewA message that has not been listened to.
· OldAfter you have listened to a new message it becomes an old message. Unless you delete them sooner, messagesare automatically deleted after 30 days (720 hours). This is the default period but your system administrator canchange the setting for different types of message. Check with your system administrator to find out how longmessages are stored before they are automatically deleted.
If you specify the order in which types of message are played to you, you hear all of the messages of one type before thenext type. For example if you specify emails, followed by voice messages, followed by fax messages, you hear priority,new and old emails followed by priority, new and old voice messages followed by priority, new and old fax messages.
While you listen to a message you have options to:
· Scan through and skip the messages or the message headers .
· Skip to the next type of message type, for example if you do not want to listen to messages that you have alreadydealt with.
· Call back the message sender .
· Reply to a message, with or without the original message .
· Forward it to a different extension or several extension numbers at the same time . You can add a comment tothe start or end of a message that you are forwarding.
From your mailbox you can also send a new message or record a single message and send it to several other mailboxes atthe same time. Your messages are kept until they are deleted either by yourself or automatically after a pre-set timeperiod.
58
22
18
18
19
Intuity Mailbox Mode User Guide Page 1715-601130 Issue 11e (15 May 2010)IP Office
Listening to Messages:
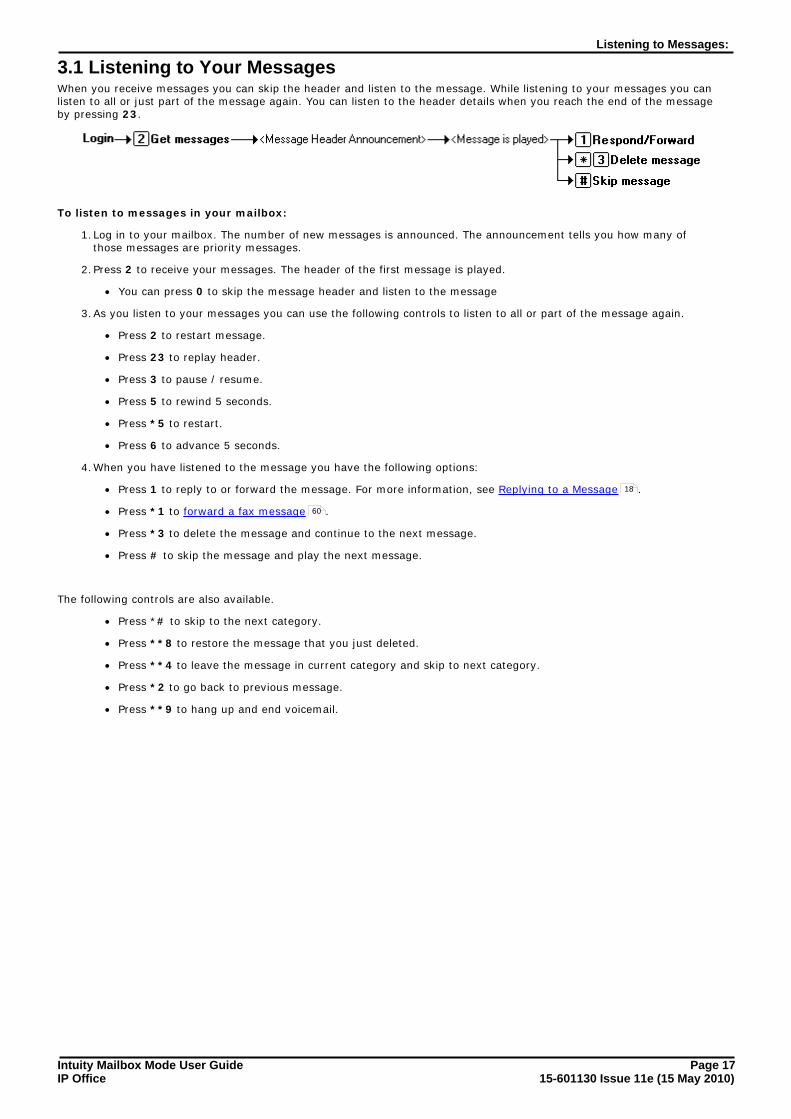
3.1 Listening to Your MessagesWhen you receive messages you can skip the header and listen to the message. While listening to your messages you canlisten to all or just part of the message again. You can listen to the header details when you reach the end of the messageby pressing 23.
To listen to messages in your mailbox:
1.Log in to your mailbox. The number of new messages is announced. The announcement tells you how many ofthose messages are priority messages.
2.Press 2 to receive your messages. The header of the first message is played.
· You can press 0 to skip the message header and listen to the message
3.As you listen to your messages you can use the following controls to listen to all or part of the message again.
· Press 2 to restart message.
· Press 23 to replay header.
· Press 3 to pause / resume.
· Press 5 to rewind 5 seconds.
· Press *5 to restart.
· Press 6 to advance 5 seconds.
4.When you have listened to the message you have the following options:
· Press 1 to reply to or forward the message. For more information, see Replying to a Message .
· Press *1 to forward a fax message .
· Press *3 to delete the message and continue to the next message.
· Press # to skip the message and play the next message.
The following controls are also available.
· Press *# to skip to the next category.
· Press **8 to restore the message that you just deleted.
· Press **4 to leave the message in current category and skip to next category.
· Press *2 to go back to previous message.
· Press **9 to hang up and end voicemail.
18
60
Intuity Mailbox Mode User Guide Page 1815-601130 Issue 11e (15 May 2010)IP Office
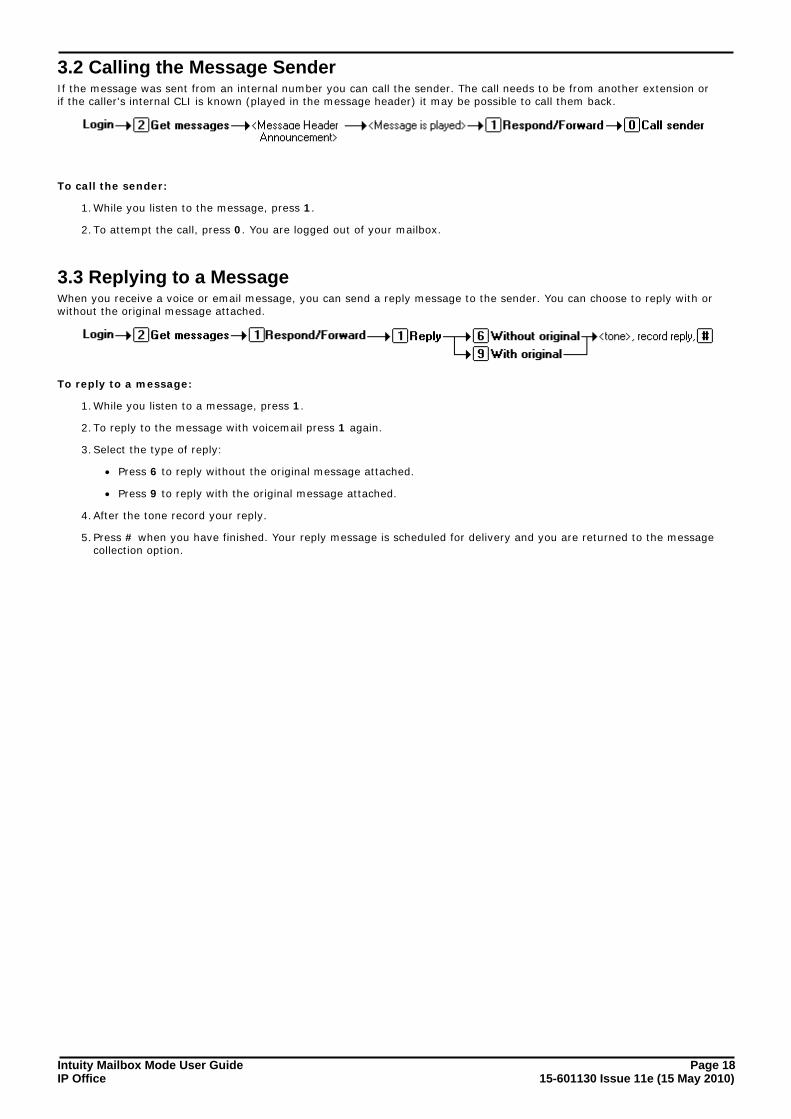
3.2 Calling the Message SenderIf the message was sent from an internal number you can call the sender. The call needs to be from another extension orif the caller's internal CLI is known (played in the message header) it may be possible to call them back.
To call the sender:
1.While you listen to the message, press 1.
2.To attempt the call, press 0. You are logged out of your mailbox.
3.3 Replying to a MessageWhen you receive a voice or email message, you can send a reply message to the sender. You can choose to reply with orwithout the original message attached.
To reply to a message:
1.While you listen to a message, press 1.
2.To reply to the message with voicemail press 1 again.
3.Select the type of reply:
· Press 6 to reply without the original message attached.
· Press 9 to reply with the original message attached.
4.After the tone record your reply.
5.Press # when you have finished. Your reply message is scheduled for delivery and you are returned to the messagecollection option.
Intuity Mailbox Mode User Guide Page 1915-601130 Issue 11e (15 May 2010)IP Office
Listening to Messages: Replying to a Message
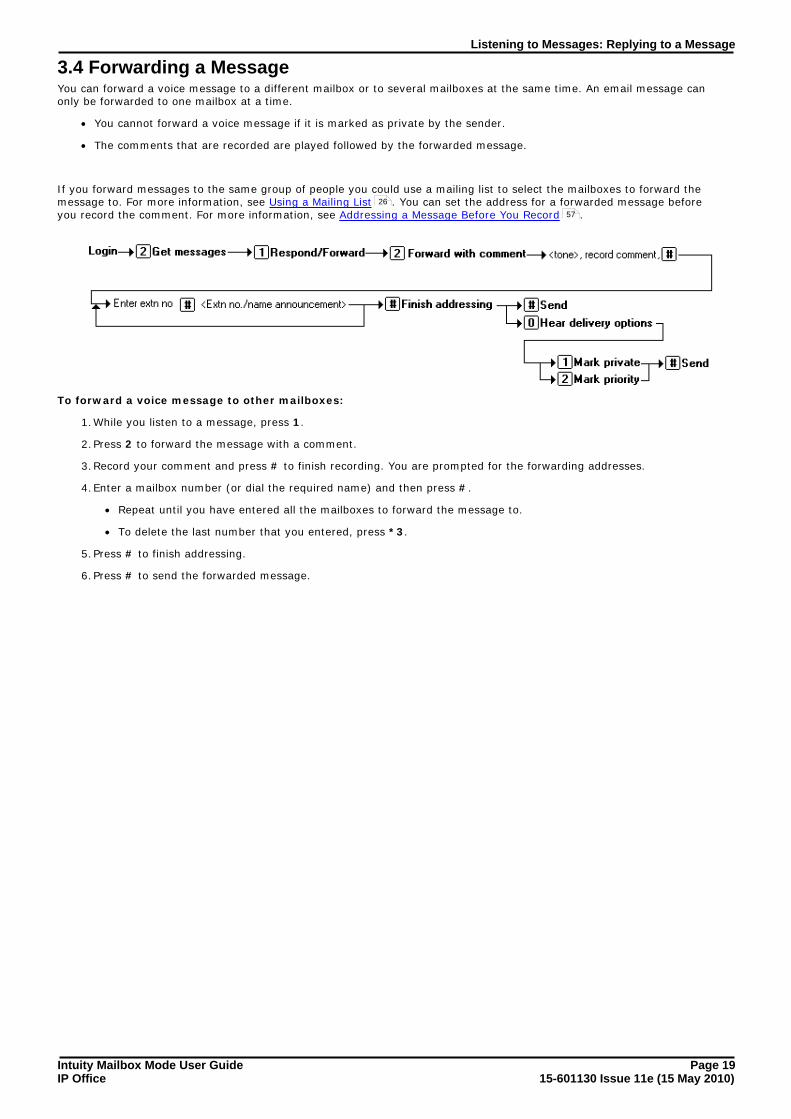
3.4 Forwarding a MessageYou can forward a voice message to a different mailbox or to several mailboxes at the same time. An email message canonly be forwarded to one mailbox at a time.
· You cannot forward a voice message if it is marked as private by the sender.
· The comments that are recorded are played followed by the forwarded message.
If you forward messages to the same group of people you could use a mailing list to select the mailboxes to forward themessage to. For more information, see Using a Mailing List . You can set the address for a forwarded message beforeyou record the comment. For more information, see Addressing a Message Before You Record .
To forward a voice message to other mailboxes:
1.While you listen to a message, press 1.
2.Press 2 to forward the message with a comment.
3.Record your comment and press # to finish recording. You are prompted for the forwarding addresses.
4.Enter a mailbox number (or dial the required name) and then press #.
· Repeat until you have entered all the mailboxes to forward the message to.
· To delete the last number that you entered, press *3.
5.Press # to finish addressing.
6.Press # to send the forwarded message.
26
57
Intuity Mailbox Mode User Guide Page 2015-601130 Issue 11e (15 May 2010)IP Office
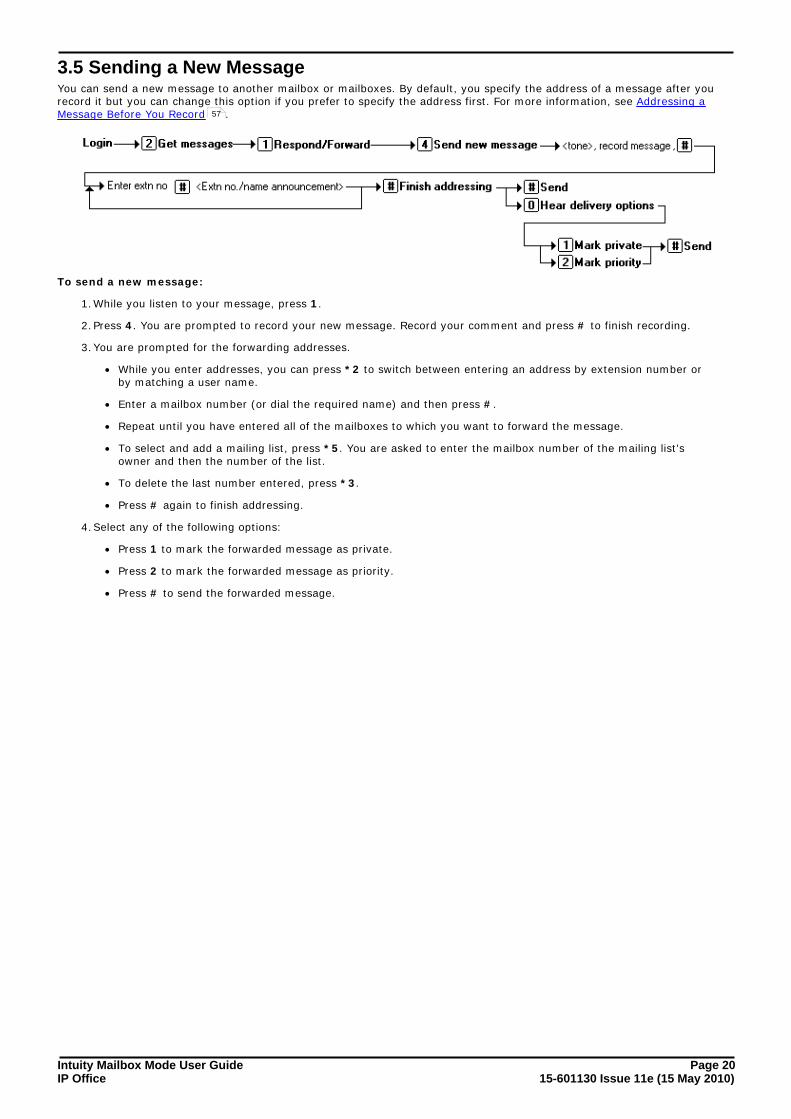
3.5 Sending a New MessageYou can send a new message to another mailbox or mailboxes. By default, you specify the address of a message after yourecord it but you can change this option if you prefer to specify the address first. For more information, see Addressing aMessage Before You Record .
To send a new message:
1.While you listen to your message, press 1.
2.Press 4. You are prompted to record your new message. Record your comment and press # to finish recording.
3.You are prompted for the forwarding addresses.
· While you enter addresses, you can press *2 to switch between entering an address by extension number orby matching a user name.
· Enter a mailbox number (or dial the required name) and then press #.
· Repeat until you have entered all of the mailboxes to which you want to forward the message.
· To select and add a mailing list, press *5. You are asked to enter the mailbox number of the mailing list'sowner and then the number of the list.
· To delete the last number entered, press *3.
· Press # again to finish addressing.
4.Select any of the following options:
· Press 1 to mark the forwarded message as private.
· Press 2 to mark the forwarded message as priority.
· Press # to send the forwarded message.
57
Intuity Mailbox Mode User Guide Page 2115-601130 Issue 11e (15 May 2010)IP Office
Listening to Messages: Sending a New Message
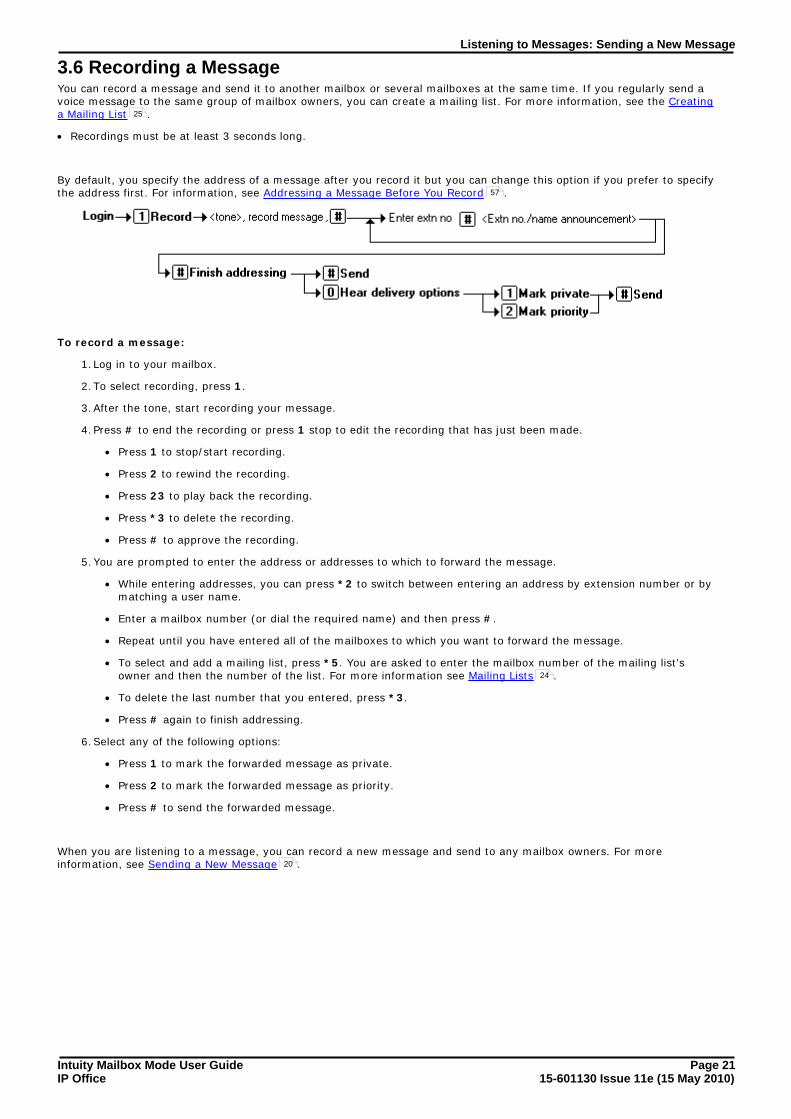
3.6 Recording a MessageYou can record a message and send it to another mailbox or several mailboxes at the same time. If you regularly send avoice message to the same group of mailbox owners, you can create a mailing list. For more information, see the Creatinga Mailing List .
· Recordings must be at least 3 seconds long.
By default, you specify the address of a message after you record it but you can change this option if you prefer to specifythe address first. For information, see Addressing a Message Before You Record .
To record a message:
1.Log in to your mailbox.
2.To select recording, press 1.
3.After the tone, start recording your message.
4.Press # to end the recording or press 1 stop to edit the recording that has just been made.
· Press 1 to stop/start recording.
· Press 2 to rewind the recording.
· Press 23 to play back the recording.
· Press *3 to delete the recording.
· Press # to approve the recording.
5.You are prompted to enter the address or addresses to which to forward the message.
· While entering addresses, you can press *2 to switch between entering an address by extension number or bymatching a user name.
· Enter a mailbox number (or dial the required name) and then press #.
· Repeat until you have entered all of the mailboxes to which you want to forward the message.
· To select and add a mailing list, press *5. You are asked to enter the mailbox number of the mailing list'sowner and then the number of the list. For more information see Mailing Lists .
· To delete the last number that you entered, press *3.
· Press # again to finish addressing.
6.Select any of the following options:
· Press 1 to mark the forwarded message as private.
· Press 2 to mark the forwarded message as priority.
· Press # to send the forwarded message.
When you are listening to a message, you can record a new message and send to any mailbox owners. For moreinformation, see Sending a New Message .
25
57
24
20

Intuity Mailbox Mode User Guide Page 2215-601130 Issue 11e (15 May 2010)IP Office
3.7 Scanning Your MessagesYou can scan through your messages and/or message headers without having to take any further action. The messageheader tells you when a message was received, who left it (if known) and the message length.
To scan your messages:
1.Log in to your mailbox.
2.Press 7 to select scan messages.
3.Select the scan mode required:
· Press 1 to scan the headers and messages.
· Press 2 to scan headers only.
· Press 3 to scan messages only.
4.While your message header or message is playing, you can:
· Press 2 to rewind current message.
· Press 3 to pause/resume.
· Press *7 to exit scan messages.
5.When you are listening to a message you can press 1 to respond or forward the message. You then have theoptions to:
· Press 0 to call the sender of the message .
· Press 1 to leave a voice message in the callers mailbox .
· Press 2 to forward the message to another mailbox .
· Press 4 to send a new message to another mailbox owner .
After you have listened to all of your messages, you are returned to the activity menu.
18
18
19
20

Intuity Mailbox Mode User Guide Page 2315-601130 Issue 11e (15 May 2010)IP Office
Mailing Lists
Chapter 4.
Intuity Mailbox Mode User Guide Page 2415-601130 Issue 11e (15 May 2010)IP Office
4. Mailing ListsWith mailing lists (also known as personal distribution lists or PDLs) you can store sets of mailbox numbers so that youcan send a voice message to several recipients at the same time. This is useful if you often send messages to the samepeople, for example the members of one or more departments or even the whole company.
Your mailbox can have up to 20 mailing lists associated with it. Each list can contain up to 360 mailbox numbers. Lists canbe private or public. Private lists can be used only by you while public lists can be used by other mailbox users when theyforward a message. If you create a public list it cannot be modified by other users. When you address a message, you canselect one of your own mailing lists or a public list from a different mailbox.
If you have set up many mailing lists, it can be useful to scan through them if you need to review them and check howmany members (mailbox numbers) each contains. During a scan you can delete a list.
Using Phone Manager
If you prefer to work with a visual representation of a mailing list, you can use the Phone Manager application if available.Phone Manager enables you to set up or change a mailing list using your computer rather than the telephone handset. Youcan also use a create a new mailing list based on a public list that you did not created.
· Any mailing lists created using your telephone are available within Phone Manager.
· In Phone Manager mailing lists are called personal distribution lists (PDLs).
· Any changes made to PDLs in Phone Manager are reflected when you use your telephone handset to manage yourmailing lists.
For more information, see the Phone Manager User Guide.

Intuity Mailbox Mode User Guide Page 2515-601130 Issue 11e (15 May 2010)IP Office
Mailing Lists:
4.1 Creating a Mailing ListYou can create up to 20 mailing lists for your mailbox. Each mailing list can contain up to 360 mailbox numbers.
· Any mailing list created can be viewed and edited using IP Office Phone Manager. For more in formation, see thePhone Manager User Guide.
To create a mailing list:
1.Log in to your mailbox.
2.Press 5 for personal options.
3.Press 1 for mailing list options.
4.Press 1 to create a new mailing list.
5.Enter a number to identify the list and then press #.
· The list identifying number must be less than 6 digits long. If the number is too long or already in use you areprompted to enter a different number followed by #.
6.Mark the list as private or public.
· Press 1 to mark the list as private
· Press 2 to mark the list as public. A public mailing list can be used by other mailbox owners but a private listcannot.
7.When prompted, start adding mailboxes to the mailing list. To add a mailbox enter the mailbox number and press #. For local mailboxes the mailbox user's name is confirmed. You can also select the following options while you addmailboxes:
· Press *2 to switch to selecting mailboxes by name.
· Press *5 to import the contents of another public mailbox list.
· You are asked to enter the list owner's mailbox number followed by # and then the list number followedby #.
· If the mailbox or list is not valid or the list is private you are returned to the option for creating a mailboxlist in the usual way.
· If the list exists and is public, its contents are imported as long as importing does not result in a list ofmore than 360 entries. Any duplicate entries are automatically removed.
8.Press # to finish adding mailbox addresses. The mailing list can now be used.
When a list is created it can be used to send and forward messages using both the telephone or IP Office Phone Managerapplication. For more information, see Using a Mailing List .
The list can also be changed or deleted using both the telephone or IP Office Phone Manager application. For moreinformation, Managing Mailing Lists .
26
28
Intuity Mailbox Mode User Guide Page 2615-601130 Issue 11e (15 May 2010)IP Office
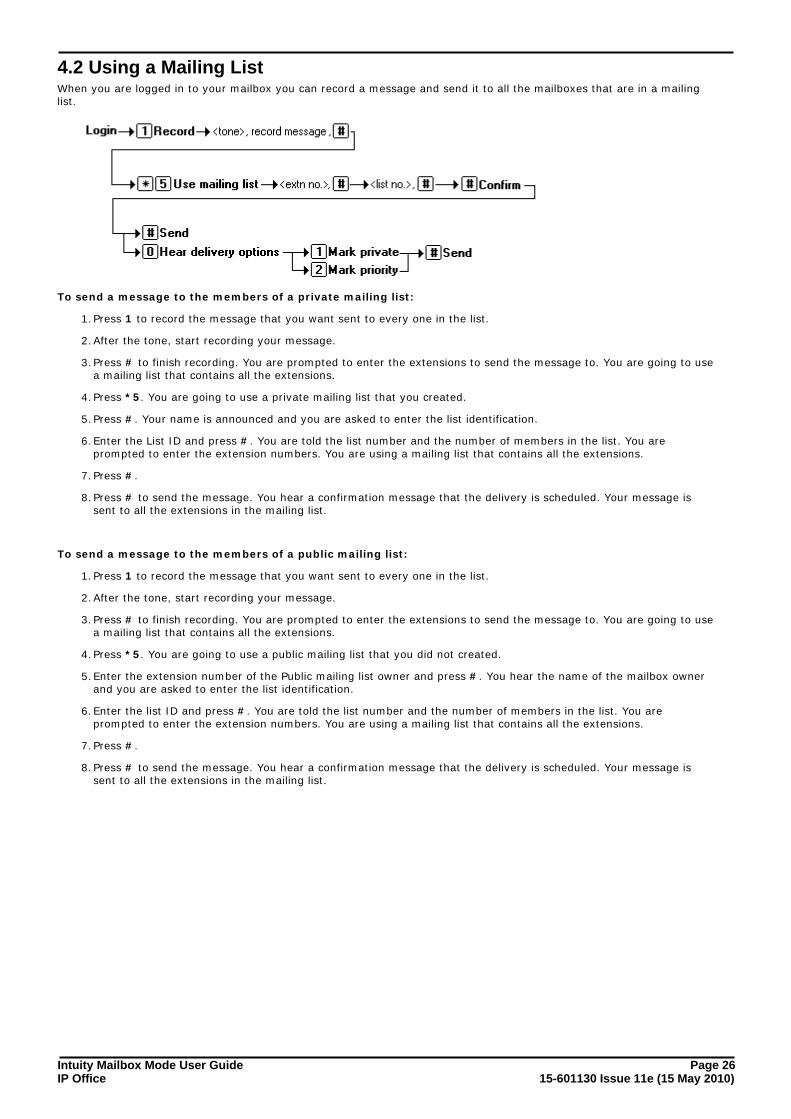
4.2 Using a Mailing ListWhen you are logged in to your mailbox you can record a message and send it to all the mailboxes that are in a mailinglist.
To send a message to the members of a private mailing list:
1.Press 1 to record the message that you want sent to every one in the list.
2.After the tone, start recording your message.
3.Press # to finish recording. You are prompted to enter the extensions to send the message to. You are going to usea mailing list that contains all the extensions.
4.Press *5. You are going to use a private mailing list that you created.
5.Press #. Your name is announced and you are asked to enter the list identification.
6.Enter the List ID and press #. You are told the list number and the number of members in the list. You areprompted to enter the extension numbers. You are using a mailing list that contains all the extensions.
7.Press #.
8.Press # to send the message. You hear a confirmation message that the delivery is scheduled. Your message issent to all the extensions in the mailing list.
To send a message to the members of a public mailing list:
1.Press 1 to record the message that you want sent to every one in the list.
2.After the tone, start recording your message.
3.Press # to finish recording. You are prompted to enter the extensions to send the message to. You are going to usea mailing list that contains all the extensions.
4.Press *5. You are going to use a public mailing list that you did not created.
5.Enter the extension number of the Public mailing list owner and press #. You hear the name of the mailbox ownerand you are asked to enter the list identification.
6.Enter the list ID and press #. You are told the list number and the number of members in the list. You areprompted to enter the extension numbers. You are using a mailing list that contains all the extensions.
7.Press #.
8.Press # to send the message. You hear a confirmation message that the delivery is scheduled. Your message issent to all the extensions in the mailing list.
Intuity Mailbox Mode User Guide Page 2715-601130 Issue 11e (15 May 2010)IP Office
Mailing Lists: Using a Mailing List
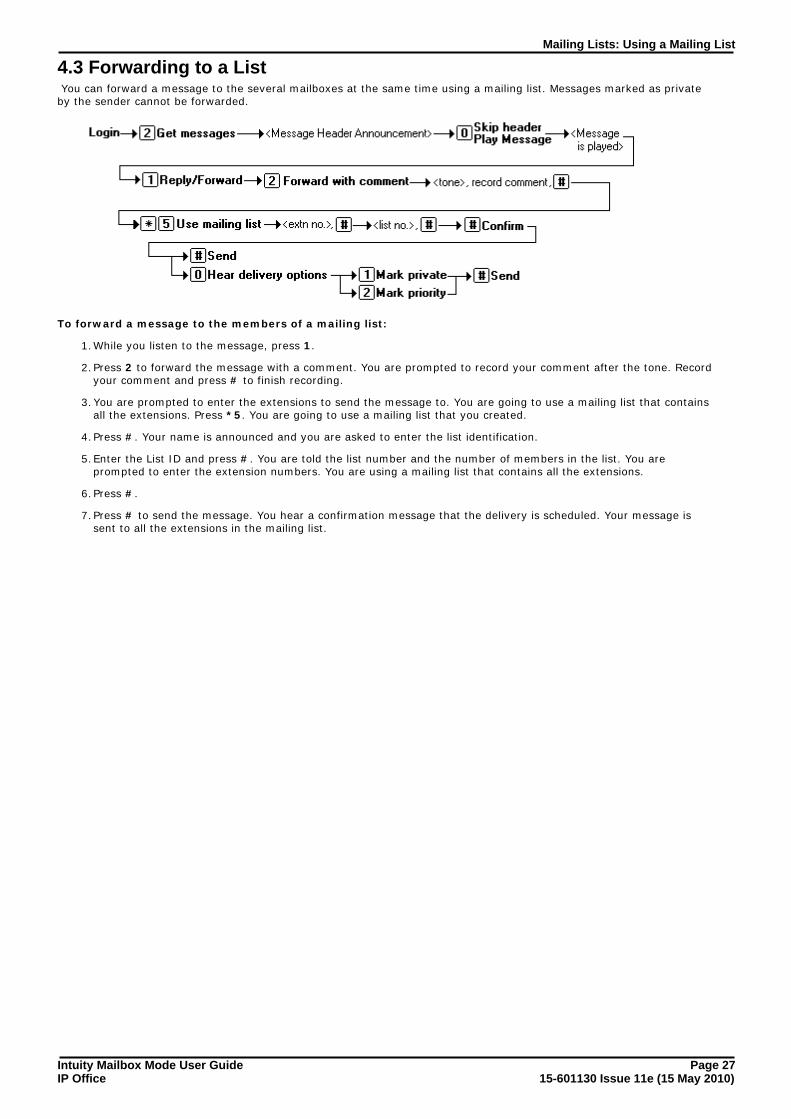
4.3 Forwarding to a List You can forward a message to the several mailboxes at the same time using a mailing list. Messages marked as privateby the sender cannot be forwarded.
To forward a message to the members of a mailing list:
1.While you listen to the message, press 1.
2.Press 2 to forward the message with a comment. You are prompted to record your comment after the tone. Recordyour comment and press # to finish recording.
3.You are prompted to enter the extensions to send the message to. You are going to use a mailing list that containsall the extensions. Press *5. You are going to use a mailing list that you created.
4.Press #. Your name is announced and you are asked to enter the list identification.
5.Enter the List ID and press #. You are told the list number and the number of members in the list. You areprompted to enter the extension numbers. You are using a mailing list that contains all the extensions.
6.Press #.
7.Press # to send the message. You hear a confirmation message that the delivery is scheduled. Your message issent to all the extensions in the mailing list.
Intuity Mailbox Mode User Guide Page 2815-601130 Issue 11e (15 May 2010)IP Office
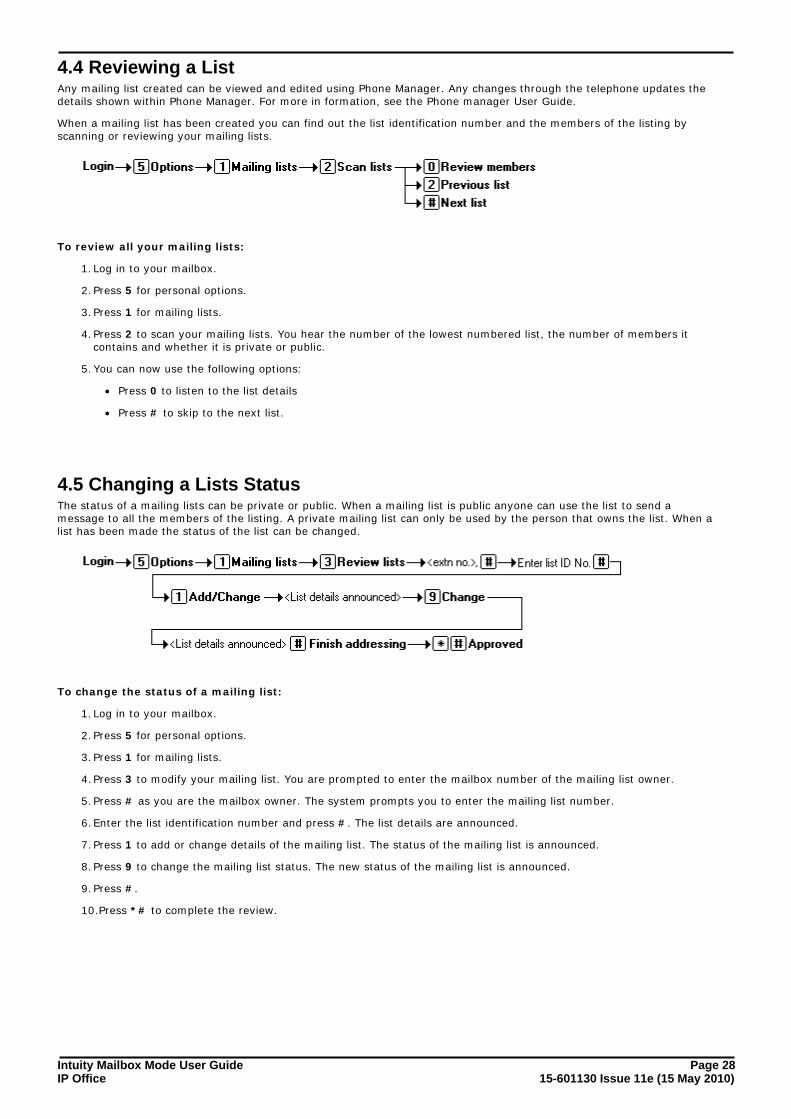
4.4 Reviewing a ListAny mailing list created can be viewed and edited using Phone Manager. Any changes through the telephone updates thedetails shown within Phone Manager. For more in formation, see the Phone manager User Guide.
When a mailing list has been created you can find out the list identification number and the members of the listing byscanning or reviewing your mailing lists.
To review all your mailing lists:
1.Log in to your mailbox.
2.Press 5 for personal options.
3.Press 1 for mailing lists.
4.Press 2 to scan your mailing lists. You hear the number of the lowest numbered list, the number of members itcontains and whether it is private or public.
5.You can now use the following options:
· Press 0 to listen to the list details
· Press # to skip to the next list.
4.5 Changing a Lists StatusThe status of a mailing lists can be private or public. When a mailing list is public anyone can use the list to send amessage to all the members of the listing. A private mailing list can only be used by the person that owns the list. When alist has been made the status of the list can be changed.
To change the status of a mailing list:
1.Log in to your mailbox.
2.Press 5 for personal options.
3.Press 1 for mailing lists.
4.Press 3 to modify your mailing list. You are prompted to enter the mailbox number of the mailing list owner.
5.Press # as you are the mailbox owner. The system prompts you to enter the mailing list number.
6.Enter the list identification number and press #. The list details are announced.
7.Press 1 to add or change details of the mailing list. The status of the mailing list is announced.
8.Press 9 to change the mailing list status. The new status of the mailing list is announced.
9.Press #.
10.Press *# to complete the review.
Intuity Mailbox Mode User Guide Page 2915-601130 Issue 11e (15 May 2010)IP Office
Mailing Lists: Adding Members to a List
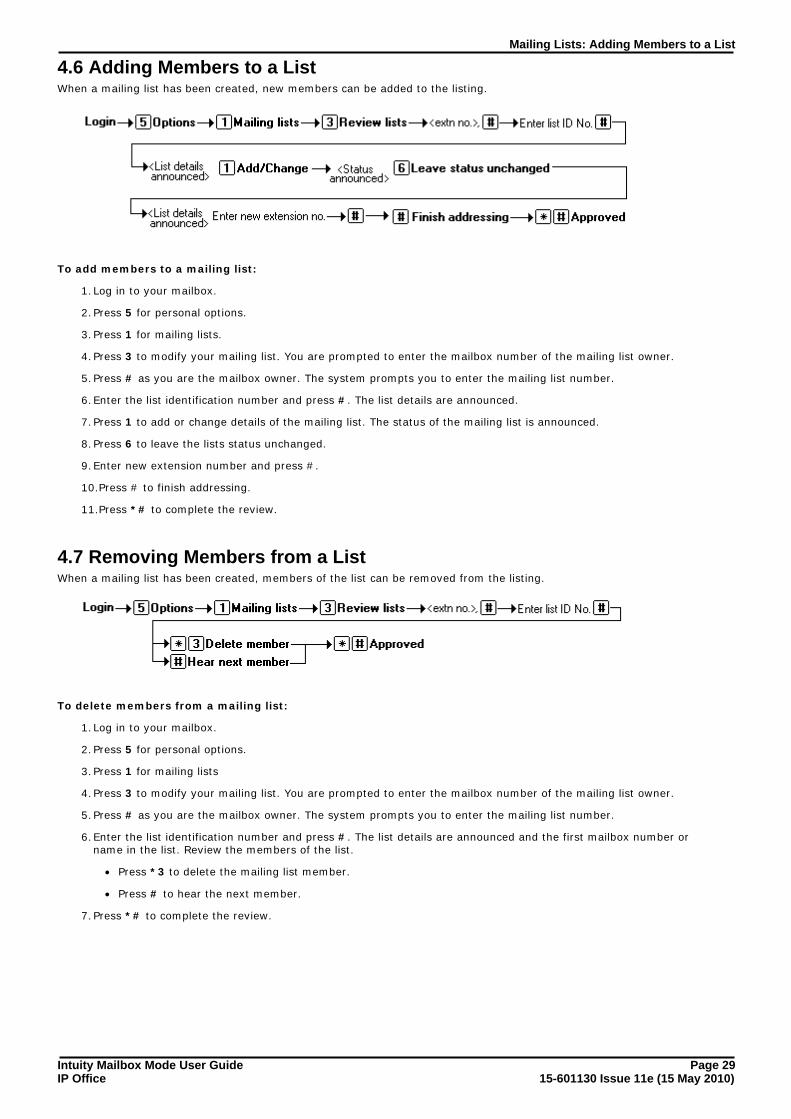
4.6 Adding Members to a ListWhen a mailing list has been created, new members can be added to the listing.
To add members to a mailing list:
1.Log in to your mailbox.
2.Press 5 for personal options.
3.Press 1 for mailing lists.
4.Press 3 to modify your mailing list. You are prompted to enter the mailbox number of the mailing list owner.
5.Press # as you are the mailbox owner. The system prompts you to enter the mailing list number.
6.Enter the list identification number and press #. The list details are announced.
7.Press 1 to add or change details of the mailing list. The status of the mailing list is announced.
8.Press 6 to leave the lists status unchanged.
9.Enter new extension number and press #.
10.Press # to finish addressing.
11.Press *# to complete the review.
4.7 Removing Members from a ListWhen a mailing list has been created, members of the list can be removed from the listing.
To delete members from a mailing list:
1.Log in to your mailbox.
2.Press 5 for personal options.
3.Press 1 for mailing lists
4.Press 3 to modify your mailing list. You are prompted to enter the mailbox number of the mailing list owner.
5.Press # as you are the mailbox owner. The system prompts you to enter the mailing list number.
6.Enter the list identification number and press #. The list details are announced and the first mailbox number orname in the list. Review the members of the list.
· Press *3 to delete the mailing list member.
· Press # to hear the next member.
7.Press *# to complete the review.

Intuity Mailbox Mode User Guide Page 3015-601130 Issue 11e (15 May 2010)IP Office
4.8 Deleting a ListIf a mailing list is no longer required, the listing can be deleted.
To delete a mailing list:
1.Log in to your mailbox.
2.Press 5 for personal options.
3.Press 1 for mailing lists.
4.Press 2 to scan your mailing lists.
5.Press # to skip the mailing lists not required.
6.Press *3 when you hear the details of the mailing list that you want to delete.
7.Press *7 to return to the activity menu.

Intuity Mailbox Mode User Guide Page 3115-601130 Issue 11e (15 May 2010)IP Office
Personal Greetings
Chapter 5.

Intuity Mailbox Mode User Guide Page 3215-601130 Issue 11e (15 May 2010)IP Office
5. Personal GreetingsBy default, callers who are directed to your mailbox hear the system greeting 'Your call is being answered by IP Office.<Name> is not available. To leave a message wait for the tone,'. The default system greeting cannot be changed.However, you can replace the system greeting with a greeting that you have recorded.
You can record a library of up to 9 personal greetings. These are the greeting messages heard by callers when they aredirected to your voicemail. You can assign a different greeting for specific call situations. For example, you can assign adifferent greeting for calls received internally to those received from outside the company. You can also use a personalgreeting message to tell callers about available transfer options .
Any greeting recorded using the telephone user interface can be accessed using IP Office Phone Manager where greetingscan be named, assigned, and re-recorded. For more information, see the Phone Manager User Guide.
There are three types of greetings:
· Temporary .
· Hunt Group .
· Personal .
The process for using greetings involves the following key steps:
1.Record your greetings .
2.Assign a greeting to a call type. There are two ways to assign greetings to call types:
· You can select the call type and then assign the greeting .
· Select a greeting and assign it to a type of call .
5.1 Temporary GreetingsA temporary greeting can be created and played for all call types. For example, a temporary greeting might be used whenyou are away from the office, giving the caller an alternative contact person. If you are using a temporary greeting, noother greetings are active. For more information, see Creating a Temporary Greeting .
41
32
33
34
35
36
37
40
Intuity Mailbox Mode User Guide Page 3315-601130 Issue 11e (15 May 2010)IP Office
Personal Greetings: Temporary Greetings
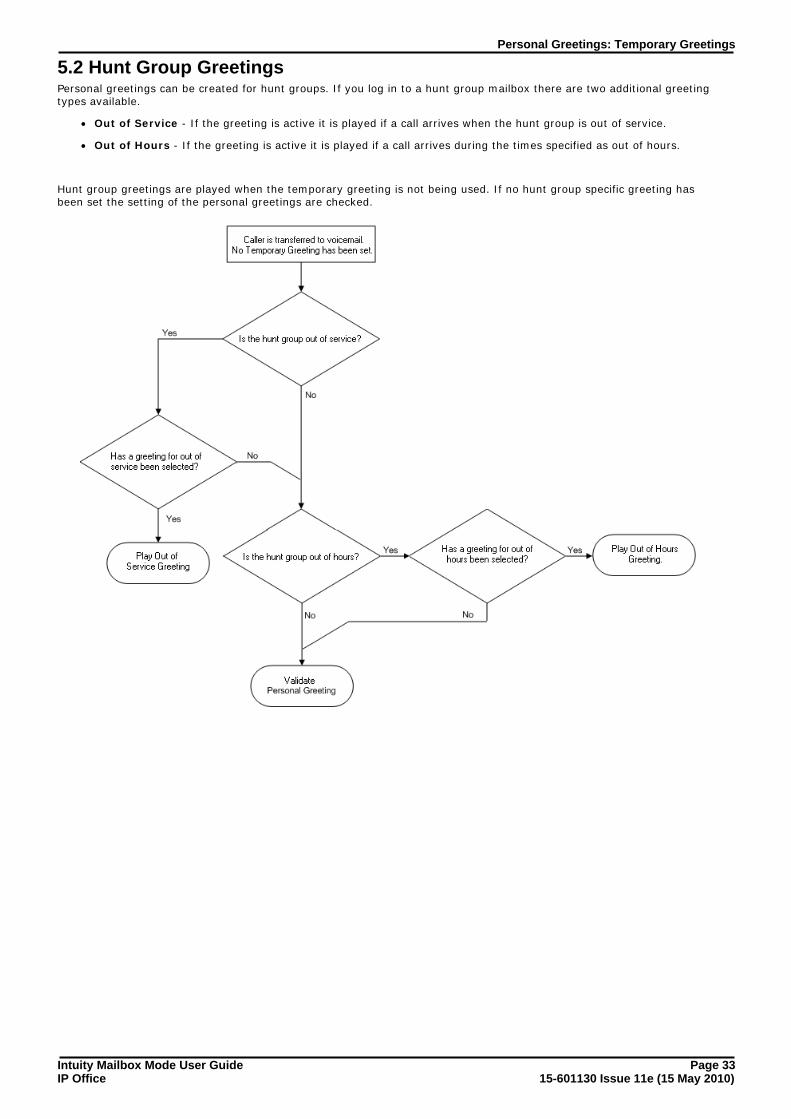
5.2 Hunt Group GreetingsPersonal greetings can be created for hunt groups. If you log in to a hunt group mailbox there are two additional greetingtypes available.
· Out of Service - If the greeting is active it is played if a call arrives when the hunt group is out of service.
· Out of Hours - If the greeting is active it is played if a call arrives during the times specified as out of hours.
Hunt group greetings are played when the temporary greeting is not being used. If no hunt group specific greeting hasbeen set the setting of the personal greetings are checked.

Intuity Mailbox Mode User Guide Page 3415-601130 Issue 11e (15 May 2010)IP Office
5.3 Personal GreetingsPersonal greetings are played when the temporary greeting is not being used. If no personal greetings are applied callerswho are directed to your mailbox hear the default system greeting - "Your call is being answered by IP Office. <Name> isnot available. To leave a message wait for the tone, ...".
Personal greetings can be created for certain call types. For example, if you are busy on a call anyone calling yourextension can hear a personalized greeting stating that you are on a call, but are in the office. There are six types ofpersonal greetings:
· All Calls
· Internal Calls
· External Calls
· Number engaged calls
· No reply calls
· Default
When you assign a personal greeting for more than one call type, the greeting used for any call is decided using an orderof priority. The priority order is shown in the flow chart. If the call is to a hunt group, the hunt group greetings arechecked before the personal greetings.
Intuity Mailbox Mode User Guide Page 3515-601130 Issue 11e (15 May 2010)IP Office
Personal Greetings: Personal Greetings
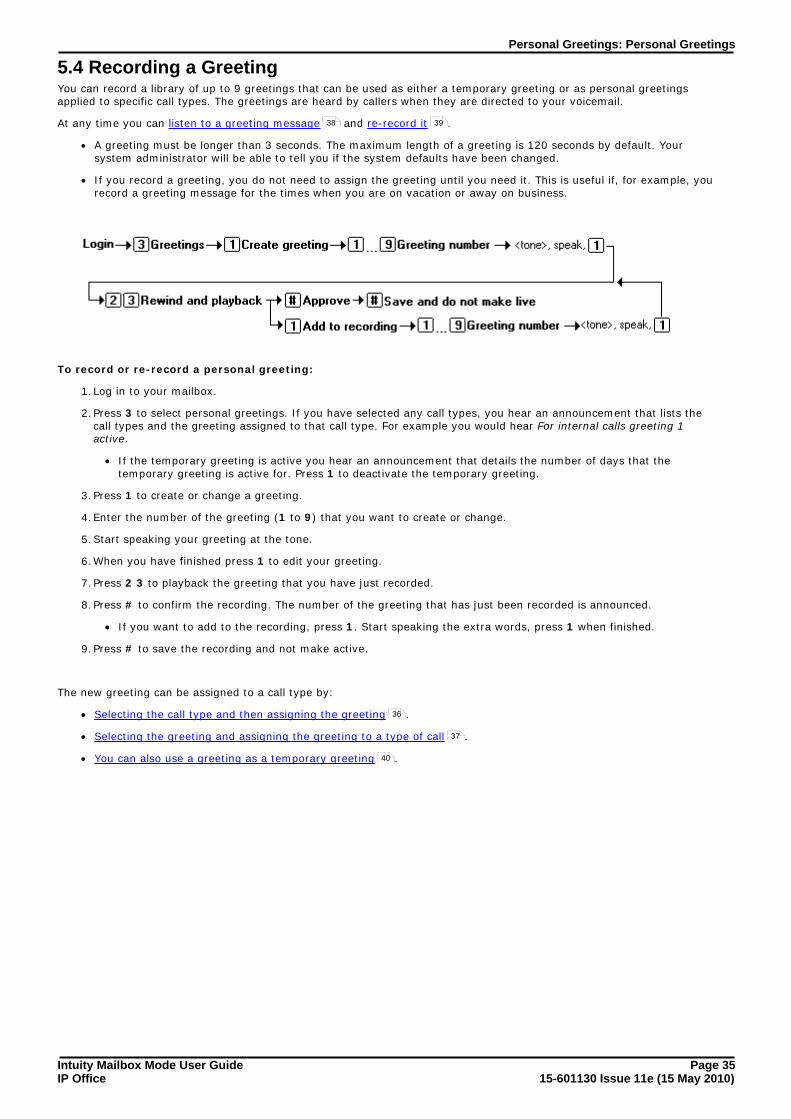
5.4 Recording a GreetingYou can record a library of up to 9 greetings that can be used as either a temporary greeting or as personal greetingsapplied to specific call types. The greetings are heard by callers when they are directed to your voicemail.
At any time you can listen to a greeting message and re-record it .
· A greeting must be longer than 3 seconds. The maximum length of a greeting is 120 seconds by default. Yoursystem administrator will be able to tell you if the system defaults have been changed.
· If you record a greeting, you do not need to assign the greeting until you need it. This is useful if, for example, yourecord a greeting message for the times when you are on vacation or away on business.
To record or re-record a personal greeting:
1.Log in to your mailbox.
2.Press 3 to select personal greetings. If you have selected any call types, you hear an announcement that lists thecall types and the greeting assigned to that call type. For example you would hear For internal calls greeting 1active.
· If the temporary greeting is active you hear an announcement that details the number of days that thetemporary greeting is active for. Press 1 to deactivate the temporary greeting.
3.Press 1 to create or change a greeting.
4.Enter the number of the greeting (1 to 9) that you want to create or change.
5.Start speaking your greeting at the tone.
6.When you have finished press 1 to edit your greeting.
7.Press 2 3 to playback the greeting that you have just recorded.
8.Press # to confirm the recording. The number of the greeting that has just been recorded is announced.
· If you want to add to the recording, press 1. Start speaking the extra words, press 1 when finished.
9.Press # to save the recording and not make active.
The new greeting can be assigned to a call type by:
· Selecting the call type and then assigning the greeting .
· Selecting the greeting and assigning the greeting to a type of call .
· You can also use a greeting as a temporary greeting .
38 39
36
37
40

Intuity Mailbox Mode User Guide Page 3615-601130 Issue 11e (15 May 2010)IP Office
5.5 Administer GreetingsWhen you have recorded greetings, you can select the call type and then assign the greeting. When you assign a personalgreeting for more than one call type, the greeting used for any call is decided using an order of priority. For moreinformation, see Call Types and Greetings .
To assign a call type to a greeting:
1.Log in to your mailbox.
2.Press 3 for personal greetings. If you have selected any call types, you hear an announcement that lists the calltypes and the greeting assigned to that call type. For example you would hear For internal calls greeting 1 active.
3.Press 4 to Administer Call Types.
4.Press 1 to activate a call type. You hear a message to confirm the call types that are currently identified.
5.Select the required call type.
· If you select 9 for temporary greeting, no other greetings are active. For more information, see Creating aTemporary Greeting .
· The options 6 (Out of hours greeting) and 7 (Out of service greeting) are only available from hunt groupmailboxes.
6.Enter the personal greeting number to assign to the call type selected.
7.Press # when you have finished to return to the greetings menu.
To deactivate a call type:
1.Log in to your mailbox.
2.Press 3 for personal greetings. If you have selected any call types, you hear an announcement that lists the calltypes and the greeting assigned to that call type. For example you would hear For internal calls greeting 1 active.
3.Press 4 to Administer Call Types.
4.Press 2 to deactivate a call type. You hear a message to confirm the call types that are currently identified.
5.Select the required call type to deactivate.
6.Press # when you have finished to return to the greetings menu.
32
40

Intuity Mailbox Mode User Guide Page 3715-601130 Issue 11e (15 May 2010)IP Office
Personal Greetings: Administer Greetings
5.6 Activating a GreetingWhen you have recorded greetings, you can select the greeting and then assign the call type. When you assign a personalgreeting for more than one call type, the greeting used for any call is decided using an order of priority. For moreinformation, see Personal Greetings:Overview .
To assign a personal greeting to a call type:
1.Log in to your mailbox.
2.Press 3 for personal greetings. If you have selected any call types, you hear an announcement that lists the calltypes and the greeting assigned to that call type. For example you would hear For internal calls greeting 1 active.
3.Press 3 for Activate Greeting. You hear a message to confirm the call types that are currently identified.
4.Enter the personal greeting number to assign to a call type.
5.Select the required call type.
6.Press # when you have finished to return to the greetings menu.
5.7 Deactivate a GreetingWhen a greeting has been assigned to a call type, you can deactivate the greeting at any time. For example, greeting 1has been recorded and assigned to the call type 'all calls'. New greetings have been recorded and assigned to the calltypes 'busy' and 'no answer'. Any caller transferred to voicemail will hear the greeting assigned to the call type 'all calls'and not the applicable 'busy' or 'no answer' greeting. The greeting assigned for 'all calls' needs to be deactivated so thatany caller transferred to voicemail will hear the appropriate greeting. When you activate greetings for more than one calltype, the greeting used is decided using an order of priority .
To deactivate a greeting:
1.Log in to your mailbox.
2.Press 3 for personal greetings. If you have selected any call types, you hear an announcement that lists the calltypes and the greeting assigned to that call type. For example you would hear For internal calls greeting 1 active.
3.Press 0 to listen to a greeting.
4.When you are prompted, enter the number of the greeting to listen to (1 to 9). The greeting number and status isplayed.
5.Press *8 to deactivate the greeting. The greeting is not deleted but is no longer associated with the call type.
32
32
Intuity Mailbox Mode User Guide Page 3815-601130 Issue 11e (15 May 2010)IP Office
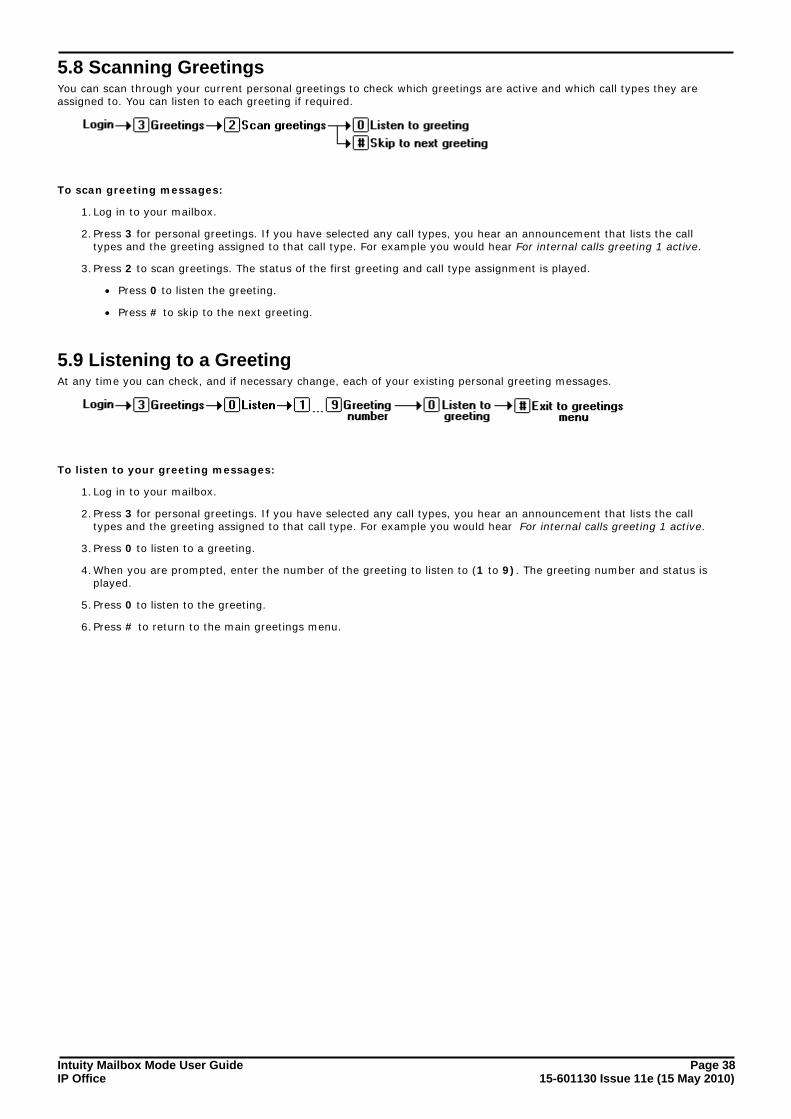
5.8 Scanning GreetingsYou can scan through your current personal greetings to check which greetings are active and which call types they areassigned to. You can listen to each greeting if required.
To scan greeting messages:
1.Log in to your mailbox.
2.Press 3 for personal greetings. If you have selected any call types, you hear an announcement that lists the calltypes and the greeting assigned to that call type. For example you would hear For internal calls greeting 1 active.
3.Press 2 to scan greetings. The status of the first greeting and call type assignment is played.
· Press 0 to listen the greeting.
· Press # to skip to the next greeting.
5.9 Listening to a GreetingAt any time you can check, and if necessary change, each of your existing personal greeting messages.
To listen to your greeting messages:
1.Log in to your mailbox.
2.Press 3 for personal greetings. If you have selected any call types, you hear an announcement that lists the calltypes and the greeting assigned to that call type. For example you would hear For internal calls greeting 1 active.
3.Press 0 to listen to a greeting.
4.When you are prompted, enter the number of the greeting to listen to (1 to 9). The greeting number and status isplayed.
5.Press 0 to listen to the greeting.
6.Press # to return to the main greetings menu.
Intuity Mailbox Mode User Guide Page 3915-601130 Issue 11e (15 May 2010)IP Office
Personal Greetings: Listening to a Greeting
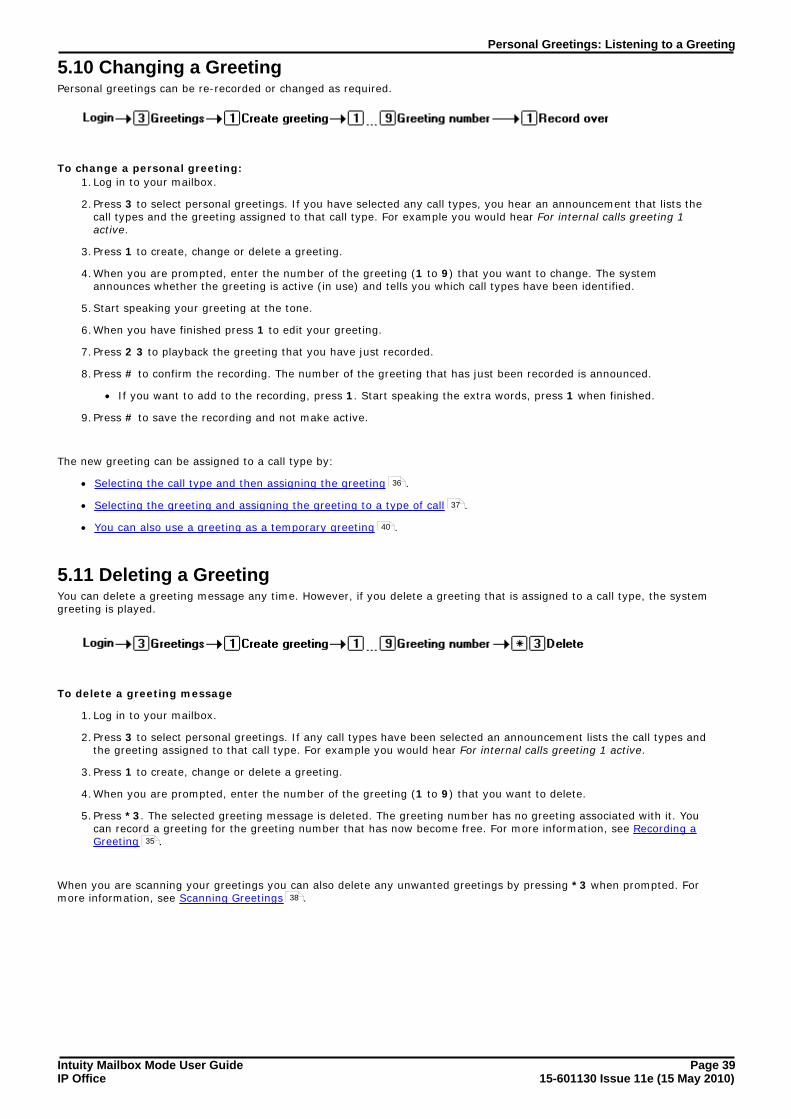
5.10 Changing a GreetingPersonal greetings can be re-recorded or changed as required.
To change a personal greeting:
1.Log in to your mailbox.
2.Press 3 to select personal greetings. If you have selected any call types, you hear an announcement that lists thecall types and the greeting assigned to that call type. For example you would hear For internal calls greeting 1active.
3.Press 1 to create, change or delete a greeting.
4.When you are prompted, enter the number of the greeting (1 to 9) that you want to change. The systemannounces whether the greeting is active (in use) and tells you which call types have been identified.
5.Start speaking your greeting at the tone.
6.When you have finished press 1 to edit your greeting.
7.Press 2 3 to playback the greeting that you have just recorded.
8.Press # to confirm the recording. The number of the greeting that has just been recorded is announced.
· If you want to add to the recording, press 1. Start speaking the extra words, press 1 when finished.
9.Press # to save the recording and not make active.
The new greeting can be assigned to a call type by:
· Selecting the call type and then assigning the greeting .
· Selecting the greeting and assigning the greeting to a type of call .
· You can also use a greeting as a temporary greeting .
5.11 Deleting a GreetingYou can delete a greeting message any time. However, if you delete a greeting that is assigned to a call type, the systemgreeting is played.
To delete a greeting message
1.Log in to your mailbox.
2.Press 3 to select personal greetings. If any call types have been selected an announcement lists the call types andthe greeting assigned to that call type. For example you would hear For internal calls greeting 1 active.
3.Press 1 to create, change or delete a greeting.
4.When you are prompted, enter the number of the greeting (1 to 9) that you want to delete.
5.Press *3. The selected greeting message is deleted. The greeting number has no greeting associated with it. Youcan record a greeting for the greeting number that has now become free. For more information, see Recording aGreeting .
When you are scanning your greetings you can also delete any unwanted greetings by pressing *3 when prompted. Formore information, see Scanning Greetings .
36
37
40
35
38
Intuity Mailbox Mode User Guide Page 4015-601130 Issue 11e (15 May 2010)IP Office
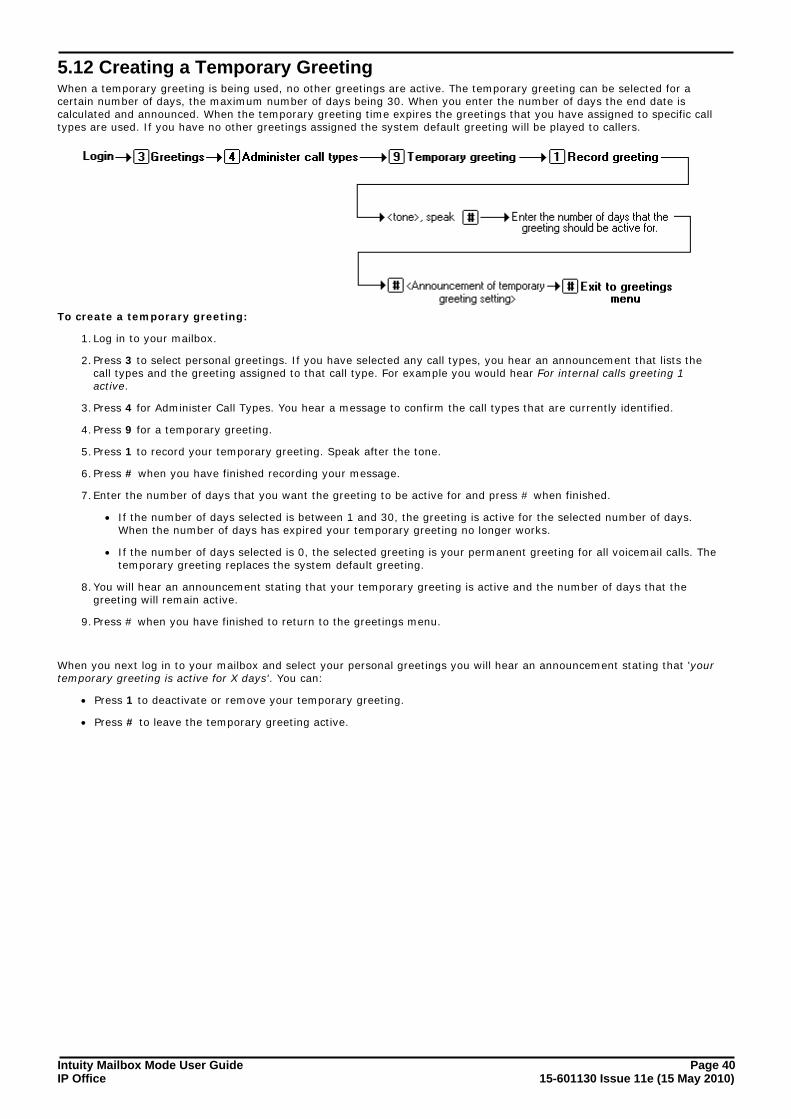
5.12 Creating a Temporary GreetingWhen a temporary greeting is being used, no other greetings are active. The temporary greeting can be selected for acertain number of days, the maximum number of days being 30. When you enter the number of days the end date iscalculated and announced. When the temporary greeting time expires the greetings that you have assigned to specific calltypes are used. If you have no other greetings assigned the system default greeting will be played to callers.
To create a temporary greeting:
1.Log in to your mailbox.
2.Press 3 to select personal greetings. If you have selected any call types, you hear an announcement that lists thecall types and the greeting assigned to that call type. For example you would hear For internal calls greeting 1active.
3.Press 4 for Administer Call Types. You hear a message to confirm the call types that are currently identified.
4.Press 9 for a temporary greeting.
5.Press 1 to record your temporary greeting. Speak after the tone.
6.Press # when you have finished recording your message.
7.Enter the number of days that you want the greeting to be active for and press # when finished.
· If the number of days selected is between 1 and 30, the greeting is active for the selected number of days.When the number of days has expired your temporary greeting no longer works.
· If the number of days selected is 0, the selected greeting is your permanent greeting for all voicemail calls. Thetemporary greeting replaces the system default greeting.
8.You will hear an announcement stating that your temporary greeting is active and the number of days that thegreeting will remain active.
9.Press # when you have finished to return to the greetings menu.
When you next log in to your mailbox and select your personal greetings you will hear an announcement stating that 'yourtemporary greeting is active for X days'. You can:
· Press 1 to deactivate or remove your temporary greeting.
· Press # to leave the temporary greeting active.

Intuity Mailbox Mode User Guide Page 4115-601130 Issue 11e (15 May 2010)IP Office
Personal Greetings: Creating a Temporary Greeting
5.13 Giving Callers a Transfer OptionYour system administrator can set up a maximum of three transfer options. If any transfer options have been created anycaller who is directed to your voicemail can be given the option to be transferred to a different extension. The transferoptions available are 0,2 and 3. Ideally a transfer option should be to an extension where a person is expected to answer.If a transfer results in the caller being diverted to a mailbox on the same system, they will be returned to your voicemailbox.
If you are using the transfer options you need to record a new greeting message to inform callers that if they press 0, 2 or3 they will be transferred accordingly . For more information, see Recording a Greeting .
· If you prefer, you can keep these options hidden and reserve them for personal use with friends and family orspecial callers such as your manager or certain customers. In this case, you should not record a new greetingmessage but you do need to tell each caller the option that you would like them to use.
Transfer destinations can also be created using the Phone Manager application. If your system administrator has grantedyou the required permissions you can create and change the transfer option destination. A greeting can also be recordedusing Phone Manager to inform the caller of the transfer options available. If you do not have the access permission, yoursystem administrator needs to assign the transfer numbers for you.
35


Intuity Mailbox Mode User Guide Page 4315-601130 Issue 11e (15 May 2010)IP Office
Voicemail Notification
Chapter 6.
Intuity Mailbox Mode User Guide Page 4415-601130 Issue 11e (15 May 2010)IP Office
6. Voicemail NotificationYou can receive notification of a new voice message by using the Ringback or Outcalling features.
· RingbackNotification is received at your own extension number. The voicemail system calls you if you have new messages.This is useful when you are using a telephone that does not have a message waiting lamp or display, for example atraditional analogue telephone. For more information, see Turning Ringback On or Off .
· OutcallingNotification is received at the destinations specified. When you receive notification of a new voice message youcan collect the message from the destination at which you receive the notification. For more information, see Answering Outcalling Calls . You can amend the outcalling settings from your telephone handset. If thedestination specified is an internal number, outcalling will not go to voicemail if it is not answered.
6.1 Turning Ringback On or OffRingback is a feature where the voicemail system calls you if you have new messages. It waits until your telephone is inuse, to confirm that you are present, and calls you when you end your next call. You can switch voicemail ringback on oroff at any time.
· Ringback is not the same as outcalling. Ringback works with your own extension number. Outcalling can be configuredto call a number other than your own extension.
To turn on ringback:
1.At your extension, dial *48.
To turn off ringback:
1.At your extension, dial *49.
44
54
Intuity Mailbox Mode User Guide Page 4515-601130 Issue 11e (15 May 2010)IP Office
Voicemail Notification: Turning Ringback On or Off
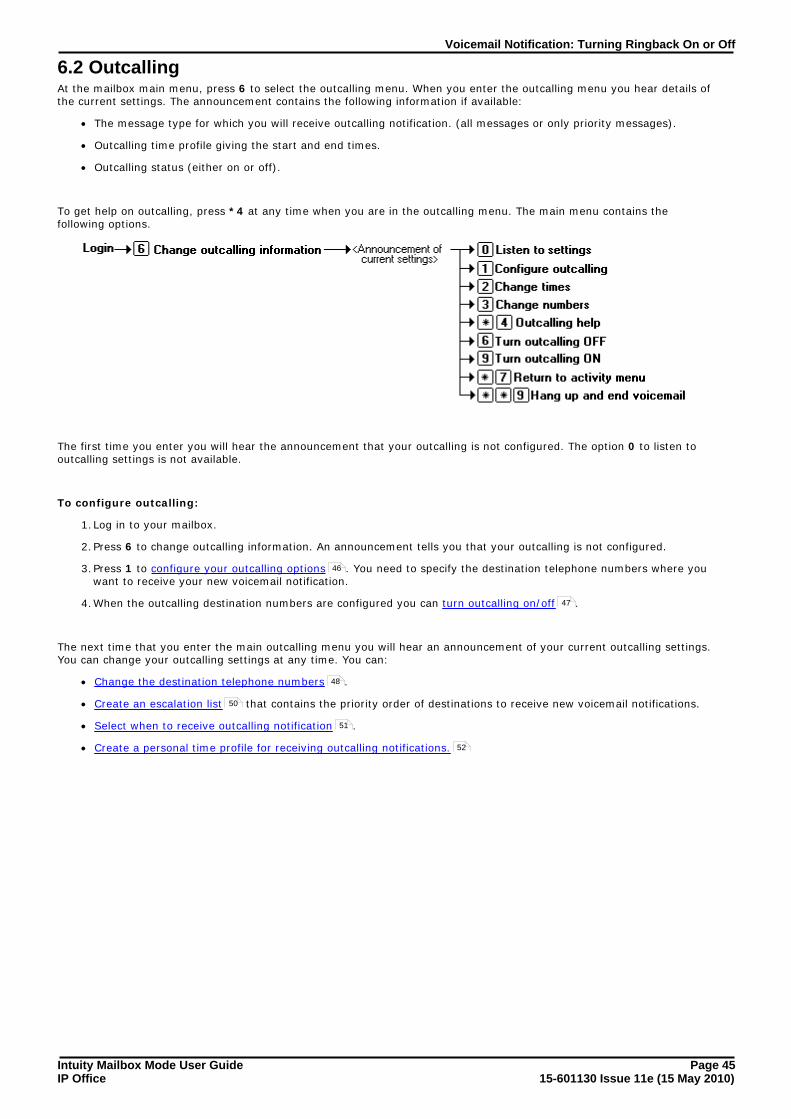
6.2 OutcallingAt the mailbox main menu, press 6 to select the outcalling menu. When you enter the outcalling menu you hear details ofthe current settings. The announcement contains the following information if available:
· The message type for which you will receive outcalling notification. (all messages or only priority messages).
· Outcalling time profile giving the start and end times.
· Outcalling status (either on or off).
To get help on outcalling, press *4 at any time when you are in the outcalling menu. The main menu contains thefollowing options.
The first time you enter you will hear the announcement that your outcalling is not configured. The option 0 to listen tooutcalling settings is not available.
To configure outcalling:
1.Log in to your mailbox.
2.Press 6 to change outcalling information. An announcement tells you that your outcalling is not configured.
3.Press 1 to configure your outcalling options . You need to specify the destination telephone numbers where youwant to receive your new voicemail notification.
4.When the outcalling destination numbers are configured you can turn outcalling on/off .
The next time that you enter the main outcalling menu you will hear an announcement of your current outcalling settings.You can change your outcalling settings at any time. You can:
· Change the destination telephone numbers .
· Create an escalation list that contains the priority order of destinations to receive new voicemail notifications.
· Select when to receive outcalling notification .
· Create a personal time profile for receiving outcalling notifications.
46
47
48
50
51
52
Intuity Mailbox Mode User Guide Page 4615-601130 Issue 11e (15 May 2010)IP Office
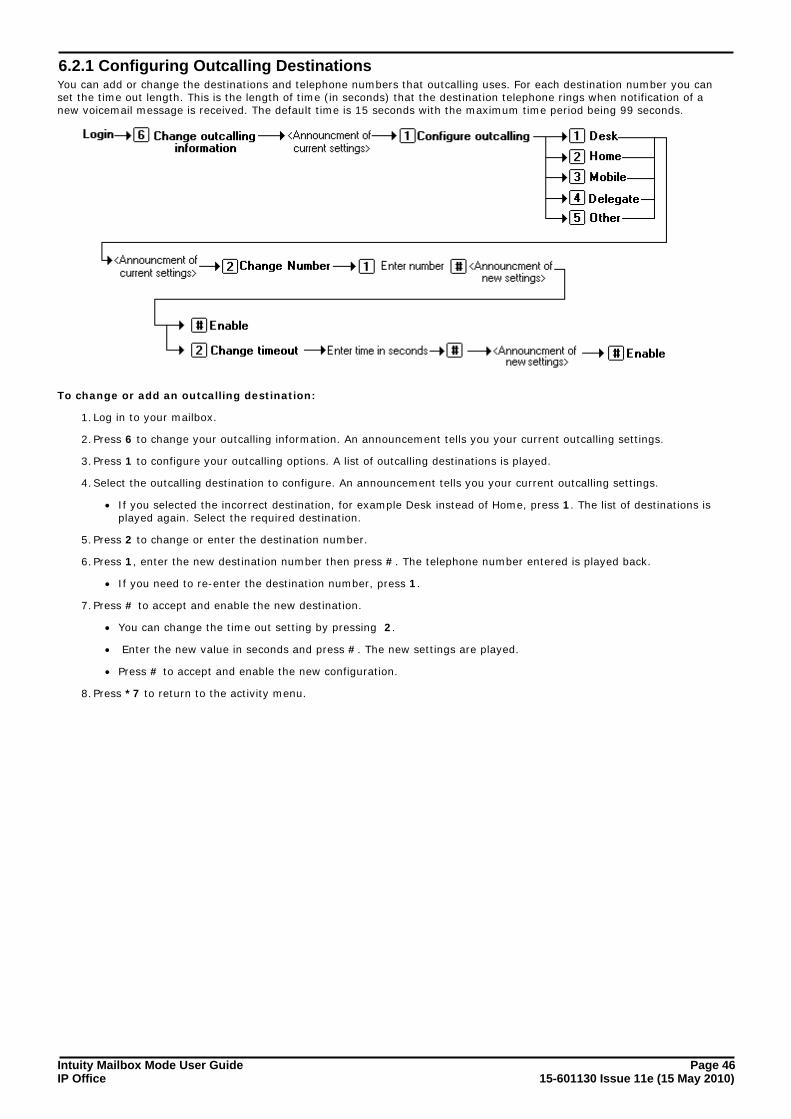
6.2.1 Configuring Outcalling DestinationsYou can add or change the destinations and telephone numbers that outcalling uses. For each destination number you canset the time out length. This is the length of time (in seconds) that the destination telephone rings when notification of anew voicemail message is received. The default time is 15 seconds with the maximum time period being 99 seconds.
To change or add an outcalling destination:
1.Log in to your mailbox.
2.Press 6 to change your outcalling information. An announcement tells you your current outcalling settings.
3.Press 1 to configure your outcalling options. A list of outcalling destinations is played.
4.Select the outcalling destination to configure. An announcement tells you your current outcalling settings.
· If you selected the incorrect destination, for example Desk instead of Home, press 1. The list of destinations isplayed again. Select the required destination.
5.Press 2 to change or enter the destination number.
6.Press 1, enter the new destination number then press #. The telephone number entered is played back.
· If you need to re-enter the destination number, press 1.
7.Press # to accept and enable the new destination.
· You can change the time out setting by pressing 2.
· Enter the new value in seconds and press #. The new settings are played.
· Press # to accept and enable the new configuration.
8.Press *7 to return to the activity menu.
Intuity Mailbox Mode User Guide Page 4715-601130 Issue 11e (15 May 2010)IP Office
Voicemail Notification: Outcalling
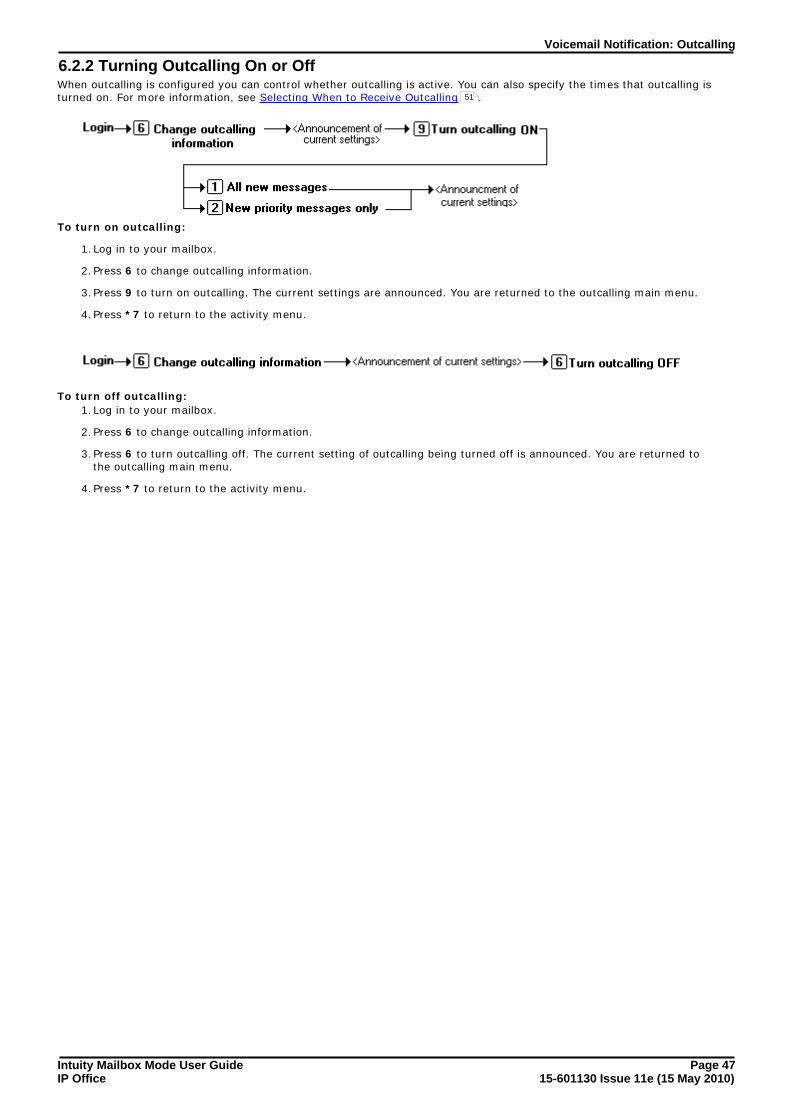
6.2.2 Turning Outcalling On or OffWhen outcalling is configured you can control whether outcalling is active. You can also specify the times that outcalling isturned on. For more information, see Selecting When to Receive Outcalling .
To turn on outcalling:
1.Log in to your mailbox.
2.Press 6 to change outcalling information.
3.Press 9 to turn on outcalling. The current settings are announced. You are returned to the outcalling main menu.
4.Press *7 to return to the activity menu.
To turn off outcalling:
1.Log in to your mailbox.
2.Press 6 to change outcalling information.
3.Press 6 to turn outcalling off. The current setting of outcalling being turned off is announced. You are returned tothe outcalling main menu.
4.Press *7 to return to the activity menu.
51

Intuity Mailbox Mode User Guide Page 4815-601130 Issue 11e (15 May 2010)IP Office
6.2.3 Changing Telephone NumbersYou can change the telephone number of an outcalling destination or if no telephone number is defined you can enter atelephone number.
To change or enter a new outcalling telephone number:
1.Log in to your mailbox.
2.Press 6 for change outcalling information.
3.Press 3 to change a destination telephone number. A list of possible destination options is played.
4.Select the destination to change.
· Press 1 to change the number for Desk.
· Press 2 to change the number for Home.
· Press 3 to change the number for Mobile.
· Press 4 to change the number for Delegate.
· Press 5 to change the number for Other.
5.The telephone number for the selected destination is announced. If you have not defined a number for the selecteddestination you are informed.
6.Press 1 to change the number.
7.Press 1, enter the new number and press # when finished.
8.Press # to enable the new telephone number.
· You can change the time out setting by pressing 2.
· Enter the new value in seconds and press #. The new settings are played.
· Press # to accept and enable the new configuration.
9.Press # to return to the outcalling menu.
Intuity Mailbox Mode User Guide Page 4915-601130 Issue 11e (15 May 2010)IP Office
Voicemail Notification: Outcalling
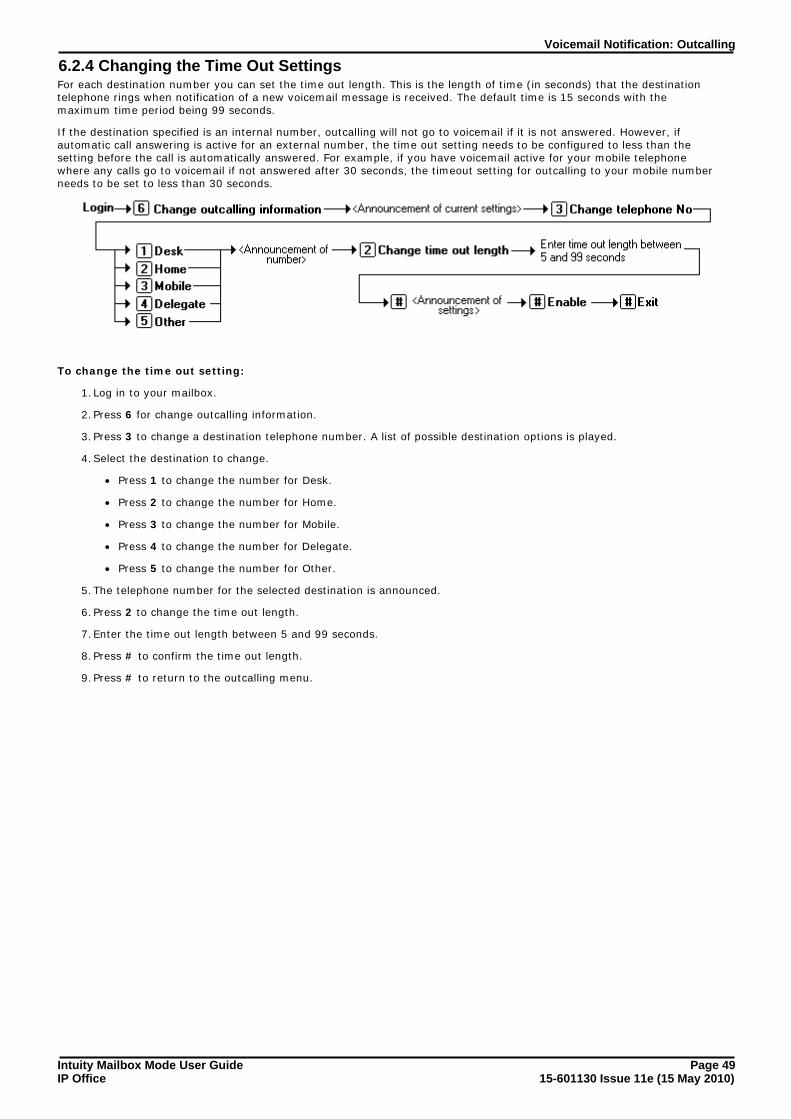
6.2.4 Changing the Time Out SettingsFor each destination number you can set the time out length. This is the length of time (in seconds) that the destinationtelephone rings when notification of a new voicemail message is received. The default time is 15 seconds with themaximum time period being 99 seconds.
If the destination specified is an internal number, outcalling will not go to voicemail if it is not answered. However, ifautomatic call answering is active for an external number, the time out setting needs to be configured to less than thesetting before the call is automatically answered. For example, if you have voicemail active for your mobile telephonewhere any calls go to voicemail if not answered after 30 seconds, the timeout setting for outcalling to your mobile numberneeds to be set to less than 30 seconds.
To change the time out setting:
1.Log in to your mailbox.
2.Press 6 for change outcalling information.
3.Press 3 to change a destination telephone number. A list of possible destination options is played.
4.Select the destination to change.
· Press 1 to change the number for Desk.
· Press 2 to change the number for Home.
· Press 3 to change the number for Mobile.
· Press 4 to change the number for Delegate.
· Press 5 to change the number for Other.
5.The telephone number for the selected destination is announced.
6.Press 2 to change the time out length.
7.Enter the time out length between 5 and 99 seconds.
8.Press # to confirm the time out length.
9.Press # to return to the outcalling menu.
Intuity Mailbox Mode User Guide Page 5015-601130 Issue 11e (15 May 2010)IP Office
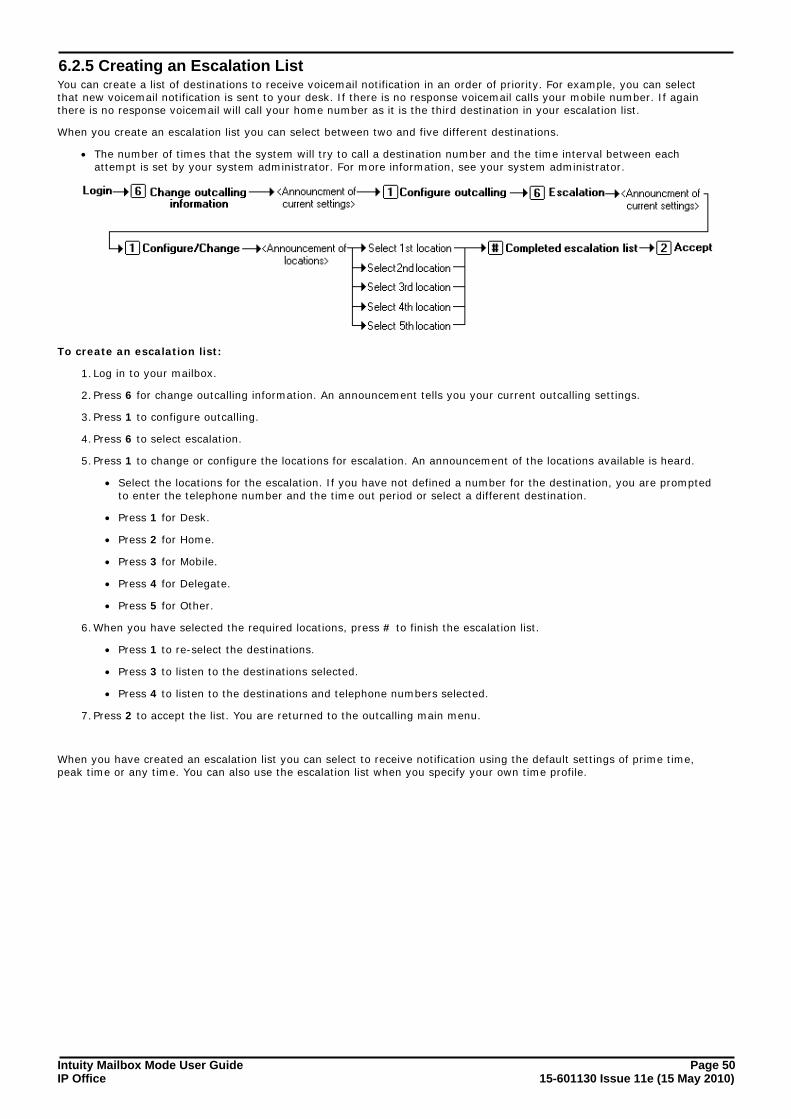
6.2.5 Creating an Escalation ListYou can create a list of destinations to receive voicemail notification in an order of priority. For example, you can selectthat new voicemail notification is sent to your desk. If there is no response voicemail calls your mobile number. If againthere is no response voicemail will call your home number as it is the third destination in your escalation list.
When you create an escalation list you can select between two and five different destinations.
· The number of times that the system will try to call a destination number and the time interval between eachattempt is set by your system administrator. For more information, see your system administrator.
To create an escalation list:
1.Log in to your mailbox.
2.Press 6 for change outcalling information. An announcement tells you your current outcalling settings.
3.Press 1 to configure outcalling.
4.Press 6 to select escalation.
5.Press 1 to change or configure the locations for escalation. An announcement of the locations available is heard.
· Select the locations for the escalation. If you have not defined a number for the destination, you are promptedto enter the telephone number and the time out period or select a different destination.
· Press 1 for Desk.
· Press 2 for Home.
· Press 3 for Mobile.
· Press 4 for Delegate.
· Press 5 for Other.
6.When you have selected the required locations, press # to finish the escalation list.
· Press 1 to re-select the destinations.
· Press 3 to listen to the destinations selected.
· Press 4 to listen to the destinations and telephone numbers selected.
7.Press 2 to accept the list. You are returned to the outcalling main menu.
When you have created an escalation list you can select to receive notification using the default settings of prime time,peak time or any time. You can also use the escalation list when you specify your own time profile.
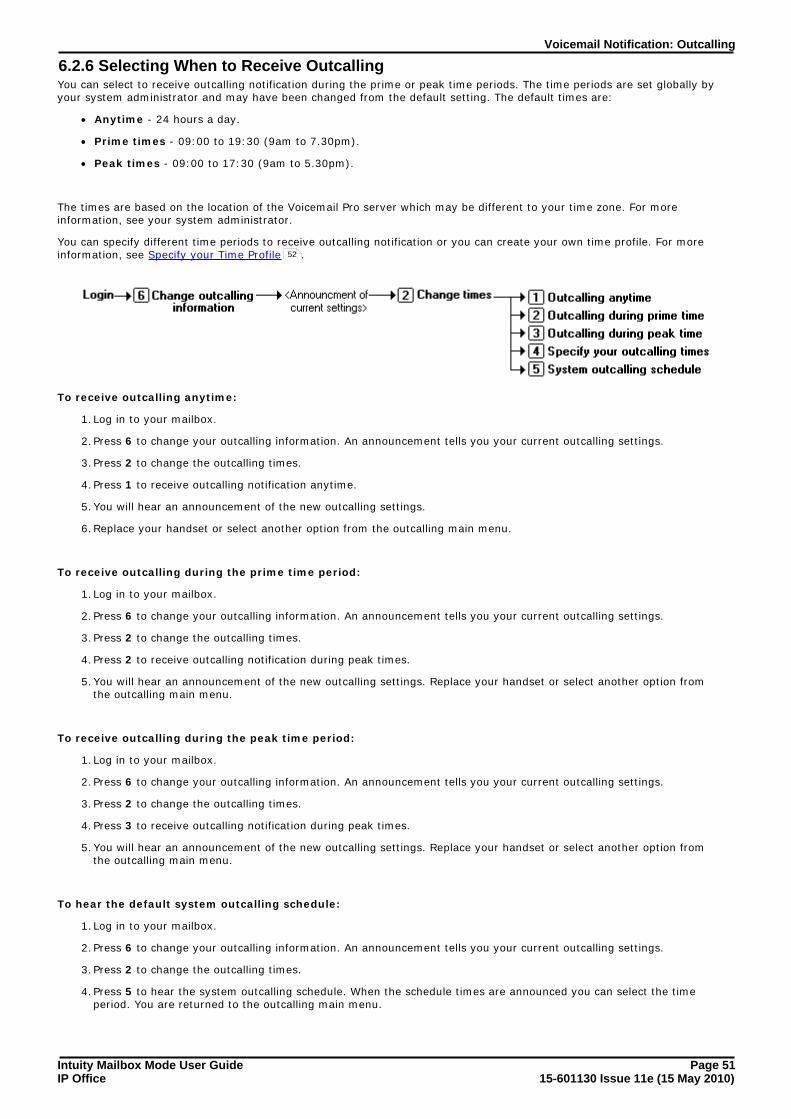
Intuity Mailbox Mode User Guide Page 5115-601130 Issue 11e (15 May 2010)IP Office
Voicemail Notification: Outcalling
6.2.6 Selecting When to Receive OutcallingYou can select to receive outcalling notification during the prime or peak time periods. The time periods are set globally byyour system administrator and may have been changed from the default setting. The default times are:
· Anytime - 24 hours a day.
· Prime times - 09:00 to 19:30 (9am to 7.30pm).
· Peak times - 09:00 to 17:30 (9am to 5.30pm).
The times are based on the location of the Voicemail Pro server which may be different to your time zone. For moreinformation, see your system administrator.
You can specify different time periods to receive outcalling notification or you can create your own time profile. For moreinformation, see Specify your Time Profile .
To receive outcalling anytime:
1.Log in to your mailbox.
2.Press 6 to change your outcalling information. An announcement tells you your current outcalling settings.
3.Press 2 to change the outcalling times.
4.Press 1 to receive outcalling notification anytime.
5.You will hear an announcement of the new outcalling settings.
6.Replace your handset or select another option from the outcalling main menu.
To receive outcalling during the prime time period:
1.Log in to your mailbox.
2.Press 6 to change your outcalling information. An announcement tells you your current outcalling settings.
3.Press 2 to change the outcalling times.
4.Press 2 to receive outcalling notification during peak times.
5.You will hear an announcement of the new outcalling settings. Replace your handset or select another option fromthe outcalling main menu.
To receive outcalling during the peak time period:
1.Log in to your mailbox.
2.Press 6 to change your outcalling information. An announcement tells you your current outcalling settings.
3.Press 2 to change the outcalling times.
4.Press 3 to receive outcalling notification during peak times.
5.You will hear an announcement of the new outcalling settings. Replace your handset or select another option fromthe outcalling main menu.
To hear the default system outcalling schedule:
1.Log in to your mailbox.
2.Press 6 to change your outcalling information. An announcement tells you your current outcalling settings.
3.Press 2 to change the outcalling times.
4.Press 5 to hear the system outcalling schedule. When the schedule times are announced you can select the timeperiod. You are returned to the outcalling main menu.
52
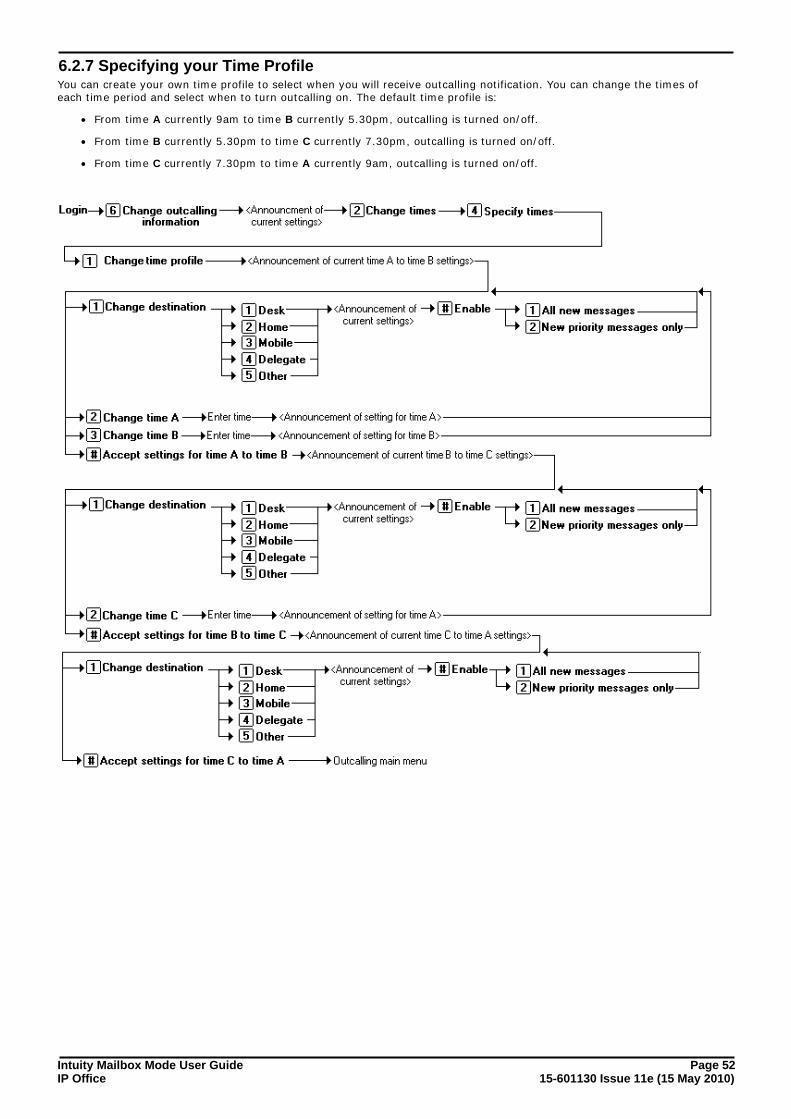
Intuity Mailbox Mode User Guide Page 5215-601130 Issue 11e (15 May 2010)IP Office
6.2.7 Specifying your Time ProfileYou can create your own time profile to select when you will receive outcalling notification. You can change the times ofeach time period and select when to turn outcalling on. The default time profile is:
· From time A currently 9am to time B currently 5.30pm, outcalling is turned on/off.
· From time B currently 5.30pm to time C currently 7.30pm, outcalling is turned on/off.
· From time C currently 7.30pm to time A currently 9am, outcalling is turned on/off.

Intuity Mailbox Mode User Guide Page 5315-601130 Issue 11e (15 May 2010)IP Office
Voicemail Notification: Outcalling
To specify your time profile:
1.Log in to your mailbox.
2.Press 6 to change your outcalling settings. You hear an announcement of the current settings.
3.Press 2 to change the outcalling times.
4.Press 4 to specify the times.
5.Press 1 to change your time profile settings. You hear an announcement of the current settings for the time periodA to B.
· Press 1 to change the outcalling destination.
· Select the outcalling destination.
· The destination details announced. Press # to enable.
· Press 1 to turn outcalling on for all new messages or 2 for new priority messages.
· Press 2 to change time A.
· Press 3 to change time B.
6.Press # to accept the settings for the time period A to B. You will hear the current settings for the time B to Csettings.
· Press 1 to change the outcalling destination.
· Select the outcalling destination.
· The destination details announced. Press # to enable.
· Press 1 to turn outcalling on for all new messages or 2 for new priority messages.
· Press 2 to change time C.
7.Press # to accept the settings for the time period B to C. You will hear the current settings for the time C to Asettings.
· Press 1 to change the outcalling destination
· Select the outcalling destination.
· The destination details are announced. Press # to enable.
· Press 1 to turn outcalling on for all new messages or 2 for new priority messages.
8.Press # # to accept the settings for the time period C to A. You are returned to the outcalling main menu.
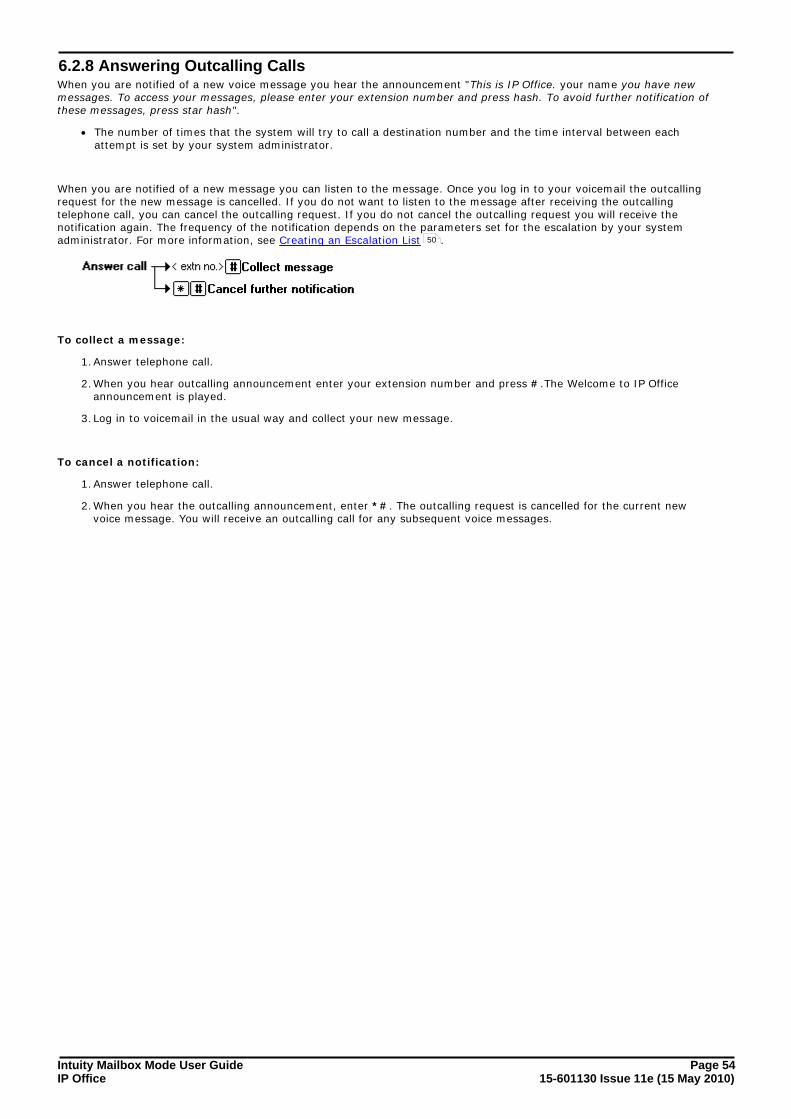
Intuity Mailbox Mode User Guide Page 5415-601130 Issue 11e (15 May 2010)IP Office
6.2.8 Answering Outcalling CallsWhen you are notified of a new voice message you hear the announcement "This is IP Office. your name you have newmessages. To access your messages, please enter your extension number and press hash. To avoid further notification ofthese messages, press star hash".
· The number of times that the system will try to call a destination number and the time interval between eachattempt is set by your system administrator.
When you are notified of a new message you can listen to the message. Once you log in to your voicemail the outcallingrequest for the new message is cancelled. If you do not want to listen to the message after receiving the outcallingtelephone call, you can cancel the outcalling request. If you do not cancel the outcalling request you will receive thenotification again. The frequency of the notification depends on the parameters set for the escalation by your systemadministrator. For more information, see Creating an Escalation List .
To collect a message:
1.Answer telephone call.
2.When you hear outcalling announcement enter your extension number and press #.The Welcome to IP Officeannouncement is played.
3.Log in to voicemail in the usual way and collect your new message.
To cancel a notification:
1.Answer telephone call.
2.When you hear the outcalling announcement, enter *#. The outcalling request is cancelled for the current newvoice message. You will receive an outcalling call for any subsequent voice messages.
50

Intuity Mailbox Mode User Guide Page 5515-601130 Issue 11e (15 May 2010)IP Office
Mailbox Administration
Chapter 7.
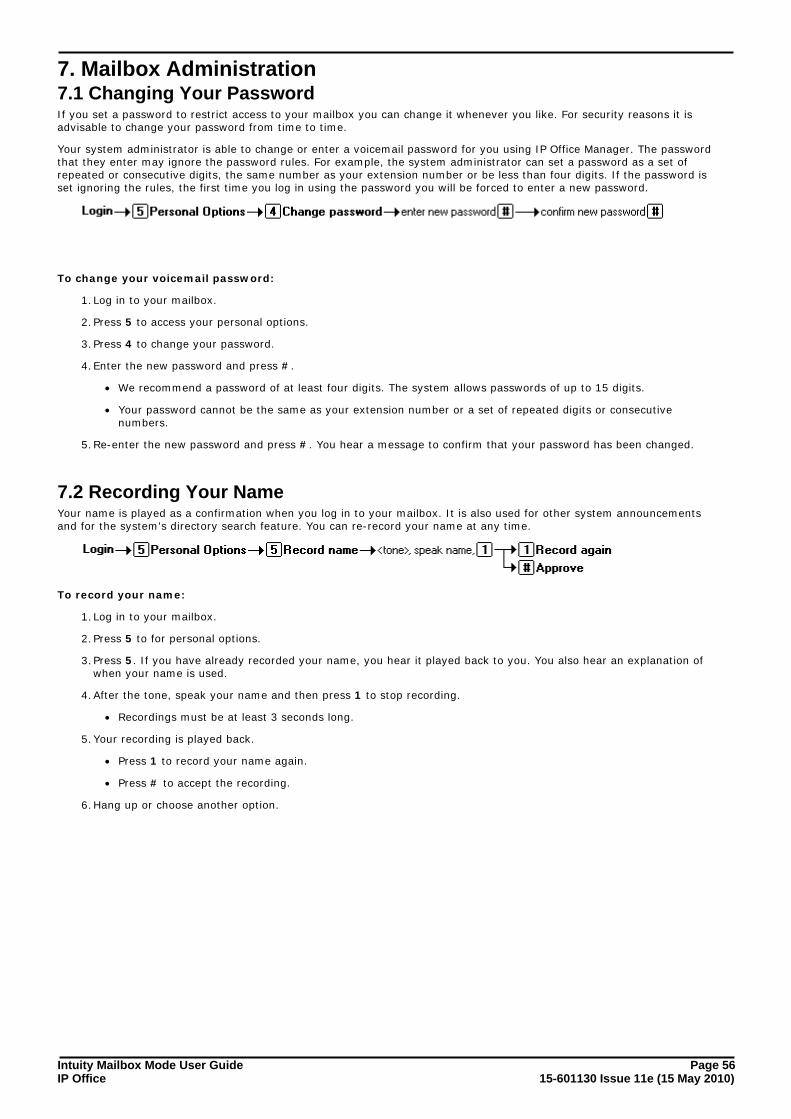
Intuity Mailbox Mode User Guide Page 5615-601130 Issue 11e (15 May 2010)IP Office
7. Mailbox Administration7.1 Changing Your PasswordIf you set a password to restrict access to your mailbox you can change it whenever you like. For security reasons it isadvisable to change your password from time to time.
Your system administrator is able to change or enter a voicemail password for you using IP Office Manager. The passwordthat they enter may ignore the password rules. For example, the system administrator can set a password as a set ofrepeated or consecutive digits, the same number as your extension number or be less than four digits. If the password isset ignoring the rules, the first time you log in using the password you will be forced to enter a new password.
To change your voicemail password:
1.Log in to your mailbox.
2.Press 5 to access your personal options.
3.Press 4 to change your password.
4.Enter the new password and press #.
· We recommend a password of at least four digits. The system allows passwords of up to 15 digits.
· Your password cannot be the same as your extension number or a set of repeated digits or consecutivenumbers.
5.Re-enter the new password and press #. You hear a message to confirm that your password has been changed.
7.2 Recording Your NameYour name is played as a confirmation when you log in to your mailbox. It is also used for other system announcementsand for the system's directory search feature. You can re-record your name at any time.
To record your name:
1.Log in to your mailbox.
2.Press 5 to for personal options.
3.Press 5. If you have already recorded your name, you hear it played back to you. You also hear an explanation ofwhen your name is used.
4.After the tone, speak your name and then press 1 to stop recording.
· Recordings must be at least 3 seconds long.
5.Your recording is played back.
· Press 1 to record your name again.
· Press # to accept the recording.
6.Hang up or choose another option.
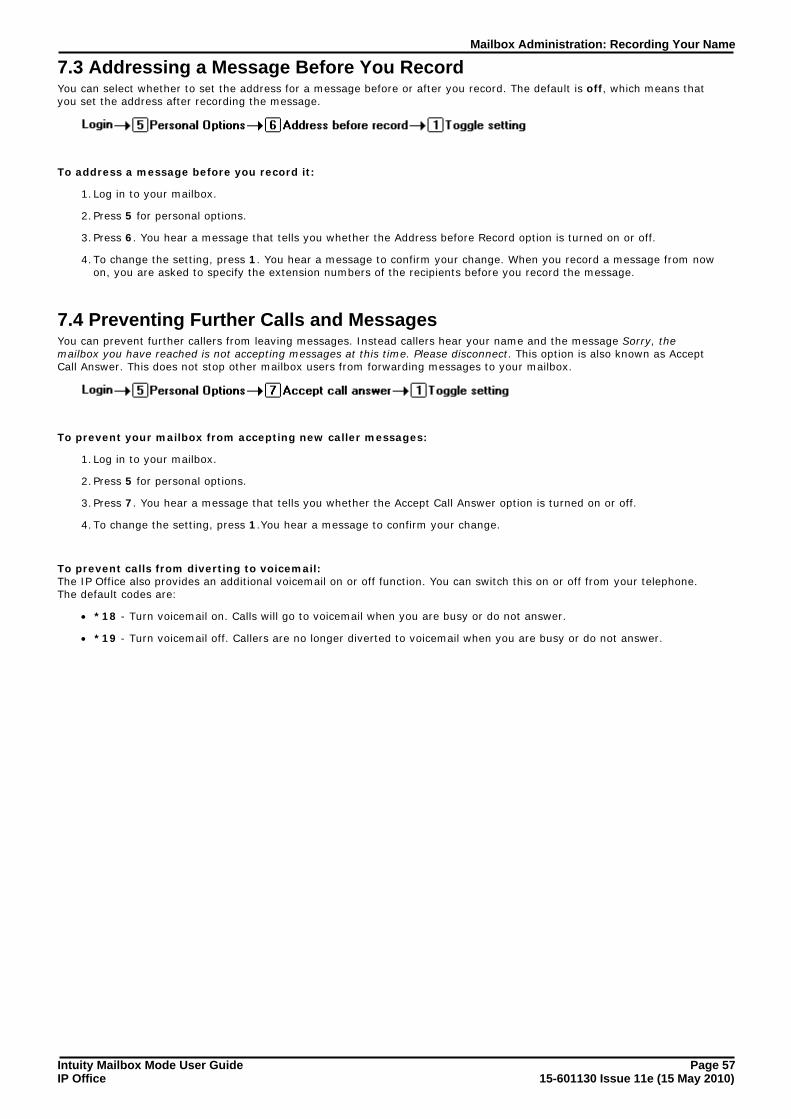
Intuity Mailbox Mode User Guide Page 5715-601130 Issue 11e (15 May 2010)IP Office
Mailbox Administration: Recording Your Name
7.3 Addressing a Message Before You RecordYou can select whether to set the address for a message before or after you record. The default is off, which means thatyou set the address after recording the message.
To address a message before you record it:
1.Log in to your mailbox.
2.Press 5 for personal options.
3.Press 6. You hear a message that tells you whether the Address before Record option is turned on or off.
4.To change the setting, press 1. You hear a message to confirm your change. When you record a message from nowon, you are asked to specify the extension numbers of the recipients before you record the message.
7.4 Preventing Further Calls and MessagesYou can prevent further callers from leaving messages. Instead callers hear your name and the message Sorry, themailbox you have reached is not accepting messages at this time. Please disconnect. This option is also known as AcceptCall Answer. This does not stop other mailbox users from forwarding messages to your mailbox.
To prevent your mailbox from accepting new caller messages:
1.Log in to your mailbox.
2.Press 5 for personal options.
3.Press 7. You hear a message that tells you whether the Accept Call Answer option is turned on or off.
4.To change the setting, press 1.You hear a message to confirm your change.
To prevent calls from diverting to voicemail: The IP Office also provides an additional voicemail on or off function. You can switch this on or off from your telephone.The default codes are:
· *18 - Turn voicemail on. Calls will go to voicemail when you are busy or do not answer.
· *19 - Turn voicemail off. Callers are no longer diverted to voicemail when you are busy or do not answer.
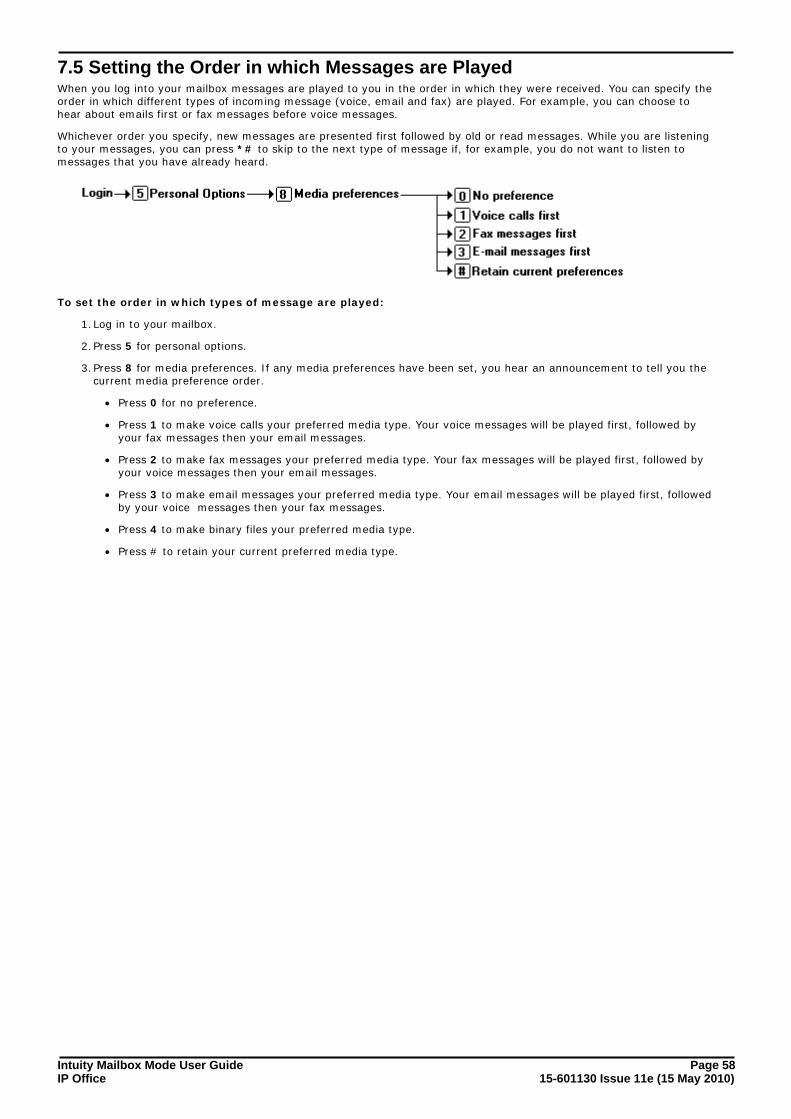
Intuity Mailbox Mode User Guide Page 5815-601130 Issue 11e (15 May 2010)IP Office
7.5 Setting the Order in which Messages are PlayedWhen you log into your mailbox messages are played to you in the order in which they were received. You can specify theorder in which different types of incoming message (voice, email and fax) are played. For example, you can choose tohear about emails first or fax messages before voice messages.
Whichever order you specify, new messages are presented first followed by old or read messages. While you are listeningto your messages, you can press *# to skip to the next type of message if, for example, you do not want to listen tomessages that you have already heard.
To set the order in which types of message are played:
1.Log in to your mailbox.
2.Press 5 for personal options.
3.Press 8 for media preferences. If any media preferences have been set, you hear an announcement to tell you thecurrent media preference order.
· Press 0 for no preference.
· Press 1 to make voice calls your preferred media type. Your voice messages will be played first, followed byyour fax messages then your email messages.
· Press 2 to make fax messages your preferred media type. Your fax messages will be played first, followed byyour voice messages then your email messages.
· Press 3 to make email messages your preferred media type. Your email messages will be played first, followedby your voice messages then your fax messages.
· Press 4 to make binary files your preferred media type.
· Press # to retain your current preferred media type.

Intuity Mailbox Mode User Guide Page 5915-601130 Issue 11e (15 May 2010)IP Office
Fax Messages
Chapter 8.
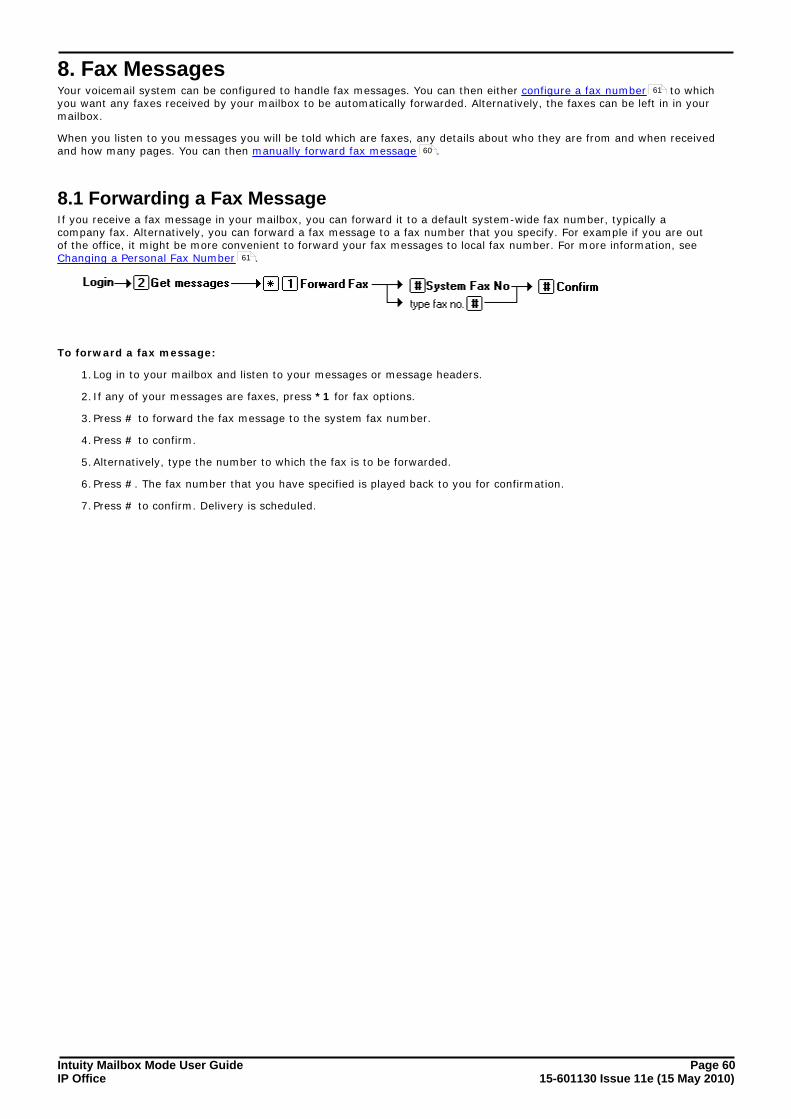
Intuity Mailbox Mode User Guide Page 6015-601130 Issue 11e (15 May 2010)IP Office
8. Fax MessagesYour voicemail system can be configured to handle fax messages. You can then either configure a fax number to whichyou want any faxes received by your mailbox to be automatically forwarded. Alternatively, the faxes can be left in in yourmailbox.
When you listen to you messages you will be told which are faxes, any details about who they are from and when receivedand how many pages. You can then manually forward fax message .
8.1 Forwarding a Fax MessageIf you receive a fax message in your mailbox, you can forward it to a default system-wide fax number, typically acompany fax. Alternatively, you can forward a fax message to a fax number that you specify. For example if you are outof the office, it might be more convenient to forward your fax messages to local fax number. For more information, see Changing a Personal Fax Number .
To forward a fax message:
1.Log in to your mailbox and listen to your messages or message headers.
2.If any of your messages are faxes, press *1 for fax options.
3.Press # to forward the fax message to the system fax number.
4.Press # to confirm.
5.Alternatively, type the number to which the fax is to be forwarded.
6.Press #. The fax number that you have specified is played back to you for confirmation.
7.Press # to confirm. Delivery is scheduled.
61
60
61
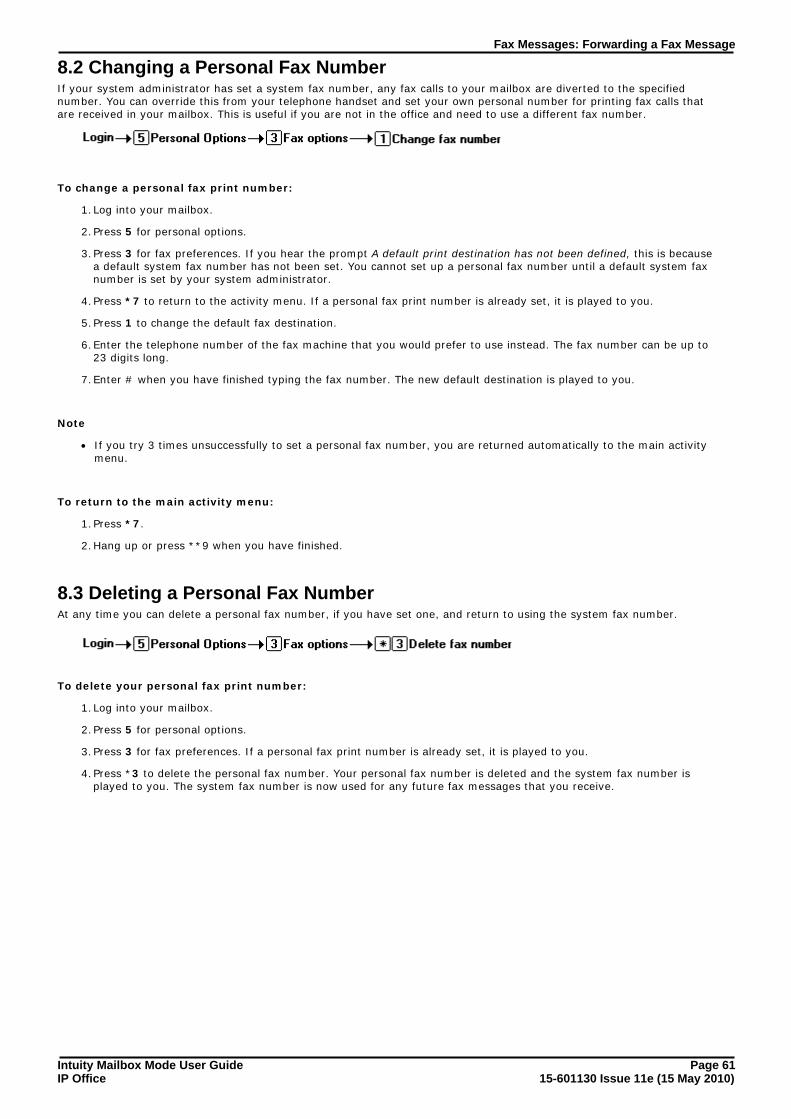
Intuity Mailbox Mode User Guide Page 6115-601130 Issue 11e (15 May 2010)IP Office
Fax Messages: Forwarding a Fax Message
8.2 Changing a Personal Fax NumberIf your system administrator has set a system fax number, any fax calls to your mailbox are diverted to the specifiednumber. You can override this from your telephone handset and set your own personal number for printing fax calls thatare received in your mailbox. This is useful if you are not in the office and need to use a different fax number.
To change a personal fax print number:
1.Log into your mailbox.
2.Press 5 for personal options.
3.Press 3 for fax preferences. If you hear the prompt A default print destination has not been defined, this is becausea default system fax number has not been set. You cannot set up a personal fax number until a default system faxnumber is set by your system administrator.
4.Press *7 to return to the activity menu. If a personal fax print number is already set, it is played to you.
5.Press 1 to change the default fax destination.
6.Enter the telephone number of the fax machine that you would prefer to use instead. The fax number can be up to23 digits long.
7.Enter # when you have finished typing the fax number. The new default destination is played to you.
Note
· If you try 3 times unsuccessfully to set a personal fax number, you are returned automatically to the main activitymenu.
To return to the main activity menu:
1.Press *7.
2.Hang up or press **9 when you have finished.
8.3 Deleting a Personal Fax NumberAt any time you can delete a personal fax number, if you have set one, and return to using the system fax number.
To delete your personal fax print number:
1.Log into your mailbox.
2.Press 5 for personal options.
3.Press 3 for fax preferences. If a personal fax print number is already set, it is played to you.
4.Press *3 to delete the personal fax number. Your personal fax number is deleted and the system fax number isplayed to you. The system fax number is now used for any future fax messages that you receive.


Intuity Mailbox Mode User Guide Page 6315-601130 Issue 11e (15 May 2010)IP Office
Visual Voice
Chapter 9.
Intuity Mailbox Mode User Guide Page 6415-601130 Issue 11e (15 May 2010)IP Office
9. Visual VoiceVisual Voice allows you to access your voicemail mailbox using the display menu of your phone rather than followingspoken mailbox prompts.
To use Visual Voice, your system maintainer must either add a Visual Voice button to your phone or set the MESSAGESbutton to use Visual Voice.
· Visual Voice is supported on most Avaya desk phones supported by IP Office subject to a suitable display. On otherphones, the button can be used for mailbox access using voice prompts and for direct to voicemail transfer during acall.
· On T3 phones, the Visual Voice button goes direct to the Listen function of Visual Voice. To access the full set ofVisual Voice functions use Menu > Settings > Voicemail Settings.
Visual Voice ControlsThe arrangement of options on the screen will vary depending on the phone type and display size.
· Listen Access your own voicemail mailbox. When pressed the screen will show the number of New, Old and Savedmessages. Select one of those options to start playback of messages in that category. Use the options below
· ListenPlay the message.
· PausePause the message playback.
· DeleteDelete the message.
· SaveMark the message as a saved message.
· Call Call the message sender if a caller ID is available.
· CopyCopy the message to another mailbox. When pressed as number ofadditional options are displayed.
· Message Record and send a voicemail message to another mailbox or mailboxes.
· Greeting Change the main greeting used for callers to your mailbox. If no greeting has been recorded then the defaultsystem mailbox greeting is used.
· Email This option is only shown if you have been configured with an email address for voicemail email usage in the IPOffice configuration. This control allows you to see and change the current voicemail email mode being used fornew messages received by your voicemail mailbox. Use Change to change the selected mode. Press Done whenthe required mode is displayed. Possible modes are:
· Password Change the voicemail mailbox password. To do this requires entry of the existing password.
· Voicemail Switch voicemail coverage on/off.
Using the Visual Voice Button for Voicemail TransferIf pressed when you have a call is connected, the MESSAGE button allows entry of an extension number for direct tovoicemail transfer of the connected call.
Intuity Mailbox Mode User Guide Page 6515-601130 Issue 11e (15 May 2010)IP Office
Index
IndexAAccept call answer 57Access to voicemail
External 11
From outside 11
With an Avaya telephone 12Activating a greeting 37Adding
Mailbox list members 25
Address Address before record 57By extension number 21
By name 21
Setting before recording message 57Advance 5 seconds 17
BBack
Back to previous message 17
Back up 5 seconds 17Busy calls 36
CCall types
Selecting and changing 36
Callback 44Caller options 41Calling the message sender 18
Changing
Greeting 39Password 56Personal greetings 35
Time Out Settings 49
Checking Active status of greetings 38Mailing list privacy status 25
Closing your mailbox 57
Collecting Your messages 17
Comment
Adding to forwarded message 19
Creating Mailing list 25Personal greetings 35
DDelete and continue to next message 17
Deleting Fax number 61Greeting messages 38
Left messages 17
Personal fax number 61Personal greetings 39
Divert
Fax messages 60
EEmail messages
Listening to first 58Escalation
Creating 50
External calls 36
FFax message
Diverting a 60
Fax messages
Listening to first 58
Fax number Changing 61Default 61
Deleting 61
Deleting a personal 61Overriding the system number 61Personal 61
Setting 61
Fax preferences 61Fax print number 61First time login 10
Forwarding a message 17, 19
GGreeting
Changing 39Deactivate 37
Greeting messages
Activating 37Checking active status 38Deleting 38
Listening to 38
Listening to message status 38Maximum number of 32Overview 32
Recording over 38
Replaying 38Re-recording 38Scanning 38
Selecting call types to assign 36
IImporting mailing list members 25Internal calls 36
LLeave message in current category 17
Left messages
Deleting 17Listening to
Greeting messages 38
Greetings 38
Voice messages 17Lists
Mailing 24, 25
Personal distribution 24, 25
Logging In First time 10Normally 11
Remotely 11
With an Avaya telephone 12
MMailbox Callers
Options 8
Mailbox message order 58
Mailbox Options Summary 7
Mailing lists 26, 28
Adding members 25
Changing public or private status 25Creating 25Deleting members 25
Importing another 25
Importing members from 25Maximum number of members per list 24, 25Maximum number per mailbox 25
Overview 24

Intuity Mailbox Mode User Guide Page 6615-601130 Issue 11e (15 May 2010)IP Office
Mailing lists 26, 28
Removing members 25Marking
Mailing list as private 25
Mailing list as public 25
Message as priority 19Message as private 19
Media preferences 58
Message
Order 58Type order 58
Messages
Collecting 17
Forwarding 19Listening to 17Marking as private 21
Marking as public 21
Recording 21Replying to 18Scanning 22
Sending new 20
NName
Recording your 10, 56New message
Creating 21
Recording 21Sending 20
Normal login 11
Number
Fax print 61
OOptions
Mailbox Callers 8
Order in which messages are played 58
Out of hours calls 36Outcalling 48
change 52
setting 47
Outcalling Calls Answering 54
Outcalling Destinations
Configuring 46
Outcalling menu enter 45select 45
Overriding
Default system fax number 61The system greeting 35
PPassword
Changing 10, 11
Setting 10Pause/Resume
When collecting messages 17
When scanning messages 22
Personal Distribution Lists Activating 37Adding members 25
Creating 25
Editing 25Personal fax number
Deleting a 61
Personal greeting messages
Oveview 32
Personal greetings 39
Changing 35Creating 35Deleting a 39
Recording 35
Scanning 38Personal options 58Preference for message order 58
Preventing
Divert to voicemail 57New caller messages 57
Priority
Forwarded message 19
New message 21order 50
Private
Fowarded message 19
Mailing list 25Message 21
Public
Fowarded message 19
Mailing list 25
RReceive Outcalling
Selecting When 51
Receiving
outcalling 54Recording
Messages 21
Personal greetings 35
Your name 10, 56Re-instating the system greeting 39Remote
Access 11
Login 11Removing
Mailbox list members 25
Replacing system greeting with personal greeting 39
Replaying Greeting messages 38
Replaying message header 17
Replying to a message 18
Re-recording greeting messages 38Restarting a message 17Retaining current message order preference 58
Reverting to the system greeting 39
Reviewing Mailbox lists 24
Ringback on or off 44
SScanning
Greetings 38Messages 22
Select 45
Selecting
Call types for greeting messages 36Media preferences 58Order in which types of message are played 58
Setting
Fax number 61Order in which messages are played 58Your password 10
Skipping
Message 17Message header 17

Intuity Mailbox Mode User Guide Page 6715-601130 Issue 11e (15 May 2010)IP Office
Index
Skipping
To next category 17System greeting
Message 32
Overriding the 35
Returning to the 39
TTemporary Greeting
Creating 40
Time Out Settings
Changing 49Time Profile 51, 52Turning
Outcalling On 47
UUndelete message 17
VVoice calls
Listening to first 58
Voicemail
Ringback 44Switching ringback on/off 44
YYour name
Recording 56


Intuity Mailbox Mode User Guide Page 6915-601130 Issue 11e (15 May 2010)IP Office

Intuity Mailbox Mode User Guide Page 7015-601130 Issue 11e (15 May 2010)IP Office
Performance figures and data quoted in this document are typical, and must bespecifically confirmed in writing by Avaya before they become applicable to anyparticular order or contract. The company reserves the right to make alterationsor amendments to the detailed specifications at its discretion. The publication of
information in this document does not imply freedom from patent or otherprotective rights of Avaya or others.
All trademarks identified by the ® or ™ are registered trademarks or trademarks,respectively, of Avaya Inc. All other trademarks are the property of their
respective owners.
This document contains proprietary information of Avaya and is not to bedisclosed or used except in accordance with applicable agreements.
© 2010 Avaya Inc. All rights reserved.