Embed Size (px)
Citation preview
For Research Use Only. Not for use in diagnostic procedures.
Ion 520™ & Ion 530™ Kit – ChefUSER GUIDE
Instructions for automated template preparation, chip loading,and sequencing
for use with:Ion Chef™ SystemIon S5™ SystemIon S5™ XL System
Catalog Numbers A27757, A30010Publication Number MAN0010846
Revision C.0
The information in this guide is subject to change without notice.DISCLAIMER: TO THE EXTENT ALLOWED BY LAW, LIFE TECHNOLOGIES AND/OR ITS AFFILIATE(S) WILL NOT BE LIABLE FOR SPECIAL, INCIDENTAL,INDIRECT, PUNITIVE, MULTIPLE, OR CONSEQUENTIAL DAMAGES IN CONNECTION WITH OR ARISING FROM THIS DOCUMENT, INCLUDING YOURUSE OF IT.
Revision history: Pub. No. MAN0010846
Revision Date DescriptionC.0 31 July 2016 • Updated to support new Ion S5™ instrument user interface in Torrent Suite™
Software v5.2.
• Graphics enhanced and workflows reorganized for ease of use.
B.0 11 November 2015 Update to user guide for 2 sequencing runs per initialization that accompany newSKU (A30010).
A.0 26 August 2015 New user guide, which includes instructions for using the Ion 520™ & Ion 530™ Kit– Chef to set up and operate Ion Chef™ Instrument for use with the Ion S5™ and IonS5™ XL Systems.
Important Licensing Information: This product may be covered by one or more Limited Use Label Licenses. By use of this product, you accept theterms and conditions of all applicable Limited Use Label Licenses.Corporate entity: Life Technologies Corporation | Carlsbad, CA 92008 USA | Toll Free in USA 1 800 955 6288
Trademarks: All trademarks are the property of Thermo Fisher Scientific and its subsidiaries unless otherwise specified. Microsoft, Windows, andExcel are trademarks of Microsoft Corporation. Macintosh is a trademark of Apple, Inc. Guava and easyCyte are trademarks of Guava Technologies,Inc. Cy is a trademark of GE Healthcare UK Limited. Agencourt and Ampure are trademarks of Beckman Coulter, Inc. Bioanalyzer is a trademark ofAgilient Technologies, Inc. Kimwipes is a trademark of Kimberly-Clark Corporation.
©2016 Thermo Fisher Scientific Inc. All rights reserved.
Contents
About this guide . . . . . . . . . . . . . . . . . . . . . . . . . . . . . . . . . . . . . . . . . . . . . . . . . . . . . . . . . . . . 8
Purpose of this guide . . . . . . . . . . . . . . . . . . . . . . . . . . . . . . . . . . . . . . . . . . . . . . . . . . . . . . . . . . . . 8
Prerequisites . . . . . . . . . . . . . . . . . . . . . . . . . . . . . . . . . . . . . . . . . . . . . . . . . . . . . . . . . . . . . . . . . . . 8
■ CHAPTER 1 Product information . . . . . . . . . . . . . . . . . . . . . . . . . . . . . . . . . . . . . . . 9
Product description . . . . . . . . . . . . . . . . . . . . . . . . . . . . . . . . . . . . . . . . . . . . . . . . . . . . . . . . . . . . . 9Library compatibility . . . . . . . . . . . . . . . . . . . . . . . . . . . . . . . . . . . . . . . . . . . . . . . . . . . . . . . . 9Software compatibility . . . . . . . . . . . . . . . . . . . . . . . . . . . . . . . . . . . . . . . . . . . . . . . . . . . . . . . 9
Ion 520™ & Ion 530™ Kit – Chef . . . . . . . . . . . . . . . . . . . . . . . . . . . . . . . . . . . . . . . . . . . . . . . . . . . 10Kit summary . . . . . . . . . . . . . . . . . . . . . . . . . . . . . . . . . . . . . . . . . . . . . . . . . . . . . . . . . . . . . . 10Kit contents and storage . . . . . . . . . . . . . . . . . . . . . . . . . . . . . . . . . . . . . . . . . . . . . . . . . . . . 10
Compatible Ion Chip™ kits . . . . . . . . . . . . . . . . . . . . . . . . . . . . . . . . . . . . . . . . . . . . . . . . . . . . . . . 11
Ion S5™ Calibration Standard . . . . . . . . . . . . . . . . . . . . . . . . . . . . . . . . . . . . . . . . . . . . . . . . . . . . 11
Ion S5™ Controls . . . . . . . . . . . . . . . . . . . . . . . . . . . . . . . . . . . . . . . . . . . . . . . . . . . . . . . . . . . . . . . 12
Required materials not supplied . . . . . . . . . . . . . . . . . . . . . . . . . . . . . . . . . . . . . . . . . . . . . . . . . 12
About the Ion Chef™ System . . . . . . . . . . . . . . . . . . . . . . . . . . . . . . . . . . . . . . . . . . . . . . . . . . . . . 13Ion Chef™ Instrument components . . . . . . . . . . . . . . . . . . . . . . . . . . . . . . . . . . . . . . . . . . . 13Interior hardware and consumables . . . . . . . . . . . . . . . . . . . . . . . . . . . . . . . . . . . . . . . . . . 14About the Ion Chef™ System touchscreen interface . . . . . . . . . . . . . . . . . . . . . . . . . . . . . 15
Precautions . . . . . . . . . . . . . . . . . . . . . . . . . . . . . . . . . . . . . . . . . . . . . . . . . . . . . . . . . . . . . . . . . . . 15Avoid nucleic acid contamination . . . . . . . . . . . . . . . . . . . . . . . . . . . . . . . . . . . . . . . . . . . . . 15Avoid chip damage . . . . . . . . . . . . . . . . . . . . . . . . . . . . . . . . . . . . . . . . . . . . . . . . . . . . . . . . . 15Guidelines for using Ion Chef™ reagents and consumables . . . . . . . . . . . . . . . . . . . . . . 16
Workflow . . . . . . . . . . . . . . . . . . . . . . . . . . . . . . . . . . . . . . . . . . . . . . . . . . . . . . . . . . . . . . . . . . . . . 17
■ CHAPTER 2 Before you begin . . . . . . . . . . . . . . . . . . . . . . . . . . . . . . . . . . . . . . . . . . 18
Create a Planned Run . . . . . . . . . . . . . . . . . . . . . . . . . . . . . . . . . . . . . . . . . . . . . . . . . . . . . . . . . . 18About Planned Runs . . . . . . . . . . . . . . . . . . . . . . . . . . . . . . . . . . . . . . . . . . . . . . . . . . . . . . . 18Create a Planned Run . . . . . . . . . . . . . . . . . . . . . . . . . . . . . . . . . . . . . . . . . . . . . . . . . . . . . . 18Planned Run wizard key fields . . . . . . . . . . . . . . . . . . . . . . . . . . . . . . . . . . . . . . . . . . . . . . . 22
Dilute the libraries . . . . . . . . . . . . . . . . . . . . . . . . . . . . . . . . . . . . . . . . . . . . . . . . . . . . . . . . . . . . . 23
Prepare the Ion Chef™ System for use . . . . . . . . . . . . . . . . . . . . . . . . . . . . . . . . . . . . . . . . . . . . 24
Ion 520™ & Ion 530™ Kit − Chef User Guide 3
■ CHAPTER 3 Run the Ion Chef™ System .. . . . . . . . . . . . . . . . . . . . . . . . . . . . . . 25
Materials required . . . . . . . . . . . . . . . . . . . . . . . . . . . . . . . . . . . . . . . . . . . . . . . . . . . . . . . . . . . . . 25
Prepare the libraries and consumables . . . . . . . . . . . . . . . . . . . . . . . . . . . . . . . . . . . . . . . . . . . 26
Load the Ion Chef™ System . . . . . . . . . . . . . . . . . . . . . . . . . . . . . . . . . . . . . . . . . . . . . . . . . . . . . . 27Load the pipette tip racks and PCR plate . . . . . . . . . . . . . . . . . . . . . . . . . . . . . . . . . . . . . . 28Load the Reagents and Solutions cartridges . . . . . . . . . . . . . . . . . . . . . . . . . . . . . . . . . . 30Load the Recovery Tubes and Enrichment Cartridge v2 . . . . . . . . . . . . . . . . . . . . . . . . . 31Load the Chip-loading centrifuge . . . . . . . . . . . . . . . . . . . . . . . . . . . . . . . . . . . . . . . . . . . . 33Confirm that consumables are correctly installed . . . . . . . . . . . . . . . . . . . . . . . . . . . . . . 35Single chip loading workflow . . . . . . . . . . . . . . . . . . . . . . . . . . . . . . . . . . . . . . . . . . . . . . . . 35Ion Chef™ pre-run checklist . . . . . . . . . . . . . . . . . . . . . . . . . . . . . . . . . . . . . . . . . . . . . . . . . 37
Start the Ion Chef™ run . . . . . . . . . . . . . . . . . . . . . . . . . . . . . . . . . . . . . . . . . . . . . . . . . . . . . . . . . 38
Unload the chips for sequencing . . . . . . . . . . . . . . . . . . . . . . . . . . . . . . . . . . . . . . . . . . . . . . . . . 43
■ CHAPTER 4 Initialize the sequencer . . . . . . . . . . . . . . . . . . . . . . . . . . . . . . . . . . 46
Ion S5™ System component positions . . . . . . . . . . . . . . . . . . . . . . . . . . . . . . . . . . . . . . . . . . . . . 46
Before you begin . . . . . . . . . . . . . . . . . . . . . . . . . . . . . . . . . . . . . . . . . . . . . . . . . . . . . . . . . . . . . . 47
When a manual sequencer cleaning is required . . . . . . . . . . . . . . . . . . . . . . . . . . . . . . . . . . . . 47
Initialize the sequencer . . . . . . . . . . . . . . . . . . . . . . . . . . . . . . . . . . . . . . . . . . . . . . . . . . . . . . . . . 48
Reagent consumables disposal . . . . . . . . . . . . . . . . . . . . . . . . . . . . . . . . . . . . . . . . . . . . . . . . . . 49CO2 scrubber removal and disposal . . . . . . . . . . . . . . . . . . . . . . . . . . . . . . . . . . . . . . . . . . 49Recycle Ion S5™ Wash and Cleaning solution bottles . . . . . . . . . . . . . . . . . . . . . . . . . . . . 50
■ CHAPTER 5 Start the sequencing run . . . . . . . . . . . . . . . . . . . . . . . . . . . . . . . . 51
Chip handling guidelines . . . . . . . . . . . . . . . . . . . . . . . . . . . . . . . . . . . . . . . . . . . . . . . . . . . . . . . . 51
Start the sequencing run . . . . . . . . . . . . . . . . . . . . . . . . . . . . . . . . . . . . . . . . . . . . . . . . . . . . . . . 52
Maintain the sequencer . . . . . . . . . . . . . . . . . . . . . . . . . . . . . . . . . . . . . . . . . . . . . . . . . . . . . . . . . 54Required materials . . . . . . . . . . . . . . . . . . . . . . . . . . . . . . . . . . . . . . . . . . . . . . . . . . . . . . . . 54Clean or decontaminate the sequencer . . . . . . . . . . . . . . . . . . . . . . . . . . . . . . . . . . . . . . . 54
■ CHAPTER 6 Clean the Ion Chef™ System . . . . . . . . . . . . . . . . . . . . . . . . . . . . . 55
About the cleaning protocol . . . . . . . . . . . . . . . . . . . . . . . . . . . . . . . . . . . . . . . . . . . . . . . . . . . . . 55
Materials required . . . . . . . . . . . . . . . . . . . . . . . . . . . . . . . . . . . . . . . . . . . . . . . . . . . . . . . . . . . . . 55
Clean the Ion Chef™ Instrument . . . . . . . . . . . . . . . . . . . . . . . . . . . . . . . . . . . . . . . . . . . . . . . . . . 56Remove and dispose of used consumables . . . . . . . . . . . . . . . . . . . . . . . . . . . . . . . . . . . . 57Inspect and clean the Recovery centrifuges and buckets . . . . . . . . . . . . . . . . . . . . . . . . 58Start the cleaning . . . . . . . . . . . . . . . . . . . . . . . . . . . . . . . . . . . . . . . . . . . . . . . . . . . . . . . . . 59
Contents
4 Ion 520™ & Ion 530™ Kit − Chef User Guide
■ APPENDIX A Troubleshooting . . . . . . . . . . . . . . . . . . . . . . . . . . . . . . . . . . . . . . . . . 61
Ion Chef™ System setup and operation . . . . . . . . . . . . . . . . . . . . . . . . . . . . . . . . . . . . . . . . . . . . 61
Ion S5™ System setup and operation . . . . . . . . . . . . . . . . . . . . . . . . . . . . . . . . . . . . . . . . . . . . . . 64Ion S5™ Sequencer alarms and events . . . . . . . . . . . . . . . . . . . . . . . . . . . . . . . . . . . . . . . . 64Initialization—General errors . . . . . . . . . . . . . . . . . . . . . . . . . . . . . . . . . . . . . . . . . . . . . . . 65
ISP Quality Control assay troubleshooting table . . . . . . . . . . . . . . . . . . . . . . . . . . . . . . . . . . . . 66
■ APPENDIX B Supplementary procedures . . . . . . . . . . . . . . . . . . . . . . . . . . . . 67
Section B.1 Perform a manual sequencer cleaning . . . . . . . . . . . . . . . . . . . . . . . . . . . . . . . . . 68
Section B.2 Quality control of Ion Sphere™ Particles . . . . . . . . . . . . . . . . . . . . . . . . . . . . . . . . 69Quality Control assay . . . . . . . . . . . . . . . . . . . . . . . . . . . . . . . . . . . . . . . . . . . . . . . . . . . . . . . . . . . 69Quality control using the Qubit™ 2.0 or Qubit™ 3.0 Fluorometer . . . . . . . . . . . . . . . . . . . . . . 69Quality control using the Guava™ easyCyte™ 5 Flow Cytometer . . . . . . . . . . . . . . . . . . . . . . . 70Quality control using the Attune™ Acoustic Focusing Cytometer . . . . . . . . . . . . . . . . . . . . . . 70
Section B.3 Quality control using the Qubit™ 2.0 Fluorometer . . . . . . . . . . . . . . . . . . . . . . . . 71Materials required . . . . . . . . . . . . . . . . . . . . . . . . . . . . . . . . . . . . . . . . . . . . . . . . . . . . . . . . . . . . . 71Upgrade the Qubit™ 2.0 Fluorometer firmware and software . . . . . . . . . . . . . . . . . . . . . . . . . 72Upgrade for firmware V2.00 or V3.00 . . . . . . . . . . . . . . . . . . . . . . . . . . . . . . . . . . . . . . . . . . . . . 73
Materials required for update . . . . . . . . . . . . . . . . . . . . . . . . . . . . . . . . . . . . . . . . . . . . . . . 73Download update files . . . . . . . . . . . . . . . . . . . . . . . . . . . . . . . . . . . . . . . . . . . . . . . . . . . . . . 73Upgrade the firmware . . . . . . . . . . . . . . . . . . . . . . . . . . . . . . . . . . . . . . . . . . . . . . . . . . . . . . 73
Upgrade for firmware V3.10 . . . . . . . . . . . . . . . . . . . . . . . . . . . . . . . . . . . . . . . . . . . . . . . . . . . . . 75
Contents
Ion 520™ & Ion 530™ Kit − Chef User Guide 5
Calculate the Qubit™ 2.0 Fluorometer Calibration Factor . . . . . . . . . . . . . . . . . . . . . . . . . . . . 77Materials required . . . . . . . . . . . . . . . . . . . . . . . . . . . . . . . . . . . . . . . . . . . . . . . . . . . . . . . . . 77Download the Qubit™ Easy Calculator . . . . . . . . . . . . . . . . . . . . . . . . . . . . . . . . . . . . . . . . . 77Prepare the calibration standard . . . . . . . . . . . . . . . . . . . . . . . . . . . . . . . . . . . . . . . . . . . . . 78Measure the calibration standard . . . . . . . . . . . . . . . . . . . . . . . . . . . . . . . . . . . . . . . . . . . . 78Calculate the Calibration Factor . . . . . . . . . . . . . . . . . . . . . . . . . . . . . . . . . . . . . . . . . . . . . 78
Measure the templated unenriched sample . . . . . . . . . . . . . . . . . . . . . . . . . . . . . . . . . . . . . . . 80Sample preparation . . . . . . . . . . . . . . . . . . . . . . . . . . . . . . . . . . . . . . . . . . . . . . . . . . . . . . . . 80Measure the sample . . . . . . . . . . . . . . . . . . . . . . . . . . . . . . . . . . . . . . . . . . . . . . . . . . . . . . . 81(Optional) Transfer the data to a USB Drive . . . . . . . . . . . . . . . . . . . . . . . . . . . . . . . . . . . . 82Templated ISP evaluation . . . . . . . . . . . . . . . . . . . . . . . . . . . . . . . . . . . . . . . . . . . . . . . . . . . 83
Section B.4 Quality control using the Qubit™ 3.0 Fluorometer . . . . . . . . . . . . . . . . . . . . . . . . 84Materials required . . . . . . . . . . . . . . . . . . . . . . . . . . . . . . . . . . . . . . . . . . . . . . . . . . . . . . . . . . . . . 84Calculate the Qubit™ 3.0 Fluorometer Calibration Factor . . . . . . . . . . . . . . . . . . . . . . . . . . . . 84
Download the Qubit™ Easy Calculator . . . . . . . . . . . . . . . . . . . . . . . . . . . . . . . . . . . . . . . . . 84Prepare the calibration standard . . . . . . . . . . . . . . . . . . . . . . . . . . . . . . . . . . . . . . . . . . . . . 84Measure the calibration standard . . . . . . . . . . . . . . . . . . . . . . . . . . . . . . . . . . . . . . . . . . . . 85Calculate the Calibration Factor . . . . . . . . . . . . . . . . . . . . . . . . . . . . . . . . . . . . . . . . . . . . . 87
Measure the templated unenriched sample . . . . . . . . . . . . . . . . . . . . . . . . . . . . . . . . . . . . . . . 88Sample preparation . . . . . . . . . . . . . . . . . . . . . . . . . . . . . . . . . . . . . . . . . . . . . . . . . . . . . . . . 88Measure the sample . . . . . . . . . . . . . . . . . . . . . . . . . . . . . . . . . . . . . . . . . . . . . . . . . . . . . . . 89(Optional) Transfer the data to a USB Drive . . . . . . . . . . . . . . . . . . . . . . . . . . . . . . . . . . . . 90Templated ISP evaluation . . . . . . . . . . . . . . . . . . . . . . . . . . . . . . . . . . . . . . . . . . . . . . . . . . . 90
Section B.5 Maintain the Ion Chef™ System . . . . . . . . . . . . . . . . . . . . . . . . . . . . . . . . . . . . . . . . 92Install a firmware update . . . . . . . . . . . . . . . . . . . . . . . . . . . . . . . . . . . . . . . . . . . . . . . . . . . . . . . 92
Check the Ion Chef™ Instrument firmware . . . . . . . . . . . . . . . . . . . . . . . . . . . . . . . . . . . . 92Change the instrument name . . . . . . . . . . . . . . . . . . . . . . . . . . . . . . . . . . . . . . . . . . . . . . . . . . . . 93
■ APPENDIX C Ion Chef™ and Torrent Server network setup . . . . . . . . . 94
Networking overview . . . . . . . . . . . . . . . . . . . . . . . . . . . . . . . . . . . . . . . . . . . . . . . . . . . . . . . . . . . 94About the Ion Chef™ instrument . . . . . . . . . . . . . . . . . . . . . . . . . . . . . . . . . . . . . . . . . . . . . . 95About the Torrent Server . . . . . . . . . . . . . . . . . . . . . . . . . . . . . . . . . . . . . . . . . . . . . . . . . . . 95Networking guidelines and best practices . . . . . . . . . . . . . . . . . . . . . . . . . . . . . . . . . . . . . 95Network setup workflow . . . . . . . . . . . . . . . . . . . . . . . . . . . . . . . . . . . . . . . . . . . . . . . . . . . . 95Network setup examples . . . . . . . . . . . . . . . . . . . . . . . . . . . . . . . . . . . . . . . . . . . . . . . . . . . 95Collect the required network information . . . . . . . . . . . . . . . . . . . . . . . . . . . . . . . . . . . . . 95Materials required . . . . . . . . . . . . . . . . . . . . . . . . . . . . . . . . . . . . . . . . . . . . . . . . . . . . . . . . . 96General requirements . . . . . . . . . . . . . . . . . . . . . . . . . . . . . . . . . . . . . . . . . . . . . . . . . . . . . . 96
Ion Chef™ Networking Configuration Options . . . . . . . . . . . . . . . . . . . . . . . . . . . . . . . . . . . . . . 99Target the Torrent Server IP Address . . . . . . . . . . . . . . . . . . . . . . . . . . . . . . . . . . . . . . . . . 99
Editing the Torrent Server firewall tables to allow the LAN port IP . . . . . . . . . . . . . . . . . . 103Create an exception . . . . . . . . . . . . . . . . . . . . . . . . . . . . . . . . . . . . . . . . . . . . . . . . . . . . . . . 103
Enable Planned Run sharing among Torrent Servers . . . . . . . . . . . . . . . . . . . . . . . . . . . . . . 105Set up Server Network (admin action) . . . . . . . . . . . . . . . . . . . . . . . . . . . . . . . . . . . . . . . 106
Contents
6 Ion 520™ & Ion 530™ Kit − Chef User Guide
Transfer a Planned Run . . . . . . . . . . . . . . . . . . . . . . . . . . . . . . . . . . . . . . . . . . . . . . . . . . . . . . . . 107
Undo a Planned Run transfer (administrator) . . . . . . . . . . . . . . . . . . . . . . . . . . . . . . . . . . . . . 109
Undo a Planned Run transfer (user) . . . . . . . . . . . . . . . . . . . . . . . . . . . . . . . . . . . . . . . . . . . . . 109
■ APPENDIX D Safety . . . . . . . . . . . . . . . . . . . . . . . . . . . . . . . . . . . . . . . . . . . . . . . . . . . 110
Symbols on this instrument . . . . . . . . . . . . . . . . . . . . . . . . . . . . . . . . . . . . . . . . . . . . . . . . . . . . 111Conformity symbols . . . . . . . . . . . . . . . . . . . . . . . . . . . . . . . . . . . . . . . . . . . . . . . . . . . . . . . 112
Location of safety labels on this instrument . . . . . . . . . . . . . . . . . . . . . . . . . . . . . . . . . . . . . . 113
Safety information for instruments not manufactured by Thermo Fisher Scientific . . . . 113
Instrument safety . . . . . . . . . . . . . . . . . . . . . . . . . . . . . . . . . . . . . . . . . . . . . . . . . . . . . . . . . . . . . 113General . . . . . . . . . . . . . . . . . . . . . . . . . . . . . . . . . . . . . . . . . . . . . . . . . . . . . . . . . . . . . . . . . 113Physical injury . . . . . . . . . . . . . . . . . . . . . . . . . . . . . . . . . . . . . . . . . . . . . . . . . . . . . . . . . . . 113Electrical . . . . . . . . . . . . . . . . . . . . . . . . . . . . . . . . . . . . . . . . . . . . . . . . . . . . . . . . . . . . . . . . 114Cleaning and decontamination . . . . . . . . . . . . . . . . . . . . . . . . . . . . . . . . . . . . . . . . . . . . . 114Ultraviolet (UV) Safety . . . . . . . . . . . . . . . . . . . . . . . . . . . . . . . . . . . . . . . . . . . . . . . . . . . . . 115
Safety and electromagnetic compatibility (EMC) standards . . . . . . . . . . . . . . . . . . . . . . . . . 115Safety compliance . . . . . . . . . . . . . . . . . . . . . . . . . . . . . . . . . . . . . . . . . . . . . . . . . . . . . . . . 115EMC . . . . . . . . . . . . . . . . . . . . . . . . . . . . . . . . . . . . . . . . . . . . . . . . . . . . . . . . . . . . . . . . . . . . 115Environmental design . . . . . . . . . . . . . . . . . . . . . . . . . . . . . . . . . . . . . . . . . . . . . . . . . . . . . 116
Chemical safety . . . . . . . . . . . . . . . . . . . . . . . . . . . . . . . . . . . . . . . . . . . . . . . . . . . . . . . . . . . . . . . 116
Biological hazard safety . . . . . . . . . . . . . . . . . . . . . . . . . . . . . . . . . . . . . . . . . . . . . . . . . . . . . . . . 117
■ Documentation and support . . . . . . . . . . . . . . . . . . . . . . . . . . . . . . . . . . . . . . . . . . . 118
Customer and technical support . . . . . . . . . . . . . . . . . . . . . . . . . . . . . . . . . . . . . . . . . . . . . . . . 118
Limited product warranty . . . . . . . . . . . . . . . . . . . . . . . . . . . . . . . . . . . . . . . . . . . . . . . . . . . . . . 118
Contents
Ion 520™ & Ion 530™ Kit − Chef User Guide 7
About this guide
IMPORTANT! Before using this product, read and understand the information in the“Safety” appendix in this document.
Purpose of this guide
This user guide describes how to use the Ion Torrent™ Ion 520™ & Ion 530™ Kit – Chef(Cat. Nos. A27757, A30010) and the Ion Chef™ System to prepare enriched, template-positive Ion Sphere™ Particles (ISPs) for up to 400 base-read sequencing of libraries onthe Ion S5™ Sequencer or the Ion S5™ XL Sequencer. The kits include all reagents andmaterials sufficient for performing four dual-sample template-preparation runs on theIon Chef™ System for subsequent sequencing on an Ion S5™ System.
WARNING! The protection provided by the equipment may be impaired if theinstrument is operated outside the environment and use specifications, the userprovides inadequate maintenance, or the equipment is used in a manner notspecified by the manufacturer.
Prerequisites
This guide also assumes that you have:• A general understanding of Ion Torrent™ sequencing chemistry and workflow• Knowledge of techniques for handling and preparing DNA libraries
8 Ion 520™ & Ion 530™ Kit − Chef User Guide
Product information
■ Product description . . . . . . . . . . . . . . . . . . . . . . . . . . . . . . . . . . . . . . . . . . . . . . . . . . . 9
■ Ion 520™ & Ion 530™ Kit – Chef . . . . . . . . . . . . . . . . . . . . . . . . . . . . . . . . . . . . . . . . 10
■ Compatible Ion Chip™ kits . . . . . . . . . . . . . . . . . . . . . . . . . . . . . . . . . . . . . . . . . . . . 11
■ Ion S5™ Calibration Standard . . . . . . . . . . . . . . . . . . . . . . . . . . . . . . . . . . . . . . . . . 11
■ Ion S5™ Controls . . . . . . . . . . . . . . . . . . . . . . . . . . . . . . . . . . . . . . . . . . . . . . . . . . . . 12
■ Required materials not supplied . . . . . . . . . . . . . . . . . . . . . . . . . . . . . . . . . . . . . . . . 12
■ About the Ion Chef™ System . . . . . . . . . . . . . . . . . . . . . . . . . . . . . . . . . . . . . . . . . . . 13
■ Precautions . . . . . . . . . . . . . . . . . . . . . . . . . . . . . . . . . . . . . . . . . . . . . . . . . . . . . . . . . . 15
■ Workflow . . . . . . . . . . . . . . . . . . . . . . . . . . . . . . . . . . . . . . . . . . . . . . . . . . . . . . . . . . . 17
Product description
The Ion 520™ & Ion 530™ Kit – Chef (Cat. Nos. A27757, A30010) include the reagentsand materials required to use the Ion Chef™ Instrument to prepare template-positiveIon Sphere™ Particles and load Ion 520™ or Ion 530™ Chips. The kit also includesreagents and materials to sequence the loaded chips on the Ion S5™ or Ion S5™ XLSequencer.
Note: Ion 520™ & Ion 530™ Kit – Chef (Cat. No. A30010), for use when performingtwo sequencing runs per initialization, only supports 200 base-read sequencing.
The Ion 520™ & Ion 530™ Kit – Chef can be used with up to 400-base-read libraries ofany type prepared using any available Ion library kit.
The Ion 520™ & Ion 530™ Kit – Chef is compatible with Torrent Suite™ Software v5.2and later. Be sure to update your Torrent Server to the latest available version ofTorrent Suite™ Software before using this kit.
1
Librarycompatibility
Softwarecompatibility
Ion 520™ & Ion 530™ Kit − Chef User Guide 9
Ion 520™ & Ion 530™ Kit – Chef
IMPORTANT! Do not substitute components from any other Ion sequencing kits. Wehave verified this protocol using these specific materials. Substitution may adverselyaffect system performance.
IMPORTANT! Store all consumables and cartridges under the recommendedconditions and in an upright position. Do NOT store the Ion S5™ Sequencing Reagents(Cat. No. A27768) on dry ice or in a closed environment where dry ice is present.
Each Ion 520™ & Ion 530™ Kit – Chef contains all materials that are required to prepareand sequence 8 Ion 520™ or Ion 530™ Chips.
• Catalog No. A27757 supports 8 initializations• Catalog No. A30010 supports 4 initializations (2 × 200 base-read sequencing runs
per initialization)
On arrival, inspect all consumables and contact Technical Support if any of theproducts have been damaged during shipping.
Component Part No.Quantity per kit
A30010 A27757
Ion S5™ Chef Supplies A27755 4 boxes 4 boxes
Ion S5™ Chef Solutions A27754 1 box 1 box
Ion 520™ & Ion 530™ Chef Reagents A27756 1 box 1 box
Ion S5™ Sequencing Solutions A27767 1 box 2 boxes
Ion S5™ Sequencing Reagents A27768 1 box 2 boxes
Contents Amount / box Storage
Ion S5™ Chef Supplies (Part No. A27755)
Chip Adapter 2 15°C to 30°C
Enrichment Cartridge v2 1
Tip Cartridge 1
PCR Plate and Frame Seal v2 1 each
Recovery Station Disposable Lid v2 2
Recovery Tube v2 12
Ion S5™ Chef Solutions (Part No. A27754)
Ion S5™ Chef Solutions 4 cartridges 15°C to 30°C
Kit summary
Kit contents andstorage
Chapter 1 Product informationIon 520™ & Ion 530™ Kit – Chef1
10 Ion 520™ & Ion 530™ Kit − Chef User Guide
Contents Amount / box Storage
Ion 520™ & Ion 530™ Chef Reagents (Part No. A27756)
Ion 520™ & Ion 530™ Chef Reagents 4 cartridges –30°C to –10°C
Ion S5™ Sequencing Solutions (Part No. A27767)
Ion S5™ Wash Solution 4 × 1.5 L 15°C to 30°C
Ion S5™ Cleaning Solution 250 mL
Ion S5™ Sequencing Reagents (Part No. A27768)
Ion S5™ Sequencing Reagents
(Cartridges ship at 2°C to 8°C. Store asindicated, do not store on dry ice.)
4 cartridges –30°C to –10°C
IMPORTANT! Do not store the Ion S5™ Sequencing Reagents (Part No. A27768) ondry ice or in a closed environment containing dry ice.
Compatible Ion Chip™ kits
Description Catalog No. Quantity Shipping andstorage
Ion 520™ Chip Kit (2 × 4-pack) A27762 8 chips15°C to 30°C
Ion 530™ Chip Kit (2 × 4-pack) A27764 8 chips
Ion S5™ Calibration Standard
For de novo sequencing applications, the Ion S5™ Calibration Standard can be added todiluted libraries to increase base-calling accuracy. The Ion S5™ Calibration Standard(Cat. No. A27988) is ordered separately.
Contents Volume Storage
Ion S5™ Calibration Standard 80 µL –30°C to –10°C
Chapter 1 Product informationCompatible Ion Chip™ kits 1
Ion 520™ & Ion 530™ Kit − Chef User Guide 11
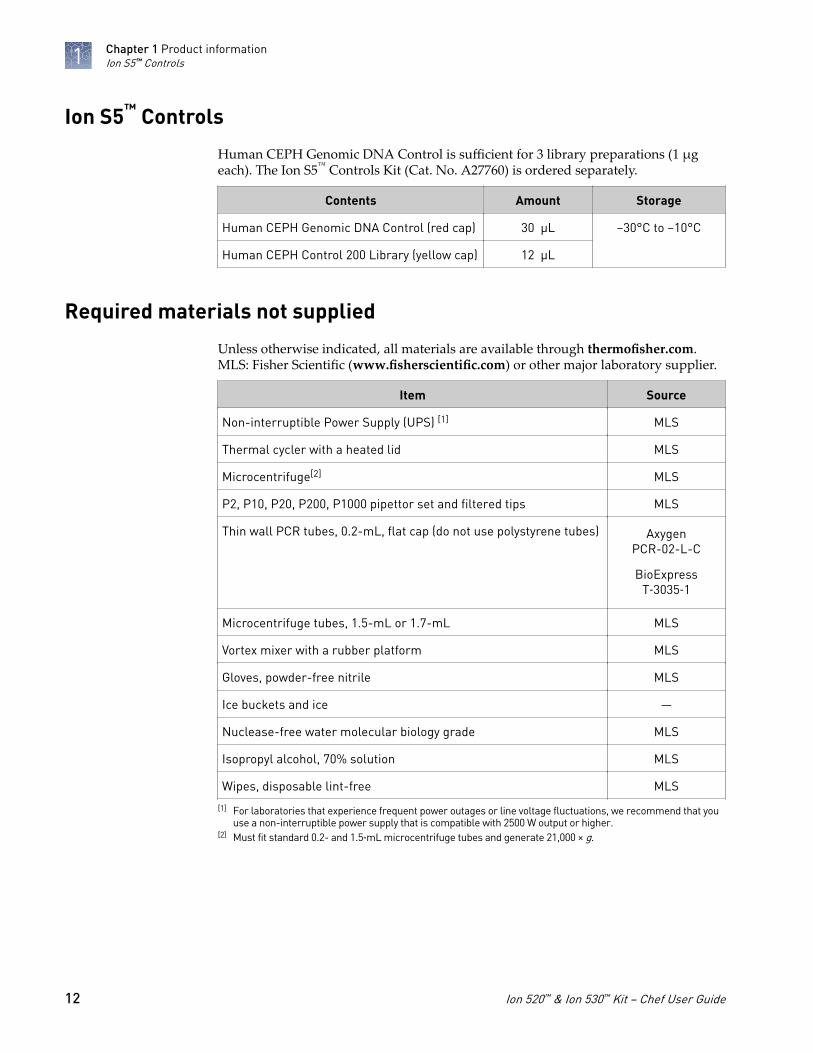
Ion S5™ Controls
Human CEPH Genomic DNA Control is sufficient for 3 library preparations (1 µgeach). The Ion S5™ Controls Kit (Cat. No. A27760) is ordered separately.
Contents Amount Storage
Human CEPH Genomic DNA Control (red cap) 30 µL –30°C to –10°C
Human CEPH Control 200 Library (yellow cap) 12 µL
Required materials not supplied
Unless otherwise indicated, all materials are available through thermofisher.com.MLS: Fisher Scientific (www.fisherscientific.com) or other major laboratory supplier.
Item Source
Non-interruptible Power Supply (UPS) [1] MLS
Thermal cycler with a heated lid MLS
Microcentrifuge[2] MLS
P2, P10, P20, P200, P1000 pipettor set and filtered tips MLS
Thin wall PCR tubes, 0.2-mL, flat cap (do not use polystyrene tubes) AxygenPCR-02-L-C
BioExpressT‑3035‑1
Microcentrifuge tubes, 1.5-mL or 1.7-mL MLS
Vortex mixer with a rubber platform MLS
Gloves, powder-free nitrile MLS
Ice buckets and ice —
Nuclease-free water molecular biology grade MLS
Isopropyl alcohol, 70% solution MLS
Wipes, disposable lint-free MLS
[1] For laboratories that experience frequent power outages or line voltage fluctuations, we recommend that you use a non-interruptible power supply that is compatible with 2500 W output or higher.
[2] Must fit standard 0.2- and 1.5‑mL microcentrifuge tubes and generate 21,000 × g.
Chapter 1 Product informationIon S5™ Controls1
12 Ion 520™ & Ion 530™ Kit − Chef User Guide
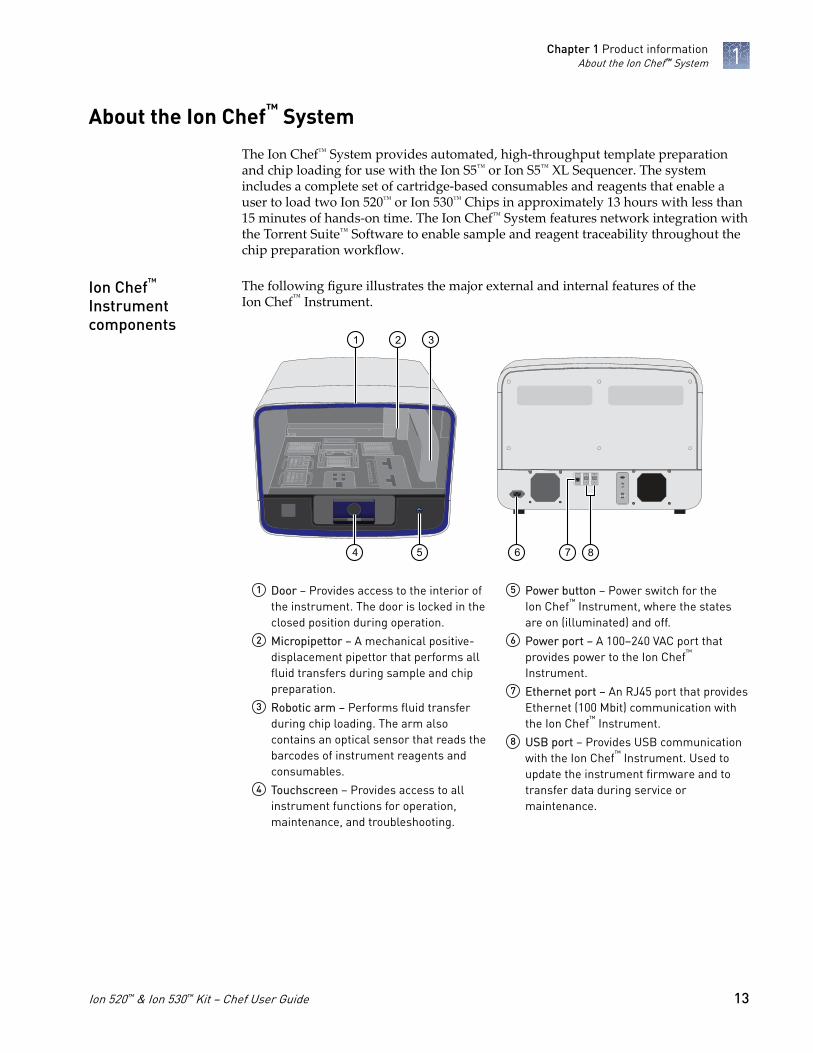
About the Ion Chef™ System
The Ion Chef™ System provides automated, high-throughput template preparationand chip loading for use with the Ion S5™ or Ion S5™ XL Sequencer. The systemincludes a complete set of cartridge-based consumables and reagents that enable auser to load two Ion 520™ or Ion 530™ Chips in approximately 13 hours with less than15 minutes of hands-on time. The Ion Chef™ System features network integration withthe Torrent Suite™ Software to enable sample and reagent traceability throughout thechip preparation workflow.
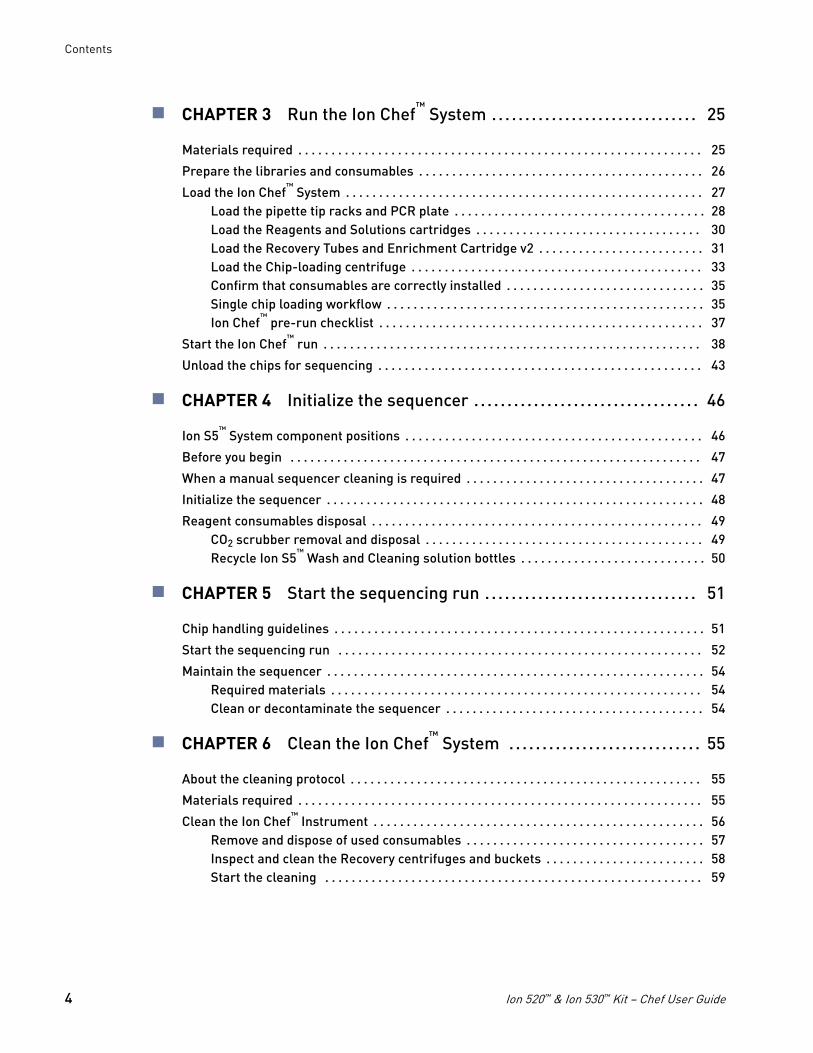
The following figure illustrates the major external and internal features of theIon Chef™ Instrument.
4
1 2 3
5 6 7 8
1 Door – Provides access to the interior ofthe instrument. The door is locked in theclosed position during operation.
2 Micropipettor – A mechanical positive-displacement pipettor that performs allfluid transfers during sample and chippreparation.
3 Robotic arm – Performs fluid transferduring chip loading. The arm alsocontains an optical sensor that reads thebarcodes of instrument reagents andconsumables.
4 Touchscreen – Provides access to allinstrument functions for operation,maintenance, and troubleshooting.
5 Power button – Power switch for theIon Chef™ Instrument, where the statesare on (illuminated) and off.
6 Power port – A 100–240 VAC port thatprovides power to the Ion Chef™
Instrument.7 Ethernet port – An RJ45 port that provides
Ethernet (100 Mbit) communication withthe Ion Chef™ Instrument.
8 USB port – Provides USB communicationwith the Ion Chef™ Instrument. Used toupdate the instrument firmware and totransfer data during service ormaintenance.
Ion Chef™
Instrumentcomponents
Chapter 1 Product informationAbout the Ion Chef™ System 1
Ion 520™ & Ion 530™ Kit − Chef User Guide 13
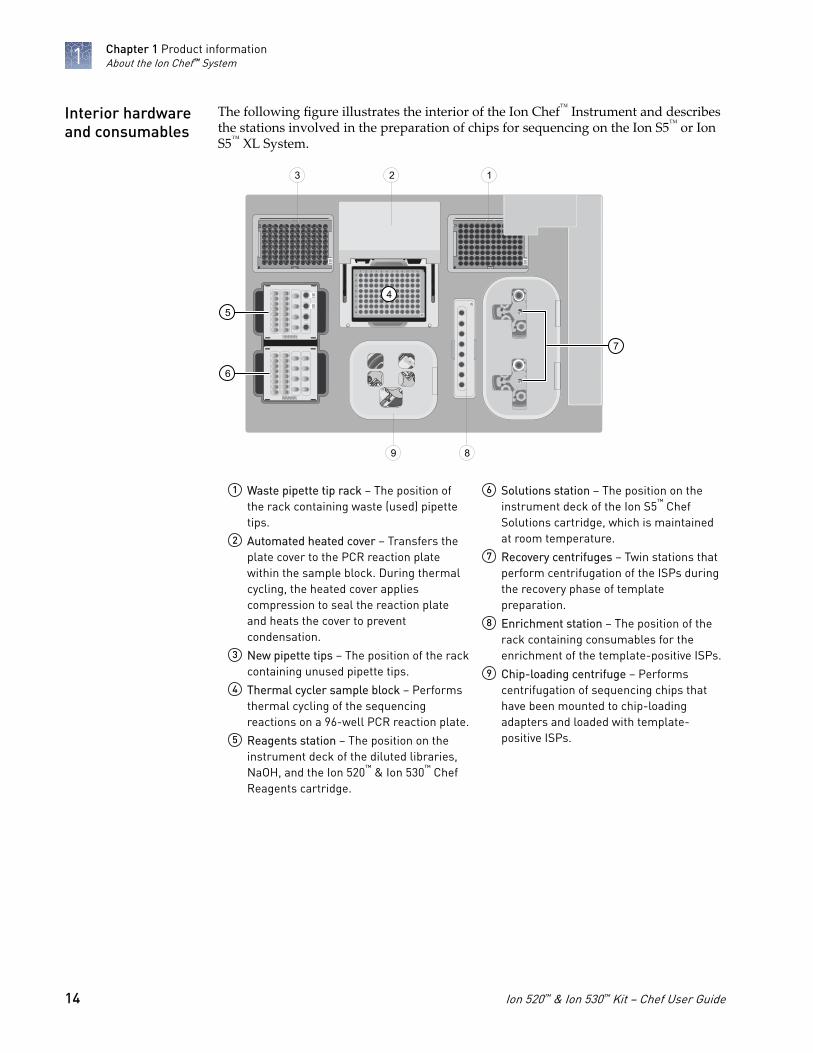
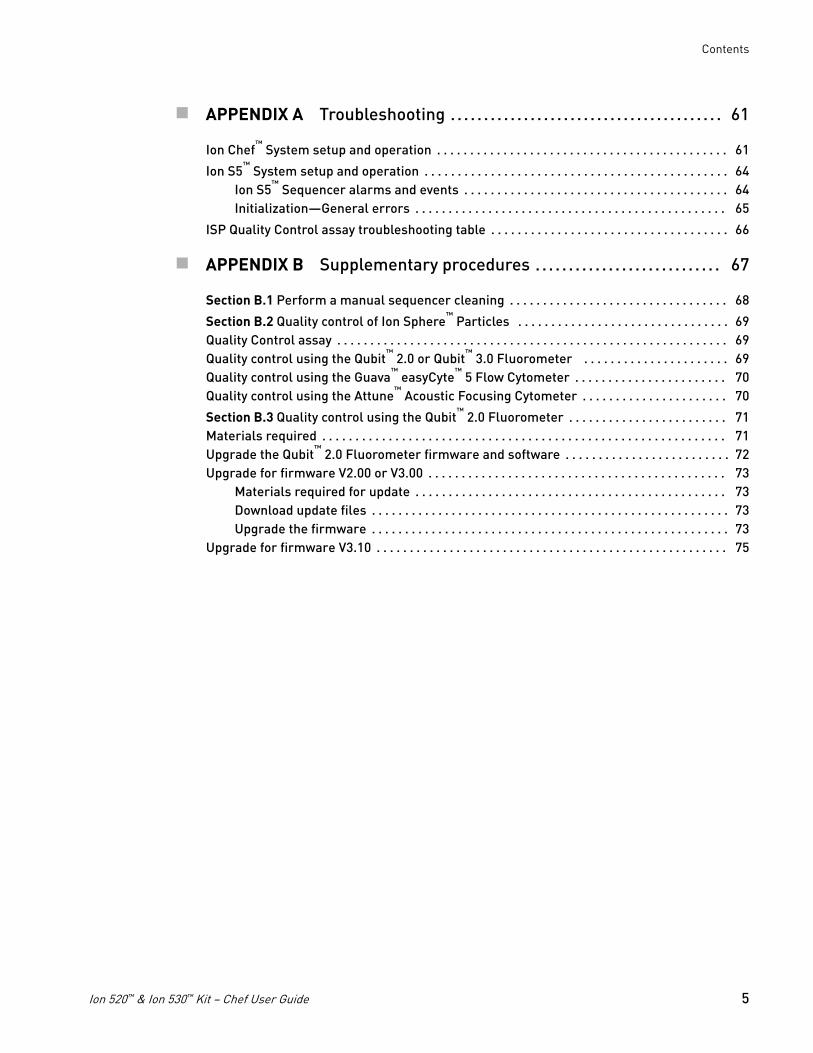
The following figure illustrates the interior of the Ion Chef™ Instrument and describesthe stations involved in the preparation of chips for sequencing on the Ion S5™ or IonS5™ XL System.
A
B
C
D
E
F
G
H
1 2 3 4 5 6 7 8 9 10 11 12
5
3
8
12
6
4
7
530
CCBD02226
530
CCBD0222
6
9
1 Waste pipette tip rack – The position ofthe rack containing waste (used) pipettetips.
2 Automated heated cover – Transfers theplate cover to the PCR reaction platewithin the sample block. During thermalcycling, the heated cover appliescompression to seal the reaction plateand heats the cover to preventcondensation.
3 New pipette tips – The position of the rackcontaining unused pipette tips.
4 Thermal cycler sample block – Performsthermal cycling of the sequencingreactions on a 96-well PCR reaction plate.
5 Reagents station – The position on theinstrument deck of the diluted libraries,NaOH, and the Ion 520™ & Ion 530™ ChefReagents cartridge.
6 Solutions station – The position on theinstrument deck of the Ion S5™ ChefSolutions cartridge, which is maintainedat room temperature.
7 Recovery centrifuges – Twin stations thatperform centrifugation of the ISPs duringthe recovery phase of templatepreparation.
8 Enrichment station – The position of therack containing consumables for theenrichment of the template-positive ISPs.
9 Chip-loading centrifuge – Performscentrifugation of sequencing chips thathave been mounted to chip-loadingadapters and loaded with template-positive ISPs.
Interior hardwareand consumables
Chapter 1 Product informationAbout the Ion Chef™ System1
14 Ion 520™ & Ion 530™ Kit − Chef User Guide
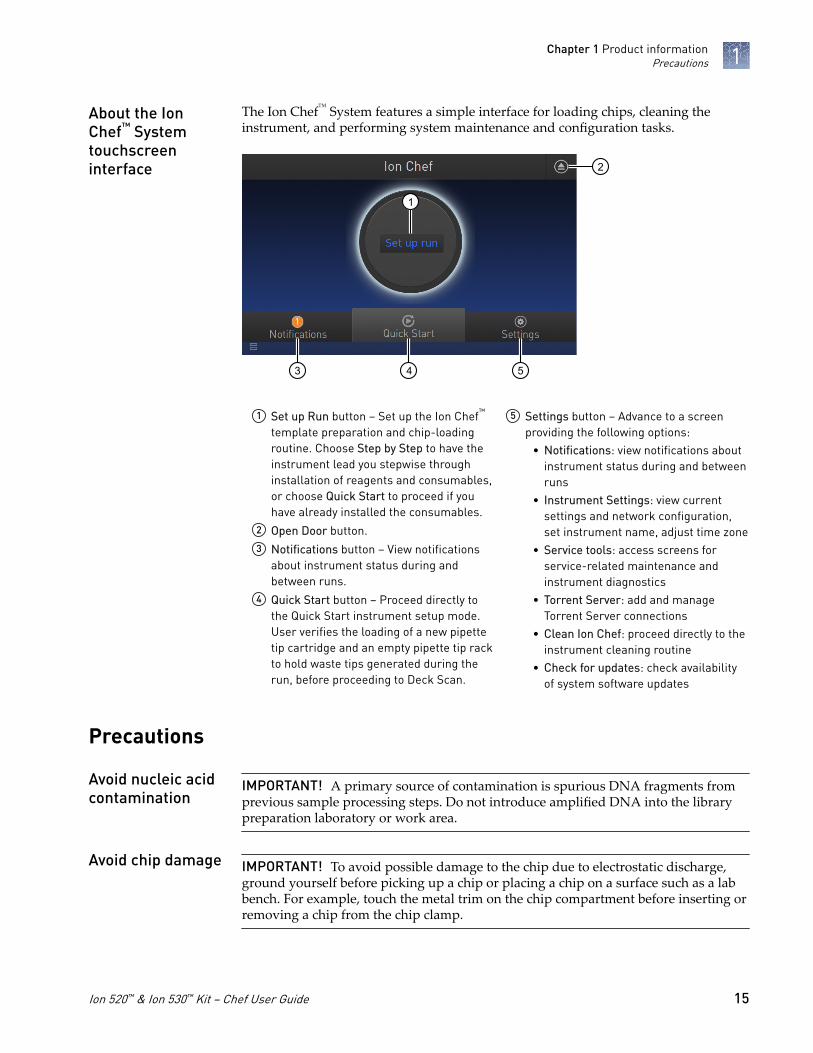
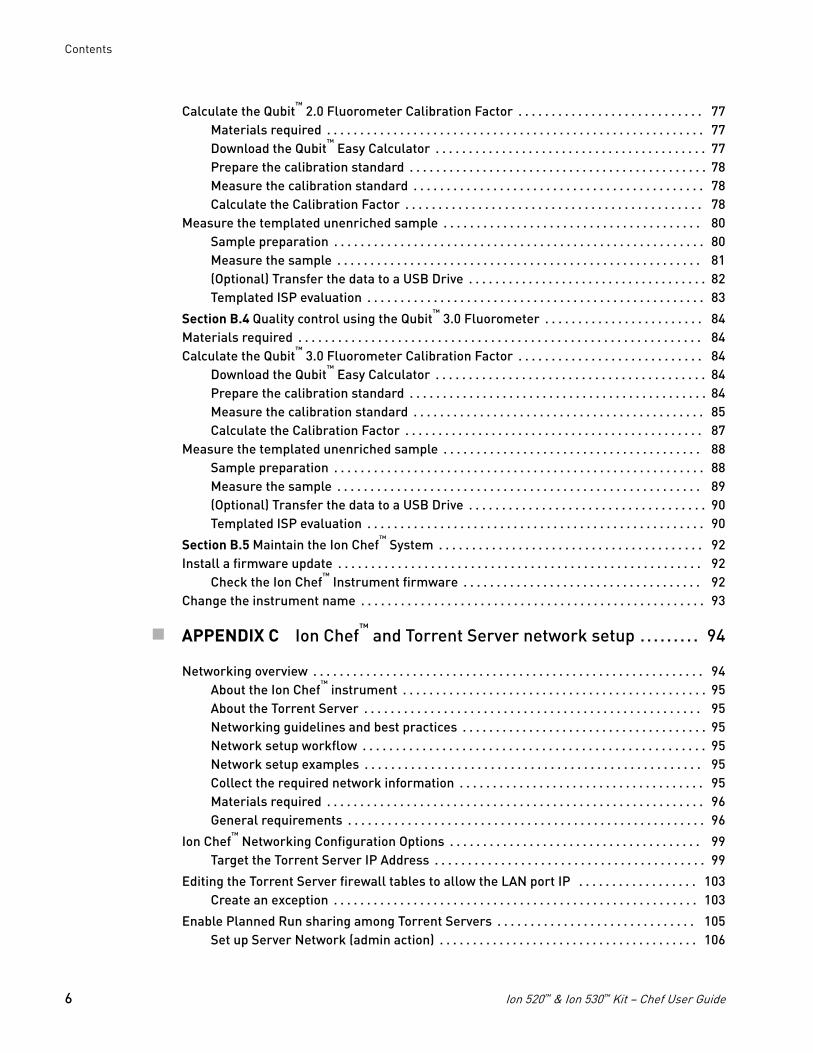
The Ion Chef™ System features a simple interface for loading chips, cleaning theinstrument, and performing system maintenance and configuration tasks.
2
1
3 4 5
1 Set up Run button – Set up the Ion Chef™
template preparation and chip-loadingroutine. Choose Step by Step to have theinstrument lead you stepwise throughinstallation of reagents and consumables,or choose Quick Start to proceed if youhave already installed the consumables.
2 Open Door button.3 Notifications button – View notifications
about instrument status during andbetween runs.
4 Quick Start button – Proceed directly tothe Quick Start instrument setup mode.User verifies the loading of a new pipettetip cartridge and an empty pipette tip rackto hold waste tips generated during therun, before proceeding to Deck Scan.
5 Settings button – Advance to a screenproviding the following options:
• Notifications: view notifications aboutinstrument status during and betweenruns
• Instrument Settings: view currentsettings and network configuration,set instrument name, adjust time zone
• Service tools: access screens forservice-related maintenance andinstrument diagnostics
• Torrent Server: add and manageTorrent Server connections
• Clean Ion Chef: proceed directly to theinstrument cleaning routine
• Check for updates: check availabilityof system software updates
Precautions
IMPORTANT! A primary source of contamination is spurious DNA fragments fromprevious sample processing steps. Do not introduce amplified DNA into the librarypreparation laboratory or work area.
IMPORTANT! To avoid possible damage to the chip due to electrostatic discharge,ground yourself before picking up a chip or placing a chip on a surface such as a labbench. For example, touch the metal trim on the chip compartment before inserting orremoving a chip from the chip clamp.
About the IonChef™ Systemtouchscreeninterface
Avoid nucleic acidcontamination
Avoid chip damage
Chapter 1 Product informationPrecautions 1
Ion 520™ & Ion 530™ Kit − Chef User Guide 15
To ensure the proper function of the Ion Chef™ System, handle the associatedconsumables and reagents according to the following guidelines:
• Store all Ion Chef™ System consumables and cartridges under the recommendedconditions and in an upright position.
• Inspect all Ion Chef™ System consumables and cartridges for damage on arrivaland again before use.
• Hold sequencing chips by gently gripping them by their edges.• When the Ion Chef™ System is not in use, remove all consumables and reagents
from the deck and close the instrument door.• Except for the New Pipette Tip Cartridge, do not reuse any of the Ion Chef™
System consumables or reagents. After each run, the empty Pipette Tip Cartridgeis transferred to the waste tip station.
IMPORTANT! All Ion Chef™ Instrument components are single-use only.
• Use only Ion Torrent™ kits and supplies with the Ion Chef™ Instrument. The useof third-party reagents and supplies can adversely affect the performance of theIon Chef™ Instrument and chips prepared.
• Always load two of the same model of sequencing chips into the Ion Chef™
System. The instrument cannot load different models of sequencing chips duringthe same run.
• Remove and sequence chips within 1 hour after the Ion Chef™ System finishesloading them. If you cannot sequence a loaded chip immediately, store it in a chipstorage container at 4°C until you are ready to run it (up to 6–8 hours maximum).
Note: If you choose to store a loaded chip, remove the chip from 4°C storage (butkeep it in the chip storage container) at least 20 minutes before running it,allowing the chip to warm to room temperature.
Guidelines forusing Ion Chef™
reagents andconsumables
Chapter 1 Product informationPrecautions1
16 Ion 520™ & Ion 530™ Kit − Chef User Guide
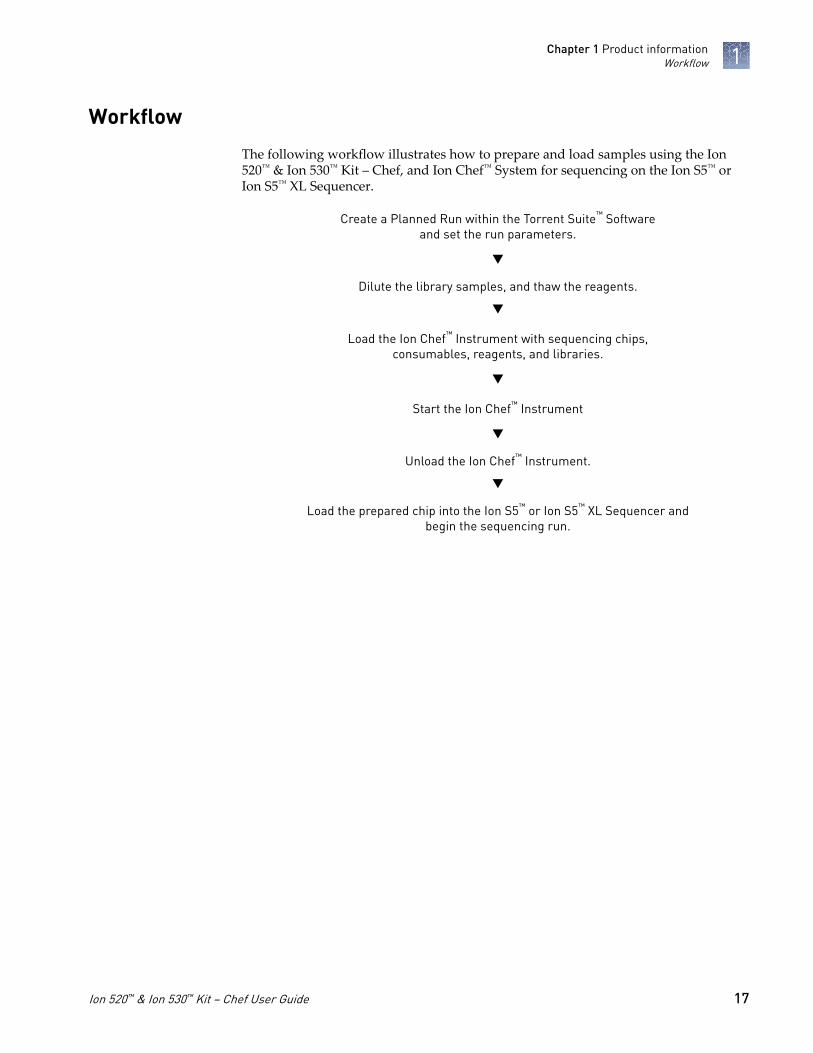
Workflow
The following workflow illustrates how to prepare and load samples using the Ion520™ & Ion 530™ Kit – Chef, and Ion Chef™ System for sequencing on the Ion S5™ orIon S5™ XL Sequencer.
Create a Planned Run within the Torrent Suite™ Softwareand set the run parameters.
q
Dilute the library samples, and thaw the reagents.
q
Load the Ion Chef™ Instrument with sequencing chips,consumables, reagents, and libraries.
q
Start the Ion Chef™ Instrument
q
Unload the Ion Chef™ Instrument.
q
Load the prepared chip into the Ion S5™ or Ion S5™ XL Sequencer andbegin the sequencing run.
Chapter 1 Product informationWorkflow 1
Ion 520™ & Ion 530™ Kit − Chef User Guide 17
Before you begin
■ Create a Planned Run . . . . . . . . . . . . . . . . . . . . . . . . . . . . . . . . . . . . . . . . . . . . . . . . . 18
■ Dilute the libraries . . . . . . . . . . . . . . . . . . . . . . . . . . . . . . . . . . . . . . . . . . . . . . . . . . . . 23
■ Prepare the Ion Chef™ System for use . . . . . . . . . . . . . . . . . . . . . . . . . . . . . . . . . . 24
Create a Planned Run
IMPORTANT! This kit is compatible with Torrent Suite™ Software v5.2 and later.Before proceeding, check for updates to the Torrent Suite™ and Ion Chef™ Systemsoftware, and install the updates if available.
Note: If you are currently using Ion Reporter™ Software v4.2.1 with an earlier versionof the Torrent Suite™ Software, contact Technical Support for assistance withupgrading to Torrent Suite™ Software v5.2.
Planned Runs contain all the settings used in a sequencing run, including number offlows, kit types, barcodes, sample information, and reference files (if any). They areused to track samples, chips, and reagents throughout the sequencing workflow, fromtemplate preparation on the Ion Chef™ Instrument through sequencing on the Ion S5™
or Ion S5™ XL Sequencer and subsequent data analysis. Each of the two chipsprepared in an Ion Chef™ run requires its own Planned Run.
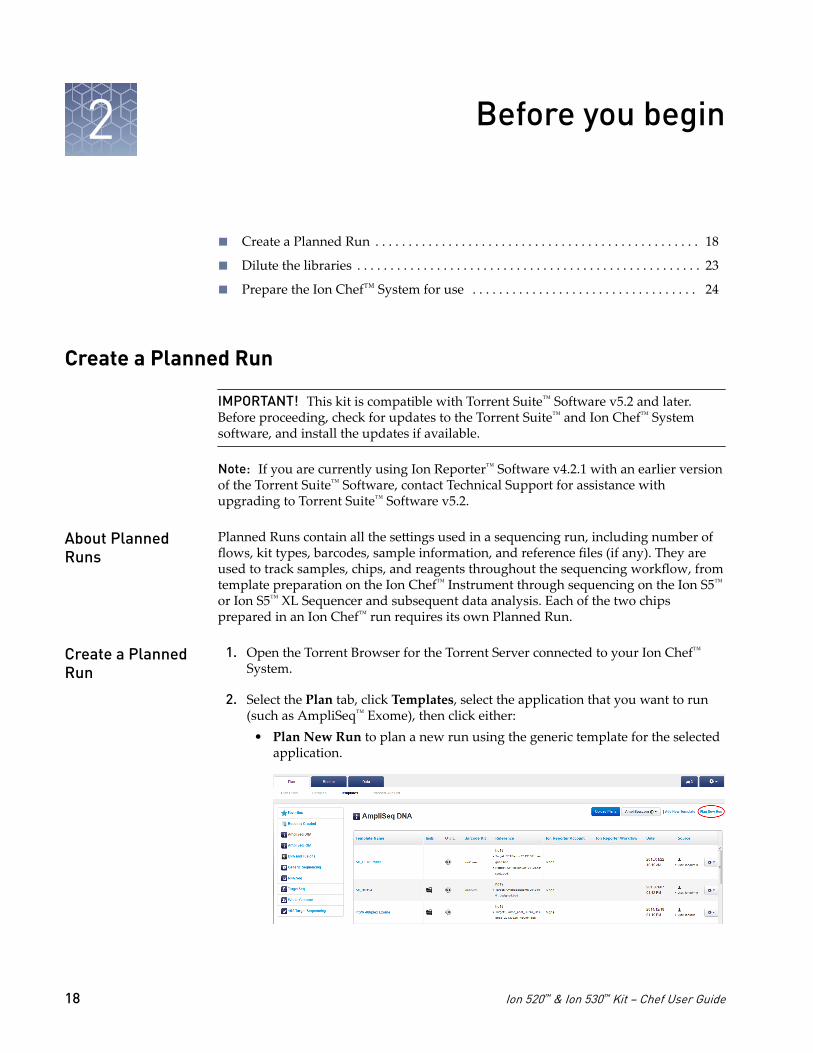
1. Open the Torrent Browser for the Torrent Server connected to your Ion Chef™
System.
2. Select the Plan tab, click Templates, select the application that you want to run(such as AmpliSeq™ Exome), then click either:
• Plan New Run to plan a new run using the generic template for the selectedapplication.
2
About PlannedRuns
Create a PlannedRun
18 Ion 520™ & Ion 530™ Kit − Chef User Guide
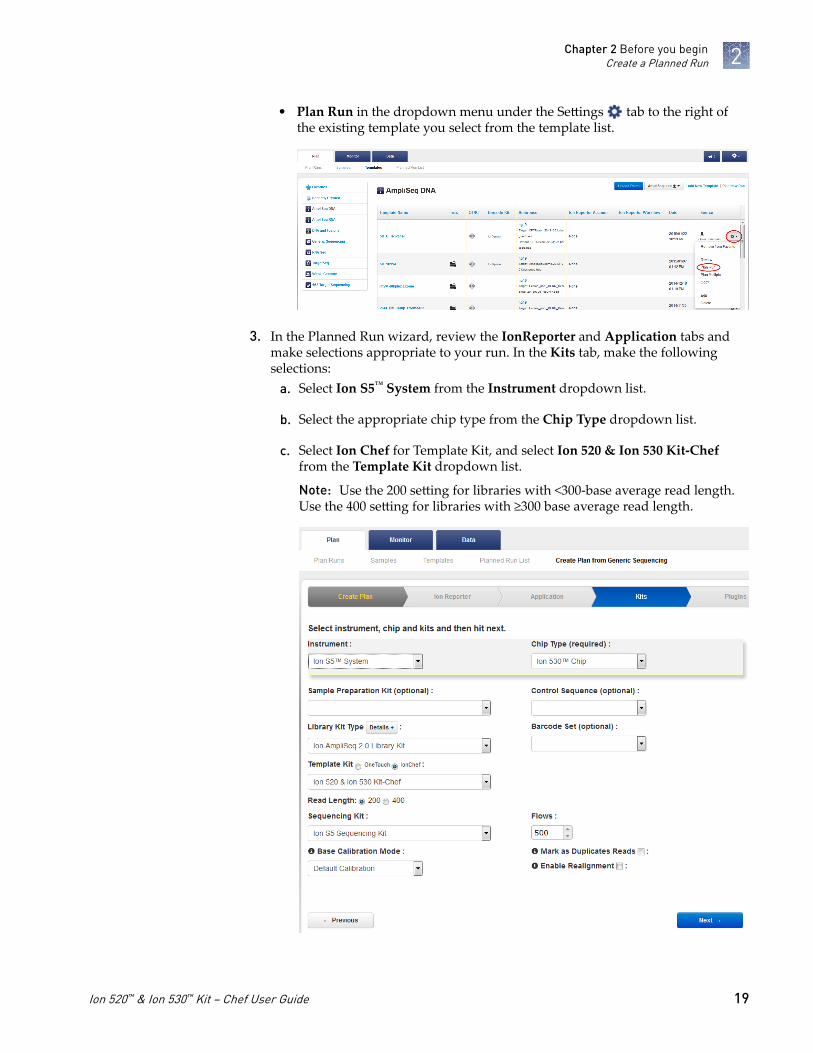
• Plan Run in the dropdown menu under the Settings tab to the right ofthe existing template you select from the template list.
3. In the Planned Run wizard, review the IonReporter and Application tabs andmake selections appropriate to your run. In the Kits tab, make the followingselections:
a. Select Ion S5™ System from the Instrument dropdown list.
b. Select the appropriate chip type from the Chip Type dropdown list.
c. Select Ion Chef for Template Kit, and select Ion 520 & Ion 530 Kit-Cheffrom the Template Kit dropdown list.
Note: Use the 200 setting for libraries with <300-base average read length.Use the 400 setting for libraries with ≥300 base average read length.
Chapter 2 Before you beginCreate a Planned Run 2
Ion 520™ & Ion 530™ Kit − Chef User Guide 19
d. Select 200 or 400 for Read Length.
e. Select Ion S5 Sequencing Kit from the Sequencing Kit dropdown list.
f. Enter the appropriate number of flows: enter 500 flows for 200-base-readsequencing, and 850 flows for 400-base-read sequencing.
g. Select or edit the optional information fields appropriately for your run.
IMPORTANT! For de novo sequencing applications that do not include areference BAM file, select Enable Calibration Standard from the BaseCalibration Mode dropdown list. Choose this option only if you will addIon S5™ Calibration Standard to the Ion Chef™ Library Sample Tubes.Selecting this option and adding the Ion S5™ Calibration Standard to yourlibrary will allow greater accuracy of base-calling in libraries for which areference BAM file does not exist.
h. Click Next.
4. Review the Plugins and Projects tabs and make selections appropriate to yourrun.
5. In the Plan tab, enter or make the following selections:a. Enter a Planned Run name and select Reference and BED files appropriate
to your run.
b. Enter the number of chips you are creating Planned Runs for. To specify twosample names, enter "2" in the Number of chips field and then click thecheck mark button to the right of this field.
c. Enter a sample name for each plan in the appropriate Sample (required)fields.
Chapter 2 Before you beginCreate a Planned Run2
20 Ion 520™ & Ion 530™ Kit − Chef User Guide
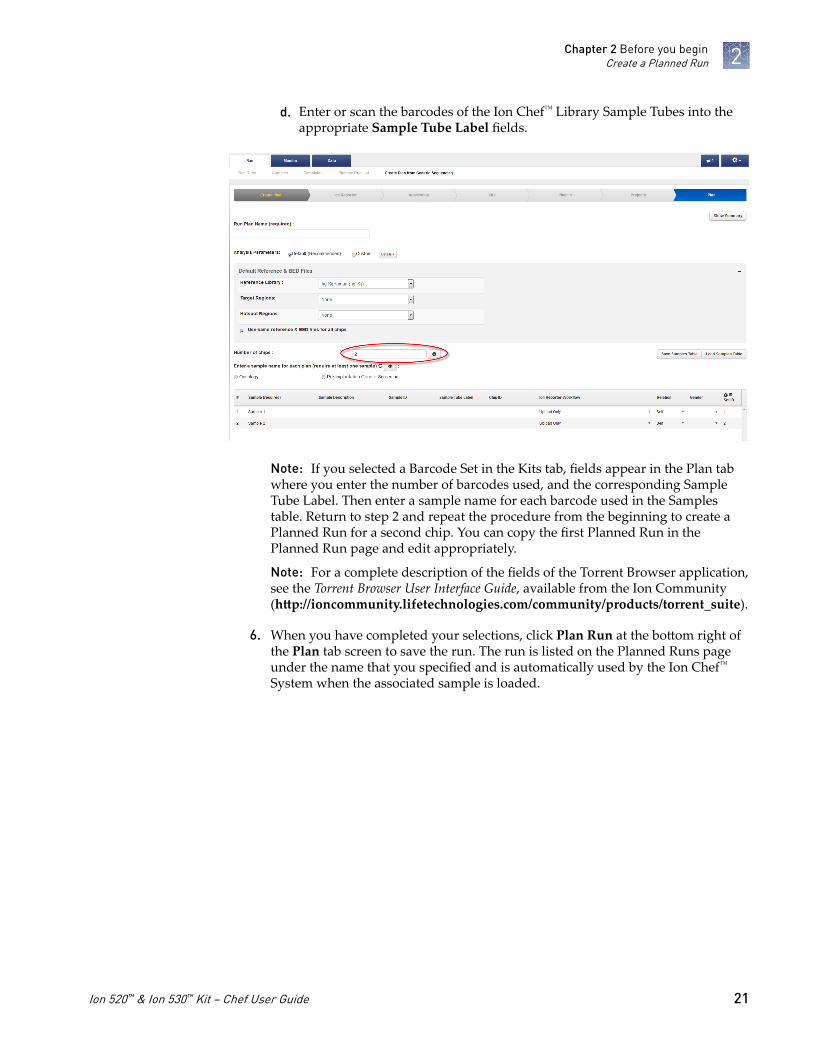
d. Enter or scan the barcodes of the Ion Chef™ Library Sample Tubes into theappropriate Sample Tube Label fields.
Note: If you selected a Barcode Set in the Kits tab, fields appear in the Plan tabwhere you enter the number of barcodes used, and the corresponding SampleTube Label. Then enter a sample name for each barcode used in the Samplestable. Return to step 2 and repeat the procedure from the beginning to create aPlanned Run for a second chip. You can copy the first Planned Run in thePlanned Run page and edit appropriately.
Note: For a complete description of the fields of the Torrent Browser application,see the Torrent Browser User Interface Guide, available from the Ion Community(http://ioncommunity.lifetechnologies.com/community/products/torrent_suite).
6. When you have completed your selections, click Plan Run at the bottom right ofthe Plan tab screen to save the run. The run is listed on the Planned Runs pageunder the name that you specified and is automatically used by the Ion Chef™
System when the associated sample is loaded.
Chapter 2 Before you beginCreate a Planned Run 2
Ion 520™ & Ion 530™ Kit − Chef User Guide 21
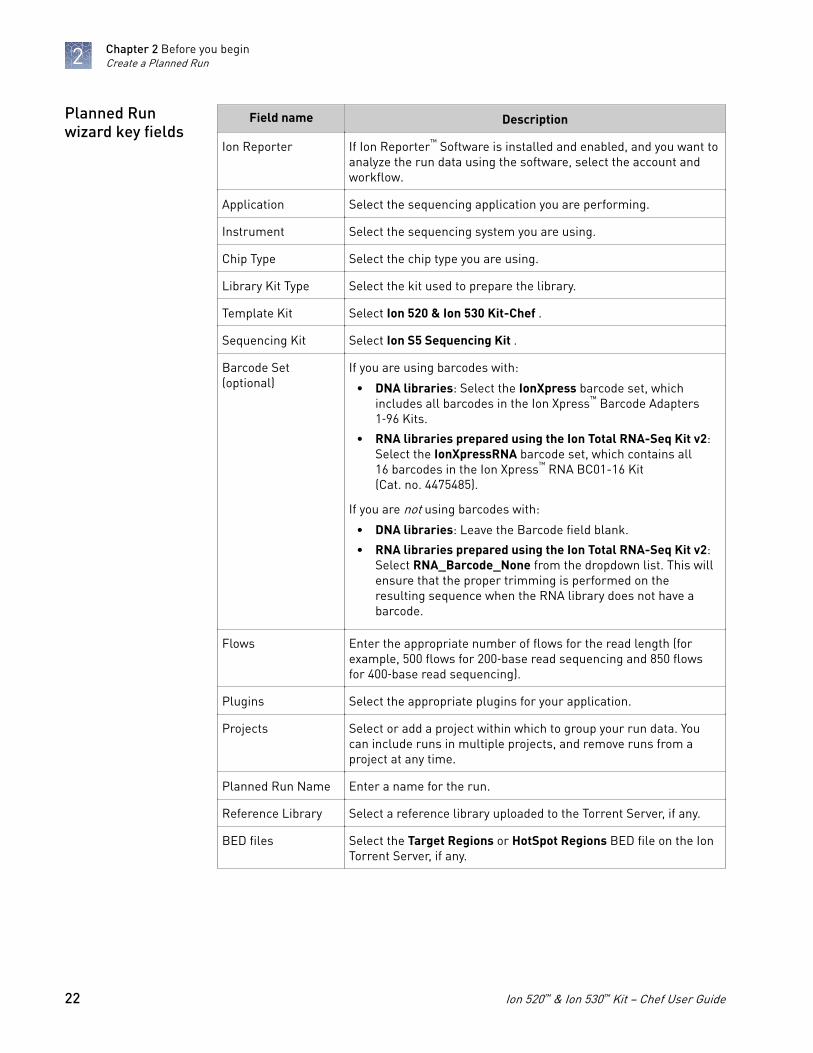
Field name Description
Ion Reporter If Ion Reporter™ Software is installed and enabled, and you want toanalyze the run data using the software, select the account andworkflow.
Application Select the sequencing application you are performing.
Instrument Select the sequencing system you are using.
Chip Type Select the chip type you are using.
Library Kit Type Select the kit used to prepare the library.
Template Kit Select Ion 520 & Ion 530 Kit-Chef .
Sequencing Kit Select Ion S5 Sequencing Kit .
Barcode Set(optional)
If you are using barcodes with:
• DNA libraries: Select the IonXpress barcode set, whichincludes all barcodes in the Ion Xpress™ Barcode Adapters1‑96 Kits.
• RNA libraries prepared using the Ion Total RNA-Seq Kit v2:Select the IonXpressRNA barcode set, which contains all16 barcodes in the Ion Xpress™ RNA BC01-16 Kit(Cat. no. 4475485).
If you are not using barcodes with:
• DNA libraries: Leave the Barcode field blank.
• RNA libraries prepared using the Ion Total RNA-Seq Kit v2:Select RNA_Barcode_None from the dropdown list. This willensure that the proper trimming is performed on theresulting sequence when the RNA library does not have abarcode.
Flows Enter the appropriate number of flows for the read length (forexample, 500 flows for 200‑base read sequencing and 850 flowsfor 400‑base read sequencing).
Plugins Select the appropriate plugins for your application.
Projects Select or add a project within which to group your run data. Youcan include runs in multiple projects, and remove runs from aproject at any time.
Planned Run Name Enter a name for the run.
Reference Library Select a reference library uploaded to the Torrent Server, if any.
BED files Select the Target Regions or HotSpot Regions BED file on the IonTorrent Server, if any.
Planned Runwizard key fields
Chapter 2 Before you beginCreate a Planned Run2
22 Ion 520™ & Ion 530™ Kit − Chef User Guide
Field name Description
Sample Name(Required)
Is Ion Reporter™ Uploader enabled?
• Yes – Enter each sample name and select the appropriatevalues for workflow, relation, relation role, and set ID.
• No – Scan the barcode of the library tube into the "SampleName" and "Sample Tube Label" fields for the specificsample.
Sample Tube Label(Required)
Scan or enter the barcodes located on the Ion Chef™ LibrarySample Tubes that you intend to use to load samples into the IonChef™ Instrument.
IMPORTANT! You must scan or enter the barcode of eachIon Chef™ Library Sample Tube used on the Ion Chef™ Instrument.
MonitoringThresholds
Set thresholds for Bead Loading, Usable Sequence, and KeySignal. In the Torrent Browser Monitor4Runs in Progress tab, analert is displayed if the values for a run fall below the selectedthresholds.
Dilute the libraries
IMPORTANT! Before proceeding, dilute the two Ion libraries to the optimal inputconcentration. The quality of your sequencing data relies greatly upon achieving thecorrect concentration of starting library.
Dilute 200-bp and 400-bp stock libraries according to the following table. Then usepolyclonality and low quality filter results from a sequencing run performed withISPs templated at the starting concentration and titrate up or down to achieve optimalconcentrations, if needed.
IMPORTANT! The recommendations below represent optimal input concentrationsfor control libraries.
Library read length Recommendedconcentration [1]
Molecules per 25-µL inputvolume
200 bp 40–60 pM 600–900 × 106
400 bp 80–120 pM 1.2–1.8 × 10⁹
[1] Recommendations are based on qPCR quantification. If libraries are quantified with an Agilent™ 2100 Bioanalyzer™ instrument, a higher calculated concentration may need to be used for equivalent input.
Note: Prepare a fresh dilution of each library before use with the Ion Chef™ System,and use the library dilutions within 48 hours.
Note: If running a control library, prepare the Human CEPH Control 200 Library,obtained from the Ion S5™ Controls Kit (Cat. No. A27760), for use by diluting 1 µLinto 52 µL nuclease-free water.
Chapter 2 Before you beginDilute the libraries 2
Ion 520™ & Ion 530™ Kit − Chef User Guide 23
Prepare the Ion Chef™ System for use
Before you use the Ion Chef™ Instrument:
• Ensure that the Ion Chef™ Instrument has been cleaned following the previousrun. If not, clean the instrument before loading it with consumables.
Note: For more information on the cleaning procedure, see Chapter 6, “Clean theIon Chef™ System“.
• Inspect the empty compartments of the Reagents and Solutions stations forcondensation. Condensate can collect in these compartments, depending ontemperature and humidity conditions. Before loading consumables into theinstrument, wipe the compartments dry with a laboratory wipe or absorbentcloth, if needed.
• Thaw the Ion 520™ & Ion 530™ Chef Reagents cartridge at room temperature for45 minutes before use.
• Ensure that the Ion Chef™ Instrument has a connection to your Torrent Server. Onthe Ion Chef™ home touchscreen, touch Settings, then Torrent Server to view theconnection status of your instrument.
Note: If the instrument is not connected, see Appendix C, “Ion Chef™ andTorrent Server network setup“ for instructions on how to configure a direct orindirect network connection of the Ion Chef™ Instrument to a Torrent Server.
Chapter 2 Before you beginPrepare the Ion Chef™ System for use2
24 Ion 520™ & Ion 530™ Kit − Chef User Guide
Run the Ion Chef™ System
■ Materials required . . . . . . . . . . . . . . . . . . . . . . . . . . . . . . . . . . . . . . . . . . . . . . . . . . . . 25
■ Prepare the libraries and consumables . . . . . . . . . . . . . . . . . . . . . . . . . . . . . . . . . . 26
■ Load the Ion Chef™ System . . . . . . . . . . . . . . . . . . . . . . . . . . . . . . . . . . . . . . . . . . . . 27
■ Start the Ion Chef™ run . . . . . . . . . . . . . . . . . . . . . . . . . . . . . . . . . . . . . . . . . . . . . . . 38
■ Unload the chips for sequencing . . . . . . . . . . . . . . . . . . . . . . . . . . . . . . . . . . . . . . . 43
This chapter describes:• Setting up the Ion Chef™ Instrument for use by diluting the two Ion libraries, and
loading the instrument with all of the required reagents and consumables• Starting an Ion Chef™ run• Unloading the Ion Chef™ Instrument
Materials required
• Ion 520™ & Ion 530™ Kit – Chef (Cat. Nos. A27757, A30010)• Ion 520™ or Ion 530™ Chip (2)• Molecular-biology grade nuclease-free water• P200 pipettor and filtered tips
3
Ion 520™ & Ion 530™ Kit − Chef User Guide 25
Prepare the libraries and consumables
1. Unbox the Ion 520™ & Ion 530™ Chef Reagents cartridge 45 minutes before useand allow it to warm to room temperature.
IMPORTANT! The Reagents cartridge must sit at room temperature for45 minutes before use.
2. Pipet 25 µL of each diluted library (see “Dilute the libraries“ on page 23) to thebottom of the appropriate Ion Chef™ Library Sample Tube (flagged tubes).
IMPORTANT! If you are performing a de novo sequencing experiment that doesnot include a reference BAM file, add 4 µL of the Ion S5™ Calibration Standard toyour diluted libraries in the Ion Chef™ Library Sample Tubes. Cap the tubes,vortex to mix, then centrifuge briefly to collect contents at the bottom of the tube.
Note: If running the Human CEPH Control 200 Library from the Ion S5™
Controls (Cat. No. A27760), prepare the control library for use by diluting 1 µL ofstock library into 52 µL nuclease-free water.
3. Cap, then store the two diluted libraries on ice until you are ready to load themonto the Ion Chef™ Instrument.
4. Remove all cartridges and consumables from their wrappings and boxes, thenplace them on the bench next to the Ion Chef™ Instrument.Prepare the following:
• Chip Adapter (2)• Enrichment Cartridge v2• Tip Cartridge• PCR Plate and Frame Seal v2• Recovery Station Disposable Lid v2 (2)• Recovery Tube v2 (12)• Ion 520™ & Ion 530™ Chef Reagents cartridge (from Step 1)• Ion S5™ Chef Solutions cartridge
IMPORTANT! Before use, gently tap the Reagents and Solutions cartridges onthe bench to force the reagents to the bottoms of the tubes.
Note: When stored under normal conditions, a precipitate can form in sometubes of the Ion 520™ & Ion 530™ Chef Reagents cartridge. If present, load thecartridge as directed – the precipitate will dissolve when the reagents are mixedduring instrument operation.
Chapter 3 Run the Ion Chef™ SystemPrepare the libraries and consumables3
26 Ion 520™ & Ion 530™ Kit − Chef User Guide
Load the Ion Chef™ System
IMPORTANT!· Rated centrifuge speeds are only intended for operation with the provided buckets
and approved consumable chips, tubes, and sample preparation reagents.· The Chip-loading centrifuge is rated to operate at the listed rotational frequencies
with the chip buckets, chips, and adapters. The centrifuge must be load-balanced.Proper care must be taken to load the buckets properly. If excessive vibrations arise,check that items are installed properly and rotors are load-balanced.
· Use only the materials supplied in the Ion 520™ & Ion 530™ Kit – Chef to run thecentrifuges at the rated speeds. Do not remove or change the rotors. Inspect thebuckets before each use to assure normal operation.
· Confirm that the instrument is powered ON and has been cleaned following thelast use.
· Ensure all components are clean and dry before loading them onto the Ion Chef™
Instrument.· Ensure the Reagents and Solutions station compartments are free of condensate
before loading components.
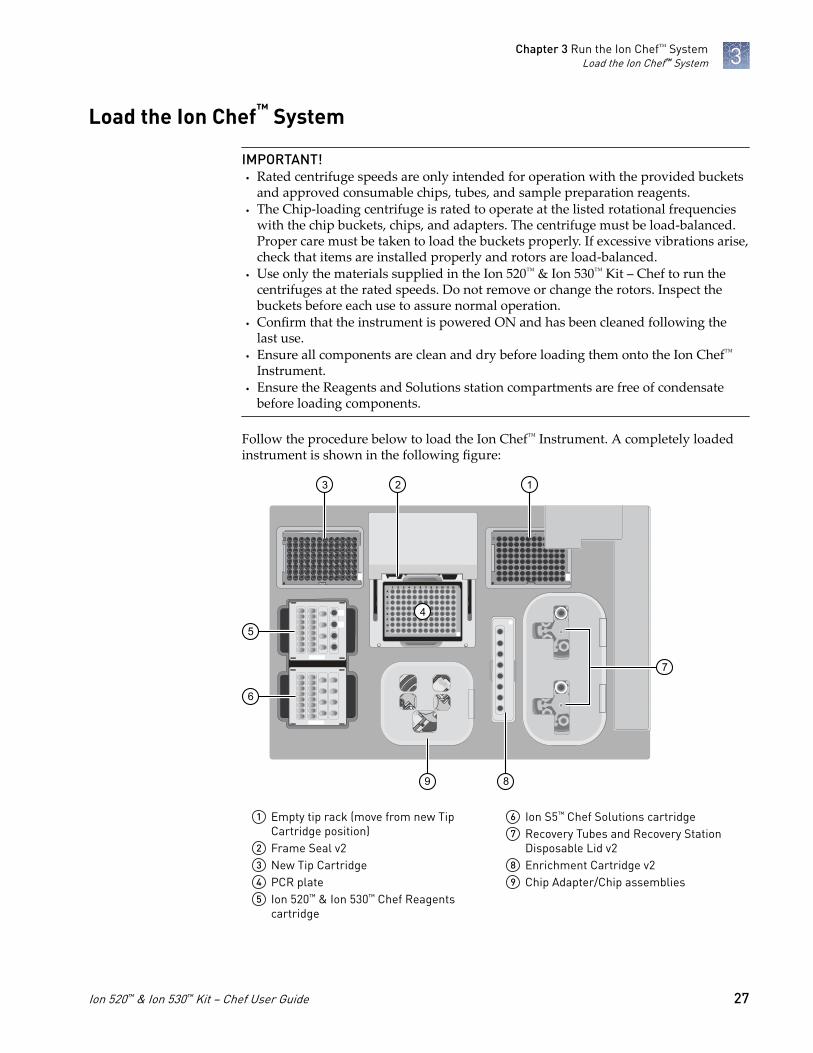
Follow the procedure below to load the Ion Chef™ Instrument. A completely loadedinstrument is shown in the following figure:
A
B
C
D
E
F
G
H
1 2 3 4 5 6 7 8 9 10 11 12
4
530
CCBD02226
530
CCBD0222
6
5
3
8
12
6
7
9
1 Empty tip rack (move from new TipCartridge position)
2 Frame Seal v23 New Tip Cartridge4 PCR plate5 Ion 520™ & Ion 530™ Chef Reagents
cartridge
6 Ion S5™ Chef Solutions cartridge7 Recovery Tubes and Recovery Station
Disposable Lid v28 Enrichment Cartridge v29 Chip Adapter/Chip assemblies
Chapter 3 Run the Ion Chef™ SystemLoad the Ion Chef™ System 3
Ion 520™ & Ion 530™ Kit − Chef User Guide 27
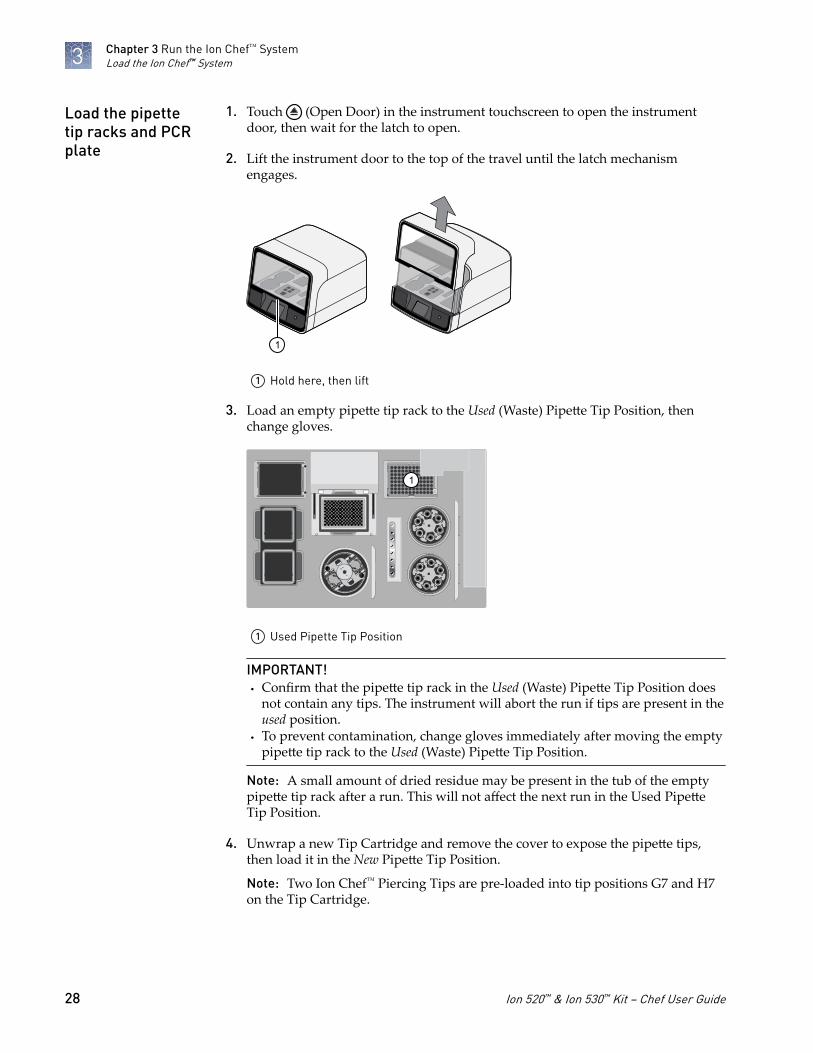
1. Touch (Open Door) in the instrument touchscreen to open the instrumentdoor, then wait for the latch to open.
2. Lift the instrument door to the top of the travel until the latch mechanismengages.
1
1 Hold here, then lift
3. Load an empty pipette tip rack to the Used (Waste) Pipette Tip Position, thenchange gloves.
11
1 Used Pipette Tip Position
IMPORTANT!· Confirm that the pipette tip rack in the Used (Waste) Pipette Tip Position does
not contain any tips. The instrument will abort the run if tips are present in theused position.
· To prevent contamination, change gloves immediately after moving the emptypipette tip rack to the Used (Waste) Pipette Tip Position.
Note: A small amount of dried residue may be present in the tub of the emptypipette tip rack after a run. This will not affect the next run in the Used PipetteTip Position.
4. Unwrap a new Tip Cartridge and remove the cover to expose the pipette tips,then load it in the New Pipette Tip Position.
Note: Two Ion Chef™ Piercing Tips are pre-loaded into tip positions G7 and H7on the Tip Cartridge.
Load the pipettetip racks and PCRplate
Chapter 3 Run the Ion Chef™ SystemLoad the Ion Chef™ System3
28 Ion 520™ & Ion 530™ Kit − Chef User Guide
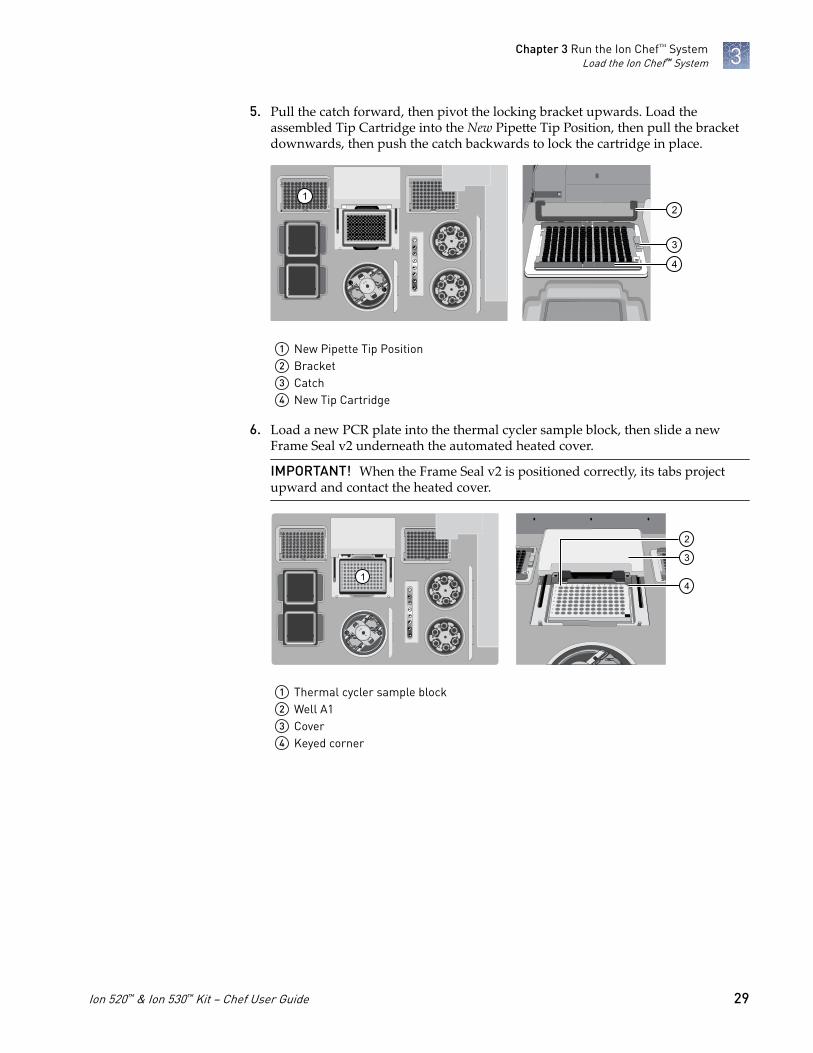
5. Pull the catch forward, then pivot the locking bracket upwards. Load theassembled Tip Cartridge into the New Pipette Tip Position, then pull the bracketdownwards, then push the catch backwards to lock the cartridge in place.
21
3
4
1 New Pipette Tip Position2 Bracket3 Catch4 New Tip Cartridge
6. Load a new PCR plate into the thermal cycler sample block, then slide a newFrame Seal v2 underneath the automated heated cover.
IMPORTANT! When the Frame Seal v2 is positioned correctly, its tabs projectupward and contact the heated cover.
A
B
C
D
E
F
G
H
1 2 3 4 5 6 7 8 9 10 11 12
1
2
3
4
1 Thermal cycler sample block2 Well A13 Cover4 Keyed corner
Chapter 3 Run the Ion Chef™ SystemLoad the Ion Chef™ System 3
Ion 520™ & Ion 530™ Kit − Chef User Guide 29
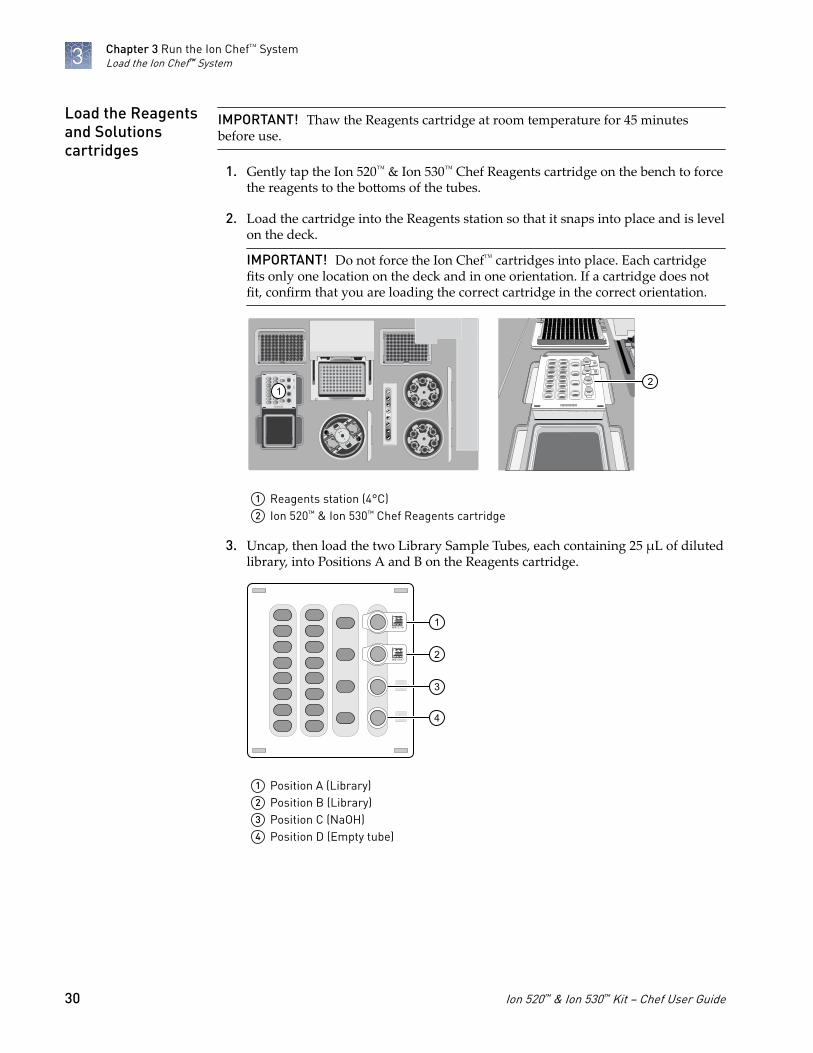
IMPORTANT! Thaw the Reagents cartridge at room temperature for 45 minutesbefore use.
1. Gently tap the Ion 520™ & Ion 530™ Chef Reagents cartridge on the bench to forcethe reagents to the bottoms of the tubes.
2. Load the cartridge into the Reagents station so that it snaps into place and is levelon the deck.
IMPORTANT! Do not force the Ion Chef™ cartridges into place. Each cartridgefits only one location on the deck and in one orientation. If a cartridge does notfit, confirm that you are loading the correct cartridge in the correct orientation.
A
B
C
D
E
F
G
H
1 2 3 4 5 6 7 8 9 10 11 12
12
1 Reagents station (4°C)2 Ion 520™ & Ion 530™ Chef Reagents cartridge
3. Uncap, then load the two Library Sample Tubes, each containing 25 µL of dilutedlibrary, into Positions A and B on the Reagents cartridge.
A
B00012647
000122161
2
C 3
D 4
1 Position A (Library)2 Position B (Library)3 Position C (NaOH)4 Position D (Empty tube)
Load the Reagentsand Solutionscartridges
Chapter 3 Run the Ion Chef™ SystemLoad the Ion Chef™ System3
30 Ion 520™ & Ion 530™ Kit − Chef User Guide
IMPORTANT!· Make sure to orient the sample tubes so that the barcodes are visible and
oriented to the right.· Make sure to remove the caps to the Library Sample Tubes before proceeding.· Because 200- and 400-base-read libraries require different run lengths, do not
load a 200-base-read library and 400-base-read library in a single Ion Chef™
run. Both libraries loaded in a run must have a similar read length.
4. Uncap both the tube of NaOH in Position C and the empty tube in Position D onthe Reagents cartridge.
IMPORTANT! When the Reagents cartridge is loaded:
· Press down on the Library Sample Tubes to ensure that they are firmly seatedin the cartridge.
· Confirm that all tubes are uncapped, including the tube at Position D.
5. Gently tap the Ion S5™ Chef Solutions cartridge on the bench to force the reagentsto the bottoms of the tubes.
6. Load the Solutions cartridge into the Solutions station until it snaps into placeand is level on the deck.
A
B
C
D
E
F
G
H
1 2 3 4 5 6 7 8 9 10 11 12
1
2
1 Solutions station (room temperature)2 Ion S5™ Chef Solutions cartridge
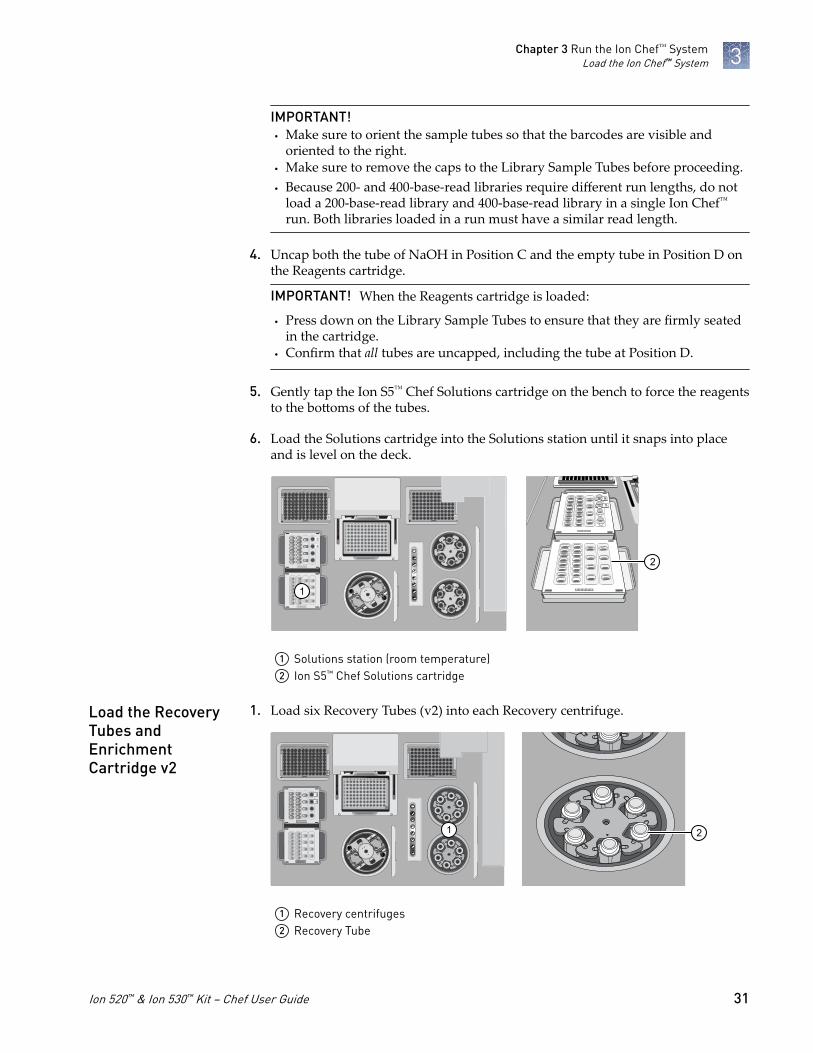
1. Load six Recovery Tubes (v2) into each Recovery centrifuge.
A
B
C
D
E
F
G
H
1 2 3 4 5 6 7 8 9 10 11 12
21
1 Recovery centrifuges2 Recovery Tube
Load the RecoveryTubes andEnrichmentCartridge v2
Chapter 3 Run the Ion Chef™ SystemLoad the Ion Chef™ System 3
Ion 520™ & Ion 530™ Kit − Chef User Guide 31
Before sealing each centrifuge, confirm that:• The centrifuge is load-balanced with all required consumables.
IMPORTANT! The centrifuge must be load-balanced.
• The buckets are securely seated in the centrifuge rotors.• The buckets are oriented correctly in the centrifuge so that they pivot
outwards.
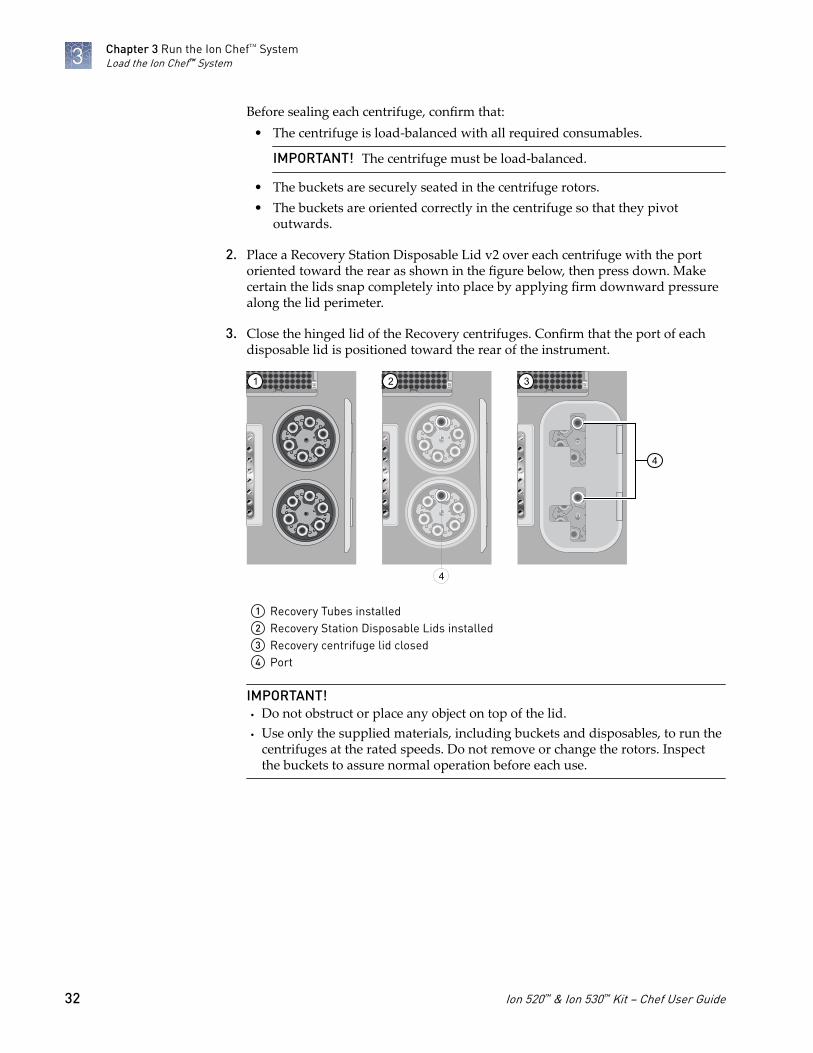
2. Place a Recovery Station Disposable Lid v2 over each centrifuge with the portoriented toward the rear as shown in the figure below, then press down. Makecertain the lids snap completely into place by applying firm downward pressurealong the lid perimeter.
3. Close the hinged lid of the Recovery centrifuges. Confirm that the port of eachdisposable lid is positioned toward the rear of the instrument.
1 32
4
4
1 Recovery Tubes installed2 Recovery Station Disposable Lids installed3 Recovery centrifuge lid closed4 Port
IMPORTANT!· Do not obstruct or place any object on top of the lid.· Use only the supplied materials, including buckets and disposables, to run the
centrifuges at the rated speeds. Do not remove or change the rotors. Inspectthe buckets to assure normal operation before each use.
Chapter 3 Run the Ion Chef™ SystemLoad the Ion Chef™ System3
32 Ion 520™ & Ion 530™ Kit − Chef User Guide
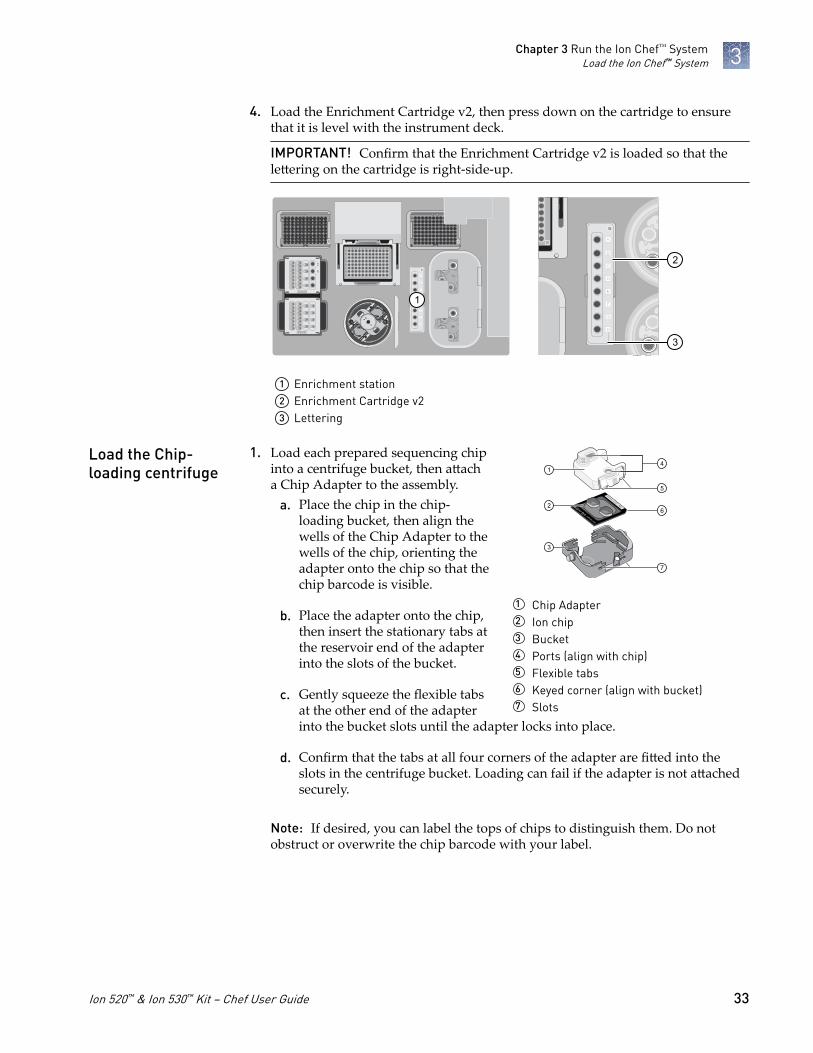
4. Load the Enrichment Cartridge v2, then press down on the cartridge to ensurethat it is level with the instrument deck.
IMPORTANT! Confirm that the Enrichment Cartridge v2 is loaded so that thelettering on the cartridge is right-side-up.
A
B
C
D
E
F
G
H
1 2 3 4 5 6 7 8 9 10 11 12
2
1
3
1 Enrichment station2 Enrichment Cartridge v23 Lettering
1. Load each prepared sequencing chipinto a centrifuge bucket, then attacha Chip Adapter to the assembly.
a. Place the chip in the chip-loading bucket, then align thewells of the Chip Adapter to thewells of the chip, orienting theadapter onto the chip so that thechip barcode is visible.
b. Place the adapter onto the chip,then insert the stationary tabs atthe reservoir end of the adapterinto the slots of the bucket.
c. Gently squeeze the flexible tabsat the other end of the adapterinto the bucket slots until the adapter locks into place.
d. Confirm that the tabs at all four corners of the adapter are fitted into theslots in the centrifuge bucket. Loading can fail if the adapter is not attachedsecurely.
Note: If desired, you can label the tops of chips to distinguish them. Do notobstruct or overwrite the chip barcode with your label.
Load the Chip-loading centrifuge
530
CBDD02226
1
2
3
6
5
7
4
1 Chip Adapter2 Ion chip3 Bucket4 Ports (align with chip)5 Flexible tabs6 Keyed corner (align with bucket)7 Slots
Chapter 3 Run the Ion Chef™ SystemLoad the Ion Chef™ System 3
Ion 520™ & Ion 530™ Kit − Chef User Guide 33
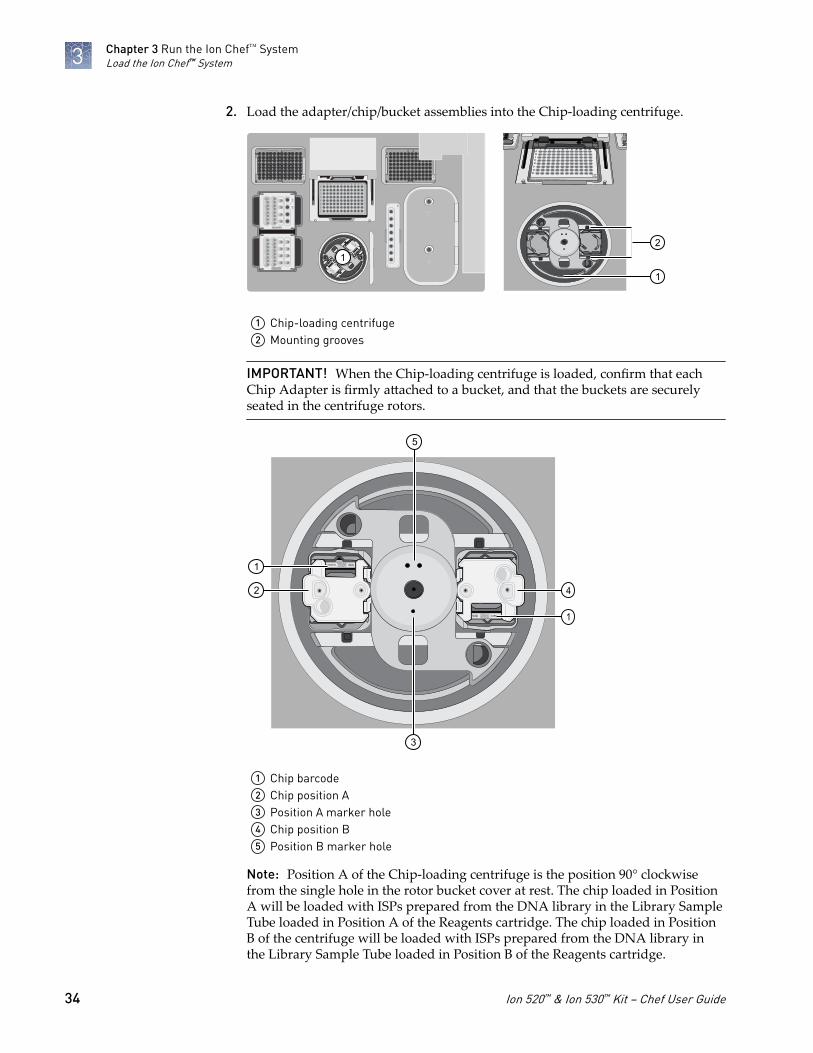
2. Load the adapter/chip/bucket assemblies into the Chip-loading centrifuge.
A
B
C
D
E
F
G
H
1 2 3 4 5 6 7 8 9 10 11 12
1
2530
CCBD02226
530
CCBD0222
6
1
1 Chip-loading centrifuge2 Mounting grooves
IMPORTANT! When the Chip-loading centrifuge is loaded, confirm that eachChip Adapter is firmly attached to a bucket, and that the buckets are securelyseated in the centrifuge rotors.
530CCBD02226
530 CCBD02226
3
5
1
42
1
1 Chip barcode2 Chip position A3 Position A marker hole4 Chip position B5 Position B marker hole
Note: Position A of the Chip-loading centrifuge is the position 90° clockwisefrom the single hole in the rotor bucket cover at rest. The chip loaded in PositionA will be loaded with ISPs prepared from the DNA library in the Library SampleTube loaded in Position A of the Reagents cartridge. The chip loaded in PositionB of the centrifuge will be loaded with ISPs prepared from the DNA library inthe Library Sample Tube loaded in Position B of the Reagents cartridge.
Chapter 3 Run the Ion Chef™ SystemLoad the Ion Chef™ System3
34 Ion 520™ & Ion 530™ Kit − Chef User Guide
3. Ensure the centrifuge is load-balanced, and the chip buckets are securely seatedand oriented correctly in the centrifuge so that they pivot 90° outwards whentouched. Then close the lid of the Chip-loading centrifuge.
IMPORTANT! Do not obstruct or place any object on top of the lid.
Before continuing:• Confirm that each cartridge is at the correct location and in the correct
orientation.• Press down on all cartridges to confirm that they are firmly pressed into place.• Confirm that all tubes on the Ion 520™ & Ion 530™ Chef Reagents cartridge are
uncapped and firmly pressed into place.• Confirm that the centrifuge lids are installed correctly so that the port is oriented
toward the rear of the instrument.• Confirm that the tube and chip buckets are seated securely in the rotor arms of
the Chip-loading and Recovery centrifuges, and that the consumables theycontain are correctly installed.
CAUTION! To ensure correct and safe instrument operation, you must confirmthat all consumables are installed correctly to the deck before you start a run.The Ion Chef™ Instrument does not verify all aspects of the consumable setupprior to beginning each run.
You can set up an Ion Chef™ run to load asingle chip instead of two, using theIon Chef™ S5 Series Chip Balance loadedopposite to the sequencing chip in theChip-loading centrifuge. The Ion Chef™
S5 Series Chip Balance is provided in theIon S5™ Installation Kit.
Load the Ion Chef™ Instrument as youwould normally load the system. Forsingle chip loading, perform thefollowing steps:
1. Add the single diluted library to an Ion Chef™ Library Sample Tube, then loadthe tube into Position A of the Reagents cartridge.
2. Load an empty Ion Chef™ Library Sample Tube into Position B of the Reagentscartridge. Uncap both tubes.
3. Load the chip in Position A and the Ion Chef™ S5 Series Chip Balance inPosition B of the Chip-loading centrifuge.
IMPORTANT! Do not use Ion Chef™ 314, 316/318, or P-Series versions of the chipbalance with the Ion 520™ or Ion 530™ Chip. Each chip balance is weight-matchedto the chip (and corresponding chip adapter) specified on the chip balance label.
Confirm thatconsumables arecorrectly installed
Single chiploading workflow
Ion Chef™ S5 Series
Chip Balance
Ion Chef™ S5 Series Chip Balance
Chapter 3 Run the Ion Chef™ SystemLoad the Ion Chef™ System 3
Ion 520™ & Ion 530™ Kit − Chef User Guide 35
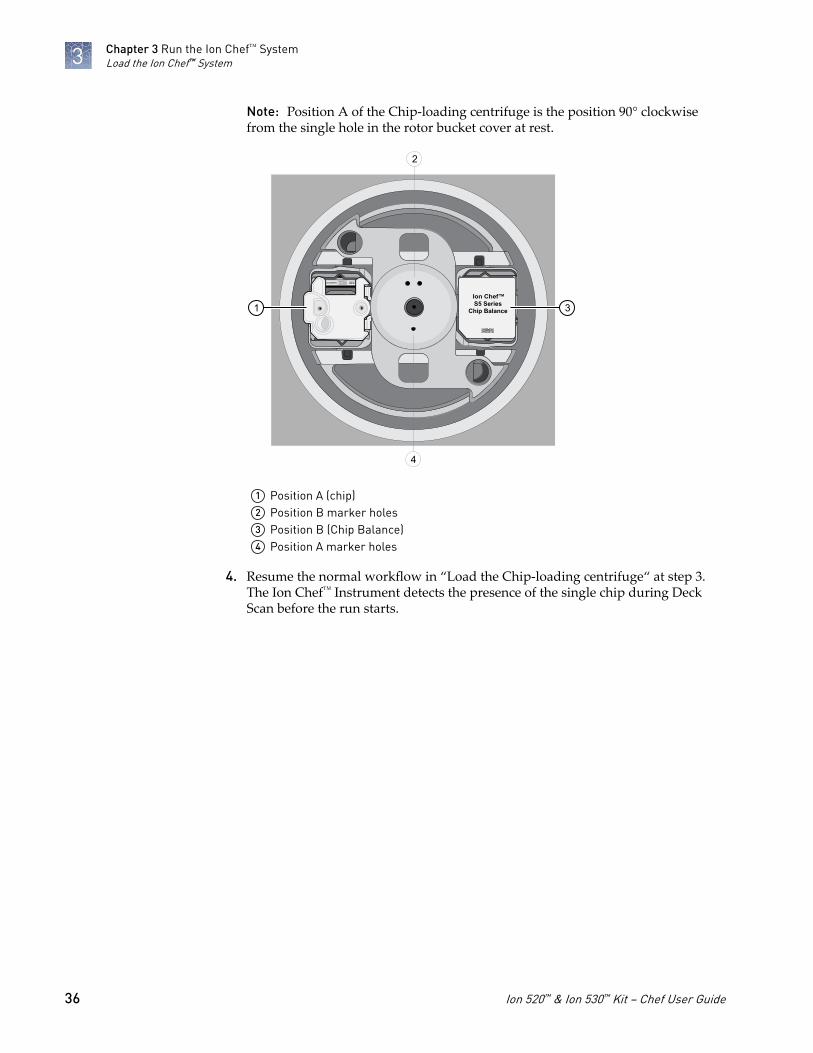
Note: Position A of the Chip-loading centrifuge is the position 90° clockwisefrom the single hole in the rotor bucket cover at rest.
530DABD02226
Ion Chef™S5 Series
Chip Balance 1 3
4
2
1 Position A (chip)2 Position B marker holes3 Position B (Chip Balance)4 Position A marker holes
4. Resume the normal workflow in “Load the Chip-loading centrifuge“ at step 3.The Ion Chef™ Instrument detects the presence of the single chip during DeckScan before the run starts.
Chapter 3 Run the Ion Chef™ SystemLoad the Ion Chef™ System3
36 Ion 520™ & Ion 530™ Kit − Chef User Guide
530
DABD02226
Ion Che f ™ S5 Series Chip Balance
1) A new Ion Chef™ Tip Cartridge v2 is loaded in the New Pipette Tip position.2) Bracket is pulled downward to lock the tip cartridge in place.
A
B
C
D
E
F
G
H
1 2 3 4 5 6 7 8 9 10 11 12
1) A new PCR Plate is loaded in the thermal cycler sample block.2) A Frame Seal v2 is in place and oriented under the heated cover. 1) The tip rack from previous run is transferred
from the New Pipette Tip position to the Used Pipette Tip position.
1) Recovery Tubes (v2) are securely seated in the Recovery centrifuge buckets.2) Recovery centrifuges are load-balanced.3) Recovery Station Disposable Lids (v2) are positioned so that the port is correctly oriented: port should not be located in the position facing the front of the instrument.
1) Enrichment Cartridge v2 is pressed into place at the Enrichment station so that the cartridge is firmly seated and level with the deck.2) Lettering on the cartridge is right-side up and positioned to the right of the enrichment tubes.1) Adapter/chip assembly is correctly
seated in the Chip-loading centrifuge buckets, with the adaptor clips inserted into the bucket slots.2) Centrifuge buckets containing the adapter/chip assemblies are securely seated in the centrifuge rotor, and freely pivot 90º outwards.3) Chip-loading centrifuge is load-balanced.
1) Solutions cartridge is pressed into place at the Solutions station so that the cartridge is firmly seated and level with the deck.
1) Reagents cartridge contents are thawed (leave at room temperature for 45 minutes).2) Reagents cartridge tubes are uncapped and pressed into place at the Reagents station so that the tubes are firmly seated and level with the deck.3) Library Sample tubes are firmly seated and in the correct orientation with barcodes facing the PCR Plate and caps removed.
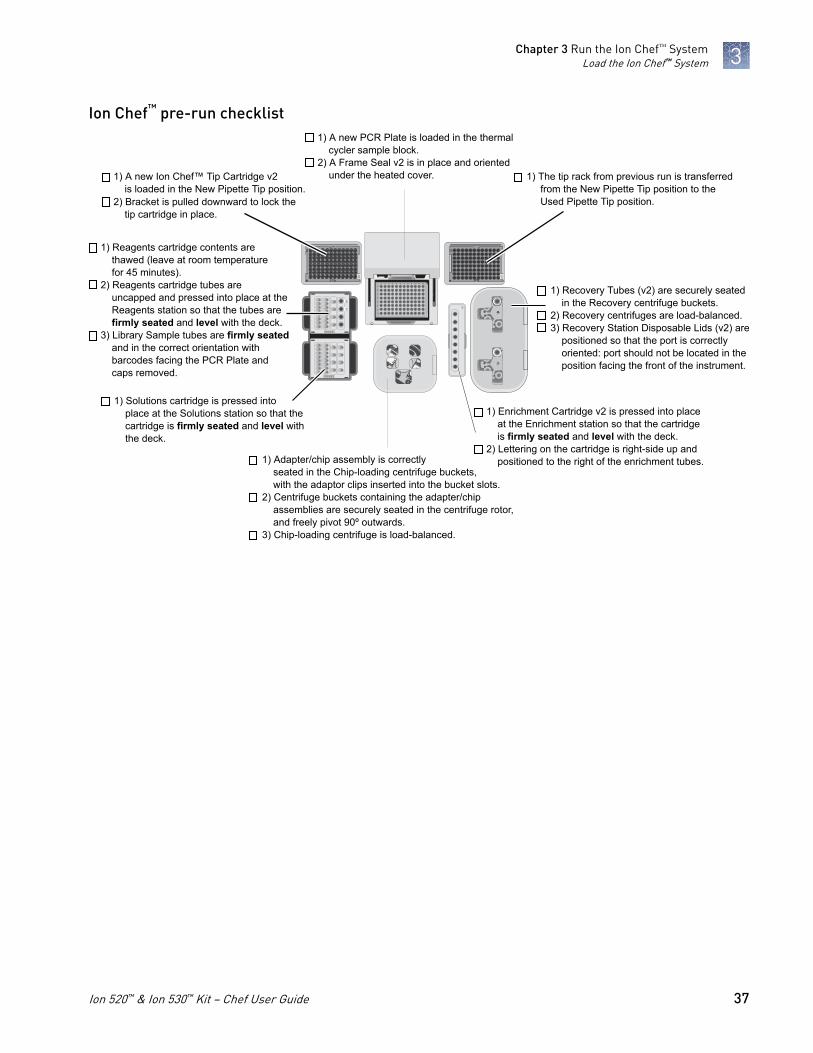
Ion Chef™ pre-run checklist
Chapter 3 Run the Ion Chef™ SystemLoad the Ion Chef™ System 3
Ion 520™ & Ion 530™ Kit − Chef User Guide 37
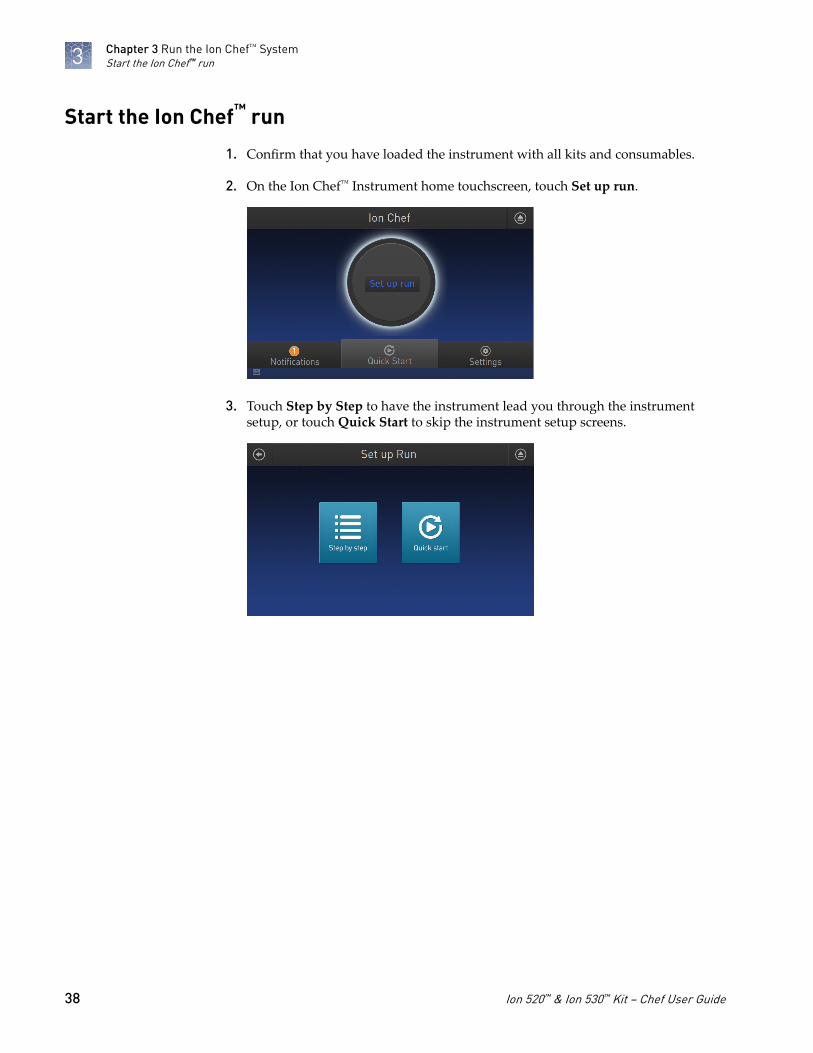
Start the Ion Chef™ run
1. Confirm that you have loaded the instrument with all kits and consumables.
2. On the Ion Chef™ Instrument home touchscreen, touch Set up run.
3. Touch Step by Step to have the instrument lead you through the instrumentsetup, or touch Quick Start to skip the instrument setup screens.
Chapter 3 Run the Ion Chef™ SystemStart the Ion Chef™ run3
38 Ion 520™ & Ion 530™ Kit − Chef User Guide
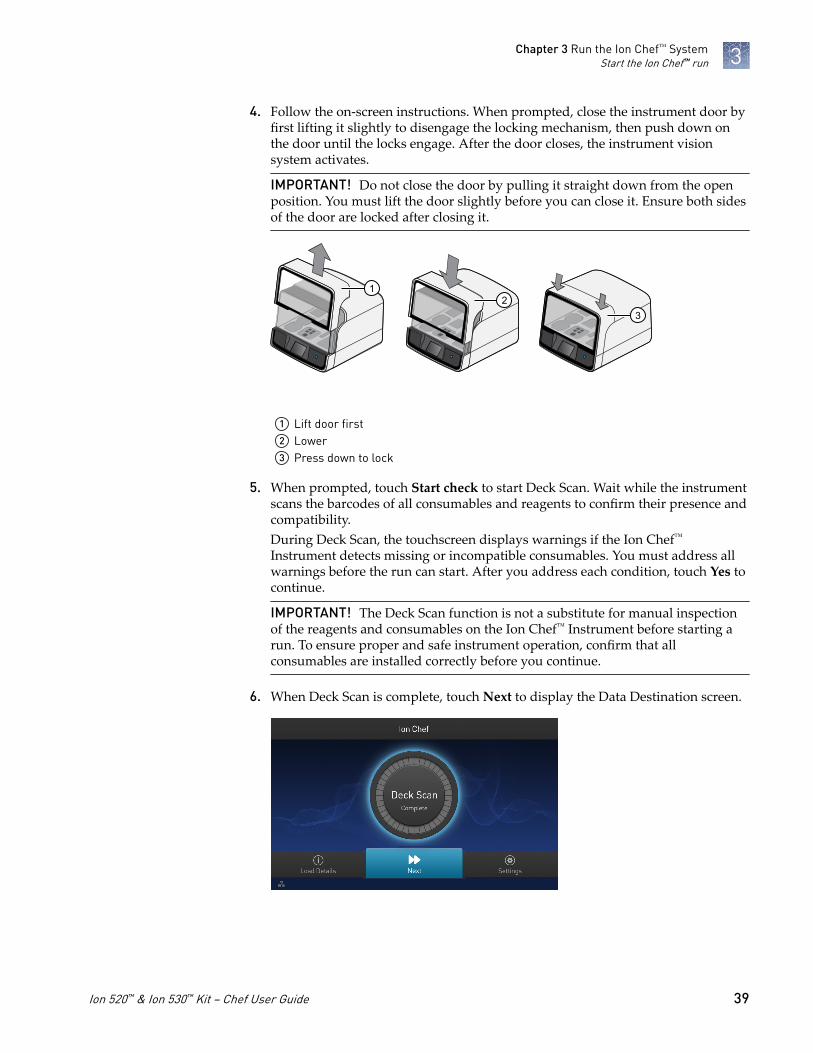
4. Follow the on-screen instructions. When prompted, close the instrument door byfirst lifting it slightly to disengage the locking mechanism, then push down onthe door until the locks engage. After the door closes, the instrument visionsystem activates.
IMPORTANT! Do not close the door by pulling it straight down from the openposition. You must lift the door slightly before you can close it. Ensure both sidesof the door are locked after closing it.
12
3
1 Lift door first2 Lower3 Press down to lock
5. When prompted, touch Start check to start Deck Scan. Wait while the instrumentscans the barcodes of all consumables and reagents to confirm their presence andcompatibility.During Deck Scan, the touchscreen displays warnings if the Ion Chef™
Instrument detects missing or incompatible consumables. You must address allwarnings before the run can start. After you address each condition, touch Yes tocontinue.
IMPORTANT! The Deck Scan function is not a substitute for manual inspectionof the reagents and consumables on the Ion Chef™ Instrument before starting arun. To ensure proper and safe instrument operation, confirm that allconsumables are installed correctly before you continue.
6. When Deck Scan is complete, touch Next to display the Data Destination screen.
Chapter 3 Run the Ion Chef™ SystemStart the Ion Chef™ run 3
Ion 520™ & Ion 530™ Kit − Chef User Guide 39
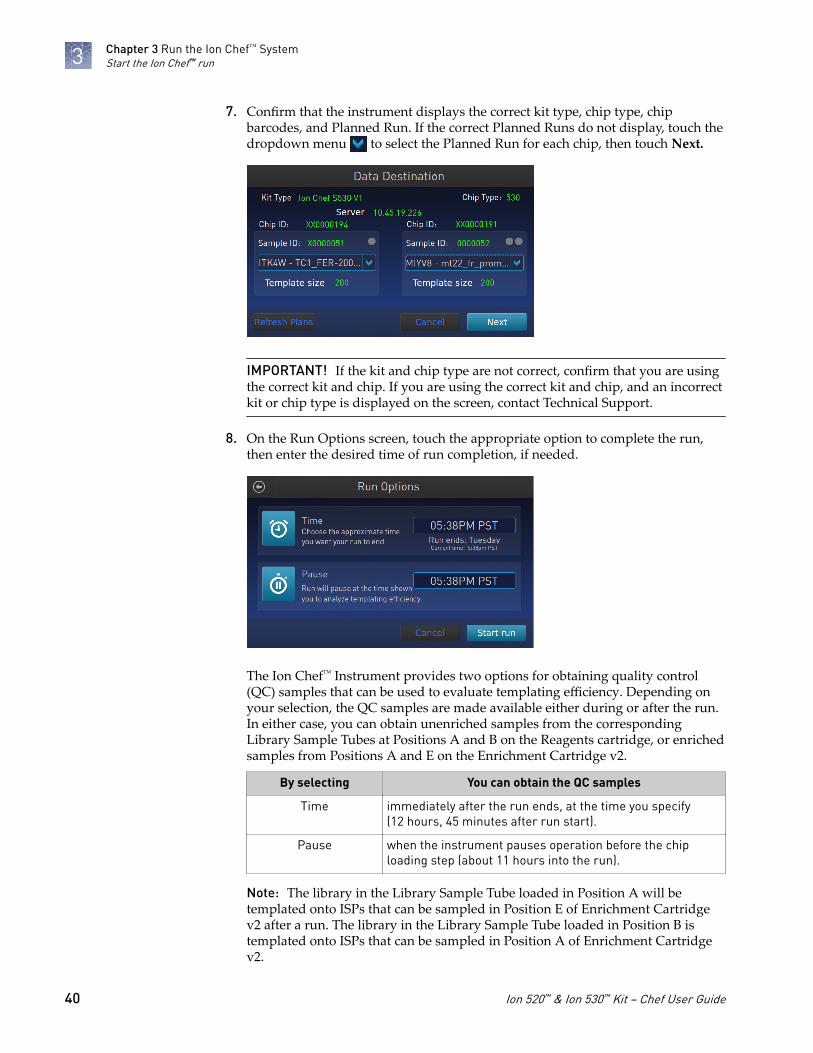
7. Confirm that the instrument displays the correct kit type, chip type, chipbarcodes, and Planned Run. If the correct Planned Runs do not display, touch thedropdown menu to select the Planned Run for each chip, then touch Next.
IMPORTANT! If the kit and chip type are not correct, confirm that you are usingthe correct kit and chip. If you are using the correct kit and chip, and an incorrectkit or chip type is displayed on the screen, contact Technical Support.
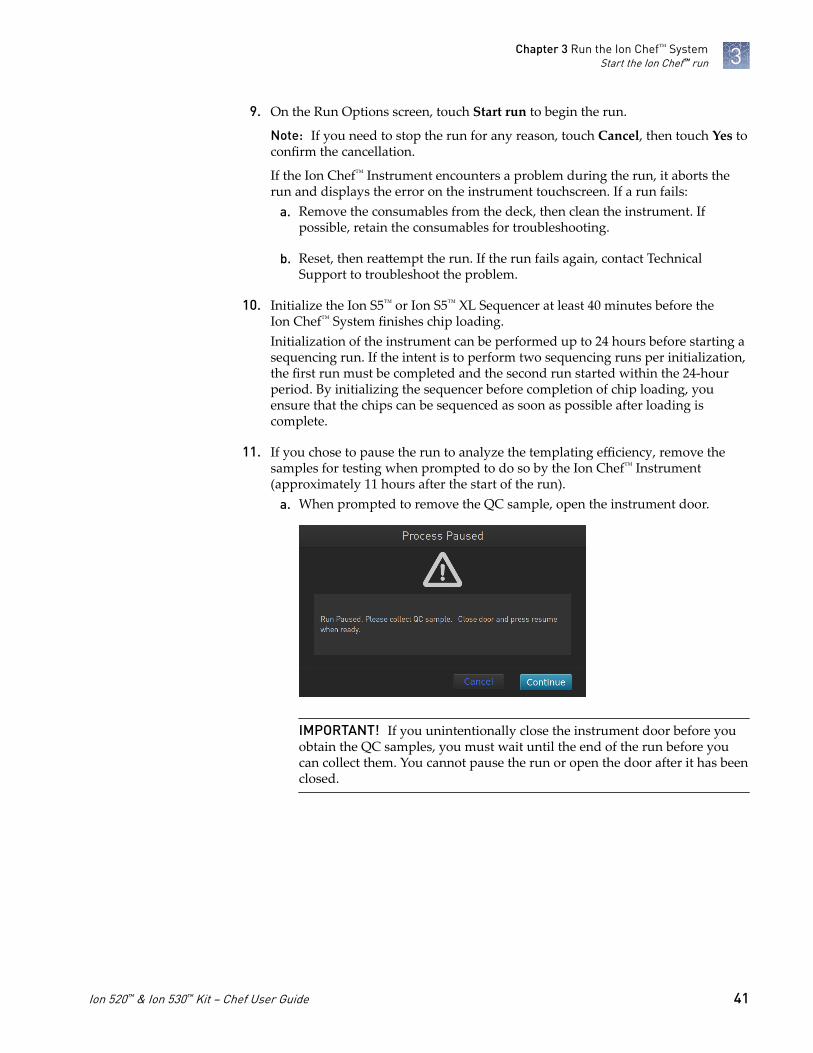
8. On the Run Options screen, touch the appropriate option to complete the run,then enter the desired time of run completion, if needed.
The Ion Chef™ Instrument provides two options for obtaining quality control(QC) samples that can be used to evaluate templating efficiency. Depending onyour selection, the QC samples are made available either during or after the run.In either case, you can obtain unenriched samples from the correspondingLibrary Sample Tubes at Positions A and B on the Reagents cartridge, or enrichedsamples from Positions A and E on the Enrichment Cartridge v2.
By selecting You can obtain the QC samples
Time immediately after the run ends, at the time you specify(12 hours, 45 minutes after run start).
Pause when the instrument pauses operation before the chiploading step (about 11 hours into the run).
Note: The library in the Library Sample Tube loaded in Position A will betemplated onto ISPs that can be sampled in Position E of Enrichment Cartridgev2 after a run. The library in the Library Sample Tube loaded in Position B istemplated onto ISPs that can be sampled in Position A of Enrichment Cartridgev2.
Chapter 3 Run the Ion Chef™ SystemStart the Ion Chef™ run3
40 Ion 520™ & Ion 530™ Kit − Chef User Guide
9. On the Run Options screen, touch Start run to begin the run.
Note: If you need to stop the run for any reason, touch Cancel, then touch Yes toconfirm the cancellation.
If the Ion Chef™ Instrument encounters a problem during the run, it aborts therun and displays the error on the instrument touchscreen. If a run fails:
a. Remove the consumables from the deck, then clean the instrument. Ifpossible, retain the consumables for troubleshooting.
b. Reset, then reattempt the run. If the run fails again, contact TechnicalSupport to troubleshoot the problem.
10. Initialize the Ion S5™ or Ion S5™ XL Sequencer at least 40 minutes before theIon Chef™ System finishes chip loading.Initialization of the instrument can be performed up to 24 hours before starting asequencing run. If the intent is to perform two sequencing runs per initialization,the first run must be completed and the second run started within the 24-hourperiod. By initializing the sequencer before completion of chip loading, youensure that the chips can be sequenced as soon as possible after loading iscomplete.
11. If you chose to pause the run to analyze the templating efficiency, remove thesamples for testing when prompted to do so by the Ion Chef™ Instrument(approximately 11 hours after the start of the run).
a. When prompted to remove the QC sample, open the instrument door.
IMPORTANT! If you unintentionally close the instrument door before youobtain the QC samples, you must wait until the end of the run before youcan collect them. You cannot pause the run or open the door after it has beenclosed.
Chapter 3 Run the Ion Chef™ SystemStart the Ion Chef™ run 3
Ion 520™ & Ion 530™ Kit − Chef User Guide 41
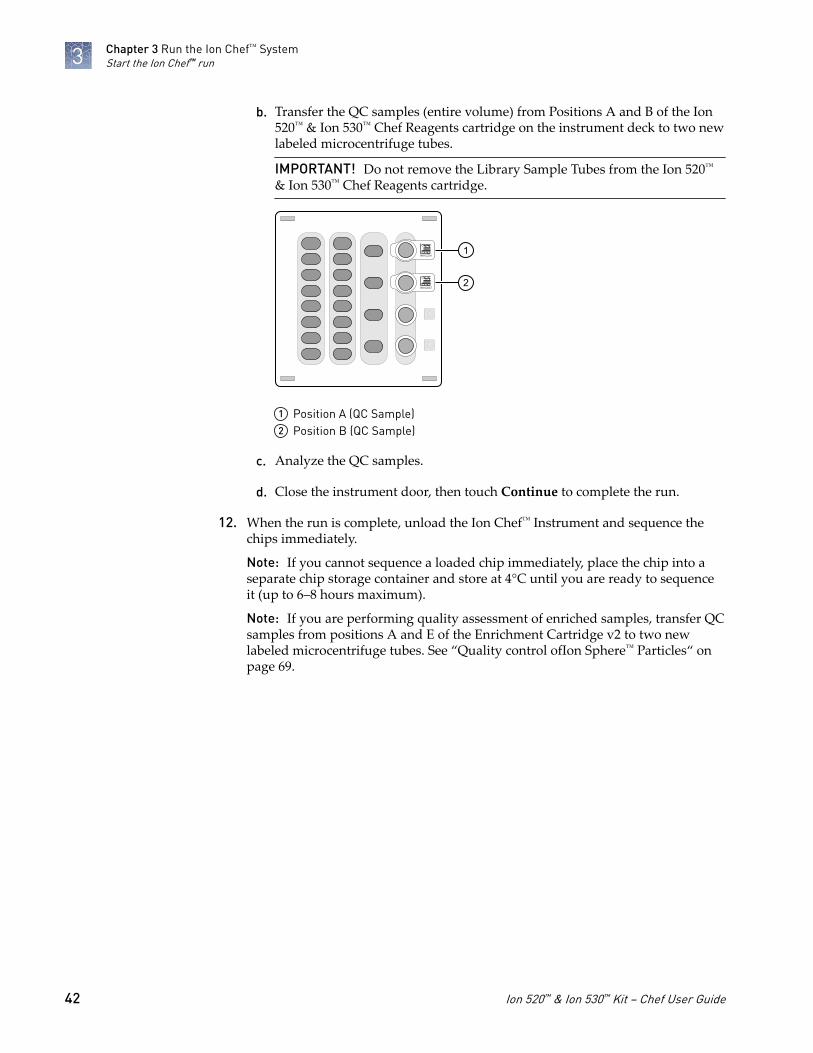
b. Transfer the QC samples (entire volume) from Positions A and B of the Ion520™ & Ion 530™ Chef Reagents cartridge on the instrument deck to two newlabeled microcentrifuge tubes.
IMPORTANT! Do not remove the Library Sample Tubes from the Ion 520™
& Ion 530™ Chef Reagents cartridge.
D
A
B
C
00012647
00012216
2
1
1 Position A (QC Sample)2 Position B (QC Sample)
c. Analyze the QC samples.
d. Close the instrument door, then touch Continue to complete the run.
12. When the run is complete, unload the Ion Chef™ Instrument and sequence thechips immediately.
Note: If you cannot sequence a loaded chip immediately, place the chip into aseparate chip storage container and store at 4°C until you are ready to sequenceit (up to 6–8 hours maximum).
Note: If you are performing quality assessment of enriched samples, transfer QCsamples from positions A and E of the Enrichment Cartridge v2 to two newlabeled microcentrifuge tubes. See “Quality control ofIon Sphere™ Particles“ onpage 69.
Chapter 3 Run the Ion Chef™ SystemStart the Ion Chef™ run3
42 Ion 520™ & Ion 530™ Kit − Chef User Guide
Unload the chips for sequencing
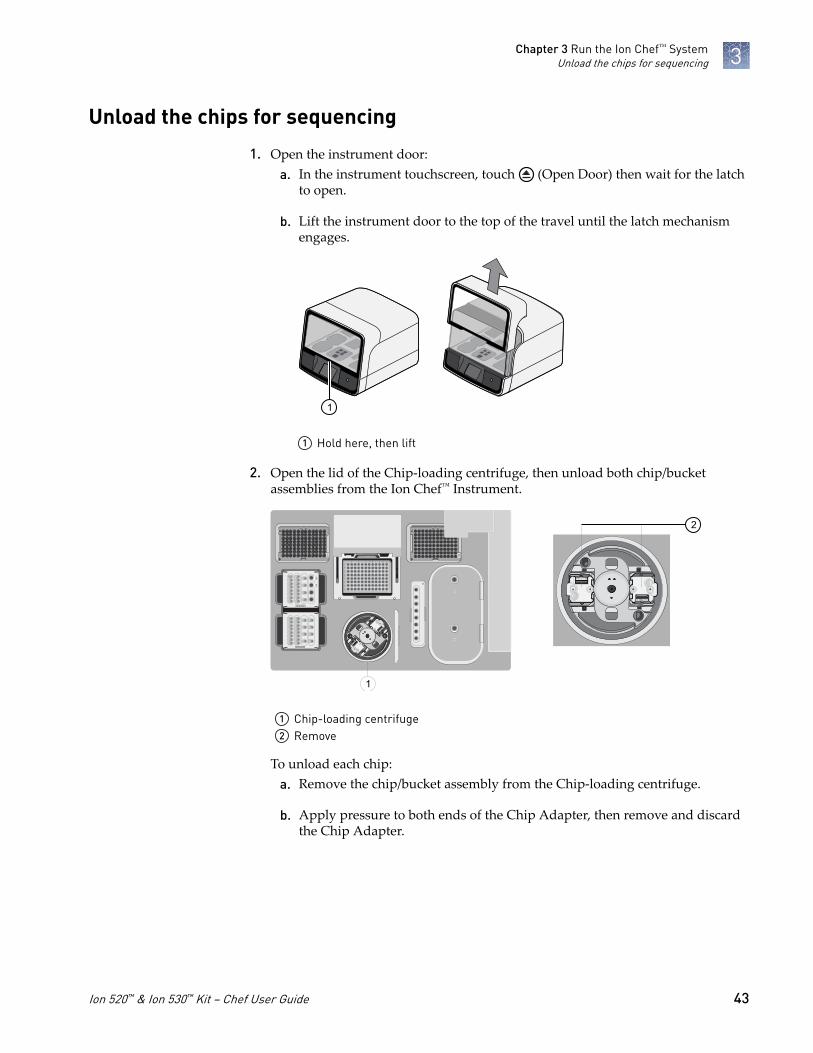
1. Open the instrument door:a. In the instrument touchscreen, touch (Open Door) then wait for the latch
to open.
b. Lift the instrument door to the top of the travel until the latch mechanismengages.
1
1 Hold here, then lift
2. Open the lid of the Chip-loading centrifuge, then unload both chip/bucketassemblies from the Ion Chef™ Instrument.
A
B
C
D
E
F
G
H
1 2 3 4 5 6 7 8 9 10 11 12
530
CCBD02226
530
CCBD0222
6
530CCBD02226
530 CCBD02226
2
1
1 Chip-loading centrifuge2 Remove
To unload each chip:a. Remove the chip/bucket assembly from the Chip-loading centrifuge.
b. Apply pressure to both ends of the Chip Adapter, then remove and discardthe Chip Adapter.
Chapter 3 Run the Ion Chef™ SystemUnload the chips for sequencing 3
Ion 520™ & Ion 530™ Kit − Chef User Guide 43
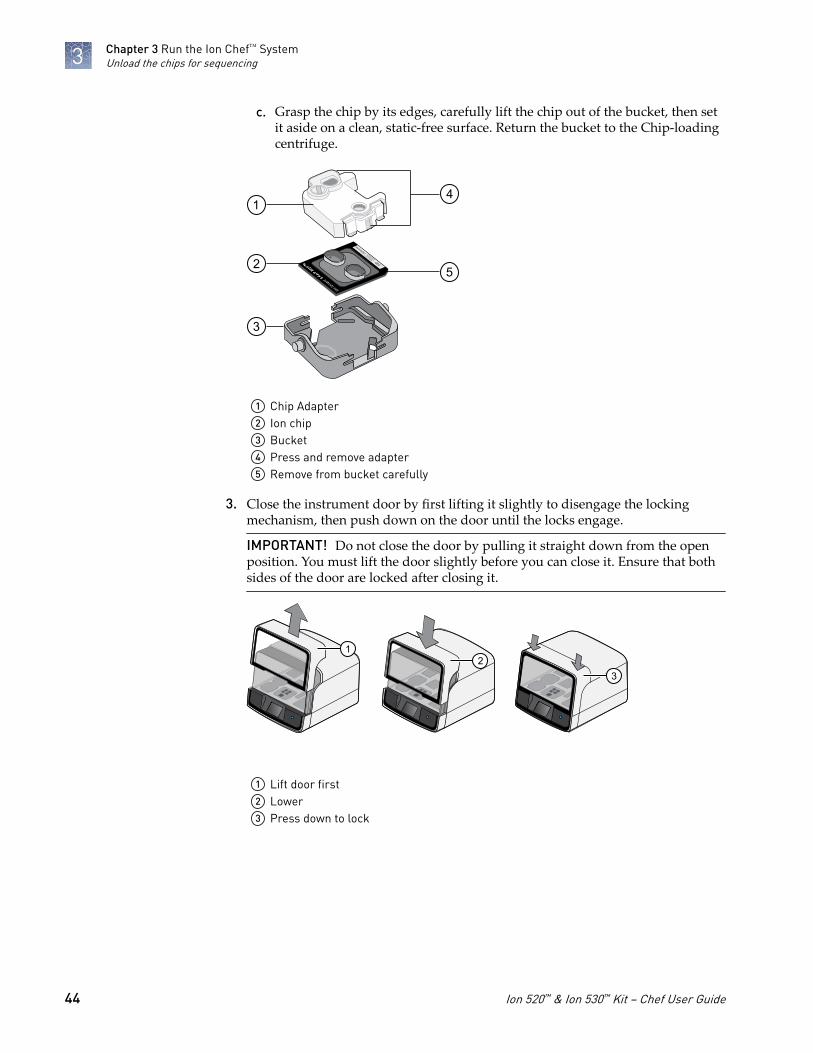
c. Grasp the chip by its edges, carefully lift the chip out of the bucket, then setit aside on a clean, static-free surface. Return the bucket to the Chip-loadingcentrifuge.
530
CBDD02226
1
2
3
4
5
1 Chip Adapter2 Ion chip3 Bucket4 Press and remove adapter5 Remove from bucket carefully
3. Close the instrument door by first lifting it slightly to disengage the lockingmechanism, then push down on the door until the locks engage.
IMPORTANT! Do not close the door by pulling it straight down from the openposition. You must lift the door slightly before you can close it. Ensure that bothsides of the door are locked after closing it.
12
3
1 Lift door first2 Lower3 Press down to lock
Chapter 3 Run the Ion Chef™ SystemUnload the chips for sequencing3
44 Ion 520™ & Ion 530™ Kit − Chef User Guide
4. Load one or both chips into Ion S5™ Sequencers and promptly start thesequencing runs.If you cannot sequence a loaded chip immediately or plan to sequence two chipsper initialization, place the chip into a separate chip storage container and storeat 4°C until you are ready to sequence it (up to 6–8 hours maximum).
IMPORTANT! If you chose to store a loaded chip, remove the chip from thecontainer and place it on a clean surface in the dark to warm to roomtemperature at least 20 minutes before running it.
Chapter 3 Run the Ion Chef™ SystemUnload the chips for sequencing 3
Ion 520™ & Ion 530™ Kit − Chef User Guide 45
Initialize the sequencer
■ Ion S5™ System component positions . . . . . . . . . . . . . . . . . . . . . . . . . . . . . . . . . . . 46
■ Before you begin . . . . . . . . . . . . . . . . . . . . . . . . . . . . . . . . . . . . . . . . . . . . . . . . . . . . . 47
■ When a manual sequencer cleaning is required . . . . . . . . . . . . . . . . . . . . . . . . . . . 47
■ Initialize the sequencer . . . . . . . . . . . . . . . . . . . . . . . . . . . . . . . . . . . . . . . . . . . . . . . . 48
■ Reagent consumables disposal . . . . . . . . . . . . . . . . . . . . . . . . . . . . . . . . . . . . . . . . . 49
Initialization takes ~40 minutes.
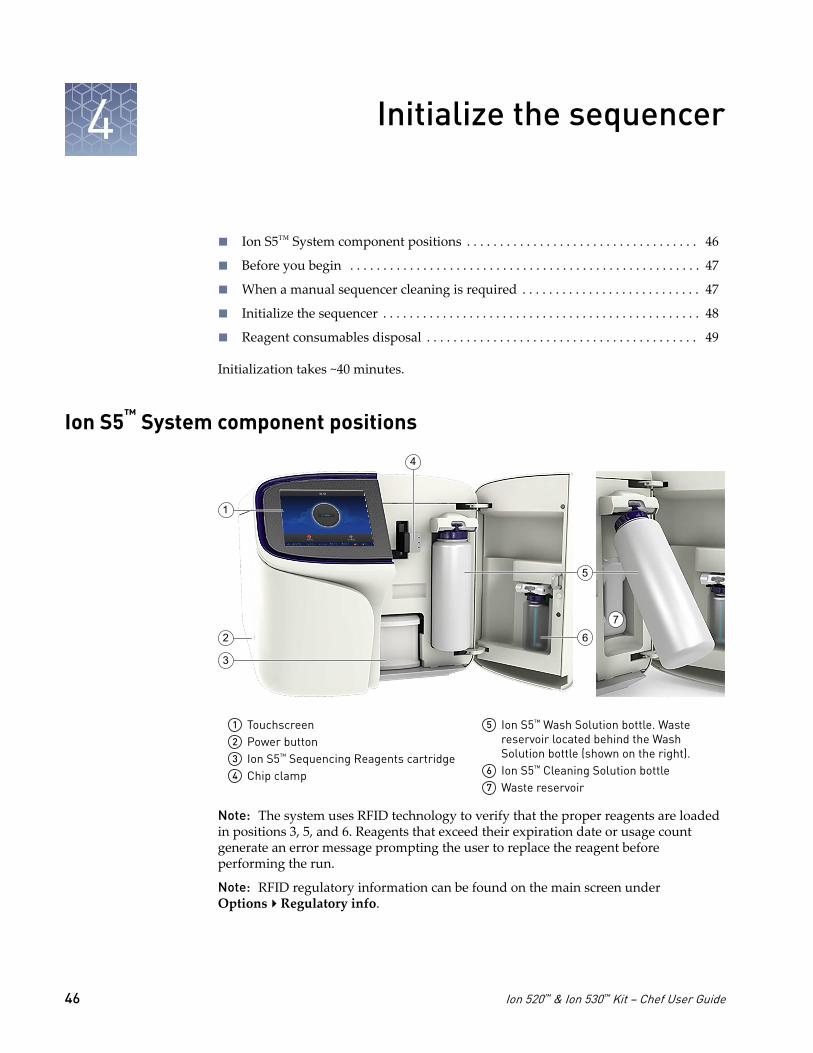
Ion S5™ System component positions
7
2
3
5
6
4
1
1 Touchscreen2 Power button3 Ion S5™ Sequencing Reagents cartridge4 Chip clamp
5 Ion S5™ Wash Solution bottle. Wastereservoir located behind the WashSolution bottle (shown on the right).
6 Ion S5™ Cleaning Solution bottle7 Waste reservoir
Note: The system uses RFID technology to verify that the proper reagents are loadedin positions 3, 5, and 6. Reagents that exceed their expiration date or usage countgenerate an error message prompting the user to replace the reagent beforeperforming the run.
Note: RFID regulatory information can be found on the main screen underOptions4Regulatory info.
4
46 Ion 520™ & Ion 530™ Kit − Chef User Guide
Before you begin
The Ion S5™ and Ion S5™ XL Sequencers are equipped to verify the compatibility ofeach chip and consumable loaded during initialization and sequencing, and that thesecomponents do not exceed their expiration date. To avoid exceptions duringinitialization, inspect this information for each consumable before installing onto theinstrument.
• Unbox the Ion S5™ Sequencing Reagents cartridge 45 minutes before use, thenallow it to equilibrate to room temperature.Do not remove the Ion S5™ Sequencing Reagents cartridge from its foil packaginguntil immediately before loading, so that you can return the unused cartridge tostorage if your sequencing run is delayed.
• Unbox the Ion S5™ Wash Solution bottle. Invert the bottle 5 times, then swirl at anangle to mix thoroughly.
• Remove the red cap from the Ion S5™ Wash Solution and Ion S5™ CleaningSolution bottles immediately before installing on the instrument.
When a manual sequencer cleaning is required
The Ion S5™ Sequencer and Ion S5™ XL Sequencer require that a cleaning beperformed before initialization. This is normally performed automatically at thecompletion of the previous sequencing run. When two sequencing runs areperformed on a single initialization, the post-run cleaning is performed after thesecond sequencing run. However, if a sequencing run is not completed (due to powerfailure, user aborting the run, etc.) the instrument will not allow the subsequentinitialization to proceed until a cleaning has been performed. See, “Perform a manualsequencer cleaning“ on page 68 for more information.
Chapter 4 Initialize the sequencerBefore you begin 4
Ion 520™ & Ion 530™ Kit − Chef User Guide 47
Initialize the sequencer
1. In the instrument touchscreen main menu, touch Initialize. The door, chip, andreagent cartridge clamps unlock.
2. When prompted, remove the Ion S5™ Wash Solution bottle to access the wastereservoir, then remove and empty the waste reservoir.
3. Reinstall the empty waste reservoir.
4. Replace the expended Ion S5™ Sequencing Reagents cartridge with a newcartridge equilibrated to room temperature.
5. Ensure the new Ion S5™ Wash Solution bottle is thoroughly mixed. Then removethe red cap and install.
1
2
3
Chapter 4 Initialize the sequencerInitialize the sequencer4
48 Ion 520™ & Ion 530™ Kit − Chef User Guide
6. Ensure that the used sequencing chip from the previous run is properly seated inthe chip clamp and the chip clamp is pushed in all the way.
7. If necessary, install a new Ion S5™ Cleaning Solution bottle.
Note: The Ion S5™ Cleaning Solution bottle contains sufficient reagent tocomplete four cleanings.
8. Close the door, then touch Next.The instrument confirms that the consumables and chip are properly installedand that the Ion S5™ Cleaning Solution bottle contains sufficient reagent toperform the post-run clean. Follow all on-screen recommendations to ensureproper installation of required consumables.
IMPORTANT! If the allowed number of post-run cleans has been met, theinstrument prompts the user to replace the Ion S5™ Cleaning Solution bottle.
9. When initialization is complete (~40 minutes), touch Home.
The instrument is now ready for a sequencing run.
Reagent consumables disposal
IMPORTANT! Follow all applicable local, state/provincial, and/or national regulationswhen recycling or disposing of Ion S5™ reagent consumables.
To properly dispose of the CO2 scrubber, you must first remove it from the Ion S5™
Sequencing Reagents cartridge.
1. Invert the Ion S5™ SequencingReagents cartridge over anappropriate receptacle to drain allresidual liquid.
2. Wearing gloves, insert the Ion S5™
Cartridge Tool firmly into the CO2scrubber until the flange stops on thetop of the cartridge.
CO2 scrubberremoval anddisposal
Ion S5™ Cartridge Tool
Chapter 4 Initialize the sequencerReagent consumables disposal 4
Ion 520™ & Ion 530™ Kit − Chef User Guide 49
3. Pull straight up on the tool while holding the nucleotide reagent cartridge down.
4. Remove the scrubber from the cartridge tool, then dispose of the scrubberaccording to applicable hazardous waste regulations.
The Ion S5™ Wash solution and Ion S5™ Cleaning solution bottles are made ofrecyclable plastic.
1. Open the expended bottle by unscrewing the cap.
2. Remove the cap, sipper, and filter, then pour any residual liquid into anappropriate receptacle.
3. Rinse the empty bottle with water. Pour out the rinse water into the same liquidwaste receptacle.
4. Recycle or dispose of the clean bottle, cap, sipper, and filter according toapplicable regulations.
Recycle Ion S5™
Wash andCleaning solutionbottles
Chapter 4 Initialize the sequencerReagent consumables disposal4
50 Ion 520™ & Ion 530™ Kit − Chef User Guide
Start the sequencing run
■ Chip handling guidelines . . . . . . . . . . . . . . . . . . . . . . . . . . . . . . . . . . . . . . . . . . . . . . 51
■ Start the sequencing run . . . . . . . . . . . . . . . . . . . . . . . . . . . . . . . . . . . . . . . . . . . . . . 52
■ Maintain the sequencer . . . . . . . . . . . . . . . . . . . . . . . . . . . . . . . . . . . . . . . . . . . . . . . 54
Chip handling guidelines
To place a chip in the chip clamp:
1 2 3 4
1 Slide the chip clamp out.2 Remove the chip currently in the clamp.3 Place the appropriate loaded chip in the
chip clamp with the chip notch in thebottom ‑front corner.
Note: Do not force the chip into theclamp. If the chip does not fit easily in theclamp, confirm that the notch is orientedas shown in the photo.
4 Slide the metal tab in fully to engage theclamp, then close the instrument door.
5
Ion 520™ & Ion 530™ Kit − Chef User Guide 51
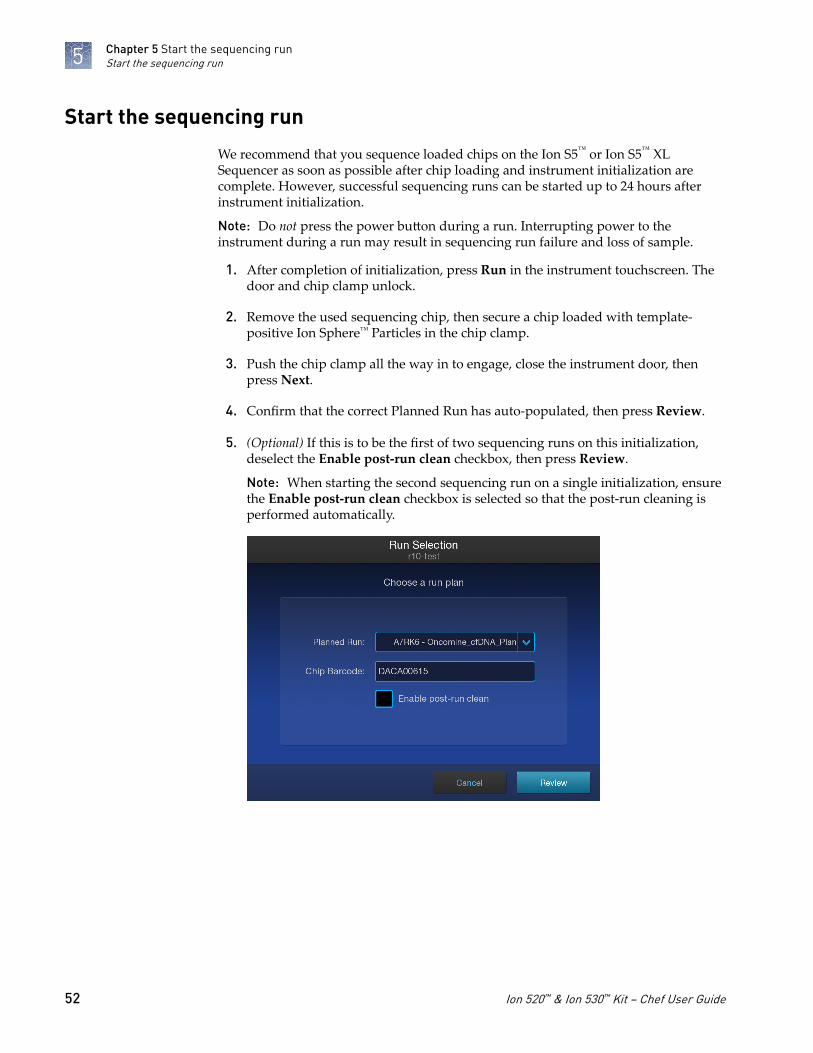
Start the sequencing run
We recommend that you sequence loaded chips on the Ion S5™ or Ion S5™ XLSequencer as soon as possible after chip loading and instrument initialization arecomplete. However, successful sequencing runs can be started up to 24 hours afterinstrument initialization.
Note: Do not press the power button during a run. Interrupting power to theinstrument during a run may result in sequencing run failure and loss of sample.
1. After completion of initialization, press Run in the instrument touchscreen. Thedoor and chip clamp unlock.
2. Remove the used sequencing chip, then secure a chip loaded with template-positive Ion Sphere™ Particles in the chip clamp.
3. Push the chip clamp all the way in to engage, close the instrument door, thenpress Next.
4. Confirm that the correct Planned Run has auto-populated, then press Review.
5. (Optional) If this is to be the first of two sequencing runs on this initialization,deselect the Enable post-run clean checkbox, then press Review.
Note: When starting the second sequencing run on a single initialization, ensurethe Enable post-run clean checkbox is selected so that the post-run cleaning isperformed automatically.
Chapter 5 Start the sequencing runStart the sequencing run5
52 Ion 520™ & Ion 530™ Kit − Chef User Guide
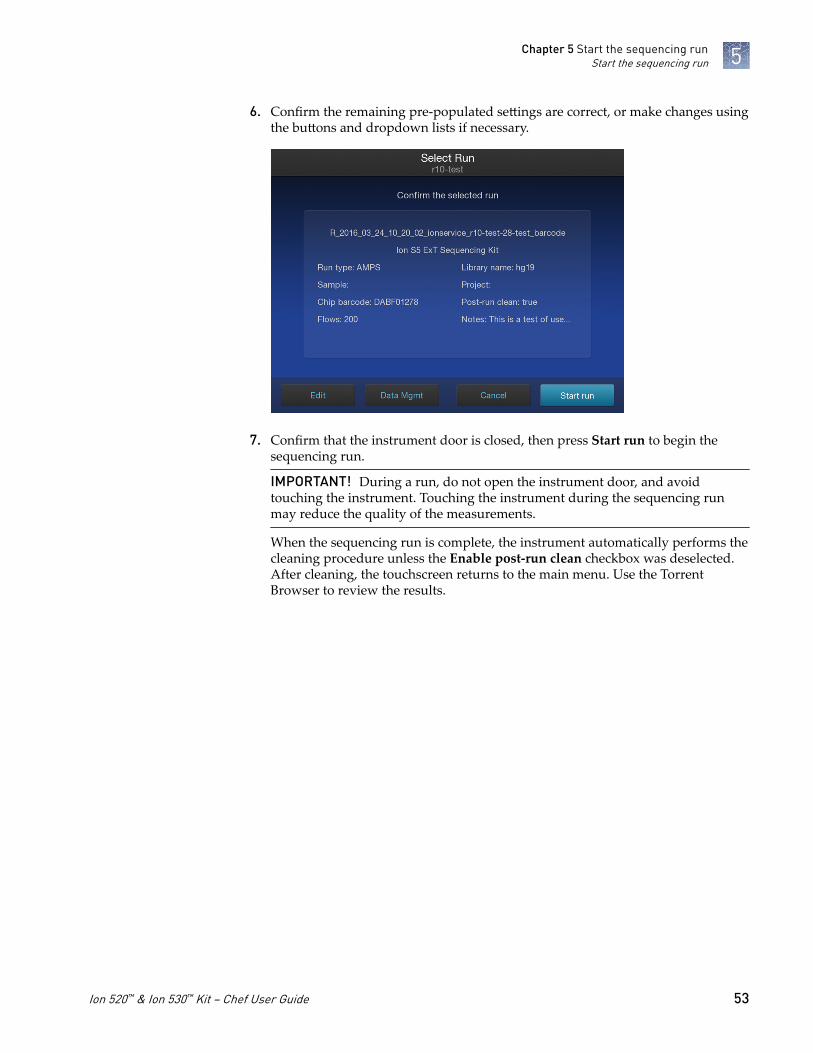
6. Confirm the remaining pre-populated settings are correct, or make changes usingthe buttons and dropdown lists if necessary.
7. Confirm that the instrument door is closed, then press Start run to begin thesequencing run.
IMPORTANT! During a run, do not open the instrument door, and avoidtouching the instrument. Touching the instrument during the sequencing runmay reduce the quality of the measurements.
When the sequencing run is complete, the instrument automatically performs thecleaning procedure unless the Enable post-run clean checkbox was deselected.After cleaning, the touchscreen returns to the main menu. Use the TorrentBrowser to review the results.
Chapter 5 Start the sequencing runStart the sequencing run 5
Ion 520™ & Ion 530™ Kit − Chef User Guide 53
Maintain the sequencer
• Lint-free wipes• 70% isopropanol• (optional)– 10% bleach solution
In the event of a spill or leak on or inside the instrument, perform the following steps.
Note: Dispose of all waste in appropriate liquid or solid waste containers.
1. Remove the Ion S5™ Wash Solution bottle, then remove and empty the wastereservoir.
2. Remove the Ion S5™ Sequencing Reagents cartridge.
3. Inspect the waste and nucleotide reagent bays for liquid.
4. Using absorbent paper soak up as much liquid as possible, then wash theaffected area with 10% bleach solution.
5. Wipe the affected surfaces with 70% isopropanol, then allow to air-dry.
Requiredmaterials
Clean ordecontaminate thesequencer
Chapter 5 Start the sequencing runMaintain the sequencer5
54 Ion 520™ & Ion 530™ Kit − Chef User Guide
Clean the Ion Chef™ System
■ About the cleaning protocol . . . . . . . . . . . . . . . . . . . . . . . . . . . . . . . . . . . . . . . . . . . 55
■ Materials required . . . . . . . . . . . . . . . . . . . . . . . . . . . . . . . . . . . . . . . . . . . . . . . . . . . . 55
■ Clean the Ion Chef™ Instrument . . . . . . . . . . . . . . . . . . . . . . . . . . . . . . . . . . . . . . . . 56
About the cleaning protocol
The Ion Chef™ System includes an automated cleaning function that must beperformed following every run. The cleaning routine is initiated from the Ion Chef™
Instrument touchscreen and is designed to minimize potential contamination. Duringthe routine, the instrument irradiates the deck with ultraviolet light for 1 minute afterall consumables have been removed from the instrument.
IMPORTANT! Although the Ion Chef™ Instrument cleaning routine provides someprotection against contamination, it is not a substitute for good laboratory techniqueor precautions. When preparing DNA libraries for use or when preparing the IonChef™ Instrument, make certain to observe sterile laboratory procedures at all times toensure minimal contamination.
Materials required
• Gloves, powder-free nitrile• Isopropanol, 70% solution• Wipes, lint-free
6
Ion 520™ & Ion 530™ Kit − Chef User Guide 55
Clean the Ion Chef™ Instrument
IMPORTANT! Clean the Ion Chef™ Instrument as described in the following pagesafter every run. To prevent contamination, do not operate the instrument unless it hasbeen recently cleaned.
4
5
3
2 1
8 7
6
Ion Chef™ Instrument stations1 Used pipette tip station2 Empty Tip Cartridge: move to Used pipette
tip station3 Thermal cycler sample block4 Reagents station
5 Solutions station6 Recovery centrifuges7 Enrichment station8 Chip-loading centrifuge
Chapter 6 Clean the Ion Chef™ SystemClean the Ion Chef™ Instrument6
56 Ion 520™ & Ion 530™ Kit − Chef User Guide
IMPORTANT!· Do not discard the empty Tip Cartridge.· Make sure to transfer the QC samples before you remove and discard the Reagents
cartridge.
1. Touch (Open Door) in the instrument touchscreen, then wait for the latch toopen.
2. Lift the instrument door to the top of the travel until the latch mechanismengages.
1
1 Hold here, then lift
3. Remove, then discard the PCR plate from the thermal cycler sample block.
4. Remove, then discard the box of used pipette tips from the waste tip position.
IMPORTANT! Handle the disposable reservoir in the waste tip position withcare. During the run, liquid waste collects in the reservoir. Dispose of the liquidwaste by tipping the reservoir on one corner and pouring the waste into anappropriate waste container:
IMPORTANT! Do not reuse the waste pipette tip rack. Always move the emptyTip Cartridge from the new tip position to the waste tip position.
5. Move the empty Tip Cartridge to the waste tip position.
Remove anddispose of usedconsumables
Chapter 6 Clean the Ion Chef™ SystemClean the Ion Chef™ Instrument 6
Ion 520™ & Ion 530™ Kit − Chef User Guide 57
6. Remove, then discard the• Ion 520™ & Ion 530™ Chef Reagents cartridge• Ion S5™ Chef Solutions cartridge• Enrichment Cartridge v2
7. Remove, then discard the consumables from the Recovery centrifuges, includingthe:
• Recovery Station Disposable Lids v2• Recovery Tubes v2
8. Close the Chip-loading centrifuge lid.
1. Inspect the Recovery centrifuges, then clean the components if excess liquid ispresent.
Is liquidpresent? Action
No Go to “Start the cleaning“ on page 59.
Yes Clean the centrifuge bowl and buckets as described below.
IMPORTANT! Clean the Recovery centrifuges occasionally, onlywhen excess liquid is noticeable in the bowl and/or buckets. Youdo not need to clean the centrifuge after every run.
IMPORTANT! Wear powder-free, nitrile gloves when cleaning the Recoverycentrifuge.
2. Remove the buckets from the Recovery centrifuges. Clean the inside and outsideof each bucket using a lint-free wipe, then place the buckets on a clean, drysurface while you clean the centrifuge.
1
2
1 Bucket2 Lint-free wipe
Inspect and cleanthe Recoverycentrifuges andbuckets
Chapter 6 Clean the Ion Chef™ SystemClean the Ion Chef™ Instrument6
58 Ion 520™ & Ion 530™ Kit − Chef User Guide
3. Use lint-free wipes to remove all fluid from inside the centrifuge bowl.
1
2
1 Inside rim of the centrifuge2 Bottom of the centrifuge bowls
4. Use lint-free wipes treated with 70% isopropanol to clean the:• Inside rim of the centrifuge.• Bottom of the centrifuge bowl.• Outside and inside of the centrifuge buckets.
5. Dry the centrifuge and buckets with lint-free wipes.
6. Install the centrifuge buckets, then close the centrifuge lid.
1
1 Buckets (cleaned and installed)
1. Close the instrument door by first lifting it up slightly to disengage the lockingmechanism, then pushing down on the door until the locks engage.
IMPORTANT! Before closing the door, ensure the lids of the centrifuges areclosed.
Start the cleaning
Chapter 6 Clean the Ion Chef™ SystemClean the Ion Chef™ Instrument 6
Ion 520™ & Ion 530™ Kit − Chef User Guide 59
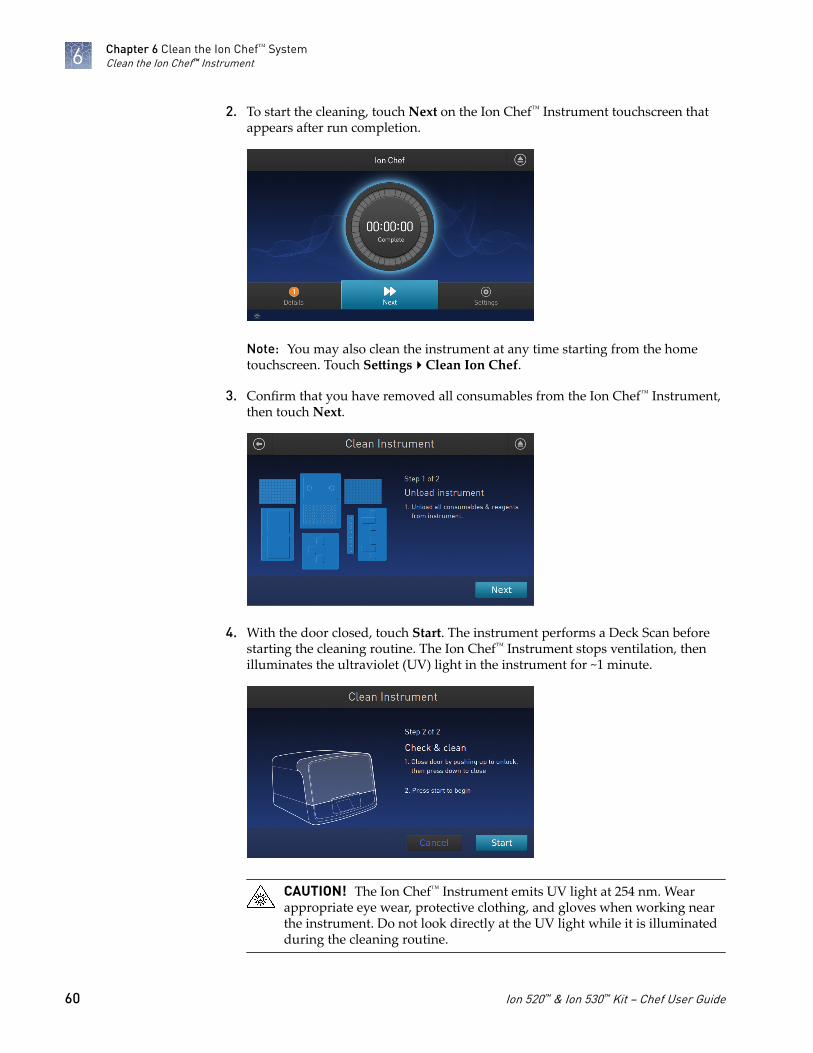
2. To start the cleaning, touch Next on the Ion Chef™ Instrument touchscreen thatappears after run completion.
Note: You may also clean the instrument at any time starting from the hometouchscreen. Touch Settings4Clean Ion Chef.
3. Confirm that you have removed all consumables from the Ion Chef™ Instrument,then touch Next.
4. With the door closed, touch Start. The instrument performs a Deck Scan beforestarting the cleaning routine. The Ion Chef™ Instrument stops ventilation, thenilluminates the ultraviolet (UV) light in the instrument for ~1 minute.
CAUTION! The Ion Chef™ Instrument emits UV light at 254 nm. Wearappropriate eye wear, protective clothing, and gloves when working nearthe instrument. Do not look directly at the UV light while it is illuminatedduring the cleaning routine.
Chapter 6 Clean the Ion Chef™ SystemClean the Ion Chef™ Instrument6
60 Ion 520™ & Ion 530™ Kit − Chef User Guide
Troubleshooting
■ Ion Chef™ System setup and operation . . . . . . . . . . . . . . . . . . . . . . . . . . . . . . . . . . 61
■ Ion S5™ System setup and operation . . . . . . . . . . . . . . . . . . . . . . . . . . . . . . . . . . . . 64
■ ISP Quality Control assay troubleshooting table . . . . . . . . . . . . . . . . . . . . . . . . . . 66
Ion Chef™ System setup and operation
Observation Possible cause Recommended action
Instrument does not display thehome screen when powered on
Multiple causes are possible. 1. Power off the instrument, wait30 seconds, then power on theinstrument.
2. If the instrument fails again, contactTechnical Support.
Cannot open the instrumentdoor
An obstruction is present on oraround the door mechanism.
Remove the obstruction blocking the door, thenoperate the instrument normally.
A hardware or software errorhas occurred.
Contact Technical Support to report theproblem and for further assistance.
Instrument stops during a run The instrument hasencountered an internal error.
1. Record the error displayed on theinstrument display, then touch OK.
2. Contact Technical Support to report theproblem and for further assistance.
Liquid residue is present in theRecovery centrifuges followinga run
During normal instrumentoperation, a noticeable coatingof liquid can collect on the bowland buckets of the Recoverycentrifuges following repeatedruns.
Remove the residue as instructed in “Inspectand clean the Recovery centrifuges andbuckets“ on page 58.
A
Ion 520™ & Ion 530™ Kit − Chef User Guide 61
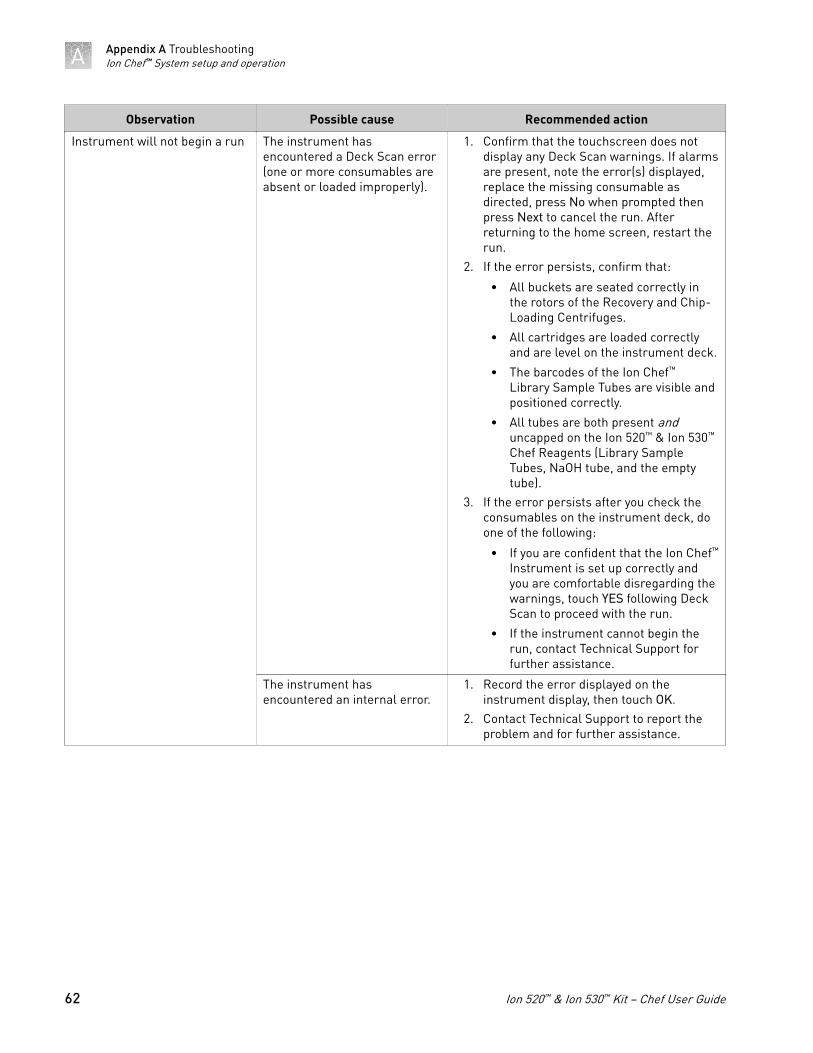
Observation Possible cause Recommended action
Instrument will not begin a run The instrument hasencountered a Deck Scan error(one or more consumables areabsent or loaded improperly).
1. Confirm that the touchscreen does notdisplay any Deck Scan warnings. If alarmsare present, note the error(s) displayed,replace the missing consumable asdirected, press No when prompted thenpress Next to cancel the run. Afterreturning to the home screen, restart therun.
2. If the error persists, confirm that:
• All buckets are seated correctly inthe rotors of the Recovery and Chip-Loading Centrifuges.
• All cartridges are loaded correctlyand are level on the instrument deck.
• The barcodes of the Ion Chef™
Library Sample Tubes are visible andpositioned correctly.
• All tubes are both present anduncapped on the Ion 520™ & Ion 530™
Chef Reagents (Library SampleTubes, NaOH tube, and the emptytube).
3. If the error persists after you check theconsumables on the instrument deck, doone of the following:
• If you are confident that the Ion Chef™
Instrument is set up correctly andyou are comfortable disregarding thewarnings, touch YES following DeckScan to proceed with the run.
• If the instrument cannot begin therun, contact Technical Support forfurther assistance.
The instrument hasencountered an internal error.
1. Record the error displayed on theinstrument display, then touch OK.
2. Contact Technical Support to report theproblem and for further assistance.
Appendix A TroubleshootingIon Chef™ System setup and operationA
62 Ion 520™ & Ion 530™ Kit − Chef User Guide
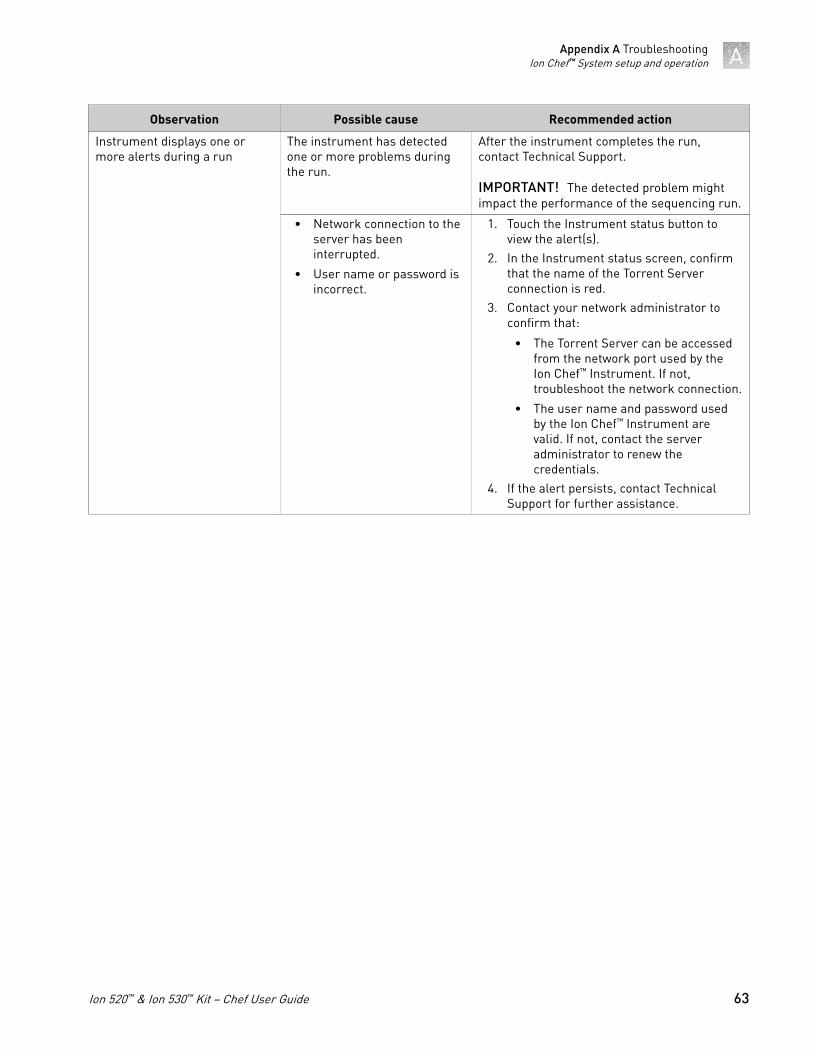
Observation Possible cause Recommended action
Instrument displays one ormore alerts during a run
The instrument has detectedone or more problems duringthe run.
After the instrument completes the run,contact Technical Support.
IMPORTANT! The detected problem mightimpact the performance of the sequencing run.
• Network connection to theserver has beeninterrupted.
• User name or password isincorrect.
1. Touch the Instrument status button toview the alert(s).
2. In the Instrument status screen, confirmthat the name of the Torrent Serverconnection is red.
3. Contact your network administrator toconfirm that:
• The Torrent Server can be accessedfrom the network port used by theIon Chef™ Instrument. If not,troubleshoot the network connection.
• The user name and password usedby the Ion Chef™ Instrument arevalid. If not, contact the serveradministrator to renew thecredentials.
4. If the alert persists, contact TechnicalSupport for further assistance.
Appendix A TroubleshootingIon Chef™ System setup and operation A
Ion 520™ & Ion 530™ Kit − Chef User Guide 63
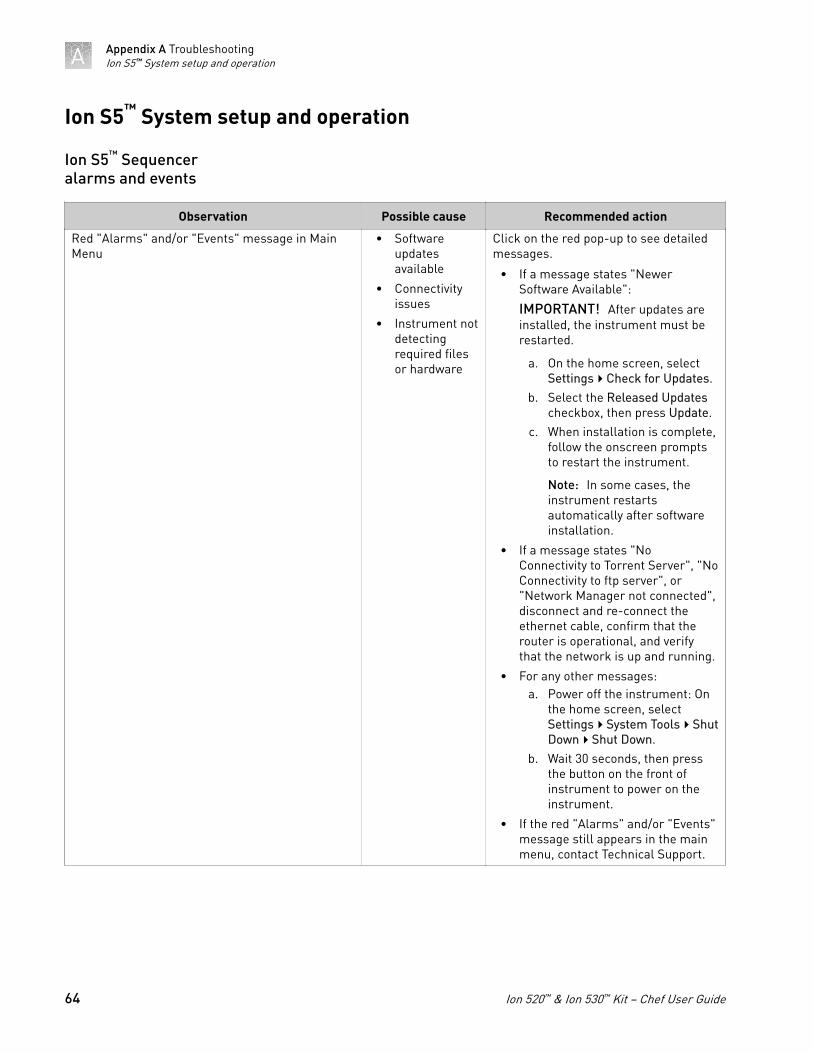
Ion S5™ System setup and operation
Observation Possible cause Recommended action
Red "Alarms" and/or "Events" message in MainMenu
• Softwareupdatesavailable
• Connectivityissues
• Instrument notdetectingrequired filesor hardware
Click on the red pop-up to see detailedmessages.
• If a message states "NewerSoftware Available":
IMPORTANT! After updates areinstalled, the instrument must berestarted.
a. On the home screen, selectSettings4Check for Updates.
b. Select the Released Updatescheckbox, then press Update.
c. When installation is complete,follow the onscreen promptsto restart the instrument.
Note: In some cases, theinstrument restartsautomatically after softwareinstallation.
• If a message states "NoConnectivity to Torrent Server", "NoConnectivity to ftp server", or"Network Manager not connected",disconnect and re-connect theethernet cable, confirm that therouter is operational, and verifythat the network is up and running.
• For any other messages:a. Power off the instrument: On
the home screen, selectSettings4System Tools4ShutDown4Shut Down.
b. Wait 30 seconds, then pressthe button on the front ofinstrument to power on theinstrument.
• If the red "Alarms" and/or "Events"message still appears in the mainmenu, contact Technical Support.
Ion S5™ Sequenceralarms and events
Appendix A TroubleshootingIon S5™ System setup and operationA
64 Ion 520™ & Ion 530™ Kit − Chef User Guide
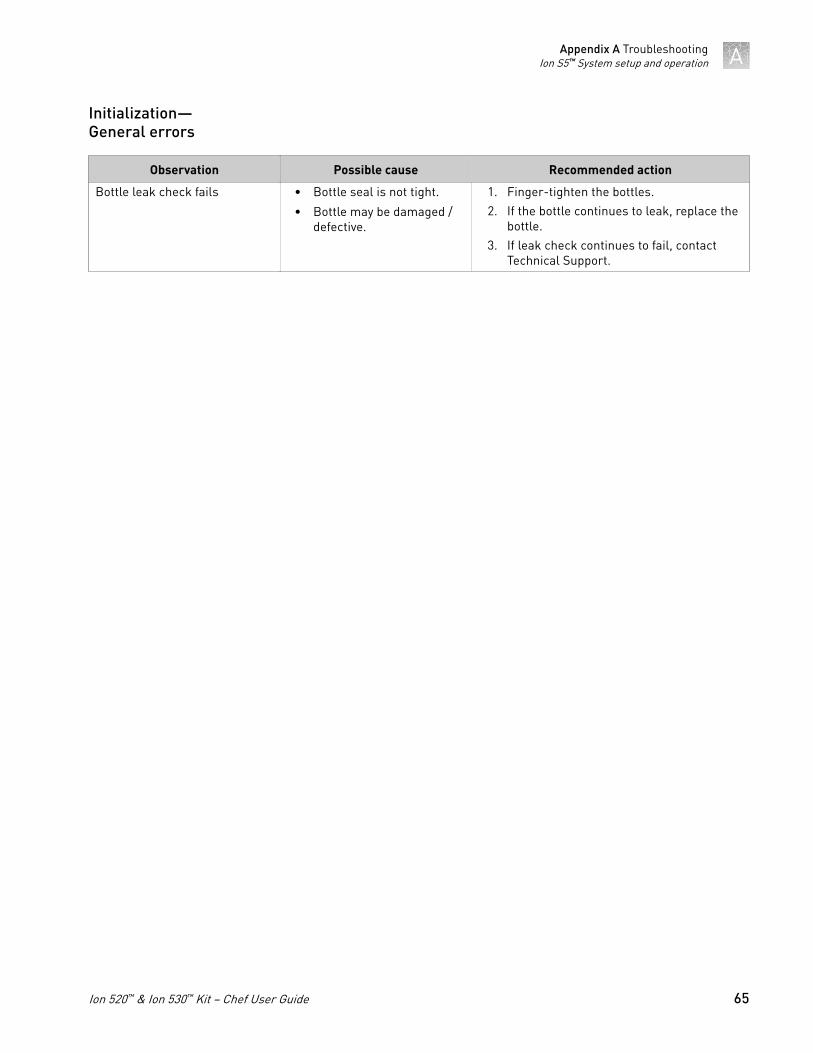
Observation Possible cause Recommended action
Bottle leak check fails • Bottle seal is not tight.
• Bottle may be damaged /defective.
1. Finger-tighten the bottles.2. If the bottle continues to leak, replace the
bottle.3. If leak check continues to fail, contact
Technical Support.
Initialization—General errors
Appendix A TroubleshootingIon S5™ System setup and operation A
Ion 520™ & Ion 530™ Kit − Chef User Guide 65
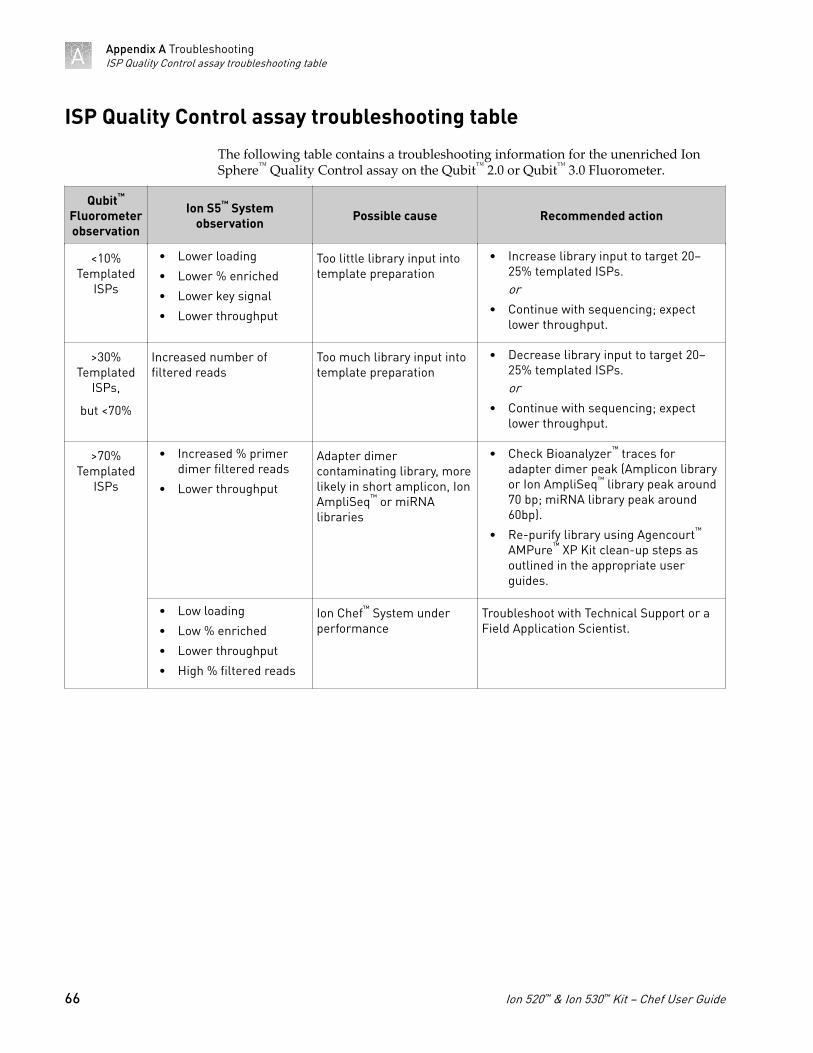
ISP Quality Control assay troubleshooting table
The following table contains a troubleshooting information for the unenriched IonSphere™ Quality Control assay on the Qubit™ 2.0 or Qubit™ 3.0 Fluorometer.
Qubit™
Fluorometerobservation
Ion S5™ Systemobservation Possible cause Recommended action
<10%Templated
ISPs
• Lower loading
• Lower % enriched
• Lower key signal
• Lower throughput
Too little library input intotemplate preparation
• Increase library input to target 20–25% templated ISPs.or
• Continue with sequencing; expectlower throughput.
>30%Templated
ISPs,
but <70%
Increased number offiltered reads
Too much library input intotemplate preparation
• Decrease library input to target 20–25% templated ISPs.or
• Continue with sequencing; expectlower throughput.
>70%Templated
ISPs
• Increased % primerdimer filtered reads
• Lower throughput
Adapter dimercontaminating library, morelikely in short amplicon, IonAmpliSeq™ or miRNAlibraries
• Check Bioanalyzer™ traces foradapter dimer peak (Amplicon libraryor Ion AmpliSeq™ library peak around70 bp; miRNA library peak around60bp).
• Re-purify library using Agencourt™
AMPure™ XP Kit clean-up steps asoutlined in the appropriate userguides.
• Low loading
• Low % enriched
• Lower throughput
• High % filtered reads
Ion Chef™ System underperformance
Troubleshoot with Technical Support or aField Application Scientist.
Appendix A TroubleshootingISP Quality Control assay troubleshooting tableA
66 Ion 520™ & Ion 530™ Kit − Chef User Guide

Supplementary procedures
Section B.1 Perform a manual sequencer cleaning . . . . . . . . . . . . . . . . . . . 68Section B.2 Quality control of Ion Sphere™ Particles . . . . . . . . . . . . . . . . . . 69■ Quality Control assay . . . . . . . . . . . . . . . . . . . . . . . . . . . . . . . . . . . . . . . . . . . . . . . . . 69
■ Quality control using the Qubit™ 2.0 or Qubit™ 3.0 Fluorometer . . . . . . . . . . . 69
■ Quality control using the Guava™ easyCyte™ 5 Flow Cytometer . . . . . . . . . . . 70
■ Quality control using the Attune™ Acoustic Focusing Cytometer . . . . . . . . . . . 70
Section B.3 Quality control using the Qubit™ 2.0 Fluorometer . . . . . . . . . 71■ Materials required . . . . . . . . . . . . . . . . . . . . . . . . . . . . . . . . . . . . . . . . . . . . . . . . . . . . 71
■ Upgrade the Qubit™ 2.0 Fluorometer firmware and software . . . . . . . . . . . . . . . 72
■ Upgrade for firmware V2.00 or V3.00 . . . . . . . . . . . . . . . . . . . . . . . . . . . . . . . . . . . 73
■ Upgrade for firmware V3.10 . . . . . . . . . . . . . . . . . . . . . . . . . . . . . . . . . . . . . . . . . . . 75
■ Calculate the Qubit™ 2.0 Fluorometer Calibration Factor . . . . . . . . . . . . . . . . . . 77
■ Measure the templated unenriched sample . . . . . . . . . . . . . . . . . . . . . . . . . . . . . . 80
Section B.4 Quality control using the Qubit™ 3.0 Fluorometer . . . . . . . . . 84■ Materials required . . . . . . . . . . . . . . . . . . . . . . . . . . . . . . . . . . . . . . . . . . . . . . . . . . . . 84
■ Calculate the Qubit™ 3.0 Fluorometer Calibration Factor . . . . . . . . . . . . . . . . . . 84
■ Measure the templated unenriched sample . . . . . . . . . . . . . . . . . . . . . . . . . . . . . . 88
Section B.5 Maintain the Ion Chef™ System . . . . . . . . . . . . . . . . . . . . . . . . . . . 92■ Install a firmware update . . . . . . . . . . . . . . . . . . . . . . . . . . . . . . . . . . . . . . . . . . . . . . 92
■ Change the instrument name . . . . . . . . . . . . . . . . . . . . . . . . . . . . . . . . . . . . . . . . . . 93
B
Ion 520™ & Ion 530™ Kit − Chef User Guide 67
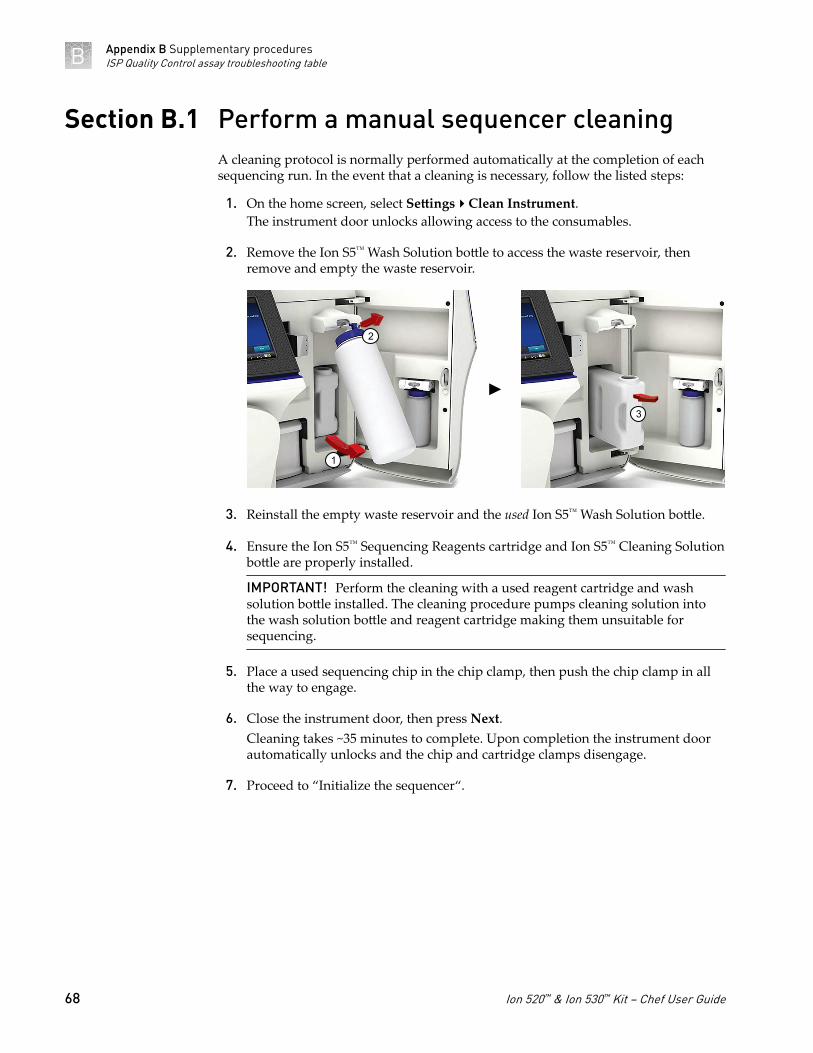
Section B.1 Perform a manual sequencer cleaningA cleaning protocol is normally performed automatically at the completion of eachsequencing run. In the event that a cleaning is necessary, follow the listed steps:
1. On the home screen, select Settings4Clean Instrument.The instrument door unlocks allowing access to the consumables.
2. Remove the Ion S5™ Wash Solution bottle to access the waste reservoir, thenremove and empty the waste reservoir.
1
2
3
3. Reinstall the empty waste reservoir and the used Ion S5™ Wash Solution bottle.
4. Ensure the Ion S5™ Sequencing Reagents cartridge and Ion S5™ Cleaning Solutionbottle are properly installed.
IMPORTANT! Perform the cleaning with a used reagent cartridge and washsolution bottle installed. The cleaning procedure pumps cleaning solution intothe wash solution bottle and reagent cartridge making them unsuitable forsequencing.
5. Place a used sequencing chip in the chip clamp, then push the chip clamp in allthe way to engage.
6. Close the instrument door, then press Next.Cleaning takes ~35 minutes to complete. Upon completion the instrument doorautomatically unlocks and the chip and cartridge clamps disengage.
7. Proceed to “Initialize the sequencer“.
Appendix B Supplementary proceduresISP Quality Control assay troubleshooting tableB
68 Ion 520™ & Ion 530™ Kit − Chef User Guide
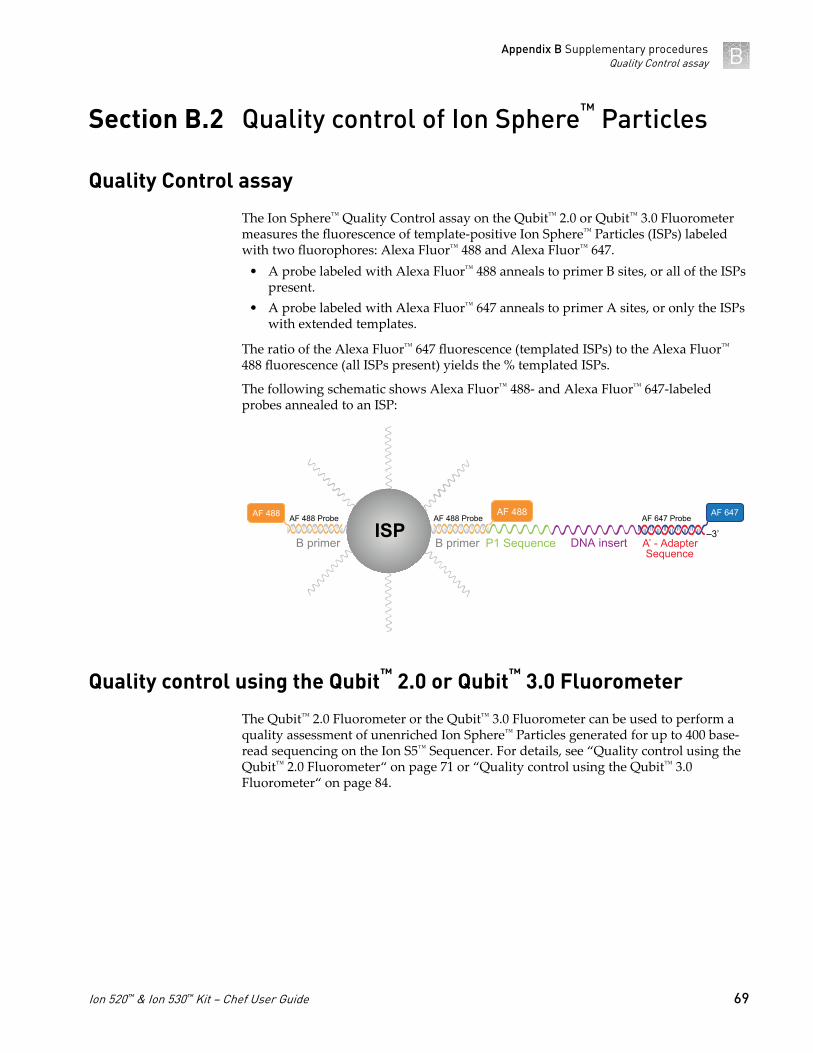
Section B.2 Quality control of Ion Sphere™ Particles
Quality Control assay
The Ion Sphere™ Quality Control assay on the Qubit™ 2.0 or Qubit™ 3.0 Fluorometermeasures the fluorescence of template-positive Ion Sphere™ Particles (ISPs) labeledwith two fluorophores: Alexa Fluor™ 488 and Alexa Fluor™ 647.
• A probe labeled with Alexa Fluor™ 488 anneals to primer B sites, or all of the ISPspresent.
• A probe labeled with Alexa Fluor™ 647 anneals to primer A sites, or only the ISPswith extended templates.
The ratio of the Alexa Fluor™ 647 fluorescence (templated ISPs) to the Alexa Fluor™
488 fluorescence (all ISPs present) yields the % templated ISPs.
The following schematic shows Alexa Fluor™ 488- and Alexa Fluor™ 647-labeledprobes annealed to an ISP:
AF 488AF 488 AF 647
ISP –3’
AF 488 Probe AF 647 Probe
B primer P1 Sequence A’ - Adapter DNA insert
AF 488 Probe
SequenceB primer
Quality control using the Qubit™ 2.0 or Qubit™ 3.0 Fluorometer
The Qubit™ 2.0 Fluorometer or the Qubit™ 3.0 Fluorometer can be used to perform aquality assessment of unenriched Ion Sphere™ Particles generated for up to 400 base-read sequencing on the Ion S5™ Sequencer. For details, see “Quality control using theQubit™ 2.0 Fluorometer“ on page 71 or “Quality control using the Qubit™ 3.0Fluorometer“ on page 84.
Appendix B Supplementary proceduresQuality Control assay B
Ion 520™ & Ion 530™ Kit − Chef User Guide 69
Quality control using the Guava™ easyCyte™ 5 Flow Cytometer
The Guava™ easyCyte™ 5 Flow Cytometer can be used for quality assessment ofunenriched and enriched Ion Sphere™ Particles generated for up to 400 base-readsequencing on the Ion S5™ Sequencer or Ion S5™ XL Sequencer.
• Unenriched samples – Obtain the QC samples from the corresponding LibrarySample Tubes on the Ion 520™ & Ion 530™ Chef Reagents cartridge (positions Aand B).
• Enriched samples – Obtain sample 1 from position E and sample 2 from positionA on the Enrichment Cartridge v2.
For details, see the Ion PI™ Ion Sphere™ Particles Quality Assessment Using the Guava™
easyCyte™ 5 Flow Cytometer User Bulletin (Pub. No. MAN0007496), available on the IonCommunity website:
http://ioncommunity.thermofisher.com
Quality control using the Attune™ Acoustic Focusing Cytometer
The Applied Biosystems™ Attune™ Acoustic Focusing Cytometer can be used forquality assessment of unenriched and enriched Ion Sphere™ Particles generated for upto 400 base-read sequencing on the Ion S5™ Sequencer or Ion S5™ XL Sequencer.
• Unenriched samples – Obtain the QC samples from the corresponding LibrarySample Tubes on the Ion 520™ & Ion 530™ Chef Reagents cartridge (positions Aand B).
• Enriched samples – Obtain sample 1 from position E and sample 2 from positionA on the Enrichment Cartridge v2.
For details, refer to the Demonstrated Protocol: Ion Sphere™ Particles (ISPs) QualityAssessment using the Applied Biosystems™ Attune™ Acoustic Focusing Cytometer UserBulletin (Pub. No. 4477181), available on the Ion Community website:
http://ioncommunity.thermofisher.com
Appendix B Supplementary proceduresQuality control using the Guava™ easyCyte™ 5 Flow CytometerB
70 Ion 520™ & Ion 530™ Kit − Chef User Guide
Section B.3 Quality control using the Qubit™ 2.0Fluorometer
IMPORTANT! Effective 15 February 2012, the Alexa Fluor™ 488 and Alexa Fluor™ 647Calibration Standards replace the spectrally similar FAM™ and Cy®5 dyes,respectively, previously used in the kit. To update the existing plugin on the Qubit™
2.0 Fluorometer with the new dye names, install the new plugin file,Ion_PluginV310_AF.qbt.
Both sets of dye-labeled calibration standards can be used in conjunction withfirmware version 3.00 and previous versions of plugin files (ion_plugin.qbt orIon_plugin_AF.qbt).
We highly recommend that you install the new firmware version 3.10 and the new Ionplugin file (Ion_PluginV310_AF) for ease of use as these new versions allow you tooperate the Ion plugin on the Qubit™ 2.0 Fluorometer without requiring the USB driveLog to be connected into the device at all times.
The selection options on the user interface of the instrument matches the new AlexaFluor™ 488 and Alexa Fluor™ 647 Calibration Standards once the new plugin file isinstalled.
Materials required
• Qubit™ 2.0 Fluorometer with the V3.10 firmware and the Ion Sphere™ QualityControl assay
• Qubit™ Assay Tubes (Cat. No. Q32856)• PCR tubes, 0.2 mL (Axygen™ Maxymum Recovery PCR Tube; Fisher Scientific
Cat. No. 14-222-283, or equivalent)• Qubit™ Easy Calculator Microsoft™ Excel™ Spreadsheet file containing theinstrument-specific Calibration Factor
• Ion Sphere™ Quality Control Kit (Cat. No. 4468656)• Unenriched ISPs• GeneAmp™ PCR System 9700 thermal cycler (Cat. No. N8050200), or equivalent
Appendix B Supplementary proceduresMaterials required B
Ion 520™ & Ion 530™ Kit − Chef User Guide 71
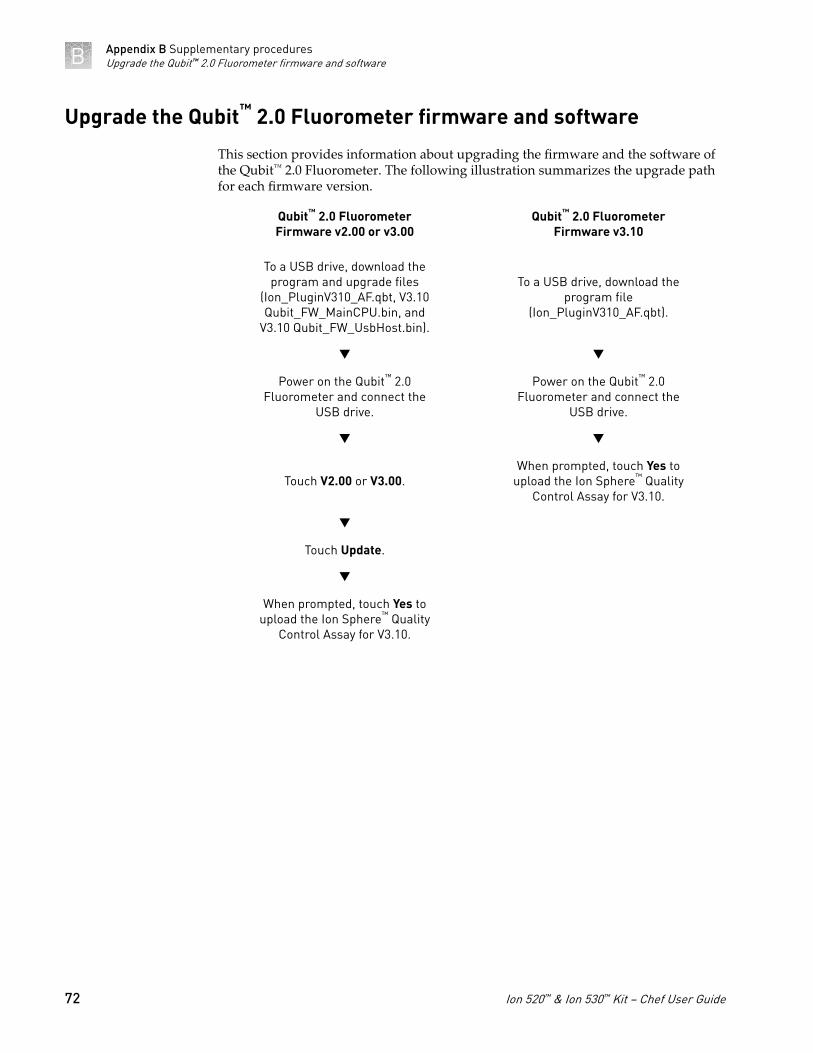
Upgrade the Qubit™ 2.0 Fluorometer firmware and software
This section provides information about upgrading the firmware and the software ofthe Qubit™ 2.0 Fluorometer. The following illustration summarizes the upgrade pathfor each firmware version.
Qubit™ 2.0 FluorometerFirmware v2.00 or v3.00
Qubit™ 2.0 FluorometerFirmware v3.10
To a USB drive, download theprogram and upgrade files
(Ion_PluginV310_AF.qbt, V3.10Qubit_FW_MainCPU.bin, and
V3.10 Qubit_FW_UsbHost.bin).
To a USB drive, download theprogram file
(Ion_PluginV310_AF.qbt).
q q
Power on the Qubit™ 2.0Fluorometer and connect the
USB drive.
Power on the Qubit™ 2.0Fluorometer and connect the
USB drive.
q q
Touch V2.00 or V3.00.When prompted, touch Yes to
upload the Ion Sphere™ QualityControl Assay for V3.10.
q
Touch Update.
q
When prompted, touch Yes toupload the Ion Sphere™ Quality
Control Assay for V3.10.
Appendix B Supplementary proceduresUpgrade the Qubit™ 2.0 Fluorometer firmware and softwareB
72 Ion 520™ & Ion 530™ Kit − Chef User Guide

Upgrade for firmware V2.00 or V3.00
Note: The previous program files (.qbt) are not compatible with the new V3.10firmware. The new program file (Ion_PluginV310_AF.qbt) is not compatible withV3.00 firmware.
• Qubit™ 2.0 Fluorometer• USB drive (included with Qubit™ 2.0 Fluorometer )• Program (.qbt) and upgrade (.bin) files:
– Ion_PluginV310_AF.qbt– V3.10 Qubit_FW_MainCPU.bin– V3.10 Qubit_FW_UsbHost.bin
We recommend that you use a Windows™ OS-based computer to download andtransfer the Qubit™ 2.0 Fluorometer files to the USB drive.
Note: Do not use a Macintosh™ computer to transfer the files to the USB drive if theserial number of your Qubit™ 2.0 Fluorometer is lower than 1104004846.
We also recommend that you use the USB drive provided with Qubit™ 2.0Fluorometer for file transfer.
Other compatible USB drives may also be used. Visit:http://ioncommunity.thermofisher.com/community/products/pgm/ to see a list of approvedUSB drives. Logging into the Ion Community is required.
1. Download the program file (.qbt) and two upgrade files (.bin) fromhttp://ioncommunity.thermofisher.com/community/products/pgm/ onto a Windows™-based PC desktop. Logging into the Ion Community is required.
2. Remove the existing program file (.qbt) and two upgrade files (.bin) from theUSB drive, if any.
3. Transfer the three downloaded files to the USB drive provided with the Qubit™
2.0 Fluorometer (recommended), or another compatible USB drive.
Note: Files on the USB drive must be in the root directory and cannot be in afolder.
1. Power on the Qubit™ 2.0 Fluorometer by plugging in the unit.
2. Insert the USB drive, containing the program (.qbt) and upgrade (.bin) files, intothe USB port on the instrument.
3. In the upper-right corner of the main menu, touch V2.00, or V3.00 depending onthe version.
4. If the image of the USB drive in the update screen displays a green dot, touchUpdate to upgrade the instrument firmware.The firmware update lasts approximately 2 minutes, during which the Qubit™
2.0 Fluorometer screen flashes:
Materials requiredfor update
Download updatefiles
Upgrade thefirmware
Appendix B Supplementary proceduresUpgrade for firmware V2.00 or V3.00 B
Ion 520™ & Ion 530™ Kit − Chef User Guide 73
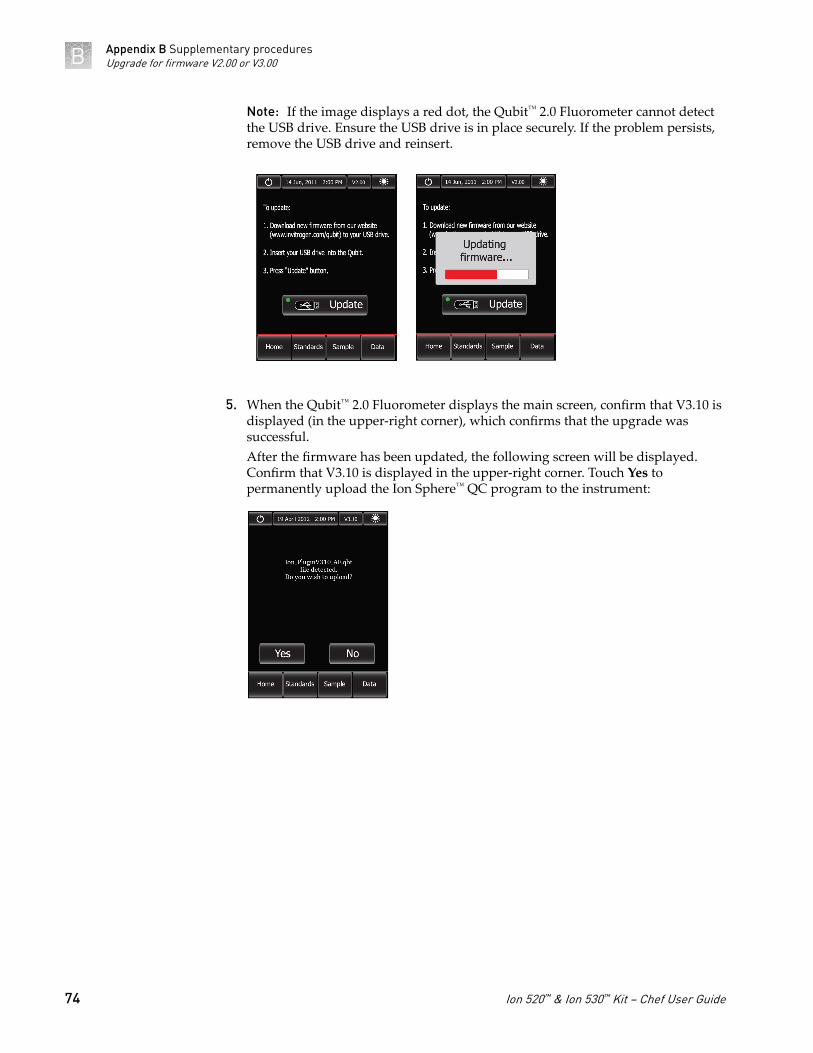
Note: If the image displays a red dot, the Qubit™ 2.0 Fluorometer cannot detectthe USB drive. Ensure the USB drive is in place securely. If the problem persists,remove the USB drive and reinsert.
5. When the Qubit™ 2.0 Fluorometer displays the main screen, confirm that V3.10 isdisplayed (in the upper-right corner), which confirms that the upgrade wassuccessful.After the firmware has been updated, the following screen will be displayed.Confirm that V3.10 is displayed in the upper-right corner. Touch Yes topermanently upload the Ion Sphere™ QC program to the instrument:
Appendix B Supplementary proceduresUpgrade for firmware V2.00 or V3.00B
74 Ion 520™ & Ion 530™ Kit − Chef User Guide
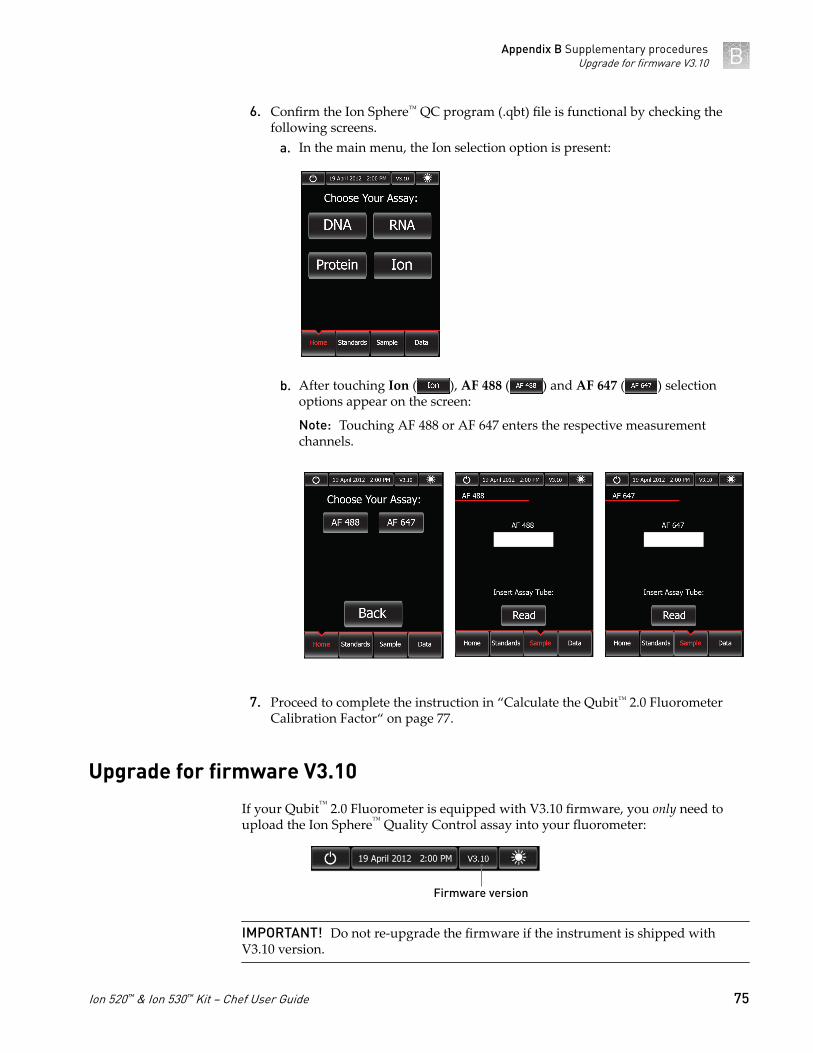
6. Confirm the Ion Sphere™ QC program (.qbt) file is functional by checking thefollowing screens.
a. In the main menu, the Ion selection option is present:
b. After touching Ion ( ), AF 488 ( ) and AF 647 ( ) selectionoptions appear on the screen:
Note: Touching AF 488 or AF 647 enters the respective measurementchannels.
7. Proceed to complete the instruction in “Calculate the Qubit™ 2.0 FluorometerCalibration Factor“ on page 77.
Upgrade for firmware V3.10
If your Qubit™ 2.0 Fluorometer is equipped with V3.10 firmware, you only need toupload the Ion Sphere™ Quality Control assay into your fluorometer:
Firmware version
IMPORTANT! Do not re-upgrade the firmware if the instrument is shipped withV3.10 version.
Appendix B Supplementary proceduresUpgrade for firmware V3.10 B
Ion 520™ & Ion 530™ Kit − Chef User Guide 75
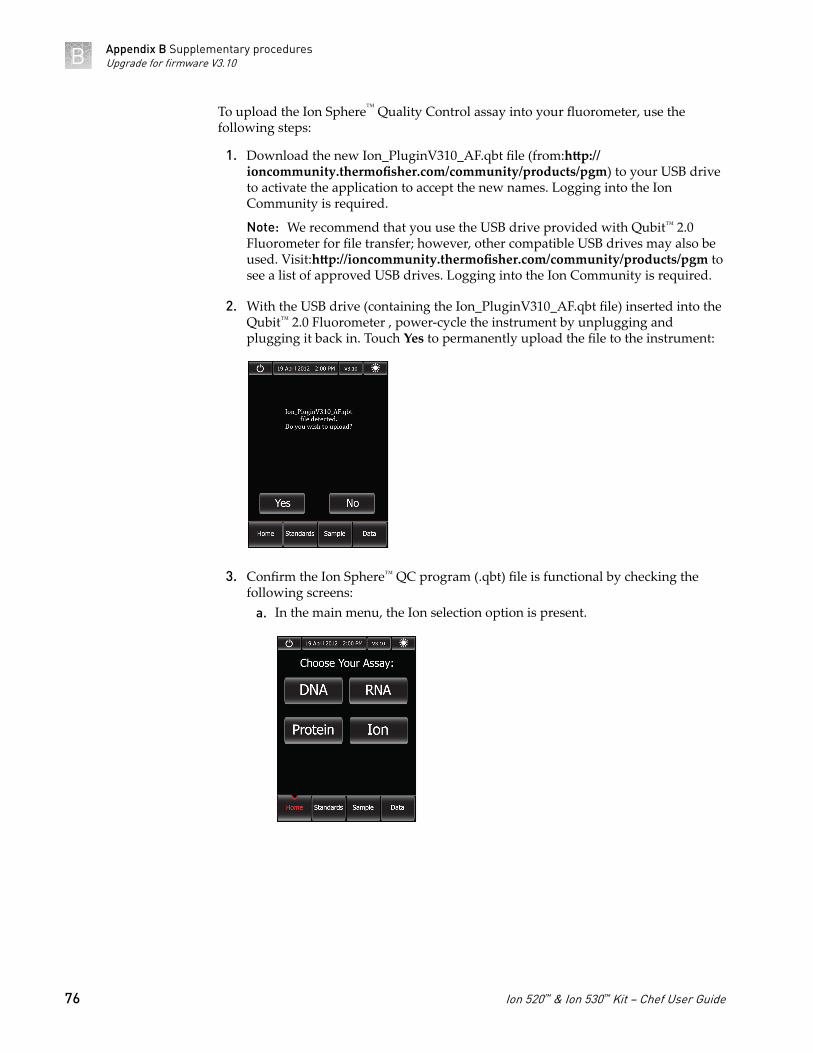
To upload the Ion Sphere™ Quality Control assay into your fluorometer, use thefollowing steps:
1. Download the new Ion_PluginV310_AF.qbt file (from:http://ioncommunity.thermofisher.com/community/products/pgm) to your USB driveto activate the application to accept the new names. Logging into the IonCommunity is required.
Note: We recommend that you use the USB drive provided with Qubit™ 2.0Fluorometer for file transfer; however, other compatible USB drives may also beused. Visit:http://ioncommunity.thermofisher.com/community/products/pgm tosee a list of approved USB drives. Logging into the Ion Community is required.
2. With the USB drive (containing the Ion_PluginV310_AF.qbt file) inserted into theQubit™ 2.0 Fluorometer , power-cycle the instrument by unplugging andplugging it back in. Touch Yes to permanently upload the file to the instrument:
3. Confirm the Ion Sphere™ QC program (.qbt) file is functional by checking thefollowing screens:
a. In the main menu, the Ion selection option is present.
Appendix B Supplementary proceduresUpgrade for firmware V3.10B
76 Ion 520™ & Ion 530™ Kit − Chef User Guide
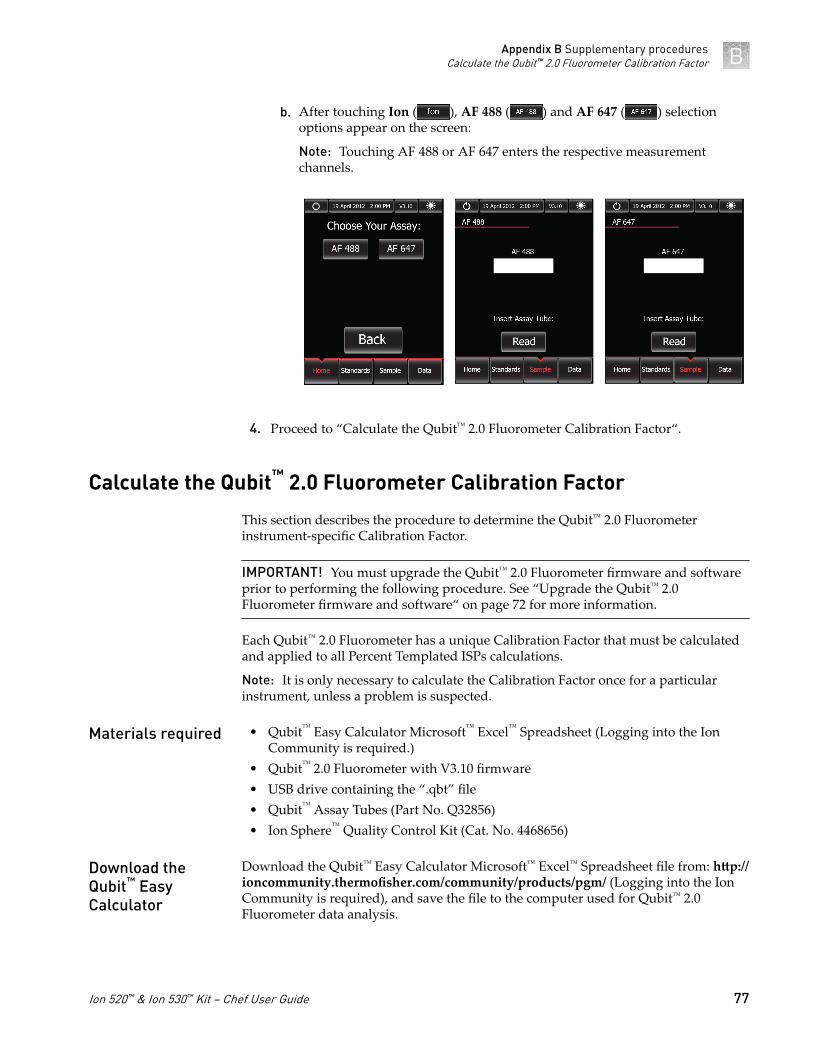
b. After touching Ion ( ), AF 488 ( ) and AF 647 ( ) selectionoptions appear on the screen:
Note: Touching AF 488 or AF 647 enters the respective measurementchannels.
4. Proceed to “Calculate the Qubit™ 2.0 Fluorometer Calibration Factor“.
Calculate the Qubit™ 2.0 Fluorometer Calibration Factor
This section describes the procedure to determine the Qubit™ 2.0 Fluorometerinstrument-specific Calibration Factor.
IMPORTANT! You must upgrade the Qubit™ 2.0 Fluorometer firmware and softwareprior to performing the following procedure. See “Upgrade the Qubit™ 2.0Fluorometer firmware and software“ on page 72 for more information.
Each Qubit™ 2.0 Fluorometer has a unique Calibration Factor that must be calculatedand applied to all Percent Templated ISPs calculations.
Note: It is only necessary to calculate the Calibration Factor once for a particularinstrument, unless a problem is suspected.
• Qubit™ Easy Calculator Microsoft™ Excel™ Spreadsheet (Logging into the IonCommunity is required.)
• Qubit™ 2.0 Fluorometer with V3.10 firmware• USB drive containing the “.qbt” file• Qubit™ Assay Tubes (Part No. Q32856)• Ion Sphere™ Quality Control Kit (Cat. No. 4468656)
Download the Qubit™ Easy Calculator Microsoft™ Excel™ Spreadsheet file from: http://ioncommunity.thermofisher.com/community/products/pgm/ (Logging into the IonCommunity is required), and save the file to the computer used for Qubit™ 2.0Fluorometer data analysis.
Materials required
Download theQubit™ EasyCalculator
Appendix B Supplementary proceduresCalculate the Qubit™ 2.0 Fluorometer Calibration Factor B
Ion 520™ & Ion 530™ Kit − Chef User Guide 77
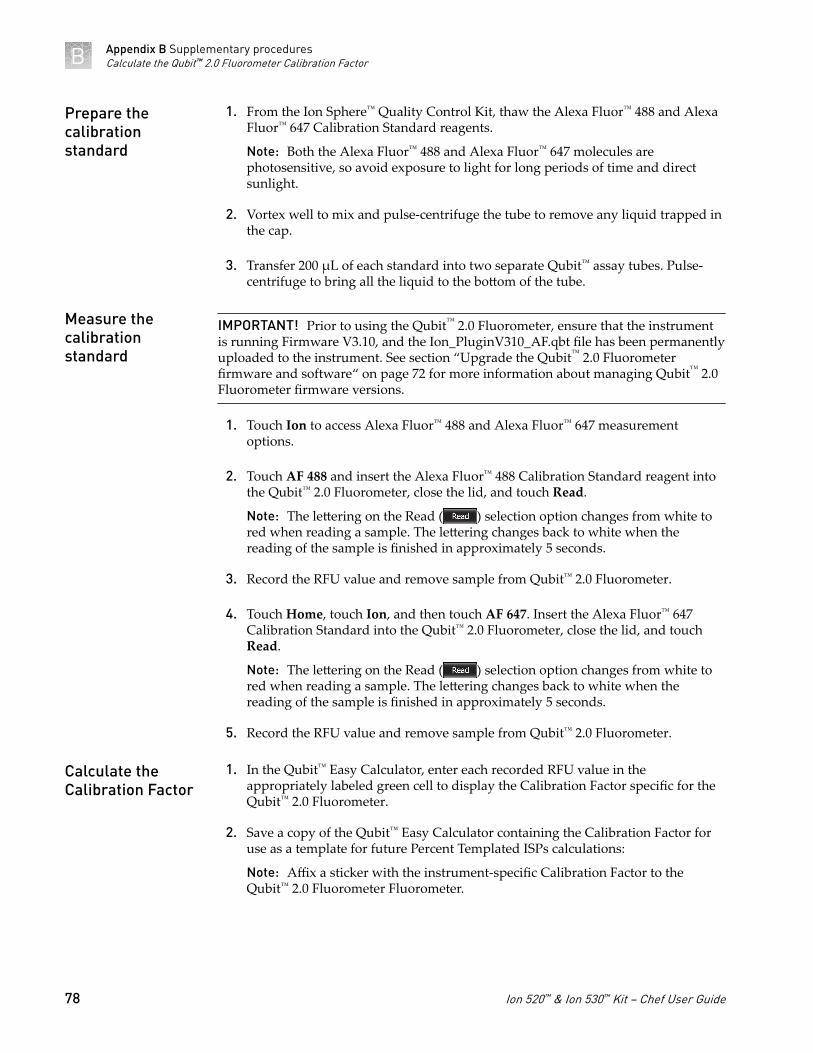
1. From the Ion Sphere™ Quality Control Kit, thaw the Alexa Fluor™ 488 and AlexaFluor™ 647 Calibration Standard reagents.
Note: Both the Alexa Fluor™ 488 and Alexa Fluor™ 647 molecules arephotosensitive, so avoid exposure to light for long periods of time and directsunlight.
2. Vortex well to mix and pulse-centrifuge the tube to remove any liquid trapped inthe cap.
3. Transfer 200 µL of each standard into two separate Qubit™ assay tubes. Pulse-centrifuge to bring all the liquid to the bottom of the tube.
IMPORTANT! Prior to using the Qubit™ 2.0 Fluorometer, ensure that the instrumentis running Firmware V3.10, and the Ion_PluginV310_AF.qbt file has been permanentlyuploaded to the instrument. See section “Upgrade the Qubit™ 2.0 Fluorometerfirmware and software“ on page 72 for more information about managing Qubit™ 2.0Fluorometer firmware versions.
1. Touch Ion to access Alexa Fluor™ 488 and Alexa Fluor™ 647 measurementoptions.
2. Touch AF 488 and insert the Alexa Fluor™ 488 Calibration Standard reagent intothe Qubit™ 2.0 Fluorometer, close the lid, and touch Read.
Note: The lettering on the Read ( ) selection option changes from white tored when reading a sample. The lettering changes back to white when thereading of the sample is finished in approximately 5 seconds.
3. Record the RFU value and remove sample from Qubit™ 2.0 Fluorometer.
4. Touch Home, touch Ion, and then touch AF 647. Insert the Alexa Fluor™ 647Calibration Standard into the Qubit™ 2.0 Fluorometer, close the lid, and touchRead.
Note: The lettering on the Read ( ) selection option changes from white tored when reading a sample. The lettering changes back to white when thereading of the sample is finished in approximately 5 seconds.
5. Record the RFU value and remove sample from Qubit™ 2.0 Fluorometer.
1. In the Qubit™ Easy Calculator, enter each recorded RFU value in theappropriately labeled green cell to display the Calibration Factor specific for theQubit™ 2.0 Fluorometer.
2. Save a copy of the Qubit™ Easy Calculator containing the Calibration Factor foruse as a template for future Percent Templated ISPs calculations:
Note: Affix a sticker with the instrument-specific Calibration Factor to theQubit™ 2.0 Fluorometer Fluorometer.
Prepare thecalibrationstandard
Measure thecalibrationstandard
Calculate theCalibration Factor
Appendix B Supplementary proceduresCalculate the Qubit™ 2.0 Fluorometer Calibration FactorB
78 Ion 520™ & Ion 530™ Kit − Chef User Guide
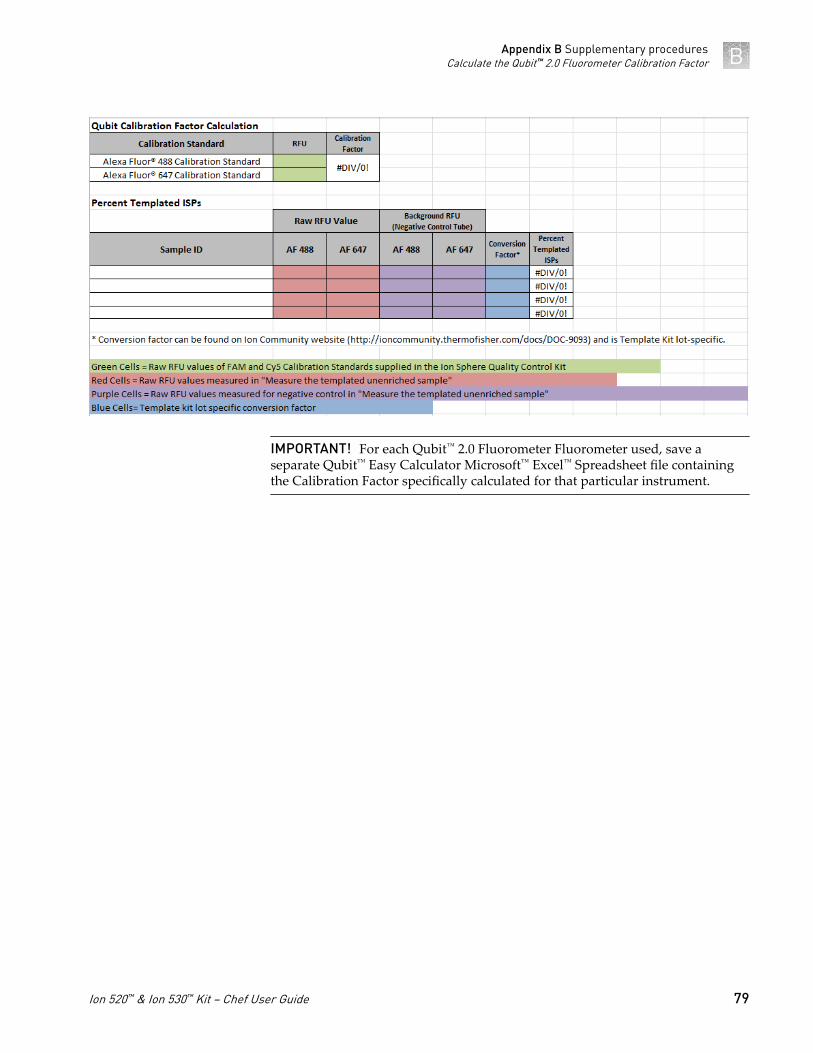
IMPORTANT! For each Qubit™ 2.0 Fluorometer Fluorometer used, save aseparate Qubit™ Easy Calculator Microsoft™ Excel™ Spreadsheet file containingthe Calibration Factor specifically calculated for that particular instrument.
Appendix B Supplementary proceduresCalculate the Qubit™ 2.0 Fluorometer Calibration Factor B
Ion 520™ & Ion 530™ Kit − Chef User Guide 79
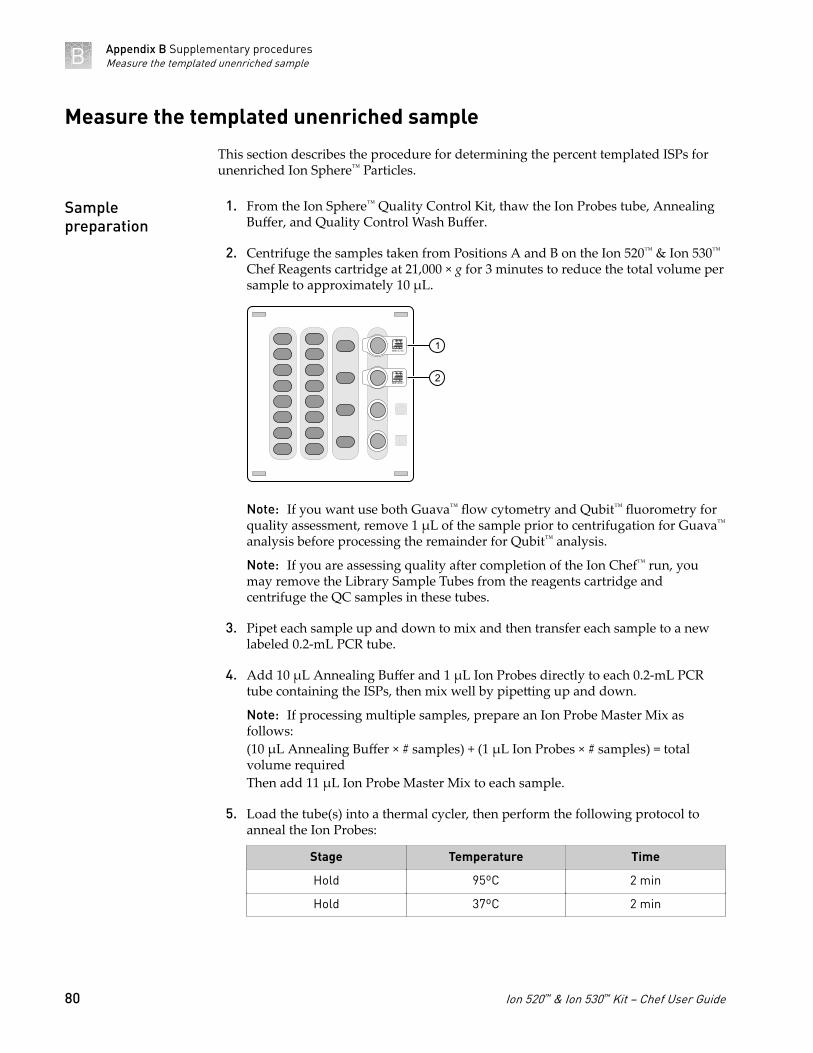
Measure the templated unenriched sample
This section describes the procedure for determining the percent templated ISPs forunenriched Ion Sphere™ Particles.
1. From the Ion Sphere™ Quality Control Kit, thaw the Ion Probes tube, AnnealingBuffer, and Quality Control Wash Buffer.
2. Centrifuge the samples taken from Positions A and B on the Ion 520™ & Ion 530™
Chef Reagents cartridge at 21,000 × g for 3 minutes to reduce the total volume persample to approximately 10 µL.
D
A
B
C
00012647
00012216
2
1
Note: If you want use both Guava™ flow cytometry and Qubit™ fluorometry forquality assessment, remove 1 µL of the sample prior to centrifugation for Guava™
analysis before processing the remainder for Qubit™ analysis.
Note: If you are assessing quality after completion of the Ion Chef™ run, youmay remove the Library Sample Tubes from the reagents cartridge andcentrifuge the QC samples in these tubes.
3. Pipet each sample up and down to mix and then transfer each sample to a newlabeled 0.2-mL PCR tube.
4. Add 10 µL Annealing Buffer and 1 µL Ion Probes directly to each 0.2-mL PCRtube containing the ISPs, then mix well by pipetting up and down.
Note: If processing multiple samples, prepare an Ion Probe Master Mix asfollows:(10 µL Annealing Buffer × # samples) + (1 µL Ion Probes × # samples) = totalvolume requiredThen add 11 µL Ion Probe Master Mix to each sample.
5. Load the tube(s) into a thermal cycler, then perform the following protocol toanneal the Ion Probes:
Stage Temperature Time
Hold 95ºC 2 min
Hold 37ºC 2 min
Samplepreparation
Appendix B Supplementary proceduresMeasure the templated unenriched sampleB
80 Ion 520™ & Ion 530™ Kit − Chef User Guide
6. Remove unbound probes by washing the sample(s) three times with 200 µL ofQuality Control Wash Buffer.
a. Add 200 µL of Quality Control Wash Buffer to the 0.2-mL tube(s).
b. Vortex to mix and centrifuge at 21,000 × g for 3 minutes.
c. Being careful not to disturb the pelleted ISPs, remove the supernatant andleave behind 10 µL.
Note: Compare to a 10 µL standard for reference.
d. Repeat substep a through substep c two times for a total of three QualityControl Wash Buffer washes.
7. After the final wash, add 190 µL of Quality Control Wash Buffer for a totalvolume of 200 µL, mix by pipetting up and down five times and transfer theentire sample to a Qubit™ assay tube.
IMPORTANT! Ensure that you measure the volumes accurately.
8. To generate a negative control, add 200 µL of Quality Control Wash Buffer to afresh Qubit™ assay tube.
9. Read the sample(s) as described below.
IMPORTANT! Prior to using the Qubit™ 2.0 Fluorometer, ensure that the instrumentis running Firmware V3.10, and the Ion_PluginV310_AF.qbt file has been permanentlyuploaded to the instrument. See section “Upgrade the Qubit™ 2.0 Fluorometerfirmware and software“ on page 72 for more information about managing Qubit™ 2.0Fluorometer firmware versions.
1. Power on the Qubit™ 2.0 Fluorometer.
2. Touch Ion to access Alexa Fluor™ 488 and Alexa Fluor™ 647 measurementoptions.
3. Touch AF 488 and insert the sample into the Qubit™ 2.0 Fluorometer, close thelid, and touch Read.
Note: The lettering on the Read ( ) selection option changes from white tored when reading a sample. The lettering changes back to white when thereading of the sample is finished in approximately 5 seconds.
Note: If more than one sample is being processed, all samples can be read withthe AF 488 setting before moving on to the AF 647 setting.
4. Record the value.
Note: The data retained on the Qubit™ 2.0 Fluorometer can be transferred to aUSB drive. See the “(Optional) Transfer the data to a USB Drive“ on page 82 fordetails. If more than one sample is being processed, all samples can be read withthe AF 488 setting before moving on to the AF 647 setting.
Measure thesample
Appendix B Supplementary proceduresMeasure the templated unenriched sample B
Ion 520™ & Ion 530™ Kit − Chef User Guide 81
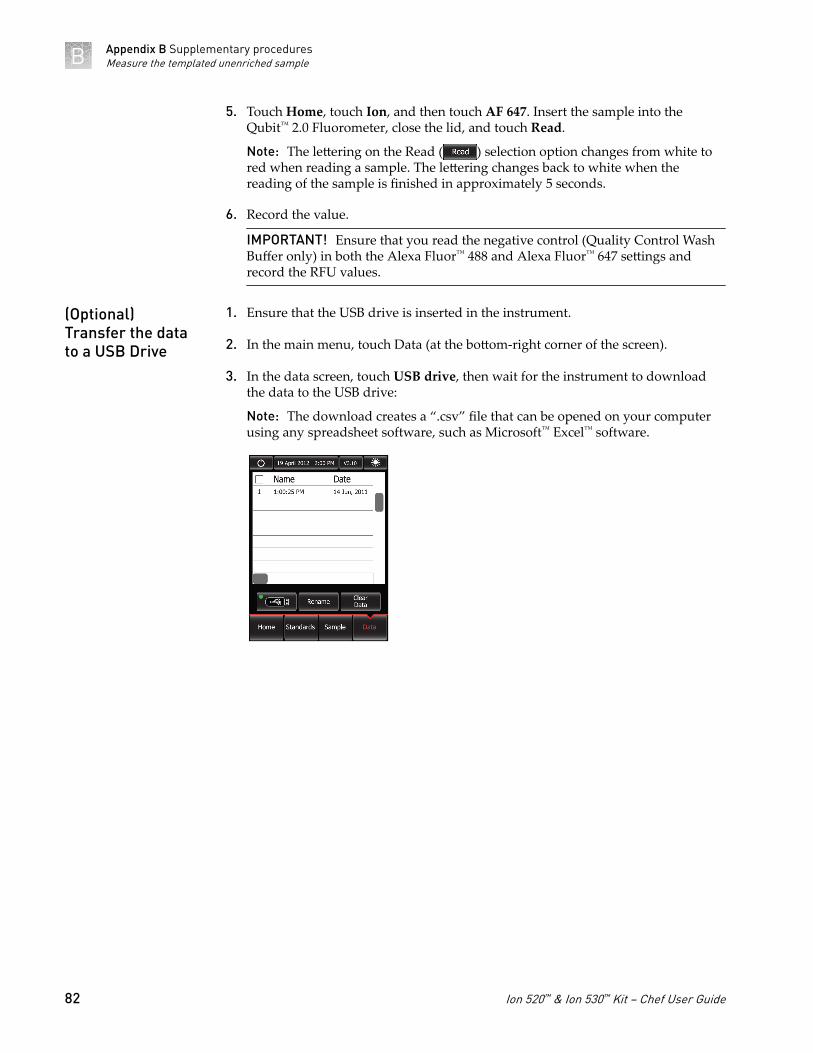
5. Touch Home, touch Ion, and then touch AF 647. Insert the sample into theQubit™ 2.0 Fluorometer, close the lid, and touch Read.
Note: The lettering on the Read ( ) selection option changes from white tored when reading a sample. The lettering changes back to white when thereading of the sample is finished in approximately 5 seconds.
6. Record the value.
IMPORTANT! Ensure that you read the negative control (Quality Control WashBuffer only) in both the Alexa Fluor™ 488 and Alexa Fluor™ 647 settings andrecord the RFU values.
1. Ensure that the USB drive is inserted in the instrument.
2. In the main menu, touch Data (at the bottom-right corner of the screen).
3. In the data screen, touch USB drive, then wait for the instrument to downloadthe data to the USB drive:
Note: The download creates a “.csv” file that can be opened on your computerusing any spreadsheet software, such as Microsoft™ Excel™ software.
(Optional)Transfer the datato a USB Drive
Appendix B Supplementary proceduresMeasure the templated unenriched sampleB
82 Ion 520™ & Ion 530™ Kit − Chef User Guide
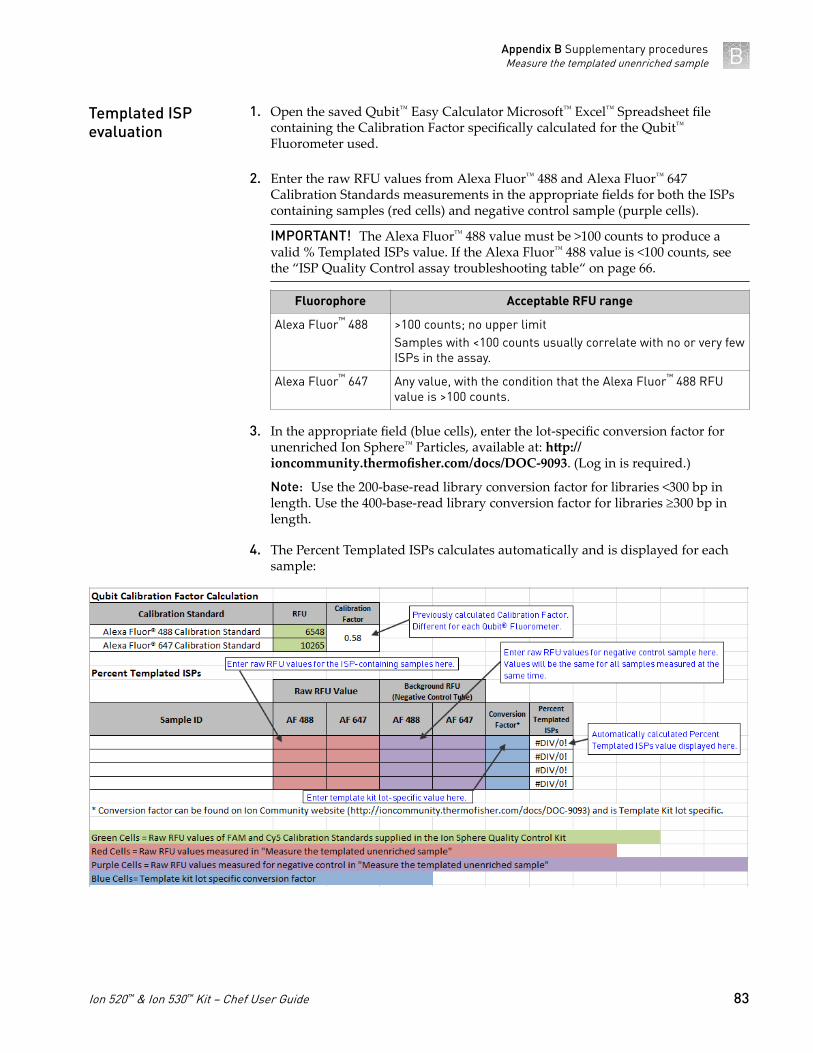
1. Open the saved Qubit™ Easy Calculator Microsoft™ Excel™ Spreadsheet filecontaining the Calibration Factor specifically calculated for the Qubit™
Fluorometer used.
2. Enter the raw RFU values from Alexa Fluor™ 488 and Alexa Fluor™ 647Calibration Standards measurements in the appropriate fields for both the ISPscontaining samples (red cells) and negative control sample (purple cells).
IMPORTANT! The Alexa Fluor™ 488 value must be >100 counts to produce avalid % Templated ISPs value. If the Alexa Fluor™ 488 value is <100 counts, seethe “ISP Quality Control assay troubleshooting table“ on page 66.
Fluorophore Acceptable RFU range
Alexa Fluor™ 488 >100 counts; no upper limitSamples with <100 counts usually correlate with no or very fewISPs in the assay.
Alexa Fluor™ 647 Any value, with the condition that the Alexa Fluor™ 488 RFUvalue is >100 counts.
3. In the appropriate field (blue cells), enter the lot-specific conversion factor forunenriched Ion Sphere™ Particles, available at: http://ioncommunity.thermofisher.com/docs/DOC-9093. (Log in is required.)
Note: Use the 200-base-read library conversion factor for libraries <300 bp inlength. Use the 400-base-read library conversion factor for libraries ³300 bp inlength.
4. The Percent Templated ISPs calculates automatically and is displayed for eachsample:
Templated ISPevaluation
Appendix B Supplementary proceduresMeasure the templated unenriched sample B
Ion 520™ & Ion 530™ Kit − Chef User Guide 83
Section B.4 Quality control using the Qubit™ 3.0FluorometerThe Qubit™ 3.0 Fluorometer features a pre-loaded Ion Sphere™ quality control assayfor determining the percentage of templated ISPs. As with the Qubit™ 2.0Fluorometer, a unique instrument-specific Calibration Factor must be calculated andapplied to all percent templated ISP calculations.
Materials required
• Qubit™ 3.0 Fluorometer (Cat. No. Q33216)• Qubit™ Assay Tubes (Cat. No. Q32856)• PCR tubes, 0.2 mL (Axygen™ Maxymum Recovery PCR Tube; Fisher Scientific
Cat. No. 14-222-283, or equivalent)• Qubit™ Easy Calculator Microsoft™ Excel™ Spreadsheet file containing theinstrument-specific Calibration Factor
• Ion Sphere™ Quality Control Kit (Cat. No. 4468656)• Unenriched ISPs• GeneAmp™ PCR System 9700 thermal cycler (Cat. No. N8050200), or equivalent
Calculate the Qubit™ 3.0 Fluorometer Calibration Factor
This section describes the procedure to determine the Qubit™ 3.0 Fluorometerinstrument-specific Calibration Factor.
Note: It is only necessary to calculate the Calibration Factor once for a particularinstrument, unless a problem is suspected.
Download the Qubit™ Easy Calculator Microsoft™ Excel™ Spreadsheet file from: http://ioncommunity.thermofisher.com/community/products/pgm (Logging into the IonCommunity is required), and save the file to the computer used for Qubit™ 3.0Fluorometer data analysis.
1. From the Ion Sphere™ Quality Control Kit, thaw the Alexa Fluor™ 488 and AlexaFluor™ 647 Calibration Standard reagents.
Note: Both the Alexa Fluor™ 488 and Alexa Fluor™ 647 molecules arephotosensitive, so avoid exposure to light for long periods of time and directsunlight.
2. Vortex well to mix and pulse-centrifuge the tube to remove any liquid trapped inthe cap.
3. Transfer 200 µL of each standard into two separate Qubit™ assay tubes. Pulse-centrifuge to bring all the liquid to the bottom of the tube.
Download theQubit™ EasyCalculator
Prepare thecalibrationstandard
Appendix B Supplementary proceduresMaterials requiredB
84 Ion 520™ & Ion 530™ Kit − Chef User Guide
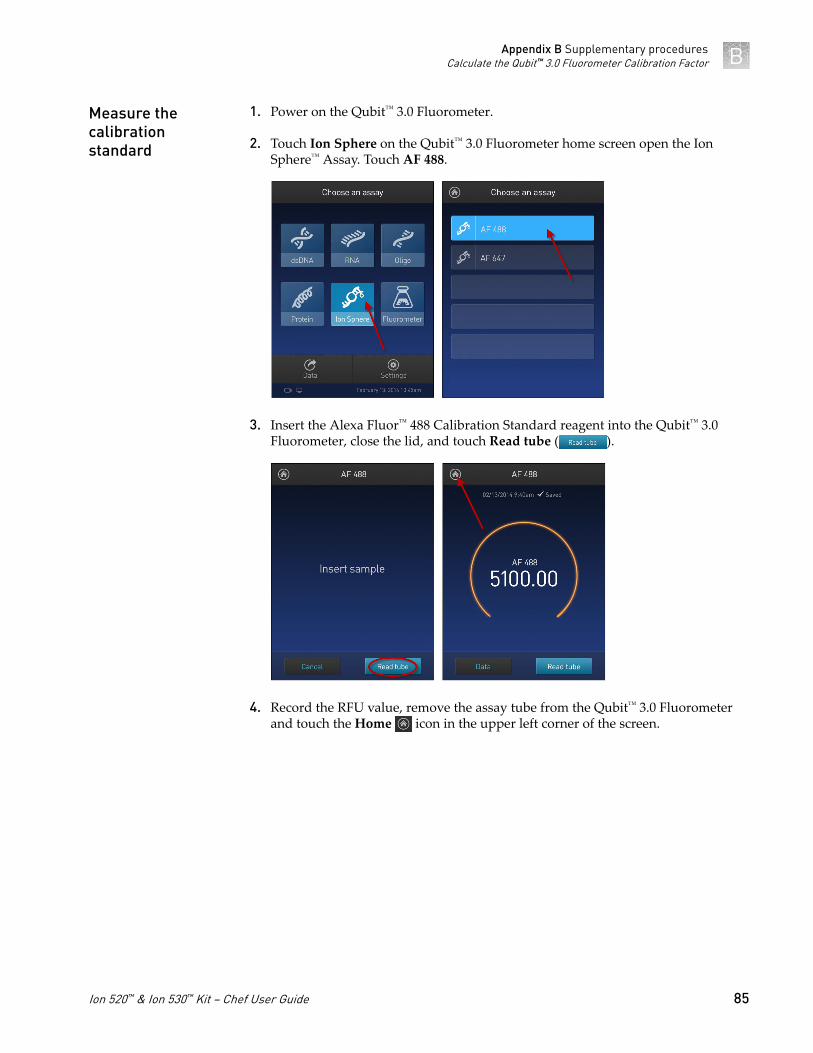
1. Power on the Qubit™ 3.0 Fluorometer.
2. Touch Ion Sphere on the Qubit™ 3.0 Fluorometer home screen open the IonSphere™ Assay. Touch AF 488.
3. Insert the Alexa Fluor™ 488 Calibration Standard reagent into the Qubit™ 3.0Fluorometer, close the lid, and touch Read tube ( ).
4. Record the RFU value, remove the assay tube from the Qubit™ 3.0 Fluorometerand touch the Home icon in the upper left corner of the screen.
Measure thecalibrationstandard
Appendix B Supplementary proceduresCalculate the Qubit™ 3.0 Fluorometer Calibration Factor B
Ion 520™ & Ion 530™ Kit − Chef User Guide 85
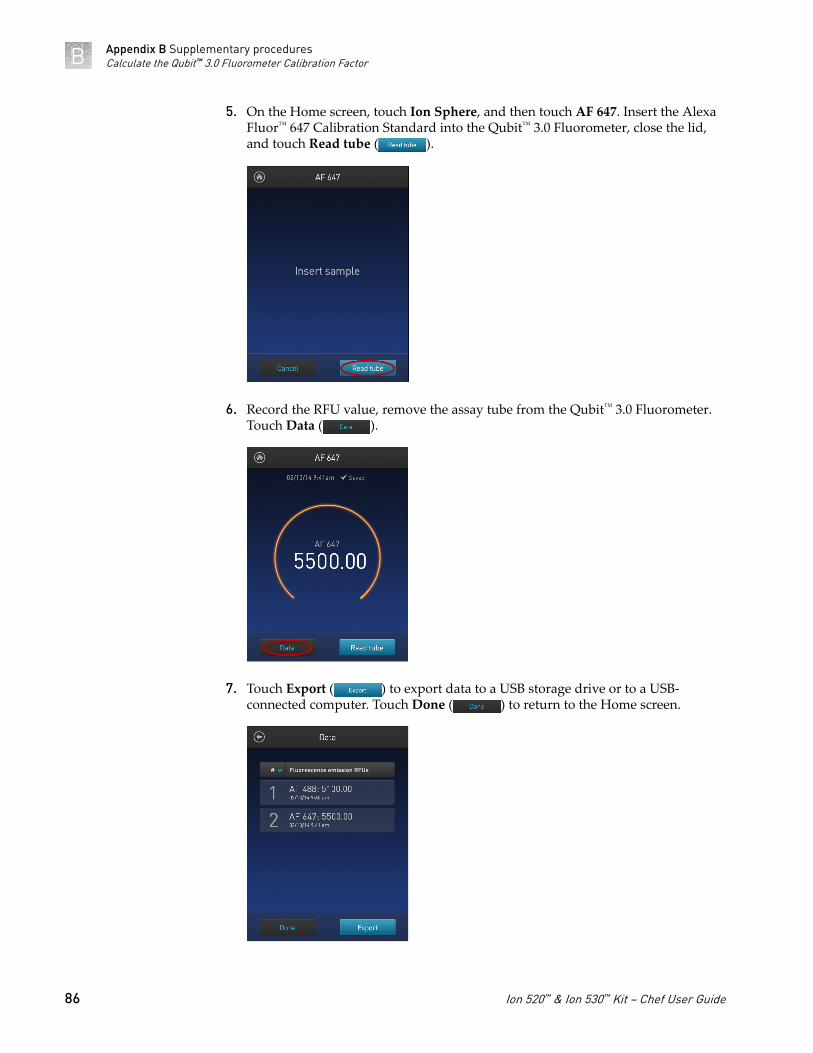
5. On the Home screen, touch Ion Sphere, and then touch AF 647. Insert the AlexaFluor™ 647 Calibration Standard into the Qubit™ 3.0 Fluorometer, close the lid,and touch Read tube ( ).
6. Record the RFU value, remove the assay tube from the Qubit™ 3.0 Fluorometer.Touch Data ( ).
7. Touch Export ( ) to export data to a USB storage drive or to a USB-connected computer. Touch Done ( ) to return to the Home screen.
Appendix B Supplementary proceduresCalculate the Qubit™ 3.0 Fluorometer Calibration FactorB
86 Ion 520™ & Ion 530™ Kit − Chef User Guide
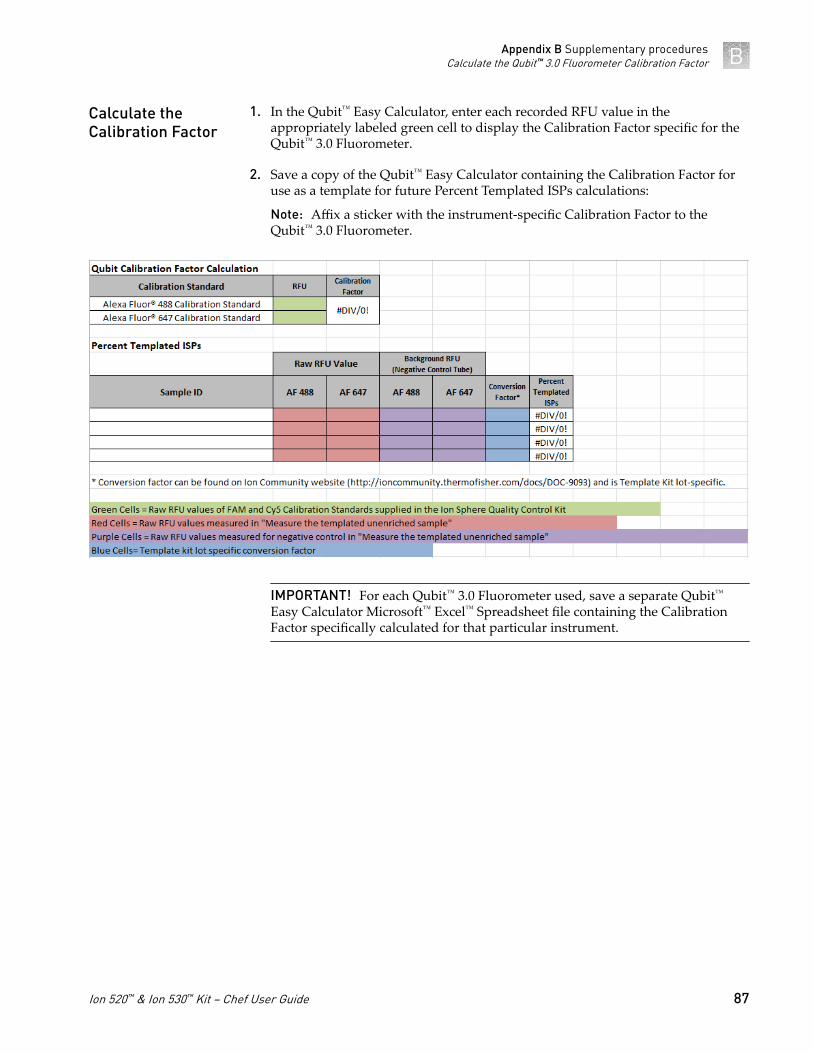
1. In the Qubit™ Easy Calculator, enter each recorded RFU value in theappropriately labeled green cell to display the Calibration Factor specific for theQubit™ 3.0 Fluorometer.
2. Save a copy of the Qubit™ Easy Calculator containing the Calibration Factor foruse as a template for future Percent Templated ISPs calculations:
Note: Affix a sticker with the instrument-specific Calibration Factor to theQubit™ 3.0 Fluorometer.
IMPORTANT! For each Qubit™ 3.0 Fluorometer used, save a separate Qubit™
Easy Calculator Microsoft™ Excel™ Spreadsheet file containing the CalibrationFactor specifically calculated for that particular instrument.
Calculate theCalibration Factor
Appendix B Supplementary proceduresCalculate the Qubit™ 3.0 Fluorometer Calibration Factor B
Ion 520™ & Ion 530™ Kit − Chef User Guide 87

Measure the templated unenriched sample
This section describes the procedure for determining the percent templated ISPs forunenriched Ion Sphere™ Particles.
1. From the Ion Sphere™ Quality Control Kit, thaw the Ion Probes tube, AnnealingBuffer, and Quality Control Wash Buffer.
2. Centrifuge the samples taken from Positions A and B on the Ion 520™ & Ion 530™
Chef Reagents cartridge at 21,000 × g for 3 minutes to reduce the total volume persample to approximately 10 µL.
D
A
B
C
00012647
00012216
2
1
Note: If you want use both Guava™ flow cytometry and Qubit™ fluorometry forquality assessment, remove 1 µL of the sample prior to centrifugation for Guava™
analysis before processing the remainder for Qubit™ analysis.
Note: If you are assessing quality after completion of the Ion Chef™ run, youmay remove the Library Sample Tubes from the reagents cartridge andcentrifuge the QC samples in these tubes.
3. Pipet each sample up and down to mix and then transfer each sample to a newlabeled 0.2-mL PCR tube.
4. Add 10 µL Annealing Buffer and 1 µL Ion Probes directly to each 0.2-mL PCRtube containing the ISPs, then mix well by pipetting up and down.
Note: If processing multiple samples, prepare an Ion Probe Master Mix asfollows:(10 µL Annealing Buffer × # samples) + (1 µL Ion Probes × # samples) = totalvolume requiredThen add 11 µL Ion Probe Master Mix to each sample.
5. Load the tube(s) into a thermal cycler, then perform the following protocol toanneal the Ion Probes:
Stage Temperature Time
Hold 95ºC 2 min
Hold 37ºC 2 min
Samplepreparation
Appendix B Supplementary proceduresMeasure the templated unenriched sampleB
88 Ion 520™ & Ion 530™ Kit − Chef User Guide
6. Remove unbound probes by washing the sample(s) three times with 200 µL ofQuality Control Wash Buffer.
a. Add 200 µL of Quality Control Wash Buffer to the 0.2-mL tube(s).
b. Vortex to mix and centrifuge at 21,000 × g for 3 minutes.
c. Being careful not to disturb the pelleted ISPs, remove the supernatant andleave behind 10 µL.
Note: Compare to a 10 µL standard for reference.
d. Repeat substep a through substep c two times for a total of three QualityControl Wash Buffer washes.
7. After the final wash, add 190 µL of Quality Control Wash Buffer for a totalvolume of 200 µL, mix by pipetting up and down five times and transfer theentire sample to a Qubit™ assay tube.
IMPORTANT! Ensure that you measure the volumes accurately.
8. To generate a negative control, add 200 µL of Quality Control Wash Buffer to afresh Qubit™ assay tube.
9. Read the sample(s) as described below.
1. Power on the Qubit™ 3.0 Fluorometer.
2. Touch Ion Sphere to access Alexa Fluor™ 488 and Alexa Fluor™ 647 measurementoptions.
3. Touch AF 488 and insert the sample into the Qubit™ 3.0 Fluorometer, close thelid, and touch Read tube.
Note: If more than one sample is being processed, all samples can be read withthe AF 488 setting before moving on to the AF 647 setting.
4. Record the value.
Note: The data retained on the Qubit™ 3.0 Fluorometer can be transferred to aUSB drive. See the “(Optional) Transfer the data to a USB Drive“ for details. Ifmore than one sample is being processed, all samples can be read with theAF 488 setting before moving on to the AF 647 setting.
5. Touch Home, touch Ion Sphere, and then touch AF 647. Insert the sample intothe Qubit™ 3.0 Fluorometer, close the lid, and touch Read tube.
6. Record the value.
IMPORTANT! Ensure that you read the negative control (Quality Control WashBuffer only) in both the Alexa Fluor™ 488 and Alexa Fluor™ 647 settings andrecord the RFU values.
Measure thesample
Appendix B Supplementary proceduresMeasure the templated unenriched sample B
Ion 520™ & Ion 530™ Kit − Chef User Guide 89
1. Ensure that the USB drive is inserted in the instrument, or a computer isconnected by USB cable.
2. On the Home screen, touch Data (at the bottom-left of the screen).
3. On the Data screen, touch Export, then wait for the instrument to download thedata to the USB drive or computer.
Note: The download creates a “.csv” file that can be opened on your computerusing any spreadsheet software, such as Microsoft™ Excel™ software.
1. Open the saved Qubit™ Easy Calculator Microsoft™ Excel™ Spreadsheet filecontaining the Calibration Factor specifically calculated for the Qubit™
Fluorometer used.
2. Enter the raw RFU values from Alexa Fluor™ 488 and Alexa Fluor™ 647Calibration Standards measurements in the appropriate fields for both the ISPscontaining samples (red cells) and negative control sample (purple cells).
IMPORTANT! The Alexa Fluor™ 488 value must be >100 counts to produce avalid % Templated ISPs value. If the Alexa Fluor™ 488 value is <100 counts, seethe “ISP Quality Control assay troubleshooting table“ on page 66.
Fluorophore Acceptable RFU range
Alexa Fluor™ 488 >100 counts; no upper limitSamples with <100 counts usually correlate with no or very fewISPs in the assay.
Alexa Fluor™ 647 Any value, with the condition that the Alexa Fluor™ 488 RFUvalue is >100 counts.
3. In the appropriate field (blue cells), enter the lot-specific conversion factor forunenriched Ion Sphere™ Particles, available at: http://ioncommunity.thermofisher.com/docs/DOC-9093. (Log in is required.)
Note: Use the 200-base-read library conversion factor for libraries <300 bp inlength. Use the 400-base-read library conversion factor for libraries ³300 bp inlength.
(Optional)Transfer the datato a USB Drive
Templated ISPevaluation
Appendix B Supplementary proceduresMeasure the templated unenriched sampleB
90 Ion 520™ & Ion 530™ Kit − Chef User Guide
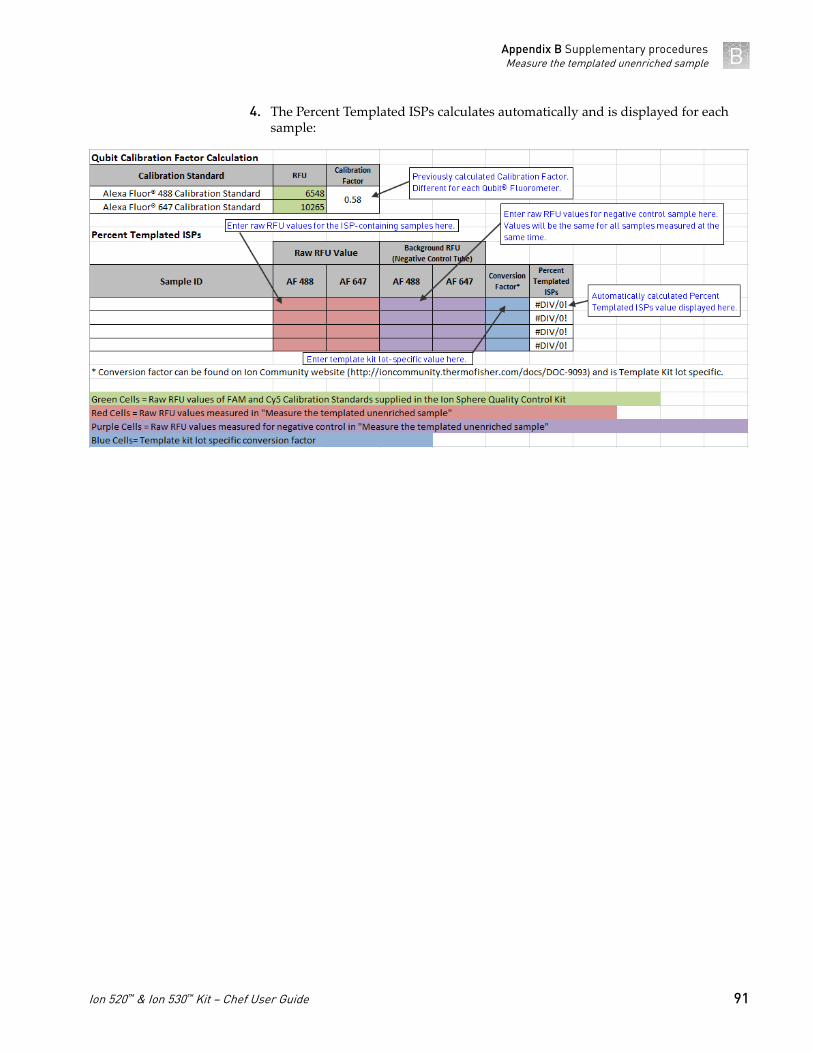
4. The Percent Templated ISPs calculates automatically and is displayed for eachsample:
Appendix B Supplementary proceduresMeasure the templated unenriched sample B
Ion 520™ & Ion 530™ Kit − Chef User Guide 91
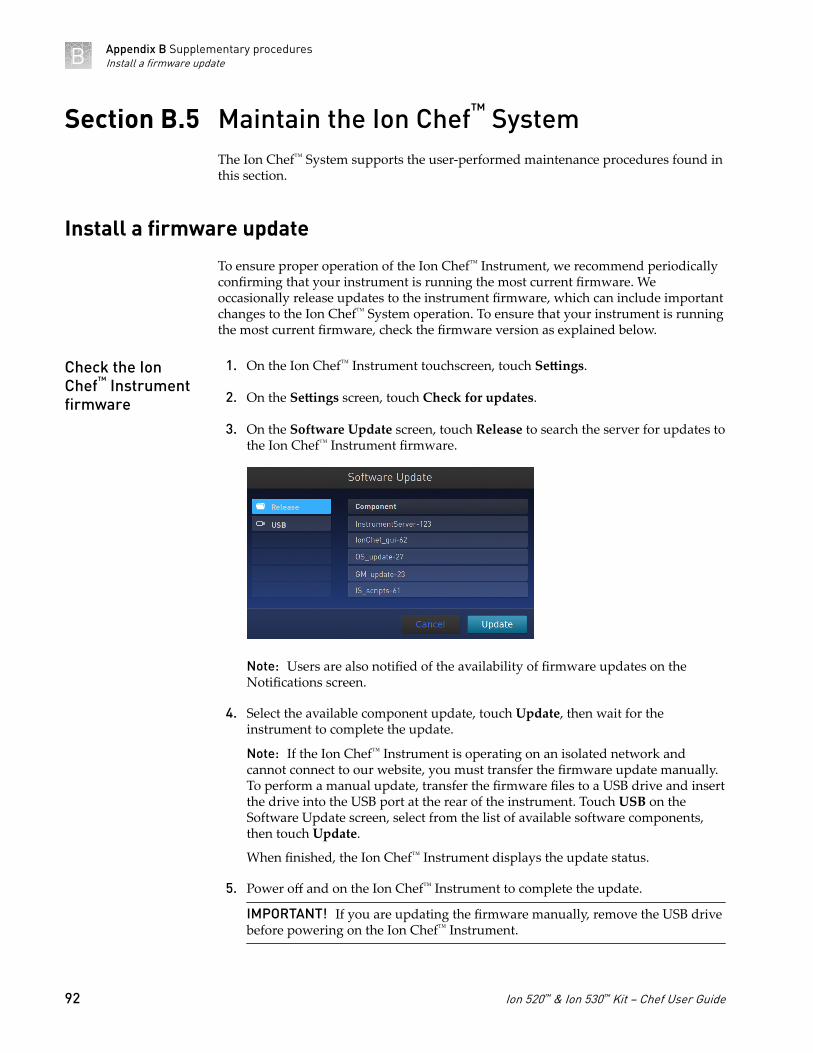
Section B.5 Maintain the Ion Chef™ SystemThe Ion Chef™ System supports the user-performed maintenance procedures found inthis section.
Install a firmware update
To ensure proper operation of the Ion Chef™ Instrument, we recommend periodicallyconfirming that your instrument is running the most current firmware. Weoccasionally release updates to the instrument firmware, which can include importantchanges to the Ion Chef™ System operation. To ensure that your instrument is runningthe most current firmware, check the firmware version as explained below.
1. On the Ion Chef™ Instrument touchscreen, touch Settings.
2. On the Settings screen, touch Check for updates.
3. On the Software Update screen, touch Release to search the server for updates tothe Ion Chef™ Instrument firmware.
Note: Users are also notified of the availability of firmware updates on theNotifications screen.
4. Select the available component update, touch Update, then wait for theinstrument to complete the update.
Note: If the Ion Chef™ Instrument is operating on an isolated network andcannot connect to our website, you must transfer the firmware update manually.To perform a manual update, transfer the firmware files to a USB drive and insertthe drive into the USB port at the rear of the instrument. Touch USB on theSoftware Update screen, select from the list of available software components,then touch Update.
When finished, the Ion Chef™ Instrument displays the update status.
5. Power off and on the Ion Chef™ Instrument to complete the update.
IMPORTANT! If you are updating the firmware manually, remove the USB drivebefore powering on the Ion Chef™ Instrument.
Check the IonChef™ Instrumentfirmware
Appendix B Supplementary proceduresInstall a firmware updateB
92 Ion 520™ & Ion 530™ Kit − Chef User Guide
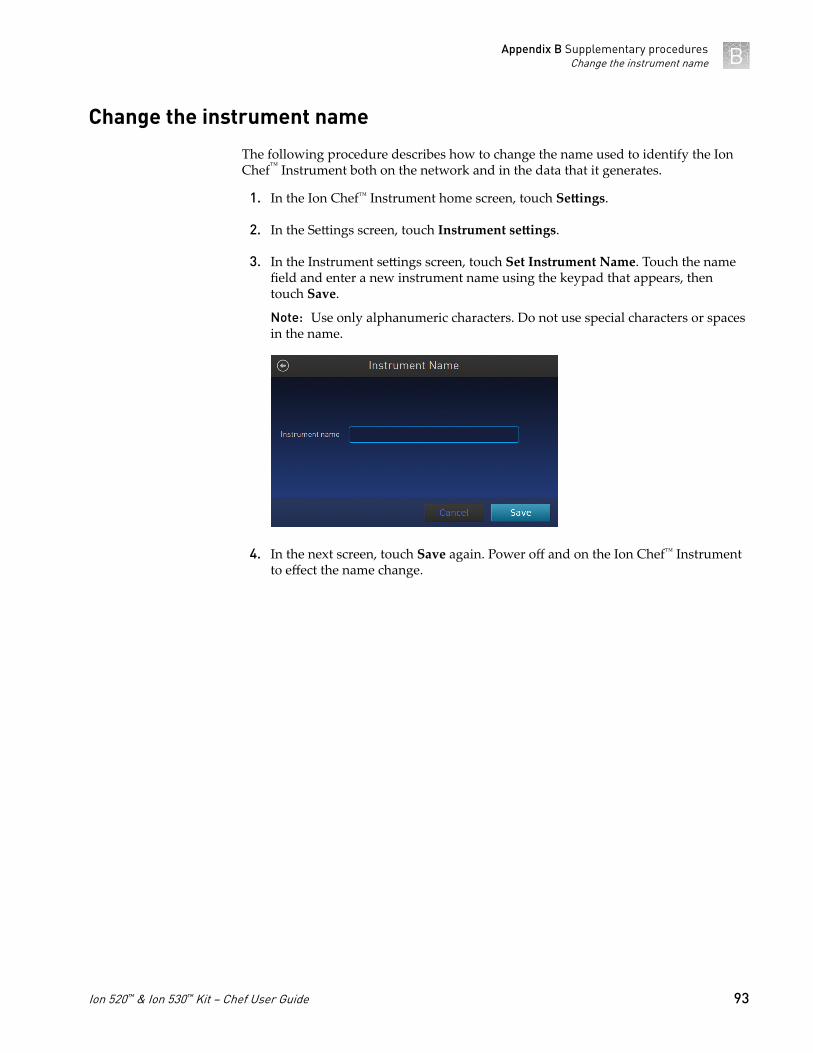
Change the instrument name
The following procedure describes how to change the name used to identify the IonChef™ Instrument both on the network and in the data that it generates.
1. In the Ion Chef™ Instrument home screen, touch Settings.
2. In the Settings screen, touch Instrument settings.
3. In the Instrument settings screen, touch Set Instrument Name. Touch the namefield and enter a new instrument name using the keypad that appears, thentouch Save.
Note: Use only alphanumeric characters. Do not use special characters or spacesin the name.
4. In the next screen, touch Save again. Power off and on the Ion Chef™ Instrumentto effect the name change.
Appendix B Supplementary proceduresChange the instrument name B
Ion 520™ & Ion 530™ Kit − Chef User Guide 93
Ion Chef™ and Torrent Servernetwork setup
■ Networking overview . . . . . . . . . . . . . . . . . . . . . . . . . . . . . . . . . . . . . . . . . . . . . . . . . 94
■ Ion Chef™ Networking Configuration Options . . . . . . . . . . . . . . . . . . . . . . . . . . . 99
■ Editing the Torrent Server firewall tables to allow the LAN port IP . . . . . . . . 103
■ Enable Planned Run sharing among Torrent Servers . . . . . . . . . . . . . . . . . . . . . 105
■ Transfer a Planned Run . . . . . . . . . . . . . . . . . . . . . . . . . . . . . . . . . . . . . . . . . . . . . . 107
■ Undo a Planned Run transfer (administrator) . . . . . . . . . . . . . . . . . . . . . . . . . . . 109
■ Undo a Planned Run transfer (user) . . . . . . . . . . . . . . . . . . . . . . . . . . . . . . . . . . . . 109
Networking overview
If you are preparing a laboratory for use with new Ion instruments, refer to therespective site preparation and safety guides. If you currently have an Ion Chef™
instrument configured in your laboratory to communicate to more than one TorrentServer, Torrent Suite™ Software v4.4 or later requires the configuration of theIon Chef™ instrument to communicate with one primary Torrent Server. Afterupgrading to Torrent Suite™ Software v4.4 or later, follow the guidelines in thisdocument to configure the instrument to communicate with a primary Torrent Server.From that Torrent Server, the new Planned Run sharing option can be used to targetadditional Torrent Servers if needed.
Networking with the Torrent Server running Torrent Suite™ Assay DevelopmentSoftware and the Ion PGM™ Dx System requires v5.0 or later. The Ion Chef™ will notconnect to the Ion PGM™ Dx in IVD mode.
If you need to connect a Torrent Server to the network for the first time, see theTorrent Server networking requirements in the site prep and safety guide for therespective sequencer.
This guide describes how to:• Set up the Ion Chef™ instrument to talk to the Torrent Server on a local area
network (LAN).• Enable Planned Run sharing.
C
94 Ion 520™ & Ion 530™ Kit − Chef User Guide
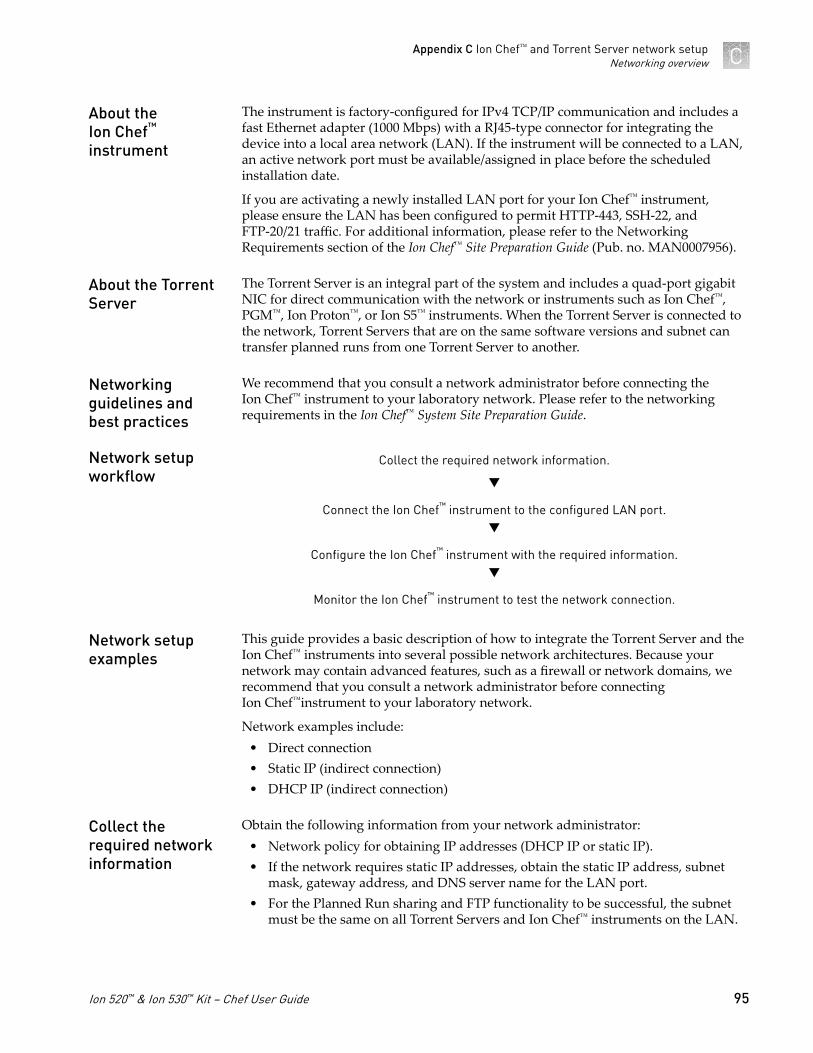
The instrument is factory-configured for IPv4 TCP/IP communication and includes afast Ethernet adapter (1000 Mbps) with a RJ45-type connector for integrating thedevice into a local area network (LAN). If the instrument will be connected to a LAN,an active network port must be available/assigned in place before the scheduledinstallation date.
If you are activating a newly installed LAN port for your Ion Chef™ instrument,please ensure the LAN has been configured to permit HTTP-443, SSH-22, andFTP-20/21 traffic. For additional information, please refer to the NetworkingRequirements section of the Ion Chef™ Site Preparation Guide (Pub. no. MAN0007956).
The Torrent Server is an integral part of the system and includes a quad-port gigabitNIC for direct communication with the network or instruments such as Ion Chef™,PGM™, Ion Proton™, or Ion S5™ instruments. When the Torrent Server is connected tothe network, Torrent Servers that are on the same software versions and subnet cantransfer planned runs from one Torrent Server to another.
We recommend that you consult a network administrator before connecting theIon Chef™ instrument to your laboratory network. Please refer to the networkingrequirements in the Ion Chef™ System Site Preparation Guide.
Collect the required network information.
q
Connect the Ion Chef™ instrument to the configured LAN port.q
Configure the Ion Chef™ instrument with the required information.q
Monitor the Ion Chef™ instrument to test the network connection.
This guide provides a basic description of how to integrate the Torrent Server and theIon Chef™ instruments into several possible network architectures. Because yournetwork may contain advanced features, such as a firewall or network domains, werecommend that you consult a network administrator before connectingIon Chef™instrument to your laboratory network.
Network examples include:• Direct connection• Static IP (indirect connection)• DHCP IP (indirect connection)
Obtain the following information from your network administrator:• Network policy for obtaining IP addresses (DHCP IP or static IP).• If the network requires static IP addresses, obtain the static IP address, subnet
mask, gateway address, and DNS server name for the LAN port.• For the Planned Run sharing and FTP functionality to be successful, the subnet
must be the same on all Torrent Servers and Ion Chef™ instruments on the LAN.
About theIon Chef™
instrument
About the TorrentServer
Networkingguidelines andbest practices
Network setupworkflow
Network setupexamples
Collect therequired networkinformation
Appendix C Ion Chef™ and Torrent Server network setupNetworking overview C
Ion 520™ & Ion 530™ Kit − Chef User Guide 95
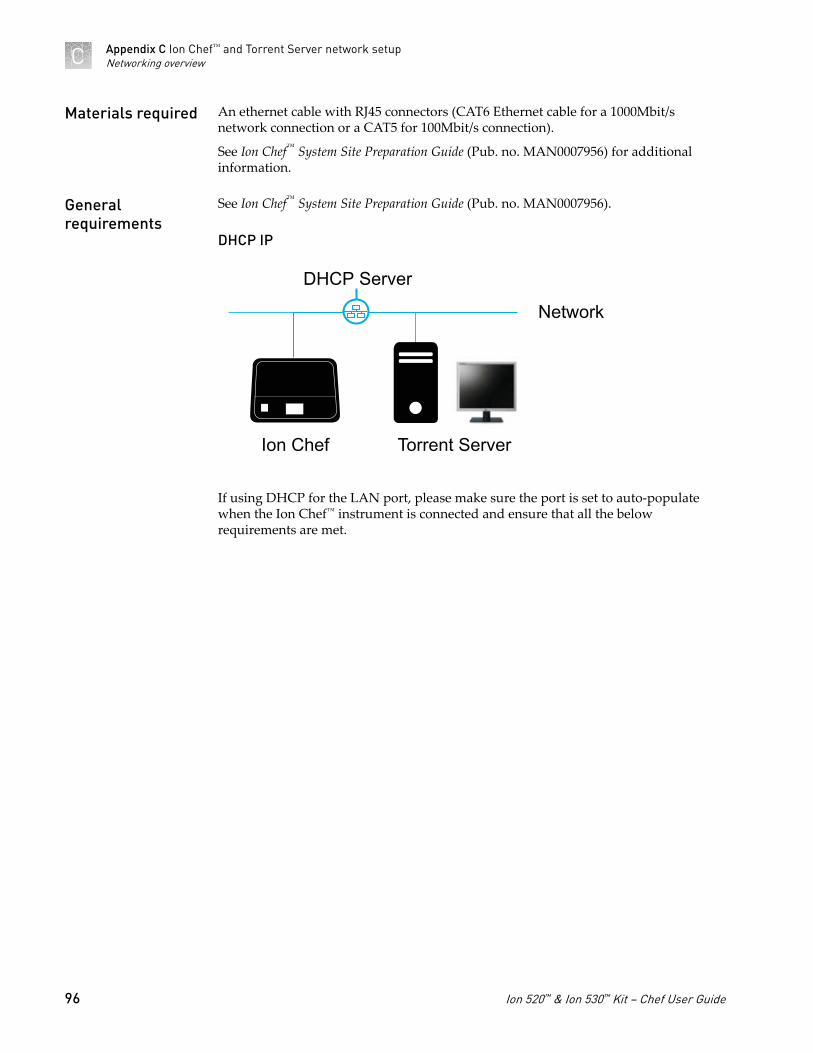
An ethernet cable with RJ45 connectors (CAT6 Ethernet cable for a 1000Mbit/snetwork connection or a CAT5 for 100Mbit/s connection).
See Ion Chef™ System Site Preparation Guide (Pub. no. MAN0007956) for additionalinformation.
See Ion Chef™ System Site Preparation Guide (Pub. no. MAN0007956).
DHCP IP
Ion Chef
Network
DHCP Server
Torrent Server
If using DHCP for the LAN port, please make sure the port is set to auto-populatewhen the Ion Chef™ instrument is connected and ensure that all the belowrequirements are met.
Materials required
Generalrequirements
Appendix C Ion Chef™ and Torrent Server network setupNetworking overviewC
96 Ion 520™ & Ion 530™ Kit − Chef User Guide
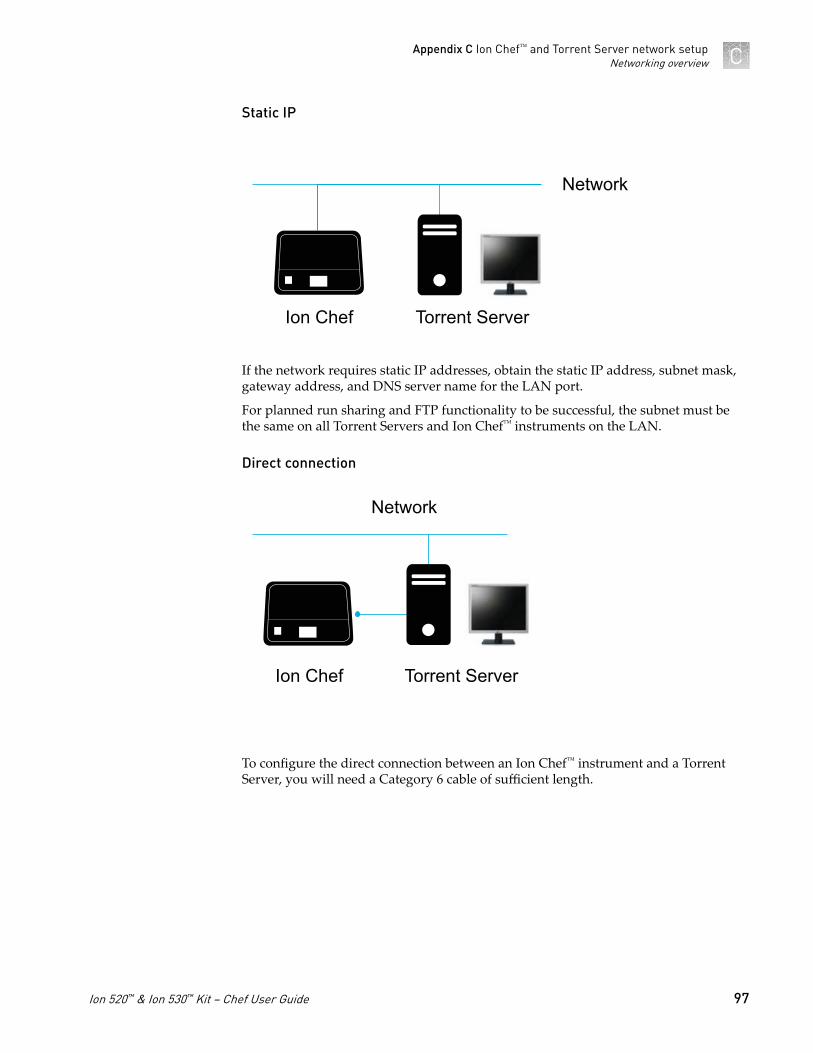
Static IP
Ion Chef
Network
Torrent Server
If the network requires static IP addresses, obtain the static IP address, subnet mask,gateway address, and DNS server name for the LAN port.
For planned run sharing and FTP functionality to be successful, the subnet must bethe same on all Torrent Servers and Ion Chef™ instruments on the LAN.
Direct connection
Ion Chef
Network
Torrent Server
To configure the direct connection between an Ion Chef™ instrument and a TorrentServer, you will need a Category 6 cable of sufficient length.
Appendix C Ion Chef™ and Torrent Server network setupNetworking overview C
Ion 520™ & Ion 530™ Kit − Chef User Guide 97
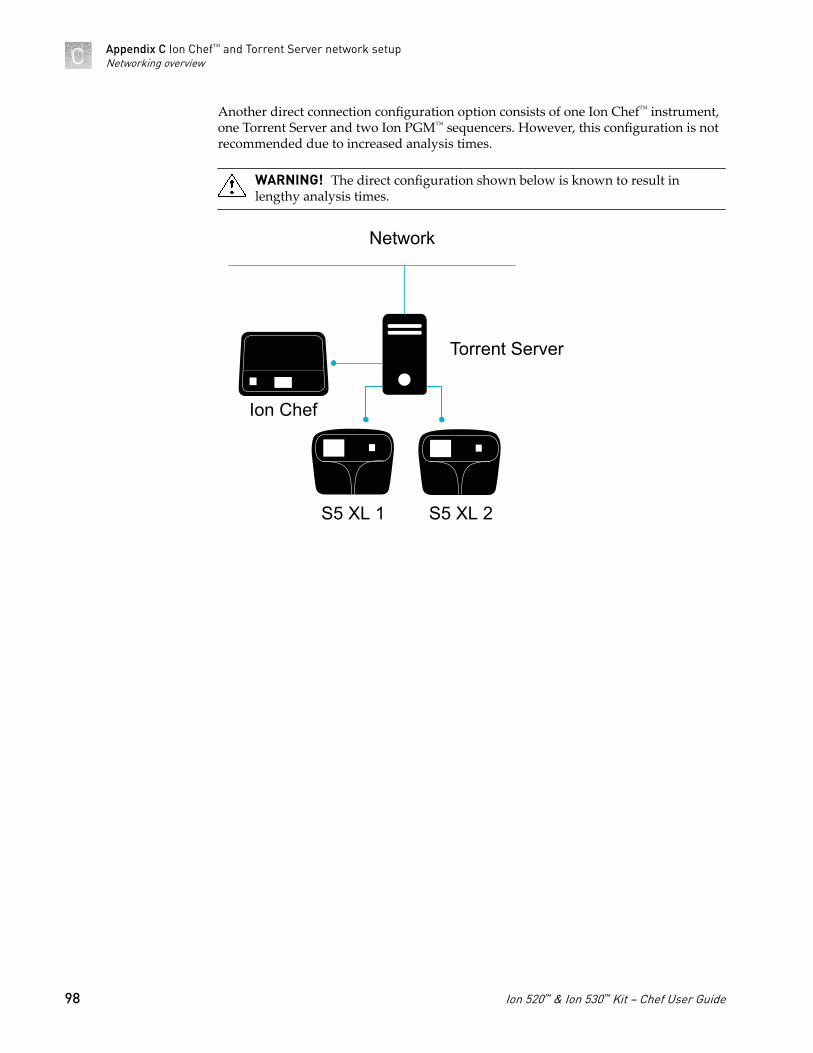
Another direct connection configuration option consists of one Ion Chef™ instrument,one Torrent Server and two Ion PGM™ sequencers. However, this configuration is notrecommended due to increased analysis times.
WARNING! The direct configuration shown below is known to result inlengthy analysis times.
Ion Chef
Network
Torrent Server
S5 XL 1 S5 XL 2
Appendix C Ion Chef™ and Torrent Server network setupNetworking overviewC
98 Ion 520™ & Ion 530™ Kit − Chef User Guide
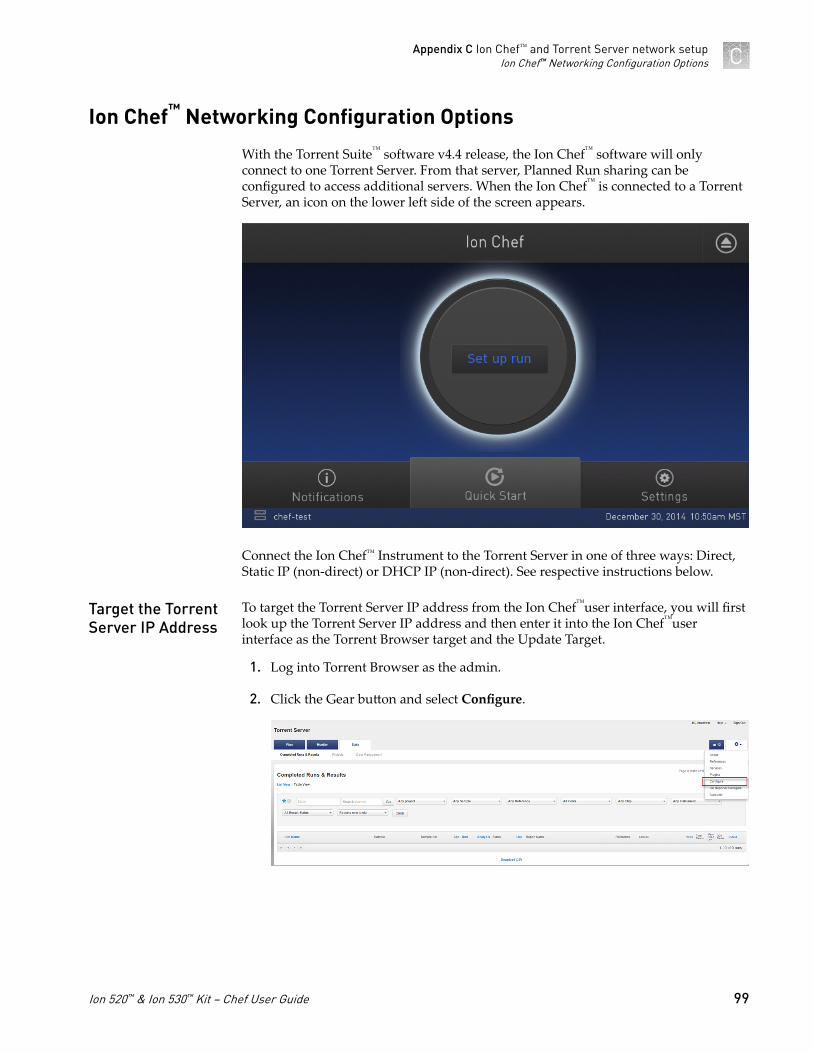
Ion Chef™ Networking Configuration Options
With the Torrent Suite™ software v4.4 release, the Ion Chef™ software will onlyconnect to one Torrent Server. From that server, Planned Run sharing can beconfigured to access additional servers. When the Ion Chef™ is connected to a TorrentServer, an icon on the lower left side of the screen appears.
Connect the Ion Chef™ Instrument to the Torrent Server in one of three ways: Direct,Static IP (non-direct) or DHCP IP (non-direct). See respective instructions below.
To target the Torrent Server IP address from the Ion Chef™user interface, you will firstlook up the Torrent Server IP address and then enter it into the Ion Chef™userinterface as the Torrent Browser target and the Update Target.
1. Log into Torrent Browser as the admin.
2. Click the Gear button and select Configure.
Target the TorrentServer IP Address
Appendix C Ion Chef™ and Torrent Server network setupIon Chef™ Networking Configuration Options C
Ion 520™ & Ion 530™ Kit − Chef User Guide 99
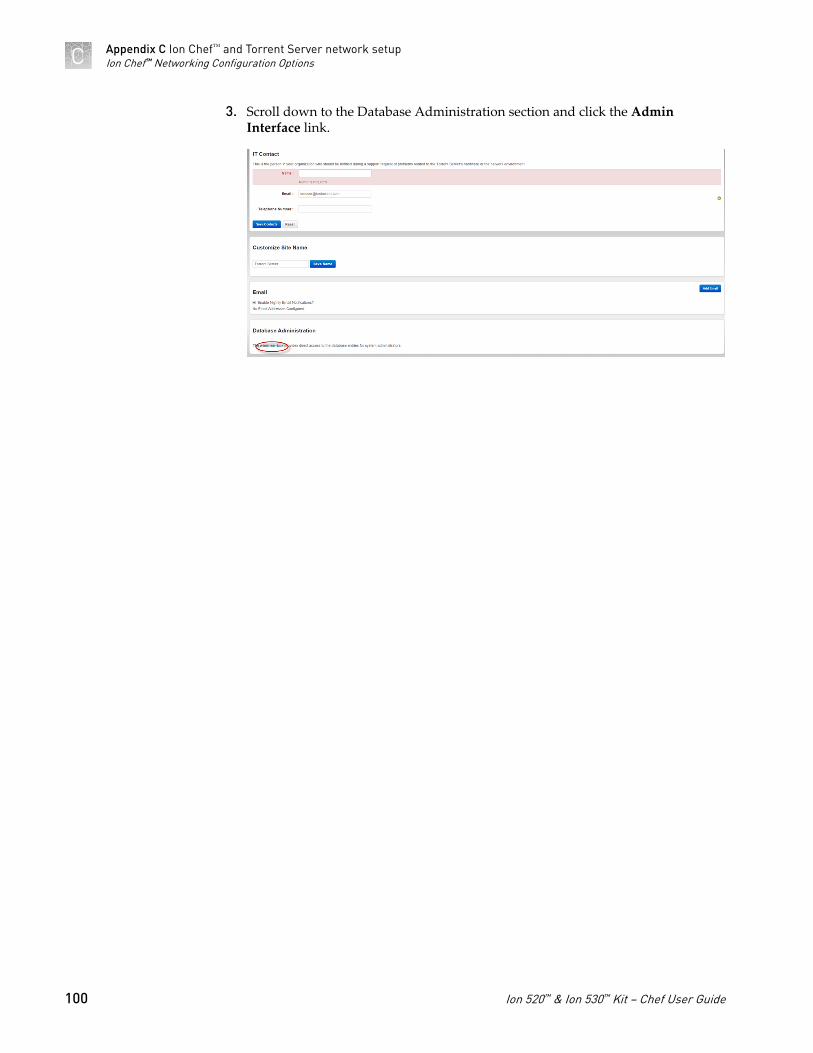
3. Scroll down to the Database Administration section and click the AdminInterface link.
Appendix C Ion Chef™ and Torrent Server network setupIon Chef™ Networking Configuration OptionsC
100 Ion 520™ & Ion 530™ Kit − Chef User Guide
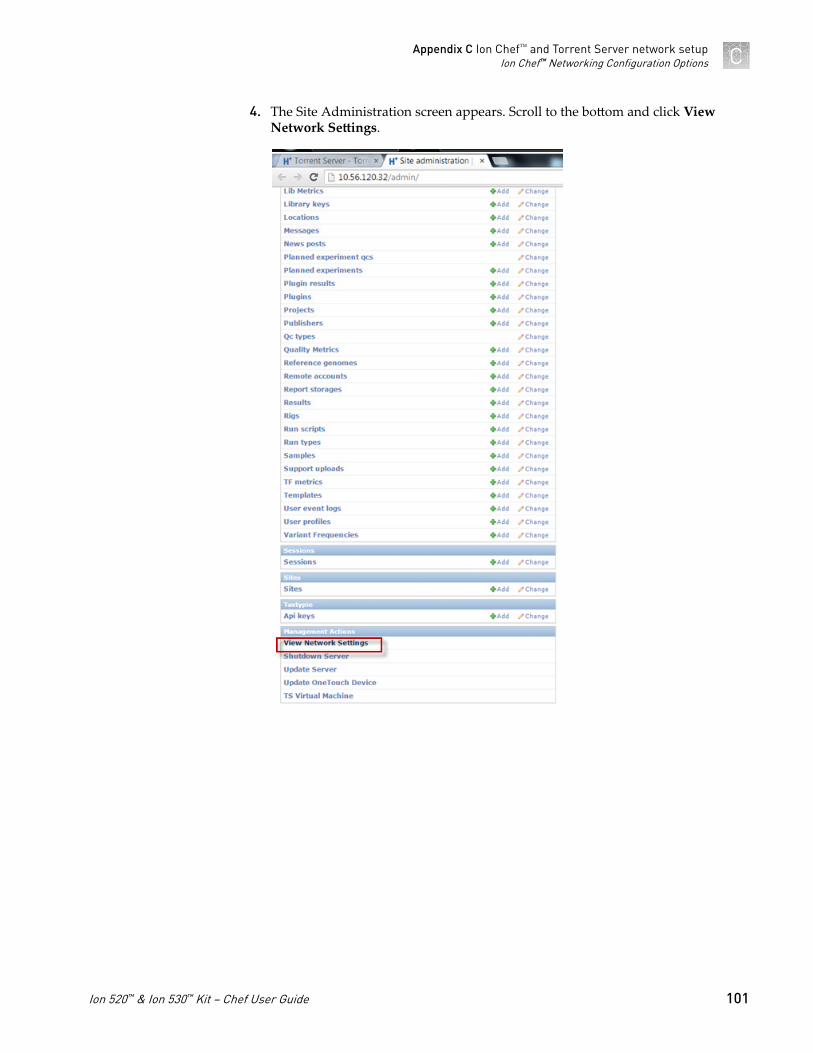
4. The Site Administration screen appears. Scroll to the bottom and click ViewNetwork Settings.
Appendix C Ion Chef™ and Torrent Server network setupIon Chef™ Networking Configuration Options C
Ion 520™ & Ion 530™ Kit − Chef User Guide 101
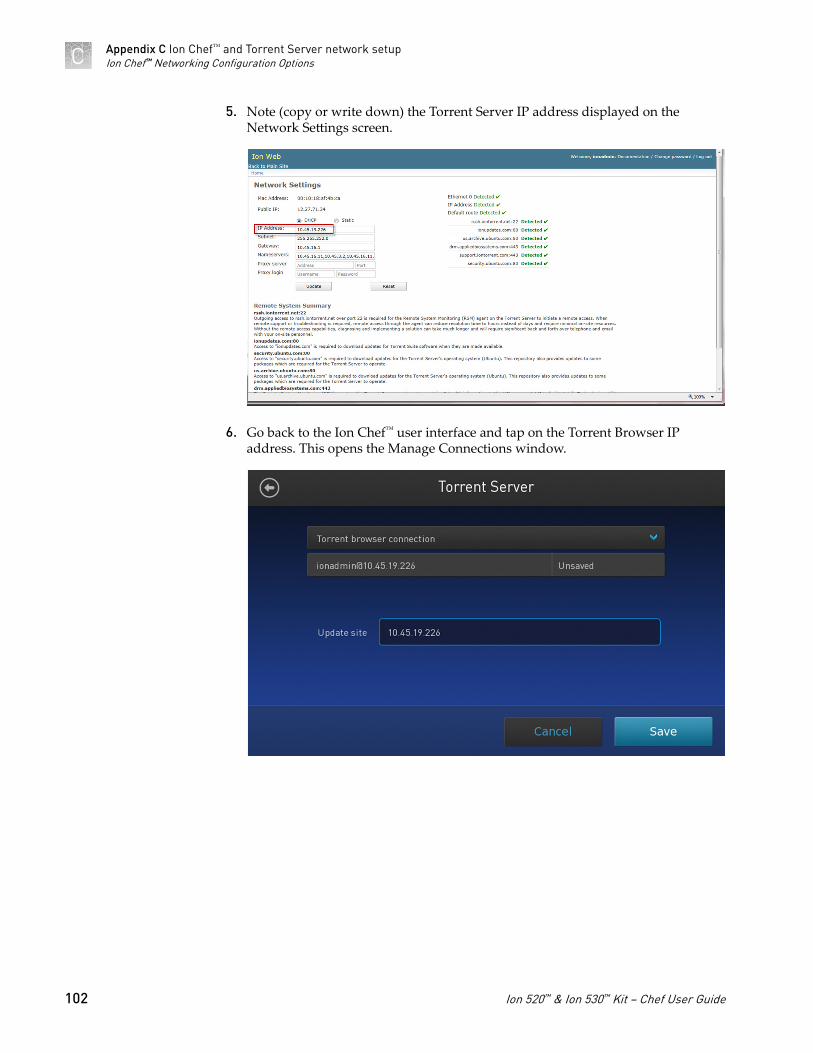
5. Note (copy or write down) the Torrent Server IP address displayed on theNetwork Settings screen.
6. Go back to the Ion Chef™ user interface and tap on the Torrent Browser IPaddress. This opens the Manage Connections window.
Appendix C Ion Chef™ and Torrent Server network setupIon Chef™ Networking Configuration OptionsC
102 Ion 520™ & Ion 530™ Kit − Chef User Guide
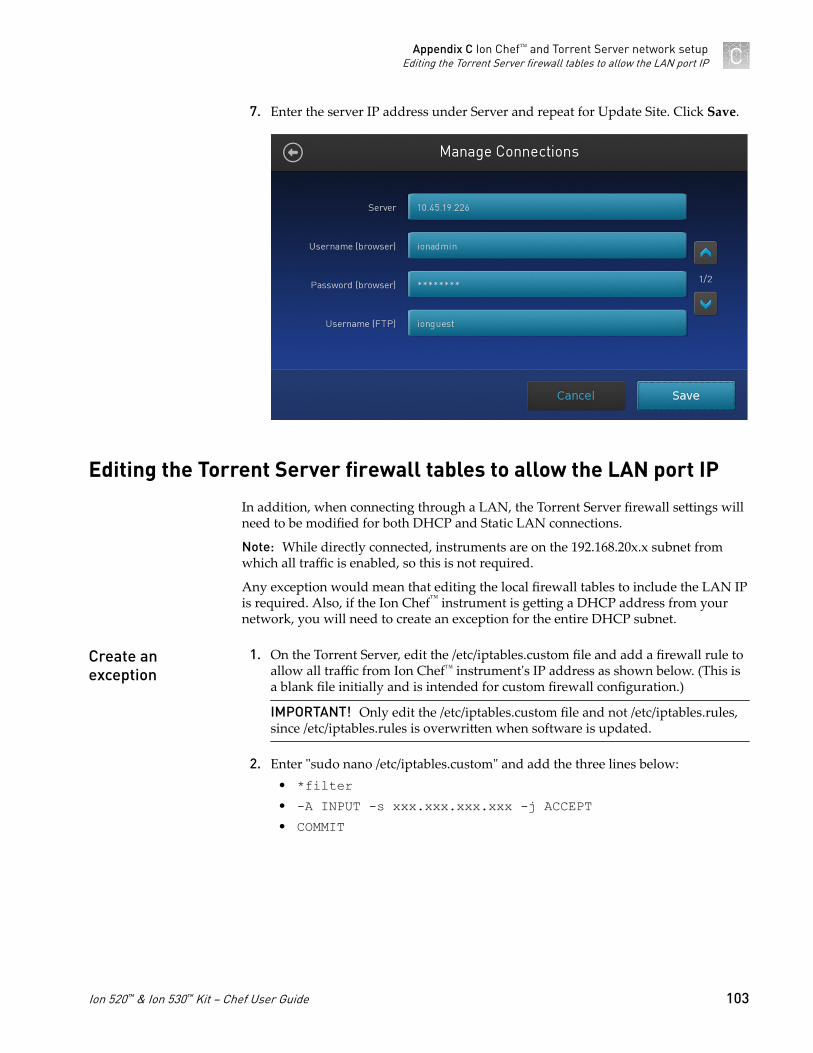
7. Enter the server IP address under Server and repeat for Update Site. Click Save.
Editing the Torrent Server firewall tables to allow the LAN port IP
In addition, when connecting through a LAN, the Torrent Server firewall settings willneed to be modified for both DHCP and Static LAN connections.
Note: While directly connected, instruments are on the 192.168.20x.x subnet fromwhich all traffic is enabled, so this is not required.
Any exception would mean that editing the local firewall tables to include the LAN IPis required. Also, if the Ion Chef™ instrument is getting a DHCP address from yournetwork, you will need to create an exception for the entire DHCP subnet.
1. On the Torrent Server, edit the /etc/iptables.custom file and add a firewall rule toallow all traffic from Ion Chef™ instrument's IP address as shown below. (This isa blank file initially and is intended for custom firewall configuration.)
IMPORTANT! Only edit the /etc/iptables.custom file and not /etc/iptables.rules,since /etc/iptables.rules is overwritten when software is updated.
2. Enter "sudo nano /etc/iptables.custom" and add the three lines below:• *filter• -A INPUT -s xxx.xxx.xxx.xxx -j ACCEPT• COMMIT
Create anexception
Appendix C Ion Chef™ and Torrent Server network setupEditing the Torrent Server firewall tables to allow the LAN port IP C
Ion 520™ & Ion 530™ Kit − Chef User Guide 103
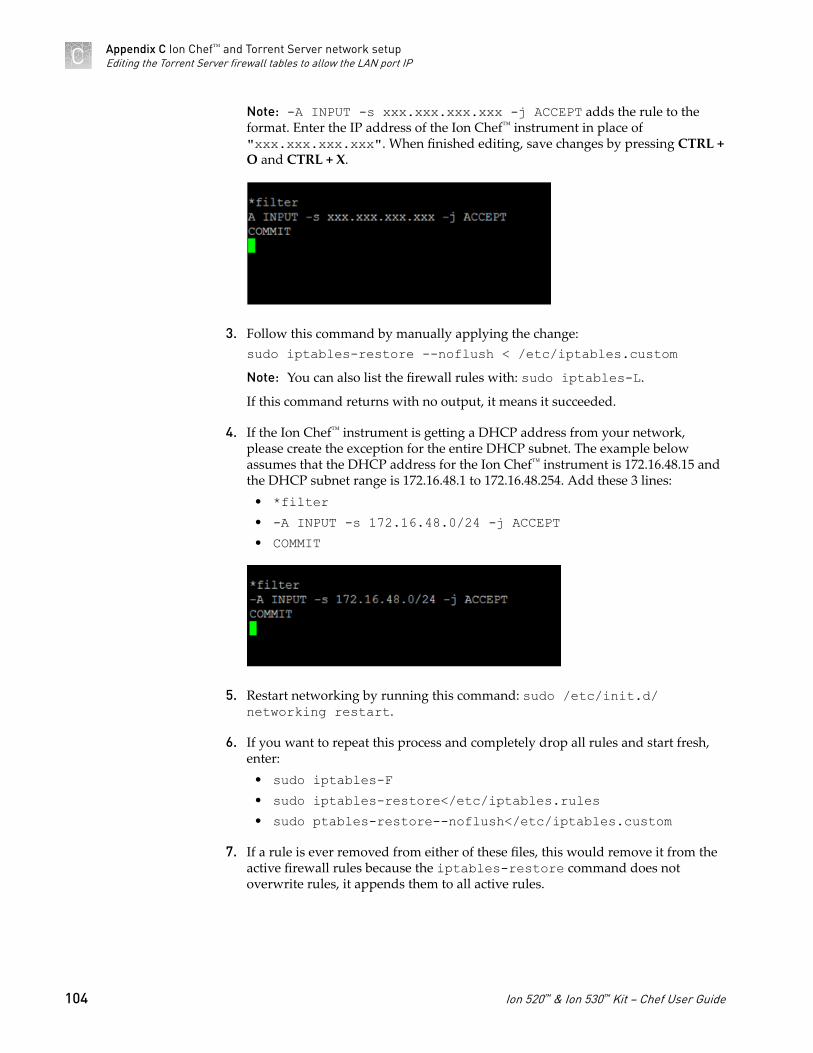
Note: -A INPUT -s xxx.xxx.xxx.xxx -j ACCEPT adds the rule to theformat. Enter the IP address of the Ion Chef™ instrument in place of"xxx.xxx.xxx.xxx". When finished editing, save changes by pressing CTRL +O and CTRL + X.
3. Follow this command by manually applying the change:sudo iptables-restore --noflush < /etc/iptables.customNote: You can also list the firewall rules with: sudo iptables-L.
If this command returns with no output, it means it succeeded.
4. If the Ion Chef™ instrument is getting a DHCP address from your network,please create the exception for the entire DHCP subnet. The example belowassumes that the DHCP address for the Ion Chef™ instrument is 172.16.48.15 andthe DHCP subnet range is 172.16.48.1 to 172.16.48.254. Add these 3 lines:
• *filter• -A INPUT -s 172.16.48.0/24 -j ACCEPT• COMMIT
5. Restart networking by running this command: sudo /etc/init.d/networking restart.
6. If you want to repeat this process and completely drop all rules and start fresh,enter:
• sudo iptables-F• sudo iptables-restore</etc/iptables.rules• sudo ptables-restore--noflush</etc/iptables.custom
7. If a rule is ever removed from either of these files, this would remove it from theactive firewall rules because the iptables-restore command does notoverwrite rules, it appends them to all active rules.
Appendix C Ion Chef™ and Torrent Server network setupEditing the Torrent Server firewall tables to allow the LAN port IPC
104 Ion 520™ & Ion 530™ Kit − Chef User Guide
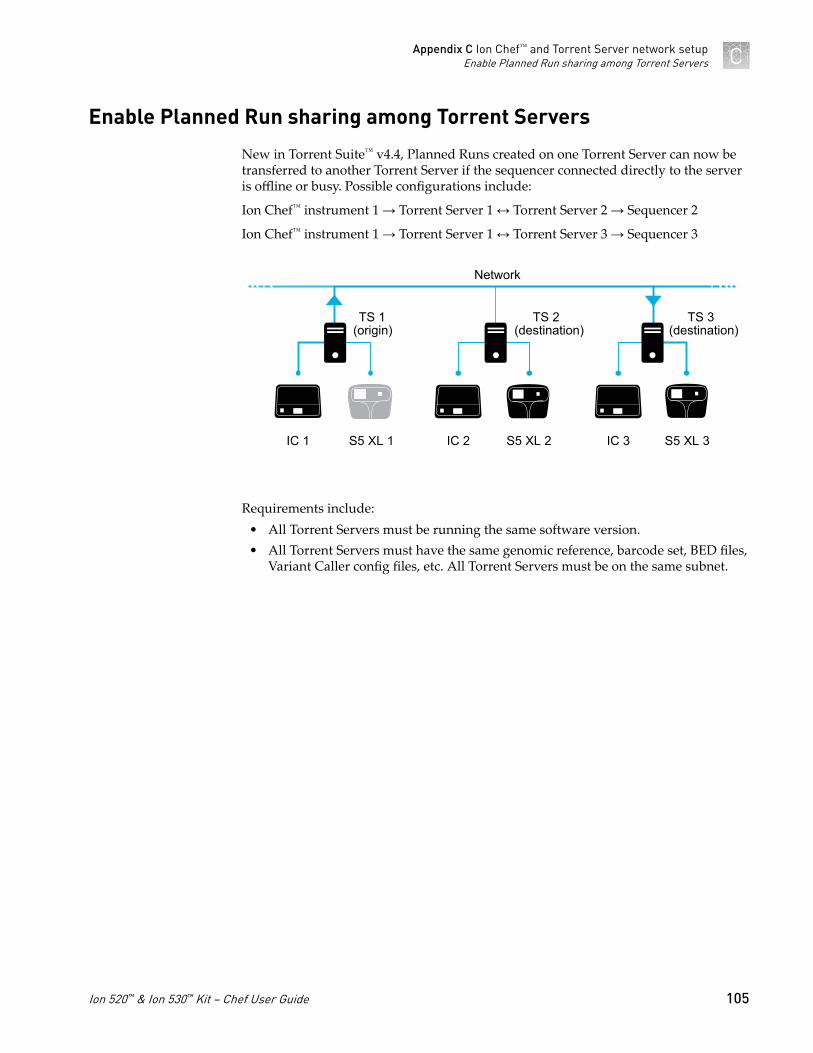
Enable Planned Run sharing among Torrent Servers
New in Torrent Suite™ v4.4, Planned Runs created on one Torrent Server can now betransferred to another Torrent Server if the sequencer connected directly to the serveris offline or busy. Possible configurations include:
Ion Chef™ instrument 1 → Torrent Server 1 ↔ Torrent Server 2 → Sequencer 2
Ion Chef™ instrument 1 → Torrent Server 1 ↔ Torrent Server 3 → Sequencer 3
Network
TS 1(origin)
IC 2IC 1 S5 XL 1 S5 XL 2 IC 3
TS 2(destination)
TS 3(destination)
S5 XL 3
Requirements include:• All Torrent Servers must be running the same software version.• All Torrent Servers must have the same genomic reference, barcode set, BED files,
Variant Caller config files, etc. All Torrent Servers must be on the same subnet.
Appendix C Ion Chef™ and Torrent Server network setupEnable Planned Run sharing among Torrent Servers C
Ion 520™ & Ion 530™ Kit − Chef User Guide 105
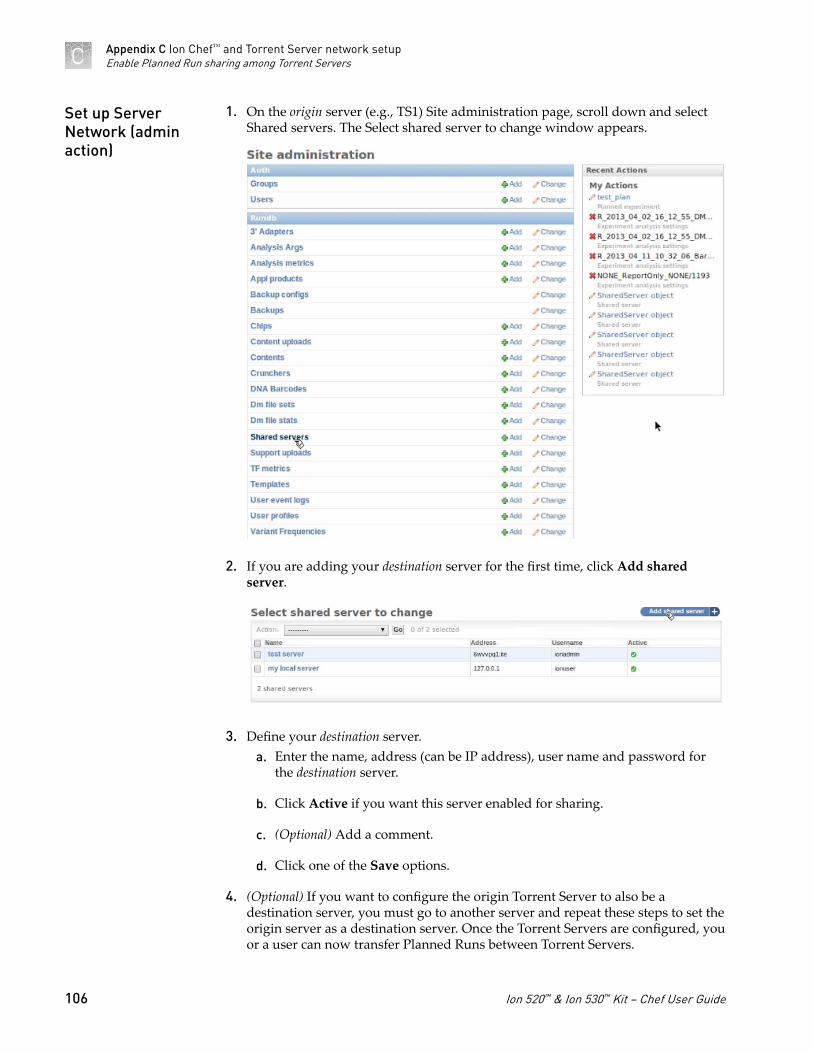
1. On the origin server (e.g., TS1) Site administration page, scroll down and selectShared servers. The Select shared server to change window appears.
2. If you are adding your destination server for the first time, click Add sharedserver.
3. Define your destination server.a. Enter the name, address (can be IP address), user name and password for
the destination server.
b. Click Active if you want this server enabled for sharing.
c. (Optional) Add a comment.
d. Click one of the Save options.
4. (Optional) If you want to configure the origin Torrent Server to also be adestination server, you must go to another server and repeat these steps to set theorigin server as a destination server. Once the Torrent Servers are configured, youor a user can now transfer Planned Runs between Torrent Servers.
Set up ServerNetwork (adminaction)
Appendix C Ion Chef™ and Torrent Server network setupEnable Planned Run sharing among Torrent ServersC
106 Ion 520™ & Ion 530™ Kit − Chef User Guide
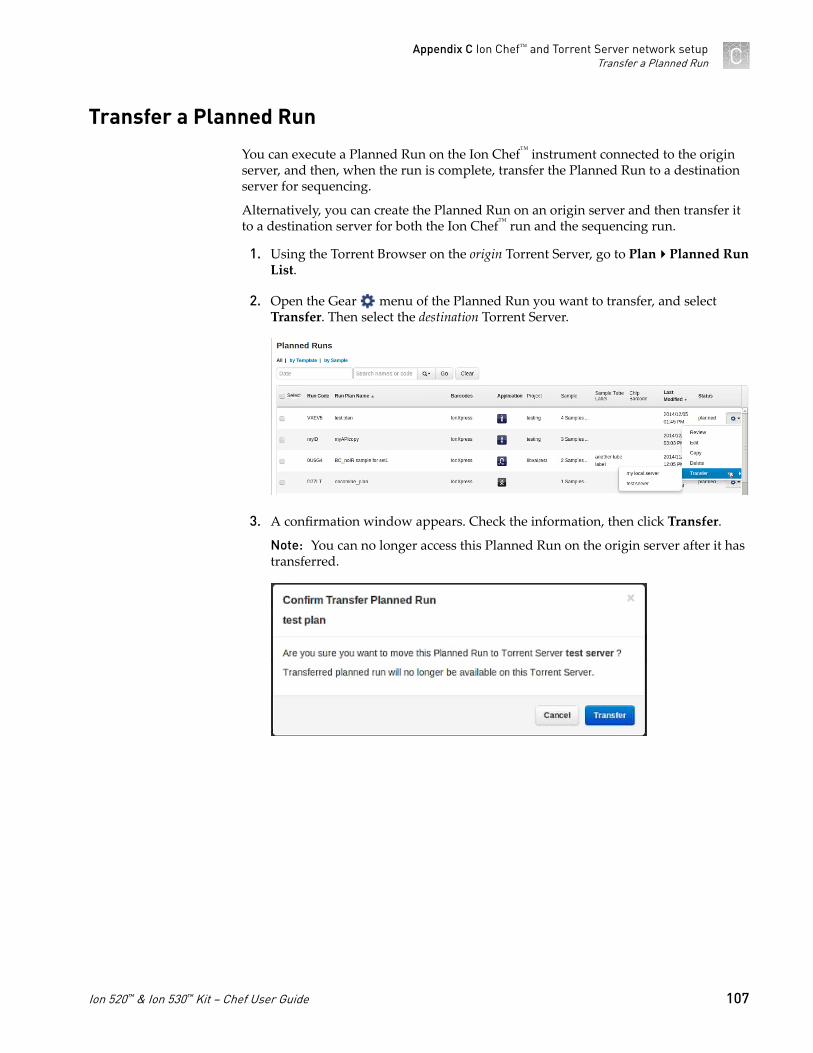
Transfer a Planned Run
You can execute a Planned Run on the Ion Chef™ instrument connected to the originserver, and then, when the run is complete, transfer the Planned Run to a destinationserver for sequencing.
Alternatively, you can create the Planned Run on an origin server and then transfer itto a destination server for both the Ion Chef™ run and the sequencing run.
1. Using the Torrent Browser on the origin Torrent Server, go to Plan4Planned RunList.
2. Open the Gear menu of the Planned Run you want to transfer, and selectTransfer. Then select the destination Torrent Server.
3. A confirmation window appears. Check the information, then click Transfer.
Note: You can no longer access this Planned Run on the origin server after it hastransferred.
Appendix C Ion Chef™ and Torrent Server network setupTransfer a Planned Run C
Ion 520™ & Ion 530™ Kit − Chef User Guide 107
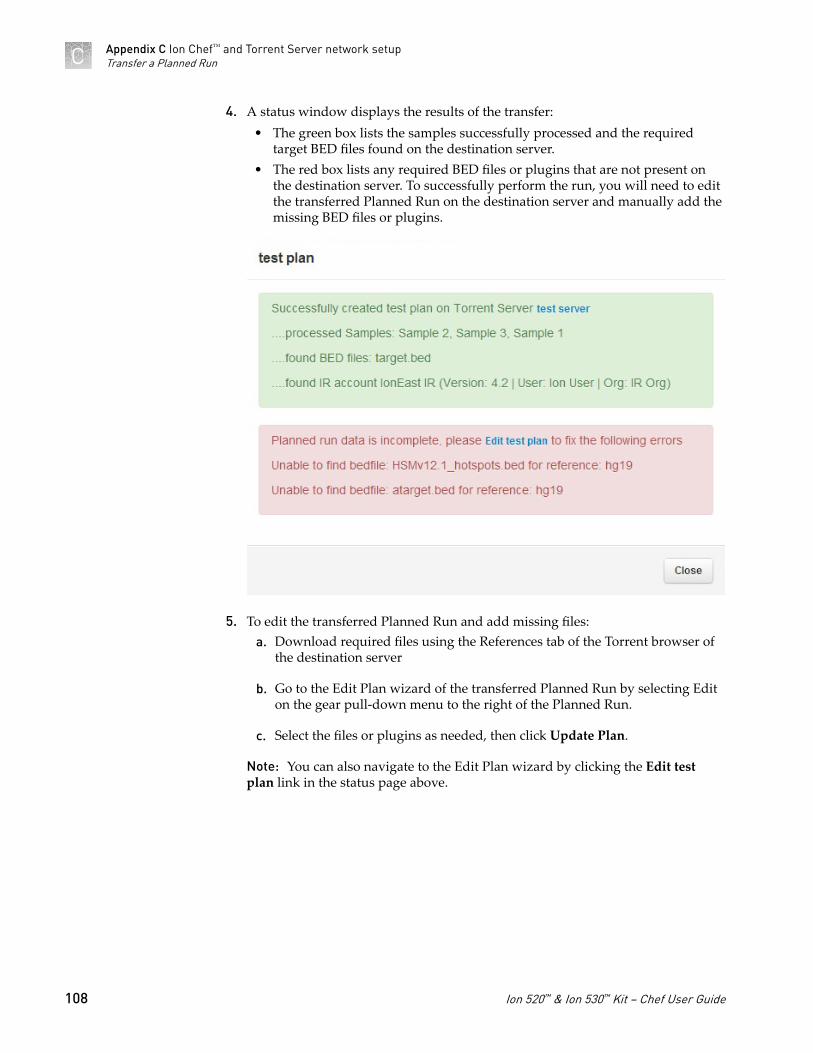
4. A status window displays the results of the transfer:• The green box lists the samples successfully processed and the required
target BED files found on the destination server.• The red box lists any required BED files or plugins that are not present on
the destination server. To successfully perform the run, you will need to editthe transferred Planned Run on the destination server and manually add themissing BED files or plugins.
5. To edit the transferred Planned Run and add missing files:a. Download required files using the References tab of the Torrent browser of
the destination server
b. Go to the Edit Plan wizard of the transferred Planned Run by selecting Editon the gear pull-down menu to the right of the Planned Run.
c. Select the files or plugins as needed, then click Update Plan.
Note: You can also navigate to the Edit Plan wizard by clicking the Edit testplan link in the status page above.
Appendix C Ion Chef™ and Torrent Server network setupTransfer a Planned RunC
108 Ion 520™ & Ion 530™ Kit − Chef User Guide
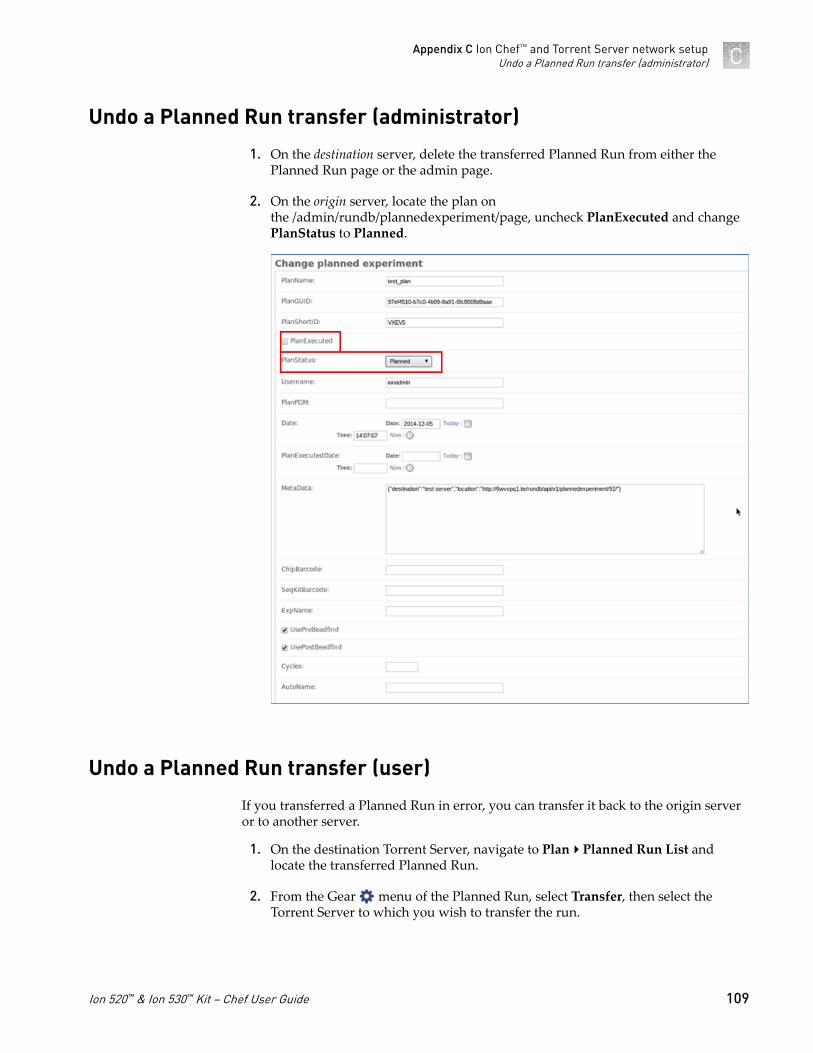
Undo a Planned Run transfer (administrator)
1. On the destination server, delete the transferred Planned Run from either thePlanned Run page or the admin page.
2. On the origin server, locate the plan onthe /admin/rundb/plannedexperiment/page, uncheck PlanExecuted and changePlanStatus to Planned.
Undo a Planned Run transfer (user)
If you transferred a Planned Run in error, you can transfer it back to the origin serveror to another server.
1. On the destination Torrent Server, navigate to Plan4Planned Run List andlocate the transferred Planned Run.
2. From the Gear menu of the Planned Run, select Transfer, then select theTorrent Server to which you wish to transfer the run.
Appendix C Ion Chef™ and Torrent Server network setupUndo a Planned Run transfer (administrator) C
Ion 520™ & Ion 530™ Kit − Chef User Guide 109
Safety
■ Symbols on this instrument . . . . . . . . . . . . . . . . . . . . . . . . . . . . . . . . . . . . . . . . . . . 111
■ Location of safety labels on this instrument . . . . . . . . . . . . . . . . . . . . . . . . . . . . . 113
■ Safety information for instruments not manufactured by ThermoFisher Scientific . . . . . . . . . . . . . . . . . . . . . . . . . . . . . . . . . . . . . . . . . . . . . . . . . . . . . 113
■ Instrument safety . . . . . . . . . . . . . . . . . . . . . . . . . . . . . . . . . . . . . . . . . . . . . . . . . . . . 113
■ Safety and electromagnetic compatibility (EMC) standards . . . . . . . . . . . . . . . 115
■ Chemical safety . . . . . . . . . . . . . . . . . . . . . . . . . . . . . . . . . . . . . . . . . . . . . . . . . . . . . 116
■ Biological hazard safety . . . . . . . . . . . . . . . . . . . . . . . . . . . . . . . . . . . . . . . . . . . . . . 117
WARNING! GENERAL SAFETY. Using this product in a manner not specifiedin the user documentation may result in personal injury or damage to theinstrument or device. Ensure that anyone using this product has receivedinstructions in general safety practices for laboratories and the safetyinformation provided in this document.
· Before using an instrument or device, read and understand the safetyinformation provided in the user documentation provided by themanufacturer of the instrument or device.
· Before handling chemicals, read and understand all applicable Safety DataSheets (SDSs) and use appropriate personal protective equipment (gloves,gowns, eye protection, etc). To obtain SDSs, see the “Documentation andSupport” section in this document.
D
110 Ion 520™ & Ion 530™ Kit − Chef User Guide
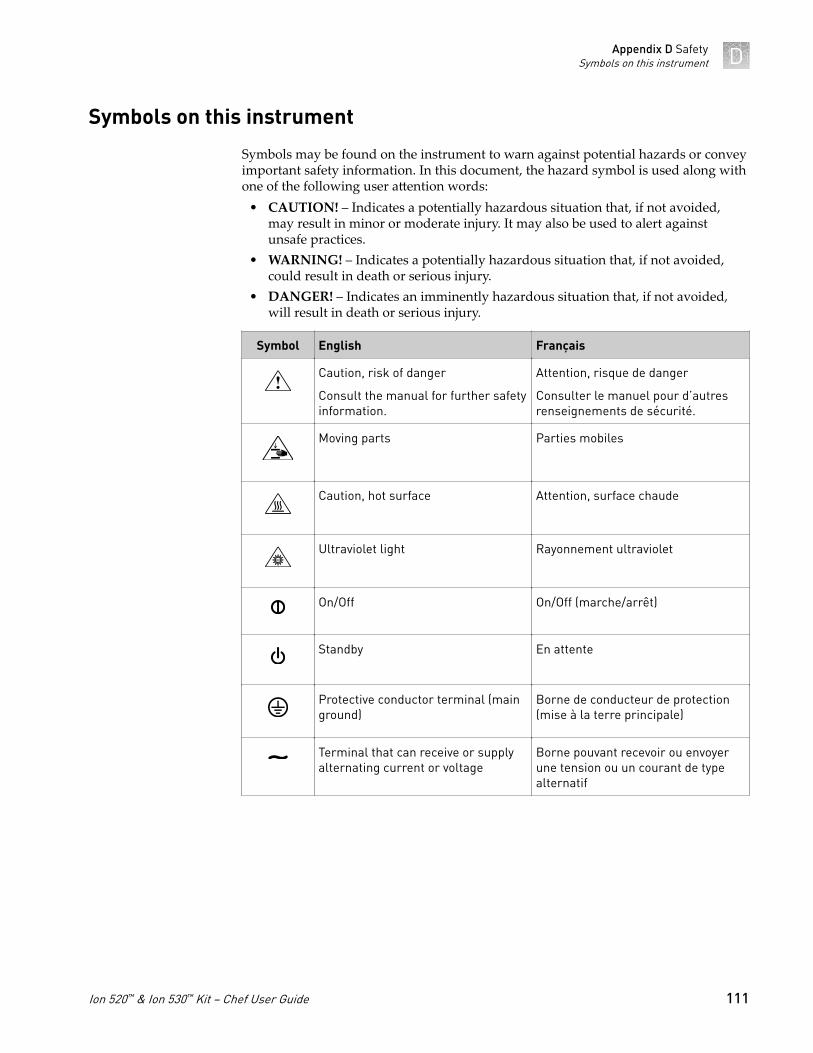
Symbols on this instrument
Symbols may be found on the instrument to warn against potential hazards or conveyimportant safety information. In this document, the hazard symbol is used along withone of the following user attention words:
• CAUTION! – Indicates a potentially hazardous situation that, if not avoided,may result in minor or moderate injury. It may also be used to alert againstunsafe practices.
• WARNING! – Indicates a potentially hazardous situation that, if not avoided,could result in death or serious injury.
• DANGER! – Indicates an imminently hazardous situation that, if not avoided,will result in death or serious injury.
Symbol English Français
Caution, risk of danger
Consult the manual for further safetyinformation.
Attention, risque de danger
Consulter le manuel pour d’autresrenseignements de sécurité.
Moving parts Parties mobiles
Caution, hot surface Attention, surface chaude
Ultraviolet light Rayonnement ultraviolet
On/Off On/Off (marche/arrêt)
Standby En attente
Protective conductor terminal (mainground)
Borne de conducteur de protection(mise à la terre principale)
Terminal that can receive or supplyalternating current or voltage
Borne pouvant recevoir ou envoyerune tension ou un courant de typealternatif
Appendix D SafetySymbols on this instrument D
Ion 520™ & Ion 530™ Kit − Chef User Guide 111
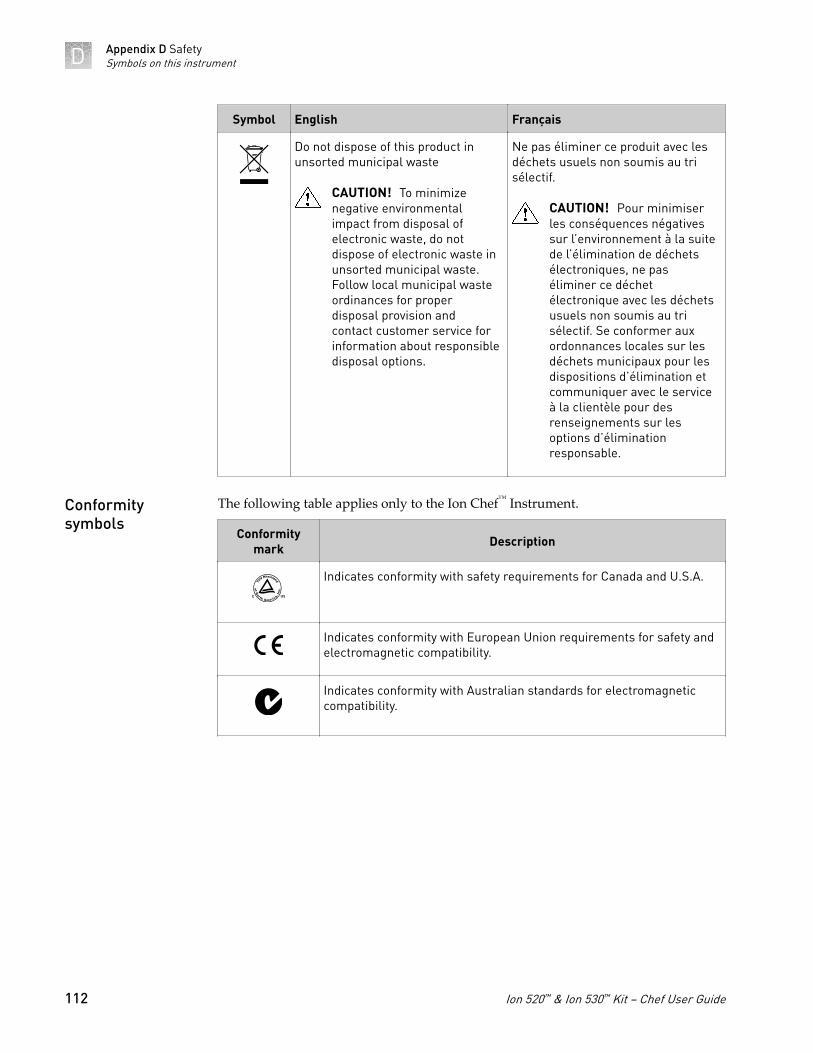
Symbol English Français
Do not dispose of this product inunsorted municipal waste
CAUTION! To minimizenegative environmentalimpact from disposal ofelectronic waste, do notdispose of electronic waste inunsorted municipal waste.Follow local municipal wasteordinances for properdisposal provision andcontact customer service forinformation about responsibledisposal options.
Ne pas éliminer ce produit avec lesdéchets usuels non soumis au trisélectif.
CAUTION! Pour minimiserles conséquences négativessur l’environnement à la suitede l’élimination de déchetsélectroniques, ne paséliminer ce déchetélectronique avec les déchetsusuels non soumis au trisélectif. Se conformer auxordonnances locales sur lesdéchets municipaux pour lesdispositions d’élimination etcommuniquer avec le serviceà la clientèle pour desrenseignements sur lesoptions d’éliminationresponsable.
The following table applies only to the Ion Chef™ Instrument.
Conformitymark Description
Indicates conformity with safety requirements for Canada and U.S.A.
Indicates conformity with European Union requirements for safety andelectromagnetic compatibility.
Indicates conformity with Australian standards for electromagneticcompatibility.
Conformitysymbols
Appendix D SafetySymbols on this instrumentD
112 Ion 520™ & Ion 530™ Kit − Chef User Guide
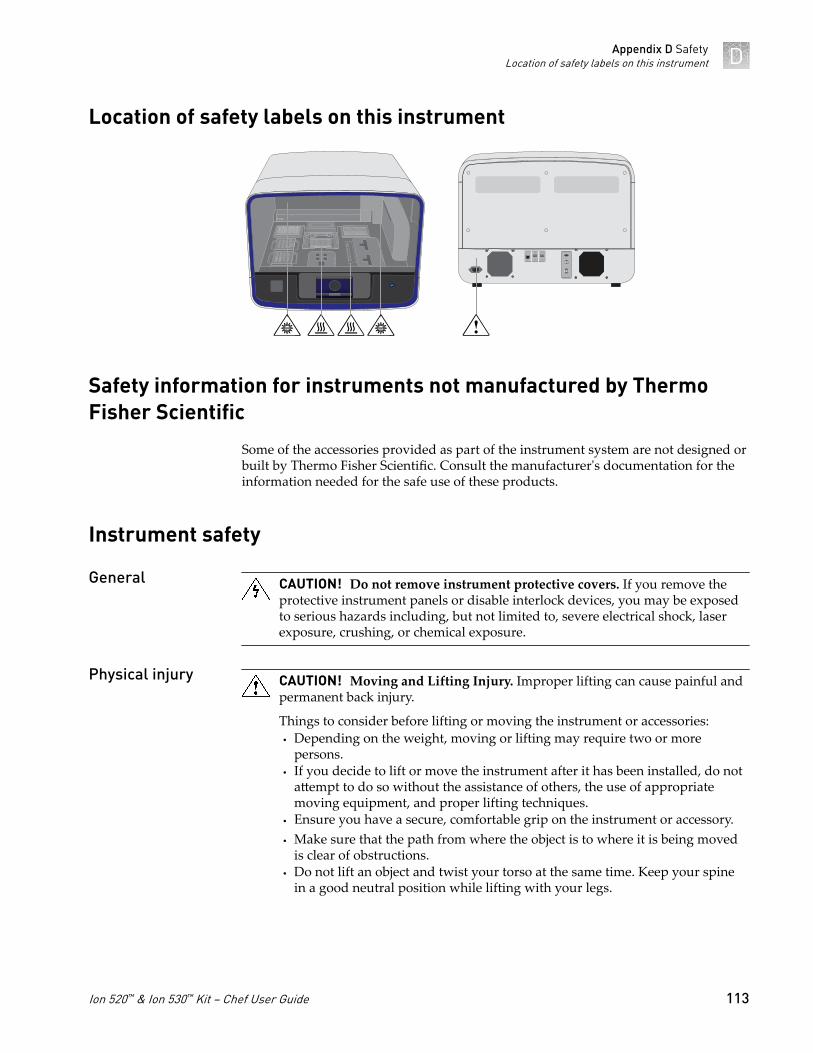
Location of safety labels on this instrument
Safety information for instruments not manufactured by ThermoFisher Scientific
Some of the accessories provided as part of the instrument system are not designed orbuilt by Thermo Fisher Scientific. Consult the manufacturer's documentation for theinformation needed for the safe use of these products.
Instrument safety
CAUTION! Do not remove instrument protective covers. If you remove theprotective instrument panels or disable interlock devices, you may be exposedto serious hazards including, but not limited to, severe electrical shock, laserexposure, crushing, or chemical exposure.
CAUTION! Moving and Lifting Injury. Improper lifting can cause painful andpermanent back injury.
Things to consider before lifting or moving the instrument or accessories:· Depending on the weight, moving or lifting may require two or more
persons.· If you decide to lift or move the instrument after it has been installed, do notattempt to do so without the assistance of others, the use of appropriatemoving equipment, and proper lifting techniques.
· Ensure you have a secure, comfortable grip on the instrument or accessory.· Make sure that the path from where the object is to where it is being moved
is clear of obstructions.· Do not lift an object and twist your torso at the same time. Keep your spine
in a good neutral position while lifting with your legs.
General
Physical injury
Appendix D SafetyLocation of safety labels on this instrument D
Ion 520™ & Ion 530™ Kit − Chef User Guide 113
· Participants should coordinate lift and move intentions with each otherbefore lifting and carrying.
· For smaller packages, rather than lifting the object from the packing box,carefully tilt the box on its side and hold it stationary while someone elseslides the contents out of the box.
CAUTION! Moving Parts. Moving parts can crush, pinch and cut. Keep handsclear of moving parts while operating the instrument. Disconnect power beforeservicing.
WARNING! Ensure appropriate electrical supply. For safe operation of theinstrument:
· Plug the system into a properly grounded receptacle with adequate currentcapacity.
· Ensure the electrical supply is of suitable voltage.· Never operate the instrument with the ground disconnected. Grounding
continuity is required for safe operation of the instrument.
WARNING! Power Supply Line Cords. Use properly configured and approvedline cords for the power supply in your facility.
WARNING! Disconnecting Power. To fully disconnect power either detach orunplug the power cord, positioning the instrument such that the power cord isaccessible.
CAUTION! Cleaning and Decontamination. Use only the cleaning anddecontamination methods specified in the manufacturer's user documentation.It is the responsibility of the operator (or other responsible person) to ensurethe following requirements are met:
· No decontamination or cleaning agents are used that could cause aHAZARD as a result of a reaction with parts of the equipment or withmaterial contained in the equipment.
· The instrument is properly decontaminated a) if hazardous material isspilled onto or into the equipment, and/or b) prior to having the instrumentserviced at your facility or sending the instrument for repair, maintenance,trade-in, disposal, or termination of a loan (decontamination forms may berequested from customer service).
· Before using any cleaning or decontamination methods (except thoserecommended by the manufacturer), users should confirm with themanufacturer that the proposed method will not damage the equipment.
Electrical
Cleaning anddecontamination
Appendix D SafetyInstrument safetyD
114 Ion 520™ & Ion 530™ Kit − Chef User Guide
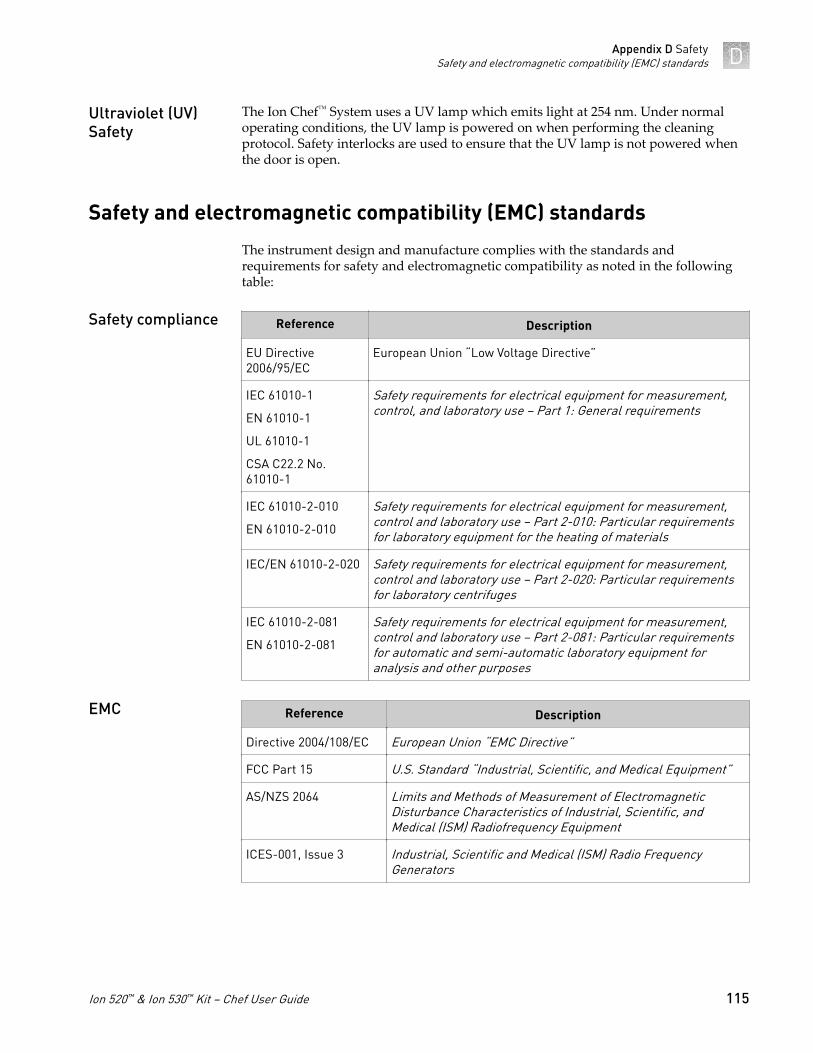
The Ion Chef™ System uses a UV lamp which emits light at 254 nm. Under normaloperating conditions, the UV lamp is powered on when performing the cleaningprotocol. Safety interlocks are used to ensure that the UV lamp is not powered whenthe door is open.
Safety and electromagnetic compatibility (EMC) standards
The instrument design and manufacture complies with the standards andrequirements for safety and electromagnetic compatibility as noted in the followingtable:
Reference Description
EU Directive2006/95/EC
European Union “Low Voltage Directive”
IEC 61010-1
EN 61010-1
UL 61010-1
CSA C22.2 No.61010-1
Safety requirements for electrical equipment for measurement,control, and laboratory use – Part 1: General requirements
IEC 61010-2-010
EN 61010-2-010
Safety requirements for electrical equipment for measurement,control and laboratory use – Part 2-010: Particular requirementsfor laboratory equipment for the heating of materials
IEC/EN 61010-2-020 Safety requirements for electrical equipment for measurement,control and laboratory use – Part 2-020: Particular requirementsfor laboratory centrifuges
IEC 61010-2-081
EN 61010-2-081
Safety requirements for electrical equipment for measurement,control and laboratory use – Part 2-081: Particular requirementsfor automatic and semi-automatic laboratory equipment foranalysis and other purposes
Reference Description
Directive 2004/108/EC European Union “EMC Directive”
FCC Part 15 U.S. Standard “Industrial, Scientific, and Medical Equipment”
AS/NZS 2064 Limits and Methods of Measurement of ElectromagneticDisturbance Characteristics of Industrial, Scientific, andMedical (ISM) Radiofrequency Equipment
ICES-001, Issue 3 Industrial, Scientific and Medical (ISM) Radio FrequencyGenerators
Ultraviolet (UV)Safety
Safety compliance
EMC
Appendix D SafetySafety and electromagnetic compatibility (EMC) standards D
Ion 520™ & Ion 530™ Kit − Chef User Guide 115
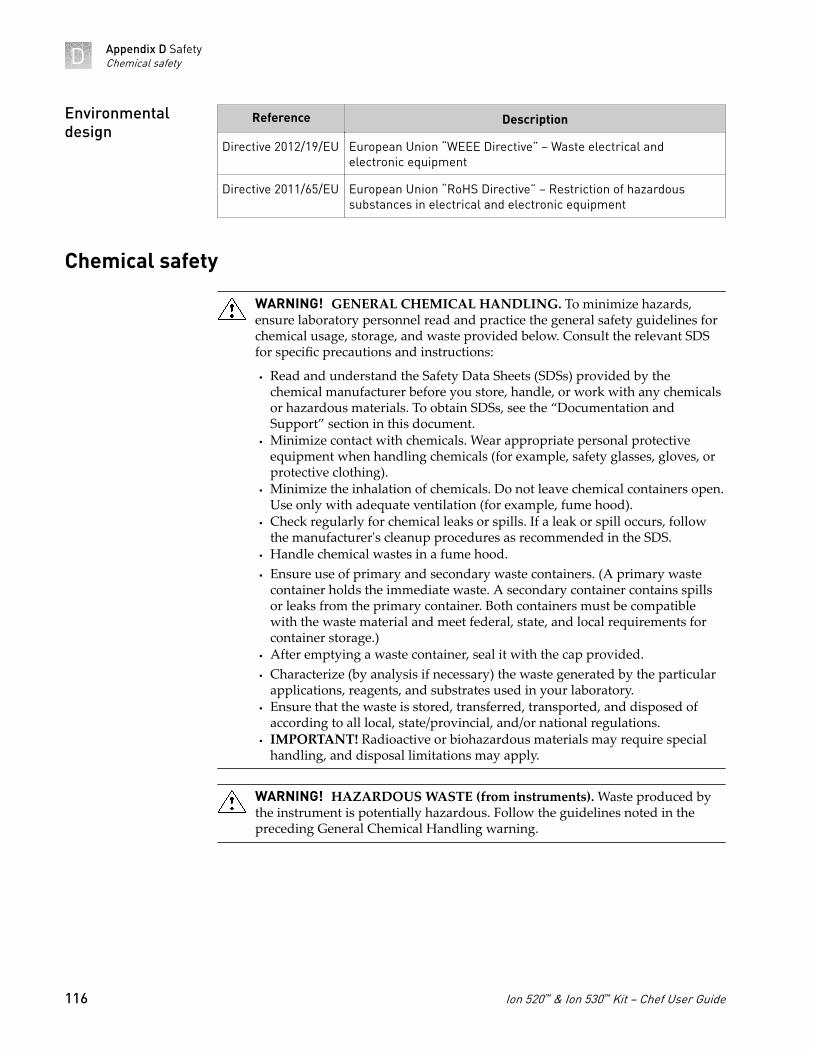
Reference Description
Directive 2012/19/EU European Union “WEEE Directive” – Waste electrical andelectronic equipment
Directive 2011/65/EU European Union “RoHS Directive” – Restriction of hazardoussubstances in electrical and electronic equipment
Chemical safety
WARNING! GENERAL CHEMICAL HANDLING. To minimize hazards,ensure laboratory personnel read and practice the general safety guidelines forchemical usage, storage, and waste provided below. Consult the relevant SDSfor specific precautions and instructions:
· Read and understand the Safety Data Sheets (SDSs) provided by thechemical manufacturer before you store, handle, or work with any chemicalsor hazardous materials. To obtain SDSs, see the “Documentation andSupport” section in this document.
· Minimize contact with chemicals. Wear appropriate personal protectiveequipment when handling chemicals (for example, safety glasses, gloves, orprotective clothing).
· Minimize the inhalation of chemicals. Do not leave chemical containers open.Use only with adequate ventilation (for example, fume hood).
· Check regularly for chemical leaks or spills. If a leak or spill occurs, followthe manufacturer's cleanup procedures as recommended in the SDS.
· Handle chemical wastes in a fume hood.· Ensure use of primary and secondary waste containers. (A primary waste
container holds the immediate waste. A secondary container contains spillsor leaks from the primary container. Both containers must be compatiblewith the waste material and meet federal, state, and local requirements forcontainer storage.)
· After emptying a waste container, seal it with the cap provided.· Characterize (by analysis if necessary) the waste generated by the particular
applications, reagents, and substrates used in your laboratory.· Ensure that the waste is stored, transferred, transported, and disposed of
according to all local, state/provincial, and/or national regulations.· IMPORTANT! Radioactive or biohazardous materials may require special
handling, and disposal limitations may apply.
WARNING! HAZARDOUS WASTE (from instruments). Waste produced bythe instrument is potentially hazardous. Follow the guidelines noted in thepreceding General Chemical Handling warning.
Environmentaldesign
Appendix D SafetyChemical safetyD
116 Ion 520™ & Ion 530™ Kit − Chef User Guide
Biological hazard safety
WARNING! BIOHAZARD. Biological samples such as tissues, body fluids,infectious agents, and blood of humans and other animals have the potential totransmit infectious diseases. Conduct all work in properly equipped facilitieswith the appropriate safety equipment (for example, physical containmentdevices). Safety equipment can also include items for personal protection, suchas gloves, coats, gowns, shoe covers, boots, respirators, face shields, safetyglasses, or goggles. Individuals should be trained according to applicableregulatory and company/ institution requirements before working withpotentially biohazardous materials. Follow all applicable local, state/provincial,and/or national regulations. The following references provide generalguidelines when handling biological samples in laboratory environment.
· U.S. Department of Health and Human Services, Biosafety in Microbiologicaland Biomedical Laboratories (BMBL), 5th Edition, HHS Publication No. (CDC)21-1112, Revised December 2009; found at:www.cdc.gov/biosafety/publications/bmbl5/BMBL.pdf
· World Health Organization, Laboratory Biosafety Manual, 3rd Edition,WHO/CDS/CSR/LYO/2004.11; found at:www.who.int/csr/resources/publications/biosafety/Biosafety7.pdf
Appendix D SafetyBiological hazard safety D
Ion 520™ & Ion 530™ Kit − Chef User Guide 117
Documentation and support
Customer and technical support
Visit thermofisher.com/support for the latest in services and support, including:• Worldwide contact telephone numbers• Product support, including:
– Product FAQs– Software, patches, and updates
• Order and web support• Product documentation, including:
– User guides, manuals, and protocols– Certificates of Analysis– Safety Data Sheets (SDSs; also known as MSDSs)
Note: For SDSs for reagents and chemicals from other manufacturers,contact the manufacturer.
Limited product warranty
Life Technologies Corporation and/or its affiliate(s) warrant their products as set forthin the Life Technologies' General Terms and Conditions of Sale found on LifeTechnologies' website at www.thermofisher.com/us/en/home/global/terms-and-conditions.html. If you have any questions, please contact LifeTechnologies at www.thermofisher.com/support.
118 Ion 520™ & Ion 530™ Kit − Chef User Guide