Embed Size (px)
Citation preview

Page 1 of 12 Invoice Approval Guide v4 04/29/13
InvoiceApprovalGuide Contents Reviewing Invoices ........................................................................................................................................ 2
Changing the # Records that Display ............................................................................................................ 3
Annotating Invoices ...................................................................................................................................... 4
Using and Creating Views ............................................................................................................................. 5
Using Views ........................................................................................................................................... 5
Creating Views ...................................................................................................................................... 6
Annotation Taskbar Icons ........................................................................................................................... 10
AP Approval Process Flowchart .................................................................................................................. 12
This Invoice Approval Guide is for Project Managers and others who review and approve invoices. The
Invoice Approval application is available at: https://ax.sharedservices.cc/
Before viewing and annotating invoices, be sure to sign on to Application Xtender and install the web
components (under Help – Check Installed Components). Refer to the Application Xtender Manual for
more information - or contact Tech Support.
REMINDER: Application Extender only supports Microsoft Internet Explorer (IE). Other browsers such
as Firefox, Chrome and Safar will not work

Page 2 of 12 Invoice Approval Guide v4 04/29/13
Reviewing Invoices 1. Sign on to the Enterprise Console.
2. The Inbox appears with all invoices awaiting approval:
3. Select an invoice.
4. As necessary, add comments to the invoice. The Accounts Payable Department needs to know
why an invoice was disapproved (or what to do with invoices approved pending changes). See
the Annotating Invoices section for more information on how to add comments.
5. Select the appropriate button:
• Approve: Automatically processes for payment.
• Approve PC: Sends the invoice back to AP. After AP makes the changes, the invoice will
NOT be returned for your approval.
• Disapprove: Sends the invoice back to AP. After AP makes the changes, the invoice will
be returned for your approval.
6. After clicking a button, the invoice disappears from the inbox. Continue reviewing invoices until
all invoices have been handled.

Page 3 of 12 Invoice Approval Guide v4 04/29/13
Changing the # Records that Display In the Approval Application, select the blue Edit hyperlink on the upper right side of the screen:
The Edit Window appears. Find the Record Size field and change it to 500. Scroll to the bottom of the
form and click the Apply button and then click the OK button:

Page 4 of 12 Invoice Approval Guide v4 04/29/13
Annotating Invoices The Accounts Payable Department needs to know why an invoice was disapproved (or what to do with
invoices approved pending changes). Here is a quick and easy way to add comments to invoices:
1. Select the TEXT button and click inside the document.
2. The “Annotation Text Editor” appears. Enter your text and click the OK button. If necessary,
drag the text so it does not cover anything on the invoice.
3. Select the HIGHLIGHT button and highlight the text you just entered.
4. Select the APPROVE PC or DISAPPROVE button.
a. Click OK when prompted “Are you sure you wish to submit this workflow item?”
b. Click YES when prompted “Do you want to save the changes that have been made to the
annotation?”
This shows the results:

Page 5 of 12 Invoice Approval Guide v4 04/29/13
Using and Creating Views
Using Views
Views allow coworkers to personalize how invoices display in their inbox, including:
• Adding or deleting columns
• Filtering invoices - to display only specific invoices
• Sorting invoices – so they display in a specific order
• Grouping Invoices – so they roll-up under a specific field
• A view is only available to the person who created it. Other people cannot see your views.
After creating a view, + appears next to the inbox:
Click the + to list the previously created views. In this example, the user created four views:
Click the view name to display it. If the view uses GROUPS, click the + to expand the group:

Page 6 of 12 Invoice Approval Guide v4 04/29/13
Right click on the view name to delete it:
Creating Views
This example creates a view using the filter to select a specific Job #, sorting by Vendor Name within
job and removing some columns. For people who approve invoices for multiple jobs, there are
advantages to creating and saving views that filters on one specific job. After approving invoices, the
screen returns to the saved view - it does not collapse the view or force you to recreate the view.
This can make it easier to quickly review and approve a large number of invoices.
1. Sign-on to the Enterprise Console and display the inbox.
2. With the cursor anywhere on the blue field headings, right click and select Filter Bar.
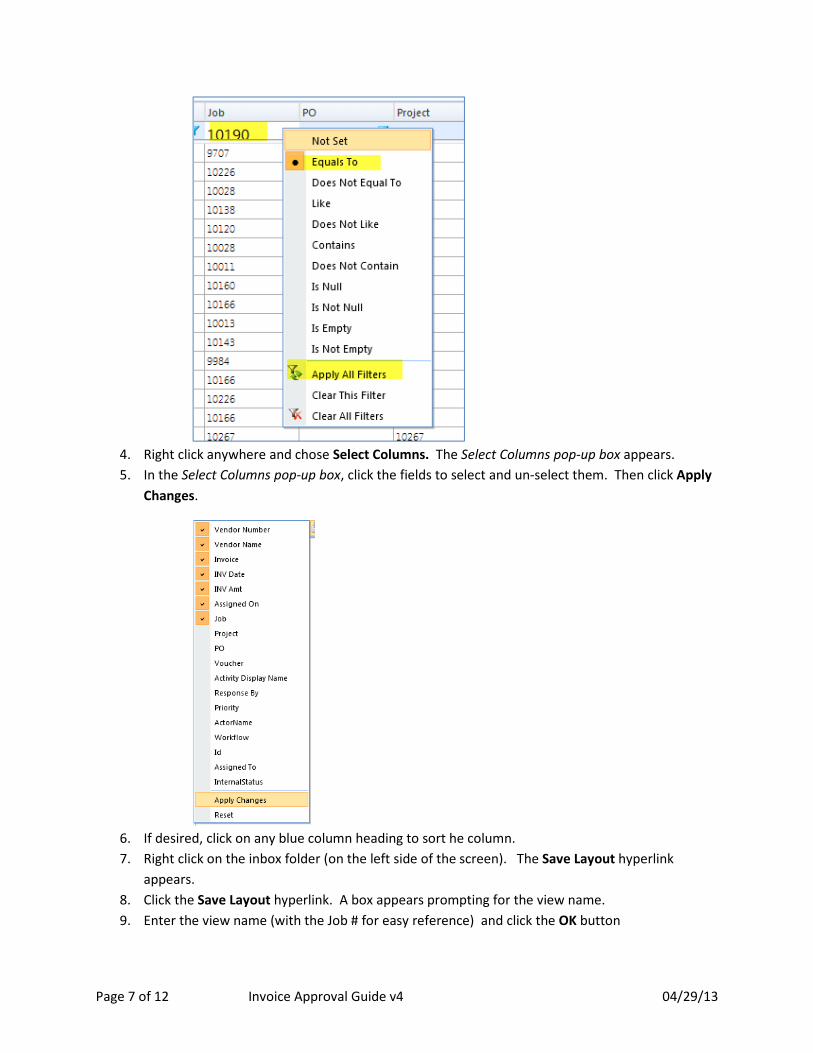
3. The Filter Bar appears. In the Filter Bar (under the Job column), enter the Job #. Then in the
pop-up box, select Equals To and Apply All Filters.
Page 7 of 12 Invoice Approval Guide v4 04/29/13
4. Right click anywhere and chose Select Columns. The Select Columns pop-up box appears.
5. In the Select Columns pop-up box, click the fields to select and un-select them. Then click Apply
Changes.
6. If desired, click on any blue column heading to sort he column.
7. Right click on the inbox folder (on the left side of the screen). The Save Layout hyperlink
appears.
8. Click the Save Layout hyperlink. A box appears prompting for the view name.
9. Enter the view name (with the Job # for easy reference) and click the OK button

Page 8 of 12 Invoice Approval Guide v4 04/29/13
This example creates a view grouping invoices by Job #, sorting by Vendor Name within job and
removing some columns. This creates a nice, grouped appearance. However, after approving an
invoice, the grouped view collapses – forcing you to click the Job # to expand the display before
approving the next invoice.
1. Sign-on to the Enterprise Console and display the inbox.
2. Right click on the Job column and select Group by This Field
3. Right click on the Vendor Name column and select Sort A to Z
4. Right click anywhere and chose Select Columns. The Select Columns pop-up box appears.
5. In the Select Columns pop-up box, check these fields:
6. Click Apply Changes
7. Right click on the inbox folder (on the left side of the screen). The Save Layout hyperlink
appears.
8. Click the Save Layout hyperlink. A box appears prompting for the view name.

Page 9 of 12 Invoice Approval Guide v4 04/29/13
9. Enter the view name and click the OK button
Here is how the view looks:
Exhibit: Saved view of invoices group by Job # and sorted by Vendor Name within job.

Page 10 of 12 Invoice Approval Guide v4 04/29/13
Annotation Taskbar Icons
This section explains each of the icons that appear on the document annotation taskbar:
Icon Description of Icon Function
FIT TO WINDOW – Displays the document on one screen (without any vertical
scrolling).
FIT HEIGHT - Displays the entire document vertically (may need to scroll horizontally)
FIT WIDTH – Displays the entire document horizontally (may need to scroll vertically)
ROTATE – Flips the document to the left or right.
ZOOM – Zoom in and out
Print (with PDF options)
PAGE MENU – Do not use this button.
SELECT - Click to alternate between the Selection Arrow and the “hand” to move the
document within the viewing window.
TEXT – To enter text on a document, select this button and click inside the
document. After clicking this button, the Annotation Text Editor appears:
Enter the text and click OK. Click the ADVANCED button for more formatting
options (different text colors, sizes and fonts):

Page 11 of 12 Invoice Approval Guide v4 04/29/13
HIGHLIGHT – To highlight areas of the document
FREEHAND – To draw freehand lines on the document
ARROW – To draw arrows on the document
SHAPES – To drag rectangles, ovals and circles on the document
ERASER – To erase annotations
LINE WIDTH – Changes the width of lines
COLOR – Change the color of lines and shapes
DELETE – This deletes the annotations. It does not delete the document.
SAVE – Save the annotations.
CANCEL CHANGES – Removes the previous annotation.

Page 12 of 12 Invoice Approval Guide v4 04/29/13
AP Approval Process Flowchart


![AME for Invoice Approval[1] Very Good One](https://img.pdfslide.us/doc/110x75/543a8cfeafaf9fc76f8b4674/ame-for-invoice-approval1-very-good-one.jpg)


![Invoice Approval Workflow_f[1]](https://img.pdfslide.us/doc/110x75/5529827c4a7959ae158b4794/invoice-approval-workflowf1.jpg)