Embed Size (px)
Citation preview
State of North Dakota Inventory Training Manual
VERSION 8.4
3130 Kilgore Road, Suite 400 Rancho Cordova, CA 95670
916.669.3720 www.maximus.com
State of North Dakota
DISCLAIMERS
MAXIMUS ERP Solutions
Written by MAXIMUS, ERP Solutions Division, January 2004.
This training manual is considered to be proprietary and confidential and may not be reproduced for any reason other than stated below without prior written consent of MAXIMUS, ERP Solutions Division.
EXCLUSION
This training manual has been prepared exclusively for State of North Dakota End-User Training. Information contained within this document may be used by the State of North Dakota for the sole purpose of personnel training. Additional manuals may be reproduced and edited as needed for training purposes ONLY. All other uses are prohibited without prior written consent from MAXIMUS, ERP Solutions Division.
Copyright 2004 MAXIMUS, ERP Solutions Division, Inc. All Rights Reserved.
State of North Dakota
INVENTORY FINANCIALS
Date: 8/20/2004 MAXIMUS, Inc. © 2004. All Rights Reserved. Page i
TABLE OF CONTENTS PEOPLESOFT OVERVIEW ................................................................................................................ 6
OVERVIEW A ND APPLICATIONS ........................................................................................................ 6
MATERIAL STORAGE STRUCTURES ................................................................................................... 7
Step 1: Establishing Storage Structures ...................................................................................7 Defining Default Storage Location Structures and Attributes ......................................................7 Step 2: Inventory Options ........................................................................................................8 Step 3: Define and Maintain Storage Locations .........................................................................9 Step 4: Maintaining Storage Location Information ................................................................... 10
VIEWING STORAGE LOCATION INFORMATION.................................................................................... 11
Pages Used to View Storage Location Information .................................................................. 11
ESTABLISHING P UTAWAY D EFAULTS .............................................................................................. 12
Pages Used to Establish Default Putaway Information and Rules............................................. 12 Step 1: Assigning Default Putaway Locations ......................................................................... 12
PEOPLESOFT INVENTORY BUSINESS PROCESSES .................................................................... 14
UNDERSTANDING R ECEIVING AND P UTAWAY PROCESSING ................................................................. 15
EXPRES S P UTAWAY PROCESSING .................................................................................................. 15
R ECORDING EXPRESS P UTAWAY.................................................................................................... 16
Pages Used to Record Express Putaway ............................................................................... 17
STEP 1: ENTERING MANDATORY EXPRESS PUTAWAY INFORMATION .................................................... 17
Optional Links:...................................................................................................................... 18 Chartfield Overrides .............................................................................................................. 18 PO Information ..................................................................................................................... 18 Line Defaults ........................................................................................................................ 19
STEP 2: AUTO-PUTAWAY PROCESSING ........................................................................................... 20
CREATING ORDERS FOR FULFILLMENT ....................................................................................... 21
UNDERSTANDING M ETHODS OF STOCK R EQUEST C REATION .............................................................. 21
COMMON ELEMENTS USED IN T HIS S ECTION .................................................................................... 21
CREATING MATERIAL STOCK R EQUESTS ......................................................................................... 24
Pages Used to Create Material Stock Requests...................................................................... 24
OVERVIEW OF MATERIAL STOCK R EQUESTS .................................................................................... 25
State of North Dakota
INVENTORY FINANCIALS
Date: 8/20/2004 MAXIMUS, Inc. © 2004. All Rights Reserved. Page ii
Optional Links:...................................................................................................................... 29 CommentsQuantity / Date Detail Link .................................................................................... 29 Quantity / Date Detail Link .................................................................................................... 30 Shipment Details Link ........................................................................................................... 32 Accounting / IUT Detail Link .................................................................................................. 33 Comments Link .................................................................................................................... 34
MATERIAL STOCK R EQUEST : EXTERNAL ORDER .............................................................................. 35
MATERIAL STOCK R EQUEST : INTERUNIT T RANSFER .......................................................................... 37
MATERIAL STOCK R EQUEST : INTERNAL ISSUE ................................................................................. 38
CANCELING ORDERS AND STOCK R EQUESTS ................................................................................... 40
MONITORING O RDER F ULFILLMENT STATUS ..................................................................................... 41
Pages Used to Monitor Order Fulfillment Status ...................................................................... 41 Viewing Fulfillment Status ..................................................................................................... 42 Searching for Orders ............................................................................................................. 43 Viewing Additional Order Line Information .............................................................................. 45 Reviewing the Status of a Particular Order ............................................................................. 46 Viewing Additional Shipment Information for an Order ............................................................. 47
PICKING INVENTORY ..................................................................................................................... 48
UNDERSTANDING THE PICKING PROCESS ........................................................................................ 48
CREATING PICKING PLANS ............................................................................................................ 50
Pages Used to Create Picking Plans ...................................................................................... 50 Creating Picking Plan Instructions .......................................................................................... 51 Additional Options................................................................................................................. 52 Specifying Additional Picking Plan Options ............................................................................. 52
ENTERING PICKING F EEDBACK ...................................................................................................... 55
Pages Used to Enter Picking Feedback.................................................................................. 55 Entering or Modifying Picked Quantities ................................................................................. 57 Selecting Demand Lines for Picking Feedback ....................................................................... 60 Selecting Multiple Pick Line Numbers for Feedback ................................................................ 61 Navigating Directly to a Specific Demand Line........................................................................ 61
CONFIRMING PICKED INVENTORY ................................................................................................... 62
Page Used to Confirm Picked Inventory ................................................................................. 63 Running the Picking Confirmation Process ............................................................................. 63
SHIPPING INVENTORY ................................................................................................................... 65
ENTERING SHIPMENT DATA ........................................................................................................... 65

State of North Dakota
INVENTORY FINANCIALS
Date: 8/20/2004 MAXIMUS, Inc. © 2004. All Rights Reserved. Page iii
Common Elements Used in This Section................................................................................ 66 Pages Used to Enter Shipment Data...................................................................................... 67 Confirming Orders for Shipment............................................................................................. 68 Selecting Orders to Ship ....................................................................................................... 70 Overriding Order Shipment Defaults....................................................................................... 71 Marking Demand Lines for Shipment ..................................................................................... 72
D EPLETING INVENTORY BALANCES ................................................................................................. 72
Page Used to Deplete Inventory Balances .............................................................................. 73 Running the Depletion Process.............................................................................................. 73
SETUP B USINESS U NIT R EPLENISHMENT ......................................................................................... 75
SETUP ITEM REPLENIS HMENT ........................................................................................................ 76
RUN THE R EPLENISHMENT PROCESS .............................................................................................. 77
PERFORMING PHYSICAL ACCOUNTING........................................................................................ 80
UNDERSTANDING COUNTS ............................................................................................................ 80
Count Types ......................................................................................................................... 80 Count Processes .................................................................................................................. 81 Count Event Statuses ........................................................................................................... 83 Zero-Quantity Items .............................................................................................................. 83 Count Dates and Times ......................................................................................................... 84 Common Elements Used in This Section................................................................................ 84
SETTING UP INVENTORY C OUNTS ................................................................................................... 86
Pages Used to Set Up Inventory Counts ................................................................................ 87 Setting Up Count Report and Display Parameters ................................................................... 87 Setting Up Count Defaults ..................................................................................................... 89
CREATING C OUNTING EVENTS ....................................................................................................... 89
Pages Used to Create Counting Events ................................................................................. 90 Defining Parameters for the Event Creation Process............................................................... 91
ENTERING COUNT DATA FROM A COUNTING SHEET R EPORT .............................................................. 93
CREATING R ECONCILIATION R EPORTS ............................................................................................ 93
Page Used to Create Reconciliation Reports .......................................................................... 93 Generating Reconciliation Reports......................................................................................... 94 Pages Used to Update Counting Events................................................................................. 95 Maintaining Event Headers .................................................................................................... 96 To cancel a counting event:................................................................................................... 96 Reviewing Event History ....................................................................................................... 97 Entering Item Count Data...................................................................................................... 99 Retrieving Event Detail Lines ............................................................................................... 101
State of North Dakota
INVENTORY FINANCIALS
Date: 8/20/2004 MAXIMUS, Inc. © 2004. All Rights Reserved. Page iv
UPDATING STOCK Q UANTITIES ..................................................................................................... 102
Page Used to Update Stock Quantities................................................................................. 102 Defining Stock Update Parameters ...................................................................................... 103 Using Error Messages From the Stock Quantity Update Process ........................................... 103
MAKING STOCK QUANTITY ADJUSTMENTS ................................................................................ 106
UNDERSTANDING STOCK QUANTITY ADJUSTMENTS ........................................................................ 106
COMMON ELEMENTS USED IN THIS SECTION .................................................................................. 106
MAKING ADJUSTMENTS ONLINE................................................................................................... 106
Pages Used to Make Adjustments Online ............................................................................. 107 Scrapping Return-to-Vendor Stock....................................................................................... 107 Making On-Hand Quantity Adjustments................................................................................ 108 Searching for Quantities to Adjust........................................................................................ 110 Defining Return-to-Vendor Adjustments to Remove .............................................................. 110
INQUIRING AND REPORTING ABOUT ON- HAND STOCK ............................................................ 111
UNDERSTANDING ON-HAND INVENTORY REPORTING ....................................................................... 111
VIEWING TRANSACTION HISTORY ................................................................................................. 111
Pages Used to View Transaction History .............................................................................. 111 Viewing Transaction History ................................................................................................ 112 Searching for Transaction History ........................................................................................ 114
VIEWING ITEM BALANCES ............................................................................................................ 114
Pages Used to View Item Balances ...................................................................................... 114 Viewing Item Balances by All Units ...................................................................................... 116 Viewing Item Balances by Unit............................................................................................. 116 Viewing Item Balances by Location ...................................................................................... 117
PERFORMING STOCK I NQUIRIES ................................................................................................... 117
Pages Used to Perform Stock Inquiries ................................................................................ 117
IDENTIFYING SLOW MOVING INVENTORY ........................................................................................ 119
Page Used to Identify Slow Moving Inventory ....................................................................... 119 Defining Slow Moving Inventory Report Parameters .............................................................. 119
RETURN FOR CREDIT .................................................................................................................. 120
ENTERING RMA DATA ............................................................................................................... 120
Common Elements Used in This Section.............................................................................. 120 Pages Used to Enter RMA Data........................................................................................... 121
State of North Dakota
INVENTORY FINANCIALS
Date: 8/20/2004 MAXIMUS, Inc. © 2004. All Rights Reserved. Page v
Entering required RMA Information ...................................................................................... 122 Selecting Order Lines to Be returned ................................................................................... 122
POSTING INVENTORY TR ANSACTIONS ....................................................................................... 123 Pages Used to Post Inventory Transactions ......................................................................... 123
STEP 1: T RANSACTION COSTING .................................................................................................. 123
STEP 2: ACCOUNTING LINE C REATION .......................................................................................... 125
STEP 3: VIEW ACCOUNTING ERRORS ............................................................................................ 127
STEP 4: ACCOUNTING LINE EDIT .................................................................................................. 128
STEP 5: JOURNAL G ENERATOR P ROCESS ..................................................................................... 129
VIEW JOURNAL ENTRIES ............................................................................................................. 131 Pages Used to View Journal Entries .................................................................................... 131

State of North Dakota
INV_107 INVENTORY
Date: 8/20/2004 MAXIMUS, Inc. © 2004. All Rights Reserved. Page 6 of 133
PEOPLESOFT OVERVIEW OVERVIEW AND APPLICATIONS In PeopleSoft 8, you will use your applications in a purely Internet environment. We call this environment PeopleSoft Internet Architecture. PeopleSoft Internet Architecture is a server-centric architecture that requires the installation of only a web browser on individual user machines (if one does not already exist).
PeopleSoft is designed to integrate all financial applications. That is, the applications may share the same relational data structure, data tables, user interfaces, reporting tools, and customization capabilities. PeopleSoft pages also display the same familiar table-driven and effective date–driven designs throughout its applications.
The system offers a compliment of applications that cover most financial needs. PeopleSoft Financials for Public Sector consists of the following applications (modules):
• Accounts Payables
• Accounts Receivables
• Asset Management Billing
• Budgets
• General Ledger
• Inventory
• Order Management
• Project Costing
• Purchasing
• Workflow
State of North Dakota
INV_107 INVENTORY
Date: 8/20/2004 MAXIMUS, Inc. © 2004. All Rights Reserved. Page 7 of 133
DEFINING STORAGE MATERIAL STORAGE STRUCTURES For each business unit, you define storage areas comprised of storage levels. A storage area is a division of a business unit used to store material and to track inventory transactions. Your storage areas might include shipping and receiving docks, staging areas, warehouse zones, and inspection and quality control departments. Each storage area can be divided into a maximum of four levels, with each level representing a physical subdivision of the area. For example, you might have a three-level warehouse area consisting of 15 aisles with 10 cabinets per aisle and 5 shelves per cabinet. The combination of a storage area and that area's most detailed storage level constitutes a storage location. Each storage location is identified by area and level.
STEP 1: ESTABLISHING STORAGE STRUCTURES
You can design a different level structure for each storage area, tailoring the individual structures to fit your business needs and the physical layout of your business unit. You might want a four-level structure for a primary storage area consisting of aisles, cabinets, shelves, and drawers, and a two-level structure for a staging area containing rows of pallets. In certain cases—if you have a bulk storage area containing only one item, for example—you might want to set up an area with no levels.
You define default storage location attributes for the SetID on the Inventory Options page. You then define attributes for individual storage areas on the Storage Areas page and for storage locations on the Material Storage Locations page.
DEFINING DEFAULT STORAGE LOCATION STRUCTURES AND ATTRIBUTES
Page Name Navigation Usage
Inventory Options Set Up Financials/Supply Chain, Business Unit Related, Inventory, Inventory Options
Define default storage location structures and attributes.
State of North Dakota
INV_107 INVENTORY
Date: 8/20/2004 MAXIMUS, Inc. © 2004. All Rights Reserved. Page 8 of 133
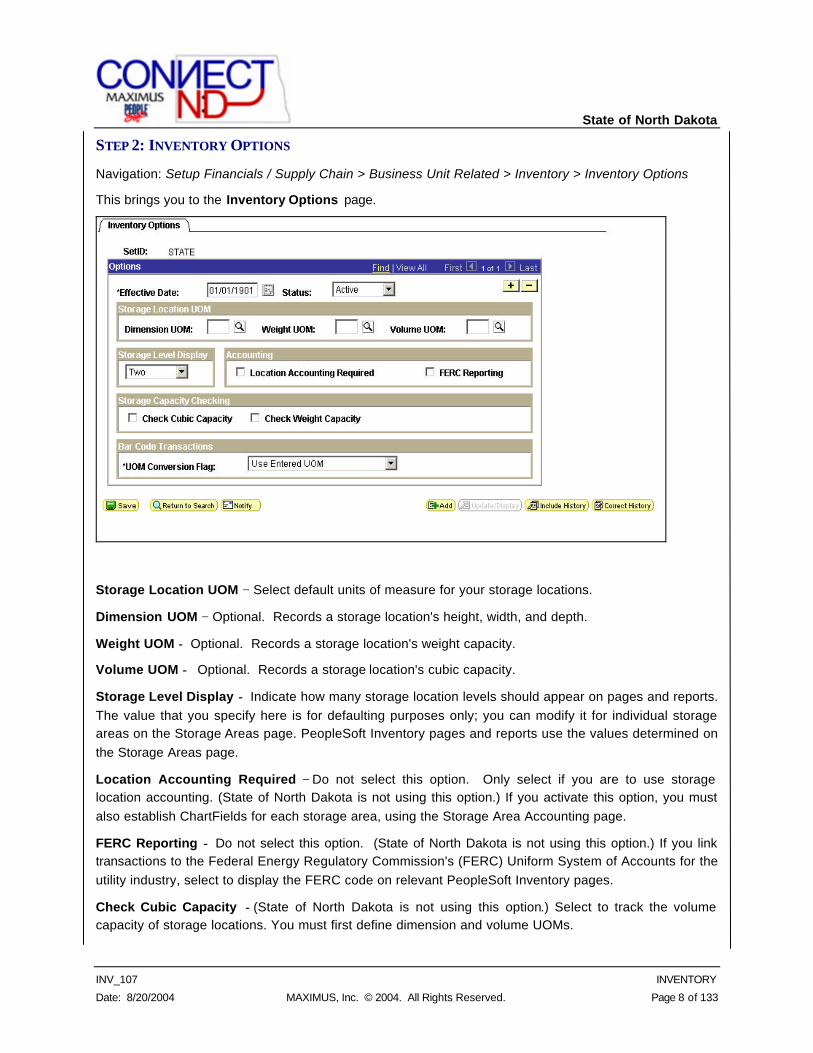
STEP 2: INVENTORY OPTIONS
Navigation: Setup Financials / Supply Chain > Business Unit Related > Inventory > Inventory Options
This brings you to the Inventory Options page.
Storage Location UOM − Select default units of measure for your storage locations.
Dimension UOM − Optional. Records a storage location's height, width, and depth.
Weight UOM − Optional. Records a storage location's weight capacity.
Volume UOM − Optional. Records a storage location's cubic capacity.
Storage Level Display − Indicate how many storage location levels should appear on pages and reports. The value that you specify here is for defaulting purposes only; you can modify it for individual storage areas on the Storage Areas page. PeopleSoft Inventory pages and reports use the values determined on the Storage Areas page.
Location Accounting Required − Do not select this option. Only select if you are to use storage location accounting. (State of North Dakota is not using this option.) If you activate this option, you must also establish ChartFields for each storage area, using the Storage Area Accounting page.
FERC Reporting − Do not select this option. (State of North Dakota is not using this option.) If you link transactions to the Federal Energy Regulatory Commission's (FERC) Uniform System of Accounts for the utility industry, select to display the FERC code on relevant PeopleSoft Inventory pages.
Check Cubic Capacity −(State of North Dakota is not using this option.) Select to track the volume capacity of storage locations. You must first define dimension and volume UOMs.
State of North Dakota
INV_107 INVENTORY
Date: 8/20/2004 MAXIMUS, Inc. © 2004. All Rights Reserved. Page 9 of 133
Check Weight Capacity − (State of North Dakota is not using this option.) Select to track the weight capacity of storage locations. You must first define a weight UOM.
Click . Now that you have setup your Inventory Options, you must define your Storage Areas and Storage Location information.
STEP 3: DEFINE AND MAINTAIN STORAGE LOCATIONS
Page Name Navigation Usage
Storage Areas Inventory, Maintain Storage Locations, Storage Areas
Establish or modify definitions for individual storage areas.
Material Storage Locations
Inventory, Maintain Storage Locations, Material Storage
Locations
Define or modify storage location information.
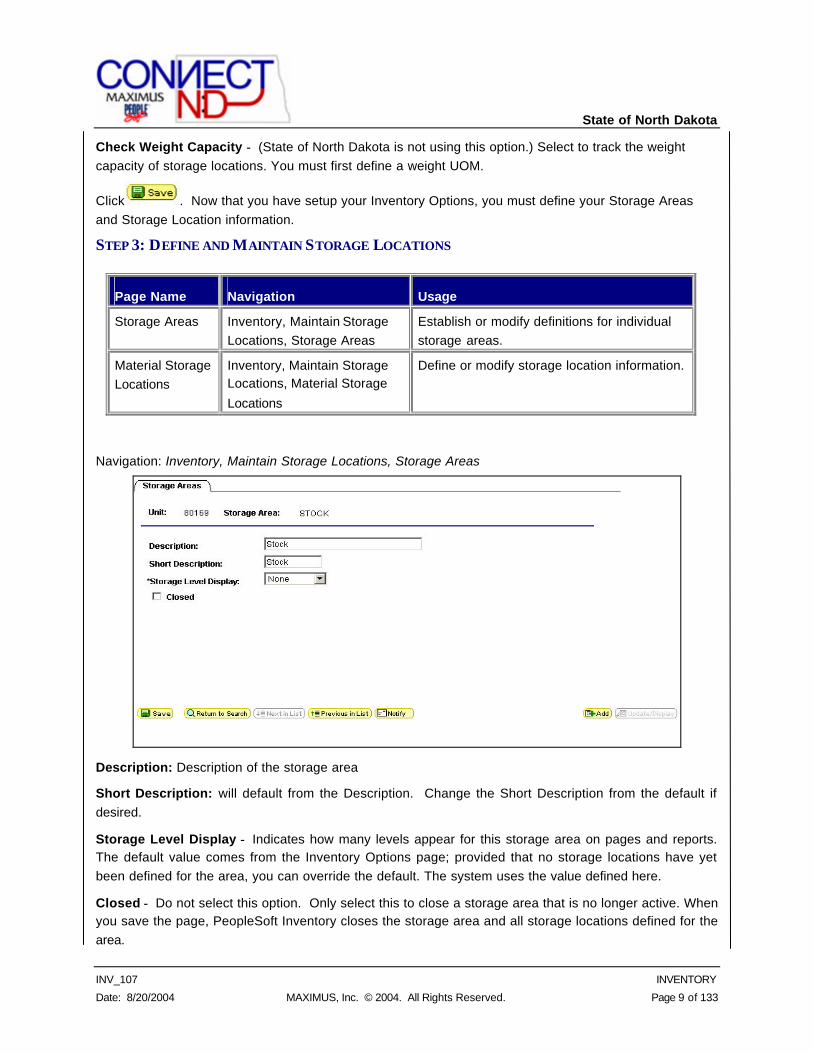
Navigation: Inventory, Maintain Storage Locations, Storage Areas
Description: Description of the storage area
Short Description: will default from the Description. Change the Short Description from the default if desired.
Storage Level Display − Indicates how many levels appear for this storage area on pages and reports. The default value comes from the Inventory Options page; provided that no storage locations have yet been defined for the area, you can override the default. The system uses the value defined here.
Closed − Do not select this option. Only select this to close a storage area that is no longer active. When you save the page, PeopleSoft Inventory closes the storage area and all storage locations defined for the area.
State of North Dakota
INV_107 INVENTORY
Date: 8/20/2004 MAXIMUS, Inc. © 2004. All Rights Reserved. Page 10 of 133
NOTE: Once you close the storage area, it is marked for deletion from the system and you cannot reopen it.
Click . Next you must define your Material Storage Locations.
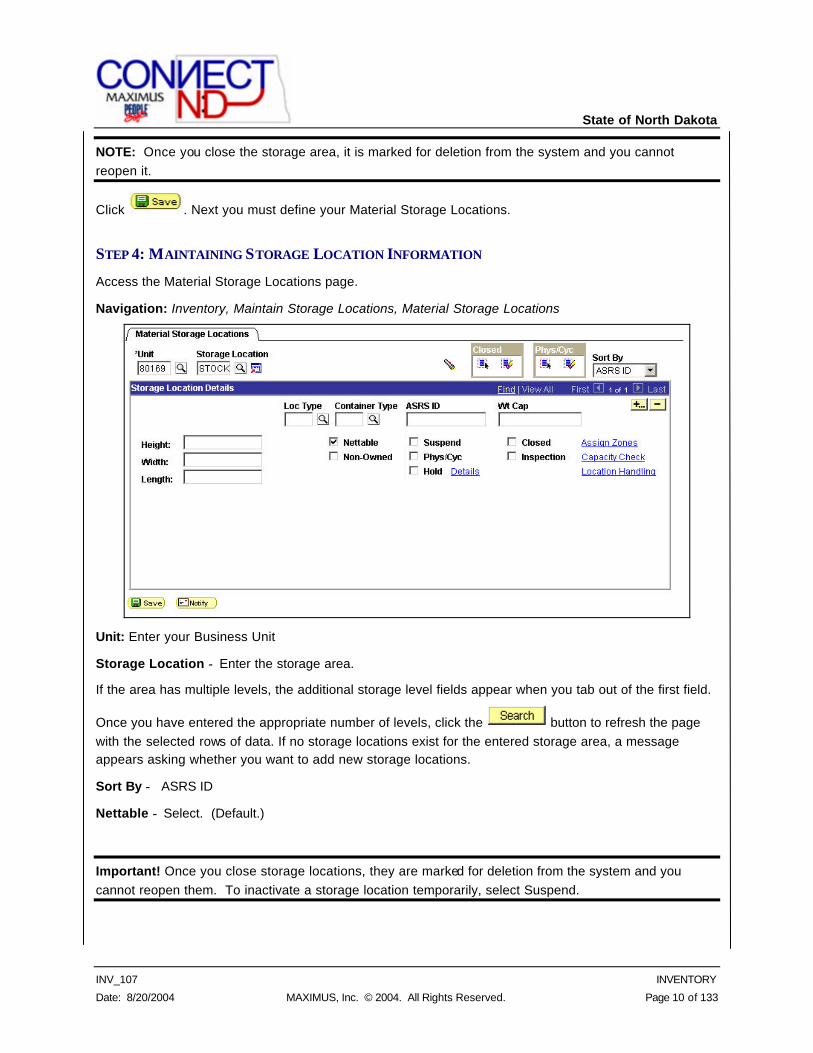
STEP 4: MAINTAINING STORAGE LOCATION INFORMATION
Access the Material Storage Locations page.
Navigation: Inventory, Maintain Storage Locations, Material Storage Locations
Unit: Enter your Business Unit
Storage Location − Enter the storage area.
If the area has multiple levels, the additional storage level fields appear when you tab out of the first field.
Once you have entered the appropriate number of levels, click the button to refresh the page with the selected rows of data. If no storage locations exist for the entered storage area, a message appears asking whether you want to add new storage locations.
Sort By − ASRS ID
Nettable − Select. (Default.)
Important! Once you close storage locations, they are marked for deletion from the system and you cannot reopen them. To inactivate a storage location temporarily, select Suspend.
State of North Dakota
INV_107 INVENTORY
Date: 8/20/2004 MAXIMUS, Inc. © 2004. All Rights Reserved. Page 11 of 133
NOTE: A WIP Location cannot be defined as an inspection location.
NOTE: You cannot place storage location scontaining allocated quantity on hold.
Important! Changing the WIP, Nettable, Hold or Inspection options for a storage location while material movement transactions are in process can result in misrepresentation of the reserved and available balances for items stored in that location. PeopleSoft recommends that you only change these options when no other users are logged onto the system.
VIEWING STORAGE LOCATION INFORMATION You can view information about your material storage locations online or generate a report to use for visual verification of storage location attributes.
PAGES USED TO VIEW STORAGE LOCATION INFORMATION
Page Name Navigation Usage
Review Material Storage Loc
(locations)
Inventory, Maintain Storage Locations, Review Material Storage Loc
View the storage location attributes defined for a business unit.
Storage Locations
(report)
Define Business Rules, Structure Inventory, Report, Storage
Locations, Storage Locations
Generate a list of material storage location attributes for visual verification.
State of North Dakota
INV_107 INVENTORY
Date: 8/20/2004 MAXIMUS, Inc. © 2004. All Rights Reserved. Page 12 of 133
ESTABLISHING PUTAWAY DEFAULTS You specify Putaway processing defaults using the Putaway Setup component.
PAGES USED TO ESTABLISH DEFAULT PUTAWAY INFORMATION AND RULES
Page Name Navigation Usage
Default Putaway Locations
Inventory, Maintain Storage Locations, Default Putaway Locations
Inventory, Maintain Storage Locations, Review Default Putaway Loc, Default
Putaway Locations
Assign or update default Putaway locations for an item.
STEP 1: ASSIGNING DEFAULT PUTAWAY LOCATIONS
When you usually store an item in the same location, you can improve the efficiency of your Putaway processing by defining a default Putaway location for the item. If you select the Default Putaway directed Putaway option on either the Putaway Setup page or the Putaway Item Setup page, PeopleSoft Inventory uses the storage location you define here as the highest-priority Putaway location. The Putaway processes also use this location if no Putaway rules are defined.
Navigation: Inventory, Maintain Storage Locations, Default Putaway Locations
Business Unit: Enter your Business Unit
Item ID: Enter the Item ID for which the default putaway location will be created.
Click . This brings you to the Default Putaway Locations page.
State of North Dakota
INV_107 INVENTORY
Date: 8/20/2004 MAXIMUS, Inc. © 2004. All Rights Reserved. Page 13 of 133
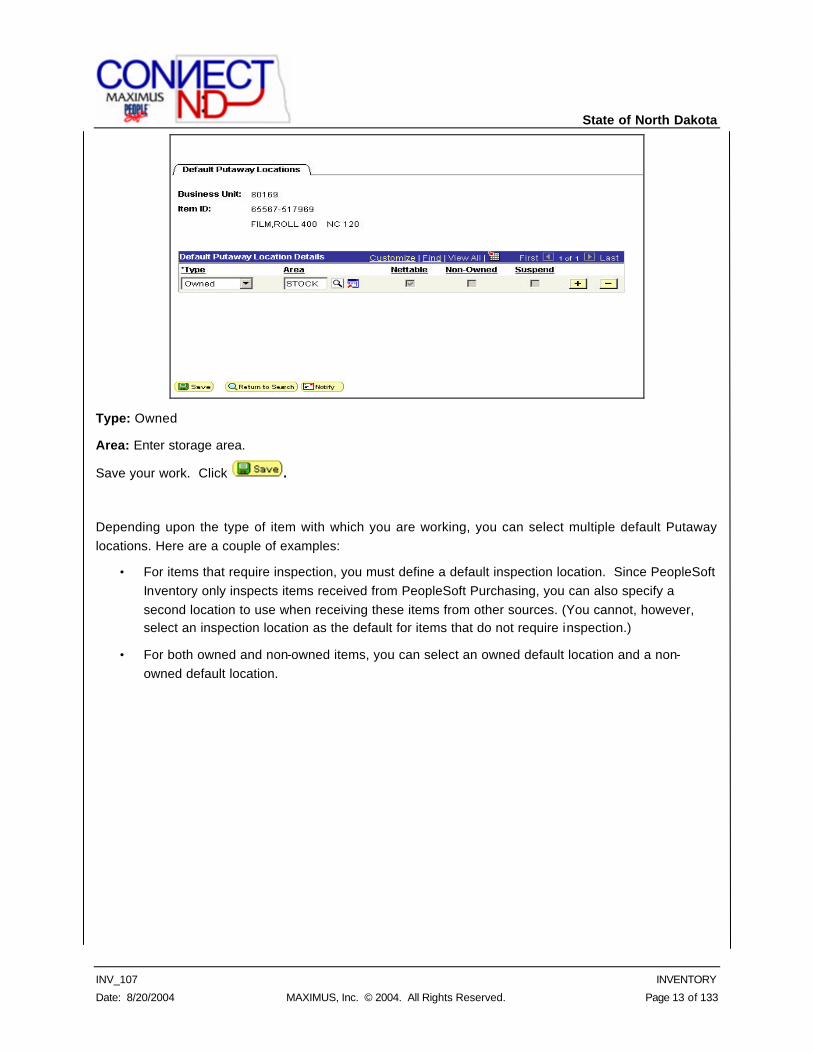
Type: Owned
Area: Enter storage area.
Save your work. Click .
Depending upon the type of item with which you are working, you can select multiple default Putaway locations. Here are a couple of examples:
• For items that require inspection, you must define a default inspection location. Since PeopleSoft Inventory only inspects items received from PeopleSoft Purchasing, you can also specify a second location to use when receiving these items from other sources. (You cannot, however, select an inspection location as the default for items that do not require inspection.)
• For both owned and non-owned items, you can select an owned default location and a non-owned default location.
State of North Dakota
INV_107 INVENTORY
Date: 8/20/2004 MAXIMUS, Inc. © 2004. All Rights Reserved. Page 14 of 133
PEOPLESOFT INVENTORY BUSINESS PROCESSES
The PeopleSoft Inventory business processes include:
• Receiving and Putaway
• Replenishment
• Creating Orders for Fulfillment
• Material reservations
• Picking
• Shipping
• Material usage and reconciliation
• Physical accounting
State of North Dakota
INV_107 INVENTORY
Date: 8/20/2004 MAXIMUS, Inc. © 2004. All Rights Reserved. Page 15 of 133
RECEIVING AND PUTTING AWAY STOCK This section provides overviews of Receiving and Putaway processing and discusses how to:
• Record Express Putaway.
• Auto Putaway
UNDERSTANDING RECEIVING AND PUTAWAY PROCESSING Receiving and Putaway processing play a key role in any material management strategy. How and where you store materials in your facility affects your total storage capacity and the efficiency of your Putaway and picking operations.
EXPRESS PUTAWAY PROCESSING Use the Express Putaway option to put away stock that is not tied to a receipt or for which no receiving information is available.
Follow these steps to perform Express Putaway processing:
11.. Enter item Putaway information in the Express Putaway component.
22.. Save the Express Putaway component to:
• Update the available quantity and inbound costs.
• For lot-controlled items, calculate lot availability, retest, and expiration dates if you have defined shelf life, availability lead-time, and retest lead-time values on the Lot Control Information page.
State of North Dakota
INV_107 INVENTORY
Date: 8/20/2004 MAXIMUS, Inc. © 2004. All Rights Reserved. Page 16 of 133
RECORDING EXPRESS PUTAWAY Use Express Putaway processing when you want to put incoming materials into their storage locations without taking the time to receive the items and create a Putaway plan.
The Express Putaway component does not update original or expected receipt information; therefore, you cannot use this processing method to put away material from purchase orders, interunit transfers, or RMAs. To receive purchase orders, use the Receiving component in PeopleSoft Purchasing; to receive and put away interunit transfers or RMAs, use the InterUnit and RMA Receiving component. Once receipt information for stock has been staged to PeopleSoft Inventory's staging interface table (STAGED_INF_INV), use auto-Putaway or multi-step Putaway processing to put away the stock.
When you save the Express Putaway component, the system performs the same validation as that performed by the Load Staged Items process. If you specify a new lot for a lot-controlled item, the system also calculates lot availability, retest, and expiration dates, provided that you have defined shelf life, availability lead-time, and retest lead-time values on the Lot Control Information page.
• Availability Date = Creation Date + Availability Lead Time
• Retest Date = Creation Date + Retest Lead Time
• Expiration Date = Creation Date + Shelf Life
Here's how to record Express Putaway:
1. Enter mandatory Express Putaway information.
2. Specify tracking information.
3. Define information common to all Putaway lines.
State of North Dakota
INV_107 INVENTORY
Date: 8/20/2004 MAXIMUS, Inc. © 2004. All Rights Reserved. Page 17 of 133
PAGES USED TO RECORD EXPRESS PUTAWAY
Page Name Navigation Usage
Express Putaway Inventory, Putaway Stock, Express Putaway
Enter mandatory information for the Express Putaway method.
Express Putaway - PO Information (Express Putaway - purchase order
information)
Click the PO Information link on the Express Putaway page.
Use if the items being put away require specific tracking information, such as
purchase order information.
Express Putaway - Putaway Line Defaults
Click the Line Defaults link on the Express Putaway page.
Define information common to all of the Putaway lines that you are processing.
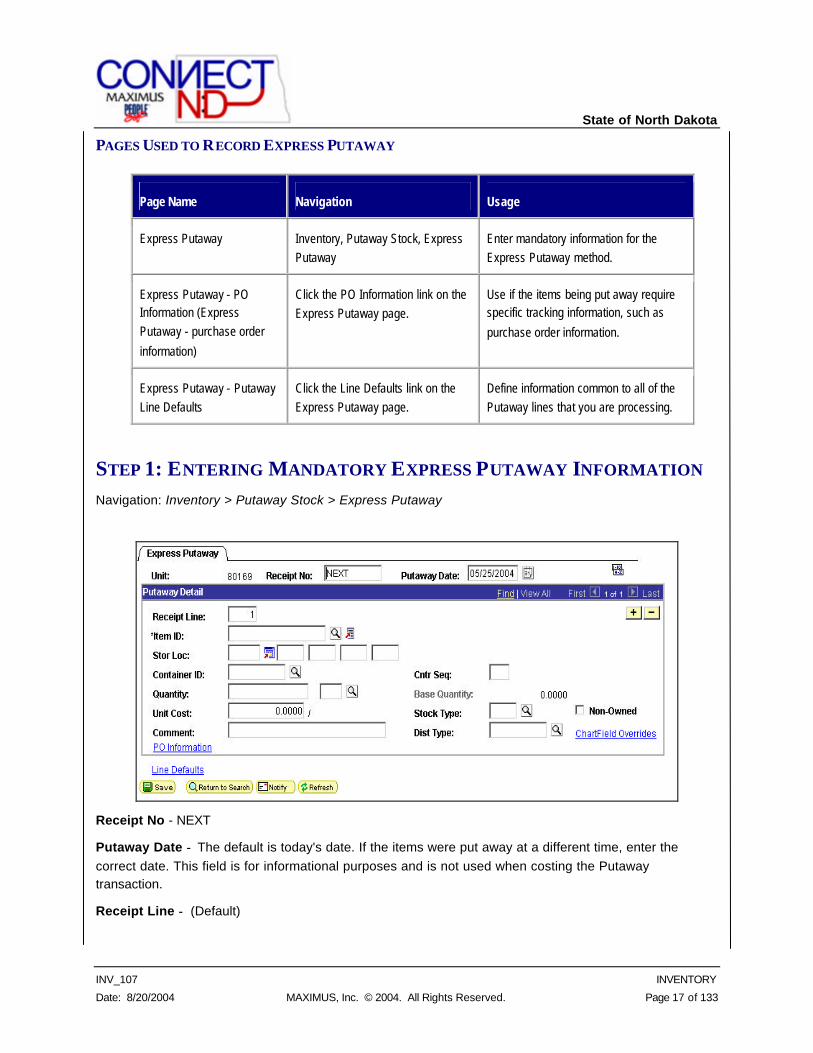
STEP 1: ENTERING MANDATORY EXPRESS PUTAWAY INFORMATION Navigation: Inventory > Putaway Stock > Express Putaway
Receipt No - NEXT
Putaway Date − The default is today's date. If the items were put away at a different time, enter the correct date. This field is for informational purposes and is not used when costing the Putaway transaction.
Receipt Line − (Default)
State of North Dakota
INV_107 INVENTORY
Date: 8/20/2004 MAXIMUS, Inc. © 2004. All Rights Reserved. Page 18 of 133
Stor Loc − If a default Putaway location has been defined for the item, that location appears. If you are not putting the item into an existing container, you can override the default Putaway location. If no default Putaway location exists, or if you are overriding the default, enter the storage location into which you want to put the item.
NOTE: The business unit's default display options determine how many storage location levels appear upon entry to this page. If you are entering a storage location that requires additional levels, enter the storage area, and then refresh the page to display the remaining levels for that area.
Unit Cost − Enter the cost per item.
Non-Owned − Do not select this option. Select only if the item is not owned by the business unit and is not consigned. The system does not cost the Putaway transaction for a non-owned item. In addition, if the item is average-costed, this transaction does not affect the average-cost calculations.
Stock Type − <blank> (Only required if the item is non-owned.)
NOTE: The business unit defaults established on the Inventory Display Options page govern whether lot serial, and configuration fields appear upon entry to this page. Any fields for which the default is Yes always appear. Any fields for which the default is No appear when you save or refresh the page, and only
if they apply to the item being put away.
OPTIONAL LINKS:
ChartField Overrides
PO Information
Line Defaults.
CHARTFIELD OVERRIDES
Click Chartfield Overrides to access the ChartField Overrides page, where you can override the credit accounting information for the Putaway line.
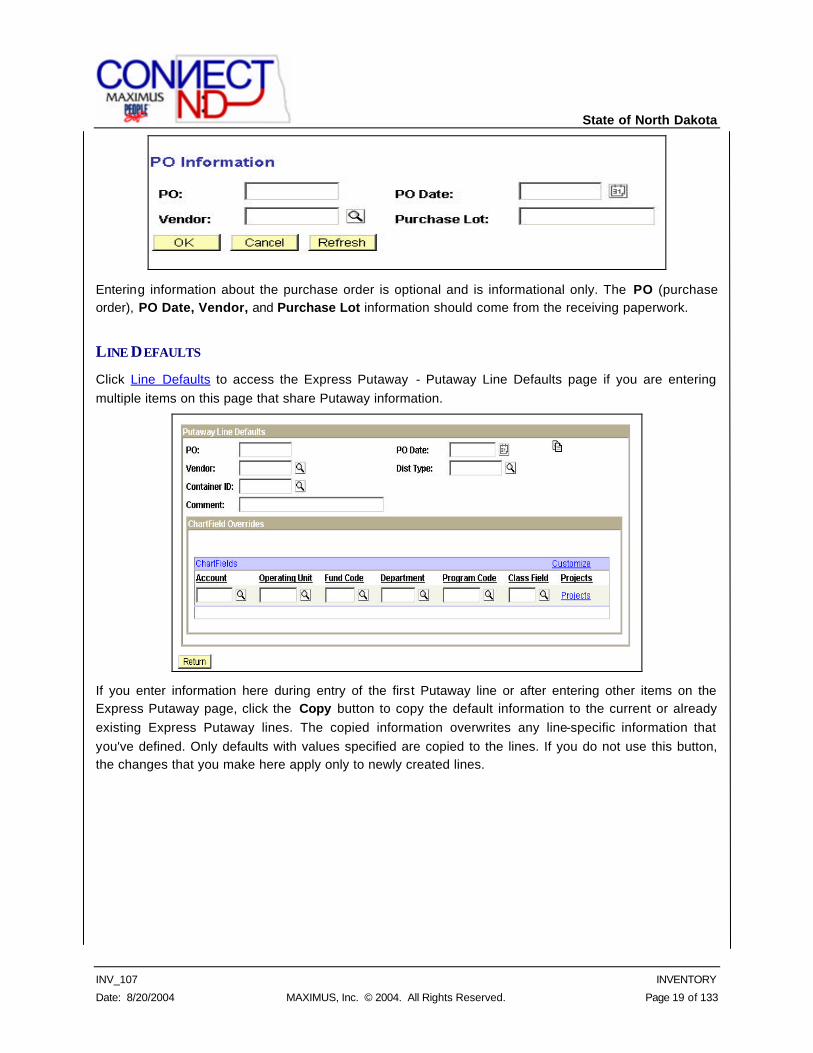
PO INFORMATION
Click PO Information to access the Express Putaway — PO Information page if any of the items that you are entering require specific purchase order tracking information.
State of North Dakota
INV_107 INVENTORY
Date: 8/20/2004 MAXIMUS, Inc. © 2004. All Rights Reserved. Page 19 of 133
Entering information about the purchase order is optional and is informational only. The PO (purchase order), PO Date, Vendor, and Purchase Lot information should come from the receiving paperwork.
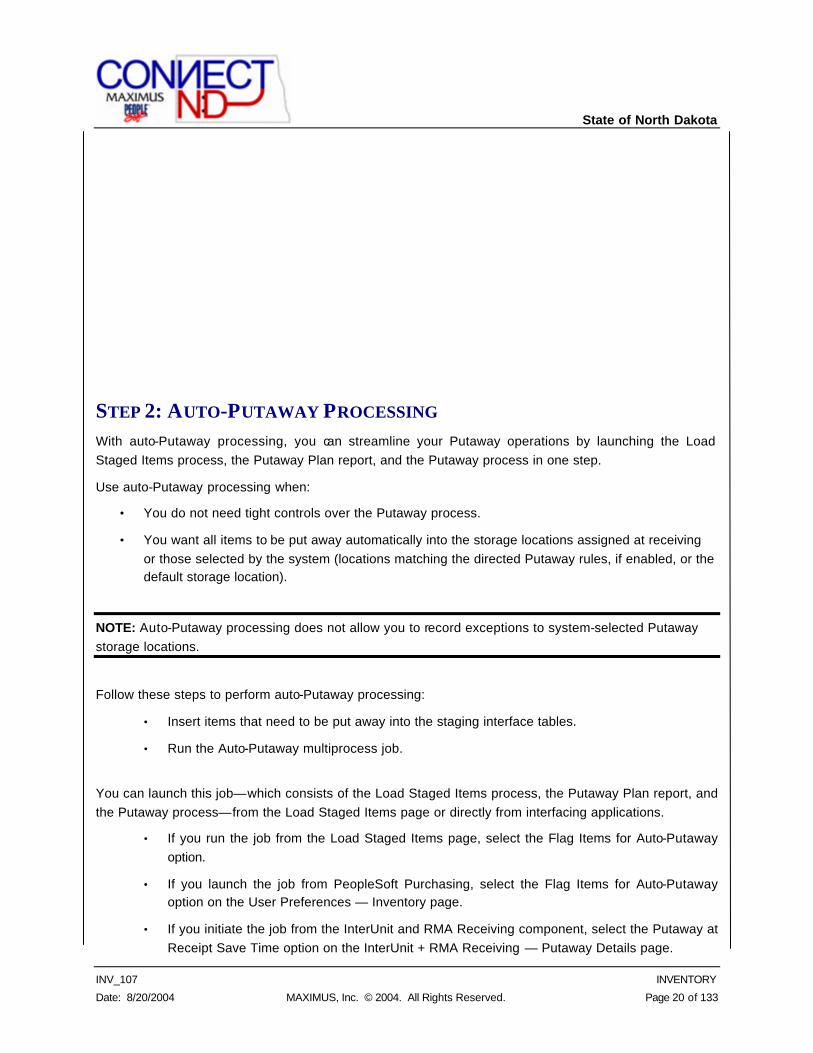
LINE DEFAULTS
Click Line Defaults to access the Express Putaway - Putaway Line Defaults page if you are entering multiple items on this page that share Putaway information.
If you enter information here during entry of the first Putaway line or after entering other items on the Express Putaway page, click the Copy button to copy the default information to the current or already existing Express Putaway lines. The copied information overwrites any line-specific information that you've defined. Only defaults with values specified are copied to the lines. If you do not use this button, the changes that you make here apply only to newly created lines.
State of North Dakota
INV_107 INVENTORY
Date: 8/20/2004 MAXIMUS, Inc. © 2004. All Rights Reserved. Page 20 of 133
STEP 2: AUTO-PUTAWAY PROCESSING With auto-Putaway processing, you can streamline your Putaway operations by launching the Load Staged Items process, the Putaway Plan report, and the Putaway process in one step.
Use auto-Putaway processing when:
• You do not need tight controls over the Putaway process.
• You want all items to be put away automatically into the storage locations assigned at receiving or those selected by the system (locations matching the directed Putaway rules, if enabled, or the default storage location).
NOTE: Auto-Putaway processing does not allow you to record exceptions to system-selected Putaway storage locations.
Follow these steps to perform auto-Putaway processing:
• Insert items that need to be put away into the staging interface tables.
• Run the Auto-Putaway multiprocess job.
You can launch this job—which consists of the Load Staged Items process, the Putaway Plan report, and the Putaway process—from the Load Staged Items page or directly from interfacing applications.
• If you run the job from the Load Staged Items page, select the Flag Items for Auto-Putaway option.
• If you launch the job from PeopleSoft Purchasing, select the Flag Items for Auto-Putaway option on the User Preferences — Inventory page.
• If you initiate the job from the InterUnit and RMA Receiving component, select the Putaway at Receipt Save Time option on the InterUnit + RMA Receiving — Putaway Details page.
State of North Dakota
INV_107 INVENTORY
Date: 8/20/2004 MAXIMUS, Inc. © 2004. All Rights Reserved. Page 21 of 133
You can configure the Auto-Putaway job definition (or add a new definition) to include only a certain subset of the processes. For example, to run the Load Staged Items process and Putaway Plan report (SQR) immediately and perform stockroom feedback, configure the job to include only those two processes and then run the Putaway process separately. If you don't need the Putaway plan, you can remove the report from the job definition.
CREATING ORDERS FOR FULFILLMENT This section provides an overview of stock request creation and discusses how to:
• Create material stock requests.
• Cancel orders and stock requests.
• Monitor order fulfillment status.
UNDERSTANDING METHODS OF STOCK REQUEST CREATION The word ‘orders’ is a generic term that covers all of the possible sources of demand managed by PeopleSoft Inventory. You can create sales orders in PeopleSoft Order Management, demand in PeopleSoft Purchasing, or stock requests in PeopleSoft Inventory.
PeopleSoft Inventory offers four methods for creating stock request transactions, using either the Material Stock Request component or the Express Issue component:
• Create a complete material stock request (MSR) on the Stock Request Summary page.
• Enter basic information on the Stock Request Summary page and then add line details on the other pages in the Material Stock Request component.
• Create an MSR on the Quantity/Date Detail page and enter complete, detailed information for the order line.
• Create a stock request, pick stock for the request, and issue the stock using the Express Issue component.
COMMON ELEMENTS USED IN THIS SECTION Unit or Business Unit − The business unit issuing the stock request.
State of North Dakota
INV_107 INVENTORY
Date: 8/20/2004 MAXIMUS, Inc. © 2004. All Rights Reserved. Page 22 of 133
Order No (order number) − The order number for the stock request. If you're using auto-numbering, the order number is either NEXT or the starting sequence that you entered.
Request Type − When you add a new MSR or express issue, the system presents you with a search dialog in which you must specify the type of order you are entering. Your selection determines which fields appear in the Material Stock Request component and on the Express Issue page. Values are:
External Order − Select to enter an MSR or express issue for an external order. While this request type enables you to identify the individual receiving the stock by using a ship to customer rather than a location, it is not intended to replace the features of a sales order. To complete a full billing and invoice transaction, create a sales order in PeopleSoft Order Management.
Internal Issue − Select to enter an MSR or express issue for an internal order (an order for a department or location within the Inventory business unit).
InterUnit Transfer − Select to enter an MSR or express issue for order that transfers stock from one Inventory business unit to another.
Vendor Returns − Select to enter an express issue for an RTV (return-to-vendor) order.
Increment Demand Line − This field, which is only available for the Material Stock Request component, determines which value increases when you click the Add button to insert a new stock request line. Select one of the following options:
Order Line − Creates another order line for the same stock request. The system automatically copies the address information defined on the Stock Request Summary page (along with the customer, ship to, location, load ID, carrier ID, and ship via) to the new order line when you enter an item ID. If no address information is defined on the Stock Request Summary page, the system copies the information from the previous order line to the new line.
Sched Line (schedule line) − Creates a new shipment schedule line for the current order line. The system copies the information from the previous schedule line to the new line, with the exception of request date, schedule ship date, and requested quantity.
Partial Orders Can Ship − Select to permit shipment of the stock request without fulfillment of the entire order. If you do not select this option, you cannot ship the request until all order lines are reserved, picked, and confirmed.
Order Line − Enables you to override the default order line value. This field is unavailable for entry in Update/Display mode.
Sched Line No (schedule line number) − Enables you to override the default schedule line number. This field is unavailable for entry in Update/Display mode.
Req Date (request date) − The date that the customer has requested that the stock arrive. The default value is the current date.
Run Process button − Click to launch the Material Reservations process (INPLDMND) for a specific order. This button is only available in the Material Stock Request component, and only after you have saved your changes.

State of North Dakota
INV_107 INVENTORY
Date: 8/20/2004 MAXIMUS, Inc. © 2004. All Rights Reserved. Page 23 of 133
Print button − In the Material Stock Request component, click to print the Material Issue Document report (INC6501). In the Express Issue component, click to print the Shipping Document report (INC6503) for the entered order.
If you change the item, quantity, or UOM after lot allocation, the system clears the current allocation information when you save or refresh the page.
Transfer button − Click the button located next to the Item ID field to access a transfer page of item-related links. On the transfer page, click the Item Search link to search for items using the Item Search Criteria page.
NOTE: Link options on transfer pages vary depending on the component and the item with which you're working. Only items with a status of Active or Discontinue are valid options.
State of North Dakota
INV_107 INVENTORY
Date: 8/20/2004 MAXIMUS, Inc. © 2004. All Rights Reserved. Page 24 of 133
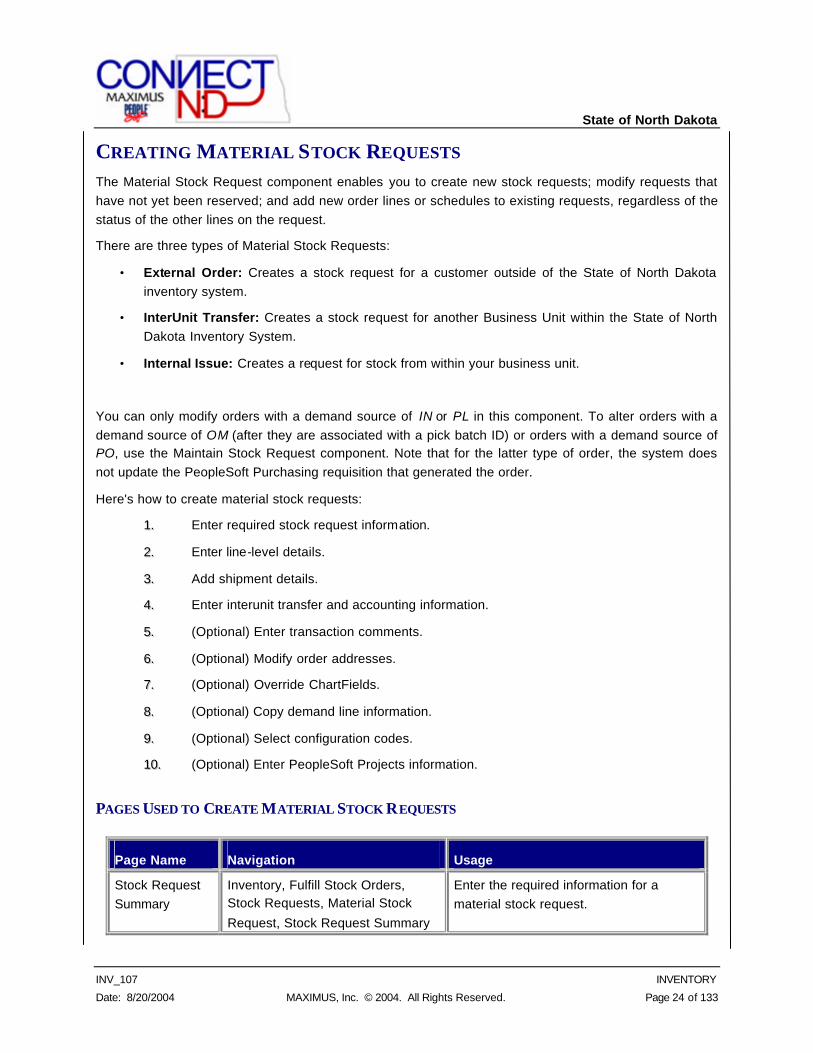
CREATING MATERIAL STOCK REQUESTS The Material Stock Request component enables you to create new stock requests; modify requests that have not yet been reserved; and add new order lines or schedules to existing requests, regardless of the status of the other lines on the request.
There are three types of Material Stock Requests:
• External Order: Creates a stock request for a customer outside of the State of North Dakota inventory system.
• InterUnit Transfer: Creates a stock request for another Business Unit within the State of North Dakota Inventory System.
• Internal Issue: Creates a request for stock from within your business unit.
You can only modify orders with a demand source of IN or PL in this component. To alter orders with a demand source of OM (after they are associated with a pick batch ID) or orders with a demand source of PO, use the Maintain Stock Request component. Note that for the latter type of order, the system does not update the PeopleSoft Purchasing requisition that generated the order.
Here's how to create material stock requests:
11.. Enter required stock request information.
22.. Enter line-level details.
33.. Add shipment details.
44.. Enter interunit transfer and accounting information.
55.. (Optional) Enter transaction comments.
66.. (Optional) Modify order addresses.
77.. (Optional) Override ChartFields.
88.. (Optional) Copy demand line information.
99.. (Optional) Select configuration codes.
1100.. (Optional) Enter PeopleSoft Projects information.
PAGES USED TO CREATE MATERIAL STOCK REQUESTS
Page Name Navigation Usage
Stock Request Summary
Inventory, Fulfill Stock Orders, Stock Requests, Material Stock
Request, Stock Request Summary
Enter the required information for a material stock request.
State of North Dakota
INV_107 INVENTORY
Date: 8/20/2004 MAXIMUS, Inc. © 2004. All Rights Reserved. Page 25 of 133
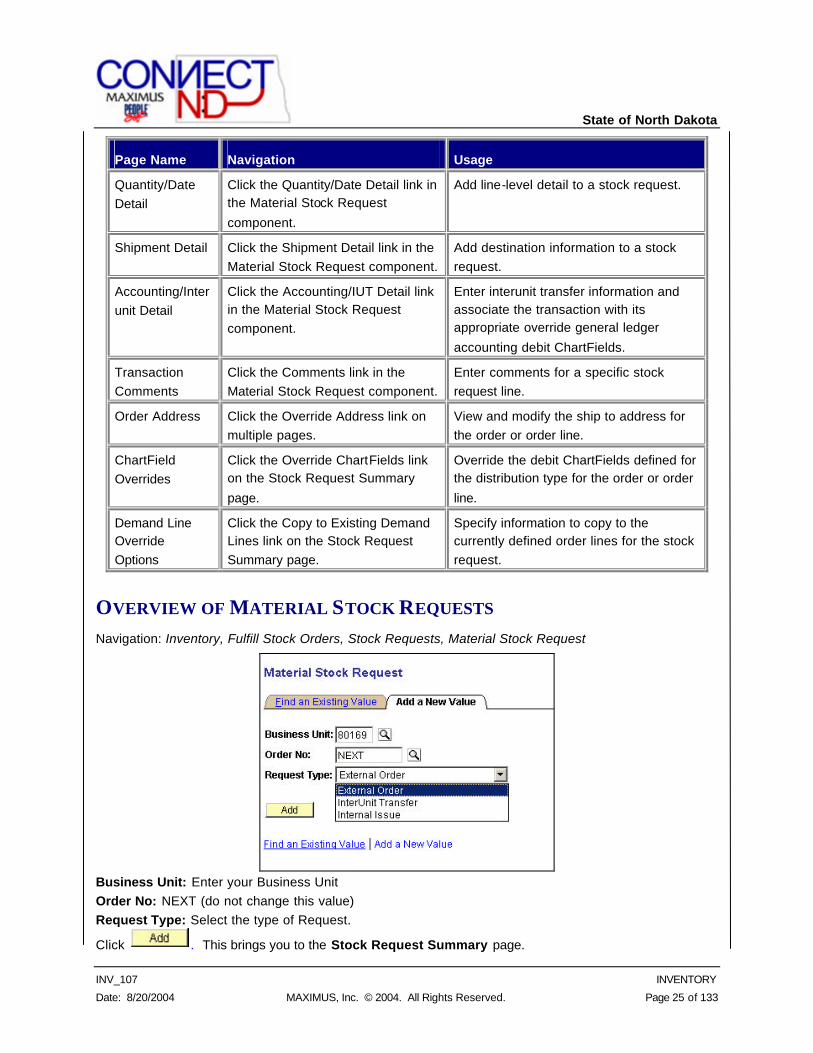
Page Name Navigation Usage
Quantity/Date Detail
Click the Quantity/Date Detail link in the Material Stock Request
component.
Add line-level detail to a stock request.
Shipment Detail Click the Shipment Detail link in the Material Stock Request component.
Add destination information to a stock request.
Accounting/Interunit Detail
Click the Accounting/IUT Detail link in the Material Stock Request component.
Enter interunit transfer information and associate the transaction with its appropriate override general ledger
accounting debit ChartFields.
Transaction Comments
Click the Comments link in the Material Stock Request component.
Enter comments for a specific stock request line.
Order Address Click the Override Address link on multiple pages.
View and modify the ship to address for the order or order line.
ChartField Overrides
Click the Override ChartFields link on the Stock Request Summary
page.
Override the debit ChartFields defined for the distribution type for the order or order
line.
Demand Line Override Options
Click the Copy to Existing Demand Lines link on the Stock Request Summary page.
Specify information to copy to the currently defined order lines for the stock request.
OVERVIEW OF MATERIAL STOCK REQUESTS Navigation: Inventory, Fulfill Stock Orders, Stock Requests, Material Stock Request
Business Unit: Enter your Business Unit Order No: NEXT (do not change this value) Request Type: Select the type of Request.
Click . This brings you to the Stock Request Summary page.
State of North Dakota
INV_107 INVENTORY
Date: 8/20/2004 MAXIMUS, Inc. © 2004. All Rights Reserved. Page 26 of 133
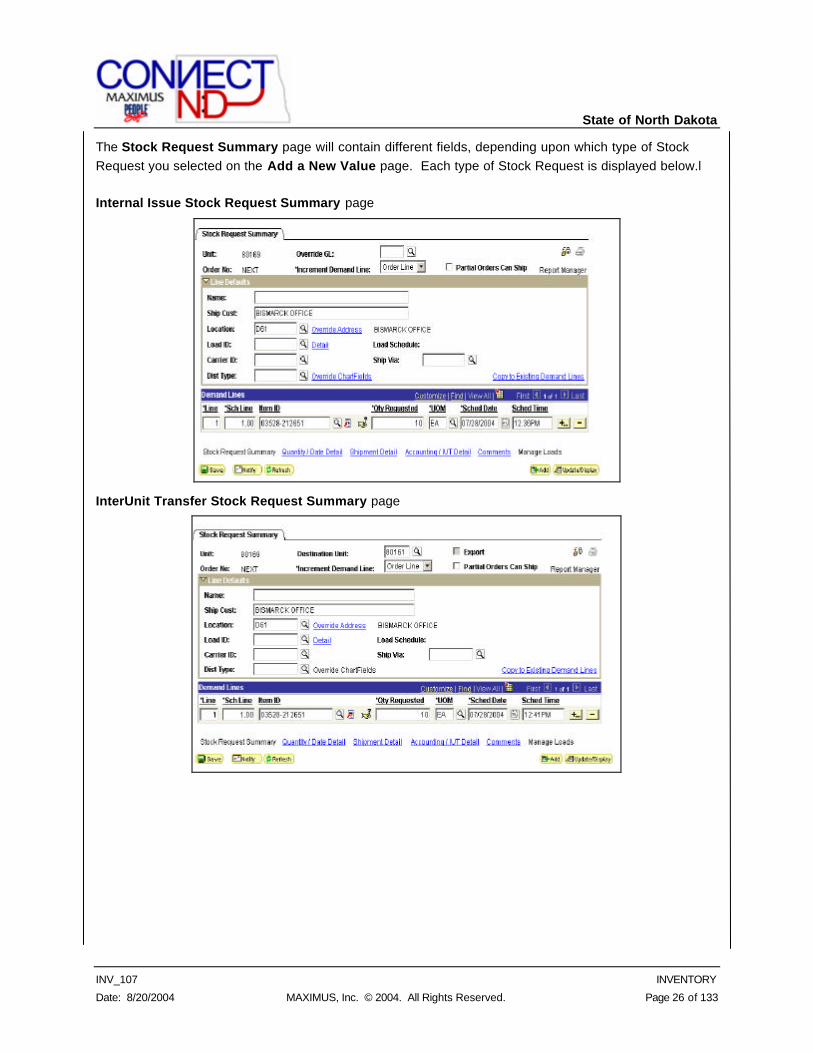
The Stock Request Summary page will contain different fields, depending upon which type of Stock Request you selected on the Add a New Value page. Each type of Stock Request is displayed below.l Internal Issue Stock Request Summary page
InterUnit Transfer Stock Request Summary page
State of North Dakota
INV_107 INVENTORY
Date: 8/20/2004 MAXIMUS, Inc. © 2004. All Rights Reserved. Page 27 of 133
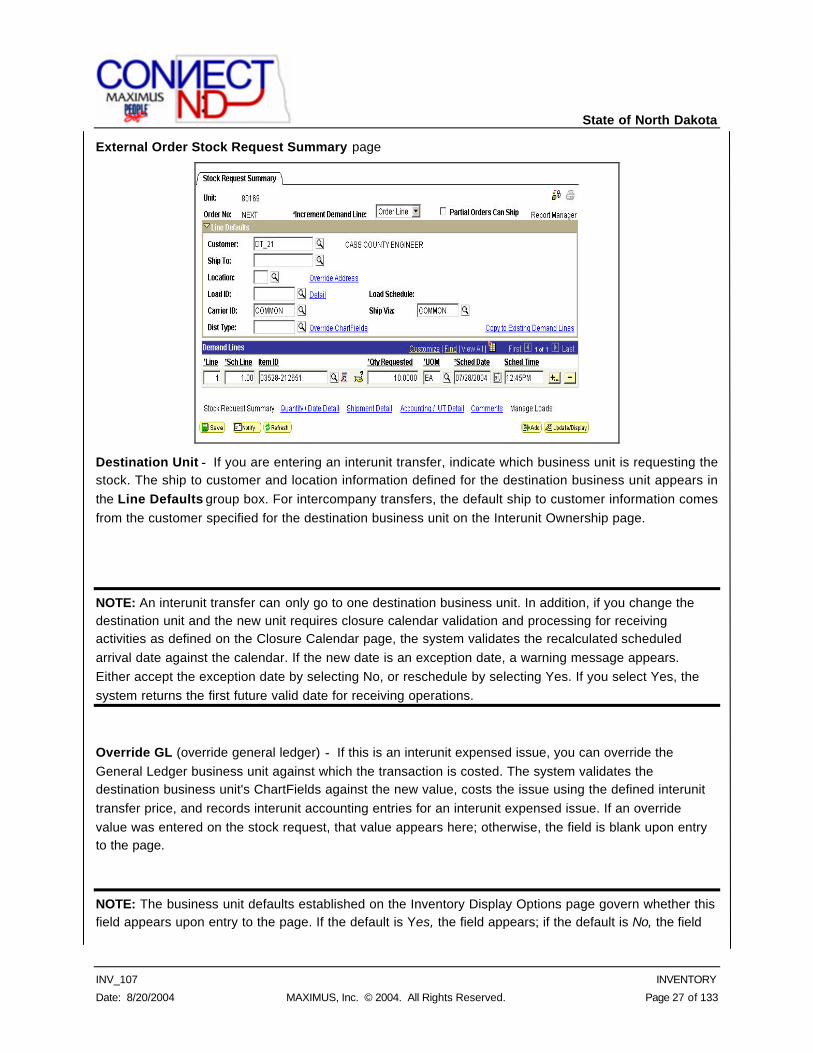
External Order Stock Request Summary page
Destination Unit − If you are entering an interunit transfer, indicate which business unit is requesting the stock. The ship to customer and location information defined for the destination business unit appears in the Line Defaults group box. For intercompany transfers, the default ship to customer information comes from the customer specified for the destination business unit on the Interunit Ownership page.
NOTE: An interunit transfer can only go to one destination business unit. In addition, if you change the destination unit and the new unit requires closure calendar validation and processing for receiving activities as defined on the Closure Calendar page, the system validates the recalculated scheduled arrival date against the calendar. If the new date is an exception date, a warning message appears. Either accept the exception date by selecting No, or reschedule by selecting Yes. If you select Yes, the system returns the first future valid date for receiving operations.
Override GL (override general ledger) − If this is an interunit expensed issue, you can override the General Ledger business unit against which the transaction is costed. The system validates the destination business unit's ChartFields against the new value, costs the issue using the defined interunit transfer price, and records interunit accounting entries for an interunit expensed issue. If an override value was entered on the stock request, that value appears here; otherwise, the field is blank upon entry to the page.
NOTE: The business unit defaults established on the Inventory Display Options page govern whether this field appears upon entry to the page. If the default is Yes, the field appears; if the default is No, the field
State of North Dakota
INV_107 INVENTORY
Date: 8/20/2004 MAXIMUS, Inc. © 2004. All Rights Reserved. Page 28 of 133
does not appear. This field is only available for internal requests, not for interunit transfers or external
requests.
Export − Indicates that the order is an intercompany transfer requiring export documentation. This field is populated at the order header level for the ship to customer defined for the destination business unit. If you override the setting here, the system transfers your selection to the line level, where it cannot be changed.
LINE DEFAULTS
Enter high-level order line information for the stock request. When you enter an item ID for a new order line (on this page or on other pages in the Material Stock Request component), the system copies this information to the line.
NOTE: The entries made here only affect newly created order lines. To change the values for existing order lines, use the Demand Line Override Options page.
Customer, Ship To, and Location − Available if the stock request is for an external order or an interunit transfer requiring intercompany processing. These three fields work together to define correct shipping information for a stock request.
If the stock request is an interunit transfer requiring intercompany processing, the default values come from the ship to customer assigned to the destination business unit, and you cannot override them. If the request is an interunit transfer not requiring intercompany processing, the system treats it as an internal order.
For an external order, you can select the customer first, and the ship to and location information associated with the customer appear by default.
Name, Ship Cust (ship to customer name), and Location − Available if the stock request is for an internal order. If you enter the location first, the system enters the ship to customer automatically.
Detail link − Click to access the Load Capacity Inquiry page, where you can view information about the capacity of the specified load.
Carrier ID and Ship Via − The system automatically populates these fields with the information associated with the load and displays the Load Schedule (the scheduled date for the load).
If you have not specified a load, enter the appropriate carrier ID and ship via. For external issues or intercompany transfer orders, the default values for these two fields come from the ship to customer.
Dist Type (distribution type) − The default value is based on the Request Type selected in the Material Stock Request search dialog: This is used for accounting purposes only.
DEMAND LINES
State of North Dakota
INV_107 INVENTORY
Date: 8/20/2004 MAXIMUS, Inc. © 2004. All Rights Reserved. Page 29 of 133
Line, Sch Line (schedule line), Item ID, Qty Requested (quantity requested), and ordering UOM (unit of measure) − For each order line and schedule line, enter the appropriate item and order quantity information.
NOTE: If the item has only one valid ordering unit of measure, that value becomes the default for the UOM field. If the item has multiple valid ordering UOMs, the standard UOM becomes the default if (a) all ordering UOMs use the same quantity precision rule, and (b) the standard UOM is a valid ordering UOM.
Otherwise, the UOM field is blank until you enter a value.
Sched Date (scheduled shipment date and time) − The default for MSRs is the current date and time.
NOTE: If the business unit requires closure-calendar validation and processing for shipping operations as defined on the Closure Calendar page, and if the scheduled shipment date is an exception date, the system uses the first valid future shipping date. If you selected Auto Reserve on the Fulfillment Setup page, saving the Stock Request Summary page
launches the Material Reservations process.
OPTIONAL LINKS:
Quantity/Date Detail
Shipment Detail
Accounting / IUT Detail Comments
State of North Dakota
INV_107 INVENTORY
Date: 8/20/2004 MAXIMUS, Inc. © 2004. All Rights Reserved. Page 30 of 133
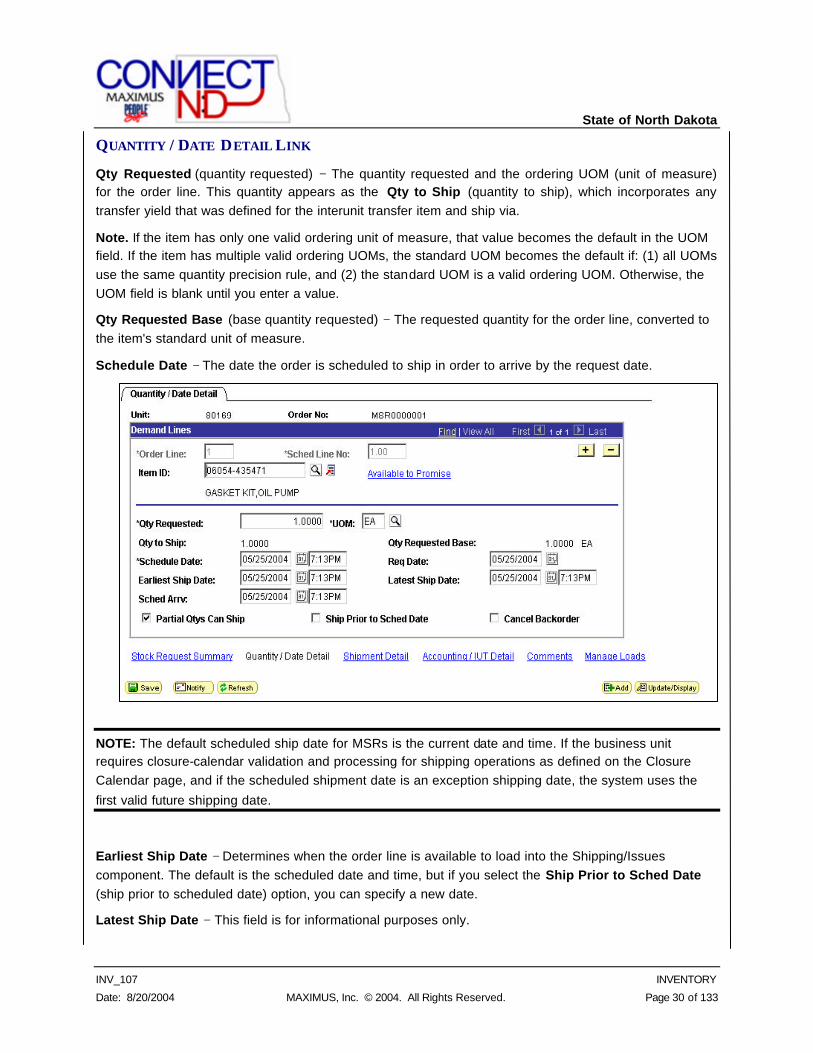
QUANTITY / DATE DETAIL LINK
Qty Requested (quantity requested) − The quantity requested and the ordering UOM (unit of measure) for the order line. This quantity appears as the Qty to Ship (quantity to ship), which incorporates any transfer yield that was defined for the interunit transfer item and ship via.
Note. If the item has only one valid ordering unit of measure, that value becomes the default in the UOM field. If the item has multiple valid ordering UOMs, the standard UOM becomes the default if: (1) all UOMs use the same quantity precision rule, and (2) the standard UOM is a valid ordering UOM. Otherwise, the UOM field is blank until you enter a value.
Qty Requested Base (base quantity requested) − The requested quantity for the order line, converted to the item's standard unit of measure.
Schedule Date − The date the order is scheduled to ship in order to arrive by the request date.
NOTE: The default scheduled ship date for MSRs is the current date and time. If the business unit requires closure-calendar validation and processing for shipping operations as defined on the Closure Calendar page, and if the scheduled shipment date is an exception shipping date, the system uses the
first valid future shipping date.
Earliest Ship Date − Determines when the order line is available to load into the Shipping/Issues component. The default is the scheduled date and time, but if you select the Ship Prior to Sched Date (ship prior to scheduled date) option, you can specify a new date.
Latest Ship Date − This field is for informational purposes only.
State of North Dakota
INV_107 INVENTORY
Date: 8/20/2004 MAXIMUS, Inc. © 2004. All Rights Reserved. Page 31 of 133
Sched Arrv (scheduled arrival) - The date the order should arrive at its destination. The scheduled arrival is linked to the scheduled shipment date. If the transfer is an interunit transfer and the user adds in transit time for the appropriate source business unit, destination business unit, and ship via, the system adds this extra time to the scheduled shipment date to determine the scheduled arrival date. In the Shipping/Issues component, the arrival date is linked to the actual shipment date and time.
NOTE: For interunit transfers, if you change the Sched Arrv date and time, and if the destination business unit requires closure-calendar validation and processing for receiving operations as defined on the Closure Calendar page, the system validates the new scheduled arrival date and time against the closure calendar. If the arrival date coincides with a receiving closure date at the destination business unit, the system issues a warning and provides the option to keep the date or move the scheduled arrival date to
the next valid date.
Partial Qtys Can Ship − (partial quantities can ship) − Select to fulfill partial quantities of stock request lines if sufficient stock is not available. If you do not select this option, the system does not process stock request lines until the quantity can be completely fulfi lled. (There is one exception to this rule—see the Cancel Backorder discussion.)
Ship Prior to Sched Date − (ship prior to scheduled date) − Select to enable shipment of the stock before the scheduled shipment date. If you do not select this option, the Shipping/Issues component does not allow shipment until the current date is equal to or later than the scheduled shipment date.
Cancel Backorder − Select to cancel the automatic backordering of a partially fulfilled order line. If you do not select this option, the system creates a backorder automatically if there is insufficient quantity to fulfill the order line. If you select this option and (1) there isn't any quantity available, or (2) there is insufficient quantity and the partial quantity check box isn't selected, the entire line is canceled rather than being fully backordered.
State of North Dakota
INV_107 INVENTORY
Date: 8/20/2004 MAXIMUS, Inc. © 2004. All Rights Reserved. Page 32 of 133
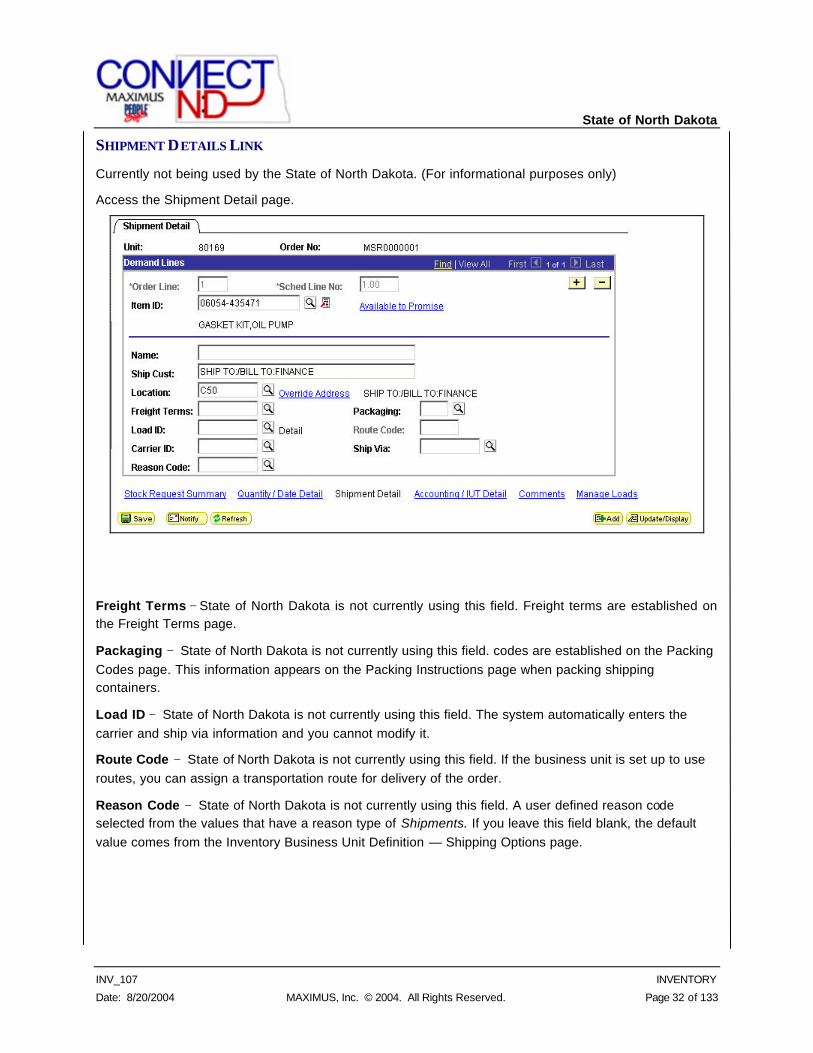
SHIPMENT DETAILS LINK
Currently not being used by the State of North Dakota. (For informational purposes only)
Access the Shipment Detail page.
Freight Terms − State of North Dakota is not currently using this field. Freight terms are established on the Freight Terms page.
Packaging − State of North Dakota is not currently using this field. codes are established on the Packing Codes page. This information appears on the Packing Instructions page when packing shipping containers.
Load ID − State of North Dakota is not currently using this field. The system automatically enters the carrier and ship via information and you cannot modify it.
Route Code − State of North Dakota is not currently using this field. If the business unit is set up to use routes, you can assign a transportation route for delivery of the order.
Reason Code − State of North Dakota is not currently using this field. A user defined reason code selected from the values that have a reason type of Shipments. If you leave this field blank, the default value comes from the Inventory Business Unit Definition — Shipping Options page.
State of North Dakota
INV_107 INVENTORY
Date: 8/20/2004 MAXIMUS, Inc. © 2004. All Rights Reserved. Page 33 of 133
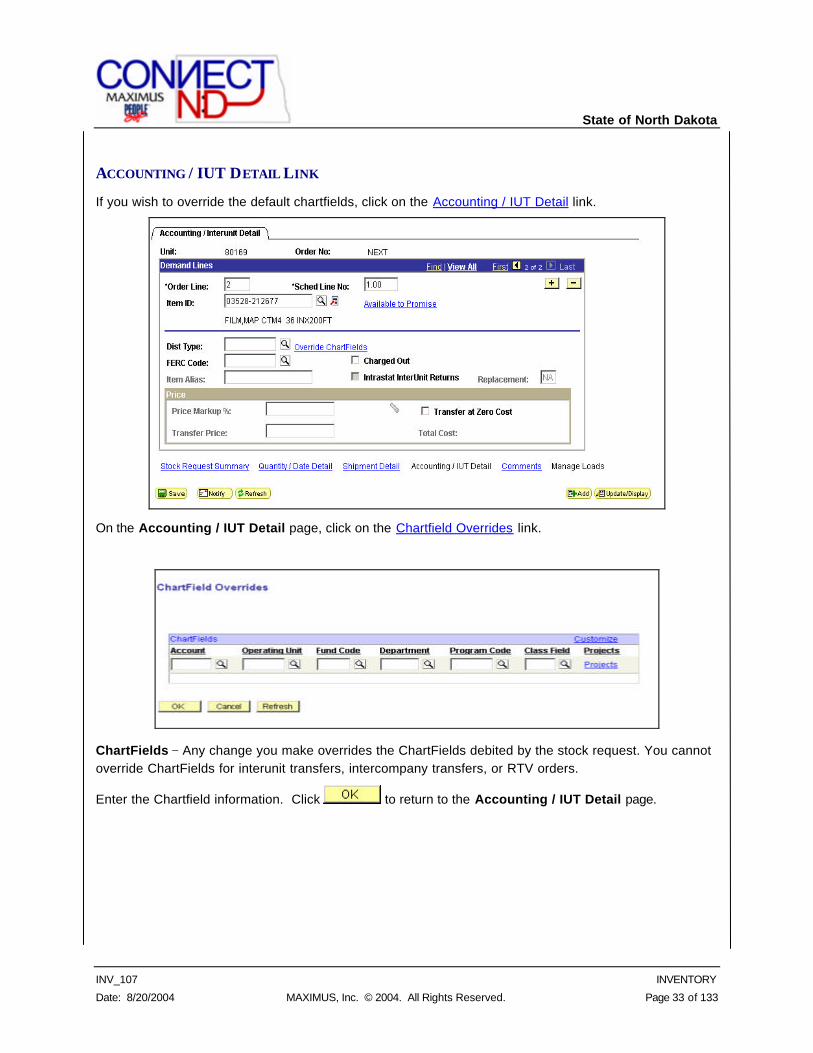
ACCOUNTING / IUT DETAIL LINK
If you wish to override the default chartfields, click on the Accounting / IUT Detail link.
On the Accounting / IUT Detail page, click on the Chartfield Overrides link.
ChartFields − Any change you make overrides the ChartFields debited by the stock request. You cannot override ChartFields for interunit transfers, intercompany transfers, or RTV orders.
Enter the Chartfield information. Click to return to the Accounting / IUT Detail page.
State of North Dakota
INV_107 INVENTORY
Date: 8/20/2004 MAXIMUS, Inc. © 2004. All Rights Reserved. Page 34 of 133
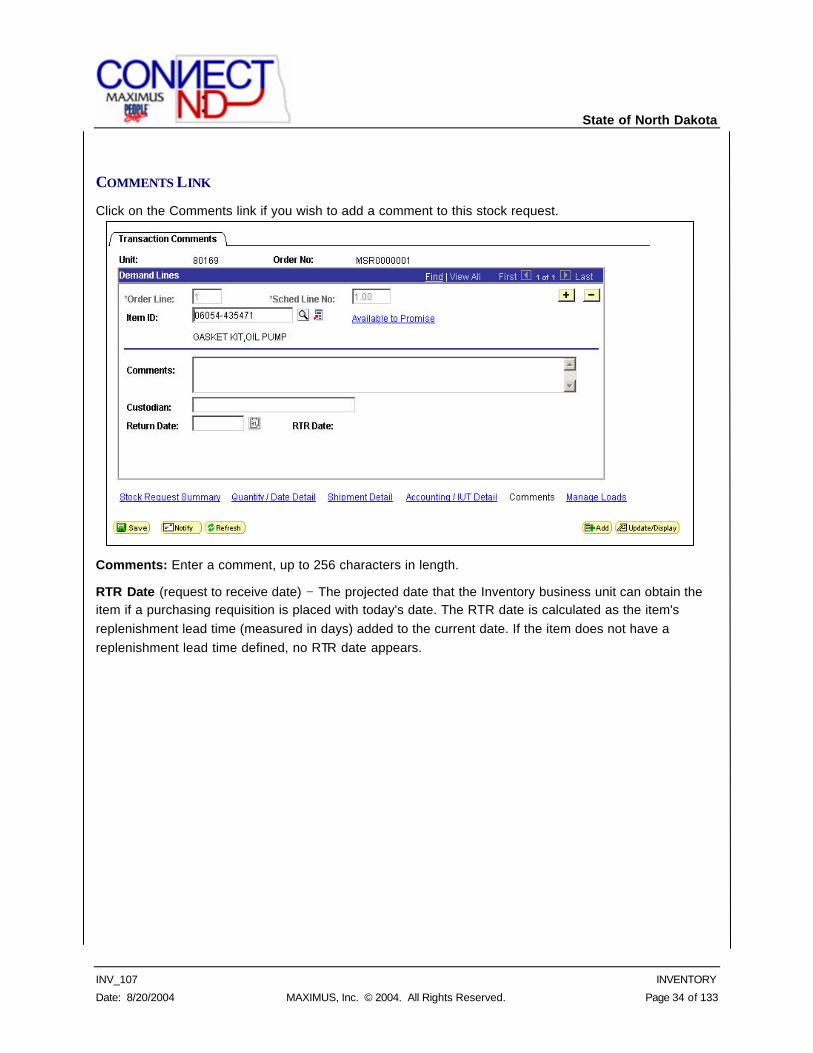
COMMENTS LINK
Click on the Comments link if you wish to add a comment to this stock request.
Comments: Enter a comment, up to 256 characters in length.
RTR Date (request to receive date) − The projected date that the Inventory business unit can obtain the item if a purchasing requisition is placed with today's date. The RTR date is calculated as the item's replenishment lead time (measured in days) added to the current date. If the item does not have a replenishment lead time defined, no RTR date appears.
State of North Dakota
INV_107 INVENTORY
Date: 8/20/2004 MAXIMUS, Inc. © 2004. All Rights Reserved. Page 35 of 133
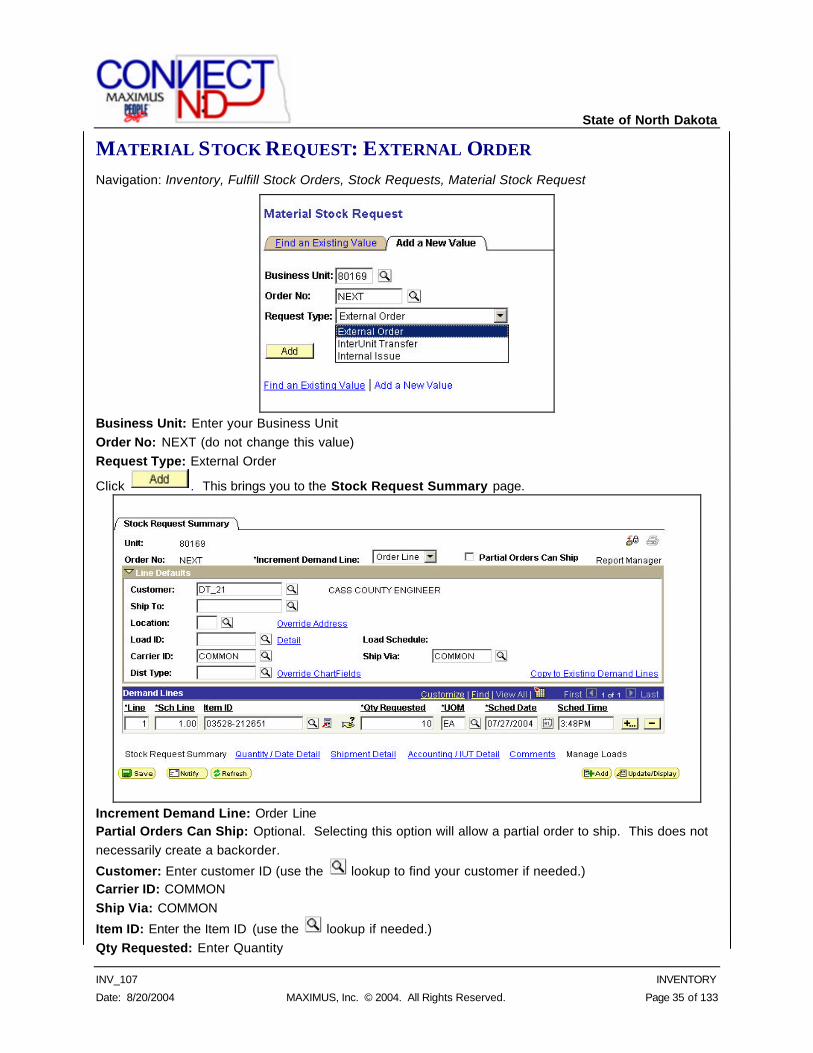
MATERIAL STOCK REQUEST: EXTERNAL ORDER Navigation: Inventory, Fulfill Stock Orders, Stock Requests, Material Stock Request
Business Unit: Enter your Business Unit Order No: NEXT (do not change this value) Request Type: External Order
Click . This brings you to the Stock Request Summary page.
Increment Demand Line: Order Line Partial Orders Can Ship: Optional. Selecting this option will allow a partial order to ship. This does not necessarily create a backorder.
Customer: Enter customer ID (use the lookup to find your customer if needed.) Carrier ID: COMMON Ship Via: COMMON
Item ID: Enter the Item ID (use the lookup if needed.) Qty Requested: Enter Quantity
State of North Dakota
INV_107 INVENTORY
Date: 8/20/2004 MAXIMUS, Inc. © 2004. All Rights Reserved. Page 36 of 133
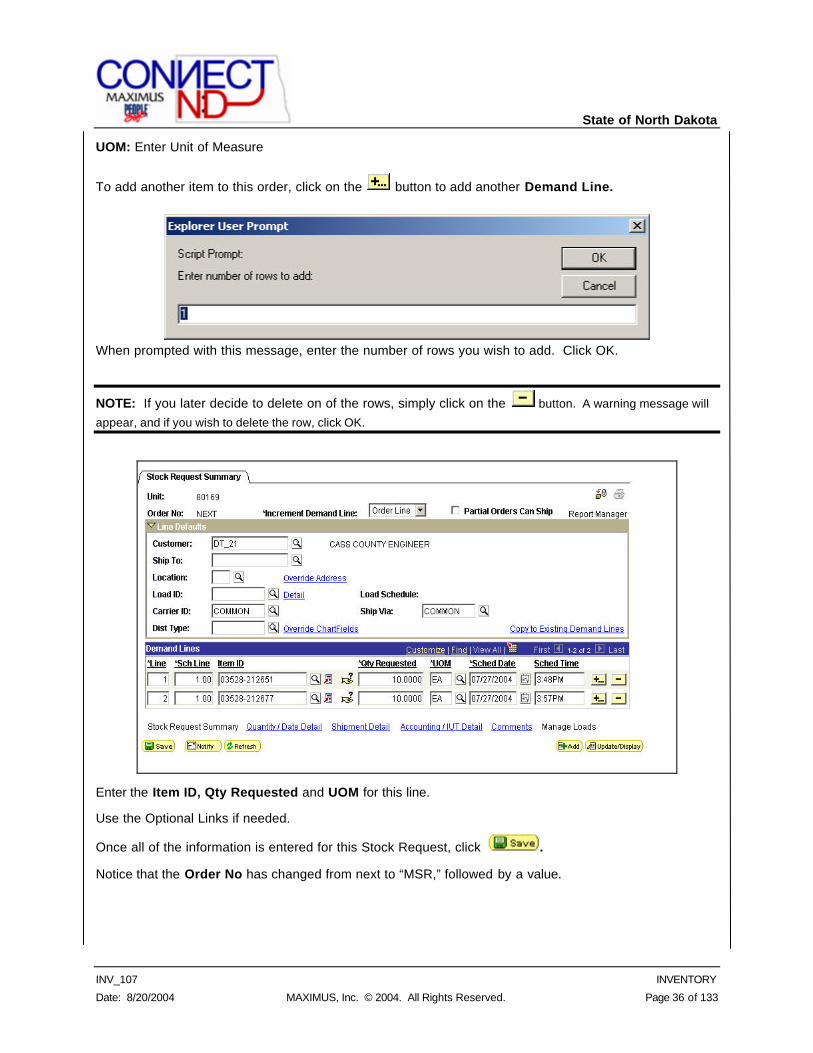
UOM: Enter Unit of Measure
To add another item to this order, click on the button to add another Demand Line.
When prompted with this message, enter the number of rows you wish to add. Click OK.
NOTE: If you later decide to delete on of the rows, simply click on the button. A warning message will
appear, and if you wish to delete the row, click OK.
Enter the Item ID, Qty Requested and UOM for this line.
Use the Optional Links if needed.
Once all of the information is entered for this Stock Request, click .
Notice that the Order No has changed from next to “MSR,” followed by a value.
State of North Dakota
INV_107 INVENTORY
Date: 8/20/2004 MAXIMUS, Inc. © 2004. All Rights Reserved. Page 37 of 133
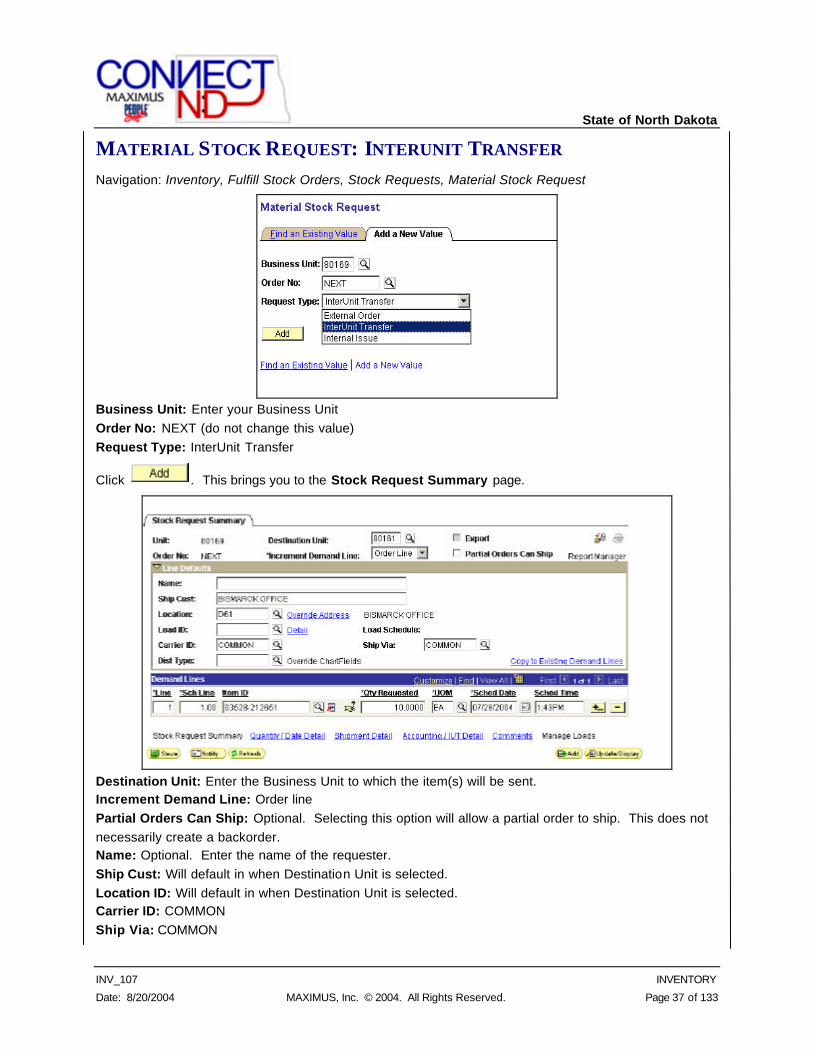
MATERIAL STOCK REQUEST: INTERUNIT TRANSFER Navigation: Inventory, Fulfill Stock Orders, Stock Requests, Material Stock Request
Business Unit: Enter your Business Unit Order No: NEXT (do not change this value) Request Type: InterUnit Transfer
Click . This brings you to the Stock Request Summary page.
Destination Unit: Enter the Business Unit to which the item(s) will be sent. Increment Demand Line: Order line Partial Orders Can Ship: Optional. Selecting this option will allow a partial order to ship. This does not necessarily create a backorder. Name: Optional. Enter the name of the requester. Ship Cust: Will default in when Destination Unit is selected. Location ID: Will default in when Destination Unit is selected. Carrier ID: COMMON Ship Via: COMMON
State of North Dakota
INV_107 INVENTORY
Date: 8/20/2004 MAXIMUS, Inc. © 2004. All Rights Reserved. Page 38 of 133
Item ID: Enter the Item ID (use the lookup if needed.) Qty Requested: Enter Quantity UOM: Enter Unit of Measure
If necessary, add additional lines. Fill in the appropriate information on each line.
Use the Optional Links if needed.
Once all of the information is entered for this Stock Request, click .
Notice that the Order No has changed from next to “MSR,” followed by a value.
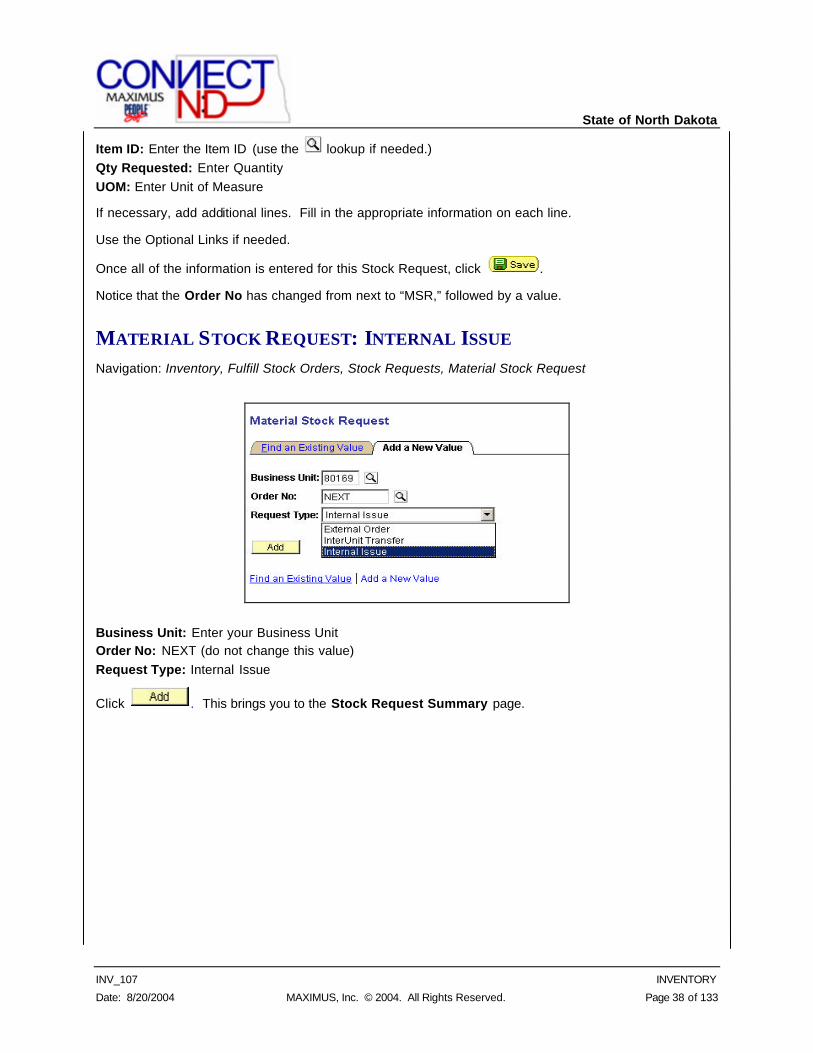
MATERIAL STOCK REQUEST: INTERNAL ISSUE Navigation: Inventory, Fulfill Stock Orders, Stock Requests, Material Stock Request
Business Unit: Enter your Business Unit Order No: NEXT (do not change this value) Request Type: Internal Issue
Click . This brings you to the Stock Request Summary page.
State of North Dakota
INV_107 INVENTORY
Date: 8/20/2004 MAXIMUS, Inc. © 2004. All Rights Reserved. Page 39 of 133
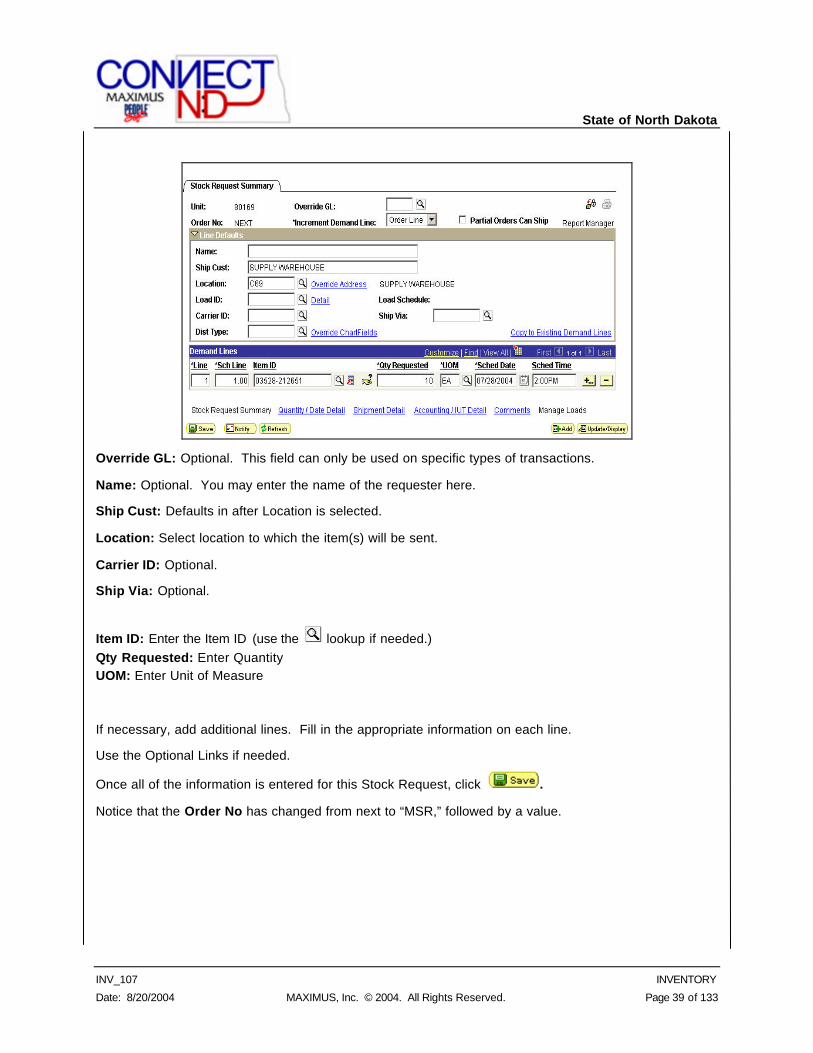
Override GL: Optional. This field can only be used on specific types of transactions.
Name: Optional. You may enter the name of the requester here.
Ship Cust: Defaults in after Location is selected.
Location: Select location to which the item(s) will be sent.
Carrier ID: Optional.
Ship Via: Optional.
Item ID: Enter the Item ID (use the lookup if needed.) Qty Requested: Enter Quantity UOM: Enter Unit of Measure
If necessary, add additional lines. Fill in the appropriate information on each line.
Use the Optional Links if needed.
Once all of the information is entered for this Stock Request, click .
Notice that the Order No has changed from next to “MSR,” followed by a value.
State of North Dakota
INV_107 INVENTORY
Date: 8/20/2004 MAXIMUS, Inc. © 2004. All Rights Reserved. Page 40 of 133
CANCELING ORDERS AND STOCK REQUESTS You can cancel the following orders from PeopleSoft Inventory:
• Orders that are not sourced from PeopleSoft Order Management and have not yet been shipped.
• Sales orders from PeopleSoft Order Management that have appeared on picking plans and have order lines or schedules that were previously canceled in PeopleSoft Order Management.
State of North Dakota
INV_107 INVENTORY
Date: 8/20/2004 MAXIMUS, Inc. © 2004. All Rights Reserved. Page 41 of 133
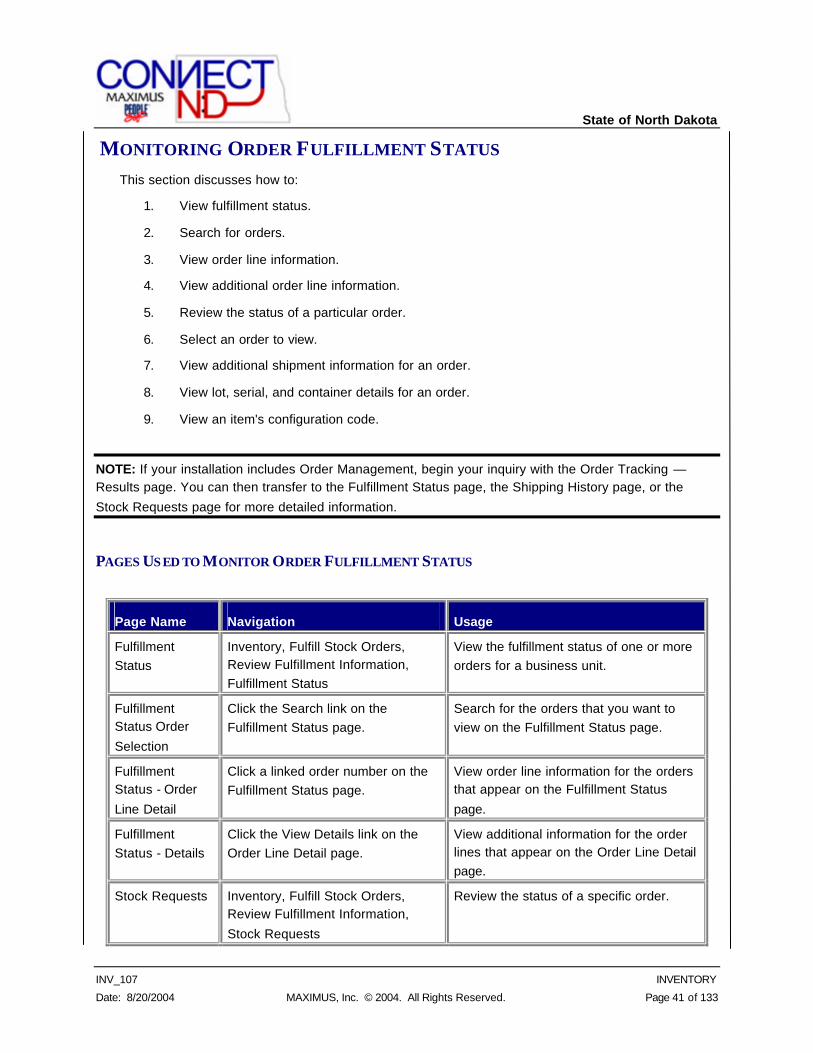
MONITORING ORDER FULFILLMENT STATUS This section discusses how to:
1. View fulfillment status.
2. Search for orders.
3. View order line information.
4. View additional order line information.
5. Review the status of a particular order.
6. Select an order to view.
7. View additional shipment information for an order.
8. View lot, serial, and container details for an order.
9. View an item's configuration code.
NOTE: If your installation includes Order Management, begin your inquiry with the Order Tracking — Results page. You can then transfer to the Fulfillment Status page, the Shipping History page, or the
Stock Requests page for more detailed information.
PAGES US ED TO MONITOR ORDER FULFILLMENT STATUS
Page Name Navigation Usage
Fulfillment Status
Inventory, Fulfill Stock Orders, Review Fulfillment Information, Fulfillment Status
View the fulfillment status of one or more orders for a business unit.
Fulfillment Status Order
Selection
Click the Search link on the Fulfillment Status page.
Search for the orders that you want to view on the Fulfillment Status page.
Fulfillment Status - Order
Line Detail
Click a linked order number on the Fulfillment Status page.
View order line information for the orders that appear on the Fulfillment Status
page.
Fulfillment Status - Details
Click the View Details link on the Order Line Detail page.
View additional information for the order lines that appear on the Order Line Detail page.
Stock Requests Inventory, Fulfill Stock Orders, Review Fulfillment Information,
Stock Requests
Review the status of a specific order.
State of North Dakota
INV_107 INVENTORY
Date: 8/20/2004 MAXIMUS, Inc. © 2004. All Rights Reserved. Page 42 of 133
Stock Request Inquiry
Selection
Click the Search link on the Stock Requests page.
Specify search criteria for the order that you want to view on the Stock Requests
page.
Stock Requests - Order Details
Click the Order Details link on the Stock Requests page.
View additional shipment information for an order line.
Stock Requests - Picking Details
Click the Picking Details link on the Stock Requests page.
View lot, serial, or container details for the stock picked or the lot allocated for the order line.
Stock Requests - Requisition
Details
Inventory, Replenish Inventory, Manage Replenishment Requests
Inventory, Replenish Inventory,
Review Replenishment Requests
Transfers you to the Replenishment Requests Inquiry page.
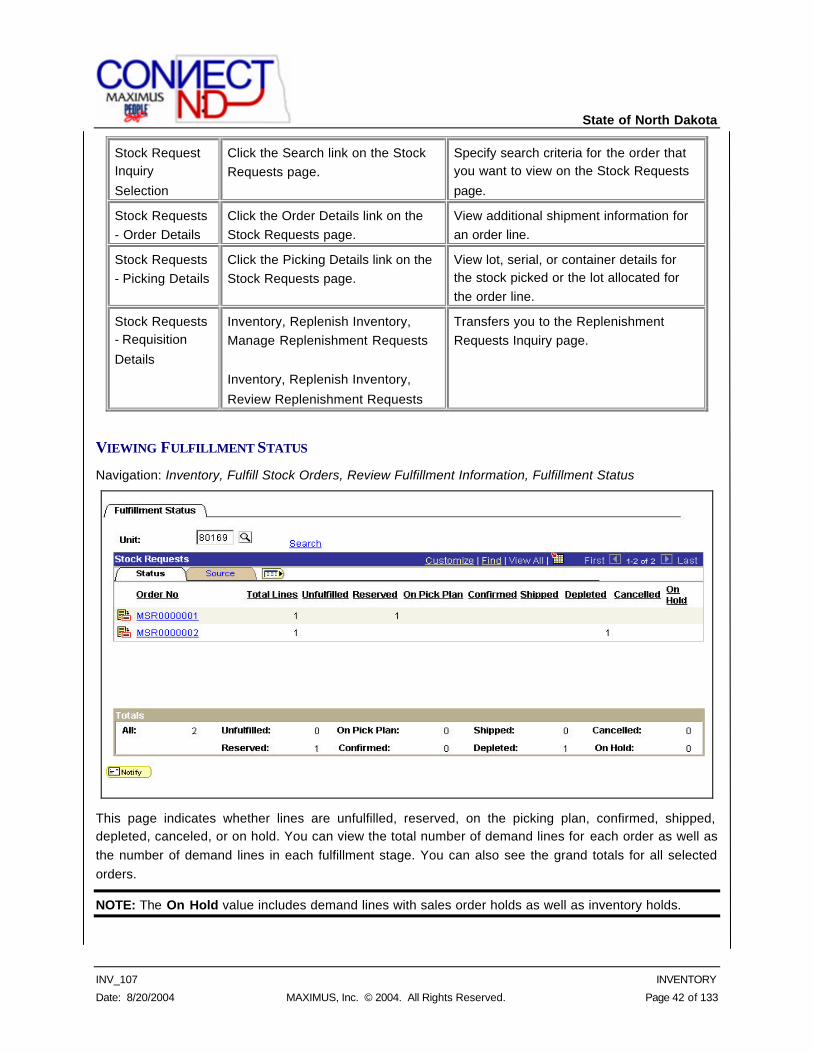
VIEWING FULFILLMENT STATUS
Navigation: Inventory, Fulfill Stock Orders, Review Fulfillment Information, Fulfillment Status
This page indicates whether lines are unfulfilled, reserved, on the picking plan, confirmed, shipped, depleted, canceled, or on hold. You can view the total number of demand lines for each order as well as the number of demand lines in each fulfillment stage. You can also see the grand totals for all selected orders.
NOTE: The On Hold value includes demand lines with sales order holds as well as inventory holds.

State of North Dakota
INV_107 INVENTORY
Date: 8/20/2004 MAXIMUS, Inc. © 2004. All Rights Reserved. Page 43 of 133
Stock Request Inquiry button − Click for an order to transfer to the Stock Requests page, where you can view the status of all demand lines in the order.
Totals − Order status totals for all orders meeting the selection criteria appear at the bottom of the page.
SEARCHING FOR ORDERS
Click the Search hyperlink on the Fulfillment Status page.
State of North Dakota
INV_107 INVENTORY
Date: 8/20/2004 MAXIMUS, Inc. © 2004. All Rights Reserved. Page 44 of 133
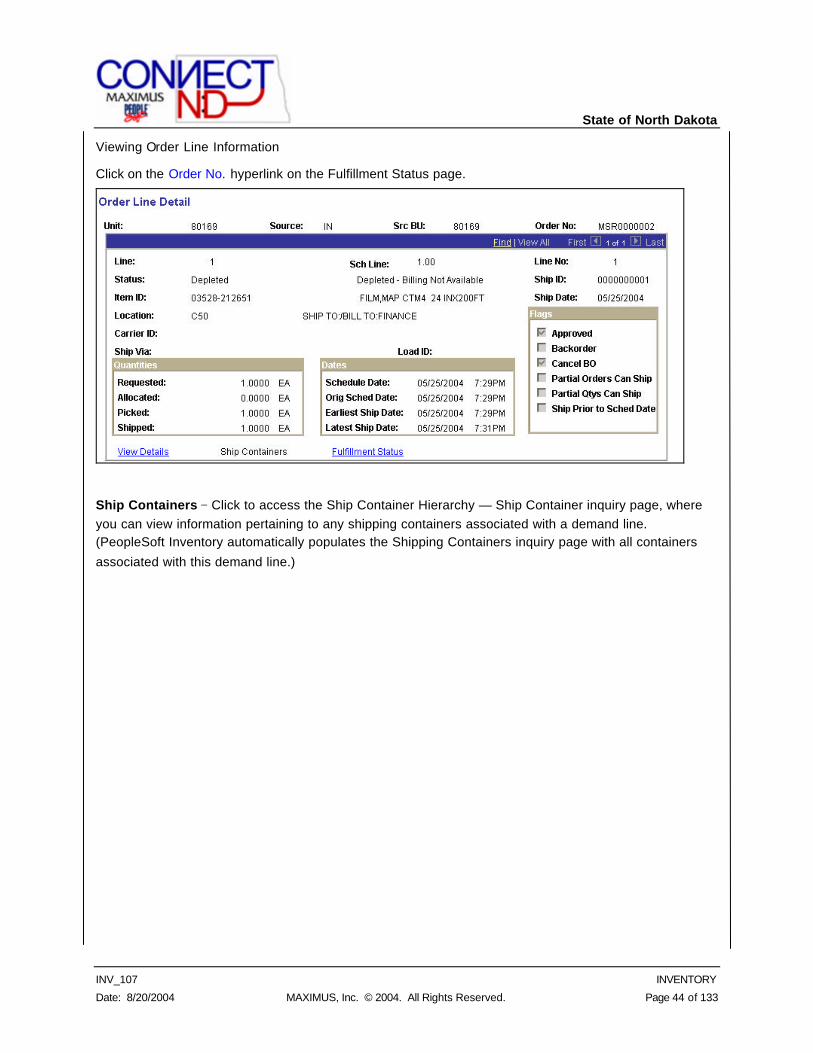
Viewing Order Line Information
Click on the Order No. hyperlink on the Fulfillment Status page.
Ship Containers − Click to access the Ship Container Hierarchy — Ship Container inquiry page, where you can view information pertaining to any shipping containers associated with a demand line. (PeopleSoft Inventory automatically populates the Shipping Containers inquiry page with all containers
associated with this demand line.)
State of North Dakota
INV_107 INVENTORY
Date: 8/20/2004 MAXIMUS, Inc. © 2004. All Rights Reserved. Page 45 of 133
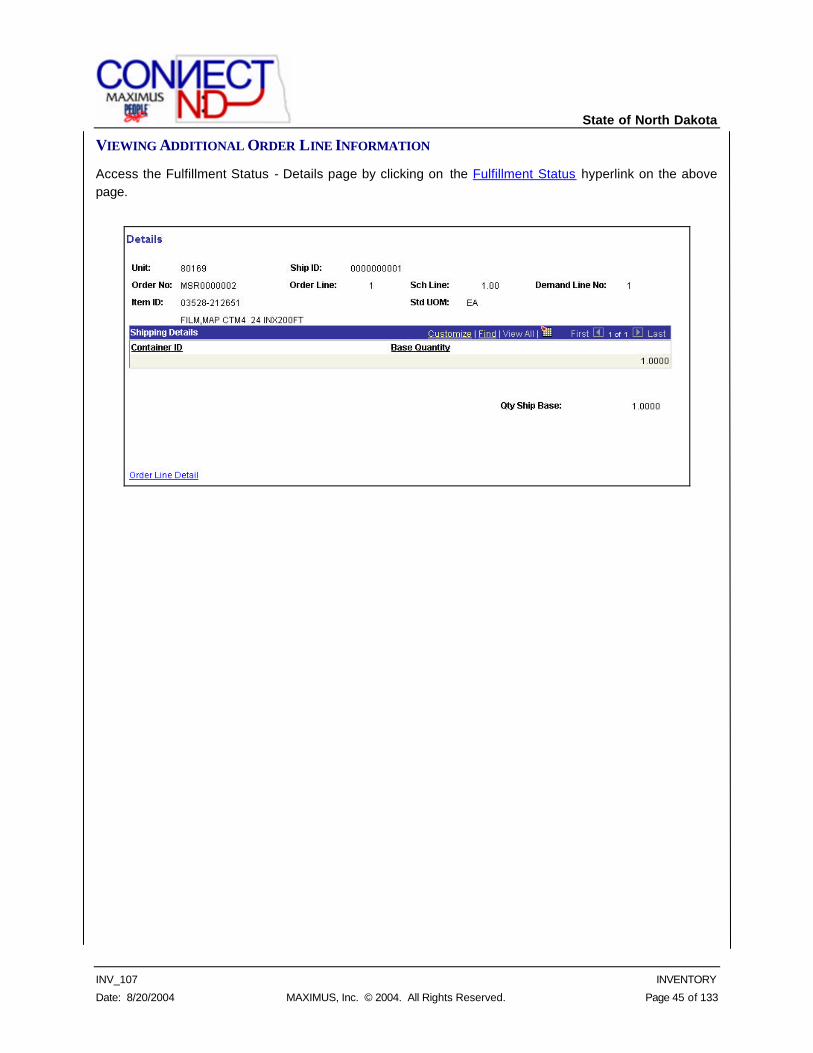
VIEWING ADDITIONAL ORDER LINE INFORMATION
Access the Fulfillment Status - Details page by clicking on the Fulfillment Status hyperlink on the above page.
State of North Dakota
INV_107 INVENTORY
Date: 8/20/2004 MAXIMUS, Inc. © 2004. All Rights Reserved. Page 46 of 133
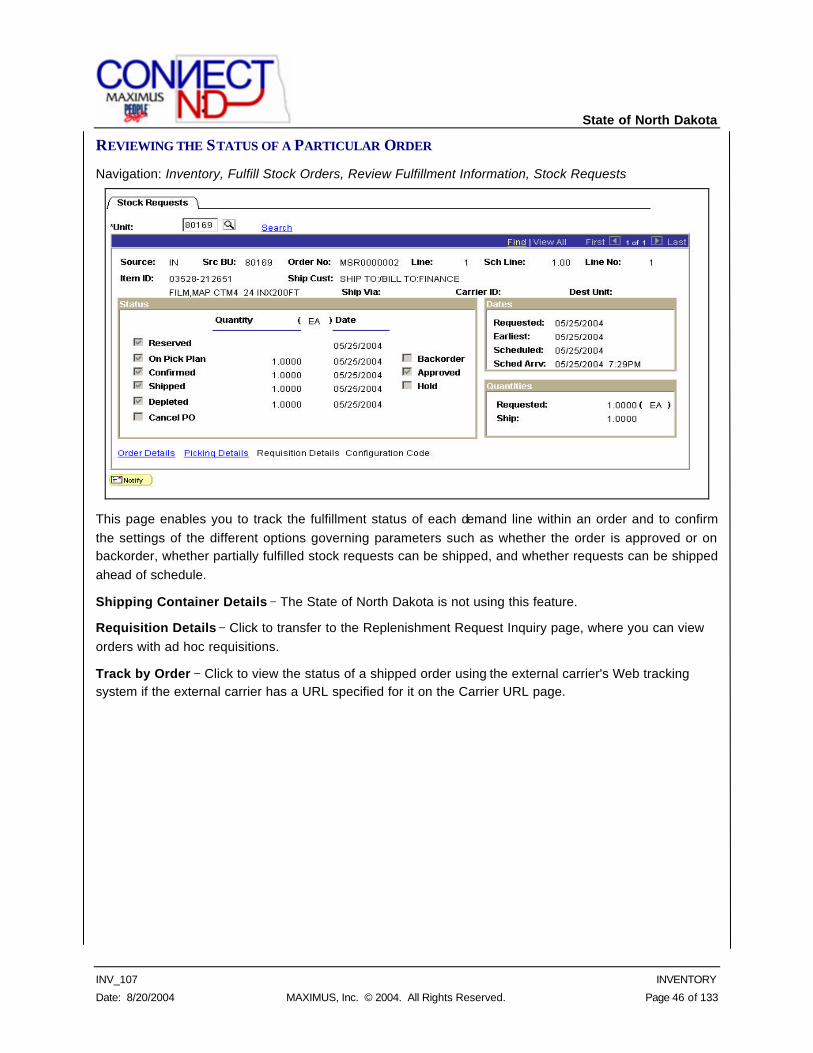
REVIEWING THE STATUS OF A PARTICULAR ORDER
Navigation: Inventory, Fulfill Stock Orders, Review Fulfillment Information, Stock Requests
This page enables you to track the fulfillment status of each demand line within an order and to confirm the settings of the different options governing parameters such as whether the order is approved or on backorder, whether partially fulfilled stock requests can be shipped, and whether requests can be shipped ahead of schedule.
Shipping Container Details − The State of North Dakota is not using this feature.
Requisition Details − Click to transfer to the Replenishment Request Inquiry page, where you can view orders with ad hoc requisitions.
Track by Order − Click to view the status of a shipped order using the external carrier's Web tracking system if the external carrier has a URL specified for it on the Carrier URL page.
State of North Dakota
INV_107 INVENTORY
Date: 8/20/2004 MAXIMUS, Inc. © 2004. All Rights Reserved. Page 47 of 133
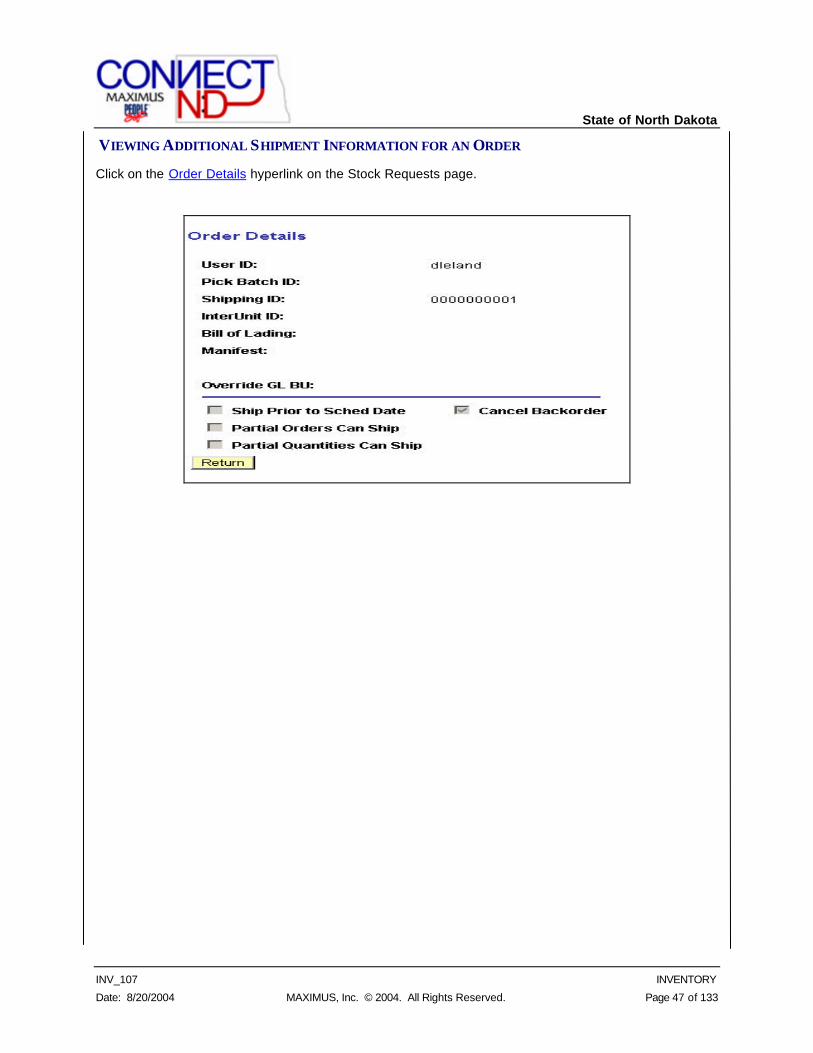
VIEWING ADDITIONAL SHIPMENT INFORMATION FOR AN ORDER
Click on the Order Details hyperlink on the Stock Requests page.
State of North Dakota
INV_107 INVENTORY
Date: 8/20/2004 MAXIMUS, Inc. © 2004. All Rights Reserved. Page 48 of 133
PICKING INVENTORY This section provides overviews of the picking business process and discusses how to:
• Create picking plans.
• Enter picking feedback
• Confirm picked inventory.
UNDERSTANDING THE PICKING PROCESS The PeopleSoft Inventory picking process enables you to translate demand from Inventory, Order Management, Purchasing, Enterprise Planning, Production Planning, and third-party applications into picking instructions for your stockroom workers. You specify business unit-level picking rules and selection criteria in the Fulfillment Setup component and establish additional parameters for each picking plan on the Picking Plan page. The Picking Plan process (INS6000) then creates the Picking Plan report, which tells your picking staff what material to pick and from which storage locations to pick it.
PeopleSoft Inventory supports two types of picking plans:
Push picking (system-defined) − The picking plan uses the specified picking rules to determine the most appropriate storage location from which to pick each item, then creates an allocation to reserve the requisite quantity in the storage location displayed on the Picking Plan report. Once an allocation exists, the allocated quantity in that storage location is unavailable to fulfill other demand lines. When picking is complete, the picker enters exceptions to the storage location information, using the Picking Feedback page, the Shipping/Issues - Picking Feedback page, or an electronic data collection device.
Pull picking (picker-defined) − The picking plan suggests storage locations from which to pick each item but does not make an allocation. Because there is no allocation of quantity, the picker is not limited to a specific location, nor is the item necessarily excluded from other picking plans. When picking is complete, the picker enters the actual storage location information using the Picking Feedback page, the Shipping/Issues — Picking Feedback page, or an electronic data collection device.
For an item to appear on either type of picking plan, its storage location must be available for picking. Items in storage locations that contain negative quantities or that are suspended, on hold, closed, non-nettable, used for work in progress, or undergoing physical cycle counts are not included on picking plans. Items in default staging locations are only included if you've selected the Available to Pick Plan option on the Default Staging Location page. Items with a status of on hold, rejected, or restricted are also excluded from picking plans.
After the picking results have been recorded (manually through the Picking Feedback page, the Shipping/Issues - Picking Feedback page, or an electronic data collection system; or automatically through auto-pick processing), the Picking Confirmation process (INPBCONF) decreases the on-hand quantities for the appropriate storage locations and prepares the demand lines for shipment processing. For push picking plans, the Picking Confirmation process also relieves the allocations created by the Picking Plan process.
State of North Dakota
INV_107 INVENTORY
Date: 8/20/2004 MAXIMUS, Inc. © 2004. All Rights Reserved. Page 49 of 133
NOTE: Because these adjustments are made at the storage location level only, your business unit quantities do not reflect the new storage location quantities until you run the Depletion process (INPDDEPL). To compare the balances, use the Item Balance by Location and Item Balance by Unit pages under the Maintaining Inventory menu.
The Picking Confirmation process only includes demand lines that are marked as confirmed. If you are auto-shipping, Picking Confirmation processes only orders that meet the shipping date, partial order, and single shipment criteria specified upon demand entry. Unless shipping ahead of schedule is allowed, auto-shipped orders must be scheduled to ship on or before the current date and time. In addition, unless shipment of partial orders is allowed, all demand lines for auto-shipped orders must be picked before they are eligible for picking confirmation. Finally, if you are auto-shipping sales orders marked for single shipment, all demand lines must be picked and assigned to the same shipping ID before the orders are processed.
The picking plan does not process PeopleSoft Order Management sales orders that are on hold. Rather, the Picking Plan report prints an error message alerting you that an order matching the selection criteria is on hold. If you place the order on hold after creating its picking plan, and you activated the Check On Hold option on the Fulfillment Setup page, neither the Picking Feedback page nor the electronic data collection Inventory Picking process (INPXPICK) confirms picking. If you have not activated Check On Hold, the Picking Confirmation process confirms picking but you cannot ship the stock.
If you cancel a demand line on the Stock Request Cancel/Hold page after running the Picking Confirmation process, PeopleSoft Inventory automatically does one of two things, depending upon your selection on the Fulfillment Setup page: if you selected Stage for Putaway, the system restages the line in the Putaway staging tables (STAGED_ITEM_INV and STAGED_COST_INV); if you selected Putaway at Save, the system puts the stock away into the storage location from which it was picked.
State of North Dakota
INV_107 INVENTORY
Date: 8/20/2004 MAXIMUS, Inc. © 2004. All Rights Reserved. Page 50 of 133
CREATING PICKING PLANS To produce a picking plan, you need to establish parameters for the business unit and for each individual picking plan.
To create a picking plan:
11.. Establish default picking options for the business unit. Define default picking rules and selection criteria on the Fulfillment Setup and Pick Plan Options pages. These options govern basic picking operations for the entire business unit. (You can override certain options on the Fulfillment Item Setup, Picking Plan, and Additional Options pages.)
22.. Define any criteria particular to a specific item in the business unit. To set up different picking options for a specific item, override the business unit defaults on the Fulfillment Item Setup page.
33.. Establish parameters for an individual picking plan. Using the Picking Plan and Additional Options pages, define run control parameters for printing the Picking Plan report. Along with the criteria specified on the Pick Plan Options page, these parameters determine which orders appear on the report, how orders are sorted, and whether the Picking Plan process generates a full picking plan or just a location summary. To pick a subset of the eligible orders, select individual orders on the Order Release Selection page.
PAGES USED TO CREATE PICKING PLANS
Page Name Navigation Usage
Pick Plan Options
Inventory, Fulfill Stock Orders, Fulfillment Rules, Setup Fulfillment, Pick Plan Options
Define default picking options.
Picking Plan Inventory, Fulfill Stock Orders, Picking, Picking Plan Report,
Picking Plan
Create picking plan instructions for the stockroom workers who physically pick
the demand quantities for shipment.
Order Release Selection
Click the Select Orders link on the Picking Plan page.
Release a subset of the orders meeting your selection criteria.
Order Release Detail
Click a linked order number on the Order Release Selection page.
View order line information for the orders displayed on the Order Release
Selection page.
Additional Click the Additional Options link on Select additional options for sorting and
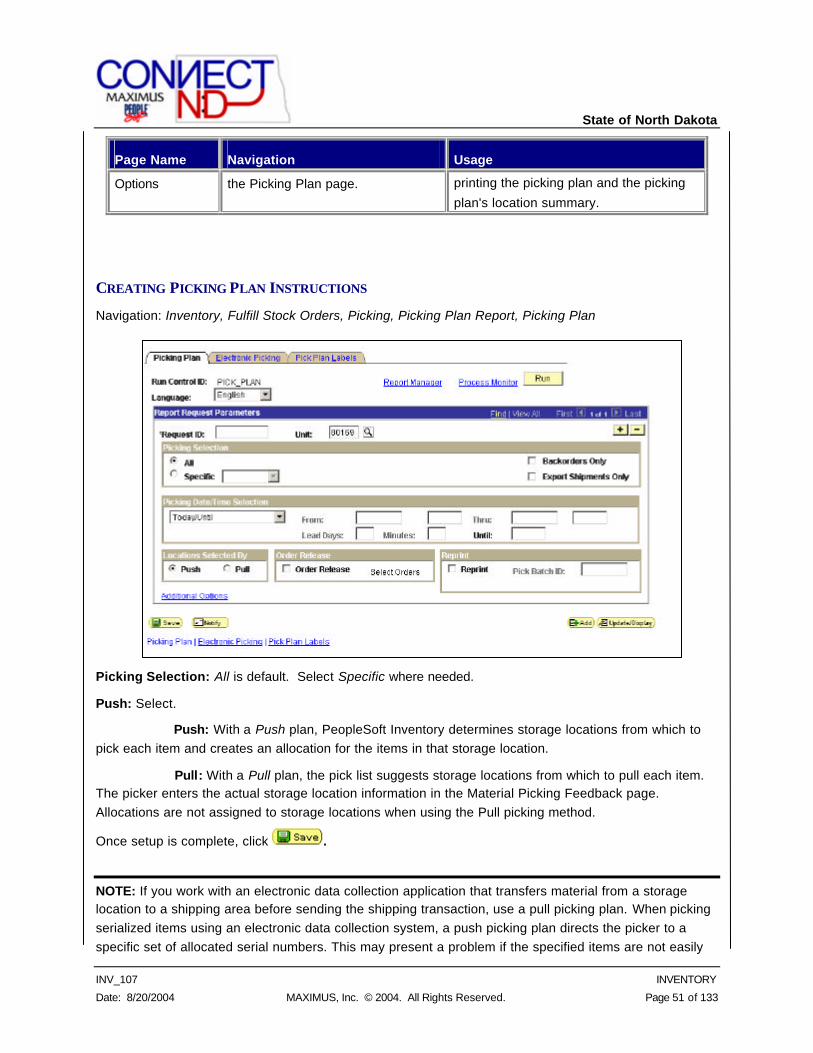
State of North Dakota
INV_107 INVENTORY
Date: 8/20/2004 MAXIMUS, Inc. © 2004. All Rights Reserved. Page 51 of 133
Page Name Navigation Usage
Options the Picking Plan page. printing the picking plan and the picking
plan's location summary.
CREATING PICKING PLAN INSTRUCTIONS
Navigation: Inventory, Fulfill Stock Orders, Picking, Picking Plan Report, Picking Plan
Picking Selection: All is default. Select Specific where needed.
Push: Select.
Push: With a Push plan, PeopleSoft Inventory determines storage locations from which to pick each item and creates an allocation for the items in that storage location.
Pull: With a Pull plan, the pick list suggests storage locations from which to pull each item. The picker enters the actual storage location information in the Material Picking Feedback page. Allocations are not assigned to storage locations when using the Pull picking method.
Once setup is complete, click .
NOTE: If you work with an electronic data collection application that transfers material from a storage location to a shipping area before sending the shipping transaction, use a pull picking plan. When picking serialized items using an electronic data collection system, a push picking plan directs the picker to a specific set of allocated serial numbers. This may present a problem if the specified items are not easily
State of North Dakota
INV_107 INVENTORY
Date: 8/20/2004 MAXIMUS, Inc. © 2004. All Rights Reserved. Page 52 of 133
retrieved, as serial number substitution can result in a transaction error if the alternate serial number has
been allocated for another plan. For this reason, you may also want to use a pull plan for serialized items.
ADDITIONAL OPTIONS
Order Release − Select to limit picking to a subset of the orders meeting your selection criteria.
NOTE: If you activate Order Release but don't select any orders to release, an error message appears when you save the page.
Reprint − If you are reprinting a picking plan that you have already created, select this option and enter a Pick Batch ID.
NOTE: If you elected on the Electronic Fulfillment Option page to create an extract file when you reprint a pick batch ID, the system sets the original or reprint flag on the extract file. This enables your data
collection system to identify the new file as a replacement for the original version.
Regenerate Order Transactions − Select to reprint and regenerate the order transactions from a warehouse management system (WMS) application. This option is available only if the Use External Warehouse Control option is active for the business unit.
NOTE: If the business unit requires closure-calendar validation and processing for shipping activities, as defined on the Closure Calendar page, and if the picking lead days include exception dates, the system adds one day to the number of picking lead days for every closed day and compares the result against the scheduled ship date. Times are not included in these calculations. Therefore, the lead days include
only open business days.
SPECIFYING ADDITIONAL PICKING PLAN OPTIONS
Access the Additional Options page.
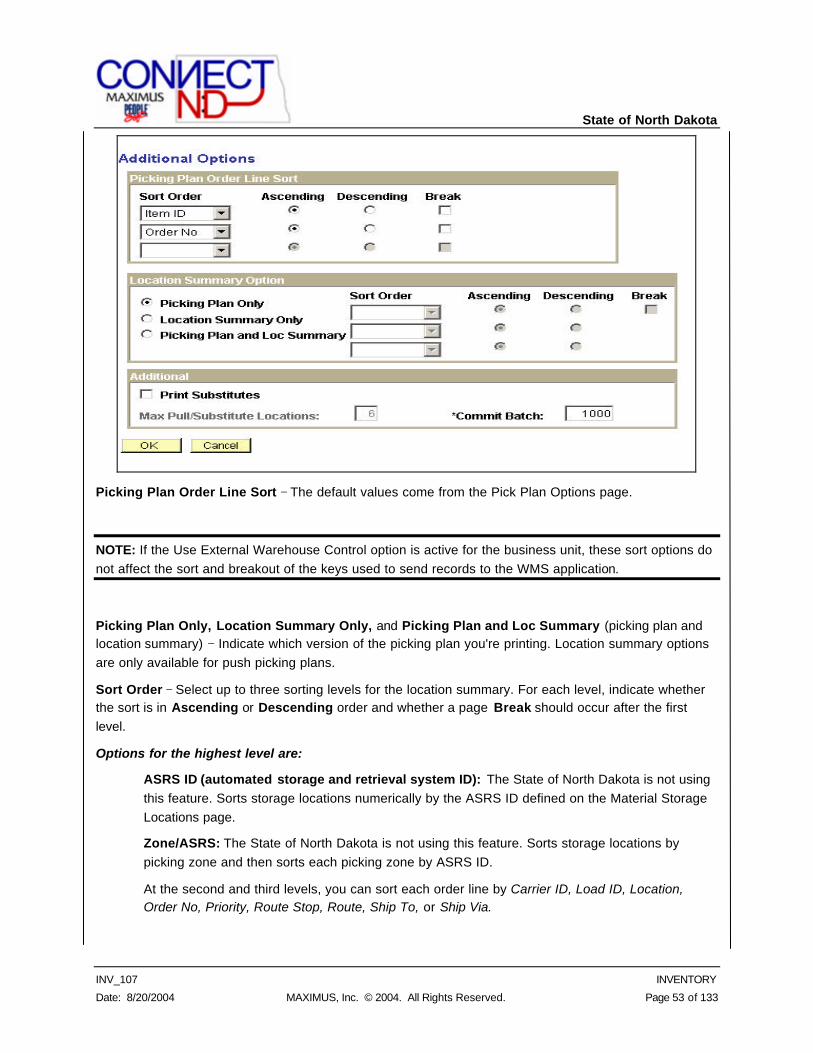
State of North Dakota
INV_107 INVENTORY
Date: 8/20/2004 MAXIMUS, Inc. © 2004. All Rights Reserved. Page 53 of 133
Picking Plan Order Line Sort − The default values come from the Pick Plan Options page.
NOTE: If the Use External Warehouse Control option is active for the business unit, these sort options do not affect the sort and breakout of the keys used to send records to the WMS application.
Picking Plan Only, Location Summary Only, and Picking Plan and Loc Summary (picking plan and location summary) − Indicate which version of the picking plan you're printing. Location summary options are only available for push picking plans.
Sort Order − Select up to three sorting levels for the location summary. For each level, indicate whether the sort is in Ascending or Descending order and whether a page Break should occur after the first level.
Options for the highest level are:
ASRS ID (automated storage and retrieval system ID): The State of North Dakota is not using this feature. Sorts storage locations numerically by the ASRS ID defined on the Material Storage Locations page.
Zone/ASRS: The State of North Dakota is not using this feature. Sorts storage locations by picking zone and then sorts each picking zone by ASRS ID.
At the second and third levels, you can sort each order line by Carrier ID, Load ID, Location, Order No, Priority, Route Stop, Route, Ship To, or Ship Via.
State of North Dakota
INV_107 INVENTORY
Date: 8/20/2004 MAXIMUS, Inc. © 2004. All Rights Reserved. Page 54 of 133
Print Substitutes − Select to have the picking plan list alternate items that can be used to fulfill the order. For order lines that allow substitutions and have insufficient quantity available to fulfill the order, any substitute items that can fulfill the order line are listed on the picking plan under the requested item in order of priority. Selecting this option also includes substitute items on bar-coded picking plans and picking extract files.
Max Pull/Substitute Locations − Indicate the maximum number of storage locations to include on pull picking plans or the maximum number of substitute item storage locations to print on the picking plan. The default value is 6.
Commit Batch − Enter the number of demand lines in the pick batch that can be processed by the picking plan before the processing changes are committed to the database by a SQL commit statement. For example, with a commit batch of 100 (the delivered default), the Picking Plan process commits processed demand lines in groups of 100 and issues a final commit statement at the end of the pick batch. If the pick batch ID includes 1050 demand lines, the Picking Plan process issues 11 commit statements, committing 10 groups of 100 demand lines and 1 group of 50 demand lines at the end of the pick batch.
A single commit strategy — that is, one SQL commit statement per pick batch ID—offers the best processing performance; however, this may lead to table contention issues in environments that print a large volume of demand lines in a single pick batch ID. To arrive at the optimal commit strategy, balance table contention against performance. If table contention is not a problem in your environment, set the Commit Batch to 999999 to simulate a single commit strategy.
NOTE: If a fatal SQL or some type of database error aborts a picking plan process run, you must determine which lines of the pick batch ID were committed and reprocess any uncommitted demand lines. See the Picking Plan process troubleshooting documentation on the PeopleSoft Customer Connection website.
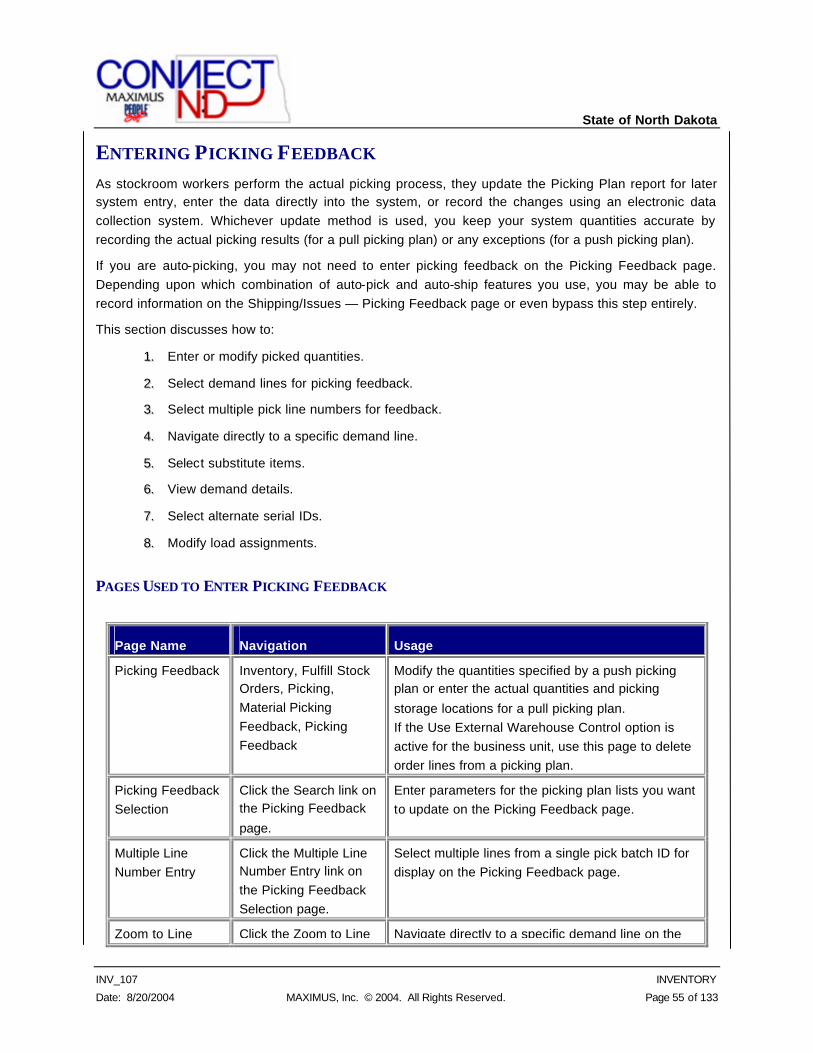
State of North Dakota
INV_107 INVENTORY
Date: 8/20/2004 MAXIMUS, Inc. © 2004. All Rights Reserved. Page 55 of 133
ENTERING PICKING FEEDBACK As stockroom workers perform the actual picking process, they update the Picking Plan report for later system entry, enter the data directly into the system, or record the changes using an electronic data collection system. Whichever update method is used, you keep your system quantities accurate by recording the actual picking results (for a pull picking plan) or any exceptions (for a push picking plan).
If you are auto-picking, you may not need to enter picking feedback on the Picking Feedback page. Depending upon which combination of auto-pick and auto-ship features you use, you may be able to record information on the Shipping/Issues — Picking Feedback page or even bypass this step entirely.
This section discusses how to:
11.. Enter or modify picked quantities.
22.. Select demand lines for picking feedback.
33.. Select multiple pick line numbers for feedback.
44.. Navigate directly to a specific demand line.
55.. Select substitute items.
66.. View demand details.
77.. Select alternate serial IDs.
88.. Modify load assignments.
PAGES USED TO ENTER PICKING FEEDBACK
Page Name Navigation Usage
Picking Feedback Inventory, Fulfill Stock Orders, Picking, Material Picking Feedback, Picking Feedback
Modify the quantities specified by a push picking plan or enter the actual quantities and picking
storage locations for a pull picking plan. If the Use External Warehouse Control option is active for the business unit, use this page to delete order lines from a picking plan.
Picking Feedback Selection
Click the Search link on the Picking Feedback
page.
Enter parameters for the picking plan lists you want to update on the Picking Feedback page.
Multiple Line Number Entry
Click the Multiple Line Number Entry link on the Picking Feedback Selection page.
Select multiple lines from a single pick batch ID for display on the Picking Feedback page.
Zoom to Line Click the Zoom to Line Navigate directly to a specific demand line on the
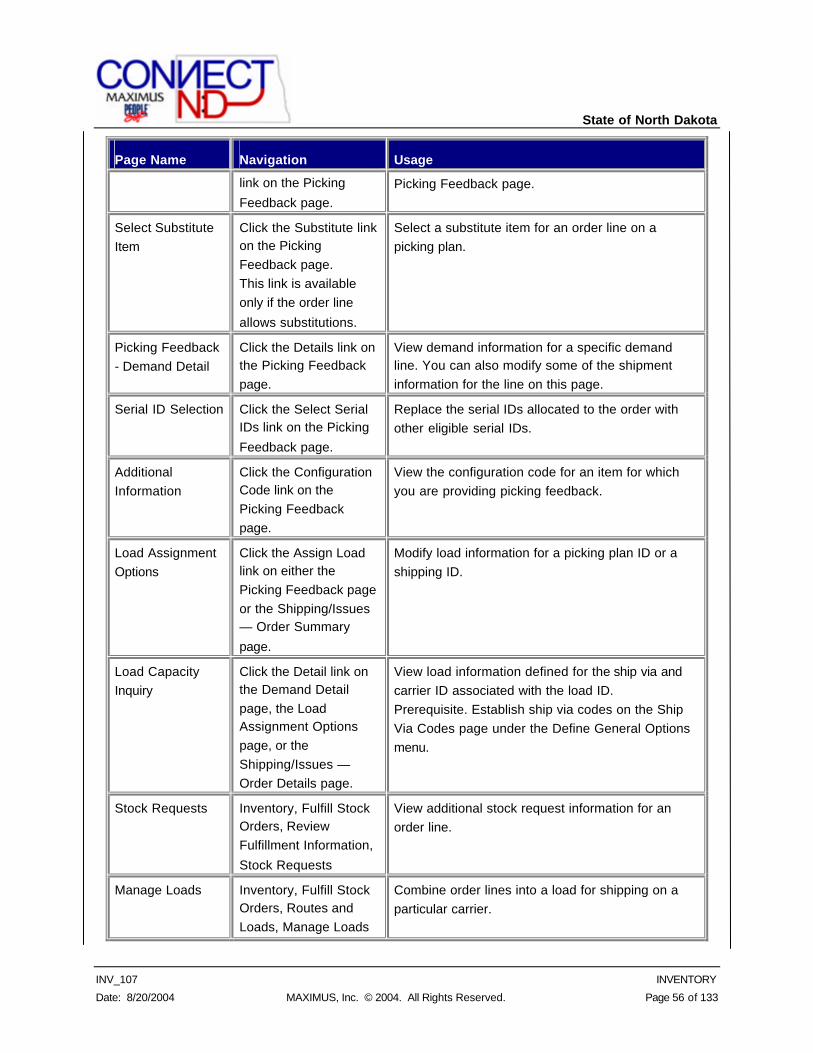
State of North Dakota
INV_107 INVENTORY
Date: 8/20/2004 MAXIMUS, Inc. © 2004. All Rights Reserved. Page 56 of 133
Page Name Navigation Usage
link on the Picking
Feedback page. Picking Feedback page.
Select Substitute Item
Click the Substitute link on the Picking Feedback page. This link is available only if the order line
allows substitutions.
Select a substitute item for an order line on a picking plan.
Picking Feedback - Demand Detail
Click the Details link on the Picking Feedback page.
View demand information for a specific demand line. You can also modify some of the shipment information for the line on this page.
Serial ID Selection Click the Select Serial IDs link on the Picking
Feedback page.
Replace the serial IDs allocated to the order with other eligible serial IDs.
Additional Information
Click the Configuration Code link on the Picking Feedback page.
View the configuration code for an item for which you are providing picking feedback.
Load Assignment Options
Click the Assign Load link on either the Picking Feedback page or the Shipping/Issues — Order Summary
page.
Modify load information for a picking plan ID or a shipping ID.
Load Capacity Inquiry
Click the Detail link on the Demand Detail page, the Load Assignment Options page, or the Shipping/Issues — Order Details page.
View load information defined for the ship via and carrier ID associated with the load ID. Prerequisite. Establish ship via codes on the Ship Via Codes page under the Define General Options menu.
Stock Requests Inventory, Fulfill Stock Orders, Review Fulfillment Information,
Stock Requests
View additional stock request information for an order line.
Manage Loads Inventory, Fulfill Stock Orders, Routes and Loads, Manage Loads
Combine order lines into a load for shipping on a particular carrier.
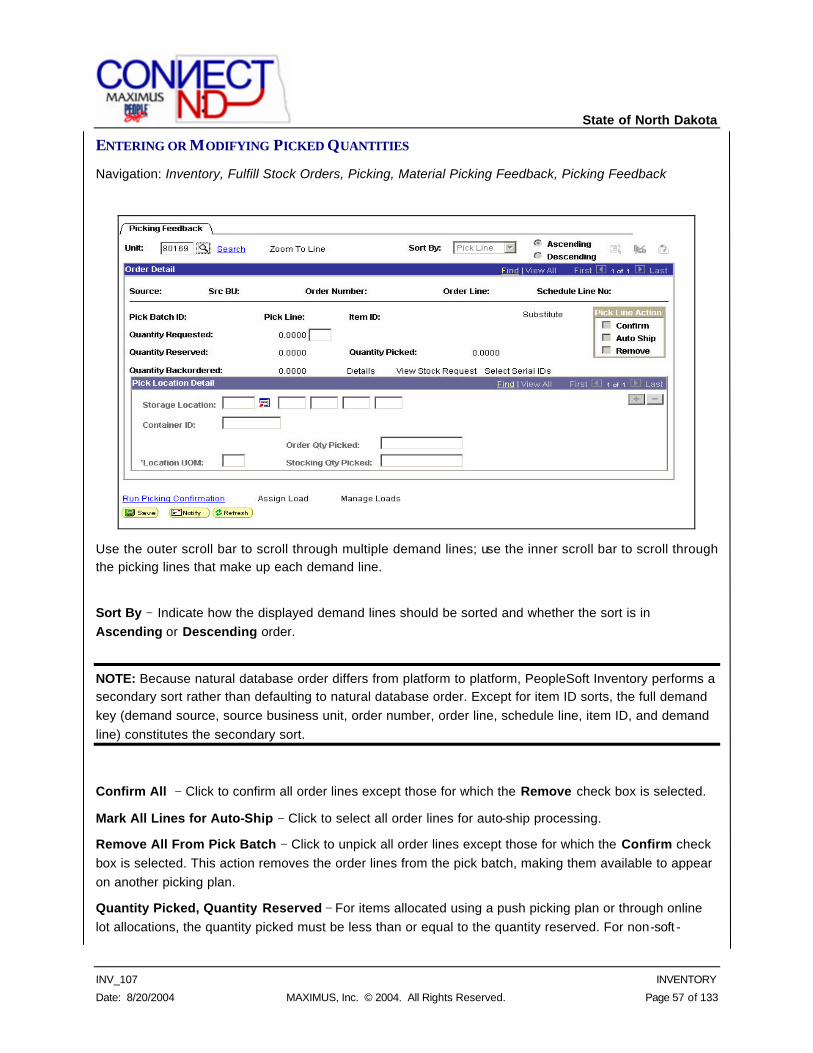
State of North Dakota
INV_107 INVENTORY
Date: 8/20/2004 MAXIMUS, Inc. © 2004. All Rights Reserved. Page 57 of 133
ENTERING OR MODIFYING PICKED QUANTITIES
Navigation: Inventory, Fulfill Stock Orders, Picking, Material Picking Feedback, Picking Feedback
Use the outer scroll bar to scroll through multiple demand lines; use the inner scroll bar to scroll through the picking lines that make up each demand line.
Sort By − Indicate how the displayed demand lines should be sorted and whether the sort is in Ascending or Descending order.
NOTE: Because natural database order differs from platform to platform, PeopleSoft Inventory performs a secondary sort rather than defaulting to natural database order. Except for item ID sorts, the full demand key (demand source, source business unit, order number, order line, schedule line, item ID, and demand line) constitutes the secondary sort.
Confirm All − Click to confirm all order lines except those for which the Remove check box is selected.
Mark All Lines for Auto-Ship − Click to select all order lines for auto-ship processing.
Remove All From Pick Batch − Click to unpick all order lines except those for which the Confirm check box is selected. This action removes the order lines from the pick batch, making them available to appear on another picking plan.
Quantity Picked, Quantity Reserved − For items allocated using a push picking plan or through online lot allocations, the quantity picked must be less than or equal to the quantity reserved. For non-soft -
State of North Dakota
INV_107 INVENTORY
Date: 8/20/2004 MAXIMUS, Inc. © 2004. All Rights Reserved. Page 58 of 133
reserved items, the quantity reserved is 0; unless overpicking is allowed, the quantity picked for these items must be less than or equal to the quantity requested minus any Quantity Backordered.
Quantity Backordered − The amount of the original order that was placed on backorder by the Material Reservations process, in the Material Stock Reservations component, or through online lot allocation. When soft reservations processing is in effect, the quantity reserved should equal the quantity requested minus any backorder quantity. If soft reservations is disabled for the item, a backorder quantity only appears for partially lot-allocated order lines.
Confirm − Select to indicate that the specified quantity has been picked from the appropriate storage location in the Pick Location Detail group box. Picked lines must be confirmed before they are eligible for the Picking Confirmation process.
Auto Ship − Select to use auto-ship processing for a demand line.
Remove − Select to unpick a demand line. This action removes the line from the pick batch, making it available to print on another picking plan.
Storage Location and Location UOM (location unit of measure) − If you are using a pull picking plan, enter the storage location from which you picked the material. (If you are modifying feedback created by a push picking plan, or if you are modifying previously saved feedback, you cannot update picking storage locations here; you can change only the quantities. To change storage location information, delete the row or set the quantity to 0 for the existing location, then insert a new row.)
NOTE: The business unit's default display options determine how many storage levels appear upon entry to this page. If, however, the material was actually picked from a storage location with additional levels, this information overrides the defaults and all appropriate levels appear. If you are entering a storage location that requires additional levels, enter the storage area, and then refresh the page to display the
remaining levels.
If you attempt to pick from a WIP location or a suspended location, the system displays an error message and prevents you from saving your feedback. You also cannot save picking feedback if the location is undergoing a cycle count and you have elected to close storage locations during cycle counts.
Order Qty Picked (quantity picked in the ordering UOM) and Stocking Qty Picked (quantity picked in the stocking UOM) − Enter the quantity picked from this location. You can enter the quantity in either the ordering or the stocking UOM and the system automatically calculates the other quantity. If you are providing feedback for items that were picked in response to a lot allocation, you can change only the storage location and quantity, and the storage location must be valid for the lots allocated to the demand line.
For lot-controlled, serial-controlled, and staged date-controlled items, the picked quantity appears in the middle section of the page and the lower section is unavailable for entry.
State of North Dakota
INV_107 INVENTORY
Date: 8/20/2004 MAXIMUS, Inc. © 2004. All Rights Reserved. Page 59 of 133
NOTE: If you are picking lot-controlled items, a warning message appears if the scheduled ship date is before the availability date or after the expiration date. For pull picking plans, the message appears when
you enter the lot ID; for push picking plans, it appears when you save the page.
Run Picking Confirmation link − Click to execute the Picking Confirmation process from this page. You must assign a run control ID to identify this process.
NOTE: If you selected the Auto Confirm option on the Fulfillment Setup page, PeopleSoft Inventory launches the Picking Confirmation process automatically when you save the Picking Feedback page.
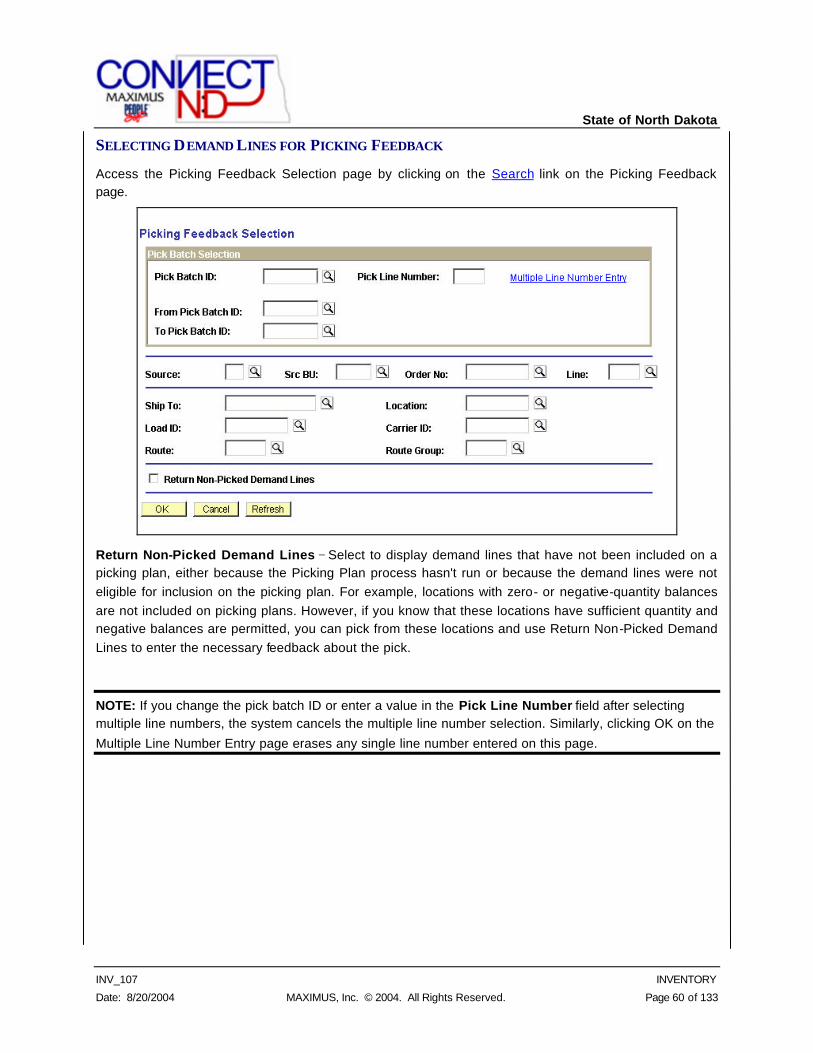
State of North Dakota
INV_107 INVENTORY
Date: 8/20/2004 MAXIMUS, Inc. © 2004. All Rights Reserved. Page 60 of 133
SELECTING DEMAND LINES FOR PICKING FEEDBACK
Access the Picking Feedback Selection page by clicking on the Search link on the Picking Feedback page.
Return Non-Picked Demand Lines − Select to display demand lines that have not been included on a picking plan, either because the Picking Plan process hasn't run or because the demand lines were not eligible for inclusion on the picking plan. For example, locations with zero- or negative-quantity balances are not included on picking plans. However, if you know that these locations have sufficient quantity and negative balances are permitted, you can pick from these locations and use Return Non-Picked Demand Lines to enter the necessary feedback about the pick.
NOTE: If you change the pick batch ID or enter a value in the Pick Line Number field after selecting multiple line numbers, the system cancels the multiple line number selection. Similarly, clicking OK on the
Multiple Line Number Entry page erases any single line number entered on this page.
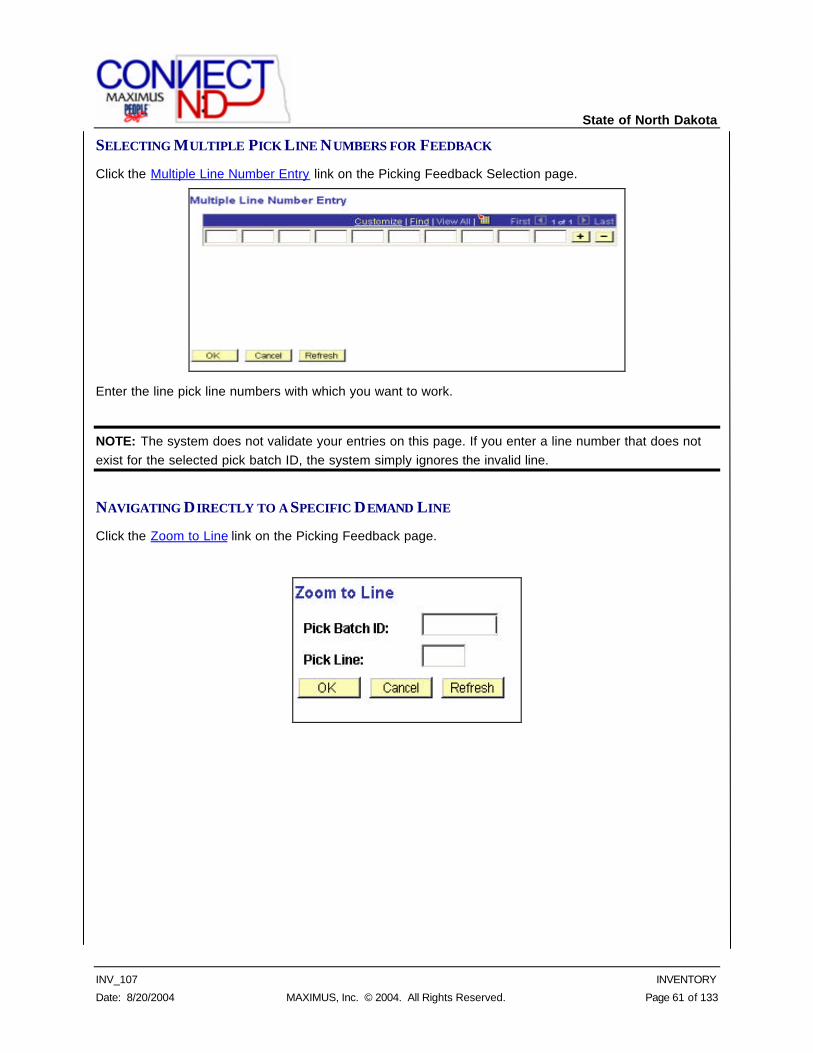
State of North Dakota
INV_107 INVENTORY
Date: 8/20/2004 MAXIMUS, Inc. © 2004. All Rights Reserved. Page 61 of 133
SELECTING MULTIPLE PICK LINE NUMBERS FOR FEEDBACK
Click the Multiple Line Number Entry link on the Picking Feedback Selection page.
Enter the line pick line numbers with which you want to work.
NOTE: The system does not validate your entries on this page. If you enter a line number that does not exist for the selected pick batch ID, the system simply ignores the invalid line.
NAVIGATING DIRECTLY TO A SPECIFIC DEMAND LINE
Click the Zoom to Line link on the Picking Feedback page.

State of North Dakota
INV_107 INVENTORY
Date: 8/20/2004 MAXIMUS, Inc. © 2004. All Rights Reserved. Page 62 of 133
Viewing Demand Details
Click the Details link on the Picking Feedback page.
NOTE: If the business unit requires closure calendar validation and processing for receiving activities, as defined on the Closure Calendar page, and you enter a Sched Arrv (scheduled arrival) date or time that is a defined closure date, the system issues an error message. You can either accept the exception by clicking No, or reschedule by clicking Yes. If you click Yes, the system returns the first valid future date
and time.
Export − Identifies whether the shipment is an intercompany transfer or sales order requiring export shipping documentation.
Route, Route Stop Number − To change a demand line's route assignment, select a new route and stop.
NOTE: When you change a route assignment on this page, PeopleSoft Inventory does not validate the new route. In addition, if you modify either the carrier or the ship via, the system cancels any existing
route assignment.
CONFIRMING PICKED INVENTORY Once you have recorded picking results, run the Picking Confirmation process to adjust storage location quantities and prepare the picked demand lines for shipping.
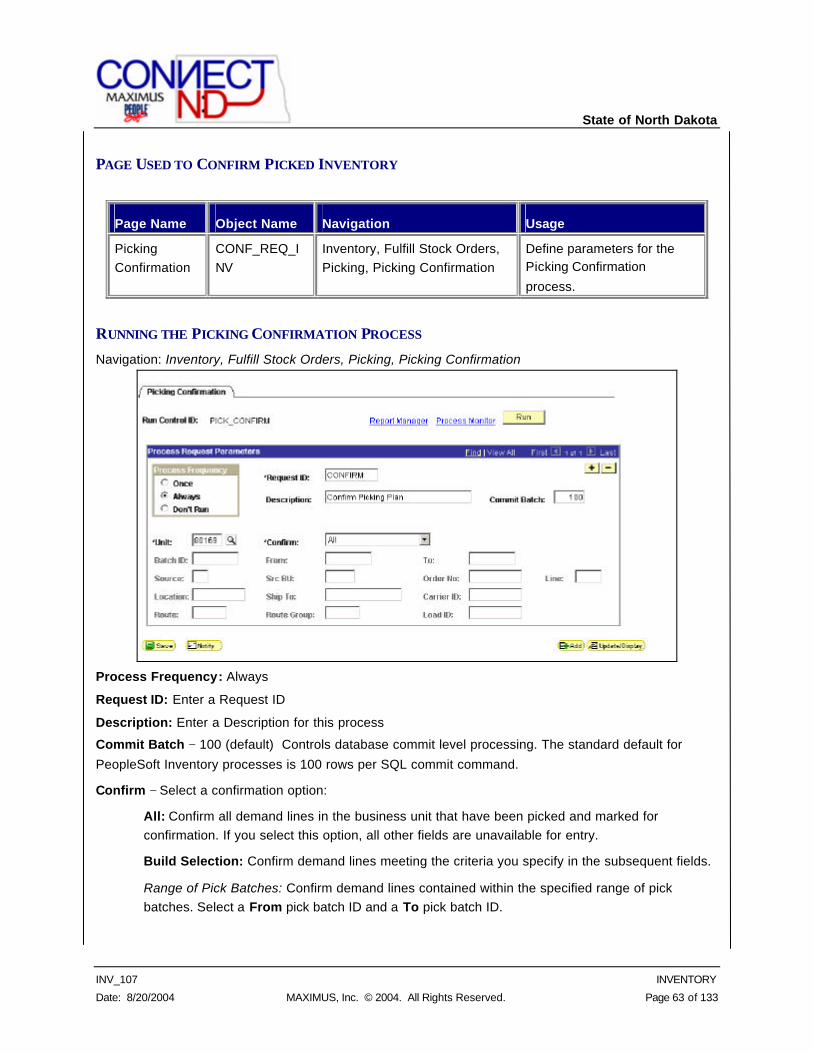
State of North Dakota
INV_107 INVENTORY
Date: 8/20/2004 MAXIMUS, Inc. © 2004. All Rights Reserved. Page 63 of 133
PAGE USED TO CONFIRM PICKED INVENTORY
Page Name Object Name Navigation Usage
Picking Confirmation
CONF_REQ_INV
Inventory, Fulfill Stock Orders, Picking, Picking Confirmation
Define parameters for the Picking Confirmation
process.
RUNNING THE PICKING CONFIRMATION PROCESS
Navigation: Inventory, Fulfill Stock Orders, Picking, Picking Confirmation
Process Frequency: Always
Request ID: Enter a Request ID
Description: Enter a Description for this process
Commit Batch − 100 (default) Controls database commit level processing. The standard default for
PeopleSoft Inventory processes is 100 rows per SQL commit command.
Confirm − Select a confirmation option:
All: Confirm all demand lines in the business unit that have been picked and marked for confirmation. If you select this option, all other fields are unavailable for entry.
Build Selection: Confirm demand lines meeting the criteria you specify in the subsequent fields.
Range of Pick Batches: Confirm demand lines contained within the specified range of pick batches. Select a From pick batch ID and a To pick batch ID.
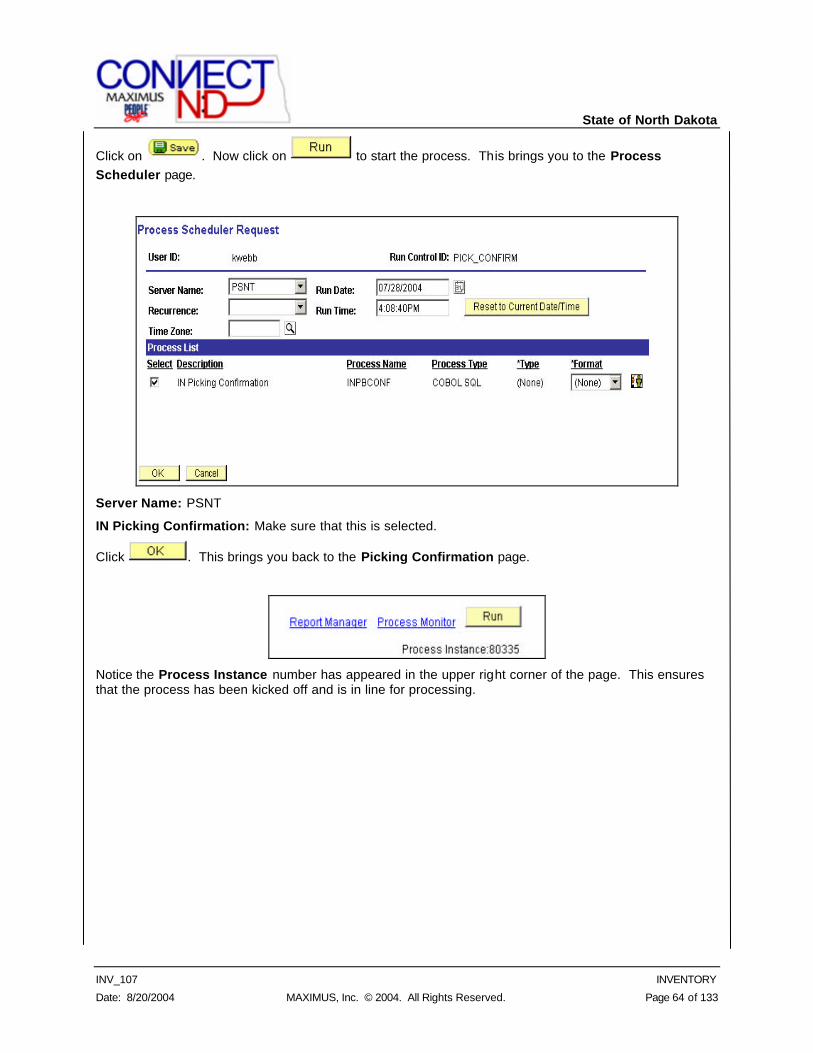
State of North Dakota
INV_107 INVENTORY
Date: 8/20/2004 MAXIMUS, Inc. © 2004. All Rights Reserved. Page 64 of 133
Click on . Now click on to start the process. This brings you to the Process Scheduler page.
Server Name: PSNT
IN Picking Confirmation: Make sure that this is selected.
Click . This brings you back to the Picking Confirmation page.
Notice the Process Instance number has appeared in the upper right corner of the page. This ensures that the process has been kicked off and is in line for processing.
State of North Dakota
INV_107 INVENTORY
Date: 8/20/2004 MAXIMUS, Inc. © 2004. All Rights Reserved. Page 65 of 133
SHIPPING INVENTORY This section provides an overview of the shipping business process and discusses how to:
• Enter shipment data.
• Ship and invoice orders automatically.
• Deplete inventory balances.
• View shipment backlogs.
ENTERING SHIPMENT DATA A unique shipping ID identifies each shipment you confirm in the Shipping/Issues component. When you add a new shipment, you can either enter a shipping ID or accept the default assignment of NEXT. If you accept NEXT, PeopleSoft Inventory automatically generates a new shipping ID.
This section discusses how to:
• Confirm orders for shipment.
• Select orders to ship.
• (Optional) Override order shipment defaults.
• (Optional) Mark demand lines for shipment.
Other pages not discussed in this manual are as follows:
• (Optional) Add shipping containers.
• (Optional) Define default pro numbers and shipping dates.
• (Optional) Enter shipping comments.
• (Optional) Enter miscellaneous charges.
• (Optional) Modify line-level quantity and transportation information.
• Enter picking information.
• (Optional) Enter Export Proforma comments.
• (Optional) View and enter product kit information.
• (Optional) Generate shipping serial IDs manually.
• (Optional) Generate shipping serial IDs automatically.
• (Optional) View configuration information.
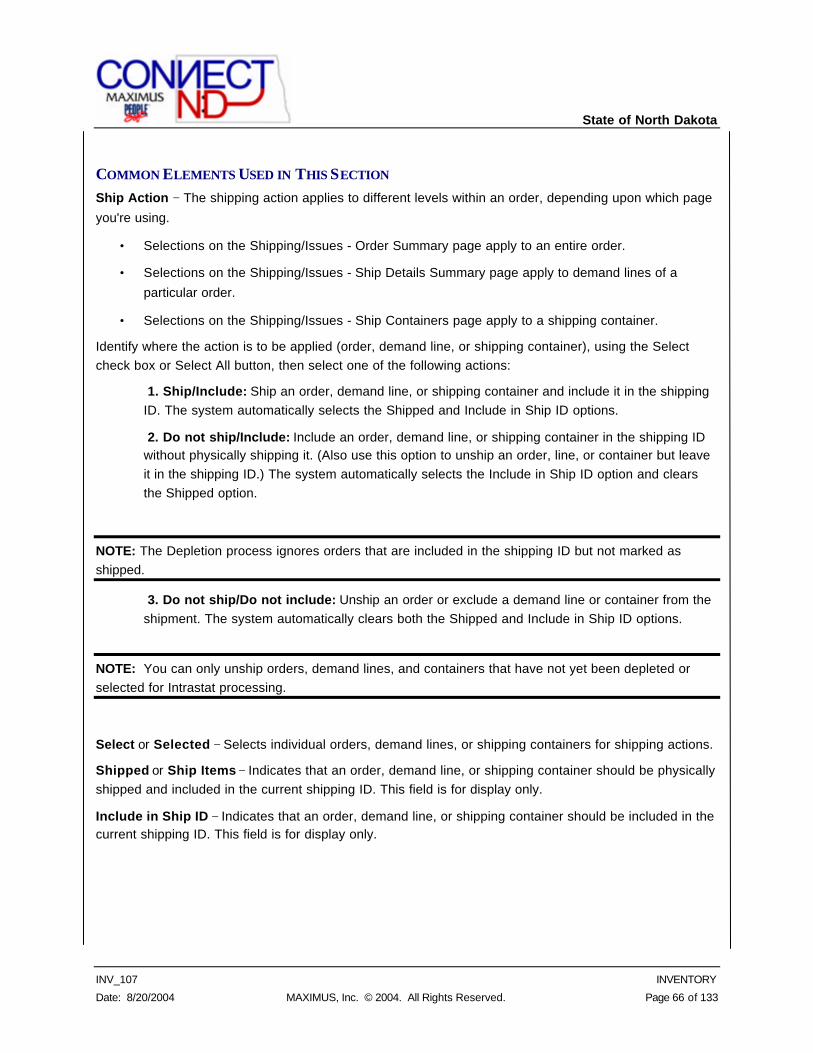
State of North Dakota
INV_107 INVENTORY
Date: 8/20/2004 MAXIMUS, Inc. © 2004. All Rights Reserved. Page 66 of 133
COMMON ELEMENTS USED IN THIS SECTION Ship Action − The shipping action applies to different levels within an order, depending upon which page
you're using.
• Selections on the Shipping/Issues - Order Summary page apply to an entire order.
• Selections on the Shipping/Issues - Ship Details Summary page apply to demand lines of a
particular order.
• Selections on the Shipping/Issues - Ship Containers page apply to a shipping container.
Identify where the action is to be applied (order, demand line, or shipping container), using the Select check box or Select All button, then select one of the following actions:
1. Ship/Include: Ship an order, demand line, or shipping container and include it in the shipping ID. The system automatically selects the Shipped and Include in Ship ID options.
2. Do not ship/Include: Include an order, demand line, or shipping container in the shipping ID without physically shipping it. (Also use this option to unship an order, line, or container but leave it in the shipping ID.) The system automatically selects the Include in Ship ID option and clears the Shipped option.
NOTE: The Depletion process ignores orders that are included in the shipping ID but not marked as shipped.
3. Do not ship/Do not include: Unship an order or exclude a demand line or container from the shipment. The system automatically clears both the Shipped and Include in Ship ID options.
NOTE: You can only unship orders, demand lines, and containers that have not yet been depleted or selected for Intrastat processing.
Select or Selected − Selects individual orders, demand lines, or shipping containers for shipping actions.
Shipped or Ship Items − Indicates that an order, demand line, or shipping container should be physically shipped and included in the current shipping ID. This field is for display only.
Include in Ship ID − Indicates that an order, demand line, or shipping container should be included in the current shipping ID. This field is for display only.
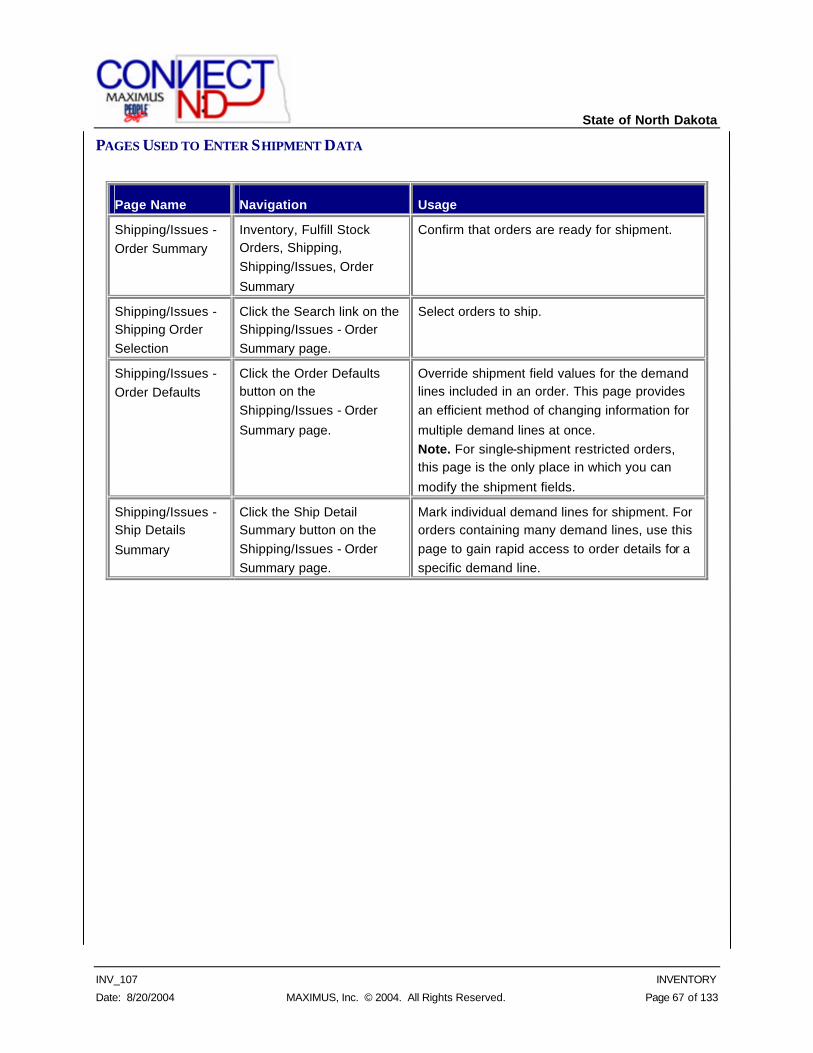
State of North Dakota
INV_107 INVENTORY
Date: 8/20/2004 MAXIMUS, Inc. © 2004. All Rights Reserved. Page 67 of 133
PAGES USED TO ENTER SHIPMENT DATA
Page Name Navigation Usage
Shipping/Issues - Order Summary
Inventory, Fulfill Stock Orders, Shipping, Shipping/Issues, Order
Summary
Confirm that orders are ready for shipment.
Shipping/Issues - Shipping Order Selection
Click the Search link on the Shipping/Issues - Order Summary page.
Select orders to ship.
Shipping/Issues - Order Defaults
Click the Order Defaults button on the Shipping/Issues - Order
Summary page.
Override shipment field values for the demand lines included in an order. This page provides an efficient method of changing information for
multiple demand lines at once. Note. For single-shipment restricted orders, this page is the only place in which you can
modify the shipment fields.
Shipping/Issues - Ship Details
Summary
Click the Ship Detail Summary button on the Shipping/Issues - Order Summary page.
Mark individual demand lines for shipment. For orders containing many demand lines, use this page to gain rapid access to order details for a specific demand line.
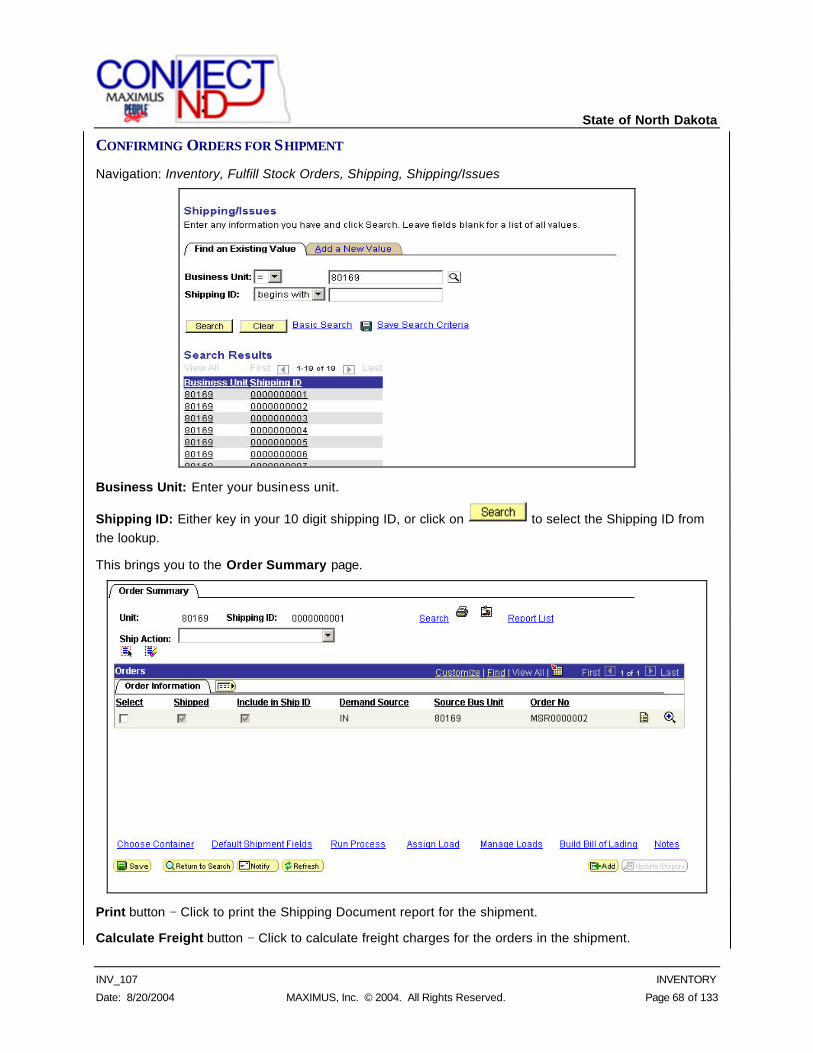
State of North Dakota
INV_107 INVENTORY
Date: 8/20/2004 MAXIMUS, Inc. © 2004. All Rights Reserved. Page 68 of 133
CONFIRMING ORDERS FOR SHIPMENT
Navigation: Inventory, Fulfill Stock Orders, Shipping, Shipping/Issues
Business Unit: Enter your business unit.
Shipping ID: Either key in your 10 digit shipping ID, or click on to select the Shipping ID from the lookup.
This brings you to the Order Summary page.
Print button − Click to print the Shipping Document report for the shipment.
Calculate Freight button − Click to calculate freight charges for the orders in the shipment.
State of North Dakota
INV_107 INVENTORY
Date: 8/20/2004 MAXIMUS, Inc. © 2004. All Rights Reserved. Page 69 of 133
Run Process link − Click to execute the Depletion process. If the shipment contains sales orders or interunit transfers requiring intercompany processing, this link enables you to run the necessary direct invoicing processes.
NOTE: If you selected the Auto Deplete option on the Fulfillment Setup page, saving the Shipping/Issues component automatically schedules the Depletion process. Any subsequent processes, such as direct invoicing, must be run manually.
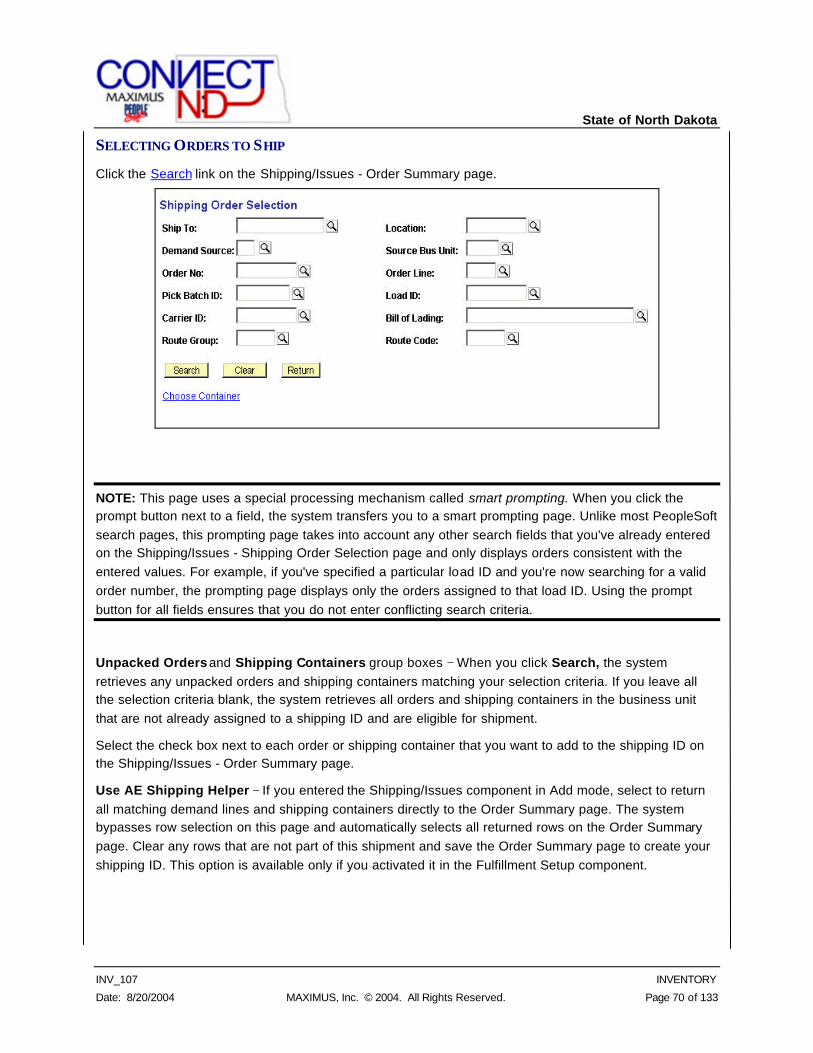
State of North Dakota
INV_107 INVENTORY
Date: 8/20/2004 MAXIMUS, Inc. © 2004. All Rights Reserved. Page 70 of 133
SELECTING ORDERS TO SHIP
Click the Search link on the Shipping/Issues - Order Summary page.
NOTE: This page uses a special processing mechanism called smart prompting. When you click the prompt button next to a field, the system transfers you to a smart prompting page. Unlike most PeopleSoft search pages, this prompting page takes into account any other search fields that you've already entered on the Shipping/Issues - Shipping Order Selection page and only displays orders consistent with the entered values. For example, if you've specified a particular load ID and you're now searching for a valid order number, the prompting page displays only the orders assigned to that load ID. Using the prompt button for all fields ensures that you do not enter conflicting search criteria.
Unpacked Orders and Shipping Containers group boxes − When you click Search, the system retrieves any unpacked orders and shipping containers matching your selection criteria. If you leave all the selection criteria blank, the system retrieves all orders and shipping containers in the business unit that are not already assigned to a shipping ID and are eligible for shipment.
Select the check box next to each order or shipping container that you want to add to the shipping ID on the Shipping/Issues - Order Summary page.
Use AE Shipping Helper − If you entered the Shipping/Issues component in Add mode, select to return all matching demand lines and shipping containers directly to the Order Summary page. The system bypasses row selection on this page and automatically selects all returned rows on the Order Summary page. Clear any rows that are not part of this shipment and save the Order Summary page to create your shipping ID. This option is available only if you activated it in the Fulfillment Setup component.
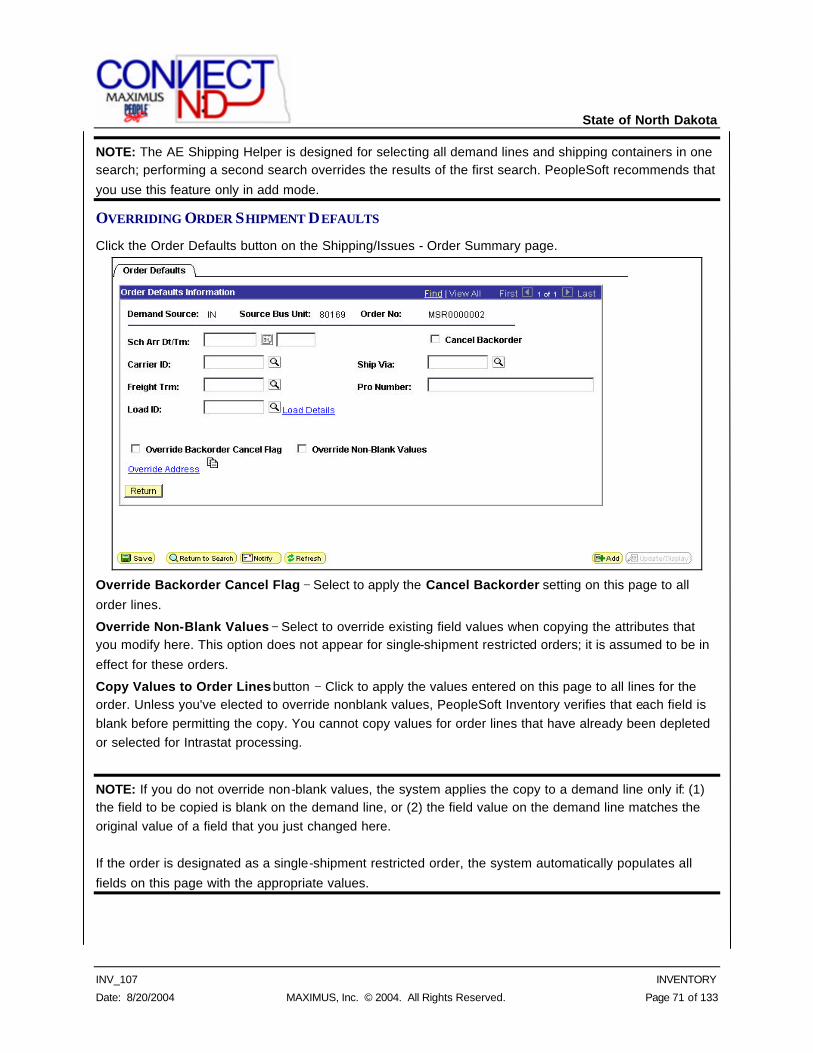
State of North Dakota
INV_107 INVENTORY
Date: 8/20/2004 MAXIMUS, Inc. © 2004. All Rights Reserved. Page 71 of 133
NOTE: The AE Shipping Helper is designed for selecting all demand lines and shipping containers in one search; performing a second search overrides the results of the first search. PeopleSoft recommends that
you use this feature only in add mode.
OVERRIDING ORDER SHIPMENT DEFAULTS
Click the Order Defaults button on the Shipping/Issues - Order Summary page.
Override Backorder Cancel Flag − Select to apply the Cancel Backorder setting on this page to all
order lines.
Override Non-Blank Values − Select to override existing field values when copying the attributes that you modify here. This option does not appear for single-shipment restricted orders; it is assumed to be in
effect for these orders.
Copy Values to Order Lines button − Click to apply the values entered on this page to all lines for the order. Unless you've elected to override nonblank values, PeopleSoft Inventory verifies that each field is blank before permitting the copy. You cannot copy values for order lines that have already been depleted or selected for Intrastat processing.
NOTE: If you do not override non-blank values, the system applies the copy to a demand line only if: (1) the field to be copied is blank on the demand line, or (2) the field value on the demand line matches the original value of a field that you just changed here. If the order is designated as a single-shipment restricted order, the system automatically populates all
fields on this page with the appropriate values.
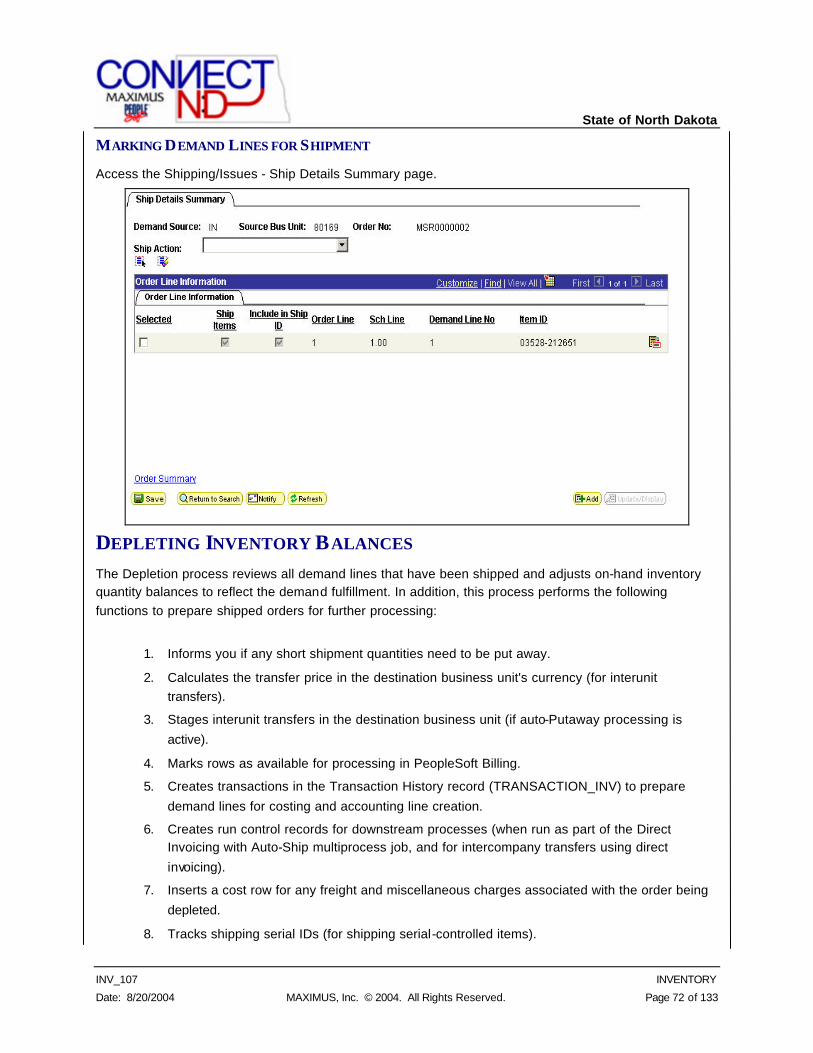
State of North Dakota
INV_107 INVENTORY
Date: 8/20/2004 MAXIMUS, Inc. © 2004. All Rights Reserved. Page 72 of 133
MARKING DEMAND LINES FOR SHIPMENT
Access the Shipping/Issues - Ship Details Summary page.
DEPLETING INVENTORY BALANCES The Depletion process reviews all demand lines that have been shipped and adjusts on-hand inventory quantity balances to reflect the demand fulfillment. In addition, this process performs the following functions to prepare shipped orders for further processing:
1. Informs you if any short shipment quantities need to be put away.
2. Calculates the transfer price in the destination business unit's currency (for interunit transfers).
3. Stages interunit transfers in the destination business unit (if auto-Putaway processing is
active).
4. Marks rows as available for processing in PeopleSoft Billing.
5. Creates transactions in the Transaction History record (TRANSACTION_INV) to prepare
demand lines for costing and accounting line creation.
6. Creates run control records for downstream processes (when run as part of the Direct Invoicing with Auto-Ship multiprocess job, and for intercompany transfers using direct
invoicing).
7. Inserts a cost row for any freight and miscellaneous charges associated with the order being
depleted.
8. Tracks shipping serial IDs (for shipping serial-controlled items).
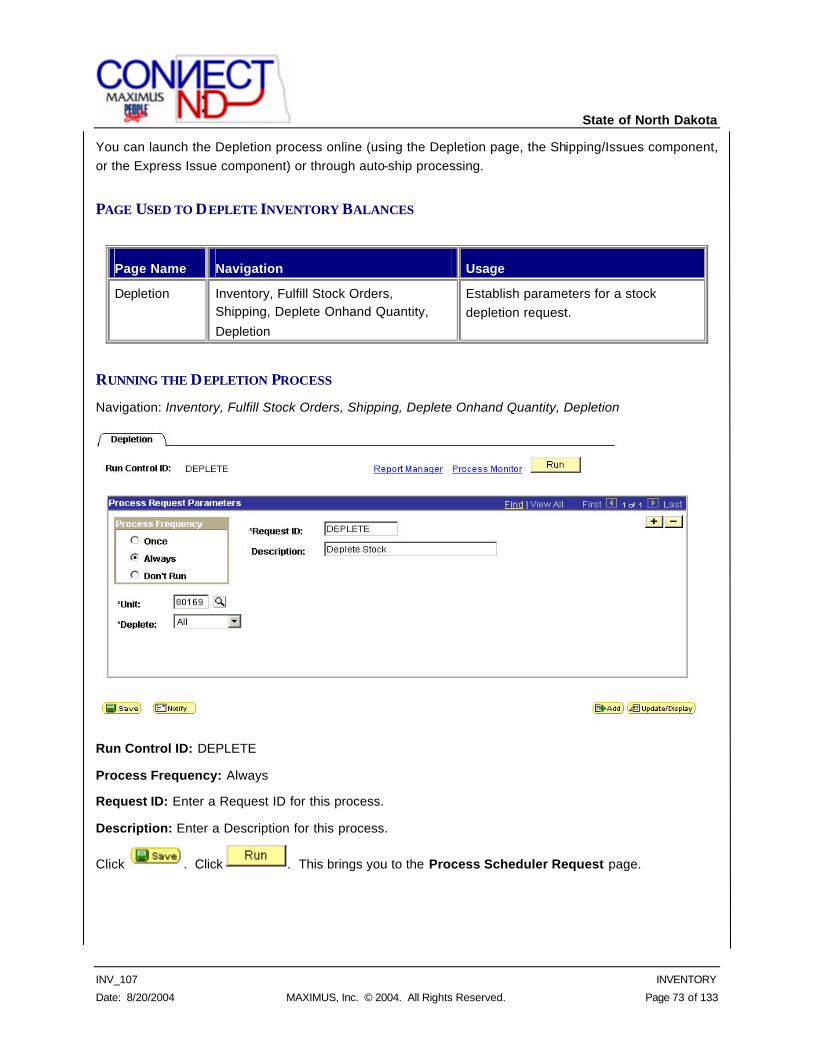
State of North Dakota
INV_107 INVENTORY
Date: 8/20/2004 MAXIMUS, Inc. © 2004. All Rights Reserved. Page 73 of 133
You can launch the Depletion process online (using the Depletion page, the Shipping/Issues component, or the Express Issue component) or through auto-ship processing.
PAGE USED TO DEPLETE INVENTORY BALANCES
Page Name Navigation Usage
Depletion Inventory, Fulfill Stock Orders, Shipping, Deplete Onhand Quantity,
Depletion
Establish parameters for a stock depletion request.
RUNNING THE DEPLETION PROCESS
Navigation: Inventory, Fulfill Stock Orders, Shipping, Deplete Onhand Quantity, Depletion
Run Control ID: DEPLETE
Process Frequency: Always
Request ID: Enter a Request ID for this process.
Description: Enter a Description for this process.
Click . Click . This brings you to the Process Scheduler Request page.
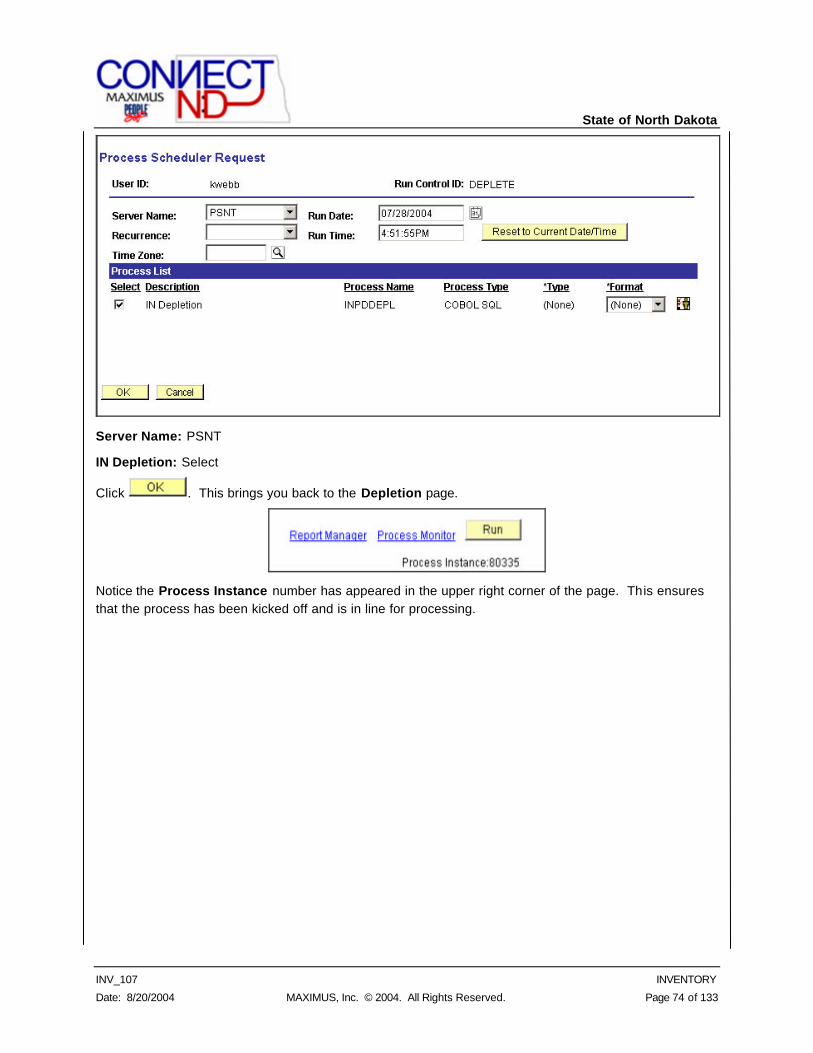
State of North Dakota
INV_107 INVENTORY
Date: 8/20/2004 MAXIMUS, Inc. © 2004. All Rights Reserved. Page 74 of 133
Server Name: PSNT
IN Depletion: Select
Click . This brings you back to the Depletion page.
Notice the Process Instance number has appeared in the upper right corner of the page. This ensures that the process has been kicked off and is in line for processing.
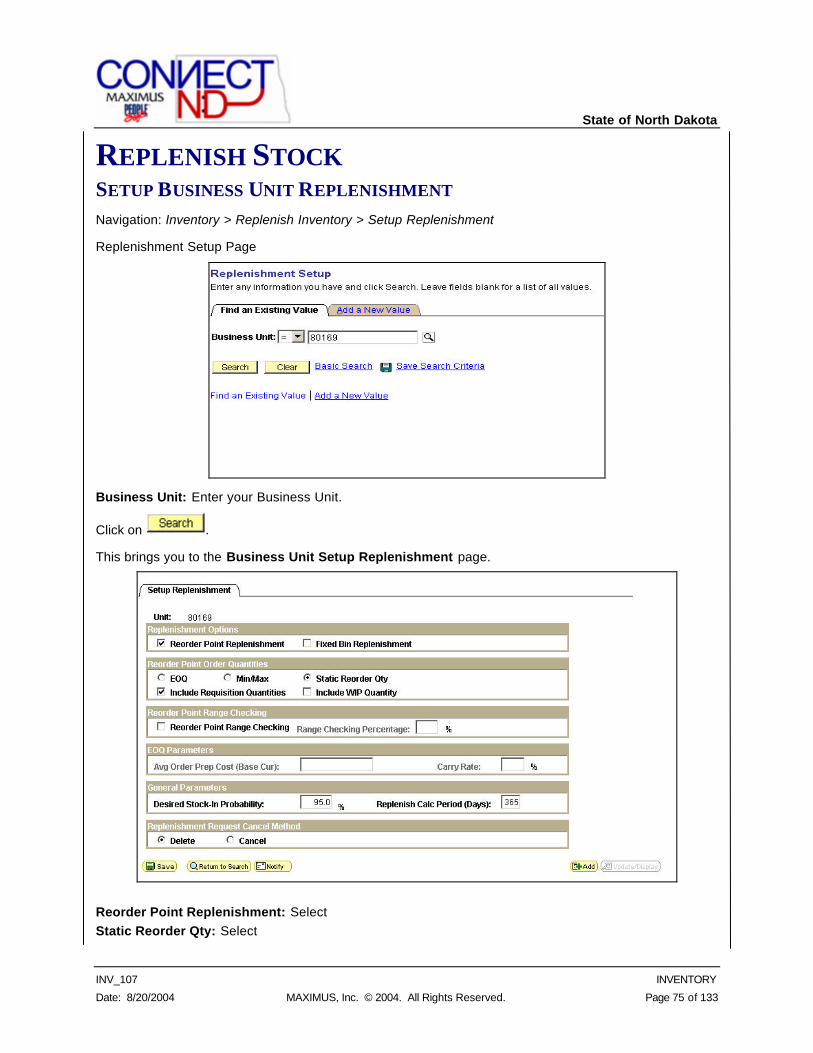
State of North Dakota
INV_107 INVENTORY
Date: 8/20/2004 MAXIMUS, Inc. © 2004. All Rights Reserved. Page 75 of 133
REPLENISH STOCK
SETUP BUSINESS UNIT REPLENISHMENT Navigation: Inventory > Replenish Inventory > Setup Replenishment
Replenishment Setup Page
Business Unit: Enter your Business Unit.
Click on .
This brings you to the Business Unit Setup Replenishment page.
Reorder Point Replenishment: Select Static Reorder Qty: Select
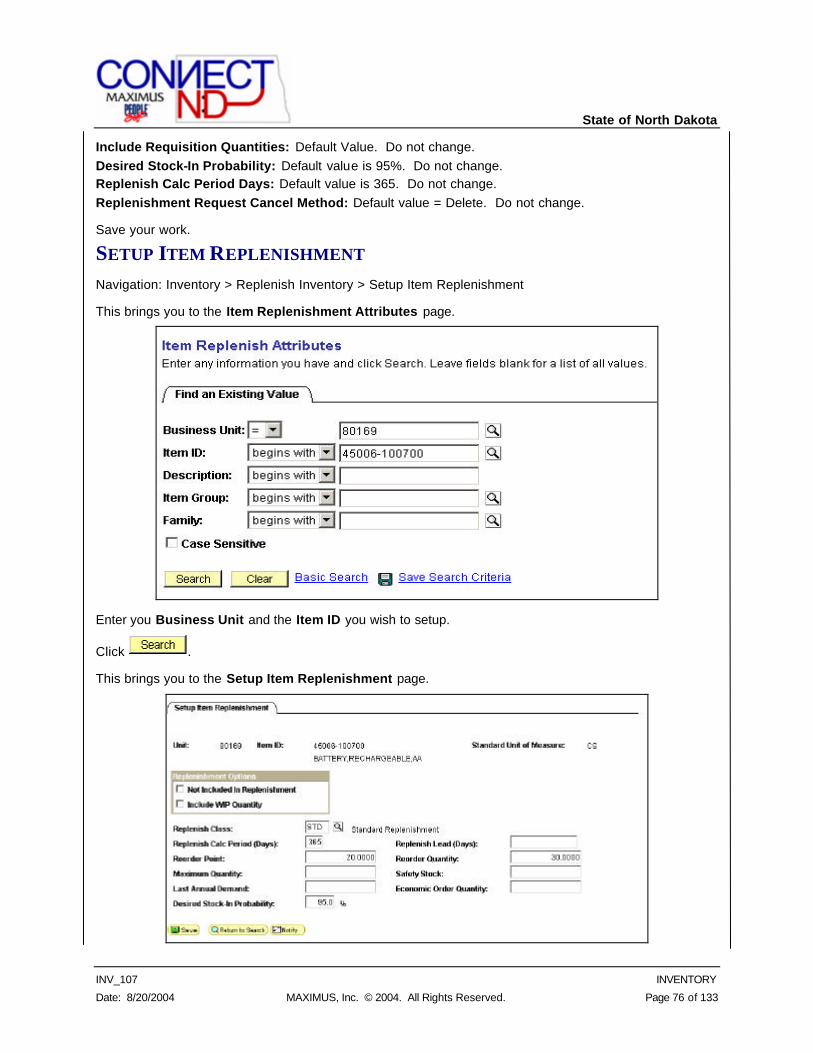
State of North Dakota
INV_107 INVENTORY
Date: 8/20/2004 MAXIMUS, Inc. © 2004. All Rights Reserved. Page 76 of 133
Include Requisition Quantities: Default Value. Do not change. Desired Stock-In Probability: Default value is 95%. Do not change. Replenish Calc Period Days: Default value is 365. Do not change. Replenishment Request Cancel Method: Default value = Delete. Do not change.
Save your work.
SETUP ITEM REPLENISHMENT Navigation: Inventory > Replenish Inventory > Setup Item Replenishment
This brings you to the Item Replenishment Attributes page.
Enter you Business Unit and the Item ID you wish to setup.
Click .
This brings you to the Setup Item Replenishment page.
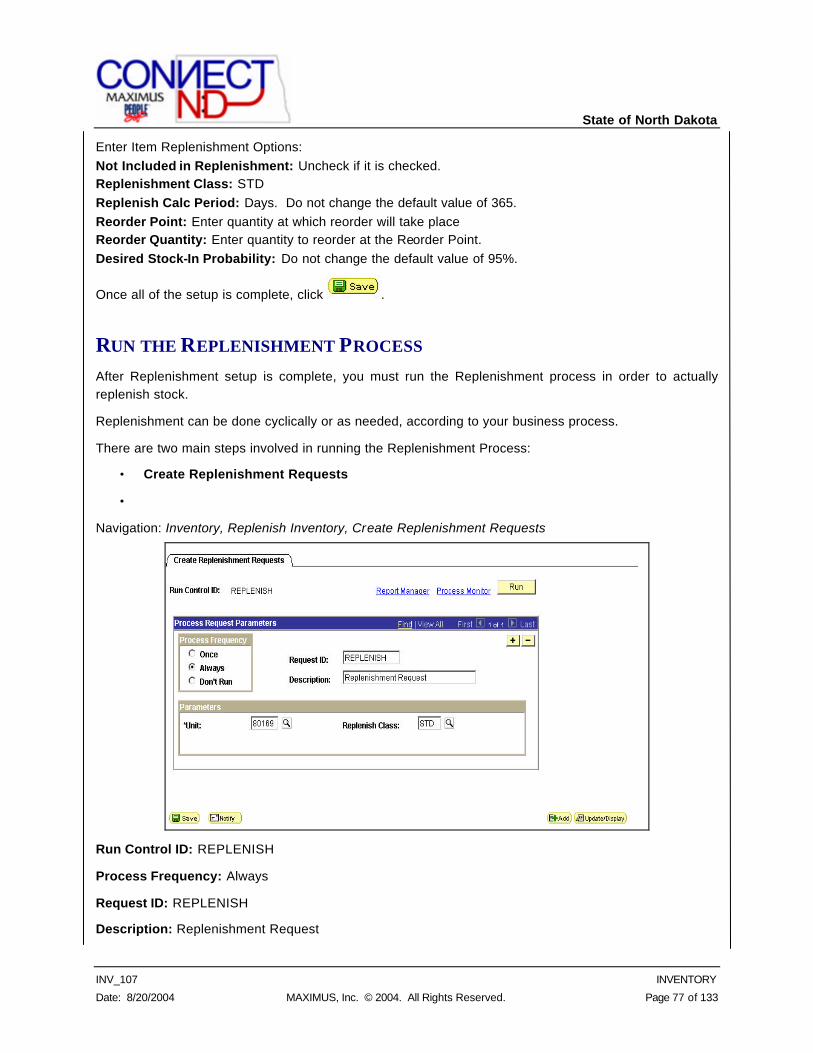
State of North Dakota
INV_107 INVENTORY
Date: 8/20/2004 MAXIMUS, Inc. © 2004. All Rights Reserved. Page 77 of 133
Enter Item Replenishment Options: Not Included in Replenishment: Uncheck if it is checked. Replenishment Class: STD Replenish Calc Period: Days. Do not change the default value of 365. Reorder Point: Enter quantity at which reorder will take place Reorder Quantity: Enter quantity to reorder at the Reorder Point. Desired Stock-In Probability: Do not change the default value of 95%.
Once all of the setup is complete, click .
RUN THE REPLENISHMENT PROCESS After Replenishment setup is complete, you must run the Replenishment process in order to actually replenish stock.
Replenishment can be done cyclically or as needed, according to your business process.
There are two main steps involved in running the Replenishment Process:
• Create Replenishment Requests
•
Navigation: Inventory, Replenish Inventory, Create Replenishment Requests
Run Control ID: REPLENISH
Process Frequency: Always
Request ID: REPLENISH
Description: Replenishment Request
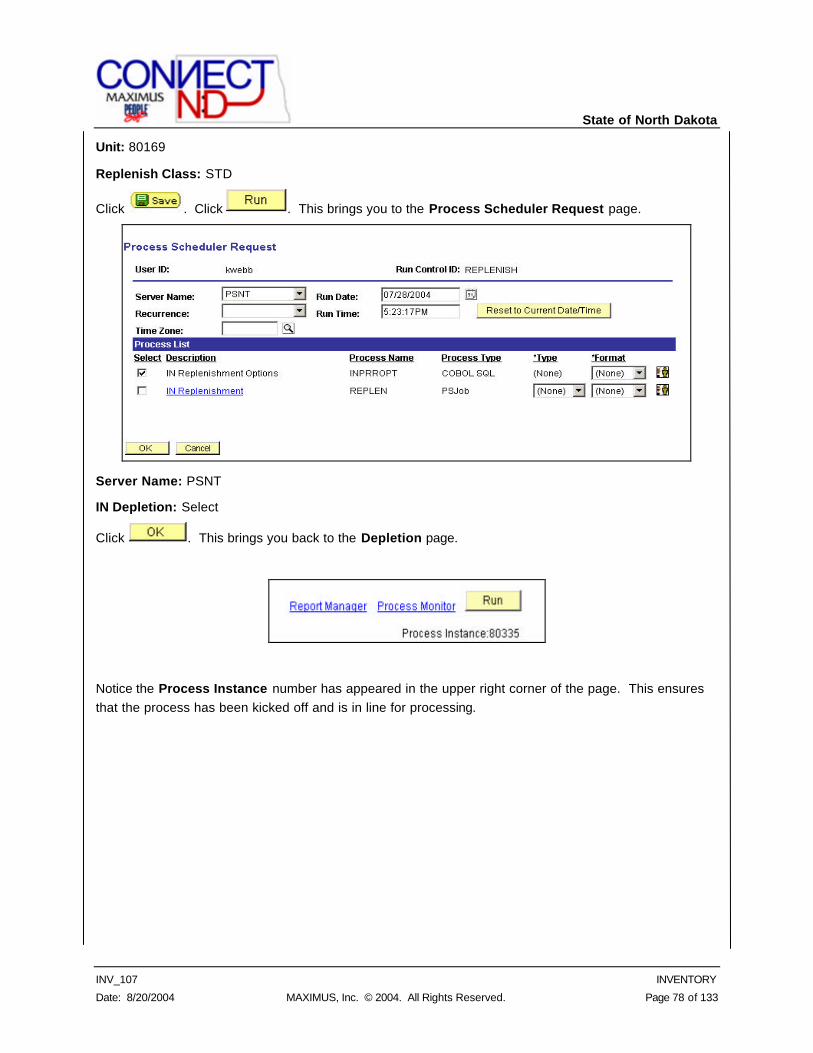
State of North Dakota
INV_107 INVENTORY
Date: 8/20/2004 MAXIMUS, Inc. © 2004. All Rights Reserved. Page 78 of 133
Unit: 80169
Replenish Class: STD
Click . Click . This brings you to the Process Scheduler Request page.
Server Name: PSNT
IN Depletion: Select
Click . This brings you back to the Depletion page.
Notice the Process Instance number has appeared in the upper right corner of the page. This ensures that the process has been kicked off and is in line for processing.
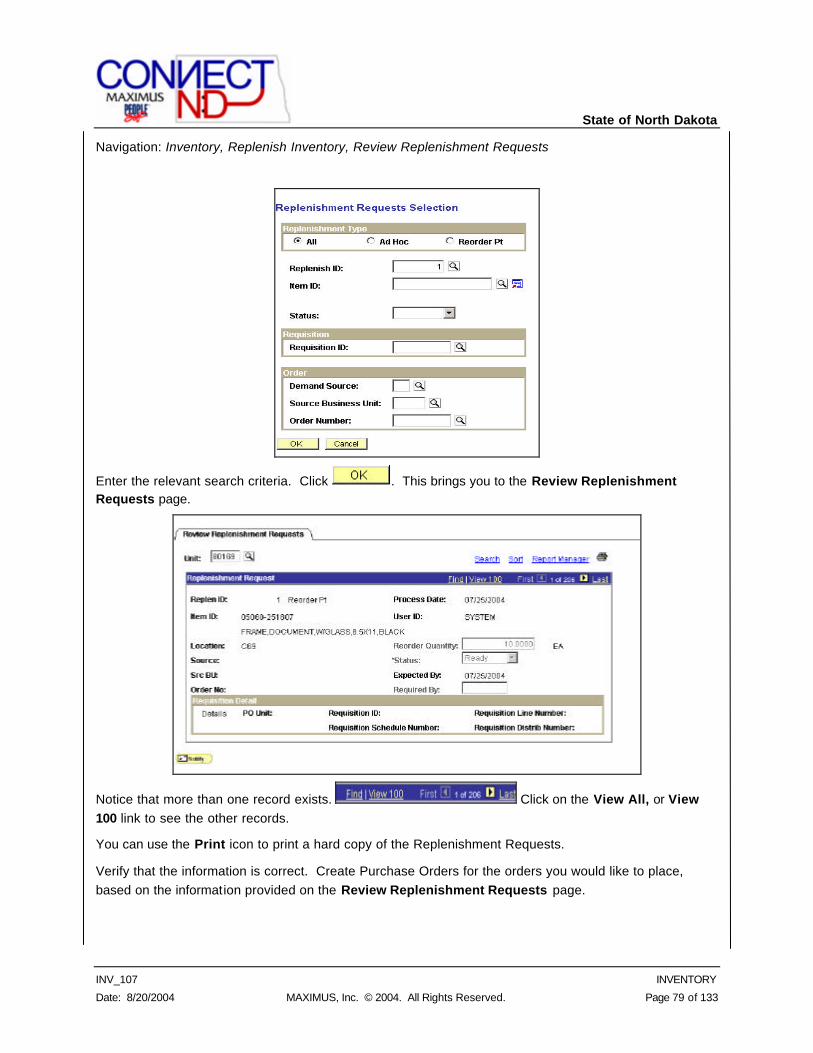
State of North Dakota
INV_107 INVENTORY
Date: 8/20/2004 MAXIMUS, Inc. © 2004. All Rights Reserved. Page 79 of 133
Navigation: Inventory, Replenish Inventory, Review Replenishment Requests
Enter the relevant search criteria. Click . This brings you to the Review Replenishment Requests page.
Notice that more than one record exists. Click on the View All, or View 100 link to see the other records.
You can use the Print icon to print a hard copy of the Replenishment Requests.
Verify that the information is correct. Create Purchase Orders for the orders you would like to place, based on the information provided on the Review Replenishment Requests page.
State of North Dakota
INV_107 INVENTORY
Date: 8/20/2004 MAXIMUS, Inc. © 2004. All Rights Reserved. Page 80 of 133
PERFORMING PHYSICAL ACCOUNTING This section provides an overview of counting inventory and discusses how to:
• Set up inventory counts.
• Create counting events.
• Collect counting data.
• Enter count data.
• Use manual counting events.
• Create Reconciliation reports.
• Update counting events.
• Update stock quantities.
• Calculate utilization type classifications.
UNDERSTANDING COUNTS PeopleSoft Inventory counts enable you to:
• Complete system-generated counts or define manual counts.
• Collect count data manually or with third-party electronic data collection devices.
• Close storage locations manually or continue to record transactions during a cycle count.
• Analyze and resolve discrepancies in inventory data using the Reconciliation report.
When you finish collecting and analyzing count data, the system will update count quantities and generate the appropriate accounting transactions to ensure that the inventory is properly reported in the system and properly valued.
With PeopleSoft Inventory, you can also set up cycle counts or physical inventory counts. After determining the type of count to perform, you create a manual count or a system-defined counting event. System-defined counting events can be blind or non-blind. You can further control the counting event by including or excluding zero-quantity items and using the count date and time to ensure that the count is accurate if inventory transactions are allowed during the cycle count process.
COUNT TYPES
With PeopleSoft Inventory, you can perform both cycle and physical inventory counts:
Physical inventory count − A wall-to-wall count of all items in the Inventory business unit. You must
prohibit material movement for the business unit before performing this type of count.
State of North Dakota
INV_107 INVENTORY
Date: 8/20/2004 MAXIMUS, Inc. © 2004. All Rights Reserved. Page 81 of 133
Cycle count − A count of a subset of items within a business unit.
You can create the following types of counting events:
System-defined − PeopleSoft Inventory chooses the items to count, based on your criteria, and creates a counting event using one of the following methods:
Blind: The counting event does not include the expected count quantities.
Non-blind: The default system balance is the count quantity field and you only need to override it for discrepancies discovered during the counting process. You can print a counting sheet or download the data to electronic data collection devices to perform the count.
Manual − You indicate that you've completed a count. This is a special type of cycle count in which you enter the count data into an interface table and then the Event Creation process extracts the data from the interface table and creates the counting event.
NOTE: Physical inventory counts are always system-defined counts. Cycle counts can be either system-defined or manual counting events.
COUNT PROCESSES
This section details the steps and status changes for system-defined and manual counts.
BLIND SYSTEM -DEFINED COUNTS
The system balance is not entered in the count quantity field for blind system-defined counts.
To perform a blind system-defined count:
If you elected not to close the storage locations during the cycle count, all inventory transactions that occurred during the cycle count are recorded on the TRANSACTION_INV table. The Reconciliation process uses this table to calculate quantity adjustments. If you determine that a discrepancy on the Reconciliation report is due to a data entry error or a timing issue, correct the error on the Item Counts page. You can also change the item status manually to include it on another Counting Sheet listing or to exclude it from the Stock Quantity Update process.
11.. Run the Stock Quantity Update process to update the inventory quantities with the count data.
22.. Request a counting event using the Event Creation page. The Event Creation process (INPCCREA) adds the specified detail lines to the counting event and sets the status of each detail line to New.
33.. Use the Counting Sheet page to generate a printed listing or a file to download to electronic data collection devices. Running the Counting Sheet listing changes the status of the counting event detail lines from New to Counting. For blind counts, the count quantity field of each item record remains blank.
State of North Dakota
INV_107 INVENTORY
Date: 8/20/2004 MAXIMUS, Inc. © 2004. All Rights Reserved. Page 82 of 133
44.. Go to the storage locations specified by the Counting Sheet listing or file and count the items. You must collect count quantity data for every counting event detail line included on the listing or displayed by the electronic data collection device.
55.. Enter the collected count quantity data into PeopleSoft Inventory. If you collected count quantity data manually using the Counting Sheet listing, enter the quantity information using the Item Counts page. If you collected count quantity data with an electronic data collection device, upload the data using the Count Data Load page or the Physical Inventory process. When you enter the count quantity data, either with the Item Counts page or by uploading the electronic data collection device file, the status of the counting event detail line changes from Counting to Ready to Update Stock Quantity.
66.. Run the Physical Accounting Reconciliation report to detect any recovery or shrinkage and to determine whether you need to correct any mistakes. Only counting event detail lines with a status of Ready to Update Stock Quantities and with the Need Reconciliation option turned off are eligible for the Stock Quantity Update process. If no errors are found, the Stock Quantity Update process updates the system tables with the data in the counting event detail lines and changes the status of these detail lines to Stock Quantity Updated. If an error is found in a detail line, the status of the line remains Ready to Update Stock Quantities and an error message (such as "Container-multiple locations") appears on the Item Counts page.
MANUAL COUNTS
You can use your existing counting procedures with PeopleSoft Inventory.
To perform a manual count:
11.. Count the quantity in the inventory storage locations.
22.. Collect the data using pen and paper or an electronic data collection device, formatting the data according to PeopleSoft file specifications.
33.. Enter the collected count data. If you collected count data manually, enter the data using the Manual Counting Entry page. If you collected count data with an electronic data collection device, upload the data using the Count Data Load page. PeopleSoft Inventory stores the data in the manual count table (COUNT_INF_INV).
44.. Modify the count data as necessary. Before you create a counting event, you can modify the count data in the manual count table (COUNT_INF_INV) using the Manual Counting page. After you run the Event Creation process, however, you must use the Item Counts page to make adjustments because the Event Creation process creates the counting event and moves the manual count data into the Counting Event table (COUNT_INV).
55.. Request a manual counting event using the Event Creation Process page. The Event Creation process moves the counting event detail lines in the manual count table
State of North Dakota
INV_107 INVENTORY
Date: 8/20/2004 MAXIMUS, Inc. © 2004. All Rights Reserved. Page 83 of 133
(COUNT_INF_INV) to the counting event (COUNT_INV) and sets the status of each detail line to Ready to Update Stock Quantity.
66.. Run the Physical Accounting Reconciliation report to detect any recovery or shrinkage and to determine whether you need to correct any mistakes. If you elected not to close the storage locations during the cycle count, all inventory transactions that occurred during the cycle count are recorded to the TRANSACTION_INV table. The Reconciliation process uses this table to calculate quantity adjustments. If you determine that a discrepancy on the Reconciliation report is due to a data entry error or a timing issue, correct the error on the Item Counts page. You can also change the status manually to include it on another Counting Sheet listing or to exclude it from the Stock Quantity Update process.
77.. Run the Stock Quantity Update process to update the inventory quantities with the count data. Only counting event detail lines with a status of Ready to Update Stock Quantities are eligible for the Stock Quantity Update process. If no errors are found, the Stock Quantity Update process updates the system tables with the data in the counting event detail lines and changes the status of these detail lines to Stock Quantity Updated. If an error is found in a detail line, the status of the line remains Ready to Update Stock Quantities and an error message (such as "Container-multiple locations") appears on the Item Counts page.
COUNT EVENT STATUSES
The status of a counting event is shown on the Counting Event Header page in the Perform Count component. The following statuses are available:
Open − Includes counting event detail lines with any item status: New, Counting, Ready to Update Stock, Quantity Entered-Hold, or Canceled.
Canceled − Contains only those counting event detail lines with a status of Canceled or Stock Quantity Updated. After an event is canceled manually on the Counting Event Header page, the status of all its event detail lines changes to Canceled, except for those detail lines with a status of Stock Quantity Updated. You cannot change a Canceled event.
Finished − Contains only those counting event detail lines with a status of Canceled or Stock Quantity Updated. After the status is changed to Finished by the Stock Quantity Update process on the Counting Event Header page, the status of all event detail lines changes to Stock Quantity Updated, except for those detail lines with a status of Canceled. You cannot change a Finished event.
NOTE: You cannot change the status of a counting event to Finished on the Counting Event Header page if it contains detail lines with a Ready to Update Count Quantities status. You must first run the Stock
Quantity Update process or change the status of these detail lines manually on the Item Counts page.
ZERO-QUANTITY ITEMS
PeopleSoft Inventory stores information for items received and put away into the Inventory business unit. After items have been either adjusted to zero or shipped completely out of a storage location, the
State of North Dakota
INV_107 INVENTORY
Date: 8/20/2004 MAXIMUS, Inc. © 2004. All Rights Reserved. Page 84 of 133
PHYSICAL_INV table reflects their zero quantity. Because the Event Creation process includes these zero-quantity records in each counting event, you count event lines for stock that is not there, requiring more time to execute your cycle counts and making it harder to identify exactly which items need to be counted. The Counting Event Setup - Count Options page and the Event Creation page both include options that eliminate or limit the number of zero-quantity rows included in counting events.
The zero-quantity count option is not applicable to all cycle count options. For example, a negative balance cycle count includes only items in storage locations with negative available quantities. Additionally, a manual cycle count includes only the items you choose to include in the counting event.
Eliminating zero-quantity records from your counting event excludes storage locations identified by the system as empty (associated with zero-quantity items). To confirm empty locations, add the empty locations to your existing counting event, using the Item Counts page, or perform a manual count.
In addition to using the zero-quantity count option, you can remove zero-quantity item records from the PHYSICAL_INV table using the Physical Inv purge routine. We recommend that you perform this purge periodically to minimize the number of zero-quantity stock records in the PHYSICAL_INV table.
COUNT DATES AND TIMES
Because you do not have to freeze a storage location for a cycle count, the date and time that a counting event is created, loaded back into the system from an electronic data collection device, or updated using pages are important. If you do not freeze the storage location, you can create a counting event at 9:30 a.m. Wednesday and continue putting away stock into the storage location, picking stock from the storage location, and completing ad hoc adjustments to the storage location.
As a result, if you complete your count at 4:00 p.m. Friday, you must indicate when you are entering the count results. Recording this current date and time ensures that inventory transactions occurring since the counting event was created are accounted for. If you counted items in a storage location at 3:00 p.m. Wednesday and you don't update the count date and time, the system defaults the creation date and time of the counting event, and the inventory transactions that have occurred between 9:30 Wednesday morning and 3:00 Wednesday afternoon are incorrectly considered as the system updates the inventory balance for the storage location.
COMMON ELEMENTS USED IN THIS SECTION
Transfer button − Click to search for storage locations. On the transfer page, click the Storage Location Search link.
Cycle Count Option − Select a default for the type of cycle counting you perform most often. Options include:
Due to Count: Creates a cycle counting event to count those items that are due to be counted based on the last cycle count date and the cycle interval defined on the Utilization Types page.
Family: Creates a cycle counting event for items in a specific item family.
Item ID: Creates a cycle counting event for items with a specific item ID.

State of North Dakota
INV_107 INVENTORY
Date: 8/20/2004 MAXIMUS, Inc. © 2004. All Rights Reserved. Page 85 of 133
Manual Count: Creates a manual cycle counting event for count quantity data loaded from an electronic data collection device or entered using the Manual Counting Entry page. Because the manual counting event is restricted to the specified items, selecting this option makes the Zero Qty Count Options (zero quantity count options) field unnecessary and therefore unavailable for entry.
Negative Balance: Creates a cycle counting event for items in storage locations with a negative available quantity. Because the negative balance counting event considers only items with negative quantity balances, selecting this option makes the Zero Qty Count Options field unnecessary and therefore unavailable for entry.
Storage Location: Creates a cycle counting event for items in specific storage locations.
Max Items (maximum items) − The number of items to include in the count. To include all of the items, leave this field blank.
Utilization Type − Classifies inventory items based on their demand and usage. If you leave the field blank, the counting event includes all items with defined cycle intervals until the maximum number is reached.
Count Qty (count quantity) − The amount you enter for a count.
Zero Quantity Option − Controls the number of zero-quantity item rows included in the counting event: Options include:
Include All − Ensures that all valid items are included in the event, regardless of their quantity.
Exclude Zero Quantity − Excludes all zero-quantity items from the event. If you select this option, storage locations identified as empty by the system are not included in the event. To confirm that these storage locations are empty, perform a manual count of the empty storage locations either by adding a new line to the existing counting event on the Item Counts page, or by requesting a separate counting event on the Manual Counting Entry page.
Include Zero Quantity − Includes all zero-quantity items in the event that have inventory transactions occurring after the date you enter in the As of Transaction Date field. Use that field to limit the zero-quantity items you include in the counting event. The counting event includes all zero-quantity items with transaction records that have transaction dates falling on or after the As of Transaction date you enter.
Inv Tag ID (inventory tag ID) − A sequential number automatically assigned to each counting event detail line when the Counting Sheet process is run. This number is also printed on each count line of the Counting Sheet report. You can confirm that you are entering the correct data line from the report by comparing the tag ID on the report with the ID that displays on the page.
Unit Cost − The minimum cost per unit. The system calculates the cost variance by multiplying the quantity variance by the unit cost. The item's unit cost depends on the cost method and cost flag and is extracted from PeopleSoft Cost Management tables.
• For non-costed items, the unit cost is zero.
State of North Dakota
INV_107 INVENTORY
Date: 8/20/2004 MAXIMUS, Inc. © 2004. All Rights Reserved. Page 86 of 133
• For consigned and non-owned items and for periodic average costed items, the unit cost is the default average cost for the business unit (BU_ITEMS_INV.AVERAGE_COST).
• For perpetual average costed items, the unit cost is the most current unit cost in the Perpetual Average Cost table (CM_PERPAVG_COST.CM_UNIT_COST).
− For periodic average costed items, the unit cost is the default average cost for the business unit (BU_ITEMS_INV.AVERAGE_COST).
− For standard costed items, the unit cost is the most current effective -dated total standard cost in the Standard Cost table (sum of CM_STDCOSTD_ VW.TL_COST and CM_STDCOSTD_VW.LL.COST).
• For actual costed items, the unit cost is the default actual cost for the business unit (BU_ITEMS_ INV.DFLT_ACTUAL_COST).
SETTING UP INVENTORY COUNTS Use the Prepare Counting Event component to specify global default values for physical inventory and cycle counts for the business unit.
This section discusses how to:
• Set up count report and display parameters.
• Set up count defaults.
• Define utilization type count data.
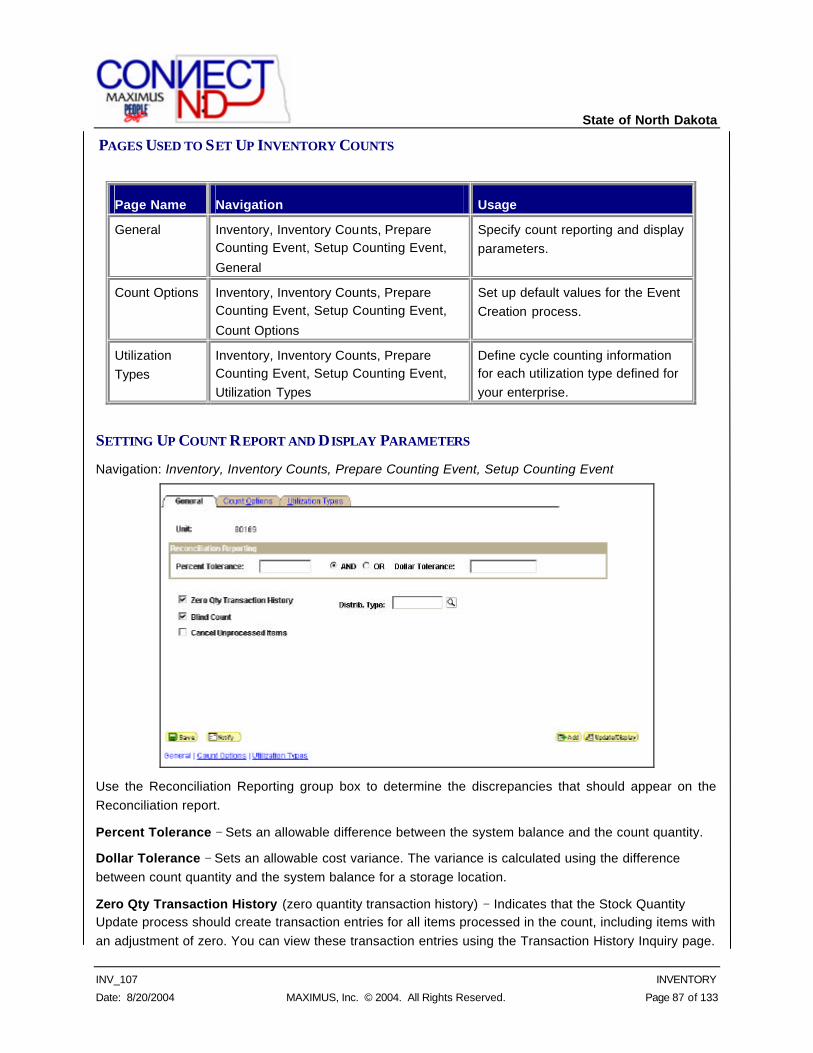
State of North Dakota
INV_107 INVENTORY
Date: 8/20/2004 MAXIMUS, Inc. © 2004. All Rights Reserved. Page 87 of 133
PAGES USED TO SET UP INVENTORY COUNTS
Page Name Navigation Usage
General Inventory, Inventory Counts, Prepare Counting Event, Setup Counting Event,
General
Specify count reporting and display parameters.
Count Options Inventory, Inventory Counts, Prepare Counting Event, Setup Counting Event,
Count Options
Set up default values for the Event Creation process.
Utilization Types
Inventory, Inventory Counts, Prepare Counting Event, Setup Counting Event, Utilization Types
Define cycle counting information for each utilization type defined for your enterprise.
SETTING UP COUNT REPORT AND DISPLAY PARAMETERS
Navigation: Inventory, Inventory Counts, Prepare Counting Event, Setup Counting Event
Use the Reconciliation Reporting group box to determine the discrepancies that should appear on the Reconciliation report.
Percent Tolerance − Sets an allowable difference between the system balance and the count quantity.
Dollar Tolerance − Sets an allowable cost variance. The variance is calculated using the difference between count quantity and the system balance for a storage location.
Zero Qty Transaction History (zero quantity transaction history) − Indicates that the Stock Quantity Update process should create transaction entries for all items processed in the count, including items with an adjustment of zero. You can view these transaction entries using the Transaction History Inquiry page.
State of North Dakota
INV_107 INVENTORY
Date: 8/20/2004 MAXIMUS, Inc. © 2004. All Rights Reserved. Page 88 of 133
If you do not select this check box, the Stock Quantity Update process only creates entries for items with non-zero adjustments.
Blind Count − Indicates that system balance quantities are not included on the Counting Sheet listing or in the file sent to the electronic data collection device. You must enter the count quantity for all detail lines in the event. For non-blind counts, expected quantities are included on the Count Sheet listing or in the electronic data collection device file. The default expected quantities appear in the quantity field of the counting event detail line. When you use non-blind counts, you must enter only exceptions to the count quantity field before running the Reconciliation report.
Cancel Unprocessed Items − Indicates that the Stock Quantity Update process should change the status of any uncounted items in a cycle counting event to Canceled. Uncounted items include those with status of New, Counting, or Quantity Entered-Hold. This selection does not apply to physical inventory counting events. Before you run the Stock Quantity Update process, you can change the status of items in the counting event manually using the Item Counts page in the Update Counting Event component.
Distrib. Type (distribution type) − Select to assign a distribution type to the adjustment results. The distribution type should be assigned based on the Count Options you select on the Counting Event Setup - Count Options page.
NOTE: If an order has been through the Picking Confirmation process, its picked quantity is not included in the counting event because the order quantity was moved from storage to shipping. If the processed order was not moved and was included in the location quantity count, a reconciliation error occurs. On the other hand, quantities for picked orders not processed by Picking Confirmation are included in the counting event because the quantity was not removed from storage. If the unprocessed order quantity is physically removed and not included in the location quantity count, a reconciliation error occurs.
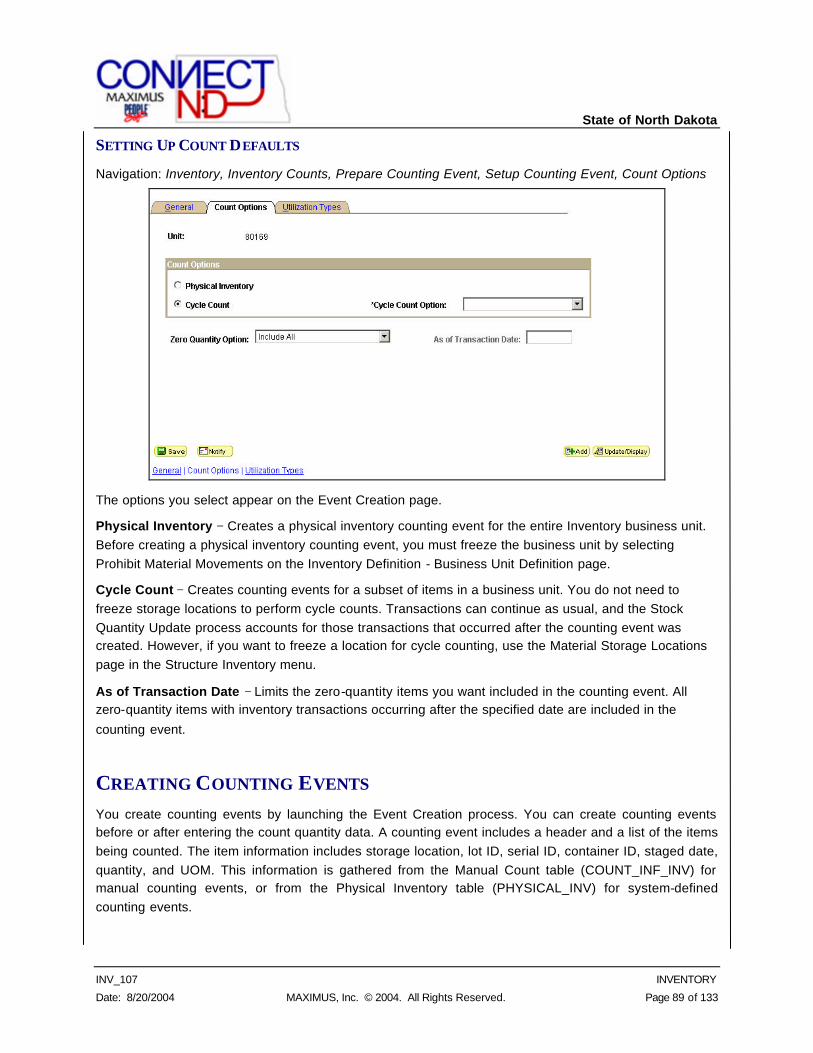
State of North Dakota
INV_107 INVENTORY
Date: 8/20/2004 MAXIMUS, Inc. © 2004. All Rights Reserved. Page 89 of 133
SETTING UP COUNT DEFAULTS
Navigation: Inventory, Inventory Counts, Prepare Counting Event, Setup Counting Event, Count Options
The options you select appear on the Event Creation page.
Physical Inventory − Creates a physical inventory counting event for the entire Inventory business unit. Before creating a physical inventory counting event, you must freeze the business unit by selecting Prohibit Material Movements on the Inventory Definition - Business Unit Definition page.
Cycle Count − Creates counting events for a subset of items in a business unit. You do not need to freeze storage locations to perform cycle counts. Transactions can continue as usual, and the Stock Quantity Update process accounts for those transactions that occurred after the counting event was created. However, if you want to freeze a location for cycle counting, use the Material Storage Locations page in the Structure Inventory menu.
As of Transaction Date − Limits the zero-quantity items you want included in the counting event. All zero-quantity items with inventory transactions occurring after the specified date are included in the
counting event.
CREATING COUNTING EVENTS You create counting events by launching the Event Creation process. You can create counting events before or after entering the count quantity data. A counting event includes a header and a list of the items being counted. The item information includes storage location, lot ID, serial ID, container ID, staged date, quantity, and UOM. This information is gathered from the Manual Count table (COUNT_INF_INV) for manual counting events, or from the Physical Inventory table (PHYSICAL_INV) for system-defined counting events.
State of North Dakota
INV_107 INVENTORY
Date: 8/20/2004 MAXIMUS, Inc. © 2004. All Rights Reserved. Page 90 of 133
NOTE: To support parallel counting events in multiple storage locations, you can create multiple counting events referencing the same item ID. However, to prevent counting stock twice, system edits do not permit you to have an item with the same combination of storage location, lot ID, serial ID, stage date, container ID, and storage UOM in more than one open counting event.
The Create Counting Event component includes two process pages: the Event Creation page and the Cycle Count Options page. Use both pages to define the parameters for specific request ID.
This section discusses how to:
• Create counting events.
• Define counting events.
PAGES USED TO CREATE COUNTING EVENTS
Page Name Navigation Usage
Event Creation Inventory, Inventory Counts, Prepare Counting Event, Create Counting Event, Event Creation
Define parameters for the Event Creation process.
Cycle Count Options
Inventory, Inventory Counts, Prepare Counting Event, Create Counting
Event, Cycle Count Options
Use with the Event Creation Process page to define parameters
for the Event Creation process.
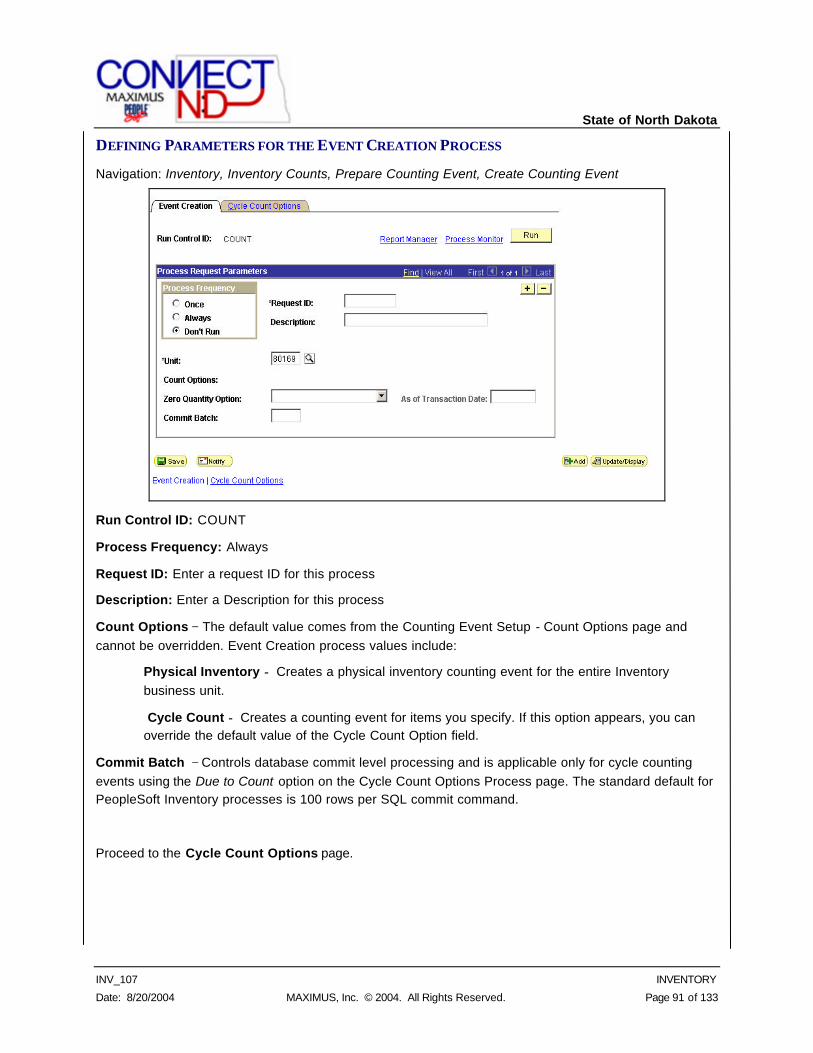
State of North Dakota
INV_107 INVENTORY
Date: 8/20/2004 MAXIMUS, Inc. © 2004. All Rights Reserved. Page 91 of 133
DEFINING PARAMETERS FOR THE EVENT CREATION PROCESS
Navigation: Inventory, Inventory Counts, Prepare Counting Event, Create Counting Event
Run Control ID: COUNT
Process Frequency: Always
Request ID: Enter a request ID for this process
Description: Enter a Description for this process
Count Options − The default value comes from the Counting Event Setup - Count Options page and cannot be overridden. Event Creation process values include:
Physical Inventory − Creates a physical inventory counting event for the entire Inventory business unit.
Cycle Count − Creates a counting event for items you specify. If this option appears, you can override the default value of the Cycle Count Option field.
Commit Batch − Controls database commit level processing and is applicable only for cycle counting events using the Due to Count option on the Cycle Count Options Process page. The standard default for PeopleSoft Inventory processes is 100 rows per SQL commit command.
Proceed to the Cycle Count Options page.
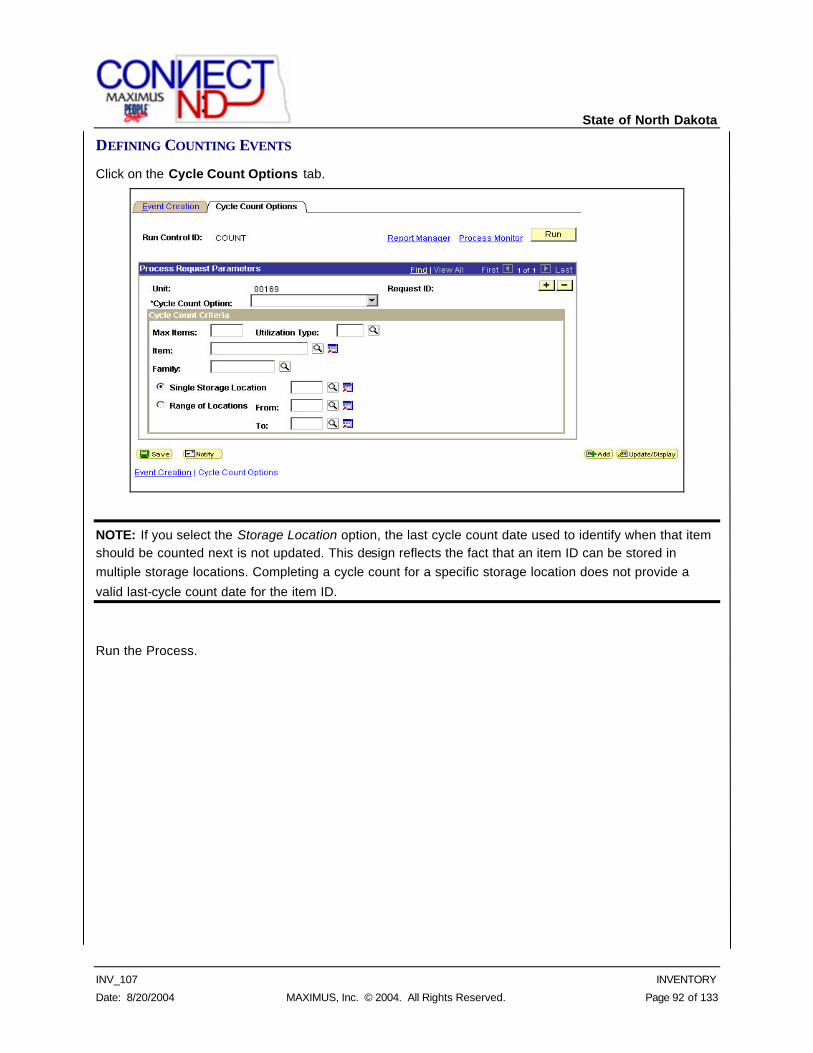
State of North Dakota
INV_107 INVENTORY
Date: 8/20/2004 MAXIMUS, Inc. © 2004. All Rights Reserved. Page 92 of 133
DEFINING COUNTING EVENTS
Click on the Cycle Count Options tab.
NOTE: If you select the Storage Location option, the last cycle count date used to identify when that item should be counted next is not updated. This design reflects the fact that an item ID can be stored in multiple storage locations. Completing a cycle count for a specific storage location does not provide a
valid last-cycle count date for the item ID.
Run the Process.
State of North Dakota
INV_107 INVENTORY
Date: 8/20/2004 MAXIMUS, Inc. © 2004. All Rights Reserved. Page 93 of 133
ENTERING COUNT DATA FROM A COUNTING SHEET REPORT Use the Item Counts page in the Update Counting Event component to enter the count data for a system-defined count that you recorded on the counting sheet.
NOTE: Use this page to change the manual count data before creating the counting event. To change data after creating the counting event, use the Item Counts page.
Click the Search button to populate the page with records from the manual count table (COUNT_INF_INV).
CREATING RECONCILIATION REPORTS After entering counting data, use the Reconciliation report to detect any recovery or shrinkage and to determine whether you need to correct mistakes. You must run the Reconciliation report to calculate the system quantity at the time of the count.
The system does this calculation by subtracting transactions occurring since the count from the current quantity. The adjustment to the storage location represents difference between the count quantity and the calculated system quantity at the time of the count. Adjustments are applied by the Stock Quantity Update process.
PAGE USED TO CREATE RECONCILIATION REPORTS
Page Name Navigation Usage
Reconciliation Inventory, Inventory Counts, Reconcile Inventory Balances, Reconciliation
Report, Reconciliation
Analyze and resolve discrepancies in collected data.
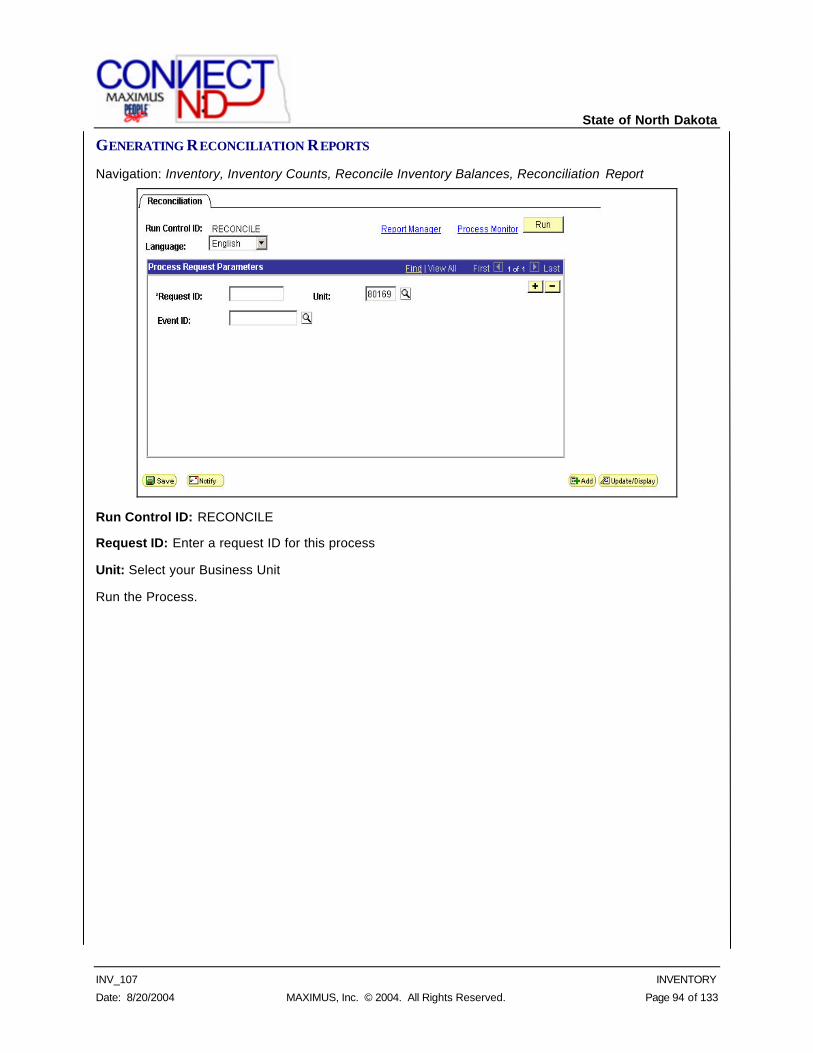
State of North Dakota
INV_107 INVENTORY
Date: 8/20/2004 MAXIMUS, Inc. © 2004. All Rights Reserved. Page 94 of 133
GENERATING RECONCILIATION REPORTS
Navigation: Inventory, Inventory Counts, Reconcile Inventory Balances, Reconciliation Report
Run Control ID: RECONCILE
Request ID: Enter a request ID for this process
Unit: Select your Business Unit
Run the Process.
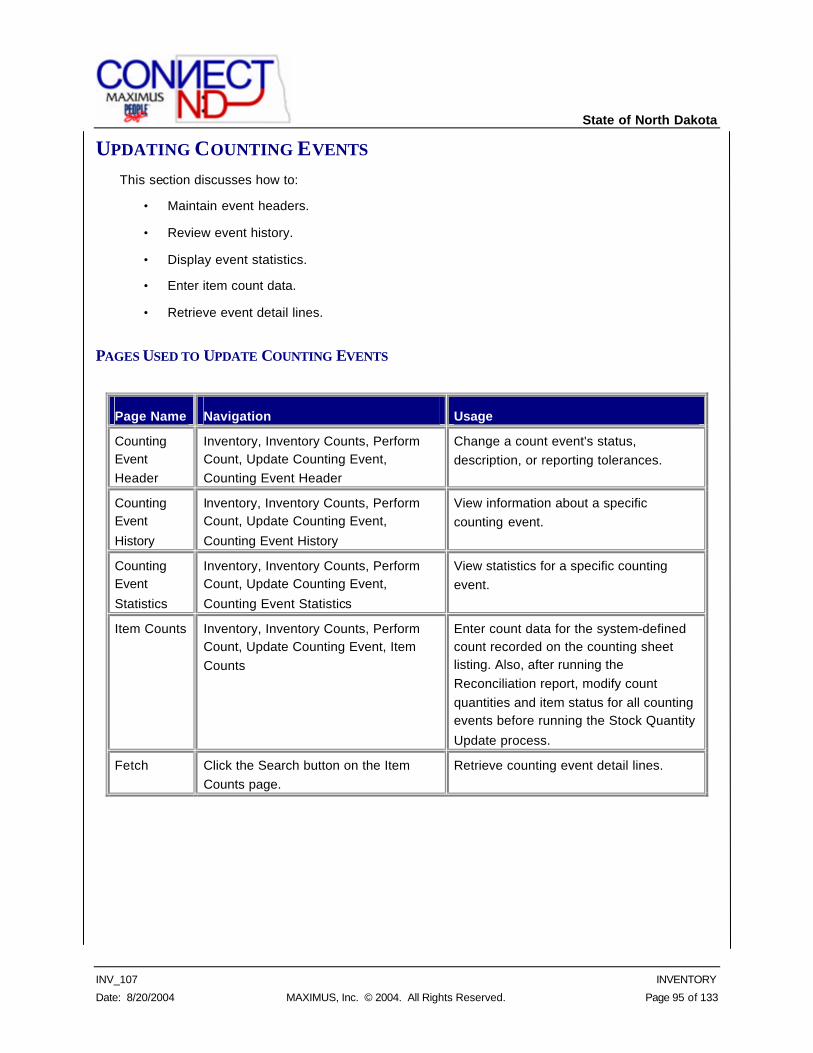
State of North Dakota
INV_107 INVENTORY
Date: 8/20/2004 MAXIMUS, Inc. © 2004. All Rights Reserved. Page 95 of 133
UPDATING COUNTING EVENTS
This section discusses how to:
• Maintain event headers.
• Review event history.
• Display event statistics.
• Enter item count data.
• Retrieve event detail lines.
PAGES USED TO UPDATE COUNTING EVENTS
Page Name Navigation Usage
Counting Event Header
Inventory, Inventory Counts, Perform Count, Update Counting Event, Counting Event Header
Change a count event's status, description, or reporting tolerances.
Counting Event
History
Inventory, Inventory Counts, Perform Count, Update Counting Event,
Counting Event History
View information about a specific counting event.
Counting Event
Statistics
Inventory, Inventory Counts, Perform Count, Update Counting Event,
Counting Event Statistics
View statistics for a specific counting event.
Item Counts Inventory, Inventory Counts, Perform Count, Update Counting Event, Item Counts
Enter count data for the system-defined count recorded on the counting sheet listing. Also, after running the Reconciliation report, modify count quantities and item status for all counting events before running the Stock Quantity
Update process.
Fetch Click the Search button on the Item Counts page.
Retrieve counting event detail lines.
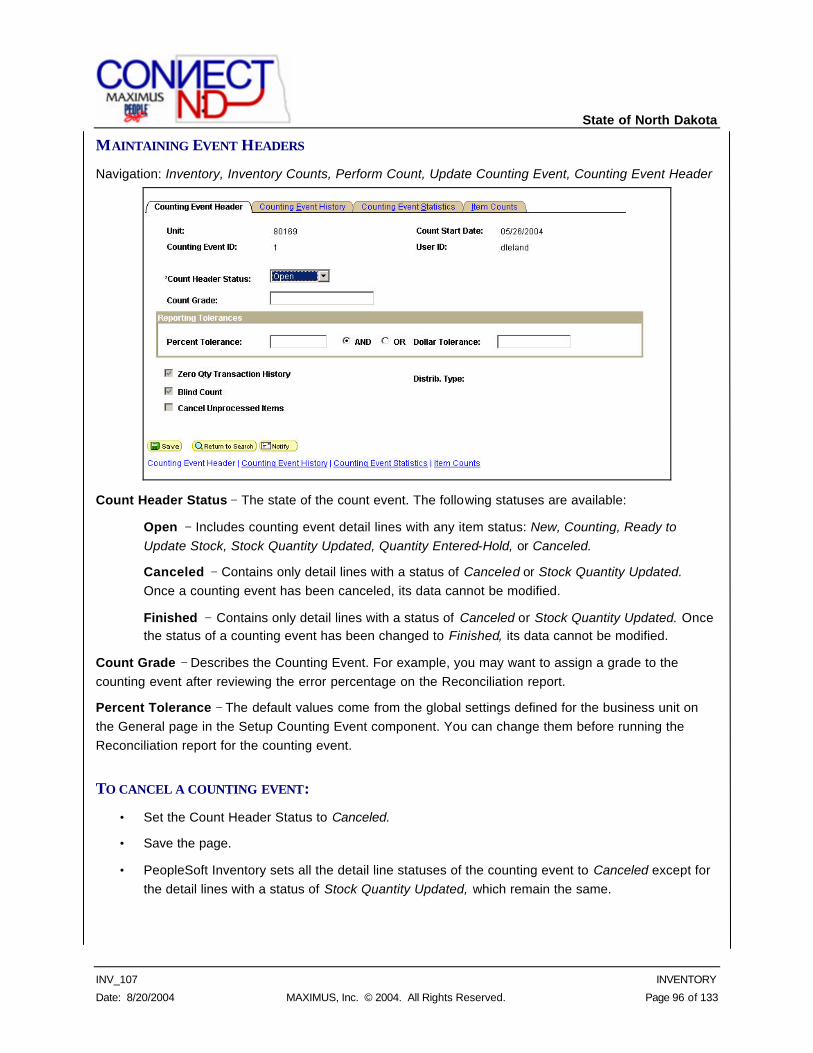
State of North Dakota
INV_107 INVENTORY
Date: 8/20/2004 MAXIMUS, Inc. © 2004. All Rights Reserved. Page 96 of 133
MAINTAINING EVENT HEADERS
Navigation: Inventory, Inventory Counts, Perform Count, Update Counting Event, Counting Event Header
Count Header Status − The state of the count event. The following statuses are available:
Open − Includes counting event detail lines with any item status: New, Counting, Ready to Update Stock, Stock Quantity Updated, Quantity Entered-Hold, or Canceled.
Canceled − Contains only detail lines with a status of Canceled or Stock Quantity Updated. Once a counting event has been canceled, its data cannot be modified.
Finished − Contains only detail lines with a status of Canceled or Stock Quantity Updated. Once the status of a counting event has been changed to Finished, its data cannot be modified.
Count Grade − Describes the Counting Event. For example, you may want to assign a grade to the counting event after reviewing the error percentage on the Reconciliation report.
Percent Tolerance − The default values come from the global settings defined for the business unit on the General page in the Setup Counting Event component. You can change them before running the Reconciliation report for the counting event.
TO CANCEL A COUNTING EVENT:
• Set the Count Header Status to Canceled.
• Save the page.
• PeopleSoft Inventory sets all the detail line statuses of the counting event to Canceled except for the detail lines with a status of Stock Quantity Updated, which remain the same.
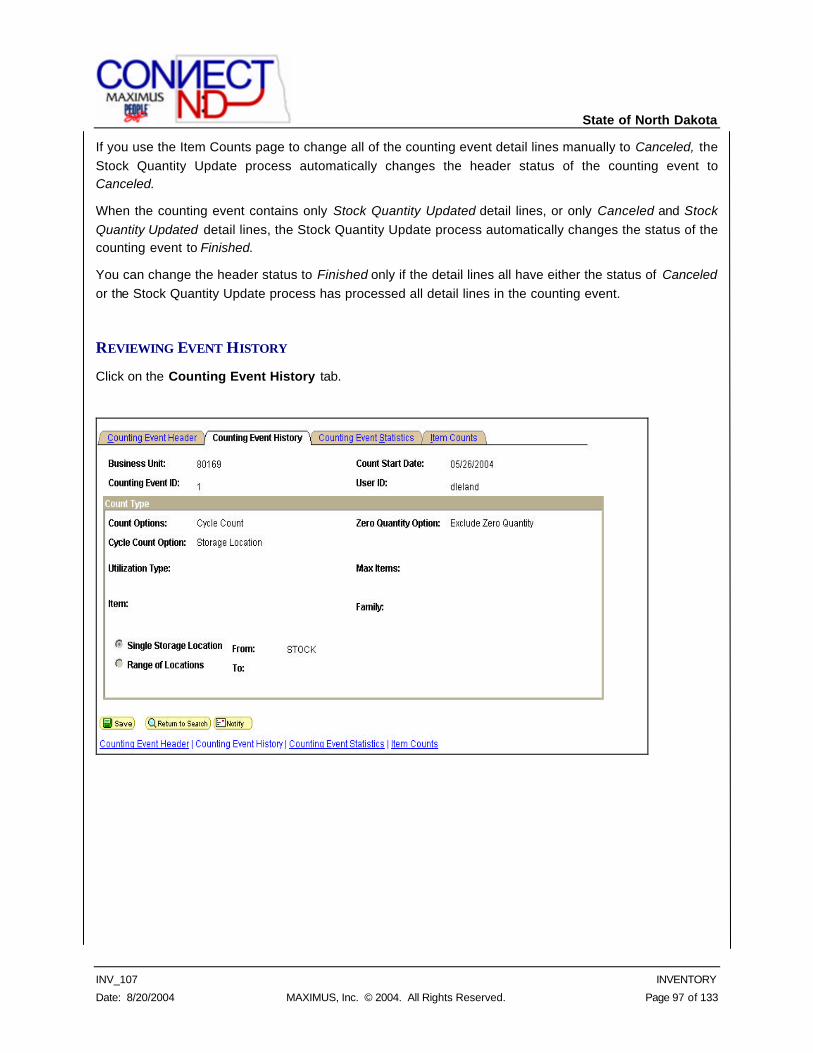
State of North Dakota
INV_107 INVENTORY
Date: 8/20/2004 MAXIMUS, Inc. © 2004. All Rights Reserved. Page 97 of 133
If you use the Item Counts page to change all of the counting event detail lines manually to Canceled, the Stock Quantity Update process automatically changes the header status of the counting event to Canceled.
When the counting event contains only Stock Quantity Updated detail lines, or only Canceled and Stock Quantity Updated detail lines, the Stock Quantity Update process automatically changes the status of the counting event to Finished.
You can change the header status to Finished only if the detail lines all have either the status of Canceled or the Stock Quantity Update process has processed all detail lines in the counting event.
REVIEWING EVENT HISTORY
Click on the Counting Event History tab.
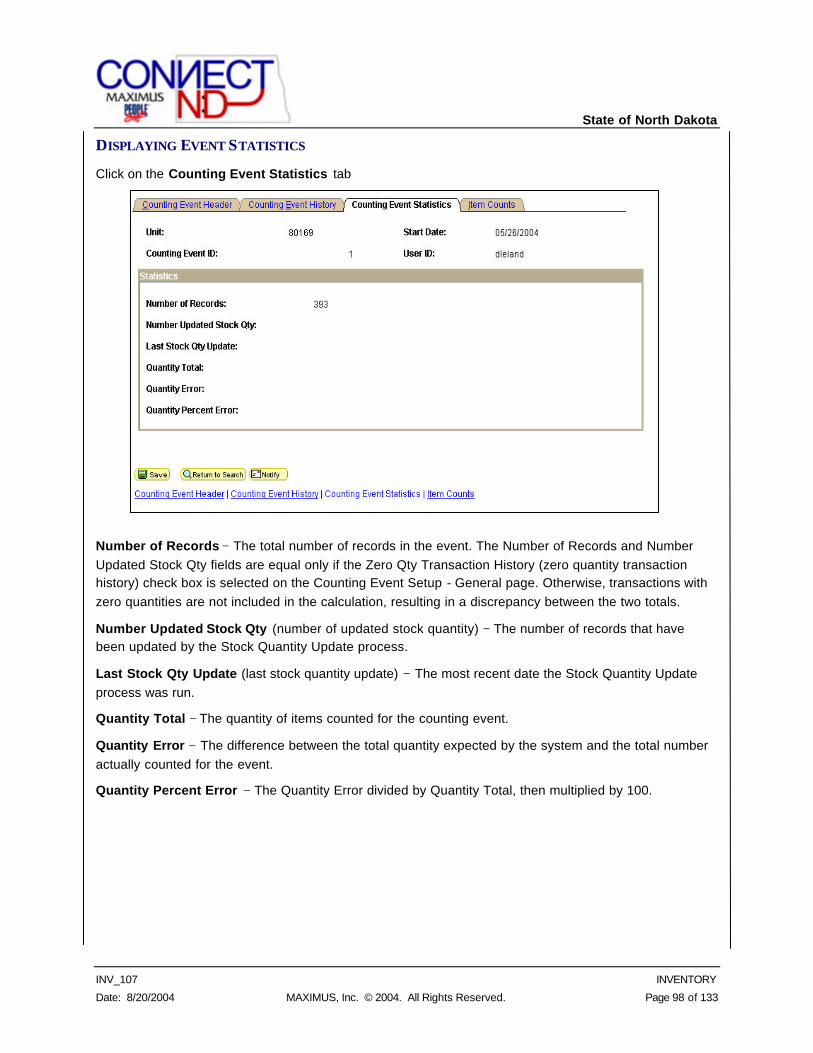
State of North Dakota
INV_107 INVENTORY
Date: 8/20/2004 MAXIMUS, Inc. © 2004. All Rights Reserved. Page 98 of 133
DISPLAYING EVENT STATISTICS
Click on the Counting Event Statistics tab
Number of Records − The total number of records in the event. The Number of Records and Number Updated Stock Qty fields are equal only if the Zero Qty Transaction History (zero quantity transaction history) check box is selected on the Counting Event Setup - General page. Otherwise, transactions with zero quantities are not included in the calculation, resulting in a discrepancy between the two totals.
Number Updated Stock Qty (number of updated stock quantity) − The number of records that have been updated by the Stock Quantity Update process.
Last Stock Qty Update (last stock quantity update) − The most recent date the Stock Quantity Update process was run.
Quantity Total − The quantity of items counted for the counting event.
Quantity Error − The difference between the total quantity expected by the system and the total number actually counted for the event.
Quantity Percent Error − The Quantity Error divided by Quantity Total, then multiplied by 100.
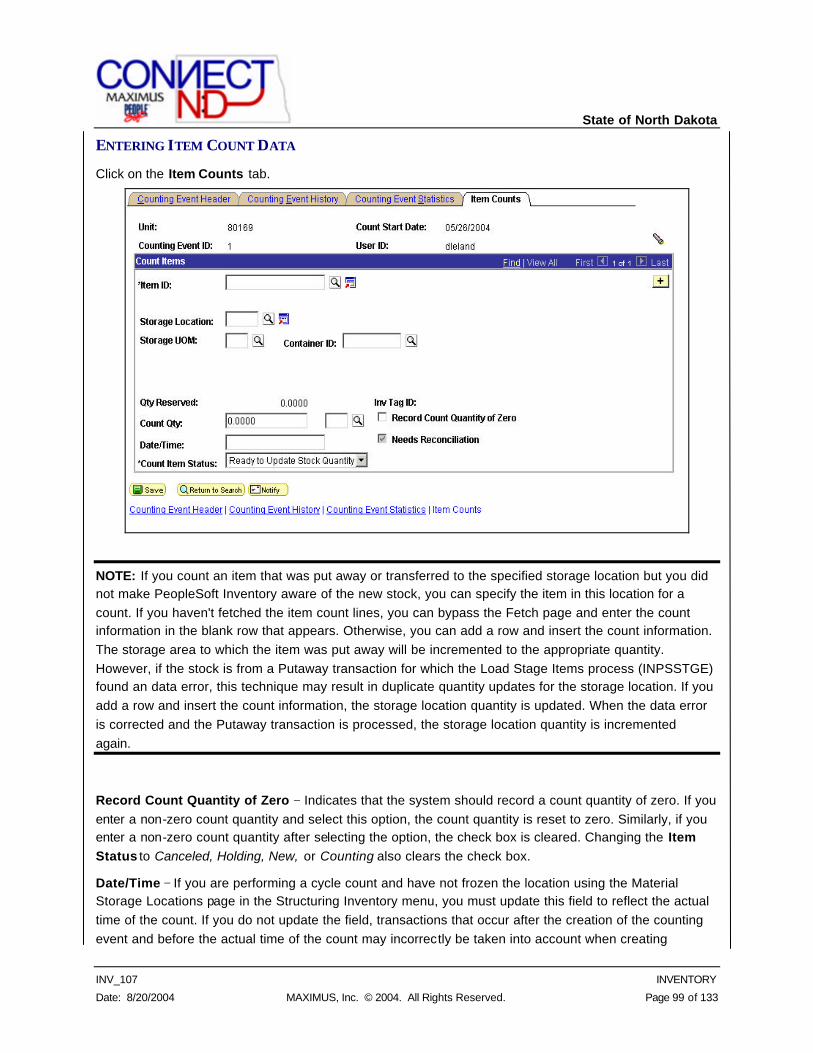
State of North Dakota
INV_107 INVENTORY
Date: 8/20/2004 MAXIMUS, Inc. © 2004. All Rights Reserved. Page 99 of 133
ENTERING ITEM COUNT DATA
Click on the Item Counts tab.
NOTE: If you count an item that was put away or transferred to the specified storage location but you did not make PeopleSoft Inventory aware of the new stock, you can specify the item in this location for a count. If you haven't fetched the item count lines, you can bypass the Fetch page and enter the count information in the blank row that appears. Otherwise, you can add a row and insert the count information. The storage area to which the item was put away will be incremented to the appropriate quantity. However, if the stock is from a Putaway transaction for which the Load Stage Items process (INPSSTGE) found an data error, this technique may result in duplicate quantity updates for the storage location. If you add a row and insert the count information, the storage location quantity is updated. When the data error is corrected and the Putaway transaction is processed, the storage location quantity is incremented again.
Record Count Quantity of Zero − Indicates that the system should record a count quantity of zero. If you enter a non-zero count quantity and select this option, the count quantity is reset to zero. Similarly, if you enter a non-zero count quantity after selecting the option, the check box is cleared. Changing the Item Status to Canceled, Holding, New, or Counting also clears the check box.
Date/Time − If you are performing a cycle count and have not frozen the location using the Material Storage Locations page in the Structuring Inventory menu, you must update this field to reflect the actual time of the count. If you do not update the field, transactions that occur after the creation of the counting event and before the actual time of the count may incorrectly be taken into account when creating
State of North Dakota
INV_107 INVENTORY
Date: 8/20/2004 MAXIMUS, Inc. © 2004. All Rights Reserved. Page 100 of 133
adjustments for the location. Transactions that occur before the actual time of the count should not be included in the adjustment calculation.
Needs Reconciliation − Indicates whether the Reconciliation report must be run before running the Stock Quantity Update process. The option is set automatically as follows:
The Count Sheet report process selects the option for blind counts. For non-blind counts, the Counting Sheet report process (INS9051) clears the check box.
If you change the Count Qty (count quantity) on the Item Counts page, the option is selected.
When the Reconciliation report process picks up an item count line, it clears the check box and updates the count item status of the line to Ready to Update Stock Quantity.
Count Item Status − Changes the status of the counting event detail line. Statuses include:
New − Includes the uncounted line in the Counting Sheet report or file when the Counting Sheet process (INS905) runs. The Counting Sheet process changes the status to Counting for blind counts or to Ready to Update Stock Quantity for non-blind counts. Events with New detail lines have a header status of Open.
Counting − The Counting Sheet process changes the status of detail lines in a blind, system-defined counting event from New to Counting. Detail lines with a status of Counting are considered uncounted. When you enter a count quantity for items with a Counting status, the status automatically changes to Ready to Update Stock Quantity. Events with items in a Counting status have a header status of Open.
Quantity Entered – Hold − Prevents the count quantity of a detail line from being applied to system tables by the Stock Quantity Update process. Events with items in a Hold status have a header status of Open.
Ready to Update Stock Quantity − The system uses quantities in counting event detail lines with this status to update tables when the Stock Quantity Update process runs. If you change the quantity of a detail line, Inventory automatically changes the status to Ready to Update Stock Quantities. Events with detail lines in a Ready to Update Stock Quantity status have a status of Open.
Stock Quantity Updated − Lines with a Ready to Update Stock Quantity status are changed to Stock Quantity Updated. When all detail lines in a counting event have a status of Stock Quantity Updated, the counting event header status changes to Finished.
Canceled − Lines with a status of Canceled are ignored by the Stock Quantity Update process. Events with only detail lines in a Canceled or Stock Quantity Updated status can be changed to Finished.
The Stock Quantity Update process checks counting event detail lines with a status of Ready To Update Count Quantities for errors before updating the system tables. If an error is found in a detail line, the status does not change, and an error message appears on the Item Counts page.

State of North Dakota
INV_107 INVENTORY
Date: 8/20/2004 MAXIMUS, Inc. © 2004. All Rights Reserved. Page 101 of 133
RETRIEVING EVENT DETAIL LINES
Click the Search button on the Item Counts page to access the Fetch page.
New − Returns the detail lines in a non-blind system-defined counting event for which the Counting Sheet process (INS9051) has not been run.
Counting − Returns the detail lines in a blind system-defined counting event.
Quantity Entered Hold − Returns counting event detail lines with statuses that were changed manually on the Item Counts page to prevent the stock quantity of an item from being updated by the Stock Quantity Update process.
Ready to Update Stock Quantity − Returns counting event detail lines with quantities that will be used to update the system tables when the Stock Quantity Update process runs.
Stock Quantity Updated − Returns counting event detail lines with quantities that have already been posted to the system tables by the Stock Quantity Update process.
Canceled − Returns detail lines that will be ignored by the Stock Quantity Update process.
From Tag ID − Defines the beginning number to retrieve. The value is used with the To Tag ID value and appears on the Counting Sheet listing. Tag IDs are unique numbers assigned to counting event detail lines (in sequence) by the Counting Sheet process to identify items in a count more easily.
NOTE: Tag IDs are assigned only by the Counting Sheet process. If no Counting Sheet was generated for the Counting event, you cannot retrieve by tag ID number.
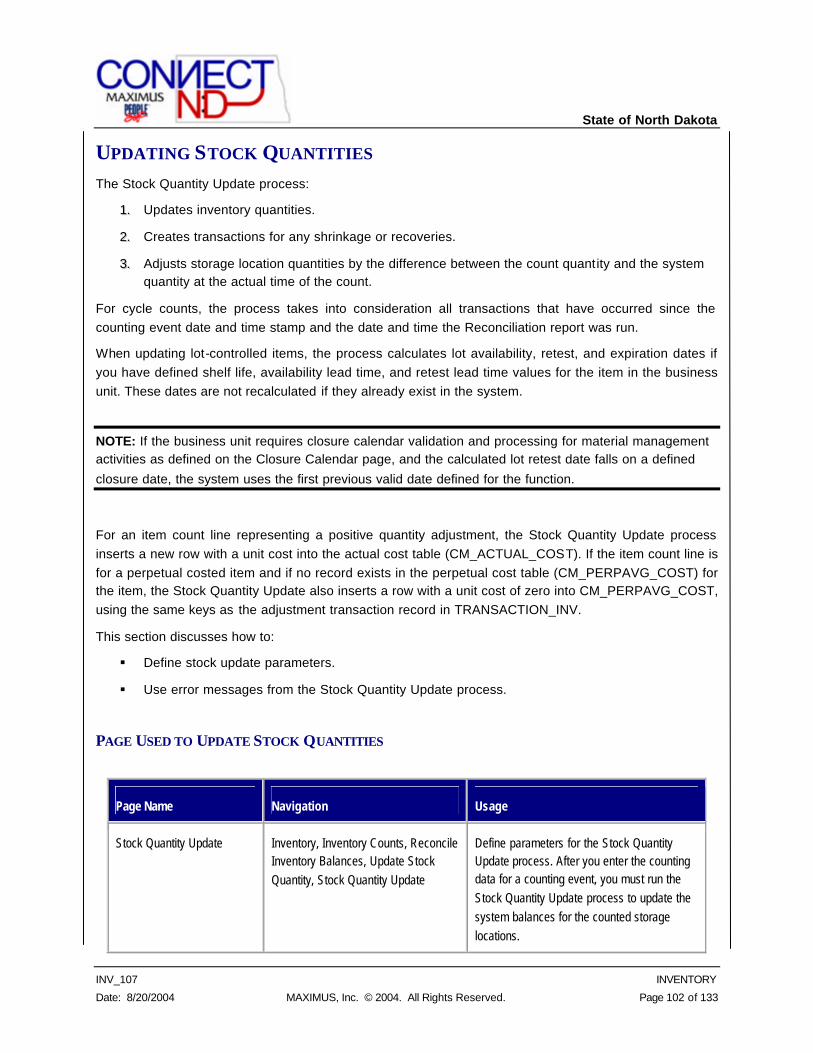
State of North Dakota
INV_107 INVENTORY
Date: 8/20/2004 MAXIMUS, Inc. © 2004. All Rights Reserved. Page 102 of 133
UPDATING STOCK QUANTITIES The Stock Quantity Update process:
11.. Updates inventory quantities.
22.. Creates transactions for any shrinkage or recoveries.
33.. Adjusts storage location quantities by the difference between the count quantity and the system quantity at the actual time of the count.
For cycle counts, the process takes into consideration all transactions that have occurred since the counting event date and time stamp and the date and time the Reconciliation report was run.
When updating lot-controlled items, the process calculates lot availability, retest, and expiration dates if you have defined shelf life, availability lead time, and retest lead time values for the item in the business unit. These dates are not recalculated if they already exist in the system.
NOTE: If the business unit requires closure calendar validation and processing for material management activities as defined on the Closure Calendar page, and the calculated lot retest date falls on a defined
closure date, the system uses the first previous valid date defined for the function.
For an item count line representing a positive quantity adjustment, the Stock Quantity Update process inserts a new row with a unit cost into the actual cost table (CM_ACTUAL_COST). If the item count line is for a perpetual costed item and if no record exists in the perpetual cost table (CM_PERPAVG_COST) for the item, the Stock Quantity Update also inserts a row with a unit cost of zero into CM_PERPAVG_COST, using the same keys as the adjustment transaction record in TRANSACTION_INV.
This section discusses how to:
§ Define stock update parameters.
§ Use error messages from the Stock Quantity Update process.
PAGE USED TO UPDATE STOCK QUANTITIES
Page Name Navigation Usage
Stock Quantity Update Inventory, Inventory Counts, Reconcile Inventory Balances, Update Stock Quantity, Stock Quantity Update
Define parameters for the Stock Quantity Update process. After you enter the counting data for a counting event, you must run the Stock Quantity Update process to update the system balances for the counted storage locations.
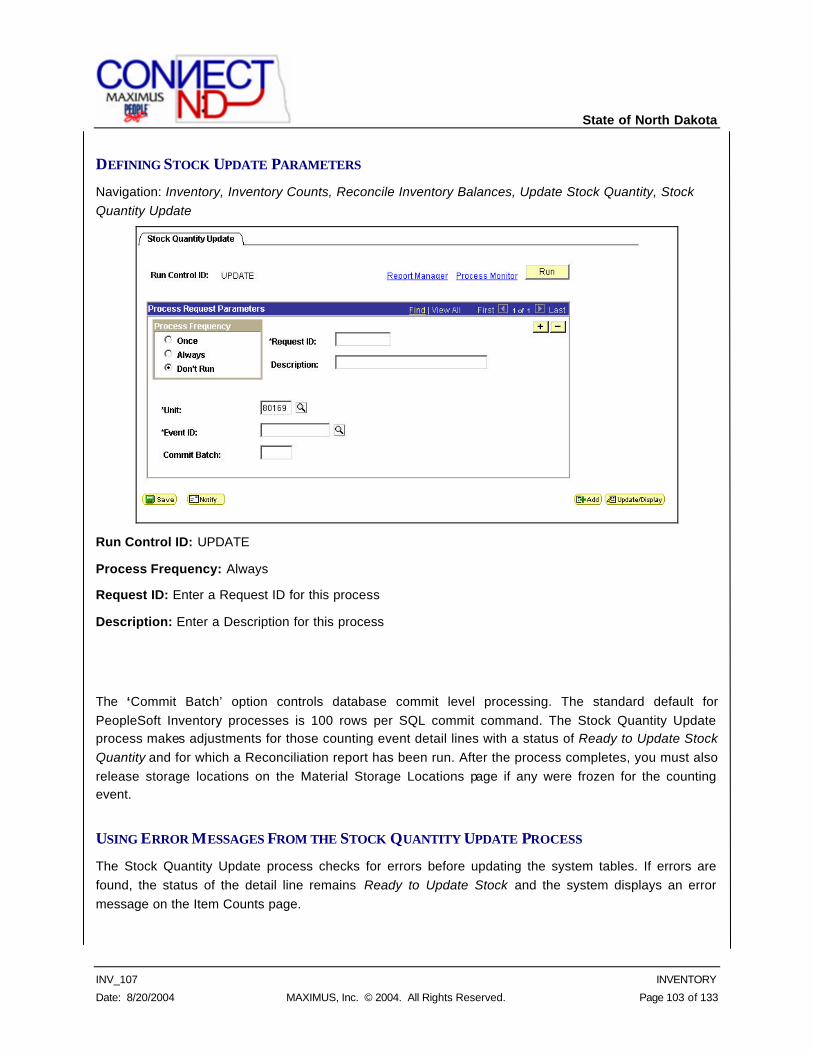
State of North Dakota
INV_107 INVENTORY
Date: 8/20/2004 MAXIMUS, Inc. © 2004. All Rights Reserved. Page 103 of 133
DEFINING STOCK UPDATE PARAMETERS
Navigation: Inventory, Inventory Counts, Reconcile Inventory Balances, Update Stock Quantity, Stock Quantity Update
Run Control ID: UPDATE
Process Frequency: Always
Request ID: Enter a Request ID for this process
Description: Enter a Description for this process
The ‘Commit Batch’ option controls database commit level processing. The standard default for PeopleSoft Inventory processes is 100 rows per SQL commit command. The Stock Quantity Update process makes adjustments for those counting event detail lines with a status of Ready to Update Stock Quantity and for which a Reconciliation report has been run. After the process completes, you must also release storage locations on the Material Storage Locations page if any were frozen for the counting event.
USING ERROR MESSAGES FROM THE STOCK QUANTITY UPDATE PROCESS
The Stock Quantity Update process checks for errors before updating the system tables. If errors are found, the status of the detail line remains Ready to Update Stock and the system displays an error message on the Item Counts page.
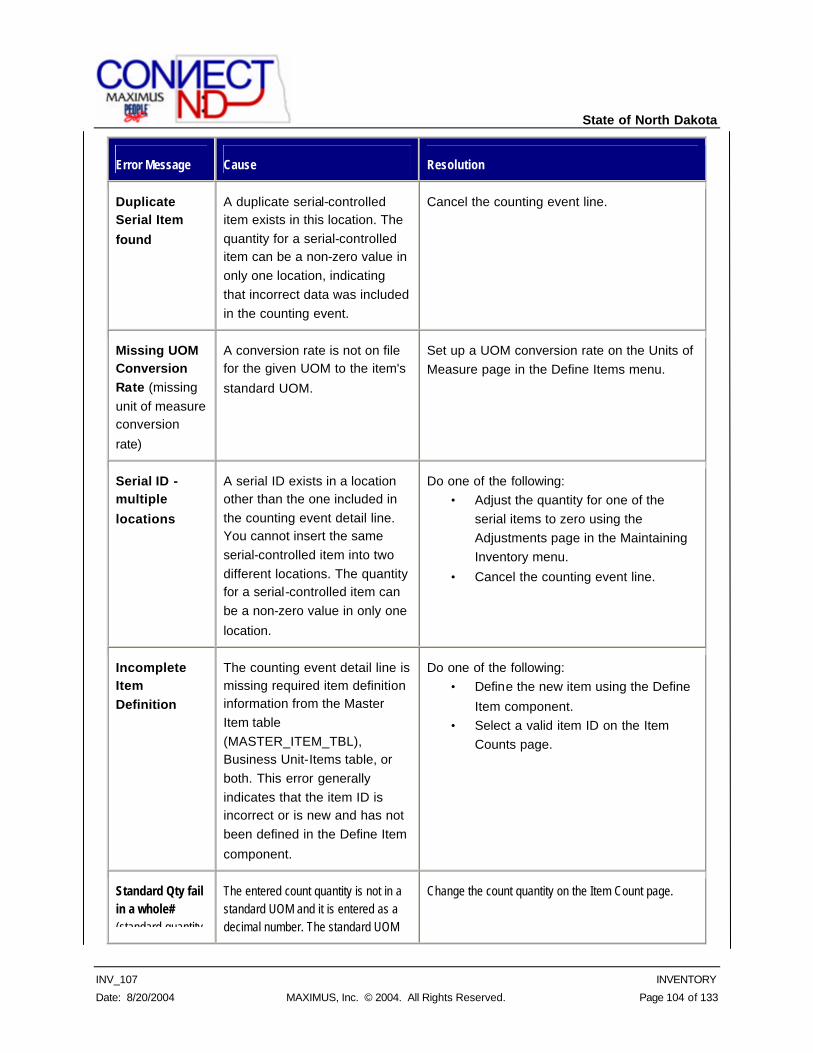
State of North Dakota
INV_107 INVENTORY
Date: 8/20/2004 MAXIMUS, Inc. © 2004. All Rights Reserved. Page 104 of 133
Error Message Cause Resolution
Duplicate Serial Item
found
A duplicate serial-controlled item exists in this location. The quantity for a serial-controlled item can be a non-zero value in only one location, indicating that incorrect data was included in the counting event.
Cancel the counting event line.
Missing UOM Conversion Rate (missing unit of measure conversion
rate)
A conversion rate is not on file for the given UOM to the item's
standard UOM.
Set up a UOM conversion rate on the Units of Measure page in the Define Items menu.
Serial ID - multiple
locations
A serial ID exists in a location other than the one included in the counting event detail line. You cannot insert the same serial-controlled item into two different locations. The quantity for a serial-controlled item can be a non-zero value in only one
location.
Do one of the following: • Adjust the quantity for one of the
serial items to zero using the Adjustments page in the Maintaining Inventory menu.
• Cancel the counting event line.
Incomplete Item Definition
The counting event detail line is missing required item definition information from the Master Item table (MASTER_ITEM_TBL), Business Unit-Items table, or both. This error generally indicates that the item ID is incorrect or is new and has not been defined in the Define Item
component.
Do one of the following: • Define the new item using the Define
Item component. • Select a valid item ID on the Item
Counts page.
Standard Qty fail in a whole# (standard quantity
The entered count quantity is not in a standard UOM and it is entered as a decimal number. The standard UOM
Change the count quantity on the Item Count page.
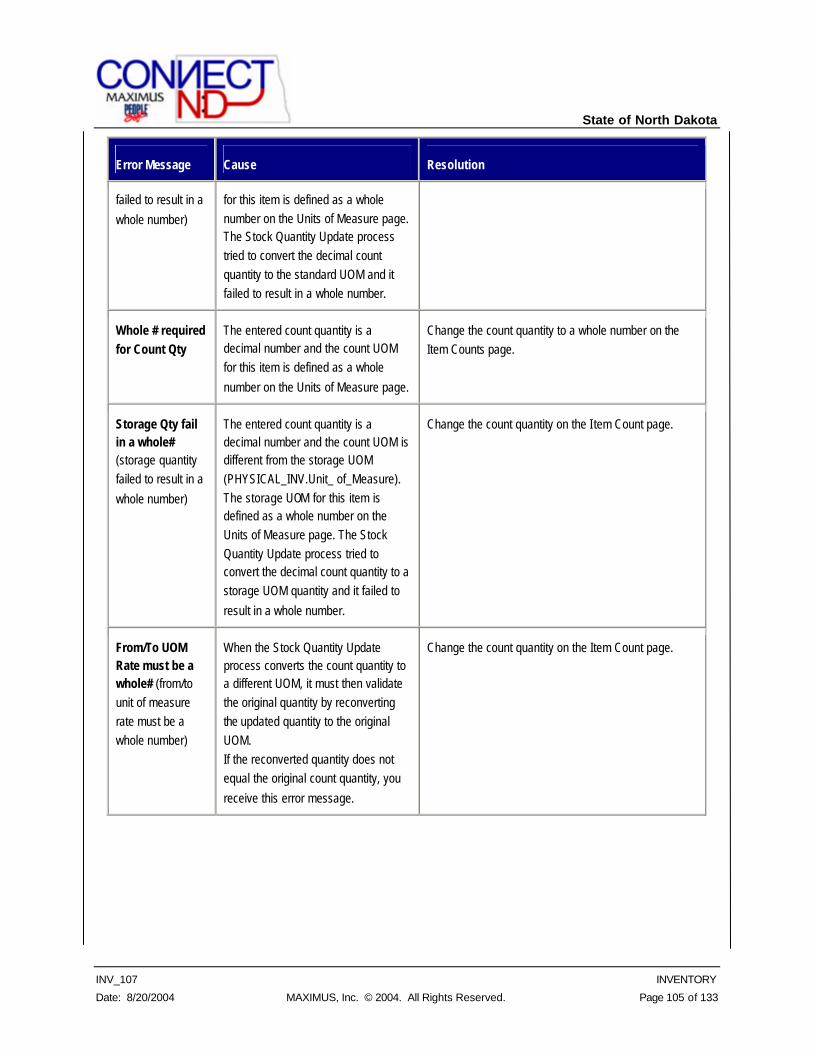
State of North Dakota
INV_107 INVENTORY
Date: 8/20/2004 MAXIMUS, Inc. © 2004. All Rights Reserved. Page 105 of 133
Error Message Cause Resolution
failed to result in a
whole number)
for this item is defined as a whole number on the Units of Measure page. The Stock Quantity Update process tried to convert the decimal count quantity to the standard UOM and it failed to result in a whole number.
Whole # required for Count Qty
The entered count quantity is a decimal number and the count UOM for this item is defined as a whole
number on the Units of Measure page.
Change the count quantity to a whole number on the Item Counts page.
Storage Qty fail in a whole# (storage quantity failed to result in a
whole number)
The entered count quantity is a decimal number and the count UOM is different from the storage UOM (PHYSICAL_INV.Unit_ of_Measure). The storage UOM for this item is defined as a whole number on the Units of Measure page. The Stock Quantity Update process tried to convert the decimal count quantity to a storage UOM quantity and it failed to
result in a whole number.
Change the count quantity on the I tem Count page.
From/To UOM Rate must be a whole# (from/to unit of measure rate must be a whole number)
When the Stock Quantity Update process converts the count quantity to a different UOM, it must then validate the original quantity by reconverting the updated quantity to the original UOM. If the reconverted quantity does not equal the original count quantity, you
receive this error message.
Change the count quantity on the Item Count page.
State of North Dakota
INV_107 INVENTORY
Date: 8/20/2004 MAXIMUS, Inc. © 2004. All Rights Reserved. Page 106 of 133
MAKING STOCK QUANTITY ADJUSTMENTS This section provides an overview of transfers within a business unit and discusses how to make adjustments online.
UNDERSTANDING STOCK QUANTITY ADJUSTMENTS PeopleSoft Inventory tracks and summarizes item quantities at the storage location level for the business unit, providing an instantaneous view of material position when you need it. Inventory also keeps inventory balances accurate by completing ad hoc adjustments and transferring material within business units.
COMMON ELEMENTS USED IN THIS SECTION Location Quantity Available − The quantity available for transfer in the original storage location. If negative inventory balances are permitted in the business unit, you can transfer quantity that is available, driving the system balance for the original location negative.
Transaction Date − The adjustment date. The default is the current date.
MAKING ADJUSTMENTS ONLINE PeopleSoft Inventory enables you to make various stock adjustments. For example, you can account for quantities found, misplaced, and damaged that must be scrapped. With the Adjustments component, you can perform ad-hoc quantity adjustments for any given storage location.
This section discusses how to:
• Scrap return-to-vendor stock.
• Make on-hand quantity adjustments.
• Search for quantities to adjust.
• Define return-to-vendor adjustments to remove.
• Inquire about adjustments.
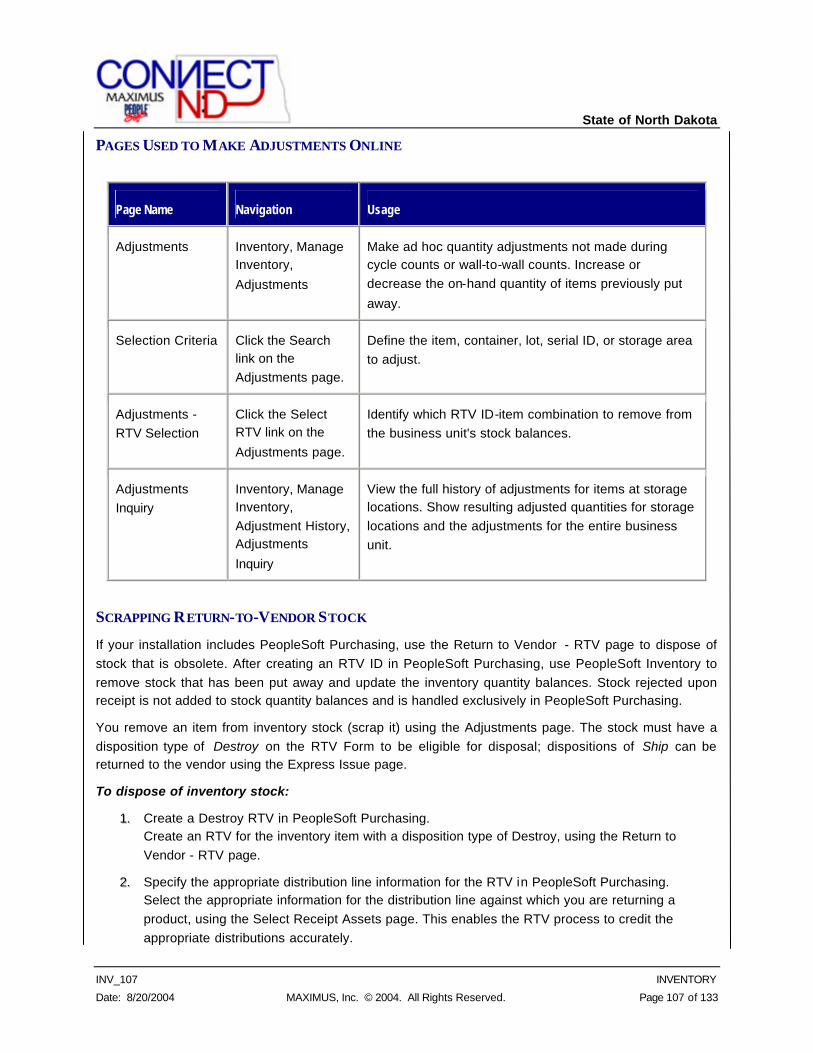
State of North Dakota
INV_107 INVENTORY
Date: 8/20/2004 MAXIMUS, Inc. © 2004. All Rights Reserved. Page 107 of 133
PAGES USED TO MAKE ADJUSTMENTS ONLINE
Page Name Navigation Usage
Adjustments Inventory, Manage Inventory,
Adjustments
Make ad hoc quantity adjustments not made during cycle counts or wall-to-wall counts. Increase or decrease the on-hand quantity of items previously put
away.
Selection Criteria Click the Search link on the Adjustments page.
Define the item, container, lot, serial ID, or storage area to adjust.
Adjustments - RTV Selection
Click the Select RTV link on the
Adjustments page.
Identify which RTV ID-item combination to remove from the business unit's stock balances.
Adjustments Inquiry
Inventory, Manage Inventory, Adjustment History, Adjustments
Inquiry
View the full history of adjustments for items at storage locations. Show resulting adjusted quantities for storage locations and the adjustments for the entire business unit.
SCRAPPING RETURN-TO-VENDOR STOCK
If your installation includes PeopleSoft Purchasing, use the Return to Vendor - RTV page to dispose of stock that is obsolete. After creating an RTV ID in PeopleSoft Purchasing, use PeopleSoft Inventory to remove stock that has been put away and update the inventory quantity balances. Stock rejected upon receipt is not added to stock quantity balances and is handled exclusively in PeopleSoft Purchasing.
You remove an item from inventory stock (scrap it) using the Adjustments page. The stock must have a disposition type of Destroy on the RTV Form to be eligible for disposal; dispositions of Ship can be returned to the vendor using the Express Issue page.
To dispose of inventory stock:
11.. Create a Destroy RTV in PeopleSoft Purchasing. Create an RTV for the inventory item with a disposition type of Destroy, using the Return to Vendor - RTV page.
22.. Specify the appropriate distribution line information for the RTV in PeopleSoft Purchasing. Select the appropriate information for the distribution line against which you are returning a product, using the Select Receipt Assets page. This enables the RTV process to credit the appropriate distributions accurately.
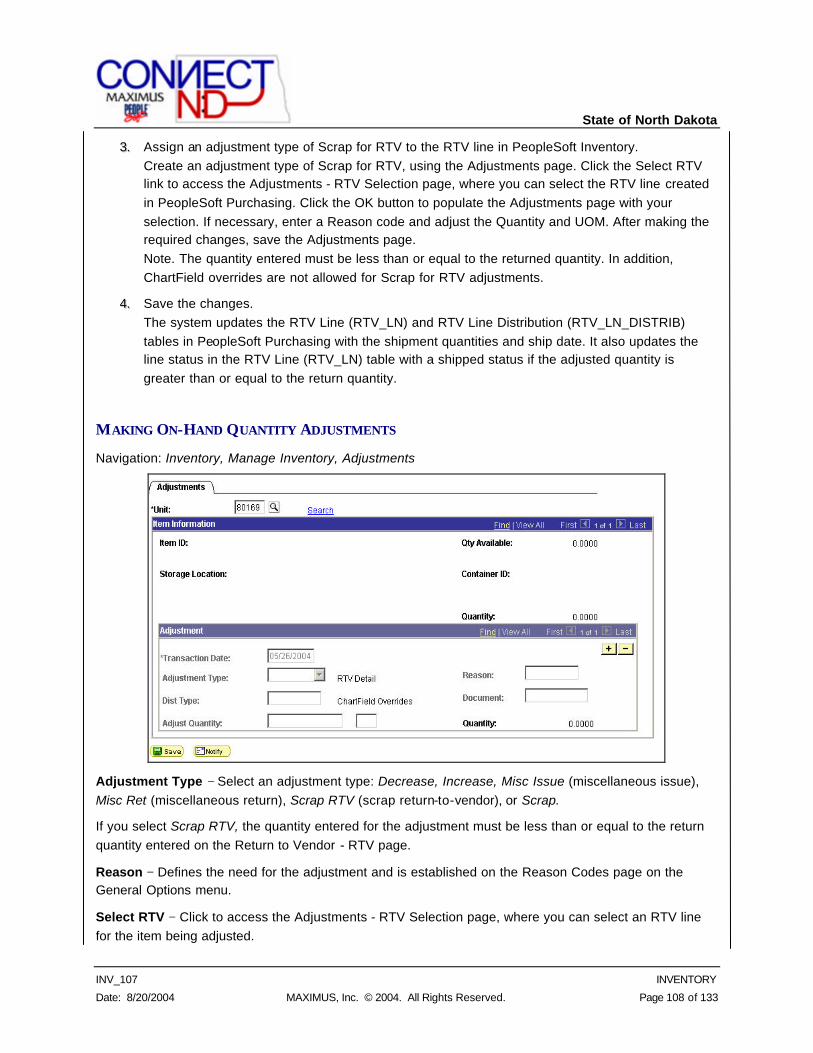
State of North Dakota
INV_107 INVENTORY
Date: 8/20/2004 MAXIMUS, Inc. © 2004. All Rights Reserved. Page 108 of 133
33.. Assign an adjustment type of Scrap for RTV to the RTV line in PeopleSoft Inventory. Create an adjustment type of Scrap for RTV, using the Adjustments page. Click the Select RTV link to access the Adjustments - RTV Selection page, where you can select the RTV line created in PeopleSoft Purchasing. Click the OK button to populate the Adjustments page with your selection. If necessary, enter a Reason code and adjust the Quantity and UOM. After making the required changes, save the Adjustments page. Note. The quantity entered must be less than or equal to the returned quantity. In addition, ChartField overrides are not allowed for Scrap for RTV adjustments.
44.. Save the changes. The system updates the RTV Line (RTV_LN) and RTV Line Distribution (RTV_LN_DISTRIB) tables in PeopleSoft Purchasing with the shipment quantities and ship date. It also updates the line status in the RTV Line (RTV_LN) table with a shipped status if the adjusted quantity is greater than or equal to the return quantity.
MAKING ON-HAND QUANTITY ADJUSTMENTS
Navigation: Inventory, Manage Inventory, Adjustments
Adjustment Type − Select an adjustment type: Decrease, Increase, Misc Issue (miscellaneous issue), Misc Ret (miscellaneous return), Scrap RTV (scrap return-to-vendor), or Scrap.
If you select Scrap RTV, the quantity entered for the adjustment must be less than or equal to the return quantity entered on the Return to Vendor - RTV page.
Reason − Defines the need for the adjustment and is established on the Reason Codes page on the General Options menu.
Select RTV − Click to access the Adjustments - RTV Selection page, where you can select an RTV line for the item being adjusted.
State of North Dakota
INV_107 INVENTORY
Date: 8/20/2004 MAXIMUS, Inc. © 2004. All Rights Reserved. Page 109 of 133
Dist Type (distribution type) − The default value is based on the adjustment type you entered for the business unit.
Document − Defines documents associated with this adjustment.
ChartField Overrides − Click to access the ChartField Overrides page, where you can override accounting information for the adjustment type. This option is not available for the Scrap RTV adjustment type.
Adjust Quantity − Enter the amount by which you want to adjust the quantity of this inventory item. You can enter adjustments in any valid stocking unit of measure; PeopleSoft Inventory converts them to the storage location's stocking unit of measure.
You can adjust a storage location to 0. If negative inventory balances are permitted in the business unit, you can also enter an adjustment that will drive the quantity negative.
You can:
• Change adjustments by entering another adjustment for the item in this storage location.
• Adjust suspended storage locations. If you enter an increase for a suspended storage location, the system warns you of the suspension. You can accept the warning and save the adjustment.
− If you enter an adjustment for an item in a storage location with an inventory status of Restricted or Rejected, you receive a warning.
− You cannot save adjustments for an item in a storage location with a status of Hold unless the storage location is designated as an inspection location.
− You cannot make adjustments for a storage location that has been closed.
NOTE: You can only adjust stock that has previously been put away. You cannot, for example, enter an increase adjustment for a lot ID, serial ID, container, or staged date that doesn't currently exist in
inventory. To put new stock away, use the Express Putaway page.
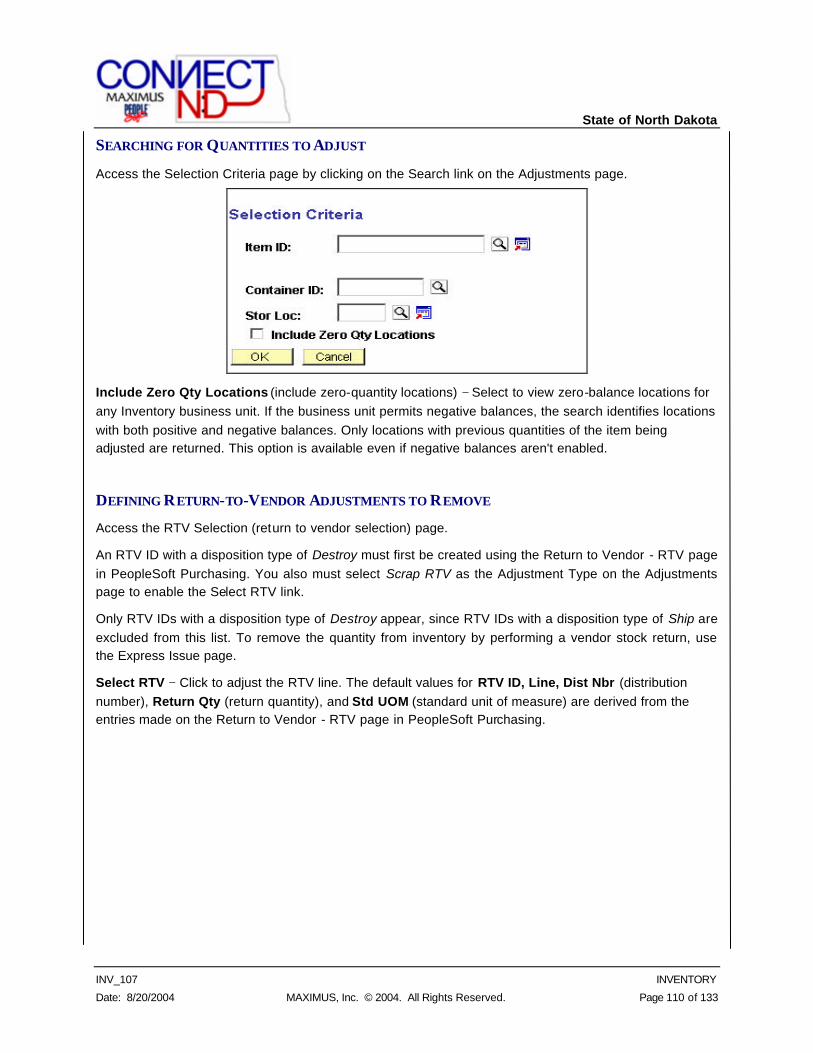
State of North Dakota
INV_107 INVENTORY
Date: 8/20/2004 MAXIMUS, Inc. © 2004. All Rights Reserved. Page 110 of 133
SEARCHING FOR QUANTITIES TO ADJUST
Access the Selection Criteria page by clicking on the Search link on the Adjustments page.
Include Zero Qty Locations (include zero-quantity locations) − Select to view zero-balance locations for any Inventory business unit. If the business unit permits negative balances, the search identifies locations with both positive and negative balances. Only locations with previous quantities of the item being adjusted are returned. This option is available even if negative balances aren't enabled.
DEFINING RETURN-TO-VENDOR ADJUSTMENTS TO REMOVE
Access the RTV Selection (return to vendor selection) page.
An RTV ID with a disposition type of Destroy must first be created using the Return to Vendor - RTV page in PeopleSoft Purchasing. You also must select Scrap RTV as the Adjustment Type on the Adjustments page to enable the Select RTV link.
Only RTV IDs with a disposition type of Destroy appear, since RTV IDs with a disposition type of Ship are excluded from this list. To remove the quantity from inventory by performing a vendor stock return, use the Express Issue page.
Select RTV − Click to adjust the RTV line. The default values for RTV ID, Line, Dist Nbr (distribution number), Return Qty (return quantity), and Std UOM (standard unit of measure) are derived from the entries made on the Return to Vendor - RTV page in PeopleSoft Purchasing.
State of North Dakota
INV_107 INVENTORY
Date: 8/20/2004 MAXIMUS, Inc. © 2004. All Rights Reserved. Page 111 of 133
INQUIRING AND REPORTING ABOUT ON-HAND STOCK This section provides an overview of stock reporting and discusses how to:
1. View transaction history.
2. Check item availability.
3. View item balances.
4. Perform stock inquiries.
5. Identify slow-moving inventory.
UNDERSTANDING ON-HAND INVENTORY REPORTING PeopleSoft Inventory provides inquiries and reports to help you track and review business unit information about stock, transactions, and quantity balances. A single record, TRANSACTION_INV, captures all inventory transactions, such as Putaway and physical accounting transactions, storage location transfers, material issues and shipments, and quantity adjustments.
VIEWING TRANSACTION HISTORY This section discusses how to:
• View transaction history.
• Search for transaction history.
PAGES USED TO VIEW TRANSACTION HISTORY
Page Name Navigation Usage
Transaction History Inventory, Manage Inventory, Analyze Inventory, Review Transaction History, Transaction History
Inventory, Inventory Counts, Reconcile Inventory Balances, Review Transaction History, Transaction History
View transaction history.
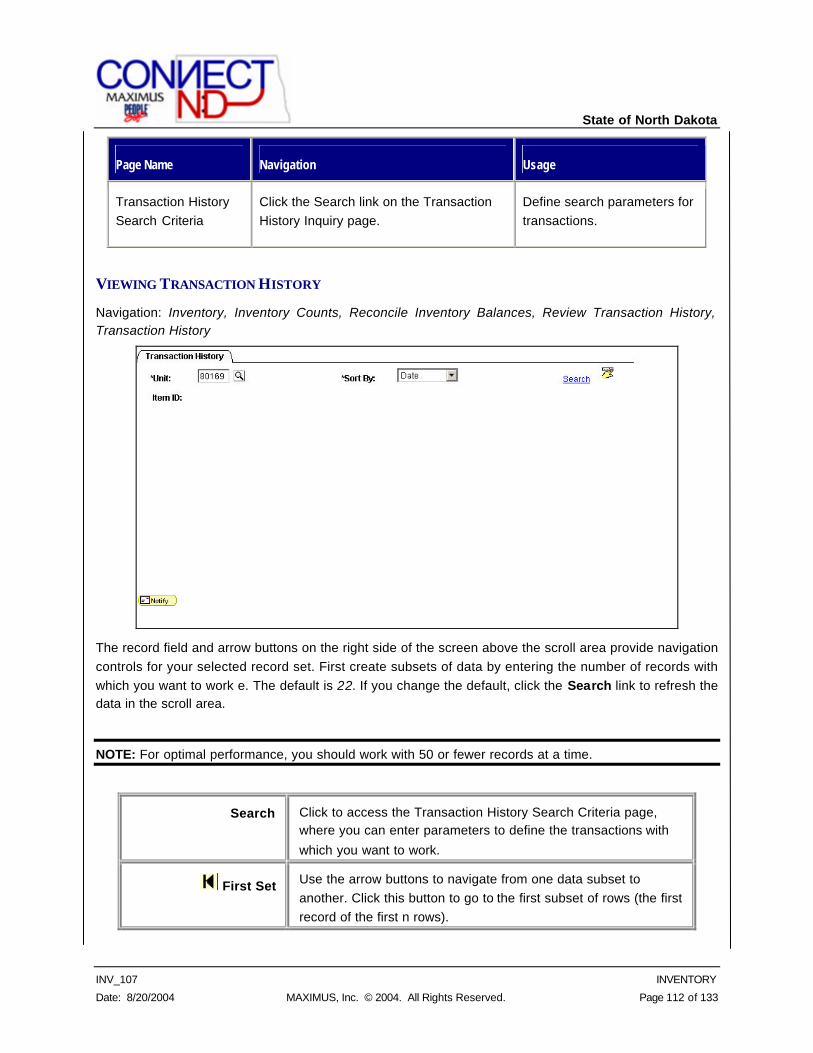
State of North Dakota
INV_107 INVENTORY
Date: 8/20/2004 MAXIMUS, Inc. © 2004. All Rights Reserved. Page 112 of 133
Page Name Navigation Usage
Transaction History Search Criteria
Click the Search link on the Transaction History Inquiry page.
Define search parameters for transactions.
VIEWING TRANSACTION HISTORY
Navigation: Inventory, Inventory Counts, Reconcile Inventory Balances, Review Transaction History, Transaction History
The record field and arrow buttons on the right side of the screen above the scroll area provide navigation controls for your selected record set. First create subsets of data by entering the number of records with which you want to work e. The default is 22. If you change the default, click the Search link to refresh the data in the scroll area.
NOTE: For optimal performance, you should work with 50 or fewer records at a time.
Search Click to access the Transaction History Search Criteria page, where you can enter parameters to define the transactions with
which you want to work.
First Set Use the arrow buttons to navigate from one data subset to another. Click this button to go to the first subset of rows (the first record of the first n rows).
State of North Dakota
INV_107 INVENTORY
Date: 8/20/2004 MAXIMUS, Inc. © 2004. All Rights Reserved. Page 113 of 133
Last Set Click to go to the last subset of rows (the first record of the last n
rows).
Previous Set Click to go to the first record of the previous set of n rows.
Next Set Click to go to the first record of the next set of n rows.
Date Timestamp Indicates when transactions occurred.
Save User Preferences Click to save the dynamic column settings for your User ID.
In the five dynamic column headings available in the scroll area, you can choose which transaction attributes you want to display and the order in which you want them arranged. For example, you might want to see the base quantity of the transaction first, then the transaction group. In this case, select Base Qty in the first list box and Tran Group in the second. PeopleSoft Inventory changes the page display to show your selections. You can change all of the columns using this method to create a custom view of the transactions that have occurred for this item in this business unit.
The Onhand Qty (onhand quantity) column displays a running total of how the transactions affected the item's on-hand quantity balance. The running total appears only if the search parameters include business unit, item ID, area, or date. If you enter the container, lot ID, serial ID, user, or transaction group, the running total does not appear.
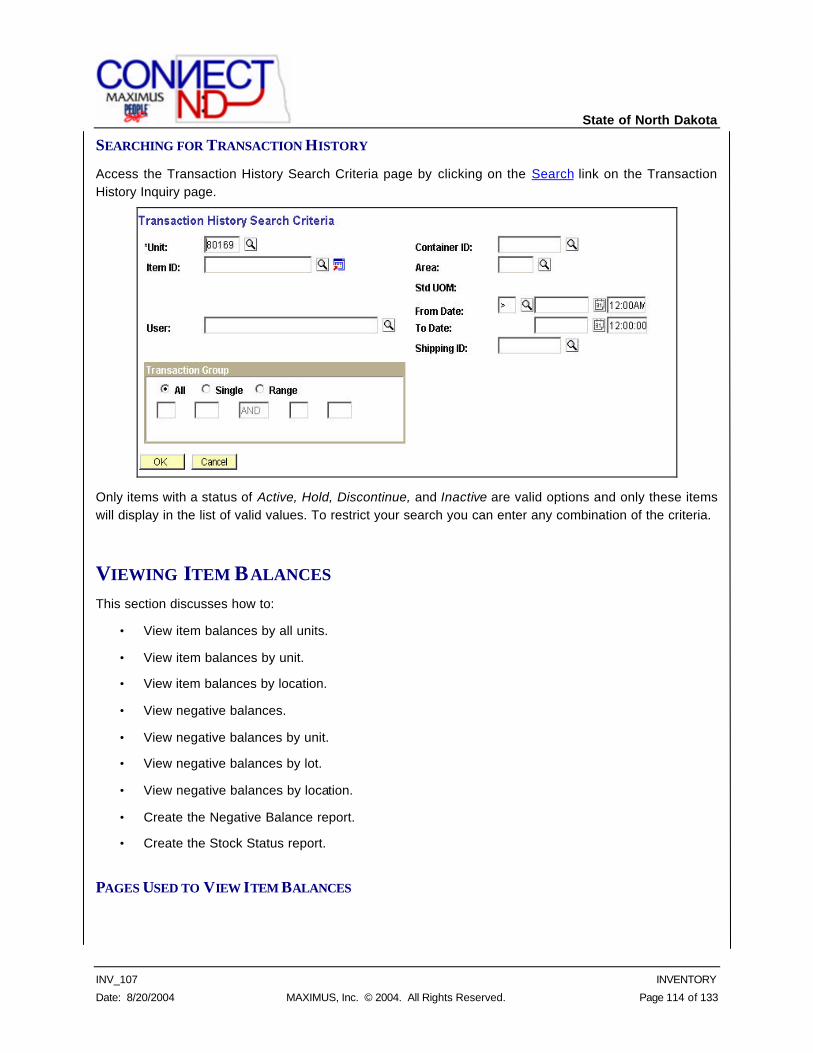
State of North Dakota
INV_107 INVENTORY
Date: 8/20/2004 MAXIMUS, Inc. © 2004. All Rights Reserved. Page 114 of 133
SEARCHING FOR TRANSACTION HISTORY
Access the Transaction History Search Criteria page by clicking on the Search link on the Transaction History Inquiry page.
Only items with a status of Active, Hold, Discontinue, and Inactive are valid options and only these items will display in the list of valid values. To restrict your search you can enter any combination of the criteria.
VIEWING ITEM BALANCES This section discusses how to:
• View item balances by all units.
• View item balances by unit.
• View item balances by location.
• View negative balances.
• View negative balances by unit.
• View negative balances by lot.
• View negative balances by location.
• Create the Negative Balance report.
• Create the Stock Status report.
PAGES USED TO VIEW ITEM BALANCES
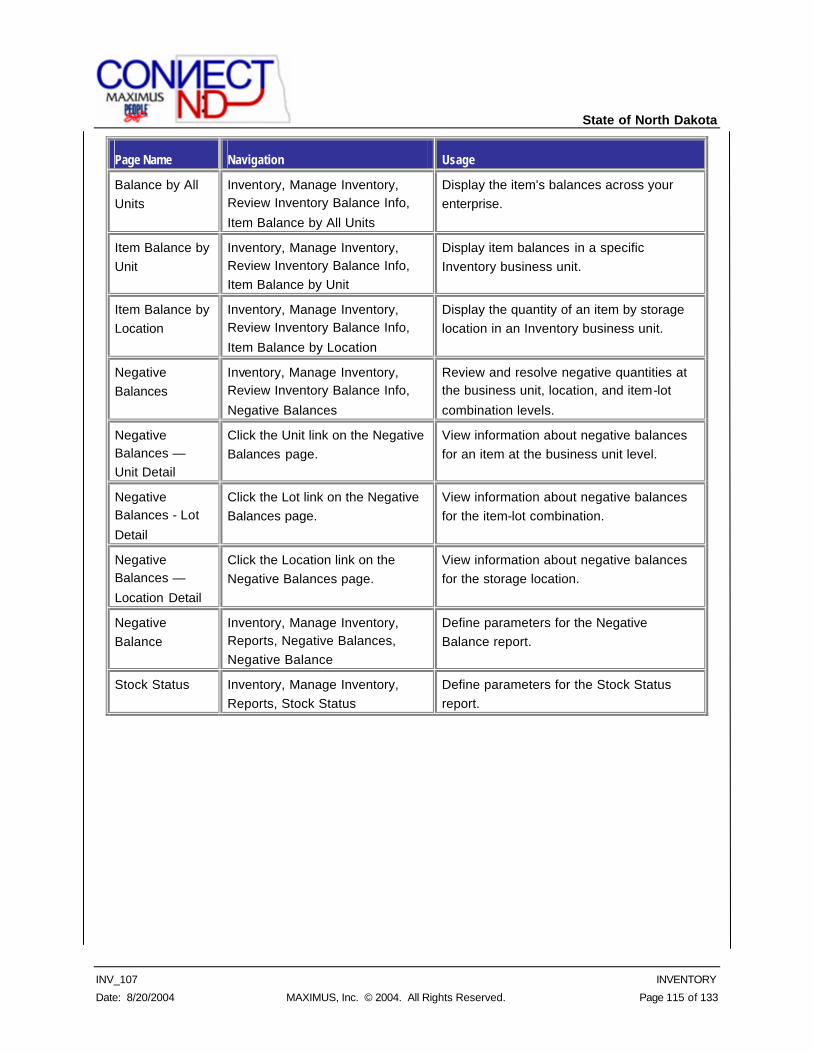
State of North Dakota
INV_107 INVENTORY
Date: 8/20/2004 MAXIMUS, Inc. © 2004. All Rights Reserved. Page 115 of 133
Page Name Navigation Usage
Balance by All Units
Inventory, Manage Inventory, Review Inventory Balance Info,
Item Balance by All Units
Display the item's balances across your enterprise.
Item Balance by Unit
Inventory, Manage Inventory, Review Inventory Balance Info, Item Balance by Unit
Display item balances in a specific Inventory business unit.
Item Balance by Location
Inventory, Manage Inventory, Review Inventory Balance Info,
Item Balance by Location
Display the quantity of an item by storage location in an Inventory business unit.
Negative Balances
Inventory, Manage Inventory, Review Inventory Balance Info,
Negative Balances
Review and resolve negative quantities at the business unit, location, and item-lot
combination levels.
Negative Balances — Unit Detail
Click the Unit link on the Negative Balances page.
View information about negative balances for an item at the business unit level.
Negative Balances - Lot
Detail
Click the Lot link on the Negative Balances page.
View information about negative balances for the item-lot combination.
Negative Balances —
Location Detail
Click the Location link on the Negative Balances page.
View information about negative balances for the storage location.
Negative Balance
Inventory, Manage Inventory, Reports, Negative Balances, Negative Balance
Define parameters for the Negative Balance report.
Stock Status Inventory, Manage Inventory, Reports, Stock Status
Define parameters for the Stock Status report.
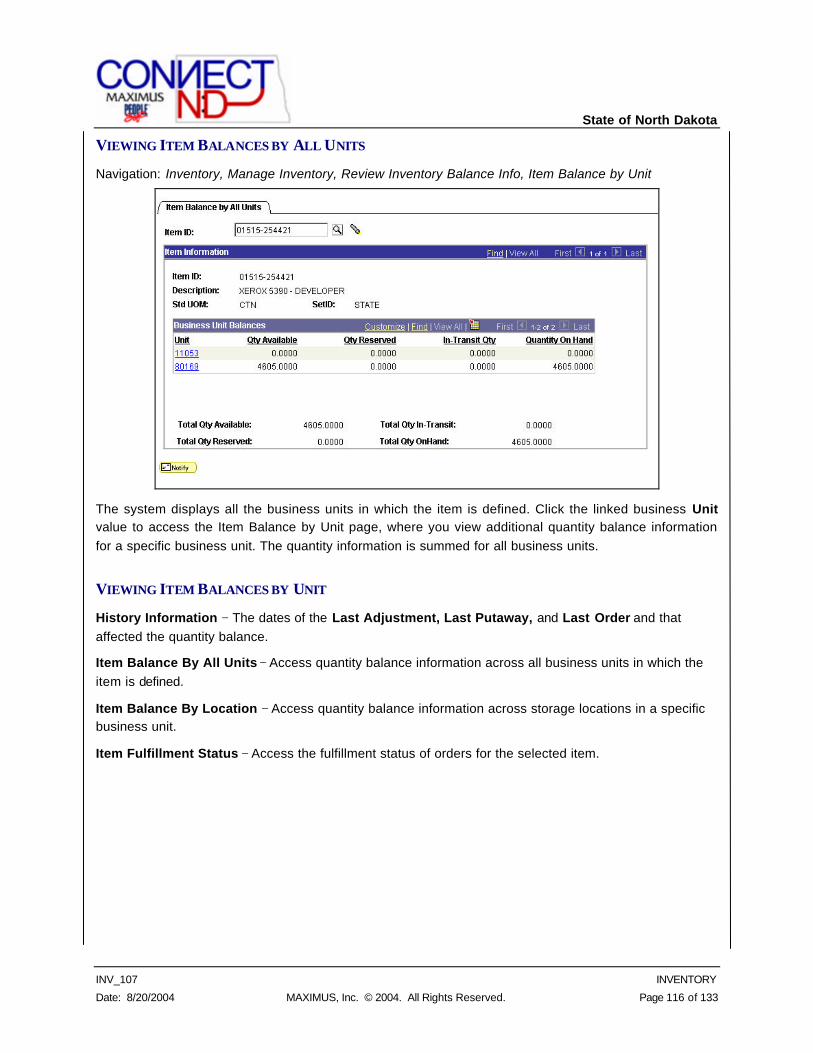
State of North Dakota
INV_107 INVENTORY
Date: 8/20/2004 MAXIMUS, Inc. © 2004. All Rights Reserved. Page 116 of 133
VIEWING ITEM BALANCES BY ALL UNITS
Navigation: Inventory, Manage Inventory, Review Inventory Balance Info, Item Balance by Unit
The system displays all the business units in which the item is defined. Click the linked business Unit value to access the Item Balance by Unit page, where you view additional quantity balance information for a specific business unit. The quantity information is summed for all business units.
VIEWING ITEM BALANCES BY UNIT
History Information − The dates of the Last Adjustment, Last Putaway, and Last Order and that affected the quantity balance.
Item Balance By All Units − Access quantity balance information across all business units in which the item is defined.
Item Balance By Location − Access quantity balance information across storage locations in a specific business unit.
Item Fulfillment Status − Access the fulfillment status of orders for the selected item.
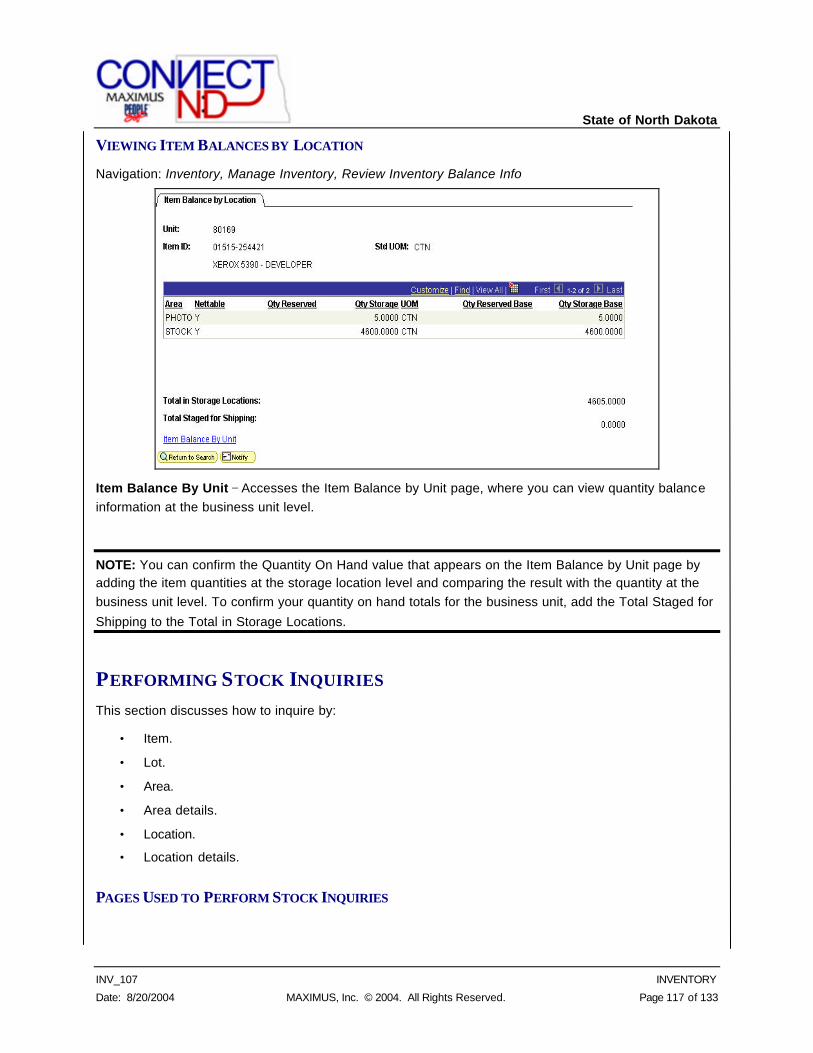
State of North Dakota
INV_107 INVENTORY
Date: 8/20/2004 MAXIMUS, Inc. © 2004. All Rights Reserved. Page 117 of 133
VIEWING ITEM BALANCES BY LOCATION
Navigation: Inventory, Manage Inventory, Review Inventory Balance Info
Item Balance By Unit − Accesses the Item Balance by Unit page, where you can view quantity balance information at the business unit level.
NOTE: You can confirm the Quantity On Hand value that appears on the Item Balance by Unit page by adding the item quantities at the storage location level and comparing the result with the quantity at the business unit level. To confirm your quantity on hand totals for the business unit, add the Total Staged for
Shipping to the Total in Storage Locations.
PERFORMING STOCK INQUIRIES This section discusses how to inquire by:
• Item.
• Lot.
• Area.
• Area details.
• Location.
• Location details.
PAGES USED TO PERFORM STOCK INQUIRIES
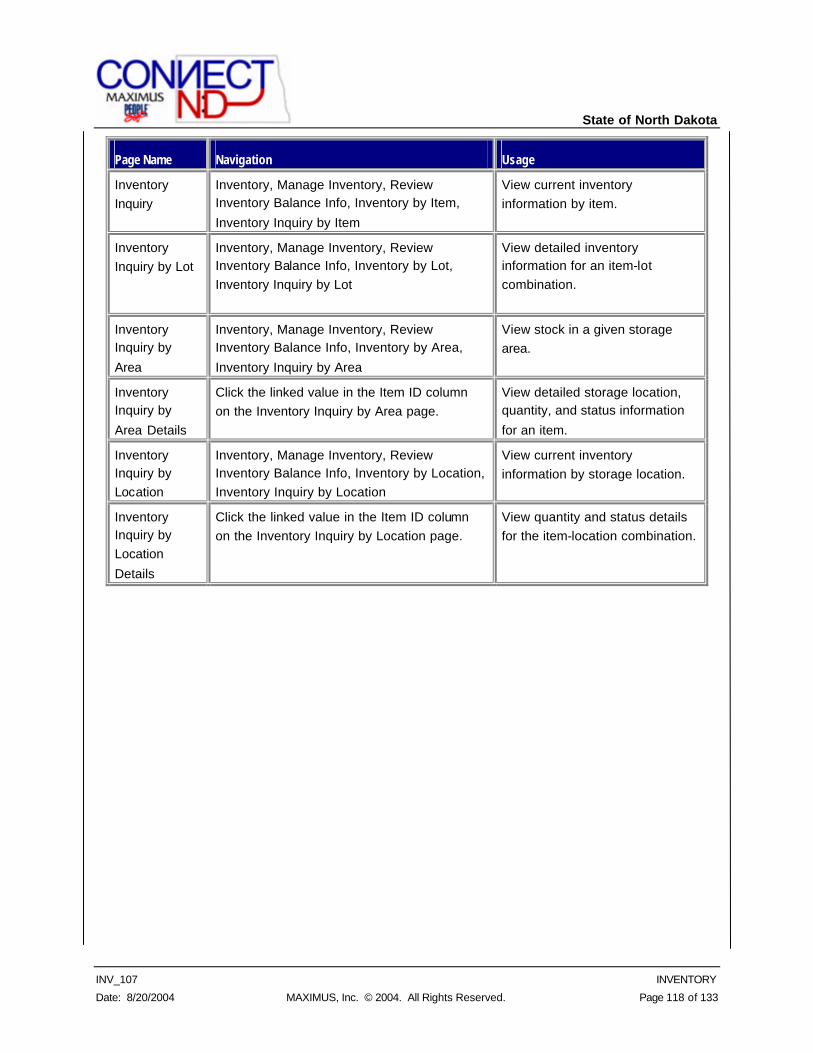
State of North Dakota
INV_107 INVENTORY
Date: 8/20/2004 MAXIMUS, Inc. © 2004. All Rights Reserved. Page 118 of 133
Page Name Navigation Usage
Inventory Inquiry
Inventory, Manage Inventory, Review Inventory Balance Info, Inventory by Item,
Inventory Inquiry by Item
View current inventory information by item.
Inventory Inquiry by Lot
Inventory, Manage Inventory, Review Inventory Balance Info, Inventory by Lot, Inventory Inquiry by Lot
View detailed inventory information for an item-lot combination.
Inventory Inquiry by
Area
Inventory, Manage Inventory, Review Inventory Balance Info, Inventory by Area,
Inventory Inquiry by Area
View stock in a given storage area.
Inventory Inquiry by
Area Details
Click the linked value in the Item ID column on the Inventory Inquiry by Area page.
View detailed storage location, quantity, and status information
for an item.
Inventory Inquiry by Location
Inventory, Manage Inventory, Review Inventory Balance Info, Inventory by Location, Inventory Inquiry by Location
View current inventory information by storage location.
Inventory Inquiry by Location
Details
Click the linked value in the Item ID column on the Inventory Inquiry by Location page.
View quantity and status details for the item-location combination.
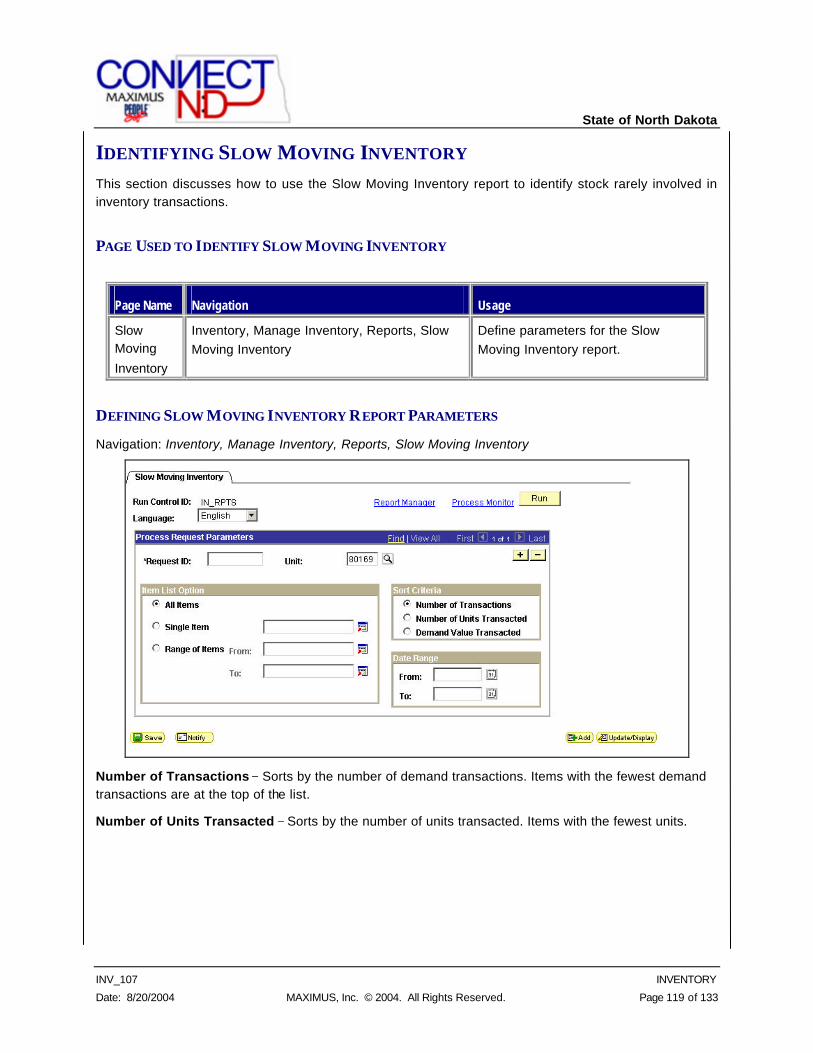
State of North Dakota
INV_107 INVENTORY
Date: 8/20/2004 MAXIMUS, Inc. © 2004. All Rights Reserved. Page 119 of 133
IDENTIFYING SLOW MOVING INVENTORY This section discusses how to use the Slow Moving Inventory report to identify stock rarely involved in inventory transactions.
PAGE USED TO IDENTIFY SLOW MOVING INVENTORY
Page Name Navigation Usage
Slow Moving
Inventory
Inventory, Manage Inventory, Reports, Slow Moving Inventory
Define parameters for the Slow Moving Inventory report.
DEFINING SLOW MOVING INVENTORY REPORT PARAMETERS
Navigation: Inventory, Manage Inventory, Reports, Slow Moving Inventory
Number of Transactions − Sorts by the number of demand transactions. Items with the fewest demand transactions are at the top of the list.
Number of Units Transacted − Sorts by the number of units transacted. Items with the fewest units.
State of North Dakota
INV_107 INVENTORY
Date: 8/20/2004 MAXIMUS, Inc. © 2004. All Rights Reserved. Page 120 of 133
RETURN FOR CREDIT This section provides an overview of the Return Material Authorization (RMA) process and discusses how to:
• Enter Return Material Authorization information.
• Process RMA Transactions
• View RMA Transactions
ENTERING RMA DATA A unique RMA ID is issued each time an RMA transaction is created. When you add a new RMA, you can either enter a Return Material Authorization ID or accept the default assignment of NEXT. If you accept NEXT, PeopleSoft Inventory automatically generates a new RMA ID.
This section discusses how to:
• Add a new RMA.
• Select orders to be returned.
COMMON ELEMENTS USED IN THIS SECTION RMA Status − The RMA Status determined determines how the RMA will be treated for further
processing.
• Selections on the RMA Form tab (header section) apply to the entire RMA.
• Selections on the RMA Lines apply to particular RMA Lines
Return From Option – Identifies the type of location and order that is being processed on the RMA.
1. Internal Location: Includes Internal Issues and InterUnit Expensed Transfers.
2. External Customer: Identifies Customers that are not identified with either an Inventory Business Unit and/or a General Ledger Business Unit.
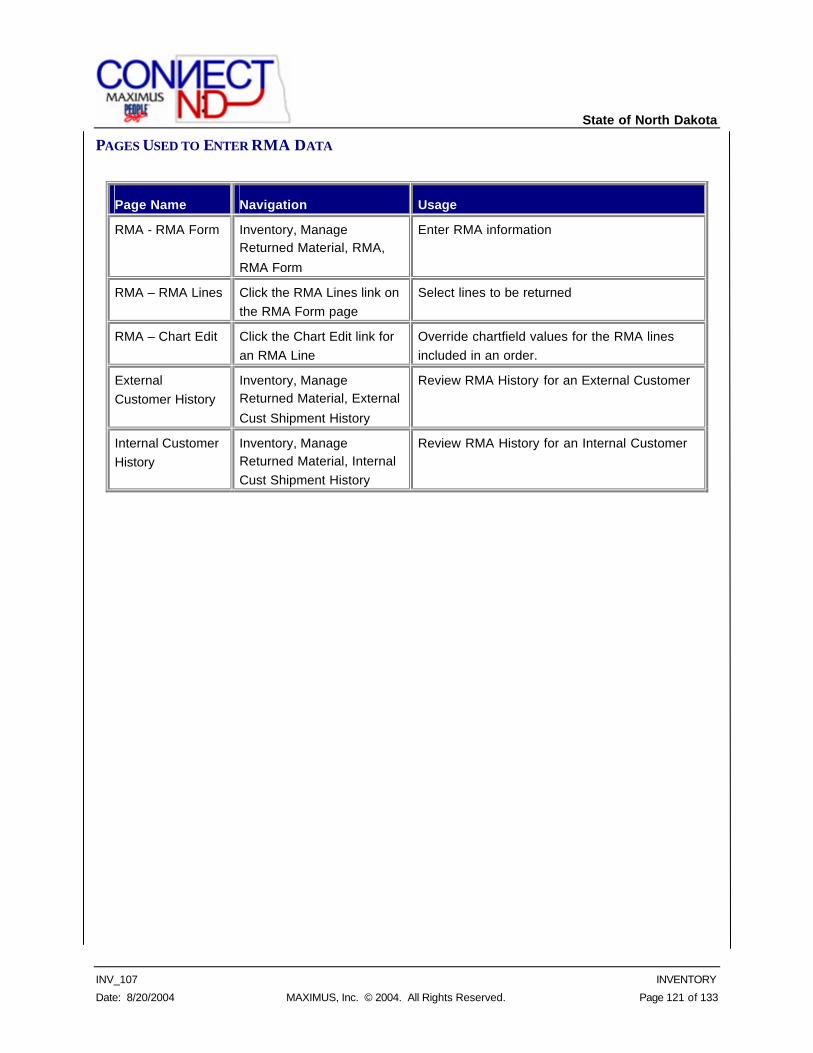
State of North Dakota
INV_107 INVENTORY
Date: 8/20/2004 MAXIMUS, Inc. © 2004. All Rights Reserved. Page 121 of 133
PAGES USED TO ENTER RMA DATA
Page Name Navigation Usage
RMA - RMA Form Inventory, Manage Returned Material, RMA,
RMA Form
Enter RMA information
RMA – RMA Lines Click the RMA Lines link on the RMA Form page
Select lines to be returned
RMA – Chart Edit Click the Chart Edit link for an RMA Line
Override chartfield values for the RMA lines included in an order.
External Customer History
Inventory, Manage Returned Material, External
Cust Shipment History
Review RMA History for an External Customer
Internal Customer History
Inventory, Manage Returned Material, Internal Cust Shipment History
Review RMA History for an Internal Customer
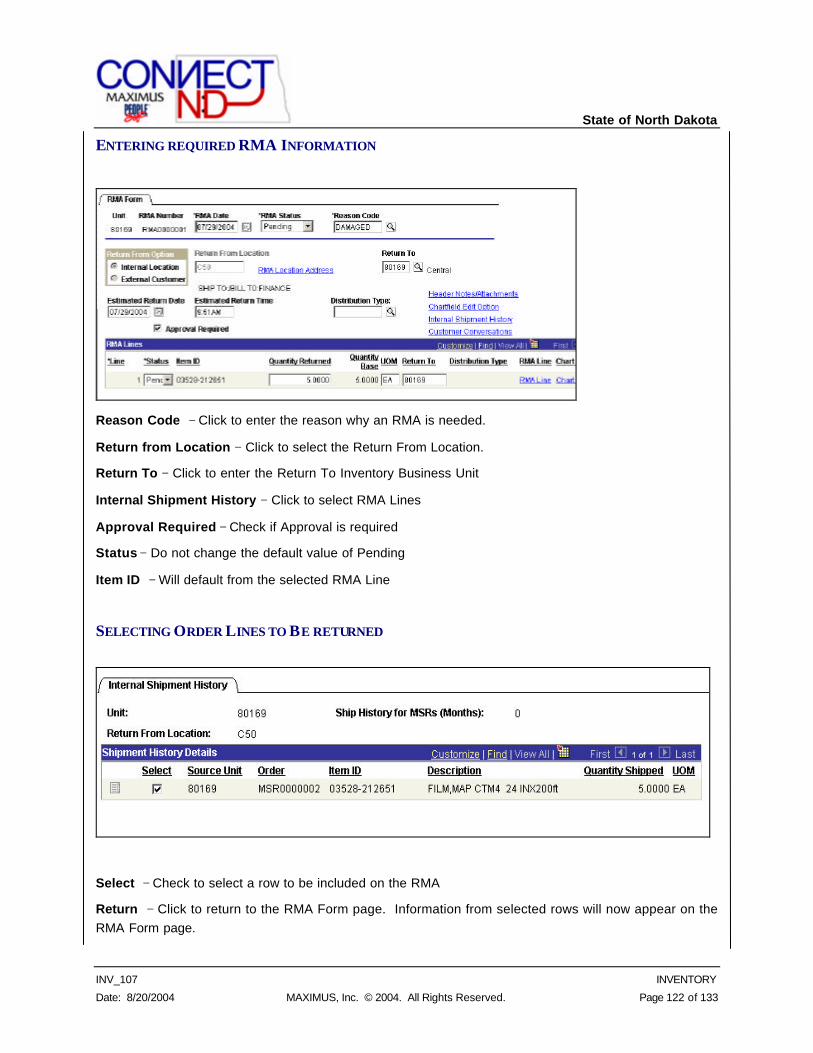
State of North Dakota
INV_107 INVENTORY
Date: 8/20/2004 MAXIMUS, Inc. © 2004. All Rights Reserved. Page 122 of 133
ENTERING REQUIRED RMA INFORMATION
Reason Code − Click to enter the reason why an RMA is needed.
Return from Location − Click to select the Return From Location.
Return To − Click to enter the Return To Inventory Business Unit
Internal Shipment History − Click to select RMA Lines
Approval Required − Check if Approval is required
Status − Do not change the default value of Pending
Item ID − Will default from the selected RMA Line
SELECTING ORDER LINES TO BE RETURNED
Select − Check to select a row to be included on the RMA
Return − Click to return to the RMA Form page. Information from selected rows will now appear on the RMA Form page.
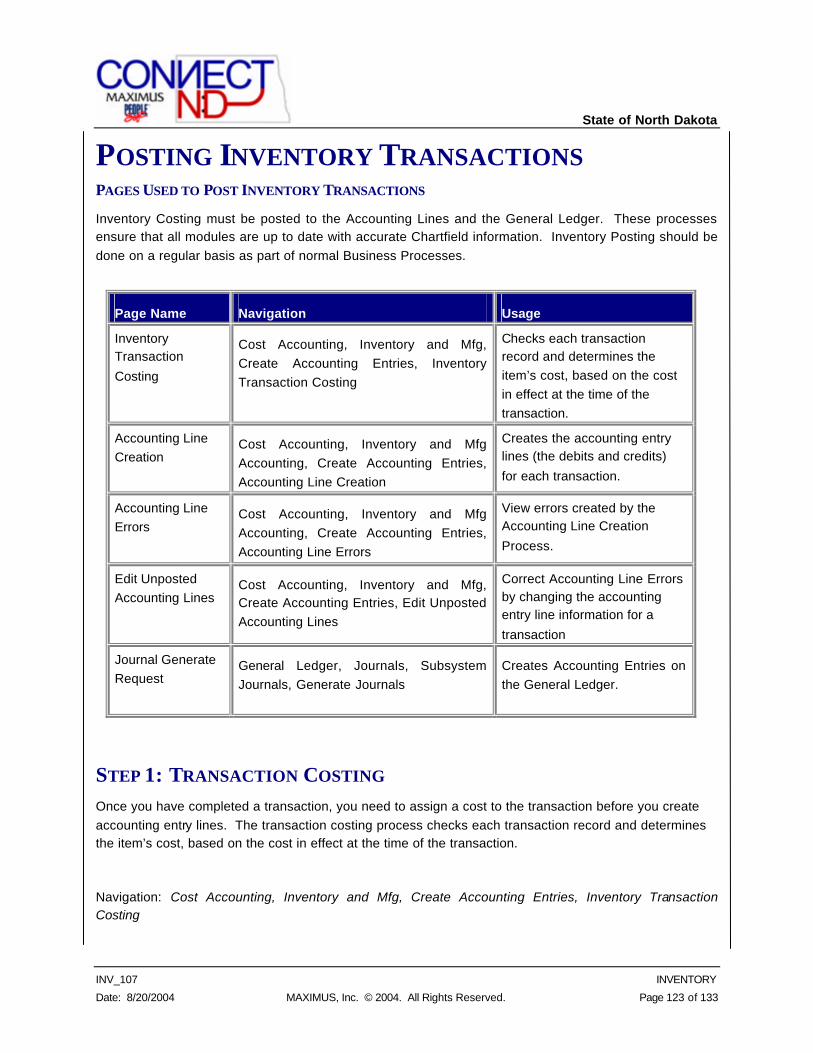
State of North Dakota
INV_107 INVENTORY
Date: 8/20/2004 MAXIMUS, Inc. © 2004. All Rights Reserved. Page 123 of 133
POSTING INVENTORY TRANSACTIONS PAGES USED TO POST INVENTORY TRANSACTIONS
Inventory Costing must be posted to the Accounting Lines and the General Ledger. These processes ensure that all modules are up to date with accurate Chartfield information. Inventory Posting should be done on a regular basis as part of normal Business Processes.
Page Name Navigation Usage
Inventory Transaction
Costing
Cost Accounting, Inventory and Mfg, Create Accounting Entries, Inventory Transaction Costing
Checks each transaction record and determines the item’s cost, based on the cost in effect at the time of the transaction.
Accounting Line Creation
Cost Accounting, Inventory and Mfg Accounting, Create Accounting Entries, Accounting Line Creation
Creates the accounting entry lines (the debits and credits)
for each transaction.
Accounting Line Errors
Cost Accounting, Inventory and Mfg Accounting, Create Accounting Entries, Accounting Line Errors
View errors created by the Accounting Line Creation
Process.
Edit Unposted Accounting Lines
Cost Accounting, Inventory and Mfg, Create Accounting Entries, Edit Unposted Accounting Lines
Correct Accounting Line Errors by changing the accounting entry line information for a
transaction
Journal Generate Request
General Ledger, Journals, Subsystem Journals, Generate Journals
Creates Accounting Entries on the General Ledger.
STEP 1: TRANSACTION COSTING Once you have completed a transaction, you need to assign a cost to the transaction before you create accounting entry lines. The transaction costing process checks each transaction record and determines the item’s cost, based on the cost in effect at the time of the transaction.
Navigation: Cost Accounting, Inventory and Mfg, Create Accounting Entries, Inventory Transaction Costing
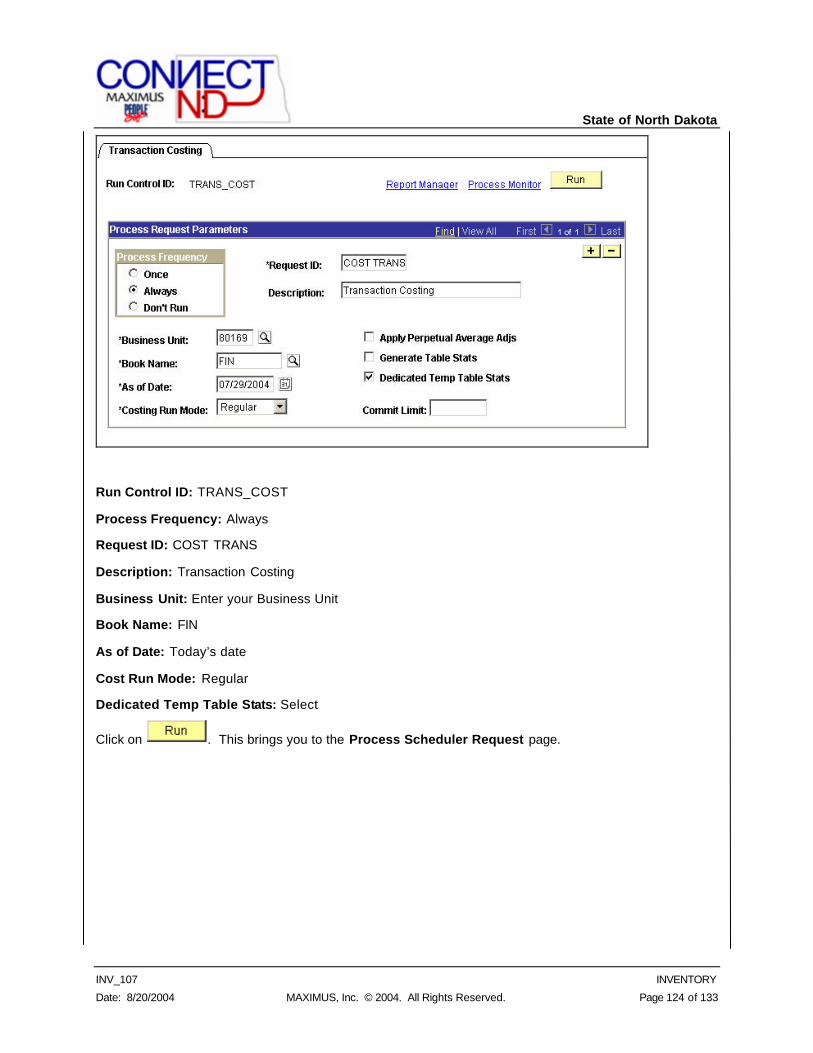
State of North Dakota
INV_107 INVENTORY
Date: 8/20/2004 MAXIMUS, Inc. © 2004. All Rights Reserved. Page 124 of 133
Run Control ID: TRANS_COST
Process Frequency: Always
Request ID: COST TRANS
Description: Transaction Costing
Business Unit: Enter your Business Unit
Book Name: FIN
As of Date: Today’s date
Cost Run Mode: Regular
Dedicated Temp Table Stats: Select
Click on . This brings you to the Process Scheduler Request page.
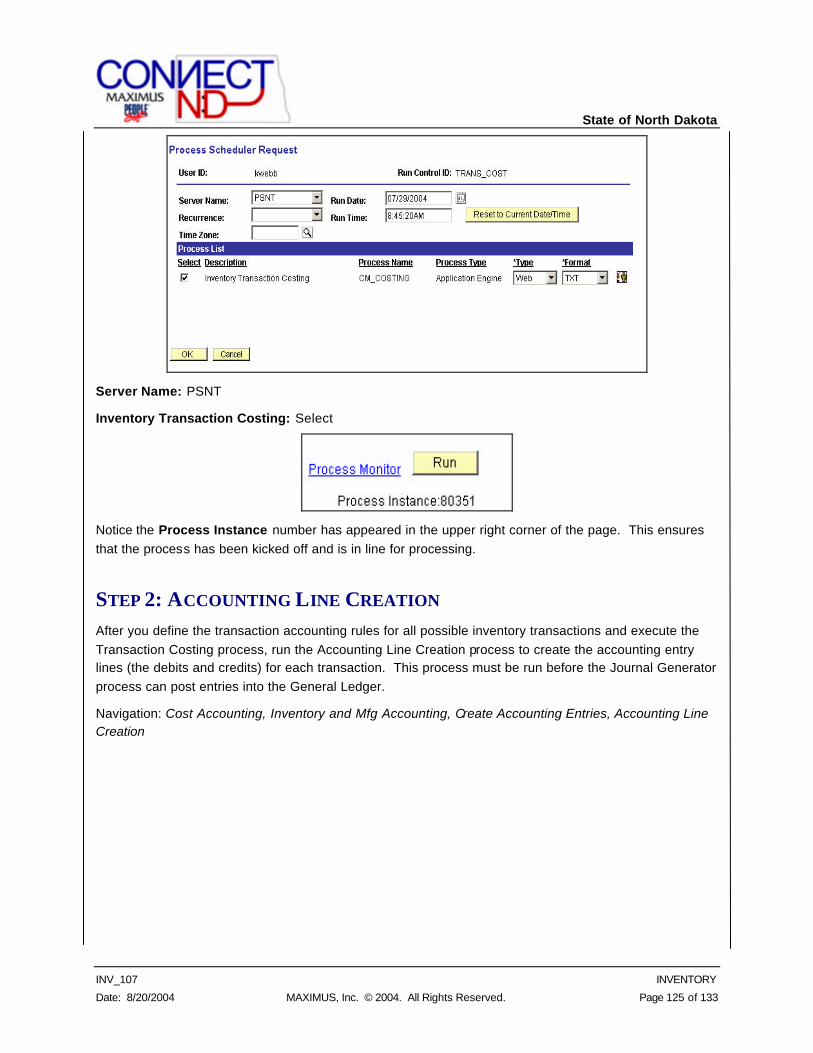
State of North Dakota
INV_107 INVENTORY
Date: 8/20/2004 MAXIMUS, Inc. © 2004. All Rights Reserved. Page 125 of 133
Server Name: PSNT
Inventory Transaction Costing: Select
Notice the Process Instance number has appeared in the upper right corner of the page. This ensures that the process has been kicked off and is in line for processing.
STEP 2: ACCOUNTING LINE CREATION After you define the transaction accounting rules for all possible inventory transactions and execute the Transaction Costing process, run the Accounting Line Creation process to create the accounting entry lines (the debits and credits) for each transaction. This process must be run before the Journal Generator process can post entries into the General Ledger.
Navigation: Cost Accounting, Inventory and Mfg Accounting, Create Accounting Entries, Accounting Line Creation
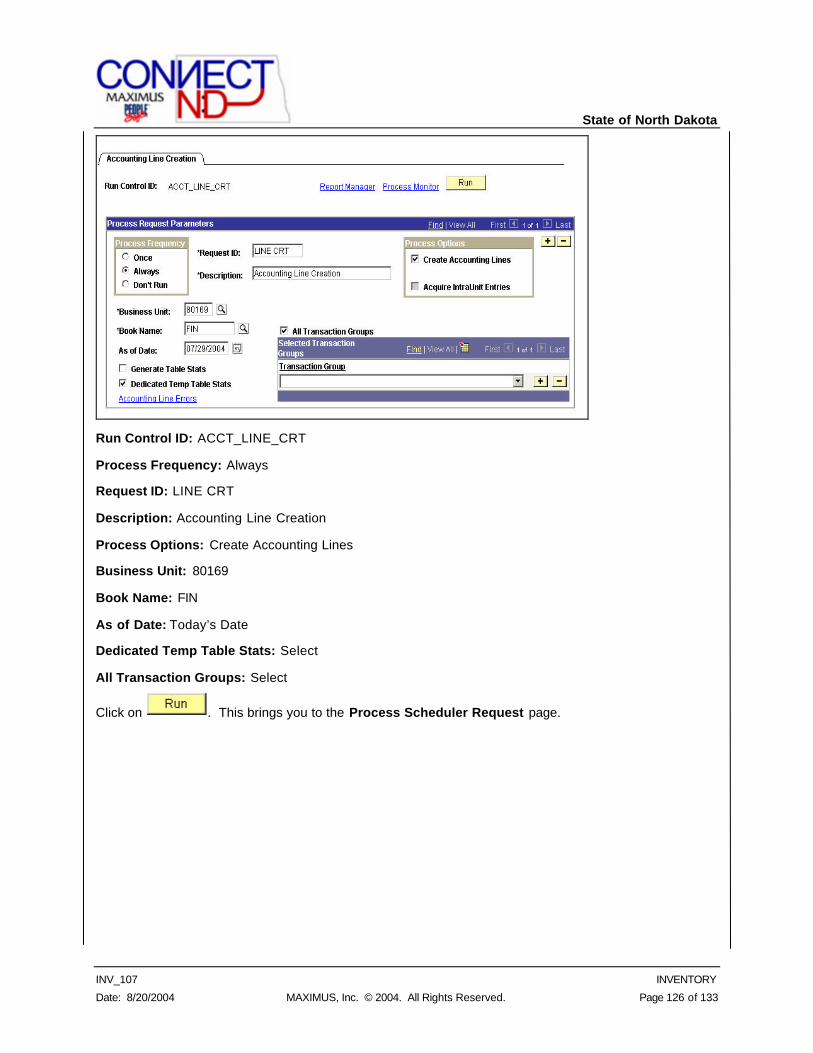
State of North Dakota
INV_107 INVENTORY
Date: 8/20/2004 MAXIMUS, Inc. © 2004. All Rights Reserved. Page 126 of 133
Run Control ID: ACCT_LINE_CRT
Process Frequency: Always
Request ID: LINE CRT
Description: Accounting Line Creation
Process Options: Create Accounting Lines
Business Unit: 80169
Book Name: FIN
As of Date: Today’s Date
Dedicated Temp Table Stats: Select
All Transaction Groups: Select
Click on . This brings you to the Process Scheduler Request page.

State of North Dakota
INV_107 INVENTORY
Date: 8/20/2004 MAXIMUS, Inc. © 2004. All Rights Reserved. Page 127 of 133
Server Name: PSNT
Accounting Line Creation: Select
Click . This brings you back to the Accounting Line Creation page.
Notice the Process Instance number has appeared in the upper right corner of the page. This ensures that the process has been kicked off and is in line for processing.
STEP 3: VIEW ACCOUNTING ERRORS Use the Correcting Accounting Errors page to view errors created by the Accounting Line Creation Process. This step should be done each time you run Accounting Line Creation Process to ensure that the entries have posted correctly.
Navigation: Cost Accounting, Inventory and Mfg Accounting, Create Accounting Entries, Accounting Line Errors
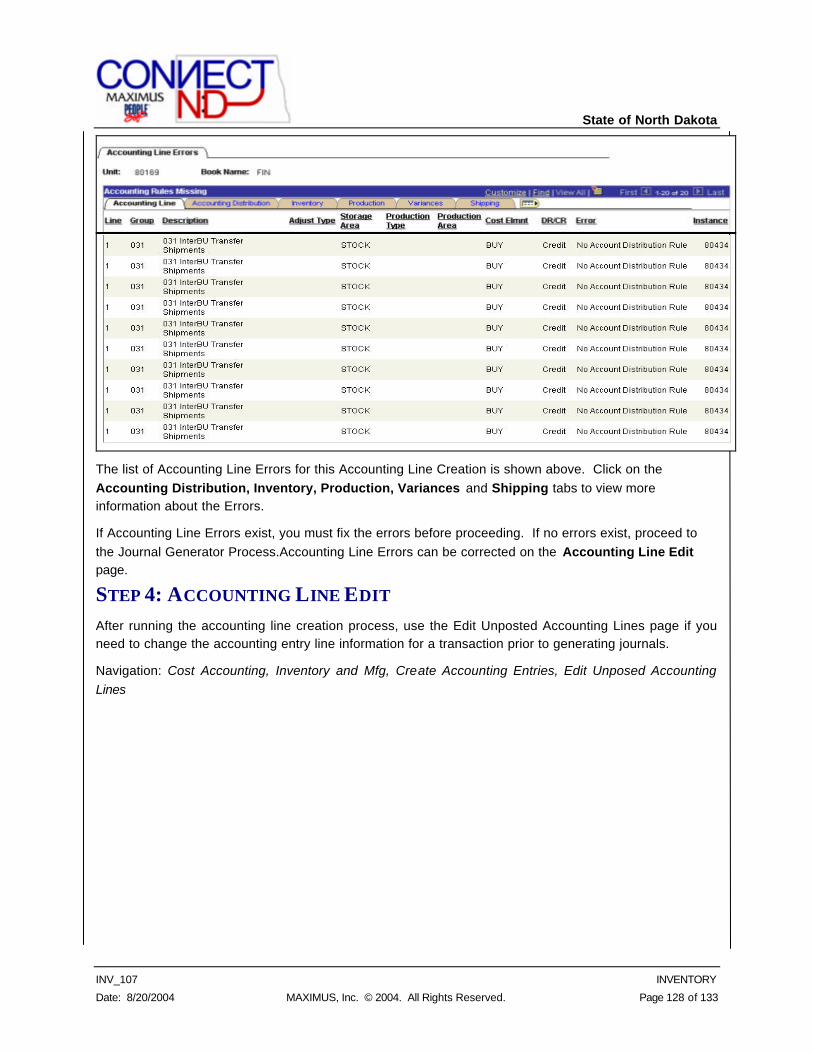
State of North Dakota
INV_107 INVENTORY
Date: 8/20/2004 MAXIMUS, Inc. © 2004. All Rights Reserved. Page 128 of 133
The list of Accounting Line Errors for this Accounting Line Creation is shown above. Click on the Accounting Distribution, Inventory, Production, Variances and Shipping tabs to view more information about the Errors.
If Accounting Line Errors exist, you must fix the errors before proceeding. If no errors exist, proceed to the Journal Generator Process.Accounting Line Errors can be corrected on the Accounting Line Edit page.
STEP 4: ACCOUNTING LINE EDIT After running the accounting line creation process, use the Edit Unposted Accounting Lines page if you need to change the accounting entry line information for a transaction prior to generating journals.
Navigation: Cost Accounting, Inventory and Mfg, Create Accounting Entries, Edit Unposed Accounting Lines
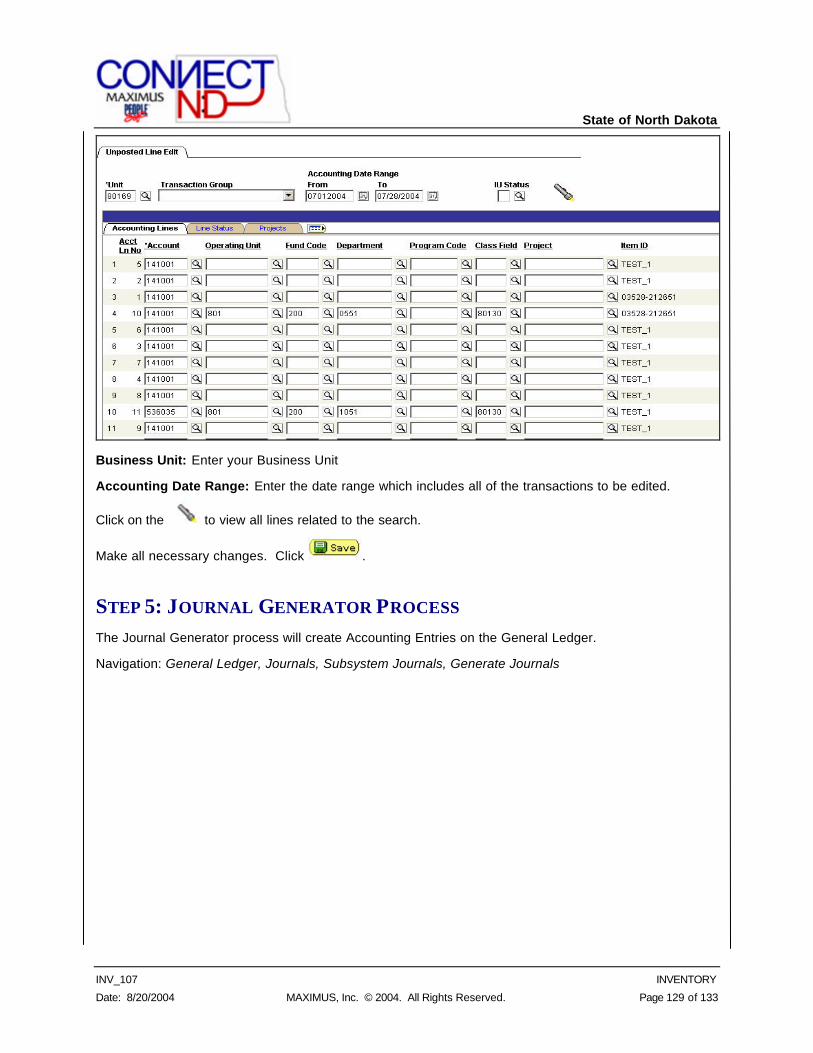
State of North Dakota
INV_107 INVENTORY
Date: 8/20/2004 MAXIMUS, Inc. © 2004. All Rights Reserved. Page 129 of 133
Business Unit: Enter your Business Unit
Accounting Date Range: Enter the date range which includes all of the transactions to be edited.
Click on the to view all lines related to the search.
Make all necessary changes. Click .
STEP 5: JOURNAL GENERATOR PROCESS The Journal Generator process will create Accounting Entries on the General Ledger.
Navigation: General Ledger, Journals, Subsystem Journals, Generate Journals
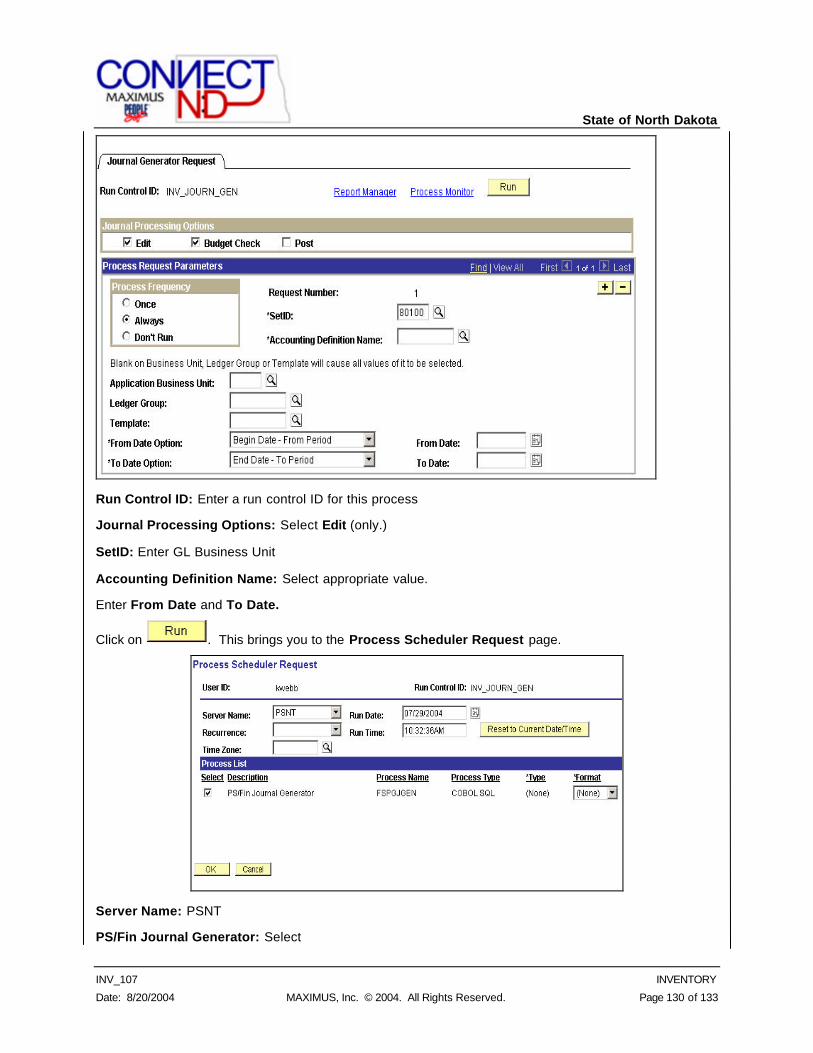
State of North Dakota
INV_107 INVENTORY
Date: 8/20/2004 MAXIMUS, Inc. © 2004. All Rights Reserved. Page 130 of 133
Run Control ID: Enter a run control ID for this process
Journal Processing Options: Select Edit (only.)
SetID: Enter GL Business Unit
Accounting Definition Name: Select appropriate value.
Enter From Date and To Date.
Click on . This brings you to the Process Scheduler Request page.
Server Name: PSNT
PS/Fin Journal Generator: Select
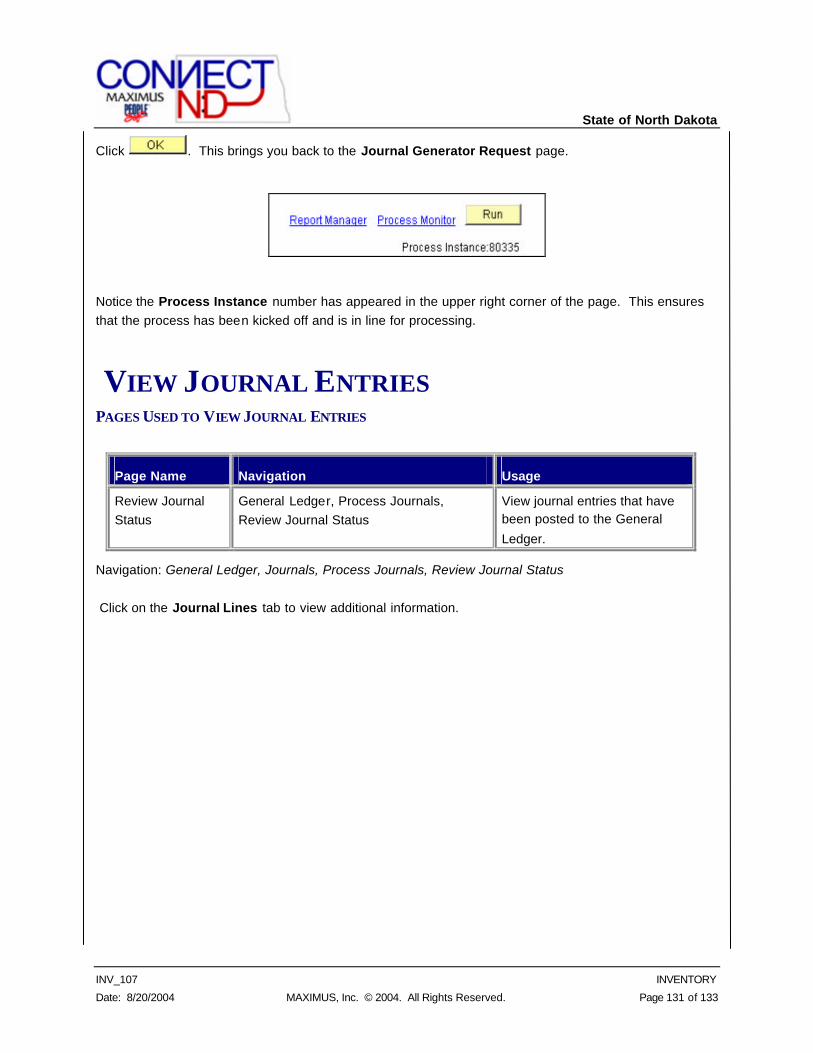
State of North Dakota
INV_107 INVENTORY
Date: 8/20/2004 MAXIMUS, Inc. © 2004. All Rights Reserved. Page 131 of 133
Click . This brings you back to the Journal Generator Request page.
Notice the Process Instance number has appeared in the upper right corner of the page. This ensures that the process has been kicked off and is in line for processing.
VIEW JOURNAL ENTRIES PAGES USED TO VIEW JOURNAL ENTRIES
Page Name Navigation Usage
Review Journal Status
General Ledger, Process Journals, Review Journal Status
View journal entries that have been posted to the General
Ledger.
Navigation: General Ledger, Journals, Process Journals, Review Journal Status
Click on the Journal Lines tab to view additional information.