Embed Size (px)
Citation preview
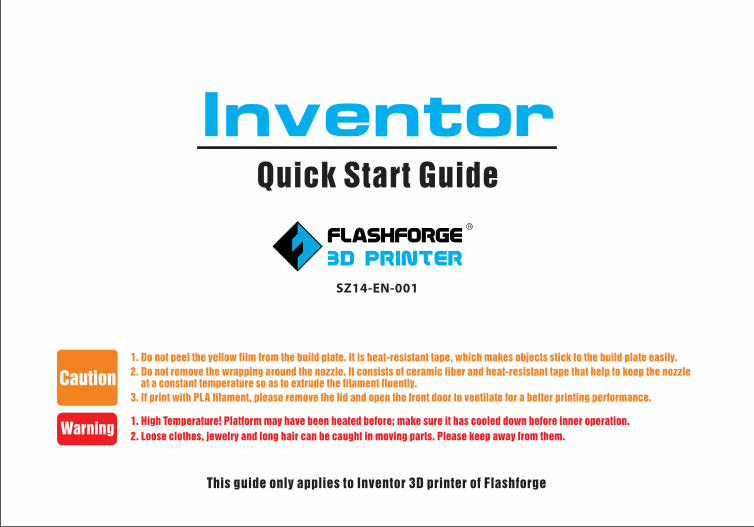
This guide only applies to Inventor 3D printer of Flashforge
Quick Start Guide
Caution
1. Do not peel the yellow film from the build plate. It is heat-resistant tape, which makes objects stick to the build plate easily.
2. Do not remove the wrapping around the nozzle. It consists of ceramic fiber and heat-resistant tape that help to keep the nozzle at a constant temperature so as to extrude the filament fluently.
3. If print with PLA filament, please remove the lid and open the front door to ventilate for a better printing performance.
Warning1. High Temperature! Platform may have been heated before; make sure it has cooled down before inner operation.
2. Loose clothes, jewelry and long hair can be caught in moving parts. Please keep away from them.
SZ14-EN-001
Inventor
Inventor 3D Printer Quick Start Guide
Power CableUSB Cable
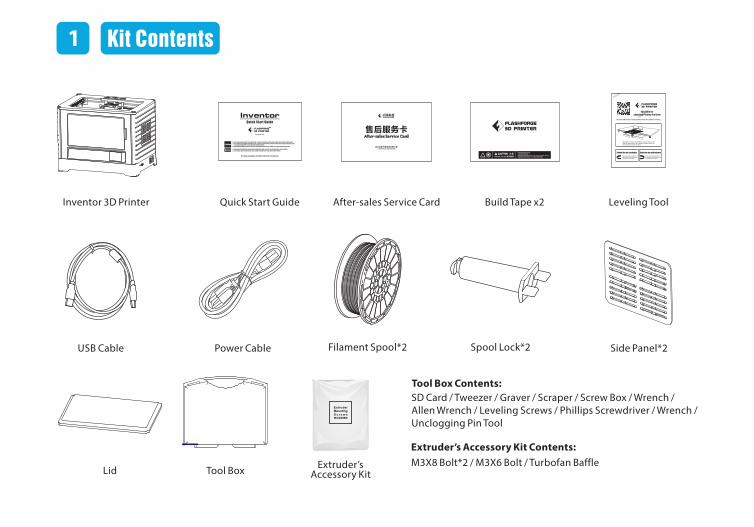
Kit Contents
Filament Spool*2 Spool Lock*2
Tool Box Contents:
Tool Box
Build Tape x2 Leveling Tool
Do Not Touch 请勿触摸
CAUTION 注意1.�Extruder hot during operation.使用过程中喷头会发热。
2.�Heating plate hot during operation. �Allow surface to cool before servicing. 使用过程中加热平台会发热,待平台表面冷却后再操作。
After-sales Service Card
Side Panel*2
Lid Extruder’s Accessory Kit
SD Card / Tweezer / Graver / Scraper / Screw Box / Wrench / Allen Wrench / Leveling Screws / Phillips Screwdriver / Wrench /Unclogging Pin Tool
Extruder’s Accessory Kit Contents:M3X8 Bolt*2 / M3X6 Bolt / Turbofan Baffle
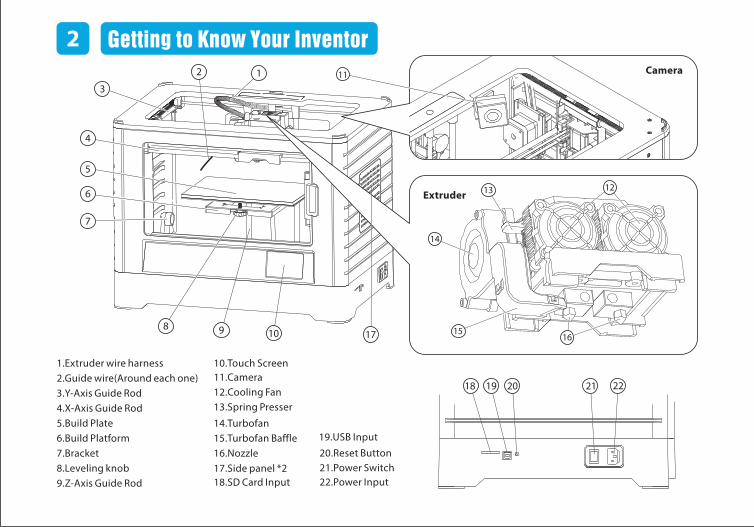
Getting to Know Your Inventor
1213
14
1516
13
4
5
6
7
9 10 17
2218 19 20 21
8
2 11
Extruder
Camera
1.Extruder wire harness2.Guide wire(Around each one)3.Y-Axis Guide Rod4.X-Axis Guide Rod5.Build Plate6.Build Platform7.Bracket8.Leveling knob9.Z-Axis Guide Rod
10.Touch Screen
12.Cooling Fan13.Spring Presser
14.Turbofan15.Turbofan Baffle16.Nozzle17.Side panel *218.SD Card Input
19.USB Input
20.Reset Button21.Power Switch22.Power Input
11.Camera
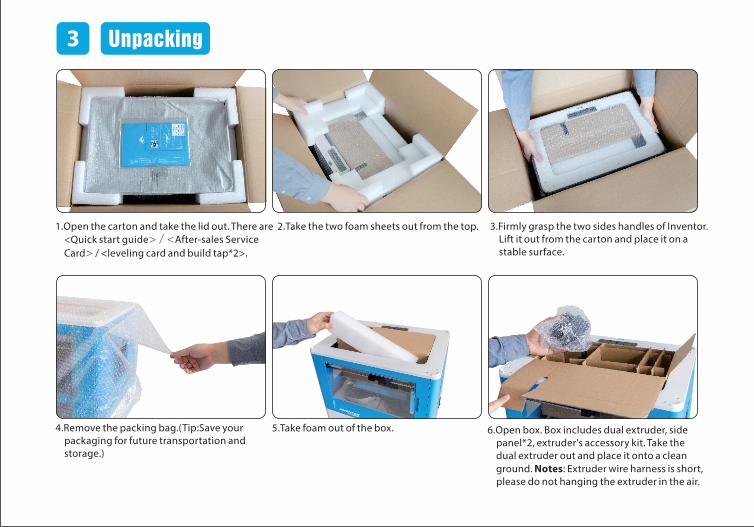
1.Open the carton and take the lid out. There are <Quick start guide> / <After-sales Service Card> / <leveling card and build tap*2>.
2.Take the two foam sheets out from the top. 3.Firmly grasp the two sides handles of Inventor. Lift it out from the carton and place it on a stable surface.
4.Remove the packing bag.(Tip:Save your packaging for future transportation and storage.)
5.Take foam out of the box.
Unpacking
6.Open box. Box includes dual extruder, side panel*2, extruder's accessory kit. Take the dual extruder out and place it onto a clean ground. Notes: Extruder wire harness is short, please do not hanging the extruder in the air.
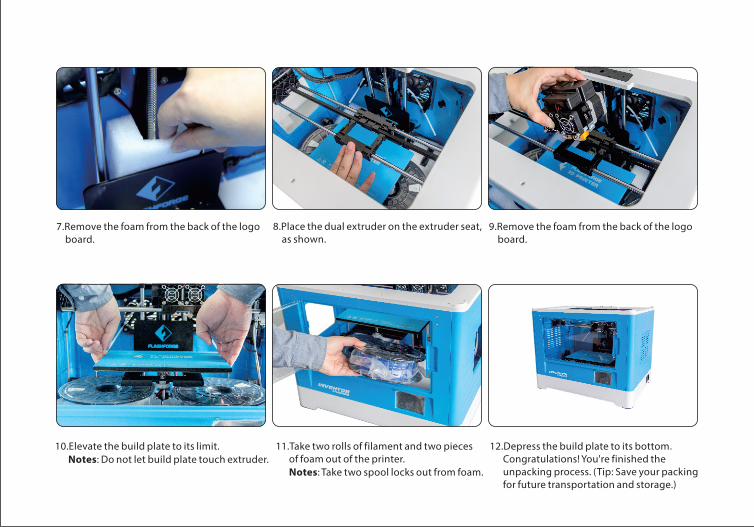
8.Place the dual extruder on the extruder seat, as shown.
10.Elevate the build plate to its limit. Notes: Do not let build plate touch extruder.
11.Take two rolls of filament and two pieces of foam out of the printer. Notes: Take two spool locks out from foam.
12.Depress the build plate to its bottom. Congratulations! You're finished the unpacking process. (Tip: Save your packing for future transportation and storage.)
9.Remove the foam from the back of the logo board.
7.Remove the foam from the back of the logo board.
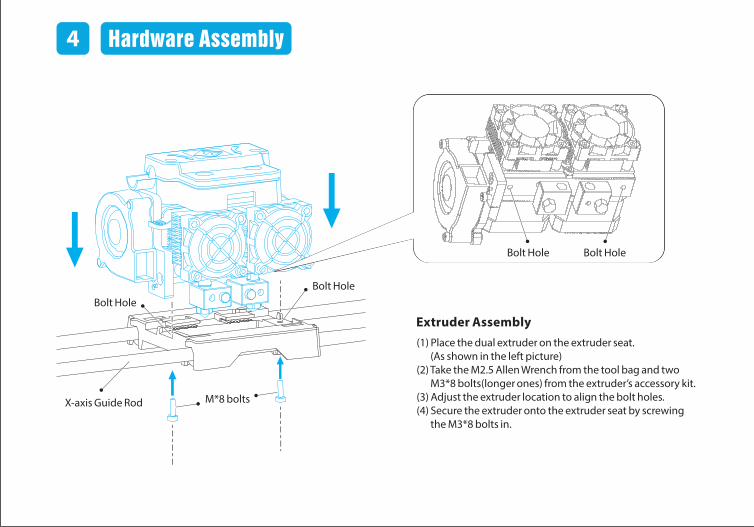
Hardware Assembly
Extruder Assembly(1) Place the dual extruder on the extruder seat. (As shown in the left picture)(2) Take the M2.5 Allen Wrench from the tool bag and two M3*8 bolts(longer ones) from the extruder’s accessory kit.(3) Adjust the extruder location to align the bolt holes.(4) Secure the extruder onto the extruder seat by screwing the M3*8 bolts in.
Bolt HoleBolt Hole
X-axis Guide Rod M*8 bolts
Bolt Hole Bolt Hole
(1)
(2)
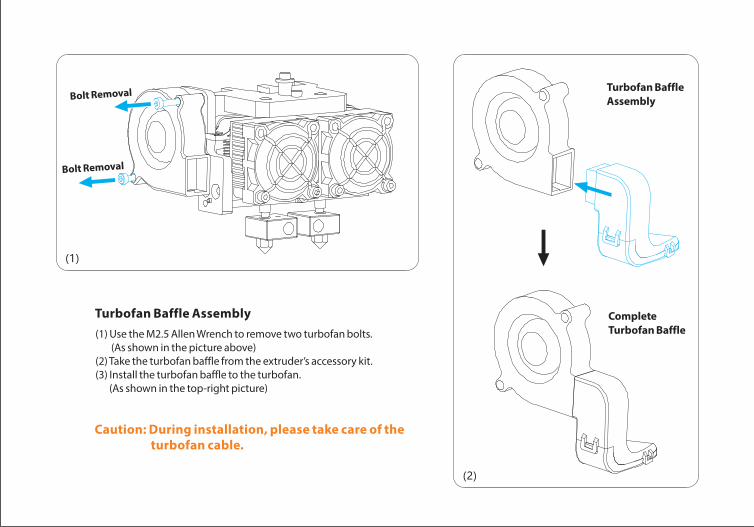
Turbofan Baffle Assembly(1) Use the M2.5 Allen Wrench to remove two turbofan bolts. (As shown in the picture above)(2) Take the turbofan baffle from the extruder’s accessory kit.(3) Install the turbofan baffle to the turbofan. (As shown in the top-right picture)
Caution: During installation, please take care of the turbofan cable.
Bolt Removal
Bolt Removal Turbofan Baffle Assembly
CompleteTurbofan Baffle
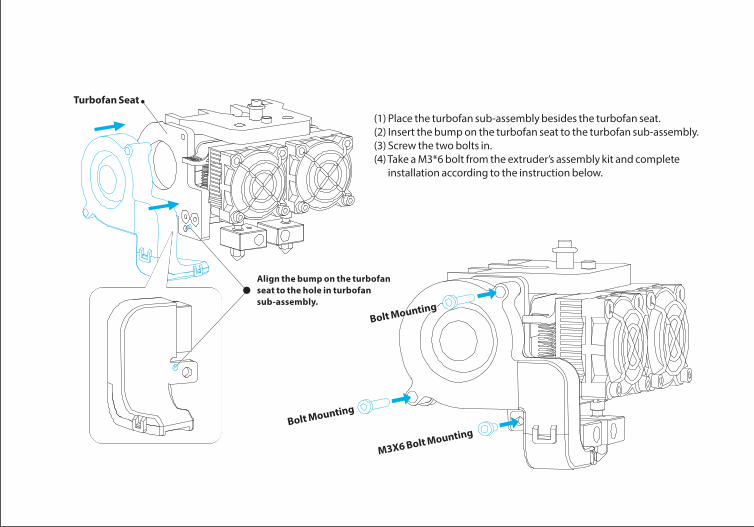
(1) Place the turbofan sub-assembly besides the turbofan seat.(2) Insert the bump on the turbofan seat to the turbofan sub-assembly.(3) Screw the two bolts in.(4) Take a M3*6 bolt from the extruder’s assembly kit and complete installation according to the instruction below.�
Turbofan Seat
Bolt MountingBolt MountingBolt Mounting
M3X6 Bolt MountingBolt Mounting
Align the bump on the turbofan seat to the hole in turbofan sub-assembly.
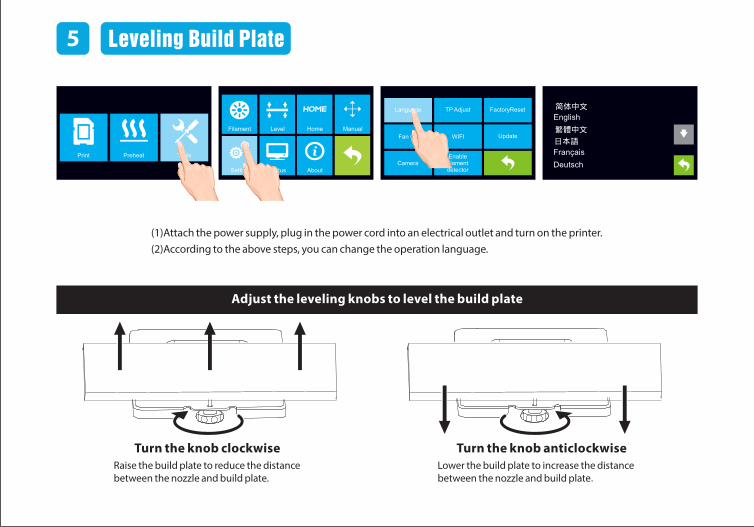
Raise the build plate to reduce the distance between the nozzle and build plate.
Lower the build plate to increase the distance between the nozzle and build plate.
Turn the knob clockwise Turn the knob anticlockwise
Adjust the leveling knobs to level the build plate
Leveling Build Plate
Print Preheat Tools
HOME
Filament Level Home Manual
Setting Status About
Language TP Adjust FactoryReset
WIFIFan On Update
CameraEnablefilamentdetector
简体中文
English
繁體中文
日本語
Français
Deutsch
(1)Attach the power supply, plug in the power cord into an electrical outlet and turn on the printer.(2)According to the above steps, you can change the operation language.
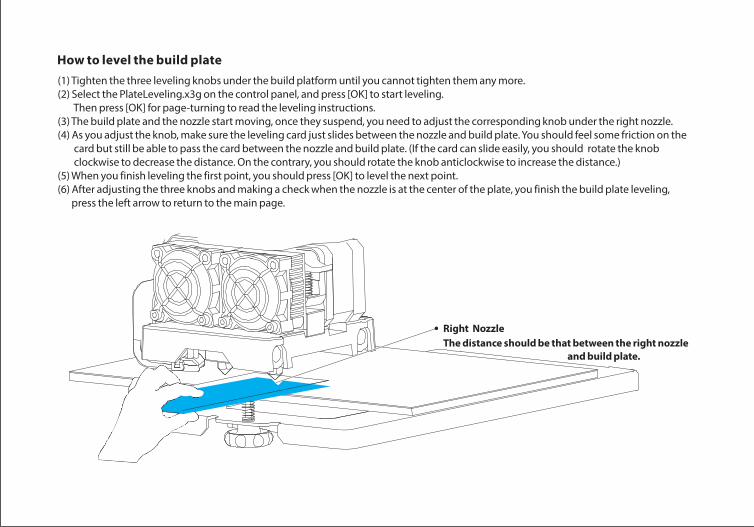
How to level the build plate(1) Tighten the three leveling knobs under the build platform until you cannot tighten them any more.(2) Select the PlateLeveling.x3g on the control panel, and press [OK] to start leveling. Then press [OK] for page-turning to read the leveling instructions.(3) The build plate and the nozzle start moving, once they suspend, you need to adjust the corresponding knob under the right nozzle.(4) As you adjust the knob, make sure the leveling card just slides between the nozzle and build plate. You should feel some friction on the card but still be able to pass the card between the nozzle and build plate. (If the card can slide easily, you should rotate the knob clockwise to decrease the distance. On the contrary, you should rotate the knob anticlockwise to increase the distance.)(5) When you finish leveling the first point, you should press [OK] to level the next point.(6) After adjusting the three knobs and making a check when the nozzle is at the center of the plate, you finish the build plate leveling, press the left arrow to return to the main page.
Right NozzleThe distance should be that between the right nozzle and build plate.
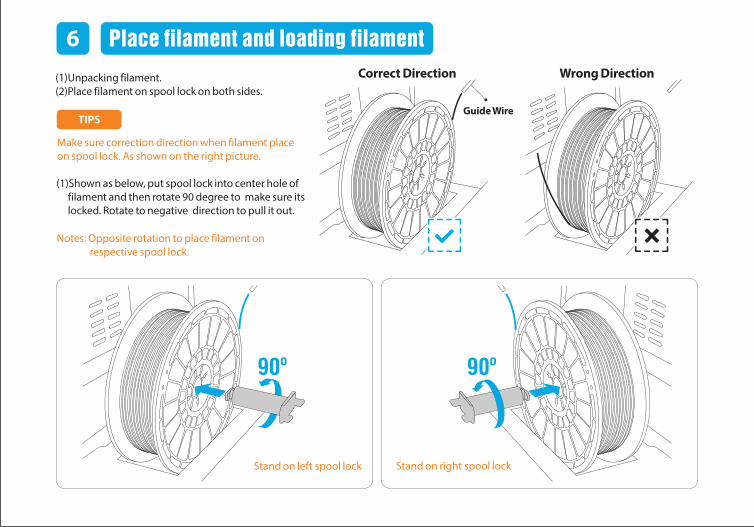
(1)Unpacking filament.(2)Place filament on spool lock on both sides.
TIPS
Stand on right�spool lock
Place filament and loading filament
Correct Direction
Guide Wire
Wrong Direction
Make sure correction direction when filament placeon spool lock. As shown on the right picture.
(1)Shown as below, put spool lock into center hole of filament and then rotate 90 degree to make sure its locked. Rotate to negative direction to pull it out.
Notes: Opposite rotation to place filament on respective spool lock.
Stand on left�spool lock
Loading Filament
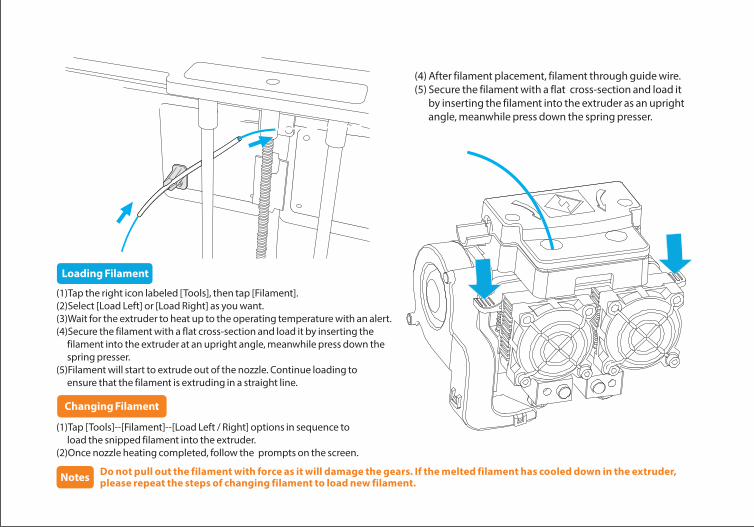
(1)Tap the right icon labeled [Tools], then tap [Filament].(2)Select [Load Left] or [Load Right] as you want.(3)Wait for the extruder to heat up to the operating temperature with an alert.(4)Secure the filament with a flat cross-section and load it by inserting the filament into the extruder at an upright angle, meanwhile press down the spring presser.(5)Filament will start to extrude out of the nozzle. Continue loading to ensure that the filament is extruding in a straight line.
Changing Filament
(1)Tap [Tools]--[Filament]--[Load Left / Right] options in sequence to load the snipped filament into the extruder.(2)Once nozzle heating completed, follow the prompts on the screen.
Notes Do not pull out the filament with force as it will damage the gears. If the melted filament has cooled down in the extruder, please repeat the steps of changing filament to load new filament.
(4) After filament placement, filament through guide wire.(5) Secure the filament with a flat cross-section and load it by inserting the filament into the extruder as an upright angle, meanwhile press down the spring presser.
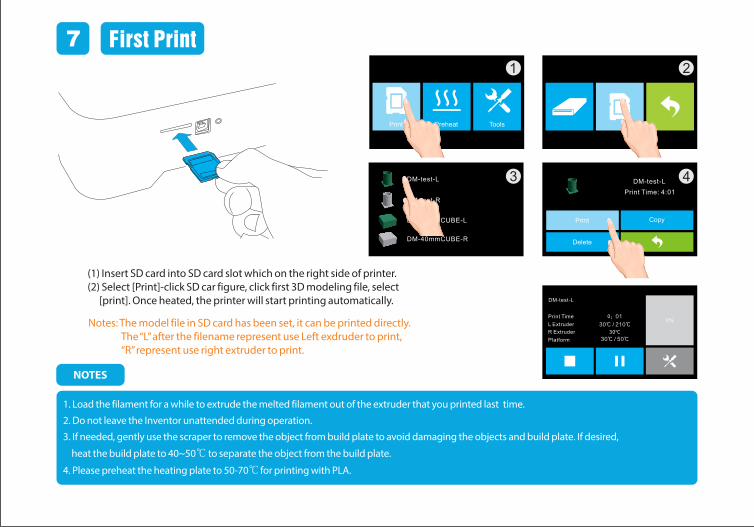
7
DM-test-L
DM-test-R
DM-40mmCUBE-L
DM-40mmCUBE-R
DM-test-L
Print Time: 4:01
Print Time
L Extruder
0:01
30℃
0%
R Extruder
Platform 30℃ / 50℃
30℃ / 210℃
DM-test-L
1 2
3 4
First Print
(1) Insert SD card into SD card slot which on the right side of printer.(2) Select [Print]-click SD car figure, click first 3D modeling file, select [print]. Once heated, the printer will start printing automatically.
NOTES
1. Load the filament for a while to extrude the melted filament out of the extruder that you printed last time.
2. Do not leave the Inventor unattended during operation.
3. If needed, gently use the scraper to remove the object from build plate to avoid damaging the objects and build plate. If desired,
heat the build plate to 40~50℃�to separate the object from the build plate.
4. Please preheat the heating plate to 50-70℃ for printing with PLA.
Print ToolsPreheat
Print Copy
Delete
Notes: The model file in SD card has been set, it can be printed directly. The “L” after the filename represent use Left exdruder to print, “R” represent use right extruder to print.