Embed Size (px)
Citation preview

1
LINK® System Customer InterfaceIntroduction to LINK®
Directory
LINK® What is It?
Features of LINK® Interface

2
LINK® System Customer Interface
Introduction to LINK®

LINK® System Customer InterfaceLINK® - What is it?
• The LINK® Customer Interface System is a proprietary application owned and developed by
Enbridge. It is the primary method by which most customers visualize and experience the company
and its business.
• LINK® provides customer access to Contracts, Nominations, Scheduling, Allocation, Imbalance and
Billing services for all of Enbridge pipelines, storage and gathering facilities. Data feeds various
other applications including Real-time and Financial systems. LINK® also has an internal Business
Intelligence portal based on the concepts of Big Data.
• LINK® meets FERC and NAESB requirements, programmatically enforces most tariff provisions
and provides for over 200 SOX controls including those related to Security and Change Control
processes. The system and these processes are audited by Internal, SOX, External and Joint
Venture audit groups.
• LINK® is a web based application with over 4 million lines of code that is written in HTML5
programming language and incorporates more than 30,000 subroutines.
• There are approximately 300 internal and 3,300 external registered users of LINK® (not including
those who manually retrieve public information from our website without being registered users).
3

LINK® System Customer InterfaceLINK® CIS – What is it?
• LINK® is offered as a web based and mobile application. LINK® was the first EBB in the
industry to offer a mobile version.
• LINK® is continually being updated with changes related to customer enhancements,
business execution, regulatory and legal requirements, manual process automation, and
break-fixes.
• To access the LINK® type the address https://link.spectraenergy.com into your internet
browser.
• To access LINK® Mobile, type the address https://linkm.spectraenergy.com into your smart
phone browser.
4

LINK® System Customer InterfaceSET US Pipelines and Storage Facilities
• FERC Regulated Pipelines
– Texas Eastern Transmission, LP
– Algonquin Gas Transmission, LLC
– Maritimes &Northeast, LLC - US
– East Tennessee Natural Gas, LLC
– Southeast Supply Header, LLC
– Ozark Gas Transmission, LLC
– Big Sandy Pipeline, LLC
– Gulfstream Natural Gas System, LLC -
– Garden Banks Gas Pipeline
– Mississippi Canyon Gas Pipeline
• Intrastate Pipelines
– Brazoria Interconnector Gas Pipeline, LLC
• NEB Pipelines
– Maritimes & Northeast, LP - Canada
• Storage
– MHP Egan Hub Storage, LLC
– MHP Moss Bluff
– Saltville Gas Storage Company, LLC
– Steckman Ridge, LP
– Bobcat Gas Storage
• Gathering
– Ozark Gas Gathering, LLC
Entity currently operating in 1LIine®
We use one system for many business units to provide a singular
customer experience, provide functionality across facilities,
reduce training needs and make the most efficient use of
business and technical support personnel.
5
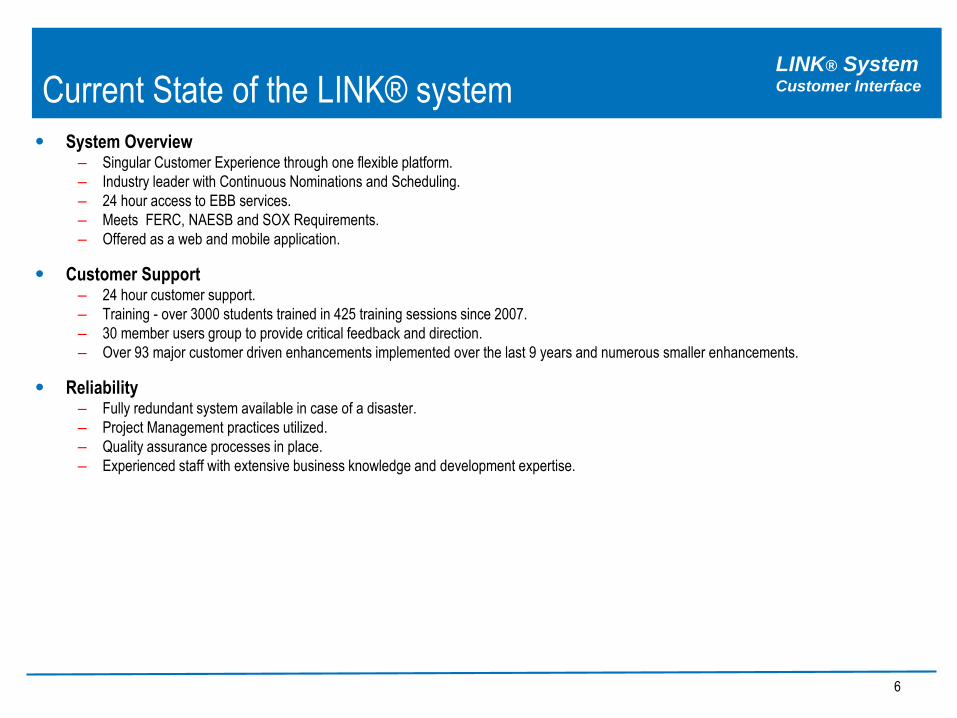
LINK® System Customer InterfaceCurrent State of the LINK® system
• System Overview– Singular Customer Experience through one flexible platform.
– Industry leader with Continuous Nominations and Scheduling.
– 24 hour access to EBB services.
– Meets FERC, NAESB and SOX Requirements.
– Offered as a web and mobile application.
• Customer Support– 24 hour customer support.
– Training - over 3000 students trained in 425 training sessions since 2007.
– 30 member users group to provide critical feedback and direction.
– Over 93 major customer driven enhancements implemented over the last 9 years and numerous smaller enhancements.
• Reliability– Fully redundant system available in case of a disaster.
– Project Management practices utilized.
– Quality assurance processes in place.
– Experienced staff with extensive business knowledge and development expertise.
6

LINK® System Customer InterfaceLINK® Process Diagram
LINK® is one application composed of many separate business processes designed in a Service-oriented Architecture that work in
a converged manner to create a unified customer experience across our facilities. This architecture provides a competitive
advantage by providing services only found in LINK®. For example, LINK®’s AABRC module provides for continuous nominations
and scheduling.
Capacity
Release
Contracts Imbalances
Imbalance
Trading
BillingNominations
AABRC Light*SecurityEntitlements Confirmations Scheduling Allocations
PDA
Setup
Measurement
1 2 3
4
5 6
8 9
9
9
9
9
10
7
* AABRC refers to the Aggregated and Algorithmic application of Business/Regulatory/Customer rulesets within and across facilities.
AABRC*
EDI, Web Crawlers
Business Partners, Shippers,
Operators, Data Miners, FERC
7

LINK® System Customer InterfaceLINK® - What can it do?
• LINK® System home page (Top Side)
LINK® Training – Access the main site for
LINK® training, which provides LINK users
to view future training events, as well as
the ability to register to attend those
events.
LINK® Helpdesk– List
LINK number and email
address.
8
LINK® Tutorials – Interactive on-line
tutorials that explain general features
and specific topics such as
Nominations, Confirmations and
Capacity Release .Contact Us – List of helpful
numbers while conducting
business on SET pipes and
storage facilities.
LINK® Learning – Customers allowed to login with their
production user id and password where access rights will
mirror that of production. The region can be used to safely
perform self training, what-if analysis, and business testing
using a majority of LINK® functionality. This functionality
includes security, nominations (including scheduling
priority generation), confirmations, flowing gas, and
capacity release.

LINK® System Customer InterfaceLINK® - What can it do?
LINK ® System Security –
Reset or Change Password - Password can be reset or changed.
Existing User - Option to log into the LINK® System.
New User (No LINK Id) - Person has no link id and wants to become
a Local Administration for the entity.
LINK ® Tutorials – Another way to access Interactive on-line tutorials
that explain general features and specific topics such as Nominations,
Confirmations and Capacity Release .
LINK Help Desk Information – List of the phone numbers for LINK
System support as well as the email address if need to send an email
to LINK-Help Desk.
9
Today’s Notices – Critical and Non-Critical Notifications for current day.
• LINK® System home page (Application Support, LINK System Security, Critical and Non-Critical Notices)

LINK® System Customer InterfaceLINK® - What can it do?
• LINK® System home page (LINK System)
Welcome – Default to welcome any link user
to the Spectra Energy Transmission’s LINK®
System Customer Interface.
The Board – The Board is used to display important
information, events and opportunities
10
Weather – Options to view weather information,
forecast high and low temperatures, cooling and
heating degree days, and a link to the Weather
Channel.
Assets – Map that displays where assets are
located within the LINK® System

LINK® System Customer InterfaceLINK® - What can it do?
• LINK® System home page (Training, Public Information)
Spectra Energy’s Internet Site –
Website for Spectra Energy
Forms, Tools and FAQs –
Forms - Directions to
download Service Request
Forms for requesting
Transportation and Aggregation
Services.
FAQ – List of frequently asked
questions.
Tools – Tools that allow us test
and debug certain issues.
LINK® Mobile – Learn to
access LINK® screens via a
mobile device
Other Useful Sites –
Useful sites such as
Storage Facilities, Spectra
Energy News Releases,
FERC, NAESB, NYMEX,
NESA, and INGAA.
Email Notices – Sign up to receive
publicly available email notifications.
Sign up to Receive Tariff Filings –
Register to receive tariff filings from
our FERC Regulated pipeline and
storage facilities.
Spectra Energy Transmission’s
Projects – Link to detailed
information about SET “New
Projects”.
11
Credit Information – Credit
application for all business units,
templates, and contact
information.
Appalachian Shale Supply –
Information regarding Appalachian
shale supply interconnect program
LINK® Training – Another way to access the main site for LINK® training, which provides LINK
users to view future training events as well as the ability to register to attend those events.

LINK® System Customer Interface
• Facility Specific Page
What’s New– Useful
information about LINK®
updates.
Your Personal Profile –
Information of who you are logged in
as link id, name, company, phone,
fax, and email.
Critical Notices – Notices
specific to the pipeline,
storage or gathering facility
selected.
LINK® - What can it do?
12
Your Account Manager –
Display of who is the Account
Manager for the specific
Business Unit.
Projects, Interconnects and
Related LINKS –
Projects – Current projects for the
SET pipeline, storage or gathering
facility selected.
Interconnect Pipelines – Web links
to interconnecting pipeline websites
Related Links – Web links to other
SET websites and sites related to
the natural gas industry.LINK® Training – Another way to
access the main site for LINK® training,
which provides LINK users to view future
training events as well as the ability to
enroll to a class.
Menu Tree – Access
business functions in the
system.

LINK® System Customer InterfaceLINK® Favorites
• Manage Preferences and Add Screen to Favorites
Favorites – Add a screen to your favorites list
by selecting the star button at the top of the
screen. Selecting the dropdown arrow next to
the star will display all screens that have been
added to favorites.
Show Tooltips – Enable or disable hover help for
fields and columns.
Nom Processing – Allows a user to customize
nomination processing. The “Nom Default End
Date” allows the date range for nominations to be
set from the begin date. The “Weekend Nom
Default End Date” configures the begin and end
dates to correspond to weekend nomination range
when a Saturday is the begin gas date.
13
Show All Pipes – If selected, all pipes that the user
has access to will be displayed along the top of the
screen in addition to the dropdown.

LINK® System Customer InterfaceLINK® Favorites
• My Profile
14
Account Manager – List all operational account manager tied to the Link ID by each
business unit. Operational account managers can assist with any issues regarding
operational section of the Link System. Some operational issues may consists of
nominations, confirmations, flowing gas, etc.
Contact Information – Contact information consists
of name, phone, fax, and email addresses. E-mail
notification will be sent to these e-mail addresses.
Entities – List all entities tied to the Link
ID.
Entity Roles – List all security roles tied to the Link ID. If
Link ID has more than one entity, click on each entity to
view the security roles tied to the entity for the Link ID.

LINK® System Customer InterfaceLINK® Email Notices
• Available Email Notifications
Email Description – Description of event that will
trigger e-mail notification to be sent to one of the
selected e-mail addresses.
Functional Area – Ability to filter the Functional
Area column of the grid.
15
Informational Description of Notification Type(s)
that are highlighted green.
Subscribe Button – After selecting notification
type(s), clicking on this button will continue to the
next step of the email process.
The grid (contains Sel, Functional Area,
and Notification Type columns) – Able to
select one or more notification types.

LINK® System Customer InterfaceLINK® Email Notices
• Create Email Notification
16
Contact Method– Ability to select one or multiple
email addresses to be assigned to a notification. (This
is dependent on how you setup you “My Profile” page)
Business Units– Select particular
business unit(s) to receive email
notification.
Svc Req Names– Allows selection of
multiple entities if your entity is
involved in an Agency or Affiliation.
The grid– Lists all specific notification
types selected from the pervious screen
and the customized setup of each.

LINK® System Customer InterfaceLINK® Email Notices
• View Subscribed Notifications
17
Email Description – Description of
event that will trigger e-mail notification to
be sent to one of the selected e-mail
addresses.
Suspend/Activite/Unsubscribe Buttons –
Ability to suspend, activate, or unsubscribe
any selected notification type(s).
Filtering Capabilities – Filter by Notification
Type, Business Unit, Contact Method, Svc
Req Name, Functional Area, and Status.
The grid – Displays all notification type sign
ups whether the status is active or suspend.

LINK® System Customer InterfaceInformational Postings
18

LINK® System Customer InterfaceInformational Postings
• Contains regulatory, notification and informational pages.
– Capacity Postings (Operationally available and peak day design information)
– Gas Quality Information (Chromatograph Postings)
– Index of Customers (Index of Firm Shippers)
– Notices (Critical/Non-critical notices)
– Posted Imbalances
– Regulatory (Recent FERC Tariff Filings)
– Standards of Conduct (Affiliate Information, Job Descriptions, Information Disclosure)
– Tariff information (Excepts and complete tariff information)
– Transactional Reporting (Postings of Capacity Release and Service Request transactions)
– Entitlements Reporting (Segment capacity)
– Gas/Electric Coordination (notices)
– Gas Quality Collaboration (Information associated with Gas Quality Efforts)
– Historical Downloads (historical data for Capacity, Gas Quality, Notices, and Transactional Reporting)
– OBA Points (listing of OBA points)
– Rate and Fuel Summary
– Contact information (under other)
– Downloadable forms
– Search (Tariff search functionality)
19

LINK® System Customer InterfaceOperational Available Capacity
• Operationally available meter capacity is posted after each batch validation process.
• For pipelines without a batch validation process, the information is posted on NAESB cycles.
• Provides operational capacity volume and nominations at critical meters.
20

LINK® System Customer InterfaceOperational Available Capacity
21

LINK® System Customer InterfaceTariffs
• PDF versions of tariffs can be found under Informational
Postings/Tariff.
22

23
LINK® System Customer Interface
Features of LINK® Interface

LINK® System Customer InterfaceSigning into LINK® Interface
• To log into a business unit, select Customer Activities in the menu bar. At this time you will be prompted to
enter your user id and password before making your business unit selection.
• Once logged in, you will be directed to the LINK® homepage where you can make your business unit
selection by hovering over the SELECT BUSINESS UNIT dropdown. LINK® Interface will allow you to access
multiple business units without having to login separately each time.
24

LINK® System Customer InterfaceSigning into LINK® Interface
• We recommend a screen resolution of 1920X1080 for the best visual experience.
• Web browsers supported include Internet Explorer 11 or higher, Google Chrome and Mozilla
Firefox.
25

LINK® System Customer InterfaceSigning into LINK® Interface
The lock dropdown allows new and existing users access to LINK® security module. The
dropdown includes hyperlinks to reset/change your password as well as LINK® tutorials.
26
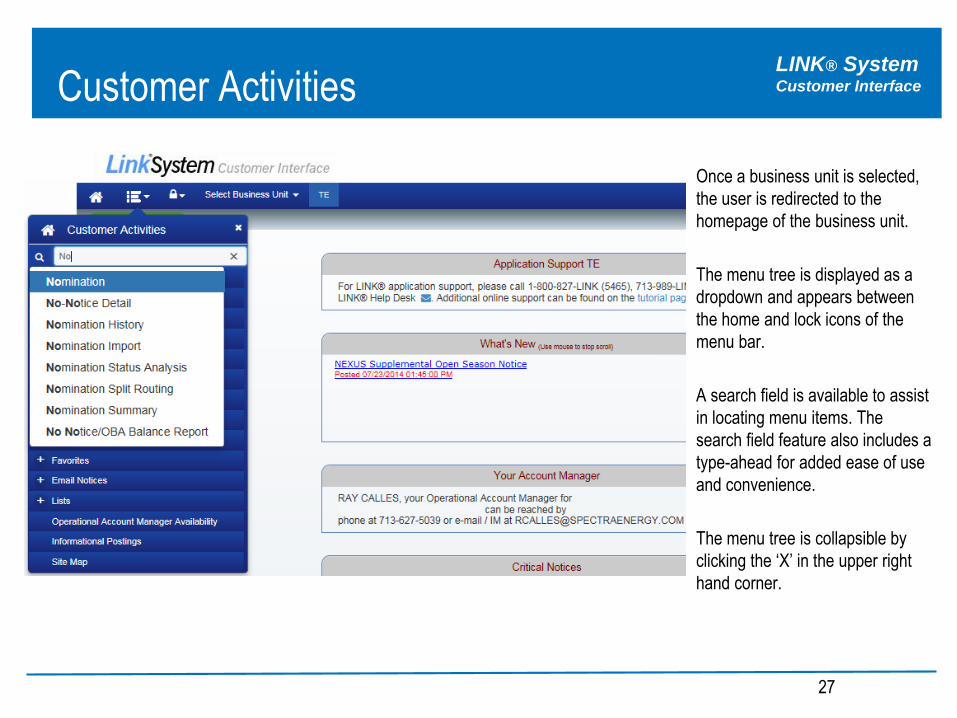
LINK® System Customer InterfaceCustomer Activities
Once a business unit is selected,
the user is redirected to the
homepage of the business unit.
The menu tree is displayed as a
dropdown and appears between
the home and lock icons of the
menu bar.
A search field is available to assist
in locating menu items. The
search field feature also includes a
type-ahead for added ease of use
and convenience.
The menu tree is collapsible by
clicking the ‘X’ in the upper right
hand corner.
27

LINK® System Customer InterfaceLINK® Homepage
Clicking the home icon in the menu bar will direct you back to the LINK® homepage.
To access the homepage of a business unit select icon within the menu tree.
28

LINK® System Customer InterfaceType-ahead Feature
A type-ahead enhancement is available to several fields including the Svc Req Name and the menu tree search
fields to make finding information easier. Typing the first 2 letters of the keyword will prompt a dropdown within
the field. As the user types additional letters, the search will further narrow. Once the keyword appears in the
dropdown, the user can either use the mouse to select it or use the arrow keys on the keyboard to make a
selection. The type-ahead feature does not replace the lookup feature.
29

LINK® System Customer InterfaceIcons
• Icons are placed in the left hand portion of the screen to activate functions such as filters, exports,
printing, related screens, favorites and screen preferences. These icons were designed to be clicked for
activation rather than by hovering to prevent unintentional use. To identify the function for each icon,
simply hover over it. (Note that the “Show Grid Filters” tooltip is available because tooltips were
activated.)
• Icons
Icon Function
Filter Activates form and grid filters
Print Prints to a PDF or native browser printer
Spreadsheet Launches the grid directly into Excel
Arrow Launches related screens
Star Add screen to favorites
Gear Set screen preferences
30

LINK® System Customer InterfaceShow Grid Filters Feature
• Grid Filters are displayed on all screens to allow users to narrow a data search.
• To access the filter feature, select the icon in the upper left had corner of the screen.
Once selected, filters will appear in the grid and/or form portion of the screen.
• To remove the filters from the screen, unclick the button.
• To clear filters, click the icon or ‘X’ in the column heading.
• To save the filters, select the “Screen Preference” button which is found on the same row
as the Select Grid Filters button and select Save Grid Filters. This will allow the user to leave
the screen and return and access the same filtered data.
• To permanently remove the grid filters, select Screen Preference > Reset Saved Grid Filters.
31

LINK® System Customer InterfaceShow Grid Filters Feature
32

LINK® System Customer InterfacePrint feature
To print, select the icon in upper left hand corner of the screen. The data
populated on the screen is displayed in a PDF format in a separate browser tab.
33

LINK® System Customer InterfaceExport as CSV feature
To export data to a CSV, click the icon in the upper left hand corner of the screen.
If multiple grids exist on the screen, a dropdown will appear requiring you to select
which grid to export. Next, you will be prompted to select if you want to Open or Save
the file. The data will be exported on to an Excel spreadsheet.
34

LINK® System Customer InterfaceExport as CSV feature
A user may also export multiple datasets into a single spreadsheet by selecting the
“Export Grid” icon and clicking the “Clipboard” icon as shown below.
Next, you will be prompted to select if you want to “Allow Access” or “Don’t Allow”
access to your clipboard. By clicking the “Allow Access” button data is copied to the
clipboard.
35

LINK® System Customer InterfaceExport as CSV feature
36
The next step is to open an Excel spreadsheet and paste data into the spreadsheet.
The user may export numerous datasets within the same spreadsheet.

LINK® System Customer InterfaceGo To Related Screens feature
The Related Screens button will navigate the user to screens related to the screen the
user is presently on. The Related Screens icon appears in the upper left hand
corner of the screen. By selecting it, the user can navigate to the related screen while
transferring the data from the original screen to the selected related screen.
37

LINK® System Customer InterfaceAdd Screen to Favorites feature
The Add Screen to Favorites feature allows users to select
and save screens that are most frequently used and save it
under the Favorites icon. This feature appears in the upper
left hand corner of all screens. Once a screen is saved under
the icon, a dropdown will appear next to it and any screen(s)
saved under this feature is available to select to navigate to
from any screen. The screen can also be removed from
favorites by selecting the ‘X’ next to the
screen.
38

LINK® System Customer InterfaceLanding Page Favorites feature
Favorite screens can also be quickly accessed from any Business Unit’s home page. The favorites
dropdown is located on the menu bar across the top of the screen. Selecting a screen from the
dropdown will send users directly to the desired screen. The favorites dropdown mimics the Add Screen
to Favorites dropdown located within each LINK® screen; so as a screen is added or removed, it will also
update Favorites dropdown on the homepage.
Note that any screens saved as a favorite on any given business unit will appear for all other business
units.
39

LINK® System Customer InterfaceScreen Preferences
• With screen preferences, you can customize grid and form layouts by de-selecting and selecting fields. The LINK®
Minimal Layout option can also be used to limit fields to those used by a majority of customers. A customer can also
drag and drop columns to change their order.
• In the example below, the NAESB receipt and delivery information has been hidden by clicking on the fields which
become highlighted in magenta and pressing “Done”. To make the fields visible again, re-click them and press “Done”.
40

LINK® System Customer InterfaceClock feature
The clock has been moved to the upper right hand corner of the screen. It will notify users as the
batch job is approaching. Just as the current LINK® System clock changes colors as the top of
each hour approaches, the new LINK® interface will also notify users by giving the message
“Next Batch Job” and will give a count down from 5mins. While the Batch job is
running, users will be notified with a Nom Batch Job running message . When
the batch job is complete, the messages will disappear.
41

LINK® System Customer InterfaceError Messaging
Error messaging will appear above the top of the data form. It appears when an error message is
encountered, or a submit action is performed, to ensure the message is seen. To eliminate the
message, the user can continue working, or click the “x” on the right hand side of the message.
42

LINK® System Customer InterfaceService Requester Filtering
Users can filter at an Entity level on the Nomination screen by leaving the Svc Req K field blank. This allows the
user to view all nominations for that Service Requester for the gas day or date range selected.
To do this, populate the Svc Req Name field and gas day or date range while leaving the Svc Req K field blank.
This will display all nominations made by the Service Requester.
43

LINK® System Customer InterfaceGrid Sorting feature
The Grid Sorting feature allows users to view their columns in ascending and descending order. LINK® provides
two ways to do so:
1. The first sorting option is by clicking the Screen Preferences button followed by Grid Sorting. Next, select
the column(s) you would like to sort. Once you have your selection, clicking the column heading once will
turn it green, indicating it will sort in an ascending order. Clicking the heading twice will turn it red, indicating
it will sort in a descending order. To remove the sorting feature, click the column heading three times and it
will turn back to blue. Once your selection is complete, hit the “Done” button located next to the screen
preferences button.
2. The second sorting option is by clicking the column heading for the column you would like to sort. Two
arrows pointing in opposite directions will appear with the initial order sorting in an ascending order
. When the column heading is clicked again, will sort it in a descending order . To remove the
sort, select Grid Sorting from Screen Preferences and click the column heading 3 times followed by the done
button. 44

LINK® System Customer InterfacePaging feature
The paging feature is the primary way to see large blocks of data. The arrows located at the bottom of the grid can be used to select
the next group of rows, allowing for faster retrieval of data. The two inner arrows will allow the user to navigate to the next and
previous pages while the two outer arrows allow to jump from the first and last page. To maximize the amount of rows that can be
viewed on a page, the arrow up button in the lower right hand corner of the screen will collapse the form.
45

LINK® System Customer InterfaceAdding New Records
When adding new records to the grid the system will place the new record at the top of the grid.
46

LINK® System Customer InterfaceDTH/GJ Toggle feature
A feature to toggle between dekatherm and gigajoule allow the user to easily switch
between the units of measurement. To move between the measurements, select the
button marked either DTH or GJ in the upper left hand corner of any MNCA
screen. The screen defaults as GJ but when the button is selected, it will convert the
quantities on the screen to DTH. To switch back to GJ, click the button once more.
47

LINK® System Customer InterfaceShow All Pipes feature
The “Show All Pipes” feature provides users the ability to have all business units with security rights available
for use immediately upon logging into LINK®.
To select this feature, log into any business unit and select Favorites in the menu tree > Manage Favorites &
Preferences , check the box next to Show All Pipes and press “Submit”. Once selected, the next time the
user logs into the LINK® System, the menu bar will display all business units the user has access to.
48

LINK® System Customer InterfaceSame Screen Access
• If logged into all business units, the system provides the ability to stay on the same screen while moving between
business units . In the example below, if a user is in the nomination screen for TETCO, they can simply click on AGT in
the blue business unit bar to access the nomination screen for that business unit. By clicking on TET, they can return to
the nomination screen on TETLP. This feature will not overlay another screen that has been already opened for a
business unit.
49

LINK® System Customer InterfaceSeparate Data Windows
Users have the ability to launch separate data windows, new sessions for screens, or launch multiple
versions of the entire application. A user can open a screen as a new tab in the same browser, or as a new
browser window. They can also use the new session option.
50

LINK® System Customer InterfaceSearch feature
The Ctrl + F feature may be used to locate specific data on a screen such as a meter. This
feature can also be found by activating the menu bar on your browser and selecting Edit > “Find
on this page.”
51

LINK® System Customer InterfaceTooltips feature
Tooltips allows the user to hover over certain fields and receive information regarding that field.
To select this feature, log into any business unit, select Favorites in the menu tree > Manage
Favorites & Preferences, check the box next to Show Tooltips and press “Submit”. Once
selected and submitted, the user will immediately be able to receive tooltips.
52

LINK® System Customer InterfaceInformational Postings
The Informational Postings site is accessible from the LINK® homepage and in the menu
tree of all business units.
53

LINK® System Customer InterfaceSession retention
When a user logins into a LINK® business unit, that creates what is called an application
session. Functionality within LINK® allows multiple application sessions to be created within the original
application window, as well as other windows that are opened. If a user leaves one business unit for
another, the original session will continue without disruption.
If the user clicks on the overall LINK® home menu icon with business unit sessions activated, the business
units will be removed from the blue activity bar. However, the application sessions can be restored without
disruption by clicking on “Customer Activities (Login)”. When clicked, the business units will reappear on the
blue activity bar with the application sessions just where they were left.
54

LINK® System Customer InterfaceTablet Devices
The LINK ® System can be used on a tablet device such as an iPad without any
additional software. Since tablets (including an iPad) function differently than a
traditional computer, there are some functionality changes which include:
• Lookup windows are accessible by moving the cursor to the desired field and then holding the
cursor down. Please note that lookup fields are highlighted with an asterisk throughout LINK®.
• Features such as Grid Filters and Screen Preferences are activated by first “pressing” the feature
button down . When the feature button grays out, then double tap it.
• The print button will pull up the selected screen in PDF format in a separate web page. To print,
hit the share icon on the PDF web page and any Wi-Fi printer connected to the same network
will print the selected screen.
• The export grid feature is available as long as the user has a CSV capable application downloaded
to their device.
55

LINK® System Customer InterfaceTitle names of List screens
To display the title names instead of the URL of the List screen popups within Internet Explorer,
a security setting must be changed. To enable the setting, select Tools > Internet Options >
Security tab > select Trusted Sites > Custom Level to open the Security Settings – Trusted Sites
Zone window. Next, scroll within the settings matrix and click “Enable” on “Allow script-initiated
windows without size or position constraints”.
56