Embed Size (px)
Citation preview
Introduction to PyMOL

Copyright NoticeThis Tutorial is Copyright (C) 2009 DeLano Scientific LLC. All Rights Reserved. Unauthorized reproduction or dissemination is prohibited under United States and international copyright laws. "Introduction to PyMOL" is a PyMOL Incentive Product created for the exclusive use of PyMOL Subscribers who sponsor the effort financially. Unrestricted distribution of this material could jeopardize the financial integrity of the PyMOL project, so please DO NOT POST THIS DOCUMENT IN AN INSECURE OR PUBLICLY ACCESSIBLE LOCATION. Current PyMOL Subscribers may only distribute copies of this tutorial internally to users within their organization who are covered by the scope of the subscription. If you come into possession of an inappropriate copy of this document, please ei-ther delete it or contact [email protected] to purchase an appropriate PyMOL Subscription.
Introduction to PyMOL
2
Table of ContentsIntroduction! 4
About this Booklet! 4Getting Started! 4
The PyMOL Layout! 5The Viewer Window! 5The Upper Control Window! 8
Mouse Controls ! 8
Features ! 11Visualization Presets! 11Saving Images! 12Taking Measurements: Distances, Angles, Dihedrals, and Neighbors! 13PyMOL Sessions! 14Sequence Viewer! 16Representations and Selections! 17Scenes and Shows! 19Creating Movies! 20Working with Multiple Objects and Selections! 21Alignments! 22
Advanced Feature Previews! 25Label Customization! 25Saving Coordinates ! 26Probing Electrostatics! 26Atom Selection Syntax! 26Automating Tasks with Scripts! 27Advanced Molecular Editing! 28
Next Steps ! 29Other Courses! 29Joining the PyMOL−Users Mailing List! 29Visiting the PyMOLWiki Community Web Site! 29Accessing the Official Documentation Site! 29
Introduction to PyMOL
3
Introduction
About this BookletWelcomeThis is a follow-along guide for the Introduction to PyMOL classroom tutorial taught by DeLano Scientific, LLC. It covers the basics of PyMOL for medicinal chemists and other industrial scientists, including visualization of protein-ligand interactions, creating figures, and working with session files.
This tutorial was created for PyMOL version 1.2 or greater running under Windows, Mac, or Linux.
Typographic ConventionsWords typeset in Courier font, such as extend, are commands that can be typed directly into a PyMOL command line. Keystroke modifier keys are typeset in upper case, where CTRL, ALT, ESC, SHIFT, are “control,” “alt”, “es-cape,” and “shift,” respectively. The mouse buttons are shown as upper case letters in Courier font, where LEFT, MID, WHEEL, RIGHT, are the left mouse button, middle mouse button, wheel, and right mouse button, respec-tively. The word DRAG indicates that a mouse button should be pressed and held while the mouse is moved. For ex-ample, CTRL-MID-DRAG indicates the user should press and hold the control key, then press and hold the middle mouse button, and drag the mouse with the control key and middle mouse button held down. Menu navigation is shown in bold Times font as Menu→SubMenu→... For example, File→Save Image As...→PNG indicates that the user should click on the File menu, choose the Save Image As submenu, and finally choose PNG, from the submenu.
Getting StartedRequirementsBefore starting this tutorial, please ensure that you have the following.
• PyMOL version 1.2 or greater
• A 3-button wheel mouse
• Tutorial-specific data files found in the IntroductionToPyMOL subfolder of the PyMOLTutorials archive supplied by DeLano Scientific. This archive is typically provided as a compressed “ZIP” file, which should be extracted on to your Desktop
Also, please make sure that your keyboard Caps Lock key is turned off when using PyMOL.
Getting Ready—Starting the PyMOL ApplicationIf you haven’t already, please launch PyMOL by double clicking on the PyMOL icon on your desktop. On Windows PCs, PyMOL brings up two windows. The MacPyMOL version will bring up one window, which contains the same two user interface components.
Introduction to PyMOL
4
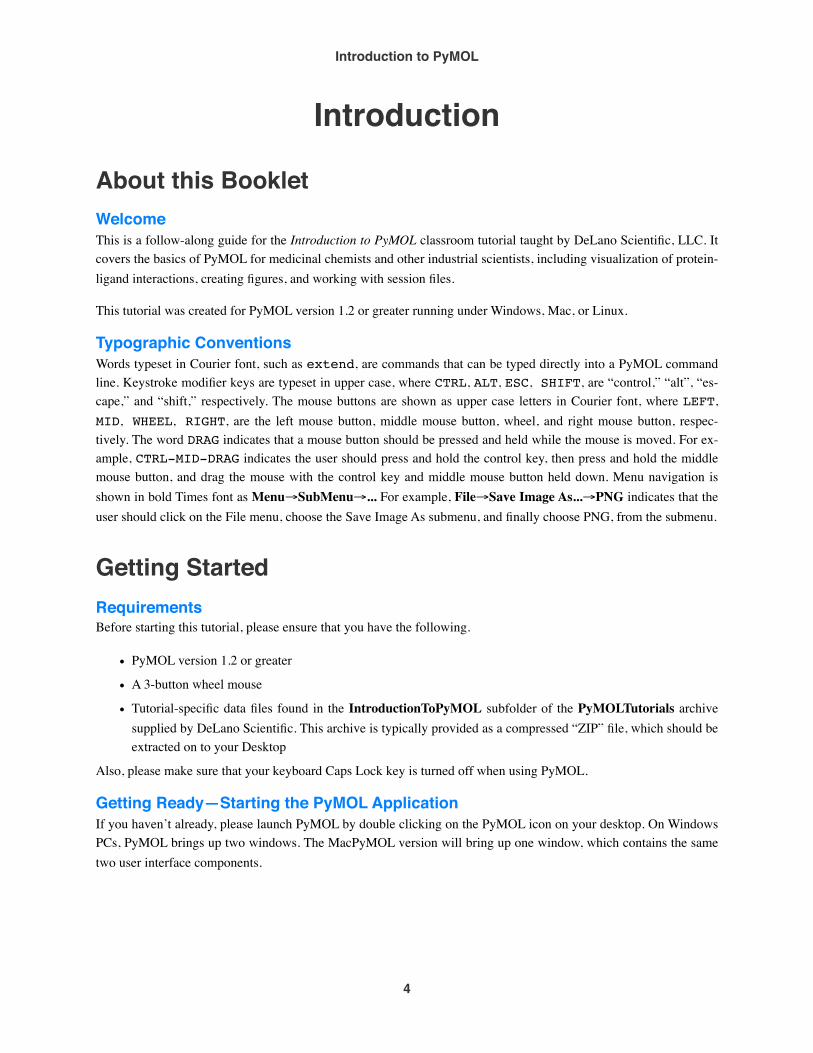
The PyMOL LayoutTry It—Loading a File and Using the MouseThe larger, Viewer Window is where our molecules and objects will appear. Above it is the Upper Control Window (see Figures 1 and 2).
Please load the structure file 1t46.pdb from disk. To do this, click on the Upper Control Window and choose File→Open. Then, from the PyMOLTutorials/IntroductionToPyMOL folder on your desktop, please select the file named 1t46.pdb. Your PyMOL should now look like Figure 2, except that the initial colors may be different.
At this time, please take a moment to familiarize yourself with the behavior of the mouse in PyMOL. Place your mouse cursor over the protein. Now, press and hold while moving the mouse—aka dragging—with each of the mouse buttons in turn. As Figure 3 shows, dragging with the left mouse button rotates the scene in the Display; dragging with the middle mouse button moves the molecule in the plane of the display; and dragging with the right mouse button zooms in and out.
Don’t worry if you get lost. Just click the Reset button in the Upper Control Window to restore the original view.
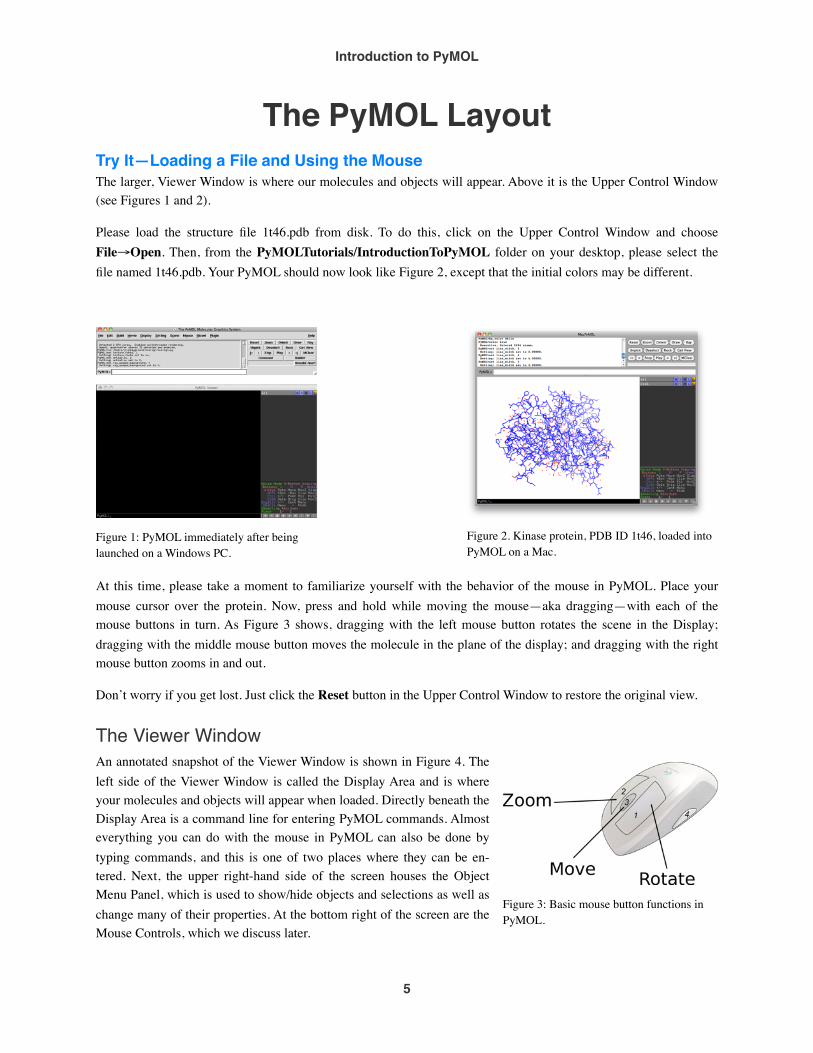
The Viewer WindowAn annotated snapshot of the Viewer Window is shown in Figure 4. The left side of the Viewer Window is called the Display Area and is where your molecules and objects will appear when loaded. Directly beneath the Display Area is a command line for entering PyMOL commands. Almost everything you can do with the mouse in PyMOL can also be done by typing commands, and this is one of two places where they can be en-tered. Next, the upper right-hand side of the screen houses the Object Menu Panel, which is used to show/hide objects and selections as well as change many of their properties. At the bottom right of the screen are the Mouse Controls, which we discuss later.
Figure 1: PyMOL immediately after being launched on a Windows PC.
Figure 2. Kinase protein, PDB ID 1t46, loaded into PyMOL on a Mac.
Figure 3: Basic mouse button functions in PyMOL.
Introduction to PyMOL
5
Try It—Using the Viewer Window: Entering Commands and Using the Object Menu PanelPlease click in the Display Area. Now, press the ESC key. Your command history and other information is shown here. Press ESC to return to the normal viewing mode. This feature pro-vides a quick way of viewing PyMOL’s text output. If the Viewer Window is selected as you type, what you input will appear in the lower command line.
Type orient and hit enter. The molecule in your scene should now be oriented, that is, displayed with the longest axis aligned with the x-axis. Now, please type reset and hit enter. This does the same thing as click-ing on the Reset button in the Upper Control Window.
Please find the Object Menu Panel in the upper right of the Viewer Win-dow. An example Object Menu is shown in Figure 5. Here, you’ll see a list of names. The objects whose names appear with light grey back-grounds are active, and may appear in the Display Area. Click on the name to deactivate, or disable, the object, and it will be hidden from view. Your Object Menu should have entries for all and 1t46, and maybe some-thing like (sele). Please click on 1t46. This disables it. Click again to re-enable it.
Each of the five Pop-up Menus, is accessed by clicking on a letter. A→Actions contains lots of preset actions; S→Show allows us to control various representations; H→Hide is the opposite of Show, here you can hide various representations; L→Label is for showing and creat-ing labels; and finally, C→Color is for coloring our objects. Click on each of the five letters to see what pops up. We’ll come back to these later.
Figure 4: The Viewer Window, with annotations.
Figure 5: Example Object Menu Panel. Kinases is a group in which there are five kinase proteins; kinase2, a protein, is dis-abled, all other kinases are enabled. Pro-teins 1cll and 1ggz are objects. (sele) is a disabled selection. We will discuss groups, objects and selections later.
Introduction to PyMOL
6
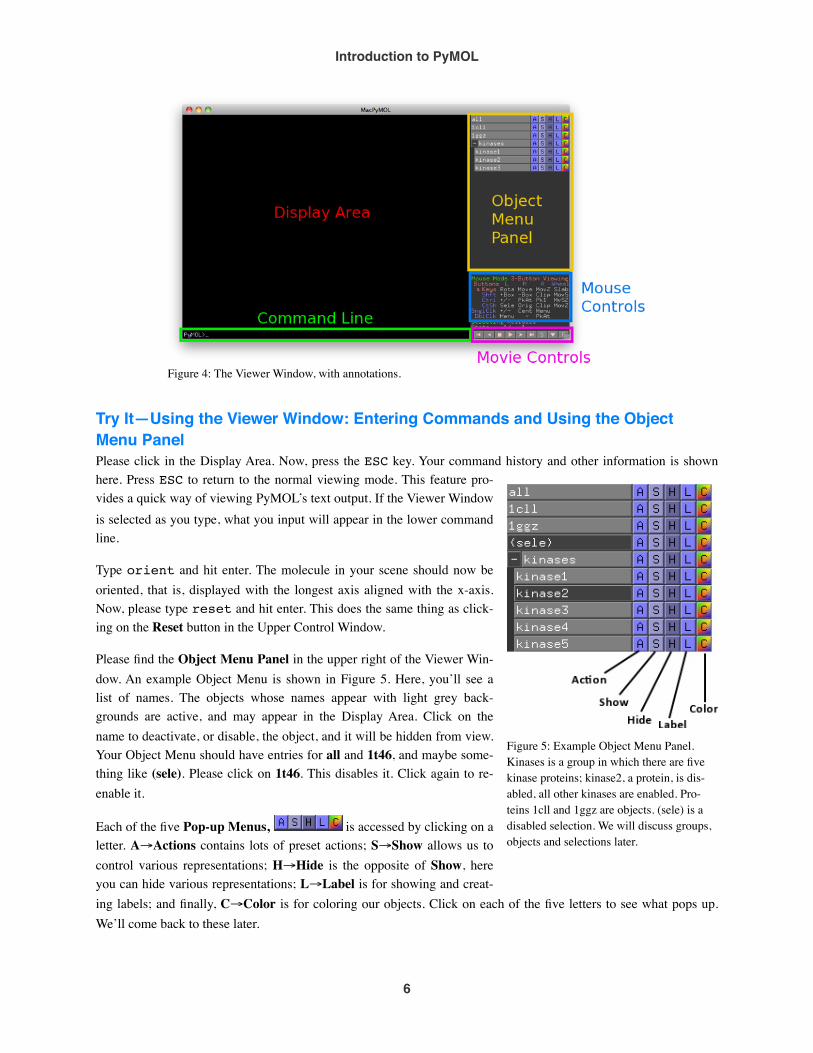
Mouse ModesMany different tasks can be performed using the mouse inside of PyMOL, through a variety of mouse modes. Each mouse mode just reassigns the mouse buttons to perform different tasks. PyMOL’s Viewing Mode is used primarily used to view, rotate, translate, and change the representations of objects. Editing Mode is used to rotate bonds, re-place atoms, physically move atoms and residues, etc. The mouse mode table for each of these modes is shown, in Figures 6a and 6b.
Try It—Setting and Using the Different Mouse ModesIn PyMOL, just click the table to cycle through the mouse modes. This table shows the current mouse mode (3-Button Viewing, 3-Button Editing) and what each keyboard and mouse action does.
Figure 6a: 3-Button Viewing Mode. Figure 6b: 3-Button Editing Mode.
Reading the Mouse Mode TableThe mouse mode table is a reference guide to PyMOL mouse functions. Column abbreviations are: L, M, and R for LEFT MID and RIGHT buttons. Actions are: Rota, rotate; PkAt, pick atom; Cent, center; PkTB, pick torsion bond; MovA, move atom. Notice that the table changes when you click on it.
Click the Mouse Mode table to enable 3-Button Viewing and locate the word Selecting, colored green, as shown in Figure 6a. The red word to the right of Selecting tells which Selecting mode the mouse is in. Clicking on the word Selecting changes the selection mode. The first mode is Residues, which means that, when we click on any atom with the mouse in the Display Area, the entire residue in which that atom resides is selected.Other selection modes are Molecules, which forces PyMOL to select the entire molecule containing the chosen atom; Chains, which will choose the chain in which the selected residue resides; Objects, which selects the entire object containing the cho-sen atom; C-alphas, the alpha carbon of the residue for the chosen atom; and Segments which chooses segments, which are special fields in a PDB file. Keep clicking to cycle through the options until you return to Residues. When in 3-Button Editing Mode, the word Selecting is replaced with Picking and the mouse is used to pick Atoms which represent Joints in the molecular graph.
Try It—Using Editing Mode to Move AtomsNow, please set the mouse mode to Editing, and CTRL-Left-drag on an atom. The atom moves with the mouse in an unphysical but compliant way, tracking with the mouse. To undo the movement, type undo and hit enter in the PyMOL command line. PyMOL currently has a very limited undo system, so please do not rely on it. We introduce it here to let you know that it exists, but only for undoing changes made to atom positions. Now that we’ve toured the Viewer Window, let’s see what is offered to us in the Upper Control Window.
Introduction to PyMOL
7
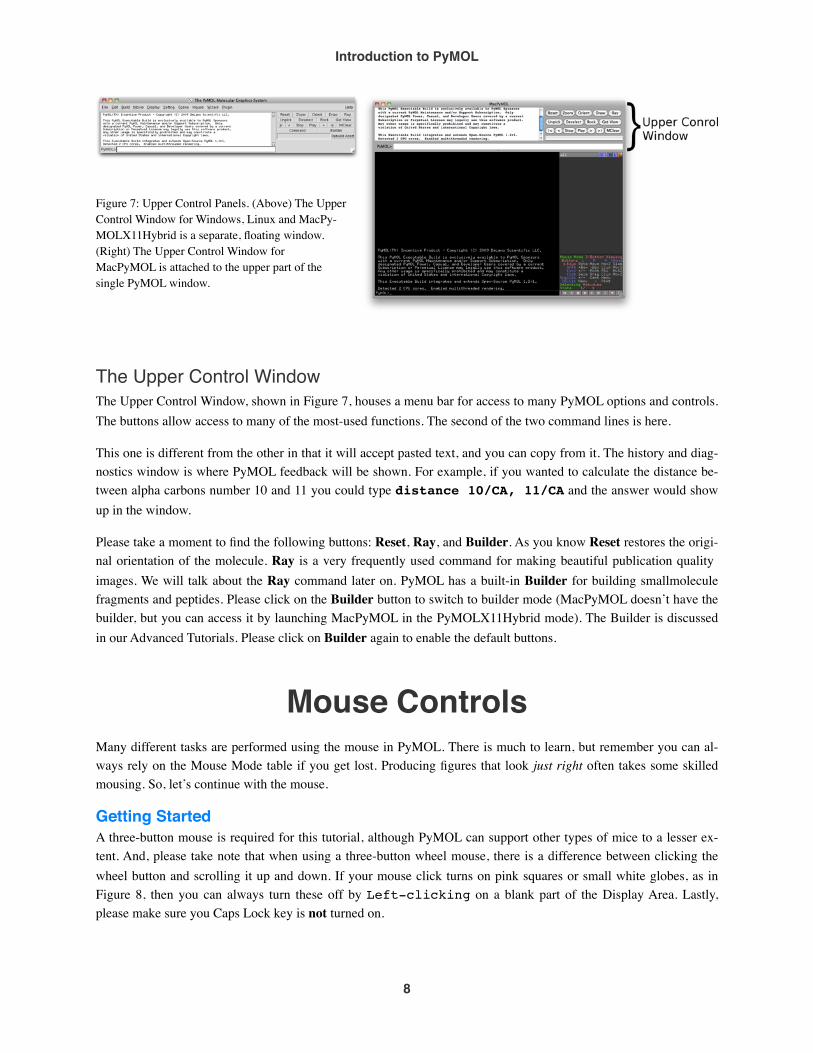
The Upper Control WindowThe Upper Control Window, shown in Figure 7, houses a menu bar for access to many PyMOL options and controls. The buttons allow access to many of the most-used functions. The second of the two command lines is here.
This one is different from the other in that it will accept pasted text, and you can copy from it. The history and diag-nostics window is where PyMOL feedback will be shown. For example, if you wanted to calculate the distance be-tween alpha carbons number 10 and 11 you could type distance 10/CA, 11/CA and the answer would show up in the window.
Please take a moment to find the following buttons: Reset, Ray, and Builder. As you know Reset restores the origi-nal orientation of the molecule. Ray is a very frequently used command for making beautiful publication quality images. We will talk about the Ray command later on. PyMOL has a built-in Builder for building smallmolecule fragments and peptides. Please click on the Builder button to switch to builder mode (MacPyMOL doesn’t have the builder, but you can access it by launching MacPyMOL in the PyMOLX11Hybrid mode). The Builder is discussed in our Advanced Tutorials. Please click on Builder again to enable the default buttons.
Mouse ControlsMany different tasks are performed using the mouse in PyMOL. There is much to learn, but remember you can al-ways rely on the Mouse Mode table if you get lost. Producing figures that look just right often takes some skilled mousing. So, let’s continue with the mouse.
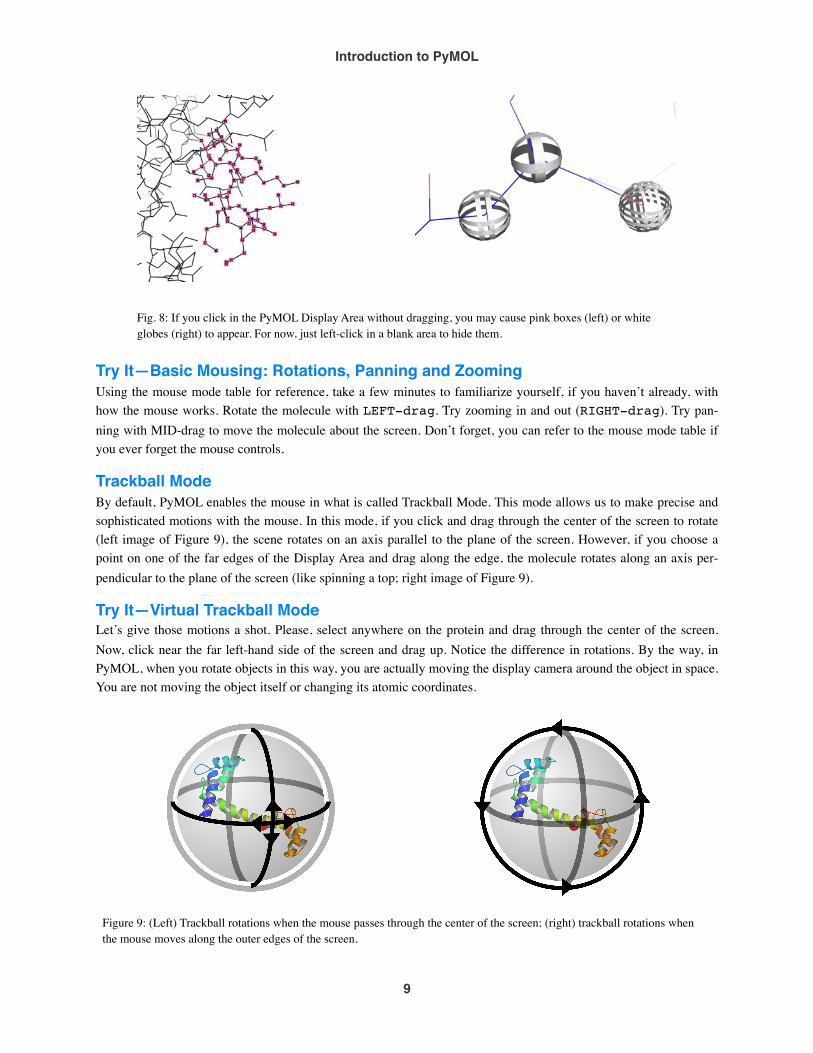
Getting StartedA three-button mouse is required for this tutorial, although PyMOL can support other types of mice to a lesser ex-tent. And, please take note that when using a three-button wheel mouse, there is a difference between clicking the wheel button and scrolling it up and down. If your mouse click turns on pink squares or small white globes, as in Figure 8, then you can always turn these off by Left-clicking on a blank part of the Display Area. Lastly, please make sure you Caps Lock key is not turned on.
Figure 7: Upper Control Panels. (Above) The Upper Control Window for Windows, Linux and MacPy-MOLX11Hybrid is a separate, floating window. (Right) The Upper Control Window for MacPyMOL is attached to the upper part of the single PyMOL window.
Introduction to PyMOL
8
Try It—Basic Mousing: Rotations, Panning and ZoomingUsing the mouse mode table for reference, take a few minutes to familiarize yourself, if you haven’t already, with how the mouse works. Rotate the molecule with LEFT-drag. Try zooming in and out (RIGHT-drag). Try pan-ning with MID-drag to move the molecule about the screen. Don’t forget, you can refer to the mouse mode table if you ever forget the mouse controls.
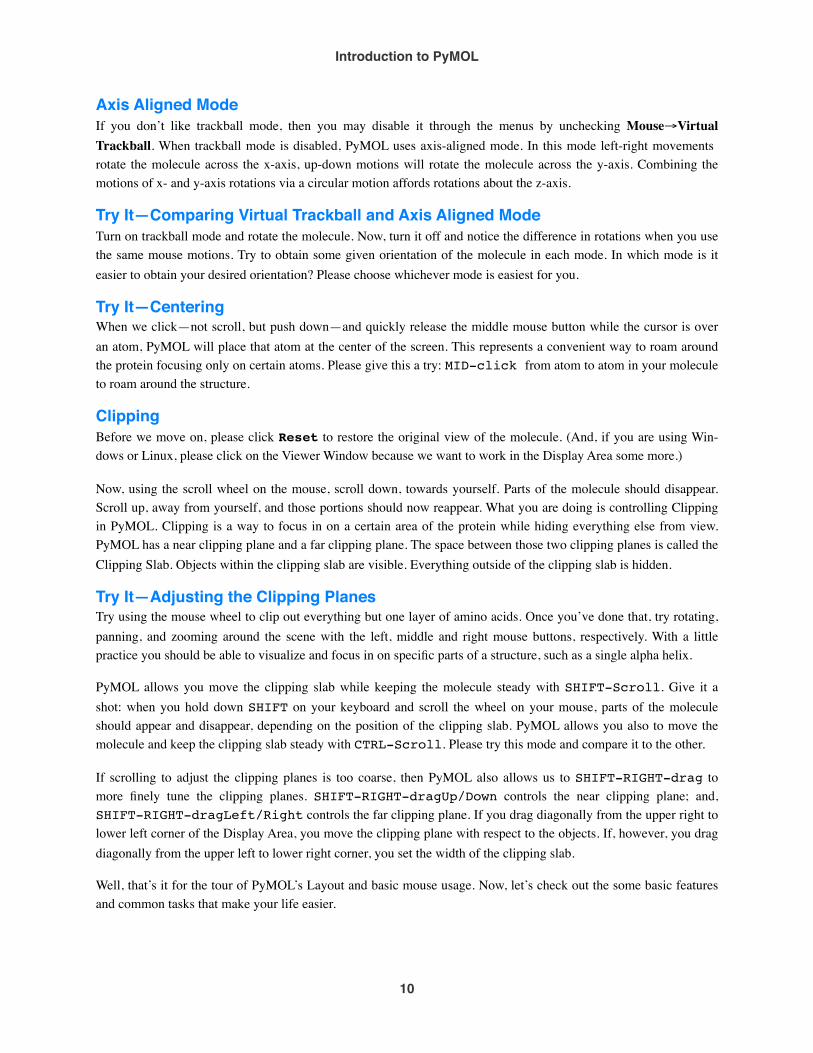
Trackball ModeBy default, PyMOL enables the mouse in what is called Trackball Mode. This mode allows us to make precise and sophisticated motions with the mouse. In this mode, if you click and drag through the center of the screen to rotate (left image of Figure 9), the scene rotates on an axis parallel to the plane of the screen. However, if you choose a point on one of the far edges of the Display Area and drag along the edge, the molecule rotates along an axis per-pendicular to the plane of the screen (like spinning a top; right image of Figure 9).
Try It—Virtual Trackball ModeLet’s give those motions a shot. Please, select anywhere on the protein and drag through the center of the screen. Now, click near the far left-hand side of the screen and drag up. Notice the difference in rotations. By the way, in PyMOL, when you rotate objects in this way, you are actually moving the display camera around the object in space. You are not moving the object itself or changing its atomic coordinates.
Figure 9: (Left) Trackball rotations when the mouse passes through the center of the screen; (right) trackball rotations when the mouse moves along the outer edges of the screen.Figure 9: (Left) Trackball rotations when the mouse passes through the center of the screen; (right) trackball rotations when the mouse moves along the outer edges of the screen.
Fig. 8: If you click in the PyMOL Display Area without dragging, you may cause pink boxes (left) or white globes (right) to appear. For now, just left-click in a blank area to hide them.
Introduction to PyMOL
9
Axis Aligned ModeIf you don’t like trackball mode, then you may disable it through the menus by unchecking Mouse→Virtual Trackball. When trackball mode is disabled, PyMOL uses axis-aligned mode. In this mode left-right movements rotate the molecule across the x-axis, up-down motions will rotate the molecule across the y-axis. Combining the motions of x- and y-axis rotations via a circular motion affords rotations about the z-axis.
Try It—Comparing Virtual Trackball and Axis Aligned ModeTurn on trackball mode and rotate the molecule. Now, turn it off and notice the difference in rotations when you use the same mouse motions. Try to obtain some given orientation of the molecule in each mode. In which mode is it easier to obtain your desired orientation? Please choose whichever mode is easiest for you.
Try It—CenteringWhen we click—not scroll, but push down—and quickly release the middle mouse button while the cursor is over an atom, PyMOL will place that atom at the center of the screen. This represents a convenient way to roam around the protein focusing only on certain atoms. Please give this a try: MID-click from atom to atom in your molecule to roam around the structure.
ClippingBefore we move on, please click Reset to restore the original view of the molecule. (And, if you are using Win-dows or Linux, please click on the Viewer Window because we want to work in the Display Area some more.)
Now, using the scroll wheel on the mouse, scroll down, towards yourself. Parts of the molecule should disappear. Scroll up, away from yourself, and those portions should now reappear. What you are doing is controlling Clipping in PyMOL. Clipping is a way to focus in on a certain area of the protein while hiding everything else from view. PyMOL has a near clipping plane and a far clipping plane. The space between those two clipping planes is called the Clipping Slab. Objects within the clipping slab are visible. Everything outside of the clipping slab is hidden.
Try It—Adjusting the Clipping PlanesTry using the mouse wheel to clip out everything but one layer of amino acids. Once you’ve done that, try rotating, panning, and zooming around the scene with the left, middle and right mouse buttons, respectively. With a little practice you should be able to visualize and focus in on specific parts of a structure, such as a single alpha helix.
PyMOL allows you move the clipping slab while keeping the molecule steady with SHIFT-Scroll. Give it a shot: when you hold down SHIFT on your keyboard and scroll the wheel on your mouse, parts of the molecule should appear and disappear, depending on the position of the clipping slab. PyMOL allows you also to move the molecule and keep the clipping slab steady with CTRL-Scroll. Please try this mode and compare it to the other.
If scrolling to adjust the clipping planes is too coarse, then PyMOL also allows us to SHIFT-RIGHT-drag to more finely tune the clipping planes. SHIFT-RIGHT-dragUp/Down controls the near clipping plane; and, SHIFT-RIGHT-dragLeft/Right controls the far clipping plane. If you drag diagonally from the upper right to lower left corner of the Display Area, you move the clipping plane with respect to the objects. If, however, you drag diagonally from the upper left to lower right corner, you set the width of the clipping slab.
Well, that’s it for the tour of PyMOL’s Layout and basic mouse usage. Now, let’s check out the some basic features and common tasks that make your life easier.
Introduction to PyMOL
10

Features
Visualization PresetsIntroducing Visualization Presets
PyMOL comes with an array of preset visualizations. Through a
couple clicks you can get a technical view, or a simple view, or even a view nicely set for publishing. Each preset emphasizes different aspects of your scene. You can access the preset visu-alizations through the A→Actions→Preset menu. Figure 10 shows the result of applying the A→Actions→Preset→Ligand Sites→Trans-parent (better). Figure 11 shows the menu of the available presets.
Try It—Sampling the Visualization PresetsSome visualizations may be immediately useful to you for visu-alizing protein-ligand complexes. Please choose the A→Action→Preset→Simple setting, which shows the protein as a ribbon and the ligands as sticks. The ligands pop out of the scene while the polymer maintains a simple struc-ture allowing us to see its topology. Do you see the ligand?
Let’s now compare this to the Technical set-ting. Please choose the A→Action→Pre-set→Technical setting from the preset menu. The ligand is now obscured by lots of technical details. This is where clipping comes in handy. While the ligand is harder to see, if you zoom in on it, you will notice that PyMOL found and is displaying all the hydrogen bonds that the ligand is making with the protein. The A→Ac-tion→Preset→Ligands preset is like the Technical preset, but instead of finding all hy-drogen bonds, it only finds the hydrogen bonds between the ligand and the protein. Please en-able this setting to see the difference.
The A→Action→Preset→Ligand Sites sub-menu opens to show more refined options, which render beautiful views of the ligand bind-ing site as a surface. Please try the various visualization presets on this protein.
Please take a few moments to try each of the presets and consider which might be best suited for your applications. Before moving on, please choose the A→Action→Preset→Publication preset.
Figure 10: An example image made with one click using the Transparent Ligands site preset.
Figure 11: Menu of visualization pre-sets built into PyMOL.
Introduction to PyMOL
11
Saving ImagesOnce your display is set up, choose File→Save Image As→PNG. PNG, or Portable Network Graphic, is a popular lossless compressed image format for publishing. PNG files can be read by Microsoft PowerPoint, Microsoft Word, and many other programs. To save a ray traced image press the Ray button before selecting File→Save Image As→PNG.
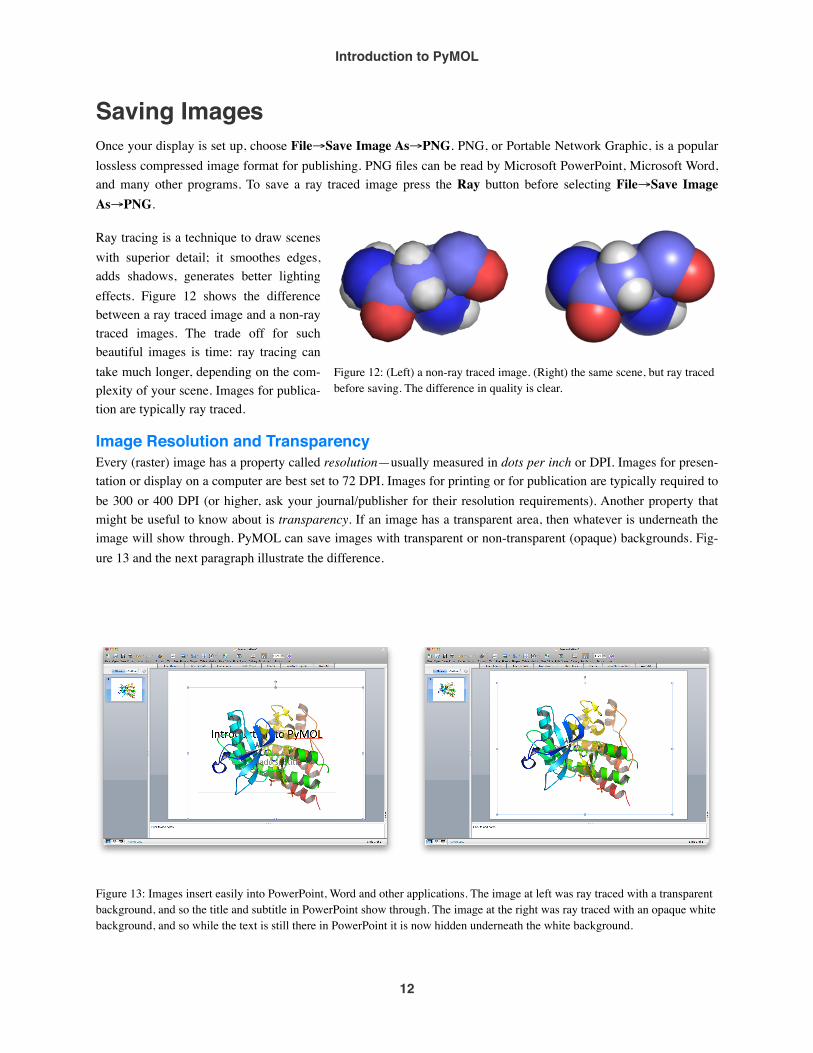
Ray tracing is a technique to draw scenes with superior detail; it smoothes edges, adds shadows, generates better lighting effects. Figure 12 shows the difference between a ray traced image and a non-ray traced images. The trade off for such beautiful images is time: ray tracing can take much longer, depending on the com-plexity of your scene. Images for publica-tion are typically ray traced.
Image Resolution and TransparencyEvery (raster) image has a property called resolution—usually measured in dots per inch or DPI. Images for presen-tation or display on a computer are best set to 72 DPI. Images for printing or for publication are typically required to be 300 or 400 DPI (or higher, ask your journal/publisher for their resolution requirements). Another property that might be useful to know about is transparency. If an image has a transparent area, then whatever is underneath the image will show through. PyMOL can save images with transparent or non-transparent (opaque) backgrounds. Fig-ure 13 and the next paragraph illustrate the difference.
Figure 12: (Left) a non-ray traced image. (Right) the same scene, but ray traced before saving. The difference in quality is clear.
Figure 13: Images insert easily into PowerPoint, Word and other applications. The image at left was ray traced with a transparent background, and so the title and subtitle in PowerPoint show through. The image at the right was ray traced with an opaque white background, and so while the text is still there in PowerPoint it is now hidden underneath the white background.
Introduction to PyMOL
12
Try It—Images for PowerPoint, Projectors, and Computer DisplaysLet’s make an image and import it into PowerPoint. We will also illustrate the difference between a transparent and opaque background. Start by ray tracing your image: please press the Ray button. By default, the image has an opaque background. Save the file containing the image to your Desktop using File→Save Image As→PNG, with the filename pymol.png. Next, let’s save an image with a transparent background. To do this, make sure Opaque is unchecked in the menu, Display→Background. Now press the Ray button. Save the file to your Desktop using File→Save Image As→PNG, with the filename pymolT.png, where the T stands for transparent. Open up Pow-erPoint. Where it says, “Click to Add Title,” write
“Introduction to PyMOL.” Now, click Insert→Pic-ture and choose the first image, pymol.png. The image pastes nicely into PowerPoint. Notice that it covered up your title text. That is because the pymol.png file has an opaque background. Now, delete that image (click on it and then hit backspace or delete), and insert the other image, pymolT.png, using Insert→Picture. Now, the text should show through the background of the image. For those with-out PowerPoint, Figure 13 shows the results of the above procedure.
Lastly, you can use the clipboard to copy images into PowerPoint if you have PyMOL for Windows or MacPyMOL. Simply setup the scene you want, then from the Upper Control Window menu choose Edit→Copy to copy the image to the clipboard. Now, in PowerPoint choose Edit→Copy (or type CTRL-v) to paste the image from computer memory.
High Resolution Images (Publication and Printing)To save a high resolution image you need to know the size of image you want (in inches) and the resolution (in dots per inch). Then all you have to do is type one simple PyMOL command: ray W,H at the PyMOL command to save the high-resolution file, where H is the height in pixels, W is the width in pixels. To calculate W and H you just multi-ply the height or width times the DPI. For example, let’s say your publisher wants images to be 4 inches wide by 3 inches tall at 400 DPI. The height in pixels is then: 3 inches * 400 DPI = 1200 pixels; and the width in pixels is 4 inches * 400 DPI = 1600 pixels. So, the exact command to type into PyMOL would be, ray 1600, 1200. Lastly, just do File→Save Image As→PNG to save your high resolution image.
Taking Measurements: Distances, Angles, Dihedrals, and NeighborsPyMOL allows you to make take measurements of distances, angles, and dihedral angles, and also to find neighbors. The easiest way to do this is to click on Wizard→Measurement. PyMOL wizards operate by prompting the user to take an action (usually written as a message in the upper left side of the Display Area) and then provide controls for the user on the right side above the Mouse Mode matrix. Don’t forget, when you’re done using a Wizard, make sure you click Done—the last button in the wizard.
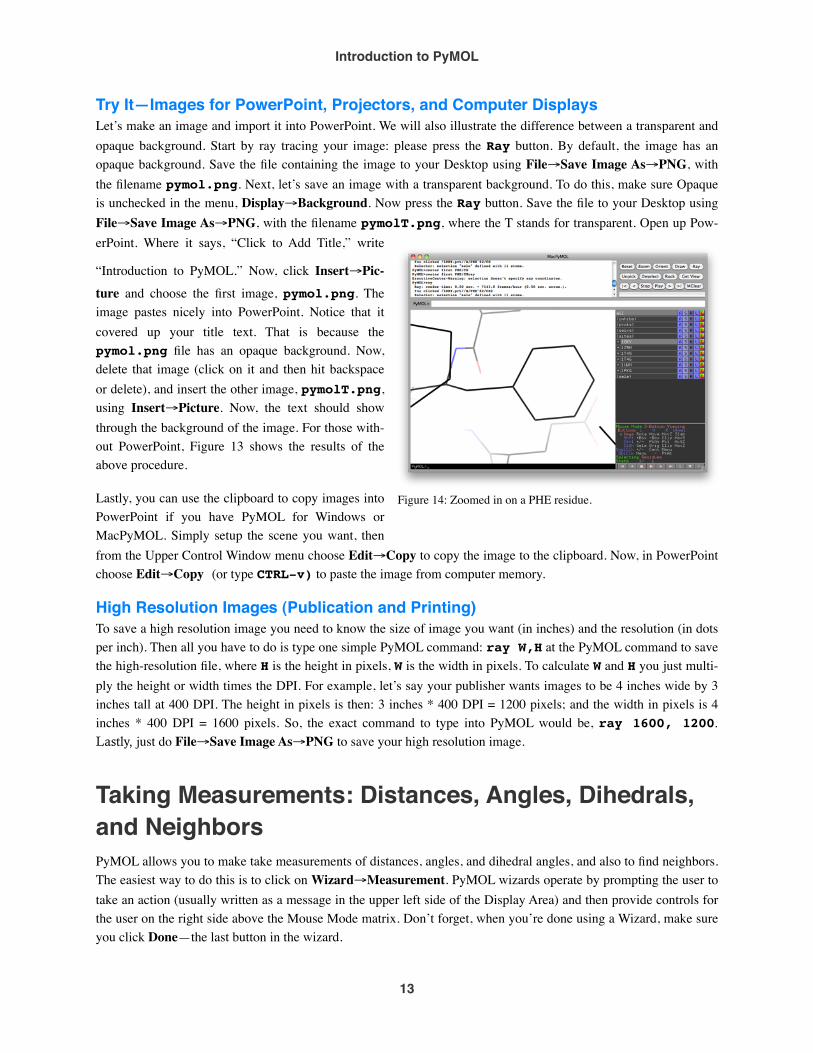
Figure 14: Zoomed in on a PHE residue.
Introduction to PyMOL
13
Try It—Taking MeasurementsPlease select S→Show→As→Lines to enable the lines visualization for 1t46. Zoom in on a residue, as shown in Figure 14. Now, please open the Measurement Wizard. Next, click on any two atoms; the dis-tance between the two should now be annotated by a dashed line and distance measure. Let’s try measuring an angle.
To change the type of measurement, click on the top button in the measurement wizard, which, in Figure 15, displays Distances. A menu will pop up, giving you the other options. If you choose Distances, you need to select two atoms. If you want to measure Angles, you
need to select three atoms. Dihedrals require four atoms. Polar, Heavy and all Neighbors need just one. Please take a few moments now to make various measurements. By default, each measurement creates a new object. You can change this by merging the new object with the previous one, or by overwriting the previous object. Control of this feature is through the third menu option in the measurement wizard (in Figure 15, Delete Last Object).
A common use of the measurement wizard is to create a dashed line between two atoms. To do this, make your measurement and then, on the Pop-up Menu for the measurement object, hide the label with H→Hide→Labels (see Figure 16). Mistakes in the Measurement Wizard can be reme-
died by choosing Delete Last Object, or by deleting the last measurement object choosing A→Action→Delete, in the row of the measurement object you wish to delete.
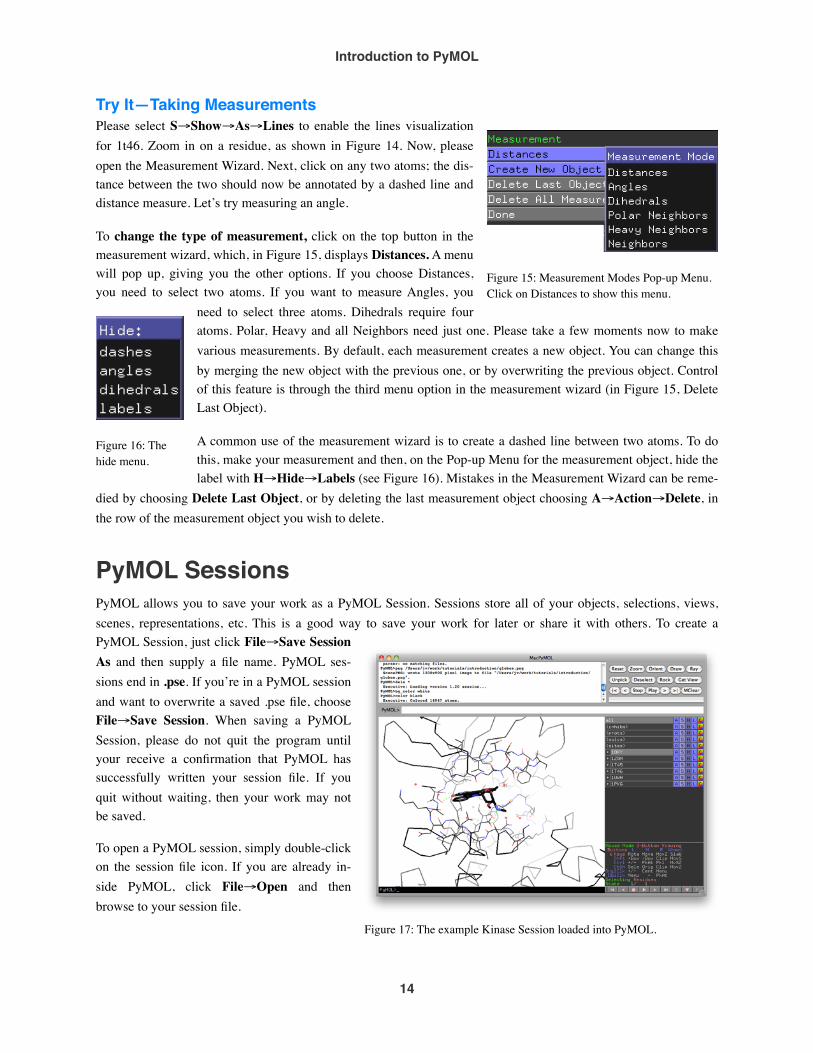
PyMOL SessionsPyMOL allows you to save your work as a PyMOL Session. Sessions store all of your objects, selections, views, scenes, representations, etc. This is a good way to save your work for later or share it with others. To create a PyMOL Session, just click File→Save Session As and then supply a file name. PyMOL ses-sions end in .pse. If you’re in a PyMOL session and want to overwrite a saved .pse file, choose File→Save Session. When saving a PyMOL Session, please do not quit the program until your receive a confirmation that PyMOL has successfully written your session file. If you quit without waiting, then your work may not be saved.
To open a PyMOL session, simply double-click on the session file icon. If you are already in-side PyMOL, click File→Open and then browse to your session file.
Figure 15: Measurement Modes Pop-up Menu. Click on Distances to show this menu.
Figure 16: The hide menu.
Figure 17: The example Kinase Session loaded into PyMOL.
Introduction to PyMOL
14
If you work in a pharmaceutical or biotech company, there may be computational chemists, crystallographers, or even automated systems that will prepare PyMOL sessions for you. Such prepared sessions are generally accessed via file servers, database systems, or your intranet. If such a system doesn’t yet exist, consider asking your structural biologist and computational chemist colleagues about making PyMOL session files available to you.
Try It—Loading and Perusing a Prepared PyMOL SessionPlease load the PyMOL session in the PyMOLTutorials/IntroductionToPyMOL folder on your desktop, called KinaseSes- sion.pse. Figure 17 is a screenshot of MacPyMOL opened to the KinaseSession.
In the Display Area you can see the structure of Phosphoinositide−Dependent Kinase 1 (PDK1) complexed with the inhibitor Staurosporine. The structure you are viewing is Protein Data Bank (PDB) structure 1OKY. If you click on the (+) button next to 1OKY, you see that all four active objects in the Viewer Window start with the prefix 1OKY, and are contained in a group called 1OKY. Groups allow you to collect objects under one common name for better organization. Open groups are prefixed with minus sign (-) and closed groups are prefixed with a plus sign (+). Try turning the 1OKY objects on and off individually. The displays of the protein, the inhibitor, the solvent, and hydrogen bonds can each be enabled and disabled independently by clicking on the object names. Also note that you can click and drag downward over the object names to toggle display of multiple ob-jects at once.
Disable all of the objects except 1OKY.prt, and then enable object 1Z5M.prt, which is a crystal structure of PDK1 with a different ligand. From this view, you can observe that, while the chemical structures are the same, the two structures differ in the precise orienta-tions of various side chains. If you enable 1OKY.inh, 1OKY.hbd, 1Z5M.inh, and 1Z5M.hbd, you can see how the two ligands interact differently with PDK1.
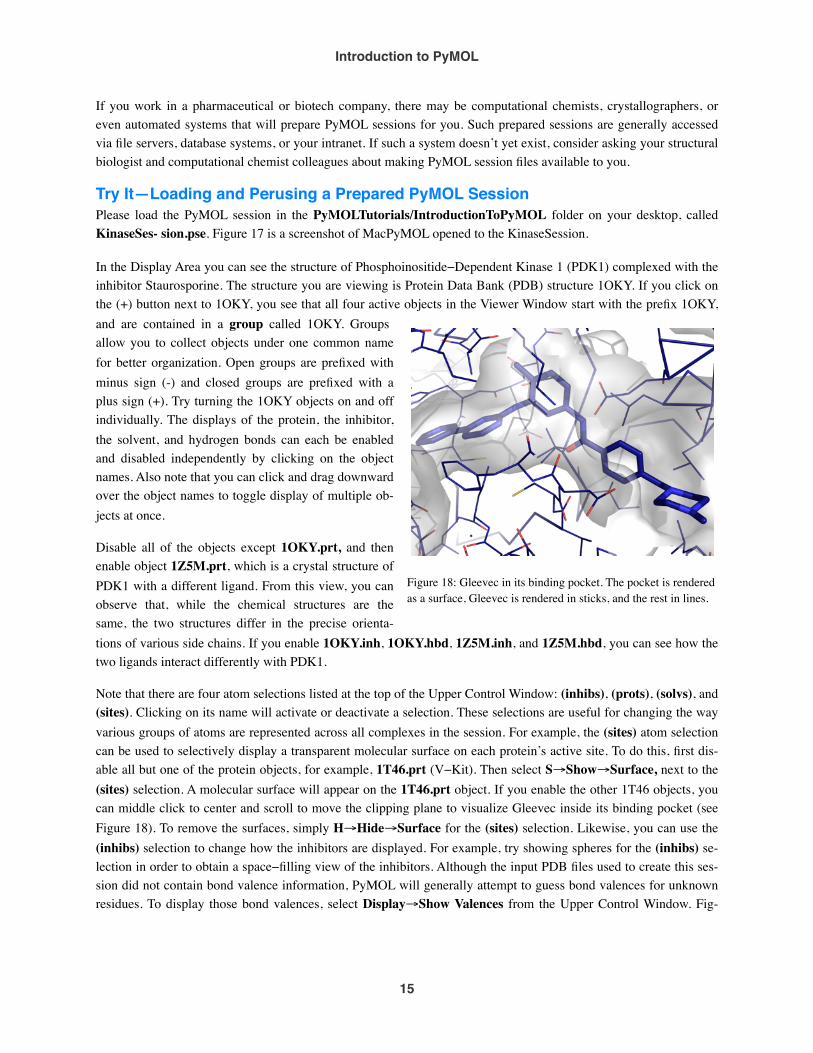
Note that there are four atom selections listed at the top of the Upper Control Window: (inhibs), (prots), (solvs), and (sites). Clicking on its name will activate or deactivate a selection. These selections are useful for changing the way various groups of atoms are represented across all complexes in the session. For example, the (sites) atom selection can be used to selectively display a transparent molecular surface on each protein’s active site. To do this, first dis-able all but one of the protein objects, for example, 1T46.prt (V−Kit). Then select S→Show→Surface, next to the (sites) selection. A molecular surface will appear on the 1T46.prt object. If you enable the other 1T46 objects, you can middle click to center and scroll to move the clipping plane to visualize Gleevec inside its binding pocket (see Figure 18). To remove the surfaces, simply H→Hide→Surface for the (sites) selection. Likewise, you can use the (inhibs) selection to change how the inhibitors are displayed. For example, try showing spheres for the (inhibs) se-lection in order to obtain a space−filling view of the inhibitors. Although the input PDB files used to create this ses-sion did not contain bond valence information, PyMOL will generally attempt to guess bond valences for unknown residues. To display those bond valences, select Display→Show Valences from the Upper Control Window. Fig-
Figure 18: Gleevec in its binding pocket. The pocket is rendered as a surface, Gleevec is rendered in sticks, and the rest in lines.
Introduction to PyMOL
15
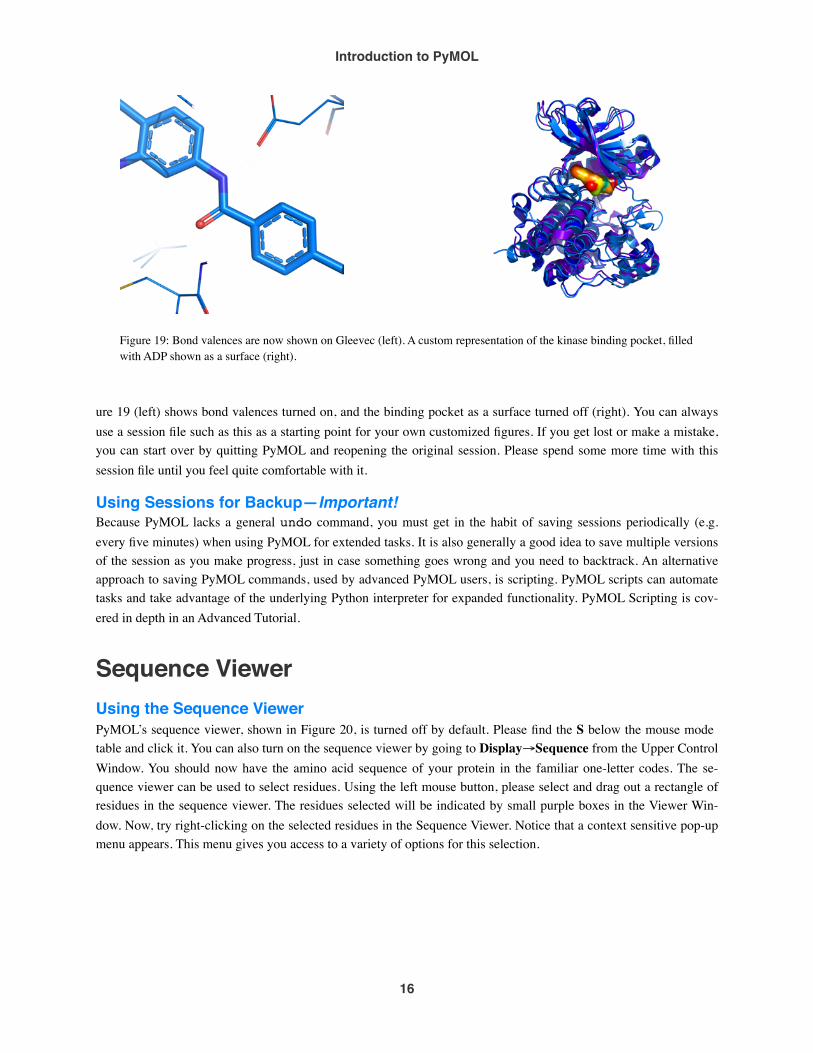
ure 19 (left) shows bond valences turned on, and the binding pocket as a surface turned off (right). You can always use a session file such as this as a starting point for your own customized figures. If you get lost or make a mistake, you can start over by quitting PyMOL and reopening the original session. Please spend some more time with this session file until you feel quite comfortable with it.
Using Sessions for Backup—Important!Because PyMOL lacks a general undo command, you must get in the habit of saving sessions periodically (e.g. every five minutes) when using PyMOL for extended tasks. It is also generally a good idea to save multiple versions of the session as you make progress, just in case something goes wrong and you need to backtrack. An alternative approach to saving PyMOL commands, used by advanced PyMOL users, is scripting. PyMOL scripts can automate tasks and take advantage of the underlying Python interpreter for expanded functionality. PyMOL Scripting is cov-ered in depth in an Advanced Tutorial.
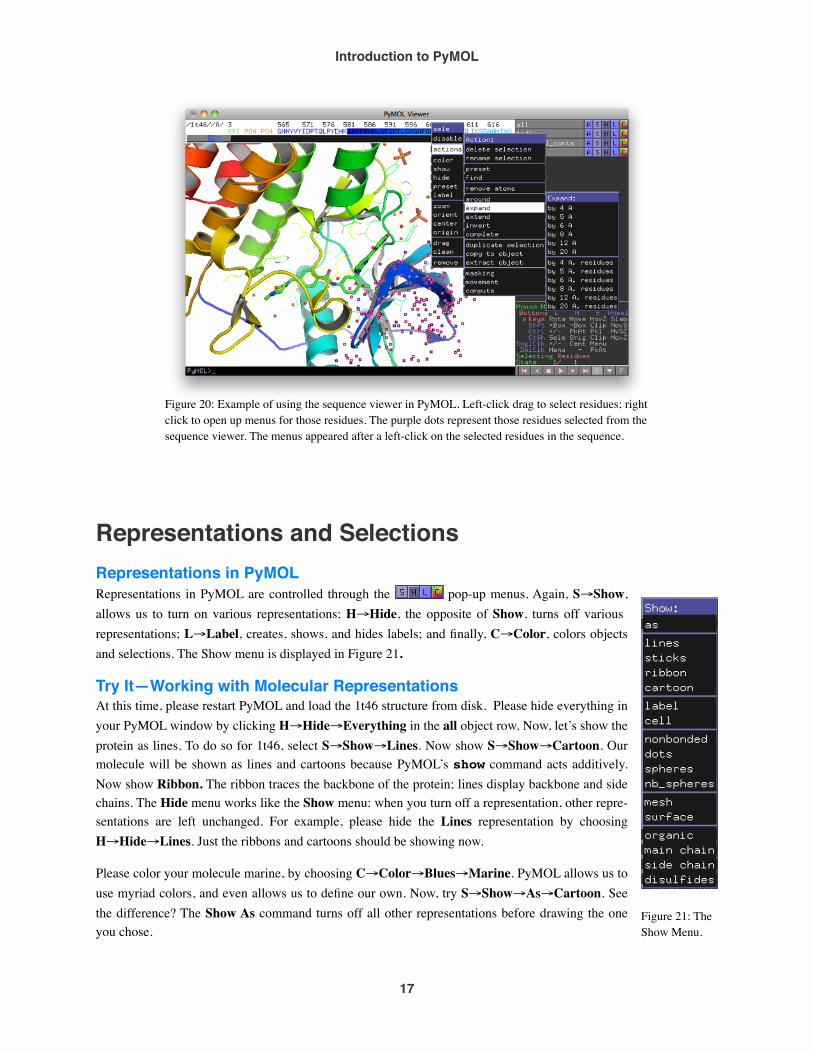
Sequence ViewerUsing the Sequence ViewerPyMOL’s sequence viewer, shown in Figure 20, is turned off by default. Please find the S below the mouse mode table and click it. You can also turn on the sequence viewer by going to Display→Sequence from the Upper Control Window. You should now have the amino acid sequence of your protein in the familiar one-letter codes. The se-quence viewer can be used to select residues. Using the left mouse button, please select and drag out a rectangle of residues in the sequence viewer. The residues selected will be indicated by small purple boxes in the Viewer Win-dow. Now, try right-clicking on the selected residues in the Sequence Viewer. Notice that a context sensitive pop-up menu appears. This menu gives you access to a variety of options for this selection.
Figure 19: Bond valences are now shown on Gleevec (left). A custom representation of the kinase binding pocket, filled with ADP shown as a surface (right).
Introduction to PyMOL
16
Representations and SelectionsRepresentations in PyMOLRepresentations in PyMOL are controlled through the pop-up menus. Again, S→Show, allows us to turn on various representations; H→Hide, the opposite of Show, turns off various representations; L→Label, creates, shows, and hides labels; and finally, C→Color, colors objects and selections. The Show menu is displayed in Figure 21.
Try It—Working with Molecular RepresentationsAt this time, please restart PyMOL and load the 1t46 structure from disk. Please hide everything in your PyMOL window by clicking H→Hide→Everything in the all object row. Now, let’s show the protein as lines. To do so for 1t46, select S→Show→Lines. Now show S→Show→Cartoon. Our molecule will be shown as lines and cartoons because PyMOL’s show command acts additively. Now show Ribbon. The ribbon traces the backbone of the protein; lines display backbone and side chains. The Hide menu works like the Show menu: when you turn off a representation, other repre-sentations are left unchanged. For example, please hide the Lines representation by choosing H→Hide→Lines. Just the ribbons and cartoons should be showing now.
Please color your molecule marine, by choosing C→Color→Blues→Marine. PyMOL allows us to use myriad colors, and even allows us to define our own. Now, try S→Show→As→Cartoon. See the difference? The Show As command turns off all other representations before drawing the one you chose.
Figure 20: Example of using the sequence viewer in PyMOL. Left-click drag to select residues; right click to open up menus for those residues. The purple dots represent those residues selected from the sequence viewer. The menus appeared after a left-click on the selected residues in the sequence.
Figure 21: The Show Menu.
Introduction to PyMOL
17
Please note that the Surface and Mesh representations can take a long time to generate for large molecules. Try S→Show→As→Surface to see your protein as a surface.
The Show and Hide commands operate on the entire molecule. But, many times when working with molecular structures, we wish to show some portion of the structure in one representation (eg. the ligand as sticks) and then show another portion in another representation (eg. the binding pocket as a surface). Well, we can do that in PyMOL using Selections.
Understanding SelectionsSelections in PyMOL are just sets of atoms that you define, and do not have any properties of their own other than a name. Selection names appear in the viewer window surrounded by parentheses, as in (sele), to distinguish them from objects. Objects are proteins, molecules, and other entities in PyMOL’s memory, whereas selections are just listings of atoms in those objects. You can turn selection indicators on and off by clicking their names in the Viewer Window just as you do for objects, except that only one selection can be turned on, or enabled, at a time. Atoms in enabled selections are shown in the Display Area with purple boxes over their atom centers. To deselect atoms when in viewing mode, just left click away from any atoms in the Display Area, click the selection name, or click Deselect in the Upper Control Window.
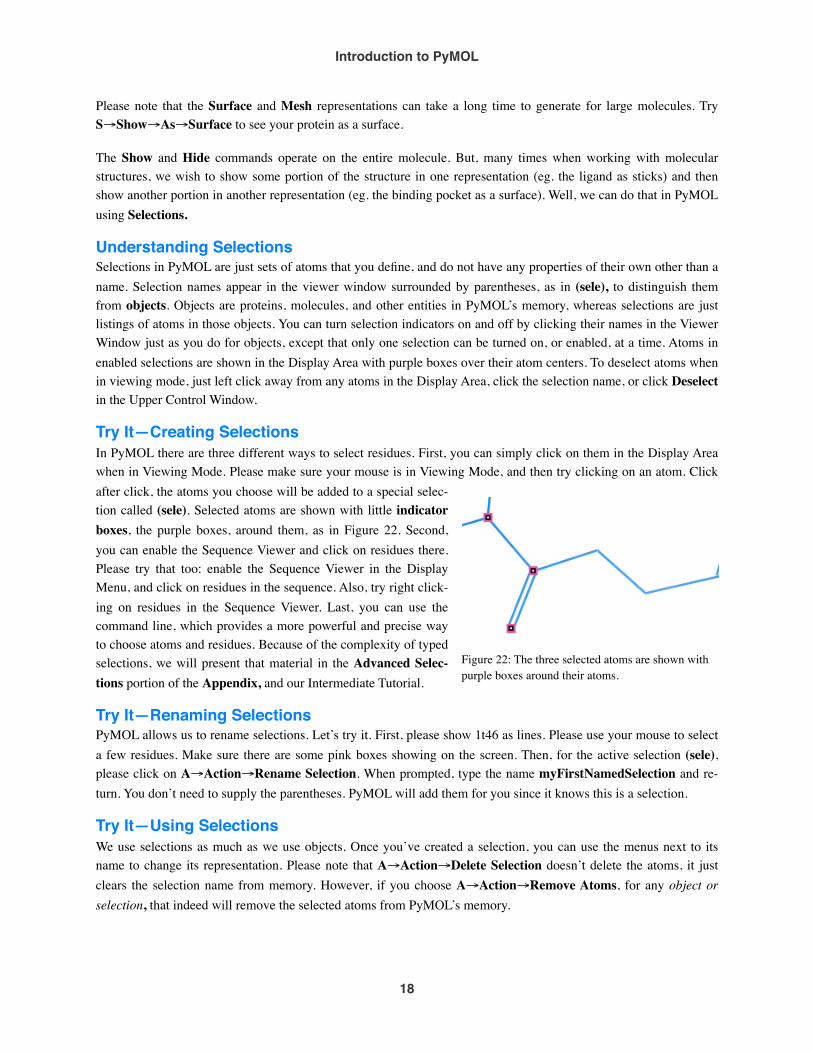
Try It—Creating SelectionsIn PyMOL there are three different ways to select residues. First, you can simply click on them in the Display Area when in Viewing Mode. Please make sure your mouse is in Viewing Mode, and then try clicking on an atom. Click after click, the atoms you choose will be added to a special selec-tion called (sele). Selected atoms are shown with little indicator boxes, the purple boxes, around them, as in Figure 22. Second, you can enable the Sequence Viewer and click on residues there. Please try that too: enable the Sequence Viewer in the Display Menu, and click on residues in the sequence. Also, try right click-ing on residues in the Sequence Viewer. Last, you can use the command line, which provides a more powerful and precise way to choose atoms and residues. Because of the complexity of typed selections, we will present that material in the Advanced Selec-tions portion of the Appendix, and our Intermediate Tutorial.
Try It—Renaming SelectionsPyMOL allows us to rename selections. Let’s try it. First, please show 1t46 as lines. Please use your mouse to select a few residues. Make sure there are some pink boxes showing on the screen. Then, for the active selection (sele), please click on A→Action→Rename Selection. When prompted, type the name myFirstNamedSelection and re-turn. You don’t need to supply the parentheses. PyMOL will add them for you since it knows this is a selection.
Try It—Using SelectionsWe use selections as much as we use objects. Once you’ve created a selection, you can use the menus next to its name to change its representation. Please note that A→Action→Delete Selection doesn’t delete the atoms, it just clears the selection name from memory. However, if you choose A→Action→Remove Atoms, for any object or selection, that indeed will remove the selected atoms from PyMOL’s memory.
Figure 22: The three selected atoms are shown with purple boxes around their atoms.
Introduction to PyMOL
18
Let’s try a few actions with selections. First, let’s select all the waters and delete them. To do this, turn on the Se-quence Viewer and then scroll to the end of the sequence. Select all the O residues by left clicking and dragging with the mouse. Remember mouse selections are additive so, to select all the waters you can, slide the rest into the Viewer using the grey slider box under the sequence, and then select those, too. Once you’ve selected all of the wa-ters, please remove them by selecting A→Action→Remove Atoms, for the selection (sele). Please also delete the selection we made earlier called myFirstSelection. (Hint: an easier way to remove waters is to select A→Action→Remove Waters.)
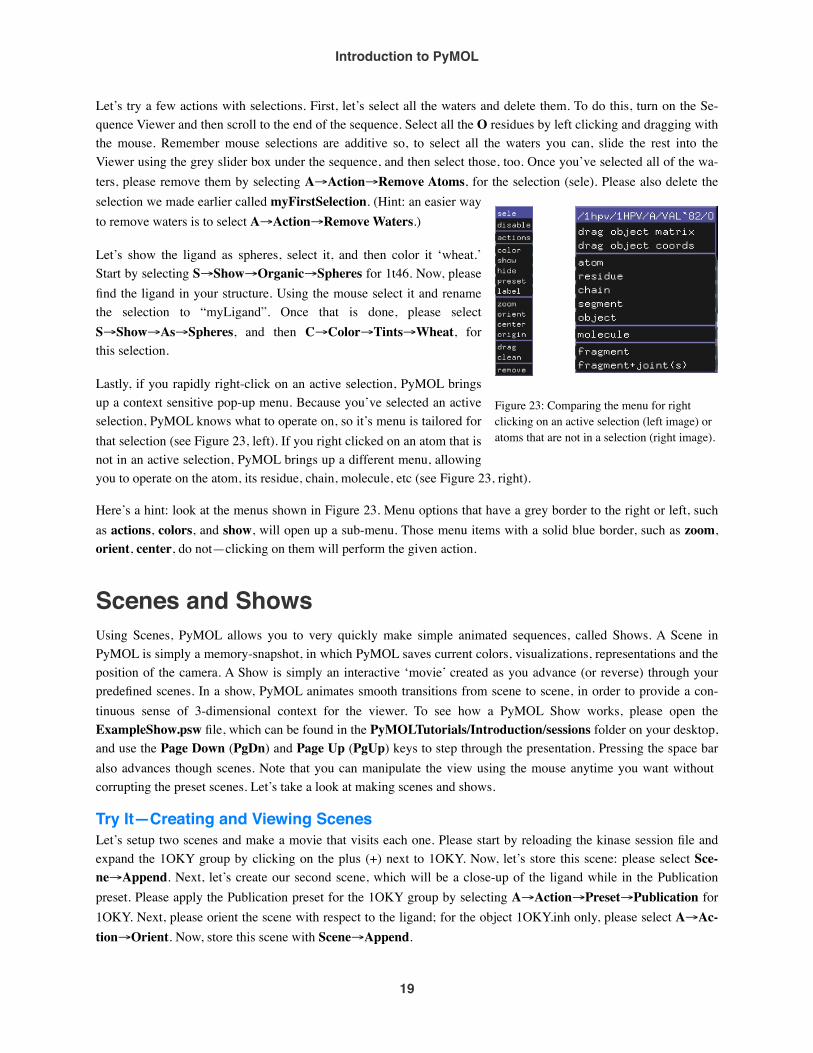
Let’s show the ligand as spheres, select it, and then color it ‘wheat.’ Start by selecting S→Show→Organic→Spheres for 1t46. Now, please find the ligand in your structure. Using the mouse select it and rename the selection to “myLigand”. Once that is done, please select S→Show→As→Spheres, and then C→Color→Tints→Wheat, for this selection.
Lastly, if you rapidly right-click on an active selection, PyMOL brings up a context sensitive pop-up menu. Because you’ve selected an active selection, PyMOL knows what to operate on, so it’s menu is tailored for that selection (see Figure 23, left). If you right clicked on an atom that is not in an active selection, PyMOL brings up a different menu, allowing you to operate on the atom, its residue, chain, molecule, etc (see Figure 23, right).
Here’s a hint: look at the menus shown in Figure 23. Menu options that have a grey border to the right or left, such as actions, colors, and show, will open up a sub-menu. Those menu items with a solid blue border, such as zoom, orient, center, do not—clicking on them will perform the given action.
Scenes and ShowsUsing Scenes, PyMOL allows you to very quickly make simple animated sequences, called Shows. A Scene in PyMOL is simply a memory-snapshot, in which PyMOL saves current colors, visualizations, representations and the position of the camera. A Show is simply an interactive ‘movie’ created as you advance (or reverse) through your predefined scenes. In a show, PyMOL animates smooth transitions from scene to scene, in order to provide a con-tinuous sense of 3-dimensional context for the viewer. To see how a PyMOL Show works, please open the ExampleShow.psw file, which can be found in the PyMOLTutorials/Introduction/sessions folder on your desktop, and use the Page Down (PgDn) and Page Up (PgUp) keys to step through the presentation. Pressing the space bar also advances though scenes. Note that you can manipulate the view using the mouse anytime you want without corrupting the preset scenes. Let’s take a look at making scenes and shows.
Try It—Creating and Viewing ScenesLet’s setup two scenes and make a movie that visits each one. Please start by reloading the kinase session file and expand the 1OKY group by clicking on the plus (+) next to 1OKY. Now, let’s store this scene: please select Sce-ne→Append. Next, let’s create our second scene, which will be a close-up of the ligand while in the Publication preset. Please apply the Publication preset for the 1OKY group by selecting A→Action→Preset→Publication for 1OKY. Next, please orient the scene with respect to the ligand; for the object 1OKY.inh only, please select A→Ac-tion→Orient. Now, store this scene with Scene→Append.
Figure 23: Comparing the menu for right clicking on an active selection (left image) or atoms that are not in a selection (right image).
Introduction to PyMOL
19
As this demonstrates, to create a scene we start by positioning molecules, coloring them, setting their representations and getting the screen to look exactly as desired. Then, to store the scene and assign it a name, we click Sce-ne→Append in the Upper Control Window. PyMOL automatically assigns a name to the Scene, which we need to refer to it (eg. “001”). And, now that two or more scenes have been defined, we can switch between them with Scene→Previous/Next.
Please use Scene→Previous now to return to the first scene. If you prefer, you can also use the Page Down (Pg-Dn) and Page Up (PgUp) keys to advance forward or retreat backward through the sequence of scenes. Also note that pressing CTRL−PgDn will insert a new scene after the current one, and CTRL−PgUp will insert a new scene before the current one.
Modifying, Annotating and Saving Scenes in a SessionThe last scene displayed can be updated by selecting Scene→Update from the Upper Control Window. You can also add textual annotation to the current scene via a typed command such as scene auto, update, Some an-notation information. This will display "Some annotation information" on the screen the next time the scene is recalled. When you save a PyMOL Session, all of the scenes you have defined will be saved as well. You can then share the session file with a collaborator, and he or she will be able to open up the session file into PyMOL and view the sequence of scenes you defined.
Creating Shows and Interconverting with SessionsA Show File is simply a PyMOL Session file that contains one or more scenes and is saved with a .psw file name extension instead of the normal .pse. When a .psw file is opened, PyMOL automatically enters full−screen mode and displays the first scene in the sequence. To convert a Session to a Show, change the .pse file name extension to .psw. To convert a PyMOL Show back to a Session, change the .psw back to .pse. If you are using Microsoft Windows and cannot see the file name extension, then it may be hidden per the Windows default. To change this, click on Tools→Folder Options from the menu of the enclosing Microsoft Windows folder. Ensure that View→Hide exten-sions for known file types option is not checked.
Creating MoviesIntroductionMovies tell stories better than static images, but complex movies can be difficult and time-consuming to create. Here, we cover the absolute basics. DeLano Scientific will soon offer additional tutorials focused on intermediate and advanced moviemaking.
Please find the Movie menu in the Upper Control Window. Take a moment to scan through all the options and sub-menus.
Movie→Append will add a given number of seconds to a movie, but will not program any content for the new time. Movie→Program will program a given movie task for a new time of a given duration. PyMOL comes with some pre-programmed animations. Just select Movie→Program and then choose from Camera Loop, Scene Loop, State Loop or State Sweep. Camera loops are animations in which the camera pans around a given scenein a rocking, rolling or combined motion. This is a nice way to visualize a pocket or a simple structure. Other camera loops are x-rock, x-roll, y-rock and y-roll. A roll is a complete 360 degree rotation about a given axis. A rock is a back-and-forth
Introduction to PyMOL
20
rocking motion. If your movie gets too long, or is not what you want, just select Movie→Reset from the Upper Control Window.
Try It—Make a Movie using Scenes and Movie PresetsLet’s use the Movie→Program submenus to make a movie. We already set up our two scenes in the last section (Scenes and Shows). Now we will have PyMOL cycle through those two scenes in a Scene Loop movie. A scene loop essentially stitches together all your scenes with a predefined pause at each scene transition. Let’s make our movie now by selecting, Movie→Program→Scene Loop→Nutate→2 Seconds Each. To watch the movie, press the Play button in the movie controls (lower right of the Viewer Window).
Before moving on, please clear any movies you have made by selecting Movie→Reset from the Upper Control Window. Also, please disable all objects except for the first two proteins, 1OKY.prt and 1Z5M.prt.
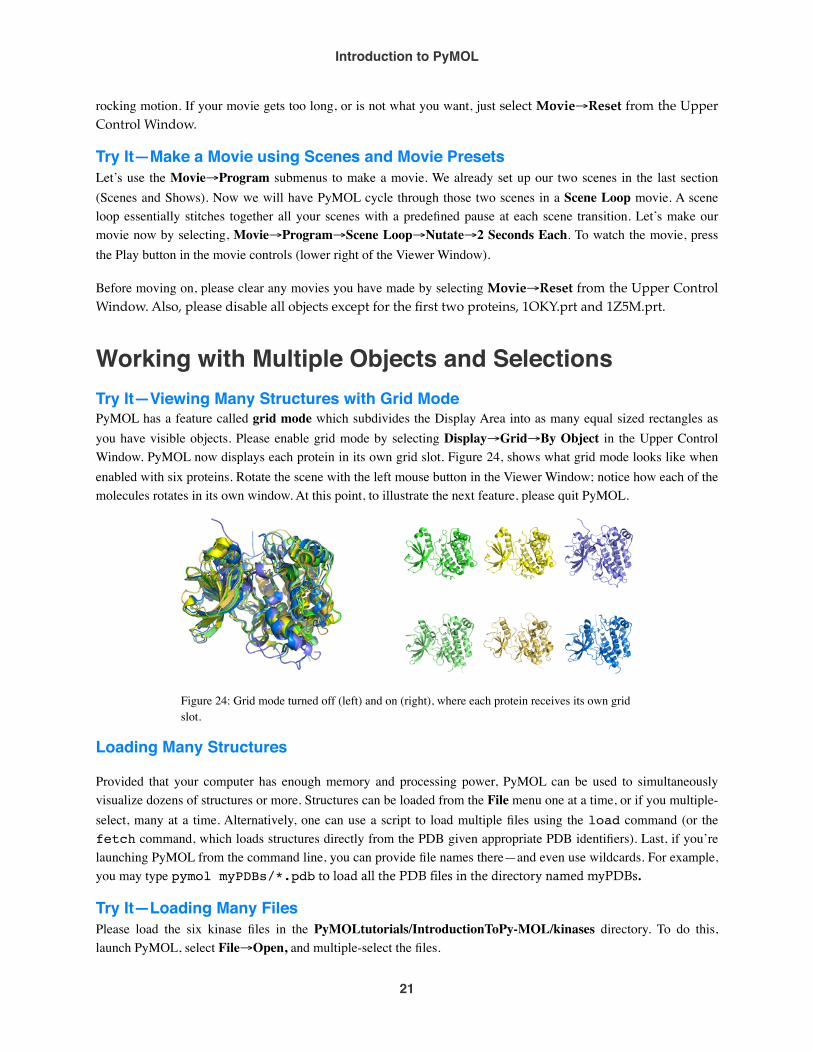
Working with Multiple Objects and SelectionsTry It—Viewing Many Structures with Grid ModePyMOL has a feature called grid mode which subdivides the Display Area into as many equal sized rectangles as you have visible objects. Please enable grid mode by selecting Display→Grid→By Object in the Upper Control Window. PyMOL now displays each protein in its own grid slot. Figure 24, shows what grid mode looks like when enabled with six proteins. Rotate the scene with the left mouse button in the Viewer Window; notice how each of the molecules rotates in its own window. At this point, to illustrate the next feature, please quit PyMOL.
Loading Many Structures
Provided that your computer has enough memory and processing power, PyMOL can be used to simultaneously visualize dozens of structures or more. Structures can be loaded from the File menu one at a time, or if you multiple-select, many at a time. Alternatively, one can use a script to load multiple files using the load command (or the fetch command, which loads structures directly from the PDB given appropriate PDB identifiers). Last, if you’re launching PyMOL from the command line, you can provide file names there—and even use wildcards. For example, you may type pymol myPDBs/*.pdb to load all the PDB files in the directory named myPDBs.
Try It—Loading Many FilesPlease load the six kinase files in the PyMOLtutorials/IntroductionToPy-MOL/kinases directory. To do this, launch PyMOL, select File→Open, and multiple-select the files.
Figure 24: Grid mode turned off (left) and on (right), where each protein receives its own grid slot.
Introduction to PyMOL
21

AlignmentsSequence BasedPyMOL can perform sequence-driven structure alignment through the A→Action→Align menu, shown in Figure 25. You can align all proteins to a currently selected one (A→Action→Align→All to this), or align proteins one by one (A→Action→Align→To Molecule). Finer control over the alignment process can be exer-cised by creating selections that represent the two regions to be aligned. In this case, one selection (e.g. sel01) should be created in the target molecule and a second independent selection (e.g. sel02) should be created in the molecule to be aligned. Then for selection sel02, you click on the A→Action→Align→To Selection→sel01 to perform a superposition based on only those two regions. Alignments performed using the A→Action menu are based on a protein sequence alignment followed by an interactive structure superposition, and only the CA atom positions are considered. Greatest control over alignment can be exercised by typing an align command in the command line. For example, the kinase structure 1uwh actually contains two copies of the enzyme, chains A and B, whereas 1t46 only contains one copy. The default align-ment of 1t46 and 1uwh matches only the 1uwh B chain. To force alignment of 1t46 against the "A" chain of 1uwh, type the follow-ing command: align 1t46////CA, 1uwh//A//CA. This command uses selection macros, which are discussed in the Advanced Features at the end of this tutorial. PyMOL comes with a more robust alignment command called super. Use super if align doesn’t do so well.
Try It—Quickly Align Multiple Structures to One TargetLet’s align all of the kinase proteins in our session to 1Z5M. For 1Z5M, choose A→Action→Align→All to this. All enabled proteins should now be aligned to 1Z5M. To see the alignment more clearly, please select S→Show→As→Ribbon.
Specific Atom PairsSometimes we don’t want a global alignment of two proteins, but rather, an alignment based on specific atom pairs. If you already know which atoms in protein A should be matched with which atoms in protein B, then you can use a fitting procedure instead of an alignment procedure. The difference is that fitting is an easy problem to solve, and PyMOL can fit perfectly. In fact, there’s a wizard to help us with fitting.
Figure 25: To perform a structure alignment, choose A→Action→Align, as shown in this screenshot.
Introduction to PyMOL
22
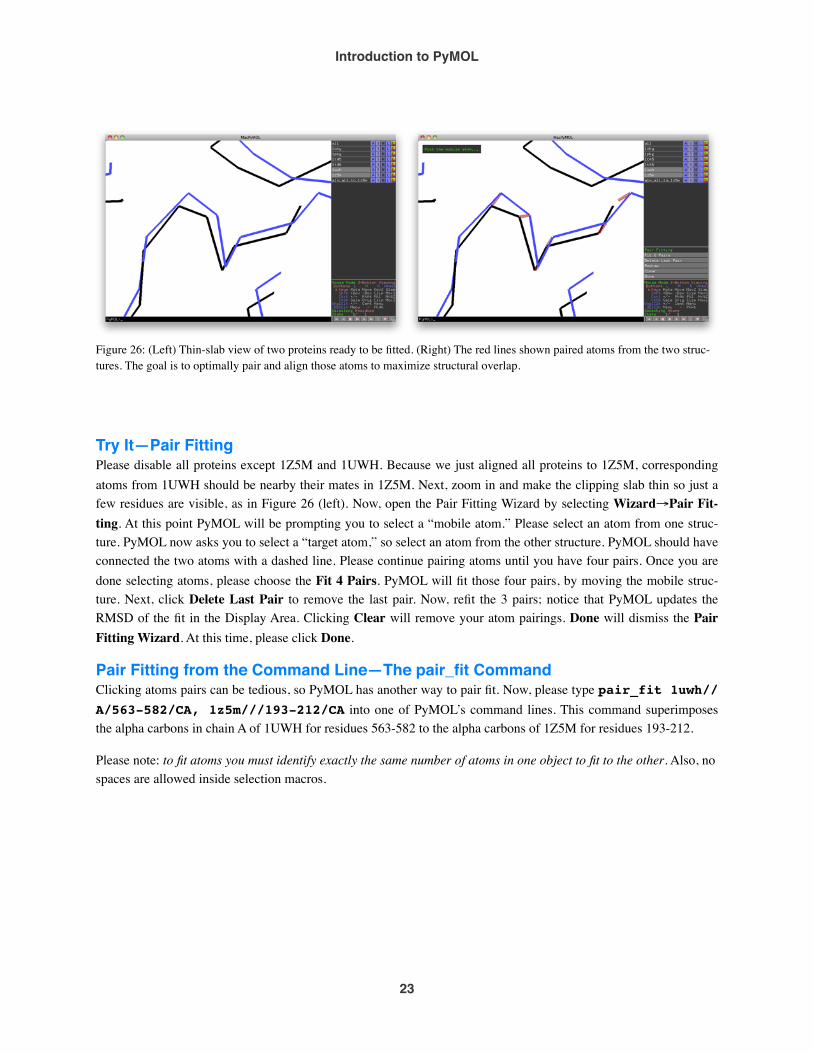
Try It—Pair FittingPlease disable all proteins except 1Z5M and 1UWH. Because we just aligned all proteins to 1Z5M, corresponding atoms from 1UWH should be nearby their mates in 1Z5M. Next, zoom in and make the clipping slab thin so just a few residues are visible, as in Figure 26 (left). Now, open the Pair Fitting Wizard by selecting Wizard→Pair Fit-ting. At this point PyMOL will be prompting you to select a “mobile atom.” Please select an atom from one struc-ture. PyMOL now asks you to select a “target atom,” so select an atom from the other structure. PyMOL should have connected the two atoms with a dashed line. Please continue pairing atoms until you have four pairs. Once you are done selecting atoms, please choose the Fit 4 Pairs. PyMOL will fit those four pairs, by moving the mobile struc-ture. Next, click Delete Last Pair to remove the last pair. Now, refit the 3 pairs; notice that PyMOL updates the RMSD of the fit in the Display Area. Clicking Clear will remove your atom pairings. Done will dismiss the Pair Fitting Wizard. At this time, please click Done.
Pair Fitting from the Command Line—The pair_fit CommandClicking atoms pairs can be tedious, so PyMOL has another way to pair fit. Now, please type pair_fit 1uwh//A/563-582/CA, 1z5m///193-212/CA into one of PyMOL’s command lines. This command superimposes the alpha carbons in chain A of 1UWH for residues 563-582 to the alpha carbons of 1Z5M for residues 193-212.
Please note: to fit atoms you must identify exactly the same number of atoms in one object to fit to the other. Also, no spaces are allowed inside selection macros.
Figure 26: (Left) Thin-slab view of two proteins ready to be fitted. (Right) The red lines shown paired atoms from the two struc-tures. The goal is to optimally pair and align those atoms to maximize structural overlap.
Introduction to PyMOL
23

Editing Molecular ObjectsPyMOL allows you to create and replace bonds, atoms, residues, and commonly used chemical groups. After modi-fication, you can clean the structure using an open-source implementation of the Merck Molecular Force Field (MMFF).
Removing Unwanted AtomsPyMOL provides a quick way of removing waters or hydrogens, by simply clicking A→Actions→Remove Waters or Remove Hydrogens, shown in Figure 27. You can also remove a specific atom, residue, chain, segment, or covalent molecule from a molecular object by right-clicking on an unselected atom in the graphics area to display the atom's default pop-up menu, following the desired level in the hierarchy, and then choosing remove atoms. Selections can also be used to remove groups of atoms. To do this, create a selection consisting of those atoms that you wish to remove, and then choose A→Actions→Remove Atoms for that selection. Finally, you can type the re-move command to specifically eliminate a specified set of atoms. For example, to re-move chains B and Y in PDB structure 1uwh, one could enter the following command: remove /1uwh//B+Y. Please try removing all waters from these proteins.
Changing Bond ValencesOne of the problem with PDB files is that they do not contain bond valences for ligands. As a consequence, it is not possible to display correct chemistry for ligands. PyMOL may not always recognize the correct hydrogen-bonding interactions between proteins and ligands until the valences have been properly specified.
Try It—Changing Bond Valences
To edit bond valences on a Windows PC, please click on the Builder button in Upper Control Window. Next, CTRL−Right-click to pick the bond whose valence you wish to change. You should see a white band appear about the bond as in Figure 28. Please cycle through the available bond valences by clicking on the Cycle button in the Builder area of the Upper Control Window, or by pressing CTRL−W on your keyboard. Once you have set the correct valence for that bond, you can CTRL−right−click to select the next bond to fix, continuing until all va-lences have been fixed. Note that PyMOL adds missing hydrogens to the atoms involved in the bond. If hydrogens are not desired, use A→Actions→Remove Hydrogens for the object, after correcting all of the bond valences.
Figure 28: Cycling valences. First, select the bond with CTRL-right-click. Then type cycle_valence at the command line or click Cycle in the Builder. Notice the automatic addition of hydrogens. If they are not desired, you can remove them after setting the valence.
Figure 28: Cycling valences. First, select the bond with CTRL-right-click. Then type cycle_valence at the command line or click Cycle in the Builder. Notice the automatic addition of hydrogens. If they are not desired, you can remove them after setting the valence.
Figure 28: Cycling valences. First, select the bond with CTRL-right-click. Then type cycle_valence at the command line or click Cycle in the Builder. Notice the automatic addition of hydrogens. If they are not desired, you can remove them after setting the valence.
Figure 27: How to easily remove waters or hydro-gens.
Introduction to PyMOL
24
Advanced Feature Previews
Label CustomizationIntroductionIn addition to labeling atoms based on identifiers and properties, PyMOL supports custom labels with arbitrary text. Here, we will touch on a few useful ideas. To get the most out of this, you should be comfortable with typing com-mands in the command line and also making named selection (either with the mouse or from the command line).
Setting the LabelYou can label a selection by clicking L→Label and then choose the appropriate label type desired. To make a cus-tom label, however, you need to type commands into the PyMOL command line. Basic labeling is accomplished by typing in the command line label selectionName, labelText and return, where selectionName is any valid PyMOL selection or selection name, and labelText is the string or keyword you want to use as the la-bel. PyMOL will also accept interpreted strings as well (see the intermediate Tutorial or PyMOLWiki for more de-tails). An example label command is label name CA, resn, which labels each alpha carbon with the three letter code of the amino acid it which it resides. Other keywords of interest are: resi, and b. Resi is the residue number and b is the b-factor.
Now that we know how to make more advanced labels, let’s learn how to customize them using PyMOLs options for labels. This requires using the set command at the command line.
Label ColorYou can set label_color in PyMOL to any valid PyMOL color, for example by typing: set label_color, blue. Colors can be valid PyMOL color names, found in the color menus for each object or selection. Label Size
You can change the size of the label with set label_size, nSize, where nSize is a number representing the size of the label. If nSize is positive then the label is rendered at a size of n points (72 points/inch). However if nSize is less than 0, it is converted to the absolute value and the label is rendered in that many Angstroms. For example, to render a 14 point font, set label_size, 14; to set labels to be 2 Angstroms (big), set la-bel_size, -2.
Label Font and Extended Unicode CharactersPyMOL supports Unicode fonts to display characters such as α, β and Å. To use Unicode characters you need to know the correct character code for your symbol; please visit http://unicode.org/charts/symbols.html for the list of codes. Once you know the proper code, for this example it is \316\261, you can issue the label command: la-bel 5/CA, "\316\261-Helix" will print “α-Helix” on the 5th atom’s alpha carbon. PyMOL allows us to change the font that our labels are rendered in. For that, use set label_font_id, nLabel, where nLabel is an integer in the rage 5-15. To use Unicode fonts, first set the PyMOL option label_font_id to 15 or 16.
Label PositionIn Editing Mode, you can CTRL-Left-drag labels around your scene. Use CTRL-Right-drag to move the label toward or away from the camera. This is a useful feature as many time a surface or structural feature will hide a label.
Introduction to PyMOL
25
Saving CoordinatesPyMOL has a limited ability to write out coordinates for input into other programs. The interchange file formats supported are: PDB (Protein Data Bank), MOL (MDL MOL-file), and MMD (Macromodel). PyMOL can also save molecules in an internal PKL (Pickle) file format, which is able to preserve all of the molecular information, includ-ing bond valences and atomic properties, something none of the other file formats do well. To save a molecule, first make sure that the atoms you wish to save are contained in either a distinct object or are pointed to by a named se-lection. Then choose File→Save Molecule..., pick the name of the object or selection in the next window, and enter the filename. Add the correct file name extension is appended to the file name (e.g. ".pdb"), and then click Save.
Probing ElectrostaticsQuantitative electrostatics calculations are typically difficult and time-consuming to perform. They require the spe-cialist skills of a computational chemist to carefully consider missing protein segments and side chain atoms, histi-dine ionization, and the presence of specific counter-ions from bulk solvent. Furthermore, calculations involving ligands usually require high-level quantum calculations to obtain reasonable atomic partial charges for novel scaf-folds. Assuming that such issues have been addressed, PyMOL can call upon the Adaptive Poisson-Boltzmann Solver (APBS) under a Unix environment to perform quantitative electrostatic calculations. The program can also read pre-calculated potentials from the Grasp, Delphi, or Zap electrostatics solvers.
In lieu of rigorous calculations, a simple, local (but technically incomplete), quasi-Coulombic calculation can often help answer the qualitative question, "Is this region of the protein surface likely to be positive, negative, or neutral relative to the rest of the protein?" PyMOL provides such answers for proteins by performing an automated calcula-tion that amounts to smoothing out the local charge density from nearby atoms (within 10 β ngstroms), without tak-ing into account solvent screening effects. To perform this calculation, select Actions→generate→vacuum electro-statics→protein contact potential. After a minute or two, PyMOL will create a new object with the protein shown as an electrostatic surface colored blue in the positive regions and red the negative regions. You can then CTRL−click−and−drag along the slider to change the color levels.
Atom Selection SyntaxPyMOL has a powerful atom selection language that is covered in-depth in the PyMOL Users Manual. Here we pro-vide some simple example selections that you can hopefully adapt for your needs:
1. To select a numbered residue in a specific object (e.g. 1t46):
! select my_resid, 1t46///640/
2. To select all residues with a given identifier in any object:
! select my_resids, 606/
3. To select specific residues and ranges of residues by identifier:
! select my_range, 601−610/
Introduction to PyMOL
26
! select my_resids, 1t46///602+606+621−631/
4. To select specific residues by residue type:
! select my_negative, 1t46///GLU+ASP/
5. To select specific atoms by name:
! select my_main_chain_atoms, 1t46////N+CA+C
6. To select one or more chains:
! select my_chain, A+B//
! select my_chains, 1uwh//A+B//
7. To select atoms in multiple objects
! select my_object, 1uwh////CA or 1t46////CA
Automating Tasks with ScriptsScripts are text files that contain a sequence of PyMOL commands, and they can be used to perform repetitive tasks automatically. For example, if you wish to prepare a series of standardized figures, but would like to use a different crystal structure for each figure, then it would make sense to use a script to perform some or all of the figure prepara-tion tasks automatically.
To run a script, select File→Run, or type "@" followed by the file name path into a command line. The following example PyMOL command script contains six commands that color and represent the target and ligand in a standard way. To use a different input structure with this script, you would just update the first command in the file with a new PDB filename.
Code 1: Example script to automate figure generation.
# load a PDB fileload kinases/1t46.pdb# show the ligands as space−filling spheres# and show the protein as a cartoonhide everythingshow spheres, organicshow cartoon, polymer# color the protein carbons cyan# and the ligand carbons yellowcolor cyan, polymer and elem ccolor yellow, organic and elem c
In addition to command scripts, PyMOL can also be controlled using the Python programming language, which also makes it possible to create custom applications that integrate PyMOL for molecular visualization.
Introduction to PyMOL
27
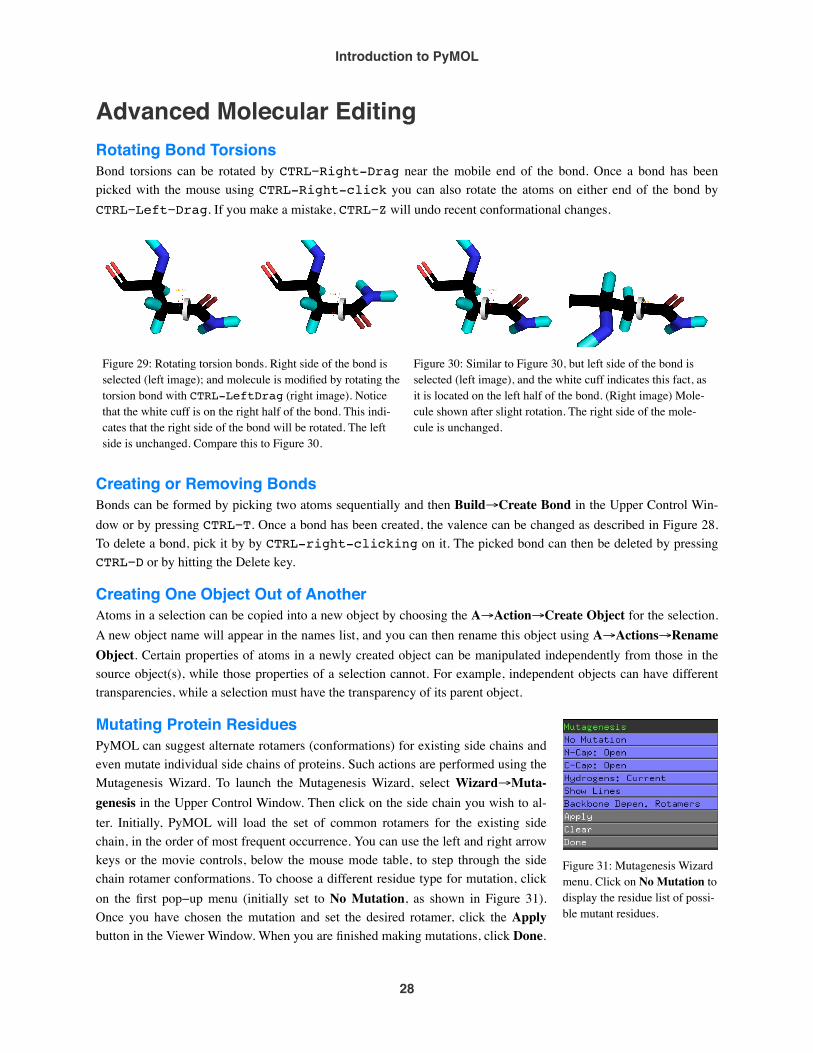
Advanced Molecular EditingRotating Bond TorsionsBond torsions can be rotated by CTRL−Right-Drag near the mobile end of the bond. Once a bond has been picked with the mouse using CTRL-Right-click you can also rotate the atoms on either end of the bond by CTRL−Left−Drag. If you make a mistake, CTRL−Z will undo recent conformational changes.
Figure 29: Rotating torsion bonds. Right side of the bond is selected (left image); and molecule is modified by rotating the torsion bond with CTRL-LeftDrag (right image). Notice that the white cuff is on the right half of the bond. This indi-cates that the right side of the bond will be rotated. The left side is unchanged. Compare this to Figure 30.
Figure 29: Rotating torsion bonds. Right side of the bond is selected (left image); and molecule is modified by rotating the torsion bond with CTRL-LeftDrag (right image). Notice that the white cuff is on the right half of the bond. This indi-cates that the right side of the bond will be rotated. The left side is unchanged. Compare this to Figure 30.
Figure 30: Similar to Figure 30, but left side of the bond is selected (left image), and the white cuff indicates this fact, as it is located on the left half of the bond. (Right image) Mole-cule shown after slight rotation. The right side of the mole-cule is unchanged.
Figure 30: Similar to Figure 30, but left side of the bond is selected (left image), and the white cuff indicates this fact, as it is located on the left half of the bond. (Right image) Mole-cule shown after slight rotation. The right side of the mole-cule is unchanged.
Creating or Removing BondsBonds can be formed by picking two atoms sequentially and then Build→Create Bond in the Upper Control Win-dow or by pressing CTRL−T. Once a bond has been created, the valence can be changed as described in Figure 28. To delete a bond, pick it by by CTRL-right-clicking on it. The picked bond can then be deleted by pressing CTRL−D or by hitting the Delete key.
Creating One Object Out of AnotherAtoms in a selection can be copied into a new object by choosing the A→Action→Create Object for the selection. A new object name will appear in the names list, and you can then rename this object using A→Actions→Rename Object. Certain properties of atoms in a newly created object can be manipulated independently from those in the source object(s), while those properties of a selection cannot. For example, independent objects can have different transparencies, while a selection must have the transparency of its parent object.
Mutating Protein ResiduesPyMOL can suggest alternate rotamers (conformations) for existing side chains and even mutate individual side chains of proteins. Such actions are performed using the Mutagenesis Wizard. To launch the Mutagenesis Wizard, select Wizard→Muta-genesis in the Upper Control Window. Then click on the side chain you wish to al-ter. Initially, PyMOL will load the set of common rotamers for the existing side chain, in the order of most frequent occurrence. You can use the left and right arrow keys or the movie controls, below the mouse mode table, to step through the side chain rotamer conformations. To choose a different residue type for mutation, click on the first pop−up menu (initially set to No Mutation, as shown in Figure 31). Once you have chosen the mutation and set the desired rotamer, click the Apply button in the Viewer Window. When you are finished making mutations, click Done.
Figure 31: Mutagenesis Wizard menu. Click on No Mutation to display the residue list of possi-ble mutant residues.
Introduction to PyMOL
28
Next Steps
Other CoursesCongratulations on finishing the Introduction to PyMOL tutorial. We hope you enjoyed the lesson and are motivated to use PyMOL for your molecular visualization, movie-making, scripting, and editing tasks. This isn’t the end, though: DeLano Scientific will soon have other courses available covering Intermediate Topics, Scripting/Programming, Moviemaking, and Molecular Editing and Cleanup. Please contact us for more information on those courses via [email protected].
Joining the PyMOL−Users Mailing ListAs of Summer 2009, well over 1,000 PyMOL users subscribe to the pymol−users mailing list, which is where the community exchanges tips on how to use the software effectively and how to solve any problems that come up. To join the mailing list, please click on the Mailing List link that appears at the top of the PyMOL Home Page, (http://www.pymol.org). Or, to quickly search the mailing list archives for posts on a specific topic, click the Mailing List Archive link.
Visiting the PyMOLWiki Community Web SiteThe community also runs a "Wiki" dynamic content site that aggregates information from the mailing list and pro-vides other kinds of PyMOL−related documentation (http://www.pymolwiki.org). PyMOLWiki users can create their own pymol−related pages, on this site or elaborate upon useful information that is already posted. The site boasts over 1,000 users, over 3,000,000 page views, is typically accessed between 3,000–4,000 times a day, and has many useful scripts, plugins and tutorials free for download.
Accessing the Official Documentation SitePyMOL subscribers access DeLano Scientific’s Official Documentation site (http://delsci.info) using the subscription credentials shown from their most recent PyMOL receipt. This site contains the latest chapters from an updated PyMOL Manual, an assortment of narrated ScreenCasts, and plenty of reference information to help users on their way becoming PyMOL experts.
Introduction to PyMOL
29