Embed Size (px)
Citation preview

Chapter 27 Introduction to AutoLISP AutoCAD and Its Applications—Advanced 695Copyright by Goodheart-Willcox Co., Inc.
Chapter Chapter
Introduction to AutoLISP
Learning ObjectivesAfter completing this chapter, you will be able to:
✓ Use basic AutoLISP functions on the command line. ✓ Locate, load, and run existing AutoLISP programs. ✓ Defi ne new AutoCAD commands. ✓ Write AutoLISP programs using the Visual LISP Editor.
What Is AutoLISP?
AutoLISP is a derivative, or dialect, of the LISP programming language. LISP, which is an acronym for list processing, is a high-level computer programming language used in artifi cial intelligence (AI) systems. In this reference, the term high-level does not mean complex, rather it means powerful. As a matter of fact, many AutoCAD users refer to AutoLISP as the “nonprogrammer’s language” because it is easy to understand.
AutoLISP is specially designed by Autodesk to work with AutoCAD. It is a fl exible language that allows the programmer to create custom commands and functions that can greatly increase productivity and drawing effi ciency.
Knowing the basics of AutoLISP gives you a better understanding of how AutoCAD works. By learning just a few simple functions, you can create new commands that make a signifi cant difference in your daily productivity. Read through this chapter slowly while you are at a computer. Type all of the examples and exercises as you read them. This is the best way to get a feel for AutoLISP.
AutoLISP and AutoCADAutoLISP can be used in several ways. It is a built-in feature of AutoCAD and,
therefore, available on the command line. When AutoLISP commands and functions are issued inside of parentheses on the command line, the AutoLISP interpreter auto-matically evaluates the entry and carries out the specifi ed tasks. AutoLISP functions can also be incorporated into AutoCAD as buttons, menu items, and tablet menu picks.
WWhaat Is AuutooLIISPP?

Chapter 27 Introduction to AutoLISP AutoCAD and Its Applications—Advanced 696Copyright by Goodheart-Willcox Co., Inc.
AutoCAD also provides an integrated development environment for editing called Visual LISP. Visual LISP and the Visual LISP Editor offer powerful features designed specifi cally for writing and editing AutoLISP programs.
The benefi ts of using AutoLISP are endless. A person with a basic understanding of AutoLISP can create new commands and functions to automate many routine tasks. After working through this chapter, you will be able to add greater capabilities to your menu macros. You can also enter simple AutoLISP expressions on the command line. More experienced programmers can create powerful programs that quickly complete very complex design requirements. Examples of possible new functions that might be designed using AutoLISP include:
• Automatic line breaks when inserting schematic symbols.• Automatic creation of shapes with associated text objects.• Parametric design applications that create geometry based on numeric entry.
AutoLISP BasicsAs stated earlier, LISP stands for list processing, which indicates that AutoLISP
processes lists. In the LISP language, a list can be defi ned as any number of data enclosed in parentheses. Each item in a list must be separated from other items by a space.
When any entry is made on the command line, it is checked to see if the fi rst character is a parenthesis. The opening parenthesis tells AutoCAD that an AutoLISP expression is being entered. AutoCAD then sends the expression to the AutoLISP interpreter for evaluation. The initial input can be supplied as direct keyboard entry or even a menu macro. The format for an AutoLISP expression, called syntax, is:
(FunctionName AnyRequiredData…)
The fi rst item in an AutoLISP expression is a function name. A function in AutoLISP is similar to a command in AutoCAD. Some functions require additional information. For example, the addition function requires numeric data:
Command: (+ 2 4)↵6Command:
Any required or optional data for a function are called the arguments. Some func-tions use no arguments; others may require one or more. When entering an AutoLISP expression, it is important to close it using a closing parenthesis prior to pressing [Enter]. When you press [Enter], the AutoLISP interpreter checks to see that the number of opening and closing parentheses match. If they do not, you are prompted:
Command: (+ 2 4↵(_>
The (_> prompt indicates that you are missing one closing parenthesis. In this example, all that is necessary is to enter the single missing parenthesis and the func-tion is complete.
(_> )↵6Command:
Chapter 27 Introduction to AutoLISP AutoCAD and Its Applications—Advanced 697Copyright by Goodheart-Willcox Co., Inc.
When the AutoLISP interpreter evaluates an AutoLISP expression, it returns a value. An expression entered on the command line instructs the system to return its result to the command line, such as 6 in the previous example. If a different prompt is active, the returned value is used as input for that prompt. For example, this next sequence uses the result of adding two numbers as the input at the Specify radius of circle or [Diameter]: prompt. Checking the CIRCLERAD system variable verifi es that the value returned by AutoLISP was in fact applied to the circle radius.
Command: C or CIRCLE↵Specify center point for circle or [3P/2P/Ttr (tan tan radius)]: (pick a point)Specify radius of circle or [Diameter]: (+ 14.25 3.0)↵17.25Command: CIRCLERAD↵Enter new value for CIRCLERAD <17.2500>: ↵
Basic AutoLISP Functions
The best way to get started learning AutoLISP is to enter a few functions on the command line and see what they do. The following discussion includes basic AutoLISP functions that are part of the foundation for all AutoLISP programs. Practice using the functions as you read. Then, begin using them in menus and macros. At fi rst, these functions and expressions will be entered on the command line. Later in this chapter, and in Chapter 28, you will learn about creating and using AutoLISP program fi les.
AutoLISP Math FunctionsAutoLISP provides many different mathematical operators for performing calcu-
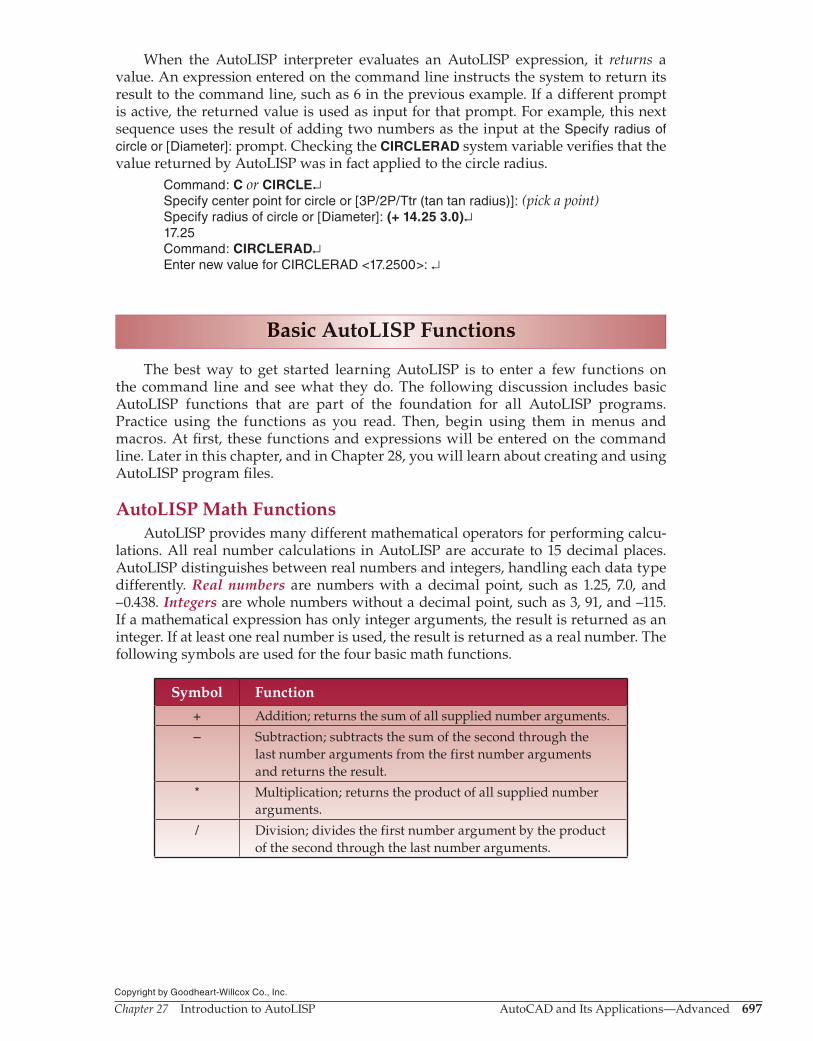
lations. All real number calculations in AutoLISP are accurate to 15 decimal places. AutoLISP distinguishes between real numbers and integers, handling each data type differently. Real numbers are numbers with a decimal point, such as 1.25, 7.0, and –0.438. Integers are whole numbers without a decimal point, such as 3, 91, and –115. If a mathematical expression has only integer arguments, the result is returned as an integer. If at least one real number is used, the result is returned as a real number. The following symbols are used for the four basic math functions.
Symbol Function
+ Addition; returns the sum of all supplied number arguments.
– Subtraction; subtracts the sum of the second through the last number arguments from the first number arguments and returns the result.
* Multiplication; returns the product of all supplied number arguments.
/ Division; divides the first number argument by the product of the second through the last number arguments.
Baassicc AuutooLLISPP Fuuncttioonnns
Chapter 27 Introduction to AutoLISP AutoCAD and Its Applications—Advanced 698Copyright by Goodheart-Willcox Co., Inc.
Real numbers technically include integers and fractions, as well as decimal numbers. However, in applications involving AutoLISP and throughout this discussion, real numbers are always classifi ed as those that have a decimal part.
The following examples illustrate AutoLISP math expressions entered on the command line. As you practice entering these expressions, use the following procedure. 1. Start with an open parenthesis. 2. Separate each item in the expression with a space. 3. End the expression with a closing parenthesis.Using these steps, enter the following expressions on the command line. If you get lost at any time or do not return to the Command: prompt when expected, press the [Esc] key to cancel the AutoLISP entry.
Command: (+ 6 2)↵8Command: (+ 6.0 2)↵8.0Command: (– 15 9)↵6Command: (* 4 6)↵24Command: (/ 12 3)↵4Command: (/ 12 3.2)↵3.75Command: (/ 19 10)↵1
An “incorrect” answer is returned in the last example. The result of dividing 19 by 10 is 1.9. However, since only integers were supplied as arguments, the result is returned as an integer. If the result were rounded, it would round to 2. However, the returned result is simply the integer portion of the actual answer. The result is not rounded, it is truncated. To get the correct result in division expressions such as the one above, specify at least one of the arguments as a real number.
Command: (/ 19.0 10)↵1.9
When entering real numbers between 1 and –1, you must include the leading zero. If the zero is not entered, you will get an error message:
Command: (+ .5 16)↵; error: misplaced dot on inputCommand:
The correct entry is:Command: (+ 0.5 16)↵16.5

Chapter 27 Introduction to AutoLISP AutoCAD and Its Applications—Advanced 699Copyright by Goodheart-Willcox Co., Inc.
Exercise 27-1 1. Solve the following equations by using AutoLISP functions on the command line.
Write down the expression you use for each equation and the answers.A. 57 + 12B. 86.4 + 16C. 24 + 12 + 8 + 35D. 8 – 3E. 29 – 17F. 89.16 – 14.6G. 8 × 4H. 16 × 5 × 35I. 7.3 × 22J. 45 ÷ 9K. 60 ÷ 2L. 76 ÷ 27.3
Nested ExpressionsThe term nested refers to an expression that is used as part of another expression.
For example, to add 15 to the product of 3.75 and 2.125, you can nest the multiplication expression within the addition expression. Notice the two closing parentheses:
Command: (+ 15 (* 3.75 2.125))↵22.9688
Nested expressions are evaluated from the deepest nested level outward. In the previous expression, the multiplication operation is evaluated fi rst and the result is applied to the addition operation. Here are some examples of nested expressions:
Command: (+ 24 (* 5 4))↵44Command: (* 12 (/ 60 20))↵36Command: (/ 39 (* 1.6 11))↵2.21591
Signifi cant DigitsAutoLISP performs all mathematical calculations to 15 decimal places, but only
displays six signifi cant digits. For example, take a close look at this expression:Command: (+ 15 (* 3.75 2.125))↵22.9688
The actual result is 22.96875, but AutoLISP displays only six signifi cant digits on the command line and rounds the number for display only. This is true for large and small numbers alike. The next example shows how AutoLISP uses exponential nota-tion to display larger numbers using only six digits:
Command: (* 1000 1575.25)↵1.57525e+006
This fi nal example uses a data conversion function (real to string) set to show eight decimal places in order to indicate the number is not actually rounded and that no precision is lost. The result is returned in decimal units (the 2 argument) and to 8 places of accuracy (the 8 argument).
Command: (rtos (+ 15 (* 3.75 2.125)) 2 8)↵"22.96875000"
Chapter 27 Introduction to AutoLISP AutoCAD and Its Applications—Advanced 700Copyright by Goodheart-Willcox Co., Inc.
Exercise 27-2 1. Use the proper AutoLISP expressions to solve the following problems. Write down
the expression you use for each equation and the answers.A. 56.3 + (12 ÷ 3)B. 23 – (17.65 ÷ 4)C. 14 ÷ (12 ÷ 3.6)D. 47 ÷ (31 – 16.4)E. 257 ÷ (34 – 3.6)F. 123.65 + (84 – 43.8)G. 16 ÷ (46 – 23)
VariablesAll programming languages make use of variables to temporarily store informa-
tion. The variable name can be used in an expression anywhere in the program. When AutoLISP encounters a variable in an expression, it uses the value of the variable to evaluate the expression.
The (setq) AutoLISP function is used to set variable values. A (setq) expression requires a variable name and value as arguments. The following example shows an expression that creates a variable named A and assigns it a value of 5.
Command: (setq A 5)↵5
An AutoLISP variable name cannot be made up of numeric characters only, nor can it contain any of the following characters.
• Open parenthesis (()• Close parenthesis ())• Period (.)• Apostrophe (')• Quotation marks ("")• Semicolon (;)
If you try to use an illegal variable name, an error message is returned. The following example tries to create a variable named 2 with an assigned value of 7. Since 2 is not a valid variable name, an error message is returned.
Command: (setq 2 7)↵; error: syntax error
Once a valid variable name has been assigned a value, the variable can be used in subsequent AutoLISP expressions or even directly accessed on the command line. To access a variable value on the command line, precede the variable name with an exclamation mark (!). For example:
Command: C or CIRCLE↵Specify center point for circle or [3P/2P/Ttr (tan tan radius)]: (pick a point)Specify radius of circle or [Diameter] <current>: !A↵5Command:
Chapter 27 Introduction to AutoLISP AutoCAD and Its Applications—Advanced 701Copyright by Goodheart-Willcox Co., Inc.
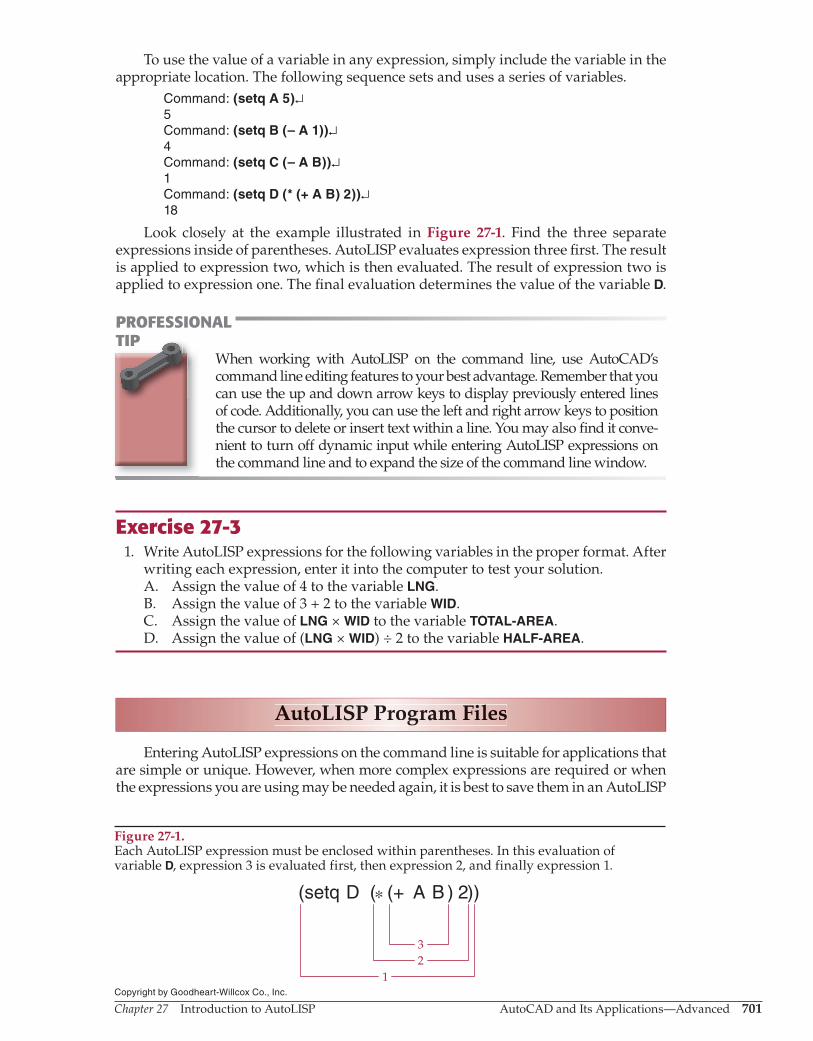
To use the value of a variable in any expression, simply include the variable in the appropriate location. The following sequence sets and uses a series of variables.
Command: (setq A 5)↵5Command: (setq B (– A 1))↵4Command: (setq C (– A B))↵1Command: (setq D (* (+ A B) 2))↵18
Look closely at the example illustrated in Figure 27-1. Find the three separate expressions inside of parentheses. AutoLISP evaluates expression three fi rst. The result is applied to expression two, which is then evaluated. The result of expression two is applied to expression one. The fi nal evaluation determines the value of the variable D.
PROFESSIONAL TIP
When working with AutoLISP on the command line, use AutoCAD’s command line editing features to your best advantage. Remember that you can use the up and down arrow keys to display previously entered lines of code. Additionally, you can use the left and right arrow keys to position the cursor to delete or insert text within a line. You may also fi nd it conve-nient to turn off dynamic input while entering AutoLISP expressions on the command line and to expand the size of the command line window.
Exercise 27-3 1. Write AutoLISP expressions for the following variables in the proper format. After
writing each expression, enter it into the computer to test your solution.A. Assign the value of 4 to the variable LNG.B. Assign the value of 3 + 2 to the variable WID.C. Assign the value of LNG × WID to the variable TOTAL-AREA.D. Assign the value of (LNG × WID) ÷ 2 to the variable HALF-AREA.
AutoLISP Program Files
Entering AutoLISP expressions on the command line is suitable for applications that are simple or unique. However, when more complex expressions are required or when the expressions you are using may be needed again, it is best to save them in an AutoLISP
TIPTIP
AAAuutooLIISPP PProoggramm FFilleess
Figure 27-1.Each AutoLISP expression must be enclosed within parentheses. In this evaluation of variable D, expression 3 is evaluated first, then expression 2, and finally expression 1.
(setq D ( (+ A B ) 2))*
32
1

Chapter 27 Introduction to AutoLISP AutoCAD and Its Applications—Advanced 702Copyright by Goodheart-Willcox Co., Inc.
program fi le. This can be easily accomplished using the Visual LISP Editor provided with AutoCAD. AutoLISP programs can be more effectively developed using the Visual LISP Editor. Creating AutoLISP program fi les is discussed in the following sections.
A very common feature found in most AutoLISP programs is a function defi nition. A function defi nition is a collection of AutoLISP expressions that performs any number of tasks. The function is assigned a name that is used to activate the expressions. Some function defi nitions create new AutoCAD command names that can be entered at the command line.
Once written and saved, an AutoLISP program can be loaded and used whenever it is needed. An AutoLISP program is available only within the drawing into which it is loaded. As you become more familiar with AutoLISP, you will learn the various methods that can be used to make your custom programs available automatically in any drawing. An AutoLISP program fi le must be a “plain” text fi le. If you choose to edit your AutoLISP fi les with a word processing program such as Microsoft Word or WordPerfect, be sure to save the fi les as “text only.” Word processing fi les use special codes that AutoLISP cannot understand. However, it is recommended that you use the Visual LISP Editor because it has tools specifi cally designed for use in writing and editing AutoLISP programs.
There are a number of methods to make your custom AutoLISP func-tions load automatically. You can add AutoLISP functions to fi les that are automatically loaded by AutoCAD. However, you should fi rst have an understanding of how these fi les work. When you fi rst begin a drawing session, AutoCAD automatically loads the acad2012.lsp fi le, if it is located in the support fi le search path. The acad2012doc.lsp fi le is automatically loaded each time you start a new drawing or open an existing drawing. However, it is recommended not to add programs to these fi les. Changing these fi les or accidentally redefi ning existing commands or functions may render certain features unusable. Instead, you can create your own fi les and add programs to them. The following explains the fi les that AutoCAD automatically loads.• acad2012.lsp. This fi le loads only when AutoCAD is initially launched
at the beginning of a drawing session. AutoCAD uses this fi le to adjust environment settings as the program opens. This fi le is consid-ered a reserved fi le and it is recommended that this fi le not be edited.
• acad2012doc.lsp. This fi le loads each time a new drawing is started or an existing drawing is opened. AutoCAD uses this fi le to load custom AutoLISP functions so that they are available while working on any drawing during a drawing session. This fi le is also consid-ered a reserved fi le and it is recommended that this fi le not be edited.
• acad.lsp. This fi le is not automatically installed when installing AutoCAD. It does not exist until it is created by the user with the Visual LISP Editor or a text editor. After this fi le is created, it loads at the beginning of the drawing session. Custom settings made to the AutoCAD environment (not custom commands and functions you want to make available in each drawing) should be added to this fi le.
• acaddoc.lsp. This fi le is not automatically installed when installing AutoCAD. Like the acad.lsp fi le, it does not exist until it is created by the user with the Visual LISP Editor or a text editor. After this fi le is created, it loads each time a new drawing is started or an existing drawing is opened. Custom commands and routines that you need to use when working with “any and all” AutoCAD drawings should be added to this fi le.

Chapter 27 Introduction to AutoLISP AutoCAD and Its Applications—Advanced 703Copyright by Goodheart-Willcox Co., Inc.
PROFESSIONAL TIP
The ACADLSPASDOC system variable can be used to control when the acad.lsp fi le is loaded by AutoCAD. By default, this system vari-able is set to 0. If set to 1, the acad.lsp fi le is loaded each time a drawing is started or an existing drawing is opened. The setting can be adjusted by checking or unchecking the Load acad.lsp with every drawing check box located in the General Settings area in the System tab of the Options dialog box.
Introduction to the Visual LISP Editor
The Visual LISP Editor provides powerful editing features. The editor is an integrated development environment (IDE) that features AutoLISP development tools not available in standard text editing programs. The interactive nature of the Visual LISP Editor simplifi es the task of creating AutoLISP program fi les. This section provides only a brief introduction to Visual LISP.
Type VLIDE or VLISP at the Command: prompt to open the Visual LISP Editor. When the Visual LISP Editor is fi rst displayed, it appears as shown in Figure 27-2. The windows within the editor can be minimized or maximized. The editor itself can be temporarily closed to return to AutoCAD as necessary.
TIPTIP
IInntrroddduucctiioon tto tthhe VVisuaal LLIISSPP EEEdiitoorr
Figure 27-2.The primary features of the Visual LISP Editor.
New filebutton
Desktop
Enter an AutoLISPexpression or variable
Trace window(minimized)
Status bar
Activate AutoCADbutton
Pull-downmenu bar
Ribbon
Manage > Applications
Visual LISP Editor
Type
VLIDEVLISP
VL
IDE

Chapter 27 Introduction to AutoLISP AutoCAD and Its Applications—Advanced 704Copyright by Goodheart-Willcox Co., Inc.
To create a new AutoLISP program using the Visual LISP Editor, pick the New fi le button. This opens a window for an untitled document on the Visual LISP Editor desktop. See Figure 27-3. The windows and features in the Visual LISP Editor are:
• Desktop. This is the main area of the editor window. It is similar to the main program window in AutoCAD and can be used to relocate toolbars or windowed components, such as the Visual LISP Console or a text editor window.
• Text editor window. Text editor windows are used to write and edit AutoLISP programs. Different windows can be used to create new fi les or view existing programs. The Visual LISP Editor provides interactive feedback as you enter material to help you avoid errors.
• Visual LISP Console window. This window provides several functions. You can use it to enter any AutoLISP expression to immediately see the results. You can also enter any AutoLISP variable to determine its value. Visual LISP commands can also be entered from this window. The text can then be copied from the window to a text editor window.
• Trace window. This window is minimized when you fi rst display the Visual LISP Editor. It records a history of the functions within your program and can be used to trace values when developing or debugging a program.
• Status bar. This area at the bottom of the Visual LISP Editor is similar to the status bar in AutoCAD’s main program window. It provides feedback regarding the status of the current window or application being used.
Several visual aids are provided to help identify functions as you enter text. For example, as you construct the expressions that make up your program, a color-coding system provides immediate feedback as you type. Text for any unrecognized items, such as a user variable or a portion of a function, is shown in black. For example, as you enter the (setq) function, the text is shown in black until you have entered the letters set. Because AutoLISP recognizes the text entry as the valid function (set), a function not covered in this book, the color of the text is changed to blue. When you have entered the full (setq) function name, the text remains blue because AutoLISP recognizes this function name also. The color coding can be very useful. If you enter a
Figure 27-3.Picking the New file button displays a text editor window in the Visual LISP Editor.
Text editorwindow
Chapter 27 Introduction to AutoLISP AutoCAD and Its Applications—Advanced 705Copyright by Goodheart-Willcox Co., Inc.
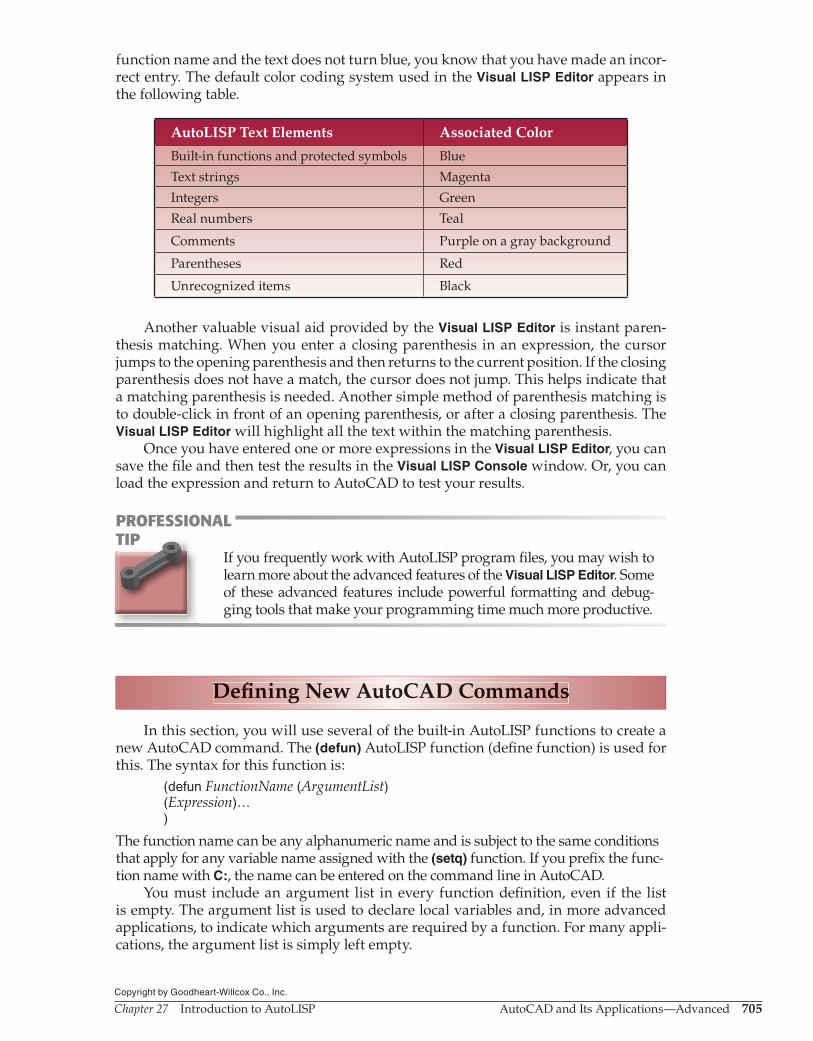
function name and the text does not turn blue, you know that you have made an incor-rect entry. The default color coding system used in the Visual LISP Editor appears in the following table.
AutoLISP Text Elements Associated Color
Built-in functions and protected symbols Blue
Text strings Magenta
Integers Green
Real numbers Teal
Comments Purple on a gray background
Parentheses Red
Unrecognized items Black
Another valuable visual aid provided by the Visual LISP Editor is instant paren-thesis matching. When you enter a closing parenthesis in an expression, the cursor jumps to the opening parenthesis and then returns to the current position. If the closing parenthesis does not have a match, the cursor does not jump. This helps indicate that a matching parenthesis is needed. Another simple method of parenthesis matching is to double-click in front of an opening parenthesis, or after a closing parenthesis. The Visual LISP Editor will highlight all the text within the matching parenthesis.
Once you have entered one or more expressions in the Visual LISP Editor, you can save the fi le and then test the results in the Visual LISP Console window. Or, you can load the expression and return to AutoCAD to test your results.
PROFESSIONAL TIP
If you frequently work with AutoLISP program fi les, you may wish to learn more about the advanced features of the Visual LISP Editor. Some of these advanced features include powerful formatting and debug-ging tools that make your programming time much more productive.
Defi ning New AutoCAD Commands
In this section, you will use several of the built-in AutoLISP functions to create a new AutoCAD command. The (defun) AutoLISP function (defi ne function) is used for this. The syntax for this function is:
(defun FunctionName (ArgumentList)(Expression)…)
The function name can be any alphanumeric name and is subject to the same conditions that apply for any variable name assigned with the (setq) function. If you prefi x the func-tion name with C:, the name can be entered on the command line in AutoCAD.
You must include an argument list in every function defi nition, even if the list is empty. The argument list is used to declare local variables and, in more advanced applications, to indicate which arguments are required by a function. For many appli-cations, the argument list is simply left empty.
TIPTIP
DDeefi nnninngg NNeww AAuutoCCCADD CCoommmmmmanndds

Chapter 27 Introduction to AutoLISP AutoCAD and Its Applications—Advanced 706Copyright by Goodheart-Willcox Co., Inc.
Any number of expressions can be included in a function defi nition. All of the expressions contained in the defi nition are evaluated when the function name is called.
A very powerful, yet simple, application for a function defi nition is to create a shortcut command similar to one of the command aliases in the acad.pgp fi le. However, a shortcut command defi ned using AutoLISP can specify command options and even multiple commands to use. Remember that the command aliases defi ned in the acad.pgp fi le can only launch a single command; they cannot specify any command options.
To create a shortcut command using AutoLISP, the (command) function is used. The syntax for creating a shortcut command with this function is:
(command "CommandName" arguments…)
The fi rst argument to the (command) function is typically an AutoCAD command name such as LINE, CIRCLE, ZOOM, etc. The command name must be enclosed in quotation marks. The remaining arguments are appropriate responses to the command being used. These remaining arguments could be text strings, numbers, or points—whatever might be appropriate at that point in the command sequence. The arguments could also be AutoLISP variables holding appropriate values. Text strings must always be enclosed in quotation marks. Numbers can be simply entered as numbers or enclosed within quotation marks. Using points as responses to command options is discussed later in this chapter. Knowing the acceptable responses for the command being used is critical to writing shortcut commands with AutoLISP.
This fi rst example shows the defi nition for a new function named ZX. The func-tion issues the ZOOM command and performs the Previous option.
(defun C:ZX () (command "ZOOM" "PREVIOUS"))
To see this function work, enter the defi nition at the command line as:Command: (defun C:ZX () (command "zoom" "previous"))↵C:ZX
Notice that the new function name is returned by the (defun) function. The C: prefi x indicates that it can be entered at the Command: prompt.
Command: ZX↵zoomSpecify corner of window, enter a scale factor (nX or nXP), or[All/Center/Dynamic/Extents/Previous/Scale/Window/Object] <real time>: previousCommand: nilCommand:
When activated, defi ned functions return the value of the last expression eval-uated in the defi nition. Since the (command) function always returns a value of “nil,” this is returned when using the ZX function. The “nil” value has no effect. You can suppress it if you do not want it to appear each time you use a defi ned function. To suppress the value, add the (princ) function using no arguments to the end of the defi nition:
(defun C:ZX () (command "ZOOM" "PREVIOUS") (princ))
Chapter 27 Introduction to AutoLISP AutoCAD and Its Applications—Advanced 707Copyright by Goodheart-Willcox Co., Inc.
As discussed earlier, entering AutoLISP expressions on the command line, espe-cially new function defi nitions, is an inconvenient way to defi ne custom functions. A more convenient method is to enter function defi nitions in a fi le. By storing such defi -nitions in a fi le, they can be loaded whenever needed.
PROFESSIONAL TIP
When defi ning new command names, keep in mind that most AutoCAD users are one-handed typists because the other hand is used for the pointing device. For example, when deciding on the name for a function that performs a ZOOM Previous, it may be easier for the user to type the [Z]+[X] key combination rather than [Z]+[P]. The [Z] and [P] keys are in opposite corners of the keyboard.
Creating Your First AutoLISP Program
As discussed earlier, a typical use for an AutoLISP program fi le is to hold function defi nitions. An AutoLISP program fi le can contain a single function or it can contain several. Many AutoLISP programs are created to perform a single group of specifi c tasks. Other AutoLISP programs hold a large number of function defi nitions, all of which become available when the program fi le is loaded. One common application for the acaddoc.lsp fi le is to create a series of function defi nitions for shortcut commands used to speed up routine drafting tasks.
Writing the ProgramTo create your fi rst AutoLISP program, open the Visual LISP Editor or another text
editing application and start a new document (fi le). Begin by entering two function defi nitions into the program. The fi rst is the ZX function from the previous example. The second defi nes a command named FC (fi llet corner) that sets the fi llet radius to 0 and allows the FILLET command to continue.
(defun C:ZX () (command "ZOOM" "PREVIOUS") (princ))
(defun C:FC () (command "FILLET" "RADIUS" 0 "FILLET" "MULTIPLE") (princ))
When using the Visual LISP Editor, the fi nal closing parenthesis is not automati-cally “fl ush left.” You will need to delete the spaces added. It is a good habit to place the fi nal closing parenthesis fl ush left to help keep your program organized.
TIPTIP
CCrreeatiiinggg YYoourr Firrsst AAuutoLLISSPP PProoogrramm

Chapter 27 Introduction to AutoLISP AutoCAD and Its Applications—Advanced 708Copyright by Goodheart-Willcox Co., Inc.
Adding the appropriate documentation to your program fi les is recommended. When a semicolon (;) is encountered in a program (except when it is part of a text string), any information on the line to the right of the semicolon is ignored. This allows you to place comments and documentation in your AutoLISP programs. The example below shows the appropriate documentation for this program fi le, called shortcuts.lsp.
; Shortcuts.lsp; by A. Novice
;C:ZX – To key ZOOM Previous command.(defun C:ZX () (command "ZOOM" "PREVIOUS") (princ))
;C:FC – Fillet Corner: Sets fillet radius to 0 and;allows Fillet command to continue.(defun C:FC () (command "FILLET" "RADIUS" 0 "FILLET") (princ))
After entering these functions and comments into the new LISP program, save the fi le as shortcuts.lsp in the AutoCAD or your user’s \Support folder.
Loading the ProgramThe APPLOAD command is used to load applications, such as AutoLISP program fi les,
into AutoCAD. Once the command is selected in AutoCAD, the Load/Unload Applications dialog box appears, Figure 27-4. A list of currently loaded applications appears in the Loaded Applications tab. To load an application fi le, select it in the fi le-selection window near the top of the dialog box. You can highlight any number of fi les in the list. Picking the Load button
Ribbon
Manage > Applications
Load Application
Type
APPLOADAP
AP
PL
OA
D
Figure 27-4.The Load/Unload Applications dialog box is used to load AutoLISP program files into AutoCAD.
Currentlyloaded
applicationfiles
Check to addthe selected
file to theHistory list
tab
Pick to loadthe selected
file intoAutoCAD
Select file

Chapter 27 Introduction to AutoLISP AutoCAD and Its Applications—Advanced 709Copyright by Goodheart-Willcox Co., Inc.
loads the currently selected application fi le(s). If the Add to History check box is activated, the loaded fi le(s) will be added to the list in the History list tab. This tab provides conve-nient access to saved fi les during subsequent APPLOAD sessions and keeps you from having to search for frequently used fi les every time they are needed. Picking the Unload button removes any highlighted fi les from the History list tab or Loaded Applications tab.
You can also load an AutoLISP fi le by highlighting the fi le in Windows Explorer and dragging and dropping it into the AutoCAD drawing area. This method is extremely convenient if Windows Explorer is open.
The (load) function can also be used to load an AutoLISP program fi le on the command line. This function requires an AutoLISP fi le name as its argument and requires that the name be enclosed in quotation marks. To load the shortcuts.lsp fi le using the (load) function, the following sequence is used.
Command: (load "shortcuts")↵C:FCCommand:
When the fi le has a .lsp fi le extension, it is not necessary to include the extension in the (load) expression. Therefore, you should use the standard .lsp fi le extension for all AutoLISP fi les you create. If you are loading an AutoLISP fi le that does not use a .lsp fi le extension, the actual extension must be included in the fi le name argument.
When an AutoLISP program fi le is loaded and no errors are encountered, the result of evaluating the last expression in the fi le is returned to the screen. In the example above, the last expression in the fi le is the defi nition for the FC function, so that func-tion name is returned.
The (load) function locates AutoLISP fi les residing in the support fi le search path. To load a fi le that exists elsewhere, the path name must also be specifi ed. In the following example, the shortcuts.lsp fi le is stored in the C:\My Documents\AutoLISP folder.
Command: (load "c:/my documents/autolisp/shortcuts")↵C:FC
Notice that backslashes are not used in the path specifi cation. In an AutoLISP text string, the backslash is used to specify special characters. For example, the string \n indicates a new line. When specifying fi le paths, you can use either forward slashes, as shown above, or double backslashes (\\). Therefore, in the example above, the fi le to load could also have been specifi ed as c:\\my documents\\autolisp\\shortcuts.
If you frequently load fi les that are in a folder not found in the current support fi le search path, it may be helpful to include the folder in the search path. This is done using the Options dialog box. After displaying this dialog box, pick the Files tab and select Support File Search Path. Then, pick the Add… button and enter the desired folder. Refer to Chapter 21 for detailed information.
As previously indicated, when you have defi ned one or more functions that you want to have available in all editing sessions, the defi nitions can be placed in the acaddoc.lsp fi le rather than in their own separate fi le (such as shortcuts.lsp). If the acaddoc.lsp fi le already exists on your system, consult your system administrator or instructor prior to editing this fi le.
Exercise 27-4 1. Use the Visual LISP Editor to create an AutoLISP program file named EX27_04.lsp.
A. Defi ne at least 10 shortcut commands.B. Load EX27_04.lsp and test each of your functions.
2. Make any necessary corrections and save the file again.
Chapter 27 Introduction to AutoLISP AutoCAD and Its Applications—Advanced 710Copyright by Goodheart-Willcox Co., Inc.
Creating Specialized Functions
The math functions you worked with earlier used real numbers and integers as arguments. The shortcut commands you created used both strings and numbers as arguments. Real numbers, integers, and strings are examples of data types. Even the “lists” themselves that you have been working with are considered to be data types.
AutoLISP is a versatile tool, offering many different functions for effectively working with numeric data, text data, point lists, data fi les, and AutoCAD drawing objects. Up to this point, you have used basic functions to create shortcut commands. You may want to write programs that automate AutoCAD commands in a more complex, specialized manner. AutoCAD commands often require input other than strings and numbers. This section introduces additional AutoLISP functions, including some that are used for acquiring not only numeric and string input from the user, but also point list data.
Providing for User InputAutoLISP can prompt the user for various types of data. Depending on its function,
a program may need numeric input, text input, or specifi cation of a coordinate loca-tion. Earlier in this chapter, you used the number 0 as an argument to the (command) function in response to the “radius” option of the FILLET command. When developing AutoLISP routines, you may need to get numeric values from the user instead of using a constant value as an argument to a function.
For example, when writing an AutoLISP routine, you may want to assign the length of a line or the distance between two points to a variable. The (getdist) function allows you to assign a distance to a variable. The syntax for the (getdist) function is:
(getdist promptstring)
The promptstring argument is optional but is almost always used so the user knows what is expected. Consider the following example:
Command: (setq LGTH (getdist "Enter a distance: "))↵Enter a distance: (pick the first point)Specify second point: (pick the second point)distance
In the above example, the Specify second point: prompt is automatic, after picking a fi rst point. Use object snaps as needed or enter absolute coordinates. After the second point is specifi ed, the distance between the points is shown as a real number value and assigned to the variable. The (getdist) function always returns a real number. In this example, the distance is assigned to the variable LGTH. You can confi rm the setting by retrieving the value of the variable.
Command: !LGTH↵distance
Alternately, the user can choose to reply to the Enter a distance: prompt defi ned in the last example with a value rather than picking two points:
Command: (setq LGTH (getdist "Enter a distance: "))↵Enter a distance: 44.0
Finally, the user can also choose to reply to the (getdist) function with a value entered in the current unit format. For example, if the units are set to architectural, a value in feet and inches can be entered in response to the (getdist) function:
Command: (setq LGTH (getdist "Enter a distance: "))↵Enter a distance: 1'3-3/4"15.75
Crrreaatting SSpeciialiized Fuunnctiionns

Chapter 27 Introduction to AutoLISP AutoCAD and Its Applications—Advanced 711Copyright by Goodheart-Willcox Co., Inc.
In the next example, the (getpoint) function is used. The (getpoint) function allows a point to be defi ned. This function pauses the program until the point is entered. For example:
Command: (setq PT1 (getpoint))↵
After you press [Enter], AutoLISP waits for a value to be input for the (getpoint) func-tion and then stores the value in the PT1 variable. A prompt can be added to the original expression to clarify what is required:
Command: (setq PT1 (getpoint "Enter a point: "))↵Enter a point:
Now, pick a point on screen. The coordinates for the selected point are assigned to PT1 and displayed on the command line. If you know the coordinates, you can enter them at the keyboard.
The following example shows how closely AutoCAD and AutoLISP work together. First, defi ne the two variables PT1 and PT2 as shown below. Then, enter the LINE command and use AutoLISP notation to return the values of PT1 and PT2 as the endpoints of the line.
Command: (setq PT1 (getpoint "From point: "))↵From point: 2,2↵(2.0 2.0 0.0)Command: (setq PT2 (getpoint "To point: "))↵To point: 6.25,2↵(6.25 2.0 0.0)Command: LINE↵Specify first point: !PT1↵(2.0 2.0 0.0)Specify next point or [Undo]: !PT2↵(6.25 2.0 0.0)Specify next point or [Undo]: ↵
The following is a sample function defi nition named 1LINE that uses expressions similar to those given in the previous example. This function will draw a line object based on user input.
(defun C:1LINE () (setq PT1 (getpoint "From point: ")) (setq PT2 (getpoint "To point: ")) (command "LINE" PT1 PT2 "") (princ))
As discussed earlier, the (command) function is used to call AutoCAD commands from within AutoLISP. Typically, an AutoCAD command that is “started” within a program is also “ended” within the program. The pair of quotation marks near the end of the fourth line is equivalent to pressing [Enter] after the second point entry, thus ending the LINE command.
The (distance) function is similar to the (getdist) function. However, the (distance) function does not require picking two points. Instead, it measures the distance between two existing points. This function can be used to display a distance or to assign a distance to a variable.
Command: (distance PT1 PT2)↵distance between PT1 and PT2
Command: (setq D1 (distance PT1 PT2))↵distance between PT1 and PT2
The fi rst example returns the distance between the previously defi ned points PT1 and PT2. The second example displays the distance and applies it to the variable D1.

Chapter 27 Introduction to AutoLISP AutoCAD and Its Applications—Advanced 712Copyright by Goodheart-Willcox Co., Inc.
PROFESSIONAL TIP
The sample AutoLISP expressions in this section are entered at the command line. However, AutoLISP expressions are more effective as part of a saved program fi le.
Exercise 27-5 1. Use the proper AutoLISP syntax to write expressions for the functions given
below. Write the expressions on a separate sheet of paper. Then, test the functions by entering them into the computer.A. Assign a point picked on screen to the variable PNT1.B. Assign a point picked on screen to the variable PNT2.C. Assign the distance between PNT1 and PNT2 to the variable DIS.D. Create a function named CIRDIA that draws a line between PNT1 and PNT2
and uses those same two variables to draw a circle with the 2P option of the CIRCLE command.
Assigning Text Values to AutoLISP ApplicationsValues assigned to AutoLISP variables do not have to be numeric. In some appli-
cations, you may need to assign a word or line of text to a variable. To do so, use the (setq) function and enclose the word(s) in quotation marks.
Command: (setq W "What next?")↵"What next?"
You can also assign a word or line of text to a variable with the (getstring) function. This function is similar to the (getpoint) function in that the user must enter a value.
Command: (setq E (getstring))↵
Nothing is displayed on the command line because the optional prompt was not specifi ed. AutoLISP is waiting for a “string” of characters. (Normally, you will include the optional prompt string so the user knows what is expected). You can enter as many characters (numbers and letters) as needed. Once you press [Enter] or the spacebar, the string is entered and displayed. To allow spaces in the response, place the letter T, without quotation marks, after the (getstring) function:
Command: (setq E (getstring T))↵HI THERE↵"HI THERE"Command:
The (prompt) function can be used to simply display a message. The resulting message has no variable value. AutoLISP indicates this by printing nil after the prompt.
Command: (prompt "Select an object: ")↵Select an object: nil
You can use prompts in AutoLISP programs to provide information or to prompt the user.
TIPTIP
Chapter 27 Introduction to AutoLISP AutoCAD and Its Applications—Advanced 713Copyright by Goodheart-Willcox Co., Inc.
CAUTION
The symbol T is a built-in AutoLISP constant defi ned as a protected symbol. However, it is possible to change its value using the (setq)function. Do not change its value. Be certain not to use the variable name T for any of your own variables or other functions referencing this symbol may not properly function. If it is accidentally changed, you can reset the value of T using the following expression.
Command: (setq T 'T)↵
Exercise 27-6 1. Use the proper AutoLISP syntax to write expressions for the functions given below.
Write out the expressions and then test them by entering them into the computer.A. Assign the word Void to the variable VO.B. Assign the text Enter text height to the variable TE.C. Create the variable JP as a point that is picked on the screen. Issue the
prompt Pick a point:.D. Create the variable KP as a point that is picked on the screen. Issue the
prompt Pick a point:.E. Set the distance between points JP and KP to the variable LP.F. Issue a prompt that says This is only an exercise.
Basic AutoLISP Review
Before applying the functions you have learned to an AutoLISP program, take a few minutes to review the following list. These functions are used in the next chapter, which discusses more advanced AutoLISP applications.
• (+), (–), (*), (/). These are the basic math functions used in AutoLISP. They must be entered as the fi rst part of an expression. For example, (+ 6 8).
• (setq). The (setq) function allows a value to be assigned to a variable. For example, the expression (setq CITY "San Francisco") sets the value San Franciscoto the variable CITY.
• !. An exclamation point entered before a variable on the command line returns the value of the variable. For example, !CITY returns the value San Francisco for the above expression.
• (getdist). This function returns the distance between two points entered at the keyboard or picked on screen. The value can be applied to a variable and a prompt can be used. For example, the expression (setq D2 (getdist "Pick two points:")) allows you to determine a distance and assign it to the variable D2.
• (getpoint). This function allows you to defi ne a point location by entering coor-dinates at the keyboard or using the pointing device. The resulting value can be applied to a variable. For example, the expression (setq A (getpoint)) assigns a point to the variable A.
• (distance). This function returns a distance between two existing points. For example, the expression (distance P1 P2) returns the distance between the defi ned points P1 and P2. The distance can also be assigned to a variable. For example, (setq D (distance P1 P2)).
BBBaasiic AAuttooLISSPP RRevieewww

Chapter 27 Introduction to AutoLISP AutoCAD and Its Applications—Advanced 714Copyright by Goodheart-Willcox Co., Inc.
• (getstring). This function returns a word or string of characters entered by the user. The resulting text can be assigned to a variable. For example, the expres-sion (getstring) waits for a string of characters and displays the string when [Enter]or the spacebar is pressed. Spaces are allowed in the text string if T follows the (getstring) function. For example, the expression (setq TXT (getstring T "Enter text:")) assigns the text entered, which can contain spaces, to the variable TXT.
• (prompt). Messages or prompts can be issued in a program using the (prompt)function. For example, the expression (prompt "Select an entity:") prints the Select an entity: prompt.
PROFESSIONAL TIP
Design your AutoLISP programs to closely resemble the AutoCAD interface. For example, it is easier for the user to read “back-to-back” prompts when the prompts appear on separate lines. Use the \n string to specify a new line for a prompt. For example:
(setq PT2 (getpoint "\nTo point:"))
Exercise 27-7 1. In this exercise, you will write an AutoLISP program that places the text NOTES:
at a location picked on screen. Name the file EX27_07.lsp. 2. On a separate sheet of paper, write a description of the program in longhand.
Then, write out each line of code. 3. Use the following guidelines when writing the program.
A. Provide a comment line giving the author, date, and name of the fi le.B. Defi ne a function named NOTES with two variables, P1 and TXT.C. Specify the value for the variable P1 as the insertion location of the text.
Include a prompt for the user to enter the text location.D. Give the variable TXT the text value NOTES:.E. Write an expression using the TEXT command with P1 as the text location, a
text height of 0.25, a rotation angle of 0, and the value for the variable TXT as the text.
4. Create the program using the Visual LISP Editor and then test it in AutoCAD.
TIPTIP
Chapter 27 Introduction to AutoLISP AutoCAD and Its Applications—Advanced 715Copyright by Goodheart-Willcox Co., Inc.
Chapter ReviewAnswer the following questions. Write your answers on a separate sheet of paper or complete the electronic chapter review on the companion website.www.g-wlearning.com/CAD
1. What is the standard extension used for AutoLISP program files? 2. A comment is indicated in an AutoLISP file with a(n) . 3. When in the drawing area, what are three ways to load the contents of the AutoLISP
file named chgtext.lsp that is saved in the support file search path? 4. Define the terms integer and real number as related to AutoLISP. 5. Write expressions in the proper AutoLISP format for the following arithmetic
functions.A. 23 + 54B. 12.45 + 6.28C. 56 – 34D. 23.004 – 7.008E. 16 × 4.6F. 7.25 × 10.30G. 45 ÷ 23H. 147 ÷ 29.6I. 53 + (12 × 3.8)J. 567 ÷ (34 – 14)
6. Explain the purpose of the (setq) function. 7. Write the proper AutoLISP notation to assign the value of (67 – 34.5) to the variable
num1. 8. What does the (getpoint) function allow you to do? 9. Which AutoLISP functions allow you to find the distance between two points?
Describe the difference between the two functions. 10. Explain the purpose of the (getstring) function. 11. Write the proper AutoLISP notation for assigning the string This is a test: to the
variable TXT. 12. How do you allow spaces in a string of text when using the (getstring) function? 13. Write the proper notation for using the PLINE command in an AutoLISP expression. 14. Which prefix must you enter before a function name in an expression to indicate
it is accessible at the Command: prompt? 15. What is a function definition? 16. Define an argument. 17. Which AutoLISP function is used to create new AutoCAD commands? 18. What is the purpose of the Visual LISP Editor? 19. When entering text in the Visual LISP Editor, which color indicates that you have
entered a built-in function or a protected symbol? 20. Explain the purpose of the \n text string in AutoLISP.
Dra
win
g P
rob
lem
s -
Chap
ter
27
Chapter 27 Introduction to AutoLISP AutoCAD and Its Applications—Advanced 716Copyright by Goodheart-Willcox Co., Inc.
Drawing ProblemsWrite AutoLISP programs for the following problems. Use the Visual LISP Editor. Save the files as P27-(problem number) with the .lsp extension.
1. Write an AutoLISP program to draw a rectangle. Use the (getpoint) function to set the opposite corners of the rectangle. Follow these guidelines:A. Set P1 as the first corner.B. Set P3 as the opposite corner.C. Use the RECTANG command to draw the rectangle using P1 and P3 in place of
picking corners.D. The users should not be able to change any options in the RECTANG command.
2. Create an AutoLISP program to draw a square. Follow these guidelines:A. Set a variable for the length of one side.B. Set the variable P1 as the lower-left corner of the square.C. Use the RECTANG command to draw the square. (Hint: Use the “dimen-
sions” option of the RECTANG command, and use the length variable for both lengths. Then use the P1 variable when prompted for the “other corner”).
3. Revise the program in Problem 2 to draw a square with filleted corners.A. The fillet radius should be equal to 1/4 of the side length.B. After the fillet rectangle is drawn, reset the fillet radius so the next rectangle
drawn with the RECTANG command does not automatically have fillets.Note: Use ̂ C to cancel a command that you do not want to complete. For example:
(command "LINE" PT1 ^C)
4. Use the program in Problem 3 to create a new command that draws a square with thick lines.A. The line thickness should be a percentage of the fillet radius (between 5% and 10%).B. Reset the line thickness so that the next rectangle drawn with the RECTANG
command does not automatically have thick lines. Note: Use ^C to cancel a command that you do not want to complete. For example:
(command "LINE" PT1 ^C)
5. Write an AutoLISP program that allows the user to draw parallel rectangles.A. Provide a prompt that asks the user to enter an offset distance for a second
rectangle to be placed inside of the first rectangle.B. Use the OFFSET command to allow the user to draw the parallel rectangle
inside the original without entering an offset distance.