Embed Size (px)
Citation preview

Internet Banking & Bill
Quick Start GuideStep-by-step instructions PLUS easy-to-read screen shots and helpful tips.
�
Welcome -- Online System Security
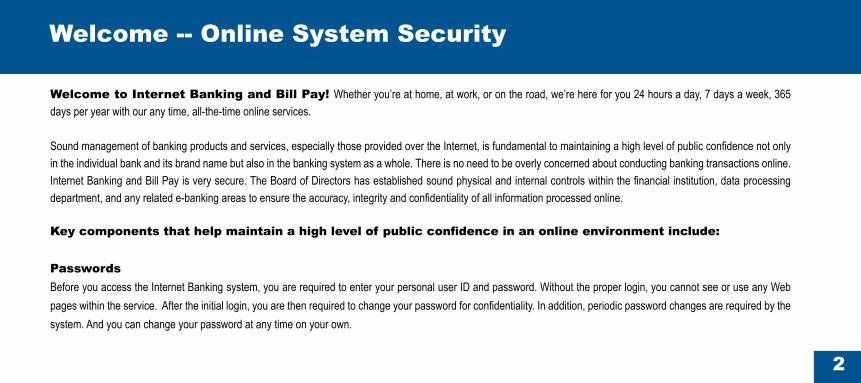
Welcome to Internet Banking and Bill Pay! Whether you’re at home, at work, or on the road, we’re here for you 24 hours a day, 7 days a week, 365 days per year with our any time, all-the-time online services.
Sound management of banking products and services, especially those provided over the Internet, is fundamental to maintaining a high level of public confidence not only in the individual bank and its brand name but also in the banking system as a whole. There is no need to be overly concerned about conducting banking transactions online. Internet Banking and Bill Pay is very secure. The Board of Directors has established sound physical and internal controls within the financial institution, data processing department, and any related e-banking areas to ensure the accuracy, integrity and confidentiality of all information processed online.
Key components that help maintain a high level of public confidence in an online environment include:
Passwords Before you access the Internet Banking system, you are required to enter your personal user ID and password. Without the proper login, you cannot see or use any Web pages within the service. After the initial login, you are then required to change your password for confidentiality. In addition, periodic password changes are required by the system. And you can change your password at any time on your own.
�
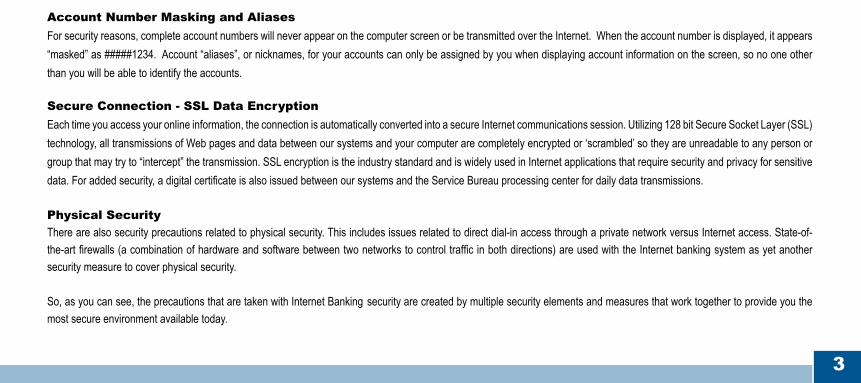
Account Number Masking and Aliases For security reasons, complete account numbers will never appear on the computer screen or be transmitted over the Internet. When the account number is displayed, it appears “masked” as #####1234. Account “aliases”, or nicknames, for your accounts can only be assigned by you when displaying account information on the screen, so no one other than you will be able to identify the accounts.
Secure Connection - SSL Data Encryption Each time you access your online information, the connection is automatically converted into a secure Internet communications session. Utilizing 128 bit Secure Socket Layer (SSL) technology, all transmissions of Web pages and data between our systems and your computer are completely encrypted or ‘scrambled’ so they are unreadable to any person or group that may try to “intercept” the transmission. SSL encryption is the industry standard and is widely used in Internet applications that require security and privacy for sensitive data. For added security, a digital certificate is also issued between our systems and the Service Bureau processing center for daily data transmissions.
Physical Security There are also security precautions related to physical security. This includes issues related to direct dial-in access through a private network versus Internet access. State-of- the-art firewalls (a combination of hardware and software between two networks to control traffic in both directions) are used with the Internet banking system as yet another security measure to cover physical security.
So, as you can see, the precautions that are taken with Internet Banking security are created by multiple security elements and measures that work together to provide you the most secure environment available today.

�
How to Use this Guide Preparation Before Logging In
This Quick Start Guide is designed to walk you through each step of the Internet Banking and Bill Pay process, from how to log in, to how to pay your first bill online.
Each Internet Banking and Bill Pay feature is illustrated by a screen shot and step-by-step instructions on how to use each feature.
Getting started for Internet Banking and Bill Pay only takes a few short minutes. It’s very easy and fast. You’ll be up and running in no time! The first step in getting started is gathering together the appropriate paperwork to make your first login as simple as possible.
Be sure to gather the Internet Banking welcome letter that you received from us. This letter is important because it contains your user ID and password information.
Also gather together your most recent statement for each account you’ll be viewing online, so you can easily identify the account numbers and choose a ‘nickname’ for each account.
If you have already signed up for Bill Pay, be sure to gather together previous bills in order to enter your payee or biller information. (You’ll only have to do this once!)
Next, logon to the Internet and go to our home page. The home page can be found at www.plantersfirst.com.
From the home page, select Internet Banking, and follow the instructions.
1
�
�
�
1
��
It’s a lot easier than you think to get started. Help is always either a quick e-mail or phone call away!
�
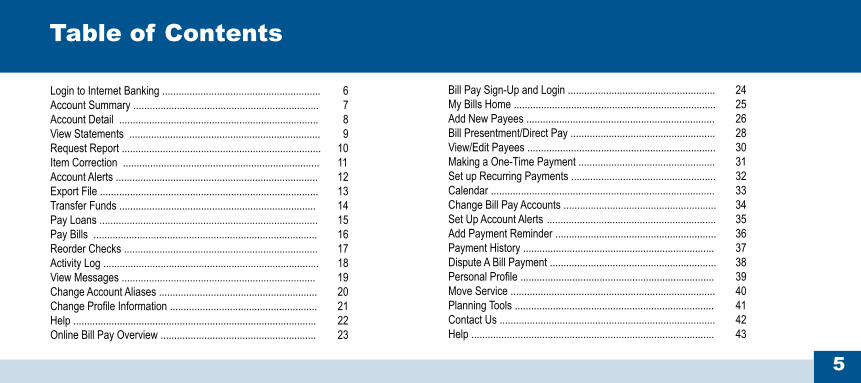
Login to Internet Banking .......................................................... 6Account Summary .................................................................... 7Account Detail ......................................................................... 8View Statements ...................................................................... 9Request Report ......................................................................... 10Item Correction ........................................................................ 11Account Alerts .......................................................................... 12Export File ................................................................................ 13Transfer Funds ........................................................................ 14Pay Loans ................................................................................ 15Pay Bills .................................................................................. 16Reorder Checks ....................................................................... 17Activity Log ............................................................................... 18View Messages ....................................................................... 19Change Account Aliases .......................................................... 20Change Profile Information ...................................................... 21Help ......................................................................................... 22Online Bill Pay Overview ......................................................... 23
Bill Pay Sign-Up and Login ...................................................... 24My Bills Home .......................................................................... 25Add New Payees ..................................................................... 26Bill Presentment/Direct Pay ..................................................... 28View/Edit Payees ..................................................................... 30Making a One-Time Payment .................................................. 31Set up Recurring Payments ..................................................... 32Calendar .................................................................................. 33Change Bill Pay Accounts ........................................................ 34Set Up Account Alerts .............................................................. 35Add Payment Reminder ........................................................... 36Payment History ...................................................................... 37Dispute A Bill Payment ............................................................. 38Personal Profile ....................................................................... 39Move Service ........................................................................... 40Planning Tools ......................................................................... 41Contact Us ............................................................................... 42Help ......................................................................................... 43
Table of Contents
�
Helpful Hints
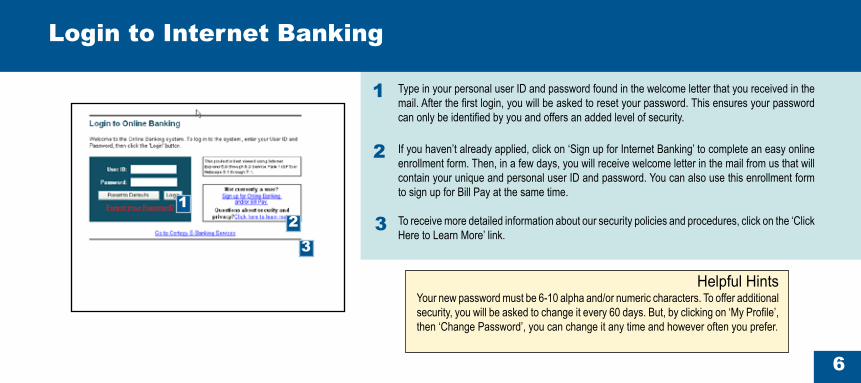
Type in your personal user ID and password found in the welcome letter that you received in the mail. After the first login, you will be asked to reset your password. This ensures your password can only be identified by you and offers an added level of security.
If you haven’t already applied, click on ‘Sign up for Internet Banking’ to complete an easy online enrollment form. Then, in a few days, you will receive welcome letter in the mail from us that will contain your unique and personal user ID and password. You can also use this enrollment form to sign up for Bill Pay at the same time.
To receive more detailed information about our security policies and procedures, click on the ‘Click Here to Learn More’ link.
1
�
Your new password must be 6-10 alpha and/or numeric characters. To offer additional security, you will be asked to change it every 60 days. But, by clicking on ‘My Profile’, then ‘Change Password’, you can change it any time and however often you prefer.
Login to Internet Banking
1�
��
�
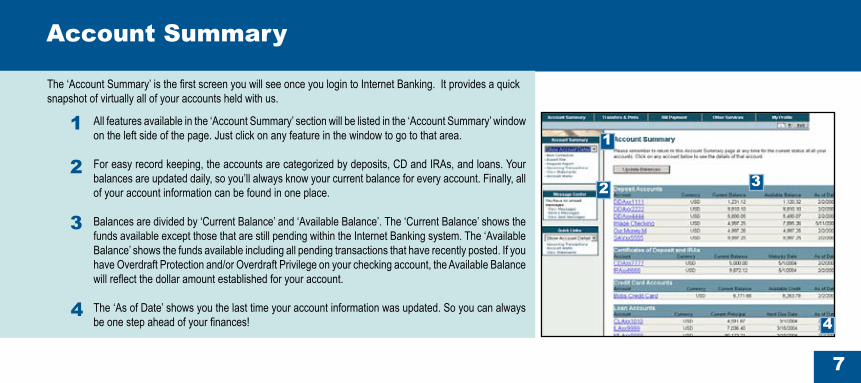
All features available in the ‘Account Summary’ section will be listed in the ‘Account Summary’ window on the left side of the page. Just click on any feature in the window to go to that area.
For easy record keeping, the accounts are categorized by deposits, CD and IRAs, and loans. Your balances are updated daily, so you’ll always know your current balance for every account. Finally, all of your account information can be found in one place.
Balances are divided by ‘Current Balance’ and ‘Available Balance’. The ‘Current Balance’ shows the funds available except those that are still pending within the Internet Banking system. The ‘Available Balance’ shows the funds available including all pending transactions that have recently posted. If you have Overdraft Protection and/or Overdraft Privilege on your checking account, the Available Balance will reflect the dollar amount established for your account.
The ‘As of Date’ shows you the last time your account information was updated. So you can always be one step ahead of your finances!
1
�
�
The ‘Account Summary’ is the first screen you will see once you login to Internet Banking. It provides a quick snapshot of virtually all of your accounts held with us.
Account Summary
1
�
��
�
�
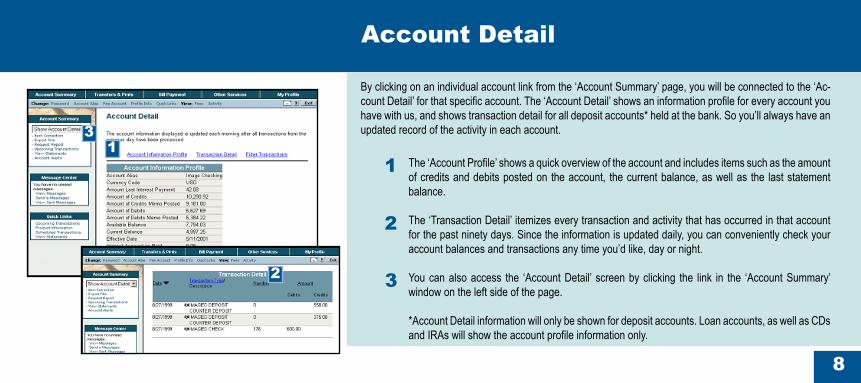
The ‘Account Profile’ shows a quick overview of the account and includes items such as the amount of credits and debits posted on the account, the current balance, as well as the last statement balance.
The ‘Transaction Detail’ itemizes every transaction and activity that has occurred in that account for the past ninety days. Since the information is updated daily, you can conveniently check your account balances and transactions any time you’d like, day or night.
You can also access the ‘Account Detail’ screen by clicking the link in the ‘Account Summary’ window on the left side of the page.
*Account Detail information will only be shown for deposit accounts. Loan accounts, as well as CDs and IRAs will show the account profile information only.
1
�
By clicking on an individual account link from the ‘Account Summary’ page, you will be connected to the ‘Ac-count Detail’ for that specific account. The ‘Account Detail’ shows an information profile for every account you have with us, and shows transaction detail for all deposit accounts* held at the bank. So you’ll always have an updated record of the activity in each account.
Account Detail
1
�
�
�
�
1
�
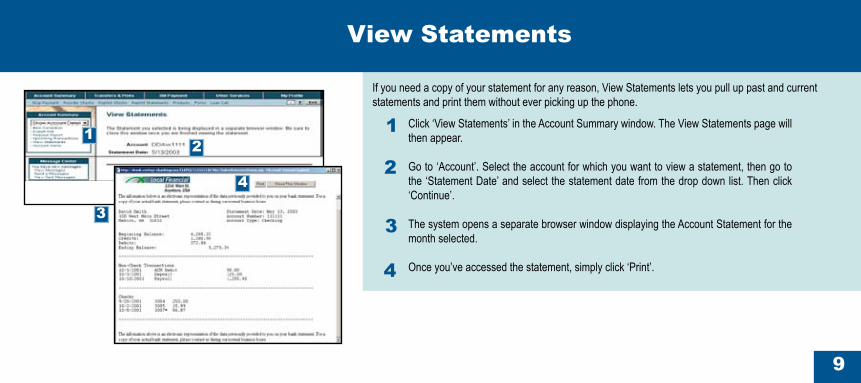
If you need a copy of your statement for any reason, View Statements lets you pull up past and current statements and print them without ever picking up the phone.
View Statements
Click ‘View Statements’ in the Account Summary window. The View Statements page will then appear.
Go to ‘Account’. Select the account for which you want to view a statement, then go to the ‘Statement Date’ and select the statement date from the drop down list. Then click ‘Continue’.
The system opens a separate browser window displaying the Account Statement for the month selected.
Once you’ve accessed the statement, simply click ‘Print’.
�
�
1�
�
�
Request Report
1
�
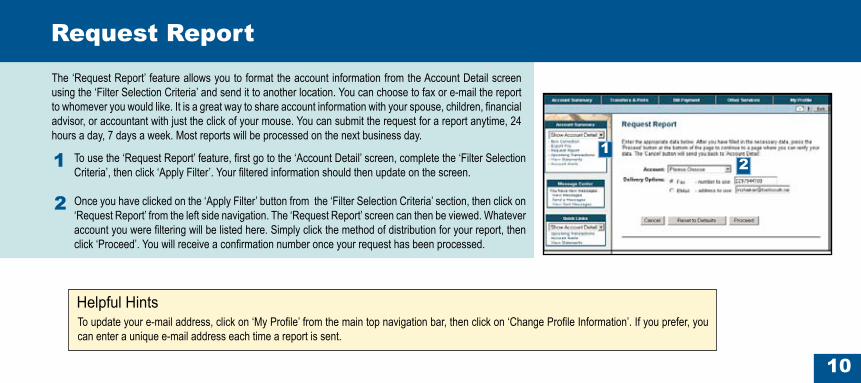
The ‘Request Report’ feature allows you to format the account information from the Account Detail screen using the ‘Filter Selection Criteria’ and send it to another location. You can choose to fax or e-mail the report to whomever you would like. It is a great way to share account information with your spouse, children, financial advisor, or accountant with just the click of your mouse. You can submit the request for a report anytime, 24 hours a day, 7 days a week. Most reports will be processed on the next business day.
Helpful HintsTo update your e-mail address, click on ‘My Profile’ from the main top navigation bar, then click on ‘Change Profile Information’. If you prefer, you can enter a unique e-mail address each time a report is sent.
To use the ‘Request Report’ feature, first go to the ‘Account Detail’ screen, complete the ‘Filter Selection Criteria’, then click ‘Apply Filter’. Your filtered information should then update on the screen.
Once you have clicked on the ‘Apply Filter’ button from the ‘Filter Selection Criteria’ section, then click on ‘Request Report’ from the left side navigation. The ‘Request Report’ screen can then be viewed. Whatever account you were filtering will be listed here. Simply click the method of distribution for your report, then click ‘Proceed’. You will receive a confirmation number once your request has been processed.
1�
10
1
�
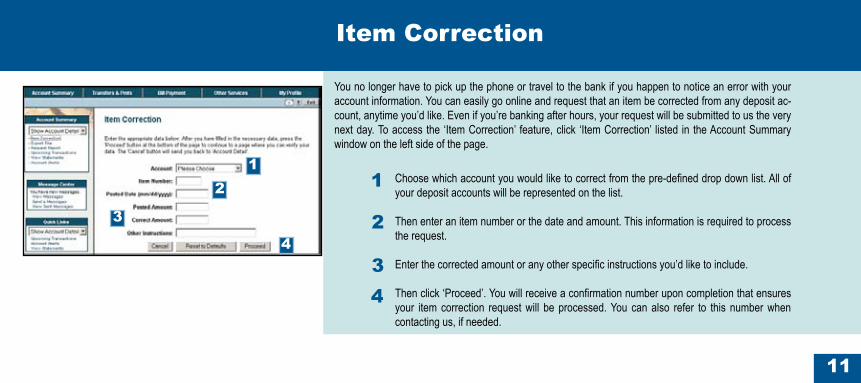
You no longer have to pick up the phone or travel to the bank if you happen to notice an error with your account information. You can easily go online and request that an item be corrected from any deposit ac-count, anytime you’d like. Even if you’re banking after hours, your request will be submitted to us the very next day. To access the ‘Item Correction’ feature, click ‘Item Correction’ listed in the Account Summary window on the left side of the page.
Item Correction
Choose which account you would like to correct from the pre-defined drop down list. All of your deposit accounts will be represented on the list.
Then enter an item number or the date and amount. This information is required to process the request.
Enter the corrected amount or any other specific instructions you’d like to include.
Then click ‘Proceed’. You will receive a confirmation number upon completion that ensures your item correction request will be processed. You can also refer to this number when contacting us, if needed.
�
1�
�
�
�
11
1�
1�
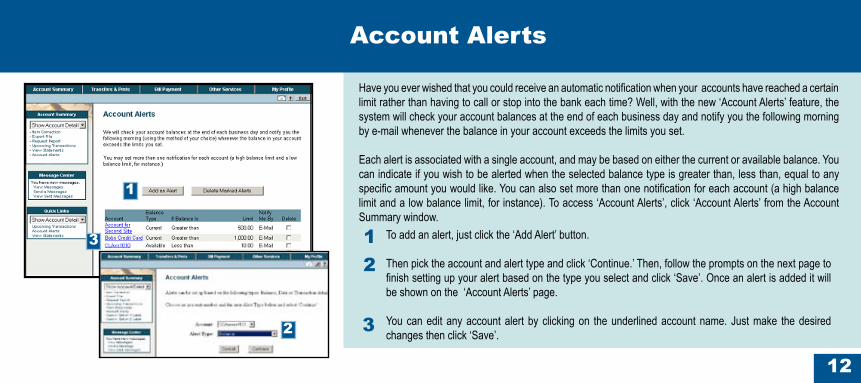
Have you ever wished that you could receive an automatic notification when your accounts have reached a certain limit rather than having to call or stop into the bank each time? Well, with the new ‘Account Alerts’ feature, the system will check your account balances at the end of each business day and notify you the following morning by e-mail whenever the balance in your account exceeds the limits you set.
Each alert is associated with a single account, and may be based on either the current or available balance. You can indicate if you wish to be alerted when the selected balance type is greater than, less than, equal to any specific amount you would like. You can also set more than one notification for each account (a high balance limit and a low balance limit, for instance). To access ‘Account Alerts’, click ‘Account Alerts’ from the Account Summary window.
To add an alert, just click the ‘Add Alert’ button.
Then pick the account and alert type and click ‘Continue.’ Then, follow the prompts on the next page to finish setting up your alert based on the type you select and click ‘Save’. Once an alert is added it will be shown on the ‘Account Alerts’ page.
You can edit any account alert by clicking on the underlined account name. Just make the desired changes then click ‘Save’.
Account Alerts
1
�
�
�
1�
Export File
1
�
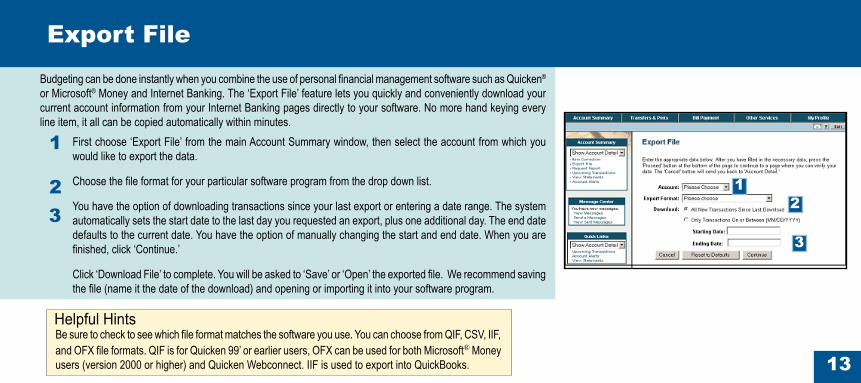
First choose ‘Export File’ from the main Account Summary window, then select the account from which you would like to export the data.
Choose the file format for your particular software program from the drop down list.
You have the option of downloading transactions since your last export or entering a date range. The system automatically sets the start date to the last day you requested an export, plus one additional day. The end date defaults to the current date. You have the option of manually changing the start and end date. When you are finished, click ‘Continue.’
Click ‘Download File’ to complete. You will be asked to ‘Save’ or ‘Open’ the exported file. We recommend saving the file (name it the date of the download) and opening or importing it into your software program.
Budgeting can be done instantly when you combine the use of personal financial management software such as Quicken® or Microsoft® Money and Internet Banking. The ‘Export File’ feature lets you quickly and conveniently download your current account information from your Internet Banking pages directly to your software. No more hand keying every line item, it all can be copied automatically within minutes.
Helpful HintsBe sure to check to see which file format matches the software you use. You can choose from QIF, CSV, IIF, and OFX file formats. QIF is for Quicken 99’ or earlier users, OFX can be used for both Microsoft® Money users (version 2000 or higher) and Quicken Webconnect. IIF is used to export into QuickBooks.
�1
�
�
1�
1
�
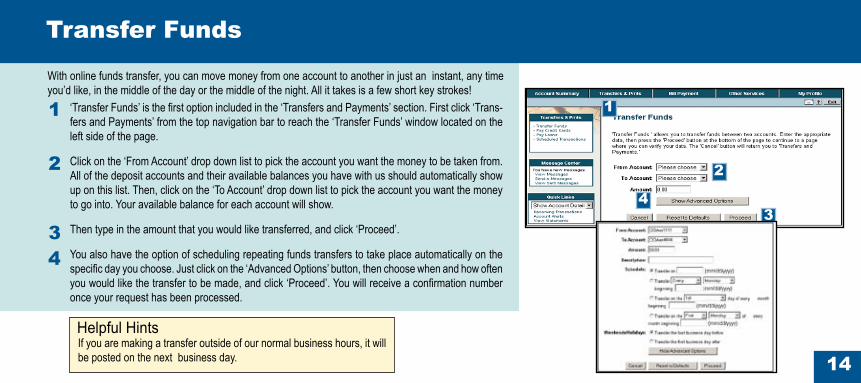
‘Transfer Funds’ is the first option included in the ‘Transfers and Payments’ section. First click ‘Trans-fers and Payments’ from the top navigation bar to reach the ‘Transfer Funds’ window located on the left side of the page.
Click on the ‘From Account’ drop down list to pick the account you want the money to be taken from. All of the deposit accounts and their available balances you have with us should automatically show up on this list. Then, click on the ‘To Account’ drop down list to pick the account you want the money to go into. Your available balance for each account will show.
Then type in the amount that you would like transferred, and click ‘Proceed’.
You also have the option of scheduling repeating funds transfers to take place automatically on the specific day you choose. Just click on the ‘Advanced Options’ button, then choose when and how often you would like the transfer to be made, and click ‘Proceed’. You will receive a confirmation number once your request has been processed.
With online funds transfer, you can move money from one account to another in just an instant, any time you’d like, in the middle of the day or the middle of the night. All it takes is a few short key strokes!
If you are making a transfer outside of our normal business hours, it will be posted on the next business day.
Helpful Hints
�
Transfer Funds
1
�
��
�
1�
Pay Loans
1
�
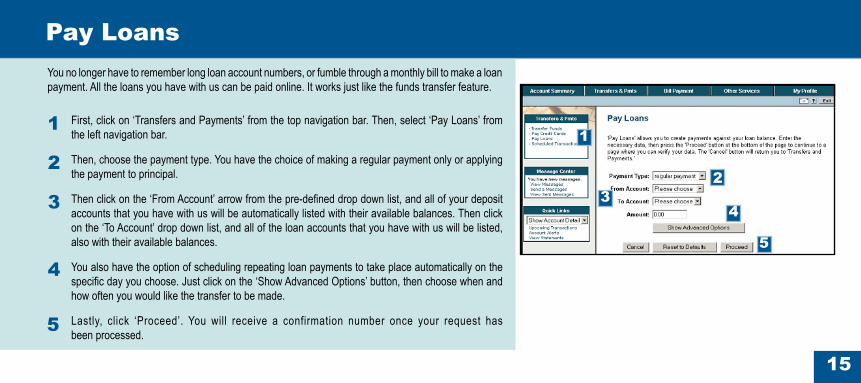
You no longer have to remember long loan account numbers, or fumble through a monthly bill to make a loan payment. All the loans you have with us can be paid online. It works just like the funds transfer feature.
First, click on ‘Transfers and Payments’ from the top navigation bar. Then, select ‘Pay Loans’ from the left navigation bar.
Then, choose the payment type. You have the choice of making a regular payment only or applying the payment to principal.
Then click on the ‘From Account’ arrow from the pre-defined drop down list, and all of your deposit accounts that you have with us will be automatically listed with their available balances. Then click on the ‘To Account’ drop down list, and all of the loan accounts that you have with us will be listed, also with their available balances.
You also have the option of scheduling repeating loan payments to take place automatically on the specific day you choose. Just click on the ‘Show Advanced Options’ button, then choose when and how often you would like the transfer to be made.
Lastly, click ‘Proceed’. You will receive a confirmation number once your request has been processed.
�
�
�
1
��
�
�
1�
1
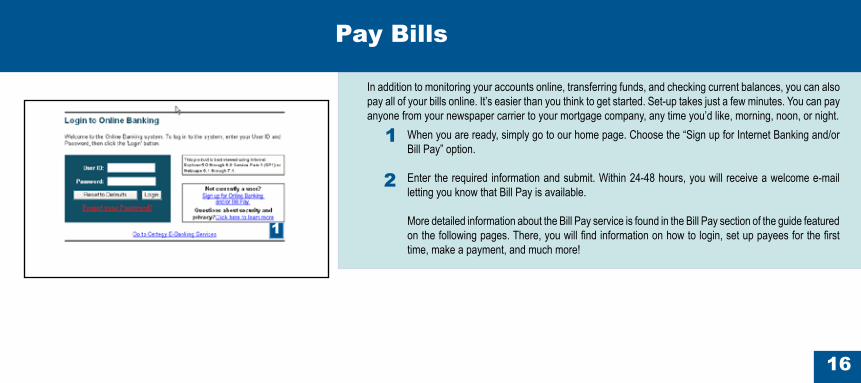
In addition to monitoring your accounts online, transferring funds, and checking current balances, you can also pay all of your bills online. It’s easier than you think to get started. Set-up takes just a few minutes. You can pay anyone from your newspaper carrier to your mortgage company, any time you’d like, morning, noon, or night.
Pay Bills
1
When you are ready, simply go to our home page. Choose the “Sign up for Internet Banking and/or Bill Pay” option.
Enter the required information and submit. Within 24-48 hours, you will receive a welcome e-mail letting you know that Bill Pay is available.
More detailed information about the Bill Pay service is found in the Bill Pay section of the guide featured on the following pages. There, you will find information on how to login, set up payees for the first time, make a payment, and much more!
�
1�
Reorder Checks
1
�
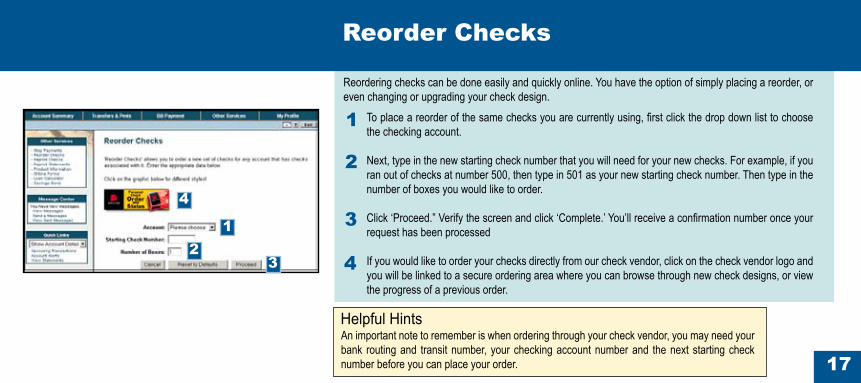
To place a reorder of the same checks you are currently using, first click the drop down list to choose the checking account.
Next, type in the new starting check number that you will need for your new checks. For example, if you ran out of checks at number 500, then type in 501 as your new starting check number. Then type in the number of boxes you would like to order.
Click ‘Proceed.” Verify the screen and click ‘Complete.’ You’ll receive a confirmation number once your request has been processed
If you would like to order your checks directly from our check vendor, click on the check vendor logo and you will be linked to a secure ordering area where you can browse through new check designs, or view the progress of a previous order.
Reordering checks can be done easily and quickly online. You have the option of simply placing a reorder, or even changing or upgrading your check design.
Helpful HintsAn important note to remember is when ordering through your check vendor, you may need your bank routing and transit number, your checking account number and the next starting check number before you can place your order.
�
�
1�
�
�
1�
Activity Log
1�
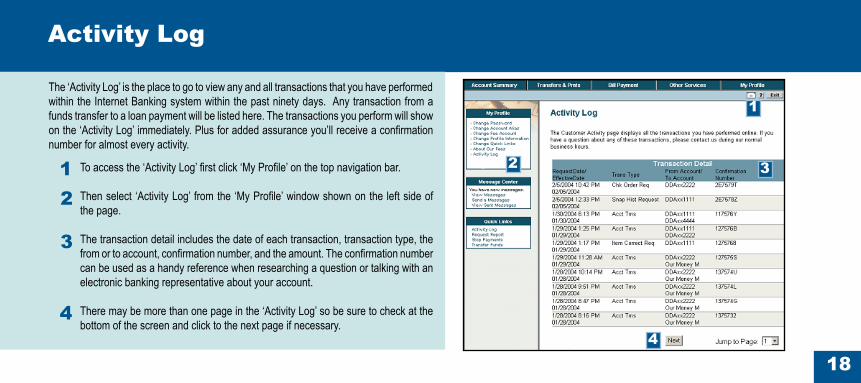
To access the ‘Activity Log’ first click ‘My Profile’ on the top navigation bar.
Then select ‘Activity Log’ from the ‘My Profile’ window shown on the left side of the page.
The transaction detail includes the date of each transaction, transaction type, the from or to account, confirmation number, and the amount. The confirmation number can be used as a handy reference when researching a question or talking with an electronic banking representative about your account.
There may be more than one page in the ‘Activity Log’ so be sure to check at the bottom of the screen and click to the next page if necessary.
The ‘Activity Log’ is the place to go to view any and all transactions that you have performed within the Internet Banking system within the past ninety days. Any transaction from a funds transfer to a loan payment will be listed here. The transactions you perform will show on the ‘Activity Log’ immediately. Plus for added assurance you’ll receive a confirmation number for almost every activity.
� �
�
�
�
1
1�
View Messages
1
�
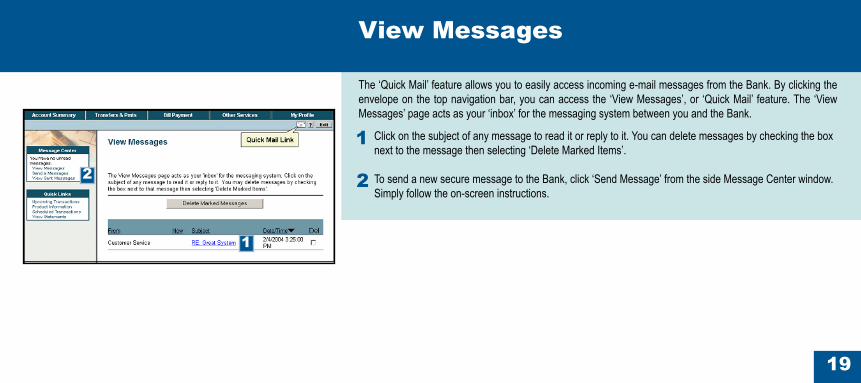
Click on the subject of any message to read it or reply to it. You can delete messages by checking the box next to the message then selecting ‘Delete Marked Items’.
To send a new secure message to the Bank, click ‘Send Message’ from the side Message Center window. Simply follow the on-screen instructions.
The ‘Quick Mail’ feature allows you to easily access incoming e-mail messages from the Bank. By clicking the envelope on the top navigation bar, you can access the ‘View Messages’, or ‘Quick Mail’ feature. The ‘View Messages’ page acts as your ‘inbox’ for the messaging system between you and the Bank.
1
�
�0
Change Password and Account Aliases
1
�
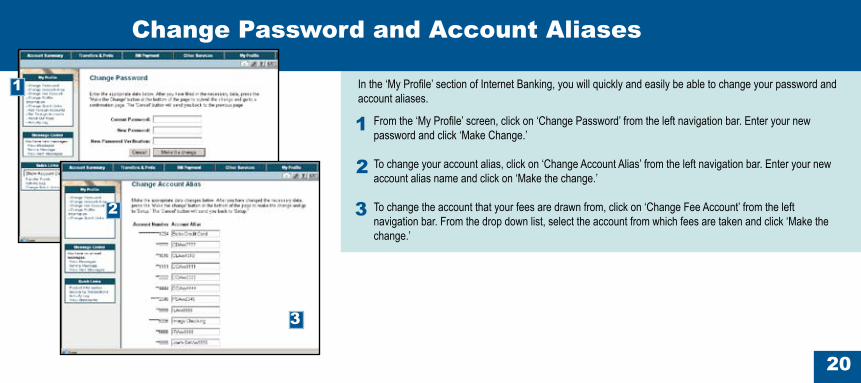
From the ‘My Profile’ screen, click on ‘Change Password’ from the left navigation bar. Enter your new password and click ‘Make Change.’
To change your account alias, click on ‘Change Account Alias’ from the left navigation bar. Enter your new account alias name and click on ‘Make the change.’
To change the account that your fees are drawn from, click on ‘Change Fee Account’ from the left navigation bar. From the drop down list, select the account from which fees are taken and click ‘Make the change.’
In the ‘My Profile’ section of Internet Banking, you will quickly and easily be able to change your password and account aliases.
X
�
1
�
�
�1
Change Profile Information
1
�
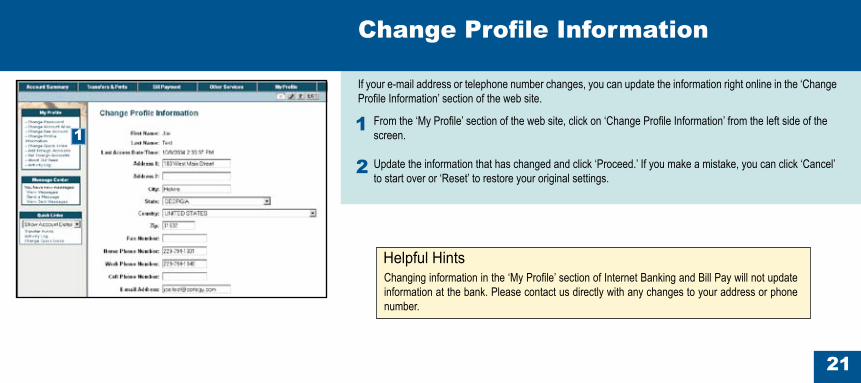
From the ‘My Profile’ section of the web site, click on ‘Change Profile Information’ from the left side of the screen.
Update the information that has changed and click ‘Proceed.’ If you make a mistake, you can click ‘Cancel’ to start over or ‘Reset’ to restore your original settings.
If your e-mail address or telephone number changes, you can update the information right online in the ‘Change Profile Information’ section of the web site.
Helpful HintsChanging information in the ‘My Profile’ section of Internet Banking and Bill Pay will not update information at the bank. Please contact us directly with any changes to your address or phone number.
1
��
Help
1
�
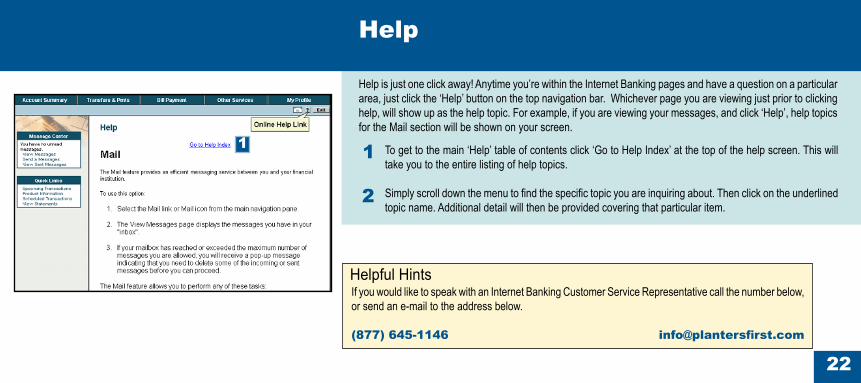
To get to the main ‘Help’ table of contents click ‘Go to Help Index’ at the top of the help screen. This will take you to the entire listing of help topics.
Simply scroll down the menu to find the specific topic you are inquiring about. Then click on the underlined topic name. Additional detail will then be provided covering that particular item.
Help is just one click away! Anytime you’re within the Internet Banking pages and have a question on a particular area, just click the ‘Help’ button on the top navigation bar. Whichever page you are viewing just prior to clicking help, will show up as the help topic. For example, if you are viewing your messages, and click ‘Help’, help topics for the Mail section will be shown on your screen.
Helpful HintsIf you would like to speak with an Internet Banking Customer Service Representative call the number below, or send an e-mail to the address below.
(���) ���-11�� [email protected]
1
��
Online Bill Pay Overview
Welcome to Bill Pay!
Financial freedom is just one click away. Bill Pay allows you to pay all of your bills electronically, online. You can pay everyone you’re used to paying by check. What used to take hours can now be done in a few short minutes. Bill Pay is much easier than paying by check! You can pay anyone, from your newspaper carrier to your mortgage company. You don’t have to worry about whether or not they can accept electronic payments, the system does that automatically for you.
Set-up takes just a few minutes, and there’s always help available if you need it. With Bill Pay, you can:
• pay your bills any time, day or night• set-up recurring payments to be made automatically at the frequency you choose• receive access to detailed payment history• and much more!
All payments sent through Bill Pay are tracked, guaranteed to be secure and sent on time. All payments are backed by the ‘Bill Pay Guarantee’ that states your payments will arrive safely and on time. How’s that for security?
Plus, you always have a record of any payment that was made with Bill Pay. The Payment History section tracks any and every transaction within the Bill Pay system and shows a detailed record of data. So, your financial information is always available to you when you need it!
��
Bill Pay Sign-Up and Login
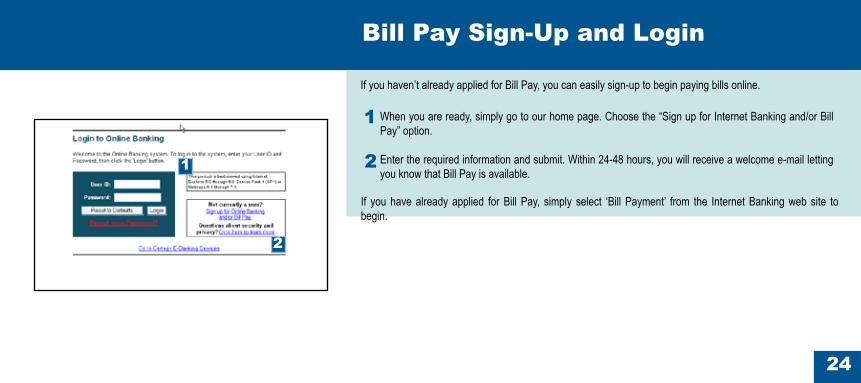
1 When you are ready, simply go to our home page. Choose the “Sign up for Internet Banking and/or Bill Pay” option.
Enter the required information and submit. Within 24-48 hours, you will receive a welcome e-mail letting you know that Bill Pay is available.
If you haven’t already applied for Bill Pay, you can easily sign-up to begin paying bills online.
�1
�
If you have already applied for Bill Pay, simply select ‘Bill Payment’ from the Internet Banking web site to begin.
��
My Bills Home
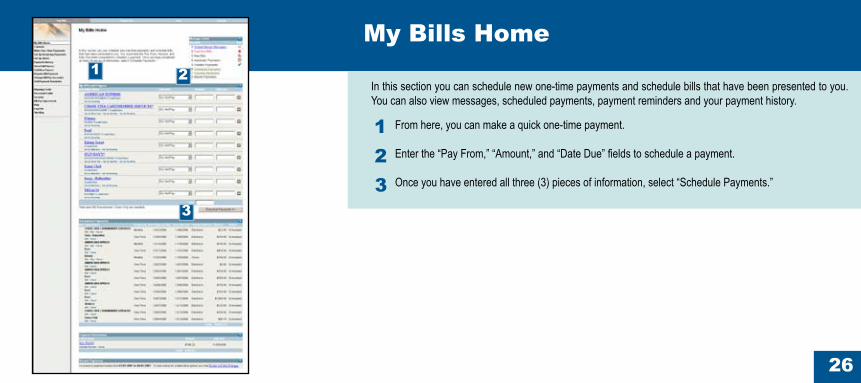
1 From here, you can make a quick one-time payment.
Enter the “Pay From,” “Amount,” and “Date Due” fields to schedule a payment.
Once you have entered all three (3) pieces of information, select “Schedule Payments.”
In this section you can schedule new one-time payments and schedule bills that have been presented to you. You can also view messages, scheduled payments, payment reminders and your payment history.
�
��
�
1 �
�
��
1�
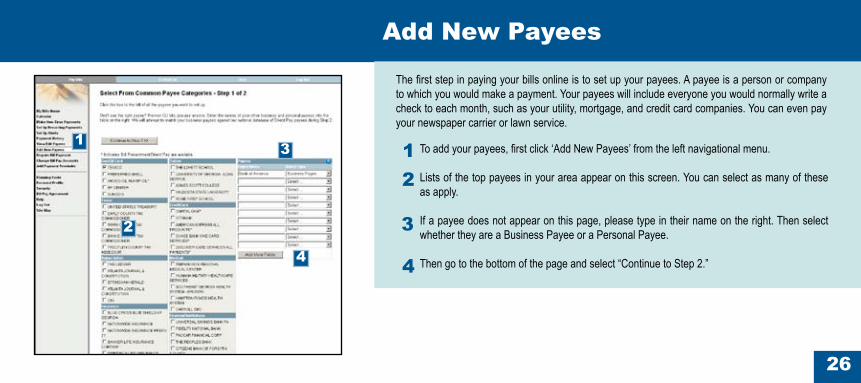
The first step in paying your bills online is to set up your payees. A payee is a person or company to which you would make a payment. Your payees will include everyone you would normally write a check to each month, such as your utility, mortgage, and credit card companies. You can even pay your newspaper carrier or lawn service.
To add your payees, first click ‘Add New Payees’ from the left navigational menu.
Lists of the top payees in your area appear on this screen. You can select as many of these as apply.
If a payee does not appear on this page, please type in their name on the right. Then select whether they are a Business Payee or a Personal Payee.
Then go to the bottom of the page and select “Continue to Step 2.”
Add New Payees
�
�
�
�
�
1
��
1�
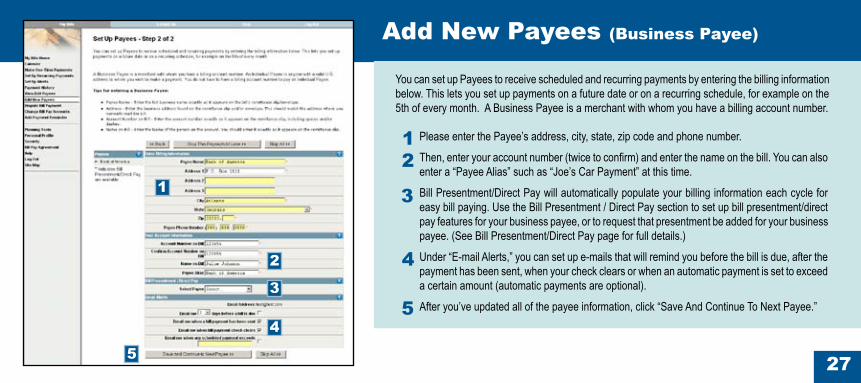
You can set up Payees to receive scheduled and recurring payments by entering the billing information below. This lets you set up payments on a future date or on a recurring schedule, for example on the 5th of every month. A Business Payee is a merchant with whom you have a billing account number.
Please enter the Payee’s address, city, state, zip code and phone number.
Then, enter your account number (twice to confirm) and enter the name on the bill. You can also enter a “Payee Alias” such as “Joe’s Car Payment” at this time.
Bill Presentment/Direct Pay will automatically populate your billing information each cycle for easy bill paying. Use the Bill Presentment / Direct Pay section to set up bill presentment/direct pay features for your business payee, or to request that presentment be added for your business payee. (See Bill Presentment/Direct Pay page for full details.)
Under “E-mail Alerts,” you can set up e-mails that will remind you before the bill is due, after the payment has been sent, when your check clears or when an automatic payment is set to exceed a certain amount (automatic payments are optional).
After you’ve updated all of the payee information, click “Save And Continue To Next Payee.”
Add New Payees (Business Payee)
�
�
�
1
�
�
�
�
��
1
�
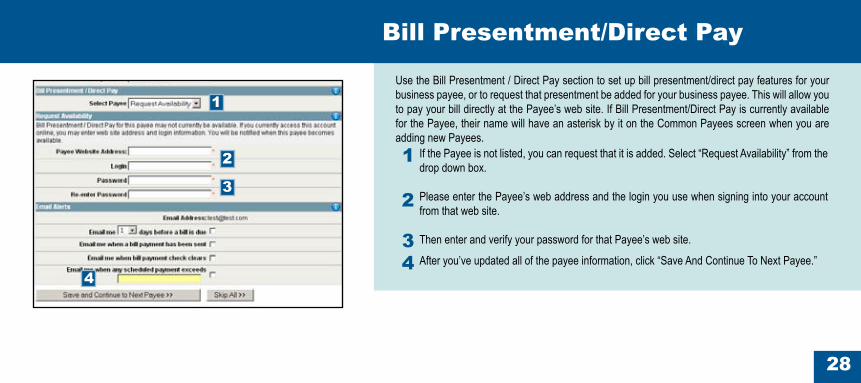
Use the Bill Presentment / Direct Pay section to set up bill presentment/direct pay features for your business payee, or to request that presentment be added for your business payee. This will allow you to pay your bill directly at the Payee’s web site. If Bill Presentment/Direct Pay is currently available for the Payee, their name will have an asterisk by it on the Common Payees screen when you are adding new Payees.
If the Payee is not listed, you can request that it is added. Select “Request Availability” from the drop down box.
Please enter the Payee’s web address and the login you use when signing into your account from that web site.
Then enter and verify your password for that Payee’s web site.
After you’ve updated all of the payee information, click “Save And Continue To Next Payee.”
Bill Presentment/Direct Pay
��
1
�
�
�
��
1�
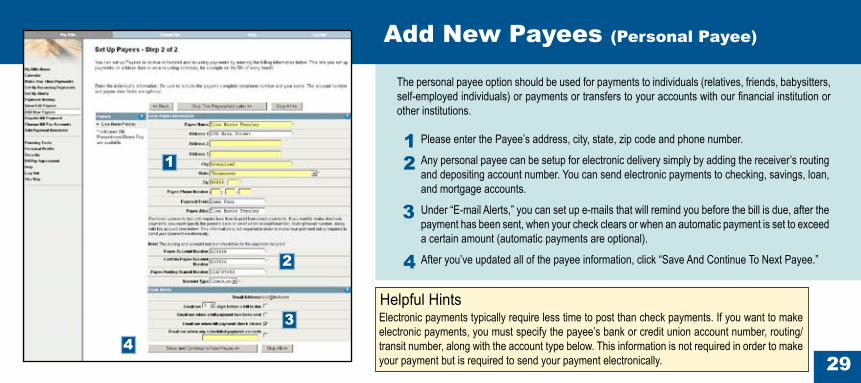
The personal payee option should be used for payments to individuals (relatives, friends, babysitters, self-employed individuals) or payments or transfers to your accounts with our financial institution or other institutions.
Please enter the Payee’s address, city, state, zip code and phone number.
Any personal payee can be setup for electronic delivery simply by adding the receiver’s routing and depositing account number. You can send electronic payments to checking, savings, loan, and mortgage accounts.
Under “E-mail Alerts,” you can set up e-mails that will remind you before the bill is due, after the payment has been sent, when your check clears or when an automatic payment is set to exceed a certain amount (automatic payments are optional).
After you’ve updated all of the payee information, click “Save And Continue To Next Payee.”
Add New Payees (Personal Payee)
�
�
Helpful HintsElectronic payments typically require less time to post than check payments. If you want to make electronic payments, you must specify the payee’s bank or credit union account number, routing/transit number, along with the account type below. This information is not required in order to make your payment but is required to send your payment electronically.
1
�
��
�0
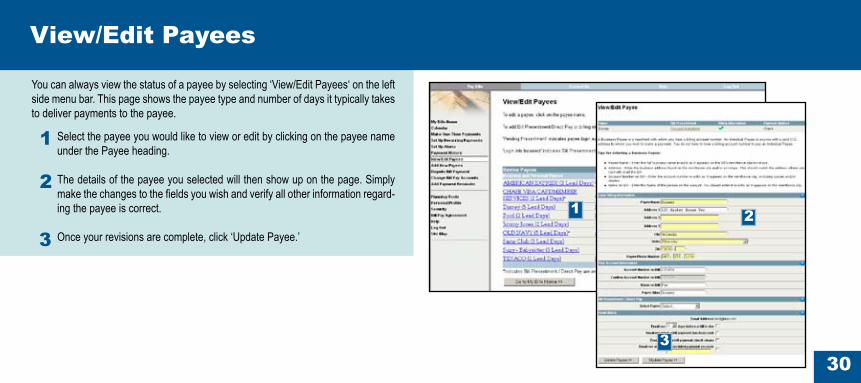
1 Select the payee you would like to view or edit by clicking on the payee name under the Payee heading.
The details of the payee you selected will then show up on the page. Simply make the changes to the fields you wish and verify all other information regard-ing the payee is correct.
Once your revisions are complete, click ‘Update Payee.’
You can always view the status of a payee by selecting ‘View/Edit Payees‘ on the left side menu bar. This page shows the payee type and number of days it typically takes to deliver payments to the payee.
�
View/Edit Payees
�
1 �
�
�1
1
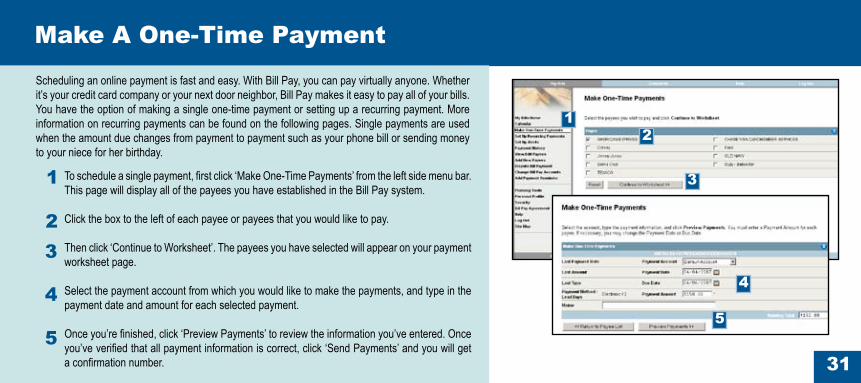
Scheduling an online payment is fast and easy. With Bill Pay, you can pay virtually anyone. Whether it’s your credit card company or your next door neighbor, Bill Pay makes it easy to pay all of your bills. You have the option of making a single one-time payment or setting up a recurring payment. More information on recurring payments can be found on the following pages. Single payments are used when the amount due changes from payment to payment such as your phone bill or sending money to your niece for her birthday.
��
To schedule a single payment, first click ‘Make One-Time Payments’ from the left side menu bar. This page will display all of the payees you have established in the Bill Pay system.
Click the box to the left of each payee or payees that you would like to pay.
Then click ‘Continue to Worksheet’. The payees you have selected will appear on your payment worksheet page.
Select the payment account from which you would like to make the payments, and type in the payment date and amount for each selected payment.
Once you’re finished, click ‘Preview Payments’ to review the information you’ve entered. Once you’ve verified that all payment information is correct, click ‘Send Payments’ and you will get a confirmation number.
Make A One-Time Payment
�
�
1�
�
�
�
��
1�
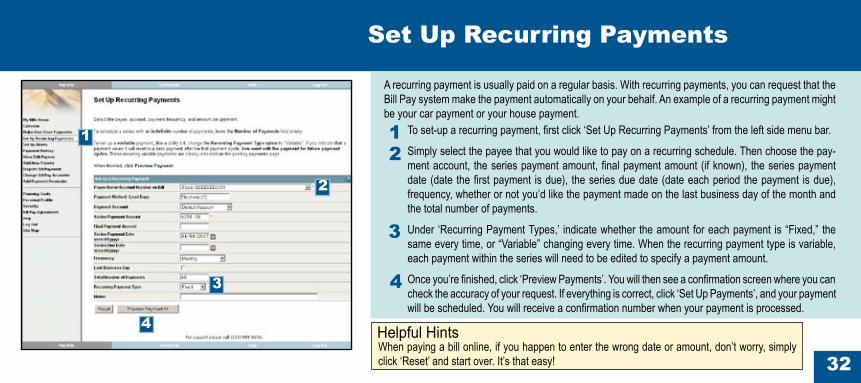
A recurring payment is usually paid on a regular basis. With recurring payments, you can request that the Bill Pay system make the payment automatically on your behalf. An example of a recurring payment might be your car payment or your house payment.
Set Up Recurring Payments
To set-up a recurring payment, first click ‘Set Up Recurring Payments’ from the left side menu bar.
Simply select the payee that you would like to pay on a recurring schedule. Then choose the pay-ment account, the series payment amount, final payment amount (if known), the series payment date (date the first payment is due), the series due date (date each period the payment is due), frequency, whether or not you’d like the payment made on the last business day of the month and the total number of payments.
Under ‘Recurring Payment Types,’ indicate whether the amount for each payment is “Fixed,” the same every time, or “Variable” changing every time. When the recurring payment type is variable, each payment within the series will need to be edited to specify a payment amount.
Once you’re finished, click ‘Preview Payments’. You will then see a confirmation screen where you can check the accuracy of your request. If everything is correct, click ‘Set Up Payments’, and your payment will be scheduled. You will receive a confirmation number when your payment is processed.
�
Helpful HintsWhen paying a bill online, if you happen to enter the wrong date or amount, don’t worry, simply click ‘Reset’ and start over. It’s that easy!
1
�
��
�
��
Calendar
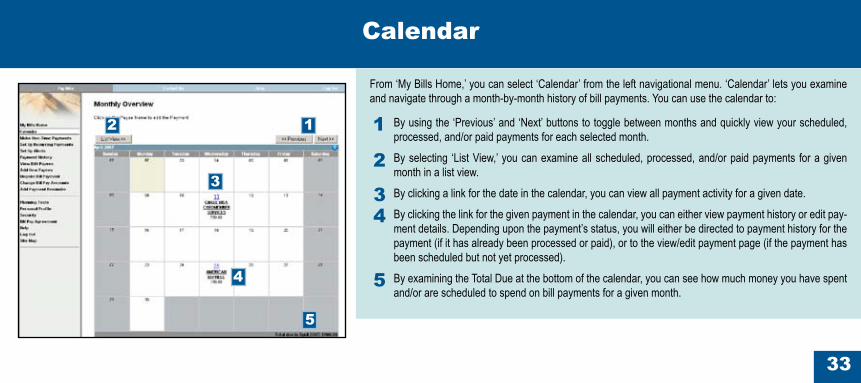
1 By using the ‘Previous’ and ‘Next’ buttons to toggle between months and quickly view your scheduled, processed, and/or paid payments for each selected month.
By selecting ‘List View,’ you can examine all scheduled, processed, and/or paid payments for a given month in a list view.
By clicking a link for the date in the calendar, you can view all payment activity for a given date.
By clicking the link for the given payment in the calendar, you can either view payment history or edit pay-ment details. Depending upon the payment’s status, you will either be directed to payment history for the payment (if it has already been processed or paid), or to the view/edit payment page (if the payment has been scheduled but not yet processed).
By examining the Total Due at the bottom of the calendar, you can see how much money you have spent and/or are scheduled to spend on bill payments for a given month.
From ‘My Bills Home,’ you can select ‘Calendar’ from the left navigational menu. ‘Calendar’ lets you examine and navigate through a month-by-month history of bill payments. You can use the calendar to:
�
��
�
1�
�
�
�

��
1�
The Change Bill Pay Accounts page allows you to update your bill pay payment and bill pay fee accounts. Your default bill payment account is the account from which bill payments that you schedule are debited, unless you specify a different account while scheduling a payment. Your bill pay fee account is the account from which fees for bill pay subscription are debited.
Change Bill Pay Accounts
Select ‘Change Bill Pay Accounts’ from the left navigational menu.
Select an account from the ‘New default bill pay payment account’ dropdown list and an account from the ‘New bill pay fee account’ drop-down list.
Click ‘Preview Changes’ to review your updated bill pay accounts on the preview page. Review your changes and select ‘Change Default Accounts’ to update your bill pay accounts. The confirmation page displays and the accounts are updated.
�
1 �
�
��
1
�
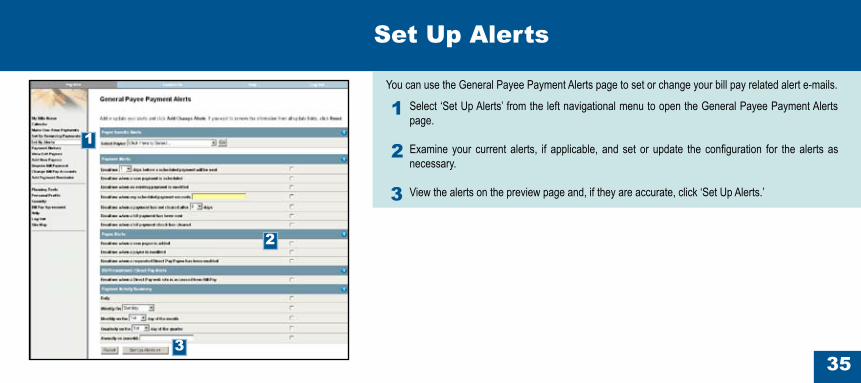
You can use the General Payee Payment Alerts page to set or change your bill pay related alert e-mails.
Set Up Alerts
Select ‘Set Up Alerts’ from the left navigational menu to open the General Payee Payment Alerts page.
Examine your current alerts, if applicable, and set or update the configuration for the alerts as necessary.
View the alerts on the preview page and, if they are accurate, click ‘Set Up Alerts.’�
1
�
�
��
1�
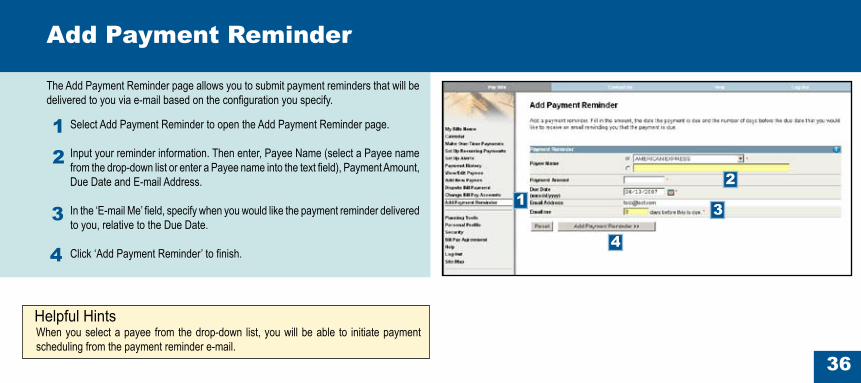
The Add Payment Reminder page allows you to submit payment reminders that will be delivered to you via e-mail based on the configuration you specify.
Add Payment Reminder
Select Add Payment Reminder to open the Add Payment Reminder page.
Input your reminder information. Then enter, Payee Name (select a Payee name from the drop-down list or enter a Payee name into the text field), Payment Amount, Due Date and E-mail Address.
In the ‘E-mail Me’ field, specify when you would like the payment reminder delivered to you, relative to the Due Date.
Click ‘Add Payment Reminder’ to finish.
�
Helpful HintsWhen you select a payee from the drop-down list, you will be able to initiate payment scheduling from the payment reminder e-mail.
�
1�
�
�
��
1
�
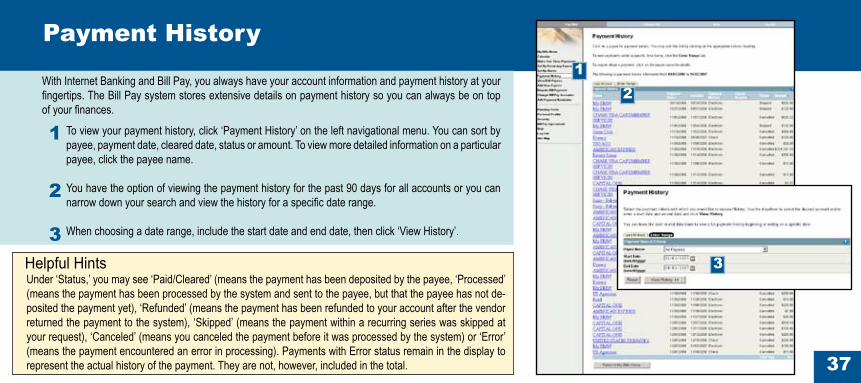
To view your payment history, click ‘Payment History’ on the left navigational menu. You can sort by payee, payment date, cleared date, status or amount. To view more detailed information on a particular payee, click the payee name.
You have the option of viewing the payment history for the past 90 days for all accounts or you can narrow down your search and view the history for a specific date range.
When choosing a date range, include the start date and end date, then click ‘View History’.
With Internet Banking and Bill Pay, you always have your account information and payment history at your fingertips. The Bill Pay system stores extensive details on payment history so you can always be on top of your finances.
�
Payment History
Helpful HintsUnder ‘Status,’ you may see ‘Paid/Cleared’ (means the payment has been deposited by the payee, ‘Processed’ (means the payment has been processed by the system and sent to the payee, but that the payee has not de-posited the payment yet), ‘Refunded’ (means the payment has been refunded to your account after the vendor returned the payment to the system), ‘Skipped’ (means the payment within a recurring series was skipped at your request), ‘Canceled’ (means you canceled the payment before it was processed by the system) or ‘Error’ (means the payment encountered an error in processing). Payments with Error status remain in the display to represent the actual history of the payment. They are not, however, included in the total.
1�
�
��
1�
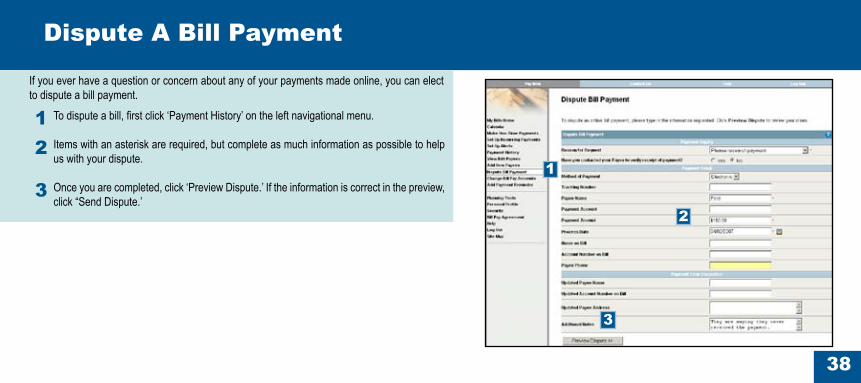
To dispute a bill, first click ‘Payment History’ on the left navigational menu.
Items with an asterisk are required, but complete as much information as possible to help us with your dispute.
Once you are completed, click ‘Preview Dispute.’ If the information is correct in the preview, click “Send Dispute.’
If you ever have a question or concern about any of your payments made online, you can elect to dispute a bill payment.
�
Dispute A Bill Payment
1
�
�
��
1�
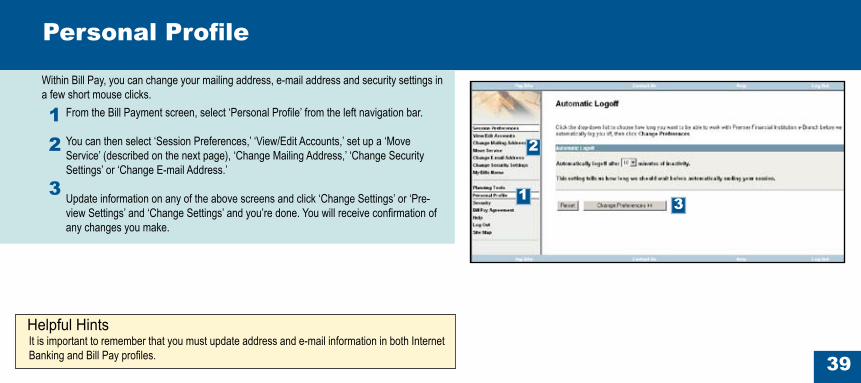
From the Bill Payment screen, select ‘Personal Profile’ from the left navigation bar.
You can then select ‘Session Preferences,’ ‘View/Edit Accounts,’ set up a ‘Move Service’ (described on the next page), ‘Change Mailing Address,’ ‘Change Security Settings’ or ‘Change E-mail Address.’
Update information on any of the above screens and click ‘Change Settings’ or ‘Pre-view Settings’ and ‘Change Settings’ and you’re done. You will receive confirmation of any changes you make.
Within Bill Pay, you can change your mailing address, e-mail address and security settings in a few short mouse clicks.
�
Personal Profile
Helpful HintsIt is important to remember that you must update address and e-mail information in both Internet Banking and Bill Pay profiles.
1
�
�
�0
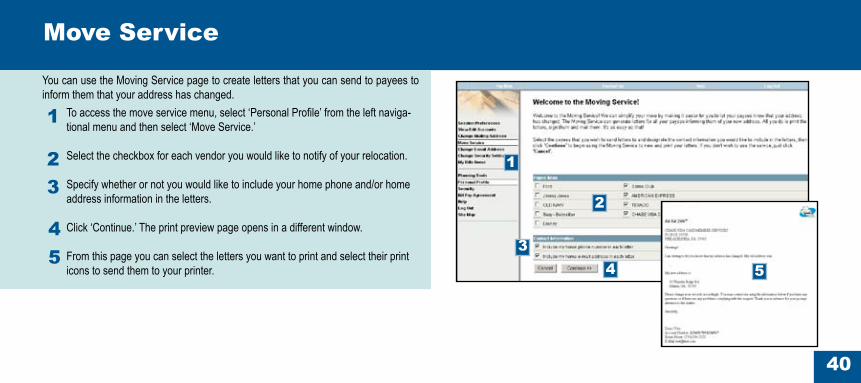
To access the move service menu, select ‘Personal Profile’ from the left naviga-tional menu and then select ‘Move Service.’ Select the checkbox for each vendor you would like to notify of your relocation.
Specify whether or not you would like to include your home phone and/or home address information in the letters.
Click ‘Continue.’ The print preview page opens in a different window.
From this page you can select the letters you want to print and select their print icons to send them to your printer.
You can use the Moving Service page to create letters that you can send to payees to inform them that your address has changed.
Move Service
1
��
��
1
�
�� �
�1
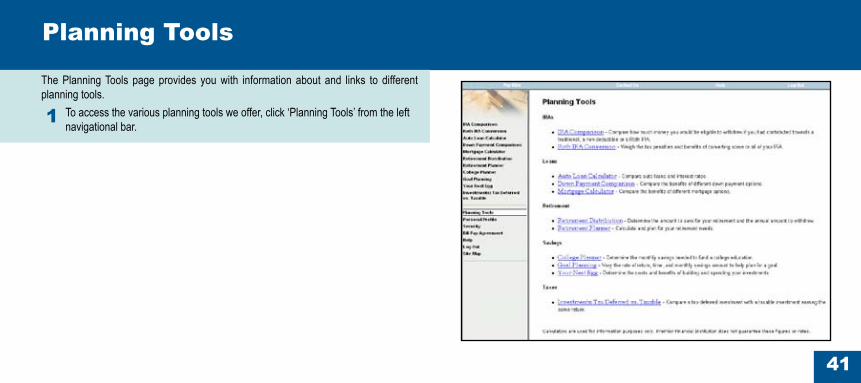
To access the various planning tools we offer, click ‘Planning Tools’ from the left navigational bar.
The Planning Tools page provides you with information about and links to different planning tools.
Planning Tools
1
1
��
1
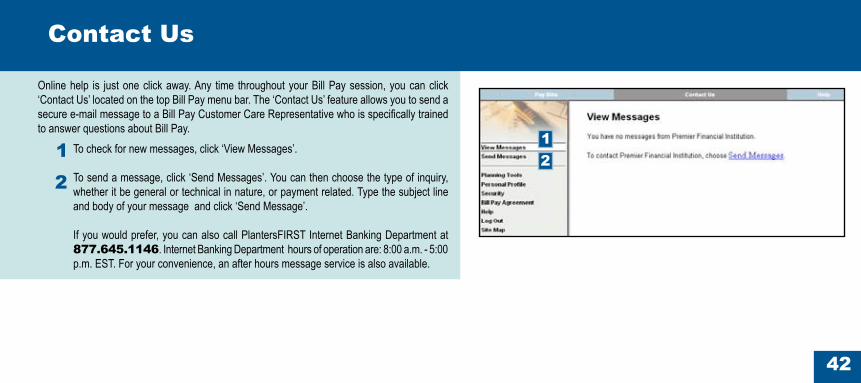
Online help is just one click away. Any time throughout your Bill Pay session, you can click ‘Contact Us’ located on the top Bill Pay menu bar. The ‘Contact Us’ feature allows you to send a secure e-mail message to a Bill Pay Customer Care Representative who is specifically trained to answer questions about Bill Pay.
Contact Us
To check for new messages, click ‘View Messages’.
To send a message, click ‘Send Messages’. You can then choose the type of inquiry, whether it be general or technical in nature, or payment related. Type the subject line and body of your message and click ‘Send Message’.
If you would prefer, you can also call PlantersFIRST Internet Banking Department at ���.���.11��. Internet Banking Department hours of operation are: 8:00 a.m. - 5:00 p.m. EST. For your convenience, an after hours message service is also available.
�
1�
��
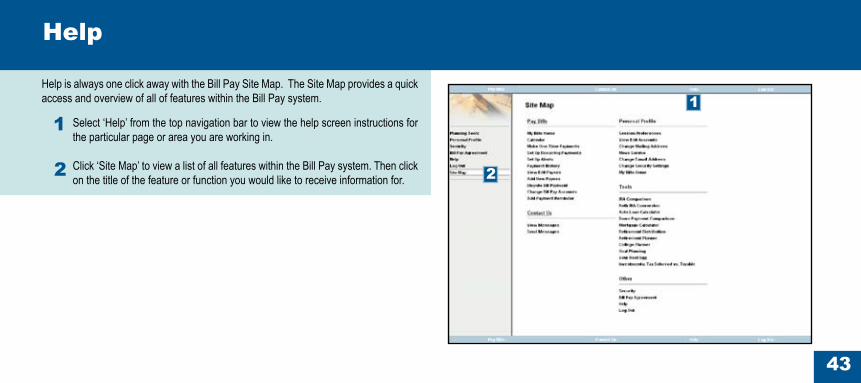
Help is always one click away with the Bill Pay Site Map. The Site Map provides a quick access and overview of all of features within the Bill Pay system.
Help
Select ‘Help’ from the top navigation bar to view the help screen instructions for the particular page or area you are working in.
Click ‘Site Map’ to view a list of all features within the Bill Pay system. Then click on the title of the feature or function you would like to receive information for.
1
�
1
�