Embed Size (px)
Citation preview
Before operating the unit, please read this manual thoroughly,and retain it for future reference.
Owner’s Operating Manual
Interactive LED Display
13
24
25
25
Contents
Security Warning
Connection and Setting
Menu Operation
Maintenance
Display Mode
Prepare to Install
Simple troubleshooting
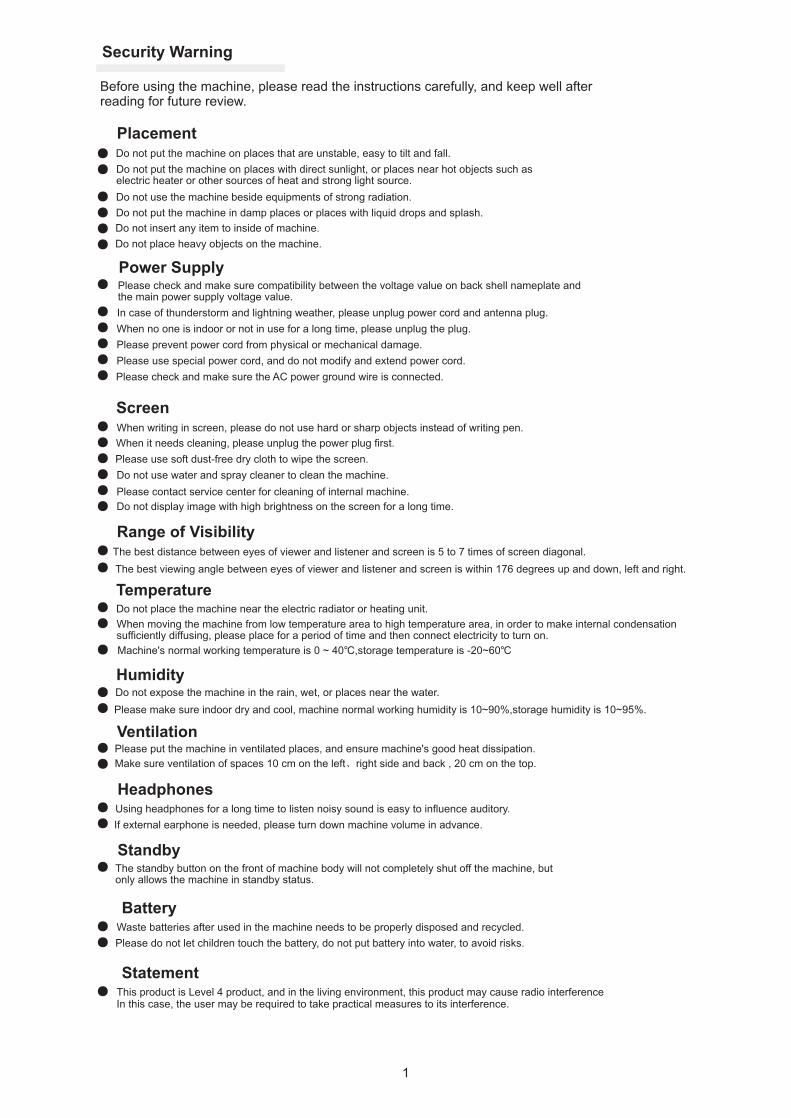
Security Warning
Before using the machine, please read the instructions carefully, and keep well after reading for future review.
Do not put the machine on places that are unstable, easy to tilt and fall.
Do not put the machine on places with direct sunlight, or places near hot objects such as
Do not put the machine in damp places or places with liquid drops and splash.
Do not insert any item to inside of machine.
Placement
Power Supply
Screen
Range of Visibility
Temperature
Humidity
Ventilation
Headphones
Standby
Battery
Do not use the machine beside equipments of strong radiation.
Do not place heavy objects on the machine.
Please check and make sure compatibility between the voltage value on back shell nameplate and
In case of thunderstorm and lightning weather, please unplug power cord and antenna plug.
When no one is indoor or not in use for a long time, please unplug the plug.
Please prevent power cord from physical or mechanical damage.
Please use special power cord, and do not modify and extend power cord.
Please check and make sure the AC power ground wire is connected.
When writing in screen, please do not use hard or sharp objects instead of writing pen.
When it needs cleaning, please unplug the power plug first.
Please use soft dust-free dry cloth to wipe the screen.
Do not use water and spray cleaner to clean the machine.
Please contact service center for cleaning of internal machine.
Do not display image with high brightness on the screen for a long time.
The best distance between eyes of viewer and listener and screen is 5 to 7 times of screen diagonal.
The best viewing angle between eyes of viewer and listener and screen is within 176 degrees up and down, left and right.
Do not place the machine near the electric radiator or heating unit.
When moving the machine from low temperature area to high temperature area, in order to make internal condensation
Do not expose the machine in the rain, wet, or places near the water.
Please make sure indoor dry and cool, machine normal working humidity is 10~90%,storage humidity is 10~95%.
Please put the machine in ventilated places, and ensure machine's good heat dissipation.
Make sure ventilation of spaces 10 cm on the left、right side and back , 20 cm on the top.
Using headphones for a long time to listen noisy sound is easy to influence auditory.
If external earphone is needed, please turn down machine volume in advance.
The standby button on the front of machine body will not completely shut off the machine, but
Waste batteries after used in the machine needs to be properly disposed and recycled.
Please do not let children touch the battery, do not put battery into water, to avoid risks.
Machine's normal working temperature is 0 ~ 40℃,storage temperature is -20~60℃
StatementThis product is Level 4 product, and in the living environment, this product may cause radio interferenceIn this case, the user may be required to take practical measures to its interference.
electric heater or other sources of heat and strong light source.
the main power supply voltage value.
sufficiently diffusing, please place for a period of time and then connect electricity to turn on.
only allows the machine in standby status.
USB cable, touch pen,DVD, AV cable,HDMI cable
1) Accessories:
Prepare to Install
Quick Start Guide, Touch pen Remote control
Power Cord USB
DVD
VGA Cable Cable
1 Unpackaging
Co
nn
ectin
g a
nd
Settin
gIn
sta
llatio
nM
en
u O
pera
tion
Tro
ub
lesh
oo
ting
Care
an
d M
ain
ten
an
ce
Dis
pla
y M
od
e
Headphone Cable
AV Cable
Quick start guide, remote control, batteries, power cord, VGA cable, headphone cable,
Batteries
HDMI cable
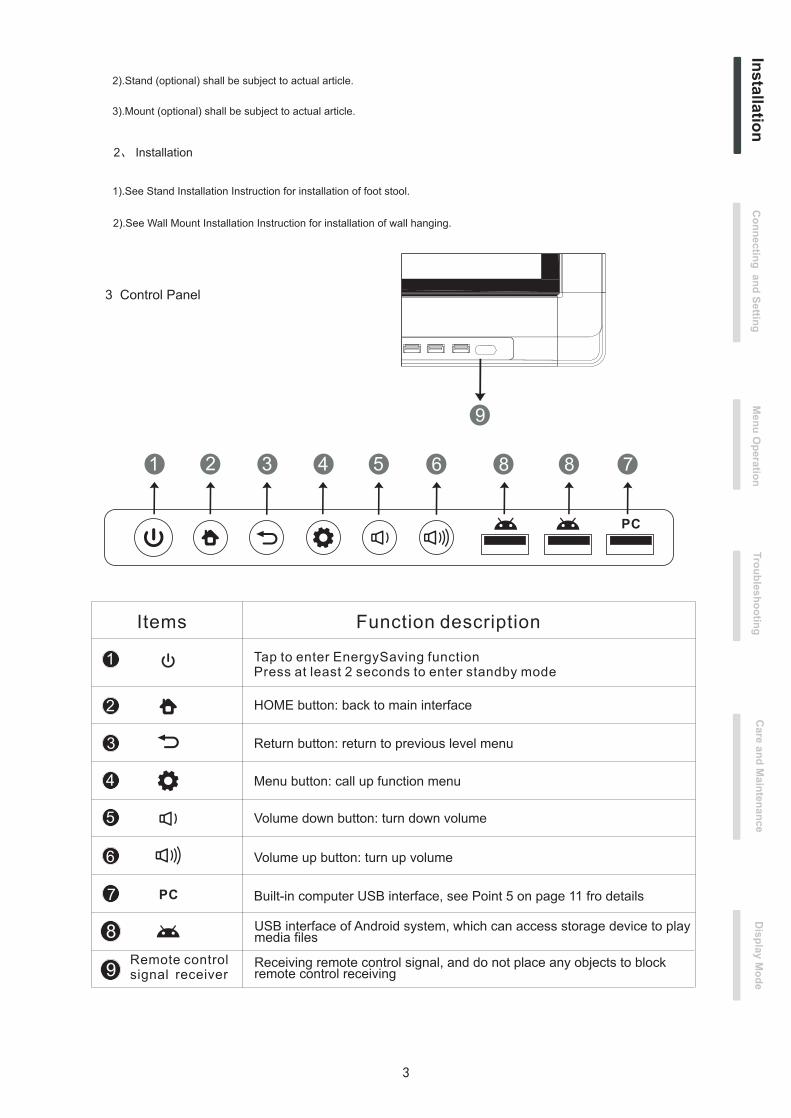
3 Control Panel
2、 Installation
1).See Installation Instruction for installation of foot stool.Stand
2).Stand (optional) shall be subject to actual article.
3).Mount (optional) shall be subject to actual article.
2).See Wall Installation Instruction for installation of wall hanging.Mount
Co
nn
ectin
g a
nd
Settin
gIn
sta
llatio
nM
en
u O
pera
tion
Tro
ub
lesh
oo
ting
Care
an
d M
ain
ten
an
ce
Dis
pla
y M
od
e
HOME button: back to main interface
Return button: return to previous level menu
Menu button: call up function menu
Volume down button: turn down volume
Built-in computer USB interface, see Point 5 on page 11 fro details
USB interface of Android system, which can access storage device to play
Receiving remote control signal, and do not place any objects to block
Volume up button: turn up volume
Items Function description
media files
remote control receivingRemote controlsignal receiver
Tap to enter EnergySaving functionPress at least 2 seconds to enter standby mode
PC
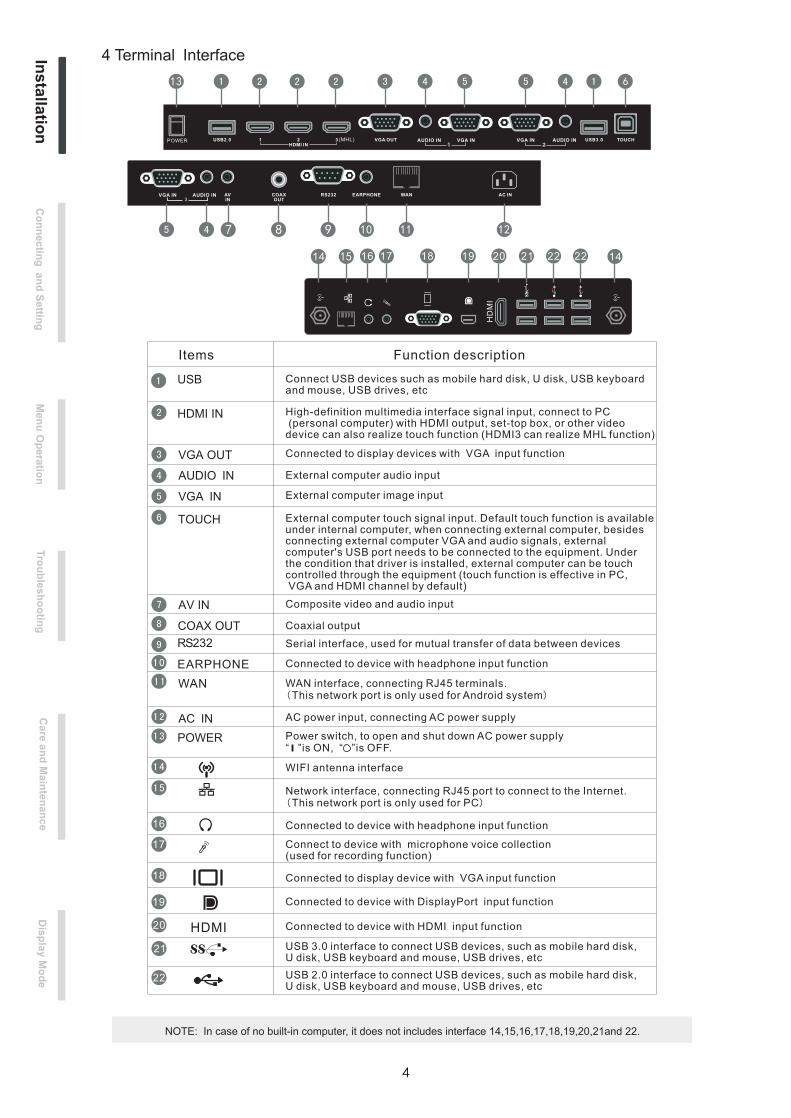
4 Terminal Interface
Co
nn
ectin
g a
nd
Settin
gIn
sta
llatio
nM
en
u O
pera
tion
Tro
ub
lesh
oo
ting
Care
an
d M
ain
ten
an
ce
Dis
pla
y M
od
e
14
NOTE: In case of no built-in computer, it does not includes interface 14,15,16,17,18,19,20,21and 22.
Items Function description
Connect USB devices such as mobile hard disk, U disk, USB keyboard and mouse, USB drives, etc
High-definition multimedia interface signal input, connect to PC (personal computer) with HDMI output, set-top box, or other video device can also realize touch function (HDMI3 can realize MHL function)
Connected to display devices with VGA input function
External computer audio input
External computer image input
External computer touch signal input. Default touch function is availableunder internal computer, when connecting external computer, besidesconnecting external computer VGA and audio signals, external computer's USB port needs to be connected to the equipment. Underthe condition that driver is installed, external computer can be touchcontrolled through the equipment (touch function is effective in PC, VGA and HDMI channel by default)
Composite video and audio input
Coaxial output
WAN interface, connecting RJ45 terminals.(This network port is only used for Android system)
Serial interface, used for mutual transfer of data between devices
Connected to device with headphone input function
Power switch, to open and shut down AC power supply“ ”is ON, “ ”is OFF.
AC power input, connecting AC power supply
WIFI antenna interface
Connected to device with headphone input function
Connect to device with microphone voice collection(used for recording function)
Connected to display device with VGA input function
Network interface, connecting RJ45 port to connect to the Internet.(This network port is only used for PC)
HD
MI
USB 3.0 interface to connect USB devices, such as mobile hard disk, U disk, USB keyboard and mouse, USB drives, etc
USB 2.0 interface to connect USB devices, such as mobile hard disk, U disk, USB keyboard and mouse, USB drives, etc
HDMI
Connected to device with DisplayPort input function
Connected to device with HDMI input function
14
Co
nn
ectin
g a
nd
Settin
gM
en
u O
pera
tion
Tro
ub
lesh
oo
ting
Care
an
d M
ain
ten
an
ce
Dis
pla
y M
od
eIn
sta
llatio
n
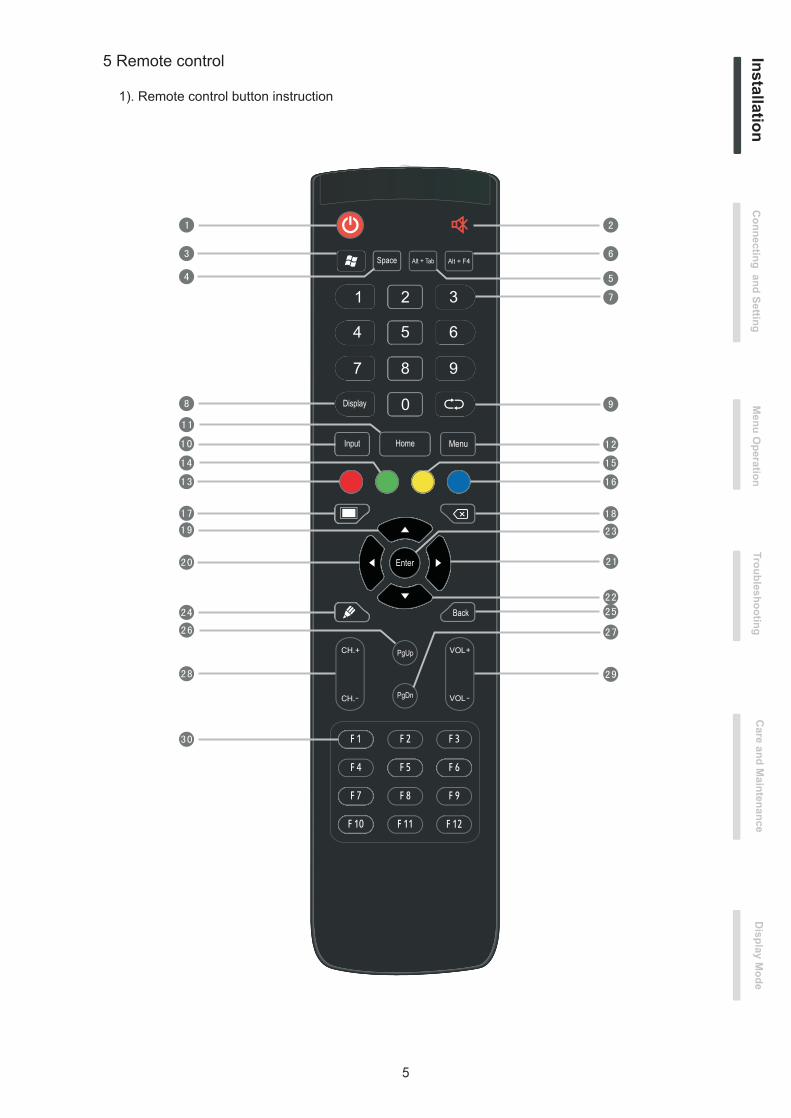
5 Remote control
1). Remote control button instruction
Back
F1-F12:
Home
Co
nn
ectin
g a
nd
Settin
gIn
sta
llatio
nM
en
u O
pera
tion
Tro
ub
lesh
oo
ting
Care
an
d M
ain
ten
an
ce
Dis
pla
y M
od
e
Detailed function description of remote control buttons
: Press this button to enter standby when power is on; Click this button to switch on
:
:
:
:
:
Mute switch
Built-in computer Windows key
:
:
:
:
:
in standby condition
Built-in computer Space key
Built-in computer spacebar Alt + Tab
Built-in computer program window close button
Numeric keys: TV digital channels input keys
Display channel information
TV channel return key
Input signal source selection key, choose different sourced according to need
Android system main screen button
TV OSD menu button, press this button to pop up TV's OSD menu
Red:
Green:
Yellow:
Blue:
Button Lock, press quickly to lock bezel buttons, press again to unlock
TV channel function button
TV channel function button
Freeze, press quickly to freeze screen, press again to unfreeze screen
:
:
:
:
:
:
:
:
:
:
:
:
:
One key for blank screen
Backspace key
Direction key, press this button for upwards selection
Direction key, press this button for left selection
Direction key, press this button for right selection
Direction key, press this button for downwards selection
confirmation key, press this key to confirm selection state
Quickly start writing software, select writing pen quickly if software is started.
Return key
Built-in computer page (previous page)
Built-in computer page (next page)
Channel switch key
Volume switch key
Built-in computer F1 - F12 function keys
NOTE: In case of no built-in computer, all function keys related with computer are regarded as no operating functions
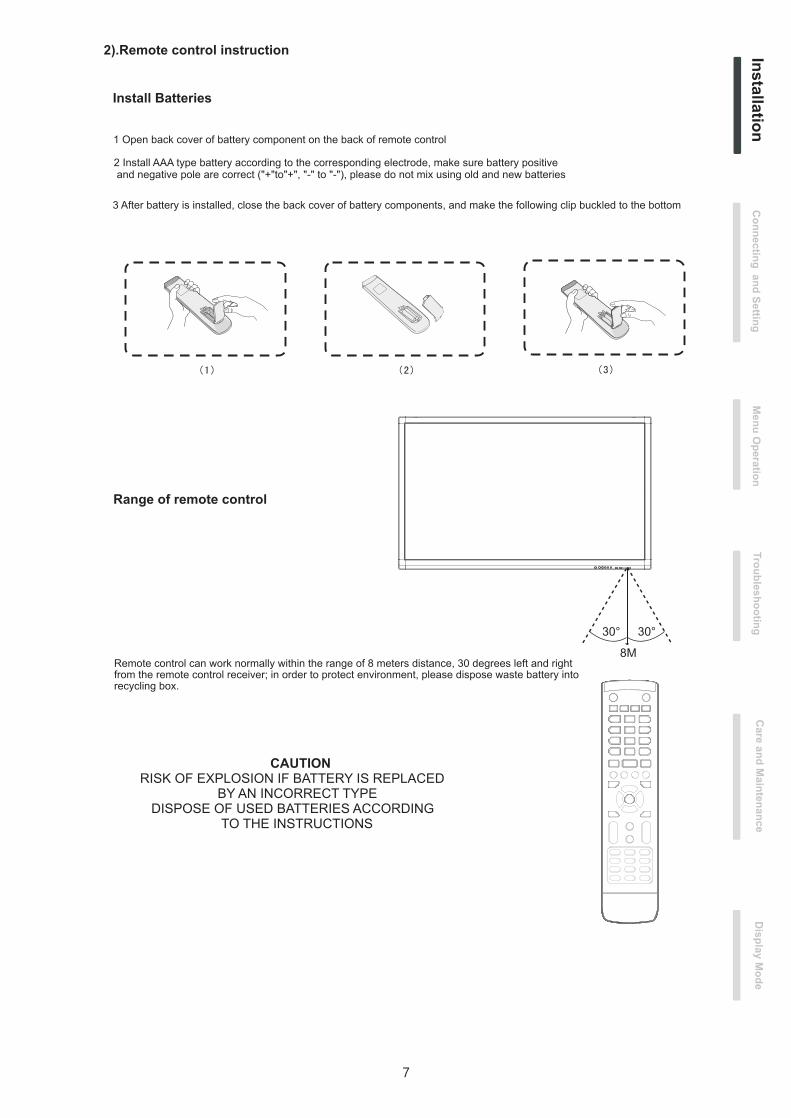
Install Batteries
1 Open back cover of battery component on the back of remote control
2 Install AAA type battery according to the corresponding electrode, make sure battery positive and negative pole are correct ("+"to"+", "-" to "-"), please do not mix using old and new batteries
3 After battery is installed, close the back cover of battery components, and make the following clip buckled to the bottom
Range of remote control
2).Remote control instruction
Remote control can work normally within the range of 8 meters distance, 30 degrees left and right
CAUTIONRISK OF EXPLOSION IF BATTERY IS REPLACED
BY AN INCORRECT TYPEDISPOSE OF USED BATTERIES ACCORDING
TO THE INSTRUCTIONS
Co
nn
ectin
g a
nd
Settin
gM
en
u O
pera
tion
Tro
ub
lesh
oo
ting
Care
an
d M
ain
ten
an
ce
Dis
pla
y M
od
eIn
sta
llatio
n
from the remote control receiver; in order to protect environment, please dispose waste battery into recycling box.
Connection and Setting
For the safety of you and the machine, please do not connect any power plug before connection
1. External Computer and Touch Connection
NOTE:
External computer input, equipment's best resolution is 1920 x1080
External computer can also connect to the equipment through the HDMI cable
Recommended computer configuration:
2.0GBHZ Processor, 1GB Memory More than 256 color display card
1GB Available Hard Drive
VGA-OUT/HDMI-OUT、Audio-OUT、USB Interface
Support Resolution 800*600,1024*768
(5)Press key, and the equipment is powered on.
(6)Press the INPUT key to switch to VGA channel.
(3)After connection is completed, plug in power cord, and switch POWER to On.
(1)Use VGA line to connect to VGA output port of external computer, and meanwhile use headphone audio line to connect to external computer audio output interface.
(2)Use USB line to connect to external computer USB port.
(4)Start external computer.
Co
nn
ectin
g a
nd
Settin
gM
en
u O
pera
tion
Tro
ub
lesh
oo
ting
Care
an
d M
ain
ten
an
ce
Dis
pla
y M
od
eIn
sta
llatio
n
Audio Cable VGA Cable
USB Cable
Computer
Co
nn
ectin
g a
nd
Settin
gIn
sta
llatio
nM
en
u O
pera
tion
Tro
ub
lesh
oo
ting
Care
an
d M
ain
ten
an
ce
Dis
pla
y M
od
e
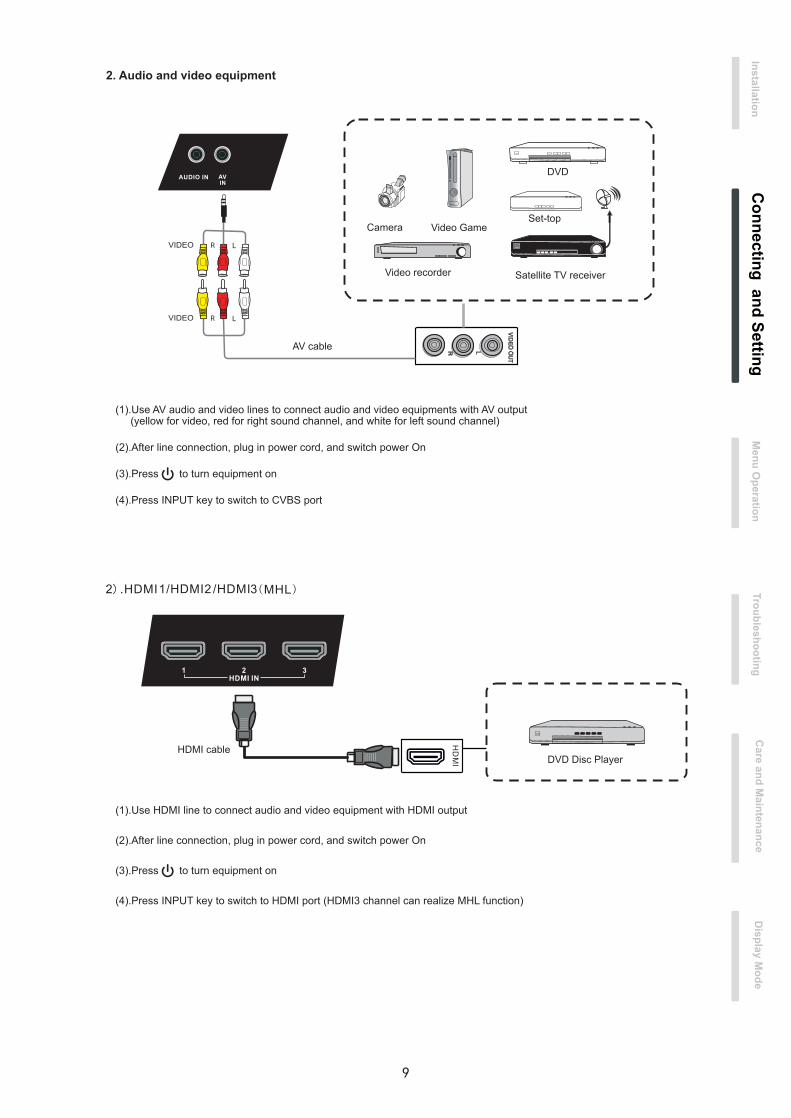
Video GameSet-top
Satellite TV receiverVideo recorder
Camera
DVD
AV cable
2. Audio and video equipment
(1).Use AV audio and video lines to connect audio and video equipments with AV output(yellow for video, red for right sound channel, and white for left sound channel)
(2).After line connection, plug in power cord, and switch power On
(3).Press to turn equipment on
(4).Press INPUT key to switch to CVBS port
HDMI cableDVD Disc Player
(1).Use HDMI line to connect audio and video equipment with HDMI output
(2).After line connection, plug in power cord, and switch power On
(3).Press to turn equipment on
(4).Press INPUT key to switch to HDMI port (HDMI3 channel can realize MHL function)
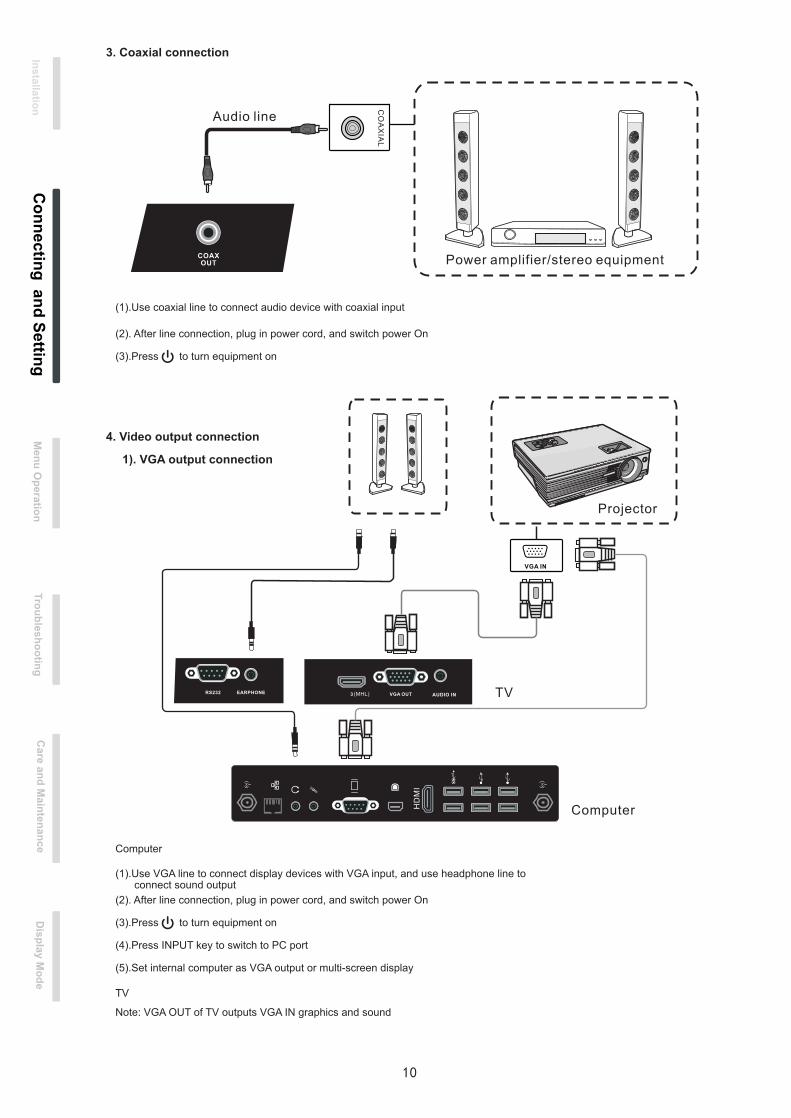
3. Coaxial connection
Audio line
Power amplifier/stereo equipment
(1).Use coaxial line to connect audio device with coaxial input
(2). After line connection, plug in power cord, and switch power On
(3).Press to turn equipment on
4. Video output connection
1). VGA output connection
(1).Use VGA line to connect display devices with VGA input, and use headphone line to
(2). After line connection, plug in power cord, and switch power On
(3).Press to turn equipment on
Computer
connect sound output
(4).Press INPUT key to switch to PC port
(5).Set internal computer as VGA output or multi-screen display
TV
Note: VGA OUT of TV outputs VGA IN graphics and sound
Co
nn
ectin
g a
nd
Settin
gM
en
u O
pera
tion
Tro
ub
lesh
oo
ting
Care
an
d M
ain
ten
an
ce
Dis
pla
y M
od
eIn
sta
llatio
n
Projector
TV
ComputerHD
MI
Internet
Co
nn
ectin
g a
nd
Settin
gIn
sta
llatio
nM
en
u O
pera
tion
Tro
ub
lesh
oo
ting
Care
an
d M
ain
ten
an
ce
Dis
pla
y M
od
e
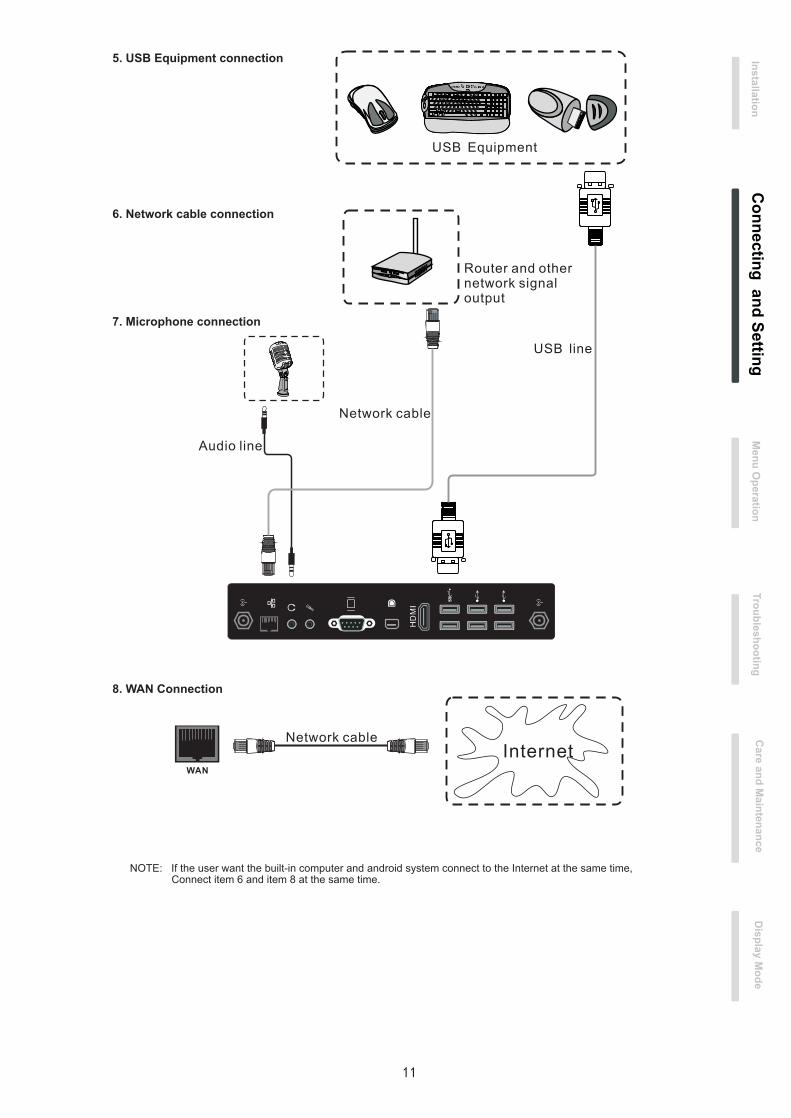
8. WAN Connection
Network cable
5. USB Equipment connection
6. Network cable connection
7. Microphone connection
USB Equipment
Router and othernetwork signal output
USB line
Network cable
Audio line
HD
MI
NOTE: If the user want the built-in computer and android system connect to the Internet at the same time, Connect item 6 and item 8 at the same time.
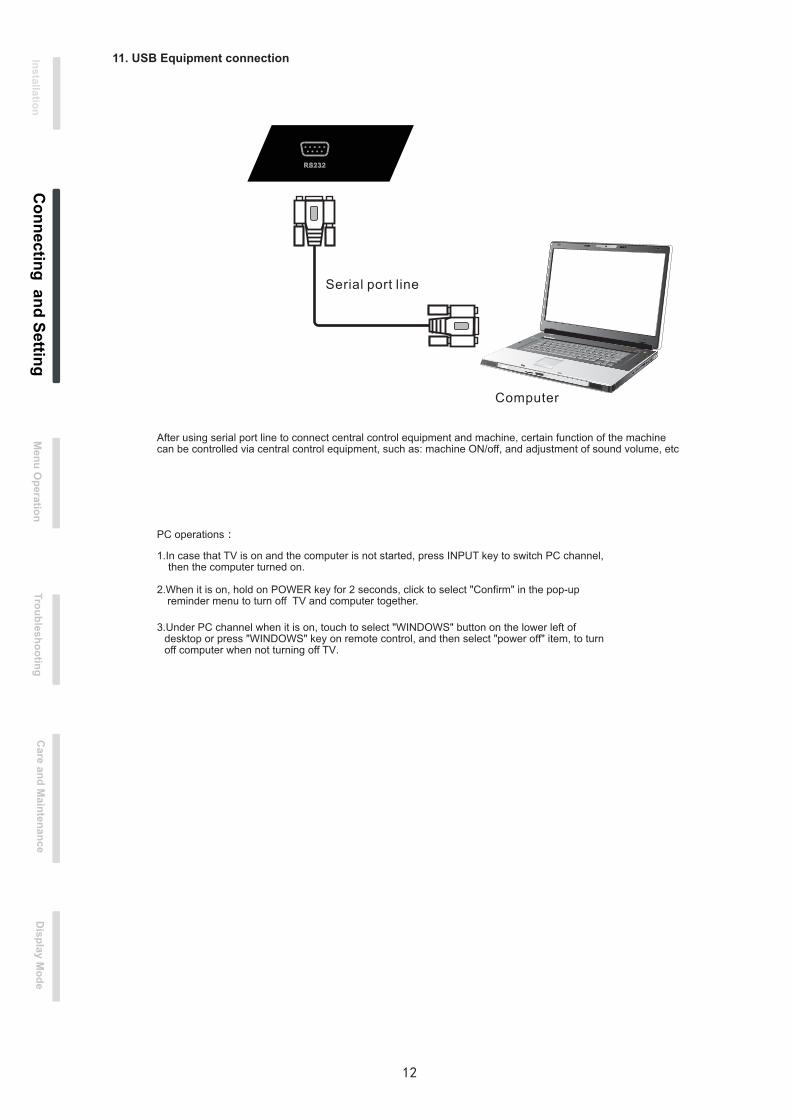
11. USB Equipment connection
Serial port line
Computer
After using serial port line to connect central control equipment and machine, certain function of the machine can be controlled via central control equipment, such as: machine ON/off, and adjustment of sound volume, etc
PC operations:
1.In case that TV is on and the computer is not started, press INPUT key to switch PC channel,
2.When it is on, hold on POWER key for 2 seconds, click to select "Confirm" in the pop-up reminder menu to turn off TV and computer together.
3.Under PC channel when it is on, touch to select "WINDOWS" button on the lower left of desktop or press "WINDOWS" key on remote control, and then select "power off" item, to turn off computer when not turning off TV.
Co
nn
ectin
g a
nd
Settin
gM
en
u O
pera
tion
Tro
ub
lesh
oo
ting
Care
an
d M
ain
ten
an
ce
Dis
pla
y M
od
eIn
sta
llatio
n
then the computer turned on.
A
1313
Menu Operation
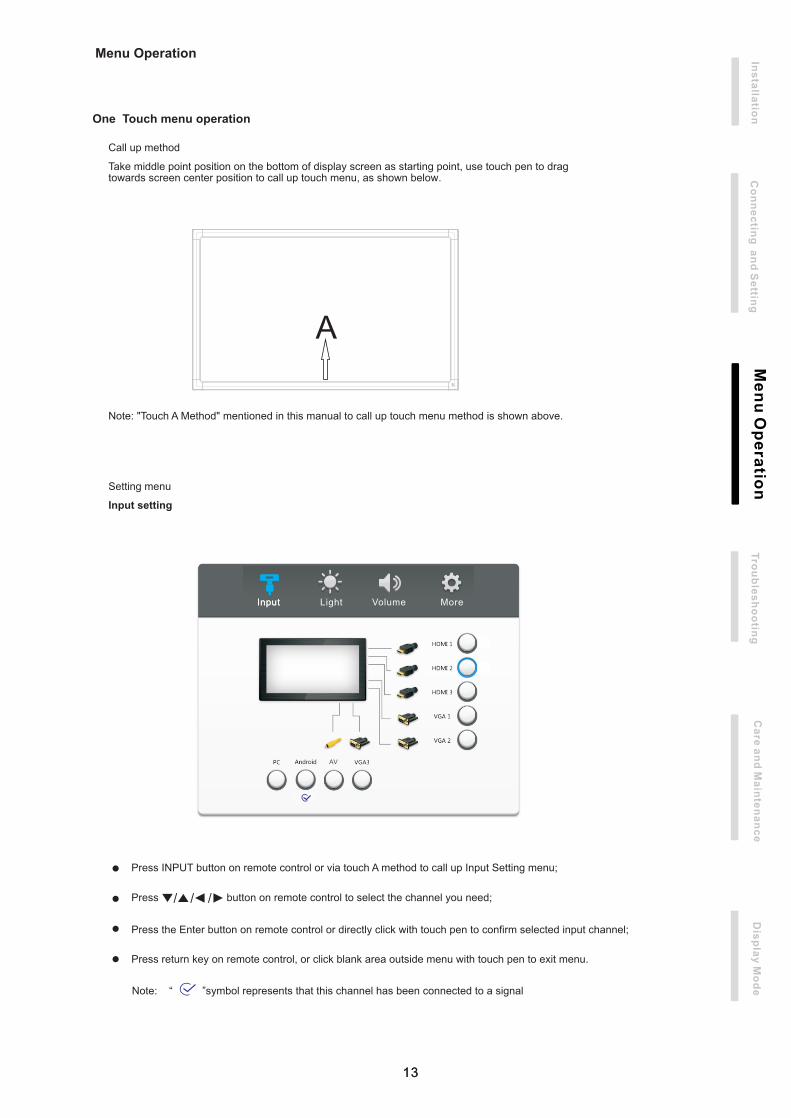
One Touch menu operation
Call up method
Take middle point position on the bottom of display screen as starting point, use touch pen to drag towards screen center position to call up touch menu, as shown below.
Note: "Touch A Method" mentioned in this manual to call up touch menu method is shown above.
Setting menu
Input setting
Press INPUT button on remote control or via touch A method to call up Input Setting menu;
Press button on remote control to select the channel you need;
Press the Enter button on remote control or directly click with touch pen to confirm selected input channel;
Press return key on remote control, or click blank area outside menu with touch pen to exit menu.
Note: “ ”symbol represents that this channel has been connected to a signal
Input Light Volume More
Co
nn
ec
ting
an
d S
ettin
gM
en
u O
pe
ratio
nT
rou
ble
sh
oo
ting
Ca
re a
nd
Ma
inte
na
nc
eD
isp
lay M
od
eIn
sta
llatio
n
Input
AV
14
Co
nn
ec
ting
an
d S
ettin
gM
en
u O
pe
ratio
nT
rou
ble
sh
oo
ting
Ca
re a
nd
Ma
inte
na
nc
eD
isp
lay M
od
eIn
sta
llatio
n
Brightness Setting
Press INPUT button on remote control or via touch A method to call up Input Setting menu;
Press button on remote control or directly click “Light”icon with touch pen to enter Brightness Setting menu;
Press button on remote control or drag brightness adjustment progress bar with touch pen to adjust brightness;
Press return key on remote control, or click blank area outside menu with touch pen to exit menu.
Volume setting
Press INPUT button on remote control or via touch A method to call up Input Setting menu;
Press button on remote control or directly click “Volume”icon with touch pen to enter Volume Setting menu;
Press button on remote control or directly drag volume adjustment progress bar with touch pen toadjust volume;
Press < Mute > button on remote control or directly click mute icon below "More Settings" with touching pen to open or close mute state;
Press return key on remote control, or click blank area outside menu with touch pen to exit menu.
Input Light Volume More
Input Light Volume More
Backlight
Volume
Sound
Sound Mode
Standard Movie
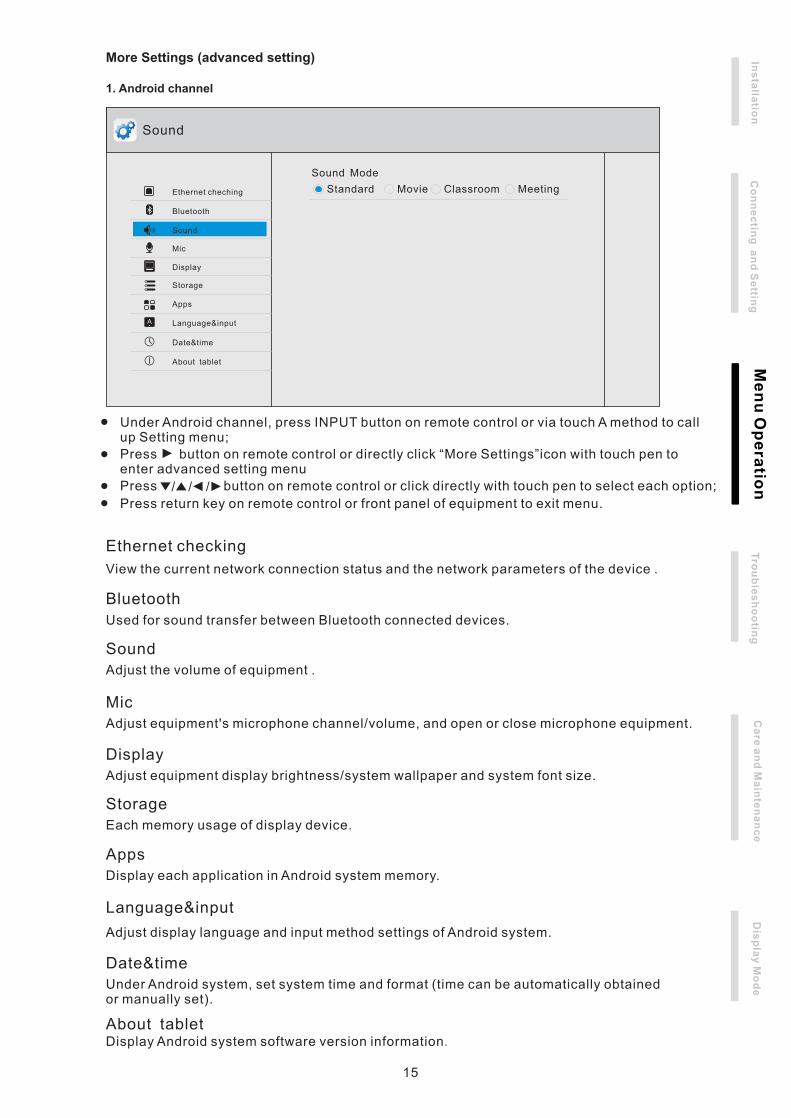
Under Android channel, press INPUT button on remote control or via touch A method to call up Setting menu;
Press button on remote control or directly click “More Settings”icon with touch pen toenter advanced setting menu
Press button on remote control or click directly with touch pen to select each option;
Press return key on remote control or front panel of equipment to exit menu.
15
Classroom Meeting
Used for sound transfer between Bluetooth connected devices.
Sound
Adjust the volume of equipment .
Mic
Adjust equipment's microphone channel/volume, and open or close microphone equipment.
Display
Adjust equipment display brightness/system wallpaper and system font size.
Apps
Display each application in Android system memory.
Language&input
Adjust display language and input method settings of Android system.
Co
nn
ec
ting
an
d S
ettin
gM
en
u O
pe
ratio
nT
rou
ble
sh
oo
ting
Ca
re a
nd
Ma
inte
na
nc
eD
isp
lay M
od
eIn
sta
llatio
n
More Settings (advanced setting)
1. Android channel
Bluetooth
Sound
Mic
Display
Apps
Language&input
Date&time
About tablet
Bluetooth
Ethernet cheching
Storage
Ethernet checking
View the current network connection status and the network parameters of the device .
Storage
Each memory usage of display device.
Date&time
Under Android system, set system time and format (time can be automatically obtained or manually set).
About tabletDisplay Android system software version information.
16
Co
nn
ec
ting
an
d S
ettin
gM
en
u O
pe
ratio
nT
rou
ble
sh
oo
ting
Ca
re a
nd
Ma
inte
na
nc
eD
isp
lay M
od
eIn
sta
llatio
n
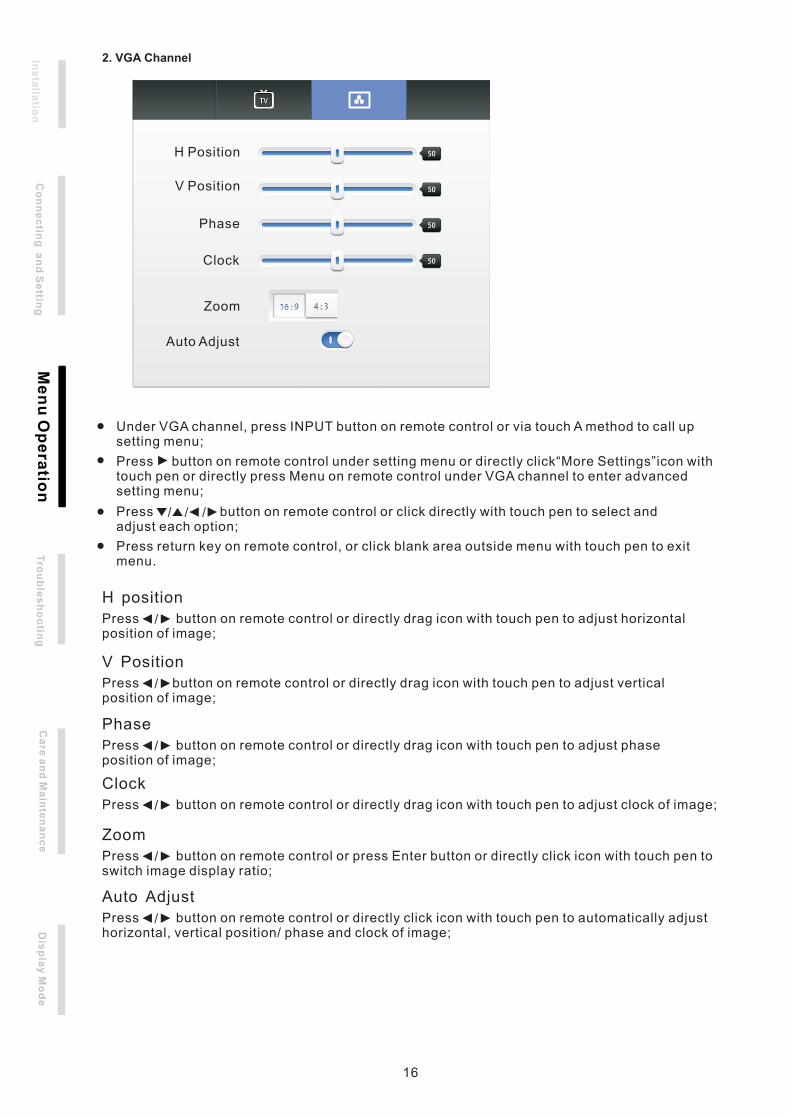
Under VGA channel, press INPUT button on remote control or via touch A method to call up setting menu;
Press button on remote control or click directly with touch pen to select and adjust each option;
Press return key on remote control, or click blank area outside menu with touch pen to exitmenu.
H position
Press button on remote control or directly drag icon with touch pen to adjust horizontal position of image;
Press button on remote control under setting menu or directly click“More Settings”icon with touch pen or directly press Menu on remote control under VGA channel to enter advanced setting menu;
V Position
Press button on remote control or directly drag icon with touch pen to adjust vertical position of image;
Phase
Press button on remote control or directly drag icon with touch pen to adjust phase position of image;
Clock
Press button on remote control or directly drag icon with touch pen to adjust clock of image;
Zoom
Press button on remote control or press Enter button or directly click icon with touch pen to switch image display ratio;
Auto Adjust
Press button on remote control or directly click icon with touch pen to automatically adjust horizontal, vertical position/ phase and clock of image;
2. VGA Channel
水平位移
缩放
H Position
V Position
Phase
Clock
Zoom
Auto Adjust
17
Co
nn
ec
ting
an
d S
ettin
gM
en
u O
pe
ratio
nT
rou
ble
sh
oo
ting
Ca
re a
nd
Ma
inte
na
nc
eD
isp
lay M
od
eIn
sta
llatio
n
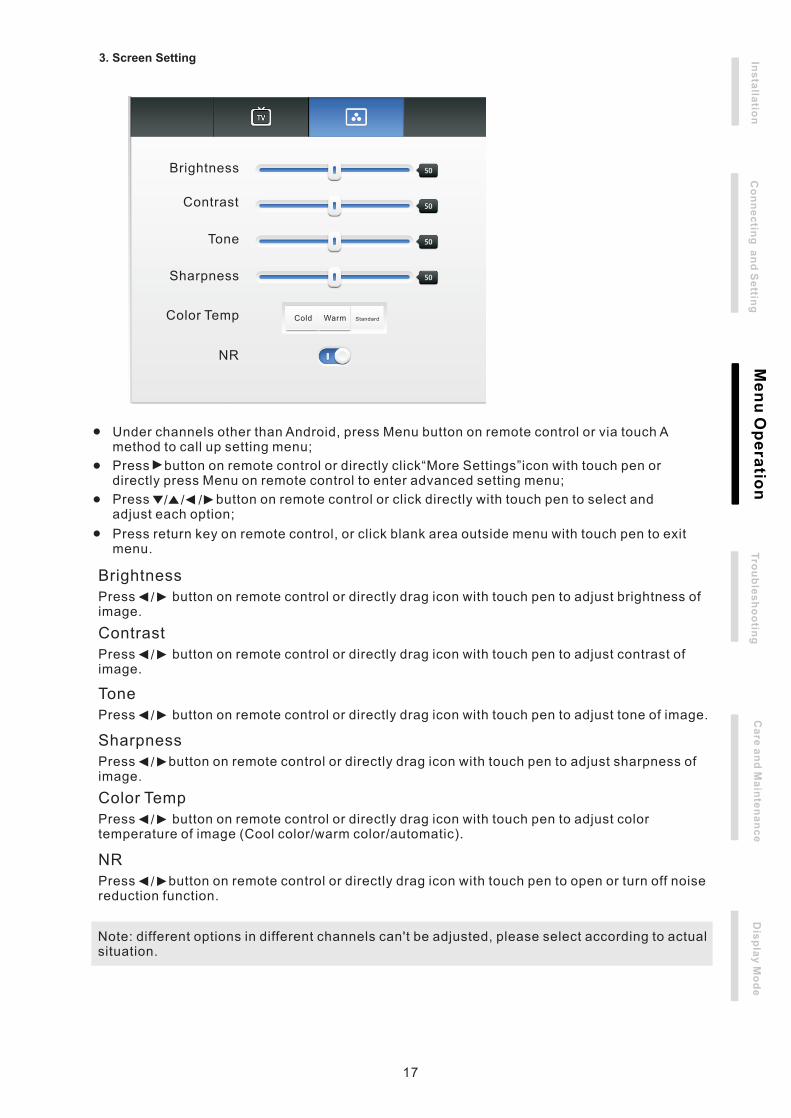
Under channels other than Android, press Menu button on remote control or via touch A method to call up setting menu;
Press button on remote control or directly click“More Settings”icon with touch pen or directly press Menu on remote control to enter advanced setting menu;
Press button on remote control or click directly with touch pen to select and adjust each option;
Press return key on remote control, or click blank area outside menu with touch pen to exit menu.
Brightness
Press button on remote control or directly drag icon with touch pen to adjust brightness of image.
Contrast
Press button on remote control or directly drag icon with touch pen to adjust contrast of image.
Tone
Press button on remote control or directly drag icon with touch pen to adjust tone of image.
Sharpness
Press button on remote control or directly drag icon with touch pen to adjust sharpness of image.
Color Temp
Press button on remote control or directly drag icon with touch pen to adjust color temperature of image (Cool color/warm color/automatic).
NR
Press button on remote control or directly drag icon with touch pen to open or turn off noise reduction function.
Note: different options in different channels can't be adjusted, please select according to actual situation.
3. Screen Setting
Brightness
Contrast
Tone
Color Temp
NR
Sharpness
Cold Warm Standard
18
Co
nn
ec
ting
an
d S
ettin
gM
en
u O
pe
ratio
nT
rou
ble
sh
oo
ting
Ca
re a
nd
Ma
inte
na
nc
eD
isp
lay M
od
eIn
sta
llatio
n
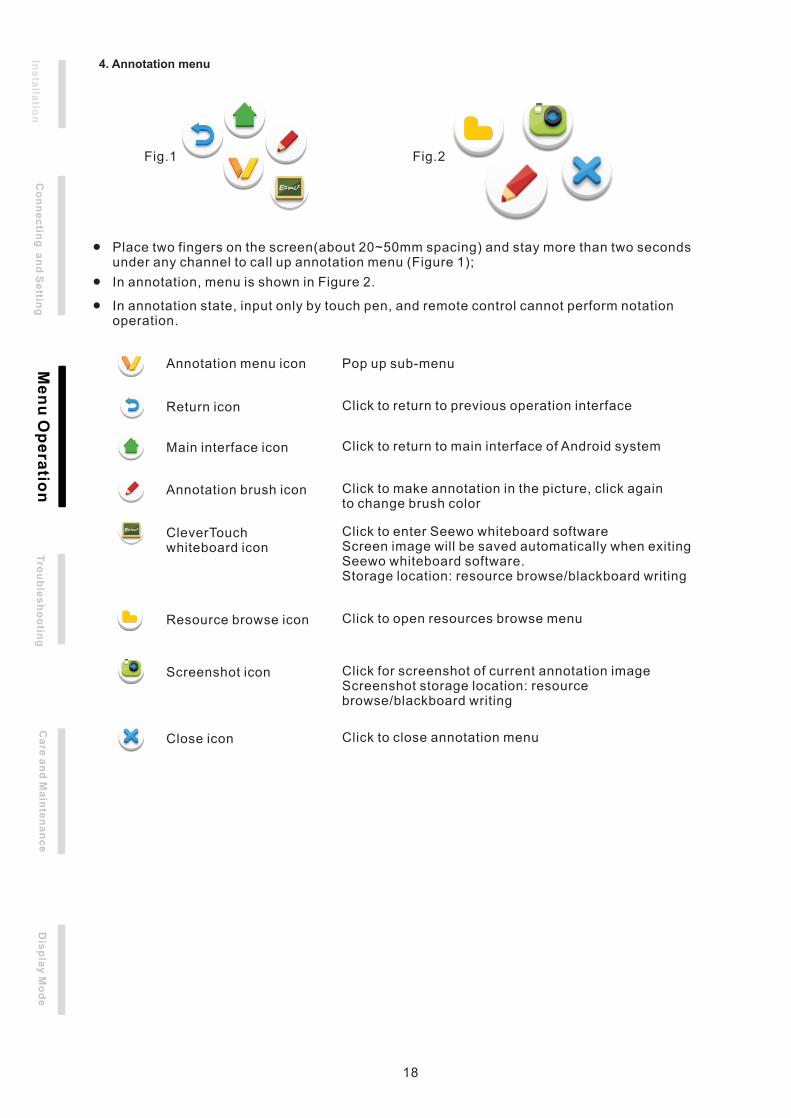
Fig.1
Annotation menu icon
Return icon
Main interface icon
Annotation brush icon
CleverTouch whiteboard icon
Screenshot icon
Close icon
Resource browse icon
4. Annotation menu
Fig.2
Pop up sub-menu
Click to return to previous operation interface
Click to return to main interface of Android system
Click to make annotation in the picture, click again to change brush color
Click to enter Seewo whiteboard softwareScreen image will be saved automatically when exiting Seewo whiteboard software. Storage location: resource browse/blackboard writing
Click to open resources browse menu
Click for screenshot of current annotation imageScreenshot storage location: resource browse/blackboard writing
Click to close annotation menu
Place two fingers on the screen(about 20~50mm spacing) and stay more than two seconds under any channel to call up annotation menu (Figure 1);
In annotation, menu is shown in Figure 2.
In annotation state, input only by touch pen, and remote control cannot perform notation operation.
19
Co
nn
ec
ting
an
d S
ettin
gM
en
u O
pe
ratio
nT
rou
ble
sh
oo
ting
Ca
re a
nd
Ma
inte
na
nc
eD
isp
lay M
od
eIn
sta
llatio
n
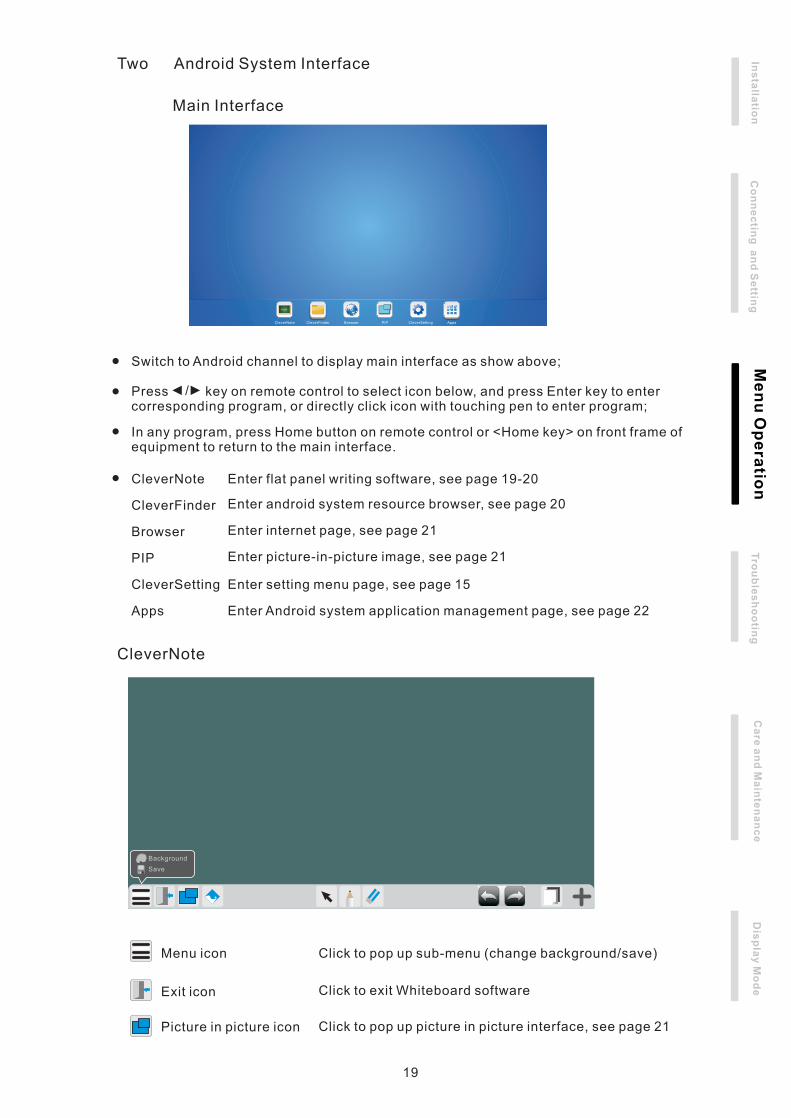
Two Android System Interface
Switch to Android channel to display main interface as show above;
Press key on remote control to select icon below, and press Enter key to enter corresponding program, or directly click icon with touching pen to enter program;
In any program, press Home button on remote control or <Home key> on front frame of equipment to return to the main interface.
CleverNote
CleverFinder
Browser
PIP
CleverSetting
Apps
CleverNote
Background
Menu icon
Picture in picture icon
Exit icon
Main Interface
CleverNote CleverFinder Browser PIP CleverSetting Apps
Enter flat panel writing software, see page 19-20
Enter android system resource browser, see page 20
Enter internet page, see page 21
Enter picture-in-picture image, see page 21
Enter setting menu page, see page 15
Enter Android system application management page, see page 22
Save
Click to pop up sub-menu (change background/save)
Click to exit Whiteboard software
Click to pop up picture in picture interface, see page 21
20
Co
nn
ec
ting
an
d S
ettin
gM
en
u O
pe
ratio
nT
rou
ble
sh
oo
ting
Ca
re a
nd
Ma
inte
na
nc
eD
isp
lay M
od
eIn
sta
llatio
n
Select icon
Brush icon
Eraser icon
Image import icon
Cancel icon
Restore icon
Page icon
Add page icon
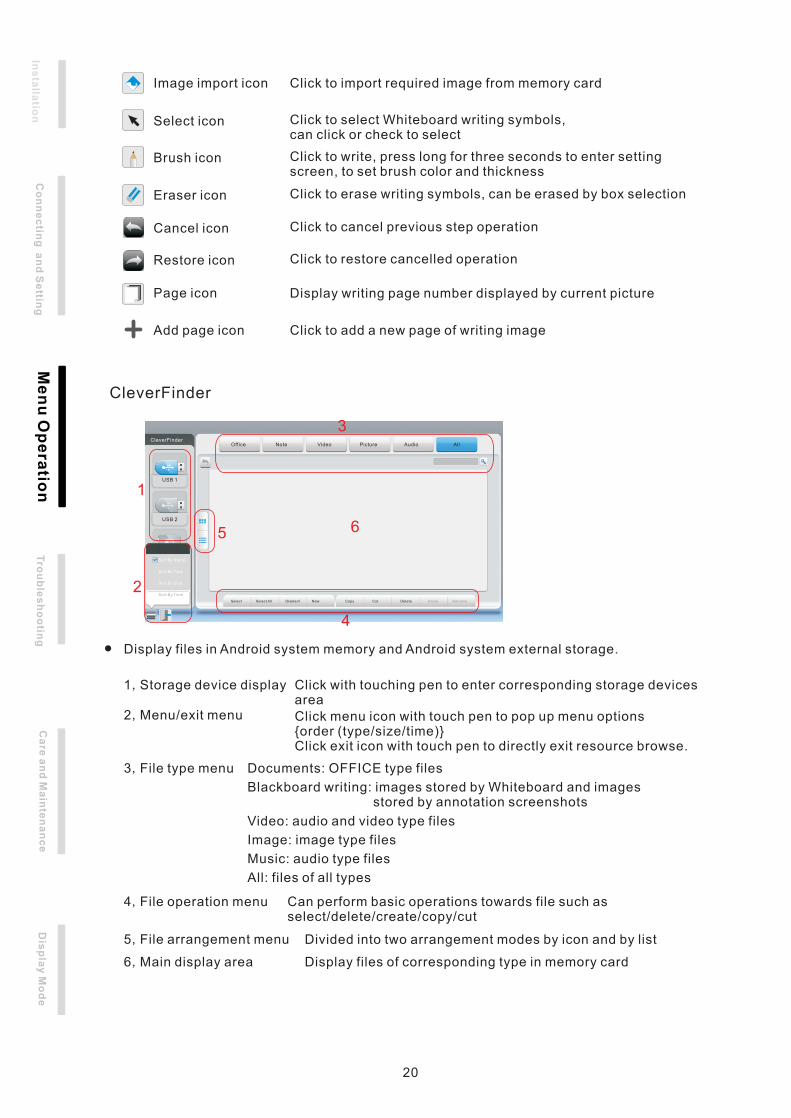
Display files in Android system memory and Android system external storage.
1
2
3
4
5
1,Storage device display
2,Menu/exit menu
3,File type menu
6
Documents: OFFICE type files
Blackboard writing: images stored by Whiteboard and images stored by annotation screenshots
Video: audio and video type files
Image: image type files
Music: audio type files
All: files of all types
4,File operation menu
5,File arrangement menu
6,Main display area
Click to import required image from memory card
Click to select Whiteboard writing symbols, can click or check to select
Click to write, press long for three seconds to enter setting screen, to set brush color and thickness
Click to erase writing symbols, can be erased by box selection
Click to cancel previous step operation
Click to restore cancelled operation
Display writing page number displayed by current picture
Click to add a new page of writing image
CleverFinder
Sort By Name
Sort By Type
Sort By Size
Sort By Time
USB 1
USB 2
Office Note Video Picture Audio All
Select Select All Diselect New Copy Cut Delete Paste Rename
Click with touching pen to enter corresponding storage devicesareaClick menu icon with touch pen to pop up menu options{order (type/size/time)}Click exit icon with touch pen to directly exit resource browse.
Can perform basic operations towards file such as select/delete/create/copy/cut
Divided into two arrangement modes by icon and by list
Display files of corresponding type in memory card
21
Co
nn
ec
ting
an
d S
ettin
gM
en
u O
pe
ratio
nT
rou
ble
sh
oo
ting
Ca
re a
nd
Ma
inte
na
nc
eD
isp
lay M
od
eIn
sta
llatio
n
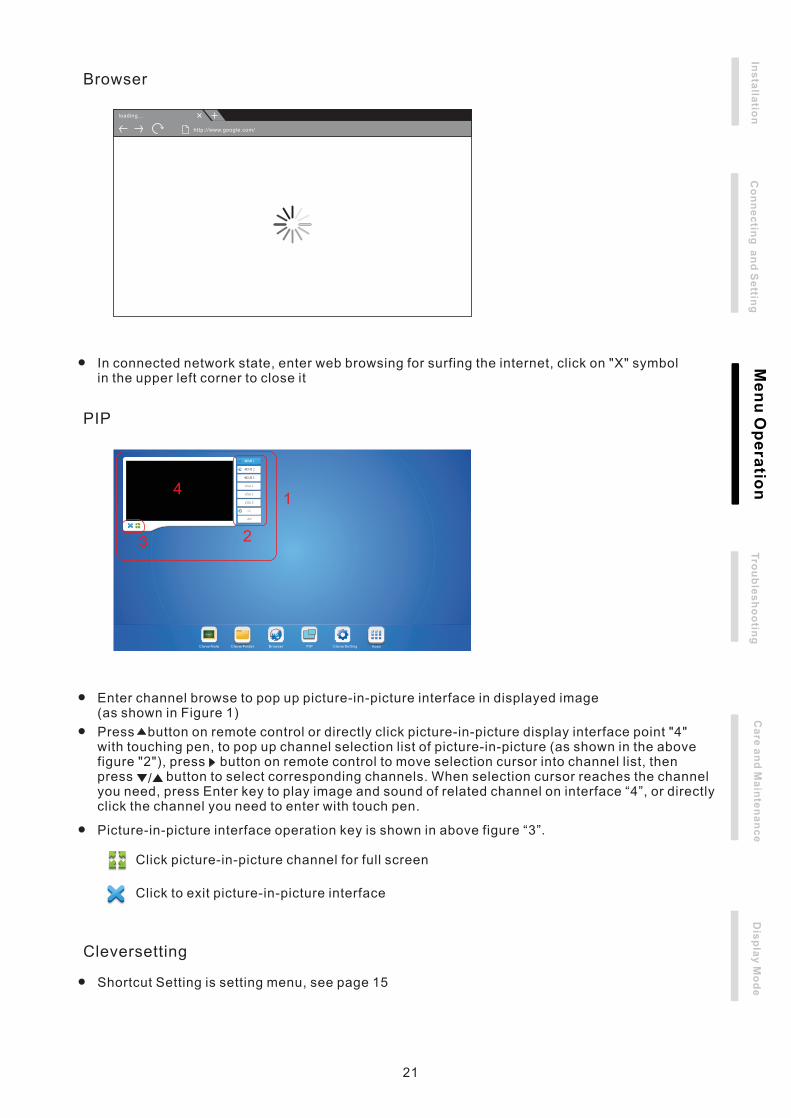
Browser
loading...
http://www.google.com/
In connected network state, enter web browsing for surfing the internet, click on "X" symbol in the upper left corner to close it
PIP
1
3
4
Enter channel browse to pop up picture-in-picture interface in displayed image(as shown in Figure 1)
Press button on remote control or directly click picture-in-picture display interface point "4" with touching pen, to pop up channel selection list of picture-in-picture (as shown in the above figure "2"), press button on remote control to move selection cursor into channel list, thenpress button to select corresponding channels. When selection cursor reaches the channel you need, press Enter key to play image and sound of related channel on interface “4”, or directly click the channel you need to enter with touch pen.
Picture-in-picture interface operation key is shown in above figure “3”.
Click picture-in-picture channel for full screen
Click to exit picture-in-picture interface
Cleversetting
Shortcut Setting is setting menu, see page 15
CleverNote CleverFinder Browser PIP CleverSetting Apps
2
AV
22
Co
nn
ec
ting
an
d S
ettin
gM
en
u O
pe
ratio
nT
rou
ble
sh
oo
ting
Ca
re a
nd
Ma
inte
na
nc
eD
isp
lay M
od
eIn
sta
llatio
n
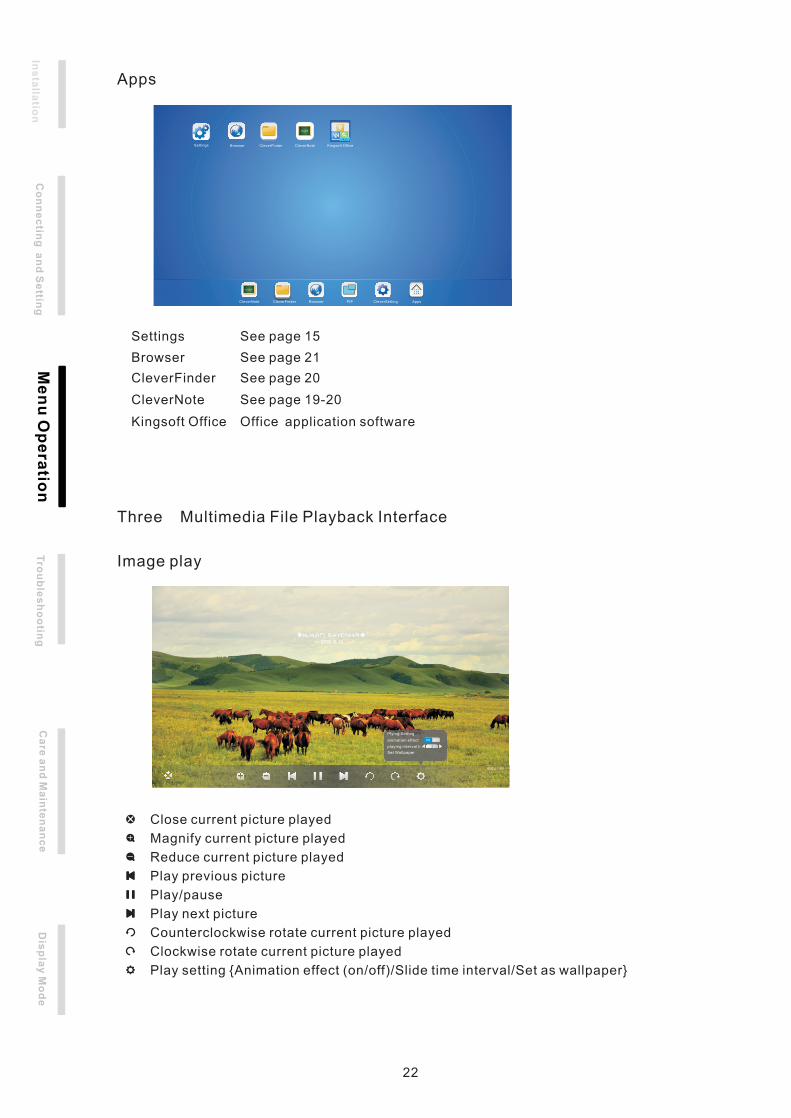
Apps
Close current picture played
Settings
Browser
CleverNote
Kingsoft Office
Three Multimedia File Playback Interface
Image play
Magnify current picture played
Reduce current picture played
Play previous picture
Play next picture
Play/pause
Counterclockwise rotate current picture played
Clockwise rotate current picture played
Play setting {Animation effect (on/off)/Slide time interval/Set as wallpaper}
CleverFinder
Settings Browser CleverNoteCleverFinder
See page 15
See page 21
See page 19-20
See page 20
Office application software
Plying Setting
animation effect
playing interval ti..
Set Wallpaper
Kingsoft Office
CleverNote CleverFinder Browser PIP CleverSetting Apps
23
Co
nn
ec
ting
an
d S
ettin
gM
en
u O
pe
ratio
nT
rou
ble
sh
oo
ting
Ca
re a
nd
Ma
inte
na
nc
eD
isp
lay M
od
eIn
sta
llatio
n
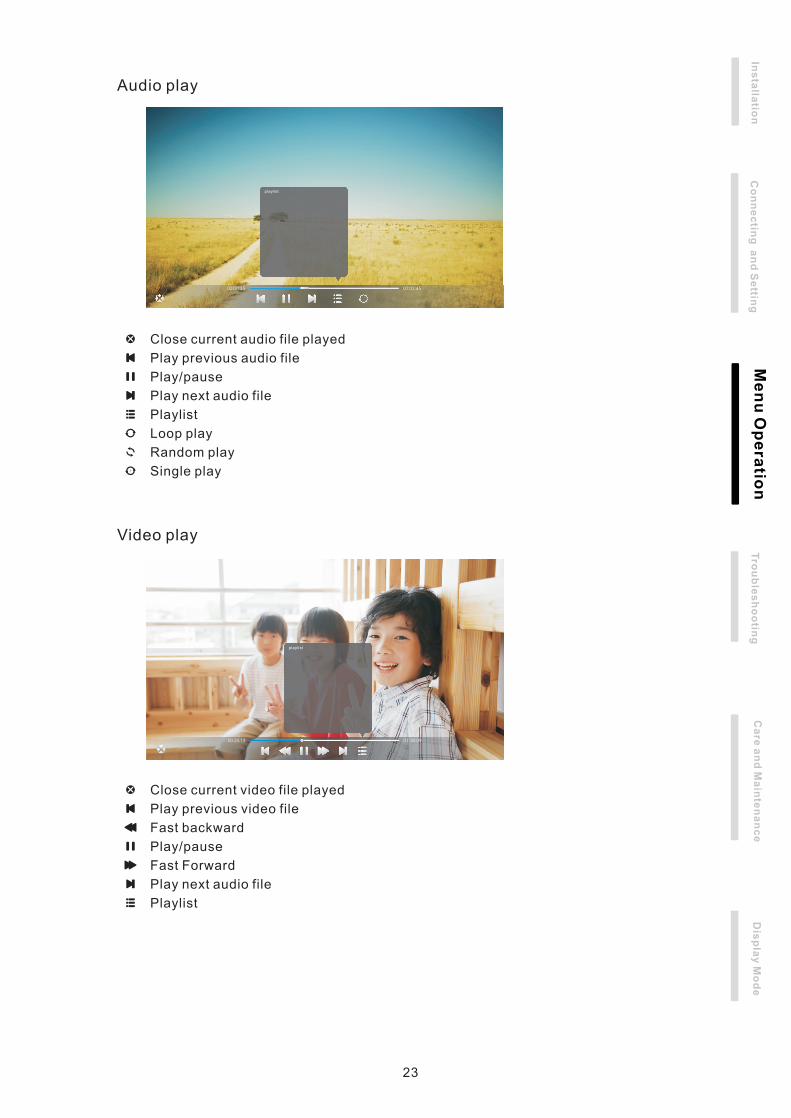
Close current audio file played
Audio play
Play previous audio file
Play next audio file
Play/pause
Playlist
Video play
Loop play
Random play
Single play
Close current video file played
Play previous video file
Play next audio file
Play/pause
Playlist
Fast backward
Fast Forward
24
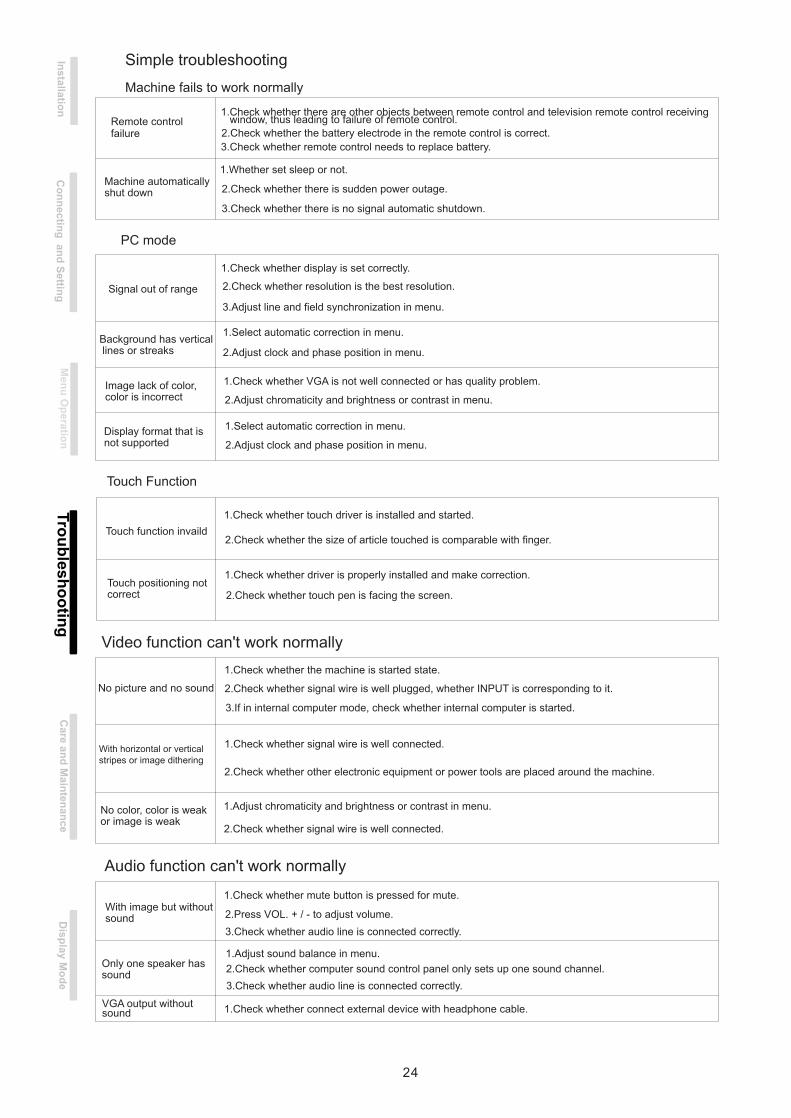
Simple troubleshooting
PC mode
Touch Function
Video function can't work normally
Audio function can't work normally
Remote control failure
Machine automatically
1.Check whether there are other objects between remote control and television remote control receiving
2.Check whether the battery electrode in the remote control is correct.
3.Check whether remote control needs to replace battery.
1.Whether set sleep or not.
2.Check whether there is sudden power outage.
3.Check whether there is no signal automatic shutdown.
1.Check whether display is set correctly.
Signal out of range
Background has vertical
Image lack of color,
Display format that is
2.Check whether resolution is the best resolution.
3.Adjust line and field synchronization in menu.
1.Select automatic correction in menu.
2.Adjust clock and phase position in menu.
1.Check whether VGA is not well connected or has quality problem.
2.Adjust chromaticity and brightness or contrast in menu.
1.Select automatic correction in menu.
2.Adjust clock and phase position in menu.
Touch function invaild
Touch positioning not
1.Check whether touch driver is installed and started.
2.Check whether the size of article touched is comparable with finger.
1.Check whether driver is properly installed and make correction.
2.Check whether touch pen is facing the screen.
No picture and no sound
With horizontal or vertical
No color, color is weak
With image but without
Only one speaker has
VGA output without
1.Check whether the machine is started state.
2.Check whether signal wire is well plugged, whether INPUT is corresponding to it.
3.If in internal computer mode, check whether internal computer is started.
1.Check whether signal wire is well connected.
2.Check whether other electronic equipment or power tools are placed around the machine.
1.Adjust chromaticity and brightness or contrast in menu.
2.Check whether signal wire is well connected.
1.Check whether mute button is pressed for mute.
2.Press VOL. + / - to adjust volume.
3.Check whether audio line is connected correctly.
1.Check whether connect external device with headphone cable.
1.Adjust sound balance in menu.
2.Check whether computer sound control panel only sets up one sound channel.
3.Check whether audio line is connected correctly.
Machine fails to work normally
window, thus leading to failure of remote control.
shut down
lines or streaks
color is incorrect
not supported
correct
stripes or image dithering
or image is weak
sound
sound
sound
Co
nn
ectin
g a
nd
Settin
gM
en
u O
pera
tion
Tro
ub
lesh
oo
ting
Care
an
d M
ain
ten
an
ce
Dis
pla
y M
od
eIn
sta
llatio
n
25
1.VGA Mode
Resolution / Display mode Field frequency (Hz)
2.HDMI Mode
Display mode
Maintenance
Proper maintenance can avoid many early faults; regular careful cleaning can make machine brand new;
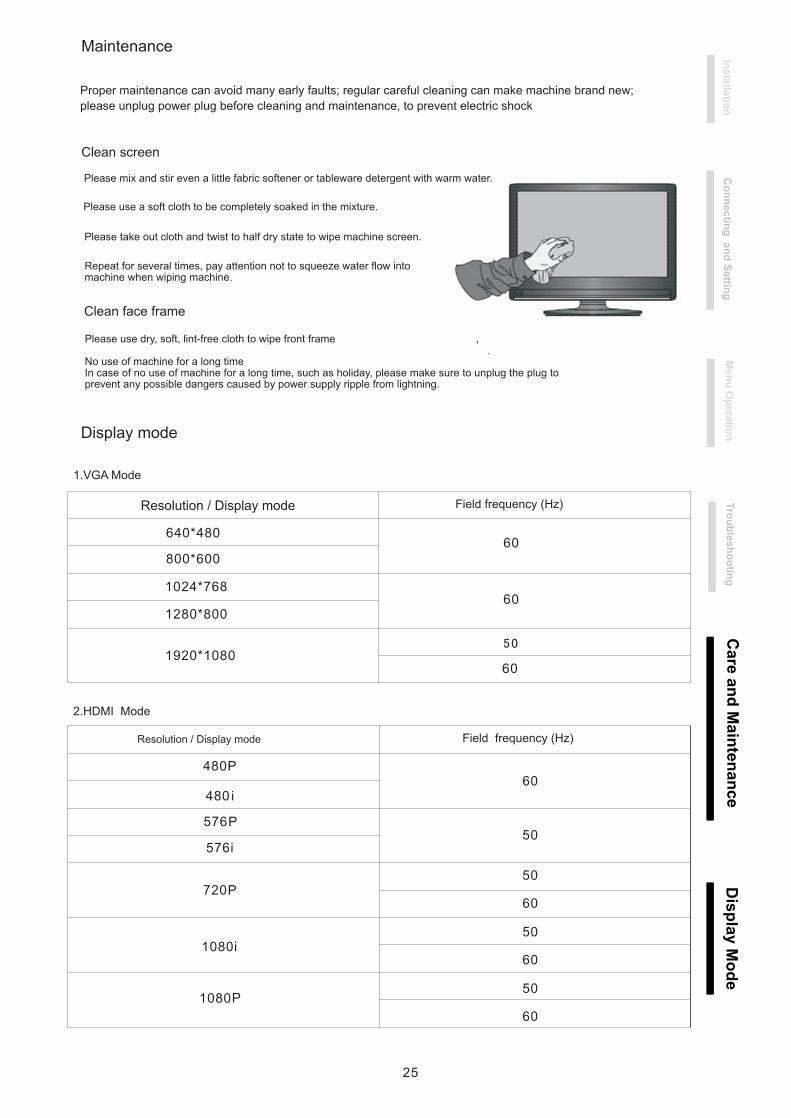
Clean screen
Clean face frame
Please mix and stir even a little fabric softener or tableware detergent with warm water.
Please use a soft cloth to be completely soaked in the mixture.
Please take out cloth and twist to half dry state to wipe machine screen.
Please use dry, soft, lint-free cloth to wipe front frame , .
Repeat for several times, pay attention not to squeeze water flow into
please unplug power plug before cleaning and maintenance, to prevent electric shock
machine when wiping machine.
No use of machine for a long timeIn case of no use of machine for a long time, such as holiday, please make sure to unplug the plug to prevent any possible dangers caused by power supply ripple from lightning.
i
Resolution / Display mode Field frequency (Hz)
Co
nn
ectin
g a
nd
Settin
gIn
sta
llatio
nM
en
u O
pera
tion
Tro
ub
lesh
oo
ting
Care
an
d M
ain
ten
an
ce
Dis
pla
y M
od
e