Embed Size (px)
Citation preview
Intel® Unite™ Enterprise Deployment Guide

Legal Disclaimers & Copyrights
All information provided here is subject to change without notice. Contact your Intel representative to
obtain the latest Intel product specifications and roadmaps.
Intel technologies’ features and benefits depend on system configuration and may require enabled
hardware, software or service activation. Performance varies depending on system configuration. No
computer system can be absolutely secure. Check with your system manufacturer or retailer or learn
more at intel.com.
You may not use or facilitate the use of this document in connection with any infringement or other
legal analysis concerning Intel products described herein. You agree to grant Intel a non-exclusive,
royalty-free license to any patent claim thereafter drafted which includes subject matter disclosed
herein.
No license (express or implied, by estoppel or otherwise) to any intellectual property rights is granted
by this document.
The products described may contain design defects or errors known as errata which may cause the
product to deviate from published specifications. Current characterized errata are available on
request.
Intel disclaims all express and implied warranties, including without limitation, the implied warranties
of merchantability, fitness for a particular purpose, and non-infringement, as well as any warranty
arising from course of performance, course of dealing, or usage in trade.
Intel, the Intel logo, and Intel Unite are trademarks of Intel Corporation in the United States and/or
other countries.
*Other names and brands may be claimed as the property of others
© 2015 Intel Corporation. All rights reserved.
.
Table of Contents
1 Introduction ............................................................................................................................................................................. 5
1.1 Audience................................................................................................................................................................... 5
1.2 Intel Unite Overview ....................................................................................................................................... 5
1.3 Intel Unite Terminology & Definitions................................................................................................. 6
1.4 Intel Unite Architecture ................................................................................................................................. 6
2 Intel Unite Requirements ............................................................................................................................................... 7
2.1 Software Requirements ................................................................................................................................. 7
2.2 Hardware Minimum Requirements ........................................................................................................ 7
2.3 Other Components............................................................................................................................................ 7
2.4 IT Considerations and Network Requirements ............................................................................. 8
3 Intel Unite Deployment ................................................................................................................................................... 9
4 Enterprise Server Installation ................................................................................................................................... 10
4.1 Enterprise Server Overview ..................................................................................................................... 10
4.2 Enterprise Server Pre- Installation ..................................................................................................... 10
4.2.1 IIS Enabling ................................................................................................................................... 10 4.2.2 Microsoft SQL Server Install .............................................................................................. 12 4.2.3 Quiet Installers ........................................................................................................................... 13 4.2.4 Registry Keys ............................................................................................................................... 14 4.2.5 Privacy Statement .................................................................................................................... 16
4.3 Enterprise Server Installation:............................................................................................................... 17
4.4 Uninstalling Intel Unite (Server) .......................................................................................................... 20
5 Hub Installation ................................................................................................................................................................... 22
5.1 Intel Unite Hub Pre-Installation ............................................................................................................ 22
5.1.1 Public Key ....................................................................................................................................... 22 5.1.2 ServerConfig file and DSN Record content ............................................................. 22
5.2 Intel Unite Hub Installation ...................................................................................................................... 23
5.3 Intel Unite Configuration Options ........................................................................................................ 28
5.4 Hub Recommended Practices ................................................................................................................. 28
5.5 Hub Security........................................................................................................................................................ 29
5.6 Intel Unite Plugins ........................................................................................................................................... 29
6 Client Installation ............................................................................................................................................................... 30
6.1 Intel Unite Client Pre-Installation ........................................................................................................ 30
6.2 Intel Unite Client Installation .................................................................................................................. 30
6.3 Launching Intel Unite in a Client .......................................................................................................... 34
6.3.1 Fail to launch Intel Unite in a Client ............................................................................ 34
6.4 Intel Unite Client Configuration ............................................................................................................. 35
7 Profile Configuration ........................................................................................................................................................ 36
7.1 Profile Provisioning ......................................................................................................................................... 36
7.1.1 Pin Refresh Interval ................................................................................................................. 38
7.2 Alerting and Monitoring ............................................................................................................................... 38
8 Admin Portal Guide ........................................................................................................................................................... 39
8.1 Create a new account ................................................................................................................................... 39
8.1.1 Assign access rights to the new account ................................................................. 40
8.2 The Admin Portal Navigation Bar ......................................................................................................... 41
8.2.1 Admin Portal Home page ..................................................................................................... 41
8.3 Devices page ....................................................................................................................................................... 42
8.4 Groups page ........................................................................................................................................................ 43
8.4.1 Groups > Device Groups ..................................................................................................... 43 8.4.2 Groups > Profiles ...................................................................................................................... 43
8.5 Management page .......................................................................................................................................... 44
8.5.1 Management > Server Properties ................................................................................. 44 8.5.2 Management > Users ............................................................................................................. 45 8.5.3 Management > Roles ............................................................................................................. 45 8.5.4 Management > Role Assignments ................................................................................ 46 8.5.5 Management > Permissions .............................................................................................. 46
9 OS and PC Security Controls ..................................................................................................................................... 48
9.1.1 Minimum Security Standards (MSS) ........................................................................... 48 9.1.2 Machine Hardening .................................................................................................................. 48 9.1.3 Other security controls .......................................................................................................... 48
10 Maintenance........................................................................................................................................................................... 49
10.1 Nightly reboot .................................................................................................................................................... 49
10.2 Patching strategy ............................................................................................................................................. 49
10.3 Reporting ............................................................................................................................................................... 49
10.4 Monitoring ............................................................................................................................................................. 49
10.4.1 Backend monitoring: .............................................................................................................. 49
Appendix A. Intel Unite Security Overview ....................................................................................................................................... 50
Unite Software - Security Flow ................................................................................................................................ 50
Step 1: PIN Assignment ............................................................................................................................. 51 Step 2: PIN Lookup ....................................................................................................................................... 52 Step 3: Connection Initiation ................................................................................................................. 53 Step 4: Connection Approval .................................................................................................................. 54
Appendix B. Intel Unite Installation Example ................................................................................................................................. 55

Intel® Unite™ Enterprise Deployment Guide v2.6 5 of 55
1 Introduction Welcome to the Intel® Unite™ Enterprise Deployment Guide. Intel Unite offers a simple application creating
an innovative conference space anywhere a display is located. Intel Unite also allows communication and
flexibility while incorporating business needs and functionality with the enterprise environment.
The content of this document includes an overview of the application and the security within; the software
architecture, the needed requirements, and how to deploy / configure on a network within an IT environment.
1.1 Audience
This document is designed for use by IT professionals within a corporate environment.
1.2 Intel Unite Overview
Intel Unite software is designed to allow fast wireless screen sharing and collaboration in 3 steps:
Launch the client application
Enter a PIN to connect to a specific session
Click ‘Share’ to display content
Intel Unite uses a non-touch display and can support any reasonably sized monitor or projector. User
interaction is limited to wireless display but includes easy connection via PIN entry and easy handover
between presenters.
The goal is to provide ‘same time same place’ wireless display with embedded capability supporting remote
connection to the room system (remote connection requires a person in the room to provide the PIN to the
remote participant) and the ability to annotate on a presenter’s screen.
Leveraging your existing network infrastructure, Intel Unite works with Microsoft® Windows 7, 8, 8.1, and 10
operating system. The software has built-in security features (TLS) and sharing capabilities to create an easy
and flexible solution for sharing information visually.
Intel Unite has the following features:
Intel Unite Features
Wireless Display Users can connect to a session and display their screen, no cables needed
Multi-client split screen display
Multiple users can connect and share concurrently to the same monitor
Lync Status Integration Intel Unite will set a user's status to “Do Not Disturb” when the user is presenting, disabling toast messages; in addition it will display “Presenting with Intel Unite”
Interactive Participant List
Users can see everyone connected to the same session
Presenter View A user has the ability to view the screen of the current presenter(s)
Annotation When viewing a presentation, users can create annotations on the presenter’s display, which will disappear after 5 seconds or remain permanently,
depending on the configuration selected

1.3 Intel Unite Terminology & Definitions
Client – Client software installed on a PC or laptop (client system) and connects to a hub.
Hub – A system that is displaying a PIN and hosting plugins as in a conference room display.
Enterprise Server (Server) – Directory Service that assigns PINs, configuration data, and allows PIN to HUB
and PIN to user resolution.
FQDN – Fully Qualified Domain Name
IP Address – Internet Protocol Address
Plugin – A software component installed on a hub that surfaces additional functionality.
IIS - Internet Information Services
SSL – Secure Socket Layer
1.4 Intel Unite Architecture The image below provides the architecture and overview of all of the components and interactions of the
application. All communication is encrypted using SSL except for the high-speed UPD updates for the Fast
Mouse Cursor feature.
The expected use of the system is for an individual to step into this shared physical environment and instantly
project their screen to the room monitor/projector. Other participants can create connections to the room
system and be able to share the screen area and take ownership of the presentation.
The system is built to allow any connected user to take over, managed meetings are not supported nor
considered necessary for an ‘in the room’ usage. If the original presenter wants to get back to presenting
he/she can just co-present again and ‘go solo’ as required. As the interactions are expected in this architecture
to be in the same room, it is expected that there is no need for an arbitrated meeting.
2 Intel Unite Requirements
Before you start with the installation process, please verify that the software, hardware and network
requirements are met as specified below.
Deployment of the Intel Unite software consist of installing three components on a network:
Server (Enterprise Server)
Hub
Client
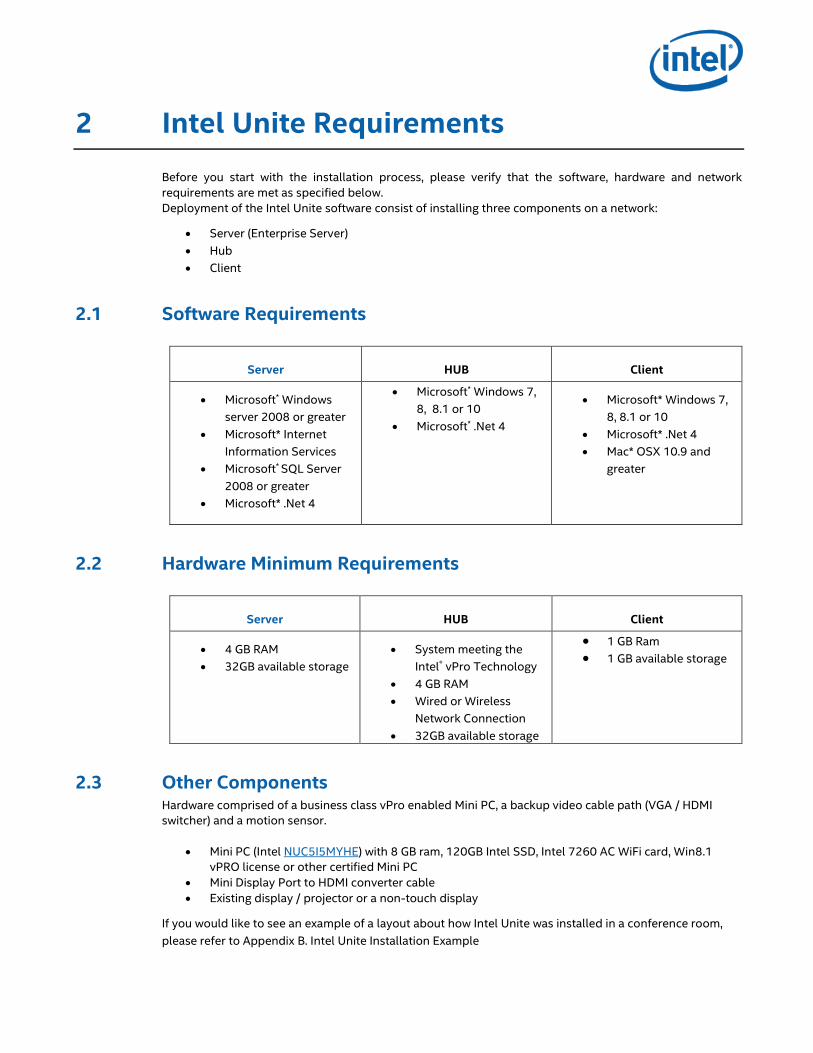
2.1 Software Requirements
Server HUB Client
Microsoft* Windows
server 2008 or greater
Microsoft* Internet
Information Services
Microsoft* SQL Server
2008 or greater
Microsoft* .Net 4
Microsoft* Windows 7,
8, 8.1 or 10
Microsoft* .Net 4
Microsoft* Windows 7,
8, 8.1 or 10
Microsoft* .Net 4
Mac* OSX 10.9 and
greater
2.2 Hardware Minimum Requirements
Server HUB Client
4 GB RAM
32GB available storage
System meeting the
Intel® vPro Technology
4 GB RAM
Wired or Wireless
Network Connection
32GB available storage
1 GB Ram 1 GB available storage
2.3 Other Components Hardware comprised of a business class vPro enabled Mini PC, a backup video cable path (VGA / HDMI
switcher) and a motion sensor.
Mini PC (Intel NUC5I5MYHE) with 8 GB ram, 120GB Intel SSD, Intel 7260 AC WiFi card, Win8.1
vPRO license or other certified Mini PC
Mini Display Port to HDMI converter cable
Existing display / projector or a non-touch display
If you would like to see an example of a layout about how Intel Unite was installed in a conference room,
please refer to Appendix B. Intel Unite Installation Example

2.4 IT Considerations and Network Requirements
The Intel Unite Hub and Client installation should be managed using your IT department established process
for software distribution. There might be specific install instructions provided by the vendor providing your
Intel Unite software.
One of the important things to consider is in the following firewall settings: Your firewall settings may cause Intel Unite to have difficulty connecting.
You will need to create an exception in your firewall for Intel Unite.exe
o TCP traffic.
o UDP traffic
Please contact your firewall vendor for specific details on how to create application exceptions.
It is strongly suggested to use a Fully Qualified Domain Name (FQDN) and to setup DNS for Enterprise Server
resolution. It is also recommended to connect all units to LAN for three reasons:
1. Potential fan-out resulting from multiple (especially remotely) connected users that require the Intel
Unite room system sending multiple copies of the display concurrently
2. Display quality of high frame rate display improves over LAN compared to WLAN
3. WLAN infrastructure bandwidth optimization through avoiding the room system to access point
WLAN traffic (even if the sender is on WLAN the same packet is sent - sender-> access point -
>receiver in infrastructure mode)
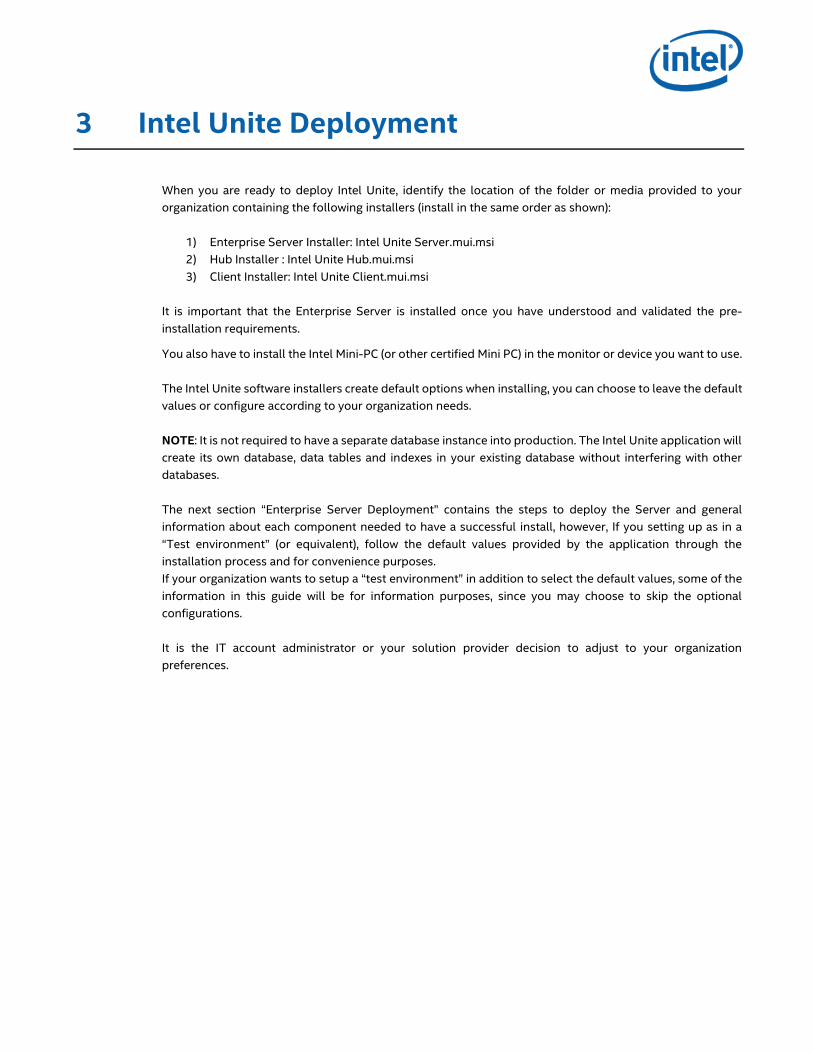
3 Intel Unite Deployment
When you are ready to deploy Intel Unite, identify the location of the folder or media provided to your
organization containing the following installers (install in the same order as shown):
1) Enterprise Server Installer: Intel Unite Server.mui.msi
2) Hub Installer : Intel Unite Hub.mui.msi
3) Client Installer: Intel Unite Client.mui.msi
It is important that the Enterprise Server is installed once you have understood and validated the pre-
installation requirements.
You also have to install the Intel Mini-PC (or other certified Mini PC) in the monitor or device you want to use.
The Intel Unite software installers create default options when installing, you can choose to leave the default
values or configure according to your organization needs.
NOTE: It is not required to have a separate database instance into production. The Intel Unite application will
create its own database, data tables and indexes in your existing database without interfering with other
databases.
The next section “Enterprise Server Deployment” contains the steps to deploy the Server and general
information about each component needed to have a successful install, however, If you setting up as in a
“Test environment” (or equivalent), follow the default values provided by the application through the
installation process and for convenience purposes.
If your organization wants to setup a “test environment” in addition to select the default values, some of the
information in this guide will be for information purposes, since you may choose to skip the optional
configurations.
It is the IT account administrator or your solution provider decision to adjust to your organization
preferences.

4 Enterprise Server Installation
4.1 Enterprise Server Overview The Enterprise Server Installer includes the PIN server, Admin Portal, and Client download page.
The Enterprise Server is the directory server that assigns pins to Intel Unite Clients and Hubs, it also resolves
PIN to IP address lookups.
The Enterprise Server contains 4 components:
1) MS SQL database: maintains all state information for the Intel Unite infrastructure.
2) Web Service: is a standardized messaging service that communicates with the database and the Intel
Unite Hubs and Clients.
3) Administration Portal Website: manages Hubs and Clients, generates statistics, and provides
monitoring and alerting.
4) Client download landing webpage: contains the client Intel Unite software.
In addition, it is important to know that Intel Unite Hubs and Clients locate your Enterprise Server on your
network infrastructure through the following 2 methods: ServerConfig.xml file or DNS Service Record.
Depending on your infrastructure configuration, use one or the other.
It is recommended that you use the DNS service record as this enables zero-touch configuration for the Client
and Hub, however, if you are not able to acquire a DNS service record, the PIN service can be defined in the
ServerConfig.xml file
4.2 Enterprise Server Pre- Installation
1. Verify that the Server that you are installing to meets the minimum software and hardware requirements
specified in section 3. Intel Unite Requirements
2. Verify that IIS version 7.0 or greater is installed on your Server. The Server installer requires IIS to be
enabled, otherwise it will fail. For help enabling and setting up IIS, see section IIS Enabling (by default
SSL is not enabled so https requests sent by the Admin Portal are not handled until IIS is enabled).
3. Make sure you have and enable ASP.net 4.5 (you may need to install it in Server 2008) and SSL, you must
set up a server certificate (Self-Signed or existing).
4. Make sure you have MS SQL installed in your Server and you have access to MS SQL via Windows
authentication or SQL authentication, see section Microsoft SQL Server Install.
4.2.1 IIS Enabling
By default ISS is not installed in a Windows Server, please verify that IIS (Internet Information Services) is
enabled, if is it, skip to the next section.
If IIS has not been enabled or to find out if it is enabled, follow the steps described below to enable it or go
to the links used as reference in this section.
For Windows 2008:
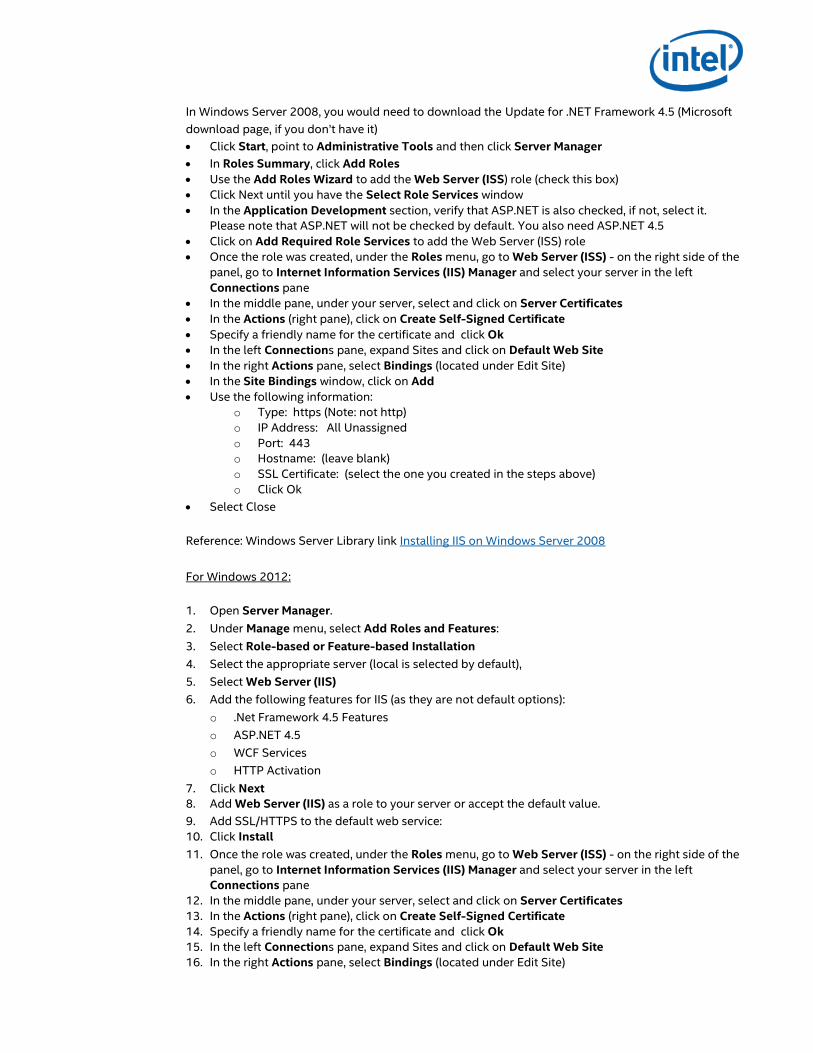
In Windows Server 2008, you would need to download the Update for .NET Framework 4.5 (Microsoft
download page, if you don’t have it)
Click Start, point to Administrative Tools and then click Server Manager
In Roles Summary, click Add Roles
Use the Add Roles Wizard to add the Web Server (ISS) role (check this box)
Click Next until you have the Select Role Services window
In the Application Development section, verify that ASP.NET is also checked, if not, select it.
Please note that ASP.NET will not be checked by default. You also need ASP.NET 4.5
Click on Add Required Role Services to add the Web Server (ISS) role
Once the role was created, under the Roles menu, go to Web Server (ISS) - on the right side of the
panel, go to Internet Information Services (IIS) Manager and select your server in the left
Connections pane
In the middle pane, under your server, select and click on Server Certificates
In the Actions (right pane), click on Create Self-Signed Certificate
Specify a friendly name for the certificate and click Ok
In the left Connections pane, expand Sites and click on Default Web Site
In the right Actions pane, select Bindings (located under Edit Site)
In the Site Bindings window, click on Add
Use the following information:
o Type: https (Note: not http)
o IP Address: All Unassigned
o Port: 443
o Hostname: (leave blank)
o SSL Certificate: (select the one you created in the steps above)
o Click Ok
Select Close
Reference: Windows Server Library link Installing IIS on Windows Server 2008
For Windows 2012:
1. Open Server Manager.
2. Under Manage menu, select Add Roles and Features:
3. Select Role-based or Feature-based Installation
4. Select the appropriate server (local is selected by default),
5. Select Web Server (IIS)
6. Add the following features for IIS (as they are not default options):
o .Net Framework 4.5 Features
o ASP.NET 4.5
o WCF Services
o HTTP Activation
7. Click Next
8. Add Web Server (IIS) as a role to your server or accept the default value.
9. Add SSL/HTTPS to the default web service:
10. Click Install
11. Once the role was created, under the Roles menu, go to Web Server (ISS) - on the right side of the
panel, go to Internet Information Services (IIS) Manager and select your server in the left
Connections pane
12. In the middle pane, under your server, select and click on Server Certificates
13. In the Actions (right pane), click on Create Self-Signed Certificate
14. Specify a friendly name for the certificate and click Ok
15. In the left Connections pane, expand Sites and click on Default Web Site
16. In the right Actions pane, select Bindings (located under Edit Site)
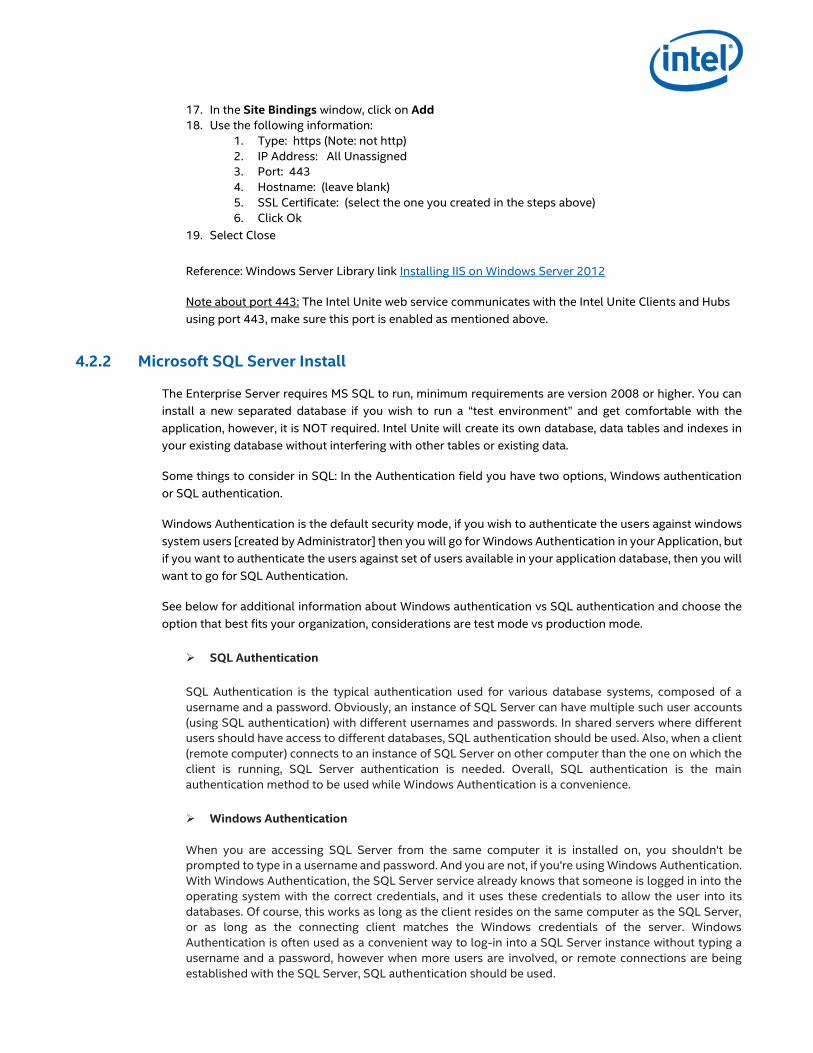
17. In the Site Bindings window, click on Add
18. Use the following information:
1. Type: https (Note: not http)
2. IP Address: All Unassigned
3. Port: 443
4. Hostname: (leave blank)
5. SSL Certificate: (select the one you created in the steps above)
6. Click Ok
19. Select Close
Reference: Windows Server Library link Installing IIS on Windows Server 2012
Note about port 443: The Intel Unite web service communicates with the Intel Unite Clients and Hubs
using port 443, make sure this port is enabled as mentioned above.
4.2.2 Microsoft SQL Server Install
The Enterprise Server requires MS SQL to run, minimum requirements are version 2008 or higher. You can
install a new separated database if you wish to run a “test environment” and get comfortable with the
application, however, it is NOT required. Intel Unite will create its own database, data tables and indexes in
your existing database without interfering with other tables or existing data.
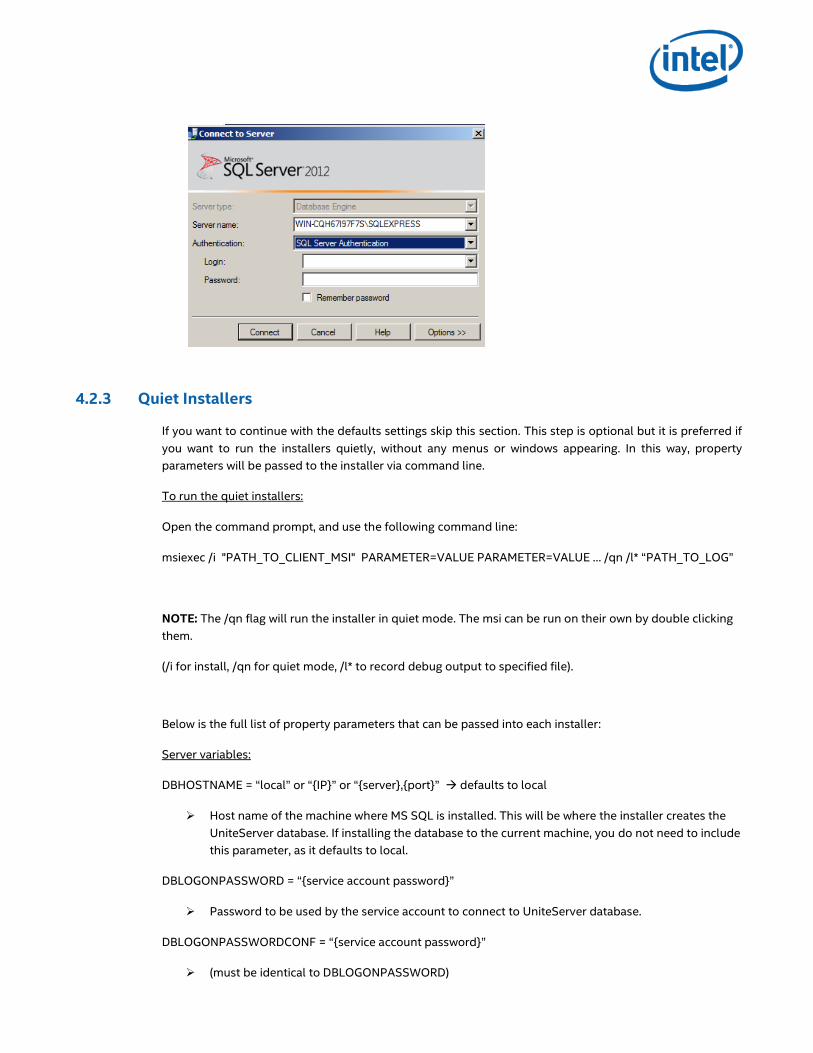
Some things to consider in SQL: In the Authentication field you have two options, Windows authentication
or SQL authentication.
Windows Authentication is the default security mode, if you wish to authenticate the users against windows
system users [created by Administrator] then you will go for Windows Authentication in your Application, but
if you want to authenticate the users against set of users available in your application database, then you will
want to go for SQL Authentication.
See below for additional information about Windows authentication vs SQL authentication and choose the
option that best fits your organization, considerations are test mode vs production mode.
SQL Authentication
SQL Authentication is the typical authentication used for various database systems, composed of a
username and a password. Obviously, an instance of SQL Server can have multiple such user accounts
(using SQL authentication) with different usernames and passwords. In shared servers where different
users should have access to different databases, SQL authentication should be used. Also, when a client
(remote computer) connects to an instance of SQL Server on other computer than the one on which the
client is running, SQL Server authentication is needed. Overall, SQL authentication is the main
authentication method to be used while Windows Authentication is a convenience.
Windows Authentication
When you are accessing SQL Server from the same computer it is installed on, you shouldn't be
prompted to type in a username and password. And you are not, if you're using Windows Authentication.
With Windows Authentication, the SQL Server service already knows that someone is logged in into the
operating system with the correct credentials, and it uses these credentials to allow the user into its
databases. Of course, this works as long as the client resides on the same computer as the SQL Server,
or as long as the connecting client matches the Windows credentials of the server. Windows
Authentication is often used as a convenient way to log-in into a SQL Server instance without typing a
username and a password, however when more users are involved, or remote connections are being
established with the SQL Server, SQL authentication should be used.
4.2.3 Quiet Installers
If you want to continue with the defaults settings skip this section. This step is optional but it is preferred if
you want to run the installers quietly, without any menus or windows appearing. In this way, property
parameters will be passed to the installer via command line.
To run the quiet installers:
Open the command prompt, and use the following command line:
msiexec /i "PATH_TO_CLIENT_MSI" PARAMETER=VALUE PARAMETER=VALUE … /qn /l* “PATH_TO_LOG”
NOTE: The /qn flag will run the installer in quiet mode. The msi can be run on their own by double clicking
them.
(/i for install, /qn for quiet mode, /l* to record debug output to specified file).
Below is the full list of property parameters that can be passed into each installer:
Server variables:
DBHOSTNAME = “local” or “{IP}” or “{server},{port}” defaults to local
Host name of the machine where MS SQL is installed. This will be where the installer creates the
UniteServer database. If installing the database to the current machine, you do not need to include
this parameter, as it defaults to local.
DBLOGONPASSWORD = “{service account password}”
Password to be used by the service account to connect to UniteServer database.
DBLOGONPASSWORDCONF = “{service account password}”
(must be identical to DBLOGONPASSWORD)

DBLOGONTYPE = “WinAccount” or “SqlAccount” defaults to WinAccount
Selects the logon type to access the MS SQL server. Options are Windows authentication and SQL
authentication.
If logon type is SqlAccount, provide the username and password via the parameters below.
DBUSER = “{SQL username}”
DBPASSWORD = “{SQL password}”
For server features:
ADDLOCAL = “ALL” installs database
Do not include if not installing database, it is not installed by default
Client/hub variables:
PINSERVERLOOKUPTYPE = “Lookup” or “Manual” defaults to Lookup
Specifies how the application will find the server. Lookup will utilize the DNS service record, while
Manual requires the input of the parameters below.
PINSERVER = “{hostname}”
The host name of the server to connect to.
CERTKEYCHECKED = “1” (checked) or “0” (unchecked)
Optional. Check if you know the certificate public key.
CERTKEY = “{certificate key}”
Optional. Enter the certificate public key (see section 4.2.4 for details regarding the public key).
SHORTCUTS
Optional. Set to "1" to place desktop shortcut icons.
INSTALLTYPE = two possible values "Enterprise" and "StandAlone". If INSTALLTYPE is "Enterprise", then the
client/hub will install as enterprise. If INSTALLTYPE is "StandAlone", then the client/hub will install as
standalone
4.2.4 Registry Keys
This section is for information purposes only. The registry keys are written to the registry when you run the
installers. Values in some of these keys can be adjusted in accordance to the desired outcome. See the list
below to understand the keys that are written by the Intel Unite application:
* Registry Keys: (current user):
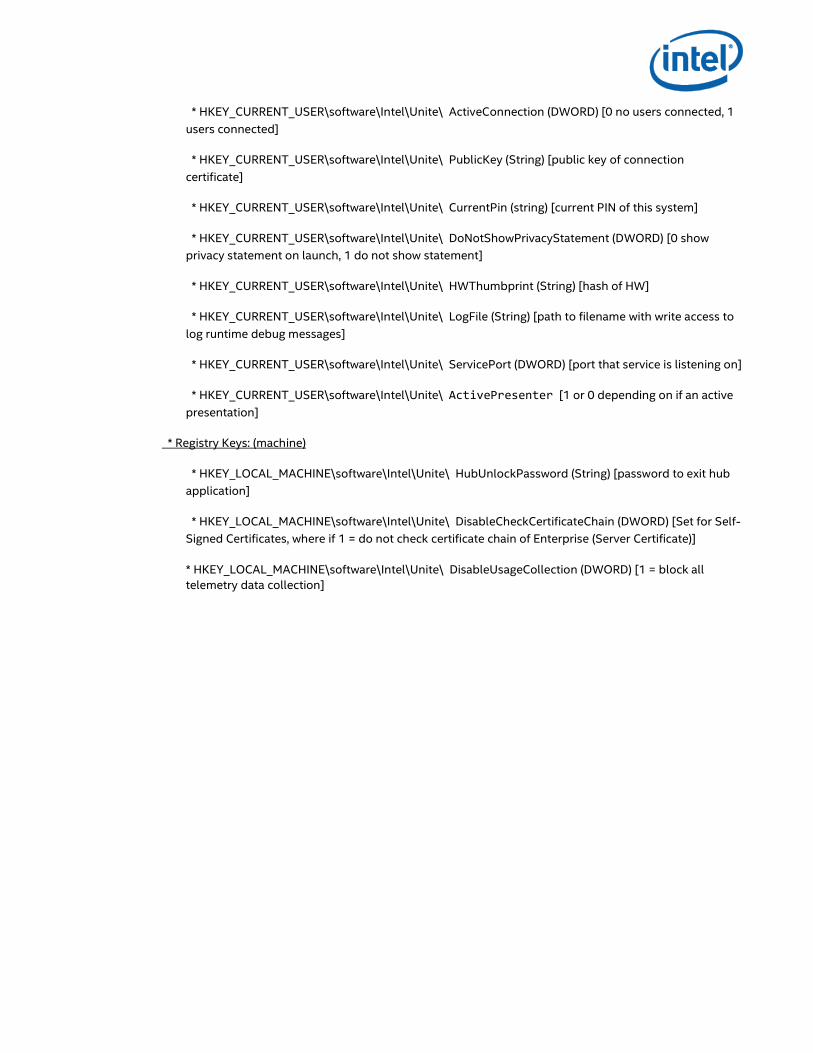
* HKEY_CURRENT_USER\software\Intel\Unite\ ActiveConnection (DWORD) [0 no users connected, 1
users connected]
* HKEY_CURRENT_USER\software\Intel\Unite\ PublicKey (String) [public key of connection
certificate]
* HKEY_CURRENT_USER\software\Intel\Unite\ CurrentPin (string) [current PIN of this system]
* HKEY_CURRENT_USER\software\Intel\Unite\ DoNotShowPrivacyStatement (DWORD) [0 show
privacy statement on launch, 1 do not show statement]
* HKEY_CURRENT_USER\software\Intel\Unite\ HWThumbprint (String) [hash of HW]
* HKEY_CURRENT_USER\software\Intel\Unite\ LogFile (String) [path to filename with write access to
log runtime debug messages]
* HKEY_CURRENT_USER\software\Intel\Unite\ ServicePort (DWORD) [port that service is listening on]
* HKEY_CURRENT_USER\software\Intel\Unite\ ActivePresenter [1 or 0 depending on if an active
presentation]
* Registry Keys: (machine)
* HKEY_LOCAL_MACHINE\software\Intel\Unite\ HubUnlockPassword (String) [password to exit hub
application]
* HKEY_LOCAL_MACHINE\software\Intel\Unite\ DisableCheckCertificateChain (DWORD) [Set for Self-
Signed Certificates, where if 1 = do not check certificate chain of Enterprise (Server Certificate)]
* HKEY_LOCAL_MACHINE\software\Intel\Unite\ DisableUsageCollection (DWORD) [1 = block all
telemetry data collection]
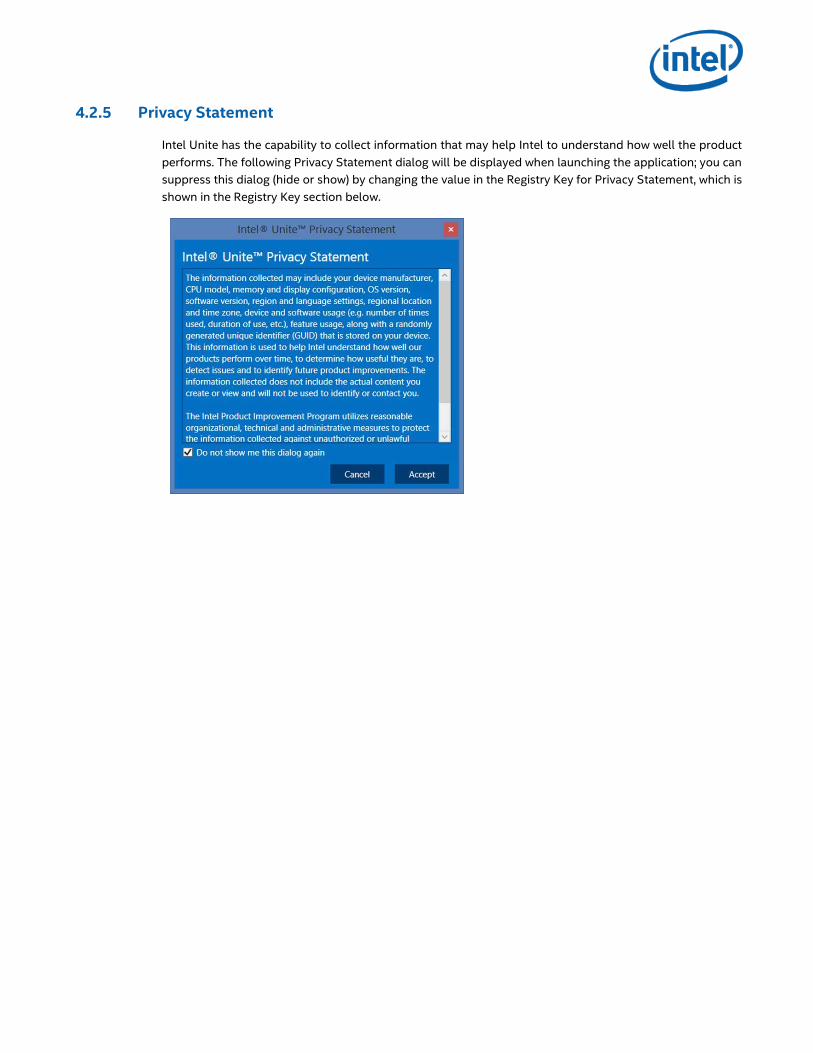
4.2.5 Privacy Statement
Intel Unite has the capability to collect information that may help Intel to understand how well the product
performs. The following Privacy Statement dialog will be displayed when launching the application; you can
suppress this dialog (hide or show) by changing the value in the Registry Key for Privacy Statement, which is
shown in the Registry Key section below.
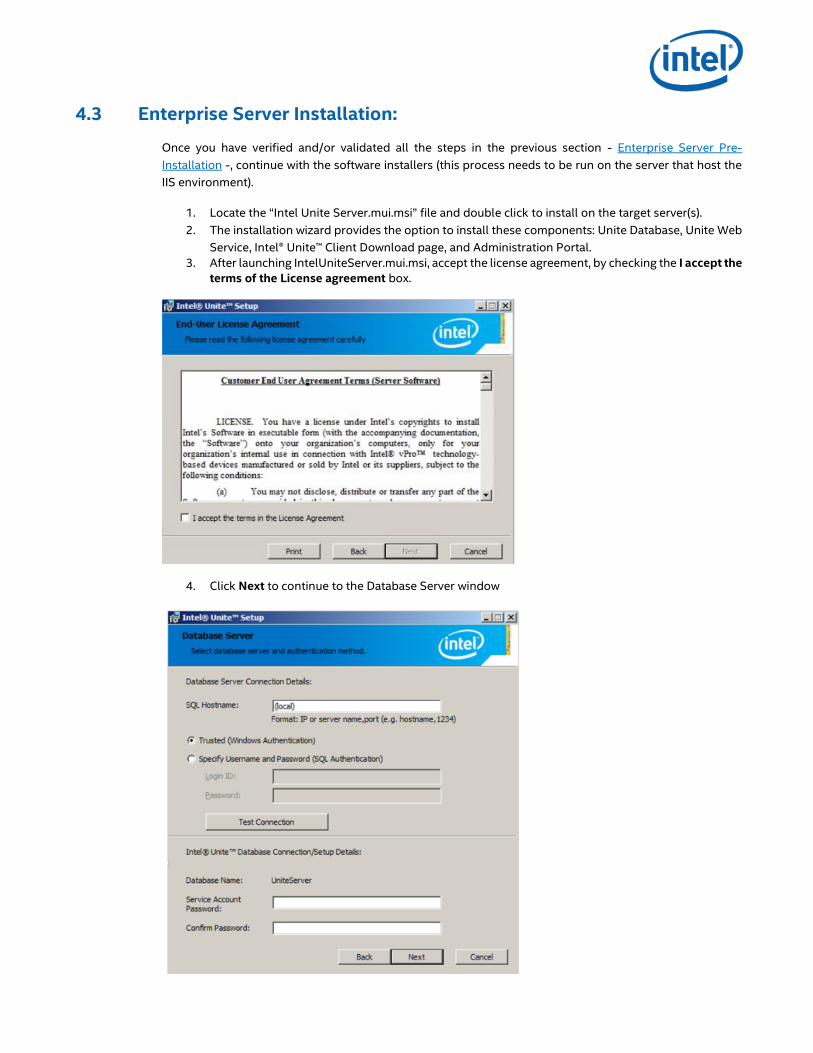
4.3 Enterprise Server Installation:
Once you have verified and/or validated all the steps in the previous section - Enterprise Server Pre-
Installation -, continue with the software installers (this process needs to be run on the server that host the
IIS environment).
1. Locate the “Intel Unite Server.mui.msi” file and double click to install on the target server(s).
2. The installation wizard provides the option to install these components: Unite Database, Unite Web
Service, Intel® Unite™ Client Download page, and Administration Portal.
3. After launching IntelUniteServer.mui.msi, accept the license agreement, by checking the I accept the
terms of the License agreement box.
4. Click Next to continue to the Database Server window
5. In the Database Server window, select the Database Server Connection Details, available options
are:
In the SQL Hostname box, (local) is the default value for the Server, you can change it by editing
your Hostname or leave the default value (leave (local) if SQL is installed in the same server)
The default value for the Server is Trusted, (if you’re already login), or select Specify Username
and Password if you have valid credentials that have access to the database and prefer SQL
authentication. If you choose the latter, make sure you TEST the database connection by
clicking Test Connection. For additional information in what option you want to choose go to
section Microsoft SQL Server Install
In the Intel Unite Database Connection/Setup Details section, you need to create a new
password for the UniteServer database, this is the password used to access the new Intel Unite
database named UniteServer, and Confirm the Password in the next box
The password must contain at least 8 characters, at least one uppercase character, one
lowercase character, one digit and one symbol.
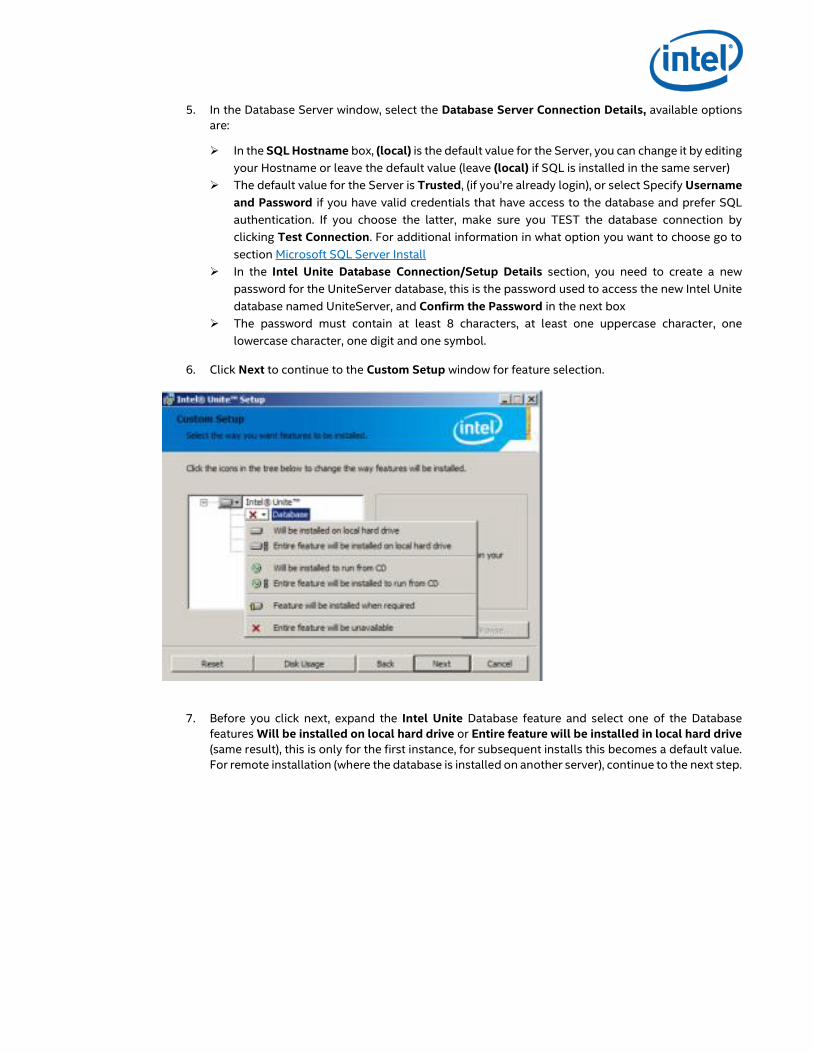
6. Click Next to continue to the Custom Setup window for feature selection.
7. Before you click next, expand the Intel Unite Database feature and select one of the Database
features Will be installed on local hard drive or Entire feature will be installed in local hard drive
(same result), this is only for the first instance, for subsequent installs this becomes a default value.
For remote installation (where the database is installed on another server), continue to the next step.
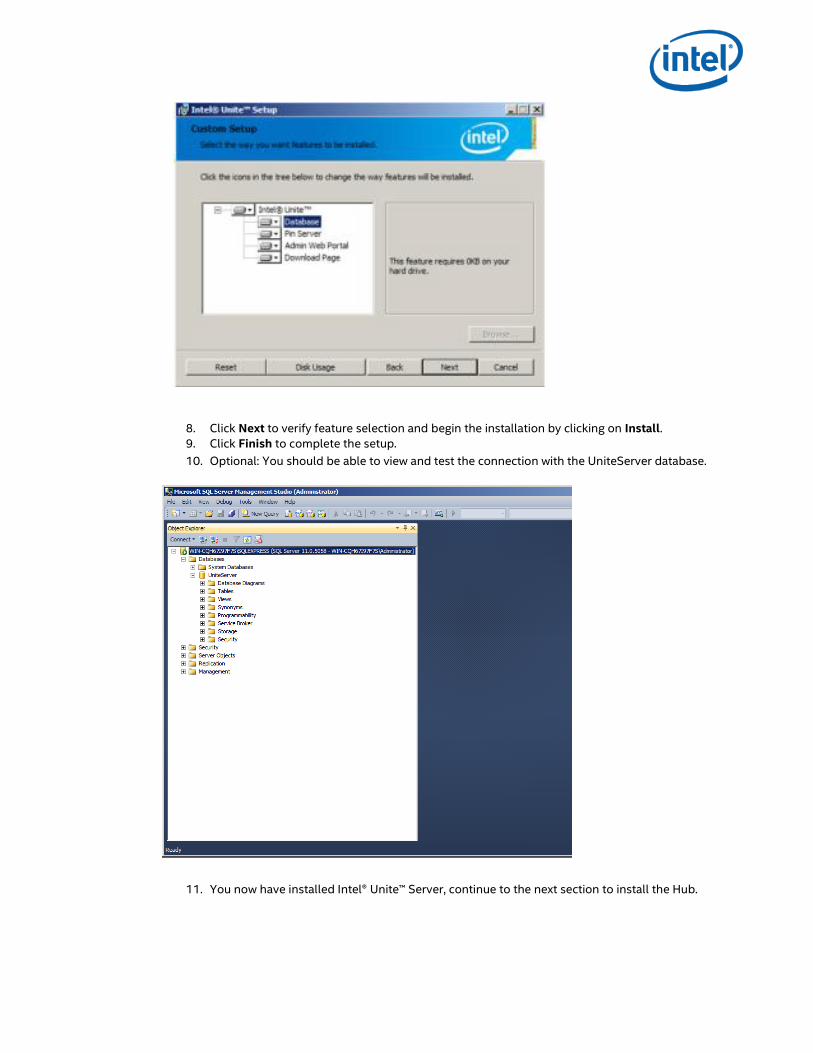
8. Click Next to verify feature selection and begin the installation by clicking on Install.
9. Click Finish to complete the setup.
10. Optional: You should be able to view and test the connection with the UniteServer database.
11. You now have installed Intel® Unite™ Server, continue to the next section to install the Hub.
4.4 Uninstalling Intel Unite (Server)
If for any reason you need to uninstall the application, you would also need to delete the UniteServer
database created previously to avoid conflict within the application.
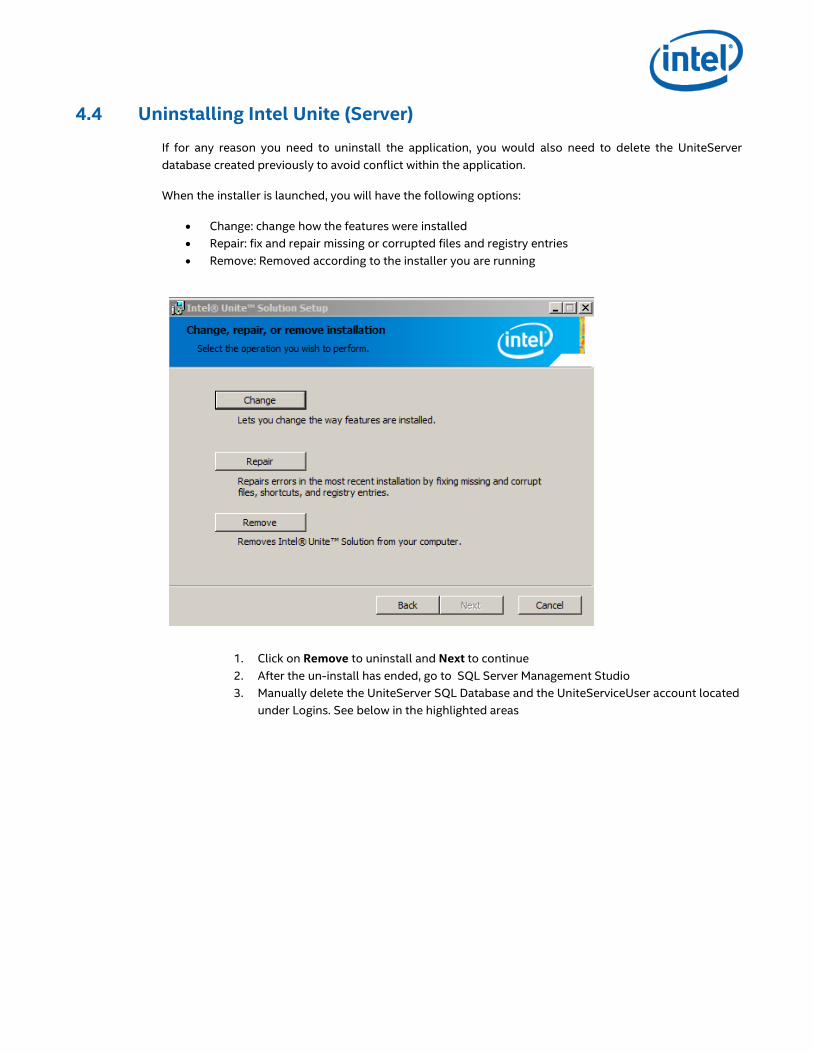
When the installer is launched, you will have the following options:
Change: change how the features were installed
Repair: fix and repair missing or corrupted files and registry entries
Remove: Removed according to the installer you are running
1. Click on Remove to uninstall and Next to continue
2. After the un-install has ended, go to SQL Server Management Studio
3. Manually delete the UniteServer SQL Database and the UniteServiceUser account located
under Logins. See below in the highlighted areas
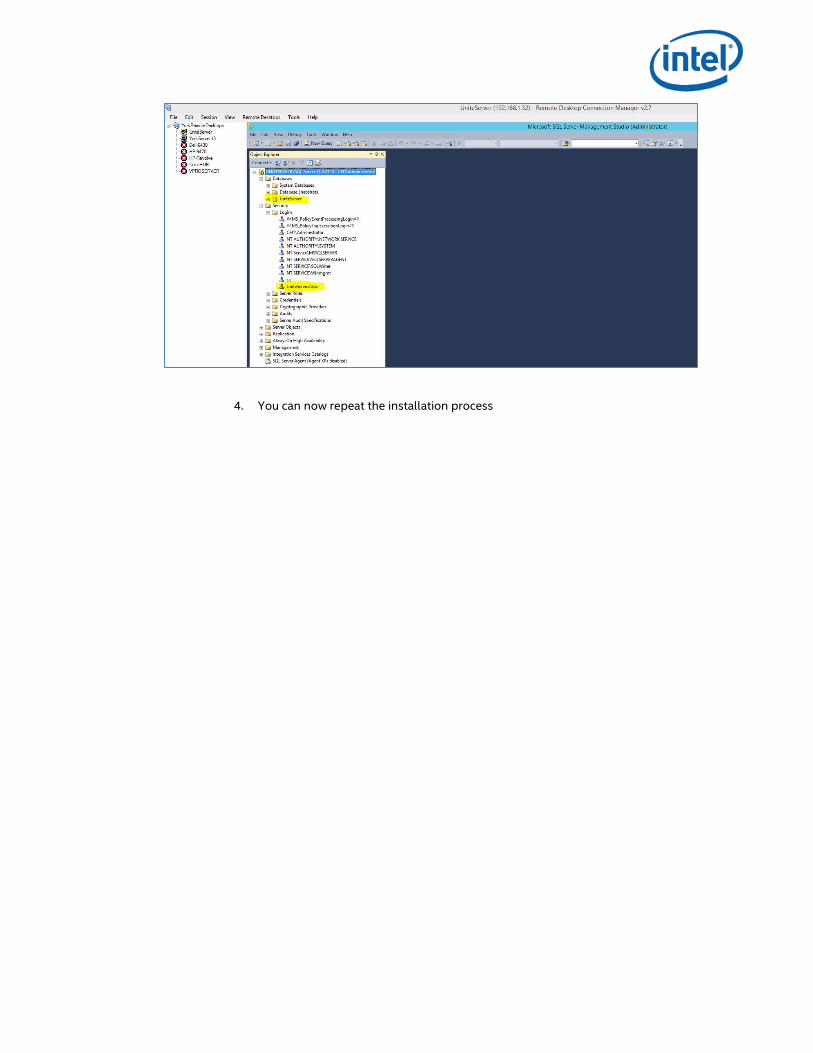
4. You can now repeat the installation process
5 Hub Installation
5.1 Intel Unite Hub Pre-Installation
The Intel Unite executable needs an exemption in the Hub firewall to check in and communicate with the
Intel Unite Enterprise Server, since the Hub needs to be able to locate and check in with the Enterprise Server.
When you run the Hub installer, it will prompt you for server connection details and give you the option of
bypassing the manual lookup (named Specify Server in the install process) in favor of retrieve information
from the DNS Service Record. When running the Hub installer, it will edit the ServerConfig.xml.
Depending on the method chosen for PIN lock up, you need to know if you will use the Automatically Find
Server or the Specify Server selection when executing the installation.
If you know that the DNS Service record exists, then you can select Automatically Find Server, it is preferable
to use the automatic lookup to avoid mistyping errors. If unsure, use the Specify Server option (manual
lookup), where you would need to know the hostname for Intel Unite. DNS Service Record is applicable only
when the serverconfig.xml file found on a Hub or Client does not contain a value in the server field that a DNS
Service record is using.
If you have edited the ServerConfig.xml with the public key (see next section Public Key), you are not required
to input the key again for the client and hub installers.
Note: If a server is defined in the ServerConfig.xml that will take precedence over the DNS Service Record.
5.1.1 Public Key
The public key is optional, what it does is specifying how the Client will talk to the Enterprise Server. If left
blank or unspecified, the Hub and the Client will validate the root of trust. If the application does not accept
the certificate it will prompt for the user.
The public key would be used when you execute the installation of the Hub and the Client. You will need this
key when running the installers for the Hub and the Client. To obtain the public key, go to:
https://<your_server_url_here>/unite/ccservice.asmx
In the URL bar, click the lock and view the certificate information. Go to details, click show all, scroll down the
field to “Public Key”, then click public key to view. Optionally, you may copy the value out there and paste it
into the ServerConfig.xml file.
Make sure you remove the spaces from the string after you paste in the ServerConfig file. If you have edited
the ServerConfig.xml with the public key, you are not required to input the key again for the client and hub
installers.
5.1.2 ServerConfig file and DSN Record content
When running the Hub installer, it will edit the ServerConfig.xml, and it will place it under Program
Files/Intel/Intel Unite/Hub. Please see below for content details.
ServerConfig.xml file content:
You must have the server host name and the public key for your server available when you start
the installation process.
DNS Service record content:
The hub or client will look for the service named _uniteservice._tcp within the DNS service records
_uniteservice._tcp.example.com 86400 IN 0 5 443 uniteserver.example.com
To add a DNS Service Record in Microsoft Windows:
i. Open DNS Manager
ii. Expand the Forward Lookup zone (left pane)
iii. Right click on the zone and select "Other New Records..."
1. In "Select a resource record type:" select "Service Location (SRV)" and
select "Create Record"
2. For "Service" enter: _uniteservice
3. For "Protocol" enter: _tcp
4. For "Port" enter: 443
5. Host offering this service: Enter the hostname/IP of the Enterprise
server(s)
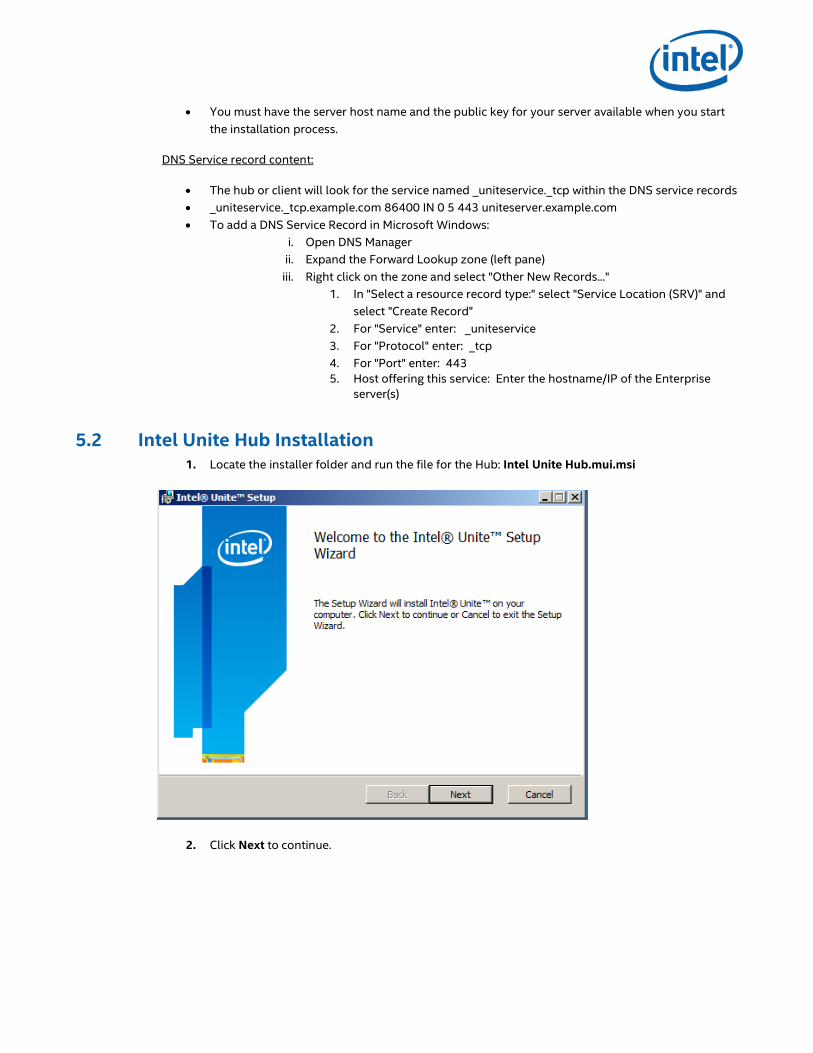
5.2 Intel Unite Hub Installation 1. Locate the installer folder and run the file for the Hub: Intel Unite Hub.mui.msi
2. Click Next to continue.
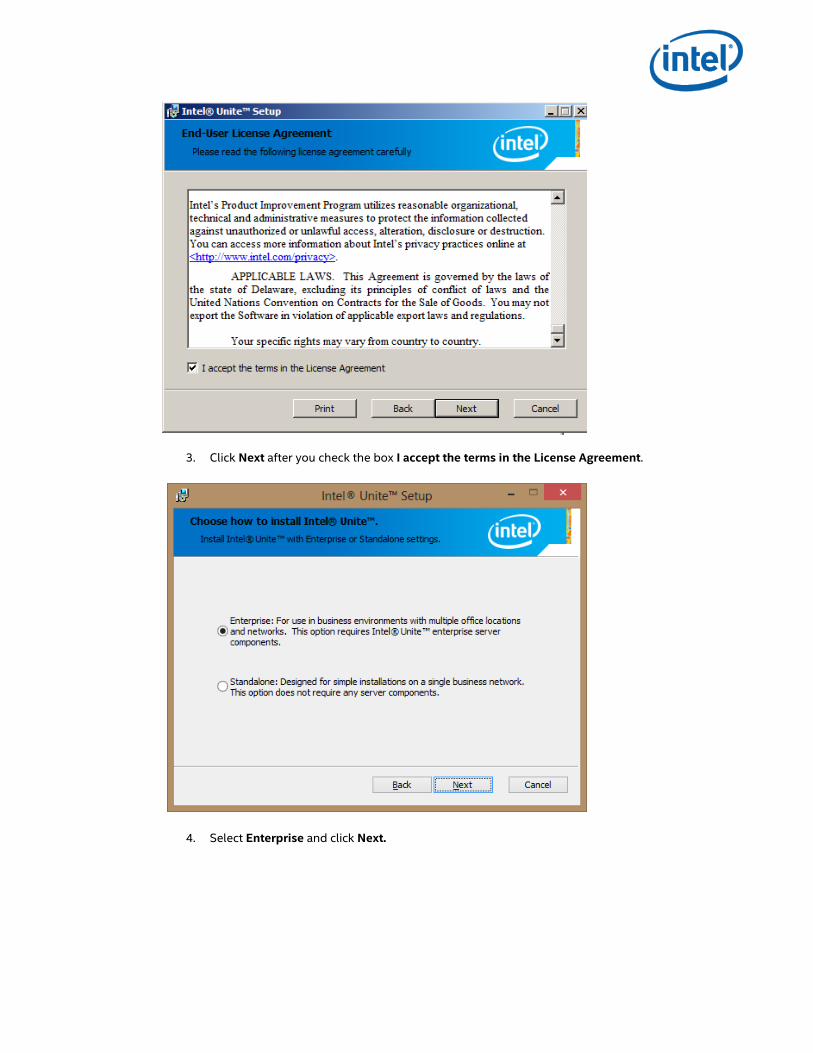
3. Click Next after you check the box I accept the terms in the License Agreement.
4. Select Enterprise and click Next.
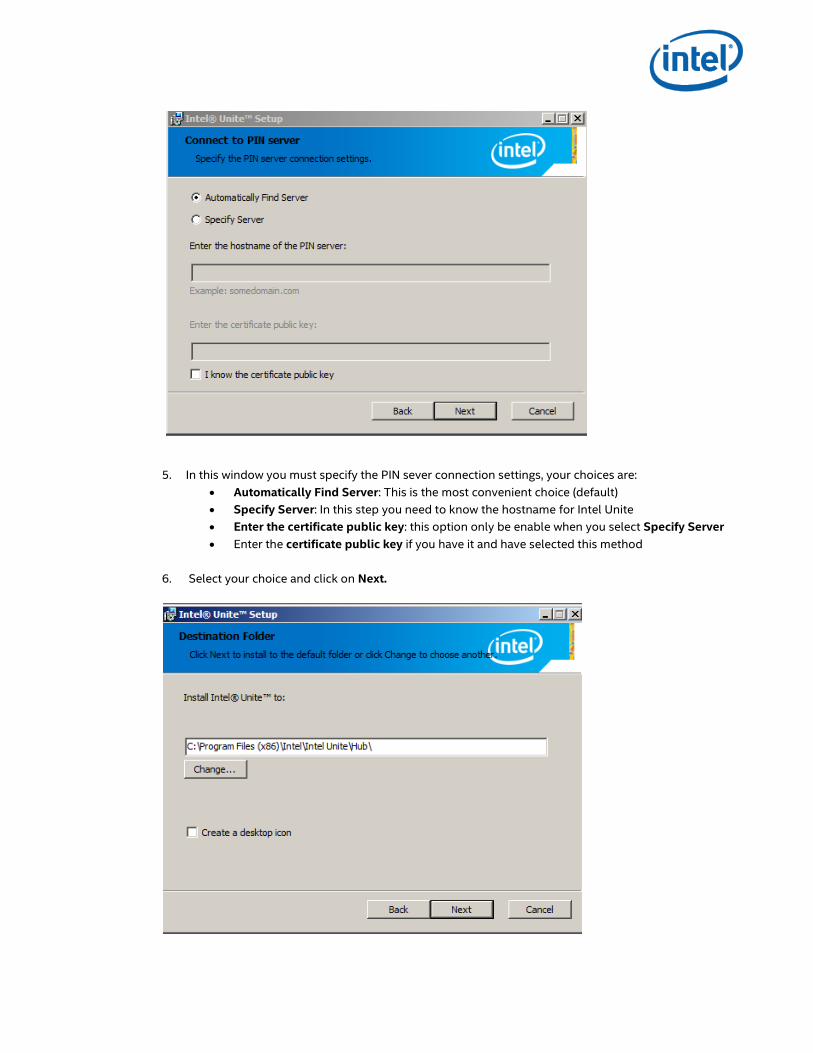
5. In this window you must specify the PIN sever connection settings, your choices are:
Automatically Find Server: This is the most convenient choice (default)
Specify Server: In this step you need to know the hostname for Intel Unite
Enter the certificate public key: this option only be enable when you select Specify Server
Enter the certificate public key if you have it and have selected this method
6. Select your choice and click on Next.
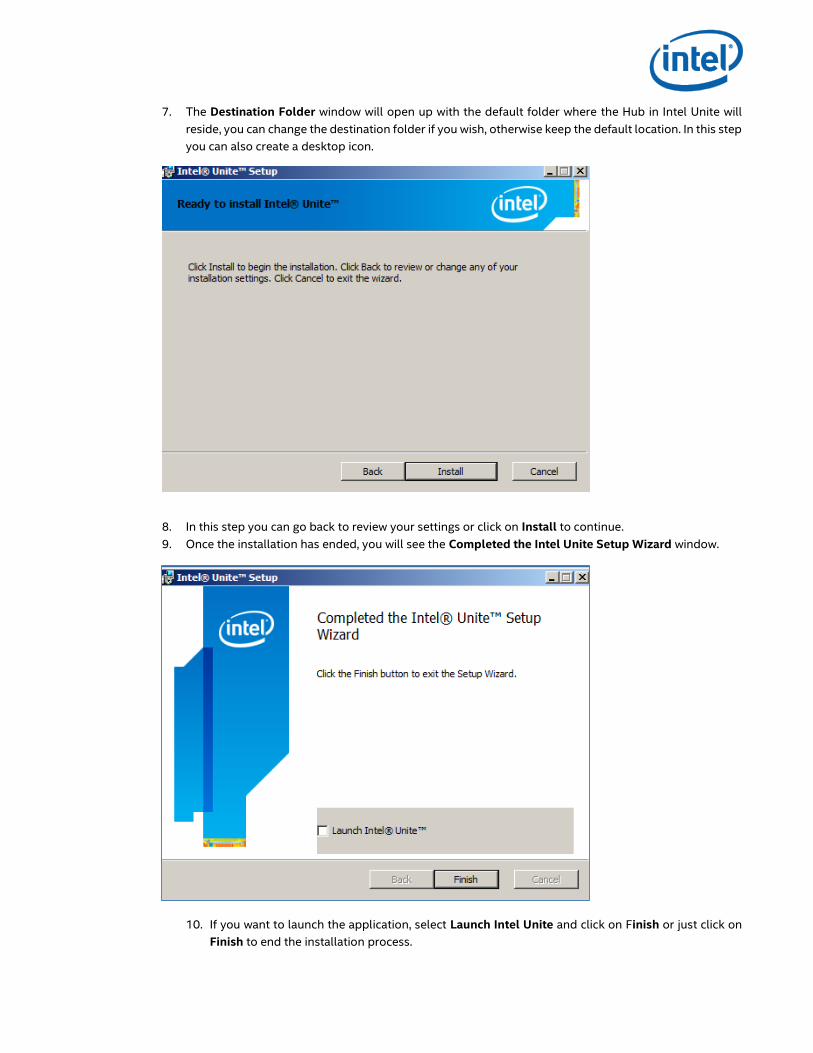
7. The Destination Folder window will open up with the default folder where the Hub in Intel Unite will
reside, you can change the destination folder if you wish, otherwise keep the default location. In this step
you can also create a desktop icon.
8. In this step you can go back to review your settings or click on Install to continue.
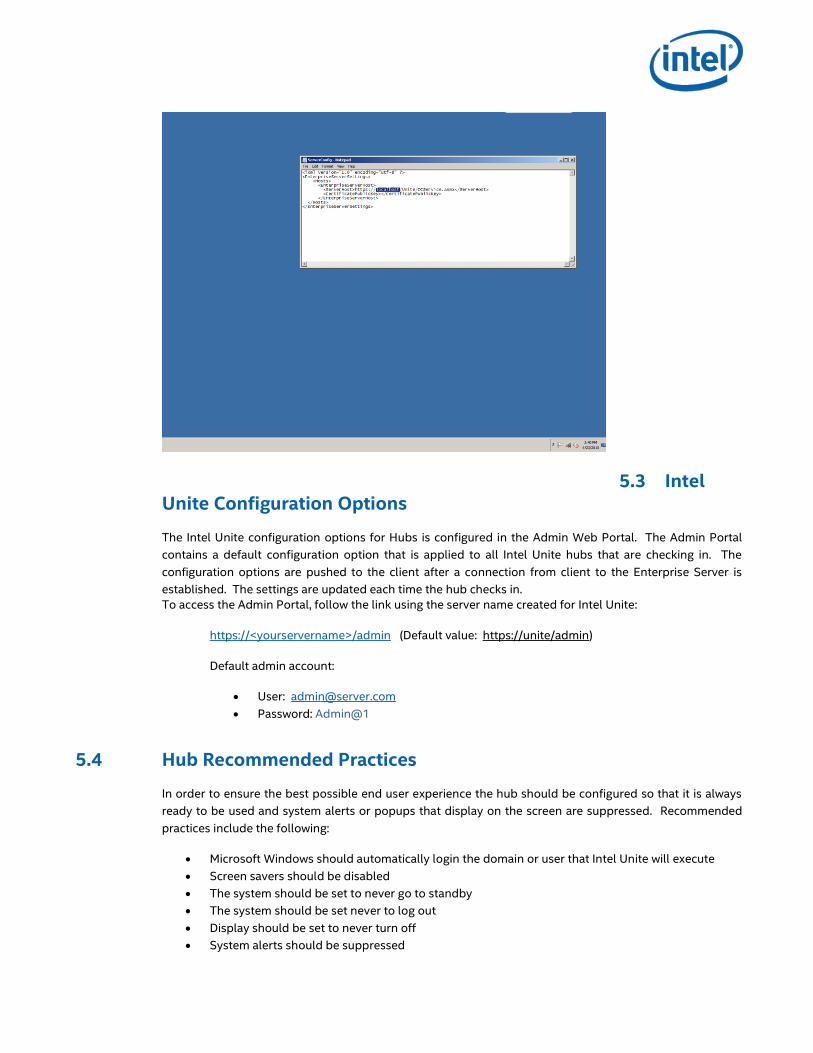
9. Once the installation has ended, you will see the Completed the Intel Unite Setup Wizard window.
10. If you want to launch the application, select Launch Intel Unite and click on Finish or just click on
Finish to end the installation process.

11. When you launch the application for the first time, you will see the following Intel Unite Privacy
Statement.
12. The Intel Unite Privacy Statement function is used to collect anonymous usage data. Intel is always
looking to improve its products and would like to collect data to continue to improve the product.
Please select YES or NO and check the box if you do not want to show the dialog box again.
13. You will now see a PIN displayed in your screen or monitor. This is the PIN you will need to connect
to your client devices.
14. Verify the installation was successful by accessing the Admin Portal, following the link:
https://<yourservername>/admin (Default value: https://unite/admin)
Default admin account:
User: [email protected]
Password: Admin@1
Note: If you receive an error page when accessing the Admin Portal, which complains about a specific
xml tag in the Web.config, remove the tag from the Web.config in the top level of the portal’s virtual
directory (accessible from IIS management console).
15. Verify the Web Service installation was successful, following the link:
https://<yourservername>/unite/ccservice.asmx
Select “GetProfile”
Enter “test” in the value field and press invoke.
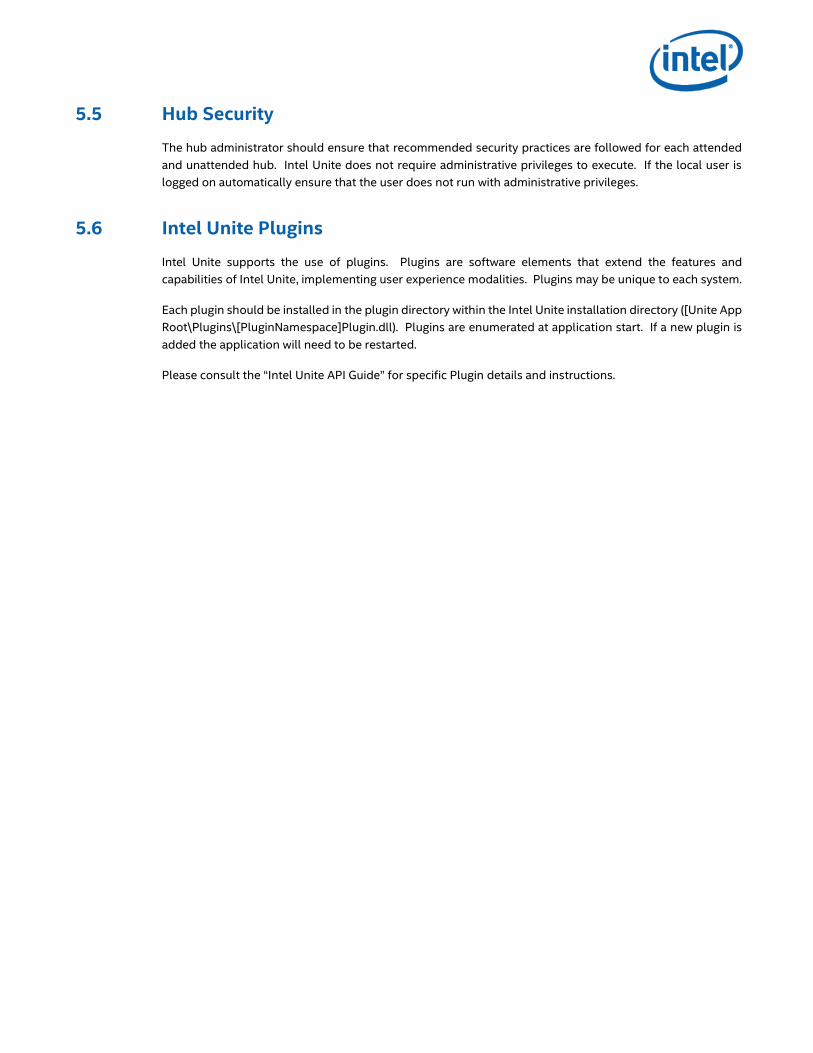
16. Optional: Verify that you can view the default profile in the ServerConfig.xml file as is shown below.
The file is located under the Intel Unite/ Hub directory. This indicates that the pin service can access
the Unite database and successfully retrieve data.
5.3 Intel Unite Configuration Options
The Intel Unite configuration options for Hubs is configured in the Admin Web Portal. The Admin Portal
contains a default configuration option that is applied to all Intel Unite hubs that are checking in. The
configuration options are pushed to the client after a connection from client to the Enterprise Server is
established. The settings are updated each time the hub checks in.
To access the Admin Portal, follow the link using the server name created for Intel Unite:
https://<yourservername>/admin (Default value: https://unite/admin)
Default admin account:
User: [email protected]
Password: Admin@1
5.4 Hub Recommended Practices
In order to ensure the best possible end user experience the hub should be configured so that it is always
ready to be used and system alerts or popups that display on the screen are suppressed. Recommended
practices include the following:
Microsoft Windows should automatically login the domain or user that Intel Unite will execute
Screen savers should be disabled
The system should be set to never go to standby
The system should be set never to log out
Display should be set to never turn off
System alerts should be suppressed
5.5 Hub Security
The hub administrator should ensure that recommended security practices are followed for each attended
and unattended hub. Intel Unite does not require administrative privileges to execute. If the local user is
logged on automatically ensure that the user does not run with administrative privileges.
5.6 Intel Unite Plugins
Intel Unite supports the use of plugins. Plugins are software elements that extend the features and
capabilities of Intel Unite, implementing user experience modalities. Plugins may be unique to each system.
Each plugin should be installed in the plugin directory within the Intel Unite installation directory ([Unite App
Root\Plugins\[PluginNamespace]Plugin.dll). Plugins are enumerated at application start. If a new plugin is
added the application will need to be restarted.
Please consult the “Intel Unite API Guide” for specific Plugin details and instructions.
6 Client Installation
6.1 Intel Unite Client Pre-Installation
The Intel Unite Client needs to be able to locate and check in with the Intel Unite Enterprise Server. The Intel
Unite executable needs an exemption in the client firewall to check in and communicate with the Intel Unite
enterprise server.
When you run the Client installer, it will prompt you for server connection details and give you the option of
bypassing the manual lookup (named Specify Server in the install process) in favor of retrieve information
from the DNS Service Record. When running the installer, it will edit the ServerConfig.xml.
Depending on the method chosen for PIN lock up, you need to know if you will use the Automatically Find
Server or the Specify Server selection when executing the installation.
If you know that the DNS Service record exists, then you can select Automatically Find Server, it is preferable
to use the automatic lookup to avoid mistyping errors. If unsure, use the Specify Server option (manual
lookup), where you would need to know the hostname for Intel Unite. DNS Service Record is applicable only
when the serverconfig.xml file found on a Hub or Client does not contain a value in the server field that a DNS
Service record is using.
Note: If a server is defined in the ServerConfig.xml that will take precedence over the DNS Service Record.
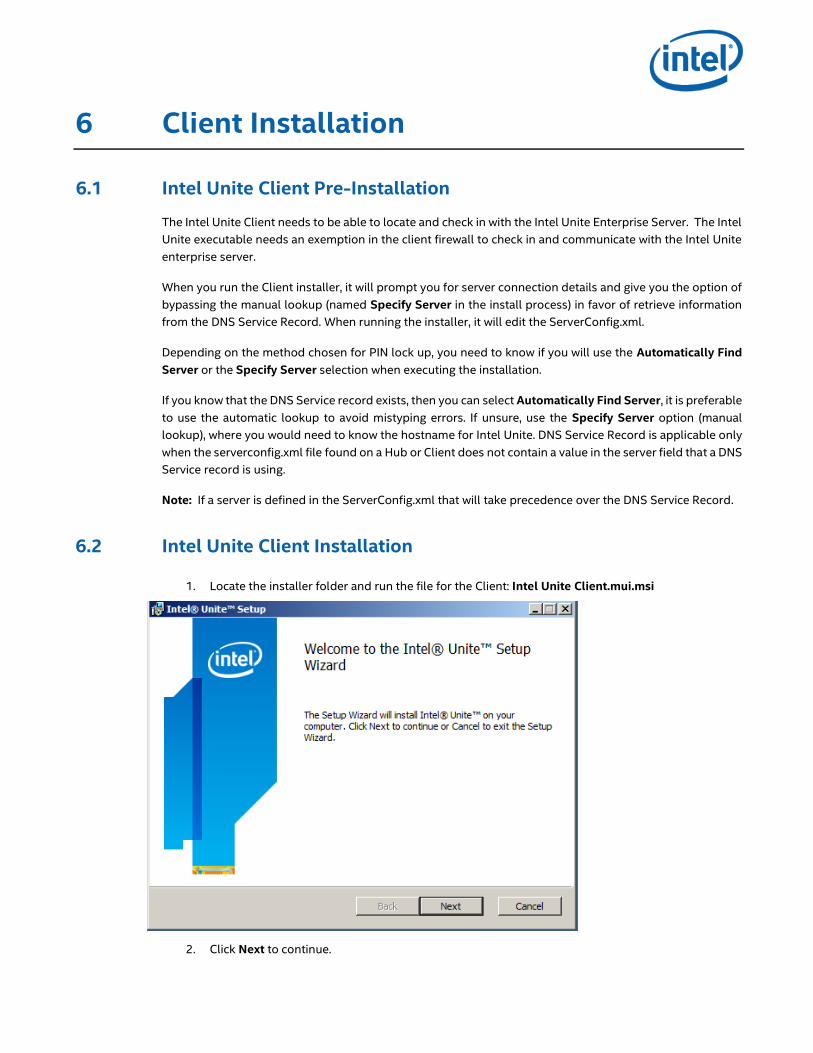
6.2 Intel Unite Client Installation
1. Locate the installer folder and run the file for the Client: Intel Unite Client.mui.msi
2. Click Next to continue.
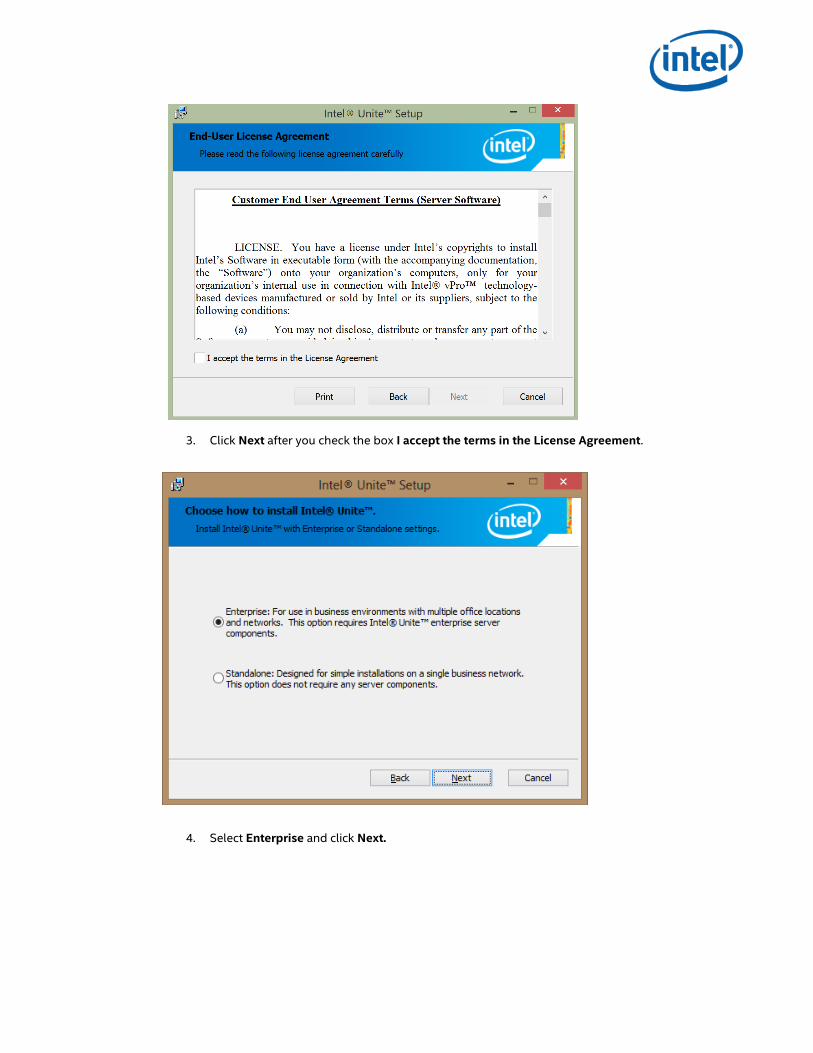
3. Click Next after you check the box I accept the terms in the License Agreement.
4. Select Enterprise and click Next.

5. In this window you must specify the PIN sever connection settings, your choices are:
Automatically Find Server: This is the most convenient choice (default)
Specify Server: In this step you need to know the hostname for Intel Unite
Enter the certificate public key: this option only be enable when you select Specify Server
Enter the certificate public key if you have it and have selected this method
6. Select your choice and click on Next to continue.
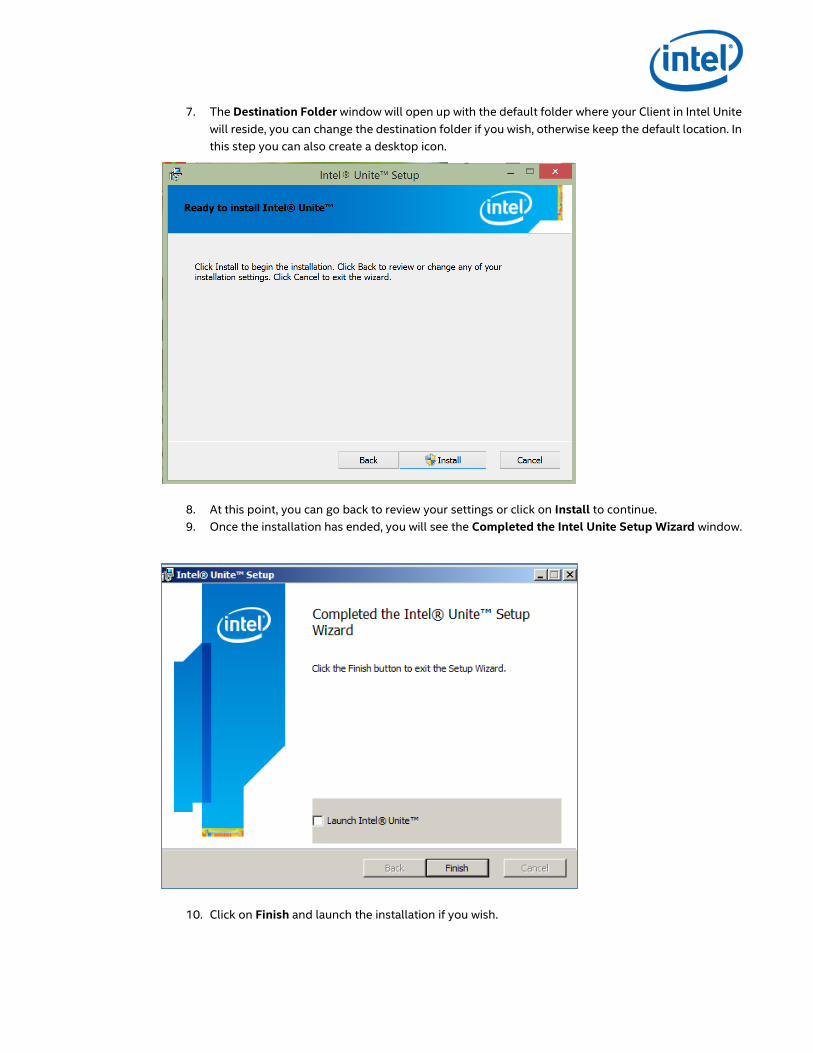
7. The Destination Folder window will open up with the default folder where your Client in Intel Unite
will reside, you can change the destination folder if you wish, otherwise keep the default location. In
this step you can also create a desktop icon.
8. At this point, you can go back to review your settings or click on Install to continue.
9. Once the installation has ended, you will see the Completed the Intel Unite Setup Wizard window.
10. Click on Finish and launch the installation if you wish.
6.3 Launching Intel Unite in a Client
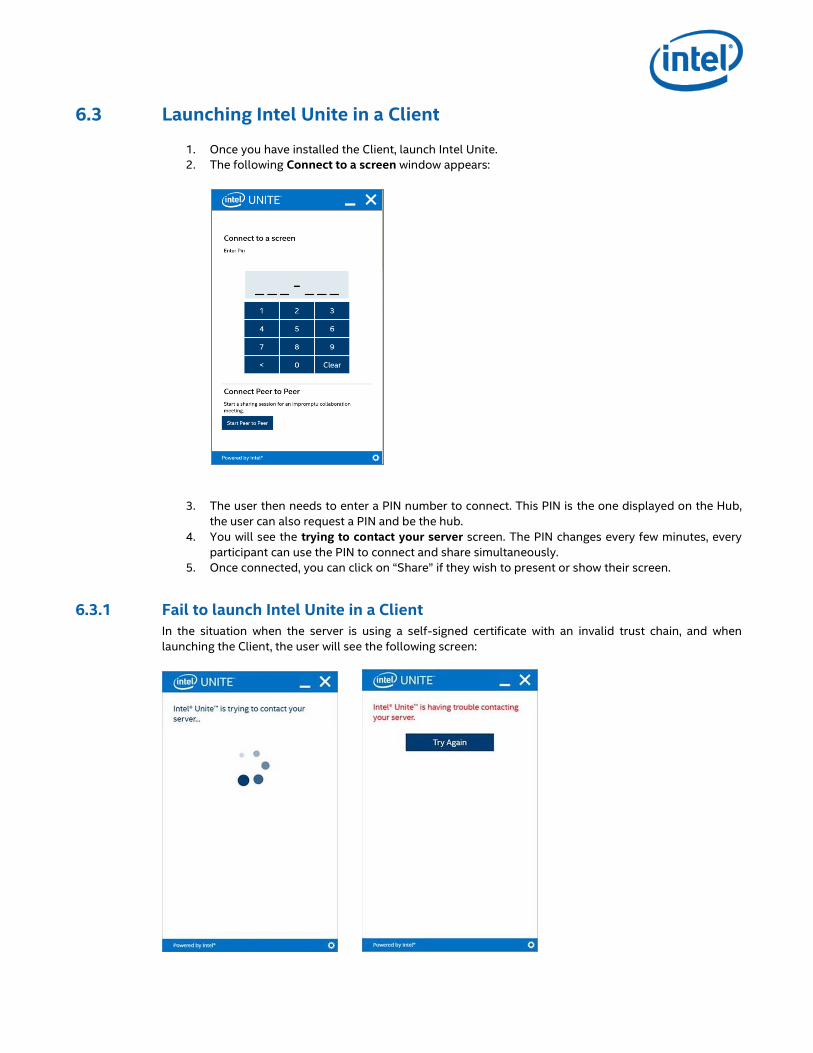
1. Once you have installed the Client, launch Intel Unite.
2. The following Connect to a screen window appears:
3. The user then needs to enter a PIN number to connect. This PIN is the one displayed on the Hub,
the user can also request a PIN and be the hub.
4. You will see the trying to contact your server screen. The PIN changes every few minutes, every
participant can use the PIN to connect and share simultaneously.
5. Once connected, you can click on “Share” if they wish to present or show their screen.
6.3.1 Fail to launch Intel Unite in a Client In the situation when the server is using a self-signed certificate with an invalid trust chain, and when
launching the Client, the user will see the following screen:
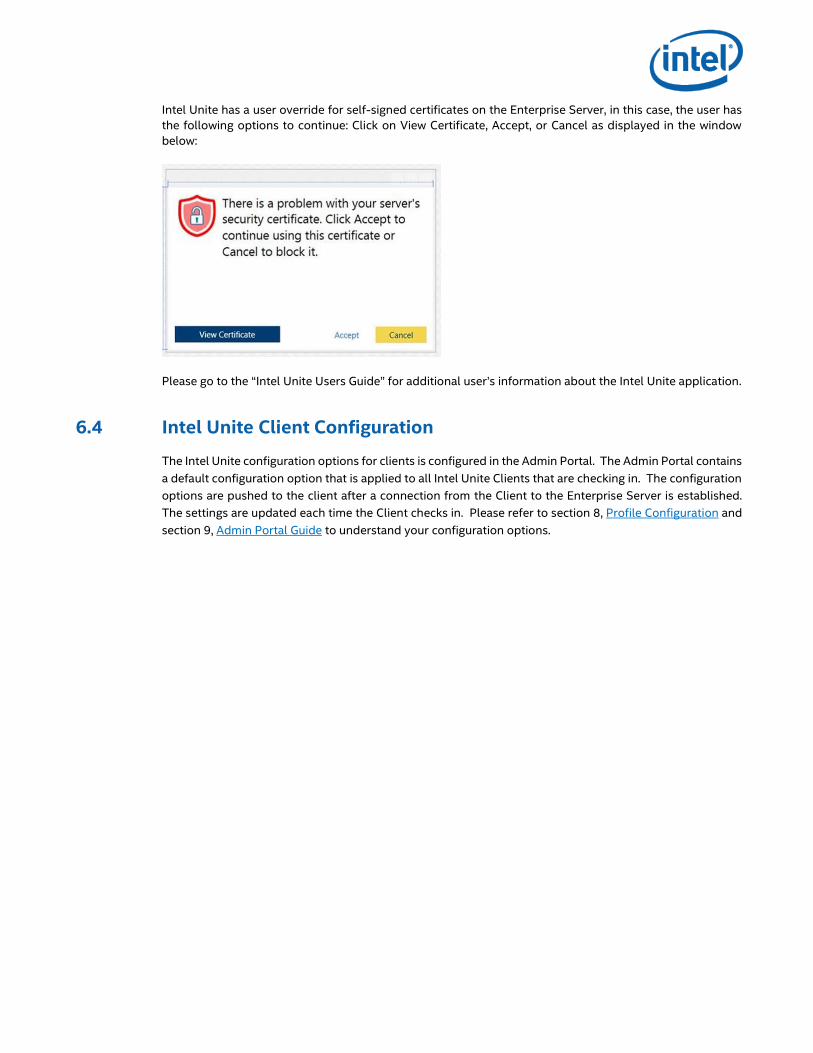
Intel Unite has a user override for self-signed certificates on the Enterprise Server, in this case, the user has
the following options to continue: Click on View Certificate, Accept, or Cancel as displayed in the window
below:
Please go to the “Intel Unite Users Guide” for additional user’s information about the Intel Unite application.
6.4 Intel Unite Client Configuration
The Intel Unite configuration options for clients is configured in the Admin Portal. The Admin Portal contains
a default configuration option that is applied to all Intel Unite Clients that are checking in. The configuration
options are pushed to the client after a connection from the Client to the Enterprise Server is established.
The settings are updated each time the Client checks in. Please refer to section 8, Profile Configuration and
section 9, Admin Portal Guide to understand your configuration options.
7 Profile Configuration
The Intel Unite Admin Portal enables Intel Unite Profile Provisioning, Alerting and Monitoring.
When Intel Unite is installed, the Clients and Hub receive a default profile when they check into the Enterprise
Server for the first time. The default values in the Profiles are specified below.
Your IT administrator can change the values to customize the application and the experience of the meeting
space.
7.1 Profile Provisioning Please note that new profiles / customization of the application can be created and or modified in the Admin
Portal with the Hubs and Clients assigned to those profiles, see section Admin Portal Guide to understand
the available menus and options you have in the Intel Unite configuration .
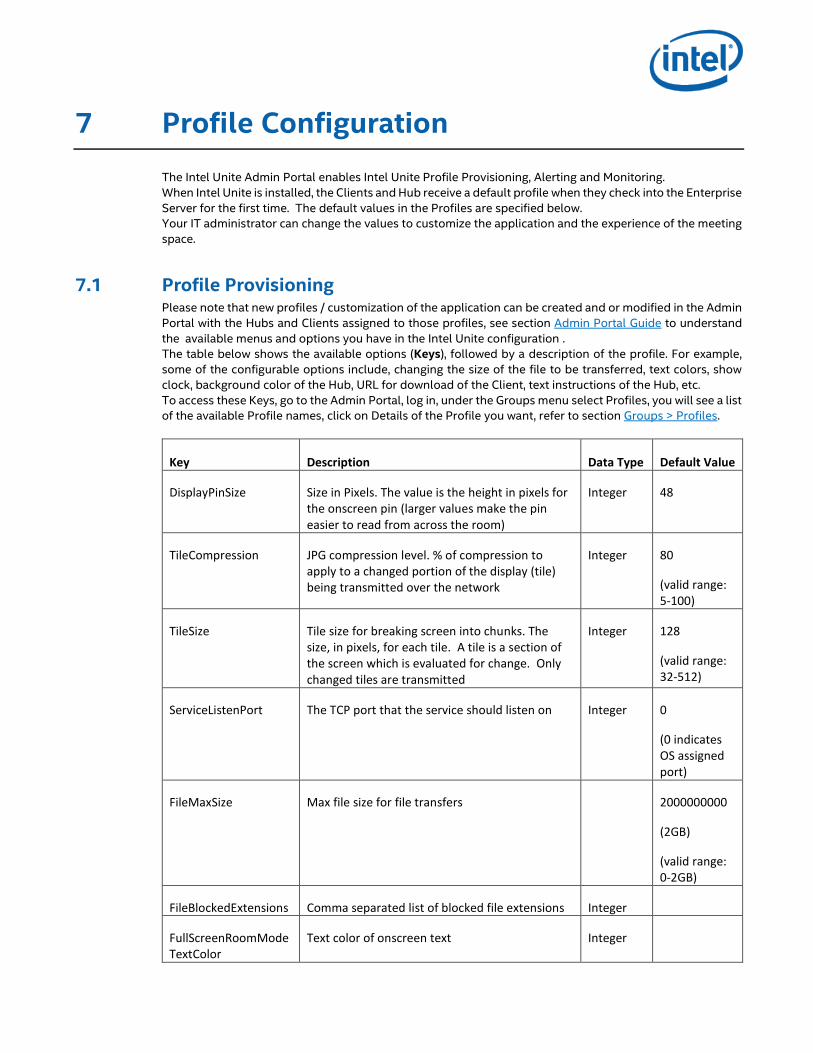
The table below shows the available options (Keys), followed by a description of the profile. For example,
some of the configurable options include, changing the size of the file to be transferred, text colors, show
clock, background color of the Hub, URL for download of the Client, text instructions of the Hub, etc.
To access these Keys, go to the Admin Portal, log in, under the Groups menu select Profiles, you will see a list
of the available Profile names, click on Details of the Profile you want, refer to section Groups > Profiles.
Key Description Data Type Default Value
DisplayPinSize Size in Pixels. The value is the height in pixels for the onscreen pin (larger values make the pin easier to read from across the room)
Integer 48
TileCompression JPG compression level. % of compression to apply to a changed portion of the display (tile) being transmitted over the network
Integer 80
(valid range: 5-100)
TileSize Tile size for breaking screen into chunks. The size, in pixels, for each tile. A tile is a section of the screen which is evaluated for change. Only changed tiles are transmitted
Integer 128
(valid range: 32-512)
ServiceListenPort The TCP port that the service should listen on Integer 0
(0 indicates OS assigned port)
FileMaxSize Max file size for file transfers 2000000000
(2GB)
(valid range: 0-2GB)
FileBlockedExtensions Comma separated list of blocked file extensions Integer
FullScreenRoomModeTextColor
Text color of onscreen text Integer
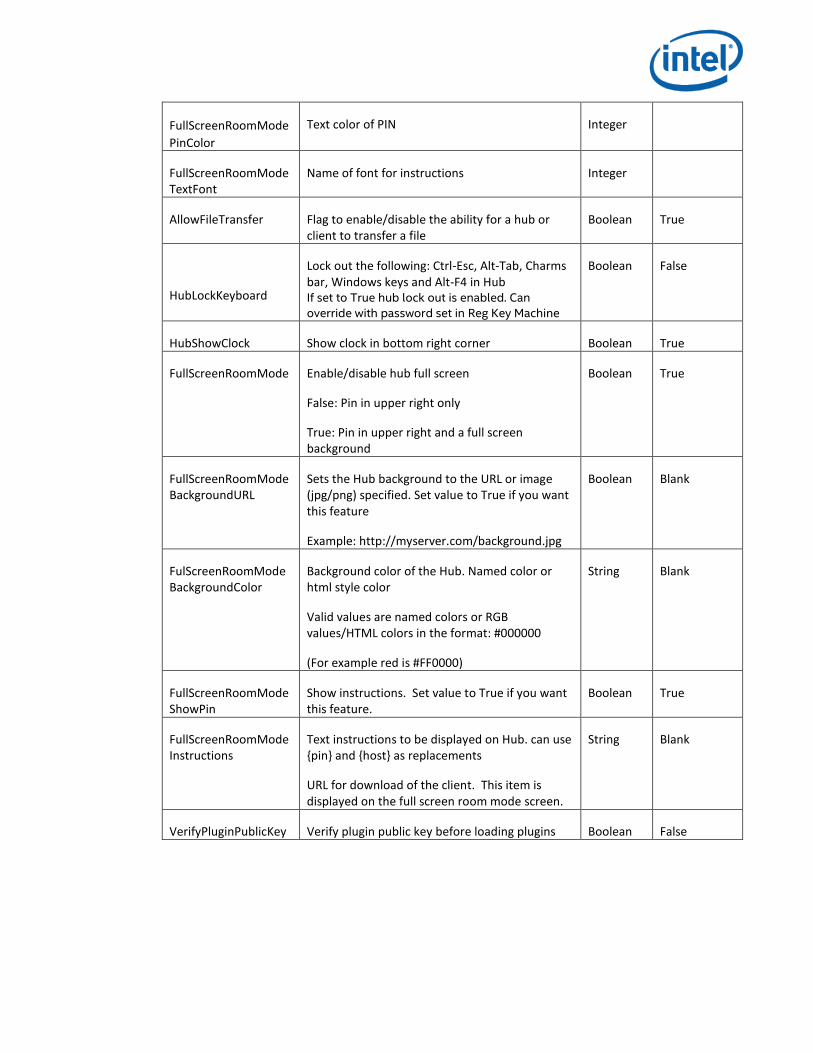
FullScreenRoomMode
PinColor
Text color of PIN Integer
FullScreenRoomModeTextFont
Name of font for instructions Integer
AllowFileTransfer Flag to enable/disable the ability for a hub or client to transfer a file
Boolean True
HubLockKeyboard
Lock out the following: Ctrl-Esc, Alt-Tab, Charms bar, Windows keys and Alt-F4 in Hub If set to True hub lock out is enabled. Can
override with password set in Reg Key Machine
Boolean False
HubShowClock Show clock in bottom right corner Boolean True
FullScreenRoomMode Enable/disable hub full screen
False: Pin in upper right only
True: Pin in upper right and a full screen background
Boolean True
FullScreenRoomModeBackgroundURL
Sets the Hub background to the URL or image (jpg/png) specified. Set value to True if you want this feature
Example: http://myserver.com/background.jpg
Boolean Blank
FulScreenRoomModeBackgroundColor
Background color of the Hub. Named color or html style color
Valid values are named colors or RGB values/HTML colors in the format: #000000
(For example red is #FF0000)
String Blank
FullScreenRoomModeShowPin
Show instructions. Set value to True if you want this feature.
Boolean True
FullScreenRoomModeInstructions
Text instructions to be displayed on Hub. can use {pin} and {host} as replacements
URL for download of the client. This item is displayed on the full screen room mode screen.
String Blank
VerifyPluginPublicKey Verify plugin public key before loading plugins Boolean False

7.1.1 Pin Refresh Interval
The default pin refresh interval is 5 minutes. This can be changed in 1 minute increments from 2 – 60 by
modifying the web.config file in the root of the web service site virtual directory. This is accessed via the IIS
manager.
Modify the <add key=”PinExpireTimeInMinutes” value=”5”></add> tag to the desired refresh interval.
7.2 Alerting and Monitoring
A monitoring and alerting service is installed on the Enterprise Server. This is an opt-in service and is
configured in the Admin Portal.
Any client that is configured for alerts will be monitored and if it has not checked in within the warning
threshold an email will be sent to specified users.
To opt in to receive emails about inactive clients, make sure that in your Admin Web Portal account the
Notifications role has been assigned. To opt a client into being monitored, add the key EnableReporting to
its metadata and set the value to True.
The warning threshold is configured in Management ->Server Properties. Defaults to 60 minutes.
InactiveCount: If user wants to get an immediate email in the next check it should be set to a low number.
The email address and email server must be specified in the clocktower.exe.config file, which is located in:
../productfiles/release/clocktower.exe.config
<mailSettings>
<smtp from="[email protected]" deliveryMethod="Network">
<network enableSsl="false" host="smtp.myco.com" port="25"
userName="[email protected]" password="pass" />
</smtp>
</mailSettings>
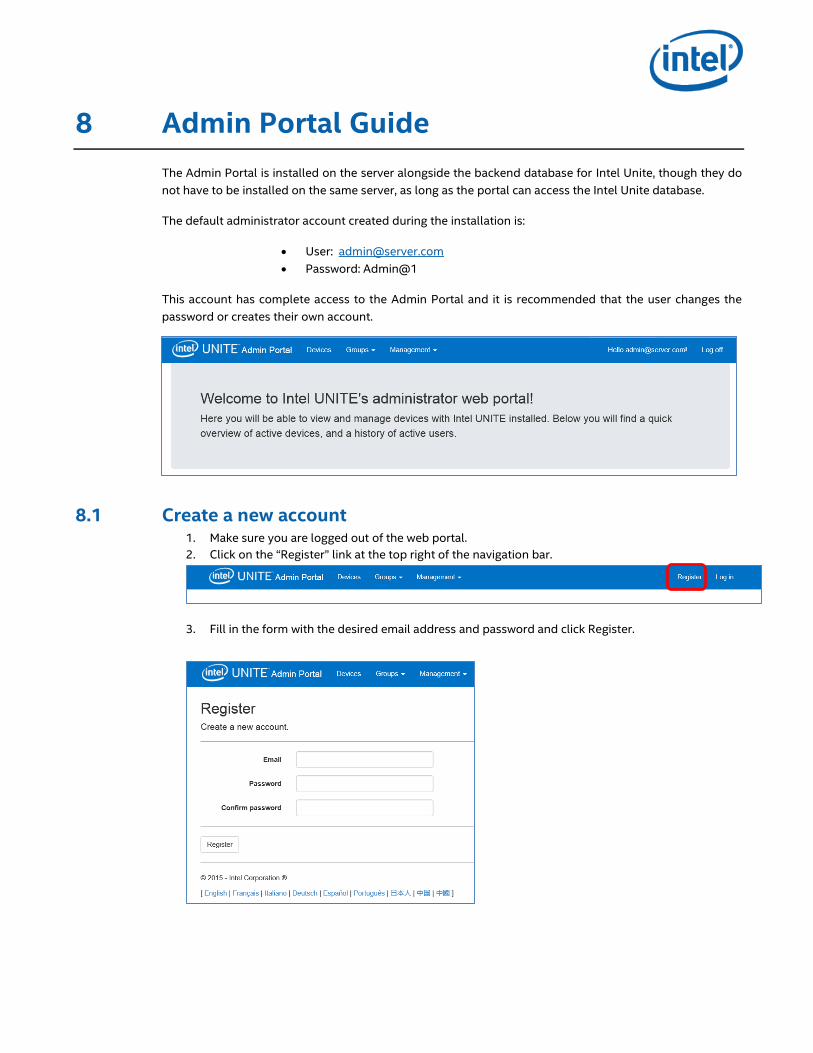
8 Admin Portal Guide
The Admin Portal is installed on the server alongside the backend database for Intel Unite, though they do
not have to be installed on the same server, as long as the portal can access the Intel Unite database.
The default administrator account created during the installation is:
User: [email protected]
Password: Admin@1
This account has complete access to the Admin Portal and it is recommended that the user changes the
password or creates their own account.
8.1 Create a new account 1. Make sure you are logged out of the web portal.
2. Click on the “Register” link at the top right of the navigation bar.
3. Fill in the form with the desired email address and password and click Register.
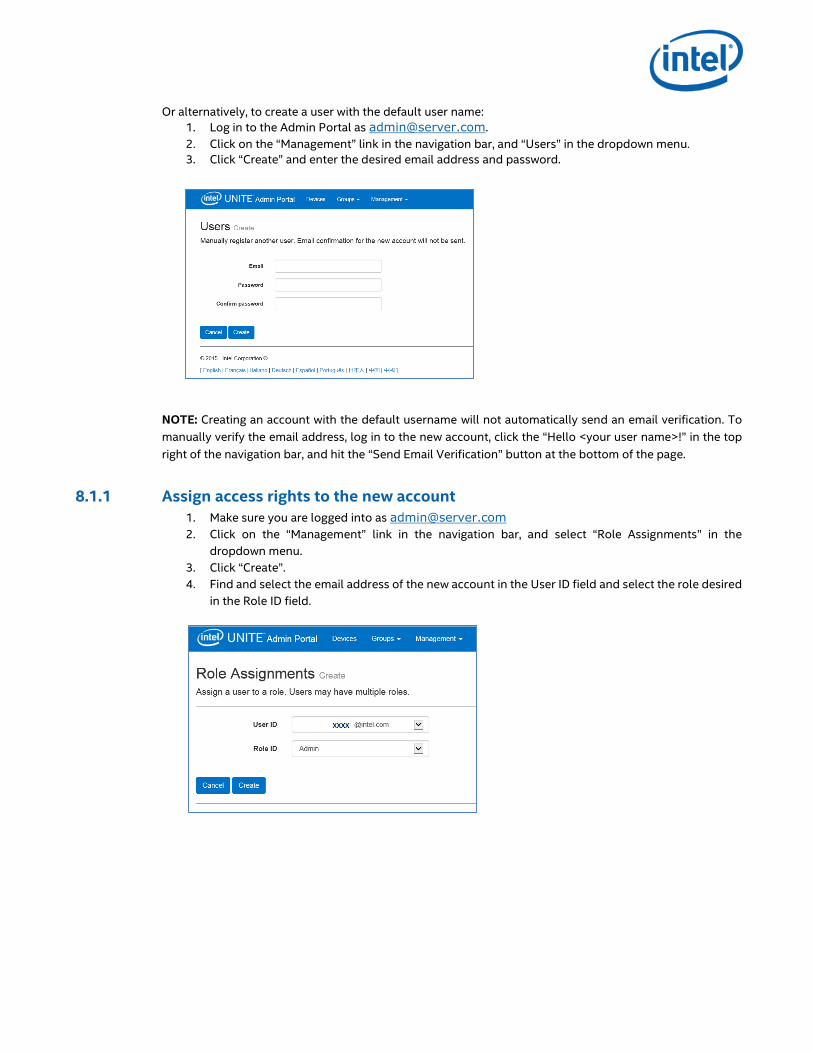
Or alternatively, to create a user with the default user name:
1. Log in to the Admin Portal as [email protected].
2. Click on the “Management” link in the navigation bar, and “Users” in the dropdown menu.
3. Click “Create” and enter the desired email address and password.
NOTE: Creating an account with the default username will not automatically send an email verification. To
manually verify the email address, log in to the new account, click the “Hello <your user name>!” in the top
right of the navigation bar, and hit the “Send Email Verification” button at the bottom of the page.
8.1.1 Assign access rights to the new account
1. Make sure you are logged into as [email protected]
2. Click on the “Management” link in the navigation bar, and select “Role Assignments” in the
dropdown menu.
3. Click “Create”.
4. Find and select the email address of the new account in the User ID field and select the role desired
in the Role ID field.
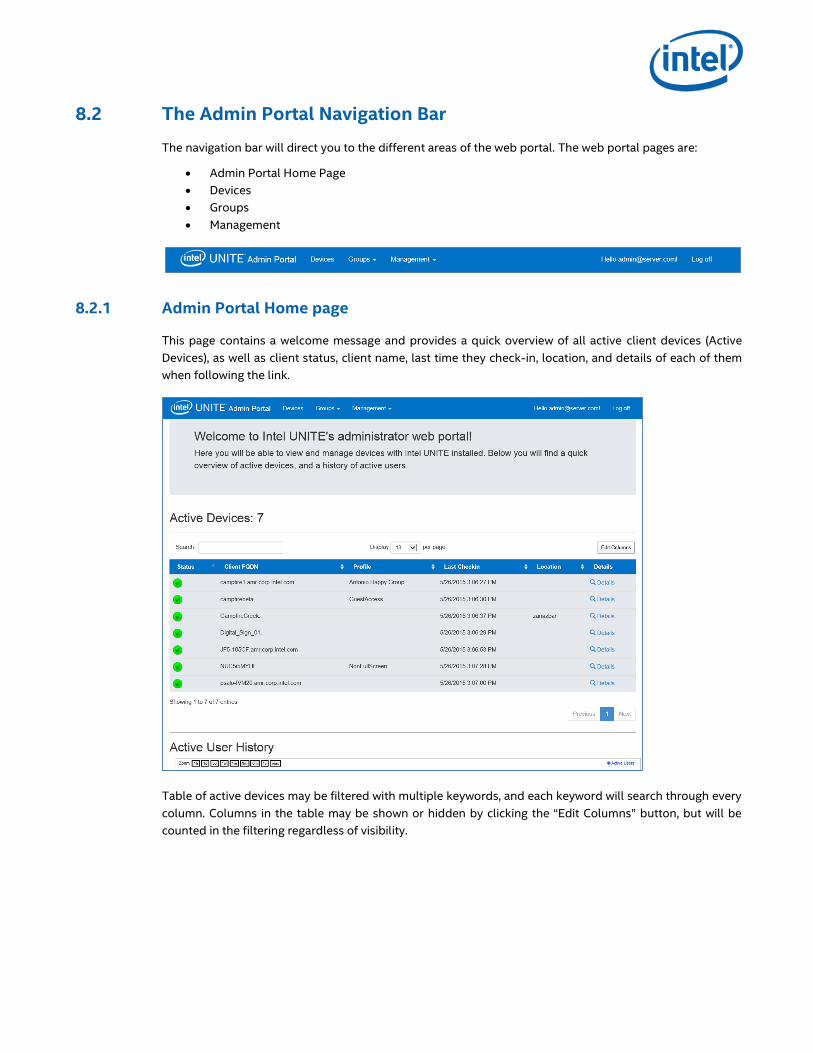
8.2 The Admin Portal Navigation Bar
The navigation bar will direct you to the different areas of the web portal. The web portal pages are:
Admin Portal Home Page
Devices
Groups
Management
8.2.1 Admin Portal Home page
This page contains a welcome message and provides a quick overview of all active client devices (Active
Devices), as well as client status, client name, last time they check-in, location, and details of each of them
when following the link.
Table of active devices may be filtered with multiple keywords, and each keyword will search through every
column. Columns in the table may be shown or hidden by clicking the “Edit Columns” button, but will be
counted in the filtering regardless of visibility.
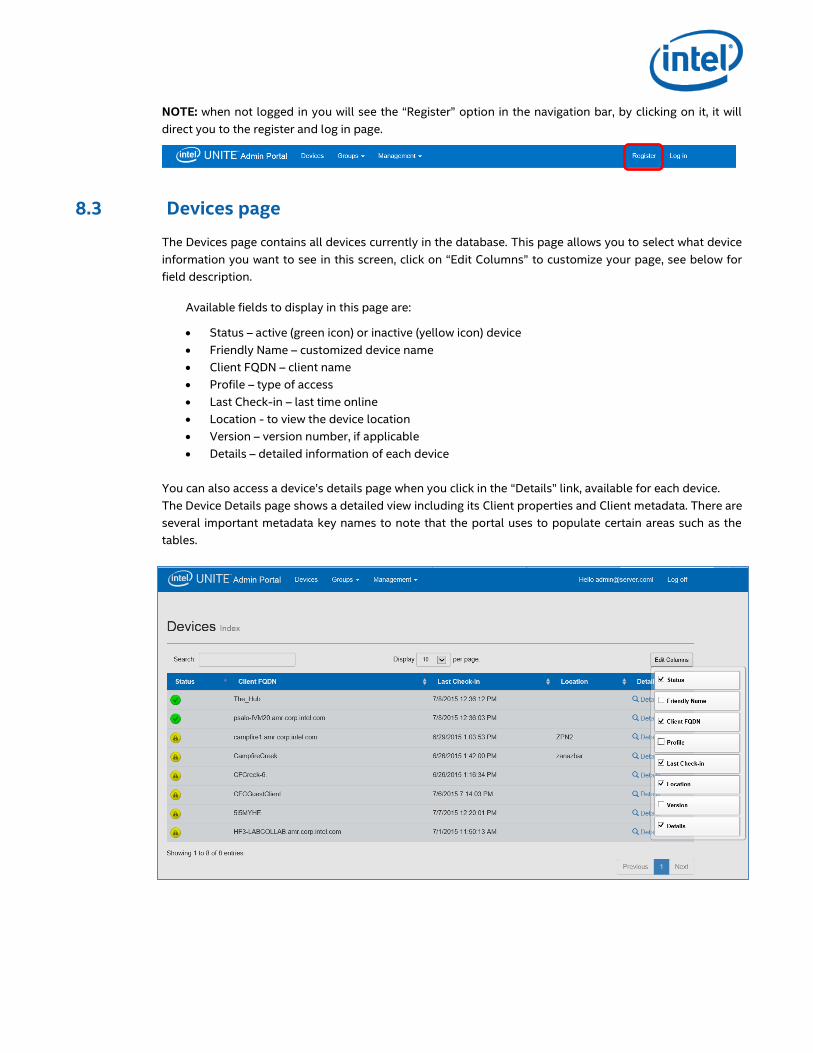
NOTE: when not logged in you will see the “Register” option in the navigation bar, by clicking on it, it will
direct you to the register and log in page.
8.3 Devices page
The Devices page contains all devices currently in the database. This page allows you to select what device
information you want to see in this screen, click on “Edit Columns” to customize your page, see below for
field description.
Available fields to display in this page are:
Status – active (green icon) or inactive (yellow icon) device
Friendly Name – customized device name
Client FQDN – client name
Profile – type of access
Last Check-in – last time online
Location - to view the device location
Version – version number, if applicable
Details – detailed information of each device
You can also access a device’s details page when you click in the “Details” link, available for each device.
The Device Details page shows a detailed view including its Client properties and Client metadata. There are
several important metadata key names to note that the portal uses to populate certain areas such as the
tables.

8.4 Groups page
The Groups page will give you two options in the menu:
8.4.1 Groups > Device Groups
In this page you can view Group Name, Total Devices in Group, Edit and View Devices. This page shows all
created groups and is the interface for group manipulation. You can create new groups here, as well as edit
group details, delete groups and go to a device view for devices contained in a group.
8.4.2 Groups > Profiles
This page is similar in layout and function to “Device Groups”, but contains profiles. Profiles differ in that
these contain the configuration options for Intel Unite devices. Devices may only belong to one profile, while
they can belong to many device groups. To access and edit configuration settings of profiles, click on the
“Details” of a particular profile.
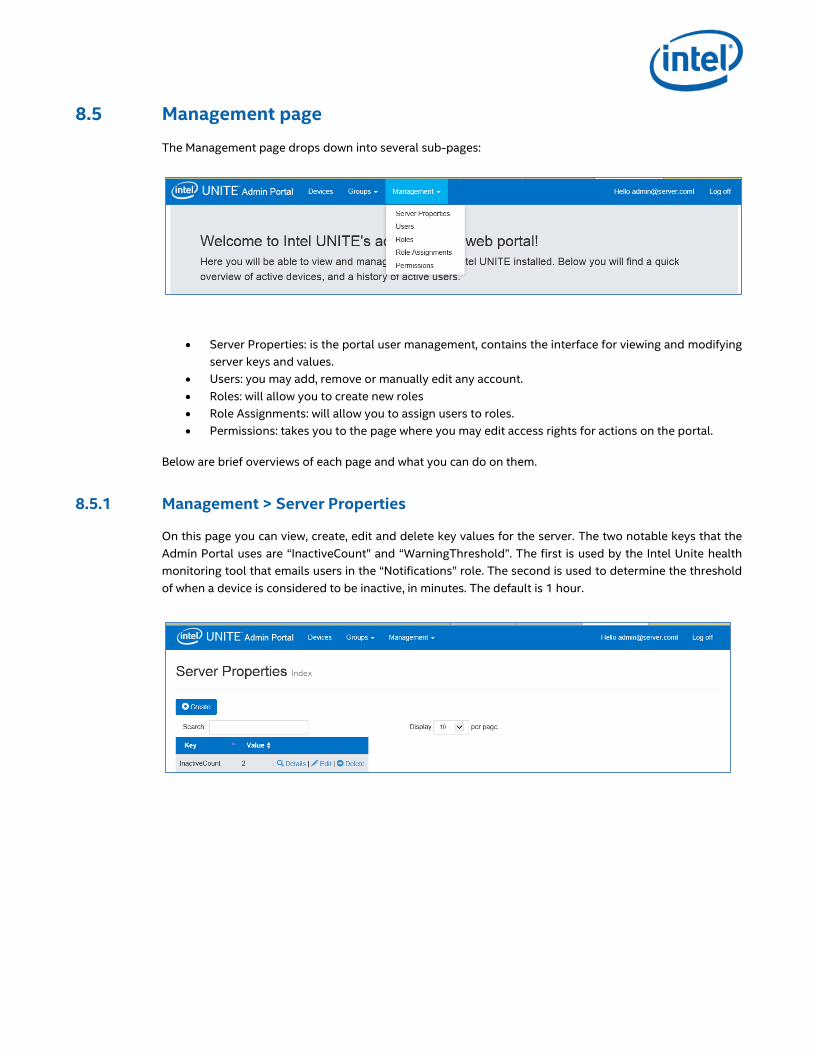
8.5 Management page
The Management page drops down into several sub-pages:
Server Properties: is the portal user management, contains the interface for viewing and modifying
server keys and values.
Users: you may add, remove or manually edit any account.
Roles: will allow you to create new roles
Role Assignments: will allow you to assign users to roles.
Permissions: takes you to the page where you may edit access rights for actions on the portal.
Below are brief overviews of each page and what you can do on them.
8.5.1 Management > Server Properties
On this page you can view, create, edit and delete key values for the server. The two notable keys that the
Admin Portal uses are “InactiveCount” and “WarningThreshold”. The first is used by the Intel Unite health
monitoring tool that emails users in the “Notifications” role. The second is used to determine the threshold
of when a device is considered to be inactive, in minutes. The default is 1 hour.
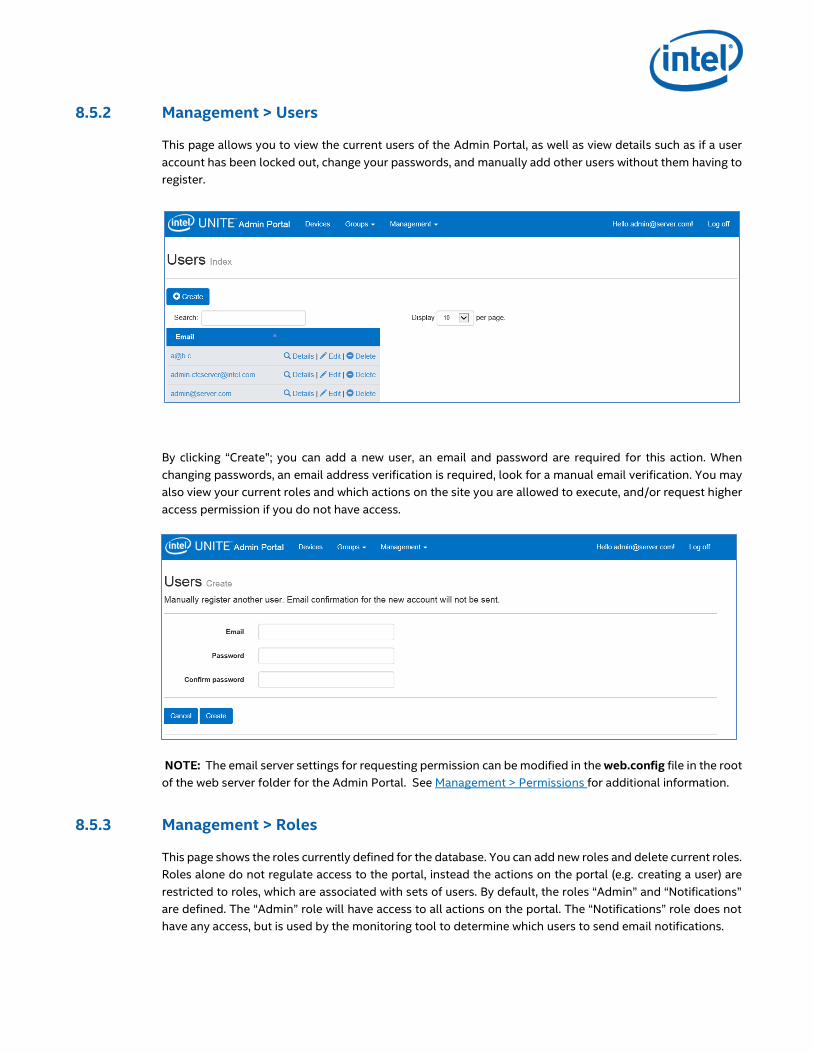
8.5.2 Management > Users
This page allows you to view the current users of the Admin Portal, as well as view details such as if a user
account has been locked out, change your passwords, and manually add other users without them having to
register.
By clicking “Create”; you can add a new user, an email and password are required for this action. When
changing passwords, an email address verification is required, look for a manual email verification. You may
also view your current roles and which actions on the site you are allowed to execute, and/or request higher
access permission if you do not have access.
NOTE: The email server settings for requesting permission can be modified in the web.config file in the root
of the web server folder for the Admin Portal. See Management > Permissions for additional information.
8.5.3 Management > Roles
This page shows the roles currently defined for the database. You can add new roles and delete current roles.
Roles alone do not regulate access to the portal, instead the actions on the portal (e.g. creating a user) are
restricted to roles, which are associated with sets of users. By default, the roles “Admin” and “Notifications”
are defined. The “Admin” role will have access to all actions on the portal. The “Notifications” role does not
have any access, but is used by the monitoring tool to determine which users to send email notifications.
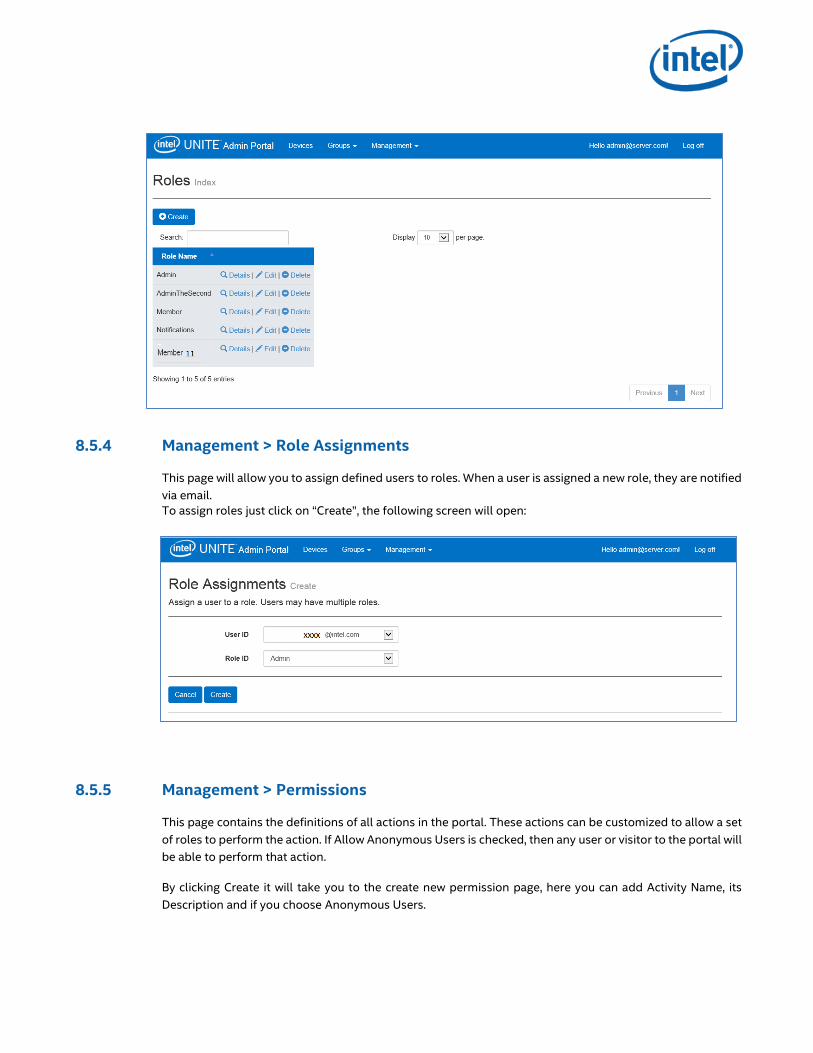
8.5.4 Management > Role Assignments
This page will allow you to assign defined users to roles. When a user is assigned a new role, they are notified
via email.
To assign roles just click on “Create”, the following screen will open:
8.5.5 Management > Permissions
This page contains the definitions of all actions in the portal. These actions can be customized to allow a set
of roles to perform the action. If Allow Anonymous Users is checked, then any user or visitor to the portal will
be able to perform that action.
By clicking Create it will take you to the create new permission page, here you can add Activity Name, its
Description and if you choose Anonymous Users.
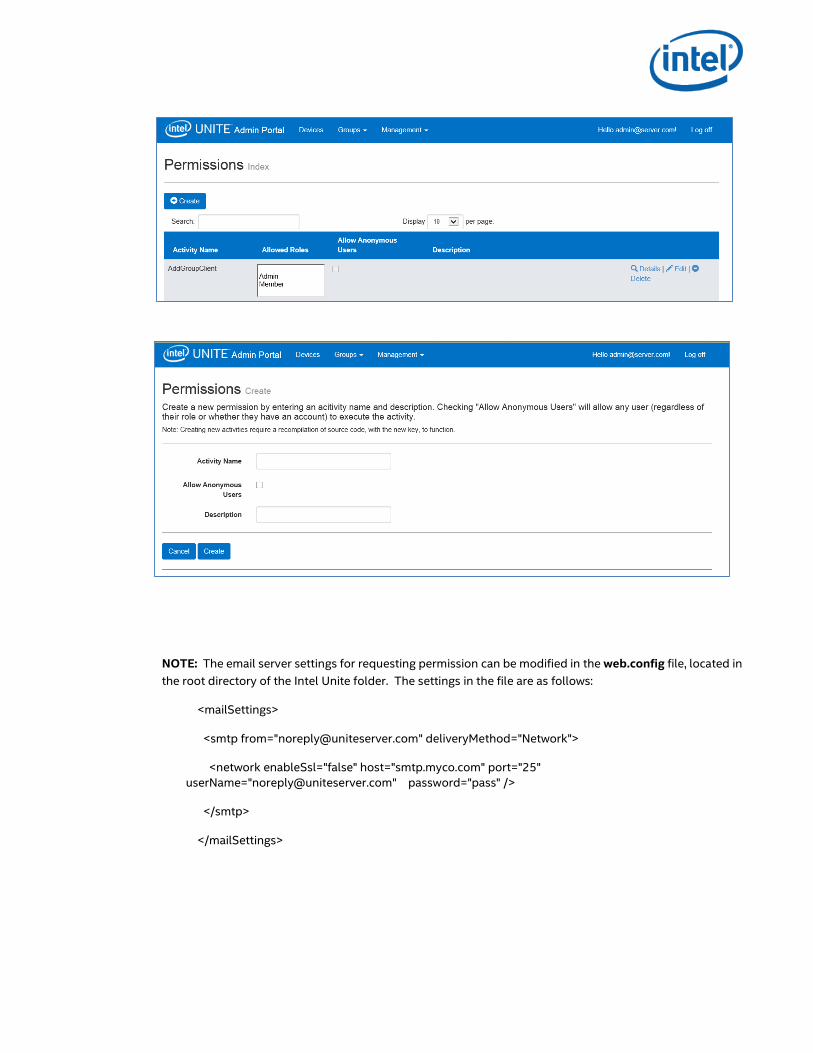
NOTE: The email server settings for requesting permission can be modified in the web.config file, located in
the root directory of the Intel Unite folder. The settings in the file are as follows:
<mailSettings>
<smtp from="[email protected]" deliveryMethod="Network">
<network enableSsl="false" host="smtp.myco.com" port="25"
userName="[email protected]" password="pass" />
</smtp>
</mailSettings>
9 OS and PC Security Controls When connecting to a display that has Intel Unite installed, use the following steps to display a client system’s
screen on the remote display.
9.1.1 Minimum Security Standards (MSS) All Intel® Unite™ devices are built with the Intel standard build for Windows 8.1 64 bit.
It is recommended to meet your default organization MSS standards, have an agent installed for patching,
and an antivirus / IPS / IDS and other necessary control as per the MSS specification (McAfee suite for Anti
Malware, IPS, IDS was tested for compatibility).
9.1.2 Machine Hardening Machine Unified Extensible Firmware Interface (UEFI) should be locked to boot the Windows boot loader
only (so trying to boot from a USB disk / DVD will not work), Execute disable bit enabled, Intel trusted
execution technology enabled, and settings are locked with a password.
Windows OS Hardening: As a baseline, the system is running with non-elevated user rights.
It is also recommended to remove unused software from the OS including unnecessary pre-installed
software and Windows components (PowerShell, Print and Document services, Windows location provider,
XPS services).
GUI subsystem lock: Since the systems uses a non-touch screen only without keyboard or mouse it make it
harder to break out of the GUI subsystem. If an attacker tries to attach a HID device (USB keyboard/mouse)
we are programmatically blocking Alt / Tab, Ctrl Shift Esc, and The ‘Charms’ bar. If the UI crashes or the user
does connect a keyboard/mouse and manages to break outside the launcher UI, the system service restarts
the UI within a few seconds.
9.1.3 Other security controls It is recommended to lock the machine user account per specific machine account in Active Directory. If the
deployment includes a high number of units, user accounts can be locked per a designated floor of a specific
building.
Machine ownership: Each machine is recommended to have an identified owner. In case the machine goes
offline for an extended period the identified owner will get notified.
Beyond the security mechanisms provided by the Intel vPro platform and the Intel Unite software itself, it is
recommended to harden the Windows OS per Microsoft's guidelines for machine hardening, for reference,
please consult the Microsoft Security Compliance Manager (SCM) in the following link:
https://technet.microsoft.com/en-us/solutionaccelerators/cc835245.aspx
Note: information in the link contains a wizard based hardening tool, including hardening BKM’s and relevant
documentation.
10 Maintenance
Your organization and IT administrator will decide in a regular maintenance program, the following
maintenance tasks are recommended:
10.1 Nightly reboot It is recommended to reboot the machines on a daily base (preferably at night time) and prior to this reboot;
run maintenance tasks such as: wiping cached temp files and initiating the standard patching procedure.
10.2 Patching strategy If available, run your standard patching mechanism in an unattended mode (no GUI prompts) preferably
before the above mentioned nightly reboot.
10.3 Reporting Collect the machine uptime indicators and create a tailored report per your organization needs.
10.4 Monitoring Use a health tracking system based on machines heartbeat and do backend uptime analysis according to
need.
10.4.1 Backend monitoring: Use standard virtual server monitoring tools to generate and send alerts to second level support.
Appendix A. Intel Unite Security Overview
Unite Software - Security Flow
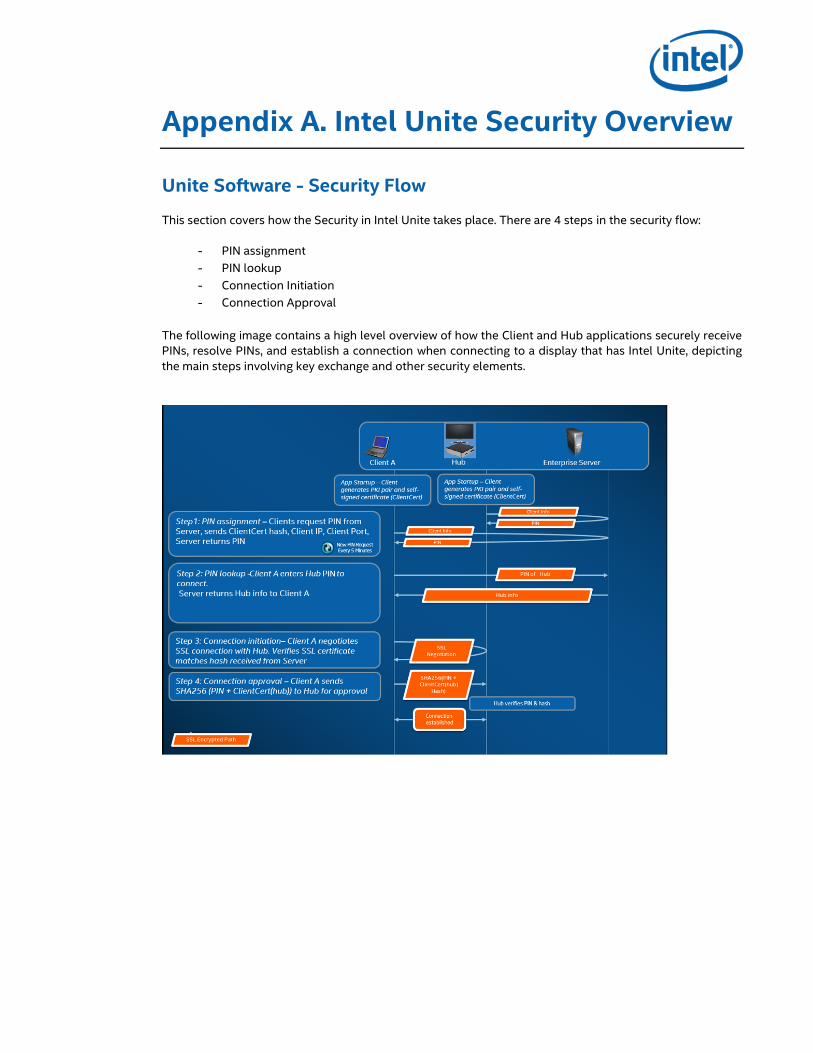
This section covers how the Security in Intel Unite takes place. There are 4 steps in the security flow:
- PIN assignment
- PIN lookup
- Connection Initiation
- Connection Approval
The following image contains a high level overview of how the Client and Hub applications securely receive
PINs, resolve PINs, and establish a connection when connecting to a display that has Intel Unite, depicting
the main steps involving key exchange and other security elements.
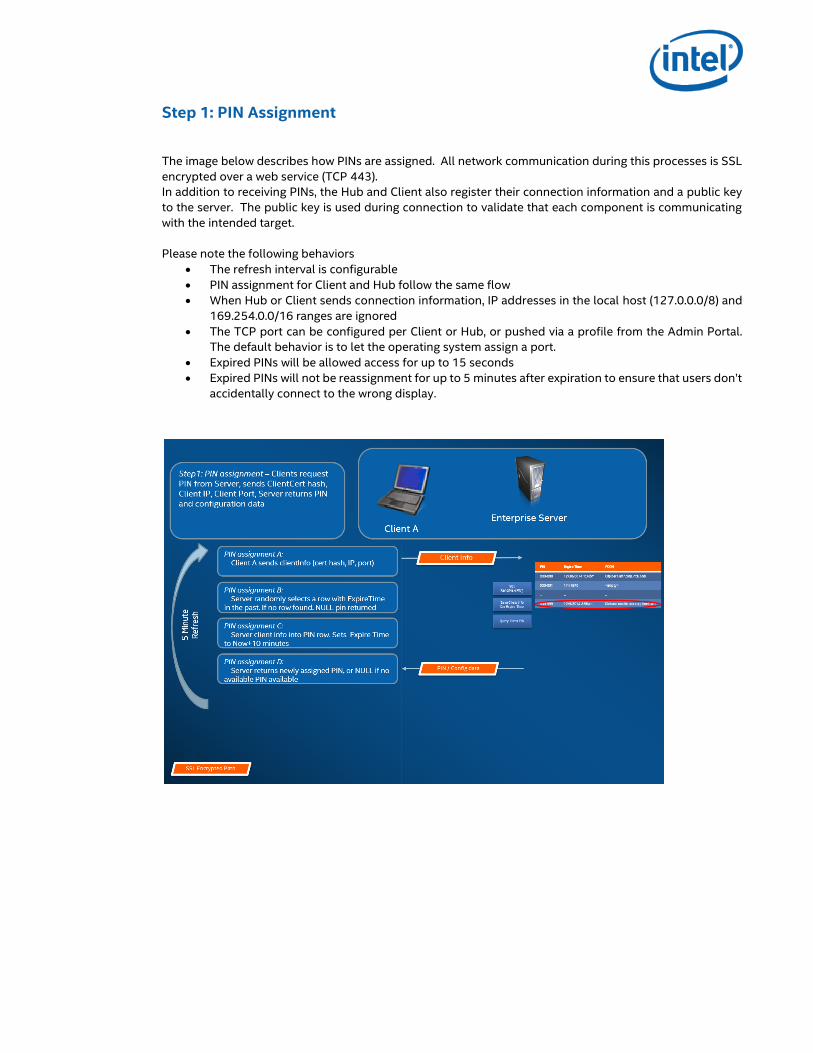
Step 1: PIN Assignment
The image below describes how PINs are assigned. All network communication during this processes is SSL
encrypted over a web service (TCP 443).
In addition to receiving PINs, the Hub and Client also register their connection information and a public key
to the server. The public key is used during connection to validate that each component is communicating
with the intended target.
Please note the following behaviors
The refresh interval is configurable
PIN assignment for Client and Hub follow the same flow
When Hub or Client sends connection information, IP addresses in the local host (127.0.0.0/8) and
169.254.0.0/16 ranges are ignored
The TCP port can be configured per Client or Hub, or pushed via a profile from the Admin Portal.
The default behavior is to let the operating system assign a port.
Expired PINs will be allowed access for up to 15 seconds
Expired PINs will not be reassignment for up to 5 minutes after expiration to ensure that users don’t
accidentally connect to the wrong display.
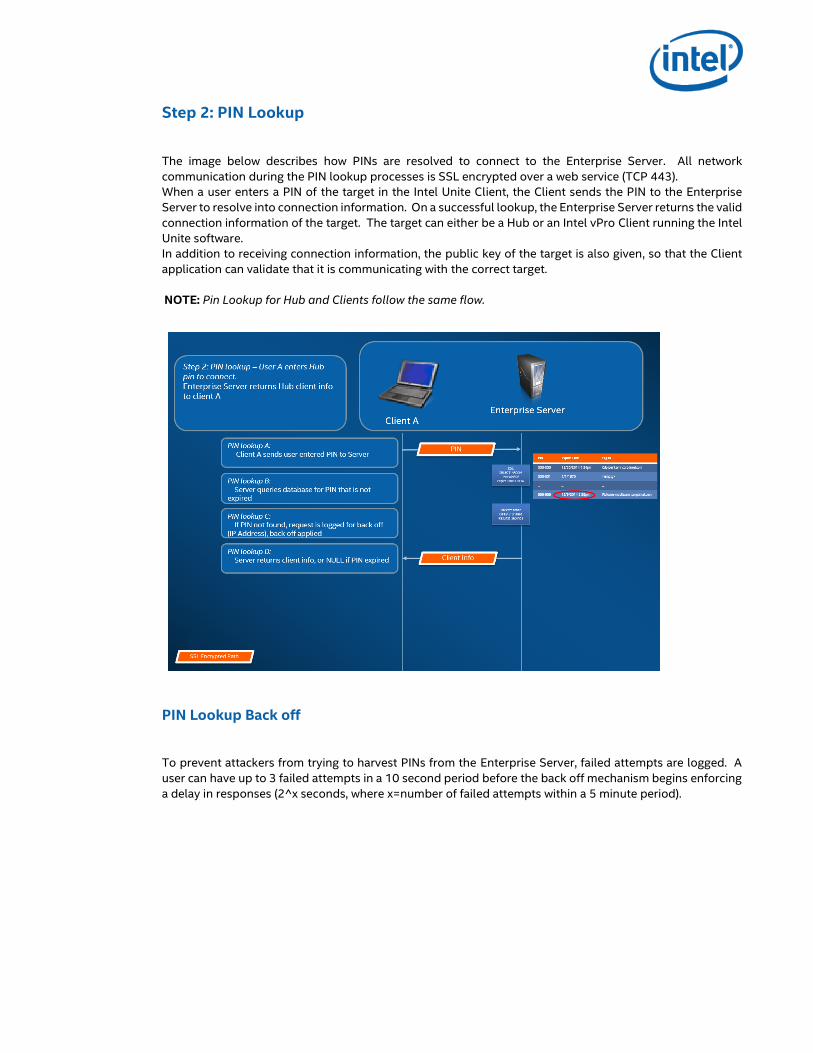
Step 2: PIN Lookup
The image below describes how PINs are resolved to connect to the Enterprise Server. All network
communication during the PIN lookup processes is SSL encrypted over a web service (TCP 443).
When a user enters a PIN of the target in the Intel Unite Client, the Client sends the PIN to the Enterprise
Server to resolve into connection information. On a successful lookup, the Enterprise Server returns the valid
connection information of the target. The target can either be a Hub or an Intel vPro Client running the Intel
Unite software.
In addition to receiving connection information, the public key of the target is also given, so that the Client
application can validate that it is communicating with the correct target.
NOTE: Pin Lookup for Hub and Clients follow the same flow.
PIN Lookup Back off
To prevent attackers from trying to harvest PINs from the Enterprise Server, failed attempts are logged. A
user can have up to 3 failed attempts in a 10 second period before the back off mechanism begins enforcing
a delay in responses (2^x seconds, where x=number of failed attempts within a 5 minute period).
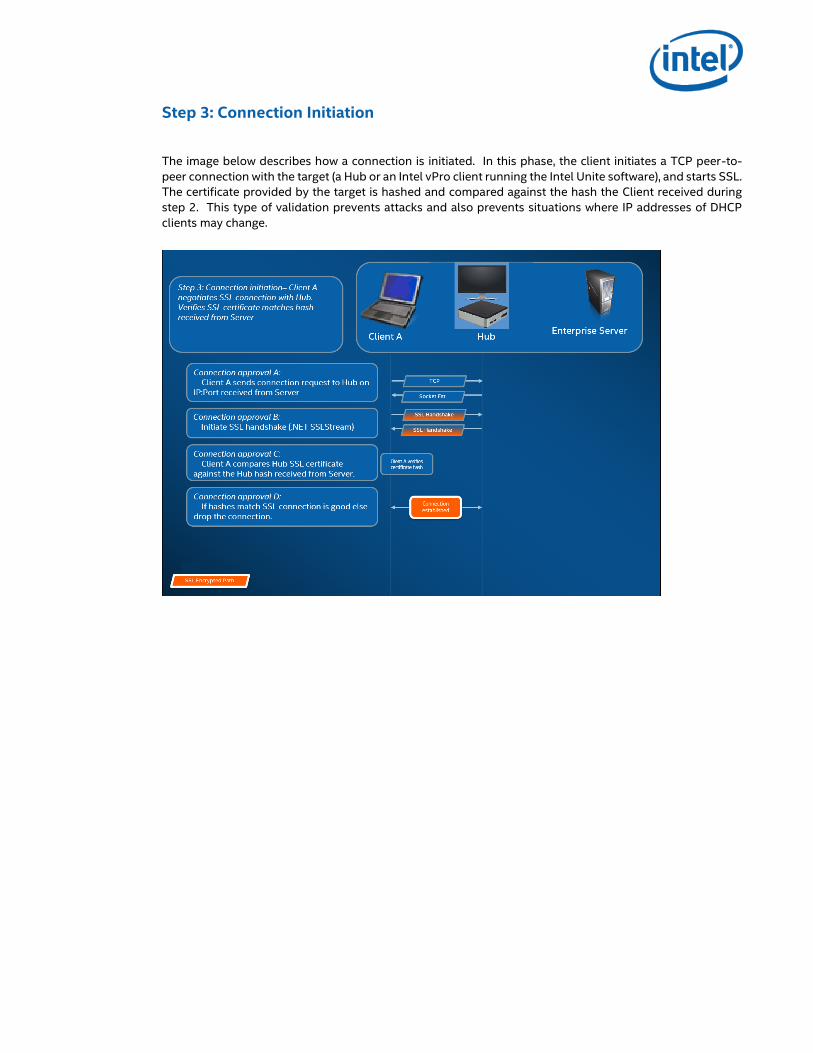
Step 3: Connection Initiation
The image below describes how a connection is initiated. In this phase, the client initiates a TCP peer-to-
peer connection with the target (a Hub or an Intel vPro client running the Intel Unite software), and starts SSL.
The certificate provided by the target is hashed and compared against the hash the Client received during
step 2. This type of validation prevents attacks and also prevents situations where IP addresses of DHCP
clients may change.
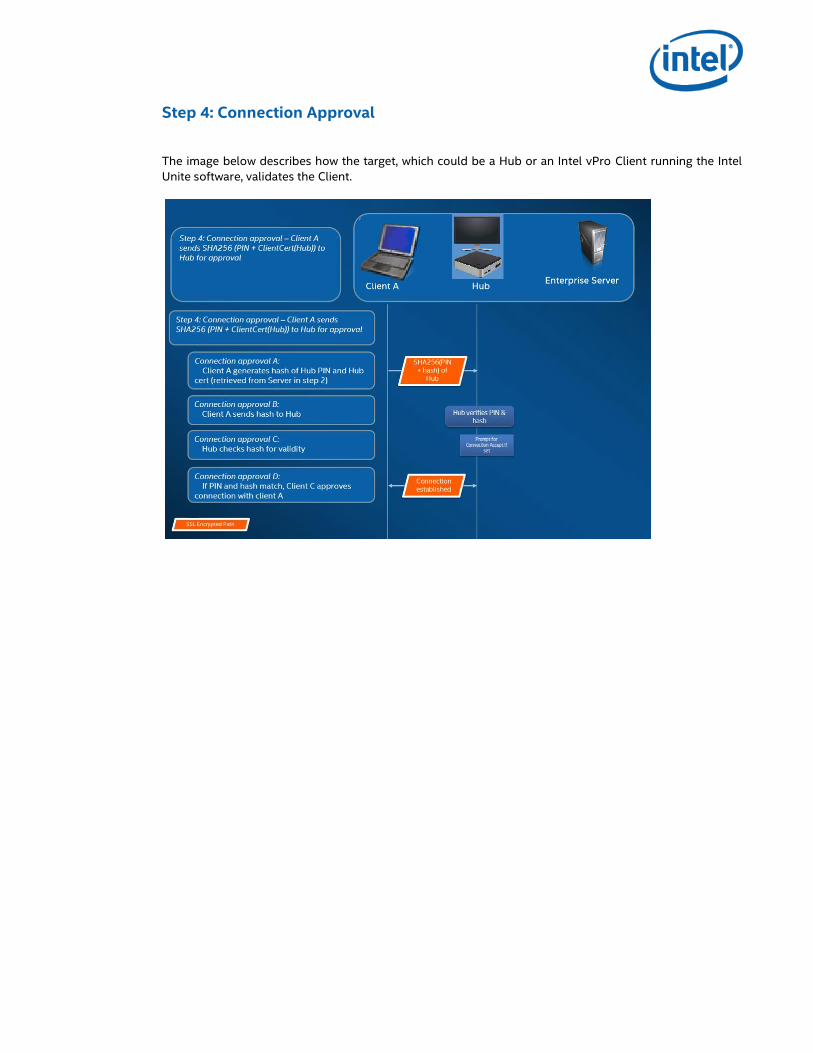
Step 4: Connection Approval
The image below describes how the target, which could be a Hub or an Intel vPro Client running the Intel
Unite software, validates the Client.

Appendix B. Intel Unite Installation
Example
The following is an example of how Intel Unite has been configured in a conference room.