Embed Size (px)
Citation preview
iNEIS - Manage Student Completion for Graduating Students
0
Integrated National Education Information System
(iNEISTM)
Activity for Manage Student Completion
Table of Contents
Introduction ............................................................................................................................................ 1
1. Create Clearance Checklist ............................................................................................................. 2
1.1 Create Clearance Checklist for Students (In batch) ............................................................... 2
1.1.1 Create Clearance Checklists for Students by using Custom option .............................. 3
1.1.2 Create Clearance Checklists for Students by using the External File option ................ 4
Roles Involved: School Admin – Student Clearance ...................................................................... 4
1.1.3 Create Clearance Checklists for Students by using the PS Query option ..................... 6
1.2 Create Clearance Checklist for a Student (Individually)........................................................ 9
2. View the Created Clearance Checklist for a Student ...................................................................... 10
3. Update status of the Clearance Checklist Items.......................................................................... 11
3.1 Update the status of Clearance Checklist Items for an individual student ........................ 11
3.2 Update the status of Clearance Checklist Items for a group of students ........................... 12
4. Graduating Students .................................................................................................................... 14
4.1 Process Graduating Students ............................................................................................... 14
4.2 View Updated Student Program/Plan ................................................................................. 16
4.3 View Student Certificate ...................................................................................................... 16
iNEIS - Manage Student Completion for Graduating Students
1
Introduction
This document contains step-by-step instructions to Manage Student Clearance and set the Student
as Completion for the graduating student such as Preschool, Year 6, Year 10(Express), Year 11, SAP
Diploma and Upper Sixth.
This document is the continuation for Part 3 from “Manage Student Progression” document where
the activities are as follows:
1. Transfer Student
2. Withdraw Student
3. Manage Student Clearance
4. Attendance Statistics Calculation Process
5. Manage Student Progression
6. Manage Graduating Student
The activities that needed to be done for the steps that is underlined above are as follows:
1. Create Clearance Checklist
2. View Created Checklist
3. Update status of Clearance Checklist Items
4. Graduating Students
iNEIS - Manage Student Completion for Graduating Students
2
1. Create Clearance Checklist This function allows to create Clearance Checklist for students who are eligible to go through clearance.
Note:
Clearance Checklists will be created for the following students:
1. Transfer Students
2. Withdrawn Students
3. Students who Completed their Academic Programs
For Transfer and Withdrawn students, the Clearance Checklist will be created when the approved
request form is ‘Completed’ by the School Admin.
There are 2 ways of creating the Clearance Checklist for the Students:
1. Create Clearance Checklist for Students (In batch)
This function allows to create for students who have completed their Academic Programs
and will be ready for ‘graduation’.
For example, Creating clearance checklists for all students from Year 10 Express.
2. Create Clearance Checklist for a Student (Individually)
This function allows to create for a student who is transferring-out of school or who is
withdrawing from school.
For example, a student who is transferring-out of school that did not go through the Transfer
Request form and therefore there is no clearance checklist automatically assigned to the
student. So, by using this process the user can manually assign the clearance checklist for
the student.
1.1 Create Clearance Checklist for Students (In batch)
Note:
There are 3 ways to create the Clearance Checklist for the Students (In batch):
1. Clearance Checklists for Students by using the Custom option
This option is available for user to manually enter the students one by one.
2. Create Clearance Checklists for Students by using the External File option
This option is available for user to create an Excel file to upload the students.
3. Create Clearance Checklists for Students by using the PS Query option
This option is available for user to create for a group of students by their Academic
Program.
For example, create clearance checklist for students from Year 10 Express.
iNEIS - Manage Student Completion for Graduating Students
3
1.1.1 Create Clearance Checklists for Students by using Custom option
Roles Involved: School Admin – Student Clearance
1. Navigate to Main Menu > Records and Enrollment > Student Movement > Clearance > Assign
Clearance Checklist.
2. To run the process to create Clearance Checklists for students, click on Add a New Value tab.
3. Enter a Run Control ID. For e.g. 1006_2015_PSRYR6 (Format are as follows: SCHOOL
CODE_YEAR_ACADEMIC PROGRAM)
4. Click on the Add button.
5. User will be directed to Create Clearance Checklist page.
6. Click on the Selection Criteria dropdown box and select ‘Custom’ from the list.
Note:
Using the Selection Criteria, Registrar will decide which method to use to select the
students for clearance:
1. Custom – This will allow the Registrar to enter the students who have completed
their programs and eligible for Clearance into the Custom Population List. The
Student IDs should be entered one by one. This option is best to process a few
students.
2. Population Selection – This will allow the Registrar to use either an External File or
PS Query to select the students who have completed their programs and is eligible
for Clearance. This option is best to process many students.
7. Click on the *Student ID lookup icon in the Custom Population section.
8. Click on the ‘+’ icon to add more students.
9. Click on the *Student ID look-up button to add the student in the newly added row.
10. Click on the ‘-‘ icon to delete a student from the Custom Population List.
11. Click on the Save button and the click on the Run button to run the process.
12. User will be directed to Process Scheduler Request page.
13. Select the process, ‘Create Clearance Checklists’ from the process list.
14. Click on ‘OK’ button.
15. Once the process has begun to run, a Process Instance number will be assigned.
16. Click on the Process Monitor link to check the status of the process run.
17. User will be directed to the Process Monitor page.
18. Monitor the process against the Process Instance number and initially the Run Status and
Distribution Status are ‘Queued’ and ‘N/A’.
19. Click on the Refresh button to view the refreshed Run Status. Click on the Refresh button until
Run Status changes to ‘Success’ and Distribution Status goes to ‘Posted’.
20. Once the Run Status goes to ‘Success’ and Distribution Status goes to ‘Posted’, click on the
Details link.
21. User will be directed to Process Detail page, click on the View Log/Trace link in the Actions
section.
iNEIS - Manage Student Completion for Graduating Students
4
22. User will be directed to View Log/Trace page, click on the ‘MOE_CHKLT_AE_(Instance
No.).log’ link.
23. The Process Log will indicate the list of students for who the Clearance Checklists were
successfully created and the students for who it wasn’t created and the reason.
1.1.2 Create Clearance Checklists for Students by using the External File option
Roles Involved: School Admin – Student Clearance
1. Navigate to Main Menu > Records and Enrollment > Student Movement > Clearance > Assign
Clearance Checklist.
2. To run the process to create Clearance Checklists for students, click on Add a New Value tab
3. Enter a Run Control ID. For e.g. 1006_2015_PSRYR6 (Format are as follows: SCHOOL
CODE_YEAR_ACADEMIC PROGRAM)
4. Click on Add button.
5. User will be directed to Create Clearance Checklist page.
6. Click on the Selection Criteria dropdown box and select ‘Population Selection’ from the list.
The Population Selection group box will appear.
Note:
Using the Selection Criteria, Registrar will decide which method to use to select the
students for clearance:
1. Custom – This will allow the Registrar to enter the students who have completed
their programs and eligible for Clearance into the Custom Population List. The
Student IDs should be entered one by one. This option is best to process a few
students.
2. Population Selection – This will allow the Registrar to use either an External File or
PS Query to select the students who have completed their programs and is eligible
for Clearance. This option is best to process many students.
7. In the Population Selection section, click on the Selection Tool dropdown.
Note:
Once the Clearance Checklists are successfully created for the selected students, the
Teachers/Persons In-charge of Clearance Checklist items will receive an email notification.
iNEIS - Manage Student Completion for Graduating Students
5
8. Select the option ‘External File’ from the list.
Note:
This option allows the Registrar to create a .csv file with the Student IDs who are eligible
for Clearance as they have completed their programs.
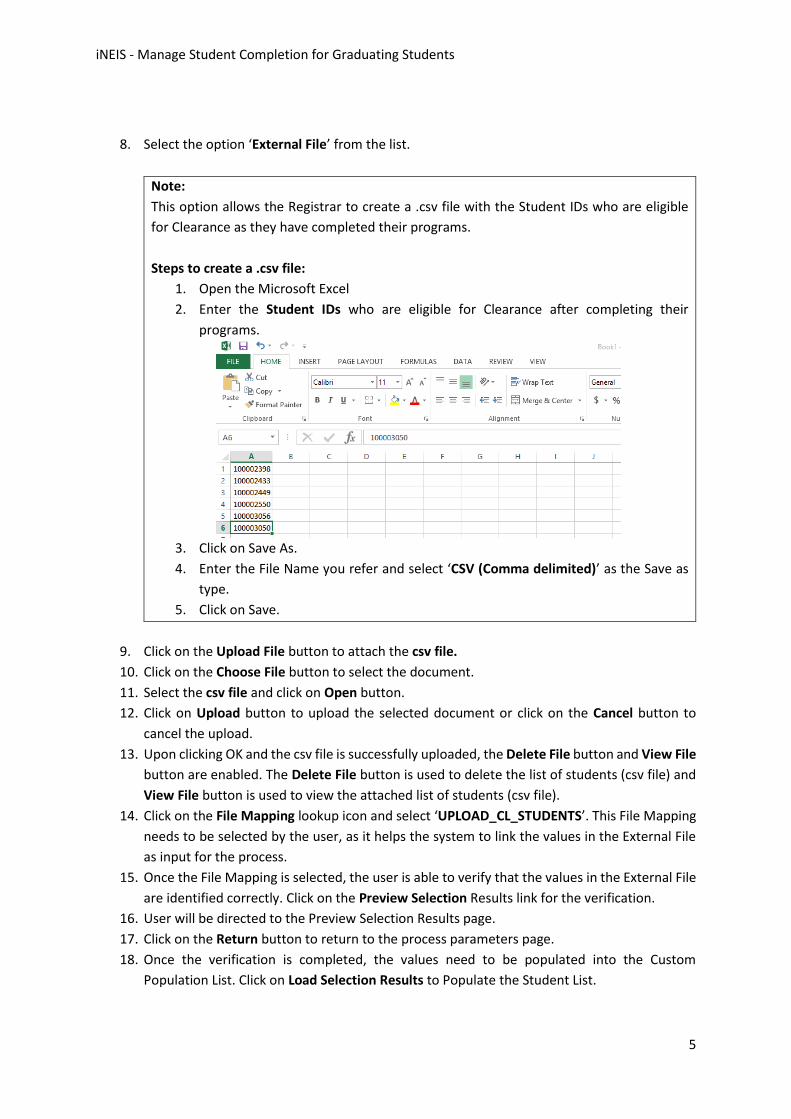
Steps to create a .csv file:
1. Open the Microsoft Excel
2. Enter the Student IDs who are eligible for Clearance after completing their
programs.
3. Click on Save As.
4. Enter the File Name you refer and select ‘CSV (Comma delimited)’ as the Save as
type.
5. Click on Save.
9. Click on the Upload File button to attach the csv file.
10. Click on the Choose File button to select the document.
11. Select the csv file and click on Open button.
12. Click on Upload button to upload the selected document or click on the Cancel button to
cancel the upload.
13. Upon clicking OK and the csv file is successfully uploaded, the Delete File button and View File
button are enabled. The Delete File button is used to delete the list of students (csv file) and
View File button is used to view the attached list of students (csv file).
14. Click on the File Mapping lookup icon and select ‘UPLOAD_CL_STUDENTS’. This File Mapping
needs to be selected by the user, as it helps the system to link the values in the External File
as input for the process.
15. Once the File Mapping is selected, the user is able to verify that the values in the External File
are identified correctly. Click on the Preview Selection Results link for the verification.
16. User will be directed to the Preview Selection Results page.
17. Click on the Return button to return to the process parameters page.
18. Once the verification is completed, the values need to be populated into the Custom
Population List. Click on Load Selection Results to Populate the Student List.
iNEIS - Manage Student Completion for Graduating Students
6
19. The Student IDs uploaded using the External file will be populated into the Custom Population
List.
20. After the Student IDs are populated into Custom Population List section, the user is able to
update the list by adding or deleting Student IDs. Click on ‘+’ icon to add more Student IDs or
‘-‘ icon to delete the added Student IDs.
21. Click on the Save button and then click on the Run button to run the process.
22. User will be directed to Process Scheduler Request page.
23. Select the process, ‘Create Clearance Checklists’ from the process list.
24. Click on ‘OK’ button.
25. Once the process has begun to run, a Process Instance number will be assigned.
26. Click on the Process Monitor link to check the status of the process run.
27. User will be directed to the Process Monitor page.
28. Monitor the process against the Process Instance number and initially the Run Status and
Distribution Status are ‘Queued’ and ‘N/A’.
29. Click on the Refresh button to view the refreshed Run Status. Click on the Refresh button until
Run Status changes to ‘Success’ and Distribution Status goes to ‘Posted’.
30. Once the Run Status goes to ‘Success’ and Distribution Status goes to ‘Posted’, click on the
Details link.
31. User will be directed to Process Detail page, click on the View Log/Trace link in the Actions
section.
32. User will be directed to View Log/Trace page, click on the ‘MOE_CHKLT_AE_(Instance
No.).log’ link.
Note:
Once the Clearance Checklists are successfully created for the selected students, the
Teachers/Persons In-charge of Clearance Checklist items will receive an email notification.
33. The Process Log will indicate the lists of student for who the Clearance Checklists were
successfully created and the students for who it wasn’t created and the reason.
1.1.3 Create Clearance Checklists for Students by using the PS Query option
Roles Involved: School Admin – Student Clearance
1. Navigate to Main Menu > Records and Enrollment > Student Movement > Clearance > Assign
Clearance Checklist.
2. To run the process to create Clearance Checklists for students, click on Add a New Value tab
3. Enter a Run Control ID. For e.g.1006_2015_PSRYR6 (Format are as follows: SCHOOL
CODE_YEAR_ACADEMIC PROGRAM)
4. Click on Add button.
5. User will be directed to Create Clearance Checklist page.
iNEIS - Manage Student Completion for Graduating Students
7
6. Click on the Selection Criteria dropdown box and select ‘Population Selection’ from the list.
The Population Selection group box will appear.
Note:
Using the Selection Criteria, Registrar will decide which method to use to select the
students for clearance:
1. Custom – This will allow the Registrar to enter the students who have completed
their programs and eligible for Clearance into the Custom Population List. The
Student IDs should be entered one by one. This option is best to process a few
students.
2. Population Selection – This will allow the Registrar to use either an External File or
PS Query to select the students who have completed their programs and is eligible
for Clearance. This option is best to process many students.
7. In the Population Selection section, click on the Selection Tool dropdown.
8. Select the option ‘PS Query’ from the list.
Note:
When the PS Query option is selected, a specific query needs to be selected to fetch the
Student IDs required to run the process.
9. Click on the Query Name lookup icon and select ‘MOE_CL_CHK_QRY’.
10. Click on the Edit Prompt link to enter the report input values.
11. In the Query Prompt box, click on the Institution lookup icon and select ‘MOE01’
12. In the Query Prompt box, click on the Academic Career lookup icon and select the career the
School Admin - Student Clearance has access to.
13. In the Query Prompt box, click on the Academic Program lookup icon and select appropriate
Academic Program.
14. In the Query Prompt box, click on the Academic Plan lookup icon and select the appropriate
Academic Plan.
15. Click on ‘OK’ button.
16. Click on the Preview Selection Results link to view all the students selected according to the
criteria mentioned in the Query Prompt.
17. User will be directed to the Preview Selection Results page.
18. Click on the Return button to return back to the process parameter page.
19. Click on the Load Selection Results link to populate the students into the Custom Population
List section.
Note:
- Launch Query Manager link next to Query Name field is use when no query is
fetched, this link will open Query Manager which will allow the Registrar to either
create or find an existing query.
- When the query is selected, input values need to be entered to select the students.
Input values are by clicking on Edit Prompts link.
iNEIS - Manage Student Completion for Graduating Students
8
20. The Student IDs selected by the PS Query will be populated into the Custom Population List.
21. After the Student IDs are populated into the Custom Population List section, the School Admin
- Student Clearance is able to update the list by adding or deleting Student IDs. Click on ‘+’
icon to add more Student IDs or ‘-‘ icon to delete the added Student IDs.
22. Click on the Save button and then click on the Run button to run the process.
23. User will be directed to Process Scheduler Request page.
24. Select the process, ‘Create Clearance Checklists’ from the process list.
25. Click on ‘OK’ button.
26. Once the process has begun to run, a Process Instance number will be assigned.
27. Click on the Process Monitor link to check the status of the process run.
28. User will be directed to the Process Monitor page.
29. Monitor the process against the Process Instance number and initially the Run Status and
Distribution Status are ‘Queued’ and ‘N/A’.
30. Click on the Refresh button to view the refreshed Run Status. Click on the Refresh button until
Run Status changes to ‘Success’ and Distribution Status goes to ‘Posted’.
31. Once the Run Status goes to ‘Success’ and Distribution Status goes to ‘Posted’, click on the
Details link.
32. User will be directed to Process Detail page, click on the View Log/Trace link in the Actions
section.
33. User will be directed to View Log/Trace page, click on the ‘MOE_CHKLT_AE_(Instance
No.).log’ link.
34. The Process Log will indicate the lists of student for who the Clearance Checklist was
successfully created and the students for who it wasn’t created and the reason.
Please refer to Online Help: http://help.ineis.moe.gov.bn/cl/cl_3.1.php under Create the
Clearance Checklist for Students.
Note:
Once the Clearance Checklists are successfully created for the selected students, the
Teachers/Persons In-charge of Clearance Checklist items will receive an email notification.
iNEIS - Manage Student Completion for Graduating Students
9
1.2 Create Clearance Checklist for a Student (Individually) Role Involved: School Admin – Student Clearance
1. Navigate to Main Menu > Campus Community > Checklists > Person Checklists > Checklist
Management – Person.
2. To create a new Clearance Checklist, click on the Add a New Value tab.
3. Click on the lookup icon to search for the Student ID.
4. Click on the Add button.
5. User will be directed to the Checklist Management - Person page.
6. Search for ‘GEN’ – General on the lookup icon of the *Administration Function.
7. Click on the lookup icon to search for the *Checklist Code.
Note:
List of Checklist Code for Primary School:
- ‘CPRICL’ (Completion – Primary)
- ‘TPRICL’ (Transfer Student – Primary)
- ‘WPRICL’ (Withdrawal Student – Primary)
List of Checklist Code for Secondary School:
- ‘CSECCL’ (Completion – Secondary)
- ‘TSECCL’ (Transfer Student – Secondary)
- ‘WSECCL’ (Withdrawal Student – Secondary)
List of Checklist Code for Sixth Form School:
- ‘CSXFCL’ (Completion – 6th Form)
- ‘TSXFCL’ (Transfer Student – 6th Form)
- ‘WSXFCL’ (Withdrawal Student – 6th Form)
List of Checklist Code for Sports School:
- ‘CSSCL’ (Completion – Sports School)
- ‘TSSCL’ (Transfer Student – Sports School)
- ‘WSSCL’ (Withdrawal Student – Sports School)
8. Select ‘Initiated’ from the *Status drop-down list.
9. Click on the Save button.
Please refer to Online Help: http://help.ineis.moe.gov.bn/cl/cl_3.2.php under Create a Clearance
Checklist for a Student.
iNEIS - Manage Student Completion for Graduating Students
10
2. View the Created Clearance Checklist for a Student This function allows to view the created clearance checklist for each individual student.
Role Involved: School Admin – Student Clearance and Class Teacher.
1. Navigate to Main Menu > Campus Community > Checklists > Person Checklist > Checklist
Management – Person.
2. Click on the Find an Existing Value tab.
3. Click on the ID lookup icon and search for the student who as a Clearance Checklist created
for him/her.
4. Click on the Search button.
5. User will be directed to the Checklist Management – Person page.
6. Click on the Checklist Management 1 tab.
Note:
The Clearance Checklist created will display the Date/Time it was created as well
as the Checklist Code.
For Transfer and Withdrawn Student, when the Clearance Checklist is created, the
Comments field will contain the Request Nbr of the Completed Request.
7. Click on the Checklist Management 2 tab.
8. User will see each of the Clearance Items listed in this page which the student is supposed to
complete.
Please refer to Online Help: http://help.ineis.moe.gov.bn/cl/cl_4.1.php under View the created
Clearance Checklist for a Student.
iNEIS - Manage Student Completion for Graduating Students
11
3. Update status of the Clearance Checklist Items This function allows the Teachers/Persons In-Charged of the Clearance items to update the status of
the clearance checklist items of the students.
Note:
There are 2 ways to Update status of the Clearance Checklist Items:
1. Update the status of Clearance Checklist Items for an individual student.
This option is available for user to update the status of the student one by one.
2. Update the status of Clearance Checklist Items for a group of students.
This option is available for user to update the status of many students.
3.1 Update the status of Clearance Checklist Items for an individual student
Role Involved: School Admin – Student Clearance and Class Teacher
1. Navigate to Main Menu > Campus Community > Checklists > Person Checklist > Checklist
Management – Person.
2. Click on the Find an Existing Value tab.
3. Click on the ID lookup icon and search for the student who as a Clearance Checklist created
for him/her.
4. Click on the Search button.
5. User will be directed to the Checklist Management – Person page.
6. Click on the Checklist Management 1 tab.
Note:
The Clearance Checklist created will display the Date/Time it was created as well as
the Checklist Code.
For Transfer and Withdrawn Student, when the Clearance Checklist is created, the
Comments field will contain the Request Nbr of the Completed Request.
7. Click on the Checklist Management 2 tab.
8. User will see each of the Clearance Items listed in this page which the student is supposed to
complete.
9. Select one of the statuses from the dropdown list of the items the School Admin or
teachers/persons in-charge of and update the status of the item.
Note:
There are 4 statuses available:
Completed : Student has returned the item or has completed the task.
Initiated : No action has been taken to clear this item, the initial status of all items.
Not Applicable : The item is not applicable for the student to clear.
Work in Progress : Action has been taken to clear the item but not yet completed.
10. Click on the Save button once user has done updating the statuses of the Clearance Items.
iNEIS - Manage Student Completion for Graduating Students
12
3.2 Update the status of Clearance Checklist Items for a group of students Role Involved: School Admin – Student Clearance and School Clearance Officer
1. Navigate to Main Menu > Records and Enrollment > Student Movement > Clearance >
Student Clearance Checklists.
2. Click on the Find an Existing Value tab.
3. Click on the Search button.
4. User will be directed to the Student Clearance Checklists page.
5. In the Student Clearance Checklists page, to search for the students the search criteria can be
used. The criteria mentioned in the email sent to the teachers/persons in-charge of Clearance
Checklists Items to fetch the students to update the status of each of the items.
6. Click on the Academic Career lookup icon to select the Academic Career. This is the field the
teacher/person in-charge must enter in order to search for the students.
7. Click on the Academic Program lookup icon and select the program.
8. Click on the Academic Plan lookup icon and select the Academic Plan.
9. Click on the Term lookup icon and select the correct term.
10. Click on Session lookup icon and select the correct session.
11. If the user wants to view the students of a particular class in a given term, select the Class
Section value from the lookup after entering the Term and Session value.
12. If the user wants to search for a particular student, the Student ID can be selected from the
lookup icon after selecting the Academic Career from above.
13. Click on:
13.1 Fetch button to fetch the students who have Clearance Checklists created matching the
criteria entered.
13.2 Clear button to erase the criteria from all the fields entered.
14. Once the Fetch button is clicked, Student IDs and the names are displayed in the grid. It will
display all the Clearance Items the students should clear before leaving the school.
Note:
The status of the clearance items can only be updated by the teachers/persons in-charge
of it. The status dropdown of the items the user is in-charge of will be editable and the
status dropdown of the items the user is not in-charge of will be disabled.
15. Select one of the statuses from the dropdown list of the items the School Admin or
teachers/persons in-charge of and update the status of the item.
16. Click on the Save button once user has done updating the statuses of the Clearance Items.
Note:
There are 4 statuses available:
Completed : Student has returned the item or has completed the task.
Initiated : No action has been taken to clear this item, the initial status of all items.
Not Applicable : The item is not applicable for the student to clear.
Work in Progress : Action has been taken to clear the item but not yet completed.
iNEIS - Manage Student Completion for Graduating Students
13
Please refer to Online Help: http://help.ineis.moe.gov.bn/cl/cl_5.1.php under Update status of
the Clearance Checklist Items.
Note:
When the statuses for all the Clearance Checklist items are updated to Not Applicable or
Completed, the entire row will be read-only. This is to indicate that the Clearance Checklist
is completed and the Clearance Process is completed for the student.
iNEIS - Manage Student Completion for Graduating Students
14
4. Graduating Students
4.1 Process Graduating Students This function allows to update the Student Records for students who have completed their Academic
Programs that will be ready for ‘graduation’.
Roles Involved: School Admin – Student Clearance
1. Navigate to Main Menu > Records and Enrollment > Graduation > Graduation Processing.
2. To run the process, click on the Add a New Value tab.
3. Enter a Run Control ID. For e.g. 1006_2015_PSRYR6 (Format are as follows: SCHOOL
CODE_YEAR_ACADEMIC PROGRAM)
4. Click on the Add button.
5. User will be directed to the Graduating Processing page.
6. In the Population Selection groupbox, the Population Selection checkbox is checked by
default. Uncheck the checkbox.
7. In the Selection Results groupbox, click on the Add Students link.
8. User will be directed to the Add Student page.
9. Enter the Student ID in the Empl ID field.
10. Click on the Search button and the details will be populated in the Search Results.
11. Click on the Select Student checkbox against the student row.
12. User will be directed back to Graduation Processing page where the selected student will be
added into the Selection Results grid.
13. To add more students, click on the Add Students link or to delete all the students in the
Selection Results group box, click on Clear List link.
14. Check the Population Selection checkbox and click on the Selection Tool dropdown box and
select PS Query.
15. When the PS Query option is selected, a specific query needs to be selected to fetch the
Student IDs to run the process. Click on the Query Name lookup button and select
‘MOE_CL_CHK_QRY_GRAD’ for Graduating Student Selection.
Note:
Launch Query Manager is use in case no query is fetched, this link will open Query Manager
which will allow the Registrar to either create or find an existing query.
Note:
There are 2 ways to update the Student Records for Graduating Students:
1. Population Selection checkbox is unchecked – It is used when there are only a few
students to process and it allows the user to manually enter the student one by one.
2. Population Selection checkbox is checked – It is used process many students where
it allows the user to select the PS Query option and fetch the students by their
Academic Program.

iNEIS - Manage Student Completion for Graduating Students
15
16. When the query is selected, input criteria needs to be entered to select students. Input criteria
is entered by clicking on Edit Prompts link.
17. Click on the Academic Career lookup icon and select the relevant Academic Career.
18. Click on the Academic Program lookup icon and select the relevant program.
19. Click on the Academic Plan lookup icon and select the relevant plan.
20. Click on the OK button.
21. To verify the students fetched by the PS Query is correct, click on the Preview Selection
Results link.
22. User will be directed to the Preview Selection results page.
23. Click on the Return button to return back.
24. Once the verification is completed, click on Load Selection Results link to populate the student
list.
25. Once the Student IDs fetched by the Query are added to the Selection Results, the Registrar
is able to update the list. Click on the Add Students link to add more students to the list.
26. After adding the students to the Custom Population list either by PS Query or manually, on
the Graduation Process Action groupbox, click on the Graduation Process Action dropdown
box and select ‘Update All’ from the list.
27. In the Program/Degree Update Options groupbox, click on the New Degree Checkout Status
dropdown box and select ‘Certification Awarded’.
Note:
New Degree Checkout Status is the certification status that should be displayed for each
eligible student. (E.g. for certifications are PSR, GCE O Level, GCE A Level, etc)
28. Click on the Completion Term lookup icon and select the term in which these students are
completing their certifications. Select the current term.
29. Click on the Program Effective Date dropdown box and select ‘Confer Dt’.
30. Click on the Save button and then click on the Run button to run the process.
31. User will be directed to Process Scheduler page.
32. Select the process ‘Graduation Processing’ from the process list.
33. Click on the OK button.
34. Once the process has begun to run, a Process Instance number will be assigned.
35. Click on the Process Monitor link to check the status of the process run.
36. User will be directed to the Process Monitor page.
37. Monitor the process against the Process Instance number and initially the Run Status and
Distribution Status are ‘Queued’ and ‘N/A’.
38. Click on the Refresh button to view the refreshed Run Status. Click on the Refresh button until
Run Status changes to ‘Success’ and Distribution Status goes to ‘Posted’.
Note:
Select the option ‘Confer Dt’. For each term, MOE HQ will set the certification date for each
certification as the Confer Date.
iNEIS - Manage Student Completion for Graduating Students
16
4.2 View Updated Student Program/Plan This function allows to view the updated Student Program/Plan once the Graduating Students process
is successfully completed.
Roles Involved: School Admin – Student Clearance
1. Navigate to Main Menu > Records and Enrollment > Career and Program Information >
Student Program/Plan.
2. Click on the Find an Existing Value tab.
3. Enter the Student ID in the ID field.
4. Click on the Search button.
5. User will be directed to the Student Program page.
6. In the Student Program tab, the Program Action of the latest record is ‘COMP’- Completion of
Program and the Status is set to ‘Completed’ for the student.
7. Click on the Student Certificates tab.
8. The Certificate Status is updated to ‘Awarded’ and the Completion Term is updated to
‘Current Term’ and both fields are non-editable.
4.3 View Student Certificate This function allows to view the certificate awarded to the student.
Roles Involved: School Admin – Student Clearance
Note:
The certificates which will be awarded are:
Pre-School: Pre-School
Primary School :
o Year 6 – PSR
o CCA Primary Completion
Secondary School :
o Year 10 (Express) & Year 11 – GCE O’ Level
o Year 11 – IGCSE
o Year 11 – BTEC EDEXCEL - Extended
o Year 12 – BTEC EDEXCEL – Diploma
o CCA Secondary Completion
Sixth Form
o Upper Sixth – GCE A’ Level
o CCA Sixth Form Completion
1. Navigate to Main Menu > Records and Enrollment > Graduation > Student Certificate.
2. Click on the Find an Existing Value tab.
3. Enter the Student ID in the ID field.
4. Click on the Search button.
5. User will be directed to the Student Certificates page.
iNEIS - Manage Student Completion for Graduating Students
17
6. Once the Graduation Processing is successfully done, the *Certificate and also *Completion
Term will be updated automatically.
Please refer to Online Help: http://help.ineis.moe.gov.bn/cl/cl_8.1.php under Upgrade the
Student Records for Graduating Students.