Embed Size (px)
Citation preview

SURGICAL TECHNIQUEIntegra® PyroSphere® System

Table of ContentsIndications For Use ...................................................................................................................................................................................................02 Contraindications .....................................................................................................................................................................................................02 Warnings .....................................................................................................................................................................................................................03 Precautions ................................................................................................................................................................................................................03Patient Positioning ....................................................................................................................................................................................................03
Surgical Technique ................................................................................................................................................................................................... 04 Step 1 • Initial Incision and Capsular Exposure .................................................................................................................................................... 04 Step 2 • Trapezium and Metacarpal Base Resections..........................................................................................................................................05 Step 3 • Implant Size Selection................................................................................................................................................................................05 Step 4 • Trapezial Preparation ................................................................................................................................................................................ 06 Step 5 • PyroSphere® Implantation ........................................................................................................................................................................07 Step 6 • Capsular Close ............................................................................................................................................................................................07
Instrumentation set ................................................................................................................................................................................................. 08

2
Indications For Use
The PyroSphere® is intended to replace the joint between the first metacarpal and the trapezium in cases of rheumatoid arthritis, traumatic arthritis, osteoarthritis or post fracture deformation or bone loss which present as either a painful, unstable thumb, or a thumb, or a thumb with limited range of motion.
The PyroSphere is also intended for use in the fourth/fifth tarsometatarsal (TMT) joint involvement where degenerative or post-traumatic arthritis presents:
• Decreased motion • Arthritic changes and/or subluxation • Unstable, stiff, or painful joints• Degenerative joint disease of the midfoot associated with gout and pseudogout
• Inadequate bone stock or soft tissue coverage • Previous open fracture or infection in the joint• Skeletal immaturity• Physical interference with or by other prostheses during implantation or use• Procedures requiring modification of the prosthesis• Skin, bone, circulatory and/or neurological deficiency at the implantation site
Contraindications
3
• Strenuous loading, excessive mobility, and articular instability all may lead to eventual failure by loosening, fracture, or dislocation of the device. Patients should be made aware of the increased potential for device failure if excessive demands are made upon it.
• Do not modify the PyroSphere implant in any manner. Reshaping the implant using cutters, grinders, burrs, or other means will damage the structural integrity of the device.
• Do not grasp the PyroSphere implant with metal instruments, or instruments with teeth, serrations, or sharp edges. • Implants should be handled only by instrumentation provided by Integra. PyroSphere implants are made of pyrocarbon,
which is a ceramic-like material. Mishandling implants could cause surface damage and reduce their strength, and could result in implant fracture and/or particulate debris.
• Do not use the PyroShere in a joint where soft tissue reconstruction cannot provide adequate stabilization. Similar to the natural joint, the PyroSphere attains stabilization from the surrounding capsuloligamentous structures. If soft tissue reconstruction cannot provide adequate stabilization, the device may dislocate or loss of motion may occur.
• Do not resterilize this device. Resterilization could lead to mishandling and surface damage that could result in impact fracture and/or particulate debris.
• Do not reuse this device. Reuse of this product may result in infection or other systemic complication that may affect the patient’s overall health. Additionally, the reuse of this product could adversely affect function of the device. Any implant that has damaged, mishandled, or removed from the sterile field may have surface damage that could result in implant fracture and/or particulate and should be discarded.
• Implants should be handled with blunt instruments to avoid scratching, cutting or nicking the device so as not to adversely affect the implant performance. Polished bearing and taper surfaces must not come in contact with hard or abrasive surfaces.
• The PyroSphere has not been evaluated for safety and compatibility in the MR environment. The PyroSpere has not been tested for heating or migration in the MR environment.
Warnings
Precautions
Patient Positioning
The PyroSphere is intended for patients who have arthritis affecting the carpal metacarpal joint at the base of the thumb. It is not designed for use in patients who have significant scaphotrapezial trapezoidal arthritis.
4
Surgical Technique This technique has been developed with the help of James W. Brodsky, MD.
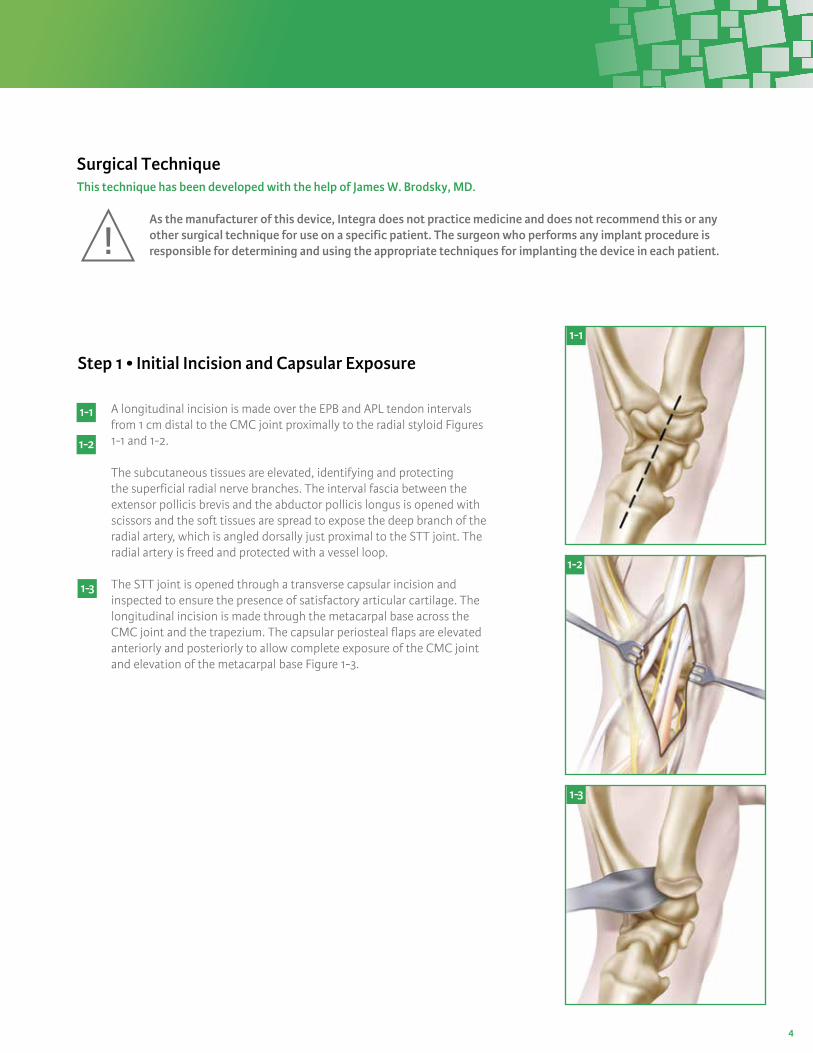
Step 1 • Initial Incision and Capsular Exposure
A longitudinal incision is made over the EPB and APL tendon intervals from 1 cm distal to the CMC joint proximally to the radial styloid Figures 1-1 and 1-2. The subcutaneous tissues are elevated, identifying and protecting the superficial radial nerve branches. The interval fascia between the extensor pollicis brevis and the abductor pollicis longus is opened with scissors and the soft tissues are spread to expose the deep branch of the radial artery, which is angled dorsally just proximal to the STT joint. The radial artery is freed and protected with a vessel loop.
The STT joint is opened through a transverse capsular incision and inspected to ensure the presence of satisfactory articular cartilage. The longitudinal incision is made through the metacarpal base across the CMC joint and the trapezium. The capsular periosteal flaps are elevated anteriorly and posteriorly to allow complete exposure of the CMC joint and elevation of the metacarpal base Figure 1-3.
1 - 1
1 - 1
1 - 2
1 - 2
1 -3
1 -3
As the manufacturer of this device, Integra does not practice medicine and does not recommend this or any other surgical technique for use on a specific patient. The surgeon who performs any implant procedure is responsible for determining and using the appropriate techniques for implanting the device in each patient.
5
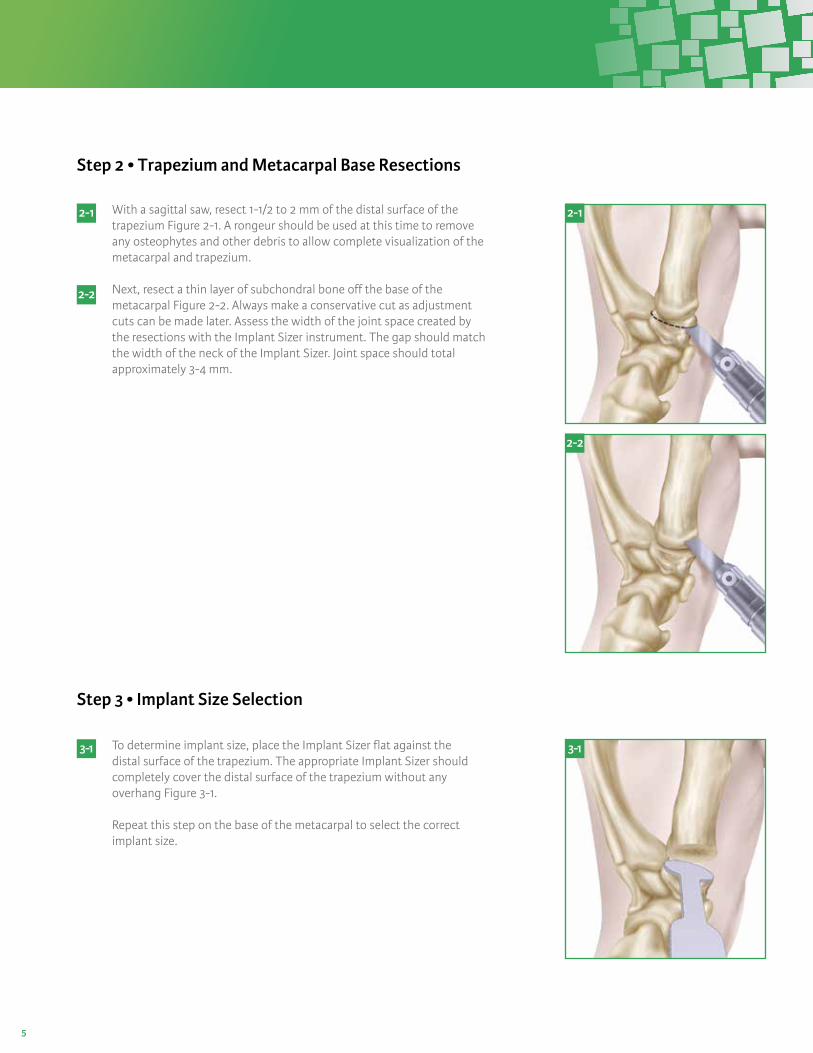
Step 2 • Trapezium and Metacarpal Base Resections
Step 3 • Implant Size Selection
With a sagittal saw, resect 1-1/2 to 2 mm of the distal surface of the trapezium Figure 2-1. A rongeur should be used at this time to remove any osteophytes and other debris to allow complete visualization of the metacarpal and trapezium.
Next, resect a thin layer of subchondral bone off the base of the metacarpal Figure 2-2. Always make a conservative cut as adjustment cuts can be made later. Assess the width of the joint space created by the resections with the Implant Sizer instrument. The gap should match the width of the neck of the Implant Sizer. Joint space should total approximately 3-4 mm.
To determine implant size, place the Implant Sizer flat against the distal surface of the trapezium. The appropriate Implant Sizer should completely cover the distal surface of the trapezium without any overhang Figure 3-1.
Repeat this step on the base of the metacarpal to select the correct implant size.
2 - 1 2 - 1
2 - 2
2 - 2
3 -1 3 -1
6
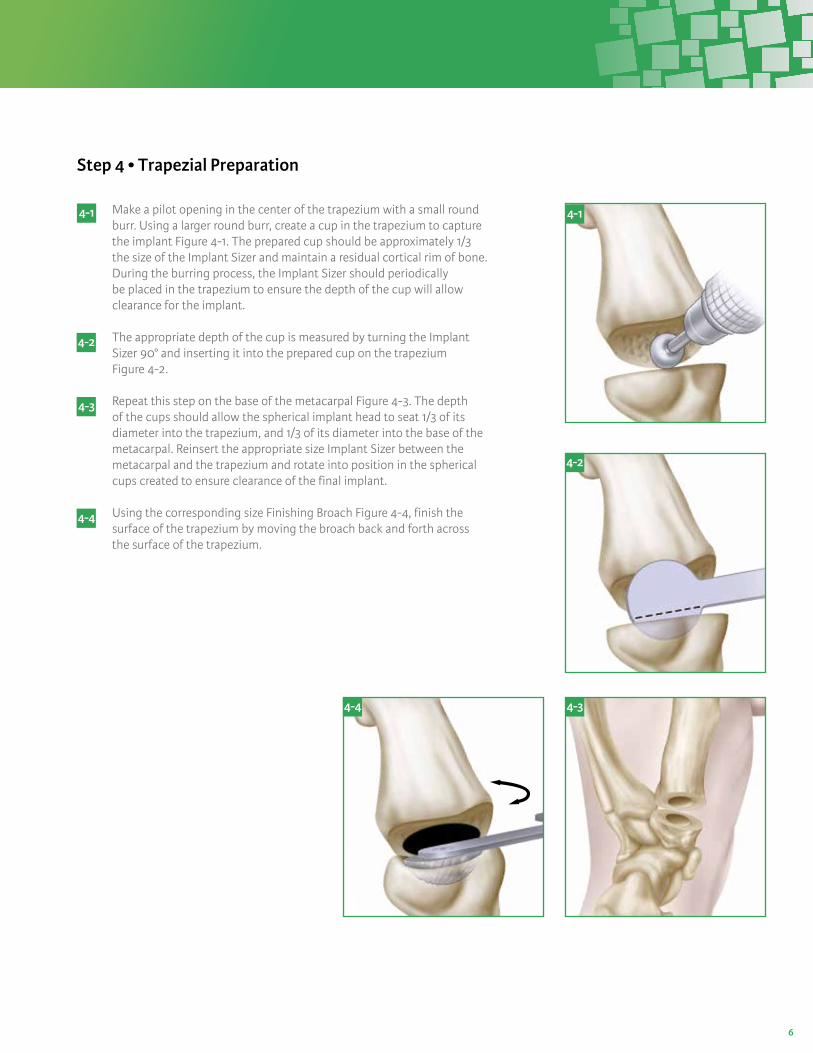
Step 4 • Trapezial Preparation
Make a pilot opening in the center of the trape zium with a small round burr. Using a larger round burr, create a cup in the trapezium to capture the implant Figure 4-1. The prepared cup should be approximately 1/3 the size of the Implant Sizer and maintain a residual cortical rim of bone. During the burring process, the Implant Sizer should periodically be placed in the trapezium to ensure the depth of the cup will allow clearance for the implant.
The appropriate depth of the cup is measured by turning the Implant Sizer 90° and inserting it into the prepared cup on the trapezium Figure 4-2.
Repeat this step on the base of the metacarpal Figure 4-3. The depth of the cups should allow the spherical implant head to seat 1/3 of its diameter into the trapezium, and 1/3 of its diameter into the base of the metacarpal. Reinsert the appropriate size Implant Sizer between the metacarpal and the trapezium and rotate into position in the spherical cups created to ensure clearance of the final implant.
Using the corresponding size Finishing Broach Figure 4-4, finish the surface of the trapezium by moving the broach back and forth across the surface of the trapezium.
4 - 1
4 - 2
4 - 3
4 - 4
4 - 1
4 - 2
4 - 34 - 4
7
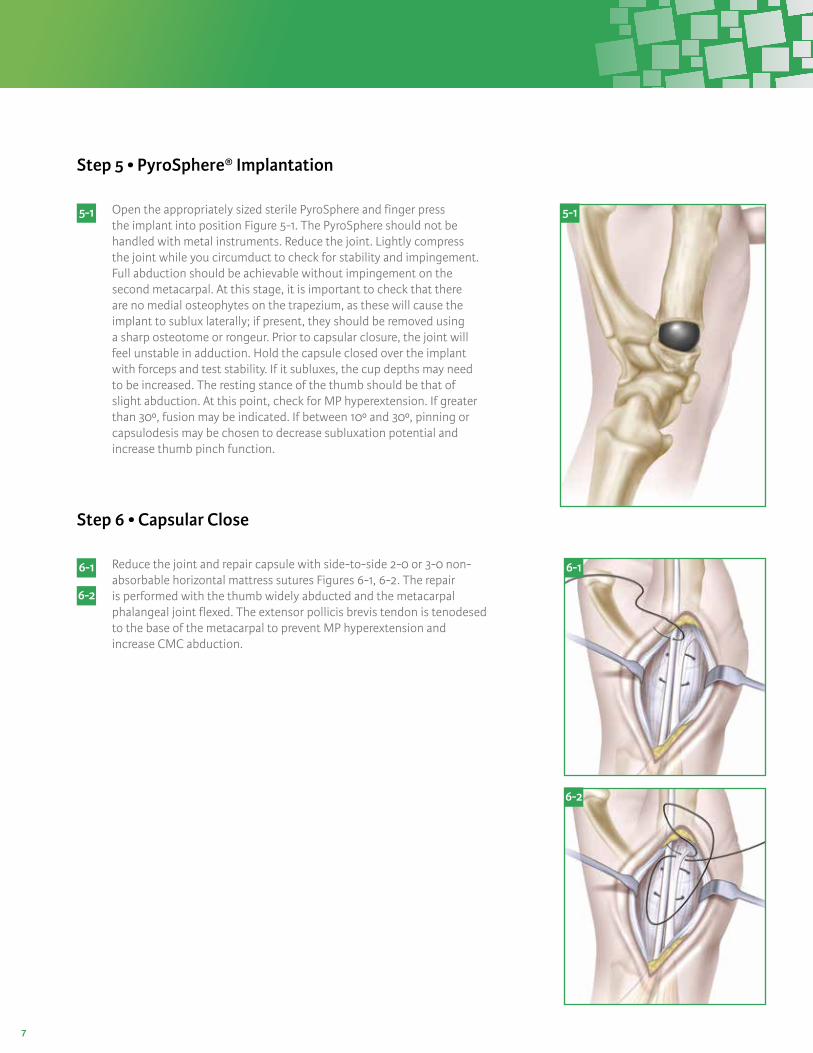
Step 5 • PyroSphere® Implantation
Step 6 • Capsular Close
Open the appropriately sized sterile PyroSphere and finger press the implant into position Figure 5-1. The PyroSphere should not be handled with metal instruments. Reduce the joint. Lightly compress the joint while you circumduct to check for stability and impingement. Full abduction should be achievable without impingement on the second metacarpal. At this stage, it is important to check that there are no medial osteophytes on the trapezium, as these will cause the implant to sublux laterally; if present, they should be removed using a sharp osteotome or rongeur. Prior to capsular closure, the joint will feel unstable in adduction. Hold the capsule closed over the implant with forceps and test stability. If it subluxes, the cup depths may need to be increased. The resting stance of the thumb should be that of slight abduction. At this point, check for MP hyperextension. If greater than 30º, fusion may be indicated. If between 10º and 30º, pinning or capsulodesis may be chosen to decrease subluxation potential and increase thumb pinch function.
Reduce the joint and repair capsule with side-to-side 2-0 or 3-0 non-absorbable horizontal mattress sutures Figures 6-1, 6-2. The repair is performed with the thumb widely abducted and the metacarpal phalangeal joint flexed. The extensor pollicis brevis tendon is tenodesed to the base of the metacarpal to prevent MP hyperextension and increase CMC abduction.
5 - 1
6 - 1 6 - 1
6 - 2
5 - 1
6 - 2
8
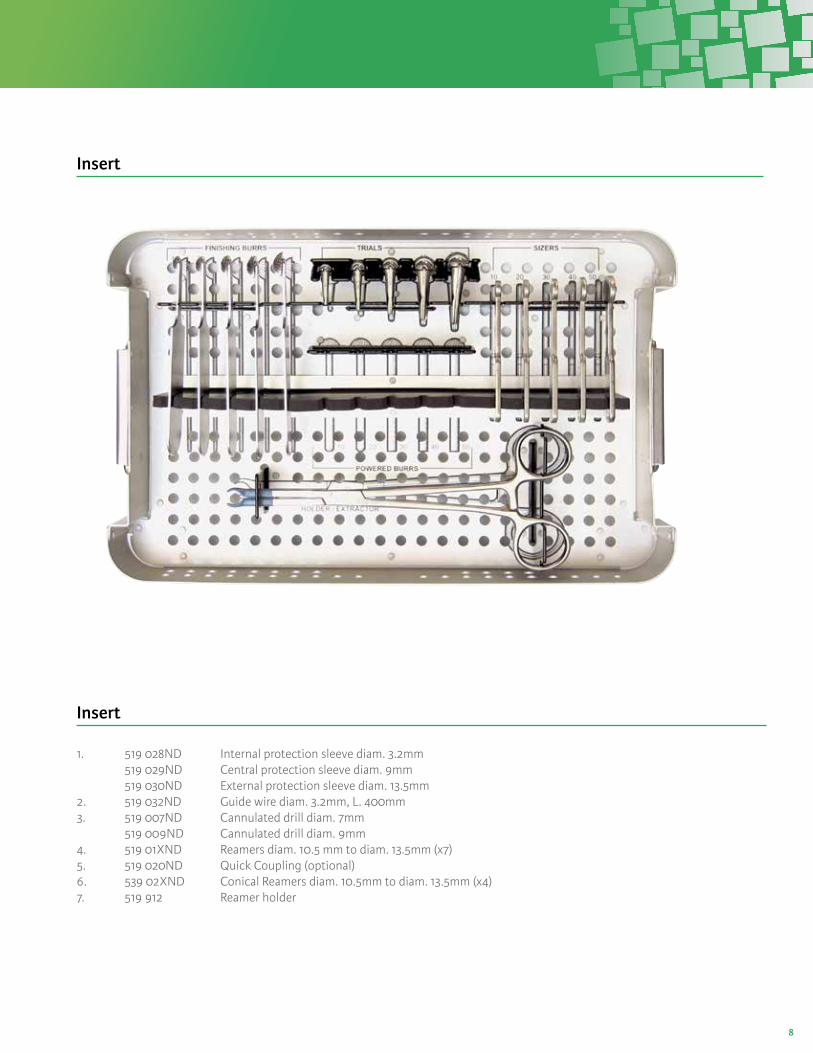
1. 519 028ND Internal protection sleeve diam. 3.2mm 519 029ND Central protection sleeve diam. 9mm 519 030ND External protection sleeve diam. 13.5mm2. 519 032ND Guide wire diam. 3.2mm, L. 400mm3. 519 007ND Cannulated drill diam. 7mm 519 009ND Cannulated drill diam. 9mm4. 519 01XND Reamers diam. 10.5 mm to diam. 13.5mm (x7)5. 519 020ND Quick Coupling (optional)6. 539 02XND Conical Reamers diam. 10.5mm to diam. 13.5mm (x4)7. 519 912 Reamer holder
Insert
Insert

9

10

Integra®
PyroSphere® System
USA 800-654-2873 n 888-980-7742 faxInternational +1 609-936-5400 n +1 609-750-4259 faxintegralife.com/contact
United States, Canada, Asia, Pacific, Latin AmericaAscension Orthopedics, Inc.11101 Metric BlvdAustin, TX 78758 n USA
Manufacturer:
Availability of these products might vary from a given country or region to another, as a result of specific local regulatory approval or clearance requirements for sale in such country or region. n Non contractual document. The manufacturer reserves the right, without prior notice, to modify the products in order to improve their quality.n Warning: Applicable laws restrict these products to sale by or on the order of a physician.n Consult product labels and inserts for any indication, contraindications, hazards, warnings, precautions, and instructions for use.
For more information or to place an order, please contact:
PyroSphere, Integra and the Integra logo are registered trademarks of Integra LifeSciences Corporation or its subsidiaries in the United States and/or other countries. ©2017 Integra LifeSciences Corporation. All rights reserved. Printed in USA. 2.5M LC-04-437-002 Rev. C 0433633-2-EN