Embed Size (px)
Citation preview

Instructions to Fill
Annual Confidential Report
In this module there are three parts following as ……
1. How an employee Fill his/her Self-Appraisal Report.
2. How a Reporting Officer assessment the ACR report.
3. How a Reviewing Officer Remarks on the ACR report.
NOTE:-Before Filling the ACR you have to, update your
Photo and Signature in Manav Sampada.
When an employee Visits the “Manav Sampada” using his / her
credentials (Login Id and Password). Then
Go to My Profile Upload ACR

When a user click on the Upload ACR then a Panel Regarding the
Employee Detail Open such as. (Part A- Employee Detail) in
which an employee- user can check his detail.
And then click on a button named Click Here to enable and Get ACR Detail
After that three types of Panel are opened such as.
1. For filling up the self-appraisal report.
2. For assessment by reporting officer on acr Report.
3. For remarking by the reviewing officer on acr report.

For Filling up the self-appraisal report
(Click on the Part B-To be filled by officer Reported Upon)
After click on the above Panel Header, Part B will be Opened and enabled and you
Can fill yours self-appraisal report.
There are some points which you have to remember when you are filling the acr
detail which are as follows.
1. Select Acr Financial Year on which year you are going to Fill Acr.
2. Select Time Period By selecting the from and to date.
3. Click on the Button Get Leave to Fill no of Leave during the above period
which you have select .If you are not satisfy the leave which are calculated
Automatically by click on the button or you take any leave and want to mention
in his/ her acr report then you can also fill it accordingly.
4. You have to fill all fields giving in this acr module (part b).No one filed You
Left blank.
5. You can also add row after filling the first row, otherwise it will give a
message to add row first.
6. You can also delete a row but all rows cannot be deleted .Ex (You filled one
row and then add row for filling more data but if you think to delete it so
then you can delete it but there will be one row.)
7. After filling all the fields now click on save button to save the ACR data.
8. Your acr data for the selected time period and financial year is saved and
now you have to submit it to the reporting officer for assessment.
9. You can also Fill Your another acr for the selected financial year but the time
period (date between from and to date will be different means the time
period from date for the second acr will be greater from the previous acr to
date )
10. One more thing to remember is that you can also fill second acr When the
Previous Acr is successfully submitted to the Reporting officer.
------------ Screen shots of the above acr module are giving below-----------

submit to the reporting Officer


How a Reporting Officer assessment the Acr report.
1. An employee (Reporting officer) Visits the “Manav Sampada” using his/her
credentials and login into the “Manav Sampada” and opens the module Upload
ACR.
2. Click on the button Click Here To Enable And Get ACR Detail
3. In case of Reporting Officer when he/she click the button a grid will be
appeared which contain the detail whose send to him his /her acr report.
Ex-Sharda Chauchan sends her acr detail to Shashi Bala for the Financial
Year 2013-2014 for assessment the Acr report.

4. Now Reporting officer want to see what the employee fill in his / her self-
appraisal report for Assessment on the acr report.
5. Click on the Above Emp name in the grid which employee acr you want to
assessment.
After that Self- Appraisal report filled by the employee can be seen in the
Part –B but this part will be disabled you can only see and you have not
Any permission to do any action in this Part b.
6. Now you can click on to the part B to see the acr detail filled By the employee
In his/ her self-appraisal report.
7. And Bases on the part b you can filled the part c –Assessment by reporting
Officer.
8. Check the employee name whose acr you are going to fill assessment in the
Part c.


9. In the above part from 1 to 5 you have to select and fill the data and further
you have to give the number (Grading).
10. after filling the all fields with data you have to press the save button to save
The data .And a grid contain the data will be appeared such as.
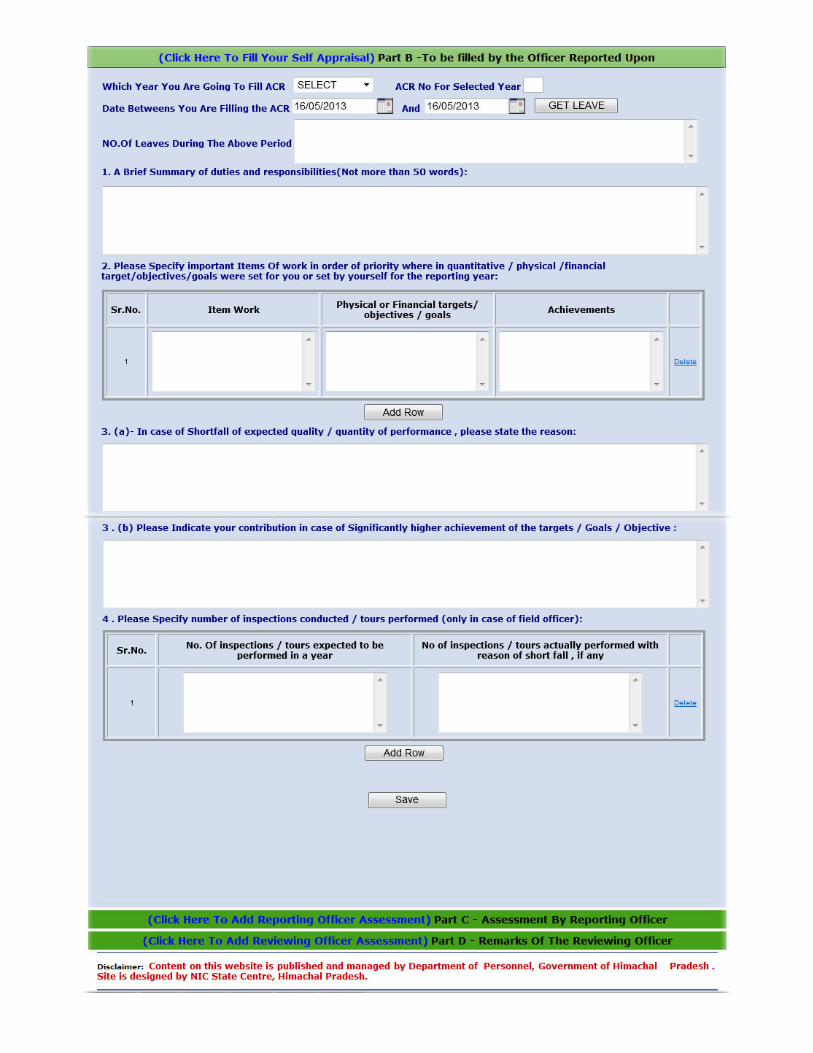
11. This Grid contain all acr record whose acr is assessment by you as a
Reporting officer.
12. Click on the employee name in the grid view and all the fields are filled with
data and now you can update the data or submit it to the reviewing officer for
Remarking on the acr detail.
13. for submitting it to reviewing officer click on
The Submit To the Reviewing Officer.
14. After clicking on the above button a panel regarding the Reviewing Detail
Will be opened and you have to choose the officer which you want to
Submit the acr detail for reviewing.

15. After clicking on the above button a panel regarding the Reviewing Detail Will be Opened and you have to choose the officer which you want to Submit the acr
Detail for reviewing. Click on the submit button to submit the acr detail to the
Reviewing officer once the detail is submit then it cannot be Changed and this
Acr detail will be locked.
16. Now you can see the acr report of employee which are assessment by you as a
Reporting officer by clicking on the View Acr Button.
17. When the acr is successfully submitted to the reviewing officer then the record
Which are appeared in the part a will be automatically disappeared.

How a Reviewing Officer Remarks on the Acr report
1. An employee (Reviewing officer) Visits the “Manav Sampada” using his/her
credentials and login into the “Manav Sampada” and opens the module Upload
ACR.
2. Click on the button Click Here To Enable And Get ACR Detail
3. In case of Reviewing Officer when he/she click the button a grid will be appeared
which contain the detail whose send to him the acr report for
Remarking.
Ex-Shashi Bala Sends the acr report of Sharda Chauchan to you for
Remarking.

4. Click on the EMP name in the grid for remarking on the acr report.
5. Now Part B and Part C are filled with data but this parts will be disabled means
you can only see the data in Part B and Part C .You cannot do further any action
in Part B And Part C.
6. Part B contain the data which are filled by employee in his / her self-appraisal
Report and Part C contain the data which are assessment by reporting
Officer.
7. Click on Part D to give remarking on the acr report. First check on which acr
You are going to give remarking as reviewing officer.
8. In Part D all the grading field are filled with grade which are given by reporting
officer if you are not satisfy with the grading given by employee then you can
Change it accordingly.
9. Fill the entire Field and click on the Save Button to Save Data.

10. Click on the Emp Name To update Data or Lock the acr report which are
Remarked by you.
11. Click on the update button if you did any change in part D otherwise click
On Verify ACR Report Button to Lock the Acr report.
12. Once You Click on Verify Acr report button then It will be Locked and you can
Not Change it.
13. Click on the View Acr Button To view complete Acr of an employee which are
Reviewed By you as a Reviewing Officer.


![INDEX [admis.hp.nic.in]admis.hp.nic.in/genPMIS/Annexures.pdf> DIVISIONAL COMMISSIONER (SHIMLA) > HP STATE COOP. BANK > COOPERATIVE MARKETING CO > COOPERATIVE DEVELOPMENT FEDERATION](https://img.pdfslide.us/doc/110x75/5ab6459b7f8b9a86428d8782/index-admishpnicinadmishpnicingenpmis-divisional-commissioner-shimla.jpg)