Embed Size (px)
Citation preview
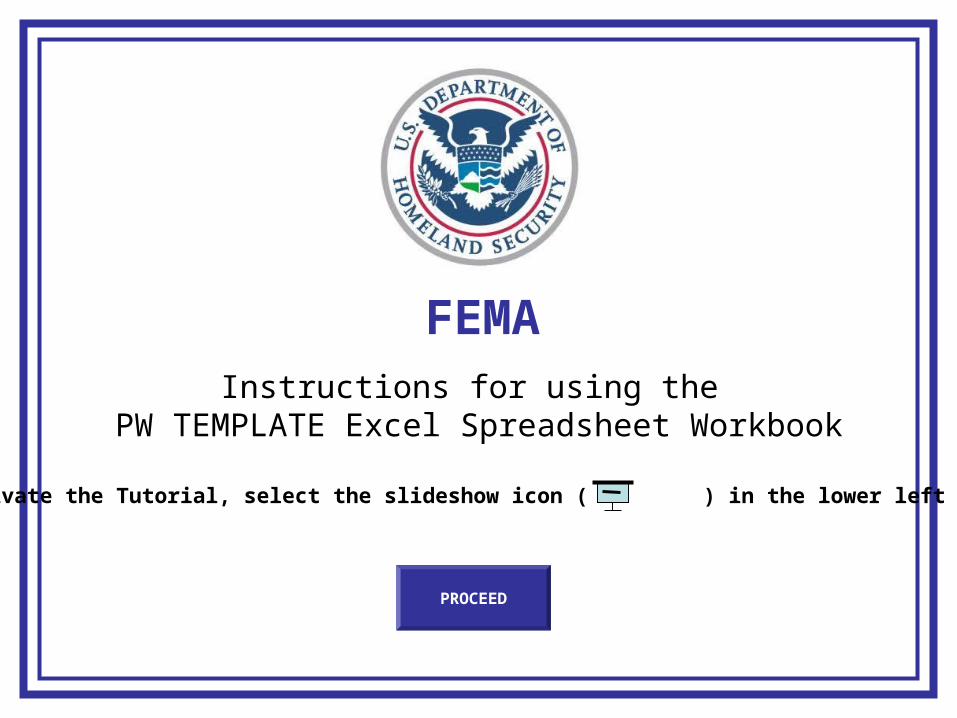
Instructions for using the PW TEMPLATE Excel Spreadsheet Workbook
FEMA
To activate the Tutorial, select the slideshow icon ( ) in the lower left corner.
PROCEED

The following is an interactive presentation which provides guidance andinstructions on using the PW TEMPLATE Project Worksheet
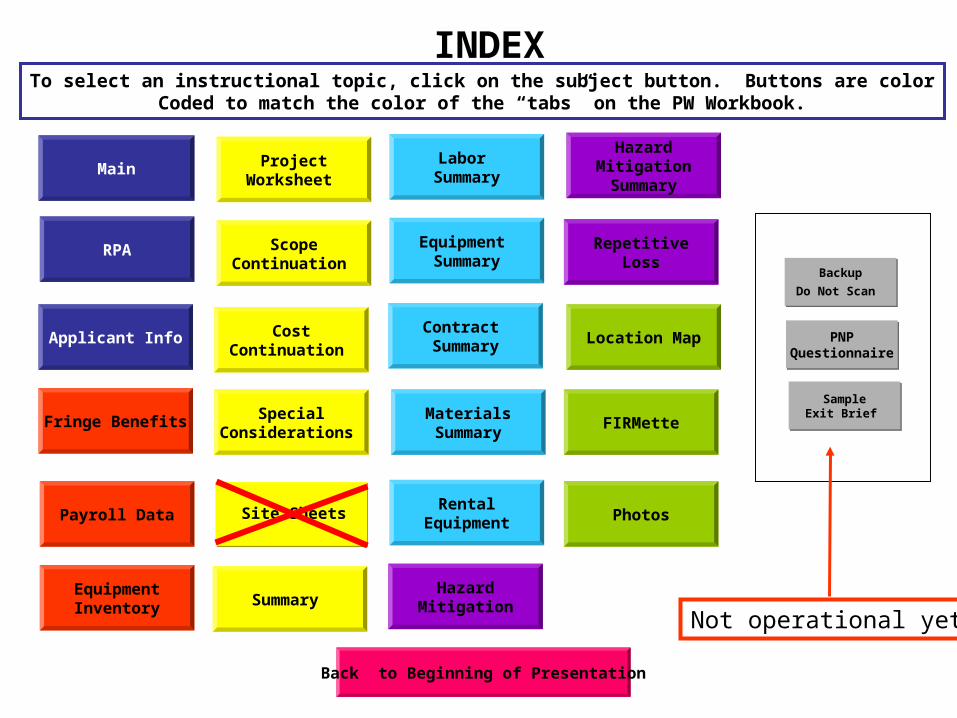
The next screen is an Index of all the “Tabs” within the MS excell program.
Simply click on the button to access the instructions for that particular pageIn the PW workbook.
Some instructional screens will have a “NEXT”, “BACK” and “INDEX” button at the bottom.
Selecting “NEXT” will take you to the next instructional screen for that “Tab”of the workbook.
Selecting “BACK” will take you back to the previous instructional screen.
Selecting “INDEX” will take you back to the index screen.
On the last instructional screen for the “Tab” you selected, only a “Back” and “INDEX” button are offered.
To end the instructional presentation, select “Esc” on your keyboard.
PROCEED
SampleExit Brief
Backup
Do Not Scan
PNPQuestionnaire
To select an instructional topic, click on the subject button. Buttons are colorCoded to match the color of the “tabs” on the PW Workbook.
INDEX
Site Sheets
Main
RPA
Applicant Info
Fringe Benefits
Payroll Data
EquipmentInventory
Labor Summary
Equipment Summary
Contract Summary
MaterialsSummary
RentalEquipment
HazardMitigation
HazardMitigationSummary
RepetitiveLoss
Location Map
FIRMette
Photos
ProjectWorksheet
ScopeContinuation
CostContinuation
SpecialConsiderations
Summary
Not operational yet
Back to Beginning of Presentation

PW Page Selection Tabs(Left Click with mouse to open page)
Basic Notes
Selecting “Update Cost Codes could result in incorrect cost estimate. These Codes and corresponding Cost are based on National. Each Region may Have different cost. The FEMA Equipment Rate Schedule Is based on National, dated 28 Aug 2005 which is the most current.
CAUTION
Scroll Bars(Click and drag –
will move page up / down, left / right)
INDEX
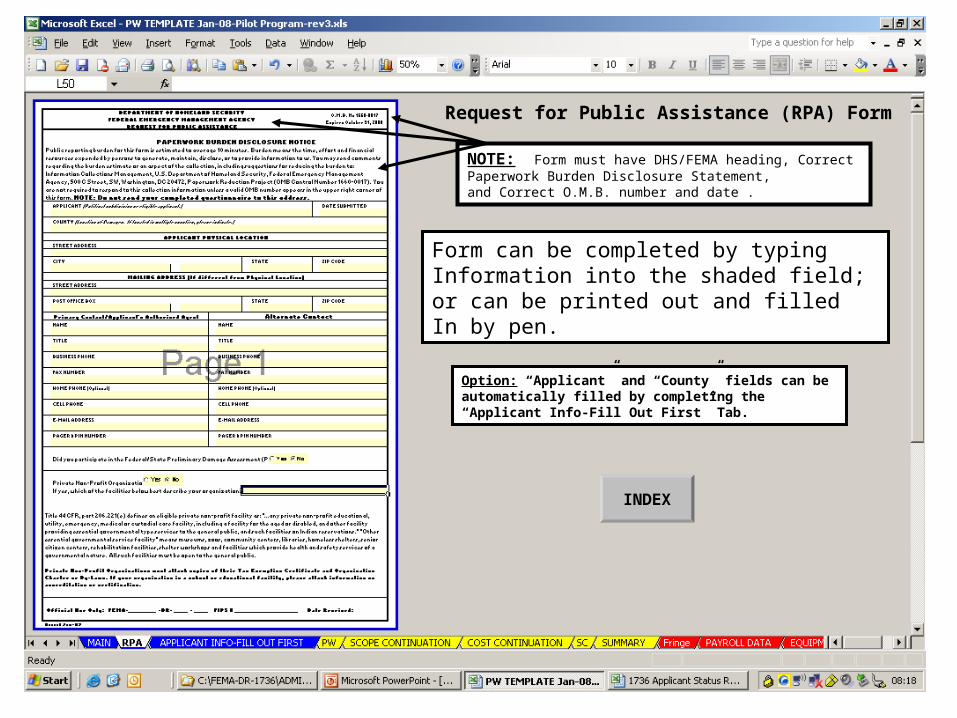
Request for Public Assistance (RPA) Form
NOTE: Form must have DHS/FEMA heading, Correct Paperwork Burden Disclosure Statement, and Correct O.M.B. number and date .
Option: “Applicant” and “County” fields can be automatically filled by completing the “Applicant Info-Fill Out First” Tab.
Form can be completed by typingInformation into the shaded field; or can be printed out and filledIn by pen.
INDEX
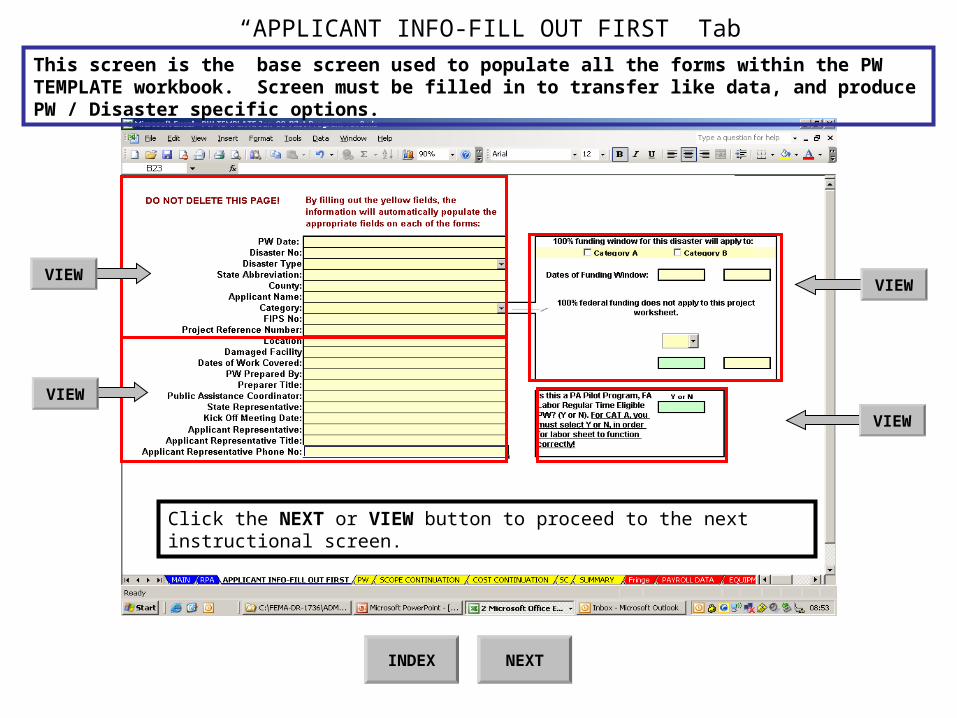
“APPLICANT INFO-FILL OUT FIRST” Tab
Click the NEXT or VIEW button to proceed to the next instructional screen.
This screen is the base screen used to populate all the forms within the PW TEMPLATE workbook. Screen must be filled in to transfer like data, and produce PW / Disaster specific options.
INDEX NEXT
VIEW
VIEW
VIEW
VIEW

Date of Site Visit or PW Written
Enter the DR or EM number only,ie. 1736
Use the drop down menu arrow toselect disaster type, “DR” or “EM”
Fields that this entry populatesare limited in space.Enter state abbreviation only.
Enter County name
Enter Applicant name.NOTE: Name should be entered as it appears in NEMIS
Use the drop down menu arrow toselect category of work: A, B, C, D, E, F, G.
Enter Applicant FIPS number as it appears in NEMIS
Enter Project Reference Number as assigned by PAC.NOTE: NEMIS is limited to 7 characters, DO NOT exceed 7 characters.
1/15/081736
A
MODR
St. Joseph, City ofBuchannan
123-34567-00SJ-001
WARNINGDeleting this page will eliminate all links
to the forms.
INDEX NEXTBACK
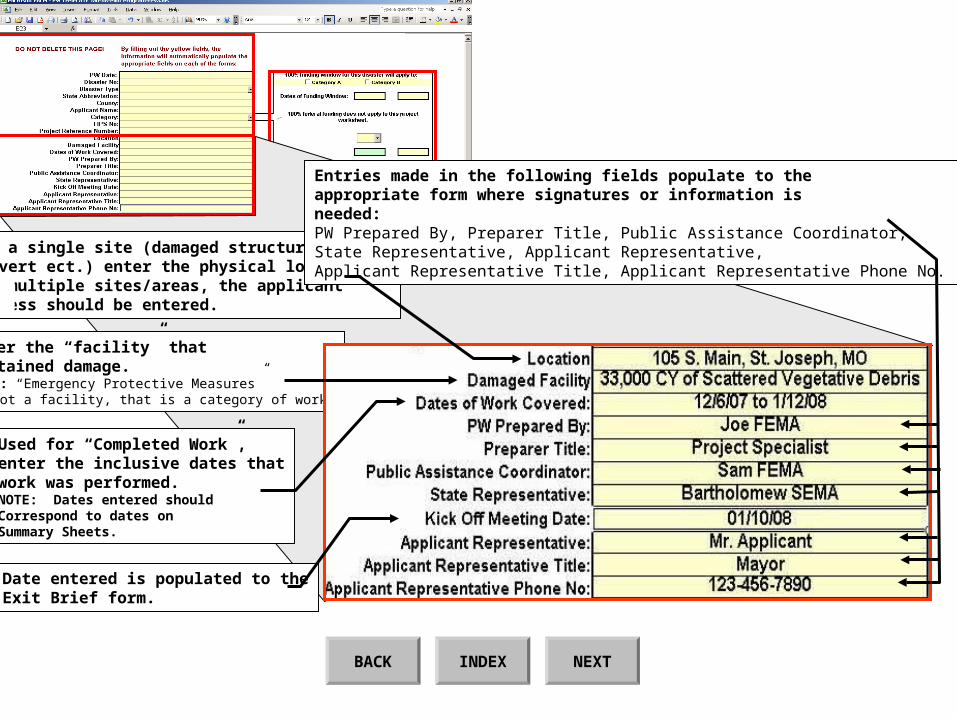
For a single site (damaged structure, culvert ect.) enter the physical location. For multiple sites/areas, the applicant address should be entered.
Enter the “facility” that sustained damage.NOTE: “Emergency Protective Measures”Is not a facility, that is a category of work.
Used for “Completed Work”,enter the inclusive dates thatwork was performed. NOTE: Dates entered shouldCorrespond to dates onSummary Sheets.
Date entered is populated to theExit Brief form.
Entries made in the following fields populate to the appropriate form where signatures or information is needed:PW Prepared By, Preparer Title, Public Assistance Coordinator,State Representative, Applicant Representative, Applicant Representative Title, Applicant Representative Phone No.
INDEX NEXTBACK
INDEX NEXTBACK
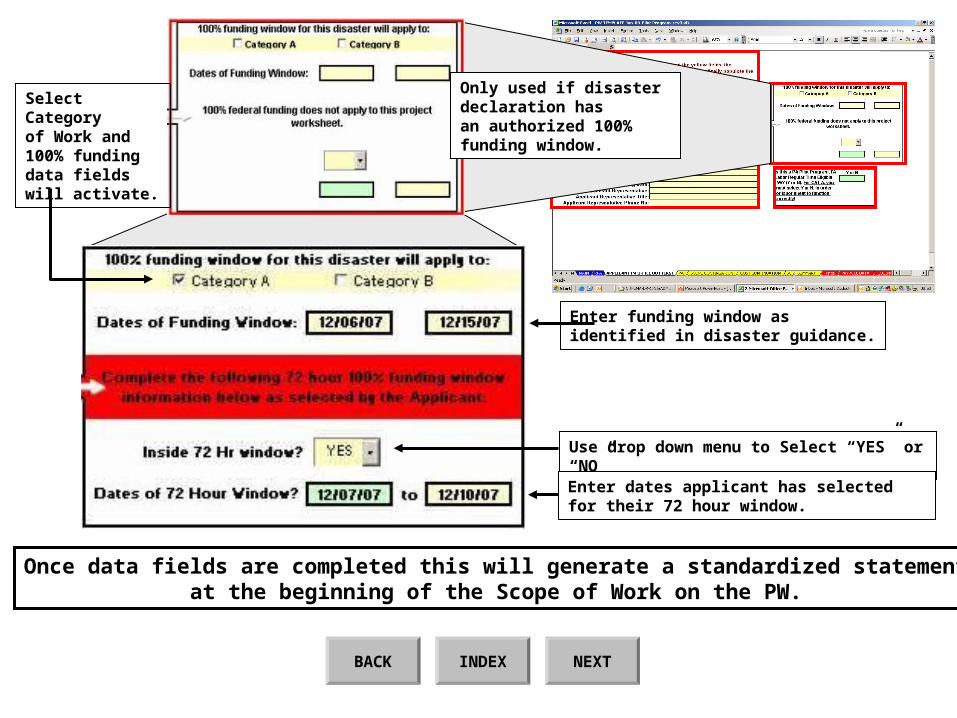
Only used if disaster declaration has an authorized 100% funding window.
Select Category of Work and 100% funding data fields will activate.
Enter funding window asidentified in disaster guidance.
Use drop down menu to Select “YES” or “NO”
Enter dates applicant has selected for their 72 hour window.
Once data fields are completed this will generate a standardized statementat the beginning of the Scope of Work on the PW.

INDEXBACK
Insert “Y” into the data field if project is to be written as a PA Pilot Program Project, for Category A work, with Force Account Labor Regular-Time Hours Option.
Selecting “Y” will allow theForce Account Labor Summary Sheet to calculate cost for regular hours.
NOTE: For all other categories of work (B, C, D, E, F, G), leave blank.
NOTE: For Category A projects, being Written and NOT using the Regular HoursLabor Option – select “N”
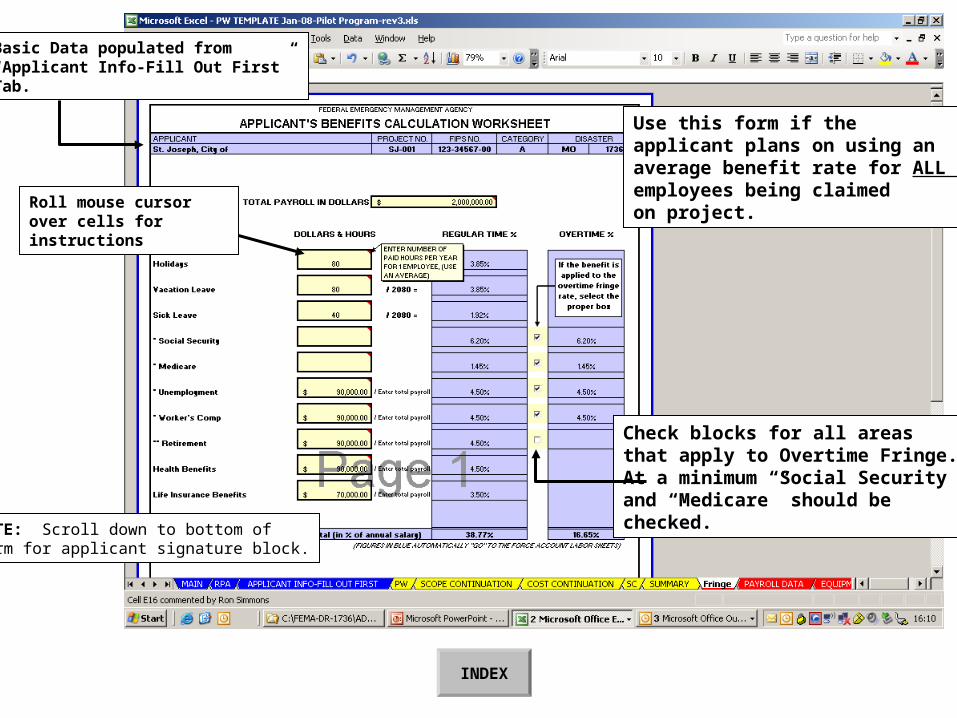
Roll mouse cursorover cells for instructions
Use this form if theapplicant plans on using anaverage benefit rate for ALL employees being claimed on project.
Check blocks for all areas that apply to Overtime Fringe. At a minimum “Social Security”and “Medicare” should be checked.
Basic Data populated from“Applicant Info-Fill Out First” Tab.
NOTE: Scroll down to bottom of Form for applicant signature block.
INDEX
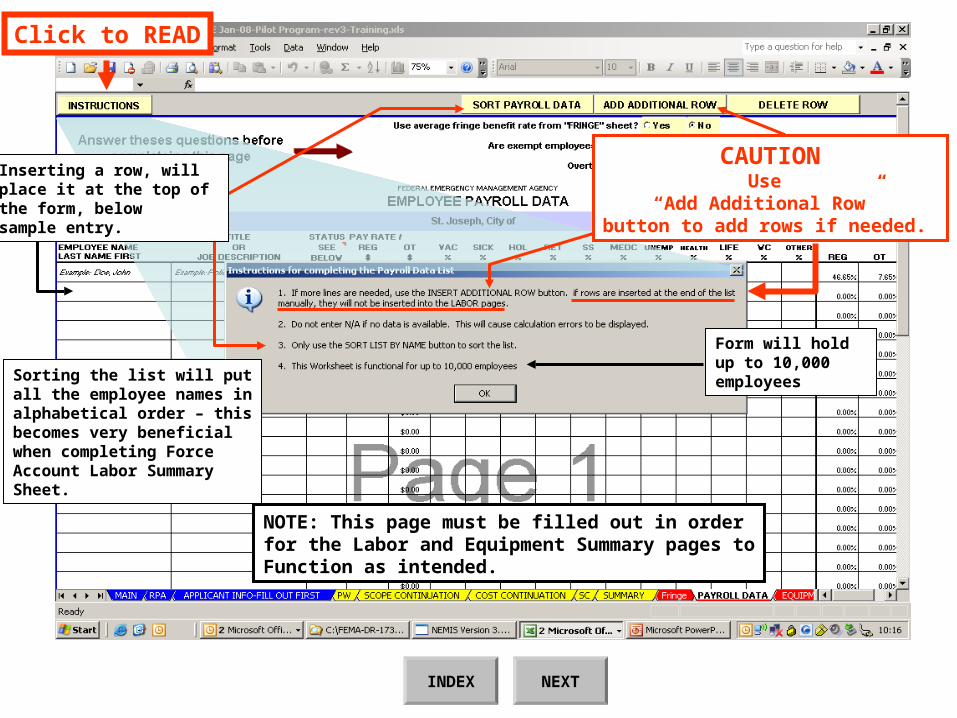
Sorting the list will putall the employee names inalphabetical order – thisbecomes very beneficialwhen completing Force Account Labor Summary Sheet.
Inserting a row, will place it at the top of the form, below sample entry.
Form will hold up to 10,000 employees
NOTE: This page must be filled out in orderfor the Labor and Equipment Summary pages toFunction as intended.
CAUTIONUse
“Add Additional Row” button to add rows if needed.
INDEX NEXT
Click to READ

Check YES if average rate is to be used. Fringe Benefitas calculated on Fringe BenefitTab will populate this page. No entries need to be made for individuals.
If individual rates are to be used, check NO, andthis area must be filled out for each individual.
Check YES only if Exempt employees are eligible for overtime as specified in applicants employee pay policy.
If overtime rate is above 1.5 times regular rate, for ALL employees, as specified in applicant pay policy, change to authorized rate.
Enter all employees, job title, pay status, regular pay rate, then “Sort”
NOTE: There is no form designed that will accommodate all applicants, or all situations as not all applicant payrolls are simple. Issues such as Comp-Time, different overtime rates for employees, different overtime for holidays, will require hard data entries on the Labor Summary Sheet. This will require un-protecting the Labor Summary Form. See the Advanced Tutorial for these type of issues.
INDEXBACK

INDEX NEXT
READ before filling out form
Can list up to 10,000
pieces of equipment Allows formatting for numerous pieces of same type of equipment, and numerous operators for same piece of equipment.
Provides ease of changing operators through drop down menu selection linked to Payroll Data page.
Provides choice of either hard entry of equipment,or input through FEMA Equipment Rate search.
Completion of this page provides ease and quick entries onto the Force Account Equipment Summary Sheet.
Vehicle Type entered manually (typed in)
Make and Modelis optional
Truck, pickup (32)-2
Identifies Second operator of same vehicle
Identifies Vehicle Number
Use drop down menu to Select operator
NOTE: Selecting the “Sort” option on the Payroll Data tab provides ease of locatingemployees using the menu.
Inputting Vehicle Information Manually
INDEX NEXTBACK
Vehicle HP and FEMA Cost Codeentered manually (typed in)
CAUTIONIf operator names are not selected using
Drop Down Menu, the labor to equipment hours imbedded check will not work.
(See Notes on Equipment Summary Form)
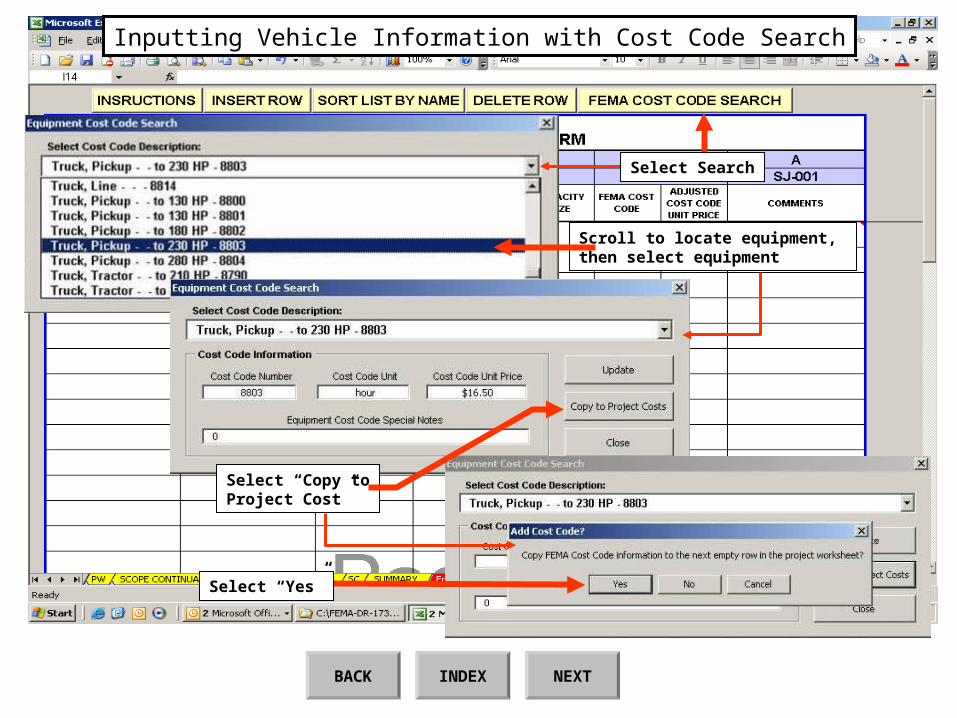
Inputting Vehicle Information with Cost Code Search
Scroll to locate equipment, then select equipment
Select “Copy toProject Cost”
Select “Yes”
INDEX NEXTBACK
Select Search

Line automatically entered using the Cost Code Search
Vehicle Identification,and any additional operatordesignator must be enteredmanually after Cost Code Search inputs line item
Operator selectedfrom drop down menu
CAUTIONIf operator names are not selected using
Drop Down Menu, the labor to equipment hours imbedded check will not work.
(See Notes on Equipment Summary Form)
INDEX NEXTBACK
Using the Sort option will placeequipment in alpha-numeric order
Use the Insert/Delete Row buttons to add/remove rows if needed. Adding a row will place it at the top of the list, then use the “Sort” to list equipment in alpha-numeric order. Inserting rows manually might not always carry over the correct links on the Equipment Summary Sheet.

“VARIOUS” should only be used forequipment that does not require a“Hands-On” operator for operation. In some cases, “tools”, such as chainsaws are operated by numerous personneldaily – check with PAO / PAC on whether“VARIOUS” will be acceptable.
“Click” for an expanded explanation on multiple pieces of equipmentwith 1 operator (pickup, trailer, backhoe)
“Click” for an expanded explanation on equipmentthat requires a dualselection of EquipmentCodes (bucket truck)
INDEXBACK
VIEW
VIEW

Since Loader is associatedwith 1 operator, and haulvehicle – a manual entryinto the Comments helpsclarify this for personneldoing review.
Since equipment trailer requiresa host vehicle it needs to be associated with the “prime” mover, in this case, a Pickup Truck, vehicle No. 32.
Identifies equipment as pickup truck # 32, with a second operator over the periodcovered on the project.
Scenario: Alan Smith hauls a backhoe to a worksite on a trailer attached to a pickup truck.This is 3 eligible pieces of equipment being operated by 1 person.
Mr. Smith is entered as theoperator for all 3 pieces of Equipment.
INDEXBACK

INDEX NEXTBACK
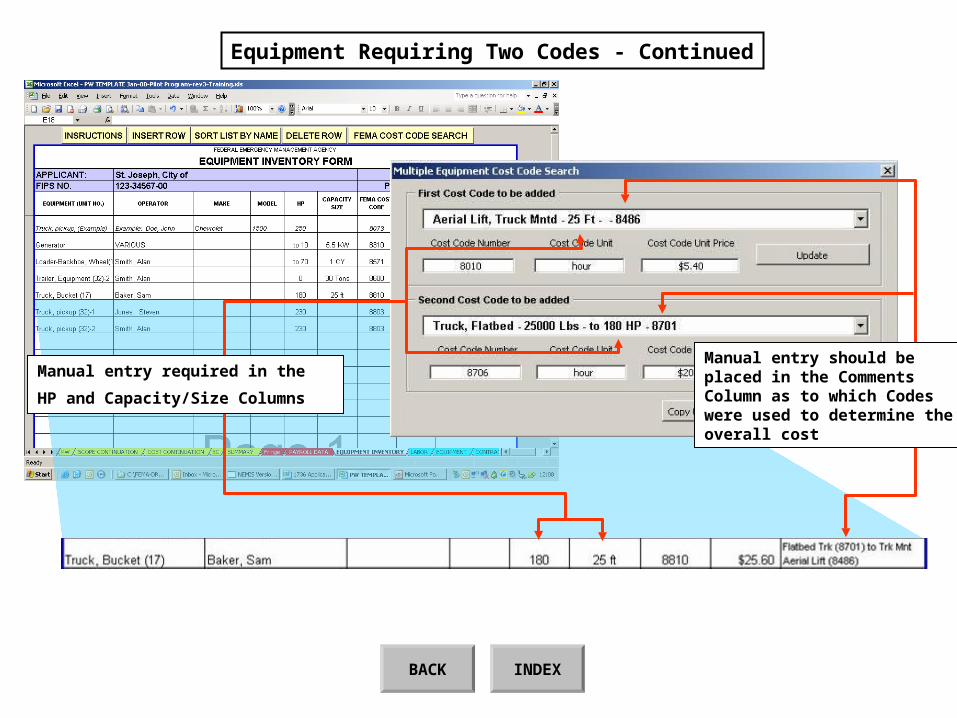
Equipment Requiring Two Codes
Step 1:Locate Item
Step 2:Copy to Project Cost
Step 3:“Yes”
Step 4:“OK”
Step 5:Select each of the pieces of equipment thatmakeup the prime equipment. Then select “Copy to Project Cost”
NOTE: Identifies the need to use two pieces of equipment to get the rate for the “prime” piece of equipment.
INDEXBACK
Manual entry required in the
HP and Capacity/Size Columns
Manual entry should beplaced in the CommentsColumn as to which Codeswere used to determine theoverall cost
Equipment Requiring Two Codes - Continued
INDEX NEXT
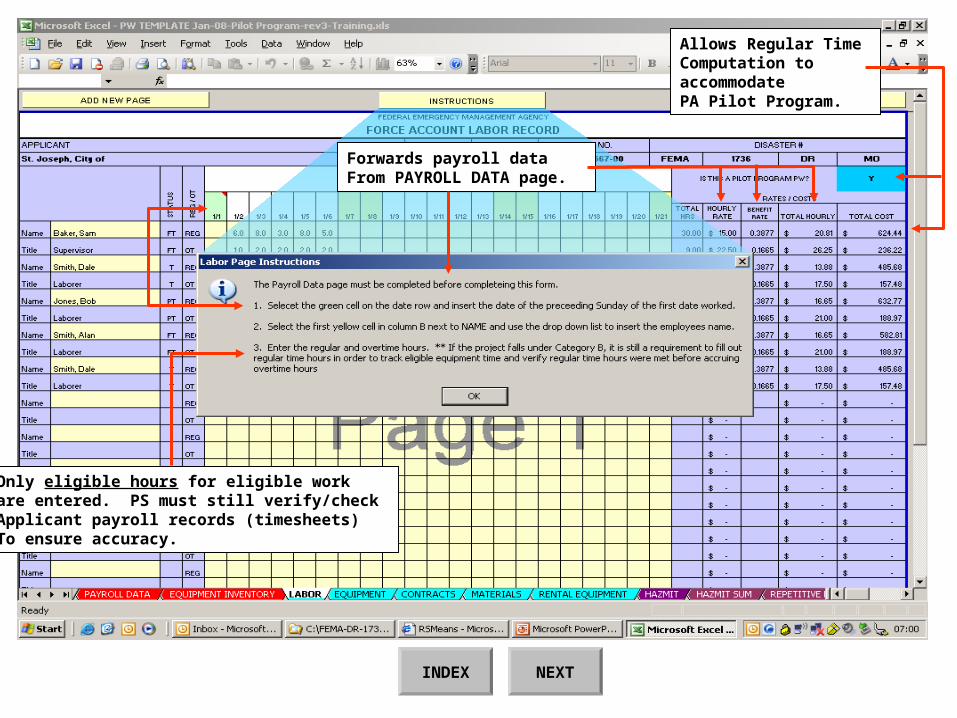
Forwards payroll dataFrom PAYROLL DATA page.
Allows Regular Time Computation to accommodatePA Pilot Program.
Only eligible hours for eligible workare entered. PS must still verify/check Applicant payroll records (timesheets)To ensure accuracy.
INDEX NEXTBACK
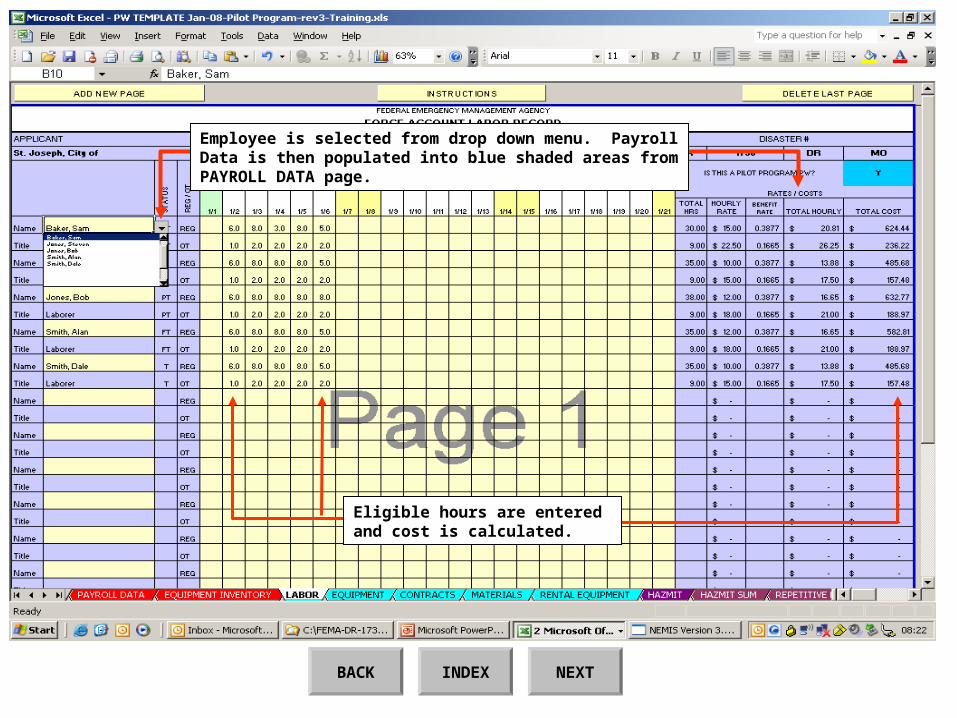
Employee is selected from drop down menu. PayrollData is then populated into blue shaded areas fromPAYROLL DATA page.
Eligible hours are entered and cost is calculated.
INDEXBACK
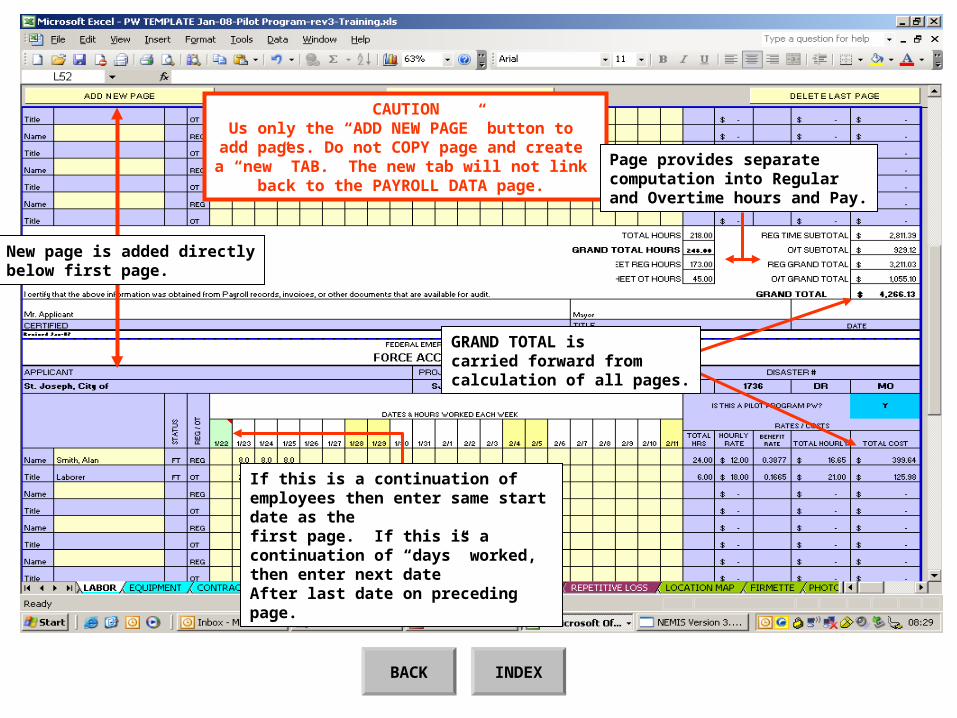
CAUTIONUs only the “ADD NEW PAGE” button to add pages. Do not COPY page and create
a “new” TAB. The new tab will not link back to the PAYROLL DATA page.
Page provides separate computation into Regular and Overtime hours and Pay.
New page is added directlybelow first page.
If this is a continuation of employees then enter same start date as thefirst page. If this is a continuation of “days” worked, then enter next dateAfter last date on preceding page.
GRAND TOTAL is carried forward fromcalculation of all pages.

INDEX NEXT
Equipment information is populated from EQUIPMENT INVENTORY page
Eligible hours are entered and costcalculated based on the currentFEMA Equipment Rate Schedule.
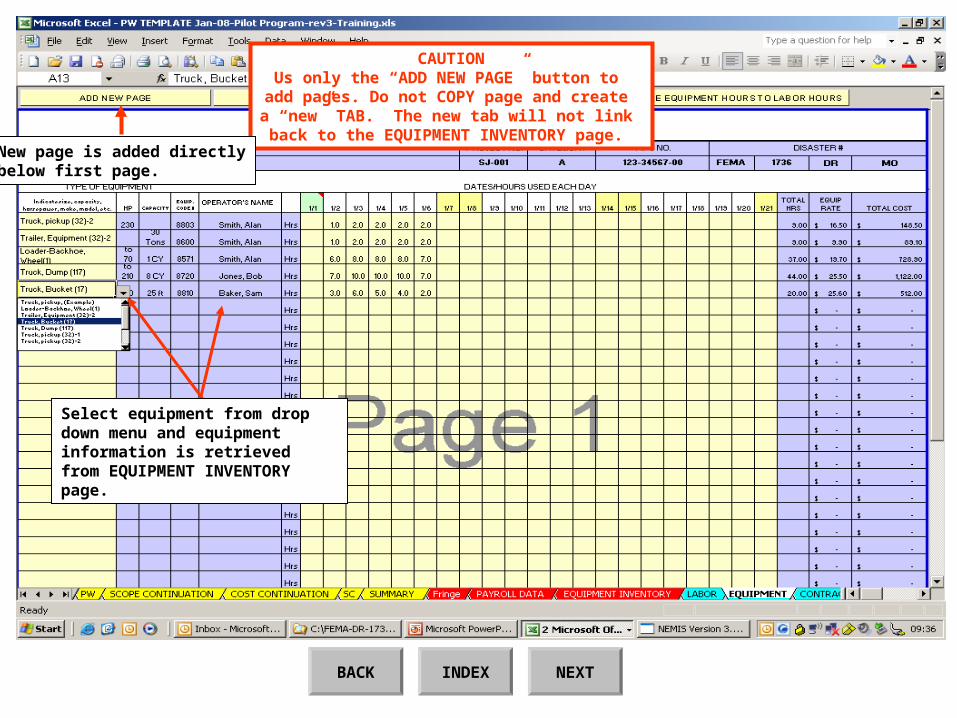
Select equipment from drop down menu and equipment information is retrieved from EQUIPMENT INVENTORY page.
CAUTIONUs only the “ADD NEW PAGE” button to add pages. Do not COPY page and create
a “new” TAB. The new tab will not link back to the EQUIPMENT INVENTORY page.
New page is added directlybelow first page.
INDEX NEXTBACK

Spreadsheet provides anembedded quick check to compare labor to equipmenthours. Can be accessed byusing the option button orby use of the vertical scrollBar.
Identifies a discrepancy between the labor and equipment hours and date.
Identifies the Labor Sheetline number where laborhours are recorded.
NOTE: Quick check application is NOT FOOL PROOF. Program will only check 1 employee, against 1 pieceof equipment on that day and compare the labor hours recorded against the equipment hours entered. TheProgram will not take into account if the wrong operator was entered on the EQUIPMENT INVENTORY page.
INDEXBACK

INDEX NEXT
Enter total invoice amount, then only the eligible cost that pertains the project. Provide a quickcomment if invoice and eligible cost are different.Provide a detailed NOTE in the PW as to whythere is a difference.
Enter information from Invoice.
NOTE: Summary form is only used to recordELIGIBLE COMPETED WORK. This is not an estimating form for Work to be Completed. Do NOT put Work to be Completed cost on Summary sheet.
INDEXBACK
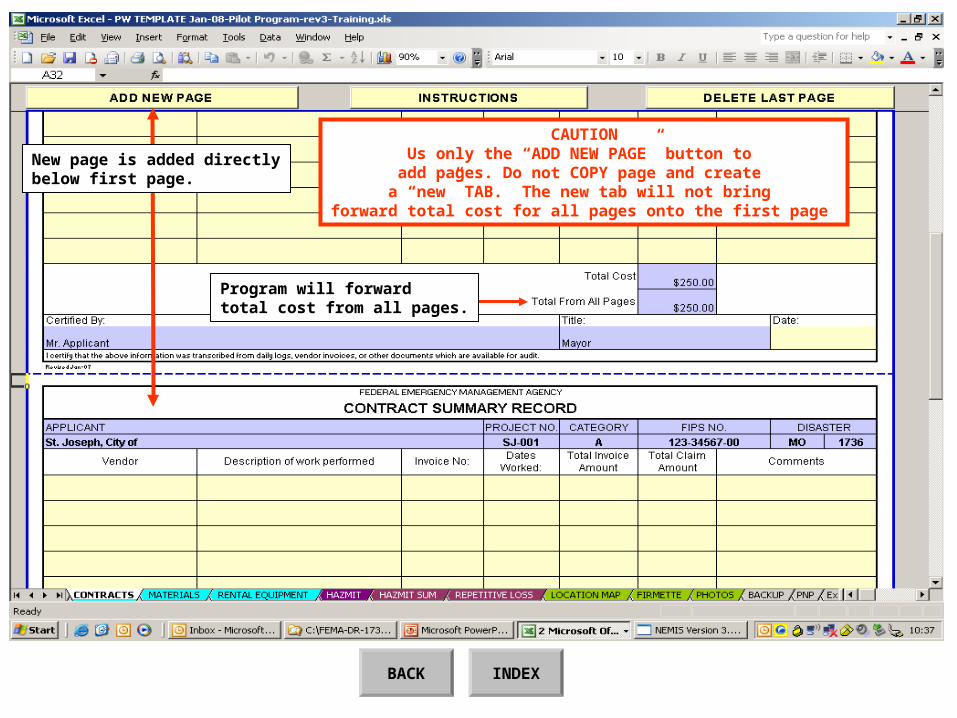
CAUTIONUs only the “ADD NEW PAGE” button to add pages. Do not COPY page and create a “new” TAB. The new tab will not bring
forward total cost for all pages onto the first page
New page is added directlybelow first page.
Program will forwardtotal cost from all pages.

INDEX NEXT
Enter total invoice amount, then only the eligible cost that pertains the project. Provide a quickcomment if invoice and eligible cost are different.Provide a detailed NOTE in the PW as to whythere is a difference.
Enter information from Invoice and/or stock information.
NOTE: Summary form is only used to recordELIGIBLE COMPETED WORK. This is not an estimating form for Work to be Completed. Do NOT put Work to be Completed cost on Summary sheet.
INDEXBACK
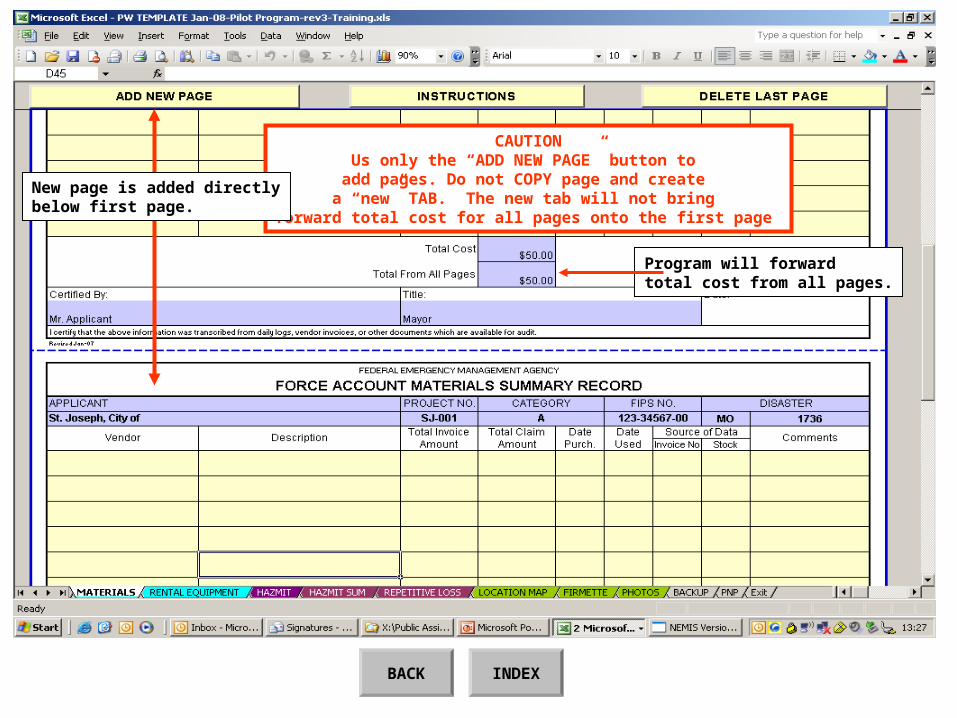
CAUTIONUs only the “ADD NEW PAGE” button to add pages. Do not COPY page and create a “new” TAB. The new tab will not bring
forward total cost for all pages onto the first page
Program will forwardtotal cost from all pages.
New page is added directlybelow first page.

INDEX NEXT
Enter only the eligible cost that pertains the project. Provide a quick comment if needed and Follow up with a detailed NOTE in the PW if needed.
Enter information from invoice.
NOTE: Summary form is only used to recordELIGIBLE COMPETED WORK. This is not an estimating form for Work to be Completed. Do NOT put Work to be Completed cost on Summary sheet.

CAUTIONUs only the “ADD NEW PAGE” button to add pages. Do not COPY page and create a “new” TAB. The new tab will not bring
forward total cost for all pages onto the first page
Program will forwardtotal cost from all pages.
New page is added directlybelow first page.
INDEXBACK

Enter Scope of Work details(materials, estimates) into field.
Enter cost line items,Quantity, Unit, Unit Price. Form will calculate total cost.
Signatures are not anapproval of the proposal,only a recommendation.
INDEX

Check box if hazard mitigation is being recommended.
Check box if hazard mitigation is not feasible.
Check box if hazard mitigation is considereda good construction practice based on pastapplication by the applicant, or one of the hazard mitigation handbooks.
Check box if hazard mitigation is being Proposed by applicant.
Check boxes forapplicable mitigation policy.
If mitigation is not feasible, state reason(s) why.(Example: Work partially completed and would require retrofit ).
Explain mitigation reasoning if it does fall within any of the above reasons.
Enter cost / percentage Information if mitigation is being proposed.
INDEX

Form is used to assist in developing a Cost Benefit Analysis (BCA) when needed.
Check type of event in which damaged occurred and date.
Check any type of proposed or completed mitigation priorto current event.
Enter previous DR, PW, and PW Version number if applicable.
Give summary of details of previous damages sustained. Give information regarding any past PWs, mitigation proposals, cost.
Check appropriate blocks if damaged facility has been damaged before.
INDEX

Creates new map page directly first page.
Map can be copy and pastedonto form from Streets and Trips
INDEX NEXT

Step 1Use box option then
click and drag box over desired map area
Step 2Select EDIT,
then COPY MAP. Return return to PW
INDEX NEXTBACK
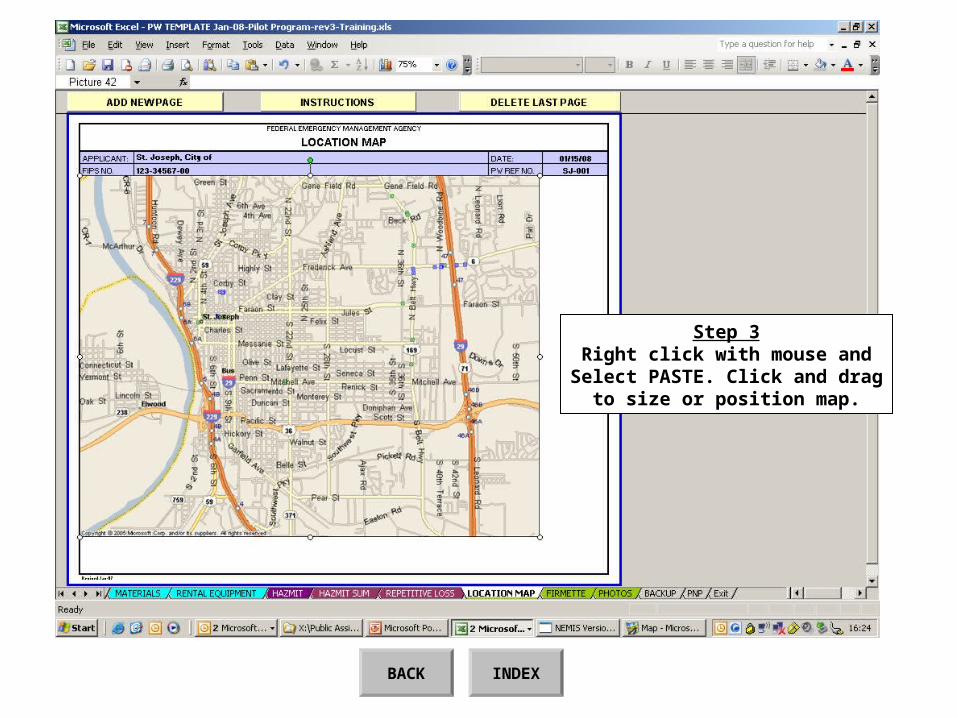
Step 3Right click with mouse and
Select PASTE. Click and dragto size or position map.
INDEXBACK

INDEX NEXT
Click YES for a direct access to FEMA Map Center
Detailed instructions on inserting a FIRMette
Creates new map page directly first page.
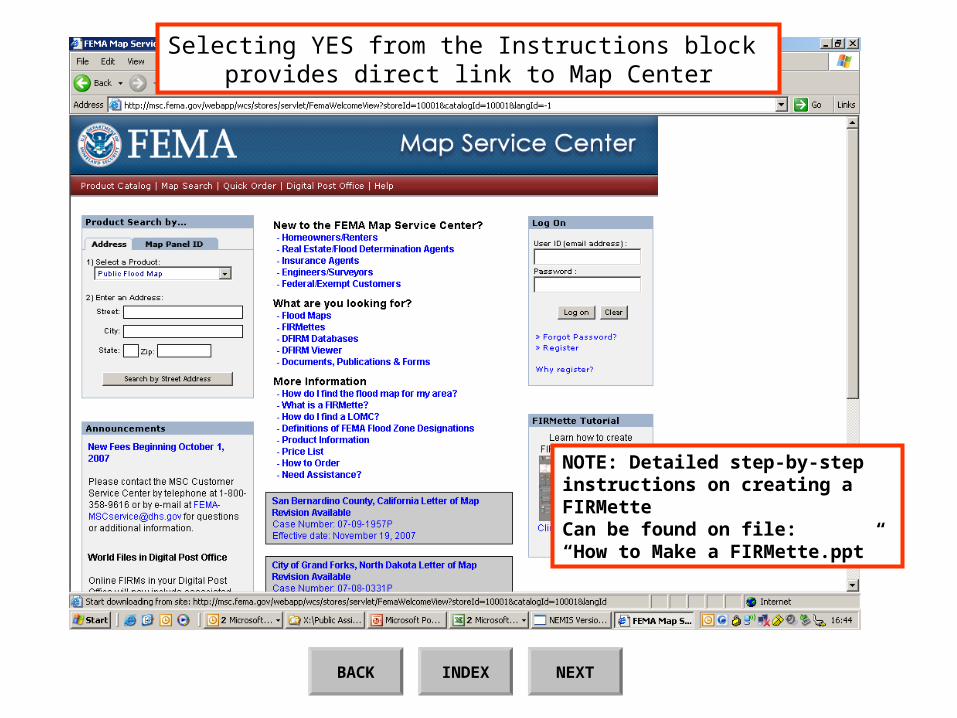
Selecting YES from the Instructions block provides direct link to Map Center
NOTE: Detailed step-by-step instructions on creating a FIRMetteCan be found on file: “How to Make a FIRMette.ppt”
INDEX NEXTBACK

Drag FIRMette from Map Centeronto PW page and size or centeras necessary.
INDEXBACK

INDEX NEXT
Creates new map page directly first page.
Instructions on reducing photo file sizeto reduce overall file size of the project.

DHS/FEMA heading, OMB No. and date; and DHS/FEMA Disclosure Statement is
MANDATORY on the PW or it is not considered a valid document for filing a claim. The written Project Worksheet is the “OFFICIAL” claim form for federal funding.
Blue fields are populated from the “Applicant Info-fill Out First” page.
Date entered should be the lastDate of “Work Completed” being submitted and match theLast date of entries on the Summary Sheets attached.
Percentage of Work Completed is based off of the dollar amount of Completed Work and total project cost
GPS location MUST be included.Enter GPS location using decimaldegree. Example: Latitude: 38.76514Longitude: -94.34567
INDEX NEXT

Step 1Click inside photo
field to activate cell
Step 2Select INSERT PICTURE
Which will open a file search window to locate photo to insert
Step 3Locate photo file and select OPEN
Step 4Photo will automatically
size itself to fit withinPhoto box
Step 5Use text field to give description of photo
INDEXBACK
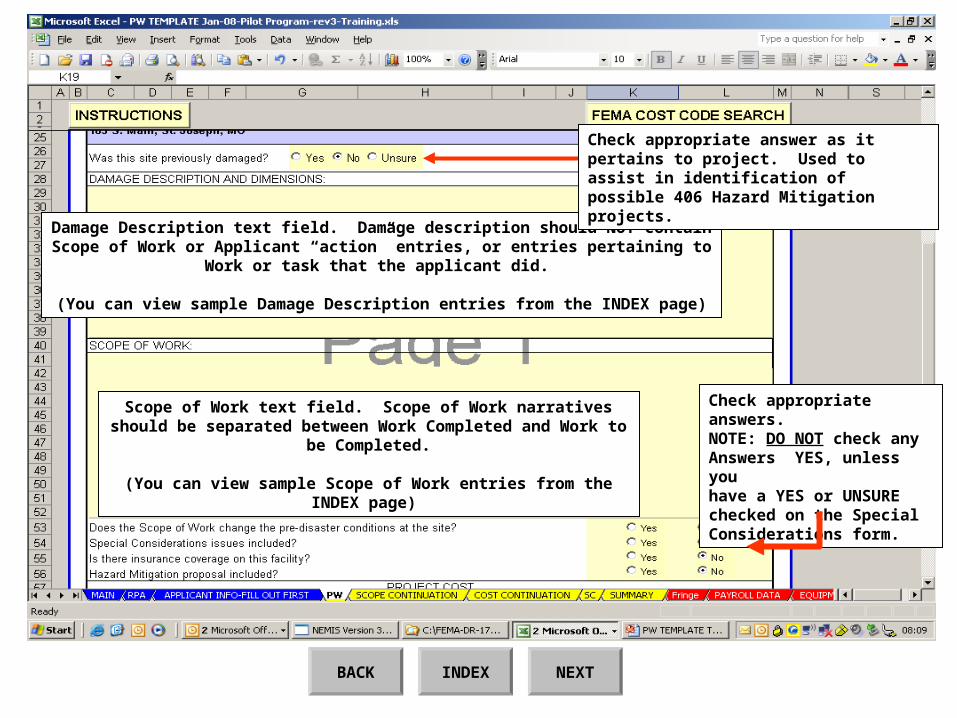
Damage Description text field. Damage description should NOT containScope of Work or Applicant “action” entries, or entries pertaining to
Work or task that the applicant did.
(You can view sample Damage Description entries from the INDEX page)
Scope of Work text field. Scope of Work narratives should be separated between Work Completed and Work to be Completed.
(You can view sample Scope of Work entries from the INDEX page)
Check appropriate answers. NOTE: DO NOT check any Answers YES, unless you have a YES or UNSURE checked on the Special Considerations form.
Check appropriate answer as it pertains to project. Used to assist in identification ofpossible 406 Hazard Mitigation projects.
INDEX NEXTBACK
INDEXBACK
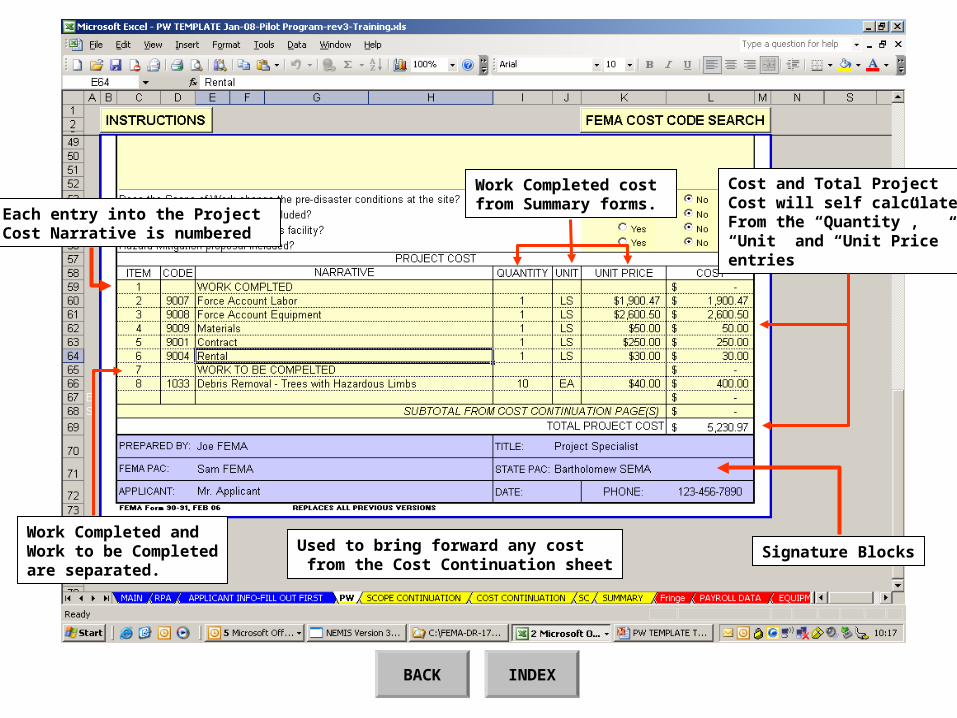
Each entry into the Project Cost Narrative is numbered
Work Completed costfrom Summary forms.
Work Completed andWork to be Completedare separated.
Used to bring forward any cost from the Cost Continuation sheet
Cost and Total ProjectCost will self calculateFrom the “Quantity”, “Unit” and “Unit Price” entries
Signature Blocks

Adds next page directlybelow first page.
Blue fields are populated from the“Applicant Fill-Out Info First page.
Text box to continue Damage DescriptionAnd/or Scope of Work narrations. Also usedfor Project Specific Notes.
INDEX

Provides searchfor Cost Codes
NOTE: Cost for codes are based on National Codes, cells are not protected so “Unit Price” cost can be adjusted for local area or Disaster Specific cost.
Select YES and itemwill post to next empty line on sheet.
NOTE: Total cost will Transfer to front of PW.
INDEX
Use drop down menuTo search for item, thenSelect “Copy to ProjectCost.”
Adds next page directlybelow first page.

Check appropriate answerfor each of the 9 questions.
NOTE: From is required to be submitted with all projects even if all answers to questions are NO.
NOTE: If any question is marked as YES or UNSURE,then the “Special Considerations Included” on the front of the Project Worksheet is marked YES.
INDEX
Any question answered YES or UNSURE requires an explanation comment placed in the text field.
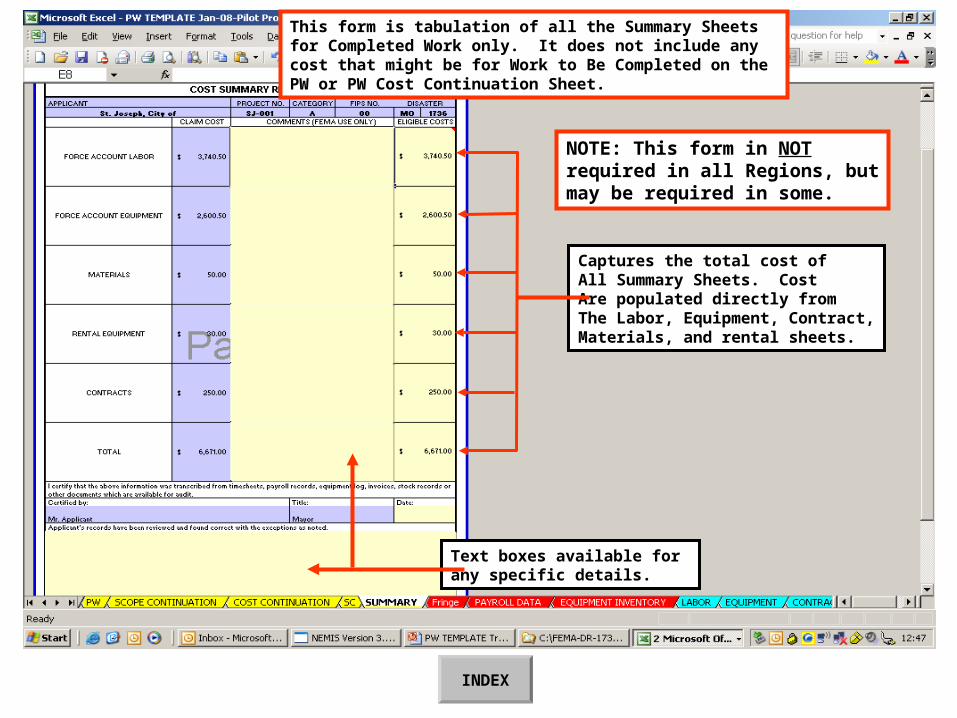
Captures the total cost ofAll Summary Sheets. CostAre populated directly fromThe Labor, Equipment, Contract,Materials, and rental sheets.
Text boxes available for any specific details.
This form is tabulation of all the Summary Sheets for Completed Work only. It does not include any cost that might be for Work to Be Completed on the PW or PW Cost Continuation Sheet.
NOTE: This form in NOTrequired in all Regions, butmay be required in some.
INDEX