Embed Size (px)
Citation preview
8/14/2019 Instructions for Using Media Mgr
http://slidepdf.com/reader/full/instructions-for-using-media-mgr 1/14
Version 1.0 ©2007 Research In Motion Limited 1
01/05/07
Job Aid
New Media Manager Features for BlackBerry Desktop Software 4.2 Service Pack 2
The purpose of this document is to profile the main features of the new Media Managerincluded in the release of BlackBerry® Desktop Software 4.2 Service Pack 2 (4.2.2).
Overview BlackBerry Desktop Software 4.2.2 includes the Roxio® Media Manager.
The Media Manager is a BlackBerry-specific version of the Roxio Easy MediaCreator® 9 application that has been specially designed by Sonic Solutions to work withBlackBerry smartphones. The Media Manager is a suite of media applications designed to
help you manage your songs, photos, and videos and to transfer them between yourcomputer and BlackBerry smartphone.
Notes:
The Media Manager requires that you have BlackBerry Device Software 4.2.0 orlater on your BlackBerry smartphone. If you have an earlier version ofBlackBerry Device Software, Media Manager will be disabled.
The Media Manager is intended for use with BlackBerry smartphones that havemultimedia capabilities.
If you have already installed Roxio Easy Media Creator 9 on your computer, theMedia Manager will add BlackBerry smartphone components and features toyour current installation.
Key featuresThe Media Manager is designed to let you
• transfer media files between your computer and your BlackBerrysmartphone or the media card in your BlackBerry smartphone
• convert media files into a format that is compatible with your BlackBerrysmartphone
• browse the contents of your BlackBerry smartphone and media card
• manage music playlists
• edit audio information tags
• share media files across a home computer network or the Internet
• monitor your computer for new media files
8/14/2019 Instructions for Using Media Mgr
http://slidepdf.com/reader/full/instructions-for-using-media-mgr 2/14
2 ©2007 Research In Motion Limited Version 1.0
01/05/07
Job Aid
Launching the media managerNote: Ensure your BlackBerry smartphone is connected to your computer before opening
the Media Manager. Each time you open the Media Manager, you will need to type yourBlackBerry smartphone password.
To launch the Media Manager
• Open BlackBerry Desktop Manager and double-click the Media Manager icon.
You can also also access the Media Manager using the taskbar. Click Start > Programs >Media Manager 9 > My Media > Media Manager.
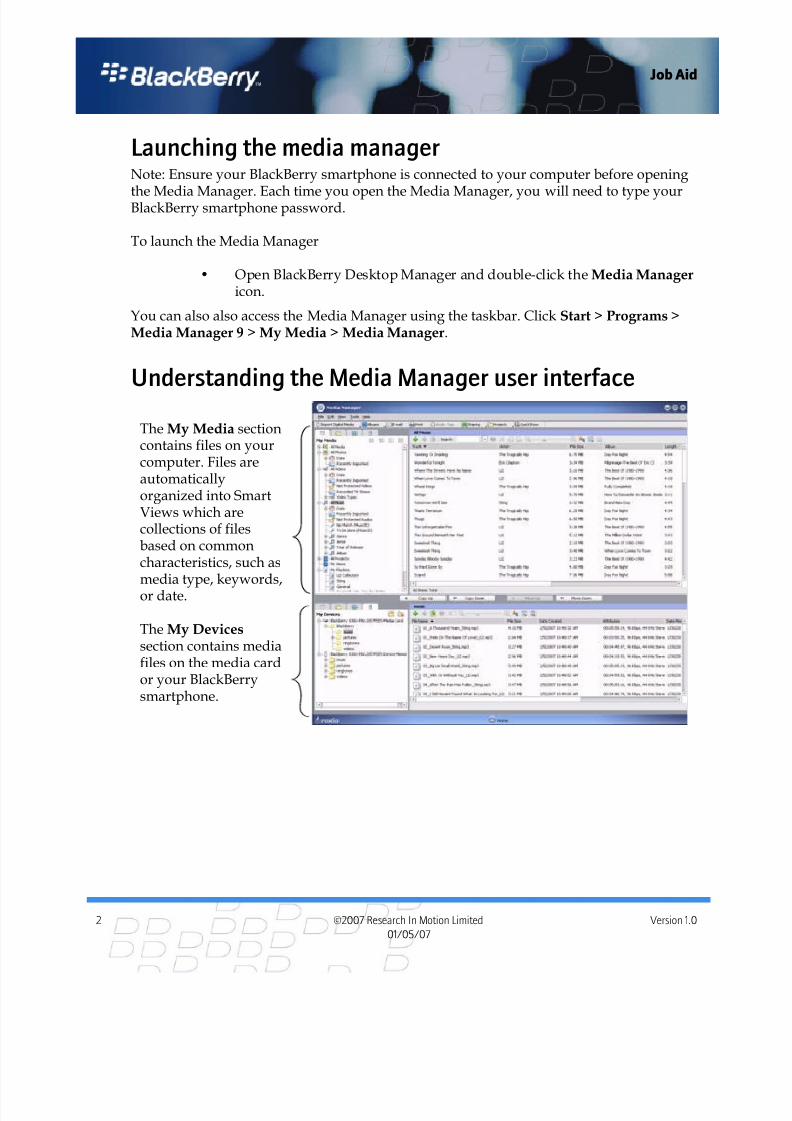
Understanding the Media Manager user interface
The My Media sectioncontains files on yourcomputer. Files areautomaticallyorganized into SmartViews which arecollections of filesbased on commoncharacteristics, such asmedia type, keywords,or date.
The My Devices section contains mediafiles on the media cardor your BlackBerrysmartphone.
8/14/2019 Instructions for Using Media Mgr
http://slidepdf.com/reader/full/instructions-for-using-media-mgr 3/14
Version 1.0 ©2007 Research In Motion Limited 3
01/05/07
Job Aid
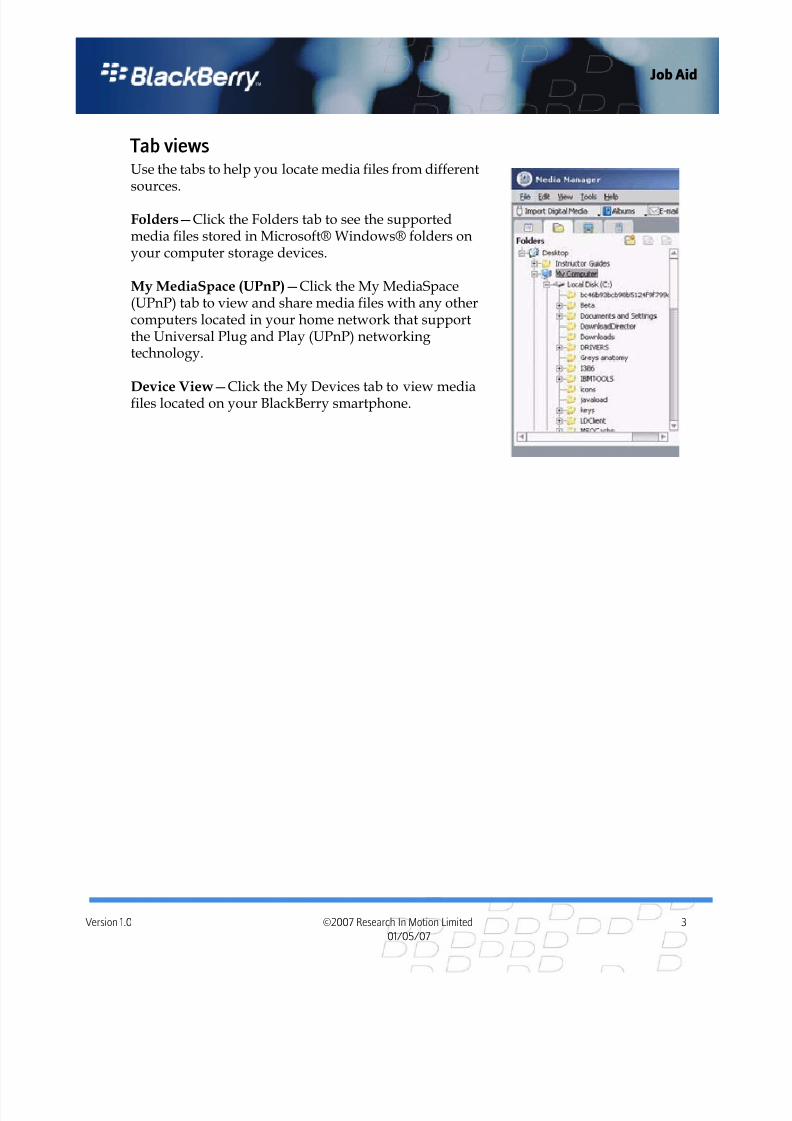
Tab viewsUse the tabs to help you locate media files from differentsources.
Folders—Click the Folders tab to see the supportedmedia files stored in Microsoft® Windows® folders onyour computer storage devices.
My MediaSpace (UPnP)—Click the My MediaSpace(UPnP) tab to view and share media files with any othercomputers located in your home network that supportthe Universal Plug and Play (UPnP) networkingtechnology.
Device View—Click the My Devices tab to view mediafiles located on your BlackBerry smartphone.
8/14/2019 Instructions for Using Media Mgr
http://slidepdf.com/reader/full/instructions-for-using-media-mgr 4/14
4 ©2007 Research In Motion Limited Version 1.0
01/05/07
Job Aid
Transferring filesFrom your computer to your BlackBerry smartphoneTo transfer files from your computer to your BlackBerry smartphone, follow these steps:
1. In My Media, select the media files you want to transfer to your BlackBerrysmartphone.
2. In My Devices, select the folder on your BlackBerry smartphone where youwant to save the files.
3. Click Copy Down.
You can also drag files from the My Media section to the My Devices section.
4. Select a conversion option from the dialog box to begin the file transfer:
• To automatically convert the files to the optimal format and size for yourBlackBerry® smartphone, select Convert for optimal playback, and clickOK.
• To copy the files with the existing format and size, select Copy with noconversion, and click OK.
• To select a destination format and size, select Advanced conversionoptions, and click OK. Change the options as desired, and click OK.For more information, see “Setting advanced conversion options” onpage 5.
From your BlackBerry smartphone to your computer
To transfer files from your BlackBerry smartphone to your computer, follow these steps:
1. In My Devices, select the folder on your BlackBerry smartphone that containsthe files that you want to transfer.
2. In My Media, browse to the folder on your computer where you want to savethe files.
3. Select a transfer option from the dialog box to begin the transfer:
• To move the files to your computer, click Move Up.
• To copy the files to your computer, click Copy Up.
Note: When you move files to your computer, they are deleted from yourBlackBerry smartphone; when you copy them, they are not deleted.
You can also drag files from the My Devices section to the My Media section.
8/14/2019 Instructions for Using Media Mgr
http://slidepdf.com/reader/full/instructions-for-using-media-mgr 5/14
Version 1.0 ©2007 Research In Motion Limited 5
01/05/07
Job Aid
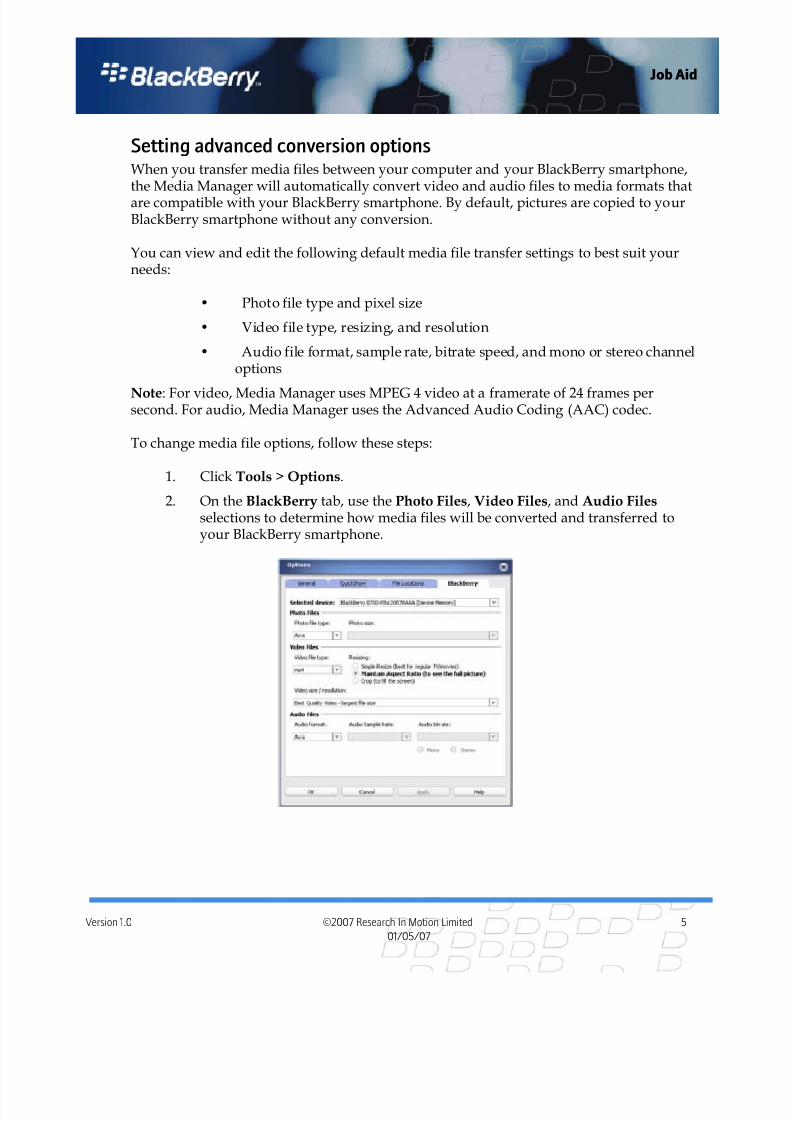
Setting advanced conversion optionsWhen you transfer media files between your computer and your BlackBerry smartphone,the Media Manager will automatically convert video and audio files to media formats thatare compatible with your BlackBerry smartphone. By default, pictures are copied to yourBlackBerry smartphone without any conversion.
You can view and edit the following default media file transfer settings to best suit yourneeds:
• Photo file type and pixel size
• Video file type, resizing, and resolution
• Audio file format, sample rate, bitrate speed, and mono or stereo channeloptions
Note: For video, Media Manager uses MPEG 4 video at a framerate of 24 frames persecond. For audio, Media Manager uses the Advanced Audio Coding (AAC) codec.
To change media file options, follow these steps:
1. Click Tools > Options.
2. On the BlackBerry tab, use the Photo Files, Video Files, and Audio Files selections to determine how media files will be converted and transferred toyour BlackBerry smartphone.
8/14/2019 Instructions for Using Media Mgr
http://slidepdf.com/reader/full/instructions-for-using-media-mgr 6/14
6 ©2007 Research In Motion Limited Version 1.0
01/05/07
Job Aid
Managing PlaylistsThe Media Manager allows you to manage your music collection by organizing your audio
files into lists of songs (playlists).
Note: When you copy or move playlists, all associated audio files are also copied to yourBlackBerry smartphone.
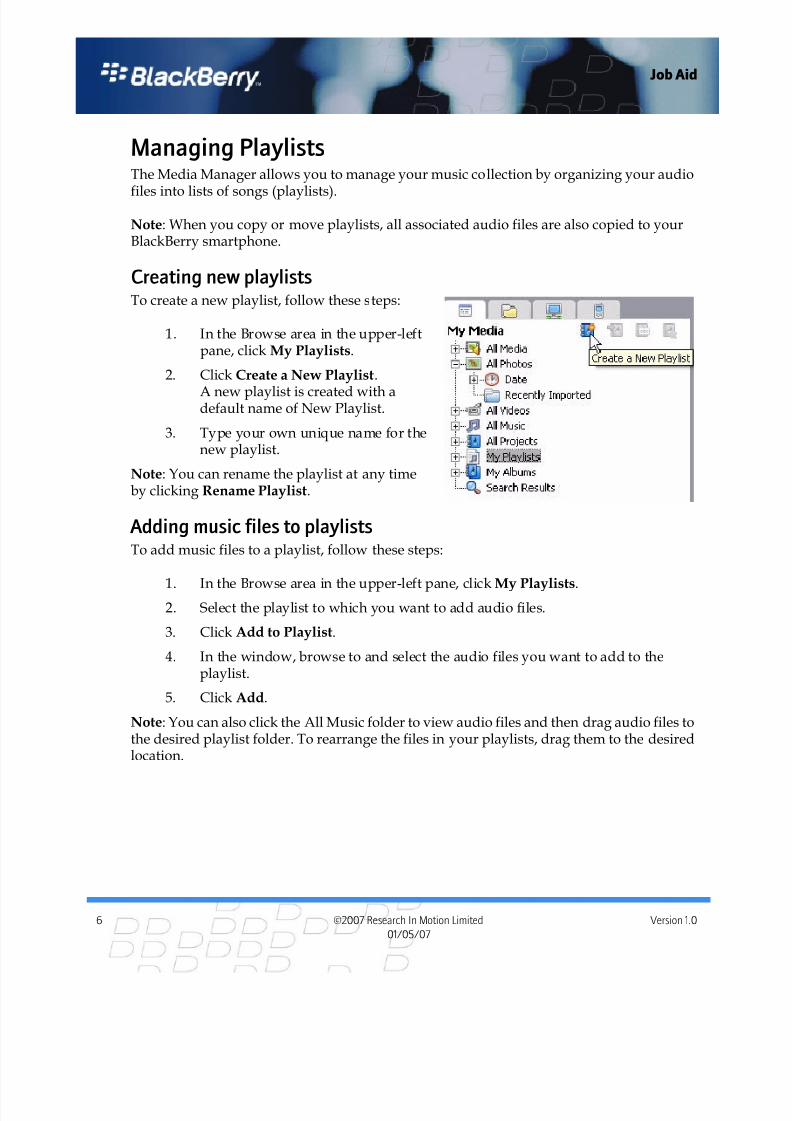
Creating new playlistsTo create a new playlist, follow these steps:
1. In the Browse area in the upper-leftpane, click My Playlists.
2. Click Create a New Playlist.
A new playlist is created with adefault name of New Playlist.
3. Type your own unique name for thenew playlist.
Note: You can rename the playlist at any timeby clicking Rename Playlist.
Adding music files to playlistsTo add music files to a playlist, follow these steps:
1. In the Browse area in the upper-left pane, click My Playlists.2. Select the playlist to which you want to add audio files.
3. Click Add to Playlist.
4. In the window, browse to and select the audio files you want to add to theplaylist.
5. Click Add.
Note: You can also click the All Music folder to view audio files and then drag audio files tothe desired playlist folder. To rearrange the files in your playlists, drag them to the desiredlocation.
8/14/2019 Instructions for Using Media Mgr
http://slidepdf.com/reader/full/instructions-for-using-media-mgr 7/14
Version 1.0 ©2007 Research In Motion Limited 7
01/05/07
Job Aid
Deleting playlistsTo delete playlists, follow these steps:
1. In the Browse area in the upper-left pane, click My Playlists.
2. Select the playlist you want to delete.
3. Click Delete Selected Playlist.
4. When the Media Manager prompts for confirmation, click Yes.
Note: If you want to delete the selected media files from Microsoft® Windows®, select thePermanently delete the selected media file(s) check box.
Editing Audio TagsThe Media Manager allows you to search for and modify audio tags and album art forsongs in your music collection. Audio tags allow information such as the song title, artistname, album, track number, and genre to be stored within the audio file itself. You can usethe Media Manager audio tag editor to correct any missing audio tag information in youraudio files before downloading the songs to your BlackBerry smartphone. By ensuringyour audio files contain accurate tag information, you should be able to quickly find songsand easily organize them into playlists.
Automatically edit audio information tagsNote: You must be connected to the Internet to use this service.
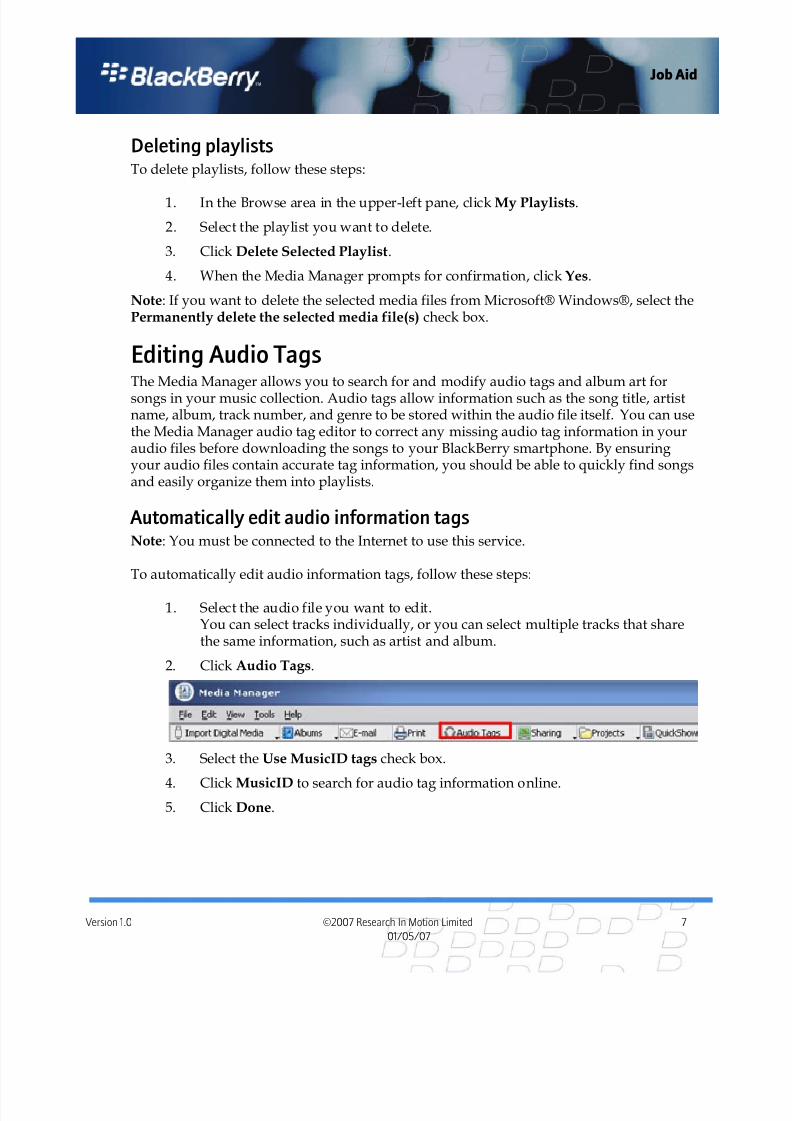
To automatically edit audio information tags, follow these steps:
1. Select the audio file you want to edit.You can select tracks individually, or you can select multiple tracks that sharethe same information, such as artist and album.
2. Click Audio Tags.
3. Select the Use MusicID tags check box.
4. Click MusicID to search for audio tag information online.5. Click Done.
8/14/2019 Instructions for Using Media Mgr
http://slidepdf.com/reader/full/instructions-for-using-media-mgr 8/14
8 ©2007 Research In Motion Limited Version 1.0
01/05/07
Job Aid
Manually edit audio information tagsTo manually edit audio information tags, follow these steps:
1. Select the audio file you want to edit.
2. Right-click and select Edit Audio Tags.
3. Use the audio tag fields to type information, such as the song title, artist, album,track number, or year for the selected file. To type information, click in theappropriate box and type the new information.
4. If you want to edit track art, click Browse and find the graphic file you want touse, then click OK.
5. Click Done.
Automatically monitor your computer for new mediafilesIf enabled, the Media Manager can automatically locate and organize the media files onyour computer. This feature is known as folder watching. You can start and stop the folderwatching feature at any time, and also specify which folders on your computer you wantthe folder watching feature to scan.
The Media Manager organizes all the media files it finds within the applicable folder on theMy Media tab. For example, if you have the folder watching feature enabled, and youdownload pictures from your digital camera to your computer, the folder watching featurewill automatically detect the new photos and place them within the All Photos folder.
8/14/2019 Instructions for Using Media Mgr
http://slidepdf.com/reader/full/instructions-for-using-media-mgr 9/14
Version 1.0 ©2007 Research In Motion Limited 9
01/05/07
Job Aid
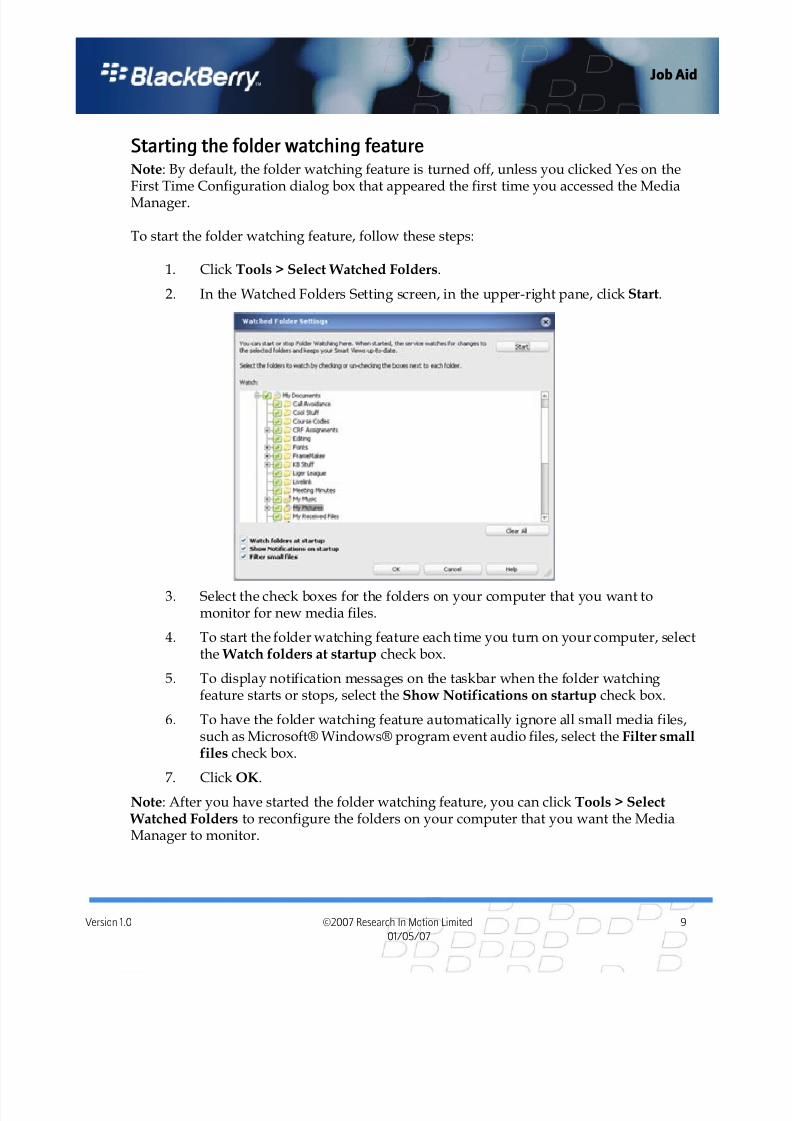
Starting the folder watching featureNote: By default, the folder watching feature is turned off, unless you clicked Yes on theFirst Time Configuration dialog box that appeared the first time you accessed the MediaManager.
To start the folder watching feature, follow these steps:
1. Click Tools > Select Watched Folders.
2. In the Watched Folders Setting screen, in the upper-right pane, click Start.
3. Select the check boxes for the folders on your computer that you want tomonitor for new media files.
4. To start the folder watching feature each time you turn on your computer, selectthe Watch folders at startup check box.
5. To display notification messages on the taskbar when the folder watchingfeature starts or stops, select the Show Notifications on startup check box.
6. To have the folder watching feature automatically ignore all small media files,such as Microsoft® Windows® program event audio files, select the Filter smallfiles check box.
7. Click OK.Note: After you have started the folder watching feature, you can click Tools > Select Watched Folders to reconfigure the folders on your computer that you want the MediaManager to monitor.
8/14/2019 Instructions for Using Media Mgr
http://slidepdf.com/reader/full/instructions-for-using-media-mgr 10/14
10 ©2007 Research In Motion Limited Version 1.0
01/05/07
Job Aid
Stopping the folder watching featureTo stop the folder watching feature, follow these steps:
1. Click Tools > Select Watched Folders.
2. dIn the Watched Folders Setting screen, in the upper-right pane, click Stop.
3. Clear the check boxes for the folders on your computer that you want tomonitor for new media files.You can also click Clear All to stop monitoring all the files on your computer.
4. Click OK.
Importing digital media to your computerThe Media Manager is also designed to let you import digital media files to your computer,provided your computer meets the necessary requirements. You can also
• Create audio compact discs (CDs)
• Capture digital or analog video
• Record audio from an audio input device, such as a microphone or line-infrom a stereo
• Transfer photos and videos from a digital camera
• Download photos from a scanner
Note: The Media Manager does not support copying or burning of encrypted audio filesthat are protected by digital rights management (DRM) technology.
To import digital media to your computer
• Click Import Digital Media, and then select the type of media you want toimport.
Sharing files across a home computer networkThe My MediaSpace (UPnP) feature allows you to share media files across a homecomputer network. Use this feature if you want to access your media files from a differentcomputer on your home network or allow others on your home network to access ordownload your media files from their computers. My MediaSpace uses UPnP networkingtechnology. All of the UPnP components required to share files with My MediaSpace areautomatically installed with BlackBerry Desktop Software 4.2.2.
Note: My MediaSpace allows you to share media files only. All other file types on yourcomputer, such as documents or programs, are not visible to others on your homecomputer network.
8/14/2019 Instructions for Using Media Mgr
http://slidepdf.com/reader/full/instructions-for-using-media-mgr 11/14
Version 1.0 ©2007 Research In Motion Limited 11
01/05/07
Job Aid
To fully enable My MediaSpace, your computer must have sharing enabled and mustauthorize any other computers that are trying to gain access. For assistance in configuringyour home network routers or firewalls for UPnP sharing, click Help > Media Manager
Help Center.
Complete the following steps to use the My MediaSpace feature:
Step 1: Enable home network sharing1. On the taskbar in the upper pane, click Sharing .
2. Choose Manage My MediaSpace (UPnP). The Manage My MediaSpace dialogbox appears.
3. To enable home network sharing, click Start Sharing . The button name changesto Stop Sharing.
4. Click Done to close the dialog box.
Note: To disable home network sharing, click Stop Sharing.
Step 2: Grant access to computers on your home network1. On the taskbar in the upper pane, click Sharing .
2. Choose Manage My MediaSpace (UPnP). The Manage MyMediaSpace dialogbox appears.
3. Select a computer with which you want to share your files, and click Authorize.
4. Repeat this step for each computer with which you want to share files.
5. Click Done to close the dialog box.
Once My MediaSpace is enabled and authorized, you can access shared files on the MyMediaSpace (UPnP) tab.
Sharing pictures across the Internet The Media Manager LiveShare feature allows you to use the Internet to share pictures withothers outside of your home network. Your friends can view and download your pictureson their computers, Internet enabled phones, or BlackBerry smartphones. Choose thealbum you want to share and then invite your friends to view it. Your friends receive an e-mail message with small thumbnail-sized pictures of a few of the shared files, plus a link toa LiveShare folder on your computer. When they click the link, they view a web pagecontaining thumbnails of all the shared files. They can view the pictures or download themto their computers or BlackBerry smartphones.
8/14/2019 Instructions for Using Media Mgr
http://slidepdf.com/reader/full/instructions-for-using-media-mgr 12/14
12 ©2007 Research In Motion Limited Version 1.0
01/05/07
Job Aid
To use LiveShare, complete these steps:
1. Click Tools > Start Sharing with LiveShare.
2. Click Tools > Manage My LiveShares. The Manage My LiveShares windowopens.
3. Configure which files you want to share and the LiveShare invitationproperties.
For more information about configuring the LiveShare feature, click Help in theManage My LiveShares window.
Note: To stop the LiveShare feature, click Tools > Stop Sharing with LiveShare.
Want more information about the Media Manager?
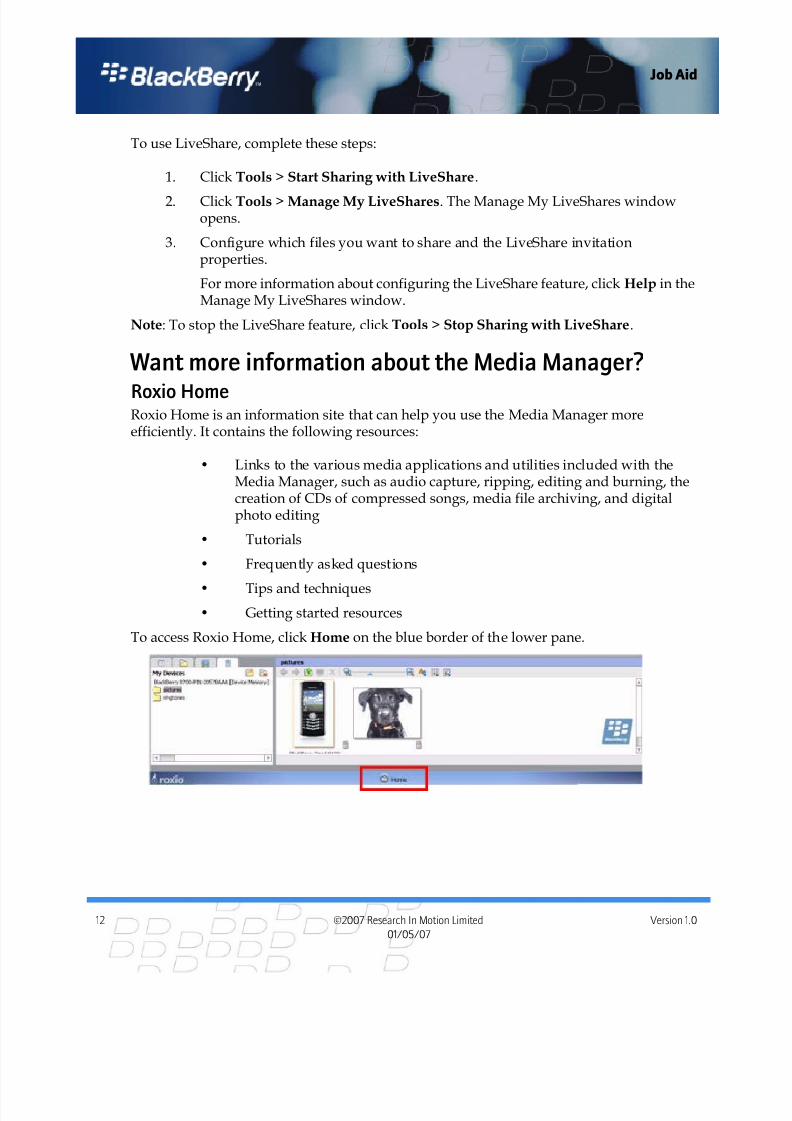
Roxio HomeRoxio Home is an information site that can help you use the Media Manager moreefficiently. It contains the following resources:
• Links to the various media applications and utilities included with theMedia Manager, such as audio capture, ripping, editing and burning, thecreation of CDs of compressed songs, media file archiving, and digitalphoto editing
• Tutorials
• Frequently asked questions
• Tips and techniques• Getting started resources
To access Roxio Home, click Home on the blue border of the lower pane.
8/14/2019 Instructions for Using Media Mgr
http://slidepdf.com/reader/full/instructions-for-using-media-mgr 13/14
Version 1.0 ©2007 Research In Motion Limited 13
01/05/07
Job Aid
Online HelpTo learn more about the Media Manager, click Help > Media Manager Help Center. Theonline help center contains extensive information about the Media Manager, includingstep-by-step instructions and detailed explanations about all the Media Manager features,such as photo editing and file sharing.
Support informationFor more information on supporting or using the Media Manager, please refer to theBlackBerry Technical Solution Center at www.BlackBerry.com/support.
8/14/2019 Instructions for Using Media Mgr
http://slidepdf.com/reader/full/instructions-for-using-media-mgr 14/14
14 ©2007 Research In Motion Limited Version 1.0
01/05/07
Job Aid
©2007 Research In Motion Limited. All Rights Reserved. The BlackBerry family of related marks, images and symbols are the exclusive properties and
trademarks of Research In Motion Limited. RIM, Research In Motion, and BlackBerry are registered with the U.S. Patent and Trademark Office and
may be pending or registered in other countries. Microsoft is a trademark of the Microsoft Corporation. Roxio and Easy Media Creator are trademarks
of Sonic Solutions. All other brands, product names, company names, trademarks and service marks are the properties of their respective owners. This
document is provided “as is” and Research In Motion Limited and its affiliated companies (“RIM”) assume no responsibility for any typographical,
technical or other inaccuracies in this document. RIM reserves the right to periodically change information contained in this document. RIM makes norepresentations, warranties, conditions or covenants, either express or implied.
Check with airtime service provider for airtime wirel;ess service, availability, roaming arrangements, service plans, and supported features. Certain
features outlined in this document may require a minimum version of software. RIM makes no representation, warranty or guarantee and assumes no
liability whatsoever in realation to third-party products and services.
For RIM and BlackBerry Partner Internal Reference Only — Do not distribute externally.