Embed Size (px)
Citation preview
Showcase DVDPlayer
Instructions for Use
Owner’s Reference
THE LEADER IN AUDIO ENGINEERING
Krell Industries, Inc.45 Connair RoadOrange, CT 06477-3650 USATEL 203-799-9954FAX 203-891-2028E-MAIL [email protected] SITE http://www.krellonline.com
This product complies with the EMC directive (89/336/EEC) and the low-voltagedirective (73/23/EEC).
Do not place the Showcase DVD where it could be exposed to dripping or splashing.
Do not remove or bypass the ground pin on the end of the AC cord. This may causeradio frequency interference (RFI) to be introduced into your playback system.
The ventilation grids on the top and bottom of the Showcase DVD must be unob-structed at all times during operation. Do not place flammable material on top of orbeneath the component.
Turn off all systems’ power before connecting the Showcase DVD to any compo-nent. Make sure all cable terminations are of the highest quality, free from frayedends, short circuits, or cold solder joints.
Caution: Visible and invisible laser radiation. When the cover is open, avoid expo-sure to beam.
This unit employs a laser. To prevent possible eye injury, only a qualified service per-son should remove the cover or attempt to service this device. Use of controls oradjustments or performance of procedures other than those specified herein mayresult in hazardous radiation exposure.
THERE ARE NO USER-SERVICEABLE PARTS INSIDE ANY KRELL PRODUCT.
Please contact your authorized dealer, distributor, or Krell if you have any questionsnot addressed in this reference manual.
This product incorporates copyright protection technology that is protected by method claims of certain U.S.patents and other property rights owned by Macrovision Corporation and other rights owners. Use of thiscopyright protection technology must be authorized by Macrovision Corporation, and is intended for homeand other limited viewing uses only unless otherwise authorized by Macrovision Corporation. Reverse engi-neering or disassembly is prohibited.
This product is manufactured in the United States of America. Krell® is a registered trademark of KrellIndustries, Inc., and is restricted for use by Krell Industries, Inc., its subsidiaries, and authorized agents. KrellCurrent Mode™ and Krellcoat™ are trademarks of Krell Industries, Inc. HDMI, the HDMI logo, and High-Definition Multimedia Interface are trademarks or registered trademarks of HDMI Licensing LLC. "DTS"and "DTS Digital Out" are registered trademarks of Digital Theater Systems, Inc. Manufactured under licensefrom Dolby Laboratories. "Dolby," and the double-D symbol are trademarks of Dolby Laboratories. “DCDi” isa trademark of Faroudja, a division of Sage, Inc. All other trademarks and tradenames are registered to theirrespective companies.
© 2003 by Krell Industries, Inc. All rights reserved P/N 306989
Showcase DVD Instructions for Usev 03.0
CONTACT INFORMATION
WARNINGS
Contents
Krell Showcase DVD iii
INTRODUCTION / 1
DEFINITION OF TERMS / 2
UNPACKING / 4
PLACEMENT / 5AC Power Guidelines / 5
QUICK START / 6
FRONT PANEL DESCRIPTION / 9
REMOTE CONTROL DESCRIPTION / 16Battery Installation and Removal / 12Remote Control-Only Functions / 12
BACK PANEL DESCRIPTION / 15
SHOWCASE DVD CONNECTIONS TO YOUR SYSTEM / 18
SHOWCASE DVD OPERATION / 20Compatible Discs / 20To Play a DVD or VCD / 20To Play an Audio CD / 24MP3 Disc Formats / 26To Play MP3 Discs / 27Interpreting Temporary Feedback Field Icons / 29
SETUP MENU OVERVIEW / 31
SHOWCASE DVD SETUP MENU / 32To Access the Setup Menu / 32Navigation Conventions / 34On Screen Display (OSD) Menus / 35Example: To Change the TV Shape / 40Multiple-Toolbar Icons / 42
SPECIAL MENU OPERATIONS / 46How To Write a Title / Chapter Program for a DVD or VCD / 46How To Write a Track Program for an Audio CD / 48How to Create an A-B Loop for a DVD, VCD, or an Audio CD / 49Child Lock/Unlock / 50To Authorize a Disk / 51To Unauthorize a Discs / 52To Activate/Deactivate Parental Control / 52To Change the Country Code / 53To Change the 4-Digit Code / 53Did You Forget the 4-Digit Code? / 54
WARRANTY / 55
RETURN AUTHORIZATION PROCEDURE / 56
iv Krell Showcase DVD
Illustrations
FIGURE 1 The Showcase DVD Front Panel / 8
FIGURE 2 The Showcase DVD Remote Control / 8
FIGURE 3 The Showcase DVD Back Panel / 14
Thank you for your purchase of the Krell Showcase DVD.
The Showcase DVD produces a brilliant video image through the useof the high bandwidth circuit architecture, pioneered by Krell in theDVD Standard, and is at the forefront of DVD video technology withHDMI, an optional scalable output stage.
A carefully regulated power supply results in picture stability, evenduring line fluctuations while the proprietary Krell Digital Video Filterenhances DAC performance. The Krell Current Mode output stagedelivers outstanding bass weight, midrange articulation, and high fre-quency extension.
The wireless infrared remote control, and RS-232 and 12 VDCremote connection options on the back panel allow you to integratethe Showcase DVD into advanced control systems. The user-friendlysetup menu provides a variety of audio, video, and access controloptions for optimum configuration and enjoyment of your ShowcaseDVD and home theater system.
This owner’s reference manual contains important information onplacement, connection, and operation of your Showcase DVD.Please read this information carefully. A thorough understanding ofthese details will help ensure satisfactory operation and long life foryour Showcase DVD and related system components.
Introduction
Krell Showcase DVD 1
Definition of Terms
2 Krell Showcase DVD
Operation
Following are the definitions of key terms used in your owner’s refer-ence manual.
ButtonFront panel selection device on the Showcase DVD.
KeyRemote control selection device on the Showcase DVD.
Video MonitorVideo screen without a receiver.
TelevisionVideo screen with a receiver. The term “television” in this documentstands for a video screen with or without a receiver.
BalancedA symmetrical input or output circuit that has equal impedance fromboth input terminals to a common ground reference point. The indus-try standard for professional and sound recording installations, bal-anced connections have 6 dB more gain than single-ended connec-tions and allow the use of long interconnect cables. Balanced con-nections are more immune to induced noise from the system or theenvironment.
Single-endedA two-wire input or output circuit. Use care when using single-endedconnections. Turn the system off prior to making or breaking single-ended connections. Single-ended connections are not recommendedfor connections requiring long cable runs.
OffWhen the AC power cord is unplugged from the AC power source,the component is off.
Stand-by ModeWhen the Showcase DVD is connected to AC power, the red stand-by LED illuminates. This indicates that the component is in stand-bymode, a low power consumption status that keeps the audio and reg-ulator circuits at idle. Krell recommends leaving the component in thestand-by mode when not playing a disc.
Operational ModeWhen the power button on the front panel or power key on theremote control is pressed and the blue power LED illuminates, thecomponent is in the operational mode and ready to play a disc.
Input and OutputConnections
Hardware
Definition of Terms, continued
Krell Showcase DVD 3
Video Technology
VIDEO SIGNALOPTIONS
BUILDING THE VIDEOPICTURE
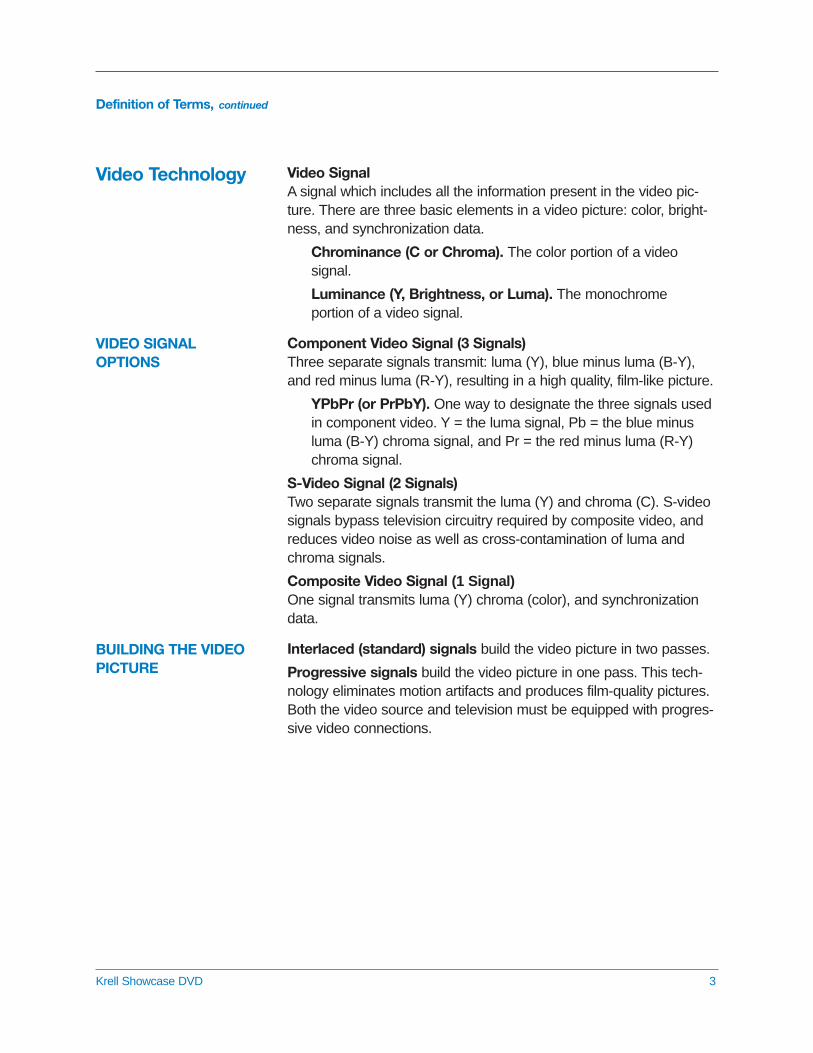
Video SignalA signal which includes all the information present in the video pic-ture. There are three basic elements in a video picture: color, bright-ness, and synchronization data.
Chrominance (C or Chroma). The color portion of a video signal.
Luminance (Y, Brightness, or Luma). The monochrome portion of a video signal.
Component Video Signal (3 Signals)Three separate signals transmit: luma (Y), blue minus luma (B-Y),and red minus luma (R-Y), resulting in a high quality, film-like picture.
YPbPr (or PrPbY). One way to designate the three signals usedin component video. Y = the luma signal, Pb = the blue minusluma (B-Y) chroma signal, and Pr = the red minus luma (R-Y)chroma signal.
S-Video Signal (2 Signals)Two separate signals transmit the luma (Y) and chroma (C). S-videosignals bypass television circuitry required by composite video, andreduces video noise as well as cross-contamination of luma andchroma signals.
Composite Video Signal (1 Signal)One signal transmits luma (Y) chroma (color), and synchronizationdata.
Interlaced (standard) signals build the video picture in two passes.
Progressive signals build the video picture in one pass. This tech-nology eliminates motion artifacts and produces film-quality pictures.Both the video source and television must be equipped with progres-sive video connections.
Unpacking
4 Krell Showcase DVD
Follow these steps to safely unpack your Showcase DVD:
1. Open the shipping box and remove the top layer of foam. Yousee these items:
1 Krell Showcase DVD1 AC power cord1 12 VDC (12 V trigger) cable1 remote control1 CR2025 lithium battery1 Quick Setup Guide
2. Grasp the underside of the foam end-caps that encase theShowcase DVD and lift it straight out of the shipping box.
3. Place the Showcase DVD in a safe location and remove the end-caps and protective plastic wrapping.
Only one person needed.
Notes If any of these items are not included in the shipping box, please contactyour authorized Krell dealer, distributor, or Krell for assistance.
Save all packing materials. If you ship your Showcase DVD in the future,repack the unit in its original packaging to prevent transit damage. SeeReturn Authorization Procedure, on page 56, for more information.
Krell Showcase DVD 5
Before you install the Showcase DVD into your system, review the following guidelines to choose the location for the component. Thiswill facilitate a clean, trouble-free installation. The Showcase DVDdoes not require any type of special rack or cabinet for installation.
Place the Showcase DVD on a firm, level surface, away from exces-sive heat, humidity, or moisture. The Showcase DVD requires atleast one inch (2.5 cm) of clearance on each side and at least oneinch (2.5 cm) of clearance above and below the component to pro-vide adequate ventilation. Installations inside cabinetry may needextra ventilation.
The Showcase DVD incorporates an advanced suspension system anddoes not require additional mass coupling or isolation. You may experimentwith feet or cones as long as they are not permanently affixed to the unit.Any unauthorized modifications to the unit or electronics will void the war-ranty.
Do not attach enhancement accessories such as rings, mats, ordampers to individual discs. These accessories may interfere with thedisc transport, resulting in erratic playback and/or poor performance.
The Showcase DVD has superb regulation and does not require adedicated AC circuit. Operate the Showcase DVD only with thepower cord supplied.
Avoid connections through extension cords or multiple AC adapters.High quality 15 amp grounded AC strips are acceptable. High qualityAC line conditioners or filters may be used if they are grounded andmeet or exceed the unit’s power supply rating of 100 VA.
Placement
Note
IMPORTANT
AC PowerGuidelines

6 Krell Showcase DVD
The Showcase DVD is shipped ready to play from the factory. Theplayer automatically switches to NTSC or PAL, depending on thedisc format. The default standard is preset, and not selectable by theuser.
To get started, Krell recommends the following routine:
Connect the Showcase DVD to AC PowerPlug the AC cord into the wall outlet. The red stand-by LED (3) illumi-nates.
Choose and Connect the Video Outputs to Your Television Choose the output that matches your television input. The ShowcaseDVD supports composite, S-Video, interlaced, and progressive scan (480p) component video signals. See Definition of Terms, onpage 3, for a detailed description of video signals.
The progressive PrPbY outputs will provide the best quality pic-ture, because they build video screen content in one pass. Toachieve this picture quality, the progressive PrPb Y outputs needto be connected to a television with a 31.5 kHz horizontal scanrate, capable of accepting a progressive signal of 480p or better.Most plasma, D-ILA, DLP, and HDTV televisions have this fea-ture.
Connect the Showcase DVD directly to the television. Set the TV to the cor-rect video input channel.
An optional HDMI connector is available for the Showcase DVD. Theconnector produces the following digital component signals: 480p,720p, and 1080i.
Quick Start
READ THIS FIRST
Step 1
Step 2
PROGRESSIVE SCAN VIDEO
HDMI CONNECTOR(Optional)
Note
Connect the Showcase DVD Audio Outputs to Your Home Theater SystemConnect the left and right balanced or single-ended analog audio out-puts to the left and right audio inputs of your amplifier or receiver.
Configure the Showcase DVD to Match Your Television Use this section of you want to change the picture view on the videoscreen, and you already have a good working knowledge of theShowcase DVD setup menu. For greater detail on how to accessand navigate the setup menu, see pages 31-45.
1. Press the power button or key (1) to place the Showcase DVD inthe operational mode. The blue power LED (2) illuminates. Thevideo screen displays the Krell logo, followed by the appearanceof a status window, which indicates the playing condition of theShowcase DVD.
2. If a disc is in the transport (12), pause (6) or stop (7) disc play-back.
3. Press the setup button or key (17) to access the setup menu.The setup menu multiple-toolbar appears on the video screen.
4. Use directional buttons or keys (14) to navigate to the OSD iconon the multiple-toolbar. When an item on the menu is selected, itis highlighted in black and surrounded by cursor arrows.
5. Press the down directional button or key to navigate to the mainmenu options for OSD.
6. Press the right directional button or key to select TV SHAPE.
7. Press the right button or key again to access the TV shapeoptions in the OSD first sub-menu:
8. Select the TV shape you want: 4:3 LETTERBOX, 4:3 PANSCAN, or 16:9.
9. Press the setup button or key again to exit the setup menu.
Krell Showcase DVD 7
Quick Start, continued
Step 3
Step 4(Optional)
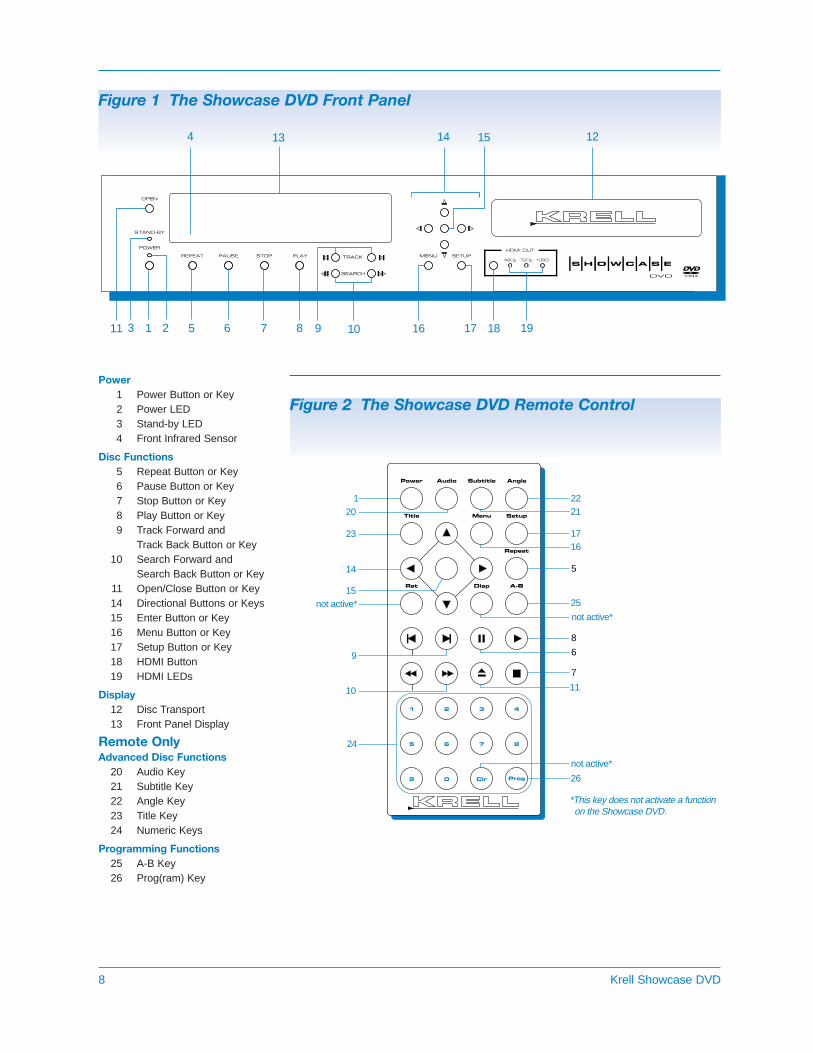
Figure 1 The Showcase DVD Front Panel
111 65 87 109 1716
1214
1918
4 13
3 2
15
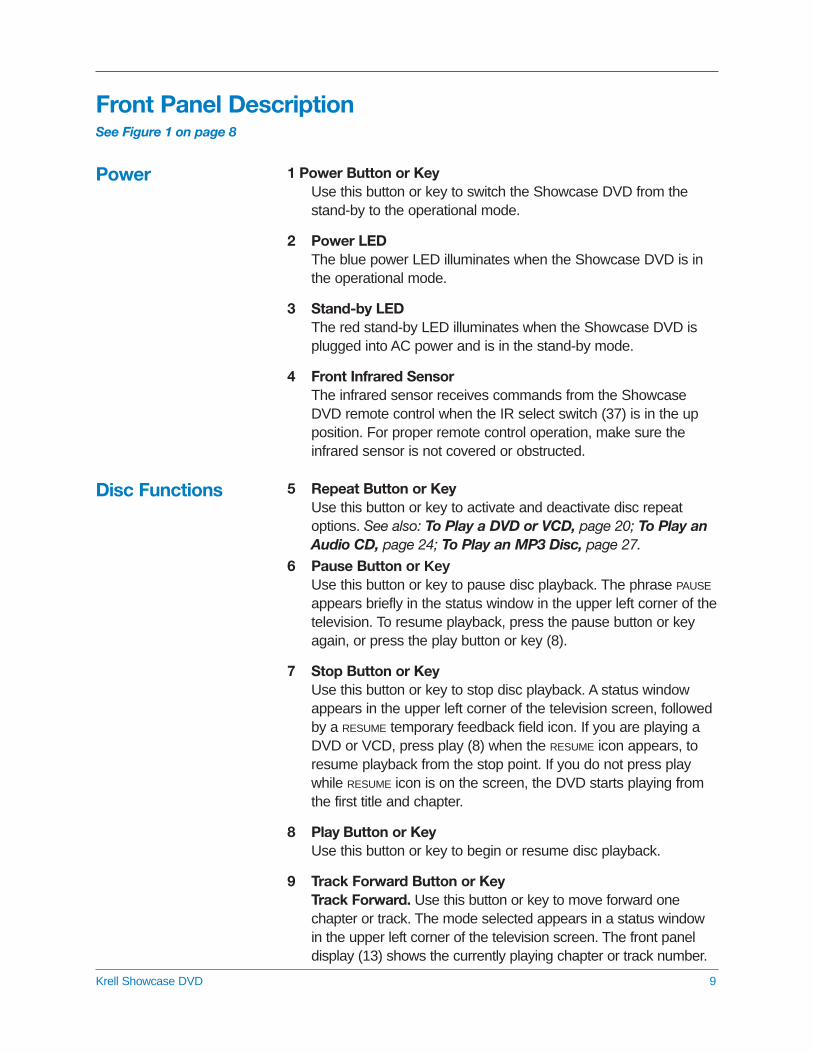
Figure 2 The Showcase DVD Remote Control
DispRet
Title Menu
A-B
Repeat
Setup
87
432
SubtitleAudio AnglePower
Prog
6
Clr09
5
1
1 2221
17
5
25
16
not active*
23
14
15not active*
9
10
24
20
8
6
7
26
11
not active*
*This key does not activate a function on the Showcase DVD.
8 Krell Showcase DVD
Power1 Power Button or Key2 Power LED3 Stand-by LED4 Front Infrared Sensor
Disc Functions5 Repeat Button or Key6 Pause Button or Key7 Stop Button or Key8 Play Button or Key9 Track Forward and
Track Back Button or Key10 Search Forward and
Search Back Button or Key11 Open/Close Button or Key14 Directional Buttons or Keys15 Enter Button or Key16 Menu Button or Key17 Setup Button or Key18 HDMI Button 19 HDMI LEDs
Display12 Disc Transport 13 Front Panel Display
Remote OnlyAdvanced Disc Functions
20 Audio Key21 Subtitle Key22 Angle Key23 Title Key24 Numeric Keys
Programming Functions25 A-B Key26 Prog(ram) Key
1 Power Button or KeyUse this button or key to switch the Showcase DVD from thestand-by to the operational mode.
2 Power LEDThe blue power LED illuminates when the Showcase DVD is inthe operational mode.
3 Stand-by LEDThe red stand-by LED illuminates when the Showcase DVD isplugged into AC power and is in the stand-by mode.
4 Front Infrared SensorThe infrared sensor receives commands from the ShowcaseDVD remote control when the IR select switch (37) is in the upposition. For proper remote control operation, make sure theinfrared sensor is not covered or obstructed.
5 Repeat Button or KeyUse this button or key to activate and deactivate disc repeatoptions. See also: To Play a DVD or VCD, page 20; To Play anAudio CD, page 24; To Play an MP3 Disc, page 27.
6 Pause Button or KeyUse this button or key to pause disc playback. The phrase PAUSE
appears briefly in the status window in the upper left corner of thetelevision. To resume playback, press the pause button or keyagain, or press the play button or key (8).
7 Stop Button or KeyUse this button or key to stop disc playback. A status windowappears in the upper left corner of the television screen, followedby a RESUME temporary feedback field icon. If you are playing aDVD or VCD, press play (8) when the RESUME icon appears, toresume playback from the stop point. If you do not press playwhile RESUME icon is on the screen, the DVD starts playing fromthe first title and chapter.
8 Play Button or KeyUse this button or key to begin or resume disc playback.
9 Track Forward Button or KeyTrack Forward. Use this button or key to move forward onechapter or track. The mode selected appears in a status windowin the upper left corner of the television screen. The front paneldisplay (13) shows the currently playing chapter or track number.
Krell Showcase DVD 9
Front Panel DescriptionSee Figure 1 on page 8
Power
Disc Functions
Front Panel Description, continued
10 Krell Showcase DVD
9 Track Forward Button or Key, continued
Track Back. Use this button or key to move back one title, chap-ter, or track. The mode selected appears in a status window inthe upper left corner of the television screen. The front panel dis-play shows the currently playing title and chapter, or track num-ber. See also: To Play a DVD or VCD, page 20; To Play anAudio CD, page 24; To Play an MP3 Disc, page 27.
10 Search Forward and Back Buttons or KeysSearch Forward. Use this button or key to access the two fast-forward playback modes. Use the search forward button or key toswitch between the slower and faster modes. On DVD, VCD, orAudio CD playback, the mode selected appears in the status boxin the upper left corner of the television screen. Press the playbutton or key to resume normal playback.
Search Back. Use this button or key to access the two fast-reverse playback modes when in the play mode. On DVD, VCD,or Audio CD playback, the mode selected appears in the statusbox in the upper left corner of the television screen. Use thesearch back button or key to switch between the slower andfaster modes. Press the play button or key to resume normalplayback. See also: To Play a DVD or VCD, page 20; To Play an Audio CD, page 24.
11 Open/Close Button or KeyUse this button or key to open and close the disc transport.
12 Disc TransportThe disc transport holds the disc.
13 Front Panel DisplayThe front panel display shows currently playing title and chapteror track numbers, elapsed time, repeat mode, and disc status.
14 Directional Buttons or KeysUse these buttons or keys to navigate the Showcase DVD setupmenu, a DVD disc menu, an audio CD, or an MP3 disc menu.Also, use these buttons to view a DVD disc as frame by framestills.
15 Enter Button or KeyUse this button or key to set select disc menu functions or exitthe setup menu.
DISC FUNCTIONS, continued
Menu Accessand Setup Functions
Front Panel Description, continued
Krell Showcase DVD 11
16 Menu Button or KeyUse this button or key to access the DVD disc menu. Disc play-back pauses automatically when you enter the menu. Use thedirectional buttons or keys (14) to move through the menu. Pressenter to select the desired menu item.
17 Setup Button or KeyUse this button or key to access the Showcase DVD setupmenu. The setup menu allows you to customize your ShowcaseDVD on screen display (OSD), audio soundtrack, and select spe-cial features such as access control. Press the setup buttonagain to reveal sub menus, or press the enter key to exit thesetup menu. See Showcase DVD Setup Menu, pp. 31-54, forinformation on configuring the Showcase DVD.
18 HDMI Button (Optional)Use this button to scroll through three output signal choices:480p, 720p and 1080i.
19 HDMI LEDs (Optional)The illuminated LED indicates the component video scan resolu-tion in use: 480p, 720p, or 1080i.
DISC FUNCTIONS, continued
Remote Control DescriptionSee Figure 2 on page 8
12 Krell Showcase DVD
The Showcase DVD remote control uses one CR2025 lithium bat-tery, which is included with the shipment.
To open the battery compartment on the back of the remote control:
1. Place the remote face down on the table.
2. Use your thumbnail or a small jeweler’s or eyeglass screwdriverto move the small tab toward the center of the remote, while using your index fingernail or screwdriver to pull down gently onthe slot to the right of the tab. The battery compartment will slideout.
3. Place the battery, positive (+) side up, in the battery tray.
4. Slide battery compartment back into the remote until you hear aclick.
The remote control is ready for operation.
Do not use a knife or other sharp object to open the battery compartment;they will scratch the remote control finish.
Replace batteries when remote control function becomes intermittent.
Remove batteries if the remote control is not used for a long time. Batteryleakage can damage the remote control.
The Showcase DVD remote control provides all the power, standarddisc functions, menu access, and menu setup functions available onthe front panel. Additional advanced disc and programming functionsare accessed only from the remote control. A description of theremote control-only keys for the Showcase DVD follows.
20 Audio KeyPress this key to access the audio icon on the multiple-toolbarmenu. Use the down directional button or key (14) to cyclebetween OFF or the languages available on the disc soundtrack.The last language scrolled to is automatically selected, andbecomes active after the transport (12) is opened and closed.Navigate to the audio sound category of the OSD menu for anexpanded view of the languages available.
Notes
Battery Installationand Removal
Remote Control-OnlyFunctions
ADVANCED DISCFUNCTIONS
Remote Control Functions, continued
Krell Showcase DVD 13
21 Subtitle KeyPress this key to access the subtitle icon in the multiple-toolbarmenu. Use the down directional button or key (14) to cyclebetween OFF or the subtitle languages available on the discsoundtrack. The last subtitle language scrolled to is automaticallyselected, and becomes active after the transport (12) is openedand closed. Navigate to the audio mode category of the OSD
menu for an expanded view of the subtitle languages available.
22 Angle KeyUse this key to select alternate camera angles, when they areavailable on the disc.
23 Title KeyPress this key to access the title which is playing.
Many discs have only one title.
24 Numeric KeysPress a numeric key to select a disc chapter, title, or track dur-ing playback. The setup menu opens with the cursor at the titleand chapter number or track number that is playing. Press thenumeric key for the next chapter, title, or track number youwant to play. Playback resumes at the selected title, chapter, ortrack.
If a title, chapter, or track is not available on the disc, the number you select is not displayed on the menu.
25 A-B KeyPress this key to define the start of a continuous loop. Pressagain to define the end of a continuous loop. Playback beginsimmediately and continues until you press the A-B key a thirdtime, to clear the loop. See How to Create an A-B Loop, onpage 49.
26 Prog(ram) KeyPress this key to access the favorite track selection (FTS) icon inthe multiple-toolbar menu. Select and playback chapters, titles, ortracks in a particular sequence. See also: How to Write aTitle/Chapter Program, for a DVD or VCD, on page 46; How toWrite a Track Program for an Audio CD, on page 48.
Note
ADVANCED DISCFUNCTIONS, continued
Note
PROGRAMMINGFUNCTIONS

Figure 1 The Showcase DVD Back Panel
27 28
40 41 32
30 29 31 33 34
35
37
36
38 39
14 Krell Showcase DVD
Analog Audio Outputs27 Left and Right Balanced Audio Outputs28 Left and Right Single-ended
Audio Outputs
Interlaced Video Outputs29 Composite Video Output30 S-Video Video Output31 Component Video Output (Y, Pb, Pr)
Progressive Scan Video Output32 Progressive Scan Video Output, (Pr, Pb,Y)
Digital Audio Outputs33 Optics Digital Output34 Coaxial Digital Output
Remote Back Panel Connections35 RS-232 Communication Port36 12 VDC In/Out (12 V Trigger)37 IR Select Switch38 Back Infrared Sensor
Power39 IEC Connector
HDMI Connection (Optional)40 Audio Sync Switch 41 HDMI Out
Back Panel DescriptionSee Figure 3 on page 14
Krell Showcase DVD 15
27 Left and Right Balanced Audio OutputsThe Showcase DVD is equipped with one pair of left and rightbalanced analog audio outputs via XLR connectors.
28 Left and Right Single-ended Audio OutputsThe Showcase DVD is equipped with one pair of left and rightsingle-ended analog audio outputs via RCA connectors.
29 Composite Video OutputThe Showcase DVD is equipped with a composite video outputvia an RCA connector. Composite video uses one wire to conveythe video signal.
30 S-Video Video OutputThe Showcase DVD is equipped with an S-video output via a 4 pin mini-DIN connector. Composite video uses two wires toconvey the video signal.
31 Component Video Output (Y, Pb, Pr)The Showcase DVD is equipped with a component video outputvia RCA connectors. Component video uses three wires to con-vey the video signal.
32 Progressive Scan Video Outputs (Pr, Pb, Y)The Showcase DVD is equipped with a progressive video outputvia RCA connectors. Progressive video uses three wires to con-vey the video signal.
The Showcase DVD automatically switches to NTSC or PAL, depending onthe disc format. The default standard is preset, and not selectable by theuser.
Analog AudioOutputs
Interlaced VideoOutputs
Progressive ScanVideo Outputs
Notes
16 Krell Showcase DVD
Back Panel Description, continued
Back PanelRemoteConnections
33 Optics Digital OutputThe Showcase DVD is equipped with one EIAJ optics digitalaudio output via a TosLink connector.
34 Coaxial Digital OutputThe Showcase DVD is equipped with one S/PDIF coaxial digitalaudio output via an RCA connector.
35 RS-232 Communication PortThe Showcase DVD is equipped with an RS-232 communicationport, which receives messages from a computer-based controlsystem, providing more intelligent control of the Showcase DVD.For more information, see RS-232 Port: Sending Commandsand Interpreting Data, the developer’s reference on the Krellwebsite at www.krellonline.com.
36 12 VDC Out and InThe 12 VDC out and in connections allows you to control theoperational and stand-by modes of components with 12 V trig-gers, to easily coordinate allowing whole systems or parts of sys-tems.
Output. The 12 VDC output sends a 12 Volt power on/off signalto other Krell components via a 12 V cable, as well as to otherdevices that incorporate a 12 V power on/off trigger input.
Input. The 12 VDC input receives 12 Volt power on/off signalsfrom other Krell components and devices that incorporate a 12 Vtrigger.
When the Showcase DVD is in the operational mode, 12 VDC output provides 12 V of DC output. When the Showcase DVD is in the stand-bymode or off, DC output is 0 V.
12 VDC Out (12 V trigger) current is limited to 30 mA.
Consult the owner’s manual of each component used in a custom installa-tion to take full advantage of the Showcase DVD’s remote capability.
37 IR Select SwitchUse this switch to activate the front or Back Infrared Sensor (38).
Front. The switch in the up position indicates that the frontinfrared sensor is active.Rear. The switch in the down position indicates that the backinfrared sensor is active.
Digital AudioOutputs
Notes

Krell Showcase DVD 17
Back Panel Description, continued
38 Back Infrared SensorThis sensor receives commands from the Showcase DVDremote control when the IR select switch (37) is in the down posi-tion.
39 IEC ConnectorThe Showcase DVD is equipped with a standard female IECpower connector, for use with the AC power cord.
40 AUDIO SYNC SWITCHUse this switch to synchronize audio and video when using theHDMI output (41). Turn this function off, if you are not using theHDMI output.
41 HDMI OUTDigital video output that interfaces with an A/V receiver or a video monitor equipped with an HDMI input.
Power
HDMI Connection(Optional)
BACK PANELREMOTE CONNECTIONS,continued
18 Krell Showcase DVD
Krell recommends using balanced interconnect cables. Balancedinterconnect cables not only can minimize sonic loss but are alsoless sensitive to induced noise, especially with installations usinglong cables. Balanced connections have 6 dB more gain than single-ended connections. When level matching is critical, keep this gainvalue in mind.
This section provides information about connecting your ShowcaseDVD to other components in your system. The Showcase DVD isequipped with a variety of connection options, for easy integrationinto your home theater system.
Follow these steps to connect the Showcase DVD to your system.
1. Make sure all power sources and components are off before con-necting inputs and outputs.
2. Neatly organize the wiring between the Showcase DVD and allsystem components. Separate AC wires from audio cables toprevent hum or other unwanted noises from being introduced intothe system.
3. Match and connect the video outputs from Showcase DVD to thevideo inputs of the television. The Showcase DVD supports com-posite, S-Video, and component interlaced video signals and pro-gressive (480p) component video signals. See Definition ofTerms, on page 3, for more information on video signals.
The progressive PrPbY outputs will provide the best quality pic-ture, when they are connected to a television capable of accept-ing a progressive signal of 480p or better. This includes mostplasma, D-ILA, DLP, and HDTV televisions.
To use the progressive scan video outputs on the Showcase DVD, the tele-vision must have a 31.5 kHz horizontal scan rate and a progressive (480p)video input.
An optional HDMI connector is available for the Showcase DVD. Theconnector uses a single cable to support multiple audio and multiple-video cables, and produces the following digital component signals:480p, 720p, and 1080i.
Showcase DVD Connectionsto Your System
Using Balanced Connections
ConnectionSteps
PROGRESSIVE SCAN VIDEO
HDMI CONNECTOR(Optional)
Note
Krell Showcase DVD 19
4. Connect the balanced (27) or single-ended (28) analog audiooutputs to your loudspeakers.
5. Connect the optics digital audio (33) or coaxial audio (34) digitaloutput to your loudspeakers.
DTS audio playback is available only from the digital outputs.
6. Plug the AC power cord into the IEC connector (39) on the backpanel, then plug the AC power cord into the wall socket. The redstand-by LED (3) on the front panel illuminates.
When powering up any system, always turn amplifiers on last. Whenpowering down, always turn amplifiers off first.
Showcase DVD Connections to Your System, continued
Note
Note
Showcase DVD Operation
This section provides information about operating the ShowcaseDVD. The Showcase DVD is shipped ready to play. After the player isconnected to the television and other system components, andplugged into AC power, it is ready for operation.
The Showcase DVD is a Region 2 player which plays the followingdisc formats: DVD, DVD-R, CDDA, CD-R, CD-RW, DVD+RW, MP3,and VCD.
Krell recommends leaving the Showcase DVD in the stand-by mode whennot playing a disc.
Do not attach enhancement accessories such as rings, mats, or dampers toindividual discs. These accessories may interfere with the disc transport,resulting in erratic playback and/or poor performance.
Adjust the volume level through your system volume control.
All functions outlined on pages 8-11 are available when you play aDVD or VCD.
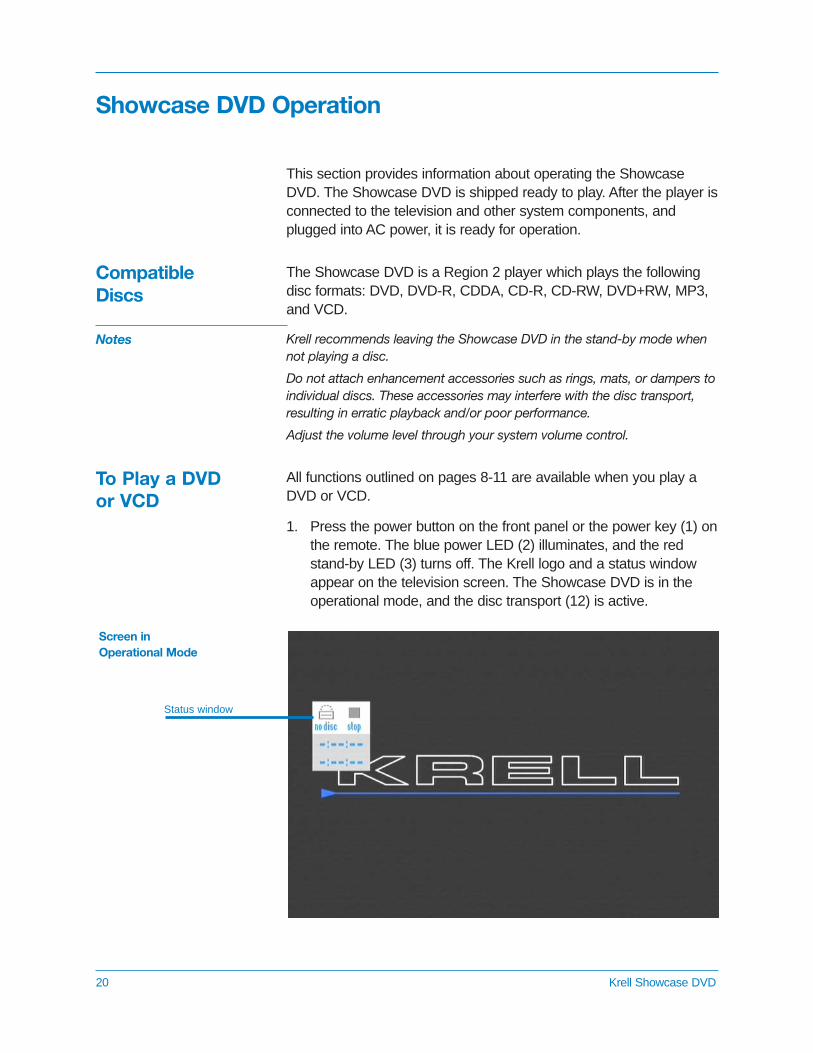
1. Press the power button on the front panel or the power key (1) onthe remote. The blue power LED (2) illuminates, and the redstand-by LED (3) turns off. The Krell logo and a status windowappear on the television screen. The Showcase DVD is in theoperational mode, and the disc transport (12) is active.
Screen in Operational Mode
Status window
20 Krell Showcase DVD
To Play a DVDor VCD
CompatibleDiscs
Notes
2. Press the open/close button or key (11) to open the disc transport.
3. Place the disc on the transport.
4. Press the open/close button or key again to close the disc trans-port. Playback begins from the first title or track. The front panelwindow displays READING and INFO.
5. The phrase INFO remains on the front panel display window untilyou press the enter (15) or play button or key.
6. The Showcase DVD starts playing the movie and the front panelwindow displays the time, the title and chapter, or the track.
7. Press the stop button or key (7) to end disc playback.
8. To turn the Showcase DVD off, press the power button on thefront panel or the power key on the remote. The red stand-byLED illuminates and the Showcase DVD is in the stand-by mode.
See Front Panel Description, on page 9, and Special Operations,on page 46, for more information on disc playback options.
The status window icon reports the current operating condition of theShowcase DVD, and appears in the upper left portion of the televi-sion screen. If a disc is playing, the function, title, chapter, or track aswell as time elapsing is displayed in the icon.
To suppress the status window, see page 38.
Krell Showcase DVD 21
Showcase DVD Operation, continued
To Play a DVD or VCD, continued
STATUS WINDOW
All functions listed under Front Panel Description, on pages 9-11and under Remote-only, on pages 12-13 are available when you playa DVD or VCD.
5 Repeat Button or Key Press this button or key to repeat a title or chapter, or an entiredisk:
CHAPTER REPEAT Press once to repeat the currently playing chapter.
TITLE REPEAT Press twice to repeat all chapters in current title.REPEAT Press three times to repeat the entire disc.REPEAT OFF Press four times to clear the repeat function.
The selected repeat option appears briefly in the temporary feed-back field icon, in the upper left corner of the television screen.The phrase REPEAT appears in the front panel display (13).
When repeat is off, there is no temporary feedback field icon inthe upper left corner of the television screen, and the phraseREPEAT disappears from the front panel display.
9 Track Forward and Track Back Buttons or KeysPress this button or key to move to another title or chapter, ormove to the beginning of the current title or chapter. Directionand title or chapter number are displayed on the front panel dis-play window (13), or in a status window on the television screen.
Track Forward. Press the track forward button or key firmly dur-ing playback, to move to the next title or chapter. Press track for-ward button or key briefly during playback, to return to the begin-ning of the current title or chapter.
Track Back. Press the track back button or key firmly duringplayback, to move to the last title or chapter. Press the track backbutton or key briefly during playback to return to the beginning ofthe current title or chapter.
To move to any title or chapter, enter the title or chapter number using the numeric keys (24) on the remote control.
DVD AND VCD FUNCTIONS
22 Krell Showcase DVD
Showcase DVD Operation, continued
10 Search Forward and Back Buttons or KeysPress this button or key to search forward or backward throughthe disc at an advanced speed. There are two fast-forward play-back modes: x 4 and x 32.
Press once and the phrase X4 appears in the status window inthe upper left corner of the television screen. Press again and thephrase X32 appears in the status window in the upper left cornerof the television screen.
Press the play button or key (8) to resume normal playback.
DVD AND VCD FUNCTIONS, continued
Krell Showcase DVD 23
Showcase DVD Operation, continued
24 Krell Showcase DVD
Showcase DVD Operation, continued
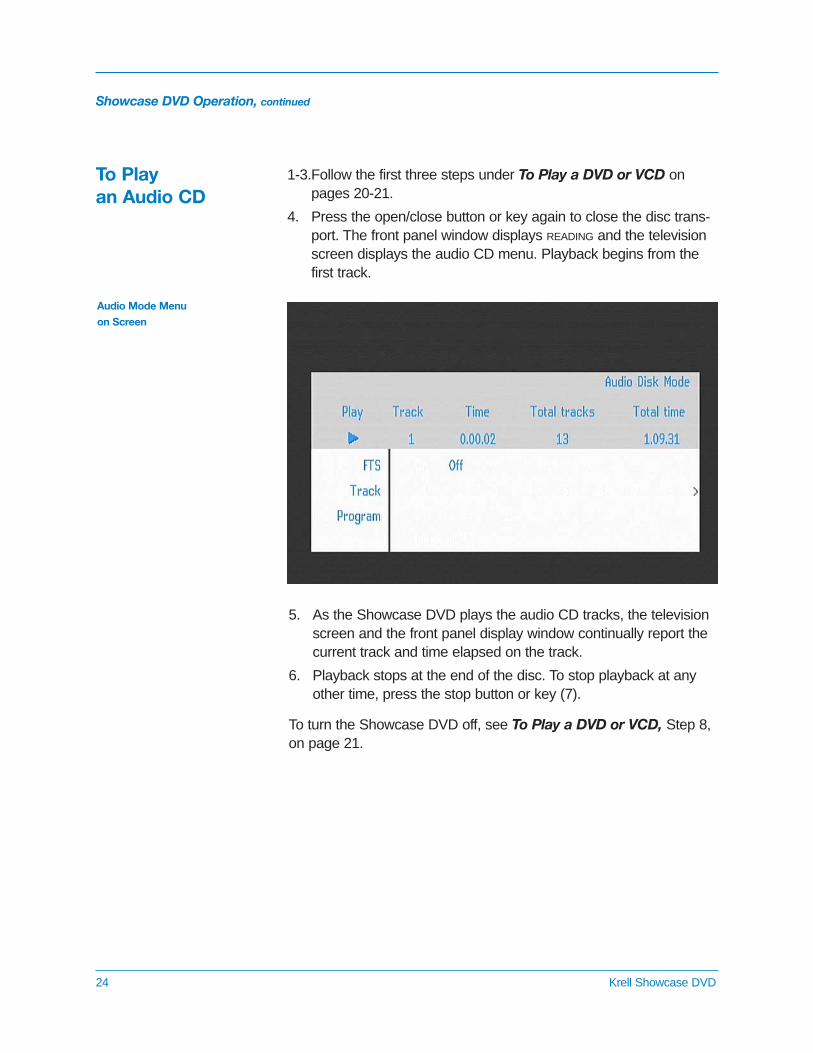
To Play an Audio CD
Audio Mode Menu
on Screen
1-3.Follow the first three steps under To Play a DVD or VCD onpages 20-21.
4. Press the open/close button or key again to close the disc trans-port. The front panel window displays READING and the televisionscreen displays the audio CD menu. Playback begins from thefirst track.
5. As the Showcase DVD plays the audio CD tracks, the televisionscreen and the front panel display window continually report thecurrent track and time elapsed on the track.
6. Playback stops at the end of the disc. To stop playback at anyother time, press the stop button or key (7).
To turn the Showcase DVD off, see To Play a DVD or VCD, Step 8,on page 21.
The following functions are available when you play an audio CD:
5 Repeat Button or KeyPress this button or key to repeat a track selection, or an entiredisc.
REPEAT TRACK Press once to repeat the currently playing track. REPEAT TRACK appears in the audio CD menu on the television screen.
REPEAT DISC Press twice to repeat an entire disc. REPEAT DISC
appears in the audio CD menu on the video screen.
To deactivate REPEAT, press the repeat button or key a third time.When repeat is off, there is no repeat phrase on the televisionscreen.
6 Pause Button or Key, 7 Stop, 8 Play Button or KeysFor descriptions of these functions, see Front PanelDescription, on page 10.
9 Track Forward and Track Back Button or KeyPress this button or key to move to another track or move to thebeginning of the current track. Direction and track number aredisplayed on the front panel display window (13), or in a statuswindow on the television screen.
Track Forward. Press the track forward button or key firmly dur-ing playback to move to the next track. Press track forward but-ton or key briefly during playback return to the beginning of thecurrent track.
Track Back. Press the track back button or key firmly duringplayback to move to the last track. Press track back button or keybriefly during playback to return to the beginning of the currenttrack.
To move to any track, enter the track number using the numerickeys (24) on the remote control.
Krell Showcase DVD 25
Showcase DVD Operation, continued
AUDIO CD FUNCTIONS
10 Search Forward and Search Back Button or KeyPress this button or key to search forward or backward throughthe disc at an advanced speed. Speed and direction are dis-played on the front panel display window (13), or in a status win-dow on the television screen. When the search begins, the soundis partially muted. To end a search, press play (8) to resume play-back or press stop (7) to stop playback.
— Hold down this button or key for approximately 1 second during playback, to search the disc at X4 the normal speed
— Hold down the button or key again, to search at X8 speed.
— Hold down the button or key a third time, to return to the normal speed.
14 Directional Buttons or KeysFor descriptions of this function, see Front Panel Description,on page 10.
25 A-B KeySee How to Create an A-B Loop, on page 49.
26 Program KeySee How to Write a Track Program for an Audio CD, on page 48.
The Showcase DVD supports the following MP3-CD formats (ISO 9660 format):
— A maximum of 30 characters— Nested director up to eight levels— A maximum ALB number of 32— VBR bit-rate supported— Sampling frequencies supported: 32 , 44.1 , and 48 k Hz.— Supported bit rates: 32, 64, 96, 128, 192, and 256 (kbps).
The Showcase DVD does not support the following formats:
— Files including *.WMA, *.AAC, *.DLF, *M3U, *PLS— Chinese file names— Non-session closed discs— Discs recorded under UDF format
It is normal to experience an occasional “skip” while listening to MP3 files.
Digital-out is not active during MP3 disc playback, in compliance withSDMI.
26 Krell Showcase DVD
Showcase DVD Operation, continued
AUDIO CD FUNCTIONS,continued
MP3 Disc Formats
Notes
Only digital audio music will play, due to the recording nature of DigitalAudio MP3 (DAM).
Disc reading time may exceed ten seconds, if there are a large number ofsongs compiled on one disc.
Only the first session of multi-session discs is supported.
1-3.Follow the first three steps under To Play a DVD or VCD above, on pages 20-21.
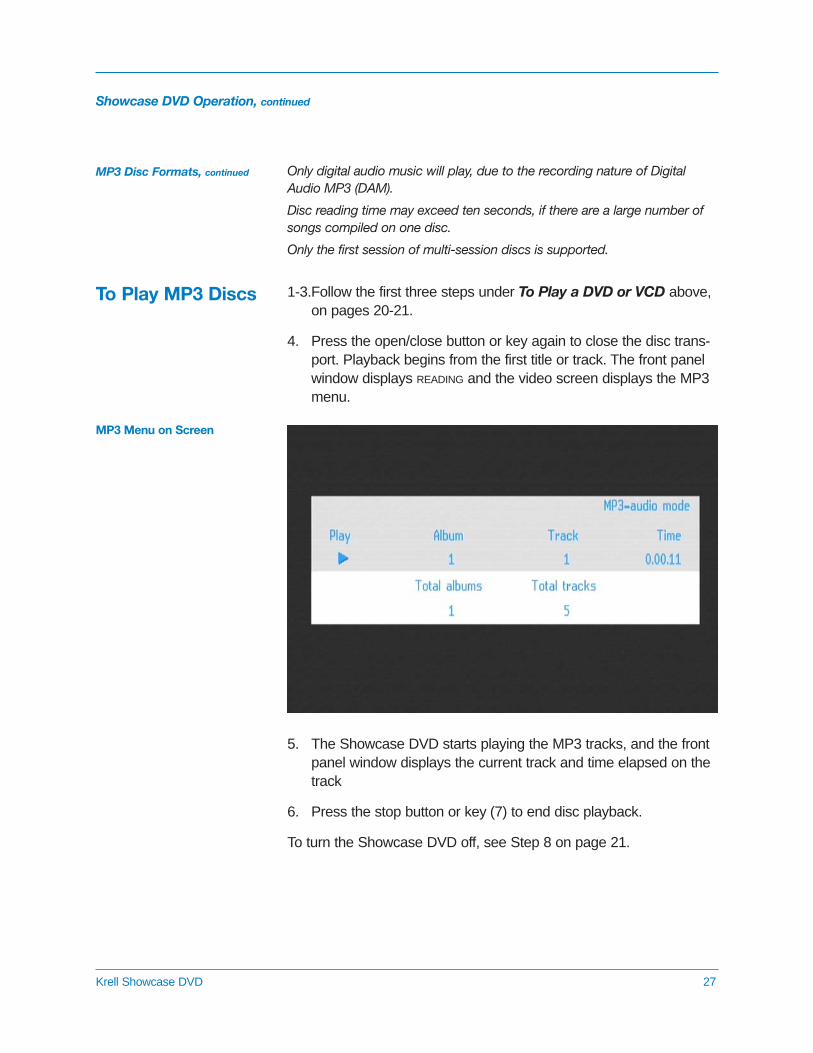
4. Press the open/close button or key again to close the disc trans-port. Playback begins from the first title or track. The front panelwindow displays READING and the video screen displays the MP3menu.
Krell Showcase DVD 27
Showcase DVD Operation, continued
MP3 Disc Formats, continued
To Play MP3 Discs
MP3 Menu on Screen
5. The Showcase DVD starts playing the MP3 tracks, and the frontpanel window displays the current track and time elapsed on thetrack
6. Press the stop button or key (7) to end disc playback.
To turn the Showcase DVD off, see Step 8 on page 21.
Showcase DVD Operation, continued
28 Krell Showcase DVD
MP3 DISC FUNCTIONS
The following functions are available when you play an MP3 disc:
5 Repeat Button or KeyPress this button or key to repeat a track or an album.
REPEAT TRACK Press once to repeat the current track. REPEAT
TRACK appears on the television screen.
REPEAT ALBUM Press the repeat button or key again to repeat an album. REPEAT ALBUM appears in the MP3 menu on the television screen.
REPEAT DISC Press the repeat button or key a third time torepeat an entire disc, REPEAT DISC appears in the MP3 menu on the television screen.
To deactivate REPEAT, press the repeat button or key a fourth time.When repeat is off, there is no repeat phrase on the television screen.
6 Pause Button or Key, 7 Stop, 8 Play Button or KeysFor descriptions of these functions, see Front PanelDescription, on page 10.
9 Track Forward and Track Back Buttons or KeysThis function allows you to move to the next or previous discalbum or track. Both the front panel window and the MP3 menudisplay the current track information.
1. Press the up or down directional button or key (14) to scroll through available albums.
2. Press the forward or backward track button or key (9) to scroll through available tracks.
You can also select an album or track using the numeric keys:
In the stop mode, use the numeric keys to select the ALBUM.
In the play mode, use the numeric keys to select the TRACK.
14 Directional Buttons or KeysFor descriptions of this function, see Front Panel Description,on page 10.
Temporary feedbackfield icon
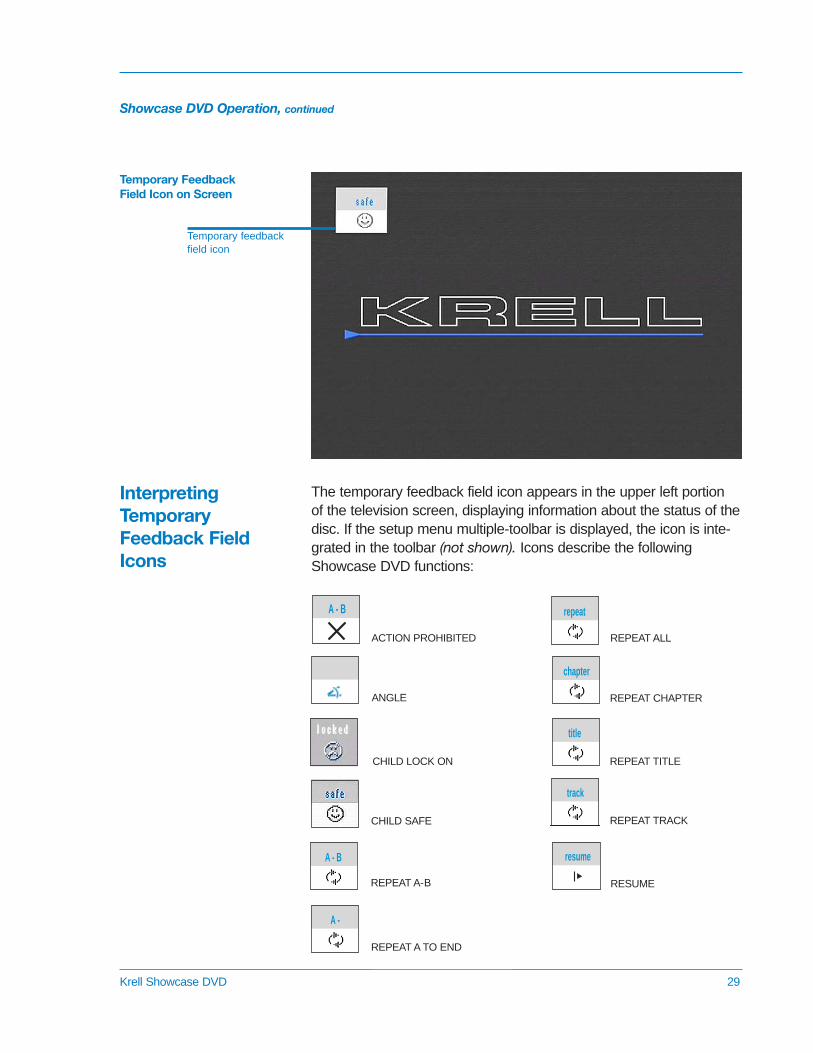
The temporary feedback field icon appears in the upper left portion of the television screen, displaying information about the status of thedisc. If the setup menu multiple-toolbar is displayed, the icon is inte-grated in the toolbar (not shown). Icons describe the followingShowcase DVD functions:
Krell Showcase DVD 29
Showcase DVD Operation, continued
InterpretingTemporaryFeedback FieldIcons
Temporary FeedbackField Icon on Screen
A - B
A - B
A -
repeat
chapter
ACTION PROHIBITED
ANGLE
CHILD LOCK ON
REPEAT CHAPTER
CHILD SAFE
REPEAT A-B
REPEAT A TO END
REPEAT ALL
title
track
resume
RESUME
REPEAT TITLE
REPEAT TRACK

ACTION PROHIBITED
A box containing an X appears on the television screen, when aselected command is not permitted by the player or the disc. Thegray area in the action prohibited box displays the specific actionrequested.
Some discs only allow limited function operation during playback.
RESUME
The resume feature applies to the disc currently in the transportwell as the last four discs played. To start playback of a disc fromthe point where it was last stopped, press play (8) when theresume icon appears on the screen.
30 Krell Showcase DVD
Showcase DVD Operation, continued
Interpreting TemporaryFeedback Field Icons,continued
Krell Showcase DVD 31
Setup Menu Overview
This section explains how to access and navigate the setup menuand how to select functions. The setup menu is comprised of:
— a multiple-toolbar at the top of the screen
— toolbar icons, each with a unique set of functions, accessed through a main menu
— a series of sub menus for each function
— a help-text bar at the bottom of the screen
Although all functions in the setup menu are optional and may be setup at your convenience, Krell encourages you to use the setup menuto optimize the performance of the Showcase DVD within your sys-tem in this sequence:
1. Access the setup menu by pressing the setup button or key (17).See pages 32–33.
2. Familiarize yourself with the navigation conventions. See page 34.
3. Select the OSD icon on the toolbar. See page 35.
4. Configure the OSD functions. See pages 36–38.
Initially, you may wish to change the picture view on your videoscreen, before playing your Showcase DVD. See Example: ToChange the TV Shape, on page 40.
5. Access other toolbar icons and their functions. See page 42.
For detailed information on limiting child access and designating authorized discs for viewing, see page 50.
6. Exit the setup menu by pressing the enter button or key (15).
Disc playback pauses automatically, when you access the OSD menu.
A temporary feedback field icon containing an X is displayed on the videoscreen, either alone or within the toolbar menu, if the disc chapter or trackyou are playing prohibits access to the setup menu. For more information,see Interpreting Temporary Feedback Field Icons, on page 29.
Note
32 Krell Showcase DVD
Showcase DVD Setup Menu
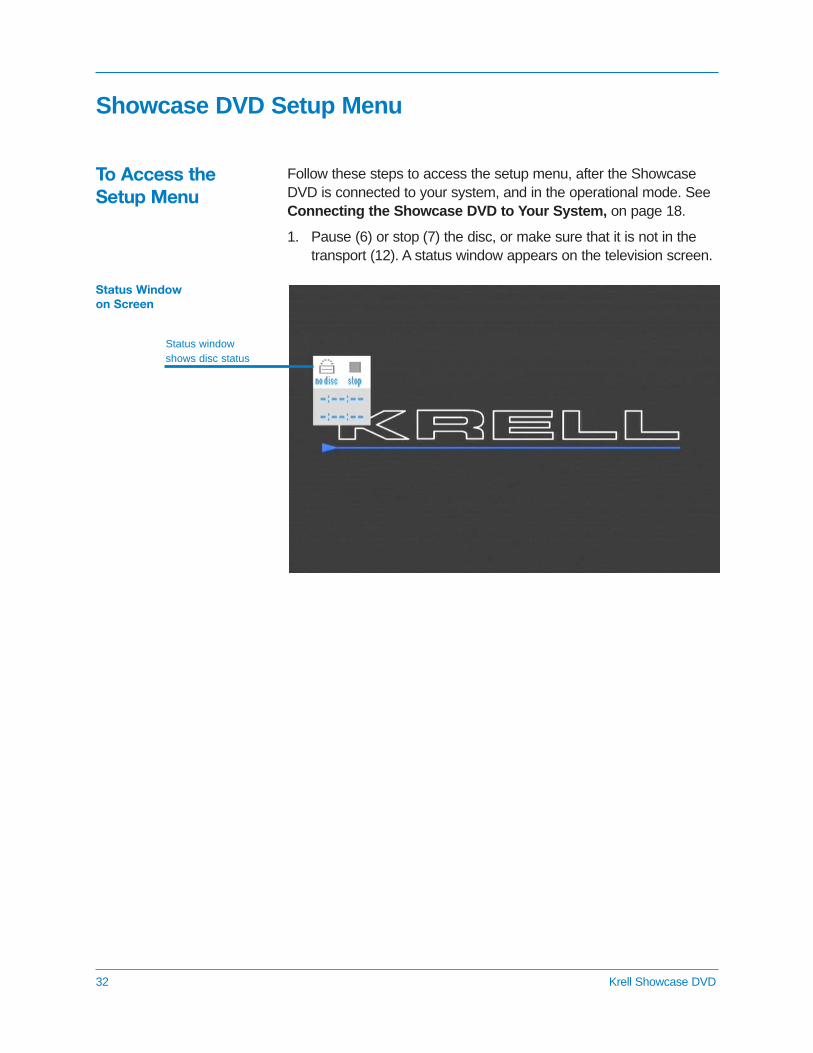
Follow these steps to access the setup menu, after the ShowcaseDVD is connected to your system, and in the operational mode. SeeConnecting the Showcase DVD to Your System, on page 18.
1. Pause (6) or stop (7) the disc, or make sure that it is not in thetransport (12). A status window appears on the television screen.
To Access theSetup Menu
Status windowshows disc status
Status Window on Screen
Krell Showcase DVD 33
Showcase DVD Setup Menu, continued
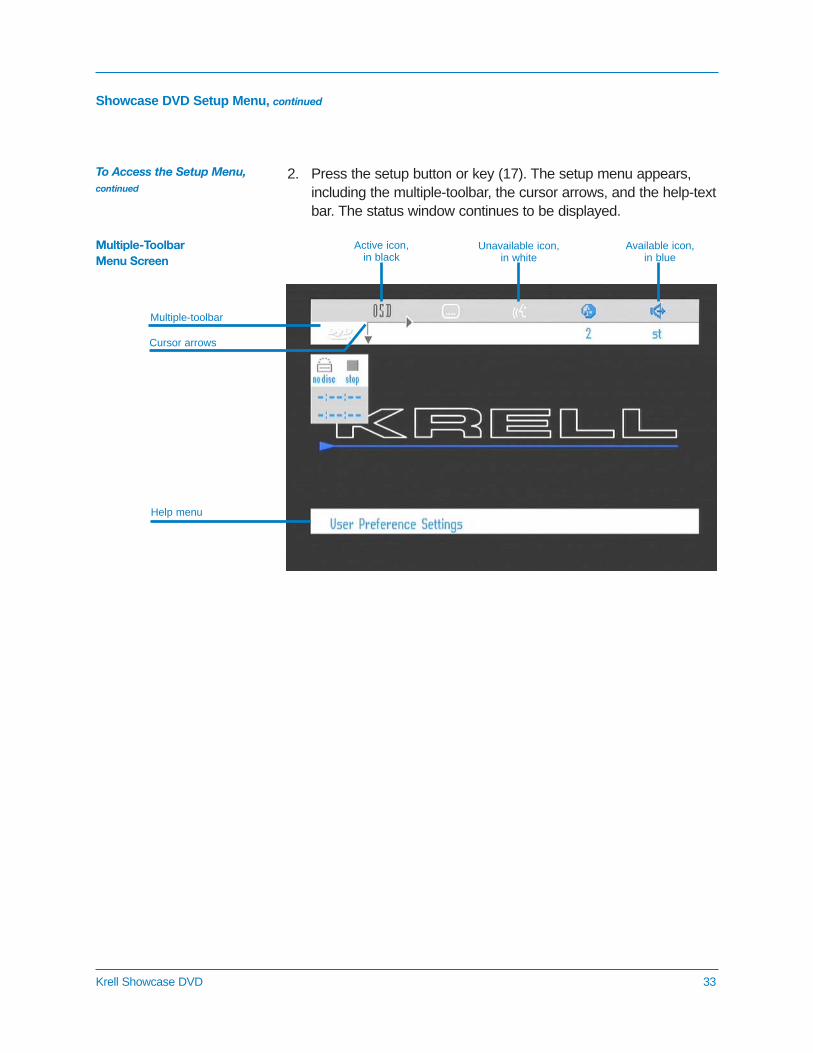
2. Press the setup button or key (17). The setup menu appears,including the multiple-toolbar, the cursor arrows, and the help-textbar. The status window continues to be displayed.
To Access the Setup Menu,continued
Active icon,in black
Unavailable icon,in white
Available icon,in blue
Multiple-Toolbar Menu Screen
Multiple-toolbar
Cursor arrows
Help menu
34 Krell Showcase DVD
Showcase DVD Setup Menu, continued
Use the directional buttons or keys (14) to move the cursor arrows tothe menu item you want. The cursor will skip over unavailable (whitein color) menu items. Once the cursor arrows are at a menu item, themenu item is selected. There is no need to press the enter button orkey to set a selection.
The cursor arrows move left and right, along the multiple-toolbar.When the cursor arrows are on the toolbar icon at the far right, pressthe right directional arrow button or key to display more toolbar icons.If the cursor arrows do not travel, there are no more toolbar icons todisplay.
The cursor arrows move up and down between the multiple-tool barmenu and the main menu. Within the main menu, the cursor arrowsmove left, right, up, or down.
Within the main menu, when the cursor arrows move to the right, theyopen sub menus with options. Some sub menus access additionalsub menus.
NavigationConventions
MENU COLOR
Color indicates selection status in the setup menu. An active menuitem is highlighted in black and available items are blue. Unavailableitems are either white or do not appear on the screen.
HELP-TEXT BAR
The help-text bar describes the active toolbar icon. The factorydefault is ON. To turn the help-text bar off, see page 39.
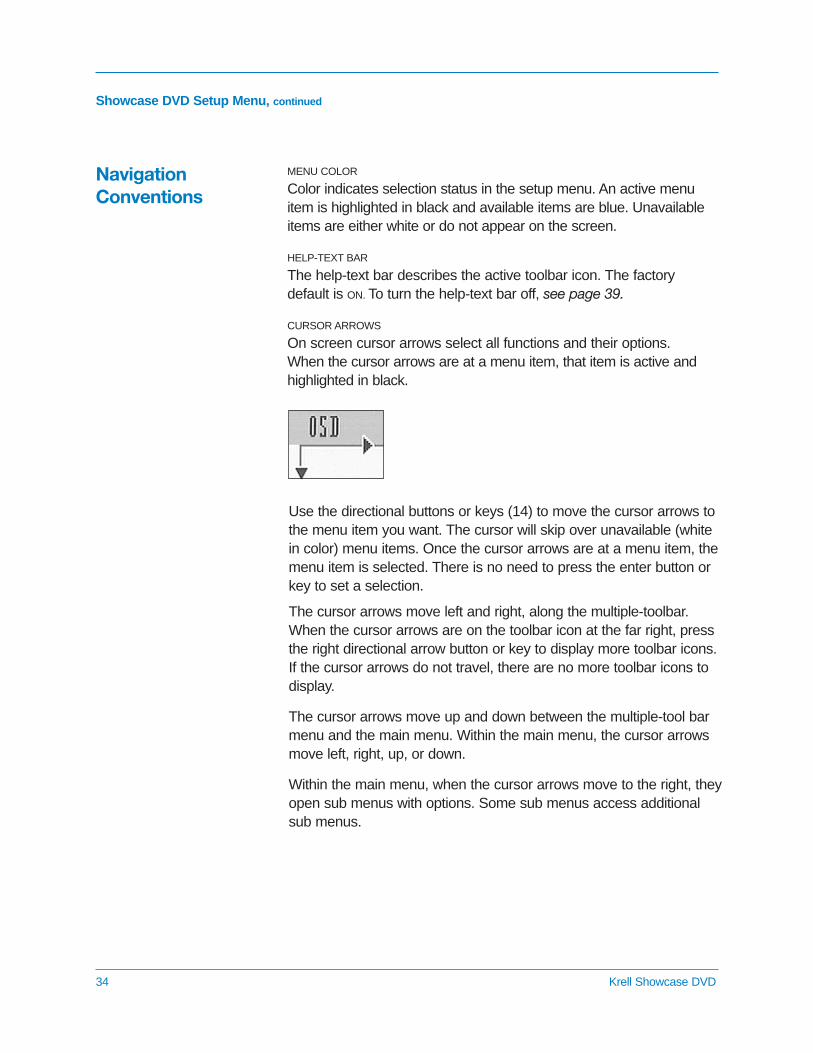
CURSOR ARROWS
On screen cursor arrows select all functions and their options.When the cursor arrows are at a menu item, that item is active andhighlighted in black.
Krell Showcase DVD 35
Showcase DVD Setup Menu, continued
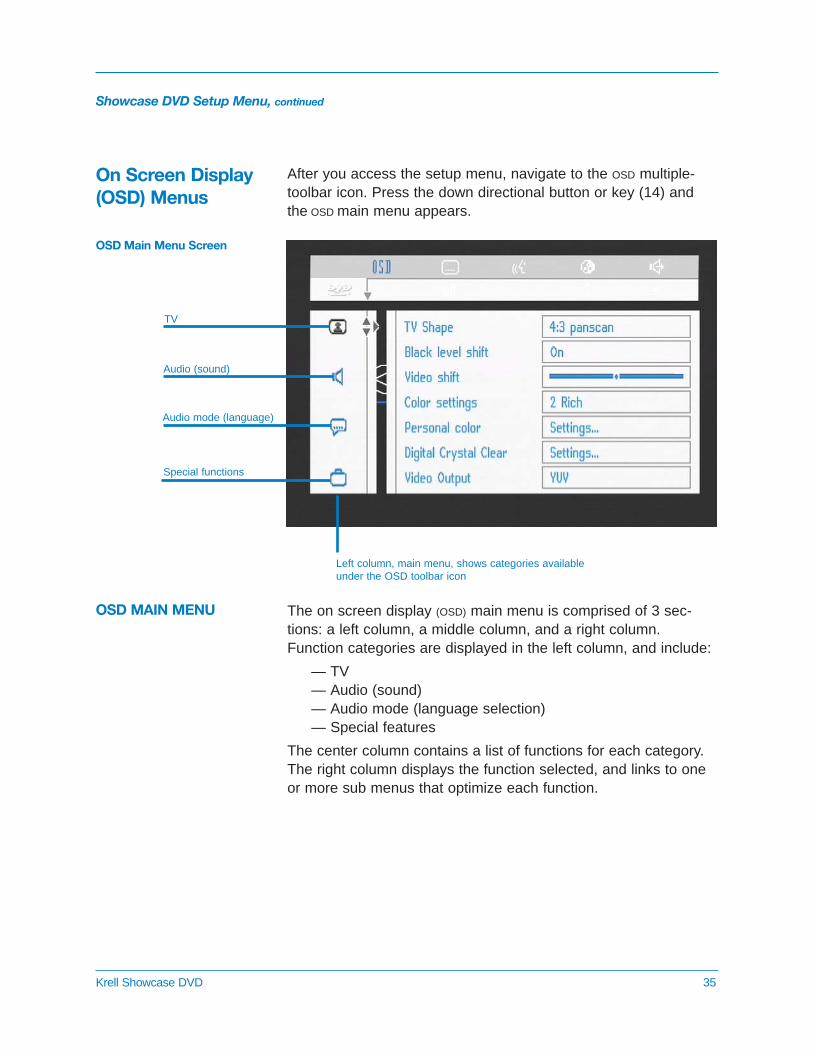
Left column, main menu, shows categories available under the OSD toolbar icon
After you access the setup menu, navigate to the OSD multiple-toolbar icon. Press the down directional button or key (14) andthe OSD main menu appears.
The on screen display (OSD) main menu is comprised of 3 sec-tions: a left column, a middle column, and a right column.Function categories are displayed in the left column, and include:
— TV— Audio (sound)— Audio mode (language selection)— Special features
The center column contains a list of functions for each category.The right column displays the function selected, and links to oneor more sub menus that optimize each function.
TV
Audio (sound)
Audio mode (language)
Special functions
On Screen Display(OSD) Menus
OSD MAIN MENU
OSD Main Menu Screen
36 Krell Showcase DVD
Showcase DVD Setup Menu, continued
On Screen Display (OSD)Menus, continued
A description of the OSD menu functions follows:
TV SHAPE
Change the aspect ratio of the video output to match your moni-tor. The choices are:
LETTERBOX
A widescreen picture with black bars at the top and bottom ofthe screen. Use with a 4:3 TV.
PAN SCAN
A full-height picture with the sides trimmed. Use with a 4:3 TV.
16:9A widescreen picture. Use with a 16.9 TV.
BLACK LEVEL SHIFT (NTSC ONLY)
Select ON to enrich the contrast of the video signal, with a NTSCformat television only. The PAL format does not have a pedestalor setup for black level shift. The choices are: oN and OFF.
VIDEO SHIFT
Use the sliders to scroll the picture to the left or right on thescreen. The factory default centers the picture on the screen.
COLOR SETTINGS
Choose one of five color settings, numbered 1 through 5. Choices 2through 5 are preset options. Choice 1 is user-adjustable using thepersonal color feature under toolbar icon OSD, function name TV SHAPE:
Setting Description1 Personal2 Rich3 Natural4 Soft5 Animation
PERSONAL COLOR
Fine tune selected color settings to your taste. Navigate to COLOR
SETTINGS to adjust the saturation, brightness, and contrast of thepicture.
TV Category: Adjusts the picture view
Krell Showcase DVD 37
Showcase DVD Setup Menu, continued
On Screen Display (OSD)Menus, continued
TV Category: Adjusts the picture view, continued
DIGITAL CRYSTAL CLEAR
Adjust the appearance of the picture. Navigate to SETTINGS andadjust:
CHROMA DELAY
Adjusts the difference between signals, affecting hue and sat-uration.
GAMMA
Adjusts the brightness, changing the contrast between lightand dark.
SHARPNESS
Values rang from +3 (very sharp) to -3 (soft).
DCDi
Directional Correlation Deinterlacing (DCDi) eliminatesjagged diagonal edges in a video picture.
VIDEO OUTPUT (INTERLACED ONLY)
Adjust the video output standard. The choices are RGB or YUV. TheEuropean version of YPbPr is YUV. The selection takes effectwhen you exit the menu.
DIGITAL OUTPUT
Adjust the digital audio output. The choices are: OFF, PCM ONLY, andALL. The factory default is ALL, which means that the coaxial outputis on. If you are not connecting to a device with a digital input,change the setting to OFF. If you are not connecting to a digitalmulti-channel decoder, set the digital output to PCM ONLY.
PCM
The abbreviation for pulse code modulation, a digital repre-sentation of an audio signal.
ANALOG OUTPUT
Adjust the analog audio output to match your system’s playbackcapability. The choices are STEREO, DOLBY SURR-COMPAT, or 3D SOUND.
NIGHT MODE
This function compresses peaks in the audio playback, and opti-mizes the dynamics of the sound for low volume playback. Thechoices are ON and OFF.
KARAOKE VOCAL
Use the DVD player to downmix a multi-channel Karaoke soundtrack to the audio outputs (2-channel sound). Use ON only when amulti-channel karaoke DVD is being played, otherwise turn this func-tion OFF. The choices are: ON and OFF.
Audio Category: Adjusts the Sound
38 Krell Showcase DVD
Showcase DVD Setup Menu, continued
On Screen Display (OSD)Menus, continued
Audio Mode Category: Adjusts the Language
PCM OUTPUT
Adjust the sampling rate of the PCM (pulse code modulation) output.The choices are: 48 kHz and 98 kHz.
AUDIO LANGUAGE
Select a language from the list provided. If available on the disc,audio will play in the selected language. If the selected language isunavailable, audio will be in the first spoken language on the disc.The languages can be selected from the toolbar audio icon, wherethe languages show up as abbreviations.
SUBTITLE
Select a subtitle language from the list provided. If the subtitle func-tion is available on the disc, subtitles:
— appear on the television screen in the language selected
— are identified in the help-text box, if it is active
— show up as abbreviations on the toolbar under the subtitle icon
after you resume disc playback. If the selected subtitle language isunavailable, subtitles will appear in the first subtitle language on thedisc. The subtitles can be selected from the toolbar audio icon,where the subtitles show up as abbreviations.
The Showcase DVD resets the subtitle icon in the multiple-menutoolbar to OFF when it is in the stand-by mode.
MENU
Displays the setup menu in English, Spanish, or French.
ACCESS CONTROL
Create, confirm, or change a 4-digit access code. The designated 4-digit code must be entered in order to playback discs. The accesscontrol system will only operate a DVD disc which is programmedwith access code software.
STATUS WINDOW
Displays the current status of the Showcase DVD. When this featureis enabled, the temporary feedback icon and the toolbar menuappear if the disc is stopped. The factory default is ON. Select OFF tosuppress the icon and toolbar.
Special Functions Category:
Audio Category: Adjusts the Sound, continued
Krell Showcase DVD 39
Showcase DVD Setup Menu, continued
On Screen Display (OSD)Menus, continued
LOW POWER STANDBY
Dims the television screen when the pause selection is active. Thefunction starts automatically after the Showcase DVD is in the pausemode for 15 minutes.
BIT RATE INDICATOR
Displays bit rate information for video and audio during playback ofDVD and SVCD discs. The choices are ON and OFF.
PLAYBACK CONTROL (PBC)
Access the menu on a VCD, gives navigation information about MP3files, or allows the viewing of computer discs. If a VCD is pro-grammed for PBC, this function must be ON in order th access thePBC menu. The choices are: ON and OFF.
HELP TEXT
View a description of a toolbar icon, when the icon is selected. Thedescription appears in a help menu along the bottom of the screen.The choices are: ON and OFF. The factory default is ON.
Special Functions Category: continued
40 Krell Showcase DVD
Showcase DVD Setup Menu, continued
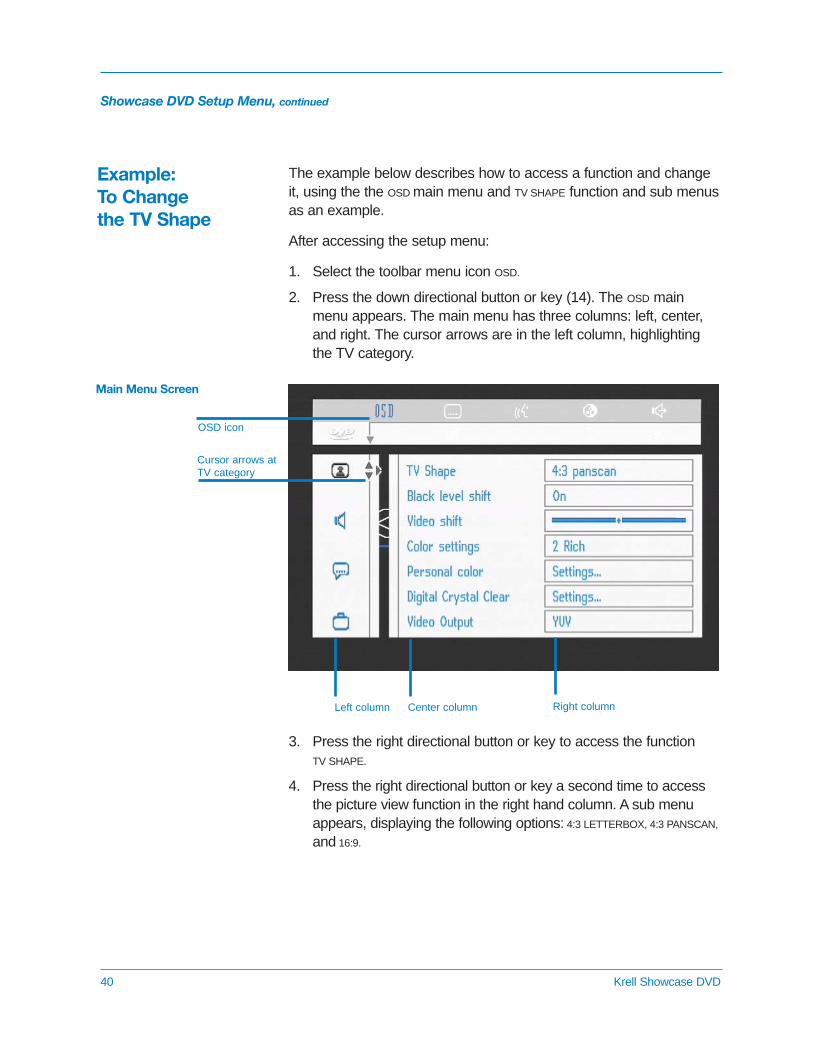
The example below describes how to access a function and changeit, using the the OSD main menu and TV SHAPE function and sub menusas an example.
After accessing the setup menu:
1. Select the toolbar menu icon OSD.
2. Press the down directional button or key (14). The OSD mainmenu appears. The main menu has three columns: left, center,and right. The cursor arrows are in the left column, highlightingthe TV category.
Left column Center column Right column
Main Menu Screen
3. Press the right directional button or key to access the function TV SHAPE.
4. Press the right directional button or key a second time to accessthe picture view function in the right hand column. A sub menuappears, displaying the following options: 4:3 LETTERBOX, 4:3 PANSCAN,
and 16:9.
Example: To Changethe TV Shape
Cursor arrows atTV category
OSD icon
Krell Showcase DVD 41
Showcase DVD Setup Menu, continued
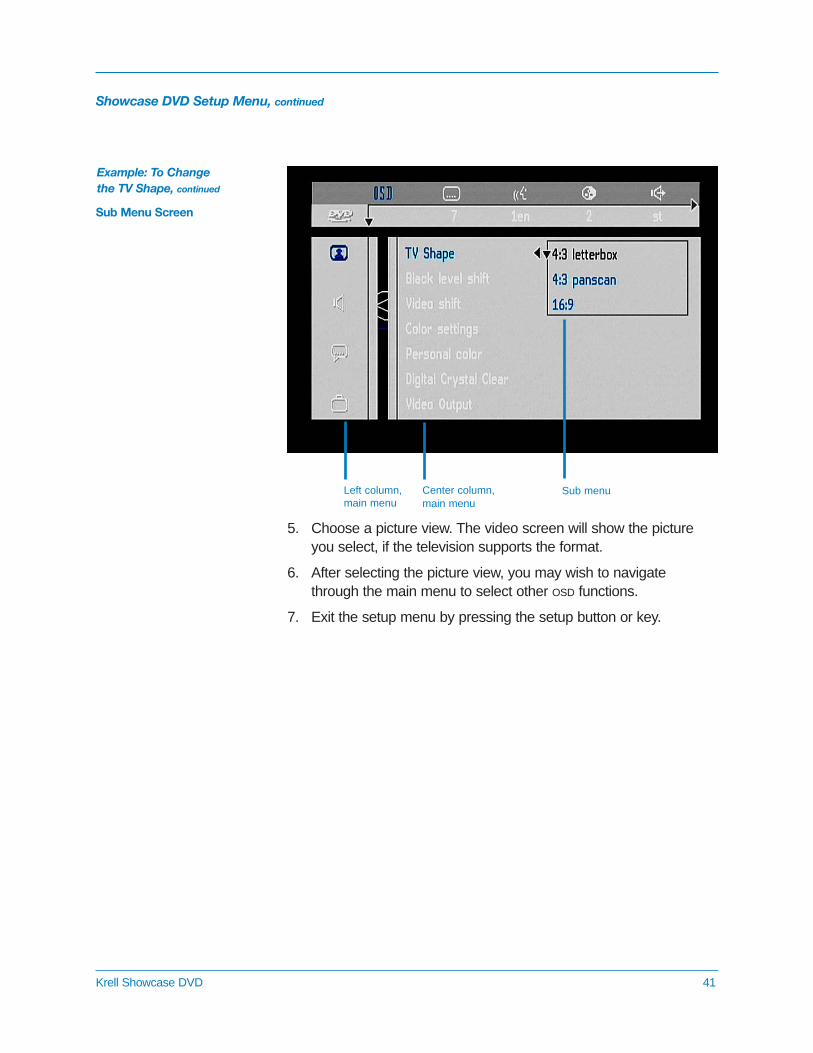
Example: To Change the TV Shape, continued
Left column,main menu
Center column,main menu
Sub menu
Sub Menu Screen
5. Choose a picture view. The video screen will show the pictureyou select, if the television supports the format.
6. After selecting the picture view, you may wish to navigatethrough the main menu to select other OSD functions.
7. Exit the setup menu by pressing the setup button or key.

42 Krell Showcase DVD
Showcase DVD Setup Menu, continued
Multiple-toolbarIcons
Located near the top of the video screen, the multiple-tool bar in thesetup menu uses a set of icons to quickly access and change func-tions the Showcase DVD performs, if the disc you are playing hasbeen programmed to allow access.
There are three toolbar menus:
Toolbar 1 On screen display (OSD)SubtitleAudio languageColor Sound
Toolbar 2 Step (frame by frame)Slow motionFast motionCamera angleZoom
Toolbar 3 TitleChapterTime searchFTS (favorite track selection)
Press the setup key (17) once to scroll through Toolbar 1, Toolbar2, and Toolbar 3. When there is no disc in the transport, onlyToolbar 1 is accessible.
There is an abbreviated phrase below each toolbar icon. Thisphrase is the function that is active when the toolbar icon isselected. Scroll through the list of abbreviated phrases using thedown directional button or key (14). The last function scrolled to isautomatically selected. Some functions do not take effect until thetransport (12) is opened and closed (11).
A description of each icon follows:
TOOLBAR ICON LIST
Krell Showcase DVD 43
Showcase DVD Setup Menu, continued
Multiple-toolbar Icons,continued
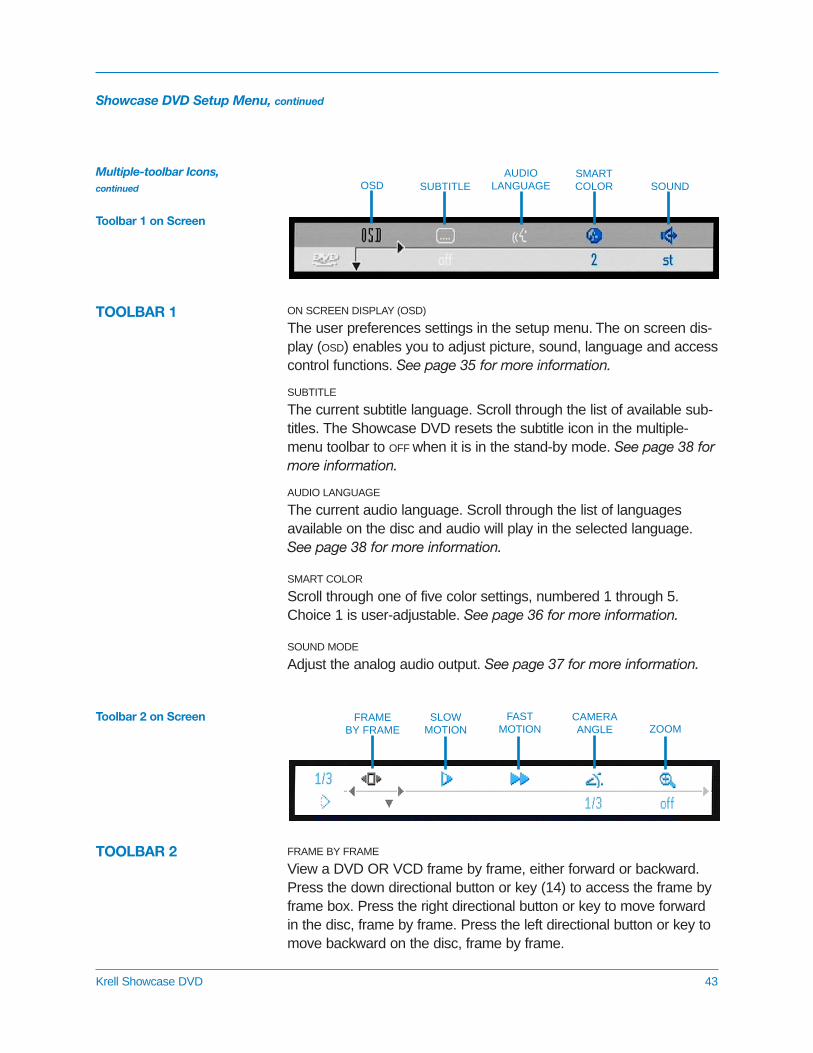
ON SCREEN DISPLAY (OSD)
The user preferences settings in the setup menu. The on screen dis-play (OSD) enables you to adjust picture, sound, language and accesscontrol functions. See page 35 for more information.
SUBTITLE
The current subtitle language. Scroll through the list of available sub-titles. The Showcase DVD resets the subtitle icon in the multiple-menu toolbar to OFF when it is in the stand-by mode. See page 38 formore information.
AUDIO LANGUAGE
The current audio language. Scroll through the list of languagesavailable on the disc and audio will play in the selected language.See page 38 for more information.
SMART COLOR
Scroll through one of five color settings, numbered 1 through 5.Choice 1 is user-adjustable. See page 36 for more information.
SOUND MODE
Adjust the analog audio output. See page 37 for more information.
TOOLBAR 1
Toolbar 1 on Screen
OSD SUBTITLEAUDIO
LANGUAGESMARTCOLOR SOUND
FRAMEBY FRAME
SLOWMOTION
FASTMOTION
CAMERAANGLE ZOOM
FRAME BY FRAME
View a DVD OR VCD frame by frame, either forward or backward.Press the down directional button or key (14) to access the frame byframe box. Press the right directional button or key to move forwardin the disc, frame by frame. Press the left directional button or key tomove backward on the disc, frame by frame.
TOOLBAR 2
Toolbar 2 on Screen
44 Krell Showcase DVD
Showcase DVD Setup Menu, continued
Multiple-Tool bar Icons,continued
SLOW MOTION
View a DVD OR VCD in slow motion, either forward or backward onthe disc. Press the down directional button or key (14) to access theslow motion settings selection box: -1/8, -1/2, -1/4, 0,1/4, 1/2, 1/8.The selected speed is highlighted in black. When you exit the selec-tion box, the disc plays at the speed you selected.
FAST MOTION
View a DVD or VCD in fast motion, either forward or backward on thedisc. Press the down directional button or key (14) to access the fastmotion settings selection box: -32, -8, -4, < 1 > 4, 8, 32. The selectedspeed is highlighted in black, and starts to play immediately uponselection. The selected speed continues to play when you exit theselection box. To return to normal playback speed, access the fastmotion settings selection box again, and highlight the number 1.
CAMERA ANGLE
If the disc currently playing contains scenes recorded from differentcamera angles, the angle icon displays the angle being shown anddisplays the number and kind of angles you can select. This icon isinactive if there are no alternate camera angles recorded on disc.
ENLARGE PICTURE
Zoom the picture up or down, and pan through the image. The avail-able zoom settings are: OFF, x 1.33. x 2.4. Press the down directional but-ton or key (14) to access the pan box and press the enter button or key (15) to pan. An OK box appears on the screen. Use the direc-tional arrows to pan around the image. Press enter to exit the setupmenu. The disc plays with the image at the enlarged size in the panposition. To return the picture image to the regular size and position,enter the setup menu, navigate to the enlarge picture icon, and selectOFF.
TOOLBAR 2, continued
Krell Showcase DVD 45
Showcase DVD Setup Menu, continued
Multiple-Tool bar Icons,continued
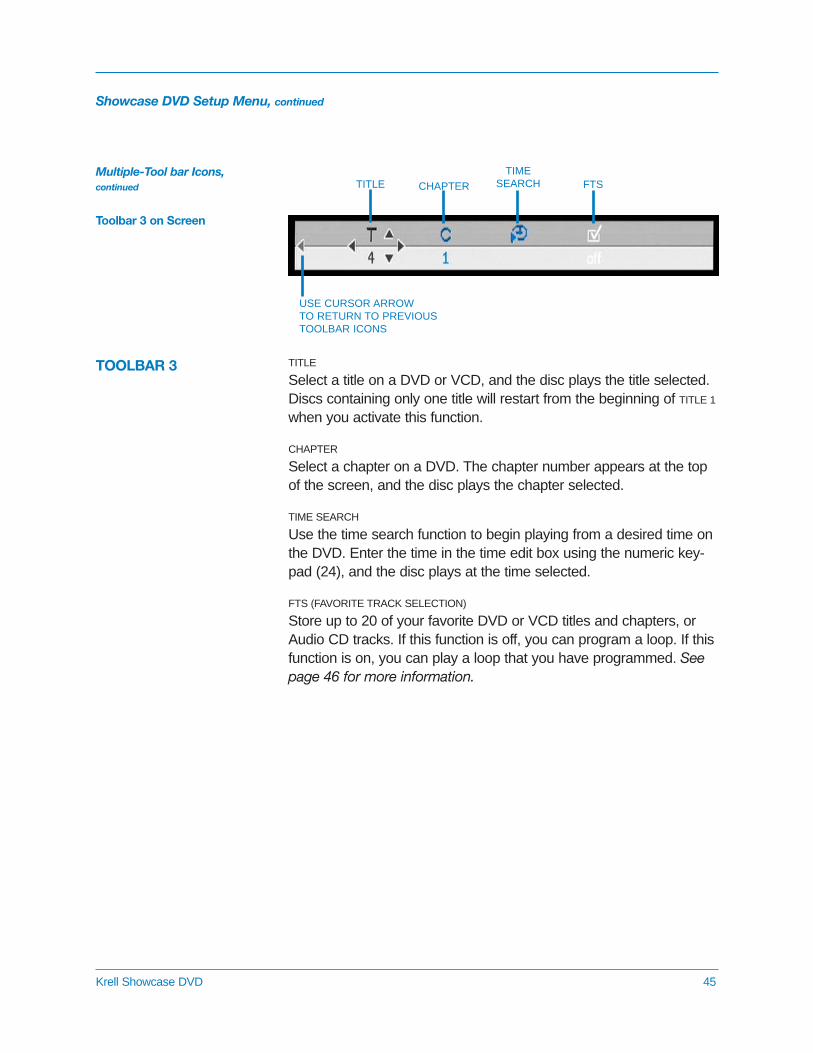
TITLE
Select a title on a DVD or VCD, and the disc plays the title selected.Discs containing only one title will restart from the beginning of TITLE 1
when you activate this function.
CHAPTER
Select a chapter on a DVD. The chapter number appears at the topof the screen, and the disc plays the chapter selected.
TIME SEARCH
Use the time search function to begin playing from a desired time onthe DVD. Enter the time in the time edit box using the numeric key-pad (24), and the disc plays at the time selected.
FTS (FAVORITE TRACK SELECTION)
Store up to 20 of your favorite DVD or VCD titles and chapters, orAudio CD tracks. If this function is off, you can program a loop. If thisfunction is on, you can play a loop that you have programmed. Seepage 46 for more information.
USE CURSOR ARROW TO RETURN TO PREVIOUSTOOLBAR ICONS
TITLE CHAPTER
TIMESEARCH FTS
TOOLBAR 3
Toolbar 3 on Screen
46 Krell Showcase DVD
Special Operations
When you play a DVD or VCD, you can write a program, if the discallows this function:
Navigate to the favorite track selection (FTS) check box at the farright of the third toolbar. ON or OFF is displayed below the icon:
ON
Titles or chapters are programmed.
OFF
Titles or chapters are not programmed.
When a disc does not offer the FTS feature, there is no FTS check box iconin the toolbar and you cannot write a program.
To select a program:
1. The phrase below the FTS icon in the FTS toolbar icon is OFF.Press the down directional button (14) on the front panel or thedown directional key on the remote control to move the cursorarrows to the FTS main menu. The FTS selection in the mainmenu is OFF.
2. Press the down directional buttons or keys to move the cursorarrows to TITLE or CHAPTER on the left FTS screen. Notice the disctitle and chapter number(s), on the right program screen. The cur-sor arrow is at the selected number, highlighted in black.
3. Use the right and left directional arrow button or key to select thetitle(s) and chapter(s) for your program.
4. Press the enter button or key (15) to set each selection. The FTSselection in the main menu changes to ON, and each selectionappears after PROGRAM.
How to Write a Title/ChapterProgram for a DVD or VCD
Notes
Krell Showcase DVD 47
Special Operations, continued
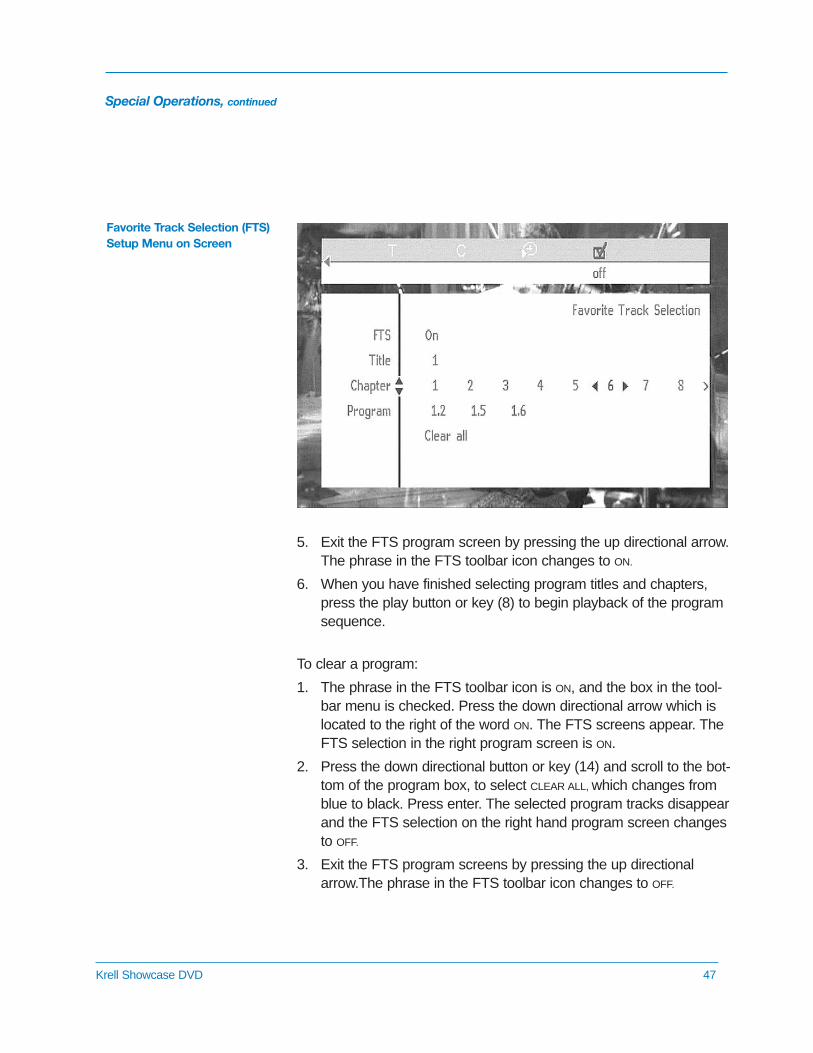
5. Exit the FTS program screen by pressing the up directional arrow.The phrase in the FTS toolbar icon changes to ON.
6. When you have finished selecting program titles and chapters,press the play button or key (8) to begin playback of the programsequence.
To clear a program:
1. The phrase in the FTS toolbar icon is ON, and the box in the tool-bar menu is checked. Press the down directional arrow which islocated to the right of the word ON. The FTS screens appear. TheFTS selection in the right program screen is ON.
2. Press the down directional button or key (14) and scroll to the bot-tom of the program box, to select CLEAR ALL, which changes fromblue to black. Press enter. The selected program tracks disappearand the FTS selection on the right hand program screen changesto OFF.
3. Exit the FTS program screens by pressing the up directionalarrow.The phrase in the FTS toolbar icon changes to OFF.
Favorite Track Selection (FTS) Setup Menu on Screen
48 Krell Showcase DVD
Special Operations, continued
FAVORITE TRACK SELECTION FTS
The FTS program allows you to store your favorite tracks for a partic-ular disc in the Showcase DVD memory. Each FTS program con-tains up to 20 tracks.
1. Place an audio disc in the disc transport (12) and press the stopbutton or key (7). The audio mode menu appears on the videoscreen.
2. Use the down directional button or key (14) to navigate to the listof available tracks.
3. Use the left and right directional button or key to select tracksfrom the list, or enter the track number using the numeric keys.
4. Store each track by pressing enter (15). The track numbers areadded to the program list. The number of tracks and the playingtime of the program are displayed in the front panel window andin the audio mode menu on the video screen. The ShowcaseDVD automatically memorizes the FTS program.
5. Use the right or left directional buttons or keys to select ON or OFF.
6. When the FTS program is complete, press play (8) to start play-back or press stop to return to the stop mode.
To erase a track from an FTS program:
1. Use the directional buttons or keys to select the track numberyou want to erase.
2. Press enter. The track number will be erased from the list ofselected tracks.
or
1. To erase the complete FTS program, use the down directionalarrow to select CLEAR ALL.
2. Press enter. The complete FTS program will be erased.
How to Write a Track Program for an Audio CD

Krell Showcase DVD 49
Special Operations, continued
1. When you see or hear the selection that you want as the begin-ning of the loop, press the A-B key (25) to insert the start position.REPEAT A appears on the video screen.
2. When you see or hear the selection you want as the end of theloop, press the A-B key again to insert the finish position. REPEAT A-B appears on the television screen.
3. Playback of the loop begins automatically and continues until youpress the A-B key a third time. REPEAT disappears on the videoscreen.
Pause and resume play functions are active within an A-B loop.
How to Create an A-B Loop fora DVD, VCD, orAudio CD
Note
50 Krell Showcase DVD
Special Operations, continued
Child Lock/Unlock
When child lock is inactive, the CHILD SAFE temporary feedback fieldicon appears in the upper left hand corner of the television screen, atthe start of playback. When child lock is active, the CHILD LOCK ON tem-porary feedback field icon appears instead, at the start of playback.
To activate or deactivate CHILD LOCK:
1. If a disc is playing, stop disc playback (7).
2. Navigate to the OSD icon on the toolbar and press the downdirectional arrow or key (14). The main menu appears on thescreen with the cursor arrows at the TV category.
3. Navigate to the ACCESS CONTROL function in the main menu.
4. Select ENTER CODE from the main menu. The enter code dialogbox appears.
5. Enter the code of your choice. The confirm code dialog boxappears.
6. Confirm the code. The access control dialog box appears.
7. Navigate to CHILD LOCK using the directional buttons or keys.
8. Select the LOCK icon using the directional buttons or keys. Thelock icon is selected when it is highlighted in black
or
select the UNLOCK icon to deactivate child lock.
8. Press the enter button or key (15) to exit the setup menu.
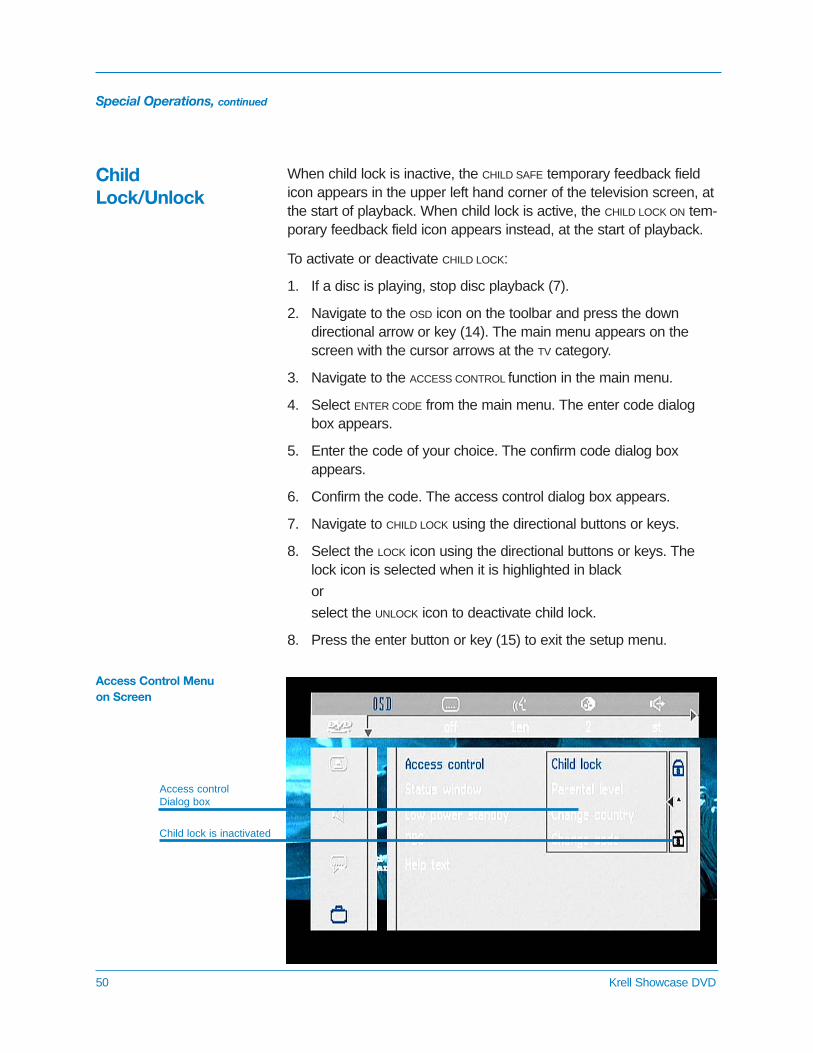
Child lock is inactivated
Access controlDialog box
Access Control Menuon Screen
Krell Showcase DVD 51
Special Operations, continued
To Authorize a Disc
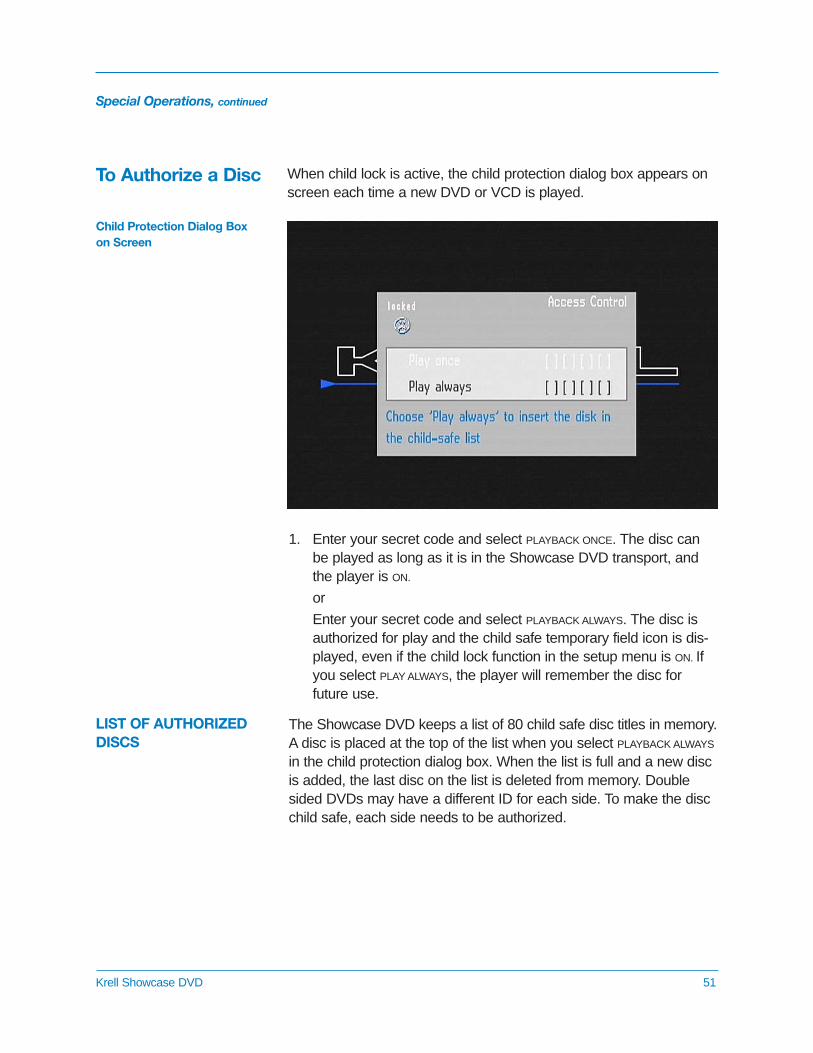
Child Protection Dialog Boxon Screen
When child lock is active, the child protection dialog box appears onscreen each time a new DVD or VCD is played.
1. Enter your secret code and select PLAYBACK ONCE. The disc canbe played as long as it is in the Showcase DVD transport, andthe player is ON.
or
Enter your secret code and select PLAYBACK ALWAYS. The disc isauthorized for play and the child safe temporary field icon is dis-played, even if the child lock function in the setup menu is ON. Ifyou select PLAY ALWAYS, the player will remember the disc forfuture use.
The Showcase DVD keeps a list of 80 child safe disc titles in memory.A disc is placed at the top of the list when you select PLAYBACK ALWAYS
in the child protection dialog box. When the list is full and a new discis added, the last disc on the list is deleted from memory. Doublesided DVDs may have a different ID for each side. To make the discchild safe, each side needs to be authorized.
LIST OF AUTHORIZEDDISCS
52 Krell Showcase DVD
Special Operations, continued
To Activate/DeactivateParental Control(DVD Only)
PARENTAL CONTROLDISCLAIMERThe Showcase DVD player fea-tures a parental control systemwhich activates when playingDVDs programmed with parentalcontrol coding. This parentalcontrol system will not be activeon a DVD which does not haveparental control coding. Pleasemake sure that the disc playsaccording to your parental con-trol settings, before you allowchildren to play the disc.
1. Place the disc in the transport (12). Playback starts immediately.
2. Press the stop button or key (7) when the CHILD SAFE temporaryfield feedback icon is visible.
3. The CHILD LOCK ON temporary field feedback icon replaces thechild safe icon. The disc is now unauthorized.
The PARENTAL LEVEL function allows you to prevent discs from beingplayed by children, or allows you to play certain discs with alternativescenes. A disc may be programmed to contain parental control infor-mation, on the entire disc or on certain scenes. These scenes arerated from 1 to 8, and alternative scenes more suitable to viewing bychildren, are available on the disc. These ratings are country depen-dent.
1. Open the setup menu (17).
2. Navigate to the OSD main menu.
3. Select ACCESS CONTROL. The access control dialog box appears.
4. Enter your 4-digit code.
5. Navigate to PARENTAL LEVEL.
6. Navigate to the value adjustment bar (1-8).
7. Use the up and down directional buttons or keys (14) to select arating for the disc that is on the transport.
RATING 0
Rating is not active. The disc plays in full.
RATINGS 1-8.
The disc contains scenes not suitable for children. If you set arating for the player, all scenes with the same rating or lowerplayback. Higher rated scenes do not playback unless an alter-native is available on the disc.
8. Press enter (15), or press the left directional button or key to exitthe menu.
To Unauthorize a Disc
Krell Showcase DVD 53
Special Operations, continued
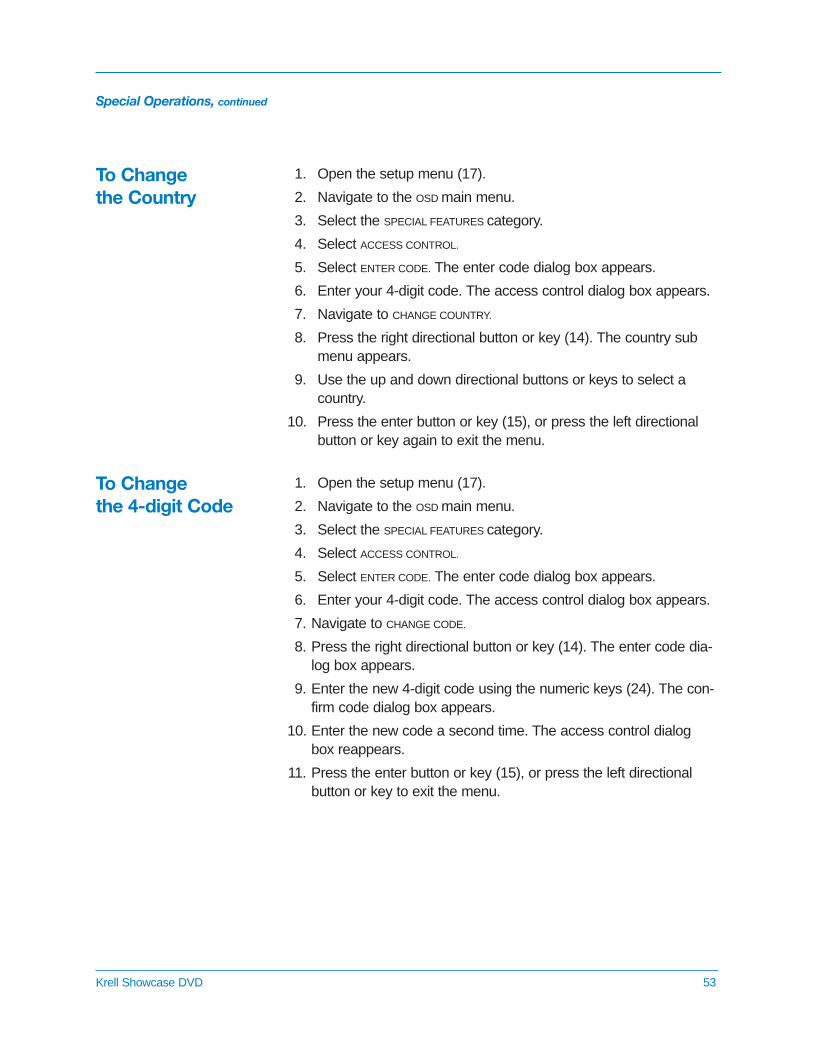
To Change the Country
To Change the 4-digit Code
1. Open the setup menu (17).
2. Navigate to the OSD main menu.
3. Select the SPECIAL FEATURES category.
4. Select ACCESS CONTROL.
5. Select ENTER CODE. The enter code dialog box appears.
6. Enter your 4-digit code. The access control dialog box appears.
7. Navigate to CHANGE COUNTRY.
8. Press the right directional button or key (14). The country sub menu appears.
9. Use the up and down directional buttons or keys to select a country.
10. Press the enter button or key (15), or press the left directional button or key again to exit the menu.
1. Open the setup menu (17).
2. Navigate to the OSD main menu.
3. Select the SPECIAL FEATURES category.
4. Select ACCESS CONTROL.
5. Select ENTER CODE. The enter code dialog box appears.
6. Enter your 4-digit code. The access control dialog box appears.
7. Navigate to CHANGE CODE.
8. Press the right directional button or key (14). The enter code dia-log box appears.
9. Enter the new 4-digit code using the numeric keys (24). The con-firm code dialog box appears.
10. Enter the new code a second time. The access control dialogbox reappears.
11. Press the enter button or key (15), or press the left directionalbutton or key to exit the menu.
54 Krell Showcase DVD
Special Operations, continued
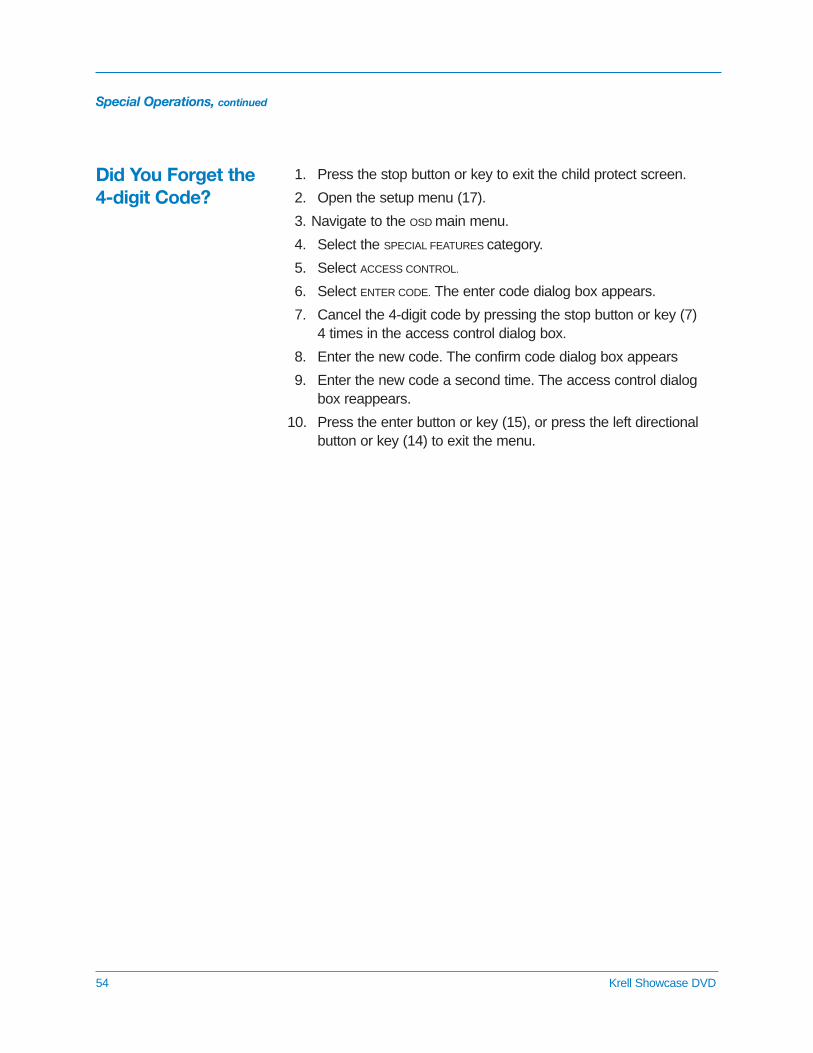
Did You Forget the4-digit Code?
1. Press the stop button or key to exit the child protect screen.
2. Open the setup menu (17).
3. Navigate to the OSD main menu.
4. Select the SPECIAL FEATURES category.
5. Select ACCESS CONTROL.
6. Select ENTER CODE. The enter code dialog box appears.
7. Cancel the 4-digit code by pressing the stop button or key (7) 4 times in the access control dialog box.
8. Enter the new code. The confirm code dialog box appears
9. Enter the new code a second time. The access control dialog box reappears.
10. Press the enter button or key (15), or press the left directional button or key (14) to exit the menu.

Krell DVD Standard 55
This Krell product has a limited warranty of five years for parts and labor on circuitry and threeyears for parts and labor on all mechanical components. Should this product fail to perform atany time during the warranty, Krell will repair it at no cost to the owner, except as set forth inthis warranty.
The warranty does not apply to damage caused by acts of God or nature.
The warranty on this page shall be in lieu of any other warranty, expressed or implied, includ-ing, but not limited to, any implied warranty of merchantability or fitness for a particular purpose.There are no warranties which exceed beyond those described in this document. If this productdoes not perform as warranted herein, the owner’s sole remedy shall be repair. In no event willKrell be liable for incidental or consequential damages arising from purchase, use, or inability touse this product, even if Krell has been advised of the possibility of such damages.
Proof of purchase in the form of a bill of sale or receipted invoice substantiating that the unit iswithin the warranty period must be presented to obtain warranty service. The warranty beginson the date of the original retail purchase, as noted on the bill of sale or receipted invoice froman authorized Krell dealer or distributor. Previously owned equipment, when re-purchased froman authorized Krell dealer or distributor, has the balance of the original warranty, based on theoriginal date of manufacture.
The warranty for Krell products is valid only in the country to which they were originally shipped,through the authorized Krell distributor for that country, and at the factory. There may be restric-tions on or changes to Krell’s warranty because of regulations within a specific country. Pleasecheck with your distributor for a complete understanding of the warranty in your country.
If a unit is serviced by a distributor who did not import the unit, there may be a charge for ser-vice, even if the product is within the warranty period.
Freight to the factory is your responsibility. Return freight within the United States (U.S.A.) isincluded in the warranty. If you have purchased your Krell product outside the U.S.A. and wishto have it serviced at the factory, all freight and associated charges to the factory are yourresponsibility.
Krell will pay return freight to the U.S.A.-based freight forwarder of your choice. Freight andother charges to ship the unit from the freight forwarder to you are also your responsibility.
Krell is not responsible for any damage incurred in transit. Krell will file claims for damages asnecessary for units damaged in transit to the factory. You are responsible for filing claims forshipping damages during the return shipment.
Krell does not supply replacement parts and/or products to the owner of the unit. Replacementparts and/or products will be furnished only to the distributor performing service on this unit onan exchange basis only; any parts and/or products returned to Krell for exchange become theproperty of Krell.
No expressed or implied warranty is made for any Krell product damaged by accident, abuse,misuse, natural or personal disaster, or unauthorized modification.
Any unauthorized voltage conversion, disassembly, component replacement, perforationof chassis, updates, or modifications performed to the unit will void the warranty.
The operating voltage of this unit is determined by the factory and can only be changed by anauthorized Krell distributor or at the factory. The voltage for this product in the U.S.A. cannot bechanged until six months from the original purchase date.
In the event that Krell receives a product for warranty service that has been modified in anyway without Krell authorization, all warranties on that product will be void. The product will bereturned to original factory layout specifications at the owner’s expense before it is repaired. Allrepairs required after the product has been returned to original factory specifications will becharged to the customer, at current parts and labor rates.
All operational features, functions, and specifications and policies are subject to change withoutnotification.
Warranty
To register your product for warranty benefits, pleasecomplete and return theWarranty Registration Cardenclosed in the shipping boxwithin 15 days of purchase. Thank you.
Your Showcase DVD product serial number is:
Return Authorization Procedure
56 Krell Showcase DVD
If you believe there is a problem with your component, please con-tact your dealer, distributor, or the Krell factory to discuss the problembefore you return the component for repair. To expedite service, youmay wish to complete and e-mail the Service Request Form in theService section of our website at:
http://www.krellonline.com
To return a product to Krell, please follow this procedure so that wemay serve you better:
1. Obtain a Return Authorization Number (R/A number) and ship-ping address from the Krell Service Department.
2. Insure and accept all liability for loss or damage to the productduring shipment to the Krell factory and ensure all freight (ship-ping) charges are prepaid.
The product may also be hand delivered if arrangements with theService Department have been made in advance. Proof of purchasewill be required for warranty validation at the time of hand delivery.
Use the original packaging to ensure the safe transit of the product tothe factory, dealer, or distributor. Krell may, at its discretion, return aproduct in new packaging and bill the owner for such packaging if theproduct received by Krell was boxed in nonstandard packaging or ifthe original packaging was so damaged that it was unusable. If Krelldetermines that new packaging is required, the owner will be notifiedbefore the product is returned.
HOW TO RETURNA PRODUCT
IMPORTANT
To purchase additional packaging, please contact your authorizedKrell dealer, distributor, or the Krell Service Department for assis-tance.
HOW TO PURCHASEADDITIONAL PACKING
To contact the Krell Service Department:
TEL 203-799-9954Monday-Friday, 9:00 AM to 5:00 PM EST
FAX 203-799-9796E-MAIL [email protected] SITE http://www.krellonline.com
SERIAL NUMBER
HOW TO EXPEDITESERVICE

Krell Industries, Inc.45 Connair RoadOrange, CT 06477-3650 USA
TEL 203-799-9954, FAX 203-891-2028E-MAIL [email protected] SITE www.krellonline.com
Showcase DVDv 03.0
HDMI Operation for the Showcase DVD
Power on the Showcase DVD and turn on your HDCP compatible displaydevice. In most cases, you see one of the resolution lights illuminate, indicating the default resolution of your monitor. This resolution is detectedautomatically by the Showcase DVD circuitry. The resolution you prefer mayor may not be the same as the detected resolution. Press the HDMI button to cycle through the available resolutions: 480p, 720p, or 1080i. For your convenience, the Showcase DVD remembers the last resolution to which it is set.
When you power on, and no HDMI resolution light illuminates, try pressingthe HDMI button anyway. Some video displays do not provide intelligibleinformation to the auto-detect circuitry in the Showcase DVD. Despite thiscondition, it is likely that you will succeed in adjusting the resolution to yourpreference by pressing the HDMI button. The lack of initial auto-detectiondoes not compromise the operation of the circuit in any way.
Please contact your authorized dealer, distributor, or Krell should you haveany questions or concerns, after completing the routine described above.
THE LEADER IN AUDIO ENGINEERING
Krell Technical Bulletin Showcase DVD withHDMI/October 2004
Krell Industries, Inc., 45 Connair Road,Orange, CT 06477-3650 USATEL 203-799-9954, FAX 203-891-2028, E-MAIL [email protected] SITE http://www.krellonline.com
P/N 307550v 04.0
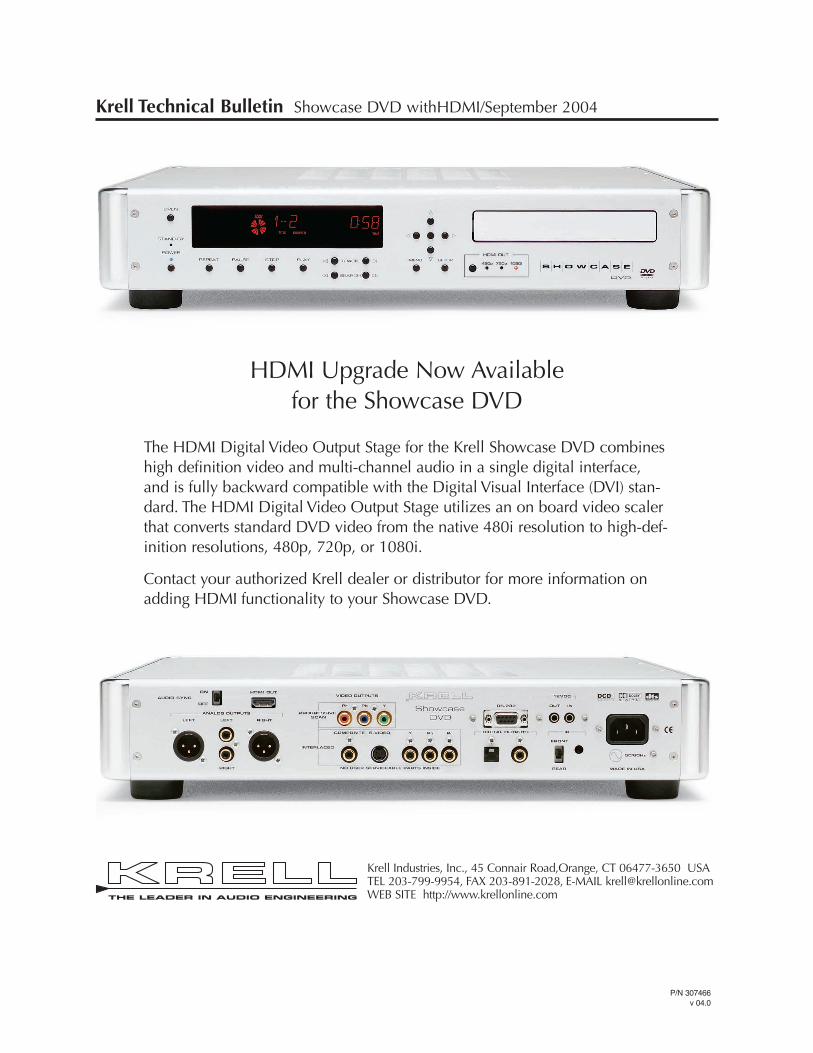
HDMI Upgrade Now Available for the Showcase DVD
The HDMI Digital Video Output Stage for the Krell Showcase DVD combineshigh definition video and multi-channel audio in a single digital interface,and is fully backward compatible with the Digital Visual Interface (DVI) stan-dard. The HDMI Digital Video Output Stage utilizes an on board video scalerthat converts standard DVD video from the native 480i resolution to high-def-inition resolutions, 480p, 720p, or 1080i.
Contact your authorized Krell dealer or distributor for more information onadding HDMI functionality to your Showcase DVD.
THE LEADER IN AUDIO ENGINEERING
Krell Technical Bulletin Showcase DVD withHDMI/September 2004
Krell Industries, Inc., 45 Connair Road,Orange, CT 06477-3650 USATEL 203-799-9954, FAX 203-891-2028, E-MAIL [email protected] SITE http://www.krellonline.com
P/N 307466v 04.0
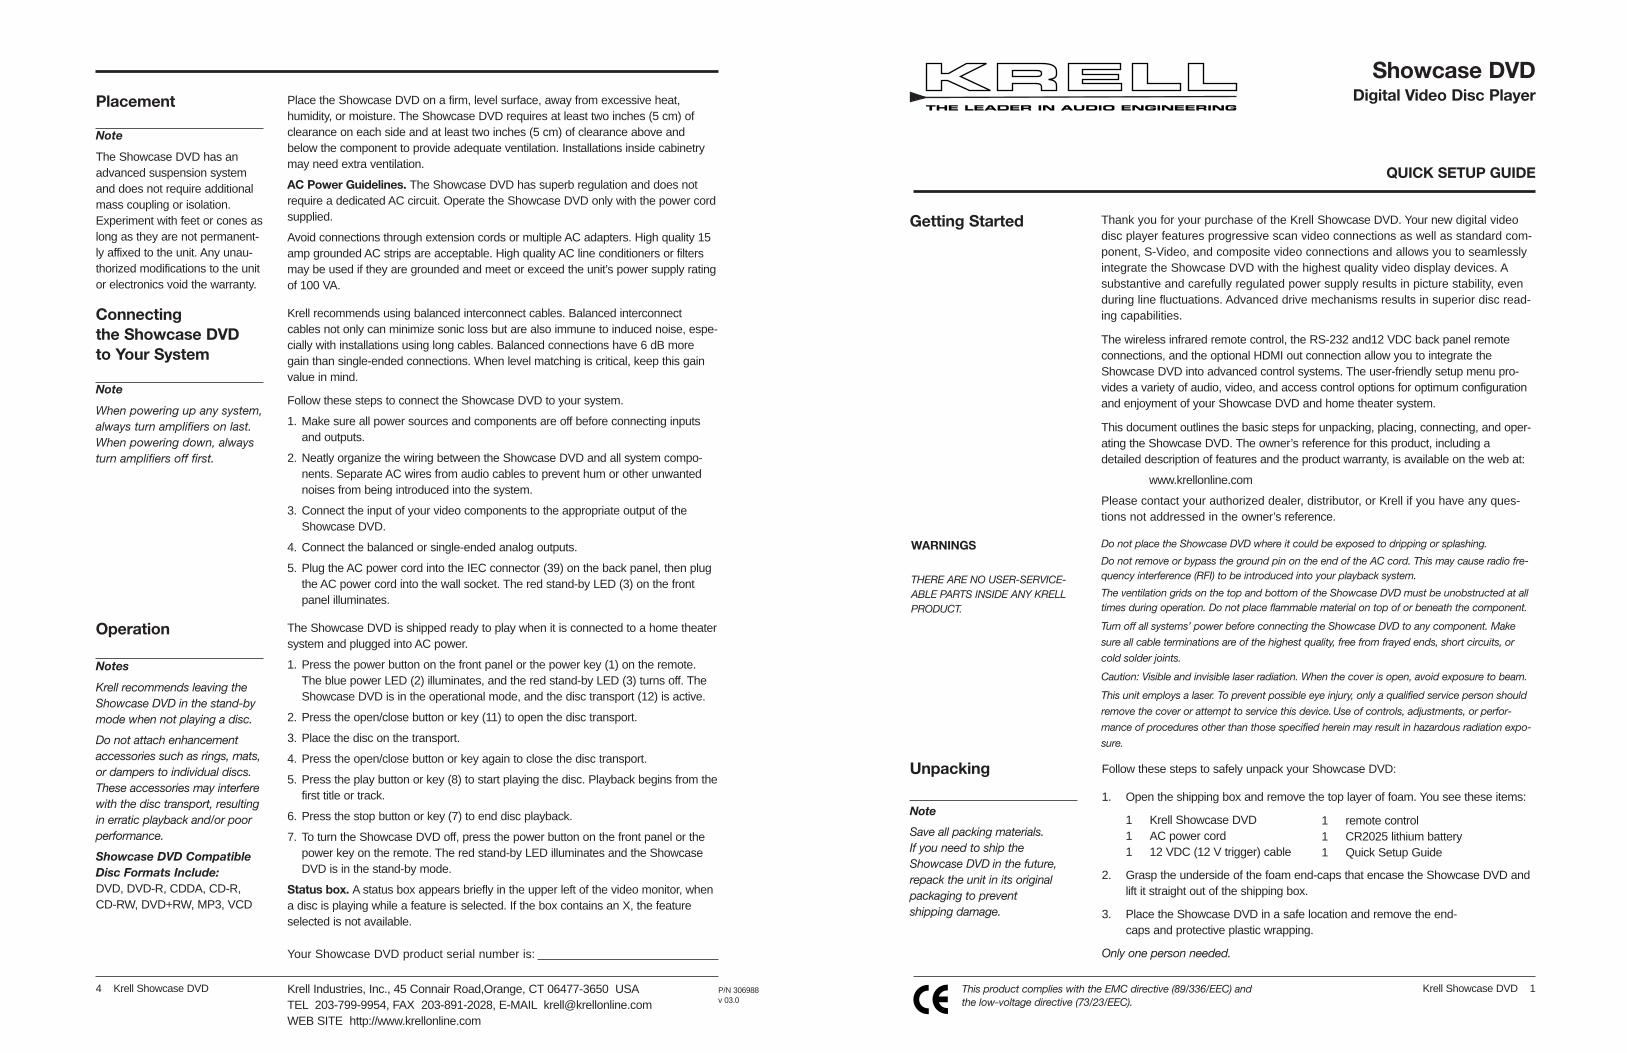
Follow these steps to safely unpack your Showcase DVD:
1. Open the shipping box and remove the top layer of foam. You see these items:
1 Krell Showcase DVD1 AC power cord1 12 VDC (12 V trigger) cable
2. Grasp the underside of the foam end-caps that encase the Showcase DVD andlift it straight out of the shipping box.
3. Place the Showcase DVD in a safe location and remove the end-caps and protective plastic wrapping.
Only one person needed.
Showcase DVDDigital Video Disc Player
QUICK SETUP GUIDE
Getting Started
THE LEADER IN AUDIO ENGINEERING
Thank you for your purchase of the Krell Showcase DVD. Your new digital videodisc player features progressive scan video connections as well as standard com-ponent, S-Video, and composite video connections and allows you to seamlesslyintegrate the Showcase DVD with the highest quality video display devices. Asubstantive and carefully regulated power supply results in picture stability, evenduring line fluctuations. Advanced drive mechanisms results in superior disc read-ing capabilities.
The wireless infrared remote control, the RS-232 and12 VDC back panel remoteconnections, and the optional HDMI out connection allow you to integrate theShowcase DVD into advanced control systems. The user-friendly setup menu pro-vides a variety of audio, video, and access control options for optimum configurationand enjoyment of your Showcase DVD and home theater system.
This document outlines the basic steps for unpacking, placing, connecting, and oper-ating the Showcase DVD. The owner’s reference for this product, including adetailed description of features and the product warranty, is available on the web at:
www.krellonline.com
Please contact your authorized dealer, distributor, or Krell if you have any ques-tions not addressed in the owner’s reference.
Do not place the Showcase DVD where it could be exposed to dripping or splashing.
Do not remove or bypass the ground pin on the end of the AC cord. This may cause radio fre-quency interference (RFI) to be introduced into your playback system.
The ventilation grids on the top and bottom of the Showcase DVD must be unobstructed at alltimes during operation. Do not place flammable material on top of or beneath the component.
Turn off all systems’ power before connecting the Showcase DVD to any component. Make
sure all cable terminations are of the highest quality, free from frayed ends, short circuits, or
cold solder joints.
Caution: Visible and invisible laser radiation. When the cover is open, avoid exposure to beam.
This unit employs a laser. To prevent possible eye injury, only a qualified service person should
remove the cover or attempt to service this device.Use of controls, adjustments, or perfor-
mance of procedures other than those specified herein may result in hazardous radiation expo-
sure.
WARNINGS
THERE ARE NO USER-SERVICE-ABLE PARTS INSIDE ANY KRELLPRODUCT.
Krell Showcase DVD 1
Unpacking
Note
Save all packing materials. If you need to ship theShowcase DVD in the future, repack the unit in its originalpackaging to prevent shipping damage.
Krell Industries, Inc., 45 Connair Road,Orange, CT 06477-3650 USATEL 203-799-9954, FAX 203-891-2028, E-MAIL [email protected] SITE http://www.krellonline.com
Connecting the Showcase DVDto Your System
Placement Place the Showcase DVD on a firm, level surface, away from excessive heat,humidity, or moisture. The Showcase DVD requires at least two inches (5 cm) ofclearance on each side and at least two inches (5 cm) of clearance above andbelow the component to provide adequate ventilation. Installations inside cabinetrymay need extra ventilation.
AC Power Guidelines. The Showcase DVD has superb regulation and does notrequire a dedicated AC circuit. Operate the Showcase DVD only with the power cordsupplied.
Avoid connections through extension cords or multiple AC adapters. High quality 15amp grounded AC strips are acceptable. High quality AC line conditioners or filtersmay be used if they are grounded and meet or exceed the unit’s power supply ratingof 100 VA.
Krell recommends using balanced interconnect cables. Balanced interconnectcables not only can minimize sonic loss but are also immune to induced noise, espe-cially with installations using long cables. Balanced connections have 6 dB moregain than single-ended connections. When level matching is critical, keep this gainvalue in mind.
Follow these steps to connect the Showcase DVD to your system.
1. Make sure all power sources and components are off before connecting inputsand outputs.
2. Neatly organize the wiring between the Showcase DVD and all system compo-nents. Separate AC wires from audio cables to prevent hum or other unwantednoises from being introduced into the system.
3. Connect the input of your video components to the appropriate output of theShowcase DVD.
4. Connect the balanced or single-ended analog outputs.
5. Plug the AC power cord into the IEC connector (39) on the back panel, then plugthe AC power cord into the wall socket. The red stand-by LED (3) on the frontpanel illuminates.
The Showcase DVD is shipped ready to play when it is connected to a home theatersystem and plugged into AC power.
1. Press the power button on the front panel or the power key (1) on the remote.The blue power LED (2) illuminates, and the red stand-by LED (3) turns off. TheShowcase DVD is in the operational mode, and the disc transport (12) is active.
2. Press the open/close button or key (11) to open the disc transport.
3. Place the disc on the transport.
4. Press the open/close button or key again to close the disc transport.
5. Press the play button or key (8) to start playing the disc. Playback begins from thefirst title or track.
6. Press the stop button or key (7) to end disc playback.
7. To turn the Showcase DVD off, press the power button on the front panel or thepower key on the remote. The red stand-by LED illuminates and the ShowcaseDVD is in the stand-by mode.
Status box. A status box appears briefly in the upper left of the video monitor, whena disc is playing while a feature is selected. If the box contains an X, the featureselected is not available.
4 Krell Showcase DVD
Your Showcase DVD product serial number is:
This product complies with the EMC directive (89/336/EEC) and the low-voltage directive (73/23/EEC).
P/N 306988v 03.0
1 remote control1 CR2025 lithium battery1 Quick Setup Guide
Operation
Notes
Krell recommends leaving theShowcase DVD in the stand-bymode when not playing a disc.
Do not attach enhancementaccessories such as rings, mats,or dampers to individual discs.These accessories may interferewith the disc transport, resultingin erratic playback and/or poorperformance.
Showcase DVD CompatibleDisc Formats Include:DVD, DVD-R, CDDA, CD-R,CD-RW, DVD+RW, MP3, VCD
Note
When powering up any system,always turn amplifiers on last.When powering down, alwaysturn amplifiers off first.
Note
The Showcase DVD has anadvanced suspension systemand does not require additionalmass coupling or isolation.Experiment with feet or cones aslong as they are not permanent-ly affixed to the unit. Any unau-thorized modifications to the unitor electronics void the warranty.

2 Krell Showcase DVD Krell Showcase DVD 3
Figure 1 The SHOWCASE DVD Front Panel
111 65 87 109 1716
1214
1918
4 13
3 2
15
Figure 2 The Showcase DVD Remote
DispRet
Title Menu
A-B
Repeat
Setup
87
432
SubtitleAudio AnglePower
Prog
6
Clr09
5
1
1 2221
17
5
25
16
not active*
23
14
15not active*
9
10
24
20
8
6
7
26
11
not active*
*This key does not activate a function on the Showcase DVD.
Figure 3 The Showcase DVD Back Panel
27 28
40 41 32
30 29 31 33 34
35
37
36
38 39
This product is manufactured in the United States of America. Krell® is a registered trademark of Krell Industries, Inc., and is restricted for use by KrellIndustries, Inc., its subsidiaries, and authorized agents. Krell Current Mode™ and Krellcoat™ are trademarks of Krell Industries, Inc. HDMI, the HDMI logo, andHigh-Definition Multimedia Interface are trademarks or registered trademarks of HDMI Licensing LLC. "DTS" and "DTS Digital Out" are registered trademarks ofDigital Theater Systems, Inc. Manufactured under license from Dolby Laboratories. "Dolby," and the double-D symbol are trademarks of Dolby Laboratories.DCDi” is a trademark of Faroudja, a division of Sage, Inc. All other trademarks and tradenames are registered to their respective companies.
© 2003 by Krell Industries, Inc., All rights reserved
This product incorporates copyright protection technology that is protected by method claims of certain U.S. patents and other property rights owned byMacrovision Corporation and other rights owners. Use of this copyright protection technology must be authorized by Macrovision Corporation, and is intendedfor home and other limited viewing uses only unless otherwise authorized by Macrovision Corporation. Reverse engineering or disassembly is prohibited.
Front Paneland Remote
Back PanelDISC FUNCTIONS, continued
Repeat, continued
REPEAT OFF Clears therepeat function.
6 Pause Button or Key Pauses disc playback.The video status boxindicates PAUSE in thetop right corner. Toresume playback as sin-gle frame stills, press thepause button again. Toresume normal play-back, press the play but-ton or key (8).
7 Stop Button or KeyStops DVD playback.
8 Play Button or Key Begins or resumes DVDplayback.
9 Track Forward andBack Button or KeySelects the track thatfollows or precedes thecurrent track.
10 Search Forward andBack Button or KeyAccesses two fast for-ward or two fast back-ward playback modes,while in the play mode.Press once to accessthe first mode. Pressagain to access the sec-ond mode. While in thepause mode, press onceto access one fast for-ward or backward play-back mode.
11 Open/Close Button or KeyOpens and closes thedisc transport.
12 Disc TransportHolds the disc.
POWER
1 Power Button and KeySwitches the ShowcaseDVD between stand-byand operational modes.
2 Power LEDThe blue power LED illu-minates when theShowcase DVD is in theoperational mode.
3 Stand-by LEDThe red stand-by LEDilluminates when theShowcase DVD isplugged into a standardAC wall receptacle,indicating that theShowcase DVD is inthe stand-by mode andready to be switched tothe operational mode.
4 Front Infrared SensorReceives commandsfrom the Showcase DVDremote. When the IRSelect Switch (37) is inthe up position, the frontinfrared sensor is active.For proper remote con-trol operation, make surethat nothing is obstruct-ing the infrared sensor.
DISC FUNCTIONS
5 Repeat Button or KeyRepeat the currentlyplaying chapter, repeatchapters in a currenttitle, or repeat the entiredisc.
DISC FUNCTIONS, continued
13 Front Panel DisplayShows currently playingtitle and chapter num-bers, elapsed time, andrepeat mode.
14 Directional Buttons or KeysNavigate the disc menuand setup menus.
15 Enter Button or KeySelects menu items,program items, returnsto previous setup menu,and suppresses setupmenu.
16 Menu Button or KeyAccesses the discmenu. The directionalbuttons or keys navi-gate the menu (14).
17 Setup Button or KeyAccesses the setupmenu, to configure dis-play, audio, language,parental control, andother functions. Pressthe setup button or keyagain to exit the setupmenu.
18 HDMI Button(Optional, located onfront panel only)Scrolls through avail-able resolutions.
19 HDMI LEDs(Optional, located onfront panel only)Illuminated LED indi-cates component videoformat and resolution ofsignal/video display.
Remote Only
ADVANCED DISC FUNCTIONS
20 Audio KeyCycles between lan-guages on the discsoundtrack.
21 Subtitle KeyActivates subtitles onthe currently playingdisc.
22 Angle KeySelects alternate cam-era angles, when theyare available on thedisc.
23 Title KeyAccess the title number.
ANALOG AUDIOOUTPUTS
27 Left and RightBalanced AudioOutputsOne pair via XLR con-nectors.
28 Left and Right Single-ended Audio OutputsOne pair via RCA con-nectors.
STANDARD VIDEO OUTPUTS
29 Composite StandardVideo OutputOne composite standardvideo output via an RCAconnector.
30 S-Video StandardVideo OutputOne S-video output via a 4 pin mini-DIN connector.
31 Component StandardVideo OutputOne component stan-dard video output viaRCA connectors.Component video usesthree wires (labeled Y,Pb, and Pr on the backpanel) to convey thevideo signal.
NoteThe Showcase DVD auto-matically switches to NTSCor PAL, depending on thedisc format. The defaultstandard is preset, and notselectable by the user.
PROGRESSIVE SCANVIDEO OUTPUT
32 Progressive VideoOutput Pr, Pb, Y.One progressive videooutput via RCA connec-tors.
DIGITAL AUDIOOUTPUTS
33 Optics Digital OutputOne EIAJ optics digitalaudio output via aTosLink connector.
34 Coaxial Digital OutputOne S/PDIF coaxial digi-tal audio output via anRCA connector.
BACK PANEL REMOTECONNECTIONS
35 RS-232Communication PortFor application develop-ers who want to controlthe Showcase DVDusing an external com-puter-based device. Formore information, seeRS-232 Port: SendingCommands andInterpreting Data, thedeveloper’s referenceshipped with theShowcase DVD.
36 12 VDC In/Out (12 V Trigger)Allows you to turn theShowcase DVD on, oroff, or to and from stand-by from other compo-nents.
REMOTE BACK PANEL CONNECTIONS,12 VDC In/Out, continued
Out. The output sends 12 VDC power on/offsignals to other compo-nents and devices thatincorporate a 12 V trig-ger.
In. The input receives 12 VDC power on/offsignals from other com-ponents and devicesthat incorporate a 12 Vtrigger.
NotesWhen the Showcase DVDis in the operational mode, 12 VDC output provides 12 V of DC output. Whenthe Showcase DVD is in the stand-by mode or off,DC output is 0 V.
12 VDC Out (12 V trigger)current is limited to 30 mA.
37 IR Select SwitchFront. The switch in theup position indicates thatthe front infrared sensoris active.Rear. The switch in thedown position indicatesthat the back infraredsensor is active.
38 Back Infrared SensorReceives commandsfrom the Showcase DVDremote control.
POWER
39 IEC ConnectorUse the provided IECstandard 15 amp powercord.
HDMI CONNECTION(Optional)
40 AUDIO SYNCSynchronizes audio andvideo when using theHDMI output (41). Turnthis function off, if youare not using the HDMIoutput.
41 HDMI OUTInterfaces with an A/Vreceiver or a video monitor.
24 Numeric KeysPress a numeric key toselect a disc track dur-ing playback. The tool-bar menu opens withthe cursor at the titleand chapter numberthat is playing. Pressthe numeric key for thetitle and chapter num-ber you want to play.Playback resumes atthe selected title andchapter.
PROGRAMMINGFUNCTIONS
25 A-B KeyPress this key to definethe start of a continuousloop. Press again todefine the end of a con-tinuous loop. Playbackbegins immediately and continues until youpress the A-B key a thirdtime, to clear the loop.
26 Prog(ram) KeyPrograms tracks to play-back in sequence .Press this key to accessthe FTS configurationmenu. Select a track,and press enter. Use thedirectional buttons orkeys (14) to add tracks.Press the play button orkey (8) to begin play-back of the sequence.
Setup MenuAlthough the ShowcaseDVD is shipped as an easyto use, “plug and play”component , the setupmenu allows you to accessand modify video, audio,and playback functions.After your DVD player isconnected to your system:
1. Access the setup menuby pressing the setupbutton on the frontpanel or the setup key(17) on the remote.
The setup menuappears, including atoolbar with the configu-ration menus at the top,and a help screen at thebottom.
When you press thedown directional arrow(14), a left hand columnincluding the categorieswithin each configura-tion menu appears,along with a right handcolumn displaying theitems in each category.
When you press theright directional arrow inthe item list, selectionsappear for each item.
2. Modify the on screendisplay (OSD) while thedisc is stopped.
3. Modify other functionswhile the disc is playing.
You can configure the fol-lowing menus on the tool-bar, if the disc you are play-ing allows access to them:
On screen display (OSD),Subtitle, Language, Color,Sound, Frame by Frame,Slow Motion, ScanSpeeds, Camera Angle,Enlarge Picture, Title ,Chapter, Time Search, andFavorite Track Selection.
For an expanded list offunctions and details onhow to use them, see theShowcase DVD Owner’sReference Setup Menu on the Krell website at:www.krellonline.com
Navigating the Setup MenuBlack menu items are thecurrent selection. Bluemenu items are availableselections. White menuitems are not selectable.Use the directional arrowson the front panel orremote control (14) to navi-gate the menu. The lastitem selected is active.
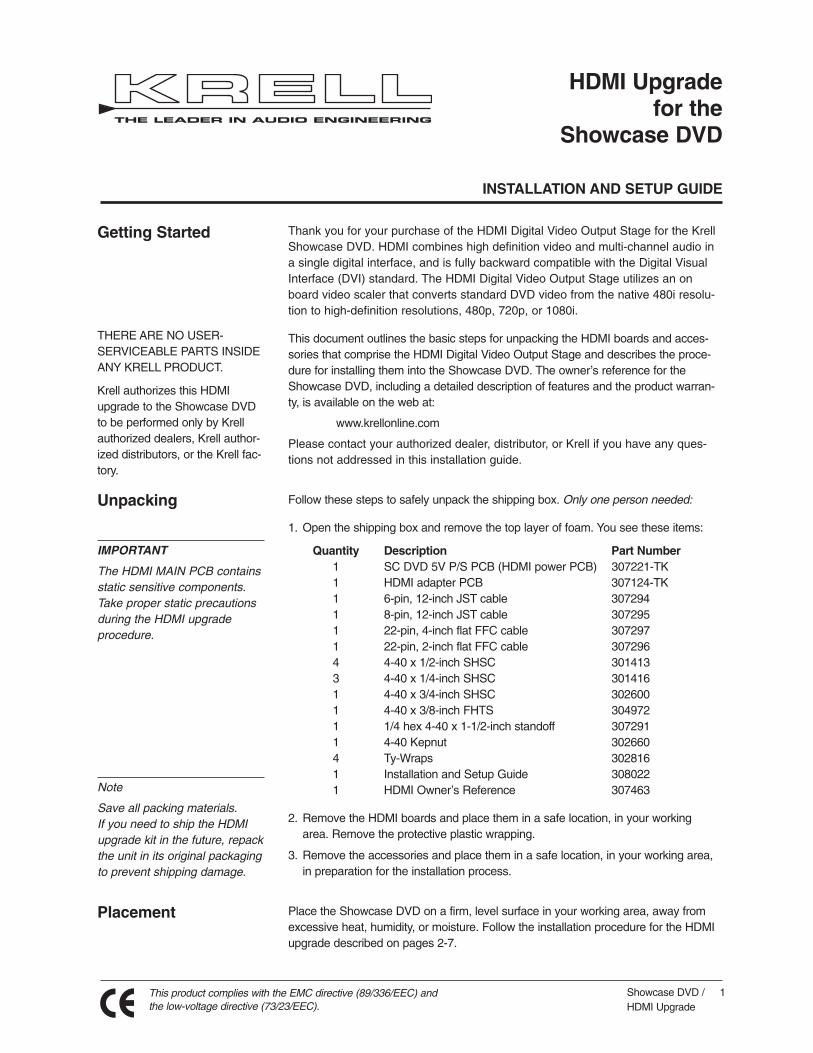
HDMI Upgradefor the
Showcase DVD
INSTALLATION AND SETUP GUIDE
Getting Started
THE LEADER IN AUDIO ENGINEERING
Thank you for your purchase of the HDMI Digital Video Output Stage for the KrellShowcase DVD. HDMI combines high definition video and multi-channel audio ina single digital interface, and is fully backward compatible with the Digital VisualInterface (DVI) standard. The HDMI Digital Video Output Stage utilizes an onboard video scaler that converts standard DVD video from the native 480i resolu-tion to high-definition resolutions, 480p, 720p, or 1080i.
This document outlines the basic steps for unpacking the HDMI boards and acces-sories that comprise the HDMI Digital Video Output Stage and describes the proce-dure for installing them into the Showcase DVD. The owner’s reference for theShowcase DVD, including a detailed description of features and the product warran-ty, is available on the web at:
www.krellonline.com
Please contact your authorized dealer, distributor, or Krell if you have any ques-tions not addressed in this installation guide.
Follow these steps to safely unpack the shipping box. Only one person needed:
1. Open the shipping box and remove the top layer of foam. You see these items:
Quantity Description Part Number1 SC DVD 5V P/S PCB (HDMI power PCB) 307221-TK1 HDMI adapter PCB 307124-TK1 6-pin, 12-inch JST cable 3072941 8-pin, 12-inch JST cable 3072951 22-pin, 4-inch flat FFC cable 3072971 22-pin, 2-inch flat FFC cable 3072964 4-40 x 1/2-inch SHSC 3014133 4-40 x 1/4-inch SHSC 3014161 4-40 x 3/4-inch SHSC 3026001 4-40 x 3/8-inch FHTS 3049721 1/4 hex 4-40 x 1-1/2-inch standoff 3072911 4-40 Kepnut 3026604 Ty-Wraps 3028161 Installation and Setup Guide 3080221 HDMI Owner’s Reference 307463
2. Remove the HDMI boards and place them in a safe location, in your working area. Remove the protective plastic wrapping.
3. Remove the accessories and place them in a safe location, in your working area,in preparation for the installation process.
Place the Showcase DVD on a firm, level surface in your working area, away fromexcessive heat, humidity, or moisture. Follow the installation procedure for the HDMIupgrade described on pages 2-7.
THERE ARE NO USER-SERVICEABLE PARTS INSIDEANY KRELL PRODUCT.
Krell authorizes this HDMIupgrade to the Showcase DVDto be performed only by Krellauthorized dealers, Krell author-ized distributors, or the Krell fac-tory.
Unpacking
Note
Save all packing materials. If you need to ship the HDMIupgrade kit in the future, repackthe unit in its original packagingto prevent shipping damage.
IMPORTANT
The HDMI MAIN PCB containsstatic sensitive components.Take proper static precautionsduring the HDMI upgrade procedure.
Showcase DVD / 1HDMI Upgrade
Placement
This product complies with the EMC directive (89/336/EEC) and the low-voltage directive (73/23/EEC).
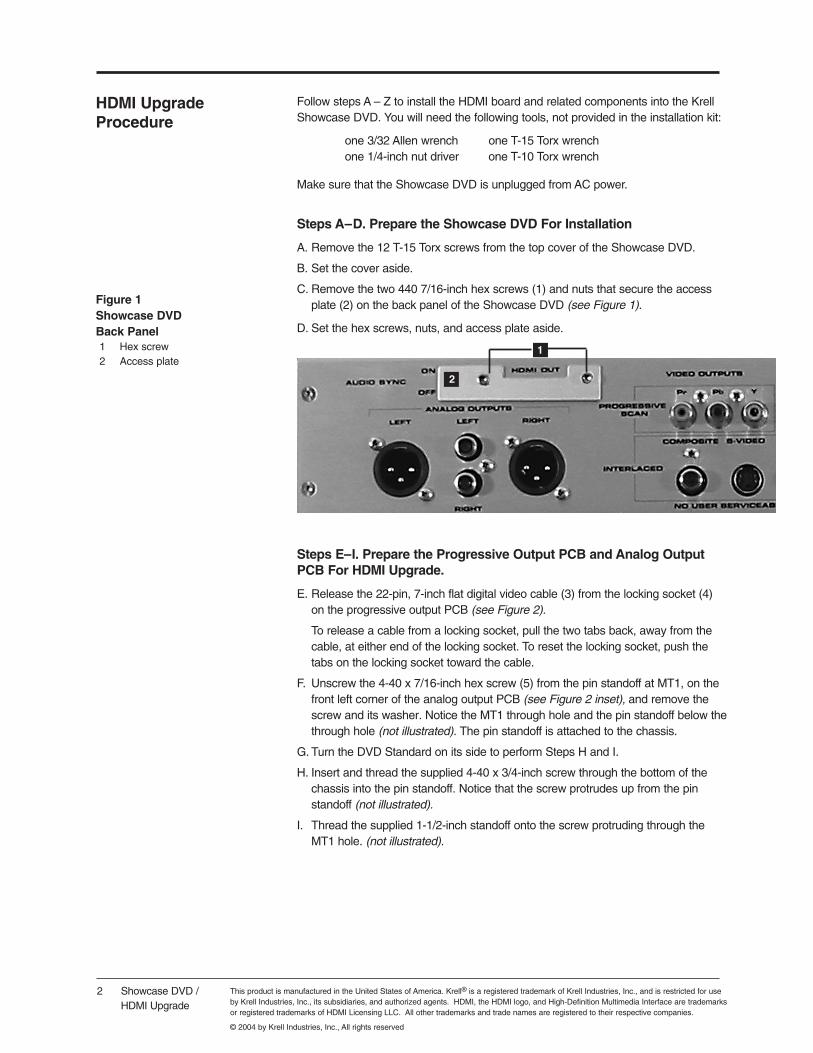
Follow steps A – Z to install the HDMI board and related components into the KrellShowcase DVD. You will need the following tools, not provided in the installation kit:
one 3/32 Allen wrench one T-15 Torx wrenchone 1/4-inch nut driver one T-10 Torx wrench
Make sure that the Showcase DVD is unplugged from AC power.
Steps A–D. Prepare the Showcase DVD For Installation
A. Remove the 12 T-15 Torx screws from the top cover of the Showcase DVD.
B. Set the cover aside.
C. Remove the two 440 7/16-inch hex screws (1) and nuts that secure the accessplate (2) on the back panel of the Showcase DVD (see Figure 1).
D. Set the hex screws, nuts, and access plate aside.
Steps E–I. Prepare the Progressive Output PCB and Analog OutputPCB For HDMI Upgrade.
E. Release the 22-pin, 7-inch flat digital video cable (3) from the locking socket (4)on the progressive output PCB (see Figure 2).
To release a cable from a locking socket, pull the two tabs back, away from thecable, at either end of the locking socket. To reset the locking socket, push thetabs on the locking socket toward the cable.
F. Unscrew the 4-40 x 7/16-inch hex screw (5) from the pin standoff at MT1, on thefront left corner of the analog output PCB (see Figure 2 inset), and remove thescrew and its washer. Notice the MT1 through hole and the pin standoff below thethrough hole (not illustrated). The pin standoff is attached to the chassis.
G. Turn the DVD Standard on its side to perform Steps H and I.
H. Insert and thread the supplied 4-40 x 3/4-inch screw through the bottom of thechassis into the pin standoff. Notice that the screw protrudes up from the pinstandoff (not illustrated).
I. Thread the supplied 1-1/2-inch standoff onto the screw protruding through theMT1 hole. (not illustrated).
2 Showcase DVD / HDMI Upgrade
Figure 1 Showcase DVD Back Panel1 Hex screw2 Access plate
HDMI Upgrade Procedure
This product is manufactured in the United States of America. Krell® is a registered trademark of Krell Industries, Inc., and is restricted for useby Krell Industries, Inc., its subsidiaries, and authorized agents. HDMI, the HDMI logo, and High-Definition Multimedia Interface are trademarks or registered trademarks of HDMI Licensing LLC. All other trademarks and trade names are registered to their respective companies.
© 2004 by Krell Industries, Inc., All rights reserved
2
1
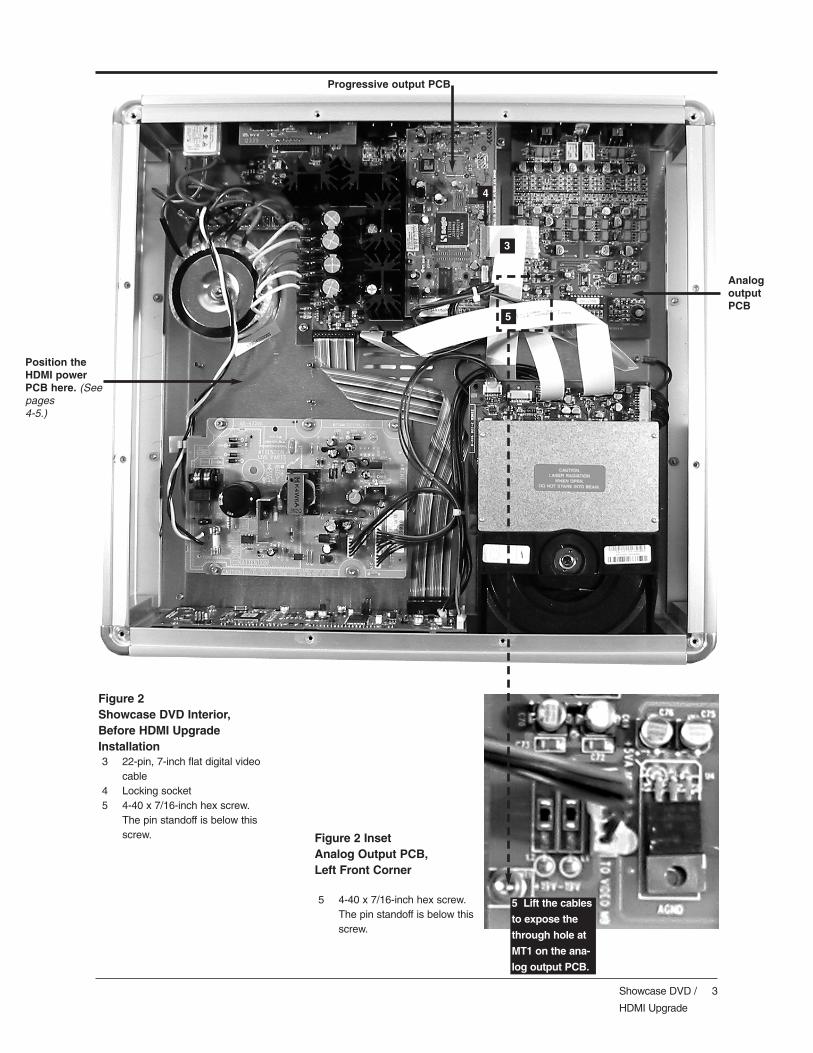
Figure 2 Showcase DVD Interior,Before HDMI UpgradeInstallation3 22-pin, 7-inch flat digital video
cable4 Locking socket5 4-40 x 7/16-inch hex screw.
The pin standoff is below this screw. Figure 2 Inset
Analog Output PCB,Left Front Corner
5 4-40 x 7/16-inch hex screw. The pin standoff is below this screw.
Showcase DVD / 3
HDMI Upgrade
4
3
5
5 Lift the cables
to expose the
through hole at
MT1 on the ana-
log output PCB.
Progressive output PCB
AnalogoutputPCB
Position theHDMI powerPCB here. (Seepages 4-5.)
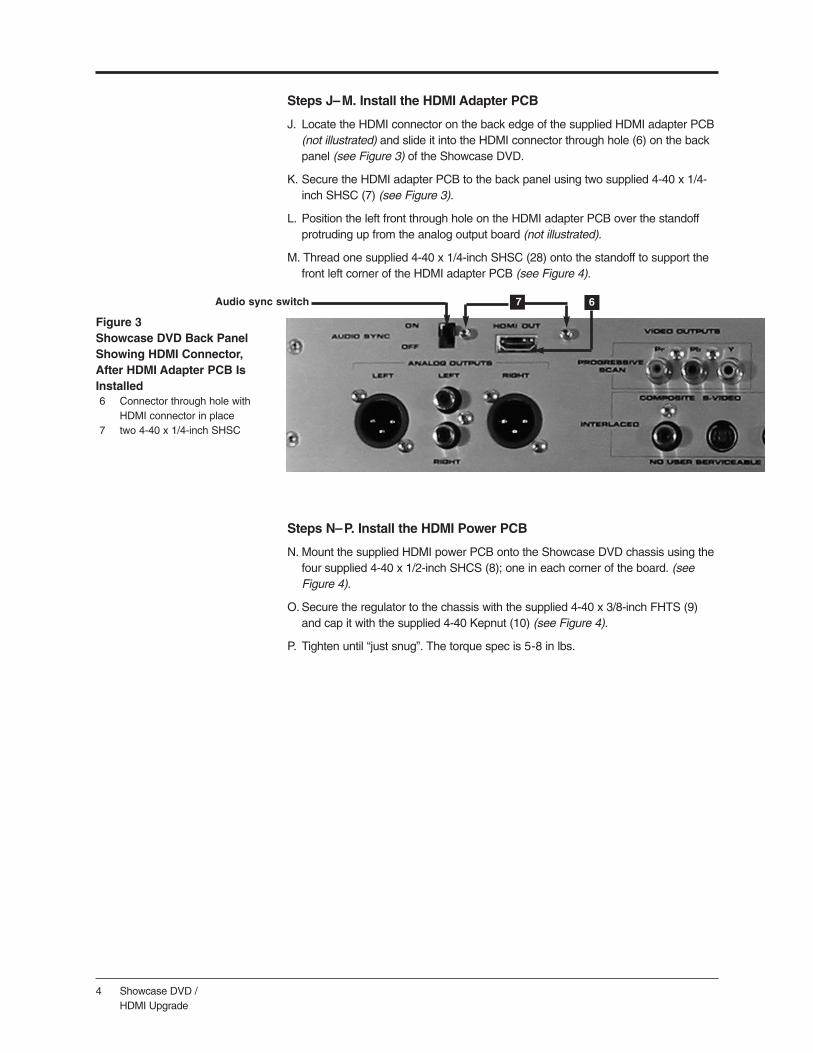
Steps J–M. Install the HDMI Adapter PCB
J. Locate the HDMI connector on the back edge of the supplied HDMI adapter PCB(not illustrated) and slide it into the HDMI connector through hole (6) on the backpanel (see Figure 3) of the Showcase DVD.
K. Secure the HDMI adapter PCB to the back panel using two supplied 4-40 x 1/4-inch SHSC (7) (see Figure 3).
L. Position the left front through hole on the HDMI adapter PCB over the standoffprotruding up from the analog output board (not illustrated).
M. Thread one supplied 4-40 x 1/4-inch SHSC (28) onto the standoff to support thefront left corner of the HDMI adapter PCB (see Figure 4).
Steps N–P. Install the HDMI Power PCB
N. Mount the supplied HDMI power PCB onto the Showcase DVD chassis using thefour supplied 4-40 x 1/2-inch SHCS (8); one in each corner of the board. (seeFigure 4).
O. Secure the regulator to the chassis with the supplied 4-40 x 3/8-inch FHTS (9)and cap it with the supplied 4-40 Kepnut (10) (see Figure 4).
P. Tighten until “just snug”. The torque spec is 5-8 in lbs.
7 6
Figure 3 Showcase DVD Back PanelShowing HDMI Connector,After HDMI Adapter PCB IsInstalled6 Connector through hole with
HDMI connector in place7 two 4-40 x 1/4-inch SHSC
4 Showcase DVD / HDMI Upgrade
Audio sync switch
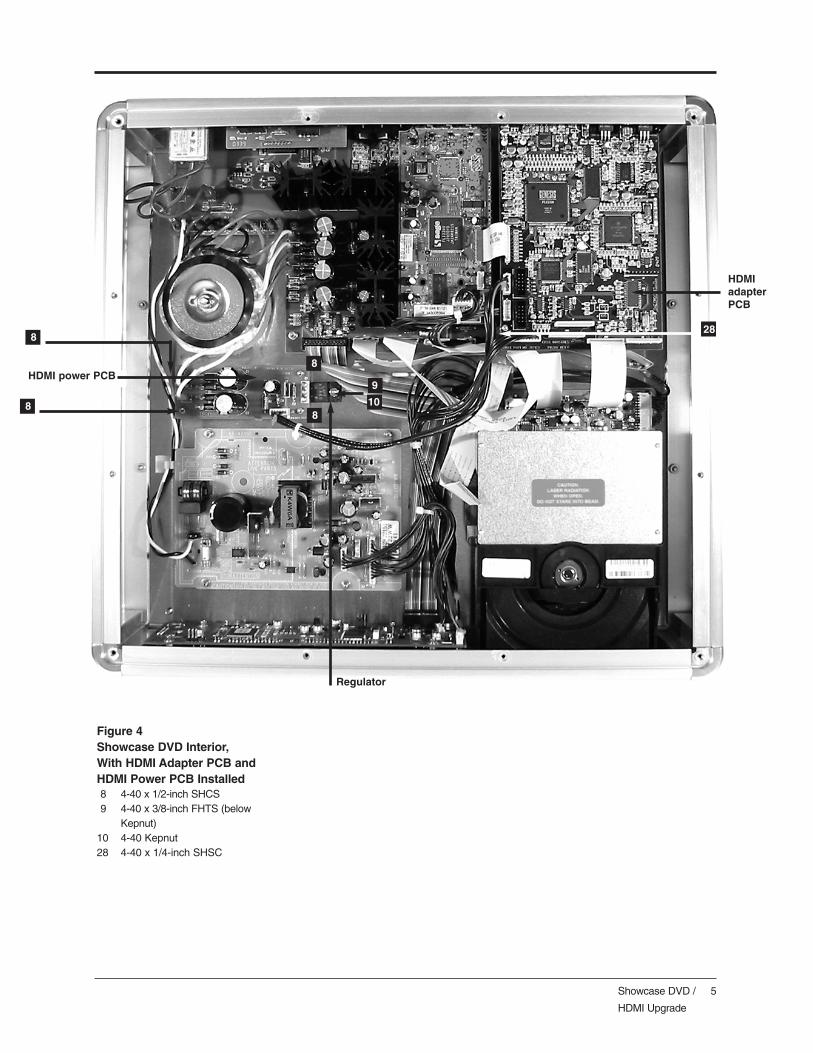
Showcase DVD / 5
HDMI Upgrade
HDMI power PCB
8
288
8
8
9
10
Figure 4 Showcase DVD Interior,With HDMI Adapter PCB andHDMI Power PCB Installed 8 4-40 x 1/2-inch SHCS9 4-40 x 3/8-inch FHTS (below
Kepnut)10 4-40 Kepnut 28 4-40 x 1/4-inch SHSC
HDMIadapterPCB
Regulator

Steps Q–Y. Connect the Cables
Q. Release the 22-pin, 10-inch flat cable (22) from J1603 (23) on the drive PCB (This cable is affixed to the main power supply PCB. Not illustrated).
R. Connect the 22-pin, 10-inch flat cable (22) to connector J29 (24) on the HDMI adapter PCB. Orient the contacts to face the front of the Showcase DVD.
S. Connect the supplied 22-pin, 2-inch flat cable (11), with the contacts facing up,from J1002 (4) on the progressive output PCB to connector J4 (12) on the HDMIadapter PCB. Reset the tabs to lock the socket on J1002 (see Figure 5).
T. Connect the supplied 6-pin JST cable (13) from connector J7 (14) on the HDMIadapter PCB to connector J3 (15) on the HDMI power PCB (see Figure 5).
U. Unplug the two white transformer wires (16) from the main power PCB (seeFigure 5 inset) and connect them to connectors J1 (17) and J2 (18) on the HDMIpower PCB (see Figure 5). Polarity is not an issue.
V. Connect the supplied 8-pin JST cable (19) from connector J12 (20) on the HDMIadapter PCB to connector J6 (21) on the front panel PCB (see Figure 5).
W.Connect the 22-pin, 4-inch flat cable (25) from connector J1603 (26), on theHDMI adapter PCB to connector J1603 (23) on the drive PCB. Orient the con-tacts from J1603 (26) to face the front of the Showcase DVD.
X. Connect the 22-pin, 7-inch, flat digital video cable (3) (previously disconnected inStep E) to connector J1506 (27) on the HDMI adapter PCB. Orient the contactsso that they are facing toward the back of the unit.
Y. Position jumper JMP2 on the faceplate board so that it is across pins 1-2 , themiddle and right-hand pins as you face the front of the unit. (not illustrated)
Step Z. Replace the Top Cover Of the Showcase DVD
Z. Replace the top cover using the 12 T-15 Torx screws (set aside in Step B above).
The Showcase DVD is ready for operation with the HDMI Digital Video Ouput Stageinstalled.
6 Showcase DVD / HDMI Upgrade
HDMI Upgrade Procedure, continued
Figure 5 Inset 2 White Transformer Wires,Main Power PCB16 2 white transformer wires
connected to the main power
PCB
16
IMPORTANT To unplug a transformer wire,pull the female fast-on connectorat the end of the wire. If you pullthe wire itself, instead of theconnector, the wire may detachfrom the connector.
NoteRemove the plastic tags fromthe supplied cables and wires,before continuing the installa-tion. Add the Ty-Wrap plastictags to cables, if needed, tokeep them neatly positionedinside the chassis.
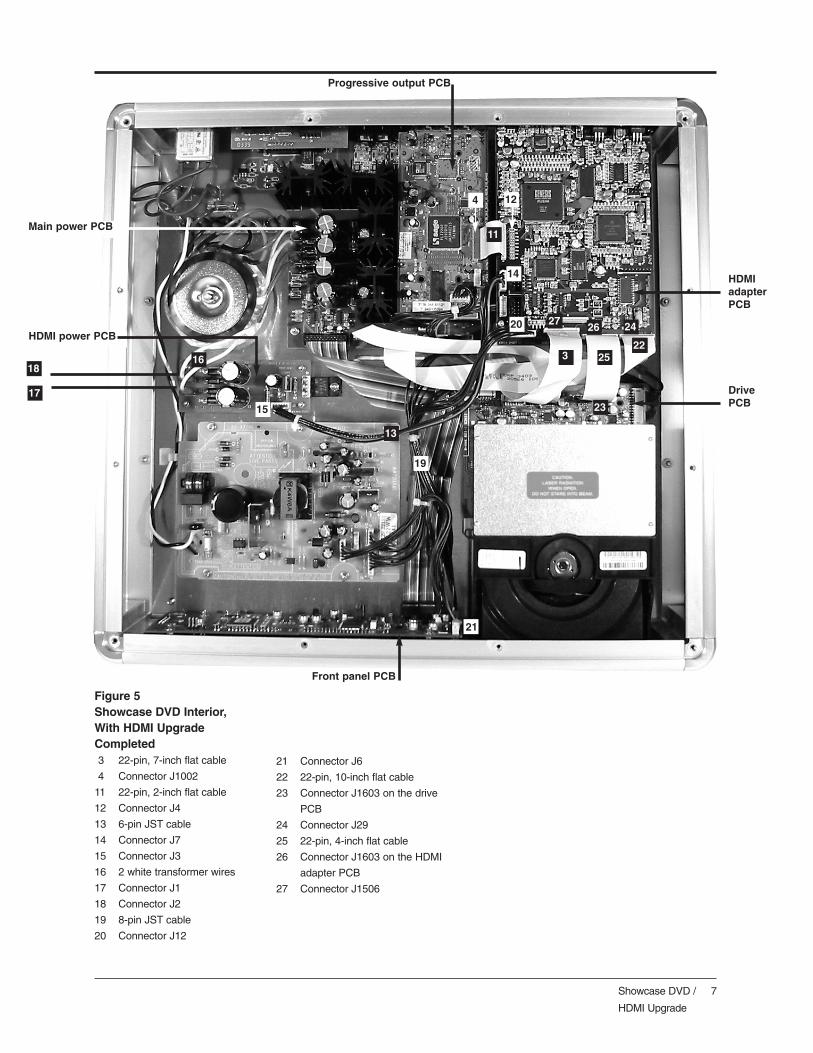
Figure 5 Showcase DVD Interior,With HDMI Upgrade Completed3 22-pin, 7-inch flat cable
4 Connector J1002
11 22-pin, 2-inch flat cable
12 Connector J4
13 6-pin JST cable
14 Connector J7
15 Connector J3
16 2 white transformer wires
17 Connector J1
18 Connector J2
19 8-pin JST cable
20 Connector J12
Showcase DVD / 7
HDMI Upgrade
17
161616
12
13
23
14
15
19
18
22
20
21
25
2426
3
27
21 Connector J6
22 22-pin, 10-inch flat cable
23 Connector J1603 on the drive
PCB
24 Connector J29
25 22-pin, 4-inch flat cable
26 Connector J1603 on the HDMI
adapter PCB
27 Connector J1506
11
4
Progressive output PCB
Front panel PCB
HDMI power PCB
Main power PCB
HDMIadapterPCB
DrivePCB

Krell Industries, Inc., 45 Connair Road,Orange, CT 06477-3650 USATEL 203-799-9954, FAX 203-891-2028, E-MAIL [email protected] SITE http://www.krellonline.com
Connections
HDMI CONNECTIONS
Questions andAnswers
Follow these steps to connect the Showcase DVD with HDMI to your system.
1. Make sure all power sources and components are off before connecting inputsand outputs.
2. Neatly organize the wiring between the Showcase DVD and all system compo-nents. Separate AC wires from audio cables to prevent hum or other unwantednoises from being introduced into the system.
3. Connect the desired Showcase DVD video output to the appropriate video inputof your video component, for example to the video input of a preamp/processor.
Connect the output of the HDMI Digital Video Output Stage to a HDMI or DVIcompatible display device using a HDMI-to-HDMI or HDMI-to-DVI cable. ForHDMI-to-HDMI and HDMI-to-DVI connections, set the Audio Sync switch (seeFigure 3) located on the rear panel to “on”. Audio Sync synchronizes audio andvideo signals to align precisely. Set the Audio Sync switch located on the rearpanel to “off” whenever you are using component, S-video, or composite videooutputs and coax or optical audio outputs.
4. Connect a digital audio output to an appropriate digital audio input.
5. Connect balanced or single-ended analog outputs if desired.
6. Plug the AC power cord into the IEC connector (39) on the back panel, then plugthe AC power cord into the wall socket. The red stand-by LED (3) on the frontpanel illuminates.
Power on the Showcase DVD and turn on your HDCP-compatible display device.The HDMI Digital Video Output Stage detects the HDMI or DVI compatible circuitryin the display device, and one of the three HDMI LED’s on the front panel illumi-nates. Push the HDMI button to cycle through available resolutions: 480p, 720p, and1080i.
When powering up any system, always turn amplifiers on last. When poweringdown, always turn amplifiers off first.
For further information on how to operate the Showcase DVD, please refer to theShowcase DVD Owner’s Reference on the website at www.krellonline.com.
Q. Where do I obtain a HDMI-to-HDMI or HDMI-to-DVI cable?A. HDMI-to-HDMI or HDMI-to-DVI cables are available from most major cable manu-
facturers. Consult your local Krell dealer or distributor.
Q. Are component, S-video, and composite video outputs active while the HDMIDigital Video Output Stage is in use?
A. Yes.
Q. Are the analog and digital audio outputs active while the HDMI Digital VideoOutput Stage is in use?
A. Yes.
Q. What is HDCP?A. HDCP stands for High-bandwidth Digital Content Protection. HDCP is a form of
copyright protection designed for digital entertainment content. The HDMI DigitalVideo Output Stage is a HDCP compliant device, and will only work with otherHDCP compliant devices.
8 Showcase DVD / HDMI Upgrade
P/N 308022-Wv 04.1
HDMI Operation
Notes