Embed Size (px)
Citation preview
MAINTENANCEACCESSORY
Instructions for UseTRELLTEST PRESSURE TEST EQUIPMENT
This test is only applicable to gas-tight suit – NOT Splash suits.
Equipment Article no
Trelltest – All gas-tight suits 487 090 078
Trelltest – Encapsulating gas-tight suits 487 090 077
Trelltest – Non-encapsulating gas-tight suits 487 090 076
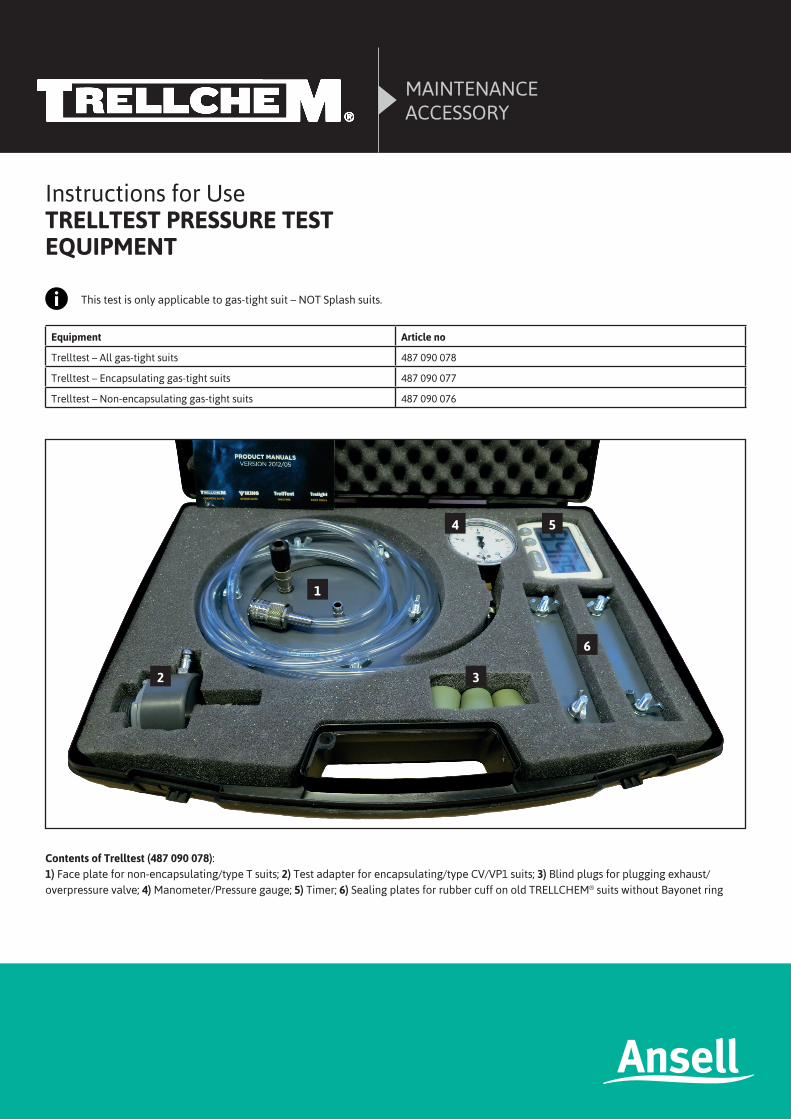
Contents of Trelltest (487 090 078):1) Face plate for non-encapsulating/type T suits; 2) Test adapter for encapsulating/type CV/VP1 suits; 3) Blind plugs for plugging exhaust/overpressure valve; 4) Manometer/Pressure gauge; 5) Timer; 6) Sealing plates for rubber cuff on old TRELLCHEM® suits without Bayonet ring
1
2 3
4 5
6
2
1. Preparing the suit for test
First:• Check that both (2) O-rings are in place
inside the Bayonet rings.
• Check that the gloves are not obviously damaged/have holes.
• If the suit is fitted with Regulating valve/Passthrough, set it on “0” and put on the outside protective cap.
1.1 Type T suits
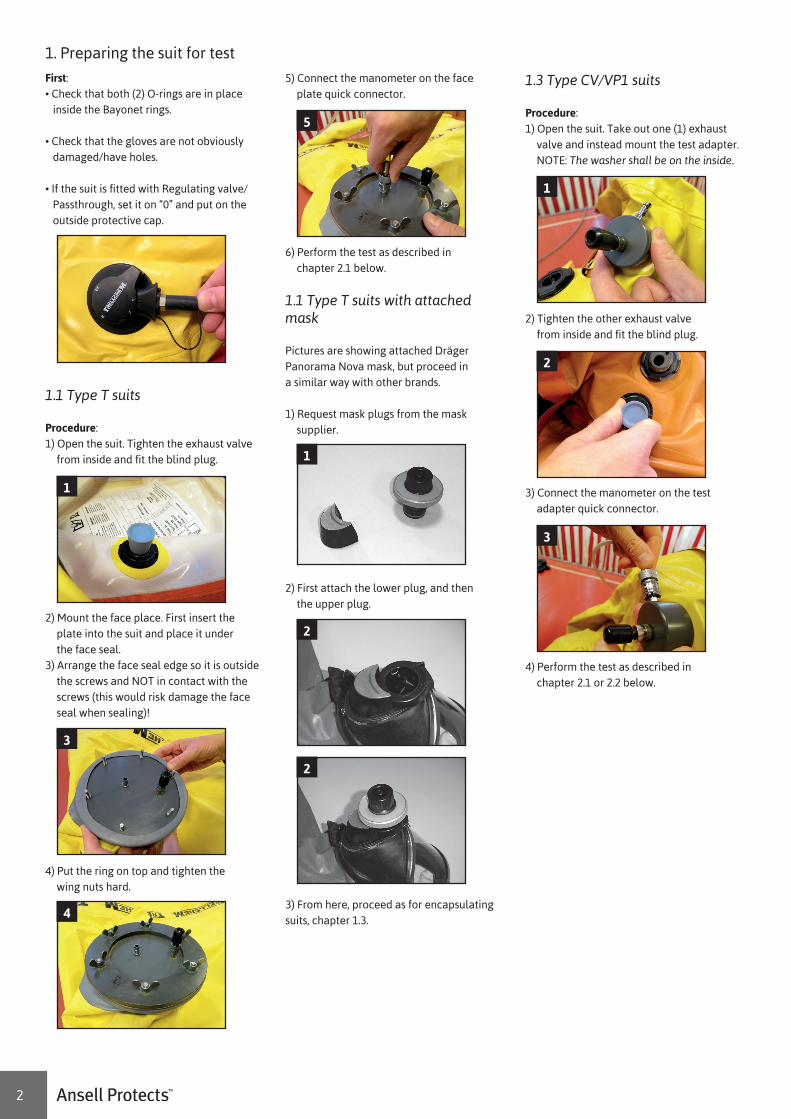
Procedure:1) Open the suit. Tighten the exhaust valve
from inside and fit the blind plug.
2) Mount the face place. First insert the plate into the suit and place it under the face seal.
3) Arrange the face seal edge so it is outside the screws and NOT in contact with the screws (this would risk damage the face seal when sealing)!
4) Put the ring on top and tighten the wing nuts hard.
1
3
4
5) Connect the manometer on the face plate quick connector.
6) Perform the test as described in chapter 2.1 below.
1.1 Type T suits with attached mask
Pictures are showing attached Dräger Panorama Nova mask, but proceed in a similar way with other brands.
1) Request mask plugs from the mask supplier.
2) First attach the lower plug, and then the upper plug.
3) From here, proceed as for encapsulating suits, chapter 1.3.
5
1
2
2
1.3 Type CV/VP1 suits
Procedure:1) Open the suit. Take out one (1) exhaust
valve and instead mount the test adapter. NOTE: The washer shall be on the inside.
2) Tighten the other exhaust valve from inside and fit the blind plug.
3) Connect the manometer on the test adapter quick connector.
4) Perform the test as described in chapter 2.1 or 2.2 below.
1
2
3

3
2. Test of gas-tightness
2.1 According to European test method EN 464
Procedure:1) Inflate the suit with an air pistol through the valve on the face plate (type T suit) or through the valve on the adapter (type CV/VP1 suit)
to a pressure of 1750 Pa/17.5 mbar/178 mm water column/7.0 inch water gauge.
Type T Type CV/VP1
2) Lower the pressure to 1700 Pa/17.0 mbar/173 mm water column/6.8 inch water gauge using the valve on the face plate/adapter. This is the pre-test expansion pressure.
3) Maintain this pressure for 10 minutes, adding air if necessary.
4) Adjust the pressure to 1650 Pa/16.5 mbar/168 mm water column/6.6 inch water gauge. This is the test pressure.
5) Set and start the timer and wait for 6 minutes.
Do not touch the suit during this period of time.
6) Note the pressure after 6 minutes. If this pressure is 1350 Pa/13.5 mbar/138 mm water column/5.4 inch water gauge or more, the suit has passed the test. Note the final pressure in the suit log.
8) After the pressure test is completed, disconnect the manometer from the face plate/adapter. Remove the face plate/adapter and reinstall the exhaust valve (if removed). Remove the blind plug from the exhaust valve.
If the suit does not pass this test, the suit shall be removed from service and, if possible, repaired.
2.2 According to American test method ASTM F 1052
Procedure:1) Inflate the suit with an air pistol through the valve on the adapter (type CV/VP1 suit) to a pressure of 5.0 inch/125 mm water gauge
(1245 Pa/12.5 mbar). This is the pre-test expansion pressure.
2) Maintain this pressure for at least 1 minute in order to fill out wrinkles and allow the material to settle. Extend the time if air temperatures inside and outside the suit are not equal.
3) Adjust the pressure to 4 inch/100 mm water gauge (996 Pa/9.96 mbar). This is the test pressure.
4) Set and start the timer and wait for 4 minutes.
Do not touch the suit during the test period of time.
5) Note the pressure after 4 minutes. If this pressure is 3.1 inch/80 mm water gauge (797 Pa/7.97 mbar) or more, the suit has passed the test.
6) Note the final pressure in the suit log.
7) After the pressure test is completed, disconnect the manometer from the adapter. Remove the adapter and reinstall the exhaust valve. Remove the blind plug from the other exhaust valve.
If the suit does not pass this test, the suit shall be removed from service and, if possible, repaired.

Ansell Protective Solutions ABJohan Kocksgatan 10, 231 81 Trelleborg, SwedenTel: +46 (0)10 205 1800, Fax: +46 (0)10 205 1840http://protective.ansell.com | [email protected]
® and ™ are trademarks owned by Ansell Limited or one of its affiliates, except as noted. TRELLCHEM® is a registered trademark owned by Trelleborg AB. ©2016 Ansell Limited. All Rights Reserved.
K7
8 1
01
84
1 A
NS
EL
L 1
70
3