Embed Size (px)
Citation preview

INSTRUCTION MANUAL
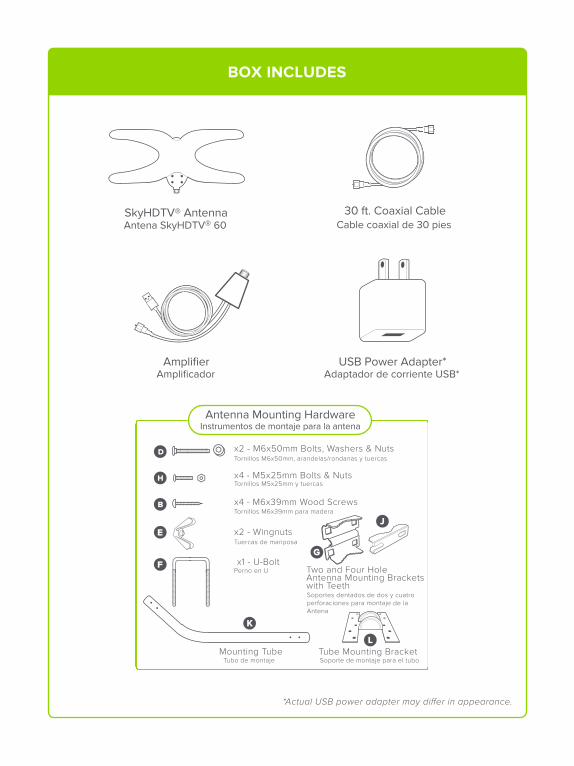
*Actual USB power adapter may di�er in appearance.
BOX INCLUDES
SkyHDTV® Antenna 30 ft. Coaxial Cable
USB Power Adapter*Amplifier
E
FG
J
K
L
Antenna Mounting HardwareInstrumentos de montaje para la antena
x2 - M6x50mm Bolts, Washers & NutsTornillos M6x50mm, arandelas/rondanas y tuercas
Tornillos M5x25mm y tuercas
Tornillos M6x39mm para madera
Tuercas de mariposa
Tubo de montaje Soporte de montaje para el tubo
Perno en U
Mounting Tube Tube Mounting Bracket
x4 - M6x39mm Wood Screws
x2 - Wingnuts
x1 - U-Bolt
x4 - M5x25mm Bolts & Nuts
Two and Four Hole Antenna Mounting Brackets with Teeth Soportes dentados de dos y cuatro perforaciones para montaje de la Antena
Cable coaxial de 30 piesAntena SkyHDTV® 60
Amplificador Adaptador de corriente USB*
SAFETY PROCEDURES• Make sure there is another person present (on the ground) while
installing the SkyHDTV® antenna.
• DO NOT attempt to mount the antenna on a windy, rainy or snowy day.
PROCEDIMIENTOS DE SEGURIDAD• Asegúrese de que se encuentra otra persona presente (en el suelo)
mientras instala la SkyHDTV® antena.
• No intente montar la antena en un día de viento, lluvia o nieve.
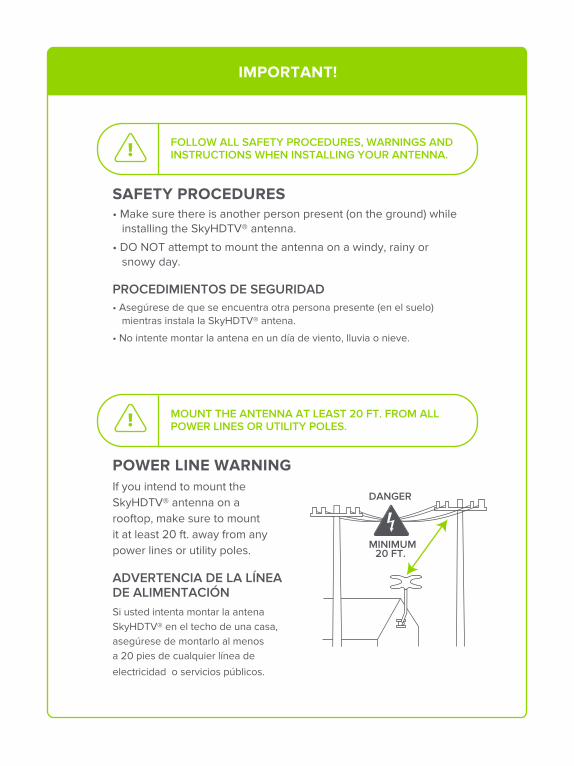
POWER LINE WARNINGIf you intend to mount the SkyHDTV® antenna on a rooftop, make sure to mount it at least 20 ft. away from any power lines or utility poles.
ADVERTENCIA DE LA LÍNEA DE ALIMENTACIÓNSi usted intenta montar la antena SkyHDTV® en el techo de una casa, asegúrese de montarlo al menos a 20 pies de cualquier línea de
electricidad o servicios públicos.
IMPORTANT!
FOLLOW ALL SAFETY PROCEDURES, WARNINGS AND INSTRUCTIONS WHEN INSTALLING YOUR ANTENNA.
MOUNT THE ANTENNA AT LEAST 20 FT. FROM ALL POWER LINES OR UTILITY POLES.
20 FT.MINIMUM
DANGER
A
B
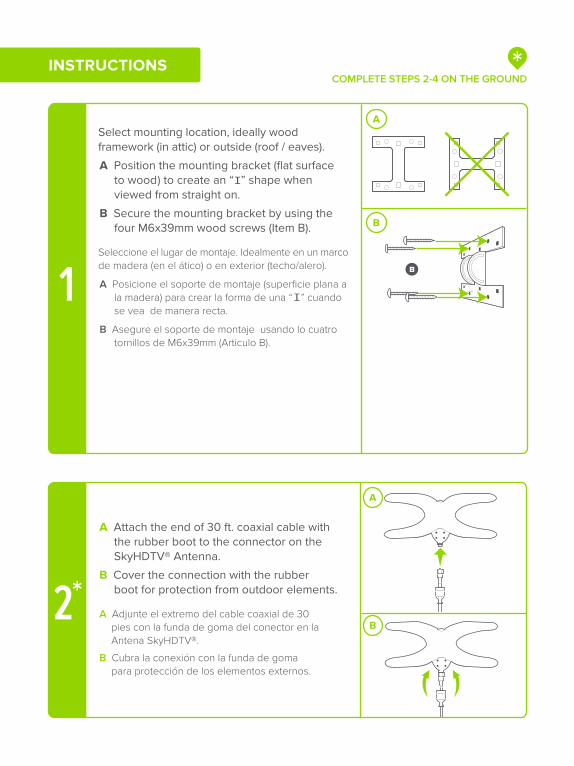
A Attach the end of 30 ft. coaxial cable with the rubber boot to the connector on the SkyHDTV® Antenna.
B Cover the connection with the rubber boot for protection from outdoor elements.
A Adjunte el extremo del cable coaxial de 30 pies con la funda de goma del conector en la Antena SkyHDTV®.
B Cubra la conexión con la funda de goma para protección de los elementos externos.
COMPLETE STEPS 2-4 ON THE GROUNDINSTRUCTIONS
A
B
Select mounting location, ideally wood framework (in attic) or outside (roof / eaves).
A Position the mounting bracket (flat surface to wood) to create an “ ” shape when viewed from straight on.
B Secure the mounting bracket by using the four M6x39mm wood screws (Item B).
Seleccione el lugar de montaje. Idealmente en un marco de madera (en el ático) o en exterior (techo/alero).
A Posicione el soporte de montaje (superficie plana a la madera) para crear la forma de una “ ” cuando se vea de manera recta.
B Asegure el soporte de montaje usando lo cuatro tornillos de M6x39mm (Articulo B).
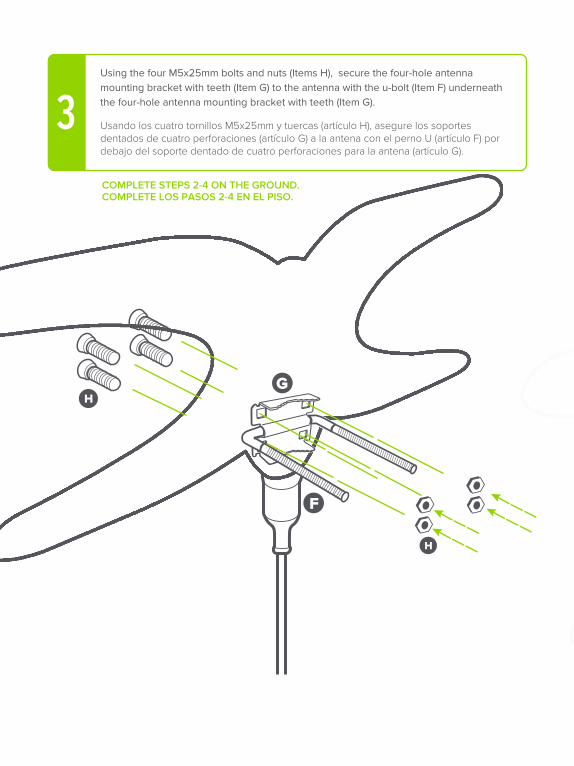
Using the four M5x25mm bolts and nuts (Items H), secure the four-hole antenna mounting bracket with teeth (Item G) to the antenna with the u-bolt (Item F) underneath the four-hole antenna mounting bracket with teeth (Item G).
Usando los cuatro tornillos M5x25mm y tuercas (artículo H), asegure los soportes dentados de cuatro perforaciones (artículo G) a la antena con el perno U (artículo F) por debajo del soporte dentado de cuatro perforaciones para la antena (artículo G).
COMPLETE STEPS 2-4 ON THE GROUND.COMPLETE LOS PASOS 2-4 EN EL PISO.
G
F
PAGE 2
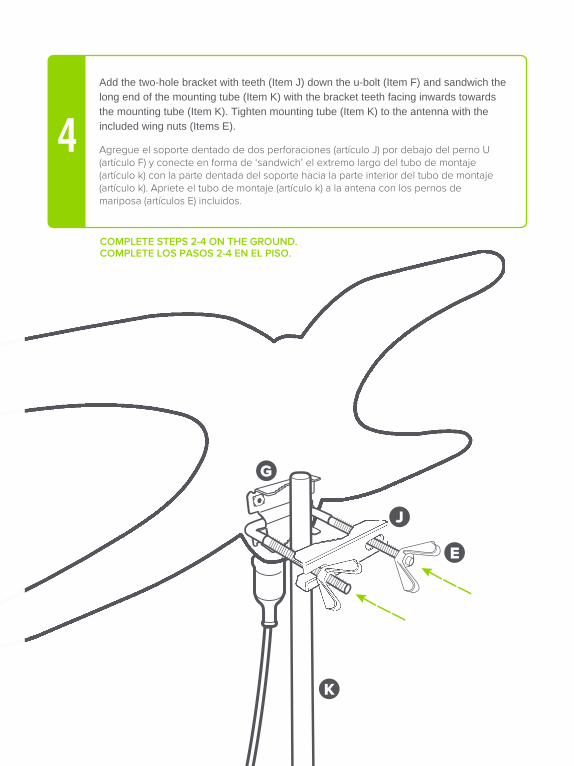
Add the two-hole bracket with teeth (Item J) down the u-bolt (Item F) and sandwich the long end of the mounting tube (Item K) with the bracket teeth facing inwards towards the mounting tube (Item K). Tighten mounting tube (Item K) to the antenna with the included wing nuts (Items E).
Agregue el soporte dentado de dos perforaciones (artículo J) por debajo del perno U (artículo F) y conecte en forma de ‘sandwich’ el extremo largo del tubo de montaje (artículo k) con la parte dentada del soporte hacia la parte interior del tubo de montaje (artículo k). Apriete el tubo de montaje (artículo k) a la antena con los pernos de mariposa (artículos E) incluidos.
COMPLETE STEPS 2-4 ON THE GROUND.COMPLETE LOS PASOS 2-4 EN EL PISO.
G
K
E
J
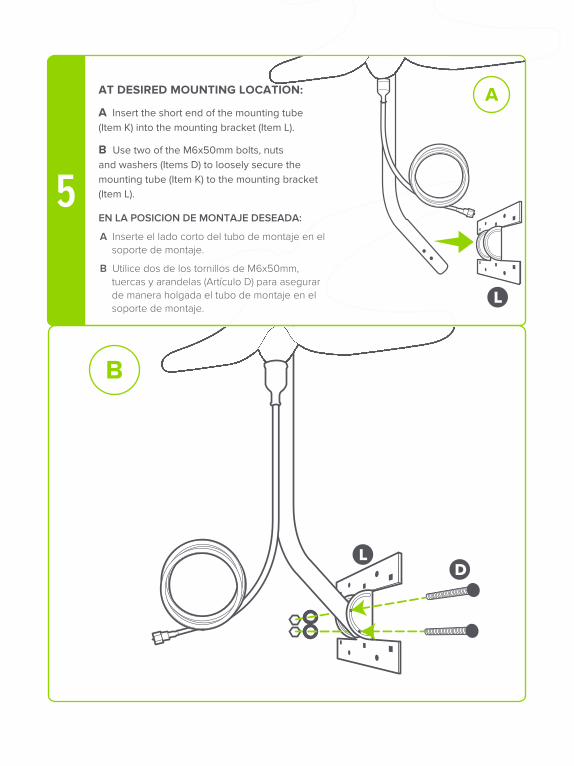
AT DESIRED MOUNTING LOCATION:
A Insert the short end of the mounting tube (Item K) into the mounting bracket (Item L).
B Use two of the M6x50mm bolts, nuts and washers (Items D) to loosely secure the mounting tube (Item K) to the mounting bracket (Item L).
EN LA POSICION DE MONTAJE DESEADA:
A Inserte el lado corto del tubo de montaje en el soporte de montaje.
B Utilice dos de los tornillos de M6x50mm, tuercas y arandelas (Artículo D) para asegurar de manera holgada el tubo de montaje en el soporte de montaje.
L
LD
OR
8
6
7
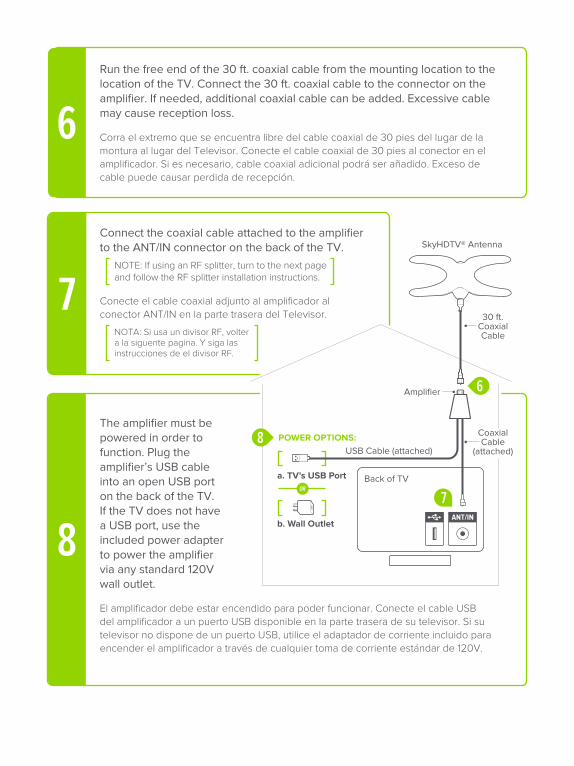
Run the free end of the 30 ft. coaxial cable from the mounting location to the location of the TV. Connect the 30 ft. coaxial cable to the connector on the amplifier. If needed, additional coaxial cable can be added. Excessive cable may cause reception loss.
Corra el extremo que se encuentra libre del cable coaxial de 30 pies del lugar de la montura al lugar del Televisor. Conecte el cable coaxial de 30 pies al conector en el amplificador. Si es necesario, cable coaxial adicional podrá ser añadido. Exceso de cable puede causar perdida de recepción.
Connect the coaxial cable attached to the amplifier to the ANT/IN connector on the back of the TV.
NOTE: If using an RF splitter, turn to the next page and follow the RF splitter installation instructions.
Conecte el cable coaxial adjunto al amplificador al conector ANT/IN en la parte trasera del Televisor.
NOTA: Si usa un divisor RF, volter a la siguente pagina. Y siga las instrucciones de el divisor RF.
The amplifier must be powered in order to function. Plug the amplifier’s USB cable into an open USB port on the back of the TV. If the TV does not have a USB port, use the included power adapter to power the amplifier via any standard 120Vwall outlet.
El amplificador debe estar encendido para poder funcionar. Conecte el cable USB del amplificador a un puerto USB disponible en la parte trasera de su televisor. Si su televisor no dispone de un puerto USB, utilice el adaptador de corriente incluido para encender el amplificador a través de cualquier toma de corriente estándar de 120V.
Amplifier
30 ft. Coaxial Cable
USB Cable (attached)
Coaxial Cable
(attached)
ANT/IN
Back of TVa. TV’s USB Port
b. Wall Outlet
POWER OPTIONS:
SkyHDTV® Antenna
?
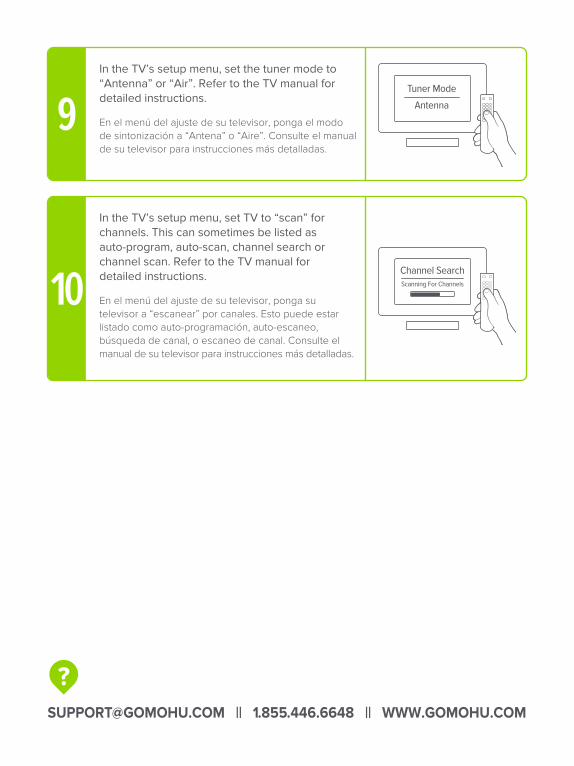
In the TV’s setup menu, set the tuner mode to “Antenna” or “Air”. Refer to the TV manual for detailed instructions.
En el menú del ajuste de su televisor, ponga el modo de sintonización a “Antena” o “Aire”. Consulte el manual de su televisor para instrucciones más detalladas.
In the TV’s setup menu, set TV to “scan” for channels. This can sometimes be listed as auto-program, auto-scan, channel search or channel scan. Refer to the TV manual for detailed instructions.
En el menú del ajuste de su televisor, ponga su televisor a “escanear” por canales. Esto puede estar listado como auto-programación, auto-escaneo, búsqueda de canal, o escaneo de canal. Consulte el manual de su televisor para instrucciones más detalladas.
[email protected] || 1.855.446.6648 || WWW.GOMOHU.COM
Scanning For Channels
Channel Search
Antenna
Tuner Mode
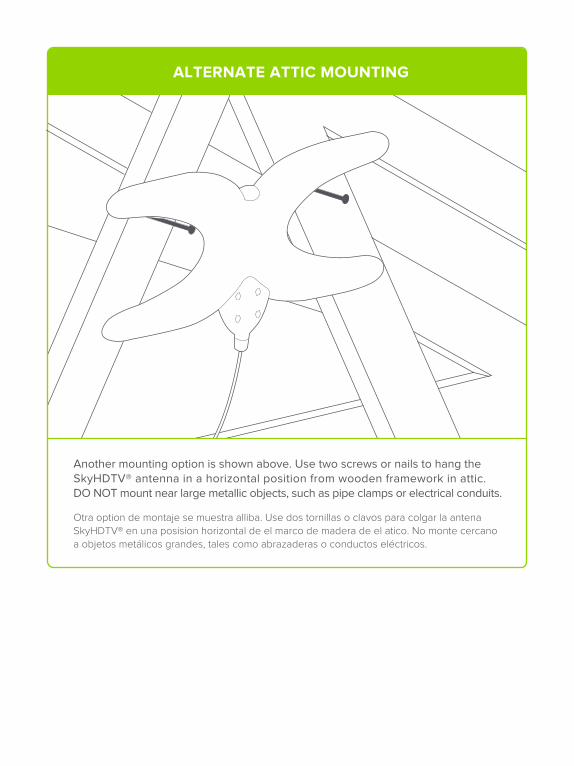
ALTERNATE ATTIC MOUNTING
Another mounting option is shown above. Use two screws or nails to hang the SkyHDTV® antenna in a horizontal position from wooden framework in attic. DO NOT mount near large metallic objects, such as pipe clamps or electrical conduits.
Otra option de montaje se muestra alliba. Use dos tornillas o clavos para colgar la antena SkyHDTV® en una posision horizontal de el marco de madera de el atico. No monte cercano a objetos metálicos grandes, tales como abrazaderas o conductos eléctricos.
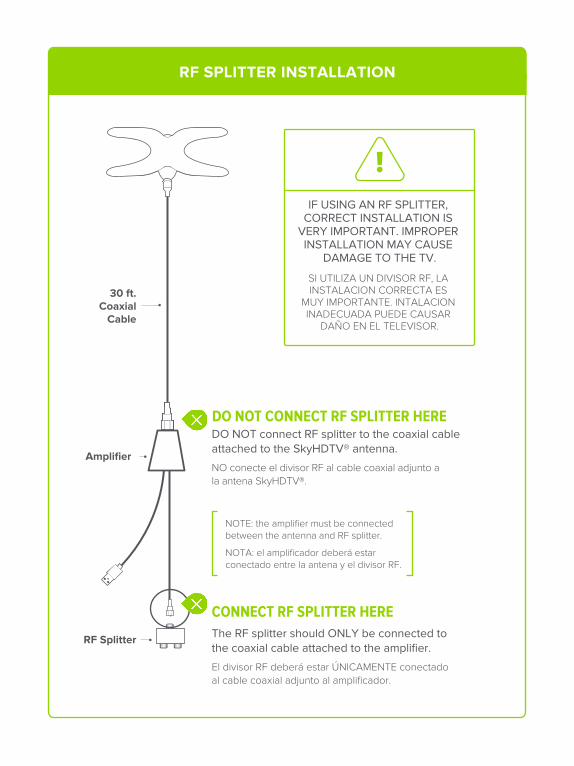
CONNECT RF SPLITTER HERE
DO NOT CONNECT RF SPLITTER HEREDO NOT connect RF splitter to the coaxial cable attached to the SkyHDTV® antenna.
NO conecte el divisor RF al cable coaxial adjunto a la antena SkyHDTV®.
NOTE: the amplifier must be connected between the antenna and RF splitter.
NOTA: el amplificador deberá estar conectado entre la antena y el divisor RF.
The RF splitter should ONLY be connected to the coaxial cable attached to the amplifier.
El divisor RF deberá estar ÚNICAMENTE conectado al cable coaxial adjunto al amplificador.
30 ft.Coaxial
Cable
Amplifier
RF Splitter
IF USING AN RF SPLITTER, CORRECT INSTALLATION IS
VERY IMPORTANT. IMPROPER INSTALLATION MAY CAUSE
DAMAGE TO THE TV.
SI UTILIZA UN DIVISOR RF, LA INSTALACION CORRECTA ES
MUY IMPORTANTE. INTALACION INADECUADA PUEDE CAUSAR
DAÑO EN EL TELEVISOR.
RF SPLITTER INSTALLATION
MOHU® WARRANTYMohu® warrants to the original purchaser of this product that for a period of one (1) year from the date of purchase the product shall be free of defects in materials or workmanship, and will repair or replace, at its sole option, any defective product at no charge. In the event Mohu chooses to replace the product, such replacement product may be a di�erent model than the one originally purchased.
This warranty shall not cover any damage arising from improper use of the product, including without limitation damage due to acts of nature (including without limitation weather induced power surges and the like), use of the product in non-residential settings, accident, misuse or improper electrical/signal connections, improper installation, tampering, negligence, or product abuse. This warranty is valid only in the USA and Canada. There are no implied warranties of merchantability or fitness for a particular purpose unless otherwise required by law, and any such implied warranties are limited to the one (1) year term of this warranty.
GARANTÍA DE MOHU®
Mohu® garantiza al comprador original este producto por un período de un (1) año desde la fecha de compra el producto deberá estar libre de defectos en cuanto a materiales y de fabricación, y se reparará o reemplazará a discreción, cualquier producto defectuoso sin ningún costo. En caso que Mohu decida reemplazar el producto este podrá ser reemplazado por un modelo diferente al que compró originalmente.
Esta garantía no cubrirá los daños que surjan de un uso inadecuado del producto, incluidos sin estar limitados a daños ocasionados por la naturaleza (incluyendo, sobrecargas de energía inducidas por el clima y similares), el uso del producto en entornos no residenciales, accidentes, abusos o conexiones inadecuadas tanto eléctricas como de señal, instalación incorrecta, alteración, negligencia o abuso del producto. Esta garantía es válida solo en los EE.UU y Canadá. No existen garantías implícitas de comerciabilidad o conveniencia para un determinado propósito a menos de que estas sean requeridas por la ley, y cualquiera de este tipo de garantías implícitas estará limitada al término de un (1) año.

? If you have any di�culties with the installation of your antenna, please contact Mohu®.
[email protected] || 1.855.446.6648 || WWW.GOMOHU.COM

M-S60-20140429Copyright © 2011-2016 Greenwave Scientific, Inc. All Rights Reserved.MOHU® and SKYHDTV® are the registered trademarks of Greenwave Scientific, Inc.Patent pending.